287 lines
16 KiB
Markdown
287 lines
16 KiB
Markdown
---
|
||
|
||
slug: /experience-vibe-coding-paradigm-with-cursor-agent-oceanbase-mcp
|
||
---
|
||
|
||
# Experience the vibe coding paradigm with Cursor Agent + OceanBase MCP
|
||
|
||
Can you launch a product without writing a single line of code? The arrival of the AI era may mean that "writing code" is no longer about "writing" code. This vision is gradually becoming reality, as AI is bringing transformative changes to people's lives and work. Vibe coding, proposed by AI researcher Andrej Karpathy in 2025, demonstrates a new development approach: developers directly express their intentions to AI through natural language (voice or text), and the rest—from generating code, optimizing structure, to partial debugging—is all handled by AI. In this mode, developers only need to consider how to clearly express "what I want", such as "create a multi-language login module for me", and AI can output the corresponding project structure and implementation code. In other words, developers focus on "goals", and AI handles "implementation".
|
||
|
||
## Vibe coding vs. traditional AI-assisted development
|
||
|
||
AI-assisted development is not a new concept. However, unlike traditional AI development assistants such as Gemini Code Assist that emphasize manual line-by-line review and code completion, vibe coding tends to automatically complete various development stages and reduces developers' involvement in underlying details.
|
||
|
||
Of course, current industry exploration is still far from complete "code-transparent black-box adoption", and actual implementations still mostly use a hybrid process of human-machine collaboration and review.
|
||
|
||
* **Trust mechanisms are not yet perfect:** In ideal vibe coding scenarios, developers can directly adopt AI output, but this is difficult to achieve in actual projects. Especially in scenarios with high security and business complexity, manual review and testing are still essential.
|
||
|
||
* **Auxiliary tools continue to evolve:** New IDEs continue to improve natural language processing and context awareness capabilities, enhancing AI code output quality and user interaction experience. However, these tools are mostly limited to standardized or prototyping tasks, and complex systems still require engineers to actively oversee and participate.
|
||
|
||
* **Collaboration and requirements management are becoming trends:** As vibe coding evolves, collaboration between developers and coordination between projects are gradually becoming new trends. The emergence of protocols such as MCP (Model Context Protocol) enables multiple developers to collaborate through fragmented descriptions, synchronize adjustments, and integrate requirements simultaneously, while agents (such as Cursor) help make these processes smoother.
|
||
|
||
## Cursor: A new generation of AI-native development environment
|
||
|
||
As emerging AI-driven development modes such as vibe coding gradually become mainstream, various AI-native tools have emerged to provide developers with more convenient and user-friendly development environments. Cursor is one of the leaders.
|
||
Cursor is an AI-driven code editor that supports efficient programming through natural language by deeply understanding codebases. The Cursor download address is as follows: [https://cursor.com](https://cursor.com).
|
||
|
||
Compared to traditional "code suggestion" tools, AI-native IDEs such as Cursor support deeper natural language-code interaction, automatic context association, and intelligent debugging assistance. For example, a single natural language description can build crawlers, configure dependencies, and even introduce testing and exception handling, helping developers lower development barriers and improve engineering efficiency.
|
||
|
||
## Cursor Agent + OceanBase MCP: A new vibe coding paradigm
|
||
|
||
seekdb, based on a unified architecture, provides users with vector capabilities and supports multi-modal fusion queries. Without introducing new technology stacks, it can meet diverse business needs, thereby reducing learning costs and accelerating AI development, making it a preferred choice for many developers when using vector databases.
|
||
|
||
Currently, both seekdb and Cursor support the MCP (Model Context Protocol) protocol. With the MCP protocol, developers can easily implement the new vibe coding paradigm based on Cursor Agent + seekdb.
|
||
|
||
The MCP protocol is regarded as an "adapter" connecting AI models with actual business systems. Through the MCP protocol, large models can access various external applications, such as Git version management and database software commonly used in development, to obtain more environmental information and automatically complete various development stages. This means that enterprises can seamlessly integrate seekdb's data service capabilities into various AI application processes directly through the MCP protocol, significantly reducing the barriers to data interface development and integration.
|
||
|
||
### Prerequisites
|
||
|
||
* You have deployed seekdb.
|
||
|
||
* Install [Python 3.11 or later](https://www.python.org/downloads/) and the corresponding [pip](https://pip.pypa.io/en/stable/installation/). If your machine has a lower Python version, you can use Miniconda to create a new Python 3.11 or later environment. For details, see the [Miniconda installation guide](https://docs.anaconda.com/miniconda/install/).
|
||
|
||
* Install [Git](https://git-scm.com/downloads) according to your operating system.
|
||
|
||
* Install the Python package manager uv. After installation, you can use the `uv --version` command to verify whether the installation is successful:
|
||
|
||
```shell
|
||
pip install uv
|
||
uv --version
|
||
```
|
||
|
||
* Download [Cursor](https://cursor.com/downloads) and install the appropriate version for your operating system. Note that when using Cursor for the first time, you need to register a new account or log in with an existing account. After logging in, you can create a new project or open an existing project.
|
||
|
||
### Vibe coding practice
|
||
|
||
Here we will combine coding with databases based on the vibe coding concept to quickly build an API service.
|
||
|
||
#### Step 1: Obtain database connection information
|
||
|
||
Contact the deployment personnel or administrator to obtain the corresponding database connection string, for example:
|
||
|
||
```sql
|
||
obclient -h$host -P$port -u$user_name -p$password -D$database_name
|
||
```
|
||
|
||
**Parameter description:**
|
||
|
||
* `$host`: Provides the seekdb connection IP.
|
||
* `$port`: Provides the seekdb database connection port. The default is `2881`, which can be customized when deploying the seekdb database.
|
||
* `$database_name`: The name of the database to access.
|
||
* `$user_name`: Provides the connection account for the tenant. The default is `root`.
|
||
* `$password`: Provides the account password.
|
||
|
||
#### Step 2: Clone the OceanBase MCP server project
|
||
|
||
Clone the project to your local machine
|
||
|
||
```shell
|
||
git clone https://github.com/oceanbase/mcp-oceanbase.git
|
||
```
|
||
|
||
#### Step 3: Prepare the Cursor environment
|
||
|
||
1. Create a Cursor client working directory and configure the OceanBase MCP server
|
||
|
||
Manually create a Cursor working directory and open it with Cursor. Files generated by Cursor will be placed in this directory. The example directory name is `cursor`.
|
||
|
||
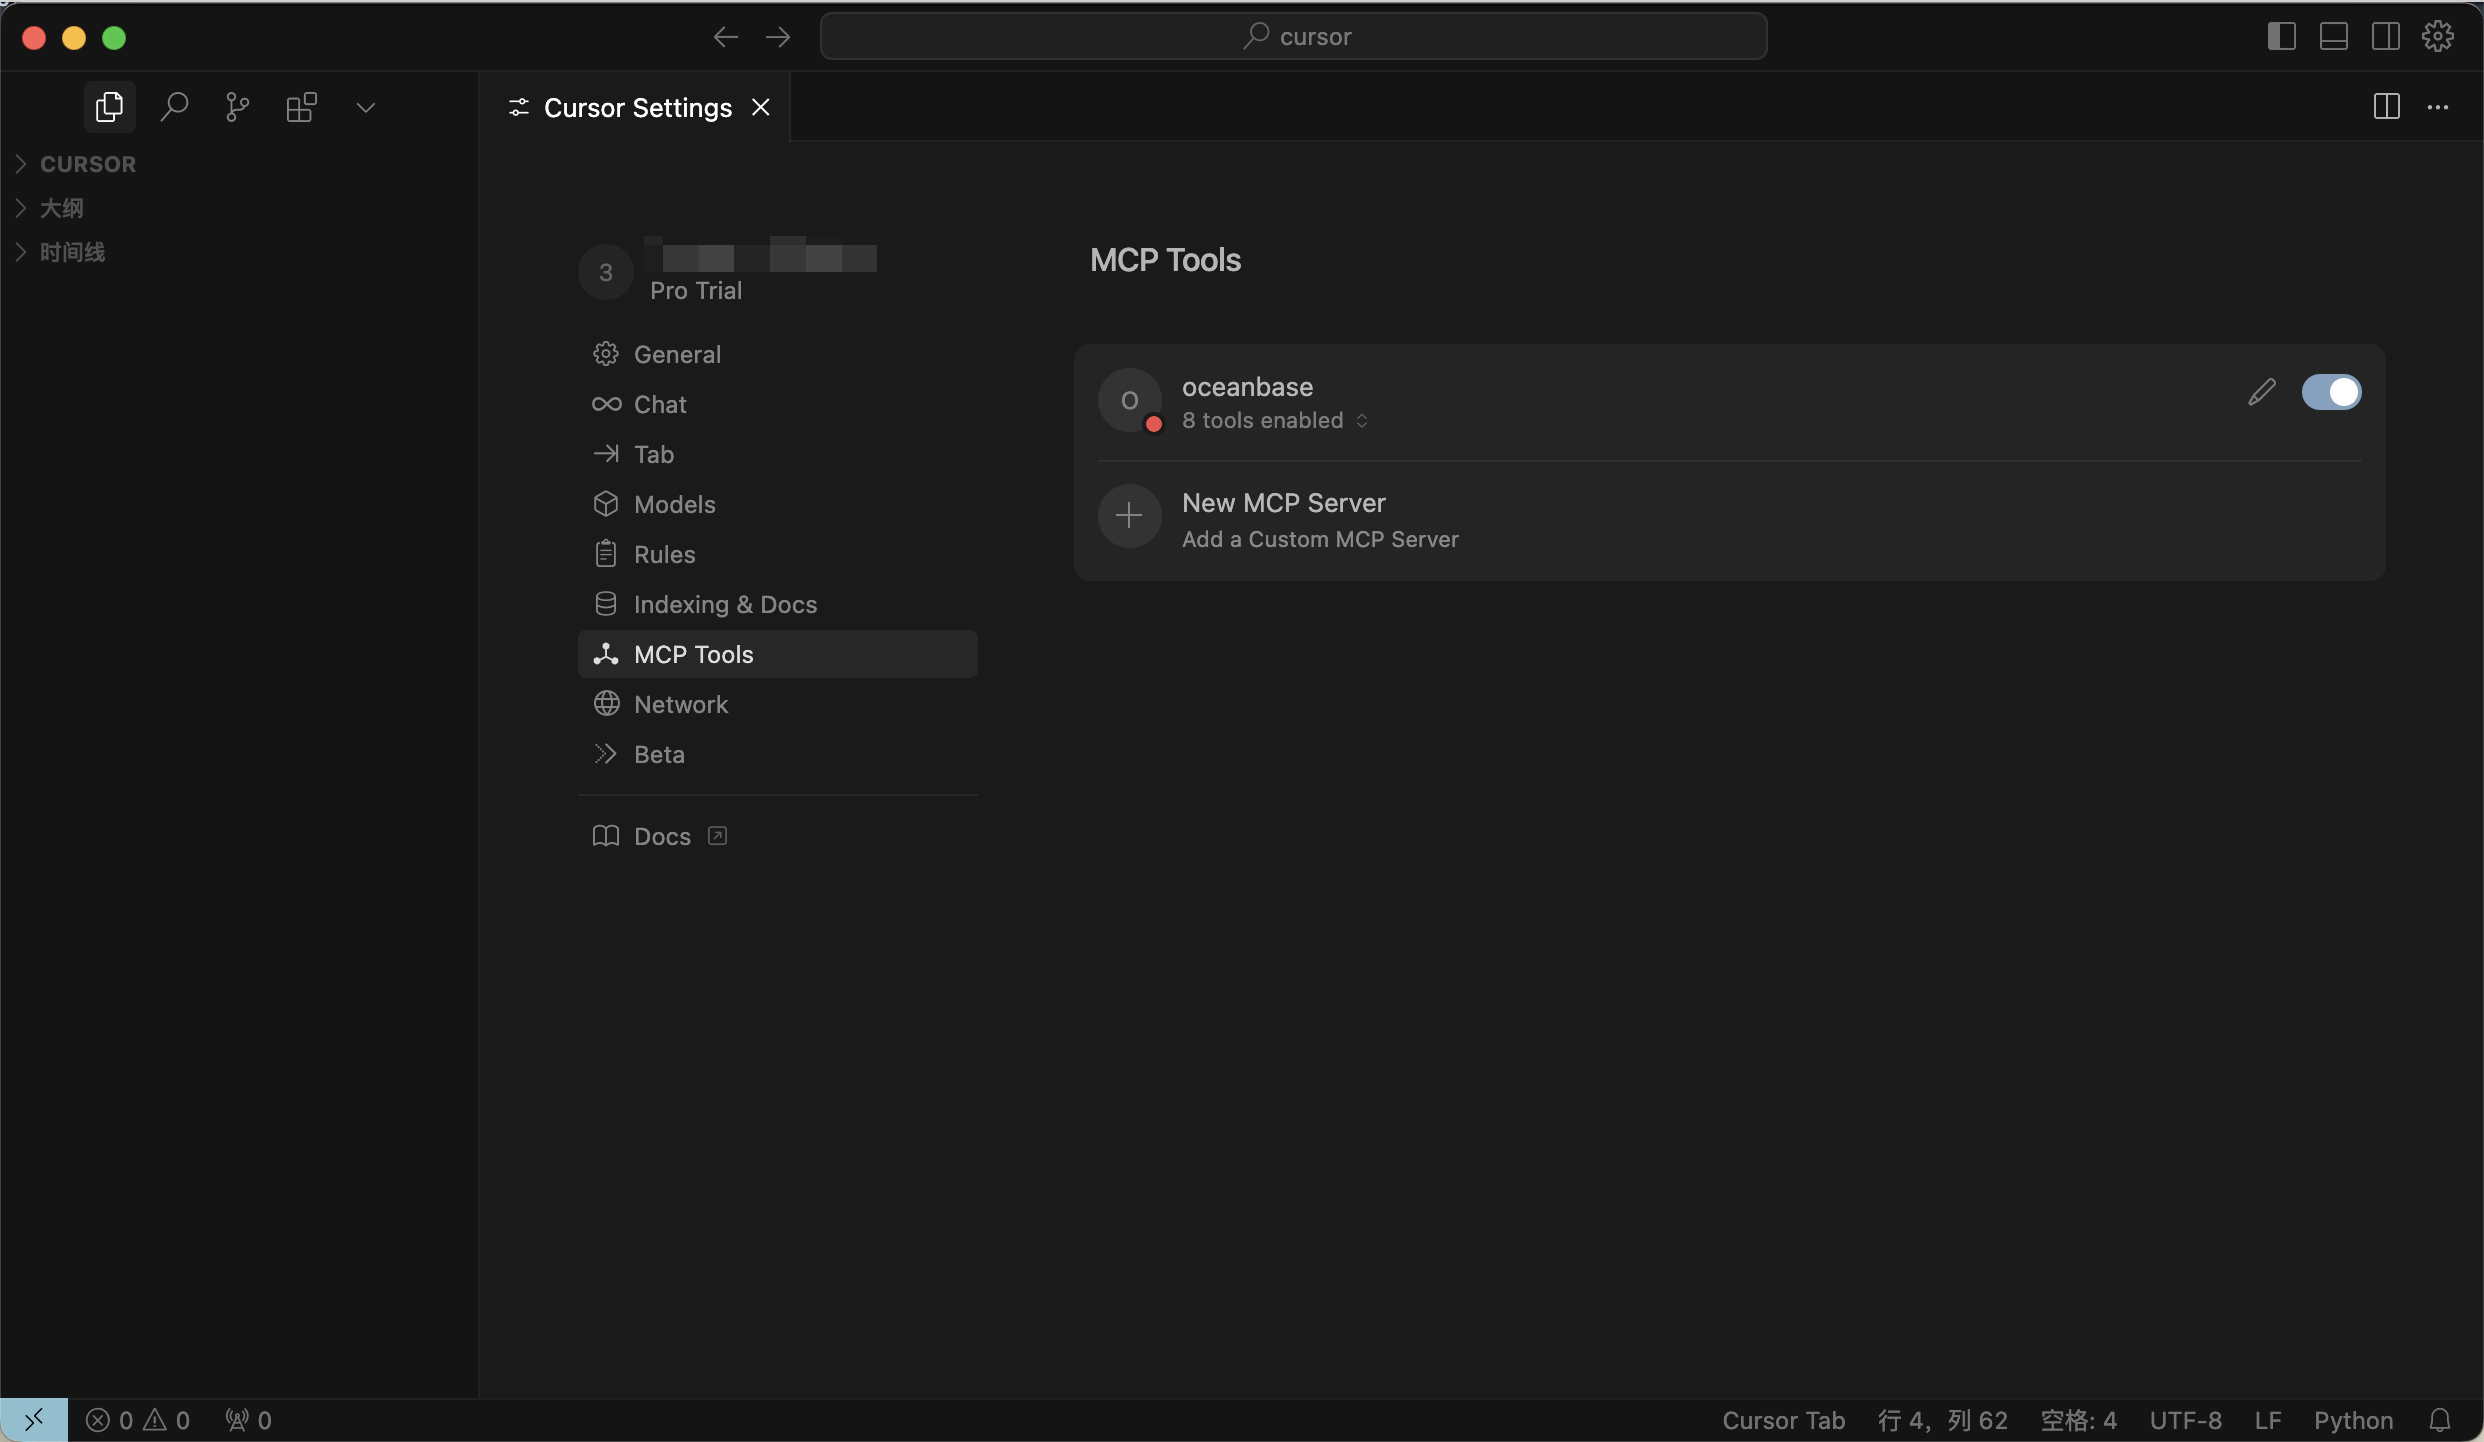
Use the shortcut `Ctrl + L` (Windows) or `Command + L` (macOS) to open the chat dialog, click the gear icon in the upper right corner, select `MCP Tools`, click `Add Custom MCP` to fill in the configuration file;
|
||
|
||
<!---->
|
||
|
||
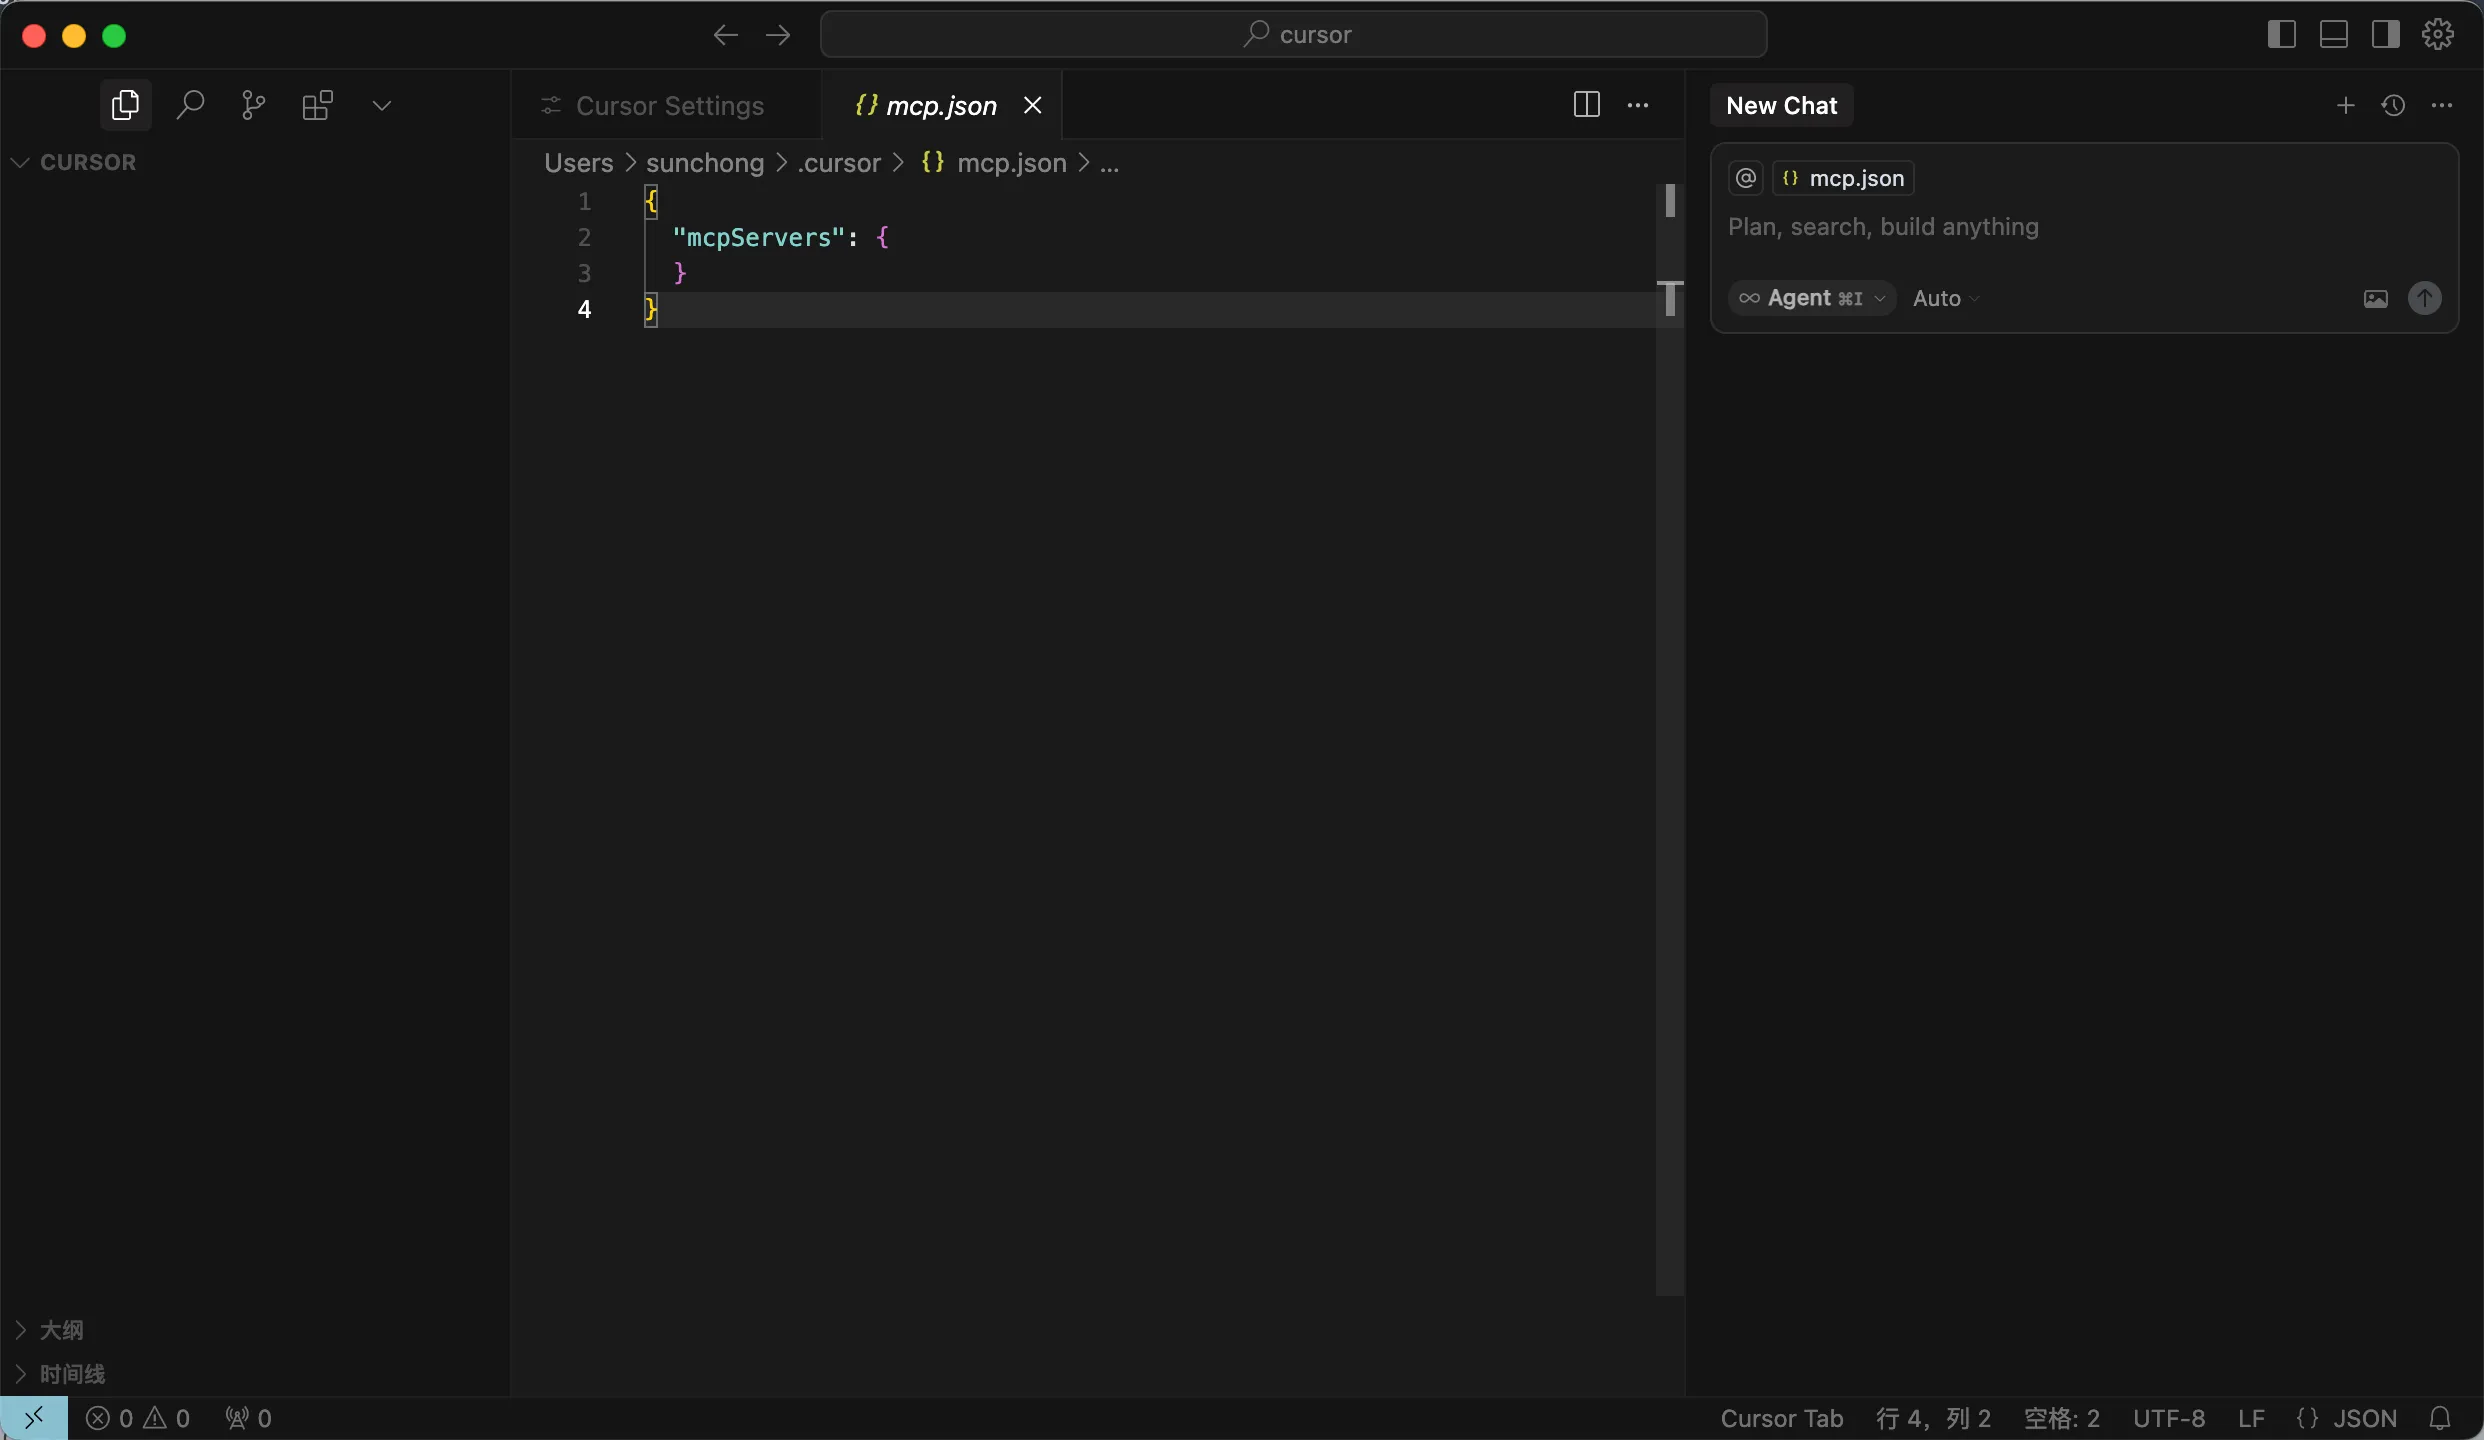
The example configuration file is as follows. Replace `path/to/your/mcp-oceanbase/src/oceanbase_mcp_server` with the absolute path of the `oceanbase_mcp_server` folder, and replace `OB_HOST`, `OB_PORT`, `OB_USER`, `OB_PASSWORD`, and `OB_DATABASE` with your database information:
|
||
|
||
```json
|
||
{
|
||
"mcpServers": {
|
||
"oceanbase": {
|
||
"command": "uv",
|
||
"args": [
|
||
"--directory",
|
||
"/path/to/your/mcp-oceanbase/src/oceanbase_mcp_server",
|
||
"run",
|
||
"oceanbase_mcp_server"
|
||
],
|
||
"env": {
|
||
"OB_HOST": "***",
|
||
"OB_PORT": "***",
|
||
"OB_USER": "***",
|
||
"OB_PASSWORD": "***",
|
||
"OB_DATABASE": "***"
|
||
}
|
||
}
|
||
}
|
||
}
|
||
```
|
||
|
||
2. If the configuration is successful, it will display the `Available` status.
|
||
|
||
<!---->
|
||
|
||
#### Step 4: Build a RESTful API
|
||
|
||
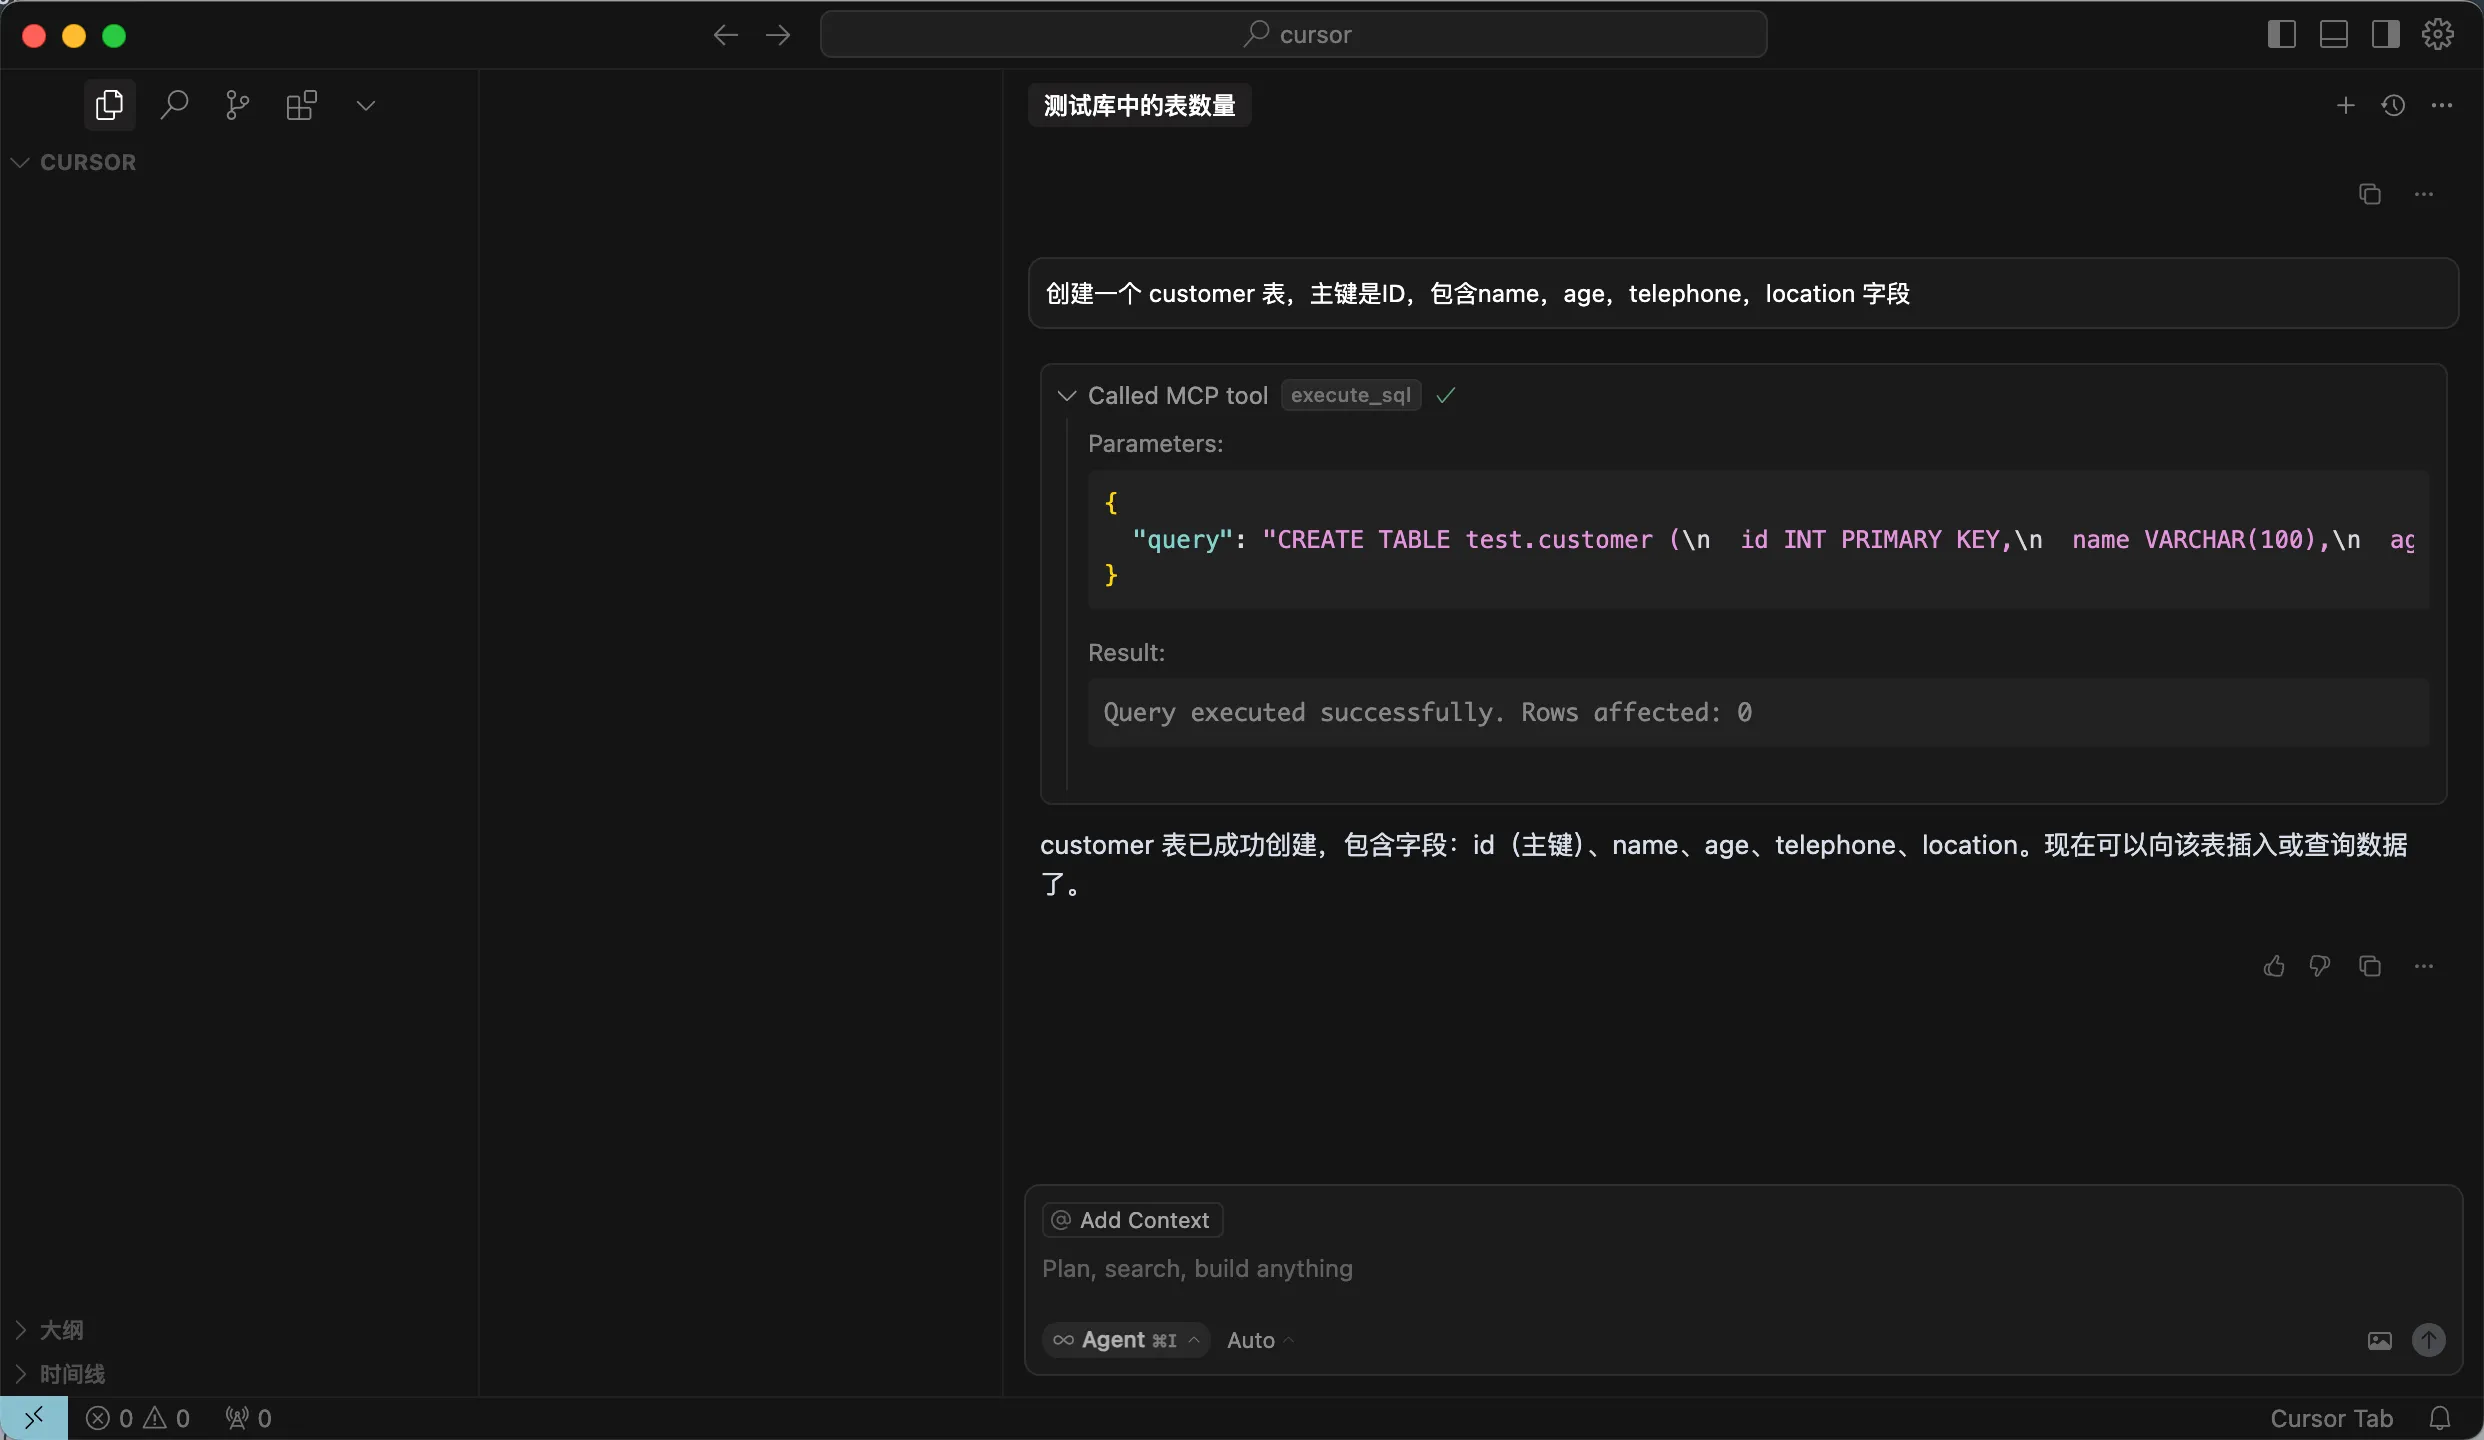
1. Create a customer table.
|
||
|
||
Enter the instruction `Create a customer table with ID as the primary key, including name, age, telephone, and location fields`. After confirming the SQL statement, click the `RUN Tool` button to execute the query.
|
||
|
||
<!---->
|
||
|
||
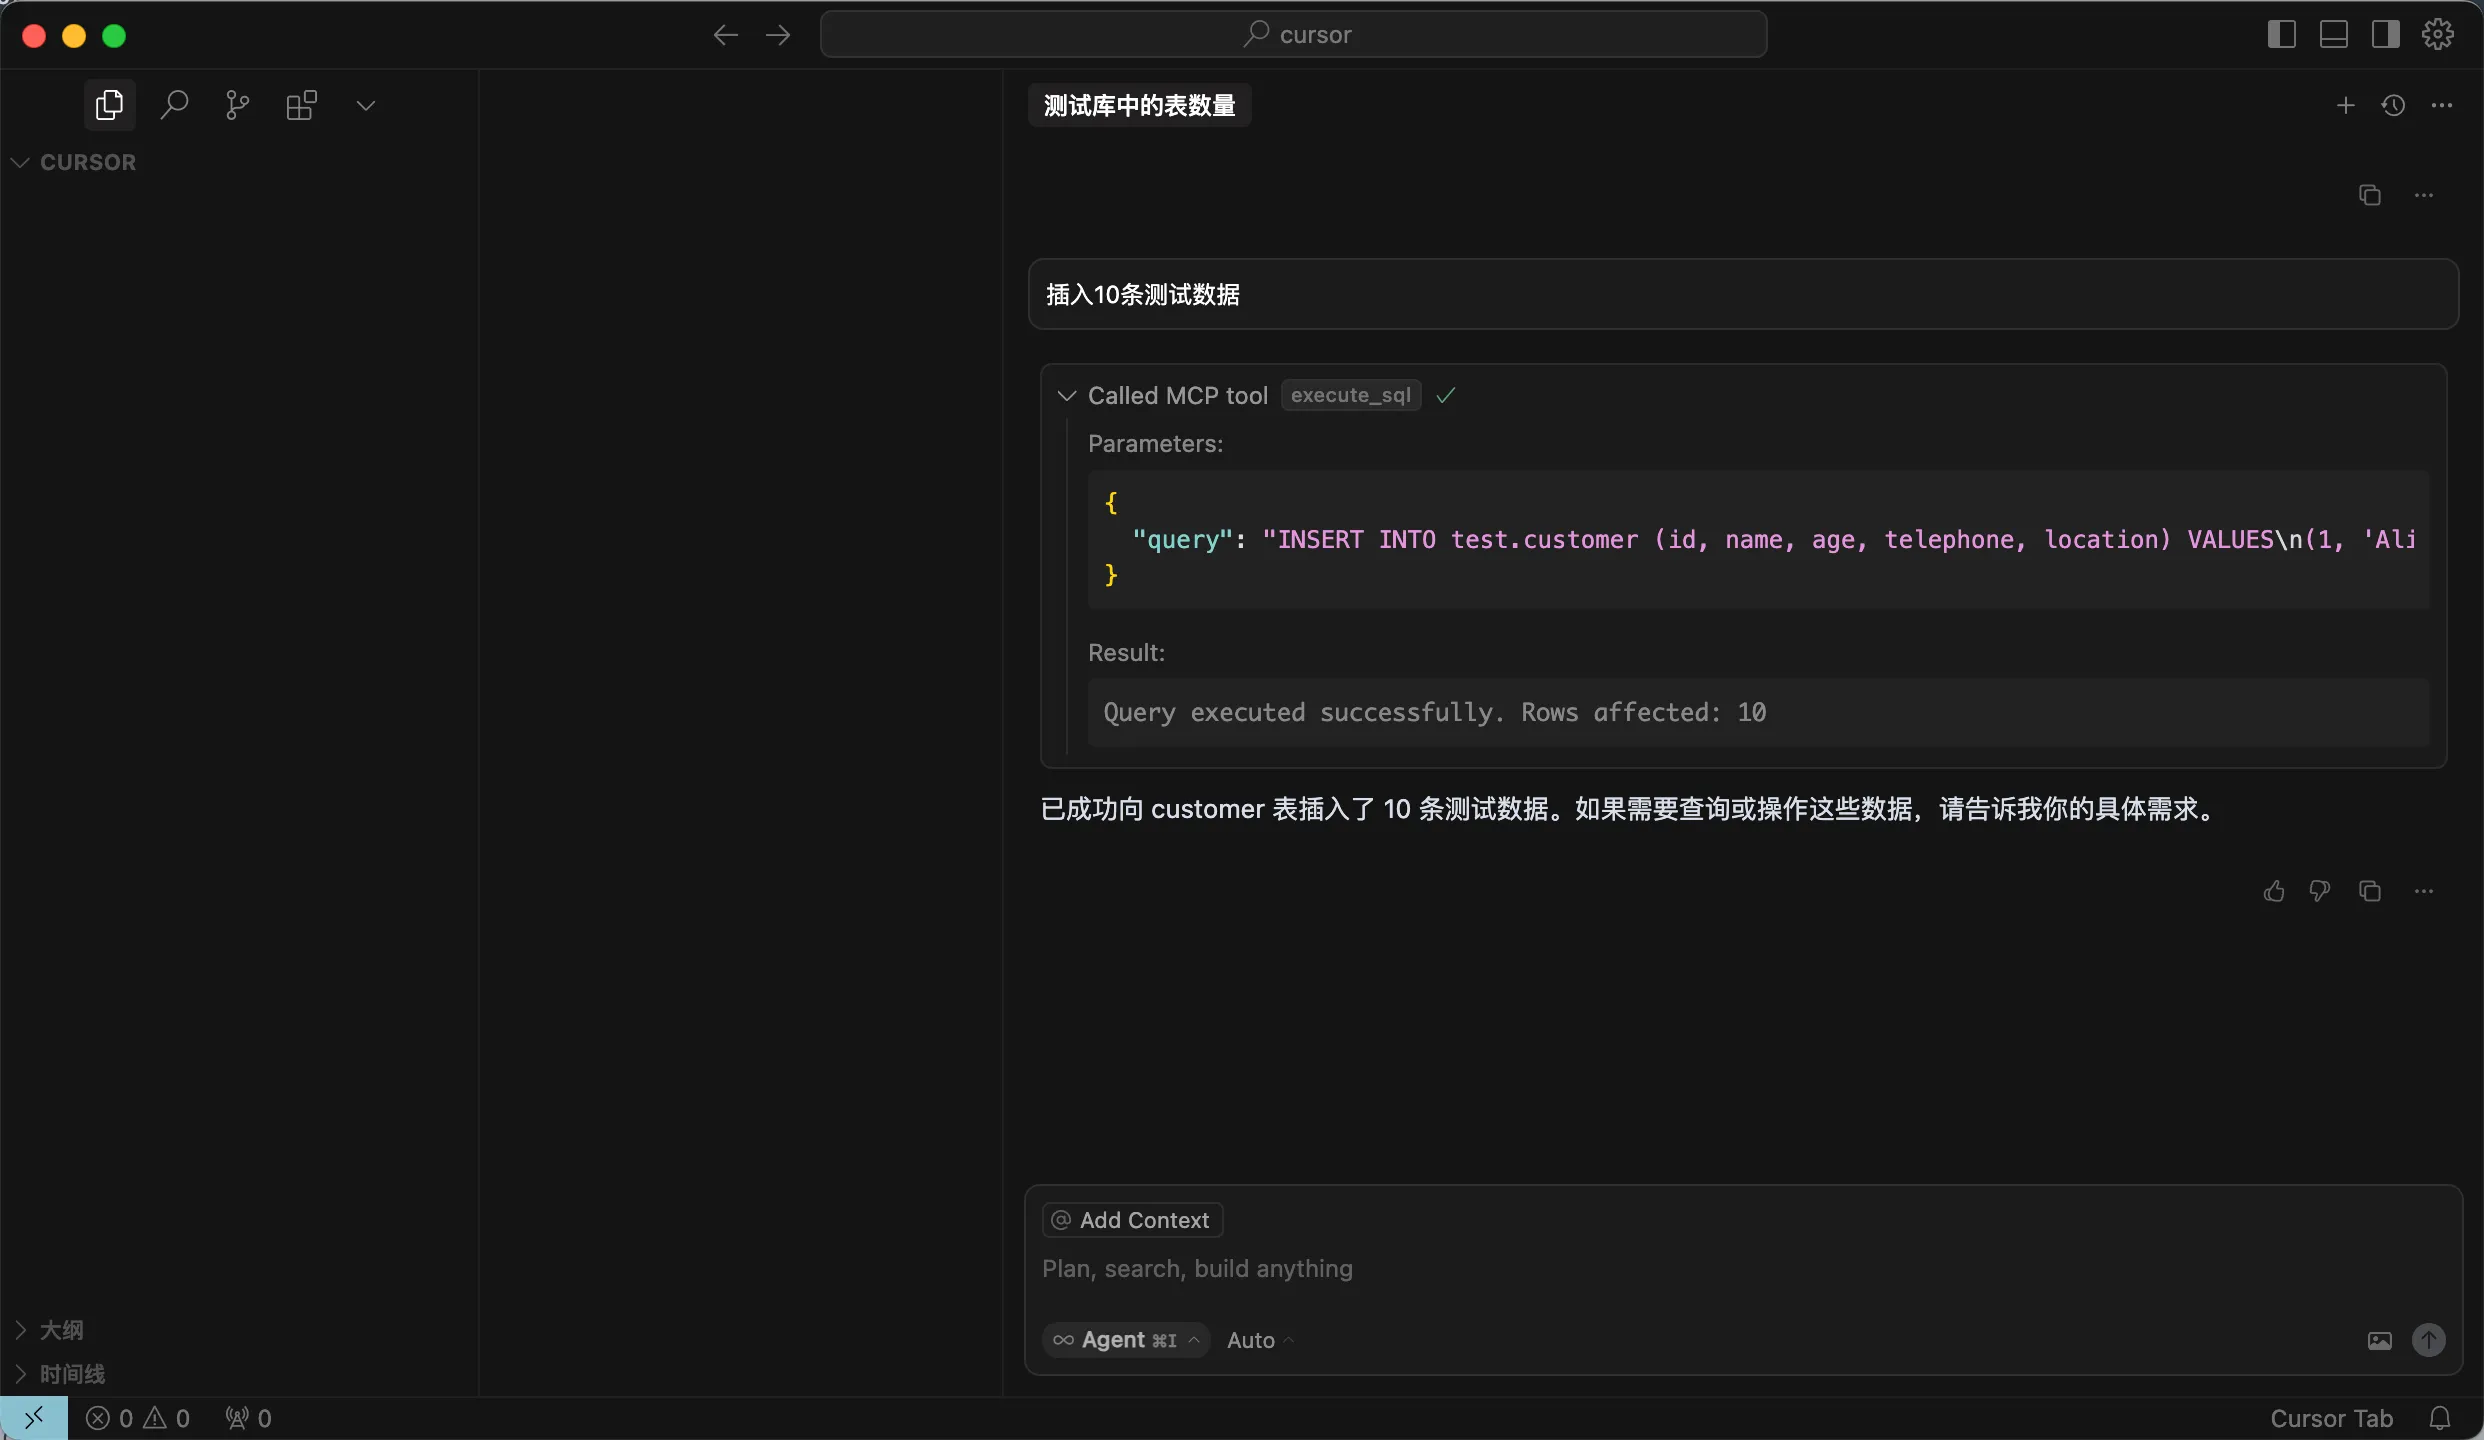
2. Insert test data.
|
||
|
||
Enter the instruction `Insert 10 test records` in the dialog box. After confirming the SQL statement, click `RUN tool`. After successful insertion, you will see a message indicating that `10 test records have been successfully inserted into the customer table...`.
|
||
|
||
<!---->
|
||
|
||
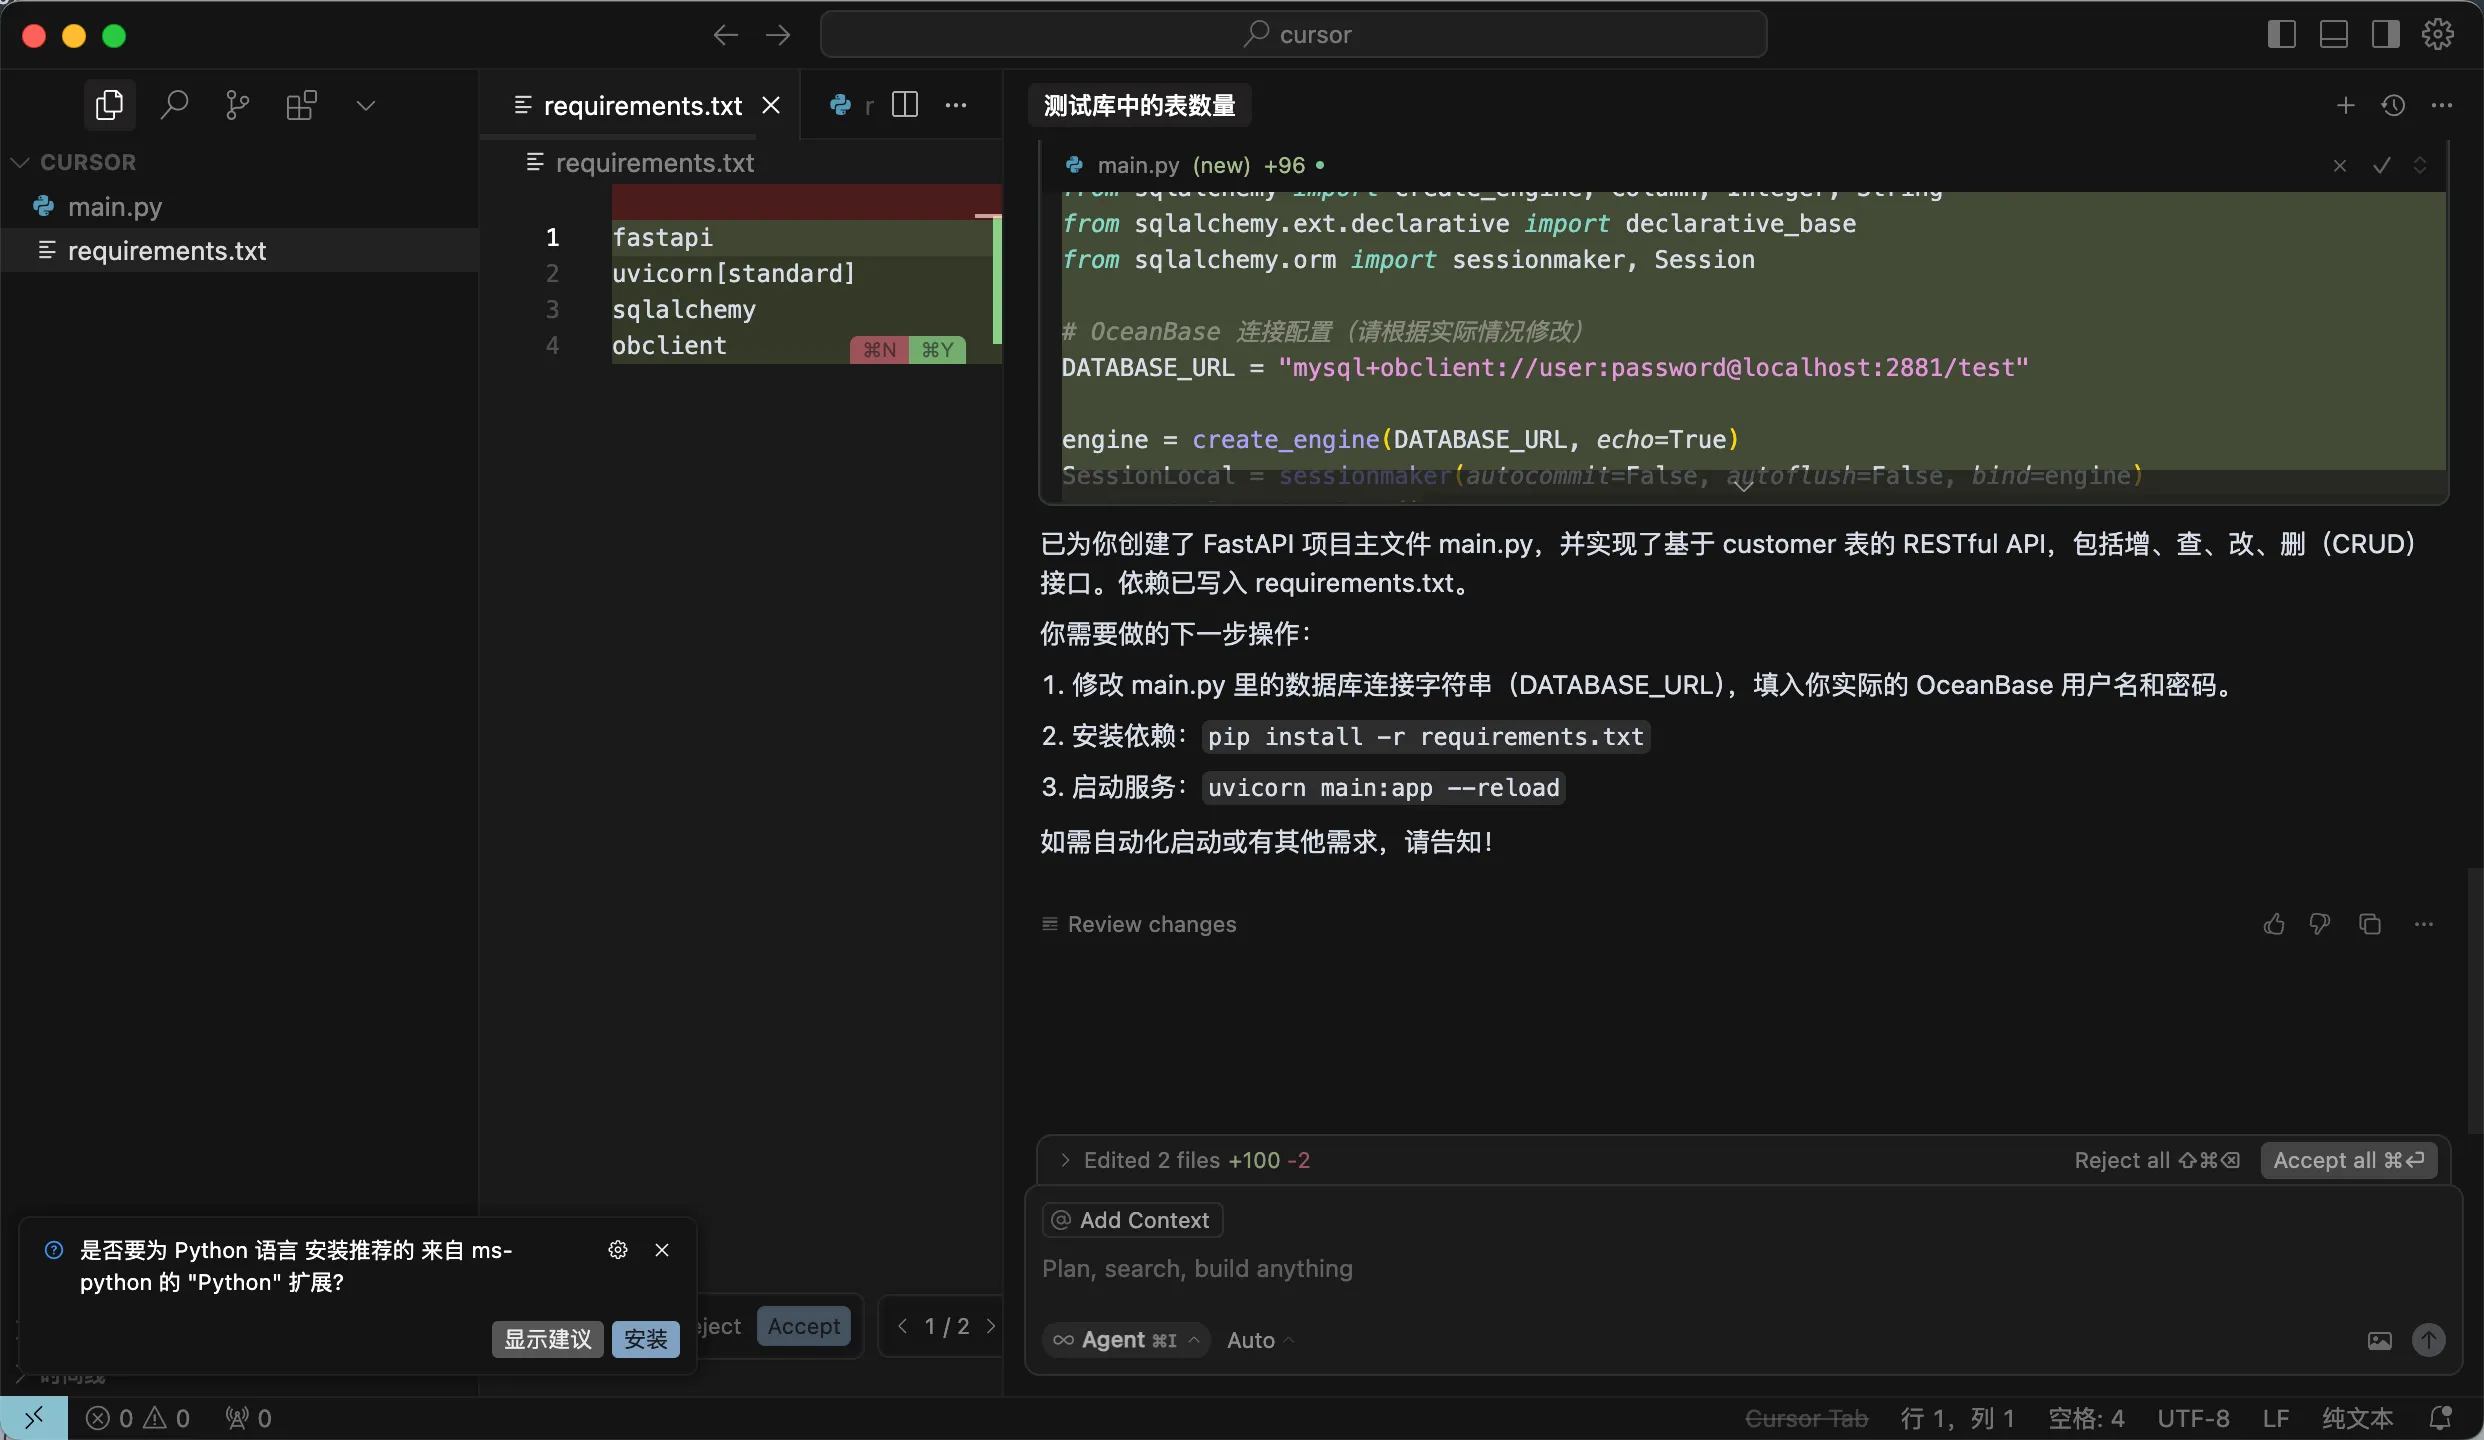
3. Create a FastAPI project.
|
||
|
||
Enter the prompt in the dialog box: `Create a FastAPI project and generate a RESTful API based on the customer table`. After confirming the SQL statement, click the `Run tool` button to execute the query. Cursor will automatically generate files such as main.py, and you can also continue to issue new instructions to automatically start the service, etc.
|
||
|
||
<!---->
|
||
|
||
4. Create a virtual environment and install dependencies.
|
||
|
||
Execute the following commands to create a virtual environment in the current directory using the uv package manager and install dependency packages:
|
||
|
||
```shell
|
||
uv venv
|
||
source .venv/bin/activate
|
||
uv pip install -r requirements.txt
|
||
```
|
||
|
||
5. Start the FastAPI project.
|
||
|
||
Execute the following command to start the FastAPI project:
|
||
|
||
```shell
|
||
uvicorn main:app --reload
|
||
```
|
||
|
||
6. View data in the table.
|
||
|
||
Run the following command in the command line, or use other request tools to view the data in the table:
|
||
|
||
```shell
|
||
curl http://127.0.0.1:8000/customers
|
||
```
|
||
|
||
The result is as follows:
|
||
|
||
```json
|
||
[{"id":1,"name":"Alice","age":28,"telephone":"1234567890","location":"Beijing"},{"id":2,"name":"Bob","age":32,"telephone":"2345678901","location":"Shanghai"},{"id":3,"name":"Charlie","age":25,"telephone":"3456789012","location":"Guangzhou"},{"id":4,"name":"David","age":40,"telephone":"4567890123","location":"Shenzhen"},{"id":5,"name":"Eve","age":22,"telephone":"5678901234","location":"Chengdu"},{"id":6,"name":"Frank","age":35,"telephone":"6789012345","location":"Wuhan"},{"id":7,"name":"Grace","age":30,"telephone":"7890123456","location":"Hangzhou"},{"id":8,"name":"Heidi","age":27,"telephone":"8901234567","location":"Nanjing"},{"id":9,"name":"Ivan","age":29,"telephone":"9012345678","location":"Tianjin"},{"id":10,"name":"Judy","age":31,"telephone":"0123456789","location":"Chongqing"}]
|
||
```
|
||
|
||
You can see that the RESTful API for create, read, update, and delete operations has been successfully generated:
|
||
|
||
```shell
|
||
from fastapi import FastAPI, HTTPException, Depends
|
||
from pydantic import BaseModel
|
||
from typing import List
|
||
from sqlalchemy import create_engine, Column, Integer, String
|
||
from sqlalchemy.ext.declarative import declarative_base
|
||
from sqlalchemy.orm import sessionmaker, Session
|
||
|
||
# OceanBase connection configuration (modify according to your actual situation)
|
||
DATABASE_URL = "mysql://***:***@***:***/***"
|
||
|
||
engine = create_engine(DATABASE_URL, echo=True)
|
||
SessionLocal = sessionmaker(autocommit=False, autoflush=False, bind=engine)
|
||
Base = declarative_base()
|
||
|
||
class Customer(Base):
|
||
__tablename__ = "customer"
|
||
id = Column(Integer, primary_key=True, index=True)
|
||
name = Column(String(100))
|
||
age = Column(Integer)
|
||
telephone = Column(String(20))
|
||
location = Column(String(100))
|
||
|
||
class CustomerCreate(BaseModel):
|
||
id: int
|
||
name: str
|
||
age: int
|
||
telephone: str
|
||
location: str
|
||
|
||
class CustomerUpdate(BaseModel):
|
||
name: str = None
|
||
age: int = None
|
||
telephone: str = None
|
||
location: str = None
|
||
|
||
class CustomerOut(BaseModel):
|
||
id: int
|
||
name: str
|
||
age: int
|
||
telephone: str
|
||
location: str
|
||
class Config:
|
||
orm_mode = True
|
||
|
||
def get_db():
|
||
db = SessionLocal()
|
||
try:
|
||
yield db
|
||
finally:
|
||
db.close()
|
||
|
||
app = FastAPI()
|
||
|
||
@app.post("/customers/", response_model=CustomerOut)
|
||
def create_customer(customer: CustomerCreate, db: Session = Depends(get_db)):
|
||
db_customer = Customer(**customer.dict())
|
||
db.add(db_customer)
|
||
try:
|
||
db.commit()
|
||
db.refresh(db_customer)
|
||
except Exception as e:
|
||
db.rollback()
|
||
raise HTTPException(status_code=400, detail=str(e))
|
||
return db_customer
|
||
|
||
@app.get("/customers/", response_model=List[CustomerOut])
|
||
def read_customers(skip: int = 0, limit: int = 100, db: Session = Depends(get_db)):
|
||
return db.query(Customer).offset(skip).limit(limit).all()
|
||
|
||
@app.get("/customers/{customer_id}", response_model=CustomerOut)
|
||
def read_customer(customer_id: int, db: Session = Depends(get_db)):
|
||
customer = db.query(Customer).filter(Customer.id == customer_id).first()
|
||
if customer is None:
|
||
raise HTTPException(status_code=404, detail="Customer not found")
|
||
return customer
|
||
|
||
@app.put("/customers/{customer_id}", response_model=CustomerOut)
|
||
def update_customer(customer_id: int, customer: CustomerUpdate, db: Session = Depends(get_db)):
|
||
db_customer = db.query(Customer).filter(Customer.id == customer_id).first()
|
||
if db_customer is None:
|
||
raise HTTPException(status_code=404, detail="Customer not found")
|
||
for var, value in vars(customer).items():
|
||
if value is not None:
|
||
setattr(db_customer, var, value)
|
||
db.commit()
|
||
db.refresh(db_customer)
|
||
return db_customer
|
||
|
||
@app.delete("/customers/{customer_id}")
|
||
def delete_customer(customer_id: int, db: Session = Depends(get_db)):
|
||
db_customer = db.query(Customer).filter(Customer.id == customer_id).first()
|
||
if db_customer is None:
|
||
raise HTTPException(status_code=404, detail="Customer not found")
|
||
db.delete(db_customer)
|
||
db.commit()
|
||
return {"ok": True}
|
||
```
|
||
|
||
## What's next
|
||
|
||
For more guides on experiencing seekdb's AI Native features and building AI applications based on seekdb, see:
|
||
|
||
* [Experience vector search](30.experience-vector-search.md)
|
||
* [Experience full-text indexing](40.experience-full-text-indexing.md)
|
||
* [Experience hybrid search](50.experience-hybrid-search.md)
|
||
* [Experience AI function service](60.experience-ai-function.md)
|
||
* [Experience semantic indexing](70.experience-hybrid-vector-index.md)
|
||
* [Build a knowledge base desktop application based on seekdb](../../500.tutorials/100.create-ai-app-demo/100.build-kb-in-seekdb.md)
|
||
* [Build a cultural tourism assistant with multi-model integration based on seekdb](../../500.tutorials/100.create-ai-app-demo/300.build-multi-model-application-based-on-oceanbase.md)
|
||
* [Build an image search application based on seekdb](../../500.tutorials/100.create-ai-app-demo/400.build-image-search-app-in-seekdb.md)
|
||
|
||
In addition to using SQL for operations, you can also use the Python SDK (pyseekdb) provided by seekdb. For usage instructions, see [Experience embedded seekdb using Python SDK](../50.embedded-mode/25.using-seekdb-in-python-sdk.md) and [pyseekdb overview](../../200.develop/900.sdk/10.pyseekdb-sdk/10.pyseekdb-sdk-get-started.md). |