16621 lines
939 KiB
Markdown
16621 lines
939 KiB
Markdown
# create api-key
|
||
Source: https://docs.vast.ai/api-reference/accounts/create-api-key
|
||
|
||
api-reference/openapi.json post /api/v0/auth/apikeys/
|
||
Creates a new API key with specified permissions for the authenticated user.
|
||
|
||
CLI Usage: `vastai create api-key --name <name> --permission_file <permissions_file> [--key_params <params>]`
|
||
|
||
|
||
|
||
# create env-var
|
||
Source: https://docs.vast.ai/api-reference/accounts/create-env-var
|
||
|
||
api-reference/openapi.json post /api/v0/secrets/
|
||
Creates a new encrypted environment variable for the authenticated user.
|
||
Keys are automatically converted to uppercase. Values are encrypted before storage.
|
||
There is a limit on the total number of environment variables per user.
|
||
|
||
CLI Usage: `vastai create env-var <key> <value>`
|
||
|
||
|
||
|
||
# create ssh-key
|
||
Source: https://docs.vast.ai/api-reference/accounts/create-ssh-key
|
||
|
||
api-reference/openapi.json post /api/v0/ssh/
|
||
Creates a new SSH key and associates it with your account.
|
||
The key will be automatically added to all your current instances.
|
||
|
||
CLI Usage: `vastai create ssh-key <ssh_key>`
|
||
|
||
|
||
|
||
# create subaccount
|
||
Source: https://docs.vast.ai/api-reference/accounts/create-subaccount
|
||
|
||
api-reference/openapi.json post /api/v0/users/
|
||
Creates either a standalone user account or a subaccount under a parent account. Subaccounts can be restricted to host-only functionality.
|
||
|
||
CLI Usage: `vastai create subaccount --email <email> --username <username> --password <password> [--type host]`
|
||
|
||
|
||
|
||
# delete api key
|
||
Source: https://docs.vast.ai/api-reference/accounts/delete-api-key
|
||
|
||
api-reference/openapi.json delete /api/v0/auth/apikeys/{id}/
|
||
Deletes an existing API key belonging to the authenticated user.
|
||
The API key is soft-deleted by setting a deleted_at timestamp.
|
||
|
||
CLI Usage: `vastai delete api-key <id>`
|
||
|
||
|
||
|
||
# delete env var
|
||
Source: https://docs.vast.ai/api-reference/accounts/delete-env-var
|
||
|
||
api-reference/openapi.json delete /api/v0/secrets/
|
||
Deletes an environment variable associated with the authenticated user.
|
||
The variable must exist and belong to the requesting user.
|
||
|
||
CLI Usage: `vastai delete env-var <name>`
|
||
|
||
|
||
|
||
# delete ssh key
|
||
Source: https://docs.vast.ai/api-reference/accounts/delete-ssh-key
|
||
|
||
api-reference/openapi.json delete /api/v0/ssh/{id}/
|
||
Removes an SSH key from the authenticated user's account
|
||
|
||
CLI Usage: `vastai delete ssh-key <id>`
|
||
|
||
|
||
|
||
# set user
|
||
Source: https://docs.vast.ai/api-reference/accounts/set-user
|
||
|
||
api-reference/openapi.json put /api/v0/users/
|
||
Updates the user data for the authenticated user.
|
||
|
||
CLI Usage: `vastai set user --file <file_path>`
|
||
|
||
|
||
|
||
# show api keys
|
||
Source: https://docs.vast.ai/api-reference/accounts/show-api-keys
|
||
|
||
api-reference/openapi.json get /api/v0/auth/apikeys/
|
||
Retrieves all API keys associated with the authenticated user.
|
||
|
||
CLI Usage: `vastai show api-keys`
|
||
|
||
|
||
|
||
# show connections
|
||
Source: https://docs.vast.ai/api-reference/accounts/show-connections
|
||
|
||
api-reference/openapi.json get /api/v0/users/cloud_integrations/
|
||
Retrieves the list of cloud connections associated with the authenticated user.
|
||
|
||
CLI Usage: `vastai show connections`
|
||
|
||
|
||
|
||
# show env vars
|
||
Source: https://docs.vast.ai/api-reference/accounts/show-env-vars
|
||
|
||
api-reference/openapi.json get /api/v0/secrets/
|
||
Retrieve a list of environment variables (secrets) for the authenticated user.
|
||
|
||
CLI Usage: `vastai show env-vars [-s]`
|
||
|
||
|
||
|
||
# show ipaddrs
|
||
Source: https://docs.vast.ai/api-reference/accounts/show-ipaddrs
|
||
|
||
api-reference/openapi.json get /api/v0/users/{user_id}/ipaddrs/
|
||
This endpoint retrieves the history of IP address accesses for the authenticated user.
|
||
|
||
CLI Usage: `vastai show ipaddrs`
|
||
|
||
|
||
|
||
# show ssh keys
|
||
Source: https://docs.vast.ai/api-reference/accounts/show-ssh-keys
|
||
|
||
api-reference/openapi.json get /api/v0/ssh/
|
||
Retrieve a list of SSH keys associated with the authenticated user's account.
|
||
|
||
CLI Usage: `vastai show ssh-keys`
|
||
|
||
|
||
|
||
# show subaccounts
|
||
Source: https://docs.vast.ai/api-reference/accounts/show-subaccounts
|
||
|
||
api-reference/openapi.json get /api/v0/subaccounts/
|
||
Retrieve a list of subaccounts associated with the authenticated user's account.
|
||
|
||
CLI Usage: `vastai show subaccounts`
|
||
|
||
|
||
|
||
# show team role
|
||
Source: https://docs.vast.ai/api-reference/accounts/show-team-role
|
||
|
||
api-reference/openapi.json get /api/v0/team/roles/{id}/
|
||
Retrieve details of a specific team role by its name.
|
||
|
||
CLI Usage: `vastai show team-role <name>`
|
||
|
||
|
||
|
||
# show user
|
||
Source: https://docs.vast.ai/api-reference/accounts/show-user
|
||
|
||
api-reference/openapi.json get /api/v0/users/current/
|
||
Retrieve information about the current authenticated user, excluding the API key.
|
||
|
||
CLI Usage: `vastai show user`
|
||
|
||
|
||
|
||
# transfer credit
|
||
Source: https://docs.vast.ai/api-reference/accounts/transfer-credit
|
||
|
||
api-reference/openapi.json put /api/v0/commands/transfer_credit/
|
||
Transfers specified amount of credits from the authenticated user's account to another user's account.
|
||
|
||
The recipient can be specified by either email address or user ID.
|
||
|
||
CLI Usage: `vastai transfer credit <recipient_email> <amount>`
|
||
|
||
|
||
|
||
# update env var
|
||
Source: https://docs.vast.ai/api-reference/accounts/update-env-var
|
||
|
||
api-reference/openapi.json put /api/v0/secrets/
|
||
Updates the value of an existing environment variable for the authenticated user.
|
||
|
||
CLI Usage: `vastai update env-var <key> <value>`
|
||
|
||
|
||
|
||
# update ssh key
|
||
Source: https://docs.vast.ai/api-reference/accounts/update-ssh-key
|
||
|
||
api-reference/openapi.json put /api/v0/ssh/{id}/
|
||
Updates the specified SSH key with the provided value.
|
||
|
||
CLI Usage: `vastai update ssh-key <id> <ssh_key>`
|
||
|
||
|
||
|
||
# search invoices
|
||
Source: https://docs.vast.ai/api-reference/billing/search-invoices
|
||
|
||
api-reference/openapi.json get /api/v0/invoices
|
||
This endpoint allows users to search and retrieve invoices based on specified filters.
|
||
|
||
CLI Usage: `vastai search invoices`
|
||
|
||
|
||
|
||
# show deposit
|
||
Source: https://docs.vast.ai/api-reference/billing/show-deposit
|
||
|
||
api-reference/openapi.json get /api/v0/instances/balance/{id}/
|
||
Retrieves the deposit details for a specified instance.
|
||
|
||
CLI Usage: `vastai show deposit <id>`
|
||
|
||
|
||
|
||
# show earnings
|
||
Source: https://docs.vast.ai/api-reference/billing/show-earnings
|
||
|
||
api-reference/openapi.json get /api/v0/users/{user_id}/machine-earnings/
|
||
Retrieves the earnings history for a specified time range and optionally per machine.
|
||
|
||
CLI Usage: `vastai show earnings [options]`
|
||
|
||
|
||
|
||
# show invoices
|
||
Source: https://docs.vast.ai/api-reference/billing/show-invoices
|
||
|
||
api-reference/openapi.json get /api/v0/users/{user_id}/invoices/
|
||
This endpoint retrieves billing history reports for the authenticated user, including charges and credits.
|
||
|
||
CLI Usage: `vastai show invoices`
|
||
|
||
|
||
|
||
# attach ssh-key
|
||
Source: https://docs.vast.ai/api-reference/instances/attach-ssh-key
|
||
|
||
api-reference/openapi.json post /api/v0/instances/{id}/ssh/
|
||
Attaches an SSH key to the specified instance, allowing SSH access using the provided key.
|
||
|
||
CLI Usage: `vastai attach ssh <instance_id> <ssh_key>`
|
||
|
||
|
||
|
||
# cancel copy
|
||
Source: https://docs.vast.ai/api-reference/instances/cancel-copy
|
||
|
||
api-reference/openapi.json delete /api/v0/commands/copy_direct/
|
||
Cancel a remote copy operation specified by the destination ID (dst_id).
|
||
|
||
CLI Usage: `vastai cancel copy --dst_id <destination_id>`
|
||
|
||
|
||
|
||
# cancel sync
|
||
Source: https://docs.vast.ai/api-reference/instances/cancel-sync
|
||
|
||
api-reference/openapi.json delete /api/v0/commands/rclone/
|
||
Cancels an in-progress remote sync operation identified by the destination instance ID.
|
||
This operation cannot be resumed once canceled and must be restarted if needed.
|
||
|
||
CLI Usage: `vastai cancel sync --dst_id <destination_id>`
|
||
|
||
|
||
|
||
# change bid
|
||
Source: https://docs.vast.ai/api-reference/instances/change-bid
|
||
|
||
api-reference/openapi.json put /api/v0/instances/bid_price/{id}/
|
||
Change the current bid price of an instance to a specified price.
|
||
|
||
CLI Usage: `vastai change bid <id> --price <price>`
|
||
|
||
|
||
|
||
# cloud copy
|
||
Source: https://docs.vast.ai/api-reference/instances/cloud-copy
|
||
|
||
api-reference/openapi.json post /api/v0/commands/rclone/
|
||
Starts a cloud copy operation by sending a command to the remote server. The operation can transfer data between an instance and a cloud service.
|
||
|
||
CLI Usage: `vastai cloud copy <instance_id> <src> <dst> [options]`
|
||
|
||
|
||
|
||
# copy
|
||
Source: https://docs.vast.ai/api-reference/instances/copy
|
||
|
||
api-reference/openapi.json put /api/v0/commands/copy_direct/
|
||
Initiate a remote copy operation to transfer data from one instance to another or between an instance and the local machine.
|
||
|
||
CLI Usage: `vastai copy <src_id> <dst_id> <src_path> <dst_path>`
|
||
|
||
|
||
|
||
# create instance
|
||
Source: https://docs.vast.ai/api-reference/instances/create-instance
|
||
|
||
api-reference/openapi.json put /api/v0/asks/{id}/
|
||
Creates a new instance by accepting an "ask" contract from a provider.
|
||
This is the main endpoint for launching new instances on Vast.ai.
|
||
|
||
CLI Usage: `vastai create instance <offer_id> [options]`
|
||
|
||
|
||
|
||
# destroy instance
|
||
Source: https://docs.vast.ai/api-reference/instances/destroy-instance
|
||
|
||
api-reference/openapi.json delete /api/v0/instances/{id}/
|
||
Destroys/deletes an instance permanently. This is irreversible and will delete all data.
|
||
|
||
CLI Usage: `vastai destroy instance <id>`
|
||
|
||
|
||
|
||
# detach ssh-key
|
||
Source: https://docs.vast.ai/api-reference/instances/detach-ssh-key
|
||
|
||
api-reference/openapi.json delete /api/v0/instances/{id}/ssh/{key}/
|
||
Detaches an SSH key from a specified instance, removing SSH access for that key.
|
||
|
||
CLI Usage: `vastai detach <instance_id> <ssh_key_id>`
|
||
|
||
|
||
|
||
# execute
|
||
Source: https://docs.vast.ai/api-reference/instances/execute
|
||
|
||
api-reference/openapi.json put /api/v0/instances/command/{id}/
|
||
Executes a constrained remote command on a specified instance.
|
||
The command output can be retrieved from the returned result URL.
|
||
|
||
CLI Usage: `vastai execute <instance_id> <command>`
|
||
|
||
|
||
|
||
# manage instance
|
||
Source: https://docs.vast.ai/api-reference/instances/manage-instance
|
||
|
||
api-reference/openapi.json put /api/v0/instances/{id}/
|
||
Manage instance state and labels. The operation is determined by the request body parameters.
|
||
|
||
CLI Usage:
|
||
- To stop: `vastai stop instance <id>`
|
||
- To start: `vastai start instance <id>`
|
||
- To label: `vastai label instance <id> <label>`
|
||
|
||
|
||
|
||
# prepay instance
|
||
Source: https://docs.vast.ai/api-reference/instances/prepay-instance
|
||
|
||
api-reference/openapi.json put /api/v0/instances/prepay/{id}/
|
||
Deposit credits into a reserved instance to receive usage discounts.
|
||
The discount rate is calculated based on how many months of usage the prepaid amount covers. Maximum discount is typically 40%.
|
||
|
||
CLI Usage: `vastai prepay instance <id> <amount>`
|
||
|
||
|
||
|
||
# reboot instance
|
||
Source: https://docs.vast.ai/api-reference/instances/reboot-instance
|
||
|
||
api-reference/openapi.json put /api/v0/instances/reboot/{id}/
|
||
Stops and starts a container without losing GPU priority. Updates container status to 'rebooting' and executes docker stop/start commands on the host machine.
|
||
|
||
CLI Usage: `vastai reboot instance <id>`
|
||
|
||
|
||
|
||
# recycle instance
|
||
Source: https://docs.vast.ai/api-reference/instances/recycle-instance
|
||
|
||
api-reference/openapi.json put /api/v0/instances/recycle/{id}/
|
||
Destroys and recreates container in place (from newly pulled image) without losing GPU priority.
|
||
Updates container status to 'recycling' and executes docker stop/remove commands on the host machine.
|
||
|
||
CLI Usage: `vastai recycle instance <id>`
|
||
|
||
|
||
|
||
# show instance
|
||
Source: https://docs.vast.ai/api-reference/instances/show-instance
|
||
|
||
api-reference/openapi.json get /api/v0/instances/{id}/
|
||
Retrieves the details of a specific instance for the authenticated user.
|
||
This endpoint returns detailed information including SSH connection parameters, instance state, resource utilization, template data, and pricing details.
|
||
|
||
CLI Usage: `vastai show instance [--api-key <api_key>] [--raw]`
|
||
|
||
|
||
|
||
# show instances
|
||
Source: https://docs.vast.ai/api-reference/instances/show-instances
|
||
|
||
api-reference/openapi.json get /api/v0/instances/
|
||
Retrieve a list of instances for the authenticated user.
|
||
|
||
CLI Usage: `vastai show instances [options] [--api-key <api_key>] [--raw]`
|
||
|
||
|
||
|
||
# show logs
|
||
Source: https://docs.vast.ai/api-reference/instances/show-logs
|
||
|
||
api-reference/openapi.json put /api/v0/instances/request_logs/{id}
|
||
Request logs from a specific instance. The logs will be uploaded to S3 and can be retrieved from a generated URL. Supports both container logs and daemon system logs.
|
||
|
||
CLI Usage: `vastai show logs <instance_id> [--tail <lines>] [--filter <grep>] [--daemon-logs]`
|
||
|
||
|
||
|
||
# show ssh-keys
|
||
Source: https://docs.vast.ai/api-reference/instances/show-ssh-keys
|
||
|
||
api-reference/openapi.json get /api/v0/instances/{instance_id}/ssh/
|
||
Retrieves the SSH keys associated with a specific instance.
|
||
|
||
CLI Usage: `vastai show ssh-keys <instance_id>`
|
||
|
||
|
||
|
||
# API Introduction
|
||
Source: https://docs.vast.ai/api-reference/introduction
|
||
|
||
|
||
|
||
Welcome to Vast.ai 's API documentation. Our API allows you to programmatically manage GPU instances, handle machine operations, and automate your AI/ML workflow. Whether you're running individual GPU instances or managing a fleet of machines, our API provides comprehensive control over all Vast.ai platform features.
|
||
|
||
<Card title="Here's a link to our API docs on Postman" href="https://www.postman.com/vast33/vast-ai-public-api-docs">
|
||
View the Postman collection
|
||
</Card>
|
||
|
||
|
||
# cancel maint
|
||
Source: https://docs.vast.ai/api-reference/machines/cancel-maint
|
||
|
||
api-reference/openapi.json put /api/v0/machines/{machine_id}/cancel_maint/
|
||
Cancel a scheduled maintenance window for a specified machine.
|
||
|
||
CLI Usage: `vastai cancel maint <machine_id>`
|
||
|
||
|
||
|
||
# cleanup machine
|
||
Source: https://docs.vast.ai/api-reference/machines/cleanup-machine
|
||
|
||
api-reference/openapi.json put /api/v0/machines/{machine_id}/cleanup/
|
||
This endpoint removes expired contracts on a specified machine, freeing up space.
|
||
|
||
CLI Usage: `vastai cleanup machine <machine_id>`
|
||
|
||
|
||
|
||
# list machine
|
||
Source: https://docs.vast.ai/api-reference/machines/list-machine
|
||
|
||
api-reference/openapi.json put /api/v0/machines/create_asks/
|
||
Creates or updates ask contracts for a machine to list it for rent on the vast.ai platform.
|
||
Allows setting pricing, minimum GPU requirements, end date and discount rates.
|
||
|
||
CLI Usage: `vastai list machine <machine_id> [options]`
|
||
|
||
|
||
|
||
# remove defjob
|
||
Source: https://docs.vast.ai/api-reference/machines/remove-defjob
|
||
|
||
api-reference/openapi.json delete /api/v0/machines/{machine_id}/defjob/
|
||
Deletes the default job (background instances) for a specified machine.
|
||
|
||
CLI Usage: `vastai remove defjob <machine_id>`
|
||
|
||
|
||
|
||
# schedule maint
|
||
Source: https://docs.vast.ai/api-reference/machines/schedule-maint
|
||
|
||
api-reference/openapi.json put /api/v0/machines/{machine_id}/dnotify
|
||
Schedules a maintenance window for a specified machine and notifies clients.
|
||
|
||
CLI Usage: `vastai schedule maint <machine_id> --sdate <sdate> --duration <duration>`
|
||
|
||
|
||
|
||
# set defjob
|
||
Source: https://docs.vast.ai/api-reference/machines/set-defjob
|
||
|
||
api-reference/openapi.json put /api/v0/machines/create_bids/
|
||
Creates default jobs (background instances) for a specified machine with the given parameters.
|
||
|
||
CLI Usage: `vastai set defjob <machine_id> --price_gpu <price> --price_inetu <price> --price_inetd <price> --image <image> [--args <args>]`
|
||
|
||
|
||
|
||
# set min-bid
|
||
Source: https://docs.vast.ai/api-reference/machines/set-min-bid
|
||
|
||
api-reference/openapi.json put /api/v0/machines/{machine_id}/minbid/
|
||
Sets the minimum bid price for a specified machine.
|
||
|
||
CLI Usage: `vastai set min-bid <machine_id> --price <price>`
|
||
|
||
|
||
|
||
# show machines
|
||
Source: https://docs.vast.ai/api-reference/machines/show-machines
|
||
|
||
api-reference/openapi.json get /api/v0/machines/
|
||
Fetches data for multiple machines associated with the authenticated user.
|
||
|
||
CLI Usage: `vastai show machines [--user_id <user_id>]`
|
||
|
||
|
||
|
||
# show reports
|
||
Source: https://docs.vast.ai/api-reference/machines/show-reports
|
||
|
||
api-reference/openapi.json get /api/v0/machines/{machine_id}/reports/
|
||
Retrieves a list of the most recent reports for a given machine. Each report includes details such as the problem identified, a message describing the issue, and the timestamp when the report was created.
|
||
|
||
CLI Usage: `vastai reports <machine_id>`
|
||
|
||
|
||
|
||
# unlist machine
|
||
Source: https://docs.vast.ai/api-reference/machines/unlist-machine
|
||
|
||
api-reference/openapi.json delete /api/v0/machines/{machine_id}/asks/
|
||
Removes all 'ask' type offer contracts for a specified machine, effectively unlisting it from being available for rent.
|
||
|
||
CLI Usage: `vastai unlist machine <id>`
|
||
|
||
|
||
|
||
# add network-disk
|
||
Source: https://docs.vast.ai/api-reference/network-volumes/add-network-disk
|
||
|
||
api-reference/openapi.json post /api/v0/network_disk/
|
||
Adds a network disk to be used to create network volume offers, or adds machines to an existing network disk.
|
||
|
||
CLI Usage: `vastai add network_disk <machine_id>... <mount_point> [options]`
|
||
|
||
|
||
|
||
# create network-volume
|
||
Source: https://docs.vast.ai/api-reference/network-volumes/create-network-volume
|
||
|
||
api-reference/openapi.json put /api/v0/network_volume/
|
||
Creates a network volume from an offer.
|
||
|
||
CLI Usage: `vastai create network-volume <offer_id> <size> [--name <name>]`
|
||
|
||
|
||
|
||
# list network-volume
|
||
Source: https://docs.vast.ai/api-reference/network-volumes/list-network-volume
|
||
|
||
api-reference/openapi.json post /api/v0/network_volume/
|
||
Lists a network disk for rent as network volumes, or updates an existing listing with a new price/size/end date/discount.
|
||
|
||
CLI Usage: `vastai list network-volume <disk_id> [options]`
|
||
|
||
|
||
|
||
# search network volumes
|
||
Source: https://docs.vast.ai/api-reference/network-volumes/search-network-volumes
|
||
|
||
api-reference/openapi.json post /api/v0/network_volumes/search/
|
||
Search for available network volume offers with advanced filtering and sorting.
|
||
|
||
CLI Usage: `vastai search network-volumes <query> [--order <field>]`
|
||
|
||
|
||
|
||
# unlist network-volume
|
||
Source: https://docs.vast.ai/api-reference/network-volumes/unlist-network-volume
|
||
|
||
api-reference/openapi.json post /api/v0/network_volumes/unlist/
|
||
Unlists a network volume for rent.
|
||
|
||
CLI Usage: `vastai unlist volume <offer_id>`
|
||
|
||
|
||
|
||
# search benchmarks
|
||
Source: https://docs.vast.ai/api-reference/search/search-benchmarks
|
||
|
||
api-reference/openapi.json get /api/v0/benchmarks/
|
||
Retrieve benchmark data based on search parameters.
|
||
|
||
CLI Usage: `vastai search benchmarks`
|
||
|
||
|
||
|
||
# search offers
|
||
Source: https://docs.vast.ai/api-reference/search/search-offers
|
||
|
||
api-reference/openapi.json post /api/v0/bundles/
|
||
Search for available GPU machine offers with advanced filtering and sorting.
|
||
|
||
Each filter parameter (such as `verified`, `gpu_name`, `num_gpus`, etc.) should be an object specifying the operator and value you want to match.
|
||
|
||
**Filter operators:**
|
||
|
||
| Operator | Meaning | Example |
|
||
|:---------|:-----------------------|:-------------------------------|
|
||
| `eq` | Equal to | `{ "eq": true }` |
|
||
| `neq` | Not equal to | `{ "neq": false }` |
|
||
| `gt` | Greater than | `{ "gt": 0.99 }` |
|
||
| `lt` | Less than | `{ "lt": 10000 }` |
|
||
| `gte` | Greater than or equal | `{ "gte": 4 }` |
|
||
| `lte` | Less than or equal | `{ "lte": 8 }` |
|
||
| `in` | Value is in a list | `{ "in": ["RTX_3090", "RTX_4090"] }` |
|
||
| `nin` | Value is not in a list | `{ "nin": ["TW", "SE"] }` |
|
||
|
||
Default filters: verified=true, rentable=true, rented=false (unless --no-default is used)
|
||
|
||
CLI Usage: `vastai search offers 'reliability > 0.99 num_gpus>=4' --order=dph_total`
|
||
|
||
|
||
|
||
# search templates
|
||
Source: https://docs.vast.ai/api-reference/search/search-templates
|
||
|
||
api-reference/openapi.json get /api/v0/template/
|
||
Searches for templates based on query parameters and retrieves matching templates.
|
||
|
||
CLI Usage: `vastai search templates`
|
||
|
||
|
||
|
||
# create endpoint
|
||
Source: https://docs.vast.ai/api-reference/serverless/create-endpoint
|
||
|
||
api-reference/openapi.json post /api/v0/endptjobs/
|
||
This endpoint creates a new job processing endpoint with specified parameters.
|
||
|
||
CLI Usage: `vastai create endpoint [options]`
|
||
|
||
|
||
|
||
# create workergroup
|
||
Source: https://docs.vast.ai/api-reference/serverless/create-workergroup
|
||
|
||
api-reference/openapi.json post /api/v0/workergroups/
|
||
Creates a new workergroup configuration that manages worker instances for a serverless endpoint.
|
||
|
||
CLI Usage: `vastai create workergroup --template_hash <hash> --endpoint_name <name> [options]`
|
||
|
||
|
||
|
||
# delete endpoint
|
||
Source: https://docs.vast.ai/api-reference/serverless/delete-endpoint
|
||
|
||
api-reference/openapi.json delete /api/v0/endptjobs/{id}/
|
||
Deletes an endpoint group by ID. Associated workergroups will also be deleted.
|
||
|
||
CLI Usage: `vastai delete endpoint <id>`
|
||
|
||
|
||
|
||
# delete workergroup
|
||
Source: https://docs.vast.ai/api-reference/serverless/delete-workergroup
|
||
|
||
api-reference/openapi.json delete /api/v0/workergroups/{id}/
|
||
Deletes an existing workergroup.
|
||
|
||
CLI Usage: `vastai delete workergroup <id>`
|
||
|
||
|
||
|
||
# get endpoint logs
|
||
Source: https://docs.vast.ai/api-reference/serverless/get-endpoint-logs
|
||
|
||
api-reference/openapi.json post /get_endpoint_logs/
|
||
Retrieves logs for a specific endpoint by name.
|
||
|
||
CLI Usage: `vastai get endpoint logs <endpoint_name> [--tail <num_lines>]`
|
||
|
||
|
||
|
||
# get endpoint workers
|
||
Source: https://docs.vast.ai/api-reference/serverless/get-endpoint-workers
|
||
|
||
api-reference/openapi.json post /get_endpoint_workers/
|
||
Retrieves the current list and status of workers for a specific endpoint.
|
||
Useful for monitoring, debugging connectivity issues, and understanding resource usage.
|
||
|
||
CLI Usage: `vastai get endpoint workers <id>`
|
||
|
||
|
||
|
||
# get workergroup logs
|
||
Source: https://docs.vast.ai/api-reference/serverless/get-workergroup-logs
|
||
|
||
api-reference/openapi.json post /get_workergroup_logs/
|
||
Retrieves logs for a specific workergroup by ID.
|
||
|
||
CLI Usage: `vastai get workergroup logs <id> [--tail <num_lines>]`
|
||
|
||
|
||
|
||
# get workergroup workers
|
||
Source: https://docs.vast.ai/api-reference/serverless/get-workergroup-workers
|
||
|
||
api-reference/openapi.json post /get_workergroup_workers/
|
||
Retrieves the current list and status of workers for a specific workergroup.
|
||
Useful for monitoring, debugging connectivity issues, and understanding resource usage within a workergroup.
|
||
|
||
CLI Usage: `vastai get workergroup workers <id>`
|
||
|
||
|
||
|
||
# route
|
||
Source: https://docs.vast.ai/api-reference/serverless/route
|
||
|
||
api-reference/openapi.json post /route/
|
||
Calls on the serverless engine to retrieve a GPU instance address within your endpoint for processing a request.
|
||
The engine will return either a ready worker URL or status information if no workers are available.
|
||
|
||
CLI Usage: `vastai route <endpoint> <cost>`
|
||
|
||
|
||
|
||
# show endpoints
|
||
Source: https://docs.vast.ai/api-reference/serverless/show-endpoints
|
||
|
||
api-reference/openapi.json get /api/v0/endptjobs/
|
||
Retrieve a list of endpoint jobs for the authenticated user.
|
||
|
||
CLI Usage: `vastai show endpoints`
|
||
|
||
|
||
|
||
# show workergroup
|
||
Source: https://docs.vast.ai/api-reference/serverless/show-workergroup
|
||
|
||
api-reference/openapi.json get /api/v0/workergroups/
|
||
Retrieves the list of workergroups associated with the authenticated user.
|
||
|
||
CLI Usage: `vastai show workergroups`
|
||
|
||
|
||
|
||
# update workergroup
|
||
Source: https://docs.vast.ai/api-reference/serverless/update-workergroup
|
||
|
||
api-reference/openapi.json put /api/v0/workergroups/{id}/
|
||
Updates the properties of an existing workergroup based on the provided parameters.
|
||
|
||
CLI Usage: `vastai update workergroup <id> [options]`
|
||
|
||
|
||
|
||
# create team
|
||
Source: https://docs.vast.ai/api-reference/team/create-team
|
||
|
||
api-reference/openapi.json post /api/v0/team/
|
||
Creates a new [team](https://docs.vast.ai/documentation/teams/teams-overview) with given name and following default roles:
|
||
- **Owner**: Full access to all team resources, settings, and member management. The team owner is the user who creates the team.
|
||
- **Manager**: All permissions of owner except team deletion.
|
||
- **Member**: Can view, create, and interact with instances, but cannot access billing, team management, autoscaler, or machines.
|
||
|
||
- The API key used to create the team becomes the team key and is used for all team operations (e.g., creating roles, deleting the team).
|
||
- You can optionally transfer credits from your personal account to the new team account using the `transfer_credit` field.
|
||
|
||
CLI Usage: `vastai create team --team_name <team_name> [--transfer_credit <amount>]`
|
||
|
||
|
||
|
||
# create team role
|
||
Source: https://docs.vast.ai/api-reference/team/create-team-role
|
||
|
||
api-reference/openapi.json post /api/v0/team/roles/
|
||
Creates a new role within a team. Only team owners or managers with the appropriate permissions can perform this operation.
|
||
|
||
CLI Usage: `vastai create team role --name <role_name> --permissions <permissions_json>`
|
||
|
||
|
||
|
||
# destroy team
|
||
Source: https://docs.vast.ai/api-reference/team/destroy-team
|
||
|
||
api-reference/openapi.json delete /api/v0/team/
|
||
Deletes a team and all associated data including API keys, rights, invitations, memberships and metadata. The team owner's master API key is converted to a normal client key.
|
||
|
||
CLI Usage: `vastai destroy team`
|
||
|
||
|
||
|
||
# invite team member
|
||
Source: https://docs.vast.ai/api-reference/team/invite-team-member
|
||
|
||
api-reference/openapi.json post /api/v0/team/invite/
|
||
Sends an invitation email to the specified user to join the team with the given role.
|
||
|
||
CLI Usage: `vastai invite team-member --email <email> --role <role>`
|
||
|
||
|
||
|
||
# remove team member
|
||
Source: https://docs.vast.ai/api-reference/team/remove-team-member
|
||
|
||
api-reference/openapi.json delete /api/v0/team/members/{id}
|
||
Removes a member from the team by revoking their team-related API keys and updating membership status. Cannot remove the team owner.
|
||
|
||
CLI Usage: `vastai remove team-member <id>`
|
||
|
||
|
||
|
||
# remove team role
|
||
Source: https://docs.vast.ai/api-reference/team/remove-team-role
|
||
|
||
api-reference/openapi.json delete /api/v0/team/roles/{id}
|
||
Removes a role from the team. Cannot remove the team owner role.
|
||
|
||
CLI Usage: `vastai remove team-role <name>`
|
||
|
||
|
||
|
||
# show team members
|
||
Source: https://docs.vast.ai/api-reference/team/show-team-members
|
||
|
||
api-reference/openapi.json get /api/v0/team/members/
|
||
Retrieve a list of team members associated with the authenticated user's team.
|
||
|
||
CLI Usage: `vastai show team-members`
|
||
|
||
|
||
|
||
# show team roles
|
||
Source: https://docs.vast.ai/api-reference/team/show-team-roles
|
||
|
||
api-reference/openapi.json get /api/v0/team/roles-full/
|
||
Retrieve a list of all roles for a team, excluding the owner' role.
|
||
|
||
CLI Usage: `vastai show team-roles`
|
||
|
||
|
||
|
||
# update team role
|
||
Source: https://docs.vast.ai/api-reference/team/update-team-role
|
||
|
||
api-reference/openapi.json put /api/v0/team/roles/{id}/
|
||
Update an existing team role with new name and permissions.
|
||
|
||
CLI Usage: `vastai update team-role <id> --name <new_name> --permissions <new_permissions_json>`
|
||
|
||
|
||
|
||
# create template
|
||
Source: https://docs.vast.ai/api-reference/templates/create-template
|
||
|
||
api-reference/openapi.json post /api/v0/template/
|
||
Creates a new template for launching instances. If an identical template already exists, returns the existing template instead of creating a duplicate.
|
||
|
||
CLI Usage: `vastai create template [options]`
|
||
|
||
|
||
|
||
# delete volume
|
||
Source: https://docs.vast.ai/api-reference/volumes/delete-volume
|
||
|
||
api-reference/openapi.json delete /api/v0/volumes/
|
||
Delete a volume by its ID.
|
||
|
||
CLI Usage: `vastai delete volume <volume_id>`
|
||
|
||
|
||
|
||
# list volumes
|
||
Source: https://docs.vast.ai/api-reference/volumes/list-volumes
|
||
|
||
api-reference/openapi.json get /api/v0/volumes/
|
||
Retrieve information about all volumes rented by you.
|
||
|
||
CLI Usage: `vastai show volumes`
|
||
|
||
|
||
|
||
# rent volume
|
||
Source: https://docs.vast.ai/api-reference/volumes/rent-volume
|
||
|
||
api-reference/openapi.json put /api/v0/volumes/
|
||
Rent/create a new volume with specified parameters.
|
||
|
||
CLI Usage: `vastai create volume <id> --size <size_gb>`
|
||
|
||
|
||
|
||
# search volumes
|
||
Source: https://docs.vast.ai/api-reference/volumes/search-volumes
|
||
|
||
api-reference/openapi.json post /api/v0/volumes/search/
|
||
Search for available volumes based on specified criteria.
|
||
|
||
CLI Usage: `vastai search volumes <query> [options]`
|
||
|
||
|
||
|
||
# unlist volume
|
||
Source: https://docs.vast.ai/api-reference/volumes/unlist-volume
|
||
|
||
api-reference/openapi.json post /api/v0/volumes/unlist/
|
||
Remove a volume listing from the marketplace.
|
||
|
||
CLI Usage: `vastai unlist volume <volume_id>`
|
||
|
||
|
||
|
||
# Blender Batch Rendering
|
||
Source: https://docs.vast.ai/blender-batch-rendering
|
||
|
||
|
||
|
||
Blender is a free, open source 3D creation suite. It can be used to create animated films, visual effects, art, 3D-printed models, motion graphics, interactive 3D applications, virtual reality, and video games. It supports the entirety of the 3D pipeline—modeling, rigging, animation, simulation, rendering, compositing and motion tracking, even video editing and game creation. You can find more information about Blender at [blender.org](https://www.blender.org/).
|
||
|
||
Animators, game developers, 3D modelers, visual effects artists, architects, and product designers are some people who use Blender.
|
||
|
||
GPUs can speed up rendering in Blender.
|
||
|
||
You can save time by automating away the rendering of animations for batch of blend files.
|
||
|
||
## Step 1 - Open Vast's Blender Batch Renderer Template
|
||
|
||
Click on this link [Blender Batch Renderer Template](https://cloud.vast.ai/?ref_id=142678\&template_id=7b570ea8454e5f2b4b026139709fa0e8) to select the vast/blender-batch-renderer template.
|
||
|
||
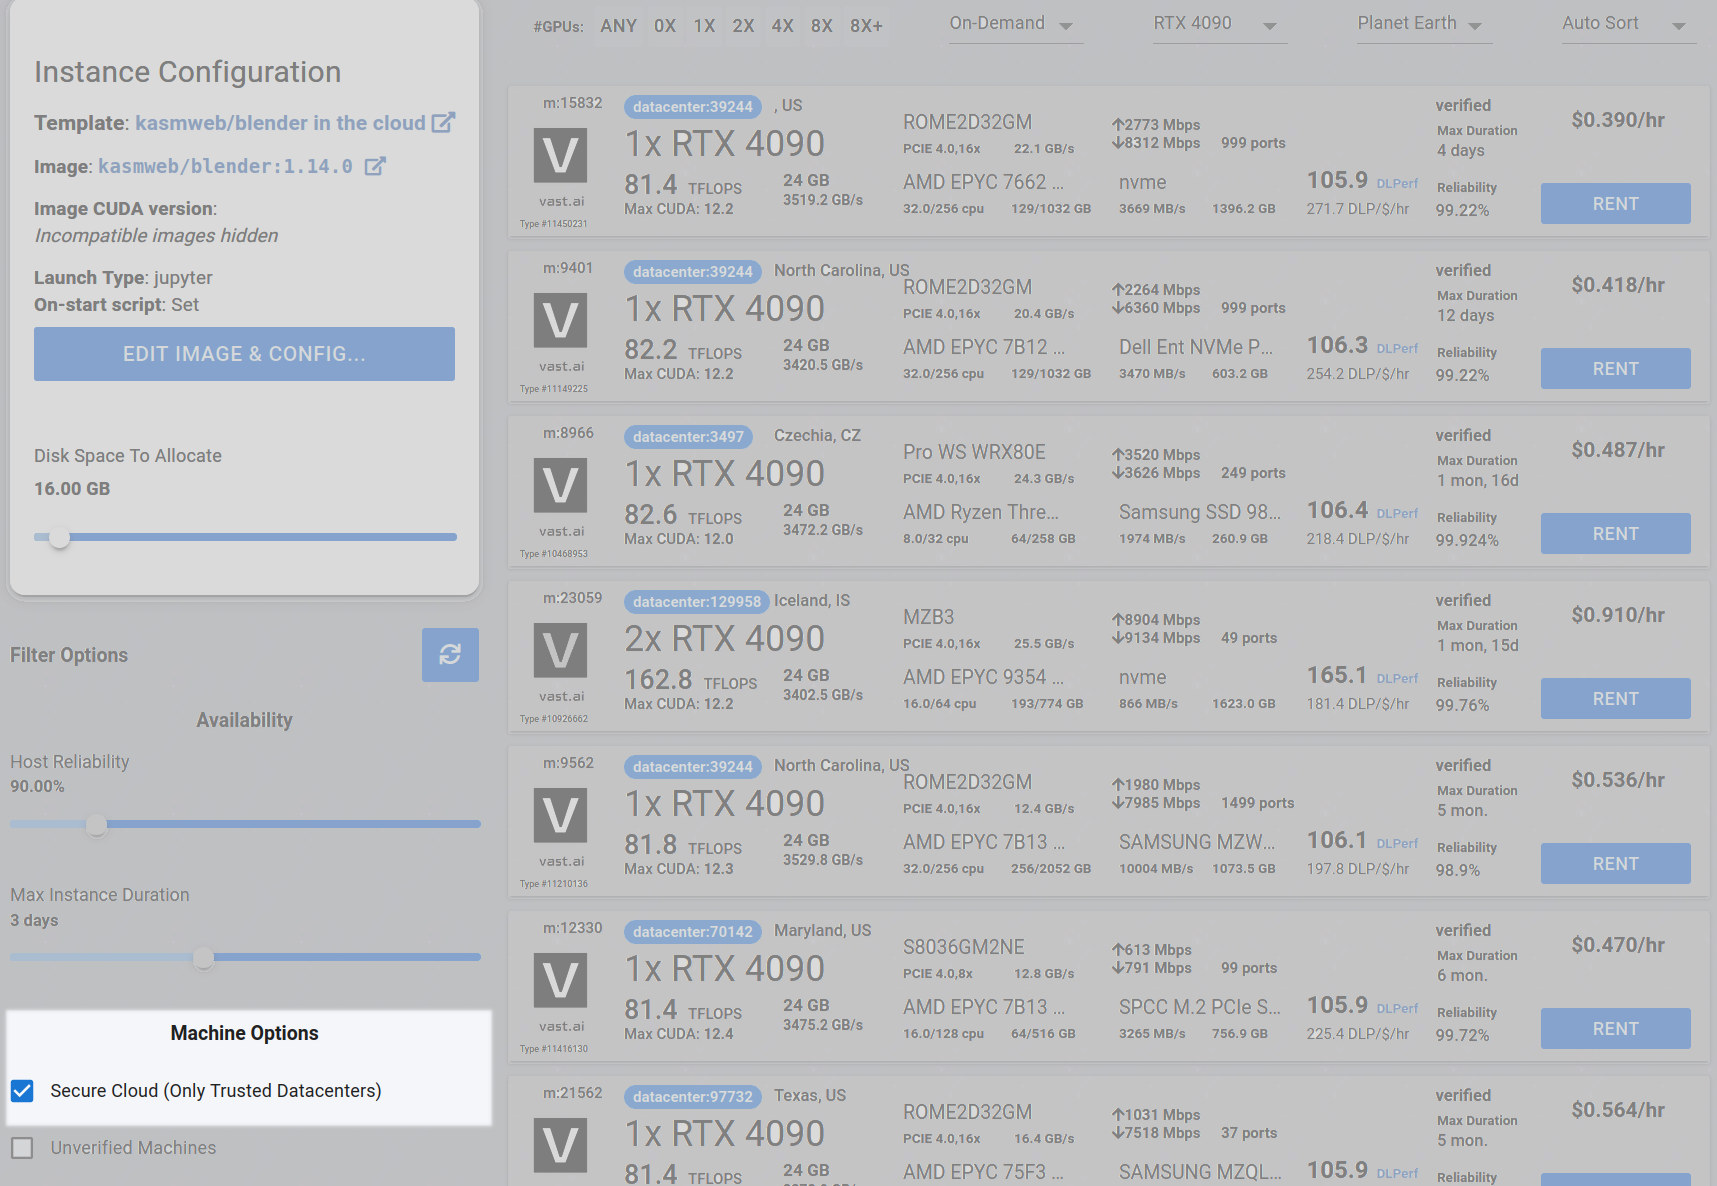
## Step 2 - Check the Secure Cloud box if you want a secure machine from trusted datacenters (Optional)
|
||
|
||
You can narrow your search results to only data center machines if you want insured security standards from our trusted datacenters.
|
||
|
||
<Frame caption="Highlighted Secure Cloud">
|
||
|
||
</Frame>
|
||
|
||
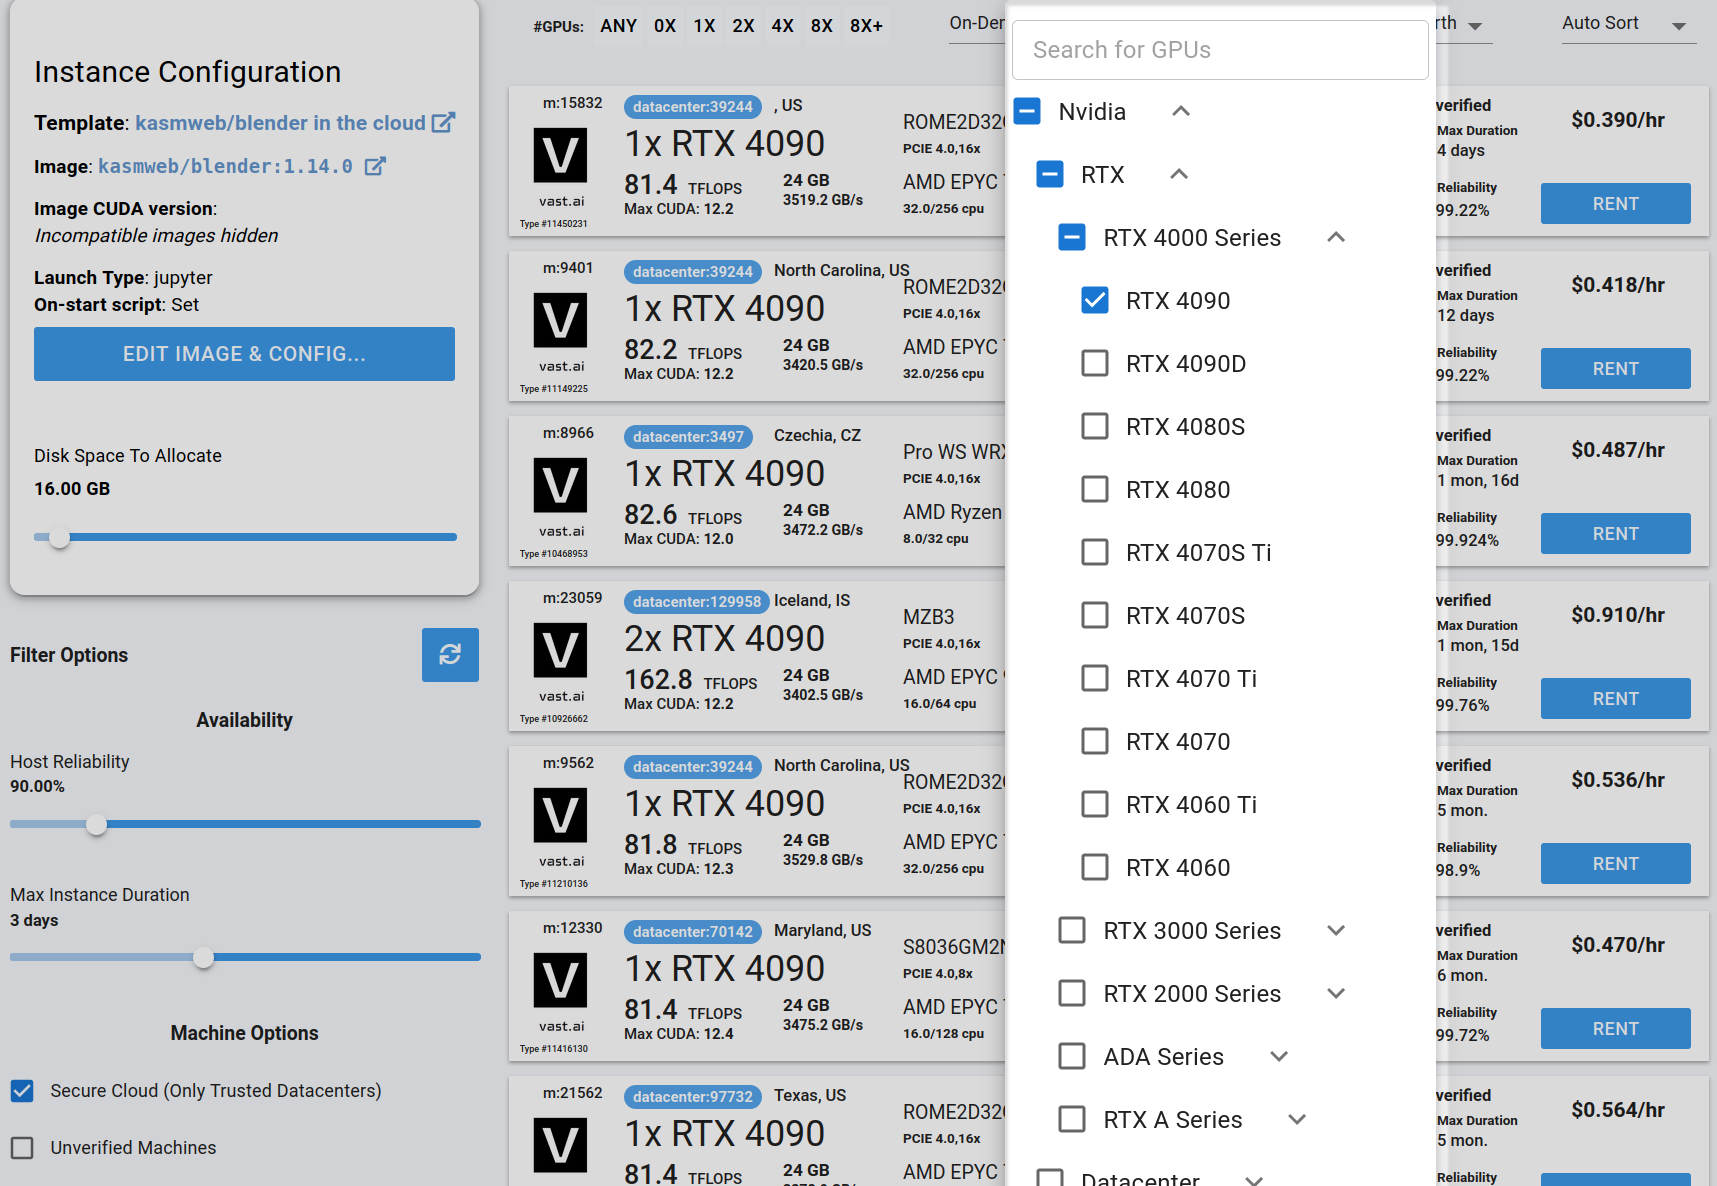
## Step 3 - Filter for a GPU that you feel best suits your needs
|
||
|
||
If you have questions about which GPU to choose, there is some data around NVIDIA Geforce RTX 4090 giving the best render speed with Blender. You can find other GPUs that work well with Blender here [Blender GPU Benchmarks](https://opendata.blender.org/benchmarks/query/?group_by=device_name\&blender_version=3.6.0). You can also find other options by searching on Google or asking ChatGPT.
|
||
|
||
The version of Blender running within Vast while using the template linked above at the time of this writing is 3.6.2.
|
||
|
||
Go to the GPUs filter and check the box for RTX 4090 or another GPU instance.
|
||
|
||
For example,
|
||
|
||
<Frame caption="Highlighted Rtx 4090 Filter Pic">
|
||
|
||
</Frame>
|
||
|
||
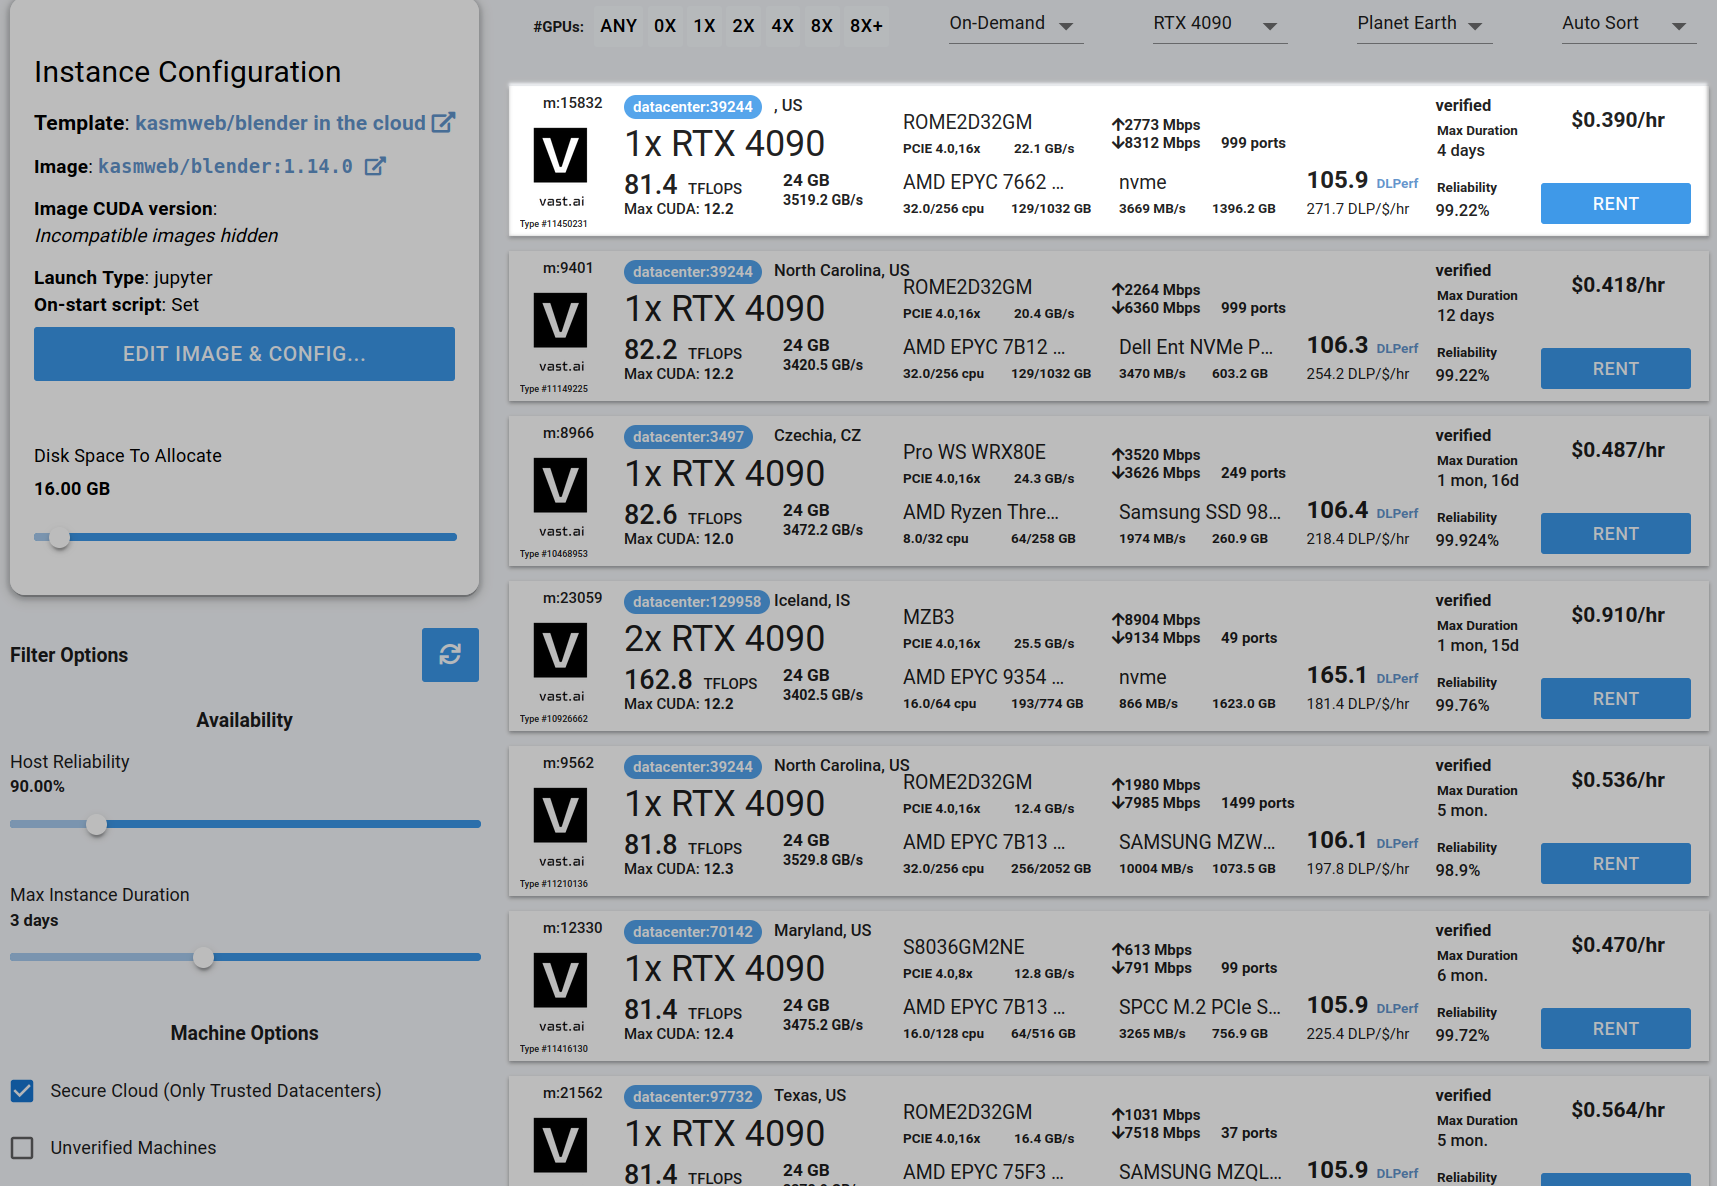
## Step 4 - Choose a GPU by Clicking "RENT"
|
||
|
||
Choose a GPU that meets your budget, desired reliability %, and other constraints by clicking "RENT". GPUs are sorted by a complex proprietary algorithm that aims to give users the best machines for their value by default.
|
||
You can filter GPUs further per your requirements if desired.
|
||
|
||
<Frame caption="Highlighted Rent">
|
||
|
||
</Frame>
|
||
|
||
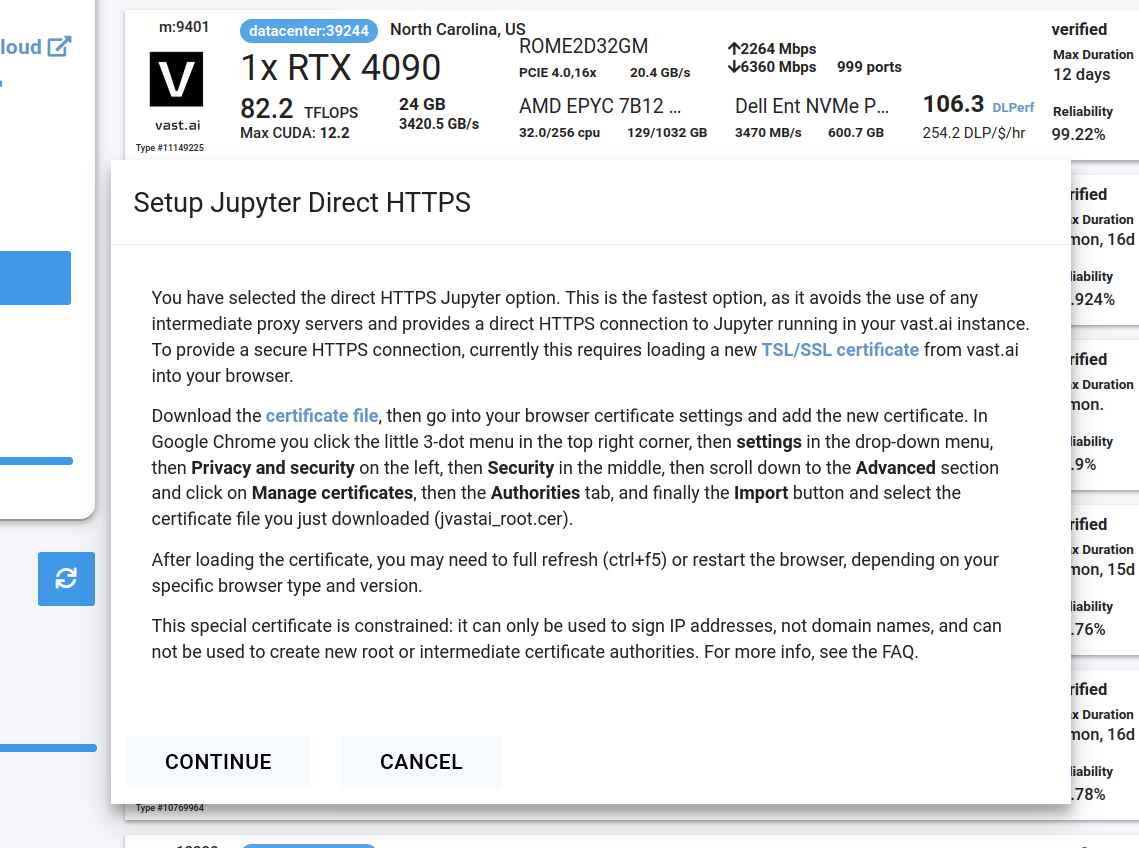
## Step 5 - Use Jupyter Direct HTTPS Launch Mode
|
||
|
||
Follow the instructions related to adding a certificate to your browser if you need to when it asks you to "Setup Jupyter Direct HTTPS" and click "CONTINUE". Here's more information on the Jupyter direct HTTPS Launch Mode and Installing the TLS certificate: [Jupyter](/documentation/instances/jupyter).
|
||
|
||
<Frame caption="Updated Jupyter Direct Https Continue">
|
||
|
||
</Frame>
|
||
|
||
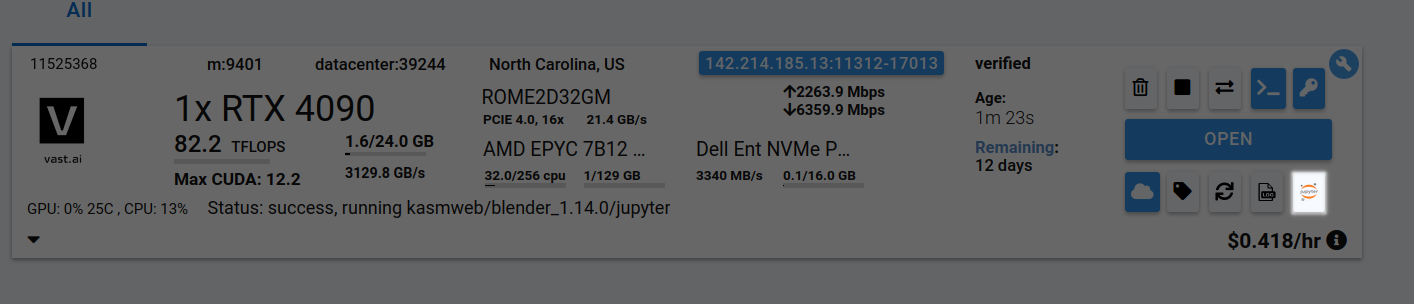
## Step 6 - Click the Open Button or Jupyter Notebook button to open Jupyter Notebook
|
||
|
||
<Frame caption="Jupyter Notebook Button">
|
||
|
||
</Frame>
|
||
|
||
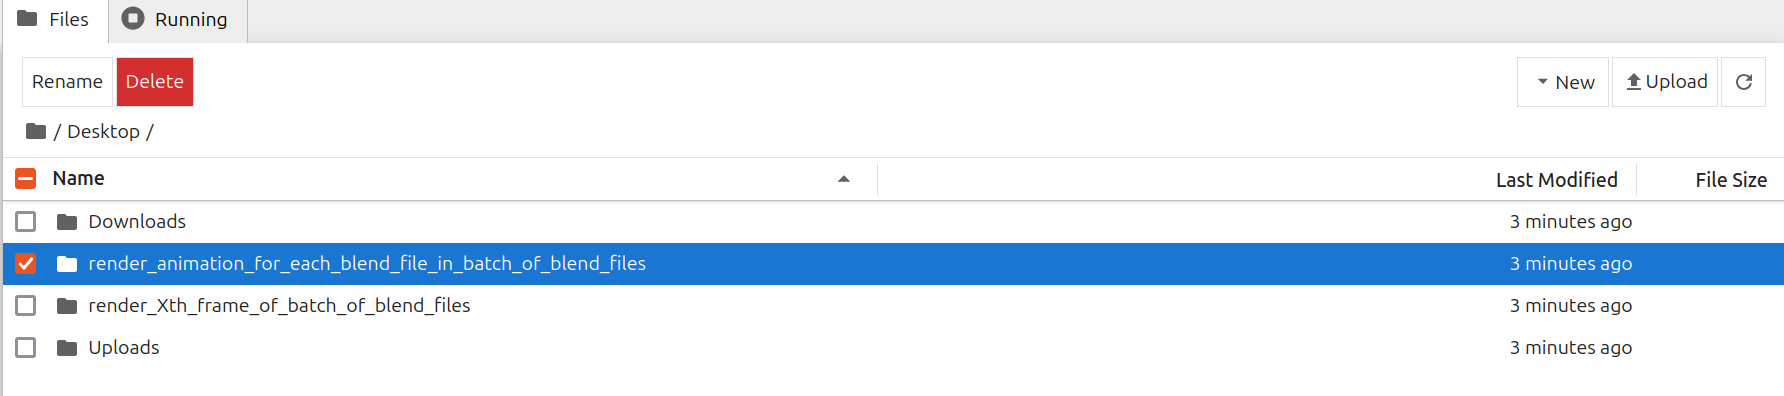
## Step 7 - To Render Animation For Each Blend File In Batch Of Blend Files
|
||
|
||
If you want to render a respective animation for each blend file in a batch of blend files, follow the following steps.
|
||
|
||
Go to /Desktop/render\_animation\_for\_each\_blend\_file\_in\_batch\_of\_blend\_files/ folder in Jupyter Notebook
|
||
|
||
<Frame caption="Go Render Animation For Batch Folder">
|
||
|
||
</Frame>
|
||
|
||
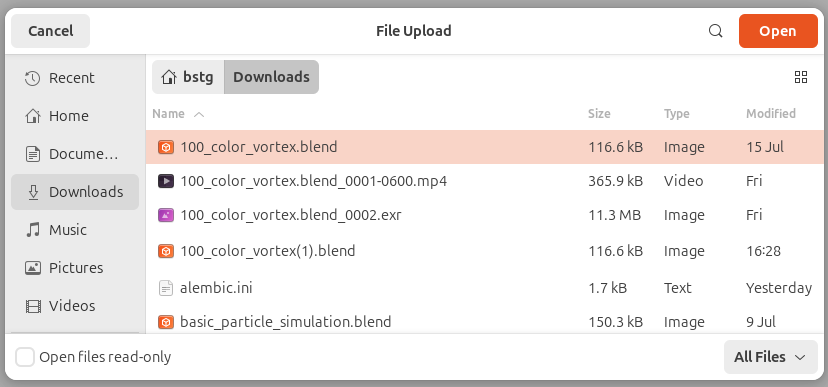
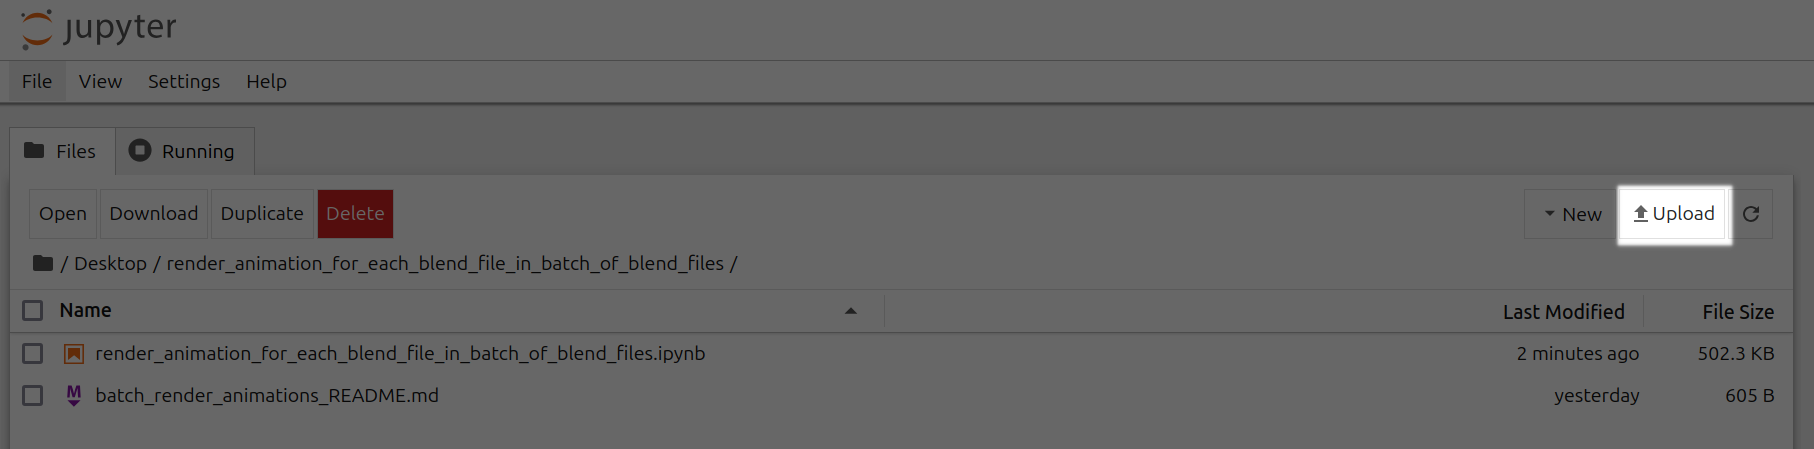
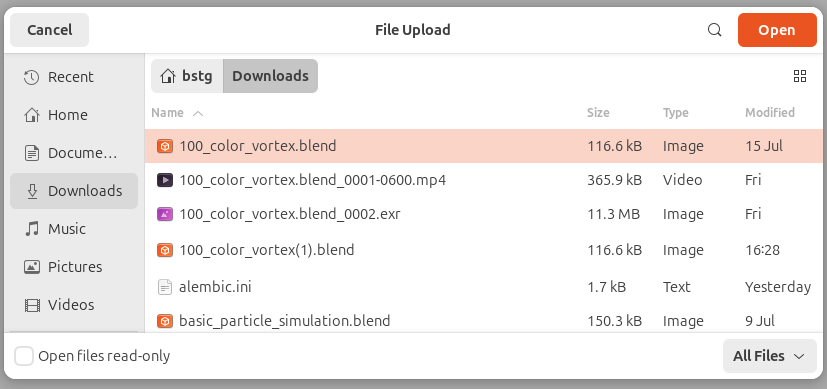
Upload .blend files to /Desktop/render\_animation\_for\_each\_blend\_file\_in\_batch\_of\_blend\_files/ folder
|
||
|
||
<Frame caption="Upload 100 Color Vortex">
|
||
|
||
</Frame>
|
||
|
||
<br />
|
||
|
||
<Frame caption="Upload Render Animation Batch Highlighted">
|
||
|
||
</Frame>
|
||
|
||
Open render\_animation\_for\_each\_blend\_file\_in\_batch\_of\_blend\_files.ipynb
|
||
|
||
<Frame caption="Open Render Animation For Batch Folder Notebook">
|
||

|
||
</Frame>
|
||
|
||
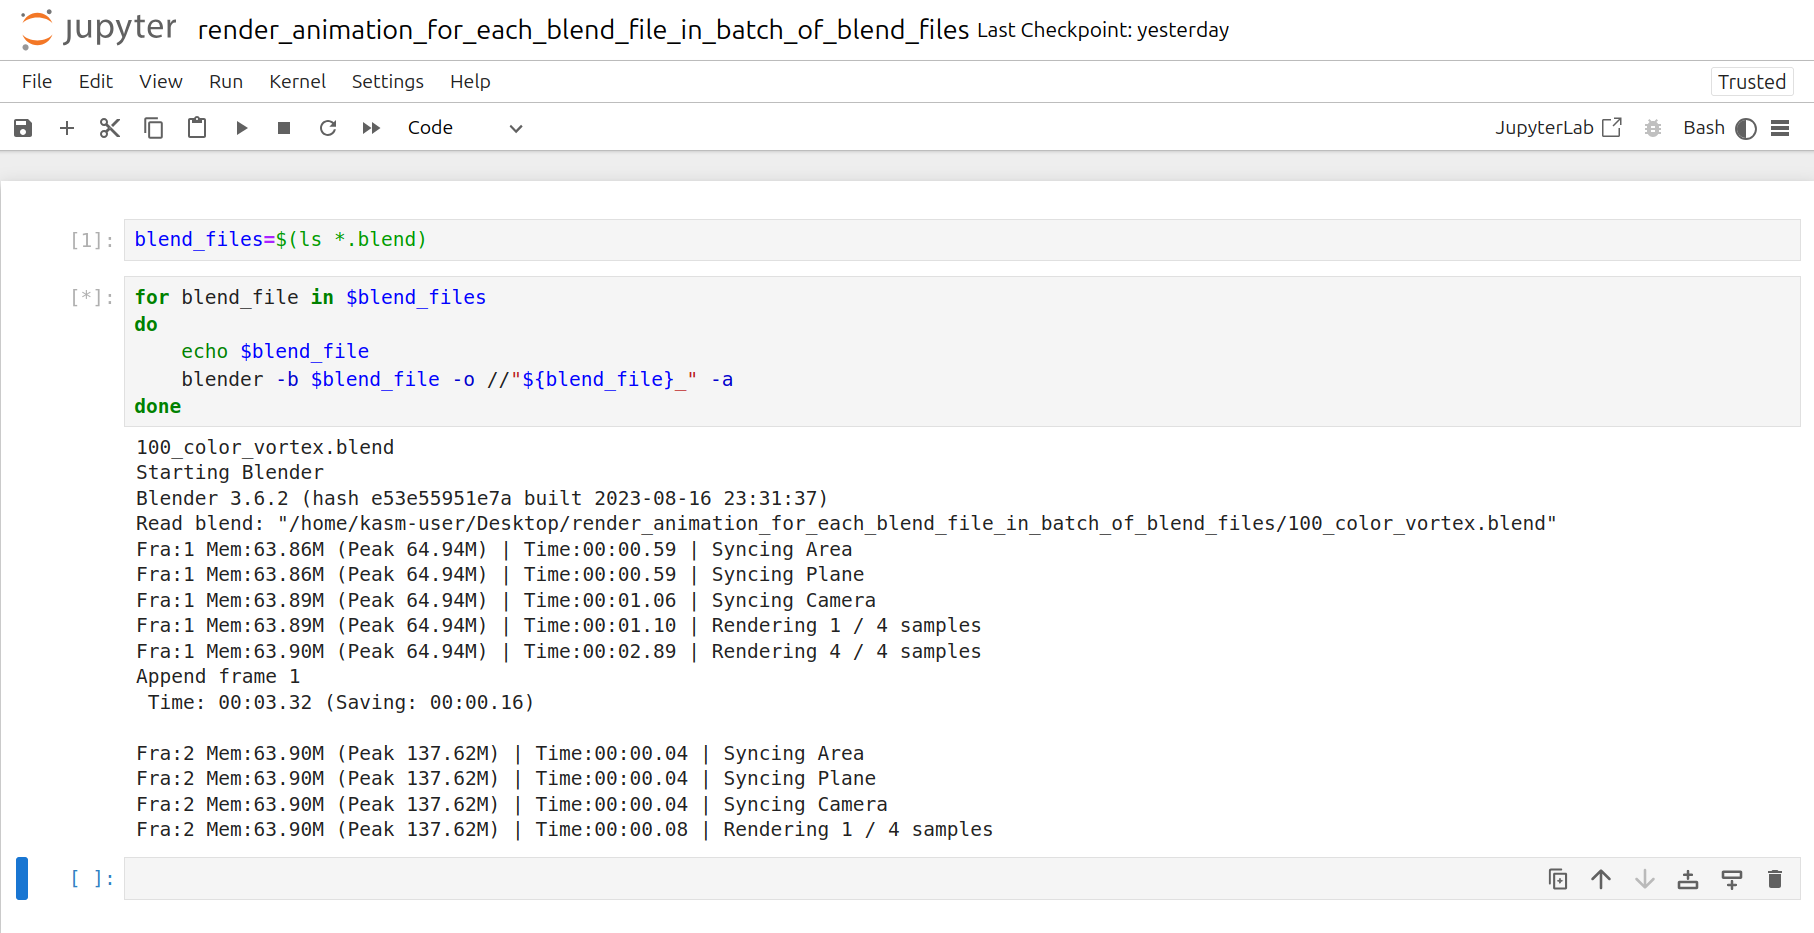
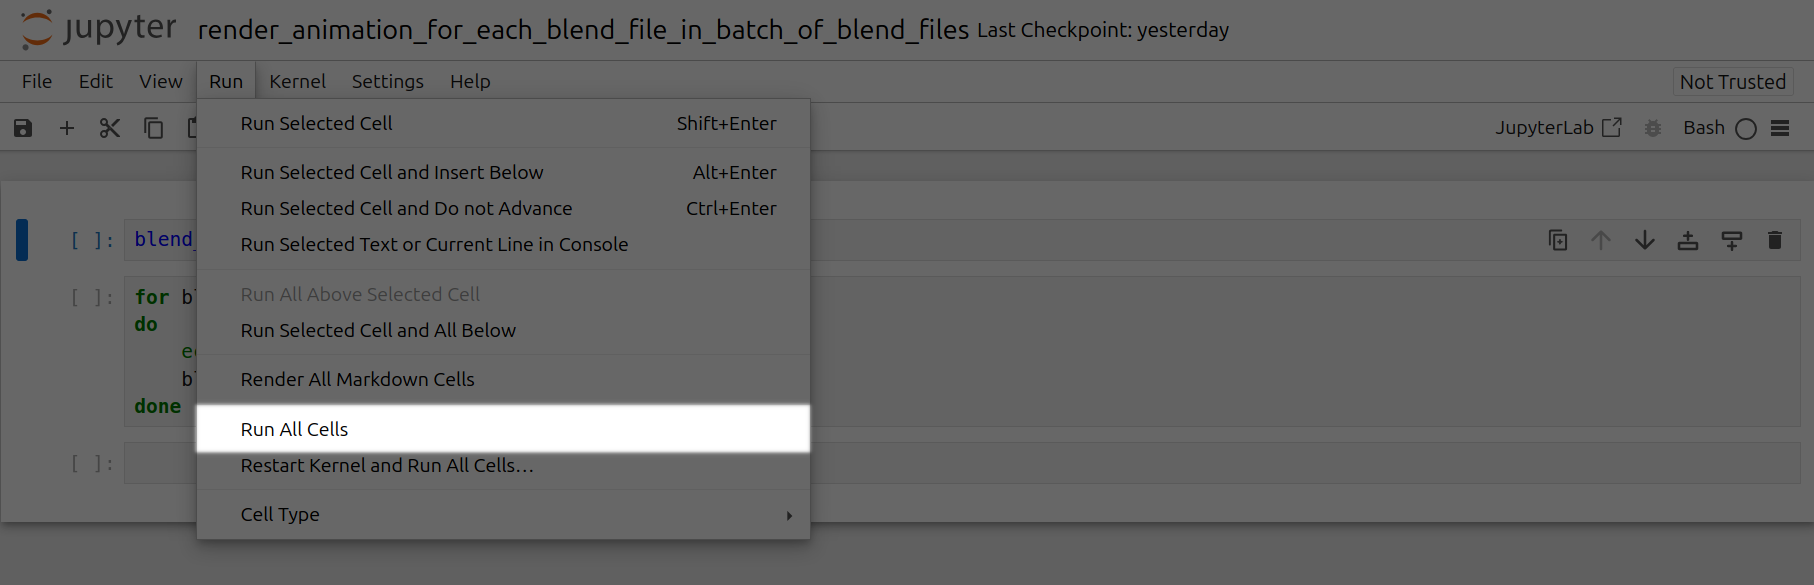
Click the Run tab and click Run All Cells
|
||
|
||
<Frame caption="Show Rendering Animations">
|
||
|
||
</Frame>
|
||
|
||
<br />
|
||
|
||
<Frame caption="Click Run All Cells Highlighted">
|
||
|
||
</Frame>
|
||
|
||
Now a corresponding animation will be rendered for each .blend file you have uploaded to this folder.
|
||
You can also close out your jupyter notebook tab in your browser and this notebook will keep running as long as your instance in Vast is running.
|
||
|
||
## Step 8 - To Render Animation For Xth Frame of Each Blend File In Batch Of Blend Files
|
||
|
||
If you want to render a respective animation for the Xth frame of each blend file in a batch of blend files, follow the following steps.
|
||
|
||
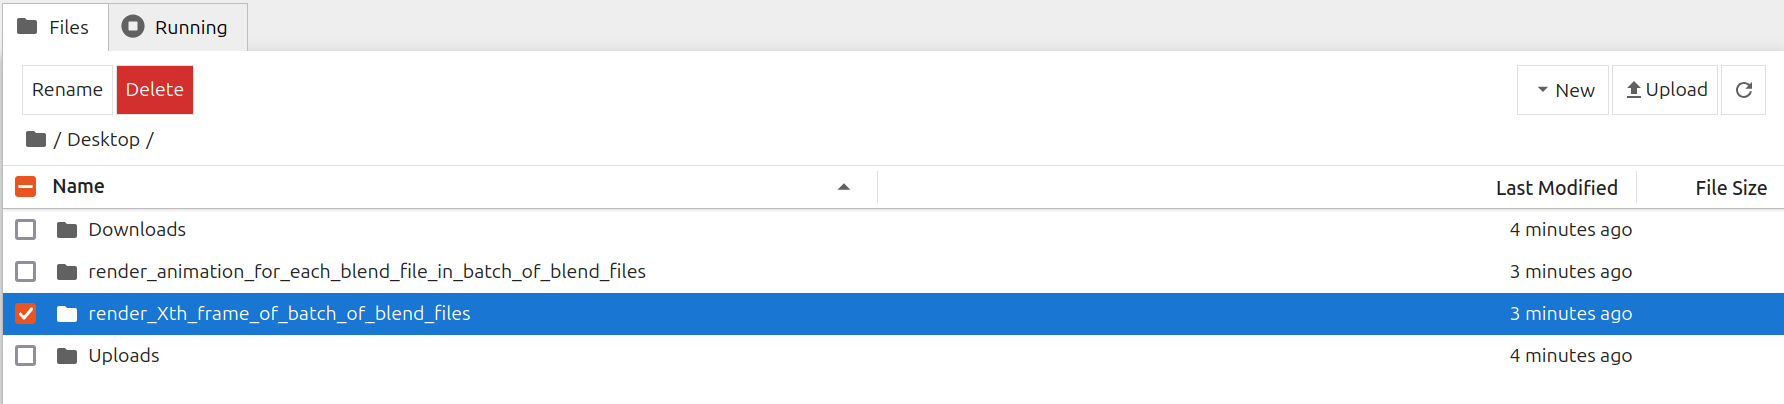
Go to /Desktop/render\_Xth\_frame\_of\_batch\_of\_blend\_files/ folder in Jupyter Notebook
|
||
|
||
<Frame caption="Go To Render Xth Frame For Batch Folder">
|
||
|
||
</Frame>
|
||
|
||
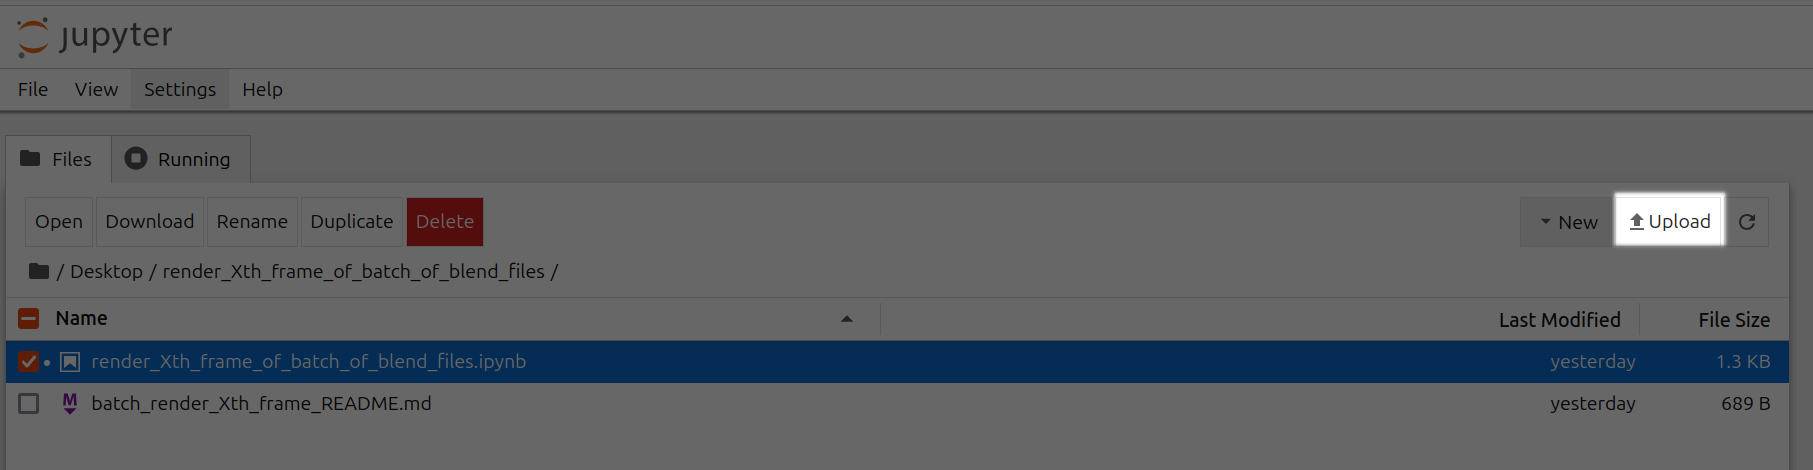
Upload .blend files to /Desktop/render\_Xth\_frame\_of\_batch\_of\_blend\_files/ folder
|
||
|
||
<Frame caption="Upload Blend Files For Xth Frame">
|
||
|
||
</Frame>
|
||
|
||
<br />
|
||
|
||
<Frame caption="Upload Xth Frame Highlighted">
|
||
|
||
</Frame>
|
||
|
||
Open render\_Xth\_frame\_of\_batch\_of\_blend\_files.ipynb
|
||
|
||
<Frame caption="Open Render Animation For Each Blend File In Batch Of Blend Files Ipynb">
|
||

|
||
</Frame>
|
||
|
||
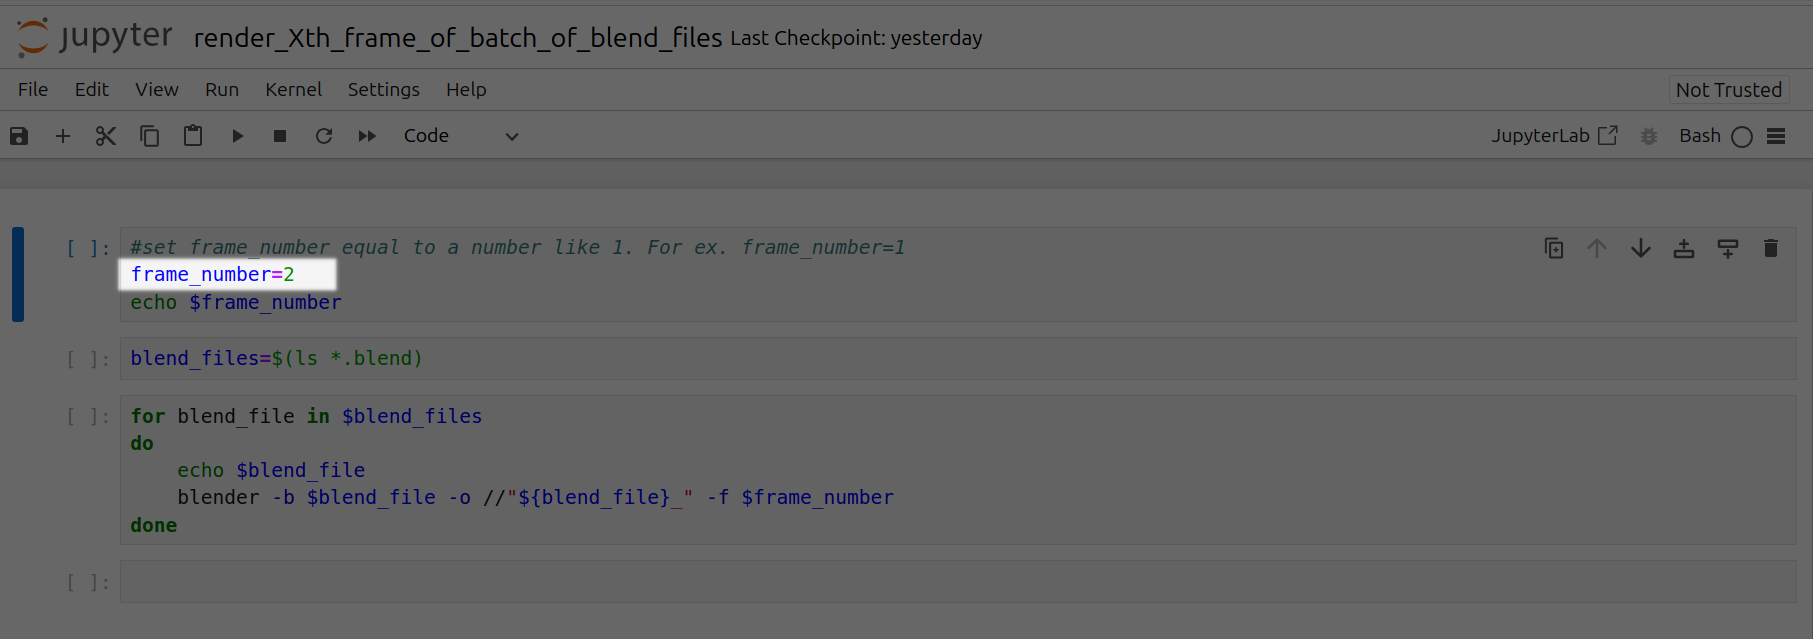
Set frame\_number equal to a particular frame number. For ex. frame\_number=2
|
||
|
||
<Frame caption="Set Frame Number 2">
|
||
|
||
</Frame>
|
||
|
||
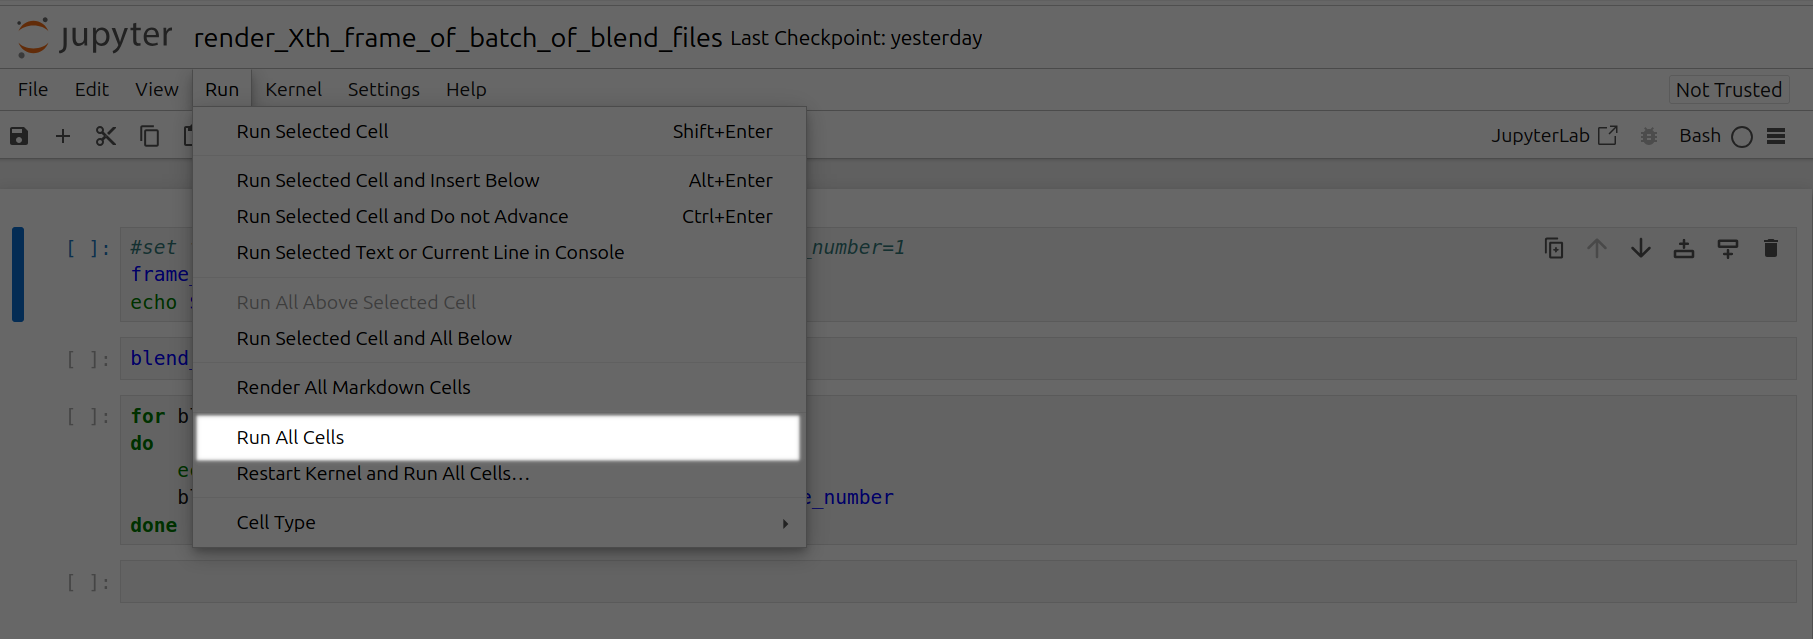
Click the Run tab and click Run All Cells
|
||
|
||
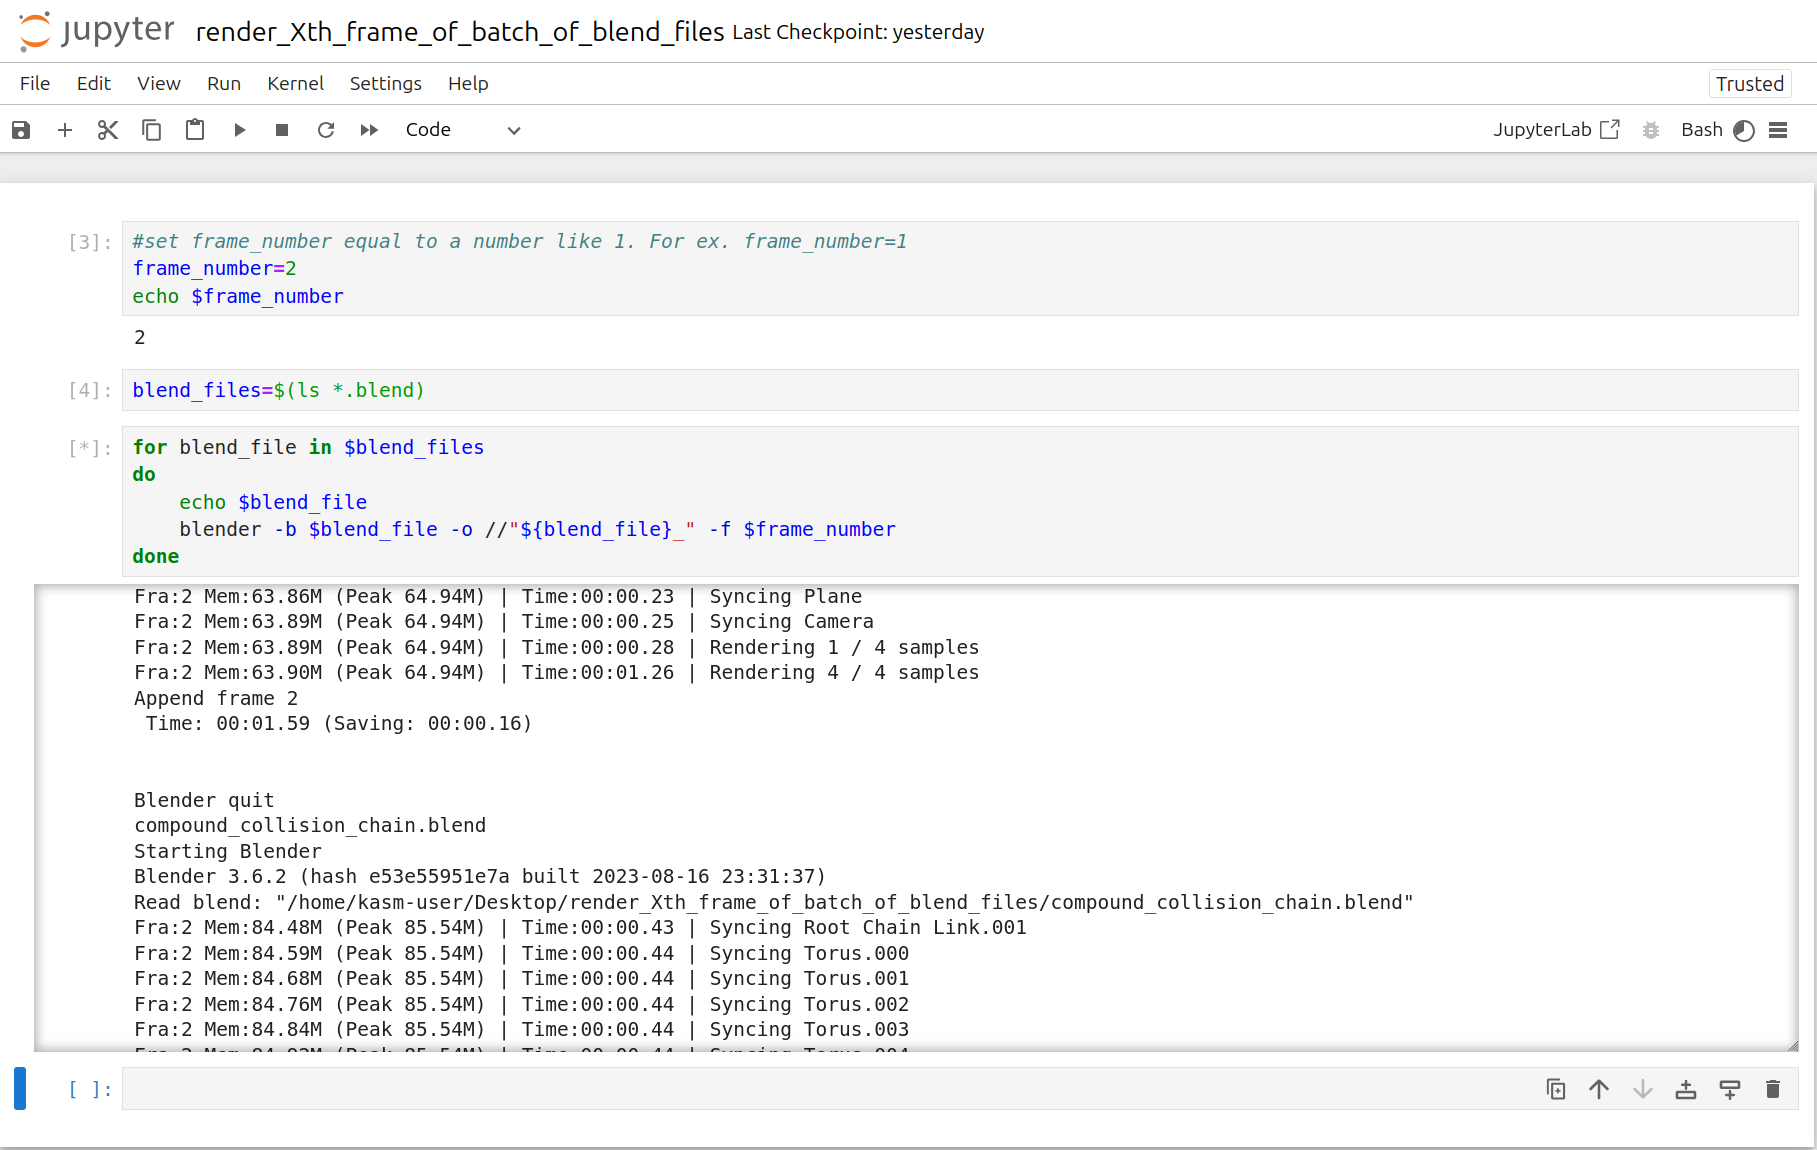
<Frame caption="Xth Frames Rendering">
|
||
|
||
</Frame>
|
||
|
||
<br />
|
||
|
||
<Frame caption="Run All Cells Xth Frame Highlighted">
|
||
|
||
</Frame>
|
||
|
||
Now a corresponding animation will be rendered for each Xth frame of each .blend file you have uploaded to this folder.
|
||
You can also close out your jupyter notebook tab in your browser and this notebook will keep running as long as your instance in Vast is running.
|
||
|
||
|
||
# Blender in the Cloud
|
||
Source: https://docs.vast.ai/blender-in-the-cloud
|
||
|
||
|
||
|
||
Blender is a free, open source 3D creation suite. It can be used to create animated films, visual effects, art, 3D-printed models, motion graphics, interactive 3D applications, virtual reality, and video games. It supports the entirety of the 3D pipeline—modeling, rigging, animation, simulation, rendering, compositing and motion tracking, even video editing and game creation. You can find more information about Blender at [blender.org](https://www.blender.org/).
|
||
|
||
Animators, game developers, 3D modelers, visual effects artists, architects, and product designers are some people who use Blender.
|
||
|
||
GPUs can speed up rendering in Blender.
|
||
|
||
## Step 1 - Open Blender in the Cloud Template
|
||
|
||
Click on this link [Blender in the Cloud Template](https://cloud.vast.ai?ref_id=142678\&template_id=5846e4535b1ff5db56024c1c0711a0ce) to select the kasmweb/blender in the cloud template.
|
||
|
||
## Step 2 - \[Optional] Check the Secure Cloud box
|
||
|
||
You can narrow your search results to only data center machines if you want insured security standards from our trusted datacenters.
|
||
|
||
<Frame caption="Highlighted Secure Cloud">
|
||

|
||
</Frame>
|
||
|
||
## Step 3 - Filter for a GPU that you feel best suits your needs
|
||
|
||
If you have questions about which GPU to choose, there is some data around NVIDIA Geforce RTX 4090 giving the best render speed with Blender. You can find other GPUs that work well with Blender here [Blender GPU Benchmarks](https://opendata.blender.org/benchmarks/query/?group_by=device_name\&blender_version=3.6.0). You can also find other options by searching on Google or asking ChatGPT.
|
||
|
||
The version of Blender running within Vast while using the template linked above at the time of this writing is 3.6.2.
|
||
|
||
Go to the GPUs filter and check the box for RTX 4090 or another GPU instance.
|
||
|
||
For example,
|
||
|
||
<Frame caption="Highlighted Rtx 4090 Filter Pic">
|
||

|
||
</Frame>
|
||
|
||
## Step 4 - Choose a GPU by Clicking "RENT"
|
||
|
||
Choose a GPU that meets your budget, desired reliability %, and other constraints by clicking "RENT". GPUs are sorted by a complex proprietary algorithm that aims to give users the best machines for their value by default.
|
||
You can filter GPUs further per your requirements if desired.
|
||
|
||
<Frame caption="Highlighted Rent">
|
||

|
||
</Frame>
|
||
|
||
## Step 5 - Use Jupyter Direct HTTPS Launch Mode
|
||
|
||
Follow the instructions related to adding a certificate to your browser if you need to when it asks you to "Setup Jupyter Direct HTTPS" and click "CONTINUE". Here's more information on the Jupyter direct HTTPS Launch Mode and Installing the TLS certificate: [Jupyter](/documentation/instances/jupyter) 
|
||
|
||
<Frame caption="Updated Jupyter Direct Https Continue">
|
||

|
||
</Frame>
|
||
|
||
## Step 6 - Open Blender
|
||
|
||
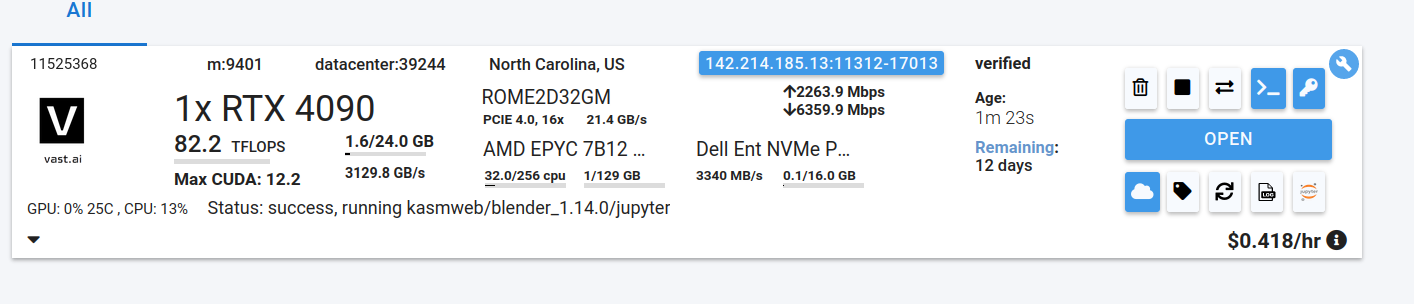
Go to the Instances tab to see your instance being created with it "Creating". When the message on the blue button changes to "Open", click on Open to open Blender.
|
||
|
||
<Frame caption="Original Open Jupyter Notebook">
|
||
|
||
</Frame>
|
||
|
||
Here's more info about instances at Vast if you need to reference it: [Instances Guide](/documentation/instances/managing-instances) 
|
||
|
||
If you see an error that says something like "'clipboard-read' is not a valid value for enumeration PermissionName", please close that window.
|
||
|
||
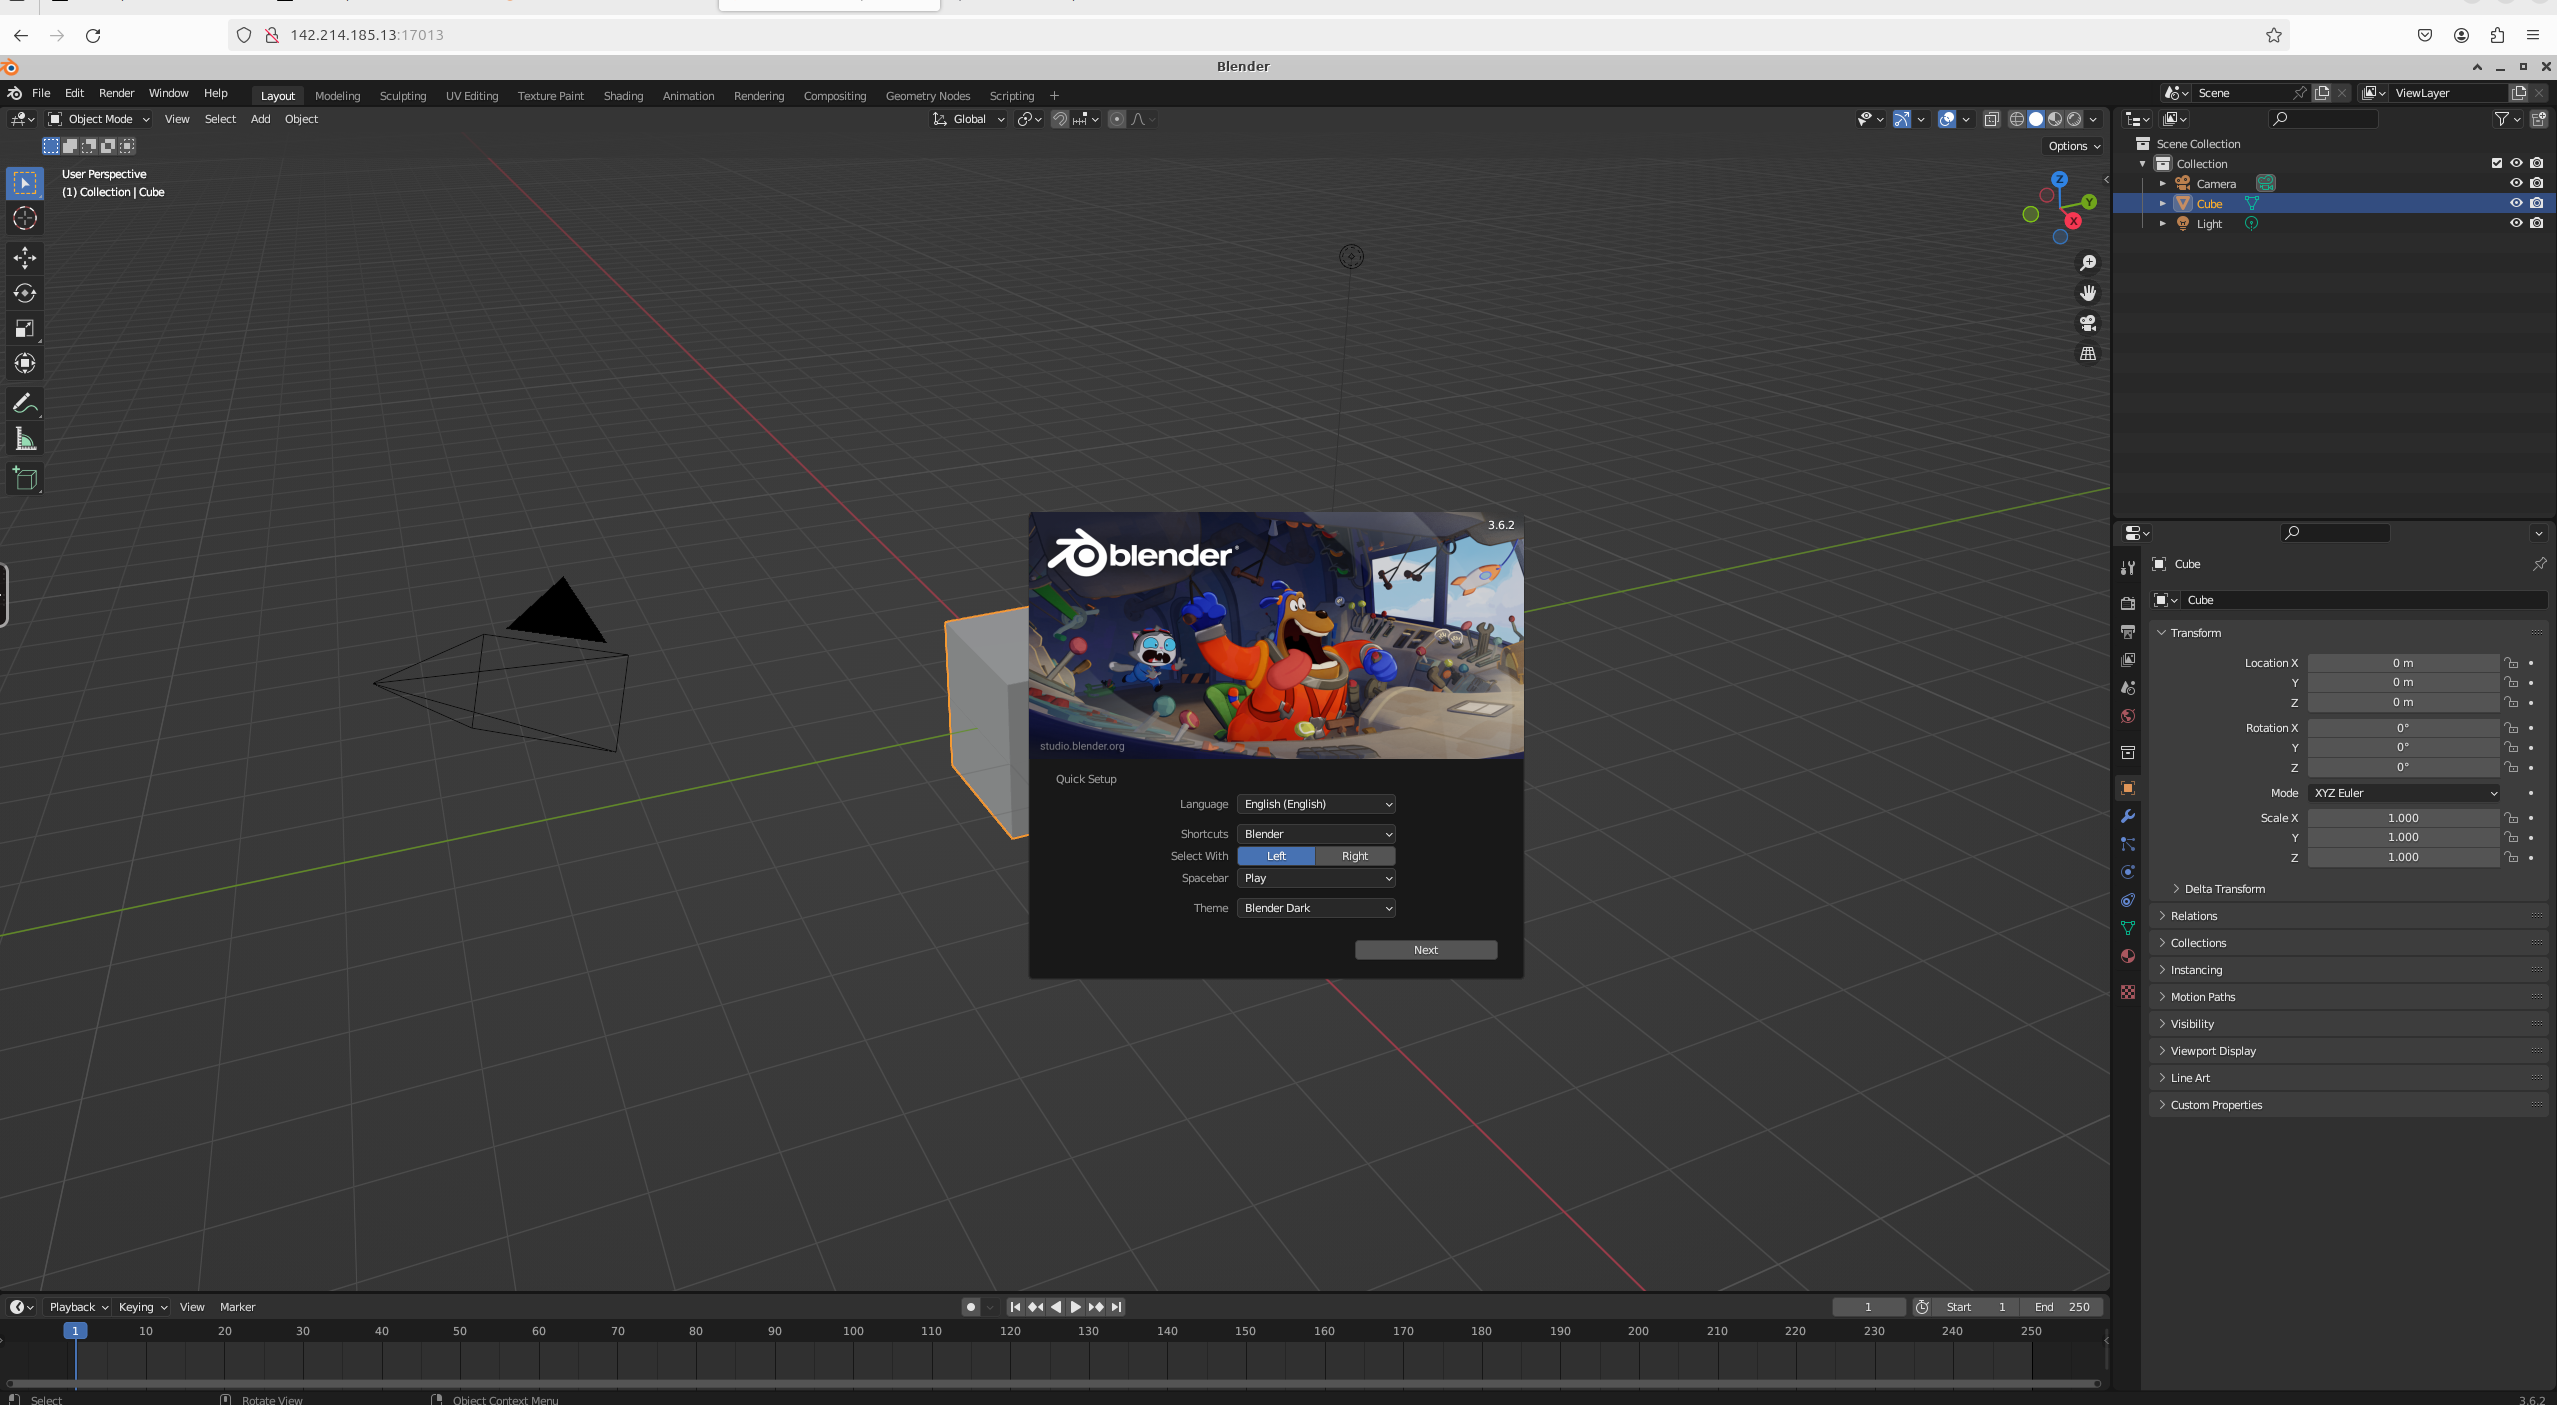
You should now see Blender!
|
||
|
||
<Frame caption="Blender In The Cloud">
|
||
|
||
</Frame>
|
||
|
||
## Step 7 - Upload .blend file(s) through Jupyter Notebook
|
||
|
||
Click the Jupyter Notebook button to open Jupyter Notebook.
|
||
|
||
<Frame caption="Jupyter Notebook Button">
|
||

|
||
</Frame>
|
||
|
||
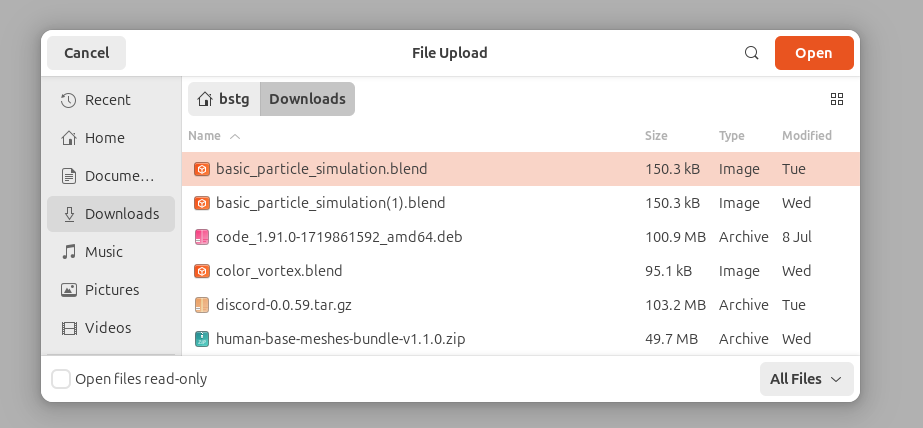
Go to your Jupyter Notebook, click the upload button on the top right, and upload one of your .blend files from your local computer to a directory in the Jupyter Notebook.
|
||
In this case, I'm uploading basic\_particle\_simulation.blend to the Desktop directory.
|
||
|
||
<Frame caption="Original Upload Blend File To Jupyter">
|
||
|
||
</Frame>
|
||
|
||
<br />
|
||
|
||
<Frame caption="Highlighted Upload">
|
||

|
||
</Frame>
|
||
|
||
## Step 8 - Open .blend file in Blender
|
||
|
||
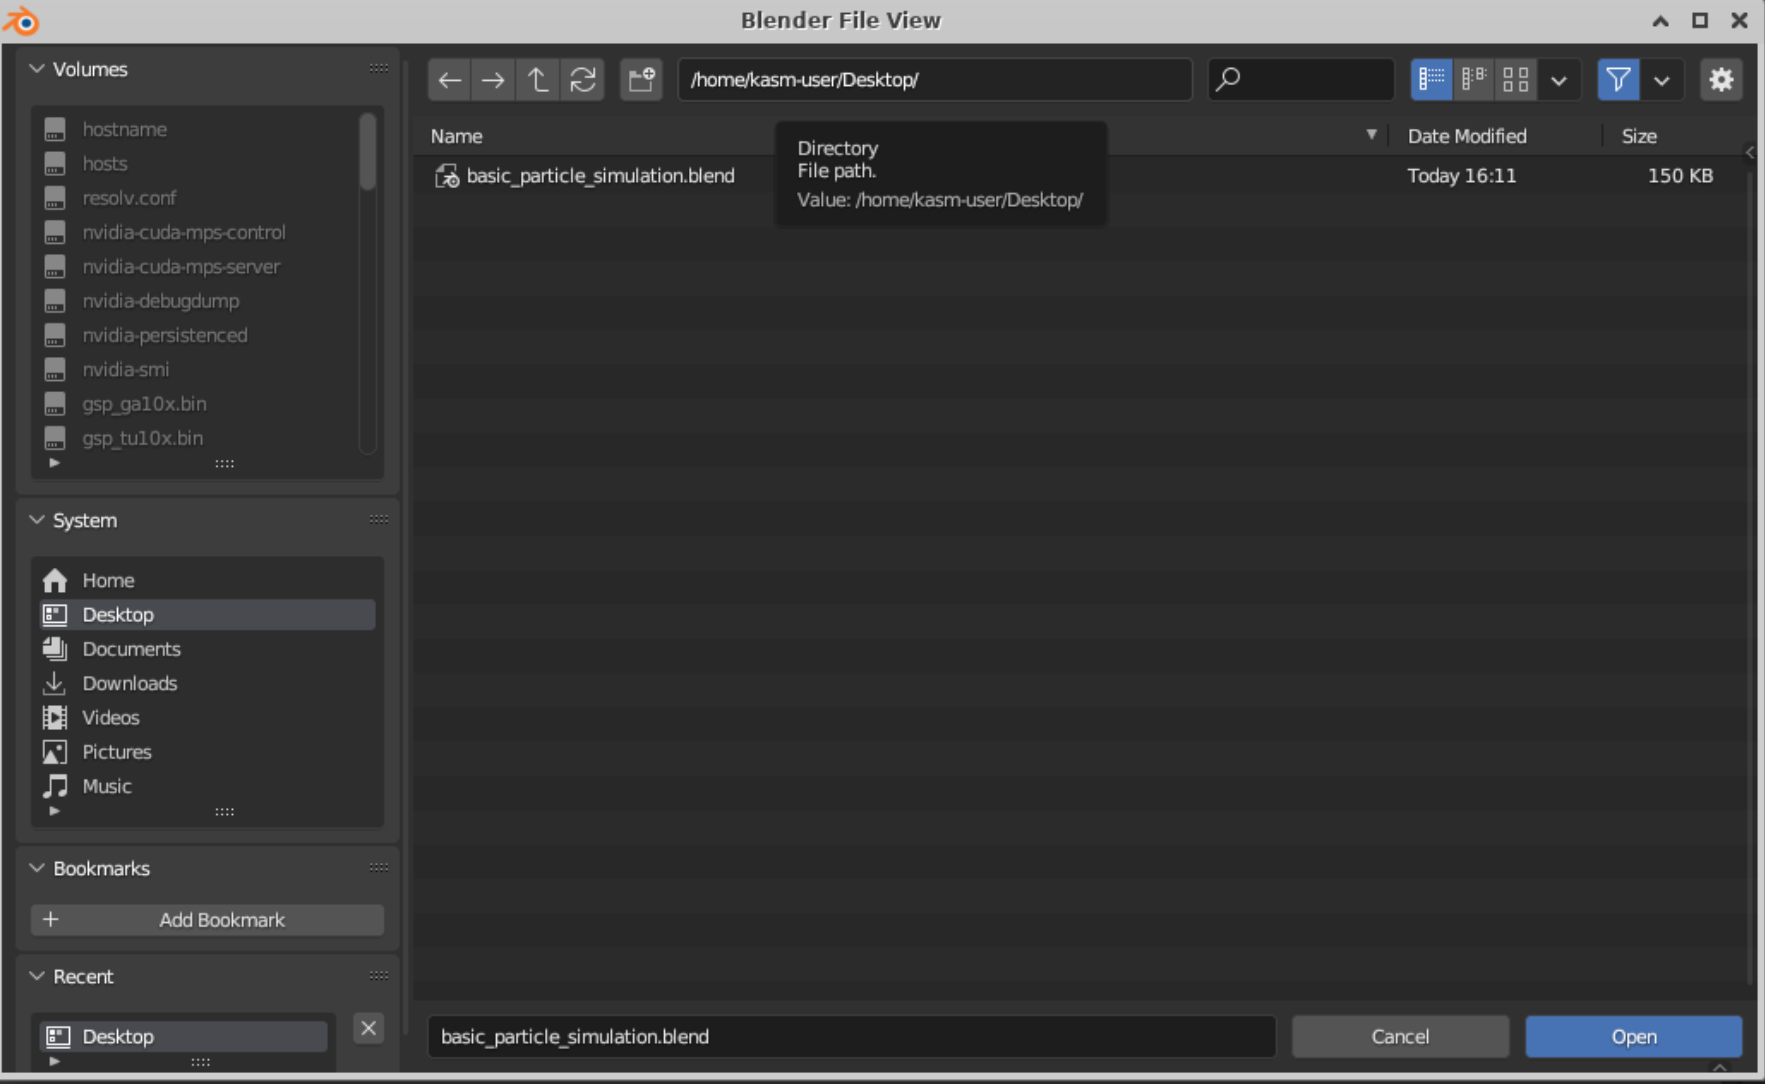
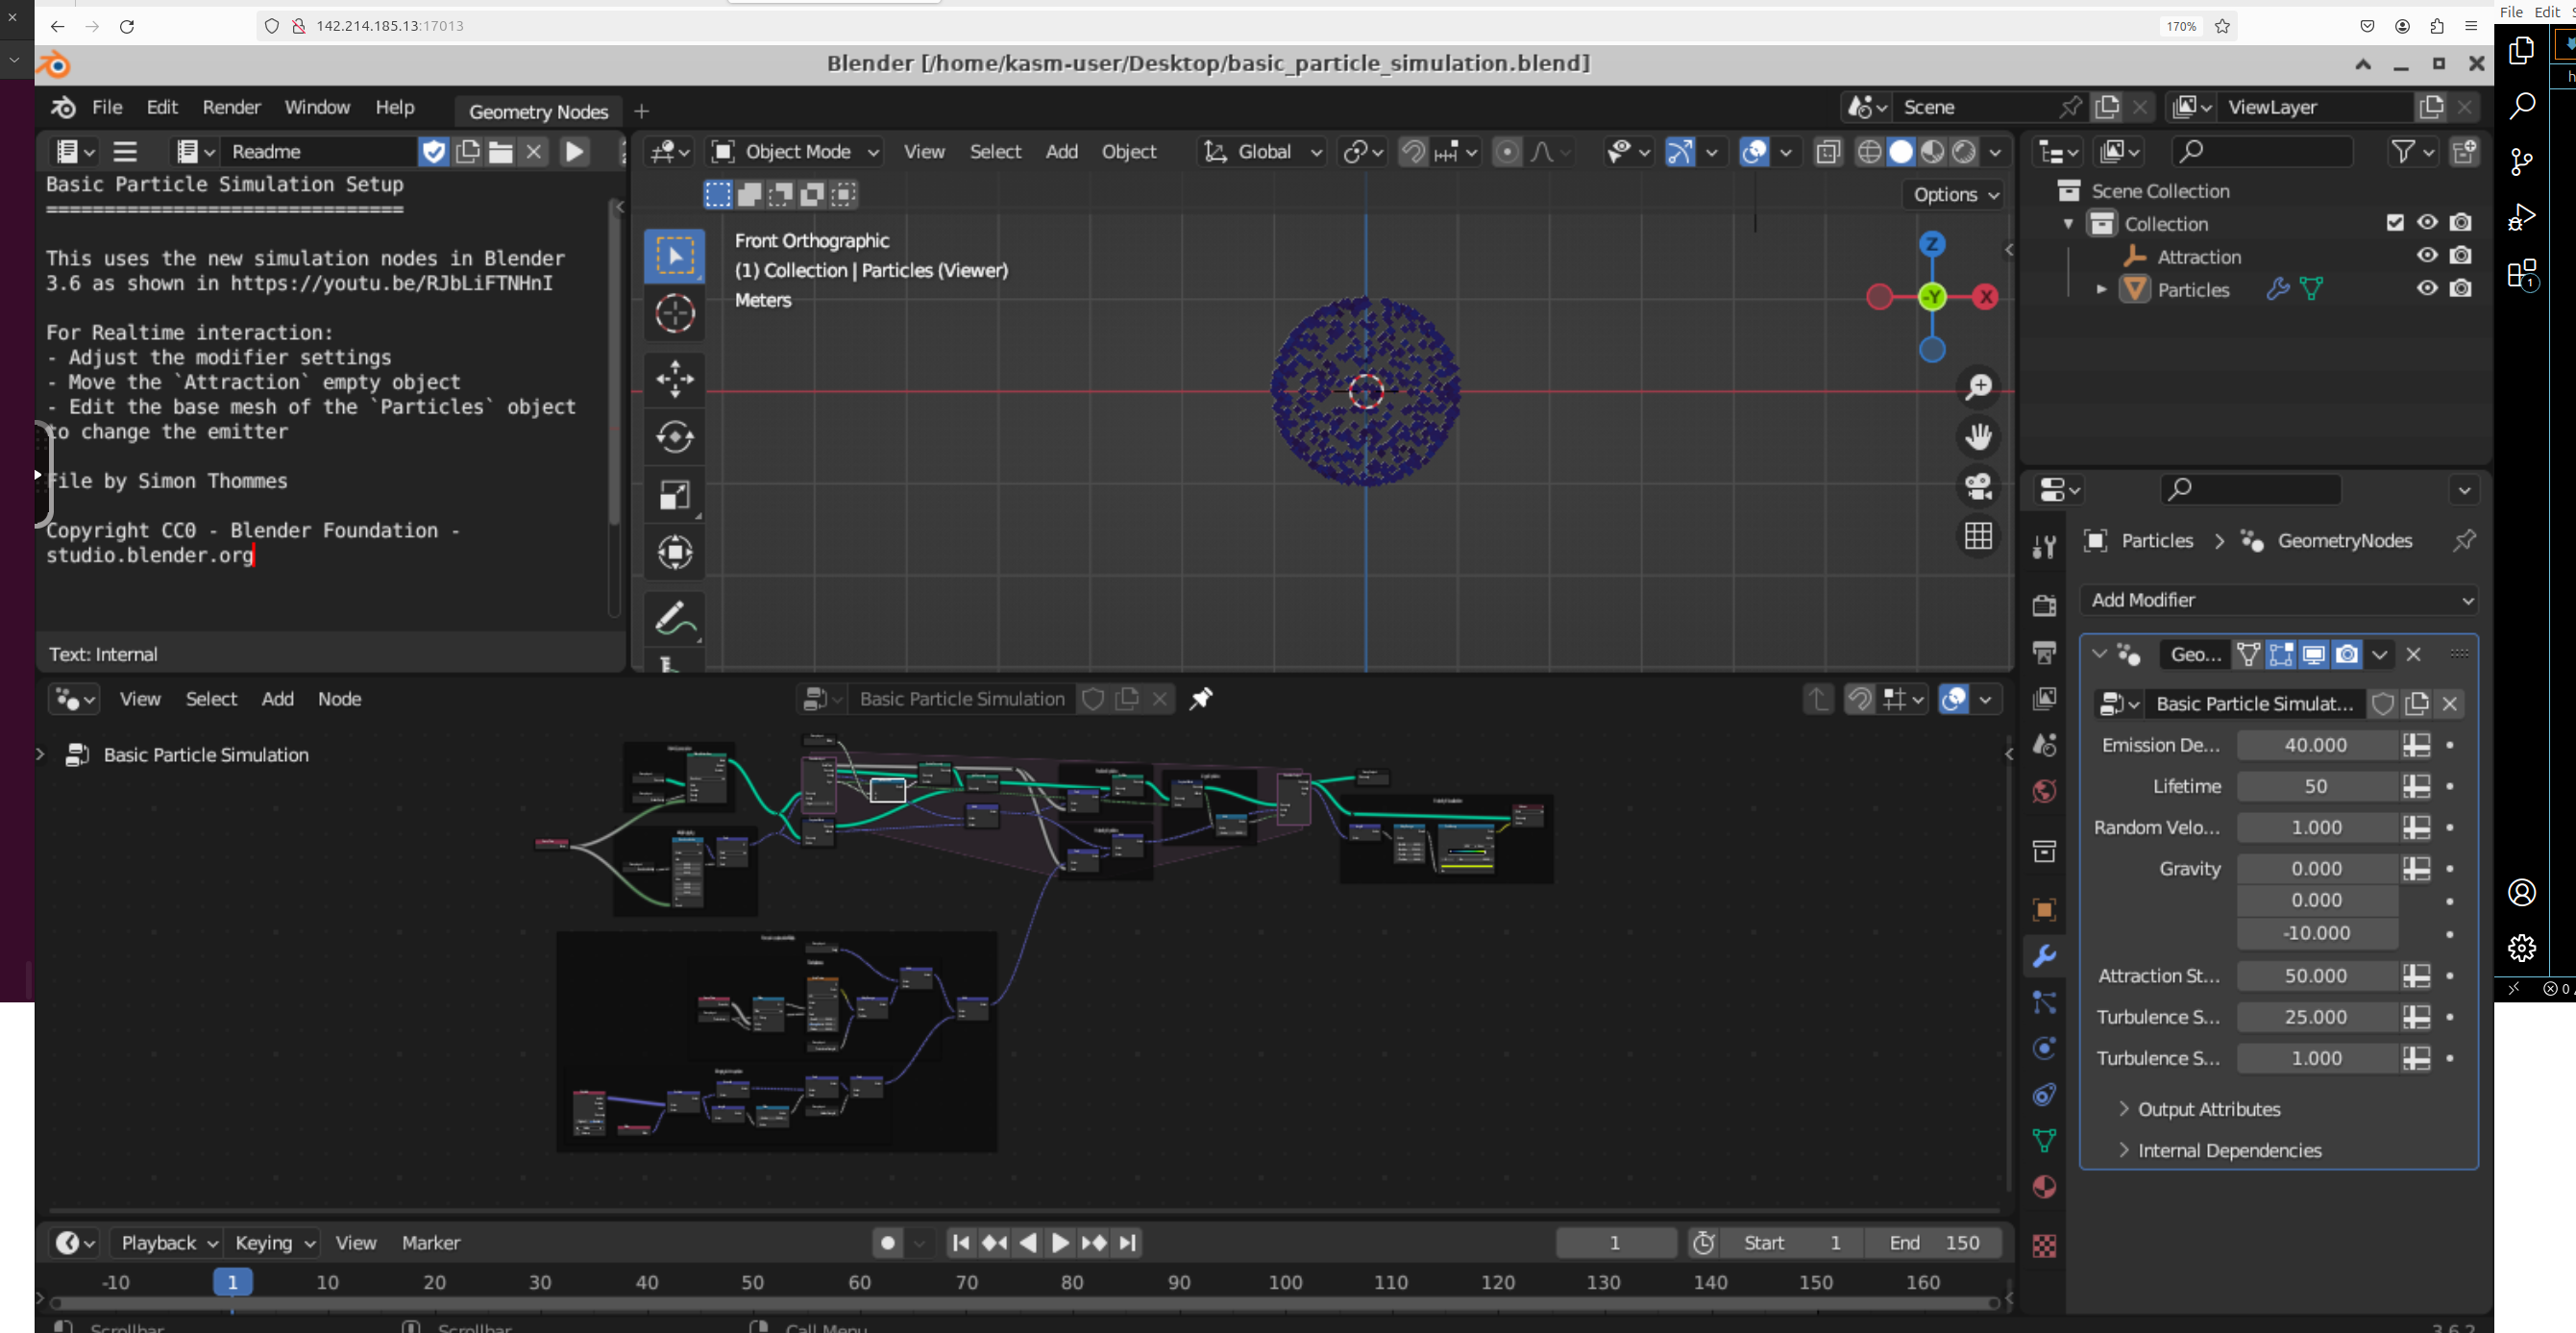
Go back to the tab where Blender is running, click on File, click on Open, find your file, and open it. In this case, my basic\_particle\_simulation.blend is in the Desktop directory since that's where I uploaded it in Jupyter Notebook
|
||
|
||
<Frame caption="Open File">
|
||
|
||
</Frame>
|
||
|
||
## Step 9 - Work on Your .blend file in Blender!
|
||
|
||
1. There you go! You should now able to see your .blend file in Blender in the Cloud using Vast.
|
||
|
||
<Frame caption="Particle Simulation Blend">
|
||
|
||
</Frame>
|
||
|
||
## Step 10 - Download files as needed from Jupyter Notebook
|
||
|
||
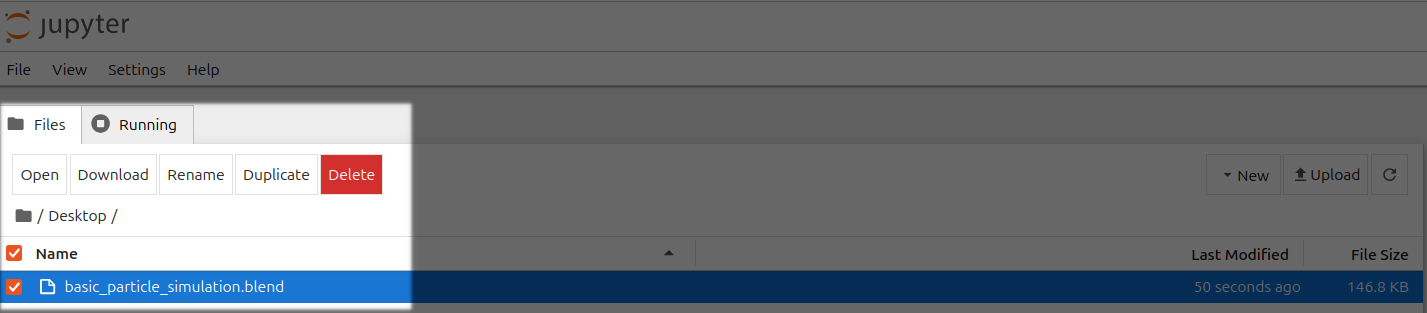
1. You can save files in Blender and download them by selecting the file(s) and clicking the Download button in Jupyter Notebook.
|
||
|
||
<Frame caption="Highlighted File To Download">
|
||
|
||
</Frame>
|
||
|
||
|
||
# Commands
|
||
Source: https://docs.vast.ai/cli/commands
|
||
|
||
|
||
|
||
<script
|
||
type="application/ld+json"
|
||
dangerouslySetInnerHTML={{
|
||
__html: JSON.stringify({
|
||
"@context": "https://schema.org",
|
||
"@type": "TechArticle",
|
||
"headline": "Vast.ai CLI Commands Reference",
|
||
"description": "Complete reference documentation for all Vast.ai CLI commands including client commands for managing instances, host commands for machine management, and detailed usage examples.",
|
||
"author": {
|
||
"@type": "Organization",
|
||
"name": "Vast.ai"
|
||
},
|
||
"datePublished": "2025-01-13",
|
||
"dateModified": "2025-07-12",
|
||
"articleSection": "CLI Reference",
|
||
"keywords": ["CLI", "command line", "API", "GPU", "vast.ai", "reference", "documentation", "Python", "instances", "hosting"],
|
||
"about": {
|
||
"@type": "SoftwareApplication",
|
||
"name": "Vast.ai CLI",
|
||
"applicationCategory": "DeveloperApplication",
|
||
"operatingSystem": ["Linux", "macOS", "Windows"],
|
||
"programmingLanguage": "Python"
|
||
}
|
||
})
|
||
}}
|
||
/>
|
||
|
||
# CLI Commands
|
||
|
||
```text Text theme={null}
|
||
usage: vastai [-h] [--url URL] [--retry RETRY] [--raw] [--explain] [--curl] [--api-key API_KEY] [--version] command ...
|
||
|
||
positional arguments:
|
||
command command to run. one of:
|
||
help print this help message
|
||
attach ssh Attach an ssh key to an instance. This will allow you to connect to the instance with the ssh key
|
||
cancel copy Cancel a remote copy in progress, specified by DST id
|
||
cancel sync Cancel a remote copy in progress, specified by DST id
|
||
change bid Change the bid price for a spot/interruptible instance
|
||
clone volume Clone an existing volume
|
||
copy Copy directories between instances and/or local
|
||
cloud copy Copy files/folders to and from cloud providers
|
||
take snapshot Schedule a snapshot of a running container and push it to your repo in a container registry
|
||
create api-key Create a new api-key with restricted permissions. Can be sent to other users and teammates
|
||
create env-var Create a new user environment variable
|
||
create ssh-key Create a new ssh-key
|
||
create autogroup Create a new autoscale group
|
||
create endpoint Create a new endpoint group
|
||
create instance Create a new instance
|
||
create subaccount Create a subaccount
|
||
create team Create a new team
|
||
create team-role Add a new role to your team
|
||
create template Create a new template
|
||
create volume Create a new volume
|
||
delete api-key Remove an api-key
|
||
delete ssh-key Remove an ssh-key
|
||
delete scheduled-job
|
||
Delete a scheduled job
|
||
delete autogroup Delete an autogroup group
|
||
delete endpoint Delete an endpoint group
|
||
delete env-var Delete a user environment variable
|
||
delete template Delete a Template
|
||
delete volume Delete a volume
|
||
destroy instance Destroy an instance (irreversible, deletes data)
|
||
destroy instances Destroy a list of instances (irreversible, deletes data)
|
||
destroy team Destroy your team
|
||
detach ssh Detach an ssh key from an instance
|
||
execute Execute a (constrained) remote command on a machine
|
||
get endpt-logs Fetch logs for a specific serverless endpoint group
|
||
invite member Invite a team member
|
||
label instance Assign a string label to an instance
|
||
launch instance Launch the top instance from the search offers based on the given parameters
|
||
logs Get the logs for an instance
|
||
prepay instance Deposit credits into reserved instance
|
||
reboot instance Reboot (stop/start) an instance
|
||
recycle instance Recycle (destroy/create) an instance
|
||
remove member Remove a team member
|
||
remove team-role Remove a role from your team
|
||
reports Get the user reports for a given machine
|
||
reset api-key Reset your api-key (get new key from website)
|
||
start instance Start a stopped instance
|
||
start instances Start a list of instances
|
||
stop instance Stop a running instance
|
||
stop instances Stop a list of instances
|
||
search benchmarks Search for benchmark results using custom query
|
||
search invoices Search for benchmark results using custom query
|
||
search offers Search for instance types using custom query
|
||
search templates Search for template results using custom query
|
||
search volumes Search for volume offers using custom query
|
||
set api-key Set api-key (get your api-key from the console/CLI)
|
||
set user Update user data from json file
|
||
ssh-url ssh url helper
|
||
scp-url scp url helper
|
||
show api-key Show an api-key
|
||
show api-keys List your api-keys associated with your account
|
||
show audit-logs Display account's history of important actions
|
||
show scheduled-jobs Display the list of scheduled jobs
|
||
show ssh-keys List your ssh keys associated with your account
|
||
show autogroups Display user's current autogroup groups
|
||
show endpoints Display user's current endpoint groups
|
||
show connections Display user's cloud connections
|
||
show deposit Display reserve deposit info for an instance
|
||
show earnings Get machine earning history reports
|
||
show env-vars Show user environment variables
|
||
show invoices Get billing history reports
|
||
show instance Display user's current instances
|
||
show instances Display user's current instances
|
||
show ipaddrs Display user's history of ip addresses
|
||
show user Get current user data
|
||
show subaccounts Get current subaccounts
|
||
show members Show your team members
|
||
show team-role Show your team role
|
||
show team-roles Show roles for a team
|
||
show volumes Show stats on owned volumes.
|
||
create cluster Create Vast cluster
|
||
join cluster Join Machine to Cluster
|
||
delete cluster Delete Cluster
|
||
remove-machine-from-cluster Removes machine from cluster
|
||
show overlays Show overlays associated with your account.
|
||
create overlay Creates overlay network on top of a physical cluster
|
||
join overlay Adds instance to an overlay network
|
||
delete overlay Deletes overlay and removes all of its associated instances
|
||
show clusters Show clusters associated with your account.
|
||
transfer credit Transfer credits to another account
|
||
update autogroup Update an existing autoscale group
|
||
update endpoint Update an existing endpoint group
|
||
update env-var Update an existing user environment variable
|
||
update instance Update recreate an instance from a new/updated template
|
||
update team-role Update an existing team role
|
||
update template Update an existing template
|
||
update ssh-key Update an existing ssh key
|
||
cancel maint [Host] Cancel maint window
|
||
cleanup machine [Host] Remove all expired storage instances from the machine, freeing up space
|
||
delete machine [Host] Delete machine if the machine is not being used by clients. host jobs on their own machines are disregarded and machine is force deleted.
|
||
list machine [Host] list a machine for rent
|
||
list machines [Host] list machines for rent
|
||
list volume [Host] list disk space for rent as a volume on a machine
|
||
list volumes [Host] list disk space for rent as a volume on machines
|
||
unlist volume [Host] unlist volume offer
|
||
remove defjob [Host] Delete default jobs
|
||
set defjob [Host] Create default jobs for a machine
|
||
set min-bid [Host] Set the minimum bid/rental price for a machine
|
||
schedule maint [Host] Schedule upcoming maint window
|
||
show machine [Host] Show hosted machines
|
||
show machines [Host] Show hosted machines
|
||
show maints [Host] Show maintenance information for host machines
|
||
unlist machine [Host] Unlist a listed machine
|
||
self-test machine [Host] Perform a self-test on the specified machine
|
||
|
||
options:
|
||
-h, --help show this help message and exit
|
||
--url URL server REST api url
|
||
--retry RETRY retry limit
|
||
--raw output machine-readable json
|
||
--explain output verbose explanation of mapping of CLI calls to HTTPS API endpoints
|
||
--curl show a curl equivalency to the call
|
||
--api-key API_KEY api key. defaults to using the one stored in /home/scott_vast/.config/vastai/vast_api_key
|
||
--version show version
|
||
|
||
Use 'vast COMMAND --help' for more info about a command
|
||
|
||
```
|
||
|
||
# Client Commands
|
||
|
||
## cancel copy
|
||
|
||
Cancel a remote copy in progress, specified by DST id
|
||
|
||
```text Text theme={null}
|
||
usage: vastai cancel copy DST
|
||
|
||
positional arguments:
|
||
dst instance_id:/path to target of copy operation.
|
||
|
||
options:
|
||
-h, --help show this help message and exit
|
||
--url URL server REST api url
|
||
--retry RETRY retry limit
|
||
--raw output machine-readable json
|
||
--explain output verbose explanation of mapping of CLI calls to
|
||
HTTPS API endpoints
|
||
--api-key API_KEY api key. defaults to using the one stored in
|
||
~/.vast_api_key
|
||
|
||
Use this command to cancel any/all current remote copy operations copying to a specific named instance, given by DST.
|
||
Examples:
|
||
vastai cancel copy 12371
|
||
|
||
The first example cancels all copy operations currently copying data into instance 12371
|
||
|
||
```
|
||
|
||
## cancel sync
|
||
|
||
Cancel a remote copy in progress, specified by DST id
|
||
|
||
```text Text theme={null}
|
||
usage: vastai cancel sync DST
|
||
|
||
positional arguments:
|
||
dst instance_id:/path to target of sync operation.
|
||
|
||
options:
|
||
-h, --help show this help message and exit
|
||
--url URL server REST api url
|
||
--retry RETRY retry limit
|
||
--raw output machine-readable json
|
||
--explain output verbose explanation of mapping of CLI calls to
|
||
HTTPS API endpoints
|
||
--api-key API_KEY api key. defaults to using the one stored in
|
||
~/.vast_api_key
|
||
|
||
Use this command to cancel any/all current remote cloud sync operations copying to a specific named instance, given by DST.
|
||
Examples:
|
||
vastai cancel sync 12371
|
||
|
||
The first example cancels all copy operations currently copying data into instance 12371
|
||
|
||
```
|
||
|
||
## change bid
|
||
|
||
Change the bid price for a spot/interruptible instance
|
||
|
||
```text Text theme={null}
|
||
usage: vastai change bid id [--price PRICE]
|
||
|
||
positional arguments:
|
||
id id of instance type to change bid
|
||
|
||
options:
|
||
-h, --help show this help message and exit
|
||
--price PRICE per machine bid price in $/hour
|
||
--url URL server REST api url
|
||
--retry RETRY retry limit
|
||
--raw output machine-readable json
|
||
--explain output verbose explanation of mapping of CLI calls to
|
||
HTTPS API endpoints
|
||
--api-key API_KEY api key. defaults to using the one stored in
|
||
~/.vast_api_key
|
||
|
||
Change the current bid price of instance id to PRICE.
|
||
If PRICE is not specified, then a winning bid price is used as the default.
|
||
|
||
```
|
||
|
||
## cloud copy
|
||
|
||
Copy files/folders to and from cloud providers
|
||
|
||
```text Text theme={null}
|
||
usage: vastai cloud_copy SRC DST CLOUD_SERVICE INSTANCE_ID CLOUD_SERVICE_SELECTED TRANSFER
|
||
|
||
options:
|
||
-h, --help show this help message and exit
|
||
--src SRC path to source of object to copy.
|
||
--dst DST path to target of copy operation.
|
||
--instance INSTANCE id of the instance
|
||
--connection CONNECTION
|
||
id of cloud connection on your account
|
||
--transfer TRANSFER type of transfer, possible options include Instance To
|
||
Cloud and Cloud To Instance
|
||
--url URL server REST api url
|
||
--retry RETRY retry limit
|
||
--raw output machine-readable json
|
||
--explain output verbose explanation of mapping of CLI calls to
|
||
HTTPS API endpoints
|
||
--api-key API_KEY api key. defaults to using the one stored in
|
||
~/.vast_api_key
|
||
|
||
Copies a directory from a source location to a target location. Each of source and destination
|
||
directories can be either local or remote, subject to appropriate read and write
|
||
permissions required to carry out the action. The format for both src and dst is [instance_id:]path.
|
||
You can find more information about the cloud copy operation here: [Cloud Sync](/documentation/instances/cloud-sync)
|
||
|
||
Examples:
|
||
vastai cloud_copy --src folder --dst /workspace --cloud_service "Amazon S3" --instance_id 6003036 --cloud_service_selected 52 --transfer "Instance To Cloud"
|
||
|
||
The example copies all contents of /folder into /workspace on instance 6003036 from Amazon S3.
|
||
|
||
```
|
||
|
||
## copy
|
||
|
||
Copy directories between instances and/or local
|
||
|
||
```text Text theme={null}
|
||
usage: vastai copy SRC DST
|
||
|
||
positional arguments:
|
||
src Source location for copy operation (supports multiple formats)
|
||
dst Target location for copy operation (supports multiple formats)
|
||
|
||
options:
|
||
-h, --help show this help message and exit
|
||
-i IDENTITY, --identity IDENTITY Location of ssh private key
|
||
--url URL server REST api url
|
||
--retry RETRY retry limit
|
||
--raw output machine-readable json
|
||
--explain output verbose explanation of mapping of CLI calls to HTTPS API endpoints
|
||
--curl show a curl equivalency to the call
|
||
--api-key API_KEY api key. defaults to using the one stored in /home/anthony-benjamin/.config/vastai/vast_api_key
|
||
--version show version
|
||
|
||
Copies a directory from a source location to a target location. Each of source and destination
|
||
directories can be either local or remote, subject to appropriate read and write
|
||
permissions required to carry out the action.
|
||
|
||
Supported location formats:
|
||
- [instance_id:]path (legacy format, still supported)
|
||
- C.instance_id:path (container copy format)
|
||
- cloud_service:path (cloud service format)
|
||
- cloud_service.cloud_service_id:path (cloud service with ID)
|
||
- local:path (explicit local path)
|
||
|
||
You should not copy to /root or / as a destination directory, as this can mess up the permissions on your instance ssh folder, breaking future copy operations (as they use ssh authentication)
|
||
You can see more information about constraints here: [Data Movement](/documentation/instances/data-movement#constraints)
|
||
|
||
Examples:
|
||
vast copy 6003036:/workspace/ 6003038:/workspace/
|
||
vast copy C.11824:/data/test local:data/test
|
||
vast copy local:data/test C.11824:/data/test
|
||
vast copy drive:/folder/file.txt C.6003036:/workspace/
|
||
vast copy s3.101:/data/ C.6003036:/workspace/
|
||
|
||
The first example copy syncs all files from the absolute directory '/workspace' on instance 6003036 to the directory '/workspace' on instance 6003038.
|
||
The second example copy syncs files from container 11824 to the local machine using structured syntax.
|
||
The third example copy syncs files from local to container 11824 using structured syntax.
|
||
The fourth example copy syncs files from Google Drive to an instance.
|
||
The fifth example copy syncs files from S3 bucket with id 101 to an instance.
|
||
```
|
||
|
||
## create api-key
|
||
|
||
Create a new api-key with restricted permissions.
|
||
|
||
```text Text theme={null}
|
||
usage: vastai create api-key
|
||
|
||
options:
|
||
-h, --help show this help message and exit
|
||
--permissions PERMISSIONS
|
||
file path for json encoded permissions, look in the
|
||
docs for more information
|
||
--url URL server REST api url
|
||
--retry RETRY retry limit
|
||
--raw output machine-readable json
|
||
--explain output verbose explanation of mapping of CLI calls to
|
||
HTTPS API endpoints
|
||
--api-key API_KEY api key. defaults to using the one stored in
|
||
~/.vast_api_key
|
||
|
||
```
|
||
|
||
## create autoscaler
|
||
|
||
Create a new autoscale group
|
||
|
||
```text Text theme={null}
|
||
usage: vastai autoscaler create [OPTIONS]
|
||
|
||
options:
|
||
-h, --help show this help message and exit
|
||
--min_load MIN_LOAD minimum floor load in perf units/s (token/s for LLms)
|
||
--target_util TARGET_UTIL
|
||
target capacity utilization (fraction, max 1.0,
|
||
default 0.9)
|
||
--cold_mult COLD_MULT
|
||
cold/stopped instance capacity target as multiple of
|
||
hot capacity target (default 2.5)
|
||
--gpu_ram GPU_RAM estimated GPU RAM req (independent of search string)
|
||
--template_hash TEMPLATE_HASH
|
||
template hash (optional)
|
||
--template_id TEMPLATE_ID
|
||
template id (optional)
|
||
--search_params SEARCH_PARAMS
|
||
search param string for search offers ex: "gpu_ram>=23
|
||
num_gpus=2 gpu_name=RTX_4090 inet_down>200
|
||
direct_port_count>2 disk_space>=64"
|
||
--launch_args LAUNCH_ARGS
|
||
launch args string for create instance ex: "--onstart
|
||
onstart_wget.sh --env '-e ONSTART_PATH=https://s3.amaz
|
||
onaws.com/vast.ai/onstart_OOBA.sh' --image
|
||
atinoda/text-generation-webui:default-nightly --disk
|
||
64"
|
||
--endpoint_name ENDPOINT_NAME
|
||
deployment endpoint name (allows multiple autoscale
|
||
groups to share same deployment endpoint)
|
||
--url URL server REST api url
|
||
--retry RETRY retry limit
|
||
--raw output machine-readable json
|
||
--explain output verbose explanation of mapping of CLI calls to
|
||
HTTPS API endpoints
|
||
--api-key API_KEY api key. defaults to using the one stored in
|
||
~/.vast_api_key
|
||
|
||
Create a new autoscaling group to manage a pool of worker instances.
|
||
|
||
Example: vastai create autoscaler --min_load 100 --target_util 0.9 --cold_mult 2.0 --search_params "gpu_ram>=23 num_gpus=2 gpu_name=RTX_4090 inet_down>200 direct_port_count>2 disk_space>=64" --launch_args "--onstart onstart_wget.sh --env '-e ONSTART_PATH=https://s3.amazonaws.com/vast.ai/onstart_OOBA.sh' --image atinoda/text-generation-webui:default-nightly --disk 64" --gpu_ram 32.0 --endpoint_name "LLama"
|
||
|
||
```
|
||
|
||
## create instance
|
||
|
||
Create a new instance
|
||
|
||
```text Text theme={null}
|
||
usage: vastai create instance ID [OPTIONS] [--args ...]
|
||
|
||
positional arguments:
|
||
ID id of instance type to launch (returned from search
|
||
offers)
|
||
|
||
options:
|
||
-h, --help show this help message and exit
|
||
--price PRICE per machine bid price in $/hour
|
||
--disk DISK size of local disk partition in GB
|
||
--image IMAGE docker container image to launch
|
||
--login LOGIN docker login arguments for private repo
|
||
authentication, surround with ''
|
||
--label LABEL label to set on the instance
|
||
--onstart ONSTART filename to use as onstart script
|
||
--onstart-cmd ONSTART_CMD
|
||
contents of onstart script as single argument
|
||
--entrypoint ENTRYPOINT
|
||
override entrypoint for args launch instance
|
||
--ssh Launch as an ssh instance type.
|
||
--jupyter Launch as a jupyter instance instead of an ssh
|
||
instance.
|
||
--direct Use (faster) direct connections for jupyter & ssh.
|
||
--jupyter-dir JUPYTER_DIR
|
||
For runtype 'jupyter', directory in instance to use to
|
||
launch jupyter. Defaults to image's working directory.
|
||
--jupyter-lab For runtype 'jupyter', Launch instance with jupyter
|
||
lab.
|
||
--lang-utf8 Workaround for images with locale problems: install
|
||
and generate locales before instance launch, and set
|
||
locale to C.UTF-8.
|
||
--python-utf8 Workaround for images with locale problems: set
|
||
python's locale to C.UTF-8.
|
||
--env ENV env variables and port mapping options, surround with
|
||
''
|
||
--args ... list of arguments passed to container ENTRYPOINT.
|
||
Onstart is recommended for this purpose.
|
||
--create-from CREATE_FROM
|
||
Existing instance id to use as basis for new instance.
|
||
Instance configuration should usually be identical, as
|
||
only the difference from the base image is copied.
|
||
--force Skip sanity checks when creating from an existing
|
||
instance
|
||
--url URL server REST api url
|
||
--retry RETRY retry limit
|
||
--raw output machine-readable json
|
||
--explain output verbose explanation of mapping of CLI calls to
|
||
HTTPS API endpoints
|
||
--api-key API_KEY api key. defaults to using the one stored in
|
||
~/.vast_api_key
|
||
|
||
Performs the same action as pressing the "RENT" button on the website at https://console.vast.ai/create/
|
||
Creates an instance from an offer ID (which is returned from "search offers"). Each offer ID can only be used to create one instance.
|
||
Besides the offer ID, you must pass in an '--image' argument as a minimum.
|
||
|
||
Examples:
|
||
vastai create instance 6995713 --image pytorch/pytorch --disk 40 --env '-p 8081:80801/udp -h billybob' --ssh --direct --onstart-cmd "env | grep _ >> /etc/environment; echo 'starting up'";
|
||
vastai create instance 384827 --image bobsrepo/pytorch:latest --login '-u bob -p 9d8df!fd89ufZ docker.io' --jupyter --direct --env '-e TZ=PDT -e XNAME=XX4 -p 22:22 -p 8080:8080' --disk 20
|
||
|
||
Return value:
|
||
Returns a json reporting the instance ID of the newly created instance.
|
||
Example: {'success': True, 'new_contract': 7835610}
|
||
|
||
```
|
||
|
||
## create overlay
|
||
|
||
Create an overlay network inside a physical cluster. 
|
||
|
||
```none theme={null}
|
||
usage: vastai create overlay CLUSTER_ID OVERLAY_NAME
|
||
|
||
positional arguments:
|
||
cluster_id ID of cluster to create overlay on top of
|
||
name overlay network name
|
||
|
||
options:
|
||
-h, --help show this help message and exit
|
||
--url URL server REST api url
|
||
--retry RETRY retry limit
|
||
--raw output machine-readable json
|
||
--explain output verbose explanation of mapping of CLI calls to HTTPS API endpoints
|
||
--curl show a curl equivalency to the call
|
||
--api-key API_KEY api key. defaults to using the one stored in /home/edgarlin/.config/vastai/vast_api_key
|
||
--version show version
|
||
|
||
Creates an overlay network to allow local networking between instances on a physical cluster
|
||
|
||
```
|
||
|
||
## create subaccount
|
||
|
||
Create a subaccount
|
||
|
||
```text Text theme={null}
|
||
usage: vastai create subaccount --email EMAIL --username USERNAME --password PASSWORD --type TYPE
|
||
|
||
options:
|
||
-h, --help show this help message and exit
|
||
--email EMAIL email address to use for login
|
||
--username USERNAME username to use for login
|
||
--password PASSWORD password to use for login
|
||
--type TYPE host/client
|
||
--url URL server REST api url
|
||
--retry RETRY retry limit
|
||
--raw output machine-readable json
|
||
--explain output verbose explanation of mapping of CLI calls to
|
||
HTTPS API endpoints
|
||
--api-key API_KEY api key. defaults to using the one stored in
|
||
~/.vast_api_key
|
||
|
||
Creates a new account that is considered a child of your current account as defined via the API key.
|
||
|
||
```
|
||
|
||
## create team
|
||
|
||
Create a new team
|
||
|
||
```text Text theme={null}
|
||
usage: vastai create-team --team_name TEAM_NAME
|
||
|
||
options:
|
||
-h, --help show this help message and exit
|
||
--team_name TEAM_NAME
|
||
name of the team
|
||
--url URL server REST api url
|
||
--retry RETRY retry limit
|
||
--raw output machine-readable json
|
||
--explain output verbose explanation of mapping of CLI calls to
|
||
HTTPS API endpoints
|
||
--api-key API_KEY api key. defaults to using the one stored in
|
||
~/.vast_api_key
|
||
|
||
```
|
||
|
||
## create team-role
|
||
|
||
Add a new role to your
|
||
|
||
```text Text theme={null}
|
||
usage: vastai create team-role name --permissions PERMISSIONS
|
||
|
||
options:
|
||
-h, --help show this help message and exit
|
||
--name NAME name of the role
|
||
--permissions PERMISSIONS
|
||
file path for json encoded permissions, look in the
|
||
docs for more information
|
||
--url URL server REST api url
|
||
--retry RETRY retry limit
|
||
--raw output machine-readable json
|
||
--explain output verbose explanation of mapping of CLI calls to
|
||
HTTPS API endpoints
|
||
--api-key API_KEY api key. defaults to using the one stored in
|
||
~/.vast_api_key
|
||
|
||
```
|
||
|
||
## delete api-key
|
||
|
||
Remove an api-key
|
||
|
||
```text Text theme={null}
|
||
usage: vastai delete api-key ID
|
||
|
||
positional arguments:
|
||
ID id of apikey to remove
|
||
|
||
options:
|
||
-h, --help show this help message and exit
|
||
--url URL server REST api url
|
||
--retry RETRY retry limit
|
||
--raw output machine-readable json
|
||
--explain output verbose explanation of mapping of CLI calls to
|
||
HTTPS API endpoints
|
||
--api-key API_KEY api key. defaults to using the one stored in
|
||
~/.vast_api_key
|
||
|
||
```
|
||
|
||
## delete autoscaler
|
||
|
||
Delete an autoscaler group
|
||
|
||
```text Text theme={null}
|
||
usage: vastai delete autoscaler ID
|
||
|
||
positional arguments:
|
||
ID id of group to delete
|
||
|
||
options:
|
||
-h, --help show this help message and exit
|
||
--url URL server REST api url
|
||
--retry RETRY retry limit
|
||
--raw output machine-readable json
|
||
--explain output verbose explanation of mapping of CLI calls to
|
||
HTTPS API endpoints
|
||
--api-key API_KEY api key. defaults to using the one stored in
|
||
~/.vast_api_key
|
||
|
||
Note that deleteing an autoscaler group doesn't automatically destroy all the instances that are associated with your autoscaler group.
|
||
Example: vastai delete autoscaler 4242
|
||
|
||
```
|
||
|
||
## delete overlay
|
||
|
||
Deletes an overlay
|
||
|
||
```none theme={null}
|
||
usage: vastai delete overlay OVERLAY_ID
|
||
|
||
positional arguments:
|
||
overlay_id ID of overlay to delete
|
||
|
||
options:
|
||
-h, --help show this help message and exit
|
||
--url URL server REST api url
|
||
--retry RETRY retry limit
|
||
--raw output machine-readable json
|
||
--explain output verbose explanation of mapping of CLI calls to HTTPS API endpoints
|
||
--curl show a curl equivalency to the call
|
||
--api-key API_KEY api key. defaults to using the one stored in /home/edgarlin/.config/vastai/vast_api_key
|
||
|
||
```
|
||
|
||
## destroy instance
|
||
|
||
Destroy an instance (irreversible, deletes data)
|
||
|
||
```text Text theme={null}
|
||
usage: vastai destroy instance id [-h] [--api-key API_KEY] [--raw]
|
||
|
||
positional arguments:
|
||
id id of instance to delete
|
||
|
||
options:
|
||
-h, --help show this help message and exit
|
||
--url URL server REST api url
|
||
--retry RETRY retry limit
|
||
--raw output machine-readable json
|
||
--explain output verbose explanation of mapping of CLI calls to
|
||
HTTPS API endpoints
|
||
--api-key API_KEY api key. defaults to using the one stored in
|
||
~/.vast_api_key
|
||
|
||
Perfoms the same action as pressing the "DESTROY" button on the website at https://console.vast.ai/instances/
|
||
Example: vastai destroy instance 4242
|
||
|
||
```
|
||
|
||
## destroy instances
|
||
|
||
Destroy a list of instances (irreversible, deletes
|
||
|
||
```text Text theme={null}
|
||
usage: vastai destroy instances [--raw] <id>
|
||
|
||
positional arguments:
|
||
ids ids of instance to destroy
|
||
|
||
options:
|
||
-h, --help show this help message and exit
|
||
--url URL server REST api url
|
||
--retry RETRY retry limit
|
||
--raw output machine-readable json
|
||
--explain output verbose explanation of mapping of CLI calls to
|
||
HTTPS API endpoints
|
||
--api-key API_KEY api key. defaults to using the one stored in
|
||
~/.vast_api_key
|
||
|
||
```
|
||
|
||
## destroy team
|
||
|
||
Destroy your team
|
||
|
||
```text Text theme={null}
|
||
usage: vastai destroy team
|
||
|
||
options:
|
||
-h, --help show this help message and exit
|
||
--url URL server REST api url
|
||
--retry RETRY retry limit
|
||
--raw output machine-readable json
|
||
--explain output verbose explanation of mapping of CLI calls to
|
||
HTTPS API endpoints
|
||
--api-key API_KEY api key. defaults to using the one stored in
|
||
~/.vast_api_key
|
||
|
||
```
|
||
|
||
## execute
|
||
|
||
Execute a (constrained) remote command on a machine
|
||
|
||
```text Text theme={null}
|
||
usage: vastai execute ID COMMAND
|
||
|
||
positional arguments:
|
||
ID id of instance to execute on
|
||
COMMAND bash command surrounded by single quotes
|
||
|
||
options:
|
||
-h, --help show this help message and exit
|
||
--url URL server REST api url
|
||
--retry RETRY retry limit
|
||
--raw output machine-readable json
|
||
--explain output verbose explanation of mapping of CLI calls to
|
||
HTTPS API endpoints
|
||
--api-key API_KEY api key. defaults to using the one stored in
|
||
~/.vast_api_key
|
||
|
||
examples:
|
||
vastai execute 99999 'ls -l -o -r'
|
||
vastai execute 99999 'rm -r home/delete_this.txt'
|
||
vastai execute 99999 'du -d2 -h'
|
||
|
||
available commands:
|
||
ls List directory contents
|
||
rm Remote files or directories
|
||
du Summarize device usage for a set of files
|
||
|
||
Return value:
|
||
Returns the output of the command which was executed on the instance, if successful. May take a few seconds to retrieve the results.
|
||
|
||
```
|
||
|
||
## generate pdf-invoices
|
||
|
||
```text Text theme={null}
|
||
usage: vastai generate pdf-invoices [OPTIONS]
|
||
|
||
options:
|
||
-h, --help show this help message and exit
|
||
-q, --quiet only display numeric ids
|
||
-s START_DATE, --start_date START_DATE
|
||
start date and time for report. Many formats accepted
|
||
(optional)
|
||
-e END_DATE, --end_date END_DATE
|
||
end date and time for report. Many formats accepted
|
||
(optional)
|
||
-c, --only_charges Show only charge items.
|
||
-p, --only_credits Show only credit items.
|
||
--url URL server REST api url
|
||
--retry RETRY retry limit
|
||
--raw output machine-readable json
|
||
--explain output verbose explanation of mapping of CLI calls to
|
||
HTTPS API endpoints
|
||
--api-key API_KEY api key. defaults to using the one stored in
|
||
~/.vast_api_key
|
||
|
||
```
|
||
|
||
## join overlay
|
||
|
||
Attaches an instance to an overlay network
|
||
|
||
```none theme={null}
|
||
usage: vastai join overlay OVERLAY_NAME INSTANCE_ID
|
||
|
||
positional arguments:
|
||
name Overlay network name to join instance to.
|
||
instance_id Instance ID to add to overlay.
|
||
|
||
options:
|
||
-h, --help show this help message and exit
|
||
--url URL server REST api url
|
||
--retry RETRY retry limit
|
||
--raw output machine-readable json
|
||
--explain output verbose explanation of mapping of CLI calls to HTTPS API endpoints
|
||
--curl show a curl equivalency to the call
|
||
--api-key API_KEY api key. defaults to using the one stored in /home/edgarlin/.config/vastai/vast_api_key
|
||
--version show version
|
||
|
||
Adds an instance to a compatible overlay network.
|
||
|
||
```
|
||
|
||
## invite team-member
|
||
|
||
Invite a team member
|
||
|
||
```text Text theme={null}
|
||
usage: vastai invite team-member --email EMAIL --role ROLE
|
||
|
||
options:
|
||
-h, --help show this help message and exit
|
||
--email EMAIL email of user to be invited
|
||
--role ROLE role of user to be invited
|
||
--url URL server REST api url
|
||
--retry RETRY retry limit
|
||
--raw output machine-readable json
|
||
--explain output verbose explanation of mapping of CLI calls to
|
||
HTTPS API endpoints
|
||
--api-key API_KEY api key. defaults to using the one stored in
|
||
~/.vast_api_key
|
||
|
||
```
|
||
|
||
## label instance
|
||
|
||
Assign a string label to an instance
|
||
|
||
```text Text theme={null}
|
||
usage: vastai label instance <id> <label>
|
||
|
||
positional arguments:
|
||
id id of instance to label
|
||
label label to set
|
||
|
||
options:
|
||
-h, --help show this help message and exit
|
||
--url URL server REST api url
|
||
--retry RETRY retry limit
|
||
--raw output machine-readable json
|
||
--explain output verbose explanation of mapping of CLI calls to
|
||
HTTPS API endpoints
|
||
--api-key API_KEY api key. defaults to using the one stored in
|
||
~/.vast_api_key
|
||
|
||
```
|
||
|
||
## logs
|
||
|
||
Get the logs for an instance
|
||
|
||
```text Text theme={null}
|
||
usage: vastai logs [OPTIONS] INSTANCE_ID
|
||
|
||
positional arguments:
|
||
INSTANCE_ID id of instance
|
||
|
||
options:
|
||
-h, --help show this help message and exit
|
||
--tail TAIL Number of lines to show from the end of the logs (default
|
||
'1000')
|
||
--url URL server REST api url
|
||
--retry RETRY retry limit
|
||
--raw output machine-readable json
|
||
--explain output verbose explanation of mapping of CLI calls to
|
||
HTTPS API endpoints
|
||
--api-key API_KEY api key. defaults to using the one stored in
|
||
~/.vast_api_key
|
||
|
||
```
|
||
|
||
## prepay instance
|
||
|
||
Deposit credits into reserved instance.
|
||
|
||
```text Text theme={null}
|
||
usage: vastai prepay instance <id> <amount>
|
||
|
||
positional arguments:
|
||
id id of instance to prepay for
|
||
amount amount of instance credit prepayment (default discount
|
||
func of 0.2 for 1 month, 0.3 for 3 months)
|
||
|
||
options:
|
||
-h, --help show this help message and exit
|
||
--url URL server REST api url
|
||
--retry RETRY retry limit
|
||
--raw output machine-readable json
|
||
--explain output verbose explanation of mapping of CLI calls to
|
||
HTTPS API endpoints
|
||
--api-key API_KEY api key. defaults to using the one stored in
|
||
~/.vast_api_key
|
||
|
||
```
|
||
|
||
## reboot instance
|
||
|
||
Reboot (stop/start) an instance
|
||
|
||
```text Text theme={null}
|
||
usage: vastai reboot instance <id> [--raw]
|
||
|
||
positional arguments:
|
||
id id of instance to reboot
|
||
|
||
options:
|
||
-h, --help show this help message and exit
|
||
--url URL server REST api url
|
||
--retry RETRY retry limit
|
||
--raw output machine-readable json
|
||
--explain output verbose explanation of mapping of CLI calls to
|
||
HTTPS API endpoints
|
||
--api-key API_KEY api key. defaults to using the one stored in
|
||
~/.vast_api_key
|
||
|
||
Instance is stopped and started without any risk of losing GPU priority.
|
||
|
||
```
|
||
|
||
## remove team-member
|
||
|
||
Remove a team member
|
||
|
||
```text Text theme={null}
|
||
usage: vastai remove team-member ID
|
||
|
||
positional arguments:
|
||
ID id of user to remove
|
||
|
||
options:
|
||
-h, --help show this help message and exit
|
||
--url URL server REST api url
|
||
--retry RETRY retry limit
|
||
--raw output machine-readable json
|
||
--explain output verbose explanation of mapping of CLI calls to
|
||
HTTPS API endpoints
|
||
--api-key API_KEY api key. defaults to using the one stored in
|
||
~/.vast_api_key
|
||
|
||
```
|
||
|
||
## remove team-role
|
||
|
||
Remove a role from your team
|
||
|
||
```text Text theme={null}
|
||
usage: vastai remove team-role NAME
|
||
|
||
positional arguments:
|
||
NAME name of the role
|
||
|
||
options:
|
||
-h, --help show this help message and exit
|
||
--url URL server REST api url
|
||
--retry RETRY retry limit
|
||
--raw output machine-readable json
|
||
--explain output verbose explanation of mapping of CLI calls to
|
||
HTTPS API endpoints
|
||
--api-key API_KEY api key. defaults to using the one stored in
|
||
~/.vast_api_key
|
||
|
||
```
|
||
|
||
## reports
|
||
|
||
Get the user reports for a given machine
|
||
|
||
```text Text theme={null}
|
||
usage: vastai reports m_id
|
||
|
||
positional arguments:
|
||
m_id machine id
|
||
|
||
options:
|
||
-h, --help show this help message and exit
|
||
--url URL server REST api url
|
||
--retry RETRY retry limit
|
||
--raw output machine-readable json
|
||
--explain output verbose explanation of mapping of CLI calls to
|
||
HTTPS API endpoints
|
||
--api-key API_KEY api key. defaults to using the one stored in
|
||
~/.vast_api_key
|
||
|
||
```
|
||
|
||
## reset api-key
|
||
|
||
Reset your api-key (get new key from website).
|
||
|
||
```text Text theme={null}
|
||
usage: vastai reset api-key
|
||
|
||
options:
|
||
-h, --help show this help message and exit
|
||
--url URL server REST api url
|
||
--retry RETRY retry limit
|
||
--raw output machine-readable json
|
||
--explain output verbose explanation of mapping of CLI calls to
|
||
HTTPS API endpoints
|
||
--api-key API_KEY api key. defaults to using the one stored in
|
||
~/.vast_api_key
|
||
|
||
```
|
||
|
||
## scp-url
|
||
|
||
scp url helper
|
||
|
||
```text Text theme={null}
|
||
usage: vastai scp-url ID
|
||
|
||
positional arguments:
|
||
id id
|
||
|
||
options:
|
||
-h, --help show this help message and exit
|
||
--url URL server REST api url
|
||
--retry RETRY retry limit
|
||
--raw output machine-readable json
|
||
--explain output verbose explanation of mapping of CLI calls to
|
||
HTTPS API endpoints
|
||
--api-key API_KEY api key. defaults to using the one stored in
|
||
~/.vast_api_key
|
||
|
||
```
|
||
|
||
## search offers
|
||
|
||
Search for instance types using custom query
|
||
|
||
```text Text theme={null}
|
||
usage: vastai search offers [--help] [--api-key API_KEY] [--raw] <query>
|
||
|
||
positional arguments:
|
||
query Query to search for. default: 'external=false
|
||
rentable=true verified=true', pass -n to ignore
|
||
default
|
||
|
||
options:
|
||
-h, --help show this help message and exit
|
||
-t TYPE, --type TYPE Show 'on-demand', 'reserved', or 'bid'(interruptible)
|
||
pricing. default: on-demand
|
||
-i, --interruptible Alias for --type=bid
|
||
-b, --bid Alias for --type=bid
|
||
-r, --reserved Alias for --type=reserved
|
||
-d, --on-demand Alias for --type=on-demand
|
||
-n, --no-default Disable default query
|
||
--disable-bundling Show identical offers. This request is more heavily
|
||
rate limited.
|
||
--storage STORAGE Amount of storage to use for pricing, in GiB.
|
||
default=5.0GiB
|
||
-o ORDER, --order ORDER
|
||
Comma-separated list of fields to sort on. postfix
|
||
field with - to sort desc. ex: -o
|
||
'num_gpus,total_flops-'. default='score-'
|
||
--url URL server REST api url
|
||
--retry RETRY retry limit
|
||
--raw output machine-readable json
|
||
--explain output verbose explanation of mapping of CLI calls to
|
||
HTTPS API endpoints
|
||
--api-key API_KEY api key. defaults to using the one stored in
|
||
~/.vast_api_key
|
||
|
||
Query syntax:
|
||
|
||
query = comparison comparison...
|
||
comparison = field op value
|
||
field = <name of a field>
|
||
op = one of: <, <=, ==, !=, >=, >, in, notin
|
||
value = <bool, int, float, etc> | 'any'
|
||
bool: True, False
|
||
|
||
note: to pass '>' and '<' on the command line, make sure to use quotes
|
||
note: to encode a string query value (ie for gpu_name), replace any spaces ' ' with underscore '_'
|
||
|
||
Examples:
|
||
|
||
# search for somewhat reliable single RTX 3090 instances, filter out any duplicates or offers that conflict with our existing stopped instances
|
||
vastai search offers 'reliability > 0.98 num_gpus=1 gpu_name=RTX_3090 rented=False'
|
||
|
||
# search for datacenter gpus with minimal compute_cap and total_flops
|
||
vastai search offers 'compute_cap > 610 total_flops > 5 datacenter=True'
|
||
|
||
# search for reliable machines with at least 4 gpus, unverified, order by num_gpus, allow duplicates
|
||
vastai search offers 'reliability > 0.99 num_gpus>=4 verified=False rented=any' -o 'num_gpus-'
|
||
|
||
Available fields:
|
||
|
||
Name Type Description
|
||
|
||
bw_nvlink float bandwidth NVLink
|
||
compute_cap: int cuda compute capability*100 (ie: 650 for 6.5, 700 for 7.0)
|
||
cpu_cores: int # virtual cpus
|
||
cpu_cores_effective: float # virtual cpus you get
|
||
cpu_ram: float system RAM in gigabytes
|
||
cuda_vers: float machine max supported cuda version (based on driver version)
|
||
datacenter: bool show only datacenter offers
|
||
direct_port_count int open ports on host's router
|
||
disk_bw: float disk read bandwidth, in MB/s
|
||
disk_space: float disk storage space, in GB
|
||
dlperf: float DL-perf score (see FAQ for explanation)
|
||
dlperf_usd: float DL-perf/$
|
||
dph: float $/hour rental cost
|
||
driver_version string machine's nvidia driver version as 3 digit string ex. "535.86.05"
|
||
duration: float max rental duration in days
|
||
external: bool show external offers in addition to datacenter offers
|
||
flops_usd: float TFLOPs/$
|
||
geolocation: string Two letter country code. Works with operators =, !=, in, not in (e.g. geolocation not in [XV,XZ])
|
||
gpu_mem_bw: float GPU memory bandwidth in GB/s
|
||
gpu_name: string GPU model name (no quotes, replace spaces with underscores, ie: RTX_3090 rather than 'RTX 3090')
|
||
gpu_ram: float GPU RAM in GB
|
||
gpu_frac: float Ratio of GPUs in the offer to gpus in the system
|
||
gpu_display_active: bool True if the GPU has a display attached
|
||
has_avx: bool CPU supports AVX instruction set.
|
||
id: int instance unique ID
|
||
inet_down: float internet download speed in Mb/s
|
||
inet_down_cost: float internet download bandwidth cost in $/GB
|
||
inet_up: float internet upload speed in Mb/s
|
||
inet_up_cost: float internet upload bandwidth cost in $/GB
|
||
machine_id int machine id of instance
|
||
min_bid: float current minimum bid price in $/hr for interruptible
|
||
num_gpus: int # of GPUs
|
||
pci_gen: float PCIE generation
|
||
pcie_bw: float PCIE bandwidth (CPU to GPU)
|
||
reliability: float machine reliability score (see FAQ for explanation)
|
||
rentable: bool is the instance currently rentable
|
||
rented: bool allow/disallow duplicates and potential conflicts with existing stopped instances
|
||
storage_cost: float storage cost in $/GB/month
|
||
static_ip: bool is the IP addr static/stable
|
||
total_flops: float total TFLOPs from all GPUs
|
||
ubuntu_version string host machine ubuntu OS version
|
||
verified: bool is the machine verified
|
||
|
||
```
|
||
|
||
## set api-key
|
||
|
||
Set api-key (get your api-key from the console/CLI)
|
||
|
||
```text Text theme={null}
|
||
usage: vastai set api-key APIKEY
|
||
|
||
positional arguments:
|
||
new_api_key Api key to set as currently logged in user
|
||
|
||
options:
|
||
-h, --help show this help message and exit
|
||
--url URL server REST api url
|
||
--retry RETRY retry limit
|
||
--raw output machine-readable json
|
||
--explain output verbose explanation of mapping of CLI calls to
|
||
HTTPS API endpoints
|
||
--api-key API_KEY api key. defaults to using the one stored in
|
||
~/.vast_api_key
|
||
|
||
```
|
||
|
||
## show api-key
|
||
|
||
Show an api-key
|
||
|
||
```text Text theme={null}
|
||
usage: vastai show api-key
|
||
|
||
positional arguments:
|
||
id id of apikey to get
|
||
|
||
options:
|
||
-h, --help show this help message and exit
|
||
--url URL server REST api url
|
||
--retry RETRY retry limit
|
||
--raw output machine-readable json
|
||
--explain output verbose explanation of mapping of CLI calls to
|
||
HTTPS API endpoints
|
||
--api-key API_KEY api key. defaults to using the one stored in
|
||
~/.vast_api_key
|
||
|
||
```
|
||
|
||
## show api-keys
|
||
|
||
List your api-keys associated with your account
|
||
|
||
```text theme={null}
|
||
usage: vastai show api-keys
|
||
|
||
options:
|
||
-h, --help show this help message and exit
|
||
--url URL server REST api url
|
||
--retry RETRY retry limit
|
||
--raw output machine-readable json
|
||
--explain output verbose explanation of mapping of CLI calls to
|
||
HTTPS API endpoints
|
||
--api-key API_KEY api key. defaults to using the one stored in
|
||
~/.vast_api_key
|
||
|
||
```
|
||
|
||
## show autoscalers
|
||
|
||
Display user's current autoscaler groups
|
||
|
||
```text Text theme={null}
|
||
usage: vastai show autoscalers [--api-key API_KEY]
|
||
|
||
options:
|
||
-h, --help show this help message and exit
|
||
--url URL server REST api url
|
||
--retry RETRY retry limit
|
||
--raw output machine-readable json
|
||
--explain output verbose explanation of mapping of CLI calls to
|
||
HTTPS API endpoints
|
||
--api-key API_KEY api key. defaults to using the one stored in
|
||
~/.vast_api_key
|
||
|
||
Example: vastai show autoscalers
|
||
|
||
```
|
||
|
||
## show connections
|
||
|
||
Displays user's cloud connections
|
||
|
||
```text Text theme={null}
|
||
usage: vastai show connections [--api-key API_KEY] [--raw]
|
||
|
||
options:
|
||
-h, --help show this help message and exit
|
||
--url URL server REST api url
|
||
--retry RETRY retry limit
|
||
--raw output machine-readable json
|
||
--explain output verbose explanation of mapping of CLI calls to
|
||
HTTPS API endpoints
|
||
--api-key API_KEY api key. defaults to using the one stored in
|
||
~/.vast_api_key
|
||
|
||
```
|
||
|
||
## show earnings
|
||
|
||
Get machine earning history reports
|
||
|
||
```text Text theme={null}
|
||
usage: vastai show earnings [OPTIONS]
|
||
|
||
options:
|
||
-h, --help show this help message and exit
|
||
-q, --quiet only display numeric ids
|
||
-s START_DATE, --start_date START_DATE
|
||
start date and time for report. Many formats accepted
|
||
-e END_DATE, --end_date END_DATE
|
||
end date and time for report. Many formats accepted
|
||
-m MACHINE_ID, --machine_id MACHINE_ID
|
||
Machine id (optional)
|
||
--url URL server REST api url
|
||
--retry RETRY retry limit
|
||
--raw output machine-readable json
|
||
--explain output verbose explanation of mapping of CLI calls to
|
||
HTTPS API endpoints
|
||
--api-key API_KEY api key. defaults to using the one stored in
|
||
~/.vast_api_key
|
||
|
||
```
|
||
|
||
## show instance
|
||
|
||
Display user's current instances
|
||
|
||
```text Text theme={null}
|
||
usage: vastai show instance [--api-key API_KEY] [--raw]
|
||
|
||
positional arguments:
|
||
id id of instance to get
|
||
|
||
options:
|
||
-h, --help show this help message and exit
|
||
--url URL server REST api url
|
||
--retry RETRY retry limit
|
||
--raw output machine-readable json
|
||
--explain output verbose explanation of mapping of CLI calls to
|
||
HTTPS API endpoints
|
||
--api-key API_KEY api key. defaults to using the one stored in
|
||
~/.vast_api_key
|
||
|
||
```
|
||
|
||
## show instances
|
||
|
||
Display user's current instances
|
||
|
||
```text Text theme={null}
|
||
usage: vastai show instances [OPTIONS] [--api-key API_KEY] [--raw]
|
||
|
||
options:
|
||
-h, --help show this help message and exit
|
||
-q, --quiet only display numeric ids
|
||
--url URL server REST api url
|
||
--retry RETRY retry limit
|
||
--raw output machine-readable json
|
||
--explain output verbose explanation of mapping of CLI calls to
|
||
HTTPS API endpoints
|
||
--api-key API_KEY api key. defaults to using the one stored in
|
||
~/.vast_api_key
|
||
|
||
```
|
||
|
||
## show invoices
|
||
|
||
Get billing history reports
|
||
|
||
```text Text theme={null}
|
||
usage: vastai show invoices [OPTIONS]
|
||
|
||
options:
|
||
-h, --help show this help message and exit
|
||
-q, --quiet only display numeric ids
|
||
-s START_DATE, --start_date START_DATE
|
||
start date and time for report. Many formats accepted
|
||
(optional)
|
||
-e END_DATE, --end_date END_DATE
|
||
end date and time for report. Many formats accepted
|
||
(optional)
|
||
-c, --only_charges Show only charge items.
|
||
-p, --only_credits Show only credit items.
|
||
--instance_label INSTANCE_LABEL
|
||
Filter charges on a particular instance label (useful
|
||
for autoscaler groups)
|
||
--url URL server REST api url
|
||
--retry RETRY retry limit
|
||
--raw output machine-readable json
|
||
--explain output verbose explanation of mapping of CLI calls to
|
||
HTTPS API endpoints
|
||
--api-key API_KEY api key. defaults to using the one stored in
|
||
~/.vast_api_key
|
||
|
||
```
|
||
|
||
## show ipaddrs
|
||
|
||
Display user's history of ip addresses
|
||
|
||
```text Text theme={null}
|
||
usage: vastai show ipaddrs [--api-key API_KEY] [--raw]
|
||
|
||
options:
|
||
-h, --help show this help message and exit
|
||
--url URL server REST api url
|
||
--retry RETRY retry limit
|
||
--raw output machine-readable json
|
||
--explain output verbose explanation of mapping of CLI calls to
|
||
HTTPS API endpoints
|
||
--api-key API_KEY api key. defaults to using the one stored in
|
||
~/.vast_api_key
|
||
|
||
```
|
||
|
||
## show overlays
|
||
|
||
Shows the client's created overlay networks
|
||
|
||
```none theme={null}
|
||
usage: vastai show overlays
|
||
|
||
options:
|
||
-h, --help show this help message and exit
|
||
--url URL server REST api url
|
||
--retry RETRY retry limit
|
||
--raw output machine-readable json
|
||
--explain output verbose explanation of mapping of CLI calls to HTTPS API endpoints
|
||
--curl show a curl equivalency to the call
|
||
--api-key API_KEY api key. defaults to using the one stored in /home/edgarlin/.config/vastai/vast_api_key
|
||
--version show version
|
||
|
||
Show overlays associated with your account.
|
||
|
||
```
|
||
|
||
## show subaccounts
|
||
|
||
Get current subaccounts
|
||
|
||
```text Text theme={null}
|
||
usage: vastai show subaccounts [OPTIONS]
|
||
|
||
options:
|
||
-h, --help show this help message and exit
|
||
-q, --quiet display subaccounts from current user
|
||
--url URL server REST api url
|
||
--retry RETRY retry limit
|
||
--raw output machine-readable json
|
||
--explain output verbose explanation of mapping of CLI calls to
|
||
HTTPS API endpoints
|
||
--api-key API_KEY api key. defaults to using the one stored in
|
||
~/.vast_api_key
|
||
|
||
```
|
||
|
||
## show team-members
|
||
|
||
Show your team members
|
||
|
||
```text Text theme={null}
|
||
usage: vastai show team-members
|
||
|
||
options:
|
||
-h, --help show this help message and exit
|
||
--url URL server REST api url
|
||
--retry RETRY retry limit
|
||
--raw output machine-readable json
|
||
--explain output verbose explanation of mapping of CLI calls to
|
||
HTTPS API endpoints
|
||
--api-key API_KEY api key. defaults to using the one stored in
|
||
~/.vast_api_key
|
||
|
||
```
|
||
|
||
## show team-role
|
||
|
||
Show your team role
|
||
|
||
```text Text theme={null}
|
||
usage: vastai show team-role NAME
|
||
|
||
positional arguments:
|
||
NAME name of the role
|
||
|
||
options:
|
||
-h, --help show this help message and exit
|
||
--url URL server REST api url
|
||
--retry RETRY retry limit
|
||
--raw output machine-readable json
|
||
--explain output verbose explanation of mapping of CLI calls to
|
||
HTTPS API endpoints
|
||
--api-key API_KEY api key. defaults to using the one stored in
|
||
~/.vast_api_key
|
||
|
||
```
|
||
|
||
## show team-roles
|
||
|
||
Show roles for a team
|
||
|
||
```text Text theme={null}
|
||
usage: vastai show team-roles
|
||
|
||
options:
|
||
-h, --help show this help message and exit
|
||
--url URL server REST api url
|
||
--retry RETRY retry limit
|
||
--raw output machine-readable json
|
||
--explain output verbose explanation of mapping of CLI calls to
|
||
HTTPS API endpoints
|
||
--api-key API_KEY api key. defaults to using the one stored in
|
||
~/.vast_api_key
|
||
|
||
```
|
||
|
||
## show user
|
||
|
||
Get current user data
|
||
|
||
```text Text theme={null}
|
||
usage: vastai show user [OPTIONS]
|
||
|
||
options:
|
||
-h, --help show this help message and exit
|
||
-q, --quiet display information about user
|
||
--url URL server REST api url
|
||
--retry RETRY retry limit
|
||
--raw output machine-readable json
|
||
--explain output verbose explanation of mapping of CLI calls to
|
||
HTTPS API endpoints
|
||
--api-key API_KEY api key. defaults to using the one stored in
|
||
~/.vast_api_key
|
||
|
||
Shows stats for logged-in user. These include user balance, email, and ssh key. Does not show API key.
|
||
|
||
```
|
||
|
||
## ssh-url
|
||
|
||
ssh url helper
|
||
|
||
```text Text theme={null}
|
||
usage: vastai ssh-url ID
|
||
|
||
positional arguments:
|
||
id id of instance
|
||
|
||
options:
|
||
-h, --help show this help message and exit
|
||
--url URL server REST api url
|
||
--retry RETRY retry limit
|
||
--raw output machine-readable json
|
||
--explain output verbose explanation of mapping of CLI calls to
|
||
HTTPS API endpoints
|
||
--api-key API_KEY api key. defaults to using the one stored in
|
||
~/.vast_api_key
|
||
|
||
```
|
||
|
||
## start instance
|
||
|
||
Start a stopped instance
|
||
|
||
```text Text theme={null}
|
||
usage: vastai start instance <id> [--raw]
|
||
|
||
positional arguments:
|
||
id id of instance to start/restart
|
||
|
||
options:
|
||
-h, --help show this help message and exit
|
||
--url URL server REST api url
|
||
--retry RETRY retry limit
|
||
--raw output machine-readable json
|
||
--explain output verbose explanation of mapping of CLI calls to
|
||
HTTPS API endpoints
|
||
--api-key API_KEY api key. defaults to using the one stored in
|
||
~/.vast_api_key
|
||
|
||
This command attempts to bring an instance from the "stopped" state into the "running" state. This is subject to resource availability on the machine that the instance is located on.
|
||
If your instance is stuck in the "scheduling" state for more than 30 seconds after running this, it likely means that the required resources on the machine to run your instance are currently unavailable.
|
||
Examples:
|
||
vastai start instances $(vastai show instances -q)
|
||
vastai start instance 329838
|
||
|
||
```
|
||
|
||
## start instances
|
||
|
||
Start a list of instances
|
||
|
||
```text Text theme={null}
|
||
usage: vastai start instances [--raw] ID0 ID1 ID2...
|
||
|
||
positional arguments:
|
||
ids ids of instance to start
|
||
|
||
options:
|
||
-h, --help show this help message and exit
|
||
--url URL server REST api url
|
||
--retry RETRY retry limit
|
||
--raw output machine-readable json
|
||
--explain output verbose explanation of mapping of CLI calls to
|
||
HTTPS API endpoints
|
||
--api-key API_KEY api key. defaults to using the one stored in
|
||
~/.vast_api_key
|
||
|
||
```
|
||
|
||
## stop instance
|
||
|
||
Stop a running instance
|
||
|
||
```text Text theme={null}
|
||
usage: vastai stop instance [--raw] ID
|
||
|
||
positional arguments:
|
||
id id of instance to stop
|
||
|
||
options:
|
||
-h, --help show this help message and exit
|
||
--url URL server REST api url
|
||
--retry RETRY retry limit
|
||
--raw output machine-readable json
|
||
--explain output verbose explanation of mapping of CLI calls to
|
||
HTTPS API endpoints
|
||
--api-key API_KEY api key. defaults to using the one stored in
|
||
~/.vast_api_key
|
||
|
||
This command brings an instance from the "running" state into the "stopped" state. When an instance is "stopped" all of your data on the instance is preserved,
|
||
and you can resume use of your instance by starting it again. Once stopped, starting an instance is subject to resource availability on the machine that the instance is located on.
|
||
There are ways to move data off of a stopped instance, which are described here: [Data Movement](/documentation/instances/data-movement)
|
||
|
||
```
|
||
|
||
## stop instances
|
||
|
||
Stop a list of instances
|
||
|
||
```text Text theme={null}
|
||
usage: vastai stop instances [--raw] ID0 ID1 ID2...
|
||
|
||
positional arguments:
|
||
ids ids of instance to stop
|
||
|
||
options:
|
||
-h, --help show this help message and exit
|
||
--url URL server REST api url
|
||
--retry RETRY retry limit
|
||
--raw output machine-readable json
|
||
--explain output verbose explanation of mapping of CLI calls to
|
||
HTTPS API endpoints
|
||
--api-key API_KEY api key. defaults to using the one stored in
|
||
~/.vast_api_key
|
||
|
||
Examples:
|
||
vastai stop instances $(vastai show instances -q)
|
||
vastai stop instances 329838 984849
|
||
|
||
```
|
||
|
||
## transfer credit
|
||
|
||
Transfer credits to another account
|
||
|
||
```text Text theme={null}
|
||
usage: vastai transfer credit RECIPIENT AMOUNT
|
||
|
||
positional arguments:
|
||
recipient email of recipient account
|
||
amount $dollars of credit to transfer
|
||
|
||
options:
|
||
-h, --help show this help message and exit
|
||
--url URL server REST api url
|
||
--retry RETRY retry limit
|
||
--raw output machine-readable json
|
||
--explain output verbose explanation of mapping of CLI calls to
|
||
HTTPS API endpoints
|
||
--api-key API_KEY api key. defaults to using the one stored in
|
||
~/.vast_api_key
|
||
|
||
Transfer (amount) credits to account with email (recipient).
|
||
|
||
```
|
||
|
||
## update autoscaler
|
||
|
||
Update an existing autoscale group
|
||
|
||
```text Text theme={null}
|
||
usage: vastai update autoscaler ID [OPTIONS]
|
||
|
||
positional arguments:
|
||
ID id of autoscale group to update
|
||
|
||
options:
|
||
-h, --help show this help message and exit
|
||
--min_load MIN_LOAD minimum floor load in perf units/s (token/s for LLms)
|
||
--target_util TARGET_UTIL
|
||
target capacity utilization (fraction, max 1.0,
|
||
default 0.9)
|
||
--cold_mult COLD_MULT
|
||
cold/stopped instance capacity target as multiple of
|
||
hot capacity target (default 2.5)
|
||
--gpu_ram GPU_RAM estimated GPU RAM req (independent of search string)
|
||
--template_hash TEMPLATE_HASH
|
||
template hash
|
||
--template_id TEMPLATE_ID
|
||
template id
|
||
--search_params SEARCH_PARAMS
|
||
search param string for search offers ex: "gpu_ram>=23
|
||
num_gpus=2 gpu_name=RTX_4090 inet_down>200
|
||
direct_port_count>2 disk_space>=64"
|
||
--launch_args LAUNCH_ARGS
|
||
launch args string for create instance ex: "--onstart
|
||
onstart_wget.sh --env '-e ONSTART_PATH=https://s3.amaz
|
||
onaws.com/vast.ai/onstart_OOBA.sh' --image
|
||
atinoda/text-generation-webui:default-nightly --disk
|
||
64"
|
||
--endpoint_name ENDPOINT_NAME
|
||
deployment endpoint name (allows multiple autoscale
|
||
groups to share same deployment endpoint)
|
||
--url URL server REST api url
|
||
--retry RETRY retry limit
|
||
--raw output machine-readable json
|
||
--explain output verbose explanation of mapping of CLI calls to
|
||
HTTPS API endpoints
|
||
--api-key API_KEY api key. defaults to using the one stored in
|
||
~/.vast_api_key
|
||
|
||
Example: vastai update autoscaler 4242 --min_load 100 --target_util 0.9 --cold_mult 2.0 --search_params "gpu_ram>=23 num_gpus=2 gpu_name=RTX_4090 inet_down>200 direct_port_count>2 disk_space>=64" --launch_args "--onstart onstart_wget.sh --env '-e ONSTART_PATH=https://s3.amazonaws.com/vast.ai/onstart_OOBA.sh' --image atinoda/text-generation-webui:default-nightly --disk 64" --gpu_ram 32.0 --endpoint_name "LLama"
|
||
|
||
```
|
||
|
||
## update team-role
|
||
|
||
Update an existing team role
|
||
|
||
```text Text theme={null}
|
||
usage: vastai update team-role ID --name NAME --permissions PERMISSIONS
|
||
|
||
positional arguments:
|
||
ID id of the role
|
||
|
||
options:
|
||
-h, --help show this help message and exit
|
||
--name NAME name of the template
|
||
--permissions PERMISSIONS
|
||
file path for json encoded permissions, look in the
|
||
docs for more information
|
||
--url URL server REST api url
|
||
--retry RETRY retry limit
|
||
--raw output machine-readable json
|
||
--explain output verbose explanation of mapping of CLI calls to
|
||
HTTPS API endpoints
|
||
--api-key API_KEY api key. defaults to using the one stored in
|
||
~/.vast_api_key
|
||
|
||
```
|
||
|
||
# Host Commands
|
||
|
||
## create cluster
|
||
|
||
Registers a new locally-networked cluster with the Vast. 
|
||
|
||
```none theme={null}
|
||
usage: vastai create cluster SUBNET MANAGER_ID
|
||
|
||
positional arguments:
|
||
subnet local subnet for cluster, ex: '0.0.0.0/24'
|
||
manager_id Machine ID of manager node in cluster. Must exist already.
|
||
|
||
options:
|
||
-h, --help show this help message and exit
|
||
--url URL server REST api url
|
||
--retry RETRY retry limit
|
||
--raw output machine-readable json
|
||
--explain output verbose explanation of mapping of CLI calls to HTTPS API endpoints
|
||
--curl show a curl equivalency to the call
|
||
--api-key API_KEY api key. defaults to using the one stored in /home/edgarlin/.config/vastai/vast_api_key
|
||
--version show version
|
||
|
||
Create Vast Cluster by defining a local subnet and manager id.
|
||
|
||
```
|
||
|
||
## delete cluster
|
||
|
||
Deregisters a cluster
|
||
|
||
```none theme={null}
|
||
usage: vastai delete cluster CLUSTER_ID
|
||
|
||
positional arguments:
|
||
cluster_id ID of cluster to delete
|
||
|
||
options:
|
||
-h, --help show this help message and exit
|
||
--url URL server REST api url
|
||
--retry RETRY retry limit
|
||
--raw output machine-readable json
|
||
--explain output verbose explanation of mapping of CLI calls to HTTPS API endpoints
|
||
--curl show a curl equivalency to the call
|
||
--api-key API_KEY api key. defaults to using the one stored in /home/edgarlin/.config/vastai/vast_api_key
|
||
--version show version
|
||
|
||
Delete Vast Cluster
|
||
|
||
```
|
||
|
||
## join cluster
|
||
|
||
Registers a machine or list of machines as a member of a cluster. 
|
||
|
||
```none theme={null}
|
||
usage: vastai join cluster CLUSTER_ID MACHINE_IDS
|
||
|
||
positional arguments:
|
||
cluster_id ID of cluster to add machine to
|
||
machine_ids machine id(s) to join cluster
|
||
|
||
options:
|
||
-h, --help show this help message and exit
|
||
--url URL server REST api url
|
||
--retry RETRY retry limit
|
||
--raw output machine-readable json
|
||
--explain output verbose explanation of mapping of CLI calls to HTTPS API endpoints
|
||
--curl show a curl equivalency to the call
|
||
--api-key API_KEY api key. defaults to using the one stored in /home/edgarlin/.config/vastai/vast_api_key
|
||
--version show version
|
||
|
||
Join's Machine to Vast Cluster
|
||
|
||
```
|
||
|
||
## list machine
|
||
|
||
\[Host] list a machine for rent
|
||
|
||
```text Text theme={null}
|
||
usage: vastai list machine id [--price_gpu PRICE_GPU] [--price_inetu PRICE_INETU] [--price_inetd PRICE_INETD] [--api-key API_KEY]
|
||
|
||
positional arguments:
|
||
id id of machine to list
|
||
|
||
options:
|
||
-h, --help show this help message and exit
|
||
-g PRICE_GPU, --price_gpu PRICE_GPU
|
||
per gpu rental price in $/hour (price for active
|
||
instances)
|
||
-s PRICE_DISK, --price_disk PRICE_DISK
|
||
storage price in $/GB/month (price for inactive
|
||
instances), default: $0.15/GB/month
|
||
-u PRICE_INETU, --price_inetu PRICE_INETU
|
||
price for internet upload bandwidth in $/GB
|
||
-d PRICE_INETD, --price_inetd PRICE_INETD
|
||
price for internet download bandwidth in $/GB
|
||
-r DISCOUNT_RATE, --discount_rate DISCOUNT_RATE
|
||
Max long term prepay discount rate fraction, default:
|
||
0.4
|
||
-m MIN_CHUNK, --min_chunk MIN_CHUNK
|
||
minimum amount of gpus
|
||
-e END_DATE, --end_date END_DATE
|
||
unix timestamp of the available until date (optional)
|
||
--url URL server REST api url
|
||
--retry RETRY retry limit
|
||
--raw output machine-readable json
|
||
--explain output verbose explanation of mapping of CLI calls to
|
||
HTTPS API endpoints
|
||
--api-key API_KEY api key. defaults to using the one stored in
|
||
~/.vast_api_key
|
||
|
||
Performs the same action as pressing the "LIST" button on the site https://cloud.vast.ai/host/machines.
|
||
On the end date the listing will expire and your machine will unlist. However any existing client jobs will still remain until ended by their owners.
|
||
Once you list your machine and it is rented, it is extremely important that you don't interfere with the machine in any way.
|
||
If your machine has an active client job and then goes offline, crashes, or has performance problems, this could permanently lower your reliability rating.
|
||
We strongly recommend you test the machine first and only list when ready.
|
||
|
||
```
|
||
|
||
## remove-machine-from-cluster
|
||
|
||
Deregisters a machine from a cluster, changing the manager node if the machine removed is the only manager. 
|
||
|
||
```none theme={null}
|
||
usage: vastai remove-machine-from-cluster CLUSTER_ID MACHINE_ID NEW_MANAGER_ID
|
||
|
||
positional arguments:
|
||
cluster_id ID of cluster you want to remove machine from.
|
||
machine_id ID of machine to remove from cluster.
|
||
new_manager_id ID of machine to promote to manager. Must already be in cluster
|
||
|
||
options:
|
||
-h, --help show this help message and exit
|
||
--url URL server REST api url
|
||
--retry RETRY retry limit
|
||
--raw output machine-readable json
|
||
--explain output verbose explanation of mapping of CLI calls to HTTPS API endpoints
|
||
--curl show a curl equivalency to the call
|
||
--api-key API_KEY api key. defaults to using the one stored in /home/edgarlin/.config/vastai/vast_api_key
|
||
--version show version
|
||
|
||
Removes machine from cluster and also reassigns manager ID,
|
||
if we're removing the manager node
|
||
|
||
```
|
||
|
||
## remove defjob
|
||
|
||
\[Host] Delete default jobs
|
||
|
||
```text Text theme={null}
|
||
usage: vastai remove defjob id
|
||
|
||
positional arguments:
|
||
id id of machine to remove default instance from
|
||
|
||
options:
|
||
-h, --help show this help message and exit
|
||
--url URL server REST api url
|
||
--retry RETRY retry limit
|
||
--raw output machine-readable json
|
||
--explain output verbose explanation of mapping of CLI calls to
|
||
HTTPS API endpoints
|
||
--api-key API_KEY api key. defaults to using the one stored in
|
||
~/.vast_api_key
|
||
|
||
```
|
||
|
||
## schedule maint
|
||
|
||
\[Host] Schedule upcoming maint window
|
||
|
||
```text Text theme={null}
|
||
usage: vastai schedule maintenance id [--sdate START_DATE --duration DURATION]
|
||
|
||
positional arguments:
|
||
id id of machine to schedule maintenance for
|
||
|
||
options:
|
||
-h, --help show this help message and exit
|
||
--sdate SDATE maintenance start date in unix epoch time (UTC seconds)
|
||
--duration DURATION maintenance duration in hours
|
||
--url URL server REST api url
|
||
--retry RETRY retry limit
|
||
--raw output machine-readable json
|
||
--explain output verbose explanation of mapping of CLI calls to
|
||
HTTPS API endpoints
|
||
--api-key API_KEY api key. defaults to using the one stored in
|
||
~/.vast_api_key
|
||
|
||
The proper way to perform maintenance on your machine is to wait until all active contracts have expired or the machine is vacant.
|
||
For unplanned or unscheduled maintenance, use this schedule maint command. That will notify the client that you have to take the machine down and that they should save their work.
|
||
You can specify a date and duration.
|
||
Example: vastai schedule maint 8207 --sdate 1677562671 --duration 0.5
|
||
|
||
```
|
||
|
||
## set defjob
|
||
|
||
\[Host] Create default jobs for a machine
|
||
|
||
```text Text theme={null}
|
||
usage: vastai set defjob id [--api-key API_KEY] [--price_gpu PRICE_GPU] [--price_inetu PRICE_INETU] [--price_inetd PRICE_INETD] [--image IMAGE] [--args ...]
|
||
|
||
positional arguments:
|
||
id id of machine to launch default instance on
|
||
|
||
options:
|
||
-h, --help show this help message and exit
|
||
--price_gpu PRICE_GPU
|
||
per gpu rental price in $/hour
|
||
--price_inetu PRICE_INETU
|
||
price for internet upload bandwidth in $/GB
|
||
--price_inetd PRICE_INETD
|
||
price for internet download bandwidth in $/GB
|
||
--image IMAGE docker container image to launch
|
||
--args ... list of arguments passed to container launch
|
||
--url URL server REST api url
|
||
--retry RETRY retry limit
|
||
--raw output machine-readable json
|
||
--explain output verbose explanation of mapping of CLI calls to
|
||
HTTPS API endpoints
|
||
--api-key API_KEY api key. defaults to using the one stored in
|
||
~/.vast_api_key
|
||
|
||
Performs the same action as creating a background job at https://cloud.vast.ai/host/create.
|
||
|
||
```
|
||
|
||
## set min-bid
|
||
|
||
\[Host] Set the minimum bid/rental price for a machine
|
||
|
||
```text Text theme={null}
|
||
usage: vastai set min_bid id [--price PRICE]
|
||
|
||
positional arguments:
|
||
id id of machine to set min bid price for
|
||
|
||
options:
|
||
-h, --help show this help message and exit
|
||
--price PRICE per gpu min bid price in $/hour
|
||
--url URL server REST api url
|
||
--retry RETRY retry limit
|
||
--raw output machine-readable json
|
||
--explain output verbose explanation of mapping of CLI calls to
|
||
HTTPS API endpoints
|
||
--api-key API_KEY api key. defaults to using the one stored in
|
||
~/.vast_api_key
|
||
|
||
Change the current min bid price of machine id to PRICE.
|
||
|
||
```
|
||
|
||
## show clusters
|
||
|
||
Shows information about the host's clusters
|
||
|
||
```none theme={null}
|
||
usage: vastai show clusters
|
||
|
||
options:
|
||
-h, --help show this help message and exit
|
||
--url URL server REST api url
|
||
--retry RETRY retry limit
|
||
--raw output machine-readable json
|
||
--explain output verbose explanation of mapping of CLI calls to HTTPS API endpoints
|
||
--curl show a curl equivalency to the call
|
||
--api-key API_KEY api key. defaults to using the one stored in /home/edgarlin/.config/vastai/vast_api_key
|
||
--version show version
|
||
|
||
Show clusters associated with your account.
|
||
|
||
```
|
||
|
||
## show machines
|
||
|
||
\[Host] Show hosted machines
|
||
|
||
```text Text theme={null}
|
||
usage: vastai show machines [OPTIONS]
|
||
|
||
options:
|
||
-h, --help show this help message and exit
|
||
-q, --quiet only display numeric ids
|
||
--url URL server REST api url
|
||
--retry RETRY retry limit
|
||
--raw output machine-readable json
|
||
--explain output verbose explanation of mapping of CLI calls to
|
||
HTTPS API endpoints
|
||
--api-key API_KEY api key. defaults to using the one stored in
|
||
~/.vast_api_key
|
||
|
||
```
|
||
|
||
## unlist machine
|
||
|
||
\[Host] Unlist a listed machine
|
||
|
||
```text Text theme={null}
|
||
usage: vastai unlist machine <id>
|
||
|
||
positional arguments:
|
||
id id of machine to unlist
|
||
|
||
options:
|
||
-h, --help show this help message and exit
|
||
--url URL server REST api url
|
||
--retry RETRY retry limit
|
||
--raw output machine-readable json
|
||
--explain output verbose explanation of mapping of CLI calls to
|
||
HTTPS API endpoints
|
||
--api-key API_KEY api key. defaults to using the one stored in
|
||
~/.vast_api_key
|
||
|
||
```
|
||
|
||
|
||
# Overview & quickstart
|
||
Source: https://docs.vast.ai/cli/get-started
|
||
|
||
|
||
|
||
<script
|
||
type="application/ld+json"
|
||
dangerouslySetInnerHTML={{
|
||
__html: JSON.stringify({
|
||
"@context": "https://schema.org",
|
||
"@type": "HowTo",
|
||
"name": "How to Get Started with Vast.ai CLI",
|
||
"description": "A quickstart guide to installing and using the Vast.ai Python CLI for managing GPU instances.",
|
||
"step": [
|
||
{
|
||
"@type": "HowToStep",
|
||
"name": "Install the CLI",
|
||
"text": "Install the latest stable PyPI release with: pip install vastai. Alternatively, get the very latest version directly from github with: wget https://raw.githubusercontent.com/vast-ai/vast-python/master/vast.py -O vast; chmod +x vast;"
|
||
},
|
||
{
|
||
"@type": "HowToStep",
|
||
"name": "Set Your API Key",
|
||
"text": "Login to the vast.ai website and get an api-key from https://cloud.vast.ai/cli/. Copy the command under the heading Login / Set API Key and run it. The command will be something like: vastai set api-key xxxxxxxxxxxxxxxxxxxxxxxxxxxxxxxxxxxxxxx. The set api-key command saves your api-key in a hidden file in your home directory. Do not share your api-keys with anyone."
|
||
},
|
||
{
|
||
"@type": "HowToStep",
|
||
"name": "Search for GPU Instances",
|
||
"text": "Use vastai search offers to find machines for rent. You can filter results with parameters like: vastai search offers 'compute_cap >= 800' or vastai search offers 'reliability > 0.99 num_gpus>=4' -o 'num_gpus-'. The search command supports all of the filters and sort options that the website GUI uses."
|
||
},
|
||
{
|
||
"@type": "HowToStep",
|
||
"name": "Create an Instance",
|
||
"text": "Create instances using the create instance command referencing an instance type ID returned from search offers. For example: vastai create instance 2459368 --image vastai/tensorflow --disk 32 --ssh --direct. Once created, the instance must first pull the image if not cached, then boots and transitions to the running state."
|
||
},
|
||
{
|
||
"@type": "HowToStep",
|
||
"name": "Manage Your Instances",
|
||
"text": "Use vastai show instances to view your instances. Use vastai start instance and vastai stop instance to control them. Stop an instance to avoid GPU charges while maintaining storage. Use vastai copy to move data between instances or cloud storage. When done, use vastai destroy instance to avoid ongoing storage charges."
|
||
}
|
||
]
|
||
})
|
||
}}
|
||
/>
|
||
|
||
We provide a python CLI (open-source) for a convenient interface to the rest API. You can use the --explain option with any CLI command and it will print out the underlying API calls.
|
||
|
||
## PyPI Install
|
||
|
||
You can install the latest stable PyPI release with:
|
||
|
||
```text Text theme={null}
|
||
pip install vastai
|
||
```
|
||
|
||
## Github
|
||
|
||
Alternatively you can get the very latest version directly from github:
|
||
|
||
```text Text theme={null}
|
||
wget https://raw.githubusercontent.com/vast-ai/vast-python/master/vast.py -O vast; chmod +x vast;
|
||
```
|
||
|
||
This repository contains the open source python command line interface for vast.ai.
|
||
This CLI has all of the functionality of the vast.ai website GUI and uses the same underlying REST API.
|
||
The CLI is self-contained in the single script file `vast.py`.
|
||
|
||
## Quickstart
|
||
|
||
In order to authenticate most commands you will need to first login to the vast.ai website and get an api-key. Go to [https://cloud.vast.ai/cli/](https://cloud.vast.ai/cli/). Copy the command under the heading "Login / Set API Key" and run it. The command will be something like:
|
||
|
||
`vastai set api-key xxxxxxxxxxxxxxxxxxxxxxxxxxxxxxxxxxxxxxx`
|
||
|
||
where the `xxxx...` is a unique api-key (a long hexadecimal number).
|
||
Note that if the script is named "vast" in this command on the website and your installed script is named "vast.py" you will need to change the name of the script in the command you run.
|
||
The `set api-key` command saves your api-key in a hidden file in your home directory.
|
||
Do not share your api-keys with anyone as they authenticate commands from your account.
|
||
Your default main key allows full access to all commands without limitations, but you can use the CLI to create additional keys with [fine-grained access restrictions](/cli/installation).
|
||
|
||
## Usage
|
||
|
||
For the most up to date help, use 'vast.py --help'. You can then get a list of the available commands. Each command also typically has help documentation:
|
||
|
||
```text Text theme={null}
|
||
vastai --help
|
||
```
|
||
|
||
To see how the API works you can use it to find machines for rent.
|
||
|
||
```text Text theme={null}
|
||
vastai search offers --help
|
||
```
|
||
|
||
There are many parameters that can be used to filter the results. The search command supports all of the filters and sort options that the website GUI uses.
|
||
To find GPU instances with compute capability 8.0 or higher:
|
||
|
||
```text Text theme={null}
|
||
vastai search offers 'compute_cap >= 800 '
|
||
```
|
||
|
||
To find instances with a reliability score >= 0.99 and at least 4 gpus, ordering by num of gpus descending:
|
||
|
||
```text Text theme={null}
|
||
vastai search offers 'reliability > 0.99 num_gpus>=4' -o 'num_gpus-'
|
||
```
|
||
|
||
The output of this command at the time of this writing is
|
||
|
||
```text Text theme={null}
|
||
ID CUDA Num Model PCIE_BW vCPUs RAM Storage $/hr DLPerf DLP/$ Nvidia Driver Version Net_up Net_down R Max_Days machine_id
|
||
1596177 11.4 10x GTX_1080 5.5 48.0 257.9 4628 2.0000 73.0 36.5 470.63.01 653.3 854.5 99.5 - 638
|
||
2459430 11.5 8x RTX_A5000 9.1 128.0 515.8 3094 4.0000 209.4 52.3 495.46 1844.2 2669.6 99.7 12.0 4384
|
||
2459380 11.4 8x RTX_3070 6.3 12.0 64.0 710 1.4200 67.2 47.3 470.86 0.0 0.0 99.8 - 4102
|
||
2456624 11.4 8x RTX_2080_Ti 10.7 32.0 257.9 1653 2.8000 126.4 45.2 470.82.00 14.6 214.2 99.8 28.7 3047
|
||
2456622 11.4 8x RTX_2080_Ti 10.8 32.0 128.9 1651 2.8000 127.1 45.4 470.82.00 14.9 214.7 99.1 28.7 1569
|
||
2456600 11.5 8x RTX_2080_Ti 10.9 48.0 256.6 1704 2.4000 125.5 52.3 495.29.05 169.0 169.8 99.7 25.7 4058
|
||
2455617 11.2 8x RTX_3090 21.7 64.0 515.8 6165 6.4000 261.1 40.8 460.67 477.6 707.2 99.8 28.7 2980
|
||
2454397 11.2 8x A100_SXM4 22.4 128.0 2064.1 21568 13.2000 300.1 22.7 460.106.00 708.7 1119.8 99.2 - 4762
|
||
2405590 11.4 8x RTX_2080_Ti 11.2 48.0 257.9 1629 3.8000 125.5 33.0 470.82.00 389.4 608.8 100.0 1.8 2776
|
||
2364579 11.4 8x A100_PCIE 18.5 128.0 515.8 4813 14.8000 278.8 18.8 470.74 472.4 699.0 99.9 28.7 3459
|
||
2281839 11.2 8x Tesla_V100 11.8 72.0 483.1 1171 5.6000 193.6 34.6 460.67 493.0 697.8 100.0 28.7 2744
|
||
2281832 11.2 8x A100_PCIE 17.7 64.0 515.9 5821 14.8000 276.7 18.7 460.91.03 478.2 655.5 99.9 28.7 2901
|
||
2452630 11.4 7x RTX_3090 6.3 28.0 64.0 61 3.5000 165.5 47.3 470.86 84.6 84.4 99.3 3.8 4420
|
||
2342561 11.4 7x RTX_3090 6.1 96.0 257.6 1664 4.5500 149.2 32.8 470.82.00 476.9 671.7 99.4 1.7 4202
|
||
2237983 11.4 7x RTX_3090 12.5 32.0 257.6 3228 3.1500 204.5 64.9 470.86 194.4 183.8 99.1 - 4207
|
||
2459511 11.4 6x RTX_3090 6.2 - 128.8 812 2.8200 150.2 53.2 470.94 374.4 271.4 99.0 6.7 3129
|
||
2448342 11.5 6x RTX_A6000 12.4 64.0 515.7 6695 3.6000 169.8 47.2 495.29.05 668.6 1082.6 99.6 - 3624
|
||
2437565 11.4 6x RTX_3090 23.0 16.0 128.8 1676 5.4000 196.8 36.5 470.94 34.1 131.5 99.4 - 4238
|
||
2332973 11.2 6x RTX_3090 11.9 48.0 193.3 1671 3.3000 180.3 54.6 460.84 582.1 737.6 99.9 25.6 3552
|
||
2459459 11.5 4x RTX_3090 23.1 32.0 257.8 1363 2.0000 131.2 65.6 495.46 1954.7 2725.8 99.6 12.0 3059
|
||
2459428 11.5 4x RTX_A5000 24.6 64.0 515.8 1547 2.0000 104.9 52.4 495.46 1844.2 2669.6 99.7 12.0 4384
|
||
2459368 11.4 4x RTX_3090 25.3 48.0 64.2 133 1.3967 130.5 93.4 470.86 0.0 0.0 99.4 - 4637
|
||
2458968 11.6 4x RTX_3090 11.7 16.0 128.5 752 1.4000 79.8 57.0 510.39.01 797.8 842.7 99.9 4.0 2555
|
||
2458878 11.6 4x RTX_3090 11.6 36.0 128.5 1531 1.4000 81.9 58.5 510.39.01 757.1 807.6 99.9 4.0 3646
|
||
2458845 11.6 4x RTX_3090 3.1 12.0 128.5 369 1.4000 92.4 66.0 510.39.01 725.7 852.2 99.8 4.0 700
|
||
2458838 11.6 4x RTX_3090 5.7 48.0 128.9 624 1.4000 85.3 60.9 510.39.01 574.9 731.7 99.8 4.0 2217
|
||
2454395 11.2 4x A100_SXM4 22.9 64.0 2064.1 10784 6.6000 150.0 22.7 460.106.00 708.7 1119.8 99.2 - 4762
|
||
2452632 11.4 4x RTX_3090 6.3 16.0 64.0 35 2.0000 123.5 61.8 470.86 84.6 84.4 99.3 3.8 4420
|
||
2450275 11.4 4x RTX_3080_Ti 12.5 32.0 128.7 817 1.8000 128.8 71.6 470.82.00 278.3 350.4 99.7 - 4260
|
||
2449210 11.5 4x RTX_3090 11.2 48.0 128.9 324 2.0000 89.7 44.9 495.29.05 688.3 775.4 99.8 - 2764
|
||
2445175 11.4 4x RTX_3090 11.9 32.0 257.6 1530 2.0000 135.4 67.7 470.86 868.6 887.1 99.7 25.9 3055
|
||
2444916 11.4 4x RTX_3090 11.9 16.0 128.7 1576 1.4000 131.8 94.2 470.82.00 39.4 402.3 99.9 - 3759
|
||
2437188 11.4 4x Tesla_P100 11.7 24.0 95.2 2945 0.7200 44.8 62.2 470.82.00 10.9 76.2 99.5 0.1 3969
|
||
2437179 11.4 4x Tesla_P100 11.7 32.0 192.1 3070 0.7200 44.8 62.3 470.82.00 11.1 66.0 99.2 0.0 4159
|
||
2431606 11.4 4x RTX_3090 17.9 32.0 110.7 330 1.8400 134.3 73.0 470.82.01 584.6 813.4 99.7 4.4 4079
|
||
2419191 11.4 4x RTX_2080_Ti 6.3 32.0 64.4 837 2.0000 64.7 32.4 470.63.01 40.5 205.9 99.7 - 162
|
||
2405589 11.4 4x RTX_2080_Ti 10.8 24.0 257.9 815 1.9000 62.8 33.0 470.82.00 389.4 608.8 100.0 1.8 2776
|
||
2392087 11.4 4x RTX_A6000 10.8 32.0 515.9 1247 1.8000 64.5 35.8 470.94 669.9 705.4 99.1 10.9 4782
|
||
2377227 11.2 4x RTX_3090 6.3 24.0 64.3 1638 2.0000 128.3 64.1 460.32.03 37.8 145.0 99.7 3.0 2672
|
||
2349173 11.4 4x RTX_3090 23.2 48.0 128.7 1475 2.0000 107.4 53.7 470.86 33.2 84.2 99.8 47.3 3949
|
||
2338635 11.4 4x RTX_3090 23.0 32.0 128.5 3151 1.6000 108.8 68.0 470.86 33.8 86.4 99.6 47.4 3948
|
||
2303959 11.2 4x RTX_3090 11.7 28.0 128.8 791 2.1200 131.3 61.9 460.32.03 519.7 570.7 99.5 - 3042
|
||
2281830 11.2 4x A100_PCIE 18.1 32.0 515.9 2910 7.4000 143.6 19.4 460.91.03 478.2 655.5 99.9 28.7 2901
|
||
2193726 11.4 4x RTX_3090 12.4 32.0 128.8 1646 3.6000 153.9 42.8 470.82.01 33.3 137.5 99.5 - 3434
|
||
1737692 11.2 4x RTX_3070 6.3 28.0 128.5 656 2.8000 37.5 13.4 460.91.03 452.6 703.2 99.6 - 3510
|
||
```
|
||
|
||
### Launching Instances
|
||
|
||
```text Text theme={null}
|
||
vastai create instance --help
|
||
```
|
||
|
||
You create instances using the create instance command referencing an instance type ID returned from search offers.
|
||
So to create an ssh direct instance of type 2459368 (using the ID returned from the search above for 4x 3090 on machine 4637) with the vastai/tensorflow image and 32 GB of disk storage:
|
||
|
||
```text Text theme={null}
|
||
vastai create instance 2459368 --image vastai/tensorflow --disk 32 --ssh --direct
|
||
```
|
||
|
||
Once an instance is created, it then must first pull the image if it is not cached. After the image is loaded the instance boots and transititons to the running state.
|
||
You are charged for the resources you reserve. As storage is reserved at creation, storage charges begin when the instance is created and end only when it is destroyed.
|
||
GPU charges begin when the instance transitions to the running state, and end when it is stopped or destroyed.
|
||
|
||
### Get Instance Info
|
||
|
||
```text Text theme={null}
|
||
vastai show instance --help
|
||
vastai show instances --help
|
||
```
|
||
|
||
### Starting Stopping
|
||
|
||
```text Text theme={null}
|
||
vastai start instance --help
|
||
vastai stop instance --help
|
||
```
|
||
|
||
You can stop an instance to avoid GPU charges, converting it into a storage unit - storage is usually very cheap compared to GPU.
|
||
Starting an existing instance takes only a second or less whereas creating a new instance can take much longer (to pull a large docker image), so maintaining a pool of stopped instances is useful for many applications.
|
||
|
||
You can [call stop/destroy instance from inside](/documentation/instances/docker-execution-environment) the instance using a special autogenerated instance apikey, to avoid exposing your main apikey.
|
||
|
||
### Copy Data
|
||
|
||
```text Text theme={null}
|
||
vastai copy --help
|
||
vastai cloud copy --help
|
||
```
|
||
|
||
You can copy data from a stopped instance to a running instance, to/from cloud storage, or to/from another machine.
|
||
|
||
### Destroy Instances
|
||
|
||
```text Text theme={null}
|
||
vastai destroy instance --help
|
||
vastai destroy instances --help
|
||
```
|
||
|
||
Once you are done with an instance make sure to destroy it to avoid ongoing storage charges.
|
||
|
||
|
||
# Permissions-and-authorization
|
||
Source: https://docs.vast.ai/cli/installation
|
||
|
||
|
||
|
||
<script
|
||
type="application/ld+json"
|
||
dangerouslySetInnerHTML={{
|
||
__html: JSON.stringify({
|
||
"@context": "https://schema.org",
|
||
"@type": "HowTo",
|
||
"name": "How to Manage API Keys and Permissions on Vast.ai",
|
||
"description": "A guide to creating API keys with restricted permissions and managing access control for your Vast.ai account and teams.",
|
||
"step": [
|
||
{
|
||
"@type": "HowToStep",
|
||
"name": "Understand Permission Categories",
|
||
"text": "Every API Key has a list of permissions associated with it. Permission categories include: instance_read, instance_write, user_read, user_write, billing_read, billing_write, machine_read, machine_write, misc, team_read, and team_write. Each category controls access to specific API endpoints and operations."
|
||
},
|
||
{
|
||
"@type": "HowToStep",
|
||
"name": "Create Custom Roles",
|
||
"text": "Custom roles can be created and managed through the CLI. Team roles can be managed on the Manage page by users with team_read level access. When creating a custom role, select from a wide range of permissions such as instance creation, billing access, monitoring, etc. This allows for precise control over what each role can and cannot do."
|
||
},
|
||
{
|
||
"@type": "HowToStep",
|
||
"name": "Define Permission JSON",
|
||
"text": "Create a JSON file defining the permissions. For example, to allow instance creation and billing access: {\"api\": {\"misc\": {}, \"user_read\":{}, \"instance_read\": {}, \"instance_write\": {}, \"billing_read\": {}, \"billing_write\": {}}}. For restricted access without billing: {\"api\": {\"misc\": {}, \"user_read\":{}, \"instance_read\": {}, \"instance_write\": {}}}."
|
||
},
|
||
{
|
||
"@type": "HowToStep",
|
||
"name": "Add Constraints (Optional)",
|
||
"text": "Constraints can be added at different levels to enforce certain parameters. You can use wildcards to represent placeholder values. For example, to restrict access to specific instance IDs, add constraints in the permission JSON with operators like eq, lte, gte."
|
||
},
|
||
{
|
||
"@type": "HowToStep",
|
||
"name": "Assign Custom Roles",
|
||
"text": "Once a custom role is created, it can be assigned to team members through the team management interface or CLI commands."
|
||
}
|
||
]
|
||
})
|
||
}}
|
||
/>
|
||
|
||
# API Endpoints and Permission Categories
|
||
|
||
This document outlines the various API endpoints and their associated permission categories, providing a clear reference for understanding the access control within our system.
|
||
|
||
<Note>
|
||
**Note:** In the early days we are going to describe these concepts as things like 'instance\_read' or 'instance\_write', We realize these are confusing. Any questions about what permissions are attributed to what actions should be asked via our support channels.
|
||
</Note>
|
||
|
||
Every API Key has a list of permissions associated with it. Every user has the ability to create keys with restricted permissions on their own account. Users can also create restricted keys in team environments using the team-centric endpoints.
|
||
|
||
### Creating Custom Roles
|
||
|
||
* **Accessing Role Management**: Custom roles can be created and managed through the CLI. Team roles can be managed on the 'Manage' page by users with team\_read level access.
|
||
* **Defining Permissions**: When creating a custom role, anyone can select from a wide range of permissions, such as instance creation, billing access, monitoring, etc. This allows for precise control over what each role can and cannot do.
|
||
* **Assigning Custom Roles**: Once a custom role is created, it can be assigned to team members through the team management interface.
|
||
|
||
### Important Elements
|
||
|
||
* **constraints**: Constraints can be added at different levels to enforce certain parameters of the body to be specific values
|
||
* **params**: You can use wildcards to represent placeholder values. (Useful if you want to generate many keys all doing similar operations)
|
||
|
||
### Examples
|
||
|
||
The following json would create a user that has access to the specified categories. In this instance, someone with these permissions would be able to create an instance as well as access billing information
|
||
|
||
```text Text theme={null}
|
||
{
|
||
"api": {
|
||
"misc": {},
|
||
"user_read":{},
|
||
"instance_read": {},
|
||
"instance_write": {},
|
||
"billing_read": {},
|
||
"billing_write": {}
|
||
}
|
||
}
|
||
```
|
||
|
||
The following json would create restricted access to only the presented categories. In this example, someone with these permissions would be able to create an instance, but they would not be able to access billing information
|
||
|
||
```text Text theme={null}
|
||
{
|
||
"api": {
|
||
"misc": {},
|
||
"user_read":{},
|
||
"instance_read": {},
|
||
"instance_write": {}
|
||
}
|
||
}
|
||
```
|
||
|
||
You can see a full list of permission types as well as the endpoints attached to that permission below
|
||
|
||
## Permission Categories
|
||
|
||
### instance\_read
|
||
|
||
* [Get Instances](https://docs.vast.ai/api-reference/instances/show-instances)
|
||
* [Request Logs](https://docs.vast.ai/api-reference/instances/show-logs)
|
||
|
||
The following permissions would allow a user to read the instance logs of instance id 1227 only
|
||
|
||
```text Text theme={null}
|
||
{
|
||
"api": {
|
||
"misc": {},
|
||
"user_read":{},
|
||
"instance_read": {},
|
||
"instance_write": {},
|
||
"billing_read": {
|
||
"api.instance.request_logs": {
|
||
"constraints": {
|
||
"id": {
|
||
"eq": 1227
|
||
}
|
||
}
|
||
}
|
||
}
|
||
}
|
||
}
|
||
```
|
||
|
||
The following permissions would allow a user to read the instance logs of instance id from $1 to $2. Apikeys using this feature have to be created using the CLI call [create api-key](/cli/commands)
|
||
|
||
```text Text theme={null}
|
||
{
|
||
"api": {
|
||
"instance_read": {
|
||
"api.instance.request_logs": {
|
||
"constraints": {
|
||
"id": {
|
||
"lte": $1,
|
||
"gte": $2
|
||
}
|
||
}
|
||
}
|
||
}
|
||
}
|
||
}
|
||
```
|
||
|
||
### instance\_write
|
||
|
||
```text theme={null}
|
||
{
|
||
"api": {
|
||
"instance_write": {}
|
||
}
|
||
}
|
||
```
|
||
|
||
* [Create Instances](https://docs.vast.ai/api-reference/instances/create-instance)
|
||
* [Update Instances](https://docs.vast.ai/api-reference/instances/manage-instance)
|
||
* [Destroy Instances](https://docs.vast.ai/api-reference/instances/destroy-instance)
|
||
* [Reboot Instances](https://docs.vast.ai/api-reference/instances/reboot-instance)
|
||
* [Execute Command](https://docs.vast.ai/api-reference/instances/execute)
|
||
* [Change Bid Price](https://docs.vast.ai/api-reference/instances/change-bid)
|
||
|
||
### user\_read
|
||
|
||
```text Text theme={null}
|
||
{
|
||
"api": {
|
||
"user_read": {}
|
||
}
|
||
}
|
||
```
|
||
|
||
* [Show User](https://docs.vast.ai/api-reference/accounts/show-user)
|
||
* [Show IP Addresses](https://docs.vast.ai/api-reference/accounts/show-ipaddrs)
|
||
* [Get Subaccount](https://docs.vast.ai/api-reference/accounts/show-subaccounts)
|
||
|
||
### user\_write
|
||
|
||
```text Text theme={null}
|
||
{
|
||
"api": {
|
||
"user_write": {}
|
||
}
|
||
}
|
||
```
|
||
|
||
* [Create Subaccount](https://docs.vast.ai/api-reference/accounts/create-subaccount)
|
||
* [Reset API Key](https://docs.vast.ai/api-reference/accounts/reset-api-key)
|
||
|
||
### billing\_read
|
||
|
||
```text Text theme={null}
|
||
{
|
||
"api": {
|
||
"billing_read": {}
|
||
}
|
||
}
|
||
```
|
||
|
||
* [Get Machine Earnings](https://docs.vast.ai/api-reference/billing/show-earnings)
|
||
* [Get Invoices](https://docs.vast.ai/api-reference/billing/search-invoices)
|
||
|
||
### billing\_write
|
||
|
||
```text Text theme={null}
|
||
{
|
||
"api": {
|
||
"billing_write": {}
|
||
}
|
||
}
|
||
```
|
||
|
||
* [Transfer Credit](https://docs.vast.ai/api-reference/accounts/transfer-credit)
|
||
|
||
### machine\_read
|
||
|
||
```text Text theme={null}
|
||
{
|
||
"api": {
|
||
"machine_read": {}
|
||
}
|
||
}
|
||
```
|
||
|
||
* [Get Machines](https://docs.vast.ai/api-reference/machines/show-machines)
|
||
|
||
### machine\_write
|
||
|
||
```text theme={null}
|
||
{
|
||
"api": {
|
||
"machine_write": {}
|
||
}
|
||
}
|
||
```
|
||
|
||
* [Set Minimum Bid](https://docs.vast.ai/api-reference/machines/set-min-bid)
|
||
* [Set Default Job](https://docs.vast.ai/api-reference/machines/set-defjob)
|
||
* [Remove Default Job](https://docs.vast.ai/api-reference/machines/remove-defjob)
|
||
* [Schedule Maintenance](https://docs.vast.ai/api-reference/machines/schedule-maint)
|
||
* [List Machine](https://docs.vast.ai/api-reference/machines/list-machine)
|
||
* [Unlist Machine](https://docs.vast.ai/api-reference/machines/unlist-machine)
|
||
|
||
### misc
|
||
|
||
```text Text theme={null}
|
||
{
|
||
"api": {
|
||
"misc": {}
|
||
}
|
||
}
|
||
```
|
||
|
||
* [Copy Data](https://docs.vast.ai/api-reference/instances/copy)
|
||
* [Cancel Copy](https://docs.vast.ai/api-reference/instances/cancel-sync)
|
||
* [Search GPUs](https://docs.vast.ai/api-reference/search/search-offers)
|
||
* [Search GPUs Advanced](https://docs.vast.ai/api-reference/search/search-offers)
|
||
|
||
### team\_read
|
||
|
||
```text Text theme={null}
|
||
{
|
||
"api": {
|
||
"team_read": {}
|
||
}
|
||
}
|
||
```
|
||
|
||
* [Get Team Role](https://docs.vast.ai/api-reference/team/show-team-role)
|
||
* [Get Team Roles](https://docs.vast.ai/api-reference/team/show-team-roles)
|
||
* [Get Team Members](https://docs.vast.ai/api-reference/team/show-team-members)
|
||
|
||
### team\_write
|
||
|
||
```json JSON theme={null}
|
||
{
|
||
"api": {
|
||
"team_write": {}
|
||
}
|
||
}
|
||
```
|
||
|
||
* [Create Team](https://docs.vast.ai/api-reference/team/create-team)
|
||
* [Delete Team](https://docs.vast.ai/api-reference/team/destroy-team)
|
||
* [Create Team Role](https://docs.vast.ai/api-reference/team/create-team-role)
|
||
* [Update Team Role](https://docs.vast.ai/api-reference/team/update-team-role)
|
||
* [Delete Team Role](https://docs.vast.ai/api-reference/team/destroy-team-role)
|
||
* [Invite Team Member](https://docs.vast.ai/api-reference/team/invite-team-member)
|
||
* [Delete Team Member](https://docs.vast.ai/api-reference/team/remove-team-member)
|
||
|
||
|
||
# CUDA
|
||
Source: https://docs.vast.ai/cuda
|
||
|
||
|
||
|
||
# CUDA Programming on Vast.ai
|
||
|
||
## Introduction
|
||
|
||
This guide walks you through setting up and running CUDA applications on Vast.ai's cloud platform. You'll learn how to set up a CUDA development environment, connect to your instance, and develop CUDA applications efficiently using NVIDIA's development tools.
|
||
|
||
## Prerequisites
|
||
|
||
* A Vast.ai account
|
||
* Basic familiarity with CUDA programming concepts
|
||
* Basic knowledge of Linux command line
|
||
* [(Optional) Install TLS Certificate for Jupyter](/documentation/instances/jupyter)
|
||
* [(Optional) SSH client installed on your local machine and SSH public key added the Keys section at cloud.vast.ai](/documentation/instances/sshscp)
|
||
* [(Optional) Vast-cli installed on your local machine for command-line management](/cli/get-started)
|
||
* [(Optional) Docker knowledge for customizing development environments](https://docs.docker.com/get-started/)
|
||
|
||
## Setup
|
||
|
||
### 1. Selecting the Right Template
|
||
|
||
Navigate to the [Templates tab](https://cloud.vast.ai/templates/) to view recommended templates.
|
||
|
||
Search for [NVIDIA CUDA](https://cloud.vast.ai?ref_id=62897\&template_id=61e14a0dd1f97aa0aa6719d20bc9b02e) template if:
|
||
|
||
* You need a standard CUDA development environment
|
||
* You want pre-configured security features (TLS, authentication)
|
||
* You require Jupyter notebook integration
|
||
* You need additional development tools like Tensorboard
|
||
|
||
[Make a custom CUDA template](/documentation/templates/creating-templates) if:
|
||
|
||
* You need a specific CUDA or Python version
|
||
* You have special library requirements
|
||
* You want to minimize image size for faster instance startup
|
||
|
||
### 2. Edit the Template and Select Template
|
||
|
||
You can edit the template to use Jupyter launch mode if: 
|
||
|
||
* You're behind a corporate firewall that blocks SSH
|
||
* You prefer browser-based development
|
||
* You want persistent terminal sessions that survive browser disconnects
|
||
* You need quick access without SSH client setup
|
||
* You want to combine CUDA development with notebook documentation
|
||
* You plan to switch between multiple terminal sessions in the browser
|
||
|
||
You can edit the template to use SSH launch mode if: 
|
||
|
||
* You're using [VSCode Remote-SSH](https://code.visualstudio.com/docs/remote/ssh) or other IDE integrations
|
||
* You need lowest possible terminal latency
|
||
* You prefer using your local terminal emulator
|
||
* You want to use advanced terminal features like tmux
|
||
* You're doing extensive command-line development
|
||
* You need to transfer files frequently using scp or rsync
|
||
|
||
### 2. Create Your Instance
|
||
|
||
Select your desired GPU configuration based on your computational needs from the [Search tab](https://cloud.vast.ai/create/). For CUDA development, consider: 
|
||
|
||
* System Requirements: 
|
||
* RAM: Minimum 16GB for development tools
|
||
* Storage: 10GB is usually sufficient
|
||
* CUDA Toolkit core: \~2GB
|
||
* Development files and builds: \~3-4GB
|
||
* Room for source code and dependencies: \~4GB
|
||
* CPU: 4+ cores recommended for compilation
|
||
* Network: 100+ Mbps for remote development
|
||
|
||
 Rent the GPU of your choice.
|
||
|
||
### 3. Connecting to Your Instance
|
||
|
||
Go to [Instances tab](https://cloud.vast.ai/instances/) to see your instance being created. There are multiple ways to connect to your instance:
|
||
|
||
* If Jupyter launch mode is selected in your template:
|
||
* Click the "OPEN" button or "Jupyter" button on your instance card 
|
||
* Access a full development environment with notebook support
|
||
* If you selected SSH launch mode:
|
||
* Click Open Terminal Access button 
|
||
* Copy Direct ssh connect string contents that looks like this "ssh -p 12345 root\@123.456.789.10 -L 8080:localhost:8080"
|
||
* You take the ssh command and execute in your terminal in your [Mac or Linux-based computer or in Powershell](/documentation/instances/sshscp)
|
||
* You can use [Powershell or Windows Putty tools](/documentation/instances/sshscp) if you have a Windows computer
|
||
|
||
## Installation
|
||
|
||
### Setting Up Your Development Environment
|
||
|
||
1. The base environment includes:
|
||
* CUDA toolkit and development tools
|
||
* Python with common ML libraries
|
||
* Development utilities (gcc, make, etc.)
|
||
2. Install additional CUDA dependencies:
|
||
|
||
```bash theme={null}
|
||
apt-get update
|
||
apt-get install -y cuda-samples
|
||
```
|
||
|
||
### Configuring Your Workspace
|
||
|
||
1. Navigate to your workspace:
|
||
|
||
```bash theme={null}
|
||
cd ${WORKSPACE}
|
||
```
|
||
|
||
1. Set up CUDA environment variables:
|
||
|
||
```bash theme={null}
|
||
echo 'export PATH=/usr/local/cuda/bin:$PATH' >> ~/.bashrc
|
||
echo 'export LD_LIBRARY_PATH=/usr/local/cuda/lib64:$LD_LIBRARY_PATH' >> ~/.bashrc
|
||
source ~/.bashrc
|
||
```
|
||
|
||
## Troubleshooting
|
||
|
||
### Common Issues and Solutions
|
||
|
||
CUDA not found:
|
||
|
||
* Check if GPU is detectable: `nvidia-smi`
|
||
|
||
```linux theme={null}
|
||
nvidia-smi
|
||
|
||
```
|
||
|
||
If output like "No devices were found" shows up, report the machine after clicking on the wrench icon and rent a different machine.
|
||
|
||
## Best Practices
|
||
|
||
### Development Workflow
|
||
|
||
* Code Organization
|
||
* Keep source files in `${WORKSPACE}`
|
||
* Use version control for code management
|
||
* Maintain separate directories for builds and source
|
||
* Performance Optimization
|
||
* Use proper CUDA stream management
|
||
* Optimize memory transfers
|
||
* Profile code using NVIDIA tools
|
||
|
||
## Advanced Topics
|
||
|
||
### Custom Environment Setup
|
||
|
||
Create a provisioning script for custom environment setup:
|
||
|
||
```bash theme={null}
|
||
#!/bin/bash
|
||
. /venv/main/bin/activate
|
||
pip install additional-packages
|
||
wget custom-tools.tar.gz
|
||
```
|
||
|
||
### Remote Development Setup
|
||
|
||
Configure VS Code or other IDEs for [remote development](https://code.visualstudio.com/docs/remote/ssh):
|
||
|
||
* Use SSH port forwarding for secure connections
|
||
* Configure development tools to use remote CUDA compiler
|
||
* Set up source synchronization using Syncthing
|
||
|
||
## Conclusion
|
||
|
||
You now have a fully configured CUDA development environment on Vast.ai. This setup provides the flexibility of cloud GPU resources with the convenience of local development.
|
||
|
||
## Additional Resources
|
||
|
||
* [NVIDIA CUDA Documentation](https://docs.nvidia.com/cuda/)
|
||
* [Vast.ai Documentation](https://vast.ai/docs/)
|
||
* [CUDA Sample Projects](https://github.com/NVIDIA/cuda-samples)
|
||
|
||
|
||
# Disco Diffusion
|
||
Source: https://docs.vast.ai/disco-diffusion
|
||
|
||
|
||
|
||
## DEPRECATED: Please see [Stable Diffusion guide](/stable-diffusion)
|
||
|
||
## Overview
|
||
|
||
Disco diffusion is an incredibly powerful free and open source AI image generator, which is easy to use on vast.ai. With the right settings and powerful GPUs, it can generate artist quality high-res images for a wide variety of subjects. All of these images were generated purely through DD on vast.ai, without any other tools or clean up.
|
||
|
||
There are a few ways to run Disco Diffusion on Vast. The simple method is to use the pytorch docker image, plain vanilla jupyter and our slightly modified notebook which you download and then upload into your instance. The core of this guide will detail this method.
|
||
|
||
<Note>
|
||
There is a custom docker image (fork) made specifically to run DD in docker- [jinaai/discoart](https://github.com/jina-ai/discoart). Discoart can spin up somewhat faster and has a number of advanced features beyond the original notebook. Directions for using Discoart on Vast are [here](/disco-diffusion)
|
||
</Note>
|
||
|
||
We have created a video guide that shows all the steps for using Disco Diffusion on Vast:
|
||
|
||
<iframe className="w-full aspect-video rounded-xl" src="https://www.youtube.com/embed/S4wIFCrKez4" title="How to rent an on-demand GPU for AI image generation using Vast and Disco Diffusion" frameborder="0" allow="accelerometer; autoplay; clipboard-write; encrypted-media; gyroscope; picture-in-picture" allowfullscreen />
|
||
|
||
## Pytorch image + Jupyter (recommended)
|
||
|
||
### 1) Select the docker image & config options
|
||
|
||
Open up the vast console and click on the EDIT IMAGE & CONFIG blue button. Select the pytorch-pytorch image. Click again to open up the config menu. Then select the jupyter-python notebook option.We also recommend checking the box for Jupyter direct HTTPS, although it is not required. To explain the tradeoff- direct HTTPS limits your search to machines with open ports which can be more expensive. HTTPS direct also requires you to install our TLS certificate or click through an "unsafe" warning on your browser. The big benefit is that you get faster download speeds and a more reliable connection. Leaving the box unchecked is fine, you will then connect to Jupyter through one of our proxy servers. It isn't as fast, but doesn't require any further setup.
|
||
|
||
<Frame caption="Select">
|
||
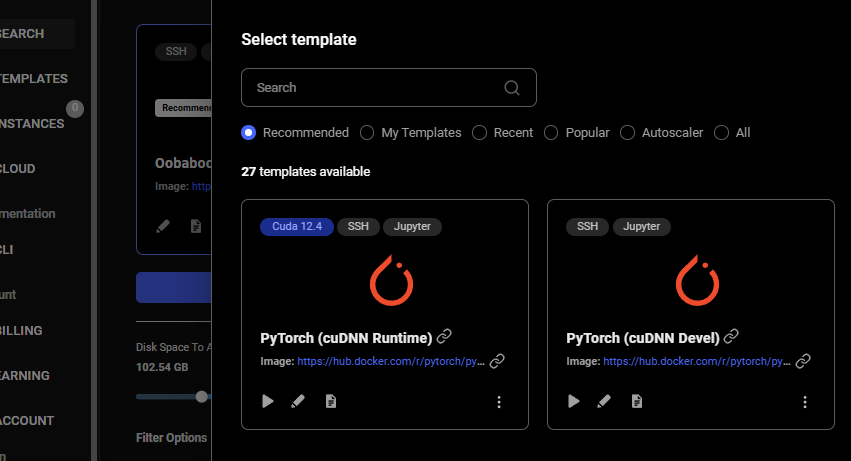
|
||
</Frame>
|
||
|
||
### 2) Allocate more disk space
|
||
|
||
Next you will want to allocate enough disk space. Under the EDIT IMAGE & CONFIG button there is a slider. The default of 10GB can sometimes not be enough. Move the slider up to 15GB or more, especially if you are making videos.
|
||
|
||
### 3) Select an offer
|
||
|
||
Here is the fun part! You can now select the GPU you want to rent. For Disco Diffusion, leave the type as "on-demand" as you don't want to be interrupted while generating art.The offers presented to you are limited to machines that can support your image configuration options. Further use the filters to pick a 1X GPU (Disco Diffusion doesn't support more than 1 GPU) and the GPU type. RTX 3090 is a great option. RTX A6000 has more GPU ram which is great for larger models but is more expensive. Other GPUs are also available.Hover over the RENT button to get a breakdown of pricing. Once ready, hit RENT to generate an instance. The instance will now appear in the instances tab and will initialize.### 4) Download the modified DD notebook as a .ipynb fileThe disco diffusion notebooks were created for colab. We made a few slight modifications (to install a few required libs) so they will run on vast.Open the latest modified Disco Diffusion notebook here (5.6) and then file->download->download as ipynb. You then have the ipynb file on your hard drive. You can close the colab tab.Here are all our modified notebooks: ([5.6](https://colab.research.google.com/github/jsbcannell/misc/blob/master/Disco_Diffusion_v5_6_vastai.ipynb), [5.4](https://colab.research.google.com/github/jsbcannell/misc/blob/master/Disco_Diffusion_v5_4_vastai.ipynb), [5.2](https://colab.research.google.com/drive/13zKUZDqOLbfbVdceW8eyfNZ_mRNVPbBP?usp=sharing#scrollTo=InstallLibs) )
|
||
|
||
### 5) Open the Jupyter instance
|
||
|
||
Navigate to the instances in your account. You should see your instance booting up. Once it is ready, click on the OPEN button to open the Jupyter interface. Note that it can sometimes take an additional 30-60 seconds for Jupyter to start after the button appears. If you get an error, wait a while and then reload.
|
||
|
||
<Frame caption="Spaces Mgwtdaam0Bo2Skpvyo6Q Uploads Biatmxba96Wrwp8Riyi9 Rdy Juypter Instance">
|
||

|
||
</Frame>
|
||
|
||
### 6) Run the modified DD notebook
|
||
|
||
Once you can connect to the instance, you will see the Jupyter logo and a few files. Click on the upload button in the upper right and upload the .ipynb file from 4. Once that uploads, click on the notebook to open it.
|
||
|
||
<Note>
|
||
If you are used to Google colab, the interface for vanilla Jupyter is similar with some differences. One thing you will notice right away is that there are no clean input boxes/check boxes for modifying the settings. Scroll through the notebook and change the settings in the code directly.
|
||
</Note>
|
||
|
||
Review section 2. Diffusion and CLIP model settings to see if there are any clip settings you want to change. Getting into the specifics of matching CLIP settings to your GPU (and GPU RAM) is beyond the scope of this guide. Join the Disco Diffusion Discord for help.
|
||
|
||
Change the Prompts at the end of section 3. Doing a quick Ctrl+F and searching for 'A beautiful painting' is a quick way to find the prompt settings. Modify the prompt to whatever art you want to generate.
|
||
|
||
**Now it's time to Disco!**
|
||
|
||
Once you have customized your settings, select Cell->Run All to start. The code will start to execute from top to bottom. The first couple of cells will install libs and download the CLIP models. This can take 5-15 minutes. The output of the code will appear in a text box.
|
||
|
||
<Frame caption="Spaces Mgwtdaam0Bo2Skpvyo6Q Uploads Wmy8Fsvuhwzdw8Avsmnb Dd Loading Models">
|
||
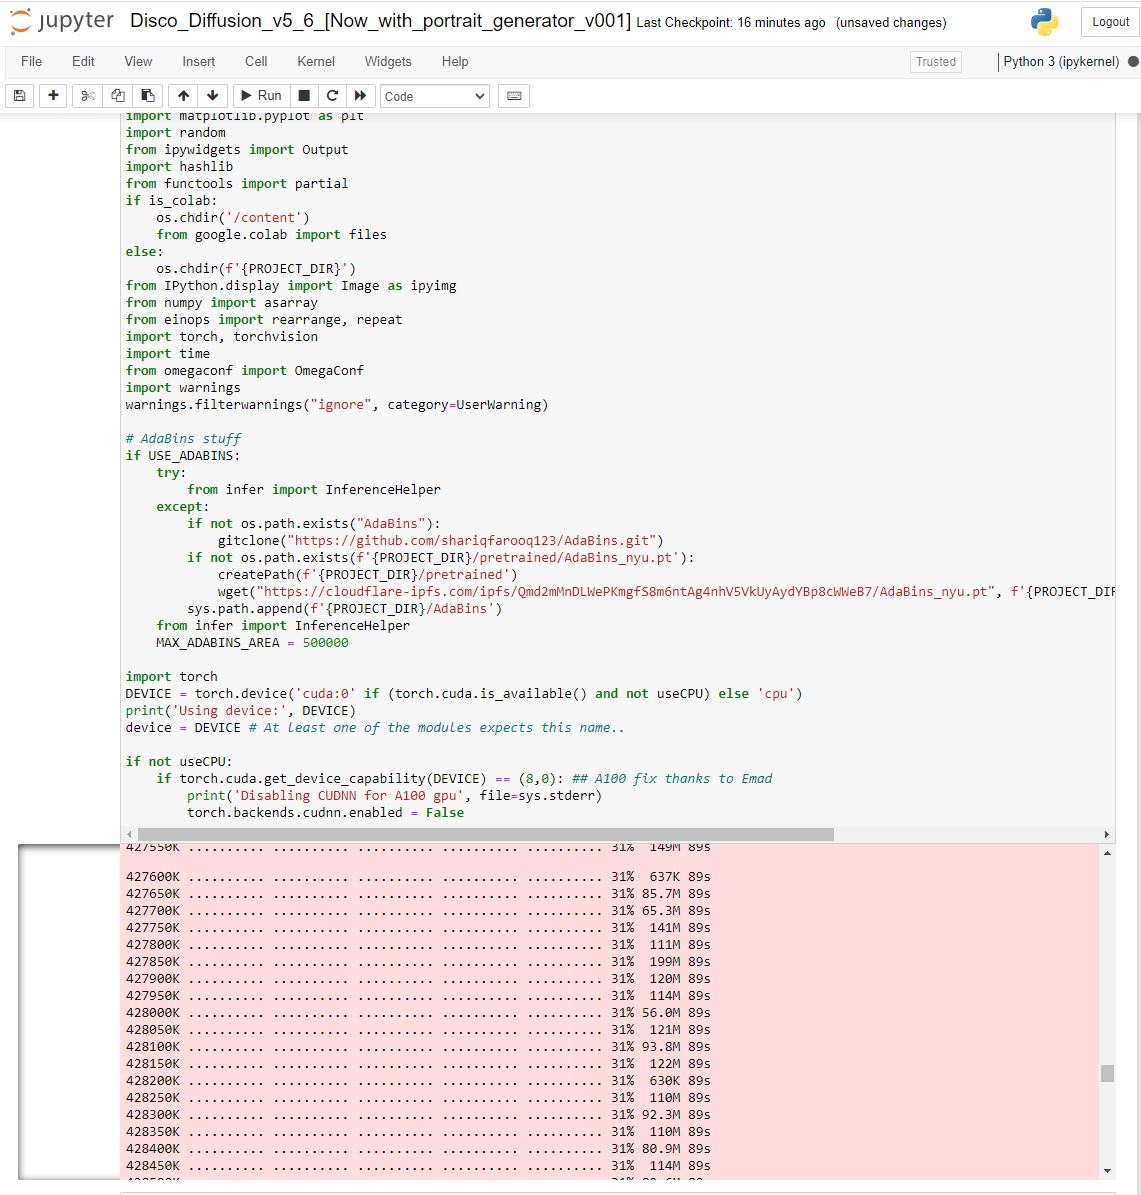
|
||
</Frame>
|
||
|
||
Scroll down to the bottom of the notebook to the end of step 4. Right above step 5 you should see the in-progress image.
|
||
|
||
<Frame caption="Spaces Mgwtdaam0Bo2Skpvyo6Q Uploads 9T2Xnymyqqygntuvkrzg Disco Time">
|
||
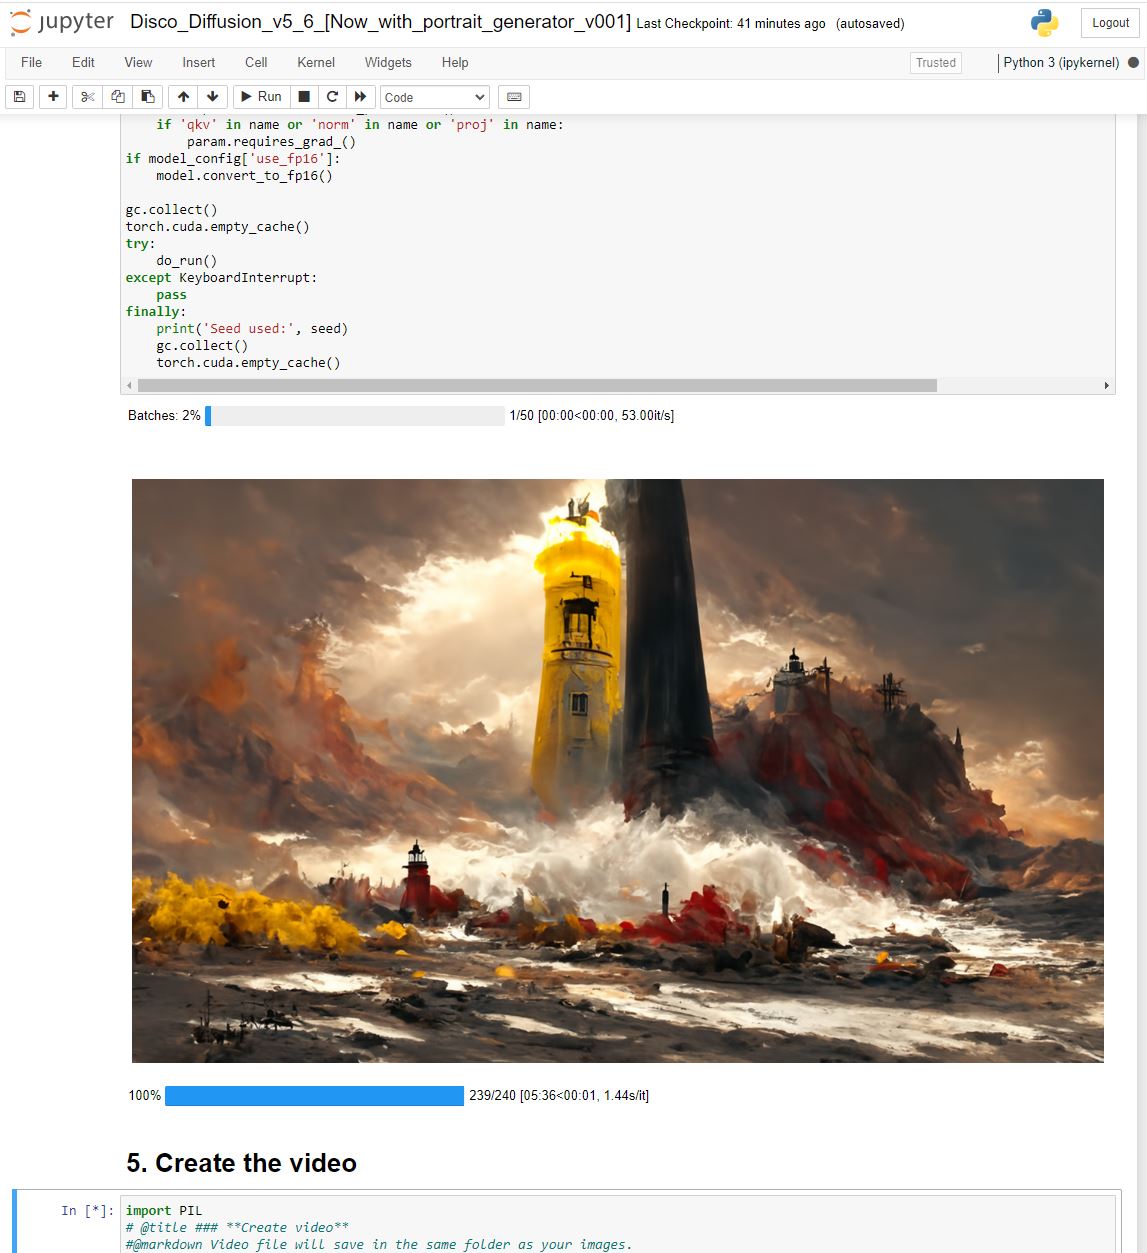
|
||
</Frame>
|
||
|
||
### 7) Changing settings and downloading images
|
||
|
||
After each image generates, it is placed into the images\_out/TimeToDisco folder. You can then review your artistic creations. They are easy to download individually.After a while you will want to change the prompt or settings. When the notebook is running, any changes that you make to it will not save. For example, if you change the prompt, the notebook will not start working off that prompt. After each setting change, you will need to hit the >> button to restart the kernal and then to run all the cells again. The second time through it will not need to download any models and so should be fast.
|
||
|
||
### Zipping up all your images
|
||
|
||
If you end up generating tens or hundreds! of images, there is a way to zip them up into a single file and then download them all. To more conveniently download folders or a number of files, you can use the command line zip tool. First open a new terminal by clicking New->Terminal:
|
||
|
||
<Frame caption="Spaces Mgwtdaam0Bo2Skpvyo6Q Uploads Nggbmr0I6L36Rzek1Izx Image">
|
||
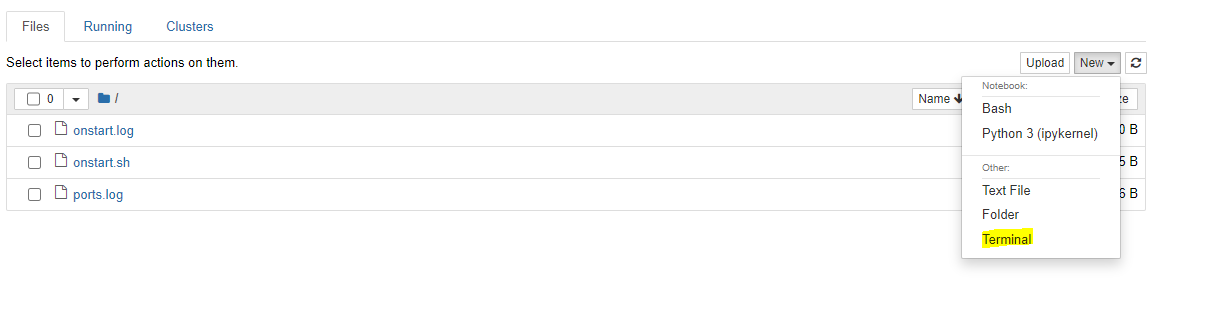
|
||
</Frame>
|
||
|
||
Then in the terminal copy and paste the following:
|
||
|
||
```text Text theme={null}
|
||
apt-get install -y zip
|
||
```
|
||
|
||
Hit enter to run those commands which will install the tool. Then to zip all of the files in the default images\_out/TimeToDisco directory:
|
||
|
||
```text Text theme={null}
|
||
zip all_images.zip images_out/TimeToDisco/*
|
||
```
|
||
|
||
Note: do no use spaces in your folder names, they cause headaches on linux! Use the '\_' underscore instead.
|
||
|
||
### Additional help
|
||
|
||
For discussion/help/advice running DD on vast find us on our discord, and make sure to check out the main DD discord .
|
||
|
||
## Custom docker image - Discoart
|
||
|
||
Instead of the pytorch image, you can use the custom jinaai/discoart docker image. Discoart can spin up somewhat faster and has a number of advanced features beyond the original notebook. To use it, the steps are similar but instead of picking the pytorch-pytorch image you select a blank template slot and then paste in the following docker image name:
|
||
|
||
```text Text theme={null}
|
||
jinaai/discoart:latest
|
||
```
|
||
|
||
Also in the second line, use the following option to set the ENV variable:
|
||
|
||
```text theme={null}
|
||
-e JUPYTER_DIR=/
|
||
```
|
||
|
||
<Frame caption="Jinai">
|
||

|
||
</Frame>
|
||
|
||
Follow steps 2) and 3) to allocate more disk space and select an offer.
|
||
|
||
Discoart has the notebook installed already in the docker image. So once Jupyter starts, hit the connect button to connect to Jupyter. Install our TLS cert (if you haven't already) for the direct HTTPS connection or else you will get a browser warning.
|
||
|
||
Open the discoart folder and then open the discoart notebook. Change the prompt and any settings you want to modify. Then select Cell->Run All to start the notebook. The results should start to appear quickly because the custom docker image already has downloaded the models.
|
||
|
||
## Examples using Vast.ai machines
|
||
|
||
<Frame caption="Spaces Mgwtdaam0Bo2Skpvyo6Q Uploads Sacdwzfaycnharkav4Ur Dd Cliff City 1">
|
||

|
||
</Frame>
|
||
|
||
<br />
|
||
|
||
<Frame caption="Spaces Mgwtdaam0Bo2Skpvyo6Q Uploads Uvlxehktlsqr8Ibbqo9G Dd Sorceress Darksun T4">
|
||

|
||
</Frame>
|
||
|
||
|
||
# Welcome to Vast.ai
|
||
Source: https://docs.vast.ai/documentation/get-started/index
|
||
|
||
Step-by-step Vast.ai developer documentation with examples, guides, and API references.
|
||
|
||
<script
|
||
type="application/ld+json"
|
||
dangerouslySetInnerHTML={{
|
||
__html: JSON.stringify({
|
||
"@context": "https://schema.org",
|
||
"@type": "WebSite",
|
||
"name": "Vast.ai Documentation",
|
||
"url": "https://docs.vast.ai",
|
||
"description": "Step-by-step Vast.ai developer documentation with examples, guides, and API references.",
|
||
"publisher": {
|
||
"@type": "Organization",
|
||
"name": "Vast.ai",
|
||
"url": "https://vast.ai"
|
||
}
|
||
})
|
||
}}
|
||
/>
|
||
|
||
# Vast.ai
|
||
|
||
[Vast.ai](https://www.vast.ai) is a marketplace for affordable GPU cloud computing. We make it easy for anyone to:
|
||
|
||
* Spin up GPU instances in seconds at competitive [prices](https://vast.ai/pricing).
|
||
* Scale across thousands of GPUs from [Secure Cloud datacenters](https://cloud.vast.ai/create/?instanceDiskSizeMin=16\&instanceDurationMin=259200\&instanceType=onDemand\&isAvxSupported=false\&isHostSecure=true\&isMachineIpStatic=false\&isOfferAvailable=true\&isOfferCompatible=true\&isOfferVerified=true\&isQueryInverted=false\&machineReliabilityMin=0.9\&sorts=score-desc) or community providers.
|
||
* Launch [prebuilt](https://cloud.vast.ai/templates/) or [custom templates](/documentation/templates/creating-templates) with one click.
|
||
|
||
## How It Works
|
||
|
||
Vast.ai connects compute providers — from hobbyists to Tier-4 datacenters — with users who need GPUs. Our search engine lets you filter by GPU type, RAM, CPU, bandwidth, and more, while providers retain full control over pricing and contracts.
|
||
|
||
## Getting started
|
||
|
||
Ready to get started? Follow our [Quick Start Guide](/documentation/get-started/quickstart) to launch your first instance.
|
||
|
||
## Mission
|
||
|
||
Vast.ai's mission is to align and democratize AI. Machine learning is progressing towards powerful AI systems with the potential to radically reshape our future. We believe it is imperative that this awesome power be distributed widely; that its benefits accrue to the many rather than the few; that its secrets are unlocked for the good of all humanity. Towards these ends we work to ensure that the compute powering AI is supplied by the people and for the people.
|
||
|
||
## Talk to Us
|
||
|
||
* **Support Chat** → Available 24/7 in the bottom-right corner of our [console](https://cloud.vast.ai).
|
||
* **Email** → [contact@vast.ai](mailto:contact@vast.ai)
|
||
|
||
|
||
# QuickStart
|
||
Source: https://docs.vast.ai/documentation/get-started/quickstart
|
||
|
||
|
||
|
||
<script
|
||
type="application/ld+json"
|
||
dangerouslySetInnerHTML={{
|
||
__html: JSON.stringify({
|
||
"@context": "https://schema.org",
|
||
"@type": "HowTo",
|
||
"name": "How to Get Started with Vast.ai",
|
||
"description": "A step-by-step guide to setting up your Vast.ai account and running your first GPU instance.",
|
||
"step": [
|
||
{
|
||
"@type": "HowToStep",
|
||
"name": "Sign Up & Add Credit",
|
||
"text": "Create an account on vast.ai, verify your email address, and add credit through Billing using credit card, Coinbase, or Crypto.com. Your balance will appear at the top right of the dashboard."
|
||
},
|
||
{
|
||
"@type": "HowToStep",
|
||
"name": "Prepare to Connect",
|
||
"text": "For SSH access: generate an SSH key pair and upload your public key in the Keys page. For Jupyter access: download and install the provided TSL certificate for secure browser access."
|
||
},
|
||
{
|
||
"@type": "HowToStep",
|
||
"name": "Pick a Template & Find a Machine",
|
||
"text": "Browse Templates for pre-built setups like PyTorch, TensorFlow, or ComfyUI. Go to Search and filter by GPU type, count, RAM, CPU, network speed, and price. Remember that disk space is permanent and cannot be changed later. Click Rent when you find a match and wait for the instance to start."
|
||
},
|
||
{
|
||
"@type": "HowToStep",
|
||
"name": "Manage or End Your Instance",
|
||
"text": "Use Stop to pause GPU billing (storage still accrues charges). Use Delete when finished to stop all charges."
|
||
}
|
||
]
|
||
})
|
||
}}
|
||
/>
|
||
|
||
<script
|
||
type="application/ld+json"
|
||
dangerouslySetInnerHTML={{
|
||
__html: JSON.stringify({
|
||
"@context": "https://schema.org",
|
||
"@type": "FAQPage",
|
||
"mainEntity": [
|
||
{
|
||
"@type": "Question",
|
||
"name": "What is a minimum deposit amount?",
|
||
"acceptedAnswer": {
|
||
"@type": "Answer",
|
||
"text": "The minimum deposit amount on Vast.ai is $5."
|
||
}
|
||
},
|
||
{
|
||
"@type": "Question",
|
||
"name": "What happens when my balance runs out? Can I avoid interruptions?",
|
||
"acceptedAnswer": {
|
||
"@type": "Answer",
|
||
"text": "When your balance reaches zero, your running instances will automatically stop. To avoid this, you can enable auto-billing on the Billing page. Set an auto-charge threshold higher than your average daily spend, so your card is automatically charged when your balance falls below that amount. We also recommend setting a low-balance email alert at a slightly lower threshold to notify you if the auto-charge fails for any reason."
|
||
}
|
||
},
|
||
{
|
||
"@type": "Question",
|
||
"name": "How can I customize a template?",
|
||
"acceptedAnswer": {
|
||
"@type": "Answer",
|
||
"text": "You can create a new template from scratch, or you can edit an existing template. You can find a guide in the templates documentation."
|
||
}
|
||
}
|
||
]
|
||
})
|
||
}}
|
||
/>
|
||
|
||
This Quickstart will guide you through setting up your Vast.ai account and running your first instance in just a few steps. 
|
||
|
||
### 1. Sign Up & Add Credit
|
||
|
||
* Create an account on [vast.ai.](https://cloud.vast.ai/)
|
||
* Verify your email address.
|
||
* Go to [**Billing**](https://cloud.vast.ai/billing/) → **Add Credit** and top up using credit card, Coinbase, or Crypto.com.
|
||
|
||
<img src="https://mintcdn.com/vastai-80aa3a82/KWV1TCiq0zjC57hU/images/guides-overview-quick-start.webp?fit=max&auto=format&n=KWV1TCiq0zjC57hU&q=85&s=3512036ce752f432218c5fc67adfe073" alt="Billing" data-og-width="800" width="800" data-og-height="853" height="853" data-path="images/guides-overview-quick-start.webp" data-optimize="true" data-opv="3" srcset="https://mintcdn.com/vastai-80aa3a82/KWV1TCiq0zjC57hU/images/guides-overview-quick-start.webp?w=280&fit=max&auto=format&n=KWV1TCiq0zjC57hU&q=85&s=232b461125a3d4a98ab962094e77a166 280w, https://mintcdn.com/vastai-80aa3a82/KWV1TCiq0zjC57hU/images/guides-overview-quick-start.webp?w=560&fit=max&auto=format&n=KWV1TCiq0zjC57hU&q=85&s=9cd76de9c4d957a0fb632a9f87465ef1 560w, https://mintcdn.com/vastai-80aa3a82/KWV1TCiq0zjC57hU/images/guides-overview-quick-start.webp?w=840&fit=max&auto=format&n=KWV1TCiq0zjC57hU&q=85&s=683729ddfc9debc85e0809fcff5d737e 840w, https://mintcdn.com/vastai-80aa3a82/KWV1TCiq0zjC57hU/images/guides-overview-quick-start.webp?w=1100&fit=max&auto=format&n=KWV1TCiq0zjC57hU&q=85&s=3555ef813dc1ae188112c85f2b058bcb 1100w, https://mintcdn.com/vastai-80aa3a82/KWV1TCiq0zjC57hU/images/guides-overview-quick-start.webp?w=1650&fit=max&auto=format&n=KWV1TCiq0zjC57hU&q=85&s=f5a88f091c569857fda64388c837fb61 1650w, https://mintcdn.com/vastai-80aa3a82/KWV1TCiq0zjC57hU/images/guides-overview-quick-start.webp?w=2500&fit=max&auto=format&n=KWV1TCiq0zjC57hU&q=85&s=6d9a579281e68580e6a6482eda020f87 2500w" />
|
||
* Your balance appears at the top right of the dashboard.
|
||
|
||
<img src="https://mintcdn.com/vastai-80aa3a82/KWV1TCiq0zjC57hU/images/guides-overview-quick-start-2.webp?fit=max&auto=format&n=KWV1TCiq0zjC57hU&q=85&s=024d3a562b305ac29f47cea16022536f" alt="" data-og-width="973" width="973" data-og-height="65" height="65" data-path="images/guides-overview-quick-start-2.webp" data-optimize="true" data-opv="3" srcset="https://mintcdn.com/vastai-80aa3a82/KWV1TCiq0zjC57hU/images/guides-overview-quick-start-2.webp?w=280&fit=max&auto=format&n=KWV1TCiq0zjC57hU&q=85&s=3deed130eecbc43adb385e88452fa94f 280w, https://mintcdn.com/vastai-80aa3a82/KWV1TCiq0zjC57hU/images/guides-overview-quick-start-2.webp?w=560&fit=max&auto=format&n=KWV1TCiq0zjC57hU&q=85&s=25fe2a5f2883f1aa4ea55f2df7f76ec1 560w, https://mintcdn.com/vastai-80aa3a82/KWV1TCiq0zjC57hU/images/guides-overview-quick-start-2.webp?w=840&fit=max&auto=format&n=KWV1TCiq0zjC57hU&q=85&s=6894eea5311426107efcd81d683c8531 840w, https://mintcdn.com/vastai-80aa3a82/KWV1TCiq0zjC57hU/images/guides-overview-quick-start-2.webp?w=1100&fit=max&auto=format&n=KWV1TCiq0zjC57hU&q=85&s=532c990e02204e56dc8a9767ef03d5a2 1100w, https://mintcdn.com/vastai-80aa3a82/KWV1TCiq0zjC57hU/images/guides-overview-quick-start-2.webp?w=1650&fit=max&auto=format&n=KWV1TCiq0zjC57hU&q=85&s=a8dae300bcde252e34ab7d47c3de3362 1650w, https://mintcdn.com/vastai-80aa3a82/KWV1TCiq0zjC57hU/images/guides-overview-quick-start-2.webp?w=2500&fit=max&auto=format&n=KWV1TCiq0zjC57hU&q=85&s=a2d8dd66a18b678322a2f5b34002a3dd 2500w" />
|
||
|
||
<Note>
|
||
Before you can **rent a machine **or **create a team**, you must verify your email address. After signing up, check your inbox (and spam folder) for the verification email and click the link inside. You can resend the verification email anytime from **Settings → Resend Verification Email.**
|
||
</Note>
|
||
|
||
### 2**. Prepare to Connect**
|
||
|
||
* **For SSH access**: generate an [SSH key pair](/documentation/instances/sshscp) and upload your **public key** in [Keys page](https://cloud.vast.ai/manage-keys/).
|
||
|
||
<img src="https://mintcdn.com/vastai-80aa3a82/KWV1TCiq0zjC57hU/images/guides-overview-quick-start-3.webp?fit=max&auto=format&n=KWV1TCiq0zjC57hU&q=85&s=5b7bd06c9d287c89754a598a2be3c360" alt="Keys" data-og-width="1279" width="1279" data-og-height="579" height="579" data-path="images/guides-overview-quick-start-3.webp" data-optimize="true" data-opv="3" srcset="https://mintcdn.com/vastai-80aa3a82/KWV1TCiq0zjC57hU/images/guides-overview-quick-start-3.webp?w=280&fit=max&auto=format&n=KWV1TCiq0zjC57hU&q=85&s=b2b2dd3126a1a716ba6d6e70832d9e99 280w, https://mintcdn.com/vastai-80aa3a82/KWV1TCiq0zjC57hU/images/guides-overview-quick-start-3.webp?w=560&fit=max&auto=format&n=KWV1TCiq0zjC57hU&q=85&s=fa2b0ef4be9a051694ee4e28f9263ce1 560w, https://mintcdn.com/vastai-80aa3a82/KWV1TCiq0zjC57hU/images/guides-overview-quick-start-3.webp?w=840&fit=max&auto=format&n=KWV1TCiq0zjC57hU&q=85&s=6faf68e85e85941c6afcd85602af3613 840w, https://mintcdn.com/vastai-80aa3a82/KWV1TCiq0zjC57hU/images/guides-overview-quick-start-3.webp?w=1100&fit=max&auto=format&n=KWV1TCiq0zjC57hU&q=85&s=3864b38246ed01a168df7ef5357a9349 1100w, https://mintcdn.com/vastai-80aa3a82/KWV1TCiq0zjC57hU/images/guides-overview-quick-start-3.webp?w=1650&fit=max&auto=format&n=KWV1TCiq0zjC57hU&q=85&s=6b492e5d08306470905e63dce37a3dc2 1650w, https://mintcdn.com/vastai-80aa3a82/KWV1TCiq0zjC57hU/images/guides-overview-quick-start-3.webp?w=2500&fit=max&auto=format&n=KWV1TCiq0zjC57hU&q=85&s=4200de798dd314922cec733c92b4160b 2500w" />
|
||
* **For Jupyter access**: download and install the provided [TSL certificate](/documentation/instances/jupyter#1SmCz) (needed for secure browser access).
|
||
|
||
<Note>
|
||
If you don’t install the provided browser certificate: 
|
||
|
||
* **Windows / Linux** – You’ll see a **“Your connection is not private”** privacy warning. You can still connect by clicking **Advanced** → **Proceed**, but the warning will appear every time.
|
||
* **macOS** – Browsers will block Jupyter until you install and trust the provided certificate in **Keychain Access**. Without it, you won’t be able to connect.
|
||
|
||
Installing the certificate once removes the warning permanently.
|
||
</Note>
|
||
|
||
### 3**. Pick a **[**Template**](/documentation/instances/templates)** & Find a Machine**
|
||
|
||
* Browse [**Templates**](https://cloud.vast.ai/templates/) for pre-built setups (e.g., [PyTorch](/pytorch), TensorFlow, ComfyUI).
|
||
* Go to [**Search**](https://cloud.vast.ai/create/) and filter by GPU type, count, RAM, CPU, network speed, and price.
|
||
* **Disk Space is Permanent. **The disk size you choose when creating an instance cannot be changed later. If you run out of space, you’ll need to create a new instance with a larger disk. Tip: Allocate a bit more than you think you need to avoid interruptions.
|
||
* Click **Rent** when you find a match.
|
||
* Wait for the instance to start—cached images launch quickly, fresh pulls may take 10–60 minutes.
|
||
* Click **Open** button to access your instance.
|
||
|
||
### **4. **[**Manage or End Your Instance**](/documentation/instances/managing-instances)
|
||
|
||
* Use **Stop** to pause GPU billing (storage still accrues charges).
|
||
* Use **Delete** when finished to stop *all* charges.
|
||
|
||
<img src="https://mintcdn.com/vastai-80aa3a82/KWV1TCiq0zjC57hU/images/guides-overview-quick-start-4.webp?fit=max&auto=format&n=KWV1TCiq0zjC57hU&q=85&s=5924a1a46183b876b909daf802c07841" alt="Manage or End Your Instance" data-og-width="1018" width="1018" data-og-height="249" height="249" data-path="images/guides-overview-quick-start-4.webp" data-optimize="true" data-opv="3" srcset="https://mintcdn.com/vastai-80aa3a82/KWV1TCiq0zjC57hU/images/guides-overview-quick-start-4.webp?w=280&fit=max&auto=format&n=KWV1TCiq0zjC57hU&q=85&s=f08910728e4eebb9dd822c866cb6a602 280w, https://mintcdn.com/vastai-80aa3a82/KWV1TCiq0zjC57hU/images/guides-overview-quick-start-4.webp?w=560&fit=max&auto=format&n=KWV1TCiq0zjC57hU&q=85&s=b48d2026679f1e83ccaab2ce2adc4e2f 560w, https://mintcdn.com/vastai-80aa3a82/KWV1TCiq0zjC57hU/images/guides-overview-quick-start-4.webp?w=840&fit=max&auto=format&n=KWV1TCiq0zjC57hU&q=85&s=6f48b1a4ee377ee27d8a67ec83f770f1 840w, https://mintcdn.com/vastai-80aa3a82/KWV1TCiq0zjC57hU/images/guides-overview-quick-start-4.webp?w=1100&fit=max&auto=format&n=KWV1TCiq0zjC57hU&q=85&s=4c7f2ecefa1c7870b45336ed4ec86820 1100w, https://mintcdn.com/vastai-80aa3a82/KWV1TCiq0zjC57hU/images/guides-overview-quick-start-4.webp?w=1650&fit=max&auto=format&n=KWV1TCiq0zjC57hU&q=85&s=8766a3a91186dd38eef4d2e2d97af3e1 1650w, https://mintcdn.com/vastai-80aa3a82/KWV1TCiq0zjC57hU/images/guides-overview-quick-start-4.webp?w=2500&fit=max&auto=format&n=KWV1TCiq0zjC57hU&q=85&s=ebe0bf0b9e5da78c1e65a3c50273f97c 2500w" />
|
||
|
||
## Common Questions
|
||
|
||
### What is a minimum deposit amount?
|
||
|
||
The minimum deposit amount on Vast.ai is \$5.
|
||
|
||
### What happens when my balance runs out? Can I avoid interruptions?
|
||
|
||
When your balance reaches zero, your running instances will automatically stop. To avoid this, you can enable **auto-billing **on the Billing page. Set an auto-charge threshold higher than your average daily spend, so your card is automatically charged when your balance falls below that amount. We also recommend setting a **low-balance email alert **at a slightly lower threshold to notify you if the auto-charge fails for any reason. 
|
||
|
||
### How can I customize a template?
|
||
|
||
You can create a new template from scratch, or you can edit an existing template. You can find a guide [here](/documentation/instances/templates#LrOME). 
|
||
|
||
|
||
# Clusters
|
||
Source: https://docs.vast.ai/documentation/host/clusters
|
||
|
||
|
||
|
||
<script
|
||
type="application/ld+json"
|
||
dangerouslySetInnerHTML={{
|
||
__html: JSON.stringify({
|
||
"@context": "https://schema.org",
|
||
"@type": "HowTo",
|
||
"name": "How to Register and Manage Clusters on Vast.ai",
|
||
"description": "A guide to registering a set of machines sharing a LAN as a cluster to allow clients to access local network resources for multi-node training and network volumes.",
|
||
"step": [
|
||
{
|
||
"@type": "HowToStep",
|
||
"name": "Update to the Newest CLI Version",
|
||
"text": "Go to https://cloud.vast.ai/cli/ and copy and run the command starting with wget to update to the newest version of the CLI."
|
||
},
|
||
{
|
||
"@type": "HowToStep",
|
||
"name": "Identify and Test the Subnet",
|
||
"text": "On the manager node, run ip addr or ifconfig to identify which interface corresponds to your LAN (usually ethernet interface with format enp$BUSs$SLOT). Find the IPv4 subnet corresponding to that network interface (format IPv4ADDRESS/MASK). Test that other machines can reach the manager node on that subnet by running nc -l IPv4ADDRESS 2337 on the manager node and nc IPv4ADDRESS 2337 on each other node."
|
||
},
|
||
{
|
||
"@type": "HowToStep",
|
||
"name": "Create the Cluster",
|
||
"text": "Run ./vast.py create cluster IPv4SUBNET MACHINE_ID_OF_MANAGER_NODE to initialize a cluster containing the machine with the manager node ID and using the network interface corresponding to the subnet."
|
||
},
|
||
{
|
||
"@type": "HowToStep",
|
||
"name": "Verify Cluster Creation",
|
||
"text": "Run ./vast.py show clusters to check the ID of the cluster you just created and see its subnet, manager node machine_id, and list of member machines."
|
||
},
|
||
{
|
||
"@type": "HowToStep",
|
||
"name": "Add Member Machines",
|
||
"text": "Run ./vast.py join cluster CLUSTER_ID MACHINE_IDS where MACHINE_IDS is a space separated list of the remaining machines to add to your cluster."
|
||
}
|
||
]
|
||
})
|
||
}}
|
||
/>
|
||
|
||
# Introduction
|
||
|
||
Vast is introducing support for several features (local VPNs for client instances \[in beta], network volumes \[in alpha]) that depend on the host's LAN configuration. 
|
||
|
||
Hosts can now register a set of machines they own sharing a LAN as a cluster to allow clients renting their machines to access local network resources. This will allow their machines to support use cases such as multi-node training via NCCL; as well, this will be a prerequisite to listing network volumes when they are released. 
|
||
|
||
A registered *cluster* is associated with:
|
||
|
||
* A machine that acts as the *manager node* and is responsible for dispatching cluster management commands from the Vast server.
|
||
* An IP *subnet* that machines in the cluster use to identify which network interface / which IP addresses for communication with other machines in the cluster. 
|
||
* A set of *member* machines. 
|
||
|
||
The requirements for a set of machines to be registered as a cluster are that every member machine has a (non-NATed) IP address in the cluster's subnet to which any other machine in the cluster can communicate with on all ports.
|
||
|
||
# Cluster registration guide
|
||
|
||
* Update to the newest version of the CLI: go to ([https://cloud.vast.ai/cli/)\[https://cloud.vast.ai/cli/](https://cloud.vast.ai/cli/\)\[https://cloud.vast.ai/cli/)] and copy+run the command starting with `wget`.
|
||
* Identify and test the subnet to register:
|
||
* On the manager node ---
|
||
* Run `ip addr` or `ifconfig` (the `ip` utility is part of the `iproute2` package). 
|
||
* Identify which interface correspond's to their LAN. For most hosts this will be an ethernet interface, which have the naming format `enp$BUSs$SLOT[f$FUNCTION]]` in modern Ubuntu. 
|
||
* Hosts using Mellanox devices for their main ethernet connection may instead see their interface show up as `bond0`
|
||
* Find the IPv4 subnet corresponding to that network interface -- 
|
||
* In `ip addr` output, the third line for each interface usually starts with `inet IPv4SUBNET` where `IPv4SUBNET` has the format `IPv4ADDRESS/MASK` where `MASK` is a non-negative integer \< 32.
|
||
* Test that the other machines to be added to the cluster can reach the manager node on that subnet/address. 
|
||
* On the manager node:
|
||
* run `nc -l IPv4ADDRESS 2337` where `IPv4ADDRESS` is the IPv4 address component of the chosen subnet. 
|
||
* On each other node:
|
||
* run `nc IPv4ADDRESS 2337`
|
||
* Type in some test text (i.e., "hello") and press enter
|
||
* Check that `nc` received and outputed the test text on the manager node. 
|
||
* Run `./vast.py create cluster IPv4SUBNET MACHINE_ID_OF_MANAGER_NODE`
|
||
* Run `./vast.py show clusters` to check the ID of the cluster you just created. 
|
||
* Run `./vast.py join cluster MACHINE_IDS` where `MACHINE_IDS` is a space seperated list of the remaining machines to add to your cluster. 
|
||
|
||
# Cluster Management Commands Reference
|
||
|
||
* `./vast create cluster SUBNET MANAGER_ID` 
|
||
* Initializes a cluster containing the machine with ID `MANAGER_ID` as its manager node and using the network interface corresponding to `SUBNET`
|
||
* `./vast show clusters`
|
||
* Shows clusters, for each cluster showing its `CLUSTER_ID`, associated `SUBNET`, manager node machine\_id, and list of member machines. 
|
||
* `./vast join cluster CLUSTER_ID MACHINE_IDS`
|
||
* Takes `MACHINE_IDS` as a space seperated list, and adds them to the cluster specified by `CLUSTER_ID`
|
||
* `./vast remove-machine-from-cluster CLUSTER_ID MACHINE_ID [NEW_MANAGER_ID]`
|
||
* Removes machine `MACHINE_ID` from cluster `CLUSTER_ID`. If the machine is the only manager, another machine in the cluster `NEW_MANAGER_ID` must be specified so that the cluster still has a manager. 
|
||
* `./vast delete cluster CLUSTER_ID`
|
||
* Deletes cluster `CLUSTER_ID`. Fails if cluster resources are currently in use by client instances. 
|
||
|
||
|
||
# Datacenter Status
|
||
Source: https://docs.vast.ai/documentation/host/datacenter-status
|
||
|
||
|
||
|
||
<script
|
||
type="application/ld+json"
|
||
dangerouslySetInnerHTML={{
|
||
__html: JSON.stringify({
|
||
"@context": "https://schema.org",
|
||
"@type": "HowTo",
|
||
"name": "How to Become a Datacenter Partner on Vast.ai",
|
||
"description": "A guide to applying for datacenter partner status to receive benefits like blue datacenter label, secure cloud inclusion, and higher search rankings.",
|
||
"step": [
|
||
{
|
||
"@type": "HowToStep",
|
||
"name": "Verify Requirements",
|
||
"text": "Ensure you meet the requirements: Have an active ISO/IEC 27001 or similar third party certificate, equipment must be owned by a registered business with up-to-date filings, business owners must be listed and verifiable, must sign the datacenter hosting Agreement, owner must undergo identity verification, and must have at least 5 GPU servers listed on Vast.ai or show significant equipment to list."
|
||
},
|
||
{
|
||
"@type": "HowToStep",
|
||
"name": "Gather Required Documentation",
|
||
"text": "Collect government issued IDs (such as passport) for business owner(s), business information (certificate of good standing or recent record), name and address of datacenter with relevant certificates, contract or invoice from datacenter linking the business, and other due diligence documentation as required."
|
||
},
|
||
{
|
||
"@type": "HowToStep",
|
||
"name": "Submit Application",
|
||
"text": "Once you have the required documentation, visit https://vast.ai/data-center-application to apply for datacenter partner status."
|
||
}
|
||
]
|
||
})
|
||
}}
|
||
/>
|
||
|
||
Equipment that is in a certified datacenter on Vast.ai is eligible to be included in the "secure cloud" offering and recieve other benefits, such as the blue datacenter label. Individual certifications will eventually be highlighted so users can understand if a given host is compliant with HIPAA, GDPR, TIER 2/3 or ISO 27001. Users typically are willing to pay more for the security and reliability that comes with equipment that is in a proper facility.
|
||
|
||
Read through this documentation to understand the minimum requirements for becoming a datacenter partner and the specific verification steps that we will take to ensure compliance.
|
||
|
||
## Benefits
|
||
|
||
* Blue datacenter label on all GPU offers in the web interface for equipment that is in the datacenter
|
||
* Offers are included in the "secure cloud" searches in the CLI and in the web interface
|
||
* Incresed reliabilty scoring
|
||
* As a result of a few factors, generally higher search rankings in the marketplace
|
||
* Direct Discord or Slack channel to Vast.ai for support
|
||
|
||
## Requirements
|
||
|
||
1. ONE of the following third party certificates must be active:
|
||
* ISO/IEC 27001
|
||
2. The equipment must be owned by a business
|
||
* The business must be registered and up to date on all filings
|
||
* The owners of the business must be listed on the registration or otherwise verifiable
|
||
3. The company must sign the datacenter hosting Agreement
|
||
4. The owner must undergo identity verification
|
||
5. The host must have at least 5 GPU servers listed on Vast.ai or otherwise show they have a significant (5+ Servers) amount of equipment to list
|
||
|
||
## Application Process
|
||
|
||
In order to apply, you will need to first gather the required documentation:
|
||
|
||
* Government issued IDs such as a passport for the business owner(s)
|
||
* Business information such as a certificate of good standing or other recent record
|
||
* The name and address of the datacenter where the equipment is located along with the relevant certificates
|
||
* A contract or invoice from the datacenter linking the business
|
||
* Other due dilligence documentation as required
|
||
|
||
Once you have the requiremed documentation, To apply please visit: [https://vast.ai/data-center-application](https://vast.ai/data-center-application)
|
||
|
||
|
||
# Earning
|
||
Source: https://docs.vast.ai/documentation/host/earning
|
||
|
||
|
||
|
||
<script
|
||
type="application/ld+json"
|
||
dangerouslySetInnerHTML={{
|
||
__html: JSON.stringify({
|
||
"@context": "https://schema.org",
|
||
"@type": "FAQPage",
|
||
"mainEntity": [
|
||
{
|
||
"@type": "Question",
|
||
"name": "How can I have earnings as a Vast user?",
|
||
"acceptedAnswer": {
|
||
"@type": "Answer",
|
||
"text": "You can generate earnings by gaining Vast credit through template creation via our referral program. You can find more information about Vast's referral program in the documentation."
|
||
}
|
||
}
|
||
]
|
||
})
|
||
}}
|
||
/>
|
||
|
||
## Overview
|
||
|
||
This page in the console allows customers to deal with their earnings from referrals. You can find more information about Vast's referral program [here](/documentation/reference/referral-program).
|
||
|
||
# Pages Walkthrough
|
||
|
||
<img src="https://mintcdn.com/vastai-80aa3a82/xCLov_y0JNSp_qUD/images/console-earning.webp?fit=max&auto=format&n=xCLov_y0JNSp_qUD&q=85&s=08dd0dd68d81144725e713523db36499" alt="" data-og-width="1280" width="1280" data-og-height="860" height="860" data-path="images/console-earning.webp" data-optimize="true" data-opv="3" srcset="https://mintcdn.com/vastai-80aa3a82/xCLov_y0JNSp_qUD/images/console-earning.webp?w=280&fit=max&auto=format&n=xCLov_y0JNSp_qUD&q=85&s=3871d132aa533510061737827f379914 280w, https://mintcdn.com/vastai-80aa3a82/xCLov_y0JNSp_qUD/images/console-earning.webp?w=560&fit=max&auto=format&n=xCLov_y0JNSp_qUD&q=85&s=4a7a06cb4d1d20653065905b8ad1e0c6 560w, https://mintcdn.com/vastai-80aa3a82/xCLov_y0JNSp_qUD/images/console-earning.webp?w=840&fit=max&auto=format&n=xCLov_y0JNSp_qUD&q=85&s=a5563cf3bd0b10eaecd66af3b5f72eb1 840w, https://mintcdn.com/vastai-80aa3a82/xCLov_y0JNSp_qUD/images/console-earning.webp?w=1100&fit=max&auto=format&n=xCLov_y0JNSp_qUD&q=85&s=c4137572b411d4261c7e188ef157a605 1100w, https://mintcdn.com/vastai-80aa3a82/xCLov_y0JNSp_qUD/images/console-earning.webp?w=1650&fit=max&auto=format&n=xCLov_y0JNSp_qUD&q=85&s=5a2d95272eba66af20f1b4b0020d0b41 1650w, https://mintcdn.com/vastai-80aa3a82/xCLov_y0JNSp_qUD/images/console-earning.webp?w=2500&fit=max&auto=format&n=xCLov_y0JNSp_qUD&q=85&s=646bc8d785fb31072d89682e6fa8e6b3 2500w" />
|
||
|
||
The **Earnings **page gives you a transparent view of your referral program performance and accumulated rewards. Here’s what each section means: 
|
||
|
||
* **Current Balance:** This is the amount you’ve earned so far from your referred users but **haven’t been paid out yet. **It keeps growing as your referrals continue to use the platform. 
|
||
* **Total Earnings**: This shows your **lifetime earnings **the total amount you’ve earned from all your referrals since you joined the earnings program or started hosting. It includes both paid and unpaid amounts. 
|
||
* **Total Referral Count**: This number represents the **total users you’ve referred **who have successfully created accounts through your referral link. It’s a great way to track how your outreach is growing! 
|
||
* **Total Rental Earnings **(host only)**: **This shows the total lifetime amount you’ve earned from your machine being rented out on the platform. 
|
||
* **Total Referral Earnings** (host only): This shows the total lifetime amout you've earned from all your referrals.
|
||
|
||
Additionally, there is the **Earning Chart** section that provides a clear visual overview of your earning history.
|
||
|
||
<Frame caption="Earnings Chart">
|
||
<img src="https://mintcdn.com/vastai-80aa3a82/xCLov_y0JNSp_qUD/images/console-earning-2.webp?fit=max&auto=format&n=xCLov_y0JNSp_qUD&q=85&s=ad275fca73851d5d4eb666be12bbc764" alt="" data-og-width="902" width="902" data-og-height="506" height="506" data-path="images/console-earning-2.webp" data-optimize="true" data-opv="3" srcset="https://mintcdn.com/vastai-80aa3a82/xCLov_y0JNSp_qUD/images/console-earning-2.webp?w=280&fit=max&auto=format&n=xCLov_y0JNSp_qUD&q=85&s=4762d7837333c4f4b71167960610e635 280w, https://mintcdn.com/vastai-80aa3a82/xCLov_y0JNSp_qUD/images/console-earning-2.webp?w=560&fit=max&auto=format&n=xCLov_y0JNSp_qUD&q=85&s=5398e8736c54b5cf12229ccd747adb75 560w, https://mintcdn.com/vastai-80aa3a82/xCLov_y0JNSp_qUD/images/console-earning-2.webp?w=840&fit=max&auto=format&n=xCLov_y0JNSp_qUD&q=85&s=06ec837fb65c404ed82640a2a7f8ad25 840w, https://mintcdn.com/vastai-80aa3a82/xCLov_y0JNSp_qUD/images/console-earning-2.webp?w=1100&fit=max&auto=format&n=xCLov_y0JNSp_qUD&q=85&s=157eed90ca661fd2bb478cdfc6267420 1100w, https://mintcdn.com/vastai-80aa3a82/xCLov_y0JNSp_qUD/images/console-earning-2.webp?w=1650&fit=max&auto=format&n=xCLov_y0JNSp_qUD&q=85&s=27553c1f2bdc726e41037a2cd3e45109 1650w, https://mintcdn.com/vastai-80aa3a82/xCLov_y0JNSp_qUD/images/console-earning-2.webp?w=2500&fit=max&auto=format&n=xCLov_y0JNSp_qUD&q=85&s=a4e188561c089bdab4329e124b39a063 2500w" />
|
||
</Frame>
|
||
|
||
The **Template Performance** chart displays the earnings hystory from templates.
|
||
|
||
### Payouts
|
||
|
||
You can view your payout history for a selected date range. Here you can generate and download invoices for your earning payouts.
|
||
|
||
<Frame caption="Payout History">
|
||
<img src="https://mintcdn.com/vastai-80aa3a82/xCLov_y0JNSp_qUD/images/console-earning-3.webp?fit=max&auto=format&n=xCLov_y0JNSp_qUD&q=85&s=cbba01543d9a1805cb39027b3018286f" alt="" data-og-width="910" width="910" data-og-height="248" height="248" data-path="images/console-earning-3.webp" data-optimize="true" data-opv="3" srcset="https://mintcdn.com/vastai-80aa3a82/xCLov_y0JNSp_qUD/images/console-earning-3.webp?w=280&fit=max&auto=format&n=xCLov_y0JNSp_qUD&q=85&s=856bcb3787ece3826d81be6fb702bdc4 280w, https://mintcdn.com/vastai-80aa3a82/xCLov_y0JNSp_qUD/images/console-earning-3.webp?w=560&fit=max&auto=format&n=xCLov_y0JNSp_qUD&q=85&s=0edb0cc2ddef36345558e6b4fdb82bde 560w, https://mintcdn.com/vastai-80aa3a82/xCLov_y0JNSp_qUD/images/console-earning-3.webp?w=840&fit=max&auto=format&n=xCLov_y0JNSp_qUD&q=85&s=bf1d85e3ae183090d7f47e114fddda9f 840w, https://mintcdn.com/vastai-80aa3a82/xCLov_y0JNSp_qUD/images/console-earning-3.webp?w=1100&fit=max&auto=format&n=xCLov_y0JNSp_qUD&q=85&s=33af72f0ccb84ddabf096c5c957fc760 1100w, https://mintcdn.com/vastai-80aa3a82/xCLov_y0JNSp_qUD/images/console-earning-3.webp?w=1650&fit=max&auto=format&n=xCLov_y0JNSp_qUD&q=85&s=27936cbe57e65222f4f9fbb88fe4bd04 1650w, https://mintcdn.com/vastai-80aa3a82/xCLov_y0JNSp_qUD/images/console-earning-3.webp?w=2500&fit=max&auto=format&n=xCLov_y0JNSp_qUD&q=85&s=f30a253bb0ae67ca56c01cc907435181 2500w" />
|
||
</Frame>
|
||
|
||
In the **Payout Account** section, you can set up a payout account. 
|
||
|
||
<Frame caption="Payout Account">
|
||
<img src="https://mintcdn.com/vastai-80aa3a82/xCLov_y0JNSp_qUD/images/console-earning-4.webp?fit=max&auto=format&n=xCLov_y0JNSp_qUD&q=85&s=90f3ee2b0a9645ffc67332ffbd24fe3b" alt="" data-og-width="903" width="903" data-og-height="339" height="339" data-path="images/console-earning-4.webp" data-optimize="true" data-opv="3" srcset="https://mintcdn.com/vastai-80aa3a82/xCLov_y0JNSp_qUD/images/console-earning-4.webp?w=280&fit=max&auto=format&n=xCLov_y0JNSp_qUD&q=85&s=1b08bb82bd160d7e7f7e05eaa59565f9 280w, https://mintcdn.com/vastai-80aa3a82/xCLov_y0JNSp_qUD/images/console-earning-4.webp?w=560&fit=max&auto=format&n=xCLov_y0JNSp_qUD&q=85&s=da1536c086fe131dc07f2f37c187f7cb 560w, https://mintcdn.com/vastai-80aa3a82/xCLov_y0JNSp_qUD/images/console-earning-4.webp?w=840&fit=max&auto=format&n=xCLov_y0JNSp_qUD&q=85&s=af0e16523e8339a52a2a62fa552f264a 840w, https://mintcdn.com/vastai-80aa3a82/xCLov_y0JNSp_qUD/images/console-earning-4.webp?w=1100&fit=max&auto=format&n=xCLov_y0JNSp_qUD&q=85&s=cc4ba7c55e09f032fa2f7cd3167e08a2 1100w, https://mintcdn.com/vastai-80aa3a82/xCLov_y0JNSp_qUD/images/console-earning-4.webp?w=1650&fit=max&auto=format&n=xCLov_y0JNSp_qUD&q=85&s=eacd66d06e5634340a3136570b723ba8 1650w, https://mintcdn.com/vastai-80aa3a82/xCLov_y0JNSp_qUD/images/console-earning-4.webp?w=2500&fit=max&auto=format&n=xCLov_y0JNSp_qUD&q=85&s=6afe4a35c16c1e07bf5d6e297e31fc23 2500w" />
|
||
</Frame>
|
||
|
||
## Common Questions
|
||
|
||
### How can I have earnings as a Vast user?
|
||
|
||
You can generate earnings by gaining Vast credit through template creaton via our referral program. You can find more information about Vast's referral program [here](/documentation/reference/referral-program).
|
||
|
||
|
||
# Tax Guide for Hosts
|
||
Source: https://docs.vast.ai/documentation/host/guide-to-taxes
|
||
|
||
|
||
|
||
<script
|
||
type="application/ld+json"
|
||
dangerouslySetInnerHTML={{
|
||
__html: JSON.stringify({
|
||
"@context": "https://schema.org",
|
||
"@type": "FAQPage",
|
||
"mainEntity": [
|
||
{
|
||
"@type": "Question",
|
||
"name": "What is Stripe Express, and how do I access it?",
|
||
"acceptedAnswer": {
|
||
"@type": "Answer",
|
||
"text": "Stripe Express allows you to update your tax information, manage tax forms, and track your earnings. If you're working with Vast.ai and earned $600 or more (within the calendar year in the US), Stripe will send an email inviting you to create an account and log in to Stripe Express."
|
||
}
|
||
},
|
||
{
|
||
"@type": "Question",
|
||
"name": "When will I receive my 1099?",
|
||
"acceptedAnswer": {
|
||
"@type": "Answer",
|
||
"text": "Your 1099 tax form will be sent to you by January 31st. Starting November 1st, Stripe will email you instructions on how to set up e-delivery and create a Stripe Express account. Before mid January, confirm your tax information is correct via Stripe Express. By January 31st, your 1099 will be available to download through Stripe Express or mailed to you if you don't consent to e-delivery."
|
||
}
|
||
},
|
||
{
|
||
"@type": "Question",
|
||
"name": "I earned enough to need a 1099 form. Why haven't I received an email from Stripe?",
|
||
"acceptedAnswer": {
|
||
"@type": "Answer",
|
||
"text": "If you earned enough to need a 1099 form, you should have received an email from Stripe. Check your spam/junk mail folder for an email titled 'Get your Vast.ai 2023 tax forms faster by enabling e-delivery'. Vast.ai may not have your most current email address on file, or the email address associated with your account may be incorrect, missing, or unable to receive mail."
|
||
}
|
||
},
|
||
{
|
||
"@type": "Question",
|
||
"name": "Will I receive a 1099 form?",
|
||
"acceptedAnswer": {
|
||
"@type": "Answer",
|
||
"text": "If you earned less than $600 over the course of the year, you may not receive a 1099 form unless you meet a threshold in your state. If your state has a filing threshold lower than $600, you might receive a 1099 form. You can check your state's requirements for 1099 state requirements."
|
||
}
|
||
},
|
||
{
|
||
"@type": "Question",
|
||
"name": "Is VAT deducted for European businesses?",
|
||
"acceptedAnswer": {
|
||
"@type": "Answer",
|
||
"text": "Vast is located in California. We do not do anything with/about VAT currently."
|
||
}
|
||
},
|
||
{
|
||
"@type": "Question",
|
||
"name": "Is VAT specified on the invoice?",
|
||
"acceptedAnswer": {
|
||
"@type": "Answer",
|
||
"text": "Vast is located in California. We do not do anything with/about VAT currently."
|
||
}
|
||
}
|
||
]
|
||
})
|
||
}}
|
||
/>
|
||
|
||
Disclaimer: As an independent contractor, you are responsible for keeping track of your earnings and accurately reporting them in tax filings. If you have any questions about what to report on your taxes, you should consult with a tax professional. Vast.ai cannot provide you with tax advice nor can we verify the accuracy of any publicly available tax guidance online.
|
||
|
||
Keep in mind: Vast.ai does not automatically withhold taxes. We calculate the subtotal of your earnings based on the date the earnings were deposited.
|
||
|
||
# International Hosts
|
||
|
||
Vast.ai does not provide any tax documents or tax advice to hosts that reside and have their machines located outside the United States.
|
||
|
||
# United States
|
||
|
||
If you earned \$600 or more in 2023 on the Vast.ai platform as a host, Vast.ai will send a 1099-MISC or 1099-K form to you either through our partner Stripe Connect, PayPal or another method. If you have a question or issue, email us at [contact@vast.ai](mailto:contact@vast.ai).
|
||
|
||
## Wise
|
||
|
||
If you use Wise to receive payments from Vast.ai, **we will need your tax information in order to send a 1099 form.** Here is the portal to submit your W9 tax information: [https://vastai.app.box.com/f/bff8fca18a3145beb34e8075ffa5dec3](https://vastai.app.box.com/f/bff8fca18a3145beb34e8075ffa5dec3)
|
||
|
||
We will be sending emails to anyone who has not submitted tax information. Non compliance could result it suspending payouts.
|
||
|
||
Once the W9 form is submitted and received, we will send out the 1099 form to the email that received payments on Wise.
|
||
|
||
## PayPal
|
||
|
||
PayPal will issue 1099-K tax forms to all income paid through their platform. For more information, see: [https://www.paypal.com/us/cshelp/article/help1131](https://www.paypal.com/us/cshelp/article/help1131)
|
||
[https://www.paypal.com/us/cshelp/article/help970](https://www.paypal.com/us/cshelp/article/help970)
|
||
|
||
## Stripe Connect
|
||
|
||
For hosts paid via Stripe Connect, Stripe will send email to collect tax information including SSN/EIN and then issue a 1099-MISC form by January 31st. See details in the below FAQ. The machine rental earnings will be reported as BOX 1 RENTS on the 1099-MISC form.
|
||
|
||
## Stripe Connect FAQ
|
||
|
||
### What is Stripe Express, and how do I access it?
|
||
|
||
Stripe Express allows you to update your tax information, manage tax forms, and track your earnings. If you’re working with Vast.ai and earned \$600 or more (within the calendar year in the US), Stripe will send an email inviting you to create an account and log in to Stripe Express.
|
||
|
||
### Which email address does Stripe use to send Stripe Express invitations?
|
||
|
||
Stripe uses the email information associated with your Vast.ai account to send you an invitation to sign up for Stripe Express.
|
||
|
||
If you’re unable to find that email, head to this Support site page where you can request a new link to be sent to your email. If you still are not able to locate your invite email, please reach out to Vast.ai support for help updating your email address and getting a new invite email.
|
||
|
||
### When will I receive my 1099?
|
||
|
||
Your 1099 tax form will be sent to you by January 31st, 2024 (note: paper forms delivered by postal delivery might take up to 10 additional business days).
|
||
|
||
Starting November 1st, 2023: Stripe will email you instructions on how to set up e-delivery and create a Stripe Express account. If you haven’t already, you’ll need to complete these steps to access your 1099 tax form electronically.
|
||
Before mid January: Confirm your tax information (e.g., name, address, and SSN or EIN) is correct via Stripe Express.
|
||
By January 31st, 2024:
|
||
Your 1099 tax form will be available to download through Stripe Express.
|
||
Your 1099 tax form will be mailed to you if you don’t receive an email from Stripe or don’t consent to e-delivery. Please allow up to 10 business days for postal delivery.
|
||
Vast.ai will file your 1099 tax form with the IRS and relevant state tax authorities.
|
||
April 15, 2024: IRS deadline to file taxes. You’ll need your 1099 tax form to file your taxes.
|
||
In January, we strongly suggest that you make sure all of your tax filing details and delivery preferences are up to date in Stripe Express. Your name, address, and Taxpayer Identification Number (Social Security Number /Employer Identification Number) are of primary importance.
|
||
|
||
### I earned enough to need a 1099 form in 2023. Why haven’t I received an email from Stripe?
|
||
|
||
If you earned enough to need a 1099 form in 2023, you should have received an email from Stripe by mid-January 2024. Emails for pre-filing confirmation will be sent out starting Nov 1, 2023 - this is separate from the email you’ll receive when your form is filed by the platform in January.
|
||
|
||
If you can’t find an email from Stripe, it’s possible that:
|
||
|
||
* The email may be in your spam/junk mail folder. Please search your inbox for an email titled: “Get your Vast.ai 2023 tax forms faster by enabling e-delivery”.
|
||
* Vast.ai does not have your most current email address on file. Please check any other email addresses you may have used to sign up for Vast.ai, or reach out to Vast.ai to update your email and have an invite email sent to you.
|
||
* The email address associated with your Vast.ai account is incorrect, missing, or unable to receive mail.
|
||
|
||
You may not have received an invitation for other reasons, such as:
|
||
|
||
* You earned less than the threshold for your form type.
|
||
* Your email address on file is incorrect, missing, or unable to receive email.
|
||
* Your specific account is unsupported on Stripe Express (in uncommon situations where multiple users are sharing the same account, or the same email address is being used on more than 20 accounts)
|
||
|
||
### Will I receive a 1099 form?
|
||
|
||
If you earned less than $600 over the course of the year, you may not receive a 1099 form and one won’t be generated for you unless you meet a threshold in your state. If your state has a filing threshold lower than $600, you might receive a 1099 form.
|
||
|
||
You can check your state’s requirements here: View [1099 state requirements](https://stripe.com/docs/connect/tax-forms-state-requirements#check-1099-form-requirements-by-state).
|
||
|
||
## Common Questions
|
||
|
||
### Is VAT deducted for European businesses?
|
||
|
||
Vast is located in California. We do not do anything with/about VAT currently.
|
||
|
||
### Is VAT specified on the invoice?
|
||
|
||
Vast is located in California. We do not do anything with/about VAT currently.
|
||
|
||
|
||
# Hosting Overview
|
||
Source: https://docs.vast.ai/documentation/host/hosting-overview
|
||
|
||
|
||
|
||
<script
|
||
type="application/ld+json"
|
||
dangerouslySetInnerHTML={{
|
||
__html: JSON.stringify({
|
||
"@context": "https://schema.org",
|
||
"@type": "FAQPage",
|
||
"mainEntity": [
|
||
{
|
||
"@type": "Question",
|
||
"name": "How do I host my machine(s) on Vast? How can I rent my PC?",
|
||
"acceptedAnswer": {
|
||
"@type": "Answer",
|
||
"text": "Hosting on Vast will require some Linux knowledge, as you will be maintaining a server. The setup guide is available at vast.ai/console/host/setup/. After the first paragraph of the guide there is a link to the hosting agreement. Once you agree, your account will be converted to a hosting account."
|
||
}
|
||
},
|
||
{
|
||
"@type": "Question",
|
||
"name": "How do I get an invoice?",
|
||
"acceptedAnswer": {
|
||
"@type": "Answer",
|
||
"text": "You can create an invoice by going to the Billing page, and then click the box for Include Charges under Generate Billing History."
|
||
}
|
||
},
|
||
{
|
||
"@type": "Question",
|
||
"name": "How do I check if my machine is listed?",
|
||
"acceptedAnswer": {
|
||
"@type": "Answer",
|
||
"text": "If your machine seems unlisted, try this command: vastai search offers 'machine_id=MACHINE_ID verified=any' to see if the CLI finds it. If there is a result, your machine is properly listed."
|
||
}
|
||
},
|
||
{
|
||
"@type": "Question",
|
||
"name": "Can you verify my machine?",
|
||
"acceptedAnswer": {
|
||
"@type": "Answer",
|
||
"text": "Verification is conducted in a randomized and automated fashion. We only run manual verification tests for datacenters and high end machines."
|
||
}
|
||
},
|
||
{
|
||
"@type": "Question",
|
||
"name": "How does verification work?",
|
||
"acceptedAnswer": {
|
||
"@type": "Answer",
|
||
"text": "Verification is mostly for higher end machines, mining rigs may never be verified. Verification is also based on supply vs demand and is machine/gpu specific. Right now the only machines which can expect fast verification are $10k+: H100 or A100 80GB should be tested quickly in a day or so. 8x4090, 4xA6000 should be tested in less than a week. For everything else we run more random auto verification roughly about once a week."
|
||
}
|
||
},
|
||
{
|
||
"@type": "Question",
|
||
"name": "How do I gain datacenter status?",
|
||
"acceptedAnswer": {
|
||
"@type": "Answer",
|
||
"text": "To apply for datacenter status we have a number of requirements. There is a minimum number of servers and the datacenter where the equipment is located will need to have a third party certification such as ISO 27001. Please read the complete requirement list and application instructions in the datacenter status documentation."
|
||
}
|
||
},
|
||
{
|
||
"@type": "Question",
|
||
"name": "How do I uninstall vast from my machine?",
|
||
"acceptedAnswer": {
|
||
"@type": "Answer",
|
||
"text": "You can use the uninstall script at https://s3.amazonaws.com/vast.ai/uninstall"
|
||
}
|
||
},
|
||
{
|
||
"@type": "Question",
|
||
"name": "Why is my machine not listed?",
|
||
"acceptedAnswer": {
|
||
"@type": "Answer",
|
||
"text": "You won't be able to see it on the GUI right away, but you can search using the CLI."
|
||
}
|
||
},
|
||
{
|
||
"@type": "Question",
|
||
"name": "How much can I make hosting on Vast?",
|
||
"acceptedAnswer": {
|
||
"@type": "Answer",
|
||
"text": "To get an understanding of prices, the best place is 500farms which is a third party website that monitors Vast listings at https://500.farm/vastai/charts/d/a6RgL05nk/vast-ai-stats"
|
||
}
|
||
},
|
||
{
|
||
"@type": "Question",
|
||
"name": "Why did the reliability on my machine decrease?",
|
||
"acceptedAnswer": {
|
||
"@type": "Answer",
|
||
"text": "If the machine loses connection or if there is a client instance that does not want to start the machine's reliability will drop."
|
||
}
|
||
}
|
||
]
|
||
})
|
||
}}
|
||
/>
|
||
|
||
Vast is a GPU marketplace. Hosts sell GPU resources on the marketplace. Hosts are responsible for:
|
||
|
||
* Setup: installing Ubuntu, creating disk partitions, installing NVIDIA drivers, opening network ports on the router and installing the Vast hosting software.
|
||
* Testing and troubleshooting all issues that can arise, such as driver conflicts, errors, bad GPUs, and bad network ports. **Vast does not offer support for getting your machine working.** There is a [host discord](https://discord.gg/hSuEbSQ4X8) with helpful members and the host-general channel is searchable for specific errors.
|
||
* Managing the listings and GPU offers for rentals, including setting pricing and end dates for the offers
|
||
* Planning for maintenance so that no client jobs are affected
|
||
|
||
## Account setup and hosting agreement
|
||
|
||
You must create a new account for hosting. If you are using Vast.ai as a client, do not use the same account. A single client and hosting account is not supported and you will quickly run into issues.
|
||
|
||
Once your account is created, open the [host setup guide](https://cloud.vast.ai/host/setup/). There is a link in the first paragraph to the hosting agreement. Read through the agreement. Once you accept, your account will then be converted to a hosting account. You will notice there is now a link to Machines in the navigation, along with some other changes. Your account can now list machines that are running the daemon software.
|
||
|
||
## Machine setup
|
||
|
||
The [host setup guide](https://cloud.vast.ai/host/setup/) is the official documentation for setting up a machine on Vast.ai. Read through each section closely.
|
||
|
||
Common issues to check:
|
||
|
||
* Make sure to test the networking. Clients require open ports to directly connect to the machine for most jobs.
|
||
* Make sure to read the section on IOMMU if you have an AMD EPYC system.
|
||
* Make sure to disable auto-updates so that your machine doesn't drop a client job to update a driver.
|
||
|
||
Once you are ready to list your machine, come back to this guide to understand pricing and listing the rental contract.
|
||
|
||
## General concepts
|
||
|
||
Clients have high expectations coming from AWS or GCP.
|
||
As a host, plan to offer 100% uptime for your machine during the contracted period.
|
||
Expect that the GPU is going to be used at close to max capacity for the rental period.
|
||
Ensure that your Internet, power source and heat dissipation systems are all functioning and that you have thought through how hosting will affect each one of those items.
|
||
|
||
## Listings and Contracts
|
||
|
||
Hosts can create machine *listings* (offers) through the CLI command list machine or the machine control panel GUI on the host machines page.
|
||
|
||
The main listing parameters include:
|
||
|
||
* the pricing for GPUs,internet,storage
|
||
* the discount schedule param which determines the price difference between [on-demand](/documentation/instances/rental-types) and [reserved](/documentation/instances/rental-types) instances
|
||
* the min bid price for [interruptible](/documentation/instances/rental-types) instances
|
||
* the min\_gpu param controlling 'slicing' (explained below)
|
||
* the end/expiration date which determines how long the listing lasts
|
||
|
||
The listing offer is good until the end date.
|
||
When a client creates an instance on your machine, this creates a *contract* from your listing.
|
||
|
||
Once you list and get rental contracts, it is very important to honor the terms of the contract until the end date.
|
||
|
||
## The Rental Contract
|
||
|
||
By listing your machine or compute services, you are offering up a rental contract to potential clients.
|
||
|
||
Once a client accepts this listing, you and the client have entered into a rental agreement - a contract.
|
||
|
||
As the provider you are *promising* to provide the services as advertized in your listing:
|
||
|
||
* the provider must provide the hardware/services according to all the advertized specs
|
||
* the hardware can not be used for any other purposes
|
||
* the client's data must be isolated and protected according to the data protection policy
|
||
* the advertized services must be provided up until the end date (contract expiration)
|
||
|
||
For full details, see the [hosting agreement](https://cloud.vast.ai/host/agreement) and [Service Level Agreement](https://cloud.vast.ai/host/SLA_default).
|
||
|
||
### Expiration date (end date)
|
||
|
||
The expiration date can be set in the hosting interface by clicking on the date field under expiration and selecting a date for when the listing contract will expire.
|
||
The CLI command to 'list machine' includes a field for end date, which is the same date.
|
||
|
||
Make sure to set an end date **before** listing your machine, or else the listing will not expire.
|
||
|
||
The "client end date" is the date of the longest client contract on a given machine.
|
||
|
||
### Min GPU
|
||
|
||
When clicking on the set pricing button, there is a min GPU field. The min GPU field allows you to set the smallest grouping of GPU rentals available on your machine in powers of 2, or down to 1. For example, if you have an 8X 3090 and set min gpu to 2, clients can create instances with 2, 4, or 8 GPUs. If you set min gpus to 1, then clients can make instances with 1, 2, 4 or 8 GPUs.
|
||
|
||
### On-demand Price
|
||
|
||
The on-demand price is the price per hour for the GPU rental. On demand rentals are the highest priority and if met will stop interruptibles.
|
||
|
||
### Interruptible min price (optional)
|
||
|
||
The interruptible price allows for the host to set the minimum interruptible price for a client to rent. Interruptibles work in a bidding system: clients set a bid price for their instance; the current highest bid is the instance that runs, the others are paused. [more info](https://vast.ai/faq#RentalTypes)
|
||
|
||
### Reserved Discount Pricing Factor
|
||
|
||
Reserved Instance Discounts are a feature for clients which allows them to rent machines over a long period of time at a reduced price. The Reserved Discount Pricing Factor represents the maximum possible discount a user can achieve on your machines.
|
||
|
||
The reserved discount pricing is determined by the hosts. If you intend to encourage a long term rental this is a factor that you may want to research. Use the filters in the UI to select reserved.
|
||
|
||
<img src="https://mintcdn.com/vastai-80aa3a82/KWV1TCiq0zjC57hU/images/hosting-overview.webp?fit=max&auto=format&n=KWV1TCiq0zjC57hU&q=85&s=f3fdfe57c8e4b8519f802e86a0aeba08" alt="" data-og-width="800" width="800" data-og-height="567" height="567" data-path="images/hosting-overview.webp" data-optimize="true" data-opv="3" srcset="https://mintcdn.com/vastai-80aa3a82/KWV1TCiq0zjC57hU/images/hosting-overview.webp?w=280&fit=max&auto=format&n=KWV1TCiq0zjC57hU&q=85&s=9af1a7adcc44cafd76c66dee71a92eea 280w, https://mintcdn.com/vastai-80aa3a82/KWV1TCiq0zjC57hU/images/hosting-overview.webp?w=560&fit=max&auto=format&n=KWV1TCiq0zjC57hU&q=85&s=b4b05229a7294fa8743c4c610458a083 560w, https://mintcdn.com/vastai-80aa3a82/KWV1TCiq0zjC57hU/images/hosting-overview.webp?w=840&fit=max&auto=format&n=KWV1TCiq0zjC57hU&q=85&s=b81fe10a66bcfc78f52a43bc89ab85a7 840w, https://mintcdn.com/vastai-80aa3a82/KWV1TCiq0zjC57hU/images/hosting-overview.webp?w=1100&fit=max&auto=format&n=KWV1TCiq0zjC57hU&q=85&s=4d7229296896497003d98beaa6d2d282 1100w, https://mintcdn.com/vastai-80aa3a82/KWV1TCiq0zjC57hU/images/hosting-overview.webp?w=1650&fit=max&auto=format&n=KWV1TCiq0zjC57hU&q=85&s=dde55d1fd81fc882e4aaf1b212d1dbdf 1650w, https://mintcdn.com/vastai-80aa3a82/KWV1TCiq0zjC57hU/images/hosting-overview.webp?w=2500&fit=max&auto=format&n=KWV1TCiq0zjC57hU&q=85&s=469ee88db29577051ab67f6597694cdb 2500w" />
|
||
|
||
Once that filter is selected, hosts who offer that discount will become easily visible. Hover over the rental button to see the discount rates that are offered. The original vs. the updated price will be shown as denoted by a stikethrough in the original amount:
|
||
|
||
<img src="https://mintcdn.com/vastai-80aa3a82/KWV1TCiq0zjC57hU/images/hosting-overview-2.webp?fit=max&auto=format&n=KWV1TCiq0zjC57hU&q=85&s=87a822822d9660ecf398847f11e04d14" alt="" data-og-width="800" width="800" data-og-height="698" height="698" data-path="images/hosting-overview-2.webp" data-optimize="true" data-opv="3" srcset="https://mintcdn.com/vastai-80aa3a82/KWV1TCiq0zjC57hU/images/hosting-overview-2.webp?w=280&fit=max&auto=format&n=KWV1TCiq0zjC57hU&q=85&s=bd299ab30a37dc019cefedf90be23eac 280w, https://mintcdn.com/vastai-80aa3a82/KWV1TCiq0zjC57hU/images/hosting-overview-2.webp?w=560&fit=max&auto=format&n=KWV1TCiq0zjC57hU&q=85&s=fdbcc62ef41c0655eb5c89fb996d21ad 560w, https://mintcdn.com/vastai-80aa3a82/KWV1TCiq0zjC57hU/images/hosting-overview-2.webp?w=840&fit=max&auto=format&n=KWV1TCiq0zjC57hU&q=85&s=c8a482c4bf575d991db3a3ec1e21cd20 840w, https://mintcdn.com/vastai-80aa3a82/KWV1TCiq0zjC57hU/images/hosting-overview-2.webp?w=1100&fit=max&auto=format&n=KWV1TCiq0zjC57hU&q=85&s=73f4c9ad885849d9a4c2d1384f8dfbe9 1100w, https://mintcdn.com/vastai-80aa3a82/KWV1TCiq0zjC57hU/images/hosting-overview-2.webp?w=1650&fit=max&auto=format&n=KWV1TCiq0zjC57hU&q=85&s=6d2008b1bbfc628261674032ba02d977 1650w, https://mintcdn.com/vastai-80aa3a82/KWV1TCiq0zjC57hU/images/hosting-overview-2.webp?w=2500&fit=max&auto=format&n=KWV1TCiq0zjC57hU&q=85&s=d92a17a9ab1721968dafcbeef29dddb2 2500w" />
|
||
|
||
This discount is not static, but rather scales over time that the user rents the machine for. These values are determined by the individual host(s).
|
||
|
||
As a host, you can set this number yourself to 0 if you wish to opt out of this feature.
|
||
|
||
## Volume Contracts
|
||
|
||
In addition to GPU contracts, hosts can now offer volume contracts on machines. This is a contract for storage space, and can be priced separately from GPU contracts. The space allocated for storage contracts is in the same pool of space as that for GPU contracts, meaning that space will not be subtracted from available offers unless it is in use. 
|
||
When a client rents a volume listing, they rent a subset of the total space set for the listing, up to the total amount.
|
||
|
||
### Storage Usage
|
||
|
||
Allocated storage (that is, storage in use by client contracts) is subtracted from the total storage available on a machine, and split up proportionally among the machines GPUs in remaining ask contracts.
|
||
|
||
For example, on a machine with 1000Gb of disk available and 2 GPUs, a host can create a volume listing of up to 1000 Gb. 
|
||
|
||
If they create a volume listing of 500 Gb, and it is not rented, the machine will be available for rent with 2 offers of 1xGPU 500Gb and 1 offer of 2xGPU 1000Gb. 
|
||
|
||
If 200 Gb of the volume contract are rented, the GPU offers will reduce to 2 1xGPU 400Gb offers and 1 2xGPU 800Gb offer. The volume contract will still remain, as there is still available space, and update to offer 300Gb. 
|
||
|
||
Similarly, if stored instances on the machine are taking up 800Gb, the volume offer will reduce to 200Gb.
|
||
|
||
If stored instances are only taking up 400 Gb, the volume offer will not update, as there is still enough space on the machine to cover the volume offer.
|
||
|
||
### Listing Volumes
|
||
|
||
By default, volume offers will be listed with contract listings at the same disk price for half of the available space on the machine. Only rented space will impact the amount of space available for contract offers, not the space in the listing itself. You can control the amount of space listed with the -v CLI option, and the price of the space with the -z option.
|
||
|
||
Space is listed in Gigabytes, and price in \$/Gb/Month.
|
||
|
||
```text Text theme={null}
|
||
vastai list machine <machine_id> -v <space> -z <price> -g .5 -e "12/23/2027" -r 0 -m 1
|
||
```
|
||
|
||
You can also directly list available space for volume contracts by running the `vastai list volume` command.
|
||
|
||
```text Text theme={null}
|
||
vastai list volume <machine_id> -s <space> -p <price>
|
||
```
|
||
|
||
<Warning>
|
||
Volume offer end dates **must** align with normal contract offer end dates. 
|
||
Setting an end date on a volume will not update if there is an existing contract offer.
|
||
Setting a contract offer end date will update volume offer end dates.
|
||
</Warning>
|
||
|
||
Volume contracts will be unlisted when the machine is unlisted. They can additionally be unlisted with the command:
|
||
|
||
```text Text theme={null}
|
||
vastai unlist volume <volume_id>
|
||
```
|
||
|
||
### Out of sync Contracts
|
||
|
||
When a client deletes a volume, the space is automatically freed on the machine. If the machine is offline at this time, there is a job that runs hourly to free the space. If for some reason this is not working, or if you want to free the space automatically, you can run the command
|
||
|
||
```text Text theme={null}
|
||
vastai cleanup machine <machine_id>
|
||
```
|
||
|
||
This will automatically remove expired/deleted contracts from the machine, and available storage will update on offers.
|
||
|
||
## Extending contracts
|
||
|
||
To extend the current contracts for all clients on a given machine, change the expiration date to a later time with the same or lower pricing.
|
||
|
||
If you have raised the pricing, you cannot extend the current contract.
|
||
|
||
## Testing your own machine
|
||
|
||
It is vital to test your own machine to ensure the ports and software is running smoothly.
|
||
|
||
### Setup a separate client account
|
||
|
||
There are two supported ways to test your own machine. If you want to use the website GUI, you will need to setup a new account on a different email address, add a credit card and then find your machine and create instances on it like a client. This has the benefit of showing you the entire client experience. Testing the recommended Pytorch template is vital to ensure that SSH and Jupyter are working properly.
|
||
|
||
### Use the CLI (preferred)
|
||
|
||
The preferred method of testing your own machine is to run the [CLI](https://cloud.vast.ai/cli/). For Windows users, we suggest setting up [WSL](https://learn.microsoft.com/en-us/windows/wsl/install) which will require you to install Ubuntu on your Windows machine and change your bios settings to allow virtualization. Then you can start an Ubuntu terminal and run the CLI.
|
||
|
||
To rent your own machine you will need to first search the offers with your machine ID to find the ID and then create an instance using that ID. The show machine command will show all your connected machines.
|
||
|
||
```text Text theme={null}
|
||
./vastai show machines
|
||
```
|
||
|
||
Then for each machine id you will need to find the available instance IDs.
|
||
|
||
```text Text theme={null}
|
||
./vastai search offers 'machine_id=12345 verified=any'
|
||
```
|
||
|
||
Replace 12345 with your actual machine ID in question.
|
||
You can see the number of available listings as well as information about the machine. This is the fastest way to also see all the offers listed for a given machine.
|
||
The website GUI stacks similar offers and so it is not easy to see all the listings for a given machine. That is not a problem for the CLI.
|
||
|
||
Take the ID number from the first column and use that to create a free instance on your own machine. This example loads the latest pytorch image along with both jupyter and ssh direct launch modes.
|
||
|
||
```text Text theme={null}
|
||
./vastai create instance <ID> --image pytorch/pytorch:latest --jupyter --direct --env '-e TZ=PDT -p 22:22 -p 8080:8080'
|
||
```
|
||
|
||
You can then look at your [instance tab](https://cloud.vast.ai/instances/) to make sure that pytorch loaded correctly along with jupyter and ssh. Click on the \<\_ button to get the ssh command to connect to the instance. Test the direct ssh command. Click on the open button to test jupyter. If the button is stuck "connecting" then there is most likely a problem with the port configuration on the router in front of the machine. Once finished, destroy the instance.
|
||
|
||
## Maintenance
|
||
|
||
The proper way to perform maintenance on your machine is to wait until all active contracts have expired or the machine is vacant.
|
||
|
||
Unlisting will prevent new contracts from starting on the machine. However if you have a current client rental, you could set the end date to the client end date to allow for other clients to create instances on that machine that expire at the same date. Once the end date is reached, you can then unlist the machine and then perform maintenance.
|
||
|
||
For unplanned or unscheduled maintenance, use the CLI and the schedule maint command. That will notify the client that you **have** to take the machine down and that they should save their work. You can specify a date and duration.
|
||
|
||
## Uninstalling
|
||
|
||
To uninstall, use the Vast uninstall script located at [https://s3.amazonaws.com/vast.ai/uninstall](https://s3.amazonaws.com/vast.ai/uninstall).
|
||
|
||
## Common Questions
|
||
|
||
### How do I host my machine(s) on Vast? How can I rent my PC?
|
||
|
||
Hosting on Vast will require some Linux knowledge, as you will be maintaining a server. Our setup guide is [here](https://vast.ai/console/host/setup/). After the first paragraph of the guide there is a link to the hosting agreement. Once you agree, your account will be converted to a hosting account. You can review our [FAQ](https://vast.ai/faq/#Hosting-General) that answers many of your hosting questions.
|
||
|
||
### How do I get an invoice?
|
||
|
||
You can create an invoice by going to the "Billing" page, and then click the box for "Include Charges" under "Generate Billing History".
|
||
|
||
### How do I check if my machine is listed?
|
||
|
||
If your machine seems unlisted, try this command `vastai search offers 'machine_id=MACHINE_ID verified=any'` to see if the CLI finds it. If there is a result, your machine is properly listed
|
||
|
||
### Can you verify my machine?
|
||
|
||
Verification is conducted in a randomized and automated fashion. We only run manual verification tests are for datacenters and high end machines.
|
||
|
||
### How does verification work?
|
||
|
||
Verification is mostly for higher end machines, mining rigs may never be verified.
|
||
Verification is also based on supply vs demand and is machine/gpu specific.
|
||
Right now the only machines which can expect fast verification are \$10k+:
|
||
H100 or A100 80GB - if not tested quickly in a day or so let us know.
|
||
8x4090, 4xA6000 - should be tested in less than a week, especially if you have a number of them
|
||
The only manual verification tests are for datacenters and high end machines.
|
||
For everything else we run more random auto verification roughly about once a week.
|
||
For datacenter partner inquiries email us at [contact@vast.ai](mailto:contact@vast.ai) directly.
|
||
|
||
### How do I gain datacenter status?
|
||
|
||
To apply for datacenter status we have a number of requirements. There is a minimum number of servers and the datacenter where the equipment is located will need to have a third party certification such as ISO 27001. Please read the complete requirement list and application instructions [here](/documentation/host/datacenter-status).
|
||
|
||
### How do I uninstall vast from my machine?
|
||
|
||
You can use the [uninstall script](https://s3.amazonaws.com/vast.ai/uninstall)
|
||
|
||
### Help I am getting this error on my machine?
|
||
|
||
For help with machine setup, specific questions about hardware, and for errors or other issues, go to [our discord](https://discord.gg/hSuEbSQ4X8).
|
||
|
||
### Why is my machine not listed?
|
||
|
||
You won't be able to see it on the GUI right away, but you can search using the [CLI](/documentation/instances/managing-instances).
|
||
|
||
### Can I send a message to a customer using my machine letting them know that I fixed an issue that they were having?
|
||
|
||
No, there is not an established process for hosts to message customers on Vast.
|
||
|
||
### I fear I will decrease my reliability from restarting my machine and potentially lose my verification.
|
||
|
||
Your machine's reliability does not directly affect your verification standing. Verification is independent of reliability. Though, whenever taking your machine offline and working on it you should procede with caution as it is easy to introduce new issues or errors that will cause your machine to be de-verified.
|
||
|
||
### How much can I make hosting on Vast?
|
||
|
||
To get an understanding of prices, the best place is 500farms which is a third party website that monitors Vast listings. The link is [here](https://500.farm/vastai/charts/d/a6RgL05nk/vast-ai-stats).
|
||
|
||
### Why did the reliability on my machine decrease?
|
||
|
||
If the machine loses connection or if there is a client instance that does not want to start the machine's reliability will drop.
|
||
|
||
### How do I minimize my reliability dropping?
|
||
|
||
Do not take your machine offline. If you must take your machine offline, minimize the time you have it offline. Note: reliability takes into account the average earnings of the machine, and machines with less earnings get penalized less from offline time.
|
||
|
||
### If someone has already used an image on my machine does redownload happen or is the system smart?
|
||
|
||
Prior images are cached.
|
||
|
||
### My storage for clients is somehow full. I just have a few jobs stored in my server and most of them are old and didn't delete once the job finished. A lot of them are really old, can I remove them to free up some space?
|
||
|
||
We suggest that you try cleaning up the docker build cache, as it sometimes frees up far more space than it claims. You can also clean up old unused images.
|
||
|
||
### I can't find my machine?
|
||
|
||
If your machine seems unlisted, try this command `vastai search offers 'machine_id=MACHINE_ID verified=any'` to see if the CLI finds it. If there is a result, your machine is properly listed.
|
||
|
||
### Why can't I see my machine on the Search page in the console?
|
||
|
||
There are over 10,000+ listings on Vast, and search only displays a small subset. You will usually not be able to find any one specific machine through most normal searches. This is expected and intentional behavior of our system. You can use `vastai search offers 'machine_id=MACHINE_ID verified=any'`, to see your machine's listing. If you want to get an understanding of the machines ranking above yours you can use very narrow filters to see what similar machines are ranking above you. For example, something like: `vastai search offers 'gpu_name=RTX_4090 cpu_ram>257 cpu_ram<258'` is a decently constrained search that will most likely include a given machine you are looking for (that fits these filters) amongst others that are similar. Keep in mind our Auto Sort that `search offers` defaults to is comprised of both ranking various factors as well as an element of randomness.
|
||
|
||
|
||
# Host Payouts
|
||
Source: https://docs.vast.ai/documentation/host/payment
|
||
|
||
|
||
|
||
<script
|
||
type="application/ld+json"
|
||
dangerouslySetInnerHTML={{
|
||
__html: JSON.stringify({
|
||
"@context": "https://schema.org",
|
||
"@type": "FAQPage",
|
||
"mainEntity": [
|
||
{
|
||
"@type": "Question",
|
||
"name": "When will I get paid?",
|
||
"acceptedAnswer": {
|
||
"@type": "Answer",
|
||
"text": "It takes 2 weeks to get your first payout. The pay period ends and goes pending, then you are paid for that pay period the following Friday."
|
||
}
|
||
},
|
||
{
|
||
"@type": "Question",
|
||
"name": "Why does it show paid on my invoice when I don't see the payment in my account yet?",
|
||
"acceptedAnswer": {
|
||
"@type": "Answer",
|
||
"text": "The paid status on invoices is marked as such when we send the payment list out to Paypal, Wise, Stripe, etc. This does not accurately represent the payment's status within Paypal, Wise, Stripe, etc., but rather shows the status of the payment solely within our system."
|
||
}
|
||
},
|
||
{
|
||
"@type": "Question",
|
||
"name": "Can I generate an invoice?",
|
||
"acceptedAnswer": {
|
||
"@type": "Answer",
|
||
"text": "You can create an invoice by going to the Billing page, and then click the box for Include Charges under Generate Billing History."
|
||
}
|
||
},
|
||
{
|
||
"@type": "Question",
|
||
"name": "How much can I make hosting on Vast?",
|
||
"acceptedAnswer": {
|
||
"@type": "Answer",
|
||
"text": "To get an understanding of prices, the best place is 500farms which is a third party website that monitors Vast listings. The link is https://500.farm/vastai/charts/d/a6RgL05nk/vast-ai-stats"
|
||
}
|
||
}
|
||
]
|
||
})
|
||
}}
|
||
/>
|
||
|
||
## Common Questions
|
||
|
||
### When will I get paid?
|
||
|
||
It takes 2 weeks to get your first payout. The pay period ends and goes pending, then you are paid for that pay period the following Friday.
|
||
|
||
### Why does it show paid on my invoice when I don't see the payment in my account yet?
|
||
|
||
The paid status on invoices is marked as such when we send the payment list out to Paypal, Wise, Stripe, etc. This does not accurately represent the payment's status within Paypal, Wise, Stripe, etc., bu rather shows the status of the payment solely within our system.
|
||
|
||
### Can I generate an invoice?
|
||
|
||
You can create an invoice by going to the "Billing" page, and then click the box for "Include Charges" under "Generate Billing History".
|
||
|
||
### How much can I make hosting on Vast?
|
||
|
||
To get an understanding of prices, the best place is 500farms which is a third party website that monitors Vast listings. The link is [here](https://500.farm/vastai/charts/d/a6RgL05nk/vast-ai-stats).
|
||
|
||
|
||
# Verification Stages
|
||
Source: https://docs.vast.ai/documentation/host/verification-stages
|
||
|
||
|
||
|
||
<script
|
||
type="application/ld+json"
|
||
dangerouslySetInnerHTML={{
|
||
__html: JSON.stringify({
|
||
"@context": "https://schema.org",
|
||
"@type": "HowTo",
|
||
"name": "How to Get Your Machine Verified on Vast.ai",
|
||
"description": "Understanding the verification stages and requirements for getting your machine verified on Vast.ai.",
|
||
"step": [
|
||
{
|
||
"@type": "HowToStep",
|
||
"name": "Meet Minimum Hardware Requirements",
|
||
"text": "Ensure your machine meets minimum guidelines: Ubuntu 18.04 or newer, dedicated machine only, fast reliable internet (at least 10Mbps per machine), 10-series Nvidia GPU or newer supported AMD GPU, at least 1 physical CPU core (2 hyperthreads) per GPU with AVX instruction set support, at least 4GB of system RAM per GPU, fast SSD storage with at least 128GB per GPU, at least 1X PCIE for every 2.5 TFLOPS of GPU performance, all GPUs on the machine must be of the same type, and an open port range mapped to each machine."
|
||
},
|
||
{
|
||
"@type": "HowToStep",
|
||
"name": "Meet Verification Requirements",
|
||
"text": "Ensure your machine meets verification requirements: CUDA version greater than or equal to 12.0, reliability of 90%, at least 3 open ports per GPU (100 recommended), internet download speed of 500 Mb/s, internet upload speed of 500 Mb/s, and GPU RAM of 7 GB."
|
||
},
|
||
{
|
||
"@type": "HowToStep",
|
||
"name": "Run Self-Test",
|
||
"text": "Use the vast cli self-test machine command to see if a machine meets all of the requirements and resolve any issues. This will give you a better chance of getting verified."
|
||
},
|
||
{
|
||
"@type": "HowToStep",
|
||
"name": "Wait for Verification",
|
||
"text": "Verification is mostly for higher end machines. High-end machines ($10k+) like H100 or A100 80GB should be tested quickly in a day or so. 8x4090, 4xA6000 should be tested in less than a week. For other machines, verification is relatively random and runs roughly about once a week. The only manual verification tests are for datacenters and high end machines."
|
||
},
|
||
{
|
||
"@type": "HowToStep",
|
||
"name": "Maintain Verification Status",
|
||
"text": "Once verified, continue to meet requirements and prevent issues that could get you deverified. Watch for red errors on your machine card and investigate and resolve them. Issues with container starting, nvidia-smi related errors, nvml errors, nvidia-container-cli device errors, or bandwidth verification issues could get your machine deverified. If deverified and the issue is resolved, your machine will go from deverified back to unverified."
|
||
}
|
||
]
|
||
})
|
||
}}
|
||
/>
|
||
|
||
Verification follows a transition flow like this: unverified -> verified -> deverified -> unverified -> ....
|
||
|
||
Verification is mostly for higher end machines, mining rigs may never be verified.
|
||
|
||
Right now the only machines which can expect fast verification are \$10k+: H100 or A100 80GB
|
||
|
||
If you have a higher end machine that is not tested quickly in a day or so let us know.
|
||
|
||
8x4090, 4xA6000 - should be tested in less than a week, especially if you have a number of them.
|
||
|
||
For machines that are not high-end machines or machines from datacenters, verification is relatively random even if your unverified machine is meeting these requirements.
|
||
|
||
We run more random auto verification roughly about once a week.
|
||
|
||
The only manual verification tests are for datacenters and high end machines.
|
||
|
||
For datacenter partner inquiries email us at [contact@vast.ai](mailto:contact@vast.ai) directly.
|
||
|
||
You can use the [vast cli](https://github.com/vast-ai/vast-cli) "self-test machine" command to see if a machine meets all of the requirements, resolve any issues, and have a better chance of getting verified.
|
||
|
||
## Unverified
|
||
|
||
These are typically new machines that have not been tested by Vast's team/software.
|
||
|
||
In order for your unverified machine to be verified, it must follow these minimum guidelines:
|
||
|
||
```text Text theme={null}
|
||
Ubuntu 18.04 or newer (required)
|
||
Dedicated machines only - the machine shouldn't be doing other stuff while rented
|
||
Fast, reliable internet: at least 10Mbps per machine.
|
||
10-series Nvidia GPU or MI25 or newer Radeon Instinct series GPU or Radeon VII or Radeon Pro VII or Radeon RX 7900 (GRE/XT/XTX); or Radeon Pro W7900/W7800. Other 6000 series or newer Radeon RX/Pro W series GPUs may be supported; but may not be searchable using standard filters for AMD ROCm.
|
||
At least 1 physical CPU core (2 hyperthreads) per GPU.
|
||
Your CPU must support AVX instruction set (not all lower end CPUs support this).
|
||
At least 4GBM of system RAM per GPU.
|
||
Fast SSD storage with at least 128GB per GPU.
|
||
at least 1X PCIE for every 2.5 TFLOPS of GPU performance.
|
||
All GPUs on the machine must be of the same type.
|
||
An open port range mapped to each machine.
|
||
```
|
||
|
||
The ideal machine will exceed these minimum guidelines, as some workloads require even more CPU, RAM, disk, and PCIE performance. Also keep in mind that everything scales with GPU power, so a 3090 will need more ram, a better cpu, etc, than a 3060.
|
||
Note that changing components that degrade machine performance (e.g, decreasing the number of GPUs, RAM capacity, etc) is not supported after the machine is created, and will result in the machine being deverified. Upgrading the machine is ok (e.g, increasing the number of GPUs, RAM capacity, etc), but it will take some time before the change is reflected in search.
|
||
|
||
In order for your unverified machine to be verified, it must also meet the following minimum requirements:
|
||
|
||
```text Text theme={null}
|
||
CUDA version greater than or equal to 12.0
|
||
Reliability of 90%
|
||
At least 3 open ports per GPU (100 recommended)
|
||
Internet download speed of 500 Mb/s
|
||
Internet upload speed of 500 Mb/s
|
||
GPU RAM of 7 GB
|
||
```
|
||
|
||
## Verified
|
||
|
||
If you've been verified by meeting those minimum requirements and having your machine being randomly selected or having higher end machine(s) or datacenter(s), continue to meet these requirements and try to prevent the issues listed in the Deverified section of this guide.
|
||
|
||
## Deverified
|
||
|
||
Your machine could go from verified -> deverified if an error in your machine is autodetected.
|
||
|
||
If you see a red error on your machine card, you should try to investigate and resolve that because it could get you deverified.
|
||
|
||
Some issues that could get your machine deverified are issues with a container starting in your machine, nvidia-smi related errors, nvml errors, nvidia-container-cli device errors, or issues with verifying the bandwidth of your machine.
|
||
|
||
If the issue is resolved, then your machine will go from deverified -> unverified.
|
||
|
||
|
||
# Finding & Renting Instances
|
||
Source: https://docs.vast.ai/documentation/instances/choosing/find-and-rent
|
||
|
||
Find and rent GPU instances on Vast.ai. Learn how to search, filter, understand offer cards, and configure your instance.
|
||
|
||
The search page is the main portal for finding good machines and creating instances on them.
|
||
|
||
<Note>
|
||
Before renting an instance, you'll need to select a template that defines your Docker image and connection method. If you haven't already, review [Choosing a Template](/documentation/instances/choosing/templates) to understand your options.
|
||
</Note>
|
||
|
||
# Page Walkthrough
|
||
|
||
## Layout
|
||
|
||
You will find various search options on the top and left control bars that allow you to filter for various criteria (location, GPU type and count, various hardware specs, rental params, etc)
|
||
|
||
## Offer card
|
||
|
||
The offer card contains detailed information about the offer available for rent. Once rented, the offer then becomes a contract between you and the host. The offer card details the terms of the contract along with the specs of the available instance.
|
||
|
||
Most of the items on the offer card can be filtered using the search filters. Some of the important parts are the price and the maximum length of the rental (max duration). Hovering over the price details the different prices for GPU rental, storage and bandwidth.
|
||
|
||
### Machine Tiers
|
||
|
||
One important concept is the category of machine which is displayed on the offer card.
|
||
|
||
* Unverified: These are typically new machines that have not been tested by Vast's team and are filtered out of results by default
|
||
* Verified: These machines have passed our internal tests
|
||
* Datacenter: These machines are verified and confirmed to be in a certified datacenter that meets our datacenter criteria. Vast verifies that these machines are in a datacenter with a TIER 2/3 rating or ISO 27001. These offer cards have a blue label and are recommended for production
|
||
|
||
### Card Details
|
||
|
||
<Frame caption="Offer Card">
|
||

|
||
</Frame>
|
||
|
||
All stats shown are the portion of the total machine rented.
|
||
|
||
* Location and Host ID: The general region and ID of the host. Datacenter machines are labeled in blue.
|
||
* GPU Model: The GPU type and number
|
||
* Performance: The total TFLOPS of the GPU(s)
|
||
* GPU Memory: The GPU RAM per card and GPU memory bandwidth in GB/s
|
||
* Motherboard: The name of the motherboard manufacturer and type
|
||
* Motherboard details: PCIE version and number of lanes along with maximum theoretical PCIE bandwidth in GB/s
|
||
* CPU: The CPU type
|
||
* CPU Cores: the number of cores allocated for this offer divided total
|
||
* System RAM: system RAM allocated for this offer divided by the total
|
||
* Network Bandwidth: Given in Mbps for upload/download
|
||
* Network Ports: number of potential ports available
|
||
* Storage: The type of disk
|
||
* Disk speed: The speed of the local storage on the machine in MB/s
|
||
* Total available disk: The maximum amount of disk space available
|
||
* DLPERF score: A custom deep learning performance score
|
||
* Price: The GPU rental price plus the hourly cost of the storage allocated. Hover over the price for a breakdown and for the price of bandwidth.
|
||
* Max Duration: The duration of the contract
|
||
* Reliability: A score of how reliable the machine has been. All machines start at 60% reliability.
|
||
Rental Option: RENT Button
|
||
|
||
## Instance Disk Size
|
||
|
||
The storage slider is both a search filter and a parameter input which determines the storage allocation size - it's important to size this correctly before creating any instance.
|
||
|
||
When the instance is created, the disk size is set and cannot be modified. It is important to estimate how much disk you will need and then to move the slider to the desired disk size. The default disk size for an instance is 10GB. Use the slider to allocate more or less, taking into consideration that providers charge for disk allocation even when the instance is stopped.
|
||
|
||
<Frame caption="Disk Space">
|
||
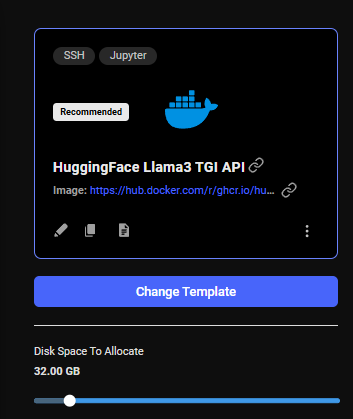
|
||
</Frame>
|
||
|
||
## Instance Configuration
|
||
|
||
Vast.ai provides out Linux docker instances. One key step during setup is specifying what Linux docker image to load. You can also specify Docker run commands, an on-start script that executes bash commands on instance start and a launch mode to connect to the instance.
|
||
|
||
The instance configuration menu is accessible in the upper left of the create instance interface. The current template is always displayed in the upper left.
|
||
Click on the "Change Template" button to bring up the template config menu that allows selecting and editing templates. For a quick overview, see [Choosing a Template](/documentation/instances/choosing/templates). For detailed template creation and Docker configuration, see the main [Templates documentation](/documentation/templates/introduction)
|
||
|
||
<Frame caption="Edit">
|
||
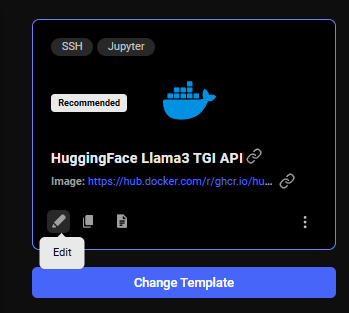
|
||
</Frame>
|
||
|
||
## Common Questions
|
||
|
||
### I can't search for instances. I am getting the error "Error: invalid\_request 0 is not a valid search op"
|
||
|
||
Reset your filters. There is probably an invalid entry in your extra filters section on the template you are currently using.
|
||
|
||
### I can't find the machine type I am looking for?
|
||
|
||
Please search to see what is available, using our Search page or `vastai search offers`. Please keep in mind that we are only a marketplace. We do not manage or provide the hardware. If there is nothing available there is little we can do.
|
||
|
||
### When I try to rent an instance I get "Error: server\_error Something went wrong on the server"
|
||
|
||
Although this error can be due to a variety of things, we recommend checking to make sure you have a version tag on your Docker Image in your template. It should look like YOUR\_DOCKER\_IMAGE\_PATH for example "pytorch/pytorch". Selecting "latest" in the Version Tag dropdown menu in the template editor should fix this for you if you have a null tag or no tag selected.
|
||
|
||
### Why did I get "offer is no longer available"?
|
||
|
||
If you get this error when clicking the RENT button, the specific machine/GPU slot you requested is no longer available. In situations of low availability due to demand surges, many people are trying to rent the same offers at once, and only one can succeed.
|
||
|
||
### Instance is taking too long to start
|
||
|
||
Startup time depends on the template and is usually under 5 minutes. If waiting over 20 minutes:
|
||
|
||
* Ensure you're using a recommended template
|
||
* Try a different machine
|
||
* Note: You're not charged while instances are loading
|
||
* With slow internet and large images, downloads can take an hour or more
|
||
|
||
|
||
# Instance Types
|
||
Source: https://docs.vast.ai/documentation/instances/choosing/instance-types
|
||
|
||
Understand Vast.ai instance types - On-demand, Reserved, and Interruptible. Learn how each type works, their differences, and when to use each.
|
||
|
||
Vast.ai offers three instance types with different priority levels and pricing models to match your workload requirements and budget.
|
||
|
||
## Overview
|
||
|
||
<CardGroup cols={3}>
|
||
<Card title="On-demand" icon="shield-check">
|
||
**High Priority**
|
||
Fixed pricing, guaranteed resources
|
||
</Card>
|
||
|
||
<Card title="Reserved" icon="piggy-bank">
|
||
**High Priority**
|
||
Discounted rates with pre-payment
|
||
</Card>
|
||
|
||
<Card title="Interruptible" icon="shuffle">
|
||
**Low Priority**
|
||
Lowest cost, may be paused
|
||
</Card>
|
||
</CardGroup>
|
||
|
||
In the create interface, you'll see a selector for "on-demand" or "interruptible". Once an instance is rented, you cannot change its type. However, you can convert on-demand instances to reserved for discounts.
|
||
|
||
## On-demand Instances
|
||
|
||
**Best for**: Production workloads, continuous training, time-sensitive tasks
|
||
|
||
On-demand instances provide:
|
||
|
||
* **Exclusive GPU control** with high priority
|
||
* **Guaranteed resources** for the contract duration
|
||
* **Fixed pricing** set by the host
|
||
* **Maximum duration** shown on offer cards
|
||
* **Data persistence** even when stopped
|
||
|
||
### Key Considerations
|
||
|
||
* Check the maximum duration before renting (shown on offer cards)
|
||
* For long-running jobs (days/weeks), verify host reliability scores
|
||
* When contracts expire, hosts may renew or stop the instance
|
||
* Data remains accessible when instances are stopped
|
||
|
||
<Warning>
|
||
**Expired Instance Deletion**: Expired instances may be deleted 48 hours after expiration. Retrieve your data before then. Expired instances cannot restart while expired.
|
||
</Warning>
|
||
|
||
## Reserved Instances
|
||
|
||
**Best for**: Long-term projects, predictable workloads, cost optimization
|
||
|
||
Reserved instances are on-demand instances with pre-paid discounts:
|
||
|
||
* **Up to 50% discount** based on commitment length
|
||
* **Same high priority** as on-demand
|
||
* **Convert anytime** from existing on-demand instances
|
||
* **Credits locked** to the specific instance
|
||
* **Partial refunds** available if cancelled early
|
||
|
||
To create a reserved instance, first rent on-demand, then convert using the discount badge on your instance card.
|
||
|
||
<Info>
|
||
For detailed instructions on creating and managing reserved instances, see [Reserved Instances](/documentation/instances/choosing/reserved-instances).
|
||
</Info>
|
||
|
||
## Interruptible Instances
|
||
|
||
**Best for**: Batch processing, fault-tolerant workloads, development/testing
|
||
|
||
Interruptible instances use a bidding system:
|
||
|
||
* **Lowest cost** (often 50%+ cheaper than on-demand)
|
||
* **Bidding priority** - higher bids get priority
|
||
* **May be paused** if outbid or if on-demand requested
|
||
* **Data preserved** when paused but instance not functional
|
||
* **Resume automatically** when priority returns
|
||
|
||
### Working with Interruptible Instances
|
||
|
||
<Warning>
|
||
When using interruptible instances:
|
||
|
||
* **Save work frequently** to disk
|
||
* **Use cloud storage** for important outputs
|
||
* **Implement checkpointing** in your code
|
||
* **Expect interruptions** and plan accordingly
|
||
</Warning>
|
||
|
||
Priority rules:
|
||
|
||
1. On-demand instances always have highest priority
|
||
2. Among interruptible instances, highest bid wins
|
||
3. Paused instances resume when they regain priority
|
||
|
||
## Choosing the Right Type
|
||
|
||
| Use Case | Recommended Type | Why |
|
||
| --------------------- | ---------------- | -------------------------------------- |
|
||
| Production inference | On-demand | Need guaranteed availability |
|
||
| Multi-day training | Reserved | Long-term discount with reliability |
|
||
| Hyperparameter search | Interruptible | Can handle interruptions, cost matters |
|
||
| Data preprocessing | Interruptible | Can resume where left off |
|
||
| Time-critical jobs | On-demand | Cannot afford interruptions |
|
||
| Development/testing | Interruptible | Short sessions, cost-sensitive |
|
||
| Steady workloads | Reserved | Predictable usage, want discounts |
|
||
|
||
## Quick Reference
|
||
|
||
### Switching Between Types
|
||
|
||
* **On-demand → Reserved**: ✅ Yes, anytime via discount badge
|
||
* **On-demand → Interruptible**: ❌ No, must create new instance
|
||
* **Interruptible → On-demand**: ❌ No, must create new instance
|
||
* **Reserved → On-demand**: ⚠️ Lose remaining discount
|
||
|
||
### Priority Levels
|
||
|
||
1. **On-demand/Reserved**: High priority, never interrupted
|
||
2. **Interruptible (high bid)**: Runs when resources available
|
||
3. **Interruptible (low bid)**: Paused until higher bids complete
|
||
|
||
## Next Steps
|
||
|
||
* **Compare costs**: Check current [Pricing](/documentation/instances/pricing)
|
||
* **Get discounts**: Learn about [Reserved Instances](/documentation/instances/choosing/reserved-instances)
|
||
* **Start renting**: [Finding & Renting](/documentation/instances/choosing/find-and-rent)
|
||
|
||
|
||
# Overview
|
||
Source: https://docs.vast.ai/documentation/instances/choosing/overview
|
||
|
||
Learn the complete process of selecting and renting a GPU instance on Vast.ai, from choosing templates to configuring and launching.
|
||
|
||
Renting an instance on Vast.ai involves three main steps that work together to get you the exact computing environment you need.
|
||
|
||
## The Rental Process
|
||
|
||
<Steps>
|
||
<Step title="Choose Your Template">
|
||
Select or customize a Docker template that defines your software environment - PyTorch, TensorFlow, Stable Diffusion, or custom configurations.
|
||
</Step>
|
||
|
||
<Step title="Find Your GPU">
|
||
Search and filter through available offers to find GPUs that match your performance needs and budget.
|
||
</Step>
|
||
|
||
<Step title="Configure & Rent">
|
||
Set your disk size, review the offer details, and launch your instance.
|
||
</Step>
|
||
</Steps>
|
||
|
||
## What You'll Need to Decide
|
||
|
||
Before renting an instance, you'll make key decisions about:
|
||
|
||
* **Software Environment**: Which Docker image and launch mode (SSH, Jupyter, etc.)
|
||
* **Hardware Requirements**: GPU type, VRAM, CPU, and system RAM needed
|
||
* **Storage Size**: How much disk space (cannot be changed after creation)
|
||
* **Instance Type**: On-demand for reliability or interruptible for cost savings
|
||
* **Budget**: Maximum price you're willing to pay per hour
|
||
|
||
## Quick Start Path
|
||
|
||
For the fastest path to a running instance:
|
||
|
||
1. **Use a Recommended Template** - Pre-configured and tested
|
||
2. **Sort by Price** - Find the best deals quickly
|
||
3. **Check Reliability Score** - 95%+ for important work
|
||
4. **Start with On-demand** - Upgrade to reserved later if needed
|
||
|
||
## What's in This Section
|
||
|
||
* **[Instance Types](/documentation/instances/choosing/instance-types)** - Understand on-demand vs interruptible vs reserved options
|
||
* **[Choosing a Template](/documentation/instances/choosing/templates)** - Understanding and selecting templates
|
||
* **[Finding & Renting](/documentation/instances/choosing/find-and-rent)** - Search, filter, configure, and rent
|
||
* **[Reserved Instances](/documentation/instances/choosing/reserved-instances)** - Save up to 50% with prepayment
|
||
|
||
## Common Questions
|
||
|
||
### How long does it take to start an instance?
|
||
|
||
Usually under 5 minutes with recommended templates. Large custom images may take longer on first launch.
|
||
|
||
### Can I change my configuration later?
|
||
|
||
* **Template**: No, you need a new instance
|
||
* **Disk size**: No, fixed at creation
|
||
* **Instance type**: Can convert on-demand to reserved only
|
||
|
||
### What if the GPU I want isn't available?
|
||
|
||
Set up search alerts or try different regions. Availability changes frequently as a marketplace.
|
||
|
||
## Next Steps
|
||
|
||
Ready to get started? Begin with **[Instance Types →](/documentation/instances/choosing/instance-types)** to understand your options.
|
||
|
||
|
||
# Reserved Instances
|
||
Source: https://docs.vast.ai/documentation/instances/choosing/reserved-instances
|
||
|
||
Save up to 50% on GPU costs by pre-paying for reserved instances. Learn how to convert on-demand instances to reserved pricing.
|
||
|
||
Reserved instances allow you to get significant discounts (up to 50%) by pre-paying for GPU time. You can convert any on-demand instance to a reserved instance at any time.
|
||
|
||
## How Reserved Instances Work
|
||
|
||
You can **convert an on-demand instance into a reserved instance** with a lower hourly rate by pre-paying.
|
||
|
||
**Key points:**
|
||
|
||
* Convert any on-demand instance to reserved pricing
|
||
* Discounts up to 50% based on commitment length
|
||
* Pre-paid credits are locked to that specific instance
|
||
* Cannot migrate between hosts
|
||
|
||
## Creating a Reserved Instance
|
||
|
||
<Tabs>
|
||
<Tab title="Web UI">
|
||
**Step 1 — Rent the Instance**
|
||
|
||
1. Go to [Search](https://cloud.vast.ai/create/) page.
|
||
2. Find a GPU that meets your requirements, click the **Rent** button.
|
||
3. This creates an **on-demand instance**.
|
||
|
||
**Step 2 — Convert to a Reserved Instance**
|
||
|
||
1. Go to the [**Instances**](https://cloud.vast.ai/instances/) page.
|
||
2. On your instance card, find the **green** **discount badge**.
|
||
|
||
<Frame caption="Save badge">
|
||
<img src="https://mintcdn.com/vastai-80aa3a82/rJSuh7NkZ00k8fzX/images/instances-reserved.webp?fit=max&auto=format&n=rJSuh7NkZ00k8fzX&q=85&s=7f6fa18f75bee7b5af6c3a951a44b475" alt="Save badge" data-og-width="1009" width="1009" data-og-height="253" height="253" data-path="images/instances-reserved.webp" data-optimize="true" data-opv="3" srcset="https://mintcdn.com/vastai-80aa3a82/rJSuh7NkZ00k8fzX/images/instances-reserved.webp?w=280&fit=max&auto=format&n=rJSuh7NkZ00k8fzX&q=85&s=7813f60a47134e77ef2621a494a71d1a 280w, https://mintcdn.com/vastai-80aa3a82/rJSuh7NkZ00k8fzX/images/instances-reserved.webp?w=560&fit=max&auto=format&n=rJSuh7NkZ00k8fzX&q=85&s=af308796688a137616b2f888cf2ef539 560w, https://mintcdn.com/vastai-80aa3a82/rJSuh7NkZ00k8fzX/images/instances-reserved.webp?w=840&fit=max&auto=format&n=rJSuh7NkZ00k8fzX&q=85&s=bd5e0a0c84c2f5741d782e30411e0743 840w, https://mintcdn.com/vastai-80aa3a82/rJSuh7NkZ00k8fzX/images/instances-reserved.webp?w=1100&fit=max&auto=format&n=rJSuh7NkZ00k8fzX&q=85&s=300871637bb6b6fa0f2fa647dd4eb025 1100w, https://mintcdn.com/vastai-80aa3a82/rJSuh7NkZ00k8fzX/images/instances-reserved.webp?w=1650&fit=max&auto=format&n=rJSuh7NkZ00k8fzX&q=85&s=4add022a9fedf1b247da8306ba570902 1650w, https://mintcdn.com/vastai-80aa3a82/rJSuh7NkZ00k8fzX/images/instances-reserved.webp?w=2500&fit=max&auto=format&n=rJSuh7NkZ00k8fzX&q=85&s=e9e9074e3515f6ce98b580ca4aad3968 2500w" />
|
||
</Frame>
|
||
3. Click the badge — a new window will open with the **available pre-paid periods** (e.g., 1 month, 3 months, 6 months).
|
||
|
||
<Frame caption="Add Reserved Discount">
|
||
<img src="https://mintcdn.com/vastai-80aa3a82/rJSuh7NkZ00k8fzX/images/instances-reserved-2.webp?fit=max&auto=format&n=rJSuh7NkZ00k8fzX&q=85&s=0d1c6936dcff580d464cfa2c774609f0" alt="Reserved Discount" data-og-width="800" width="800" data-og-height="703" height="703" data-path="images/instances-reserved-2.webp" data-optimize="true" data-opv="3" srcset="https://mintcdn.com/vastai-80aa3a82/rJSuh7NkZ00k8fzX/images/instances-reserved-2.webp?w=280&fit=max&auto=format&n=rJSuh7NkZ00k8fzX&q=85&s=cf59f5a95054890d5711a1aebdc5e21c 280w, https://mintcdn.com/vastai-80aa3a82/rJSuh7NkZ00k8fzX/images/instances-reserved-2.webp?w=560&fit=max&auto=format&n=rJSuh7NkZ00k8fzX&q=85&s=0ebb1858f50acd48c6c8706550fd8305 560w, https://mintcdn.com/vastai-80aa3a82/rJSuh7NkZ00k8fzX/images/instances-reserved-2.webp?w=840&fit=max&auto=format&n=rJSuh7NkZ00k8fzX&q=85&s=896c2936d60389a866696b1a7b3fc42d 840w, https://mintcdn.com/vastai-80aa3a82/rJSuh7NkZ00k8fzX/images/instances-reserved-2.webp?w=1100&fit=max&auto=format&n=rJSuh7NkZ00k8fzX&q=85&s=7f892282b86a727759f95f53dd737cbc 1100w, https://mintcdn.com/vastai-80aa3a82/rJSuh7NkZ00k8fzX/images/instances-reserved-2.webp?w=1650&fit=max&auto=format&n=rJSuh7NkZ00k8fzX&q=85&s=442f3777e8c0a07e76f098ad6969d571 1650w, https://mintcdn.com/vastai-80aa3a82/rJSuh7NkZ00k8fzX/images/instances-reserved-2.webp?w=2500&fit=max&auto=format&n=rJSuh7NkZ00k8fzX&q=85&s=24ae0e1596fe64cef438dc012cf884f1 2500w" />
|
||
</Frame>
|
||
4. Select your preferred period and confirm. The system calculates deposit and discount automatically.
|
||
|
||
Your instance is now reserved at the discounted rate. When an instance is converted to a reserved instance, you will see **Saved %** badge on the instance card to indicate the reserved discount is active.
|
||
|
||
<img src="https://mintcdn.com/vastai-80aa3a82/rJSuh7NkZ00k8fzX/images/instances-reserved-3.webp?fit=max&auto=format&n=rJSuh7NkZ00k8fzX&q=85&s=f8b6fff9111a6f239d05782764737dc1" alt="" data-og-width="800" width="800" data-og-height="354" height="354" data-path="images/instances-reserved-3.webp" data-optimize="true" data-opv="3" srcset="https://mintcdn.com/vastai-80aa3a82/rJSuh7NkZ00k8fzX/images/instances-reserved-3.webp?w=280&fit=max&auto=format&n=rJSuh7NkZ00k8fzX&q=85&s=f1a2305481103432769a3eedfd71a7ba 280w, https://mintcdn.com/vastai-80aa3a82/rJSuh7NkZ00k8fzX/images/instances-reserved-3.webp?w=560&fit=max&auto=format&n=rJSuh7NkZ00k8fzX&q=85&s=b933077653d549cf8d902d92dba5aed2 560w, https://mintcdn.com/vastai-80aa3a82/rJSuh7NkZ00k8fzX/images/instances-reserved-3.webp?w=840&fit=max&auto=format&n=rJSuh7NkZ00k8fzX&q=85&s=69e52657e1a30dff64d6d40eeaf21bfc 840w, https://mintcdn.com/vastai-80aa3a82/rJSuh7NkZ00k8fzX/images/instances-reserved-3.webp?w=1100&fit=max&auto=format&n=rJSuh7NkZ00k8fzX&q=85&s=02ee5c28a6f14452a03ad8b32d891c5f 1100w, https://mintcdn.com/vastai-80aa3a82/rJSuh7NkZ00k8fzX/images/instances-reserved-3.webp?w=1650&fit=max&auto=format&n=rJSuh7NkZ00k8fzX&q=85&s=c21ad0d829dc0883a0b5295b7f8cf27d 1650w, https://mintcdn.com/vastai-80aa3a82/rJSuh7NkZ00k8fzX/images/instances-reserved-3.webp?w=2500&fit=max&auto=format&n=rJSuh7NkZ00k8fzX&q=85&s=c7518417a97a8a9a6a5ef625ae1ebb60 2500w" />
|
||
</Tab>
|
||
|
||
<Tab title="CLI">
|
||
1. **Add credits** to your account (if needed).
|
||
2. Create an instance, get the instance id. CLI:`vastai show instances`
|
||
3. Run the following command, where: **ID** is the id of instance to prepay for **AMOUNT** is amount of instance credit prepayment (default discount func of 0.2 for 1 month, 0.3 for 3 months)
|
||
|
||
```cli CLI theme={null}
|
||
vastai prepay instance ID AMOUNT
|
||
```
|
||
|
||
An example:
|
||
|
||
```cli CLI theme={null}
|
||
vastai prepay instance 24973511 50
|
||
prepaid for 0.546 months of instance 24973511 applying $50.0 credits for a discount of 3.5000000000000004%
|
||
```
|
||
</Tab>
|
||
</Tabs>
|
||
|
||
## Important Considerations
|
||
|
||
* If you later change your mind, you can withdrawal only any fraction of the funds that remain after paying the difference between the on demand and discounted price over the current duration.
|
||
* If the machine fails the implicit or explicit Service Level Agreement and is deverified the full balance can be withdrawn without penalty.
|
||
* Reserved instances cannot migrate between different hosts.
|
||
|
||
<Warning>
|
||
**Important:** Every time you add credits, your discount is recalculated. Avoid adding small amounts mid-term — you could end up with a worse rate. For example: If you have a 3-month reservation and add 2 weeks of credit with only 2 weeks left, your discount could drop.
|
||
</Warning>
|
||
|
||
## Extending a Reserved Instance
|
||
|
||
You can extend your reservation at any time:
|
||
|
||
<Tabs>
|
||
<Tab title="Web UI">
|
||
Same flow as above - via **Save** badge on instance card.
|
||
</Tab>
|
||
|
||
<Tab title="CLI">
|
||
More flexibility — deposit any amount you choose. For example:
|
||
|
||
```bash Bash theme={null}
|
||
vastai prepay instance 24973511 50
|
||
prepaid for 0.546 months of instance 24973511 applying $50.0 credits for a discount of 3.5000000000000004%
|
||
```
|
||
</Tab>
|
||
</Tabs>
|
||
|
||
## Refunds
|
||
|
||
You can cancel (destroy) a reserved / prepaid instance to get part of your deposit back. Refund = Remaining deposit **minus** total discount already received.
|
||
|
||
**Example:**
|
||
|
||
* On-demand: $1/hr → $720/month
|
||
* Reserved (1 month): \$576/month
|
||
* Cancel immediately → Refund = \$576
|
||
* Cancel after 15 days → Remaining = $288 → Refund = $216 (after discount penalty)
|
||
* Cancel at the end → Refund = \$0
|
||
|
||
You will see the refund on the Billing page -> Invoices table.
|
||
|
||
## Preview Reserved Pricing Before Renting
|
||
|
||
You can check the reserved price before committing:
|
||
|
||
1. Go to the **Search** page.
|
||
2. Switch the **On-demand** filter to the **Reserved** filter.
|
||
|
||
<Frame caption="Reserved Filter">
|
||
<img src="https://mintcdn.com/vastai-80aa3a82/rJSuh7NkZ00k8fzX/images/instances-reserved-5.webp?fit=max&auto=format&n=rJSuh7NkZ00k8fzX&q=85&s=71bab55e7a0904c2f26b94bbda5c1e6b" alt="Reserved Filter" data-og-width="1032" width="1032" data-og-height="658" height="658" data-path="images/instances-reserved-5.webp" data-optimize="true" data-opv="3" srcset="https://mintcdn.com/vastai-80aa3a82/rJSuh7NkZ00k8fzX/images/instances-reserved-5.webp?w=280&fit=max&auto=format&n=rJSuh7NkZ00k8fzX&q=85&s=e70d16316831a5c23152372b20e8429d 280w, https://mintcdn.com/vastai-80aa3a82/rJSuh7NkZ00k8fzX/images/instances-reserved-5.webp?w=560&fit=max&auto=format&n=rJSuh7NkZ00k8fzX&q=85&s=4de8d1b6936e39d6ff553b5852234d44 560w, https://mintcdn.com/vastai-80aa3a82/rJSuh7NkZ00k8fzX/images/instances-reserved-5.webp?w=840&fit=max&auto=format&n=rJSuh7NkZ00k8fzX&q=85&s=082f1c496d0cb3b518a671bd769884c9 840w, https://mintcdn.com/vastai-80aa3a82/rJSuh7NkZ00k8fzX/images/instances-reserved-5.webp?w=1100&fit=max&auto=format&n=rJSuh7NkZ00k8fzX&q=85&s=7e24d0444cff330e45ddb0bdd7b25f5f 1100w, https://mintcdn.com/vastai-80aa3a82/rJSuh7NkZ00k8fzX/images/instances-reserved-5.webp?w=1650&fit=max&auto=format&n=rJSuh7NkZ00k8fzX&q=85&s=d823ceda86efb47e9c8672c2eeeb5758 1650w, https://mintcdn.com/vastai-80aa3a82/rJSuh7NkZ00k8fzX/images/instances-reserved-5.webp?w=2500&fit=max&auto=format&n=rJSuh7NkZ00k8fzX&q=85&s=aed8b83ac53fbe79e8e45bbd06eca487 2500w" />
|
||
</Frame>
|
||
3. Set the **duration filter** (e.g., 1 month), if needed.
|
||
4. Hover over the **Rent** button — you'll see a breakdown, including a **Reserved cost** section.
|
||
|
||
<Frame caption="Price Breakdown">
|
||
<img src="https://mintcdn.com/vastai-80aa3a82/rJSuh7NkZ00k8fzX/images/instances-reserved-6.webp?fit=max&auto=format&n=rJSuh7NkZ00k8fzX&q=85&s=37bf837abbfab76a8d864d2923323827" alt="Price" data-og-width="830" width="830" data-og-height="451" height="451" data-path="images/instances-reserved-6.webp" data-optimize="true" data-opv="3" srcset="https://mintcdn.com/vastai-80aa3a82/rJSuh7NkZ00k8fzX/images/instances-reserved-6.webp?w=280&fit=max&auto=format&n=rJSuh7NkZ00k8fzX&q=85&s=699bdf7e69f66cc44bc1131d39dc08b3 280w, https://mintcdn.com/vastai-80aa3a82/rJSuh7NkZ00k8fzX/images/instances-reserved-6.webp?w=560&fit=max&auto=format&n=rJSuh7NkZ00k8fzX&q=85&s=e7d299ae128902ddb6ce5fa0e884e408 560w, https://mintcdn.com/vastai-80aa3a82/rJSuh7NkZ00k8fzX/images/instances-reserved-6.webp?w=840&fit=max&auto=format&n=rJSuh7NkZ00k8fzX&q=85&s=99a34a439cd5baec2d97b7277b45d8ce 840w, https://mintcdn.com/vastai-80aa3a82/rJSuh7NkZ00k8fzX/images/instances-reserved-6.webp?w=1100&fit=max&auto=format&n=rJSuh7NkZ00k8fzX&q=85&s=7c0faa451f9df48912796b2569694f21 1100w, https://mintcdn.com/vastai-80aa3a82/rJSuh7NkZ00k8fzX/images/instances-reserved-6.webp?w=1650&fit=max&auto=format&n=rJSuh7NkZ00k8fzX&q=85&s=6dfcb0b28fa2236a84fa653717a6704f 1650w, https://mintcdn.com/vastai-80aa3a82/rJSuh7NkZ00k8fzX/images/instances-reserved-6.webp?w=2500&fit=max&auto=format&n=rJSuh7NkZ00k8fzX&q=85&s=fa4c222d761053b62dfc63939c066d25 2500w" />
|
||
</Frame>
|
||
5. If you like the price, click **Rent** and follow the steps to convert it to a reserved instance.
|
||
|
||
## Common Questions
|
||
|
||
### Can I switch an existing on-demand instance to reserved?
|
||
|
||
Yes, if there is an available discount. Go to the **Instances** page, click the **discount badge** on your instance card, choose a period, and confirm.
|
||
|
||
### Can I extend a reserved instance?
|
||
|
||
Yes — you can extend it anytime via the same discount badge in the Instances page, as long as the instance still has an active discount period. You can use the CLI for custom amounts.
|
||
|
||
### What happens if I cancel / delete a reserved instance early?
|
||
|
||
You'll receive a partial refund of your unused pre-paid balance, minus the total discount received so far. The refund amount will be displayed in the delete instance modal and will also appear on the Billing page after you delete the instance.
|
||
|
||
<img src="https://mintcdn.com/vastai-80aa3a82/S-Qxq5X5egtYDcmf/images/image.png?fit=max&auto=format&n=S-Qxq5X5egtYDcmf&q=85&s=093b0f562ed809c88aa30f1c04b5920f" alt="image.png" data-og-width="700" width="700" data-og-height="400" height="400" data-path="images/image.png" data-optimize="true" data-opv="3" srcset="https://mintcdn.com/vastai-80aa3a82/S-Qxq5X5egtYDcmf/images/image.png?w=280&fit=max&auto=format&n=S-Qxq5X5egtYDcmf&q=85&s=05f736bb7ce4e2b653b783a857568938 280w, https://mintcdn.com/vastai-80aa3a82/S-Qxq5X5egtYDcmf/images/image.png?w=560&fit=max&auto=format&n=S-Qxq5X5egtYDcmf&q=85&s=b3f6cdbb0d406c20763c99c3cce05df7 560w, https://mintcdn.com/vastai-80aa3a82/S-Qxq5X5egtYDcmf/images/image.png?w=840&fit=max&auto=format&n=S-Qxq5X5egtYDcmf&q=85&s=ce300e3bb3ef6db7b43ea5af676ed47f 840w, https://mintcdn.com/vastai-80aa3a82/S-Qxq5X5egtYDcmf/images/image.png?w=1100&fit=max&auto=format&n=S-Qxq5X5egtYDcmf&q=85&s=10db613cb26d730940956e94fc70c4ce 1100w, https://mintcdn.com/vastai-80aa3a82/S-Qxq5X5egtYDcmf/images/image.png?w=1650&fit=max&auto=format&n=S-Qxq5X5egtYDcmf&q=85&s=e1b273c57e521c8848fb9bceac5b6da5 1650w, https://mintcdn.com/vastai-80aa3a82/S-Qxq5X5egtYDcmf/images/image.png?w=2500&fit=max&auto=format&n=S-Qxq5X5egtYDcmf&q=85&s=402c4d425842f3bc4ee9e21a5d9fbc0a 2500w" />
|
||
|
||
### What happens if I stop a reserved instance?
|
||
|
||
If you stop the instance, the GPU will be released like any other instance and may be rented by another user.
|
||
|
||
## Next Steps
|
||
|
||
* Learn about other [rental types](/documentation/instances/pricing#rental-types)
|
||
* Understand [billing basics](/documentation/reference/billing)
|
||
* View your [current instances](https://cloud.vast.ai/instances/)
|
||
|
||
|
||
# Choosing a Template
|
||
Source: https://docs.vast.ai/documentation/instances/choosing/templates
|
||
|
||
Select the right template for your Vast.ai instance. Templates define your Docker image, launch mode, and initialization settings.
|
||
|
||
## What are Templates?
|
||
|
||
Templates are saved configurations that define how your instance will be set up. Every instance on Vast.ai requires a template that specifies:
|
||
|
||
* **Docker image** - The base container environment
|
||
* **Launch mode** - How you'll connect (SSH, Jupyter, or Entrypoint)
|
||
* **Initialization** - Startup scripts and environment variables
|
||
* **Ports and networking** - Required network configurations
|
||
|
||
<Note>
|
||
For comprehensive template documentation including creating custom templates, see the main [Templates section](/documentation/templates/introduction).
|
||
</Note>
|
||
|
||
## Selecting a Template
|
||
|
||
When renting an instance, you must select a template first. You have three options:
|
||
|
||
### 1. Recommended Templates
|
||
|
||
Pre-configured templates for common use cases:
|
||
|
||
* **PyTorch** - Ready for deep learning with Jupyter
|
||
* **TensorFlow** - ML development environment
|
||
* **Stable Diffusion** - Image generation UIs
|
||
* **LLM Inference** - Text generation setups
|
||
* **Base Ubuntu** - Clean development environment
|
||
|
||
### 2. Your Recent Templates
|
||
|
||
Templates you've previously used or customized are saved for quick access.
|
||
|
||
### 3. Custom Templates
|
||
|
||
Create your own or modify existing templates to match your exact needs.
|
||
|
||
## Quick Template Selection
|
||
|
||
1. On the [search page](https://cloud.vast.ai/create/), look for the template selector in the upper left
|
||
2. Click "Change Template" to see available options
|
||
3. Select a template that matches your needs
|
||
4. The search will update to show compatible machines
|
||
|
||
<Tip>
|
||
Start with a recommended template and modify it rather than creating from scratch. This ensures compatibility and faster startup times.
|
||
</Tip>
|
||
|
||
## Launch Modes
|
||
|
||
Templates support three connection methods:
|
||
|
||
### SSH
|
||
|
||
* Terminal access via SSH
|
||
* Best for: Development, training scripts, command-line work
|
||
* Includes tmux session management
|
||
|
||
### Jupyter
|
||
|
||
* Web-based notebook interface
|
||
* Best for: Data science, experimentation, visualization
|
||
* Includes terminal access
|
||
|
||
### Entrypoint
|
||
|
||
* Runs Docker's native entrypoint
|
||
* Best for: Automated workloads, API servers, production deployments
|
||
* No automatic SSH/Jupyter setup
|
||
|
||
## Important Template Settings
|
||
|
||
### Docker Image
|
||
|
||
* Always specify a version tag (avoid "latest")
|
||
* Vast.ai base images (`vastai/pytorch`) start faster due to caching
|
||
* Custom images from Docker Hub supported
|
||
|
||
### On-start Script
|
||
|
||
* Runs after the container starts
|
||
* Use for installing additional packages
|
||
* Executes as bash commands
|
||
|
||
### Disk Space
|
||
|
||
* Set in the search interface (not the template)
|
||
* Cannot be changed after instance creation
|
||
* Default is 10GB - increase as needed
|
||
|
||
## Common Issues
|
||
|
||
### Template Compatibility
|
||
|
||
Not all templates work on all machines. If an instance fails to start:
|
||
|
||
* Try a recommended template
|
||
* Check Docker image availability
|
||
* Verify port requirements match machine capabilities
|
||
|
||
### Invalid Docker Image Path
|
||
|
||
If you get an error like "Unable to find image 'ubuntu20.04\_latest/ssh'":
|
||
|
||
* You have an invalid Docker image path
|
||
* Use proper format: `nvidia/cuda:12.0.1-devel-ubuntu20.04`
|
||
* Always include repository and tag
|
||
* Test locally: `docker pull <YOUR_IMAGE_PATH>`
|
||
* Use recommended templates to ensure valid paths
|
||
|
||
### Image Loading Time
|
||
|
||
* First launch can take 5-60 minutes depending on image size
|
||
* Vast.ai base images load faster (pre-cached on many machines)
|
||
* You're not charged during loading
|
||
|
||
### Can't Change Template on Existing Instance
|
||
|
||
Templates are recipes for new instances. Once an instance is created:
|
||
|
||
* Template changes only affect new instances
|
||
* To use a different template, create a new instance
|
||
* Transfer data if needed using [data movement tools](/documentation/instances/storage/data-movement)
|
||
|
||
## Next Steps
|
||
|
||
**Ready to customize?**
|
||
See the full [Templates documentation](/documentation/templates/introduction) for:
|
||
|
||
* [Creating custom templates](/documentation/templates/creating-templates)
|
||
* [Advanced configuration](/documentation/templates/advanced-setup)
|
||
* [Template settings reference](/documentation/templates/template-settings)
|
||
|
||
**Having issues?**
|
||
|
||
* Start with a recommended template
|
||
* Check the [Templates FAQ](/documentation/reference/faq/instances#templates)
|
||
* Review [troubleshooting guide](/documentation/reference/troubleshooting)
|
||
|
||
|
||
# Instance Portal
|
||
Source: https://docs.vast.ai/documentation/instances/connect/instance-portal
|
||
|
||
|
||
|
||
## What is the Instance Portal?
|
||
|
||
The Instance Portal is the first application you will see after clicking the 'Open' button to access an instance that has been loaded with a [Vast.ai Docker image](https://github.com/vast-ai/base-image/). Many of our recommended templates include the Instance Portal.
|
||
|
||
<Frame caption="Instance card interface shows the open button">
|
||
<img src="https://mintcdn.com/vastai-80aa3a82/v_EM_-NdbnPjb9tX/images/console-templates-instance-portal.webp?fit=max&auto=format&n=v_EM_-NdbnPjb9tX&q=85&s=7cb467e126f32ad43c444158ac07989d" alt="Instance card interface shows the open button" data-og-width="953" width="953" data-og-height="354" height="354" data-path="images/console-templates-instance-portal.webp" data-optimize="true" data-opv="3" srcset="https://mintcdn.com/vastai-80aa3a82/v_EM_-NdbnPjb9tX/images/console-templates-instance-portal.webp?w=280&fit=max&auto=format&n=v_EM_-NdbnPjb9tX&q=85&s=4cc8bc6e36401701f55ba1777fd3cb0c 280w, https://mintcdn.com/vastai-80aa3a82/v_EM_-NdbnPjb9tX/images/console-templates-instance-portal.webp?w=560&fit=max&auto=format&n=v_EM_-NdbnPjb9tX&q=85&s=99b92664c4c8290c92609596d3dcc4d8 560w, https://mintcdn.com/vastai-80aa3a82/v_EM_-NdbnPjb9tX/images/console-templates-instance-portal.webp?w=840&fit=max&auto=format&n=v_EM_-NdbnPjb9tX&q=85&s=0fbd4bee39954fce83a86696db9634f2 840w, https://mintcdn.com/vastai-80aa3a82/v_EM_-NdbnPjb9tX/images/console-templates-instance-portal.webp?w=1100&fit=max&auto=format&n=v_EM_-NdbnPjb9tX&q=85&s=3a3180da81f2deefa823cfc6b19b65b8 1100w, https://mintcdn.com/vastai-80aa3a82/v_EM_-NdbnPjb9tX/images/console-templates-instance-portal.webp?w=1650&fit=max&auto=format&n=v_EM_-NdbnPjb9tX&q=85&s=cee266735b35f64dada7a52a7a4e2f28 1650w, https://mintcdn.com/vastai-80aa3a82/v_EM_-NdbnPjb9tX/images/console-templates-instance-portal.webp?w=2500&fit=max&auto=format&n=v_EM_-NdbnPjb9tX&q=85&s=132709a8bedfbcd95e963bb57c247f81 2500w" />
|
||
</Frame>
|
||
|
||
## Loading Process
|
||
|
||
Upon opening the Instance Portal you will see a loading indicator for a short time. 
|
||
|
||
<Frame caption="Loading Indicator">
|
||
<img src="https://mintcdn.com/vastai-80aa3a82/v_EM_-NdbnPjb9tX/images/console-templates-instance-portal-2.webp?fit=max&auto=format&n=v_EM_-NdbnPjb9tX&q=85&s=cd0bb1186ee7794bb0c5954f7da1ec64" alt="Loading Indicator" data-og-width="800" width="800" data-og-height="570" height="570" data-path="images/console-templates-instance-portal-2.webp" data-optimize="true" data-opv="3" srcset="https://mintcdn.com/vastai-80aa3a82/v_EM_-NdbnPjb9tX/images/console-templates-instance-portal-2.webp?w=280&fit=max&auto=format&n=v_EM_-NdbnPjb9tX&q=85&s=82d98db57d332fa5330a52ef02dce73b 280w, https://mintcdn.com/vastai-80aa3a82/v_EM_-NdbnPjb9tX/images/console-templates-instance-portal-2.webp?w=560&fit=max&auto=format&n=v_EM_-NdbnPjb9tX&q=85&s=f726a81aa99378a37d4af6e5a623ad24 560w, https://mintcdn.com/vastai-80aa3a82/v_EM_-NdbnPjb9tX/images/console-templates-instance-portal-2.webp?w=840&fit=max&auto=format&n=v_EM_-NdbnPjb9tX&q=85&s=1728e0fdf6a4253cefbabf423a4f3458 840w, https://mintcdn.com/vastai-80aa3a82/v_EM_-NdbnPjb9tX/images/console-templates-instance-portal-2.webp?w=1100&fit=max&auto=format&n=v_EM_-NdbnPjb9tX&q=85&s=459950cfdc1e18502ccbefde36e538f3 1100w, https://mintcdn.com/vastai-80aa3a82/v_EM_-NdbnPjb9tX/images/console-templates-instance-portal-2.webp?w=1650&fit=max&auto=format&n=v_EM_-NdbnPjb9tX&q=85&s=e454d71dd3bb3940e6695f8d0e594826 1650w, https://mintcdn.com/vastai-80aa3a82/v_EM_-NdbnPjb9tX/images/console-templates-instance-portal-2.webp?w=2500&fit=max&auto=format&n=v_EM_-NdbnPjb9tX&q=85&s=f8058ca973df1a967082fc22b21b1f96 2500w" />
|
||
</Frame>
|
||
|
||
During this loading phase, a secure Cloudflare tunnel will be created for each of your instance's open ports and the browser will test whether these tunnel links are accessible.
|
||
|
||
The secure tunnel link will be formatted like this:
|
||
|
||
[https://four-randomly-selected-words.trycloudflare.com](https://four-randomly-selected-words.trycloudflare.com)
|
||
|
||
When the secure tunnel for port `1111` becomes accessible, the instance Portal will redirect to this link before revealing the full interface.
|
||
|
||
If it is taking too long for the tunnels to be ready, you will see the Instance Portal interface revealed at `http://ip_address:port_1111`
|
||
|
||
If you would like the default application URLs to be **https\://** rather than **http\://** you can add the following environment variable to your [account level environment variables](https://cloud.vast.ai/account/):
|
||
|
||
<Frame caption="Enable HTTPS Variable">
|
||
<img src="https://mintcdn.com/vastai-80aa3a82/v_EM_-NdbnPjb9tX/images/console-templates-instance-portal-3.webp?fit=max&auto=format&n=v_EM_-NdbnPjb9tX&q=85&s=96b23ffcbd961ef44c3a6ce8a93d95f0" alt="Enable HTTPS Variable" data-og-width="1280" width="1280" data-og-height="296" height="296" data-path="images/console-templates-instance-portal-3.webp" data-optimize="true" data-opv="3" srcset="https://mintcdn.com/vastai-80aa3a82/v_EM_-NdbnPjb9tX/images/console-templates-instance-portal-3.webp?w=280&fit=max&auto=format&n=v_EM_-NdbnPjb9tX&q=85&s=d7112fc8470e70a42c7048388d604704 280w, https://mintcdn.com/vastai-80aa3a82/v_EM_-NdbnPjb9tX/images/console-templates-instance-portal-3.webp?w=560&fit=max&auto=format&n=v_EM_-NdbnPjb9tX&q=85&s=9dd8d15847c80ada98cab8a781a85c11 560w, https://mintcdn.com/vastai-80aa3a82/v_EM_-NdbnPjb9tX/images/console-templates-instance-portal-3.webp?w=840&fit=max&auto=format&n=v_EM_-NdbnPjb9tX&q=85&s=41e1a8a9294eee2279666e1819965e42 840w, https://mintcdn.com/vastai-80aa3a82/v_EM_-NdbnPjb9tX/images/console-templates-instance-portal-3.webp?w=1100&fit=max&auto=format&n=v_EM_-NdbnPjb9tX&q=85&s=f7f64b732a2de16d679a9fa6b9356b11 1100w, https://mintcdn.com/vastai-80aa3a82/v_EM_-NdbnPjb9tX/images/console-templates-instance-portal-3.webp?w=1650&fit=max&auto=format&n=v_EM_-NdbnPjb9tX&q=85&s=65fa0aa53c12536fa18efe03ed99c758 1650w, https://mintcdn.com/vastai-80aa3a82/v_EM_-NdbnPjb9tX/images/console-templates-instance-portal-3.webp?w=2500&fit=max&auto=format&n=v_EM_-NdbnPjb9tX&q=85&s=e91816df735bc82267ccba5574ff8d43 2500w" />
|
||
</Frame>
|
||
|
||
If you set this variable, it is important to add the Vast.ai Jupyter certificate to your local system to avoid browser warnings. See [this page](/documentation/instances/jupyter#1SmCz) for more information about installing the certificate.
|
||
|
||
## Landing Page
|
||
|
||
The instance Portal has a simple interface to help you access other web applications that may be running in the instance. See the configuration section of this document for further details on application startup.
|
||
|
||
<Frame caption="Landing Page">
|
||
<img src="https://mintcdn.com/vastai-80aa3a82/v_EM_-NdbnPjb9tX/images/console-templates-instance-portal-4.webp?fit=max&auto=format&n=v_EM_-NdbnPjb9tX&q=85&s=6f10480de3430c01d1aa6a9086ee7498" alt="Landing Page" data-og-width="1280" width="1280" data-og-height="621" height="621" data-path="images/console-templates-instance-portal-4.webp" data-optimize="true" data-opv="3" srcset="https://mintcdn.com/vastai-80aa3a82/v_EM_-NdbnPjb9tX/images/console-templates-instance-portal-4.webp?w=280&fit=max&auto=format&n=v_EM_-NdbnPjb9tX&q=85&s=cb4ec0fa4630eb433d5120cebc3401fd 280w, https://mintcdn.com/vastai-80aa3a82/v_EM_-NdbnPjb9tX/images/console-templates-instance-portal-4.webp?w=560&fit=max&auto=format&n=v_EM_-NdbnPjb9tX&q=85&s=3f8bc2c49890ac251216a39ac5129663 560w, https://mintcdn.com/vastai-80aa3a82/v_EM_-NdbnPjb9tX/images/console-templates-instance-portal-4.webp?w=840&fit=max&auto=format&n=v_EM_-NdbnPjb9tX&q=85&s=041ac9f65a7b7009285c310761a1c407 840w, https://mintcdn.com/vastai-80aa3a82/v_EM_-NdbnPjb9tX/images/console-templates-instance-portal-4.webp?w=1100&fit=max&auto=format&n=v_EM_-NdbnPjb9tX&q=85&s=ea8826ae5fb17c1a223f9b5222109e1f 1100w, https://mintcdn.com/vastai-80aa3a82/v_EM_-NdbnPjb9tX/images/console-templates-instance-portal-4.webp?w=1650&fit=max&auto=format&n=v_EM_-NdbnPjb9tX&q=85&s=c685d186e36a1983b0177ec135aefffb 1650w, https://mintcdn.com/vastai-80aa3a82/v_EM_-NdbnPjb9tX/images/console-templates-instance-portal-4.webp?w=2500&fit=max&auto=format&n=v_EM_-NdbnPjb9tX&q=85&s=6fed7bf60dcc1e5e97511a2d0569e205 2500w" />
|
||
</Frame>
|
||
|
||
The large blue 'Launch Application' buttons will open your running applications in a new browser tab.  
|
||
|
||
If a secure tunnel is available, the button will open the 'trycloudflare.com' link. If a tunnel is not yet available then the button will open the direct IP address link.
|
||
|
||
In both cases, a secure token is appended to the link to prevent unauthorised access to your applications.
|
||
|
||
You can also click the 'Advanced Connection Options' link to see all available connection methods.
|
||
|
||
## Tunnels Page
|
||
|
||
Use this page to manage existing secure tunnels and add new tunnels to get access to ports that have not directly been opened in the instance
|
||
|
||
<Frame caption="Tunnels Page">
|
||
<img src="https://mintcdn.com/vastai-80aa3a82/v_EM_-NdbnPjb9tX/images/console-templates-instance-portal-5.webp?fit=max&auto=format&n=v_EM_-NdbnPjb9tX&q=85&s=6dab1170d5581a5c86727c0237b05269" alt="Tunnels Page" data-og-width="1280" width="1280" data-og-height="619" height="619" data-path="images/console-templates-instance-portal-5.webp" data-optimize="true" data-opv="3" srcset="https://mintcdn.com/vastai-80aa3a82/v_EM_-NdbnPjb9tX/images/console-templates-instance-portal-5.webp?w=280&fit=max&auto=format&n=v_EM_-NdbnPjb9tX&q=85&s=b79b4a0bcc915d6acaadf711ec9ee565 280w, https://mintcdn.com/vastai-80aa3a82/v_EM_-NdbnPjb9tX/images/console-templates-instance-portal-5.webp?w=560&fit=max&auto=format&n=v_EM_-NdbnPjb9tX&q=85&s=e3d9ab43b367a2469b005c24000df9fb 560w, https://mintcdn.com/vastai-80aa3a82/v_EM_-NdbnPjb9tX/images/console-templates-instance-portal-5.webp?w=840&fit=max&auto=format&n=v_EM_-NdbnPjb9tX&q=85&s=cd3bda8319e3d23eb4cf61953f526e14 840w, https://mintcdn.com/vastai-80aa3a82/v_EM_-NdbnPjb9tX/images/console-templates-instance-portal-5.webp?w=1100&fit=max&auto=format&n=v_EM_-NdbnPjb9tX&q=85&s=e673a490a1cf735c841bc23835c0c459 1100w, https://mintcdn.com/vastai-80aa3a82/v_EM_-NdbnPjb9tX/images/console-templates-instance-portal-5.webp?w=1650&fit=max&auto=format&n=v_EM_-NdbnPjb9tX&q=85&s=8ad316357160fe20ba5aa47e9310608d 1650w, https://mintcdn.com/vastai-80aa3a82/v_EM_-NdbnPjb9tX/images/console-templates-instance-portal-5.webp?w=2500&fit=max&auto=format&n=v_EM_-NdbnPjb9tX&q=85&s=0c08a5608535233360dbe3ff980f1fef 2500w" />
|
||
</Frame>
|
||
|
||
Use this interface to create links to applications you have started after configuring your instance. For example:
|
||
|
||
If you started an instance but later decide that you want to install some new software that listens on port `7860`, it will not be available directly if you did not configure the port when creating or editing the template.
|
||
|
||
Simply enter `http://localhost:7860` in the top input box and click the blue 'Create New Tunnel' button. A tunnel will be created for this port. It may take a moment to be available after creation. 
|
||
|
||
You can use the 'Manage' buttons to stop existing tunnels or to refresh them if you want a new URL.
|
||
|
||
If you would like to link your own domain name to the instance then please see 'Named Tunnels' in the configuration section of this document.
|
||
|
||
## Instance Logs Page
|
||
|
||
The logs page will show a live stream of entries added to any `.log` files in the `/var/log/portal/` directory.
|
||
|
||
Use the 'Copy Logs' button to copy the currently displayed logging output to your clipboard. You can also use the 'Download Logs' button to download a zip file containing all files and directories in the `/var/log/` directory of your instance.
|
||
|
||
<Frame caption="Instance Portal logs interface">
|
||
<img src="https://mintcdn.com/vastai-80aa3a82/v_EM_-NdbnPjb9tX/images/console-templates-instance-portal-6.webp?fit=max&auto=format&n=v_EM_-NdbnPjb9tX&q=85&s=969f9449473336fa10be1581d9611aa6" alt="Logs Page" data-og-width="1280" width="1280" data-og-height="614" height="614" data-path="images/console-templates-instance-portal-6.webp" data-optimize="true" data-opv="3" srcset="https://mintcdn.com/vastai-80aa3a82/v_EM_-NdbnPjb9tX/images/console-templates-instance-portal-6.webp?w=280&fit=max&auto=format&n=v_EM_-NdbnPjb9tX&q=85&s=87d0493c517d7d7e57eaaa599c26b306 280w, https://mintcdn.com/vastai-80aa3a82/v_EM_-NdbnPjb9tX/images/console-templates-instance-portal-6.webp?w=560&fit=max&auto=format&n=v_EM_-NdbnPjb9tX&q=85&s=2497d0dfaf2750c66a7652c3ba629ac0 560w, https://mintcdn.com/vastai-80aa3a82/v_EM_-NdbnPjb9tX/images/console-templates-instance-portal-6.webp?w=840&fit=max&auto=format&n=v_EM_-NdbnPjb9tX&q=85&s=9e5ab0fcbd2051d6954f1aa1b3133d51 840w, https://mintcdn.com/vastai-80aa3a82/v_EM_-NdbnPjb9tX/images/console-templates-instance-portal-6.webp?w=1100&fit=max&auto=format&n=v_EM_-NdbnPjb9tX&q=85&s=a81d208c6dd437b914eacf2ec7763acb 1100w, https://mintcdn.com/vastai-80aa3a82/v_EM_-NdbnPjb9tX/images/console-templates-instance-portal-6.webp?w=1650&fit=max&auto=format&n=v_EM_-NdbnPjb9tX&q=85&s=11b572d3fd3b8390791ba8db31984840 1650w, https://mintcdn.com/vastai-80aa3a82/v_EM_-NdbnPjb9tX/images/console-templates-instance-portal-6.webp?w=2500&fit=max&auto=format&n=v_EM_-NdbnPjb9tX&q=85&s=1d7d097c2277c896ec16b6dea9f2fb8b 2500w" />
|
||
</Frame>
|
||
|
||
## Tools & Help Page
|
||
|
||
This page links to useful pages in the Vast.ai documentation to help you get the most from your instance.
|
||
|
||
<Frame caption="Instance Portal tools and help page">
|
||
<img src="https://mintcdn.com/vastai-80aa3a82/v_EM_-NdbnPjb9tX/images/console-templates-instance-portal-7.webp?fit=max&auto=format&n=v_EM_-NdbnPjb9tX&q=85&s=f1a8b5607e17dfd8beac31fede839221" alt="Instance Portal tools and help page" data-og-width="1280" width="1280" data-og-height="617" height="617" data-path="images/console-templates-instance-portal-7.webp" data-optimize="true" data-opv="3" srcset="https://mintcdn.com/vastai-80aa3a82/v_EM_-NdbnPjb9tX/images/console-templates-instance-portal-7.webp?w=280&fit=max&auto=format&n=v_EM_-NdbnPjb9tX&q=85&s=4bd169a47e1c38b42eade331db5044b9 280w, https://mintcdn.com/vastai-80aa3a82/v_EM_-NdbnPjb9tX/images/console-templates-instance-portal-7.webp?w=560&fit=max&auto=format&n=v_EM_-NdbnPjb9tX&q=85&s=77246a11201fe8431d1b967828ad4d88 560w, https://mintcdn.com/vastai-80aa3a82/v_EM_-NdbnPjb9tX/images/console-templates-instance-portal-7.webp?w=840&fit=max&auto=format&n=v_EM_-NdbnPjb9tX&q=85&s=f5e740b54703db18614472d31d0a9bd0 840w, https://mintcdn.com/vastai-80aa3a82/v_EM_-NdbnPjb9tX/images/console-templates-instance-portal-7.webp?w=1100&fit=max&auto=format&n=v_EM_-NdbnPjb9tX&q=85&s=8cfbe55fb68d7d51ab30278b54e180aa 1100w, https://mintcdn.com/vastai-80aa3a82/v_EM_-NdbnPjb9tX/images/console-templates-instance-portal-7.webp?w=1650&fit=max&auto=format&n=v_EM_-NdbnPjb9tX&q=85&s=37f519fb5036ec73dc60b7a6856e91da 1650w, https://mintcdn.com/vastai-80aa3a82/v_EM_-NdbnPjb9tX/images/console-templates-instance-portal-7.webp?w=2500&fit=max&auto=format&n=v_EM_-NdbnPjb9tX&q=85&s=571dfe29e9df3a190d6c347b9e2827e9 2500w" />
|
||
</Frame>
|
||
|
||
## Configuration
|
||
|
||
Initial configuration of the Instance Portal is via the `PORTAL_CONFIG` enviroment variable. The default value looks like this:
|
||
|
||
```bash Bash theme={null}
|
||
localhost:1111:11111:/:Instance Portal|localhost:8080:18080:/:Jupyter|localhost:8080:8080:/terminals/1:Jupyter Terminal|localhost:8384:18384:/:Syncthing|localhost:6006:16006:/:Tensorboard
|
||
```
|
||
|
||
Each application is separated by a pipe (`|`) character, and each application option is separated by a colon (`:`) 
|
||
|
||
For each application, we provide the following configuration options
|
||
|
||
* Interface to bind the application (currently always `localhost`)
|
||
* External port to proxy the application. This must have been added to the template. Eg. `-p 1111:1111`)
|
||
* Internal port where the running application will be bound
|
||
* URL path for links to open (often `/`)
|
||
* Application Name
|
||
|
||
Where the external port and internal port **are not equal**, a reverse proxy (Caddy) will make your application available on the external port.
|
||
|
||
Where the external port and internal port **are equal** the application will not be proxied to the external port but secure tunnel application links will be created.
|
||
|
||
### In Place Configuration
|
||
|
||
On first boot the configuration variable will be processed and is used to create the configuration file `/etc/portal.yaml`
|
||
|
||
You can edit this file in a running instance to add or remove applications from the interface.
|
||
|
||
Any applications you have added after the instance has started will not initially be reachable so you will need to reboot the instance.
|
||
|
||
### Disable Default Applictions
|
||
|
||
The startup scripts we use for the default applications we provide will read this configuration and will not start if they are not specified in the configuration file.
|
||
|
||
### Named Tunnels
|
||
|
||
While the default behavior of the Instance Portal is to create 'quick' tunnels with a randomly assigned subdomain of 'trycloudflare.com', it is also possible to assign a pre-configured subdomain of your own domain name.
|
||
|
||
To do this you will need a free [Cloudflare Zero Trust](https://developers.cloudflare.com/cloudflare-one/connections/connect-networks/) account and a domain name linked to that account.
|
||
|
||
Here's an example of how your tunnel configuration might look in the Cloudflare dashboard:
|
||
|
||
<img src="https://mintcdn.com/vastai-80aa3a82/v_EM_-NdbnPjb9tX/images/console-templates-instance-portal-8.webp?fit=max&auto=format&n=v_EM_-NdbnPjb9tX&q=85&s=019e511e85452b7b487a567e1a760812" alt="Example named tunnel configuration" data-og-width="1280" width="1280" data-og-height="486" height="486" data-path="images/console-templates-instance-portal-8.webp" data-optimize="true" data-opv="3" srcset="https://mintcdn.com/vastai-80aa3a82/v_EM_-NdbnPjb9tX/images/console-templates-instance-portal-8.webp?w=280&fit=max&auto=format&n=v_EM_-NdbnPjb9tX&q=85&s=3907ef2d71bbc6f03abb0934d3829d90 280w, https://mintcdn.com/vastai-80aa3a82/v_EM_-NdbnPjb9tX/images/console-templates-instance-portal-8.webp?w=560&fit=max&auto=format&n=v_EM_-NdbnPjb9tX&q=85&s=3bb42307d2051c5a5b21c587c90165ab 560w, https://mintcdn.com/vastai-80aa3a82/v_EM_-NdbnPjb9tX/images/console-templates-instance-portal-8.webp?w=840&fit=max&auto=format&n=v_EM_-NdbnPjb9tX&q=85&s=5b87589d4fcdf074146b0904fb71acec 840w, https://mintcdn.com/vastai-80aa3a82/v_EM_-NdbnPjb9tX/images/console-templates-instance-portal-8.webp?w=1100&fit=max&auto=format&n=v_EM_-NdbnPjb9tX&q=85&s=8befe20571c1b6080e994458246df4e0 1100w, https://mintcdn.com/vastai-80aa3a82/v_EM_-NdbnPjb9tX/images/console-templates-instance-portal-8.webp?w=1650&fit=max&auto=format&n=v_EM_-NdbnPjb9tX&q=85&s=ba63a5d456878bac116e949dd3d7b00d 1650w, https://mintcdn.com/vastai-80aa3a82/v_EM_-NdbnPjb9tX/images/console-templates-instance-portal-8.webp?w=2500&fit=max&auto=format&n=v_EM_-NdbnPjb9tX&q=85&s=e36a48d17fee7afa222b8c44e416c70c 2500w" />
|
||
|
||
Once you have created your named tunnel, you can link it to your instance by providing the token associated with your tunnel as the value of environment variable `CF_TUNNEL_TOKEN`. You can save this in the 'Environment Variables' section in your [account settings](https://cloud.vast.ai/account/) or directly in the template if you are saving it privately.
|
||
|
||
If the instance is already running you can provide then token in the `/etc/environment` file and reboot the instance.
|
||
|
||
Named tunnels are generally more reliable than quick tunnels and will provide consistent URLs you can use to access applications running in an instance.
|
||
|
||
When named tunnels are configured, the 'Launch Application' button will direct to the named tunnel rather than the quick tunnel.
|
||
|
||
**Important: **Using the same tunnel token for multiple running instances is not possible and will cause broken links. If you need several instances then you will need a separate tunnel token for each of them.
|
||
|
||
|
||
# Jupyter
|
||
Source: https://docs.vast.ai/documentation/instances/connect/jupyter
|
||
|
||
Run Jupyter on Vast.ai with proxy or direct HTTPS. Learn setup, TLS certificate installation, and secure connections for smooth AI/ML development.
|
||
|
||
Jupyter is an interactive notebook interface that is very popular for AI/ML development using Python. Using Jupyter, you can connect to an interface in your browser and open any notebook that you can download as a .ipynb file.
|
||
|
||
We recommend this launch mode to start. We also recommend this launch mode over trying to run Google Colab with Vast. While Google Colab has a way to connect to a "local runtime", running Jupyter directly is more robust and less error prone if connections drop or the browser window is closed.
|
||
|
||
By default Jupyter instances use a proxy server. This is a simple setup that works on machines with or without open ports. The only downside is it can be slower to upload/download large files.
|
||
|
||
## Jupyter direct HTTPS launch mode
|
||
|
||
When selecting Jupyter there is a check box for "Jupyter direct HTTPS". This preferred option will establish a direct connection to the instance which is faster for uploading and downloading files from your local machine. Selecting this option will automatically filter out machines that do not have open ports, as they cannot establish a direct connection.
|
||
|
||
Jupyter uses a browser interface, so to get the direct HTTPS connection to work, you will need to install a certificate onto your operating system.
|
||
|
||
<Warning>
|
||
**WARNING**<br />
|
||
If you don't install the browser certificate, Windows and Linux will show a "Your connection is not private" Privacy error. It is annoying but you can click through by clicking "Advanced" and then proceed.
|
||
</Warning>
|
||
|
||
If you don't install the certificate on macOS, the OS might not let you open the Jupyter webpage.
|
||
|
||
## Installing the TLS certificate
|
||
|
||
Start by downloading the certificate [here](https://console.vast.ai/static/jvastai_root.cer). Then follow the directions for your operating system.
|
||
|
||
In most operating systems, double clicking on the certificate will start an installation wizard. You can also access the correct settings by clicking on the appropriate security settings in your browser.
|
||
|
||
### Chrome on Windows
|
||
|
||
1. Open your Chrome security settings by clicking on the three dot menu in the upper right. Then click Settings. Then click Privacy and security on the left hand navigation. From that menu, select Security.
|
||
2. Click on "Manage device certificates"
|
||
3. Click Next and then click Import and find the downloaded [jvastai\_root.cer](https://console.vast.ai/static/jvastai_root.cer) file.
|
||
4. Click "Place all certificates in the following store" and then use the browse button. Click on the **Trusted Root Certification Authorities** folder.
|
||
|
||
<Frame caption="Cert Chrome Windows 1">
|
||
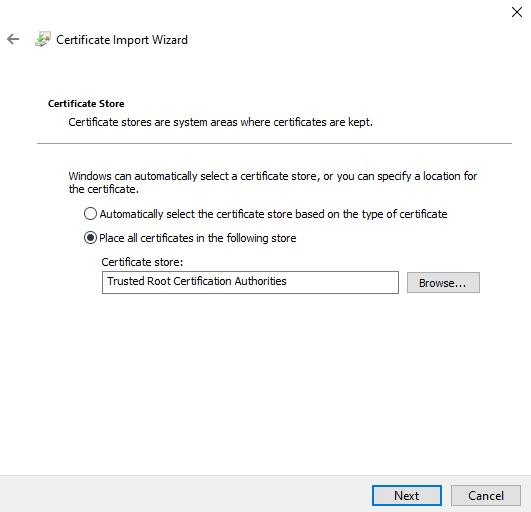
|
||
</Frame>
|
||
|
||
1. Click finish and agree to finalize the import. No reboot is necessary and all new instances created will then not have the warning pop-up.
|
||
|
||
**Note that existing instances will still have the warning**.
|
||
|
||
### Chrome on Linux
|
||
|
||
1. Open your Chrome security settings by clicking on the three dot menu in the upper right. Then click Settings. Then click Privacy and security on the left hand navigation. From that menu, select Security (safe browsing).
|
||
2. Scroll down and select "Manage Certificates" on that page.
|
||
3. Select the 'Authorities' tab under 'Manage certificates'.
|
||
4. Press the import button and import the downloaded [jvastai\_root.cer](https://console.vast.ai/static/jvastai_root.cer) file. You may need to select show all file types.
|
||
|
||
### Windows - General
|
||
|
||
1. After downloading the [certificate](https://console.vast.ai/static/jvastai_root.cer), double click on it to open the installation wizard.
|
||
2. Click "Open".
|
||
|
||
<Frame caption="Cert Windows 1">
|
||
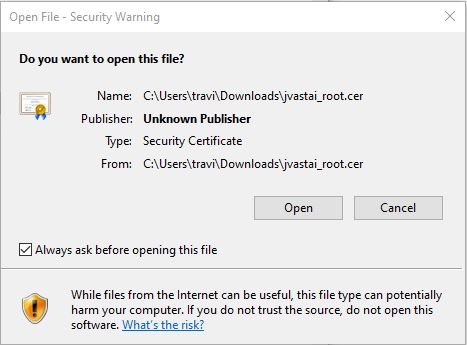
|
||
</Frame>
|
||
|
||
1. Click on the "Install Certificate" button. Select either the current user or local machine and hit next.
|
||
|
||
<Frame caption="Cert Windows 2">
|
||
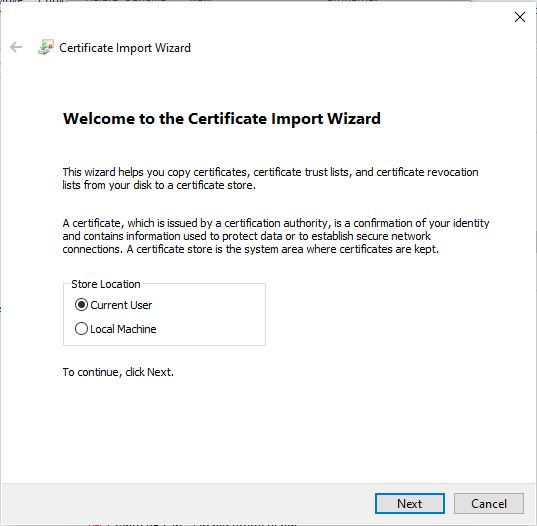
|
||
</Frame>
|
||
|
||
1. Click "Place all certificates in the following store".
|
||
2. Click Browse and select the folder "Trusted Root Certification Authorities". Click OK. Then click Next. Click "Finish" to install the certificate.
|
||
|
||
<Frame caption="Cert Windows 3">
|
||
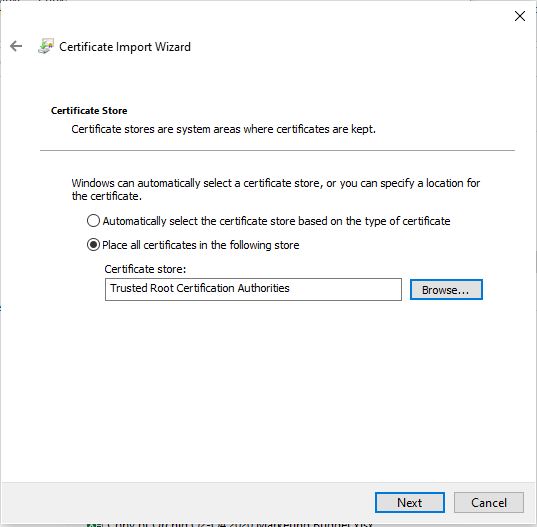
|
||
</Frame>
|
||
|
||
1. Reboot the machine so the change can take effect.
|
||
|
||
### macOS
|
||
|
||
1. Double click the [certificate](https://console.vast.ai/static/jvastai_root.cer) after downloading it. It will then be added to your Keychain under the Login default keychain. Make sure that the Keychain Access application is opened and that there is an entry for Vast.ai Jupyter in the list of certificates. If it does not appear, then use the import button to manually import the certificate so that it appears in your list of certificates.
|
||
|
||
<Frame caption="Cert Macos 1">
|
||
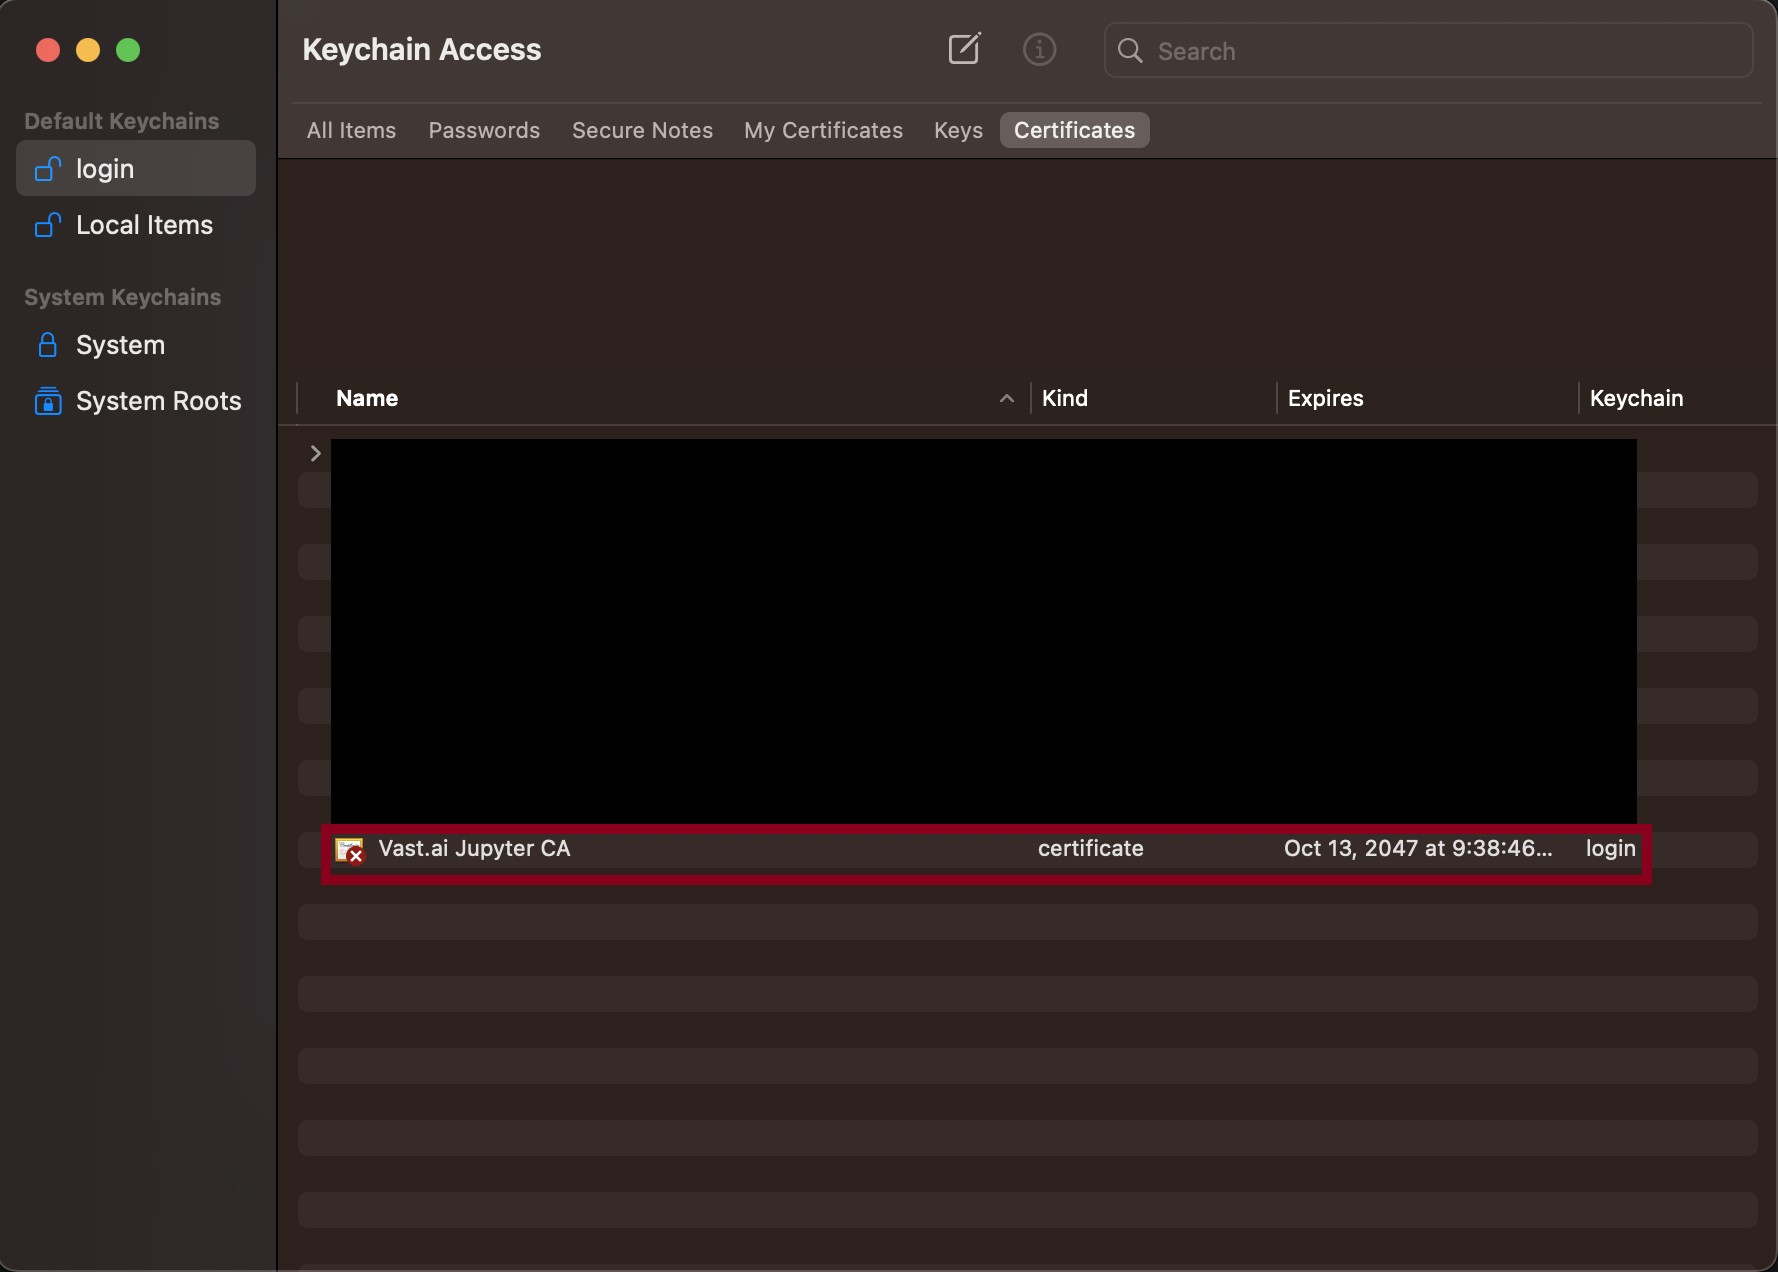
|
||
</Frame>
|
||
|
||
1. Double click the entry and then click on the "Trust" box.
|
||
2. Change the "When using this certificate" box to "Always Trust".
|
||
|
||
<Frame caption="Cert Macos 2">
|
||
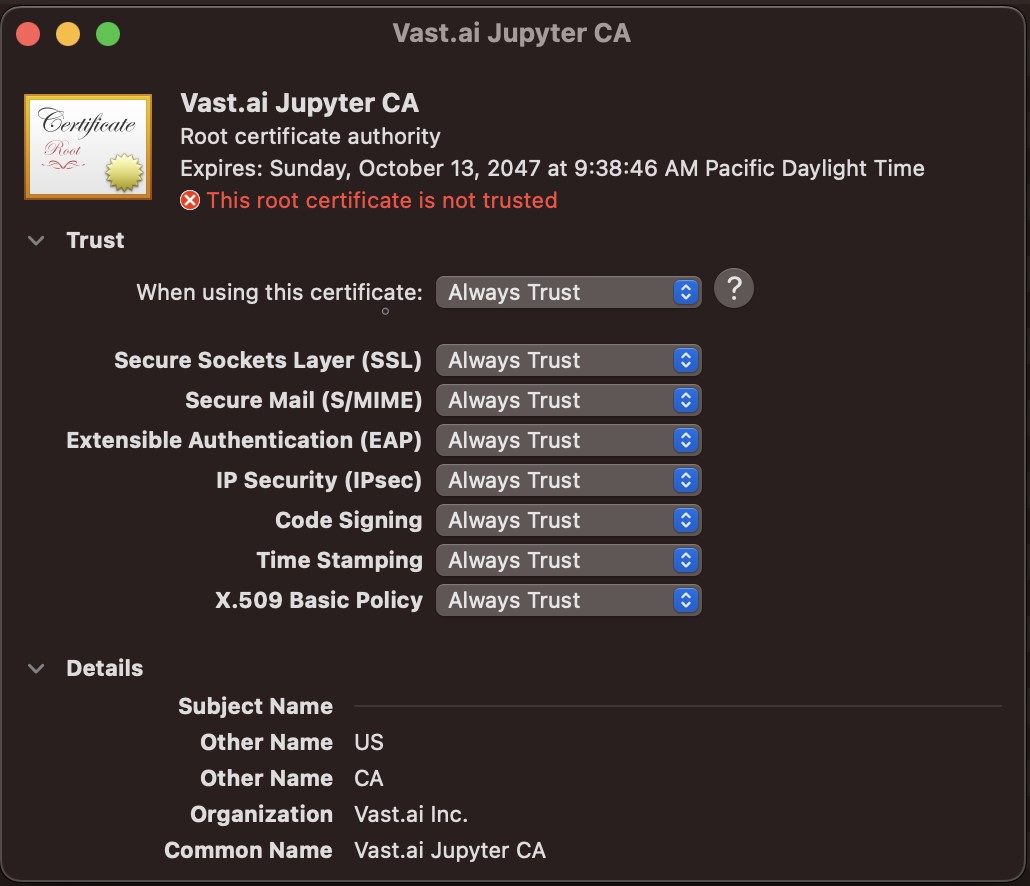
|
||
</Frame>
|
||
|
||
1. Close the window. The change should take effect immediately for all instances you have running and create in the future.
|
||
|
||
|
||
# Networking & Ports
|
||
Source: https://docs.vast.ai/documentation/instances/connect/networking
|
||
|
||
Understand how Vast.ai handles networking, port mapping, and environment variables for Docker instances.
|
||
|
||
## How Networking Works
|
||
|
||
Vast.ai docker instances have full internet access, but generally do not have unique IP addresses. Instances can have public open ports, but as IP addresses are shared across machines/instances the public external ports are partitioned somewhat randomly.
|
||
|
||
In essence each docker instance gets a fraction of a public IP address based on a subset of ports. Each open internal port (such as 22 or 8080 etc) is mapped to a *random* external port on the machine's (usually shared) public IP address.
|
||
|
||
Selecting the ssh launch mode will open and use port 22 internal by default, whereas jupyter will open and use port 8080 (in addition to 22 for ssh).
|
||
|
||
## Opening Custom Ports
|
||
|
||
There are several ways to open additional application ports:
|
||
|
||
<Note>
|
||
There is currently a limit of 64 total open ports per container/instance.
|
||
</Note>
|
||
|
||
### Using Docker Options
|
||
|
||
You can open custom ports for any docker image using -p arguments in the docker create/run options box in the image config editor pop-up menu.
|
||
|
||
To open ports 8081 (tcp) and 8082 udp, use something like this:
|
||
|
||
```text Text theme={null}
|
||
-p 8081:8081 -p 8082:8082/udp
|
||
```
|
||
|
||
This will result in additional arguments to docker create/run to expose those internal ports, which will be mapped to random external ports.
|
||
|
||
Any ports exposed in these docker options are in addition to:
|
||
|
||
* Ports exposed through EXPOSE commands in the docker image
|
||
* Ports 22 or 8080 which may be opened automatically for SSH or Jupyter
|
||
|
||
### Using EXPOSE in Dockerfile
|
||
|
||
Any EXPOSE commands in your docker image will be automatically mapped to port requests.
|
||
|
||
## Finding Your Mapped Ports
|
||
|
||
After the instance has loaded, you can find the corresponding external public IP by opening the IP Port Info pop-up (button on top of the instance) and then looking for the external port which maps to your internal port.
|
||
|
||
It will have a format of PUBLIC\_IP -> INTERNAL\_PORT. For example:
|
||
|
||
```text Text theme={null}
|
||
65.130.162.74:33526 -> 8081/tcp
|
||
```
|
||
|
||
In this case, the public IP 65.130.162.74:33526 can be used to access anything you run on port 8081 inside the instance.
|
||
|
||
## Testing Your Ports
|
||
|
||
We strongly recommend you test your port mapping. You can quickly test your port mapping with a simple command to start a minimal web server inside the instance:
|
||
|
||
```text Text theme={null}
|
||
python -m http.server 8081
|
||
```
|
||
|
||
Which you would then access in this example by loading 65.130.162.74:33526 in your web browser. This should open a file directory.
|
||
|
||
## Identity Ports
|
||
|
||
In some cases you may need an identity port map like 32001:32001 where external and internal ports are the same.
|
||
|
||
For this just use an out-of-range port above 70000:
|
||
|
||
```text Text theme={null}
|
||
-p 70000:70000 -p 70001:70001
|
||
```
|
||
|
||
These out of range requests will map to random external ports and matching internal ports.
|
||
You can then find the resulting mapped port with the appropriate env variables like: `$VAST_TCP_PORT_70000`
|
||
|
||
## Port Environment Variables
|
||
|
||
Our system predefines environment variables for port mappings that you can use:
|
||
|
||
### Default Ports
|
||
|
||
* **VAST\_TCP\_PORT\_22**: The external public TCP port that maps to internal port 22 (ssh)
|
||
* **VAST\_TCP\_PORT\_8080**: The external public TCP port that maps to internal port 8080 (jupyter)
|
||
|
||
### Custom Ports
|
||
|
||
For each internal TCP port request:
|
||
|
||
* **VAST\_TCP\_PORT\_X**: The external public TCP port that maps to internal port X
|
||
|
||
For each internal UDP port request:
|
||
|
||
* **VAST\_UDP\_PORT\_X**: The external public UDP port that maps to internal port X
|
||
|
||
## Special Environment Variables for UI
|
||
|
||
You can use special environment variables to control the Vast.ai interface:
|
||
|
||
### OPEN\_BUTTON\_PORT
|
||
|
||
Set this to map the open button on the instance panel to a specific (external) port corresponding to the specified internal port.
|
||
|
||
```text Text theme={null}
|
||
-e OPEN_BUTTON_PORT=7860
|
||
```
|
||
|
||
This will map the open button to whatever external port maps to internal port 7860.
|
||
|
||
### JUPYTER\_PORT
|
||
|
||
Use this to control the jupyter button. Set this to your internal jupyter port and the UI will map the jupyter button to open jupyter on the corresponding IP in a new tab.
|
||
|
||
```text Text theme={null}
|
||
-e JUPYTER_PORT=8081
|
||
```
|
||
|
||
This will map the jupyter button to whatever external port maps to internal port 8081.
|
||
|
||
### JUPYTER\_TOKEN
|
||
|
||
Use this to control the jupyter button. Set this to your jupyter token and the UI will map the jupyter button to open jupyter using the corresponding JUPYTER\_TOKEN in a new tab.
|
||
|
||
```text Text theme={null}
|
||
-e JUPYTER_TOKEN=TOKEN
|
||
```
|
||
|
||
This will use TOKEN as a value of your jupyter Token.
|
||
|
||
## Docker Create Options
|
||
|
||
You can currently set 3 types of docker create/run options in the GUI and CLI:
|
||
|
||
1. **Environment variables**: `-e JUPYTER_DIR=/ -e TEST=OK`
|
||
2. **Hostname**: `-h billybob`
|
||
3. **Ports**: `-p 8081:8081 -p 8082:8082/udp -p 70000:70000`
|
||
|
||
## Best Practices
|
||
|
||
1. **Test your ports**: Always verify port mappings work after instance creation
|
||
2. **Use identity ports sparingly**: Only when absolutely necessary (ports above 70000)
|
||
3. **Document your port usage**: Keep track of which services use which ports
|
||
4. **Check the limit**: Remember the 64 port limit per instance
|
||
5. **Use environment variables**: Leverage predefined port variables in your scripts
|
||
|
||
|
||
# Overview
|
||
Source: https://docs.vast.ai/documentation/instances/connect/overview
|
||
|
||
Learn about Vast.ai connection methods—SSH, Jupyter, and Entrypoint—and how each controls instance access and workflow.
|
||
|
||
We currently support 3 launch modes: entrypoint, ssh, and jupyter.
|
||
|
||
## Entrypoint
|
||
|
||
For this launch mode we simply run a docker container from your specified image as is.
|
||
The docker image entrypoint is the main run process, which you can override in the GUI or CLI (--entrypoint).
|
||
You can also pass arguments to your entrypoint in the GUI or CLI (--args).
|
||
Entrypoint launch mode is suitable for GPU worker instances which receive tasks from your webserver.
|
||
As ssh/jupyter access is not provided, your docker image is responsible for setting up any such connections as needed.
|
||
|
||
## SSH
|
||
|
||
For this launch option we setup an ssh connection using proxy and or direct connections where appropriate (mapping to port 22 internal).
|
||
If the machine supports open ports our system will try to setup both a direct ssh connection and a backup proxy connection.
|
||
This is mostly automatic under the hood, but it does require that your docker image is compatible with typical ssh daemon setup.
|
||
|
||
With the SSH launch option your docker image entrypoint is not called as we must override it.
|
||
Instead we allow you to specify an onstart script which is called as part of the new entrypoint.
|
||
|
||
So if you are using making a template from an existing docker image, you typically will want to find its entrypoint command and move that to the onstart.
|
||
|
||
More information on [SSH/SCP](/documentation/instances/connect/ssh)
|
||
|
||
## Jupyter
|
||
|
||
For this launch option we setup a jupyter using a proxy and or direct connections where appropriate (mapping to port 8080 internal).
|
||
If the machine supports open ports our system will try to setup a direct jupyter connection with a custom HTTPS certificate.
|
||
This is mostly automatic under the hood, but it does require that your docker image is compatible with typical jupyter setup.
|
||
|
||
With the Jupyter launch option your docker image entrypoint is not called as we must override it.
|
||
Instead we allow you to specify an onstart script which is called as part of the new entrypoint.
|
||
|
||
So if you are using making a template from an existing docker image, you typically will want to find its entrypoint command and move that to the onstart.
|
||
|
||
More information on [Jupyter and installing the certificate](/documentation/instances/connect/jupyter)
|
||
|
||
|
||
# SSH Connection
|
||
Source: https://docs.vast.ai/documentation/instances/connect/ssh
|
||
|
||
Learn how to securely connect to Vast.ai instances using SSH. Generate keys, establish connections, use port forwarding, and integrate with VS Code.
|
||
|
||
## About SSH
|
||
|
||
**SSH (Secure Shell)** is a protocol for safely connecting to remote servers. It encrypts your connection so you can:
|
||
|
||
* Log in securely
|
||
* Run commands remotely
|
||
* Transfer files without exposing your data
|
||
|
||
<Note>
|
||
Vast.ai instances are configured to accept keys only - Password authentication is disabled for improved security.
|
||
</Note>
|
||
|
||
## Quick start: Generate and add your SSH key to your Vast account
|
||
|
||
<Tabs>
|
||
<Tab title="Terminal">
|
||
**1. Generate a SSH key pair in your terminal**
|
||
|
||
<CodeGroup>
|
||
```bash Bash theme={null}
|
||
ssh-keygen -t ed25519 -C "your_email@example.com"
|
||
```
|
||
|
||
```powershell PowerShell theme={null}
|
||
ssh-keygen -t ed25519 -C "your_email@example.com"
|
||
```
|
||
</CodeGroup>
|
||
|
||
1. Creates two files (by default in \~/.ssh/):
|
||
* id\_ed25519 → your **private key** (keep safe, never share).
|
||
* id\_ed25519.pub → your **public key** (safe to share, add to servers).
|
||
2. -C "[your\_email@example.com](mailto:your_email@example.com)" is optional. Whatever you put there is stored as a comment in the public key file (e.g., id\_ed25519.pub). It's just for identification (helpful if you use multiple keys), not for security.
|
||
|
||
<Note>
|
||
When you run ssh-keygen -t ed25519 in **Windows PowerShell**, the keys are created in your Windows user profile folder:
|
||
`C:\Users\<YourUsername>\.ssh\`
|
||
</Note>
|
||
|
||
**2. Copy your public key.**
|
||
|
||
<CodeGroup>
|
||
```bash Bash theme={null}
|
||
# Print the public key
|
||
cat ~/.ssh/id_ed25519.pub
|
||
ssh-ed25519 AAAAC3NzaC1lZ9DdI1NTE5AAAAIHWGYlMT8CxcILI/i3DsRvX74HNChkm4JSNFu0wmcv0a
|
||
```
|
||
|
||
```powershell PowerShell theme={null}
|
||
# Print the public key
|
||
Get-Content $env:USERPROFILE\.ssh\id_ed25519.pub
|
||
ssh-ed25519 AAAAC3NzaC1lZ9DdI1NTE5AAAAIHWGYlMT8CxcILI/i3DsRvX74HNChkm4JSNFu0wm
|
||
```
|
||
</CodeGroup>
|
||
|
||
**3. Add it in your** [**vast account**](https://cloud.vast.ai/manage-keys/)
|
||
|
||
<img src="https://mintcdn.com/vastai-80aa3a82/rJSuh7NkZ00k8fzX/images/instances-sshscp.webp?fit=max&auto=format&n=rJSuh7NkZ00k8fzX&q=85&s=0c4875e49e2b1250de56ca5d06c8dd8a" alt="" data-og-width="914" width="914" data-og-height="684" height="684" data-path="images/instances-sshscp.webp" data-optimize="true" data-opv="3" srcset="https://mintcdn.com/vastai-80aa3a82/rJSuh7NkZ00k8fzX/images/instances-sshscp.webp?w=280&fit=max&auto=format&n=rJSuh7NkZ00k8fzX&q=85&s=ce25808c68ef5747ae61afc47e21dbac 280w, https://mintcdn.com/vastai-80aa3a82/rJSuh7NkZ00k8fzX/images/instances-sshscp.webp?w=560&fit=max&auto=format&n=rJSuh7NkZ00k8fzX&q=85&s=ad998abfde5ababac4ce81f09fd2d465 560w, https://mintcdn.com/vastai-80aa3a82/rJSuh7NkZ00k8fzX/images/instances-sshscp.webp?w=840&fit=max&auto=format&n=rJSuh7NkZ00k8fzX&q=85&s=d02a30b53bd09b1014350478397dece5 840w, https://mintcdn.com/vastai-80aa3a82/rJSuh7NkZ00k8fzX/images/instances-sshscp.webp?w=1100&fit=max&auto=format&n=rJSuh7NkZ00k8fzX&q=85&s=8154e85ec34d201cde1ae4647f334bec 1100w, https://mintcdn.com/vastai-80aa3a82/rJSuh7NkZ00k8fzX/images/instances-sshscp.webp?w=1650&fit=max&auto=format&n=rJSuh7NkZ00k8fzX&q=85&s=6577c4d72389e767fb8ffe14e92167f8 1650w, https://mintcdn.com/vastai-80aa3a82/rJSuh7NkZ00k8fzX/images/instances-sshscp.webp?w=2500&fit=max&auto=format&n=rJSuh7NkZ00k8fzX&q=85&s=7e4c0d56416402102e8e115bc9c481e6 2500w" />
|
||
</Tab>
|
||
|
||
<Tab title="Vast CLI">
|
||
**Add & Generate SSH Key (using** [**Vast CLI**](/cli/get-started)**)**
|
||
|
||
1. **Install Vast CLI:**
|
||
|
||
<CodeGroup>
|
||
```bash Bash theme={null}
|
||
pip install vastai
|
||
```
|
||
|
||
```powershell PowerShell theme={null}
|
||
py -m pip install vastai
|
||
# or
|
||
python -m pip install vastai
|
||
```
|
||
</CodeGroup>
|
||
|
||
2. **Generate an API key in your vast account:**
|
||
1. Open [CLI page](https://cloud.vast.ai/cli/)
|
||
2. Create an API key
|
||
<Frame caption="API Key creation">
|
||
<img src="https://mintcdn.com/vastai-80aa3a82/rJSuh7NkZ00k8fzX/images/instances-sshscp-2.webp?fit=max&auto=format&n=rJSuh7NkZ00k8fzX&q=85&s=b87717158bb150f91e707186ee5e3d0f" alt="API Key creation" data-og-width="800" width="800" data-og-height="316" height="316" data-path="images/instances-sshscp-2.webp" data-optimize="true" data-opv="3" srcset="https://mintcdn.com/vastai-80aa3a82/rJSuh7NkZ00k8fzX/images/instances-sshscp-2.webp?w=280&fit=max&auto=format&n=rJSuh7NkZ00k8fzX&q=85&s=142b3c9d5f6649159213ffd6808b72dd 280w, https://mintcdn.com/vastai-80aa3a82/rJSuh7NkZ00k8fzX/images/instances-sshscp-2.webp?w=560&fit=max&auto=format&n=rJSuh7NkZ00k8fzX&q=85&s=00b017024671fc23e9ff633b929ad068 560w, https://mintcdn.com/vastai-80aa3a82/rJSuh7NkZ00k8fzX/images/instances-sshscp-2.webp?w=840&fit=max&auto=format&n=rJSuh7NkZ00k8fzX&q=85&s=29ff3c6567e5eb5fc92198a007d2cbb8 840w, https://mintcdn.com/vastai-80aa3a82/rJSuh7NkZ00k8fzX/images/instances-sshscp-2.webp?w=1100&fit=max&auto=format&n=rJSuh7NkZ00k8fzX&q=85&s=cff4606483c2ce7b077be309ed80af02 1100w, https://mintcdn.com/vastai-80aa3a82/rJSuh7NkZ00k8fzX/images/instances-sshscp-2.webp?w=1650&fit=max&auto=format&n=rJSuh7NkZ00k8fzX&q=85&s=b154d75102218364a8a476b999b003dd 1650w, https://mintcdn.com/vastai-80aa3a82/rJSuh7NkZ00k8fzX/images/instances-sshscp-2.webp?w=2500&fit=max&auto=format&n=rJSuh7NkZ00k8fzX&q=85&s=5959f2128d22d7794176c4fa391d30dd 2500w" />
|
||
</Frame>
|
||
|
||
3. **Generate a new SSH key pair** (you will need your vast API key):
|
||
|
||
<CodeGroup>
|
||
```cli CLI theme={null}
|
||
vastai create ssh-key --api-key YOUR_API_KEY
|
||
```
|
||
|
||
```cli CLI theme={null}
|
||
vastai set api-key YOUR_API_KEY
|
||
vastai create ssh-key
|
||
```
|
||
</CodeGroup>
|
||
|
||
* Saves keys as \~/.ssh/id\_ed25519 (private) and \~/.ssh/id\_ed25519.pub (public).
|
||
* Backs up existing keys as .backup\_\[timestamp].
|
||
* Keys are stored in your Vast account and used for new instances.
|
||
</Tab>
|
||
</Tabs>
|
||
|
||
<Warning>
|
||
* Adding a key to your account keys only applies to **new instances**.
|
||
* Existing instances will **not** get the new key automatically. To add a key, use the **instance-specific SSH interface**.
|
||
* For **VM instances**, changing keys requires recreating the VM.
|
||
</Warning>
|
||
|
||
## Connecting to your Instance
|
||
|
||
Start a new instance and click the SSH icon to see your connection information.
|
||
|
||
<Frame caption="Terminal Connection Options">
|
||
<img src="https://mintcdn.com/vastai-80aa3a82/rJSuh7NkZ00k8fzX/images/instances-sshscp-3.webp?fit=max&auto=format&n=rJSuh7NkZ00k8fzX&q=85&s=0baecee39ed1714254241d265a1583ef" alt="Connection details" data-og-width="1063" width="1063" data-og-height="453" height="453" data-path="images/instances-sshscp-3.webp" data-optimize="true" data-opv="3" srcset="https://mintcdn.com/vastai-80aa3a82/rJSuh7NkZ00k8fzX/images/instances-sshscp-3.webp?w=280&fit=max&auto=format&n=rJSuh7NkZ00k8fzX&q=85&s=23a7cc28f35a45da60ae7bac6851c5c3 280w, https://mintcdn.com/vastai-80aa3a82/rJSuh7NkZ00k8fzX/images/instances-sshscp-3.webp?w=560&fit=max&auto=format&n=rJSuh7NkZ00k8fzX&q=85&s=55d399312c5cd759898b27d23d80fd05 560w, https://mintcdn.com/vastai-80aa3a82/rJSuh7NkZ00k8fzX/images/instances-sshscp-3.webp?w=840&fit=max&auto=format&n=rJSuh7NkZ00k8fzX&q=85&s=46cf12ad1ed7a5fa4dc4e0f377c64059 840w, https://mintcdn.com/vastai-80aa3a82/rJSuh7NkZ00k8fzX/images/instances-sshscp-3.webp?w=1100&fit=max&auto=format&n=rJSuh7NkZ00k8fzX&q=85&s=8a954169f77ccb3e9ff2ce5d095d00e8 1100w, https://mintcdn.com/vastai-80aa3a82/rJSuh7NkZ00k8fzX/images/instances-sshscp-3.webp?w=1650&fit=max&auto=format&n=rJSuh7NkZ00k8fzX&q=85&s=8d694128da14e5c0540821be56579377 1650w, https://mintcdn.com/vastai-80aa3a82/rJSuh7NkZ00k8fzX/images/instances-sshscp-3.webp?w=2500&fit=max&auto=format&n=rJSuh7NkZ00k8fzX&q=85&s=7cfb49180130e1d6dd523d2d90c9fe99 2500w" />
|
||
</Frame>
|
||
|
||
Now you can enter the connection command string into your terminal
|
||
|
||
```bash Bash theme={null}
|
||
ssh -p 20544 root@142.214.185.187 -L 8080:localhost:8080
|
||
|
||
The authenticity of host '[142.214.185.187]:20544 ([142.214.185.187]:20544)' can't be established.
|
||
ED25519 key fingerprint is SHA256:WTUphznpN0zikMp+L5EtZpiCH6EeZ2PA/7+DSXDRjT0.
|
||
This key is not known by any other names.
|
||
Are you sure you want to continue connecting (yes/no/[fingerprint])? yes
|
||
```
|
||
|
||
You should now see a screen similar to this. You will, by default, be placed into a tmux session.
|
||
|
||
<Frame caption="Connected to Instance">
|
||
<img src="https://mintcdn.com/vastai-80aa3a82/rJSuh7NkZ00k8fzX/images/instances-sshscp-4.webp?fit=max&auto=format&n=rJSuh7NkZ00k8fzX&q=85&s=e3dadd004d54ec00fbe7236860f5adc2" alt="Instance SSH session" data-og-width="1254" width="1254" data-og-height="464" height="464" data-path="images/instances-sshscp-4.webp" data-optimize="true" data-opv="3" srcset="https://mintcdn.com/vastai-80aa3a82/rJSuh7NkZ00k8fzX/images/instances-sshscp-4.webp?w=280&fit=max&auto=format&n=rJSuh7NkZ00k8fzX&q=85&s=a185fcc096f446ee40f48d6bc58a8871 280w, https://mintcdn.com/vastai-80aa3a82/rJSuh7NkZ00k8fzX/images/instances-sshscp-4.webp?w=560&fit=max&auto=format&n=rJSuh7NkZ00k8fzX&q=85&s=fabdfe7e040ea540d21dc4c552966358 560w, https://mintcdn.com/vastai-80aa3a82/rJSuh7NkZ00k8fzX/images/instances-sshscp-4.webp?w=840&fit=max&auto=format&n=rJSuh7NkZ00k8fzX&q=85&s=3d35d7fb1b7d2d5a1bd7731a02d5dff2 840w, https://mintcdn.com/vastai-80aa3a82/rJSuh7NkZ00k8fzX/images/instances-sshscp-4.webp?w=1100&fit=max&auto=format&n=rJSuh7NkZ00k8fzX&q=85&s=e259ec3f325fa860ba277948a5481ce8 1100w, https://mintcdn.com/vastai-80aa3a82/rJSuh7NkZ00k8fzX/images/instances-sshscp-4.webp?w=1650&fit=max&auto=format&n=rJSuh7NkZ00k8fzX&q=85&s=53eb278140b2d8dd6507121fcaada6ee 1650w, https://mintcdn.com/vastai-80aa3a82/rJSuh7NkZ00k8fzX/images/instances-sshscp-4.webp?w=2500&fit=max&auto=format&n=rJSuh7NkZ00k8fzX&q=85&s=29713333a4bf70aac4f71d5d96fb8bee 2500w" />
|
||
</Frame>
|
||
|
||
### Direct vs Proxy Connections
|
||
|
||
Vast offers both proxy (default) and direct connection methods for SSH:
|
||
|
||
* **Proxy SSH**: Works on all machines, slower for data transfer, uses Vast proxy server
|
||
* **Direct SSH**: Requires machines with open ports, faster and more reliable, preferred method
|
||
|
||
## Tmux
|
||
|
||
We connect you to a tmux session by default for reliability and to prevent unintentional termination of foreground processes. You can create a new bash terminal window with `ctrl+b` + `c`. Cycle through your windows with `ctrl+b` + `n`
|
||
|
||
There is an excellent guide for getting to grips with tmux at [https://tmuxcheatsheet.com](https://tmuxcheatsheet.com/)
|
||
|
||
If, however, you would prefer to disable TMUX, you can apply the following either in a terminal or from your template's on-start section.
|
||
|
||
```text Text theme={null}
|
||
touch ~/.no_auto_tmux
|
||
```
|
||
|
||
## SSH Local Port Forwarding
|
||
|
||
An often overlooked feature of SSH is its ability to forward local ports to another machine. When you access a server remotely over SSH, you can make ports from the remote machine available as if they were listening on your own device. This is a secure alternative to opening ports on the public interface as all data is transported over the SSH connection.
|
||
|
||
```bash Bash theme={null}
|
||
ssh -p 1234 root@180.123.123.123 -L 8080:localhost:8080 -L 5000:localhost:5000
|
||
```
|
||
|
||
This SSH command connects to the remote instance and sets up **local port forwarding** (SSH tunneling):
|
||
|
||
**Connection details:**
|
||
|
||
* Connects to IP 180.123.123.123 as user root
|
||
* Uses port 1234 instead of the default SSH port 22
|
||
|
||
**Port forwarding (the key part):**
|
||
|
||
* `-L 8080:localhost:8080` - Creates a tunnel so when you access localhost:8080 on your local machine, it forwards to port `8080` on the remote server
|
||
* `-L 5000:localhost:5000` - Same thing for port `5000`
|
||
|
||
You can repeat the `-L` arguments to forward as many ports as you need.
|
||
|
||
**What this means:** After connecting, you can open your web browser and go to [https://localhost:8080](https://localhost:8080) or [http://localhost:5000](http://localhost:5000) on your local computer, and you'll actually be accessing services running on those ports on the remote server. It's like creating secure "tunnels" through the SSH connection to reach applications on the remote machine that might not be directly accessible from the internet.
|
||
|
||
## SSH Alternative - Jupyter Terminal
|
||
|
||
As a simple alternative to SSH, you might like to consider Jupyter Terminal instead. All instances started in Jupyter launch mode will have this enabled. It is a very straightforward web-based terminal with session persistence. It's great for a quick CLI session.
|
||
|
||
Access the terminal from the SSH connections interface.
|
||
|
||
<img src="https://mintcdn.com/vastai-80aa3a82/rJSuh7NkZ00k8fzX/images/instances-sshscp-5.webp?fit=max&auto=format&n=rJSuh7NkZ00k8fzX&q=85&s=209bceca0c9c25960269d6af03a4ec00" alt="" data-og-width="800" width="800" data-og-height="174" height="174" data-path="images/instances-sshscp-5.webp" data-optimize="true" data-opv="3" srcset="https://mintcdn.com/vastai-80aa3a82/rJSuh7NkZ00k8fzX/images/instances-sshscp-5.webp?w=280&fit=max&auto=format&n=rJSuh7NkZ00k8fzX&q=85&s=7fd1f0b63e9e32976482c161d8adb0ff 280w, https://mintcdn.com/vastai-80aa3a82/rJSuh7NkZ00k8fzX/images/instances-sshscp-5.webp?w=560&fit=max&auto=format&n=rJSuh7NkZ00k8fzX&q=85&s=3a37e3391a09f2b2d5442640ad5371a1 560w, https://mintcdn.com/vastai-80aa3a82/rJSuh7NkZ00k8fzX/images/instances-sshscp-5.webp?w=840&fit=max&auto=format&n=rJSuh7NkZ00k8fzX&q=85&s=445a424b204acae3aa5892c0fb5e19f7 840w, https://mintcdn.com/vastai-80aa3a82/rJSuh7NkZ00k8fzX/images/instances-sshscp-5.webp?w=1100&fit=max&auto=format&n=rJSuh7NkZ00k8fzX&q=85&s=3a1c02fd93343b38f04db5301a07abe1 1100w, https://mintcdn.com/vastai-80aa3a82/rJSuh7NkZ00k8fzX/images/instances-sshscp-5.webp?w=1650&fit=max&auto=format&n=rJSuh7NkZ00k8fzX&q=85&s=9f74b697ddbcd0b226db17785c72ff8d 1650w, https://mintcdn.com/vastai-80aa3a82/rJSuh7NkZ00k8fzX/images/instances-sshscp-5.webp?w=2500&fit=max&auto=format&n=rJSuh7NkZ00k8fzX&q=85&s=19409536de358a89230eeb9f50f1683c 2500w" />
|
||
|
||
## Troubleshooting
|
||
|
||
### Permission Denied (publickey)
|
||
|
||
If you get this error when trying to SSH:
|
||
|
||
1. Ensure your SSH key is added to your [Vast account](https://cloud.vast.ai/manage-keys/)
|
||
2. Verify you're using the correct private key
|
||
3. Check key file permissions: `chmod 600 ~/.ssh/id_ed25519`
|
||
4. Use `-vv` flag for detailed debug info: `ssh -vv -p PORT root@IP`
|
||
|
||
### SSH Key Changes
|
||
|
||
* New account keys only apply to NEW instances created after adding the key
|
||
* Existing instances keep their original keys (won't get new keys automatically)
|
||
* For VM instances, changing keys requires recreating the VM
|
||
* To add keys to existing instances, use the instance-specific SSH interface
|
||
|
||
### General Connection Issues
|
||
|
||
You can often determine the exact cause of a connection failure by using the -vv arguments with ssh to get more information.
|
||
|
||
Common reasons include:
|
||
|
||
* Using the wrong private key
|
||
* Incorrect permissions for your private key
|
||
* Public key not added to instance or account
|
||
* Connecting to the wrong port
|
||
|
||
## SCP & SFTP File Transfer
|
||
|
||
Both **SCP** (Secure Copy Protocol) and **SFTP** (SSH File Transfer Protocol) are tools for securely transferring files that piggyback on the SSH protocol. They use the same authentication and encryption as SSH.
|
||
|
||
### SCP (Secure Copy Protocol)
|
||
|
||
* **What it is:** Simple, command-line tool for copying files between local and remote machines
|
||
* **Best for:** Quick, one-time file transfers
|
||
* **Syntax:** `scp -P <port> source destination`
|
||
|
||
**Examples:**
|
||
|
||
```bash Bash theme={null}
|
||
# Copy file TO instance
|
||
scp -P <ssh_port> my_file.txt root@<instance_ip>:/workspace/
|
||
# Copy file FROM remote server
|
||
scp -P <ssh_port> root@<instance_ip>:/workspace/my_file.txt ./
|
||
# Copy entire directory
|
||
scp -P <ssh_port> -r myfolder/ root@<instance_ip>:/workspace/
|
||
```
|
||
|
||
### SFTP (SSH File Transfer Protocol)
|
||
|
||
* **What it is:** Interactive file transfer program with a full command set
|
||
* **Best for:** Managing files, browsing directories, multiple operations
|
||
* **Usage:** CLI or GUI tools available
|
||
|
||
**Example:**
|
||
|
||
```bash Bash theme={null}
|
||
# Establish connection
|
||
sftp -P <ssh_port> root@<instance_ip>
|
||
|
||
Welcome to vast.ai. If authentication fails, try again after a few seconds, and double check your ssh key.
|
||
Have fun!
|
||
Connected to 79.116.73.220.
|
||
sftp> ls
|
||
hasbooted onstart.sh
|
||
```
|
||
|
||
<Note>
|
||
Note that both scp and sftp take the `-P` argument in uppercase. This differs from the ssh command which uses lowercase.
|
||
</Note>
|
||
|
||
## VS Code Integration
|
||
|
||
Once you have your ssh keys set up, connecting to VS Code is quite straightforward. We will cover the basics here.
|
||
|
||
### Install the Remote SSH extension
|
||
|
||
You will need to add the remote extension named 'Remote - SSH'.
|
||
|
||
<img src="https://mintcdn.com/vastai-80aa3a82/rJSuh7NkZ00k8fzX/images/instances-sshscp-6.webp?fit=max&auto=format&n=rJSuh7NkZ00k8fzX&q=85&s=17c9e3e3a16d8c26955d3514ae1711e6" alt="" data-og-width="800" width="800" data-og-height="197" height="197" data-path="images/instances-sshscp-6.webp" data-optimize="true" data-opv="3" srcset="https://mintcdn.com/vastai-80aa3a82/rJSuh7NkZ00k8fzX/images/instances-sshscp-6.webp?w=280&fit=max&auto=format&n=rJSuh7NkZ00k8fzX&q=85&s=9714350821d91df6127260d3433f50b3 280w, https://mintcdn.com/vastai-80aa3a82/rJSuh7NkZ00k8fzX/images/instances-sshscp-6.webp?w=560&fit=max&auto=format&n=rJSuh7NkZ00k8fzX&q=85&s=b7c3b40e2a93fff71c0c308c8d5f0070 560w, https://mintcdn.com/vastai-80aa3a82/rJSuh7NkZ00k8fzX/images/instances-sshscp-6.webp?w=840&fit=max&auto=format&n=rJSuh7NkZ00k8fzX&q=85&s=04210bc95d585b19614a206dffb5d617 840w, https://mintcdn.com/vastai-80aa3a82/rJSuh7NkZ00k8fzX/images/instances-sshscp-6.webp?w=1100&fit=max&auto=format&n=rJSuh7NkZ00k8fzX&q=85&s=518d8f0d739d5d41276570c9d30aa122 1100w, https://mintcdn.com/vastai-80aa3a82/rJSuh7NkZ00k8fzX/images/instances-sshscp-6.webp?w=1650&fit=max&auto=format&n=rJSuh7NkZ00k8fzX&q=85&s=6fc23484109e25873900841e94db4f0f 1650w, https://mintcdn.com/vastai-80aa3a82/rJSuh7NkZ00k8fzX/images/instances-sshscp-6.webp?w=2500&fit=max&auto=format&n=rJSuh7NkZ00k8fzX&q=85&s=16596074877718ce9ab5d0053dfe01fd 2500w" />
|
||
|
||
### Open Remote Window
|
||
|
||
<Columns cols={2}>
|
||
<div>
|
||
Click the open remote window button.
|
||
|
||
<Frame caption="Open Remote Window">
|
||
<img src="https://mintcdn.com/vastai-80aa3a82/rJSuh7NkZ00k8fzX/images/instances-sshscp-7.webp?fit=max&auto=format&n=rJSuh7NkZ00k8fzX&q=85&s=1b086f5d4c976f519aa1623f3a613297" alt="" data-og-width="800" width="800" data-og-height="275" height="275" data-path="images/instances-sshscp-7.webp" data-optimize="true" data-opv="3" srcset="https://mintcdn.com/vastai-80aa3a82/rJSuh7NkZ00k8fzX/images/instances-sshscp-7.webp?w=280&fit=max&auto=format&n=rJSuh7NkZ00k8fzX&q=85&s=0637c8e27f36d55cce47ea9bd360417b 280w, https://mintcdn.com/vastai-80aa3a82/rJSuh7NkZ00k8fzX/images/instances-sshscp-7.webp?w=560&fit=max&auto=format&n=rJSuh7NkZ00k8fzX&q=85&s=eb85b4133b8347ac79300267e480de61 560w, https://mintcdn.com/vastai-80aa3a82/rJSuh7NkZ00k8fzX/images/instances-sshscp-7.webp?w=840&fit=max&auto=format&n=rJSuh7NkZ00k8fzX&q=85&s=30d674f29c36de381fde6440d600278d 840w, https://mintcdn.com/vastai-80aa3a82/rJSuh7NkZ00k8fzX/images/instances-sshscp-7.webp?w=1100&fit=max&auto=format&n=rJSuh7NkZ00k8fzX&q=85&s=c7624f765c2507f9fc26fbb11ac33f61 1100w, https://mintcdn.com/vastai-80aa3a82/rJSuh7NkZ00k8fzX/images/instances-sshscp-7.webp?w=1650&fit=max&auto=format&n=rJSuh7NkZ00k8fzX&q=85&s=ab25486608fd22422a7bb031a1e33a89 1650w, https://mintcdn.com/vastai-80aa3a82/rJSuh7NkZ00k8fzX/images/instances-sshscp-7.webp?w=2500&fit=max&auto=format&n=rJSuh7NkZ00k8fzX&q=85&s=4eba58f81bfb08aa91466442c288973f 2500w" />
|
||
</Frame>
|
||
</div>
|
||
|
||
<div>
|
||
Enter your ssh address details in the box that appears at the top of your window
|
||
<img src="https://mintcdn.com/vastai-80aa3a82/rJSuh7NkZ00k8fzX/images/instances-sshscp-8.webp?fit=max&auto=format&n=rJSuh7NkZ00k8fzX&q=85&s=34351926e878b0b59c9a24d4262bbdba" alt="" data-og-width="800" width="800" data-og-height="64" height="64" data-path="images/instances-sshscp-8.webp" data-optimize="true" data-opv="3" srcset="https://mintcdn.com/vastai-80aa3a82/rJSuh7NkZ00k8fzX/images/instances-sshscp-8.webp?w=280&fit=max&auto=format&n=rJSuh7NkZ00k8fzX&q=85&s=7a7c31202f250992d0ecf2f60a7ce0f1 280w, https://mintcdn.com/vastai-80aa3a82/rJSuh7NkZ00k8fzX/images/instances-sshscp-8.webp?w=560&fit=max&auto=format&n=rJSuh7NkZ00k8fzX&q=85&s=e686d4d9c5c8fd436a5f1c547b3a84ff 560w, https://mintcdn.com/vastai-80aa3a82/rJSuh7NkZ00k8fzX/images/instances-sshscp-8.webp?w=840&fit=max&auto=format&n=rJSuh7NkZ00k8fzX&q=85&s=460e9dce5de901e9a7010de836b7eead 840w, https://mintcdn.com/vastai-80aa3a82/rJSuh7NkZ00k8fzX/images/instances-sshscp-8.webp?w=1100&fit=max&auto=format&n=rJSuh7NkZ00k8fzX&q=85&s=a578db5eb4be54040bd057455814f09c 1100w, https://mintcdn.com/vastai-80aa3a82/rJSuh7NkZ00k8fzX/images/instances-sshscp-8.webp?w=1650&fit=max&auto=format&n=rJSuh7NkZ00k8fzX&q=85&s=898a2017185b8f41fa66f6f8eba2d012 1650w, https://mintcdn.com/vastai-80aa3a82/rJSuh7NkZ00k8fzX/images/instances-sshscp-8.webp?w=2500&fit=max&auto=format&n=rJSuh7NkZ00k8fzX&q=85&s=6fdf5538044a44f086057ea94227e7a7 2500w" />
|
||
</div>
|
||
</Columns>
|
||
|
||
Now simply allow a moment for VS code to configure the instance and you will be able to work with the instance as if it was a local machine.
|
||
|
||
For more information, see the [VS Code documentation](https://code.visualstudio.com/docs/remote/ssh).
|
||
|
||
## Windows GUI Clients
|
||
|
||
For Windows users who prefer GUI tools, please see our [Windows Connection Guide](/documentation/instances/connect/windows-guide) for detailed setup instructions for PuTTY, MobaXterm, and other GUI clients.
|
||
|
||
|
||
# Windows SSH Guide
|
||
Source: https://docs.vast.ai/documentation/instances/connect/windows-guide
|
||
|
||
Learn how to securely connect to Vast.ai instances using SSH on Windows. Understand the basics of SSH, how to generate and add keys, and how to use PuTTY and MobaXterm for GUI-based connections.
|
||
|
||
## Windows Powershell
|
||
|
||
Modern versions of Windows support running CLI ssh commands in PowerShell. We recommemnd you use the CLI wherever possible.
|
||
|
||
<Note>
|
||
This guide will focus only on **Windows GUI tools.** If you would like to proceed with the CLI, please navigate to the [full SSH guide](/documentation/instances/sshscp) for setup information.
|
||
</Note>
|
||
|
||
## Jupyter Terminal - SSH Alternative
|
||
|
||
As a simple alternative to SSH, you might like to consider Jupyter Terminal instead. All instances started in Jupyter launch mode will have this enabled. It is a very straightforward web-based terminal with session persistence. It's great for a quick CLI session.
|
||
|
||
Access the terminal from the SSH connections interface
|
||
|
||
<img src="https://mintcdn.com/vastai-80aa3a82/rJSuh7NkZ00k8fzX/images/instances-windows-ssh.webp?fit=max&auto=format&n=rJSuh7NkZ00k8fzX&q=85&s=01afd3db4a7a5b5dc23f5794e18f48b0" alt="" data-og-width="800" width="800" data-og-height="174" height="174" data-path="images/instances-windows-ssh.webp" data-optimize="true" data-opv="3" srcset="https://mintcdn.com/vastai-80aa3a82/rJSuh7NkZ00k8fzX/images/instances-windows-ssh.webp?w=280&fit=max&auto=format&n=rJSuh7NkZ00k8fzX&q=85&s=6144c64d7c043f429e98d93686efcfd1 280w, https://mintcdn.com/vastai-80aa3a82/rJSuh7NkZ00k8fzX/images/instances-windows-ssh.webp?w=560&fit=max&auto=format&n=rJSuh7NkZ00k8fzX&q=85&s=4e5a1fdf286d7570a0c945b35dbb2dac 560w, https://mintcdn.com/vastai-80aa3a82/rJSuh7NkZ00k8fzX/images/instances-windows-ssh.webp?w=840&fit=max&auto=format&n=rJSuh7NkZ00k8fzX&q=85&s=98431659bbf4572ced674c07a839544a 840w, https://mintcdn.com/vastai-80aa3a82/rJSuh7NkZ00k8fzX/images/instances-windows-ssh.webp?w=1100&fit=max&auto=format&n=rJSuh7NkZ00k8fzX&q=85&s=9ae1e305072ccd33cd036c7237a8589d 1100w, https://mintcdn.com/vastai-80aa3a82/rJSuh7NkZ00k8fzX/images/instances-windows-ssh.webp?w=1650&fit=max&auto=format&n=rJSuh7NkZ00k8fzX&q=85&s=4f062d82a46e8def6872e61aeb1b534e 1650w, https://mintcdn.com/vastai-80aa3a82/rJSuh7NkZ00k8fzX/images/instances-windows-ssh.webp?w=2500&fit=max&auto=format&n=rJSuh7NkZ00k8fzX&q=85&s=9e3581a13c0e56a78a97a5b6f3c8cd74 2500w" />
|
||
|
||
<Frame caption="Jupyter Terminal">
|
||
<img src="https://mintcdn.com/vastai-80aa3a82/rJSuh7NkZ00k8fzX/images/instances-windows-ssh-2.webp?fit=max&auto=format&n=rJSuh7NkZ00k8fzX&q=85&s=6e9f775b251b25e48aa29dce3694ed9c" alt="Jupyter Terminal" data-og-width="1218" width="1218" data-og-height="416" height="416" data-path="images/instances-windows-ssh-2.webp" data-optimize="true" data-opv="3" srcset="https://mintcdn.com/vastai-80aa3a82/rJSuh7NkZ00k8fzX/images/instances-windows-ssh-2.webp?w=280&fit=max&auto=format&n=rJSuh7NkZ00k8fzX&q=85&s=1a0848ed5618a1c06ed6ab2c01f46662 280w, https://mintcdn.com/vastai-80aa3a82/rJSuh7NkZ00k8fzX/images/instances-windows-ssh-2.webp?w=560&fit=max&auto=format&n=rJSuh7NkZ00k8fzX&q=85&s=27d69a5fbd9d2d556f82eb1b790f33f9 560w, https://mintcdn.com/vastai-80aa3a82/rJSuh7NkZ00k8fzX/images/instances-windows-ssh-2.webp?w=840&fit=max&auto=format&n=rJSuh7NkZ00k8fzX&q=85&s=f7a34b14e0af0df378232dfc71def7ff 840w, https://mintcdn.com/vastai-80aa3a82/rJSuh7NkZ00k8fzX/images/instances-windows-ssh-2.webp?w=1100&fit=max&auto=format&n=rJSuh7NkZ00k8fzX&q=85&s=97c9839a83a300f223a99f94030b92d1 1100w, https://mintcdn.com/vastai-80aa3a82/rJSuh7NkZ00k8fzX/images/instances-windows-ssh-2.webp?w=1650&fit=max&auto=format&n=rJSuh7NkZ00k8fzX&q=85&s=7b3b0014c8df7cb421197000e49a87e7 1650w, https://mintcdn.com/vastai-80aa3a82/rJSuh7NkZ00k8fzX/images/instances-windows-ssh-2.webp?w=2500&fit=max&auto=format&n=rJSuh7NkZ00k8fzX&q=85&s=d6eac253a2e655c70c5683219ce7e498 2500w" />
|
||
</Frame>
|
||
|
||
## GUI Setup Guide (Windows)
|
||
|
||
Several GUI tools are available to help with SSH connectivity. While it is often most straightforward to use the terminal we will cover some of the popular options here.
|
||
|
||
For each application we will assume the following:
|
||
|
||
* IP address: 142.114.29.158
|
||
* Port: 46230
|
||
* Username: root
|
||
|
||
To find your own connection details you can click the SSH button on your instance card.
|
||
|
||
<Frame caption="SSH Button">
|
||
<img src="https://mintcdn.com/vastai-80aa3a82/rJSuh7NkZ00k8fzX/images/instances-windows-ssh-3.webp?fit=max&auto=format&n=rJSuh7NkZ00k8fzX&q=85&s=ff769315673347ef690cfa1a5168a993" alt="SSH Button" data-og-width="800" width="800" data-og-height="437" height="437" data-path="images/instances-windows-ssh-3.webp" data-optimize="true" data-opv="3" srcset="https://mintcdn.com/vastai-80aa3a82/rJSuh7NkZ00k8fzX/images/instances-windows-ssh-3.webp?w=280&fit=max&auto=format&n=rJSuh7NkZ00k8fzX&q=85&s=433737469b8b469f8799c9d4eebe6b4a 280w, https://mintcdn.com/vastai-80aa3a82/rJSuh7NkZ00k8fzX/images/instances-windows-ssh-3.webp?w=560&fit=max&auto=format&n=rJSuh7NkZ00k8fzX&q=85&s=874c7c6327d6d6bbbee6e05eb08ab1ba 560w, https://mintcdn.com/vastai-80aa3a82/rJSuh7NkZ00k8fzX/images/instances-windows-ssh-3.webp?w=840&fit=max&auto=format&n=rJSuh7NkZ00k8fzX&q=85&s=5801549c88b09e5a52c779ffa9bd6cef 840w, https://mintcdn.com/vastai-80aa3a82/rJSuh7NkZ00k8fzX/images/instances-windows-ssh-3.webp?w=1100&fit=max&auto=format&n=rJSuh7NkZ00k8fzX&q=85&s=c0212dac5d7ad26942f0c198e6673327 1100w, https://mintcdn.com/vastai-80aa3a82/rJSuh7NkZ00k8fzX/images/instances-windows-ssh-3.webp?w=1650&fit=max&auto=format&n=rJSuh7NkZ00k8fzX&q=85&s=d8f49a6a201b0292b6e38deb95622140 1650w, https://mintcdn.com/vastai-80aa3a82/rJSuh7NkZ00k8fzX/images/instances-windows-ssh-3.webp?w=2500&fit=max&auto=format&n=rJSuh7NkZ00k8fzX&q=85&s=c3a2207921ae96ed0de7bc44b7746a6c 2500w" />
|
||
</Frame>
|
||
|
||
<br />
|
||
|
||
<Frame caption="Example SSH Details">
|
||
<img src="https://mintcdn.com/vastai-80aa3a82/rJSuh7NkZ00k8fzX/images/instances-windows-ssh-4.webp?fit=max&auto=format&n=rJSuh7NkZ00k8fzX&q=85&s=2f5b7d8657e179d2f32ba673adf1b046" alt="Example SSH Details" data-og-width="800" width="800" data-og-height="445" height="445" data-path="images/instances-windows-ssh-4.webp" data-optimize="true" data-opv="3" srcset="https://mintcdn.com/vastai-80aa3a82/rJSuh7NkZ00k8fzX/images/instances-windows-ssh-4.webp?w=280&fit=max&auto=format&n=rJSuh7NkZ00k8fzX&q=85&s=02670ec999f69b155c8cc4b60fa9a28a 280w, https://mintcdn.com/vastai-80aa3a82/rJSuh7NkZ00k8fzX/images/instances-windows-ssh-4.webp?w=560&fit=max&auto=format&n=rJSuh7NkZ00k8fzX&q=85&s=db65d1eb7a7a25b05a9642d5e4c74b6a 560w, https://mintcdn.com/vastai-80aa3a82/rJSuh7NkZ00k8fzX/images/instances-windows-ssh-4.webp?w=840&fit=max&auto=format&n=rJSuh7NkZ00k8fzX&q=85&s=0334de4cee6dd03d3f385eb12ed08212 840w, https://mintcdn.com/vastai-80aa3a82/rJSuh7NkZ00k8fzX/images/instances-windows-ssh-4.webp?w=1100&fit=max&auto=format&n=rJSuh7NkZ00k8fzX&q=85&s=90d806f9d3cfe83906d8206b15163852 1100w, https://mintcdn.com/vastai-80aa3a82/rJSuh7NkZ00k8fzX/images/instances-windows-ssh-4.webp?w=1650&fit=max&auto=format&n=rJSuh7NkZ00k8fzX&q=85&s=fb5528ab0a4df50e56ed88144351821f 1650w, https://mintcdn.com/vastai-80aa3a82/rJSuh7NkZ00k8fzX/images/instances-windows-ssh-4.webp?w=2500&fit=max&auto=format&n=rJSuh7NkZ00k8fzX&q=85&s=6d585ab30e3e2a81e99abb9d240788d7 2500w" />
|
||
</Frame>
|
||
|
||
### PuTTY
|
||
|
||
[PuTTY](https://www.chiark.greenend.org.uk/~sgtatham/putty/) consists of two important components - PuTTY for making connections and PuTTYGen for creating SSH keys.
|
||
|
||
First, we will generate a public and private key pair. PuTTy uses its own `.ppk` private key type.
|
||
|
||
Open PuTTYGen and click the 'Generate' button. You will be asked to move your mouse around until the green bar is full.
|
||
|
||
<Frame caption="PuTTYgen Key Generation">
|
||
<img src="https://mintcdn.com/vastai-80aa3a82/rJSuh7NkZ00k8fzX/images/instances-windows-ssh-5.webp?fit=max&auto=format&n=rJSuh7NkZ00k8fzX&q=85&s=96d7795b67e0028c2f45e134c6ff8fc3" alt="Key generation interface" data-og-width="800" width="800" data-og-height="624" height="624" data-path="images/instances-windows-ssh-5.webp" data-optimize="true" data-opv="3" srcset="https://mintcdn.com/vastai-80aa3a82/rJSuh7NkZ00k8fzX/images/instances-windows-ssh-5.webp?w=280&fit=max&auto=format&n=rJSuh7NkZ00k8fzX&q=85&s=1b079377223811bde80122adaaf03358 280w, https://mintcdn.com/vastai-80aa3a82/rJSuh7NkZ00k8fzX/images/instances-windows-ssh-5.webp?w=560&fit=max&auto=format&n=rJSuh7NkZ00k8fzX&q=85&s=e33bf747fdf6540b30bfc67a1eb0cdf3 560w, https://mintcdn.com/vastai-80aa3a82/rJSuh7NkZ00k8fzX/images/instances-windows-ssh-5.webp?w=840&fit=max&auto=format&n=rJSuh7NkZ00k8fzX&q=85&s=b23bb52da9abb40c36e7c0ee17240325 840w, https://mintcdn.com/vastai-80aa3a82/rJSuh7NkZ00k8fzX/images/instances-windows-ssh-5.webp?w=1100&fit=max&auto=format&n=rJSuh7NkZ00k8fzX&q=85&s=c826e72ebcafa810fa42ae318414762d 1100w, https://mintcdn.com/vastai-80aa3a82/rJSuh7NkZ00k8fzX/images/instances-windows-ssh-5.webp?w=1650&fit=max&auto=format&n=rJSuh7NkZ00k8fzX&q=85&s=8d73ba5fc29c76f7d40dcc4190e47d7c 1650w, https://mintcdn.com/vastai-80aa3a82/rJSuh7NkZ00k8fzX/images/instances-windows-ssh-5.webp?w=2500&fit=max&auto=format&n=rJSuh7NkZ00k8fzX&q=85&s=4181475561d0f4125c9ceb18fbd13592 2500w" />
|
||
</Frame>
|
||
|
||
Once the key generation has completed, save both your public and private key somewhere safe such as in your Documents folder. Optionally you can enter a passphrase for your private key for added security.
|
||
|
||
Next, copy the full public key to the clipboard and add it to your account at [https://cloud.vast.ai/manage-keys/](https://cloud.vast.ai/manage-keys/)
|
||
|
||
Any keys stored at the account level will automatically be added to new instances as they are created. If you have an existing instance you can add keys to it from the instance card.
|
||
|
||
<img src="https://mintcdn.com/vastai-80aa3a82/rJSuh7NkZ00k8fzX/images/instances-windows-ssh-6.webp?fit=max&auto=format&n=rJSuh7NkZ00k8fzX&q=85&s=70eba6e9c8d4b61ceb20e91a802e00b2" alt="" data-og-width="800" width="800" data-og-height="331" height="331" data-path="images/instances-windows-ssh-6.webp" data-optimize="true" data-opv="3" srcset="https://mintcdn.com/vastai-80aa3a82/rJSuh7NkZ00k8fzX/images/instances-windows-ssh-6.webp?w=280&fit=max&auto=format&n=rJSuh7NkZ00k8fzX&q=85&s=2744d1c8720d75851d0d4d90ffe7c79c 280w, https://mintcdn.com/vastai-80aa3a82/rJSuh7NkZ00k8fzX/images/instances-windows-ssh-6.webp?w=560&fit=max&auto=format&n=rJSuh7NkZ00k8fzX&q=85&s=d2e8ce8aed2a1e6e5b81dcbc8cffaf54 560w, https://mintcdn.com/vastai-80aa3a82/rJSuh7NkZ00k8fzX/images/instances-windows-ssh-6.webp?w=840&fit=max&auto=format&n=rJSuh7NkZ00k8fzX&q=85&s=7e0a8143f4e330b755faee21f9e29545 840w, https://mintcdn.com/vastai-80aa3a82/rJSuh7NkZ00k8fzX/images/instances-windows-ssh-6.webp?w=1100&fit=max&auto=format&n=rJSuh7NkZ00k8fzX&q=85&s=916e0cb13ac882e4b00d3717474c9e77 1100w, https://mintcdn.com/vastai-80aa3a82/rJSuh7NkZ00k8fzX/images/instances-windows-ssh-6.webp?w=1650&fit=max&auto=format&n=rJSuh7NkZ00k8fzX&q=85&s=cf8b1b35769fe31579caf790af255b22 1650w, https://mintcdn.com/vastai-80aa3a82/rJSuh7NkZ00k8fzX/images/instances-windows-ssh-6.webp?w=2500&fit=max&auto=format&n=rJSuh7NkZ00k8fzX&q=85&s=8b345084eb9d89f521f7aa3229ad3fe7 2500w" />
|
||
|
||
<Frame caption="Save Keys">
|
||
<img src="https://mintcdn.com/vastai-80aa3a82/rJSuh7NkZ00k8fzX/images/instances-windows-ssh-7.webp?fit=max&auto=format&n=rJSuh7NkZ00k8fzX&q=85&s=b2bdf20bc2d7e43e9f62167537a7c538" alt="Save keys interface" data-og-width="800" width="800" data-og-height="624" height="624" data-path="images/instances-windows-ssh-7.webp" data-optimize="true" data-opv="3" srcset="https://mintcdn.com/vastai-80aa3a82/rJSuh7NkZ00k8fzX/images/instances-windows-ssh-7.webp?w=280&fit=max&auto=format&n=rJSuh7NkZ00k8fzX&q=85&s=4f535ed20bbf88ee6ea8c44e6e791beb 280w, https://mintcdn.com/vastai-80aa3a82/rJSuh7NkZ00k8fzX/images/instances-windows-ssh-7.webp?w=560&fit=max&auto=format&n=rJSuh7NkZ00k8fzX&q=85&s=9c8192d7ad06047c54511e85db04d02c 560w, https://mintcdn.com/vastai-80aa3a82/rJSuh7NkZ00k8fzX/images/instances-windows-ssh-7.webp?w=840&fit=max&auto=format&n=rJSuh7NkZ00k8fzX&q=85&s=f40065d26158cac19696bf6963c9b071 840w, https://mintcdn.com/vastai-80aa3a82/rJSuh7NkZ00k8fzX/images/instances-windows-ssh-7.webp?w=1100&fit=max&auto=format&n=rJSuh7NkZ00k8fzX&q=85&s=6a3b79d45d49db46aea38a2adbcd9f27 1100w, https://mintcdn.com/vastai-80aa3a82/rJSuh7NkZ00k8fzX/images/instances-windows-ssh-7.webp?w=1650&fit=max&auto=format&n=rJSuh7NkZ00k8fzX&q=85&s=f8bdae2f6602a0640f1cda9cafc6abb8 1650w, https://mintcdn.com/vastai-80aa3a82/rJSuh7NkZ00k8fzX/images/instances-windows-ssh-7.webp?w=2500&fit=max&auto=format&n=rJSuh7NkZ00k8fzX&q=85&s=1511cf5e9ac494196dbd0ad43688be5b 2500w" />
|
||
</Frame>
|
||
|
||
Now that we have a suitable key to use, close PuTTYGen and open the main PuTTY application.
|
||
|
||
In the 'Session' tab, enter the **IP address** and the **port**
|
||
|
||
<Frame caption="PuTTY session tab">
|
||
<img src="https://mintcdn.com/vastai-80aa3a82/rJSuh7NkZ00k8fzX/images/instances-windows-ssh-8.webp?fit=max&auto=format&n=rJSuh7NkZ00k8fzX&q=85&s=cc7ef4d52e8e411520e7c9e4d40c22ee" alt="PuTTY session tab" data-og-width="800" width="800" data-og-height="786" height="786" data-path="images/instances-windows-ssh-8.webp" data-optimize="true" data-opv="3" srcset="https://mintcdn.com/vastai-80aa3a82/rJSuh7NkZ00k8fzX/images/instances-windows-ssh-8.webp?w=280&fit=max&auto=format&n=rJSuh7NkZ00k8fzX&q=85&s=0db397f2a3f864f3b8842f52f2c79a9e 280w, https://mintcdn.com/vastai-80aa3a82/rJSuh7NkZ00k8fzX/images/instances-windows-ssh-8.webp?w=560&fit=max&auto=format&n=rJSuh7NkZ00k8fzX&q=85&s=49dcb42f68c243dd6b1a9b07ce9c36a3 560w, https://mintcdn.com/vastai-80aa3a82/rJSuh7NkZ00k8fzX/images/instances-windows-ssh-8.webp?w=840&fit=max&auto=format&n=rJSuh7NkZ00k8fzX&q=85&s=3af1a7ca25c1e2ecd18ebb53fcfa398b 840w, https://mintcdn.com/vastai-80aa3a82/rJSuh7NkZ00k8fzX/images/instances-windows-ssh-8.webp?w=1100&fit=max&auto=format&n=rJSuh7NkZ00k8fzX&q=85&s=891d2ab0c5ef2273e58307d35ad78b16 1100w, https://mintcdn.com/vastai-80aa3a82/rJSuh7NkZ00k8fzX/images/instances-windows-ssh-8.webp?w=1650&fit=max&auto=format&n=rJSuh7NkZ00k8fzX&q=85&s=98dad0c976268cee21ff96b34ebd2017 1650w, https://mintcdn.com/vastai-80aa3a82/rJSuh7NkZ00k8fzX/images/instances-windows-ssh-8.webp?w=2500&fit=max&auto=format&n=rJSuh7NkZ00k8fzX&q=85&s=4e333e496df5a6b639449cf36aa09b8a 2500w" />
|
||
</Frame>
|
||
|
||
Next, move to the 'Connection -> Data\` tab and set the Auto-login username to 'root'
|
||
|
||
<Frame caption="Connection data tab">
|
||
<img src="https://mintcdn.com/vastai-80aa3a82/rJSuh7NkZ00k8fzX/images/instances-windows-ssh-9.webp?fit=max&auto=format&n=rJSuh7NkZ00k8fzX&q=85&s=92e594a978715a90e5a8bcfa98cadedf" alt="Connection data tab" data-og-width="800" width="800" data-og-height="786" height="786" data-path="images/instances-windows-ssh-9.webp" data-optimize="true" data-opv="3" srcset="https://mintcdn.com/vastai-80aa3a82/rJSuh7NkZ00k8fzX/images/instances-windows-ssh-9.webp?w=280&fit=max&auto=format&n=rJSuh7NkZ00k8fzX&q=85&s=a880607163526792b8ffad5e3118ddf8 280w, https://mintcdn.com/vastai-80aa3a82/rJSuh7NkZ00k8fzX/images/instances-windows-ssh-9.webp?w=560&fit=max&auto=format&n=rJSuh7NkZ00k8fzX&q=85&s=d59c4954ebdef5872880eed68c39f941 560w, https://mintcdn.com/vastai-80aa3a82/rJSuh7NkZ00k8fzX/images/instances-windows-ssh-9.webp?w=840&fit=max&auto=format&n=rJSuh7NkZ00k8fzX&q=85&s=354b252a5c1d03303c43cc8e57960329 840w, https://mintcdn.com/vastai-80aa3a82/rJSuh7NkZ00k8fzX/images/instances-windows-ssh-9.webp?w=1100&fit=max&auto=format&n=rJSuh7NkZ00k8fzX&q=85&s=03195a679ae929d104b7e2c84c41e7d9 1100w, https://mintcdn.com/vastai-80aa3a82/rJSuh7NkZ00k8fzX/images/instances-windows-ssh-9.webp?w=1650&fit=max&auto=format&n=rJSuh7NkZ00k8fzX&q=85&s=a0dc903c821ce5778706d4d93d576921 1650w, https://mintcdn.com/vastai-80aa3a82/rJSuh7NkZ00k8fzX/images/instances-windows-ssh-9.webp?w=2500&fit=max&auto=format&n=rJSuh7NkZ00k8fzX&q=85&s=ad3cd81d1fe4c36f60cd96851ad7cf9c 2500w" />
|
||
</Frame>
|
||
|
||
Now navigate to 'Connection -> SSH -> Auth -> Credentials' and browse for the private key (.ppk) that you saved earlier. 
|
||
|
||
<Frame caption="SSH credentials tab">
|
||
<img src="https://mintcdn.com/vastai-80aa3a82/rJSuh7NkZ00k8fzX/images/instances-windows-ssh-10.webp?fit=max&auto=format&n=rJSuh7NkZ00k8fzX&q=85&s=0a2a4c0820f2b67c6091851af565ed67" alt="SSH credentials tab" data-og-width="800" width="800" data-og-height="786" height="786" data-path="images/instances-windows-ssh-10.webp" data-optimize="true" data-opv="3" srcset="https://mintcdn.com/vastai-80aa3a82/rJSuh7NkZ00k8fzX/images/instances-windows-ssh-10.webp?w=280&fit=max&auto=format&n=rJSuh7NkZ00k8fzX&q=85&s=27ec13581bb90915fef3446d897b87e2 280w, https://mintcdn.com/vastai-80aa3a82/rJSuh7NkZ00k8fzX/images/instances-windows-ssh-10.webp?w=560&fit=max&auto=format&n=rJSuh7NkZ00k8fzX&q=85&s=0a6cb4fe27feadb93d69bf40446b9240 560w, https://mintcdn.com/vastai-80aa3a82/rJSuh7NkZ00k8fzX/images/instances-windows-ssh-10.webp?w=840&fit=max&auto=format&n=rJSuh7NkZ00k8fzX&q=85&s=200b89937b26d65b78124746fe124754 840w, https://mintcdn.com/vastai-80aa3a82/rJSuh7NkZ00k8fzX/images/instances-windows-ssh-10.webp?w=1100&fit=max&auto=format&n=rJSuh7NkZ00k8fzX&q=85&s=532770c259de944567e4020a1ee4f1af 1100w, https://mintcdn.com/vastai-80aa3a82/rJSuh7NkZ00k8fzX/images/instances-windows-ssh-10.webp?w=1650&fit=max&auto=format&n=rJSuh7NkZ00k8fzX&q=85&s=6c7625d394b6fd29bcef822b34f6294d 1650w, https://mintcdn.com/vastai-80aa3a82/rJSuh7NkZ00k8fzX/images/instances-windows-ssh-10.webp?w=2500&fit=max&auto=format&n=rJSuh7NkZ00k8fzX&q=85&s=25f9cf717dde52c09f398f587ca0283b 2500w" />
|
||
</Frame>
|
||
|
||
Finally navigate back to the 'Sessions' tab to save the connection details. Here I have saved the session with the instance ID so that I can access it again later. 
|
||
|
||
<Frame caption="Save connection">
|
||
<img src="https://mintcdn.com/vastai-80aa3a82/rJSuh7NkZ00k8fzX/images/instances-windows-ssh-11.webp?fit=max&auto=format&n=rJSuh7NkZ00k8fzX&q=85&s=5559b3736a5c13f78457fc4ae5eb578a" alt="Save connection" data-og-width="800" width="800" data-og-height="786" height="786" data-path="images/instances-windows-ssh-11.webp" data-optimize="true" data-opv="3" srcset="https://mintcdn.com/vastai-80aa3a82/rJSuh7NkZ00k8fzX/images/instances-windows-ssh-11.webp?w=280&fit=max&auto=format&n=rJSuh7NkZ00k8fzX&q=85&s=b61e8866a0bf34d0bc232a3321296c5c 280w, https://mintcdn.com/vastai-80aa3a82/rJSuh7NkZ00k8fzX/images/instances-windows-ssh-11.webp?w=560&fit=max&auto=format&n=rJSuh7NkZ00k8fzX&q=85&s=8d4443568d5c1a30bf051a85b43afcc3 560w, https://mintcdn.com/vastai-80aa3a82/rJSuh7NkZ00k8fzX/images/instances-windows-ssh-11.webp?w=840&fit=max&auto=format&n=rJSuh7NkZ00k8fzX&q=85&s=215ccefb8c60e1415affda68c9873aa5 840w, https://mintcdn.com/vastai-80aa3a82/rJSuh7NkZ00k8fzX/images/instances-windows-ssh-11.webp?w=1100&fit=max&auto=format&n=rJSuh7NkZ00k8fzX&q=85&s=534a52154745d739fd778f03942567ea 1100w, https://mintcdn.com/vastai-80aa3a82/rJSuh7NkZ00k8fzX/images/instances-windows-ssh-11.webp?w=1650&fit=max&auto=format&n=rJSuh7NkZ00k8fzX&q=85&s=734f8b693d5087e72483431c287b30d3 1650w, https://mintcdn.com/vastai-80aa3a82/rJSuh7NkZ00k8fzX/images/instances-windows-ssh-11.webp?w=2500&fit=max&auto=format&n=rJSuh7NkZ00k8fzX&q=85&s=8f5d6cf9157f834a7f21e4e3f20c99c7 2500w" />
|
||
</Frame>
|
||
|
||
Finally, Click the 'Open' button to be connected to your instance.
|
||
|
||
PuTTY has many additional features to explore. Find the full documentation [here.](https://www.chiark.greenend.org.uk/~sgtatham/putty/docs.html)
|
||
|
||
### MobaXterm
|
||
|
||
First, we need to create a public and private key pair. MobaXterm uses puTTY style `.ppk` keys.
|
||
|
||
Open the application and navigate to Tools -> MobaKeyGen (SSH Key Generator)
|
||
|
||
Glick the 'Generate' button. You will be asked to move your mouse around until the green bar is full.
|
||
|
||
<Frame caption="Generate Key">
|
||
<img src="https://mintcdn.com/vastai-80aa3a82/rJSuh7NkZ00k8fzX/images/instances-windows-ssh-12.webp?fit=max&auto=format&n=rJSuh7NkZ00k8fzX&q=85&s=bb298726a5f55d4af7ace09e6f19f137" alt="Key generation interface" data-og-width="800" width="800" data-og-height="626" height="626" data-path="images/instances-windows-ssh-12.webp" data-optimize="true" data-opv="3" srcset="https://mintcdn.com/vastai-80aa3a82/rJSuh7NkZ00k8fzX/images/instances-windows-ssh-12.webp?w=280&fit=max&auto=format&n=rJSuh7NkZ00k8fzX&q=85&s=26f42d827d995958b36a6a40348b7bf1 280w, https://mintcdn.com/vastai-80aa3a82/rJSuh7NkZ00k8fzX/images/instances-windows-ssh-12.webp?w=560&fit=max&auto=format&n=rJSuh7NkZ00k8fzX&q=85&s=eed582b8dbdb611bfae6f4024ff4f7de 560w, https://mintcdn.com/vastai-80aa3a82/rJSuh7NkZ00k8fzX/images/instances-windows-ssh-12.webp?w=840&fit=max&auto=format&n=rJSuh7NkZ00k8fzX&q=85&s=6776683eb4ba13d1fd5c904ef015606e 840w, https://mintcdn.com/vastai-80aa3a82/rJSuh7NkZ00k8fzX/images/instances-windows-ssh-12.webp?w=1100&fit=max&auto=format&n=rJSuh7NkZ00k8fzX&q=85&s=88c4e527367d1f973db54ddd2913ed59 1100w, https://mintcdn.com/vastai-80aa3a82/rJSuh7NkZ00k8fzX/images/instances-windows-ssh-12.webp?w=1650&fit=max&auto=format&n=rJSuh7NkZ00k8fzX&q=85&s=698278e206c50974cc36bd3b5eaa3719 1650w, https://mintcdn.com/vastai-80aa3a82/rJSuh7NkZ00k8fzX/images/instances-windows-ssh-12.webp?w=2500&fit=max&auto=format&n=rJSuh7NkZ00k8fzX&q=85&s=7492be4ab1a13ecc01ef32496b68b538 2500w" />
|
||
</Frame>
|
||
|
||
Once the key generation has completed, save both your public and private key somewhere safe such as in your Documents folder. Optionally you can enter a passphrase for your private key for added security.
|
||
|
||
Next, copy the full public key to the clipboard and add it to your account at [https://cloud.vast.ai/manage-keys/](https://cloud.vast.ai/manage-keys/)
|
||
|
||
Any keys stored at the account level will automatically be added to new instances as they are created. If you have an existing instance you can add keys to it from the instance card.
|
||
|
||
<Frame caption="Save Keys">
|
||
<img src="https://mintcdn.com/vastai-80aa3a82/rJSuh7NkZ00k8fzX/images/instances-windows-ssh-13.webp?fit=max&auto=format&n=rJSuh7NkZ00k8fzX&q=85&s=3469c3b8071ce5d9b10d241855a8374d" alt="Save keys interface" data-og-width="800" width="800" data-og-height="626" height="626" data-path="images/instances-windows-ssh-13.webp" data-optimize="true" data-opv="3" srcset="https://mintcdn.com/vastai-80aa3a82/rJSuh7NkZ00k8fzX/images/instances-windows-ssh-13.webp?w=280&fit=max&auto=format&n=rJSuh7NkZ00k8fzX&q=85&s=26015547dd256f6952134e81af97a686 280w, https://mintcdn.com/vastai-80aa3a82/rJSuh7NkZ00k8fzX/images/instances-windows-ssh-13.webp?w=560&fit=max&auto=format&n=rJSuh7NkZ00k8fzX&q=85&s=c14480a08837bc2f4e8988870f8767d6 560w, https://mintcdn.com/vastai-80aa3a82/rJSuh7NkZ00k8fzX/images/instances-windows-ssh-13.webp?w=840&fit=max&auto=format&n=rJSuh7NkZ00k8fzX&q=85&s=5454b069c9d65427060b78a4266c33a6 840w, https://mintcdn.com/vastai-80aa3a82/rJSuh7NkZ00k8fzX/images/instances-windows-ssh-13.webp?w=1100&fit=max&auto=format&n=rJSuh7NkZ00k8fzX&q=85&s=a78471bd8cbfd81a1917ce9e9ca0e917 1100w, https://mintcdn.com/vastai-80aa3a82/rJSuh7NkZ00k8fzX/images/instances-windows-ssh-13.webp?w=1650&fit=max&auto=format&n=rJSuh7NkZ00k8fzX&q=85&s=4512d6d0f186e979878a165e3fb848c9 1650w, https://mintcdn.com/vastai-80aa3a82/rJSuh7NkZ00k8fzX/images/instances-windows-ssh-13.webp?w=2500&fit=max&auto=format&n=rJSuh7NkZ00k8fzX&q=85&s=8acfba6d5e9d2656fcbafd23aeda2d84 2500w" />
|
||
</Frame>
|
||
|
||
<br />
|
||
|
||
<img src="https://mintcdn.com/vastai-80aa3a82/rJSuh7NkZ00k8fzX/images/instances-windows-ssh-14.webp?fit=max&auto=format&n=rJSuh7NkZ00k8fzX&q=85&s=6d27de25885e6114ba63d69a51d425f4" alt="" data-og-width="800" width="800" data-og-height="331" height="331" data-path="images/instances-windows-ssh-14.webp" data-optimize="true" data-opv="3" srcset="https://mintcdn.com/vastai-80aa3a82/rJSuh7NkZ00k8fzX/images/instances-windows-ssh-14.webp?w=280&fit=max&auto=format&n=rJSuh7NkZ00k8fzX&q=85&s=9debe52b5a9d54b20975b52a876da80e 280w, https://mintcdn.com/vastai-80aa3a82/rJSuh7NkZ00k8fzX/images/instances-windows-ssh-14.webp?w=560&fit=max&auto=format&n=rJSuh7NkZ00k8fzX&q=85&s=ddb0889094e13398d171e8fde8441091 560w, https://mintcdn.com/vastai-80aa3a82/rJSuh7NkZ00k8fzX/images/instances-windows-ssh-14.webp?w=840&fit=max&auto=format&n=rJSuh7NkZ00k8fzX&q=85&s=82683adab02f51fec9acccc7f479fac5 840w, https://mintcdn.com/vastai-80aa3a82/rJSuh7NkZ00k8fzX/images/instances-windows-ssh-14.webp?w=1100&fit=max&auto=format&n=rJSuh7NkZ00k8fzX&q=85&s=62872007343e5ef5304da60879f0ef75 1100w, https://mintcdn.com/vastai-80aa3a82/rJSuh7NkZ00k8fzX/images/instances-windows-ssh-14.webp?w=1650&fit=max&auto=format&n=rJSuh7NkZ00k8fzX&q=85&s=f8fd65cc8c60f4303e665c618e21bde0 1650w, https://mintcdn.com/vastai-80aa3a82/rJSuh7NkZ00k8fzX/images/instances-windows-ssh-14.webp?w=2500&fit=max&auto=format&n=rJSuh7NkZ00k8fzX&q=85&s=0b0cbb4ce74ad948ad412694d17dcfc8 2500w" />
|
||
|
||
Now you can close the key generation interface. We will create a new session.
|
||
|
||
Navigate to Sessions -> New Session -> SSH
|
||
|
||
<Frame caption="Create a Session">
|
||
<img src="https://mintcdn.com/vastai-80aa3a82/rJSuh7NkZ00k8fzX/images/instances-windows-ssh-15.webp?fit=max&auto=format&n=rJSuh7NkZ00k8fzX&q=85&s=a9d56ff5e774e62362f0ed9459f77c89" alt="Sesison interface" data-og-width="800" width="800" data-og-height="536" height="536" data-path="images/instances-windows-ssh-15.webp" data-optimize="true" data-opv="3" srcset="https://mintcdn.com/vastai-80aa3a82/rJSuh7NkZ00k8fzX/images/instances-windows-ssh-15.webp?w=280&fit=max&auto=format&n=rJSuh7NkZ00k8fzX&q=85&s=9f5584b76bd620618798f13f4b534afe 280w, https://mintcdn.com/vastai-80aa3a82/rJSuh7NkZ00k8fzX/images/instances-windows-ssh-15.webp?w=560&fit=max&auto=format&n=rJSuh7NkZ00k8fzX&q=85&s=3ce6c9a95e19f99e81658da87ada17b7 560w, https://mintcdn.com/vastai-80aa3a82/rJSuh7NkZ00k8fzX/images/instances-windows-ssh-15.webp?w=840&fit=max&auto=format&n=rJSuh7NkZ00k8fzX&q=85&s=b68b12a3cd05a8aaf6ab080b109ed95a 840w, https://mintcdn.com/vastai-80aa3a82/rJSuh7NkZ00k8fzX/images/instances-windows-ssh-15.webp?w=1100&fit=max&auto=format&n=rJSuh7NkZ00k8fzX&q=85&s=33dca9df2ed3a8e88a352f303673e945 1100w, https://mintcdn.com/vastai-80aa3a82/rJSuh7NkZ00k8fzX/images/instances-windows-ssh-15.webp?w=1650&fit=max&auto=format&n=rJSuh7NkZ00k8fzX&q=85&s=06019ae07050823e4f1470edd91c332c 1650w, https://mintcdn.com/vastai-80aa3a82/rJSuh7NkZ00k8fzX/images/instances-windows-ssh-15.webp?w=2500&fit=max&auto=format&n=rJSuh7NkZ00k8fzX&q=85&s=2ddda34cd7aeed5952ba451d610dfe39 2500w" />
|
||
</Frame>
|
||
|
||
Important details to complete:
|
||
|
||
* Remote Host
|
||
* Specify Username (root)
|
||
* Port
|
||
* Use private key
|
||
|
||
Click 'OK' and you will be connected to the instance.
|
||
|
||
<Frame caption="Successful Connection">
|
||
<img src="https://mintcdn.com/vastai-80aa3a82/rJSuh7NkZ00k8fzX/images/instances-windows-ssh-16.webp?fit=max&auto=format&n=rJSuh7NkZ00k8fzX&q=85&s=c238ee5aa5afda020a4ca4dbe3afb110" alt="SSH terminal" data-og-width="950" width="950" data-og-height="567" height="567" data-path="images/instances-windows-ssh-16.webp" data-optimize="true" data-opv="3" srcset="https://mintcdn.com/vastai-80aa3a82/rJSuh7NkZ00k8fzX/images/instances-windows-ssh-16.webp?w=280&fit=max&auto=format&n=rJSuh7NkZ00k8fzX&q=85&s=3fe6a26dcbf150adf734df362658bdea 280w, https://mintcdn.com/vastai-80aa3a82/rJSuh7NkZ00k8fzX/images/instances-windows-ssh-16.webp?w=560&fit=max&auto=format&n=rJSuh7NkZ00k8fzX&q=85&s=85b5e94b400caaa96d4d728c8537100a 560w, https://mintcdn.com/vastai-80aa3a82/rJSuh7NkZ00k8fzX/images/instances-windows-ssh-16.webp?w=840&fit=max&auto=format&n=rJSuh7NkZ00k8fzX&q=85&s=18c5350f3aaa6c851720e1594701282f 840w, https://mintcdn.com/vastai-80aa3a82/rJSuh7NkZ00k8fzX/images/instances-windows-ssh-16.webp?w=1100&fit=max&auto=format&n=rJSuh7NkZ00k8fzX&q=85&s=aa7674dcaa1b3a780159c4be7641284c 1100w, https://mintcdn.com/vastai-80aa3a82/rJSuh7NkZ00k8fzX/images/instances-windows-ssh-16.webp?w=1650&fit=max&auto=format&n=rJSuh7NkZ00k8fzX&q=85&s=5034fcc68cd8d1d92e37775185fdedc7 1650w, https://mintcdn.com/vastai-80aa3a82/rJSuh7NkZ00k8fzX/images/instances-windows-ssh-16.webp?w=2500&fit=max&auto=format&n=rJSuh7NkZ00k8fzX&q=85&s=32f3efe91475978cf14cf13673e01583 2500w" />
|
||
</Frame>
|
||
|
||
You can find the documentation for MobaXterm [here](https://mobaxterm.mobatek.net/documentation.html).
|
||
|
||
### Other GUI Clients
|
||
|
||
Many GUI clients are available for Windows and other operating systems, and although it is not possible to cover all of these here, the key things to remember when setting up are:
|
||
|
||
* Create a public and private key pair
|
||
* Add the public key to your vast account and any running instances
|
||
* Keep the private key safe
|
||
* Ensure you are connecting to the correct IP address and port as user `root`
|
||
|
||
|
||
# Managing Instances
|
||
Source: https://docs.vast.ai/documentation/instances/manage-instances
|
||
|
||
Learn how to manage running instances - start, stop, destroy, monitor status, and handle common operational tasks.
|
||
|
||
## Overview
|
||
|
||
The Instances page ([cloud.vast.ai/instances](https://cloud.vast.ai/instances)) is your central hub for managing rented instances. From here you can:
|
||
|
||
* View instance status and information
|
||
* Start, stop, and destroy instances
|
||
* Access connection details
|
||
* Monitor resource usage
|
||
* Transfer data between instances
|
||
|
||
## Instance Card Interface
|
||
|
||
<Frame caption="Instances Page">
|
||
<img src="https://mintcdn.com/vastai-80aa3a82/xCLov_y0JNSp_qUD/images/console-instance-guide.webp?fit=max&auto=format&n=xCLov_y0JNSp_qUD&q=85&s=122ccf4a5cabb0e8c40b476898bbee3e" alt="" data-og-width="865" width="865" data-og-height="421" height="421" data-path="images/console-instance-guide.webp" data-optimize="true" data-opv="3" srcset="https://mintcdn.com/vastai-80aa3a82/xCLov_y0JNSp_qUD/images/console-instance-guide.webp?w=280&fit=max&auto=format&n=xCLov_y0JNSp_qUD&q=85&s=3eabdbd625b2f04739dee5ec06efea88 280w, https://mintcdn.com/vastai-80aa3a82/xCLov_y0JNSp_qUD/images/console-instance-guide.webp?w=560&fit=max&auto=format&n=xCLov_y0JNSp_qUD&q=85&s=c5be44c51078121e5eb2486807bea5f2 560w, https://mintcdn.com/vastai-80aa3a82/xCLov_y0JNSp_qUD/images/console-instance-guide.webp?w=840&fit=max&auto=format&n=xCLov_y0JNSp_qUD&q=85&s=1a06be03d630d2d6fee6c7ecc4339b51 840w, https://mintcdn.com/vastai-80aa3a82/xCLov_y0JNSp_qUD/images/console-instance-guide.webp?w=1100&fit=max&auto=format&n=xCLov_y0JNSp_qUD&q=85&s=29e5af14ff46bca642ac5cedb63103fc 1100w, https://mintcdn.com/vastai-80aa3a82/xCLov_y0JNSp_qUD/images/console-instance-guide.webp?w=1650&fit=max&auto=format&n=xCLov_y0JNSp_qUD&q=85&s=0034aaa6fcd8ec220c7fdd3724868650 1650w, https://mintcdn.com/vastai-80aa3a82/xCLov_y0JNSp_qUD/images/console-instance-guide.webp?w=2500&fit=max&auto=format&n=xCLov_y0JNSp_qUD&q=85&s=7a90acb5ca7b31b0e8c7ee6ca94da224 2500w" />
|
||
</Frame>
|
||
|
||
Each instance card displays comprehensive information about your rental:
|
||
|
||
### Main Status Button
|
||
|
||
<Frame caption="Open button">
|
||
<img src="https://mintcdn.com/vastai-80aa3a82/xCLov_y0JNSp_qUD/images/console-instance-guide-2.webp?fit=max&auto=format&n=xCLov_y0JNSp_qUD&q=85&s=38a8c99429148ea4b347397c8b923e9b" alt="" data-og-width="800" width="800" data-og-height="202" height="202" data-path="images/console-instance-guide-2.webp" data-optimize="true" data-opv="3" srcset="https://mintcdn.com/vastai-80aa3a82/xCLov_y0JNSp_qUD/images/console-instance-guide-2.webp?w=280&fit=max&auto=format&n=xCLov_y0JNSp_qUD&q=85&s=9568c18c7f8f6ec2970aefe3b72d6637 280w, https://mintcdn.com/vastai-80aa3a82/xCLov_y0JNSp_qUD/images/console-instance-guide-2.webp?w=560&fit=max&auto=format&n=xCLov_y0JNSp_qUD&q=85&s=69392e3c5b1ab7da7bb5423849e24ef0 560w, https://mintcdn.com/vastai-80aa3a82/xCLov_y0JNSp_qUD/images/console-instance-guide-2.webp?w=840&fit=max&auto=format&n=xCLov_y0JNSp_qUD&q=85&s=8bbffb4bfdbfae94e4a26b1fa8c4a45c 840w, https://mintcdn.com/vastai-80aa3a82/xCLov_y0JNSp_qUD/images/console-instance-guide-2.webp?w=1100&fit=max&auto=format&n=xCLov_y0JNSp_qUD&q=85&s=e3b5aa443a1c67fb7fc2d4038cce1f3a 1100w, https://mintcdn.com/vastai-80aa3a82/xCLov_y0JNSp_qUD/images/console-instance-guide-2.webp?w=1650&fit=max&auto=format&n=xCLov_y0JNSp_qUD&q=85&s=003b9d8d3cc32beaeed9cdc16e167c01 1650w, https://mintcdn.com/vastai-80aa3a82/xCLov_y0JNSp_qUD/images/console-instance-guide-2.webp?w=2500&fit=max&auto=format&n=xCLov_y0JNSp_qUD&q=85&s=e87ad65a858e16907b0a142e91a893ed 2500w" />
|
||
</Frame>
|
||
|
||
The main button (left side of card) shows instance status and provides quick access:
|
||
|
||
**Status Indicators:**
|
||
|
||
* **Open**: Instance loaded, click to access via browser
|
||
* **Connect**: Instance loaded, click for SSH info
|
||
* **Inactive**: Stopped but data preserved (can restart if GPU available)
|
||
* **Offline**: Machine disconnected from Vast servers
|
||
* **Scheduling**: Attempting to restart (waiting for GPU availability)
|
||
* **Creating**: Vast initiating instance creation
|
||
* **Loading**: Downloading Docker image
|
||
* **Connecting**: Docker running but connection not verified
|
||
|
||
### Instance Information
|
||
|
||
<Frame caption="ID numbers">
|
||
<img src="https://mintcdn.com/vastai-80aa3a82/xCLov_y0JNSp_qUD/images/console-instance-guide-9.webp?fit=max&auto=format&n=xCLov_y0JNSp_qUD&q=85&s=45df3ca5eade69027abb1b63d11d2d91" alt="" data-og-width="1137" width="1137" data-og-height="265" height="265" data-path="images/console-instance-guide-9.webp" data-optimize="true" data-opv="3" srcset="https://mintcdn.com/vastai-80aa3a82/xCLov_y0JNSp_qUD/images/console-instance-guide-9.webp?w=280&fit=max&auto=format&n=xCLov_y0JNSp_qUD&q=85&s=09376ffbc87f9898187000a4ff40c753 280w, https://mintcdn.com/vastai-80aa3a82/xCLov_y0JNSp_qUD/images/console-instance-guide-9.webp?w=560&fit=max&auto=format&n=xCLov_y0JNSp_qUD&q=85&s=b834904c3d7d25d0a895757d18dccc96 560w, https://mintcdn.com/vastai-80aa3a82/xCLov_y0JNSp_qUD/images/console-instance-guide-9.webp?w=840&fit=max&auto=format&n=xCLov_y0JNSp_qUD&q=85&s=612ab74906d4e37b7f48bca2eba02706 840w, https://mintcdn.com/vastai-80aa3a82/xCLov_y0JNSp_qUD/images/console-instance-guide-9.webp?w=1100&fit=max&auto=format&n=xCLov_y0JNSp_qUD&q=85&s=c156104dce169a17376e2d4bca82d21a 1100w, https://mintcdn.com/vastai-80aa3a82/xCLov_y0JNSp_qUD/images/console-instance-guide-9.webp?w=1650&fit=max&auto=format&n=xCLov_y0JNSp_qUD&q=85&s=5d615c24a6a55ea4c19f969141c0f18e 1650w, https://mintcdn.com/vastai-80aa3a82/xCLov_y0JNSp_qUD/images/console-instance-guide-9.webp?w=2500&fit=max&auto=format&n=xCLov_y0JNSp_qUD&q=85&s=65dcdb828fd4e6ce04037d4c72df13ac 2500w" />
|
||
</Frame>
|
||
|
||
**ID Information:**
|
||
|
||
* Instance ID - Unique identifier for your instance
|
||
* Host/Datacenter ID - Provider identification
|
||
* Machine ID - Physical machine identifier
|
||
|
||
**Hardware Details:**
|
||
<img src="https://mintcdn.com/vastai-80aa3a82/xCLov_y0JNSp_qUD/images/console-instance-guide-10.webp?fit=max&auto=format&n=xCLov_y0JNSp_qUD&q=85&s=e8598b22b07767de412534ef05d86644" alt="" data-og-width="800" width="800" data-og-height="194" height="194" data-path="images/console-instance-guide-10.webp" data-optimize="true" data-opv="3" srcset="https://mintcdn.com/vastai-80aa3a82/xCLov_y0JNSp_qUD/images/console-instance-guide-10.webp?w=280&fit=max&auto=format&n=xCLov_y0JNSp_qUD&q=85&s=6b5a39bca4929960caddba21e5038e30 280w, https://mintcdn.com/vastai-80aa3a82/xCLov_y0JNSp_qUD/images/console-instance-guide-10.webp?w=560&fit=max&auto=format&n=xCLov_y0JNSp_qUD&q=85&s=2518cb4c39339170435eb81f4477e200 560w, https://mintcdn.com/vastai-80aa3a82/xCLov_y0JNSp_qUD/images/console-instance-guide-10.webp?w=840&fit=max&auto=format&n=xCLov_y0JNSp_qUD&q=85&s=9abc7ef1a9bc09b681aa0abfb4389fe8 840w, https://mintcdn.com/vastai-80aa3a82/xCLov_y0JNSp_qUD/images/console-instance-guide-10.webp?w=1100&fit=max&auto=format&n=xCLov_y0JNSp_qUD&q=85&s=7ab06edb75a83719e071da2d342a3be8 1100w, https://mintcdn.com/vastai-80aa3a82/xCLov_y0JNSp_qUD/images/console-instance-guide-10.webp?w=1650&fit=max&auto=format&n=xCLov_y0JNSp_qUD&q=85&s=81c72ca56dd9a0701a2f214d3be1a4b4 1650w, https://mintcdn.com/vastai-80aa3a82/xCLov_y0JNSp_qUD/images/console-instance-guide-10.webp?w=2500&fit=max&auto=format&n=xCLov_y0JNSp_qUD&q=85&s=d5bcbf5f46d5cfa68126c33361e348a7 2500w" />
|
||
|
||
* GPU model and count
|
||
* CPU and RAM allocation
|
||
* Storage capacity
|
||
* Network configuration
|
||
|
||
**Contract Info:**
|
||
<img src="https://mintcdn.com/vastai-80aa3a82/xCLov_y0JNSp_qUD/images/console-instance-guide-12.webp?fit=max&auto=format&n=xCLov_y0JNSp_qUD&q=85&s=20d3f1379bd41e625f646ba9769a16eb" alt="" data-og-width="800" width="800" data-og-height="396" height="396" data-path="images/console-instance-guide-12.webp" data-optimize="true" data-opv="3" srcset="https://mintcdn.com/vastai-80aa3a82/xCLov_y0JNSp_qUD/images/console-instance-guide-12.webp?w=280&fit=max&auto=format&n=xCLov_y0JNSp_qUD&q=85&s=120388f90c8a9c25bbd968a1c078210d 280w, https://mintcdn.com/vastai-80aa3a82/xCLov_y0JNSp_qUD/images/console-instance-guide-12.webp?w=560&fit=max&auto=format&n=xCLov_y0JNSp_qUD&q=85&s=60a07f345df7fe155a2fbe4390c3209f 560w, https://mintcdn.com/vastai-80aa3a82/xCLov_y0JNSp_qUD/images/console-instance-guide-12.webp?w=840&fit=max&auto=format&n=xCLov_y0JNSp_qUD&q=85&s=21045200910f11781549c780e276a8b7 840w, https://mintcdn.com/vastai-80aa3a82/xCLov_y0JNSp_qUD/images/console-instance-guide-12.webp?w=1100&fit=max&auto=format&n=xCLov_y0JNSp_qUD&q=85&s=feaf4417b5b7b1cd49495517a5723108 1100w, https://mintcdn.com/vastai-80aa3a82/xCLov_y0JNSp_qUD/images/console-instance-guide-12.webp?w=1650&fit=max&auto=format&n=xCLov_y0JNSp_qUD&q=85&s=7eb294f05535573cc6ad8f043862ed7d 1650w, https://mintcdn.com/vastai-80aa3a82/xCLov_y0JNSp_qUD/images/console-instance-guide-12.webp?w=2500&fit=max&auto=format&n=xCLov_y0JNSp_qUD&q=85&s=03241fd0536aaaa8ade812c7541cbe0b 2500w" />
|
||
|
||
* Instance age (time since creation)
|
||
* Expiry date (contract end time)
|
||
* Remaining duration
|
||
|
||
## Instance Operations
|
||
|
||
### Starting, Stopping, and Destroying
|
||
|
||
<img src="https://mintcdn.com/vastai-80aa3a82/xCLov_y0JNSp_qUD/images/console-instance-guide-5.webp?fit=max&auto=format&n=xCLov_y0JNSp_qUD&q=85&s=82cbb83c39d36a1f1127f5a4537d94eb" alt="" data-og-width="1280" width="1280" data-og-height="307" height="307" data-path="images/console-instance-guide-5.webp" data-optimize="true" data-opv="3" srcset="https://mintcdn.com/vastai-80aa3a82/xCLov_y0JNSp_qUD/images/console-instance-guide-5.webp?w=280&fit=max&auto=format&n=xCLov_y0JNSp_qUD&q=85&s=d687437cb212d7f3a065cfb4243e7228 280w, https://mintcdn.com/vastai-80aa3a82/xCLov_y0JNSp_qUD/images/console-instance-guide-5.webp?w=560&fit=max&auto=format&n=xCLov_y0JNSp_qUD&q=85&s=5449fc3a11300d3b46d890518f598625 560w, https://mintcdn.com/vastai-80aa3a82/xCLov_y0JNSp_qUD/images/console-instance-guide-5.webp?w=840&fit=max&auto=format&n=xCLov_y0JNSp_qUD&q=85&s=b4d7664c626e77e1062b93b12f7e42fa 840w, https://mintcdn.com/vastai-80aa3a82/xCLov_y0JNSp_qUD/images/console-instance-guide-5.webp?w=1100&fit=max&auto=format&n=xCLov_y0JNSp_qUD&q=85&s=f079369ef8cb17c3b9782b65924fad98 1100w, https://mintcdn.com/vastai-80aa3a82/xCLov_y0JNSp_qUD/images/console-instance-guide-5.webp?w=1650&fit=max&auto=format&n=xCLov_y0JNSp_qUD&q=85&s=a381b4275753b27ba092aa774ad97d06 1650w, https://mintcdn.com/vastai-80aa3a82/xCLov_y0JNSp_qUD/images/console-instance-guide-5.webp?w=2500&fit=max&auto=format&n=xCLov_y0JNSp_qUD&q=85&s=a69702ff4c5bc3d92ddf62b9b925c3e1 2500w" />
|
||
|
||
* **Stop Button** (square icon): Pauses instance, preserves data, continues storage charges
|
||
* **Destroy Button** (trash icon): Permanently deletes instance and all data
|
||
* **Restart Button** (play icon): Appears when stopped, attempts to reclaim GPU
|
||
|
||
<Warning>
|
||
**Important:** Stopped instances continue incurring storage charges. Destroy instances when no longer needed to avoid ongoing costs.
|
||
</Warning>
|
||
|
||
### Restart Behavior
|
||
|
||
<Frame caption="Play button">
|
||
<img src="https://mintcdn.com/vastai-80aa3a82/xCLov_y0JNSp_qUD/images/console-instance-guide-6.webp?fit=max&auto=format&n=xCLov_y0JNSp_qUD&q=85&s=7ab41ae42eb8246933307998fe70f765" alt="" data-og-width="1280" width="1280" data-og-height="306" height="306" data-path="images/console-instance-guide-6.webp" data-optimize="true" data-opv="3" srcset="https://mintcdn.com/vastai-80aa3a82/xCLov_y0JNSp_qUD/images/console-instance-guide-6.webp?w=280&fit=max&auto=format&n=xCLov_y0JNSp_qUD&q=85&s=9dd3f2a097e4f88b561a8fa8b6925d20 280w, https://mintcdn.com/vastai-80aa3a82/xCLov_y0JNSp_qUD/images/console-instance-guide-6.webp?w=560&fit=max&auto=format&n=xCLov_y0JNSp_qUD&q=85&s=ea401cbfe1b6c515b63206cd7f6fbdfe 560w, https://mintcdn.com/vastai-80aa3a82/xCLov_y0JNSp_qUD/images/console-instance-guide-6.webp?w=840&fit=max&auto=format&n=xCLov_y0JNSp_qUD&q=85&s=043f6dc2c8f68addcf303ac4e78d3dd6 840w, https://mintcdn.com/vastai-80aa3a82/xCLov_y0JNSp_qUD/images/console-instance-guide-6.webp?w=1100&fit=max&auto=format&n=xCLov_y0JNSp_qUD&q=85&s=881c1894d50bf6e5e40adc4008aea402 1100w, https://mintcdn.com/vastai-80aa3a82/xCLov_y0JNSp_qUD/images/console-instance-guide-6.webp?w=1650&fit=max&auto=format&n=xCLov_y0JNSp_qUD&q=85&s=0218a4b1fbad303493afdebba232fd66 1650w, https://mintcdn.com/vastai-80aa3a82/xCLov_y0JNSp_qUD/images/console-instance-guide-6.webp?w=2500&fit=max&auto=format&n=xCLov_y0JNSp_qUD&q=85&s=64e94982b60bc5050f5421692728c522 2500w" />
|
||
</Frame>
|
||
|
||
When restarting a stopped instance:
|
||
|
||
1. Instance enters `SCHEDULING` status
|
||
2. Waits for GPU availability
|
||
3. If stuck >30 seconds, GPU likely rented by another user
|
||
4. Cancel scheduling by clicking stop again
|
||
5. Consider creating new instance if GPU unavailable
|
||
|
||
### Additional Controls
|
||
|
||
<img src="https://mintcdn.com/vastai-80aa3a82/xCLov_y0JNSp_qUD/images/console-instance-guide-13.webp?fit=max&auto=format&n=xCLov_y0JNSp_qUD&q=85&s=c9db6b0fcb2826990104f1df4b983f6c" alt="" data-og-width="1280" width="1280" data-og-height="306" height="306" data-path="images/console-instance-guide-13.webp" data-optimize="true" data-opv="3" srcset="https://mintcdn.com/vastai-80aa3a82/xCLov_y0JNSp_qUD/images/console-instance-guide-13.webp?w=280&fit=max&auto=format&n=xCLov_y0JNSp_qUD&q=85&s=e0585ed33c63b0ad7e9d7536e285ac02 280w, https://mintcdn.com/vastai-80aa3a82/xCLov_y0JNSp_qUD/images/console-instance-guide-13.webp?w=560&fit=max&auto=format&n=xCLov_y0JNSp_qUD&q=85&s=83463e53647bf74cb687aeecf5680678 560w, https://mintcdn.com/vastai-80aa3a82/xCLov_y0JNSp_qUD/images/console-instance-guide-13.webp?w=840&fit=max&auto=format&n=xCLov_y0JNSp_qUD&q=85&s=f367200f941413057f93520e1c52bbe2 840w, https://mintcdn.com/vastai-80aa3a82/xCLov_y0JNSp_qUD/images/console-instance-guide-13.webp?w=1100&fit=max&auto=format&n=xCLov_y0JNSp_qUD&q=85&s=97942d6886dfae52e483eb78ccaf5a6d 1100w, https://mintcdn.com/vastai-80aa3a82/xCLov_y0JNSp_qUD/images/console-instance-guide-13.webp?w=1650&fit=max&auto=format&n=xCLov_y0JNSp_qUD&q=85&s=73d5d566f35cc7508b04450f143237ba 1650w, https://mintcdn.com/vastai-80aa3a82/xCLov_y0JNSp_qUD/images/console-instance-guide-13.webp?w=2500&fit=max&auto=format&n=xCLov_y0JNSp_qUD&q=85&s=3f390761af0b64f869443dc88741e742 2500w" />
|
||
|
||
* **Label Instance** - Add custom name for identification
|
||
* **Reboot Instance** - Restart without data loss
|
||
* **View Logs** - Access Docker container logs
|
||
|
||
## Data Management
|
||
|
||
<Frame caption="Data movement">
|
||
<img src="https://mintcdn.com/vastai-80aa3a82/xCLov_y0JNSp_qUD/images/console-instance-guide-7.webp?fit=max&auto=format&n=xCLov_y0JNSp_qUD&q=85&s=108aedecb03c94c20252d40845e2c4fb" alt="" data-og-width="1280" width="1280" data-og-height="330" height="330" data-path="images/console-instance-guide-7.webp" data-optimize="true" data-opv="3" srcset="https://mintcdn.com/vastai-80aa3a82/xCLov_y0JNSp_qUD/images/console-instance-guide-7.webp?w=280&fit=max&auto=format&n=xCLov_y0JNSp_qUD&q=85&s=9fa6cff4efe7a60dff881e7d6fb2ec46 280w, https://mintcdn.com/vastai-80aa3a82/xCLov_y0JNSp_qUD/images/console-instance-guide-7.webp?w=560&fit=max&auto=format&n=xCLov_y0JNSp_qUD&q=85&s=dcd56f53be5a0cf3a20d6cb7e682b4bc 560w, https://mintcdn.com/vastai-80aa3a82/xCLov_y0JNSp_qUD/images/console-instance-guide-7.webp?w=840&fit=max&auto=format&n=xCLov_y0JNSp_qUD&q=85&s=495eceed2e02eeb6a5fa78c69cc5a4f1 840w, https://mintcdn.com/vastai-80aa3a82/xCLov_y0JNSp_qUD/images/console-instance-guide-7.webp?w=1100&fit=max&auto=format&n=xCLov_y0JNSp_qUD&q=85&s=a6c7847f33165e34772cd12dae832f1f 1100w, https://mintcdn.com/vastai-80aa3a82/xCLov_y0JNSp_qUD/images/console-instance-guide-7.webp?w=1650&fit=max&auto=format&n=xCLov_y0JNSp_qUD&q=85&s=cbd830668fe7b799dfaf561ebf393279 1650w, https://mintcdn.com/vastai-80aa3a82/xCLov_y0JNSp_qUD/images/console-instance-guide-7.webp?w=2500&fit=max&auto=format&n=xCLov_y0JNSp_qUD&q=85&s=fafe2b12e21c1bb9948fd0f47d7d7b1b 2500w" />
|
||
</Frame>
|
||
|
||
* **Copy Data** - Transfer between your instances (see [Data Movement](/documentation/instances/storage/data-movement))
|
||
* **Cloud Sync** - Sync with cloud providers (see [Cloud Sync](/documentation/instances/storage/cloud-sync))
|
||
|
||
<Note>
|
||
Use Cloud Sync only on trusted datacenters (indicated by **Secure** icon).
|
||
</Note>
|
||
|
||
## Connection Quick Reference
|
||
|
||
For detailed connection instructions, see [Connect to Instances](/documentation/instances/connect/overview):
|
||
|
||
* **SSH button** - Shows SSH command
|
||
* **Open button** - Launches web UI
|
||
* **IP/Ports button** - Network information
|
||
|
||
## Troubleshooting Instance States
|
||
|
||
### Instance Stuck on "Loading"
|
||
|
||
* Normal for 30 seconds with cached images
|
||
* Can take hours with slow internet/large images
|
||
* Not charged during loading
|
||
* Try machines with faster internet
|
||
|
||
### Instance Stuck on "Scheduling"
|
||
|
||
When stopped instances try to restart:
|
||
|
||
* GPU may be reassigned to other users
|
||
* High-priority jobs block restart
|
||
* May wait indefinitely for GPU availability
|
||
* Consider copying data to new instance
|
||
|
||
### Instance Stuck on "Connecting"
|
||
|
||
* Port configuration may be broken
|
||
* Report the machine
|
||
* Try different machine
|
||
|
||
### Machine Shows "Offline"
|
||
|
||
* Lost connection to Vast servers
|
||
* Often internet/power issues
|
||
* Host notified automatically
|
||
* May be maintenance or unforeseen problems
|
||
|
||
## Important Considerations
|
||
|
||
### Data Persistence
|
||
|
||
* **Stopped instances**: Data preserved, storage charges continue
|
||
* **Destroyed instances**: All data permanently deleted
|
||
* **Before destroying**: Copy important data or sync to cloud
|
||
|
||
### Contract Expiration
|
||
|
||
<Warning>
|
||
Expired instances may be deleted 48 hours after expiration. Expired instances cannot restart. Retrieve your data promptly.
|
||
</Warning>
|
||
|
||
### Security
|
||
|
||
* Hosts can technically access files on their machines
|
||
* For sensitive data, use verified datacenters
|
||
* Implement encryption for critical data
|
||
|
||
### IP Addresses
|
||
|
||
Some instances have dynamic IPs that may change. Check IP type via the IP button on instance card. For static IPs, filter by "Static IP Address" when searching.
|
||
|
||
## Common Questions
|
||
|
||
### Can I run Docker inside my instance?
|
||
|
||
No, instances are already Docker containers. Docker-in-Docker is not supported.
|
||
|
||
### Do I pay for "Loading" instances?
|
||
|
||
No, you're not charged while instances show "Loading" status.
|
||
|
||
### Can I view past instances?
|
||
|
||
No, destroyed instances cannot be viewed. Recent template history is preserved for configuration reference.
|
||
|
||
### Why is my machine location showing only ", US"?
|
||
|
||
This means geolocation couldn't determine the state. It's not an indication of reliability.
|
||
|
||
### Can I run VMs or bare metal?
|
||
|
||
Currently only Docker containers are supported. VM and bare-metal options planned for future.
|
||
|
||
## Related Documentation
|
||
|
||
* [Instance Types](/documentation/instances/instance-types) - On-demand vs Reserved vs Interruptible
|
||
* [Storage Options](/documentation/instances/storage/types) - Managing disk space
|
||
* [Connection Methods](/documentation/instances/connect/overview) - SSH, Jupyter, and more
|
||
* [Templates](/documentation/instances/templates) - Instance configuration
|
||
|
||
|
||
# Instances Overview
|
||
Source: https://docs.vast.ai/documentation/instances/overview
|
||
|
||
Instances are Docker containers that give you exclusive GPU access for training, inference, and development. Pay by the second, connect via SSH or Jupyter.
|
||
|
||
## What Are Instances?
|
||
|
||
Instances are containerized environments where you rent dedicated GPUs from Vast.ai's marketplace. Each instance:
|
||
|
||
* Provides exclusive GPU access (never shared between users)
|
||
* Runs your choice of Docker image
|
||
* Includes proportional CPU, RAM, and storage
|
||
* Connects via SSH, Jupyter, or custom entrypoint
|
||
* Bills by the second for actual usage
|
||
|
||
<Tip>
|
||
New to Vast.ai? Start with the [Quickstart Guide](/documentation/get-started/quickstart).
|
||
</Tip>
|
||
|
||
## Core Concepts
|
||
|
||
<CardGroup cols={2}>
|
||
<Card title="Pricing" href="/documentation/instances/pricing">
|
||
Market-driven rates for GPU, storage, and bandwidth
|
||
</Card>
|
||
|
||
<Card title="Instance Types" href="/documentation/instances/instance-types">
|
||
On-demand, Reserved, and Interruptible options
|
||
</Card>
|
||
|
||
<Card title="Templates" href="/documentation/instances/templates">
|
||
Pre-configured environments or custom Docker images
|
||
</Card>
|
||
|
||
<Card title="Find & Rent" href="/documentation/instances/choose-an-instance">
|
||
Find and rent GPUs by model, location, and price
|
||
</Card>
|
||
|
||
<Card title="Connect to Instances" href="/documentation/instances/connect/overview">
|
||
SSH, Jupyter, and Entrypoint connection methods
|
||
</Card>
|
||
|
||
<Card title="Managing Instances" href="/documentation/instances/manage-instances">
|
||
Start, stop, connect, and monitor your instances
|
||
</Card>
|
||
|
||
<Card title="Storage" href="/documentation/instances/storage/types">
|
||
Container storage and persistent volumes
|
||
</Card>
|
||
|
||
<Card title="Data Movement" href="/documentation/instances/storage/data-movement">
|
||
Move data between instances, cloud, and local storage
|
||
</Card>
|
||
|
||
<Card title="Cloud Sync" href="/documentation/instances/storage/cloud-sync">
|
||
Sync with Google Drive, S3, and other cloud providers
|
||
</Card>
|
||
</CardGroup>
|
||
|
||
## Next Steps
|
||
|
||
**New to Vast.ai?**
|
||
[Start with the Quickstart Guide →](/documentation/get-started/quickstart) for a complete walkthrough
|
||
|
||
**Ready to rent?**
|
||
[Understand pricing →](/documentation/instances/pricing) | [Choose a template →](/documentation/instances/templates) | [Find GPUs →](/documentation/instances/choose-an-instance)
|
||
|
||
**Need help connecting?**
|
||
[Connection methods →](/documentation/instances/connect/overview) | [SSH guide →](/documentation/instances/connect/ssh)
|
||
|
||
|
||
# Pricing
|
||
Source: https://docs.vast.ai/documentation/instances/pricing
|
||
|
||
Understand Vast.ai's marketplace pricing model, rental types, reserved discounts, and costs for GPU instances.
|
||
|
||
<Tip>
|
||
Vast.ai operates as a marketplace, connecting users with GPU providers worldwide. This means prices vary based on supply and demand, giving you access to competitive rates for GPU computing.
|
||
</Tip>
|
||
|
||
## How Vast.ai Pricing Works
|
||
|
||
Unlike traditional cloud providers with fixed pricing, Vast.ai uses a **marketplace model** where hosts set their own prices. This creates competitive rates without static price quotes—the market determines pricing in real-time.
|
||
|
||
You can easily check current market rates:
|
||
|
||
* **Web**: [Dashboard](https://cloud.vast.ai/create/) shows real-time prices
|
||
* **CLI**: Use `vastai search offers` to query prices programmatically (see [CLI Commands](/cli/commands#search-offers))
|
||
* **API**: Query programmatically via the [search offers endpoint](/api-reference/introduction)
|
||
|
||
<Info>
|
||
**Serverless Pricing**: Vast Serverless auto-scales instances with no separate pricing tier—you pay only for the underlying instance costs (compute, storage, bandwidth) with no additional fees. See [Serverless Pricing](/documentation/serverless/pricing) for details.
|
||
</Info>
|
||
|
||
### Key Pricing Principles
|
||
|
||
* **Market-driven rates**: Prices fluctuate based on real-time supply and demand
|
||
* **Combined pricing**: Your total cost includes a combination of GPU compute, storage, and bandwidth charges
|
||
* **Pay for what you use**: Billed by the second for actual usage
|
||
* **Service level pricing**: Costs vary based on dedicated or interruptible access and term length
|
||
|
||
## What does Vast cost compared to other providers?
|
||
|
||
Vast typically delivers more competitive pricing than traditional cloud providers. The marketplace model creates natural price competition—hosts compete for your business rather than locking you into fixed rates.
|
||
|
||
Key advantages:
|
||
|
||
* Direct competition between hosts drives rates lower
|
||
* Real-time supply and demand optimizes pricing
|
||
* No markup layered on top of host-set prices
|
||
* Global GPU supply improves availability and cost
|
||
|
||
Check current market rates in the [Dashboard](https://cloud.vast.ai/create/) or query programmatically via the [CLI](/cli/commands#search-offers) or [API](/api-reference/introduction).
|
||
|
||
## Cost Components
|
||
|
||
Your total rental cost includes three primary components:
|
||
|
||
### GPU Compute
|
||
|
||
Charged per second while your instance is running. Rates vary significantly based on:
|
||
|
||
* **GPU model**: High-end models (H100, A100) command premium rates
|
||
* **GPU quantity**: Multi-GPU configurations increase costs proportionally
|
||
* **Host reliability**: Higher reliability scores typically correlate with higher prices
|
||
* **Geographic location**: Regional supply and demand affects pricing
|
||
* **Market conditions**: Real-time marketplace dynamics influence rates
|
||
|
||
### Storage
|
||
|
||
Billed continuously while your instance exists, regardless of running state. Storage costs vary by host and are typically higher for stopped instances than running instances.
|
||
|
||
<Warning>
|
||
Storage charges continue even when instances are stopped. Delete instances completely to cease storage billing.
|
||
</Warning>
|
||
|
||
### Bandwidth
|
||
|
||
Data transfer costs vary by host and include both upload and download traffic. Charges apply per byte transferred. Review bandwidth rates during instance selection as these can significantly impact total costs for data-intensive workloads.
|
||
|
||
## Instance Types & Pricing
|
||
|
||
Vast.ai offers three instance types with different pricing models:
|
||
|
||
* **On-demand**: Fixed pricing, guaranteed resources (high priority)
|
||
* **Reserved**: Discounted rates with pre-payment (high priority)
|
||
* **Interruptible**: Lowest cost, may be paused (low priority)
|
||
|
||
Pricing varies by instance type, with interruptible instances often 50%+ cheaper than on-demand, and reserved instances offering up to 50% discount with commitment.
|
||
|
||
For detailed information about each instance type and when to use them, see [Instance Types](/documentation/instances/choosing/instance-types).
|
||
|
||
## Common Pricing Questions
|
||
|
||
### How do I find the cheapest GPUs?
|
||
|
||
Use the search filters on the [Dashboard](https://cloud.vast.ai/create/) to sort by price. Consider:
|
||
|
||
* Interruptible instances for non-critical workloads (often 50%+ cheaper)
|
||
* Lower reliability scores (may offer better rates)
|
||
* Different geographic regions
|
||
|
||
### Can I get a discount for long-term use?
|
||
|
||
Yes! Convert any on-demand instance to reserved pricing for up to 50% off. See [Reserved Instances](/documentation/instances/choosing/reserved-instances) for details.
|
||
|
||
### Why do prices vary so much?
|
||
|
||
Vast.ai is a marketplace where hosts set their own prices based on:
|
||
|
||
* Supply and demand in their region
|
||
* Their operating costs
|
||
* Machine specifications and reliability
|
||
* Competition from other hosts
|
||
|
||
## Billing Basics
|
||
|
||
Here are the essential billing concepts to understand:
|
||
|
||
* **Credits required upfront**: You must add credits to your account before starting any instances
|
||
* **Automatic instance suspension**: When your credit balance reaches zero, instances are automatically stopped but remain in your account
|
||
* **Ongoing storage charges**: You continue to be billed for storage on stopped instances until they are deleted
|
||
|
||
For complete billing details, see the [billing page](/documentation/reference/billing).
|
||
|
||
|
||
# Scheduled Cloud Backups
|
||
Source: https://docs.vast.ai/documentation/instances/storage/cloud-backups
|
||
|
||
Learn how to set up and schedule automated Vast.ai cloud backups using CLI or cron. Keep your data safe with best practices and easy management.
|
||
|
||
## Introduction
|
||
|
||
This guide walks you through setting up and running automated backups for your Vast.ai container instances to cloud storage. Cloud backups can you help preserve your work when using Vast's Docker-based instances. With proper backup strategies, you can ensure your valuable data remains safe and accessible even if your instance goes offline.
|
||
|
||
## Prerequisites
|
||
|
||
* A Vast.ai account
|
||
* Access to a Vast.ai Docker-based instance
|
||
* [Cloud storage connection set up in Vast.ai](/documentation/instances/cloud-sync)
|
||
* [(Optional) Install and use vast-cli](/cli/get-started)
|
||
* [(Optional) Understanding of how to use cron in computers with Unix-like OS](https://cronitor.io/guides/cron-jobs)
|
||
|
||
## Setup
|
||
|
||
### 1. Setting Up Cloud Storage Connections
|
||
|
||
Before creating backup jobs, you need to ensure you have a cloud storage connection set up in your Vast.ai account. You can view your existing connections using the vast-cli:
|
||
|
||
```text theme={null}
|
||
python3 vast.py show connections
|
||
|
||
ID NAME Cloud Type
|
||
19447 karthik_vast_ai_google_drive drive
|
||
```
|
||
|
||
If you don't have a connection yet, you'll need to set one up in [Vast.ai's Settings page ](/documentation/instances/cloud-sync)before proceeding with backup operations.
|
||
|
||
### 2. Understanding Backup Options
|
||
|
||
Vast.ai provides multiple approaches to schedule data backups:
|
||
|
||
* **Using Vast's job scheduling system via CLI** - Create hourly, daily, or weekly automated backup jobs
|
||
* **Using cron on your personal computer** - Schedule backups with custom timing from your local machine
|
||
|
||
Both approaches have their advantages depending on your workflow and requirements.
|
||
|
||
## Backup Methods
|
||
|
||
### 1. Using CLI for Scheduled Backups
|
||
|
||
The vast-cli tool allows you to create scheduled backup jobs with several timing options. The basic structure of a scheduled backup command includes these parameters:
|
||
|
||
```text theme={null}
|
||
--schedule SCHEDULE Values: HOURLY, DAILY, WEEKLY
|
||
--start_date START_DATE Start date in format 'YYYY-MM-DD HH:MM:SS PM' (UTC)
|
||
--end_date END_DATE End date in format 'YYYY-MM-DD HH:MM:SS PM' (UTC)
|
||
--day DAY Day of week (0-6, where 0=Sunday) or "*"
|
||
--hour HOUR Hour of day (0-23) or "*"
|
||
```
|
||
|
||
You can run this command to see more details about these parameters:
|
||
|
||
```text theme={null}
|
||
python3 vast.py cloud copy --help
|
||
```
|
||
|
||
Let's explore the different scheduling options:
|
||
|
||
To create a weekly backup job that runs every Saturday at 9 PM UTC:
|
||
|
||
```text theme={null}
|
||
python3 vast.py cloud copy --src /workspace --dst /backups/19015821_backups/ --instance 19015821 --connection 19447 --transfer "Instance To Cloud" --schedule WEEKLY --day 6 --hour 21
|
||
```
|
||
|
||
In this command:
|
||
|
||
* \--src /workspace specifies the source directory on your instance
|
||
* \--dst /backups/19015821\_backups/ is the destination folder in your cloud storage
|
||
* \--instance 19015821 is your instance's ID
|
||
* \--connection 19447 is your cloud storage connection ID
|
||
* \--day 6 represents Saturday (0=Sunday, 1=Monday, etc.)
|
||
* \--hour 21 represents 9 PM UTC (0=12am UTC, 1=1am UTC, etc.)
|
||
|
||
For daily backups at a specific hour (e.g., 9 PM UTC every day):
|
||
|
||
```text theme={null}
|
||
python3 vast.py cloud copy --src /workspace --dst /backups/19015821_backups/ --instance 19015821 --connection 19447 --transfer "Instance To Cloud" --schedule DAILY --day "*" --hour 21
|
||
```
|
||
|
||
The --day "\*" parameter indicates that the job should run every day.
|
||
|
||
For hourly backups that run every hour of every day:
|
||
|
||
```text theme={null}
|
||
python3 vast.py cloud copy --src /workspace --dst /backups/19015821_backups/ --instance 19015821 --connection 19447 --transfer "Instance To Cloud" --schedule HOURLY --day "*" --hour "*"
|
||
```
|
||
|
||
Setting both --day "\*" and --hour "\*" along with --schedule HOURLY makes the job run every hour.
|
||
|
||
To update your backup schedule, simply run the same command with the new schedule. The system will prompt you for confirmation, and upon acceptance, it will update the schedule accordingly. 
|
||
|
||
```text theme={null}
|
||
Existing scheduled job found. Do you want to update it (y|n)? y
|
||
add_scheduled_job update: success - Scheduling DAILY job to cloud copy from 1745599087.0 to 1746599887.0
|
||
```
|
||
|
||
### 2. Using Cron on Your Personal Linux Computer
|
||
|
||
If you prefer more granular control over your backup schedule, you can use cron on your local Linux or Mac computer. This approach allows for customized schedules beyond the hourly/daily/weekly options.
|
||
|
||
First, open your crontab file for editing:
|
||
|
||
```text theme={null}
|
||
crontab -e
|
||
```
|
||
|
||
Then, add a line that specifies your backup schedule. For example, to run a backup every 4 hours:
|
||
|
||
```text theme={null}
|
||
0 */4 * * * python3 vast.py cloud copy --src /workspace --dst /backups/19015821_backups/ --instance 19015821 --connection 19447 --transfer 'Instance To Cloud'
|
||
```
|
||
|
||
In this cron schedule:
|
||
|
||
* 0 represents the minute (0th minute of the hour)
|
||
* \*/4 means "every 4 hours"
|
||
* The three asterisks \* \* \* represent day of month, month, and day of week, indicating "every day"
|
||
|
||
## Viewing Scheduled Backup Jobs
|
||
|
||
To see all your currently scheduled backup jobs:
|
||
|
||
```text theme={null}
|
||
python3 vast.py show scheduled-jobs
|
||
```
|
||
|
||
Example output:
|
||
|
||
```bash Bash theme={null}
|
||
Scheduled Job ID Instance ID API Endpoint Start (Date/Time in UTC) End (Date/Time in UTC) Day of the Week Hour of the Day in UTC Minute of the Hour Frequency
|
||
1 19778412 /api/v0/commands/rclone/ 2025-04-24/23:38 2028-05-06/23:38 Everyday 4_PM 00 DAILY
|
||
2 19782577 /api/v0/commands/rclone/ 2025-04-29/23:47 2025-05-09/23:47 Wednesday 10_AM 00 WEEKLY
|
||
3 19757389 /api/v0/commands/rclone/ 2025-05-01/00:04 2026-05-01/00:04 Everyday Every_hour 00 HOURLY
|
||
```
|
||
|
||
Understanding the Output
|
||
|
||
<table isTableHeaderOn="true" selectedColumns="" selectedRows="" selectedTable="false">
|
||
<tr>
|
||
<td selected="false">
|
||
<p>Field</p>
|
||
</td>
|
||
|
||
<td selected="false">
|
||
<p>Description</p>
|
||
</td>
|
||
</tr>
|
||
|
||
<tr>
|
||
<td selected="false">
|
||
<p><strong>Scheduled Job ID</strong></p>
|
||
</td>
|
||
|
||
<td selected="false">
|
||
<p>Unique identifier for your job (needed for deletion)</p>
|
||
</td>
|
||
</tr>
|
||
|
||
<tr>
|
||
<td selected="false">
|
||
<p><strong>Instance ID</strong></p>
|
||
</td>
|
||
|
||
<td selected="false">
|
||
<p>The instance this job is associated with</p>
|
||
</td>
|
||
</tr>
|
||
|
||
<tr>
|
||
<td selected="false">
|
||
<p><strong>API Endpoint</strong></p>
|
||
</td>
|
||
|
||
<td selected="false">
|
||
<p>The endpoint being called (rclone is used for backups to cloud storage)</p>
|
||
</td>
|
||
</tr>
|
||
|
||
<tr>
|
||
<td selected="false">
|
||
<p><strong>Start (Date/Time)</strong></p>
|
||
</td>
|
||
|
||
<td selected="false">
|
||
<p>Start date/time of period when this scheduled job will be executed (in UTC)</p>
|
||
</td>
|
||
</tr>
|
||
|
||
<tr>
|
||
<td selected="false">
|
||
<p><strong>End (Date/Time)</strong></p>
|
||
</td>
|
||
|
||
<td selected="false">
|
||
<p>End date/time of period when this scheduled job will be executed (in UTC). Default is the end of the contract.</p>
|
||
</td>
|
||
</tr>
|
||
|
||
<tr>
|
||
<td selected="false">
|
||
<p><strong>Day of the Week</strong></p>
|
||
</td>
|
||
|
||
<td selected="false">
|
||
<p>Which day the job runs (can be specific day like "Wednesday", "Saturday", or "Everyday")</p>
|
||
</td>
|
||
</tr>
|
||
|
||
<tr>
|
||
<td selected="false">
|
||
<p><strong>Hour of the Day</strong></p>
|
||
</td>
|
||
|
||
<td selected="false">
|
||
<p>At what hour the job runs (formatted as 1\_PM, 11\_PM, 8\_PM in UTC, etc.)</p>
|
||
</td>
|
||
</tr>
|
||
|
||
<tr>
|
||
<td selected="false">
|
||
<p><strong>Minute of the Hour</strong></p>
|
||
</td>
|
||
|
||
<td selected="false">
|
||
<p>At what minute of the specified hour the job runs (00, 33, 10, etc.)</p>
|
||
</td>
|
||
</tr>
|
||
|
||
<tr>
|
||
<td selected="false">
|
||
<p><strong>Frequency</strong></p>
|
||
</td>
|
||
|
||
<td selected="false">
|
||
<p>How often the job runs (HOURLY, DAILY, WEEKLY)</p>
|
||
</td>
|
||
</tr>
|
||
</table>
|
||
|
||
Examples Explained:
|
||
|
||
1. **Job 1**: A **DAILY** backup that runs **every day at 4:00 PM UTC** 
|
||
* Runs daily at the same time
|
||
* Will continue running from Apr 24, 2025 until May 6, 2028
|
||
2. **Job 2**: A **WEEKLY** backup that runs on **Wednesdays at 10:00 AM UTC** 
|
||
* Runs only on Wednesdays at 10:00 AM UTC
|
||
* Short duration job (Apr 29 - May 9, 2025)
|
||
3. **Job 3**: A **HOURLY** backup that runs **every hour of every day**
|
||
* Runs every hour (1\_AM, 2\_AM, 3\_AM, etc.)
|
||
* Will continue running for a year
|
||
|
||
## Deleting Scheduled Backup Jobs
|
||
|
||
If you need to remove a scheduled backup job that you no longer want to run, you can use the delete scheduled-job command followed by the job ID:
|
||
|
||
```bash Bash theme={null}
|
||
python3 vast.py delete scheduled-job JOB_ID
|
||
```
|
||
|
||
For example:
|
||
|
||
```bash Bash theme={null}
|
||
python3 vast.py delete scheduled-job 4462309
|
||
```
|
||
|
||
This will completely remove the scheduled job from the system. When successful, you'll receive a confirmation message:
|
||
|
||
```bash Bash theme={null}
|
||
{'success': True, 'msg': 'Scheduled job 4462309 deleted successfully'}
|
||
```
|
||
|
||
### Find Job IDs to Delete
|
||
|
||
To find the ID of the job you want to delete, first run:
|
||
|
||
```bash Bash theme={null}
|
||
python3 vast.py show scheduled-jobs
|
||
```
|
||
|
||
You'll see output similar to:
|
||
|
||
```bash Bash theme={null}
|
||
Scheduled Job ID Instance ID API Endpoint Start (Date/Time) End (Date/Time) Day of the Week Hour of the Day Minute of the Hour Frequency
|
||
4462317 19281511 /api/v0/commands/rclone/ 2025-04-08/09:01 2028-06-08/18:48 Everyday 1_PM 33 DAILY
|
||
4462321 19489711 /api/v0/commands/rclone/ 2025-04-15/20:00 2025-04-19/20:00 Saturday 11_PM 00 WEEKLY
|
||
4462322 19490133 /api/v0/commands/rclone/ 2025-04-15/20:00 2025-04-19/20:00 Wednesday 8_PM 10 WEEKLY
|
||
```
|
||
|
||
The scheduled\_job\_id column in the output contains the IDs you'll need for deletion.
|
||
|
||
## Best Practices
|
||
|
||
### Choose the Right Backup Frequency
|
||
|
||
Consider these factors when determining how often to back up your data:
|
||
|
||
* How frequently your data changes
|
||
* The criticality of your data
|
||
* The cost of data loss
|
||
* The performance impact of backup operations
|
||
* The bandwidth costs of backing your data up in cloud storage
|
||
|
||
### Back Up Only What You Need
|
||
|
||
Be selective about what you back up to save time and storage costs:
|
||
|
||
* Focus on backing up only important data (models, results, custom code)
|
||
|
||
### Verify Your Backups
|
||
|
||
Periodically check that your backups are working correctly:
|
||
|
||
* Download a sample backup from cloud storage and verify its contents
|
||
* Check logs for any cloud copy failures
|
||
* Test the restoration process before you actually need it
|
||
* If contract is extended, update end\_date of scheduled job
|
||
|
||
## Conclusion
|
||
|
||
Setting up regular backups for your Vast.ai instances can be a valuable part of a robust workflow. By choosing the appropriate backup method and schedule, you can ensure that your valuable work remains safe and accessible regardless of instance lifecycle events.
|
||
|
||
Remember that the best backup system is one that you set up before you need it. Take time now to implement a backup strategy that meets your needs, and you can thank yourself later.
|
||
|
||
## Additional Resources
|
||
|
||
* [Vast.ai Documentation](https://vast.ai/docs/)
|
||
* [Vast.ai CLI Repository](https://github.com/vast-ai/vast-python)
|
||
* [Cron Job Documentation](https://en.wikipedia.org/wiki/Cron)
|
||
|
||
|
||
# Cloud Sync
|
||
Source: https://docs.vast.ai/documentation/instances/storage/cloud-sync
|
||
|
||
Learn how to connect Vast.ai instances with cloud storage providers like Google Drive, S3, Backblaze, and Dropbox for secure data sync.
|
||
|
||
<Warning>
|
||
**WARNING**<br />
|
||
Cloud Sync is only supported on Docker-based instances. Cloud Sync is not currently supported on VM-based instances (instances created using a vastai/kvm repository template)
|
||
</Warning>
|
||
|
||
Cloud Sync Integrations allow you to move data freely to and from instances on Vast.
|
||
|
||
<Note>
|
||
In order to move data from cloud providers to Vast instances you must provide certain credentials which will be temporarily moved onto your instance which is stored on a host machine. For this reason you should only use cloud integration options when using verified hosts that are datacenters. You can filters for these hosts using the command line interface or on the website instance creation page using the 'Secure Cloud' checkbox.
|
||
</Note>
|
||
|
||
## Google Drive
|
||
|
||
<Warning>
|
||
**WARNING**<br />
|
||
Note that Vast will connect at the account level. Therefore it is recommended for users to have a dedicated Google Drive for Vast use cases rather than using their personal account.
|
||
</Warning>
|
||
|
||
Prerequisites: Have an active Google Drive account
|
||
|
||
1. Navigate to your [account](https://cloud.vast.ai/account) page
|
||
2. On the bottom you should see a button that says Connect to Google Drive
|
||
3. Enter a name for your integration with Google Drive.
|
||
4. Submit the name, after which a new tab should open up asking if you would like to give Vast access to your Google Drive.
|
||
5. Once the verification prompt has been accepted, you will be redirected back to vast with your Google Drive fully integrated.
|
||
|
||
<Frame caption="Gdrive">
|
||

|
||
</Frame>
|
||
|
||
You have now connected your Google Drive with Vast. This will allow you to move data to and from instances even while inactive.
|
||
|
||
## Amazon S3
|
||
|
||
Prerequisites: An active Amazon Web Services (AWS) account.
|
||
|
||
<Warning>
|
||
**WARNING**<br />
|
||
We do not recommend using an existing IAM user on Vast. Vast connects on a user level rather than an account level, so it's best to create a new IAM user with the intended authorization for the data you want to store on vast.ai servers.
|
||
</Warning>
|
||
|
||
1. Create a S3 Bucket in AWS
|
||
2. Create an IAM User and Grant Access to the S3 Bucket, we recommend you create a user with access to your specific bucket for this process rather than full access.
|
||
|
||
<Frame caption="Awss3">
|
||
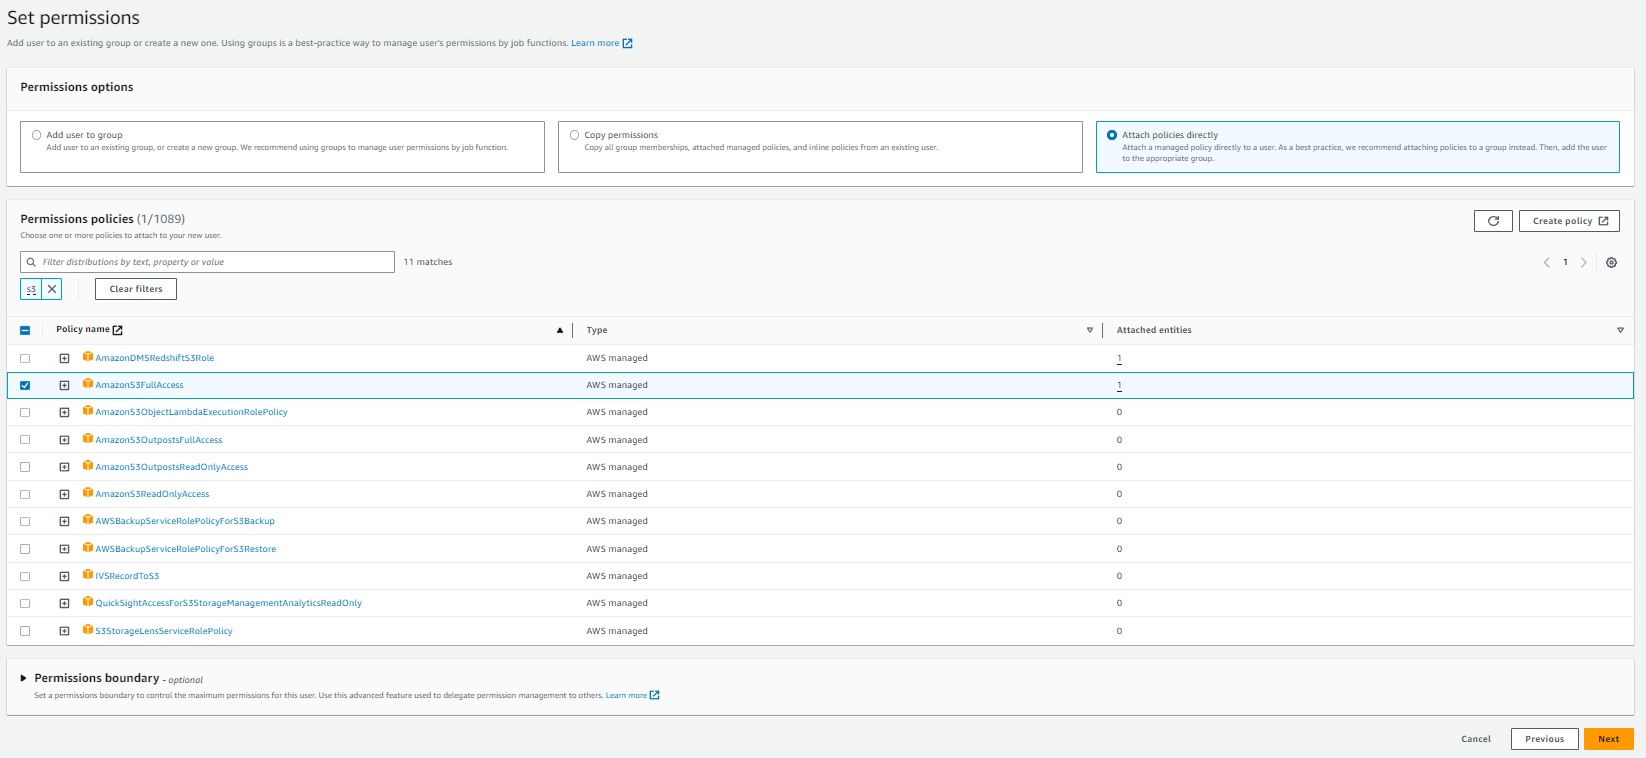
|
||
</Frame>
|
||
|
||
1. Once the user is created, click the user and go Security credentials.
|
||
2. Click Create access key, and enable for Command Line interface
|
||
3. Once the access key is created, you will be prompted with an Access Key, and a Secret access Key. This will be the information required to use your AWS user permissions on Vast.
|
||
4. Navigate to your [account](https://cloud.vast.ai/account) page
|
||
5. On the bottom you should see a button that says Connect to Amazon S3
|
||
6. Enter your credentials in the given fields, as well as a name for your integration with Amazon.
|
||
|
||
You have now connected an Amazon Web Services user with Vast. This will allow you to move files from services like Amazon S3 to and from instances on Vast.
|
||
|
||
## Backblaze
|
||
|
||
<Warning>
|
||
**WARNING**<br />
|
||
Note that Vast connects to cloud providers at the account level. Any bucket your application key has access to will be accessible with Vast. This can cause security concerns with some use cases that should be dealt with by creating a new application key used specifically for data you want to store on vast.ai servers.
|
||
</Warning>
|
||
|
||
1. Create a bucket in Backblaze. It should not matter if the bucket is private or public.
|
||
2. Go to Application Keys
|
||
3. Select Add a New Application Key
|
||
4. Grant access for Read and Write operations on the bucket of your choice
|
||
5. Note the keyId and the applicationKey that are returned to you. This is the data required for Vast.
|
||
6. Navigate to your [account](https://cloud.vast.ai/account) page
|
||
7. On the bottom you should see a button that says Connect to Backblaze
|
||
8. Enter your credentials in the given fields, as well as a name for your integration with Backblaze.
|
||
|
||
You have now connected your Backblaze account with Vast. This will allow you to move data to and from Instances easily.
|
||
|
||
## Dropbox
|
||
|
||
<Warning>
|
||
**WARNING**<br />
|
||
Note that Vast will connect at the account level. Therefore it is recommended for users to have dedicated dropbox accounts for Vast use cases rather than using their personal account.
|
||
</Warning>
|
||
|
||
1. Navigate to your [account](https://cloud.vast.ai/account) page
|
||
2. On the bottom you should see a button that says Connect to Dropbox
|
||
3. Enter a name for your integration with Dropbox.
|
||
4. Submit the name, after which a new tab should open up asking if you would like to give Vast access to your Dropbox.
|
||
5. Once the verification prompt has been accepted, you will be redirected back to vast with dropbox fully integrated.
|
||
|
||
You have now connected your Dropbox account with Vast. This will allow you to move data to and from Instances seamlessly.
|
||
|
||
|
||
# Data Movement
|
||
Source: https://docs.vast.ai/documentation/instances/storage/data-movement
|
||
|
||
Learn how to move data on Vast.ai using cloud sync, instance-to-instance transfers, CLI copy, VM migration, scp, and other efficient methods.
|
||
|
||
Vast.ai currently supports several built-in mechanisms to copy data to/from instance storage (in addition to all of the standard linux/unix options available inside the instance):
|
||
|
||
For docker based instances:
|
||
|
||
1. Instance\<->Instance and Instance\<->Local copy using the `vastai copy` CLI command
|
||
2. Instance\<->Instance copy in the GUI instance control panel or `vastai copy` CLI command
|
||
3. Instance\<->Cloud copy using the GUI instance control panel or `vastai cloud copy` CLI command
|
||
|
||
For VM instances:
|
||
|
||
1. Instance\<->Instance migration through the `vastai vm copy` CLI command or the GUI instance control panel
|
||
|
||
These are in addition to standard ssh based copy protocols such as scp or sftp which you can run over ssh, built in jupyter http copy, and any other linux tools you can run inside the instance yourself (rclone, rsync, bittorent, [insync](https://www.insynchq.com/headless-for-linux) etc).
|
||
|
||
The 3 built-in methods discussed here are unique in that they offer ways to copy data to/from a *stopped instance*, with some constraints. Copying data between instances accrues internet bandwidth usage charges (with prices varying across providers), unless the copy is between two instances on the same machine or local network, in which case there is no bandwidth charge.
|
||
|
||
## Instance\<->Cloud copy (cloud sync)
|
||
|
||
The cloud sync feature allows you to copy data to/from instance local storage and several cloud storage providers (S3, gdrive, backblaze, etc) - even when the instance is stopped.
|
||
|
||
### Using the GUI
|
||
|
||
Vast currently supports Dropbox, Amazon S3 and Backblaze cloud storage providers.
|
||
|
||
First you will need to connect to the cloud provider on the [account page](https://cloud.vast.ai/account/) and then use the cloud copy button on the instance to start the copy operation.
|
||
|
||
<Frame caption="Cloud Copy">
|
||

|
||
</Frame>
|
||
|
||
See [Cloud Sync](/documentation/instances/cloud-sync) for more details.
|
||
|
||
### Using the CLI
|
||
|
||
You can also access this feature using the `vastai cloud copy` [CLI command](/cli/commands#cloud-copy).
|
||
|
||
## Instance \<-> Instance copy
|
||
|
||
Instance to instance copy allows moving data directly between the local storage of two instances.
|
||
If the two instances are on the same machine or the same local network (same provider and location) then the copy can run at faster local network storage speeds and there is no internet transit cost.
|
||
|
||
### Using the GUI
|
||
|
||
You can use the copy buttons to copy data between two instances. Instances can be stopped/inactive. See complete [Constraints](./#constraints) below.
|
||
|
||
Click the copy button on the source instance and then on the destination instance to bring up the copy dialogue. For docker-based instances you will see the following folder dialogue.
|
||
|
||
<Frame caption="Itoicopy">
|
||
|
||
</Frame>
|
||
|
||
Pick the folders where you want to copy to/from. Leave a '/' at the end of the source directory to copy all the files inside into the target directory, vs nesting a copy of the source dir into the target dir.
|
||
|
||
<Warning>
|
||
**WARNING**\\
|
||
|
||
You should not copy to /root or / as a destination directory, as this can mess
|
||
up the permissions on your instance ssh folder, breaking future copy
|
||
operations (as they use ssh authentication).
|
||
</Warning>
|
||
|
||
<Frame caption="Copy Modal">
|
||
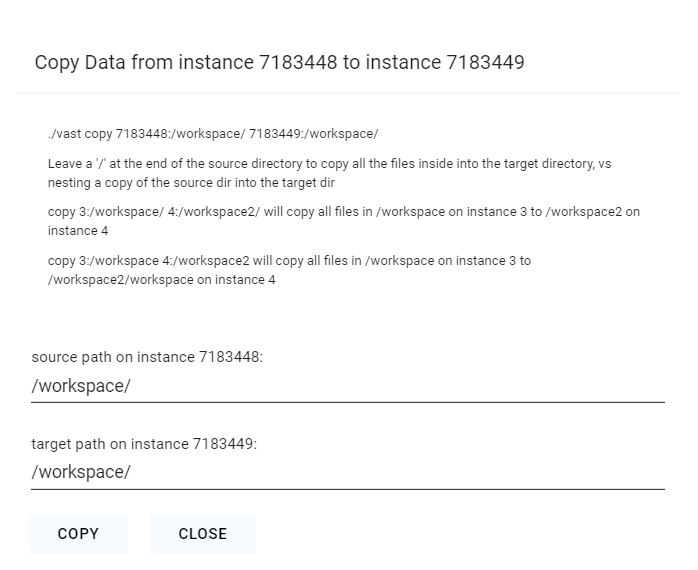
|
||
</Frame>
|
||
|
||
After clicking the copy button, give it 5-10 seconds to start. The status messages will display as the copy operation begins.
|
||
|
||
For VM based instances you will see a confirmation dialog instead; the copy will copy your entire source instance to the destination machine. The destination instance's disk will be replaced by the contents of the source instance.
|
||
|
||
### Using the CLI
|
||
|
||
You can also access this feature using the `vastai copy` [CLI command](/cli/commands#copy).
|
||
|
||
## CLI Copy Command
|
||
|
||
You can use the [CLI](/cli/get-started) copy command to copy from/to directories on a remote instance and your local machine, or to copy data between two remote instances.
|
||
The copy command uses rsync and is generally fast and efficient, subject to single link upload/download constraints.
|
||
|
||
The copy command supports multiple location formats:
|
||
|
||
* `[instance_id:]path` - Legacy format (still supported)
|
||
* `C.instance_id:path` - Container copy format
|
||
* `cloud_service:path` - Cloud service format
|
||
* `cloud_service.cloud_service_id:path` - Cloud service with ID
|
||
* `local:path` - Explicit local path
|
||
|
||
Examples:
|
||
|
||
```text Text theme={null}
|
||
vastai copy 6003036:/workspace/ 6003038:/workspace/
|
||
vastai copy C.11824:/data/test local:data/test
|
||
vastai copy local:data/test C.11824:/data/test
|
||
vastai copy drive:/folder/file.txt C.6003036:/workspace/
|
||
vastai copy s3.101:/data/ C.6003036:/workspace/
|
||
```
|
||
|
||
The first example copy syncs all files from the absolute directory '/workspace' on instance 6003036 to the directory '/workspace' on instance 6003038.
|
||
The second example copy syncs files from container 11824 to the local machine using structured syntax.
|
||
The third example copy syncs files from local to container 11824 using structured syntax.
|
||
The fourth example copy syncs files from Google Drive to an instance.
|
||
The fifth example copy syncs files from S3 bucket with id 101 to an instance.
|
||
|
||
## CLI Copy Command (VMs)
|
||
|
||
You can use the [CLI](/cli/get-started) vm copy command to copy your entire VM from one instance to another. The destination VM's disk will be replaced with the contents of the source machine.
|
||
|
||
Example:
|
||
|
||
```text Text theme={null}
|
||
vastai vm copy 1241241 1241245
|
||
```
|
||
|
||
This will transfer the contents of 1241241 to 1241245.
|
||
|
||
### Constraints
|
||
|
||
For VM-based instances, the destination instance must be stopped during the transfer.
|
||
|
||
<Warning>
|
||
**WARNING**\\
|
||
|
||
You should not copy to /root or / as a destination directory, as this can mess
|
||
up the permissions on your instance ssh folder, breaking future copy
|
||
operations (as they use ssh authentication).
|
||
</Warning>
|
||
|
||
### Performance
|
||
|
||
If your data is already stored in the cloud (S3, gdrive, etc) then you should naturally use the appropriate linux CLI or commands to download and upload data directly, or you could use the [cloud sync](/documentation/instances/cloud-sync) feature.
|
||
This generally will be one the fastest methods for moving large quantities of data, as it can fully saturate a large number of download links.
|
||
If you are using multiple instances with significant data movement requirements you will want to use high bandwidth cloud storage to avoid any single machine bottlenecks.
|
||
|
||
If you launched a Jupyter notebook instance, you can use its upload feature, but this has a file size limit and can be slow.
|
||
|
||
You can also use standard Linux tools like scp, ftp, rclone, or rsync to move data.
|
||
For moving code and smaller files scp is fast enough and convenient.
|
||
However, be warned that the default ssh connection uses a proxy and can be slow for large transfers (direct ssh recommended).
|
||
|
||
Instance to instance copy is generally as fast as other methods, and can be much faster (and cheaper) for moving data between instances on the same datacenter.
|
||
|
||
## SCP
|
||
|
||
If you launched an ssh instance, you can copy files using scp. The proxy ssh connection can be slow (in terms of latency and bandwidth).
|
||
Thus we recommend only using scp over the proxy ssh connection for smaller transfers (less than 1 GB).
|
||
For larger inbound transfers, using the direct ssh connection is recommended.
|
||
Downloading from a cloud data store using wget or curl can have much higher performance.
|
||
|
||
The relevant scp command syntax is:
|
||
|
||
```text Text theme={null}
|
||
scp -P PORT LOCAL_FILE root@IPADDR:/REMOTEDIR
|
||
```
|
||
|
||
The PORT and IPADDR fields must match those from the ssh command (note the use of -P for port instead of -p !). The "Connect" button on the instance will give you these fields in the form:
|
||
|
||
```text Text theme={null}
|
||
ssh -p PORT root@IPADDR -L 8080:localhost:8080
|
||
```
|
||
|
||
For example, if Connect gives you this:
|
||
|
||
```text Text theme={null}
|
||
ssh -p 7417 root@52.204.230.7 -L 8080:localhost:8080
|
||
```
|
||
|
||
You could use scp to upload a local file called "myfile.tar.gz" to a remote folder called "mydir" like so:
|
||
|
||
```text Text theme={null}
|
||
scp -P 7417 myfile.tar.gz root@52.204.230.7:/mydir
|
||
```
|
||
|
||
## Common Questions
|
||
|
||
### How do you recommend I move data from an existing instance?
|
||
|
||
The [cloud sync feature](/documentation/instances/cloud-sync) will allow you to move data to and from instances easily.
|
||
The main benefit is that you can move data around while the machine is inactive.
|
||
Currently, we support Google Drive, S3, Dropbox, and Backblaze
|
||
|
||
### Help, I want to move my data but I forgot what directory it's in!
|
||
|
||
For moving your data, by either using our Cloud Sync or Instance Copy features, you will need to define the path from where the data you are transferring is coming from and where it is to be put. If you don't remember where the data is you are trying to transfer, you can use our [CLI execute command](/cli/commands#execute) to access your instance when your instance access is limited.
|
||
|
||
### What if I don't remember the file names on my inactive instance, but I want to copy certain files?
|
||
|
||
Use the vast CLI, run the `execute` command to display the file tree. This will help you browse the available files and identify the names or paths you need. More about the execute command you can find [here](https://cloud.vast.ai/cli/).
|
||
|
||
```
|
||
vastai execute INSTANCE_ID 'ls -l'
|
||
```
|
||
|
||
### How I can free up disk space on an inactive instance?
|
||
|
||
When an instance is inactive (stopped, exited, cannot be started), you can still manage its file system and remove unneeded data using vast CLI. This is useful if you want to free up disk space without starting the instance.
|
||
|
||
Check disk usage:
|
||
|
||
```
|
||
vastai execute INSTANCE_ID 'du -d1 -h'
|
||
```
|
||
|
||
Delete unnecessary files:
|
||
|
||
```
|
||
vastai execute INSTANCE_ID 'rm file_name.txt'
|
||
```
|
||
|
||
|
||
# Storage Types
|
||
Source: https://docs.vast.ai/documentation/instances/storage/types
|
||
|
||
Understand the different storage options available on Vast.ai instances, including container storage and volumes.
|
||
|
||
## Storage Overview
|
||
|
||
Vast.ai provides two main types of storage for your instances:
|
||
|
||
1. **Container Storage** - Temporary storage within the Docker container
|
||
2. **Volumes** - Persistent local storage that can be attached to instances
|
||
|
||
## Container Storage
|
||
|
||
Container storage is the default storage allocated to every instance when it's created.
|
||
|
||
### Key Characteristics
|
||
|
||
* **Size is fixed at creation**: You must specify the disk size when creating the instance
|
||
* **Cannot be resized**: Once created, the allocation cannot be changed
|
||
* **Persists while instance exists**: Data remains even when instance is stopped
|
||
* **Deleted with instance**: All data is permanently lost when instance is destroyed
|
||
* **Charged continuously**: Storage costs apply even when instance is stopped
|
||
|
||
### Default Allocation
|
||
|
||
* Minimum: 10GB (default)
|
||
* Maximum: Varies by host machine capacity
|
||
* Set via disk size slider during instance creation
|
||
|
||
<Warning>
|
||
Storage charges continue even when instances are stopped. To stop storage billing, you must destroy the instance completely.
|
||
</Warning>
|
||
|
||
### Best Practices
|
||
|
||
1. **Estimate generously**: Better to have extra space than run out mid-task
|
||
2. **Monitor usage**: Check disk space regularly with `df -h`
|
||
3. **Clean up regularly**: Remove unnecessary files to free space
|
||
4. **Back up important data**: Container storage is lost when instance is destroyed
|
||
|
||
## Volumes
|
||
|
||
Volumes provide persistent storage that survives instance destruction and can be reattached to new instances.
|
||
|
||
### Key Features
|
||
|
||
* **Local only**: Tied to the physical machine where created
|
||
* **Persistent**: Survives instance destruction
|
||
* **Reattachable**: Can be mounted to new instances on same machine
|
||
* **Fixed size**: Cannot be resized after creation
|
||
* **Separate billing**: Charged independently from instances
|
||
|
||
### Volume Limitations
|
||
|
||
* Cannot migrate between different physical machines
|
||
* Can only attach to instances on the same host
|
||
* Must destroy attached instance before deleting volume
|
||
* Size must be specified at creation time
|
||
|
||
For detailed volume management, see [Volumes](/documentation/instances/storage/volumes).
|
||
|
||
## Storage Costs
|
||
|
||
Storage pricing varies by host and includes:
|
||
|
||
1. **Container storage**: Charged per GB while instance exists
|
||
2. **Volume storage**: Charged per GB while volume exists
|
||
3. **Different rates**: Stopped instances may have higher storage rates than running instances
|
||
|
||
## Data Persistence Strategy
|
||
|
||
### Temporary Work
|
||
|
||
Use container storage for:
|
||
|
||
* Temporary files
|
||
* Build artifacts
|
||
* Cache data
|
||
* Working datasets
|
||
|
||
### Important Data
|
||
|
||
Use volumes or cloud sync for:
|
||
|
||
* Trained models
|
||
* Datasets
|
||
* Code repositories
|
||
* Configuration files
|
||
|
||
### Backup Options
|
||
|
||
1. **Volumes**: For same-machine persistence
|
||
2. **Cloud Sync**: For off-machine backup (Google Drive, S3, etc.)
|
||
3. **Instance-to-instance copy**: Transfer between instances
|
||
4. **SCP/SFTP**: Download to local machine
|
||
|
||
## Common Questions
|
||
|
||
### Can I increase storage after instance creation?
|
||
|
||
No, container storage size is fixed at creation. You can:
|
||
|
||
* Create a new instance with more storage and [transfer your data](/documentation/instances/storage/data-movement)
|
||
* Attach a volume for additional space
|
||
* Use cloud storage for overflow
|
||
|
||
### What happens to my data when the instance stops?
|
||
|
||
* Container storage: Data persists, charges continue
|
||
* Volumes: Data persists, charges continue
|
||
* No data is lost when stopping instances
|
||
|
||
### How do I avoid storage charges?
|
||
|
||
* Destroy instances you're not using
|
||
* Delete unneeded volumes
|
||
* Transfer important data to local/cloud storage first
|
||
|
||
## Next Steps
|
||
|
||
* [Volumes](/documentation/instances/storage/volumes) - Create and manage persistent volumes
|
||
* [Data Movement](/documentation/instances/storage/data-movement) - Transfer files between instances
|
||
* [Cloud Sync](/documentation/instances/storage/cloud-sync) - Connect to cloud storage providers
|
||
* [Cloud Backups](/documentation/instances/storage/cloud-backups) - Automate backup strategies
|
||
|
||
|
||
# Volumes
|
||
Source: https://docs.vast.ai/documentation/instances/storage/volumes
|
||
|
||
|
||
|
||
The [**Storage**](https://cloud.vast.ai/storage/) page allows you to easily access and manage your **volumes -** storage that can be attached to your instances for data storage.
|
||
|
||
We currently provide **local volumes only**, meaning:
|
||
|
||
* A volume is physically tied to the machine it was created on.
|
||
* It can only be attached to instances running on the same physical machine.
|
||
* It cannot be moved or attached to instances on other machines.
|
||
|
||
<Note>
|
||
Volume size cannot be changed after creation, so be sure to choose the size carefully based on your expected storage needs. 
|
||
</Note>
|
||
|
||
## Creating a Volume in GUI
|
||
|
||
This guide will walk you through the process of creating a volume using a template in the GUI. You can create the volume during instance creation by using a template with volume settings enabled, or you can create a volume by using dropdown menu on the Search page. 
|
||
|
||
### **How to create a volume via Add volume dropdown menu on the Search page?**
|
||
|
||
1. Select a template then click on **Add volume** dropdown. You will see an option labeled **Local volume** with a + (plus) button next to it.
|
||
|
||
<img src="https://mintcdn.com/vastai-80aa3a82/1a9mKbP8zn3lYY0d/images/volumes.webp?fit=max&auto=format&n=1a9mKbP8zn3lYY0d&q=85&s=d818347fcfa8ee7b670e80b32ac995fe" alt="" data-og-width="1280" width="1280" data-og-height="674" height="674" data-path="images/volumes.webp" data-optimize="true" data-opv="3" srcset="https://mintcdn.com/vastai-80aa3a82/1a9mKbP8zn3lYY0d/images/volumes.webp?w=280&fit=max&auto=format&n=1a9mKbP8zn3lYY0d&q=85&s=37bc7ec3b9a85e095d87028788076e8f 280w, https://mintcdn.com/vastai-80aa3a82/1a9mKbP8zn3lYY0d/images/volumes.webp?w=560&fit=max&auto=format&n=1a9mKbP8zn3lYY0d&q=85&s=abb08fc0d1c2ad931cd93ed6b91cbbb0 560w, https://mintcdn.com/vastai-80aa3a82/1a9mKbP8zn3lYY0d/images/volumes.webp?w=840&fit=max&auto=format&n=1a9mKbP8zn3lYY0d&q=85&s=9b6b0b523935cbd5461579e293c70f4b 840w, https://mintcdn.com/vastai-80aa3a82/1a9mKbP8zn3lYY0d/images/volumes.webp?w=1100&fit=max&auto=format&n=1a9mKbP8zn3lYY0d&q=85&s=cf45e7b8f47987661e544c641b2deea0 1100w, https://mintcdn.com/vastai-80aa3a82/1a9mKbP8zn3lYY0d/images/volumes.webp?w=1650&fit=max&auto=format&n=1a9mKbP8zn3lYY0d&q=85&s=1b8617e0d1a2626979c5061a6007fd27 1650w, https://mintcdn.com/vastai-80aa3a82/1a9mKbP8zn3lYY0d/images/volumes.webp?w=2500&fit=max&auto=format&n=1a9mKbP8zn3lYY0d&q=85&s=cda1b8eaa8cfad3463ee56b9b1ff4107 2500w" />
|
||
2. Click + button. This will allow you to adjust the volume size using the slider. Once enabled, offes will display the available volume size. 
|
||
|
||
<Frame caption="Create local volume">
|
||
<img src="https://mintcdn.com/vastai-80aa3a82/1a9mKbP8zn3lYY0d/images/volumes-2.webp?fit=max&auto=format&n=1a9mKbP8zn3lYY0d&q=85&s=9bb72e7030922749446069dc9b84eab6" alt="Create local volume" data-og-width="1280" width="1280" data-og-height="712" height="712" data-path="images/volumes-2.webp" data-optimize="true" data-opv="3" srcset="https://mintcdn.com/vastai-80aa3a82/1a9mKbP8zn3lYY0d/images/volumes-2.webp?w=280&fit=max&auto=format&n=1a9mKbP8zn3lYY0d&q=85&s=2634841a7f0b293cd855022106815cb0 280w, https://mintcdn.com/vastai-80aa3a82/1a9mKbP8zn3lYY0d/images/volumes-2.webp?w=560&fit=max&auto=format&n=1a9mKbP8zn3lYY0d&q=85&s=96cbae1718d37cb1c5d0fccf1aeb2fa1 560w, https://mintcdn.com/vastai-80aa3a82/1a9mKbP8zn3lYY0d/images/volumes-2.webp?w=840&fit=max&auto=format&n=1a9mKbP8zn3lYY0d&q=85&s=a5a6f8c05a4f1ea243ff95bd681a4111 840w, https://mintcdn.com/vastai-80aa3a82/1a9mKbP8zn3lYY0d/images/volumes-2.webp?w=1100&fit=max&auto=format&n=1a9mKbP8zn3lYY0d&q=85&s=e0cd4c44b94e30c0c6c006be139932e0 1100w, https://mintcdn.com/vastai-80aa3a82/1a9mKbP8zn3lYY0d/images/volumes-2.webp?w=1650&fit=max&auto=format&n=1a9mKbP8zn3lYY0d&q=85&s=7d7b05e56f17a3bb5066893cbfe5150b 1650w, https://mintcdn.com/vastai-80aa3a82/1a9mKbP8zn3lYY0d/images/volumes-2.webp?w=2500&fit=max&auto=format&n=1a9mKbP8zn3lYY0d&q=85&s=b7f469fe30e4566bb14508c2474c34b1 2500w" />
|
||
</Frame>
|
||
3. Click **Rent **button to launch your instance along with the volume. Once the instance is running, your volume will be automatically mounted and available inside the container at the /data directory.
|
||
|
||
<Frame caption="Volume on instance">
|
||
<img src="https://mintcdn.com/vastai-80aa3a82/1a9mKbP8zn3lYY0d/images/volumes-3.webp?fit=max&auto=format&n=1a9mKbP8zn3lYY0d&q=85&s=7b38d96b6f8e241b5415e530556ccad2" alt="Volume on instance" data-og-width="1018" width="1018" data-og-height="645" height="645" data-path="images/volumes-3.webp" data-optimize="true" data-opv="3" srcset="https://mintcdn.com/vastai-80aa3a82/1a9mKbP8zn3lYY0d/images/volumes-3.webp?w=280&fit=max&auto=format&n=1a9mKbP8zn3lYY0d&q=85&s=6257a5e5b8a76b2d49cab81b0bb85516 280w, https://mintcdn.com/vastai-80aa3a82/1a9mKbP8zn3lYY0d/images/volumes-3.webp?w=560&fit=max&auto=format&n=1a9mKbP8zn3lYY0d&q=85&s=170f374bb64059724d0579eec28c315b 560w, https://mintcdn.com/vastai-80aa3a82/1a9mKbP8zn3lYY0d/images/volumes-3.webp?w=840&fit=max&auto=format&n=1a9mKbP8zn3lYY0d&q=85&s=161746e6605734ba2930d66b89e472c6 840w, https://mintcdn.com/vastai-80aa3a82/1a9mKbP8zn3lYY0d/images/volumes-3.webp?w=1100&fit=max&auto=format&n=1a9mKbP8zn3lYY0d&q=85&s=f058d8fa3acb2307d778c5245c64a60a 1100w, https://mintcdn.com/vastai-80aa3a82/1a9mKbP8zn3lYY0d/images/volumes-3.webp?w=1650&fit=max&auto=format&n=1a9mKbP8zn3lYY0d&q=85&s=e54c8e9ef1bf53b788d37e668246d4c7 1650w, https://mintcdn.com/vastai-80aa3a82/1a9mKbP8zn3lYY0d/images/volumes-3.webp?w=2500&fit=max&auto=format&n=1a9mKbP8zn3lYY0d&q=85&s=c8293aaa3a82f2817a8f41e57c05ed52 2500w" />
|
||
</Frame>
|
||
4. You can find your volume information on **Storage **page.
|
||
|
||
<Frame caption="Volume info">
|
||
<img src="https://mintcdn.com/vastai-80aa3a82/1a9mKbP8zn3lYY0d/images/volumes-4.webp?fit=max&auto=format&n=1a9mKbP8zn3lYY0d&q=85&s=701c608adba8e5806f535276ed7a31d6" alt="Volume info" data-og-width="1280" width="1280" data-og-height="525" height="525" data-path="images/volumes-4.webp" data-optimize="true" data-opv="3" srcset="https://mintcdn.com/vastai-80aa3a82/1a9mKbP8zn3lYY0d/images/volumes-4.webp?w=280&fit=max&auto=format&n=1a9mKbP8zn3lYY0d&q=85&s=c5c62a1739792c9d2e6e0b06d1e564bc 280w, https://mintcdn.com/vastai-80aa3a82/1a9mKbP8zn3lYY0d/images/volumes-4.webp?w=560&fit=max&auto=format&n=1a9mKbP8zn3lYY0d&q=85&s=b9ea7c821d212507a4e633d16501e42d 560w, https://mintcdn.com/vastai-80aa3a82/1a9mKbP8zn3lYY0d/images/volumes-4.webp?w=840&fit=max&auto=format&n=1a9mKbP8zn3lYY0d&q=85&s=5393c15275f319eb2db77f60addd1980 840w, https://mintcdn.com/vastai-80aa3a82/1a9mKbP8zn3lYY0d/images/volumes-4.webp?w=1100&fit=max&auto=format&n=1a9mKbP8zn3lYY0d&q=85&s=f3b7088e88382caee6d1519379732efb 1100w, https://mintcdn.com/vastai-80aa3a82/1a9mKbP8zn3lYY0d/images/volumes-4.webp?w=1650&fit=max&auto=format&n=1a9mKbP8zn3lYY0d&q=85&s=fa104f9c3d29cbead41bc583c1e1c5b5 1650w, https://mintcdn.com/vastai-80aa3a82/1a9mKbP8zn3lYY0d/images/volumes-4.webp?w=2500&fit=max&auto=format&n=1a9mKbP8zn3lYY0d&q=85&s=d8f958134d4d86f34ee516d8f290c1e5 2500w" />
|
||
</Frame>
|
||
|
||
### **How to create a volume using a template?**
|
||
|
||
1. Choose a Template. You can either choose an existing template from the [**Recommended**](https://cloud.vast.ai/templates/) list or create your own [custom template](/documentation/templates/creating-templates).
|
||
2. Open Template Editor (Click on pencil icon on a template card). Scroll down until you see the **Disk Space (Container + Volume) **section. 
|
||
|
||
<img src="https://mintcdn.com/vastai-80aa3a82/1a9mKbP8zn3lYY0d/images/volumes-5.webp?fit=max&auto=format&n=1a9mKbP8zn3lYY0d&q=85&s=a05044602cb747bb9cc9713e13c523e1" alt="Volume settings" data-og-width="800" width="800" data-og-height="657" height="657" data-path="images/volumes-5.webp" data-optimize="true" data-opv="3" srcset="https://mintcdn.com/vastai-80aa3a82/1a9mKbP8zn3lYY0d/images/volumes-5.webp?w=280&fit=max&auto=format&n=1a9mKbP8zn3lYY0d&q=85&s=6004df77e76256e3aebdc8e9bd993db3 280w, https://mintcdn.com/vastai-80aa3a82/1a9mKbP8zn3lYY0d/images/volumes-5.webp?w=560&fit=max&auto=format&n=1a9mKbP8zn3lYY0d&q=85&s=116432e3c735acb6e9c703b4198ba988 560w, https://mintcdn.com/vastai-80aa3a82/1a9mKbP8zn3lYY0d/images/volumes-5.webp?w=840&fit=max&auto=format&n=1a9mKbP8zn3lYY0d&q=85&s=2fc16b3f7b305ab449a1eabeb9a99cd0 840w, https://mintcdn.com/vastai-80aa3a82/1a9mKbP8zn3lYY0d/images/volumes-5.webp?w=1100&fit=max&auto=format&n=1a9mKbP8zn3lYY0d&q=85&s=aaf3fdd5360eb9357eae7a47eb813396 1100w, https://mintcdn.com/vastai-80aa3a82/1a9mKbP8zn3lYY0d/images/volumes-5.webp?w=1650&fit=max&auto=format&n=1a9mKbP8zn3lYY0d&q=85&s=262d589b4e42a7e06f293034c19e5aa9 1650w, https://mintcdn.com/vastai-80aa3a82/1a9mKbP8zn3lYY0d/images/volumes-5.webp?w=2500&fit=max&auto=format&n=1a9mKbP8zn3lYY0d&q=85&s=0f2379c0ac6634b5d4b975528b3a8189 2500w" />
|
||
3. In this section, check the box **Add recommended volume settings**. Once selected, a new configuration area will appear where you can enter the **volume size **and specify the **installation path. **A default path is provided, but you can modify it if needed. 
|
||
|
||
<Frame caption="Volume settings">
|
||
<img src="https://mintcdn.com/vastai-80aa3a82/1a9mKbP8zn3lYY0d/images/volumes-6.webp?fit=max&auto=format&n=1a9mKbP8zn3lYY0d&q=85&s=d107bd4b36b023ddf52444b5bdcb5edd" alt="Volume settings" data-og-width="1049" width="1049" data-og-height="354" height="354" data-path="images/volumes-6.webp" data-optimize="true" data-opv="3" srcset="https://mintcdn.com/vastai-80aa3a82/1a9mKbP8zn3lYY0d/images/volumes-6.webp?w=280&fit=max&auto=format&n=1a9mKbP8zn3lYY0d&q=85&s=d9b20538fd243a6eeb8f92cfbe4749f9 280w, https://mintcdn.com/vastai-80aa3a82/1a9mKbP8zn3lYY0d/images/volumes-6.webp?w=560&fit=max&auto=format&n=1a9mKbP8zn3lYY0d&q=85&s=764c4ab1f520483f366abe9548369567 560w, https://mintcdn.com/vastai-80aa3a82/1a9mKbP8zn3lYY0d/images/volumes-6.webp?w=840&fit=max&auto=format&n=1a9mKbP8zn3lYY0d&q=85&s=a357d4fa0d2ae8f59d20b5dacef25aa8 840w, https://mintcdn.com/vastai-80aa3a82/1a9mKbP8zn3lYY0d/images/volumes-6.webp?w=1100&fit=max&auto=format&n=1a9mKbP8zn3lYY0d&q=85&s=26f053aa120943b90ae5f2b9d2ed644a 1100w, https://mintcdn.com/vastai-80aa3a82/1a9mKbP8zn3lYY0d/images/volumes-6.webp?w=1650&fit=max&auto=format&n=1a9mKbP8zn3lYY0d&q=85&s=421d5c6eb13eb050bdc6ccb1d8ed34df 1650w, https://mintcdn.com/vastai-80aa3a82/1a9mKbP8zn3lYY0d/images/volumes-6.webp?w=2500&fit=max&auto=format&n=1a9mKbP8zn3lYY0d&q=85&s=9bbd902a1a58cfcb51cfb4a820dcad7a 2500w" />
|
||
</Frame>
|
||
4. After filling in the volume details, click **Save\&Use **or **Create\&Use Template **to apply your changes and navigate to the Search page. Offers that support volumes will now display a volume badge showing the available volume size. You can adjust the volume size using the slider in the Search page after your template is configured.
|
||
|
||
<img src="https://mintcdn.com/vastai-80aa3a82/1a9mKbP8zn3lYY0d/images/volumes-7.webp?fit=max&auto=format&n=1a9mKbP8zn3lYY0d&q=85&s=c70715c2f8c2ad95a6b154ddcaaa286a" alt="Volume settings" data-og-width="1280" width="1280" data-og-height="676" height="676" data-path="images/volumes-7.webp" data-optimize="true" data-opv="3" srcset="https://mintcdn.com/vastai-80aa3a82/1a9mKbP8zn3lYY0d/images/volumes-7.webp?w=280&fit=max&auto=format&n=1a9mKbP8zn3lYY0d&q=85&s=1d55b1da6336fbd36e0a9d031aec4f74 280w, https://mintcdn.com/vastai-80aa3a82/1a9mKbP8zn3lYY0d/images/volumes-7.webp?w=560&fit=max&auto=format&n=1a9mKbP8zn3lYY0d&q=85&s=e873689b57753427b0b8033e69660fd4 560w, https://mintcdn.com/vastai-80aa3a82/1a9mKbP8zn3lYY0d/images/volumes-7.webp?w=840&fit=max&auto=format&n=1a9mKbP8zn3lYY0d&q=85&s=36b54b78ab2be7fb9d2ac93727dbe8e8 840w, https://mintcdn.com/vastai-80aa3a82/1a9mKbP8zn3lYY0d/images/volumes-7.webp?w=1100&fit=max&auto=format&n=1a9mKbP8zn3lYY0d&q=85&s=60c8fc9a74cf76cece6d81e4b301e125 1100w, https://mintcdn.com/vastai-80aa3a82/1a9mKbP8zn3lYY0d/images/volumes-7.webp?w=1650&fit=max&auto=format&n=1a9mKbP8zn3lYY0d&q=85&s=1ddcffdec1e9637d5024dc76fc18949e 1650w, https://mintcdn.com/vastai-80aa3a82/1a9mKbP8zn3lYY0d/images/volumes-7.webp?w=2500&fit=max&auto=format&n=1a9mKbP8zn3lYY0d&q=85&s=a4064978ff8418bec6384f0d24628c34 2500w" />
|
||
5. Select a GPU and click **Rent **button.
|
||
|
||
### **How to view volume pricing?**
|
||
|
||
To view pricing details, simply hover over the Rent button for any offer. 
|
||
|
||
<img src="https://mintcdn.com/vastai-80aa3a82/1a9mKbP8zn3lYY0d/images/volumes-8.webp?fit=max&auto=format&n=1a9mKbP8zn3lYY0d&q=85&s=f0d07bb5a6cd540184f7e2498eb287ac" alt="" data-og-width="800" width="800" data-og-height="375" height="375" data-path="images/volumes-8.webp" data-optimize="true" data-opv="3" srcset="https://mintcdn.com/vastai-80aa3a82/1a9mKbP8zn3lYY0d/images/volumes-8.webp?w=280&fit=max&auto=format&n=1a9mKbP8zn3lYY0d&q=85&s=5b776105e9adc182a574127a956ce9be 280w, https://mintcdn.com/vastai-80aa3a82/1a9mKbP8zn3lYY0d/images/volumes-8.webp?w=560&fit=max&auto=format&n=1a9mKbP8zn3lYY0d&q=85&s=20cd05562e5cedaee43bb9d4a272c35c 560w, https://mintcdn.com/vastai-80aa3a82/1a9mKbP8zn3lYY0d/images/volumes-8.webp?w=840&fit=max&auto=format&n=1a9mKbP8zn3lYY0d&q=85&s=7f75fc09a7cf7dae04f372055e0c11bc 840w, https://mintcdn.com/vastai-80aa3a82/1a9mKbP8zn3lYY0d/images/volumes-8.webp?w=1100&fit=max&auto=format&n=1a9mKbP8zn3lYY0d&q=85&s=b4a5392d1394c7db761e5c9d620b9ceb 1100w, https://mintcdn.com/vastai-80aa3a82/1a9mKbP8zn3lYY0d/images/volumes-8.webp?w=1650&fit=max&auto=format&n=1a9mKbP8zn3lYY0d&q=85&s=1a2b80b5b936d23e79830b466c8626b2 1650w, https://mintcdn.com/vastai-80aa3a82/1a9mKbP8zn3lYY0d/images/volumes-8.webp?w=2500&fit=max&auto=format&n=1a9mKbP8zn3lYY0d&q=85&s=763a1353b89acfe4dd1c16a60989a2f2 2500w" />
|
||
|
||
### Deleting volume
|
||
|
||
To delete a volume, the instance it is attached to must be **deleted first**. Deleting a volume that is currently **mounted to a running or stopped instance is not allowed**.
|
||
|
||
Delete a Volume:
|
||
|
||
1. Make sure the volume is **not attached** to any instance.
|
||
 If it is, **delete the instance** first from the Instances page.
|
||
2. Once the volume is detached, go to the **Storage** page.
|
||
3. Find the volume you want to delete, click on the **three-dot menu** (⋮) next to it, and select **"Delete volume"**.
|
||
|
||
<Frame caption="Delete volume">
|
||
<img src="https://mintcdn.com/vastai-80aa3a82/1a9mKbP8zn3lYY0d/images/volumes-9.webp?fit=max&auto=format&n=1a9mKbP8zn3lYY0d&q=85&s=cb0d822b0931c74b3f25b9ddddd960e4" alt="Delete volume" data-og-width="1280" width="1280" data-og-height="540" height="540" data-path="images/volumes-9.webp" data-optimize="true" data-opv="3" srcset="https://mintcdn.com/vastai-80aa3a82/1a9mKbP8zn3lYY0d/images/volumes-9.webp?w=280&fit=max&auto=format&n=1a9mKbP8zn3lYY0d&q=85&s=924a7e65a42e58d918ae9f9129d2126b 280w, https://mintcdn.com/vastai-80aa3a82/1a9mKbP8zn3lYY0d/images/volumes-9.webp?w=560&fit=max&auto=format&n=1a9mKbP8zn3lYY0d&q=85&s=a788903a7c7ad4d46228fd927039886c 560w, https://mintcdn.com/vastai-80aa3a82/1a9mKbP8zn3lYY0d/images/volumes-9.webp?w=840&fit=max&auto=format&n=1a9mKbP8zn3lYY0d&q=85&s=170ae795c18cd934aff97dd8485b0585 840w, https://mintcdn.com/vastai-80aa3a82/1a9mKbP8zn3lYY0d/images/volumes-9.webp?w=1100&fit=max&auto=format&n=1a9mKbP8zn3lYY0d&q=85&s=9e222f9f6cd77a2d9933be2ea571811d 1100w, https://mintcdn.com/vastai-80aa3a82/1a9mKbP8zn3lYY0d/images/volumes-9.webp?w=1650&fit=max&auto=format&n=1a9mKbP8zn3lYY0d&q=85&s=4b41df08a96e9e2b51eaad176a3c7238 1650w, https://mintcdn.com/vastai-80aa3a82/1a9mKbP8zn3lYY0d/images/volumes-9.webp?w=2500&fit=max&auto=format&n=1a9mKbP8zn3lYY0d&q=85&s=170124f25598d02e93442f185753809c 2500w" />
|
||
</Frame>
|
||
4. Confirm the deletion. This action is **permanent** and cannot be undone.
|
||
|
||
<Warning>
|
||
Important: Deleting a volume will permanently remove all data stored in it. Make sure to back up any important data before proceeding.
|
||
</Warning>
|
||
|
||
### How to create an instance with existing volume?
|
||
|
||
If you already have a volume and want to launch a new instance using it, follow these steps:
|
||
|
||
1. Go to the **Storage** page and select the volume you want to use.
|
||
|
||
2. In the **Volume Info** section, you will see a button labeled **Rent instance using this volume**.
|
||
|
||
<img src="https://mintcdn.com/vastai-80aa3a82/1a9mKbP8zn3lYY0d/images/volumes-10.webp?fit=max&auto=format&n=1a9mKbP8zn3lYY0d&q=85&s=8c4db1caeb318e91efe1850d0fdcacfc" alt="Rent instance using this volume" data-og-width="1280" width="1280" data-og-height="884" height="884" data-path="images/volumes-10.webp" data-optimize="true" data-opv="3" srcset="https://mintcdn.com/vastai-80aa3a82/1a9mKbP8zn3lYY0d/images/volumes-10.webp?w=280&fit=max&auto=format&n=1a9mKbP8zn3lYY0d&q=85&s=ab654c1695400e43e38b41977f4ce40b 280w, https://mintcdn.com/vastai-80aa3a82/1a9mKbP8zn3lYY0d/images/volumes-10.webp?w=560&fit=max&auto=format&n=1a9mKbP8zn3lYY0d&q=85&s=ab9eb0a79d57f5da8a097bc265579e35 560w, https://mintcdn.com/vastai-80aa3a82/1a9mKbP8zn3lYY0d/images/volumes-10.webp?w=840&fit=max&auto=format&n=1a9mKbP8zn3lYY0d&q=85&s=f4c9d1deeb06f35fe2107d5a2680235f 840w, https://mintcdn.com/vastai-80aa3a82/1a9mKbP8zn3lYY0d/images/volumes-10.webp?w=1100&fit=max&auto=format&n=1a9mKbP8zn3lYY0d&q=85&s=5482e5891a57e783b772ae83145f2f99 1100w, https://mintcdn.com/vastai-80aa3a82/1a9mKbP8zn3lYY0d/images/volumes-10.webp?w=1650&fit=max&auto=format&n=1a9mKbP8zn3lYY0d&q=85&s=082666cb048688d73ed1379d6e4e7620 1650w, https://mintcdn.com/vastai-80aa3a82/1a9mKbP8zn3lYY0d/images/volumes-10.webp?w=2500&fit=max&auto=format&n=1a9mKbP8zn3lYY0d&q=85&s=6ca65ed70090abc4332bcf61bc6fff35 2500w" />
|
||
|
||
3. Click this button. You will be redirected to the **Search Page**, where available offers are automatically filtered to match the **same machine** where the volume is located.
|
||
|
||
4. Select your preferred offer and proceed to launch the instance.
|
||
 The selected volume will be automatically attached to the instance upon creation.
|
||
|
||
## Creating a Volume in CLI
|
||
|
||
To create a volume, you can use the vast CLI. See our [CLI documentation](https://cloud.vast.ai/cli/) for set-up and usage of the CLI. You can search for volume offers using the command:
|
||
|
||
```text Text theme={null}
|
||
vastai search volumes
|
||
```
|
||
|
||
There is a modified list of search params available, for more information, you can add the -- help option to the search. 
|
||
|
||
This will bring up a list of available volume offers. You will be able to see the maximum capacity for the volume (in Gigabytes). Just like creating an instance, you can copy the offer ID and create a volume with the command:
|
||
|
||
```text Text theme={null}
|
||
vastai create volume <offer_id> -s <volume_size> -n <name>
|
||
```
|
||
|
||
This will send a command to the host machine to allocate the given space to your volume. You can optionally specify a name with -n, it can be alphanumeric with underscores, with a max length of 64. If all goes well, you should be able to see your volume as created when you run the command 
|
||
|
||
```text Text theme={null}
|
||
vastai show volumes
|
||
```
|
||
|
||
### How can I create an instance with a volume?
|
||
|
||
Now that your volume is created, you can use it by creating an instance on the machine with the volume, and passing the volume in the env argument. The format is -v \<volume\_name>:\<mount\_point>, for example: 
|
||
|
||
```text Text theme={null}
|
||
vastai create instance 874 --image pytorch/pytorch --env '-v V.881:/mnt' --disk 30 --ssh --direct
|
||
```
|
||
|
||
That command mounts your volume at the directory /mnt. The directory does not need to exist in order to be mounted.
|
||
|
||
### Can I use my volume on a different machine?
|
||
|
||
You can't directly use the same volume on a different machine, but you can clone the volume to a machine that has an available volume contract.The clone command will create a new volume contract on the new machine, provision the volume, and copy all existing data from the existing volume to the new volume. To clone a volume, you can use the command:
|
||
|
||
```text Text theme={null}
|
||
vastai clone volume <existing_volume_id> <dest_contract_id>
|
||
```
|
||
|
||
where \<dest\_contract\_id> is a volume offer of at least the size of your existing volume. 
|
||
|
||
The volumes are independent and do not sync data after the clone is completed. Any changes that occur (on either) volume AFTER the volume is successfully cloned will not be reflected on the other volume.
|
||
|
||
### How can I delete my volume?
|
||
|
||
When you're done using it, you can delete your volume using the command 
|
||
|
||
```text Text theme={null}
|
||
vastai delete volume <volume_id>
|
||
```
|
||
|
||
<Warning>
|
||
This will only work if all instances using the volume have been destroyed. 
|
||
</Warning>
|
||
|
||
### How can I see what instances are using my volume?
|
||
|
||
The command
|
||
|
||
```text Text theme={null}
|
||
vastai show volumes
|
||
```
|
||
|
||
will display a list of volumes you own, as well as what instances exist that are using that volume.
|
||
|
||
## A machine with my volume went offline! Am I still being charged?
|
||
|
||
Just like with normal instances, you are never charged when a machine is offline. This is usually a temporary issue, and when the machine comes back online, volume charges will resume as normal. If you wish to delete the volume in the meantime, you can do so, and you will not be charged when the machine comes back online. If the machine is offline for an extended period of time, please reach out to vast support. 
|
||
|
||
## Can I use my volume with a VM instance?
|
||
|
||
At this time, volumes are only supported for docker instances, and cannot be used with VM instances.
|
||
|
||
|
||
# Account Settings
|
||
Source: https://docs.vast.ai/documentation/reference/account-settings
|
||
|
||
|
||
|
||
<script
|
||
type="application/ld+json"
|
||
dangerouslySetInnerHTML={{
|
||
__html: JSON.stringify({
|
||
"@context": "https://schema.org",
|
||
"@type": "HowTo",
|
||
"name": "How to Manage Your Vast.ai Account Settings",
|
||
"description": "A comprehensive guide to managing your Vast.ai account settings including dark mode, security, referral links, environment variables, notifications, cloud connections, and invoice information.",
|
||
"step": [
|
||
{
|
||
"@type": "HowToStep",
|
||
"name": "Enable Dark Mode",
|
||
"text": "Turn the switch on and off to enable and disable dark mode. You can also toggle this setting in the navigation bar with the moon and sun icons."
|
||
},
|
||
{
|
||
"@type": "HowToStep",
|
||
"name": "Set Up Account Security",
|
||
"text": "In the Account Security section, you can set up two-factor authentication, resend a verification email, change your email, or reset your password. Two-factor authentication can be used to help protect your account from unauthorized access."
|
||
},
|
||
{
|
||
"@type": "HowToStep",
|
||
"name": "Access Your Referral Link",
|
||
"text": "You can access your referral link in the Referral Link section of the Settings page. When users create an account through your referral link and use Vast services, you'll earn credits and receive payouts for your referrals."
|
||
},
|
||
{
|
||
"@type": "HowToStep",
|
||
"name": "Manage Environment Variables",
|
||
"text": "Add, edit, and delete environment variables stored on your account. Input the env key into the key field and value into the value field, then select the + button to save. To add multiple at once, select the Batch Paste option. Make sure you select the Save Edits button to save all of your changes."
|
||
},
|
||
{
|
||
"@type": "HowToStep",
|
||
"name": "Configure Cloud Connections",
|
||
"text": "Integrate and connect with cloud providers such as Amazon S3, Backblaze, and Dropbox. This integration allows you to sync data even while instances are inactive. You can access this feature via the Cloud Copy button on the Instances page."
|
||
},
|
||
{
|
||
"@type": "HowToStep",
|
||
"name": "Set Invoice Information",
|
||
"text": "In the Invoice Information section, you can set personal information for your invoices. Click into any input field to edit it, and select the Save button to save your changes."
|
||
}
|
||
]
|
||
})
|
||
}}
|
||
/>
|
||
|
||
On this page you can view and edit important information about your customer account.
|
||
|
||
# Page Walkthrough
|
||
|
||
## Enable Dark Mode
|
||
|
||
Turning the switch on and off will enable and disable dark mode.
|
||
|
||
<Frame caption="Enable Dark Mode Section">
|
||

|
||
</Frame>
|
||
|
||
You can also toggle this setting in the navigation bar with the moon and sun icons.
|
||
|
||
<img src="https://mintcdn.com/vastai-80aa3a82/v_EM_-NdbnPjb9tX/images/console-setting.webp?fit=max&auto=format&n=v_EM_-NdbnPjb9tX&q=85&s=caf1da8c5179beba5563cacb464a4431" alt="" data-og-width="868" width="868" data-og-height="52" height="52" data-path="images/console-setting.webp" data-optimize="true" data-opv="3" srcset="https://mintcdn.com/vastai-80aa3a82/v_EM_-NdbnPjb9tX/images/console-setting.webp?w=280&fit=max&auto=format&n=v_EM_-NdbnPjb9tX&q=85&s=2581eb1adcacee1f8b4e3fa1bfa2e850 280w, https://mintcdn.com/vastai-80aa3a82/v_EM_-NdbnPjb9tX/images/console-setting.webp?w=560&fit=max&auto=format&n=v_EM_-NdbnPjb9tX&q=85&s=e008cbe8bd9f457c85b5f829ad0b6fc5 560w, https://mintcdn.com/vastai-80aa3a82/v_EM_-NdbnPjb9tX/images/console-setting.webp?w=840&fit=max&auto=format&n=v_EM_-NdbnPjb9tX&q=85&s=f4f5fe231f6c1329cc906b7870b5bfb9 840w, https://mintcdn.com/vastai-80aa3a82/v_EM_-NdbnPjb9tX/images/console-setting.webp?w=1100&fit=max&auto=format&n=v_EM_-NdbnPjb9tX&q=85&s=47ae03114e29e80bef2447baa248ba14 1100w, https://mintcdn.com/vastai-80aa3a82/v_EM_-NdbnPjb9tX/images/console-setting.webp?w=1650&fit=max&auto=format&n=v_EM_-NdbnPjb9tX&q=85&s=3fbdc9428c817744f72e6d524318da1d 1650w, https://mintcdn.com/vastai-80aa3a82/v_EM_-NdbnPjb9tX/images/console-setting.webp?w=2500&fit=max&auto=format&n=v_EM_-NdbnPjb9tX&q=85&s=bf5c56bb7a9ef23a14733ce5ba39a64f 2500w" />
|
||
|
||
<img src="https://mintcdn.com/vastai-80aa3a82/v_EM_-NdbnPjb9tX/images/console-setting-2.webp?fit=max&auto=format&n=v_EM_-NdbnPjb9tX&q=85&s=6b11e929f2c30dcda9a73d1a9e31acd1" alt="" data-og-width="843" width="843" data-og-height="51" height="51" data-path="images/console-setting-2.webp" data-optimize="true" data-opv="3" srcset="https://mintcdn.com/vastai-80aa3a82/v_EM_-NdbnPjb9tX/images/console-setting-2.webp?w=280&fit=max&auto=format&n=v_EM_-NdbnPjb9tX&q=85&s=1672a9c218bacb2aa8a304b765933e9f 280w, https://mintcdn.com/vastai-80aa3a82/v_EM_-NdbnPjb9tX/images/console-setting-2.webp?w=560&fit=max&auto=format&n=v_EM_-NdbnPjb9tX&q=85&s=4a0fde1257858cf0d70862e3c27c8813 560w, https://mintcdn.com/vastai-80aa3a82/v_EM_-NdbnPjb9tX/images/console-setting-2.webp?w=840&fit=max&auto=format&n=v_EM_-NdbnPjb9tX&q=85&s=823c7a1c8afa017ff0136b7b1f25dfcc 840w, https://mintcdn.com/vastai-80aa3a82/v_EM_-NdbnPjb9tX/images/console-setting-2.webp?w=1100&fit=max&auto=format&n=v_EM_-NdbnPjb9tX&q=85&s=51bd60d0d33d080e7b212cb3a0bb396e 1100w, https://mintcdn.com/vastai-80aa3a82/v_EM_-NdbnPjb9tX/images/console-setting-2.webp?w=1650&fit=max&auto=format&n=v_EM_-NdbnPjb9tX&q=85&s=bde2fa6a6ecca495c1e0f906c5800ca1 1650w, https://mintcdn.com/vastai-80aa3a82/v_EM_-NdbnPjb9tX/images/console-setting-2.webp?w=2500&fit=max&auto=format&n=v_EM_-NdbnPjb9tX&q=85&s=37685d7d30d80df425a3b8b8acc704da 2500w" />
|
||
|
||
## Account Security
|
||
|
||
In the Account Security section, you can set up two-factor authentication, resend a verification email, change your email, or reset your password.
|
||
|
||
<Frame caption="Account Security Section">
|
||

|
||
</Frame>
|
||
|
||
### Two-Factor Authentication
|
||
|
||
You can set up two-factor authentication (2FA) for your Vast account. This can be used to help protect your account from unauthorized access. You’ll be required to enter a security code each time you sign in.
|
||
|
||
<Frame caption="Two Factor Authentication">
|
||

|
||
</Frame>
|
||
|
||
### Resend Verification Email
|
||
|
||
Select the "Resend" button to receive a new verification email in your inbox.
|
||
|
||
<Frame caption="Resend Verification Email">
|
||

|
||
</Frame>
|
||
|
||
### Change Email
|
||
|
||
You can view the current email connected to your account and change your email at any time by pressing the 'Change' button.
|
||
|
||
<Frame caption="Change Email">
|
||

|
||
</Frame>
|
||
|
||
When you change your email using this feature you will not be required to re-verify your email address. All emails that would normally be sent to the old e-mail will be now be directed towards your new email.
|
||
|
||
### Reset Password
|
||
|
||
You can change your password by selecting the "Reset" button, and you will get a link to reset your password via email.
|
||
|
||
<Frame caption="Reset Password">
|
||

|
||
</Frame>
|
||
|
||
## Referral Link
|
||
|
||
You can access your referral link in the Referral Link section of the Settings page.
|
||
|
||
<Frame caption="Referral Link Section">
|
||

|
||
</Frame>
|
||
|
||
When users create an account through your referral link and use Vast services, you'll earn credits and receive payouts for your referrals.
|
||
|
||
<Frame caption="Referral Link Fields">
|
||

|
||
</Frame>
|
||
|
||
## Environment Variables
|
||
|
||
You can add, edit, and delete the environment variables stored on your account in the Environment Variables section.
|
||
|
||
<Frame caption="Env Section">
|
||

|
||
</Frame>
|
||
|
||
When adding individually, input the env key into the key field and value into the value field, then select the "+" button to save your environment variable.
|
||
|
||
<Frame caption="Env Fields">
|
||
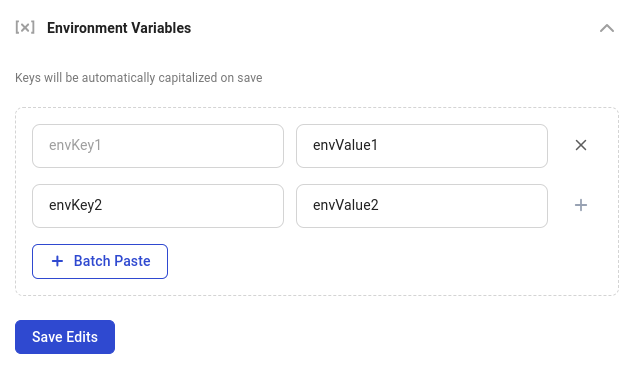
|
||
</Frame>
|
||
|
||
To add multiple at once, select the "Batch Paste" option and paste your environment variables into that input, according to the format below.
|
||
|
||
<Frame caption="Env Batch Paste">
|
||

|
||
</Frame>
|
||
|
||
Within the batch paste mode, you can save your changes by selecting the "Save" button or erase them with the "Cancel" button.
|
||
|
||
When you are finished editing your environment variables, make sure you select the "Save Edits" button to save all of your changes.
|
||
|
||
## Notification Settings
|
||
|
||
You can subscribe or unsubscribe from our email newsletter by selecting or unselecting this checkbox in the Notification Settings section.
|
||
|
||
<img src="https://mintcdn.com/vastai-80aa3a82/v_EM_-NdbnPjb9tX/images/console-setting-3.webp?fit=max&auto=format&n=v_EM_-NdbnPjb9tX&q=85&s=e72d133c3deaac20891673a9bd31c04e" alt="" data-og-width="858" width="858" data-og-height="102" height="102" data-path="images/console-setting-3.webp" data-optimize="true" data-opv="3" srcset="https://mintcdn.com/vastai-80aa3a82/v_EM_-NdbnPjb9tX/images/console-setting-3.webp?w=280&fit=max&auto=format&n=v_EM_-NdbnPjb9tX&q=85&s=50c167c301eea111adf5845b8d254d47 280w, https://mintcdn.com/vastai-80aa3a82/v_EM_-NdbnPjb9tX/images/console-setting-3.webp?w=560&fit=max&auto=format&n=v_EM_-NdbnPjb9tX&q=85&s=57a2be3944cb2505bb388714621fb363 560w, https://mintcdn.com/vastai-80aa3a82/v_EM_-NdbnPjb9tX/images/console-setting-3.webp?w=840&fit=max&auto=format&n=v_EM_-NdbnPjb9tX&q=85&s=b75731ab1ac7cdf39102c2806aa24c55 840w, https://mintcdn.com/vastai-80aa3a82/v_EM_-NdbnPjb9tX/images/console-setting-3.webp?w=1100&fit=max&auto=format&n=v_EM_-NdbnPjb9tX&q=85&s=27707cb05b399f50378d245c28a9378c 1100w, https://mintcdn.com/vastai-80aa3a82/v_EM_-NdbnPjb9tX/images/console-setting-3.webp?w=1650&fit=max&auto=format&n=v_EM_-NdbnPjb9tX&q=85&s=3b745568914cacc1f490ff4c0bc35546 1650w, https://mintcdn.com/vastai-80aa3a82/v_EM_-NdbnPjb9tX/images/console-setting-3.webp?w=2500&fit=max&auto=format&n=v_EM_-NdbnPjb9tX&q=85&s=0838b670ce67a47ece4528a49b2d3870 2500w" />
|
||
|
||
## Cloud Connection
|
||
|
||
In this section, you can integrate and connect with cloud providers such as Amazon S3, Backblaze, and Dropbox.
|
||
|
||
<Frame caption="Cloud Connection Section">
|
||

|
||
</Frame>
|
||
|
||
This integration process is very straightforward. If you need assistance in setting up these integrations you can read our guides [here](/documentation/instances/cloud-sync).
|
||
|
||
One of the benefits of these integrations is the ability to sync data even while instances are inactive.
|
||
|
||
<Frame caption="Cloud Connection Fields">
|
||
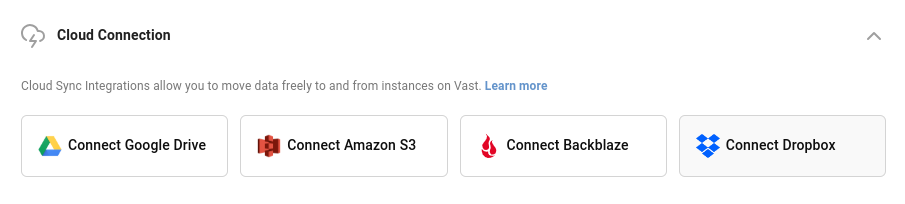
|
||
</Frame>
|
||
|
||
You can access this feature via the 'Cloud Copy' button on the Instances page.
|
||
|
||
## Invoice Information
|
||
|
||
In the Invoice Information section, you can set personal information for your invoices.
|
||
|
||
<Frame caption="Invoice Information Section">
|
||

|
||
</Frame>
|
||
|
||
Click into any input field to edit it, and select the "Save" button to save your changes.
|
||
|
||
<Frame caption="Invoice Information Fields">
|
||
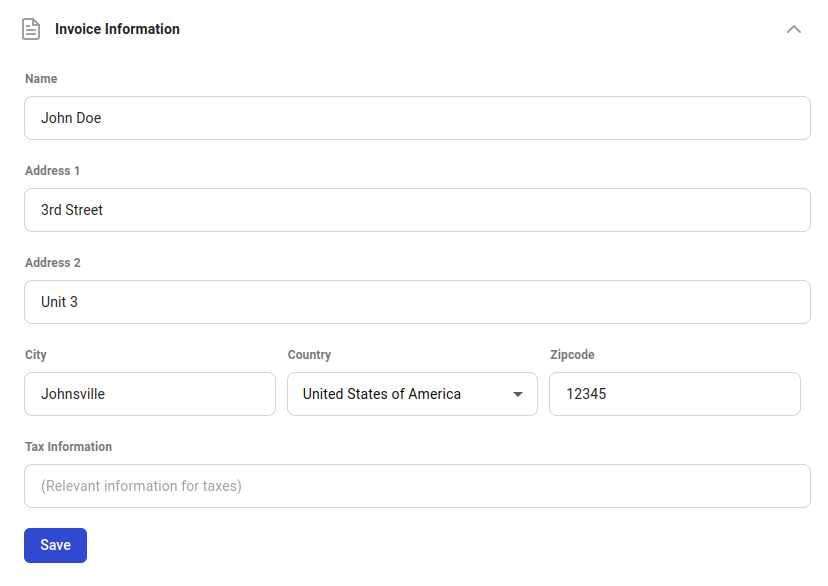
|
||
</Frame>
|
||
|
||
## Common Questions
|
||
|
||
### Can I delete my account?
|
||
|
||
You can now delete your Vast.ai account. **Before deleting:**
|
||
|
||
* Remove all machines, clusters if you are a host.
|
||
* `vastai delete machine machine_id`
|
||
* `vastai delete cluster cluster_id`
|
||
* Destroy / delete all instances and volumes.
|
||
* **Teams:** If you **own** a team, it will be deleted — [transfer ownership](/documentation/teams/managing-teams#transferring-team-ownership) if needed. If you're **a member** of a team, you'll be removed from it.
|
||
|
||
After these steps, contact us via the **Support Chat** to complete deletion.
|
||
|
||
<img src="https://mintcdn.com/vastai-80aa3a82/v_EM_-NdbnPjb9tX/images/console-setting-4.webp?fit=max&auto=format&n=v_EM_-NdbnPjb9tX&q=85&s=52246daa78f22b7c5ed8ee0a923a6d8c" alt="" data-og-width="800" width="800" data-og-height="883" height="883" data-path="images/console-setting-4.webp" data-optimize="true" data-opv="3" srcset="https://mintcdn.com/vastai-80aa3a82/v_EM_-NdbnPjb9tX/images/console-setting-4.webp?w=280&fit=max&auto=format&n=v_EM_-NdbnPjb9tX&q=85&s=2d91e40bf3eb994f6819f5ee879b9d56 280w, https://mintcdn.com/vastai-80aa3a82/v_EM_-NdbnPjb9tX/images/console-setting-4.webp?w=560&fit=max&auto=format&n=v_EM_-NdbnPjb9tX&q=85&s=a0c531379b701807c3fa3555a581fe90 560w, https://mintcdn.com/vastai-80aa3a82/v_EM_-NdbnPjb9tX/images/console-setting-4.webp?w=840&fit=max&auto=format&n=v_EM_-NdbnPjb9tX&q=85&s=2997501fa0f6ca09a228c43982c89cdf 840w, https://mintcdn.com/vastai-80aa3a82/v_EM_-NdbnPjb9tX/images/console-setting-4.webp?w=1100&fit=max&auto=format&n=v_EM_-NdbnPjb9tX&q=85&s=f06e8550630d741d3ca00c5e5aa01df4 1100w, https://mintcdn.com/vastai-80aa3a82/v_EM_-NdbnPjb9tX/images/console-setting-4.webp?w=1650&fit=max&auto=format&n=v_EM_-NdbnPjb9tX&q=85&s=20e0be1eca33a5508a8e7a4dafda881b 1650w, https://mintcdn.com/vastai-80aa3a82/v_EM_-NdbnPjb9tX/images/console-setting-4.webp?w=2500&fit=max&auto=format&n=v_EM_-NdbnPjb9tX&q=85&s=72da2b3f672bd9688b2b176461d874bc 2500w" />
|
||
|
||
### Is there a spend rate limit on my account?
|
||
|
||
There is a spend rate limit for new users. Make sure you have verified your email; otherwise, your limit is near zero. Once you have verified your email, your spend rate limit increases automatically over time.
|
||
If you are an enterprise user, email us at [contact@vast.ai](mailto:contact@vast.ai) to request a larger rate limit increase. Users paying with crypto are also eligible for rate increases.
|
||
|
||
|
||
# Billing
|
||
Source: https://docs.vast.ai/documentation/reference/billing
|
||
|
||
|
||
|
||
<script
|
||
type="application/ld+json"
|
||
dangerouslySetInnerHTML={{
|
||
__html: JSON.stringify({
|
||
"@context": "https://schema.org",
|
||
"@type": "HowTo",
|
||
"name": "How to Manage Billing on Vast.ai",
|
||
"description": "A comprehensive guide to managing your Vast.ai billing, credits, payments, and understanding pricing.",
|
||
"step": [
|
||
{
|
||
"@type": "HowToStep",
|
||
"name": "Add Credits to Your Account",
|
||
"text": "Vast requires pre-payment of credits for GPU rentals. Accept credit card payments through Stripe and crypto payments through Crypto.com and Coinbase. Use the add credit button to purchase credits one-time. Before buying credit with Stripe you must add a card first."
|
||
},
|
||
{
|
||
"@type": "HowToStep",
|
||
"name": "Set Up Auto Debit (Optional)",
|
||
"text": "Set a balance threshold to configure auto debits, which will attempt to maintain your balance above the threshold by charging your card periodically. We recommend setting a threshold around your daily or weekly spend, and then setting a balance email notification threshold around 75% of that value."
|
||
},
|
||
{
|
||
"@type": "HowToStep",
|
||
"name": "Understand Pricing",
|
||
"text": "There are separate prices for Active rental (GPU), Storage costs, and Bandwidth costs. You are charged per second for active instances and storage. Stopping an instance does not avoid storage costs. Bandwidth is charged per byte. Hover over the price on instance cards to see pricing details. You are only charged for actual usage time - if you delete after 10 minutes, you only pay for 10 minutes."
|
||
},
|
||
{
|
||
"@type": "HowToStep",
|
||
"name": "Monitor Your Balance",
|
||
"text": "When balance reaches zero or below, instances are stopped automatically but not destroyed. Your credit card will be automatically charged periodically to cover any negative balance. If you do not have a payment method saved, instances and stored data will be deleted to prevent indefinite unpaid usage."
|
||
},
|
||
{
|
||
"@type": "HowToStep",
|
||
"name": "Manage Invoices and Refunds",
|
||
"text": "Set invoice information in the Invoice Info section. Generate billing history from the Billing page. For refunds: If you pay with credit card you can get a refund on unspent Vast credits. We do not refund Vast credits bought with crypto."
|
||
},
|
||
{
|
||
"@type": "HowToStep",
|
||
"name": "Transfer Credits",
|
||
"text": "Transfer your personal credits to a different account or team. To transfer to another user, you will need their email address (this action is irreversible). To transfer to a team, you should be a part of the team. To transfer from a team back to personal account, you must be the team owner."
|
||
}
|
||
]
|
||
})
|
||
}}
|
||
/>
|
||
|
||
<script
|
||
type="application/ld+json"
|
||
dangerouslySetInnerHTML={{
|
||
__html: JSON.stringify({
|
||
"@context": "https://schema.org",
|
||
"@type": "FAQPage",
|
||
"mainEntity": [
|
||
{
|
||
"@type": "Question",
|
||
"name": "If I rent a server and delete if after 10 minutes will I pay for 1 hour of usage or 10 minutes?",
|
||
"acceptedAnswer": {
|
||
"@type": "Answer",
|
||
"text": "You will only be charged for the 10 minutes of usage."
|
||
}
|
||
},
|
||
{
|
||
"@type": "Question",
|
||
"name": "Can I get a refund?",
|
||
"acceptedAnswer": {
|
||
"@type": "Answer",
|
||
"text": "If you pay with credit card you can get a refund on unspent Vast credits. We do not refund Vast credits bought with crypto."
|
||
}
|
||
},
|
||
{
|
||
"@type": "Question",
|
||
"name": "Why has the prices changed?",
|
||
"acceptedAnswer": {
|
||
"@type": "Answer",
|
||
"text": "Pricing is fixed by the host, and is specific to each machine and contract. You can refine your search and look for a machine that suits your needs."
|
||
}
|
||
},
|
||
{
|
||
"@type": "Question",
|
||
"name": "Why am I getting the error 'No such payment method id None.' when I try to add credit?",
|
||
"acceptedAnswer": {
|
||
"@type": "Answer",
|
||
"text": "Before buying credit with Stripe you must add a card!"
|
||
}
|
||
},
|
||
{
|
||
"@type": "Question",
|
||
"name": "Am I charged for 'Loading' instances?",
|
||
"acceptedAnswer": {
|
||
"@type": "Answer",
|
||
"text": "No, you are not charged when it says 'Loading'."
|
||
}
|
||
},
|
||
{
|
||
"@type": "Question",
|
||
"name": "What happens if my Vast balance is negative?",
|
||
"acceptedAnswer": {
|
||
"@type": "Answer",
|
||
"text": "If your account has a negative credit balance, your instances are stopped and can resume once you pay the balance owed."
|
||
}
|
||
},
|
||
{
|
||
"@type": "Question",
|
||
"name": "Why am I getting charge more per hour than expected?",
|
||
"acceptedAnswer": {
|
||
"@type": "Answer",
|
||
"text": "You may see your Vast credit decline at a greater rate than expected due to upload and downloads costs, which is not shown in your cost/hr or cost/day pricing breakdowns as it is charged on a usage basis and not a constant rate. You can find these rates for bandwidth usage in the Internet: section of the pricing details, which you can see when you hover over the price in the bottom right-hand corner of instance cards within the Instance console page. You can also see pricing detail before instance creation from hovering over the prices on the Search page. You can also get a detailed document of your billing history by Generate Billing History within the Billing page of the console."
|
||
}
|
||
}
|
||
]
|
||
})
|
||
}}
|
||
/>
|
||
|
||
## Overview
|
||
|
||
Vast requires pre-payment of credits for GPU rentals. Once credits are purchased, they appear in your account balance.
|
||
|
||
We accept credit card payments through Stripe and crypto payments through Crypto.com and Coinbase. Use the add credit button to purchase credits one-time. Use the auto-debt feature to have the system automatically top up your account using a saved credit card when it runs low.
|
||
|
||
### Negative Balances
|
||
|
||
Vast does **not** immediately delete your instances or data when your account balance reaches zero.
|
||
|
||
* **When balance reaches zero (or below):**
|
||
* Your instances are **stopped automatically** but **not destroyed**.
|
||
* This ensures your data remains available so you can copy it off.
|
||
* However, since the data is still stored on the machine, you will continue to be billed for **storage on stopped instances** — even if your balance is negative.
|
||
* **If you have a payment method saved:**
|
||
* Your credit card will be automatically charged periodically to cover any negative balance.
|
||
* This allows you to restart and continue using your instances without losing data.
|
||
* **If you do not have a payment method saved:**
|
||
* The system cannot charge your account.
|
||
* Your instances and stored data will be **deleted** to prevent indefinite unpaid usage.
|
||
|
||
<Tip>
|
||
Important: Instances showing in your account are **never free**, even if your balance is negative or zero.
|
||
</Tip>
|
||
|
||
### Auto Debit (credit card only)
|
||
|
||
You can set a balance threshold to configure auto debits, which will attempt to maintain your balance above the threshold by charging your card periodically.
|
||
|
||
We recommend setting a threshold around your daily or weekly spend, and then setting an balance email notification threshold around 75% of that value, so that you get notified if the auto billing fails but long before your balance depletes to zero.
|
||
|
||
There is also an optional debit-mode feature which can be enabled by request for older accounts.
|
||
When debit-mode is enabled, your account balance is allowed to go negative (without immediately stopping your instances).
|
||
|
||
<Warning>
|
||
**WARNING**
|
||
|
||
Your card is charged automatically regardless of whether or not you have
|
||
debit-mode enabled. Instances are never free - even stopped instances have
|
||
storage charges. Make sure you delete instances when you are done with them -
|
||
otherwise, your card will continue to be periodically charged indefinitely.
|
||
</Warning>
|
||
|
||
### Update Frequency
|
||
|
||
Balances are updated about once every few seconds.
|
||
|
||
### Credit Card Security
|
||
|
||
Vast.ai does not see, store or process your credit card numbers, they are passed directly to Stripe (which you can verify in the javascript).
|
||
|
||
## Refunds
|
||
|
||
After spending credits, there are absolutely no refunds.
|
||
|
||
For unspent credits, contact us on the website chat to request a refund. In most cases we can refund unspent credits. Unfortunately Coinbase Commerce does not support refunds, so there are no refunds possible for credits purchased via Coinbase Commerce.
|
||
|
||
## Pricing
|
||
|
||
There are separate prices and charges for:
|
||
|
||
* Active rental (GPU) (in \$/hr)
|
||
* Storage costs (in $/GB/month or total $/hr)
|
||
* Bandwidth costs (in \$/TB)
|
||
|
||
You are charged the base active rental cost for every second your instance is in the active/connected state.
|
||
You are charged the storage cost (which depends on the size of your storage allocation) for every single second your instance exists and is online (for all states other than offline).
|
||
Stopping an instance does not avoid storage costs.
|
||
|
||
You are charged bandwidth prices for every byte sent or received to or from the instance, regardless of what state it is in.
|
||
The prices for base rental, storage, and bandwidth vary considerably from machine to machine, so make sure to check them.
|
||
|
||
You are not charged active rental or storage costs for instances that are currently offline.
|
||
|
||
To see a pricing breakdown on your current instances within your Instance page in the console or from offers on the Search page you can hover over the price to see pricing details.
|
||
|
||
<Frame caption="Price Details">
|
||
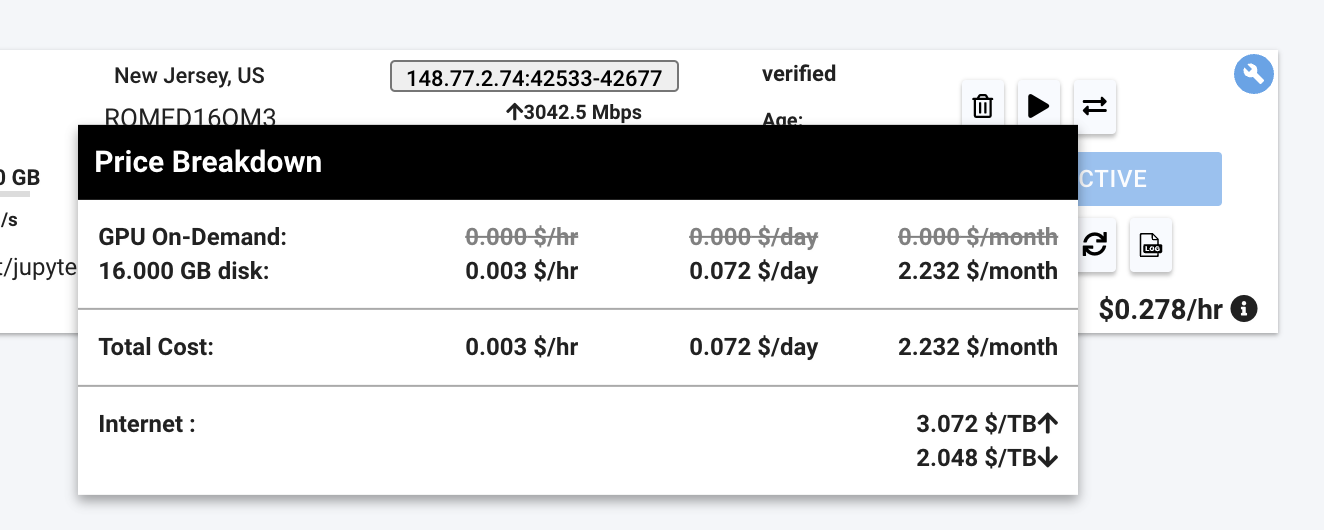
|
||
</Frame>
|
||
|
||
## Payment Integrations
|
||
|
||
We currently support major credit cards through stripe and crypto payments through Coinbase and crypto.com.
|
||
|
||
# Page Walkthrough
|
||
|
||
In this section we will walk through the Billing page you can find within the Console when logged into your Vast account.
|
||
|
||
### Credit Balance
|
||
|
||
Here you can see the current amount of Vast credits you have. This section also shows your current credit spend given your current instances. You can also view your transactions and generate invoices here.
|
||
|
||
<Frame caption="Credit Balance">
|
||
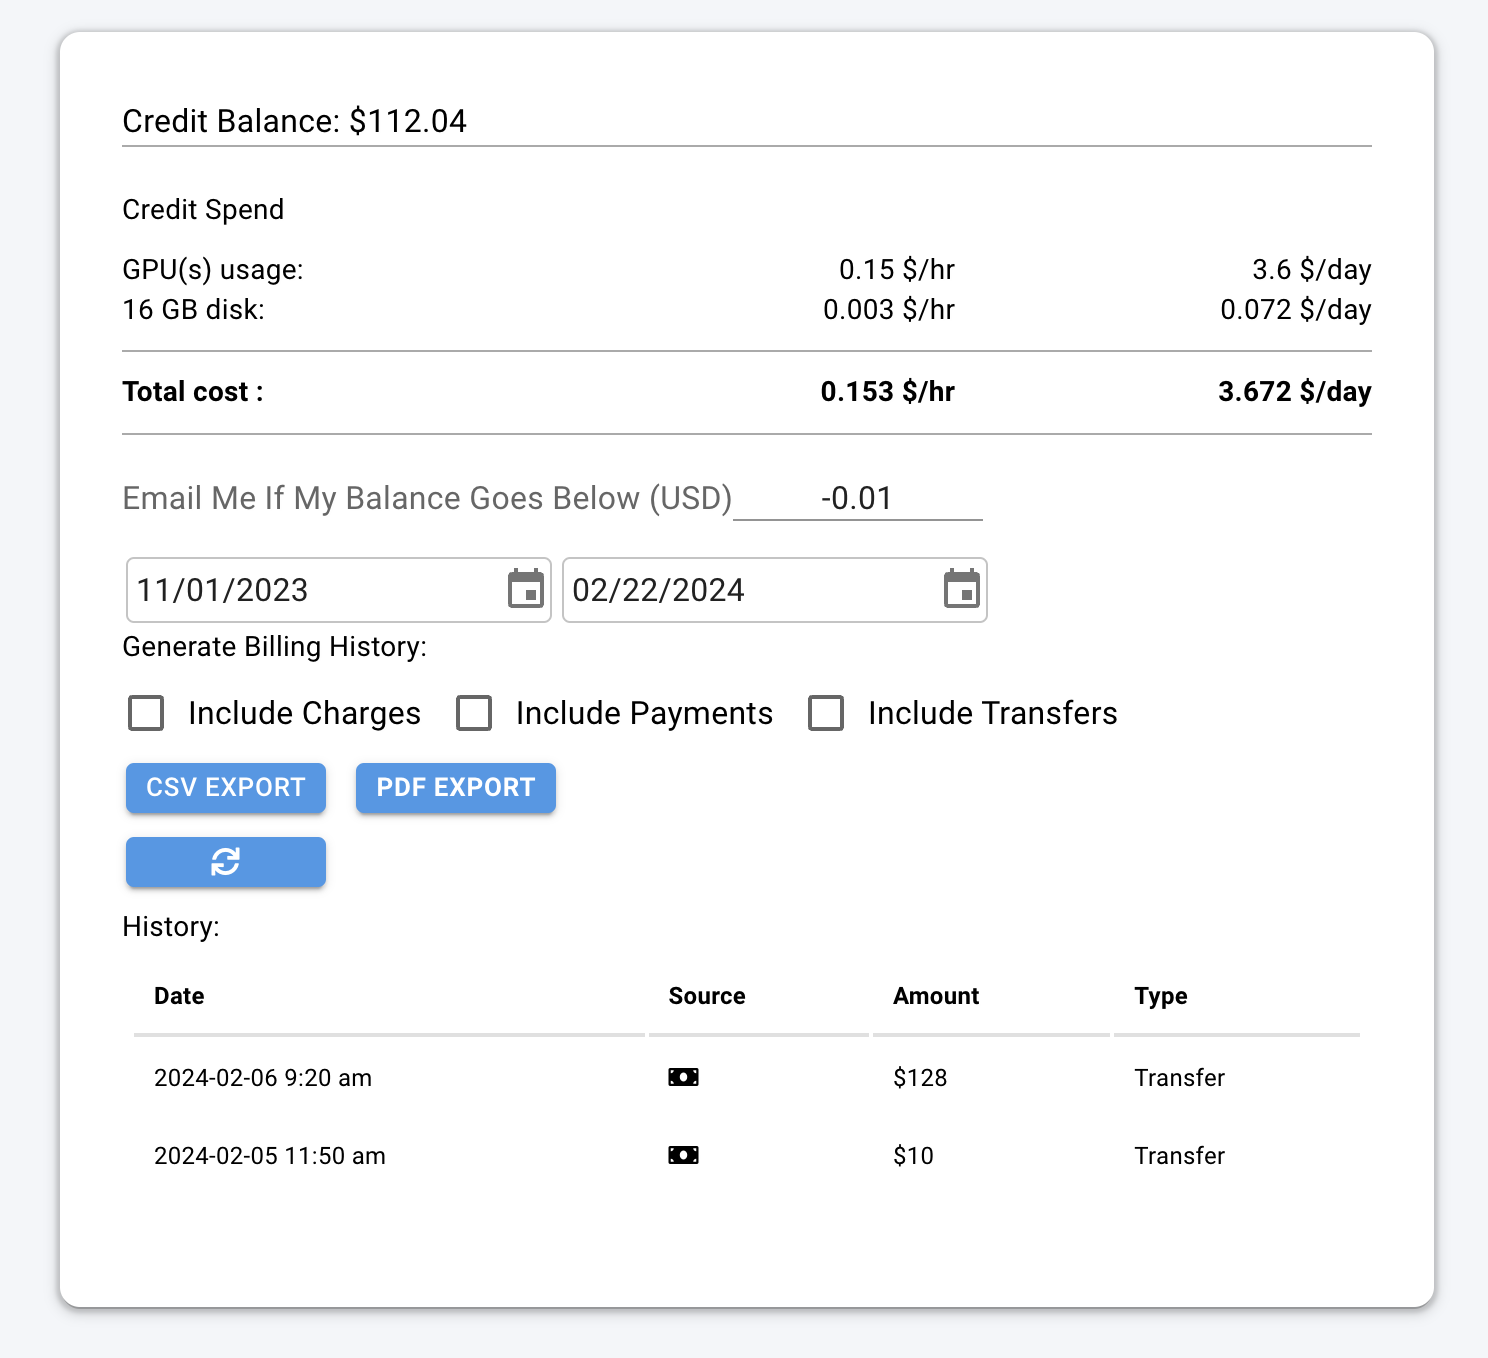
|
||
</Frame>
|
||
|
||
### Payment Sources
|
||
|
||
In this section you can add payment methods and add credit to your account.
|
||
|
||
<Frame caption="Payment Sources">
|
||

|
||
</Frame>
|
||
|
||
### Transfer Credits
|
||
|
||
From this section, you can transfer your personal credits to a different account or team.
|
||
|
||
<img src="https://mintcdn.com/vastai-80aa3a82/xCLov_y0JNSp_qUD/images/console-billing.webp?fit=max&auto=format&n=xCLov_y0JNSp_qUD&q=85&s=794f31c21f730cb2e33f0c363f9867a4" alt="" data-og-width="800" width="800" data-og-height="97" height="97" data-path="images/console-billing.webp" data-optimize="true" data-opv="3" srcset="https://mintcdn.com/vastai-80aa3a82/xCLov_y0JNSp_qUD/images/console-billing.webp?w=280&fit=max&auto=format&n=xCLov_y0JNSp_qUD&q=85&s=4b6e97aedc750d4b34e6a61eacd8d3fb 280w, https://mintcdn.com/vastai-80aa3a82/xCLov_y0JNSp_qUD/images/console-billing.webp?w=560&fit=max&auto=format&n=xCLov_y0JNSp_qUD&q=85&s=8bf622e2b22788f2a5dd7e011c89a05e 560w, https://mintcdn.com/vastai-80aa3a82/xCLov_y0JNSp_qUD/images/console-billing.webp?w=840&fit=max&auto=format&n=xCLov_y0JNSp_qUD&q=85&s=8f662693212e27c7a02287b5ea0345d5 840w, https://mintcdn.com/vastai-80aa3a82/xCLov_y0JNSp_qUD/images/console-billing.webp?w=1100&fit=max&auto=format&n=xCLov_y0JNSp_qUD&q=85&s=d29302d10bd0841f6848e06f24ed209d 1100w, https://mintcdn.com/vastai-80aa3a82/xCLov_y0JNSp_qUD/images/console-billing.webp?w=1650&fit=max&auto=format&n=xCLov_y0JNSp_qUD&q=85&s=1f8eac35d3e108a3dc80727144945779 1650w, https://mintcdn.com/vastai-80aa3a82/xCLov_y0JNSp_qUD/images/console-billing.webp?w=2500&fit=max&auto=format&n=xCLov_y0JNSp_qUD&q=85&s=3cb37f16d3cf55588105349b4d12d089 2500w" />
|
||
|
||
Click the **Transfer Credits** button to open a pop-up. There, you can select the destination account or team to send the credit to.
|
||
|
||
* To transfer credit to another **user**, you will need their email address.
|
||
|
||
⚠️ This action is irreversible, so please double-check the email before proceeding.
|
||
|
||
<Frame caption="Transfer Credits pop-up">
|
||
<img src="https://mintcdn.com/vastai-80aa3a82/xCLov_y0JNSp_qUD/images/console-billing-2.webp?fit=max&auto=format&n=xCLov_y0JNSp_qUD&q=85&s=fac1fbe8921e2155b60bb17ca45a8243" alt="Transfer Credits pop-up" data-og-width="800" width="800" data-og-height="996" height="996" data-path="images/console-billing-2.webp" data-optimize="true" data-opv="3" srcset="https://mintcdn.com/vastai-80aa3a82/xCLov_y0JNSp_qUD/images/console-billing-2.webp?w=280&fit=max&auto=format&n=xCLov_y0JNSp_qUD&q=85&s=6fe15707025cbf6cf887578fdcb085a0 280w, https://mintcdn.com/vastai-80aa3a82/xCLov_y0JNSp_qUD/images/console-billing-2.webp?w=560&fit=max&auto=format&n=xCLov_y0JNSp_qUD&q=85&s=2d19815efe97ac78567c1e3ec34b7441 560w, https://mintcdn.com/vastai-80aa3a82/xCLov_y0JNSp_qUD/images/console-billing-2.webp?w=840&fit=max&auto=format&n=xCLov_y0JNSp_qUD&q=85&s=9ee8d36852e80d05d5eaf95af22a0e89 840w, https://mintcdn.com/vastai-80aa3a82/xCLov_y0JNSp_qUD/images/console-billing-2.webp?w=1100&fit=max&auto=format&n=xCLov_y0JNSp_qUD&q=85&s=217c7a038e9d85fa0610c7d4402a17a5 1100w, https://mintcdn.com/vastai-80aa3a82/xCLov_y0JNSp_qUD/images/console-billing-2.webp?w=1650&fit=max&auto=format&n=xCLov_y0JNSp_qUD&q=85&s=358d453e5e557cc9c25a3a9c7120cf22 1650w, https://mintcdn.com/vastai-80aa3a82/xCLov_y0JNSp_qUD/images/console-billing-2.webp?w=2500&fit=max&auto=format&n=xCLov_y0JNSp_qUD&q=85&s=b9ee6129eaa7c4ccfaa59ba490c939ef 2500w" />
|
||
</Frame>
|
||
|
||
* to transfer credit to a **team**, you should be a part of the team.
|
||
|
||
<Frame caption="Transfer Credit to a team">
|
||
<img src="https://mintcdn.com/vastai-80aa3a82/xCLov_y0JNSp_qUD/images/console-billing-3.webp?fit=max&auto=format&n=xCLov_y0JNSp_qUD&q=85&s=4c258da34fe5fd3c9dd22adb47ddbe66" alt="Transfer Credit to a team" data-og-width="800" width="800" data-og-height="934" height="934" data-path="images/console-billing-3.webp" data-optimize="true" data-opv="3" srcset="https://mintcdn.com/vastai-80aa3a82/xCLov_y0JNSp_qUD/images/console-billing-3.webp?w=280&fit=max&auto=format&n=xCLov_y0JNSp_qUD&q=85&s=ae3ca0755b2592d1660d55227b27e5cf 280w, https://mintcdn.com/vastai-80aa3a82/xCLov_y0JNSp_qUD/images/console-billing-3.webp?w=560&fit=max&auto=format&n=xCLov_y0JNSp_qUD&q=85&s=4ed5c804cfcf870add4f584001ed6bd7 560w, https://mintcdn.com/vastai-80aa3a82/xCLov_y0JNSp_qUD/images/console-billing-3.webp?w=840&fit=max&auto=format&n=xCLov_y0JNSp_qUD&q=85&s=c24531e1a0defea1eac5a1336a86509d 840w, https://mintcdn.com/vastai-80aa3a82/xCLov_y0JNSp_qUD/images/console-billing-3.webp?w=1100&fit=max&auto=format&n=xCLov_y0JNSp_qUD&q=85&s=861d3948a8de015dca92e149de9b853f 1100w, https://mintcdn.com/vastai-80aa3a82/xCLov_y0JNSp_qUD/images/console-billing-3.webp?w=1650&fit=max&auto=format&n=xCLov_y0JNSp_qUD&q=85&s=b5a5c87c7a15e942f9fcbef502f35b51 1650w, https://mintcdn.com/vastai-80aa3a82/xCLov_y0JNSp_qUD/images/console-billing-3.webp?w=2500&fit=max&auto=format&n=xCLov_y0JNSp_qUD&q=85&s=560f7ff51669e9558096c82eebc0c42f 2500w" />
|
||
</Frame>
|
||
|
||
* To transfer credit from a team back to a personal account, you must be the team owner. You will need to switch to your team context and open Billing Page form there to see following pop-up.
|
||
|
||
<Frame caption="Transfer Credits">
|
||
<img src="https://mintcdn.com/vastai-80aa3a82/xCLov_y0JNSp_qUD/images/console-billing-4.webp?fit=max&auto=format&n=xCLov_y0JNSp_qUD&q=85&s=17e6992ac9aaacd802988d33800828de" alt="Transfer Credits" data-og-width="800" width="800" data-og-height="823" height="823" data-path="images/console-billing-4.webp" data-optimize="true" data-opv="3" srcset="https://mintcdn.com/vastai-80aa3a82/xCLov_y0JNSp_qUD/images/console-billing-4.webp?w=280&fit=max&auto=format&n=xCLov_y0JNSp_qUD&q=85&s=7068fa0b2200953642ad8366bc64b2c9 280w, https://mintcdn.com/vastai-80aa3a82/xCLov_y0JNSp_qUD/images/console-billing-4.webp?w=560&fit=max&auto=format&n=xCLov_y0JNSp_qUD&q=85&s=83097a275ffa1794d0c37682baa56f10 560w, https://mintcdn.com/vastai-80aa3a82/xCLov_y0JNSp_qUD/images/console-billing-4.webp?w=840&fit=max&auto=format&n=xCLov_y0JNSp_qUD&q=85&s=244f3b329cd69cfa8809c94cc8d30b83 840w, https://mintcdn.com/vastai-80aa3a82/xCLov_y0JNSp_qUD/images/console-billing-4.webp?w=1100&fit=max&auto=format&n=xCLov_y0JNSp_qUD&q=85&s=53ad33385a256b5ce4a7590b0140f6bc 1100w, https://mintcdn.com/vastai-80aa3a82/xCLov_y0JNSp_qUD/images/console-billing-4.webp?w=1650&fit=max&auto=format&n=xCLov_y0JNSp_qUD&q=85&s=5bd1386fa4e1686f282ce531c5fa8dab 1650w, https://mintcdn.com/vastai-80aa3a82/xCLov_y0JNSp_qUD/images/console-billing-4.webp?w=2500&fit=max&auto=format&n=xCLov_y0JNSp_qUD&q=85&s=39f39c54515ce3727de7fb128c428edd 2500w" />
|
||
</Frame>
|
||
|
||
### Invoice Info
|
||
|
||
Here you can add the information to be shown on invoices you generate.
|
||
|
||
<Frame caption="Invoice Filled">
|
||
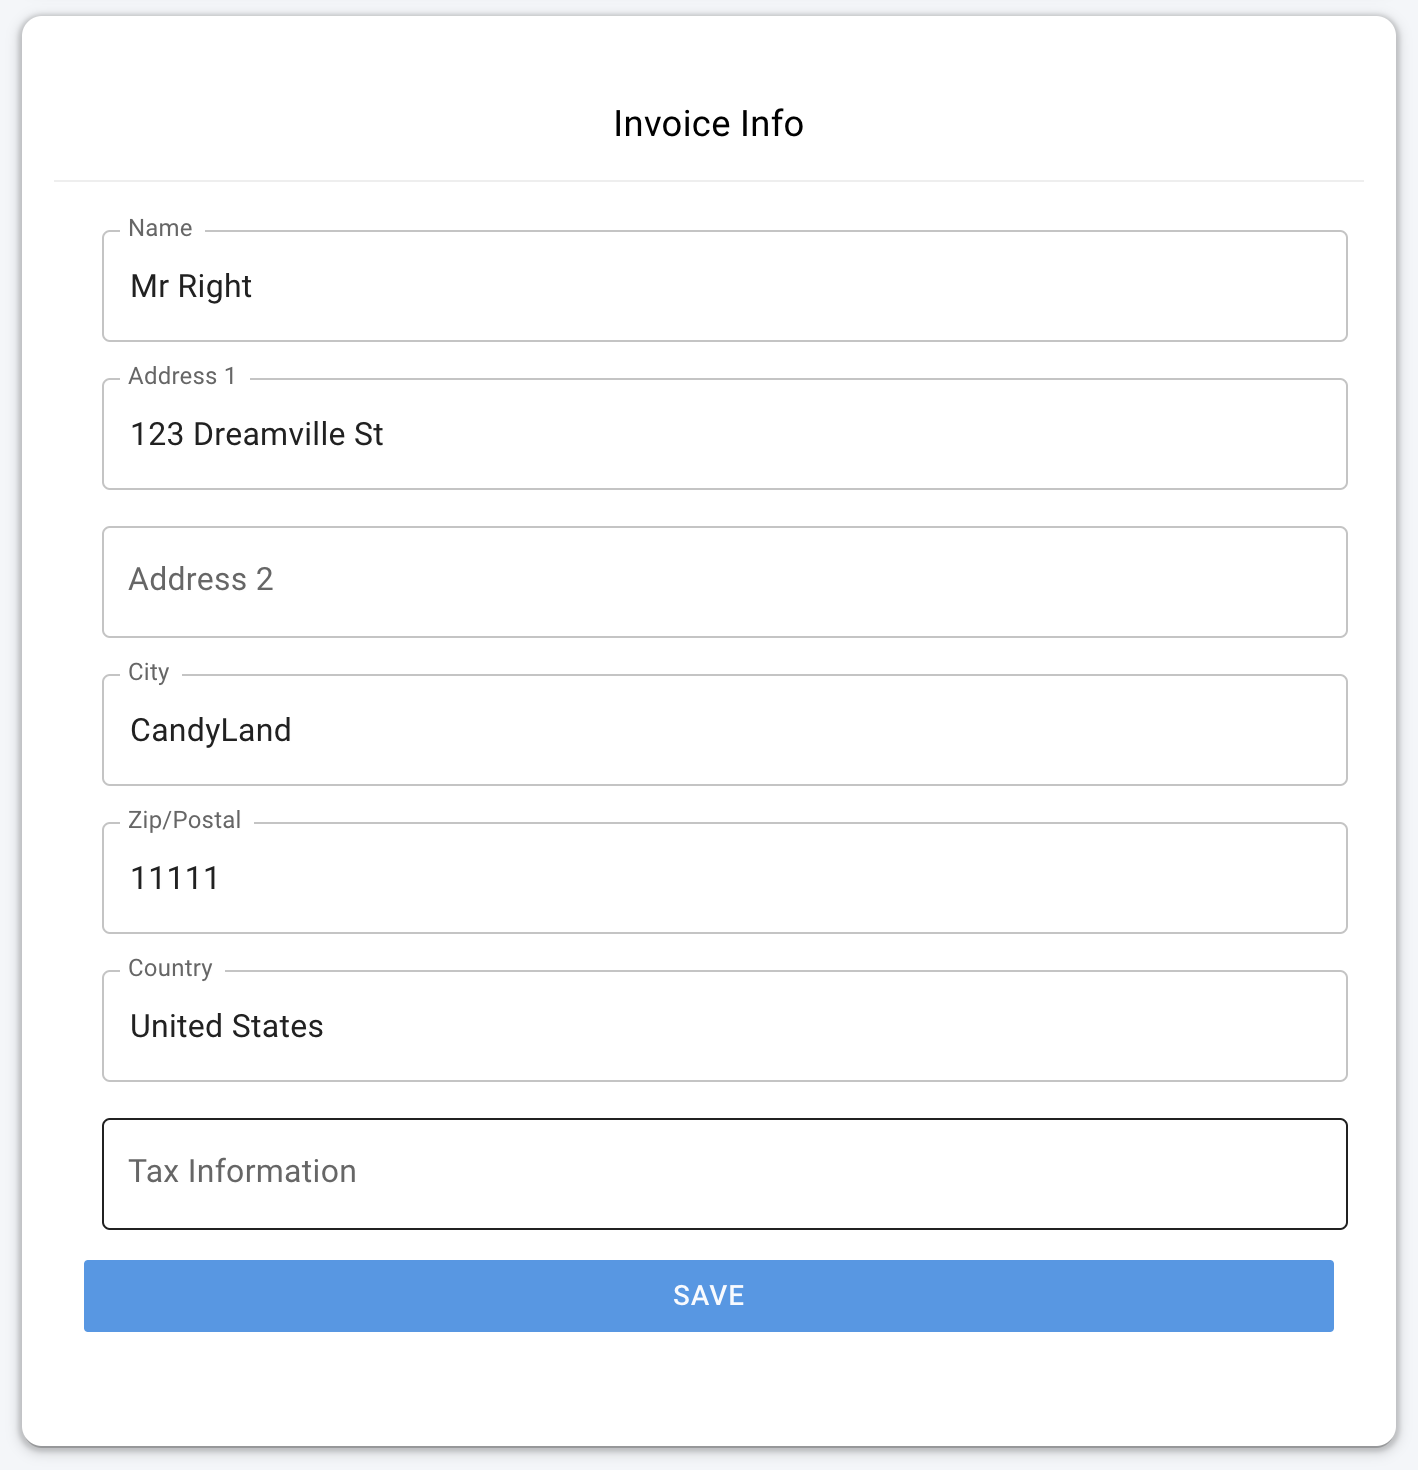
|
||
</Frame>
|
||
|
||
Here's an example that shows where and how the invoice info appears on generated invoices:
|
||
|
||
<Frame caption="Invoice With Fill Circle">
|
||
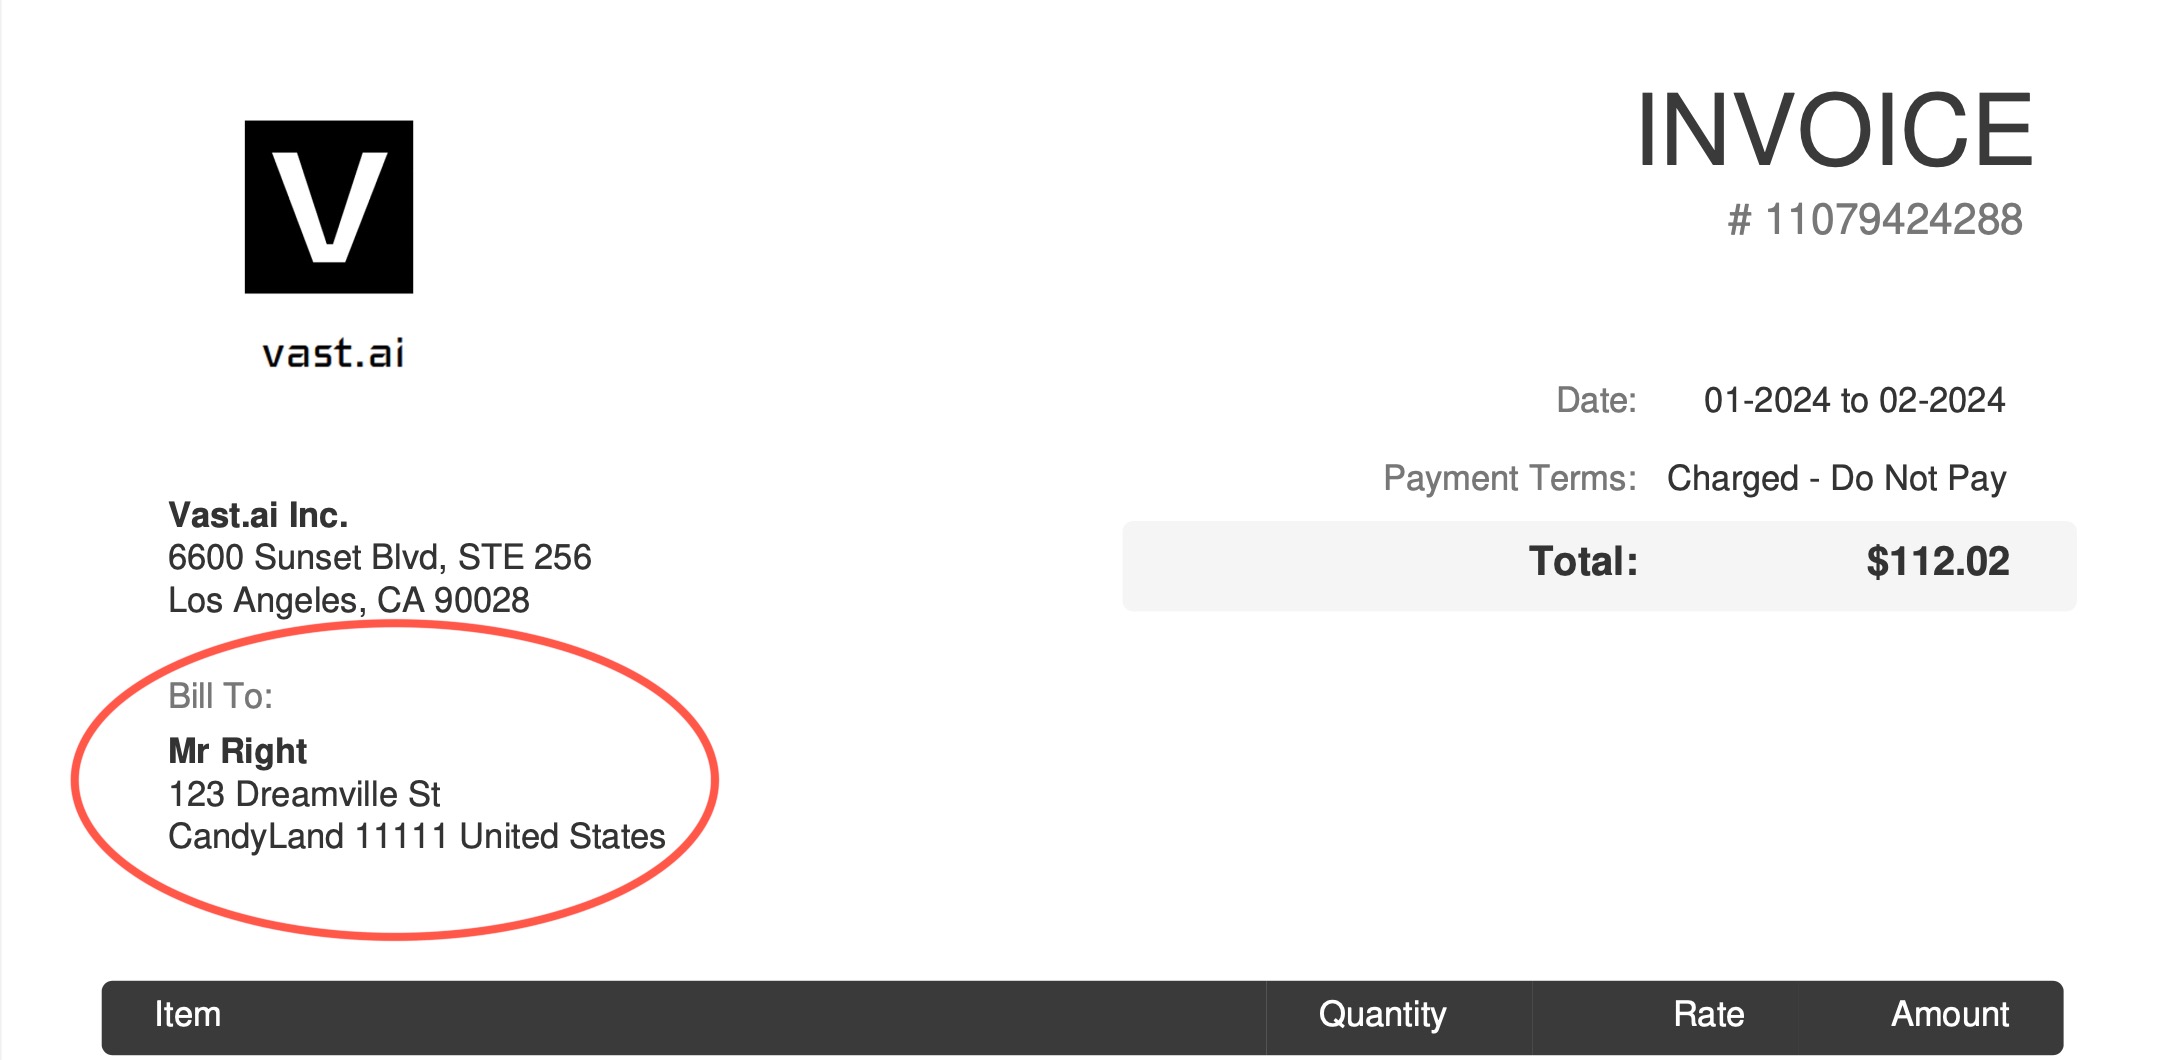
|
||
</Frame>
|
||
|
||
If you leave your Invoice Info blank it will default to your Vast account's email address for the "Bill To:" information.
|
||
|
||
## Common Questions
|
||
|
||
### If I rent a server and delete if after 10 minutes will I pay for 1 hour of usage or 10 minutes?
|
||
|
||
You will only be charged for the 10 minutes of usage.
|
||
|
||
### Can I get a refund?
|
||
|
||
If you pay with credit card you can get a refund on unspent Vast credits. We do not refund Vast credits bought with crypto.
|
||
|
||
### Why has the prices changed?
|
||
|
||
Pricing is fixed by the host, and is specific to each machine and contract. You can refine your search and look for a machine that suits your needs [here](https://cloud.vast.ai/create/).
|
||
|
||
### Why am I getting the error "No such payment method id None." when I try to add credit?
|
||
|
||
Before buying credit with Stripe you must add a card!
|
||
|
||
### Am I charged for "Loading" instances?
|
||
|
||
No, you are not charged when it says "Loading".
|
||
|
||
### If my account is negative a few \$, what will happen? What happens if my Vast balance is negative?
|
||
|
||
It says in the Billing page: "You have a negative credit balance. Your instances are stopped and can resume once you pay the balance owed".
|
||
|
||
### Why am I getting charge more per hour than expected?
|
||
|
||
You may be see your Vast credit decline at a greater rate than expected due to upload and downloads costs, which is not shown in your $cost/hr or$cost/day pricing breakdowns as it is charged on a usage basis and not a constant rate. You can find these rates for bandwidth usage in the Internet: section of the pricing details, which you can see when you hover over the price in the bottom right-hand corner of instance cards within the Instance console page. You can also see pricing detail before instance creation from hovering over the prices on the Search page. You can also get a detailed document of your billing history by "Generate Billing History" within the Billing page of the console.
|
||
|
||
### Why are my GPUs not showing up in the list?
|
||
|
||
There are over 10,000+ listings on vast, and search only displays a small subset. You will usually not be able to find any one specific machine through most normal searches. To test that your machine is listed correctly, you can use the CLI:
|
||
vastai search offers 'machine\_id=12345 verified=any'
|
||
|
||
Replace 12345 with your actual machine ID
|
||
If your machine is verified, you should still be able to find it without the verified=any.
|
||
|
||
[Use the CLI (preferred)](/cli/get-started)
|
||
|
||
|
||
# Billing Help
|
||
Source: https://docs.vast.ai/documentation/reference/billing-help
|
||
|
||
|
||
|
||
<script
|
||
type="application/ld+json"
|
||
dangerouslySetInnerHTML={{
|
||
__html: JSON.stringify({
|
||
"@context": "https://schema.org",
|
||
"@type": "FAQPage",
|
||
"mainEntity": [
|
||
{
|
||
"@type": "Question",
|
||
"name": "How does billing work?",
|
||
"acceptedAnswer": {
|
||
"@type": "Answer",
|
||
"text": "Once you enter a credit card and an email address and both are verified you can then increase your credit balance using one-time payments with the add credit button. Whenever your credit balance hits zero or below, your instances will be stopped automatically, but not destroyed. You are still charged storage costs for stopped instances, so it is important to destroy instances when you are done using them. Your credit card will be automatically charged periodically to pay off any outstanding negative balance."
|
||
}
|
||
},
|
||
{
|
||
"@type": "Question",
|
||
"name": "Can you bill my card automatically so I don't have to add credit in advance?",
|
||
"acceptedAnswer": {
|
||
"@type": "Answer",
|
||
"text": "You can set a balance threshold to configure auto billing, which will attempt to maintain your balance above the threshold. We recommend setting a threshold around your daily or weekly spend, and then setting an balance email notification threshold around 75% of that value, so that you get notified if the auto billing fails but long before your balance depletes to zero. There is also an optional debit-mode feature which can be enabled by request for older accounts. When debit-mode is enabled, your account balance is allowed to go negative (without immediately stopping your instances)."
|
||
}
|
||
},
|
||
{
|
||
"@type": "Question",
|
||
"name": "I didn't enable debit-mode - what are these automatic charges to my card?",
|
||
"acceptedAnswer": {
|
||
"@type": "Answer",
|
||
"text": "Your card is charged automatically regardless of whether or not you have debit-mode enabled. Instances are never free - even stopped instances have storage charges. Make sure you delete instances when you are done with them - otherwise, your card will continue to be periodically charged indefinitely."
|
||
}
|
||
},
|
||
{
|
||
"@type": "Question",
|
||
"name": "How does pricing work?",
|
||
"acceptedAnswer": {
|
||
"@type": "Answer",
|
||
"text": "There are separate prices and charges for: Active rental (GPU) costs, Storage costs, and Bandwidth costs. You are charged the base active rental cost for every second your instance is in the active/connected state. You are charged the storage cost (which depends on the size of your storage allocation) for every second your instance exists and is online, regardless of what state it is in: active, inactive, loading, etc. Stopping an instance does not avoid storage costs. You are charged bandwidth prices for every byte sent or received to or from the instance, regardless of what state it is in. The prices for base rental, storage, and bandwidth vary considerably from machine to machine, so make sure to check them. You are not charged active rental or storage costs for instances that are currently offline."
|
||
}
|
||
},
|
||
{
|
||
"@type": "Question",
|
||
"name": "What is the billing frequency?",
|
||
"acceptedAnswer": {
|
||
"@type": "Answer",
|
||
"text": "Balances are updated about once every few seconds."
|
||
}
|
||
},
|
||
{
|
||
"@type": "Question",
|
||
"name": "Why should I trust vast.ai with my credit card info?",
|
||
"acceptedAnswer": {
|
||
"@type": "Answer",
|
||
"text": "You don't need to: Vast.ai does not see, store or process your credit card numbers, they are passed directly to Stripe (which you can verify in the javascript)."
|
||
}
|
||
},
|
||
{
|
||
"@type": "Question",
|
||
"name": "Do you support PayPal? What about cryptocurrency?",
|
||
"acceptedAnswer": {
|
||
"@type": "Answer",
|
||
"text": "We currently support major credit cards through stripe and crypto payments through Coinbase and crypto.com."
|
||
}
|
||
}
|
||
]
|
||
})
|
||
}}
|
||
/>
|
||
|
||
### How does billing work?
|
||
|
||
Once you enter a credit card and an email address and both are verified you can then increase your credit balance using one-time payments with the add credit button.
|
||
Whenever your credit balance hits zero or below, your instances will be stopped automatically, but not destroyed.
|
||
|
||
You are still charged storage costs for stopped instances, so it is important to destroy instances when you are done using them.
|
||
|
||
Your credit card will be automatically charged periodically to pay off any outstanding negative balance.
|
||
|
||
### Can you bill my card automatically so I don't have to add credit in advance?
|
||
|
||
You can set a balance threshold to configure auto billing, which will attempt to maintain your balance above the threshold.
|
||
We recommend setting a threshold around your daily or weekly spend, and then setting an balance email notification threshold around 75% of that value, so that you get notified if the auto billing fails but long before your balance depletes to zero.
|
||
|
||
There is also an optional debit-mode feature which can be enabled by request for older accounts.
|
||
When debit-mode is enabled, your account balance is allowed to go negative (without immediately stopping your instances).
|
||
|
||
### I didn't enable debit-mode - what are these automatic charges to my card?
|
||
|
||
Your card is charged automatically regardless of whether or not you have debit-mode enabled.
|
||
Instances are never free - even stopped instances have storage charges.
|
||
Make sure you delete instances when you are done with them - otherwise, your card will continue to be periodically charged indefinitely.
|
||
|
||
### How does pricing work?
|
||
|
||
There are separate prices and charges for:
|
||
|
||
* Active rental (GPU) costs
|
||
* Storage costs
|
||
* Bandwidth costs
|
||
|
||
You are charged the base active rental cost for every second your instance is in the active/connected state.
|
||
You are charged the storage cost (which depends on the size of your storage allocation) for every second your instance exists and is online, regardless of what state it is in: active, inactive, loading, etc.
|
||
Stopping an instance does not avoid storage costs.
|
||
You are charged bandwidth prices for every byte sent or received to or from the instance, regardless of what state it is in.
|
||
The prices for base rental, storage, and bandwidth vary considerably from machine to machine, so make sure to check them.
|
||
You are not charged active rental or storage costs for instances that are currently offline.
|
||
|
||
### What is the billing frequency?
|
||
|
||
Balances are updated about once every few seconds.
|
||
|
||
### Why should I trust vast.ai with my credit card info?
|
||
|
||
You don't need to: Vast.ai does not see, store or process your credit card numbers, they are passed directly to Stripe (which you can verify in the javascript).
|
||
|
||
### Do you support PayPal? What about cryptocurrency?
|
||
|
||
We currently support major credit cards through stripe and crypto payments through Coinbase and crypto.com.
|
||
|
||
|
||
# General FAQ
|
||
Source: https://docs.vast.ai/documentation/reference/faq/general
|
||
|
||
Basic questions about the Vast.ai platform
|
||
|
||
<script
|
||
type="application/ld+json"
|
||
dangerouslySetInnerHTML={{
|
||
__html: JSON.stringify({
|
||
"@context": "https://schema.org",
|
||
"@type": "FAQPage",
|
||
"mainEntity": [
|
||
{
|
||
"@type": "Question",
|
||
"name": "What is Vast.ai?",
|
||
"acceptedAnswer": {
|
||
"@type": "Answer",
|
||
"text": "Vast.ai is a cloud computing, matchmaking, and aggregation service focused on lowering the price of compute-intensive workloads. Our software allows anyone to easily become a host by renting out their hardware."
|
||
}
|
||
},
|
||
{
|
||
"@type": "Question",
|
||
"name": "How does Vast.ai work?",
|
||
"acceptedAnswer": {
|
||
"@type": "Answer",
|
||
"text": "Hosts download and run our management software, list their machines, configure prices, and set any default jobs. Clients then find suitable machines using our flexible search interface, rent their desired machines, and finally run commands or start SSH sessions with a few clicks."
|
||
}
|
||
},
|
||
{
|
||
"@type": "Question",
|
||
"name": "What are Vast's advantages?",
|
||
"acceptedAnswer": {
|
||
"@type": "Answer",
|
||
"text": "Vast.ai provides a simple interface to rent powerful machines at the best possible prices, reducing GPU cloud computing costs by ~3x to 5x. Consumer computers and consumer GPUs are considerably more cost-effective than equivalent enterprise hardware."
|
||
}
|
||
},
|
||
{
|
||
"@type": "Question",
|
||
"name": "What is the Secure Cloud filter?",
|
||
"acceptedAnswer": {
|
||
"@type": "Answer",
|
||
"text": "Vast.ai partners with vetted datacenter providers all over the globe. These partners have their equipment in certified locations that are current with ISO 27001 and/or Tier 3/4 standards. For sensitive or production workloads, we recommend checking the 'secure cloud' filter."
|
||
}
|
||
}
|
||
]
|
||
})
|
||
}}
|
||
/>
|
||
|
||
## What is Vast.ai?
|
||
|
||
Vast.ai is a cloud computing, matchmaking, and aggregation service focused on lowering the price of compute-intensive workloads. Our software allows anyone to easily become a host by renting out their hardware. Our web search interface allows users to quickly find the best deals for compute according to their specific requirements.
|
||
|
||
## How does Vast.ai work?
|
||
|
||
Hosts download and run our management software, list their machines, configure prices, and set any default jobs. Clients then find suitable machines using our flexible search interface, rent their desired machines, and finally run commands or start SSH sessions with a few clicks.
|
||
|
||
## What are Vast's advantages?
|
||
|
||
Vast.ai provides a simple interface to rent powerful machines at the best possible prices, reducing GPU cloud computing costs by \~3x to 5x. Consumer computers and consumer GPUs, in particular, are considerably more cost-effective than equivalent enterprise hardware. We are helping the millions of underutilized consumer GPUs around the world enter the cloud computing market for the first time.
|
||
|
||
## What is the Secure Cloud filter?
|
||
|
||
The "Secure Cloud (Only Trusted Datacenters)" filter shows only vetted datacenter providers. These partners have their equipment in certified locations that are current with [ISO 27001](https://www.iso.org/standard/27001) and/or [Tier 3/4](https://uptimeinstitute.com/tiers) standards.
|
||
|
||
Vast.ai has verified that this equipment is in these facilities and that their certifications are up to date. For sensitive or production workloads, we recommend checking the "secure cloud" filter. Look for the blue datacenter label.
|
||
|
||
## What operating systems are provided?
|
||
|
||
Vast currently provides **Linux Docker instances only**, mostly Ubuntu-based. We do not support Windows.
|
||
|
||
## What interfaces are available?
|
||
|
||
Currently, Vast.ai provides:
|
||
|
||
* **SSH access** for terminal/command line control
|
||
* **Jupyter** for notebook interfaces with GUI
|
||
* **Command-only** instance mode for automated workloads
|
||
* **Instance Portal** for web-based access
|
||
|
||
We do not provide remote desktop interfaces.
|
||
|
||
|
||
# FAQ Overview
|
||
Source: https://docs.vast.ai/documentation/reference/faq/index
|
||
|
||
Find answers to common questions about Vast.ai
|
||
|
||
<script
|
||
type="application/ld+json"
|
||
dangerouslySetInnerHTML={{
|
||
__html: JSON.stringify({
|
||
"@context": "https://schema.org",
|
||
"@type": "WebPage",
|
||
"name": "Vast.ai FAQ",
|
||
"description": "Frequently asked questions about Vast.ai",
|
||
"author": {
|
||
"@type": "Person",
|
||
"name": "Vast.ai Team"
|
||
},
|
||
"datePublished": "2025-10-10",
|
||
"dateModified": "2025-10-10"
|
||
})
|
||
}}
|
||
/>
|
||
|
||
Browse our frequently asked questions organized by topic.
|
||
|
||
<CardGroup cols={2}>
|
||
<Card title="General" icon="circle-info" href="/documentation/reference/faq/general">
|
||
Platform basics, advantages, and how Vast.ai works
|
||
</Card>
|
||
|
||
<Card title="Instances" icon="server" href="/documentation/reference/faq/instances">
|
||
Creating, managing, and configuring GPU instances
|
||
</Card>
|
||
|
||
<Card title="Rental Types" icon="tag" href="/documentation/reference/faq/rental-types">
|
||
On-demand vs interruptible instances and pricing
|
||
</Card>
|
||
|
||
<Card title="Jupyter & SSH" icon="terminal" href="/documentation/reference/faq/jupyter-ssh">
|
||
Connecting to instances via Jupyter and SSH
|
||
</Card>
|
||
|
||
<Card title="Security" icon="shield" href="/documentation/reference/faq/security">
|
||
Data protection and platform security
|
||
</Card>
|
||
|
||
<Card title="Technical" icon="gear" href="/documentation/reference/faq/technical">
|
||
DLPerf scores, Docker, and advanced topics
|
||
</Card>
|
||
</CardGroup>
|
||
|
||
|
||
# Instances FAQ
|
||
Source: https://docs.vast.ai/documentation/reference/faq/instances
|
||
|
||
Questions about creating and managing instances
|
||
|
||
<script
|
||
type="application/ld+json"
|
||
dangerouslySetInnerHTML={{
|
||
__html: JSON.stringify({
|
||
"@context": "https://schema.org",
|
||
"@type": "FAQPage",
|
||
"mainEntity": [
|
||
{
|
||
"@type": "Question",
|
||
"name": "What does Lifetime mean on my instance?",
|
||
"acceptedAnswer": {
|
||
"@type": "Answer",
|
||
"text": "Every instance offer has a Max Duration. When you accept an offer and create an instance, this becomes the instance lifetime and begins counting down. When the lifetime expires, the instance is automatically stopped. The host can extend the contract (adding more lifetime), but this is at their discretion. Always assume your instance will be lost once the lifetime expires and copy out any important data before then."
|
||
}
|
||
},
|
||
{
|
||
"@type": "Question",
|
||
"name": "How can I restart programs when my instance restarts?",
|
||
"acceptedAnswer": {
|
||
"@type": "Answer",
|
||
"text": "For custom command instances: Your command runs automatically on startup. For SSH instances: Place startup commands in /root/onstart.sh. This script runs automatically on container startup."
|
||
}
|
||
},
|
||
{
|
||
"@type": "Question",
|
||
"name": "How do I set environment variables?",
|
||
"acceptedAnswer": {
|
||
"@type": "Answer",
|
||
"text": "Use the -e Docker syntax in the docker create/run options: -e TZ=UTC -e TASKID=TEST. To make variables visible in SSH/Jupyter sessions, export them to /etc/environment. You can also set global environment variables in your account Settings page."
|
||
}
|
||
},
|
||
{
|
||
"@type": "Question",
|
||
"name": "How do I get the instance ID from within the container?",
|
||
"acceptedAnswer": {
|
||
"@type": "Answer",
|
||
"text": "Use the VAST_CONTAINERLABEL environment variable: echo $VAST_CONTAINERLABEL. This will output something like C.38250."
|
||
}
|
||
},
|
||
{
|
||
"@type": "Question",
|
||
"name": "How can I find OPEN_BUTTON_TOKEN?",
|
||
"acceptedAnswer": {
|
||
"@type": "Answer",
|
||
"text": "SSH into your instance or open Jupyter terminal and run: echo $OPEN_BUTTON_TOKEN. Alternatively, check the instance logs."
|
||
}
|
||
},
|
||
{
|
||
"@type": "Question",
|
||
"name": "How do I stop an instance from within itself?",
|
||
"acceptedAnswer": {
|
||
"@type": "Answer",
|
||
"text": "A special instance API key is pre-installed. Install the CLI with pip install vastai, then use vastai stop instance $CONTAINER_ID to stop the instance. If $CONTAINER_ID is not defined, check your environment variables with env."
|
||
}
|
||
},
|
||
{
|
||
"@type": "Question",
|
||
"name": "Can I run Docker within my instance?",
|
||
"acceptedAnswer": {
|
||
"@type": "Answer",
|
||
"text": "No, Vast.ai does not support Docker-in-Docker due to security constraints. Each Docker container must run on a separate instance."
|
||
}
|
||
},
|
||
{
|
||
"@type": "Question",
|
||
"name": "Can I change disk size after creating an instance?",
|
||
"acceptedAnswer": {
|
||
"@type": "Answer",
|
||
"text": "No. Disk size is permanent and cannot be changed after instance creation. If you run out of space, you'll need to create a new instance with a larger disk. Always allocate more space than you think you need to avoid interruptions."
|
||
}
|
||
},
|
||
{
|
||
"@type": "Question",
|
||
"name": "What happens to my data when an instance stops?",
|
||
"acceptedAnswer": {
|
||
"@type": "Answer",
|
||
"text": "Stopped instances: Data persists, storage charges continue. Destroyed instances: All data is permanently deleted. Lifetime expired: Instance stops, data remains until destroyed. Always backup important data to external storage."
|
||
}
|
||
}
|
||
]
|
||
})
|
||
}}
|
||
/>
|
||
|
||
## Instance Lifecycle
|
||
|
||
### What does "Lifetime" mean on my instance?
|
||
|
||
Every instance offer has a **Max Duration**. When you accept an offer and create an instance, this becomes the instance lifetime and begins counting down. When the lifetime expires, the instance is automatically stopped.
|
||
|
||
The host can extend the contract (adding more lifetime), but this is at their discretion. **Important:** Always assume your instance will be lost once the lifetime expires and copy out any important data before then.
|
||
|
||
### How can I restart programs when my instance restarts?
|
||
|
||
**For custom command instances:** Your command runs automatically on startup.
|
||
|
||
**For SSH instances:** Place startup commands in `/root/onstart.sh`. This script runs automatically on container startup.
|
||
|
||
```bash theme={null}
|
||
# Example /root/onstart.sh
|
||
#!/bin/bash
|
||
cd /workspace
|
||
python train.py --resume
|
||
```
|
||
|
||
## Environment Configuration
|
||
|
||
### How do I set environment variables?
|
||
|
||
Use the `-e` Docker syntax in the docker create/run options:
|
||
|
||
```bash theme={null}
|
||
-e TZ=UTC -e TASKID="TEST"
|
||
```
|
||
|
||
To make variables visible in SSH/Jupyter sessions, export them to `/etc/environment`:
|
||
|
||
```bash theme={null}
|
||
# Export variables with underscores
|
||
env | grep _ >> /etc/environment
|
||
|
||
# Or export all variables
|
||
env >> /etc/environment
|
||
```
|
||
|
||
You can also set global environment variables in your account Settings page.
|
||
|
||
### How do I get the instance ID from within the container?
|
||
|
||
Use the `VAST_CONTAINERLABEL` environment variable:
|
||
|
||
```bash theme={null}
|
||
echo $VAST_CONTAINERLABEL
|
||
# Output: C.38250
|
||
```
|
||
|
||
### How can I find OPEN\_BUTTON\_TOKEN?
|
||
|
||
SSH into your instance or open Jupyter terminal and run:
|
||
|
||
```bash theme={null}
|
||
echo $OPEN_BUTTON_TOKEN
|
||
```
|
||
|
||
Alternatively, check the instance logs.
|
||
|
||
## Controlling Instances
|
||
|
||
### How do I stop an instance from within itself?
|
||
|
||
A special instance API key is pre-installed. Install the CLI and use it:
|
||
|
||
```bash theme={null}
|
||
# Install CLI
|
||
pip install vastai
|
||
|
||
# Test with start (no-op if already running)
|
||
vastai start instance $CONTAINER_ID
|
||
|
||
# Stop the instance
|
||
vastai stop instance $CONTAINER_ID
|
||
```
|
||
|
||
If `$CONTAINER_ID` is not defined, check your environment variables with `env`.
|
||
|
||
### Can I run Docker within my instance?
|
||
|
||
No, Vast.ai does not support Docker-in-Docker due to security constraints. Each Docker container must run on a separate instance.
|
||
|
||
## Data and Storage
|
||
|
||
### Can I change disk size after creating an instance?
|
||
|
||
**No.** Disk size is permanent and cannot be changed after instance creation. If you run out of space, you'll need to create a new instance with a larger disk.
|
||
|
||
**Tip:** Always allocate more space than you think you need to avoid interruptions.
|
||
|
||
### What happens to my data when an instance stops?
|
||
|
||
* **Stopped instances:** Data persists, storage charges continue
|
||
* **Destroyed instances:** All data is permanently deleted
|
||
* **Lifetime expired:** Instance stops, data remains until destroyed
|
||
|
||
Always backup important data to external storage.
|
||
|
||
|
||
# Jupyter & SSH FAQ
|
||
Source: https://docs.vast.ai/documentation/reference/faq/jupyter-ssh
|
||
|
||
Connecting to instances via Jupyter and SSH
|
||
|
||
<script
|
||
type="application/ld+json"
|
||
dangerouslySetInnerHTML={{
|
||
__html: JSON.stringify({
|
||
"@context": "https://schema.org",
|
||
"@type": "FAQPage",
|
||
"mainEntity": [
|
||
{
|
||
"@type": "Question",
|
||
"name": "What is the HTTPS security warning?",
|
||
"acceptedAnswer": {
|
||
"@type": "Answer",
|
||
"text": "When accessing Jupyter, browsers show a security warning because we use self-signed certificates. To fix: 1. Download and install our TLS certificate 2. Windows/Linux: Can bypass by clicking Advanced → Proceed 3. macOS: Must install certificate in Keychain Access. Installing the certificate removes the warning permanently."
|
||
}
|
||
},
|
||
{
|
||
"@type": "Question",
|
||
"name": "Why are Jupyter transfers slow?",
|
||
"acceptedAnswer": {
|
||
"@type": "Answer",
|
||
"text": "Jupyter's upload/download is not optimized for large files. Alternatives: Use SCP/SFTP for large transfers, use cloud storage (S3, GCS), use the Vast CLI copy commands, or zip multiple files before downloading."
|
||
}
|
||
},
|
||
{
|
||
"@type": "Question",
|
||
"name": "How do I delete files in Jupyter to free space?",
|
||
"acceptedAnswer": {
|
||
"@type": "Answer",
|
||
"text": "Jupyter moves deleted files to trash. To permanently delete, run: rm -r ~/.local/share/Trash in the Jupyter terminal."
|
||
}
|
||
},
|
||
{
|
||
"@type": "Question",
|
||
"name": "How do I run Colab notebooks?",
|
||
"acceptedAnswer": {
|
||
"@type": "Answer",
|
||
"text": "1. Select the PyTorch template with Jupyter enabled 2. Start your instance 3. Download the Colab notebook as .ipynb 4. Upload to Jupyter 5. Install any missing dependencies with pip install."
|
||
}
|
||
},
|
||
{
|
||
"@type": "Question",
|
||
"name": "How do I download multiple files from Jupyter?",
|
||
"acceptedAnswer": {
|
||
"@type": "Answer",
|
||
"text": "Jupyter Lab: Shift-click to select multiple files, right-click to download. Jupyter Notebook: Must download individually or zip first using apt-get install -y zip, then zip -r all_files.zip /path/to/files/."
|
||
}
|
||
},
|
||
{
|
||
"@type": "Question",
|
||
"name": "Missing library or package errors?",
|
||
"acceptedAnswer": {
|
||
"@type": "Answer",
|
||
"text": "Install dependencies in Jupyter terminal. For system packages: apt-get install -y PACKAGE_NAME. For Python packages: pip install PACKAGE_NAME."
|
||
}
|
||
},
|
||
{
|
||
"@type": "Question",
|
||
"name": "How do I connect via SSH on Linux/Mac?",
|
||
"acceptedAnswer": {
|
||
"@type": "Answer",
|
||
"text": "1. Generate an SSH keypair with ssh-keygen -t rsa 2. Load the key with ssh-add 3. Get your public key with cat ~/.ssh/id_rsa.pub 4. Copy the entire output (including ssh-rsa prefix and user@host suffix) to your Keys section."
|
||
}
|
||
},
|
||
{
|
||
"@type": "Question",
|
||
"name": "How do I connect via SSH from Windows?",
|
||
"acceptedAnswer": {
|
||
"@type": "Answer",
|
||
"text": "Two options: 1. Windows Subsystem for Linux (WSL) - Follow Linux/Mac instructions 2. PuTTY - See our Windows SSH Guide. Make sure to save the key in SSH RSA-2 format when using PuTTY."
|
||
}
|
||
},
|
||
{
|
||
"@type": "Question",
|
||
"name": "What is tmux and how do I use it?",
|
||
"acceptedAnswer": {
|
||
"@type": "Answer",
|
||
"text": "We connect you to a tmux session by default for reliability. Common commands: Create new terminal: Ctrl+b, c. Switch terminals: Ctrl+b, n. Split screen: Ctrl+b, % (vertical) or Ctrl+b, \" (horizontal)."
|
||
}
|
||
},
|
||
{
|
||
"@type": "Question",
|
||
"name": "SSH asks for a password - what's wrong?",
|
||
"acceptedAnswer": {
|
||
"@type": "Answer",
|
||
"text": "There is no SSH password - Vast.ai uses SSH key authentication only. If SSH asks for a password, your SSH key wasn't added correctly to your account, you didn't copy the entire public key (must include ssh-rsa prefix and user@host suffix), your SSH client is misconfigured, or the private key isn't loaded in your SSH agent."
|
||
}
|
||
}
|
||
]
|
||
})
|
||
}}
|
||
/>
|
||
|
||
## Jupyter
|
||
|
||
### What is the HTTPS security warning?
|
||
|
||
When accessing Jupyter, browsers show a security warning because we use self-signed certificates. To fix:
|
||
|
||
1. Download and install our [TLS certificate](/documentation/instances/jupyter)
|
||
2. **Windows/Linux:** Can bypass by clicking Advanced → Proceed
|
||
3. **macOS:** Must install certificate in Keychain Access
|
||
|
||
Installing the certificate removes the warning permanently.
|
||
|
||
### Why are Jupyter transfers slow?
|
||
|
||
Jupyter's upload/download is not optimized for large files. Alternatives:
|
||
|
||
* Use SCP/SFTP for large transfers
|
||
* Use cloud storage (S3, GCS)
|
||
* Use the Vast CLI copy commands
|
||
* Zip multiple files before downloading
|
||
|
||
### How do I delete files in Jupyter to free space?
|
||
|
||
Jupyter moves deleted files to trash. To permanently delete:
|
||
|
||
```bash theme={null}
|
||
# In Jupyter terminal
|
||
rm -r ~/.local/share/Trash
|
||
```
|
||
|
||
### How do I run Colab notebooks?
|
||
|
||
1. Select the [PyTorch template](https://cloud.vast.ai/?ref_id=43484\&template_id=e4c5e88bc289f4eecb0c955c4fe7430d) with Jupyter enabled
|
||
2. Start your instance
|
||
3. Download the Colab notebook as `.ipynb`
|
||
4. Upload to Jupyter
|
||
5. Install any missing dependencies with `pip install`
|
||
|
||
For direct Colab connection, see our [Colab guide](/google-colab).
|
||
|
||
### How do I download multiple files from Jupyter?
|
||
|
||
**Jupyter Lab:** Shift-click to select multiple files, right-click to download
|
||
|
||
**Jupyter Notebook:** Must download individually or zip first:
|
||
|
||
```bash theme={null}
|
||
# Install zip
|
||
apt-get install -y zip
|
||
|
||
# Zip a directory
|
||
zip -r all_files.zip /path/to/files/
|
||
```
|
||
|
||
### Missing library or package errors?
|
||
|
||
Install dependencies in Jupyter terminal:
|
||
|
||
```bash theme={null}
|
||
# System packages
|
||
apt-get install -y PACKAGE_NAME
|
||
|
||
# Python packages
|
||
pip install PACKAGE_NAME
|
||
```
|
||
|
||
## SSH Access
|
||
|
||
### How do I connect via SSH on Linux/Mac?
|
||
|
||
1. Generate an SSH keypair:
|
||
|
||
```bash theme={null}
|
||
ssh-keygen -t rsa
|
||
```
|
||
|
||
2. Load the key and verify:
|
||
|
||
```bash theme={null}
|
||
ssh-add
|
||
ssh-add -l
|
||
```
|
||
|
||
3. Get your public key:
|
||
|
||
```bash theme={null}
|
||
cat ~/.ssh/id_rsa.pub
|
||
```
|
||
|
||
4. Copy the **entire output** (including `ssh-rsa` prefix and `user@host` suffix) to your [Keys section](https://cloud.vast.ai/manage-keys/)
|
||
|
||
Example of complete SSH key:
|
||
|
||
```
|
||
ssh-rsa AAAAB3NzaC1yc2EAAAADAQABAAZBAQDdxWwxwN5Lz7ubkMrxM5FCHhVz... bob@velocity
|
||
```
|
||
|
||
### How do I connect via SSH from Windows?
|
||
|
||
Two options:
|
||
|
||
1. **Windows Subsystem for Linux (WSL)** - Follow Linux/Mac instructions above
|
||
2. **PuTTY** - See our [Windows SSH Guide](/documentation/instances/windows-ssh-guide)
|
||
|
||
Make sure to save the key in SSH RSA-2 format when using PuTTY.
|
||
|
||
### What is tmux and how do I use it?
|
||
|
||
We connect you to a tmux session by default for reliability. Common commands:
|
||
|
||
* **Create new terminal:** `Ctrl+b, c`
|
||
* **Switch terminals:** `Ctrl+b, n`
|
||
* **Split screen:** `Ctrl+b, %` (vertical) or `Ctrl+b, "` (horizontal)
|
||
|
||
Search "tmux cheat sheet" for more commands.
|
||
|
||
### Can I disable tmux?
|
||
|
||
Not recommended (SSH can be unstable), but if needed, add to your onstart:
|
||
|
||
```bash theme={null}
|
||
touch ~/.no_auto_tmux
|
||
```
|
||
|
||
### SSH asks for a password - what's wrong?
|
||
|
||
There is no SSH password - Vast.ai uses SSH key authentication only. If SSH asks for a password:
|
||
|
||
* Your SSH key wasn't added correctly to your account
|
||
* You didn't copy the entire public key (must include `ssh-rsa` prefix and `user@host` suffix)
|
||
* Your SSH client is misconfigured
|
||
* The private key isn't loaded in your SSH agent
|
||
|
||
Double-check that you copied the complete public key to your Keys section.
|
||
|
||
|
||
# Networking
|
||
Source: https://docs.vast.ai/documentation/reference/faq/networking
|
||
|
||
|
||
|
||
<script
|
||
type="application/ld+json"
|
||
dangerouslySetInnerHTML={{
|
||
__html: JSON.stringify({
|
||
"@context": "https://schema.org",
|
||
"@type": "FAQPage",
|
||
"mainEntity": [
|
||
{
|
||
"@type": "Question",
|
||
"name": "How can I open custom ports?",
|
||
"acceptedAnswer": {
|
||
"@type": "Answer",
|
||
"text": "Add -p arguments in the docker create/run options box in the template configuration or image config editor pop-up menu. To open ports 8081 and 8082, use: -p 8081:8081 -p 8082:8082. This will result in additional arguments to docker create/run to expose those internal ports, which will be mapped to random external ports. After the instance has loaded, you can find the corresponding external public IP by opening the IP Port Info pop-up."
|
||
}
|
||
},
|
||
{
|
||
"@type": "Question",
|
||
"name": "How can I open an identity port map where external and internal ports are the same?",
|
||
"acceptedAnswer": {
|
||
"@type": "Answer",
|
||
"text": "Just use an out-of-range port above 70000. For example: -p 70000:70000 -p 70001:70001. This allows you to have matching internal and external port numbers."
|
||
}
|
||
}
|
||
]
|
||
})
|
||
}}
|
||
/>
|
||
|
||
## Port Configuration
|
||
|
||
### How can I open custom ports?
|
||
|
||
Add -p arguments in the docker create/run options box in the template configuration or image config editor pop-up menu. To open ports 8081 and 8082, use something like this:
|
||
|
||
```text theme={null}
|
||
-p 8081:8081 -p 8082:8082
|
||
```
|
||
|
||
This will result in additional arguments to docker create/run to expose those internal ports, which will be mapped to random external ports. Any ports exposed in these docker options are in addition to ports exposed through EXPOSE commands in the docker image, and the ports 22 or 8080 which may be opened automatically for SSH or Jupyter.
|
||
|
||
After the instance has loaded, you can find the corresponding external public IP by opening the IP Port Info pop-up (button on top of the instance) and then looking for something like:
|
||
|
||
```text theme={null}
|
||
65.130.162.74:33526 -> 8081/tcp
|
||
```
|
||
|
||
In this case, the public IP 65.130.162.74:33526 can be used to access anything you run on port 8081 inside the instance. As a simple test case, you can run a simple minimal web browser inside the instance with the following command:
|
||
|
||
```text theme={null}
|
||
python -m http.server 8081
|
||
```
|
||
|
||
Which you would then access in this example by loading 65.130.162.74:33526 in your web browser.
|
||
|
||
### How can I open an identity port map like 32001:32001 where external are the same?
|
||
|
||
Just use an out-of-range port above 70000:
|
||
|
||
```text theme={null}
|
||
-p 70000:70000 -p 70001:70001
|
||
```
|
||
|
||
##
|
||
|
||
|
||
# Rental Types FAQ
|
||
Source: https://docs.vast.ai/documentation/reference/faq/rental-types
|
||
|
||
Understanding on-demand vs interruptible instances
|
||
|
||
<script
|
||
type="application/ld+json"
|
||
dangerouslySetInnerHTML={{
|
||
__html: JSON.stringify({
|
||
"@context": "https://schema.org",
|
||
"@type": "FAQPage",
|
||
"mainEntity": [
|
||
{
|
||
"@type": "Question",
|
||
"name": "What are the rental types available?",
|
||
"acceptedAnswer": {
|
||
"@type": "Answer",
|
||
"text": "We offer two rental types: On-Demand (High Priority) with fixed price set by the host, runs as long as you want, cannot be interrupted, more expensive but reliable. Interruptible (Low Priority) where you set a bid price, can be stopped by higher bids, saves 50-80% on costs, good for fault-tolerant workloads."
|
||
}
|
||
},
|
||
{
|
||
"@type": "Question",
|
||
"name": "How do interruptible instances compare to AWS Spot?",
|
||
"acceptedAnswer": {
|
||
"@type": "Answer",
|
||
"text": "Similarities: Both can be interrupted and offer significant savings. Differences: Vast.ai uses direct bidding (you control your bid price) while AWS uses market pricing. No 24-hour limit like GCE preemptible instances. Vast.ai instances can run indefinitely if not outbid."
|
||
}
|
||
},
|
||
{
|
||
"@type": "Question",
|
||
"name": "What happens when my interruptible instance loses the bid?",
|
||
"acceptedAnswer": {
|
||
"@type": "Answer",
|
||
"text": "Your instance is stopped (killing running processes). Important considerations: Save work frequently to disk, use cloud storage for backups, instance may wait long to resume, implement checkpointing for long jobs. Always design your workload to handle interruptions gracefully."
|
||
}
|
||
},
|
||
{
|
||
"@type": "Question",
|
||
"name": "What is DLPerf?",
|
||
"acceptedAnswer": {
|
||
"@type": "Answer",
|
||
"text": "DLPerf (Deep Learning Performance) is our scoring function that estimates performance for typical deep learning tasks. It predicts iterations/second for common tasks like training ResNet50 CNNs. Example scores: V100: ~21 DLPerf, 2080 Ti: ~14 DLPerf, 1080 Ti: ~10 DLPerf. A V100 (21) is roughly 2x faster than a 1080 Ti (10) for typical deep learning."
|
||
}
|
||
},
|
||
{
|
||
"@type": "Question",
|
||
"name": "Is DLPerf accurate for my workload?",
|
||
"acceptedAnswer": {
|
||
"@type": "Answer",
|
||
"text": "DLPerf is optimized for common deep learning tasks like CNN training (ResNet, VGG, etc.), Transformer models, and standard computer vision. It's less accurate for unusual compute patterns and not optimized for non-ML workloads. For specialized workloads, benchmark on different GPUs yourself. While not perfect, DLPerf is more useful than raw TFLOPS for most ML tasks."
|
||
}
|
||
}
|
||
]
|
||
})
|
||
}}
|
||
/>
|
||
|
||
## Rental Type Overview
|
||
|
||
We currently offer two rental types:
|
||
|
||
### On-Demand (High Priority)
|
||
|
||
* Fixed price set by the host
|
||
* Runs as long as you want
|
||
* Cannot be interrupted
|
||
* More expensive but reliable
|
||
|
||
### Interruptible (Low Priority)
|
||
|
||
* You set a bid price
|
||
* Can be stopped by higher bids
|
||
* Saves 50-80% on costs
|
||
* Good for fault-tolerant workloads
|
||
|
||
## How do interruptible instances compare to AWS Spot?
|
||
|
||
**Similarities:**
|
||
|
||
* Both can be interrupted
|
||
* Both offer significant savings
|
||
|
||
**Differences:**
|
||
|
||
* Vast.ai uses direct bidding (you control your bid price)
|
||
* AWS uses market pricing
|
||
* No 24-hour limit like GCE preemptible instances
|
||
* Vast.ai instances can run indefinitely if not outbid
|
||
|
||
## What happens when my interruptible instance loses the bid?
|
||
|
||
Your instance is stopped (killing running processes). Important considerations:
|
||
|
||
* **Save work frequently** to disk
|
||
* **Use cloud storage** for backups
|
||
* **Instance may wait long** to resume
|
||
* **Implement checkpointing** for long jobs
|
||
|
||
When using interruptible instances, always design your workload to handle interruptions gracefully.
|
||
|
||
## DLPerf Scoring
|
||
|
||
### What is DLPerf?
|
||
|
||
DLPerf (Deep Learning Performance) is our scoring function that estimates performance for typical deep learning tasks. It predicts iterations/second for common tasks like training ResNet50 CNNs.
|
||
|
||
**Example scores:**
|
||
|
||
* V100: \~21 DLPerf
|
||
* 2080 Ti: \~14 DLPerf
|
||
* 1080 Ti: \~10 DLPerf
|
||
|
||
A V100 (21) is roughly 2x faster than a 1080 Ti (10) for typical deep learning.
|
||
|
||
### Is DLPerf accurate for my workload?
|
||
|
||
DLPerf is optimized for common deep learning tasks:
|
||
|
||
* ✅ CNN training (ResNet, VGG, etc.)
|
||
* ✅ Transformer models
|
||
* ✅ Standard computer vision
|
||
* ⚠️ Less accurate for unusual compute patterns
|
||
* ⚠️ Not optimized for non-ML workloads
|
||
|
||
For specialized workloads, benchmark on different GPUs yourself. While not perfect, DLPerf is more useful than raw TFLOPS for most ML tasks.
|
||
|
||
|
||
# Security FAQ
|
||
Source: https://docs.vast.ai/documentation/reference/faq/security
|
||
|
||
Data protection and platform security
|
||
|
||
<script
|
||
type="application/ld+json"
|
||
dangerouslySetInnerHTML={{
|
||
__html: JSON.stringify({
|
||
"@context": "https://schema.org",
|
||
"@type": "FAQPage",
|
||
"mainEntity": [
|
||
{
|
||
"@type": "Question",
|
||
"name": "How is my data protected from other clients?",
|
||
"acceptedAnswer": {
|
||
"@type": "Answer",
|
||
"text": "Clients are isolated in unprivileged Docker containers and only have access to their own data. Each container is completely separate from others on the same host machine with separate namespaces and cgroups, network isolation, file system isolation, and process isolation."
|
||
}
|
||
},
|
||
{
|
||
"@type": "Question",
|
||
"name": "How is my data protected from providers?",
|
||
"acceptedAnswer": {
|
||
"@type": "Answer",
|
||
"text": "Provider security varies significantly. Tier 4 datacenters have extensive physical and operational security while individual hosts may have less formal security measures. For maximum security: Use Secure Cloud certified providers only, encrypt sensitive data at rest, don't store credentials in instances, and use external key management."
|
||
}
|
||
},
|
||
{
|
||
"@type": "Question",
|
||
"name": "What is Secure Cloud?",
|
||
"acceptedAnswer": {
|
||
"@type": "Answer",
|
||
"text": "Secure Cloud providers are vetted datacenters with ISO 27001 certification, Tier 3/4 datacenter standards, verified physical security, and professional operations. Enable the Secure Cloud filter when searching for instances to see only these providers."
|
||
}
|
||
},
|
||
{
|
||
"@type": "Question",
|
||
"name": "How do I secure my account?",
|
||
"acceptedAnswer": {
|
||
"@type": "Answer",
|
||
"text": "Best practices: Use a strong, unique password, regularly rotate API keys, monitor account activity, use separate API keys for different applications, and review billing regularly for unusual activity."
|
||
}
|
||
},
|
||
{
|
||
"@type": "Question",
|
||
"name": "What if my API key is compromised?",
|
||
"acceptedAnswer": {
|
||
"@type": "Answer",
|
||
"text": "Immediately: Delete the compromised key in Settings, generate a new key, update all applications, check billing for unauthorized usage, and contact support if you see suspicious activity."
|
||
}
|
||
},
|
||
{
|
||
"@type": "Question",
|
||
"name": "Are connections encrypted?",
|
||
"acceptedAnswer": {
|
||
"@type": "Answer",
|
||
"text": "Yes, all connections use encryption: Web interface uses HTTPS with TLS, SSH is encrypted by default, Jupyter uses HTTPS with self-signed certificates, and API requires HTTPS."
|
||
}
|
||
},
|
||
{
|
||
"@type": "Question",
|
||
"name": "Can I restrict network access to my instances?",
|
||
"acceptedAnswer": {
|
||
"@type": "Answer",
|
||
"text": "Network restrictions depend on the host configuration. Some options: Use SSH key authentication (no passwords), configure firewall rules in your container, and select providers with static IPs for IP whitelisting."
|
||
}
|
||
}
|
||
]
|
||
})
|
||
}}
|
||
/>
|
||
|
||
## Data Protection
|
||
|
||
### How is my data protected from other clients?
|
||
|
||
Clients are isolated in unprivileged Docker containers and only have access to their own data. Each container is completely separate from others on the same host machine with:
|
||
|
||
* Separate namespaces and cgroups
|
||
* Network isolation
|
||
* File system isolation
|
||
* Process isolation
|
||
|
||
### How is my data protected from providers?
|
||
|
||
Provider security varies significantly:
|
||
|
||
* **Tier 4 datacenters** have extensive physical and operational security
|
||
* **Individual hosts** may have less formal security measures
|
||
|
||
For maximum security:
|
||
|
||
* Use **Secure Cloud** certified providers only
|
||
* Encrypt sensitive data at rest
|
||
* Don't store credentials in instances
|
||
* Use external key management
|
||
|
||
### What is Secure Cloud?
|
||
|
||
Secure Cloud providers are vetted datacenters with:
|
||
|
||
* [ISO 27001](https://www.iso.org/standard/27001) certification
|
||
* [Tier 3/4](https://uptimeinstitute.com/tiers) datacenter standards
|
||
* Verified physical security
|
||
* Professional operations
|
||
|
||
Enable the "Secure Cloud" filter when searching for instances to see only these providers.
|
||
|
||
## Account Security
|
||
|
||
### How do I secure my account?
|
||
|
||
Best practices:
|
||
|
||
1. Use a strong, unique password
|
||
2. Regularly rotate API keys
|
||
3. Monitor account activity
|
||
4. Use separate API keys for different applications
|
||
5. Review billing regularly for unusual activity
|
||
|
||
### What if my API key is compromised?
|
||
|
||
Immediately:
|
||
|
||
1. Delete the compromised key in Settings
|
||
2. Generate a new key
|
||
3. Update all applications
|
||
4. Check billing for unauthorized usage
|
||
5. Contact support if you see suspicious activity
|
||
|
||
## Network Security
|
||
|
||
### Are connections encrypted?
|
||
|
||
Yes, all connections use encryption:
|
||
|
||
* **Web interface:** HTTPS with TLS
|
||
* **SSH:** Encrypted by default
|
||
* **Jupyter:** HTTPS with self-signed certificates
|
||
* **API:** HTTPS required
|
||
|
||
### Can I restrict network access to my instances?
|
||
|
||
Network restrictions depend on the host configuration. Some options:
|
||
|
||
* Use SSH key authentication (no passwords)
|
||
* Configure firewall rules in your container
|
||
* Select providers with static IPs for IP whitelisting
|
||
|
||
## Best Practices
|
||
|
||
### Security checklist for sensitive workloads
|
||
|
||
* [ ] Use Secure Cloud providers only
|
||
* [ ] Encrypt data before uploading
|
||
* [ ] Use strong SSH keys
|
||
* [ ] Don't store credentials in instances
|
||
* [ ] Destroy instances immediately when done
|
||
* [ ] Monitor account activity regularly
|
||
* [ ] Use separate accounts for different projects
|
||
* [ ] Implement application-level encryption
|
||
* [ ] Keep software updated
|
||
|
||
|
||
# Technical FAQ
|
||
Source: https://docs.vast.ai/documentation/reference/faq/technical
|
||
|
||
Docker configuration, performance, and advanced topics
|
||
|
||
<script
|
||
type="application/ld+json"
|
||
dangerouslySetInnerHTML={{
|
||
__html: JSON.stringify({
|
||
"@context": "https://schema.org",
|
||
"@type": "FAQPage",
|
||
"mainEntity": [
|
||
{
|
||
"@type": "Question",
|
||
"name": "What Docker options can I use?",
|
||
"acceptedAnswer": {
|
||
"@type": "Answer",
|
||
"text": "Add Docker run arguments in the template configuration. For port mapping: -p 8080:8080 -p 8081:8081. For environment variables: -e TZ=UTC -e CUDA_VISIBLE_DEVICES=0. For shared memory (for PyTorch): --shm-size=32gb."
|
||
}
|
||
},
|
||
{
|
||
"@type": "Question",
|
||
"name": "Can I use my own Docker images?",
|
||
"acceptedAnswer": {
|
||
"@type": "Answer",
|
||
"text": "Yes! When creating a template: Specify your Docker image URL, ensure it's publicly accessible or provide auth, use standard Docker Hub, GHCR, or other registries, and include all dependencies in the image."
|
||
}
|
||
},
|
||
{
|
||
"@type": "Question",
|
||
"name": "Why can't I run Docker inside my instance?",
|
||
"acceptedAnswer": {
|
||
"@type": "Answer",
|
||
"text": "Docker-in-Docker is disabled for security. Alternatives: Use separate instances for different containers, build multi-service images, or use process managers like supervisord."
|
||
}
|
||
},
|
||
{
|
||
"@type": "Question",
|
||
"name": "How can I maximize GPU utilization?",
|
||
"acceptedAnswer": {
|
||
"@type": "Answer",
|
||
"text": "1. Batch size optimization: Increase until GPU memory is nearly full, monitor with nvidia-smi. 2. Data pipeline: Pre-process data, use multiple data loader workers, cache datasets locally. 3. Mixed precision training using PyTorch autocast or similar frameworks."
|
||
}
|
||
},
|
||
{
|
||
"@type": "Question",
|
||
"name": "Why is my training slower than expected?",
|
||
"acceptedAnswer": {
|
||
"@type": "Answer",
|
||
"text": "Common issues: CPU bottleneck - Check data loading. Network I/O - Download data to local storage first. Wrong GPU mode - Ensure CUDA is enabled. Thermal throttling - Some consumer GPUs throttle. PCIe bandwidth - Multi-GPU setups may be limited."
|
||
}
|
||
},
|
||
{
|
||
"@type": "Question",
|
||
"name": "What's the difference between instance storage and volumes?",
|
||
"acceptedAnswer": {
|
||
"@type": "Answer",
|
||
"text": "Instance Storage: Included with every instance, deleted when instance is destroyed, size set at creation (cannot change), faster performance. Volumes: Persistent across instances, can be attached/detached, additional cost, good for datasets and checkpoints."
|
||
}
|
||
},
|
||
{
|
||
"@type": "Question",
|
||
"name": "How do I install additional packages?",
|
||
"acceptedAnswer": {
|
||
"@type": "Answer",
|
||
"text": "In Jupyter terminal or SSH: For system packages: apt-get update && apt-get install -y package-name. For Python packages: pip install package-name. For Conda (if available): conda install package-name. Add to /root/onstart.sh for persistence across restarts."
|
||
}
|
||
},
|
||
{
|
||
"@type": "Question",
|
||
"name": "How do I use specific CUDA versions?",
|
||
"acceptedAnswer": {
|
||
"@type": "Answer",
|
||
"text": "CUDA version depends on the Docker image. To check: nvcc --version or nvidia-smi. To use specific versions, choose appropriate templates or create custom images with your required CUDA version."
|
||
}
|
||
},
|
||
{
|
||
"@type": "Question",
|
||
"name": "My instance won't start - how do I debug?",
|
||
"acceptedAnswer": {
|
||
"@type": "Answer",
|
||
"text": "1. Check instance logs for errors 2. Verify Docker image exists and is accessible 3. Check if ports are already in use 4. Ensure sufficient disk space requested 5. Try a different provider 6. Contact support with instance ID."
|
||
}
|
||
}
|
||
]
|
||
})
|
||
}}
|
||
/>
|
||
|
||
## Docker Configuration
|
||
|
||
### What Docker options can I use?
|
||
|
||
Add Docker run arguments in the template configuration:
|
||
|
||
```bash theme={null}
|
||
# Port mapping
|
||
-p 8080:8080 -p 8081:8081
|
||
|
||
# Environment variables
|
||
-e TZ=UTC -e CUDA_VISIBLE_DEVICES=0
|
||
|
||
# Shared memory (for PyTorch)
|
||
--shm-size=32gb
|
||
```
|
||
|
||
### Can I use my own Docker images?
|
||
|
||
Yes! When creating a template:
|
||
|
||
1. Specify your Docker image URL
|
||
2. Ensure it's publicly accessible or provide auth
|
||
3. Use standard Docker Hub, GHCR, or other registries
|
||
4. Include all dependencies in the image
|
||
|
||
### Why can't I run Docker inside my instance?
|
||
|
||
Docker-in-Docker is disabled for security. Alternatives:
|
||
|
||
* Use separate instances for different containers
|
||
* Build multi-service images
|
||
* Use process managers like supervisord
|
||
|
||
## Performance Optimization
|
||
|
||
### How can I maximize GPU utilization?
|
||
|
||
1. **Batch size optimization:**
|
||
* Increase until GPU memory is nearly full
|
||
* Monitor with `nvidia-smi`
|
||
|
||
2. **Data pipeline:**
|
||
* Pre-process data
|
||
* Use multiple data loader workers
|
||
* Cache datasets locally
|
||
|
||
3. **Mixed precision training:**
|
||
```python theme={null}
|
||
# PyTorch example
|
||
from torch.cuda.amp import autocast
|
||
with autocast():
|
||
output = model(input)
|
||
```
|
||
|
||
### Why is my training slower than expected?
|
||
|
||
Common issues:
|
||
|
||
* **CPU bottleneck** - Check data loading
|
||
* **Network I/O** - Download data to local storage first
|
||
* **Wrong GPU mode** - Ensure CUDA is enabled
|
||
* **Thermal throttling** - Some consumer GPUs throttle
|
||
* **PCIe bandwidth** - Multi-GPU setups may be limited
|
||
|
||
## Storage and Volumes
|
||
|
||
### What's the difference between instance storage and volumes?
|
||
|
||
**Instance Storage:**
|
||
|
||
* Included with every instance
|
||
* Deleted when instance is destroyed
|
||
* Size set at creation (cannot change)
|
||
* Faster performance
|
||
|
||
**Volumes:**
|
||
|
||
* Persistent across instances
|
||
* Can be attached/detached
|
||
* Additional cost
|
||
* Good for datasets and checkpoints
|
||
|
||
### How do I use volumes?
|
||
|
||
1. Create a volume in the Volumes section
|
||
2. Attach when creating an instance
|
||
3. Mount point specified in template
|
||
4. Data persists after instance destruction
|
||
|
||
See [Volumes Guide](/documentation/instances/volumes) for details.
|
||
|
||
## Environment Setup
|
||
|
||
### How do I install additional packages?
|
||
|
||
In Jupyter terminal or SSH:
|
||
|
||
```bash theme={null}
|
||
# System packages
|
||
apt-get update && apt-get install -y package-name
|
||
|
||
# Python packages
|
||
pip install package-name
|
||
|
||
# Conda (if available)
|
||
conda install package-name
|
||
```
|
||
|
||
Add to `/root/onstart.sh` for persistence across restarts.
|
||
|
||
### How do I use specific CUDA versions?
|
||
|
||
CUDA version depends on the Docker image. To check:
|
||
|
||
```bash theme={null}
|
||
nvcc --version
|
||
nvidia-smi
|
||
```
|
||
|
||
To use specific versions, choose appropriate templates or create custom images with your required CUDA version.
|
||
|
||
## Debugging
|
||
|
||
### How do I view instance logs?
|
||
|
||
* Through web console: Click "Logs" on instance card
|
||
* Via CLI: `vastai logs INSTANCE_ID`
|
||
* Inside instance: Check `/var/log/` directory
|
||
|
||
### My instance won't start - how do I debug?
|
||
|
||
1. Check instance logs for errors
|
||
2. Verify Docker image exists and is accessible
|
||
3. Check if ports are already in use
|
||
4. Ensure sufficient disk space requested
|
||
5. Try a different provider
|
||
6. Contact support with instance ID
|
||
|
||
### How do I monitor resource usage?
|
||
|
||
```bash theme={null}
|
||
# GPU monitoring
|
||
watch -n 1 nvidia-smi
|
||
|
||
# CPU and memory
|
||
htop
|
||
|
||
# Disk usage
|
||
df -h
|
||
|
||
# Network
|
||
iftop or nethogs
|
||
|
||
# All resources
|
||
gpustat -cp
|
||
```
|
||
|
||
|
||
# Keys
|
||
Source: https://docs.vast.ai/documentation/reference/keys
|
||
|
||
|
||
|
||
<script
|
||
type="application/ld+json"
|
||
dangerouslySetInnerHTML={{
|
||
__html: JSON.stringify({
|
||
"@context": "https://schema.org",
|
||
"@type": "HowTo",
|
||
"name": "How to Manage Keys on Vast.ai",
|
||
"description": "A guide to managing SSH keys, API keys, and session keys for secure access to your Vast.ai account.",
|
||
"step": [
|
||
{
|
||
"@type": "HowToStep",
|
||
"name": "Add SSH Keys",
|
||
"text": "Click on the +New button in the SSH Keys section. Copy and paste your SSH public key into the input to attach it to your account. You can use this SSH key to log into instances remotely. Once saved, it will appear in the SSH Keys section and will be automatically added to your future instances."
|
||
},
|
||
{
|
||
"@type": "HowToStep",
|
||
"name": "Create API Keys",
|
||
"text": "Click on the +New button in the API Keys section. Select specific permissions and assign a name to the key (by default, all your account permissions are selected). You will need an API key to access the Command Line Interface and the REST API."
|
||
},
|
||
{
|
||
"@type": "HowToStep",
|
||
"name": "Manage Session Keys",
|
||
"text": "Review your session keys regularly for security. Session keys are temporary keys that allow access to your Vast.ai account and are automatically created when you log in. They expire in one week. You can view a list of all active session keys and see which devices are currently logged into your account. If you notice any session keys that you don't recognize, you can delete those keys to immediately remove access."
|
||
}
|
||
]
|
||
})
|
||
}}
|
||
/>
|
||
|
||
The Keys page helps you manage secure access to your Vast.ai account. Here, you'll find different types of keys used for authentication and connection.
|
||
|
||
## SSH Keys
|
||
|
||
You can add, edit, or remove your ssh keys in the SSH Keys section of the Keys page of your console.
|
||
|
||
<Frame caption="SSH Keys empty section">
|
||
<img src="https://mintcdn.com/vastai-80aa3a82/xCLov_y0JNSp_qUD/images/console-keys-2.webp?fit=max&auto=format&n=xCLov_y0JNSp_qUD&q=85&s=ee9da8cd0a06f76df7a0daefc8ec9316" alt="SSH Keys empty section" data-og-width="974" width="974" data-og-height="258" height="258" data-path="images/console-keys-2.webp" data-optimize="true" data-opv="3" srcset="https://mintcdn.com/vastai-80aa3a82/xCLov_y0JNSp_qUD/images/console-keys-2.webp?w=280&fit=max&auto=format&n=xCLov_y0JNSp_qUD&q=85&s=bf684848f9f73ed0a7db5f2d3958ebb7 280w, https://mintcdn.com/vastai-80aa3a82/xCLov_y0JNSp_qUD/images/console-keys-2.webp?w=560&fit=max&auto=format&n=xCLov_y0JNSp_qUD&q=85&s=9c7f368a5cb42bbe9e48d30fb638c99c 560w, https://mintcdn.com/vastai-80aa3a82/xCLov_y0JNSp_qUD/images/console-keys-2.webp?w=840&fit=max&auto=format&n=xCLov_y0JNSp_qUD&q=85&s=855edc61eb35aa52e35e475328252b80 840w, https://mintcdn.com/vastai-80aa3a82/xCLov_y0JNSp_qUD/images/console-keys-2.webp?w=1100&fit=max&auto=format&n=xCLov_y0JNSp_qUD&q=85&s=1bfee14fdb9cf891849f1b122d11b992 1100w, https://mintcdn.com/vastai-80aa3a82/xCLov_y0JNSp_qUD/images/console-keys-2.webp?w=1650&fit=max&auto=format&n=xCLov_y0JNSp_qUD&q=85&s=3d64607730ee2ea8016ef1ecde75eae7 1650w, https://mintcdn.com/vastai-80aa3a82/xCLov_y0JNSp_qUD/images/console-keys-2.webp?w=2500&fit=max&auto=format&n=xCLov_y0JNSp_qUD&q=85&s=b73a4ff63165c462b2778ccf30e52cd9 2500w" />
|
||
</Frame>
|
||
|
||
Add a new ssh key by clicking on the **+New** button. Copy and paste your key into the input in order for it to be attached to your account. You can use this ssh key to log into instances remotely. More [here](/documentation/instances/sshscp).
|
||
|
||
<Frame caption="Add SSH Key">
|
||
<img src="https://mintcdn.com/vastai-80aa3a82/xCLov_y0JNSp_qUD/images/console-keys-3.webp?fit=max&auto=format&n=xCLov_y0JNSp_qUD&q=85&s=af420ad5d113f1eec7569af0558df027" alt="Add SSH Key" data-og-width="800" width="800" data-og-height="390" height="390" data-path="images/console-keys-3.webp" data-optimize="true" data-opv="3" srcset="https://mintcdn.com/vastai-80aa3a82/xCLov_y0JNSp_qUD/images/console-keys-3.webp?w=280&fit=max&auto=format&n=xCLov_y0JNSp_qUD&q=85&s=bc6601d2cddc37b0c325fd3ecd87a609 280w, https://mintcdn.com/vastai-80aa3a82/xCLov_y0JNSp_qUD/images/console-keys-3.webp?w=560&fit=max&auto=format&n=xCLov_y0JNSp_qUD&q=85&s=6c006ac1b29fc8194f6b9a1ada822703 560w, https://mintcdn.com/vastai-80aa3a82/xCLov_y0JNSp_qUD/images/console-keys-3.webp?w=840&fit=max&auto=format&n=xCLov_y0JNSp_qUD&q=85&s=7c5a7ce0e687f2aa9b39583556df9a6a 840w, https://mintcdn.com/vastai-80aa3a82/xCLov_y0JNSp_qUD/images/console-keys-3.webp?w=1100&fit=max&auto=format&n=xCLov_y0JNSp_qUD&q=85&s=f261952f70dff57a4ef80c95ee463c8a 1100w, https://mintcdn.com/vastai-80aa3a82/xCLov_y0JNSp_qUD/images/console-keys-3.webp?w=1650&fit=max&auto=format&n=xCLov_y0JNSp_qUD&q=85&s=8ae224cee9b3b375362363d01fabd512 1650w, https://mintcdn.com/vastai-80aa3a82/xCLov_y0JNSp_qUD/images/console-keys-3.webp?w=2500&fit=max&auto=format&n=xCLov_y0JNSp_qUD&q=85&s=c6b7564ff533bce4d111790c3f19fa84 2500w" />
|
||
</Frame>
|
||
|
||
Once the SSH key is saved, it will appear in the SSH Keys section and will be automatically added to your future instances.
|
||
|
||
<img src="https://mintcdn.com/vastai-80aa3a82/xCLov_y0JNSp_qUD/images/console-keys-4.webp?fit=max&auto=format&n=xCLov_y0JNSp_qUD&q=85&s=3f60694c8a33950942497e4bf917f6de" alt="SSH Keys" data-og-width="942" width="942" data-og-height="311" height="311" data-path="images/console-keys-4.webp" data-optimize="true" data-opv="3" srcset="https://mintcdn.com/vastai-80aa3a82/xCLov_y0JNSp_qUD/images/console-keys-4.webp?w=280&fit=max&auto=format&n=xCLov_y0JNSp_qUD&q=85&s=c4ba96932f91742e34b8ee08cce6d295 280w, https://mintcdn.com/vastai-80aa3a82/xCLov_y0JNSp_qUD/images/console-keys-4.webp?w=560&fit=max&auto=format&n=xCLov_y0JNSp_qUD&q=85&s=441bcf5fa3c7f8b6208e8a4f1ab1935c 560w, https://mintcdn.com/vastai-80aa3a82/xCLov_y0JNSp_qUD/images/console-keys-4.webp?w=840&fit=max&auto=format&n=xCLov_y0JNSp_qUD&q=85&s=b9fb209d91c8e1dae83e089df823e4dc 840w, https://mintcdn.com/vastai-80aa3a82/xCLov_y0JNSp_qUD/images/console-keys-4.webp?w=1100&fit=max&auto=format&n=xCLov_y0JNSp_qUD&q=85&s=3f305ba035f12d21bbed35a34678cc29 1100w, https://mintcdn.com/vastai-80aa3a82/xCLov_y0JNSp_qUD/images/console-keys-4.webp?w=1650&fit=max&auto=format&n=xCLov_y0JNSp_qUD&q=85&s=7dc94a68c41cd24c9d28de3657c8bb99 1650w, https://mintcdn.com/vastai-80aa3a82/xCLov_y0JNSp_qUD/images/console-keys-4.webp?w=2500&fit=max&auto=format&n=xCLov_y0JNSp_qUD&q=85&s=d687d291fc531bab1c7675b114c948a4 2500w" />
|
||
|
||
You can edit an existing ssh key by clicking on the **Edit** button and changing the text.
|
||
|
||
<img src="https://mintcdn.com/vastai-80aa3a82/xCLov_y0JNSp_qUD/images/console-keys-5.webp?fit=max&auto=format&n=xCLov_y0JNSp_qUD&q=85&s=05a156d4a4b4dedc8110bc362a4bf9ed" alt="Edit SSH Key" data-og-width="800" width="800" data-og-height="359" height="359" data-path="images/console-keys-5.webp" data-optimize="true" data-opv="3" srcset="https://mintcdn.com/vastai-80aa3a82/xCLov_y0JNSp_qUD/images/console-keys-5.webp?w=280&fit=max&auto=format&n=xCLov_y0JNSp_qUD&q=85&s=d8ecacf1d0992b9825f4e1d933b37109 280w, https://mintcdn.com/vastai-80aa3a82/xCLov_y0JNSp_qUD/images/console-keys-5.webp?w=560&fit=max&auto=format&n=xCLov_y0JNSp_qUD&q=85&s=688fb0f9ee44aad3efdddf788ad0ac68 560w, https://mintcdn.com/vastai-80aa3a82/xCLov_y0JNSp_qUD/images/console-keys-5.webp?w=840&fit=max&auto=format&n=xCLov_y0JNSp_qUD&q=85&s=30abdc3c419e9ad975e0e6cb4d2fa9fc 840w, https://mintcdn.com/vastai-80aa3a82/xCLov_y0JNSp_qUD/images/console-keys-5.webp?w=1100&fit=max&auto=format&n=xCLov_y0JNSp_qUD&q=85&s=cc1574534a66e342b8fa5075984e668e 1100w, https://mintcdn.com/vastai-80aa3a82/xCLov_y0JNSp_qUD/images/console-keys-5.webp?w=1650&fit=max&auto=format&n=xCLov_y0JNSp_qUD&q=85&s=e31f789b6a3a425eb0e37b6dcc1d6871 1650w, https://mintcdn.com/vastai-80aa3a82/xCLov_y0JNSp_qUD/images/console-keys-5.webp?w=2500&fit=max&auto=format&n=xCLov_y0JNSp_qUD&q=85&s=dbcbfafd2781ccfa68e5a0a29dbed096 2500w" />
|
||
|
||
Delete an existing ssh key by selecting the **Delete** button.
|
||
|
||
These ssh keys will be used primarily when accessing an instance. You must switch out your ssh keys on this page if you wish to connect easily via multiple machines.
|
||
|
||
## API Keys
|
||
|
||
You can view, copy, edit, and update your API keys in the Keys section of the console. You will need an API key to access the Command Line Interface and the REST API.
|
||
|
||
To create an API key click on the **+New** button. It will trigger API key creation pop-up.
|
||
|
||
<img src="https://mintcdn.com/vastai-80aa3a82/xCLov_y0JNSp_qUD/images/console-keys-6.webp?fit=max&auto=format&n=xCLov_y0JNSp_qUD&q=85&s=7a99db976bdef97e9738ec401c0e5353" alt="API Keys" data-og-width="931" width="931" data-og-height="657" height="657" data-path="images/console-keys-6.webp" data-optimize="true" data-opv="3" srcset="https://mintcdn.com/vastai-80aa3a82/xCLov_y0JNSp_qUD/images/console-keys-6.webp?w=280&fit=max&auto=format&n=xCLov_y0JNSp_qUD&q=85&s=393f76c6ad4c4ccc9661024eb391f6c4 280w, https://mintcdn.com/vastai-80aa3a82/xCLov_y0JNSp_qUD/images/console-keys-6.webp?w=560&fit=max&auto=format&n=xCLov_y0JNSp_qUD&q=85&s=7f71547881a2befd02077c133fa056e2 560w, https://mintcdn.com/vastai-80aa3a82/xCLov_y0JNSp_qUD/images/console-keys-6.webp?w=840&fit=max&auto=format&n=xCLov_y0JNSp_qUD&q=85&s=3d3121eb8535f9943c1a6284ff3d43e7 840w, https://mintcdn.com/vastai-80aa3a82/xCLov_y0JNSp_qUD/images/console-keys-6.webp?w=1100&fit=max&auto=format&n=xCLov_y0JNSp_qUD&q=85&s=38718dbbd99b8abdab0fb6d715098cda 1100w, https://mintcdn.com/vastai-80aa3a82/xCLov_y0JNSp_qUD/images/console-keys-6.webp?w=1650&fit=max&auto=format&n=xCLov_y0JNSp_qUD&q=85&s=eee000408c9e9b0b3defd60f7ea85d82 1650w, https://mintcdn.com/vastai-80aa3a82/xCLov_y0JNSp_qUD/images/console-keys-6.webp?w=2500&fit=max&auto=format&n=xCLov_y0JNSp_qUD&q=85&s=c25fc40ead5434703927770a268ad5e2 2500w" />
|
||
|
||
Here, you can select specific permissions and assign a name to the key (by default, all you account permissions are selected).
|
||
|
||
<img src="https://mintcdn.com/vastai-80aa3a82/xCLov_y0JNSp_qUD/images/console-keys-7.webp?fit=max&auto=format&n=xCLov_y0JNSp_qUD&q=85&s=b5989d9aae21e3f0f0639b274e8659a7" alt="API Keys" data-og-width="903" width="903" data-og-height="121" height="121" data-path="images/console-keys-7.webp" data-optimize="true" data-opv="3" srcset="https://mintcdn.com/vastai-80aa3a82/xCLov_y0JNSp_qUD/images/console-keys-7.webp?w=280&fit=max&auto=format&n=xCLov_y0JNSp_qUD&q=85&s=ef35ded18c9932007d89343f065bf20f 280w, https://mintcdn.com/vastai-80aa3a82/xCLov_y0JNSp_qUD/images/console-keys-7.webp?w=560&fit=max&auto=format&n=xCLov_y0JNSp_qUD&q=85&s=64d1706671a318b922057069939dfc71 560w, https://mintcdn.com/vastai-80aa3a82/xCLov_y0JNSp_qUD/images/console-keys-7.webp?w=840&fit=max&auto=format&n=xCLov_y0JNSp_qUD&q=85&s=34a6cb1a5bfd405a4a4a6b6517ce000b 840w, https://mintcdn.com/vastai-80aa3a82/xCLov_y0JNSp_qUD/images/console-keys-7.webp?w=1100&fit=max&auto=format&n=xCLov_y0JNSp_qUD&q=85&s=277f8c41b2ba6c69f342e3b7ac171c10 1100w, https://mintcdn.com/vastai-80aa3a82/xCLov_y0JNSp_qUD/images/console-keys-7.webp?w=1650&fit=max&auto=format&n=xCLov_y0JNSp_qUD&q=85&s=0812e60ce14a452e928400aca9557038 1650w, https://mintcdn.com/vastai-80aa3a82/xCLov_y0JNSp_qUD/images/console-keys-7.webp?w=2500&fit=max&auto=format&n=xCLov_y0JNSp_qUD&q=85&s=6bcb7f9eda116b2865eda596632c76fc 2500w" />
|
||
|
||
You can reset an API key by clicking the **Reset** button. A new key will be automatically generated. To remove a key, simply click the **Delete** button.
|
||
|
||
## Session Keys
|
||
|
||
A **session key** is a temporary key that allows access to your Vast.ai account. These keys are automatically created when you log in and will expire in one week.
|
||
|
||
However, for security reasons, it's important to review your session keys regularly. You can view a list of all active session keys and see which devices are currently logged into your account. If you notice any session keys that you don't recognize, or if a device is no longer in use, you can delete those keys to immediately remove access. This helps keep your account secure and ensures only your devices remain connected.
|
||
|
||
<img src="https://mintcdn.com/vastai-80aa3a82/xCLov_y0JNSp_qUD/images/console-keys.webp?fit=max&auto=format&n=xCLov_y0JNSp_qUD&q=85&s=bec511227a3c5e664b40fe6e897fda97" alt="Session Keys" data-og-width="1088" width="1088" data-og-height="543" height="543" data-path="images/console-keys.webp" data-optimize="true" data-opv="3" srcset="https://mintcdn.com/vastai-80aa3a82/xCLov_y0JNSp_qUD/images/console-keys.webp?w=280&fit=max&auto=format&n=xCLov_y0JNSp_qUD&q=85&s=af2398621528faba860dc32e2f34cfed 280w, https://mintcdn.com/vastai-80aa3a82/xCLov_y0JNSp_qUD/images/console-keys.webp?w=560&fit=max&auto=format&n=xCLov_y0JNSp_qUD&q=85&s=e6b2dc98158e1e3eab8bb895383a6ab8 560w, https://mintcdn.com/vastai-80aa3a82/xCLov_y0JNSp_qUD/images/console-keys.webp?w=840&fit=max&auto=format&n=xCLov_y0JNSp_qUD&q=85&s=f1f3ec795d4ab749e9a3724046d2d368 840w, https://mintcdn.com/vastai-80aa3a82/xCLov_y0JNSp_qUD/images/console-keys.webp?w=1100&fit=max&auto=format&n=xCLov_y0JNSp_qUD&q=85&s=9b07500e6c75c3658e9c15b98aceb7b1 1100w, https://mintcdn.com/vastai-80aa3a82/xCLov_y0JNSp_qUD/images/console-keys.webp?w=1650&fit=max&auto=format&n=xCLov_y0JNSp_qUD&q=85&s=48f9e1741d65010495f2fdaca831b656 1650w, https://mintcdn.com/vastai-80aa3a82/xCLov_y0JNSp_qUD/images/console-keys.webp?w=2500&fit=max&auto=format&n=xCLov_y0JNSp_qUD&q=85&s=7e53c7f2d6c67e9fe9e578115c7daaf0 2500w" />
|
||
|
||
|
||
# Referral Program
|
||
Source: https://docs.vast.ai/documentation/reference/referral-program
|
||
|
||
|
||
|
||
<script
|
||
type="application/ld+json"
|
||
dangerouslySetInnerHTML={{
|
||
__html: JSON.stringify({
|
||
"@context": "https://schema.org",
|
||
"@type": "HowTo",
|
||
"name": "How to Use the Vast.ai Referral Program",
|
||
"description": "Turn your audience into earnings by sharing your Vast.ai referral link and earning 3% of their lifetime spend.",
|
||
"step": [
|
||
{
|
||
"@type": "HowToStep",
|
||
"name": "Create a Dedicated Referral Account",
|
||
"text": "To receive cash payouts outside of Vast, you must use a dedicated referral account. If you've ever rented instances or hosted machines on an account, you cannot cash out until your referral earnings exceed your lifetime instance spend. Create a new account specifically for referrals to be payout-eligible."
|
||
},
|
||
{
|
||
"@type": "HowToStep",
|
||
"name": "Get Your Referral Link",
|
||
"text": "Go to Settings and find your Referral Link section. Copy the link to share it with your audience. You can also create template referral links: Open your Templates page, go to My Templates, click the three-dot menu on each template card, and select Copy Referral Link."
|
||
},
|
||
{
|
||
"@type": "HowToStep",
|
||
"name": "Share Your Link",
|
||
"text": "Post your referral link on your site, in videos, blogs, GitHub repos, or wherever your audience is. When someone creates a new client account through your link and buys credits, you get 3% of everything they spend for the lifetime of their account."
|
||
},
|
||
{
|
||
"@type": "HowToStep",
|
||
"name": "Earn and Cash Out",
|
||
"text": "You earn 3% of their lifetime spend as referral credits. Use credits on Vast to rent instances, or withdraw up to 75% as cash via Stripe Connect, PayPal, or Wise. Note: You can't refer yourself or any account connected to you."
|
||
},
|
||
{
|
||
"@type": "HowToStep",
|
||
"name": "Use Templates for Better Conversions (Optional)",
|
||
"text": "Create a public template with pre-configured Docker image, launch modes, onstart script, and environment variables. Share its template referral link. Your audience clicks, Vast loads with your settings, they sign up, and you earn. This is perfect for GitHub repos, videos, and blog posts."
|
||
}
|
||
]
|
||
})
|
||
}}
|
||
/>
|
||
|
||
Turn your audience into earnings! Share your unique Vast.ai referral link (or a public template link), and when someone creates a **new client account** and buys credits, you get **3%** of everything they spend — for the **lifetime** of their account.
|
||
|
||
Better yet, you can cash out **75% of those referral credits** via **Stripe Connect, PayPal, or Wise**.
|
||
|
||
<Warning>
|
||
In order to receive payouts for referrals you MUST create a new account. You are unlikely to be able to receive payouts to any bank account outside Vast if the account you are using for referrals has ever rented instances or hosted machines
|
||
</Warning>
|
||
|
||
## How It Works
|
||
|
||
1. **Share Your Link** – Post it on your site, in videos, blogs, or wherever your audience is.
|
||
2. **They Join & Buy Credits** – New users sign up through your link and purchase credits.
|
||
3. **You Earn** – Get 3% of their lifetime spend as referral credits.
|
||
4. **Cash Out or Spend** – Use credits on Vast, or withdraw up to 75% as cash.
|
||
|
||
<Note>
|
||
If someone spends $1,000 over time, you get $30 in referral credits — forever.
|
||
</Note>
|
||
|
||
## Payout Rules — Important!
|
||
|
||
To **receive cash payouts** (outside of Vast), you **must** use a **dedicated referral account**:
|
||
|
||
* If you’ve **ever rented instances or hosted machines** on an account, you **cannot** cash out until your referral earnings exceed your lifetime instance spend.
|
||
* If you just want credits to rent Vast instances, you can use your main account.
|
||
|
||
**Why a separate account?**<br />
|
||
It keeps your referral earnings clear and makes sure you’re payout-eligible.
|
||
|
||
<Warning>
|
||
**Example:**
|
||
|
||
* You’ve earned \$300 in referral credits.
|
||
* Lifetime charges on your account: \$855.
|
||
* Since $300 < $855, you can't cash out until referral earnings exceed \$855.
|
||
</Warning>
|
||
|
||
## Getting Your Referral Link
|
||
|
||
1. Create a new account for referrals.
|
||
2. Go to [**Settings**](https://cloud.vast.ai/account/) → **Referral Link**.
|
||
|
||
<Frame caption="Account Settings">
|
||
<img src="https://mintcdn.com/vastai-80aa3a82/v_EM_-NdbnPjb9tX/images/console-referral.webp?fit=max&auto=format&n=v_EM_-NdbnPjb9tX&q=85&s=3f50106f47e4ce38d6ad451260c981eb" alt="Referral Link" data-og-width="897" width="897" data-og-height="820" height="820" data-path="images/console-referral.webp" data-optimize="true" data-opv="3" srcset="https://mintcdn.com/vastai-80aa3a82/v_EM_-NdbnPjb9tX/images/console-referral.webp?w=280&fit=max&auto=format&n=v_EM_-NdbnPjb9tX&q=85&s=d95c63596e51a6782d4605d6df35a558 280w, https://mintcdn.com/vastai-80aa3a82/v_EM_-NdbnPjb9tX/images/console-referral.webp?w=560&fit=max&auto=format&n=v_EM_-NdbnPjb9tX&q=85&s=fbe8cf126b2e8d422a7b69f855a78d90 560w, https://mintcdn.com/vastai-80aa3a82/v_EM_-NdbnPjb9tX/images/console-referral.webp?w=840&fit=max&auto=format&n=v_EM_-NdbnPjb9tX&q=85&s=e9b96599887c38aa1616c8ad4679c1ae 840w, https://mintcdn.com/vastai-80aa3a82/v_EM_-NdbnPjb9tX/images/console-referral.webp?w=1100&fit=max&auto=format&n=v_EM_-NdbnPjb9tX&q=85&s=effc5f7d0ac15a155b8960a4385976a8 1100w, https://mintcdn.com/vastai-80aa3a82/v_EM_-NdbnPjb9tX/images/console-referral.webp?w=1650&fit=max&auto=format&n=v_EM_-NdbnPjb9tX&q=85&s=610c70ffa00a0655038a745832b40022 1650w, https://mintcdn.com/vastai-80aa3a82/v_EM_-NdbnPjb9tX/images/console-referral.webp?w=2500&fit=max&auto=format&n=v_EM_-NdbnPjb9tX&q=85&s=9f80482a0089ecfcbf4f6d6f3c0f1e12 2500w" />
|
||
</Frame>
|
||
|
||
3. Copy the link.
|
||
4. Share it!
|
||
|
||
<Note>
|
||
**Note:** You can’t refer yourself or any account connected to you — those won’t earn rewards.
|
||
</Note>
|
||
|
||
## Using Templates for Referrals
|
||
|
||
Want to make referrals even easier? Use [**Templates page**](https://cloud.vast.ai/templates/) to create your template.
|
||
 A template can pre-load:
|
||
|
||
* A Docker image
|
||
* Launch mode(s)
|
||
* Onstart script
|
||
* Environment variables
|
||
|
||
**Example:** The Stable Diffusion template loads the image, sets up Automatic1111 WebUI, starts Jupyter, and preps the environment — ready to go.
|
||
|
||
Create [your own template](/documentation/templates/creating-templates) for a use case, set it to **public**, then share its **template referral link.** The link will have this format:
|
||
|
||
<Note>
|
||
**Note:** You can’t refer yourself or any account connected to you — those won’t earn rewards.
|
||
</Note>
|
||
|
||
Your audience clicks → Vast loads with your settings → they sign up → you earn.
|
||
|
||
**Where to use it:** GitHub repos, videos, blog posts — anywhere your audience needs a “click and run” setup.
|
||
|
||
## Bigger Opportunities
|
||
|
||
For large-scale referral or marketing collaborations, reach us at **[support@vast.ai](mailto:support@vast.ai)**.
|
||
|
||
## Common Questions
|
||
|
||
### Where can I find referral link for my template?
|
||
|
||
Open your **Templates **page -> My Templates. On each template card, click the **three-dot menu **and select **Copy Referral Link**. This gives you a ready-to-share link that includes your referral ID and the template ID — perfect for sharing with your audience. 
|
||
|
||
<Frame caption="Template Card">
|
||
<img src="https://mintcdn.com/vastai-80aa3a82/v_EM_-NdbnPjb9tX/images/console-referral-2.webp?fit=max&auto=format&n=v_EM_-NdbnPjb9tX&q=85&s=d567f7d51aadd108bce8ee0524bf38cf" alt="Three-dot menu" data-og-width="800" width="800" data-og-height="734" height="734" data-path="images/console-referral-2.webp" data-optimize="true" data-opv="3" srcset="https://mintcdn.com/vastai-80aa3a82/v_EM_-NdbnPjb9tX/images/console-referral-2.webp?w=280&fit=max&auto=format&n=v_EM_-NdbnPjb9tX&q=85&s=7250c8af62c99d6d8397a738086446fd 280w, https://mintcdn.com/vastai-80aa3a82/v_EM_-NdbnPjb9tX/images/console-referral-2.webp?w=560&fit=max&auto=format&n=v_EM_-NdbnPjb9tX&q=85&s=cf034d5d3ac19dfbeedd755b99eab918 560w, https://mintcdn.com/vastai-80aa3a82/v_EM_-NdbnPjb9tX/images/console-referral-2.webp?w=840&fit=max&auto=format&n=v_EM_-NdbnPjb9tX&q=85&s=5565e31a83d6400f011b96c9f1c04732 840w, https://mintcdn.com/vastai-80aa3a82/v_EM_-NdbnPjb9tX/images/console-referral-2.webp?w=1100&fit=max&auto=format&n=v_EM_-NdbnPjb9tX&q=85&s=a5aef372324b2a7987e3f673a4ff8fc9 1100w, https://mintcdn.com/vastai-80aa3a82/v_EM_-NdbnPjb9tX/images/console-referral-2.webp?w=1650&fit=max&auto=format&n=v_EM_-NdbnPjb9tX&q=85&s=9c665d0e16eb6f8e47aaabd03a0f7771 1650w, https://mintcdn.com/vastai-80aa3a82/v_EM_-NdbnPjb9tX/images/console-referral-2.webp?w=2500&fit=max&auto=format&n=v_EM_-NdbnPjb9tX&q=85&s=57e2729110f0f1e7aac6b0347f82fbc8 2500w" />
|
||
</Frame>
|
||
|
||
|
||
# Troubleshooting
|
||
Source: https://docs.vast.ai/documentation/reference/troubleshooting
|
||
|
||
|
||
|
||
<script
|
||
type="application/ld+json"
|
||
dangerouslySetInnerHTML={{
|
||
__html: JSON.stringify({
|
||
"@context": "https://schema.org",
|
||
"@type": "HowTo",
|
||
"name": "How to Troubleshoot Common Vast.ai Issues",
|
||
"description": "Solutions for common problems with Vast.ai instances, SSH connections, and account limits.",
|
||
"step": [
|
||
{
|
||
"@type": "HowToStep",
|
||
"name": "Fix Instance Stuck on Scheduling",
|
||
"text": "When you stop an instance, the GPU(s) it was using may get reassigned. When you try to restart, it tries to get those GPU(s) back - that is the scheduling phase. If another high priority job is using any of the same GPU(s), your instance will be stuck until the conflicting jobs are done. We recommend not stopping an instance unless you are ok with the risk of waiting to restart it."
|
||
},
|
||
{
|
||
"@type": "HowToStep",
|
||
"name": "Resolve Instances Stopping Automatically",
|
||
"text": "Check your credit balance. If it hits zero or below, your instances will be stopped automatically. Add more credits to your account to keep instances running."
|
||
},
|
||
{
|
||
"@type": "HowToStep",
|
||
"name": "Fix spend_rate_limit Error",
|
||
"text": "There is a spend rate limit for new accounts. The limit is extremely small for unverified accounts, so make sure to verify your email first. The limit increases over time automatically. Try a cheaper instance type or wait a few hours. If still having trouble, use the online support chat in the lower right."
|
||
},
|
||
{
|
||
"@type": "HowToStep",
|
||
"name": "Fix SSH Password Prompt",
|
||
"text": "There is no SSH password - we use SSH key authentication. If SSH asks for a password, there is something wrong with your SSH key or client configuration. On Ubuntu or Mac: 1) Generate keypair with ssh-keygen -t rsa 2) Load the key with ssh-add; ssh-add -l 3) Get public key with cat ~/.ssh/id_rsa.pub 4) Copy the entire output (including ssh-rsa prefix and user@host suffix) and paste into your Keys section."
|
||
}
|
||
]
|
||
})
|
||
}}
|
||
/>
|
||
|
||
### I stopped my instance, and now when I try to restart it the status is stuck on "scheduling". What is wrong?
|
||
|
||
When you stop an instance, the gpu(s) it was using may get reassigned. When you later then try to restart the instance, it tries to get those gpu(s) back - that is the "scheduling" phase. If another high priority job is currently using any of the same gpu(s), your instance will be stuck in "scheduling" phase until the conflicting jobs are done. We know this is not ideal, and we are working on ways to migrate containers across gpus and machines, but until then we recommend not stopping an instance unless you are ok with the risk of waiting a while to restart it."
|
||
|
||
### All my instances keep stopping, switching to inactive status, even though I didn't press the stop button. What's going on?
|
||
|
||
Check your credit balance. If it hits zero or below, your instances will be stopped automatically.
|
||
|
||
### I keep getting this error: spend\_rate\_limit. What's going on?
|
||
|
||
There is a spend rate limit for new accounts. The limit is extremely small for unverified accounts, so make sure to verify your email. The limit increases over time, so try a cheaper instance type or wait a few hours. If you are still having trouble, use the online support chat in the lower right.
|
||
|
||
### I tried to connect with ssh and it asked for a password. What is the password?
|
||
|
||
There is no ssh password, we use ssh key authentication. If ssh asks for a password, typically this means there is something wrong with the ssh key that you entered or your ssh client is misconfigured.
|
||
|
||
On Ubuntu or Mac, first you need to generate an rsa ssh public/private keypair using the command:
|
||
|
||
```text theme={null}
|
||
ssh-keygen -t rsa
|
||
```
|
||
|
||
Next you may need to force the daemon to load the new private key, and confirm it's loaded:
|
||
|
||
```text theme={null}
|
||
ssh-add; ssh-add -l
|
||
```
|
||
|
||
Then get the contents of the public key with:
|
||
|
||
```text theme={null}
|
||
cat ~/.ssh/id_rsa.pub
|
||
```
|
||
|
||
Copy the entire output to your clipboard, then paste that into a new SSH Key in your [Keys section](https://cloud.vast.ai/manage-keys/). The key text *includes* the opening "ssh-rsa" part and the ending "user\@something" part. If you don't copy the entire thing, it won't work.
|
||
|
||
Example SSH key text:
|
||
|
||
```text theme={null}
|
||
ssh-rsa AAAAB3NzaC1yc2EAAAADAQABAAABAQDdxWwxwN5Lz7ubkMrxM5FCHhVzOnZuLt5FHi7J8zFXCJHfr96w+ccBOBo2rtBBTTRDLnJjIsKLgBcC3+jGyZhpUNMFRVIJ7MeqdEHgHFvUUV/uBkb7RjbyyFcb4BCSYNggUZkMNNoNgEa3aqtBSzt47bnuGqqszs9bfDCaPFtr9Wo0b8p4IYil/gfOYBkuSVwkqrBCWrg53/+T2rAk/02mWNHXyBktJAu1q7qTWcyO68JTDd0sa+4apSu+CsJMBJs3FcDDRAl3bcpiKwRbCkQ+N6sol4xDV3zQRebUc98CJPh04Gnc41W02lmdqGL2XG5U/rV8/JM7CawKiIz3dbkv bob@velocity
|
||
```
|
||
|
||
###
|
||
|
||
|
||
# Architecture
|
||
Source: https://docs.vast.ai/documentation/serverless/architecture
|
||
|
||
Understand the architecture of Vast.ai Serverless, including the Serverless System, GPU Instances, and User (Client Application). Learn how the system works, how to use the routing process, and how to create Worker Groups.
|
||
|
||
The Vast.ai Serverless solution manages groups of GPU instances to efficiently serve applications, automatically scaling up or down based on load metrics defined by the Vast PyWorker. It streamlines instance management, performance measurement, and error handling.
|
||
|
||
## Endpoints and Worker Groups
|
||
|
||
The Serverless system needs to be configured at two levels:
|
||
|
||
* **Endpoints:** The highest level clustering of instances for the Serverless system, consisting of a named endpoint string, a collection of Worker groups, and hyperparameters.
|
||
* **Worker Groups**: A lower level organization that lives within an Endpoint. It consists of a [template](/documentation/instances/templates) (with extra filters for search), a set of GPU instances (workers) created from that template, and hyperparameters. Multiple Worker Groups can exist within an Endpoint.
|
||
|
||
Having two-level scaling provides several benefits:
|
||
|
||
1. **Comparing Performance Metrics Across Hardware**: Suppose you want to run the same templates on different hardware to compare performance metrics. You can create several groups, each configured to run on specific hardware. By leaving this setup running for a period of time, you can review the metrics and select
|
||
the most suitable hardware for your users' needs.
|
||
2. **Smooth Rollout of a New Model**: If you're using TGI to handle LLM inference with LLama3 and want to transition to LLama4, you can do so gradually. For a smooth rollout where only 10% of user requests are handled by LLama4, you can create a new Worker Group under the existing Endpoint. Let it run for a while,
|
||
review the metrics, and then fully switch to LLama4 when ready.
|
||
3. **Handling Diverse Workloads with Multiple Models**: You can create an Endpoint to manage LLM inference using TGI. Within this group, you can set up multiple
|
||
Worker Groups, each using a different LLM to serve requests. This approach is beneficial when you need a few resource-intensive models to handle most requests, while smaller, more cost-effective models manage overflow during workload spikes.
|
||
|
||
It's important to note that having multiple Worker Groups within a single Endpoint is not always necessary. For most users, a single Worker Group within an Endpoint provides an optimal setup.
|
||
|
||
You can create Worker Groups using our [Serverless-Compatible Templates](/documentation/serverless/text-generation-inference-tgi), which are customized versions of popular templates on Vast, designed to be used on the serverless system.
|
||
|
||
## System Architecture
|
||
|
||
The system architecture for an application using Vast.ai Serverless includes the following components:
|
||
|
||
* **Serverless System** 
|
||
* **GPU Instances** 
|
||
* **User (Client Application)**
|
||
|
||
<Frame caption="Serverless Architecture">
|
||
<img src="https://mintcdn.com/vastai-80aa3a82/_4z8utTktrZmQOU6/images/serverless-architecture.webp?fit=max&auto=format&n=_4z8utTktrZmQOU6&q=85&s=10a86ac6eb9418b9083243255796e4d7" alt="Serverless Architecture" data-og-width="1205" width="1205" data-og-height="989" height="989" data-path="images/serverless-architecture.webp" data-optimize="true" data-opv="3" srcset="https://mintcdn.com/vastai-80aa3a82/_4z8utTktrZmQOU6/images/serverless-architecture.webp?w=280&fit=max&auto=format&n=_4z8utTktrZmQOU6&q=85&s=a24a287ab03c3ab46e22c540befcd430 280w, https://mintcdn.com/vastai-80aa3a82/_4z8utTktrZmQOU6/images/serverless-architecture.webp?w=560&fit=max&auto=format&n=_4z8utTktrZmQOU6&q=85&s=a38d6bde804407e9a88e49beabd353ec 560w, https://mintcdn.com/vastai-80aa3a82/_4z8utTktrZmQOU6/images/serverless-architecture.webp?w=840&fit=max&auto=format&n=_4z8utTktrZmQOU6&q=85&s=52174d287cef7c202fbf9ea506ee97bb 840w, https://mintcdn.com/vastai-80aa3a82/_4z8utTktrZmQOU6/images/serverless-architecture.webp?w=1100&fit=max&auto=format&n=_4z8utTktrZmQOU6&q=85&s=6365bb774ed072e1987c7f4ffbf8e2c0 1100w, https://mintcdn.com/vastai-80aa3a82/_4z8utTktrZmQOU6/images/serverless-architecture.webp?w=1650&fit=max&auto=format&n=_4z8utTktrZmQOU6&q=85&s=175da80c04658fe02aba39c4da20dbd5 1650w, https://mintcdn.com/vastai-80aa3a82/_4z8utTktrZmQOU6/images/serverless-architecture.webp?w=2500&fit=max&auto=format&n=_4z8utTktrZmQOU6&q=85&s=7b16f69ea58b0c3d3f27a103932355ac 2500w" />
|
||
</Frame>
|
||
|
||
### Example Workflow 
|
||
|
||
1. A client initiates a request to the Serverless system by invoking the `https://run.vast.ai/route/` endpoint.
|
||
2. The Serverless system returns a suitable worker address. In the example above, this would be `ip_address_2` since that GPU instance is 'Ready'.
|
||
3. The client calls the GPU instance's specific API endpoint, passing the authentication info returned by `/route/` along with payload parameters.
|
||
4. The PyWorker on the GPU instance receives the payload and forwards it to the ML model. After model inference, the PyWorker receives the results.
|
||
5. The PyWorker sends the model results back to the client.
|
||
6. Independently and concurrently, each PyWorker in the Endpoint sends its operational metrics to the Serverless system, which it uses to make scaling decisions.
|
||
|
||
### Two-Step Routing Process
|
||
|
||
This 2-step routing process is used for security and flexibility. By having the client send payloads directly to the GPU instances, your payload information is never stored on Vast servers.
|
||
|
||
The `/route/` endpoint signs its messages with a public key available at `https://run.vast.ai/pubkey/`, allowing the GPU worker to validate requests and prevent unauthorized usage.
|
||
|
||
|
||
# Comfy UI
|
||
Source: https://docs.vast.ai/documentation/serverless/comfy-ui
|
||
|
||
Learn how to use Comfy UI with Vast.ai Serverless for image generation workflows.
|
||
|
||
The [Comfy UI serverless template](https://cloud.vast.ai/?template_id=f8aac491656a1d1040e7dfc5f8fcf059) can be used to run Comfy stable diffusion models on Vast GPU instances. This page documents required environment variables and endpoints to get started.
|
||
|
||
A full PyWorker and Client implementation can be found [here](https://github.com/vast-ai/pyworker/tree/main).
|
||
|
||
# Environment Variables
|
||
|
||
* `HF_TOKEN`(string): HuggingFace API token with read permissions, used to download gated models. Read more about HuggingFace tokens [here](https://huggingface.co/docs/hub/en/security-tokens).
|
||
* `COMFY_MODEL`(string): Text2Image model being used. 
|
||
* options: `"sd3"`, `"flux"`
|
||
|
||
# Endpoints
|
||
|
||
## **/**prompt/
|
||
|
||
The ComfyUI defined endpoint to generate an image. After receving a GPU worker address from the `/route/` endpoint, a `/prompt/` endpoint would have the following structure.
|
||
|
||
### Inputs
|
||
|
||
For both "sd3" and "flux": 
|
||
|
||
Payload:
|
||
|
||
* `prompt`(string): The model prompt used to generate the image.
|
||
* `width`(int): Width in pixels of the resulting generated image.
|
||
* `height`(int): Height in pixels of the resulting generated image.
|
||
* `steps`(int): Number of diffusion steps taken during image generation. The assumed default is 28.
|
||
* `seed`(int): The value used to initialize the random noise pattern in the diffusion model. Used for reproducability. 
|
||
|
||
Auth\_data:
|
||
|
||
* `signature`(string): A cryptographic string that authenticates the url, cost, and reqnum fields in the response, proving they originated from the server. Clients can use this signature, along with the server's public key, to verify that these specific details have not been tampered with.
|
||
* `cost`(float): The estimated compute resources for the request. The units of this cost are defined by the PyWorker. 
|
||
* `endpoint`(string): Name of the Endpoint.
|
||
* `reqnum`(int): The request number corresponding to this worker instance. Note that workers expect to receive requests in approximately the same order as these reqnums, but some flexibility is allowed due to potential out-of-order requests caused by concurrency or small delays on the proxy server.
|
||
* `url`(string): The address of the worker instance to send the request to.
|
||
|
||
```json JSON icon="js" theme={null}
|
||
{
|
||
"payload": {
|
||
"prompt": "a majestic lion with a flowing mane, fantasy art style",
|
||
"width": 1024,
|
||
"height": 1024,
|
||
"steps": 28,
|
||
"seed": 55512345
|
||
},
|
||
"auth_data": {
|
||
"signature": "mock_signature_from_routing_service_abc123",
|
||
"cost": 100,
|
||
"endpoint": "comfyui-flux-default",
|
||
"reqnum": "req_789xyz",
|
||
"url": "http://127.0.0.1:8188/" //this is the base URL of the worker, 'prompt/' is appended to the end
|
||
}
|
||
}
|
||
```
|
||
|
||
### Outputs
|
||
|
||
* `prompt_id`(string): A unique identifier assigned by the ComfyUI instance for this specific workflow execution or prompt.
|
||
* `number`(int): A sequential number assigned by the ComfyUI instance to this prompt. This number reflects the order in which prompts are received or processed by the worker.
|
||
* `node_errors`(object): An object that contains details about any errors that occurred within specific nodes during the workflow execution.
|
||
* `outputs`(object): An object containing the outputs generated by specific nodes in the ComfyUI workflow. The keys of this object are the string identifiers of the nodes that produced output
|
||
|
||
```json JSON icon="js" theme={null}
|
||
{
|
||
"prompt_id": "f9e0a3c2-0b7a-4f8e-8c1d-5a7b9e2f3c0a",
|
||
"number": 7,
|
||
"node_errors": {},
|
||
"outputs": {
|
||
"9": {
|
||
"images": [
|
||
{
|
||
"filename": "ComfyUI_00007_.png",
|
||
"subfolder": "",
|
||
"type": "output"
|
||
}
|
||
]
|
||
}
|
||
}
|
||
}
|
||
```
|
||
|
||
## /custom\_workflow/
|
||
|
||
Allows a client to send a complete, user-defined ComfyUI workflow (in JSON format) to the server for execution. It includes the `payload` and `auth_data` objects, but modified according to the user's design.
|
||
|
||
The workflow is a direct ComfyUI graph. Here is an example, similar to the SD3 workflow.
|
||
|
||
```json JSON icon="js" theme={null}
|
||
{
|
||
"payload": {
|
||
"custom_fields": {
|
||
"steps": 20,
|
||
"width": 512,
|
||
"height": 512
|
||
},
|
||
"workflow": {
|
||
"3": {
|
||
"inputs": {
|
||
"seed": 156680208700286,
|
||
"steps": 20,
|
||
"cfg": 8,
|
||
"sampler_name": "euler",
|
||
"scheduler": "normal",
|
||
"denoise": 1,
|
||
"model": ["4", 0],
|
||
"positive": ["6", 0],
|
||
"negative": ["7", 0],
|
||
"latent_image": ["5", 0]
|
||
},
|
||
"class_type": "KSampler"
|
||
},
|
||
"4": {
|
||
"inputs": {
|
||
"ckpt_name": "sd3_medium_incl_clips_t5xxlfp16.safetensors"
|
||
},
|
||
"class_type": "CheckpointLoaderSimple"
|
||
},
|
||
"5": {
|
||
"inputs": {
|
||
"width": 512,
|
||
"height": 512,
|
||
"batch_size": 1
|
||
},
|
||
"class_type": "EmptyLatentImage"
|
||
},
|
||
"6": {
|
||
"inputs": {
|
||
"text": "a futuristic cityscape at dusk, neon lights, flying vehicles",
|
||
"clip": ["4", 1]
|
||
},
|
||
"class_type": "CLIPTextEncode"
|
||
},
|
||
"7": {
|
||
"inputs": {
|
||
"text": "blurry, low quality, ugly",
|
||
"clip": ["4", 1]
|
||
},
|
||
"class_type": "CLIPTextEncode"
|
||
},
|
||
"8": {
|
||
"inputs": {
|
||
"samples": ["3", 0],
|
||
"vae": ["4", 2]
|
||
},
|
||
"class_type": "VAEDecode"
|
||
},
|
||
"9": {
|
||
"inputs": {
|
||
"filename_prefix": "CustomWorkflowOutput",
|
||
"images": ["8", 0]
|
||
},
|
||
"class_type": "SaveImage"
|
||
}
|
||
}
|
||
},
|
||
"auth_data": {
|
||
"signature": "mock_signature_for_custom_workflow_def456",
|
||
"cost": 150,
|
||
"endpoint": "comfyui-sd3-custom",
|
||
"reqnum": "req_101112jkl",
|
||
"url": "http://127.0.0.1:8188/"
|
||
}
|
||
}
|
||
```
|
||
|
||
|
||
# Create Endpoints and Workergroups
|
||
Source: https://docs.vast.ai/documentation/serverless/create-endpoints-and-workergroups
|
||
|
||
Learn how to create endpoints and workergroups in Vast.ai Serverless. Understand the inputs, outputs, and examples for creating endpoints and workergroups.
|
||
|
||
The `/endptjobs/` and `/workergroups/` endpoints calls on the webserver to create a new Endpoint and Workergroup.
|
||
|
||
# POST [https://console.vast.ai/api/v0/endptjobs/](https://console.vast.ai/api/v0/endptjobs/)
|
||
|
||
## Inputs
|
||
|
||
* `api_key`(string): The Vast API key associated with the account that controls the Endpoint. The key can also be placed in the header as an Authorization: Bearer.
|
||
* `endpoint_name`(string): The name given to the endpoint that is created.
|
||
* `min_load`(integer): A minimum baseline load (measured in tokens/second for LLMs) that the serverless engine will assume your Endpoint needs to handle, regardless of actual measured traffic. 
|
||
* `target_util` (float): A ratio that determines how much spare capacity (headroom) the serverless engine maintains.
|
||
* `cold_mult`(float): A multiplier applied to your target capacity for longer-term planning (1+ hours). This parameter controls how much extra capacity the serverless engine will plan for in the future compared to immediate needs.
|
||
* `cold_workers` (integer): The minimum number of workers that must be kept in a "ready quick" state before the serverless engine is allowed to destroy any workers. 
|
||
* `max_workers` (integer): A hard upper limit on the total number of worker instances (ready, stopped, loading, etc.) that your endpoint can have at any given time.
|
||
|
||
```json JSON icon="js" theme={null}
|
||
{
|
||
"api_key": "YOUR_VAST_API_KEY",
|
||
"endpoint_name": "YOUR_ENDPOINT_NAME",
|
||
"min_load": 10,
|
||
"target_util": 0.9,
|
||
"cold_mult": 2.0,
|
||
"cold_workers": 5,
|
||
"max_workers": 20
|
||
}
|
||
```
|
||
|
||
## Outputs
|
||
|
||
### On Successful Worker Return
|
||
|
||
* `success`(bool): True on successful creation of Endpoint, False if otherwise.
|
||
* `result`(int): The endpoint\_id of the newly created Endpoint. 
|
||
|
||
```json JSON icon="js" theme={null}
|
||
{
|
||
"success": true,
|
||
"result": 1234
|
||
}
|
||
```
|
||
|
||
### On Failure to Find Ready Worker
|
||
|
||
* `success`(bool): True on successful creation of Endpoint, False if otherwise.
|
||
* `error`(string): The type of error status.
|
||
* `msg` (string): The error message related to the error.
|
||
|
||
```json JSON icon="js" theme={null}
|
||
{
|
||
"success": false,
|
||
"error": "auth_error",
|
||
"msg": "Invalid user key"
|
||
}
|
||
```
|
||
|
||
## Example: Creating an Endpoint with cURL
|
||
|
||
```curl Curl icon="cube" theme={null}
|
||
curl --location 'https://console.vast.ai/api/v0/endptjobs/' \
|
||
--header 'Accept: application/json' \
|
||
--header 'Content-Type: application/json' \
|
||
--header 'Authorization: Bearer MY_VAST_TOKEN_HERE' \
|
||
--data '{
|
||
"min_load": 10,
|
||
"target_util": 0.9,
|
||
"cold_mult": 2.5,
|
||
"cold_workers": 5,
|
||
"max_workers": 20,
|
||
"endpoint_name": "my-endpoint"
|
||
}'
|
||
```
|
||
|
||
## Example: Creating an Endpoint with the Vast CLI
|
||
|
||
```none Terminal theme={null}
|
||
vastai create endpoint --min_load 10 --target_util 0.9 --cold_mult 2.0 --cold_workers 5 --max_workers 20 --endpoint_name "my-endpoint"
|
||
```
|
||
|
||
***
|
||
|
||
# POST [https://console.vast.ai/api/v0/workergroups/](https://console.vast.ai/api/v0/workergroups/)
|
||
|
||
## Inputs
|
||
|
||
**Required:**
|
||
|
||
* `api_key`(string): The Vast API key associated with the account that controls the Endpoint. The key can also be placed in the header as an Authorization: Bearer.
|
||
* `endpoint_name`(string): The name of the Endpoint that the Workergroup will be created under.
|
||
|
||
AND one of the following:
|
||
|
||
* `template_hash` (string): The hexadecimal string that identifies a particular template. 
|
||
|
||
OR
|
||
|
||
* `template_id` (integer): The unique id that identifes a template.
|
||
|
||
NOTE: If you use either the template hash or id, you can skip `search_params`, as they are automatically inferred from the template. 
|
||
|
||
OR
|
||
|
||
* `search_params` (string): A query string that specifies the hardware and performance criteria for filtering GPU offers in the vast.ai marketplace.
|
||
* `launch_args` (string): A command-line style string containing additional parameters for instance creation that will be parsed and applied when the autoscaler creates new workers. This allows you to customize instance configuration beyond what's specified in templates.
|
||
|
||
**Optional** (Default values will be assigned if not specified):
|
||
|
||
* `min_load`(integer): A minimum baseline load (measured in tokens/second for LLMs) that the serverless engine will assume your Endpoint needs to handle, regardless of actual measured traffic. Default value is 1.0.
|
||
* `target_util` (float): A ratio that determines how much spare capacity (headroom) the serverless engine maintains. Default value is 0.9.
|
||
* `cold_mult`(float): A multiplier applied to your target capacity for longer-term planning (1+ hours). This parameter controls how much extra capacity the serverless engine will plan for in the future compared to immediate needs. Default value is 3.0.
|
||
* `test_workers` (integer): The number of different physical machines that a Workergroup should test during its initial "exploration" phase to gather performance data before transitioning to normal demand-based scaling. Default value is 3.
|
||
* `gpu_ram` (integer): The amount of GPU memory (VRAM) in gigabytes that your model or workload requires to run. This parameter tells the serverless engine how much GPU memory your model needs. Default value is 24.
|
||
|
||
```json JSON icon="js" theme={null}
|
||
{
|
||
"api_key": "YOUR_VAST_API_KEY",
|
||
"endpoint_name": "YOUR_ENDPOINT_NAME",
|
||
"template_hash": "YOUR_TEMPLATE_HASH",
|
||
"min_load": 1.0,
|
||
"target_util": 0.9,
|
||
"cold_mult": 3.0,
|
||
"test_workers": 3,
|
||
"gpu_ram": 24
|
||
}
|
||
```
|
||
|
||
## Outputs
|
||
|
||
### On Successful Worker Return
|
||
|
||
* `success`(bool): True on successful creation of Workergroup, False if otherwise.
|
||
* `result`(int): The autogroup\_id of the newly created Workergroup. 
|
||
|
||
```json JSON icon="js" theme={null}
|
||
{
|
||
"success": true,
|
||
"result": 789
|
||
}
|
||
```
|
||
|
||
### On Failure to Find Ready Worker
|
||
|
||
* `success`(bool): True on successful creation of Workergroup, False if otherwise.
|
||
* `error`(string): The type of error status.
|
||
* `msg` (string): The error message related to the error.
|
||
|
||
```json JSON icon="js" theme={null}
|
||
{
|
||
"success": false,
|
||
"error": "auth_error",
|
||
"msg": "Invalid user key"
|
||
}
|
||
```
|
||
|
||
## Example: Creating a Workergroup with cURL
|
||
|
||
```curl Curl icon="cube" theme={null}
|
||
curl --location 'https://console.vast.ai/api/v0/workergroups/' \
|
||
--header 'Accept: application/json' \
|
||
--header 'Content-Type: application/json' \
|
||
--header 'Authorization: Bearer MY_ENDPOINT_KEY' \
|
||
--data '{
|
||
"endpoint_name": "MY_ENDPOINT",
|
||
"template_hash": "MY_TEMPLATE_HASH",
|
||
"min_load": 10,
|
||
"target_util": 0.9,
|
||
"cold_mult": 3.0,
|
||
"test_workers": 3,
|
||
"gpu_ram": 24
|
||
}'
|
||
```
|
||
|
||
## Example: Creating an Endpoint with the Vast CLI
|
||
|
||
```none Terminal theme={null}
|
||
vastai create workergroup --endpoint_name "MY_ENDPOINT" --template_hash "MY_TEMPLATE_HASH" --min_load 10 --target_util 0.9 --cold_mult 3.0 --test_workers 3 --gpu_ram 24
|
||
```
|
||
|
||
|
||
# Creating New PyWorkers
|
||
Source: https://docs.vast.ai/documentation/serverless/creating-new-pyworkers
|
||
|
||
Learn how to create a new PyWorker for Vast.ai Serverless. Understand the structure of a PyWorker, the required files, and how to implement the server.py module.
|
||
|
||
This guide walks you through the structure of a PyWorker. By the end, you will know all of the pieces of a PyWorker and be able to create your own.  
|
||
|
||
<Note>
|
||
Vast has pre-made templates with PyWorkers already built-in. Search the [templates section](/documentation/templates/quickstart) first to see if a supported template works for your use case. 
|
||
</Note>
|
||
|
||
[This repo](https://github.com/vast-ai/pyworker/tree/main) contains all the components of a PyWorker. Simply for pedagogical purposes, the `workers/hello_world/` PyWorker is created for an LLM server with two API endpoints:
|
||
|
||
1. `/generate`: generates a LLM response and sends a JSON response
|
||
2. `/generate_stream`: streams a response one token at a time
|
||
|
||
Both of these endpoints take the same API JSON payload:
|
||
|
||
```json JSON icon="js" theme={null}
|
||
{
|
||
"prompt": String,
|
||
"max_response_tokens": Number | null
|
||
}
|
||
```
|
||
|
||
***
|
||
|
||
## Structure
|
||
|
||
All PyWorkers have four files:
|
||
|
||
```text Text theme={null}
|
||
.
|
||
└── workers
|
||
└── hello_world
|
||
├── __init__.py # blank file
|
||
├── data_types.py # contains data types representing model API endpoints
|
||
├── server.py # contains endpoint handlers
|
||
└── test_load.py # script for load testing
|
||
|
||
```
|
||
|
||
All of the classes follow strict type hinting. It is recommended that you type hint all of your functions. This will allow your IDE or VSCode with `pyright` plugin to find any type errors in your implementation. You can also install `pyright` with `npm install pyright` and run `pyright` in the root of the project to find any type errors.
|
||
|
||
### \_\_init\_\_.py
|
||
|
||
The `__init__.py`file is left blank. This tells the Python interpreter to treat the hello\_world directory as a package. This allows us to import modules from within the directory.  
|
||
|
||
### data\_types.py
|
||
|
||
This file defines how the PyWorker interacts with the ML model, and must adhere to the common framework laid out in `lib/data_types.py`. The file implements the specific request structure and payload handling that will be used in `server.py`. 
|
||
|
||
Data handling classes must inherit from `lib.data_types.ApiPayload`. `ApiPayload` is an abstract class that needs several functions defined for it. Below is an example implementation from the hello\_world PyWorker that shows how to use the `ApiPayload` class. 
|
||
|
||
```python icon="python" Python theme={null}
|
||
import dataclasses
|
||
import random
|
||
from typing import Dict, Any
|
||
|
||
from transformers import AutoTokenizer # used to count tokens in a prompt
|
||
import nltk # used to download a list of all words to generate a random prompt and benchmark the LLM model
|
||
|
||
from lib.data_types import ApiPayload
|
||
|
||
nltk.download("words")
|
||
WORD_LIST = nltk.corpus.words.words()
|
||
|
||
#### you can use any tokenizer that fits your LLM. `openai-gpt` is free to use and is a good fit for most LLMs
|
||
tokenizer = AutoTokenizer.from_pretrained("openai-community/openai-gpt")
|
||
|
||
@dataclasses.dataclass
|
||
class InputData(ApiPayload):
|
||
prompt: str
|
||
max_response_tokens: int
|
||
|
||
@classmethod
|
||
def for_test(cls) -> "ApiPayload":
|
||
"""defines how create a payload for load testing"""
|
||
prompt = " ".join(random.choices(WORD_LIST, k=int(250)))
|
||
return cls(prompt=prompt, max_response_tokens=300)
|
||
|
||
def generate_payload_json(self) -> Dict[str, Any]:
|
||
"""defines how to convert an ApiPayload to JSON that will be sent to model API"""
|
||
return dataclasses.asdict(self)
|
||
|
||
def count_workload(self) -> float:
|
||
"""defines how to calculate workload for a payload"""
|
||
return len(tokenizer.tokenize(self.prompt))
|
||
|
||
@classmethod
|
||
def from_json_msg(cls, json_msg: Dict[str, Any]) -> "InputData":
|
||
"""
|
||
defines how to transform JSON data to AuthData and payload type,
|
||
in this case `InputData` defined above represents the data sent to the model API.
|
||
AuthData is data generated by the serverless system in order to authenticate payloads.
|
||
In this case, the transformation is simple and 1:1. That is not always the case. See comfyui's PyWorker
|
||
for more complicated examples
|
||
"""
|
||
errors = {}
|
||
for param in inspect.signature(cls).parameters:
|
||
if param not in json_msg:
|
||
errors[param] = "missing parameter"
|
||
if errors:
|
||
raise JsonDataException(errors)
|
||
return cls(
|
||
**{
|
||
k: v
|
||
for k, v in json_msg.items()
|
||
if k in inspect.signature(cls).parameters
|
||
}
|
||
)
|
||
|
||
```
|
||
|
||
Your specific use case could require additional classes or methods. Reference the TGI worker as another example.
|
||
|
||
### server.py
|
||
|
||
For every ML model API endpoint you want to use, you must implement an `EndpointHandler`. This class handles incoming requests, processes them, sends them to the model API server, and finally returns an HTTP response with the model's results. `EndpointHandler` has several abstract functions that must be implemented. Here, we implement the `/generate` endpoint functionality for the PyWorker by creating the `GenerateHandler` class that inherits from `EndpointHandler`.
|
||
|
||
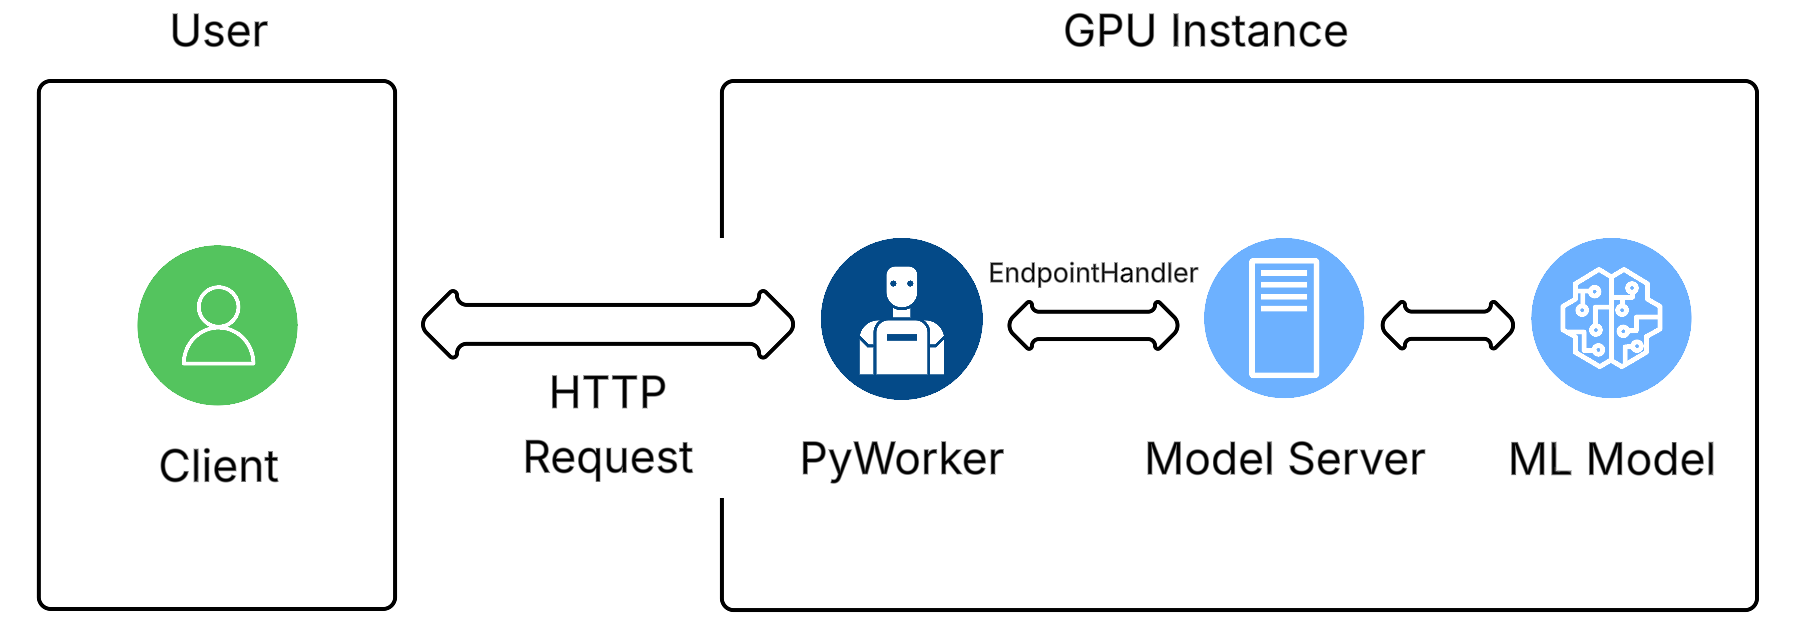
|
||
|
||
```python icon="python" Python theme={null}
|
||
|
||
"""
|
||
AuthData is a dataclass that represents Authentication data sent from the serverless system to the client requesting a route.
|
||
When a user requests a route, see Vast's Serverless documentation for how routing and AuthData
|
||
work.
|
||
When a user receives a route for this PyWorker, they'll call PyWorkers API with the following JSON:
|
||
{
|
||
auth_data: AuthData,
|
||
payload : InputData # defined above
|
||
}
|
||
"""
|
||
from aiohttp import web
|
||
|
||
from lib.data_types import EndpointHandler, JsonDataException
|
||
from lib.server import start_server
|
||
from .data_types import InputData
|
||
|
||
#### This class is the implementer for the '/generate' endpoint of model API
|
||
@dataclasses.dataclass
|
||
class GenerateHandler(EndpointHandler[InputData]):
|
||
|
||
@property
|
||
def endpoint(self) -> str:
|
||
# the API endpoint
|
||
return "/generate"
|
||
|
||
@classmethod
|
||
def payload_cls(cls) -> Type[InputData]:
|
||
"""this function should just return ApiPayload subclass used by this handler"""
|
||
return InputData
|
||
|
||
def generate_payload_json(self, payload: InputData) -> Dict[str, Any]:
|
||
"""
|
||
defines how to convert `InputData` defined above, to
|
||
JSON data to be sent to the model API. This function too is a simple dataclass -> JSON, but
|
||
can be more complicated, See comfyui for an example
|
||
"""
|
||
return dataclasses.asdict(payload)
|
||
|
||
def make_benchmark_payload(self) -> InputData:
|
||
"""
|
||
defines how to generate an InputData for benchmarking. This needs to be defined in only
|
||
one EndpointHandler, the one passed to the backend as the benchmark handler. Here we use the .for_test()
|
||
method on InputData. However, in some cases you might need to fine tune your InputData used for
|
||
benchmarking to closely resemble the average request users call the endpoint with in order to get the best
|
||
performance
|
||
"""
|
||
return InputData.for_test()
|
||
|
||
async def generate_client_response(
|
||
self, client_request: web.Request, model_response: ClientResponse
|
||
) -> Union[web.Response, web.StreamResponse]:
|
||
"""
|
||
defines how to convert a model API response to a response to PyWorker client
|
||
"""
|
||
_ = client_request
|
||
match model_response.status:
|
||
case 200:
|
||
log.debug("SUCCESS")
|
||
data = await model_response.json()
|
||
return web.json_response(data=data)
|
||
case code:
|
||
log.debug("SENDING RESPONSE: ERROR: unknown code")
|
||
return web.Response(status=code)
|
||
|
||
|
||
```
|
||
|
||
We also handle `GenerateStreamHandler` for streaming responses. It is identical to `GenerateHandler`, except that this implementation creates a web response:
|
||
|
||
```python icon="python" Python theme={null}
|
||
class GenerateStreamHandler(EndpointHandler[InputData]):
|
||
@property
|
||
def endpoint(self) -> str:
|
||
return "/generate_stream"
|
||
|
||
@classmethod
|
||
def payload_cls(cls) -> Type[InputData]:
|
||
return InputData
|
||
|
||
def generate_payload_json(self, payload: InputData) -> Dict[str, Any]:
|
||
return dataclasses.asdict(payload)
|
||
|
||
def make_benchmark_payload(self) -> InputData:
|
||
return InputData.for_test()
|
||
|
||
async def generate_client_response(
|
||
self, client_request: web.Request, model_response: ClientResponse
|
||
) -> Union[web.Response, web.StreamResponse]:
|
||
match model_response.status:
|
||
case 200:
|
||
log.debug("Streaming response...")
|
||
res = web.StreamResponse()
|
||
res.content_type = "text/event-stream"
|
||
await res.prepare(client_request)
|
||
async for chunk in model_response.content:
|
||
await res.write(chunk)
|
||
await res.write_eof()
|
||
log.debug("Done streaming response")
|
||
return res
|
||
case code:
|
||
log.debug("SENDING RESPONSE: ERROR: unknown code")
|
||
return web.Response(status=code)
|
||
|
||
|
||
```
|
||
|
||
You can now instantiate a Backend and use it to handle requests.
|
||
|
||
```python icon="python" Python theme={null}
|
||
from lib.backend import Backend, LogAction
|
||
|
||
#### the url and port of model API
|
||
MODEL_SERVER_URL = "http://0.0.0.0:5001"
|
||
|
||
|
||
#### This is the log line that is emitted once the server has started
|
||
MODEL_SERVER_START_LOG_MSG = "server has started"
|
||
MODEL_SERVER_ERROR_LOG_MSGS = [
|
||
"Exception: corrupted model file" # message in the logs indicating the unrecoverable error
|
||
]
|
||
|
||
backend = Backend(
|
||
model_server_url=MODEL_SERVER_URL,
|
||
# location of model log file
|
||
model_log_file=os.environ["MODEL_LOG"],
|
||
# for some model backends that can only handle one request at a time, be sure to set this to False to
|
||
# let PyWorker handling queueing requests.
|
||
allow_parallel_requests=True,
|
||
# give the backend an EndpointHandler instance that is used for benchmarking
|
||
# number of benchmark run and number of words for a random benchmark run are given
|
||
benchmark_handler=GenerateHandler(benchmark_runs=3, benchmark_words=256),
|
||
# defines how to handle specific log messages. See docstring of LogAction for details
|
||
log_actions=[
|
||
(LogAction.ModelLoaded, MODEL_SERVER_START_LOG_MSG),
|
||
(LogAction.Info, '"message":"Download'),
|
||
*[
|
||
(LogAction.ModelError, error_msg)
|
||
for error_msg in MODEL_SERVER_ERROR_LOG_MSGS
|
||
],
|
||
],
|
||
)
|
||
|
||
#### this is a simple ping handler for PyWorker
|
||
async def handle_ping(_: web.Request):
|
||
return web.Response(body="pong")
|
||
|
||
#### this is a handler for forwarding a health check to model API
|
||
async def handle_healthcheck(_: web.Request):
|
||
healthcheck_res = await backend.session.get("/healthcheck")
|
||
return web.Response(body=healthcheck_res.content, status=healthcheck_res.status)
|
||
|
||
routes = [
|
||
web.post("/generate", backend.create_handler(GenerateHandler())),
|
||
web.post("/generate_stream", backend.create_handler(GenerateStreamHandler())),
|
||
web.get("/ping", handle_ping),
|
||
web.get("/healthcheck", handle_healthcheck),
|
||
]
|
||
|
||
if __name__ == "__main__":
|
||
# start server, called from start_server.sh
|
||
start_server(backend, routes)
|
||
```
|
||
|
||
The full module is written in the `server.py` implementation of the hello\_world PyWorker, as shown here:
|
||
|
||
```python icon="python" Python theme={null}
|
||
"""
|
||
PyWorker works as a man-in-the-middle between the client and model API. It's function is:
|
||
1. receive request from client, update metrics such as workload of a request, number of pending requests, etc.
|
||
2a. transform the data and forward the transformed data to model API
|
||
2b. send updated metrics to autoscaler
|
||
3. transform response from model API(if needed) and forward the response to client
|
||
|
||
PyWorker forward requests to many model API endpoint. each endpoint must have an EndpointHandler. You can also
|
||
write function to just forward requests that don't generate anything with the model to model API without an
|
||
EndpointHandler. This is useful for endpoints such as healthchecks. See below for example
|
||
"""
|
||
|
||
import os
|
||
import logging
|
||
import dataclasses
|
||
from typing import Dict, Any, Union, Type
|
||
|
||
from aiohttp import web, ClientResponse
|
||
|
||
from lib.backend import Backend, LogAction
|
||
from lib.data_types import EndpointHandler
|
||
from lib.server import start_server
|
||
from .data_types import InputData
|
||
|
||
# the url and port of model API
|
||
MODEL_SERVER_URL = "http://0.0.0.0:5001"
|
||
|
||
|
||
# This is the log line that is emitted once the server has started
|
||
MODEL_SERVER_START_LOG_MSG = "infer server has started"
|
||
MODEL_SERVER_ERROR_LOG_MSGS = [
|
||
"Exception: corrupted model file" # message in the logs indicating the unrecoverable error
|
||
]
|
||
|
||
|
||
logging.basicConfig(
|
||
level=logging.DEBUG,
|
||
format="%(asctime)s[%(levelname)-5s] %(message)s",
|
||
datefmt="%Y-%m-%d %H:%M:%S",
|
||
)
|
||
log = logging.getLogger(__file__)
|
||
|
||
|
||
# This class is the implementer for the '/generate' endpoint of model API
|
||
@dataclasses.dataclass
|
||
class GenerateHandler(EndpointHandler[InputData]):
|
||
|
||
@property
|
||
def endpoint(self) -> str:
|
||
# the API endpoint
|
||
return "/generate"
|
||
|
||
@classmethod
|
||
def payload_cls(cls) -> Type[InputData]:
|
||
return InputData
|
||
|
||
def generate_payload_json(self, payload: InputData) -> Dict[str, Any]:
|
||
"""
|
||
defines how to convert `InputData` defined above, to
|
||
json data to be sent to the model API
|
||
"""
|
||
return dataclasses.asdict(payload)
|
||
|
||
def make_benchmark_payload(self) -> InputData:
|
||
"""
|
||
defines how to generate an InputData for benchmarking. This needs to be defined in only
|
||
one EndpointHandler, the one passed to the backend as the benchmark handler
|
||
"""
|
||
return InputData.for_test()
|
||
|
||
async def generate_client_response(
|
||
self, client_request: web.Request, model_response: ClientResponse
|
||
) -> Union[web.Response, web.StreamResponse]:
|
||
"""
|
||
defines how to convert a model API response to a response to PyWorker client
|
||
"""
|
||
_ = client_request
|
||
match model_response.status:
|
||
case 200:
|
||
log.debug("SUCCESS")
|
||
data = await model_response.json()
|
||
return web.json_response(data=data)
|
||
case code:
|
||
log.debug("SENDING RESPONSE: ERROR: unknown code")
|
||
return web.Response(status=code)
|
||
|
||
|
||
# This is the same as GenerateHandler, except that it calls a streaming endpoint of the model API and streams the
|
||
# response, which itself is streaming, back to the client.
|
||
# it is nearly identical to handler as above, but it calls a different model API endpoint and it streams the
|
||
# streaming response from model API to client
|
||
class GenerateStreamHandler(EndpointHandler[InputData]):
|
||
@property
|
||
def endpoint(self) -> str:
|
||
return "/generate_stream"
|
||
|
||
@classmethod
|
||
def payload_cls(cls) -> Type[InputData]:
|
||
return InputData
|
||
|
||
def generate_payload_json(self, payload: InputData) -> Dict[str, Any]:
|
||
return dataclasses.asdict(payload)
|
||
|
||
def make_benchmark_payload(self) -> InputData:
|
||
return InputData.for_test()
|
||
|
||
async def generate_client_response(
|
||
self, client_request: web.Request, model_response: ClientResponse
|
||
) -> Union[web.Response, web.StreamResponse]:
|
||
match model_response.status:
|
||
case 200:
|
||
log.debug("Streaming response...")
|
||
res = web.StreamResponse()
|
||
res.content_type = "text/event-stream"
|
||
await res.prepare(client_request)
|
||
async for chunk in model_response.content:
|
||
await res.write(chunk)
|
||
await res.write_eof()
|
||
log.debug("Done streaming response")
|
||
return res
|
||
case code:
|
||
log.debug("SENDING RESPONSE: ERROR: unknown code")
|
||
return web.Response(status=code)
|
||
|
||
|
||
# This is the backend instance of pyworker. Only one must be made which uses EndpointHandlers to process
|
||
# incoming requests
|
||
backend = Backend(
|
||
model_server_url=MODEL_SERVER_URL,
|
||
model_log_file=os.environ["MODEL_LOG"],
|
||
allow_parallel_requests=True,
|
||
# give the backend a handler instance that is used for benchmarking
|
||
# number of benchmark run and number of words for a random benchmark run are given
|
||
benchmark_handler=GenerateHandler(benchmark_runs=3, benchmark_words=256),
|
||
# defines how to handle specific log messages. See docstring of LogAction for details
|
||
log_actions=[
|
||
(LogAction.ModelLoaded, MODEL_SERVER_START_LOG_MSG),
|
||
(LogAction.Info, '"message":"Download'),
|
||
*[
|
||
(LogAction.ModelError, error_msg)
|
||
for error_msg in MODEL_SERVER_ERROR_LOG_MSGS
|
||
],
|
||
],
|
||
)
|
||
|
||
|
||
# this is a simple ping handler for pyworker
|
||
async def handle_ping(_: web.Request):
|
||
return web.Response(body="pong")
|
||
|
||
|
||
# this is a handler for forwarding a health check to modelAPI
|
||
async def handle_healthcheck(_: web.Request):
|
||
healthcheck_res = await backend.session.get("/healthcheck")
|
||
return web.Response(body=healthcheck_res.content, status=healthcheck_res.status)
|
||
|
||
|
||
routes = [
|
||
web.post("/generate", backend.create_handler(GenerateHandler())),
|
||
web.post("/generate_stream", backend.create_handler(GenerateStreamHandler())),
|
||
web.get("/ping", handle_ping),
|
||
web.get("/healthcheck", handle_healthcheck),
|
||
]
|
||
|
||
if __name__ == "__main__":
|
||
# start the PyWorker server
|
||
start_server(backend, routes)
|
||
|
||
```
|
||
|
||
### test\_load.py
|
||
|
||
Once a Serverless Endpoint is setup with a \{\{Worker\_Group}}, the `test_load` module lets us test the running instances:
|
||
|
||
```python icon="python" Python theme={null}
|
||
from lib.test_harness import run
|
||
from .data_types import InputData
|
||
|
||
WORKER_ENDPOINT = "/generate"
|
||
|
||
if __name__ == "__main__":
|
||
run(InputData.for_test(), WORKER_ENDPOINT)
|
||
```
|
||
|
||
To run the script, provide the following parameters:
|
||
|
||
* -n is the total number of requests to be send to the Endpoint
|
||
* -rps is the rate (rate per second) at which the requests will be sent
|
||
* -k is your Vast API key. You can define it in your environment or paste it into the command
|
||
* -e is the name of the Serverless Endpoint
|
||
|
||
You can run the following command from the root of the PyWorker repo:
|
||
|
||
```sh Text theme={null}
|
||
python3 workers.hello_world.test_load -n 1000 -rps 0.5 -k "$API_KEY" -e "$ENDPOINT_NAME"
|
||
```
|
||
|
||
<Warning>
|
||
Be sure to define "API\_KEY" and "ENDPOINT\_NAME" in your environment before running, or replace these names with their actual values.
|
||
</Warning>
|
||
|
||
A successful test with n = 10 requests would look like the following. This test used 4 different GPU workers in the Worker Group for the 10 requests it was sent.
|
||
|
||

|
||
|
||
***
|
||
|
||
These are all the parts of a PyWorker! You will also find a client.py module in the worker folders of the repo. While it is *not* part of the PyWorker, Vast provides it as an example of how a user could interact with their model on the serverless system. The client.py file is not needed for the PyWorker to run on a GPU instance, and is intended to run on your local machine. The PyWorker [Overview](/documentation/serverless/overview) page shows more details.
|
||
|
||
|
||
# Debugging
|
||
Source: https://docs.vast.ai/documentation/serverless/debugging
|
||
|
||
Learn how to debug issues with Vast.ai Serverless. Understand the worker errors, increasing and decreasing load, and how to check the instance logs.
|
||
|
||
## Worker Errors
|
||
|
||
The [Vast PyWorker](https://github.com/vast-ai/pyworker/tree/main) framework automatically detects some errors, while others may cause the instance to timeout. When an error is detected, the Serverless system will destroy or
|
||
reboot the instance. To manually debug an issue, check the instance logs available via the logs button on the instance page in the GUI. All PyWorker issues will be logged here.
|
||
If further investigation is needed, ssh into the instance and find the model backend logs location by running:
|
||
|
||
```sh Text theme={null}
|
||
echo "$MODEL_LOG"
|
||
```
|
||
|
||
And PyWorker logs:
|
||
|
||
```sh Text theme={null}
|
||
echo "${WORKSPACE_DIR:-/workspace}/pyworker.log"
|
||
```
|
||
|
||
### Increasing Load
|
||
|
||
To handle high load on instances:
|
||
|
||
* **Set **`test_workers`** high**: Create more instances initially for Worker Groups with anticipated high load.
|
||
* **Adjust **`cold_workers`: Keep enough workers around to prevent them from being destroyed during low initial load.
|
||
* **Increase **`cold_mult`: Quickly create instances by predicting higher future load based on current high load. Adjust back down once enough instances are created.
|
||
* **Check **`max_workers`: Ensure this parameter is set high enough to create the necessary number of workers.
|
||
|
||
### Decreasing Load
|
||
|
||
To manage decreasing load:
|
||
|
||
* **Reduce **`cold_workers`: Stop instances quickly when the load decreases to avoid unnecessary costs. The serverless system will handle this automatically, but manual adjustment can help if needed.
|
||
|
||
|
||
# Getting Started With Serverless
|
||
Source: https://docs.vast.ai/documentation/serverless/getting-started-with-serverless
|
||
|
||
Learn how to get started with Vast.ai Serverless. Understand the prerequisites, setup process, and how to use the serverless engine.
|
||
|
||
<Warning>
|
||
For users not familiar with Vast.ai's Serverless engine, we recommend starting with the [Serverless Architecture documentation](/documentation/serverless/architecture). It will be helpful in understanding how the system operates, processes requests, and manages resources.
|
||
</Warning>
|
||
|
||
# Overview & Prerequisites
|
||
|
||
Vast.ai provides pre-made serverless templates ([vLLM](/documentation/serverless/vllm), [ComfyUI](/documentation/serverless/comfy-ui)) for popular use cases, and can be used with minimal setup effort. In this guide, we will setup a serverless engine to handle inference requests to a model using vLLM, namely Qwen3-8B , using the pre-made Vast.ai vLLM serverless template. This prebuilt template bundles vLLM with scaling logic so you don’t have to write custom orchestration code. By the end of this guide, you will be able to host the Qwen3-8B model with dynamic scaling to meet your demand.
|
||
|
||
<Note>
|
||
This guide assumes knowledge of the Vast CLI. An introduction for it can be found [here](/cli/get-started).
|
||
</Note>
|
||
|
||
Before we start, there are a few things you will need:
|
||
|
||
1. A Vast.ai account with credits
|
||
2. A Vast.ai [API Key](/documentation/reference/keys)
|
||
3. A HuggingFace account with a [read-access API token](https://huggingface.co/docs/hub/en/security-tokens)
|
||
|
||
# Setting Up a vLLM + **Qwen3-8B** Serverless Engine
|
||
|
||
<Steps>
|
||
<Step title="Configure User Environment Variables">
|
||
Navigate to the user account settings page [here](https://cloud.vast.ai/account/) and drop down the "Environment Variables" tab. In the Key field, add "HF\_TOKEN", and in the Value field add the HuggingFace read-access token. Click the "+" button to the right of the fields, then click "Save Edits".
|
||
|
||
<img src="https://mintcdn.com/vastai-80aa3a82/kXucPQ3Cl04LpCWx/images/getting-started-serverless.webp?fit=max&auto=format&n=kXucPQ3Cl04LpCWx&q=85&s=209303d04548e71453da6d41ef9ee401" alt="" data-og-width="1034" width="1034" data-og-height="1129" height="1129" data-path="images/getting-started-serverless.webp" data-optimize="true" data-opv="3" srcset="https://mintcdn.com/vastai-80aa3a82/kXucPQ3Cl04LpCWx/images/getting-started-serverless.webp?w=280&fit=max&auto=format&n=kXucPQ3Cl04LpCWx&q=85&s=16c6f7e8d15a2743804583e73f04e5fe 280w, https://mintcdn.com/vastai-80aa3a82/kXucPQ3Cl04LpCWx/images/getting-started-serverless.webp?w=560&fit=max&auto=format&n=kXucPQ3Cl04LpCWx&q=85&s=e74dd18906758c7094c5893259fd4476 560w, https://mintcdn.com/vastai-80aa3a82/kXucPQ3Cl04LpCWx/images/getting-started-serverless.webp?w=840&fit=max&auto=format&n=kXucPQ3Cl04LpCWx&q=85&s=79983116bfcb2b607f83f246808eb4c9 840w, https://mintcdn.com/vastai-80aa3a82/kXucPQ3Cl04LpCWx/images/getting-started-serverless.webp?w=1100&fit=max&auto=format&n=kXucPQ3Cl04LpCWx&q=85&s=a0b66964ca57b4318eb55f8fc0c7ab16 1100w, https://mintcdn.com/vastai-80aa3a82/kXucPQ3Cl04LpCWx/images/getting-started-serverless.webp?w=1650&fit=max&auto=format&n=kXucPQ3Cl04LpCWx&q=85&s=da434d9c9b107ac8b5cd298b8943d786 1650w, https://mintcdn.com/vastai-80aa3a82/kXucPQ3Cl04LpCWx/images/getting-started-serverless.webp?w=2500&fit=max&auto=format&n=kXucPQ3Cl04LpCWx&q=85&s=5df9bf2ee7b5e0dc6c171c2aee35daef 2500w" />
|
||
</Step>
|
||
|
||
<Step title="Prepare a Template for our Workers">
|
||
Templates encapsulate all the information required to run an application on a GPU worker, including machine parameters, docker image, and environment variables.
|
||
|
||
Navigate to the [Templates Page](https://cloud.vast.ai/templates/), select the Serverless filter, and click the Edit button on the 'vLLM + Qwen/Qwen3-8B (Serverless)' template. 
|
||
|
||
In the Environment Variables section, "Qwen/Qwen3-8B" is the default value for `MODEL_NAME`, but can be changed to any compatible vLLM model on HuggingFace. Set this template to Private and click Save & Use. 
|
||
|
||
<img src="https://mintcdn.com/vastai-80aa3a82/kXucPQ3Cl04LpCWx/images/getting-started-serverless-2.webp?fit=max&auto=format&n=kXucPQ3Cl04LpCWx&q=85&s=f72307bd1ddf07074a3d2a9737cec7c4" alt="" data-og-width="1006" width="1006" data-og-height="1212" height="1212" data-path="images/getting-started-serverless-2.webp" data-optimize="true" data-opv="3" srcset="https://mintcdn.com/vastai-80aa3a82/kXucPQ3Cl04LpCWx/images/getting-started-serverless-2.webp?w=280&fit=max&auto=format&n=kXucPQ3Cl04LpCWx&q=85&s=183ca84f60d0bfc5056ae7a10f8c8068 280w, https://mintcdn.com/vastai-80aa3a82/kXucPQ3Cl04LpCWx/images/getting-started-serverless-2.webp?w=560&fit=max&auto=format&n=kXucPQ3Cl04LpCWx&q=85&s=652dd6da562a35c091a6a051c6587ef1 560w, https://mintcdn.com/vastai-80aa3a82/kXucPQ3Cl04LpCWx/images/getting-started-serverless-2.webp?w=840&fit=max&auto=format&n=kXucPQ3Cl04LpCWx&q=85&s=f12b95f233105237c9499c1e8492b3ba 840w, https://mintcdn.com/vastai-80aa3a82/kXucPQ3Cl04LpCWx/images/getting-started-serverless-2.webp?w=1100&fit=max&auto=format&n=kXucPQ3Cl04LpCWx&q=85&s=d57d0f3f7cdd8a53aee36191215990ca 1100w, https://mintcdn.com/vastai-80aa3a82/kXucPQ3Cl04LpCWx/images/getting-started-serverless-2.webp?w=1650&fit=max&auto=format&n=kXucPQ3Cl04LpCWx&q=85&s=73921a4a5ebdd1659f5ead8b6e744c4c 1650w, https://mintcdn.com/vastai-80aa3a82/kXucPQ3Cl04LpCWx/images/getting-started-serverless-2.webp?w=2500&fit=max&auto=format&n=kXucPQ3Cl04LpCWx&q=85&s=18ea4fcab93da29d353a8be78c9a2f4f 2500w" />
|
||
|
||
<Check>
|
||
The template will now work without any further edits, but can be customized to suit specific needs. Vast recommends keeping the template private to avoid making any private information publically known.
|
||
</Check>
|
||
|
||
We should now see the Vast.ai search page with the template selected. For those intending to use the Vast CLI, click More Options on the template and select 'Copy template hash'. We will use this in step 3.
|
||
|
||
<img src="https://mintcdn.com/vastai-80aa3a82/kXucPQ3Cl04LpCWx/images/getting-started-serverless-3.webp?fit=max&auto=format&n=kXucPQ3Cl04LpCWx&q=85&s=2bfc3b57a3d9f16e7d7d4c05cd219dd4" alt="" data-og-width="1280" width="1280" data-og-height="1200" height="1200" data-path="images/getting-started-serverless-3.webp" data-optimize="true" data-opv="3" srcset="https://mintcdn.com/vastai-80aa3a82/kXucPQ3Cl04LpCWx/images/getting-started-serverless-3.webp?w=280&fit=max&auto=format&n=kXucPQ3Cl04LpCWx&q=85&s=a54ea7589253eb44c27b8e8fbf7c0a47 280w, https://mintcdn.com/vastai-80aa3a82/kXucPQ3Cl04LpCWx/images/getting-started-serverless-3.webp?w=560&fit=max&auto=format&n=kXucPQ3Cl04LpCWx&q=85&s=51875a5f6f63e29b2405fe797c3c01bd 560w, https://mintcdn.com/vastai-80aa3a82/kXucPQ3Cl04LpCWx/images/getting-started-serverless-3.webp?w=840&fit=max&auto=format&n=kXucPQ3Cl04LpCWx&q=85&s=7f9aabb7f917fa0e37baf96af6ac9d3f 840w, https://mintcdn.com/vastai-80aa3a82/kXucPQ3Cl04LpCWx/images/getting-started-serverless-3.webp?w=1100&fit=max&auto=format&n=kXucPQ3Cl04LpCWx&q=85&s=18a1d0af9a1f73d7ddee58001389911d 1100w, https://mintcdn.com/vastai-80aa3a82/kXucPQ3Cl04LpCWx/images/getting-started-serverless-3.webp?w=1650&fit=max&auto=format&n=kXucPQ3Cl04LpCWx&q=85&s=227e5a6900ff9de39dfd6b8320eebf85 1650w, https://mintcdn.com/vastai-80aa3a82/kXucPQ3Cl04LpCWx/images/getting-started-serverless-3.webp?w=2500&fit=max&auto=format&n=kXucPQ3Cl04LpCWx&q=85&s=b0130f33637b686d1710d6a4f629cb60 2500w" />
|
||
</Step>
|
||
|
||
<Step title="Create The Endpoint">
|
||
Next we will create an Endpoint that any user can query for generation. This can be done through the Web UI or the Vast CLI. Here, we'll create an endpoint named 'vLLM-Qwen3-8B '.
|
||
|
||
<Tabs>
|
||
<Tab title="Web UI">
|
||
Navigate to the [Serverless Page](https://cloud.vast.ai/serverless/) and click Create Endpoint. A screen to create a new Endpoint will pop up, with default values already assigned. Our Endpoint will work with these default values, but you can change them to suit your needs.
|
||
|
||
<img src="https://mintcdn.com/vastai-80aa3a82/kXucPQ3Cl04LpCWx/images/getting-started-serverless-4.webp?fit=max&auto=format&n=kXucPQ3Cl04LpCWx&q=85&s=528f0ada7825b3229c5112c9cefd5004" alt="" data-og-width="800" width="800" data-og-height="1210" height="1210" data-path="images/getting-started-serverless-4.webp" data-optimize="true" data-opv="3" srcset="https://mintcdn.com/vastai-80aa3a82/kXucPQ3Cl04LpCWx/images/getting-started-serverless-4.webp?w=280&fit=max&auto=format&n=kXucPQ3Cl04LpCWx&q=85&s=b8572eb2f09dfde4f052cf70c5450e10 280w, https://mintcdn.com/vastai-80aa3a82/kXucPQ3Cl04LpCWx/images/getting-started-serverless-4.webp?w=560&fit=max&auto=format&n=kXucPQ3Cl04LpCWx&q=85&s=3e14554e72395505d986d8b2c28c5f22 560w, https://mintcdn.com/vastai-80aa3a82/kXucPQ3Cl04LpCWx/images/getting-started-serverless-4.webp?w=840&fit=max&auto=format&n=kXucPQ3Cl04LpCWx&q=85&s=a49f2f0e743df3a5028cad4514b22ad7 840w, https://mintcdn.com/vastai-80aa3a82/kXucPQ3Cl04LpCWx/images/getting-started-serverless-4.webp?w=1100&fit=max&auto=format&n=kXucPQ3Cl04LpCWx&q=85&s=9c55942d734f2ac36f2fefa2d73576d7 1100w, https://mintcdn.com/vastai-80aa3a82/kXucPQ3Cl04LpCWx/images/getting-started-serverless-4.webp?w=1650&fit=max&auto=format&n=kXucPQ3Cl04LpCWx&q=85&s=d8712ca7bea74520634a6bd8355faf40 1650w, https://mintcdn.com/vastai-80aa3a82/kXucPQ3Cl04LpCWx/images/getting-started-serverless-4.webp?w=2500&fit=max&auto=format&n=kXucPQ3Cl04LpCWx&q=85&s=258589c23450e78dd507e8ccdb14f190 2500w" />
|
||
|
||
* `endpoint_name`: The name of the Endpoint.
|
||
* `cold_mult`: The multiple of the current load that is used to predict the future load. For example, if we currently have 10 users, but expect there to be 20 in the near future, we can set cold\_mult = 2. 
|
||
* For LLMs, a good default is 2.
|
||
* `min_load`: The baseline amount of load (tokens / second for LLMs) we want the Endpoint to be able to handle. 
|
||
* For LLMs, a good default is 100.0
|
||
* `target_util`: The percentage of the Endpoint compute resources that we want to be in-use at any given time. A lower value allows for more slack, which means the Endpoint will be less likely to be overwhelmed if there is a sudden spike in usage. 
|
||
* For LLMs, a good default is 0.9
|
||
* `max_workers`: The maximum number of workers the Endpoint can have at any one time.
|
||
* `cold_workers`: The minimum number of workers kept "cold" (meaning stopped but fully loaded with the image) when the Endpoint has no load. Having cold workers available allows the Serverless system to seamlessly spin up more workers as when load increases.
|
||
|
||
Click Create, where you will be taken back to the Serverless page. After a few moments, the Endpoint will show up with the name 'vLLM-Qwen3-8B'.
|
||
</Tab>
|
||
|
||
<Tab title="Vast CLI">
|
||
If your machine is properly configured for the Vast CLI, you can run the following command:
|
||
|
||
```cli CLI Command theme={null}
|
||
vastai create endpoint --endpoint_name "vLLM-Qwen3-8B" --cold_mult 1.0 --min_load 100 --target_util 0.9 --max_workers 20 --cold_workers 5
|
||
```
|
||
|
||
* `endpoint_name`: The name you use to identify your Endpoint.
|
||
* `cold_mult`: The multiple of your current load that is used to predict your future load. For example if you currently have 10 users, but expect there to be 20 in the near future, you can set cold\_mult = 2.0.
|
||
* For LLMs, a good default is 2.0
|
||
* `min_load`: This is the baseline amount of load (tokens / second for LLMs) you want your Endpoint to be able to handle. 
|
||
* For LLMs, a good default is 100.0
|
||
* `target_util`: The percentage of your Endpoint compute resources that you want to be in-use at any given time. A lower value allows for more slack, which means your Endpoint will be less likely to be overwhelmed if there is a sudden spike in usage. 
|
||
* For LLMs, a good default is 0.9
|
||
* `max_workers`: The maximum number of workers your Endpoint can have at any one time.
|
||
* `cold_workers`: The minimum number of workers you want to keep "cold" (meaning stopped and fully loaded) when your Endpoint has no load.
|
||
|
||
A successful creation of the endpoint should return a `'success': True` as the output in the terminal.
|
||
</Tab>
|
||
</Tabs>
|
||
</Step>
|
||
|
||
<Step title="Create a Workergroup">
|
||
Now that we have our Endpoint, we can create a Workergroup with the template we prepared in step 1. 
|
||
|
||
<Tabs>
|
||
<Tab title="Web UI">
|
||
From the Serverless page, click '+ Workergroup' under the Endpoint. Our custom vLLM (Serverless) template should already be selected. To confirm, click the Edit button and check that the `MODEL_NAME`environment variable is filled in.
|
||
|
||
For our simple setup, we can enter the following values:
|
||
|
||
* Cold Multiplier = 3
|
||
* Minimum Load = 1
|
||
* Target Utilization = 0.9
|
||
* Workergroup Name = 'Workergroup'
|
||
* Select Endpoint = 'vLLM-Qwen3-8B'
|
||
|
||
A complete page should look like the following:
|
||
|
||
<img src="https://mintcdn.com/vastai-80aa3a82/kXucPQ3Cl04LpCWx/images/getting-started-serverless-5.webp?fit=max&auto=format&n=kXucPQ3Cl04LpCWx&q=85&s=1b564ea5d330e6b5eb5acecea847c58a" alt="" data-og-width="943" width="943" data-og-height="1143" height="1143" data-path="images/getting-started-serverless-5.webp" data-optimize="true" data-opv="3" srcset="https://mintcdn.com/vastai-80aa3a82/kXucPQ3Cl04LpCWx/images/getting-started-serverless-5.webp?w=280&fit=max&auto=format&n=kXucPQ3Cl04LpCWx&q=85&s=32561ebad0e1f5ba649a354ddf0d033d 280w, https://mintcdn.com/vastai-80aa3a82/kXucPQ3Cl04LpCWx/images/getting-started-serverless-5.webp?w=560&fit=max&auto=format&n=kXucPQ3Cl04LpCWx&q=85&s=0fe9772d15f535fcb27e11b5e6e284b8 560w, https://mintcdn.com/vastai-80aa3a82/kXucPQ3Cl04LpCWx/images/getting-started-serverless-5.webp?w=840&fit=max&auto=format&n=kXucPQ3Cl04LpCWx&q=85&s=d39f804d922ba71860818d383e26c281 840w, https://mintcdn.com/vastai-80aa3a82/kXucPQ3Cl04LpCWx/images/getting-started-serverless-5.webp?w=1100&fit=max&auto=format&n=kXucPQ3Cl04LpCWx&q=85&s=7cc204bde8b414dd2e66e89e8a8cc538 1100w, https://mintcdn.com/vastai-80aa3a82/kXucPQ3Cl04LpCWx/images/getting-started-serverless-5.webp?w=1650&fit=max&auto=format&n=kXucPQ3Cl04LpCWx&q=85&s=626fb138075cb6cf0a95c92dd82ccb1f 1650w, https://mintcdn.com/vastai-80aa3a82/kXucPQ3Cl04LpCWx/images/getting-started-serverless-5.webp?w=2500&fit=max&auto=format&n=kXucPQ3Cl04LpCWx&q=85&s=87ab443f0e47edaf28683d9b9bcfee82 2500w" />
|
||
|
||
After entering the values, click Create, where you will be taken back to the Serverless page. After a moment, the Workergroup will be created under the 'vLLM-Qwen3-8B' Endpoint.
|
||
</Tab>
|
||
|
||
<Tab title="Vast CLI">
|
||
Run the following command to create your Workergroup:
|
||
|
||
```sh CLI Command theme={null}
|
||
vastai create workergroup --endpoint_name "vLLM-DeepSeek" --template_hash "$TEMPLATE_HASH" --test_workers 5
|
||
```
|
||
|
||
`endpoint_name`: The name of the Endpoint.
|
||
`template_hash`: The hash code of our custom vLLM (Serverless) template.
|
||
`test_workers`: The minimum number of workers to create while initializing the Workergroup. This allows the Workergroup to get performance estimates before serving the Endpoint, and also creates workers which are fully loaded and "stopped" (aka "cold").
|
||
|
||
<Warning>
|
||
You will need to replace "\$TEMPLATE\_HASH" with the template hash copied from step 1.
|
||
</Warning>
|
||
</Tab>
|
||
</Tabs>
|
||
|
||
Once the Workergroup is created, the serverless engine will automatically find offers and create instances. This may take \~10-60 seconds to find appropritate GPU workers.
|
||
|
||
<Tabs>
|
||
<Tab title="Web UI">
|
||
To see the instances the system creates, click the 'View detailed stats' button on the Workergroup. Five workers should startup, showing the 'Loading' status:
|
||
|
||
<img src="https://mintcdn.com/vastai-80aa3a82/kXucPQ3Cl04LpCWx/images/getting-started-serverless-6.webp?fit=max&auto=format&n=kXucPQ3Cl04LpCWx&q=85&s=7c1eb6313d15408a96d09484b9e6c584" alt="" data-og-width="1280" width="1280" data-og-height="206" height="206" data-path="images/getting-started-serverless-6.webp" data-optimize="true" data-opv="3" srcset="https://mintcdn.com/vastai-80aa3a82/kXucPQ3Cl04LpCWx/images/getting-started-serverless-6.webp?w=280&fit=max&auto=format&n=kXucPQ3Cl04LpCWx&q=85&s=e2dc902b671c95cda0356e6088792945 280w, https://mintcdn.com/vastai-80aa3a82/kXucPQ3Cl04LpCWx/images/getting-started-serverless-6.webp?w=560&fit=max&auto=format&n=kXucPQ3Cl04LpCWx&q=85&s=e2a2dd3ec1c1300ae3258529d0508aa6 560w, https://mintcdn.com/vastai-80aa3a82/kXucPQ3Cl04LpCWx/images/getting-started-serverless-6.webp?w=840&fit=max&auto=format&n=kXucPQ3Cl04LpCWx&q=85&s=2c8d479d5f7272c5e816d9bafd1ce734 840w, https://mintcdn.com/vastai-80aa3a82/kXucPQ3Cl04LpCWx/images/getting-started-serverless-6.webp?w=1100&fit=max&auto=format&n=kXucPQ3Cl04LpCWx&q=85&s=4651be38d4f4e5dc192b3b490296c168 1100w, https://mintcdn.com/vastai-80aa3a82/kXucPQ3Cl04LpCWx/images/getting-started-serverless-6.webp?w=1650&fit=max&auto=format&n=kXucPQ3Cl04LpCWx&q=85&s=7e5a8eb2c1bbd80e92908eb237555183 1650w, https://mintcdn.com/vastai-80aa3a82/kXucPQ3Cl04LpCWx/images/getting-started-serverless-6.webp?w=2500&fit=max&auto=format&n=kXucPQ3Cl04LpCWx&q=85&s=c833ba2eedb8f49aa1c20c79bc99251a 2500w" />
|
||
</Tab>
|
||
|
||
<Tab title="Vast CLI">
|
||
To see the instances the autoscaler creates, run the following command:
|
||
|
||
```sh CLI Command theme={null}
|
||
vastai show instances
|
||
```
|
||
</Tab>
|
||
</Tabs>
|
||
</Step>
|
||
|
||
<Step title="Getting The First Ready Worker">
|
||
Now that we have created both the Endpoint and the Workergroup, all that is left to do is await for the first "Ready" worker. We can see the status of the workers in the Serverless section of the Vast.ai console. The workers will automatically download the Qwen3-8B model defined in the template, but it will take time to fully initialize. The worker is loaded and benchmarked when the `Curr. Performance` value is non-zero.
|
||
|
||
When a worker has finished benchmarking, the worker's status in the Workergroup will become Ready. We are now able to get a successful /route/ call to the Workergroup and send it requests!
|
||
|
||
<img src="https://mintcdn.com/vastai-80aa3a82/kXucPQ3Cl04LpCWx/images/getting-started-serverless-7.webp?fit=max&auto=format&n=kXucPQ3Cl04LpCWx&q=85&s=da0c0b388c21903d377c3d3f84af8e51" alt="" data-og-width="800" width="800" data-og-height="1107" height="1107" data-path="images/getting-started-serverless-7.webp" data-optimize="true" data-opv="3" srcset="https://mintcdn.com/vastai-80aa3a82/kXucPQ3Cl04LpCWx/images/getting-started-serverless-7.webp?w=280&fit=max&auto=format&n=kXucPQ3Cl04LpCWx&q=85&s=e88c5d594429aa42e0b716284c1a9748 280w, https://mintcdn.com/vastai-80aa3a82/kXucPQ3Cl04LpCWx/images/getting-started-serverless-7.webp?w=560&fit=max&auto=format&n=kXucPQ3Cl04LpCWx&q=85&s=8d5bdad77b4e9ddcc1f142235bc7ac72 560w, https://mintcdn.com/vastai-80aa3a82/kXucPQ3Cl04LpCWx/images/getting-started-serverless-7.webp?w=840&fit=max&auto=format&n=kXucPQ3Cl04LpCWx&q=85&s=f10bfac2ded8710c77f05bbf0b176a14 840w, https://mintcdn.com/vastai-80aa3a82/kXucPQ3Cl04LpCWx/images/getting-started-serverless-7.webp?w=1100&fit=max&auto=format&n=kXucPQ3Cl04LpCWx&q=85&s=4dda0f6bfdb503571486f0088d6c357b 1100w, https://mintcdn.com/vastai-80aa3a82/kXucPQ3Cl04LpCWx/images/getting-started-serverless-7.webp?w=1650&fit=max&auto=format&n=kXucPQ3Cl04LpCWx&q=85&s=699f0f2bd18922530e985fb3f1686768 1650w, https://mintcdn.com/vastai-80aa3a82/kXucPQ3Cl04LpCWx/images/getting-started-serverless-7.webp?w=2500&fit=max&auto=format&n=kXucPQ3Cl04LpCWx&q=85&s=72e4c11b8b7ba8264a5774f58dfcfcf6 2500w" />
|
||
</Step>
|
||
</Steps>
|
||
|
||
We have now successfully created a vLLM + Qwen3-8B Serverless Engine! It is ready to receive user requests and will automatically scale up or down to meet the request demand. In this next section, we will setup a client to test the serverless engine, and learn how to use the core serverless endpoints along the way.
|
||
|
||
***
|
||
|
||
# Using the Serverless Engine
|
||
|
||
To fully understand this section, it is recommended to read the [PyWorker Overview](/documentation/serverless/overview). The overview shows how all the pieces related to the serverless engine work together.
|
||
|
||
The Vast vLLM (Serverless) template we used in the last section already has a client (client.py) written for it. To use this client, we must run commands in a terminal, since there is no UI available for this section. The client, along with all other files the GPU worker is cloning during initialization, can be found in the [Vast.ai Github repo](https://github.com/vast-ai/pyworker/tree/main). For this section, simply clone the entire repo using:
|
||
|
||
 `git clone https://github.com/vast-ai/pyworker.git`
|
||
|
||
As the User, we want all the files under 'User' to be in our file system. The GPU workers that the system initializes will have the files and entities under 'GPU Worker'.
|
||
|
||
<Frame caption="Files and Entities for the user and GPU worker">
|
||
<img src="https://mintcdn.com/vastai-80aa3a82/kXucPQ3Cl04LpCWx/images/getting-started-serverless-8.webp?fit=max&auto=format&n=kXucPQ3Cl04LpCWx&q=85&s=8b3c93284477f9261d759a0f35dbde47" alt="Files and Entities for the user and GPU worker" data-og-width="1280" width="1280" data-og-height="733" height="733" data-path="images/getting-started-serverless-8.webp" data-optimize="true" data-opv="3" srcset="https://mintcdn.com/vastai-80aa3a82/kXucPQ3Cl04LpCWx/images/getting-started-serverless-8.webp?w=280&fit=max&auto=format&n=kXucPQ3Cl04LpCWx&q=85&s=b74607b73a45520e541cd2d8e34dc19c 280w, https://mintcdn.com/vastai-80aa3a82/kXucPQ3Cl04LpCWx/images/getting-started-serverless-8.webp?w=560&fit=max&auto=format&n=kXucPQ3Cl04LpCWx&q=85&s=58936a35d7e3ea04b9407389a64e48b7 560w, https://mintcdn.com/vastai-80aa3a82/kXucPQ3Cl04LpCWx/images/getting-started-serverless-8.webp?w=840&fit=max&auto=format&n=kXucPQ3Cl04LpCWx&q=85&s=26d0ceb3a476116653a3b1521edc8a80 840w, https://mintcdn.com/vastai-80aa3a82/kXucPQ3Cl04LpCWx/images/getting-started-serverless-8.webp?w=1100&fit=max&auto=format&n=kXucPQ3Cl04LpCWx&q=85&s=58f5b1a78729912e85ca7c6b34ce4e8c 1100w, https://mintcdn.com/vastai-80aa3a82/kXucPQ3Cl04LpCWx/images/getting-started-serverless-8.webp?w=1650&fit=max&auto=format&n=kXucPQ3Cl04LpCWx&q=85&s=7b41b99aaa4e7ecd0d3764d3822c19b6 1650w, https://mintcdn.com/vastai-80aa3a82/kXucPQ3Cl04LpCWx/images/getting-started-serverless-8.webp?w=2500&fit=max&auto=format&n=kXucPQ3Cl04LpCWx&q=85&s=fd44e0ca0d0fb2cf24185b7ddeaced31 2500w" />
|
||
</Frame>
|
||
|
||
## API Keys
|
||
|
||
Upon creation of a Serverless endpoint group, the group will obtain a special API key specifically for Serverless. This key is unique to an account, and will be used for all calls to the Serverless engine. This key is different from a standard Vast.ai API key and only works with Serverless endpoint groups.  
|
||
|
||
### Where to find a Serverless API key:
|
||
|
||
Use the Vast CLI to find a Serverless API key.
|
||
|
||
```cli CLI Command theme={null}
|
||
vastai show endpoints
|
||
```
|
||
|
||
The `show endpoints` command will return a JSON blob like this:
|
||
|
||
```javascript Javascript icon="js" theme={null}
|
||
{
|
||
"api_key": "952laufhuefiu2he72yhewikhf28732873827uifdhfiuh2ifh72hs80a8s728c699s9",
|
||
"cold_mult": 2.0,
|
||
"cold_workers": 3,
|
||
"created_at": 1755115734.0841732,
|
||
"endpoint_name": "vLLM-Qwen3-8B",
|
||
"endpoint_state": "active",
|
||
"id": 1234,
|
||
"max_workers": 5,
|
||
"min_load": 10.0,
|
||
"target_util": 0.9,
|
||
"user_id": 123456
|
||
}
|
||
```
|
||
|
||
<Accordion title="Install the TLS certificate \[Optional]">
|
||
## Install the TLS certificate \[Optional]
|
||
|
||
All of Vast.ai's pre-made Serverless templates use SSL by default. If you want to disable it, you can add `-e USE_SSL=false` to the Docker options in your copy of the template. The Serverless Engine will automatically adjust the instance URL to enable or disable SSL as needed.
|
||
|
||
1. Download Vast AI's certificate from [here](https://console.vast.ai/static/jvastai_root.cer).
|
||
2. In the Python environment where you're running the client script, execute the following command: `python3 -m certifi`
|
||
3. The command in step 2 will print the path to a file where certificates are stored. Append Vast AI's certificate to that file using the following command: `cat jvastai_root.cer >> PATH/TO/CERT/STORE`
|
||
4. You may need to run the above command with `sudo` if you are not running Python in a virtual environment.
|
||
|
||
<Note>
|
||
This process only adds Vast AI's TLS certificate as a trusted certificate for Python clients. 
|
||
|
||
For non-Python clients, you'll need to add the certificate to the trusted certificates for that specific client. If you encounter any issues, feel free to contact us on support chat for assistance.
|
||
</Note>
|
||
</Accordion>
|
||
|
||
<Steps>
|
||
<Step title="Running client.py">
|
||
In client.py, we are first sending a POST request to the [`/route/`](/documentation/serverless/route) endpoint. This sends a request to the serverless engine asking for a ready worker, with a payload that looks like:
|
||
|
||
```javascript Javascript icon="js" theme={null}
|
||
route_payload = {
|
||
"endpoint": "endpoint_name",
|
||
"api_key": "your_serverless_api_key",
|
||
"cost": COST,
|
||
}
|
||
```
|
||
|
||
The `cost` input here tells the serverless engine how much workload to expect for this request, and is *not *related to credits on a Vast.ai account. The engine will reply with a valid worker address, where client.py then calls the `/v1/completions` endpoint with the authentication data returned by the serverless engine and the user's model input text as the payload.
|
||
|
||
```json JSON theme={null}
|
||
{
|
||
"auth_data": {
|
||
"cost": 256.0,
|
||
"endpoint": "endpoint_name",
|
||
"reqnum": "req_num",
|
||
"signature": "signature",
|
||
"url": "worker_address"
|
||
},
|
||
"payload": {
|
||
"input": {
|
||
"model": "Qwen/Qwen3-8B",
|
||
"prompt": "The capital of USA is",
|
||
"temperature": 0.7,
|
||
"max_tokens": 256,
|
||
"top_k": 20,
|
||
"top_p": 0.4,
|
||
"stream": false}
|
||
}
|
||
}
|
||
}
|
||
```
|
||
|
||
The worker hosting the Qwen3-8B model will return the model results to the client, and print them to the user. 
|
||
|
||
To quickly run a basic test of the serverless engine with vLLM, navigate to the `pyworker` directory and run:
|
||
|
||
```none CLI Command theme={null}
|
||
pip install -r requirements.txt && \
|
||
python3 -m workers.openai.client -k "$YOUR_USER_API_KEY" -e "vLLM-Qwen3-8B" --model "Qwen/Qwen3-8B" --completion
|
||
```
|
||
|
||
<Warning>
|
||
client.py is configured to work with a vast.ai API key, not a Serverless API key. Make sure to set the `API_KEY` variable in your environment, or replace it by pasting in your actual key. You only need to install the requirements.txt file on the first run.
|
||
</Warning>
|
||
|
||
This should result in a "Ready" worker with the Qwen3-8B model printing a Completion Demo to your terminal window. If we enter the same command without --completion, you will see all of the test modes vLLM has. Because we are testing with Qwen3-8B, all test modes will provide a response (not all LLMs are equipped to use tools).
|
||
|
||
```bash CLI Command theme={null}
|
||
python3 -m workers.openai.client -k "$YOUR_USER_API_KEY" -e "vLLM-Qwen3-8B" --model "Qwen/Qwen3-8B"
|
||
|
||
Please specify exactly one test mode:
|
||
--completion : Test completions endpoint
|
||
--chat : Test chat completions endpoint (non-streaming)
|
||
--chat-stream : Test chat completions endpoint with streaming
|
||
--tools : Test function calling with ls tool (non-streaming)
|
||
--interactive : Start interactive streaming chat session
|
||
```
|
||
</Step>
|
||
|
||
<Step title="Monitoring Groups">
|
||
There are several endpoints we can use to monitor the status of the serverless engine. To fetch all [Endpoint logs](/documentation/serverless/logs), run the following cURL command:
|
||
|
||
```bash Bash theme={null}
|
||
curl https://run.vast.ai/get_endpoint_logs/ \
|
||
-X POST \
|
||
-d '{"endpoint" : "vLLM-Qwen3-8B", "api_key" : "$YOUR_SERVERLESS_API_KEY"}' \
|
||
-H 'Content-Type: application/json'
|
||
```
|
||
|
||
Similarily, to fetch all [Workergroup logs](/documentation/serverless/logs), execute:
|
||
|
||
```bash Bash theme={null}
|
||
curl https://run.vast.ai/get_workergroup_logs/ \
|
||
-X POST \
|
||
-d '{"id" : WORKERGROUP_ID, "api_key" : "$YOUR_SERVERLESS_API_KEY"}' \
|
||
-H 'Content-Type: application/json'
|
||
```
|
||
|
||
All Endpoints and Workergroups continuously track their performance over time, which is sent to the serverless engine as metrics. To see Workergroup metrics, run the following:
|
||
|
||
```bash Bash theme={null}
|
||
curl -X POST "https://console.vast.ai/api/v0/serverless/metrics/" \
|
||
-H "Content-Type: application/json" \
|
||
-d '{
|
||
"start_date": 1749672382.157,
|
||
"end_date": 1749680792.188,
|
||
"step": 500,
|
||
"type": "autogroup",
|
||
"metrics": [
|
||
"capacity",
|
||
"curload",
|
||
"nworkers",
|
||
"nrdy_workers_",
|
||
"reliable",
|
||
"reqrate",
|
||
"totreqs",
|
||
"perf",
|
||
"nrdy_soon_workers_",
|
||
"model_disk_usage",
|
||
"reqs_working"
|
||
],
|
||
"resource_id": '"${workergroup_id}"'
|
||
}'
|
||
|
||
```
|
||
|
||
These metrics are displayed in a Workergroup's UI page.
|
||
</Step>
|
||
|
||
<Step title="Load Testing">
|
||
In the Github repo that we cloned earlier, there is a load testing script called `workers/openai/test_load.py`. The *-n *flag indicates the total number of requests to send to the serverless engine, and the *-rps *flag indicates the rate (requests/second). The script will print out statistics that show metrics like:
|
||
|
||
* Total requests currently being generated
|
||
* Number of successful generations
|
||
* Number of errors
|
||
* Total number of workers used during the test
|
||
|
||
To run this script, make sure the python packages from `requirements.txt` are installed, and execute the following command:
|
||
|
||
```sh SH theme={null}
|
||
python3 -m workers.openai.test_load -n 100 -rps 1 -k "$YOUR_USER_API_KEY" -e "vLLM-Qwen3-8B" --model "Qwen/Qwen3-8B"
|
||
```
|
||
</Step>
|
||
</Steps>
|
||
|
||
This is everything you need to start, test, and monitor a vLLM + Qwen3-8B Serverless engine! There are other Vast pre-made [serverless templates](/documentation/templates/quickstart), like the ComfyUI Image Generation model, that can be setup in a similar fashion. 
|
||
|
||
|
||
# Serverless Overview
|
||
Source: https://docs.vast.ai/documentation/serverless/index
|
||
|
||
Learn how to use Vast.ai's Serverless system to automate the provisioning of GPU workers to match the dynamic computational needs of your workloads.
|
||
|
||
Use Vast.ai’s Serverless system to automate the provisioning of GPU workers to match the dynamic computational needs of your workloads. This system ensures efficient and cost-effective scaling for AI inference and other GPU computing tasks.
|
||
|
||
## Key Features
|
||
|
||
* **Dynamic Scaling**: Automatically scale your AI inference up or down based on customizable performance metrics.
|
||
* **Global GPU Fleet**: Leverage Vast’s global fleet of powerful, affordable GPUs for your computational needs.
|
||
* **Fast Cold-Start Times**: Minimize cold-start times with a reserve pool of workers that can spin up in seconds.
|
||
* **Metrics and Debugging**: Access ample metrics and debugging tools for your serverless usage, including logs and Jupyter/SSH access.
|
||
* **Performance Exploration**: Perform in-depth performance exploration to optimize based on performance and price metrics.
|
||
* **Custom Worker Types**: Define custom worker types through CLI search filters and create commands, supporting multiple worker types per endpoint.
|
||
|
||
|
||
# Inside a Serverless GPU
|
||
Source: https://docs.vast.ai/documentation/serverless/inside-a-serverless-gpu
|
||
|
||
Learn about the components of a Serverless GPU instance - the core ML model, model server code, and PyWorker server code.
|
||
|
||
All GPU instances on Vast Serverless contain three parts:
|
||
|
||
1. The core ML model.
|
||
2. The model server code that handles requests and inferences the ML model.
|
||
3. The [PyWorker](/documentation/serverless/overview) server code that wraps the ML model, which formats incoming HTTP requests into a compatible format for the model server.
|
||
|
||
<img src="https://mintcdn.com/vastai-80aa3a82/_4z8utTktrZmQOU6/images/serverless-inside.webp?fit=max&auto=format&n=_4z8utTktrZmQOU6&q=85&s=91cb81e587fbb2e78d3a431aa4270c76" alt="Backend diagram" data-og-width="800" width="800" data-og-height="295" height="295" data-path="images/serverless-inside.webp" data-optimize="true" data-opv="3" srcset="https://mintcdn.com/vastai-80aa3a82/_4z8utTktrZmQOU6/images/serverless-inside.webp?w=280&fit=max&auto=format&n=_4z8utTktrZmQOU6&q=85&s=cb6f8b393e3b30c2c730d8b213c26416 280w, https://mintcdn.com/vastai-80aa3a82/_4z8utTktrZmQOU6/images/serverless-inside.webp?w=560&fit=max&auto=format&n=_4z8utTktrZmQOU6&q=85&s=42132dc13ec899dc1f2a0c053db77949 560w, https://mintcdn.com/vastai-80aa3a82/_4z8utTktrZmQOU6/images/serverless-inside.webp?w=840&fit=max&auto=format&n=_4z8utTktrZmQOU6&q=85&s=05e5ca072208e07884f8218fbd91475b 840w, https://mintcdn.com/vastai-80aa3a82/_4z8utTktrZmQOU6/images/serverless-inside.webp?w=1100&fit=max&auto=format&n=_4z8utTktrZmQOU6&q=85&s=676f7c51f2e5a13a5ba35cb993a2de27 1100w, https://mintcdn.com/vastai-80aa3a82/_4z8utTktrZmQOU6/images/serverless-inside.webp?w=1650&fit=max&auto=format&n=_4z8utTktrZmQOU6&q=85&s=84b01d6be4b3337ae1bd9047b1486834 1650w, https://mintcdn.com/vastai-80aa3a82/_4z8utTktrZmQOU6/images/serverless-inside.webp?w=2500&fit=max&auto=format&n=_4z8utTktrZmQOU6&q=85&s=cd95de65c5a1a52839d7132bfdaaa8d9 2500w" />
|
||
|
||
The term 'Backend' refers to the machine learning model itself, and the supplementary code used to make its inference work.
|
||
|
||
On Vast Serverless, the only way to access the ML model is through the PyWorker that wraps it. This allows the PyWorker to report accurate metrics to the serverless system so it can size the number of GPU instances appropriatley. 
|
||
|
||
## Backend Configuration
|
||
|
||
Once a User has connected to a GPU Instance over Vast, the backend will start its own launch script. The launch script will:
|
||
|
||
* Setup a log file.
|
||
* Start a webserver to communicate with the ML model and PyWorker.
|
||
* Set environment variables.
|
||
* Launch the PyWorker and create a directory for it.
|
||
* Monitor the webserver and PyWorker processes.
|
||
|
||
After launch, the PyWorker acts as an inference API server façade, receiving HTTP requests, parsing them, and turning them into internal calls.  
|
||
|
||
The 'Model Server' icon in the image above represents the inference runtime. This piece loads the model, exposes an interface, performs the model forward pass, and returns the resulting tensors to the PyWorker.
|
||
|
||
## Adding Endpoints
|
||
|
||
To add an endpoint to an existing backend, follow the instructions in the [PyWorker Extension Guide](/documentation/serverless/creating-new-pyworkers). This guide can also be used to write new backends.
|
||
|
||
## Authentication
|
||
|
||
The authentication information returned by [https://run.vast.ai/route/ ](/documentation/serverless/route)must be included in the request JSON to the PyWorker, but will be filtered out before forwarding to the model server. For example, a PyWorker expects to receive auth data in the request:
|
||
|
||
```json JSON icon="js" theme={null}
|
||
{
|
||
"auth_data": {
|
||
"signature": "a_base64_encoded_signature_string_from_route_endpoint",
|
||
"cost": 256,
|
||
"endpoint": "Your-Endpoint-Name",
|
||
"reqnum": 1234567890,
|
||
"url": "http://worker-ip-address:port"
|
||
},
|
||
"payload": {
|
||
"inputs": "What is the answer to the universe?",
|
||
"parameters": {
|
||
"max_new_tokens": 256,
|
||
"temperature": 0.7,
|
||
"top_p": 0.9,
|
||
"do_sample": true
|
||
}
|
||
}
|
||
}
|
||
```
|
||
|
||
Once authenticated, the PyWorker will forward the following to the model server:
|
||
|
||
```json JSON icon="js" theme={null}
|
||
{
|
||
"inputs": "What is the answer to the universe?",
|
||
"parameters": {
|
||
"max_new_tokens": 256,
|
||
"temperature": 0.7,
|
||
"top_p": 0.9,
|
||
"do_sample": true
|
||
}
|
||
}
|
||
```
|
||
|
||
When the Serverless system returns an instance address from the `/route/` endpoint, it provides a unique signature with your request. The authentication server verifies this signature to ensure that only authorized clients can send requests to your server.
|
||
|
||
## More Information
|
||
|
||
For more detailed information and advanced configuration, visit the [Vast PyWorker repository](https://github.com/vast-ai/pyworker/).
|
||
|
||
Vast also has pre-made backends in our supported templates, which can be found in the Serverless section [here](https://cloud.vast.ai/templates/). 
|
||
|
||
##
|
||
|
||
|
||
# Logs
|
||
Source: https://docs.vast.ai/documentation/serverless/logs
|
||
|
||
Learn how to fetch and analyze logs from Vast.ai Serverless endpoints and worker groups. Understand the log levels, how to use cURL to fetch logs, and how to interpret the logs for debugging and performance monitoring.
|
||
|
||
Both Endpoints and Worker Groups keep logs that can be fetched by using the `/get_endpoint_logs/` and `/get_autogroup_logs/` endpoints, respectively.
|
||
|
||
Endpoint logs relate to managing instances, and Worker Group logs relate to searching for offers to create instances from, as well as calls to create instances using the offers. 
|
||
|
||
For both types of groups, there are four levels of logs with decreasing levels of detail: **debug**, **trace**, **info0**, and **info1**.
|
||
|
||
<Warning>
|
||
Each log level has a fixed size, and once it is full, the log is wiped and overwritten with new log messages. It is good practice to check these regularly while debugging.
|
||
</Warning>
|
||
|
||
# POST [https://run.vast.ai/get\_endpoint\_logs/](https://run.vast.ai/get_endpoint_logs/)
|
||
|
||
## Inputs
|
||
|
||
* One of the following:
|
||
* `id`(int): ID of your endpoint
|
||
* `endpoint`(string): Name of your endpoint
|
||
* `api_key`(string): The Vast API key associated with the account that controls the Endpoint.
|
||
|
||
```json JSON icon="js" theme={null}
|
||
{
|
||
"endpoint": "YOUR_ENDPOINT_NAME",
|
||
"api_key": "YOUR_VAST_API_KEY"
|
||
}
|
||
```
|
||
|
||
## Outputs
|
||
|
||
* `info0`: The contents of the `info0` log
|
||
* `info1`: The contents of the `info1` log
|
||
* `trace`: The contents of the `trace` log
|
||
* `debug`: The contents of the `debug` log
|
||
|
||
## Example: Fetching Endpoint Logs with cURL
|
||
|
||
```curl Curl icon="cube" theme={null}
|
||
curl https://run.vast.ai/get_endpoint_logs/ \
|
||
-X POST \
|
||
-d '{"endpoint" : 123, "api_key" : "API_KEY_HERE"}' \
|
||
-H 'Content-Type: application/json'
|
||
```
|
||
|
||
***
|
||
|
||
# POST [https://run.vast.ai/get\_autogroup\_logs/](https://run.vast.ai/get_autogroup_logs/)
|
||
|
||
## Inputs
|
||
|
||
* `id`(int): The ID of the Worker Group
|
||
* `api_key`(string): The Vast API key associated with the account that controls the Worker Group.
|
||
|
||
```json JSON icon="js" theme={null}
|
||
{
|
||
"id": 1001,
|
||
"api_key": "YOUR_VAST_API_KEY"
|
||
}
|
||
```
|
||
|
||
## Outputs
|
||
|
||
* `info0`: The contents of the `info0` log
|
||
* `info1`: The contents of the `info1` log
|
||
* `trace`: The contents of the `trace` log
|
||
* `debug`: The contents of the `debug` log
|
||
|
||
## Example: Fetching Worker Group Logs with cURL
|
||
|
||
```bash Bash theme={null}
|
||
curl https://run.vast.ai/get_autogroup_logs/ \
|
||
-X POST \
|
||
-d '{"id" : 1001, "api_key" : "API_KEY_HERE"}' \
|
||
-H 'Content-Type: application/json'
|
||
```
|
||
|
||
<Warning>
|
||
In some cases `info0` may not contain logs for a Worker Group.
|
||
</Warning>
|
||
|
||
|
||
# Overview
|
||
Source: https://docs.vast.ai/documentation/serverless/overview
|
||
|
||
Learn about Vast.ai's Serverless system - the Vast PyWorker, integration with model instances, and creating custom backends.
|
||
|
||
The Vast PyWorker is a Python web server designed to run alongside a machine learning model instance, providing serverless compatibility. It serves as the primary entry point for API requests, forwarding them to the model's API hosted on the same instance. Additionally, it monitors performance metrics and estimates current workload, reporting these metrics to the serverless system.
|
||
|
||
<Note>
|
||
All of Vast's serverless templates use the Vast PyWorker. If you are using a recommended serverless template from Vast, the PyWorker is *already* integrated with the template and will automatically startup when a \{\{Worker\_Group}} is created. 
|
||
</Note>
|
||
|
||
<img src="https://mintcdn.com/vastai-80aa3a82/Wp3R6uoNeIDZvzDI/images/serverless-pyworker.webp?fit=max&auto=format&n=Wp3R6uoNeIDZvzDI&q=85&s=c72a382427d134cc0d7040d3264a2eda" alt="Pyworker Diagram" data-og-width="1254" width="1254" data-og-height="819" height="819" data-path="images/serverless-pyworker.webp" data-optimize="true" data-opv="3" srcset="https://mintcdn.com/vastai-80aa3a82/Wp3R6uoNeIDZvzDI/images/serverless-pyworker.webp?w=280&fit=max&auto=format&n=Wp3R6uoNeIDZvzDI&q=85&s=affc610bc9da4d67bfb16275b0bc3e51 280w, https://mintcdn.com/vastai-80aa3a82/Wp3R6uoNeIDZvzDI/images/serverless-pyworker.webp?w=560&fit=max&auto=format&n=Wp3R6uoNeIDZvzDI&q=85&s=26446ff0a801b94e1d135ebf2d14dcc6 560w, https://mintcdn.com/vastai-80aa3a82/Wp3R6uoNeIDZvzDI/images/serverless-pyworker.webp?w=840&fit=max&auto=format&n=Wp3R6uoNeIDZvzDI&q=85&s=af2c9f2ba408fe01b023c0a6a22e2f93 840w, https://mintcdn.com/vastai-80aa3a82/Wp3R6uoNeIDZvzDI/images/serverless-pyworker.webp?w=1100&fit=max&auto=format&n=Wp3R6uoNeIDZvzDI&q=85&s=fd8f8e1eee822dd50ea959fd5a9d8d7b 1100w, https://mintcdn.com/vastai-80aa3a82/Wp3R6uoNeIDZvzDI/images/serverless-pyworker.webp?w=1650&fit=max&auto=format&n=Wp3R6uoNeIDZvzDI&q=85&s=ed1e64ac9cb0631836abed52d09ba4fd 1650w, https://mintcdn.com/vastai-80aa3a82/Wp3R6uoNeIDZvzDI/images/serverless-pyworker.webp?w=2500&fit=max&auto=format&n=Wp3R6uoNeIDZvzDI&q=85&s=293321da88543ed0d9543dee61f302e7 2500w" />
|
||
|
||
In the diagram's example, a user's client is attempting to infer from a machine learning model. With Vast's Serverless setup, the client:
|
||
|
||
1. Sends a [`/route/`](/documentation/serverless/route) POST request to the serverless system. This asks the system for a GPU instance to send the inference request.
|
||
2. The serverless system selects a ready and available worker instance from the user's endpoint and replies with a JSON object containing the URL of the selected instance.
|
||
3. The client then constructs a new POST request with it's payload, authentication data, and the URL of the worker instance. This is sent to the worker.
|
||
4. The PyWorker running on that specific instance validates the request and extracts the payload. It then sends the payload to the model inference server, which runs on the same instance as the PyWorker.
|
||
5. The model generates it's output and returns the result to the PyWorker.
|
||
6. The PyWorker formats the model's response as needed, and sends the response back to the client. 
|
||
7. Independently and concurrently, the PyWorker periodically sends it's operational metrics to the serverless system, which is used to make scaling decisions.
|
||
|
||
The [Vast PyWorker repository](https://github.com/vast-ai/pyworker/) gives examples that are useful for learning how to create a custom PyWorker for your custom template and integrate with Vast’s Serverless system. Even with a custom PyWorker, the PyWorker code runs on your Vast instance, and we automate its installation and activation during instance creation. The graphic below shows how the files and entities for the Serverless system are organized.
|
||
|
||
<img src="https://mintcdn.com/vastai-80aa3a82/_4z8utTktrZmQOU6/images/serverless-pyworker-2.webp?fit=max&auto=format&n=_4z8utTktrZmQOU6&q=85&s=869303362e8072da8a86d83f1873290e" alt="" data-og-width="800" width="800" data-og-height="286" height="286" data-path="images/serverless-pyworker-2.webp" data-optimize="true" data-opv="3" srcset="https://mintcdn.com/vastai-80aa3a82/_4z8utTktrZmQOU6/images/serverless-pyworker-2.webp?w=280&fit=max&auto=format&n=_4z8utTktrZmQOU6&q=85&s=a545883f8697bc6b8fcb64802ef3aa3b 280w, https://mintcdn.com/vastai-80aa3a82/_4z8utTktrZmQOU6/images/serverless-pyworker-2.webp?w=560&fit=max&auto=format&n=_4z8utTktrZmQOU6&q=85&s=86116e519dc7391082ef9c13b624f542 560w, https://mintcdn.com/vastai-80aa3a82/_4z8utTktrZmQOU6/images/serverless-pyworker-2.webp?w=840&fit=max&auto=format&n=_4z8utTktrZmQOU6&q=85&s=1145536e0895620a01f18ddf97f0d03a 840w, https://mintcdn.com/vastai-80aa3a82/_4z8utTktrZmQOU6/images/serverless-pyworker-2.webp?w=1100&fit=max&auto=format&n=_4z8utTktrZmQOU6&q=85&s=f22c53a387af6abb48e1d40e065313b2 1100w, https://mintcdn.com/vastai-80aa3a82/_4z8utTktrZmQOU6/images/serverless-pyworker-2.webp?w=1650&fit=max&auto=format&n=_4z8utTktrZmQOU6&q=85&s=4d88f79cdd33348f20d32c16ffe75ec4 1650w, https://mintcdn.com/vastai-80aa3a82/_4z8utTktrZmQOU6/images/serverless-pyworker-2.webp?w=2500&fit=max&auto=format&n=_4z8utTktrZmQOU6&q=85&s=3248be1e9b8309d488303f9917ca064a 2500w" />
|
||
|
||
## Integration with Model Instance
|
||
|
||
The Vast PyWorker wraps the backend code of the model instance you are running. The PyWorker calls the appropriate backend function when the PyWorker's corresponding API endpoint is invoked. For example, if you are running a text generation inference (TGI) server, your PyWorker might receive the following JSON body from a `/generate` endpoint: 
|
||
|
||
```json JSON icon="js" theme={null}
|
||
{
|
||
"auth_data": {
|
||
"signature": "a_base64_encoded_signature_string_from_route_endpoint",
|
||
"cost": 256,
|
||
"endpoint": "Your-TGI-Endpoint-Name",
|
||
"reqnum": 1234567890,
|
||
"url": "http://worker-ip-address:port"
|
||
},
|
||
"payload": {
|
||
"inputs": "What is the answer to the universe?",
|
||
"parameters": {
|
||
"max_new_tokens": 256,
|
||
"temperature": 0.7,
|
||
"top_p": 0.9,
|
||
"do_sample": true
|
||
}
|
||
}
|
||
}
|
||
```
|
||
|
||
When it receives this request, your PyWorker will internally send the following to the TGI model sever:
|
||
|
||
```json JSON icon="js" theme={null}
|
||
{
|
||
"inputs": "What is the answer to the universe?",
|
||
"parameters": {
|
||
"max_new_tokens": 256,
|
||
"temperature": 0.7,
|
||
"top_p": 0.9,
|
||
"do_sample": true
|
||
}
|
||
}
|
||
```
|
||
|
||
Your PyWorker would similarily receive the output result from the TGI server, and forward a formatted version to the client.
|
||
|
||
## Communication with Serverless
|
||
|
||
If you are building a custom PyWorker for your own use case, to be able to integrate with Vast's serverless system, each backend must:
|
||
|
||
* Send a message to the serverless system when the backend server is ready (e.g., after model installation).
|
||
* Periodically send performance metrics to the serverless system to optimize usage and performance.
|
||
* Report any errors to the serverless system.
|
||
|
||
For example implementations, reference the [Vast PyWorker repository](https://github.com/vast-ai/pyworker/).
|
||
|
||
## Creating a Custom Backend
|
||
|
||
If you want to create your own backend and learn how to integrate with the serverless system, please refer to the following guides: 
|
||
|
||
* [Creating New PyWorkers](/documentation/serverless/creating-new-pyworkers)
|
||
|
||
## Vast Supported Backends
|
||
|
||
Vast has pre-made templates for popular models such as [Text-Generation-Inference](/documentation/serverless/text-generation-inference-tgi)
|
||
and [Comfy UI](/documentation/serverless/comfy-ui). These templates allow you to use these models in API mode, automatically handling performance and error tracking, making them compatible with Vast Serverless with no additional code required.
|
||
|
||
To get started with Vast-supported backends, see the [Inside a Severless GPU](/documentation/serverless/inside-a-serverless-gpu) guide.
|
||
|
||
|
||
# Performance Testing
|
||
Source: https://docs.vast.ai/documentation/serverless/performance-testing
|
||
|
||
Learn about the performance testing process in Vast.ai Serverless. Understand how the test measures LLM and image generation capabilities, how it translates pixel generation to tokens, and how it normalizes performance across different GPUs.
|
||
|
||
When the serverless system recruits a GPU for a \{\{Worker\_Group}}, the PyWorker on the GPU instance starts by conducting a performance test to assess the GPU's maximum capabilities.
|
||
|
||
### LLMs
|
||
|
||
For LLMs, this test measures the maximum tokens per second that can be generated across concurrent batches. 
|
||
|
||
### Image Generation
|
||
|
||
For image generation, the model is generating pixels, which does not directly translate to tokens. To translate pixel generation to tokens, the test counts the number of 512x512 pixel grids required to cover the image resolution, considering each grid as equivalent to 175 tokens. 
|
||
|
||
This value is added on top of a constant overhead token value of 85. Based on the number of diffusion steps performed, the value is adjusted to accomodate for the request time.
|
||
|
||
The value is then normalized so that a system running Flux on a 4090 GPU achieves a standardized performance rating of 200 tokens per second.
|
||
|
||
***
|
||
|
||
These performance tests may take several minutes to complete, depending on the machine's specifications. Progress can be monitored through the instance logs. Once the test is completed, the results are saved. If the instance is rebooted, the saved results will be loaded, and the test will not run again.
|
||
|
||
For more details on the full implementation, visit the [Vast PyWorker repository](https://github.com/vast-ai/pyworker/) and reference `backend.py` in the `lib/` folder of the PyWorker.
|
||
|
||
|
||
# Pricing
|
||
Source: https://docs.vast.ai/documentation/serverless/pricing
|
||
|
||
Learn how Vast.ai Serverless pricing works - GPU recruitment, endpoint suspension, and stopping.
|
||
|
||
Vast.ai Serverless offers pay-as-you-go pricing for all workloads at the same rates as Vast.ai's non-Serverless GPU instances. Each instance accrues cost on a per second basis.
|
||
This guide explains how pricing works.
|
||
|
||
## GPU Recruitment
|
||
|
||
As the Serverless engine takes requests, it will automatically scale its number of workers up or down depending on the incoming and forecasted demand. When scaling up,
|
||
the engine searches over the Vast.ai marketplace for GPU instances that offer the best performance / price ratio. Once determined, the GPU instance(s) is recruited into
|
||
the Serverless engine, and its cost (\$/hr) is added to the running sum of all GPU instances running on your Serverless engine. 
|
||
|
||
As the request demand falls off, the engine will remove GPU instance(s) and your credit account immediatley stops being charged for those corresponding instance(s).
|
||
|
||
Visit the [Billing Help](/documentation/reference/billing#ugwiY) page to see details on GPU instance costs.
|
||
|
||
## Suspending an Endpoint
|
||
|
||
By suspending an Endpoint, the Endpoint will no longer recruit any new GPU instances, but will continue to use the instances it currently has. This is a way to cap the
|
||
number of instances an Endpoint can manage, and therefore limit costs. 
|
||
|
||
## Stopping an Endpoint
|
||
|
||
Stopping an Endpoint will pause the recruitment of GPU instances, and put the existing instances into the "Stopped" state, preventing any work from being sent to
|
||
the Endpoint group. The instances will still charge the small storage cost, but active rental and bandwidth costs will not be charged to the user account. 
|
||
|
||
## Billing by Instance State
|
||
|
||
The specific charges depend on the instance's state:
|
||
|
||
| State | GPU compute | Storage | Bandwidth in | Bandwidth out |
|
||
| -------- | ----------- | ------- | ------------ | ------------- |
|
||
| Ready | Billed | Billed | Billed | Billed |
|
||
| Loading | Billed | Billed | Billed | Billed |
|
||
| Creating | Not billed | Billed | Billed | Billed |
|
||
| Inactive | Not billed | Billed | Billed | Billed |
|
||
|
||
GPU compute refers to the per-second GPU rental charges. See the [Billing Help](/documentation/reference/billing#ugwiY) page for rate details.
|
||
|
||
|
||
# Route
|
||
Source: https://docs.vast.ai/documentation/serverless/route
|
||
|
||
Learn how to use the /route/ endpoint to retrieve a GPU instance address within your Endpoint. Understand the inputs, outputs, and examples for using the endpoint.
|
||
|
||
The `/route/` endpoint calls on the serverless engine to retrieve a GPU instance address within your Endpoint.
|
||
|
||
# POST [https://run.vast.ai/route/](https://run.vast.ai/route/)
|
||
|
||
## Inputs
|
||
|
||
* `endpoint`(string): Name of the Endpoint.
|
||
* `api_key`(string): The Vast API key associated with the account that controls the Endpoint. The key can also be placed in the header as an Authorization: Bearer.
|
||
* `cost`(float): The estimated compute resources for the request. The units of this cost are defined by the PyWorker. The serverless engine uses the cost as an estimate of the request's workload, and can scale GPU instances to ensure the Endpoint has the proper compute capacity.
|
||
|
||
```json JSON icon="js" theme={null}
|
||
{
|
||
"endpoint": "YOUR_ENDPOINT_NAME",
|
||
"api_key": "YOUR_VAST_API_KEY",
|
||
"cost": 242.0
|
||
}
|
||
```
|
||
|
||
## Outputs
|
||
|
||
### On Successful Worker Return
|
||
|
||
* `url`(string): The address of the worker instance to send the request to.
|
||
* `reqnum`(int): The request number corresponding to this worker instance. Note that workers expect to receive requests in approximately the same order as these reqnums, but some flexibility is allowed due to potential out-of-order requests caused by concurrency or small delays on the proxy server.
|
||
* `signature`(string): The signature is a cryptographic string that authenticates the url, cost, and reqnum fields in the response, proving they originated from the server. Clients can use this signature, along with the server's public key, to verify that these specific details have not been tampered with.
|
||
* `endpoint`(string): Same as the input parameter.
|
||
* `cost`(float): Same as the input parameter.
|
||
* `__request_id `(string): The \_\_request\_id is a unique string identifier generated by the server for each individual API request it receives. This ID is created at the start of processing the request and included in the response, allowing for distinct tracking and logging of every transaction.
|
||
|
||
```json JSON icon="js" theme={null}
|
||
{
|
||
"endpoint": "YOUR_ENDPOINT_NAME",
|
||
"url": "http://192.168.1.10:8000",
|
||
"cost": 242.0,
|
||
"reqnum": 12345,
|
||
"signature": "a1b2c3d4e5f60708090a0b0c0d0e0f101112131415161718191a1b1c1d1e1f202122232425262728292a2b2c2d2e2f303132333435363738393a3b3c3d3e3f40",
|
||
"__request_id": "xxxxxxxx-xxxx-xxxx-xxxx-xxxxxxxxxxxx"
|
||
}
|
||
```
|
||
|
||
### On Failure to Find Ready Worker
|
||
|
||
* `endpoint`: Same as the input parameter to `/route/`.
|
||
* `status`: The breakdown of workers in your endpoint group by status.
|
||
|
||
## Example: Hitting route with cURL
|
||
|
||
```curl Curl icon="cube" theme={null}
|
||
curl --location 'https://run.vast.ai/route/' \
|
||
--header 'Accept: application/json' \
|
||
--header 'Content-Type: application/json' \
|
||
--header 'Authorization: Bearer YOUR_TOKEN_HERE' \
|
||
--data '{
|
||
"endpoint": "your_endpoint_name",
|
||
"cost": 100
|
||
}'
|
||
```
|
||
|
||
|
||
# Serverless Parameters
|
||
Source: https://docs.vast.ai/documentation/serverless/serverless-parameters
|
||
|
||
Learn about the parameters that can be configured for Vast.ai Serverless endpoints and worker groups.
|
||
|
||
The Vast.ai Serverless system has parameters that allow control over the scaling behavior. 
|
||
|
||
# Endpoint Parameters
|
||
|
||
## cold\_mult
|
||
|
||
A multiplier applied to your target capacity for longer-term planning (1+ hours). This parameter controls how much extra capacity the serverless engine will plan for in the future compared to immediate needs. For example, if your current target capacity is 100 tokens/sec and cold\_mult is 2.0, the system will plan to have capacity for 200 tokens/sec for longer-term scenarios.
|
||
|
||
This helps ensure your endpoint has sufficient "cold" (stopped but ready) workers available to handle future load spikes without delay. A higher value means more aggressive capacity planning and better preparedness for sudden traffic increases, while a lower value reduces costs from maintaining stopped instances.
|
||
|
||
If not specified during endpoint creation, the default value is 2.5.
|
||
|
||
## cold\_workers
|
||
|
||
The minimum number of workers that must be kept in a "ready quick" state before the serverless engine is allowed to destroy any workers. A worker is considered "ready quick" if it's either:
|
||
\- Actively serving (status = "idle" with model loaded)
|
||
\- Stopped but ready (status = "stopped" with model loaded)
|
||
|
||
Cold workers are not shut-down, they are stopped but have the model fully loaded. This means they can start serving requests very quickly (seconds) without having to re-download the model or benchmark the GPU performance.
|
||
|
||
If not specified during endpoint creation, the default value is 5.
|
||
|
||
## max\_workers
|
||
|
||
A hard upper limit on the total number of worker instances (ready, stopped, loading, etc.) that your endpoint can have at any given time.
|
||
|
||
If not specified during endpoint creation, the default value is 20.
|
||
|
||
## min\_load
|
||
|
||
A minimum baseline load (measured in tokens/second for LLMs) that the serverless system will assume your Endpoint needs to handle, regardless of actual measured traffic. This acts as a "floor" for load predictions across all time horizons (1 second to 24+ hours), ensuring your endpoint maintains minimum capacity even during periods of zero or very low traffic.
|
||
|
||
For example, if your min\_load is set to 100 tokens/second, but your endpoint currently has zero traffic, the serverless system will still plan capacity as if you need to handle at least 100 tokens/second. This prevents the endpoint from scaling down to zero capacity and ensures you're always ready for incoming requests.
|
||
|
||
If not specified during endpoint creation, the default value is 10.
|
||
|
||
## target\_util
|
||
|
||
The target utilization ratio determines how much spare capacity (headroom) the serverless system maintains. For example, if your predicted load is 900 tokens/second and target\_util is 0.9, the serverless engine will plan for 1000 tokens/second of capacity (900 ÷ 0.9 = 1000), leaving 100 tokens/second (11%) as buffer for traffic spikes.
|
||
|
||
A lower target\_util means more headroom:
|
||
\- target\_util = 0.9 → 11.1% spare capacity relative to load
|
||
\- target\_util = 0.8 → 25% spare capacity relative to load
|
||
\- target\_util = 0.5 → 100% spare capacity relative to load
|
||
\- target\_util = 0.4 → 150% spare capacity relative to load
|
||
|
||
If not specified during endpoint creation, the default value is 0.9.
|
||
|
||
# Workergroup Parameters
|
||
|
||
The following parameters can be specified specifically for a Workergroup and override Endpoint parameters. The Endpoint parameters will continue to apply for other Workergroups contained in it, unless specifically set. 
|
||
|
||
* min\_load
|
||
* target\_util
|
||
* cold\_mult
|
||
|
||
The parameters below are specific to only Workergroups, not Endpoints.
|
||
|
||
## gpu\_ram
|
||
|
||
The amount of GPU memory (VRAM) in gigabytes that your model or workload requires to run. This parameter tells the serverless engine how much GPU memory your model needs.
|
||
|
||
If not specified during workergroup creation, the default value is 24.
|
||
|
||
## launch\_args
|
||
|
||
A command-line style string containing additional parameters for instance creation that will be parsed and applied when the serverless engine creates new workers. This allows you to customize instance configuration beyond what's specified in templates.
|
||
|
||
There is no default value for launch\_args.
|
||
|
||
## search\_params
|
||
|
||
A query string, list, or dictionary that specifies the hardware and performance criteria for filtering GPU offers in the vast.ai marketplace. It uses a simple query syntax to define requirements for the machines that your Workergroup will consider when searching for workers to create.
|
||
|
||
Example:
|
||
|
||
```python icon="python" Python theme={null}
|
||
{"verified": {"eq": true}, "rentable": {"eq": true}, "rented": {"eq": false}}
|
||
```
|
||
|
||
There is no default value for search\_params. To see all available search filters, see the CLI docs [here](https://docs.vast.ai/cli/commands).
|
||
|
||
## template\_hash
|
||
|
||
A unique hexadecimal identifier that references a pre-configured template containing all the configuration needed to create instances. Templates are comprehensive specifications that include the Docker image, environment variables, onstart scripts, resource requirements, and other deployment settings.
|
||
|
||
There is no default value for template\_hash.
|
||
|
||
## template\_id
|
||
|
||
A numeric (integer) identifier that uniquely references a template in the Vast.ai database. This is an alternative way to reference the same template that `template_hash` points to, but using the template's database primary key instead of its hash string.
|
||
|
||
There is no default value for template\_id.
|
||
|
||
## test\_workers
|
||
|
||
The number of different physical machines that a Workergroup should test during its initial "exploration" phase to gather performance data before transitioning to normal demand-based scaling. The Worker Group remains in "exploring" mode until it has successfully tested at least `floor(test_workers / 2)` machines.
|
||
|
||
If not specified during workergroup creation, the default value is 3.
|
||
|
||
|
||
# Text Generation Inference (TGI)
|
||
Source: https://docs.vast.ai/documentation/serverless/text-generation-inference-tgi
|
||
|
||
Learn how to use Text Generation Inference (TGI) with Vast.ai Serverless for text generation models.
|
||
|
||
The [Text Generation Inference serverless template](https://cloud.vast.ai?ref_id=140778\&template_id=e97e6c337efd5562ad419cdb392981a4) can be used to infer LLMs on Vast GPU instances. This page documents required environment variables and endpoints to get started.
|
||
|
||
A full PyWorker and Client implementation can be found [here](https://github.com/vast-ai/pyworker/tree/main).
|
||
|
||
# Environment Variables
|
||
|
||
* `HF_TOKEN`(string): HuggingFace API token with read permissions, used to download gated models. Read more about HuggingFace tokens [here](https://huggingface.co/docs/hub/en/security-tokens).
|
||
* `MODEL_ID`(string): ID of the model to be used for inference. Supported HuggingFace models are shown [here.](https://huggingface.co/docs/text-generation-inference/en/supported_models)
|
||
|
||
<Warning>
|
||
Some models on HuggingFace require the user to accept the terms and conditions on their HuggingFace account before using. For such models, this must be done first before using it with a Vast template.
|
||
</Warning>
|
||
|
||
# Endpoints
|
||
|
||
## /generate/ 
|
||
|
||
Generates the LLM's response to a given prompt in a single request.
|
||
|
||
### Inputs
|
||
|
||
Auth\_data:
|
||
|
||
* `signature`(string): A cryptographic string that authenticates the url, cost, and reqnum fields in the response, proving they originated from the server. Clients can use this signature, along with the server's public key, to verify that these specific details have not been tampered with.
|
||
* `cost`(float): The estimated compute resources for the request. The units of this cost are defined by the PyWorker. 
|
||
* `endpoint`(string): Name of the Endpoint.
|
||
* `reqnum`(int): The request number corresponding to this worker instance. Note that workers expect to receive requests in approximately the same order as these reqnums, but some flexibility is allowed due to potential out-of-order requests caused by concurrency or small delays on the proxy server.
|
||
* `url`(string): The address of the worker instance to send the request to.
|
||
|
||
Payload:
|
||
|
||
* `inputs`(string): The prompt message to be used as the input for the LLM.
|
||
* Parameters:
|
||
* `max_new_tokens`(int): The maximum number of tokens the model will generate for the response to the input.
|
||
|
||
```json JSON icon="js" theme={null}
|
||
{
|
||
"auth_data": {
|
||
"signature": "a_base64_encoded_signature_string_from_route_endpoint",
|
||
"cost": 256,
|
||
"endpoint": "Your-TGI-Endpoint-Name",
|
||
"reqnum": 1234567890,
|
||
"url": "http://worker-ip-address:port"
|
||
},
|
||
"payload": {
|
||
"inputs": "What is the answer to the universe?",
|
||
"parameters": {
|
||
"max_new_tokens": 256
|
||
}
|
||
}
|
||
}
|
||
```
|
||
|
||
Depending on the model being used, other parameters like 'temperature' or 'top\_p' may be supported. Passing in these values in `parameters` will forward the values to the model, but they are *not* required.
|
||
|
||
### Outputs
|
||
|
||
* `generated_text`(string): The model response to the input prompt.
|
||
|
||
```json JSON icon="js" theme={null}
|
||
[
|
||
{
|
||
"generated_text": "The model's response..."
|
||
}
|
||
]
|
||
```
|
||
|
||
## **/generate\_stream**/ 
|
||
|
||
Generates and streams the LLM's response token by token.
|
||
|
||
### Inputs
|
||
|
||
`/generate_stream/` takes the same inputs as `/generate/`:
|
||
|
||
Auth\_data:
|
||
|
||
* `signature`(string): A cryptographic string that authenticates the url, cost, and reqnum fields in the response, proving they originated from the server. Clients can use this signature, along with the server's public key, to verify that these specific details have not been tampered with.
|
||
* `cost`(float): The estimated compute resources for the request. The units of this cost are defined by the PyWorker. 
|
||
* `endpoint`(string): Name of the Endpoint.
|
||
* `reqnum`(int): The request number corresponding to this worker instance. Note that workers expect to receive requests in approximately the same order as these reqnums, but some flexibility is allowed due to potential out-of-order requests caused by concurrency or small delays on the proxy server.
|
||
* `url`(string): The address of the worker instance to send the request to.
|
||
|
||
Payload:
|
||
|
||
* `inputs`(string): The prompt message to be used as the input for the LLM.
|
||
* Parameters:
|
||
* `max_new_tokens`(int): The maximum number of tokens the model will generate for the response to the input.
|
||
|
||
<Note>
|
||
The `max_new_tokens` parameter, rather than the prompt size, impacts performance. For example, if an instance is benchmarked to process 100 tokens per second, a request with `max_new_tokens = 200` will take approximately 2 seconds to complete.
|
||
</Note>
|
||
|
||
```json JSON icon="js" theme={null}
|
||
{
|
||
"auth_data": {
|
||
"signature": "a_base64_encoded_signature_string_from_route_endpoint",
|
||
"cost": 256,
|
||
"endpoint": "Your-TGI-Endpoint-Name",
|
||
"reqnum": 1234567890,
|
||
"url": "http://worker-ip-address:port"
|
||
},
|
||
"payload": {
|
||
"inputs": "What is the answer to the universe?",
|
||
"parameters": {
|
||
"max_new_tokens": 256
|
||
}
|
||
}
|
||
}
|
||
```
|
||
|
||
### Outputs
|
||
|
||
`/generate_stream/` outputs are a stream of Server-Sent Events (SSE), which each event looking like:
|
||
|
||
```json JSON icon="js" theme={null}
|
||
{
|
||
"token": {
|
||
"id": 123, // Token ID
|
||
"text": "Hello", // The actual text of the token
|
||
"logprob": -0.12345, // Log probability of the token
|
||
"special": false // Whether it's a special token (e.g., EOS)
|
||
}
|
||
}
|
||
```
|
||
|
||
|
||
# vLLM
|
||
Source: https://docs.vast.ai/documentation/serverless/vllm
|
||
|
||
Learn how to use vLLM with Vast.ai Serverless for large language model inference.
|
||
|
||
The vLLM Serverless template can be used to infer LLMs on Vast GPU instances. This page documents required environment variables and endpoints to get started.
|
||
|
||
A full PyWorker and Client implementation can be found [here](https://github.com/vast-ai/pyworker/tree/main), which implements the endpoints below.
|
||
|
||
# Environment Variables
|
||
|
||
* `HF_TOKEN`(string): HuggingFace API token with read permissions, used to download gated models. Read more about HuggingFace tokens [here](https://huggingface.co/docs/hub/en/security-tokens). This token should be added to your Vast user account's environment variables. The [Getting Started](/documentation/serverless/getting-started-with-serverless) guide shows this in step 1.
|
||
* `MODEL_NAME`(string): Name of the model to be used for inference. Supported HuggingFace models are shown [here.](https://huggingface.co/docs/text-generation-inference/en/supported_models)
|
||
* `VLLM_ARGS`(string): vLLM specific arguments that are already pre-set in the template. 
|
||
|
||
<Warning>
|
||
Some models on HuggingFace require the user to accept the terms and conditions on their HuggingFace account before using. For such models, this must be done first before using it with a Vast template.
|
||
</Warning>
|
||
|
||
# Endpoints
|
||
|
||
## /v1/completions/ 
|
||
|
||
This endpoint generates a text completion that attempts to match any context or pattern provided in a given prompt. Provide a text prompt, and the model returns the predicted continuation. This endpoint is best suited for single-turn tasks, whereas the /v1/chat/completions endpoint is optimized for multi-turn conversational scenarios.
|
||
|
||
### Inputs
|
||
|
||
auth\_data:
|
||
|
||
* `signature`(string): A cryptographic string that authenticates the url, cost, and reqnum fields in the response, proving they originated from the server. Clients can use this signature, along with the server's public key, to verify that these specific details have not been tampered with.
|
||
* `cost`(float): The estimated compute resources for the request. The units of this cost are defined by the PyWorker. 
|
||
* `endpoint`(string): Name of the Endpoint.
|
||
* `reqnum`(int): The request number corresponding to this worker instance. Note that workers expect to receive requests in approximately the same order as these reqnums, but some flexibility is allowed due to potential out-of-order requests caused by concurrency or small delays on the proxy server.
|
||
* `url`(string): The address of the worker instance to send the request to.
|
||
|
||
payload:
|
||
|
||
* `input`:
|
||
* `model`(string): The specific identifier of the model to be used for generating the text completion.
|
||
* `prompt`(optional, string): The input text that the model will use as a starting point to generate a response. Default is "Hello".
|
||
* `max_tokens`(optional, int): The maximum number of tokens the model will generate for the response to the input. Default is 256.
|
||
* `temperature`(optional, float): A value between 0 and 2 that controls the randomness of the output. Higher values result in more creative and less predictable responses, while lower values make the output more deterministic. Default is 0.7.
|
||
* `top_k`(optional, int): An integer that restricts the model to sampling from the k most likely tokens at each step of the generation process. Default is 20.
|
||
* `top_p`(optional, float): A float between 0 and 1 that controls nucleus sampling. The model considers only the most probable tokens whose cumulative probability exceeds p. Default is 0.4.
|
||
* `stream`(optional, bool): A boolean flag that determines the response format. If true, the server will send back a stream of token-by-token events as they are generated. If false, it will send the full completion in a single response after it's finished. Default is false.
|
||
|
||
```json JSON icon="js" theme={null}
|
||
{
|
||
"auth_data": {
|
||
"signature": "a_base64_encoded_signature_string_from_route_endpoint",
|
||
"cost": 256,
|
||
"endpoint": "Your-Endpoint-Name",
|
||
"reqnum": 1234567890,
|
||
"url": "http://worker-ip-address:port"
|
||
},
|
||
"payload": {
|
||
"input": {
|
||
"prompt": "The capital of the United States is",
|
||
"model": "Qwen/Qwen3-8B",
|
||
"max_tokens": 256,
|
||
"temperature": 0.7,
|
||
"top_k": 20,
|
||
"top_p": 0.4,
|
||
"stream": false
|
||
}
|
||
}
|
||
}
|
||
```
|
||
|
||
Depending on the model being used, other parameters like 'temperature' or 'top\_p' may be supported. Passing in these values in `parameters` will forward the values to the model, but they are *not* required. All parameters can be found in the `CompletionConfig` class in client.py.
|
||
|
||
### Outputs
|
||
|
||
* `id`(string): A unique identifier for the completion request.
|
||
* `object`(string): The type of object returned. For completions, this is always `text_completion`.
|
||
* `created`(int): The Unix timestamp (in seconds) of when the completion was created.
|
||
* `model`(string): The name of the model that generated the response.
|
||
* `choices`:
|
||
* `index`(int): The index of the choice in the list (e.g., 0 for the first choice).
|
||
* `text`(string): The generated text for this completion choice.
|
||
* `logprobs`(object): This field is null unless you requested log probabilities. If requested, it contains the log probabilities of the generated tokens.
|
||
* `finish_reason`(string): The reason the model stopped generating text. Common values include length (reached max\_tokens), stop (encountered a stop sequence), or tool\_calls.
|
||
* `stop_reason`(string): Provides a more specific reason for why the model stopped, often related to internal model logic. It can be null if not applicable.
|
||
* `prompt_logprobs`(object): Similar to logprobs, but for the tokens in the initial prompt. It is null unless specifically requested.
|
||
* `usage`:
|
||
* `prompt_tokens`(int): The number of tokens in the input prompt.
|
||
* `total_tokens`(int): The total number of tokens used in the request (prompt + completion).
|
||
* `completion_tokens`(int): The number of tokens in the generated completion.
|
||
* `prompt_tokens_details`(object): Provides a more detailed breakdown of prompt tokens. It is null unless requested.
|
||
* `kv_transfer_params`(object): An extension field (outside the official OpenAI spec) that carries all the metadata you need to reuse or move around the model’s key/value (KV) cache instead of recomputing it on every call.
|
||
|
||
```json JSON icon="js" theme={null}
|
||
{
|
||
"id": "cmpl-7bd54bc0b3f4d48abf3fe4fa3c11f8b",
|
||
"object": "text_completion",
|
||
"created": 1754334436,
|
||
"model": "Qwen/Qwen3-8B",
|
||
"choices": [
|
||
{
|
||
"index": 0,
|
||
"text": " Washington D.C...",
|
||
"logprobs": null,
|
||
"finish_reason": "length",
|
||
"stop_reason": null,
|
||
"prompt_logprobs": null
|
||
}
|
||
],
|
||
"usage": {
|
||
"prompt_tokens": 6,
|
||
"total_tokens": 262,
|
||
"completion_tokens": 256,
|
||
"prompt_tokens_details": null
|
||
},
|
||
"kv_transfer_params": null
|
||
}
|
||
|
||
```
|
||
|
||
## **/v1**/chat/completions/ 
|
||
|
||
This endpoint generates a model response for a given conversational history. Unlike the /v1/completions/ endpoint, which is designed to continue a single text prompt, the chat endpoint excels at multi-turn dialogues. By providing a sequence of messages, each with a designated role (system, user, or assistant), you can simulate a conversation, and the model will generate the next appropriate message from the assistant.
|
||
|
||
<Danger>
|
||
Not all LLMs will work with this endpoint. The model must be fine-tuned to understand messages and tools. The default model used in the Vast template will work. 
|
||
</Danger>
|
||
|
||
### Inputs
|
||
|
||
`auth_data`:
|
||
|
||
* `signature`(string): A cryptographic string that authenticates the url, cost, and reqnum fields in the response, proving they originated from the server. Clients can use this signature, along with the server's public key, to verify that these specific details have not been tampered with.
|
||
* `cost`(float): The estimated compute resources for the request. The units of this cost are defined by the PyWorker. 
|
||
* `endpoint`(string): Name of the Endpoint.
|
||
* `reqnum`(int): The request number corresponding to this worker instance. Note that workers expect to receive requests in approximately the same order as these reqnums, but some flexibility is allowed due to potential out-of-order requests caused by concurrency or small delays on the proxy server.
|
||
* `url`(string): The address of the worker instance to send the request to.
|
||
|
||
`payload`:
|
||
|
||
* `input`:
|
||
* `model`(string): The specific identifier of the model to be used for generating the text completion.
|
||
* `messages`(array): A list of message objects that form the conversation history.
|
||
* `role`(string): The role of the message author. Can be system, user, or assistant.
|
||
* `content`(string): The content of the message.
|
||
* `max_tokens`(optional, int): The maximum number of tokens the model will generate for the response to the input. Default is 256.
|
||
* `temperature`(optional, float): A value between 0 and 2 that controls the randomness of the output. Higher values result in more creative and less predictable responses, while lower values make the output more deterministic. Default is 0.7.
|
||
* `top_k`(optional, int): An integer that restricts the model to sampling from the k most likely tokens at each step of the generation process. Default is 20.
|
||
* `top_p`(optional, float): A float between 0 and 1 that controls nucleus sampling. The model considers only the most probable tokens whose cumulative probability exceeds p. Default is 0.4.
|
||
* `stream`(optional, bool): A boolean flag that determines the response format. If true, the server will send back a stream of token-by-token events as they are generated. If false, it will send the full completion in a single response after it's finished. Default is false.
|
||
* `tools`(optional, List\[Dict\[str, Any]]): A list of function definitions that the model can call to perform external actions. When a relevant tool is detected in the user's prompt, the model can generate a JSON object with the function name and arguments to call. Your code can then execute this function and return the output to the model to continue the conversation.
|
||
* `tool_choice`(optional, string): This parameter controls how the model uses the functions provided in the tools list. It can be set to "none" to prevent the model from using any tools, "auto" to let the model decide when to call a function, or you can force the model to call a specific function by providing an object like \{"type": "function", "function": \{"name": "my\_function\_name"}}.
|
||
|
||
<Note>
|
||
The `max_tokens` parameter, rather than the `messages` size, impacts performance. For example, if an instance is benchmarked to process 100 tokens per second, a request with `max_tokens = 200` will take approximately 2 seconds to complete.
|
||
</Note>
|
||
|
||
```json JSON icon="js" theme={null}
|
||
{
|
||
"auth_data": {
|
||
"signature": "a_base64_encoded_signature_string_from_route_endpoint",
|
||
"cost": 2096,
|
||
"endpoint": "Your-OpenAI-Endpoint-Name",
|
||
"reqnum": 1234567893,
|
||
"url": "http://worker-ip-address:port"
|
||
},
|
||
"payload": {
|
||
"input": {
|
||
"model": "Qwen/Qwen3-8B",
|
||
"messages": [
|
||
{
|
||
"role": "user",
|
||
"content": "What's the weather like in LA today?"
|
||
}
|
||
],
|
||
"max_tokens": 256,
|
||
"temperature": 0.7,
|
||
"top_k": 40,
|
||
"top_p": 0.9,
|
||
"stream": false,
|
||
"tools": [
|
||
{
|
||
"type": "function",
|
||
"function": {
|
||
"name": "get_current_weather",
|
||
"description": "Get the current weather in a given location",
|
||
"parameters": {
|
||
"type": "object",
|
||
"properties": {
|
||
"location": {
|
||
"type": "string",
|
||
"description": "The city and state, e.g. Los Angeles, CA"
|
||
},
|
||
"unit": {
|
||
"type": "string",
|
||
"enum": ["celsius", "fahrenheit"],
|
||
"description": "The unit of temperature"
|
||
}
|
||
},
|
||
"required": ["location"]
|
||
}
|
||
}
|
||
}
|
||
],
|
||
"tool_choice": {
|
||
"type": "function",
|
||
"function": {
|
||
"name": "get_current_weather"
|
||
}
|
||
}
|
||
}
|
||
}
|
||
}
|
||
```
|
||
|
||
### Outputs
|
||
|
||
* `id`(string): A unique identifier for the completion request.
|
||
* `object`(string): The type of object returned. For chat completions, this is always `chat.completion`.
|
||
* `created`(int): The Unix timestamp (in seconds) of when the completion was created.
|
||
* `model`(string): The name of the model that generated the response.
|
||
* `choices`:
|
||
* `index`(int): The index of the choice in the list (e.g., 0 for the first choice).
|
||
* `messages`(string): A message object generated by the model.
|
||
* `role`(string): The role of the message author. Can be system, user, or assistant.
|
||
* `content`(string): The content of the message.
|
||
* `tool_calls`(array): Contains the function call(s) the model wants to execute. The arguments field is a JSON string containing the parameters extracted from the user's prompt.
|
||
* `finish_reason`(string): The reason the model stopped generating text. Common values include length (reached max\_tokens), stop (encountered a stop sequence), or tool\_calls.
|
||
* `usage`:
|
||
* `prompt_tokens`(int): The number of tokens in the input prompt.
|
||
* `total_tokens`(int): The total number of tokens used in the request (prompt + completion).
|
||
* `completion_tokens`(int): The number of tokens in the generated completion.
|
||
|
||
```json JSON icon="js" theme={null}
|
||
{
|
||
"id": "chatcmpl-a1b2c3d4-e5f6-7890-1234-5g6h7j8k9l0m",
|
||
"object": "chat.completion",
|
||
"created": 1754336000,
|
||
"model": "Qwen/Qwen3-8B",
|
||
"choices": [
|
||
{
|
||
"index": 0,
|
||
"message": {
|
||
"role": "assistant",
|
||
"content": null,
|
||
"tool_calls": [
|
||
{
|
||
"id": "call_Abc123Xyz",
|
||
"type": "function",
|
||
"function": {
|
||
"name": "get_current_weather",
|
||
"arguments": "{\"location\": \"Los Angeles, CA\"}"
|
||
}
|
||
}
|
||
]
|
||
},
|
||
"finish_reason": "tool_calls"
|
||
}
|
||
],
|
||
"usage": {
|
||
"prompt_tokens": 85,
|
||
"completion_tokens": 18,
|
||
"total_tokens": 103
|
||
}
|
||
}
|
||
```
|
||
|
||
|
||
# Worker List
|
||
Source: https://docs.vast.ai/documentation/serverless/worker-list
|
||
|
||
Learn how to use the /get_endpoint_workers/ and /get_autogroup_workers/ endpoints to retrieve a list of GPU instances under an Endpoint and Worker Group. Understand the inputs, outputs, and examples for using the endpoints.
|
||
|
||
The `/get_endpoint_workers/` and `/get_autogroup_workers/` endpoints return a list of GPU instances under an Endpoint and \{\{Worker\_Group}}, respectively. 
|
||
|
||
# [https://run.vast.ai/get\_endpoint\_workers/](https://run.vast.ai/get_endpoint_workers/)
|
||
|
||
## Inputs
|
||
|
||
* `id` (int): The id value of the Endpoint.
|
||
* `api_key` (string): The Vast API key associated with the account that controls the Endpoint.
|
||
|
||
The `api_key` could alternatively be provided in the request header as a bearer token.
|
||
|
||
```json JSON icon="js" theme={null}
|
||
{
|
||
"id": 123,
|
||
"api_key": "$API_KEY"
|
||
}
|
||
```
|
||
|
||
## Outputs
|
||
|
||
For each GPU instance in the Endpoint, the following will be returned:
|
||
|
||
* `cur_load`(float): Current load (as defined by the PyWorker) the GPU instance is receiving per second.
|
||
* `cur_load_rolling_avg`(float): Rolling average of `cur_load`.
|
||
* `cur_perf`(float): The most recent or current operational performance level of the instance (as defined by the PyWorker). For example, a text generation model has the units of tokens generated per second.
|
||
* `disk_usage`(float): Storage used by instance (in Gb).
|
||
* `dlperf`(float): Measured DLPerf of the instance. DLPerf is explained [here.](/documentation/reference/faq/index)
|
||
* `id`(int): Instance ID.
|
||
* `loaded_at`(float): Unix epoch time the instance finished loading.
|
||
* `measured_perf`(float): Benchmarked performances (tokens/s). Set to DLPerf if instance is not benchmarked.
|
||
* `perf`(float): `measured_perf` \* `reliability`.
|
||
* `reliability`(float): Uptime of the instance, ranges 0-1.
|
||
* `reqs_working`(int): Number of active requests currently being processed by the instance.
|
||
* `status`(string): Current status of the worker.
|
||
|
||
```json JSON icon="js" theme={null}
|
||
{
|
||
"cur_load": 150,
|
||
"cur_load_rolling_avg": 50,
|
||
"cur_perf": 80,
|
||
"disk_usage": 30,
|
||
"dlperf": 105.87206734930771,
|
||
"id": 123456,
|
||
"loaded_at": 1724275993.997,
|
||
"measured_perf": 105.87206734930771,
|
||
"perf": 100.5784639818423245,
|
||
"reliability": 0.95,
|
||
"reqs_working": 2,
|
||
"status": "running"
|
||
}
|
||
```
|
||
|
||
## Example
|
||
|
||
Run the following Bash command in a terminal to receive Endpoint workers.
|
||
|
||
```bash Bash theme={null}
|
||
curl https://run.vast.ai/get_endpoint_workers/ \
|
||
-X POST \
|
||
-d '{"id" : 123, "api_key" : "API_KEY_HERE"}' \
|
||
-H 'Content-Type: application/json'
|
||
```
|
||
|
||
***
|
||
|
||
# [https://run.vast.ai/get\_autogroup\_workers/](https://run.vast.ai/get_autogroup_workers/)
|
||
|
||
## Inputs
|
||
|
||
* `id` (int): The id value of the Worker Group.
|
||
* `api_key` (string): The Vast API key associated with the account that controls the Endpoint.
|
||
|
||
The `api_key` could alternatively be provided in the request header as a bearer token.
|
||
|
||
```json JSON icon="js" theme={null}
|
||
{
|
||
"id": 1001,
|
||
"api_key": "$API_KEY"
|
||
}
|
||
```
|
||
|
||
## Outputs
|
||
|
||
For each GPU instance in the Worker Group, the following will be returned:
|
||
|
||
* `cur_load`(float): Current load (as defined by the PyWorker) the GPU instance is receiving per second.
|
||
* `cur_load_rolling_avg`(float): Rolling average of `cur_load`.
|
||
* `cur_perf`(float): The most recent or current operational performance level of the instance (as defined by the PyWorker). For example, a text generation model has the units of tokens generated per second.
|
||
* `disk_usage`(float): Storage used by instance (in Gb).
|
||
* `dlperf`(float): Measured DLPerf of the instance. DLPerf is explained [here.](/documentation/reference/faq/index)
|
||
* `id`(int): Instance ID.
|
||
* `loaded_at`(float): Unix epoch time the instance finished loading.
|
||
* `measured_perf`(float): Benchmarked performances (tokens/s). Set to DLPerf if instance is not benchmarked.
|
||
* `perf`(float): `measured_perf` \* `reliability`.
|
||
* `reliability`(float): Uptime of the instance, ranges 0-1.
|
||
* `reqs_working`(int): Number of active requests currently being processed by the instance.
|
||
* `status`(string): Current status of the worker.
|
||
|
||
```javascript theme={null}
|
||
{
|
||
"cur_load": 150,
|
||
"cur_load_rolling_avg": 50,
|
||
"cur_perf": 80,
|
||
"disk_usage": 30,
|
||
"dlperf": 105.87206734930771,
|
||
"id": 123456,
|
||
"loaded_at": 1724275993.997,
|
||
"measured_perf": 105.87206734930771,
|
||
"perf": 100.5784639818423245,
|
||
"reliability": 0.95,
|
||
"reqs_working": 2,
|
||
"status": "running"
|
||
}
|
||
```
|
||
|
||
## Example
|
||
|
||
Run the following Bash command in a terminal to receive Worker Group workers.
|
||
|
||
```bash Bash theme={null}
|
||
curl https://run.vast.ai/get_autogroup_workers/ \
|
||
-X POST \
|
||
-d '{"id" : 1001, "api_key" : "API_KEY_HERE"}' \
|
||
-H 'Content-Type: application/json'
|
||
```
|
||
|
||
|
||
# Legacy Teams
|
||
Source: https://docs.vast.ai/documentation/teams/legacy-teams
|
||
|
||
|
||
|
||
<script
|
||
type="application/ld+json"
|
||
dangerouslySetInnerHTML={{
|
||
__html: JSON.stringify({
|
||
"@context": "https://schema.org",
|
||
"@type": "TechArticle",
|
||
"headline": "Legacy Teams on Vast.ai",
|
||
"description": "Understanding the legacy team account system where personal accounts were converted into team accounts, and important reminders about this irreversible process.",
|
||
"author": {
|
||
"@type": "Organization",
|
||
"name": "Vast.ai"
|
||
},
|
||
"datePublished": "2025-01-13",
|
||
"dateModified": "2025-04-28",
|
||
"articleSection": "Teams Documentation",
|
||
"keywords": ["teams", "legacy teams", "account conversion", "vast.ai", "team management"]
|
||
})
|
||
}}
|
||
/>
|
||
|
||
## Overview
|
||
|
||
Originally, the process of creating a team involved converting a user's personal account into a special team account. This legacy method has now been replaced with the ability to create separate team accounts.
|
||
|
||
### Reminders for Legacy Team Accounts
|
||
|
||
* **Irreversible Process**: Once a user account has been converted into a team account, the change is permanent and cannot be reversed.
|
||
* **Inheritance of Account Attributes**: The converted team account inherits all aspects of your existing personal account, including billing information, cloud services, and any other account settings.
|
||
|
||
|
||
# Managing Your Team
|
||
Source: https://docs.vast.ai/documentation/teams/managing-teams
|
||
|
||
|
||
|
||
<script
|
||
type="application/ld+json"
|
||
dangerouslySetInnerHTML={{
|
||
__html: JSON.stringify({
|
||
"@context": "https://schema.org",
|
||
"@type": "HowTo",
|
||
"name": "How to Manage Your Vast.ai Team",
|
||
"description": "A comprehensive guide covering all operations needed to manage your team including inviting members, managing roles, editing settings, transferring ownership, and deleting teams.",
|
||
"step": [
|
||
{
|
||
"@type": "HowToStep",
|
||
"name": "Navigate to the Members Page",
|
||
"text": "The Members page is the main hub for managing your team. From this page, you can view all team members and their assigned roles, change member roles, remove team members, invite new members, and access team settings through the three-dot menu."
|
||
},
|
||
{
|
||
"@type": "HowToStep",
|
||
"name": "Invite Team Members",
|
||
"text": "Go to the Members Page and click the Invite button. Enter the email and team role for the person you want to invite, then click Invite to send the invitation email. Anyone with team_write permissions can send invitations. Invitees will receive an email with a unique team invitation link. Note that team invitations expire after 4 hours."
|
||
},
|
||
{
|
||
"@type": "HowToStep",
|
||
"name": "Manage Member Roles",
|
||
"text": "Change a member's role by clicking on the directional arrow next to their name and selecting a new role. Every team comes with two default roles: Manager (full access to team resources) and Member (limited read access while still being able to rent instances). You can also create custom roles with specific permissions."
|
||
},
|
||
{
|
||
"@type": "HowToStep",
|
||
"name": "Edit Team Settings",
|
||
"text": "To change the team name, switch to Team Context, select the team you want to manage, open the Members Page, and click the three-dot menu to select 'Edit Team Name'. You must be a team owner or team manager to update the team name."
|
||
},
|
||
{
|
||
"@type": "HowToStep",
|
||
"name": "Transfer Team Ownership (Optional)",
|
||
"text": "Navigate to the Members page and click the three-dot menu. Select Transfer Team Ownership, choose a new owner (who must already be a member of the team), and confirm the transfer. Once confirmed, ownership will be reassigned and your role will be changed to a manager."
|
||
},
|
||
{
|
||
"@type": "HowToStep",
|
||
"name": "Remove Team Members or Delete Team",
|
||
"text": "To remove a team member, click Delete next to their name and confirm. To delete a team (owner only), open the three-dot menu on the Members page and select 'Delete team'. Make sure you have deleted all instances and machines before proceeding. Warning: This action is permanent and cannot be undone."
|
||
}
|
||
]
|
||
})
|
||
}}
|
||
/>
|
||
|
||
This guide covers all the operations you'll need to manage your team after creation, including inviting members, managing roles, editing settings, and more.
|
||
|
||
## The Members Page
|
||
|
||
The Members page is the main hub for managing your team. Here you can view team members, assign roles, invite new members, and access team settings.
|
||
|
||
Here's an example of what a Members page looks like in the console:
|
||
|
||
<img src="https://mintcdn.com/vastai-80aa3a82/xCLov_y0JNSp_qUD/images/console-members.webp?fit=max&auto=format&n=xCLov_y0JNSp_qUD&q=85&s=edeb6ce87327da1cedb9d4ef60b575d3" alt="Members Page" data-og-width="1280" width="1280" data-og-height="890" height="890" data-path="images/console-members.webp" data-optimize="true" data-opv="3" srcset="https://mintcdn.com/vastai-80aa3a82/xCLov_y0JNSp_qUD/images/console-members.webp?w=280&fit=max&auto=format&n=xCLov_y0JNSp_qUD&q=85&s=ec90f977173d2e2ffeec6807662b6006 280w, https://mintcdn.com/vastai-80aa3a82/xCLov_y0JNSp_qUD/images/console-members.webp?w=560&fit=max&auto=format&n=xCLov_y0JNSp_qUD&q=85&s=67258ded6ffe21e36b52b4d4af04c908 560w, https://mintcdn.com/vastai-80aa3a82/xCLov_y0JNSp_qUD/images/console-members.webp?w=840&fit=max&auto=format&n=xCLov_y0JNSp_qUD&q=85&s=c076832c401edb7a63c1df12f5740ccf 840w, https://mintcdn.com/vastai-80aa3a82/xCLov_y0JNSp_qUD/images/console-members.webp?w=1100&fit=max&auto=format&n=xCLov_y0JNSp_qUD&q=85&s=b3e67253ae07ccce43752d86a8ac3c6f 1100w, https://mintcdn.com/vastai-80aa3a82/xCLov_y0JNSp_qUD/images/console-members.webp?w=1650&fit=max&auto=format&n=xCLov_y0JNSp_qUD&q=85&s=c11f38b0d060d9fad853d2dc290e2a26 1650w, https://mintcdn.com/vastai-80aa3a82/xCLov_y0JNSp_qUD/images/console-members.webp?w=2500&fit=max&auto=format&n=xCLov_y0JNSp_qUD&q=85&s=9f32a8fe79c0fae48f657e9f0a779eae 2500w" />
|
||
|
||
From this page, you can:
|
||
|
||
* View all team members and their assigned roles
|
||
* Change member roles by clicking the directional arrow
|
||
* Remove team members
|
||
* Invite new members
|
||
* Access team settings (three-dot menu)
|
||
|
||
## Inviting Team Members
|
||
|
||
To invite a team member, go to the **Members Page** and click on the **Invite** button.
|
||
|
||
This will bring up a popup where you can enter the email and team role for the person you want to invite. Once complete, click **Invite** to send the invitation email.
|
||
|
||
<Frame caption="Invite Member">
|
||
<img src="https://mintcdn.com/vastai-80aa3a82/KWV1TCiq0zjC57hU/images/teams-quickstart-6.webp?fit=max&auto=format&n=KWV1TCiq0zjC57hU&q=85&s=d963643955c5f12551d9173709c8f40b" alt="" data-og-width="800" width="800" data-og-height="605" height="605" data-path="images/teams-quickstart-6.webp" data-optimize="true" data-opv="3" srcset="https://mintcdn.com/vastai-80aa3a82/KWV1TCiq0zjC57hU/images/teams-quickstart-6.webp?w=280&fit=max&auto=format&n=KWV1TCiq0zjC57hU&q=85&s=d25cd9cdaef7868d03026a1d2b0f9ddf 280w, https://mintcdn.com/vastai-80aa3a82/KWV1TCiq0zjC57hU/images/teams-quickstart-6.webp?w=560&fit=max&auto=format&n=KWV1TCiq0zjC57hU&q=85&s=fcee46502ca03df6b1d1f629e92cdefc 560w, https://mintcdn.com/vastai-80aa3a82/KWV1TCiq0zjC57hU/images/teams-quickstart-6.webp?w=840&fit=max&auto=format&n=KWV1TCiq0zjC57hU&q=85&s=0752c21e714cc0c5f5e8dbbf20f958c2 840w, https://mintcdn.com/vastai-80aa3a82/KWV1TCiq0zjC57hU/images/teams-quickstart-6.webp?w=1100&fit=max&auto=format&n=KWV1TCiq0zjC57hU&q=85&s=c7383bba2988ebdc45f96e8959be43e6 1100w, https://mintcdn.com/vastai-80aa3a82/KWV1TCiq0zjC57hU/images/teams-quickstart-6.webp?w=1650&fit=max&auto=format&n=KWV1TCiq0zjC57hU&q=85&s=6434c18c1da509e41797e94bbccc41d9 1650w, https://mintcdn.com/vastai-80aa3a82/KWV1TCiq0zjC57hU/images/teams-quickstart-6.webp?w=2500&fit=max&auto=format&n=KWV1TCiq0zjC57hU&q=85&s=6fab82b602917714b5432cb727d3892d 2500w" />
|
||
</Frame>
|
||
|
||
Anyone with the proper permissions (currently **team\_write**) can send invitations to invite team members at any role level.
|
||
|
||
### Accepting Team Invitations
|
||
|
||
1. **Receiving the Invitation Email**: Invitees will receive an email containing a unique team invitation link.
|
||
2. **Completing the Joining Process**: Clicking the link will initiate a set of operations to add the invitee to the team. This may involve signing into the Vast.ai platform or creating an account if necessary.
|
||
3. **Confirmation of Membership**: Once the process is complete, the new member will be officially added to the team and will have access based on their role.
|
||
|
||
**Note:** If the recipient of the invitation does not have a Vast account, they will need to create one before being added to your Team.
|
||
|
||
### Best Practices for Invitations
|
||
|
||
* **Ensure Accurate Email Address**: Double-check the email address before sending invitations to avoid any miscommunication.
|
||
* **Communicate with Invitees**: Inform potential team members that they will be receiving an invitation and what steps they need to follow.
|
||
* **Follow-up on Pending Invitations**: Keep track of sent invitations and follow up with invitees who haven't joined yet. **Note:** Team Invitations will expire after **4 hours.**
|
||
|
||
## Managing Member Roles
|
||
|
||
You can change a member's role by clicking on the directional arrow next to their name and selecting a new role.
|
||
|
||
<Frame caption="Change Roles">
|
||
<img src="https://mintcdn.com/vastai-80aa3a82/xCLov_y0JNSp_qUD/images/console-members-2.webp?fit=max&auto=format&n=xCLov_y0JNSp_qUD&q=85&s=7ada3883d8d900c0e13a8ac61247dcb7" alt="Roles" data-og-width="800" width="800" data-og-height="504" height="504" data-path="images/console-members-2.webp" data-optimize="true" data-opv="3" srcset="https://mintcdn.com/vastai-80aa3a82/xCLov_y0JNSp_qUD/images/console-members-2.webp?w=280&fit=max&auto=format&n=xCLov_y0JNSp_qUD&q=85&s=675c85fcfea338af3daeef4760191134 280w, https://mintcdn.com/vastai-80aa3a82/xCLov_y0JNSp_qUD/images/console-members-2.webp?w=560&fit=max&auto=format&n=xCLov_y0JNSp_qUD&q=85&s=eb5fa74f98de477f4319ca8f940677f7 560w, https://mintcdn.com/vastai-80aa3a82/xCLov_y0JNSp_qUD/images/console-members-2.webp?w=840&fit=max&auto=format&n=xCLov_y0JNSp_qUD&q=85&s=7be3927548afc1f0909670315a790bb2 840w, https://mintcdn.com/vastai-80aa3a82/xCLov_y0JNSp_qUD/images/console-members-2.webp?w=1100&fit=max&auto=format&n=xCLov_y0JNSp_qUD&q=85&s=9262e7d6f131fabb4ec99d1868f5dece 1100w, https://mintcdn.com/vastai-80aa3a82/xCLov_y0JNSp_qUD/images/console-members-2.webp?w=1650&fit=max&auto=format&n=xCLov_y0JNSp_qUD&q=85&s=c1e2f5ee67175c760ea62d75d1a43c18 1650w, https://mintcdn.com/vastai-80aa3a82/xCLov_y0JNSp_qUD/images/console-members-2.webp?w=2500&fit=max&auto=format&n=xCLov_y0JNSp_qUD&q=85&s=b3640bc05790cb394d928cf13dec1434 2500w" />
|
||
</Frame>
|
||
|
||
Every team comes with two default roles:
|
||
|
||
* **Manager**: Full access to team resources
|
||
* **Member**: Limited read access to most resources while still being able to rent instances
|
||
|
||
For detailed information about creating custom roles with specific permissions, see the [Teams Roles](/documentation/teams/teams-roles) documentation.
|
||
|
||
## Editing Team Settings
|
||
|
||
### Change Team Name
|
||
|
||
You must be a team owner or team manager to update the team name. Here is how to do it:
|
||
|
||
1. Switch to Team Context by clicking your profile in the top-left corner
|
||
2. Select the team you want to manage
|
||
3. Open the Members Page
|
||
4. Click the three-dot menu and select 'Edit Team Name'
|
||
|
||
<img src="https://mintcdn.com/vastai-80aa3a82/KWV1TCiq0zjC57hU/images/teams-quickstart-edit.webp?fit=max&auto=format&n=KWV1TCiq0zjC57hU&q=85&s=bded8efb6d77674e88fa02ef994231c8" alt="" data-og-width="800" width="800" data-og-height="594" height="594" data-path="images/teams-quickstart-edit.webp" data-optimize="true" data-opv="3" srcset="https://mintcdn.com/vastai-80aa3a82/KWV1TCiq0zjC57hU/images/teams-quickstart-edit.webp?w=280&fit=max&auto=format&n=KWV1TCiq0zjC57hU&q=85&s=f80fd939b41a3f0a884f731e54a40490 280w, https://mintcdn.com/vastai-80aa3a82/KWV1TCiq0zjC57hU/images/teams-quickstart-edit.webp?w=560&fit=max&auto=format&n=KWV1TCiq0zjC57hU&q=85&s=30775ee141d730928c322c778b5f911e 560w, https://mintcdn.com/vastai-80aa3a82/KWV1TCiq0zjC57hU/images/teams-quickstart-edit.webp?w=840&fit=max&auto=format&n=KWV1TCiq0zjC57hU&q=85&s=cb675fca342dfbdd825997583de6eb44 840w, https://mintcdn.com/vastai-80aa3a82/KWV1TCiq0zjC57hU/images/teams-quickstart-edit.webp?w=1100&fit=max&auto=format&n=KWV1TCiq0zjC57hU&q=85&s=95e98a500e898fd58e8da6e36ef56ca6 1100w, https://mintcdn.com/vastai-80aa3a82/KWV1TCiq0zjC57hU/images/teams-quickstart-edit.webp?w=1650&fit=max&auto=format&n=KWV1TCiq0zjC57hU&q=85&s=7835a63598ddd3db83bbfbb87b89c3d8 1650w, https://mintcdn.com/vastai-80aa3a82/KWV1TCiq0zjC57hU/images/teams-quickstart-edit.webp?w=2500&fit=max&auto=format&n=KWV1TCiq0zjC57hU&q=85&s=8d8f4fd5fb8c72e00d4bb1976821c07e 2500w" />
|
||
|
||
The 'Edit team name' option opens a pop-up that allows you to enter and save a new team name.
|
||
|
||
<Frame caption="Edit team">
|
||
<img src="https://mintcdn.com/vastai-80aa3a82/KWV1TCiq0zjC57hU/images/teams-quickstart-edit-2.webp?fit=max&auto=format&n=KWV1TCiq0zjC57hU&q=85&s=85f59f8ffc1030e23f2300ef9a7bc095" alt="" data-og-width="800" width="800" data-og-height="461" height="461" data-path="images/teams-quickstart-edit-2.webp" data-optimize="true" data-opv="3" srcset="https://mintcdn.com/vastai-80aa3a82/KWV1TCiq0zjC57hU/images/teams-quickstart-edit-2.webp?w=280&fit=max&auto=format&n=KWV1TCiq0zjC57hU&q=85&s=e040d1550deebf937df5fc8fca6dfa3a 280w, https://mintcdn.com/vastai-80aa3a82/KWV1TCiq0zjC57hU/images/teams-quickstart-edit-2.webp?w=560&fit=max&auto=format&n=KWV1TCiq0zjC57hU&q=85&s=4503b496387cf1076e06e28e3db2b5f7 560w, https://mintcdn.com/vastai-80aa3a82/KWV1TCiq0zjC57hU/images/teams-quickstart-edit-2.webp?w=840&fit=max&auto=format&n=KWV1TCiq0zjC57hU&q=85&s=b0d7245a03f78b741c494dd4d1e4590b 840w, https://mintcdn.com/vastai-80aa3a82/KWV1TCiq0zjC57hU/images/teams-quickstart-edit-2.webp?w=1100&fit=max&auto=format&n=KWV1TCiq0zjC57hU&q=85&s=79085810584e011d740546be4e97aede 1100w, https://mintcdn.com/vastai-80aa3a82/KWV1TCiq0zjC57hU/images/teams-quickstart-edit-2.webp?w=1650&fit=max&auto=format&n=KWV1TCiq0zjC57hU&q=85&s=91822825a8790a951aff0216670f8351 1650w, https://mintcdn.com/vastai-80aa3a82/KWV1TCiq0zjC57hU/images/teams-quickstart-edit-2.webp?w=2500&fit=max&auto=format&n=KWV1TCiq0zjC57hU&q=85&s=ddce522916ca71dce8a48941eef9fb3b 2500w" />
|
||
</Frame>
|
||
|
||
## Transferring Team Ownership
|
||
|
||
The Transfer Team Ownership feature allows an owner to seamlessly reassign the team to another member within it. To do so, navigate to the **Members** page and click the three-dot menu in the upper right corner.
|
||
|
||
<Frame caption="Three-dot menu">
|
||
<img src="https://mintcdn.com/vastai-80aa3a82/LEwury95WvhzGW2f/images/teams-transfer.webp?fit=max&auto=format&n=LEwury95WvhzGW2f&q=85&s=e26c429a692c1d77c0784e307f44a644" alt="" data-og-width="800" width="800" data-og-height="283" height="283" data-path="images/teams-transfer.webp" data-optimize="true" data-opv="3" srcset="https://mintcdn.com/vastai-80aa3a82/LEwury95WvhzGW2f/images/teams-transfer.webp?w=280&fit=max&auto=format&n=LEwury95WvhzGW2f&q=85&s=bdf7af9a917ba99ba5a383638b873330 280w, https://mintcdn.com/vastai-80aa3a82/LEwury95WvhzGW2f/images/teams-transfer.webp?w=560&fit=max&auto=format&n=LEwury95WvhzGW2f&q=85&s=fd50661113710f6bb42db746dd3bb582 560w, https://mintcdn.com/vastai-80aa3a82/LEwury95WvhzGW2f/images/teams-transfer.webp?w=840&fit=max&auto=format&n=LEwury95WvhzGW2f&q=85&s=85dce935b3192a1b4200ee53def8aca4 840w, https://mintcdn.com/vastai-80aa3a82/LEwury95WvhzGW2f/images/teams-transfer.webp?w=1100&fit=max&auto=format&n=LEwury95WvhzGW2f&q=85&s=3c6a5d73b2ee83934a4cd865b62f9109 1100w, https://mintcdn.com/vastai-80aa3a82/LEwury95WvhzGW2f/images/teams-transfer.webp?w=1650&fit=max&auto=format&n=LEwury95WvhzGW2f&q=85&s=1ae3c868c72514d6d9231ff7da02bc73 1650w, https://mintcdn.com/vastai-80aa3a82/LEwury95WvhzGW2f/images/teams-transfer.webp?w=2500&fit=max&auto=format&n=LEwury95WvhzGW2f&q=85&s=7535241576ae2b5099d23452d94c40c2 2500w" />
|
||
</Frame>
|
||
|
||
From there, you can click **Transfer Team Ownership** and open a pop-up, select a new owner (who must already be a member of the team), and confirm the transfer. Once confirmed, ownership will be reassigned, and your role will be changed to a manager.
|
||
|
||
<Frame caption="Transfer Team Ownership pop-up">
|
||
<img src="https://mintcdn.com/vastai-80aa3a82/LEwury95WvhzGW2f/images/teams-transfer-2.webp?fit=max&auto=format&n=LEwury95WvhzGW2f&q=85&s=5a1a23db2fc0e7a9c46465f9a088ed37" alt="" data-og-width="800" width="800" data-og-height="758" height="758" data-path="images/teams-transfer-2.webp" data-optimize="true" data-opv="3" srcset="https://mintcdn.com/vastai-80aa3a82/LEwury95WvhzGW2f/images/teams-transfer-2.webp?w=280&fit=max&auto=format&n=LEwury95WvhzGW2f&q=85&s=d9db044f06fee4be475ac0acb0ff79df 280w, https://mintcdn.com/vastai-80aa3a82/LEwury95WvhzGW2f/images/teams-transfer-2.webp?w=560&fit=max&auto=format&n=LEwury95WvhzGW2f&q=85&s=b6cdf947b6406487910c24c974ec5407 560w, https://mintcdn.com/vastai-80aa3a82/LEwury95WvhzGW2f/images/teams-transfer-2.webp?w=840&fit=max&auto=format&n=LEwury95WvhzGW2f&q=85&s=cc55f9656901a2565f15bdbb1bfefe69 840w, https://mintcdn.com/vastai-80aa3a82/LEwury95WvhzGW2f/images/teams-transfer-2.webp?w=1100&fit=max&auto=format&n=LEwury95WvhzGW2f&q=85&s=7a262c6a3349154982c76b24ec3c4bac 1100w, https://mintcdn.com/vastai-80aa3a82/LEwury95WvhzGW2f/images/teams-transfer-2.webp?w=1650&fit=max&auto=format&n=LEwury95WvhzGW2f&q=85&s=08ec086a8b613051702021fe17975826 1650w, https://mintcdn.com/vastai-80aa3a82/LEwury95WvhzGW2f/images/teams-transfer-2.webp?w=2500&fit=max&auto=format&n=LEwury95WvhzGW2f&q=85&s=ccd4e3d7bfc02a0de839ab1ae48ce395 2500w" />
|
||
</Frame>
|
||
|
||
## Removing Team Members
|
||
|
||
You can remove a team member by clicking on 'Delete' next to their name, which will trigger a confirmation pop-up.
|
||
|
||
<Frame caption="Remove Member">
|
||
<img src="https://mintcdn.com/vastai-80aa3a82/xCLov_y0JNSp_qUD/images/console-members-3.webp?fit=max&auto=format&n=xCLov_y0JNSp_qUD&q=85&s=62e936356bfb9e79c866e6ba78c0c261" alt="Remove Member" data-og-width="800" width="800" data-og-height="353" height="353" data-path="images/console-members-3.webp" data-optimize="true" data-opv="3" srcset="https://mintcdn.com/vastai-80aa3a82/xCLov_y0JNSp_qUD/images/console-members-3.webp?w=280&fit=max&auto=format&n=xCLov_y0JNSp_qUD&q=85&s=f39bb79dea3afed7645d948be9d22048 280w, https://mintcdn.com/vastai-80aa3a82/xCLov_y0JNSp_qUD/images/console-members-3.webp?w=560&fit=max&auto=format&n=xCLov_y0JNSp_qUD&q=85&s=ebf88fdc789be8722708df287af7c9c2 560w, https://mintcdn.com/vastai-80aa3a82/xCLov_y0JNSp_qUD/images/console-members-3.webp?w=840&fit=max&auto=format&n=xCLov_y0JNSp_qUD&q=85&s=df58eac23d32d907a62456ab204290da 840w, https://mintcdn.com/vastai-80aa3a82/xCLov_y0JNSp_qUD/images/console-members-3.webp?w=1100&fit=max&auto=format&n=xCLov_y0JNSp_qUD&q=85&s=1a15f18efd9f80c03e819bb6c543711e 1100w, https://mintcdn.com/vastai-80aa3a82/xCLov_y0JNSp_qUD/images/console-members-3.webp?w=1650&fit=max&auto=format&n=xCLov_y0JNSp_qUD&q=85&s=e6b20decae72863108efeeee3e2c2599 1650w, https://mintcdn.com/vastai-80aa3a82/xCLov_y0JNSp_qUD/images/console-members-3.webp?w=2500&fit=max&auto=format&n=xCLov_y0JNSp_qUD&q=85&s=1e52fd3d3622404878290d1074eb6177 2500w" />
|
||
</Frame>
|
||
|
||
## Deleting a Team
|
||
|
||
Only the Team Owner can delete a team.
|
||
|
||
To delete a team, open the three-dot menu on the Members page and select 'Delete team'. Make sure you have deleted all instances from the Instances page, or all machines from the Machines page (if you are a host), before proceeding.
|
||
|
||
⚠ **Warning**: This action is permanent and cannot be undone. All team members will be removed and any remaining credits will be returned to your personal account.
|
||
|
||
|
||
# Teams Overview
|
||
Source: https://docs.vast.ai/documentation/teams/teams-overview
|
||
|
||
|
||
|
||
<script
|
||
type="application/ld+json"
|
||
dangerouslySetInnerHTML={{
|
||
__html: JSON.stringify({
|
||
"@context": "https://schema.org",
|
||
"@type": "TechArticle",
|
||
"headline": "Vast.ai Teams Overview",
|
||
"description": "An introduction to Vast.ai's Teams feature for collaborative GPU computing environments, including key features like resource management, consolidated billing, and access controls.",
|
||
"author": {
|
||
"@type": "Organization",
|
||
"name": "Vast.ai"
|
||
},
|
||
"datePublished": "2025-01-13",
|
||
"dateModified": "2025-04-04",
|
||
"articleSection": "Teams Documentation",
|
||
"keywords": ["teams", "collaboration", "GPU computing", "resource management", "billing", "access controls", "vast.ai"]
|
||
})
|
||
}}
|
||
/>
|
||
|
||
## Introduction
|
||
|
||
Vast.ai's Teams feature extends our powerful GPU compute services to collaborative environments. It allows multiple users to work together seamlessly in a shared space, managing serverless workers for AI Inference and GPU computing tasks collectively.
|
||
|
||
### Key Features:
|
||
|
||
* **Collaborative Environment**: Enable teams to work together in a shared space, managing resources and tasks collectively.
|
||
* **Resource Allocation & Management**: Team managers can manage access among team members, ensuring efficient use of GPU workers. (In the future, resource allocation will also be in play)
|
||
* **Consolidated Billing**: Simplifies the financial management by consolidating usage and billing across the team.
|
||
* **Performance Metrics & Access Controls**: Each team member can access shared metrics and logs, with custom access controls set by team owners.
|
||
|
||
## Getting Started with Teams
|
||
|
||
Ready to create your first team? Check out our [Team Creation guide](https://docs.vast.ai/teams-quickstart) for a step-by-step tutorial on creating a team, inviting members, and assigning roles.
|
||
|
||
## Creating Multiple Teams
|
||
|
||
Teams are created as separate accounts, allowing multiple teams to be created by a single user. Note: This feature is unavailble for Legacy Teams (accounts that were converted into teams directly). Each team operates independently, with its own members, roles, and permissions. Users can seamlessly switch between their personal and team accounts using the Context Switcher.
|
||
|
||
* **Independent Team Management:** Each team has its own and members and roles.
|
||
* **Shared Resources:** Each team shares resources such as instances, templates, machines, and certain settings with all team members.
|
||
* **Separate Billing & Credits:** Teams maintain their own separate balance/credit, billing information, and payment history, separate from personal accounts.
|
||
* **Easy Switching:** Users can navigate between personal and team accounts without affecting their workflow.
|
||
|
||
## Conclusion
|
||
|
||
The Teams feature at Vast.ai is designed to bring a new level of collaboration and efficiency to your GPU computing tasks. Additionally, by bringing together the power of our Autoscaling system with these collaborative tools, your team will be well-equipped to tackle all kinds of complex, dynamic workloads effectively.
|
||
|
||
|
||
# Teams Quickstart
|
||
Source: https://docs.vast.ai/documentation/teams/teams-quickstart
|
||
|
||
|
||
|
||
<script
|
||
type="application/ld+json"
|
||
dangerouslySetInnerHTML={{
|
||
__html: JSON.stringify({
|
||
"@context": "https://schema.org",
|
||
"@type": "HowTo",
|
||
"name": "How to Get Started with Vast.ai Teams",
|
||
"description": "A quickstart guide to creating a team, inviting team members, assigning roles, and using SSH keys with team instances on Vast.ai.",
|
||
"step": [
|
||
{
|
||
"@type": "HowToStep",
|
||
"name": "Create Your Team",
|
||
"text": "There are two ways to create a team: Click on your profile name in the Context Switcher and click the Create Team button, or navigate to the Members section in the Sidebar and click Create Team. Enter your Team Name and optionally transfer some credit to your team during creation by selecting the 'Transfer my personal credits' checkbox. Click Create to finish."
|
||
},
|
||
{
|
||
"@type": "HowToStep",
|
||
"name": "Understand Default Team Roles",
|
||
"text": "Every team comes with two default roles: Manager (full access to team resources) and Member (limited read access to most resources while still being able to rent instances). You can view and manage these roles from the Members Page."
|
||
},
|
||
{
|
||
"@type": "HowToStep",
|
||
"name": "Create Custom Roles (Optional)",
|
||
"text": "To create a new role with custom permissions, navigate to the Roles tab of the Members Page. Name the role and choose the permission groups that the new role will have access to. Once satisfied, click Generate to create the new role."
|
||
},
|
||
{
|
||
"@type": "HowToStep",
|
||
"name": "Invite Team Members",
|
||
"text": "Go to the Members Page and click the Invite button. Enter the email and team role for the person you want to invite, then click Invite to send the invitation email. The invitee will receive an email with a link to join your team. Note: If the recipient does not have a Vast account, they will need to create one before being added to your team."
|
||
},
|
||
{
|
||
"@type": "HowToStep",
|
||
"name": "Set Up SSH Keys for Team Instances",
|
||
"text": "For VM Instances: Add your SSH key to your personal account before the VM is created. For Non-VM Instances: Either add your SSH key directly to the instance or add your key to your personal account, and it will be automatically applied to the team instance."
|
||
}
|
||
]
|
||
})
|
||
}}
|
||
/>
|
||
|
||
## Introduction
|
||
|
||
This quickstart guide will walk you through how to create a team, invite new team members and assign them to different roles.
|
||
|
||
## Creating the Team
|
||
|
||
There are two ways to create a team:
|
||
|
||
1. Click on your profile name (or email address) in the Context Switcher and then click the **Create Team** button
|
||
2. Or you can navigate to the **Members** section in the Sidebar and click **Create Team**
|
||
|
||
<Frame caption="Create Team">
|
||
<img src="https://mintcdn.com/vastai-80aa3a82/KWV1TCiq0zjC57hU/images/teams-quickstart.webp?fit=max&auto=format&n=KWV1TCiq0zjC57hU&q=85&s=be252d285d1d7a76a287d5033bf7f2b9" alt="" data-og-width="800" width="800" data-og-height="464" height="464" data-path="images/teams-quickstart.webp" data-optimize="true" data-opv="3" srcset="https://mintcdn.com/vastai-80aa3a82/KWV1TCiq0zjC57hU/images/teams-quickstart.webp?w=280&fit=max&auto=format&n=KWV1TCiq0zjC57hU&q=85&s=bf1b4c8550ebd50ca11ff29e3ed16695 280w, https://mintcdn.com/vastai-80aa3a82/KWV1TCiq0zjC57hU/images/teams-quickstart.webp?w=560&fit=max&auto=format&n=KWV1TCiq0zjC57hU&q=85&s=d9a36c15849bae48e8223f1ce2bf722b 560w, https://mintcdn.com/vastai-80aa3a82/KWV1TCiq0zjC57hU/images/teams-quickstart.webp?w=840&fit=max&auto=format&n=KWV1TCiq0zjC57hU&q=85&s=f99bdd7bb037572f53dc5af00afcbc5e 840w, https://mintcdn.com/vastai-80aa3a82/KWV1TCiq0zjC57hU/images/teams-quickstart.webp?w=1100&fit=max&auto=format&n=KWV1TCiq0zjC57hU&q=85&s=acfb606715fb038075e0a74b2c39fbfa 1100w, https://mintcdn.com/vastai-80aa3a82/KWV1TCiq0zjC57hU/images/teams-quickstart.webp?w=1650&fit=max&auto=format&n=KWV1TCiq0zjC57hU&q=85&s=132eb07867f6cffc1324c8f41c55fd0a 1650w, https://mintcdn.com/vastai-80aa3a82/KWV1TCiq0zjC57hU/images/teams-quickstart.webp?w=2500&fit=max&auto=format&n=KWV1TCiq0zjC57hU&q=85&s=a5ccdb036013cc4d6c6a9202db1e4506 2500w" />
|
||
</Frame>
|
||
|
||
<Frame caption="Members Page">
|
||
<img src="https://mintcdn.com/vastai-80aa3a82/KWV1TCiq0zjC57hU/images/teams-quickstart-2.webp?fit=max&auto=format&n=KWV1TCiq0zjC57hU&q=85&s=52c71e6f8be73e535c8775759d419e77" alt="" data-og-width="800" width="800" data-og-height="379" height="379" data-path="images/teams-quickstart-2.webp" data-optimize="true" data-opv="3" srcset="https://mintcdn.com/vastai-80aa3a82/KWV1TCiq0zjC57hU/images/teams-quickstart-2.webp?w=280&fit=max&auto=format&n=KWV1TCiq0zjC57hU&q=85&s=53dc890e68c9c58a23ff6f4aa0dc0164 280w, https://mintcdn.com/vastai-80aa3a82/KWV1TCiq0zjC57hU/images/teams-quickstart-2.webp?w=560&fit=max&auto=format&n=KWV1TCiq0zjC57hU&q=85&s=808ac838a29ed95b051bc0d88ba0b44a 560w, https://mintcdn.com/vastai-80aa3a82/KWV1TCiq0zjC57hU/images/teams-quickstart-2.webp?w=840&fit=max&auto=format&n=KWV1TCiq0zjC57hU&q=85&s=aca3a4bd0c23c526a370c98b0ac0549f 840w, https://mintcdn.com/vastai-80aa3a82/KWV1TCiq0zjC57hU/images/teams-quickstart-2.webp?w=1100&fit=max&auto=format&n=KWV1TCiq0zjC57hU&q=85&s=d66325b15f0fb0577d5bc9cbc435e050 1100w, https://mintcdn.com/vastai-80aa3a82/KWV1TCiq0zjC57hU/images/teams-quickstart-2.webp?w=1650&fit=max&auto=format&n=KWV1TCiq0zjC57hU&q=85&s=4630a59c795b4e8892140883ed71e8d5 1650w, https://mintcdn.com/vastai-80aa3a82/KWV1TCiq0zjC57hU/images/teams-quickstart-2.webp?w=2500&fit=max&auto=format&n=KWV1TCiq0zjC57hU&q=85&s=9ad36fbc3768102f6eb54fe0c144b82b 2500w" />
|
||
</Frame>
|
||
|
||
Once there, you can create your **Team Name** and transfer some credit to your team during creation. You can also skip the credit transfer step and do it later from the [**Billing Page**](/documentation/reference/billing#a6bsE).
|
||
|
||
To add credit during team creation, select **Transfer my personal credits** checkbox, enter an amount, and then click **Create**.
|
||
|
||
<Frame caption="Team Creation">
|
||
<img src="https://mintcdn.com/vastai-80aa3a82/KWV1TCiq0zjC57hU/images/teams-quickstart-3.webp?fit=max&auto=format&n=KWV1TCiq0zjC57hU&q=85&s=08f15631ba03184c7bd98478fee0f96b" alt="" data-og-width="800" width="800" data-og-height="720" height="720" data-path="images/teams-quickstart-3.webp" data-optimize="true" data-opv="3" srcset="https://mintcdn.com/vastai-80aa3a82/KWV1TCiq0zjC57hU/images/teams-quickstart-3.webp?w=280&fit=max&auto=format&n=KWV1TCiq0zjC57hU&q=85&s=639b487b13c0d85d58a73abc695ed559 280w, https://mintcdn.com/vastai-80aa3a82/KWV1TCiq0zjC57hU/images/teams-quickstart-3.webp?w=560&fit=max&auto=format&n=KWV1TCiq0zjC57hU&q=85&s=7b057c718c5f07ba0879f6382531d8d8 560w, https://mintcdn.com/vastai-80aa3a82/KWV1TCiq0zjC57hU/images/teams-quickstart-3.webp?w=840&fit=max&auto=format&n=KWV1TCiq0zjC57hU&q=85&s=8533b1a8dbdfcd1886555eb6295bb1db 840w, https://mintcdn.com/vastai-80aa3a82/KWV1TCiq0zjC57hU/images/teams-quickstart-3.webp?w=1100&fit=max&auto=format&n=KWV1TCiq0zjC57hU&q=85&s=d2c701d2c4668a8e5455ec515c3c6b81 1100w, https://mintcdn.com/vastai-80aa3a82/KWV1TCiq0zjC57hU/images/teams-quickstart-3.webp?w=1650&fit=max&auto=format&n=KWV1TCiq0zjC57hU&q=85&s=5bdcc5a205ba71100a7bfc3945329a7f 1650w, https://mintcdn.com/vastai-80aa3a82/KWV1TCiq0zjC57hU/images/teams-quickstart-3.webp?w=2500&fit=max&auto=format&n=KWV1TCiq0zjC57hU&q=85&s=f327bfe8ab36765542b29a96a1561d22 2500w" />
|
||
</Frame>
|
||
|
||
After successfully creating the team you should see your Team Name and role in the Context Switcher in the upper left corner and the Team Dashboard on the **Members** page.
|
||
|
||
<Frame caption="Members Page">
|
||
<img src="https://mintcdn.com/vastai-80aa3a82/KWV1TCiq0zjC57hU/images/teams-quickstart-4.webp?fit=max&auto=format&n=KWV1TCiq0zjC57hU&q=85&s=1ee87edcfb1cda108a11959a325145de" alt="" data-og-width="1079" width="1079" data-og-height="419" height="419" data-path="images/teams-quickstart-4.webp" data-optimize="true" data-opv="3" srcset="https://mintcdn.com/vastai-80aa3a82/KWV1TCiq0zjC57hU/images/teams-quickstart-4.webp?w=280&fit=max&auto=format&n=KWV1TCiq0zjC57hU&q=85&s=d078db8a60c90961286acac7f83d608a 280w, https://mintcdn.com/vastai-80aa3a82/KWV1TCiq0zjC57hU/images/teams-quickstart-4.webp?w=560&fit=max&auto=format&n=KWV1TCiq0zjC57hU&q=85&s=05aa2b9be5a402673e4e82540fe3fe2f 560w, https://mintcdn.com/vastai-80aa3a82/KWV1TCiq0zjC57hU/images/teams-quickstart-4.webp?w=840&fit=max&auto=format&n=KWV1TCiq0zjC57hU&q=85&s=d4b20ca15f2b8d3590842709093782de 840w, https://mintcdn.com/vastai-80aa3a82/KWV1TCiq0zjC57hU/images/teams-quickstart-4.webp?w=1100&fit=max&auto=format&n=KWV1TCiq0zjC57hU&q=85&s=26f8a436865186780b6c81e99c9ebdd4 1100w, https://mintcdn.com/vastai-80aa3a82/KWV1TCiq0zjC57hU/images/teams-quickstart-4.webp?w=1650&fit=max&auto=format&n=KWV1TCiq0zjC57hU&q=85&s=60e1144bc564629701cd658960bead22 1650w, https://mintcdn.com/vastai-80aa3a82/KWV1TCiq0zjC57hU/images/teams-quickstart-4.webp?w=2500&fit=max&auto=format&n=KWV1TCiq0zjC57hU&q=85&s=ee5fcc9e4b3e2966af9755e941b80534 2500w" />
|
||
</Frame>
|
||
|
||
The **Members** section is the main way that team owners and managers can interact with the Teams ecosystem. From here you can invite team members, create/manage team roles, remove team members, etc.
|
||
|
||
## Managing Team Roles
|
||
|
||
Every team comes with two default roles: manager and member.
|
||
|
||
Managers have full access to team resources, while members have limited read access to most resources while still being able to rent instances. [Learn more.](/documentation/teams/teams-roles)
|
||
|
||
To create a new role with your desired permissions, navigate to the **Roles** tab of the **Members** **Page**. Then you can name the role and choose the permission groups that the new role will have access to. Once you are satisfied, click **Generate** to create the new role.
|
||
|
||
<Frame caption="Create Role with custom permissions">
|
||
<img src="https://mintcdn.com/vastai-80aa3a82/KWV1TCiq0zjC57hU/images/teams-quickstart-5.webp?fit=max&auto=format&n=KWV1TCiq0zjC57hU&q=85&s=eb3adf6615921db1e9390af9b72344be" alt="" data-og-width="953" width="953" data-og-height="801" height="801" data-path="images/teams-quickstart-5.webp" data-optimize="true" data-opv="3" srcset="https://mintcdn.com/vastai-80aa3a82/KWV1TCiq0zjC57hU/images/teams-quickstart-5.webp?w=280&fit=max&auto=format&n=KWV1TCiq0zjC57hU&q=85&s=de8df1404d7e00c10e081c6f6e4a9d8e 280w, https://mintcdn.com/vastai-80aa3a82/KWV1TCiq0zjC57hU/images/teams-quickstart-5.webp?w=560&fit=max&auto=format&n=KWV1TCiq0zjC57hU&q=85&s=2b7ed8c100580079daf0a6aea8748391 560w, https://mintcdn.com/vastai-80aa3a82/KWV1TCiq0zjC57hU/images/teams-quickstart-5.webp?w=840&fit=max&auto=format&n=KWV1TCiq0zjC57hU&q=85&s=17b42a318365894a924521d201d5e3a3 840w, https://mintcdn.com/vastai-80aa3a82/KWV1TCiq0zjC57hU/images/teams-quickstart-5.webp?w=1100&fit=max&auto=format&n=KWV1TCiq0zjC57hU&q=85&s=e8f58d3d6db735cca2d661f8f6d7fe00 1100w, https://mintcdn.com/vastai-80aa3a82/KWV1TCiq0zjC57hU/images/teams-quickstart-5.webp?w=1650&fit=max&auto=format&n=KWV1TCiq0zjC57hU&q=85&s=7b2c804d1835d6f4c1ed56fc08b33889 1650w, https://mintcdn.com/vastai-80aa3a82/KWV1TCiq0zjC57hU/images/teams-quickstart-5.webp?w=2500&fit=max&auto=format&n=KWV1TCiq0zjC57hU&q=85&s=d95a7559c72420c9397528e0a7ed7356 2500w" />
|
||
</Frame>
|
||
|
||
For more information on Permission Groups and what they allow access to, [click here](/cli/installation).
|
||
|
||
## Inviting Team Members
|
||
|
||
To invite a team member, go to the **Members Page** and click on the **Invite** button.
|
||
|
||
This will bring up a quick popup where you can enter the email and team role for the person you want to invite. Once complete, click **Invite** to send the invitation email.
|
||
|
||
<Frame caption="Invite Member">
|
||
<img src="https://mintcdn.com/vastai-80aa3a82/KWV1TCiq0zjC57hU/images/teams-quickstart-6.webp?fit=max&auto=format&n=KWV1TCiq0zjC57hU&q=85&s=d963643955c5f12551d9173709c8f40b" alt="" data-og-width="800" width="800" data-og-height="605" height="605" data-path="images/teams-quickstart-6.webp" data-optimize="true" data-opv="3" srcset="https://mintcdn.com/vastai-80aa3a82/KWV1TCiq0zjC57hU/images/teams-quickstart-6.webp?w=280&fit=max&auto=format&n=KWV1TCiq0zjC57hU&q=85&s=d25cd9cdaef7868d03026a1d2b0f9ddf 280w, https://mintcdn.com/vastai-80aa3a82/KWV1TCiq0zjC57hU/images/teams-quickstart-6.webp?w=560&fit=max&auto=format&n=KWV1TCiq0zjC57hU&q=85&s=fcee46502ca03df6b1d1f629e92cdefc 560w, https://mintcdn.com/vastai-80aa3a82/KWV1TCiq0zjC57hU/images/teams-quickstart-6.webp?w=840&fit=max&auto=format&n=KWV1TCiq0zjC57hU&q=85&s=0752c21e714cc0c5f5e8dbbf20f958c2 840w, https://mintcdn.com/vastai-80aa3a82/KWV1TCiq0zjC57hU/images/teams-quickstart-6.webp?w=1100&fit=max&auto=format&n=KWV1TCiq0zjC57hU&q=85&s=c7383bba2988ebdc45f96e8959be43e6 1100w, https://mintcdn.com/vastai-80aa3a82/KWV1TCiq0zjC57hU/images/teams-quickstart-6.webp?w=1650&fit=max&auto=format&n=KWV1TCiq0zjC57hU&q=85&s=6434c18c1da509e41797e94bbccc41d9 1650w, https://mintcdn.com/vastai-80aa3a82/KWV1TCiq0zjC57hU/images/teams-quickstart-6.webp?w=2500&fit=max&auto=format&n=KWV1TCiq0zjC57hU&q=85&s=6fab82b602917714b5432cb727d3892d 2500w" />
|
||
</Frame>
|
||
|
||
Once you send the invitation, the user should get an email asking them to join your team. Upon clicking the link in the email they will be added as a member of your team.
|
||
|
||
**Note:** if the recipient of the invitation does not have a Vast account, they will need to create one before being added to your Team.
|
||
|
||
Once the invitee has joined your team, you should see them listed in the **Members** section.
|
||
|
||
<Frame caption="Team Members">
|
||
<img src="https://mintcdn.com/vastai-80aa3a82/KWV1TCiq0zjC57hU/images/teams-quickstart-7.webp?fit=max&auto=format&n=KWV1TCiq0zjC57hU&q=85&s=2a94f40a9320dbd81ce43cfeaa13c028" alt="" data-og-width="1171" width="1171" data-og-height="512" height="512" data-path="images/teams-quickstart-7.webp" data-optimize="true" data-opv="3" srcset="https://mintcdn.com/vastai-80aa3a82/KWV1TCiq0zjC57hU/images/teams-quickstart-7.webp?w=280&fit=max&auto=format&n=KWV1TCiq0zjC57hU&q=85&s=c564195ec6bc86800650f23865a1721f 280w, https://mintcdn.com/vastai-80aa3a82/KWV1TCiq0zjC57hU/images/teams-quickstart-7.webp?w=560&fit=max&auto=format&n=KWV1TCiq0zjC57hU&q=85&s=5bfe04b4e0bec34e724b298450e1b958 560w, https://mintcdn.com/vastai-80aa3a82/KWV1TCiq0zjC57hU/images/teams-quickstart-7.webp?w=840&fit=max&auto=format&n=KWV1TCiq0zjC57hU&q=85&s=1a2baf736ff5b39c377de1d15c715a1b 840w, https://mintcdn.com/vastai-80aa3a82/KWV1TCiq0zjC57hU/images/teams-quickstart-7.webp?w=1100&fit=max&auto=format&n=KWV1TCiq0zjC57hU&q=85&s=1046029b36e2b000a99e3b0ed5c359f2 1100w, https://mintcdn.com/vastai-80aa3a82/KWV1TCiq0zjC57hU/images/teams-quickstart-7.webp?w=1650&fit=max&auto=format&n=KWV1TCiq0zjC57hU&q=85&s=13cf6e41d3c518787f094648bf4a332a 1650w, https://mintcdn.com/vastai-80aa3a82/KWV1TCiq0zjC57hU/images/teams-quickstart-7.webp?w=2500&fit=max&auto=format&n=KWV1TCiq0zjC57hU&q=85&s=cd47702b3b116d64614b372f0732e54b 2500w" />
|
||
</Frame>
|
||
|
||
## Using SSH Keys with Team Instances
|
||
|
||
If you are part of a **team** and want to connect to a **team’s instance** using SSH, simply add your key to your individual account keys. Here’s how it works depending on the type of instance:
|
||
|
||
🔹 VM Instances
|
||
|
||
* Your SSH key **must be added to your personal account before the VM is created**.
|
||
* When the VM is launched, all SSH keys in your account are automatically included for access a team instance.
|
||
|
||
🔹 Non-VM Instances
|
||
|
||
* You can either:
|
||
* **Add your SSH key directly to the instance**, or
|
||
* **Add your key to your personal account**, in which case it will be automatically applied to the team instance as well.
|
||
|
||
<img src="https://mintcdn.com/vastai-80aa3a82/QCY8wvX6GFpUG_n2/images/Screenshot2025-09-08171421.png?fit=max&auto=format&n=QCY8wvX6GFpUG_n2&q=85&s=06bf91354f63ee759ee43d76b83a201b" alt="Screenshot2025 09 08171421 Pn" data-og-width="1016" width="1016" data-og-height="249" height="249" data-path="images/Screenshot2025-09-08171421.png" data-optimize="true" data-opv="3" srcset="https://mintcdn.com/vastai-80aa3a82/QCY8wvX6GFpUG_n2/images/Screenshot2025-09-08171421.png?w=280&fit=max&auto=format&n=QCY8wvX6GFpUG_n2&q=85&s=4bfdd66394655ae9dff88ccae48bd548 280w, https://mintcdn.com/vastai-80aa3a82/QCY8wvX6GFpUG_n2/images/Screenshot2025-09-08171421.png?w=560&fit=max&auto=format&n=QCY8wvX6GFpUG_n2&q=85&s=419842cd19411b071737de500e84aa4e 560w, https://mintcdn.com/vastai-80aa3a82/QCY8wvX6GFpUG_n2/images/Screenshot2025-09-08171421.png?w=840&fit=max&auto=format&n=QCY8wvX6GFpUG_n2&q=85&s=dfc022c871b67fb4f257de16f4f5a275 840w, https://mintcdn.com/vastai-80aa3a82/QCY8wvX6GFpUG_n2/images/Screenshot2025-09-08171421.png?w=1100&fit=max&auto=format&n=QCY8wvX6GFpUG_n2&q=85&s=eac559ba1163621bab1e234a7fd7029d 1100w, https://mintcdn.com/vastai-80aa3a82/QCY8wvX6GFpUG_n2/images/Screenshot2025-09-08171421.png?w=1650&fit=max&auto=format&n=QCY8wvX6GFpUG_n2&q=85&s=5fb15162d5b4ff15371268e09372decf 1650w, https://mintcdn.com/vastai-80aa3a82/QCY8wvX6GFpUG_n2/images/Screenshot2025-09-08171421.png?w=2500&fit=max&auto=format&n=QCY8wvX6GFpUG_n2&q=85&s=947f12c38900b6f47360d2874f8eadf6 2500w" />
|
||
|
||
## Conclusion
|
||
|
||
You have now successfully created a team!
|
||
|
||
From this point, you can add any Billing information the same way as a regular account and invite as many of your teammates as you like so you can collaborate together with ease.
|
||
|
||
|
||
# Teams Roles
|
||
Source: https://docs.vast.ai/documentation/teams/teams-roles
|
||
|
||
|
||
|
||
<script
|
||
type="application/ld+json"
|
||
dangerouslySetInnerHTML={{
|
||
__html: JSON.stringify({
|
||
"@context": "https://schema.org",
|
||
"@type": "TechArticle",
|
||
"headline": "Understanding Team Roles on Vast.ai",
|
||
"description": "A comprehensive guide to team roles on Vast.ai including default roles (Owner, Manager, Member), custom roles with tailored permissions, role syntax, and best practices for managing access control.",
|
||
"author": {
|
||
"@type": "Organization",
|
||
"name": "Vast.ai"
|
||
},
|
||
"datePublished": "2025-01-13",
|
||
"dateModified": "2025-04-04",
|
||
"articleSection": "Teams Documentation",
|
||
"keywords": ["team roles", "permissions", "access control", "custom roles", "vast.ai", "collaboration", "security"]
|
||
})
|
||
}}
|
||
/>
|
||
|
||
## What Are Team Roles?
|
||
|
||
Team roles in Vast.ai's platform are designed to streamline collaboration and enhance security by assigning specific permissions and access levels to different members of a team. These roles determine what actions a team member can perform and what data they can access within the team's shared workspace/context.
|
||
|
||
### Types of Team Roles
|
||
|
||
1. **Default Roles**: These are the standard roles with preset permissions, suitable for common team structures:
|
||
* *Owner*: Full access to all team resources, settings, and member management.
|
||
* *Manager*: All permissions of Team Owner apart from Team Deletion.
|
||
* *Member*: Has ability to view, create, and interact with instances, but no access to billing info, team management, autoscaler, machines, etc.
|
||
2. **Custom Roles**: Custom roles allow team managers to create roles with custom, tailored permissions via permission groups. This feature is particularly useful for teams with unique workflow requirements or specific security protocols.
|
||
|
||
For more information on Permission Groups and what they allow access to, [click here](/cli/installation).
|
||
|
||
### Creating Custom Roles
|
||
|
||
* **Accessing Role Management**: Custom roles can be created and managed through the **Roles** tab of the **Members** Page on the Vast.ai platform.
|
||
* **Defining Permissions**: When creating a custom role, you can select from a wide range of read/write permissions, such as instance creation, billing access, etc. This allows for precise control over what each role can and cannot do.
|
||
* **Assigning Custom Roles**: Once a custom role is created, it can be assigned to team members through the team management interface.
|
||
|
||
You can create roles either in the Vast CLI or on your team dashbaord if you have permission to create roles within your team (team\_write).
|
||
|
||
<Frame caption="Default Roles">
|
||
<img src="https://mintcdn.com/vastai-80aa3a82/LEwury95WvhzGW2f/images/teams-roles.webp?fit=max&auto=format&n=LEwury95WvhzGW2f&q=85&s=84dfe4a0e897e0c961ca632abc387069" alt="" data-og-width="963" width="963" data-og-height="284" height="284" data-path="images/teams-roles.webp" data-optimize="true" data-opv="3" srcset="https://mintcdn.com/vastai-80aa3a82/LEwury95WvhzGW2f/images/teams-roles.webp?w=280&fit=max&auto=format&n=LEwury95WvhzGW2f&q=85&s=6f21996b233f92def107771d009e415c 280w, https://mintcdn.com/vastai-80aa3a82/LEwury95WvhzGW2f/images/teams-roles.webp?w=560&fit=max&auto=format&n=LEwury95WvhzGW2f&q=85&s=13e79c6f70325f74be0a6013c697849c 560w, https://mintcdn.com/vastai-80aa3a82/LEwury95WvhzGW2f/images/teams-roles.webp?w=840&fit=max&auto=format&n=LEwury95WvhzGW2f&q=85&s=bc91651350694f6c1217a0267812a67e 840w, https://mintcdn.com/vastai-80aa3a82/LEwury95WvhzGW2f/images/teams-roles.webp?w=1100&fit=max&auto=format&n=LEwury95WvhzGW2f&q=85&s=66d7a6093c5a2eb4a0e8cde11d656ce7 1100w, https://mintcdn.com/vastai-80aa3a82/LEwury95WvhzGW2f/images/teams-roles.webp?w=1650&fit=max&auto=format&n=LEwury95WvhzGW2f&q=85&s=c26cd400855cd8a8b5fcee9e97f6275a 1650w, https://mintcdn.com/vastai-80aa3a82/LEwury95WvhzGW2f/images/teams-roles.webp?w=2500&fit=max&auto=format&n=LEwury95WvhzGW2f&q=85&s=3cddd21c57b76c02962212db2e1af2ff 2500w" />
|
||
</Frame>
|
||
|
||
You can easily edit any roles on your team using the team dashboard. When editing a role you should see the same series of checkboxes and categories as before.
|
||
|
||
<Frame caption="Edit Role">
|
||
<img src="https://mintcdn.com/vastai-80aa3a82/LEwury95WvhzGW2f/images/teams-roles-2.webp?fit=max&auto=format&n=LEwury95WvhzGW2f&q=85&s=52a177afa7a231a9d6b68d2de64f0c84" alt="" data-og-width="800" width="800" data-og-height="712" height="712" data-path="images/teams-roles-2.webp" data-optimize="true" data-opv="3" srcset="https://mintcdn.com/vastai-80aa3a82/LEwury95WvhzGW2f/images/teams-roles-2.webp?w=280&fit=max&auto=format&n=LEwury95WvhzGW2f&q=85&s=42c781cb77895536dd26caea6ccffc69 280w, https://mintcdn.com/vastai-80aa3a82/LEwury95WvhzGW2f/images/teams-roles-2.webp?w=560&fit=max&auto=format&n=LEwury95WvhzGW2f&q=85&s=674601204bcaf58da7ae178a06b67030 560w, https://mintcdn.com/vastai-80aa3a82/LEwury95WvhzGW2f/images/teams-roles-2.webp?w=840&fit=max&auto=format&n=LEwury95WvhzGW2f&q=85&s=2b20d1d7d076fdc748babbbef11c80db 840w, https://mintcdn.com/vastai-80aa3a82/LEwury95WvhzGW2f/images/teams-roles-2.webp?w=1100&fit=max&auto=format&n=LEwury95WvhzGW2f&q=85&s=44d13e0233d620702eb20d5c15b1833d 1100w, https://mintcdn.com/vastai-80aa3a82/LEwury95WvhzGW2f/images/teams-roles-2.webp?w=1650&fit=max&auto=format&n=LEwury95WvhzGW2f&q=85&s=7c40f75d97ad4ad8d72c3ed1080312e8 1650w, https://mintcdn.com/vastai-80aa3a82/LEwury95WvhzGW2f/images/teams-roles-2.webp?w=2500&fit=max&auto=format&n=LEwury95WvhzGW2f&q=85&s=c922d90ff4ad0504c3cd0454aeca9da1 2500w" />
|
||
</Frame>
|
||
|
||
### Role Syntax
|
||
|
||
All team roles are created through the team dashboard using the role editor. You can also create roles through the Vast CLI by passing in a permissions JSON object that delegates what group of endpoints can be accessed.
|
||
|
||
Currently, the system only supports groups of endpoint categories, but soon it will be extended for further granularity.
|
||
|
||
The current activated scopes are as follows
|
||
|
||
* **misc**: Supports uncategorized operations like search offers, getting logs from various sources, etc
|
||
* **user\_read**: Allows the usage of obtaining basic user data like email, credits, etc. Essential for web usage.
|
||
* **user\_write**: Allows the ability to change account settings such as email, password, 2FA, etc.
|
||
* **instance\_read**: Grants ability to view instances, and certain read-only instance operations
|
||
* **instance\_write**: Grants access to instances and all relevant operations such as starting/stopping instances, cloud copy, reserving credits, etc
|
||
* **billing\_read**: Ability to view billing page and get billing information
|
||
* **billing\_write**: Ability to change billing page information
|
||
* **machine\_read**: Read access to machines owned by the team
|
||
* **machine\_write**: Ability to add/remove machines, and also edit machine settings
|
||
|
||
An example of a permissions json would look like this:
|
||
|
||
```text Text theme={null}
|
||
{
|
||
"api": {
|
||
"misc": {},
|
||
"user_read":{},
|
||
"instance_read": {},
|
||
"instance_write": {},
|
||
"team_read": {
|
||
"api.team.members": {}
|
||
}
|
||
}
|
||
}
|
||
```
|
||
|
||
In order to create a granular team roles you must either use the CLI or the API. In the above example, the only API under team\_read that the user would have access to would be viewing the list of team members.
|
||
|
||
For more information on Permissions [click here](/cli/installation).
|
||
|
||
### Best Practices for Using Team Roles
|
||
|
||
* **Clear Role Definitions**: Clearly define the responsibilities and permissions for each role to avoid confusion and ensure effective collaboration.
|
||
* **Use Custom Roles Judiciously**: Create custom roles when predefined roles do not meet your specific needs. Be mindful of the permissions assigned to ensure team security and efficiency.
|
||
|
||
### Conclusion
|
||
|
||
Team roles are a fundamental aspect of managing a secure environment for collaboration on the Vast.ai platform. By effectively utilizing predefined and custom roles, teams can ensure that each member has the appropriate level of access and control, fostering a productive and secure working environment.
|
||
|
||
|
||
# Advanced Setup
|
||
Source: https://docs.vast.ai/documentation/templates/advanced-setup
|
||
|
||
|
||
|
||
## Overview
|
||
|
||
This guide covers advanced customization techniques available on the Vast.ai platform. These features allow you to extend and enhance your templates beyond basic configuration.
|
||
|
||
For a complete reference of all template settings, see [Template Settings](/documentation/templates/template-settings).
|
||
|
||
For a step-by-step tutorial on creating your first template, see [Creating Templates](/documentation/templates/creating-templates).
|
||
|
||
## Customization Options
|
||
|
||
There are two main ways to customize templates on Vast.ai:
|
||
|
||
1. **Runtime customization with PROVISIONING\_SCRIPT** - Add a setup script that runs when the instance starts
|
||
* Works with any Docker image
|
||
* Simplest approach - no Docker build needed
|
||
* Perfect for installing packages, downloading models, configuring services
|
||
|
||
2. **Build custom Docker images** - Create your own Dockerfile with everything pre-installed
|
||
* Can start FROM Vast base images for built-in security features
|
||
* Or FROM any other base image
|
||
* Full control, faster instance startup
|
||
* Best for complex setups or frequently reused configurations
|
||
|
||
## PROVISIONING\_SCRIPT
|
||
|
||
Vast.ai templates support running a remote script on start to help configure the instance and download models and extensions that may not already be available in the Docker image.
|
||
|
||
This is the simplest way to customize a template - you start with one of our recommended templates (like `vastai/base-image` or `vastai/pytorch`) and add custom setup via a provisioning script.
|
||
|
||
### How to use
|
||
|
||
1. Go to the [Templates tab](https://cloud.vast.ai/templates/) in Vast.ai interface
|
||
2. Search for "base-image" or "Pytorch" depending on your needs: 
|
||
* `vastai/base-image` is a general purpose image
|
||
* `vastai/pytorch` is a base image for working with PyTorch-based applications on Vast
|
||
3. Click "Edit" on your chosen template
|
||
4. Add the PROVISIONING\_SCRIPT environment variable: 
|
||
* In the Environment Variables section, add a new variable named "PROVISIONING\_SCRIPT"
|
||
* The value should be a URL pointing to a shell script (from GitHub, Gist, etc.)
|
||
|
||
```curl Example URL theme={null}
|
||
https://raw.githubusercontent.com/karthik-vast-ai/vast-cli/distributed-inference-integration/provisioning_script.sh
|
||
```
|
||
|
||
5. Make sure to click "+" to add the environment variable
|
||
6. Click Create and Use
|
||
|
||
<Frame caption="Add PROVISIONING_SCRIPT variable">
|
||
<img src="https://mintcdn.com/vastai-80aa3a82/xCLov_y0JNSp_qUD/images/console-create-custom-template.webp?fit=max&auto=format&n=xCLov_y0JNSp_qUD&q=85&s=1ab4a7c4fd92be9d305e78a1f58588df" alt="" data-og-width="1280" width="1280" data-og-height="1091" height="1091" data-path="images/console-create-custom-template.webp" data-optimize="true" data-opv="3" srcset="https://mintcdn.com/vastai-80aa3a82/xCLov_y0JNSp_qUD/images/console-create-custom-template.webp?w=280&fit=max&auto=format&n=xCLov_y0JNSp_qUD&q=85&s=e2e519d0b1fe447327458d72ca85e781 280w, https://mintcdn.com/vastai-80aa3a82/xCLov_y0JNSp_qUD/images/console-create-custom-template.webp?w=560&fit=max&auto=format&n=xCLov_y0JNSp_qUD&q=85&s=d95fd71ff1e2f49a0a0a732de6ba779e 560w, https://mintcdn.com/vastai-80aa3a82/xCLov_y0JNSp_qUD/images/console-create-custom-template.webp?w=840&fit=max&auto=format&n=xCLov_y0JNSp_qUD&q=85&s=ab5f9203c97cbb0c8911ff45e7d1b31f 840w, https://mintcdn.com/vastai-80aa3a82/xCLov_y0JNSp_qUD/images/console-create-custom-template.webp?w=1100&fit=max&auto=format&n=xCLov_y0JNSp_qUD&q=85&s=35074e5d806b006525d2ad1bf8bd0df8 1100w, https://mintcdn.com/vastai-80aa3a82/xCLov_y0JNSp_qUD/images/console-create-custom-template.webp?w=1650&fit=max&auto=format&n=xCLov_y0JNSp_qUD&q=85&s=a9a7603dce0590e296ca27ef56e1cd6b 1650w, https://mintcdn.com/vastai-80aa3a82/xCLov_y0JNSp_qUD/images/console-create-custom-template.webp?w=2500&fit=max&auto=format&n=xCLov_y0JNSp_qUD&q=85&s=9012327661c79a6a2568804990619ae8 2500w" />
|
||
</Frame>
|
||
|
||
### Example PROVISIONING\_SCRIPT
|
||
|
||
```bash Bash theme={null}
|
||
#!/bin/bash
|
||
|
||
#
|
||
cd /workspace/
|
||
# Cause the script to exit on failure.
|
||
set -eo pipefail
|
||
|
||
# Activate the main virtual environment
|
||
. /venv/main/bin/activate
|
||
|
||
# Install your packages
|
||
pip install your-packages
|
||
|
||
# Download some useful files
|
||
wget -P "${WORKSPACE}/" https://example.org/my-application.tar.gz
|
||
tar xvf ${WORKSPACE}/my-application.tar.gz"
|
||
|
||
# Set up any additional services
|
||
echo "my-supervisor-config" > /etc/supervisor/conf.d/my-application.conf
|
||
echo "my-supervisor-wrapper" > /opt/supervisor-scripts/my-application.sh
|
||
chmod +x /opt/supervisor-scripts/my-application.sh
|
||
|
||
# Reconfigure the instance portal
|
||
rm -f /etc/portal.yaml
|
||
export PORTAL_CONFIG="localhost:1111:11111:/:Instance Portal|localhost:1234:11234:/:My Application"
|
||
|
||
# Reload Supervisor
|
||
supervisorctl reload
|
||
```
|
||
|
||
This script will run on first boot to set up your environment. All installations should go to /workspace/ for proper persistence.
|
||
|
||
### Configuring Application Access with PORTAL\_CONFIG
|
||
|
||
The base-image template includes PORTAL\_CONFIG for secure application access management. This environment variable controls how applications are exposed and accessed.
|
||
|
||
```bash PORTAL_CONFIG structure theme={null}
|
||
hostname:external_port:local_port:url_path:Application Name|hostname:external_port:local_port:url_path:Application Name
|
||
```
|
||
|
||
The structure of this variable is:
|
||
|
||
* Each application is separated by the `|` character
|
||
* Each application parameter is separated by the `:` character
|
||
* Each application must specify `hostname:external_port:local_port:url_path:Application Name`
|
||
|
||
Example:
|
||
|
||
```bash Bash theme={null}
|
||
"localhost:8002:18002:/hello:MyApp|localhost:1111:11111:/:Instance Portal|localhost:8080:18080:/:Jupyter|localhost:8080:8080:/terminals/1:Jupyter Terminal|localhost:8384:18384:/:Syncthing|localhost:6006:16006:/:Tensorboard"
|
||
```
|
||
|
||
The hostname in Docker instances will always be `localhost`
|
||
|
||
Where the internal port and local port are not equal then Caddy will be configured to listen on `0.0.0.0:external_port` acting as a reverse proxy for `hostname:local_port`
|
||
|
||
If the `external_port` and `local_port` are equal then Caddy will not act as a proxy but the Instance Portal UI will still create links. This is useful because it allows us to create links to Jupyter which is not controlled by Supervisor in Jupyter Launch mode.
|
||
|
||
`url_path` will be appended to the instance address and is generally set to `/` but can be used to create application deep links.
|
||
|
||
The `caddy_manager` script will write an equivalent config file at `/etc/portal.yaml` on boot if it does not already exist. This file can be edited in a running instance.
|
||
|
||
Important: When defining multiple links to a single application, only the first should have non equal ports - We cannot proxy one application multiple times.
|
||
|
||
Note: Instance Portal UI is **not** required and its own config declaration can be removed from `PORTAL_CONFIG`. This will not affect the authentication system.
|
||
|
||
## Building Custom Docker Images
|
||
|
||
If you want to create your own custom Docker image, you can optionally start FROM one of our [Vast.ai base images](https://hub.docker.com/r/vastai/base-image/tags) to get built-in security features and Instance Portal integration. See the [Introduction](/documentation/templates/introduction#vastai-base-images) for more details on why you might want to use Vast base images.
|
||
|
||
### Building FROM Vast Base Images
|
||
|
||
Start with a [Vast.ai base image](https://hub.docker.com/r/vastai/base-image/tags) or [Vast.ai Pytorch base image](https://hub.docker.com/r/vastai/pytorch/tags) in your Dockerfile:
|
||
|
||
```dockerfile Dockerfile theme={null}
|
||
#For example
|
||
FROM vastai/base-image:cuda-12.6.3-cudnn-devel-ubuntu22.04-py313
|
||
# or
|
||
FROM vastai/pytorch:2.6.0-cuda-12.6.3-py312
|
||
|
||
# Install your applications into /opt/workspace-internal/
|
||
# This ensures files can be properly synced between instances
|
||
WORKDIR /opt/workspace-internal/
|
||
|
||
# Activate virtual environment from base image
|
||
RUN . /venv/main/bin/activate
|
||
|
||
RUN your-installation-commands
|
||
```
|
||
|
||
After building your image:
|
||
|
||
1. [Build](https://docs.docker.com/build/) and [push your image](https://docs.docker.com/reference/cli/docker/image/push/) to a container registry
|
||
2. Create a new template and enter your custom image path in the Image Path:Tag field (see [Template Settings](/documentation/templates/template-settings#docker-repository-and-environment))
|
||
|
||
|
||
# Creating Templates
|
||
Source: https://docs.vast.ai/documentation/templates/creating-templates
|
||
|
||
|
||
|
||
## Introduction
|
||
|
||
Creating a template is simple - it's just telling Vast.ai how you want your instances to be configured. This guide will walk you through creating your first template step by step.
|
||
|
||
## Prerequisites
|
||
|
||
* A Vast.ai account
|
||
* [SSH client installed on your local machine and SSH public key added in the SSH Keys tab in the Keys section of your console](https://cloud.vast.ai/manage-keys/) 
|
||
* [(Optional) Install and use vast-cli](/cli/get-started) 
|
||
|
||
## Ways to Create Templates
|
||
|
||
You have three options:
|
||
|
||
### 1. Edit an Existing Template (Recommended for Beginners)
|
||
|
||
Start with one of our recommended templates and customize it to your needs. This is the easiest way to get started.
|
||
|
||
**Best for:** First-time users, quick customization of existing setups
|
||
|
||
### 2. Create from Scratch
|
||
|
||
Click "+ New" on the templates page for a blank template and configure everything yourself.
|
||
|
||
**Best for:** Users who know exactly what they need
|
||
|
||
### 3. Use an Existing Docker Image
|
||
|
||
Find a Docker image on DockerHub or another registry and create a template around it.
|
||
|
||
**Best for:** Users with a specific application in mind (e.g., nginx, postgres, a specific ML framework)
|
||
|
||
## Tutorial: Create Your First Template
|
||
|
||
Let's create a simple template together. We'll edit the NVIDIA CUDA template from the [Quick Start](/documentation/templates/quickstart) guide.
|
||
|
||
### Step 1: Open the Template Editor
|
||
|
||
1. Go to [cloud.vast.ai/templates](https://cloud.vast.ai/templates/)
|
||
2. Find the "NVIDIA CUDA" template (or any recommended template)
|
||
3. Click the pencil icon to edit
|
||
|
||
<Frame caption="Template editor showing Config tab">
|
||
<img src="https://mintcdn.com/vastai-80aa3a82/v_EM_-NdbnPjb9tX/images/console-templates-5.webp?fit=max&auto=format&n=v_EM_-NdbnPjb9tX&q=85&s=92d2cbbecc86af090d7d43a8e6409515" alt="Template editor showing Config tab" data-og-width="936" width="936" data-og-height="294" height="294" data-path="images/console-templates-5.webp" data-optimize="true" data-opv="3" srcset="https://mintcdn.com/vastai-80aa3a82/v_EM_-NdbnPjb9tX/images/console-templates-5.webp?w=280&fit=max&auto=format&n=v_EM_-NdbnPjb9tX&q=85&s=b326bc9a8573f910771c8078028477b3 280w, https://mintcdn.com/vastai-80aa3a82/v_EM_-NdbnPjb9tX/images/console-templates-5.webp?w=560&fit=max&auto=format&n=v_EM_-NdbnPjb9tX&q=85&s=1e16e256733332321ed15b0477c7c5d4 560w, https://mintcdn.com/vastai-80aa3a82/v_EM_-NdbnPjb9tX/images/console-templates-5.webp?w=840&fit=max&auto=format&n=v_EM_-NdbnPjb9tX&q=85&s=960ce67c4b5e6bef28204d285e9d6af5 840w, https://mintcdn.com/vastai-80aa3a82/v_EM_-NdbnPjb9tX/images/console-templates-5.webp?w=1100&fit=max&auto=format&n=v_EM_-NdbnPjb9tX&q=85&s=e9a3251d5cc29821078a0c685735afb4 1100w, https://mintcdn.com/vastai-80aa3a82/v_EM_-NdbnPjb9tX/images/console-templates-5.webp?w=1650&fit=max&auto=format&n=v_EM_-NdbnPjb9tX&q=85&s=9bf15355378ba5f5f296b6a27c689aab 1650w, https://mintcdn.com/vastai-80aa3a82/v_EM_-NdbnPjb9tX/images/console-templates-5.webp?w=2500&fit=max&auto=format&n=v_EM_-NdbnPjb9tX&q=85&s=c6fb73fca150d0b06f40a727e01de7d0 2500w" />
|
||
</Frame>
|
||
|
||
You'll see two tabs: `Config` and `ReadMe`. Stay on the Config tab.
|
||
|
||
### Step 2: Give Your Template a Name
|
||
|
||
In the **Identification** section:
|
||
|
||
* Change the **Template Name** to something descriptive (e.g., "My First Template")
|
||
* Add a **Template Description** if you'd like (optional)
|
||
|
||
### Step 3: Choose Your Docker Image
|
||
|
||
In the **Docker Repository And Environment** section, you'll see the **Image Path:Tag** field.
|
||
|
||
You can use:
|
||
|
||
* **Any public Docker image** (e.g., `nginx:latest`, `postgres:14`, `python:3.11`)
|
||
* **Vast.ai base images** (e.g., `vastai/base-image`, `vastai/pytorch`)
|
||
* **Your own custom images** from any registry
|
||
|
||
For this tutorial, keep the existing NVIDIA CUDA image or try `nginx:latest` for a simple web server.
|
||
|
||
<Note>
|
||
For a complete explanation of all Docker settings, see our [Template Settings](/documentation/templates/template-settings#docker-repository-and-environment) guide.
|
||
</Note>
|
||
|
||
### Step 4: Add Ports (Optional)
|
||
|
||
If your application needs external access, add ports in the **Ports** section.
|
||
|
||
For example, if you're running nginx, add port `80`.
|
||
|
||
### Step 5: Set Environment Variables (Optional)
|
||
|
||
If your Docker image requires environment variables, add them in the **Environment Variables** section.
|
||
|
||
<Warning>
|
||
Never put sensitive information (passwords, API keys) in template environment variables if you plan to make the template public. Use your [account settings](https://cloud.vast.ai/account/) instead.
|
||
</Warning>
|
||
|
||
### Step 6: Choose a Launch Mode
|
||
|
||
Select how you want to access your instance:
|
||
|
||
* **Jupyter + SSH** - Best for interactive development (default for most use cases)
|
||
* **SSH only** - If you don't need Jupyter
|
||
* **docker ENTRYPOINT** - If you want the container to run exactly as designed
|
||
|
||
For this tutorial, keep the default (Jupyter + SSH).
|
||
|
||
<Note>
|
||
For detailed information about launch modes, see our [Template Settings](/documentation/templates/template-settings#select-launch-mode) guide.
|
||
</Note>
|
||
|
||
### Step 7: Save Your Template
|
||
|
||
Scroll to the bottom and click one of the save buttons:
|
||
|
||
* **Create** - Saves the template to "My Templates" for later use
|
||
* **Create & Use** - Saves and immediately takes you to the offers page to rent an instance
|
||
|
||
<Frame caption="Save buttons">
|
||
<img src="https://mintcdn.com/vastai-80aa3a82/v_EM_-NdbnPjb9tX/images/console-templates-15.webp?fit=max&auto=format&n=v_EM_-NdbnPjb9tX&q=85&s=204e5427f10491896bdfd3da4001ef7e" alt="Save buttons" data-og-width="800" width="800" data-og-height="139" height="139" data-path="images/console-templates-15.webp" data-optimize="true" data-opv="3" srcset="https://mintcdn.com/vastai-80aa3a82/v_EM_-NdbnPjb9tX/images/console-templates-15.webp?w=280&fit=max&auto=format&n=v_EM_-NdbnPjb9tX&q=85&s=882f55ab8e980cee4c909756332105d2 280w, https://mintcdn.com/vastai-80aa3a82/v_EM_-NdbnPjb9tX/images/console-templates-15.webp?w=560&fit=max&auto=format&n=v_EM_-NdbnPjb9tX&q=85&s=3c762e2f60ae6b0e493a7fb390f8f684 560w, https://mintcdn.com/vastai-80aa3a82/v_EM_-NdbnPjb9tX/images/console-templates-15.webp?w=840&fit=max&auto=format&n=v_EM_-NdbnPjb9tX&q=85&s=ffa93edd1d40351184f2741d546fe37c 840w, https://mintcdn.com/vastai-80aa3a82/v_EM_-NdbnPjb9tX/images/console-templates-15.webp?w=1100&fit=max&auto=format&n=v_EM_-NdbnPjb9tX&q=85&s=e7455ee727b36380074c4f246719f09b 1100w, https://mintcdn.com/vastai-80aa3a82/v_EM_-NdbnPjb9tX/images/console-templates-15.webp?w=1650&fit=max&auto=format&n=v_EM_-NdbnPjb9tX&q=85&s=4a4996d972ab492832c1443938572b2e 1650w, https://mintcdn.com/vastai-80aa3a82/v_EM_-NdbnPjb9tX/images/console-templates-15.webp?w=2500&fit=max&auto=format&n=v_EM_-NdbnPjb9tX&q=85&s=ff72dd2126f7020597b1e9c21c0c14aa 2500w" />
|
||
</Frame>
|
||
|
||
Congratulations! You've created your first template.
|
||
|
||
## Next Steps
|
||
|
||
Now that you know the basics, you can:
|
||
|
||
### Explore All Template Options
|
||
|
||
See our [Template Settings](/documentation/templates/template-settings) for complete documentation of every field in the template editor.
|
||
|
||
### Add Advanced Customization
|
||
|
||
Learn about runtime customization and building custom Docker images in our [Advanced Setup](/documentation/templates/advanced-setup) guide:
|
||
|
||
* **PROVISIONING\_SCRIPT** - Run setup scripts when instances start
|
||
* **PORTAL\_CONFIG** - Configure the Instance Portal
|
||
* **Base Images** - Build custom Docker images with Vast.ai security features
|
||
* **VM Templates** - When to use virtual machines instead of containers
|
||
|
||
### Manage Your Templates
|
||
|
||
Learn how to update, share, and troubleshoot templates in our [Managing Templates](/documentation/templates/managing-templates) guide.
|
||
|
||
### See Real Examples
|
||
|
||
Check out our [GROBID example](/documentation/templates/examples/grobid) to see a complete template creation workflow for a real application.
|
||
|
||
## Common Use Cases
|
||
|
||
### I want to run a specific application (e.g., nginx, postgres)
|
||
|
||
1. Find the official Docker image on [DockerHub](https://hub.docker.com/)
|
||
2. Create a template with that image path
|
||
3. Add required ports and environment variables
|
||
4. Save and launch
|
||
|
||
### I want to customize a Vast recommended template
|
||
|
||
1. Edit one of our recommended templates
|
||
2. Add a PROVISIONING\_SCRIPT environment variable pointing to your setup script
|
||
3. See [Advanced Setup](/documentation/templates/advanced-setup#provisioning-script) for details
|
||
|
||
### I want to build my own custom Docker image
|
||
|
||
1. Create a Dockerfile (optionally FROM a Vast base image)
|
||
2. Build and push to a container registry
|
||
3. Create a template with your custom image path
|
||
4. See [Advanced Setup](/documentation/templates/advanced-setup#building-custom-docker-images) for details
|
||
|
||
|
||
# Creating Templates for GROBID
|
||
Source: https://docs.vast.ai/documentation/templates/examples/grobid
|
||
|
||
|
||
|
||
## Introduction
|
||
|
||
This guide demonstrates creating a template using an existing Docker image. See our [Creating Templates](/documentation/templates/creating-templates) guide for more details on template configuration. We will be using the image from [GROBID on dockerhub](https://hub.docker.com/r/grobid/grobid).
|
||
|
||
## Find The Image and Tag You Want to Use
|
||
|
||
### Step 1 - Find a Suitable Image
|
||
|
||
There are multiple GROBID images in dockerhub, but for this guide we will be using the official GROBID image.
|
||
|
||
<Frame caption="Grobid Overview">
|
||
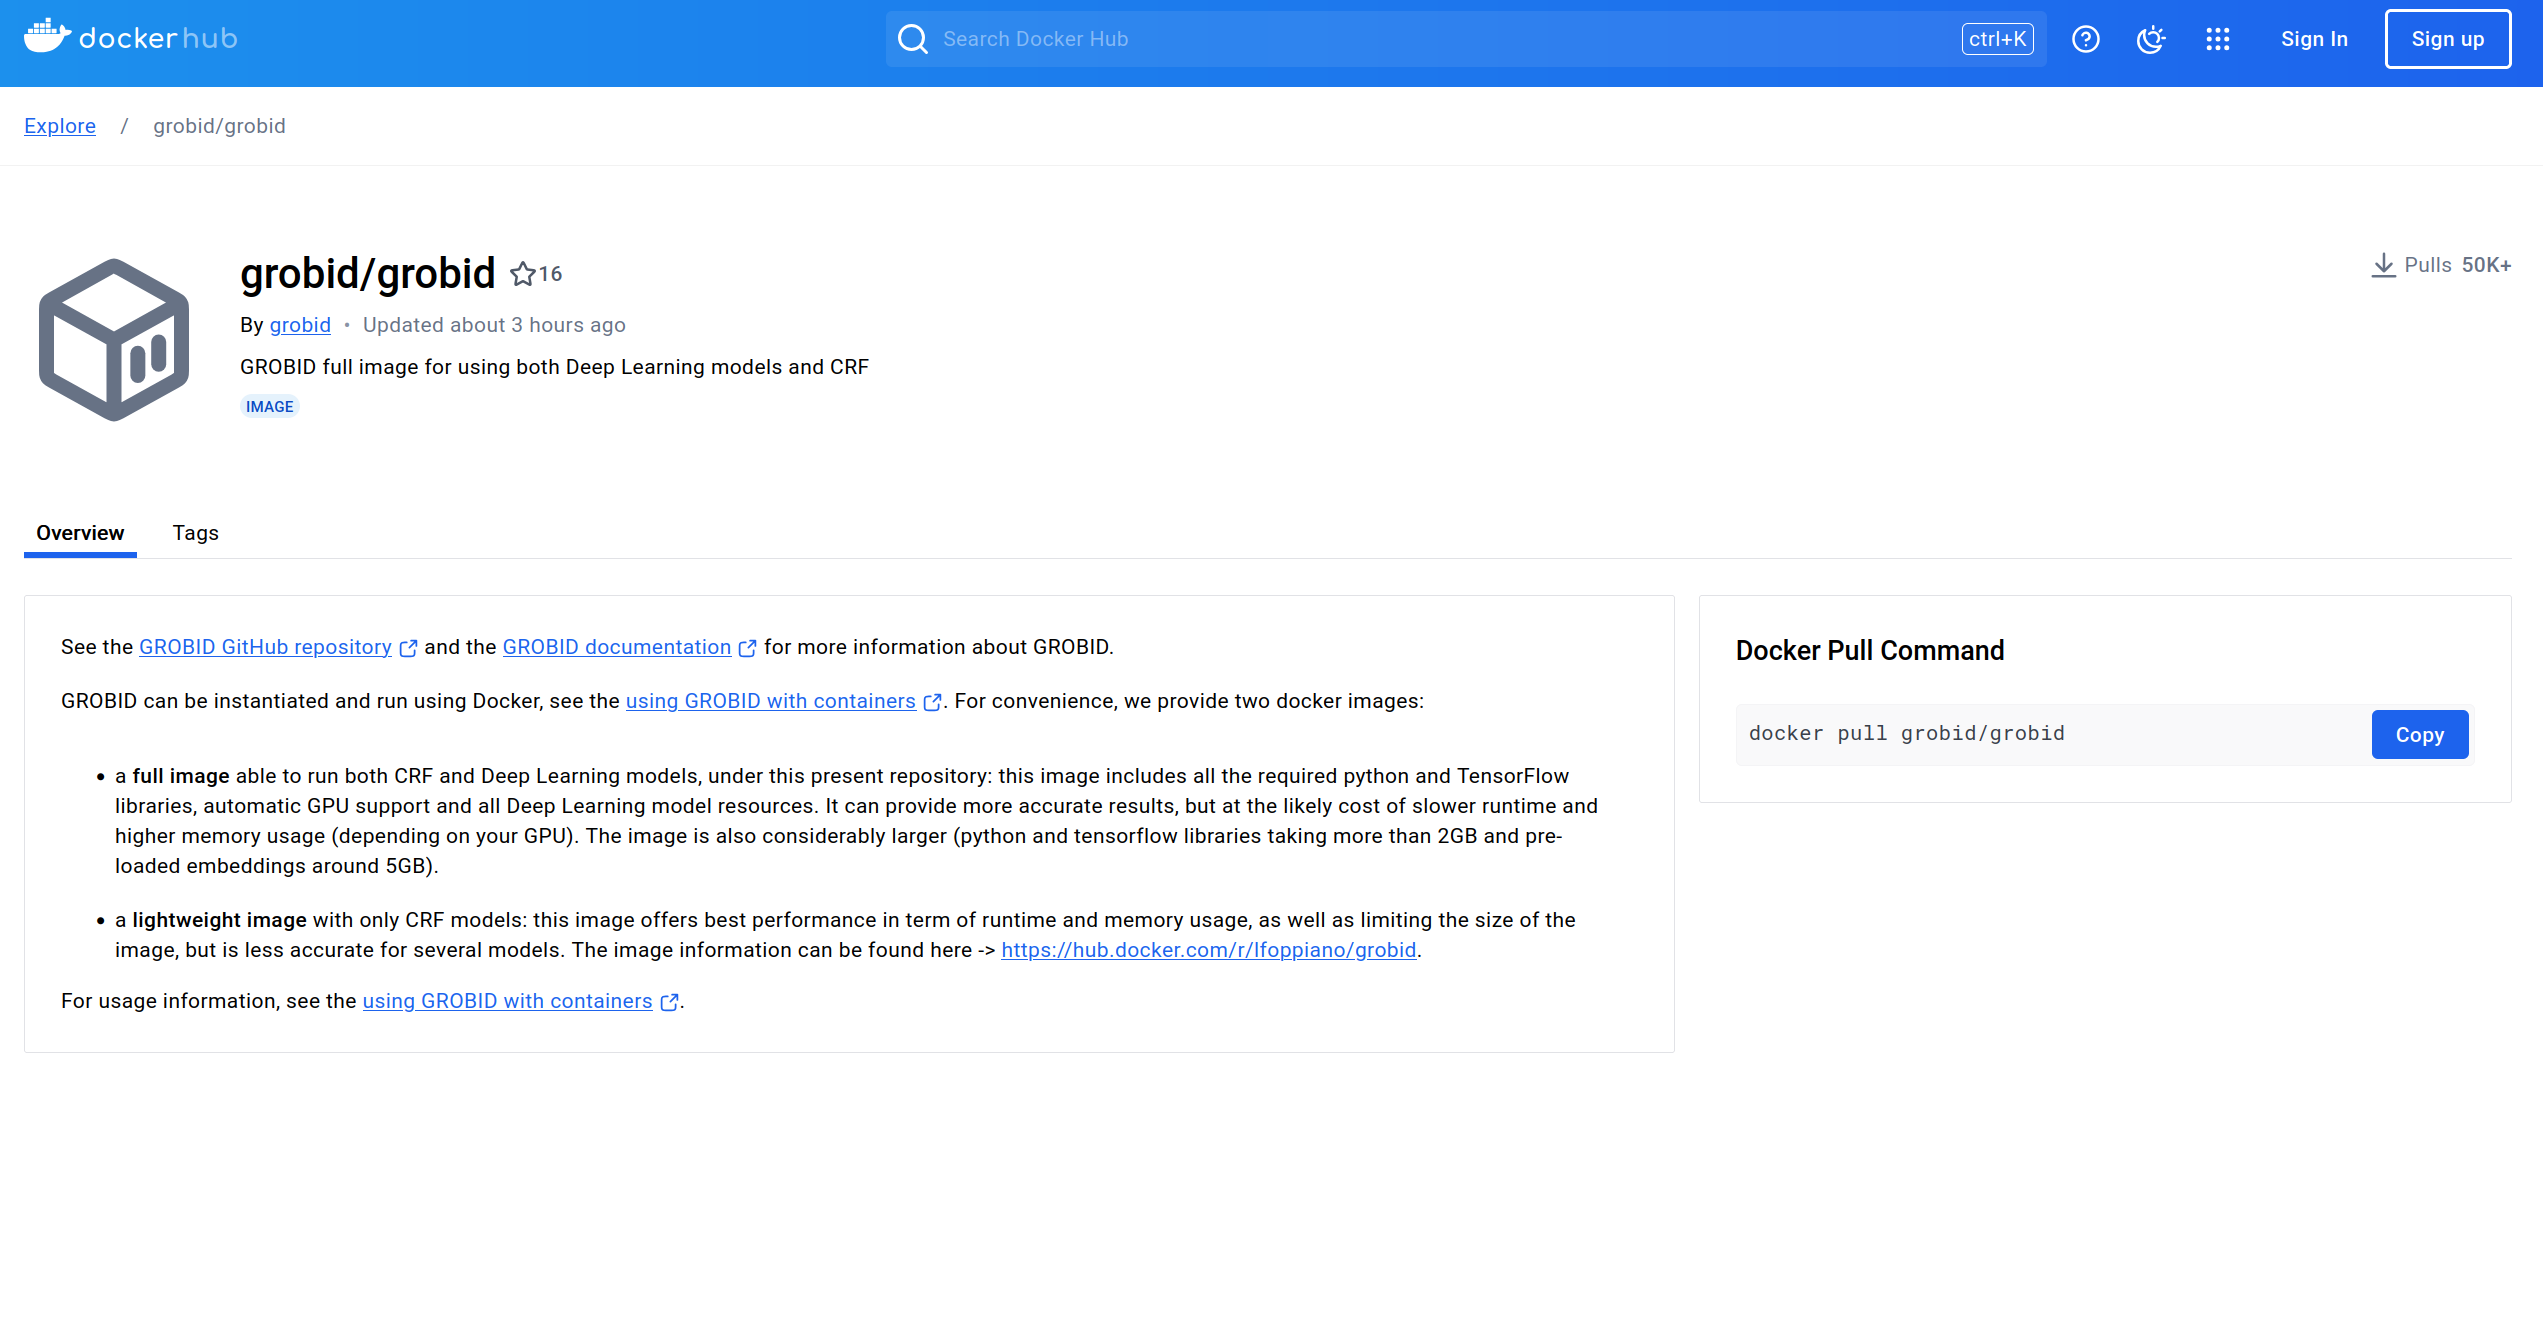
|
||
</Frame>
|
||
|
||
### Step 2 - Selecting the Version Tag
|
||
|
||
If you don't already have a version you intend to use, we recommend selecting the latest stable version. 
|
||
|
||
<Frame caption="Stable Tag">
|
||

|
||
</Frame>
|
||
|
||
At the time of writing, the current stable version is 0.8.0, so that is the version we'll be using here.
|
||
|
||
## Configuring The Template
|
||
|
||
### Step 1 - Setting Your Chosen Image and Tag in Your Vast.ai Template
|
||
|
||
In the Docker Repository And Environment section, you will enter your image path and tag.
|
||
|
||
<Frame caption="Imageandtag">
|
||

|
||
</Frame>
|
||
|
||
### Step 2 - Map Ports and Specify Your Image and Tag Combination
|
||
|
||
The overview page for this image at dockerhub has a link to their guide to [using GROBID with containers](https://grobid.readthedocs.io/en/latest/Grobid-docker/#crf-and-deep-learning-image), which you can read to get their recommendations for containerizing GROBID. 
|
||
|
||
As we follow their guide to containerizing GROBID, we'll need to make sure the container's port 8070 is set to the host machine's port 8070. We will do that in the Vast.ai template. We use -p 8070:8070 as one of the docker run options.
|
||
|
||
<Frame caption="Run Cmd">
|
||
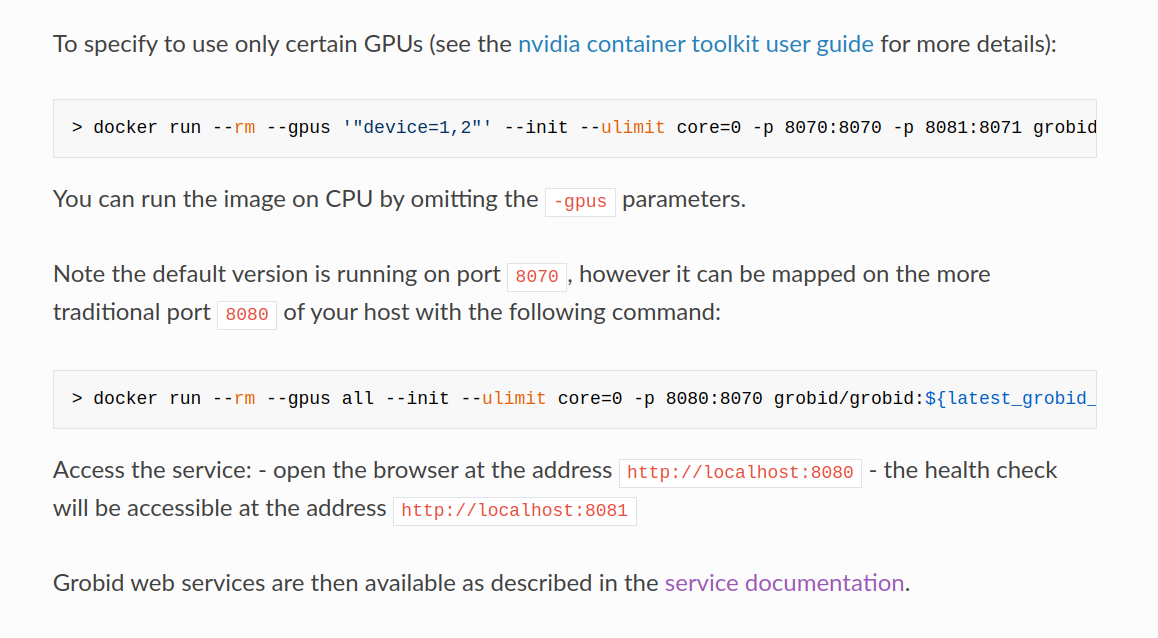
|
||
</Frame>
|
||
|
||
**Note:** Vast only allows -e and -p docker run options to set environment variables and expose ports.
|
||
|
||
<Frame caption="Grobidport">
|
||
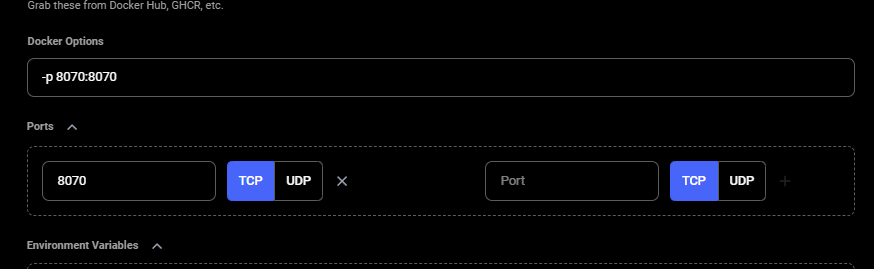
|
||
</Frame>
|
||
|
||
### Step 3 - Select the Launch Mode
|
||
|
||
Here we will select the SSH launch mode.
|
||
|
||
<Frame caption="Sshdirect">
|
||
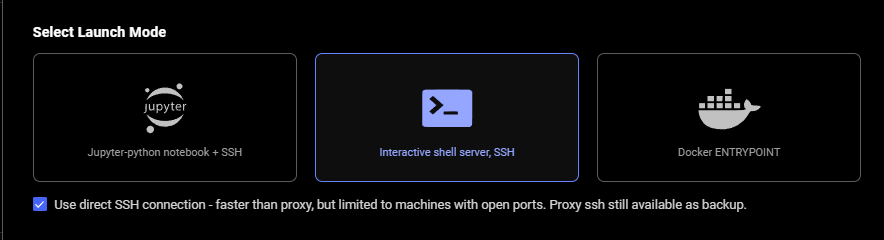
|
||
</Frame>
|
||
|
||
### Step 4 - Look for CMD or ENTRYPOINT command
|
||
|
||
<Frame caption="Found Tag">
|
||

|
||
</Frame>
|
||
|
||
To find this for the template we are creating, we searched the [image's page in Dockerhub](https://hub.docker.com/r/grobid/grobid) and found the **CMD **command in the **Tags** tab under the link "0.8.0" highlighted in blue.
|
||
|
||
<Frame caption="Found Cmd">
|
||
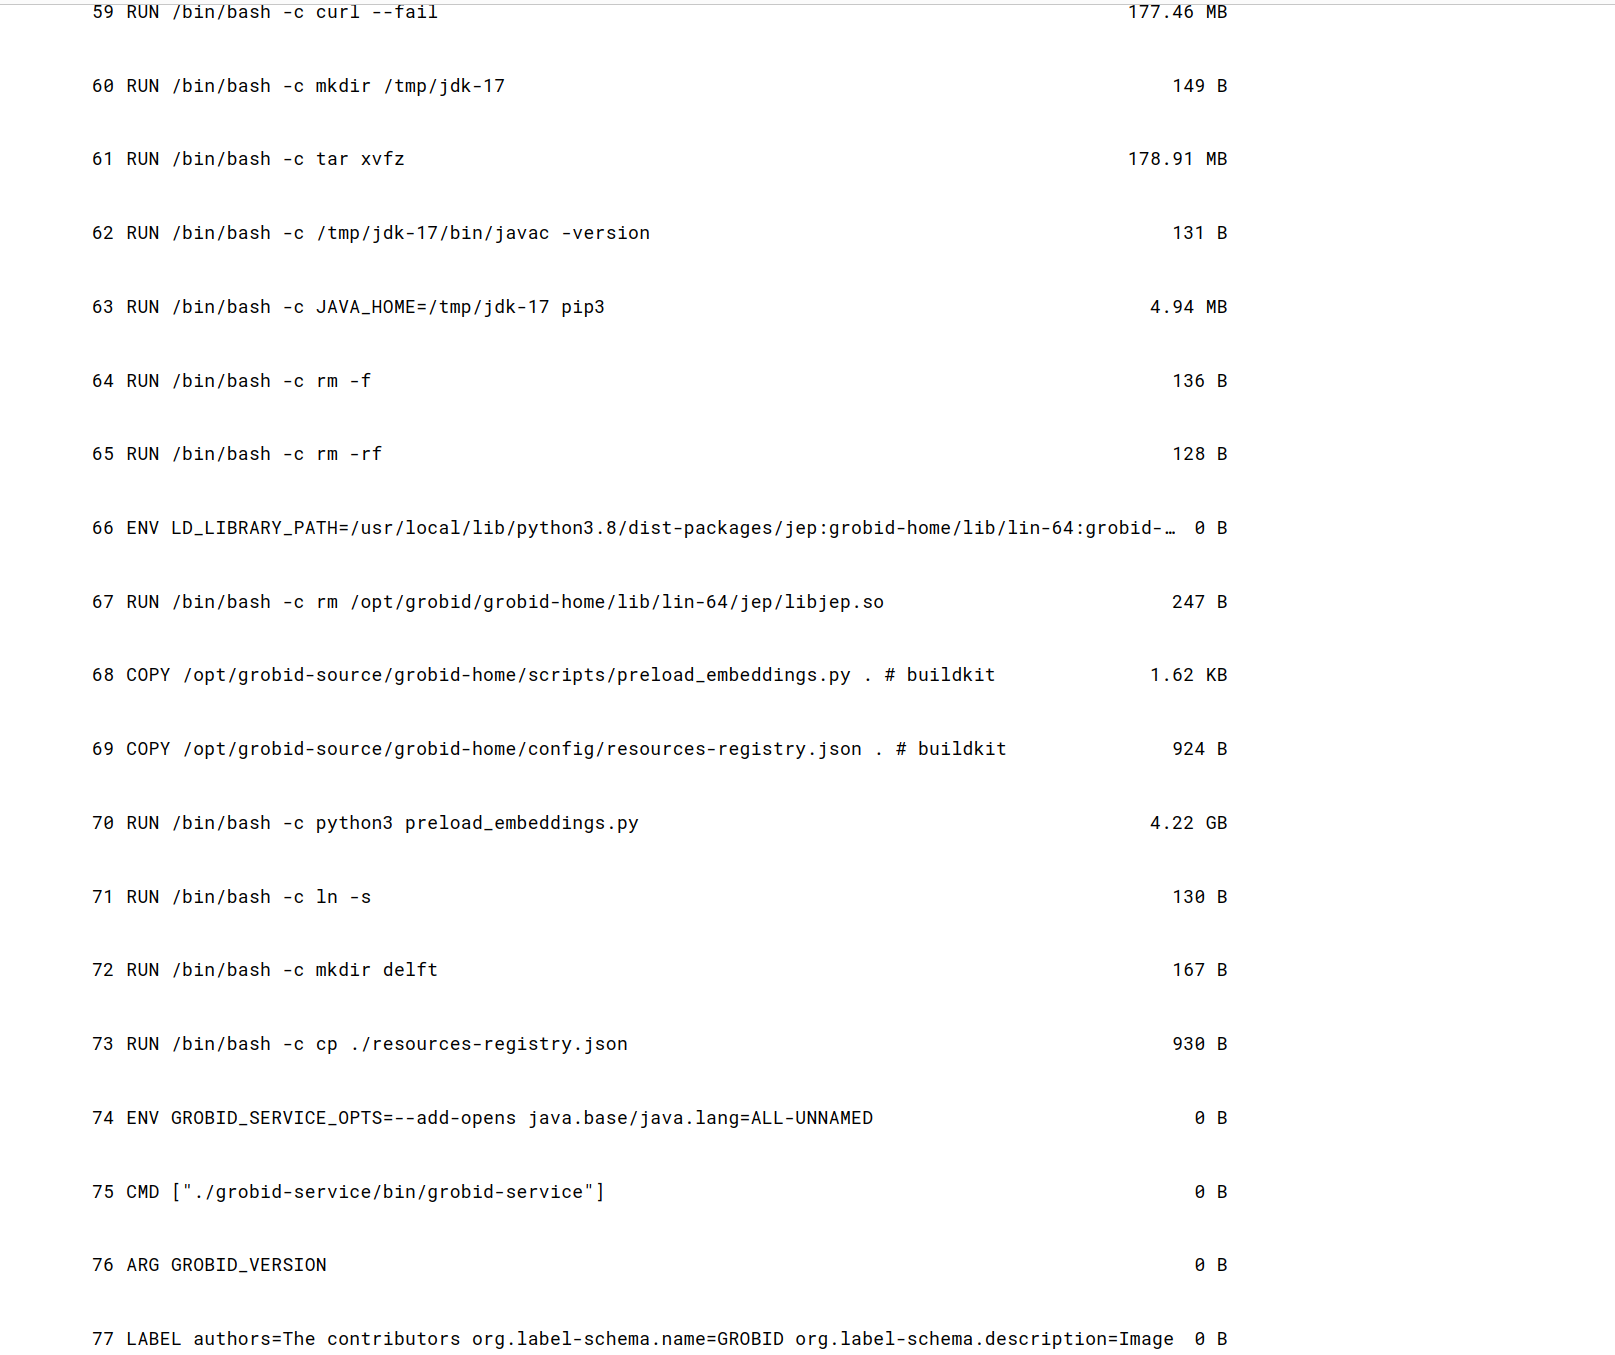
|
||
</Frame>
|
||
|
||
### Step 5 - Fill Out On-start Script section using the CMD command we just found
|
||
|
||
Next, we add the contents of the **CMD **command to the end of the bash commands section of the **On-start Script** fields.
|
||
|
||
Also, appended environment variables to /etc/environment file in our on-start section.
|
||
|
||
<img src="https://mintcdn.com/vastai-80aa3a82/xCLov_y0JNSp_qUD/images/console-creating-templates-for-grobid.webp?fit=max&auto=format&n=xCLov_y0JNSp_qUD&q=85&s=8c2a472c7f7376a29c6d74c4de94b596" alt="" data-og-width="930" width="930" data-og-height="159" height="159" data-path="images/console-creating-templates-for-grobid.webp" data-optimize="true" data-opv="3" srcset="https://mintcdn.com/vastai-80aa3a82/xCLov_y0JNSp_qUD/images/console-creating-templates-for-grobid.webp?w=280&fit=max&auto=format&n=xCLov_y0JNSp_qUD&q=85&s=cff8871bf43d6037d8b199b8366856e0 280w, https://mintcdn.com/vastai-80aa3a82/xCLov_y0JNSp_qUD/images/console-creating-templates-for-grobid.webp?w=560&fit=max&auto=format&n=xCLov_y0JNSp_qUD&q=85&s=762242ea430ae696ad25bb306a20bdc9 560w, https://mintcdn.com/vastai-80aa3a82/xCLov_y0JNSp_qUD/images/console-creating-templates-for-grobid.webp?w=840&fit=max&auto=format&n=xCLov_y0JNSp_qUD&q=85&s=52b54159811795e225bdce83ebfc743b 840w, https://mintcdn.com/vastai-80aa3a82/xCLov_y0JNSp_qUD/images/console-creating-templates-for-grobid.webp?w=1100&fit=max&auto=format&n=xCLov_y0JNSp_qUD&q=85&s=2dc4735f92ec08de5b5122629f62708f 1100w, https://mintcdn.com/vastai-80aa3a82/xCLov_y0JNSp_qUD/images/console-creating-templates-for-grobid.webp?w=1650&fit=max&auto=format&n=xCLov_y0JNSp_qUD&q=85&s=476a28e41f5991eb05f8f0e6247f19a4 1650w, https://mintcdn.com/vastai-80aa3a82/xCLov_y0JNSp_qUD/images/console-creating-templates-for-grobid.webp?w=2500&fit=max&auto=format&n=xCLov_y0JNSp_qUD&q=85&s=fd94da7e9b2cffe77f8305049336a678 2500w" />
|
||
|
||
This makes environment variables available to all users and processes and ensures they are persistent even if our instance/docker container is rebooted. We suggest doing the same for your templates.
|
||
|
||
### Step 6 - Name and Save The Template
|
||
|
||
<Frame caption="Grobidexample">
|
||
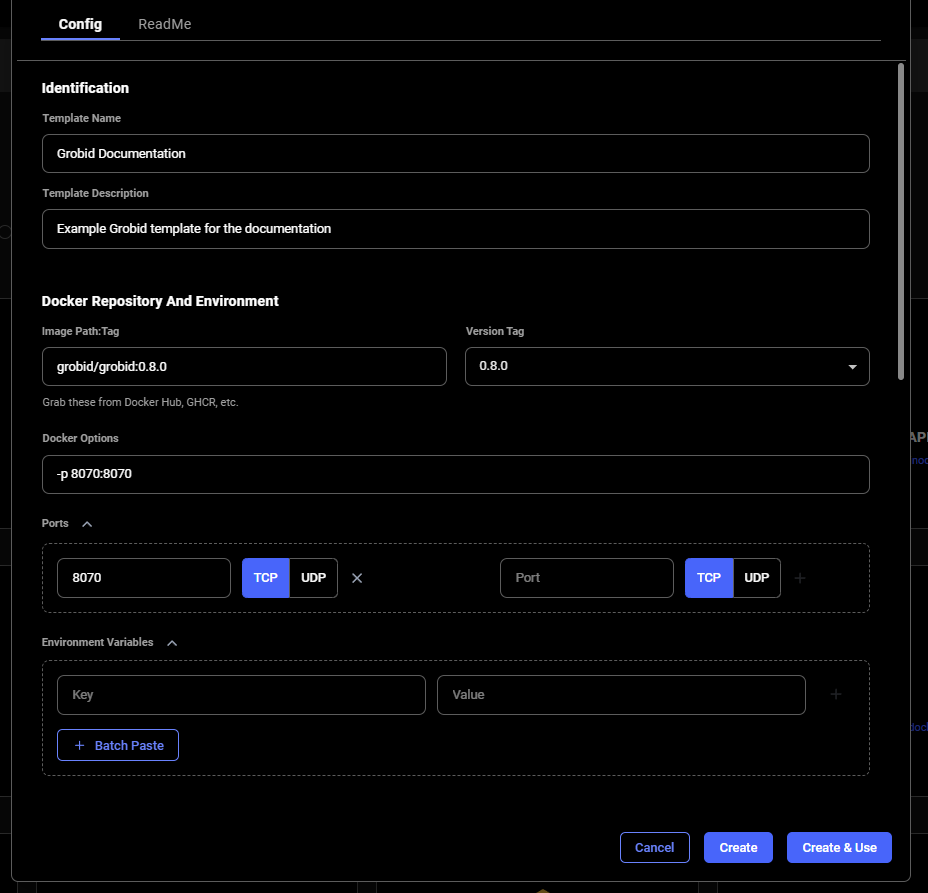
|
||
</Frame>
|
||
|
||
When you are finished setting up your template, If you haven't already done so, specify the template name and description.
|
||
|
||
Finally, click **Create & Use** to save the template and navigate to the GPU offers search page. You'll notice that your template is selected and ready to be used.
|
||
|
||
## Rent an Instance Using Your Template and Open GROBID Web App
|
||
|
||
Once you have selected an instance offer, You'll click on the **INSTANCES **link in the left menu and see your rented GPU instance that has your template applied. 
|
||
|
||
<img src="https://mintcdn.com/vastai-80aa3a82/xCLov_y0JNSp_qUD/images/console-creating-templates-for-grobid-2.webp?fit=max&auto=format&n=xCLov_y0JNSp_qUD&q=85&s=4feb5053b253885ec8fe5dd7d54fb45e" alt="" data-og-width="910" width="910" data-og-height="151" height="151" data-path="images/console-creating-templates-for-grobid-2.webp" data-optimize="true" data-opv="3" srcset="https://mintcdn.com/vastai-80aa3a82/xCLov_y0JNSp_qUD/images/console-creating-templates-for-grobid-2.webp?w=280&fit=max&auto=format&n=xCLov_y0JNSp_qUD&q=85&s=d6a30c67d4dde7cc9ec565328326eb9b 280w, https://mintcdn.com/vastai-80aa3a82/xCLov_y0JNSp_qUD/images/console-creating-templates-for-grobid-2.webp?w=560&fit=max&auto=format&n=xCLov_y0JNSp_qUD&q=85&s=e43967c9192155b3de9cae49f0c4c0d4 560w, https://mintcdn.com/vastai-80aa3a82/xCLov_y0JNSp_qUD/images/console-creating-templates-for-grobid-2.webp?w=840&fit=max&auto=format&n=xCLov_y0JNSp_qUD&q=85&s=ac99d03ba0bef9130828304bb32e7b52 840w, https://mintcdn.com/vastai-80aa3a82/xCLov_y0JNSp_qUD/images/console-creating-templates-for-grobid-2.webp?w=1100&fit=max&auto=format&n=xCLov_y0JNSp_qUD&q=85&s=94315a14cea4bb91455e57360032cf9f 1100w, https://mintcdn.com/vastai-80aa3a82/xCLov_y0JNSp_qUD/images/console-creating-templates-for-grobid-2.webp?w=1650&fit=max&auto=format&n=xCLov_y0JNSp_qUD&q=85&s=efc81f6ecf46433edbcd42e8ae5a7038 1650w, https://mintcdn.com/vastai-80aa3a82/xCLov_y0JNSp_qUD/images/console-creating-templates-for-grobid-2.webp?w=2500&fit=max&auto=format&n=xCLov_y0JNSp_qUD&q=85&s=85676741fcd321a599c13994b7f4f738 2500w" />
|
||
|
||
When the instance is done loading and the **>\_CONNECT** state on the blue button appears, you should be able to see the ip range button at the top of the instance card.
|
||
|
||
<img src="https://mintcdn.com/vastai-80aa3a82/xCLov_y0JNSp_qUD/images/console-creating-templates-for-grobid-3.webp?fit=max&auto=format&n=xCLov_y0JNSp_qUD&q=85&s=a359678ad0010345f644c553508d3f4f" alt="" data-og-width="800" width="800" data-og-height="120" height="120" data-path="images/console-creating-templates-for-grobid-3.webp" data-optimize="true" data-opv="3" srcset="https://mintcdn.com/vastai-80aa3a82/xCLov_y0JNSp_qUD/images/console-creating-templates-for-grobid-3.webp?w=280&fit=max&auto=format&n=xCLov_y0JNSp_qUD&q=85&s=0f4f5a023fb8659737bf46b75bca7922 280w, https://mintcdn.com/vastai-80aa3a82/xCLov_y0JNSp_qUD/images/console-creating-templates-for-grobid-3.webp?w=560&fit=max&auto=format&n=xCLov_y0JNSp_qUD&q=85&s=6eb95f5fae681267f67947cb4b9da74a 560w, https://mintcdn.com/vastai-80aa3a82/xCLov_y0JNSp_qUD/images/console-creating-templates-for-grobid-3.webp?w=840&fit=max&auto=format&n=xCLov_y0JNSp_qUD&q=85&s=ef5ea1d7387b1151e2921ab9c3f1ee44 840w, https://mintcdn.com/vastai-80aa3a82/xCLov_y0JNSp_qUD/images/console-creating-templates-for-grobid-3.webp?w=1100&fit=max&auto=format&n=xCLov_y0JNSp_qUD&q=85&s=7ca3f0619a9edde2b828e5b6f2feb952 1100w, https://mintcdn.com/vastai-80aa3a82/xCLov_y0JNSp_qUD/images/console-creating-templates-for-grobid-3.webp?w=1650&fit=max&auto=format&n=xCLov_y0JNSp_qUD&q=85&s=46945c997766649d2df89ee3749002f3 1650w, https://mintcdn.com/vastai-80aa3a82/xCLov_y0JNSp_qUD/images/console-creating-templates-for-grobid-3.webp?w=2500&fit=max&auto=format&n=xCLov_y0JNSp_qUD&q=85&s=9cdce10373032e842de495ac36d6790e 2500w" />
|
||
|
||
If you click the IP range button you will see a new modal has the IP and port information for your instance. You'll see the port 8070 that we set listed in Open Ports.
|
||
|
||
<img src="https://mintcdn.com/vastai-80aa3a82/xCLov_y0JNSp_qUD/images/console-creating-templates-for-grobi-4.webp?fit=max&auto=format&n=xCLov_y0JNSp_qUD&q=85&s=645a9347c850c1862a99840c968d568a" alt="" data-og-width="800" width="800" data-og-height="1077" height="1077" data-path="images/console-creating-templates-for-grobi-4.webp" data-optimize="true" data-opv="3" srcset="https://mintcdn.com/vastai-80aa3a82/xCLov_y0JNSp_qUD/images/console-creating-templates-for-grobi-4.webp?w=280&fit=max&auto=format&n=xCLov_y0JNSp_qUD&q=85&s=488e196c046de27f903555a4d6ad4a6e 280w, https://mintcdn.com/vastai-80aa3a82/xCLov_y0JNSp_qUD/images/console-creating-templates-for-grobi-4.webp?w=560&fit=max&auto=format&n=xCLov_y0JNSp_qUD&q=85&s=c390d783fa0005846d4173c03a47a24c 560w, https://mintcdn.com/vastai-80aa3a82/xCLov_y0JNSp_qUD/images/console-creating-templates-for-grobi-4.webp?w=840&fit=max&auto=format&n=xCLov_y0JNSp_qUD&q=85&s=6bc8a3a03ff38cf7fbbffcfc2f64184d 840w, https://mintcdn.com/vastai-80aa3a82/xCLov_y0JNSp_qUD/images/console-creating-templates-for-grobi-4.webp?w=1100&fit=max&auto=format&n=xCLov_y0JNSp_qUD&q=85&s=ea4fe4bece127d0986b853b1e2b2fbc1 1100w, https://mintcdn.com/vastai-80aa3a82/xCLov_y0JNSp_qUD/images/console-creating-templates-for-grobi-4.webp?w=1650&fit=max&auto=format&n=xCLov_y0JNSp_qUD&q=85&s=6de2ac44d9741fd0d3fdea0397e11023 1650w, https://mintcdn.com/vastai-80aa3a82/xCLov_y0JNSp_qUD/images/console-creating-templates-for-grobi-4.webp?w=2500&fit=max&auto=format&n=xCLov_y0JNSp_qUD&q=85&s=0e217fa7822ffb4393497255cc03b3f2 2500w" />
|
||
|
||
You can copy the machine IP and port and load the address (in this example: 195.0.159.206:55734) in a new browser tab or window. This address will load the GROBID web app.
|
||
|
||
<img src="https://mintcdn.com/vastai-80aa3a82/xCLov_y0JNSp_qUD/images/console-creating-templates-for-grobid-5.webp?fit=max&auto=format&n=xCLov_y0JNSp_qUD&q=85&s=39196202780eece3d7c8f0d05bac6021" alt="" data-og-width="1114" width="1114" data-og-height="369" height="369" data-path="images/console-creating-templates-for-grobid-5.webp" data-optimize="true" data-opv="3" srcset="https://mintcdn.com/vastai-80aa3a82/xCLov_y0JNSp_qUD/images/console-creating-templates-for-grobid-5.webp?w=280&fit=max&auto=format&n=xCLov_y0JNSp_qUD&q=85&s=eba776a128f33c8c7a18e571c8834f79 280w, https://mintcdn.com/vastai-80aa3a82/xCLov_y0JNSp_qUD/images/console-creating-templates-for-grobid-5.webp?w=560&fit=max&auto=format&n=xCLov_y0JNSp_qUD&q=85&s=b4749dddb805f12de4c2ead496fb2f32 560w, https://mintcdn.com/vastai-80aa3a82/xCLov_y0JNSp_qUD/images/console-creating-templates-for-grobid-5.webp?w=840&fit=max&auto=format&n=xCLov_y0JNSp_qUD&q=85&s=456544e32817c6dc94f21185bc9a845e 840w, https://mintcdn.com/vastai-80aa3a82/xCLov_y0JNSp_qUD/images/console-creating-templates-for-grobid-5.webp?w=1100&fit=max&auto=format&n=xCLov_y0JNSp_qUD&q=85&s=24fc1eff388fca3b6a5bd8996abdefd2 1100w, https://mintcdn.com/vastai-80aa3a82/xCLov_y0JNSp_qUD/images/console-creating-templates-for-grobid-5.webp?w=1650&fit=max&auto=format&n=xCLov_y0JNSp_qUD&q=85&s=783db8b7d9eefd941f095aef4361ae99 1650w, https://mintcdn.com/vastai-80aa3a82/xCLov_y0JNSp_qUD/images/console-creating-templates-for-grobid-5.webp?w=2500&fit=max&auto=format&n=xCLov_y0JNSp_qUD&q=85&s=b4874a1ca4bc8bb090323d6ea37a493a 2500w" />
|
||
|
||
## Additional Resources
|
||
|
||
[GROBID Documentation](https://grobid.readthedocs.io/en/latest/)
|
||
|
||
|
||
# Templates
|
||
Source: https://docs.vast.ai/documentation/templates/introduction
|
||
|
||
|
||
|
||
## What is a Template?
|
||
|
||
A template is how Vast helps you launch an instance, setting up your rented machine with whatever software and formatting you need. Templates are generally used for launching instances through the web interface, but they can also be used in the CLI or through the API. In this document, we will focus on the web interface, but we will link to other relevant documentation throughout.
|
||
|
||
In the simplest technical terms, you can consider a template to be a wrapper around `docker run`. The template contains all of the information you want to pass to our systems to configure the environment.
|
||
|
||
You can browse the template section of the web interface at [cloud.vast.ai/templates](https://cloud.vast.ai/templates/)
|
||
|
||
## Recommended Templates
|
||
|
||
We provide several recommended templates to help you get started. These are pre-configured environments that you can use as-is, or you can tweak them to your own requirements.  
|
||
|
||
<Note>
|
||
It's a great idea to look at how these templates have been configured to guide you in creating your own.
|
||
</Note>
|
||
|
||
### Vast.ai Base Images
|
||
|
||
Our recommended templates are built on Vast.ai base images like `vastai/base-image` and `vastai/pytorch`. You can find the source code on [`GitHub`](https://github.com/vast-ai/base-image/).
|
||
|
||
These are large Docker images that contain CUDA development libraries, node + npm, OpenCL and other useful libraries. Despite their large size you'll find they generally start quickly because they have been cached on many of the host machines.
|
||
|
||
**Why use Vast.ai base images?**
|
||
|
||
* **Faster cold boots** due to frequent caching on host machines
|
||
* **Built-in security features** through Caddy proxy
|
||
* **Automatic TLS encryption** for web services
|
||
* **Authentication token protection** for all services
|
||
* **Proper isolation** between external and internal services
|
||
* **Instance Portal** integration (explained below)
|
||
* **PROVISIONING\_SCRIPT** support for easy customization
|
||
|
||
### Instance Portal
|
||
|
||
When you click the Open button on an instance running one of our recommended templates, you'll see the Instance Portal:
|
||
|
||
<Frame caption="Instance portal landing page">
|
||
<img src="https://mintcdn.com/vastai-80aa3a82/v_EM_-NdbnPjb9tX/images/console-templates-18.webp?fit=max&auto=format&n=v_EM_-NdbnPjb9tX&q=85&s=f1c027a606889dd4301b0cbfbc1abe8b" alt="Instance portal landing page" data-og-width="1280" width="1280" data-og-height="509" height="509" data-path="images/console-templates-18.webp" data-optimize="true" data-opv="3" srcset="https://mintcdn.com/vastai-80aa3a82/v_EM_-NdbnPjb9tX/images/console-templates-18.webp?w=280&fit=max&auto=format&n=v_EM_-NdbnPjb9tX&q=85&s=786b86dc4b009a122179aae08e3c6040 280w, https://mintcdn.com/vastai-80aa3a82/v_EM_-NdbnPjb9tX/images/console-templates-18.webp?w=560&fit=max&auto=format&n=v_EM_-NdbnPjb9tX&q=85&s=629b8c39a8b0a1e59c17cec237d56f1e 560w, https://mintcdn.com/vastai-80aa3a82/v_EM_-NdbnPjb9tX/images/console-templates-18.webp?w=840&fit=max&auto=format&n=v_EM_-NdbnPjb9tX&q=85&s=f18aece8e32134eb4a7917f2de83b74b 840w, https://mintcdn.com/vastai-80aa3a82/v_EM_-NdbnPjb9tX/images/console-templates-18.webp?w=1100&fit=max&auto=format&n=v_EM_-NdbnPjb9tX&q=85&s=1c2fbb97bded3f69d8fe77086c209b0e 1100w, https://mintcdn.com/vastai-80aa3a82/v_EM_-NdbnPjb9tX/images/console-templates-18.webp?w=1650&fit=max&auto=format&n=v_EM_-NdbnPjb9tX&q=85&s=54151d2738fc3df59ca2ba177119682e 1650w, https://mintcdn.com/vastai-80aa3a82/v_EM_-NdbnPjb9tX/images/console-templates-18.webp?w=2500&fit=max&auto=format&n=v_EM_-NdbnPjb9tX&q=85&s=0cdb5b424c06b59a5a1ed921d8bb5d24 2500w" />
|
||
</Frame>
|
||
|
||
The **Instance Portal** provides easy access links to services running in your instance. It places an authentication layer in front of these services to prevent access by anyone who does not have the correct authentication token. You can also create tunnels to your services without exposing ports.
|
||
|
||
Full documentation for the Instance Portal is available in our [Instance Portal guide](/documentation/instances/instance-portal).
|
||
|
||
### Virtual Machine Templates
|
||
|
||
In addition to standard Docker container templates, we also offer Virtual Machine (VM) templates. These launch a full virtual machine environment rather than a docker container.
|
||
|
||
**When to use VM templates:**
|
||
|
||
* Run applications that require namespace support
|
||
* Run more than one Docker container in an instance
|
||
* Load kernel modules or run profiling jobs
|
||
* Mount remote drives with rclone or similar
|
||
|
||
You can edit VM templates just like regular templates, but you should not change the docker image field. Only the images we distribute from `docker.io/vastai/kvm` will work.
|
||
|
||
### Customizing Recommended Templates
|
||
|
||
To learn how to customize our recommended templates with provisioning scripts or build your own custom Docker images, see our [Advanced Setup](/documentation/templates/advanced-setup) guide.
|
||
|
||
## Next Steps
|
||
|
||
Ready to start using templates? Here's what you can do:
|
||
|
||
* **Try it now** - Follow our [Quick Start](/documentation/templates/quickstart) guide to run your first template in minutes
|
||
* **Create your own** - See [Creating Templates](/documentation/templates/creating-templates) to build a custom template
|
||
* **Learn more** - Explore [Advanced Setup](/documentation/templates/advanced-setup) for provisioning scripts and custom Docker images
|
||
|
||
|
||
# Managing Templates
|
||
Source: https://docs.vast.ai/documentation/templates/managing-templates
|
||
|
||
|
||
|
||
## Updating a Template
|
||
|
||
If you want to make changes to a template you previously saved, simply navigate back to the templates page and select 'My Templates'. Here you'll be able to make your changes by clicking the pencil icon.
|
||
|
||
<Frame caption="My templates showing the NVIDIA CUDA - Demo template">
|
||
<img src="https://mintcdn.com/vastai-80aa3a82/v_EM_-NdbnPjb9tX/images/console-templates-16.webp?fit=max&auto=format&n=v_EM_-NdbnPjb9tX&q=85&s=a10dba2b81b04511da306adab3943250" alt="My templates showing the NVIDIA CUDA - Demo template" data-og-width="800" width="800" data-og-height="659" height="659" data-path="images/console-templates-16.webp" data-optimize="true" data-opv="3" srcset="https://mintcdn.com/vastai-80aa3a82/v_EM_-NdbnPjb9tX/images/console-templates-16.webp?w=280&fit=max&auto=format&n=v_EM_-NdbnPjb9tX&q=85&s=222383226ae20e83d098a1df2d1ada01 280w, https://mintcdn.com/vastai-80aa3a82/v_EM_-NdbnPjb9tX/images/console-templates-16.webp?w=560&fit=max&auto=format&n=v_EM_-NdbnPjb9tX&q=85&s=0361a4ee0436222b62187bd061171605 560w, https://mintcdn.com/vastai-80aa3a82/v_EM_-NdbnPjb9tX/images/console-templates-16.webp?w=840&fit=max&auto=format&n=v_EM_-NdbnPjb9tX&q=85&s=4d95e9b2ffd691f9ab7e9b86af2bb860 840w, https://mintcdn.com/vastai-80aa3a82/v_EM_-NdbnPjb9tX/images/console-templates-16.webp?w=1100&fit=max&auto=format&n=v_EM_-NdbnPjb9tX&q=85&s=e4107173a768513602929f1685049943 1100w, https://mintcdn.com/vastai-80aa3a82/v_EM_-NdbnPjb9tX/images/console-templates-16.webp?w=1650&fit=max&auto=format&n=v_EM_-NdbnPjb9tX&q=85&s=82a6b71266be86d417804846e8b7e583 1650w, https://mintcdn.com/vastai-80aa3a82/v_EM_-NdbnPjb9tX/images/console-templates-16.webp?w=2500&fit=max&auto=format&n=v_EM_-NdbnPjb9tX&q=85&s=9dd219092a382e9a9816e0ae2602c6cc 2500w" />
|
||
</Frame>
|
||
|
||
## Sharing a Template
|
||
|
||
It's really easy to share your template with other users. We have two special links you can use and both include your referral code so you can earn if new users sign up - Find more about that [here](/documentation/reference/referral-program).
|
||
|
||
To share, click the three dots icon in the bottom right of the template card.
|
||
|
||
<Frame caption="Menu shows sharing options">
|
||
<img src="https://mintcdn.com/vastai-80aa3a82/v_EM_-NdbnPjb9tX/images/console-templates-17.webp?fit=max&auto=format&n=v_EM_-NdbnPjb9tX&q=85&s=f02daabbababb169c43dd8cd9512d0ba" alt="Menu shows sharing options" data-og-width="800" width="800" data-og-height="341" height="341" data-path="images/console-templates-17.webp" data-optimize="true" data-opv="3" srcset="https://mintcdn.com/vastai-80aa3a82/v_EM_-NdbnPjb9tX/images/console-templates-17.webp?w=280&fit=max&auto=format&n=v_EM_-NdbnPjb9tX&q=85&s=f06b8d4b2943fdb72f1574ec90409709 280w, https://mintcdn.com/vastai-80aa3a82/v_EM_-NdbnPjb9tX/images/console-templates-17.webp?w=560&fit=max&auto=format&n=v_EM_-NdbnPjb9tX&q=85&s=ccd4a53a9f4bc4dfd7c8da469cd92ff4 560w, https://mintcdn.com/vastai-80aa3a82/v_EM_-NdbnPjb9tX/images/console-templates-17.webp?w=840&fit=max&auto=format&n=v_EM_-NdbnPjb9tX&q=85&s=00cc544a7828c59653c8f71d2c56c273 840w, https://mintcdn.com/vastai-80aa3a82/v_EM_-NdbnPjb9tX/images/console-templates-17.webp?w=1100&fit=max&auto=format&n=v_EM_-NdbnPjb9tX&q=85&s=e81cf9a3b618c1ffdccfe27cd9a84891 1100w, https://mintcdn.com/vastai-80aa3a82/v_EM_-NdbnPjb9tX/images/console-templates-17.webp?w=1650&fit=max&auto=format&n=v_EM_-NdbnPjb9tX&q=85&s=62beb1b7ab3c97f6d42f702394832d2d 1650w, https://mintcdn.com/vastai-80aa3a82/v_EM_-NdbnPjb9tX/images/console-templates-17.webp?w=2500&fit=max&auto=format&n=v_EM_-NdbnPjb9tX&q=85&s=6842a0ecb290e1cf11c3ad6003eef60f 2500w" />
|
||
</Frame>
|
||
|
||
### Copy referral link
|
||
|
||
This will copy a link that contains your referral ID, creator ID and the template name. It will always point to the most recent template you created with this name - Really useful if you want people clicking the link to always get the most recent version.
|
||
|
||
### Copy template link 
|
||
|
||
This will copy a link containing your referral ID and the template hash ID. It points to this specific template at this point in time.  
|
||
|
||
Templates all have a unique hash after every save. This is useful as it allows you to find a previous version if you have tracked the hash ID, but for sharing you probably want the referral link above.
|
||
|
||
<Note>
|
||
Remember to add a comprehensive Readme to your template if you're going to share it. This will help users to get started easily.
|
||
</Note>
|
||
|
||
## Troubleshooting
|
||
|
||
* If your image is built for a different CPU architecture than your Vast machine, then it won't work. You can try to find a machine with the required CPU architecture using our GUI or [CLI](/cli/get-started).
|
||
* If your image requires a higher CUDA version, then look for a machine with a higher Max CUDA version. The Max CUDA version can be found on the instance card. 
|
||
* If your image is built to run jupyter, then try running it on a port different than 8080.
|
||
* If you are having issues using ssh launch mode, add your public key to \~/.authorized\_keys, install openssh, start openssh when the container starts, and forward the ssh server's port.
|
||
|
||
|
||
# Quick Start
|
||
Source: https://docs.vast.ai/documentation/templates/quickstart
|
||
|
||
|
||
|
||
## Run Your First Template
|
||
|
||
To jump right in and run a template, follow these steps.
|
||
|
||
Visit the templates section of the console where you will find all of our recommended templates.
|
||
|
||
<Frame caption="Recommended Templates">
|
||
<img src="https://mintcdn.com/vastai-80aa3a82/v_EM_-NdbnPjb9tX/images/console-templates.webp?fit=max&auto=format&n=v_EM_-NdbnPjb9tX&q=85&s=9c7a61209ae98f93a100f061451c0cef" alt="Recommended Templates page" data-og-width="1280" width="1280" data-og-height="583" height="583" data-path="images/console-templates.webp" data-optimize="true" data-opv="3" srcset="https://mintcdn.com/vastai-80aa3a82/v_EM_-NdbnPjb9tX/images/console-templates.webp?w=280&fit=max&auto=format&n=v_EM_-NdbnPjb9tX&q=85&s=4f3c470ed270ef560e364bee2f0017a1 280w, https://mintcdn.com/vastai-80aa3a82/v_EM_-NdbnPjb9tX/images/console-templates.webp?w=560&fit=max&auto=format&n=v_EM_-NdbnPjb9tX&q=85&s=d59b13c4905889f1cbbd334053c7b8c3 560w, https://mintcdn.com/vastai-80aa3a82/v_EM_-NdbnPjb9tX/images/console-templates.webp?w=840&fit=max&auto=format&n=v_EM_-NdbnPjb9tX&q=85&s=ea941cb1ede1a8b806877ec4de1b25fc 840w, https://mintcdn.com/vastai-80aa3a82/v_EM_-NdbnPjb9tX/images/console-templates.webp?w=1100&fit=max&auto=format&n=v_EM_-NdbnPjb9tX&q=85&s=993d271426111d6d74ac1fc727a97638 1100w, https://mintcdn.com/vastai-80aa3a82/v_EM_-NdbnPjb9tX/images/console-templates.webp?w=1650&fit=max&auto=format&n=v_EM_-NdbnPjb9tX&q=85&s=e118ef047604697bd3a2eae2f4e34758 1650w, https://mintcdn.com/vastai-80aa3a82/v_EM_-NdbnPjb9tX/images/console-templates.webp?w=2500&fit=max&auto=format&n=v_EM_-NdbnPjb9tX&q=85&s=e4f3b176674f97461b043d75e7cc122b 2500w" />
|
||
</Frame>
|
||
|
||
Browse through the templates until you find one that meets your requirements. In this guide we will use NVIDIA CUDA, which is the first on the list. It's a great starter template as it just includes the CUDA development environment, plus a few extras to improve the user experience.
|
||
|
||
<Frame caption="NVIDIA CUDA Template">
|
||
<img src="https://mintcdn.com/vastai-80aa3a82/v_EM_-NdbnPjb9tX/images/console-templates-2.webp?fit=max&auto=format&n=v_EM_-NdbnPjb9tX&q=85&s=60832c4ec4dcdde0e0a31feeaf044d3d" alt="NVIDIA CUDA Template whos play button in bottom left corner" data-og-width="800" width="800" data-og-height="526" height="526" data-path="images/console-templates-2.webp" data-optimize="true" data-opv="3" srcset="https://mintcdn.com/vastai-80aa3a82/v_EM_-NdbnPjb9tX/images/console-templates-2.webp?w=280&fit=max&auto=format&n=v_EM_-NdbnPjb9tX&q=85&s=797be6f7b48487106867506889e4e142 280w, https://mintcdn.com/vastai-80aa3a82/v_EM_-NdbnPjb9tX/images/console-templates-2.webp?w=560&fit=max&auto=format&n=v_EM_-NdbnPjb9tX&q=85&s=f445159d12f7a946512df081ad821af7 560w, https://mintcdn.com/vastai-80aa3a82/v_EM_-NdbnPjb9tX/images/console-templates-2.webp?w=840&fit=max&auto=format&n=v_EM_-NdbnPjb9tX&q=85&s=25f06510518ee7b961095e6adec2c66d 840w, https://mintcdn.com/vastai-80aa3a82/v_EM_-NdbnPjb9tX/images/console-templates-2.webp?w=1100&fit=max&auto=format&n=v_EM_-NdbnPjb9tX&q=85&s=a505e8e10c310f540098d6c14fce5a2a 1100w, https://mintcdn.com/vastai-80aa3a82/v_EM_-NdbnPjb9tX/images/console-templates-2.webp?w=1650&fit=max&auto=format&n=v_EM_-NdbnPjb9tX&q=85&s=869eddf8feed1c02c759e1a18ce32493 1650w, https://mintcdn.com/vastai-80aa3a82/v_EM_-NdbnPjb9tX/images/console-templates-2.webp?w=2500&fit=max&auto=format&n=v_EM_-NdbnPjb9tX&q=85&s=96c89d74cad87e6bcbfebf6135646673 2500w" />
|
||
</Frame>
|
||
|
||
Now, click the 'play' button. This will load the template and take you to the available offers.
|
||
|
||
<Frame caption="Offers page with GPU filter active">
|
||
<img src="https://mintcdn.com/vastai-80aa3a82/v_EM_-NdbnPjb9tX/images/console-templates-3.webp?fit=max&auto=format&n=v_EM_-NdbnPjb9tX&q=85&s=fae921f268cc70d667e0cdb85bf3a017" alt="Offers page with GPU filter active" data-og-width="1201" width="1201" data-og-height="837" height="837" data-path="images/console-templates-3.webp" data-optimize="true" data-opv="3" srcset="https://mintcdn.com/vastai-80aa3a82/v_EM_-NdbnPjb9tX/images/console-templates-3.webp?w=280&fit=max&auto=format&n=v_EM_-NdbnPjb9tX&q=85&s=c1fcec64bec1480b508017482909cd2b 280w, https://mintcdn.com/vastai-80aa3a82/v_EM_-NdbnPjb9tX/images/console-templates-3.webp?w=560&fit=max&auto=format&n=v_EM_-NdbnPjb9tX&q=85&s=c541370af2a4f59f2c25ab91893439a4 560w, https://mintcdn.com/vastai-80aa3a82/v_EM_-NdbnPjb9tX/images/console-templates-3.webp?w=840&fit=max&auto=format&n=v_EM_-NdbnPjb9tX&q=85&s=194cebbc64b56924b1bf27f8abc78f89 840w, https://mintcdn.com/vastai-80aa3a82/v_EM_-NdbnPjb9tX/images/console-templates-3.webp?w=1100&fit=max&auto=format&n=v_EM_-NdbnPjb9tX&q=85&s=6cbe78e44760cd391ddc0b2b188797fe 1100w, https://mintcdn.com/vastai-80aa3a82/v_EM_-NdbnPjb9tX/images/console-templates-3.webp?w=1650&fit=max&auto=format&n=v_EM_-NdbnPjb9tX&q=85&s=91c479d59d4219014a41d45917edad5b 1650w, https://mintcdn.com/vastai-80aa3a82/v_EM_-NdbnPjb9tX/images/console-templates-3.webp?w=2500&fit=max&auto=format&n=v_EM_-NdbnPjb9tX&q=85&s=cd7d286054869afe2c55bc6a3d5f9ad5 2500w" />
|
||
</Frame>
|
||
|
||
There are filters available at the top of the page to help you target a particular GPU. You will also find many additional filters on the left of the page for more fine-grained control over the instances you find.
|
||
|
||
When you have found a suitable offer, simply click the 'RENT' button to create your new instance.
|
||
|
||
You can now visit [cloud.vast.ai/instances](https://cloud.vast.ai/instances/) where you will find your running instance. It may take a few minutes to be ready as everything is being set up.
|
||
|
||
<Frame caption="Instance view with blue open button">
|
||
<img src="https://mintcdn.com/vastai-80aa3a82/v_EM_-NdbnPjb9tX/images/console-templates-4.webp?fit=max&auto=format&n=v_EM_-NdbnPjb9tX&q=85&s=a0fbe9daa15082fa3c1698766956405b" alt="Instance view with blue open button" data-og-width="906" width="906" data-og-height="718" height="718" data-path="images/console-templates-4.webp" data-optimize="true" data-opv="3" srcset="https://mintcdn.com/vastai-80aa3a82/v_EM_-NdbnPjb9tX/images/console-templates-4.webp?w=280&fit=max&auto=format&n=v_EM_-NdbnPjb9tX&q=85&s=50246bbdd664c7139e5042ad946a1760 280w, https://mintcdn.com/vastai-80aa3a82/v_EM_-NdbnPjb9tX/images/console-templates-4.webp?w=560&fit=max&auto=format&n=v_EM_-NdbnPjb9tX&q=85&s=b58a76cda5d98dbf433e7fae8ccbc585 560w, https://mintcdn.com/vastai-80aa3a82/v_EM_-NdbnPjb9tX/images/console-templates-4.webp?w=840&fit=max&auto=format&n=v_EM_-NdbnPjb9tX&q=85&s=7b4baba1deed3eea32ca3d55ab261c37 840w, https://mintcdn.com/vastai-80aa3a82/v_EM_-NdbnPjb9tX/images/console-templates-4.webp?w=1100&fit=max&auto=format&n=v_EM_-NdbnPjb9tX&q=85&s=3d676c0fd41c07fb63283195ffb74222 1100w, https://mintcdn.com/vastai-80aa3a82/v_EM_-NdbnPjb9tX/images/console-templates-4.webp?w=1650&fit=max&auto=format&n=v_EM_-NdbnPjb9tX&q=85&s=5276ad739be7902e31ecd48ffa701ea1 1650w, https://mintcdn.com/vastai-80aa3a82/v_EM_-NdbnPjb9tX/images/console-templates-4.webp?w=2500&fit=max&auto=format&n=v_EM_-NdbnPjb9tX&q=85&s=a26ac401bed25ace00fcd21638aa2160 2500w" />
|
||
</Frame>
|
||
|
||
When it is ready you will see the blue open button. This indicates that the instance is ready to connect.
|
||
|
||
<Note>
|
||
The action of the open button depends on the template you have chosen - In this example you will be transferred to the [Instance Portal](/documentation/instances/instance-portal). To learn how to configure Instance Portal links, see our [Advanced Setup](/documentation/templates/advanced-setup#portal-config) guide.
|
||
</Note>
|
||
|
||
## Next Steps
|
||
|
||
Now that you've run your first template:
|
||
|
||
* **Understand templates better** - See [Introduction](/documentation/templates/introduction) to learn about templates and Vast's template ecosystem
|
||
* **Create your own template** - Follow our [Creating Templates](/documentation/templates/creating-templates) tutorial
|
||
* **Explore advanced features** - Check out [Advanced Setup](/documentation/templates/advanced-setup) for provisioning scripts and custom images
|
||
|
||
|
||
# Template Settings
|
||
Source: https://docs.vast.ai/documentation/templates/template-settings
|
||
|
||
|
||
|
||
## Overview
|
||
|
||
This guide documents all settings and options available when configuring a template. Use this guide when you need to understand what a specific setting does or how to configure a particular option.
|
||
|
||
For a step-by-step tutorial on creating your first template, see [Creating Templates](/documentation/templates/creating-templates).
|
||
|
||
For advanced customization techniques, see [Advanced Setup](/documentation/templates/advanced-setup).
|
||
|
||
## Identification
|
||
|
||
The first section helps you to keep your templates organized.
|
||
|
||
<Frame caption="Identification section of the template editor">
|
||
<img src="https://mintcdn.com/vastai-80aa3a82/v_EM_-NdbnPjb9tX/images/console-templates-5.webp?fit=max&auto=format&n=v_EM_-NdbnPjb9tX&q=85&s=92d2cbbecc86af090d7d43a8e6409515" alt="Identification section of the template editor" data-og-width="936" width="936" data-og-height="294" height="294" data-path="images/console-templates-5.webp" data-optimize="true" data-opv="3" srcset="https://mintcdn.com/vastai-80aa3a82/v_EM_-NdbnPjb9tX/images/console-templates-5.webp?w=280&fit=max&auto=format&n=v_EM_-NdbnPjb9tX&q=85&s=b326bc9a8573f910771c8078028477b3 280w, https://mintcdn.com/vastai-80aa3a82/v_EM_-NdbnPjb9tX/images/console-templates-5.webp?w=560&fit=max&auto=format&n=v_EM_-NdbnPjb9tX&q=85&s=1e16e256733332321ed15b0477c7c5d4 560w, https://mintcdn.com/vastai-80aa3a82/v_EM_-NdbnPjb9tX/images/console-templates-5.webp?w=840&fit=max&auto=format&n=v_EM_-NdbnPjb9tX&q=85&s=960ce67c4b5e6bef28204d285e9d6af5 840w, https://mintcdn.com/vastai-80aa3a82/v_EM_-NdbnPjb9tX/images/console-templates-5.webp?w=1100&fit=max&auto=format&n=v_EM_-NdbnPjb9tX&q=85&s=e9a3251d5cc29821078a0c685735afb4 1100w, https://mintcdn.com/vastai-80aa3a82/v_EM_-NdbnPjb9tX/images/console-templates-5.webp?w=1650&fit=max&auto=format&n=v_EM_-NdbnPjb9tX&q=85&s=9bf15355378ba5f5f296b6a27c689aab 1650w, https://mintcdn.com/vastai-80aa3a82/v_EM_-NdbnPjb9tX/images/console-templates-5.webp?w=2500&fit=max&auto=format&n=v_EM_-NdbnPjb9tX&q=85&s=c6fb73fca150d0b06f40a727e01de7d0 2500w" />
|
||
</Frame>
|
||
|
||
**Template Name**
|
||
|
||
This will be displayed in bold on the template card. Choose something that helps you identify the template amongst your other templates.
|
||
|
||
**Template Description**
|
||
|
||
This field helps describe the function and purpose of the template. Completely optional for your own purposes, but very helpful if you intend to make this template public or share it with others.
|
||
|
||
## Docker Repository And Environment
|
||
|
||
This is where you define the Docker image you want to run, along with any options we want to pass into the container.
|
||
|
||
<Frame caption="Docker section of the template editor">
|
||
<img src="https://mintcdn.com/vastai-80aa3a82/v_EM_-NdbnPjb9tX/images/console-templates-6.webp?fit=max&auto=format&n=v_EM_-NdbnPjb9tX&q=85&s=2dd0053fa0ec8cd91fa23d4bf8185318" alt="Docker section of the template editor" data-og-width="844" width="844" data-og-height="775" height="775" data-path="images/console-templates-6.webp" data-optimize="true" data-opv="3" srcset="https://mintcdn.com/vastai-80aa3a82/v_EM_-NdbnPjb9tX/images/console-templates-6.webp?w=280&fit=max&auto=format&n=v_EM_-NdbnPjb9tX&q=85&s=bfd7dbb3ce076232e55a8536bcba90cd 280w, https://mintcdn.com/vastai-80aa3a82/v_EM_-NdbnPjb9tX/images/console-templates-6.webp?w=560&fit=max&auto=format&n=v_EM_-NdbnPjb9tX&q=85&s=1516f5878cf2ac74fed48b159aaf48a9 560w, https://mintcdn.com/vastai-80aa3a82/v_EM_-NdbnPjb9tX/images/console-templates-6.webp?w=840&fit=max&auto=format&n=v_EM_-NdbnPjb9tX&q=85&s=f987e6d61bf53e6921960aa8ecd08b9a 840w, https://mintcdn.com/vastai-80aa3a82/v_EM_-NdbnPjb9tX/images/console-templates-6.webp?w=1100&fit=max&auto=format&n=v_EM_-NdbnPjb9tX&q=85&s=3bc65674968d0cd6fe5042bfff602a3b 1100w, https://mintcdn.com/vastai-80aa3a82/v_EM_-NdbnPjb9tX/images/console-templates-6.webp?w=1650&fit=max&auto=format&n=v_EM_-NdbnPjb9tX&q=85&s=cd79074383be2f3b0159c8d0510a8c74 1650w, https://mintcdn.com/vastai-80aa3a82/v_EM_-NdbnPjb9tX/images/console-templates-6.webp?w=2500&fit=max&auto=format&n=v_EM_-NdbnPjb9tX&q=85&s=152ce71cfb3f7357390cdd4700a8faaf 2500w" />
|
||
</Frame>
|
||
|
||
**Image Path:Tag**
|
||
|
||
Here is where you can define the docker image to run. This field must be in the format `repository/image_name:tag`.
|
||
|
||
Many of our templates pull from DockerHub but you can use any container registry - Just remember to add the full path if you're using an alternative registry. Eg. `nvcr.io/nvidia/pytorch:25.04-py3`
|
||
|
||
You can use any Docker image:
|
||
|
||
* Public images from DockerHub (e.g., `nginx:latest`, `postgres:14`, `python:3.11`)
|
||
* Vast.ai base images (e.g., `vastai/base-image`, `vastai/pytorch`)
|
||
* Your own custom images from any registry
|
||
* Images from alternative registries (GitHub Container Registry, Google Container Registry, etc.)
|
||
|
||
**Version Tag**
|
||
|
||
For many registries we are able to pull the available list of tags so this field allows you to quickly select another version.
|
||
|
||
There is also a special `[Automatic]` tag you can use. With this selected, the machine you choose for your instance will pull the most recent docker image that is compatible with that machine's own CUDA version. 
|
||
|
||
This will only work if the image tag contains the CUDA version string. For example: `my-image-cuda-12.8` would be loaded on a machine supporting CUDA 12.8, but a machine with only CUDA 12.6 would pull `my-image-cuda-12.6`
|
||
|
||
**Docker Options**
|
||
|
||
This field is a textual representation of the ports and environment variables declared in the sections beneath it. You can edit it directly or you can use the page widgets.
|
||
|
||
<Note>
|
||
This field will only accept ports and environment variables. Other docker run options will be ignored.
|
||
</Note>
|
||
|
||
**Ports**
|
||
|
||
To access your instance via the external IP address, you will need to add some ports to the template. You can add both TCP and UDP ports.
|
||
|
||
When your instance is created, a port will be randomly assigned to the external interface which will map into the instance port you selected.
|
||
|
||
You can also use SSH to open a tunnel to access ports. Use a command like:
|
||
|
||
```text theme={null}
|
||
ssh -p [SSH_PORT] [USER]@[REMOTE_HOST] -L [LOCAL_PORT]:localhost:[REMOTE_PORT]
|
||
ssh -p 22 user@remote.example.com -L 8080:localhost:8080
|
||
```
|
||
|
||
The machine will forward traffic from the host machine's public port to the container port you specified.
|
||
|
||
**Environment Variables**
|
||
|
||
Here you can add any environment variables that your docker image requires. Do not save any sensitive information here if you are planning to make the template public.
|
||
|
||
Place any variables with sensitive values into the Environment Variables section of your [account settings page](https://cloud.vast.ai/account/). They will then be made available in any instance you create, regardless of the template used.
|
||
|
||
Special environment variables like `PROVISIONING_SCRIPT` and `PORTAL_CONFIG` can be used to customize Vast templates - see our [Advanced Setup](/documentation/templates/advanced-setup) guide for details.
|
||
|
||
You can find out more about port mapping and special environment variables in our [Docker Execution Environment](/documentation/instances/docker-execution-environment) guide.
|
||
|
||
## Select Launch Mode
|
||
|
||
Templates offer three launch modes you can select from. Our recommended templates will usually launch in Jupyter mode for easiest access, but you are free to choose whichever suits your needs.
|
||
|
||
<Frame caption="Launch mode selection options">
|
||
<img src="https://mintcdn.com/vastai-80aa3a82/v_EM_-NdbnPjb9tX/images/console-templates-7.webp?fit=max&auto=format&n=v_EM_-NdbnPjb9tX&q=85&s=accc9a98a9c908de96ffd1be1b44979b" alt="Launch mode selection options" data-og-width="936" width="936" data-og-height="191" height="191" data-path="images/console-templates-7.webp" data-optimize="true" data-opv="3" srcset="https://mintcdn.com/vastai-80aa3a82/v_EM_-NdbnPjb9tX/images/console-templates-7.webp?w=280&fit=max&auto=format&n=v_EM_-NdbnPjb9tX&q=85&s=fe6bd58c7bb8e942baa1e07f714df807 280w, https://mintcdn.com/vastai-80aa3a82/v_EM_-NdbnPjb9tX/images/console-templates-7.webp?w=560&fit=max&auto=format&n=v_EM_-NdbnPjb9tX&q=85&s=ed25b25c7de241a57a6ef26b49fd8fe4 560w, https://mintcdn.com/vastai-80aa3a82/v_EM_-NdbnPjb9tX/images/console-templates-7.webp?w=840&fit=max&auto=format&n=v_EM_-NdbnPjb9tX&q=85&s=9c708ed19996a249cec72a6eae791bd1 840w, https://mintcdn.com/vastai-80aa3a82/v_EM_-NdbnPjb9tX/images/console-templates-7.webp?w=1100&fit=max&auto=format&n=v_EM_-NdbnPjb9tX&q=85&s=56e8dcfd5d4704647e9391fcc013f3a2 1100w, https://mintcdn.com/vastai-80aa3a82/v_EM_-NdbnPjb9tX/images/console-templates-7.webp?w=1650&fit=max&auto=format&n=v_EM_-NdbnPjb9tX&q=85&s=9d57ee991fa568a44878ba3567799dc8 1650w, https://mintcdn.com/vastai-80aa3a82/v_EM_-NdbnPjb9tX/images/console-templates-7.webp?w=2500&fit=max&auto=format&n=v_EM_-NdbnPjb9tX&q=85&s=466d12e23ca96bc9d03d5059a428612d 2500w" />
|
||
</Frame>
|
||
|
||
**Jupyter-python notebook + SSH**
|
||
|
||
When you run the template in this mode, we will install Jupyter and SSH at runtime. Jupyter will be available on mapped port `8080` and SSH will be available on mapped port `22`.
|
||
|
||
**Interactive shell server, SSH**
|
||
|
||
As above, but SSH only with no Jupyter installation.
|
||
|
||
<Warning>
|
||
In both Jupyter and SSH mode, the docker entrypoint for your image will not be run. It will be replaced with our instance setup script so you should use the on start section (documented below) to start any services.
|
||
</Warning>
|
||
|
||
**docker ENTRYPOINT**
|
||
|
||
In this mode, your Docker image will run precisely as it is. We will not include any additional software or access methods. If your Docker image does not offer SSH or another appropriate interface, please select one of the alternative modes if you need to interact with the running instance.
|
||
|
||
An additional field will be shown when using this launch mode to allow passing arguments to the image entrypoint.
|
||
|
||
<Frame caption="Field allowing for argument passing">
|
||
<img src="https://mintcdn.com/vastai-80aa3a82/v_EM_-NdbnPjb9tX/images/console-templates-8.webp?fit=max&auto=format&n=v_EM_-NdbnPjb9tX&q=85&s=afd38e3ca501849480e31ebb8cfd7215" alt="Field allowing for argument passing" data-og-width="936" width="936" data-og-height="63" height="63" data-path="images/console-templates-8.webp" data-optimize="true" data-opv="3" srcset="https://mintcdn.com/vastai-80aa3a82/v_EM_-NdbnPjb9tX/images/console-templates-8.webp?w=280&fit=max&auto=format&n=v_EM_-NdbnPjb9tX&q=85&s=f7441a7220cf1431cc15370a8e0dea82 280w, https://mintcdn.com/vastai-80aa3a82/v_EM_-NdbnPjb9tX/images/console-templates-8.webp?w=560&fit=max&auto=format&n=v_EM_-NdbnPjb9tX&q=85&s=34185f64e9d1438b0d61bb29c48a6564 560w, https://mintcdn.com/vastai-80aa3a82/v_EM_-NdbnPjb9tX/images/console-templates-8.webp?w=840&fit=max&auto=format&n=v_EM_-NdbnPjb9tX&q=85&s=cc6f950b7d52774f691832735d3d0090 840w, https://mintcdn.com/vastai-80aa3a82/v_EM_-NdbnPjb9tX/images/console-templates-8.webp?w=1100&fit=max&auto=format&n=v_EM_-NdbnPjb9tX&q=85&s=699a98f18f6580f738e68a0cb084ac38 1100w, https://mintcdn.com/vastai-80aa3a82/v_EM_-NdbnPjb9tX/images/console-templates-8.webp?w=1650&fit=max&auto=format&n=v_EM_-NdbnPjb9tX&q=85&s=59b5ee232756140b55757c5e0c56cf34 1650w, https://mintcdn.com/vastai-80aa3a82/v_EM_-NdbnPjb9tX/images/console-templates-8.webp?w=2500&fit=max&auto=format&n=v_EM_-NdbnPjb9tX&q=85&s=1b624c363b9472bb7daee330e9862fe4 2500w" />
|
||
</Frame>
|
||
|
||
## On-start Script
|
||
|
||
Here you can enter a short Bash script which will be run during instance startup. It is only available when using the Jupyter or SSH launch modes, and is most useful for starting any services that your docker image would have launched if the entrypoint had been executed.
|
||
|
||
<Frame caption="On-start Script">
|
||
<img src="https://mintcdn.com/vastai-80aa3a82/v_EM_-NdbnPjb9tX/images/console-templates-9.webp?fit=max&auto=format&n=v_EM_-NdbnPjb9tX&q=85&s=e5684180dfcbbb1b24441dda6dc62851" alt="On-start Script" data-og-width="936" width="936" data-og-height="177" height="177" data-path="images/console-templates-9.webp" data-optimize="true" data-opv="3" srcset="https://mintcdn.com/vastai-80aa3a82/v_EM_-NdbnPjb9tX/images/console-templates-9.webp?w=280&fit=max&auto=format&n=v_EM_-NdbnPjb9tX&q=85&s=ffc64a21cca13ae1be0deb35c3326204 280w, https://mintcdn.com/vastai-80aa3a82/v_EM_-NdbnPjb9tX/images/console-templates-9.webp?w=560&fit=max&auto=format&n=v_EM_-NdbnPjb9tX&q=85&s=462a27c896e9ffaf6457361c5beac9aa 560w, https://mintcdn.com/vastai-80aa3a82/v_EM_-NdbnPjb9tX/images/console-templates-9.webp?w=840&fit=max&auto=format&n=v_EM_-NdbnPjb9tX&q=85&s=8683feca744ec21671fdecb28838e1da 840w, https://mintcdn.com/vastai-80aa3a82/v_EM_-NdbnPjb9tX/images/console-templates-9.webp?w=1100&fit=max&auto=format&n=v_EM_-NdbnPjb9tX&q=85&s=721f6644f78497b0cb094a25bf42e45c 1100w, https://mintcdn.com/vastai-80aa3a82/v_EM_-NdbnPjb9tX/images/console-templates-9.webp?w=1650&fit=max&auto=format&n=v_EM_-NdbnPjb9tX&q=85&s=d15e1062f506f6a6e2c149cf3cd6742b 1650w, https://mintcdn.com/vastai-80aa3a82/v_EM_-NdbnPjb9tX/images/console-templates-9.webp?w=2500&fit=max&auto=format&n=v_EM_-NdbnPjb9tX&q=85&s=c1c1676721633844f5bd8c65cec7bef4 2500w" />
|
||
</Frame>
|
||
|
||
**Additional On-start Script Examples**
|
||
|
||
You can execute custom startup scripts:
|
||
|
||
```text theme={null}
|
||
chmod +x /usr/local/bin/start.sh
|
||
bash /usr/local/bin/start.sh
|
||
```
|
||
|
||
You can also overwrite existing files built into the image. Make sure you can switch to a user that has write permissions to that particular file.
|
||
|
||
For example, you can remove all instances of '-sslOnly' in a particular file using sed:
|
||
|
||
```text theme={null}
|
||
sed -i 's/-sslOnly//g' /dockerstartup/vnc_startup.sh
|
||
```
|
||
|
||
You can also make directories:
|
||
|
||
```text theme={null}
|
||
sudo -i -u kasm-user mkdir -p /home/kasm-user/Desktop
|
||
```
|
||
|
||
Make sure to append environment variables to /etc/environment file in your on-start section because this makes environment variables available to all users and processes and ensures they are persisted even if your instance/docker container is rebooted:
|
||
|
||
```text theme={null}
|
||
env >> /etc/environment
|
||
```
|
||
|
||
Also make sure to find the image's ENTRYPOINT or CMD command and call that command at the end of the on-start section. We overwrite that command to set up jupyter/ssh server, etc. under the hood.
|
||
|
||
## Extra Filters
|
||
|
||
Use this area to place restrictions on the machines that should show up in the search page when the template is selected.
|
||
|
||
<Frame caption="Extra filters showing this template is configured for both AMD64 and ARM64 CPUs">
|
||
<img src="https://mintcdn.com/vastai-80aa3a82/v_EM_-NdbnPjb9tX/images/console-templates-10.webp?fit=max&auto=format&n=v_EM_-NdbnPjb9tX&q=85&s=d0b46d8718eeb1e6d03f1924c5592465" alt="Extra filters showing this template is configured for both AMD64 and ARM64 CPUs" data-og-width="936" width="936" data-og-height="142" height="142" data-path="images/console-templates-10.webp" data-optimize="true" data-opv="3" srcset="https://mintcdn.com/vastai-80aa3a82/v_EM_-NdbnPjb9tX/images/console-templates-10.webp?w=280&fit=max&auto=format&n=v_EM_-NdbnPjb9tX&q=85&s=699da072b92ce3785faab1160c46ff77 280w, https://mintcdn.com/vastai-80aa3a82/v_EM_-NdbnPjb9tX/images/console-templates-10.webp?w=560&fit=max&auto=format&n=v_EM_-NdbnPjb9tX&q=85&s=14ca41c6b1b124d184bfa0e399d806de 560w, https://mintcdn.com/vastai-80aa3a82/v_EM_-NdbnPjb9tX/images/console-templates-10.webp?w=840&fit=max&auto=format&n=v_EM_-NdbnPjb9tX&q=85&s=d83cf565ea5ddbbc8a5b77cda3f6216d 840w, https://mintcdn.com/vastai-80aa3a82/v_EM_-NdbnPjb9tX/images/console-templates-10.webp?w=1100&fit=max&auto=format&n=v_EM_-NdbnPjb9tX&q=85&s=b359635e7820d3288255405738ec54a0 1100w, https://mintcdn.com/vastai-80aa3a82/v_EM_-NdbnPjb9tX/images/console-templates-10.webp?w=1650&fit=max&auto=format&n=v_EM_-NdbnPjb9tX&q=85&s=587c7dc9d367a9aabdbe70bc3ba3b578 1650w, https://mintcdn.com/vastai-80aa3a82/v_EM_-NdbnPjb9tX/images/console-templates-10.webp?w=2500&fit=max&auto=format&n=v_EM_-NdbnPjb9tX&q=85&s=f024b48bf616811eaea377b4c861c332 2500w" />
|
||
</Frame>
|
||
|
||
## Docker Repository Authentication
|
||
|
||
If you are using a private Docker image then you will need to add authentication credentials so the machine running the instance can download it.
|
||
|
||
<Frame caption="Docker Repository Authentication">
|
||
<img src="https://mintcdn.com/vastai-80aa3a82/v_EM_-NdbnPjb9tX/images/console-templates-11.webp?fit=max&auto=format&n=v_EM_-NdbnPjb9tX&q=85&s=845e9caffad7a7cf2063bc9c9a74195c" alt="Docker Repository Authentication" data-og-width="945" width="945" data-og-height="152" height="152" data-path="images/console-templates-11.webp" data-optimize="true" data-opv="3" srcset="https://mintcdn.com/vastai-80aa3a82/v_EM_-NdbnPjb9tX/images/console-templates-11.webp?w=280&fit=max&auto=format&n=v_EM_-NdbnPjb9tX&q=85&s=64d8129734e54342c9f0ad8a468c241a 280w, https://mintcdn.com/vastai-80aa3a82/v_EM_-NdbnPjb9tX/images/console-templates-11.webp?w=560&fit=max&auto=format&n=v_EM_-NdbnPjb9tX&q=85&s=346890098f2918b036798ee6e72c7840 560w, https://mintcdn.com/vastai-80aa3a82/v_EM_-NdbnPjb9tX/images/console-templates-11.webp?w=840&fit=max&auto=format&n=v_EM_-NdbnPjb9tX&q=85&s=cc1ce3577f7e7ec29c24de6be5b619c4 840w, https://mintcdn.com/vastai-80aa3a82/v_EM_-NdbnPjb9tX/images/console-templates-11.webp?w=1100&fit=max&auto=format&n=v_EM_-NdbnPjb9tX&q=85&s=687cc079e04e348b468c8cae13ab1de3 1100w, https://mintcdn.com/vastai-80aa3a82/v_EM_-NdbnPjb9tX/images/console-templates-11.webp?w=1650&fit=max&auto=format&n=v_EM_-NdbnPjb9tX&q=85&s=5a6d6173d6dd2f3f4b9e030394078335 1650w, https://mintcdn.com/vastai-80aa3a82/v_EM_-NdbnPjb9tX/images/console-templates-11.webp?w=2500&fit=max&auto=format&n=v_EM_-NdbnPjb9tX&q=85&s=da79a3dd042f2f457189e1df0aabd978 2500w" />
|
||
</Frame>
|
||
|
||
**Docker Registry Server Names**
|
||
|
||
You don't have to specify docker.io as the server name if your repository is Docker Hub. Docker automatically uses docker.io to pull the image if no other registry is specified.
|
||
|
||
You do have to specify your server name if your repository is something else. For example:
|
||
|
||
* GitHub Container Registry (GHCR) - Server Name: `ghcr.io`
|
||
* Google Container Registry (GCR) - Server Name: `gcr.io`
|
||
|
||
## Disk Space
|
||
|
||
By setting the disk space in the template, you can ensure that new instances created from the template will use this amount as a minimum. 
|
||
|
||
<img src="https://mintcdn.com/vastai-80aa3a82/v_EM_-NdbnPjb9tX/images/console-templates-12.webp?fit=max&auto=format&n=v_EM_-NdbnPjb9tX&q=85&s=f6f7548d2944bba92edbf92f2298f1bd" alt="" data-og-width="945" width="945" data-og-height="129" height="129" data-path="images/console-templates-12.webp" data-optimize="true" data-opv="3" srcset="https://mintcdn.com/vastai-80aa3a82/v_EM_-NdbnPjb9tX/images/console-templates-12.webp?w=280&fit=max&auto=format&n=v_EM_-NdbnPjb9tX&q=85&s=9b34aca53de956809dd5a0d518d8c7c3 280w, https://mintcdn.com/vastai-80aa3a82/v_EM_-NdbnPjb9tX/images/console-templates-12.webp?w=560&fit=max&auto=format&n=v_EM_-NdbnPjb9tX&q=85&s=4652475e296b06f026ce32e83bcad1ce 560w, https://mintcdn.com/vastai-80aa3a82/v_EM_-NdbnPjb9tX/images/console-templates-12.webp?w=840&fit=max&auto=format&n=v_EM_-NdbnPjb9tX&q=85&s=9abe04c75ecaea4888db8c536a7a50d0 840w, https://mintcdn.com/vastai-80aa3a82/v_EM_-NdbnPjb9tX/images/console-templates-12.webp?w=1100&fit=max&auto=format&n=v_EM_-NdbnPjb9tX&q=85&s=1cc8ce0653aff8aae31e6cfd566796a6 1100w, https://mintcdn.com/vastai-80aa3a82/v_EM_-NdbnPjb9tX/images/console-templates-12.webp?w=1650&fit=max&auto=format&n=v_EM_-NdbnPjb9tX&q=85&s=8066a88a611676bd9e9fe43a08371cbe 1650w, https://mintcdn.com/vastai-80aa3a82/v_EM_-NdbnPjb9tX/images/console-templates-12.webp?w=2500&fit=max&auto=format&n=v_EM_-NdbnPjb9tX&q=85&s=3e7924b2c6ee30d2ca612dcb2ed09f68 2500w" />
|
||
|
||
## Template Visibility
|
||
|
||
Any template marked as public will be available in the template search system, while private images will not.
|
||
|
||
Private templates can still be used by others if you have shared the template URL.
|
||
|
||
<img src="https://mintcdn.com/vastai-80aa3a82/v_EM_-NdbnPjb9tX/images/console-templates-13.webp?fit=max&auto=format&n=v_EM_-NdbnPjb9tX&q=85&s=49f230e0326c8dc467e6f741cad9ee81" alt="" data-og-width="945" width="945" data-og-height="65" height="65" data-path="images/console-templates-13.webp" data-optimize="true" data-opv="3" srcset="https://mintcdn.com/vastai-80aa3a82/v_EM_-NdbnPjb9tX/images/console-templates-13.webp?w=280&fit=max&auto=format&n=v_EM_-NdbnPjb9tX&q=85&s=fa00d78c75d0bbd7ea1a3ead9dd8efaa 280w, https://mintcdn.com/vastai-80aa3a82/v_EM_-NdbnPjb9tX/images/console-templates-13.webp?w=560&fit=max&auto=format&n=v_EM_-NdbnPjb9tX&q=85&s=940356d95de0eae158a6d0506237a8b8 560w, https://mintcdn.com/vastai-80aa3a82/v_EM_-NdbnPjb9tX/images/console-templates-13.webp?w=840&fit=max&auto=format&n=v_EM_-NdbnPjb9tX&q=85&s=70bd0db750ee864a41c18c66c8947faa 840w, https://mintcdn.com/vastai-80aa3a82/v_EM_-NdbnPjb9tX/images/console-templates-13.webp?w=1100&fit=max&auto=format&n=v_EM_-NdbnPjb9tX&q=85&s=0db3b59b6ef6b176065a3ea34136a3dd 1100w, https://mintcdn.com/vastai-80aa3a82/v_EM_-NdbnPjb9tX/images/console-templates-13.webp?w=1650&fit=max&auto=format&n=v_EM_-NdbnPjb9tX&q=85&s=081d8018edfae000027fa86a16aa4db4 1650w, https://mintcdn.com/vastai-80aa3a82/v_EM_-NdbnPjb9tX/images/console-templates-13.webp?w=2500&fit=max&auto=format&n=v_EM_-NdbnPjb9tX&q=85&s=bf5bde58b6f4e81cacbb30b86b2086a6 2500w" />
|
||
|
||
<Danger>
|
||
Never save a template as public if it contains sensitive information or secrets. Use the account level environment variables as an alternative.
|
||
</Danger>
|
||
|
||
## CLI Command
|
||
|
||
Templates can be translated directly into CLI launch commands. This read-only area shows what you would need to type or copy to the CLI if you wanted to programatically launch an instance this way.
|
||
|
||
<Frame caption="Launch a template via the CLI">
|
||
<img src="https://mintcdn.com/vastai-80aa3a82/v_EM_-NdbnPjb9tX/images/console-templates-14.webp?fit=max&auto=format&n=v_EM_-NdbnPjb9tX&q=85&s=ef36a018bb9f508d2d836c6a7cea71ca" alt="Launch a template via the CLI" data-og-width="945" width="945" data-og-height="183" height="183" data-path="images/console-templates-14.webp" data-optimize="true" data-opv="3" srcset="https://mintcdn.com/vastai-80aa3a82/v_EM_-NdbnPjb9tX/images/console-templates-14.webp?w=280&fit=max&auto=format&n=v_EM_-NdbnPjb9tX&q=85&s=652af28974ad4b6ecd574e879a9d3022 280w, https://mintcdn.com/vastai-80aa3a82/v_EM_-NdbnPjb9tX/images/console-templates-14.webp?w=560&fit=max&auto=format&n=v_EM_-NdbnPjb9tX&q=85&s=ff9256f8febdf503423e494aeb464291 560w, https://mintcdn.com/vastai-80aa3a82/v_EM_-NdbnPjb9tX/images/console-templates-14.webp?w=840&fit=max&auto=format&n=v_EM_-NdbnPjb9tX&q=85&s=ca8783c389899765a89aa2528cf5bde8 840w, https://mintcdn.com/vastai-80aa3a82/v_EM_-NdbnPjb9tX/images/console-templates-14.webp?w=1100&fit=max&auto=format&n=v_EM_-NdbnPjb9tX&q=85&s=6bf1ccd1747886b4b46719915db0c1d7 1100w, https://mintcdn.com/vastai-80aa3a82/v_EM_-NdbnPjb9tX/images/console-templates-14.webp?w=1650&fit=max&auto=format&n=v_EM_-NdbnPjb9tX&q=85&s=d33bd5a11900d30c08804f3c6a7642ee 1650w, https://mintcdn.com/vastai-80aa3a82/v_EM_-NdbnPjb9tX/images/console-templates-14.webp?w=2500&fit=max&auto=format&n=v_EM_-NdbnPjb9tX&q=85&s=651187a027e28f9ce019584ae5e7012a 2500w" />
|
||
</Frame>
|
||
|
||
To learn more about starting instance from the CLI, check out our [quickstart guide](/cli/get-started).
|
||
|
||
## Save the Template
|
||
|
||
Finally, you can save the template. If you are creating a new template or editing one which is not associated with your account - Such as one of our recommended templates - The buttons you see will be labelled 'Create'. For your own templates, you will see them labelled 'Save'
|
||
|
||
<Frame caption="Buttons for saving">
|
||
<img src="https://mintcdn.com/vastai-80aa3a82/v_EM_-NdbnPjb9tX/images/console-templates-15.webp?fit=max&auto=format&n=v_EM_-NdbnPjb9tX&q=85&s=204e5427f10491896bdfd3da4001ef7e" alt="Buttons for saving" data-og-width="800" width="800" data-og-height="139" height="139" data-path="images/console-templates-15.webp" data-optimize="true" data-opv="3" srcset="https://mintcdn.com/vastai-80aa3a82/v_EM_-NdbnPjb9tX/images/console-templates-15.webp?w=280&fit=max&auto=format&n=v_EM_-NdbnPjb9tX&q=85&s=882f55ab8e980cee4c909756332105d2 280w, https://mintcdn.com/vastai-80aa3a82/v_EM_-NdbnPjb9tX/images/console-templates-15.webp?w=560&fit=max&auto=format&n=v_EM_-NdbnPjb9tX&q=85&s=3c762e2f60ae6b0e493a7fb390f8f684 560w, https://mintcdn.com/vastai-80aa3a82/v_EM_-NdbnPjb9tX/images/console-templates-15.webp?w=840&fit=max&auto=format&n=v_EM_-NdbnPjb9tX&q=85&s=ffa93edd1d40351184f2741d546fe37c 840w, https://mintcdn.com/vastai-80aa3a82/v_EM_-NdbnPjb9tX/images/console-templates-15.webp?w=1100&fit=max&auto=format&n=v_EM_-NdbnPjb9tX&q=85&s=e7455ee727b36380074c4f246719f09b 1100w, https://mintcdn.com/vastai-80aa3a82/v_EM_-NdbnPjb9tX/images/console-templates-15.webp?w=1650&fit=max&auto=format&n=v_EM_-NdbnPjb9tX&q=85&s=4a4996d972ab492832c1443938572b2e 1650w, https://mintcdn.com/vastai-80aa3a82/v_EM_-NdbnPjb9tX/images/console-templates-15.webp?w=2500&fit=max&auto=format&n=v_EM_-NdbnPjb9tX&q=85&s=ff72dd2126f7020597b1e9c21c0c14aa 2500w" />
|
||
</Frame>
|
||
|
||
The 'Create' button will create a copy of the template in the 'My Templates' section of the [templates page](https://cloud.vast.ai/templates/) for you to use later. The 'Create & Use' button will save the template, load it and then open up the [offers page](https://cloud.vast.ai/create/).
|
||
|
||
|
||
# Google Colab
|
||
Source: https://docs.vast.ai/google-colab
|
||
|
||
|
||
|
||
Google Colab is a flavor of Jupyter notebook. The service is not meant to be run on cloud based GPUs. This guide provides a "hack" that uses SSH port forwarding so that Colab detects the Vast GPU instance as a local GPU and connects to the remote instance.
|
||
|
||
<Note>
|
||
For simple notebooks, we recommend downloading the notebook from Goolge Colab as a .ipynb file, running a Vast Jupyter instance with the recommended [Pytorch template](https://cloud.vast.ai/?ref_id=43484\&template_id=f5540ef1a1398b8499546edb53dae704) and then uploading the notebook into Jupyter directly. Jupyter by itself is much more reliable than Google Colab, doesn't require setting up SSH keys (you can open a terminal inside the browser), and has none of the limitations.
|
||
</Note>
|
||
|
||
## Run any Google Colab notebook on Vast
|
||
|
||
Colab supports a 'local runtime' option to allow people to run colab connecting to their local machine, using their own GPUs. This feature is **intentionally restricted** to allow only a localhost connection. Getting around that restriction requires using ssh forwarding to make a remote Jupyter instance appear local.
|
||
|
||
## Known issues and limitations
|
||
|
||
Colab is connecting to a remote Jupyter instance using SSH forwarding. If you close your browser, you might not be able to re-open the session. To fix that you will need to stop and then restart Jupyter through the SSH connection, get a new token, and then use that to reconnect to the local runtime in Colab.
|
||
|
||
Another small limitation is that there is no way (unless you get Colabs Pro) to open a terminal from within Colab. A simple Jupyter Vast instance doesn't have that limitation and you can always open a terminal right in the browser.
|
||
|
||
## Step 1 - Create a Pytorch SSH instance
|
||
|
||
Use this [Colab template](https://cloud.vast.ai/?ref_id=43484\&template_id=8d383ad48fff4012d42806e4781020ef) that uses the common Pytorch image with a direct SSH launch mode.
|
||
|
||
After clicking on that link, your instance configuration will be set. Setup an account, purchase credits and then select an appropriate GPU by clicking the "rent" button.
|
||
|
||
## Step 2 - SSH into the instance
|
||
|
||
Our default SSH command for Linux/macOS already forwards port 8080. The default SSH command can be found by clicking on the Connect button from a rented instance. Run that command. You will then have an active SSH connection to the GPU instance.
|
||
|
||
## Step 2.5 - Windows Only
|
||
|
||
On Windows, Colab is more complicated. The reason is that Windows has no simple SSH client built-in, unlike Linux/macOS. One solution is to install [WSL](https://learn.microsoft.com/en-us/windows/wsl/about) and then use the SSH command provided on the Vast instance. Or you can follow our [Windows SSH Guide](/documentation/instances/windows-ssh-guide) and use Putty tools to generate your SSH keys and SSH into the instance.
|
||
|
||
There is one additional Windows step if you use Putty tools. After making sure you can SSH into the instance, close the SSH connection and then modify your Putty configuration to forward port 8080 to local host.
|
||
|
||
Go to Connection->SSH->Tunnels. In the "source port" add 8080. Then in "destination" add:
|
||
|
||
```text Text theme={null}
|
||
localhost:8080
|
||
```
|
||
|
||
Then click back to "Session" and save your configuration. You can then click the Open button to start the Windows SSH session with port 8080 forwarded to localhost.
|
||
|
||
## Step 3 - Run Jupyter
|
||
|
||
Run Jupyter with options like these (adjust the port 8080 to match whatever port you forwarded over SSH):
|
||
|
||
```text Text theme={null}
|
||
jupyter notebook --NotebookApp.allow_origin='*' --port=8080 --NotebookApp.port_retries=0 --allow-root --NotebookApp.allow_remote_access=True
|
||
```
|
||
|
||
That will output a couple of http addresses. You want to use the localhost address with the access token. Make sure to copy the entire string so you can paste it into your Colab session.
|
||
|
||
## Step 4 - Connect to local runtime
|
||
|
||
Open Google Colab and hit the Connect button and select the option to "connect to local runtime". Paste in the localhost URL from your SSH session into the box and hit connect. Colab will then initialize and make the connection.
|
||
|
||
## If SSH connection drops
|
||
|
||
If your SSH connection disconnects due to a network error or other reason, the Google colab instance will throw an error and give you the option to reconnect.
|
||
|
||
The first thing to do is to reconnect via SSH to the Vast instance. Once that is established, you can try to "reconnect" to the Google colab instance, but that typically does not work.
|
||
|
||
The only way to re-establish a connection is to stop the Jupyter running on the Vast instance and then restart it. Then you can take the new URL + token and reconnect on Google Colab.
|
||
|
||
This can cause other problems to the running notebook. You may or may not need to then re-run all the cells of your notebook.
|
||
|
||
All your data will still be on the Vast instance and available to be copied, even if Colab cannot connect to your instance.
|
||
|
||
|
||
# Huggingface TGI with LLama3
|
||
Source: https://docs.vast.ai/huggingface-tgi-with-llama3
|
||
|
||
|
||
|
||
This is a guide on how to setup and expose an API for Llama3 Text Generation.
|
||
|
||
>
|
||
|
||
## 1) Choose The Huggingface LLama3 TGI API Template From the Recommended Section
|
||
|
||
Login to your Vast account on the [console](https://cloud.vast.ai)
|
||
|
||
Select the [HuggingFace Llama3 TGI API](https://cloud.vast.ai/?template_id=906891f677fb36f21662a92e6092b5fc) template by clicking the link provider
|
||
|
||
For this template we will be using the meta-llama/Meta-Llama-3-8B-Instruct model, and the TGI 2.0.4 from Huggingface
|
||
|
||
Templates encapsulate all the information required to run an application with the autoscaler, including machine parameters, docker image, and environment variables.
|
||
|
||
For this template, the only requirement is that you have your own Huggingface access token. You will also need to apply to have access to Llama3 on huggingface in order to access this gated repository.
|
||
|
||
The template comes with some filters that are minimum requirements for TGI to run effectively. This includes but is not limited to a disk space requirement of 100GB, and a gpu ram requirement of at least 16GB.
|
||
|
||
After selecting the template your screen should look like this:
|
||
|
||
<Frame caption="Select">
|
||
<img src="https://mintcdn.com/vastai-80aa3a82/MV3o3hbz7ZsjLzLy/images/Select.png?fit=max&auto=format&n=MV3o3hbz7ZsjLzLy&q=85&s=02e8297d55467706c3411dcb8a9fa6bf" alt="Select" data-og-width="1082" width="1082" data-og-height="465" height="465" data-path="images/Select.png" data-optimize="true" data-opv="3" srcset="https://mintcdn.com/vastai-80aa3a82/MV3o3hbz7ZsjLzLy/images/Select.png?w=280&fit=max&auto=format&n=MV3o3hbz7ZsjLzLy&q=85&s=8fff2658ba8f39ea17b1244a3e74e88f 280w, https://mintcdn.com/vastai-80aa3a82/MV3o3hbz7ZsjLzLy/images/Select.png?w=560&fit=max&auto=format&n=MV3o3hbz7ZsjLzLy&q=85&s=8fb7d9f1ddde6e1be705793093308c26 560w, https://mintcdn.com/vastai-80aa3a82/MV3o3hbz7ZsjLzLy/images/Select.png?w=840&fit=max&auto=format&n=MV3o3hbz7ZsjLzLy&q=85&s=60bc97e88501c1fd1a8ee3de9a455517 840w, https://mintcdn.com/vastai-80aa3a82/MV3o3hbz7ZsjLzLy/images/Select.png?w=1100&fit=max&auto=format&n=MV3o3hbz7ZsjLzLy&q=85&s=3baf5713662c147ee48d9e7cf85d16fe 1100w, https://mintcdn.com/vastai-80aa3a82/MV3o3hbz7ZsjLzLy/images/Select.png?w=1650&fit=max&auto=format&n=MV3o3hbz7ZsjLzLy&q=85&s=7a6e17fad2f5bab89d29bd4fb4cd9248 1650w, https://mintcdn.com/vastai-80aa3a82/MV3o3hbz7ZsjLzLy/images/Select.png?w=2500&fit=max&auto=format&n=MV3o3hbz7ZsjLzLy&q=85&s=4928a1b1b5bc5569ac5575d94cbd7085 2500w" />
|
||
</Frame>
|
||
|
||
## 2) Modifying the Template
|
||
|
||
>
|
||
|
||
Once you have selected the template, you will need to then add in your huggingface token and click the 'Select & Save' button.
|
||
|
||
You can add your huggingface token with the rest of the docker run options.
|
||
|
||
<Frame caption="Edithf">
|
||

|
||
</Frame>
|
||
|
||
This is the only modification you will need to make on this template.
|
||
|
||
You can then press 'Select & Save' to get ready to launch your instance.
|
||
|
||
## 3) Rent a GPU
|
||
|
||
Once you have selected the template, you can then choose to rent a GPU of your choice from either the search page or the CLI/API.
|
||
|
||
For someone just getting started I recommend either an Nvidia RTX 4090, or an A5000.
|
||
|
||
<Frame caption="Rent">
|
||
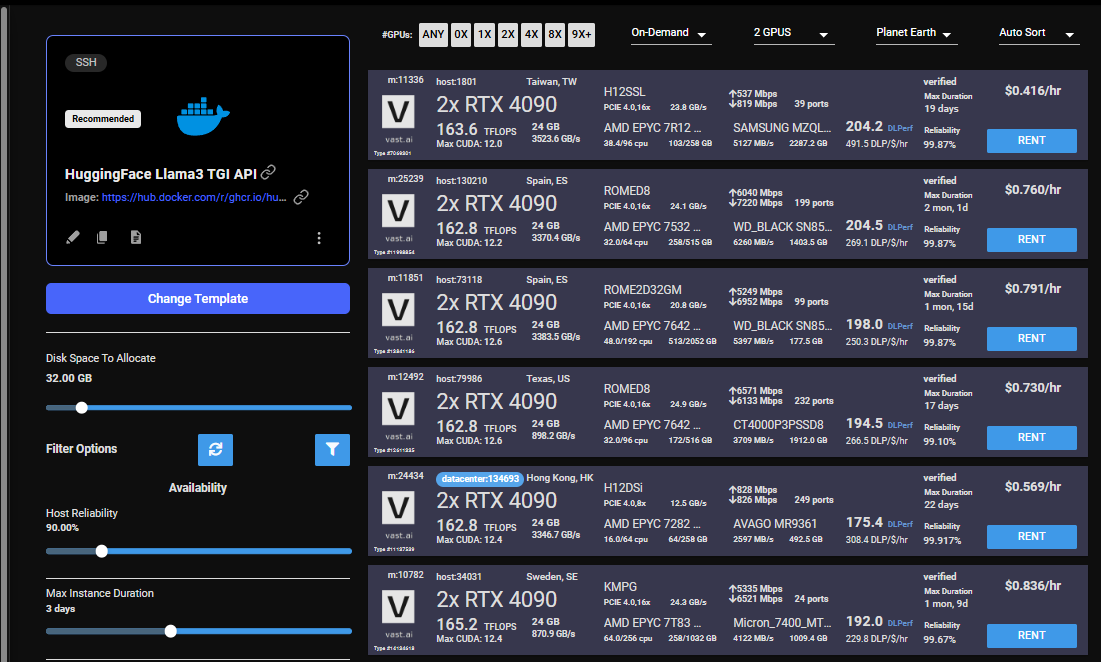
|
||
</Frame>
|
||
|
||
## 4) Monitor Your Instance
|
||
|
||
Once you rent a GPU your instance will being spinning up on the Instances page.
|
||
|
||
You know the API will be ready when your instance looks like this:
|
||
|
||
<Frame caption="Llama3Tgiinstances">
|
||

|
||
</Frame>
|
||
|
||
Once your instance is ready you will need to find where your API is exposed. Go to the IP & Config by pressing the blue button on the top of the instance card. You can see the networking configuration here.
|
||
|
||
<Frame caption="Llama3Ip">
|
||
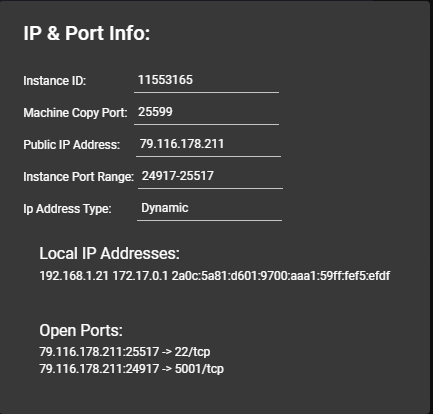
|
||
</Frame>
|
||
|
||
After opening the IP & Port Config you should see a forwarded port from 5001, this is where your API resides. To hit TGI you can use the '/generate' endpoint on that port.
|
||
|
||
Here is an example:
|
||
|
||
<Frame caption="Llama3Tgipostman">
|
||
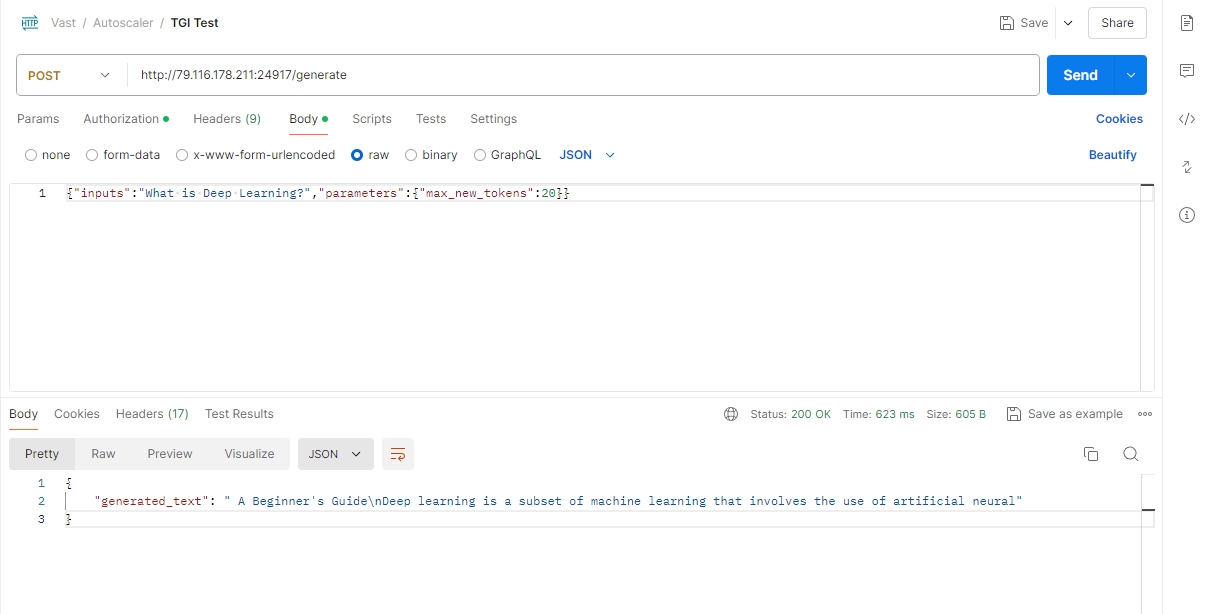
|
||
</Frame>
|
||
|
||
## 5) Congratulations!
|
||
|
||
You now have a running instance with an API that is using TGI loaded up with Llama3 8B!
|
||
|
||
# Serverless/Autoscaler Guide
|
||
|
||
As you use TGI you may want to scale up to higher loads. We currently offer a serverless version of the Huggingface
|
||
TGI via a template built to run with the Autoscaler. See [Getting Started with Autoscaler](/documentation/serverless/getting-started-with-serverless)
|
||
|
||
|
||
# Image Generation
|
||
Source: https://docs.vast.ai/image-generation
|
||
|
||
|
||
|
||
# Running Image Generation on Vast.ai: A Complete Guide
|
||
|
||
## Introduction
|
||
|
||
This guide walks you through setting up and running image generation workloads on Vast.ai, a marketplace for renting GPU compute power. Whether you're using Stable Diffusion or other image generation models, this guide will help you get started efficiently.
|
||
|
||
## Prerequisites
|
||
|
||
* A Vast.ai account
|
||
* Basic familiarity with image generation models
|
||
* [(Optional) Read Jupyter guide](/documentation/instances/jupyter)
|
||
* [(Optional) SSH client installed on your local machine and SSH public key added the Keys section at cloud.vast.ai](/documentation/instances/sshscp)  
|
||
* (Optional) Basic understanding of model management
|
||
|
||
## Setting Up Your Environment
|
||
|
||
### 1. Selecting the Right Template
|
||
|
||
Navigate to the [Templates tab](https://cloud.vast.ai/templates/) to view available templates. For image generation, we recommend searching for "SD Web UI Forge" among the recommended templates.
|
||
|
||
* **Stable Diffusion Web UI Forge Template**
|
||
* Pre-installed with:
|
||
* Latest SD Web UI version
|
||
* Popular extensions
|
||
* Common models
|
||
* Optimized settings for vast.ai
|
||
|
||
Choose this template if:
|
||
|
||
* You want a ready-to-use environment for image generation
|
||
* You need a user-friendly web interface
|
||
* You want access to multiple models and extensions
|
||
* You're looking for an optimized setup
|
||
|
||
Edit the template and add/update key environment variables if needed:
|
||
|
||
```bash Bash theme={null}
|
||
# Core Configuration
|
||
AUTO_UPDATE=false # Auto-update to latest release
|
||
FORGE_REF=latest # Git reference for updates
|
||
FORGE_ARGS="" # Launch arguments
|
||
|
||
# Authentication Tokens
|
||
CF_TUNNEL_TOKEN="" # Cloudflare Zero Trust
|
||
CIVITAI_TOKEN="" # Access gated Civitai models
|
||
HF_TOKEN="" # Access gated HuggingFace models
|
||
|
||
# Custom Setup
|
||
PROVISIONING_SCRIPT="" # URL to custom setup script
|
||
```
|
||
|
||
**Important**: Never save your template as public if you've included tokens in Docker Options or added your docker login password.
|
||
|
||
### 2. Choosing an Instance
|
||
|
||
When selecting a GPU for image generation, consider:
|
||
|
||
* **GPU Memory**:
|
||
* Minimum 8GB for basic models
|
||
* 12GB+ recommended for larger models
|
||
* 24GB+ for advanced techniques (img2img, inpainting, etc.)
|
||
* **GPU Type**:
|
||
* RTX 3090, 4090 for best performance
|
||
* RTX 3080, 3080 Ti for good balance
|
||
* A4000, A5000 for stability
|
||
* **Disk Space**:
|
||
* Minimum 50GB for base models
|
||
* 100GB+ recommended for multiple models
|
||
* Consider SSD speed for model loading
|
||
|
||
### 3. Connecting to Your Instance
|
||
|
||
The Forge template provides multiple ways to access your instance:
|
||
|
||
* **AI-Dock Landing Page (Recommended)**:
|
||
* Click the "Open" button in Instances tab once the blue button says "Open" on your instance
|
||
* You'll be automatically logged in to the AI-Dock landing page
|
||
* Access Forge and other management tools from there
|
||
* **Direct Access**:
|
||
* Basic authentication is enabled by default
|
||
* Username: `vastai`
|
||
* Password: Check `OPEN_BUTTON_TOKEN` value
|
||
* To find token: `echo $OPEN_BUTTON_TOKEN` in terminal
|
||
* **API Access**:
|
||
|
||
```bash theme={null}
|
||
curl -X POST https://[INSTANCE_IP]:[MAPPED_PORT]/endpoint \
|
||
-H 'Authorization: Bearer <OPEN_BUTTON_TOKEN>' \
|
||
...
|
||
```
|
||
|
||
* **Security Setup**:
|
||
* HTTPS and token authentication enabled by default
|
||
* Install TLS certificate to avoid browser warnings
|
||
* Configure via `WEB_ENABLE_HTTPS` and `WEB_ENABLE_AUTH` variables
|
||
* **Jupyter Access for Uploading/Downloading**:
|
||
* You can access jupyter clicking on the jupyter button on the instance card to easily upload and download files
|
||
|
||
## Working with Models
|
||
|
||
### Managing Models
|
||
|
||
### Default Setup
|
||
|
||
The template includes a default provisioning script that downloads:
|
||
|
||
* Base Stable Diffusion XL models
|
||
* Popular extensions
|
||
* Common configurations
|
||
|
||
### Custom Provisioning
|
||
|
||
Create your own setup by:
|
||
|
||
1. Copy the default provisioning script by editing the SD Web UI Forge template and grabbing the value of `PROVISIONING_SCRIPT` environment variable and downloading it
|
||
2. Modify it to download your preferred:
|
||
* Models
|
||
* Extensions
|
||
* Configurations
|
||
3. Upload to Gist/Pastebin
|
||
4. Edit the template and set `PROVISIONING_SCRIPT` environment variable to the raw URL
|
||
|
||
Example for adding more models:
|
||
|
||
```bash Bash theme={null}
|
||
# Navigate to models directory
|
||
cd /workspace/stable-diffusion-webui/models/Stable-diffusion
|
||
|
||
# Download new models (example)
|
||
wget https://civitai.com/api/download/models/[MODEL_ID]
|
||
```
|
||
|
||
### Model Organization
|
||
|
||
Keep your models organized:
|
||
|
||
```text Text theme={null}
|
||
/workspace/stable-diffusion-webui/models/
|
||
├── Stable-diffusion/ # Main models
|
||
├── Lora/ # LoRA models
|
||
├── VAE/ # VAE files
|
||
└── embeddings/ # Textual inversions
|
||
```
|
||
|
||
You can access jupyter clicking on the jupyter button on the instance card to easily upload and download files.
|
||
|
||
## Optimization Tips
|
||
|
||
###  Performance Settings
|
||
|
||
Access Settings > Performance in Web UI:
|
||
|
||
* Enable xformers memory efficient attention
|
||
* Use float16 precision when possible
|
||
* Optimize VRAM usage based on your GPU
|
||
|
||
### Batch Processing
|
||
|
||
For multiple images:
|
||
|
||
* Use batch count for variations
|
||
* Use batch size for parallel processing
|
||
* Monitor GPU memory usage
|
||
|
||
### Memory Management
|
||
|
||
```python icon="python" Python theme={null}
|
||
# Recommended settings for different GPU sizes
|
||
8GB GPU:
|
||
- max_batch_count: 4
|
||
- max_batch_size: 2
|
||
|
||
12GB GPU:
|
||
- max_batch_count: 6
|
||
- max_batch_size: 3
|
||
|
||
24GB+ GPU:
|
||
- max_batch_count: 10
|
||
- max_batch_size: 5
|
||
```
|
||
|
||
## Advanced Features
|
||
|
||
### Custom Scripts
|
||
|
||
Place custom scripts in:
|
||
|
||
```bash Bash theme={null}
|
||
/workspace/stable-diffusion-webui/scripts/
|
||
```
|
||
|
||
### Extensions Management
|
||
|
||
Popular extensions are pre-installed. Add more via Web UI:
|
||
|
||
* Extensions tab
|
||
* Install from URL
|
||
* Restart UI to apply
|
||
|
||
### API Usage
|
||
|
||
Enable API in settings:
|
||
|
||
```bash Bash theme={null}
|
||
# Add to config.json
|
||
{
|
||
"api": {
|
||
"enable_api": true,
|
||
"api_auth": false
|
||
}
|
||
}
|
||
```
|
||
|
||
## Troubleshooting
|
||
|
||
### Common Issues and Solutions
|
||
|
||
* **Out of Memory (OOM)**
|
||
* Reduce batch size
|
||
* Lower resolution
|
||
* Enable optimization settings
|
||
* **Slow Generation**
|
||
* Check GPU utilization
|
||
* Verify model loading
|
||
* Consider switching to half precision
|
||
* **Connection Issues**
|
||
* Use --listen flag for network access
|
||
* Check instance status
|
||
* Verify network settings
|
||
|
||
## Best Practices
|
||
|
||
### Workflow Management
|
||
|
||
* Save prompts for reuse
|
||
* Use version control for custom scripts
|
||
* Document model combinations
|
||
|
||
### Resource Optimization
|
||
|
||
* Monitor costs in Billing tab
|
||
* Use appropriate batch sizes
|
||
* Clean up unused models
|
||
|
||
### Quality Control
|
||
|
||
* Maintain prompt libraries
|
||
* Document successful settings
|
||
* Track model performance
|
||
|
||
## Cost Optimization
|
||
|
||
### Instance Selection
|
||
|
||
* Compare GPU prices
|
||
* Consider spot instances
|
||
* Monitor usage patterns
|
||
|
||
### Storage Management
|
||
|
||
* Remove unused models
|
||
* Archive generated images
|
||
* Use efficient formats
|
||
|
||
## Additional Resources
|
||
|
||
* [Vast.ai Documentation](https://vast.ai/docs/)
|
||
* [Stable Diffusion Web UI Wiki](https://github.com/AUTOMATIC1111/stable-diffusion-webui/wiki)
|
||
* [CivitAI Models](https://civitai.com/)
|
||
|
||
## Conclusion
|
||
|
||
Running image generation workloads on Vast.ai provides a cost-effective way to access powerful GPUs. By following this guide and best practices, you can efficiently set up and manage your image generation pipeline while optimizing costs and performance.
|
||
|
||
|
||
# Infinity Embeddings
|
||
Source: https://docs.vast.ai/infinity-embeddings
|
||
|
||
|
||
|
||
# Serving Infinity Embeddings with Vast.ai
|
||
|
||
## Background:
|
||
|
||
Infinity Embeddings is a helpful serving framework to serve embedding models. It is particularly great at enabling embedding, re-ranking, and classification out of the box. It supports multiple different runtime frameworks to deploy on different types of GPU’s while still achieving great speed. Infinity Embeddings also supports dynamic batching, which allows it to process requests faster under significant load.
|
||
|
||
One of its best features is that you can deploy multiple models on the same GPU at the same time, which is particularly helpful as often times embedding models are much smaller than GPU RAM. We also love that it complies with the OpenAI embeddings spec, which enables developers to quickly integrate this into their application for rag, clustering, classification and re-ranking tasks.
|
||
|
||
This guide will show you how to setup Infinity Embeddings to serve an LLM on Vast. We reference a note book that you can use [here](https://nbviewer.org/urls/bitbucket.org/%21api/2.0/snippets/jsbcannell/nE66og/f86a1c070ddc362abc6572eb300926a0b7190ad3/files/serve_infinity_on_vast.ipynb)
|
||
|
||
```bash Bash theme={null}
|
||
pip install --upgrade vastai
|
||
```
|
||
|
||
Once you create your account, you can go [here](https://cloud.vast.ai/cli/) to set your API Key.
|
||
|
||
```bash Bash theme={null}
|
||
vastai set api-key <Your-API-Key-Here>
|
||
```
|
||
|
||
For serving an LLM, we're looking for a machine that has a static IP address, ports available to host on, plus a single modern GPU with decent RAM since these embedding models will be small. We will query the vast API to get a list of these types of machines.
|
||
|
||
```bash Bash theme={null}
|
||
vastai search offers 'compute_cap > 800 gpu_ram > 20 num_gpus = 1 static_ip=true direct_port_count > 1'
|
||
```
|
||
|
||
## Deploying the Image:
|
||
|
||
### Hosting a Single Embedding Model:
|
||
|
||
For now, we'll host just one embedding model.
|
||
The easiest way to deploy a single model on this instance is to use the command line. Copy and paste a specific instance id you choose from the list above into `instance-id` below.
|
||
|
||
We particularly need `v2` so that we use the correct version of the api, `--port 8000` so it serves on the correct model, and `--model-id michaelfeil/bge-small-en-v1.5` to serve the correct model.
|
||
|
||
```bash Bash theme={null}
|
||
|
||
vastai create instance <instance-id> --image michaelf34/infinity:latest --env '-p 8000:8000' --disk 40 --args v2 --model-id michaelfeil/bge-small-en-v1.5 --port 8000
|
||
```
|
||
|
||
## Connecting and Testing:
|
||
|
||
Once your instance is done setting up, you should see something like this:
|
||
|
||
<Frame caption="IP_address_view">
|
||

|
||
</Frame>
|
||
|
||
Click on the highlighted button to see the IP address and correct port for our requests. To connect to your instance, we'll first need to get the IP address and port number.
|
||
|
||
<Frame caption="Instance_view">
|
||
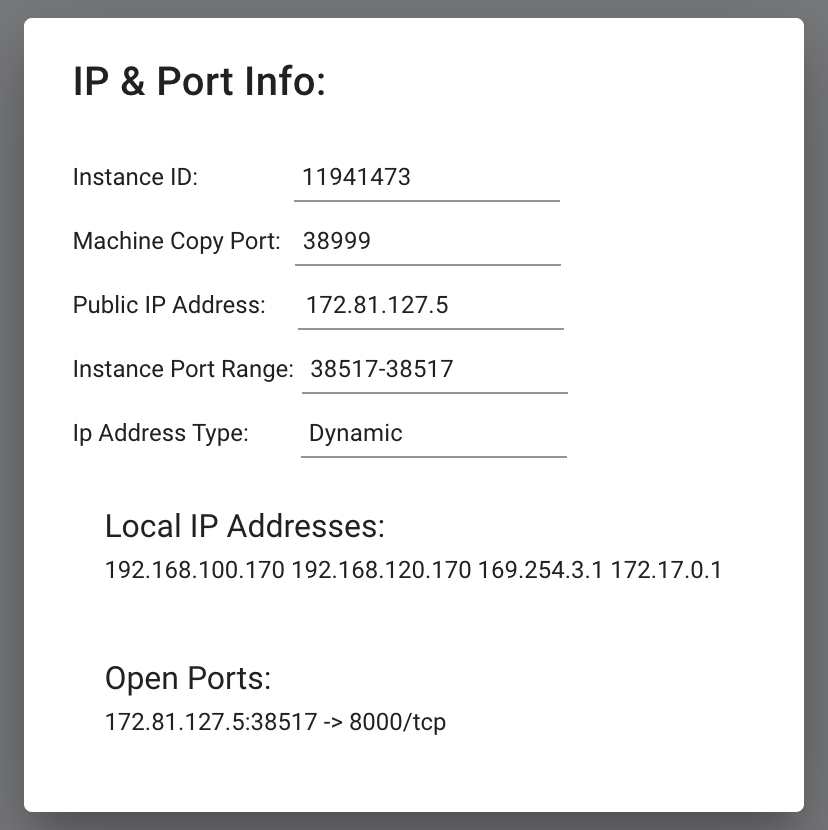
|
||
</Frame>
|
||
|
||
Now we'll call this with the Open AI SDK:
|
||
|
||
```bash Bash theme={null}
|
||
pip install openai
|
||
```
|
||
|
||
We will copy over the IP address and the port into the cell below.
|
||
|
||
```python icon="python" Python theme={null}
|
||
|
||
from openai import OpenAI
|
||
|
||
# Modify OpenAI's API key and API base to use vLLM's's API server.
|
||
openai_api_key = "EMPTY"
|
||
openai_api_base = "http://<Instance-IP-Address>:<Port>/v1"
|
||
client = OpenAI(
|
||
api_key=openai_api_key,
|
||
base_url=openai_api_base,
|
||
)
|
||
model = "michaelfeil/bge-small-en-v1.5"
|
||
embeddings = client.embeddings.create(model=model, input="What is Deep Learning?").data[0].embedding
|
||
print("Embeddings:")
|
||
print(embeddings)
|
||
```
|
||
|
||
In this, we can see that the embeddings from our model. Feel free to delete this instance as we'll redeploy a different configuration now.
|
||
|
||
### Advanced Usage: Rerankers, Classifiers, and Multiple Models at the same time
|
||
|
||
The following steps will show you how to use Rerankers, Classifiers, and deploy them at the same time. First, we'll deploy two models on the same GPU and container, the first is a reranker and the second is a classifier. Note that all we've done is change the value for `--model-id`, and added a new `--model-id` with its own value. These represent the two different models that we're running.
|
||
|
||
```bash Bash theme={null}
|
||
vastai create instance <instance-id> --image michaelf34/infinity:latest --env '-p 8000:8000' --disk 40 --args v2 --model-id mixedbread-ai/mxbai-rerank-xsmall-v1 --model-id SamLowe/roberta-base-go_emotions --port 8000
|
||
```
|
||
|
||
Now, we'll call these models with the requests library and follow `Infinity`'s API spec. Add your new IP address and Port here:
|
||
|
||
```python icon="python" Python theme={null}
|
||
import requests
|
||
base_url = "http://<Instance-IP-Address>:<Port>"
|
||
```
|
||
|
||
```python icon="python" Python theme={null}
|
||
rerank_url = base_url + "/rerank"
|
||
model1 = "mixedbread-ai/mxbai-rerank-xsmall-v1"
|
||
input_json = {"query": "Where is Munich?","documents": ["Munich is in Germany.", "The sky is blue."],"return_documents": "false","model": "mixedbread-ai/mxbai-rerank-xsmall-v1"}
|
||
headers = {
|
||
"accept": "application/json",
|
||
"Content-Type": "application/json"
|
||
}
|
||
|
||
payload = {
|
||
"query": input_json["query"],
|
||
"documents": input_json["documents"],
|
||
"return_documents": input_json["return_documents"],
|
||
"model": model1
|
||
}
|
||
|
||
response = requests.post(rerank_url, json=payload, headers=headers)
|
||
|
||
if response.status_code == 200:
|
||
resp_json = response.json()
|
||
print(resp_json)
|
||
else:
|
||
print(response.status_code)
|
||
print(response.text)
|
||
```
|
||
|
||
We can see from the output of the cell that it gives us a list of jsons for each score, in order of highest relevance. Therefore in this case, the first entry in the list had a relevancy of .74, meaning that it "won" the ranking of samples for this query.
|
||
|
||
And we'll now query the classification model:
|
||
|
||
```python icon="python" Python theme={null}
|
||
classify_url = base_url + "/classify"
|
||
model2 = "SamLowe/roberta-base-go_emotions"
|
||
|
||
headers = {
|
||
"accept": "application/json",
|
||
"Content-Type": "application/json"
|
||
}
|
||
|
||
payload = {
|
||
"input": ["I am feeling really happy today"],
|
||
"model": model2
|
||
}
|
||
|
||
response = requests.post(classify_url, json=payload, headers=headers)
|
||
|
||
if response.status_code == 200:
|
||
resp_json = response.json()
|
||
print(resp_json)
|
||
else:
|
||
print(response.status_code)
|
||
print(response.text)
|
||
```
|
||
|
||
We can see from this that the most likely emotion from this model's choices was "joy".
|
||
|
||
So there you have it, now you can see how with Vast and Infinity, you can serve embedding, reranking, and classifier models all from just one GPU on the most affordable compute on the market.
|
||
|
||
|
||
# Langflow + Ollama
|
||
Source: https://docs.vast.ai/langflow-ollama
|
||
|
||
|
||
|
||
Langflow is a node-based agent builder you can use from your web browser. While it integrates with many frontier language models it also has a fantastic Ollama integration which makes it really easy to use with open weight models as well as custom fine-tunes.
|
||
|
||
We have two templates you can choose for this guide. The **Langflow template** provides both Ollama and Langflow installed within the instance. You can also use the [**Ollama standalone template**](https://cloud.vast.ai/?ref_id=62897\&creator_id=62897\&name=Ollama) to integrate with a local langflow installation via [ssh local port forwarding](/documentation/instances/sshscp#Yj5Wh). The choice is yours. For this guide we will use the Langflow bundled template.
|
||
|
||
Before moving on with the guide,** Setup your Vast account and add credit**. Review the [quickstart guide](/documentation/get-started/quickstart) to get familar with the service if you do not have an account with credits loaded.
|
||
|
||
## Initial Setup
|
||
|
||
Let's get started with the configuration - There is not much you need to change here but it's a good idea to create a customized version of the template so Ollama automatically downloads your preferred model.
|
||
|
||
### Find the Template
|
||
|
||
You can find the Langflow template in our [recommended templates](https://cloud.vast.ai/templates/) page. Before loading it up, click the pencil icon to open up the template editor
|
||
|
||
<Frame caption="Langflow Template">
|
||
<img src="https://mintcdn.com/vastai-80aa3a82/LEwury95WvhzGW2f/images/use-cases-ai-agents.webp?fit=max&auto=format&n=LEwury95WvhzGW2f&q=85&s=4894e927eb3abf183b71e83feb7b99fd" alt="Langflow template card" data-og-width="800" width="800" data-og-height="518" height="518" data-path="images/use-cases-ai-agents.webp" data-optimize="true" data-opv="3" srcset="https://mintcdn.com/vastai-80aa3a82/LEwury95WvhzGW2f/images/use-cases-ai-agents.webp?w=280&fit=max&auto=format&n=LEwury95WvhzGW2f&q=85&s=273a100e8135212393b375ea94a9cdcb 280w, https://mintcdn.com/vastai-80aa3a82/LEwury95WvhzGW2f/images/use-cases-ai-agents.webp?w=560&fit=max&auto=format&n=LEwury95WvhzGW2f&q=85&s=3e5b31f8217b7752cdbe5cd119f859bc 560w, https://mintcdn.com/vastai-80aa3a82/LEwury95WvhzGW2f/images/use-cases-ai-agents.webp?w=840&fit=max&auto=format&n=LEwury95WvhzGW2f&q=85&s=859b9a7c9927d4ffe5e49c3b0ef14447 840w, https://mintcdn.com/vastai-80aa3a82/LEwury95WvhzGW2f/images/use-cases-ai-agents.webp?w=1100&fit=max&auto=format&n=LEwury95WvhzGW2f&q=85&s=1ac547d0dd85e01886e96689b7225a59 1100w, https://mintcdn.com/vastai-80aa3a82/LEwury95WvhzGW2f/images/use-cases-ai-agents.webp?w=1650&fit=max&auto=format&n=LEwury95WvhzGW2f&q=85&s=01720ba1c6d8f9f8827e70cdee8f14fc 1650w, https://mintcdn.com/vastai-80aa3a82/LEwury95WvhzGW2f/images/use-cases-ai-agents.webp?w=2500&fit=max&auto=format&n=LEwury95WvhzGW2f&q=85&s=07712a78a33eb9594526b1f90fb5e5a0 2500w" />
|
||
</Frame>
|
||
|
||
### Custom configuration
|
||
|
||
In the template editor you'll find two really useful configuration variables.
|
||
|
||
* `OLLAMA_MODEL` is the most important variable. Here you can choose which model should be downloaded when the instance starts.
|
||
* `LANGFLOW_ARGS`allows you to pass alternative startup arguments to the langflow application. The defaults should be fine for this demo, but you are free to change these as you need.
|
||
|
||
<img src="https://mintcdn.com/vastai-80aa3a82/LEwury95WvhzGW2f/images/use-cases-ai-agents-2.webp?fit=max&auto=format&n=LEwury95WvhzGW2f&q=85&s=3e1803266c92d85e7641de9e5e5240a7" alt="" data-og-width="942" width="942" data-og-height="172" height="172" data-path="images/use-cases-ai-agents-2.webp" data-optimize="true" data-opv="3" srcset="https://mintcdn.com/vastai-80aa3a82/LEwury95WvhzGW2f/images/use-cases-ai-agents-2.webp?w=280&fit=max&auto=format&n=LEwury95WvhzGW2f&q=85&s=92c4b909fa03f3441a720f6863a7a863 280w, https://mintcdn.com/vastai-80aa3a82/LEwury95WvhzGW2f/images/use-cases-ai-agents-2.webp?w=560&fit=max&auto=format&n=LEwury95WvhzGW2f&q=85&s=2de4688fae01b5e9838b2f3024cb8061 560w, https://mintcdn.com/vastai-80aa3a82/LEwury95WvhzGW2f/images/use-cases-ai-agents-2.webp?w=840&fit=max&auto=format&n=LEwury95WvhzGW2f&q=85&s=510217d0b0eca19a3f6fb6b2e205a9b2 840w, https://mintcdn.com/vastai-80aa3a82/LEwury95WvhzGW2f/images/use-cases-ai-agents-2.webp?w=1100&fit=max&auto=format&n=LEwury95WvhzGW2f&q=85&s=23c4a49b82270bacf5c544d1b3ae0fdd 1100w, https://mintcdn.com/vastai-80aa3a82/LEwury95WvhzGW2f/images/use-cases-ai-agents-2.webp?w=1650&fit=max&auto=format&n=LEwury95WvhzGW2f&q=85&s=ad7a28d4ffa45913839fe7f61dba5007 1650w, https://mintcdn.com/vastai-80aa3a82/LEwury95WvhzGW2f/images/use-cases-ai-agents-2.webp?w=2500&fit=max&auto=format&n=LEwury95WvhzGW2f&q=85&s=001332169c1fc771143ab995b5b2f22a 2500w" />
|
||
|
||
When you have finished entering your settings click the '**Create & Use**' button to save your copy of the template.
|
||
|
||
You'll be taken to the search interface where you can choose an appropriate GPU instance to run your model. You can access your custom template in future from the 'My Templates' section of the templates page.
|
||
|
||
## Starting the Instance
|
||
|
||
It's now time to use your template to start a GPU instance.
|
||
|
||
### Choose a GPU
|
||
|
||
The most important consideration when picking an instance to run laguage models is the VRAM. For best performance, your model weights must fit into the GPU VRAM with room left over for the context window. 
|
||
|
||
You do not have to use a single GPU when running LLMs - Sometimes a multi-GPU setup can be as effective of better than a single high VRAM instance.
|
||
|
||
### Rent an Instance
|
||
|
||
When you have found a suitable instance it's time to click the '**Rent**' button. This will start the loading phase.
|
||
|
||
<Note>
|
||
If you are not sure which instance to choose - Try one. There is no minimum rental period and if it is not suitable you are able to destroy that instance and start another, paying only for the time the instance was in the 'running' state
|
||
</Note>
|
||
|
||
## Accessing the Instance
|
||
|
||
After a short time, your instance will be ready to access. Simply click the 'Open' button to get started.
|
||
|
||
<img src="https://mintcdn.com/vastai-80aa3a82/LEwury95WvhzGW2f/images/use-cases-ai-agents-3.webp?fit=max&auto=format&n=LEwury95WvhzGW2f&q=85&s=ad8aef19558d8a9b5e30ba3f6a8f4c17" alt="" data-og-width="917" width="917" data-og-height="225" height="225" data-path="images/use-cases-ai-agents-3.webp" data-optimize="true" data-opv="3" srcset="https://mintcdn.com/vastai-80aa3a82/LEwury95WvhzGW2f/images/use-cases-ai-agents-3.webp?w=280&fit=max&auto=format&n=LEwury95WvhzGW2f&q=85&s=2484c5ca420241ba1eb64c992065df43 280w, https://mintcdn.com/vastai-80aa3a82/LEwury95WvhzGW2f/images/use-cases-ai-agents-3.webp?w=560&fit=max&auto=format&n=LEwury95WvhzGW2f&q=85&s=b06d59c62b4ad581514bf5d3b4d2b026 560w, https://mintcdn.com/vastai-80aa3a82/LEwury95WvhzGW2f/images/use-cases-ai-agents-3.webp?w=840&fit=max&auto=format&n=LEwury95WvhzGW2f&q=85&s=b67fa69a5b16ecad06ab676262a92ab6 840w, https://mintcdn.com/vastai-80aa3a82/LEwury95WvhzGW2f/images/use-cases-ai-agents-3.webp?w=1100&fit=max&auto=format&n=LEwury95WvhzGW2f&q=85&s=11e49321ea2183a77833fe2d924de79d 1100w, https://mintcdn.com/vastai-80aa3a82/LEwury95WvhzGW2f/images/use-cases-ai-agents-3.webp?w=1650&fit=max&auto=format&n=LEwury95WvhzGW2f&q=85&s=37d9c1e7458b1a22e21578e39cc97d89 1650w, https://mintcdn.com/vastai-80aa3a82/LEwury95WvhzGW2f/images/use-cases-ai-agents-3.webp?w=2500&fit=max&auto=format&n=LEwury95WvhzGW2f&q=85&s=0b62717f36ef9cc571b4986b8a033941 2500w" />
|
||
|
||
You will now find the Instance Portal has opened. 
|
||
|
||
<Frame caption="Instance Portal">
|
||
<img src="https://mintcdn.com/vastai-80aa3a82/LEwury95WvhzGW2f/images/use-cases-ai-agents-4.webp?fit=max&auto=format&n=LEwury95WvhzGW2f&q=85&s=768955d5c2635603121144a5bc474fd6" alt="Instance Portal" data-og-width="1149" width="1149" data-og-height="726" height="726" data-path="images/use-cases-ai-agents-4.webp" data-optimize="true" data-opv="3" srcset="https://mintcdn.com/vastai-80aa3a82/LEwury95WvhzGW2f/images/use-cases-ai-agents-4.webp?w=280&fit=max&auto=format&n=LEwury95WvhzGW2f&q=85&s=81706186ff63c088f469cb700a3396b4 280w, https://mintcdn.com/vastai-80aa3a82/LEwury95WvhzGW2f/images/use-cases-ai-agents-4.webp?w=560&fit=max&auto=format&n=LEwury95WvhzGW2f&q=85&s=283b158e484858b3648e38a40538a912 560w, https://mintcdn.com/vastai-80aa3a82/LEwury95WvhzGW2f/images/use-cases-ai-agents-4.webp?w=840&fit=max&auto=format&n=LEwury95WvhzGW2f&q=85&s=9593370ae0d6c992df9bd6fc629ae031 840w, https://mintcdn.com/vastai-80aa3a82/LEwury95WvhzGW2f/images/use-cases-ai-agents-4.webp?w=1100&fit=max&auto=format&n=LEwury95WvhzGW2f&q=85&s=d314e8ab7de123d2e1ca865bf4ba7c5f 1100w, https://mintcdn.com/vastai-80aa3a82/LEwury95WvhzGW2f/images/use-cases-ai-agents-4.webp?w=1650&fit=max&auto=format&n=LEwury95WvhzGW2f&q=85&s=d270be5f688126695ff08265ed11a50d 1650w, https://mintcdn.com/vastai-80aa3a82/LEwury95WvhzGW2f/images/use-cases-ai-agents-4.webp?w=2500&fit=max&auto=format&n=LEwury95WvhzGW2f&q=85&s=eedd4ad13919c3fe1d75bdac9dd1e1f8 2500w" />
|
||
</Frame>
|
||
|
||
This page gives you easy access to both the Langflow application and the Ollama API. Click Langflow's 'Launch Application' button. 
|
||
|
||
<Note>
|
||
It will take some time for Langflow and Ollama to be installed and for the Ollama model to download. You can monitor the loading status in the Instance Portal 'Logs' tab 
|
||
</Note>
|
||
|
||
## Getting Started with Langflow
|
||
|
||
After opening Langflow, click the '**Create first flow**' button.
|
||
|
||
<img src="https://mintcdn.com/vastai-80aa3a82/LEwury95WvhzGW2f/images/use-cases-ai-agents-5.webp?fit=max&auto=format&n=LEwury95WvhzGW2f&q=85&s=5ef99a459c076fc71d54e1800c479769" alt="" data-og-width="800" width="800" data-og-height="749" height="749" data-path="images/use-cases-ai-agents-5.webp" data-optimize="true" data-opv="3" srcset="https://mintcdn.com/vastai-80aa3a82/LEwury95WvhzGW2f/images/use-cases-ai-agents-5.webp?w=280&fit=max&auto=format&n=LEwury95WvhzGW2f&q=85&s=f32d45f14eb2906952cbe7ab82aa1aec 280w, https://mintcdn.com/vastai-80aa3a82/LEwury95WvhzGW2f/images/use-cases-ai-agents-5.webp?w=560&fit=max&auto=format&n=LEwury95WvhzGW2f&q=85&s=318b5d55c7dcabd82133b20a608a1ee4 560w, https://mintcdn.com/vastai-80aa3a82/LEwury95WvhzGW2f/images/use-cases-ai-agents-5.webp?w=840&fit=max&auto=format&n=LEwury95WvhzGW2f&q=85&s=4e14674adaedbae2f6e96c6c36e33813 840w, https://mintcdn.com/vastai-80aa3a82/LEwury95WvhzGW2f/images/use-cases-ai-agents-5.webp?w=1100&fit=max&auto=format&n=LEwury95WvhzGW2f&q=85&s=37d0528a5d2ba65cf527ffde7a65c0b6 1100w, https://mintcdn.com/vastai-80aa3a82/LEwury95WvhzGW2f/images/use-cases-ai-agents-5.webp?w=1650&fit=max&auto=format&n=LEwury95WvhzGW2f&q=85&s=8f85f3aede63e4d1fd561b84141b9e1b 1650w, https://mintcdn.com/vastai-80aa3a82/LEwury95WvhzGW2f/images/use-cases-ai-agents-5.webp?w=2500&fit=max&auto=format&n=LEwury95WvhzGW2f&q=85&s=83bf931e433abdd97ad2371b4ac38c9f 2500w" />
|
||
|
||
While Langflow is extremely powerful, for this example we will create a simple blow post writer.
|
||
|
||
Select **Content Generation** -> **Blog Writer**
|
||
|
||
<img src="https://mintcdn.com/vastai-80aa3a82/LEwury95WvhzGW2f/images/use-cases-ai-agents-6.webp?fit=max&auto=format&n=LEwury95WvhzGW2f&q=85&s=c380220d81e56ecaea1f07dc7382824e" alt="" data-og-width="1242" width="1242" data-og-height="665" height="665" data-path="images/use-cases-ai-agents-6.webp" data-optimize="true" data-opv="3" srcset="https://mintcdn.com/vastai-80aa3a82/LEwury95WvhzGW2f/images/use-cases-ai-agents-6.webp?w=280&fit=max&auto=format&n=LEwury95WvhzGW2f&q=85&s=b5ae2a71a2ae2e90fe69a51c33642c5f 280w, https://mintcdn.com/vastai-80aa3a82/LEwury95WvhzGW2f/images/use-cases-ai-agents-6.webp?w=560&fit=max&auto=format&n=LEwury95WvhzGW2f&q=85&s=b11251edb3ea1e922416dc027c639e5d 560w, https://mintcdn.com/vastai-80aa3a82/LEwury95WvhzGW2f/images/use-cases-ai-agents-6.webp?w=840&fit=max&auto=format&n=LEwury95WvhzGW2f&q=85&s=160b9b87fc78ca7ca13b8763858cd67f 840w, https://mintcdn.com/vastai-80aa3a82/LEwury95WvhzGW2f/images/use-cases-ai-agents-6.webp?w=1100&fit=max&auto=format&n=LEwury95WvhzGW2f&q=85&s=02eee6eb8f779b2cee683f325493c47e 1100w, https://mintcdn.com/vastai-80aa3a82/LEwury95WvhzGW2f/images/use-cases-ai-agents-6.webp?w=1650&fit=max&auto=format&n=LEwury95WvhzGW2f&q=85&s=878a352258a7a539347cbbf3f7e984da 1650w, https://mintcdn.com/vastai-80aa3a82/LEwury95WvhzGW2f/images/use-cases-ai-agents-6.webp?w=2500&fit=max&auto=format&n=LEwury95WvhzGW2f&q=85&s=fc187e3bc9abc309956a7aba0cb7e502 2500w" />
|
||
|
||
Initially, the flow will look like this
|
||
|
||
<Frame caption="Blog Writer Defaults">
|
||
<img src="https://mintcdn.com/vastai-80aa3a82/LEwury95WvhzGW2f/images/use-cases-ai-agents-7.webp?fit=max&auto=format&n=LEwury95WvhzGW2f&q=85&s=921b66728895c8c3e1bd66ef8adca884" alt="blog writer flow" data-og-width="1280" width="1280" data-og-height="455" height="455" data-path="images/use-cases-ai-agents-7.webp" data-optimize="true" data-opv="3" srcset="https://mintcdn.com/vastai-80aa3a82/LEwury95WvhzGW2f/images/use-cases-ai-agents-7.webp?w=280&fit=max&auto=format&n=LEwury95WvhzGW2f&q=85&s=65cef733272b3985106eee5695080205 280w, https://mintcdn.com/vastai-80aa3a82/LEwury95WvhzGW2f/images/use-cases-ai-agents-7.webp?w=560&fit=max&auto=format&n=LEwury95WvhzGW2f&q=85&s=eebcf345024da263fd589ef382fac8d8 560w, https://mintcdn.com/vastai-80aa3a82/LEwury95WvhzGW2f/images/use-cases-ai-agents-7.webp?w=840&fit=max&auto=format&n=LEwury95WvhzGW2f&q=85&s=3c8c3c6d7f5bfa0efb48a54297942547 840w, https://mintcdn.com/vastai-80aa3a82/LEwury95WvhzGW2f/images/use-cases-ai-agents-7.webp?w=1100&fit=max&auto=format&n=LEwury95WvhzGW2f&q=85&s=1023e60f00767d3ed09fa5febfa2635d 1100w, https://mintcdn.com/vastai-80aa3a82/LEwury95WvhzGW2f/images/use-cases-ai-agents-7.webp?w=1650&fit=max&auto=format&n=LEwury95WvhzGW2f&q=85&s=5d4f9010d55c1f6fa3fbaa8f4d695276 1650w, https://mintcdn.com/vastai-80aa3a82/LEwury95WvhzGW2f/images/use-cases-ai-agents-7.webp?w=2500&fit=max&auto=format&n=LEwury95WvhzGW2f&q=85&s=6e87512b6469df366c1c8730457c278d 2500w" />
|
||
</Frame>
|
||
|
||
We will need to replace the Language Model with the Ollama alternative to make use of the GPU and avoid having to make API calls to external services. 
|
||
|
||
Click on the **Language Model** node and using the three dot icon, choose **Delete.**
|
||
|
||
<Frame caption="Delete Language Model">
|
||
<img src="https://mintcdn.com/vastai-80aa3a82/LEwury95WvhzGW2f/images/use-cases-ai-agents-8.webp?fit=max&auto=format&n=LEwury95WvhzGW2f&q=85&s=c794d16e4c1881ba9c3519d6a7c1051d" alt="delete language model" data-og-width="800" width="800" data-og-height="938" height="938" data-path="images/use-cases-ai-agents-8.webp" data-optimize="true" data-opv="3" srcset="https://mintcdn.com/vastai-80aa3a82/LEwury95WvhzGW2f/images/use-cases-ai-agents-8.webp?w=280&fit=max&auto=format&n=LEwury95WvhzGW2f&q=85&s=d6fb89ceb811a6495523bf2b0dce271f 280w, https://mintcdn.com/vastai-80aa3a82/LEwury95WvhzGW2f/images/use-cases-ai-agents-8.webp?w=560&fit=max&auto=format&n=LEwury95WvhzGW2f&q=85&s=1e21f7c2da8eb06945a06357568f3d56 560w, https://mintcdn.com/vastai-80aa3a82/LEwury95WvhzGW2f/images/use-cases-ai-agents-8.webp?w=840&fit=max&auto=format&n=LEwury95WvhzGW2f&q=85&s=c242353a7341ee633334398e43dd2b67 840w, https://mintcdn.com/vastai-80aa3a82/LEwury95WvhzGW2f/images/use-cases-ai-agents-8.webp?w=1100&fit=max&auto=format&n=LEwury95WvhzGW2f&q=85&s=1ba931100a28cd3566e68a961ada8dd1 1100w, https://mintcdn.com/vastai-80aa3a82/LEwury95WvhzGW2f/images/use-cases-ai-agents-8.webp?w=1650&fit=max&auto=format&n=LEwury95WvhzGW2f&q=85&s=daf93cb3369b835ee12818d25d4ddff7 1650w, https://mintcdn.com/vastai-80aa3a82/LEwury95WvhzGW2f/images/use-cases-ai-agents-8.webp?w=2500&fit=max&auto=format&n=LEwury95WvhzGW2f&q=85&s=0511c078357a838e3519767bedb8950c 2500w" />
|
||
</Frame>
|
||
|
||
Next, from the left side menu, select the **Ollama** component and drag it to the space created by deleting the original language model component.
|
||
|
||
<Frame caption="Add Ollama Node">
|
||
<img src="https://mintcdn.com/vastai-80aa3a82/LEwury95WvhzGW2f/images/use-cases-ai-agents-9.webp?fit=max&auto=format&n=LEwury95WvhzGW2f&q=85&s=66e249067470e2c74be5ccfd965556e8" alt="Add Ollama node" data-og-width="800" width="800" data-og-height="843" height="843" data-path="images/use-cases-ai-agents-9.webp" data-optimize="true" data-opv="3" srcset="https://mintcdn.com/vastai-80aa3a82/LEwury95WvhzGW2f/images/use-cases-ai-agents-9.webp?w=280&fit=max&auto=format&n=LEwury95WvhzGW2f&q=85&s=18abfc9ce3b6ab95ba7a9a899d9c359d 280w, https://mintcdn.com/vastai-80aa3a82/LEwury95WvhzGW2f/images/use-cases-ai-agents-9.webp?w=560&fit=max&auto=format&n=LEwury95WvhzGW2f&q=85&s=46485863fffed4f8a33428fbebf375a1 560w, https://mintcdn.com/vastai-80aa3a82/LEwury95WvhzGW2f/images/use-cases-ai-agents-9.webp?w=840&fit=max&auto=format&n=LEwury95WvhzGW2f&q=85&s=a6748a0828df0e1de0dec0339f987cc3 840w, https://mintcdn.com/vastai-80aa3a82/LEwury95WvhzGW2f/images/use-cases-ai-agents-9.webp?w=1100&fit=max&auto=format&n=LEwury95WvhzGW2f&q=85&s=79600066b518a1a7412c264640f7ba19 1100w, https://mintcdn.com/vastai-80aa3a82/LEwury95WvhzGW2f/images/use-cases-ai-agents-9.webp?w=1650&fit=max&auto=format&n=LEwury95WvhzGW2f&q=85&s=303005a34ab24f135100c4d2487d41b3 1650w, https://mintcdn.com/vastai-80aa3a82/LEwury95WvhzGW2f/images/use-cases-ai-agents-9.webp?w=2500&fit=max&auto=format&n=LEwury95WvhzGW2f&q=85&s=11b1ac1efa569b6e94acb76a6a4eb7db 2500w" />
|
||
</Frame>
|
||
|
||
Now that is in place it must be configured to communicate with the Ollama API. Enter `http://localhost:11434` in the Base URL field. You'll need to then select your Ollama model and re-connect the nodes as shown below.
|
||
|
||
<Frame caption="Ollama Node Connected">
|
||
<img src="https://mintcdn.com/vastai-80aa3a82/LEwury95WvhzGW2f/images/use-cases-ai-agents-10.webp?fit=max&auto=format&n=LEwury95WvhzGW2f&q=85&s=19f569fdc75304ba01faf90a41a8f8e1" alt="Ollama node connected" data-og-width="1280" width="1280" data-og-height="466" height="466" data-path="images/use-cases-ai-agents-10.webp" data-optimize="true" data-opv="3" srcset="https://mintcdn.com/vastai-80aa3a82/LEwury95WvhzGW2f/images/use-cases-ai-agents-10.webp?w=280&fit=max&auto=format&n=LEwury95WvhzGW2f&q=85&s=2ea9378bb2d757d8d161dc634811d51f 280w, https://mintcdn.com/vastai-80aa3a82/LEwury95WvhzGW2f/images/use-cases-ai-agents-10.webp?w=560&fit=max&auto=format&n=LEwury95WvhzGW2f&q=85&s=cfb34dc5039310feb083e29dab019348 560w, https://mintcdn.com/vastai-80aa3a82/LEwury95WvhzGW2f/images/use-cases-ai-agents-10.webp?w=840&fit=max&auto=format&n=LEwury95WvhzGW2f&q=85&s=5daa888965fe175b693998c0b94af19b 840w, https://mintcdn.com/vastai-80aa3a82/LEwury95WvhzGW2f/images/use-cases-ai-agents-10.webp?w=1100&fit=max&auto=format&n=LEwury95WvhzGW2f&q=85&s=5114cf922b22f1fc9963d89990503b81 1100w, https://mintcdn.com/vastai-80aa3a82/LEwury95WvhzGW2f/images/use-cases-ai-agents-10.webp?w=1650&fit=max&auto=format&n=LEwury95WvhzGW2f&q=85&s=8db43998f81bc8880ce3397d6417e3aa 1650w, https://mintcdn.com/vastai-80aa3a82/LEwury95WvhzGW2f/images/use-cases-ai-agents-10.webp?w=2500&fit=max&auto=format&n=LEwury95WvhzGW2f&q=85&s=39b5bb30cfece65c6595a768ff1cb400 2500w" />
|
||
</Frame>
|
||
|
||
<Note>
|
||
If the model field does not immediately show your available models, simply toggle the 'Tool Mode Enabled' switch.
|
||
</Note>
|
||
|
||
### Configuring the Workflow
|
||
|
||
You could run this node immediately, but first let's make some minor modifications.
|
||
|
||
Change the **URL** in the **URL node** to `https://vast.ai`and set the **Depth** to `2`
|
||
|
||
Change the **Text** in the **Instructions node** to `Use the references above for style to write a new blog/tutorial about how Vast.ai can empower people who want to leverage affordable GPU resources`
|
||
|
||
### Run the Workflow
|
||
|
||
Simply click the **Playground** button followed by the **Run flow** button and wait for the agent to learn about the subject matter and write a blog post. It'll only take a few seconds.
|
||
|
||
<Frame caption="Completed Blog Post">
|
||
<img src="https://mintcdn.com/vastai-80aa3a82/LEwury95WvhzGW2f/images/use-cases-ai-agents-11.webp?fit=max&auto=format&n=LEwury95WvhzGW2f&q=85&s=a169244ebdb342711ed2a3fb5281ffbe" alt="Completed Blog Post" data-og-width="846" width="846" data-og-height="893" height="893" data-path="images/use-cases-ai-agents-11.webp" data-optimize="true" data-opv="3" srcset="https://mintcdn.com/vastai-80aa3a82/LEwury95WvhzGW2f/images/use-cases-ai-agents-11.webp?w=280&fit=max&auto=format&n=LEwury95WvhzGW2f&q=85&s=e04736deab750dd351af117ff5ba4201 280w, https://mintcdn.com/vastai-80aa3a82/LEwury95WvhzGW2f/images/use-cases-ai-agents-11.webp?w=560&fit=max&auto=format&n=LEwury95WvhzGW2f&q=85&s=1aea70978d5d26bd72b9b84cf70f4216 560w, https://mintcdn.com/vastai-80aa3a82/LEwury95WvhzGW2f/images/use-cases-ai-agents-11.webp?w=840&fit=max&auto=format&n=LEwury95WvhzGW2f&q=85&s=116b39f1295baccaa1a5b44551a4722c 840w, https://mintcdn.com/vastai-80aa3a82/LEwury95WvhzGW2f/images/use-cases-ai-agents-11.webp?w=1100&fit=max&auto=format&n=LEwury95WvhzGW2f&q=85&s=7ee1818360fa1c074a75a0fb983b59fc 1100w, https://mintcdn.com/vastai-80aa3a82/LEwury95WvhzGW2f/images/use-cases-ai-agents-11.webp?w=1650&fit=max&auto=format&n=LEwury95WvhzGW2f&q=85&s=fe888bd8e8f9385696f5407640b5edfd 1650w, https://mintcdn.com/vastai-80aa3a82/LEwury95WvhzGW2f/images/use-cases-ai-agents-11.webp?w=2500&fit=max&auto=format&n=LEwury95WvhzGW2f&q=85&s=4d2192bc86177af51696c5978611ee1b 2500w" />
|
||
</Frame>
|
||
|
||
## Advanced Usage
|
||
|
||
This short guide serves only as an introduction to Langflow, but it is extremely capabale and easy to use with some practice. We recommend that you check out the excellent [documentation](https://docs.langflow.org/about-langflow) to assist you in creating complex projects.
|
||
|
||
Remember, any *Language Model* component can be replaced with the *Ollama* component, and any *Agent* component can be configured to use *Ollama* as a custom provider.
|
||
|
||
|
||
# Linux Virtual Desktop
|
||
Source: https://docs.vast.ai/linux-virtual-desktop
|
||
|
||
|
||
|
||
# Guide: Linux Virtual Desktop on Vast.ai
|
||
|
||
This guide will help you set up and use a Linux Virtual Desktop environment on Vast.ai using the Ubuntu Desktop (VM) template.
|
||
|
||
## Prerequisites
|
||
|
||
* A Vast.ai account
|
||
* [(Optional) Install TLS Certificate for Jupyter](/documentation/instances/jupyter) 
|
||
* [(Optional) SSH client installed on your local machine and SSH public key added the Keys section at cloud.vast.ai](/documentation/instances/sshscp) 
|
||
|
||
## Initial Setup
|
||
|
||
### Creating Your Instance
|
||
|
||
1. Navigate to the [Templates tab](https://cloud.vast.ai/templates/) 
|
||
2. In the search bar at the top, type "Ubuntu Desktop (VM)" to find the template. Make sure you're searching across all templates and not only recommended templates.
|
||
3. Select the template by clicking the play button
|
||
4. Choose your preferred GPU from the search results. Try to find a GPU close to you if possible
|
||
5. Click "Rent" to create your instance
|
||
6. Go to Instances tab and wait for the blue button on the instance card to say "Open". It can take a good amount of time to load if the docker image isn't cached on the machine.
|
||
|
||
### Accessing Your Instance
|
||
|
||
After launching your instance, you have several ways to connect:
|
||
|
||
* **Browser Access** (Recommended)
|
||
* Click the 'Open' button on your instance card to launch the Instance Portal
|
||
* Choose between two browser-based viewers:
|
||
* Selkies WebRTC: More responsive, better performance
|
||
* NoVNC: Alternative option if WebRTC isn't working well
|
||
* **VNC Client**
|
||
* Connect using any VNC client
|
||
* Address: instance\_ip:5900
|
||
* Password: Your OPEN\_BUTTON\_TOKEN
|
||
* **SSH Access**
|
||
* Connect via SSH using the command provided in the Vast.ai console
|
||
* For non-root access: 
|
||
|
||
```linux Linux theme={null}
|
||
ssh -p mapped_port user@instance_ip
|
||
```
|
||
|
||
### First-Time Setup
|
||
|
||
* Change the default password by executing the following command in Linux terminal and go along with rest of the prompts:
|
||
|
||
```linux Linux theme={null}
|
||
#Default username: user
|
||
#Default password: password
|
||
passwd
|
||
```
|
||
|
||
* Configure TLS (Optional):
|
||
* [Install the 'Jupyter' certificate](/documentation/instances/jupyter) following the instance setup guide 
|
||
* This eliminates certificate warnings in your browser
|
||
|
||
## Features and Capabilities
|
||
|
||
### Pre-installed Software
|
||
|
||
The environment comes with several applications ready to use:
|
||
|
||
* **Web Browsers**
|
||
* Firefox
|
||
* Chrome
|
||
* **Development Tools**
|
||
* Docker (pre-configured for non-root use)
|
||
* Terminal emulator
|
||
* Common development utilities
|
||
* **Creative Software**
|
||
* Blender (3D creation suite)
|
||
* Wine (Windows application compatibility layer)
|
||
* **Gaming Support**
|
||
* Steam (with Proton compatibility for Windows games)
|
||
* Sunshine streaming server
|
||
|
||
### Remote Desktop Options
|
||
|
||
### Selkies WebRTC (Recommended)
|
||
|
||
* Access via port 6100
|
||
* Best performance for most users
|
||
* Hardware-accelerated graphics
|
||
* Audio support
|
||
|
||
### NoVNC
|
||
|
||
* Access via port 6200
|
||
* Backup option if WebRTC isn't working
|
||
* More compatible with different browsers
|
||
|
||
### VNC Client
|
||
|
||
* Traditional VNC connection
|
||
* Use your preferred VNC client
|
||
* Port: 5900
|
||
|
||
### Advanced Features
|
||
|
||
### Tailscale Integration
|
||
|
||
1. [Install Tailscale](https://tailscale.com/kb/1347/installation) on your local device. Password is "password" if you haven't changed it. 
|
||
2. On the instance, run:  
|
||
|
||
```linux Linux theme={null}
|
||
sudo tailscale up
|
||
```
|
||
|
||
 Follow rest of the prompts to connect to your tailnet.
|
||
|
||
### Game Streaming with Moonlight
|
||
|
||
1. Set up Tailscale (required)
|
||
2. Configure the pre-installed Sunshine server
|
||
3. Connect using the Moonlight client on your local device
|
||
|
||
### Cloudflare Tunnels
|
||
|
||
* Create [secure tunnels](https://developers.cloudflare.com/cloudflare-one/connections/connect-networks/get-started/) without exposing ports and having to create a new instance
|
||
* Manage via the Instance Portal
|
||
* Perfect for temporary application sharing
|
||
|
||
## Security Considerations
|
||
|
||
### Port Management
|
||
|
||
The following ports are exposed by default:
|
||
|
||
* 22: SSH
|
||
* 1111: Instance Portal
|
||
* 3478: TURN Server
|
||
* 5900: VNC Server
|
||
* 6100: Selkies WebRTC
|
||
* 6200: NoVNC
|
||
* 741641: Tailscale
|
||
|
||
Consider:
|
||
|
||
* Using Tailscale for secure access
|
||
* Creating Cloudflare tunnels for HTTP access
|
||
* Closing unnecessary ports
|
||
|
||
### Authentication
|
||
|
||
* Instance Portal 
|
||
* username: vastai
|
||
* password: Your OPEN\_BUTTON\_TOKEN
|
||
* Change the default user password immediately
|
||
* Use SSH keys for remote access
|
||
|
||
## Troubleshooting
|
||
|
||
* **Connection Issues**
|
||
* Try different connection methods (WebRTC, NoVNC, VNC)
|
||
* Check if ports are accessible
|
||
* Verify your authentication credentials
|
||
* **Performance Problems**
|
||
* Ensure you're using hardware acceleration
|
||
* Try WebRTC for better performance
|
||
* Check your internet connection quality
|
||
* **Application Problems**
|
||
* Check system logs: `/var/log/portal/`
|
||
* Restart Caddy if needed: `systemctl restart caddy`
|
||
* Verify application configurations in `/etc/portal.yaml`
|
||
|
||
## Best Practices
|
||
|
||
* **Security**
|
||
* Change default passwords immediately
|
||
* Use Tailscale or Cloudflare tunnels when possible
|
||
* Keep unnecessary ports closed
|
||
* **Performance**
|
||
* Use WebRTC for best desktop performance
|
||
* Enable hardware acceleration when available
|
||
* Close unused applications
|
||
* **Data Management**
|
||
* Keep important data backed up
|
||
* Use version control for development
|
||
* Monitor instance storage usage
|
||
|
||
## Additional Resources
|
||
|
||
* [Vast.ai Documentation](https://docs.vast.ai)
|
||
* [Tailscale Documentation](https://tailscale.com/kb/)
|
||
* [Cloudflare Tunnels](https://developers.cloudflare.com/cloudflare-one/connections/connect-apps/)
|
||
|
||
|
||
# Linux Virtual Machines
|
||
Source: https://docs.vast.ai/linux-virtual-machines
|
||
|
||
|
||
|
||
# Complete Guide to Running Virtual Machines on Vast.ai
|
||
|
||
## Introduction
|
||
|
||
Vast.ai provides virtual machine (VM) capabilities alongside its Docker-based instance rentals. This guide walks you through everything you need to know about running VMs on machines with GPUs found at Vast.
|
||
|
||
## Prerequisites
|
||
|
||
* A Vast.ai account
|
||
* [SSH client installed on your local machine and SSH public key added the Keys section at cloud.vast.ai](/documentation/instances/sshscp) 
|
||
* [(Optional) Install and use vast-cli](/cli/get-started) 
|
||
|
||
## VM vs Docker: Understanding the Differences
|
||
|
||
### VM Advantages
|
||
|
||
* Full support for init managers like `systemd`
|
||
* Enable running Docker, Kubernetes, and Snap applications
|
||
* Perfect for containerization within your instance
|
||
* Process tracing support via `ptrace`
|
||
* Ideal for debugging and system monitoring
|
||
* Complete system isolation
|
||
* Full control over the virtual environment
|
||
|
||
### VM Limitations
|
||
|
||
* Longer instance creation and boot times compared to Docker
|
||
* Higher disk space requirements
|
||
* Limited machine selection
|
||
* Fewer preconfigured templates
|
||
* Currently restricted to SSH-only launch mode
|
||
|
||
## Common Use Cases
|
||
|
||
### Deep Learning Development Environments
|
||
|
||
* **Custom ML Framework Setups**: Run multiple ML framework versions simultaneously with full control over CUDA versions, perfect for maintaining compatibility with legacy projects while using newer frameworks.
|
||
* **Distributed Training Systems**: Set up complete Kubernetes clusters for distributed machine learning, enabling efficient training of large models across multiple nodes.
|
||
|
||
### Development and Testing
|
||
|
||
* **Docker Compose Development**: Deploy and test multi-container applications with full Docker Compose support, including volume mounts and network configurations not possible in regular Docker instances.
|
||
* **CUDA Performance Profiling**: Profile CUDA applications with full system access and hardware counters, enabling detailed performance analysis and optimization.
|
||
* **Containerization Development**: Test Docker and Kubernetes configurations in fully isolated environments with Docker-in-Docker capabilities.
|
||
* **System-Level Development**: Develop and test custom drivers and kernel modules with direct access to system resources.
|
||
|
||
### Production Workloads
|
||
|
||
* **Database Systems**: Run database servers with full control over system parameters and storage configurations for optimal performance.
|
||
* **Web Services**: Deploy web applications requiring specific system-level configurations or systemd integration.
|
||
|
||
### Research and Academic Use
|
||
|
||
* **Reproducible Research**: Create and preserve complete system environments to ensure research reproducibility across different setups.
|
||
* **GPU Architecture Research**: Conduct low-level GPU research with direct hardware access and custom driver configurations.
|
||
|
||
### Security Testing
|
||
|
||
**Isolated Security Research**: Perform security testing and malware analysis in completely isolated environments without risking host system contamination.
|
||
|
||
### Legacy Application Support
|
||
|
||
**Legacy Software**: Run older applications that require specific operating system versions or library combinations not available in containers.
|
||
|
||
### Resource-Intensive Applications
|
||
|
||
* **High-Performance Computing**: Configure custom parallel computing environments with specific network and scheduler requirements.
|
||
* **Graphics and Rendering**: Set up rendering systems with precise control over GPU configurations and driver versions.
|
||
|
||
## Getting Started
|
||
|
||
### Prerequisites
|
||
|
||
**SSH Key Setup (Required)**
|
||
|
||
NOTE: You must add your SSH public key to the Keys section after logging into your Vast.ai account before creating a VM instance. If you start a VM before any SSH keys have been added to your account, the VM will not be accessible. 
|
||
|
||
Steps to setup your SSH key:
|
||
|
||
1. Generate an SSH key and copy your public key
|
||
2. Access your account settings page
|
||
3. Navigate to the SSH keys section
|
||
4. Add your public key
|
||
|
||
NOTE: SSH keys cannot be modified once a VM is running
|
||
|
||
## Creating and Configuring VMs
|
||
|
||
### Search for Ubuntu VM Template
|
||
|
||
Go to [Templates tab](https://cloud.vast.ai/templates/) and search for recommended Ubuntu 22.04 VM template.
|
||
|
||
### Edit Template as Needed
|
||
|
||
When you find the Ubuntu 22.04 VM template, you can edit the template. 
|
||
|
||
### **Environment Variables**
|
||
|
||
You can set environment variables by editing the VM template and adding a specific environment variable name and value in the Environment Variables section or adding a line like this to "Docker options" field:
|
||
|
||
```docker Docker theme={null}
|
||
-e JUPYTER_DIR=/ -e TEST=OK
|
||
```
|
||
|
||
Variables are written to `/etc/environment.`To use these environment variables in a script once you're inside your machine, run this command:
|
||
|
||
```linux Linux theme={null}
|
||
source /etc/environment
|
||
```
|
||
|
||
### Expose Ports Publicly
|
||
|
||
You can expose ports publicly by editing the VM template and adding specific ports in Ports section or adding a line similar to this in "Docker options" field:
|
||
|
||
```docker Docker theme={null}
|
||
-p 8081:8081 -p 8082:8082/udp -p 70000:70000
|
||
```
|
||
|
||
### Specify On-Start Script Configuration 
|
||
|
||
The On-start script field allows specifying a script to run on instance start. Unlike in docker-based instances, the interpreter must be specified by a shebang. Here's an example for bash:
|
||
|
||
```linux Linux theme={null}
|
||
#!/bin/bash
|
||
```
|
||
|
||
## Rent a Machine
|
||
|
||
Rent a machine of your choice from the [Search tab](https://cloud.vast.ai/create/).
|
||
|
||
You can see the instance being created in the Instances tab. It can take some time to load.
|
||
|
||
## Connect to Your VM
|
||
|
||
Once the blue button the instance card says **>\_CONNECT**, you can click the button and copy the ssh command to execute in your terminal in your Mac or Linux-based computer. You can also use [Powershell or Windows Putty tools](/documentation/instances/sshscp) if you have a Windows computer.
|
||
|
||
## VM Management
|
||
|
||
### Cloud Copy Utility
|
||
|
||
* Different from Docker-based instances
|
||
* Use cli command: `vastai vm copy $SRC_VM_ID $DEST_VM_ID`
|
||
* Limitations:
|
||
* Only supports full VM migration
|
||
* Copying between VMs only (no external storage support)
|
||
* No individual folder copy support
|
||
|
||
### Best Practices
|
||
|
||
* **Resource Management**
|
||
* Monitor disk usage due to higher overhead
|
||
* Plan for longer boot times in your workflows
|
||
* **Security**
|
||
* Keep SSH keys secure
|
||
* Configure firewall rules appropriately
|
||
* Regular security updates
|
||
* **Performance Optimization**
|
||
* Use appropriate VM sizes for your workload
|
||
* Monitor resource utilization
|
||
* Clean up unused resources
|
||
|
||
## Troubleshooting
|
||
|
||
### Common Issues
|
||
|
||
* **VM Won't Start**
|
||
* Check if SSH key is added in Account
|
||
* Verify that rented machine supports VMs
|
||
* **Environment Variables Not Working**
|
||
* Ensure variables are properly set in Docker options
|
||
* Check if `/etc/environment` is being sourced
|
||
* Verify script permissions
|
||
* **Connectivity Issues**
|
||
* Verify SSH key permissions
|
||
* Check network configuration
|
||
* Confirm port forwarding setup
|
||
* Try a different host machine
|
||
|
||
### Support Resources
|
||
|
||
* [Vast.ai documentation](/documentation/get-started/index)
|
||
* [Vast.ai Discord](https://discord.gg/hSuEbSQ4X8)
|
||
* [Support chat at Vast.ai](https://vast.ai/)
|
||
|
||
## Conclusion
|
||
|
||
Virtual Machines on Vast.ai provide powerful capabilities for specific use cases, particularly those requiring full system control or containerization support. While they have some limitations compared to Docker instances, their flexibility and isolation make them ideal for many advanced computing scenarios.
|
||
|
||
|
||
# Mining on Bittensor
|
||
Source: https://docs.vast.ai/mining-on-bittensor
|
||
|
||
|
||
|
||
# Vast internal guide to test subnets inside the Opentensor image
|
||
|
||
This tutorial shows how to use the Bittensor testnet to create a subnet and run your incentive mechanism on it.
|
||
|
||
## 1. Install Bittensor subnet template
|
||
|
||
`cd` into your project directory and clone the bittensor-subnet-template repo:
|
||
|
||
```bash Bash theme={null}
|
||
git clone https://github.com/opentensor/bittensor-subnet-template.git
|
||
```
|
||
|
||
Next, `cd` into bittensor-subnet-template repo directory:
|
||
|
||
```bash Bash theme={null}
|
||
cd bittensor-subnet-template # Enter the
|
||
```
|
||
|
||
Install the bittensor-subnet-template package:
|
||
|
||
```bash Bash theme={null}
|
||
python -m pip install -e .
|
||
```
|
||
|
||
## 2. Create wallets
|
||
|
||
Create wallets for subnet owner, subnet validator and for subnet miner.
|
||
|
||
Follow all of these steps:
|
||
|
||
```bash Bash theme={null}
|
||
btcli wallet new_coldkey --wallet.name owner
|
||
```
|
||
|
||
Create a coldkey and hotkey for your miner wallet:
|
||
|
||
```bash Bash theme={null}
|
||
btcli wallet new_coldkey --wallet.name miner
|
||
```
|
||
|
||
and
|
||
|
||
```bash Bash theme={null}
|
||
btcli wallet new_hotkey --wallet.name miner --wallet.hotkey default
|
||
```
|
||
|
||
Create a coldkey and hotkey for your validator wallet:
|
||
|
||
```bash Bash theme={null}
|
||
btcli wallet new_coldkey --wallet.name validator
|
||
```
|
||
|
||
and
|
||
|
||
```bash Bash theme={null}
|
||
btcli wallet new_hotkey --wallet.name validator --wallet.hotkey default
|
||
```
|
||
|
||
## 3. Get the price of subnet creation
|
||
|
||
Creating subnets on the testnet is competitive. The cost is determined by the rate at which new subnets are being registered onto the chain.
|
||
|
||
```bash Bash theme={null}
|
||
btcli subnet lock_cost --subtensor.network test
|
||
```
|
||
|
||
The above command will show:
|
||
|
||
```bash Bash theme={null}
|
||
>> Subnet lock cost: τ100.000000000
|
||
```
|
||
|
||
## 4 Go to the Bittensor discord channel and ask them for test Taos
|
||
|
||
Here is the [link](https://discord.com/channels/799672011265015819/830068283314929684) to the discord channel for Bittensor.
|
||
|
||
## 4.5 Transfer test Taos to your miner wallet
|
||
|
||
Use the following command to list all your wallets:
|
||
|
||
```text Text theme={null}
|
||
btcli w list
|
||
```
|
||
|
||
You will get an output like this:
|
||
|
||
```text Text theme={null}
|
||
Wallets
|
||
├──
|
||
│ owner (5FyRdpzddeN7KGLhn6S6ia1up7dzbtXiZ5trc2hmm9AN9Pj4)
|
||
├──
|
||
│ miner (5GCahkVacWRHzVgRBfSmnt11gHnWWZhkapquzPEwR7je1a8w)
|
||
│ └── default (5CUgZBi3GQpJDhe1EhdPJfzBb6pyWvnkuSWJ6SBhEpSby1XP)
|
||
└──
|
||
validator (5FZSLAZsiFaZzhcL2oxMesSrQQHmWHSGpPfNjMUmiruBpYGB)
|
||
└── default (5EqaFbjHDUQCHRbG5592QvCbpNkvAxsLCLKRNoLaVLN76g55)
|
||
```
|
||
|
||
Then transfer 0.001 Taos to your miner and validator wallet.
|
||
|
||
### Transfer to miner wallet
|
||
|
||
```text Text theme={null}
|
||
btcli wallet transfer --dest 5GCahkVacWRHzVgRBfSmnt11gHnWWZhkapquzPEwR7je1a8w --wallet.name owner --amount 0.001 --subtensor.network test
|
||
```
|
||
|
||
Make sure the --dest key is the same as your wallet key that you get from the btcli w list command.
|
||
|
||
### Transfer to validator wallet
|
||
|
||
Repeat this step for the validator wallet as well.
|
||
|
||
```text Text theme={null}
|
||
btcli wallet transfer --dest 5FZSLAZsiFaZzhcL2oxMesSrQQHmWHSGpPfNjMUmiruBpYGB --wallet.name owner --amount 0.001 --subtensor.network test
|
||
```
|
||
|
||
## 6. Register keys
|
||
|
||
This step registers your subnet validator and subnet miner keys to the subnet, giving them the **first two slots** on the subnet.
|
||
|
||
Register your miner key to the subnet:
|
||
|
||
```bash Bash theme={null}
|
||
btcli subnet register --netuid 15 --subtensor.network test --wallet.name miner --wallet.hotkey default
|
||
```
|
||
|
||
Follow the below prompts:
|
||
|
||
```bash Bash theme={null}
|
||
>> Enter netuid [1] (1): # Enter netuid 1 to specify the subnet you just created.
|
||
>> Continue Registration?
|
||
hotkey: ...
|
||
coldkey: ...
|
||
network: finney [y/n]: # Select yes (y)
|
||
>> ✅ Registered
|
||
```
|
||
|
||
Next, register your validator key to the subnet:
|
||
|
||
```bash Bash theme={null}
|
||
btcli subnet recycle_register --netuid 15 --subtensor.network test --wallet.name validator --wallet.hotkey default
|
||
```
|
||
|
||
Follow the prompts:
|
||
|
||
```bash Bash theme={null}
|
||
>> Enter netuid [1] (1): # Enter netuid 1 to specify the subnet you just created.
|
||
>> Continue Registration?
|
||
hotkey: ...
|
||
coldkey: ...
|
||
network: finney [y/n]: # Select yes (y)
|
||
>> ✅ Registered
|
||
```
|
||
|
||
## 7. Check that your keys have been registered
|
||
|
||
This step returns information about your registered keys.
|
||
|
||
Check that your miner has been registered:
|
||
|
||
```bash Bash theme={null}
|
||
btcli wallet overview --wallet.name miner --subtensor.network test
|
||
```
|
||
|
||
The above command will display the below:
|
||
|
||
```bash Bash theme={null}
|
||
Subnet: 1
|
||
COLDKEY HOTKEY UID ACTIVE STAKE(τ) RANK TRUST CONSENSUS INCENTIVE DIVIDENDS EMISSION(ρ) VTRUST VPERMIT UPDATED AXON HOTKEY_SS58
|
||
miner default 1 True 0.00000 0.00000 0.00000 0.00000 0.00000 0.00000 0 0.00000 14 none 5GTFrsEQfvTsh3WjiEVFeKzFTc2xcf…
|
||
1 1 2 τ0.00000 0.00000 0.00000 0.00000 0.00000 0.00000 ρ0 0.00000
|
||
Wallet balance: τ0.0
|
||
```
|
||
|
||
## 8. Run subnet miner and subnet validator
|
||
|
||
Run the subnet miner:
|
||
|
||
```bash Bash theme={null}
|
||
python neurons/miner.py --netuid 15 --subtensor.network test --wallet.name miner --wallet.hotkey default --logging.debug
|
||
```
|
||
|
||
You will see the below terminal output:
|
||
|
||
```bash Bash theme={null}
|
||
2024-01-22 17:34:42.694 | INFO | Miner running... 1705944882.6945262
|
||
2024-01-22 17:34:47.700 | INFO | Miner running... 1705944887.7002594
|
||
2024-01-22 17:34:52.706 | INFO | Miner running... 1705944892.7061048
|
||
2024-01-22 17:34:57.712 | INFO | Miner running... 1705944897.7120056
|
||
```
|
||
|
||
|
||
# Multi-Node training using Torch + NCCL
|
||
Source: https://docs.vast.ai/multi-node-training-using-torch-nccl
|
||
|
||
|
||
|
||
<Note>
|
||
Need RoCE or Infiniband? Submit a [cluster request](https://vast.ai/products/clusters). Availability currently limited to A100/H100/H200 machines.
|
||
</Note>
|
||
|
||
<Note>
|
||
Note: Private networking currently only available on Docker-based templates; not available for VM-based templates.  
|
||
</Note>
|
||
|
||
NCCL expects all nodes to be on the same network. By default, Vast instances on different physical machines are on separate bridge networks isolated from the host's LAN and must go through a NAT to reach the outside internet. 
|
||
|
||
Vast now supports creating *overlay* networks for instances, allowing client instances on different machines on the same physical LAN to share a private, virtual LAN separate from both the host network and the networks of other clients' instances. 
|
||
|
||
Overlay networks can be created for instances located in the same *physical cluster* --- these are groups of machines that support fast local networking to each other. 
|
||
|
||
This allows direct communication between the instances on all ports, which is expected by NCCL. 
|
||
|
||
## Creating a Virtual Cluster
|
||
|
||
* Make sure to update to/install the newest version of the CLI first: go to our [CLI docs](https://cloud.vast.ai/cli/) and copy+run the command starting with `wget`.
|
||
* View physical clusters with instances matching your requirements by running `./vast search offers --raw cluster_id!=None [YOUR_INSTANCE_SEARCH_FILTERS] | grep cluster_id`
|
||
* This will print out cluster\_ids for clusters with offers available for instances matching your search parameters. 
|
||
* For a detailed view of the available offers within a specific cluster, run `./vast search offers cluster_id=CLUSTER_ID [YOUR_INSTANCE_SEARCH_FILTERS]` 
|
||
* Once you've chosen a physical cluster, create your overlay network inside the cluster---
|
||
* `./vast create overlay CLUSTER_ID NAME_FOR_NETWORK_TO_CREATE`
|
||
* Search for instance offers in the physical cluster you created your overlay network in---
|
||
* `./vast search offers cluster_id=CLUSTER_ID [YOUR_INSTANCE_SEARCH_FILTERS]`
|
||
* Create instances attached to your overlay by appending `--env "-n YOUR_NETWORK_NAME"` to your `./vast create instance` command. 
|
||
|
||
## TCP Initialization for NCCL + PyTorch
|
||
|
||
Depending on your setup, you will have one or more worker processes running on each node. NCCL expects each worker process to be assigned a unique rank that's an integer from 0-(NUM\_WORKERS - 1). 
|
||
|
||
NCCL expects to be able to perform a TCP rendezvous during initialization at the local IP address of the node running the rank 0 worker process. 
|
||
|
||
### Finding the IPv4 address for TCP rendezvous
|
||
|
||
* On the node that will run the rank 0 worker, run `ip a` (`apt install iproute2` if not already installed). 
|
||
* You should have three network interfaces: `lo`, `eth0`, and `eth1`. 
|
||
* Unless you added/removed networks after instant creation, `eth0` should be the interface to the overlay network between your instances. ( `lo` is the loopback interface; `eth1` is a bridge to the host machine's gateway to the external internet). 
|
||
* Under the `eth0` entry, there should be the line that starts with `inet IPv4ADDRESS/MASK`, this `IPv4ADDRESS` will be the address you will want to use for TCP initialization. 
|
||
|
||
### Running the training script
|
||
|
||
* In your training script, you'll want to initialize your process group at the beginning every worker process with the parameters `backend='nccl'` and `init_method = 'tcp://IPv4ADDRESS:PORT'` where `IPv4ADDRESS` is the IPv4 address of your `eth0` device as found using the instructions above, and port is a free port number chosen between 1000 and 65535 (all ports are exposed between instances on the same overlay network). 
|
||
* You may need to set the `NCCL_SOCKET_IFNAME=eth0` environment variable for the script, as NCCL is sometimes unable to detect that the `eth1` device on the different nodes are not directly connected to each other. 
|
||
* Other debugging notes:
|
||
* NCCL may not initialize all channels until the first communication function is called. 
|
||
* Setting the `NCCL_DEBUG=INFO` environment variable may be useful for getting additional debug info.
|
||
* PyTorch sometimes does not block on communication methods finishing until the output tensors area actually used.  
|
||
|
||
### Example
|
||
|
||
Here we will use a python script called `nccl_speedtest.py` using the following contents: 
|
||
|
||
```python icon="python" Python theme={null}
|
||
import torch as t
|
||
import torch.distributed as dist
|
||
import sys
|
||
import time
|
||
import string
|
||
|
||
# tests nccl bandwidth between two nodes.
|
||
# Run this script on both nodes, setting one as RANK 0 and the other as RANK 1
|
||
# Invoke: python3 nccl_speedtest.py NODE_0_IP:PORT SIZE[K|M|G] RANK(0|1)
|
||
|
||
if __name__ == "__main__":
|
||
handshake_ip = sys.argv[1]
|
||
size_s = sys.argv[2]
|
||
split_idx = size_s.find(string.ascii_letters)
|
||
sizes = { "K" : 1024, "M" : 1024**2, "G" : 1024 ** 3, "":1}
|
||
size = int(size_s[0:split_idx]) * sizes[size_s[split_idx:]]
|
||
rank = int(sys.argv[3])
|
||
if len(sys.argv) >= 5:
|
||
device = int(sys.argv[4])
|
||
else:
|
||
device = 0
|
||
|
||
|
||
print("Initializing tensors...")
|
||
# number of fp32 to allocate is bytes >> 2
|
||
v1 = t.rand(size>>3, device=f'cuda:{device}') # for bidirectional test
|
||
warmup1 = t.rand(size>>13, device=f'cuda:{device}')
|
||
if rank:
|
||
warmup = t.rand(size>>12, device=f'cuda:{device}')
|
||
v = t.rand(size>>2, device=f'cuda:{device}')
|
||
else:
|
||
warmup = t.zeros(size>>12,device=f'cuda:{device}')
|
||
v = t.zeros(size>>2, device=f'cuda:{device}')
|
||
|
||
print("Executing NCCL TCP handshake...")
|
||
dist.init_process_group(init_method = f"tcp://{handshake_ip}", rank = rank, world_size=2)
|
||
print("NCCL TCP handshake done, warming up connection...")
|
||
if rank:
|
||
dist.send(warmup, 0)
|
||
else:
|
||
dist.recv(warmup,1)
|
||
ignore = t.sum(warmup).to('cpu') # force sync
|
||
|
||
print("Warmup done; starting uni-directional speedtest...")
|
||
|
||
start = time.time()
|
||
if rank:
|
||
dist.send(v, 0)
|
||
else:
|
||
dist.recv(v,1)
|
||
# Torch returns from dist.send/dist.recv as soon as the communication channels initialize; it does not block on the full tensor being received.
|
||
# t.sum(v) will block on communication operations on v completing though, so we don't check end time until that is done.
|
||
checksum = t.sum(v).to('cpu')
|
||
end = time.time()
|
||
print(f"Checksum: {checksum}")
|
||
print(f"elapsed: {end-start}")
|
||
print(f"unidirectional bandwidth: {size / (end-start) / sizes['M']} MiB/s")
|
||
|
||
print("Warming up bidirection speedtest...")
|
||
dist.all_gather_into_tensor(warmup,warmup1)
|
||
|
||
print("Warmup done, starting bidirectional speedtest...")
|
||
start = time.time()
|
||
dist.all_gather_into_tensor(v, v1)
|
||
checksum = t.sum(v).to('cpu')
|
||
end = time.time()
|
||
|
||
print(f"Checksum: {checksum}")
|
||
print(f"elapsed: {end-start}")
|
||
print(f"bidirectional bandwidth: {size / (end-start) / sizes['M']} MiB/s")
|
||
|
||
|
||
print("Done, cleaning up!")
|
||
dist.destroy_process_group()
|
||
```
|
||
|
||
We will have rented two instances on the same overlay network already.
|
||
|
||
On the first instance: 
|
||
|
||
Run `apt update; apt install iproute2` then run `ip a`: 
|
||
|
||
We should get output that looks like this ----
|
||
|
||
```text Text theme={null}
|
||
1: lo: <LOOPBACK,UP,LOWER_UP> mtu 65536 qdisc noqueue state UNKNOWN group default qlen 1000
|
||
link/loopback 00:00:00:00:00:00 brd 00:00:00:00:00:00
|
||
inet 127.0.0.1/8 scope host lo
|
||
valid_lft forever preferred_lft forever
|
||
inet6 ::1/128 scope host noprefixroute
|
||
valid_lft forever preferred_lft forever
|
||
2: eth0@if23: <BROADCAST,MULTICAST,UP,LOWER_UP> mtu 65536 qdisc noqueue state UNKNOWN group default qlen 1000
|
||
link/ether 62:82:b2:1b:38:a6 brd ff:ff:ff:ff:ff:ff link-netnsid 0
|
||
inet 10.0.0.1/24 scope global eth0
|
||
valid_lft forever preferred_lft forever
|
||
3: lo: <BROADCAST,MULTICAST,LOWER_UP> mtu 1500 qdisc noqueue state UNKNOWN group default qlen 1000
|
||
link/ether 94:04:a2:fb:a1:66 brd ff:ff:ff:ff:ff:ff link-netnsid 0
|
||
inet 172.17.0.2/16 brd 172.17.255.255 scope global eth1
|
||
valid_lft forever preferred_lft forever
|
||
|
||
```
|
||
|
||
From this we see that we will want to use `10.0.0.1` as our rendezvous address; we can choose any available port above 1000 (e.g. `5000`) for our rendezvous port.
|
||
|
||
Then, run `NCCL_SOCKET_IFNAME=eth0 python3 nccl_speedtest.py 10.0.0.1:5000 10G 0` 
|
||
|
||
The script will start, then, once it reaches `init_process_group` it will wait for the worker process on the other node to reach the same point and complete the rendezvous before proceeding. 
|
||
|
||
On the second instance, we run `NCCL_SOCKET_IFNAME=eth0 python3 nccl_speedtest.py 10.0.0.1:5000 10G 1`
|
||
|
||
Once we've done the script on the second instance reaches the TCP rendezvous, both processes will continue and start communicating over NCCL. 
|
||
|
||
|
||
# Ollama + Webui
|
||
Source: https://docs.vast.ai/ollama-webui
|
||
|
||
|
||
|
||
# Ollama & WebUI Documentation
|
||
|
||
Below is a step-by-step guide on how to configure and run Ollama. Our template will automatically setup Open WebUI as a web based interface as well as expose a port for the Ollama API.
|
||
|
||
**R1** (deepseek-r1:70b) is used as the example model in this guide. Ollama has many [R1 models](https://ollama.com/library/deepseek-r1) available to use which the webui can download. The larger the model, the more total GPU RAM and disk space you will need to allocate when renting your GPU. The models page has a drop down menu showing the model name and total GPU RAM needed to run it. You will also need at least that much disk space on the instance.
|
||
|
||
## Find and rent your GPU
|
||
|
||
1. **Setup your Vast account and add credit:** Review the [quickstart guide](/documentation/get-started/quickstart) to get familar with the service if you do not have an account with credits loaded.
|
||
2. **Select the Ollama template:** click on [temp](https://cloud.vast.ai/templates/) and select the recommended Ollama template **Open Webui (Ollama). **Click on the play icon to select the template. You will then go to the search menu to find a GPU. 
|
||
* Click on the Readme link at any time for a detailed guide on how to use the template.
|
||
3. **Disk Space**: From the search menu, ensure you have **sufficient disk space** for the model(s) you plan to run. The disk slider is located under the template icon on the left hand column. Large models (e.g., 70B parameters) can require dozens of gigabytes of storage. For Deep Seek R1 70B, make sure to allocate 50GB of disk space using the slider. 
|
||
4. **VRAM Requirements**: Check that your **GPU VRAM** is sufficient for the model. Larger models require more VRAM. For Deep Seek R1 70B, we will need at least 43GB of VRAM. Find the slider titled GPU Total Ram and slide it ot 44GB.
|
||
5. **Example R1 **(deepseek-r1:70b): We recomend a 2X 4090 instance with 50GB of disk space. 
|
||
|
||
## Steps to Open the WebUI with Ollama
|
||
|
||
1. **After the instance loads, click the "Open" Button**
|
||
* This will initiate the Instance Portal with links to all the services running on the instance. Click the "Open WebUI" Link.
|
||
2. **Create an Admin Account**
|
||
* Upon first use (or if prompted), create an **Admin** username and password to secure your instance.
|
||
* You can add additional users in the Admin Panel
|
||
3. **Model Download**
|
||
* Click on the **admin panel -> settings**
|
||
* Click on the **Models** tab
|
||
* Click the download icon to **Manage Models**
|
||
* Put in the model name to pull directly from Ollama.com. For our example that would be: deepseek-r1:70b
|
||
* Wait for the model to fully download.
|
||
4. **Start a New Chat**
|
||
* Once the download is complete, return to the WebUI main page and start a new chat session.
|
||
* You can now test the model by sending prompts. Enjoy!
|
||
|
||
## Ollama API Usage
|
||
|
||
Ollama provides a direct API that you can call outside the WebUI. By default, it is available at:
|
||
|
||
```bash theme={null}
|
||
https://INSTANCE_IP:PORT_11434
|
||
```
|
||
|
||
### Authentication Token
|
||
|
||
* When making requests, you must include an **Authorization** header with the token value of OPEN\_BUTTON\_TOKEN.
|
||
* This token is typically displayed or stored in the WebUI settings or environment variable.
|
||
|
||
### Sample Curl Command
|
||
|
||
```bash theme={null}
|
||
curl -k https://INSTANCE_IP:EXTERNAL_PORT/v1/completions \
|
||
-H "Content-Type: application/json" \
|
||
-H "Authorization: Bearer OPEN_BUTTON_TOKEN" \
|
||
-d '{
|
||
"model": "deepseek-r1:70b",
|
||
"prompt": "San Francisco is a",
|
||
"max_tokens": 128,
|
||
"temperature": 0.6
|
||
}'
|
||
```
|
||
|
||
* -k: Allows curl to perform insecure SSL connections and transfers as Vast.ai uses a self-signed certificate.
|
||
* Replace **INSTANCE\_IP** and **EXTERNAL\_PORT** with the externally mapped port for 11434 from the IP button on the instance.
|
||
* Update the Authorization header value to match your **OPEN\_BUTTON\_TOKEN**. You can get that from any of the links in the Instance Portal or from the Open button on the instance card.
|
||
* Modify the prompt, model, and other fields (max\_tokens, temperature, etc.) as needed.
|
||
|
||
|
||
# Oobabooga (LLM webui)
|
||
Source: https://docs.vast.ai/oobabooga-llm-webui
|
||
|
||
|
||
|
||
A large language model(LLM) learns to predict the next word in a sentence by analyzing the patterns and structures in the text it has been trained on. This enables it to generate human-like text based on the input it receives.
|
||
|
||
There are many popular Open Source LLMs: Falcon 40B, Guanaco 65B, LLaMA and Vicuna. Hugging Face maintains [a leaderboard](https://huggingface.co/spaces/HuggingFaceH4/open_llm_leaderboard) of the most popular Open Source models that they have available.
|
||
|
||
[Oobabooga](https://github.com/oobabooga/text-generation-webui) is a front end that uses Gradio to serve a simple web UI for interacting with the Open Source model. In this guide, we will show you how to run an LLM using Oobabooga on Vast.
|
||
|
||
## 1) Setup your Vast account
|
||
|
||
The first thing to do if you are new to Vast is to create an account and verify your email address. Then head to the Billing tab and add credits. Vast uses Stripe to processes credit card payments and also accepts major cryptocurrencies through Coinbase or Crypto.com. \$20 should be enough to start. You can setup auto-top ups so that your credit card is charged when your balance is low.
|
||
|
||
## 2) Pick the Oobabooga template
|
||
|
||
Go to the [Templates tab](https://cloud.vast.ai/templates/) and search for "Oobabooga" among recommended templates and select it.
|
||
|
||
## 3) Allocate storage
|
||
|
||
The default storage amount will not be enough for downloading an LLM. Use the slider under the Instance Configuration to allocate more storage. 100GB should be enough.
|
||
|
||
<Frame caption="Ooobaboogasize">
|
||
<img src="https://mintcdn.com/vastai-80aa3a82/LEwury95WvhzGW2f/images/use-cases-ai-text-generation-oobabooga.png?fit=max&auto=format&n=LEwury95WvhzGW2f&q=85&s=475f6f1f9679f7248a2ea66250bba3f0" alt="Ooobaboogasize" data-og-width="362" width="362" data-og-height="418" height="418" data-path="images/use-cases-ai-text-generation-oobabooga.png" data-optimize="true" data-opv="3" srcset="https://mintcdn.com/vastai-80aa3a82/LEwury95WvhzGW2f/images/use-cases-ai-text-generation-oobabooga.png?w=280&fit=max&auto=format&n=LEwury95WvhzGW2f&q=85&s=ae8de18a0a969cd3cb4a4d41a751abd6 280w, https://mintcdn.com/vastai-80aa3a82/LEwury95WvhzGW2f/images/use-cases-ai-text-generation-oobabooga.png?w=560&fit=max&auto=format&n=LEwury95WvhzGW2f&q=85&s=c58b8676132f511b0ed5d0287ad62634 560w, https://mintcdn.com/vastai-80aa3a82/LEwury95WvhzGW2f/images/use-cases-ai-text-generation-oobabooga.png?w=840&fit=max&auto=format&n=LEwury95WvhzGW2f&q=85&s=1dc197058d6de5dcba6e6a7a6ff530a4 840w, https://mintcdn.com/vastai-80aa3a82/LEwury95WvhzGW2f/images/use-cases-ai-text-generation-oobabooga.png?w=1100&fit=max&auto=format&n=LEwury95WvhzGW2f&q=85&s=79d65d76951b5d68bbe1f3148fc399cb 1100w, https://mintcdn.com/vastai-80aa3a82/LEwury95WvhzGW2f/images/use-cases-ai-text-generation-oobabooga.png?w=1650&fit=max&auto=format&n=LEwury95WvhzGW2f&q=85&s=fc76db914cea236ec6fbb456492719d1 1650w, https://mintcdn.com/vastai-80aa3a82/LEwury95WvhzGW2f/images/use-cases-ai-text-generation-oobabooga.png?w=2500&fit=max&auto=format&n=LEwury95WvhzGW2f&q=85&s=ecf742ff152e495017ae93e32fc1a277 2500w" />
|
||
</Frame>
|
||
|
||
## 4) Pick a GPU offer
|
||
|
||
You will need to understand how much GPU RAM the LLM requires before you pick a GPU. For example, the [Falcon 40B Instruct](https://huggingface.co/tiiuae/falcon-40b-instruct) model requires 85-100 GB of GPU RAM. Falcon 7B only requires 16GB. Other models do not have great documentation on how much GPU RAM they require. If the instance doesn't have enough GPU RAM, there will be an error when trying to load the model. You can use multiple GPUs in a single instance and add their GPU RAM together.
|
||
|
||
For this guide, we will load the Falcon 40B Instruct model on a 2X A6000 instance, which has 96GB of GPU RAM in total.
|
||
|
||
<Frame caption="Oobabooga search">
|
||
<img src="https://mintcdn.com/vastai-80aa3a82/LEwury95WvhzGW2f/images/use-cases-ai-text-generation-oobabooga-2.png?fit=max&auto=format&n=LEwury95WvhzGW2f&q=85&s=276afbf4f3c2004ff62c918280d2d6dd" alt="Oobaboogasearch" data-og-width="1074" width="1074" data-og-height="558" height="558" data-path="images/use-cases-ai-text-generation-oobabooga-2.png" data-optimize="true" data-opv="3" srcset="https://mintcdn.com/vastai-80aa3a82/LEwury95WvhzGW2f/images/use-cases-ai-text-generation-oobabooga-2.png?w=280&fit=max&auto=format&n=LEwury95WvhzGW2f&q=85&s=590ff34e45967b02360839859d37c925 280w, https://mintcdn.com/vastai-80aa3a82/LEwury95WvhzGW2f/images/use-cases-ai-text-generation-oobabooga-2.png?w=560&fit=max&auto=format&n=LEwury95WvhzGW2f&q=85&s=b5cc3116532d57a2dd33ff895e55ef9e 560w, https://mintcdn.com/vastai-80aa3a82/LEwury95WvhzGW2f/images/use-cases-ai-text-generation-oobabooga-2.png?w=840&fit=max&auto=format&n=LEwury95WvhzGW2f&q=85&s=2ee38cb6dcfec6c090ae706e84d46f0f 840w, https://mintcdn.com/vastai-80aa3a82/LEwury95WvhzGW2f/images/use-cases-ai-text-generation-oobabooga-2.png?w=1100&fit=max&auto=format&n=LEwury95WvhzGW2f&q=85&s=87e230fddabcead2affee7beee6f0448 1100w, https://mintcdn.com/vastai-80aa3a82/LEwury95WvhzGW2f/images/use-cases-ai-text-generation-oobabooga-2.png?w=1650&fit=max&auto=format&n=LEwury95WvhzGW2f&q=85&s=0b0c361361cd226ad9dbbd964b7d29ff 1650w, https://mintcdn.com/vastai-80aa3a82/LEwury95WvhzGW2f/images/use-cases-ai-text-generation-oobabooga-2.png?w=2500&fit=max&auto=format&n=LEwury95WvhzGW2f&q=85&s=9c002e403413387129032b9bbd5ffa97 2500w" />
|
||
</Frame>
|
||
|
||
Click on the RENT button to start the instance which will download the docker container and boot up.
|
||
|
||
## 5) Open Oobabooga
|
||
|
||
Once the instance boots up, the Open button will open port 7860 in a new browser window. This is the Oobabooga web interface.
|
||
|
||
The web gui can take an additional 1-2 minutes to load. If the button is stuck on "Connecting" for more than 10 minutes, then something has gone wrong. You can check the log for an error and/or contact us on website chat support for 24/7 help.
|
||
|
||
## 6) Download the LLM
|
||
|
||
Click on the Model tab in the interface. Enter the Hugging Face username/model path, for instance: tiiuae/falcon-40b-instruct. To specify a branch, add it at the end after a ":" character like this: tiiuae/falcon-40b-instruct
|
||
|
||
The download will take 15-20 minutes depending on the machine's internet connection.
|
||
|
||
<Frame caption="Oob Downloading">
|
||
<img src="https://mintcdn.com/vastai-80aa3a82/LEwury95WvhzGW2f/images/use-cases-ai-text-generation-oobabooga-3.png?fit=max&auto=format&n=LEwury95WvhzGW2f&q=85&s=5631c7665f59711749e088019273888e" alt="Oob Downloading" data-og-width="1669" width="1669" data-og-height="765" height="765" data-path="images/use-cases-ai-text-generation-oobabooga-3.png" data-optimize="true" data-opv="3" srcset="https://mintcdn.com/vastai-80aa3a82/LEwury95WvhzGW2f/images/use-cases-ai-text-generation-oobabooga-3.png?w=280&fit=max&auto=format&n=LEwury95WvhzGW2f&q=85&s=b8bdaeed15b65ab4ecc1753da22b3878 280w, https://mintcdn.com/vastai-80aa3a82/LEwury95WvhzGW2f/images/use-cases-ai-text-generation-oobabooga-3.png?w=560&fit=max&auto=format&n=LEwury95WvhzGW2f&q=85&s=380f2b11a7ffe18a8e8617a4b7ec1d79 560w, https://mintcdn.com/vastai-80aa3a82/LEwury95WvhzGW2f/images/use-cases-ai-text-generation-oobabooga-3.png?w=840&fit=max&auto=format&n=LEwury95WvhzGW2f&q=85&s=91a9f825be927d61cb3a93f9815e2ddf 840w, https://mintcdn.com/vastai-80aa3a82/LEwury95WvhzGW2f/images/use-cases-ai-text-generation-oobabooga-3.png?w=1100&fit=max&auto=format&n=LEwury95WvhzGW2f&q=85&s=42f275645f69019502b8a26d17ea3e30 1100w, https://mintcdn.com/vastai-80aa3a82/LEwury95WvhzGW2f/images/use-cases-ai-text-generation-oobabooga-3.png?w=1650&fit=max&auto=format&n=LEwury95WvhzGW2f&q=85&s=e71af6f32e8eca4c13475fa6381fbda7 1650w, https://mintcdn.com/vastai-80aa3a82/LEwury95WvhzGW2f/images/use-cases-ai-text-generation-oobabooga-3.png?w=2500&fit=max&auto=format&n=LEwury95WvhzGW2f&q=85&s=169d6e6f25ae31e2d1baee1eb87548a9 2500w" />
|
||
</Frame>
|
||
|
||
To check the progress of the download, you can click on the log button on the Vast instance card on [cloud.vast.ai/instances/](https://cloud.vast.ai/instances/) which will show you the download speed for each of the LLM file segments.
|
||
|
||
## 7) Load the LLM
|
||
|
||
If you are using multiple GPUs such as the 2X A6000 selected in this guide, you will need to move the memory slider all the way over for all the GPUs. You may also have to select the "trust-remote-code" option if you get that error. Once those items are fixed, you can reload the model.
|
||
|
||
<Frame caption="Oob Model Load">
|
||
<img src="https://mintcdn.com/vastai-80aa3a82/LEwury95WvhzGW2f/images/use-cases-ai-text-generation-oobabooga-4.png?fit=max&auto=format&n=LEwury95WvhzGW2f&q=85&s=fa4a800581cb9543e7ec83c3d731aea3" alt="Oob Model Load" data-og-width="1670" width="1670" data-og-height="750" height="750" data-path="images/use-cases-ai-text-generation-oobabooga-4.png" data-optimize="true" data-opv="3" srcset="https://mintcdn.com/vastai-80aa3a82/LEwury95WvhzGW2f/images/use-cases-ai-text-generation-oobabooga-4.png?w=280&fit=max&auto=format&n=LEwury95WvhzGW2f&q=85&s=dea2a27ae3ce45d95526d3a16edfac22 280w, https://mintcdn.com/vastai-80aa3a82/LEwury95WvhzGW2f/images/use-cases-ai-text-generation-oobabooga-4.png?w=560&fit=max&auto=format&n=LEwury95WvhzGW2f&q=85&s=140e027234e2a93594660f21d138555c 560w, https://mintcdn.com/vastai-80aa3a82/LEwury95WvhzGW2f/images/use-cases-ai-text-generation-oobabooga-4.png?w=840&fit=max&auto=format&n=LEwury95WvhzGW2f&q=85&s=91ce3e994c6c14f413f83ae19fde424e 840w, https://mintcdn.com/vastai-80aa3a82/LEwury95WvhzGW2f/images/use-cases-ai-text-generation-oobabooga-4.png?w=1100&fit=max&auto=format&n=LEwury95WvhzGW2f&q=85&s=16dc6922ecea4a94e83f9ab168276837 1100w, https://mintcdn.com/vastai-80aa3a82/LEwury95WvhzGW2f/images/use-cases-ai-text-generation-oobabooga-4.png?w=1650&fit=max&auto=format&n=LEwury95WvhzGW2f&q=85&s=e59c4152b1722219c311b645bd0d2e42 1650w, https://mintcdn.com/vastai-80aa3a82/LEwury95WvhzGW2f/images/use-cases-ai-text-generation-oobabooga-4.png?w=2500&fit=max&auto=format&n=LEwury95WvhzGW2f&q=85&s=59e065d29171306e50ec040e599ded42 2500w" />
|
||
</Frame>
|
||
|
||
Any errrors loading the model will appear under the download button.
|
||
|
||
## 8) Start chatting!
|
||
|
||
Navigate to the Text generation tab to start chatting with the model. This is the most basic way to use Oobabooga, there are many other settings and things you can do with the interface.
|
||
|
||
## 9) Done? Destroy the instance
|
||
|
||
If you STOP the instance using the stop button, you will no longer pay the hourly GPU charges. **However you will still incur storage charges** because the data is still stored on the host machine. When you hit the START button to restart the instance, you are also not guaranteed that you can rent the GPU as someone else might have rented it while it was stopped.
|
||
|
||
To incur no other charges you have to DESTROY the instance using the trash can icon. **We recommend you destroy instances** so as not to incur storage charges while you are not using the system.
|
||
|
||
Have fun!
|
||
|
||
|
||
# PyTorch
|
||
Source: https://docs.vast.ai/pytorch
|
||
|
||
|
||
|
||
<script
|
||
type="application/ld+json"
|
||
dangerouslySetInnerHTML={{
|
||
__html: JSON.stringify({
|
||
"@context": "https://schema.org",
|
||
"@type": "HowTo",
|
||
"name": "Running PyTorch on Vast.ai: A Complete Guide",
|
||
"description": "Step-by-step guide to setting up and running PyTorch workloads on Vast.ai GPU cloud computing platform",
|
||
"image": "https://docs.vast.ai/images/pytorch-logo.webp",
|
||
"totalTime": "PT30M",
|
||
"supply": [
|
||
{
|
||
"@type": "HowToSupply",
|
||
"name": "Vast.ai Account"
|
||
},
|
||
{
|
||
"@type": "HowToSupply",
|
||
"name": "GPU Instance"
|
||
},
|
||
{
|
||
"@type": "HowToSupply",
|
||
"name": "PyTorch Framework"
|
||
}
|
||
],
|
||
"tool": [
|
||
{
|
||
"@type": "HowToTool",
|
||
"name": "SSH Client"
|
||
},
|
||
{
|
||
"@type": "HowToTool",
|
||
"name": "Jupyter Notebook"
|
||
}
|
||
],
|
||
"step": [
|
||
{
|
||
"@type": "HowToStep",
|
||
"name": "Set up Prerequisites",
|
||
"text": "Create a Vast.ai account and install necessary tools like SSH client",
|
||
"url": "https://docs.vast.ai/pytorch#prerequisites"
|
||
},
|
||
{
|
||
"@type": "HowToStep",
|
||
"name": "Launch GPU Instance",
|
||
"text": "Create a GPU instance with PyTorch template on Vast.ai",
|
||
"url": "https://docs.vast.ai/pytorch#launch-instance"
|
||
},
|
||
{
|
||
"@type": "HowToStep",
|
||
"name": "Configure Environment",
|
||
"text": "Set up PyTorch environment and install dependencies",
|
||
"url": "https://docs.vast.ai/pytorch#configure"
|
||
}
|
||
],
|
||
"author": {
|
||
"@type": "Organization",
|
||
"name": "Vast.ai Team"
|
||
},
|
||
"datePublished": "2025-01-13",
|
||
"dateModified": "2025-05-12"
|
||
})
|
||
}}
|
||
/>
|
||
|
||
# Running PyTorch on Vast.ai: A Complete Guide
|
||
|
||
## Introduction
|
||
|
||
This guide walks you through setting up and running PyTorch workloads on Vast.ai, a marketplace for renting GPU compute power. Whether you're training large models or running inference, this guide will help you get started efficiently.
|
||
|
||
## Prerequisites
|
||
|
||
* A Vast.ai account
|
||
* Basic familiarity with PyTorch
|
||
* [Install TLS Certificate for Jupyter](/documentation/instances/jupyter)
|
||
* [(Optional) SSH client installed on your local machine and SSH public key added in Account tab at cloud.vast.ai](/documentation/instances/sshscp)
|
||
* [(Optional) Install and use vast-cli](/cli/get-started)
|
||
* [(Optional) Docker knowledge for custom environments](https://docs.docker.com/get-started/)
|
||
|
||
## Setting Up Your Environment
|
||
|
||
### 1. Selecting PyTorch Template
|
||
|
||
Navigate to the [Templates tab](https://cloud.vast.ai/templates/) to view available templates. Before choosing a specific instance, you'll need to select the appropriate PyTorch template for your needs:
|
||
|
||
* **Choose recommended** [**PyTorch**](https://cloud.vast.ai?ref_id=62897\&template_id=a33b72bd045341cfcd678ce7c932a614) **template:**
|
||
* A container is built on the Vast.ai base image, inheriting its core functionality
|
||
* It provides a flexible development environment with pre-configured libraries
|
||
* PyTorch is pre-installed at `/venv/main/` for immediate use
|
||
* Supports for both **AMD64** and **ARM64**(Grace) architectures, especially on CUDA 12.4+
|
||
* You can select specific PyTorch versions via the Version Tag selector
|
||
|
||
<Frame caption="PyTorch">
|
||
<img src="https://mintcdn.com/vastai-80aa3a82/LEwury95WvhzGW2f/images/use-cases-ai-ml-pytorch.webp?fit=max&auto=format&n=LEwury95WvhzGW2f&q=85&s=526bc758ee1c18649a5892b706149678" alt="PyTorch" data-og-width="800" width="800" data-og-height="607" height="607" data-path="images/use-cases-ai-ml-pytorch.webp" data-optimize="true" data-opv="3" srcset="https://mintcdn.com/vastai-80aa3a82/LEwury95WvhzGW2f/images/use-cases-ai-ml-pytorch.webp?w=280&fit=max&auto=format&n=LEwury95WvhzGW2f&q=85&s=06c9ab6a75fd74b5ac4cd3a93e186bed 280w, https://mintcdn.com/vastai-80aa3a82/LEwury95WvhzGW2f/images/use-cases-ai-ml-pytorch.webp?w=560&fit=max&auto=format&n=LEwury95WvhzGW2f&q=85&s=5ca551d6e5805f20c5453b90afcf4790 560w, https://mintcdn.com/vastai-80aa3a82/LEwury95WvhzGW2f/images/use-cases-ai-ml-pytorch.webp?w=840&fit=max&auto=format&n=LEwury95WvhzGW2f&q=85&s=bdd2054149f7a7eb96de51fe119a66a0 840w, https://mintcdn.com/vastai-80aa3a82/LEwury95WvhzGW2f/images/use-cases-ai-ml-pytorch.webp?w=1100&fit=max&auto=format&n=LEwury95WvhzGW2f&q=85&s=a81dce8541135bb78511f0618da55ff0 1100w, https://mintcdn.com/vastai-80aa3a82/LEwury95WvhzGW2f/images/use-cases-ai-ml-pytorch.webp?w=1650&fit=max&auto=format&n=LEwury95WvhzGW2f&q=85&s=e0b91d1f5281bd4fab1366de683a5905 1650w, https://mintcdn.com/vastai-80aa3a82/LEwury95WvhzGW2f/images/use-cases-ai-ml-pytorch.webp?w=2500&fit=max&auto=format&n=LEwury95WvhzGW2f&q=85&s=c0a246ad87d85addc78d1b67964966a1 2500w" />
|
||
</Frame>
|
||
|
||
### 2. Choosing an Instance
|
||
|
||
Click the play button to select the template and see GPUs you can rent. For PyTorch workloads, consider:
|
||
|
||
* GPU Memory: Minimum 8GB for most models
|
||
* CUDA Version: PyTorch 2.0+ works best with CUDA 11.7 or newer
|
||
* Disk Space: Minimum 50GB for datasets and checkpoints
|
||
* Internet Speed: Look for instances with >100 Mbps for dataset downloads
|
||
|
||
Rent the GPU of your choice.
|
||
|
||
### 3. Connecting to Your Instance
|
||
|
||
Click blue button on instance card in Instances tab when it says "Open" to access Jupyter.
|
||
|
||
## Setting Up Your PyTorch Environment
|
||
|
||
### 1. Basic Environment Check
|
||
|
||
Open Python's Interactive Shell in the jupyter terminal
|
||
|
||
<img src="https://mintcdn.com/vastai-80aa3a82/LEwury95WvhzGW2f/images/use-cases-ai-ml-pytorch-2.webp?fit=max&auto=format&n=LEwury95WvhzGW2f&q=85&s=8bedff75376a9102d9cff148bcc38ccf" alt="" data-og-width="1264" width="1264" data-og-height="502" height="502" data-path="images/use-cases-ai-ml-pytorch-2.webp" data-optimize="true" data-opv="3" srcset="https://mintcdn.com/vastai-80aa3a82/LEwury95WvhzGW2f/images/use-cases-ai-ml-pytorch-2.webp?w=280&fit=max&auto=format&n=LEwury95WvhzGW2f&q=85&s=0d75bf7960e6110aa60c642db1aa118a 280w, https://mintcdn.com/vastai-80aa3a82/LEwury95WvhzGW2f/images/use-cases-ai-ml-pytorch-2.webp?w=560&fit=max&auto=format&n=LEwury95WvhzGW2f&q=85&s=7c526fade72dadcbaf617817e80f1e8b 560w, https://mintcdn.com/vastai-80aa3a82/LEwury95WvhzGW2f/images/use-cases-ai-ml-pytorch-2.webp?w=840&fit=max&auto=format&n=LEwury95WvhzGW2f&q=85&s=0a869fc781c09bfc2b90fe54596b2a5f 840w, https://mintcdn.com/vastai-80aa3a82/LEwury95WvhzGW2f/images/use-cases-ai-ml-pytorch-2.webp?w=1100&fit=max&auto=format&n=LEwury95WvhzGW2f&q=85&s=bcde22844d119a35ad0a77776edfc77e 1100w, https://mintcdn.com/vastai-80aa3a82/LEwury95WvhzGW2f/images/use-cases-ai-ml-pytorch-2.webp?w=1650&fit=max&auto=format&n=LEwury95WvhzGW2f&q=85&s=6f506ce40f67d8ccf363f6346cea6836 1650w, https://mintcdn.com/vastai-80aa3a82/LEwury95WvhzGW2f/images/use-cases-ai-ml-pytorch-2.webp?w=2500&fit=max&auto=format&n=LEwury95WvhzGW2f&q=85&s=1ba26feb72fa09cc4ad90f1964801509 2500w" />
|
||
|
||
<img src="https://mintcdn.com/vastai-80aa3a82/LEwury95WvhzGW2f/images/use-cases-ai-ml-pytorch-3.webp?fit=max&auto=format&n=LEwury95WvhzGW2f&q=85&s=9269f46f24f54e7f9a4013cb96323e98" alt="" data-og-width="800" width="800" data-og-height="104" height="104" data-path="images/use-cases-ai-ml-pytorch-3.webp" data-optimize="true" data-opv="3" srcset="https://mintcdn.com/vastai-80aa3a82/LEwury95WvhzGW2f/images/use-cases-ai-ml-pytorch-3.webp?w=280&fit=max&auto=format&n=LEwury95WvhzGW2f&q=85&s=453e09a6d491ae4d62f37ddcca967683 280w, https://mintcdn.com/vastai-80aa3a82/LEwury95WvhzGW2f/images/use-cases-ai-ml-pytorch-3.webp?w=560&fit=max&auto=format&n=LEwury95WvhzGW2f&q=85&s=d4a759cebd74d5e099202c2b451275de 560w, https://mintcdn.com/vastai-80aa3a82/LEwury95WvhzGW2f/images/use-cases-ai-ml-pytorch-3.webp?w=840&fit=max&auto=format&n=LEwury95WvhzGW2f&q=85&s=c2b42c4ce87a0986e7a3ff232fc18da9 840w, https://mintcdn.com/vastai-80aa3a82/LEwury95WvhzGW2f/images/use-cases-ai-ml-pytorch-3.webp?w=1100&fit=max&auto=format&n=LEwury95WvhzGW2f&q=85&s=c3b413ce5cc06314166081a7885eb578 1100w, https://mintcdn.com/vastai-80aa3a82/LEwury95WvhzGW2f/images/use-cases-ai-ml-pytorch-3.webp?w=1650&fit=max&auto=format&n=LEwury95WvhzGW2f&q=85&s=5496ff8769b30cbae5abd6413c7f70aa 1650w, https://mintcdn.com/vastai-80aa3a82/LEwury95WvhzGW2f/images/use-cases-ai-ml-pytorch-3.webp?w=2500&fit=max&auto=format&n=LEwury95WvhzGW2f&q=85&s=dc9edbbac948582c13e4201702625404 2500w" />
|
||
|
||
Verify your setup by executing these commands in Python's Interactive Shell in a Jupyter terminal:
|
||
|
||
```python icon="python" Python icon="python" Python theme={null}
|
||
import torch
|
||
print(f"PyTorch version: {torch.__version__}")
|
||
print(f"CUDA available: {torch.cuda.is_available()}")
|
||
print(f"GPU device: {torch.cuda.get_device_name(0)}")
|
||
```
|
||
|
||
### 2. Data Management
|
||
|
||
For efficient data handling:
|
||
|
||
a) Fast local storage:
|
||
|
||
```bash theme={null}
|
||
mkdir /workspace/data
|
||
cd /workspace/data
|
||
```
|
||
|
||
b) Dataset downloads:
|
||
|
||
```bash theme={null}
|
||
# Using wget
|
||
wget your_dataset_url
|
||
|
||
# Using git lfs for larger files: https://git-lfs.com/
|
||
sudo apt-get install git-lfs
|
||
git lfs install
|
||
git clone your_dataset_repo
|
||
```
|
||
|
||
## Training Best Practices
|
||
|
||
### Checkpoint Management
|
||
|
||
Always save checkpoints to prevent data loss:
|
||
|
||
```python icon="python" Python theme={null}
|
||
checkpoint_dir = '/workspace/checkpoints'
|
||
os.makedirs(checkpoint_dir, exist_ok=True)
|
||
|
||
checkpoint = {
|
||
'epoch': epoch,
|
||
'model_state_dict': model.state_dict(),
|
||
'optimizer_state_dict': optimizer.state_dict(),
|
||
'loss': loss,
|
||
}
|
||
torch.save(checkpoint, f'{checkpoint_dir}/checkpoint_{epoch}.pt')
|
||
```
|
||
|
||
### Resource Monitoring
|
||
|
||
Monitor GPU usage:
|
||
|
||
```bash theme={null}
|
||
watch -n 1 nvidia-smi
|
||
```
|
||
|
||
Or in Python:
|
||
|
||
```python icon="python" Python theme={null}
|
||
def print_gpu_utilization():
|
||
print(torch.cuda.memory_allocated() / 1024**2, "MB Allocated")
|
||
print(torch.cuda.memory_reserved() / 1024**2, "MB Reserved")
|
||
```
|
||
|
||
## Cost Optimization
|
||
|
||
### Instance Selection
|
||
|
||
* Use [vast cli search offers command ](https://vast.ai/docs/cli/commands#search-offers)to search for machines that fit your budget
|
||
* Monitor your spending in Vast.ai's Billing tab
|
||
|
||
### Resource Utilization
|
||
|
||
* Use appropriate batch sizes to maximize GPU utilization
|
||
* Enable gradient checkpointing for large models
|
||
* Implement early stopping to avoid unnecessary compute time
|
||
|
||
## Troubleshooting
|
||
|
||
### Common Issues and Solutions
|
||
|
||
* Out of Memory (OOM) Errors
|
||
* Reduce batch size
|
||
* Enable gradient checkpointing
|
||
* Use mixed precision training
|
||
|
||
```python icon="python" Python theme={null}
|
||
from torch.cuda.amp import autocast, GradScaler
|
||
|
||
scaler = GradScaler()
|
||
with autocast():
|
||
outputs = model(inputs)
|
||
loss = criterion(outputs, labels)
|
||
scaler.scale(loss).backward()
|
||
```
|
||
|
||
* Slow Training
|
||
* Check GPU utilization
|
||
* Verify data loading pipeline
|
||
* Consider using `torch.compile()` for PyTorch 2.0+
|
||
|
||
```python icon="python" Python theme={null}
|
||
model = torch.compile(model)
|
||
```
|
||
|
||
* Connection Issues
|
||
* Use `tmux` or `screen` for persistent sessions
|
||
* Set up automatic reconnection in your SSH config
|
||
|
||
## Best Practices
|
||
|
||
### Environment Management
|
||
|
||
* Document your setup and requirements
|
||
* Keep track of software versions
|
||
|
||
### Data Management
|
||
|
||
* Use data versioning tools
|
||
* Implement proper data validation
|
||
* Set up efficient data loading pipelines
|
||
|
||
### Training Management
|
||
|
||
* Implement logging (e.g., WandB, TensorBoard)
|
||
* Set up experiment tracking
|
||
* Use configuration files for hyperparameters
|
||
|
||
## Advanced Topics
|
||
|
||
### Multi-GPU Training
|
||
|
||
For distributed training:
|
||
|
||
```python icon="python" Python theme={null}
|
||
model = torch.nn.DataParallel(model)
|
||
```
|
||
|
||
### Mixed Precision Training
|
||
|
||
Enable AMP for faster training:
|
||
|
||
```python icon="python" Python theme={null}
|
||
from torch.cuda.amp import autocast
|
||
|
||
with autocast():
|
||
outputs = model(inputs)
|
||
```
|
||
|
||
### Custom Docker Images
|
||
|
||
Create a custom Docker image from your own Dockerfile and [create your own template](https://vast.ai/docs/use-cases/create-your-own-template) as needed:
|
||
|
||
```dockerfile theme={null}
|
||
FROM pytorch/pytorch:2.1.0-cuda11.8-cudnn8-runtime
|
||
|
||
# Install additional dependencies
|
||
RUN pip install wandb tensorboard
|
||
|
||
# Add your custom requirements
|
||
COPY requirements.txt .
|
||
RUN pip install -r requirements.txt
|
||
```
|
||
|
||
## Conclusion
|
||
|
||
Running PyTorch on Vast.ai provides a cost-effective way to rent cheap GPUs and accelerate deep learning workloads. By following this guide and best practices, you can efficiently set up and manage your PyTorch workloads while optimizing costs and performance.
|
||
|
||
## Additional Resources
|
||
|
||
* [PyTorch Documentation](https://pytorch.org/docs/stable/index.html)
|
||
* [Vast.ai Documentation](/documentation/get-started/index)
|
||
* [PyTorch Performance Tuning Guide](https://pytorch.org/tutorials/recipes/recipes/tuning_guide.html)
|
||
|
||
|
||
# Quantized GGUF models (cloned)
|
||
Source: https://docs.vast.ai/quantized-gguf-models-cloned
|
||
|
||
|
||
|
||
Here's a step-by-step guide to running quantized LLM models in multi-part GGUF format. We will use [Unsloth's Deepseek-R1 Q8\_0 model](https://huggingface.co/unsloth/DeepSeek-R1-GGUF) as an example. This model is very large and will require an 8xH200 machine configuration, but you can also follow this guide for much smaller models.
|
||
|
||
Before moving on with the guide,** Setup your Vast account and add credit**. Review the [quickstart guide](/documentation/get-started/quickstart) to get familar with the service if you do not have an account with credits loaded.
|
||
|
||
## Llama.cpp
|
||
|
||
Llama.cpp is the recommended method for loading these models as it is able to directly load a split file of many parts without first merging them.
|
||
|
||
While it's easy to build llama.cpp inside one of our instances, we will focus on running this model in the Open WebUI template which contains a pre-compiled CUDA compatible versions of llama-server and llama-cli. 
|
||
|
||
## Open WebUI Template  
|
||
|
||
OpenWebui + Ollama is one of our recommended templates. While its default setup uses Ollama as a backend, it can also access an OpenAI-compatible API and it has been pre-configured to find one running on `http://localhost:20000`
|
||
|
||
A full guide to getting started with the OpenWebUI template is available [here](/ollama-webui)
|
||
|
||
Ensure you have enough disk space and a suitable configuration. For Deepseek-R1 Q8\_0 you'll need:
|
||
|
||
* At least 800GB VRAM
|
||
* 700GB storage space
|
||
|
||
The recommended configuration for this particular model is 8 x H200 with 750GB storage.
|
||
|
||
Once you have loaded up the template, you'll need to open up a terminal where we will pull and then serve the model.
|
||
|
||
### Pulling the model
|
||
|
||
You will want to download the models from the [Deepseek-R1 Q8\_0 model](https://huggingface.co/unsloth/DeepSeek-R1-GGUF) hugging face repo to the `/workspace/llama.cpp/models` directory on your instance. We have included a script with the [Ollama + Open WebUI](https://cloud.vast.ai?ref_id=62897\&template_id=d8aa06abd242979cee20d6646068167d) template that you may use to easily download the models.
|
||
|
||
```bash Bash theme={null}
|
||
llama-dl.sh --repo unsloth/DeepSeek-R1-GGUF --version Q8_0
|
||
```
|
||
|
||
This download will take some time as HuggingFace limits download speed, so even on an instance with very fast download speeds it may take up to an hour to completely download.
|
||
|
||
### Serving the model
|
||
|
||
Once the dowload has completed it's time to serve the model using the pre-built `llama-server` application.
|
||
|
||
Again, from the terminal, type the following:
|
||
|
||
```javascript JavaScript icon="js" theme={null}
|
||
llama-server \
|
||
--model /workspace/llama.cpp/models/DeepSeek-R1-Q8_0/DeepSeek-R1.Q8_0-00001-of-00015.gguf \
|
||
--ctx-size 8192 \
|
||
--n-gpu-layers 62 \
|
||
--port 20000
|
||
```
|
||
|
||
This command will load all of the model layers into GPU VRAM and begin serving the API at http\://localhost:20000
|
||
|
||
Once the model has finished loading to the GPU, it will be availabe directly from the OpenWebui interface in the model selector. Again, this may take some time to load and if you already have OpenWebui open then you may need to refresh the page.
|
||
|
||
## Building Llama.cpp
|
||
|
||
If you prefer to build llama.cpp yourself, you can simply run the following from any Vast-built template. The Recommended Nvidia CUDA template would be an ideal start.
|
||
|
||
```bash Bash theme={null}
|
||
apt-get install libcurl4-openssl-dev
|
||
git clone https://github.com/ggerganov/llama.cpp
|
||
cmake llama.cpp -B /tmp/llama.cpp/build \
|
||
-DBUILD_SHARED_LIBS=OFF -DGGML_CUDA=ON -DLLAMA_CURL=ON
|
||
cmake --build /tmp/llama.cpp/build --config Release -j --clean-first --target llama-quantize llama-cli llama-server llama-gguf-split
|
||
```
|
||
|
||
These commands will build the `llama-quantize` `llama-cli` `llama-server` and `llama-gguf-split` tools.
|
||
|
||
For advanced build instructions you should see the [official documentation](https://github.com/ggerganov/llama.cpp?tab=readme-ov-file#building-the-project) on GitHub. 
|
||
|
||
## Further Reading
|
||
|
||
Please see the template Readme for advanced template configuration, particularly if you would like to modify the template to make the llama-server API available externally with authentication or via a SSH tunnel.
|
||
|
||
|
||
# RTX 5 Series
|
||
Source: https://docs.vast.ai/rtx-5-series
|
||
|
||
Optimize your GPU experience with our comprehensive guide on RTX 5 Series GPUs (5090/5080/5070) and CUDA 12.8 compatibility. Learn how to rent an RTX 5090 on Vast.ai, select the right templates, and customize your storage while ensuring optimal performance.
|
||
|
||
## Renting RTX 5 Series GPUs (5090/5080/5070/5060)
|
||
|
||
Many of our recommended templates now support Blackwell series Nvidia GPU's including the RTX 5 series.
|
||
|
||
Blackwell GPUs do not have the same backwards compatibility as seen in some previous generation Nvidia GPU's so it is important that the template and Docker image has been configured to use CUDA 12.8 and PyTorch 2.7 or greater.
|
||
|
||
Any template that is known to be compatible with this GPU type will automatically show these GPUs in the offer listing. Those without support will exclude the unsupported cards when searching for an instance.
|
||
|
||
Templates configured with the `[Automatic]` tag will pull the most recent & supported docker image. This enables wider support across the range of GPUs you can find at Vast.ai
|
||
|
||
## Steps to Rent an RTX 5000 Series GPU on Vast.ai
|
||
|
||
1. **Create / Log in to your Vast.ai account**
|
||
Go to [cloud.vast.ai](https://cloud.vast.ai) and either create a new account or log in.
|
||
|
||
2. **Select a Recommended template with "\[Automatic]" set as the Version Tag (this is the default option).**
|
||
To check this, click the 'pencil' icon on the template card to open the template editor, you can view the image tag.
|
||
|
||
<img src="https://mintcdn.com/vastai-80aa3a82/cNHQLqV42N4xE1uT/images/rtx-5-series.webp?fit=max&auto=format&n=cNHQLqV42N4xE1uT&q=85&s=cda9408340cbd1c2efc8fca4adaf3a79" alt="" data-og-width="961" width="961" data-og-height="130" height="130" data-path="images/rtx-5-series.webp" data-optimize="true" data-opv="3" srcset="https://mintcdn.com/vastai-80aa3a82/cNHQLqV42N4xE1uT/images/rtx-5-series.webp?w=280&fit=max&auto=format&n=cNHQLqV42N4xE1uT&q=85&s=0373b04288659f89c21784bf798358bc 280w, https://mintcdn.com/vastai-80aa3a82/cNHQLqV42N4xE1uT/images/rtx-5-series.webp?w=560&fit=max&auto=format&n=cNHQLqV42N4xE1uT&q=85&s=40334f5e1a2f6601309bf0569ce0bf45 560w, https://mintcdn.com/vastai-80aa3a82/cNHQLqV42N4xE1uT/images/rtx-5-series.webp?w=840&fit=max&auto=format&n=cNHQLqV42N4xE1uT&q=85&s=b0d5a2f32526834bec271e510b7fc0ff 840w, https://mintcdn.com/vastai-80aa3a82/cNHQLqV42N4xE1uT/images/rtx-5-series.webp?w=1100&fit=max&auto=format&n=cNHQLqV42N4xE1uT&q=85&s=7be02362eea4c7f6fef048fcc13169cc 1100w, https://mintcdn.com/vastai-80aa3a82/cNHQLqV42N4xE1uT/images/rtx-5-series.webp?w=1650&fit=max&auto=format&n=cNHQLqV42N4xE1uT&q=85&s=7f5dc706c3f36c8dd497f8bb331f5b88 1650w, https://mintcdn.com/vastai-80aa3a82/cNHQLqV42N4xE1uT/images/rtx-5-series.webp?w=2500&fit=max&auto=format&n=cNHQLqV42N4xE1uT&q=85&s=eb0993a314ffef4d1695c569db61425b 2500w" />
|
||
|
||
3. **Select the 5 series GPU from search filters**
|
||
In the GPU drop down menu select the specific 5 series card you want to rent or select the whole category.
|
||
|
||
<img src="https://mintcdn.com/vastai-80aa3a82/cNHQLqV42N4xE1uT/images/rtx-5-series-2.webp?fit=max&auto=format&n=cNHQLqV42N4xE1uT&q=85&s=9c9a4241a9756afd99a9606b59aed118" alt="" data-og-width="800" width="800" data-og-height="552" height="552" data-path="images/rtx-5-series-2.webp" data-optimize="true" data-opv="3" srcset="https://mintcdn.com/vastai-80aa3a82/cNHQLqV42N4xE1uT/images/rtx-5-series-2.webp?w=280&fit=max&auto=format&n=cNHQLqV42N4xE1uT&q=85&s=7c11ee8475015ffe46cd9cc4ce53c05f 280w, https://mintcdn.com/vastai-80aa3a82/cNHQLqV42N4xE1uT/images/rtx-5-series-2.webp?w=560&fit=max&auto=format&n=cNHQLqV42N4xE1uT&q=85&s=5d5fd2ad6b0aec6899f88f674762ac03 560w, https://mintcdn.com/vastai-80aa3a82/cNHQLqV42N4xE1uT/images/rtx-5-series-2.webp?w=840&fit=max&auto=format&n=cNHQLqV42N4xE1uT&q=85&s=2accb02127b7e747ca8568350b1f6704 840w, https://mintcdn.com/vastai-80aa3a82/cNHQLqV42N4xE1uT/images/rtx-5-series-2.webp?w=1100&fit=max&auto=format&n=cNHQLqV42N4xE1uT&q=85&s=50fb3122f6581767ab44bc98e53a8632 1100w, https://mintcdn.com/vastai-80aa3a82/cNHQLqV42N4xE1uT/images/rtx-5-series-2.webp?w=1650&fit=max&auto=format&n=cNHQLqV42N4xE1uT&q=85&s=64d8ceb9c18bc58ef7b9b4bee0ef2ce7 1650w, https://mintcdn.com/vastai-80aa3a82/cNHQLqV42N4xE1uT/images/rtx-5-series-2.webp?w=2500&fit=max&auto=format&n=cNHQLqV42N4xE1uT&q=85&s=55ea8365034ac5cb31ec0a2d4da51a21 2500w" />
|
||
|
||
4. **Review and customize**
|
||
Set your storage and further refine your search filters (e.g., secure cloud, location, system RAM, CPU, etc.). ⚠️ Do **not** change the Docker image because you need to maintain CUDA 12.8 and the dev version of PyTorch. If you switch to an incompatible Docker image, you may lose 5 series compatibility.
|
||
|
||
5. **Select and rent**
|
||
Click “Rent” next to your preferred server. You can now launch Jupyter notebooks, SSH into the instance, or start your own training jobs using the pre-installed CUDA 12.8 / PyTorch dev environment.
|
||
|
||
## Tips and Troubleshooting
|
||
|
||
* **Check CUDA version**: If you manually change the Docker image, ensure it’s compiled for CUDA 12.8 or else you may lose compatibility with these GPUs.
|
||
* **Stay up to date**: New PyTorch releases (especially nightlies / dev builds) often update their CUDA support. If you need a stable release, confirm that the Docker image tags match a stable version with CUDA 12.8.
|
||
* **Use custom Docker**: If you have your own Docker image, you must ensure it is built with CUDA 12.8 (and ideally tested on a GPU supporting that version).
|
||
|
||
|
||
# Python SDK Usage
|
||
Source: https://docs.vast.ai/sdk/python/quickstart
|
||
|
||
|
||
|
||
We provide a [PyPI package](https://pypi.org/project/vastai/), `vastai-sdk`, for convenient Python usage.
|
||
|
||
## PyPI Install
|
||
|
||
You can install the latest stable PyPI release with:
|
||
|
||
```text Text theme={null}
|
||
pip install vastai-sdk
|
||
```
|
||
|
||
## Usage
|
||
|
||
Import the package:
|
||
|
||
```text Text theme={null}
|
||
from vastai_sdk import VastAI
|
||
```
|
||
|
||
Construct a Vast client with your API key:
|
||
|
||
```text Text theme={null}
|
||
vast_sdk = VastAI(api_key='YOUR_API_KEY')
|
||
```
|
||
|
||
## Resource Methods
|
||
|
||
Most useful available VastAI resources are implemented. Commands for Vast CLI usage should have equivalent class methods on your Vast client object. Most IDEs should show type hints and relevant class methods and their expected arguments for `VastAI`, due to the implementation of our base class.
|
||
|
||
For example, the CLI command `vastai show instances` has the equivalent, `vast_sdk.show_instances()`.
|
||
|
||
```text Text theme={null}
|
||
from vastai_sdk import VastAI
|
||
|
||
vast_sdk = VastAI(api_key='YOUR_API_KEY')
|
||
|
||
output = vast_sdk.show_instances()
|
||
print(output)
|
||
```
|
||
|
||
## Example Usage
|
||
|
||
Here are some example usages of our Python SDK class `VastAI`:
|
||
|
||
### Starting and Stopping Instances
|
||
|
||
```text Text theme={null}
|
||
from vastai_sdk import VastAI
|
||
|
||
vast_sdk = VastAI(api_key='YOUR_API_KEY')
|
||
|
||
vast_sdk.start_instance(ID=12345678)
|
||
|
||
vast_sdk.stop_instance(ID=12345678)
|
||
```
|
||
|
||
### Creating a New Instance
|
||
|
||
Create a new instance based on given parameters (performs search offers + create instance).
|
||
|
||
```text Text theme={null}
|
||
from vastai_sdk import VastAI
|
||
|
||
vast_sdk = VastAI(api_key='YOUR_API_KEY')
|
||
|
||
vast_sdk.launch_instance(num_gpus="1", gpu_name="RTX_3090", image="pytorch/pytorch")
|
||
```
|
||
|
||
### Copying Files Between Instances
|
||
|
||
```text Text theme={null}
|
||
from vastai_sdk import VastAI
|
||
|
||
vast_sdk = VastAI(api_key='YOUR_API_KEY')
|
||
|
||
vast_sdk.copy(src='source_path', dst='destination_path', identity='identity_file')
|
||
```
|
||
|
||
### Managing SSH Keys
|
||
|
||
Create a new SSH key, show all SSH keys, and delete an SSH key.
|
||
|
||
```text Text theme={null}
|
||
from vastai_sdk import VastAI
|
||
|
||
vast_sdk = VastAI(api_key='YOUR_API_KEY')
|
||
|
||
vast_sdk.create_ssh_key(ssh_key='your_ssh_key')
|
||
|
||
ssh_keys = vast_sdk.show_ssh_keys()
|
||
print(ssh_keys)
|
||
|
||
vast_sdk.delete_ssh_key(ID=123456)
|
||
```
|
||
|
||
## Contribution and Issue Reporting
|
||
|
||
This [code repository](https://github.com/vast-ai/vast-python) is open source and can be rapidly changing at times. If you find a potential bug, please open an issue on GitHub. If you wish to contribute to improving this code and its functionality, feel welcome to open a PR with any improvements on our [GitHub repository](https://github.com/vast-ai/vast-python).
|
||
|
||
## Available Methods
|
||
|
||
Below is a list of the available methods you can call on the `VastAI` client. These methods are categorized for better readability.
|
||
|
||
### Instance Management
|
||
|
||
| Method | Description |
|
||
| ---------------------------------------------------- | ---------------------------------------------- |
|
||
| `start_instance(ID: int)` | Start an instance. |
|
||
| `stop_instance(ID: int)` | Stop an instance. |
|
||
| `reboot_instance(ID: int)` | Reboot an instance. |
|
||
| `destroy_instance(id: int)` | Destroy an instance. |
|
||
| `destroy_instances(ids: List[int])` | Destroy multiple instances. |
|
||
| `recycle_instance(ID: int)` | Recycle an instance. |
|
||
| `label_instance(id: int, label: str)` | Label an instance. |
|
||
| `show_instance(id: int)` | Show details of an instance. |
|
||
| `show_instances(quiet: bool = False)` | Show all instances. |
|
||
| `logs(INSTANCE_ID: int, tail: Optional[str] = None)` | Retrieve logs for an instance. |
|
||
| `execute(ID: int, COMMAND: str)` | Execute a command on an instance. |
|
||
| `launch_instance(...)` | Launch a new instance with various parameters. |
|
||
|
||
### SSH Key Management
|
||
|
||
| Method | Description |
|
||
| ----------------------------------------------- | ----------------------------------- |
|
||
| `create_ssh_key(ssh_key: str)` | Create a new SSH key. |
|
||
| `delete_ssh_key(ID: int)` | Delete an SSH key. |
|
||
| `show_ssh_keys()` | Show all SSH keys. |
|
||
| `attach_ssh(instance_id: int, ssh_key: str)` | Attach an SSH key to an instance. |
|
||
| `detach_ssh(instance_id: int, ssh_key_id: str)` | Detach an SSH key from an instance. |
|
||
|
||
### API Key Management
|
||
|
||
| Method | Description |
|
||
| ------------------------------------------------- | --------------------------- |
|
||
| `create_api_key(name: Optional[str] = None, ...)` | Create a new API key. |
|
||
| `delete_api_key(ID: int)` | Delete an API key. |
|
||
| `reset_api_key()` | Reset the API key. |
|
||
| `show_api_key(id: int)` | Show details of an API key. |
|
||
| `show_api_keys()` | Show all API keys. |
|
||
| `set_api_key(new_api_key: str)` | Set a new API key. |
|
||
|
||
### Autoscaler Management
|
||
|
||
| Method | Description |
|
||
| ------------------------------------------------------------------- | ------------------------ |
|
||
| `create_autoscaler(test_workers: int = 3, ...)` | Create a new autoscaler. |
|
||
| `update_autoscaler(ID: int, min_load: Optional[float] = None, ...)` | Update an autoscaler. |
|
||
| `delete_autoscaler(ID: int)` | Delete an autoscaler. |
|
||
| `show_autoscalers()` | Show all autoscalers. |
|
||
|
||
### Endpoint Management
|
||
|
||
| Method | Description |
|
||
| ----------------------------------------------------------------- | ---------------------- |
|
||
| `create_endpoint(min_load: float = 0.0, ...)` | Create a new endpoint. |
|
||
| `update_endpoint(ID: int, min_load: Optional[float] = None, ...)` | Update an endpoint. |
|
||
| `delete_endpoint(ID: int)` | Delete an endpoint. |
|
||
| `show_endpoints()` | Show all endpoints. |
|
||
|
||
### File Management
|
||
|
||
| Method | Description |
|
||
| ------------------------------------------------------------------------------- | ----------------------------------------------------------- |
|
||
| `copy(src: str, dst: str, identity: Optional[str] = None)` | Copy files between instances. |
|
||
| `cloud_copy(src: Optional[str] = None, dst: Optional[str] = "/workspace", ...)` | Copy files between cloud and instance. |
|
||
| `cancel_copy(dst: str)` | Cancel a file copy operation. |
|
||
| `cancel_sync(dst: str)` | Cancel a file sync operation. |
|
||
| `scp_url(id: int)` | Get the SCP URL for transferring files to/from an instance. |
|
||
|
||
### Team Management
|
||
|
||
| Method | Description |
|
||
| ------------------------------------------------------------------------------------------ | ------------------------------------- |
|
||
| `create_team(team_name: Optional[str] = None)` | Create a new team. |
|
||
| `destroy_team()` | Destroy a team. |
|
||
| `invite_team_member(email: Optional[str] = None, role: Optional[str] = None)` | Invite a new member to the team. |
|
||
| `remove_team_member(ID: int)` | Remove a member from the team. |
|
||
| `create_team_role(name: Optional[str] = None, permissions: Optional[str] = None)` | Create a new team role. |
|
||
| `remove_team_role(NAME: str)` | Remove a role from the team. |
|
||
| `update_team_role(ID: int, name: Optional[str] = None, permissions: Optional[str] = None)` | Update details of a team role. |
|
||
| `show_team_members()` | Show all team members. |
|
||
| `show_team_role(NAME: str)` | Show details of a specific team role. |
|
||
| `show_team_roles()` | Show all team roles. |
|
||
|
||
### Host Management
|
||
|
||
| Method | Description |
|
||
| ---------------------------------------------------------------------------------------------------------------------------------------------------------------------------------------------------------------------------------------------------------------------------------------- | ------------------------------------------------------------------------------------- |
|
||
| `cleanup_machine(ID: int)` | Clean up a machine's configuration and resources. |
|
||
| `list_machine(ID: int, price_gpu: Optional[float] = None, price_disk: Optional[float] = None, price_inetu: Optional[float] = None, price_inetd: Optional[float] = None, discount_rate: Optional[float] = None, min_chunk: Optional[int] = None, end_date: Optional[str] = None)` | List details of a single machine with optional pricing and configuration parameters. |
|
||
| `list_machines(IDs: List[int], price_gpu: Optional[float] = None, price_disk: Optional[float] = None, price_inetu: Optional[float] = None, price_inetd: Optional[float] = None, discount_rate: Optional[float] = None, min_chunk: Optional[int] = None, end_date: Optional[str] = None)` | List details of multiple machines with optional pricing and configuration parameters. |
|
||
| `remove_defjob(id: int)` | Remove the default job from a machine. |
|
||
| `set_defjob(id: int, price_gpu: Optional[float] = None, price_inetu: Optional[float] = None, price_inetd: Optional[float] = None, image: Optional[str] = None, args: Optional[List[str]] = None)` | Set a default job on a machine with specified parameters. |
|
||
| `set_min_bid(id: int, price: Optional[float] = None)` | Set the minimum bid price for a machine. |
|
||
| `schedule_maint(id: int, sdate: Optional[float] = None, duration: Optional[float] = None)` | Schedule maintenance for a machine. |
|
||
| `cancel_maint(id: int)` | Cancel scheduled maintenance for a machine. |
|
||
| `unlist_machine(id: int)` | Unlist a machine from being available for new jobs. |
|
||
| `show_machines(quiet: bool = False, filter: Optional[str] = None)` | Retrieve and display a list of machines based on specified criteria. |
|
||
|
||
### Other Methods
|
||
|
||
| Method | Description |
|
||
| ---------------------------------------------------------------------------------------------------------------------------------------------------------------------- | ------------------------------------------------ |
|
||
| `get_gpu_names()` | Returns a set of GPU names available on Vast.ai. |
|
||
| `show_connections()` | Show all connections. |
|
||
| `show_deposit(ID: int)` | Show deposit details for an instance. |
|
||
| `show_earnings(quiet: bool = False, start_date: Optional[str] = None, end_date: Optional[str] = None, machine_id: Optional[int] = None)` | Show earnings information. |
|
||
| `show_invoices(quiet: bool = False, start_date: Optional[str] = None, end_date: Optional[str] = None, ...)` | Show invoice details. |
|
||
| `show_ipaddrs()` | Show IP addresses. |
|
||
| `show_user(quiet: bool = False)` | Show user details. |
|
||
| `show_subaccounts(quiet: bool = False)` | Show all subaccounts of the current user. |
|
||
| `transfer_credit(recipient: str, amount: float)` | Transfer credit to another account. |
|
||
| `update_ssh_key(id: int, ssh_key: str)` | Update an SSH key. |
|
||
| `generate_pdf_invoices(quiet: bool = False, start_date: Optional[str] = None, end_date: Optional[str] = None, only_charges: bool = False, only_credits: bool = False)` | Generate PDF invoices based on filters. |
|
||
|
||
Please refer to the VastAI Python SDK [API Reference](https://github.com/vast-ai/vast-python) for detailed information on all available methods and their usage.
|
||
|
||
|
||
# Stable Diffusion
|
||
Source: https://docs.vast.ai/stable-diffusion
|
||
|
||
|
||
|
||
Stable Diffusion is a deep learning, text-to-image model that has been publicly released. It uses a variant of the diffusion model called latent diffusion. There are a few popular Open Source repos that create an easy to use web interface for typing in the prompts, managing the settings and seeing the images.
|
||
|
||
This guide will use the webui Github repo maintained by Automatic111 [here](https://github.com/AUTOMATIC1111/stable-diffusion-webui). The docker image used comes pre-loaded with Stable Diffusion v2.1, and it is possible to upload other models once you have the instance up and running. The recommend template will also setup Jupyter so you can use a web browser to download and upload files to the instance.
|
||
|
||
For all questions or issues with the web GUI, the project has a [readme](https://github.com/AUTOMATIC1111/stable-diffusion-webui) with links.
|
||
|
||
## 1) Setup your Vast account
|
||
|
||
The first thing to do if you are new to Vast is to create an account. Then head to the Billing tab and add credits. This is pretty self-explanatory. Vast uses Stripe to processes credit card payments and also accepts major cryptocurrencies through Crypto.com. \$20 should be enough to start. You pre-buy credits on Vast and then spend them down.
|
||
|
||
## 2) Pick the webui template
|
||
|
||
Click on the Change template button from the create page. Then click on the edit button on the Stable Diffusion template. We will need to set a username and password, so it is very important that we *edit* our template to set a username and password first.
|
||
|
||
<Frame caption="Stablediffusionedit">
|
||

|
||
</Frame>
|
||
|
||
## 3) Set your username and password
|
||
|
||
>
|
||
|
||
To set your username and password, go to the beginning of the Docker Options and add the arguments
|
||
|
||
```text Text theme={null}
|
||
-e WEB_USER=YOUR_USERNAME -e WEB_PASSWORD=YOUR_PASSWORD
|
||
```
|
||
|
||
as shown below.
|
||
|
||
<Frame caption="Stablediffusionoptions">
|
||

|
||
</Frame>
|
||
|
||
You can also add the variables one by one in the env input
|
||
|
||
<Frame caption="Stablediffusionenv">
|
||

|
||
</Frame>
|
||
|
||
## 4) Pick a GPU offer
|
||
|
||
Stable Diffusion can only run on a 1X GPU so select 1X from the filter menu on the top nav. This will then update the interface to show 1X GPU offers. Note that some Stable Diffusion models require large amounts of GPU VRAM. For max settings, you want more GPU RAM. Use the GPU RAM slider in the interface to find offers with over 20GB. We recommend an A6000, A40 or A100 if you want to max the Stable Diffusion settings.
|
||
|
||
<Frame caption="Spaces Mgwtdaam0Bo2Skpvyo6Q Uploads Pyphz4Oz3M2Fz8Kwl7Wo Stable Diffusion Gpu Selection">
|
||
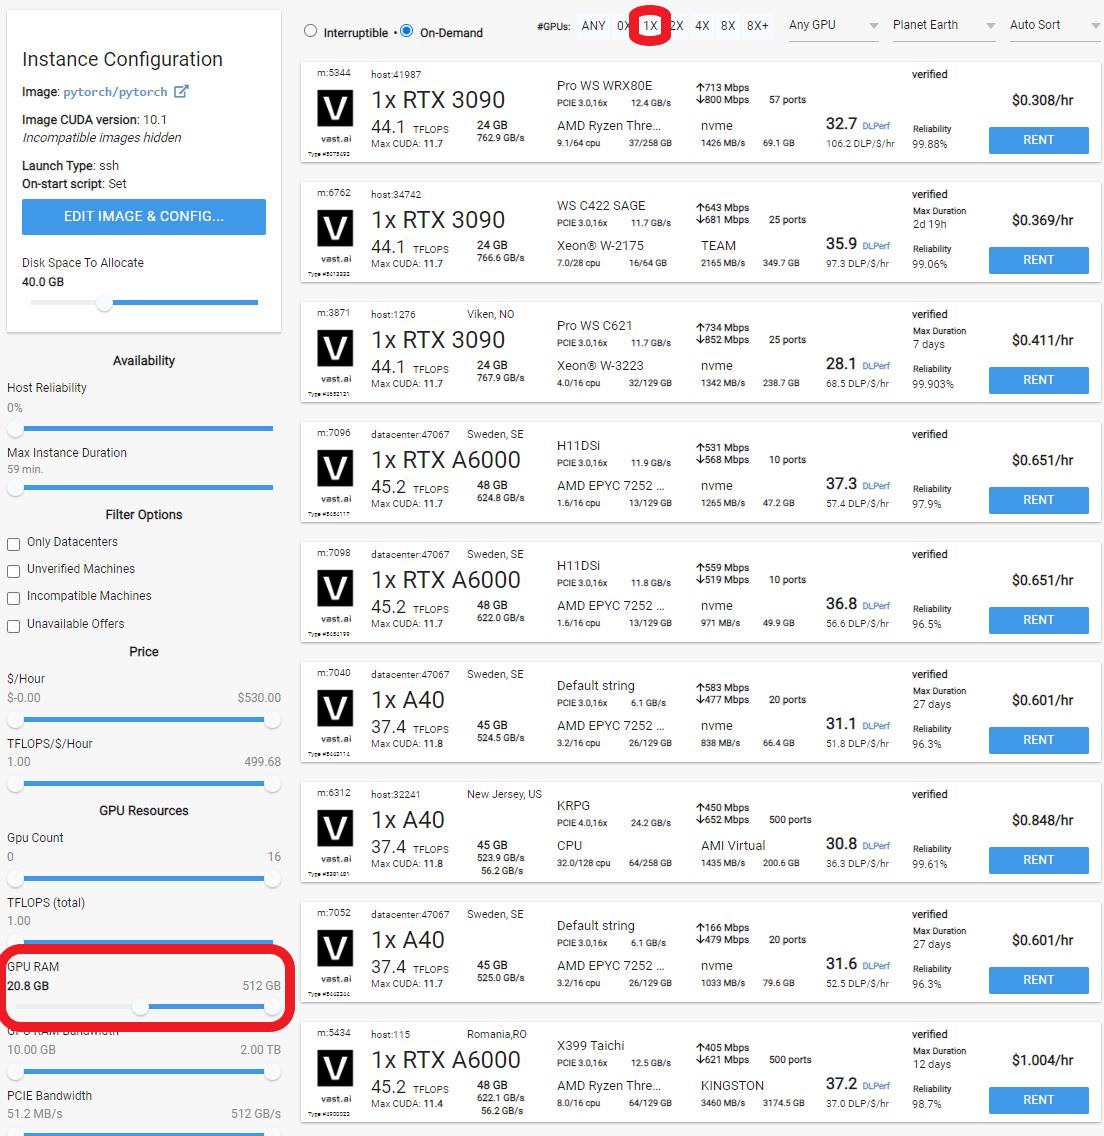
|
||
</Frame>
|
||
|
||
If available, it is also best to pick a host with the datacenter label, as those machines are more reliable.
|
||
|
||
Click the blue RENT button to spin up the instance. You can then watch progress from the instance tab.
|
||
|
||
## 5) Connect and start making art
|
||
|
||
The instance can take 3-5 minutes to start. Once it is ready a blue connect button will appear. Click on that to open the web gui.
|
||
|
||
<Warning>
|
||
**WARNING**<br />
|
||
The web gui can take an additional 1-2 minutes to load. If you click on the connect button and get a blank page or error, simply wait 1-2 minutes and reload the page.
|
||
</Warning>
|
||
|
||
And there you go! Please read the [Automatic111 documentation](https://github.com/AUTOMATIC1111/stable-diffusion-webui) for how the web GUI works.
|
||
|
||
There are buttons to save and download the artwork, and also to zip it up.
|
||
|
||
<Frame caption="Spaces Mgwtdaam0Bo2Skpvyo6Q Uploads Klcmg0Mgpmu9Bmipwvsv Stable Diffusion Working">
|
||
|
||
</Frame>
|
||
|
||
## 6) Upload other model checkpoints
|
||
|
||
The recommended template has both SSH and Jupyter HTTPS launch modes enabled. To upload a model checkpoint, the simplest way is to click on the Jupyter button on the instances card to open Jupyter and then to upload the .ckpt file to the /workspace/stable-diffusion-webui/models/Stable-diffusion directory.
|
||
|
||
The Jupyter HTTPS launch mode will require you to install a certificate on your local machine. On macOS, this is not optional. Windows and Linux will show an error if the cert is not installed but there is a way to click through the error. To install the Jupyter certificate for Vast, follow the instructions [here](/documentation/instances/jupyter).
|
||
|
||
To use SSH, you will need to create an SSH key and upload the public portion to Vast. Learn more [here](/documentation/instances/sshscp).
|
||
|
||
For Linux/macOS users, SCP will also work.
|
||
|
||
## 7) Done? Destroy the instance
|
||
|
||
After you generate your artwork and are done with the instance, you have a few options. If you STOP the instance using the stop button, you will no longer pay the hourly GPU charges. **However you will still incur storage charges** because the data is still stored on the host machine. When you hit the START button to restart the instance, you are also not guaranteed that you can rent the GPU as someone else might have rented it while it was stopped. We don't recommend that you stop an instance once done.
|
||
|
||
To incur no other charges you have to DESTROY the instance using the trash can icon. **We recommend you destroy instances** so as not to incur storage charges while you are not using the system.
|
||
|
||
Have fun!
|
||
|
||
|
||
# TTS with Nari Labs Dia
|
||
Source: https://docs.vast.ai/tts-with-nari-labs-dia
|
||
|
||
|
||
|
||
Below is a step-by-step guide on how to configure and run Nari Labs Dia 1.6b model for text to speech. Our template will automatically setup an easy to access web based interface to help you get started.
|
||
|
||
## Find and rent your GPU
|
||
|
||
1. **Setup your Vast account and add credit:** Review the [quickstart guide](/documentation/get-started/quickstart) to get familar with the service if you do not have an account with credits loaded.
|
||
2. **Select the Dia TTS template:** click on [temp](https://cloud.vast.ai/templates/) and select the recomended TTS template [**Dia 1.6b TTS**](https://cloud.vast.ai/?ref_id=62897\&creator_id=62897\&name=Dia%201.6b%20TTS)**. **Click on the play icon to select the template. You will then go to the search menu to find a GPU. 
|
||
* Click on the Readme link at any time for a detailed guide on how to use the template.
|
||
3. **VRAM Requirements**: Check that your **GPU VRAM** is sufficient for the model. You will need approximately 8Gb VRAM
|
||
|
||
## Steps to Open the TTS Interface
|
||
|
||
1. **After the instance loads, click the "Open" Button**
|
||
* This will initiate the Instance Portal with links to all the services running on the instance. 
|
||
2. **Check the installation progress**
|
||
* The TTS application and model will be installed on first launch. From the Instance Portal you can view the progress by clicking the 'Instance Logs' tab. 
|
||
3. **Launch the Application**
|
||
* When the installation is complete, You can click the "Dia TTS Interface" launch button to start the interface.
|
||
|
||
## Generate some audio
|
||
|
||
Once the interface has loaded, you can begin generating speech. Simply modify the input text, ensuring that each line is prefixed with the speaker ID and then click the 'Generate Audio' button.
|
||
|
||
It will take a few seconds to generate, but once it has finished you can click the play button in the upper right to hear the results.
|
||
|
||
<Frame caption="Dia TTS Interface">
|
||
<img src="https://mintcdn.com/vastai-80aa3a82/LEwury95WvhzGW2f/images/use-cases-ai-audio-generation.webp?fit=max&auto=format&n=LEwury95WvhzGW2f&q=85&s=cbc857cb2820dc9fe97233f2ae472f04" alt="Gradio application for speech generation with Dia TTS model" data-og-width="1280" width="1280" data-og-height="464" height="464" data-path="images/use-cases-ai-audio-generation.webp" data-optimize="true" data-opv="3" srcset="https://mintcdn.com/vastai-80aa3a82/LEwury95WvhzGW2f/images/use-cases-ai-audio-generation.webp?w=280&fit=max&auto=format&n=LEwury95WvhzGW2f&q=85&s=ab310b28a7eea6fa907e95acc787b8c8 280w, https://mintcdn.com/vastai-80aa3a82/LEwury95WvhzGW2f/images/use-cases-ai-audio-generation.webp?w=560&fit=max&auto=format&n=LEwury95WvhzGW2f&q=85&s=9dc251fd6ff71f63c4b9a1067066d46e 560w, https://mintcdn.com/vastai-80aa3a82/LEwury95WvhzGW2f/images/use-cases-ai-audio-generation.webp?w=840&fit=max&auto=format&n=LEwury95WvhzGW2f&q=85&s=474e6f25d3b48de00d05f192f26b69cf 840w, https://mintcdn.com/vastai-80aa3a82/LEwury95WvhzGW2f/images/use-cases-ai-audio-generation.webp?w=1100&fit=max&auto=format&n=LEwury95WvhzGW2f&q=85&s=d45f3072cf4f71a1e48eba4bc7552ff9 1100w, https://mintcdn.com/vastai-80aa3a82/LEwury95WvhzGW2f/images/use-cases-ai-audio-generation.webp?w=1650&fit=max&auto=format&n=LEwury95WvhzGW2f&q=85&s=4d0306fb2689a252c5a5bf89f0aaab6d 1650w, https://mintcdn.com/vastai-80aa3a82/LEwury95WvhzGW2f/images/use-cases-ai-audio-generation.webp?w=2500&fit=max&auto=format&n=LEwury95WvhzGW2f&q=85&s=da1dc8cb715428420c784ae43d43726b 2500w" />
|
||
</Frame>
|
||
|
||
If you prefer to use the CLI, you can find all of the files you need in the `/workspace/dia` directory which you can access either via SSH or in a Jupyter terminal.
|
||
|
||
Full instructions for Nari Labs Dia can be found in their [GitHub Repository](https://github.com/nari-labs/dia).
|
||
|
||
|
||
# Video Generation
|
||
Source: https://docs.vast.ai/video-generation
|
||
|
||
|
||
|
||
# Video Generation Guide: Using ComfyUI on Vast.ai
|
||
|
||
This guide will walk you through setting up and using ComfyUI for video generation on Vast.ai. ComfyUI provides a powerful node-based interface for creating advanced stable diffusion pipelines, making it ideal for video generation workflows.
|
||
|
||
## Prerequisites
|
||
|
||
* A Vast.ai account
|
||
* Basic familiarity with image or video generation models
|
||
* [(Optional) Read Jupyter guide](/documentation/instances/jupyter)
|
||
* [(Optional) SSH client installed on your local machine and SSH public key added in Account tab at cloud.vast.ai](/documentation/instances/sshscp)
|
||
|
||
## Setting Up Your Instance
|
||
|
||
### 1. Select the Right Template
|
||
|
||
Navigate to the Templates tab to view available templates. For video generation, we recommend searching for "ComfyUI" among the recommended templates. [The ComfyUI template](https://cloud.vast.ai/?ref_id=62897\&creator_id=62897\&name=ComfyUI) provides a powerful and modular stable diffusion GUI for designing and executing advanced pipelines using a graph/nodes/flowchart based interface.
|
||
|
||
**Template Features:**
|
||
|
||
* Access through both Jupyter and SSH
|
||
* Instance Portal
|
||
* Token-based authentication enabled by default
|
||
* Built-in provisioning script for models and custom nodes
|
||
|
||
### 2. **Edit your Template Configuration**
|
||
|
||
**Add/update these environment variables as needed:**
|
||
|
||
```bash Bash theme={null}
|
||
# Core Settings
|
||
COMFYUI_ARGS="--disable-auto-launch --port 18188 --enable-cors-header" # ComfyUI launch arguments
|
||
|
||
# Authentication
|
||
WEB_ENABLE_HTTPS=false # Enable/disable direct HTTPS
|
||
WEB_ENABLE_AUTH=true # Enable/disable authentication
|
||
|
||
# Access Tokens
|
||
CF_TUNNEL_TOKEN="" # Cloudflare Zero Trust token
|
||
CIVITAI_TOKEN="" # Access gated Civitai models
|
||
HF_TOKEN="" # Access gated HuggingFace models
|
||
|
||
# Custom Setup
|
||
PROVISIONING_SCRIPT="" # URL to custom provisioning script
|
||
```
|
||
|
||
**Provisioning Script:**
|
||
|
||
* Default script includes popular image models and custom nodes
|
||
* Fully customizable - Create your own script for a custom instance
|
||
* Must be Bash-compatible and start with `#!/bin/bash`
|
||
* Upload modified script to a GitHub Gist or respository and update the PROVISIONING\_SCRIPT variable to point to the raw file
|
||
|
||
<Warning>
|
||
**Important: Never save your template as public if you've included tokens or other secrets in the Docker Options field.**
|
||
</Warning>
|
||
|
||
Select your template from '[My Templates](https://cloud.vast.ai/templates/)' after making any desired edits to it.
|
||
|
||
### 3. Create Your Instance
|
||
|
||
1. In the [Search interface](https://cloud.vast.ai/create/), look for machines that have **sufficient VRAM** to handle your chosen video model. ⚠All models are different so check the model requirements carefully.
|
||
2. Click RENT to create an instance on the machine with the GPU of your choice
|
||
|
||
### 3. Connect to Your Instance
|
||
|
||
1. Go to [Instances tab](https://cloud.vast.ai/instances/) to see your instance loading
|
||
2. When the blue button says "OPEN", click this button to access the [Instance Portal](/documentation/instances/instance-portal) which will provide access to ComfyUI and other useful applications.
|
||
3. Click the direct link or cloudflare quick tunnel link to access ComfyUI. Here's a [beginner's guide to using ComfyUI](https://stable-diffusion-art.com/comfyui/).
|
||
|
||
### 4. Select a Video Workflow
|
||
|
||
ComfyUI has a workflow browser, so for a quick start you can choose on of their templates
|
||
|
||
<Frame caption="ComfyUI Workflows">
|
||
<img src="https://mintcdn.com/vastai-80aa3a82/LEwury95WvhzGW2f/images/use-cases-ai-video-generation.png?fit=max&auto=format&n=LEwury95WvhzGW2f&q=85&s=efdb8c17316d44d1e12ce771385acb2a" alt="ComfyUI template workflows" data-og-width="1280" width="1280" data-og-height="623" height="623" data-path="images/use-cases-ai-video-generation.png" data-optimize="true" data-opv="3" srcset="https://mintcdn.com/vastai-80aa3a82/LEwury95WvhzGW2f/images/use-cases-ai-video-generation.png?w=280&fit=max&auto=format&n=LEwury95WvhzGW2f&q=85&s=07e30c3fa5617278687a226a5a4a2cbf 280w, https://mintcdn.com/vastai-80aa3a82/LEwury95WvhzGW2f/images/use-cases-ai-video-generation.png?w=560&fit=max&auto=format&n=LEwury95WvhzGW2f&q=85&s=f15b6cc24ef1e38fd5a373896ff51094 560w, https://mintcdn.com/vastai-80aa3a82/LEwury95WvhzGW2f/images/use-cases-ai-video-generation.png?w=840&fit=max&auto=format&n=LEwury95WvhzGW2f&q=85&s=8bda75981991d22fdcf0b3bc0637298d 840w, https://mintcdn.com/vastai-80aa3a82/LEwury95WvhzGW2f/images/use-cases-ai-video-generation.png?w=1100&fit=max&auto=format&n=LEwury95WvhzGW2f&q=85&s=9a9094ac13b9e21f16d2ce5b5f0f4993 1100w, https://mintcdn.com/vastai-80aa3a82/LEwury95WvhzGW2f/images/use-cases-ai-video-generation.png?w=1650&fit=max&auto=format&n=LEwury95WvhzGW2f&q=85&s=47495cdec8f5bccb759ae3336b14792b 1650w, https://mintcdn.com/vastai-80aa3a82/LEwury95WvhzGW2f/images/use-cases-ai-video-generation.png?w=2500&fit=max&auto=format&n=LEwury95WvhzGW2f&q=85&s=43cf5a5e8b2a9a84d8e51f0bd123e56c 2500w" />
|
||
</Frame>
|
||
|
||
We'll pick the LTX Video workflow for this guide. Simply click it to proceed.
|
||
|
||
### 5. Download Missing Files
|
||
|
||
Your new instance will not yet have the required models, but fortunately ComfyUI will alert us to this and offer the models for download.
|
||
|
||
<img src="https://mintcdn.com/vastai-80aa3a82/LEwury95WvhzGW2f/images/use-cases-ai-video-generation-2.png?fit=max&auto=format&n=LEwury95WvhzGW2f&q=85&s=b11356de47a6b85046304819d2e8f93f" alt="ComfyUI template workflows" data-og-width="800" width="800" data-og-height="634" height="634" data-path="images/use-cases-ai-video-generation-2.png" data-optimize="true" data-opv="3" srcset="https://mintcdn.com/vastai-80aa3a82/LEwury95WvhzGW2f/images/use-cases-ai-video-generation-2.png?w=280&fit=max&auto=format&n=LEwury95WvhzGW2f&q=85&s=90b23d7efe224df2413e7cb90b2594ca 280w, https://mintcdn.com/vastai-80aa3a82/LEwury95WvhzGW2f/images/use-cases-ai-video-generation-2.png?w=560&fit=max&auto=format&n=LEwury95WvhzGW2f&q=85&s=7d178e1e0d718177447d44972a87c8d9 560w, https://mintcdn.com/vastai-80aa3a82/LEwury95WvhzGW2f/images/use-cases-ai-video-generation-2.png?w=840&fit=max&auto=format&n=LEwury95WvhzGW2f&q=85&s=eb0327ae5bf24a8846e36864aa56d4ae 840w, https://mintcdn.com/vastai-80aa3a82/LEwury95WvhzGW2f/images/use-cases-ai-video-generation-2.png?w=1100&fit=max&auto=format&n=LEwury95WvhzGW2f&q=85&s=449287dac3896af2456cdfa01f564c46 1100w, https://mintcdn.com/vastai-80aa3a82/LEwury95WvhzGW2f/images/use-cases-ai-video-generation-2.png?w=1650&fit=max&auto=format&n=LEwury95WvhzGW2f&q=85&s=923fbc1ad92eb52377eb671b521d6efc 1650w, https://mintcdn.com/vastai-80aa3a82/LEwury95WvhzGW2f/images/use-cases-ai-video-generation-2.png?w=2500&fit=max&auto=format&n=LEwury95WvhzGW2f&q=85&s=4e3956d83979beedf27e4b22c1b1384f 2500w" />
|
||
|
||
Unfortunately, the interface does not know it is running in the cloud so clicking the download buttons will download the models to your local machine. To work around this you can either: 
|
||
|
||
* Download the models to your computer and then upload them to the instance
|
||
* SSH to the instance and use `curl` or `wget` to directly download the models to their correct locations
|
||
|
||
To complete this guide we will use SSH
|
||
|
||
```bash Bash theme={null}
|
||
# Download the models
|
||
wget --content-disposition -P /workspace/ComfyUI/models/checkpoints/ "https://huggingface.co/Lightricks/LTX-Video/resolve/main/ltx-video-2b-v0.9.safetensors"
|
||
wget --content-disposition -P /workspace/ComfyUI/models/clip/ "https://huggingface.co/comfyanonymous/flux_text_encoders/resolve/main/t5xxl_fp16.safetensors"
|
||
|
||
# Download the workflow source image
|
||
wget --content-disposition -P /workspace/ComfyUI/input/ "https://comfyanonymous.github.io/ComfyUI_examples/ltxv/island.jpg"
|
||
```
|
||
|
||
The above commands will download the required models into the instance. When the downloads have completed you can refresh the browser window to clear the missing models error.
|
||
|
||
### 6. Run the Workflow
|
||
|
||
Finally, click the **Run** button to process the workflow.
|
||
|
||
<img src="https://mintcdn.com/vastai-80aa3a82/LEwury95WvhzGW2f/images/use-cases-ai-video-generation-3.png?fit=max&auto=format&n=LEwury95WvhzGW2f&q=85&s=58da0d2e64c44d049ca77eb3734267f1" alt="" data-og-width="1280" width="1280" data-og-height="611" height="611" data-path="images/use-cases-ai-video-generation-3.png" data-optimize="true" data-opv="3" srcset="https://mintcdn.com/vastai-80aa3a82/LEwury95WvhzGW2f/images/use-cases-ai-video-generation-3.png?w=280&fit=max&auto=format&n=LEwury95WvhzGW2f&q=85&s=820ea14cb9b3f04ed69a10aa171c37a5 280w, https://mintcdn.com/vastai-80aa3a82/LEwury95WvhzGW2f/images/use-cases-ai-video-generation-3.png?w=560&fit=max&auto=format&n=LEwury95WvhzGW2f&q=85&s=0fbbee485aa6b943c85327e146020238 560w, https://mintcdn.com/vastai-80aa3a82/LEwury95WvhzGW2f/images/use-cases-ai-video-generation-3.png?w=840&fit=max&auto=format&n=LEwury95WvhzGW2f&q=85&s=ebbca017626d9161476926f5236ef45e 840w, https://mintcdn.com/vastai-80aa3a82/LEwury95WvhzGW2f/images/use-cases-ai-video-generation-3.png?w=1100&fit=max&auto=format&n=LEwury95WvhzGW2f&q=85&s=06074c1591266a8e3cbf4b6961931f48 1100w, https://mintcdn.com/vastai-80aa3a82/LEwury95WvhzGW2f/images/use-cases-ai-video-generation-3.png?w=1650&fit=max&auto=format&n=LEwury95WvhzGW2f&q=85&s=a3914834059527694dad708276a9bbf6 1650w, https://mintcdn.com/vastai-80aa3a82/LEwury95WvhzGW2f/images/use-cases-ai-video-generation-3.png?w=2500&fit=max&auto=format&n=LEwury95WvhzGW2f&q=85&s=25fecb8e64f06fa34c0145a148e7dfa9 2500w" />
|
||
|
||
Feel free to modify the prompts and experiement!
|
||
|
||
## Pre-Configured Templates
|
||
|
||
We have some pre-configured ComfyUI templates - And one for this guide. Check them out here
|
||
|
||
* [ComfyUI + LTX Video](https://cloud.vast.ai/?ref_id=62897\&creator_id=62897\&name=ComfyUI%20%2B%20LTX%20Video)
|
||
* [Open-Sora](https://cloud.vast.ai/?ref_id=62897\&creator_id=62897\&name=Open-Sora)
|
||
|
||
## Resources and Further Reading
|
||
|
||
1. [ComfyUI Official Repository](https://github.com/comfyanonymous/ComfyUI)
|
||
2. [Vast.ai Documentation](/documentation/get-started/index)
|
||
3. [Comfy Workflows](https://comfyworkflows.com/)
|
||
4. [Vast.ai support chat on website](https://vast.ai/)
|
||
|
||
Remember to always check VRAM usage and adjust parameters accordingly. Start with smaller frames and resolutions, then scale up as you become more comfortable with the workflow.
|
||
|
||
|
||
# vLLM (LLM inference and serving)
|
||
Source: https://docs.vast.ai/vllm-llm-inference-and-serving
|
||
|
||
|
||
|
||
Below is a guide for runing the [vLLM template](https://cloud.vast.ai/?creator_id=62897\&name=vLLM) on Vast. The template contains everything you need to get started, so you will only need to specify the model you want to serve and the corresponding vLLM configuration.
|
||
|
||
For simplicity, we have set the default template model as [DeepSeek-R1-Distill-Llama-8B](https://huggingface.co/deepseek-ai/DeepSeek-R1-Distill-Llama-8B) with a limited context window because it can run on a single GPU with only 21GB VRAM, but vLLM can scale easily over multiple GPUs to handle much larger models.
|
||
|
||
## Set Up Your Account
|
||
|
||
1. **Setup your Vast account and add credit:** Review the [quickstart guide](/documentation/get-started/quickstart) to get familar with the service if you do not have an account with credits loaded.
|
||
|
||
## Configure the vLLM Template
|
||
|
||
vLLM serve is launched automatically by the template and it will use the configuration defined in the environment variables `VLLM_MODEL` and `VLLM_ARGS`. Here's how you can set it up
|
||
|
||
1. Vist the [templates](https://cloud.vast.ai/templates/) page and find the recommended vLLM template.
|
||
2. Click the pencil button to open up the template editor.
|
||
3. If you would like to run a model other than the default, edit the `VLLM_MODEL`environment variable. The default value is `deepseek-ai/DeepSeek-R1-Distill-Llama-8B` which is a HuggingFace repository.
|
||
4. You can also set the arguments to pass to `vllm serve` by modifying the `VLLM_ARGS` environment variable. vLLM is highly configurable so it's a good idea to check the official documentation before changing anything here. All available startup arguments are listed in the [official vLLM documentation](https://docs.vllm.ai/en/latest/serving/engine_args.html).
|
||
5. Save the template. You will be able to find the version you have just modified in the templates page in the 'My Templates' section.
|
||
|
||
## Launch Your Instance
|
||
|
||
1. **Select the template** you just saved from the 'My Templates' section of the templates page.
|
||
2. Click the **Play icon** on this template to be taken to view the available offers.
|
||
3. Use the search filters to select a suitable GPU, ensuring that you have **sufficient VRAM** to load all of the model's layers to GPU.
|
||
4. From the search menu, ensure you have **sufficient disk space** for the model you plan to run. The disk slider is located under the template icon on the left hand column. Large models (e.g., 70B parameters) can require dozens of gigabytes of storage. For Deep Seek R1 8B, make sure to allocate over 17Gb of disk space using the slider. 
|
||
5. Click **Rent** on a suitable instance and wait for it to load
|
||
|
||
Once the instance has loaded you'll be able to click the Open button to access the instance portal where you'll see links to the interactive vLLM API documentation and the Ray control panel.
|
||
|
||
As vLLM must download your model upon first run it may take some time before the API is available. You can follow the startup progress in the instance logs. 
|
||
|
||
## vLLM API Usage
|
||
|
||
The vLLM API can be accessed programmatically at:
|
||
|
||
```bash Bash theme={null}
|
||
https://INSTANCE_IP:PORT_8000
|
||
```
|
||
|
||
### Authentication Token
|
||
|
||
* When making requests, you must include an **Authorization** header with the token value of OPEN\_BUTTON\_TOKEN.
|
||
|
||
### Sample Curl Command
|
||
|
||
```bash Bash theme={null}
|
||
curl -k https://INSTANCE_IP:EXTERNAL_PORT/v1/completions \
|
||
-H "Content-Type: application/json" \
|
||
-H "Authorization: Bearer 7b040f8d37017016a336a804a8039068d7c744850f3a441db48d6da559379058" \
|
||
-d '{
|
||
"model": "deepseek-ai/DeepSeek-R1-Distill-Llama-8B",
|
||
"prompt": "San Francisco is a",
|
||
"max_tokens": 128,
|
||
"temperature": 0.6
|
||
}'
|
||
|
||
```
|
||
|
||
* -k: Allows curl to perform insecure SSL connections and transfers as Vast.ai uses a self-signed certificate.
|
||
* Replace **INSTANCE\_IP** and **EXTERNAL\_PORT** with the externally mapped port for 8000 from the IP button on the instance.
|
||
* Update the Authorization header value to match your **OPEN\_BUTTON\_TOKEN**. You can get that from any of the links in the Instance Portal or from the Open button on the instance card.
|
||
* Modify the prompt, model, and other fields (max\_tokens, temperature, etc.) as needed.
|
||
|
||
## vLLM with Python
|
||
|
||
Although the instance starts the vllm serve function to provide an inference API, the template has been configured with Jupyter and SSH access so you can also interact with vLLM in code from your instance. To do this simply include the vllm modules at the top of your Python script:
|
||
|
||
```python icon="python" Python theme={null}
|
||
from vllm import LLM, SamplingParams
|
||
```
|
||
|
||
## Further Reading
|
||
|
||
Please see the template Readme file on our recommended vLLM template for advanced template configuration and other methods of connecting to and interacting with your instance.
|
||
|
||
|
||
# VMs
|
||
Source: https://docs.vast.ai/vms
|
||
|
||
|
||
|
||
<Warning>
|
||
**WARNING:**
|
||
VMs interface much more directly with hardware than Docker containers.
|
||
Proper VM support is very sensitive to hardware setup.
|
||
This guide covers the configuration steps needed to enable support for Vast VMs on most setups, but is not and cannot be exhausitve.
|
||
</Warning>
|
||
|
||
# Introduction
|
||
|
||
Vast now supports VM instances running on Kernel Virtual Machine (KVM) in addition to Docker container based instances.
|
||
VM support is currently an optional feature for hosts as it usually requires additional configuration steps on top of those needed to support Docker-based instances.
|
||
|
||
Host machines are not required to be VM compatible; the Vast hosting software will automatically test and enable the feature on machines on which VMs are supported.
|
||
On new machines the tests will be run on install; for machines configured before the VM-feature release, testing for VM-compatability will happen when the machine is unoccupied.
|
||
|
||
Machines that do not have VM support enabled will be hidden in the search page for clients who have VM-based templates selected.
|
||
|
||
## VM Support Benefits/Drawbacks
|
||
|
||
### Benefits
|
||
|
||
VM support will allow your machine to take advantage of demand for use cases that Docker cannot easily support, in addition to demand for conventional Docker-based instances.
|
||
|
||
VMs support the following features/use-cases that Docker-based instances do not:
|
||
|
||
<Columns cols={2}>
|
||
<p>Feature</p>
|
||
<p>Use-case</p>
|
||
</Columns>
|
||
|
||
Systemd/Docker
|
||
|
||
Multi-Application Server Tooling and DevOps (e.g., Docker Compose, Kubernetes, Docker Build)
|
||
|
||
Non-Linux OSes
|
||
|
||
Windows Graphics (e.g., for rendering or cloud gaming)
|
||
|
||
ptrace
|
||
|
||
Program analysis for CUDA-performance optimization (e.g., via Nvidia NSight)
|
||
|
||
Currently no other peer-to-peer GPU rental marketplace offers full VMs; instead full VMs are only available from traditional providers at much higher costs.
|
||
Thus we believe that hosts who have VMs enabled can expect to command a substantial preumium.
|
||
|
||
### Drawbacks
|
||
|
||
* Due to greater user control over hardware, VM support requires IOMMU settings for securing PCIe communications that can degrade the performance of NCCL on non-RTX 40X0 multi-GPU machines that rely on PCI-based GPU peer-to-peer communication.
|
||
* VMs require more disk space than Docker containers as they do not share components with the host OS. Hosts with VMs enabled may want to set higher disk and internet bandwidth prices.
|
||
|
||
### Summary
|
||
|
||
We recommend all hosts with single-GPU rigs to try to ensure VM support as the drawbacks for single-GPU machines are minimal.
|
||
|
||
We also generally recommend multi-GPU Hosts with RTX 40X0 series GPUs try enabling VMs, especially if they have plentiful disk space and fast (500Mbps+) internet speed,
|
||
as rendering/gaming users will benefit from those, as well as users who need multi-application orchestration tools.
|
||
|
||
We do not recommend multi-GPU hosts with datacenter GPUs enable VMs until we can ensure better GPU P2P communication support in VMs, including support for NVLink.
|
||
|
||
## Configuring VMs on your machine
|
||
|
||
### Checking VM enablement status.
|
||
|
||
Run `python3 /var/lib/vastai_kaalia/enable_vms.py check`.
|
||
|
||
Possible results are:
|
||
|
||
* `on`: VMs are enabled on your machine.
|
||
* `off`: VMs are disabled on your machine. Either you disabled VMs or our previous tests failed.
|
||
* `pending`: VMs are not disabled, but will try to enable once the machine is idle.
|
||
|
||
### Disabling VMs.
|
||
|
||
To prevent VMs from being enabled on your machine, or to disable VMs after they have been enabled, run `python3 /var/lib/vastai_kaalia/enable_vms.py off`.
|
||
|
||
Note that default configuration settings for most machines will not support VMs, and we can detect that, so most hosts who do not want VMs enabled do not need to take any action.
|
||
|
||
### Configuring your machine to support VMs.
|
||
|
||
### Hardware prerequisites
|
||
|
||
You will require a CPU and a chipset that support Intel VT-d or AMD-Vi.
|
||
|
||
### Configure BIOS
|
||
|
||
Check that virtualization is enabled in your BIOS. On most machines, this should be enabled by default.
|
||
|
||
### Configure Kernel Commandline Arguments
|
||
|
||
For further reference refer to [Preparing the IOMMU](https://ubuntu.com/server/docs/gpu-virtualization-with-qemu-kvm#preparing-the-input-output-memory-management-unit-iommu).
|
||
|
||
We will need to ensure IOMMU, a technology that secures and isolates communication between PCIe devices, is set up, along with disabling all driver features that interfere with VMs.
|
||
|
||
Open `/etc/default/grub` and add to the `GRUB_CMDLINE_LINUX=` the following:
|
||
|
||
* `amd_iommu=on` or `intel_iommu=on` depending on whether you have an AMD or Intel CPU.
|
||
* `nvidia_drm.modeset=0`
|
||
|
||
Some hosts may also need to add the following settings:
|
||
|
||
* `rd.driver.blacklist=nouveau`
|
||
* `modprobe.blacklist=nouveau`
|
||
|
||
Then run `sudo update-grub` and reboot.
|
||
|
||
### Disable display managers/background GPU processes.
|
||
|
||
If you have a display manager (e.g., GDM) or display server (XOrg, Wayland, etc) running, you must disable them.
|
||
|
||
You may not run any background GPU processes for VMs to work (`nvidia-persitenced` is OK, it is managed by our hosting software).
|
||
|
||
### Enabling VMs
|
||
|
||
We will check/test your configuration when your machine is idle and enable VMs by default if your machine is capable of supporting VMs, and you have not set VMs to `off`.
|
||
|
||
If you have VMs set to off, and you'd like to retry enabling VMs, run `sudo python3 /var/lib/vastai_kaalia/enable_vms.py on -f` while your machine is idle.
|
||
|
||
|
||
# Whisper ASR Guide
|
||
Source: https://docs.vast.ai/whisper-asr-guide
|
||
|
||
|
||
|
||
**Whisper** is a general-purpose speech recognition model trained on a large dataset of diverse audio. Go through the [Readme](https://cloud.vast.ai/template/readme/0c0c7d65cd4ebb2b340fbce39879703b) first before using. 
|
||
|
||
**Connecting to the Instance**
|
||
|
||
1. Go to the templates tab and search for “*Whisper*” or click the provided link to the template [here](https://cloud.vast.ai/?ref_id=62897\&creator_id=62897\&name=Whisper%20ASR%20Webservice) . 
|
||
2. After you select the template by pressing the triangle button the next step is to choose a gpu.
|
||
|
||
<img src="https://mintcdn.com/vastai-80aa3a82/rfbLJXS6cduyf_mj/images/use-cases-audio-to-text.png?fit=max&auto=format&n=rfbLJXS6cduyf_mj&q=85&s=66af3dd1c3607f2eef10502462f94540" alt="" data-og-width="1166" width="1166" data-og-height="1088" height="1088" data-path="images/use-cases-audio-to-text.png" data-optimize="true" data-opv="3" srcset="https://mintcdn.com/vastai-80aa3a82/rfbLJXS6cduyf_mj/images/use-cases-audio-to-text.png?w=280&fit=max&auto=format&n=rfbLJXS6cduyf_mj&q=85&s=512e742a5d7f977794db3982a7e90c24 280w, https://mintcdn.com/vastai-80aa3a82/rfbLJXS6cduyf_mj/images/use-cases-audio-to-text.png?w=560&fit=max&auto=format&n=rfbLJXS6cduyf_mj&q=85&s=967119acddc90f71fa6d6f71d2058833 560w, https://mintcdn.com/vastai-80aa3a82/rfbLJXS6cduyf_mj/images/use-cases-audio-to-text.png?w=840&fit=max&auto=format&n=rfbLJXS6cduyf_mj&q=85&s=59abde76eae5b0f8a9c1ab576aeb627d 840w, https://mintcdn.com/vastai-80aa3a82/rfbLJXS6cduyf_mj/images/use-cases-audio-to-text.png?w=1100&fit=max&auto=format&n=rfbLJXS6cduyf_mj&q=85&s=41b7209857f468b942bd4d06ecfc7951 1100w, https://mintcdn.com/vastai-80aa3a82/rfbLJXS6cduyf_mj/images/use-cases-audio-to-text.png?w=1650&fit=max&auto=format&n=rfbLJXS6cduyf_mj&q=85&s=81e5bc088cadf1cdc62b07a9e37ba7f2 1650w, https://mintcdn.com/vastai-80aa3a82/rfbLJXS6cduyf_mj/images/use-cases-audio-to-text.png?w=2500&fit=max&auto=format&n=rfbLJXS6cduyf_mj&q=85&s=de2b52f5e19aca1f20a4011414ca4976 2500w" />
|
||
|
||
3\. **Select a GPU Offering **
|
||
|
||
<img src="https://mintcdn.com/vastai-80aa3a82/rfbLJXS6cduyf_mj/images/use-cases-audio-to-text-2.png?fit=max&auto=format&n=rfbLJXS6cduyf_mj&q=85&s=1b73a9a02194da22890e2442d5816a18" alt="" data-og-width="1265" width="1265" data-og-height="670" height="670" data-path="images/use-cases-audio-to-text-2.png" data-optimize="true" data-opv="3" srcset="https://mintcdn.com/vastai-80aa3a82/rfbLJXS6cduyf_mj/images/use-cases-audio-to-text-2.png?w=280&fit=max&auto=format&n=rfbLJXS6cduyf_mj&q=85&s=780c44c7fb01a43cbaccc429b8d3ae61 280w, https://mintcdn.com/vastai-80aa3a82/rfbLJXS6cduyf_mj/images/use-cases-audio-to-text-2.png?w=560&fit=max&auto=format&n=rfbLJXS6cduyf_mj&q=85&s=5e339b1de83e0656fd964781b4199f4c 560w, https://mintcdn.com/vastai-80aa3a82/rfbLJXS6cduyf_mj/images/use-cases-audio-to-text-2.png?w=840&fit=max&auto=format&n=rfbLJXS6cduyf_mj&q=85&s=57099eb7d2f00f45ec02cbc52534f4b3 840w, https://mintcdn.com/vastai-80aa3a82/rfbLJXS6cduyf_mj/images/use-cases-audio-to-text-2.png?w=1100&fit=max&auto=format&n=rfbLJXS6cduyf_mj&q=85&s=6a01844cb74a4d057ef6bc41ae960f43 1100w, https://mintcdn.com/vastai-80aa3a82/rfbLJXS6cduyf_mj/images/use-cases-audio-to-text-2.png?w=1650&fit=max&auto=format&n=rfbLJXS6cduyf_mj&q=85&s=48e1d4fde1b8002eda8ddb09510828d6 1650w, https://mintcdn.com/vastai-80aa3a82/rfbLJXS6cduyf_mj/images/use-cases-audio-to-text-2.png?w=2500&fit=max&auto=format&n=rfbLJXS6cduyf_mj&q=85&s=c9093dd77ef8fe676f2dbe040536802e 2500w" />
|
||
|
||
The template you selected will give your instance access to both Jupyter and SSH. Additionally the Open button will connect you to the instance portal web interface. 
|
||
|
||
4\. HTTP and token-based auth are both enabled by default. To avoid certificate errors in your browser, please follow the instructions for installing the TLS certificate [here](/documentation/instances/jupyter#1SmCz) to allow secure HTTPS connections to your instance via its IP. 
|
||
|
||
<img src="https://mintcdn.com/vastai-80aa3a82/rfbLJXS6cduyf_mj/images/use-cases-audio-to-text-3.png?fit=max&auto=format&n=rfbLJXS6cduyf_mj&q=85&s=fced8cc2a8ed092f724e2d4f4c229a77" alt="" data-og-width="896" width="896" data-og-height="216" height="216" data-path="images/use-cases-audio-to-text-3.png" data-optimize="true" data-opv="3" srcset="https://mintcdn.com/vastai-80aa3a82/rfbLJXS6cduyf_mj/images/use-cases-audio-to-text-3.png?w=280&fit=max&auto=format&n=rfbLJXS6cduyf_mj&q=85&s=30edab899d9a154e51c23be9dec620dc 280w, https://mintcdn.com/vastai-80aa3a82/rfbLJXS6cduyf_mj/images/use-cases-audio-to-text-3.png?w=560&fit=max&auto=format&n=rfbLJXS6cduyf_mj&q=85&s=f409ae4c6858e14cecf6bd340710a696 560w, https://mintcdn.com/vastai-80aa3a82/rfbLJXS6cduyf_mj/images/use-cases-audio-to-text-3.png?w=840&fit=max&auto=format&n=rfbLJXS6cduyf_mj&q=85&s=556f8977797f0ea95588f7f8602f270b 840w, https://mintcdn.com/vastai-80aa3a82/rfbLJXS6cduyf_mj/images/use-cases-audio-to-text-3.png?w=1100&fit=max&auto=format&n=rfbLJXS6cduyf_mj&q=85&s=27f781cad8fb1847c3dbc9212afa1724 1100w, https://mintcdn.com/vastai-80aa3a82/rfbLJXS6cduyf_mj/images/use-cases-audio-to-text-3.png?w=1650&fit=max&auto=format&n=rfbLJXS6cduyf_mj&q=85&s=1204c339d50b05e2dcc2a246b261ad6c 1650w, https://mintcdn.com/vastai-80aa3a82/rfbLJXS6cduyf_mj/images/use-cases-audio-to-text-3.png?w=2500&fit=max&auto=format&n=rfbLJXS6cduyf_mj&q=85&s=3d0dde02c064242ac1c061b4983e8660 2500w" />
|
||
|
||
5\. Use the open button to open up the instance, if you are not using the open button the default username will be: vastai , and the password will be the value of the environment variable:* OPEN\_BUTTON\_TOKEN*. You can also find the token value by accessing the terminal and executing this command: *echo \$OPEN\_BUTTON\_TOKEN*
|
||
|
||
<img src="https://mintcdn.com/vastai-80aa3a82/rfbLJXS6cduyf_mj/images/use-cases-audio-to-text-4.png?fit=max&auto=format&n=rfbLJXS6cduyf_mj&q=85&s=c22ace26047bee59dc113d7eec023619" alt="" data-og-width="1280" width="1280" data-og-height="489" height="489" data-path="images/use-cases-audio-to-text-4.png" data-optimize="true" data-opv="3" srcset="https://mintcdn.com/vastai-80aa3a82/rfbLJXS6cduyf_mj/images/use-cases-audio-to-text-4.png?w=280&fit=max&auto=format&n=rfbLJXS6cduyf_mj&q=85&s=c8bcdc747a18ee48c5b5051942dd43b5 280w, https://mintcdn.com/vastai-80aa3a82/rfbLJXS6cduyf_mj/images/use-cases-audio-to-text-4.png?w=560&fit=max&auto=format&n=rfbLJXS6cduyf_mj&q=85&s=a7d4b7eef15d2fb0e9a3d74d5b2a4817 560w, https://mintcdn.com/vastai-80aa3a82/rfbLJXS6cduyf_mj/images/use-cases-audio-to-text-4.png?w=840&fit=max&auto=format&n=rfbLJXS6cduyf_mj&q=85&s=25888c36e15dba231b159eac2362d4e3 840w, https://mintcdn.com/vastai-80aa3a82/rfbLJXS6cduyf_mj/images/use-cases-audio-to-text-4.png?w=1100&fit=max&auto=format&n=rfbLJXS6cduyf_mj&q=85&s=811e77b2a6d00f667fcf51c32499f636 1100w, https://mintcdn.com/vastai-80aa3a82/rfbLJXS6cduyf_mj/images/use-cases-audio-to-text-4.png?w=1650&fit=max&auto=format&n=rfbLJXS6cduyf_mj&q=85&s=1e8fb901f203541d424479c5a5047de5 1650w, https://mintcdn.com/vastai-80aa3a82/rfbLJXS6cduyf_mj/images/use-cases-audio-to-text-4.png?w=2500&fit=max&auto=format&n=rfbLJXS6cduyf_mj&q=85&s=a1ae7b242fca211589b7e1a66e9620c0 2500w" />
|
||
|
||
6\. After accessing the SwaggerUi by clicking the triangle button first then waiting for the page to load, then clicking into the link aligning with SwaggerUI you should see the page below. (note: usually loads fast but can take 5-10 minutes) 
|
||
|
||
<img src="https://mintcdn.com/vastai-80aa3a82/rfbLJXS6cduyf_mj/images/use-cases-audio-to-text-5.png?fit=max&auto=format&n=rfbLJXS6cduyf_mj&q=85&s=4582d62ecc00b116421db56a8c9a2a35" alt="" data-og-width="1154" width="1154" data-og-height="601" height="601" data-path="images/use-cases-audio-to-text-5.png" data-optimize="true" data-opv="3" srcset="https://mintcdn.com/vastai-80aa3a82/rfbLJXS6cduyf_mj/images/use-cases-audio-to-text-5.png?w=280&fit=max&auto=format&n=rfbLJXS6cduyf_mj&q=85&s=fcdb58beb0d30aee8b86edc43376d96c 280w, https://mintcdn.com/vastai-80aa3a82/rfbLJXS6cduyf_mj/images/use-cases-audio-to-text-5.png?w=560&fit=max&auto=format&n=rfbLJXS6cduyf_mj&q=85&s=5453f339a637b848c1d11ea397d03d69 560w, https://mintcdn.com/vastai-80aa3a82/rfbLJXS6cduyf_mj/images/use-cases-audio-to-text-5.png?w=840&fit=max&auto=format&n=rfbLJXS6cduyf_mj&q=85&s=741cdfd31be34b5d6ee600e37ab8c28e 840w, https://mintcdn.com/vastai-80aa3a82/rfbLJXS6cduyf_mj/images/use-cases-audio-to-text-5.png?w=1100&fit=max&auto=format&n=rfbLJXS6cduyf_mj&q=85&s=c002c7fcbad11880b422741aed167e5b 1100w, https://mintcdn.com/vastai-80aa3a82/rfbLJXS6cduyf_mj/images/use-cases-audio-to-text-5.png?w=1650&fit=max&auto=format&n=rfbLJXS6cduyf_mj&q=85&s=06d550e69c33d2c7f2950ebeb4bb4f21 1650w, https://mintcdn.com/vastai-80aa3a82/rfbLJXS6cduyf_mj/images/use-cases-audio-to-text-5.png?w=2500&fit=max&auto=format&n=rfbLJXS6cduyf_mj&q=85&s=b1ac6d0f3a669a2c0313f2ffdcba6fc1 2500w" />
|
||
|
||
**Usage**
|
||
|
||
Two POST endpoints are exposed in this template:
|
||
|
||
**/detect-language**
|
||
|
||
Use this endpoint to automatically detect the spoken language in a given audio file.
|
||
|
||
<img src="https://mintcdn.com/vastai-80aa3a82/rfbLJXS6cduyf_mj/images/use-cases-audio-to-text-6.png?fit=max&auto=format&n=rfbLJXS6cduyf_mj&q=85&s=18950fe4f6e962ce51085815d1ed1526" alt="" data-og-width="1109" width="1109" data-og-height="942" height="942" data-path="images/use-cases-audio-to-text-6.png" data-optimize="true" data-opv="3" srcset="https://mintcdn.com/vastai-80aa3a82/rfbLJXS6cduyf_mj/images/use-cases-audio-to-text-6.png?w=280&fit=max&auto=format&n=rfbLJXS6cduyf_mj&q=85&s=040d71ce4101d47aeb3350c450d8cf42 280w, https://mintcdn.com/vastai-80aa3a82/rfbLJXS6cduyf_mj/images/use-cases-audio-to-text-6.png?w=560&fit=max&auto=format&n=rfbLJXS6cduyf_mj&q=85&s=b05305002ed7a562a258dd1be69f0a04 560w, https://mintcdn.com/vastai-80aa3a82/rfbLJXS6cduyf_mj/images/use-cases-audio-to-text-6.png?w=840&fit=max&auto=format&n=rfbLJXS6cduyf_mj&q=85&s=f66b84a4cd8026432d70151cff692962 840w, https://mintcdn.com/vastai-80aa3a82/rfbLJXS6cduyf_mj/images/use-cases-audio-to-text-6.png?w=1100&fit=max&auto=format&n=rfbLJXS6cduyf_mj&q=85&s=a04795a1596c67e75ceb27e1239fe3ae 1100w, https://mintcdn.com/vastai-80aa3a82/rfbLJXS6cduyf_mj/images/use-cases-audio-to-text-6.png?w=1650&fit=max&auto=format&n=rfbLJXS6cduyf_mj&q=85&s=d3ba68f63379b7e5285dd775c6124b28 1650w, https://mintcdn.com/vastai-80aa3a82/rfbLJXS6cduyf_mj/images/use-cases-audio-to-text-6.png?w=2500&fit=max&auto=format&n=rfbLJXS6cduyf_mj&q=85&s=3d923ab4905226baa8cd8b6418e94733 2500w" />
|
||
|
||
**/asr**
|
||
|
||
Use this endpoint for both transcription and translation of audio files.
|
||
|
||
*Both of these endpoints are documented using the OpenAPI standard and can be tested in a web browser. *
|
||
|
||
<img src="https://mintcdn.com/vastai-80aa3a82/rfbLJXS6cduyf_mj/images/use-cases-audio-to-text-7.png?fit=max&auto=format&n=rfbLJXS6cduyf_mj&q=85&s=6cd4c43fbe5e4b36ae9f5060e1943bfb" alt="" data-og-width="1111" width="1111" data-og-height="1048" height="1048" data-path="images/use-cases-audio-to-text-7.png" data-optimize="true" data-opv="3" srcset="https://mintcdn.com/vastai-80aa3a82/rfbLJXS6cduyf_mj/images/use-cases-audio-to-text-7.png?w=280&fit=max&auto=format&n=rfbLJXS6cduyf_mj&q=85&s=9ecff89e12a97ea462b247d95b5d352f 280w, https://mintcdn.com/vastai-80aa3a82/rfbLJXS6cduyf_mj/images/use-cases-audio-to-text-7.png?w=560&fit=max&auto=format&n=rfbLJXS6cduyf_mj&q=85&s=218facf0a61ea3678be636f618919fdf 560w, https://mintcdn.com/vastai-80aa3a82/rfbLJXS6cduyf_mj/images/use-cases-audio-to-text-7.png?w=840&fit=max&auto=format&n=rfbLJXS6cduyf_mj&q=85&s=c8ec55f1c6cefec572276e34d928efc3 840w, https://mintcdn.com/vastai-80aa3a82/rfbLJXS6cduyf_mj/images/use-cases-audio-to-text-7.png?w=1100&fit=max&auto=format&n=rfbLJXS6cduyf_mj&q=85&s=c1434ac7b96cc7dc5b402d229cdaa386 1100w, https://mintcdn.com/vastai-80aa3a82/rfbLJXS6cduyf_mj/images/use-cases-audio-to-text-7.png?w=1650&fit=max&auto=format&n=rfbLJXS6cduyf_mj&q=85&s=f47c010775502fdc2c6f6fce45bdabf2 1650w, https://mintcdn.com/vastai-80aa3a82/rfbLJXS6cduyf_mj/images/use-cases-audio-to-text-7.png?w=2500&fit=max&auto=format&n=rfbLJXS6cduyf_mj&q=85&s=dfda3c8ac530cdd2a98e3168c40b9b91 2500w" />
|
||
|
||
7\. *Select the detect language endpoint*
|
||
|
||
8\. *Then click try it out. *
|
||
|
||
<img src="https://mintcdn.com/vastai-80aa3a82/rfbLJXS6cduyf_mj/images/use-cases-audio-to-text-8.png?fit=max&auto=format&n=rfbLJXS6cduyf_mj&q=85&s=425d3820c122aa88e3fb047b815c1e23" alt="" data-og-width="1099" width="1099" data-og-height="105" height="105" data-path="images/use-cases-audio-to-text-8.png" data-optimize="true" data-opv="3" srcset="https://mintcdn.com/vastai-80aa3a82/rfbLJXS6cduyf_mj/images/use-cases-audio-to-text-8.png?w=280&fit=max&auto=format&n=rfbLJXS6cduyf_mj&q=85&s=c1b493090a39bde212cc020ffb756b13 280w, https://mintcdn.com/vastai-80aa3a82/rfbLJXS6cduyf_mj/images/use-cases-audio-to-text-8.png?w=560&fit=max&auto=format&n=rfbLJXS6cduyf_mj&q=85&s=c8e914c3ad9e979e159f3b7015aa6bcb 560w, https://mintcdn.com/vastai-80aa3a82/rfbLJXS6cduyf_mj/images/use-cases-audio-to-text-8.png?w=840&fit=max&auto=format&n=rfbLJXS6cduyf_mj&q=85&s=4f5b93c3d624e09fe504ba49198f0241 840w, https://mintcdn.com/vastai-80aa3a82/rfbLJXS6cduyf_mj/images/use-cases-audio-to-text-8.png?w=1100&fit=max&auto=format&n=rfbLJXS6cduyf_mj&q=85&s=f7f738d6ff1c387bd7e8dc2d0f05d71d 1100w, https://mintcdn.com/vastai-80aa3a82/rfbLJXS6cduyf_mj/images/use-cases-audio-to-text-8.png?w=1650&fit=max&auto=format&n=rfbLJXS6cduyf_mj&q=85&s=fb81b99245985df5b8a5bf70501534e4 1650w, https://mintcdn.com/vastai-80aa3a82/rfbLJXS6cduyf_mj/images/use-cases-audio-to-text-8.png?w=2500&fit=max&auto=format&n=rfbLJXS6cduyf_mj&q=85&s=d6fb02a8f6c339ebd3600ad0af32ad07 2500w" />
|
||
|
||
9.* From here upload an audio clip* 
|
||
|
||
10\. *Then press the execute button. *
|
||
|
||
<img src="https://mintcdn.com/vastai-80aa3a82/rfbLJXS6cduyf_mj/images/use-cases-audio-to-text-9.png?fit=max&auto=format&n=rfbLJXS6cduyf_mj&q=85&s=31135a8d4b05ea585c0680295ad7bdcd" alt="" data-og-width="1109" width="1109" data-og-height="385" height="385" data-path="images/use-cases-audio-to-text-9.png" data-optimize="true" data-opv="3" srcset="https://mintcdn.com/vastai-80aa3a82/rfbLJXS6cduyf_mj/images/use-cases-audio-to-text-9.png?w=280&fit=max&auto=format&n=rfbLJXS6cduyf_mj&q=85&s=d178a0fa4e8124ec9bc28a5d3de56226 280w, https://mintcdn.com/vastai-80aa3a82/rfbLJXS6cduyf_mj/images/use-cases-audio-to-text-9.png?w=560&fit=max&auto=format&n=rfbLJXS6cduyf_mj&q=85&s=fa8b8b69123e4b67b9bb070ecef3c791 560w, https://mintcdn.com/vastai-80aa3a82/rfbLJXS6cduyf_mj/images/use-cases-audio-to-text-9.png?w=840&fit=max&auto=format&n=rfbLJXS6cduyf_mj&q=85&s=f55872a3ca6aa64d3005b9c05e7581b1 840w, https://mintcdn.com/vastai-80aa3a82/rfbLJXS6cduyf_mj/images/use-cases-audio-to-text-9.png?w=1100&fit=max&auto=format&n=rfbLJXS6cduyf_mj&q=85&s=b12cb36eb8211c355b56da5d817c94db 1100w, https://mintcdn.com/vastai-80aa3a82/rfbLJXS6cduyf_mj/images/use-cases-audio-to-text-9.png?w=1650&fit=max&auto=format&n=rfbLJXS6cduyf_mj&q=85&s=edcc1ed7ae2a8538e53eb51a1b37ecbc 1650w, https://mintcdn.com/vastai-80aa3a82/rfbLJXS6cduyf_mj/images/use-cases-audio-to-text-9.png?w=2500&fit=max&auto=format&n=rfbLJXS6cduyf_mj&q=85&s=b886b1a0a798948ab17cca1aa295b14c 2500w" />
|
||
|
||
11.* If you look in the response body (see below) you can see it was able to detect the language was English.* 
|
||
|
||
*Note: If you are getting an internal 500 error its most likely the file you selected to upload is to large. *
|
||
|
||
<img src="https://mintcdn.com/vastai-80aa3a82/rfbLJXS6cduyf_mj/images/use-cases-audio-to-text-10.png?fit=max&auto=format&n=rfbLJXS6cduyf_mj&q=85&s=b4229287b94dc286939c28b54dac7b18" alt="" data-og-width="800" width="800" data-og-height="601" height="601" data-path="images/use-cases-audio-to-text-10.png" data-optimize="true" data-opv="3" srcset="https://mintcdn.com/vastai-80aa3a82/rfbLJXS6cduyf_mj/images/use-cases-audio-to-text-10.png?w=280&fit=max&auto=format&n=rfbLJXS6cduyf_mj&q=85&s=f1ac03d77a38cb9fb7847997ec63e946 280w, https://mintcdn.com/vastai-80aa3a82/rfbLJXS6cduyf_mj/images/use-cases-audio-to-text-10.png?w=560&fit=max&auto=format&n=rfbLJXS6cduyf_mj&q=85&s=da9ec9fd783f02eeb8c9f5a8344a5b42 560w, https://mintcdn.com/vastai-80aa3a82/rfbLJXS6cduyf_mj/images/use-cases-audio-to-text-10.png?w=840&fit=max&auto=format&n=rfbLJXS6cduyf_mj&q=85&s=080df835b1e0efaa0c47f8583922c489 840w, https://mintcdn.com/vastai-80aa3a82/rfbLJXS6cduyf_mj/images/use-cases-audio-to-text-10.png?w=1100&fit=max&auto=format&n=rfbLJXS6cduyf_mj&q=85&s=7cde6f5bb2f2bf846775d53f0c7d7048 1100w, https://mintcdn.com/vastai-80aa3a82/rfbLJXS6cduyf_mj/images/use-cases-audio-to-text-10.png?w=1650&fit=max&auto=format&n=rfbLJXS6cduyf_mj&q=85&s=d78a1227f7257c8819a4dbd4b7c460f4 1650w, https://mintcdn.com/vastai-80aa3a82/rfbLJXS6cduyf_mj/images/use-cases-audio-to-text-10.png?w=2500&fit=max&auto=format&n=rfbLJXS6cduyf_mj&q=85&s=f4fc44f6ff6de8b9434fea28b0c3d184 2500w" />
|
||
|
||
*For more information and specifics on things such as but not limited to Configuration, Additional Functionality, Instance Logs, Cloudflared, Api request, ssh tunnels and port reference mapping, and Caddy you can visit the*[ Readme linked here to learn more. ](https://cloud.vast.ai/template/readme/0c0c7d65cd4ebb2b340fbce39879703b)
|
||
|
||
**Links**
|
||
|
||
* [GitHub Repository](https://github.com/ahmetoner/whisper-asr-webservice/)
|
||
* [Docker Image](https://hub.docker.com/r/onerahmet/openai-whisper-asr-webservice)
|
||
|
||
|