5.4 MiB
Apify Documentation
The entire content of Apify documentation is available in a single Markdown file at https://docs.apify.com/llms-full.txt
Apify API
- Apify API
- Apify API: The Apify API (version 2) provides programmatic access to the Apify platform.
- Abort build: :::caution deprecated This endpoint has been deprecated and may be replaced or removed in future versions of the API.
- Get default build: Clients Python JavaScriptGet the default build for an Actor.
- Get build: :::caution deprecated API endpoints related to build of the Actor were moved under new namespace
actor-builds. - Get list of builds: Clients Python JavaScriptGets the list of builds of a specific Actor.
- Build Actor: Clients Python JavaScriptBuilds an Actor.
- Delete Actor: Clients JavaScriptDeletes an Actor.
- Get Actor: Clients Python JavaScriptGets an object that contains all the details about a specific Actor.
- Get OpenAPI definition: Get the OpenAPI definition for Actor builds.
- Update Actor: Clients Python JavaScriptUpdates settings of an Actor using values specified by an Actor object passed as JSON in the POST payload.
- Abort run: :::caution deprecated This endpoint has been deprecated and may be replaced or removed in future versions of the API.
- Get run: :::caution deprecated This endpoint has been deprecated and may be replaced or removed in future versions of the API.
- Metamorph run: :::caution deprecated This endpoint has been deprecated and may be replaced or removed in future versions of the API.
- Resurrect run: [DEPRECATED] API endpoints related to run of the Actor were moved under new namespace
actor-runs.Resurrects a finished Actor run and returns an object that contains all the details about the resurrected run. - Without input: Runs a specific Actor and returns its output.
- Run Actor synchronously without input and get dataset items: Runs a specific Actor and returns its dataset items.
- Run Actor synchronously with input and get dataset items: Runs a specific Actor and returns its dataset items.
- Run Actor synchronously with input and return output: Runs a specific Actor and returns its output.
- Get list of runs: Clients Python JavaScriptGets the list of runs of a specific Actor.
- Get last run: This is not a single endpoint, but an entire group of endpoints that lets you to retrieve and manage the last run of given Actor or any of its default storages.
- Run Actor: Clients Python JavaScriptRuns an Actor and immediately returns without waiting for the run to finish.
- Delete version: Deletes a specific version of Actor's source code.
- Delete environment variable: Deletes a specific environment variable.
- Get environment variable: Clients PythonGets a EnvVar object that contains all the details about a specific environment variable of an Actor.
- Update environment variable: Clients PythonUpdates Actor environment variable using values specified by a EnvVar object passed as JSON in the POST payload.
- Get list of environment variables: Clients PythonGets the list of environment variables for a specific version of an Actor.
- Create environment variable: Clients PythonCreates an environment variable of an Actor using values specified in a EnvVar object passed as JSON in the POST payload.
- Get version: Clients PythonGets a Version object that contains all the details about a specific version of an Actor.
- Update version: Clients PythonUpdates Actor version using values specified by a Version object passed as JSON in the POST payload.
- Get list of versions: Clients PythonGets the list of versions of a specific Actor.
- Create version: Clients PythonCreates a version of an Actor using values specified in a Version object passed as JSON in the POST payload.
- Get list of webhooks: Gets the list of webhooks of a specific Actor.
- Abort build: Clients Python JavaScriptAborts an Actor build and returns an object that contains all the details about the build.
- Delete build: Clients JavaScriptDelete the build.
- Get build: Clients Python JavaScriptGets an object that contains all the details about a specific build of an Actor.
- Get log: Check out Logs for full reference.
- Get OpenAPI definition: Clients Python JavaScriptGet the OpenAPI definition for Actor builds.
- Actor builds - Introduction: The API endpoints described in this section enable you to manage, and delete Apify Actor builds.
- Get user builds list: Gets a list of all builds for a user.
- Abort run: Clients Python JavaScriptAborts an Actor run and returns an object that contains all the details about the run.
- Delete run: Clients JavaScriptDelete the run.
- Get run: This is not a single endpoint, but an entire group of endpoints that lets you retrieve the run or any of its default storages.
- Metamorph run: Clients Python JavaScriptTransforms an Actor run into a run of another Actor with a new input.
- Update status message: You can set a single status message on your run that will be displayed in the Apify Console UI.
- Reboot run: Clients Python JavaScriptReboots an Actor run and returns an object that contains all the details about the rebooted run.
- Actor runs - Introduction: The API endpoints described in this section enable you to manage, and delete Apify Actor runs.
- Get user runs list: Gets a list of all runs for a user.
- Delete task: Clients JavaScriptDelete the task specified through the
actorTaskIdparameter. - Get task: Clients Python JavaScriptGet an object that contains all the details about a task.
- Get task input: Clients Python JavaScriptReturns the input of a given task.
- Update task input: Clients Python JavaScriptUpdates the input of a task using values specified by an object passed as JSON in the PUT payload.
- Update task: Clients Python JavaScriptUpdate settings of a task using values specified by an object passed as JSON in the POST payload.
- Run task synchronously: Run a specific task and return its output.
- Run task synchronously and get dataset items: Run a specific task and return its dataset items.
- Run task synchronously and get dataset items: Runs an Actor task and synchronously returns its dataset items.
- Run task synchronously: Runs an Actor task and synchronously returns its output.
- Get list of task runs: Get a list of runs of a specific task.
- Get last run: This is not a single endpoint, but an entire group of endpoints that lets you to retrieve and manage the last run of given actor task or any of its default storages.
- Run task: Clients Python JavaScriptRuns an Actor task and immediately returns without waiting for the run to finish.
- Get list of webhooks: Gets the list of webhooks of a specific Actor task.
- Actor tasks - Introduction: The API endpoints described in this section enable you to create, manage, delete, and run Apify Actor tasks.
- Get list of tasks: Clients Python JavaScriptGets the complete list of tasks that a user has created or used.
- Create task: Clients Python JavaScriptCreate a new task with settings specified by the object passed as JSON in the POST payload.
- Actors - Introduction: The API endpoints in this section allow you to manage Apify Actors.
- Actor builds - Introduction: The API endpoints in this section allow you to manage your Apify Actors builds.
- Actor runs - Introduction: The API endpoints in this section allow you to manage your Apify Actors runs.
- Actor versions - Introduction: The API endpoints in this section allow you to manage your Apify Actors versions.
- Webhook collection - Introduction: The API endpoint in this section allows you to get a list of webhooks of a specific Actor.
- Get list of Actors: Clients Python JavaScriptGets the list of all Actors that the user created or used.
- Create Actor: Clients Python JavaScriptCreates a new Actor with settings specified in an Actor object passed as JSON in the POST payload.
- Delete dataset: Clients JavaScriptDeletes a specific dataset.
- Get dataset: Clients Python JavaScriptReturns dataset object for given dataset ID.
- Get items: Clients Python JavaScriptReturns data stored in the dataset in a desired format.
- Store items: Clients Python JavaScriptAppends an item or an array of items to the end of the dataset.
- Update dataset: Clients Python JavaScriptUpdates a dataset's name using a value specified by a JSON object passed in the PUT payload.
- Get dataset statistics: Returns statistics for given dataset.
- Get list of datasets: Clients Python JavaScriptLists all of a user's datasets.
- Create dataset: Clients Python JavaScriptCreates a dataset and returns its object.
- Getting started with Apify API: The Apify API provides programmatic access to the Apify platform.
- Delete store: Clients JavaScriptDeletes a key-value store.
- Get store: Clients Python JavaScriptGets an object that contains all the details about a specific key-value store.
- Get list of keys: Clients Python JavaScriptReturns a list of objects describing keys of a given key-value store, as well as some information about the values (e.g.
- Update store: Clients Python JavaScriptUpdates a key-value store's name using a value specified by a JSON object passed in the PUT payload.
- Delete record: Clients Python JavaScriptRemoves a record specified by a key from the key-value store.
- Get record: Clients Python JavaScriptGets a value stored in the key-value store under a specific key.
- Check if a record exists: Clients Python JavaScriptCheck if a value is stored in the key-value store under a specific key.
- Store record: Clients Python JavaScriptStores a value under a specific key to the key-value store.
- Get list of key-value stores: Clients Python JavaScriptGets the list of key-value stores owned by the user.
- Create key-value store: Clients Python JavaScriptCreates a key-value store and returns its object.
- Get log: Clients Python JavaScriptRetrieves logs for a specific Actor build or run.
- Logs - Introduction: The API endpoints described in this section are used the download the logs generated by Actor builds and runs.
- Charge events in run: Clients Python JavaScriptCharge for events in the run of your pay per event Actor.
- Resurrect run: Clients Python JavaScriptResurrects a finished Actor run and returns an object that contains all the details about the resurrected run.
- Delete request queue: Clients JavaScriptDeletes given queue.
- Get request queue: Clients Python JavaScriptReturns queue object for given queue ID.
- Get head: Clients Python JavaScriptReturns given number of first requests from the queue.
- Get head and lock: Clients Python JavaScriptReturns the given number of first requests from the queue and locks them for the given time.
- Update request queue: Clients Python JavaScriptUpdates a request queue's name using a value specified by a JSON object passed in the PUT payload.
- Delete request: Clients JavaScriptDeletes given request from queue.
- Get request: Clients Python JavaScriptReturns request from queue.
- Delete request lock: Clients Python JavaScriptDeletes a request lock.
- Prolong request lock: Clients Python JavaScriptProlongs request lock.
- Update request: Clients Python JavaScriptUpdates a request in a queue.
- Delete requests: Clients Python JavaScriptBatch-deletes given requests from the queue.
- Add requests: Clients Python JavaScriptAdds requests to the queue in batch.
- List requests: Clients Python JavaScriptReturns a list of requests.
- Add request: Clients Python JavaScriptAdds request to the queue.
- Unlock requests: Clients Python JavaScriptUnlocks requests in the queue that are currently locked by the client.
- Get list of request queues: Clients Python JavaScriptLists all of a user's request queues.
- Create request queue: Clients Python JavaScriptCreates a request queue and returns its object.
- Delete schedule: Clients JavaScriptDeletes a schedule.
- Get schedule: Clients Python JavaScriptGets the schedule object with all details.
- Get schedule log: Clients Python JavaScriptGets the schedule log as a JSON array containing information about up to a 1000 invocations of the schedule.
- Update schedule: Clients Python JavaScriptUpdates a schedule using values specified by a schedule object passed as JSON in the POST payload.
- Schedules - Introduction: This section describes API endpoints for managing schedules.
- Get list of schedules: Clients Python JavaScriptGets the list of schedules that the user created.
- Create schedule: Clients Python JavaScriptCreates a new schedule with settings provided by the schedule object passed as JSON in the payload.
- Datasets - Introduction: This section describes API endpoints to manage Datasets.
- Key-value stores - Introduction: This section describes API endpoints to manage Key-value stores.
- Request queues - Introduction: This section describes API endpoints to create, manage, and delete request queues.
- Requests- Introduction: This section describes API endpoints to create, manage, and delete requests within request queues.
- Requests locks - Introduction: This section describes API endpoints to create, manage, and delete request locks within request queues.
- Store - Introduction: Apify Store is home to thousands of public Actors available to the Apify community.
- Get list of Actors in store: Gets the list of public Actors in Apify Store.
- Get public user data: Returns public information about a specific user account, similar to what can be seen on public profile pages (e.g.
- Users - Introduction: The API endpoints described in this section return information about user accounts.
- Get private user data: Returns information about the current user account, including both public and private information.
- Get limits: Returns a complete summary of your account's limits.
- Update limits: Updates the account's limits manageable on your account's Limits page.
- Get monthly usage: Returns a complete summary of your usage for the current usage cycle, an overall sum, as well as a daily breakdown of usage.
- Delete webhook: Clients JavaScriptDeletes a webhook.
- Get webhook dispatch: Clients Python JavaScriptGets webhook dispatch object with all details.
- Get list of webhook dispatches: Clients Python JavaScriptGets the list of webhook dispatches that the user have.
- Get webhook: Clients Python JavaScriptGets webhook object with all details.
- Update webhook: Clients Python JavaScriptUpdates a webhook using values specified by a webhook object passed as JSON in the POST payload.
- Test webhook: Clients Python JavaScriptTests a webhook.
- Get collection: Clients PythonGets a given webhook's list of dispatches.
- Get list of webhooks: Clients Python JavaScriptGets the list of webhooks that the user created.
- Create webhook: Clients Python JavaScriptCreates a new webhook with settings provided by the webhook object passed as JSON in the payload.
- Webhook dispatches - Introduction: This section describes API endpoints to get webhook dispatches.
- Webhooks - Introduction: This section describes API endpoints to manage webhooks.
open-source
sdk
search
Apify academy
- Web Scraping Academy: Learn everything about web scraping and automation with our free courses that will turn you into an expert scraper developer.
- Actor marketing playbook: Learn how to optimize and monetize your Actors on Apify Store by sharing them with other platform users. --- Apify Store is a marketplace featuring thousands of ready-made automation tools called Actors.
- Actor description & SEO description: Learn about Actor description and meta description.
- Actors and emojis: Using emojis in Actors is a science on its own.
- How to create an Actor README: Learn how to write a comprehensive README to help users better navigate, understand and run public Actors in Apify Store. --- ## What's a README in the Apify sense?
- Importance of Actor URL: **Actor URL (or technical name, as we call it), is the page URL of the Actor shown on the web.
- Name your Actor: **Apify's standards for Actor naming.
- Emails to Actor users: **Getting users is one thing, but keeping them is another.
- Handle Actor issues: **Once you publish your Actor in Apify Store, it opens the door to new users, feedback, and… issue reports.
- Your Apify Store bio: ## Your Apify Store bio and Store “README” To help our community showcase their talents and projects, we introduced public profile pages for developers.
- Actor bundles: Learn what an Actor bundle is, explore existing examples, and discover how to promote them. --- ## What is an Actor bundle?
- How to create a great input schema: Optimizing your input schema.
- Affiliates: The Apify Affiliate Program offers you a way to earn recurring commissions while helping others discover automation and web scraping solutions.
- Blogs and blog resources: **Blogs remain a powerful tool for promoting your Actors and establishing authority in the field.
- Marketing checklist: You're a developer, not a marketer.
- Parasite SEO: **Do you want to attract more users to your Actors?
- Product Hunt: Product Hunt is one of the best platforms for introducing new tools, especially in the tech community.
- SEO: SEO means optimizing your content to rank high for your target queries in search engines such as Google, Bing, etc.
- Social media: **Social media is a powerful way to connect with your Actor users and potential users.
- Video tutorials: **Videos and live streams are powerful tools for connecting with users and potential users, especially when promoting your Actors.
- Webinars: Webinars and live streams are a fantastic way to connect with your audience, showcase your Actor's capabilities, and gather feedback from users.
- How Actor monetization works: **You can turn your web scrapers into a source of income by publishing them on Apify Store.
- How Apify Store works: **Out of thousands of Actors on Apify Store marketplace, most of them were created by developers just like you.
- How to build Actors: At Apify, we try to make building web scraping and automation straightforward.
- Wrap open-source as an Actor: Apify is a cloud platform with a marketplace of 6,000+ web scraping and automation tools called Actors.
- Advanced web scraping: In the Web scraping basics for JavaScript devs course, we have learned the necessary basics required to create a scraper.
- Crawling sitemaps: In the previous lesson, we learned what is the utility (and dangers) of crawling sitemaps.
- Scraping websites with search: # Scraping websites with search In this lesson, we will start with a simpler example of scraping HTML based websites with limited pagination.
- Sitemaps vs search: The core crawling problem comes to down to ensuring that we reliably find all detail pages on the target website or inside its categories.
- Tips and tricks for robustness: **Learn how to make your automated processes more effective.
- AI agent tutorial: **In this section of the Apify Academy, we show you how to build an AI agent with the CrewAI Python framework.
- Anti-scraping protections: # Anti-scraping protections {#anti-scraping-protections} Understand the various anti-scraping measures different sites use to prevent bots from accessing them, and how to appear more human to fix these issues. --- If at any point in time you've strayed away from the Academy's demo content, and into the Wild West by writing some scrapers of your own, you may have been hit with anti-scraping measures.
- Anti-scraping mitigation: # Anti-scraping mitigation {#anti-scraping-mitigation} After learning about the various different anti-scraping techniques websites use, learn how to mitigate them with a few different techniques. --- In the techniques section of this course, you learned about multiple methods websites use to prevent bots from accessing their content.
- Bypassing Cloudflare browser check: # Bypassing Cloudflare browser check {#cloudflare-challenge} Learn how to bypass Cloudflare browser challenge with Crawlee. --- If you find yourself stuck, there are a few strategies that you can employ.
- Generating fingerprints: # Generating fingerprints {#generating-fingerprints} Learn how to use two super handy npm libraries to generate fingerprints and inject them into a Playwright or Puppeteer page. --- In Crawlee, you can use FingerprintOptions on a crawler to automatically generate fingerprints.
- Proxies: # Proxies {#about-proxies} Learn all about proxies, how they work, and how they can be leveraged in a scraper to avoid blocking and other anti-scraping tactics. --- A proxy server provides a gateway between users and the internet, to be more specific in our case - between the crawler and the target website.
- Using proxies: # Using proxies {#using-proxies} Learn how to use and automagically rotate proxies in your scrapers by using Crawlee, and a bit about how to obtain pools of proxies. --- In the Web scraping basics for JavaScript devs course, we learned about the power of Crawlee, and how it can streamline the development process of web crawlers.
- Anti-scraping techniques: # Anti-scraping techniques {#anti-scraping-techniques} Understand the various common (and obscure) anti-scraping techniques used by websites to prevent bots from accessing their content. --- In this section, we'll be discussing some of the most common (as well as some obscure) anti-scraping techniques used by websites to detect and block/limit bots from accessing their content.
- Browser challenges: # Browser challenges {#fingerprinting} > Learn how to navigate browser challenges like Cloudflare's to effectively scrape data from protected websites.
- Captchas: # Captchas {#captchas} Learn about the reasons a bot might be presented a captcha, the best ways to avoid captchas in the first place, and how to programmatically solve them. --- In general, a website will present a user (or scraper) a captcha for 2 main reasons: 1.
- Fingerprinting: # Fingerprinting {#fingerprinting} Understand browser fingerprinting, an advanced technique used by browsers to track user data and even block bots from accessing them. --- Browser fingerprinting is a method that some websites use to collect information about a browser's type and version, as well as the operating system being used, any active plugins, the time zone and language of the machine, the screen resolution, and various other active settings.
- Firewalls: # Firewalls {#firewalls} Understand what a web-application firewall is, how they work, and the various common techniques for avoiding them altogether. --- A web-application firewall (or WAF) is a tool for website admins which allows them to set various access rules for their visitors.
- Geolocation: # Geolocation {#geolocation} Learn about the geolocation techniques to determine where requests are coming from, and a bit about how to avoid being blocked based on geolocation. --- Geolocation is yet another way websites can detect and block access or show limited data.
- Rate-limiting: # Rate-limiting {#rate-limiting} Learn about rate-limiting, a common tactic used by websites to avoid a large and non-human rate of requests coming from a single IP address. --- When crawling a website, a web scraping bot will typically send many more requests from a single IP address than a human user could generate over the same period.
- Using Apify API: # Using Apify API A collection of various tutorials explaining how to interact with the Apify platform programmatically using its API. --- This section explains how you can run Apify Actors using Apify's API, retrieve their results, and integrate them into your own product and workflows.
- API scraping: # API scraping Learn all about how the professionals scrape various types of APIs with various configurations, parameters, and requirements. --- API scraping is locating a website's API endpoints, and fetching the desired data directly from their API, as opposed to parsing the data from their rendered HTML pages.
- General API scraping: # General API scraping {#general-api-scraping} Learn the benefits and drawbacks of API scraping, how to locate an API, how to utilize its features, and how to work around common roadblocks. --- This section will teach you everything you should know about API scraping before moving into the next sections in the API Scraping module.
- Dealing with headers, cookies, and tokens: # Dealing with headers, cookies, and tokens {#challenges} Learn about how some APIs require certain cookies, headers, and/or tokens to be present in a request in order for data to be received. --- Unfortunately, most APIs will require a valid cookie to be included in the
cookiefield within a request's headers in order to be authorized. - Handling pagination: # Handling pagination {#handling-pagination} Learn about the three most popular API pagination techniques and how to handle each of them when scraping an API with pagination. --- When scraping large APIs, you'll quickly realize that most APIs limit the number of results it responds back with.
- Locating API endpoints: # Locating API endpoints {#locating-endpoints} Learn how to effectively locate a website's API endpoints, and learn how to use them to get the data you want faster and more reliably. --- In order to retrieve a website's API endpoints, as well as other data about them, the Network tab within Chrome's (or another browser's) DevTools can be used.
- GraphQL scraping: # GraphQL scraping {#graphql-scraping} **Dig into the topic of scraping APIs which use the latest and greatest API technology - GraphQL.
- Custom queries: # Custom queries {#custom-queries} Learn how to write custom GraphQL queries, how to pass input values into GraphQL requests as variables, and how to retrieve and output the data from a scraper. --- Sometimes, the queries found in the Network tab aren't good enough for your use case.
- Introspection: # Introspection {#introspection} Understand what introspection is, and how it can help you understand a GraphQL API to take advantage of the features it has to offer before writing any code. --- Introspection is when you make a query to the target GraphQL API requesting information about its schema.
- Modifying variables: # Modifying variables {#modifying-variables} Learn how to modify the variables of a JSON format GraphQL query to use the API without needing to write any GraphQL language or create custom queries. --- In the introduction of this course, we searched for the term test on the Cheddar website and discovered a request to their GraphQL API.
- How to retry failed requests: Learn how to re-scrape only failed requests in your run. --- Requests of a scraper can fail for many reasons.
- Run Actor and retrieve data via API: **Learn how to run an Actor/task via the Apify API, wait for the job to finish, and retrieve its output data.
- Tutorials on Apify Actors: Learn how to deploy your API project to the Apify platform. --- This tutorial shows you how to add your existing RapidAPI project to Apify, giving you access to managed hosting, data storage, and a broader user base through Apify Store while maintaining your RapidAPI presence.
- Adding your RapidAPI project to Apify: If you've published an API project on RapidAPI, you can expand your project's visibility by listing it on Apify Store.
- Introduction to the Apify platform: # Introduction to the Apify platform {#about-the-platform} Learn all about the Apify platform, all of the tools it offers, and how it can improve your overall development experience. --- The Apify platform was built to serve large-scale and high-performance web scraping and automation needs.
- Using ready-made Apify scrapers: # Using ready-made Apify scrapers **Discover Apify's ready-made web scraping and automation tools.
- Scraping with Cheerio Scraper: [//]: # (TODO: Should be updated) # This scraping tutorial will go into the nitty gritty details of extracting data from https://apify.com/store using Cheerio Scraper (apify/cheerio-scraper).
- Getting started with Apify scrapers: [//]: # (TODO: Should be updated) # Welcome to the getting started tutorial!
- Scraping with Puppeteer Scraper: [//]: # (TODO: Should be updated) # This scraping tutorial will go into the nitty gritty details of extracting data from https://apify.com/store using Puppeteer Scraper (apify/puppeteer-scraper).
- Scraping with Web Scraper: [//]: # (TODO: Should be updated) # This scraping tutorial will go into the nitty gritty details of extracting data from https://apify.com/store using Web Scraper (apify/web-scraper).
- Validate your Actor idea: Before investing time into building an Actor, validate that people actually need it.
- Find ideas for new Actors: Learn what kind of software tools are suitable to be packaged and published as Actors on Apify, and where you can find inspiration what to build.
- Why publish Actors on Apify: Publishing Actors on Apify Store transforms your web scraping and automation code into revenue-generating products without the overhead of traditional SaaS development.
- Concepts 🤔: # Concepts 🤔 {#concepts} Learn about some common yet tricky concepts and terms that are used frequently within the academy, as well as in the world of scraper development. --- You'll see some terms and concepts frequently repeated throughout various courses in the academy.
- CSS selectors: CSS selectors are patterns used to select HTML elements on a web page.
- Dynamic pages and single-page applications (SPAs): # Dynamic pages and single-page applications (SPAs) {#dynamic-pages} Understand what makes a page dynamic, and how a page being dynamic might change your approach when writing a scraper for it. --- Oftentimes, web pages load additional information dynamically, long after their main body is loaded in the browser.
- HTML elements: An HTML element is a building block of an HTML document.
- HTTP cookies: # HTTP cookies {#cookies} Learn a bit about what cookies are, and how they are utilized in scrapers to appear logged-in, view specific data, or even avoid blocking. --- HTTP cookies are small pieces of data sent by the server to the user's web browser, which are typically stored by the browser and used to send later requests to the same server.
- HTTP headers: # HTTP headers {#headers} Understand what HTTP headers are, what they're used for, and three of the biggest differences between HTTP/1.1 and HTTP/2 headers. --- HTTP headers let the client and the server pass additional information with an HTTP request or response.
- Querying elements:
document.querySelector()anddocument.querySelectorAll()are JavaScript functions that allow you to select elements on a web page using CSS selectors. - What is robotic process automation (RPA)?: # What is robotic process automation (RPA)?
- Deploying your code to Apify: # Deploying your code to Apify {#deploying} In this course learn how to take an existing project of yours and deploy it to the Apify platform as an Actor. --- This section will discuss how to use your newfound knowledge of the Apify platform and Actors from the Getting started section to deploy your existing project's code to the Apify platform as an Actor.
- Creating dataset schema: Learn how to generate an appealing Overview table interface to preview your Actor results in real time on the Apify platform. --- The dataset schema generates an interface that enables users to instantly preview their Actor results in real time.
- Publishing your Actor: Push local code to the platform, or create a new Actor on the console and integrate it with a Git repository to optionally automatically rebuild any new changes. --- Once you've actorified your code, there are two ways to deploy it to the Apify platform.
- Creating Actor Dockerfile: Understand how to write a Dockerfile (Docker image blueprint) for your project so that it can be run within a Docker container on the Apify platform. --- The Dockerfile is a file which gives the Apify platform (or Docker, more specifically) instructions on how to create an environment for your code to run in.
- How to write Actor input schema: Learn how to generate a user interface on the platform for your Actor's input with a single file - the INPUT_SCHEMA.json file. --- Though writing an input schema for an Actor is not a required step, it is most definitely an ideal one.
- Managing Actor inputs and outputs: **Learn to accept input into your Actor, do something with it, and then return output.
- Expert scraping with Apify: # Expert scraping with Apify {#expert-scraping} After learning the basics of Actors and Apify, learn to develop pro-level scrapers on the Apify platform with this advanced course. --- This course will teach you the nitty gritty of what it takes to build pro-level scrapers with Apify.
- Webhooks & advanced Actor overview: # Webhooks & advanced Actor overview {#webhooks-and-advanced-actors} **Learn more advanced details about Actors, how they work, and the default configurations they can take.
- Apify API & client: # Apify API & client {#api-and-client} Gain an in-depth understanding of the two main ways of programmatically interacting with the Apify platform - through the API, and through a client. --- You can use one of the two main ways to programmatically interact with the Apify platform: by directly using Apify's RESTful API, or by using the JavaScript and Python API clients.
- Bypassing anti-scraping methods: # Bypassing anti-scraping methods {#bypassing-anti-scraping-methods} Learn about bypassing anti-scraping methods using proxies and proxy/session rotation together with Crawlee and the Apify SDK. --- Effectively bypassing anti-scraping software is one of the most crucial, but also one of the most difficult skills to master.
- Managing source code: # Managing source code {#managing-source-code} **Learn how to manage your Actor's source code more efficiently by integrating it with a GitHub repository.
- Migrations & maintaining state: # Migrations & maintaining state {#migrations-maintaining-state} Learn about what Actor migrations are and how to handle them properly so that the state is not lost and runs can safely be resurrected. --- We already know that Actors are Docker containers that can be run on any server.
- Saving useful run statistics: # Saving useful run statistics {#savings-useful-run-statistics} Understand how to save statistics about an Actor's run, what types of statistics you can save, and why you might want to save them for a large-scale scraper. --- Using Crawlee and the Apify SDK, we are now able to collect and format data coming directly from websites and save it into a Key-Value store or Dataset.
- Solutions: # Solutions **View all of the solutions for all of the activities and tasks of this course.
- Handling migrations: # Handling migrations {#handling-migrations} Get real-world experience of maintaining a stateful object stored in memory, which will be persisted through migrations and even graceful aborts. --- Let's first head into our demo-actor and create a new file named asinTracker.js in the src folder.
- Integrating webhooks: # Integrating webhooks {#integrating-webhooks} **Learn how to integrate webhooks into your Actors.
- Managing source: # Managing source View in-depth answers for all three of the quiz questions that were provided in the corresponding lesson about managing source code. --- In the lesson corresponding to this solution, we discussed an extremely important topic: source code management.
- Rotating proxies/sessions: # Rotating proxies/sessions {#rotating-proxy-sessions} Learn firsthand how to rotate proxies and sessions in order to avoid the majority of the most common anti-scraping protections. --- If you take a look at our current code for the Amazon scraping Actor, you might notice this snippet:
js const proxyConfiguration = await Actor.createProxyConfiguration({ groups: ['RESIDENTIAL'], });We didn't provide much explanation for this initially, as it was not directly relevant to the lesson at hand. - Saving run stats: # Saving run stats {#saving-stats} Implement the saving of general statistics about an Actor's run, as well as adding request-specific statistics to dataset items. --- The code in this solution will be similar to what we already did in the Handling migrations solution; however, we'll be storing and logging different data.
- Using the Apify API & JavaScript client: # Using the Apify API & JavaScript client {#using-api-and-client} Learn how to interact with the Apify API directly through the well-documented RESTful routes, or by using the proprietary Apify JavaScript client. --- Since we need to create another Actor, we'll once again use the
apify createcommand and start from an empty template. - Using storage & creating tasks: # Using storage & creating tasks {#using-storage-creating-tasks} ## Quiz answers 📝 {#quiz-answers} Q: What is the relationship between Actors and tasks? A: Tasks are pre-configured runs of Actors.
- Tasks & storage: # Tasks & storage {#tasks-and-storage} **Understand how to save the configurations for Actors with Actor tasks.
- Monetizing your Actor: Learn how you can monetize your web scraping and automation projects by publishing Actors to users in Apify Store. --- When you publish your Actor on the Apify platform, you have the option to make it a Paid Actor and earn revenue from users who benefit from your tool.
- Getting started: # Getting started {#getting-started} Get started with the Apify platform by creating an account and learning about the Apify Console, which is where all Apify Actors are born! --- Your gateway to the Apify platform is your Apify account.
- Actors: **What is an Actor?
- The Apify API: # The Apify API {#the-apify-api} Learn how to use the Apify API to programmatically call your Actors, retrieve data stored on the platform, view Actor logs, and more! --- Apify's API is your ticket to the Apify platform without even needing to access the Apify Console web-interface.
- Apify client: # Apify client {#apify-client} Interact with the Apify API in your code by using the apify-client package, which is available for both JavaScript and Python. --- Now that you've gotten your toes wet with interacting with the Apify API through raw HTTP requests, you're ready to become familiar with the Apify client, which is a package available for both JavaScript and Python that allows you to interact with the API in your code without explicitly needing to make any GET or POST requests.
- Creating Actors: **This lesson offers hands-on experience in building and running Actors in Apify Console using a template.
- Inputs & outputs: Create an Actor from scratch which takes an input, processes that input, and then outputs a result that can be used elsewhere. --- Actors, as any other programs, take inputs and generate outputs.
- Why a glossary?: # Why a glossary?
- Scraping with Node.js: # Scraping with Node.js A collection of various Node.js tutorials on scraping sitemaps, optimizing your scrapers, using popular Node.js web scraping libraries, and more. --- This section contains various web-scraping or web-scraping related tutorials for Node.js.
- How to add external libraries to Web Scraper: Sometimes you need to use some extra JavaScript in your Web Scraper page functions.
- How to analyze and fix errors when scraping a website: # How to analyze and fix errors when scraping a website {#scraping-with-sitemaps} **Learn how to deal with random crashes in your web-scraping and automation jobs.
- Apify's free Google SERP API: You need to regularly grab SERP data about your target keywords?
- Avoid EACCES error in Actor builds with a custom Dockerfile: Sometimes when building an Actor using a custom Dockerfile, you might receive errors like: ```shell Missing write access to ...
- Block requests in Puppeteer: :::caution Improve Performance: Use
blockRequestsUnfortunately, in the recent version of Puppeteer, request interception disables the native cache and slows down the Actor significantly. - How to optimize Puppeteer by caching responses: # How to optimize Puppeteer by caching responses {#caching-responses-in-puppeteer} Learn why it is important for performance to cache responses in memory when intercepting requests in Puppeteer and how to implement it in your code. --- > In the latest version of Puppeteer, the request-interception function inconveniently disables the native cache and significantly slows down the crawler.
- How to choose the right scraper for the job: # How to choose the right scraper for the job {#choosing-the-right-scraper} Learn basic web scraping concepts to help you analyze a website and choose the best scraper for your particular use case. --- You can use one of the two main ways to proceed with building your crawler: 1.
- How to scrape from dynamic pages: # How to scrape from dynamic pages {#dealing-with-dynamic-pages} **Learn about dynamic pages and dynamic content.
- Running code in a browser console: A lot of beginners struggle through trial and error while scraping a simple site.
- Filter out blocked proxies using sessions: _This article explains how the problem was solved before the SessionPool class was added into Apify SDK.
- BasicCrawler: One of the main defense mechanisms websites use to ensure they are not scraped by bots is allowing only a limited number of requests from a specific IP address.
- How to fix 'Target closed' error in Puppeteer and Playwright: # How to fix 'Target closed' error in Puppeteer and Playwright Learn about common causes for the 'Target closed' error in browser automation and what you can do to fix it. --- The
Target closederror happens when you try to access thepageobject (or some of its parent objects like thebrowser), but the underlying browser tab has already been closed. - How to save screenshots from puppeteer: A good way to debug your puppeteer crawler in Apify Actors is to save a screenshot of a browser window to the Apify key-value store.
- How to scrape hidden JavaScript objects in HTML: # How to scrape hidden JavaScript objects in HTML {#what-is-js-in-html} Learn about "hidden" data found within the JavaScript of certain pages, which can increase the scraper reliability and improve your development experience. --- Depending on the technology the target website is using, the data to be collected not only can be found within HTML elements, but also in a JSON format within `` tags in the DOM.
- Scrape website in parallel with multiple Actor runs: # Scrape website in parallel with multiple Actor runs **Learn how to run multiple instances of an Actor to scrape a website faster.
- How to optimize and speed up your web scraper: # How to optimize and speed up your web scraper {#optimizing-scrapers} **We all want our scrapers to run as cost-effective as possible.
- Enqueuing start pages for all keywords: Sometimes you need to process the same URL several times, but each time with a different setup.
- Request labels and how to pass data to other requests: Are you trying to use Actors for the first time and don't know how to deal with the request label or how to pass data to the request?
- How to scrape from sitemaps: # How to scrape from sitemaps {#scraping-with-sitemaps} :::tip Processing sitemaps automatically with Crawlee Crawlee allows you to scrape sitemaps with ease.
- How to scrape sites with a shadow DOM: # How to scrape sites with a shadow DOM {#scraping-shadow-doms} **The shadow DOM enables isolation of web components, but causes problems for those building web scrapers.
- Scraping a list of URLs from a Google Sheets document: You can export URLs from Google Sheets such as this one directly into an Actor's Start URLs field.
- Downloading the file to memory: When doing web automation with Apify, it can sometimes be necessary to submit an HTML form with a file attachment.
- Submitting forms on .ASPX pages: Apify users sometimes need to submit a form on pages created with ASP.NET (URL typically ends with .aspx).
- Using man-in-the-middle proxy to intercept requests in Puppeteer: Sometimes you may need to intercept (or maybe block) requests in headless Chrome / Puppeteer, but
page.setRequestInterception()is not 100% reliable when the request is started in a new window. - Waiting for dynamic content: Use these helper functions to wait for data: -
page.waitForin Puppeteer (or Puppeteer Scraper (apify/puppeteer-scraper)). - When to use Puppeteer Scraper: You may have read in the Web Scraper readme or somewhere else at Apify that Puppeteer Scraper is more powerful and gives you more control over the browser, enabling you to do almost anything.
- How to use Apify from PHP: # How to use Apify from PHP Apify's RESTful API allows you to use the platform from basically anywhere.
- Puppeteer & Playwright course: # Puppeteer & Playwright course {#puppeteer-playwright-course} Learn in-depth how to use two of the most popular Node.js libraries for controlling a headless browser - Puppeteer and Playwright. --- Puppeteer and Playwright are libraries that allow you to automate browsing.
- Browser: # Browser {#browser} Understand what the Browser object is in Puppeteer/Playwright, how to create one, and a bit about how to interact with one. --- In order to automate a browser in Playwright or Puppeteer, we need to open one up programmatically.
- Creating multiple browser contexts: # Creating multiple browser contexts {#creating-browser-contexts} Learn what a browser context is, how to create one, how to emulate devices, and how to use browser contexts to automate multiple sessions at one time. --- A BrowserContext is an isolated incognito session within a Browser instance.
- Common use cases: # Common use cases {#common-use-cases} Learn about some of the most common use cases of Playwright and Puppeteer, and how to handle these use cases when you run into them. --- You can do about anything with a headless browser, but, there are some extremely common use cases that are important to understand and be prepared for when you might run into them.
- Downloading files: # Downloading files Learn how to automatically download and save files to the disk using two of the most popular web automation libraries, Puppeteer and Playwright. --- Downloading a file using Puppeteer can be tricky.
- Logging into a website: # Logging into a website {#logging-into-a-website} Understand the "login flow" - logging into a website, then maintaining a logged in status within different browser contexts for an efficient automation process. --- Whether it's auto-renewing a service, automatically sending a message on an interval, or automatically cancelling a Netflix subscription, one of the most popular things headless browsers are used for is automating things within a user's account on a certain website.
- Paginating through results: # Paginating through results {#paginating-through-results} Learn how to paginate through results on websites that use either pagination based on page numbers or dynamic lazy loading. --- If you're trying to collect data on a website that has millions, thousands, or even hundreds of results, it is very likely that they are paginating their results to reduce strain on their back-end as well as on the users loading and rendering the content.
- Scraping iFrames: # Scraping iFrames **Extracting data from iFrames can be frustrating.
- Submitting a form with a file attachment: # Submitting a form with a file attachment Understand how to download a file, attach it to a form using a headless browser in Playwright or Puppeteer, then submit the form. --- We can use Puppeteer or Playwright to simulate submitting the same way a human-operated browser would.
- Executing scripts: # Executing scripts {#executing-scripts} Understand the two different contexts which your code can be run in, and how to run custom scripts in the context of the browser. --- An important concept to understand when dealing with headless browsers is the context in which your code is being run.
- Extracting data: # Extracting data {#extracting-data} Learn how to extract data from a page with evaluate functions, then how to parse it by using a second library called Cheerio. --- Now that we know how to execute scripts on a page, we're ready to learn a bit about data extraction.
- Injecting code: # Injecting code {#injecting-code} Learn how to inject scripts prior to a page's load (pre-injecting), as well as how to expose functions to be run at a later time on the page. --- In the previous lesson, we learned how to execute code on the page using
page.evaluate(), and though this fits the majority of use cases, there are still some more unusual cases. - Opening a page: # Opening a page {#opening-a-page} Learn how to create and open a Page with a Browser, and how to use it to visit and programmatically interact with a website. --- When you open up your regular browser and visit a website, you open up a new page (or tab) before entering the URL in the search bar and hitting the Enter key.
- Interacting with a page: # Interacting with a page {#interacting-with-a-page} **Learn how to programmatically do actions on a page such as clicking, typing, and pressing keys.
- Page methods: # Page methods {#page-methods} Understand that the Page object has many different methods to offer, and learn how to use two of them to capture a page's title and take a screenshot. --- Other than having methods for interacting with a page and waiting for events and elements, the Page object also supports various methods for doing other things, such as reloading, screenshotting, changing headers, and extracting the page's content.
- Waiting for elements and events: # Waiting for elements and events {#waiting-for-elements-and-events} Learn the importance of waiting for content and events before running interaction or extraction code, as well as the best practices for doing so. --- In a perfect world, every piece of content served on a website would be loaded instantaneously.
- Using proxies: # Using proxies {#using-proxies} Understand how to use proxies in your Puppeteer and Playwright requests, as well as a couple of the most common use cases for proxies. --- Proxies are a great way of appearing as if you are making requests from a different location.
- Reading & intercepting requests: # Reading & intercepting requests {#reading-intercepting-requests} **You can use DevTools, but did you know that you can do all the same stuff (plus more) programmatically?
- Scraping with Python: # Scraping with Python A collection of various Python tutorials to aid you in your journey to becoming a master web scraping and automation developer. --- This section contains various web-scraping or web-scraping related tutorials for Python.
- How to process data in Python using Pandas: # How to process data in Python using Pandas Learn how to process the resulting data of a web scraper in Python using the Pandas library, and how to visualize the processed data using Matplotlib. --- In the previous tutorial, we learned how to scrape data from the web in Python using the Beautiful Soup library.
- How to scrape data in Python using Beautiful Soup: # How to scrape data in Python using Beautiful Soup Learn how to create a Python Actor and use Python libraries to scrape, process and visualize data extracted from the web. --- Web scraping is not limited to the JavaScript world.
- Run a web server on the Apify platform: **A web server running in an Actor can act as a communication channel with the outside world.
- Web scraping basics for JavaScript devs: Learn how to use JavaScript to extract information from websites in this practical course, starting from the absolute basics. --- In this course we'll use JavaScript to create an application for watching prices.
- Crawling websites with Node.js: **In this lesson, we'll follow links to individual product pages.
- Extracting data from a web page with browser DevTools: In this lesson we'll use the browser tools for developers to manually extract product data from an e-commerce website. --- In our pursuit to scrape products from the Sales page, we've been able to locate parent elements containing relevant data.
- Inspecting web pages with browser DevTools: In this lesson we'll use the browser tools for developers to inspect and manipulate the structure of a website. --- A browser is the most complete tool for navigating websites.
- Locating HTML elements on a web page with browser DevTools: In this lesson we'll use the browser tools for developers to manually find products on an e-commerce website. --- Inspecting Wikipedia and tweaking its subtitle is fun, but let's shift gears and focus on building an app to track prices on an e-commerce site.
- Downloading HTML with Node.js: **In this lesson we'll start building a Node.js application for watching prices.
- Extracting data from HTML with Node.js: **In this lesson we'll finish extracting product data from the downloaded HTML.
- Using a scraping framework with Node.js: **In this lesson, we'll rework our application for watching prices so that it builds on top of a scraping framework.
- Getting links from HTML with Node.js: **In this lesson, we'll locate and extract links to individual product pages.
- Locating HTML elements with Node.js: **In this lesson we'll locate product data in the downloaded HTML.
- Parsing HTML with Node.js: **In this lesson we'll look for products in the downloaded HTML.
- Using a scraping platform with Node.js: **In this lesson, we'll deploy our application to a scraping platform that automatically runs it daily.
- Saving data with Node.js: **In this lesson, we'll save the data we scraped in the popular formats, such as CSV or JSON.
- Scraping product variants with Node.js: In this lesson, we'll scrape the product detail pages to represent each product variant as a separate item in our dataset. --- We'll need to figure out how to extract variants from the product detail page, and then change how we add items to the data list so we can add multiple items after scraping one product URL.
- Web scraping basics for Python devs: Learn how to use Python to extract information from websites in this practical course, starting from the absolute basics. --- In this course we'll use Python to create an application for watching prices.
- Crawling websites with Python: **In this lesson, we'll follow links to individual product pages.
- Extracting data from a web page with browser DevTools: In this lesson we'll use the browser tools for developers to manually extract product data from an e-commerce website. --- In our pursuit to scrape products from the Sales page, we've been able to locate parent elements containing relevant data.
- Inspecting web pages with browser DevTools: In this lesson we'll use the browser tools for developers to inspect and manipulate the structure of a website. --- A browser is the most complete tool for navigating websites.
- Locating HTML elements on a web page with browser DevTools: In this lesson we'll use the browser tools for developers to manually find products on an e-commerce website. --- Inspecting Wikipedia and tweaking its subtitle is fun, but let's shift gears and focus on building an app to track prices on an e-commerce site.
- Downloading HTML with Python: **In this lesson we'll start building a Python application for watching prices.
- Extracting data from HTML with Python: **In this lesson we'll finish extracting product data from the downloaded HTML.
- Using a scraping framework with Python: **In this lesson, we'll rework our application for watching prices so that it builds on top of a scraping framework.
- Getting links from HTML with Python: **In this lesson, we'll locate and extract links to individual product pages.
- Locating HTML elements with Python: **In this lesson we'll locate product data in the downloaded HTML.
- Parsing HTML with Python: **In this lesson we'll look for products in the downloaded HTML.
- Using a scraping platform with Python: **In this lesson, we'll deploy our application to a scraping platform that automatically runs it daily.
- Saving data with Python: **In this lesson, we'll save the data we scraped in the popular formats, such as CSV or JSON.
- Scraping product variants with Python: In this lesson, we'll scrape the product detail pages to represent each product variant as a separate item in our dataset. --- We'll need to figure out how to extract variants from the product detail page, and then change how we add items to the data list so we can add multiple items after scraping one product URL.
- Tools 🔧: # Tools 🔧 {#tools} Discover a variety of tools that can be used to enhance the scraper development process, or even unlock doors to new scraping possibilities. --- Here at Apify, we've found many tools, some quite popular and well-known and some niche, which can aid any developer in their scraper development process.
- The Apify CLI: # The Apify CLI {#the-apify-cli} Learn about, install, and log into the Apify CLI - your best friend for interacting with the Apify platform via your terminal. --- The Apify CLI helps you create, develop, build and run Apify Actors, and manage the Apify cloud platform from any computer.
- What's EditThisCookie?: # What's EditThisCookie?
- What is Insomnia: # What is Insomnia {#what-is-insomnia} Learn about Insomnia, a valuable tool for testing requests and proxies when building scalable web scrapers. --- Despite its name, the Insomnia desktop application has absolutely nothing to do with having a lack of sleep.
- What is ModHeader?: # What is ModHeader?
- What is Postman?: # What is Postman?
- What's Proxyman?: # What's Proxyman?
- Quick JavaScript Switcher: # Quick JavaScript Switcher **Discover a handy tool for disabling JavaScript on a certain page to determine how it should be scraped.
- What is SwitchyOmega?: # What is SwitchyOmega?
- User-Agent Switcher: # User-Agent Switcher Learn how to switch your User-Agent header to different values in order to monitor how a certain site responds to the changes. --- User-Agent Switcher is a Chrome extension that allows you to quickly change your User-Agent and see how a certain website would behave with different user agents.
- Tutorials 📚: # Tutorials 📚 Learn about various different specific topics related to web-scraping and web-automation with the Apify Academy tutorial lessons! --- In web scraping, there are a whole lot of niche cases that you will run into.
- Web scraping basics for JavaScript devs: # Web scraping basics for JavaScript devs {#welcome} **Learn how to develop web scrapers with this comprehensive and practical course.
- Best practices when writing scrapers: # Best practices when writing scrapers {#best-practices} Understand the standards and best practices that we here at Apify abide by to write readable, scalable, and maintainable code. --- Every developer has their own style, which evolves as they grow and learn.
- Challenge: # Challenge Test your knowledge acquired in the previous sections of this course by building an Amazon scraper using Crawlee's CheerioCrawler! --- Before moving onto the other courses in the academy, we recommend following along with this section, as it combines everything you've learned in the previous lessons into one cohesive project that helps you prove to yourself that you've thoroughly understood the material.
- Initialization & setting up: # Initialization & setting up **When you extract links from a web page, you often end up with a lot of irrelevant URLs.
- Modularity: # Modularity Before you build your first web scraper with Crawlee, it is important to understand the concept of modularity in programming. --- Now that we've gotten our first request going, the first challenge is going to be selecting all of the resulting products on the page.
- Scraping Amazon: # Scraping Amazon **Build your first web scraper with Crawlee.
- Basics of crawling: **Learn how to crawl the web with your scraper.
- Exporting data: # Exporting data {#exporting-data} Learn how to export the data you scraped using Crawlee to CSV or JSON. --- In the previous lessons, you learned that: 1.
- Filtering links: # Filtering links {#filtering-links} **When you extract links from a web page, you often end up with a lot of irrelevant URLs.
- Finding links: Learn what a link looks like in HTML and how to find and extract their URLs when web scraping using both DevTools and Node.js. --- Many kinds of links exist on the internet, and we'll cover all the types in the advanced Academy courses.
- Your first crawl: # Your first crawl {#your-first-crawl} **Learn how to crawl the web using Node.js, Cheerio and an HTTP client.
- Headless browsers: # Headless browsers {#headless-browser} **Learn how to scrape the web with a headless browser using only a few lines of code.
- Professional scraping 👷: # Professional scraping 👷 {#pro-scraping} Learn how to build scrapers quicker and get better and more robust results by using Crawlee, an open-source library for scraping in Node.js. --- While it's definitely an interesting exercise to do all the programming manually, and we hope you enjoyed it, it's neither the most effective, nor the most efficient way of scraping websites.
- Recap of data extraction basics: # Recap of data extraction basics {#quick-recap} Review our e-commerce website scraper and refresh our memory about its code and the programming techniques we used to extract and save the data. --- We finished off the first section of the Web scraping basics for JavaScript devs course by creating a web scraper in Node.js.
- Relative URLs: # Relative URLs {#filtering-links} Learn about absolute and relative URLs used on web pages and how to work with them when parsing HTML with Cheerio in your scraper. --- You might have noticed in the previous lesson that while printing URLs to the DevTools console, they would always show in full length, like this:
text https://warehouse-theme-metal.myshopify.com/products/denon-ah-c720-in-ear-headphonesBut in the Elements tab, when checking the `` attributes, the URLs would look like this:text /products/denon-ah-c720-in-ear-headphonesWhat's up with that? - Scraping data: # Scraping data {#scraping-data} Learn how to add data extraction logic to your crawler, which will allow you to extract data from all the websites you crawled. --- At the very beginning of this course, we learned that the term web scraping usually means a combined process of data extraction and crawling.
- Basics of data extraction: # Basics of data extraction {#basics} Learn about HTML, CSS, and JavaScript, the basic building blocks of a website, and how to use them in web scraping and data extraction. --- Every web scraping project starts with some detective work.
- Starting with browser DevTools: Learn about browser DevTools, a valuable tool in the world of web scraping, and how you can use them to extract data from a website. --- Even though DevTools stands for developer tools, everyone can use them to inspect a website.
- Prepare your computer for programming: # Prepare your computer for programming {#prepare-computer} **Set up your computer to be able to code scrapers with Node.js and JavaScript.
- Extracting data with DevTools: Continue learning how to extract data from a website using browser DevTools, CSS selectors, and JavaScript via the DevTools console. --- In the previous parts of the DevTools tutorial, we were able to extract information about a single product from the Sales collection of the Warehouse store.
- Extracting data with Node.js: **Continue learning how to create a web scraper with Node.js and Cheerio.
- Scraping with Node.js: Learn how to use JavaScript and Node.js to create a web scraper, plus take advantage of the Cheerio and Got-scraping libraries to make your job easier. --- Finally, we have everything ready to start scraping!
- Setting up your project: # Setting up your project {#setting-up} **Create a new project with npm and Node.js.
- Saving results to CSV: # Saving results to CSV {#saving-to-csv} Learn how to save the results of your scraper's collected data to a CSV file that can be opened in Excel, Google Sheets, or any other spreadsheets program. --- In the last lesson, we were able to extract data about all the on-sale products from Warehouse Store.
- Finding elements with DevTools: Learn how to use browser DevTools, CSS selectors, and JavaScript via the DevTools console to extract data from a website. --- With the knowledge of the basics of DevTools we can finally try doing something more practical - extracting data from a website.
- Introduction: # Introduction {#introduction} Start learning about web scraping, web crawling, data extraction, and popular tools to start developing your own scraper. --- Web scraping or crawling?
Legal documents
- Apify Legal: ## Company details (Impressum) Apify Technologies s.r.o. Registered seat: Vodickova 704/36, 110 00 Prague 1, Czech Republic VAT ID: CZ04788290 (EU), GB373153700 (UK) Company ID: 04788290 Czech limited liability company registered in the Commercial Register kept by the Municipal Court of Prague, File No.: C 253224 Represented by managing director Jan Čurn IBAN: CZ0355000000000027434378 SWIFT / BIC: RZBCCZPP ### Contacts General: hello@apify.com Legal team contact: legal@apify.com Privacy team contact: privacy@apify.com Apify Trust Center: https://trust.apify.com/ ### Trademarks "APIFY" is a word trademark registered with USPTO (4517178), EUIPO (011628377), UKIPO (UK00911628377), and DPMA (3020120477984).
- Apify Acceptable Use Policy: # Apify Acceptable Use Policy Apify Technologies s.r.o., with its registered seat at Vodičkova 704/36, Nové Město, 110 00 Prague 1, Czech Republic, Company ID No.: 04788290, registered in the Commercial Register kept by the Municipal Court of Prague, File No.: C 253224 (hereinafter referred to as “we” or “Apify”), is committed to making sure that the Platform and the Website are being used only for legitimate and legal purposes.
- Apify Affiliate Program Terms and Conditions: # Apify Affiliate Program Terms and Conditions Effective date: May 14, 2024 Latest version effective from: July 5, 2025 --- Apify Technologies s.r.o., with its registered seat at Vodičkova 704/36, 110 00 Prague 1, Czech Republic, Company reg.
- Apify Candidate Referral Program: # Apify Candidate Referral Program Last Updated: April 14, 2025 --- Apify Technologies s.r.o., as the announcer (“Apify”), is constantly looking for new employees and prefers to recruit people based on credible references.Therefore, Apify is announcing this public candidate referral program.
- Apify $1M Challenge Terms and Conditions: # Apify $1M Challenge Terms and Conditions Effective date: November 3, 2025 Apify Technologies s.r.o., a company registered in the Czech Republic, with its registered office at Vodičkova 704/36, 110 00 Prague 1, Czech Republic, Company ID No.: 04788290 ("Apify", "we", "us") offers you (also referred to as "participant") the opportunity to enroll in the "Apify $1M Challenge" ("Challenge"), which is subject to the following "Apify 1M Challenge Terms and Conditions" ("Challenge Terms").
- Apify Community Code of Conduct: # Apify Community Code of Conduct Effective Date: August 18, 2025 --- ## Overview and Purpose Apify community is intended to be a place for further collaboration, support, and brainstorming.
- Apify Cookie Policy: # Apify Cookie Policy Apify Technologies s.r.o., with its registered seat at Vodičkova 704/36, 110 00 Prague 1, Czech Republic, Company reg.
- Apify Data Processing Addendum: # Apify Data Processing Addendum Last Updated: January 13, 2025 --- If you wish to execute this DPA, continue here and follow instructions in the PandaDoc form.
- Apify Event Terms and Conditions: # Apify Event Terms and Conditions Effective date: November 3, 2025 These Event Terms and Conditions ("Terms") apply to all Events organized or co-organized by Apify Technologies s.r.o., a company registered in the Czech Republic, with its registered office at Vodičkova 704/36, 110 00 Prague 1, Czech Republic, Company ID No.: 04788290 ("Apify", "we", "us"), whether in-person, hybrid, or online ("Events").
- Apify Open Source Fair Share Program Terms and Conditions: # Apify Open Source Fair Share Program Terms and Conditions You are reading terms and conditions that are no longer effective.
- Apify GDPR Information: # Apify GDPR Information The European Union (“EU”) General Data Protection Regulation (“GDPR”) replaces the 1995 EU Data Protection Directive.
- Apify General Terms and Conditions: # Apify General Terms and Conditions Effective date: May 14, 2024 --- Apify Technologies s.r.o., with its registered seat at Vodičkova 704/36, 110 00 Prague 1, Czech Republic, Company reg.
- Apify General Terms and Conditions October 2022: ## Version History You are reading terms and conditions that are no longer effective.
- Apify Store Publishing Terms and Conditions December 2022: ## Version History You are reading terms and conditions that are no longer effective.
- Apify Privacy Policy: # Apify Privacy Policy Last Updated: February 10, 2025 Welcome to the Apify Privacy Policy!
- Apify Store Publishing Terms and Conditions: # Apify Store Publishing Terms and Conditions Last updated: February 26, 2025 --- Apify Technologies s.r.o., with its registered seat at Vodičkova 704/36, 110 00 Prague 1, Czech Republic, Company reg.
- Apify Whistleblowing Policy: # Apify Whistleblowing Policy [verze v českém jazyce níže] Last updated: April 14, 2025 At Apify, we are committed to upholding the highest standards of integrity, ethics, and accountability.
Platform documentation
- Apify platform: > Apify is a cloud platform that helps you build reliable web scrapers, fast, and automate anything you can do manually in a web browser.
- Actors: **Learn how to develop, run and share serverless cloud programs.
- Actor development: **Read about the technical part of building Apify Actors.
- Actor definition: Learn how to turn your arbitrary code into an Actor simply by adding an Actor definition directory. --- A single isolated Actor consists of source code and various settings.
- actor.json: Learn how to write the main Actor configuration in the
.actor/actor.jsonfile. --- Your main Actor configuration is in the.actor/actor.jsonfile at the root of your Actor's directory. - Dataset schema specification: Learn how to define and present your dataset schema in an user-friendly output UI. --- The dataset schema defines the structure and representation of data produced by an Actor, both in the API and the visual user interface.
- Dataset validation: Specify the dataset schema within the Actors so you can add monitoring and validation at the field level. --- To define a schema for a default dataset of an Actor run, you need to set
fieldsproperty in the dataset schema. - Dockerfile: **Learn about the available Docker images you can use as a base for your Apify Actors.
- Actor input schema: **Learn how to define and validate a schema for your Actor's input with code examples.
- Secret input: **Learn about making some Actor input fields secret and encrypted.
- Actor input schema specification: **Learn how to define and validate a schema for your Actor's input with code examples.
- Key-value store schema specification: Learn how to define and present your key-value store schema to organize records into collections. --- The key‑value store schema organizes keys into logical groups called collections, which can be used to filter and categorize data both in the API and the visual user interface.
- Actor output schema: Learn how to define and present the output of your Actor. --- The Actor output schema builds upon the schemas for the dataset and key-value store.
- Source code: Learn about the Actor's source code placement and its structure. --- The Apify Actor's source code placement is defined by its Dockerfile.
- Automated tests for Actors: **Learn how to automate ongoing testing and make sure your Actors perform over time.
- Builds and runs: Learn about Actor builds and runs, their lifecycle, versioning, and other properties. --- Actor builds and runs are fundamental concepts within the Apify platform.
- Builds: **Learn about Actor build numbers, versioning, and how to use specific Actor version in runs.
- Runs: Learn about Actor runs, how to start them, and how to manage them. --- When you start an Actor, you create a run.
- State persistence: **Learn how to maintain an Actor's state to prevent data loss during unexpected restarts.
- Deployment: Learn how to deploy your Actors to the Apify platform and build them. --- Deploying an Actor involves uploading your source code and building it on the Apify platform.
- Continuous integration for Actors: Learn how to set up automated builds, deploys, and testing for your Actors. --- Automating your Actor development process can save time and reduce errors, especially for projects with multiple Actors or frequent updates.
- Source types: Learn about Apify Actor source types and how to deploy an Actor from GitHub using CLI or Gist. --- This section explains the various sources types available for Apify Actors and how to deploy an Actor from GitHub using CLI or Gist.
- Performance: Learn how to get the maximum value out of your Actors, minimize costs, and maximize results. --- ## Optimization Tips This guide provides tips to help you maximize the performance of your Actors, minimize costs, and achieve optimal results.
- Programming interface: Learn about the programming interface of Apify Actors, important commands and features provided by the Apify SDK, and how to use them in your Actors. --- This chapter will guide you through all the commands you need to build your first Actor.
- Basic commands: Learn how to use basic commands of the Apify SDK for both JavaScript and Python. --- This page covers essential commands for the Apify SDK in JavaScript & Python.
- Container web server: Learn about how to run a web server inside your Actor to enable communication with the outside world through both UI and API. --- Each Actor run is assigned a unique URL (e.g.
- Actor environment variables: Learn how to provide your Actor with context that determines its behavior through a plethora of pre-defined environment variables set by the Apify platform. --- ## How to use environment variables in an Actor You can set up environment variables for your Actor in two ways: - Set up environment variables in
actor.json- Set up environment variables in Apify Console :::info Environment variable precedence Your local.actor/actor.jsonfile overrides variables set in Apify Console. - Metamorph: The metamorph operation transforms an Actor run into the run of another Actor with a new input. --- ## Transform Actor runs Metamorph is a powerful operation that transforms an Actor run into the run of another Actor with a new input.
- Standby mode: Use Actors as an API server for fast response times. --- Traditional Actors are designed to run a single task and then stop.
- Status messages: Learn how to use custom status messages to inform users about an Actor's progress. --- Each Actor run has a status, represented by the
statusfield. - System events in Apify Actors: Learn about system events sent to your Actor and how to benefit from them. --- ## Understand system events Apify's system notifies Actors about various events, such as: - Migration to another server - Abort operations triggered by another Actor - CPU overload These events help you manage your Actor's behavior and resources effectively.
- Quick start: Create your first Actor using the Apify Web IDE or locally in your IDE. --- :::info Before you build Before you start building your own Actor, try out a couple of existing Actors from Apify Store.
- Build with AI: Use pre-built prompts, reference Apify docs via llms.txt, and follow best practices to build Actors efficiently with AI coding assistants. --- You will learn several approaches to building Apify Actors with the help of AI coding assistants.
- Local development: Create your first Actor locally on your machine, deploy it to the Apify platform, and run it in the cloud. --- ## What you'll learn This guide walks you through the full lifecycle of an Actor.
- Web IDE: Create your first Actor using the web IDE in Apify Console. --- ## What you'll learn This guide walks you through the full lifecycle of an Actor.
- Publishing and monetization: **Apify provides a platform for developing, publishing, and monetizing web automation solutions called Actors.
- Monetize your Actor: Learn how you can monetize your web scraping and automation projects by publishing Actors to users in Apify Store. --- Apify Store allows you to monetize your web scraping, automation and AI Agent projects by publishing them as paid Actors.
- Pay per event: Learn how to monetize your Actor with pay-per-event (PPE) pricing, charging users for specific actions like Actor starts, dataset items, or API calls, and understand how to set profitable, transparent event-based pricing. --- The PPE pricing model offers a flexible monetization option for Actors on Apify Store.
- Pay per result: Learn how to monetize your Actor with pay-per-result (PPR) pricing, charging users based on the number of results produced and stored in the dataset, and understand how to set profitable, transparent result-based pricing. --- In this model, you set a price per 1,000 results.
- Pricing and costs: Learn how to set Actor pricing and calculate your costs, including platform usage rates, discount tiers, and profit formulas for PPE and PPR monetization models. --- ## Computing your costs for PPE and PPR Actors For both PPE and PPR Actors, profit is computed using the formula
(0.8 * revenue) - costs. - Rental pricing model: Learn how to monetize your Actor with the rental pricing model, offering users a free trial and a flat monthly fee, and understand how profit is calculated and the limitations of this approach. --- With the rental model, you can specify a free trial period and a monthly rental price.
- Publish your Actor: Prepare your Actor for Apify Store with a description and README file, and learn how to make your Actor available to the public. --- Before making your Actor public, it's important to ensure your Actor has a clear Description and comprehensive README section.
- Actor quality score: The Actor quality score is a metric that evaluates your Actor's performance across multiple dimensions, including reliability, ease of use, popularity, and other quality indicators.
- Actor status badge: The Actor status badge can be embedded in the README or documentation to show users the current status and usage of your Actor on the Apify platform.
- Automated testing: Apify has a QA system that regularly runs automated tests to ensure that all Actors in the store are functional. --- ### Why we test We want to make sure that all Actors in Apify Store are top-notch, or at least as top-notch as they can be.
- Running Actors: **In this section, you learn how to run Apify Actors using Apify Console or programmatically.
- Actors in Store: **Apify Store is home to thousands of public Actors available to the Apify community.
- Input and output: **Configure your Actor's input parameters using Apify Console, locally or via API.
- Runs and builds: Learn about Actor builds and runs, their lifecycle, sharing, and data retention policy. --- ## Builds An Actor is a combination of source code and various settings in a Docker container.
- Standby mode: Use Actors in lightweight Standby mode for fast API responses. --- Traditional Actors are designed to run a single job and then stop.
- Actor tasks: Create and save reusable configurations of Apify Actors tailored to specific use cases. --- Actor tasks let you create multiple reusable configurations of a single Actor, adapted for specific use cases.
- Usage and resources: Learn about your Actors' memory and processing power requirements, their relationship with Docker resources, minimum requirements for different use cases and its impact on the cost. --- ## Resources Actors run in Docker containers, which have a limited amount of resources (memory, CPU, disk size, etc).
- Collaboration: Learn how to collaborate with other users and manage permissions for organizations or private resources such as Actors, Actor runs, and storages. --- Apify was built from the ground up as a collaborative platform.
- Access rights: **Manage permissions for your private resources such as Actors, Actor runs, and storages.
- General resource access: Some resources, like storages, Actor runs or Actor builds, can be shared simply by sending their unique resource ID or Console link and the recipient can then view the data in Console or fetch it via API without needing an API token.
- List of permissions: **Learn about the access rights you can grant to other users.
- Organization account: **Create a specialized account for your organization to encourage collaboration and manage permissions.
- Using the organization account: **Learn to use and manage your organization account using the Apify Console or API.
- Setup: **Configure your organization account by inviting new members and assigning their roles.
- Apify Console: Learn about Apify Console's easy account creation and user-friendly homepage for efficient web scraping management. --- ## Sign-up To use Apify Console, you first need to create an account.
- Billing: The Billings page is the central place for all information regarding your invoices, billing information regarding usage in the current billing cycle, historical usage, subscriptions & limits. --- ## Current period The Current period tab is a comprehensive resource for understanding your platform usage during the ongoing billing cycle.
- Account settings: Learn how to manage your Apify account, configure integrations, create and manage organizations, and set notification preferences in the Settings tab. --- ## Account By clicking the Settings tab on the side menu, you will be presented with an Account page where you can view & edit various settings regarding your account, such as: * account email * username * profile information * theme * login information * session information * account delete :::info Verify your identity The Login & Privacy tab (Security & Privacy for organization accounts) contains sensitive settings.
- Apify Store: Explore Apify Store, browse and select Actors, search by criteria, sort by relevance, and adjust settings for immediate or future runs. ---
 Apify Store is a place where you can explore a variety of Actors, both created and maintained by Apify or our community members.
 - Two-factor authentication setup: Learn about Apify Console's account two-factor authentication process and how to set it up. --- If you use your email and password to sign in to Apify Console, you can enable two-factor authentication for your account.
- Integrations: Learn how to integrate the Apify platform with other services, your systems, data pipelines, and other web automation workflows. --- > The whole is greater than the sum of its parts.
- What are Actor integrations?: Learn how to integrate with other Actors and tasks. --- :::note Integration Actors You can check out a catalogue of our Integration Actors within Apify Store.
- Integrating Actors via API: Learn how to integrate with other Actors and tasks using the Apify API. --- You can integrate Actors via API using the Create webhook endpoint.
- Creating integration Actors: Learn how to create Actors that are ready to be integrated with other Actors and tasks. --- Any Actor can be used in integrations.
- Agno Integration: Integrate Apify with Agno to power AI agents with web scraping, automation, and data insights. --- ## What is Agno?
- Airbyte integration: Learn how to integrate your Apify datasets with Airbyte. --- Airbyte is an open-source data integration platform that allows you to move your data between different sources and destinations using pre-built connectors, which are maintained either by Airbyte itself or by its community.
- Airtable integration: **Learn how to integrate your Apify Actors with Airtable.
- API integration: Learn how to integrate with Apify using the REST API. --- All aspects of the Apify platform can be controlled via a REST API, which is described in detail in the API Reference.
- Amazon Bedrock integrations: Learn how to integrate Apify with Amazon Bedrock Agents to provide web data for AI agents. --- Amazon Bedrock is a fully managed service that provides access to large language models (LLMs), allowing users to create and manage retrieval-augmented generative (RAG) pipelines, and create AI agents to plan and perform actions.
- Bubble integration: Learn how to integrate your Apify Actors with Bubble for automated workflows and notifications. --- Bubble is a no-code platform that allows you to build web applications without writing code.
- 🤖🚀 CrewAI integration: Learn how to build AI Agents with Apify and CrewAI. --- ## What is CrewAI CrewAI is an open-source Python framework designed to orchestrate autonomous, role-playing AI agents that collaborate as a "crew" to tackle complex tasks.
- Google Drive integration: **Learn how to integrate your Apify Actors with Google Drive.
- Flowise integration: Learn how to integrate Apify with Flowise. --- ## What is Flowise?
- GitHub integration: **Learn how to integrate your Apify Actors with GitHub.
- Gmail integration: **Learn how to integrate your Apify Actors with Gmail.
- Gumloop integration: With the Gumloop Apify integration you can retrieve key data for your AI-powered workflows in a flash.
- Gumloop - Instagram Actor integration: Get Instagram profile posts, details, stories, reels, post comments and hashtags, users, and tagged posts in Gumloop.
- Gumloop - Google maps Actor integration: Search, extract, and enrich business data from Google Maps in Gumloop.
- Gumloop - TikTok Actor integration: Get TikTok hashtag videos, profile videos, followers, video details, and search results in Gumloop.
- Gumloop - YouTube Actor integration: Get YouTube search results, video details, channel videos, playlists, and channel metadata in Gumloop.
- Haystack integration: Learn how to integrate Apify with Haystack to work with web data in the Haystack ecosystem. --- Haystack is an open source framework for building production-ready LLM applications, agents, advanced retrieval-augmented generative pipelines, and state-of-the-art search systems that work intelligently over large document collections.
- IFTTT integration: Connect Apify Actors with IFTTT to automate workflows using Actor run events, data queries, and task actions. --- IFTTT is a service that helps you create automated workflows called Applets.
- Integrate with Apify: If you are building a service and your users could benefit from integrating with Apify or vice versa, we would love to hear from you!
- Keboola integration: Integrate your Apify Actors with Keboola, a cloud-based data integration platform that consolidates data from various sources into a centralized storage. --- With Apify integration for Keboola, you can extract data from various sources using your Apify Actors and load it into Keboola for further processing, transformation, and integration with other platforms.
- 🦜🔗 LangChain integration: Learn how to integrate Apify with LangChain, in order to feed vector databases and LLMs with data crawled from the web. --- > For more information on LangChain visit its documentation.
- Langflow integration: Learn how to integrate Apify with Langflow to run complex AI agent workflows. --- ## What is Langflow Langflow is a low-code, visual tool that enables developers to build powerful AI agents and workflows that can use any API, models, or databases.
- 🦜🔘➡️ LangGraph integration: Learn how to build AI Agents with Apify and LangGraph. --- ## What is LangGraph LangGraph is a framework designed for constructing stateful, multi-agent applications with Large Language Models (LLMs), allowing developers to build complex AI agent workflows that can leverage tools, APIs, and databases.
- Lindy integration: Learn how to integrate your Apify Actors with Lindy. --- Lindy is an AI-powered automation platform that lets you create intelligent workflows and automate complex tasks.
- LlamaIndex integration: Learn how to integrate Apify with LlamaIndex to feed vector databases and LLMs with data crawled from the web. --- > For more information on LlamaIndex, visit its documentation.
- Make integration: Learn how to integrate your Apify Actors with Make. --- Make (formerly Integromat) allows you to create scenarios where you can integrate various services (modules) to automate and centralize jobs.
- Make - AI crawling Actor integration: ## Apify Scraper for AI Crawling Apify Scraper for AI Crawling from Apify lets you extract text content from websites to feed AI models, LLM applications, vector databases, or Retrieval Augmented Generation (RAG) pipelines.
- Make - Amazon Actor integration: ## Apify Scraper for Amazon Data The Amazon Scraper module from Apify allows you to extract product, search, or category data from Amazon.
- Make - Facebook Actor integration: ## Apify Scraper for Facebook Data The Facebook Scraper modules from Apify allow you to extract posts, comments, and profile data from Facebook.
- Make - Instagram Actor integration: **Learn about Instagram scraper modules.
- Make - LLMs Actor integration: ## Apify Scraper for LLMs Apify Scraper for LLMs from Apify is a web browsing module for OpenAI Assistants, RAG pipelines, and AI agents.
- Make - Google Maps Leads Actor integration: ## Apify Scraper for Google Maps Leads The Google Maps Leads Scraper modules from apify.com allow you to extract valuable business lead data from Google Maps, including contact information, email addresses, social media profiles, business websites, phone numbers, and detailed location data.
- Make - Google Search Actor integration: ## Apify Scraper for Google Search The Google search modules from Apify allows you to crawl Google Search Results Pages (SERPs) and extract data from those web pages in structured format such as JSON, XML, CSV, or Excel.
- Make - TikTok Actor integration: ## Apify Scraper for TikTok Data The TikTok Scraper modules from Apify allow you to extract hashtag, comments, and profile data from TikTok.
- Make - YouTube Actor integration: ## Apify Scraper for YouTube Data The YouTube Scraper module from apify.com allows you to extract channel, video, streams, shorts, and search data from YouTube.
- Mastra MCP integration: Learn how to build AI agents with Mastra and Apify Actors MCP Server. --- ## What is Mastra Mastra is an open-source TypeScript framework for building AI applications efficiently.
- Apify MCP server: The Apify Model Context Protocol (MCP) Server enables AI applications to connect to Apify's extensive library of Actors.
- Milvus integration: Learn how to integrate Apify with Milvus (Zilliz) to save data scraped from websites into the Milvus vector database. --- Milvus is an open-source vector database optimized for performing similarity searches on large datasets of high-dimensional vectors.
- n8n integration: Connect Apify with n8n to automate workflows by running Actors, extracting structured data, and responding to Actor or task events. --- n8n is an open source, fair-code licensed tool for workflow automation.
- n8n - Website Content Crawler by Apify: Website Content Crawler from Apify lets you extract text content from websites to feed AI models, LLM applications, vector databases, or Retrieval Augmented Generation (RAG) pipelines.
- OpenAI Assistants integration: Learn how to integrate Apify with OpenAI Assistants to provide real-time search data and to save them into OpenAI Vector Store. --- OpenAI Assistants API allows you to build your own AI applications such as chatbots, virtual assistants, and more.
- Pinecone integration: Learn how to integrate Apify with Pinecone to feed data crawled from the web into the Pinecone vector database. --- Pinecone is a managed vector database that allows users to store and query dense vectors for AI applications such as recommendation systems, semantic search, and retrieval augmented generation (RAG).
- Qdrant integration: Learn how to integrate Apify with Qdrant to transfer crawled data into the Qdrant vector database. --- Qdrant is a high performance managed vector database that allows users to store and query dense vectors for next generation AI applications such as recommendation systems, semantic search, and retrieval augmented generation (RAG).
- Slack integration: **Learn how to integrate your Apify Actors with Slack.
- Telegram integration through Zapier: Learn how to integrate your Apify Actors with Telegram through Zapier. --- With Apify integration for Zapier, you can connect your Apify Actors to Slack, Trello, Google Sheets, Dropbox, Salesforce, and loads more.
- 🔺 Vercel AI SDK integration: Learn how to integrate Apify Actors as tools for AI with Vercel AI SDK. --- ## What is the Vercel AI SDK Vercel AI SDK is the TypeScript toolkit designed to help developers build AI-powered applications and agents with React, Next.js, Vue, Svelte, Node.js, and more.
- Webhook integration: **Learn how to integrate multiple Apify Actors or external systems with your Actor or task run.
- Webhook actions: **Send notifications when specific events occur in your Actor/task run or build.
- Ad-hoc webhooks: **Set up one-time webhooks for Actor runs initiated through the Apify API or from the Actor's code.
- Events types for webhooks: **Specify the types of events that trigger a webhook in an Actor or task run.
- Zapier integration: Learn how to integrate your Apify Actors with Zapier. --- With Apify integration for Zapier, you can connect your Apify Actors to Slack, Trello, Google Sheets, Dropbox, Salesforce, and loads more.
- Limits: Learn the Apify platform's resource capability and limitations such as max memory, disk size and number of Actors and tasks per user. --- The tables below demonstrate the Apify platform's default resource limits.
- Monitoring: **Learn how to continuously make sure that your Actors and tasks perform as expected and retrieve correct results.
- Proxy: **Learn to anonymously access websites in scraping/automation jobs.
- Datacenter proxy: **Learn how to reduce blocking when web scraping using IP address rotation.
- Google SERP proxy: **Learn how to collect search results from Google Search-powered tools.
- Residential proxy: **Achieve a higher level of anonymity using IP addresses from human users.
- Proxy usage: **Learn how to configure and use Apify Proxy.
- Using your own proxies: Learn how to use your own proxies while using the Apify platform. --- In addition to our proxies, you can use your own both in Apify Console and SDK.
- Schedules: **Learn how to automatically start your Actor and task runs and the basics of cron expressions.
- Security: Learn more about Apify's security practices and data protection measures that are used to protect your Actors, their data, and the Apify platform in general. --- ## SOC 2 type II compliance The Apify platform is SOC 2 Type II compliant.
- Storage: **Store anything from images and key-value pairs to structured output data.
- Dataset: **Store and export web scraping, crawling or data processing job results.
- Key-value store: **Store anything from Actor or task run results, JSON documents, or images.
- Request queue: **Queue URLs for an Actor to visit in its run.
- Storage usage: **Learn how to effectively use Apify's storage options.

Full Documentation Content
https://docs.apify.com/academyhttps://docs.apify.com/platform
- https://docs.apify.com/api/v2
- https://docs.apify.com/api/client/js/
- https://docs.apify.com/api/client/python/
https://docs.apify.com/open-source
- https://crawlee.dev
- https://github.com/apify/got-scraping
- https://github.com/apify/fingerprint-suite
- https://github.com/apify
- https://whitepaper.actor
Chat on Discordhttps://console.apify.com
Apify API
Apify API provides programmatic access to the https://docs.apify.com/
API reference
The Apify API allows developers to interact programmatically with apps using HTTP requests. The Apify API is built around https://en.wikipedia.org/wiki/REST.
The API has predictable resource-oriented URLs, returns JSON-encoded responses, and uses standard HTTP response codes, authentication, and verbs.
https://docs.apify.com/api/v2.md
cURL
# Prepare Actor input and run it synchronously
echo '{ "searchStringsArray": ["Apify"] }' |
curl -X POST -d @- \
-H 'Content-Type: application/json' \
-H 'Authorization: Bearer ' \
-L 'https://api.apify.com/v2/acts/compass~crawler-google-places/run-sync-get-dataset-items'
API client
The official library to interact with Apify API.
 JavaScript Client
 Python Client
JavaScript API client
The official library to interact with Apify API from a web browser, Node.js, JavaScript, or Typescript applications.https://github.com/apify/apify-client-js
https://docs.apify.com/api/client/js/docshttps://docs.apify.com/api/client/js/reference
npm install apify-client
// Easily run Actors, await them to finish using the convenient .call() method, and retrieve results from the resulting dataset.
const { ApifyClient } = require('apify-client');
const client = new ApifyClient({
token: 'MY-APIFY-TOKEN',
});
// Starts an actor and waits for it to finish.
const { defaultDatasetId } = await client.actor('john-doe/my-cool-actor').call();
// Fetches results from the actor's dataset.
const { items } = await client.dataset(defaultDatasetId).listItems();
Related articles
https://blog.apify.com/web-scraping-with-client-side-vanilla-javascript/
https://blog.apify.com/web-scraping-with-client-side-vanilla-javascript/
https://blog.apify.com/web-scraping-with-client-side-vanilla-javascript/
https://blog.apify.com/apify-python-api-client/
https://blog.apify.com/apify-python-api-client/
https://blog.apify.com/apify-python-api-client/
https://blog.apify.com/api-for-dummies/
https://blog.apify.com/api-for-dummies/
https://blog.apify.com/api-for-dummies/
Learn
API
- https://docs.apify.com/api/v2
- https://docs.apify.com/api/client/js/
- https://docs.apify.com/api/client/python/
SDK
Other
More
- https://crawlee.dev
- https://github.com/apify
- https://discord.com/invite/jyEM2PRvMU
- https://trust.apify.com
https://docs.apify.com/academyhttps://docs.apify.com/platform
- https://docs.apify.com/api/v2
- https://docs.apify.com/api/client/js/
- https://docs.apify.com/api/client/python/
https://docs.apify.com/open-source
- https://crawlee.dev
- https://github.com/apify/got-scraping
- https://github.com/apify/fingerprint-suite
- https://github.com/apify
- https://whitepaper.actor
Chat on Discordhttps://console.apify.com
Apify open source
Open-source tools and libraries created and maintained by Apify experts to help you with web scraping, browser automation, and proxy management.
Crawlee
Crawlee is a fully open-source web scraping and browser automation library that helps you build reliable crawlers.
https://crawlee.dev/
https://crawlee.dev/python/
Other
https://github.com/apify/fingerprint-suite
https://github.com/apify/fingerprint-suite
Generate and inject browser fingerprints to avoid detection and improve scraper stealth.
https://github.com/apify/fingerprint-suite
https://github.com/apify/got-scraping
https://github.com/apify/got-scraping
A powerful extension for sending browser-like requests and blending in with web traffic.
https://github.com/apify/got-scraping
https://github.com/apify/proxy-chain
A Node.js proxy server with support for SSL, authentication, upstream proxy chaining, custom HTTP responses, and traffic statistics.
https://github.com/apify/proxy-chain
Actor templates
Actor templates help you quickly set up your web scraping projects. Save development time and get immediate access to all the features of the Apify platform.
Learn
API
- https://docs.apify.com/api/v2
- https://docs.apify.com/api/client/js/
- https://docs.apify.com/api/client/python/
SDK
Other
More
- https://crawlee.dev
- https://github.com/apify
- https://discord.com/invite/jyEM2PRvMU
- https://trust.apify.com
https://docs.apify.com/academyhttps://docs.apify.com/platform
- https://docs.apify.com/api/v2
- https://docs.apify.com/api/client/js/
- https://docs.apify.com/api/client/python/
https://docs.apify.com/open-source
- https://crawlee.dev
- https://github.com/apify/got-scraping
- https://github.com/apify/fingerprint-suite
- https://github.com/apify
- https://whitepaper.actor
Chat on Discordhttps://console.apify.com
Apify SDK
The Apify SDK is a toolkit for building Actors—serverless microservices running (not only) on the Apify platform. Apify comes with first-class support for JavaScript/TypeScript and Python, but you can run any containerized code on the Apify platform.

SDK for JavaScript
Toolkit for building Actors—serverless microservices running (not only) on the Apify platform.
https://github.com/apify/apify-sdk-js
https://docs.apify.com/sdk/js/docs/guides/apify-platformhttps://docs.apify.com/sdk/js/reference
npx apify-cli create my-crawler
// The Apify SDK makes it easy to initialize the actor on the platform with the Actor.init() method,
// and to save the scraped data from your Actors to a dataset by simply using the Actor.pushData() method.
import { Actor } from 'apify';
import { PlaywrightCrawler } from 'crawlee';
await Actor.init();
const crawler = new PlaywrightCrawler({
async requestHandler({ request, page, enqueueLinks }) {
const title = await page.title();
console.log(`Title of ${request.loadedUrl} is '${title}'`);
await Actor.pushData({ title, url: request.loadedUrl });
await enqueueLinks();
}
});
await crawler.run(['https://crawlee.dev']);
await Actor.exit();

SDK for Python
The Apify SDK for Python is the official library for creating Apify Actors in Python. It provides useful features like actor lifecycle management, local storage emulation, and actor event handling.
https://github.com/apify/apify-sdk-python
apify create my-python-actor
# The Apify SDK makes it easy to read the actor input with the Actor.get_input() method,
# and to save the scraped data from your Actors to a dataset by simply using the Actor.push_data() method.
from apify import Actor
from bs4 import BeautifulSoup
import requests
async def main():
async with Actor:
actor_input = await Actor.get_input()
response = requests.get(actor_input['url'])
soup = BeautifulSoup(response.content, 'html.parser')
await Actor.push_data({ 'url': actor_input['url'], 'title': soup.title.string })
Learn
API
- https://docs.apify.com/api/v2
- https://docs.apify.com/api/client/js/
- https://docs.apify.com/api/client/python/
SDK
Other
More
- https://crawlee.dev
- https://github.com/apify
- https://discord.com/invite/jyEM2PRvMU
- https://trust.apify.com
https://docs.apify.com/academyhttps://docs.apify.com/platform
- https://docs.apify.com/api/v2
- https://docs.apify.com/api/client/js/
- https://docs.apify.com/api/client/python/
https://docs.apify.com/open-source
- https://crawlee.dev
- https://github.com/apify/got-scraping
- https://github.com/apify/fingerprint-suite
- https://github.com/apify
- https://whitepaper.actor
Chat on Discordhttps://console.apify.com
Search the documentation
Type your search here
Learn
API
- https://docs.apify.com/api/v2
- https://docs.apify.com/api/client/js/
- https://docs.apify.com/api/client/python/
SDK
Other
More
- https://crawlee.dev
- https://github.com/apify
- https://discord.com/invite/jyEM2PRvMU
- https://trust.apify.com
Web Scraping Academy
Learn everything about web scraping and automation with our free courses that will turn you into an expert scraper developer.
Beginner courses
https://docs.apify.com/academy/web-scraping-for-beginners.md
https://docs.apify.com/academy/web-scraping-for-beginners.md
https://docs.apify.com/academy/web-scraping-for-beginners.md
https://docs.apify.com/academy/scraping-basics-python.md
https://docs.apify.com/academy/scraping-basics-python.md
https://docs.apify.com/academy/scraping-basics-python.md
https://docs.apify.com/academy/apify-platform.md
https://docs.apify.com/academy/apify-platform.md
https://docs.apify.com/academy/apify-platform.md
Advanced web scraping courses
https://docs.apify.com/academy/api-scraping.md
https://docs.apify.com/academy/api-scraping.md
https://docs.apify.com/academy/api-scraping.md
https://docs.apify.com/academy/anti-scraping.md
https://docs.apify.com/academy/anti-scraping.md
https://docs.apify.com/academy/anti-scraping.md
https://docs.apify.com/academy/expert-scraping-with-apify.md
https://docs.apify.com/academy/expert-scraping-with-apify.md
https://docs.apify.com/academy/expert-scraping-with-apify.md
Actor marketing playbook
Learn how to optimize and monetize your Actors on Apify Store by sharing them with other platform users.
https://apify.com/store is a marketplace featuring thousands of ready-made automation tools called Actors. As a developer, you can publish your own Actors and generate revenue through our https://apify.com/partners/actor-developers.
To help you succeed, we've created a comprehensive Actor marketing playbook. You'll learn how to:
- Optimize your Actor's visibility on Apify Store
- Create compelling descriptions and documentation
- Build your developer brand
- Promote your work to potential customers
- Analyze performance metrics
- Engage with the Apify community
Apify Store basics
https://docs.apify.com/academy/actor-marketing-playbook/store-basics/how-store-works.md
https://docs.apify.com/academy/actor-marketing-playbook/store-basics/how-store-works.md
https://docs.apify.com/academy/actor-marketing-playbook/store-basics/how-to-build-actors.md
https://docs.apify.com/academy/actor-marketing-playbook/store-basics/how-to-build-actors.md
https://docs.apify.com/academy/actor-marketing-playbook/store-basics/how-actor-monetization-works.md
https://docs.apify.com/academy/actor-marketing-playbook/store-basics/how-actor-monetization-works.md
Actor basics
https://docs.apify.com/academy/actor-marketing-playbook/actor-basics/name-your-actor.md
https://docs.apify.com/academy/actor-marketing-playbook/actor-basics/name-your-actor.md
https://docs.apify.com/academy/actor-marketing-playbook/actor-basics/importance-of-actor-url.md
https://docs.apify.com/academy/actor-marketing-playbook/actor-basics/importance-of-actor-url.md
https://docs.apify.com/academy/actor-marketing-playbook/actor-basics/actor-description.md
https://docs.apify.com/academy/actor-marketing-playbook/actor-basics/actor-description.md
https://docs.apify.com/academy/actor-marketing-playbook/actor-basics/how-to-create-an-actor-readme.md
https://docs.apify.com/academy/actor-marketing-playbook/actor-basics/actors-and-emojis.md
https://docs.apify.com/academy/actor-marketing-playbook/actor-basics/actors-and-emojis.md
Promoting your Actor
https://docs.apify.com/academy/actor-marketing-playbook/promote-your-actor/seo.md
https://docs.apify.com/academy/actor-marketing-playbook/promote-your-actor/seo.md
https://docs.apify.com/academy/actor-marketing-playbook/promote-your-actor/social-media.md
https://docs.apify.com/academy/actor-marketing-playbook/promote-your-actor/social-media.md
https://docs.apify.com/academy/actor-marketing-playbook/promote-your-actor/parasite-seo.md
https://docs.apify.com/academy/actor-marketing-playbook/promote-your-actor/parasite-seo.md
https://docs.apify.com/academy/actor-marketing-playbook/promote-your-actor/product-hunt.md
https://docs.apify.com/academy/actor-marketing-playbook/promote-your-actor/product-hunt.md
https://docs.apify.com/academy/actor-marketing-playbook/promote-your-actor/blogs-and-blog-resources.md
https://docs.apify.com/academy/actor-marketing-playbook/promote-your-actor/video-tutorials.md
https://docs.apify.com/academy/actor-marketing-playbook/promote-your-actor/video-tutorials.md
https://docs.apify.com/academy/actor-marketing-playbook/promote-your-actor/webinars.md
https://docs.apify.com/academy/actor-marketing-playbook/promote-your-actor/webinars.md
Interacting with users
https://docs.apify.com/academy/actor-marketing-playbook/interact-with-users/emails-to-actor-users.md
https://docs.apify.com/academy/actor-marketing-playbook/interact-with-users/emails-to-actor-users.md
https://docs.apify.com/academy/actor-marketing-playbook/interact-with-users/issues-tab.md
https://docs.apify.com/academy/actor-marketing-playbook/interact-with-users/issues-tab.md
https://docs.apify.com/academy/actor-marketing-playbook/interact-with-users/your-store-bio.md
https://docs.apify.com/academy/actor-marketing-playbook/interact-with-users/your-store-bio.md
Product optimization
https://docs.apify.com/academy/actor-marketing-playbook/product-optimization/how-to-create-a-great-input-schema.md
https://docs.apify.com/academy/actor-marketing-playbook/product-optimization/actor-bundles.md
https://docs.apify.com/academy/actor-marketing-playbook/product-optimization/actor-bundles.md
Ready to grow your presence on the Apify platform? Check out our guide to https://docs.apify.com/platform/actors/publishing.md.
Actor description & SEO description
Learn about Actor description and meta description. Where to set them and best practices for both content and length.
What is an Actor description?
First impressions are important, especially when it comes to tools. Actor descriptions are the first connection potential users have with your Actor. You can set two kinds of descriptions: regular description (in Apify Store) and SEO description (on Google search), along with their respective names: regular name and SEO name.
tip
You can change descriptions and names as many times as you want.
Regular description vs. SEO description
| Actor description & name | SEO description & name | |
|---|---|---|
| Name length | 40-50 characters | 40-50 characters |
| Description length | 300 characters | 145-155 characters |
| Visibility | Visible on Store | Visible on Google |
Description & Actor name
Actor description is what users see on the Actor's web page in Apify Store, along with the Actor's name and URL. When creating an Actor description, a “warm” visitor experience is prioritized (more on that later).

Actor description is also present in Apify Console and across Apify Store.

SEO description & SEO name
Actor SEO description is a tool description visible on Google. It is shorter and SEO-optimized (keywords matter here). When creating the SEO description, a “cold” visitor experience is prioritized.

Usually the way the potential user interacts with both these descriptions goes like this: SEO first, regular description second. Is there any benefit in them being different?
Is there any benefit in the description and meta description being different?
Different descriptions give you a chance to target different stages of user acquisition. And make sure the acquisition takes place.
SEO description (and SEO name) is targeting a “cold” potential user who knows nothing about your tool yet and just came across it on Google search. They’re searching to solve a problem or use case. The goal of the meta description is to convince that visitor to click on your tool's page among other similar search results on Google. While it's shorter, SEO description is also the space to search-engine-optimize your language to the max to attract the most matching search intent.
Description (and name) is targeting a “warm” potential user who is already curious about your tool. They have clicked on the tool's page and have a few seconds to understand how complex the tool is and what it can do for them. Here you can forget SEO optimization and speak directly to the user. The regular description also has a longer character limit, which means you can expand on your Actor’s features.
Learn more about search intent here: https://docs.apify.com/academy/actor-marketing-playbook/promote-your-actor/seo.md
Where can Actor descriptions be set?
Both descriptions can be found and edited on the very right Publication tab → Display information. It has to be done separately for each Actor.
note
Setting the SEO description and SEO name is optional. If not set, the description will just be duplicated.


Actor description specifically can also be quick-edited in this pop-up on the Actor's page in Apify Console. Open the Actor's page, then click on … in the top right corner, and choose ✎ Edit name or description. Then set the URL in the Unique name ✎ field and click Save.

Tips and recommendations on how to write descriptions
When writing a description, less is more. You only have a few seconds to capture attention and communicate what your Actor can do. To make the most of that time, follow these guidelines used by Apify (these apply to both types of descriptions):
Use variations and experiment 🔄
-
SEO name vs. regular name:
- name: Airbnb Scraper
- SEO name: Airbnb Data Scraper
-
Keywords on the web page:
Include variations, e.g. Airbnb API, Airbnb data, Airbnb data scraper, Airbnb rentals, Airbnb listings
- No-code scraping tool to extract Airbnb data: host info, prices, dates, location, and reviews.
- Scrape Airbnb listings without official Airbnb API!
-
Scraping/automation process variations:
Use terms, e.g. crawl, crawler, scraping tool, finder, scraper, data extraction tool, extract data, get data
- Scrape XYZ data, scraped data, data scraper, data crawler.
Choose how to start your sentences 📝
-
Noun-first (descriptive):
- Data extraction tool to extract Airbnb data: host info, prices, dates, location, and reviews.
-
Imperative-first (motivating):
- Try a free web scraping tool to extract Airbnb data: host info, prices, dates, location, and reviews.
Keep it short and SEO-focused ✂️
-
Be concise and direct: clearly state what your Actor does. Avoid unnecessary fluff and boilerplate text.
- ✅ Scrapes job listings from Indeed and gathers...
- ❌ *This Actor scrapes job listings from Indeed in order to gather...
-
Optimize for search engines: include popular keywords related to your Actor’s functionality that users might search for.
- ✅ This Indeed scraper helps you collect job data efficiently. Use the tool to gather...
- ❌ This tool will search through job listings on Indeed and offers you...
List the data your Actor works with 📝
- Data extraction tool to extract Airbnb data: host info, prices, dates, location, and reviews.
- Get hashtags, usernames, mentions, URLs, comments, images, likes, locations without the official Instagram API.
Use keywords or the language of the target website 🗣️
- Extract data from hundreds of Airbnb home rentals in seconds.
- Extract data from chosen tik-toks. Just add a TikTok URL and get TikTok video and profile data: URLs, numbers of shares, followers, hashtags, hearts, video, and music metadata.
- Scrape Booking with this hotels scraper and get data about accommodation on Booking.com.
Highlight your strong suits 🌟
-
Ease of use, no coding, user-friendly:
- Easy scraping tool to extract Airbnb data.
-
Fast and scalable:
- Scrape whole cities or extract data from hundreds of Airbnb rentals in seconds.
-
Free (only if the trial run can cover $5 free credits):
- Try a free scraping tool to extract Airbnb data: host info, prices, dates, location, and reviews.
- Extract host information, locations, availability, stars, reviews, images, and host/guest details for free.
-
Available platform features (various formats, API, integrations, scheduling):
- Export scraped data in formats like HTML, JSON, and Excel.
-
Additional tips:
- Avoid ending lists with etc.
- Consider adding relevant emojis for visual appeal.
Break it down 🔠
Descriptions typically fit into 2-3 sentences. Don't try to jam everything into one.
Examples:
- Scrape whole cities or extract data from hundreds of Airbnb rentals in seconds.
- Extract host information, addresses, locations, prices, availability, stars, reviews, images, and host/guest details.
- Export scraped data, run the scraper via API, schedule and monitor runs, or integrate with other tools.
FAQ
Can the Actor's meta description and description be the same?
Yes, they can, as long as they have the same (shorter) length (under 150 characters). But they can also be different - there's no harm in that.
How different can description and meta description be?
They can be vastly different and target different angles of your Actor. You can experiment by setting up different SEO descriptions for a period of time and seeing if the click-through rate rises.
I set a custom SEO description but Google doesn't show it
Sometimes Google picks up a part of the README as the SEO description. It's heavily dependent on the search query. Sometimes what you see on Google might look differently compared to how you set the SEO description. It's all a part of how Google customizes search results.
Actors and emojis
Using emojis in Actors is a science on its own. Learn how emojis enhance the user experience in Actors by grabbing attention, simplifying navigation, and making information clearer.
On the use of emojis in Actors
We started using emojis in Actors for several reasons. First, tech today often uses emojis to make things look more user-friendly. Second, people don’t read as much as we’d like. You only have a few seconds to grab their attention, and text alone can feel overwhelming. Third, we don’t have many opportunities or space to explain things about Actors, and we want to avoid users needing to open extra tabs or pages. Clarity should come instantly, so we turned to emojis.
When evaluating a new tool, those first 5 seconds are critical. That’s why we use emojis extensively with our Actors. They’re part of the Actor SEO title and description to help the tool stand out in Google search results, although Google doesn't always display them. In READMEs, they serve as shortcuts to different sections and help users quickly understand the type of data they’ll get. In complex input schemas, we rely on emojis to guide users and help them navigate the tool more efficiently.
Emoji science
Believe it or not, there’s a science to emoji usage. When we use emojis in Actors and related content, we tap into the brain's iconic and working memory. Iconic memory holds information for less than a second - this is unconscious processing, where attributes like color, size, and location are instantly recognized. This part is where emojis guide the person's attention in the sea of text. They signify that something important is here. Emojis help with that immediate first impression and create a sense of clarity.
After that, the brain shifts to working memory, where it combines information into visual chunks. Since we can only hold about 3-4 chunks at once, emojis help reinforce key points, thus reducing cognitive load. Consistent emoji use across the Actor ecosystem ensures users can quickly connect information without getting overwhelmed.
As an example of this whole process, first, the user notices the emojis used in the field titles (pre-attentive processing). They learn to associate the emojis with those titles (attentive processing). Later, when they encounter the same emojis in a README section, they’ll make the connection, making it easier to navigate without drowning in a sea of text.
Caveats to emojis
- Don't overuse them, and don’t rely on emojis for critical information. Emojis should support the text, not replace key explanations or instructions. They're a crutch for concise copywriting, not a universal solution.
- Use them consistently. Choose one and stick with it across all content: descriptions, parts of input schema, mentions in README, blog posts, etc.
- Some emojis have multiple meanings, so choose the safest one. It could be general internet knowledge or cultural differences, so make sure the ones you choose won’t confuse or offend users in other markets.
- Some emojis don’t render well on Windows or older devices. Try to choose ones that display correctly on Mac, Windows, and mobile platforms. Besides, emoji-heavy content can be harder for screen readers and accessibility tools to interpret. Make sure the information is still clear without the emojis.
- It's okay not to use them.
How to create an Actor README
Learn how to write a comprehensive README to help users better navigate, understand and run public Actors in Apify Store.
What's a README in the Apify sense?
At Apify, when we talk about a README, we don’t mean a guide mainly aimed at developers that explains what a project is, how to set it up, or how to contribute to it. At least, not in its traditional sense.
You could argue our notion of README is closer to this https://docs.github.com/en/repositories/managing-your-repositorys-settings-and-features/customizing-your-repository/about-readmes:
README files typically include information on:
- What the project does
- Why the project is useful
- How users can get started with the project
- Where users can get help with your project
We mean all of this and even more. At Apify, when we talk about READMEs, we refer to the public Actor detail page on Apify Store. Specifically, its first tab. The README exists in the same form both on the web and in Console. What is it for then?
Before we dive in, a little disclaimer: you don't need your Apify README to fulfill all its purposes. Technically, you could even publish an Actor with just a single word in the README. But you'd be missing out if you did that.
Your Actor’s README has at least four functions:
- SEO - If your README is well-structured and includes important keywords — both in headings and across the text — it has a high chance of being noticed and promoted by Google. Organic search brings the most motivated type of potential users. If you win this game, you've won most of the SEO game.
- First impression - Your README is one of the first points of contact with a potential user. If you come across as convincing, clear, and reassuring it could be the factor that will make a user try your Actor for their task.
- Extended instruction - The README is also the space that explains specific complex input settings. For example, special formatting of the input, any coding-related, or extended functions. Of course, you could put that all in a blog post as well, but the README should be their first point of contact.
- Support - Your users come back to the README when they face issues. Use it as a space to let them know that's where they can find links to the tutorials if they run into issues, describe common troubleshooting techniques, share tricks, or warn you about bugs.
README elements theory
These are the most important elements of the README. This structure is also not to be followed to a “t”. Of course, what you want to say to your potential users and how you want to promote your Actor will differ case by case. These are just the most common practices we have for our Actor READMEs. Beware that the headings are written with SEO in mind, which is why you see certain keywords repeated over and over.
Aim for sections 1–6 below and try to include at least 300 words. You can move the sections around to some extent if it makes sense, e.g. 3 might come after 6. Consider using emojis as bullet points or otherwise trying to break up the text.
Intro and features
What is [Actor]?
- explain in two or three sentences what the Actor does and the easiest way to try it. Mention briefly what kind of data it can extract and any other tangible goal the tool can achieve. Describe the input in one sentence. Highlight the most important words in bold.
What can this [Actor] do?
- list the main features of this tool. list multiple ways of input if applicable. list platform advantages. If it's a bundle, mention the steps that the Actor will do for you, mention specific obstacles this tool is able to overcome, say upfront how many results you can get for free.
Remember the Apify platform!
Your Actor + the Apify platform. They come as a package. Don't forget to flaunt all the advantages that the platform gives to your solution.
Imagine if there was a solution that is identical to yours but without the platform advantages such as monitoring, access to API, scheduling, possibility of integrations, proxy rotation. Now, if that tool suddenly gained all those advantages it would surely make a selling point out of it. This is how you should be thinking about your tool — as a solution boosted by the Apify platform. Don't ever forget that advantage.
What data can [Actor] extract?
What data can you extract from [target website]
- Create a table that represents the main data points that the Actor can extract. You don't have to list every single one, just list the most understandable and relatable ones.
Depending on the complexity of your Actor, you might include one or all three of these sections. It will also depend on what your Actor does. If your Actor has simple input but does a lot of steps for the user under the hood (like a bundle would), you might like to include the "What can this Actor do?" section. If your Actor extracts data, it makes sense to include a section with a table.
Tutorial section
This could be a simple listed step-by-step section or a paragraph with a link to a tutorial on a blog.
A step-by-step section is reassuring for the user, and it can be a section optimized for Google.
How do I use [Actor] to scrape website data?
Pricing
How much will it cost to scrape [target site]?
How much will scraping [target site] cost?
Is scraping [target site] free?
How much does it cost to extract [target site] data?
Web scraping can be very unpredictable because there are a lot of elements involved in order for the process to be successful: the complexity of the website, proxies, cookies, etc. This is why it's important to set the pricing and scraping volume expectations for your users.
You might think the part above the Actor detail page already indicates pricing. But this paragraph can still be useful. First of all, cost-related questions can show up in Google, if they are SEO optimized. Second, you can use this space to inform and reassure the user about the pricing, give more details about it, or entice them with the promise of very scalable scraping.
- If it's a consumption pricing model (only consumed CUs), you can use this space to set expectations and explain what it means to pay for Compute Units. Similarly, if it's a rental Actor, you can also use this paragraph to set expectations. Talk about the average amount of data that can be scraped per given price. Make it easy for users to imagine how much they will pay for a given dataset. This will also make it easier for them to compare your solution with others on the market price-wise and value-wise.
- If it's price per result, you can extrapolate how many results a user can get on a free plan and also entice them with a larger plan and how many thousands of results they can get with that.
- If it's a bundle that consists of a couple of Actors that are priced differently, you can use this section to talk about the difference between all the Actors involved and how that will affect the final price of a run.
In any case, on top of setting expectations and reassuring users, this paragraph can get into Google. If somebody is Googling "How much does it cost to scrape [website]", they might come across this part of your README and it will lead them from Google search directly to your Actor's detail page. You don't want to miss that opportunity.

Input and output examples
This is what people click on the most in the table of contents of the README. After they are done scrolling through the first part of the README, users are interested in how difficult the input it, what it looks like, and what kind of information they can expect.
Input: often a screenshot of the input schema. This is also a way for people to see the platform even before they create an account.
Output: can be shown as a screenshot if your output schema looks like something you would want to promote to users. You can also just include a JSON example containing a few objects. Even better if there's continuity between the input example and output example.
If your datasets come out too complex and you want to save your users some scrolling, you can also show multiple output examples: one for reviews, one for contact details, one for ads, etc.
Other Actors
Don't forget to promote your other Actors. While our system for Actor recommendation works - you can see related Actors at the bottom of the README — it only works within the same category or similar name. It won't recommend a completely different Actor from the same creator. Make sure to interconnect your work by taking the initiative yourself. You can mention your other Actors in a list or as a table.
FAQ, disclaimers, and support
The FAQ is a section where you can keep all the secondary questions that might still come up.
Here are just a few things we usually push to the FAQ section.
- disclaimers and legality
- comparison table between your Actor and similar solutions
- information about the official API and how the scraper is a stand-in for it (SEO)
- questions brought up by the users
- tips on how best to use the Actor
- troubleshooting and mentioning known bugs
- mentioning the Issues tab and highlighting that you're open for feedback and collecting feedback
- mentioning being open to creating a custom solution based on the current one and showing a way to contact you
- interlinking
- mentioning the possibility of transferring data using an API — API tab
- possibility for integrations
- use cases for the data scraped, success stories exemplifying the use of data
Format of the README
Markdown
The README has to be written in Markdown. The most important elements are H2 and H3 headings, links to pages, links to images, and tables. For specific formatting, you can try using basic HTML. That will also work. CSS won’t.
HTML use
You can mix HTML with Markdown interchangeably. The Actor README will display either on the Apify platform. That gives you more freedom to use HTML when needed. Remember, don't try CSS.
Tone of the README
Apify Store has many Actors in its stock, and it's only growing. The advantage of an Actor is that an Actor can be anything, as versatile or complex as possible. From a single URL type of input to complex features that give customized control over the input parameters to the user. There are Actors that are intended for users who aren't familiar with coding and don't have any experience with it. Ideally, the README should reflect the level of skill one should need to use the Actor.
The tone of the README should make it immediately obvious who the tool is aimed at. If your tool's input includes glob patterns or looking for selectors, it should be immediately visible from the README. Before the user even tries the tool. Trying to simplify this information using simple words with ChatGPT can be misleading to the user. You will attract the wrong audience, and they will end up churning or asking you too many questions.
And vice versa. If your target audience is people with little to no coding skills, who just prefer point-and-click solutions, this should be visible from the README. Speak in regular terms, avoid code blocks or complex information at the beginning unless it's absolutely necessary. This means that, when people land on your Actor detail page, they will have their expectations set from the get-go.
Length of a README
When working on improving a README, we regularly look at heatmaps that show us where our website visitors spend most of their time. From our experience, most first-time visitors don't scroll past the first 25% of a README. That means that the first quarter of the README is where you want to focus the most of your attention if you're trying to persuade the page visitor to try your Actor.
From the point of view of acquisition, the first few sections should make it immediately obvious what the tool is about, how hard it is to use, and who it is created for. This is why, in Apify's READMEs, you can see our first few paragraphs are built in such a way as to explain these things and reassure the visitors that anyone can use these tools.
From the point of view of retention, it doesn't mean you can't have long or complex READMEs or not care for the information beyond the 25% mark. Since the README is also intended to be used as a backup when something goes wrong or the user needs more guidance, your users will come back to it multiple times.
Images and videos
As for using screenshots and gifs, put them in some sort of image hosting. Your own GitHub repository would be best because you have full control over it. Name the images with SEO in mind and try to keep them compressed but good enough quality. You don't want to load an image or gif for too long.
One trick is not only to add images but also to make them clickable. For some reason, people like clicking on images, at least they try to when we look at the heatmaps. You can lead the screenshot clicks towards a signup page, which is possible with Markdown.
If your screenshot seems too big or occupies too much space, smaller size images are possible by using HTML.
To embed a YouTube video, all you have to do is include its URL. No further formatting is needed, the thumbnail will render itself on the README page.
Try Carbon for code
If you want to add snippets of code anywhere in your README, you can use https://github.com/carbon-app/carbon.
If you need quick Markdown guidance, check out https://www.markdownguide.org/cheat-sheet/
README and SEO
Your README is your landing page.
If there were only one thing to remember about READMEs on Apify Store, it would be this. A README on Apify Store is not just dry instructions on how to use your Actor. It has much more potential than that.
In the eyes of Google, your Actor's detail page, aka README, is a full-fledged landing page containing all the most important information to be found and understood by users.
Of course, that all only counts if your README is both well formatted and contains keywords. We'll talk about that part later on.
What makes a good README?
A good README has to be a balance between what you want your page visitors to know, your users to turn to when they run into trouble, and Google to register when it's indexing pages and considering which one deserves to be put up higher.
Table of contents
The H1 of your page is the Actor name, so you don't have to set that up. Don't add more H1s. README headings should be H2 or H3. H2 headings will make up the table of contents on the right. If you don't want the table to be too crowded, keep the H2s to the basics and push all the longer phrases and questions to H3s. H3s will stay hidden in the accordion in the default state until the visitor hovers their cursor over it. H4 readings can also be included, of course, but they won't show up as a part of the table of contents.
Keyword opportunities
Do SEO research for keywords and see how they can fit organically into the text. Priority for H2s and H3s, then the regular text. Add new keyword-heavy paragraphs if you see an opportunity.
The easiest sections to include keywords in are, for example:
- API, as in Instagram API
- data, as in extract Instagram data
- Python, as in extract data in Python
- scrape, as in how to scrape X
- scraping, as in scraping X
Now, could every H2 just say exactly what it is about, without SEO? Of course. You don't have to optimize your H2s and H3s, and are free to call them simply Features, How it works, Pricing, Support, etc. or not even to have many H2s at all and keep it all as one page.
However, the H2s and H3s are what sometimes get into the Google Search results. If you're familiar with the People Also Ask section, that's the best place to match your H2s. They can also get highlighted in the Sitelinks of Google Search Results.
Any part of your README can make it onto Google pages. The intro sentence describing what your Actor is about, a video, a random question. Each one can become a good candidate for those prime Google pages. That's why it's important to structure and write your README with SEO in mind.
Importance of including a video
If your page has a video, it has a better chance of ranking higher in Google.
README and input schema
The README should serve as a fallback for your users if something isn't immediately obvious in the input schema. There's also only that much space in the input schema and the tooltips, so naturally, if you want to provide more details about something, e.g. input, formatting, or expectations, you should put it in the README and refer to it from the relevant place in the input schema.
Readme elements template
-
What does (Actor name) do?
- in 1–2 sentences describe what the Actor does and what it does not do
- consider adding keywords like API, e.g. Instagram API
- always have a link to the target website in this section
-
Why use (Actor name)? or Why scrape (target site)?
- How it can be beneficial for the user
- Business use cases
- Link to a success story, a business use case, or a blog post.
-
How to scrape (target site)
- Link to "How to…" blogs, if one exists (or suggest one if it doesn't)
- Add a video tutorial or gif from an ideal Actor run.
Embedding YouTube videos
For better user experience, Apify Console automatically renders every YouTube URL as an embedded video player. Simply add a separate line with the URL of your YouTube video.
- Consider adding a short numbered tutorial, as Google will sometimes pick these up as rich snippets. Remember that this might be in search results, so you can repeat the name of the Actor and give a link, e.g.
-
Is it legal to scrape (target site)?
- This can be used as a boilerplate text for the legal section, but you should use your own judgment and also customize it with the site name.
Our scrapers are ethical and do not extract any private user data, such as email addresses, gender, or location. They only extract what the user has chosen to share publicly. We therefore believe that our scrapers, when used for ethical purposes by Apify users, are safe. However, you should be aware that your results could contain personal data. Personal data is protected by the GDPR in the European Union and by other regulations around the world. You should not scrape personal data unless you have a legitimate reason to do so. If you're unsure whether your reason is legitimate, consult your lawyers. You can also read our blog post on the legality of web scraping
-
Input
- Each Actor detail page has an input tab, so you just need to refer to that. If you like, you can add a screenshot showing the user what the input fields will look like.
- This is an example of how to refer to the input tab:
Twitter Scraper has the following input options. Click on the input tab for more information.
-
Output
- Mention "You can download the dataset extracted by (Actor name) in various formats such as JSON, HTML, CSV, or Excel.”
- Add a simplified JSON dataset example, like here https://apify.com/compass/crawler-google-places#output-example
-
Tips or Advanced options section
- Share any tips on how to best run the Actor, such as how to limit compute unit usage, get more accurate results, or improve speed.
If you want some general tips on how to make a GitHub README that stands out, check out these guides. Not everything in there will be suitable for an Apify Actor README, so you should cherry-pick what you like and use your imagination.
Resources
https://towardsdatascience.com/build-a-stunning-readme-for-your-github-profile-9b80434fe5d7
https://yushi95.medium.com/how-to-create-a-beautiful-readme-for-your-github-profile-36957caa711c
Importance of Actor URL
Actor URL (or technical name, as we call it), is the page URL of the Actor shown on the web. When you're creating an Actor, you can set the URL yourself along with the Actor name. Here are best practices on how to do it well.

Why is Actor URL so important?
The Actor URL plays a crucial role in SEO. Google doesn't just read the Actor's name or README; it also analyzes the URL. The URL is one of the first signals to Google about the content of your page- whether it's a product listing, a tool, a blog post, a landing page for a specific offering, or something else entirely. Therefore, it's important to know how to use this shorthand to your advantage and clearly communicate to Google what your page offers.
Choose the URL carefully
This part of the manual is only applicable to new Actors. Once set, existing Actor URLs shouldn't change.
How to choose a URL
The right naming can propel or hinder the success of the Actor on Google Search. Just as naming your Actor is important, so is choosing its URL. The only difference is, once set, the URL is intended to be permanent (more on this https://docs.apify.com/academy/actor-marketing-playbook/actor-basics/importance-of-actor-url.md). What's the formula for the best Actor URL?
Brainstorming
What does your Actor do? Does it scrape, find, extract, automate, connect? Think of these when you are looking for a name. You might already have a code name in mind, but it’s essential to ensure it stands out and is distinct from similar names—both on Google and on Apify Store.
Matching URL and name
The easiest way is to make sure the Actor name and the technical name match. As in TikTok Scraper (tiktok-scraper) or Facebook Data Extractor (facebook-data-extractor). But they can also be different.
SEO
The name should reflect not only what Actor does (or what website it targets), but also what words people use when they search for it. This is why it's also important to do SEO research to see which keywords work best for the topic. Ideally, the URL should include a keyword that has low complexity (low competition) but high traffic (high demand).
Learn more about SEO research and the best tools for it here: https://docs.apify.com/academy/actor-marketing-playbook/promote-your-actor/seo.md
Inspiration in Apify Store
Explore Store URLs of similar Actors. But avoid naming your Actor too similarly to what already exists, because of these two reasons:
- There’s evidence that new URLs that are similar to existing ones can have drastically different levels of success. The first URL might thrive while a similar one published later struggles to gain traction. For example, onedev/pentagon-scraper was published first and has almost 100x traction than justanotherdev/pentagon-scraper. It will be very hard for the latter to beat the former. The reason for this is that Google operates on a "first come, first served” basis, and once it's set, it is very hard to make Google change its ways and make it pay attention to new pages with a similar name.
- As Apify Store is growing, it's important to differentiate yourself from the competition. A different URL is just one more way to do that. If a person is doing research on Store, they will be less likely to get confused between two tools with the same name.
Length of URL
Ideally, keep it under four words. As in, Facebook Data Extractor (facebook-data-extractor), not (facebook-data-meta-online-extractor-light). If the name is long and you're trying to match it with your URL, keep only the most essential words for the URL.
Variations
It can be a long-tail keyword with the tool type in it: scraper, finder, extractor. But you can also consider keywords that include terms like API, data, and even variations of the website name. Check out what keywords competitors outside of Apify Store are using for similar tools.
Nouns and adjectives
One last tip on this topic is to avoid adjectives and verbs. Your page is about a tool, so keep it to nouns. Anything regarding what the tool does (scrape, automate, import) and what it's like (fast, light, best) can be expressed in the Actor's name, not the Actor's URL. Adding an adjective or verb like that either does nothing for SEO and might even damage the SEO chances of the page.
Why you shouldn’t change your Actor URL
Don't change the URL
There's only one rule about Actor URL: don't change the URL. The Actor's name, however, can be changed without any problems.
Once set, the page URL should not be changed. Because of those two important reasons:
- Google dislikes changes to URLs. Once your Actor has built up keyword associations and familiarity with Google, regaining that standing after a URL change can be challenging. You will have to start from scratch.
- Current integrations will break for your Actor's users. This is essential for maintaining functionality.
If you absolutely have to change the URL, you will have to communicate that fact to your users.
💡 Learn more about the easiest ways to communicate with your users: [Emails to Actor users]
How and where to set the Actor URL
In Console. Open the Actor's page, then click on … in the top right corner, and choose ✎ Edit name or description. Then set the URL in the Unique name ✎ field and click Save.


FAQ
Can Actor URL be different from Actor name?
Yes. While they can be the same, they don’t have to be. For the best user experience, keeping them identical is recommended, but you can experiment with the Actor's name. Just avoid changing the Actor URL.
Can I change a very fresh Actor URL?
Yes, but act quickly. It takes Google a few days to start recognizing your page. For this reason, if you really have to, it is best to change the Actor's name in the first few days, before you build a steady user base and rapport with Google.
How long does it take Google to pick up on the new URL?
Google reindexes Apify web pages almost every day. It might take anywhere from 3-7 days for it to pick up a new URL. Or it might happen within a day.
Can I use the identical technical name as this other Actor?
Yes, you can. But it will most likely lower your chances of being noticed by Google.
Does changing my Apify account name affect the Actor URL?
Yes. If you're changing from justanotherdev/pentagon-scraper to dev/pentagon-scraper, it counts as a new page. Essentially, the consequences are the same as after changing the technical name of the Actor.
Name your Actor
Apify's standards for Actor naming. Learn how to choose the right name for scraping and automation Actors and how to optimize your Actor for search engines.
Naming your Actor can be tricky, especially after you’ve worked hard on it. To help people find your Actor and make it stand out, we’ve set some naming guidelines. These will help your Actor rank better on Google and keep things consistent on https://apify.com/store.
Ideally, you should choose a name that clearly shows what your Actor does and includes keywords people might use to search for it.
Parts of Actor naming
Your Actor's name consists of four parts: actual name, SEO name, URL, and GitHub repository name.
-
Actor name (name shown in Apify Store), e.g. Booking Scraper.
- Actor SEO name (name shown on Google Search, optional), e.g. Booking.com Hotel Data Scraper.
- If the SEO name is not set, the Actor name will be the default name shown on Google.
-
Actor URL (technical name), e.g. booking-scraper.
-
GitHub repository name (best to keep it similar to the other ones, for convenience), e.g. actor-booking-scraper.
Actor name
The Actor name provides a human-readable name. The name is the most important real estate from an SEO standpoint. It should exactly match the most likely search query that potential users of your Actor will use. At the same time, it should give your Actor a clear name for people who will use it every day.
tip
Your Actor's name should be 40-50 characters long. You can change your Actor name freely in Apify Console.
Actor name vs. SEO name
There's an option to step away from your Actor's name for the sake of search engine optimization — the Actor SEO name. The Actor name and Actor SEO name serve different purposes:
-
Actor name: this is the name visible in Apify Store and Console. It should be easy for users to understand and quickly show what your Actor does. It’s about attracting users who browse the Store.

-
Actor SEO name: this is the name that appears in search engine results. It should include keywords people might search for to find your Actor. It’s about improving visibility on search engines and encouraging users to click on your link.


For example:
- Actor name: YouTube Scraper
- Actor SEO name: YouTube data extraction tool for video analysis
Here, the SEO name uses extra keywords to help people find it through search engines, while the Actor name is simpler and easier for users to understand and find on Apify Store.
💡 When creating the SEO name, focus on using relevant keywords that potential users might search for. It should still match what your Actor does. More about SEO name and description: [Actor description and SEO description]
Actor name vs. technical name
The Actor name and technical name (or URL) have different uses:
- Actor name: this is the name users see on Apify Store and Console. It’s designed to be user-friendly and should make the Actor's purpose clear to anyone browsing or searching for it.
- Technical name: this is a simplified, URL-friendly version used in technical contexts like API calls and scripts. This name should be concise and easily readable. Once set, it should not be changed as it can affect existing integrations and cause broken links.
For example:
- Actor name: Google Search Scraper
- Technical name: google-search-scraper
The Actor name is user-friendly and descriptive, while the technical name is a clean, URL-compatible version. Note that the technical name does not include spaces or special characters to ensure it functions properly in technical contexts.
important
This is important for SEO! Once set, the technical name should not be changed. Make sure you finalize this name early in development. More on why here: [Importance of Actor URL]
Best practices for naming
Brainstorming
What does your Actor do? Does it scrape, find, extract, automate, connect, or upload? When choosing a name, ensure it stands out and is distinct from similar names both on Google and on Apify Store.
- Use nouns and variations: use nouns like "scraper", "extractor", “downloader”, “checker”, or "API" to describe what your Actor does. You can also include terms like API, data, or variations of the website name.
- Include key features: mention unique features or benefits to highlight what sets your Actor apart.
- Check for uniqueness: ensure your name isn’t too similar to existing Actors to avoid confusion and help with SEO.
Match name and URL
The simplest approach is to make all names match. For example, TikTok Ads Scraper (tiktok-ads-scraper) or Facebook Data Extractor (facebook-data-extractor). However, variations are acceptable.
Name length
Keep the name concise, ideally less than four words. For instance, Facebook Data Extractor is preferable to Facebook Meta Data Extractor Light.
Check Apify Store for inspiration
Look at the names of similar Actors on Apify Store, but avoid naming your Actor too similarly. By choosing a unique name, you can stand out from the competition. This will also reduce confusion and help users easily distinguish your Actor.
Keep SEO in mind
Even though you can set a different variation for SEO name specifically, consider doing a bit of research when setting the regular name as well. The name should reflect what the Actor does and the keywords people use when searching for it. If the keywords you find sound too robotic, save them for the SEO name. But if they sound like something you'd search for, it's a good candidate for a name.
You can also check the keywords competitors use for similar tools outside Apify Store.
Occasionally experiment
You can test and refine your SEO assumptions by occasionally changing the SEO name. This allows you to track how changes to names affect search rankings and user engagement. Changing the regular name is not forbidden but still less desirable since it can confuse your existing users and also affect SEO.
Naming examples
Scraping Actors
✅:
- Technical name (Actor's name in the https://console.apify.com/):
${domain}-scraper, e.g. youtube-scraper. - Actor name:
${Domain} Scraper, e.g. YouTube Scraper. - Name of the GitHub repository:
actor-${domain}-scraper, e.g. actor-youtube-scraper.
❌:
- Technical name:
the-scraper-of-${domain}, e.g. the-scraper-of-youtube. - Actor name:
The Scraper of ${Domain}, e.g. The Scraper of YouTube. - GitHub repository:
actor-the-scraper-of-${domain}, e.g. actor-the-scraper-of-youtube.
If your Actor only caters to a specific service on a domain (and you don't plan on extending it), add the service to the Actor's name.
For example,
- Technical name:
${domain}-${service}-scraper, e.g. google-search-scraper. - Actor name:
${Domain} ${Service} Scraper, e.g. https://apify.com/apify/google-search-scraper. - GitHub repository:
actor-${domain}-${service}-scraper, e.g. actor-google-search-scraper.
Non-scraping Actors
Naming for non-scraping Actors is more liberal. Being creative and considering SEO and user experience are good places to start. Think about what your users will type into a search engine when looking for your Actor. What is your Actor's function?
Below are examples for the https://apify.com/lukaskrivka/google-sheets Actor.
✅:
- Technical name: google-sheets.
- Actor name: Google Sheets Import & Export.
- GitHub repository: actor-google-sheets.
❌:
- Technical name: import-to-and-export-from-google-sheets.
- Actor name: Actor for Importing to and Exporting from Google Sheets.
- GitHub repository: actor-for-import-and-export-google-sheets.
Renaming your Actor
You may rename your Actor freely, except when it comes to the Actor URL. Remember to read https://docs.apify.com/academy/actor-marketing-playbook/actor-basics/importance-of-actor-url.md to find out why!
Emails to Actor users
Getting users is one thing, but keeping them is another. While emailing your users might not seem like a typical marketing task, any seasoned marketer will tell you it’s essential. It’s much easier to keep your current users happy and engaged than to find new ones. This guide will help you understand when and how to email your users effectively.
Whom and where to email
You can email the audience of a specific Actor directly from Apify Console. Go to Messaging > Emails > Compose new. From there, select the Actor whose users you want to email, write a subject line, and craft your message. An automatic signature will be added to the end of your email.
How to write a good email
Emails can include text, formatting, images, GIFs, and links. Here are four main rules for crafting effective emails:
- Don’t email users without a clear purpose.
- Keep your message concise and friendly.
- Make the subject line direct and to the point. Consider adding an emoji to give users a hint about the email’s content.
- Use formatting to your advantage. Console emails support Markdown, so use bold, italics, and lists to highlight important details.
Additional tips:
- Show, don’t tell — use screenshots with arrows to illustrate your points.
- If you’re asking users to take action, include a direct link to what you're referring to.
- Provide alternatives if it suits the situation.
- Always send a preview to yourself before sending the email to all your users.
When to email users
Our general policy is to avoid spamming users with unnecessary emails. We contact them only if there's a valid reason. Here’s the list of regular good reasons to contact users of the Actor:
1. Introducing a new feature of the Actor
New filter, faster scraping, changes in input schema, in output schema, a new Integration, etc.
✉️ 🏙️ Introducing Deep city search for Tripadvisor scrapers
Hi,
Tired of Tripadvisor's 3000 hotels-per-search limit? We've got your back. Say hello to our latest baked-in feature: Deep city search. Now, to get all results from a country-wide search you need to just set Max search results above 3000, and watch the magic happen.
A bit of context: while Tripadvisor never limited the search for restaurants or attractions, hotel search was a different case; it always capped at 3000. Our smart search is designed to overcome that limit by including every city within your chosen location. We scrape hotels from each one, ensuring no hidden gems slip through the cracks. This feature is available for https://console.apify.com/actors/dbEyMBriog95Fv8CW/console and https://console.apify.com/actors/qx7G70MC4WBE273SM/console.
Get ready for an unbeatable hotel-hunting experience. Give it a spin, and let us know what you think!
Introduce and explain the features, add a screenshot of a feature if it will show in the input schema, and ask for feedback.
2. Actor adapting to the changes of the website it scrapes
A common situation in web scraping that's out of your control.
✉️ 📣 Output changes for Facebook Ads Scraper
Hi,
We've got some news regarding your favorite Actor – https://console.apify.com/actors/JJghSZmShuco4j9gJ/console. Recently, Facebook Ads have changed their data format. To keep our Actor running smoothly, we'll be adapting to these changes by slightly tweaking the Actor Output. Don't worry; it's a breeze! Some of the output data might just appear under new titles.
This change will take place on October 10; please** **make sure to remap your integrations accordingly.
Need a hand or have questions? Our support team is just one friendly message away.
Inform users about the reason for changes and how the changes impact them and the Actor + give them a date when the change takes effect.
3. Actor changing its payment model (from rental to pay-per-result, for example)
Email 1 (before the change, warning about deprecation).
✉️ 🛎 Changes to Booking Scraper
Hi,
We’ve got news regarding the Booking scraper you have been using. This change will happen in two steps:
- On September 22, we will deprecate it, i.e., new users will not be able to find it in Store. You will still be able to use it though.
- At the end of October, we will unpublish this Actor, and from that point on, you will not be able to use it anymore.
Please use this time to change your integrations to our new https://apify.com/voyager/booking-scraper.
That’s it! If you have any questions or need more information, don’t hesitate to reach out.
Warn the users about the deprecation and future unpublishing + add extra information about related Actors if applicable + give them steps and the date when the change takes effect.
Email 2 (after the change, warning about unpublishing)
✉️ 📢 Deprecated Booking Scraper will stop working as announced 📢
Hi,
Just a heads-up: today, the deprecated https://console.apify.com/actors/5T5NTHWpvetjeRo3i/console you have been using will be completely unpublished as announced, and you will not be able to use it anymore.
If you want to continue to scrape Booking.com, make sure to switch to the https://apify.com/voyager/booking-scraper.
For any assistance or questions, don't hesitate to reach out to our support team.
Remind users to switch to the Actor with a new model.
4. After a major issue
Actor downtime, performance issues, Actor directly influenced by platform hiccups.
✉️ 🛠️ Update on Google Maps Scraper: fixed and ready to go
Hi,
We've got a quick update on the Google Maps Scraper for you. If you've been running the Actor this week, you might have noticed some hiccups — scraping was failing for certain places, causing retries and overall slowness.
We apologize for any inconvenience this may have caused you. The good news is those performance issues are now resolved. Feel free to resurrect any affected runs using the "latest" build, should work like a charm now.
Need a hand or have questions? Feel free to reply to this email.
Apologize to users and or let them know you're working on it/everything is fixed now. This approach helps maintain trust and reassures users that you're addressing the situation.
tip
It might be an obvious tip, but If you're not great at emails, just write a short draft and ask ChatGPT to polish it. Play with the style until you find the one that suits you. You can even create templates for each situation. If ChatGPT is being too wordy, you can ask it to write at 9th or 10th-grade level, and it will use simpler words and sentences.
Emails vs. newsletters
While sending an email is usually a quick way to address immediate needs or support for your users, newsletters can be a great way to keep everyone in the loop on a regular basis. Instead of reaching out every time something small happens, newsletters let you bundle updates together.
Unless it's urgent, it’s better to wait until you have 2 or 3 pieces of news and share them all at once. Even if those updates span across different Actors, it’s perfectly fine to send one newsletter to all relevant users.
Here are a few things you can include in your newsletter:
- updates or new features for your Actors or Actor-to-Actor Integrations
- an invitation to a live webinar or tutorial session
- asking your users to upvote your Actor, leave a review or a star
- a quick feedback request after introducing new features
- spotlighting a helpful blog post or guide you wrote or found
- sharing success stories or use cases from other users
- announcing a promotion or a limited-time discount
- links to your latest YouTube videos or tutorials
Newsletters are a great way to keep your users engaged without overwhelming them. Plus, it's an opportunity to build a more personal connection by showing them you’re actively working to improve the tools they rely on.
Emailing a separate user
There may be times when you need to reach out to a specific user — whether it’s to address a unique situation, ask a question that doesn’t fit the public forum of the Issue tab, or explore a collaboration opportunity. While there isn’t a quick way to do this through Apify Console just yet, you can ensure users can contact you by adding your email or other contact info to your Store bio. This makes it easy for them to reach out directly.
✍🏻 Learn best practices on how to use your Store bio to connect with your users https://docs.apify.com/academy/actor-marketing-playbook/interact-with-users/your-store-bio.md.
Handle Actor issues
Once you publish your Actor in Apify Store, it opens the door to new users, feedback, and… issue reports. Users can create issues and add comments after trying your Actor. But why is this space so important?
What is the Issues tab?
The Issues tab is a dedicated section on your Actor’s page where signed-in users can report problems, share feedback, ask questions, and have conversations with you. You can manage each issue thread individually, and the whole thread is visible to everyone. The tab is divided into three categories: Open, Closed, and All, and it shows how long each response has been there. While only signed-in users can post and reply, all visitors can see the interactions, giving your page a transparent and welcoming vibe.
Keep active
🕑 On the web, your average 🕑 Response time is calculated and shown in your Actor Metrics. The purpose of this metric is to make it easy for potential users to see how active you are and how well-maintained the Actor is.
You can view all the issues related to your Actors by going to Actors > https://console.apify.com/actors?tab=issues in Apify Console. Users can get automatic updates on their reported issues or subscribe to issues they are interested in, so they stay informed about any responses. When users report an issue, they’re encouraged to share their run, which helps you get the full context and solve the problem more efficiently. Note that shared runs aren’t visible on the public Actor page.
What is the Issues tab for?
The tab is a series of conversations between you and your users. There are existing systems like GitHub for that. Why create a separate system like an Issues tab? Since the Issues tab exists both in private space (Console) and public space (Actor's page on the web), it can fulfill two different sets of purposes.
Issues tab in Apify Console
Originally, the Issues tab was only available in Apify Console, and its main goals were:
- Convenience: a single space to hold the communication between you and your users.
- Unity and efficiency: make sure multiple users don't submit the same issue through multiple channels or multiple times.
- Transparency: make sure users have their issues addressed publicly and professionally. You can’t delete issues, you can only close them, so there's a clear record of what's been resolved and how.
- Quality of service and innovation: make sure the Actor gets fixed and continuously improved, and users get the quality scraping services they pay for.
Issues tab on the web
Now that the Issues tab is public and on the web, it also serves other goals:
- Credibility: new users can check how active and reliable you are by looking at the issues and your average 🕑 Response time even before trying your Actor. It also sets expectations for when to expect a response from you.
- Collaboration: developers can learn from each other’s support styles, which motivates everyone to maintain good interactions and keep up good quality work.
- SEO boost: every issue now generates its own URL, potentially driving more keyword traffic to your Actor's page
Example of a well-managed Issues tab
Check out how the team behind the Apollo.io leads scraper manages their https://apify.com/curious_coder/apollo-io-scraper/issues/open for a great example of professional responses and quick problem-solving.
Note that this Actor is a rental, so users expect a high-quality service.

warning
Once your Actor is public, you’re required to have an Issues tab.
SEO for the Issues tab
Yes, you read that right! The public Issues tab can boost your search engine visibility. Each issue now has its own URL, which means every report could help your Actor rank for relevant keywords.
When we made the tab public, we took inspiration from StackOverflow’s SEO strategy. Even though StackOverflow started as a Q&A forum, its strong SEO has been key to its success. Similarly, your Actor’s Issues tab can help bring in more traffic, with each question and answer potentially generating more visibility. This makes it easier for users to find solutions quickly.
Tips for handling Actor issues
-
Don’t stay silent
Respond quickly, even if it’s just a short note. If an issue takes weeks to resolve, keep the user in the loop. A quick update prevents frustration and shows the user (and others following it) that you’re actively working on solving the issue.
-
Encourage search to avoid duplication
Save time by encouraging users to search for existing issues before submitting new ones. If a similar issue exists, they can follow that thread for updates instead of creating a new one.
-
Encourage reporters to be specific
The more context, the better! Ask users to share details about their run, which helps you diagnose issues faster. If needed, remind them that runs are shared privately, so sensitive data won’t be exposed.
-
Use screenshots and links
The same goes for your side. Screenshots and links to specific runs make your answers much clearer. It’s easier to walk the user through a solution if they can see what you’re referencing.
-
Structure issue reporting
As you get more experienced, you’ll notice common types of issues: bugs, feature requests, questions, reports, misc. This way, you can prioritize and respond faster based on the category.
-
Have ready answers for common categories
Once you recognize recurring types of issues, have pre-prepared responses. For example, if it’s a bug report, you might already have a troubleshooting guide you can link to, or if it’s a feature request, you can figure out the development timeline.
-
Be polite and precise
Politeness goes a long way! Make sure your responses are respectful and straight to the point. It helps to keep things professional, even if the issue seems minor.
https://rewind.com/blog/best-practices-for-using-github-issues/
Your Apify Store bio
Your Apify Store bio and Store “README”
To help our community showcase their talents and projects, we introduced public profile pages for developers. On a dedicated page, you can showcase contact info, a summary of important Actor metrics (like total users, response time, and success rates), and all of their public Actors. We took inspiration from freelance platforms.
This space is all about helping you shine and promote your tools and skills. Here’s how you can use it to your advantage:
-
Share your contact email, website, GitHub, X (Twitter), LinkedIn, or Discord handles.
-
Summarize what you’ve been doing in Apify Store, your main skills, big achievements, and any relevant experience.
-
Offer more ways for people to connect with you, such as links for booking a meeting, discounts, a subscription option for your email newsletter, or your YouTube channel or blog.
- You can even add a Linktree to keep things neat.
-
Highlight your other tools on different platforms.
-
Get creative by adding banners and GIFs to give your profile some personality.
Everything is neatly available under a single URL, making it easy to share.
Need some inspiration? Check out examples of how others are using their Store bio and README. You can set yours up by heading to Settings > Account > Profile.
https://apify.com/curious_coder
Actor bundles
Learn what an Actor bundle is, explore existing examples, and discover how to promote them.
What is an Actor bundle?
If an Actor is an example of web automation software, what is an Actor bundle? An Actor bundle is basically a chain of multiple Actors unified by a common use case. Bundles can include both scrapers and automation tools, and they are usually designed to achieve an overarching goal related to scraping or automation.
The concept of an Actor bundle originated from frequent customer requests for comprehensive tools. For example, someone would ask for a Twitter scraper that also performs additional tasks, or for a way to find all profiles of the same public figure across multiple social media platforms without needing to use each platform separately.
For example, consider a bundle that scrapes company reviews from multiple platforms, such as Glassdoor, LinkedIn, and Indeed. Typically, you would need to use several different scrapers and then consolidate the results. But this bundle would do it all in one run, once provided with the name of the company. Or consider a bundle that scrapes all posts and comments of a given profile, and then produces a sentiment score for each scraped comment.
The main advantage of an Actor bundle is its ease of use. The user inputs a keyword or a URL, and the Actor triggers all the necessary Actors sequentially to achieve the desired result. The user is not expected to use each Actor separately and then process and filter the results themselves.
Examples of bundles
🔍 https://apify.com/tri_angle/social-media-finder searches for profiles on 13 social media sites provided just the (nick)name.
🍝 https://apify.com/tri_angle/restaurant-review-aggregator gets restaurant reviews from Google Maps, DoorDash, Uber Eats, Yelp, Tripadvisor, and Facebook in one place.
🤔 https://apify.com/tri_angle/social-media-sentiment-analysis-tool not only collects comments from Facebook, Instagram, and TikTok but also performs sentiment analysis on them. It unites post scrapers, comments scrapers and a text analysis tool.
🦾 https://apify.com/tri_angle/wcc-pinecone-integration scrapes a website and stores the data in a Pinecone database to build and improve your own AI chatbot assistant.
🤖 https://apify.com/tri_angle/pinecone-gpt-chatbot combines OpenAI's GPT models with Pinecone's vector database, which simplifies creating a GPT chatbot.
As you can see, they vary in complexity and range.
Caveats
Pricing model
Since bundles are still relatively experimental, profitability is not guaranteed and will depend heavily on the complexity of the bundle.
However, if you have a solid idea for a bundle, don’t hesitate to reach out. Prepare your case, write to our support team, and we’ll help determine if it’s worth it.
Specifics of bundle promotion
First of all, when playing with the idea of creating a bundle, always check the keyword potential. Sometimes, there are true keyword gems just waiting to be discovered, with high search volume and little competition.
However, bundles may face the challenge of being "top-of-the-funnel" solutions. People might not search for them directly because they don't have a specific keyword in mind. For instance, someone is more likely to search for an Instagram comment scraper than imagine a bundle that scrapes comments from 10 different platforms, including Instagram.
Additionally, Google tends to favor tools with rather focused descriptions. If your tool offers multiple functions, it can send mixed signals that may conflict with each other rather than accumulate.
Sometimes, even though a bundle can be a very innovative tool product-wise, it can be hard to market from an SEO perspective and match the search intent.
In such cases, you may need to try different marketing and promotion strategies. Once you’ve exhausted every angle of SEO research, be prepared to explore non-organic marketing channels like Product Hunt, email campaigns, community engagement, Reddit, other social media, your existing customer base, word-of-mouth promotion, etc.
Remember, bundles originated as customized solutions for specific use cases - they were not primarily designed to be easily found.
This is also an opportunity to tell a story rather than just presenting a tool. Consider writing a blog post about how you created this tool, recording a video, or hosting a live webinar. If you go this route, it’s important to emphasize how the tool was created and what a technical feat it represents.
That said, don’t abandon SEO entirely. You can still capture some SEO value by referencing the bundle in the READMEs of the individual Actors that comprise it. For example, if a bundle collects reviews from multiple platforms, potential users are likely to search for review scrapers for each specific platform—Google Maps reviews scraper, Tripadvisor reviews scraper, Booking reviews scraper, etc. These keywords may not lead directly to your review scraping bundle, but they can guide users to the individual scrapers, where you can then present the bundle as a more comprehensive solution.
Resources
Learn more about Actor Bundles: https://blog.apify.com/apify-power-actors/
How to create a great input schema
Optimizing your input schema. Learn to design and refine your input schema with best practices for a better user experience.
What is an input schema
You've succeeded: your user has:
- Found your Actor on Google.
- Explored the Actor's landing page.
- Decided to try it.
- Created an Apify account.
Now they’re on your Actor's page in Apify Console. The SEO fight is over. What’s next?
Your user is finally one-on-one with your Actor — specifically, its input schema. This is the moment when they try your Actor and decide whether to stick with it. The input schema is your representative here, and you want it to work in your favor.
Technically, the input schema is a JSON object with various field types supported by the Apify platform, designed to simplify the use of the Actor. Based on the input schema you define, the Apify platform automatically generates a user interface for your Actor.
Of course, you can create an Actor without setting up an elaborate input schema. If your Actor is designed for users who don't need a good interface (e.g. they’ll use a JSON object and call it via API), you can skip this guide. But most users engage with Actors in Manual mode, aka the Actor interface. If your Actor is complex or you’re targeting regular users who need an intuitive interface, it's essential to consider their experience.
In this article, we’ll refer to the input schema as the user interface of your Actor and focus exclusively on it.
Understand input schemas
To fully understand the recommendations in this blog post, you’ll first need to familiarize yourself with the https://docs.apify.com/platform/actors/development/actor-definition/input-schema. This context is essential to make good use of the insights shared here.
The importance of a good input schema
It can feel intimidating when facing the Apify platform for the first time. You only have a few seconds for a user to assess the ease of using your Actor.
If something goes wrong or is unclear with the input, an ideal user will first turn to the tooltips in the input schema. Next, they might check the README or tutorials, and finally, they’ll reach out to you through the Issues tab. However, many users won’t go through all these steps — they may simply get overwhelmed and abandon the tool altogether.
A well-designed input schema is all about managing user expectations, reducing cognitive load, and preventing frustration. Ideally, a good input schema, as your first line of interaction, should:
- Make the tool as easy to use as possible
- Reduce the user’s cognitive load and make them feel confident about using and paying for it
- Give users enough information and control to figure things out on their own
- Save you time on support by providing clear guidance
- Prevent incorrect or harmful tool usage, like overcharges or scraping personal information by default
Reasons to rework an input schema
- Your Actor is complex and has many input fields
- Your Actor offers multiple ways to set up input (by URL, search, profile, etc.)
- You’re adding new features to your Actor
- Certain uses of the Actor have caveats that need to be communicated immediately
- Users frequently ask questions about specific fields
👀 Input schema can be formatted using basic HTML.
Most important elements of the input schema
You can see the full list of elements and their technical characteristics in https://docs.apify.com/academy/deploying-your-code/input-schema: titles, tooltips, toggles, prefills, etc. That's not what this guide is about. It's not enough to just create an input schema, you should ideally aim to place and word its elements to the user's advantage: to alleviate the user's cognitive load and make the acquaintance and usage of your tool as smooth as possible.
Unfortunately, when it comes to UX, there's only so much you can achieve armed with HTML alone. Here are the best elements to focus on, along with some best practices for using them effectively:
-
descriptionat the top-
As the first thing users see, the description needs to provide crucial information and a sense of reassurance if things go wrong. Key points to mention: the easiest way to try the Actor, links to a guide, and any disclaimers or other similar Actors to try.

-
Descriptions can include multiple paragraphs. If you're adding a link, it’s best to use the
target_blankproperty so your user doesn’t lose the original Actor page when clicking.
-
-
titleof the field (regular bold text)-
This is the default way to name a field.
-
Keep it brief. The user’s flow should be 1. title → 2. tooltip → 3. link in the tooltip. Ideally, the title alone should provide enough clarity. However, avoid overloading the title with too much information. Instead, make the title as concise as possible, expand details in the tooltip, and include a link in the tooltip for full instructions.

-
-
prefill, the default input-
this is your chance to show rather than tell
- Keep the prefilled number low. Set it to 0 if it's irrelevant for a default run.
- Make the prefilled text example simple and easy to remember.
- If your Actor accepts various URL formats, add a few different prefilled URLs to show that possibility.
- Use the prefilled date format that the user is expected to follow. This way, they can learn the correct format without needing to check the tooltip.
- There’s also a type of field that looks like a prefill but isn’t — usually a
defaultfield. It’s not counted as actual input but serves as a mock input to show users what to type or paste. It is gray and disappears after clicking on it. Use this to your advantage.
-
-
toggle
-
The toggle is a boolean field. A boolean field represents a yes/no choice.
-
How would you word this toggle: Skip closed places or Scrape open places only? And should the toggle be enabled or disabled by default?

- You have to consider this when you're choosing how to word the toggle button and which choice to set up as the default. If you're making this more complex than it's needed (e.g. by using negation as the ‘yes’ choice), you're increasing your user's cognitive load. You also might get them to receive way less, or way more, data than they need from a default run.
- In our example, we assume the default user wants to scrape all places but still have the option to filter out closed ones. However, they have to make that choice consciously, so we keep the toggle disabled by default. If the toggle were enabled by default, users might not notice it, leading them to think the tool isn't working properly when it returns fewer results than expected.
-
-
sections or
sectionCaption(BIG bold text) andsectionDescription-
A section looks like a wrapped toggle list.

-
It is useful to section off non-default ways of input or extra features. If your tool is complex, don't leave all fields in the first section. Just group them by topic and section them off (see the screenshot above ⬆️)
- You can add a description to every section. Use
sectionDescriptiononly if you need to provide extra information about the section (see the screenshot below ⬇️. - sometimes
sectionDescriptionis used as a space for disclaimers so the user is informed of the risks from the outset instead of having to click on the tooltip.

- You can add a description to every section. Use
-
-
tooltips or
descriptionto the title-
To see the tooltip's text, the user needs to click on the
?icon. -
This is your space to explain the title and what's going to happen in that field: any terminology, referrals to other fields of the tool, examples that don't fit the prefill, or caveats can be detailed here. Using HTML, you can add links, line breaks, code, and other regular formatting here. Use this space to add links to relevant guides, video tutorials, screenshots, issues, or readme parts if needed.
-
Wording in titles vs. tooltips. Titles are usually nouns. They have a neutral tone and simply inform on what content this field is accepting (Usernames).
- Tooltips to those titles are usually verbs in the imperative that tell the user what to do (Add, enter, use).
- This division is not set in stone, but the reason why the tooltip is an imperative verb is because, if the user is clicking on the tooltip, we assume they are looking for clarifications or instructions on what to do.

-
-
emojis (visual component)
-
Use them to attract attention or as visual shortcuts. Use emojis consistently to invoke a user's iconic memory. The visual language should match across the whole input schema (and README) so the user can understand what section or field is referred to without reading the whole title.
- Don't overload the schema with emojis. They attract attention, so you need to use them sparingly.
-


tip
Read more on the use of emojis: https://docs.apify.com/academy/actor-marketing-playbook/actor-basics/actors-and-emojis.md
Example of an improved input schema
- A well-used
descriptionspace. The description briefly introduces possible scraping options, visual language (sections represented by emojis), the easiest way to try the tool, and a link to a tutorial in case of issues. The description isn't too long, uses different formatting, and looks reassuring. - The main section is introduced and visually separated from the rest. This is the space for the user to try the first run before they can discover the other options.
- The title says right away that this field refers to multiple other fields, not only the first section.
prefillis a small number (so in case users run the tool with default settings, it doesn't take too long and isn't expensive for them) and uses the language of the target website (not results or posts, videos).- The tooltip expands with more details and refers to other sections it's applicable to using matching emojis.
- Section names are short. Sections are grouped by content type.
- More technical parameters lack emojis. They are formatted this way to attract less attention and visually inform the user that this section is the most optional to set.
- Visual language is unified across the whole input schema. Emojis are used as a shortcut for the user to understand what section or field is referred to without actually reading the whole title.

Example of a worse input schema
The version above was the improved input schema. Here's what this tool's input schema looked like before:
- Brief and dry description, with little value for the user, easy to miss. Most likely, the user already knows this info because what this Actor does is described in the Actor SEO description, description, and README.
- The field title is wordy and reads a bit techie: it uses terminology that's not the most accurate for the target website (posts) and limiting terms (max). The field is applicable for scraping by hashtags (field above) and by profile (section below). Easy detail to miss.
- The prefilled number is too high. If the user runs the Actor with default settings, they might spend a lot of money, and it will take some time. Users often just leave if an Actor takes a long time to complete on the first try.
- The tooltip simply reiterates what is said in the title. Could've been avoided if the language of the title wasn't so complex.
- Merging two possible input types into one (profiles and URLs) can cause confusion. Verbose, reminds the user about an unrelated field (hashtags).
- This section refers to profiles but is separate. The user had to make extra effort to scrape profiles. They have to move across 3 sections: (use Max posts from section 1, use Profiles input from section 2, use Date sorting filters from section 3).
- The proxy and browser section invites the users to explore it even though it's not needed for a default run. It's more technical to set up and can make an impression that you need to know how to set it so the tool works.

Best practices
- Keep it short. Don’t rely too much on text - most users prefer to read as little as possible.
- Use formatting to your advantage (bold, italic, underline), links, and breaks to highlight key points.
- Use specific terminology (e.g., posts, images, tweets) from the target website instead of generic terms like "results" or "pages."
- Group related items for clarity and ease of use.
- Use emojis as shortcuts and visual anchors to guide attention.
- Avoid technical jargon — keep the language simple.
- Minimize cognitive load wherever possible.
Signs and tools for improving input schema
- User feedback. If they're asking obvious things, complaining, or consistently making silly mistakes with input, take notes. Feedback from users can help you understand their experience and identify areas for improvement.
- High churn rates. If your users are trying your tool but quickly abandon it, this is a sign they are having difficulties with your schema.
- Input Schema Viewer. Write your base schema in any code editor, then copy the file and put it into https://console.apify.com/actors/UHTe5Bcb4OUEkeahZ/source.** This tool should help you visualize your Input Schema before you add it to your Actor and build it. Seeing how your edits look in Apify Console right away will make the process of editing the fields in code easier.
Resources
- Basics of input schema: https://docs.apify.com/academy/deploying-your-code/input-schema
- Specifications of input schema: https://docs.apify.com/platform/actors/development/actor-definition/input-schema
Affiliates
The Apify Affiliate Program offers you a way to earn recurring commissions while helping others discover automation and web scraping solutions. Whether you promote Apify Store or refer customers to Apify's professional services, you can monetize your expertise and network.
The program rewards collaboration with up to 30% recurring commission and up to $2,500 per customer for professional services referrals. With no time limits on commissions, transparent tracking, and flexible payout options, it's built for long-term partnerships.
How the program works
The Apify Affiliate Program lets you promote three main offerings:
- Apify Store: recommend Actors from the marketplace that help businesses automate lead generation, pricing intelligence, content aggregation, and more.
- Apify platform: promote the platform's features, including scheduling, monitoring, data export options, proxies, and integrations.
- Professional services: refer customers who need custom web scraping solutions to Apify's Professional Services team and earn up to $2,500 per closed deal.
Commission structure
- 20% commission for the first 3 months of each customer's subscription
- 30% commission from month 4 onwards for as long as they remain customers
- Up to $2,500 per customer for professional services referrals
- No time limits on commissions - you earn as long as your referrals stay active
Free trial advantage
Apify offers a $5 free trial that renews monthly, giving your referrals time to test the tools before subscribing. This increases conversion rates and helps you earn more consistent commissions.
How to succeed as an affiliate
Use word of mouth
Tell clients, business contacts, or colleagues how Apify solves their lead generation, data collection, and automation challenges. Personal recommendations carry weight, especially when you can speak to real use cases.
Create educational content
Use your platform to demonstrate value:
- Blog posts: write tutorials, case studies, or problem-solving guides that feature Apify tools
- Video content: record demos, walkthroughs, or quick tips showing how Actors work
- Podcasts: discuss automation workflows and mention specific Actors that solve common problems
- Social media: share favorite Actors, tools, or workflows with your audience
Engage your community
If you run a forum, Discord server, or an online group, position Apify as a resource for solving automation and data collection challenges. Answer questions and recommend relevant Actors when they fit the problem.
Teach and inspire
If you teach AI automation, engineering, marketing, or lead generation, include Apify in your curriculum. Show students how to use Actors in webinars, online courses, or workshops.
Benefits beyond commissions
Exclusive perks for top performers
High-performing affiliates and their referrals can access:
- Exclusive discounts on platform usage
- Free prepaid credits
- Early access to new tools and features
Co-marketing opportunities
Collaborate with Apify on:
- Joint marketing campaigns
- Workshops and webinars
- Partner success stories
- Industry events and conferences
These opportunities help you build visibility and strengthen relationships with your audience.
Payment and tracking
Transparent dashboard
Track referrals in real-time through a dashboard that shows:
- Active referrals
- Commission earnings
- Conversion rates
- Payment history
Payment options
Receive payouts via:
- Bank transfer
- PayPal
You'll receive your first payment within 30 days of your first successful referral.
Best practices for affiliate success
- Know your audience: understand their pain points and recommend solutions that genuinely help them. Tailor your messaging to their technical level and needs.
- Be authentic: promote tools you've used or understand. Personal experience builds trust and credibility.
- Provide context: explain how Apify solves specific problems rather than just listing features. Use real examples and use cases.
- Follow up: engage with people who click your links. Answer questions and provide additional resources to help them get started.
- Combine strategies: use multiple channels to promote Apify. Cross-reference blog posts in videos, mention tutorials in newsletters, and share content on social media.
- Track what works: monitor which content and channels drive the most conversions, then double down on what performs best.
Getting started
To join the Apify Affiliate Program:
- Sign up through the https://apify.com/partners/affiliate
- Access your unique tracking links and promotional materials
- Start sharing with your network
- Monitor your referrals and earnings through the dashboard
Maximize your impact
Combine affiliate promotion with other marketing strategies covered in this guide, including SEO, social media, blogs, and video tutorials. The more touchpoints you create, the higher your conversion potential.
Blogs and blog resources
Blogs remain a powerful tool for promoting your Actors and establishing authority in the field. With social media, SEO, and other platforms, you might wonder if blogging is still relevant. The answer is a big yes. Writing blog posts can help you engage your users, share expertise, and drive organic traffic to your Actor.
Why blogs still matter
- SEO. Blog posts are great for boosting your Actor’s search engine ranking. Well-written content with relevant keywords can attract users searching for web scraping or automation solutions. For example, a blog about “how to scrape social media profiles” could drive people to your Actor who might not find it on Google otherwise.
- Establishing authority. When you write thoughtful, well-researched blog posts, you position yourself as an expert in your niche. This builds trust and makes it more likely users will adopt your Actors.
- Long-form content. Blogs give you the space to explain the value of your Actor in-depth. This is especially useful for complex tools that need more context than what can fit into a README or product description.
- Driving traffic. Blog posts can be shared across social media, linked in webinars, and included in your Actor’s README. This creates multiple avenues for potential users to discover your Actor.
Good topics for blog posts
- Problem-solving guides. Write about the specific problems your Actor solves. For example, if you’ve created an Actor that scrapes e-commerce reviews, write a post titled "How to automate e-commerce review scraping in 5 minutes". Focus on the pain points your tool alleviates.
- Actor use cases. Show real-world examples of how your Actor can be applied. These can be case studies or hypothetical scenarios like "Using web scraping to track competitor pricing."
- Tutorials and step-by-step guides. Tutorials showing how to use your Actor or similar tools are always helpful. Step-by-step guides make it easier for beginners to start using your Actor with minimal hassle.
- Trends. If you’ve noticed emerging trends in web scraping or automation, write about them. Tie your Actor into these trends to highlight its relevance.
- Feature announcements or updates. Have you recently added new features to your Actor? Write a blog post explaining how these features work and what makes them valuable.
🪄 These days, blog posts always need to be written with SEO in mind. Yeah, it's annoying to use keywords, but think of it this way: even if there's the most interesting customer story and amazing programming insights, but nobody can find it, it won't have the impact you want. Do try to optimize your posts with relevant keywords and phrases — across text, structure, and even images — to ensure they reach your target audience.
Factors to consider when writing a blog
- Audience. Know your target audience. Are they developers, small business owners, or data analysts? Tailor your writing to match their technical level and needs.
- SEO. Incorporate relevant keywords naturally throughout your post. Don’t overstuff your content, but make sure it ranks for search queries like "web scraping tools", "automation solutions", or "how to scrape LinkedIn profiles". Remember to include keywords in H2 and H3 headings.
- Clarity and simplicity. Avoid jargon, especially if your target audience includes non-technical users. Use simple language to explain how your Actor works and why it’s beneficial.
- Visuals. Include screenshots, GIFs, or even videos to demonstrate your Actor’s functionality. Visual content makes your blog more engaging and easier to follow.
- Call to action (CTA). Always end your blog with a clear CTA. Whether it’s "try our Actor today" or "download the demo", guide your readers to the next step.
- Engage with comments. If readers leave comments or questions, engage with them. Answer their queries and use the feedback to improve both your blog and Actor.
Best places to publish blogs
There are a variety of platforms where you can publish your blog posts to reach the right audience:
- http://dev.to/: It's a developer-friendly platform where technical content gets a lot of visibility, and a great place to publish how-to guides, tutorials, and technical breakdowns of your Actor.
- Medium: Allows you to reach a broader, less technical audience. It’s also good for writing about general topics like automation trends or how to improve data scraping practices.
- ScrapeDiary: Run by Apify, http://scrapediary.com is a blog specifically geared toward Apify community devs and web scraping topics. Publishing here is a great way to reach users already interested in scraping and automation. Contact us if you want to publish a blog post there.
- Personal blogs or company websites. If you have your own blog or a company site, post there. It’s the most direct way to control your content and engage your established audience.
Not-so-obvious SEO tips for blog posts
Everybody knows you should include keywords wherever it looks natural. Some people know the structure of the blog post should be hierarchical and follow an H1 - H2 - H3 - H4 structure with only one possible H1. Here are some unobvious SEO tips for writing a blog post that can help boost its visibility and ranking potential:
1. Keep URL length concise and strategic
Optimal length. Keep your URL short and descriptive. URLs between 50-60 characters perform best, so aim for 3-4 words. Avoid unnecessary words like "and", "of", or long prepositions.
Include keywords. Ensure your primary keyword is naturally integrated into the URL. This signals relevance to both users and search engines.
Avoid dates. Don’t include dates or numbers in the URL to keep the content evergreen, as dates can make the post seem outdated over time.
2. Feature a video at the top of the post
Engagement boost. Videos significantly increase the time users spend on a page, positively influencing SEO rankings. Blog posts with videos in them generally do better SEO-wise.
Thumbnail optimization. Use an optimized thumbnail with a clear title and engaging image to increase click-through rates.
3. Alt text for images with a keyword focus
Descriptive alt text. Include a short, descriptive alt text for every image with one or two keywords where it makes sense. This also improves accessibility.
Optimize file names. Name your images with SEO-friendly keywords before uploading (e.g., "web-scraping-tools.png" rather than "IMG12345_screenshot1.png"). This helps search engines understand the content of your images.
File format and size. Use web-optimized formats like WebP or compressed JPEGs/PNGs to ensure fast page loading, which is a key SEO factor.
Lazy loading images. Use lazy loading to only load images when the user scrolls to them, reducing initial page load times, which can help your SEO ranking.
4. Interlinking for better user experience and SEO
Internal links. Use contextual links to other relevant blog posts or product pages on your site. This not only helps with SEO but also keeps users engaged longer on your site, reducing bounce rates.
Anchor text. When linking internally, use keyword-rich anchor text that describes what users will find on the linked page.
Content depth. By interlinking, you can show Google that your site has a strong internal structure and is a hub of related, authoritative content.
5. Target the 'People Also Ask' section of Google results with an FAQ
Answer common questions. Including an FAQ section that answers questions people search for can help you rank in the "People Also Ask" section of Google. Research questions that come up in this feature related to your topic and address them in your content.
Provide clear, concise answers to the FAQs, typically between 40-60 words, since these match the format used in "People Also Ask".
Don't bother using FAQ schema. Google doesn't react to those anymore unless you’re a .gov or .edu domain.
6. Optimize for readability and structure
Short paragraphs and subheadings. Make your blog post easy to scan by using short paragraphs and meaningful subheadings that contain keywords.
Bullet points and lists. Include bullet points and numbered lists to break up content and make it more digestible. Search engines prioritize well-structured content.
Readability tools. Use tools like Hemingway Editor or Grammarly to improve readability. Content that is easy to read tends to rank higher, as it keeps readers engaged.
Referring to blogs in your Actor’s ecosystem
To drive traffic to your blog and keep users engaged, reference your blog posts across various touchpoints:
- README. Add links to your blog posts in your Actor’s README. If you’ve written a tutorial or feature guide, include it under a "Further reading" section.
- Input schema. Use your input schema to link to blog posts. For instance, if a certain field in your Actor has complex configurations, add a link to a blog post that explains how to use it.
- YouTube videos. If you’ve created tutorial videos about your Actor, link them in your blog and vice versa. Cross-promoting these assets will increase your overall engagement.
- Webinars and live streams. Mention your blog posts during webinars, especially if you’re covering a topic that’s closely related. Include the links in follow-up emails after the event.
- Social media. Share your blog posts on Twitter, LinkedIn, or other social platforms. Include snippets or key takeaways to entice users to click through.
🔄 Remember, you can always turn your blog into a video and vice versa. You can also use parts of blog posts for social media promotion.
Additional tips for blog success
- Consistency. Regular posting helps build an audience and makes sure you keep at it. Try to stick to a consistent schedule, whether it’s weekly, bi-weekly, or monthly. As Woody Allen said, “80 percent of success is showing up”.
- Guest blogging. Reach out to other blogs or platforms like http://dev.to/ for guest blogging opportunities. This helps you tap into new audiences.
- Repurpose content. Once you’ve written a blog post, repurpose it. Turn it into a YouTube video, break it down into social media posts, or use it as the base for a webinar.
- Monitor performance. Use analytics to track how your blog is performing. Are people reading it? Is it driving traffic to your Actor? What keywords is it ranking for? Who are your competitors? Use this data to refine your content strategy.
Marketing checklist
You're a developer, not a marketer. You built something awesome, and now you need people to find it. This checklist breaks down the marketing process into simple, actionable steps.
Complete many tasks using AI prompts that generate content in minutes. Each completed task brings you closer to your goals.
Tag Apify for broader reach
Tag @apify when you share content on X.com (Twitter) or LinkedIn to potentially reach thousands of additional users through Apify's social channels.
Social media promotion
Share on Twitter/X with a demo
Twitter's developer community is active and engaged. A well-crafted tweet with a video demo can reach thousands of potential users.
Create a 30-60 second demo video or gif showing your Actor in action. Include relevant hashtags like #webscraping, #API, #automation, and #buildinpublic.
Use pre-built prompt for your AI assistant
Show promptCopy prompt
Share on LinkedIn with a demo
LinkedIn reaches professionals, decision-makers, and business users with purchasing power. The platform's algorithm favors native video content, giving it 5x more reach than link posts.
Create a 30-90 second demo video showing your Actor delivering business value. Upload the video directly to LinkedIn (native videos perform better than YouTube links). Focus your post on the business problem solved, not technical features. Use 3-5 relevant hashtags like #BusinessAutomation, #Productivity, #DataIntelligence, #Efficiency, or #MarketResearch.
Use pre-built prompt for your AI assistant
Show promptCopy prompt
Post in relevant Discord and Slack communities
Developer communities on Discord and Slack are where your target users spend time. These platforms enable deeper conversations and direct feedback.
Join communities related to data for AI, web scraping, automation, data science, or your specific niche. Share your Actor in relevant channels, but always check the community rules first. Consider Apify Discord, web scraping communities, automation groups, and data engineering Slacks.
Video content creation
Create a tutorial video or walkthrough
Video content ranks well on YouTube and Google. It's perfect for developers who prefer visual learning. Videos get embedded and shared, multiplying your reach.
Record a 5-10 minute screen recording showing your Actor in action. Use Loom, OBS, or your computer's built-in recorder. Distribute your video across multiple channels:
- YouTube
- Twitter/X
- Your README and articles
Video structure:
- Introduction (30-45 seconds) - Greet viewers, explain the problem you're solving, what they'll learn, and time estimate
- Outcome preview (30-45 seconds) - Show the result first, preview the final output
- Step-by-step walkthrough (4-7 minutes) - Navigate to the Actor, set up configuration, show optional features, run the Actor, review results, export the data
- Pro tips (30-60 seconds) - Share 2-3 quick tips you've learned
- Wrap up (30-45 seconds) - Recap, call-to-action, engagement prompt
Recording tips: Close unnecessary tabs, use a clean browser profile, speak clearly at a moderate pace, pause briefly between steps for easier editing, and use your natural voice.
Create short-form videos (TikTok, YouTube Shorts, Instagram Reels)
Short-form video is one of the fastest-growing content formats with incredible organic reach. Even accounts with zero followers can get thousands of views. These videos showcase your Actor's value in 15-60 seconds and appear in AI-generated answers and search results.
Focus on the "wow factor": show the problem (manual work taking forever) versus the solution (your Actor doing it in seconds). Use trending sounds when possible, add text overlays explaining what's happening (most people watch without sound), and include a clear call-to-action at the end. Post the same video across all three platforms to maximize reach.
Best practices for short-form videos
- Hook viewers in the first 3 seconds (show the result or problem immediately)
- Keep it fast-paced
- Add captions and text overlays (essential for silent viewing)
- Record in portrait mode (9:16 aspect ratio)
- End with a clear next step: "Link in bio" or "Search [Actor Name] on Apify"
Launch and community engagement
Create a Product Hunt launch
Product Hunt drives significant traffic and visibility. A successful launch brings hundreds of users and valuable feedback.
Create a Product Hunt listing for your Actor. Schedule it for a weekday morning (Tuesday through Thursday works best). Prepare assets: logo, screenshots, and demo video.
Learn more in the https://docs.apify.com/academy/actor-marketing-playbook/promote-your-actor/product-hunt.md.
Submit to Hacker News
Hacker News drives significant developer traffic and has high domain authority. A front-page post brings thousands of visitors and generates discussions that lead to improvements and feature ideas.
Submit your "How I Built This" post, tutorial, or Actor launch with a descriptive title. Post between 8-10 AM EST on weekdays for best results. Engage authentically in comments. The HN community values substance over promotion.
Promote your Actor on Reddit
Reddit ranks highly for almost all keywords and topics. You can get your product mentioned in LLMs by engaging in popular threads.
- Search
site:reddit.com [ACTOR NAME]in Google - Find relevant Reddit threads
- Comment authentically and mention your product naturally without being salesy
Craft comments that genuinely address the thread topic, naturally mention your Actor as a solution, and add real value to the conversation. Use casual Reddit tone, not corporate speak.
Cross-post to relevant subreddits
Original posts in relevant subreddits (r/webdev, r/datascience, r/SideProject, r/programming, r/automation) drive significant traffic when done thoughtfully.
Write a Reddit-native post that explains the problem, your solution, and invites feedback. Use titles like "I built X to solve Y" instead of "Check out my new tool." Follow subreddit self-promotion rules (many require you to be an active community member first). Share both challenges and successes to foster authentic engagement.
Answer Stack Overflow questions
Stack Overflow answers rank well in search and are frequently referenced by AI systems. Providing helpful answers that mention your Actor creates lasting SEO value.
Search for questions related to your Actor's use case (e.g., "web scraping", "API integration"). Provide genuinely helpful answers that solve the problem, and mention your Actor as one potential solution.
Contribute to Quora discussions
Quora answers rank well in Google and are often featured in AI-generated answers. People actively seek solutions to problems on this platform.
- Search
site:quora.com [ACTOR NAME]or related keywords in Google - Find relevant Quora threads
- Write comprehensive, helpful answers and mention your product naturally without being salesy
Write 300-500 word answers that open with a direct response, provide context, offer 2-3 different approaches, mention your Actor as one option, and include personal experience. Use subheadings for readability. Keep tone expert but approachable.
Content marketing
Write a technical "How I built this" blog post
Developers love reading about other developers' journeys. This positions you as an expert, builds trust, and naturally promotes your Actor while providing educational value. It's great for SEO and getting indexed by AI search engines.
Share your development process, challenges you faced, and how you solved them. Post on dev.to, Medium, Hashnode, or your personal blog.
Learn more in the https://docs.apify.com/academy/actor-marketing-playbook/promote-your-actor/blogs-and-blog-resources.md.
Create a "Best X" article for Medium
Medium has excellent SEO and a massive audience of professionals and developers. Publishing on Medium and submitting to relevant publications like "Better Programming" or "The Startup" can reach thousands of readers. Medium articles frequently appear in Google search results and AI-generated answers.
Write a comprehensive "Best [CATEGORY]" roundup article (1,800-2,500 words) featuring 6-8 solutions with your Actor prominently positioned. Create a Medium account if you don't have one, and publish it. Use all 5 available tags strategically (e.g., "web scraping", "APIs", "automation", "developer tools", "[your specific niche]"). Submit your article to relevant Medium publications to multiply your reach by 10x or more.
Write in first person with a conversational yet professional tone. Include pros and cons for each solution, add a comparison table, and share your genuine perspective.
Use pre-built prompt for your AI assistant
Show promptCopy prompt
Create a "Best X" article for dev.to
dev.to is the go-to platform for developers seeking tools and tutorials. It has a highly engaged community and strong domain authority, so your articles rank well in search engines. The community actively comments and shares, boosting visibility. dev.to content is frequently referenced by AI tools.
Write a developer-focused "Best [CATEGORY] for Developers" article (1,500-2,000 words) featuring 6-8 solutions. Create a dev.to account if needed and publish your article. Add relevant tags (up to 4 tags, e.g., #webdev, #api, #productivity, #tools). Engage with comments. The dev.to community values authentic interaction.
Write like you're advising a fellow developer: casual and helpful. Be genuinely objective about all tools, include code examples or API snippets where relevant, and use markdown formatting with H2/H3 headers.
Use pre-built prompt for your AI assistant
Show promptCopy prompt
Create a "Best X" article for Hashnode
Hashnode is a rapidly growing developer blogging platform with excellent SEO and a clean reading experience. It's perfect for technical content with features built for developers (code highlighting, series, custom domains). Articles rank well in search results and are frequently discovered by developers. High-quality content often gets featured on Hashnode's homepage, dramatically increasing visibility.
Write a technical "Best [CATEGORY] for [SPECIFIC USE CASE]: A Developer's Guide" article (1,500-2,000 words). Create a Hashnode account if you don't have one (you can use a custom domain). Publish your article and add it to relevant Hashnode tags and communities.
Include a TL;DR section at the top, use proper heading hierarchy for auto-generated table of contents, and add code examples with proper syntax highlighting. Write with technical authority but remain accessible.
Use pre-built prompt for your AI assistant
Show promptCopy prompt
Create a "Best X" article for LinkedIn
LinkedIn reaches a professional, business-oriented audience including decision-makers, CTOs, product managers, and team leads who have budget and purchasing authority. LinkedIn articles have strong SEO and are shared within professional networks, multiplying your reach. Content on LinkedIn is frequently indexed by AI systems.
Write a business-focused "Best [CATEGORY] for [BUSINESS OUTCOME]" article (1,200-1,800 words) featuring 5-7 solutions. Publish it as a LinkedIn Article (use the "Write article" feature, not just a post). After publishing, share the article link in a regular LinkedIn post with a compelling intro to drive traffic.
Use a professional, authoritative but accessible tone. Focus on business impact like time savings, cost efficiency, ROI, and productivity gains rather than technical features. Include comparison tables with business-relevant metrics.
Use pre-built prompt for your AI assistant
Show promptCopy prompt
Create a "How to use [Actor]" tutorial for dev.to
dev.to is the platform for developer tutorials. It has a massive, engaged community that actively searches for and shares how-to content. Tutorials rank exceptionally well in Google and are frequently referenced by AI systems when developers ask "how to" questions.
Write a step-by-step tutorial (1,200-2,000 words) showing developers how to use your Actor to achieve a specific outcome. Create a dev.to account if you don't have one, then publish your article with up to 4 relevant tags (e.g., #tutorial, #webdev, #api, #automation).
Structure: Introduction with hook, prerequisites, what they'll achieve, step-by-step guide (access the Actor, configure inputs, run it, view results, download data), understanding results, pro tips, troubleshooting, and next steps. Write like you're helping a friend get started.
Use pre-built prompt for your AI assistant
Show promptCopy prompt
Create a "How to use [Actor]" tutorial for Hashnode
Hashnode is perfect for comprehensive technical tutorials with a clean reading experience. It has excellent SEO, strong domain authority, and a growing developer community. The platform is built for technical writing with great code formatting and features like table of contents auto-generation.
Write a comprehensive "Complete Guide: How to [ACHIEVE OUTCOME] Using [YOUR ACTOR NAME]" tutorial (1,800-2,500 words). Sign up for Hashnode if you haven't already. Publish your article and add it to relevant tags.
Include a TL;DR section, detailed step-by-step walkthrough with screenshots, API integration examples with code blocks, advanced usage patterns, troubleshooting guide, and best practices. Write with technical authority, but be thorough and maintain clarity.
Use pre-built prompt for your AI assistant
Show promptCopy prompt
Create a "How to use [Actor]" tutorial for Medium
Medium reaches a broader, less technical audience. It's perfect for tutorials that appeal to marketers, entrepreneurs, product managers, no-code users, or less technical users. Medium's strong SEO means your tutorial can rank for years. Submitting to publications like "Better Programming", "The Startup", or "UX Collective" can reach tens of thousands of readers.
Write an accessible, engaging tutorial "How I [ACHIEVED OUTCOME] in Minutes Using [YOUR ACTOR] (Step-by-Step)" (1,500-2,200 words). Create or log into your Medium account, then publish the article. Use all 5 available tags strategically.
Take a story-driven approach with personal context. Write in first person, use simple jargon-free language, and make readers feel "I can do this too." Focus on the outcome and value, not technical complexity.
Use pre-built prompt for your AI assistant
Show promptCopy prompt
Create a "How to use [Actor]" tutorial for LinkedIn
LinkedIn tutorials reach professionals, decision-makers, and business users who value productivity and efficiency. LinkedIn articles have strong SEO and professional credibility. They're perfect for tutorials focused on business outcomes, time-saving, or solving professional challenges.
Write a professional "How to [ACHIEVE BUSINESS OUTCOME] in [TIME] Using [YOUR ACTOR]: A Professional Guide" tutorial (1,400-2,000 words). Publish it as a LinkedIn Article using the "Write article" feature. After publishing, share the article in a regular LinkedIn post with an engaging business-focused intro.
Use professional, consultative tone focused on business value. Emphasize time savings, efficiency, and ROI. Include sections on business case, measuring success, professional best practices, and real-world business applications. Address common professional questions about security, cost, reliability, and team adoption.
Use pre-built prompt for your AI assistant
Show promptCopy prompt
GitHub and developer resources
Create a GitHub repository with examples
GitHub repos rank well in search and are developer-friendly. A repo with usage examples, tutorials, or integration guides makes it easier for others to adopt and reference your Actor.
Create a GitHub repo with code examples, integration guides, or sample projects using your Actor. Include a comprehensive README with use cases, code snippets, and links to your Actor.
Your README should include: project title with badges, short description, key features, quick start guide, installation and setup instructions, usage examples with code snippets, use cases section, configuration options, common questions and troubleshooting, links to Apify Store and documentation, contributing guidelines, and license.
Use pre-built prompt for your AI assistant
Show promptCopy prompt
Quick wins
Simple actions you can take right now with minimal effort but immediate impact:
- Share your launch on your personal social media accounts (Twitter, LinkedIn, Facebook)
- Post about your new Actor on your personal website or blog
- Ask friends and colleagues to share
- Update your email signature to mention your Actor
- Add the Actor to your portfolio if you're a freelancer on UpWork or Fiverr
Create a content hub
Create a free Notion page or GitHub README that lists all your Actors and content with links. Share this hub in your Actor description, social profiles, and email signature. This becomes your content portfolio and makes it easy for people to find all your work.
Parasite SEO
Do you want to attract more users to your Actors? Consider parasite SEO, a non-conventional method of ranking that leverages third-party sites.
Here’s a full definition, from Authority Hackers:
Parasite SEO involves publishing a quality piece of content on an established, high-authority external site to rank on search engines. This gives you the benefit of the host’s high traffic, boosting your chances for leads and successful conversions. These high DR websites have a lot of authority and trust in the eyes of Google
As you can see, you’re leveraging the existing authority of a third-party site where you can publish content promoting your Actors, and the content should rank better and faster as you publish it on an established site.
You can do parasite SEO for free, but you can also pay for guest posts on high-authority sites to post your articles promoting the Actors.
Let’s keep things simple and practical for this guide, so you can start immediately. We will cover only the free options, which should give you enough exposure to get started.
If you want to learn more, we recommend the following reading about parasite SEO:
In this guide, we will cover the following sites that you can use for parasite SEO for free:
- Medium
- Quora
Medium
You probably know https://medium.com/. But you might not know that Google quite likes Medium, and you have a good chance of ranking high in Google with articles you publish there.
- You need a Medium account. It’s free and easy to create.
- Now, you need to do keyword research. Go to https://ahrefs.com/keyword-generator/?country=us, enter your main keyword (e.g. Airbnb scraper), and check what keyword has the highest search volume.
- Search for that keyword in Google. Use incognito mode and a US VPN if you can. Analyze the results and check what type of content you need to create. Is it a how-to guide on how to create an Airbnb scraper? Or is it a list of the best Airbnb scrapers? Or perhaps it’s a review or just a landing page.
- Now, you should have a good idea of the article you have to write. Write the article and try to mimic the structure of the first results.
- Once you’re done with the article, don’t forget to include a few calls to action linking to your Actor on Apify Store. Don’t be too pushy, but mention all the benefits of your Actor.
- Publish the article. Make sure your title and URL have the main keyword and that the main keyword is also in the first paragraph of the article. Also, try to use relevant tags for your Actor.
LinkedIn Pulse
LinkedIn Pulse is similar to Medium, so we won’t go into too much detail. The entire process is the same as with Medium; the way you publish the article differs.
https://www.linkedin.com/pulse/how-publish-content-linkedin-pulse-hamza-sarfraz/ for publishing your article on LinkedIn Pulse.
- You must have a Reddit account to use to comment in relevant subreddits.
- Go to Google and perform this search:
site:reddit.com, where you replace `` with the main topic of your Actor. - Now, list relevant Reddit threads that Google gives you. For an Airbnb scraper, this might be a good thread: https://www.reddit.com/r/webscraping/comments/m650ol/has_anybody_have_an_latest_airbnb_scraper_code/
- To prioritize threads from the list, you can check the traffic they get from Google in https://ahrefs.com/traffic-checker. Just paste the URL, and the tool will give you traffic estimation. You can use this number to prioritize your list. If the volume exceeds 10, it usually has some traffic potential.
- Now, the last step is to craft a helpful comment that also promotes your Actor. Try to do that subtly. People on Reddit usually don’t like people who promote their stuff, but you should be fine if you’re being genuinely helpful.
Quora
Quora is similar to Reddit, so again we won’t go into too much detail. The entire process is the same. You just have to use a different search phrase in Google, which is site:quora.com .
Product Hunt
Product Hunt is one of the best platforms for introducing new tools, especially in the tech community. It attracts a crowd of early adopters, startup enthusiasts, and developers eager to discover the latest innovations. Even https://www.producthunt.com/products/apify was on PH.
If you're looking to build awareness and generate short-term traffic, Product Hunt can be a powerful tool in your marketing strategy. It's a chance to attract a wide audience, including developers, startups, and businesses looking for automation. If your Actor solves a common problem, automates a tedious process, or enhances productivity, it's a perfect candidate for Product Hunt.
Product Hunt is also great for tools with a strong visual component or demo potential. If you can show the value of your Actor in action, you’re more likely to grab attention and drive engagement.
How to promote your Actor on Product Hunt
Create a compelling launch
Launching your Actor on Product Hunt requires thoughtful planning. Start by creating a product page that clearly explains what your Actor does and why it’s valuable. You’ll need:
- A catchy tagline. Keep it short and to the point. Think of something that captures your Actor's essence in just a few words.
- Eye-catching visuals. Screenshots, GIFs, or short videos that demonstrate your Actor in action are essential. Show users what they’ll get, how it works, and why it’s awesome.
- Concise description. Write a brief description of what your Actor does, who it’s for, and the problem it solves. Use plain language to appeal to a wide audience, even if they aren’t developers.
- Demo video. A short video that shows how your Actor works in a real-life scenario will resonate with potential users.
Once your page is set up, you’ll need to choose the right day to launch. Product Hunt is most active on weekdays, with Tuesday and Wednesday being the most popular launch days. Avoid launching on weekends or holidays when traffic is lower.
Build momentum before launch
Start building awareness before your launch day. This is where your social media channels and community engagement come into play. Share teasers about your upcoming Product Hunt launch on Twitter (X), Discord, LinkedIn, and even StackOverflow, where other developers might take an interest. Highlight key features or the problems your Actor solves.
If you have a mailing list, give your subscribers a heads-up about your launch date. Encourage them to visit Product Hunt and support your launch by upvoting and commenting. This pre-launch activity helps create early momentum on launch day.
Timing your launch
The timing of your Product Hunt launch matters a lot. Since Product Hunt operates on a daily ranking system, getting in early gives your product more time to gain votes. Aim to launch between 12:01 AM and 2:00 AM PST, as this will give your product a full day to collect upvotes.
Once you’ve launched, be ready to engage with the community throughout the day. Respond to comments, answer questions, and thank users for their support. Product Hunt users appreciate creators who are active and communicative, and this can help drive more visibility for your Actor.
Engage with your audience
The first few hours after your launch are crucial for gaining traction. Engage with users who comment on your product page, answer any questions, and address any concerns they might have. The more interaction you generate, the more likely you are to climb the daily rankings.
Be transparent and friendly in your responses. If users point out potential improvements or bugs, acknowledge them and make a commitment to improve your Actor. Product Hunt users are often open to giving feedback, and this can help you iterate on your product quickly.
If possible, have team members or collaborators available to help respond to comments. The more responsive and helpful you are, the better the overall experience will be for users checking out your Actor.
Leverage Apify
You can also give a shoutout to Apify, this way your Actor will also notified to the community of Apify on Product Hunt: https://www.producthunt.com/stories/introducing-shoutouts
Expectations and results
Launching on Product Hunt can provide a massive spike in short-term traffic and visibility. However, it’s important to manage your expectations. Not every launch will result in hundreds of upvotes or immediate sales. Here’s what you can realistically expect:
- Short-term traffic boost. Your Actor might see a surge in visitors, especially on the day of the launch. If your Actor resonates with users, this traffic may extend for a few more days.
- Potential long-term benefits. While the short-term traffic is exciting, the long-term value lies in the relationships you build with early users. Some of them may convert into paying customers or become advocates for your Actor.
- SEO boost. Product Hunt is a high-authority site with a 91 https://help.ahrefs.com/en/articles/1409408-what-is-domain-rating-dr. Having your product listed can provide an SEO boost and help your Actor's page rank higher in search engines.
- User feedback. Product Hunt is a great place to gather feedback. Users may point out bugs, request features, or suggest improvements.
Tricks for a successful launch
- Leverage your network. Ask friends, colleagues, and early users to support your launch. Ask the Apify community. Ask your users. Encourage them to upvote, comment, and share your product on social media.
- Prepare for feedback. Product Hunt users can be critical, but this is an opportunity to gather valuable insights. Be open to suggestions and use them to improve your Actor.
- Use a consistent brand voice. Make sure your messaging is consistent across all platforms when you're responding to comments and promoting your launch on social media.
- Offer a special launch deal. Incentivize users to try your Actor by offering a discount or exclusive access for Product Hunt users. This can drive early adoption and build momentum.
Caveats to Product Hunt promotion
- Not every Actor is a good fit. Product Hunt is best for tools with broad appeal or innovative features. If your Actor is highly specialized or niche, it may not perform as well.
- High competition. Product Hunt is a popular platform, and your Actor will be competing with many other launches. A strong marketing strategy is essential to stand out.
- Short-term focus. While the traffic spike is great, Product Hunt tends to focus on short-term visibility. To maintain long-term growth, you’ll need to continue promoting your Actor through other channels.
SEO
SEO means optimizing your content to rank high for your target queries in search engines such as Google, Bing, etc. SEO is a great way to get more users for your Actors. It’s also free, and it can bring you traffic for years. This guide will give you a simple framework to rank better for your targeted queries.
Search intent
Matching the search intent of potential users is super important when creating your Actor's README. The information you include should directly address the problems or needs that led users to search for a solution like yours. For example:
- User goals: What are users trying to accomplish?
- Pain points: What challenges are they facing?
- Specific use cases: How might they use your Actor?
Make sure your README demonstrates how your Actor aligns with the search intent. This alignment helps users quickly recognize your Actor's value and helps Google understand your Actor and rank you better.
Example:
Let’s say you want to create a “YouTube Hashtag Scraper” Actor. After you search YouTube HashTag Scraper, you see that most people searching for it want to extract hashtags from YouTube videos, not download videos using a certain hashtag.
Keyword research
Keyword research is a very important part of your SEO success. Without that, you won’t know which keywords you should target with your Actor, and you might be leaving traffic on the table by not targeting all the angles or targeting the wrong one.
We will do keyword research with free tools, but if you want to take this seriously, we highly recommend https://ahrefs.com/.
Google autocomplete suggestions
Start by typing your Actor's main function or purpose into Google. As you type, Google will suggest popular search terms. These suggestions are based on common user queries and can provide insight into what your potential users are searching for.
Example:
Let's say you've created an Actor for scraping product reviews. Type "product review scraper" into Google and note the suggestions:
- product review scraper free
- product review scraper amazon
- product review scraper python
- product review scraper api
These suggestions reveal potential features or use cases to highlight in your README.
Alphabet soup method
This technique is similar to the previous one, but it involves adding each letter of the alphabet after your main keyword to discover more specific and long-tail keywords.
Example:
Continue with "product review scraper" and add each letter of the alphabet:
- product review scraper a (autocomplete might suggest "api")
- product review scraper b (might suggest "best")
- product review scraper c (might suggest "chrome extension")
...and so on through the alphabet.
People Also Ask
Search for your Actor's main function or purpose on Google. Scroll down to find the "People Also Ask" section, which contains related questions.
Example:
For a "product review scraper" Actor:
- How do I scrape product reviews?
- Is it legal to scrape product reviews?
- What is the best tool for scraping reviews?
- How can I automate product review collection?
Now, you can expand the “People Also Ask” questions. Click on each question to reveal the answer and generate more related questions you can use in your README.
Google Keyword Planner
Another way to collect more keywords is to use the official Google Keyword Planner. Go to https://ads.google.com/home/tools/keyword-planner/ and open the tool. You need a Google Ads account, so just create one for free if you don’t have one already.
After you’re in the tool, click on “Discover new keywords”, make sure you’re in the “Start with keywords” tab, enter your Actor's main function or purpose, and then select the United States as the region and English as the language. Click “Get results” to see keywords related to your actor.
Write them down.
Ahrefs Keyword Generator
Go to https://ahrefs.com/keyword-generator, enter your Actor's main function or purpose, and click “Find keywords.” You should see a list of keywords related to your actor.
Write them down.
What to do with the keywords
First, remove any duplicates that you might have on your list. You can use an online tool https://dedupelist.com/ for that.
After that, we need to get search volumes for your keywords. Put all your keywords in a spreadsheet, with one column being the keyword and the second one being the search volume.
Go to the https://backlinko.com/tools/keyword, enter the keyword, and write down the search volume. You will also see other related keywords, so you might as well write them down if you don’t have them on your list yet.
At the end, you should have a list of keywords together with their search volumes that you can use to prioritize the keywords, use the keywords to name your Actor, choose the URL, etc.
Headings
If it makes sense, consider using keywords with the biggest search volume and the most relevant for your Actor as H2 headings in your README.
Put the most relevant keyword at the beginning of the heading when possible. Also, remember to use a clear hierarchy. The main features are H2, sub-features are H3, etc.
Content
When putting keywords in your Actor’s README, it's important to maintain a natural, informative tone. Your primary goal should be to create valuable, easily understandable content for your users.
Aim to use your most important keyword in the first paragraph of your README. This helps both search engines and users quickly understand what your Actor does. But avoid forcing keywords where they don't fit naturally.
In your content, you can use the keywords you gathered before where they make sense. We want to include those keywords naturally in your README.
If there are relevant questions in your keyword list, you can always cover them within an “FAQ” section of your Actor.
Remember that while including keywords is important, always prioritize readability and user experience. Your content should flow naturally and provide real value to the reader.
Learn more about SEO
If you want to learn more about SEO, these two free courses will get you started:
- https://ahrefs.com/academy/seo-training-course by Ahrefs
- https://www.semrush.com/academy/courses/seo/ by Semrush
The https://www.youtube.com/@AhrefsCom/featured is also a great resource. You can start with https://www.youtube.com/watch?v=xsVTqzratPs.
Social media
Social media is a powerful way to connect with your Actor users and potential users. Whether your tool focuses on web scraping or automation, social platforms can help you showcase its features, answer user questions, and grow your audience. This guide will show you how to use social media effectively, what to share, and how to avoid common mistakes along the way.
Now, before we start listing social media platforms, it might be important to acknowledge something.
Developers are notorious for not using social media that much. Or they use social media exclusively in the context of their own interests: that won’t find them new users, but rather colleagues or collaborators.
That's a good start, and maybe it's enough. A developer that can also “do” social media is a unicorn. These are super rare. And if you want to really promote your Actor, you'll need to become that unicorn. Before we start, you need to understand the benefits of this activity.
Why be active on social media
Engaging with your users on social media offers a lot of benefits beyond just promoting your Actor. Let’s look at some of the main reasons why being active online can be a game-changer for your Actor’s success:
- Social platforms make it easy to gather real-time feedback and also provide support in real-time. You can quickly learn what users love, what they struggle with, and what features they’d like to see. This can guide your Actor’s future development. It also allows you to build trust and credibility with your audience.
- Shot in the dark: social media exposes your Actor to new users who might not find you through search engines alone. A shared post or retweet can dramatically expand your reach, helping you grow your user base.
- Consistent activity on social platforms creates more backlinks to your Actor’s page, which can improve its search engine ranking and drive organic traffic.
Where to engage: Choosing the right platforms
Choosing the right platforms is key to reaching your target audience. Here's a breakdown of the best places for developers to promote their web scraping and automation tools:
-
Discord: We started with an easy one. Create a community around your Actor to engage with users directly. Offering quick support and discussing the features of your Actor in a real-time chat setting can lead to deeper user engagement.
Use Apify's Discord
You can also promote your tools through https://discord.com/invite/crawlee-apify-801163717915574323.
-
Twitter (X): Good for short updates, feature announcements, and quick interactions with users. The tech community on Twitter is very active, which makes it a great spot for sharing tips and getting noticed.
-
Reddit: In theory, subreddits like r/webscraping, r/automation, and r/programming allow you to share expertise, engage in discussions, and present your Actor as a solution. However, in reality, you have to be quite careful with promotion there. Be very mindful of subreddit rules to avoid spamming or over-promoting. For Reddit, personal stories on how you built the tool + a roadblock you might be facing right now are the safest formula. If a tool is already finished and perfected, it will be treated as promotional content. But if you're asking for advice - now that's a community activity.
-
TikTok: Might not be an obvious choice, but that’s where most young people spend time. They discuss a myriad of topics, laugh at the newest memes, and create trends that take weeks to get to Reels and Shorts. If you want to create educational, fun, short video content (and be among the first to talk about web scraping), this is your place for experiments and taking algorithm guesses.
-
YouTube: Ideal for tutorials and demos. A visual walk-through of how to use your Actor can attract users who prefer watching videos to reading tutorials or READMEs. It's also good for Shorts and short, funny content.
-
StackOverflow: While not a traditional social media platform, StackOverflow is a great space to answer technical questions and demonstrate your expertise. Offering help related to web scraping or automation can build credibility, and you can subtly mention your Actor if it directly solves the issue (as long as it adheres to community guidelines).
-
LinkedIn: If your Actor solves problems for professionals or automates business tasks, LinkedIn is the place to explain how your tool provides value to an industry or business.
Best practices for promoting your Actor on social media
Now that you know where to engage and why it’s important, here are some best practices to help you make the most of social media:
- Offer value beyond promotion: If you look around, you'll see that the golden rule of social media these days is to educate and entertain. Focus on sharing useful information related to your Actor. Post tips on automation, web scraping techniques, or industry insights that can help your audience. When you do promote your Actor, users will see it as part of a valuable exchange, not just an ad. Besides, constantly posting promotional content turns anybody off.
- Post consistently: The most important rule for social media is to show up. Whether it’s a weekly post about new features or daily tips for using your Actor more effectively, maintaining a regular posting schedule keeps your audience connected.
- Visuals matter: Screenshots, GIFs, and short videos can explain more than text ever could. Show users how your Actor works, the results it scrapes, or how automation saves time.
- Widen your reach: Web scraping is a niche topic. Find ways to talk about it more widely. If you stumble upon ways to relate it to wider topics: news, science, research, even politics and art, use it. Or you can go more technical and talk about various libraries and languages you can use to build it.
- Use relevant hashtags: Hashtags like #webscraping, #automation, #programming, and #IT help you reach a wider audience on platforms like Twitter and TikTok. Stick to a few relevant hashtags per post to avoid clutter.
- Engage actively: Social media is a two-way street. Reply to comments, thank users for sharing your content, create stitches, and answer questions. Building relationships with your users helps foster loyalty and builds a sense of community around your Actor.
- Use polls and Q&As: Interactive content like polls or Q&A sessions can drive engagement. Ask users what features they’d like to see next or run a live Q&A to answer questions about using your Actor. These tools encourage participation and provide valuable insights.
- Collaborate with other creators.
Caveats to social media engagement
- Over-promotion: Constantly pushing your Actor without offering value can turn users away. Balance your promotional content with educational posts, interesting links, or insights into the development process. Users are more likely to engage when they feel like they’re learning something, rather than just being sold to.
- Handling negative feedback: Social media is a public forum, and not all feedback will be positive. Be prepared to address user concerns or criticism professionally. Responding kindly (or funnily) to criticism shows you’re committed to improving your tool and addressing users' needs.
- Managing multiple platforms: Social media management can be time-consuming, especially if you’re active on multiple platforms. Focus on one or two platforms that matter most to your audience instead of spreading yourself too thin.
- Algorithm changes: Social media platforms often tweak their algorithms, which can impact your content’s visibility. Stay updated on these changes, and adjust your strategy accordingly. If a post doesn’t perform well, experiment with different formats (videos, visuals, polls) to see what resonates with your audience.
- Privacy and compliance: Very important here to be mindful of sharing user data or results, especially if your Actor handles sensitive information. Make sure your posts comply with privacy laws and don’t inadvertently expose any personal data.
For inspiration
It's sometimes hard to think of a good reason to scream into the void that is social media. Here are 25 scenarios where you might use social media to promote your Actor or your work:
- Funny interaction with a user: Share a humorous tweet or post about a quirky question or feedback from a user that highlights your Actor’s unique features.
- Roadblock story: Post about a challenging bug you encountered while developing your Actor and how you solved it, including a screenshot or snippet of code.
- Success story: Share a post detailing how a user’s feedback led to a new feature in your Actor and thank them for their suggestion.
- Tutorial video: Create and share a short video demonstrating how to use a specific feature of your Actor effectively.
- Before-and-after example: Post a visual comparison showing the impact of your Actor’s automation on a task or process.
- Feature announcement: Announce a new feature or update in your Actor with a brief description and a call-to-action for users to try it out.
- User testimonial: Share a positive review or testimonial from a user who benefited from your Actor, including their quote and a link to your tool.
- Live Q&A: Host a live Q&A session on a platform like Twitter or Reddit, answering questions about your Actor and its capabilities.
- Behind-the-scenes look: Post a behind-the-scenes photo or video of your development process or team working on your Actor.
- Debugging tip: Share a tip or trick related to debugging or troubleshooting common issues with web scraping or automation.
- Integration highlight: Post about how your Actor integrates with other popular tools or platforms, showcasing its versatility. Don't forget to tag them.
- Case study: Share a case study or success story showing how a business or individual used your Actor to achieve specific results.
- Commentary on a news piece: Offer your perspective on a recent news story related to technology, scraping, or automation. If possible, explain how it relates to your Actor.
- User-generated content: Share content created by your users, such as screenshots or examples of how they’re using your Actor.
- Memes: Post a relevant meme about the challenges of web scraping or automation.
- Milestone celebration: Announce and celebrate reaching a milestone, such as a certain number of users or downloads for your Actor.
- Quick tip: Share a short, useful tip or hack related to using your Actor more efficiently.
- Throwback post: Share a throwback post about the early development stages of your Actor, including any challenges or milestones you achieved.
- Collaboration announcement: Announce a new collaboration with another developer or tool, explaining how it enhances your Actor’s functionality.
- Community shout-out. Give a shout-out to a user or community member who has been particularly supportive or helpful.
- Demo invitation: Invite your followers to a live demo or webinar where you’ll showcase your Actor and answer questions.
- Feedback request: Ask your audience for feedback on a recent update or feature release, and encourage them to share their thoughts.
- Book or resource recommendation: Share a recommendation for a book or resource that helped you in developing your Actor, and explain its relevance.
Video tutorials
Videos and live streams are powerful tools for connecting with users and potential users, especially when promoting your Actors. You can use them to demonstrate functionality, provide tutorials, or engage with your audience in real time.
Why videos and live streams matter
- Visual engagement. Videos allow you to show rather than just tell. Demonstrating how your Actor works or solving a problem in makes the content more engaging and easier to understand. For complex tools, visual explanations can be much more effective than text alone.
- Enhanced communication. Live streams offer a unique opportunity for direct interaction. You can answer questions, address concerns, and gather immediate feedback from your audience, creating a more dynamic and personal connection.
- Increased reach. Platforms like YouTube and TikTok have massive user bases, giving you access to a broad audience. Videos can also be shared across various social media channels, extending your reach even further.
Learn more about the rules of live streams in our next section: https://docs.apify.com/academy/actor-marketing-playbook/promote-your-actor/webinars.md
Optimizing videos for SEO
- Keywords and titles. Use relevant keywords in your video titles and descriptions. For instance, if your Actor is a web scraping tool, include terms like “web scraping tutorial” or “how to use web scraping tools” to help users find your content.
- Engaging thumbnails. Create eye-catching thumbnails that accurately represent the content of your video. Thumbnails are often the first thing users see, so make sure they are visually appealing and relevant.
- Transcriptions and captions. Adding transcripts and captions to your videos improves accessibility and can enhance SEO. They allow search engines to index your content more effectively and help users who prefer reading or have hearing impairments.
YouTube vs. TikTok
- YouTube. YouTube is an excellent platform for longer, detailed videos. Create a channel dedicated to your Actors and regularly upload content such as tutorials, feature walkthroughs, and industry insights. Utilize YouTube’s SEO features by optimizing video descriptions, tags, and titles with relevant keywords. Engage with your audience through comments and encourage them to subscribe for updates. Collaborating with other YouTubers or influencers in the tech space can also help grow your channel.
- TikTok. TikTok is ideal for short, engaging videos. Use it to share quick tips, demo snippets, or behind-the-scenes content about your Actors. The platform’s algorithm favors high engagement, so create catchy content that encourages viewers to interact. Use trending hashtags and participate in challenges relevant to your niche to increase visibility. Consistency is key, so post regularly and monitor which types of content resonate most with your audience.
Growing your channels
- Regular content. Consistently upload content to keep your audience engaged and attract new viewers. Create a content calendar to plan and maintain a regular posting schedule.
- Cross-promotion. Share your videos across your social media channels, blogs, and newsletters. This cross-promotion helps drive traffic to your videos and increases your reach.
- Engage with your audience. Respond to comments and feedback on your videos. Engaging with viewers builds a community around your content and encourages ongoing interaction.
- Analyze performance. Use analytics tools provided by YouTube and TikTok to track the performance of your videos. Monitor metrics like watch time, engagement rates, and viewer demographics to refine your content strategy.
Where to mention videos across your Actor ecosystem
- README: include links to your videos in your Actor’s README file. For example, if you have a tutorial video, mention it in a "How to scrape X" or "Resources" section to guide users.
- Input schema: if your Actor’s input schema includes complex fields, link to a video that explains how to configure these fields. This can be especially helpful for users who prefer visual guides.
- Social media: share your videos on platforms like Twitter, LinkedIn, and Facebook. Use engaging snippets or highlights to attract users to watch the full video.
- Blog posts: embed videos in your blog posts for a richer user experience. If you write a tutorial or feature update, include a video to provide additional context.
- Webinars and live streams: mention your videos during webinars or live streams. If you’re covering a topic related to a video you’ve posted, refer to it as a supplemental resource.
Webinars
Webinars and live streams are a fantastic way to connect with your audience, showcase your Actor's capabilities, and gather feedback from users. Though the term webinar might sound outdated these days, the concept of a live video tutorial is alive and well in the world of marketing and promotion.
Whether you're introducing a new feature, answering questions, or walking through a common use case, a live event can create more personal engagement, boost user trust, and open the door for valuable two-way communication.
But how do you get started? Here's a friendly guide on where to host, how to prepare, and what to do before, during, and after your webinar.
Why host a live stream?
Here are a few reasons why live streams are ideal for promoting your Actor:
- Demo. You can show your Actor in action and highlight its most powerful features. You can tell a story about how you built it. You can also show how your Actor interacts with other tools and platforms and what its best uses are. A live demo lets users see immediately how your tool solves their problems.
- Building trust and rapport. Interacting directly with your users builds trust and rapport. Even showing up and showing your face/voice, it's a chance to let your users meet you and get a feel for the team behind the Actor.
- Live Q&A. Users often have questions that can be hard to fully address in documentation, README, or tutorials. A live session allows for Q&A, so you can explain complex features and demonstrate how to overcome common issues.
- Tutorial or training. If you don't have time for complex graphics, this is an easy replacement for a video tutorial until you do. Remember that some platforms (YouTube) give the option of publishing the webinar after it's over. You can reuse it later in other content as well as a guide. Also, if you’ve noticed users struggling with particular features, a webinar is a great way to teach them directly.
Webinars help build a community around your Actor and turn one-time users into loyal advocates.
Where to host your webinar or live stream
It all goes back to where you have or would like to have your audience and whether you want to have the webinar available on the web later.
-
Social media:
- YouTube: ideal for reaching a broad audience. It’s free and easy to set up. You can also make recordings available for future viewing.
- TikTok: same, ideal for reaching a broad audience, free and easy to set up. However, live video will disappear once the broadcast has ended. TikTok does allow you to save your livestreams. You won't be able to republish them to the platform (we assume your live stream will be longer than 10 minutes). But you can later re-upload it elsewhere.
- Twitch: Known for gaming, Twitch has become a space for tech demos, coding live streams, and webinars. If your target audience enjoys an interactive and casual format, Twitch might be a good fit.
- LinkedIn: If your audience is more professional, LinkedIn Live could be a good fit to present your Actor there. Once a stream is complete, it will remain on the feed of your LinkedIn Page or profile as a video that was ‘previously recorded live’.
- Facebook: Not recommended.
-
General platforms:
- Zoom or Google Meet: More personal, these are great for smaller webinars where you might want closer interaction. They also give you control over who attends.
Pick a platform where your users are most likely to hang out. If your audience is primarily tech-savvy, YouTube or Twitch could work. If your Actor serves businesses, LinkedIn might be the best spot.
Webinar/live stream prep
Promote your webinar and get your users
Send an email blast if you have an email list of users or potential users, send a friendly invite. Include details about what you’ll cover and how they can benefit from attending.
- Social media promotion on Twitter (X), LinkedIn, or other platforms. Highlight what people will learn and any special features you’ll be demonstrating. Do it a few times - 2 weeks before the webinar, 1 week before, a day before, and the day of. Don't forget to announce on Apify’s Discord. These are places where your potential audience is likely hanging out. Let them know you’re hosting an event and what they can expect.
- Use every piece of real estate on Apify Store and Actor pages. Add a banner or notification to your Actor’s page (top of the README): This can be a great way to notify people who are already looking at your Actor. A simple “join us for a live demo on DATE” message works well. Add something like that to your Store bio and its README. Mention it at the top description of your Actor's input schema.
Use UTM tags
When creating a link to share to the webinar, you can add different UTM tags for different places where you will insert the link. That way you can later learn which space brought the most webinar sign-ups.
- Collaborate with other developers. If you can team up with someone in the Apify community, you’ll double your reach. Cross-promotion can bring in users from both sides.
Plan the content
Think carefully about what you’ll cover. Focus on what’s most relevant for your audience:
- Decide on your content. What will you cover? A demo? A deep dive into Actor configurations? Create a flow and timeline to keep yourself organized.
- Prepare visuals. Slides, product demos, and examples are helpful to explain complex ideas clearly.
- Feature highlights. Demonstrate the key features of your Actor. Walk users through common use cases and be ready to show live examples.
- Input schema. If your Actor has a complex input schema, spend time explaining how to use it effectively. Highlight tips that will save users time and frustration. You can incorporate your knowledge from the issues tab.
- Q&A session. Leave time for questions at the end. Make sure to keep this flexible, as it’s often where users will engage the most.
Don't forget to add an intro with an agenda and an outro with your contact details.
Consider timezones
When thinking of when to run the webinar, focus on the timezone of the majority of your users.
Prepare technically
Test your setup before going live. Here’s what to focus on:
- Stable internet connection. This one’s obvious but essential. Test your stream quality ahead of time.
- Test the Actor live. If you're demoing your Actor, ensure it works smoothly. Avoid running scripts that take too long or have potential bugs during the live session.
- Audio quality. People are far more likely to tolerate a blurry video than bad audio. Use a good-quality microphone to ensure you’re heard clearly.
- Screen sharing. If you’re doing a live demo, make sure you know how to seamlessly switch between windows and share your screen effectively.
- Backup plan. Have a backup plan in case something goes wrong. This could be as simple as a recorded version of your presentation to share if things go south during the live session.
- Make it interactive. Consider using polls or a live Q&A session to keep the audience engaged. Maybe have a support person assisting with that side of things while you're speaking.
Best practices during the live stream
When the time comes, here’s how to make the most of your webinar or live stream:
- Start with an introduction. Begin with a brief introduction of yourself, the Actor you’re showcasing, and what attendees can expect to learn. This sets expectations and gives context. It's also best if you have a slide that shows the agenda.
- Try to stay on time. Stick to the agenda. Users appreciate when events run on schedule.
- Show a live demo. Walk through a live demo of your Actor. Show it solving a problem from start to finish.
- Explain as you go. Be mindful that some people might be unfamiliar with technical terms or processes. Try to explain things simply and offer helpful tips as you demonstrate but don't go off on a tangent.
- Invite questions and engage your audience. Encourage users to ask questions throughout the session. This creates a more conversational tone and helps you address their concerns in real time. You can also ask a simple question or poll to get the chat going. Try to direct the Q&A into one place so you don't have to switch tabs. Throughout the presentation, pause for questions and make sure you're addressing any confusion in real time.
- Wrap up with a clear call to action. Whether it’s to try your Actor, leave a review, or sign up for a future live, finish with a clear CTA. Let them know the next step to take.
This works for when it's a simple tutorial walkthrough and if you have a code-along session, the practices work for it as well.s
After the live session
Once your live session wraps up, there are still sides of it you can benefit from:
- Make it public and share the recording. Not everyone who wanted to attend will have been able to make it. Send a recording to all attendees whose emails you have and make it publicly available on your channels (emails, README, social media, etc.). Upload the recorded session to YouTube and your Actor’s documentation. If it's on YouTube, you can also ask Apify's video team to add it to their Community playlist. Make it easy for people to revisit the content or share it with others.
- Follow up with attendees, thank them, and ask for feedback. Send a follow-up email thanking people for attending. Include a link to the recording, additional resources, and ways to get in touch if they have more questions. Share any special offers or discount codes if relevant. If you don’t have the attendees' emails, include a link in your newsletter and publish it on your channels. Ask for feedback on what they liked and what could be improved. This can guide your next webinar or help fine-tune your Actor.
- Answer lingering questions. If any questions didn’t get answered live, take the time to address them in the follow-up email.
- Create a blog post or article. Summarize the key points of your webinar in a written format. This can boost your SEO and help users find answers in the future.
- Review your performance. Analyze the data from your webinar, if available. How many people attended? Which platform brought the most sign-ups? How many questions did you receive? Were there any technical difficulties? This helps refine your approach for future events.
- Share snippets from the webinar or interesting takeaways on social media. Encourage people to watch the recording and let them know when you’ll be hosting another event.
How Actor monetization works
You can turn your web scrapers into a source of income by publishing them on Apify Store. Learn how it's done and what monetization options you have.
Monetizing your Actor
Monetizing your Actor on the Apify platform involves several key steps:
- Development: create and refine your Actor.
- Testing: ensure your Actor works reliably.
- Publication & monetization: publish your Actor and set up its monetization model.
- Promotion: attract users to your Actor.
Monetization models
Pay-per-event pricing model

-
How it works: you charge users based on specific events triggered programmatically by your Actor's code. You earn 80% of the revenue minus platform usage costs.
-
- Profit calculation:
profit = (0.8 * revenue) - platform usage costs
- Profit calculation:
-
Event cost example: you set the following events for your Actor:
Actor start per 1 GB of memoryat $0.005Pages scrapedat $0.002Page opened with residential proxyat $0.002 - this is on top ofPages scrapedPage opened with a browserat $0.002 - this is on top ofPages scraped
-
Example:
-
User A:
- Started the Actor 10 times = $0.05
- Scraped 1,000 pages = $2.00
- 500 of those were scraped using residential proxy = $1.00
- 300 of those were scraped using browser = $0.60
- This comes up to $3.65 of total revenue
-
User B:
- Started the Actor 5 times = $0.025
- Scraped 500 pages = $1.00
- 200 of those were scraped using residential proxy = $0.40
- 100 of those were scraped using browser = $0.20
- This comes up to $1.625 of total revenue
-
That means if platform usage costs are $0.365 for user A and $0.162 for user B your profit is $4.748
-
Pay-per-event details
If you want more details about PPE pricing, refer to our https://docs.apify.com/platform/actors/publishing/monetize/pay-per-event.md.
Pay-per-result pricing model

-
How it works: you charge users based on the number of results your Actor generates. You earn 80% of the revenue minus platform usage costs.
-
Profit calculation:
profit = (0.8 * revenue) - platform usage costs -
Cost breakdown:
- Compute unit: $0.3 per CU
- Residential proxies: $13 per GB
- SERPs proxy: $3 per 1,000 SERPs
- Data transfer (external): $0.20 per GB
- Dataset storage: $1 per 1,000 GB-hours
-
Example: you set a price of $1 per 1,000 results. Two users generate 50,000 and 20,000 results, paying $50 and $20, respectively. If the platform usage costs are $5 and $2, your profit is $49.
Pay-per-result details
If you want more details about PPR pricing, refer to our https://docs.apify.com/platform/actors/publishing/monetize/pay-per-result.md.
Rental pricing model

-
How it works: you offer a free trial period and set a monthly fee. Users on Apify paid plans can continue using the Actor after the trial. You earn 80% of the monthly rental fees.
-
Example: you set a 7-day free trial and $30/month rental. If 3 users start using your Actor:
- 1st user on a paid plan pays $30 after the trial (you earn $24).
- 2nd user starts their trial but pays next month.
- 3rd user on a free plan finishes the trial without upgrading to a paid plan and can’t use the Actor further.
Rental pricing details
If you want more details about rental pricing, refer to our https://docs.apify.com/platform/actors/publishing/monetize/rental.md.
Setting up monetization
- Go to your Actor page: navigate to the Publication tab and open the Monetization section.
- Fill in billing details: set up your payment details for payouts.
- Choose your pricing model: use the monetization wizard to select your model and set fees.
Changing monetization
Adjustments to monetization settings take 14 days to take effect and can be made once per month.
Tracking and promotion
- Track profit: review payout invoices and statistics in Apify Console (Monitoring tab).
- Promote your Actor: optimize your Actor’s description for SEO, share on social media, and consider creating tutorials or articles to attract users.
Marketing tips for defining the price for your Actor
It's up to you to set the pricing, of course. It can be as high or low as you wish, you can even make your Actor free. But if you're generally aiming for a successful, popular Actor, here are a few directions:
Do market research outside Apify Store
The easiest way to understand your tool's value is to look around. Are there similar tools on the market? What do they offer, and how much do they charge? What added value does your tool provide compared to theirs? What features can your tool borrow from theirs for the future?
Try competitor tools yourself (to assess the value and the quality they provide), check their SEO (to see how much traffic they get), and note ballpark figures. Think about what your Actor can do that competitors might be missing.
Also, remember that your Actor is a package deal with the Apify platform. All the platform's features automatically transfer onto your Actor and its value. Scheduling, monitoring runs, ways of exporting data, proxies, and integrations can all add value to your Actor (on top of its own functionalities). Be sure to factor this into your tool's value proposition and communicate that to the potential user.
Do research in Apify Store
Apify Store is like any other marketplace, so take a look at your competition there. Are you the first in your lane, or are there other similar tools? What makes yours stand out? Remember, your README is your first impression — communicate your tool's benefits clearly and offer something unique. Competing with other developers is great, but collaborations can drive even better results 😉
Learn more about what makes a good readme here: https://docs.apify.com/academy/actor-marketing-playbook/actor-basics/how-to-create-an-actor-readme.md
Rental, pay-per-result (PPR), or pay-per-event (PPE)
Rental pricing allows you to charge a monthly fee for your Actor and users cover their own compute usage.
Pay-per-result (PPR) charges users based on the number of items your Actor adds to the dataset. This model works best when each dataset item represents clear value to the user - like scraped product listings, extracted contact information, or processed documents.
Pay-per-event (PPE) gives you the most flexibility and growth potential. You can charge for any meaningful event your Actor performs (for example, page scraped, browser page opened, or an external API call). This makes costs predictable for users, lets you model value precisely, and is fully compatible with AI and MCP-based integrations.
Additional benefits
Actors that implement PPE receive additional benefits, including increased visibility in Apify Store and enhanced discoverability.
To estimate pricing, run a few test runs and review the statistics in the Actor https://console.apify.com/actors?tab=analytics tab.
Adapt when needed
Don’t be afraid to experiment with pricing, especially at the start. You can monitor your results in the dashboard and adjust if necessary.
Keep an eye on SEO as well. If you monitor the volume of the keywords your Actor is targeting as well as how well your Actor's page is ranking for those keywords, you can estimate the number of people who actually end up trying your tool (aka conversion rate). If your keywords are getting volume, but conversions are lower than expected, it might point to a few issues It could be due to your pricing, a verbose README, or complex input. If users are bouncing right away, it makes sense to check out your pricing and your closest competitors to see where adjustments might help.
Summary & a basic plan
Pick a pricing model, run some tests, and calculate your preliminary costs (Analytics tab in Console).
Then check your costs against similar solutions in the Store and the market (try Google search or other marketplaces), and set a price that gives you some margin.
It’s also normal to adjust pricing as you get more demand. For context, most prices on Apify Store range between $1-10 per 1,000 results.
Example of useful pricing estimates from the Analytics tab:

Use emails!
📫 Don't forget to set an email sequence to warn and remind your users about pricing changes. Learn more about emailing your users here: [Emails to Actor users]
Resources
- Learn about https://apify.com/partners/actor-developers
- Detailed guide to https://docs.apify.com/academy/get-most-of-actors/monetizing-your-actor
- Guide to https://docs.apify.com/platform/actors/publishing
- Watch our webinar on how to https://www.youtube.com/watch?v=4nxStxC1BJM
- Read a blog post from our CEO on the https://blog.apify.com/make-regular-passive-income-developing-web-automation-actors-b0392278d085/
- Learn about the https://apify.com/pricing/creator-plan, which allows you to create and freely test your own Actors for $1
How Apify Store works
Out of thousands of Actors on https://apify.com/store marketplace, most of them were created by developers just like you. Let's get acquainted with the concept of Apify Store and what it takes to publish an Actor there.
What are Actors (and why they're called that)?
https://apify.com/actors are serverless cloud applications that run on the Apify platform, capable of performing various computing tasks on the web, such as crawling websites or sending automated emails. They are developed by independent developers all over the world, and you can be one of them.
The term "Actor" is used because, like human actors, these programs follow a script. This naming convention unifies both web scraping and web automation solutions, including AI agents, under a single term. Actors can range in complexity and function, targeting different websites or performing multiple tasks, which makes the umbrella term very useful.
What is Apify Store?
https://apify.com/store is a public library of Actors that is constantly growing and evolving. It's basically a publicly visible (and searchable) part of the Apify platform. With thousands of Actors currently available, most of them are created and maintained by the community. Actors that consistently perform well remain on Apify Store, while those reported as malfunctioning or under maintenance are eventually removed. This keeps the tools in our ecosystem reliable, effective, and competitive.
Types of Actors
- Web scraping Actors: for instance, https://apify.com/apidojo/twitter-user-scraper extracts data from Twitter.
- Automation Actors: for example, https://apify.com/jakubbalada/content-checker monitors website content for changes and emails you once a change occurs.
- Bundles: chains of multiple Actors united by a common data point or target website. For example, https://apify.com/tri_angle/restaurant-review-aggregator can scrape reviews from six platforms at once.
Learn more about bundles here: https://docs.apify.com/academy/actor-marketing-playbook/product-optimization/actor-bundles.md
Public and private Actors
Actors on Apify Store can be public or private:
- Private Actors: these are only accessible to you in Apify Console. You can use them without exposing them to the web. However, you can still share the results they produce.
- Public Actors: these are available to everyone on Apify Store. You can choose to make them free or set a price. By publishing your web scrapers and automation solutions, you can attract users and generate income.
How Actor monetization works (briefly)
You can monetize your Actors using three different pricing models:
- Pay for usage: charge based on how much the Actor is used.
- Pay per result: the price is based on the number of results produced, with the first few free.
- Pay per event: the price is based on specific events triggered by the Actor.
- Monthly billing: set a fixed monthly rental rate for using the Actor.
For detailed information on which pricing model might work for your Actor, refer to https://docs.apify.com/academy/actor-marketing-playbook/store-basics/how-actor-monetization-works.md.
Actor ownership on Store
Actors are either created and maintained by Apify or by members of the community:
- Maintained by Apify: created and supported by the Apify team.
- Maintained by Community: created and managed by independent developers from the community.
To see who maintains an Actor, check the upper-right corner of the Actor's page.
When it comes to managing Actors on Apify, it’s important that every potential community developer understands the differences between Apify-maintained and Community-maintained Actors. Here’s what you need to know to navigate the platform effectively and ensure your work stands out.
Community-maintained Actors
✨ Features and functionality: offers a broader range of use cases and features, often tailored to specific needs. Great for exploring unique or niche applications.
🧑💻 Ownership: created and maintained by independent developers like you.
🛠 Maintenance: you’re responsible for all updates, bug fixes, and ongoing maintenance. Apify hosts your Actor but does not manage its code.
👷♀️ Reliability and testing: it’s up to you to ensure your Actor’s reliability and performance.
☝️ Support and Issues: Apify does not provide direct support for Community-maintained Actors. You must manage issues through the Issues tab, where you handle user queries and problems yourself.
✍️ Documentation: you’re responsible for creating and maintaining documentation for your Actor. Make sure it’s clear and helpful for users.
Test your Actor!
For the best results, make sure your Actor is well-documented and thoroughly tested. Engage with users through the Issues tab to address any problems promptly. By maintaining high standards and being proactive, you’ll enhance your Actor’s reputation and usability in Apify Store.
Importance of Actor testing and reliability
It's essential to test your Actors and make sure they work as intended. That's why Apify does it on our side as much as you should do it on yours.
Apify runs automated tests daily to ensure all Actors on Apify Store are functional and reliable. These tests check if an Actor can successfully run with its default input within 5 minutes. If an Actor fails for three consecutive days, it’s labeled under maintenance, and the developer is notified. Continuous failures for another 28 days lead to deprecation.
To restore an Actor's health, developers should fix and rebuild it. The testing system will automatically recognize the changes within 24 hours. If your Actor requires longer run times or authentication, contact support to explain why it should be excluded from tests. For more control, you can implement your own tests using the Actor Testing tool available on Apify Store.
Actor metrics and reliability score
On the right panel of each Actor on Store, you can see a list of Actor metrics.
Actor metrics such as the number of monthly users, star ratings, success rates, response times, creation dates, and recent modifications collectively offer insights into its reliability. Basically, they serve as a shorthand for potential users to assess your Actor's reliability before even trying it out.
A high number of monthly users indicates widespread trust and effective performance, while a high star rating reflects user satisfaction. A success rate nearing 100% demonstrates consistent performance. Short response times show a commitment to addressing issues promptly, though quicker responses are ideal. A recent creation date suggests modern features and ongoing development, while recent modifications point to active maintenance and continuous improvements. Together, these metrics provide a comprehensive view of an Actor’s reliability and quality.
Reporting Issues in Actors
Each Actor has an Issues tab in Apify Console and on the web. Here, users can open an issue (ticket) and engage in discussions with the Actor's creator, platform admins, and other users. The tab is ideal for asking questions, requesting new features, or providing feedback.
Since the Issues tab is public, the level of activity — or lack thereof — can be observed by potential users and may serve as an indicator of the Actor's reliability. A well-maintained Issues tab with prompt responses suggests an active and dependable Actor.
Learn more about how to handle the https://docs.apify.com/academy/actor-marketing-playbook/interact-with-users/issues-tab.md
Resources
- Best practices on setting up https://docs.apify.com/platform/actors/publishing/test
- What are Apify-maintained and https://help.apify.com/en/articles/6999799-what-are-apify-maintained-and-community-maintained-actors? On ownership, maintenance, features, and support
- Step-by-step guide on how to https://docs.apify.com/platform/actors/publishing
- Watch our webinar on how to https://www.youtube.com/watch?v=4nxStxC1BJM
- Detailed https://docs.apify.com/platform/actors/running/actors-in-store for Actors in Store
How to build Actors
At Apify, we try to make building web scraping and automation straightforward. You can customize our universal scrapers with JavaScript for quick tweaks, use our code templates for rapid setup in JavaScript, TypeScript, or Python, or build from scratch using our JavaScript and Python SDKs or Crawlee libraries for Node.js and Python for ultimate flexibility and control. This guide offers a quick overview of our tools to help you find the right fit for your needs.
Three ways to build Actors
-
https://apify.com/scrapers/universal-web-scrapers — customize our boilerplate tools to your needs with a bit of JavaScript and setup.
-
https://apify.com/templates for web scraping projects — for a quick project setup to save you development time (includes JavaScript, TypeScript, and Python templates).
-
Open-source libraries and SDKs
- https://docs.apify.com/sdk/js/ & https://docs.apify.com/sdk/python/ — for creating your own solution from scratch on the Apify platform using our free development kits. Involves more coding but offers infinite flexibility.
- https://crawlee.dev/ and https://crawlee.dev/python — for creating your own solutions from scratch using our free web automation libraries. Involves even more coding but offers infinite flexibility. There’s also no need to host these on the platform.
Universal scrapers & what are they for
https://apify.com/scrapers/universal-web-scrapers were built to provide an intuitive UI plus configuration that will help you start extracting data as quickly as possible. Usually, you just provide a https://docs.apify.com/tutorials/apify-scrapers/getting-started#the-page-function and set up one or two parameters, and you're good to go.
Since scraping and automation come in various forms, we decided to build not just one, but six scrapers. This way, you can always pick the right tool for the job. Let's take a look at each particular tool and its advantages and disadvantages.
| Scraper | Technology | Advantages | Disadvantages | Best for |
|---|---|---|---|---|
| 🌐 Web Scraper | Headless Chrome Browser | Simple, fully JavaScript-rendered pages | Executes only client-side JavaScript | Websites with heavy client-side JavaScript |
| 👐 Puppeteer Scraper | Headless Chrome Browser | Powerful Puppeteer functions, executes both server-side and client-side JavaScript | More complex | Advanced scraping with client/server-side JS |
| 🎭 Playwright Scraper | Cross-browser support with Playwright library | Cross-browser support, executes both server-side and client-side JavaScript | More complex | Cross-browser scraping with advanced features |
| 🍩 Cheerio Scraper | HTTP requests + Cheerio parser (JQuery-like for servers) | Simple, fast, cost-effective | Pages may not be fully rendered (lacks JavaScript rendering), executes only server-side JavaScript | High-speed, cost-effective scraping |
| ⚠️ JSDOM Scraper | JSDOM library (Browser-like DOM API) | + Handles client-side JavaScript+ Faster than full-browser solutions+ Ideal for light scripting | Not for heavy dynamic JavaScript, executes server-side code only, depends on pre-installed NPM modules | Speedy scraping with light client-side JS |
| 🍲 BeautifulSoup Scraper | Python-based, HTTP requests + BeautifulSoup parser | Python-based, supports recursive crawling and URL lists | No full-featured web browser, not suitable for dynamic JavaScript-rendered pages | Python users needing simple, recursive crawling |
How do I choose the right universal web scraper to start with?
🎯 Decision points:
- Use 🌐 https://apify.com/apify/web-scraper if you need simplicity with full browser capabilities and client-side JavaScript rendering.
- Use 🍩 https://apify.com/apify/cheerio-scraper for fast, cost-effective scraping of static pages with simple server-side JavaScript execution.
- Use 🎭 https://apify.com/apify/playwright-scraper when cross-browser compatibility is crucial.
- Use 👐 https://apify.com/apify/puppeteer-scraper for advanced, powerful scraping where you need both client-side and server-side JavaScript handling.
- Use ⚠️ https://apify.com/apify/jsdom-scraper for lightweight, speedy scraping with minimal client-side JavaScript requirements.
- Use 🍲 https://apify.com/apify/beautifulsoup-scraper for Python-based scraping, especially with recursive crawling and processing URL lists.
To make it easier, here's a short questionnaire that guides you on selecting the best scraper based on your specific use case:
Questionnaire
-
Is the website content rendered with a lot of client-side JavaScript?
-
Yes:
-
Do you need full browser capabilities?
- Yes: use Web Scraper or Playwright Scraper
- No, but I still want advanced features: use Puppeteer Scraper
-
-
No:
-
Do you prioritize speed and cost-effectiveness?
- Yes: use Cheerio Scraper
- No: use JSDOM Scraper
-
-
-
Do you need cross-browser support for scraping?
- Yes:** use Playwright Scraper
- No:** continue to the next step.
-
Is your preferred scripting language Python?**
- Yes:** use BeautifulSoup Scraper
- No:** continue to the next step.
-
Are you dealing with static pages or lightweight client-side JavaScript?**
-
Static pages: use Cheerio Scraper or BeautifulSoup Scraper
-
Light client-side JavaScript:
-
Do you want a balance between speed and client-side JavaScript handling?
- Yes: use JSDOM Scraper
- No: use Web Scraper or Puppeteer Scraper
-
-
-
Do you need to support recursive crawling or process lists of URLs?
- Yes, and I prefer Python: use BeautifulSoup Scraper
- Yes, and I prefer JavaScript: use Web Scraper or Cheerio Scraper
- No: choose based on other criteria above.
This should help you navigate through the options and choose the right scraper based on the website’s complexity, your scripting language preference, and your need for speed or advanced features.
📚 Resources:
- How to use https://www.youtube.com/watch?v=5kcaHAuGxmY to scrape any website
- How to use https://www.youtube.com/watch?v=1KqLLuIW6MA to scrape the web
- Learn about our $1/month https://apify.com/pricing/creator-plan that encourages devs to build Actors based on universal scrapers
Web scraping code templates
Similar to our universal scrapers, our https://apify.com/templates also provide a quick start for developing web scrapers, automation scripts, and testing tools. Built on popular libraries like BeautifulSoup for Python or Playwright for JavaScript, they save time on setup, allowing you to focus on customization. Though they require more coding than universal scrapers, they're ideal for those who want a flexible foundation while still needing room to tailor their solutions.
| Code template | Supported libraries | Purpose | Pros | Cons |
|---|---|---|---|---|
| 🐍 Python | Requests, BeautifulSoup, Scrapy, Selenium, Playwright | Creating scrapers Automation Testing tools | - Simplifies setup - Supports major Python libraries | - Requires more manual coding (than universal scrapers)- May be restrictive for complex tasks |
| ☕️ JavaScript | Playwright, Selenium, Cheerio, Cypress, LangChain | Creating scrapers Automation Testing tools | - Eases development with pre-set configurations - Flexibility with JavaScript and TypeScript | - Requires more manual coding (than universal scrapers)- May be restrictive for tasks needing full control |
📚 Resources:
- https://www.youtube.com/watch?v=u-i-Korzf8w using a web scraper template.
Toolkits and libraries
Apify JavaScript and Python SDKs
https://docs.apify.com/sdk/js/ are designed for developers who want to interact directly with the Apify platform. It allows you to perform tasks like saving data in Apify Datasets, running Apify Actors, and accessing the key-value store. Ideal for those who are familiar with https://docs.apify.com/sdk/js/ and https://docs.apify.com/sdk/python/, SDKs provide the tools needed to develop software specifically on the Apify platform, offering complete freedom and flexibility within the JavaScript ecosystem.
- Best for: interacting with the Apify platform (e.g., saving data, running Actors, etc)
- Pros: full control over platform-specific operations, integrates seamlessly with Apify services
- Cons: requires writing boilerplate code, higher complexity with more room for errors
Crawlee
https://crawlee.dev/ (for both Node.js and https://crawlee.dev/python) is a powerful web scraping library that focuses on tasks like extracting data from web pages, automating browser interactions, and managing complex scraping workflows. Unlike the Apify SDK, Crawlee does not require the Apify platform and can be used independently for web scraping tasks. It handles complex operations like concurrency management, auto-scaling, and request queuing, allowing you to concentrate on the actual scraping tasks.
- Best for: web scraping and automation (e.g., scraping paragraphs, automating clicks)
- Pros: full flexibility in web scraping tasks, does not require the Apify platform, leverages the JavaScript ecosystem
- Cons: requires more setup and coding, higher chance of mistakes with complex operations
Combining Apify SDK and Crawlee
While these tools are distinct, they can be combined. For example, you can use Crawlee to scrape data from a page and then use the Apify SDK to save that data in an Apify dataset. This integration allows developers to make use of the strengths of both tools while working within the Apify ecosystem.
📚 Resources:
- Introduction to https://www.youtube.com/watch?v=g1Ll9OlFwEQ
- Crawlee https://crawlee.dev/blog
- Webinar on scraping with https://www.youtube.com/watch?v=iAk1mb3v5iI: how to create scrapers in JavaScript and TypeScript
- Step-by-step video guide: https://www.youtube.com/watch?v=yTRHomGg9uQ in Node.js with Crawlee
- Webinar on how to use https://www.youtube.com/watch?v=ip8Ii0eLfRY
- Introduction to Apify's https://www.youtube.com/watch?v=C8DmvJQS3jk
Code templates vs. universal scrapers vs. libraries
Basically, the choice here depends on how much flexibility you need and how much coding you're willing to do. More flexibility → more coding.
https://apify.com/scrapers/universal-web-scrapers are simple to set up but are less flexible and configurable. Our https://crawlee.dev/, on the other hand, enable the development of a standard https://nodejs.org/ or Python application, so be prepared to write a little more code. The reward for that is almost infinite flexibility.
https://apify.com/templates are sort of a middle ground between scrapers and libraries. But since they are built on libraries, they are still on the rather more coding than less coding side. They will only give you a starter code to begin with. Please take this into account when choosing the way to build your scraper, and if in doubt — just ask us, and we'll help you out.
Switching sides: How to transfer an existing solution from another platform
You can also take advantage of the Apify platform's features without having to modify your existing scraping or automation solutions.
Integrating Scrapy spiders
The Apify platform fully supports Scrapy spiders. By https://apify.com/run-scrapy-in-cloud, you can take advantage of features like scheduling, monitoring, scaling, and API access, all without needing to modify your original spider. This process is made easy with the https://docs.apify.com/cli/, which allows you to convert your Scrapy spider into an Apify Actor with just a few commands. Once deployed, your spider can run in the cloud, offering a reliable and scalable solution for your web scraping needs.
Additionally, you can monetize your spiders by https://apify.com/partners/actor-developers on Apify Store, potentially earning passive income from your work while benefiting from the platform’s extensive features.
ScrapingBee, ScrapingAnt, ScraperAPI
To make the transition from these platforms easier, we've also created https://apify.com/apify/super-scraper-api. This API is an open-source REST API designed for scraping websites by simply passing a URL and receiving the rendered HTML content in return. This service functions as a cost-effective alternative to other scraping services like ScrapingBee, ScrapingAnt, and ScraperAPI. It supports dynamic content rendering with a headless browser, can use various proxies to avoid blocking, and offers features such as capturing screenshots of web pages. It is ideal for large-scale scraping tasks due to its scalable nature.
To use SuperScraper API, you can deploy it with an Apify API token and access it via HTTP requests. The API supports multiple parameters for fine-tuning your scraping tasks, including options for rendering JavaScript, waiting for specific elements, and handling cookies and proxies. It also allows for custom data extraction rules and JavaScript execution on the scraped pages. Pricing is based on actual usage, which can be cheaper or more expensive than competitors, depending on the configuration.
📚 Resources:
- https://docs.apify.com/cli/docs/integrating-scrapy
- Scrapy monitoring: how to https://blog.apify.com/scrapy-monitoring-spidermon/
- Run ScrapingBee, ScraperAPI, and ScrapingAnt on Apify — https://www.youtube.com/watch?v=YKs-I-2K1Rg
General resources
- Creating your Actor: https://docs.apify.com/academy/getting-started/creating-actors
- Use it, build it or buy it? https://help.apify.com/en/articles/3024655-choosing-the-right-solution
- How to programmatically retrieve data with the https://www.youtube.com/watch?v=ViYYDHSBAKM&t=0s
- Improved way to https://www.youtube.com/watch?v=8QJetr-BYdQ
- Webinar on https://www.youtube.com/watch?v=4nxStxC1BJM on Apify Store
- 6 things you should know before buying or https://blog.apify.com/6-things-to-know-about-web-scraping/
- For a comprehensive guide on creating your first Actor, visit the https://docs.apify.com/academy.
Wrap open-source as an Actor
Apify is a cloud platform with a https://apify.com/store of 6,000+ web scraping and automation tools called Actors. These tools are used for extracting data from social media, search engines, maps, e-commerce sites, travel portals, and general websites.
Most Actors are developed by a global creator community, and some are developed by Apify. We have 18k monthly active users/developers on the platform (growing 138% YoY). Last month, we paid out $170k to creators (growing 118% YoY), and in total, over the program's history, we paid out almost $2M to them.
What are Actors
Under the hood, Actors are programs packaged as Docker images, that accept a well-defined JSON input, perform an action, and optionally produce a well-defined JSON output. This makes it easy to auto-generate user interfaces for Actors and integrate them with one another or with external systems. For example, we have user-friendly integrations with Zapier, Make, LangChain, MCP, OpenAPI, and SDKs for TypeScript/Python, CLI, etc. etc.
Actors are a new way to build reusable serverless micro-apps that are easy to develop, share, integrate, and build upon—and, importantly, monetize. While Actors are our invention, we’re in the process of making them an open standard. Learn more at https://whitepaper.actor/.
While most Actors on our marketplace are web scrapers or crawlers, there are ever more Actors for other use cases including data processing, web automation, API backend, or https://apify.com/store/categories/agents. In fact, any piece of software that accepts input, performs a job, and can run in Docker, can be Actorized simply by adding an .actor directory to it with a couple of JSON files.
Why Actorize
By publishing your service or project at https://apify.com/store your project will benefit from:
- Expanded reach: Your tool instantly becomes available to Apify's user community and connects with popular automation platforms like https://www.make.com, https://n8n.io/, and https://zapier.com/.
- Multiple monetization paths: Choose from flexible pricing models (monthly subscriptions, pay-per-result, or pay-per-event).
- AI integration: Your Actor can serve as a tool for AI agents through Apify's MCP (Model Context Protocol) server, creating new use cases and opportunities while you earn 80% of all revenues.
Open-Source Benefits
For open-source developers, Actorization adds value without extra costs:
- Host your code in the cloud for easy user trials (no local installs needed).
- Avoid managing cloud infrastructure—users cover the costs.
- Earn income through https://apify.com/partners/open-source-fair-share via GitHub Sponsors or direct payouts.
- Publish and monetize 10x faster than building a micro-SaaS, with Apify handling infra, billing, and access to 700,000+ monthly visitors and 70,000 signups.
For example, IBM’s https://github.com/docling-project/docling merged our pull request that actorized their open-source GitHub repo (24k stars) and added the Apify Actor badge to the README:
![]()
Example Actorized projects
You can Actorize various projects ranging from open-source libraries, throughout existing SaaS services, up to MCP server:
| Name | Type | Source | Actor |
|---|---|---|---|
| Parsera | SaaS service | https://parsera.org/ | https://apify.com/parsera-labs/parsera |
| Monolith | Open source library | https://github.com/Y2Z/monolith | https://apify.com/snshn/monolith |
| Crawl4AI | Open source library | https://github.com/unclecode/crawl4ai | https://apify.com/janbuchar/crawl4ai |
| Docling | Open source library | https://github.com/docling-project/docling | https://apify.com/vancura/docling/source-code |
| Playwright MCP | Open source MCP server | https://github.com/microsoft/playwright-mcp | https://apify.com/jiri.spilka/playwright-mcp-server |
| Browserbase MCP | SaaS MCP server | https://www.browserbase.com/ | https://apify.com/mcp-servers/browserbase-mcp-server |
What projects are suitable for Actorization
Use these criteria to decide if your project is a good candidate for Actorization:
- Is it self-contained? Does the project work non-interactively, with a well-defined, preferably structured input and output format? Positive examples include various data processing utilities, web scrapers and other automation scripts. Negative examples are GUI applications or applications that run indefinitely. If you want to run HTTP APIs on Apify, you can do so using https://docs.apify.com/platform/actors/development/programming-interface/standby.md.
- Can the state be stored in Apify storages? If the application has state that can be stored in a small number of files it can utilize https://docs.apify.com/platform/storage/key-value-store.md, or if it processes records that can be stored in Apify’s https://docs.apify.com/platform/storage/request-queue.md. If the output consists of one or many similar JSON objects, it can utilize https://docs.apify.com/platform/storage/dataset.md.
- Can it be containerized? The project needs to be able to run in a Docker container. Apify currently does not support GPU workloads. External services (e.g., databases) need to be managed by developer.
- Can it use Apify tooling? Javascript/Typescript applications and Python applications can be Actorized with the help of the https://docs.apify.com/sdk.md, which makes easy for your code to interacts with the Apify platform. Applications that can be run using just the CLI can also be Actorized using the Apify CLI by writing a simple shell script that retrieves user input using https://docs.apify.com/cli, then runs your application and sends the results back to Apify (also using the CLI). If your application is implemented differently, you can still call the https://docs.apify.com/api/v2.md directly - it’s just HTTP and pretty much every language has support for that but the implementation is less straightforward.
Actorization guide
This guide outlines the steps to convert your application into an Apify https://docs.apify.com/platform/actors.md. Follow the documentation links for detailed information - this guide provides an overview rather than exhaustive instructions.
1. Add Actor metadata - the .actor folder
The Apify platform requires your Actor repository to have a .actor folder at the root level, which contains the metadata needed to build and run the Actor.
For existing projects, you can add the .actor folder using the https://docs.apify.com/cli/docs/reference#apify-init-actorname.
In case you're starting a new project, we strongly advise to start with a https://apify.com/templates using the https://docs.apify.com/cli/docs/reference#apify-create-actorname based on your usecase
-
… and many others, check out for comprehensive list https://apify.com/templates
Quick Start for beginners
For a step-by-step introduction to creating your first Actor (including tech stack choices and development paths), see https://docs.apify.com/platform/actors/development/quick-start.md.
The newly created .actor folder contains an actor.json file - a manifest of the Actor. See https://docs.apify.com/platform/actors/development/actor-definition/actor-json.md for more details
You must also make sure your Actor has a Dockerfile and that it installs everything needed to successfully run your application. Check out https://docs.apify.com/platform/actors/development/actor-definition/dockerfile.md by Apify. If you don't want to use these, you are free to use any image as the base of your Actor.
When launching the Actor, the Apify platform will simply run your Docker image. This means that a) you need to configure the ENTRYPOINT and CMD directives so that it launches your application and b) you can test your image locally using Docker.
These steps are the bare minimum you need to run your code on Apify. The rest of the guide will help you flesh it out better.
2. Define input and output
Most Actors accept an input and produce an output. As part of Actorization, you need to define the input and output structure of your application.
For detailed information, read the docs for https://docs.apify.com/platform/actors/development/actor-definition/input-schema.md, https://docs.apify.com/platform/actors/development/actor-definition/dataset-schema.md, and general https://docs.apify.com/platform/storage.md.
Design guidelines
- If your application has some arguments or options, those should be part of the input defined by input schema.
- If there is a configuration file or if your application is configured with environment variables, those should also be part of the input. Ideally, nested structures should be “unpacked”, i.e., try not to accept deeply nested structures in your input. Start with less input options and expand later.
- If the output is a single file, you’ll probably want your Actor to output a single dataset item that contains a public URL to the output file stored in the Apify key-value store
- If the output has a table-like structure or a series of JSON-serializable objects, you should output each row or object as a separate dataset item
- If the output is a single key-value record, your Actor should return a single dataset item
3. Handle state persistence (optional)
If your application performs a number of well-defined subtasks, the https://docs.apify.com/platform/storage/request-queue.md lets you pause and resume execution on job restart. This is important for long-running jobs that might be migrated between servers at some point. In addition, this allows the Apify platform to display the progress to your users in the UI.
A lightweight alternative to the request queue is simply storing the state of your application as a JSON object in the key-value store and checking for that when your Actor is starting.
Fully-fledged Actors will often combine these two approaches for maximum reliability. More on this topic you find in the https://docs.apify.com/platform/actors/development/builds-and-runs/state-persistence.md article.
4. Write Actorization code
Perhaps the most important part of the Actorization process is writing the code that will be executed when the Apify platform launches your Actor.
Unless you’re writing an application targeted directly on the Apify platform, this will have the form of a script that calls your code and integrates it with the Apify Storages
Apify provides SDKs for https://docs.apify.com/sdk/js and https://docs.apify.com/sdk/python plus a https://docs.apify.com/cli allowing an easy interaction with Apify platform from command line.
Check out https://docs.apify.com/platform/actors/development/programming-interface.md documentation article for details on interacting with the Apify platform in your Actor's code.
5. Deploy the Actor
Deployment to Apify platform can be done easily via apify push command of https://docs.apify.com/cli and for details see https://docs.apify.com/platform/actors/development/deployment.md documentation.
6. Publish and monetize
For details on publishing the Actor in https://apify.com/store see the https://docs.apify.com/platform/actors/publishing.md. You can also follow our guide on https://docs.apify.com/academy/actor-marketing-playbook/actor-basics/how-to-create-an-actor-readme.md and https://docs.apify.com/academy/actor-marketing-playbook.md.
Advanced web scraping
In the https://docs.apify.com/academy/web-scraping-for-beginners.md course, we have learned the necessary basics required to create a scraper. In the following courses, we learned more about specific practices and techniques that will help us to solve most of the problems we will face.
In this course, we will take all of that knowledge, add a few more advanced concepts, and apply them to learn how to build a production-ready web scraper.
What does production-ready mean
To scrape large and complex websites, we need to scale two essential aspects of the scraper: crawling and data extraction. Big websites can have millions of pages and the data we want to extract requires more sophisticated parsing techniques than just selecting elements by CSS selectors or using APIs as they are.
We will also touch on monitoring, performance, anti-scraping protections, and debugging.
If you've managed to follow along with all of the courses prior to this one, then you're more than ready to take these upcoming lessons on 😎
First up
First, we will explore https://docs.apify.com/academy/advanced-web-scraping/crawling/sitemaps-vs-search.md that will help us to find all pages or products on the website.
Crawling sitemaps
In the previous lesson, we learned what is the utility (and dangers) of crawling sitemaps. In this lesson, we will go in-depth to how to crawl sitemaps.
We will look at the following topics:
- How to find sitemap URLs
- How to set up HTTP requests to download sitemaps
- How to parse URLs from sitemaps
- Using Crawlee to get all URLs in a few lines of code
How to find sitemap URLs
Sitemaps are commonly restricted to contain a maximum of 50k URLs so usually, there will be a whole list of them. There can be a master sitemap containing URLs of all other sitemaps or the sitemaps might simply be indexed in robots.txt and/or have auto-incremented URLs like /sitemap1.xml, /sitemap2.xml, etc.
You can try your luck on Google by searching for site:example.com sitemap.xml or site:example.com sitemap.xml.gz and see if you get any results. If you do, you can try to download the sitemap and see if it contains any useful URLs. The success of this approach depends on the website telling Google to index the sitemap file itself which is rather uncommon.
robots.txt
If the website has a robots.txt file, it often contains sitemap URLs. The sitemap URLs are usually listed under Sitemap: directive.
Common URL paths
You can check some common URL paths, such as the following:
/sitemap.xml /product_index.xml /product_template.xml /sitemap_index.xml /sitemaps/sitemap_index.xml /sitemap/product_index.xml /media/sitemap.xml /media/sitemap/sitemap.xml /media/sitemap/index.xml
Make also sure you test the list with .gz, .tar.gz and .tgz extensions and by capitalizing the words (e.g. /Sitemap_index.xml.tar.gz).
Some websites also provide an HTML version, to help indexing bots find new content. Those include:
/sitemap /category-sitemap /sitemap.html /sitemap_index
Apify provides the https://apify.com/vaclavrut/sitemap-sniffer, an open source actor that scans the URL variations automatically for you so that you don't have to check them manually.
How to set up HTTP requests to download sitemaps
For most sitemaps, you can make a single HTTP request and parse the downloaded XML text. Some sitemaps are compressed and have to be streamed and decompressed. The code can get fairly complicated, but scraping frameworks, such as , can do this out of the box.
How to parse URLs from sitemaps
Use your favorite XML parser to extract the URLs from inside the `` tags. Just be careful that the sitemap might contain other URLs that you don't want to crawl (e.g. /about, /contact, or various special category sections). For specific code examples, see https://docs.apify.com/academy/node-js/scraping-from-sitemaps.md.
Using Crawlee
Fortunately, you don't have to worry about any of the above steps if you use https://crawlee.dev, a scraping framework, which has rich traversing and parsing support for sitemap. It can traverse nested sitemaps, download, and parse compressed sitemaps, and extract URLs from them. You can get all the URLs in a few lines of code:
import { RobotsFile } from 'crawlee';
const robots = await RobotsFile.find('https://www.mysite.com');
const allWebsiteUrls = await robots.parseUrlsFromSitemaps();
Next up
That's all we need to know about sitemaps for now. Let's dive into a much more interesting topic - search, filters, and pagination.
Scraping websites with search
In this lesson, we will start with a simpler example of scraping HTML based websites with limited pagination.
Limiting pagination is a common practice on e-commerce sites. It makes sense: a real user will never want to look through more than 200 pages of results – only bots love unlimited pagination. Fortunately, there are ways to overcome this limit while keeping our code clean and generic.
In a rush? Skip the tutorial and get the https://github.com/apify-projects/apify-extra-library/tree/master/examples/crawler-with-filters.
How to overcome the limit
Websites usually limit the pagination of a single (sub)category to somewhere between 1,000 to 20,000 listings. The site might have over a million listings in total. Without a proven algorithm, it will be very manual and almost impossible to scrape all listings.
We will first look at a couple of ideas that don't work so well and then present the .
Going deeper into subcategories
This is usually the first solution that comes to mind. You traverse the smallest subcategories and hope that those are below the pagination limits. Unfortunately, there are two big problems with this approach:
- Any subcategory might be bigger than the pagination limit.
- Some listings from the parent category might not be present in any subcategory.
While you can often manually test if the second problem is true on the site, the first problem is a hard blocker. You might be just lucky, and it may work on this site but usually, traversing subcategories is not enough. It can be used as a first step of the solution but not as the solution itself.
Using filters
Most websites also provide a way for the user to select search filters. These allow a more granular level of search than categories and can be combined with them. Common filters allow you to select a color, size, location and similar attributes.
At first, it might seem like an easy solution. Enqueue all possible filter combinations and that should be so granular that it will never hit a pagination limit. Unfortunately, this solution is still far from good.
- No guarantee that some products won't slip through the chosen filter combinations.
- The resulting split might be too granular and end up having too many tiny paginations with many duplicate products. This leads to scraping a lot more pages than necessary and makes analytics much harder.
Using filter ranges
The best option is to use only a specific type of filter that can be used as a range. The most common one is price range but there may be others like the apartment size, etc. You can split the pagination pages to only contain listings within that range, e.g. products costing between $10 and $20.
This has several benefits:
- All listings can eventually be found in a range.
- The ranges do not overlap, so we scrape the smallest possible number of pages and avoid duplicate listings.
- Ranges can be controlled by a generic algorithm that can be reused for different sites.
Splitting pages with range filters
In the previous section, we analyzed different options to split the pages to overcome the pagination limit. We have chosen range filters as the most reliable way to do that. In this section, we will discuss a generic algorithm to work with ranges, look at a few special cases and then write an example crawler.

The algorithm
The core algorithm can be used on any (even overlapping) range. This is a simplified presentation, we will discuss the details later.
- We choose a few pivot ranges with a similar number of products and enqueue them. For example, $0-$10, $100-$1000, $1000-$10000, $10000-.
- For each range, we open the page and check if the listings are below the limit. If yes, we continue to step 3. If not, we split the filter in half, e.g. $0-$10 to $0-$5 and $5-$10 and enqueue those again. We recursively repeat step 2 for each range as long as needed.
- We now have a pagination URL that is below the limit, we enqueue it under a pagination label and start enqueuing products.
Because the algorithm is recursive, we don't need to think about how big the final ranges should be, the algorithm will find them over time.
Special cases to look for
We have the base algorithm, but before we start coding, let's answer a few questions to get more insight.
Can the ranges overlap?
Some sites will allow you to construct non-overlapping ranges. For example, you can set the ranges with cents, e.g. $0-$4.99, $5-$9.99, etc. If that is possible, create the pivot ranges this way, too.
Non-overlapping ranges should remove the possibility of duplicate products (unless a ) and the lowest number of pages.
If the website supports only overlapping ranges (e.g. $0-$5, $5–10), it is not a big problem. Only a small portion of the listings will be duplicates, and they can be removed using a https://docs.apify.com/platform/storage/request-queue.md.
Can a listing have more values?
In rare cases, a listing can have more than one value that you are filtering in a range. A typical example is Amazon, where each product has several offers and those offers have different prices. If any of those offers is within the range, the product is shown.
No easy way exists to get around this but the price range split works even with duplicate listings, use a https://developer.mozilla.org/en-US/docs/Web/JavaScript/Reference/Global_Objects/Set or request queue to deduplicate them.
How is the range passed to the URL?
In the easiest case, you can pass the range directly in the page's URL. For example, https://example.com/products?price=0-10. Sometimes, you will need to do some query composition because the price range might be encoded together with more information into a single parameter.
Some sites don't have page URLs with filters and instead load the filtered products via https://developer.mozilla.org/en-US/docs/Web/API/XMLHttpRequest. Those can be GET or POST requests with varying URL and payload syntax.
The nice thing here is that if you get to understand how their internal API works, you can have it return more products per page or extract full product details just from this single request.
In addition, XHRs are smaller and faster than loading an HTML page. On the other hand, you should not overly abuse them (with setting overly large limits), as this can expose you.
Does the website show the number of products for each filtered page?
If it does, it's a nice bonus. It gives us a way to check if we are over or below the pagination limit and helps with analytics.
If it doesn't, we have to find a different way to check if the number of listings is within a limit. One option is to go to the last allowed page of the pagination. If that page is still full of products, we can assume the filter is over the limit.
How to handle (open) ends of the range
Logically, every full (price) range starts at 0 and ends at infinity. But the way this is encoded will differ on each site. The end of the price range can be either closed (0) or open (infinity). Open ranges require special handling when you split them (we will get to that).
Most sites will let you start with 0 (there might be exceptions, where you will have to make the start open), so we can use just that. The high end is more complicated. Because you don't know the biggest price, it is best to leave it open and handle it specially. Internally you can assign null to the value.
Here are a few examples of a query parameter with an open and closed high-end range:
- Open:
p:100-(higher than 100), Closed:p:100-200(between 100 and 200) - Open:
min_price=100, Closed:min_price=100&max_price=200
Can the range exceed the limit on a single value?
In very rare cases, a site will have so many listings that a single value (e.g. $100 or $4.99) will include a number of listings over the limit. will recurse until the min value equals the max value and then stop because it cannot split that single value anymore.
In this rare case, you will need to add another range or other filters to combine it to get an even deeper split.
Implementing a range filter
This section shows a code example implementing our solution for an imaginary website. Writing a real solution will bring up more complex problems but the previous section should prepare you for some of them.
First, let's define our imaginary site:
- It has a single
/productspath that contains all the products that we want to scrape. - Max pagination limit is 1000.
- The site contains over a million products.
- It allows for filtering over a price range with query parameters
min_priceandmax_price. - If
min_priceormax_priceare not defined, it opens that end of the range (all products up to or all products over that). - The site allows to specify the price in cents.
- Pagination is done via
pagequery parameter.
Define and enqueue pivot ranges
This step is not necessary but it is useful. The algorithm doesn't start with splitting over too large or too small values.
import { Actor } from 'apify';
import { CheerioCrawler } from 'crawlee';
await Actor.init();
const MAX_PRODUCTS_PAGINATION = 1000;
// Just an example, choose what makes sense for your site
const PIVOT_PRICE_RANGES = [
{ min: 0, max: 9.99 },
{ min: 10, max: 99.99 },
{ min: 100, max: 999.99 },
{ min: 1000, max: 9999.99 },
{ min: 10000, max: null }, // open-ended
];
// Let's create a helper function for creating the filter URLs, you can move those to a utils.js file
const createFilterUrl = ({ min, max }) => {
const minString = `min_price=${min}`;
// We don't want to pass the parameter at all if it is null (open-ended)
const maxString = max ? `&max_price=${max}` : '';
return `https://www.mysite.com/products?${minString}${maxString}`;
};
// And another helper for getting filters back from the URL, we could also pass them in userData
const getFiltersFromUrl = (url) => {
const min = Number(url.match(/min_price=([0-9.]+)/)[1]);
// Max price might be empty
const maxMatch = url.match(/max_price=([0-9.]+)/);
const max = maxMatch ? Number(maxMatch[1]) : null;
return { min, max };
};
// Actor setup things here
const crawler = new CheerioCrawler({
async requestHandler(context) {
// ...
},
});
// Let's create the pivot requests
const initialRequests = [];
for (const { min, max } of PIVOT_PRICE_RANGES) {
initialRequests.push({
url: createFilterUrl({ min, max }),
label: 'FILTER',
});
}
// Let's start the crawl
await crawler.run(initialRequests);
await Actor.exit();
Define the logic for the FILTER page
import { CheerioCrawler } from 'crawlee';
// Doesn't matter what Crawler class we choose
const crawler = new CheerioCrawler({
// Crawler options here
// ...
async requestHandler({ request, $ }) {
const { label } = request;
if (label === 'FILTER') {
// Of course, change the selectors and make it more robust
const numberOfProducts = Number($('.product-count').text());
// The filter is either good enough of we have to split it
if (numberOfProducts max) {
throw new Error(`WRONG FILTER - min(${min}) is greater than max(${max})`);
}
// We crate a middle value for the split. If max in null, we will use double min as the middle value
const middle = max
? min + Math.floor((max - min) / 2)
: min * 2;
// We have to do the Math.max and Math.min to prevent having min > max
const filterMin = {
min,
max: Math.max(middle, min),
};
const filterMax = {
min: max ? Math.min(middle + 1, max) : middle + 1,
max,
};
// We return 2 new filters
return [filterMin, filterMax];
}
Enqueue the filters
Let's finish the crawler now. This code example will go inside the else block of the previous crawler example.
const { min, max } = getFiltersFromUrl(request.url);
// Our generic splitFilter function doesn't account for decimal values so we will have to convert to cents and back to dollars
const newFilters = splitFilter({ min: min * 100, max: max * 100 });
// And we enqueue those 2 new filters so the process will recursively repeat until all pages get to the PAGINATION phase
const requestsToEnqueue = [];
for (const filter of newFilters) {
requestsToEnqueue.push({
// Remember that we have to convert back from cents to dollars
url: createFilterUrl({ min: filter.min / 100, max: filter.max / 100 }),
label: 'FILTER',
});
}
await crawler.addRequests(requestsToEnqueue);
Summary
And that's it. We have an elegant solution for a complicated problem. In a real project, you would want to make this a bit more robust and https://docs.apify.com/academy/expert-scraping-with-apify/saving-useful-stats.md. This will let you know what filters you went through and how many products each of them had.
Check out the https://github.com/apify-projects/apify-extra-library/tree/master/examples/crawler-with-filters.
Sitemaps vs search
The core crawling problem comes to down to ensuring that we reliably find all detail pages on the target website or inside its categories. This is trivial for small sites. We just open the home page or category pages and paginate to the end as we did in the https://docs.apify.com/academy/web-scraping-for-beginners.md course.
Unfortunately, most modern websites restrict pagination only to somewhere between 1 and 10,000 products. Solving this problem might seem relatively straightforward at first but there are multiple hurdles that we will explore in this lesson.
There are two main approaches to solving this problem:
- Extracting all page URLs from the website's sitemap.
- Using categories, search and filters to split the website so we get under the pagination limit.
Both of these approaches have their pros and cons so the best solution is to use both and combine the results. Here we will learn why.
Pros and cons of sitemaps
Sitemap is usually a simple XML file that contains a list of all pages on the website. They are created and maintained mainly for search engines like Google to help ensure that the website gets fully indexed there. They are commonly located at URLs like https://example.com/sitemap.xml or https://example.com/sitemap.xml.gz. We will get to work with sitemaps in the next lesson.
Pros
- Quick to set up - The logic to find all sitemaps and extract all URLs is usually simple and can be done in a few lines of code.
- Fast to run - You only need to run a single request for each sitemap that contains up to 50,000 URLs. This means you can get all the URLs in a matter of seconds.
- Usually complete - Websites have an incentive to keep their sitemaps up to date as they are used by search engines. This means that they usually contain all pages on the website.
Cons
- Does not directly reflect the website - There is no way you can ensure that all pages on the website are in the sitemap. The sitemap also can contain pages that were already removed and will return 404s. This is a major downside of sitemaps which prevents us from using them as the only source of URLs.
- Updated in intervals - Sitemaps are usually not updated in real-time. This means that you might miss some pages if you scrape them too soon after they were added to the website. Common update intervals are 1 day or 1 week.
- Hard to find or unavailable - Sitemaps are not always trivial to locate. They can be deployed on a CDN with unpredictable URLs. Sometimes they are not available at all.
- Streamed, compressed, and archived - Sitemaps are often streamed and archived with .tgz extensions and compressed with gzip. This means that you cannot use default HTTP client settings and must handle these cases with extra code or use a scraping framework.
Pros and cons of categories, search, and filters
This approach means traversing the website like a normal user does by going through categories, setting up different filters, ranges, and sorting options. The goal is to ensure that we cover all categories or ranges where products can be located, and that for each of those we stay under the pagination limit.
The pros and cons of this approach are pretty much the opposite of relying on sitemaps.
Pros
- Directly reflects the website - With most scraping use-cases, we want to analyze the website as the regular users see it. By going through the intended user flow, we ensure that we are getting the same pages as the users.
- Updated in real-time - The website is updated in real-time so we can be sure that we are getting all pages.
- Often contain detailed data - While sitemaps are usually just a list of URLs, categories, searches and filters often contain additional data like product names, prices, categories, etc, especially if available via JSON API. This means that we can sometimes get all the data we need without going to the detail pages.
Cons
- Complex to set up - The logic to traverse the website is usually complex and can take a lot of time to get right. We will get to this in the next lessons.
- Slow to run - The traversing can require a lot of requests. Some filters or categories will have products we already found.
- Not always complete - Sometimes the combination of filters and categories will not allow us to ensure we have all products. This is especially painful for sites where we don't know the exact number of products we are looking for. The tools we'll build in the following lessons will help us with this.
Do we know how many products there are?
Most websites list a total number of detail pages somewhere. It might be displayed on the home page, search results, or be provided in the API response. We just need to make sure that this number really represents the whole site or category we are looking to scrape. By knowing the total number of products, we can tell if our approach to scrape all succeeded or if we still need to refine it.
Some sites, like Amazon, do not provide exact numbers. In this case, we have to work with what they give us and put even more effort into making our scraping logic accurate. We will tackle this in the following lessons as well.
Next up
Next, we will look into https://docs.apify.com/academy/advanced-web-scraping/crawling/crawling-sitemaps.md. After that we will go through all the intricacies of the category, search and filter crawling, and build up tools implementing a generic approach that we can use on any website. At last, we will combine the results of both and set up monitoring and persistence to ensure we can run this regularly without any manual controls.
Tips and tricks for robustness
Learn how to make your automated processes more effective. Avoid common web scraping and web automation pitfalls, future-proof your programs and improve your processes.
This collection of tips and tricks aims to help you make your scrapers work smoother and produce fewer errors.
Proofs and verification
Absence of evidence ≠ evidence of absence.
Make sure output remains consistent regardless of any changes at the target host/website:
- Always base all important checks on the presence of proof.
- Never build any important checks on the absence of anything.
The absence of an expected element or message does not prove an action has been (un)successful. The website might have been updated or expected content may no longer exist in the original form. The action relying on the absence of something might still be failing. Instead, it must rely on proof of presence.
Good: Rely on the presence of an element or other content confirming a successful action.
async function isPaymentSuccessful() {
try {
await page.waitForSelector('#PaymentAccepted');
} catch (error) {
return OUTPUT.paymentFailure;
}
return OUTPUT.paymentSuccess;
}
Avoid: Relying on the absence of an element that may have been updated or changed.
async function isPaymentSuccessful() {
const $paymentAmount = await page.$('#PaymentAmount');
if (!$paymentAmount) return OUTPUT.paymentSuccess;
}
Presumption of failure
Every action has failed until it has provably succeeded.
Always assume an action has failed before having a proof of success. Always verify important steps to avoid false positives or false negatives.
- False positive = false / failed outcome reported as true / successful on output.
- False negative = true / successful outcome reported as false / failed on output.
Assuming any action has been successful without direct proof is dangerous. Disprove failure actively through proof of success instead. Only then consider output valid and verified.
Good: Verify outcome through proof. Clearly disprove failure of an important action.
async function submitPayment() {
await Promise.all([
page.click('submitPayment'),
page.waitForNavigation(),
]);
try {
await page.waitForFunction(
(selector) => document.querySelector(selector).innerText.includes('Payment Success'),
{ polling: 'mutation' },
'#PaymentOutcome',
);
} catch (error) {
return OUTPUT.paymentFailure;
}
return OUTPUT.paymentSuccess;
}
Avoid: Not verifying an outcome. It can fail despite output claiming otherwise.
async function submitPayment() {
await Promise.all([
page.click('submitPayment'),
page.waitForNavigation(),
]);
return OUTPUT.paymentSuccess;
}
Targeting elements
Be both as specific and as generic as possible at the same time.
DOM element selectors
Make sure your https://developer.mozilla.org/en-US/docs/Web/CSS/CSS_Selectors have the best chance to remain valid after a website is updated.
- Prefer https://developer.mozilla.org/en-US/docs/Web/CSS/Specificity selectors over lower specificity ones (#id over .class).
- Use https://developer.mozilla.org/en-US/docs/Web/CSS/Attribute_selectors to search parts of attributes (prefix, suffix, etc.).
- Use element attributes with the lowest probability of a future change.
- Completely avoid or strip selectors of values that are clearly random.
- Completely avoid or strip selectors of values that are clearly flexible.
- Extend low-specificity selectors to reduce the probability of collisions.
Below is an example of stripping away too-specific parts of a selector that are likely random or subject to change.
#P_L_v201w3_t3_ReceiptToolStripLabel => a[id*="ReceiptToolStripLabel"]
If you are reasonably confident a page layout will remain without any dramatic future changes and need to increase the selector specificity to reduce the chance of a collision with other selectors, you can extend the selector as per the principle below.
#ReceiptToolStripLabel_P_L_v201w3_t3 => table li > a[id^="ReceiptToolStripLabel"]
Content pattern matching
Matching elements by content is already natively supported by https://playwright.dev/. Playwright is a https://nodejs.org/en/ library that allows you to automate Chromium, Firefox and WebKit with a single API.
In https://pptr.dev/, you can use custom utility functions to https://developer.mozilla.org/en-US/docs/Glossary/Polyfill this functionality.
Event-bound flows
Always strive to make code as fluid as possible. Listen to events and react to them as needed by triggering consecutive actions immediately.
- Avoid any fixed-duration delays wherever possible.
- Prefer fluid flow based on the occurrence of events.
// Avoid:
await page.waitForTimeout(timeout);
// Good:
await page.waitForFunction(myFunction, options, args);
// Good:
await page.waitForFunction(() => {
return window.location.href.includes('path');
});
// Good:
await page.waitForFunction(
(selector) => document.querySelector(selector).innerText,
{ polling: 'mutation' },
'[data-qa="btnAppleSignUp"]',
);
AI agent tutorial
In this section of the Apify Academy, we show you how to build an AI agent with the CrewAI Python framework. You’ll learn how to create an agent for Instagram analysis and integrate it with LLMs and Apify Actors.
AI agents are goal-oriented systems that make independent decisions. They interact with environments using predefined tools and workflows to automate complex tasks.
On Apify, AI agents are built as Actors—serverless cloud programs for web scraping, data processing, and AI deployment. Apify evolved from running scrapers in the cloud to supporting LLMs that follow predefined workflows with dynamically defined goals.
Prerequisites
To build an effective AI agent, you need prompts to guide it, tools for external interactions, a large language model (LLM) to connect the components, an agentic framework to handle LLM behavior, and a platform to run, deploy, and scale the solution.
Benefits of using Apify for AI agents
Apify provides a complete platform for building and deploying AI agents with the following benefits:
- Serverless execution - without infrastructure management
- Stateful execution - with agent memory capabilities
- Monetization options - through usage-based charging
- Extensive tool ecosystem - with thousands of available Actors
- Scalability and reliability - for production environments
- Pre-integrated tools - for web scraping and automation
Building an AI agent
Step 1: Define the use case
This tutorial creates a social media analysis agent that analyzes Instagram posts based on user queries using the https://apify.com/apify/instagram-scraper.
Example:
- Input: "Analyze the last 10 posts from @openai and summarize AI trends."
- Output: Trend analysis based on post content.
Step 2: Configure input and output
Define the input format (URL, JSON configuration, or text query) and output format (text response or structured data) for your agent.
Example input:
- User query: "Analyze @openai posts for AI trends"
- OpenAI model selection (e.g.,
gpt-4)
Example output:
- Text response with insights
- Data stored in Apify https://docs.apify.com/platform/storage/dataset.md
Agent memory
Agents can include memory for storing information between conversations. Single-task agents typically do not require memory.
Step 3: Set up the development environment
Install the Apify CLI, which allows you to create, run, and deploy Actors from your local machine.
npm install -g @apify/cli
Create a new Actor project from the CrewAI template and navigate into the new directory.
apify create agent-actor -t python-crewai
cd agent-actor
Step 4: Understand the project structure
The template includes:
-
.actor/– Actor configuration files.actor.json– The Actor's definition.input_schema.json– Defines the UI for the Actor's input.dataset_schema.json– Defines the structure of the output data.pay_per_event.json– Configuration for monetization.
-
src/– Source codemain.py– The main script for Actor execution, agent, and task definition.tools.py– Implementations of the tools the agent can use.models.py– Pydantic models for structured tool output.ppe_utils.py– Helper functions for pay-per-event monetization.
Step 5: Define input and output schemas
Update .actor/input_schema.json to define the Actor's inputs. This schema generates a user interface for running the Actor on the Apify platform.
{
"title": "Instagram Analysis Agent Input",
"type": "object",
"schemaVersion": 1,
"properties": {
"query": {
"title": "Query",
"type": "string",
"description": "Task for the agent to perform",
"example": "Analyze @openai posts for AI trends"
},
"modelName": {
"title": "Model Name",
"type": "string",
"description": "OpenAI model to use",
"default": "gpt-4"
}
},
"required": ["query"]
}
Define the dataset schema in .actor/dataset_schema.json. This helps structure the data pushed to the dataset.
{
"title": "Instagram Analysis Output",
"type": "object",
"properties": {
"query": {
"title": "Query",
"type": "string"
},
"response": {
"title": "Response",
"type": "string"
}
}
}
Step 6: Configure tools
The Instagram post scraper tool is implemented using the https://apify.com/apify/instagram-scraper. The tool returns structured output as Pydantic models defined in src/models.py:
class InstagramPost(BaseModel):
id: str
url: str
caption: str
timestamp: datetime
likes_count: int
comments_count: int
The tool is defined in src/tools.py and includes:
- Tool description and argument schema for the agent
- Integration with Instagram Scraper Actor
- Data retrieval and formatting
Step 7: Implement the agent
The agent implementation in src/main.py includes:
-
Handle Actor input: Read the user's query and any other parameters from the Actor input.
async def main(): async with Actor: actor_input = await Actor.get_input() query = actor_input.get("query") model_name = actor_input.get("modelName", "gpt-4") -
Define the agent: Instantiate the agent, giving it a role, a goal, and access to the tools you configured.
agent = Agent( role="Social Media Analyst", goal="Analyze Instagram posts and provide insights", backstory="Expert in social media analysis and trend identification", tools=[instagram_scraper_tool], llm=ChatOpenAI(model=model_name) ) -
Create task and crew: Define the task for the agent to complete based on the user's query.
task = Task( description=query, agent=agent, expected_output="Detailed analysis with insights" ) crew = Crew( agents=[agent], tasks=[task] ) -
Execute and save results: Kick off the crew to run the task and save the final result to the Actor's default dataset.
result = crew.kickoff() await Actor.push_data({ "query": query, "response": str(result) })
Step 8: Test locally
Run the agent on your local machine using the Apify CLI. Ensure you have set any required environment variables (e.g., OPENAI_API_KEY).
apify run
Step 9: Deploy to Apify
Push your Actor's code to the Apify platform.
apify push
After deployment:
- Navigate to your Actor's settings.
- Set
OPENAI_API_KEYas a secret environment variable. - Rebuild the Actor version to apply the changes.
Step 10: Test the deployed agent
Run the agent on the platform with a sample query and monitor the results in the output dataset.
Analyze the posts of the @openai and @googledeepmind and summarize me current trends in the AI.
Troubleshooting
Common issues and solutions:
- Agent fails to call tools: Check that the tool descriptions in src/tools.py are clear and the argument schemas are correct.
- Instagram scraper fails: Verify that the Instagram usernames exist and are public. Check the scraper Actor's run logs for specific errors.
- Missing API key: Ensure OPENAI_API_KEY is set as a secret environment variable in your Actor's Settings.
Monetizing your AI agent
Apify's pay-per-event (PPE) pricing model allows charging users based on specific triggered events through the API or SDKs.
How pay-per-event pricing works
If you want more details about PPE pricing, refer to our https://docs.apify.com/platform/actors/publishing/monetize/pay-per-event.md.
Step 1: Define chargeable events
You can configure charges for events like the Actor starting, a task completing successfully, or custom events such as specific API calls.
Example event definition:
{
"eventName": "task-completed",
"description": "Charge for completed analysis task",
"price": 0.10
}
Step 2: Implement charging in code
Add charging logic to your code:
await Actor.charge({
"eventName": "task-completed",
"amount": 1
})
Step 3: Configure PPE settings
- Enable pay-per-event monetization in Actor settings.
- Define events from
pay_per_event.json. - Set pricing for each event.
Step 4: Publish the agent
Before making your agent public on https://apify.com/store, complete the following checklist:
- Update README with usage instructions.
- Validate
input_schema.jsonanddataset_schema.json. - Verify
OPENAI_API_KEYenvironment variable is handled correctly. - Check monetization settings on the Actor publication page.
- Test the Actor thoroughly.
- Set your Actor's visibility to public.
Next steps
To continue developing AI agents:
- Use the CrewAI template: Start with
apify create agent-actor -t python-crewai - Explore other templates: Visit the Apify templates page for alternatives
- Review existing agents: Check the AI agents collection on Apify Store
- Publish and monetize: Deploy with
apify pushand enable monetization
Anti-scraping protections
Understand the various anti-scraping measures different sites use to prevent bots from accessing them, and how to appear more human to fix these issues.
If at any point in time you've strayed away from the Academy's demo content, and into the Wild West by writing some scrapers of your own, you may have been hit with anti-scraping measures. This is extremely common in the scraping world; however, the good thing is that there are always solutions.
This section covers the essentials of mitigating anti-scraping protections, such as proxies, HTTP headers and cookies, and a few other things to consider when working on a reliable and scalable crawler. Proper usage of the methods taught in the next lessons will allow you to extract data which is specific to a certain location, enable your crawler to browse websites as a logged-in user, and more.
In development, it is crucial to check and adjust the configurations related to our next lessons' topics, as doing this can fix blocking issues on the majority of websites.
Quick start
If you don't have time to read about the theory behind anti-scraping protections to fine-tune your scraping project and instead you need to get unblocked ASAP, here are some quick tips:
- Use high-quality proxies. https://docs.apify.com/platform/proxy/residential-proxy.md are the least blocked. You can find many providers out there like Apify, BrightData, Oxylabs, NetNut, etc.
- Set real-user-like HTTP settings and browser fingerprints. https://crawlee.dev/ uses statistically generated realistic HTTP headers and browser fingerprints by default for all of its crawlers.
- Use a browser to pass bot capture challenges. We recommend https://crawlee.dev/docs/examples/playwright-crawler-firefox because it is not that common for scraping. You can also play with https://crawlee.dev/api/playwright-crawler/interface/PlaywrightCrawlerOptions#headless and adjust other https://crawlee.dev/api/browser-pool/interface/FingerprintGeneratorOptions.
- Consider extracting data from https://docs.apify.com/academy/api-scraping.md or mobile app APIs. They are usually much less protected.
- Increase the number of request retries significantly to at least 10 with https://crawlee.dev/api/basic-crawler/interface/BasicCrawlerOptions#maxRequestRetries. Rotate sessions after every error with https://crawlee.dev/api/core/interface/SessionOptions#maxErrorScore
- If you cannot afford to use browsers for performance reasons, you can try https://playwright.dev/docs/api/class-playwright#playwright-request or https://www.npmjs.com/package/node-libcurl as the HTTP library for https://crawlee.dev/api/cheerio-crawler/class/CheerioCrawler or https://crawlee.dev/api/basic-crawler/class/BasicCrawler Crawlers, instead of its default https://crawlee.dev/docs/guides/got-scraping HTTP back end. These libraries have access to native code which offers much finer control over the HTTP traffic and mimics real browsers more than what can be achieved with plain Node.js implementation like
got-scraping. These libraries should become part of Crawlee itself in the future.
In the vast majority of cases, this configuration should lead to success. Success doesn't mean that all requests will go through unblocked, that is not realistic. Some IP addresses and fingerprint combinations will still be blocked but the automatic retry system takes care of that. If you can get at least 10% of your requests through, you can still scrape the whole website with enough retries. The default https://crawlee.dev/api/core/class/SessionPool configuration will preserve the working sessions and eventually the success rate will increase.
If the above tips didn't help, you can try to fiddle with the following:
- Try different browsers. Crawlee & Playwright support Chromium, Firefox and WebKit out of the box. You can also try the https://brave.com which https://blog.apify.com/unlocking-the-potential-of-brave-and-playwright-for-browser-automation/.
- Don't use browsers at all. Sometimes the anti-scraping protections are extremely sensitive to browser behavior but will allow plain HTTP requests (with the right headers) just fine. Don't forget to match the specific https://docs.apify.com/academy/concepts/http-headers.md for each request.
- Decrease concurrency. Slower scraping means you can blend in better with the rest of the traffic.
- Add human-like behavior. Don't traverse the website like a bot (paginating quickly from 1 to 100). Instead, visit various types of pages, add time randomizations and you can even introduce some mouse movements and clicks.
- Try Puppeteer with the https://github.com/berstend/puppeteer-extra/tree/master/packages/puppeteer-extra-plugin-stealth plugin. Generally, Crawlee's default configuration should have stronger bypassing but some features might land first in the stealth plugin.
- Find different sources of the data. The data might be rendered to the HTML but you could also find it in JavaScript (inlined in the HTML or in files) or in the API responses. Especially the APIs are often much less protected (if you use the right headers).
- Reverse engineer the JavaScript challenges that run on the page so you can figure out how the bypass them. This is a very advanced topic that you can read about online. We plan to introduce more content about this.
Keep in mind that there is no silver bullet solution. You can find many anti-scraping systems and each of them behaves differently depending the website's configuration. That is why "trying a few things" usually leads to success. You will find more details about these tricks in the https://docs.apify.com/academy/anti-scraping/mitigation.md section below.
First of all, why do websites want to block bots?
What's up with that?! A website might have a variety of reasons to block bots from accessing it. Here are a few of the main ones:
- To prevent the possibility of malicious bots from crawling the site to steal sensitive data like passwords or personal data about users.
- In order to avoid server performance hits due to bots making a large amount of requests to the website at a single time.
- To avoid their competitors to gain market insights about their business.
- To prevent bots from scraping their content and selling it to other websites or re-publishing it.
- To not skew their analytics data with bot traffic.
- If it is a social media website, they might be attempting to keep away bots programmed to mass create fake profiles (which are usually sold later).
We recommend checking out https://blog.apify.com/is-web-scraping-legal/.
Unfortunately for these websites, they have to make compromises and tradeoffs. While super strong anti-bot protections will surely prevent the majority of bots from accessing their content, there is also a higher chance of regular users being flagged as bots and being blocked as well. Because of this, different sites have different scraping-difficulty levels based on the anti-scraping measures they take.
Going into this topic, it's important to understand that there is no one silver bullet solution to bypassing protections against bots. Even if two websites are using Cloudflare (for example), one of them might be significantly more difficult to scrape due to harsher CloudFlare configurations. It is all about configuration, not the anti-scraping tool itself.
The principles of anti-scraping protections
Anti-scraping protections can work on many different layers and use a large amount of bot-identification techniques.
- Where you are coming from - The IP address of the incoming traffic is always available to the website. Proxies are used to emulate a different IP addresses but their quality matters a lot.
- How you look - With each request, the website can analyze its HTTP headers, TLS version, ciphers, and other information. Moreover, if you use a browser, the website can also analyze the whole browser fingerprint and run challenges to classify your hardware (like graphics hardware acceleration).
- What you are scraping - The same data can be extracted in many ways from a website. You can get the initial HTML or you can use a browser to render the full page or you can reverse engineer internal APIs. Each of those endpoints can be protected differently.
- How you behave - The website can see patterns in how you are ordering your requests, how fast you are scraping, etc. It can also analyze browser behavior like mouse movement, clicks or key presses.
These are the 4 main principles that anti-scraping protections are based on.
Not all websites use all of these principles but they encompass the possibilities websites have to track and block bots. All techniques that help you mitigate anti-scraping protections are based on making yourself blend in with the crowd of regular users with each of these principles.
A bot can usually be detected in one of two ways, which follow two different types of web scraping:
- Crawlers using HTTP requests
- Crawlers using browser automation (usually with a headless browser)
Once a bot is detected, there are some countermeasures a website takes to prevent it from re-accessing it. The protection techniques are divided into two main categories:
- Uses only the information provided within the HTTP request, such as headers, IP addresses, TLS versions, ciphers, etc.
- Uses JavaScript evaluation to collect browser fingerprint, or even track the user behavior on the website. These JavaScript evaluations can also track mouse movement or keys pressed. Based on the information gathered, they can decide if the user is a bot or a human. This method is often paired with the first one.
Once one of these methods detects that the user is a bot, it will take countermeasures depending on how advanced its techniques are.
A common workflow of a website after it has detected a bot goes as follows:
- The bot is added to the "greylist" (a list of suspicious IP addresses, fingerprints or any other value that can be used to uniquely identify the bot).
- A https://en.wikipedia.org/wiki/Turing_test is provided to the bot. Typically a captcha. If the bot succeeds, it is added to the whitelist.
- If the captcha is failed, the bot is added to the blacklist.
One thing to keep in mind while navigating through this course is that advanced anti-scraping methods are able to identify non-humans not only by one value (such as a single header value, or IP address), but are able to identify them through more complex things such as header combinations.
Watch a conference talk by https://github.com/mnmkng, which provides an overview of various anti-scraping measures and tactics for circumventing them.
https://www.youtube-nocookie.com/embed/aXil0K-M-Vs
Several years old?
Although the talk, given in 2021, features some outdated code examples, it still serves well as a general overview.
Common anti-scraping measures
Because we here at Apify scrape for a living, we have discovered many popular and niche anti-scraping techniques. We've compiled them into a short and comprehensible list here to help understand the roadblocks before this course teaches you how to get around them.
Not all issues you encounter are caused by anti-scraping systems. Sometimes, it's a configuration issue. Learn https://docs.apify.com/academy/node-js/analyzing-pages-and-fixing-errors.md.
IP rate-limiting
This is the most straightforward and standard protection, which is mainly implemented to prevent DDoS attacks, but it also works for blocking scrapers. Websites using rate limiting don't allow to more than some defined number of requests from one IP address in a certain time span. If the max-request number is low, then there is a high potential for false-positive due to IP address uniqueness, such as in large companies where hundreds of employees can share the same IP address.
Learn more about rate limiting https://docs.apify.com/academy/anti-scraping/techniques/rate-limiting.md
Header checking
This type of bot identification is based on the given fact that humans are accessing web pages through browsers, which have specific https://docs.apify.com/academy/concepts/http-headers.md sets which they send along with every request. The most commonly known header that helps to detect bots is the User-Agent header, which holds a value that identifies which browser is being used, and what version it's running. Though User-Agent is the most commonly used header for the Header checking method, other headers are sometimes used as well. The evaluation is often also run based on the header consistency, and includes a known combination of browser headers.
URL analysis
Solely based on the way how the bots operate. It compares data-rich page visits and the other page visits. The ratio of the data-rich and regular pages has to be high to identify the bot and reduce false positives successfully.
Regular structure changes
By definition, this is not an anti-scraping method, but it can heavily affect the reliability of a scraper. If your target website drastically changes its CSS selectors, and your scraper is heavily reliant on selectors, it could break. In principle, websites using this method change their HTML structure or CSS selectors randomly and frequently, making the parsing of the data harder, and requiring more maintenance of the bot.
One of the best ways of avoiding the possible breaking of your scraper due to website structure changes is to limit your reliance on data from HTML elements as much as possible (see https://docs.apify.com/academy/api-scraping.md and https://docs.apify.com/academy/node-js/js-in-html.md)
IP session consistency
This technique is commonly used to entirely block the bot from accessing the website altogether. It works on the principle that every entity that accesses the site gets a token. This token is then saved together with the IP address and HTTP request information such as User-Agent and other specific headers. If the entity makes another request, but without the session token, the IP address is added on the greylist.
Interval analysis
This technique is based on analyzing the time intervals of the visit of a website. If the times are very similar, the entity is added to the greylist. This method’s premise is that the bot runs in regular intervals by, for example, a CRON job that starts every Monday. It is a long-term strategy, so it should be used as an extension. This technique needs only the information from the HTTP request to identify the frequency of the visits.
Browser fingerprinting
One of the most successful and advanced methods is collecting the browser's "fingerprint", which is a fancy name for information such as fonts, audio codecs, canvas fingerprint, graphics card, and more. Browser fingerprints are highly unique, so they are a reliable means of identifying a specific user (or bot). If the fingerprint provides different/inconsistent information, the user is added to the greylist.
It's important to note that this method also blocks all users that cannot evaluate JavaScript (such as bots sending only static HTTP requests), and combines both of the fundamental methods mentioned earlier.
Honeypots
The honeypot approach is based on providing links that only bots can see. A typical example is hidden pagination. Usually, the bot needs to go through all the pages in the pagination, so the website's last "fake" page has a hidden link for the user, but has the same selector as the real one. Once the bot visits the link, it is automatically blacklisted. This method needs only the HTTP information.
First up
In our https://docs.apify.com/academy/anti-scraping/techniques.md, we'll be discussing more in-depth about the various anti-scraping methods and techniques websites use, as well as how to mitigate these protections.
Anti-scraping mitigation
After learning about the various different anti-scraping techniques websites use, learn how to mitigate them with a few different techniques.
In the https://docs.apify.com/academy/anti-scraping/techniques.md section of this course, you learned about multiple methods websites use to prevent bots from accessing their content. This Mitigation section will be all about how to circumvent these protections using various different techniques.
Next up
In the https://docs.apify.com/academy/anti-scraping/mitigation/proxies.md of this section, you'll be learning about what proxies are and how to use them in your own crawler.
Bypassing Cloudflare browser check
Learn how to bypass Cloudflare browser challenge with Crawlee.
If you find yourself stuck, there are a few strategies that you can employ. One key strategy is to ensure that your browser fingerprint is consistent. In some cases, the default browser fingerprint may actually be more effective than an inconsistently generated fingerprint. Additionally, it may be beneficial to avoid masking a Linux browser to look like a Windows or macOS browser, although this will depend on the specific configuration of the website you are targeting.
For those using Crawlee, the library provides out-of-the-box support for generating consistent fingerprints that are able to pass the Cloudflare challenge. However, it's important to note that in some cases, the Cloudflare challenge screen may return a 403 status code even if it is evaluating the fingerprint and the request is not blocked. This can cause the default Crawlee browser crawlers to throw an error and not wait until the challenge is submitted and the page is redirected to the target webpage.
To address this issue, it is necessary to alter the crawler configuration. For example, you might use the following code to remove default blocked status code handling from the crawler:
const crawler = new PlaywrightCrawler({
...otherOptions,
sessionPoolOptions: {
blockedStatusCodes: [],
},
});
It's important to note that by removing default blocked status code handling, you should also add custom session retire logic on blocked pages to reduce retries. Additionally, you should add waiting logic to start the automation logic only after the Cloudflare challenge is solved and the page is redirected. This can be accomplished by waiting for a common selector that is available on all pages, such as a header logo.
In some cases, the browser may not pass the check and you may be presented with a captcha, indicating that your IP address has been graylisted. If you are working with a large pool of proxies you can retire the session and use another IP. However, if you have a small pool of proxies you might want to whitelist the IP. To do this, you'll need to solve the captcha to improve your IP address's reputation. You can find various captcha-solving services, such as https://anti-captcha.com/, that you can use for this purpose. For more info check the section about https://docs.apify.com/academy/anti-scraping/techniques/captchas.md.
In summary, while Cloudflare's browser challenge is designed to protect websites from automated scraping, it can be bypassed by ensuring a consistent browser fingerprint and customizing your scraping strategy. Crawlee offers out-of-the-box support for generating consistent fingerprints, but you may need to adjust your crawler configuration to handle Cloudflare's response. By following these tips, you can successfully navigate Cloudflare's browser challenge and continue scraping the data you need.
Generating fingerprints
Learn how to use two super handy npm libraries to generate fingerprints and inject them into a Playwright or Puppeteer page.
In https://crawlee.dev, you can use https://crawlee.dev/api/browser-pool/interface/FingerprintOptions on a crawler to automatically generate fingerprints.
import { PlaywrightCrawler } from 'crawlee';
const crawler = new PlaywrightCrawler({
browserPoolOptions: {
fingerprintOptions: {
fingerprintGeneratorOptions: {
browsers: [{ name: 'firefox', minVersion: 80 }],
devices: ['desktop'],
operatingSystems: ['windows'],
},
},
},
});
Note that Crawlee will automatically generate fingerprints for you with no configuration necessary, but the option to configure them yourself is still there within browserPoolOptions.
Using the fingerprint-generator package
Crawlee uses the https://github.com/apify/fingerprint-suite npm package to do its fingerprint generating magic. For maximum control outside of Crawlee, you can install it on its own. With this package, you can generate browser fingerprints.
It is crucial to generate fingerprints for the specific browser and operating system being used to trick the protections successfully. For example, if you are trying to overcome protection locally with Firefox on a macOS system, you should generate fingerprints for Firefox and macOS to achieve the best results.
import { FingerprintGenerator } from 'fingerprint-generator';
// Instantiate the fingerprint generator with
// configuration options
const fingerprintGenerator = new FingerprintGenerator({
browsers: [
{ name: 'firefox', minVersion: 80 },
],
devices: [
'desktop',
],
operatingSystems: [
'windows',
],
});
// Grab a fingerprint from the fingerprint generator
const generated = fingerprintGenerator.getFingerprint({
locales: ['en-US', 'en'],
});
Injecting fingerprints
Once you've manually generated a fingerprint using the Fingerprint generator package, it can be injected into the browser using https://github.com/apify/fingerprint-injector. This tool allows you to inject fingerprints into browsers automated by Playwright or Puppeteer:
import FingerprintGenerator from 'fingerprint-generator';
import { FingerprintInjector } from 'fingerprint-injector';
import { chromium } from 'playwright';
// Instantiate a fingerprint injector
const fingerprintInjector = new FingerprintInjector();
// Launch a browser in Playwright
const browser = await chromium.launch();
// Instantiate the fingerprint generator with
// configuration options
const fingerprintGenerator = new FingerprintGenerator({
browsers: [
{ name: 'firefox', minVersion: 80 },
],
devices: [
'desktop',
],
operatingSystems: [
'windows',
],
});
// Grab a fingerprint
const generated = fingerprintGenerator.getFingerprint({
locales: ['en-US', 'en'],
});
// Create a new browser context, plugging in
// some values from the fingerprint
const context = await browser.newContext({
userAgent: generated.fingerprint.userAgent,
locale: generated.fingerprint.navigator.language,
});
// Attach the fingerprint to the newly created
// browser context
await fingerprintInjector.attachFingerprintToPlaywright(context, generated);
// Create a new page and go to Google
const page = await context.newPage();
await page.goto('https://google.com');
Note that https://crawlee.dev automatically applies wide variety of fingerprints by default, so it is not required to do this unless you aren't using Crawlee or if you need a super specific custom fingerprint to scrape with.
Generating headers
Headers are also used by websites to fingerprint users (or bots), so it might sometimes be necessary to generate some user-like headers to mitigate anti-scraping protections. Similarly with fingerprints, Crawlee automatically generates headers for you, but you can have full control by using the https://github.com/apify/browser-headers-generator package.
import BrowserHeadersGenerator from 'browser-headers-generator';
const browserHeadersGenerator = new BrowserHeadersGenerator({
operatingSystems: ['windows'],
browsers: ['chrome'],
});
await browserHeadersGenerator.initialize();
const randomBrowserHeaders = await browserHeadersGenerator.getRandomizedHeaders();
Wrap up
That's it for the Mitigation course for now, but be on the lookout for future lessons! We release lessons as we write them, and will be updating the Academy frequently, so be sure to check back every once in a while for new content!
Proxies
Learn all about proxies, how they work, and how they can be leveraged in a scraper to avoid blocking and other anti-scraping tactics.
A proxy server provides a gateway between users and the internet, to be more specific in our case - between the crawler and the target website.
Many websites have https://docs.apify.com/academy/anti-scraping/techniques/rate-limiting.md set up, which is when a website limits the rate at which requests can be sent from a single IP address. In cases when a higher number of requests is expected for the crawler - using a proxy is essential to let the crawler run as smoothly as possible and avoid being blocked.
The following factors determine the quality of a proxy IP:
- How many users share the same proxy IP address?
- How did the previous user use (or overuse) the proxy?
- How long was the proxy left to "heal" before it was resold?
- What is the quality of the underlying server of the proxy? (latency)
Although IP quality is still the most important factor when it comes to using proxies and avoiding anti-scraping measures, nowadays it's not just about avoiding rate-limiting, which brings new challenges for scrapers that can no longer rely on IP rotation. Anti-scraping software providers, such as CloudFlare, have global databases of "suspicious" IP addresses. If you are unlucky, your newly bought IP might be blocked even before you use it. If the previous owners overused it, it might have already been marked as suspicious in many databases, or even (very likely) was blocked altogether. If you care about the quality of your IPs, use them as a real user, and any website will have a hard time banning them completely.
Fixing rate-limiting issues is only the tip of the iceberg of what proxies can do for your scrapers, though. By implementing proxies properly, you can successfully avoid the majority of anti-scraping measures listed in the https://docs.apify.com/academy/anti-scraping.md.
About proxy links
To use a proxy, you need a proxy link, which contains the connection details, sometimes including credentials.
http://proxy.example.com:8080
The proxy link above has several parts:
http://tells us we're using HTTP protocol,proxy.example.comis a hostname, i.e. an address to the proxy server,8080is a port number.
Sometimes the proxy server has no name, so the link contains an IP address instead:
http://123.456.789.10:8080
If proxy requires authentication, the proxy link can contain username and password:
http://USERNAME:PASSWORD@proxy.example.com:8080
Proxy rotation
Web scrapers can implement a method called "proxy rotation" to rotate the IP addresses they use to access websites. Each request can be assigned a different IP address, which makes it appear as if they are all coming from different users in different location. This greatly enhances performance, and is a major factor when it comes to making a web scraper appear more human.
Next up
Proxies are one of the most important things to understand when it comes to mitigating anti-scraping techniques in a scraper. Now that you're familiar with what they are, the next lesson will be teaching you how to configure your crawler in Crawlee to use and automatically rotate proxies. https://docs.apify.com/academy/anti-scraping/mitigation/using-proxies.md
Using proxies
Learn how to use and automagically rotate proxies in your scrapers by using Crawlee, and a bit about how to obtain pools of proxies.
In the https://docs.apify.com/academy/web-scraping-for-beginners/crawling/pro-scraping.md course, we learned about the power of Crawlee, and how it can streamline the development process of web crawlers. You've already seen how powerful the crawlee package is; however, what you've been exposed to thus far is only the tip of the iceberg.
Because proxies are so widely used in the scraping world, Crawlee has built-in features for implementing them in an effective way. One of the main functionalities that comes baked into Crawlee is proxy rotation, which is when each request is sent through a different proxy from a proxy pool.
Implementing proxies in a scraper
Let's borrow some scraper code from the end of the https://docs.apify.com/academy/web-scraping-for-beginners/crawling/pro-scraping.md lesson in our Web scraping basics for JavaScript devs course and paste it into a new file called proxies.js. This code enqueues all of the product links on https://demo-webstore.apify.org's on-sale page, then makes a request to each product page and scrapes data about each one:
// crawlee.js
import { CheerioCrawler, Dataset } from 'crawlee';
const crawler = new CheerioCrawler({
requestHandler: async ({ $, request, enqueueLinks }) => {
if (request.label === 'START') {
await enqueueLinks({
selector: 'a[href*="/product/"]',
});
// When on the START page, we don't want to
// extract any data after we extract the links.
return;
}
// We copied and pasted the extraction code
// from the previous lesson
const title = $('h3').text().trim();
const price = $('h3 + div').text().trim();
const description = $('div[class*="Text_body"]').text().trim();
// Instead of saving the data to a variable,
// we immediately save everything to a file.
await Dataset.pushData({
title,
description,
price,
});
},
});
await crawler.addRequests([{
url: 'https://demo-webstore.apify.org/search/on-sale',
// By labeling the Request, we can identify it
// later in the requestHandler.
label: 'START',
}]);
await crawler.run();
In order to implement a proxy pool, we will first need some proxies. We'll quickly use the free https://apify.com/mstephen190/proxy-scraper on the Apify platform to get our hands on some quality proxies. Next, we'll need to set up a https://crawlee.dev/api/core/class/ProxyConfiguration and configure it with our custom proxies, like so:
import { ProxyConfiguration } from 'crawlee';
const proxyConfiguration = new ProxyConfiguration({
proxyUrls: ['http://45.42.177.37:3128', 'http://43.128.166.24:59394', 'http://51.79.49.178:3128'],
});
Awesome, so there's our proxy pool! Usually, a proxy pool is much larger than this; however, a three proxies pool is totally fine for tutorial purposes. Finally, we can pass the proxyConfiguration into our crawler's options:
const crawler = new CheerioCrawler({
proxyConfiguration,
requestHandler: async ({ $, request, enqueueLinks }) => {
if (request.label === 'START') {
await enqueueLinks({
selector: 'a[href*="/product/"]',
});
return;
}
const title = $('h3').text().trim();
const price = $('h3 + div').text().trim();
const description = $('div[class*="Text_body"]').text().trim();
await Dataset.pushData({
title,
description,
price,
});
},
});
Note that if you run this code, it may not work, as the proxies could potentially be down/non-operating at the time you are going through this course.
That's it! The crawler will now automatically rotate through the proxies we provided in the proxyUrls option.
A bit about debugging proxies
At the time of writing, the scraper above utilizing our custom proxy pool is working just fine. But how can we check that the scraper is for sure using the proxies we provided it, and more importantly, how can we debug proxies within our scraper? Luckily, within the same context object we've been destructuring $ and request out of, there is a proxyInfo key as well. proxyInfo is an object which includes useful data about the proxy which was used to make the request.
const crawler = new CheerioCrawler({
proxyConfiguration,
// Destructure "proxyInfo" from the "context" object
handlePageFunction: async ({ $, request, proxyInfo }) => {
// Log its value
console.log(proxyInfo);
// ...
// ...
},
});
After modifying your code to log proxyInfo to the console and running the scraper, you're going to see some logs which look like this:

These logs confirm that our proxies are being used and rotated successfully by Crawlee, and can also be used to debug slow or broken proxies.
Higher level proxy scraping
Though we will discuss it more in-depth in future courses, it is still important to mention that Crawlee has integrated support for the Apify SDK, which supports https://apify.com/proxy - a service that provides access to pools of both residential and datacenter IP addresses. A proxyConfiguration using Apify Proxy might look something like this:
import { Actor } from 'apify';
const proxyConfiguration = await Actor.createProxyConfiguration({
countryCode: 'US',
});
Notice that we didn't provide it a list of proxy URLs. This is because the SHADER group already serves as our proxy pool (courtesy of Apify Proxy).
Next up
https://docs.apify.com/academy/anti-scraping/mitigation/generating-fingerprints.md, we'll be checking out how to use two npm packages to generate and inject https://docs.apify.com/academy/anti-scraping/techniques/fingerprinting.md.
Anti-scraping techniques
Understand the various common (and obscure) anti-scraping techniques used by websites to prevent bots from accessing their content.
In this section, we'll be discussing some of the most common (as well as some obscure) anti-scraping techniques used by websites to detect and block/limit bots from accessing their content.
When a scraper is detected, a website can respond in a variety of ways:
"Access denied" page
This is a complete block which usually has a response status code of 403. Usually, you'll hit an Access denied page if you have bad IP address or the website is restricted in the country of the IP address.
For a better understanding of what all the HTTP status codes mean, we recommend checking out https://http.cat/ which provides a highly professional description for each status code.
Captcha page
Probably the most common blocking method. The website gives you a chance to prove that you are not a bot by presenting you with a captcha. We'll be covering captchas within this course.
Redirect
Another common method is redirecting to the home page of the site (or a different location).
Request timeout/Socket hangup
This is the cheapest defense mechanism where the website won't even respond to the request. Dealing with timeouts in a scraper can be challenging, because you have to differentiate them from regular network problems.
Custom status code or message
Similar to getting an Access denied page, but some sites send along specific status codes (eg. 503) and messages explaining what was wrong with the request.
Empty results
The website responds "normally," but pretends to not find any results. This requires manual testing to recognize the pattern.
Fake results
The website responds with data, but the data is totally fake, which is very difficult to recognize and requires extensive manual testing. Luckily, this type of response is not all too common.
Next up
In the https://docs.apify.com/academy/anti-scraping/techniques/rate-limiting.md of this course, you'll be learning about rate limiting, which is a technique used to prevent a large amount of requests from being sent from one user.
Browser challenges
Learn how to navigate browser challenges like Cloudflare's to effectively scrape data from protected websites.
Browser challenges
Browser challenges are a type of security measure that relies on browser fingerprints. These challenges typically involve a JavaScript program that collects both static and dynamic browser fingerprints. Static fingerprints include attributes such as User-Agent, video card, and number of CPU cores available. Dynamic fingerprints, on the other hand, might involve rendering fonts or objects in the canvas (known as a https://docs.apify.com/academy/anti-scraping/techniques/fingerprinting.md#with-canvases), or playing audio in the https://docs.apify.com/academy/anti-scraping/techniques/fingerprinting.md#from-audiocontext. We were covering the details in the previous https://docs.apify.com/academy/anti-scraping/techniques/fingerprinting.md lesson.
While some browser challenges are relatively straightforward - for example, loading an image and checking if it renders correctly - others can be much more complex. One well-known example of a complex browser challenge is Cloudflare's browser screen check. In this challenge, Cloudflare visually inspects the browser screen and blocks the first request if any inconsistencies are found. This approach provides an extra layer of protection against automated attacks.
Many online protections incorporate browser challenges into their security measures, but the specific techniques used can vary.
Cloudflare browser challenge
One of the most well-known browser challenges is the one used by Cloudflare. Cloudflare has a massive dataset of legitimate canvas fingerprints and User-Agent pairs, which they use in conjunction with machine learning algorithms to detect any device property spoofing. This might include spoofed User-Agent headers, operating systems, or GPUs.
When you encounter a Cloudflare browser challenge, the platform checks your canvas fingerprint against the expected value. If there is a mismatch, the request is blocked. However, if your canvas fingerprint matches the expected value, Cloudflare issues a cookie that allows you to continue scraping - even without the browser - until the cookie is invalidated.
It's worth noting that Cloudflare's protection is highly customizable, and can be adjusted to be extremely strict or relatively loose. This makes it a powerful tool for website owners who want to protect against automated traffic, while still allowing legitimate traffic to flow through.
If you want to learn how to bypass Cloudflare challenge visit the https://docs.apify.com/academy/anti-scraping/mitigation/cloudflare-challenge.md article.
Next up
In the https://docs.apify.com/academy/anti-scraping/techniques/captchas.md, we'll be covering captchas, which were mentioned throughout this lesson. It's important to note that attempting to solve a captcha programmatically is the last resort - always try to avoid being presented with the captcha in the first place by using the techniques mentioned in this lesson.
Captchas
Learn about the reasons a bot might be presented a captcha, the best ways to avoid captchas in the first place, and how to programmatically solve them.
In general, a website will present a user (or scraper) a captcha for 2 main reasons:
- The website always does captcha checks to access the desired content.
- One of the website's anti-bot measures (or the https://docs.apify.com/academy/anti-scraping/techniques/firewalls.md) has flagged the user as suspicious.
Dealing with captchas
When you've hit a captcha, your first thought should not be how to programmatically solve it. Rather, you should consider the factors as to why you received the captcha in the first place: your bot didn't appear enough like a real user to avoid being presented the challenge.
Have you expended all of the possible options to make your scraper appear more human-like? Are you:
- Using https://docs.apify.com/academy/anti-scraping/mitigation/proxies.md?
- Making the request with the proper https://docs.apify.com/academy/concepts/http-headers.md and https://docs.apify.com/academy/concepts/http-cookies.md?
- Generating and using a custom https://docs.apify.com/academy/anti-scraping/techniques/fingerprinting.md?
- Trying different general scraping methods (HTTP scraping, browser scraping)? If you are using browser scraping, have you tried using a different browser?
Solving captchas
If you've tried everything you can to avoid being presented the captcha and are still facing this roadblock, there are methods to programmatically solve captchas.
Tons of different types of captchas exist, but one of the most popular is Google's https://www.google.com/recaptcha/about/.

reCAPTCHAs can be solved using the https://apify.com/petr_cermak/anti-captcha-recaptcha Actor on the Apify platform (note that this method requires an account on https://anti-captcha.com).
Another popular captcha is the https://www.geetest.com/en/adaptive-captcha-demo. You can learn how to solve these types of captchas in Puppeteer by reading this https://filipvitas.medium.com/how-to-solve-geetest-slider-captcha-with-js-ac764c4e9905. Amazon's captcha can similarly also be solved programmatically.
Wrap up
In this course, you've learned about some of the most common (and some of the most advanced) anti-scraping techniques. Keep in mind that as the web (and technology in general) evolves, this section of the Anti scraping course will evolve as well. In the https://docs.apify.com/academy/anti-scraping/mitigation.md, we'll be discussing how to mitigate the anti-scraping techniques you learned about in this section.
Fingerprinting
Understand browser fingerprinting, an advanced technique used by browsers to track user data and even block bots from accessing them.
Browser fingerprinting is a method that some websites use to collect information about a browser's type and version, as well as the operating system being used, any active plugins, the time zone and language of the machine, the screen resolution, and various other active settings. All of this information is called the fingerprint of the browser, and the act of collecting it is called fingerprinting.
Yup! Surprisingly enough, browsers provide a lot of information about the user (and even their machine) that is accessible to websites! Browser fingerprinting wouldn't even be possible if it weren't for the sheer amount of information browsers provide, and the fact that each fingerprint is unique.
Based on https://www.eff.org/press/archives/2010/05/13 carried out by the Electronic Frontier Foundation, 84% of collected fingerprints are globally exclusive, and they found that the next 9% were in sets with a size of two. They also stated that even though fingerprints are dynamic, new ones can be matched up with old ones with 99.1% correctness. This makes fingerprinting a very viable option for websites that want to track the online behavior of their users in order to serve hyper-personalized advertisements to them. In some cases, it is also used to aid in preventing bots from accessing the websites (or certain sections of it).
What makes up a fingerprint?
To collect a good fingerprint, websites must collect them from various places.
From HTTP headers
Several https://docs.apify.com/academy/concepts/http-headers.md can be used to create a fingerprint about a user. Here are some of the main ones:
- User-Agent provides information about the browser and its operating system (including its versions).
- Accept tells the server what content types the browser can render and send, and Content-Encoding provides data about the content compression.
- Content-Language and Accept-Language both indicate the user's (and browser's) preferred language.
- Referer gives the server the address of the previous page from which the link was followed.
A few other headers commonly used for fingerprinting can be seen below:

From window properties
The window is defined as a global variable that is accessible from JavaScript running in the browser. It is home to a vast amount of functions, variables, and constructors, and most of the global configuration is stored there.
Most of the attributes that are used for fingerprinting are stored under the window.navigator object, which holds methods and info about the user's state and identity starting with the User-Agent itself and ending with the device's battery status. All of these properties can be used to fingerprint a device; however, most fingerprinting solutions (such as https://valve.github.io/fingerprintjs/) only use the most crucial ones.
Here is a list of some of the most crucial properties on the window object used for fingerprinting:
| Property | Example | Description |
|---|---|---|
screen.width |
1680 |
Defines the width of the device screen. |
screen.height |
1050 |
Defines the height of the device screen. |
screen.availWidth |
1680 |
The portion of the screen width available to the browser window. |
screen.availHeight |
1050 |
The portion of the screen height available to the browser window. |
navigator.userAgent |
'Mozilla/5.0 (X11; Linux x86_64; rv:90.0) Gecko/20100101 Firefox/90.0' |
Same as the HTTP header. |
navigator.platform |
'MacIntel' |
The platform the browser is running on. |
navigator.cookieEnabled |
true |
Whether or not the browser accepts cookies. |
navigator.doNotTrack |
'1' |
Indicates the browser's Do Not Track settings. |
navigator.buildID |
20181001000000 |
The build ID of the browser. |
navigator.product |
'Gecko' |
The layout engine used. |
navigator.productSub |
20030107 |
The version of the layout engine used. |
navigator.vendor |
'Google Inc.' |
Vendor of the browser. |
navigator.hardwareConcurrency |
4 |
The number of logical processors the user's computer has available to run threads on. |
navigator.javaEnabled |
false |
Whether or not the user has enabled Java. |
navigator.deviceMemory |
8 |
Approximately the amount of user memory (in gigabytes). |
navigator.language |
'en-US' |
The user's primary language. |
navigator.languages |
['en-US', 'cs-CZ', 'es'] |
Other user languages. |
From function calls
Fingerprinting tools can also collect pieces of information that are retrieved by calling specific functions:
// Get the WebGL vendor information
WebGLRenderingContext.getParameter(37445);
// Get the WebGL renderer information
WebGLRenderingContext.getParameter(37446);
// Pass any codec into this function (ex. "audio/aac"). It will return
// either "maybe," "probably," or "" indicating whether
// or not the browser can play that codec. An empty
// string means that it can't be played.
HTMLMediaElement.canPlayType('some/codec');
// can ask for a permission if it is not already enabled.
// allows you to know which permissions the user has
// enabled, and which are disabled
navigator.permissions.query('some_permission');
With canvases
This technique is based on rendering https://developer.mozilla.org/en-US/docs/Web/API/WebGL_API scenes to a canvas element and observing the pixels rendered. WebGL rendering is tightly connected with the hardware, and therefore provides high entropy. Here's a quick breakdown of how it works:
- A JavaScript script creates a https://developer.mozilla.org/en-US/docs/Web/API/Canvas_API and renders some font or a custom shape.
- The script then gets the pixel-map from the `` element.
- The collected pixel-map is stored in a cryptographic hash specific to the device's hardware.
Canvas fingerprinting takes advantage of the CSS3 feature for importing fonts into CSS (called https://developer.mozilla.org/en-US/docs/Learn/CSS/Styling_text/Web_fonts). This means it's not required to use just the machine's preinstalled fonts.
Here's an example of multiple WebGL scenes visibly being rendered differently on different machines:

From AudioContext
The https://developer.mozilla.org/en-US/docs/Web/API/AudioContext API represents an audio-processing graph built from audio modules linked together, each represented by an https://developer.mozilla.org/en-US/docs/Web/API/AudioNode (https://developer.mozilla.org/en-US/docs/Web/API/OscillatorNode).
In the simplest cases, the fingerprint can be obtained by checking for the existence of AudioContext. However, this doesn't provide very much information. In advanced cases, the technique used to collect a fingerprint from AudioContext is quite similar to the `` method:
- Audio is passed through an OscillatorNode.
- The signal is processed and collected.
- The collected signal is cryptographically hashed to provide a short ID.
A downfall of this method is that two same machines with the same browser will get the same ID.
From BatteryManager
The navigator.getBattery() function returns a promise which resolves with a https://developer.mozilla.org/en-US/docs/Web/API/BatteryManager interface. BatteryManager offers information about whether or not the battery is charging, and how much time is left until the battery has fully discharged/charged.
On its own this method is quite weak, but it can be potent when combined with the `` and AudioContext fingerprinting techniques mentioned above.
Fingerprint example
When all is said and done, this is what a browser fingerprint might look like:
{
"userAgent": "Mozilla/5.0 (X11; Linux x86_64; rv:90.0) Gecko/20100101 Firefox/90.0",
"cookiesEnabled": true,
"timezone": "Europe/Prague",
"timezoneOffset": -60,
"audioCodecs": {
"ogg": "probably",
"mp3": "maybe",
"wav": "probably",
"m4a": "maybe",
"aac": "maybe"
},
"videoCodecs": {
"ogg": "probably",
"h264": "probably",
"webm": "probably"
},
"videoCard": [
"Intel Open Source Technology Center",
"Mesa DRI Intel(R) HD Graphics 4600 (HSW GT2)"
],
"productSub": "20100101",
"hardwareConcurrency": 8,
"multimediaDevices": {
"speakers": 0,
"micros": 0,
"webcams": 0
},
"platform": "Linux x86_64",
"pluginsSupport": true,
"screenResolution": [ 1920, 1080 ],
"availableScreenResolution": [ 1920, 1080 ],
"colorDepth": 24,
"touchSupport": {
"maxTouchPoints": 0,
"touchEvent": false,
"touchStart": false
},
"languages": [ "en-US", "en" ]
}
How it works
Sites employ multiple levels and different approaches to collect browser fingerprints. However, they all have one thing in common: they are using a script written in JavaScript to evaluate the target browser's context and collect information about it (oftentimes also storing it in their database, or in a cookie). These scripts are often obfuscated and difficult to track down and understand, especially if they are anti-bot scripts.
Multiple levels of script obfuscation are used to make fingerprinting scripts unreadable and hard to find:
Randomization
The script is modified with some random JavaScript elements. Additionally, it also often incorporates a random number of whitespaces and other unusual formatting characters as well as cryptic variable and function names devoid of readable meaning.
Data obfuscation
Two main data obfuscation techniques are widely employed:
- String splitting uses the concatenation of multiple substrings. It is mostly used alongside an
eval()ordocument.write(). - Keyword replacement allows the script to mask the accessed properties. This allows the script to have a random order of the substrings and makes it harder to detect.
Oftentimes, both of these data obfuscation techniques are used together.
Encoding
Built-in JavaScript encoding functions are used to transform the code into, for example, hexadecimal string. Or, a custom encoding function is used and a custom decoding function decodes the code as it is evaluated in the browser.
Detecting fingerprinting scripts
As mentioned above, many sites obfuscate their fingerprinting scripts to make them harder to detect. Luckily for us, there are ways around this.
Manual de-obfuscation
Almost all sites using fingerprinting and tracking scripts try to protect them as much as much as they can. However, it is impossible to make client-side JavaScript immune to reverse engineering. It is only possible to make reverse engineering difficult and unpleasant for the developer. The procedure used to make the code as unreadable as possible is called https://www.techtarget.com/searchsecurity/definition/obfuscation#:~:text=Obfuscation%20means%20to%20make%20something,code%20is%20one%20obfuscation%20method..
When you want to dig inside the protection code to determine exactly which data is collected, you will probably have to deobfuscate it. Be aware that this can be a very time-consuming process. Code deobfuscation can take anywhere up to 1–2 days to be in a semi-readable state.
We recommend watching some videos from https://www.youtube.com/channel/UCJbZGfomrHtwpdjrARoMVaA/videos to learn the tooling necessary to deobfuscate code.
Using browser extensions
Because of how common it has become to obfuscate fingerprinting scripts, there are many extensions that help identify fingerprinting scripts due to the fact that browser fingerprinting is such a big privacy question. Browser extensions such as https://github.com/freethenation/DFPM have been created to help detect them. In the extension's window, you can see a report on which functions commonly used for fingerprinting have been called, and which navigator properties have been accessed.

This extension provides monitoring of only a few critical attributes, but in order to deceive anti-scraping protections, the full list is needed. However, the extension does reveal the scripts that collect the fingerprints.
Anti-bot fingerprinting
On websites which implement advanced fingerprinting techniques, they will tie the fingerprint and certain headers (such as the User-Agent header) to the IP address of the user. These sites will block a user (or scraper) if it made a request with one fingerprint and set of headers, then tries to make another request on the same proxy but with a different fingerprint.
When dealing with these cases, it's important to sync the generation of headers and fingerprints with the rotation of proxies (this is known as session rotation).
Next up
https://docs.apify.com/academy/anti-scraping/techniques/geolocation.md, we'll be covering geolocation methods that websites use to grab the location from which a request has been made, and how they relate to anti-scraping.
Firewalls
Understand what a web-application firewall is, how they work, and the various common techniques for avoiding them altogether.
A web-application firewall (or WAF) is a tool for website admins which allows them to set various access rules for their visitors. The rules can vary on each website and are usually hard to detect; therefore, on sites using a WAF, you need to run a set of tests to test the rules and find out their limits.
One of the most common WAFs one can come across is the one from https://www.cloudflare.com. It allows setting a waiting screen that runs a few tests against the visitor to detect a genuine visitor or a bot. However, not all WAFs are that easy to detect.

How it works
WAFs work on a similar premise as regular firewalls. Web admins define the rules, and the firewall executes them. As an example of how the WAF can work, we will take a look at Cloudflare's solution:
- The visitor sends a request to the webpage.
- The request is intercepted by the firewall.
- The firewall decides if presenting a challenge (captcha) is necessary. If the user already solved a captcha in the past or nothing is suspicious, it will immediately forward the request to the application's server.
- A captcha is presented which must be solved. Once it is solved, a https://docs.apify.com/academy/concepts/http-cookies.md is stored in the visitor's browser.
- The request is forwarded to the application's server.

Since there are multiple providers, it is essential to say that the challenges are not always graphical and can be entirely server-side (without any JavaScript evaluation in the visitor browser).
Bypassing web-application firewalls
- Using https://docs.apify.com/academy/anti-scraping/mitigation/proxies.md.
- Mocking https://docs.apify.com/academy/concepts/http-headers.md.
- Overriding the browser's https://docs.apify.com/academy/anti-scraping/techniques/fingerprinting.md (most effective).
- Farming the https://docs.apify.com/academy/concepts/http-cookies.md from a website with a headless browser, then using the farmed cookies to do HTTP based scraping (most performant).
As you likely already know, there is no solution that fits all. If you are struggling to get past a WAF provider, you can try using Firefox with Playwright.
Next up
In the https://docs.apify.com/academy/anti-scraping/techniques/browser-challenges.md, we'll be covering browser challenges and specifically the Cloudflare browser challenge which is part of the Cloudflare WAF mentioned in this lesson.
Geolocation
Learn about the geolocation techniques to determine where requests are coming from, and a bit about how to avoid being blocked based on geolocation.
Geolocation is yet another way websites can detect and block access or show limited data. Other than by using the https://developer.mozilla.org/en-US/docs/Web/API/Geolocation_API (which requires user permission in order to receive location data), there are two main ways that websites geolocate a user (or bot) visiting it.
Cookies & headers
Certain websites might use certain location-specific/language-specific https://docs.apify.com/academy/concepts/http-headers.md/https://docs.apify.com/academy/concepts/http-cookies.md to geolocate a user. Some examples of these headers are Accept-Language and CloudFront-Viewer-Country (which is a custom HTTP header from https://docs.aws.amazon.com/AmazonCloudFront/latest/DeveloperGuide/adding-cloudfront-headers.html).
On targets which are utilizing just cookies and headers to identify the location from which a request is coming from, it is pretty straightforward to make requests which appear like they are coming from somewhere else.
IP address
The oldest (and still most common) way of geolocating is based on the IP address used to make the request. Sometimes, country-specific sites block themselves from being accessed from any other country (some Chinese, Indian, Israeli, and Japanese websites do this).
https://docs.apify.com/academy/anti-scraping/mitigation/proxies.md can be used in a scraper to bypass restrictions and to make requests from a different location. Oftentimes, proxies need to be used in combination with location-specific https://docs.apify.com/academy/concepts/http-cookies.md/https://docs.apify.com/academy/concepts/http-headers.md.
Override/emulate geolocation when using a browser-based scraper
When using https://pptr.dev/#?product=Puppeteer&show=api-pagesetgeolocationoptions, you can emulate the geolocation with the page.setGeolocation() function.
In https://playwright.dev/docs/api/class-browsercontext#browsercontextsetgeolocationgeolocation, geolocation can be emulated by using browserContext.setGeolocation().
Overriding browser geolocation should be used in tandem with a proper proxy corresponding to the emulated geolocation. You would still likely get blocked if you, for example, used a German proxy with the overridden location set to Japan.
Rate-limiting
Learn about rate-limiting, a common tactic used by websites to avoid a large and non-human rate of requests coming from a single IP address.
When crawling a website, a web scraping bot will typically send many more requests from a single IP address than a human user could generate over the same period. Websites can monitor how many requests they receive from a single IP address, and block it or require a https://docs.apify.com/academy/anti-scraping/techniques/captchas.md test to continue making requests.
In the past, most websites had their own anti-scraping solutions, the most common of which was IP address rate-limiting. In recent years, the popularity of third-party specialized anti-scraping providers has dramatically increased, but a lot of websites still use rate-limiting to only allow a certain number of requests per second/minute/hour to be sent from a single IP; therefore, crawler requests have the potential of being blocked entirely quite quickly.
In cases when a higher number of requests is expected for the crawler, using a https://docs.apify.com/academy/anti-scraping/mitigation/proxies.md and rotating the IPs is essential to let the crawler run as smoothly as possible and avoid being blocked.
Dealing with rate limiting by rotating proxy or session
The most popular and effective way of avoiding rate-limiting issues is by rotating https://docs.apify.com/academy/anti-scraping/mitigation/proxies.md after every n number of requests, which makes your scraper appear as if it is making requests from various different places. Since the majority of rate-limiting solutions are based on IP addresses, rotating IPs allows a scraper to make large amounts to a website without getting restricted.
In Crawlee, proxies are automatically rotated for you when you use ProxyConfiguration and a https://crawlee.dev/api/core/class/SessionPool within a crawler. The SessionPool handles a lot of the nitty gritty of proxy rotating, especially with https://docs.apify.com/academy/puppeteer-playwright.md by retiring a browser instance after a certain number of requests have been sent from it in order to use a new proxy (a browser instance must be retired in order to use a new proxy).
Here is an example of these features being used in a PuppeteerCrawler instance:
import { PuppeteerCrawler } from 'crawlee';
import { Actor } from 'apify';
const myCrawler = new PuppeteerCrawler({
proxyConfiguration: await Actor.createProxyConfiguration({
groups: ['RESIDENTIAL'],
}),
sessionPoolOptions: {
// Note that a proxy is tied to a session
sessionOptions: {
// Let's say the website starts blocking requests after
// 20 requests have been sent in the span of 1 minute from
// a single user.
// We can stay on the safe side and retire the browser
// and rotate proxies after 15 pages (requests) have been opened.
maxUsageCount: 15,
},
},
// ...
});
Take a look at the https://docs.apify.com/academy/anti-scraping/mitigation/using-proxies.md lesson to learn more about how to use proxies and rotate them in Crawlee.
Configuring a session pool
To set up the SessionPool for different rate-limiting scenarios, you can use various configuration options in sessionPoolOptions. In the example above, we used maxUsageCount within sessionOptions to prevent more than 15 requests from being sent using a session before it was thrown away; however, a maximum age can also be set using maxAgeSecs.
When dealing with frequent and unpredictable blockage, the maxErrorScore option can be set to trash a session after it's hit a certain number of errors.
To learn more about all configurations available in sessionPoolOptions, refer to the https://crawlee.dev/api/core/interface/SessionPoolOptions.
Don't worry too much about these configurations. Crawlee's defaults are usually good enough for the majority of use cases.
Next up
Though rate limiting is still common today, a lot of sites have improved over the years to use more complicated techniques such as browser fingerprinting, which is covered in the https://docs.apify.com/academy/anti-scraping/techniques/fingerprinting.md.
Using Apify API
A collection of various tutorials explaining how to interact with the Apify platform programmatically using its API.
This section explains how you can run https://docs.apify.com/platform/actors.md using Apify's https://docs.apify.com/api/v2.md, retrieve their results, and integrate them into your own product and workflows. You can do this using a raw HTTP client, or you can benefit from using one of our API clients for:
API scraping
Learn all about how the professionals scrape various types of APIs with various configurations, parameters, and requirements.
API scraping is locating a website's API endpoints, and fetching the desired data directly from their API, as opposed to parsing the data from their rendered HTML pages.
Note: In the next few lessons, we'll be using https://soundcloud.com as an example target, but the techniques described here can be applied to any site.
In this module, we will discuss the benefits and drawbacks of API scraping, how to locate an API, how to utilize its potential features, and how to work around some common roadblocks.
What's an API?
An API is a custom service that lives on the server of any given website. They provide an intuitive way for the website's client-side pages to send and receive data to and from the server, where it can be stored in a database, manipulated, or used to perform an operation. Though not all sites have APIs, many do, especially those built as complex web applications. Learn more about APIs https://blog.apify.com/what-is-an-api/.
Different types of APIs
Websites use APIs which can be either REST or GraphQL. While REST is a vague architectural style based only on conventions, GraphQL is a specification.
The REST APIs usually consists of many so-called endpoints, to which you can send your requests. In the responses you are provided with information about various resources, such as users, products, etc. Examples of typical REST API requests:
GET https://api.example.com/users/123
GET https://api.example.com/comments/abc123?limit=100
POST https://api.example.com/orders
In a GraphQL API, all requests are POST and point to a single URL, typically something like https://api.example.com/graphql. To get data, you send along a query in the GraphQL query language, optionally with variables. Example of such query:
query($number_of_repos: Int!) {
viewer {
name
repositories(last: $number_of_repos) {
nodes {
name
}
}
}
}
Advantages of API scraping
1. More reliable
Since the data is coming directly from the site's API, as opposed to the parsing of HTML content based on CSS selectors, it can be relied on more, as it is less likely to change. Typically, websites change their APIs much less frequently than they change the structure/selectors of their pages.
2. Configurable
Most APIs accept query parameters such as maxPosts or fromCountry. These parameters can be mapped to the configuration options of the scraper, which makes creating a scraper that supports various requirements and use-cases much easier. They can also be utilized to filter and/or limit data results.
3. Fast and efficient
Especially for https://blog.apify.com/what-is-a-dynamic-page/, in which a headless browser would otherwise be required (it can sometimes be slow and cumbersome), scraping their API can prove to be much quicker and more efficient.
4. Easy on the target website
Depending on the website, sending large amounts of requests to their pages could result in a slight performance decrease on their end. By using their API instead, not only does your scraper run better, but it is less demanding of the target website.
Disadvantages of API Scraping
1. Sometimes requires special tokens
Many APIs will require the session cookie, an API key, or some other special value to be included within the header of the request in order to receive any data back. For certain projects, this can be a challenge.
2. Potential overhead
For complex APIs that require certain headers and/or payloads in order to make a successful request, return encoded data, have rate limits, or that use GraphQL, there can be a slight overhead in figuring out how to utilize them in a scraper.
Extra challenges
1. Different data formats
APIs come in all different shapes and sizes. That means every API will vary in not only the quality of the data that it returns, but also the format that it is in. The two most common formats are JSON and HTML.
JSON responses are ideal, as they can be manipulated in JavaScript code. In general, no serious parsing is necessary, and the data can be filtered and formatted to fit a scraper's dataset schema.
APIs which output HTML generally return the raw HTML of a small component of the page which is already hydrated with data. In these cases, it is still worth using the API, as it is still more efficient than making a request to the entire page; even though the data does still need to be parsed from the HTML response.
2. Encoded data
Sometimes, a response will look something like this:
{
"title": "Scraping Academy Message",
"message": "SGVsbG8hIFlvdSBoYXZlIHN1Y2Nlc3NmdWxseSBkZWNvZGVkIHRoaXMgYmFzZTY0IGVuY29kZWQgbWVzc2FnZSEgV2UgaG9wZSB5b3UncmUgbGVhcm5pbmcgYSBsb3QgZnJvbSB0aGUgQXBpZnkgU2NyYXBpbmcgQWNhZGVteSE="
}
Or some other encoding format. This example's message has some data encoded in https://en.wikipedia.org/wiki/Base64, which is one of the most common encoding types. For testing out Base64 encoding and decoding, you can use https://www.base64encode.org/ and https://www.base64decode.org/. Within a project where base64 decoding/encoding is necessary, the https://nodejs.org/api/buffer.html can be used like so:
const value = 'SGVsbG8hIFlvdSBoYXZlIHN1Y2Nlc3NmdWxseSBkZWNvZGVkIHRoaXMgYmFzZTY0IGVuY29kZWQgbWVzc2FnZSEgV2UgaG9wZSB5b3UncmUgbGVhcm5pbmcgYSBsb3QgZnJvbSB0aGUgQXBpZnkgU2NyYXBpbmcgQWNhZGVteSE=';
const decoded = Buffer.from(value, 'base64').toString('utf-8');
console.log(decoded);
First up
Get started with this course by learning some general knowledge about API scraping in the https://docs.apify.com/academy/api-scraping/general-api-scraping.md section! This section will teach you everything you need to know about scraping APIs before moving into more complex sections.
General API scraping
Learn the benefits and drawbacks of API scraping, how to locate an API, how to utilize its features, and how to work around common roadblocks.
This section will teach you everything you should know about API scraping before moving into the next sections in the API Scraping module. Learn how to find APIs, how to use them, how to paginate them, and how to get past some common roadblocks when dealing with them.
Each lesson will prepare you for real-world API scraping, and will help put yet another data extraction technique into your scraping toolbelt.
Next up
In our https://docs.apify.com/academy/api-scraping/general-api-scraping/locating-and-learning.md, we will take a look at how to locate a website's API endpoints with DevTools, and how to use them. This is your entrypoint into learning how to scrape APIs.
Dealing with headers, cookies, and tokens
Learn about how some APIs require certain cookies, headers, and/or tokens to be present in a request in order for data to be received.
Unfortunately, most APIs will require a valid cookie to be included in the cookie field within a request's headers in order to be authorized. Other APIs may require special tokens, or other data that validates the request.
Luckily, there are ways to retrieve and set cookies for requests prior to sending them, which will be covered more in-depth within future Scraping Academy modules. The most important things to know at the moment are:
Cookies
- For sites that heavily rely on cookies for user-verification and request authorization, certain generic requests (such as to the website's main page, or to the target page) will return back a (or multiple)
set-cookieheader(s). - The
set-cookieresponse header(s) can be parsed and used as thecookieheader in the headers of a request. A great package for parsing these values from a response's headers is https://www.npmjs.com/package/set-cookie-parser. With this package, cookies can be parsed from headers like so:
import axios from 'axios';
// import the set-cookie-parser module
import setCookieParser from 'set-cookie-parser';
const getCookie = async () => {
// make a request to the target site
const response = await axios.get('https://www.example.com/');
// parse the cookies from the response
const cookies = setCookieParser.parse(response);
// format the parsed data into a usable string
const cookieString = cookies.map(({ name, value }) => `${name}=${value};`).join(' ');
// log the final cookie string to be used in a 'cookie' header
console.log(cookieString);
};
getCookie();
Headers
Other APIs may not require a valid cookie header, but instead will require certain headers to be attached to the request which are typically attached when a user makes a "real" request from a browser. The most commonly required headers are:
User-AgentRefererOriginHost
Headers required by the target API can be configured manually in a manner such as this, and attached to every single request the scraper sends:
const HEADERS = {
'User-Agent': 'Mozilla/5.0 (Macintosh; Intel Mac OS X 10_15_7) AppleWebKit/537.36 (KHTML, like Gecko)'
+ 'Chrome/96.0.4664.110 YaBrowser/22.1.0.2500 Yowser/2.5 Safari/537.36',
Referer: 'https://soundcloud.com',
// ...
};
However, a much better option is to use either a custom implementation of generating random headers for each request, or to use a package such as https://www.npmjs.com/package/got-scraping to automatically do this.
With got-scraping, generating request-specific headers can be done right within a request with headerGeneratorOptions. Specific headers can also be set with the headers option:
const response = await gotScraping({
url: 'https://example.com',
headerGeneratorOptions: {
browsers: [
{
name: 'chrome',
minVersion: 87,
maxVersion: 89,
},
],
devices: ['desktop'],
locales: ['de-DE', 'en-US'],
operatingSystems: ['windows', 'linux'],
},
headers: {
'some-header': 'Hello, Academy!',
},
});
Tokens
For our SoundCloud example, testing the endpoint from the previous section in a tool like https://docs.apify.com/academy/tools/postman.md works perfectly, and returns the data we want; however, when the client_id parameter is removed, we receive a 401 Unauthorized error. Luckily, the Client ID is the same for every user, which means that it is not tied to a session or an IP address (this is based on our own observations and tests). The big downfall is that the token being used by SoundCloud changes every few weeks, so it shouldn't be hardcoded. This case is actually quite common, and is not only seen with SoundCloud.
Ideally, this client_id should be scraped dynamically, especially since it changes frequently, but unfortunately, the token cannot be found anywhere on SoundCloud's pages. We already know that it's available within the parameters of certain requests though, and luckily, https://github.com/puppeteer/puppeteer offers a way to analyze each response when on a page. It's a bit like using browser DevTools, which you are already familiar with by now, but programmatically instead.
Here is a way you could dynamically scrape the client_id using Puppeteer:
// import the puppeteer module
import puppeteer from 'puppeteer';
const scrapeClientId = async () => {
const browser = await puppeteer.launch({ headless: false });
const page = await browser.newPage();
// initialize a variable that will eventually hold the client_id
let clientId = null;
// handle each response
page.on('response', async (res) => {
// try to grab the 'client_id' parameter from each URL
const id = new URL(res.url()).searchParams.get('client_id') ?? null;
// if the parameter exists, set our clientId variable to the newly parsed value
if (id) clientId = id;
});
// visit the page
await page.goto('https://soundcloud.com/tiesto/tracks');
// wait for a selector that ensures the page has time to load and make requests to its API
await page.waitForSelector('.profileHeader__link');
await browser.close();
console.log(clientId); // log the retrieved client_id
};
scrapeClientId();
Next up
Keep the code above in mind, because we'll be using it in the https://docs.apify.com/academy/api-scraping/general-api-scraping/handling-pagination.md when paginating through results from SoundCloud's API.
Handling pagination
Learn about the three most popular API pagination techniques and how to handle each of them when scraping an API with pagination.
When scraping large APIs, you'll quickly realize that most APIs limit the number of results it responds back with. For some APIs, the max number of results is 5, while for others it's 2000. Either way, they all have something in common - pagination.
If you've never dealt with it before, trying to scrape thousands to hundreds of thousands of items from an API with pagination can be a bit challenging. In this lesson, we'll be discussing a few of the different types of pagination, as well as how to work with them.
Page-number pagination
The most common and rudimentary forms of pagination have page numbers. Imagine paginating through a typical e-commerce website.
This implementation makes it fairly straightforward to programmatically paginate through an API, as it pretty much entails incrementing up or down in order to receive the next set of items. The page number is usually provided right in the parameters of the request URL; however, some APIs require it to be provided in the request body instead.
Offset pagination
The second most popular pagination technique used is based on using a limit parameter along with an offset parameter. The limit says how many records should be returned in a single request, while the offset parameter says how many records should be skipped.
For example, let's say that we have this dataset and an API route to retrieve its items:
const myAwesomeDataset = [1, 2, 3, 4, 5, 6, 7, 8, 9, 10, 11, 12, 13, 14, 15];
If we were to make a request with the limit set to 5 and the offset parameter also set to 5, the API would skip over the first five items and return [6, 7, 8, 9, 10].
Cursor pagination
Sometimes pagination uses cursor instead of offset. Cursor is a marker of an item in the dataset. It can be a date, number, or a more or less random string of letters and numbers. Request with a cursor parameter will result in an API response containing items which follow after the item which the cursor points to.
One of the most painful things about scraping APIs with cursor pagination is that you can't skip to, for example, the 5th page. You have to paginate through each page one by one.
Note: SoundCloud https://developers.soundcloud.com/blog/pagination-updates-on-our-api/ over to using cursor-based pagination; however, they did not change the parameter name from offset to cursor. Always be on the lookout for this type of stuff!
Using "next page"
In a minute, we're going to create a mini-project which will scrape the first 100 of Tiësto's tracks by keeping a limit of 20 and paginating through until we've scraped 100 items.
Luckily for us, SoundCloud's API (and many others) provides a next_href property in each response, which means we don't have to directly deal with setting the offset (cursor) parameter:
//...
{
"next_href": "https://api-v2.soundcloud.com/users/141707/tracks?offset=2020-03-13T00%3A00%3A00.000Z%2Ctracks%2C00774168919&limit=20&representation=https%3A%2F%2Fapi-v2.soundcloud.com%2Fusers%2F141707%2Ftracks%3Flimit%3D20",
"query_urn": null
}
This URL can take various different forms, and can be given different names; however, they all generally do the same thing - bring you to the next page of results.
Mini project
First, create a new folder called pagination-tutorial and run this command inside of it:
# initialize the project and install the puppeteer
# and got-scraping packages
npm init -y && npm i puppeteer got-scraping
Now, make a new file called scrapeClientId, copying the client_id scraping code from the previous lesson and making a slight modification:
// scrapeClientId.js
import puppeteer from 'puppeteer';
// export the function to be used in a different file
export const scrapeClientId = async () => {
const browser = await puppeteer.launch({ headless: true });
const page = await browser.newPage();
let clientId = null;
page.on('response', async (res) => {
const id = new URL(res.url()).searchParams.get('client_id') ?? null;
if (id) clientId = id;
});
await page.goto('https://soundcloud.com/tiesto/tracks');
await page.waitForSelector('.profileHeader__link');
await browser.close();
// return the client_id
return clientId;
};
Now, in a new file called index.js we'll write the skeleton for our pagination and item-scraping code:
// index.js
// we will need gotScraping to make HTTP requests
import { gotScraping } from 'got-scraping';
import { scrapeClientId } from './scrapeClientId';
const scrape100Items = async () => {
// the initial request URL
const nextHref = 'https://api-v2.soundcloud.com/users/141707/tracks?limit=20&offset=0';
// create an array for all of our scraped items to live
const items = [];
// scrape the client ID with the script from the
// previous lesson
const clientId = await scrapeClientId();
// More code will go here
};
Let's now take a step back and think about the condition on which we should continue paginating:
- If the API responds with a next_href set to null, that means that there are no more pages, and that we have scraped all of the possible items and we should stop paginating.
- If our items list has 100 records or more, we should stop paginating. Otherwise, we should continue until 100+ items has been reached.
With a full understanding of this condition, we can translate it into code:
const scrape100Items = async () => {
// ...previous code
// continue making requests until either we've reached 100+ items
while (items.flat().length Note that it's better to add requests to a requests queue rather than processing them in memory. The crawlers offered by https://crawlee.dev/docs/ provide this functionality out of the box.
// index.js import { gotScraping } from 'got-scraping'; import { scrapeClientId } from './scrapeClientId';
const scrape100Items = async () => { let nextHref = 'https://api-v2.soundcloud.com/users/141707/tracks?limit=20&offset=0'; const items = [];
const clientId = await scrapeClientId();
while (items.flat().length {
// run the function
const data = await scrape100Items();
// log the length of the items array
console.log(data.length);
})();
> We are using the https://developer.mozilla.org/en-US/docs/Web/JavaScript/Reference/Global_Objects/Array/flat method when returning the **items** array to turn our array of arrays into a single array of items.
Here's what the output of this code looks like:
105
## Final note
Sometimes, APIs have limited pagination. That means that they limit the total number of results that can appear for a set of pages, or that they limit the pages to a certain number. To learn how to handle these cases, take a look at the https://docs.apify.com/academy/advanced-web-scraping/crawling/crawling-with-search.md article.
## Next up
This is the last lesson in the API scraping tutorial for now, but be on the lookout for more lessons soon to come! Thus far, you've learned how to:
1. Locate API endpoints
2. Understand located API endpoints and their parameters
3. Parse and modify cookies
4. Modify/set headers
5. Farm API tokens using Puppeteer
6. Use paginated APIs
If you'd still like to read more about API scraping, check out the https://docs.apify.com/academy/api-scraping/graphql-scraping.md course! GraphQL is the king of API scraping.
---
# Locating API endpoints
**Learn how to effectively locate a website's API endpoints, and learn how to use them to get the data you want faster and more reliably.**
***
In order to retrieve a website's API endpoints, as well as other data about them, the **Network** tab within Chrome's (or another browser's) DevTools can be used. This tab allows you to see all of the various network requests being made, and even allows you to filter them based on request type, response type, or by a keyword.
On our target page, we'll open up the Network tab, and filter by request type of `Fetch/XHR`, as opposed to the default of `All`. Next, we'll do some action on the page which causes the request for the target data to be sent, which will enable us to view the request in DevTools. The types of actions that need to be done can vary depending on the website, the type of page, and the type of data being returned. Sometimes, reloading the page is enough, while other times, a button must be clicked, or the page must be scrolled. For our example use case, reloading the page is sufficient.
*Here's what we can see in the Network tab after reloading the page:*

Let's say that our target data is a full list of Tiësto's uploaded songs on SoundCloud. We can use the **Filter** option to search for the keyword `tracks`, and see if any endpoints have been hit that include that word. Multiple results may still be in the list when using this feature, so it is important to carefully examine the payloads and responses of each request in order to ensure that the correct one is found.
Filtering requests
To find what we're looking for, we must wisely choose what piece of data (in this case a keyword) we filter by. Think of something that is most likely to be part of the endpoint (in this case a string `tracks`).
After a little bit of digging through the different response values of each request in our filtered list within the Network tab, we can discover this endpoint, which returns a JSON list including 20 of Tiësto's latest tracks:

## Learning the API
The majority of APIs, especially for popular sites that serve up large amounts of data, are configurable through different parameters, query options, or payload values. A lot of times, an endpoint discovered through the Network tab will reveal at least a few of these options.
Here's what our target endpoint's URL looks like coming directly from the Network tab:
Since our request doesn't have any body/payload, we need to analyze the URL. We can break this URL down into chunks that help us understand what each value does.

Understanding an API's various configurations helps with creating a game-plan on how to best scrape it, as many of the parameters can be utilized for pagination, or data-filtering. Additionally, these values can be mapped to a scraper's configuration options, which overall makes the scraper more versatile.
Let's say we want to receive all of the user's tracks in one request. Based on our observations of the endpoint's different parameters, we can modify the URL and utilize the `limit` option to return more than twenty songs. The `limit` option is extremely common with most APIs, and allows the person making the request to literally limit the maximum number of results to be returned in the request:
By using the ridiculously large number of `99999`, we ensure that all of the user's tracks will be captured in this single request. Luckily, with SoundCloud's API, there is no cap to the `limit` parameter; however, most other APIs will have a limit to ensure that hundreds of thousands of results aren't retrieved at one time. For this use-case, setting a massive results limit is not much of a risk, as most users don't have a track-count over 500 anyways, but receiving too many results at once can result in overflow errors.
## Next up
https://docs.apify.com/academy/api-scraping/general-api-scraping/cookies-headers-tokens.md will be all about cookies, headers, and tokens, and how they're relevant when scraping an API.
---
# GraphQL scraping
**Dig into the topic of scraping APIs which use the latest and greatest API technology - GraphQL. GraphQL APIs are very different from regular REST APIs.**
***
https://graphql.org/ APIs different from the regular https://www.redhat.com/en/topics/api/what-is-a-rest-apiful APIs you're likely familiar with, which means that different methods and tooling are used to scrape them. This course will teach you everything you need to know about GraphQL to scrape an API built with it.
## How do I know if it's a GraphQL API?
In this section, we'll be scraping https://www.cheddar.com/'s GraphQL API. When you visit the website and make a search for anything while your **Network Tab** is open, you'll see a request that has been sent to the endpoint **api.cheddar.com/graphql**.

As a rule of thumb, when the endpoint ends with **/graphql** and it's a **POST** request, it's a 99.99% bulletproof indicator that the target site is using GraphQL. If you want to be 100% certain though, taking a look at the request payload will most definitely give it away.

Every GraphQL payload will be a JSON object with a **query** property, and a **variables** property if any variables were provided. If you take a closer look at the full **query** property of this request, you'll notice that it's stringified GraphQL language content.

## Advantages & disadvantages
We already discussed the advantages and disadvantages of API scraping in general in this course's introduction, but because GraphQL is such a different technology, scraping an API built with it comes with its own pros and cons.
### Advantages
1. GraphQL allows you as the developer to choose which fields you'd like to be returned back to you. Not only does this leave you with only the data you want and no extra unwanted fields, but it is also easier on the target.
2. Allows access to data that is not readily available natively through the website.
3. Queries are heavily customizable due to features like **fragments**.
### Disadvantages
1. Though it's a fantastic technology with lots of awesome features, it is also more complex to understand.
2. GraphQL https://docs.apify.com/academy/api-scraping/graphql-scraping/introspection.md is disabled on many sites, which makes it more difficult to reap the full benefits of GraphQL.
## Next up
This course section's https://docs.apify.com/academy/api-scraping/graphql-scraping/modifying-variables.md will discuss how to customize GraphQL queries without ever having to write any GraphQL language.
---
# Custom queries
**Learn how to write custom GraphQL queries, how to pass input values into GraphQL requests as variables, and how to retrieve and output the data from a scraper.**
***
Sometimes, the queries found in the **Network** tab aren't good enough for your use case. Or, perhaps they're even returning more data than what you're after (which can slow down the queries depending on how much data they're giving back). In these situations, it's a good idea to dig a bit deeper into the API and start writing your own custom use-case specific queries.
In this lesson, we're building a scraper which expects a single number (in **hours**) and a **query** string as its input. As output, it should provide data about the first 1000 Cheddar posts published within the last **n** hours which match the provided query. Each **post** object should contain the **title**, the **publishDate** and the **videoUrl** of the post.
[ { "title": "FDA Authorizes 1st Breath Test for COVID-19 Infection", "publishDate": "2022-04-15T11:58:44-04:00", "videoUrl": "https://vod.chdrstatic.com/source%3Dbackend%2Cexpire%3D1651782479%2Cpath%3D%2Ftranscode%2Fb68f8133-3aa9-4c96-ac26-047452bbc9ce%2Ctoken%3D581fd52bb7f634834edca5c201619c014cd21eb20448cf89525bf101ca8a6f64/transcode/b68f8133-3aa9-4c96-ac26-047452bbc9ce/b68f8133-3aa9-4c96-ac26-047452bbc9ce.mp4" }, { "...": "..." } ]
## Project setup
To make sure we're all on the same page, we're going to set up the project together by first creating a folder named **graphql-scraper**. Once navigated to the folder within your terminal, run the following command:
npm init -y && npm install graphql-tag puppeteer got-scraping
This command will first initialize the project with npm, then will install the `puppeteer`, `graphql-tag`, and `got-scraping` packages, which we will need in this lesson.
Finally, create a file called **index.js**. This is the file we will be working in for the rest of the lesson.
## Preparations
If we remember from the last lesson, we need to pass a valid "app token" within the **X-App-Token** header of every single request we make, or else we will be blocked. When testing queries, we copied this value straight from the **Network** tab; however, since this is a dynamic value, we should farm it.
Since we know requests with this header are sent right when the front page is loaded, it can be farmed by visiting the page and intercepting requests in Puppeteer like so:
// scrapeAppToken.js import puppeteer from 'puppeteer';
const scrapeAppToken = async () => { const browser = await puppeteer.launch(); const page = await browser.newPage();
let appToken = null;
page.on('response', async (res) => {
// grab the token from the request headers
const token = res.request().headers()?.['x-app-token'];
// if there is a token, grab it and close the browser
if (token) {
appToken = token;
await browser.close();
}
});
await page.goto('https://www.cheddar.com/');
await page.waitForNetworkIdle();
// otherwise, close the browser after networkidle
// has been fired
await browser.close();
// return the apptoken (or null)
return appToken;
};
export default scrapeAppToken;
With this code, we're doing the same exact thing as we did in the previous lesson to grab this header value, except programmatically.
> To learn more about this method of scraping headers and tokens, refer to the https://docs.apify.com/academy/api-scraping/general-api-scraping/cookies-headers-tokens.md lesson of the **General API scraping** section.
Now, we can import this function into our **index.js** and use it to create a `token` variable which will be passed as our **X-App-Token** header when scraping:
// index.js
// import the function import scrapeAppToken from './scrapeAppToken.mjs';
const token = await scrapeAppToken();
## Building the query
First, we'll write a skeleton query where we define which variables we're expecting (from the user of the scraper):
query SearchQuery($query: String!, $max_age: Int!) { # query will go here }
Also in the previous lesson, we learned that the **media** type is dependent on the **organization** type. This means to get any **media**, it must be wrapped in the **organization** query:
query SearchQuery($query: String!, $max_age: Int!) { organization { media(query: $query, max_age: $max_age , first: 1000) {
}
} }
Finally, since Cheddar is using https://relay.dev/graphql/connections.htm#relay-style-cursor-pagination for their API, we must access the data through the **edges** property, where each **node** is a result item:
query SearchQuery($query: String!) { organization { media(query: $query, max_age: $max_age , first: 1000) { edges { node { # here we will define the fields we want } } } } }
The next step is to fill out the fields we'd like back, and we've got our final query!
query SearchQuery($query: String!) { organization { media(query: $query, max_age: $max_age , first: 1000) { edges { node { title # title public_at # this will be publishDate hero_video { video_urls { url # the first URL from these results will be videoUrl } } } } } } }
## Making the request
Back in our code, we can import `gql` from `graphql-tag` and use it to store our query:
// index.js import { gql } from 'graphql-tag'; import scrapeAppToken from './scrapeAppToken.mjs';
const token = await scrapeAppToken();
const GET_LATEST = gqlquery SearchQuery($query: String!, $max_age: Int!) { organization { media(query: $query, max_age: $max_age, first: 1000) { edges { node { title public_at hero_video { video_urls { url } } thumbnail_url } } } } };
Alternatively, if you don't want to write your GraphQL queries right within your JavaScript code, you can write them in files using the **.graphql** format, then read them from the filesystem or import them.
> In order to receive nice GraphQL syntax highlighting in these template literals, download the https://marketplace.visualstudio.com/items?itemName=GraphQL.vscode-graphql
Then, we'll take our input and use it to create a **variables** object which will be used for the request:
// find posts from the last 48 hours that include the keyword "stocks". // since we don't have any real input, we'll simulate some input const testInput = { hours: 48, query: 'stocks' };
// the API takes max_input in the format of minutes * 60 // to calculate this value, we do hours * 60^2 const variables = { query: testInput.query, max_age: Math.round(testInput.hours) * 60 ** 2 };
The final step is to take the query and variable and marry them within a `gotScraping()` call, which will return the API response:
const data = await gotScraping('https://api.cheddar.com/graphql', { // we are expecting a JSON response back responseType: 'json', // we must use a post request method: 'POST', // this is where we pass in our token headers: { 'X-App-Token': token, 'Content-Type': 'application/json' }, // here is our query with our variables body: JSON.stringify({ query: GET_LATEST.loc.source.body, variables }), });
The final step after making the query is to format the data to match the expected dataset schema.
## Final code
Here's what our final project looks like:
// index.js import { gql } from 'graphql-tag'; import { gotScraping } from 'got-scraping'; import scrapeAppToken from './scrapeAppToken.mjs';
// Scrape the token const token = await scrapeAppToken();
// Define our query
const GET_LATEST = gqlquery SearchQuery($query: String!, $max_age: Int!) { organization { media(query: $query, max_age: $max_age, first: 1000) { edges { node { title public_at hero_video { video_urls { url } } thumbnail_url } } } } };
// Grab our input const testInput = { hours: 48, query: 'stocks' };
// Calculate and prepare our variables const variables = { query: testInput.query, max_age: Math.round(testInput.hours) * 60 ** 2 };
// Make the request const { body: { data: { organization } } } = await gotScraping('https://api.cheddar.com/graphql', { responseType: 'json', method: 'POST', headers: { 'X-App-Token': token, 'Content-Type': 'application/json' }, body: JSON.stringify({ query: GET_LATEST.loc.source.body, variables }), });
// Format the data const result = organization.media.edges.map(({ node }) => ({ title: node?.title, publishDate: node?.public_at, videoUrl: node?.hero_video ? node.hero_video.video_urls[0].url : null, }));
// Log the result console.log(result);
// scrapeAppToken.js import puppeteer from 'puppeteer';
const scrapeAppToken = async () => { const browser = await puppeteer.launch(); const page = await browser.newPage();
let appToken = null;
page.on('response', async (res) => {
const token = res.request().headers()?.['x-app-token'];
if (token) {
appToken = token;
await browser.close();
}
});
await page.goto('https://www.cheddar.com/');
await page.waitForNetworkIdle();
await browser.close();
return appToken;
};
export default scrapeAppToken;
## Wrap up
If you've made it this far, that means that you've conquered the king of API scraping - GraphQL, and that you're ready to take on writing scrapers for the majority of websites out there. Nice work!
Take a moment to review the skills you learned in this section:
1. Modifying the variables of copied GraphQL queries
2. Introspecting a GraphQL API
3. Visualizing and understanding a GraphQL API introspection
4. Writing custom queries
5. Dealing with cursor-based relay pagination
6. Writing a GraphQL scraper with custom queries
---
# Introspection
**Understand what introspection is, and how it can help you understand a GraphQL API to take advantage of the features it has to offer before writing any code.**
***
https://graphql.org/learn/introspection/ is when you make a query to the target GraphQL API requesting information about its schema. When done properly, this can provide a whole lot of information about the API and the different **queries** and **mutations** it supports.
Just like when working with regular RESTful APIs in the https://docs.apify.com/academy/api-scraping/general-api-scraping/locating-and-learning.md section, it's important to learn a bit about the different available features of the GraphQL API (or at least of the query/mutation) you are scraping before actually writing any code.
Not only does becoming comfortable with and understanding the ins and outs of using the API make the development process easier, but it can also sometimes expose features which will return data you'd otherwise be scraping from a different location.
## Making the query
warning
Cheddar website was changed and the below example no longer works there. Nonetheless, the general approach is still viable on some websites even though introspection is disabled on most.
In order to perform introspection on our https://www.cheddar.com, we need to make a request to their GraphQL API with this introspection query using https://docs.apify.com/academy/tools/insomnia.md or another HTTP client that supports GraphQL:
> To make a GraphQL query in Insomnia, make sure you've set the HTTP method to **POST** and the request body type to **GraphQL Query**.
query { __schema { queryType { name } mutationType { name } subscriptionType { name } types { ...FullType } directives { name description locations args { ...InputValue } } } } fragment FullType on __Type { kind name description fields(includeDeprecated: true) { name description args { ...InputValue } type { ...TypeRef } isDeprecated deprecationReason } inputFields { ...InputValue } interfaces { ...TypeRef } enumValues(includeDeprecated: true) { name description isDeprecated deprecationReason } possibleTypes { ...TypeRef } } fragment InputValue on __InputValue { name description type { ...TypeRef } defaultValue } fragment TypeRef on __Type { kind name ofType { kind name ofType { kind name ofType { kind name ofType { kind name ofType { kind name ofType { kind name ofType { kind name } } } } } } } }
Here's what we got back from the request:

The response body of our introspection query contains a whole lot of useful information about the API, such as the data types defined within it, as well the queries and mutations available for retrieving/changing the data.
## Understanding the response
An introspection query's response body size will vary depending on how big the target API is. In our case, what we got back is a 27 thousand line JSON response 🤯 If you thought to yourself, "Wow, that's a whole lot to sift through! I don't want to look through that!", you are absolutely right. Luckily for us, there is a fantastic online tool called https://graphql-kit.com/graphql-voyager/ (no install required) which can take this massive JSON response and turn it into a digestable visualization of the API.
Let's copy the response to our clipboard by clicking inside of the response body and pressing **CMD** + **A**, then subsequently **CMD** + **C**. Now, we'll head over to https://graphql-kit.com/graphql-voyager/ and click on **Change Schema**. In the modal, we'll click on the **Introspection** tab and paste our data into the text area.

Finally, we can click on **Display** and immediately be shown a visualization of the API:

Now that we have this visualization to work off of, it will be much easier to build a query of our own.
## Building a query
In future lessons, we'll be building more complex queries using **dynamic variables** and advanced features such as **fragments**; however, for now let's get our feet wet by using the data we have from GraphQL Voyager to build a query.
Right now, our goal is to fetch the 1000 most recent articles on https://www.cheddar.com. From each article, we'd like to fetch the **title** and the **publish date**. After a bit of digging through the schema, we've come across the **media** field within the **organization** type, which has both **title** and **public\_at** fields - seems to check out!

Cool. Now we know we need to access **media** through the **organization** query. The **media** field also takes in some arguments, of which we will be using the **first** parameter set to **1000**. Let's start writing our query in Insomnia!

While writing our query, we've hit a slight roadblock - the **media** type doesn't seem to be accepting a **title** field; however, we are being suggested an **edges** field. This signifies that Cheddar is using https://relay.dev/graphql/connections.htm#relay-style-cursor-pagination, and that what is returned from media is actually a **Connection** type with multiple properties. The **edges** property contains the list of results we're after, and each result lies within a **Node** type accessible within **edges** as **node**. With this knowledge, we can finish writing our query:
query { organization { media(first: 1000) { edges { node { title public_at } } } } }
## Sending the query
Let's send it!

Oh, okay. That didn't work. But **why**?
Rest assured, nothing is wrong with our query. We are most likely missing an authorization token/parameter. Let's check back on the Cheddar website within our browser to see what types of headers are being sent with the requests there:

The **Authorization** and **X-App-Token** headers seem to be our culprits. Of course these values are dynamic, but for testing purposes we can copy them right from the **Network** tab and use them for our request in Insomnia.

Cool, it worked! Now we know that if we want to scrape this API, we'll likely have to scrape these authorization headers as well in order to not get blocked.
> For more information about cookies, headers, and tokens, refer back to https://docs.apify.com/academy/api-scraping/general-api-scraping/cookies-headers-tokens.md from the previous section of the **API scraping** course.
## Introspection disabled?
If the target website is smart, they will have introspection disabled. One of the most widely used GraphQL development tools is https://www.apollographql.com/docs/apollo-server/, which automatically disables introspection, so these cases are actually quite common.

In these cases, it is still possible to get some information about the API when using https://docs.apify.com/academy/tools/insomnia.md or https://docs.apify.com/academy/tools/postman.md, due to the autocomplete that they provide. If we remember from the section of this lesson, we were able to receive autocomplete suggestions when we entered a non-existent field into the query. Though this is not as great as seeing an entire visualization of the API in GraphQL Voyager, it can still be quite helpful.
## Next up
https://docs.apify.com/academy/api-scraping/graphql-scraping/custom-queries.md's code-along project will walk you through how to construct a custom GraphQL query for scraping purposes, how to accept input into it, and how to retrieve and output the data.
---
# Modifying variables
**Learn how to modify the variables of a JSON format GraphQL query to use the API without needing to write any GraphQL language or create custom queries.**
***
In the introduction of this course, we searched for the term **test** on the https://www.cheddar.com/ website and discovered a request to their GraphQL API. The payload looked like this:
{ "query": "query SearchQuery($query: String!, $count: Int!, $cursor: String) {\n organization {\n ...SearchList_organization\n id\n }\n }\n fragment SearchList_organization on Organization {\n media(\n first: $count\n after: $cursor\n query: $query\n recency_weight: 0.6\n recency_days: 30\n include_private: false\n include_unpublished: false\n ) {\n hitCount\n edges {\n node {\n _score\n id\n ...StandardListCard_video\n __typename\n }\n cursor\n }\n pageInfo {\n endCursor\n hasNextPage\n }\n }\n }\n fragment StandardListCard_video on Slugable {\n ...Thumbnail_video\n ...StandardTextCard_media\n slug\n id\n __typename\n }\n fragment Thumbnail_video on Slugable {\n original_thumbnails: thumbnails(aspect_ratio: ORIGINAL) {\n small\n medium\n large\n }\n sd_thumbnails: thumbnails(aspect_ratio: SD) {\n small\n medium\n large\n }\n hd_thumbnails: thumbnails(aspect_ratio: HD) {\n small\n medium\n large\n }\n film_thumbnails: thumbnails(aspect_ratio: FILM) {\n small\n medium\n large\n }\n square_thumbnails: thumbnails(aspect_ratio: SQUARE) {\n small\n medium\n large\n }\n }\n fragment StandardTextCard_media on Slugable {\n public_at\n updated_at\n title\n hero_video {\n duration\n }\n description\n }", "variables": { "query": "test","count": 10,"cursor": null }, "operationName": "SearchQuery" }
We also learned that every GraphQL request payload will have a **query** property, which contains a stringified version of the query, and a **variables** property, which contains any parameters for the query.
If we convert the query field to a `.graphql` format, we can get it nicely formatted with syntax highlighting (install GraphQL extension for editor)
query SearchQuery($query: String!, $count: Int!, $cursor: String) { organization { ...SearchList_organization id } } fragment SearchList_organization on Organization { media( first: $count after: $cursor query: $query recency_weight: 0.6 recency_days: 30 include_private: false include_unpublished: false ) { hitCount edges { node { _score id ...StandardListCard_video __typename } cursor } pageInfo { endCursor hasNextPage } } } fragment StandardListCard_video on Slugable { ...Thumbnail_video ...StandardTextCard_media slug id __typename } fragment Thumbnail_video on Slugable { original_thumbnails: thumbnails(aspect_ratio: ORIGINAL) { small medium large } sd_thumbnails: thumbnails(aspect_ratio: SD) { small medium large } hd_thumbnails: thumbnails(aspect_ratio: HD) { small medium large } film_thumbnails: thumbnails(aspect_ratio: FILM) { small medium large } square_thumbnails: thumbnails(aspect_ratio: SQUARE) { small medium large } } fragment StandardTextCard_media on Slugable { public_at updated_at title hero_video { duration } description }
If the query provided in the payload you find in the **Network** tab is good enough for your scraper's needs, you don't actually have to go down the GraphQL rabbit hole. Rather, you can change the variables to receive the data you want. For example, right now, our example payload is set up to search for articles matching the keyword **test**. However, if we wanted to search for articles matching **cats** instead, we could do that by changing the **query** variable like so:
{ "...": "...", "variables": { "query": "cats","count": 10,"cursor": null } }
Depending on the API, doing just this can be sufficient. However, sometimes we want to utilize complex GraphQL features in order to optimize our scrapers or to receive more data than is being provided in the response of the request found in the **Network** tab. This is what we will be discussing in the next lessons.
## Next up
In the https://docs.apify.com/academy/api-scraping/graphql-scraping/introspection.md we will be walking you through how to learn about a GraphQL API before scraping it by using **introspection**.
---
# How to retry failed requests
**Learn how to re-scrape only failed requests in your run.**
***
Requests of a scraper can fail for many reasons. The most common causes are different page layouts or proxy blocking issues (https://docs.apify.com/academy/node-js/analyzing-pages-and-fixing-errors). Both https://apify.com and https://crawlee.dev/ allow you to restart your scraper run from the point where it ended, but there is no native functionality to re-scrape only failed requests. Usually, you also want to first analyze the problem, update the code, and build it before trying again.
If you attempt to restart an already finished run, it will likely immediately finish because all the requests in the https://crawlee.dev/docs/guides/request-storage are marked as handled. You need to update the failed requests in the queue to be marked as pending again.
The additional complication is that the https://crawlee.dev/api/core/class/Request object doesn't have anything like the `isFailed` property. We have to approximate it using other fields. Fortunately, we can use the `errorMessages` and `retryCount` properties to identify failed requests. Unless the user explicitly has overridden these properties, we can identify failed requests with a larger amount of `errorMessages` than `retryCount`. That happens because the last error that doesn't cause a retry anymore is added to `errorMessages`.
A simplified code example can look like this:
// The code is similar for both Crawlee-only but uses a different API import { Actor } from 'apify';
const REQUEST_QUEUE_ID = 'pFCvCasdvsyvyZdfD'; // Replace with your valid request queue ID const allRequests = []; let exclusiveStartId = null; // List all requests from the queue, we have to do it in a loop because the request queue list is paginated for (; ;) { const { items: requests } = await Actor.apifyClient .requestQueue(REQUEST_QUEUE_ID) .listRequests({ exclusiveStartId, limit: 1000 }); allRequests.push(...requests); // If we didn't get the full 1,000 requests, we have all and can finish the loop if (requests.length (request.errorMessages?.length || 0) > (request.retryCount || 0));
// We need to update them 1 by 1 to the pristine state for (const request of failedRequests) { request.retryCount = 0; request.errorMessages = []; // This tells the request queue to handle it again request.handledAt = null; await Actor.apifyClient.requestQueue(REQUEST_QUEUE_ID).updateRequest(request); }
// And now we can resurrect our scraper again; it will only process the failed requests.
## Resurrect automatically with a free public Actor
Fortunately, you don't need to implement this code into your workflow. https://apify.com/store provides the https://apify.com/lukaskrivka/rebirth-failed-requests Actor (that is https://github.com/metalwarrior665/rebirth-failed-requests) that does this and more. The Actor can automatically scan multiple runs of your Actors based on filters like `date started`. It can also automatically resurrect the runs after renewing the failed requests. That means you will finish your scrape into the final successful state with a single click on the Run button.
---
# Run Actor and retrieve data via API
**Learn how to run an Actor/task via the Apify API, wait for the job to finish, and retrieve its output data. Your key to integrating Actors with your projects.**
***
The most popular way of https://help.apify.com/en/collections/1669769-integrations the Apify platform with an external project/application is by programmatically running an https://docs.apify.com/platform/actors.md or https://docs.apify.com/platform/actors/running/tasks.md, waiting for it to complete its run, then collecting its data and using it within the project. Follow this tutorial to have an idea on how to approach this, it isn't as complicated as it sounds!
> Remember to check out our https://docs.apify.com/api/v2.md with examples in different languages and a live API console. We also recommend testing the API with a desktop client like https://www.postman.com/ or https://insomnia.rest.
Apify API offers two ways of interacting with it:
*
*
If the Actor being run via API takes 5 minutes or less to complete a typical run, it should be called **synchronously**. Otherwise, (if a typical run takes longer than 5 minutes), it should be called **asynchronously**.
## Run an Actor or task
> If you are unsure about the differences between an Actor and a task, you can read about them in the https://docs.apify.com/platform/actors/running/tasks.md documentation. In brief, tasks are pre-configured inputs for Actors.
The API endpoints and usage (for both sync and async) for https://docs.apify.com/api/v2.md#tag/ActorsRun-collection/operation/act_runs_post and https://docs.apify.com/api/v2/actor-task-runs-post.md are essentially the same.
To run, or **call**, an Actor/task, you will need a few things:
* The name or ID of the Actor/task. The name looks like `username~actorName` or `username~taskName`. The ID can be retrieved on the **Settings** page of the Actor/task.
* Your https://docs.apify.com/platform/integrations.md, which you can find on the **Integrations** page in https://console.apify.com/account?tab=integrations (do not share it with anyone!).
* Possibly an input, which is passed in JSON format as the request's **body**.
* Some other optional settings if you'd like to change the default values (such as allocated memory or the build).
The URL of https://developer.mozilla.org/en-US/docs/Web/HTTP/Methods/POST to run an Actor looks like this:
https://api.apify.com/v2/acts/ACTOR_NAME_OR_ID/runs?token=YOUR_TOKEN
For tasks, we can switch the path from **acts** to **actor-tasks** and keep the rest the same:
https://api.apify.com/v2/actor-tasks/TASK_NAME_OR_ID/runs?token=YOUR_TOKEN
If we send a correct POST request to one of these endpoints, the actor/actor-task will start just as if we had pressed the **Start** button on the Actor's page in the https://console.apify.com.
### Additional settings
We can also add settings for the Actor (which will override the default settings) as additional query parameters. For example, if we wanted to change how much memory the Actor's run should be allocated and which build to run, we could add the `memory` and `build` parameters separated by `&`.
https://api.apify.com/v2/acts/ACTOR_NAME_OR_ID/runs?token=YOUR_TOKEN&memory=8192&build=beta
This works in almost exactly the same way for both Actors and tasks; however, for tasks, there is no reason to specify a https://docs.apify.com/platform/actors/development/builds-and-runs/builds.md parameter, as a task already has only one specific Actor build which cannot be changed with query parameters.
### Input JSON
Most Actors would not be much use if input could not be passed into them to change their behavior. Additionally, even though tasks already have specified input configurations, it is handy to have the ability to overwrite task inputs through the **body** of the POST request.
> The input can technically be any https://developer.mozilla.org/en-US/docs/Web/JavaScript/Reference/Global_Objects/JSON, and will vary depending on the Actor being run. Ensure that you are familiar with the Actor's input schema while writing the body of the request.
Good Actors have reasonable defaults for most input fields, so if you want to run one of the major Actors from https://apify.com/store, you usually do not need to provide all possible fields.
Via API, let's quickly try to run https://apify.com/apify/web-scraper, which is the most popular Actor on the Apify Store at the moment. The full input with all possible fields is https://apify.com/apify/web-scraper?section=example-run, so we will not show it here. Because it has default values for most fields, we can provide a JSON input containing only the fields we'd like to customize. We will send a POST request to the endpoint below and add the JSON as the **body** of the request:
https://api.apify.com/v2/acts/apify~web-scraper/runs?token=YOUR_TOKEN
Here is how it looks in https://www.postman.com/:

If we press **Send**, it will immediately return some info about the run. The `status` will be either `READY` (which means that it is waiting to be allocated on a server) or `RUNNING` (99% of cases).

We will later use this **run info** JSON to retrieve the run's output data. This info about the run can also be retrieved with another call to the https://docs.apify.com/api/v2/act-run-get.md endpoint.
## JavaScript and Python client
If you are using JavaScript or Python, we highly recommend using the Apify API client (https://docs.apify.com/api/client/js/, https://docs.apify.com/api/client/python/) instead of the raw HTTP API. The client implements smart polling and exponential backoff, which makes calling Actors and getting results efficient.
You can skip most of this tutorial by following this code example that calls Google Search Results Scraper and logs its results:
* Node.js
* Python
import { ApifyClient } from 'apify-client';
const client = new ApifyClient({ token: 'YOUR_API_TOKEN' });
const input = { queries: 'Food in NYC' };
// Run the Actor and wait for it to finish // .call method waits infinitely long using smart polling // Get back the run API object const run = await client.actor('apify/google-search-scraper').call(input);
// Fetch and print Actor results from the run's dataset (if any) const { items } = await client.dataset(run.defaultDatasetId).listItems(); items.forEach((item) => { console.dir(item); });
from apify_client import ApifyClient client = ApifyClient(token='YOUR_API_TOKEN')
run_input = { "queries": "Food in NYC", }
Run the Actor and wait for it to finish
.call method waits infinitely long using smart polling
Get back the run API object
run = client.actor("apify/google-search-scraper").call(run_input=run_input)
Fetch and print Actor results from the run's dataset (if there are any)
for item in client.dataset(run["defaultDatasetId"]).iterate_items(): print(item)
By using our client, you don't need to worry about choosing between synchronous or asynchronous flow. But if you don't want your code to wait during `.call` (potentially for hours), continue reading below about how to implement webhooks.
## Synchronous flow
If each of your runs will last shorter than 5 minutes, you can use a single https://usergrid.apache.org/docs/introduction/async-vs-sync.html#synchronous. When running **synchronously**, the connection will be held for *up to* 5 minutes.
If your synchronous run exceeds the 5-minute time limit, the response will be a run object containing information about the run and the status of `RUNNING`. If that happens, you need to restart the run and .
### Synchronous runs with dataset output
Most Actor runs will store their data in the default https://docs.apify.com/platform/storage/dataset.md. The Apify API provides **run-sync-get-dataset-items** endpoints for https://docs.apify.com/api/v2/act-run-sync-get-dataset-items-post.md and https://docs.apify.com/api/v2/actor-task-run-sync-get-dataset-items-post.md, which allow you to run an Actor and receive the items from the default dataset once the run has finished.
Here is a Node.js example of calling a task via the API and logging the dataset items to the console:
// Use your favorite HTTP client import got from 'got';
// Specify your API token // (find it at https://console.apify.com/account#/integrations) const myToken = '';
// Start apify/google-search-scraper Actor
// and pass some queries into the JSON body
const response = await got({
url: https://api.apify.com/v2/acts/apify~google-search-scraper/run-sync-get-dataset-items?token=${myToken},
method: 'POST',
json: {
queries: 'web scraping\nweb crawling',
},
responseType: 'json',
});
const items = response.body;
// Log each non-promoted search result for both queries
items.forEach((item) => {
const { nonPromotedSearchResults } = item;
nonPromotedSearchResults.forEach((result) => {
const { title, url, description } = result;
console.log(${title}: ${url} --- ${description});
});
});
### Synchronous runs with key-value store output
https://docs.apify.com/platform/storage/key-value-store.md are useful for storing files like images, HTML snapshots, or JSON data. The Apify API provides **run-sync** endpoints for https://docs.apify.com/api/v2/act-run-sync-post.md and https://docs.apify.com/api/v2/actor-task-run-sync-post.md, which allow you to run a specific task and receive the output. By default, they return the `OUTPUT` record from the default key-value store.
## Asynchronous flow
For runs longer than 5 minutes, the process consists of three steps:
*
*
*
### Wait for the run to finish
There may be cases where we need to run the Actor and go away. But in any kind of integration, we are usually interested in its output. We have three basic options for how to wait for the actor/task to finish.
*
*
*
#### `waitForFinish` parameter
This solution is quite similar to the synchronous flow. To make the POST request wait, add the `waitForFinish` parameter. It can have a value from `0` to `60`, which is the maximum time in seconds to wait (the max value for `waitForFinish` is 1 minute). Knowing this, we can extend the example URL like this:
https://api.apify.com/v2/acts/apify~web-scraper/runs?token=YOUR_TOKEN&waitForFinish=60
You can also use the `waitForFinish` parameter with the https://docs.apify.com/api/v2/actor-run-get.md to implement a smarter system.
Once again, the final response will be the **run info object**; however, now its status should be `SUCCEEDED` or `FAILED`. If the run exceeds the `waitForFinish` duration, the status will still be `RUNNING`.
#### Webhooks
If you have a server, https://docs.apify.com/platform/integrations/webhooks.md are the most elegant and flexible solution for integrations with Apify. You can set up a webhook for any Actor or task, and that webhook will send a POST request to your server after an https://docs.apify.com/platform/integrations/webhooks/events.md has occurred.
Usually, this event is a successfully finished run, but you can also set a different webhook for failed runs, etc.

The webhook will send you a pretty complicated https://docs.apify.com/platform/integrations/webhooks/actions.md, but usually, you would only be interested in the `resource` object within the response, which is like the **run info** JSON from the previous sections. We can leave the payload template as is for our example since it is all we need.
Once your server receives this request from the webhook, you know that the event happened, and you can ask for the complete data.
> Don't forget to respond to the webhook with a **200** status code! Otherwise, it will ping you again.
#### Polling
What if you don't have a server, and the run you'd like to do is much too long to use a synchronous call? In cases like these, periodic **polling** of the run's status is the solution.
When we run the Actor with the shown above, we will back a response with the **run info** object. From this JSON object, we can then extract the ID of the Actor run that we just started from the `id` field. Then, we can set an interval that will poll the Apify API (let's say every 5 seconds) by calling the https://docs.apify.com/api/v2/actor-run-get.md endpoint to retrieve the run's status.
Replace the `RUN_ID` in the following URL with the ID you extracted earlier:
https://api.apify.com/v2/acts/ACTOR_NAME_OR_ID/runs/RUN_ID
Once a status of `SUCCEEDED` or `FAILED` has been received, we know the run has finished and can cancel the interval and finally .
### Collecting the data
Unless you used the mentioned above, you will have to make one additional request to the API to retrieve the data.
The **run info** JSON also contains the IDs of the default https://docs.apify.com/platform/storage/dataset.md and https://docs.apify.com/platform/storage/key-value-store.md that are allocated separately for each run, which is usually everything you need. The fields are called `defaultDatasetId` and `defaultKeyValueStoreId`.
#### Retrieving a dataset
> If you are scraping products, or any list of items with similar fields, the https://docs.apify.com/platform/storage/dataset.md should be your storage of choice. Don't forget though, that dataset items are immutable. This means that you can only add to the dataset, and not change the content that is already inside it.
To retrieve the data from a dataset, send a GET request to the https://docs.apify.com/api/v2/dataset-items-get.md endpoint and pass the `defaultDatasetId` into the URL. For a GET request to the default dataset, no token is needed.
https://api.apify.com/v2/datasets/DATASET_ID/items
By default, it will return the data in JSON format with some metadata. The actual data are in the `items` array.
You can use plenty of additional parameters, to learn more about them, visit our API reference https://docs.apify.com/api/v2/dataset-items-get.md. We will only mention that you can pass a `format` parameter that transforms the response into popular formats like CSV, XML, Excel, RSS, etc.
The items are paginated, which means you can ask only for a subset of the data. Specify this using the `limit` and `offset` parameters. This endpoint has a limit of 250,000 items that it can return per request. To retrieve more, you will need to send more requests incrementing the `offset` parameter.
https://api.apify.com/v2/datasets/DATASET_ID/items?format=csv&offset=250000
#### Retrieving a key-value store
> https://docs.apify.com/platform/storage/key-value-store.md are mainly useful if you have a single output or any kind of files that cannot be https://developer.mozilla.org/en-US/docs/Web/JavaScript/Reference/Global_Objects/JSON/stringify (such as images or PDFs).
When you want to retrieve something from a key-value store, the `defaultKeyValueStoreId` is *not* enough. You also need to know the name (or **key**) of the record you want to retrieve.
If you have a single output JSON, the convention is to return it as a record named `OUTPUT` to the default key-value store. To retrieve the record's content, call the https://docs.apify.com/api/v2/key-value-store-record-get.md endpoint.
https://api.apify.com/v2/key-value-stores/STORE_ID/records/RECORD_KEY
If you don't know the keys (names) of the records in advance, you can retrieve just the keys with the https://docs.apify.com/api/v2/key-value-store-keys-get.md endpoint.
Keep in mind that you can get a maximum of 1000 keys per request, so you will need to paginate over the keys using the `exclusiveStartKey` parameter if you have more than 1000 keys. To do this, after each call, take the last record key and provide it as the `exclusiveStartKey` parameter. You can do this until you get 0 keys back.
https://api.apify.com/v2/key-value-stores/STORE_ID/keys?exclusiveStartKey=myLastRecordKey
---
# Tutorials on Apify Actors
**Learn how to deploy your API project to the Apify platform.**
***
This tutorial shows you how to add your existing RapidAPI project to Apify, giving you access to managed hosting, data storage, and a broader user base through Apify Store while maintaining your RapidAPI presence.
* https://docs.apify.com/academy/apify-actors/adding-rapidapi-project.md
---
# Adding your RapidAPI project to Apify
If you've published an API project on https://rapidapi.com/, you can expand your project's visibility by listing it on Apify Store. This gives you access to Apify's developer community and ecosystem.
***
## Why add your API project to Apify
By publishing your API project on Apify, you'll reach thousands of active users in Apify Store. You'll also get access to the Apify platform's infrastructure: managed hosting, data storage, scheduling, advanced web scraping and crawling capabilities, and integrated proxy management. These tools help you reach more users and enhance your API's functionality.
## Step-by-step guide
The approach is demonstrated on an app built on top of https://expressjs.com/, but with a few adaptations to the code, any API framework will work.
You'll deploy your API as an https://apify.com/actors - a serverless cloud program that runs on the Apify platform. Actors can handle everything from simple automation to running web servers.
### Prerequisites
You’ll need an https://console.apify.com/sign-in - *it’s free and no credit card is required*. For simple migration and deployment, we recommend installing the Apify CLI:
curl -fsSL https://apify.com/install-cli.sh | bash
Other ways to install the CLI
Check the https://docs.apify.com/cli/docs/installation for more details and all the options.
### Step 1: Initialize the Actor structure
Once you have the Apify CLI, run the following command:
apify init
The command sets up an Actor project in your current directory by creating `actor.json` (Actor configuration) and storage files (Dataset and Key-value store).
### Step 2: Add Actor logic
The initialization of the Actor is the first important thing. The second is the correct mapping of the PORT. Check the following example for inspiration:
await Actor.init(); // Initializes the Actor
const app = express(); const PORT = Actor.config.get('containerPort'); // Specifies the PORT const DATA_FILE = path.join(__dirname, 'data', 'items.json');
app.use(express.json());
// Rest of the logic
Readiness checks
The Apify platform performs readiness checks by sending GET requests to `/` with the `x-apify-container-server-readiness-probe` header. For better resource efficiency, consider checking for this header and returning a simple response early, rather than processing it as a full request. This optimization is particularly useful for resource-intensive Actors.
app.get('*', (req, res) => { if (req.headers['x-apify-container-server-readiness-probe']) { console.log('Readiness probe'); res.send('Hello, readiness probe!\n'); } });
### Step 3: Test your Actor locally
Once you’ve added the Actor logic, test your Actor locally with the following command:
apify run
Now, check that your server is running. Check one of your endpoints, for example `/health`.
### Step 4: Deploy your Actor to Apify
Now push your Actor to https://console.apify.com/. You’ll be able to do this only if you’re logged in to your Apify account with the CLI. Run `apify info` to check, and if you’re not logged in yet, run `apify login`. This only needs to be done once. To push your project, run the following command:
apify push
### Step 5: Run your Actor
After pushing your Actor to the platform, in the terminal you’ll see an output similar to this:
2025-10-03T07:57:13.671Z ACTOR: Build finished. Actor build detail https://console.apify.com/actors/a0c... Actor detail https://console.apify.com/actors/aOc... Success: Actor was deployed to Apify cloud and built there.
You can click the **Actor detail** link, or go to **Apify Console > My Actors**, and click on your Actor. Now, click on the Settings tab, and enable **Actor Standby**:

Two modes of Actors
Actors can run in two modes: as batch processing jobs that execute a single task and stop, or in **Standby mode** as a web server. For use cases like deploying an API that needs to respond to incoming requests in real-time, Standby mode is the best choice. It keeps your Actor running continuously and ready to handle HTTP requests like a standard web server.
Once you’ve saved the settings, go to the **Standby** tab, and click the **Test endpoint** button. It will start the Actor, and you can test it. Once the Actor is running, you're done with the migration!
## Next steps
Ready to monetize your Actor and start earning? Check out these guides:
* https://docs.apify.com/platform/actors/publishing/monetize
* https://docs.apify.com/platform/actors/publishing/publish
You can also extend your Actor with custom logic and leverage additional Apify platform features, such as storage or web scraping capabilities.
---
# Introduction to the Apify platform
**Learn all about the Apify platform, all of the tools it offers, and how it can improve your overall development experience.**
***
The https://apify.com was built to serve large-scale and high-performance web scraping and automation needs. It provides easy access to compute instances (https://docs.apify.com/academy/getting-started/actors.md), convenient request and result storages, proxies, scheduling, webhooks and more - all accessible through the **Console** web interface, https://docs.apify.com/api/v2.md, or our https://docs.apify.com/api/client/js and https://docs.apify.com/api/client/python API clients.
## Category outline
In this category, you'll learn how to become an Apify platform developer from the ground up. From creating your first account, to developing Actors, this is your one-stop-shop for understanding how the platform works, and how to work with it.
## First up
We'll start off this category light, by showing you how to create an Apify account and get everything ready for development with the platform. https://docs.apify.com/academy/getting-started.md
---
# Using ready-made Apify scrapers
**Discover Apify's ready-made web scraping and automation tools. Compare Web Scraper, Cheerio Scraper and Puppeteer Scraper to decide which is right for you.**
***
Scraping and crawling the web can be difficult and time-consuming without the right tools. That's why Apify provides ready-made solutions to crawl and scrape any website. They are based on our https://apify.com/actors, the https://docs.apify.com/sdk/js and https://crawlee.dev/.
Don't let the number of options confuse you. Unless you're really sure you need to use a specific tool, go ahead and use **Web Scraper** (https://docs.apify.com/academy/apify-scrapers/web-scraper.md). It is the easiest to pick up and can handle almost anything. Look at **Puppeteer Scraper** (https://docs.apify.com/academy/apify-scrapers/puppeteer-scraper.md) or **Cheerio Scraper** (https://docs.apify.com/academy/apify-scrapers/cheerio-scraper.md) only after you know your target websites well and need to optimize your scraper.
https://docs.apify.com/academy/apify-scrapers/getting-started.md
## Web Scraper
Web Scraper is a ready-made solution for scraping the web using the Chrome browser. It takes away all the work necessary to set up a browser for crawling, controls the browser automatically and produces machine-readable results in several common formats.
Underneath, it uses the Puppeteer library to control the browser, but you don't need to worry about that. Using a web UI and a little of basic JavaScript, you can tweak it to serve almost any scraping need.
https://docs.apify.com/academy/apify-scrapers/web-scraper.md
## Cheerio Scraper
Cheerio Scraper is a ready-made solution for crawling the web using plain HTTP requests to retrieve HTML pages and then parsing and inspecting the HTML using the https://www.npmjs.com/package/cheerio library. It's blazing fast.
Cheerio is a server-side version of the popular jQuery library that does not run in the browser but instead constructs a DOM out of an HTML string and then provides the user an API to work with that DOM.
Cheerio Scraper is ideal for scraping websites that do not rely on client-side JavaScript to serve their content. It can be as much as 20 times faster than using a full-browser solution like Puppeteer.
https://docs.apify.com/academy/apify-scrapers/cheerio-scraper.md
## Puppeteer Scraper
Puppeteer Scraper is the most powerful scraper tool in our arsenal (aside from developing your own Actors). It uses the Puppeteer library to programmatically control a headless Chrome browser, and it can make it do almost anything. If using Web Scraper does not cut it, Puppeteer Scraper is what you need.
Puppeteer is a Node.js library, so knowledge of Node.js and its paradigms is expected when working with Puppeteer Scraper.
https://docs.apify.com/academy/apify-scrapers/puppeteer-scraper.md
---
#
This scraping tutorial will go into the nitty gritty details of extracting data from **https://apify.com/store** using **Cheerio Scraper** (https://apify.com/apify/cheerio-scraper). If you arrived here from the https://docs.apify.com/academy/apify-scrapers/getting-started.md, tutorial, great! You are ready to continue where we left off. If you haven't seen the Getting started yet, check it out, it will help you learn about Apify and scraping in general and set you up for this tutorial, because this one builds on topics and code examples discussed there.
## Getting to know our tools
In the https://docs.apify.com/academy/apify-scrapers/getting-started.md tutorial, we've confirmed that the scraper works as expected, so now it's time to add more data to the results.
To do that, we'll be using the https://github.com/cheeriojs/cheerio library. This may not sound familiar, so let's try again. Does https://jquery.com/ ring a bell? If it does you're in luck, because Cheerio is like jQuery that doesn't need an actual browser to run. Everything else is the same. All the functions you already know are there and even the familiar `$` is used. If you still have no idea what either of those are, don't worry. We'll walk you through using them step by step.
> https://github.com/cheeriojs/cheerio to learn more about it.
Now that's out of the way, let's open one of the Actor detail pages in the Store, for example the **Web Scraper** (https://apify.com/apify/web-scraper) page, and use our DevTools-Fu to scrape some data.
> If you're wondering why we're using Web Scraper as an example instead of Cheerio Scraper, it's only because we didn't want to triple the number of screenshots we needed to make. Lazy developers!
## Building our Page function
Before we start, let's do a quick recap of the data we chose to scrape:
1. **URL** - The URL that goes directly to the Actor's detail page.
2. **Unique identifier** - Such as **apify/web-scraper**.
3. **Title** - The title visible in the Actor's detail page.
4. **Description** - The Actor's description.
5. **Last modification date** - When the Actor was last modified.
6. **Number of runs** - How many times the Actor was run.
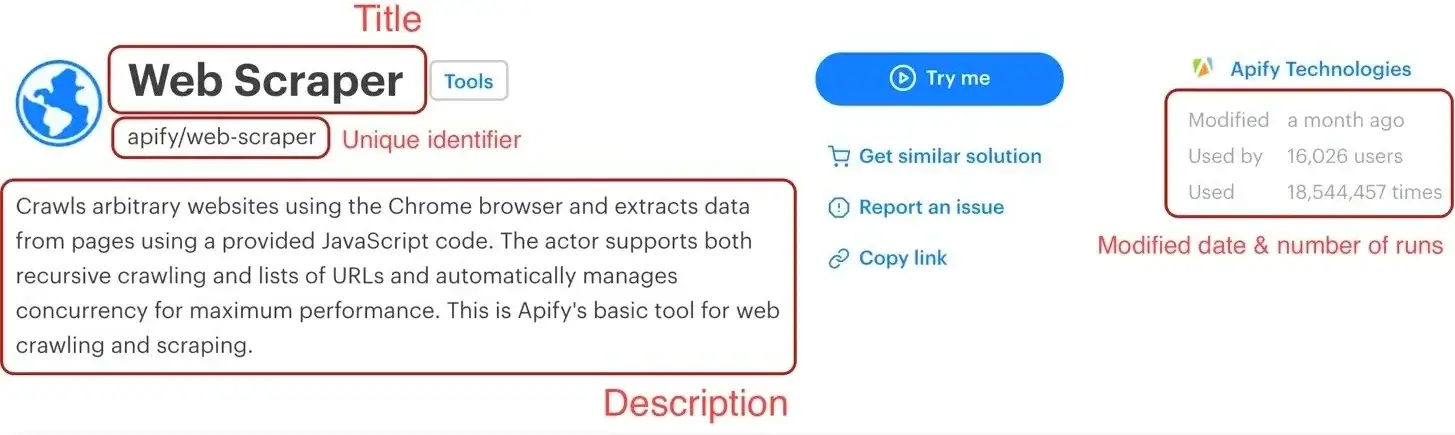
We've already scraped numbers 1 and 2 in the https://docs.apify.com/academy/apify-scrapers/getting-started.md tutorial, so let's get to the next one on the list: title.
### Title
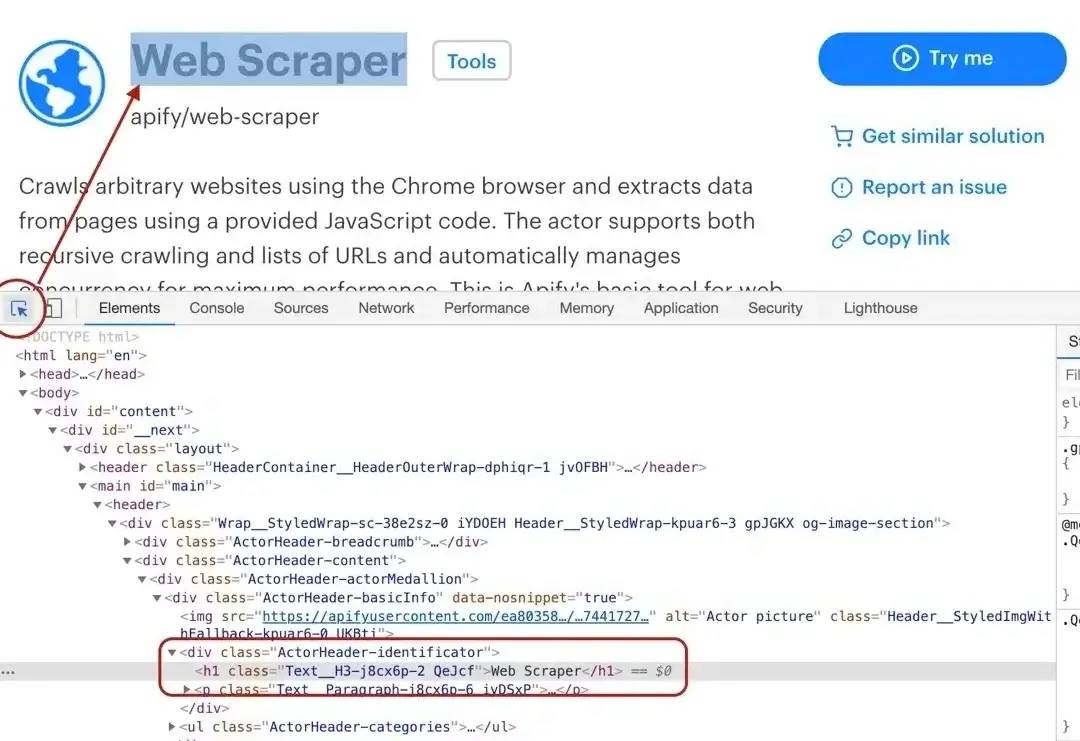
By using the element selector tool, we find out that the title is there under an `` tag, as titles should be. Maybe surprisingly, we find that there are actually two `` tags on the detail page. This should get us thinking. Is there any parent element that includes our `` tag, but not the other ones? Yes, there is! A `` element that we can use to select only the heading we're interested in.
> Remember that you can press CTRL+F (CMD+F) in the Elements tab of DevTools to open the search bar where you can quickly search for elements using their selectors. And always make sure to use the DevTools to verify your scraping process and assumptions. It's faster than changing the crawler code all the time.
To get the title we need to find it using a `header h1` selector, which selects all `` elements that have a `` ancestor. And as we already know, there's only one.
// Using Cheerio. async function pageFunction(context) { const { $ } = context; // ... rest of your code can come here return { title: $('header h1').text(), }; }
### Description
Getting the Actor's description is a little more involved, but still pretty straightforward. We cannot search for a `` tag, because there's a lot of them in the page. We need to narrow our search down a little. Using the DevTools we find that the Actor description is nested within the `` element too, same as the title. Moreover, the actual description is nested inside a `` tag with a class `actor-description`.
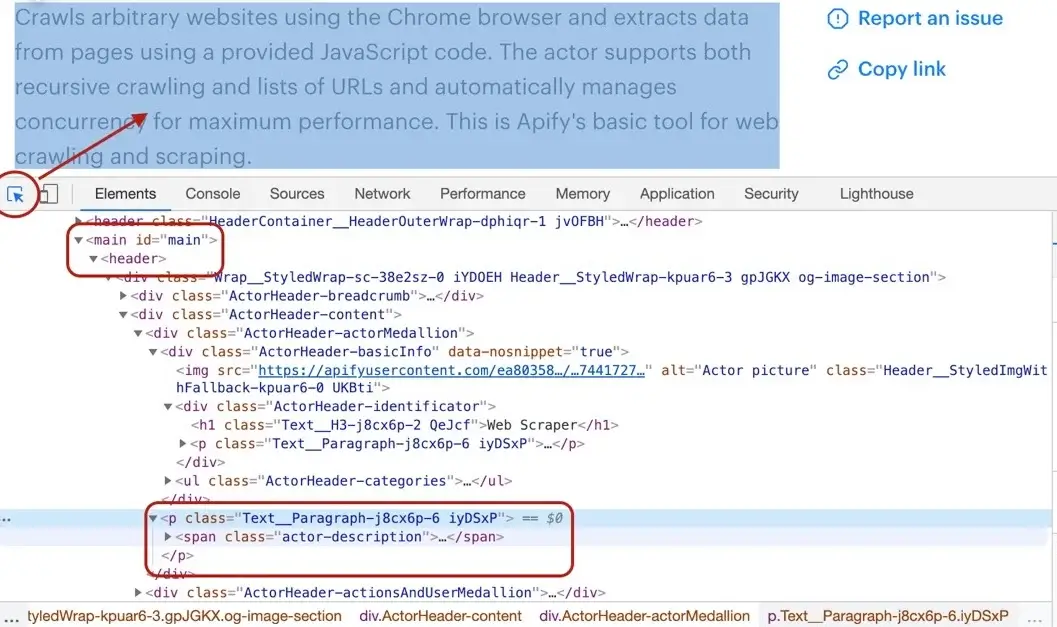
async function pageFunction(context) { const { $ } = context; // ... rest of your code can come here return { title: $('header h1').text(), description: $('header span.actor-description').text(), }; }
### Modified date
The DevTools tell us that the `modifiedDate` can be found in a `` element.
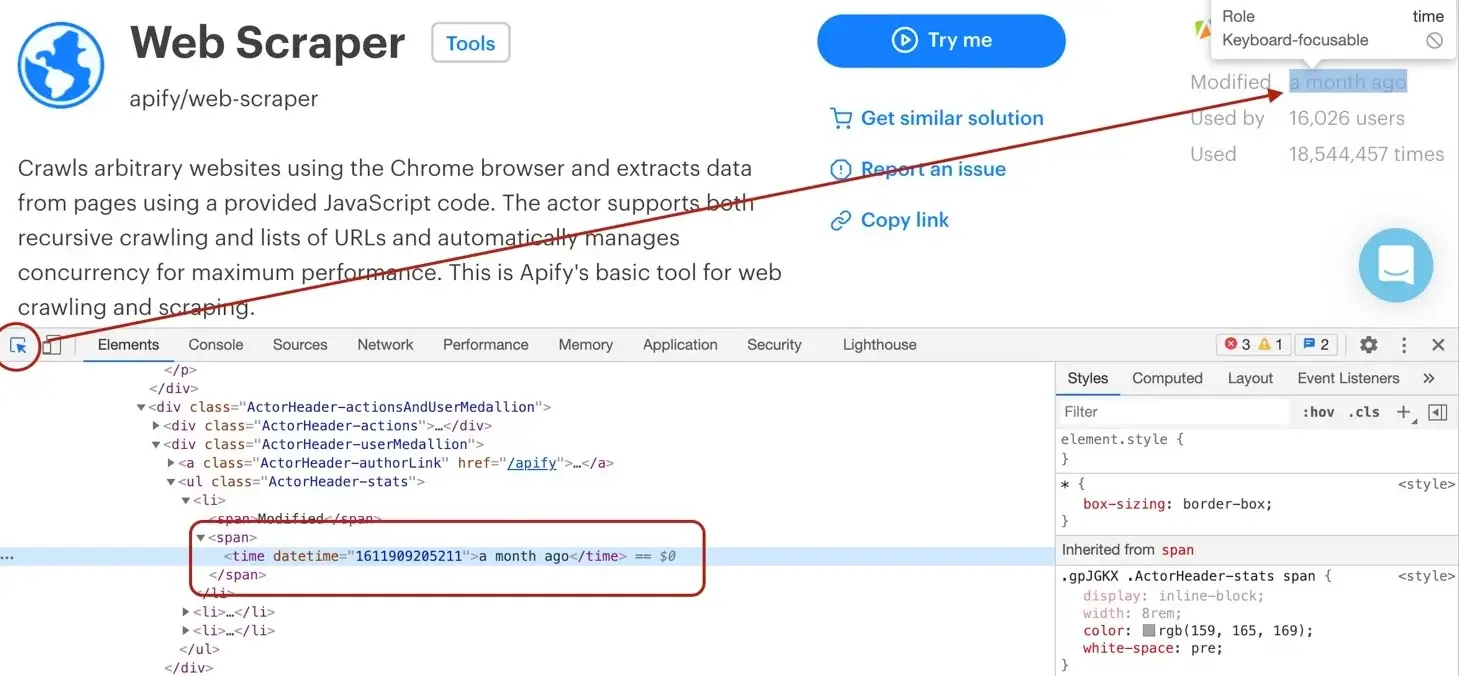
async function pageFunction(context) { const { $ } = context; // ... rest of your code can come here return { title: $('header h1').text(), description: $('header span.actor-description').text(), modifiedDate: new Date( Number( $('ul.ActorHeader-stats time').attr('datetime'), ), ), }; }
It might look a little too complex at first glance, but let us walk you through it. We find all the `` elements. Then, we read its `datetime` attribute, because that's where a unix timestamp is stored as a `string`.
But we would much rather see a readable date in our results, not a unix timestamp, so we need to convert it. Unfortunately, the `new Date()` constructor will not accept a `string`, so we cast the `string` to a `number` using the `Number()` function before actually calling `new Date()`. Phew!
### Run count
And so we're finishing up with the `runCount`. There's no specific element like ``, so we need to create a complex selector and then do a transformation on the result.
async function pageFunction(context) { const { $ } = context; // ... rest of your code can come here return { title: $('header h1').text(), description: $('header span.actor-description').text(), modifiedDate: new Date( Number( $('ul.ActorHeader-stats time').attr('datetime'), ), ), runCount: Number( $('ul.ActorHeader-stats > li:nth-of-type(3)') .text() .match(/[\d,]+/)[0] .replace(/,/g, ''), ), }; }
The `ul.ActorHeader-stats > li:nth-of-type(3)` looks complicated, but it only reads that we're looking for a `` element and within that element we're looking for the third `` element. We grab its text, but we're only interested in the number of runs. We parse the number out using a regular expression, but its type is still a `string`, so we finally convert the result to a `number` by wrapping it with a `Number()` call.
> The numbers are formatted with commas as thousands separators (e.g. `'1,234,567'`), so to extract it, we first use regular expression `/[\d,]+/` - it will search for consecutive number or comma characters. Then we extract the match via `.match(/[\d,]+/)[0]` and finally remove all the commas by calling `.replace(/,/g, '')`. We need to use `/,/g` with the global modifier to support large numbers with multiple separators, without it we would replace only the very first occurrence.
>
> This will give us a string (e.g. `'1234567'`) that can be converted via `Number` function.
### Wrapping it up
And there we have it! All the data we needed in a single object. For the sake of completeness, let's add the properties we parsed from the URL earlier and we're good to go.
async function pageFunction(context) { const { $ } = context; const { url } = request; // ... rest of your code can come here
const uniqueIdentifier = url
.split('/')
.slice(-2)
.join('/');
return {
url,
uniqueIdentifier,
title: $('header h1').text(),
description: $('header span.actor-description').text(),
modifiedDate: new Date(
Number(
$('ul.ActorHeader-stats time').attr('datetime'),
),
),
runCount: Number(
$('ul.ActorHeader-stats > li:nth-of-type(3)')
.text()
.match(/[\d,]+/)[0]
.replace(/,/g, ''),
),
};
}
All we need to do now is add this to our `pageFunction`:
async function pageFunction(context) {
// $ is Cheerio
const { request, log, skipLinks, $ } = context;
if (request.userData.label === 'START') {
log.info('Store opened!');
// Do some stuff later.
}
if (request.userData.label === 'DETAIL') {
const { url } = request;
log.info(Scraping ${url});
await skipLinks();
// Do some scraping.
const uniqueIdentifier = url
.split('/')
.slice(-2)
.join('/');
return {
url,
uniqueIdentifier,
title: $('header h1').text(),
description: $('header span.actor-description').text(),
modifiedDate: new Date(
Number(
$('ul.ActorHeader-stats time').attr('datetime'),
),
),
runCount: Number(
$('ul.ActorHeader-stats > li:nth-of-type(3)')
.text()
.match(/[\d,]+/)[0]
.replace(/,/g, ''),
),
};
}
}
### Test run
As always, try hitting that **Save & Run** button and visit the **Dataset** preview of clean items. You should see a nice table of all the attributes correctly scraped. You nailed it!
## Pagination
Pagination is a term that represents "going to the next page of results". You may have noticed that we did not actually scrape all the Actors, just the first page of results. That's because to load the rest of the Actors, one needs to click the **Show more** button at the very bottom of the list. This is pagination.
> This is a typical JavaScript pagination, sometimes called infinite scroll. Other pages may use links that take you to the next page. If you encounter those, make a Pseudo URL for those links and they will be automatically enqueued to the request queue. Use a label to let the scraper know what kind of URL it's processing.
If you paid close attention, you may now see a problem. How do we click a button in the page when we're working with Cheerio? We don't have a browser to do it and we only have the HTML of the page to work with. The simple answer is that we can't click a button. Does that mean that we cannot get the data at all? Usually not, but it requires some clever DevTools-Fu.
### Analyzing the page
While with Web Scraper and **Puppeteer Scraper** (https://apify.com/apify/puppeteer-scraper), we could get away with clicking a button, with Cheerio Scraper we need to dig a little deeper into the page's architecture. For this, we will use the Network tab of the Chrome DevTools.
> DevTools is a powerful tool with many features, so if you're not familiar with it, please https://developer.chrome.com/docs/devtools/, which explains everything much better than we ever could.
We want to know what happens when we click the **Show more** button, so we open the DevTools **Network** tab and clear it. Then we click the **Show more** button and wait for incoming requests to appear in the list.
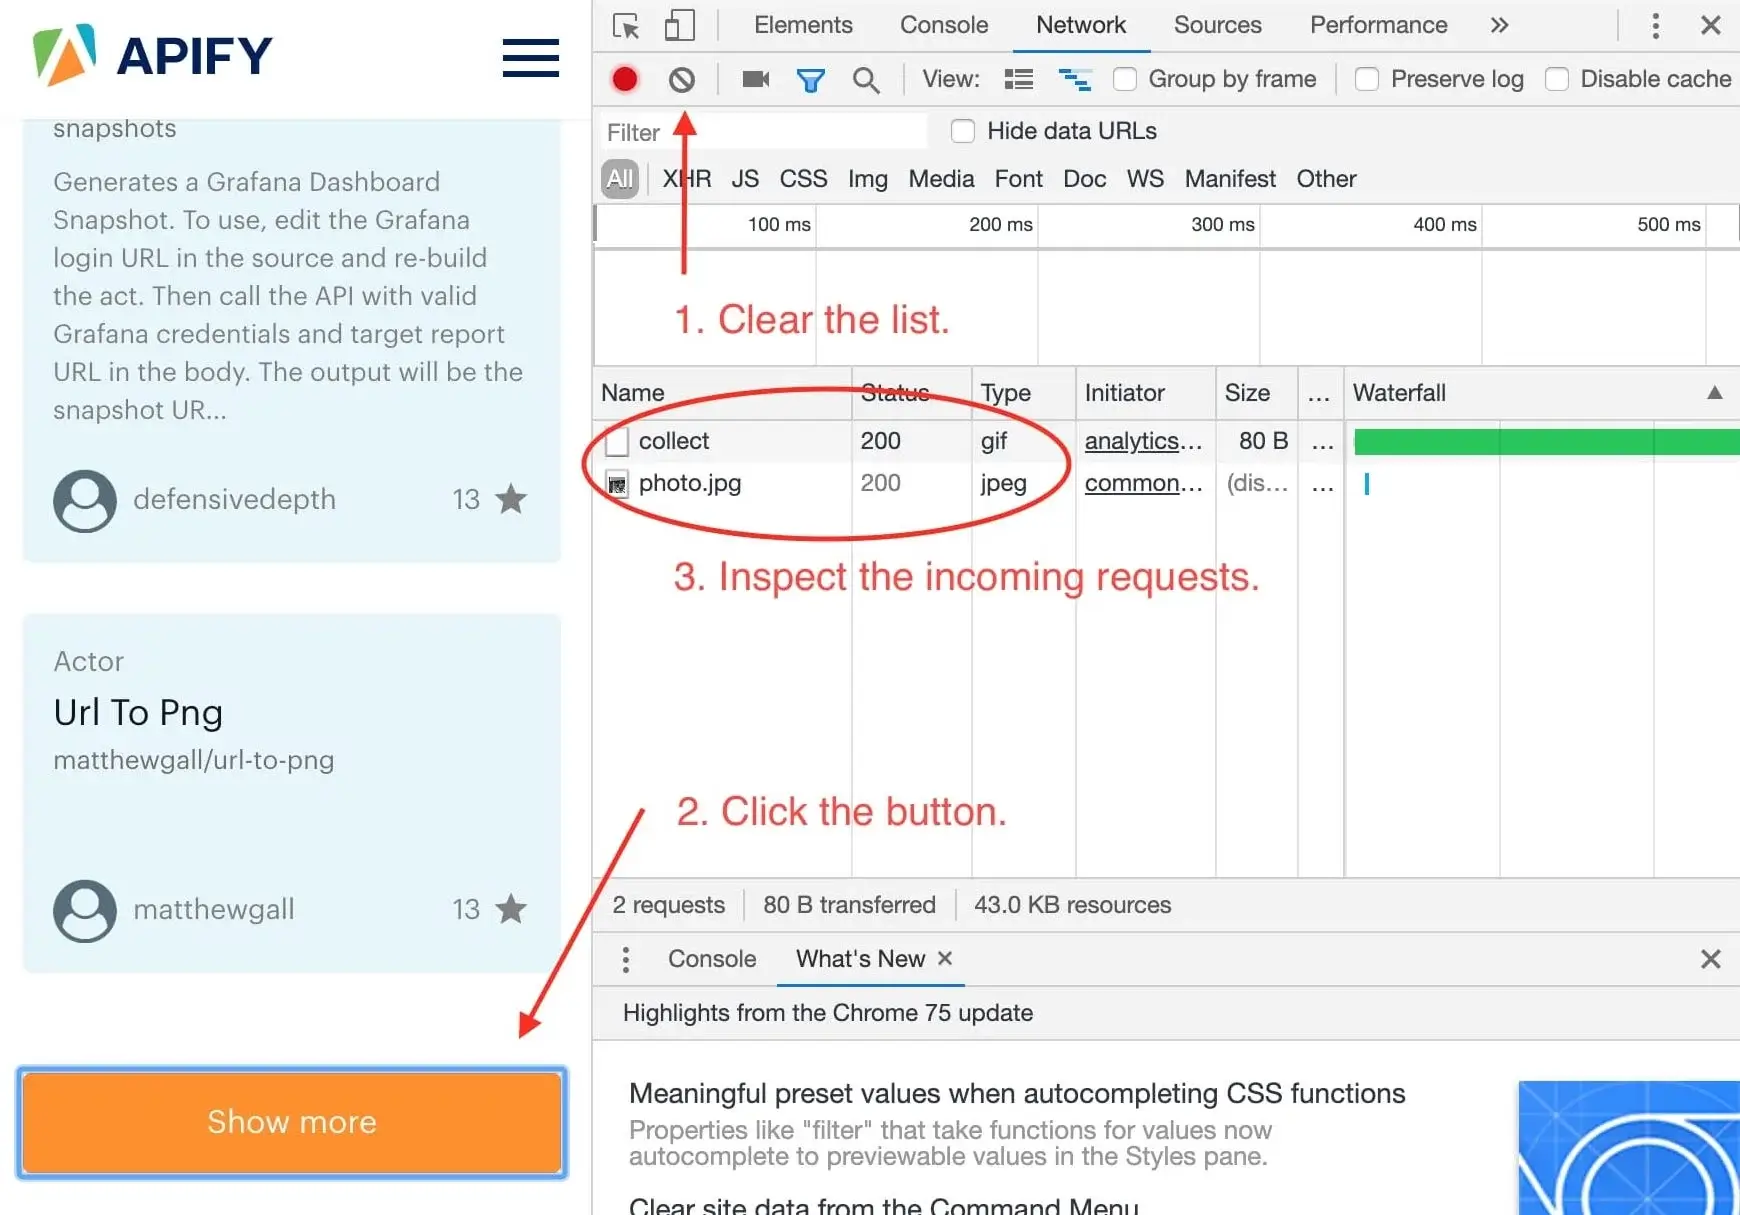
Now, this is interesting. It seems that we've only received two images after clicking the button and no additional data. This means that the data about Actors must already be available in the page and the **Show more** button only displays it. This is good news.
### Finding the Actors
Now that we know the information we seek is already in the page, we just need to find it. The first Actor in the store is Web Scraper, so let's try using the search tool in the **Elements** tab to find some reference to it. The first few hits do not provide any interesting information, but in the end, we find our goldmine. A `` tag, with the ID `__NEXT_DATA__` that seems to hold a lot of information about Web Scraper. In DevTools, you can right click an element and click **Store as global variable** to make this element available in the **Console**.
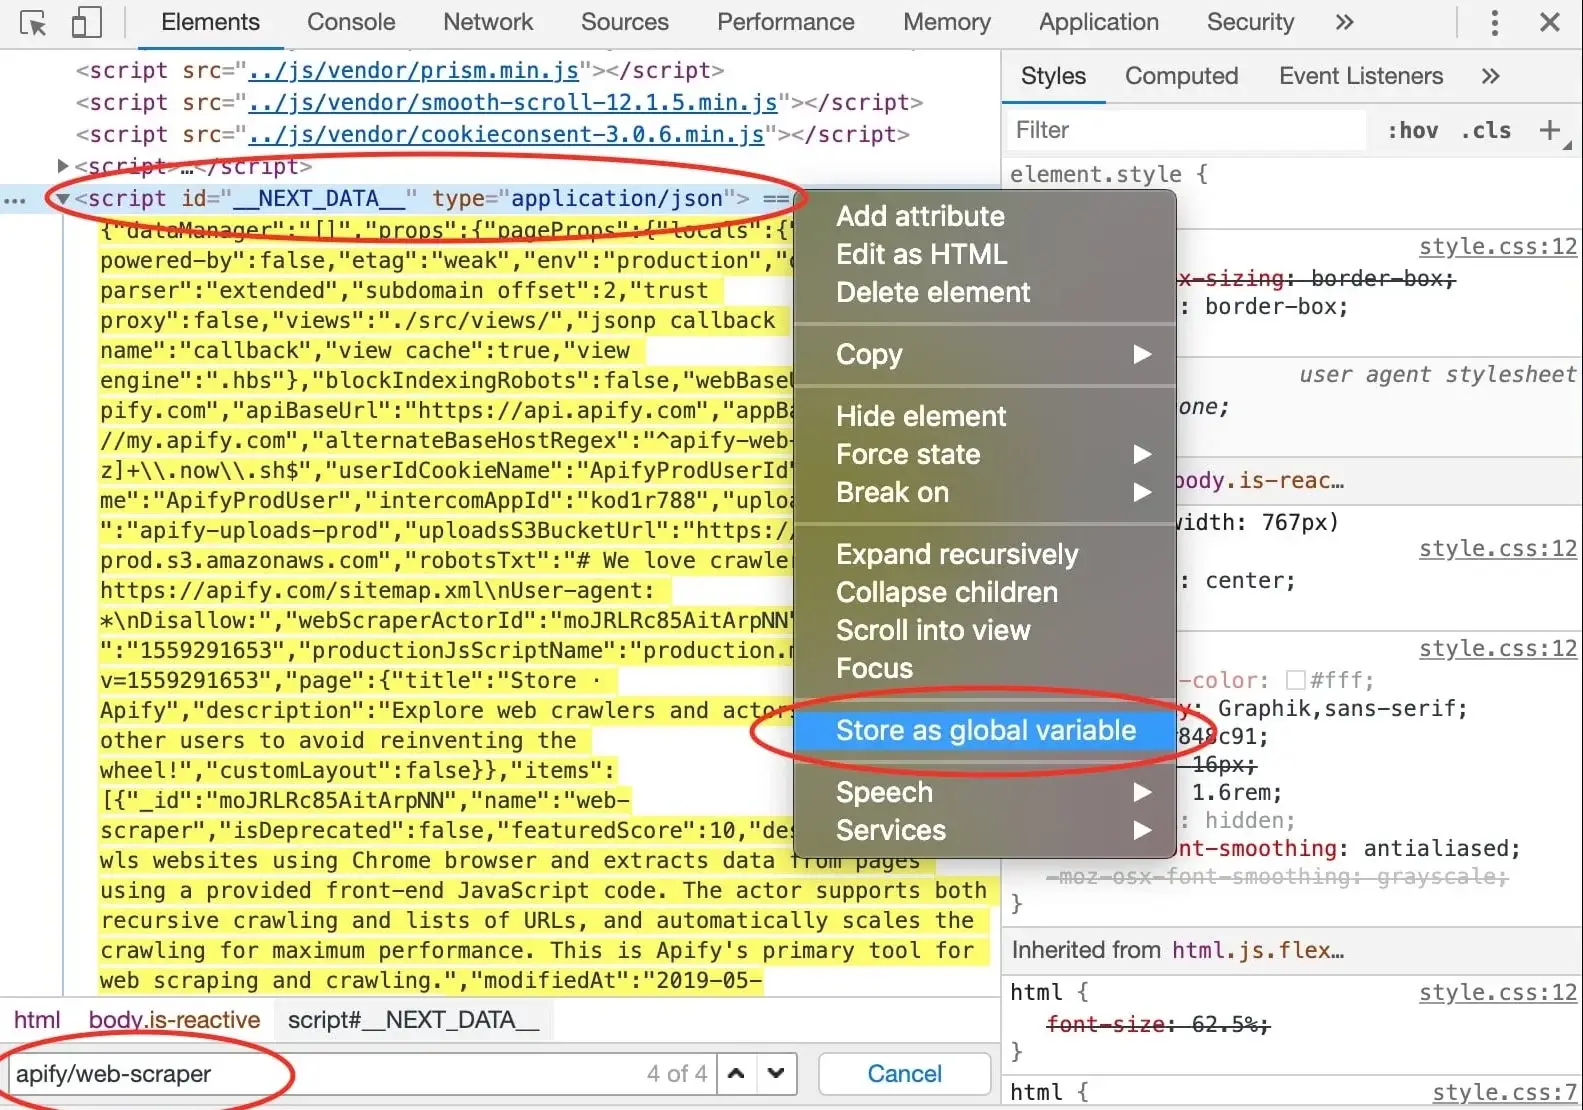
A `temp1` variable is now added to your console. We're mostly interested in its contents and we can get that using the `temp1.textContent` property. You can see that it's a rather large JSON string. How do we know? The `type` attribute of the `` element says `application/json`. But working with a string would be very cumbersome, so we need to parse it.
const data = JSON.parse(temp1.textContent);
After entering the above command into the console, we can inspect the `data` variable and see that all the information we need is there, in the `data.props.pageProps.items` array. Great!
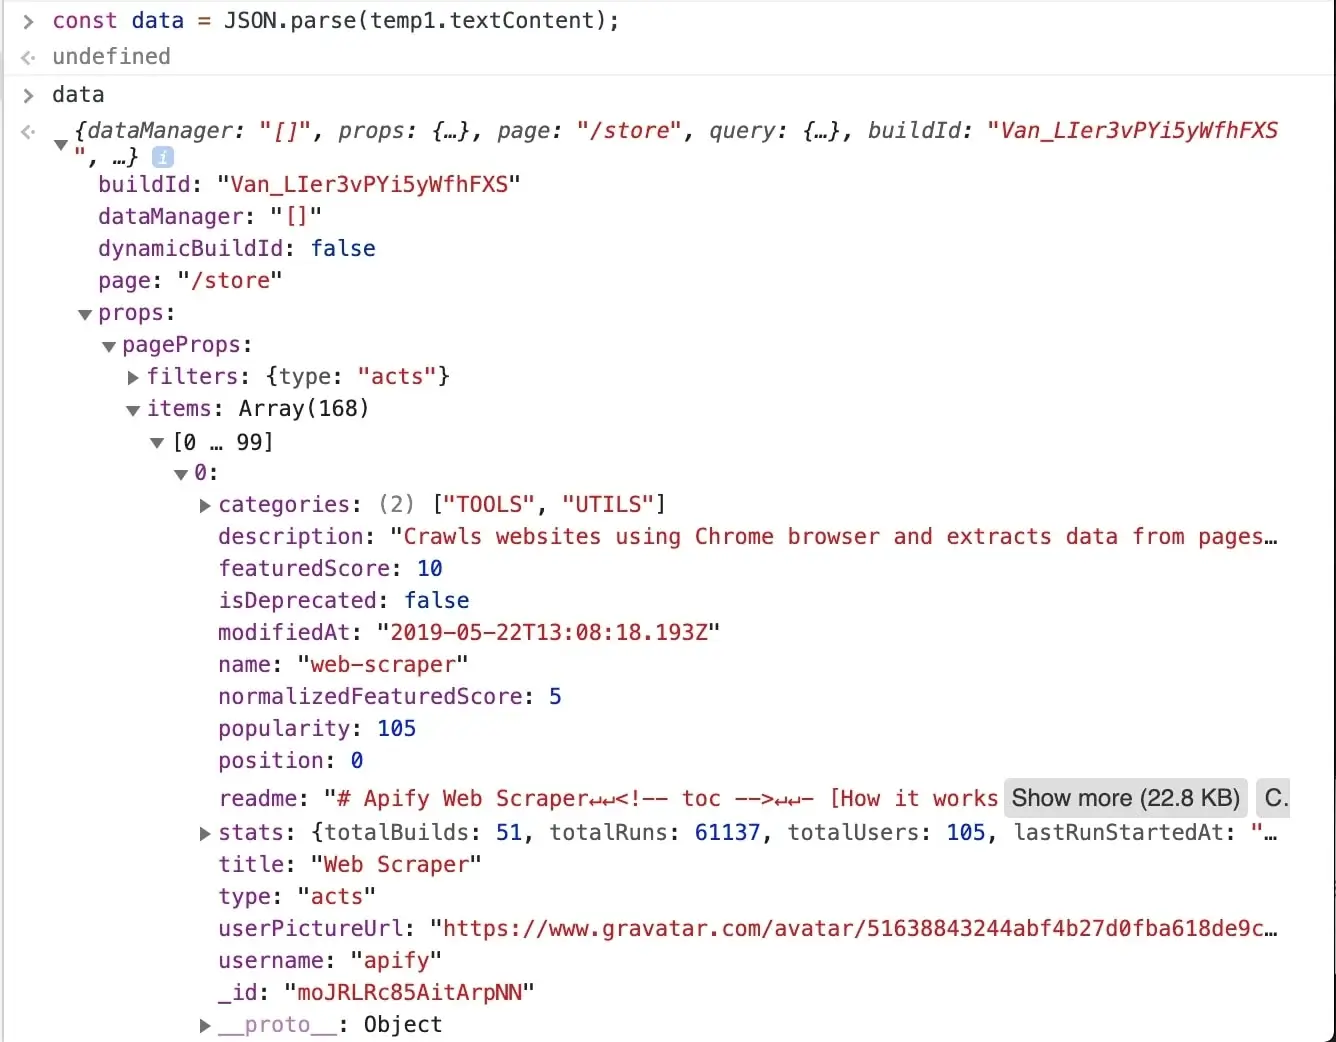
> It's obvious that all the information we set to scrape is available in this one data object, so you might already be wondering, can I make one request to the store to get this JSON and then parse it out and be done with it in a single request? Yes you can! And that's the power of clever page analysis.
### Using the data to enqueue all Actor details
We don't really need to go to all the Actor details now, but for the sake of practice, let's imagine we only found Actor names such as `cheerio-scraper` and their owners, such as `apify` in the data. We will use this information to construct URLs that will take us to the Actor detail pages and enqueue those URLs into the request queue.
// We're not in DevTools anymore, // so we use Cheerio to get the data. const dataJson = $('#NEXT_DATA').html(); // We requested HTML, but the data are actually JSON. const data = JSON.parse(dataJson);
for (const item of data.props.pageProps.items) {
const { name, username } = item;
const actorDetailUrl = https://apify.com/${username}/${name};
await context.enqueueRequest({
url: actorDetailUrl,
userData: {
// Don't forget the label.
label: 'DETAIL',
},
});
}
We iterate through the items we found, build Actor detail URLs from the available properties and then enqueue those URLs into the request queue. We need to specify the label too, otherwise our page function wouldn't know how to route those requests.
> If you're wondering how we know the structure of the URL, see the https://docs.apify.com/academy/apify-scrapers/getting-started.md tutorial again.
### Plugging it into the Page function
We've got the general algorithm ready, so all that's left is to integrate it into our earlier `pageFunction`. Remember the `// Do some stuff later` comment? Let's replace it.
async function pageFunction(context) { const { request, log, skipLinks, $ } = context; if (request.userData.label === 'START') { log.info('Store opened!');
const dataJson = $('#__NEXT_DATA__').html();
// We requested HTML, but the data are actually JSON.
const data = JSON.parse(dataJson);
for (const item of data.props.pageProps.items) {
const { name, username } = item;
const actorDetailUrl = `https://apify.com/${username}/${name}`;
await context.enqueueRequest({
url: actorDetailUrl,
userData: {
label: 'DETAIL',
},
});
}
}
if (request.userData.label === 'DETAIL') {
const { url } = request;
log.info(`Scraping ${url}`);
await skipLinks();
// Do some scraping.
const uniqueIdentifier = url
.split('/')
.slice(-2)
.join('/');
return {
url,
uniqueIdentifier,
title: $('header h1').text(),
description: $('header span.actor-description').text(),
modifiedDate: new Date(
Number(
$('ul.ActorHeader-stats time').attr('datetime'),
),
),
runCount: Number(
$('ul.ActorHeader-stats > li:nth-of-type(3)')
.text()
.match(/[\d,]+/)[0]
.replace(/,/g, ''),
),
};
}
}
That's it! You can now remove the **Max pages per run** limit, **Save & Run** your task and watch the scraper scrape all of the Actors' data. After it succeeds, open the **Dataset** tab again click on **Preview**. You should have a table of all the Actor's details in front of you. If you do, great job! You've successfully scraped Apify Store. And if not, no worries, go through the code examples again, it's probably just a typo.
> There's an important caveat. The way we implemented pagination here is in no way a generic system that you can use with other websites. Cheerio is fast (and that means it's cheap), but it's not easy. Sometimes there's just no way to get all results with Cheerio only and other times it takes hours of research. Keep this in mind when choosing the right scraper for your job. But don't get discouraged. Often times, the only thing you will ever need is to define a correct Pseudo URL. Do your research first before giving up on Cheerio Scraper.
## Downloading the scraped data
You already know the **Dataset** tab of the run console since this is where we've always previewed our data. Notice the row of data formats such as JSON, CSV, and Excel. Below it are options for viewing and downloading the data. Go ahead and try it.
> If you prefer working with an API, you can find the example endpoint under the API tab: **Get dataset items**.
### Clean items
You can view and download your data without modifications, or you can choose to only get **clean** items. Data that aren't cleaned include a record for each `pageFunction` invocation, even if you did not return any results. The record also includes hidden fields such as `#debug`, where you can find a variety of information that can help you with debugging your scrapers.
Clean items, on the other hand, include only the data you returned from the `pageFunction`. If you're only interested in the data you scraped, this format is what you will be using most of the time.
To control this, open the **Advanced options** view on the **Dataset** tab.
## Bonus: Making your code neater
You may have noticed that the `pageFunction` gets quite bulky. To make better sense of your code and have an easier time maintaining or extending your task, feel free to define other functions inside the `pageFunction` that encapsulate all the different logic. You can, for example, define a function for each of the different pages:
async function pageFunction(context) { switch (context.request.userData.label) { case 'START': return handleStart(context); case 'DETAIL': return handleDetail(context); default: throw new Error('Unknown request label.'); }
async function handleStart({ log, waitFor, $ }) {
log.info('Store opened!');
const dataJson = $('#__NEXT_DATA__').html();
// We requested HTML, but the data are actually JSON.
const data = JSON.parse(dataJson);
for (const item of data.props.pageProps.items) {
const { name, username } = item;
const actorDetailUrl = `https://apify.com/${username}/${name}`;
await context.enqueueRequest({
url: actorDetailUrl,
userData: {
label: 'DETAIL',
},
});
}
}
async function handleDetail({ request, log, skipLinks, $ }) {
const { url } = request;
log.info(`Scraping ${url}`);
await skipLinks();
// Do some scraping.
const uniqueIdentifier = url
.split('/')
.slice(-2)
.join('/');
return {
url,
uniqueIdentifier,
title: $('header h1').text(),
description: $('header span.actor-description').text(),
modifiedDate: new Date(
Number(
$('ul.ActorHeader-stats time').attr('datetime'),
),
),
runCount: Number(
$('ul.ActorHeader-stats > li:nth-of-type(3)')
.text()
.match(/[\d,]+/)[0]
.replace(/,/g, ''),
),
};
}
}
> If you're confused by the functions being declared below their executions, it's called hoisting and it's a feature of JavaScript. It helps you put what matters on top, if you so desire.
## Final word
Thank you for reading this whole tutorial! Really! It's important to us that our users have the best information available to them so that they can use Apify and effectively. We're glad that you made it all the way here and congratulations on creating your first scraping task. We hope that you liked the tutorial and if there's anything you'd like to ask, https://discord.gg/jyEM2PRvMU!
## What's next
* Check out the https://docs.apify.com/sdk and its https://docs.apify.com/sdk/js/docs/guides/apify-platform tutorial if you'd like to try building your own Actors. It's a bit more complex and involved than writing a `pageFunction`, but it allows you to fine-tune all the details of your scraper to your liking.
* https://docs.apify.com/platform/actors.md, from how they work to https://docs.apify.com/platform/actors/publishing.md them in Apify Store, and even https://blog.apify.com/make-regular-passive-income-developing-web-automation-actors-b0392278d085/ on Actors.
* Found out you're not into the coding part but would still to use Apify Actors? Check out our https://apify.com/store or https://apify.com/contact-sales from an Apify-certified developer.
**Learn how to scrape a website using Apify's Cheerio Scraper. Build an Actor's page function, extract information from a web page and download your data.**
***
---
#
Welcome to the getting started tutorial! It will walk you through creating your first scraping task step by step. You will learn how to set up all the different configuration options, code a **Page function** (`pageFunction`), and finally download the scraped data either as an Excel sheet or in another format, such as JSON or CSV. But first, let's give you a brief introduction to web scraping with Apify.
## What is an Apify scraper
It doesn't matter whether you arrived here from **Web Scraper** (https://apify.com/apify/web-scraper), **Puppeteer Scraper** (https://apify.com/apify/puppeteer-scraper) or **Cheerio Scraper** (https://apify.com/apify/cheerio-scraper). All of them are **Actors** and for now, let's think of an **Actor** as an application that you can use with your own configuration. **apify/web-scraper** is therefore an application called **web-scraper**, built by **apify**, that you can configure to scrape any webpage. We call these configurations **tasks**.
> If you need help choosing the right scraper, see this https://help.apify.com/en/articles/3024655-choosing-the-right-solution. If you want to learn more about Actors in general, you can read our https://apify.com/actors or https://docs.apify.com/platform/actors.md.
You can create 10 different **tasks** for 10 different websites, with very different options, but there will always be just one **Actor**, the `apify/*-scraper` you chose. This is the essence of tasks. They are nothing but **saved configurations** of the Actor that you can run repeatedly.
## Trying it out
Depending on how you arrived at this tutorial, you may already have your first task created for the scraper of your choice. If not, the easiest way is to go to https://console.apify.com/actors#/store/ and select the Actor you want to base your task on. Then, click the **Create a new task** button in the top-right corner.
> This tutorial covers the use of **Web**, **Cheerio**, and **Puppeteer** scrapers, but a lot of the information here can be used with all Actors. For this tutorial, we will select **Web Scraper**.
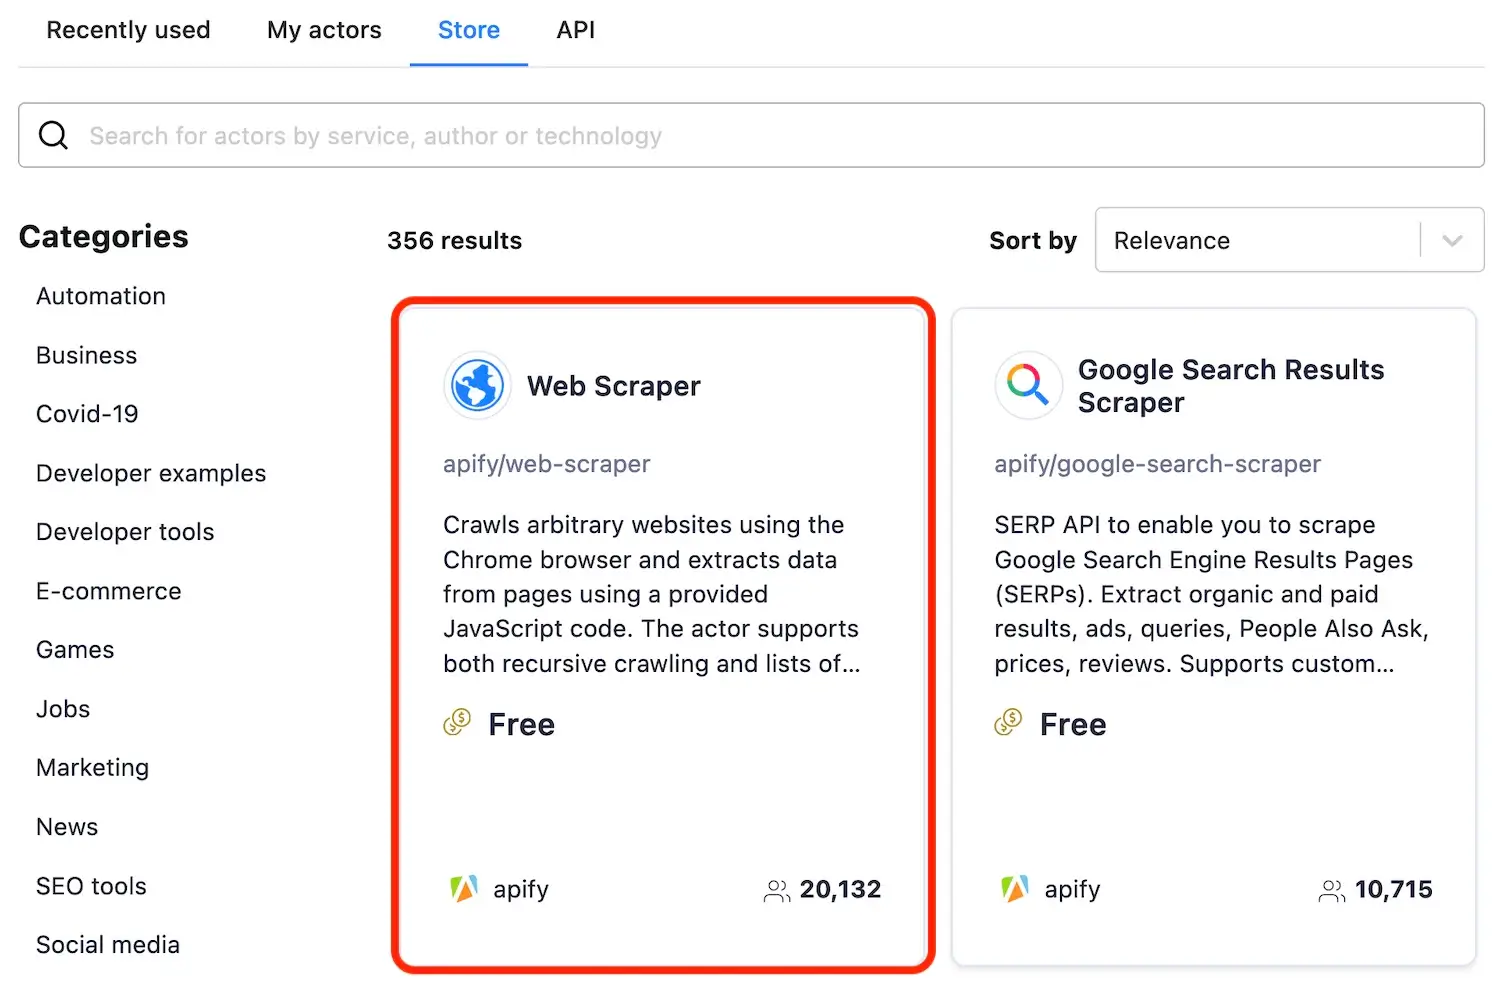
### Running a task
This takes you to the **Input and options** tab of the task configuration. Before we delve into the details, let's see how the example works. You can see that there are already some pre-configured input values. It says that the task should visit **https://apify.com** and all its subpages, such as **https://apify.com/contact** and scrape some data using the provided `pageFunction`, specifically the `` of the page and its URL.
Scroll down to the **Performance and limits** section and set the **Max pages per run** option to **10**. This tells your task to finish after 10 pages have been visited. We don't need to crawl the whole domain to see that the Actor works.
> This also helps with keeping your https://docs.apify.com/platform/actors/running/usage-and-resources.md (CU) consumption low. To get an idea, our free plan includes 10 CUs and this run will consume about 0.04 CU, so you can run it 250 times a month for free. If you accidentally go over the limit, no worries, we won't charge you for it. You just won't be able to run more tasks that month.
Now click **Save & Run**! *(in the bottom-left part of your screen)*
### The run detail
After clicking **Save & Run**, the window will change to the run detail. Here, you will see the run's log. If it seems that nothing is happening, don't worry, it takes a few seconds for the run to fully boot up. In under a minute, you should have the 10 pages scraped. You will know that the run successfully completed when the `RUNNING` card in top-left corner changes to `SUCCEEDED`.
> Feel free to browse through the various new tabs: **Log**, **Info**, **Input** and other, but for the sake of brevity, we will not explain all their features in this tutorial.
Now that the run has `SUCCEEDED`, click on the glowing **Results** card to see the scrape's results. This takes you to the **Dataset** tab, where you can display or download the results in various formats. For now, click the **Preview** button. Voila, the scraped data!
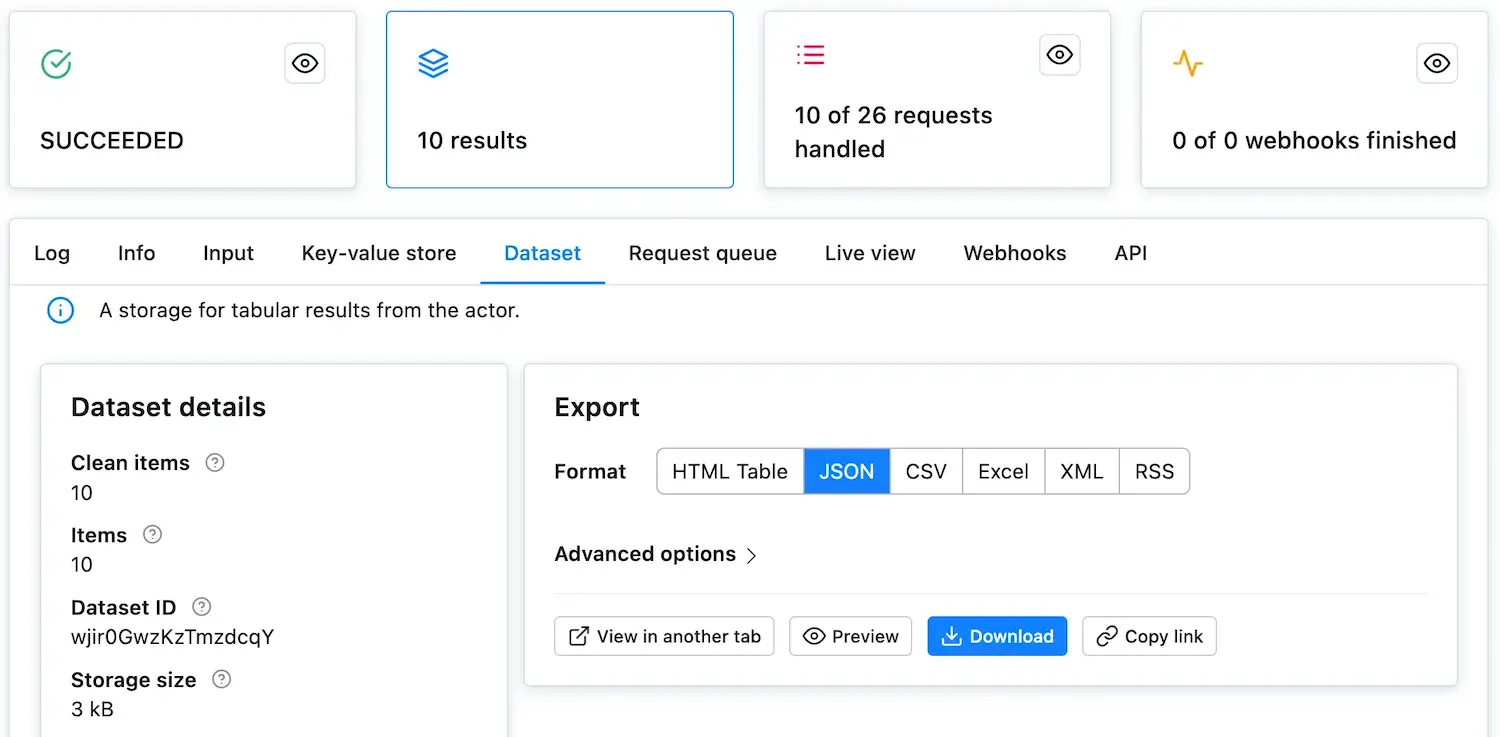
Good job! We've run our first task and got some results. Let's learn how to change the default configuration to scrape something more interesting than the page's ``.
## Creating your own task
Before we jump into the scraping itself, let's have a quick look at the user interface that's available to us. Click on the task's name in the top-left corner to visit the task's configuration.

### Input and options
The **Input** tab is where we started and it's the place where you create your scraping configuration. The Actor's creator prepares the **Input** form so that you can tell the Actor what to do. Feel free to check the tooltips of the various options to get a better idea of what they do. To display the tooltip, click the question mark next to each input field's name.
> We will not go through all the available input options in this tutorial. See the Actor's README for detailed information.
Below the input fields are the Build, Timeout and Memory options. Let's keep them at default settings for now. Remember that if you see a yellow `TIMED-OUT` status after running your task, you might want to come back here and increase the timeout.
> Timeouts are there to prevent tasks from running forever. Always set a reasonable timeout to prevent a rogue task from eating up all your compute units.
### Settings
In the settings tab, you can set options that are common to all tasks and not directly related to the Actor's purpose. Unless you've already changed the task's name, it's set to **my-task**, so why not try changing it to **my-first-scraper** and clicking **Save**.
### Runs
You can find all the task runs and their detail pages here. Every time you start a task, it will appear here in the list. Apify securely stores your ten most recent runs indefinitely, ensuring your records are always accessible. All of your task's runs and their outcomes, beyond the latest ten, will be stored here for the data retention period, https://apify.com/pricing.
### Webhooks
Webhooks are a feature that help keep you aware of what's happening with your tasks. You can set them up to inform you when a task starts, finishes, fails etc., or you can even use them to run more tasks, depending on the outcome of the original one. https://docs.apify.com/platform/integrations/webhooks.md.
### Information
Since tasks are configurations for Actors, this tab shows you all the information about the underlying Actor, the Apify scraper of your choice. You can see the available versions and their READMEs - it's always a good idea to read an Actor's README first before creating a task for it.
### API
The API tab gives you a quick overview of all the available API calls in case you would like to use your task programmatically. It also includes links to detailed API documentation. You can even try it out immediately using the **Test endpoint** button.
> Never share a URL containing the authentication token (`?token=...` parameter in the URLs), as this will compromise your account's security.
## Scraping theory
Since this is a tutorial, we'll be scraping our own website. https://apify.com/store is a great candidate for some scraping practice. It's a page built on popular technologies, which displays a lot of different items in various categories, just like an online store, a typical scraping target, would.
### The goal
We want to create a scraper that scrapes all the Actors in the store and collects the following attributes for each Actor:
1. **URL** - The URL that goes directly to the Actor's detail page.
2. **Unique identifier** - Such as **apify/web-scraper**.
3. **Title** - The title visible in the Actor's detail page.
4. **Description** - The Actor's description.
5. **Last modification date** - When the Actor was last modified.
6. **Number of runs** - How many times the Actor was run.
Some of this information may be scraped directly from the listing pages, but for the rest, we will need to visit the detail pages of all the Actors.
### The start URL
In the **Input** tab of the task we have, we'll change the **Start URL** from **https://apify.com**. This will tell the scraper to start by opening a different URL. You can add more **Start URL**s or even , but in this case, we'll be good with just one.
How do we choose the new **Start URL**? The goal is to scrape all Actors in the store, which is available at https://apify.com/store, so we choose this URL as our **Start URL**.
We also need to somehow distinguish the **Start URL** from all the other URLs that the scraper will add later. To do this, click the **Details** button in the **Start URL** form and see the **User data** input. Here you can add any information you'll need during the scrape in a JSON format. For now, add a label to the **Start URL**.
{ "label": "START" }
### Filtering with a Link selector
The **Link selector**, together with **Pseudo URL**s, are your URL matching arsenal. The Link selector is a CSS selector and its purpose is to select the HTML elements where the scraper should look for URLs. And by looking for URLs, we mean finding the elements' `href` attributes. For example, to enqueue URLs from `` tags, we would enter `'div.my-class'`.
What's the connection to **Pseudo URL**s? Well, first, all the URLs found in the elements that match the Link selector are collected. Then, **Pseudo URL**s are used to filter through those URLs and enqueue only the ones that match the **Pseudo URL** structure.
To scrape all the Actors in Apify Store, we should use the Link selector to tell the scraper where to find the URLs we need. For now, let us tell you that the Link selector you're looking for is:
div.item > a
Save it as your **Link selector**. If you're wondering how we figured this out, follow along with the tutorial. By the time we finish, you'll know why we used this selector, too.
### Crawling the website with pseudo URLs
What is a **Pseudo URL**? Let us explain. Before we can start scraping the Actor details, we need to find all the links to the details. If the links follow a set structure, we can use a certain pattern to describe this structure. And that's what a **Pseudo URL** is. A pattern that describes a URL structure. By setting a **Pseudo URL**, all links that follow the given structure will automatically be added to the crawling queue.
Let's see an example. To find the pattern, open some of the Actor details in the store. You'll find that the URLs are always structured the same:
https://apify.com/{OWNER}/{NAME}
In the structures, only the `OWNER` and `NAME` change. We can leverage this in a **Pseudo URL**.
#### Making a pseudo URL
**Pseudo URL**s are URLs with some variable parts in them. Those variable parts are represented by https://developer.mozilla.org/en-US/docs/Web/JavaScript/Guide/Regular_Expressions enclosed in brackets `[]`.
Working with our Actor details example, we could produce a **Pseudo URL** like this:
This **Pseudo URL** will match all Actor detail pages, such as:
https://apify.com/apify/web-scraper
But it will not match pages we're not interested in, such as:
In addition, together with the filter we set up using the **Link selector**, the scraper will now avoid URLs such as:
https://apify.com/industries/manufacturing
This is because even though it matches our **Pseudo URL**'s format, the HTML element that contains it does not match the `div.item > a` element we specified in the **Link selector**.
Let's use the above **Pseudo URL** in our task. We should also add a label as we did with our **Start URL**. This label will be added to all pages that were enqueued into the request queue using the given **Pseudo URL**.
{ "label": "DETAIL" }
### Test run
Now that we've added some configuration, it's time to test it. Run the task, keeping the **Max pages per run** set to `10` and the `pageFunction` as it is. You should see in the log that the scraper first visits the **Start URL** and then several of the Actor details matching the **Pseudo URL**.
## The page function
The `pageFunction` is a JavaScript function that gets executed for each page the scraper visits. To figure out how to create it, you must first inspect the page's structure to get an idea of its inner workings. The best tools for that are a browser's inbuilt developer tools - DevTools.
### Using DevTools
Open https://apify.com/store in the Chrome browser (or use any other browser, just note that the DevTools may differ slightly) and open the DevTools, either by right-clicking on the page and selecting **Inspect** or by pressing **F12**.
The DevTools window will pop up and display a lot of, perhaps unfamiliar, information. Don't worry about that too much - open the Elements tab (the one with the page's HTML). The Elements tab allows you to browse the page's structure and search within it using the search tool. You can open the search tool by pressing **CTRL+F** or **CMD+F**. Try typing **title** into the search bar.
You'll see that the Element tab jumps to the first `` element of the current page and that the title is **Store · Apify**. It's always good practice to do your research using the DevTools before writing the `pageFunction` and running your task.
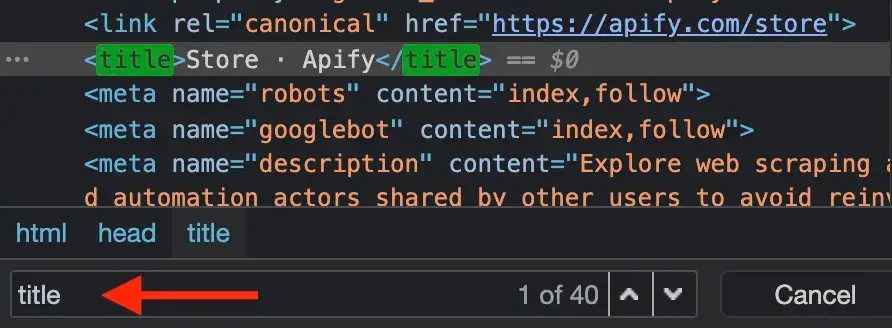
> For the sake of brevity, we won't go into the details of using the DevTools in this tutorial. If you're just starting out with DevTools, this https://developer.chrome.com/docs/devtools/ is a good place to begin.
### Understanding `context`
The `pageFunction` has access to global variables such as `window` and `document`, which are provided by the browser, as well as to `context`, which is the `pageFunction`'s single argument. `context` carries a lot of useful information and helpful functions, which are described in the Actor's README.
### New page function boilerplate
We know that we'll visit two kinds of pages, the list page (**Start URL**) and the detail pages (enqueued using the **Pseudo URL**). We want to enqueue links on the list page and scrape data on the detail page.
Since we're not covering jQuery in this tutorial for the sake of brevity, replace the default boilerplate with the code below.
async function pageFunction(context) {
const { request, log, skipLinks } = context;
if (request.userData.label === 'START') {
log.info('Store opened!');
// Do some stuff later.
}
if (request.userData.label === 'DETAIL') {
log.info(Scraping ${request.url});
await skipLinks();
// Do some scraping.
return {
// Scraped data.
};
}
}
This may seem like a lot of new information, but it's all connected to our earlier configuration.
### `context.request`
The `request` is an instance of the https://sdk.apify.com/docs/api/request class and holds information about the currently processed page, such as its `url`. Each `request` also has the `request.userData` property of type `Object`. While configuring the **Start URL** and the **Pseudo URL**, we gave them a `label`. We're now using them in the `pageFunction` to distinguish between the store page and the detail pages.
### `context.skipLinks()`
When a **Pseudo URL** is set, the scraper attempts to enqueue matching links on each page it visits. `skipLinks()` is used to tell the scraper that we don't want this to happen on the current page.
### `context.log`
`log` is used for printing messages to the console. You may be tempted to use `console.log()`, but this will not work unless you turn on the **Browser log** option. `log.info()` should be used for general messages, but you can also use `log.debug()` for messages that will only be shown when you turn on the **Debug log** option. https://sdk.apify.com/docs/api/log.
### The page function's return value
The `pageFunction` may only return nothing, `null`, `Object` or `Object[]`. If an `Object` is returned, it will be saved as a single result. Returning an `Array` of `Objects` will save each item in the array as a result.
The scraping results are saved in a https://docs.apify.com/platform/storage/dataset.md (one of the tabs in the run console, as you may remember). It behaves like a table. Each item is a row in the table and its properties are its columns. Returning the following `Object`:
async function pageFunction(context) { // ... rest of your code return { url: 'https://apify.com', title: 'Web Scraping, Data Extraction and Automation - Apify', }; }
will produce the following table:
| title | url |
| ---------------------------------------------------- | ----------------- |
| Web Scraping, Data Extraction and Automation - Apify | https://apify.com |
## Scraper lifecycle
Now that we're familiar with all the pieces in the puzzle, we'll quickly take a look at the scraper lifecycle, or in other words, what the scraper actually does when it scrapes. It's quite straightforward.
The scraper:
1. Visits the first **Start URL** and waits for the page to load.
2. Executes the `pageFunction`.
3. Finds all the elements matching the **Link selector** and extracts their `href` attributes (URLs).
4. Uses the **pseudo URLs** to filter the extracted URLs and throws away those that don't match.
5. Enqueues the matching URLs to the end of the crawling queue.
6. Closes the page and selects a new URL to visit, either from the **Start URL**s if there are any left, or from the beginning of the crawling queue.
> When you're not using the request queue, the scraper repeats steps 1 and 2. You would not use the request queue when you already know all the URLs you want to visit. For example, when you have a pre-existing list of a thousand URLs that you uploaded as a text file. Or when scraping a single URL.
## Scraping practice
We've covered all the concepts that we need to understand to successfully scrape the data in our goal, so let's get to it. We will only output data that are already available to us in the page's URL. Remember from that we also want to include the **URL** and a **Unique identifier** in our results. To get those, we need the `request.url`, because it is the URL and includes the Unique identifier.
const { url } = request; const uniqueIdentifier = url.split('/').slice(-2).join('/');
### Test run 2
We'll add our first data to the `pageFunction` and carry out a test run to see that everything works as expected.
async function pageFunction(context) {
const { request, log, skipLinks } = context;
if (request.userData.label === 'START') {
log.info('Store opened!');
// Do some stuff later.
}
if (request.userData.label === 'DETAIL') {
const { url } = request;
log.info(Scraping ${url});
await skipLinks();
// Do some scraping.
const uniqueIdentifier = url
.split('/')
.slice(-2)
.join('/');
return {
url,
uniqueIdentifier,
};
}
}
Now **Save & Run** the task and once it finishes, check the dataset by clicking on the **Results** card. Click **Preview** and you should see the URLs and unique identifiers scraped. Great job!
## Choosing sides
Up until now, everything has been the same for all the Apify scrapers. Whether you're using Web Scraper, Puppeteer Scraper or Cheerio Scraper, what you've learned now will always be the same. This is great if you ever need to switch scrapers, because there's no need to learn everything from scratch.
Differences can be found in the code we use in the `pageFunction`. Often subtle, sometimes large. In the next part of the tutorial, we'll focus on the individual scrapers' specific implementation details. It's time to choose sides. But don't worry, at Apify, no side is the dark side.
* https://docs.apify.com/academy/apify-scrapers/web-scraper.md
* https://docs.apify.com/academy/apify-scrapers/cheerio-scraper.md
* https://docs.apify.com/academy/apify-scrapers/puppeteer-scraper.md
**Step-by-step tutorial that will help you get started with all Apify Scrapers. Learn the foundations of scraping the web with Apify and creating your own Actors.**
---
#
This scraping tutorial will go into the nitty gritty details of extracting data from **https://apify.com/store** using **Puppeteer Scraper** (https://apify.com/apify/puppeteer-scraper). If you arrived here from the https://docs.apify.com/academy/apify-scrapers/getting-started.md, tutorial, great! You are ready to continue where we left off. If you haven't seen the Getting started yet, check it out, it will help you learn about Apify and scraping in general and set you up for this tutorial, because this one builds on topics and code examples discussed there.
## Getting to know our tools
In the https://docs.apify.com/academy/apify-scrapers/getting-started tutorial, we've confirmed that the scraper works as expected, so now it's time to add more data to the results.
To do that, we'll be using the https://github.com/puppeteer/puppeteer. Puppeteer is a browser automation library that allows you to control a browser using JavaScript. That is, simulate a real human sitting in front of a computer, using a mouse and a keyboard. It gives you almost unlimited possibilities, but you need to learn quite a lot before you'll be able to use all of its features. We'll walk you through some of the basics of Puppeteer, so that you can start using it for some of the most typical scraping tasks, but if you really want to master it, you'll need to visit its https://pptr.dev/ and really dive deep into its intricacies.
> The purpose of Puppeteer Scraper is to remove some of the difficulty faced when using Puppeteer by wrapping it in a nice, manageable UI. It provides almost all of its features in a format that is much easier to grasp when first trying to scrape using Puppeteer.
### Web Scraper differences
At first glance, it may seem like **Web Scraper** (https://apify.com/apify/web-scraper) and Puppeteer Scraper are almost the same. Well, they are. In fact, Web Scraper uses Puppeteer underneath. The difference is the amount of control they give you. Where Web Scraper only gives you access to in-browser JavaScript and the `pageFunction` is executed in the browser context, Puppeteer Scraper's `pageFunction` is executed in Node.js context, giving you much more freedom to bend the browser to your will. You're the puppeteer and the browser is your puppet. It's also much easier to work with external APIs, databases or the https://sdk.apify.com in the Node.js context. The tradeoff is simplicity vs power. Web Scraper is simple, Puppeteer Scraper is powerful (and the https://sdk.apify.com is super-powerful).
> In other words, Web Scraper's `pageFunction` is like a single https://pptr.dev/#?product=Puppeteer&show=api-pageevaluatepagefunction-args call.
Now that's out of the way, let's open one of the Actor detail pages in the Store, for example the Web Scraper page and use our DevTools-Fu to scrape some data.
> If you're wondering why we're using Web Scraper as an example instead of Puppeteer Scraper, it's only because we didn't want to triple the number of screenshots we needed to make. Lazy developers!
## Building our Page function
Before we start, let's do a quick recap of the data we chose to scrape:
1. **URL** - The URL that goes directly to the Actor's detail page.
2. **Unique identifier** - Such as **apify/web-scraper**.
3. **Title** - The title visible in the Actor's detail page.
4. **Description** - The Actor's description.
5. **Last modification date** - When the Actor was last modified.
6. **Number of runs** - How many times the Actor was run.

We've already scraped numbers 1 and 2 in the https://docs.apify.com/academy/apify-scrapers/getting-started.md tutorial, so let's get to the next one on the list: title.
### Title

By using the element selector tool, we find out that the title is there under an `` tag, as titles should be. Maybe surprisingly, we find that there are actually two `` tags on the detail page. This should get us thinking. Is there any parent element that includes our `` tag, but not the other ones? Yes, there is! A `` element that we can use to select only the heading we're interested in.
> Remember that you can press CTRL+F (CMD+F) in the Elements tab of DevTools to open the search bar where you can quickly search for elements using their selectors. And always make sure to use the DevTools to verify your scraping process and assumptions. It's faster than changing the crawler code all the time.
To get the title we need to find it using a `header h1` selector, which selects all `` elements that have a `` ancestor. And as we already know, there's only one.
// Using Puppeteer async function pageFunction(context) { const { page } = context; const title = await page.$eval( 'header h1', ((el) => el.textContent), );
return {
title,
};
}
The https://pptr.dev/#?product=Puppeteer&show=api-elementhandleevalselector-pagefunction-args-1 function allows you to run a function in the browser, with the selected element as the first argument. Here we use it to extract the text content of a `h1` element that's in the page. The return value of the function is automatically passed back to the Node.js context, so we receive an actual `string` with the element's text.
### Description
Getting the Actor's description is a little more involved, but still pretty straightforward. We cannot search for a `` tag, because there's a lot of them in the page. We need to narrow our search down a little. Using the DevTools we find that the Actor description is nested within the `` element too, same as the title. Moreover, the actual description is nested inside a `` tag with a class `actor-description`.

async function pageFunction(context) { const { page } = context; const title = await page.$eval( 'header h1', ((el) => el.textContent), ); const description = await page.$eval( 'header span.actor-description', ((el) => el.textContent), );
return {
title,
description,
};
}
### Modified date
The DevTools tell us that the `modifiedDate` can be found in a `` element.

async function pageFunction(context) { const { page } = context; const title = await page.$eval( 'header h1', ((el) => el.textContent), ); const description = await page.$eval( 'header span.actor-description', ((el) => el.textContent), );
const modifiedTimestamp = await page.$eval(
'ul.ActorHeader-stats time',
(el) => el.getAttribute('datetime'),
);
const modifiedDate = new Date(Number(modifiedTimestamp));
return {
title,
description,
modifiedDate,
};
}
Similarly to `page.$eval`, the https://pptr.dev/#?product=Puppeteer&show=api-elementhandleevalselector-pagefunction-args function runs a function in the browser, only this time, it does not provide you with a single `Element` as the function's argument, but rather with an `Array` of `Elements`. Once again, the return value of the function will be passed back to the Node.js context.
It might look a little too complex at first glance, but let us walk you through it. We find all the `` elements. Then, we read its `datetime` attribute, because that's where a unix timestamp is stored as a `string`.
But we would much rather see a readable date in our results, not a unix timestamp, so we need to convert it. Unfortunately, the `new Date()` constructor will not accept a `string`, so we cast the `string` to a `number` using the `Number()` function before actually calling `new Date()`. Phew!
### Run count
And so we're finishing up with the `runCount`. There's no specific element like ``, so we need to create a complex selector and then do a transformation on the result.
async function pageFunction(context) { const { page } = context; const title = await page.$eval( 'header h1', ((el) => el.textContent), ); const description = await page.$eval( 'header span.actor-description', ((el) => el.textContent), );
const modifiedTimestamp = await page.$eval(
'ul.ActorHeader-stats time',
(el) => el.getAttribute('datetime'),
);
const modifiedDate = new Date(Number(modifiedTimestamp));
const runCountText = await page.$eval(
'ul.ActorHeader-stats > li:nth-of-type(3)',
((el) => el.textContent),
);
const runCount = Number(runCountText.match(/[\d,]+/)[0].replace(',', ''));
return {
title,
description,
modifiedDate,
runCount,
};
}
The `ul.ActorHeader-stats > li:nth-of-type(3)` looks complicated, but it only reads that we're looking for a `` element and within that element we're looking for the third `` element. We grab its text, but we're only interested in the number of runs. We parse the number out using a regular expression, but its type is still a `string`, so we finally convert the result to a `number` by wrapping it with a `Number()` call.
> The numbers are formatted with commas as thousands separators (e.g. `'1,234,567'`), so to extract it, we first use regular expression `/[\d,]+/` - it will search for consecutive number or comma characters. Then we extract the match via `.match(/[\d,]+/)[0]` and finally remove all the commas by calling `.replace(/,/g, '')`. We need to use `/,/g` with the global modifier to support large numbers with multiple separators, without it we would replace only the very first occurrence.
>
> This will give us a string (e.g. `'1234567'`) that can be converted via `Number` function.
### Wrapping it up
And there we have it! All the data we needed in a single object. For the sake of completeness, let's add the properties we parsed from the URL earlier and we're good to go.
async function pageFunction(context) { const { page, request } = context; const { url } = request;
// ...
const uniqueIdentifier = url
.split('/')
.slice(-2)
.join('/');
const title = await page.$eval(
'header h1',
((el) => el.textContent),
);
const description = await page.$eval(
'header span.actor-description',
((el) => el.textContent),
);
const modifiedTimestamp = await page.$eval(
'ul.ActorHeader-stats time',
(el) => el.getAttribute('datetime'),
);
const modifiedDate = new Date(Number(modifiedTimestamp));
const runCountText = await page.$eval(
'ul.ActorHeader-stats > li:nth-of-type(3)',
((el) => el.textContent),
);
const runCount = Number(runCountText.match(/[\d,]+/)[0].replace(',', ''));
return {
url,
uniqueIdentifier,
title,
description,
modifiedDate,
runCount,
};
}
All we need to do now is add this to our `pageFunction`:
async function pageFunction(context) { // page is Puppeteer's page const { request, log, skipLinks, page } = context;
if (request.userData.label === 'START') {
log.info('Store opened!');
// Do some stuff later.
}
if (request.userData.label === 'DETAIL') {
const { url } = request;
log.info(`Scraping ${url}`);
await skipLinks();
// Do some scraping.
const uniqueIdentifier = url
.split('/')
.slice(-2)
.join('/');
// Get attributes in parallel to speed up the process.
const titleP = page.$eval(
'header h1',
(el) => el.textContent,
);
const descriptionP = page.$eval(
'header span.actor-description',
(el) => el.textContent,
);
const modifiedTimestampP = page.$eval(
'ul.ActorHeader-stats time',
(el) => el.getAttribute('datetime'),
);
const runCountTextP = page.$eval(
'ul.ActorHeader-stats > li:nth-of-type(3)',
(el) => el.textContent,
);
const [
title,
description,
modifiedTimestamp,
runCountText,
] = await Promise.all([
titleP,
descriptionP,
modifiedTimestampP,
runCountTextP,
]);
const modifiedDate = new Date(Number(modifiedTimestamp));
const runCount = Number(runCountText.match(/[\d,]+/)[0].replace(',', ''));
return {
url,
uniqueIdentifier,
title,
description,
modifiedDate,
runCount,
};
}
}
> You have definitely noticed that we changed up the code a little bit. This is because the back and forth communication between Node.js and browser takes some time and it slows down the scraper. To limit the effect of this, we changed all the functions to start at the same time and only wait for all of them to finish at the end. This is called concurrency or parallelism. Unless the functions need to be executed in a specific order, it's often a good idea to run them concurrently to speed things up.
### Test run
As always, try hitting that **Save & Run** button and visit the **Dataset** preview of clean items. You should see a nice table of all the attributes correctly scraped. You nailed it!
## Pagination
Pagination is a term that represents "going to the next page of results". You may have noticed that we did not actually scrape all the Actors, just the first page of results. That's because to load the rest of the Actors, one needs to click the **Show more** button at the very bottom of the list. This is pagination.
> This is a typical form of JavaScript pagination, sometimes called infinite scroll. Other pages may use links that take you to the next page. If you encounter those, make a **Pseudo URL** for those links and they will be automatically enqueued to the request queue. Use a label to let the scraper know what kind of URL it's processing.
### Waiting for dynamic content
Before we talk about paginating, we need to have a quick look at dynamic content. Since Apify Store is a JavaScript application (a popular approach), the button might not exist in the page when the scraper runs the `pageFunction`.
How is this possible? Because the scraper only waits with executing the `pageFunction` for the page to load its HTML. If there's additional JavaScript that modifies the DOM afterwards, the `pageFunction` may execute before this JavaScript had the time to run.
At first, you may think that the scraper is broken, but it just cannot wait for all the JavaScript in the page to finish executing. For a lot of pages, there's always some JavaScript executing or some network requests being made. It would never stop waiting. It is therefore up to you, the programmer, to wait for the elements you need.
#### The `context.page.waitFor()` function
`waitFor()` is a function that's available on the Puppeteer `page` object that's in turn available on the `context` argument of the `pageFunction` (as you already know from previous chapters). It helps you with, well, waiting for stuff. It accepts either a number of milliseconds to wait, a selector to await in the page, or a function to execute. It will stop waiting once the time elapses, the selector appears or the provided function returns `true`.
> See https://pptr.dev/#?product=Puppeteer&show=api-pagewaitforselectororfunctionortimeout-options-args in the Puppeteer documentation.
// Waits for 2 seconds. await page.waitFor(2000); // Waits until an element with id "my-id" appears in the page. await page.waitFor('#my-id'); // Waits until a "myObject" variable appears // on the window object. await page.waitFor(() => !!window.myObject);
The selector may never be found and the function might never return `true`, so the `page.waitFor()` function also has a timeout. The default is `30` seconds. You can override it by providing an options object as the second parameter, with a `timeout` property.
await page.waitFor('.bad-class', { timeout: 5000 });
With those tools, you should be able to handle any dynamic content the website throws at you.
### How to paginate
After going through the theory, let's design the algorithm:
1. Wait for the **Show more** button.
2. Click it.
3. Is there another **Show more** button?
* Yes? Repeat from 1. (loop)
* No? We're done. We have all the Actors.
#### Waiting for the button
Before we can wait for the button, we need to know its unique selector. A quick look in the DevTools tells us that the button's class is some weird randomly generated string, but fortunately, there's an enclosing `` with a class of `show-more`. Great! Our unique selector:
div.show-more > button
> Don't forget to confirm our assumption in the DevTools finder tool (CTRL/CMD + F).
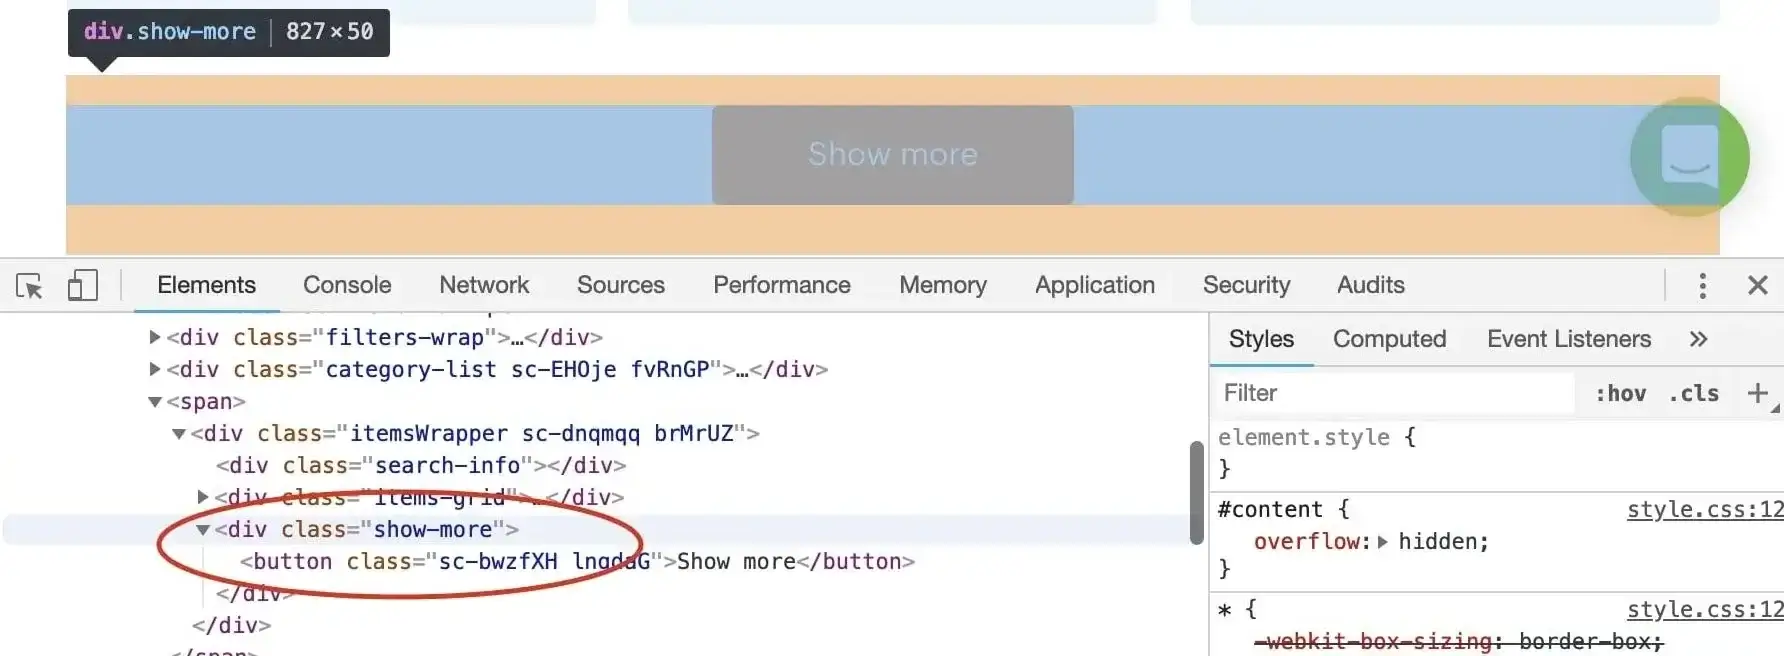
Now that we know what to wait for, we plug it into the `waitFor()` function.
await page.waitFor('div.show-more > button');
#### Clicking the button
We have a unique selector for the button and we know that it's already rendered in the page. Clicking it is a piece of cake. We'll use the Puppeteer `page` again to issue the click. Puppeteer will actually simulate dragging the mouse and making a left mouse click in the element.
await page.click('div.show-more > button');
This will show the next page of Actors.
#### Repeating the process
We've shown two function calls, but how do we make this work together in the `pageFunction`?
async function pageFunction(context) {
// ...
let timeout; // undefined
const buttonSelector = 'div.show-more > button';
for (;;) {
log.info('Waiting for the "Show more" button.');
try {
// Default timeout first time.
await page.waitFor(buttonSelector, { timeout });
// 2 sec timeout after the first.
timeout = 2000;
} catch (err) {
// Ignore the timeout error.
log.info('Could not find the "Show more button", '
+ 'we\'ve reached the end.');
break;
}
log.info('Clicking the "Show more" button.');
await page.click(buttonSelector);
}
// ...
}
We want to run this until the `waitFor()` function throws, so that's why we use a `while(true)` loop. We're also not interested in the error, because we're expecting it, so we ignore it and print a log message instead.
You might be wondering what's up with the `timeout`. Well, for the first page load, we want to wait longer, so that all the page's JavaScript has had a chance to execute, but for the other iterations, the JavaScript is already loaded and we're waiting for the page to re-render so waiting for `2` seconds is enough to confirm that the button is not there. We don't want to stall the scraper for `30` seconds just to make sure that there's no button.
### Plugging it into the Page function
We've got the general algorithm ready, so all that's left is to integrate it into our earlier `pageFunction`. Remember the `// Do some stuff later` comment? Let's replace it.
async function pageFunction(context) { const { request, log, skipLinks, page } = context; if (request.userData.label === 'START') { log.info('Store opened!'); let timeout; // undefined const buttonSelector = 'div.show-more > button'; for (;;) { log.info('Waiting for the "Show more" button.'); try { // Default timeout first time. await page.waitFor(buttonSelector, { timeout }); // 2 sec timeout after the first. timeout = 2000; } catch (err) { // Ignore the timeout error. log.info('Could not find the "Show more button", ' + 'we've reached the end.'); break; } log.info('Clicking the "Show more" button.'); await page.click(buttonSelector); } }
if (request.userData.label === 'DETAIL') {
const { url } = request;
log.info(`Scraping ${url}`);
await skipLinks();
// Do some scraping.
const uniqueIdentifier = url
.split('/')
.slice(-2)
.join('/');
// Get attributes in parallel to speed up the process.
const titleP = page.$eval(
'header h1',
(el) => el.textContent,
);
const descriptionP = page.$eval(
'header span.actor-description',
(el) => el.textContent,
);
const modifiedTimestampP = page.$eval(
'ul.ActorHeader-stats time',
(el) => el.getAttribute('datetime'),
);
const runCountTextP = page.$eval(
'ul.ActorHeader-stats > li:nth-of-type(3)',
(el) => el.textContent,
);
const [
title,
description,
modifiedTimestamp,
runCountText,
] = await Promise.all([
titleP,
descriptionP,
modifiedTimestampP,
runCountTextP,
]);
const modifiedDate = new Date(Number(modifiedTimestamp));
const runCount = Number(runCountText.match(/[\d,]+/)[0].replace(',', ''));
return {
url,
uniqueIdentifier,
title,
description,
modifiedDate,
runCount,
};
}
}
That's it! You can now remove the **Max pages per run** limit, **Save & Run** your task and watch the scraper paginate through all the Actors and then scrape all of their data. After it succeeds, open the **Dataset** tab again and click on **Preview**\*\*. You should have a table of all the Actor's details in front of you. If you do, great job! You've successfully scraped Apify Store. And if not, no worries, go through the code examples again, it's probably just a typo.
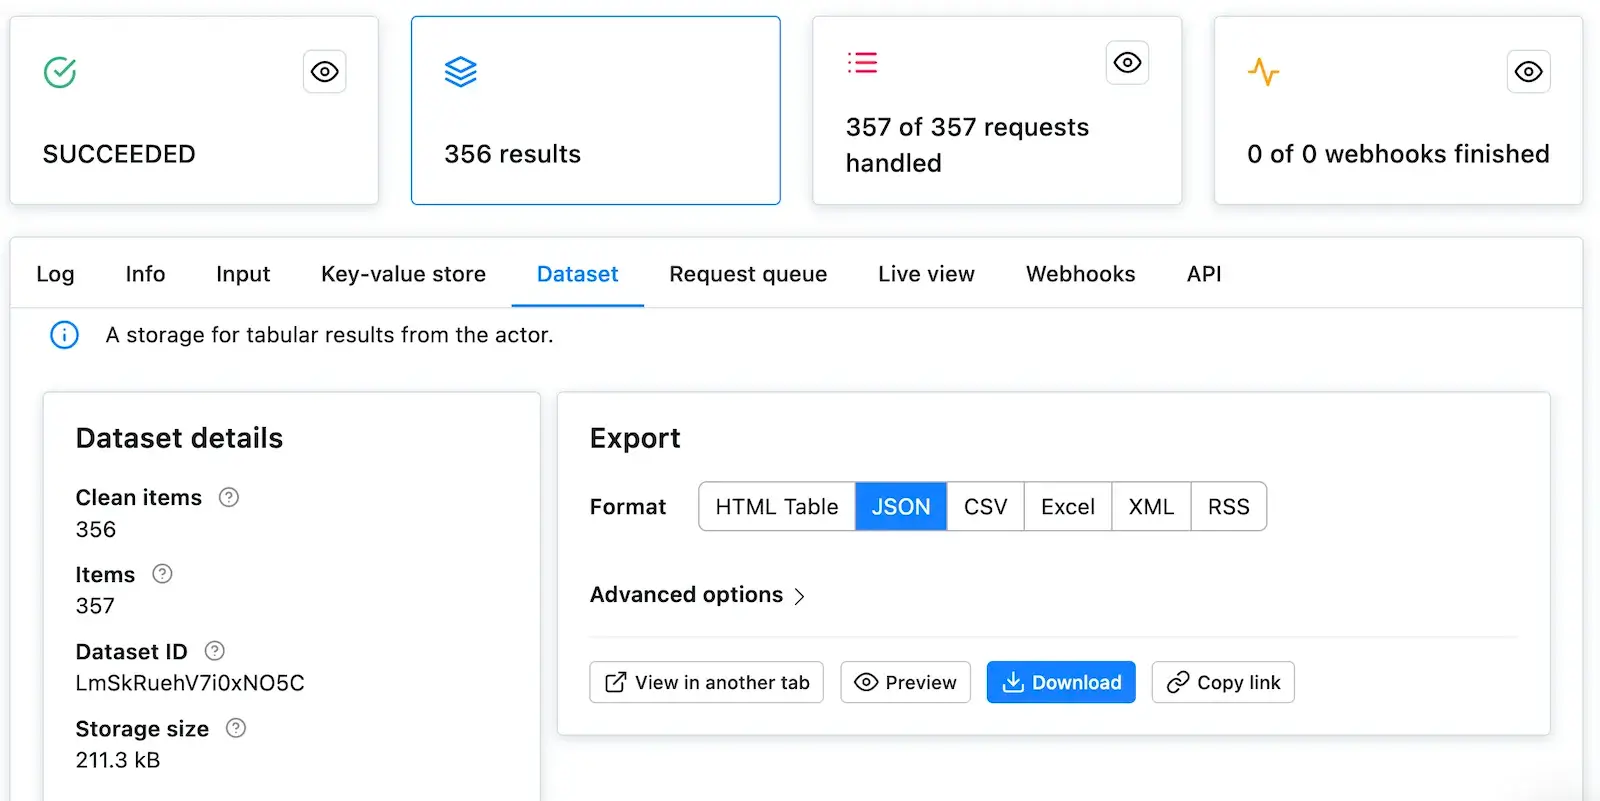
## Downloading the scraped data
You already know the **Dataset** tab of the run console since this is where we've always previewed our data. Notice the row of data formats such as JSON, CSV, and Excel. Below it are options for viewing and downloading the data. Go ahead and try it.
> If you prefer working with an API, you can find the example endpoint under the API tab: **Get dataset items**.
### Clean items
You can view and download your data without modifications, or you can choose to only get **clean** items. Data that aren't cleaned include a record for each `pageFunction` invocation, even if you did not return any results. The record also includes hidden fields such as `#debug`, where you can find a variety of information that can help you with debugging your scrapers.
Clean items, on the other hand, include only the data you returned from the `pageFunction`. If you're only interested in the data you scraped, this format is what you will be using most of the time.
To control this, open the **Advanced options** view on the **Dataset** tab.
## Bonus: Making your code neater
You may have noticed that the `pageFunction` gets quite bulky. To make better sense of your code and have an easier time maintaining or extending your task, feel free to define other functions inside the `pageFunction` that encapsulate all the different logic. You can, for example, define a function for each of the different pages:
async function pageFunction(context) { switch (context.request.userData.label) { case 'START': return handleStart(context); case 'DETAIL': return handleDetail(context); default: throw new Error('Unknown request label.'); }
async function handleStart({ log, page }) {
log.info('Store opened!');
let timeout; // undefined
const buttonSelector = 'div.show-more > button';
for (;;) {
log.info('Waiting for the "Show more" button.');
try {
// Default timeout first time.
await page.waitFor(buttonSelector, { timeout });
// 2 sec timeout after the first.
timeout = 2000;
} catch (err) {
// Ignore the timeout error.
log.info('Could not find the "Show more button", '
+ 'we\'ve reached the end.');
break;
}
log.info('Clicking the "Show more" button.');
await page.click(buttonSelector);
}
}
async function handleDetail({
request,
log,
skipLinks,
page,
}) {
const { url } = request;
log.info(`Scraping ${url}`);
await skipLinks();
// Do some scraping.
const uniqueIdentifier = url
.split('/')
.slice(-2)
.join('/');
// Get attributes in parallel to speed up the process.
const titleP = page.$eval(
'header h1',
(el) => el.textContent,
);
const descriptionP = page.$eval(
'header span.actor-description',
(el) => el.textContent,
);
const modifiedTimestampP = page.$eval(
'ul.ActorHeader-stats time',
(el) => el.getAttribute('datetime'),
);
const runCountTextP = page.$eval(
'ul.ActorHeader-stats > li:nth-of-type(3)',
(el) => el.textContent,
);
const [
title,
description,
modifiedTimestamp,
runCountText,
] = await Promise.all([
titleP,
descriptionP,
modifiedTimestampP,
runCountTextP,
]);
const modifiedDate = new Date(Number(modifiedTimestamp));
const runCount = Number(runCountText.match(/[\d,]+/)[0].replace(',', ''));
return {
url,
uniqueIdentifier,
title,
description,
modifiedDate,
runCount,
};
}
}
> If you're confused by the functions being declared below their executions, it's called hoisting and it's a feature of JavaScript. It helps you put what matters on top, if you so desire.
## Bonus 2: Using jQuery with Puppeteer Scraper
If you're familiar with the https://jquery.com/, you may have looked at the scraping code and thought that it's unnecessarily complicated. That's probably up to everyone to decide on their own, but the good news is, you can use jQuery with Puppeteer Scraper too.
### Injecting jQuery
To be able to use jQuery, we first need to introduce it to the browser. The https://sdk.apify.com/docs/api/puppeteer#puppeteerinjectjquerypage function will help us with the task.
> Friendly warning: Injecting jQuery into a page may break the page itself, if it expects a specific version of jQuery to be available and you override it with an incompatible one. Be careful.
You can either call this function directly in your `pageFunction`, or you can set up jQuery injection in the **Pre goto function** in the **Input and options** section.
async function pageFunction(context) { const { Apify, page } = context; await Apify.utils.puppeteer.injectJQuery(page);
// your code ...
}
async function preGotoFunction({ page, Apify }) { await Apify.utils.puppeteer.injectJQuery(page); }
The implementations are almost equal in effect. That means that in some cases, you may see performance differences, or one might work while the other does not. Depending on the target website.
Let's try refactoring the Bonus 1 version of the `pageFunction` to use jQuery.
async function pageFunction(context) {
switch (context.request.userData.label) {
case 'START': return handleStart(context);
case 'DETAIL': return handleDetail(context);
default: throw new Error(Unknown label: ${context.request.userData.label});
}
async function handleStart({ log, page }) {
log.info('Store opened!');
let timeout; // undefined
const buttonSelector = 'div.show-more > button';
for (;;) {
log.info('Waiting for the "Show more" button.');
try {
await page.waitFor(buttonSelector, { timeout });
timeout = 2000;
} catch (err) {
log.info('Could not find the "Show more button", '
+ 'we\'ve reached the end.');
break;
}
log.info('Clicking the "Show more" button.');
await page.click(buttonSelector);
}
}
async function handleDetail(contextInner) {
const {
request,
log,
skipLinks,
page,
Apify,
} = contextInner;
// Inject jQuery
await Apify.utils.puppeteer.injectJQuery(page);
const { url } = request;
log.info(`Scraping ${url}`);
await skipLinks();
// Do some scraping.
const uniqueIdentifier = url
.split('/')
.slice(-2)
.join('/');
// Use jQuery only inside page.evaluate (inside browser)
const results = await page.evaluate(() => {
return {
title: $('header h1').text(),
description: $('header span.actor-description').text(),
modifiedDate: new Date(
Number(
$('ul.ActorHeader-stats time').attr('datetime'),
),
).toISOString(),
runCount: Number(
$('ul.ActorHeader-stats > li:nth-of-type(3)')
.text()
.match(/[\d,]+/)[0]
.replace(/,/g, ''),
),
};
});
return {
url,
uniqueIdentifier,
// Add results from browser to output
...results,
};
}
}
> There's an important takeaway from the example code. You can only use jQuery in the browser scope, even though you're injecting it outside of the browser. We're using the https://pptr.dev/#?product=Puppeteer&show=api-pageevaluatepagefunction-args function to run the script in the context of the browser and the return value is passed back to Node.js. Keep this in mind.
## Final word
Thank you for reading this whole tutorial! Really! It's important to us that our users have the best information available to them so that they can use Apify effectively. We're glad that you made it all the way here and congratulations on creating your first scraping task. We hope that you liked the tutorial and if there's anything you'd like to ask, https://discord.gg/jyEM2PRvMU!
## What's next
* Check out the https://docs.apify.com/sdk and its https://docs.apify.com/sdk/js/docs/guides/apify-platform tutorial if you'd like to try building your own Actors. It's a bit more complex and involved than writing a `pageFunction`, but it allows you to fine-tune all the details of your scraper to your liking.
* https://docs.apify.com/platform/actors.md, from how they work to https://docs.apify.com/platform/actors/publishing.md them in Apify Store, and even https://blog.apify.com/make-regular-passive-income-developing-web-automation-actors-b0392278d085/ on Actors.
* Found out you're not into the coding part but would still to use Apify Actors? Check out our https://apify.com/store or https://apify.com/contact-sales from an Apify-certified developer.
**Learn how to scrape a website using Apify's Puppeteer Scraper. Build an Actor's page function, extract information from a web page and download your data.**
***
---
#
This scraping tutorial will go into the nitty gritty details of extracting data from **https://apify.com/store** using **Web Scraper** (https://apify.com/apify/web-scraper). If you arrived here from the https://docs.apify.com/academy/apify-scrapers/getting-started.md, tutorial, great! You are ready to continue where we left off. If you haven't seen the Getting started yet, check it out, it will help you learn about Apify and scraping in general and set you up for this tutorial, because this one builds on topics and code examples discussed there.
## Getting to know our tools
In the https://docs.apify.com/academy/apify-scrapers/getting-started tutorial, we've confirmed that the scraper works as expected, so now it's time to add more data to the results.
To do that, we'll be using the https://jquery.com/, because it provides some nice tools and a lot of people familiar with JavaScript already know how to use it.
> https://api.jquery.com/ if you're not familiar with it. And if you don't want to use it, that's okay. Everything can be done using pure JavaScript, too.
To add jQuery, all we need to do is turn on **Inject jQuery** under the **Input and options** tab. This will add a `context.jQuery` function that you can use.
Now that's out of the way, let's open one of the Actor detail pages in the Store, for example the https://apify.com/apify/web-scraper page and use our DevTools-Fu to scrape some data.
## Building our Page function
Before we start, let's do a quick recap of the data we chose to scrape:
1. **URL** - The URL that goes directly to the Actor's detail page.
2. **Unique identifier** - Such as **apify/web-scraper**.
3. **Title** - The title visible in the Actor's detail page.
4. **Description** - The Actor's description.
5. **Last modification date** - When the Actor was last modified.
6. **Number of runs** - How many times the Actor was run.

We've already scraped numbers 1 and 2 in the https://docs.apify.com/academy/apify-scrapers/getting-started.md tutorial, so let's get to the next one on the list: title.
### Title

By using the element selector tool, we find out that the title is there under an `` tag, as titles should be. Maybe surprisingly, we find that there are actually two `` tags on the detail page. This should get us thinking. Is there any parent element that includes our `` tag, but not the other ones? Yes, there is! A `` element that we can use to select only the heading we're interested in.
> Remember that you can press CTRL+F (CMD+F) in the Elements tab of DevTools to open the search bar where you can quickly search for elements using their selectors. And always make sure to use the DevTools to verify your scraping process and assumptions. It's faster than changing the crawler code all the time.
To get the title we need to find it using a `header h1` selector, which selects all `` elements that have a `` ancestor. And as we already know, there's only one.
// Using jQuery. async function pageFunction(context) { const { jQuery: $ } = context;
// ... rest of the code
return {
title: $('header h1').text(),
};
}
### Description
Getting the Actor's description is a little more involved, but still pretty straightforward. We cannot search for a `` tag, because there's a lot of them in the page. We need to narrow our search down a little. Using the DevTools we find that the Actor description is nested within the `` element too, same as the title. Moreover, the actual description is nested inside a `` tag with a class `actor-description`.

async function pageFunction(context) { const { jQuery: $ } = context;
// ... rest of the code
return {
title: $('header h1').text(),
description: $('header span.actor-description').text(),
};
}
### Modified date
The DevTools tell us that the `modifiedDate` can be found in a `` element.

async function pageFunction(context) { const { jQuery: $ } = context;
// ... rest of the code
return {
title: $('header h1').text(),
description: $('header span.actor-description').text(),
modifiedDate: new Date(
Number(
$('ul.ActorHeader-stats time').attr('datetime'),
),
),
};
}
It might look a little too complex at first glance, but let us walk you through it. We find all the `` elements. Then, we read its `datetime` attribute, because that's where a unix timestamp is stored as a `string`.
But we would much rather see a readable date in our results, not a unix timestamp, so we need to convert it. Unfortunately, the `new Date()` constructor will not accept a `string`, so we cast the `string` to a `number` using the `Number()` function before actually calling `new Date()`. Phew!
### Run count
And so we're finishing up with the `runCount`. There's no specific element like ``, so we need to create a complex selector and then do a transformation on the result.
async function pageFunction(context) { const { jQuery: $ } = context;
// ... rest of the code
return {
title: $('header h1').text(),
description: $('header span.actor-description').text(),
modifiedDate: new Date(
Number(
$('ul.ActorHeader-stats time').attr('datetime'),
),
),
runCount: Number(
$('ul.ActorHeader-stats > li:nth-of-type(3)')
.text()
.match(/[\d,]+/)[0]
.replace(/,/g, ''),
),
};
}
The `ul.ActorHeader-stats > li:nth-of-type(3)` looks complicated, but it only reads that we're looking for a `` element and within that element we're looking for the third `` element. We grab its text, but we're only interested in the number of runs. We parse the number out using a regular expression, but its type is still a `string`, so we finally convert the result to a `number` by wrapping it with a `Number()` call.
> The numbers are formatted with commas as thousands separators (e.g. `'1,234,567'`), so to extract it, we first use regular expression `/[\d,]+/` - it will search for consecutive number or comma characters. Then we extract the match via `.match(/[\d,]+/)[0]` and finally remove all the commas by calling `.replace(/,/g, '')`. We need to use `/,/g` with the global modifier to support large numbers with multiple separators, without it we would replace only the very first occurrence.
>
> This will give us a string (e.g. `'1234567'`) that can be converted via `Number` function.
### Wrapping it up
And there we have it! All the data we needed in a single object. For the sake of completeness, let's add the properties we parsed from the URL earlier and we're good to go.
async function pageFunction(context) { const { request, jQuery: $ } = context; const { url } = request;
// ... rest of the code
const uniqueIdentifier = url.split('/').slice(-2).join('/');
return {
url,
uniqueIdentifier,
title: $('header h1').text(),
description: $('header span.actor-description').text(),
modifiedDate: new Date(
Number(
$('ul.ActorHeader-stats time').attr('datetime'),
),
),
runCount: Number(
$('ul.ActorHeader-stats > li:nth-of-type(3)')
.text()
.match(/[\d,]+/)[0]
.replace(/,/g, ''),
),
};
}
All we need to do now is add this to our `pageFunction`:
async function pageFunction(context) { // use jQuery as $ const { request, log, skipLinks, jQuery: $ } = context;
if (request.userData.label === 'START') {
log.info('Store opened!');
// Do some stuff later.
}
if (request.userData.label === 'DETAIL') {
const { url } = request;
log.info(`Scraping ${url}`);
await skipLinks();
// Do some scraping.
const uniqueIdentifier = url
.split('/')
.slice(-2)
.join('/');
return {
url,
uniqueIdentifier,
title: $('header h1').text(),
description: $('header span.actor-description').text(),
modifiedDate: new Date(
Number(
$('ul.ActorHeader-stats time').attr('datetime'),
),
),
runCount: Number(
$('ul.ActorHeader-stats > li:nth-of-type(3)')
.text()
.match(/[\d,]+/)[0]
.replace(/,/g, ''),
),
};
}
}
### Test run
As always, try hitting that **Save & Run** button and visit the **Dataset** preview of clean items. You should see a nice table of all the attributes correctly scraped. You nailed it!
## Pagination
Pagination is a term that represents "going to the next page of results". You may have noticed that we did not actually scrape all the Actors, just the first page of results. That's because to load the rest of the Actors, one needs to click the **Show more** button at the very bottom of the list. This is pagination.
> This is a typical form of JavaScript pagination, sometimes called infinite scroll. Other pages may use links that take you to the next page. If you encounter those, make a **Pseudo URL** for those links and they will be automatically enqueued to the request queue. Use a label to let the scraper know what kind of URL it's processing.
### Waiting for dynamic content
Before we talk about paginating, we need to have a quick look at dynamic content. Since Apify Store is a JavaScript application (a popular approach), the button might not exist in the page when the scraper runs the `pageFunction`.
How is this possible? Because the scraper only waits with executing the `pageFunction` for the page to load its HTML. If there's additional JavaScript that modifies the DOM afterwards, the `pageFunction` may execute before this JavaScript had the time to run.
At first, you may think that the scraper is broken, but it just cannot wait for all the JavaScript in the page to finish executing. For a lot of pages, there's always some JavaScript executing or some network requests being made. It would never stop waiting. It is therefore up to you, the programmer, to wait for the elements you need.
#### The `context.waitFor()` function
`waitFor()` is a function that's available on the `context` object passed to the `pageFunction` and helps you with, well, waiting for stuff. It accepts either a number of milliseconds to wait, a selector to await in the page, or a function to execute. It will stop waiting once the time elapses, the selector appears or the provided function returns `true`.
// Waits for 2 seconds. await waitFor(2000); // Waits until an element with id "my-id" appears // in the page. await waitFor('#my-id'); // Waits until a "myObject" variable appears // on the window object. await waitFor(() => !!window.myObject);
The selector may never be found and the function might never return `true`, so the `waitFor()` function also has a timeout. The default is `20` seconds. You can override it by providing an options object as the second parameter, with a `timeoutMillis` property.
await waitFor('.bad-class', { timeoutMillis: 5000 });
With those tools, you should be able to handle any dynamic content the website throws at you.
### How to paginate
After going through the theory, let's design the algorithm:
1. Wait for the **Show more** button.
2. Click it.
3. Is there another **Show more** button?
* Yes? Repeat from 1. (loop)
* No? We're done. We have all the Actors.
#### Waiting for the button
Before we can wait for the button, we need to know its unique selector. A quick look in the DevTools tells us that the button's class is some weird randomly generated string, but fortunately, there's an enclosing `` with a class of `show-more`. Great! Our unique selector:
div.show-more > button
> Don't forget to confirm our assumption in the DevTools finder tool (CTRL/CMD + F).

Now that we know what to wait for, we plug it into the `waitFor()` function.
await waitFor('div.show-more > button');
#### Clicking the button
We have a unique selector for the button and we know that it's already rendered in the page. Clicking it is a piece of cake. We'll use jQuery again, but feel free to use plain JavaScript, it works the same.
$('div.show-more > button').click();
This will show the next page of Actors.
#### Repeating the process
We've shown two function calls, but how do we make this work together in the `pageFunction`?
async function pageFunction(context) {
// ...
let timeoutMillis; // undefined
const buttonSelector = 'div.show-more > button';
for (;;) {
log.info('Waiting for the "Show more" button.');
try {
// Default timeout first time.
await waitFor(buttonSelector, { timeoutMillis });
// 2 sec timeout after the first.
timeoutMillis = 2000;
} catch (err) {
// Ignore the timeout error.
log.info('Could not find the "Show more button", '
+ 'we\'ve reached the end.');
break;
}
log.info('Clicking the "Show more" button.');
$(buttonSelector).click();
}
// ...
}
We want to run this until the `waitFor()` function throws, so that's why we use a `while(true)` loop. We're also not interested in the error, because we're expecting it, so we ignore it and print a log message instead.
You might be wondering what's up with the `timeoutMillis`. Well, for the first page load, we want to wait longer, so that all the page's JavaScript has had a chance to execute, but for the other iterations, the JavaScript is already loaded and we're waiting for the page to re-render so waiting for `2` seconds is enough to confirm that the button is not there. We don't want to stall the scraper for `20` seconds just to make sure that there's no button.
### Plugging it into the pageFunction
We've got the general algorithm ready, so all that's left is to integrate it into our earlier `pageFunction`. Remember the `// Do some stuff later` comment? Let's replace it. And don't forget to destructure the `waitFor()` function on the first line.
async function pageFunction(context) { const { request, log, skipLinks, jQuery: $, waitFor, } = context;
if (request.userData.label === 'START') {
log.info('Store opened!');
let timeoutMillis; // undefined
const buttonSelector = 'div.show-more > button';
for (;;) {
log.info('Waiting for the "Show more" button.');
try {
// Default timeout first time.
await waitFor(buttonSelector, { timeoutMillis });
// 2 sec timeout after the first.
timeoutMillis = 2000;
} catch (err) {
// Ignore the timeout error.
log.info('Could not find the "Show more button", '
+ 'we\'ve reached the end.');
break;
}
log.info('Clicking the "Show more" button.');
$(buttonSelector).click();
}
}
if (request.userData.label === 'DETAIL') {
const { url } = request;
log.info(`Scraping ${url}`);
await skipLinks();
// Do some scraping.
const uniqueIdentifier = url
.split('/')
.slice(-2)
.join('/');
return {
url,
uniqueIdentifier,
title: $('header h1').text(),
description: $('header span.actor-description').text(),
modifiedDate: new Date(
Number(
$('ul.ActorHeader-stats time').attr('datetime'),
),
),
runCount: Number(
$('ul.ActorHeader-stats > li:nth-of-type(3)')
.text()
.match(/[\d,]+/)[0]
.replace(/,/g, ''),
),
};
}
}
That's it! You can now remove the **Max pages per run** limit, **Save & Run** your task and watch the scraper paginate through all the Actors and then scrape all of their data. After it succeeds, open the **Dataset** tab again click on **Preview**. You should have a table of all the Actor's details in front of you. If you do, great job! You've successfully scraped Apify Store. And if not, no worries, go through the code examples again, it's probably just a typo.

## Downloading the scraped data
You already know the **Dataset** tab of the run console since this is where we've always previewed our data. Notice the row of data formats such as JSON, CSV, and Excel. Below it are options for viewing and downloading the data. Go ahead and try it.
> If you prefer working with an API, you can find the example endpoint under the API tab: **Get dataset items**.
### Clean items
You can view and download your data without modifications, or you can choose to only get **clean** items. Data that aren't cleaned include a record for each `pageFunction` invocation, even if you did not return any results. The record also includes hidden fields such as `#debug`, where you can find a variety of information that can help you with debugging your scrapers.
Clean items, on the other hand, include only the data you returned from the `pageFunction`. If you're only interested in the data you scraped, this format is what you will be using most of the time.
To control this, open the **Advanced options** view on the **Dataset** tab.
## Bonus: Making your code neater
You may have noticed that the `pageFunction` gets quite bulky. To make better sense of your code and have an easier time maintaining or extending your task, feel free to define other functions inside the `pageFunction` that encapsulate all the different logic. You can, for example, define a function for each of the different pages:
async function pageFunction(context) { switch (context.request.userData.label) { case 'START': return handleStart(context); case 'DETAIL': return handleDetail(context); default: throw new Error('Unknown request label.'); }
async function handleStart({ log, waitFor }) {
log.info('Store opened!');
let timeoutMillis; // undefined
const buttonSelector = 'div.show-more > button';
for (;;) {
log.info('Waiting for the "Show more" button.');
try {
// Default timeout first time.
await waitFor(buttonSelector, { timeoutMillis });
// 2 sec timeout after the first.
timeoutMillis = 2000;
} catch (err) {
// Ignore the timeout error.
log.info('Could not find the "Show more button", '
+ 'we\'ve reached the end.');
break;
}
log.info('Clicking the "Show more" button.');
$(buttonSelector).click();
}
}
async function handleDetail({
request,
log,
skipLinks,
jQuery: $,
}) {
const { url } = request;
log.info(`Scraping ${url}`);
await skipLinks();
// Do some scraping.
const uniqueIdentifier = url
.split('/')
.slice(-2)
.join('/');
return {
url,
uniqueIdentifier,
title: $('header h1').text(),
description: $('header span.actor-description').text(),
modifiedDate: new Date(
Number(
$('ul.ActorHeader-stats time').attr('datetime'),
),
),
runCount: Number(
$('ul.ActorHeader-stats > li:nth-of-type(3)')
.text()
.match(/[\d,]+/)[0]
.replace(/,/g, ''),
),
};
}
}
> If you're confused by the functions being declared below their executions, it's called hoisting and it's a feature of JavaScript. It helps you put what matters on top, if you so desire.
## Final word
Thank you for reading this whole tutorial! Really! It's important to us that our users have the best information available to them so that they can use Apify effectively. We're glad that you made it all the way here and congratulations on creating your first scraping task. We hope that you liked the tutorial and if there's anything you'd like to ask, https://discord.gg/jyEM2PRvMU!
## What's next
* Check out the https://docs.apify.com/sdk and its https://docs.apify.com/sdk/js/docs/guides/apify-platform tutorial if you'd like to try building your own Actors. It's a bit more complex and involved than writing a `pageFunction`, but it allows you to fine-tune all the details of your scraper to your liking.
* https://docs.apify.com/platform/actors.md, from how they work to https://docs.apify.com/platform/actors/publishing.md them in Apify Store, and even https://blog.apify.com/make-regular-passive-income-developing-web-automation-actors-b0392278d085/ on Actors.
* Found out you're not into the coding part but would still to use Apify Actors? Check out our https://apify.com/store or https://apify.com/contact-sales from an Apify-certified developer.
**Learn how to scrape a website using Apify's Web Scraper. Build an Actor's page function, extract information from a web page and download your data.**
***
---
# Validate your Actor idea
Before investing time into building an Actor, validate that people actually need it. This guide shows you how to assess market demand using free tools and research techniques.
## Assess your motivation
Ask yourself: *Do you want to build this?*
You'll work on this Actor for a long time. The best Actors come from developers who genuinely care about the problem they're solving. You don't need to be obsessed, but you should feel excited. That enthusiasm carries you through challenges and shows in your work.
## Estimate demand with SEO data
Check if people are searching for solutions like yours. If your idea aligns with popular search queries, you have a built-in user base.
### Keyword demand
Search for terms related to your Actor's function. If you're building a Reddit sentiment analysis scraper, check volume for phrases like *Reddit data extractor* or *analyze Reddit comments tool*.
Use free tools:
* https://business.google.com/en-all/ad-tools/keyword-planner/
* https://chromewebstore.google.com/detail/whatsmyserp/chbmoagfhnkggnhbjpoonnmhnpjdjdod Chrome extension
* https://keywordseverywhere.com/ (paid)
High search volume or multiple related terms indicate solid demand. Low or zero searches mean a very niche market, which isn't bad, but you'll rely more on direct marketing.
### Google autocomplete and related searches
Type your core keywords into Google and note the suggestions. Typing *scrape Amazon* might show *scrape Amazon reviews* or *Amazon price tracker*, confirming what people actually want.
### SEO difficulty and content gaps
Examine current search results. Few quality results for a query like *download data from \[obscure site]* indicates a content gap your Actor can fill.
Many results or ads for *Instagram scraper* means the market is proven but competitive. You'll need to differentiate.
Check keyword difficulty and domain authority. If difficulty is 70+ and top pages have 80+ domain authority with thousands of backlinks—and Apify already has an official Actor with 100,000+ users—you can't compete directly. Find an adjacent angle or specialization.
## Analyze Google Trends
Google Trends shows if interest in your idea is rising or falling. Declining trends are red flags. If searches dropped 90% over 12+ months (like *Clubhouse scraper* since 2021), that market has moved on.
Growth velocity matters more than current volume. A keyword growing from 10 to 100 monthly searches over 12 months shows exploding demand. Jump in early, before competition heats up.
Watch for spikes. Sudden jumps from media coverage or viral moments usually don't mean sustainable demand.
## Research community discussions
Beyond SEO data, go where your potential users are. Browse Reddit, Hacker News, Stack Overflow, X (Twitter), Discord, and Facebook groups. What problems are people discussing? What tools do they wish existed?
Document your findings. Note quotes and recurring themes like *Multiple marketers on Reddit want easy competitor pricing tracking—no existing solution mentioned*. These insights complement your SEO data and help you speak your users' language.
Zero discussion across multiple platforms over 4+ weeks means either no one cares about the problem or they've already solved it.
### Reddit
Search relevant subreddits (r/webscraping, r/datascience, r/SEO, r/marketing, or industry-specific ones) for questions like *How can I extract \[data] from \[site]?* or *I wish there was a tool to do X*. Multiple people independently asking for the same solution is strong validation.
Use the `site:` parameter in Google to search for relevant threads:
site:reddit.com extracting data from LinkedIn
You can also use tools like https://f5bot.com/ or https://gummysearch.com/.
### Q\&A forums and Stack Overflow
Look for questions about doing the task manually. If thinking about a LinkedIn scraper, check Stack Overflow for questions like *How can I scrape LinkedIn profiles?* Frequent questions or upvotes indicate many people trying to solve it without a good tool—an opportunity for your Actor.
Use the `site:` parameter:
site:stackoverflow.com extracting data from LinkedIn
### X and social media
Search keywords on X, LinkedIn, or other social media for professionals asking for recommendations like *Does anyone know a tool to monitor news about \[topic]?*
Run quick polls or ask your followers if they'd use a tool that does XYZ. A few positive responses validate your idea. Silence means rethink your value proposition. Engaging this way is early marketing.
Use the `site:` parameter:
site:x.com extracting data from LinkedIn
### Hacker News and niche forums
Platforms like https://news.ycombinator.com/ often have discussions on tech pain points and new tool launches. Search for keywords like *scrape Airbnb data* to see if people have shown interest or if someone launched a similar tool and what the reaction was.
Use the `site:` parameter:
site:news.ycombinator.com extracting data from LinkedIn
Look for spending signals
Current spending patterns are the strongest signal. When users mention "currently paying $X/month for \[existing tool] but..." or "upgraded from free to paid plan because..." or specific competitor pricing, they are proven buyers.
You can also engage in communities. Answer related questions, share knowledge, build reputation. Mention your Actor idea casually where relevant: "I'm building a tool to solve exactly this, would you use it?" Track responses. Positive responses with questions about pricing or features mean genuine interest.
## Analyze GitHub repositories
Star counts signal market demand. https://github.com/scrapy/scrapy has 58,000+, https://github.com/apify/crawlee has 20,000+, web scraping is validated. Use the https://www.star-history.com/ to check if stars are rising (growing momentum) or flat.
Issue analysis reveals pain points your Actor could solve. High issue counts with active responses indicate healthy, used projects. Open issues with themes like *JavaScript rendering problems* or *CAPTCHA bypass needed* show gaps you can fill. Issues with 10+ upvotes mean multiple users face the same problem.
Fork and commit activity shows developers actively work with the technology. High fork-to-star ratios mean people are building extensions (evidence of real usage). Recent commits (within 30 days) indicate active maintenance and a healthy project. No commits for 6+ months suggests declining interest.
## Review Product Hunt launches
Study successful automation tool launches from the past 12-24 months on Product Hunt. Filter by *Browser Automation* and *Automation tools*, then sort by upvotes. Note which taglines, value propositions, and features resonated. Products with 500+ upvotes validated something—figure out what worked.
## Research Apify Store
Apify Store shows transparent competitive intelligence most marketplaces hide. Every Actor displays monthly users, ratings, pricing, and last updates, a data goldmine for what works and what doesn't.
Search your use case or segment thoroughly. List relevant Actors with their metrics: monthly users, ratings, pricing, last update, and creator. Create a feature comparison matrix. Analyze top performers' READMEs, documentation quality, and issues.
Review competitor issues tabs closely. High-quality READMEs with examples and clear value propositions perform better in Store search. Issues reveal unresolved pain points from actual users. If competitors have 20+ open issues with repeated themes, that's your differentiation roadmap.
### Assess market saturation
* 10-30 Actors: healthy competition (market validated, you need differentiation)
* 50+ Actors: saturated (need obvious gaps)
* 1-5 Actors: blue ocean or unproven demand (validate carefully)
If the market has 50+ Actors with strong leaders (Apify-maintained with 50,000+ users) and you can't articulate clear differentiation, pivot. If you spot feature gaps or underserved niches, continue.
## Scan the broader market
Do a general Google search for tools or services that solve your problem. Your competition might not be another Actor—it could be a SaaS tool or API. If your idea is *monitor website uptime and screenshot changes*, established services probably exist.
Note direct competitors: How do they price it? What audience do they target? Are users satisfied or complaining? This validates that people pay for the service and reveals gaps you can fill.
Understanding the competition helps you refine your unique value—whether that's lower cost, better features, or targeting an underserved niche.
No existing solutions? Ask why. You might have found an untapped need, or it's a red flag (too difficult to implement, or the target website aggressively blocks scraping). Use your judgment.
## Get feedback from potential users
Reach out to people who match your target user profile. Building a real estate data Actor? Contact real estate analysts or agents (LinkedIn works well) and ask if a tool that does X would help them. Keep it informal—describe the problem you're solving and ask if they'd use or pay for it.
Direct feedback helps you:
* Validate your assumptions
* Understand pricing expectations
* Identify must-have features
* Refine your value proposition
Track responses carefully. Enthusiasm with specific questions about features or pricing indicates genuine interest. Generic "sounds interesting" responses mean keep validating.
---
# Find ideas for new Actors
Learn what kind of software tools are suitable to be packaged and published as Actors on Apify, and where you can find inspiration what to build.
***
## What can you build as an Actor
https://docs.apify.com/platform/actors are a new concept for building serverless micro-apps, which are easy to develop, share, integrate, and build upon.
They are useful for backend automation jobs, which users set up, integrate into their workflow, and let run in the background, rather than consumer-facing applications that users need to interact with.
Actors can run in two modes:
* In *batch mode*, they take a well-defined input, perform a job, and produce a well-defined output. This is useful for longer-running operations, such as web crawling or data processing.
* In *standby mode*, they run as a web server at a specific public URL. This is useful for request-response style applications, such as APIs or MCP servers.
### Web scrapers and crawlers
This is the most common type of Actors on https://apify.com/store. These Actors navigate websites, collect information from web pages, and store structured data in datasets for further processing.
Examples:
* **Website-specific scrapers** (https://apify.com/junglee/amazon-crawler, https://apify.com/curious_coder/linkedin-profile-scraper)
* **Search engines** (https://apify.com/apify/google-search-scraper, https://apify.com/curious_coder/bing-search-scraper)
* **Social media** (https://apify.com/apidojo/twitter-scraper-lite, https://apify.com/apify/instagram-scraper)
* **E-commerce data** (https://apify.com/autofacts/shopify, https://apify.com/dtrungtin/ebay-items-scraper)
* **General-purpose crawlers** (https://apify.com/apify/web-scraper, https://apify.com/apify/website-content-crawler)
### SaaS API wrappers
These Actors wrap existing SaaS services as Actors to make them accessible through the Apify platform and its many integrations.
Examples:
* https://apify.com/apify/openrouter
* https://apify.com/parsera-labs/parsera
* https://apify.com/apify/super-scraper-api
### Open-source libraries
Many open-source automation or data processing tools do not have a presence in the cloud, and need to be installed locally in "just five easy steps". Wrap those tools as Actors and make it easy for users to try and integrate those tools.
Examples:
* https://apify.com/misceres/sherlock
* https://apify.com/vancura/docling
* https://apify.com/snshn/monolith
* https://apify.com/janbuchar/crawl4ai
For inspiration, check out the https://apify.com/store/categories/open-source in Apify Store, or the following list:
GitHub projects potentially suitable for turning into Actors
* https://github.com/bytedance/Dolphin
* https://github.com/google/langextract
* https://github.com/virattt/ai-hedge-fund
* https://github.com/jamesturk/scrapeghost/
* https://github.com/idosal/git-mcp
* https://github.com/browser-use/browser-use
* https://github.com/browserbase/stagehand
* https://github.com/BuilderIO/gpt-crawler
* https://github.com/errata-ai/vale
* https://github.com/scrapybara/scrapybara-demos
* https://github.com/David-patrick-chuks/Riona-AI-Agent
* https://github.com/projectdiscovery/katana
* https://github.com/exa-labs/company-researcher
* https://github.com/Janix-ai/mcp-validator
* https://github.com/JoshuaC215/agent-service-toolkit
* https://github.com/dequelabs/axe-core
* https://github.com/janreges/siteone-crawler
* https://github.com/eugeneyan/news-agents
* https://github.com/askui/askui
* https://github.com/Shubhamsaboo/awesome-llm-apps
* https://github.com/TheAgenticAI/TheAgenticBrowser
* https://github.com/zcaceres/markdownify-mcp
Open Source Fair Share
Developers of open-source Actors can earn passive affiliate income through Apify's https://apify.com/partners/open-source-fair-share program to help them support their projects.
### MCP servers and tools for AI
https://modelcontextprotocol.io/docs/getting-started/intro lets AI agents interact with external tools and data sources. Many MCP servers are still stand-alone packages that need to be installed locally, which is both inefficient and insecure, or require an external service account. Publishing these packages as Actors makes the MCP servers remote and accessible through the Apify platform and ecosystem, including the new agentic payments protocols.
Examples:
* https://apify.com/jiri.spilka/playwright-mcp-server
* https://apify.com/mcp-servers/browserbase-mcp-server
* https://apify.com/agentify/firecrawl-mcp-server
* https://apify.com/agentify/brave-search-mcp-server
For more inspiration, check out the https://apify.com/store/categories/mcp-servers in Apify Store.
### AI agents
Build Actors that use LLMs to perform complex tasks autonomously. These Actors can navigate websites, make decisions, and complete multistep workflows.
Secure execution
Actors are cloud-based sandboxes that can securely run any AI-generated code.
For inspiration, check out the https://apify.com/store/categories/agents in Apify Store.
### Other
Any repetitive job matching the following criteria might be suitable for turning into an Actor:
* The job is better to be run in the background in the cloud and forgotten.
* The task is isolated and can be described and delegated to another person.
* There are at least a few hundred people in the world dealing with this problem.
If you look closely, you'll start seeing opportunities for new Actors everywhere. Be creative!
## Use the Actor ideas page
The https://apify.com/ideas page is where you can find inspiration for new Actors sourced from the Apify community.
### Browse and claim ideas
1. *Visit* https://apify.com/ideas to find ideas that interest you. Look for ideas that align with your skills.
2. *Select an Actor idea*: Review the details and requirements. Check the status—if it's marked **Open to develop**, you can start building.
3. *Build your Actor*: Develop your Actor based on the idea. You don't need to notify Apify during development.
4. *Prepare for launch*: Ensure your Actor meets quality standards and has a comprehensive README with installation instructions, usage details, and examples.
5. *Publish your Actor*: Deploy your Actor on Apify Store and make it live.
6. *Claim the idea*: After publishing, email mailto:ideas@apify.com with your Actor URL and the original idea. Apify will tag the idea as **Completed** and link it to your Actor.
1. To claim an idea, ensure your Actor is functional, README contains relevant information, and your Actor closely aligns with the original idea.
7. *Monitor and optimize*: Track your Actor's performance and user feedback. Make improvements to keep your Actor current.
#### Multiple developers for one idea
Apify Store can host multiple Actors with similar functions. However, the "first come, first served" rule applies—the first developer to claim an idea receives the **Completed** tag and a link from the Actor ideas page.
Competition motivates developers to improve the code. You can still build the Actor, but differentiate with a unique set of features.
### Submit your own ideas
The Ideas page is also where you contribute concepts to drive innovation in the community.
Here's how you can contribute too:
* *Submit ideas*: Share Actor concepts through the https://apify.typeform.com/to/BNON8poB#source=ideas. Provide clear details about what the tool should do and how it should work.
* *Engage with the community*: Upvote ideas you find intriguing. More support increases the likelihood a developer will build it.
## Find ideas from other sources
Beyond the https://apify.com/ideas page, you can find new Actor ideas through:
* SEO tools: Discover relevant search terms people use to find solutions
* Your experience: Draw from problems you've encountered in your work
* Community discussions: Browse Reddit, Twitter, Stack Overflow, and forums for user pain points
* Competitor analysis: Research existing tools and identify gaps
Once you get one, learn how to https://docs.apify.com/academy/build-and-publish/actor-ideas/actor-validation.md.
---
# Why publish Actors on Apify
Publishing Actors on Apify Store transforms your web scraping and automation code into revenue-generating products without the overhead of traditional SaaS development.
***
## What you get when you publish on Apify
When you publish your Actor on Apify Store, you eliminate the complexity of building and maintaining a traditional SaaS product. The platform handles infrastructure, billing, and distribution, so you can focus on your code.
### Skip the SaaS overhead
Your Actor gets its own dedicated landing page with built-in documentation hosting through README integration, giving you instant distribution with direct exposure to organic user traffic through Apify Store's marketplace. You won't pay hosting costs since the built-in cloud infrastructure with automatic scaling handles all compute needs. Payment infrastructure is completely handled for you with multiple payment options, automated billing, and transactions.
### No infrastructure headaches
Publishing on Apify Store means you don't need to purchase and manage domains or websites, build payment processing systems, set up hosting infrastructure, or handle customer billing manually. You also won't need to invest heavily in marketing since the marketplace presence drives discovery.
## Choose your pricing options
Apify Store offers flexible pricing models that let you match your Actor's value proposition:
* Pay-per-event (PPE): Charge for any custom events your Actor triggers (maximum flexibility, AI/MCP compatible, priority store placement)
* Pay-per-result (PPR): Set pricing based on dataset items generated (predictable costs for users, unlimited revenue potential)
* Rental: Charge a flat monthly fee for continuous access (users cover their own platform usage costs)
All models give you 80% of revenue, with platform usage costs deducted for PPR and PPE models.
Learn more in https://docs.apify.com/academy/actor-marketing-playbook/store-basics/how-actor-monetization-works.md.
## Why developers publish Actors
### Generate passive income
Developers successfully monetize their Actors through the Apify platform. Once published and promoted, Actors can generate recurring revenue with minimal maintenance.
Check out their success stories:
* https://blog.apify.com/web-scraping-freelance-financial-freedom/ - Achieved financial freedom through Actor development.
* https://apify.com/success-stories/paid-actor-journey-apify-freelancer-tugkan - Built a successful freelance career with paid Actors.
### Build your portfolio
Publishing Actors demonstrates your skills publicly. Your Actors become visible examples of your work, showcasing your technical expertise to potential clients while building your reputation in the developer community. This visibility can open freelance opportunities and establish you as a subject matter expert.
### Join a marketplace
Apify Store is a growing library of thousands of Actors, most created by community developers. When you publish, you reach users actively searching for automation solutions while benefiting from platform features like monitoring, scheduling, API access, and integrations. You get visibility through Store categories and search, plus access to analytics to understand user behavior and optimize pricing.
## What it takes to succeed
### Maintain quality
Public Actors require higher standards than private ones. Since users depend on your Actor, you'll need to commit to regular maintenance—reserve approximately 2 hours per week for bug fixes, updates, and user support. Thorough documentation is essential; write clear README files using simple language since users may not be developers. Set up automated testing or use manual testing to prevent user issues, and respond promptly to issues through the Issues tab, where your response time is publicly visible. Learn more about metrics determining quality in https://docs.apify.com/platform/actors/publishing/quality-score.md.
### When you need to change things
If you need to make breaking changes to your Actor, contact mailto:community@apify.com beforehand. Major pricing changes require 14-day notice and are limited to once per month. The platform helps communicate changes to your users.
## Getting started
Ready to publish? The process involves four main stages:
1. Development: Build your Actor using https://docs.apify.com/sdk, https://crawlee.dev/, or https://apify.com/templates
2. Publication: Set up display information, description, README, and monetization
3. Testing: Ensure your Actor works reliably with automated or manual tests
4. Promotion: Optimize for SEO, share on social media, and create tutorials
Learn more:
* https://docs.apify.com/academy/actor-marketing-playbook/store-basics/how-to-build-actors.md
* https://docs.apify.com/academy/actor-marketing-playbook/store-basics/how-store-works.md
* https://docs.apify.com/platform/actors/publishing/publish.md
---
# Concepts 🤔
**Learn about some common yet tricky concepts and terms that are used frequently within the academy, as well as in the world of scraper development.**
***
You'll see some terms and concepts frequently repeated throughout various courses in the academy. Many of these concepts are common, and even fundamental in the scraping world, which makes it necessary to explain them to our course-takers; however it would be inconvenient for our readers to explain these terms each time they appear in a lesson.
Because of this slight dilemma, and because there are no outside resources which compile all of these concepts into an educational and digestible form, we've decided to do just that. Welcome to the **Concepts** section of the Apify Academy's **Glossary**!
> It's important to note that there is no specific order to these concepts. All of them range in their relevance and importance to your every day scraping endeavors.
---
# CSS selectors
CSS selectors are patterns used to select https://docs.apify.com/academy/concepts/html-elements.md on a web page. They are used in combination with CSS styles to change the appearance of web pages, and also in JavaScript to access and manipulate the elements on a web page.
> Querying of CSS selectors with JavaScript is done using https://docs.apify.com/academy/concepts/querying-css-selectors.md.
## Common types of CSS selectors
Some of the most common types of CSS selectors are:
### Element selector
This is used to select elements by their tag name. For example, to select all `` elements, you would use the `p` selector.
const paragraphs = document.querySelectorAll('p');
### Class selector
This is used to select elements by their class attribute. For example, to select all elements with the class of `highlight`, you would use the `.highlight` selector.
const highlightedElements = document.querySelectorAll('.highlight');
### ID selector
This is used to select an element by its `id` attribute. For example, to select an element with the id of `header`, you would use the `#header` selector.
const header = document.querySelector(#header);
### Attribute selector
This is used to select elements based on the value of an attribute. For example, to select all elements with the attribute `data-custom` whose value is `yes`, you would use the `[data-custom="yes"]` selector.
const customElements = document.querySelectorAll('[data-custom="yes"]');
### Chaining selectors
You can also chain multiple selectors together to select elements more precisely. For example, to select an element with the class `highlight` that is inside a `` element, you would use the `p.highlight` selector.
const highlightedParagraph = document.querySelectorAll('p.highlight');
## CSS selectors in web scraping
CSS selectors are important for web scraping because they allow you to target specific elements on a web page and extract their data. When scraping a web page, you typically want to extract specific pieces of information from the page, such as text, images, or links. CSS selectors allow you to locate these elements on the page, so you can extract the data that you need.
For example, if you wanted to scrape a list of all the titles of blog posts on a website, you could use a CSS selector to select all the elements that contain the title text. Once you have selected these elements, you can extract the text from them and use it for your scraping project.
Additionally, when web scraping it is important to understand the structure of the website and CSS selectors can help you to navigate it. With them, you can select specific elements and their children, siblings, or parent elements. This allows you to extract data that is nested within other elements, or to navigate through the page structure to find the data you need.
## Resources
* Find all the available CSS selectors and their syntax on the https://developer.mozilla.org/en-US/docs/Web/CSS/CSS_Selectors.
---
# Dynamic pages and single-page applications (SPAs)
**Understand what makes a page dynamic, and how a page being dynamic might change your approach when writing a scraper for it.**
***
Oftentimes, web pages load additional information dynamically, long after their main body is loaded in the browser. A subset of dynamic pages takes this approach further and loads all of its content dynamically. Such style of constructing websites is called Single-page applications (SPAs), and it's widespread thanks to some popular JavaScript libraries, such as https://react.dev/ or https://vuejs.org/.
As you progress in your scraping journey, you'll quickly realize that different websites load their content and populate their pages with data in different ways. Some pages are rendered entirely on the server, some retrieve the data dynamically, and some use a combination of both those methods.
## How page loading works
The process of loading a page involves three main events, each with a designated corresponding name:
1. `DOMContentLoaded` - The initial HTML document is loaded, which contains the HTML as it was rendered on the website's server. It also includes all of the JavaScript which will be run in the next step.
2. `load` - The page's JavaScript is executed.
3. `networkidle` - Network https://developer.mozilla.org/en-US/docs/Web/API/XMLHttpRequest are sent and loaded, and data from these requests is populated onto the page. Many websites load essential data this way. These requests might be sent upon certain page events as well (not just the first load), such as scrolling or clicking.
Now that we have a solid understanding of the different stages of page-loading, and the order they happen in, we can fully understand what a dynamic page is.
## What is dynamic content
Dynamic content is any content that is rendered **after** the `DOMContentLoaded` event, which means any content loaded by JavaScript during the `load` event, or after any network XHR/Fetch requests have been made.
Sometimes, it can be quite obvious when content is dynamically being rendered. For example, take a look at this gif:

Here, it's very clear that new content is being generated. As we scroll down the Twitter feed, we can see the scroll bar jumping back up, signifying that more elements have been created using JavaScript.
Other times, it's less obvious though. Content can appear to be static (non-dynamic) when it is not, or even sometimes the other way around.
---
# HTML elements
An HTML element is a building block of an HTML document. It is used to represent a piece of content on a web page, such as text, images, or videos. Each element is defined by a tag, which is a set of characters enclosed in angle brackets, such as ``, ``, or ``. For example, this is a paragraph element:
This is a paragraph of text.
You can also add **attributes** to an element to provide additional information or to control how the element behaves. For example, the `src` attribute is used to specify the source of an image, like this:
In JavaScript, you can use the **DOM** (Document Object Model) to interact with elements on a web page. For example, you can use the https://docs.apify.com/academy/concepts/querying-css-selectors.md to select an element by its https://docs.apify.com/academy/concepts/css-selectors.md, like this:
const myElement = document.querySelector('#myId');
You can also use `getElementById()` method to select an element by its `id`, like this:
const myElement = document.getElementById('myId');
You can also use `getElementsByTagName()` method to select all elements of a certain type, like this:
const myElements = document.getElementsByTagName('p');
Once you have selected an element, you can use JavaScript to change its content, style, or behavior.
In summary, an HTML element is a building block of a web page. It is defined by a **tag** with **attributes**, which provide additional information or control how the element behaves. You can use the **DOM** (Document Object Model) to interact with elements on a web page.
---
# HTTP cookies
**Learn a bit about what cookies are, and how they are utilized in scrapers to appear logged-in, view specific data, or even avoid blocking.**
***
HTTP cookies are small pieces of data sent by the server to the user's web browser, which are typically stored by the browser and used to send later requests to the same server. Cookies are usually represented as a string (if used together with a plain HTTP request) and sent with the request under the **Cookie** https://docs.apify.com/academy/concepts/http-headers.md.
## Most common uses of cookies in crawlers
1. To make the website show data to you as if you were a logged-in user.
2. To make the website show location-specific data (works for websites where you could set a zip code or country directly on the page, but unfortunately doesn't work for some location-based ads).
3. To make the website less suspicious of the crawler and let the crawler's traffic blend in with regular user traffic.
For local testing, we recommend using the https://chrome.google.com/webstore/detail/fngmhnnpilhplaeedifhccceomclgfbg Chrome extension.
---
# HTTP headers
**Understand what HTTP headers are, what they're used for, and three of the biggest differences between HTTP/1.1 and HTTP/2 headers.**
***
https://developer.mozilla.org/en-US/docs/Web/HTTP/Headers let the client and the server pass additional information with an HTTP request or response. Headers are represented by an object where the keys are header names. Headers can also contain certain authentication tokens.
In general, there are 4 different paths you'll find yourself on when scraping a website and dealing with headers:
## No headers
For some websites, you won't need to worry about modifying headers at all, as there are no checks or verifications in place.
## Some default headers required
Some websites will require certain default browser headers to work properly, such as **User-Agent** (though, this header is becoming more obsolete, as there are more sophisticated ways to detect and block a suspicious user).
Another example of such a "default" header is **Referer**. Some e-commerce websites might share the same platform, and data is loaded through XMLHttpRequests to that platform, which would not know which data to return without knowing which exact website is requesting it.
## Custom headers required
A custom header is a non-standard HTTP header used for a specific website. For example, an imaginary website of **cool-stuff.com** might have a header with the name **X\_Cool\_Stuff\_Token** which is required for every single request to a product page.
Dealing with cases like these usually isn't difficult, but can sometimes be tedious.
## Very specific headers required
The most challenging websites to scrape are the ones that require a full set of site-specific headers to be included with the request. For example, not only would they potentially require proper **User-Agent** and **Referer** headers mentioned above, but also **Accept**, **Accept-Language**, **Accept-Encoding**, etc. with specific values.
Another big one to mention is the **Cookie** header. We cover this in more detail within the https://docs.apify.com/academy/concepts/http-cookies.md lesson.
You could use Chrome DevTools to inspect request headers, and https://docs.apify.com/academy/tools/insomnia.md or https://docs.apify.com/academy/tools/postman.md to test how the website behaves with or without specific headers.
## HTTP/1.1 vs HTTP/2 headers
HTTP/1.1 and HTTP/2 headers have several differences. Here are the three key differences that you should be aware of:
1. HTTP/2 headers do not include status messages. They only contain status codes.
2. Certain headers are no longer used in HTTP/2 (such as **Connection** along with a few others related to it like **Keep-Alive**). In HTTP/2, connection-specific headers are prohibited. While some browsers will ignore them, Safari and other Webkit-based browsers will outright reject any response that contains them. Easy to do by accident, and a big problem.
3. While HTTP/1.1 headers are case-insensitive and could be sent by the browsers with capitalized letters (e.g. **Accept-Encoding**, **Cache-Control**, **User-Agent**), HTTP/2 headers must be lower-cased (e.g. **accept-encoding**, **cache-control**, **user-agent**).
> To learn more about the difference between HTTP/1.1 and HTTP/2 headers, check out https://httptoolkit.com/blog/translating-http-2-into-http-1/ article
---
# Querying elements
`document.querySelector()` and `document.querySelectorAll()` are JavaScript functions that allow you to select elements on a web page using https://docs.apify.com/academy/concepts/css-selectors.md.
`document.querySelector()` is used to select the first element that matches the provided https://docs.apify.com/academy/concepts/css-selectors.md. It returns the first matching element or null if no matching element is found.
Here's an example of how you can use it:
const firstButton = document.querySelector('button');
This will select the first button element on the page and store it in the variable **firstButton**.
`document.querySelectorAll()` is used to select all elements that match the provided CSS selector. It returns a `NodeList` (a collection of elements) that can be accessed and manipulated like an array.
Here's an example of how you can use it:
const buttons = document.querySelectorAll('button');
This will select all button elements on the page and store them in the variable "buttons".
Both functions can be used to access and manipulate the elements in the web page. Here's an example on how you can use it to extract the text of all buttons.
const buttons = document.querySelectorAll('button'); const buttonTexts = buttons.forEach((button) => button.textContent);
It's important to note that when using `querySelectorAll()` in a browser environment, it returns a live `NodeList`, which means that if the DOM changes, the NodeList will also change.
---
# What is robotic process automation (RPA)?
**Learn the basics of robotic process automation. Make your processes on the web and other software more efficient by automating repetitive tasks.**
***
RPA allows you to create software (also known as **bots**), which can imitate your digital actions. You can program bots to perform repetitive tasks faster, more reliably and more accurately than humans. Plus, they can do these tasks all day, every day.
## What can I use RPA for?
You can https://apify.com/use-cases/rpa RPA to automate any repetitive task you perform using software. The tasks can range from https://apify.com/jakubbalada/content-checker to monitoring web pages for changes (such as changes in your competitors' pricing).
Other use cases for RPA include filling forms or https://apify.com/lukaskrivka/google-sheets while you get on with more important tasks. And it's not just simple tasks you can automate. How about https://apify.com/katerinahronik/toggl-invoice-download or posting content across several marketing channels at once?
## How does RPA work?
In a traditional automation workflow, you
1. Break a repetitive process down into https://kissflow.com/workflow/workflow-automation/an-8-step-checklist-to-get-your-workflow-ready-for-automation/, e.g. open website => log into website => click button "X" => download section "Y", etc.
2. Program a bot that does each of those chunks.
3. Execute the chunks of code in the right order (or in parallel).
With the advance of https://en.wikipedia.org/wiki/Machine_learning, it is becoming possible to https://www.nice.com/info/rpa-guide/process-recorder-function-in-rpa/ your workflows and analyze which can be automated. However, this technology is still not perfected and at times can even be less practical than the manual process.
## Is RPA the same as web scraping?
While https://docs.apify.com/academy/web-scraping-for-beginners.md is a kind of RPA, it focuses on extracting structured data. RPA focuses on the other tasks in browsers - everything except for extracting information.
## Additional resources
An easy-to-follow https://www.youtube.com/watch?v=9URSbTOE4YI on what RPA is.
To learn about RPA in plain English, check out https://enterprisersproject.com/article/2019/5/rpa-robotic-process-automation-how-explain article.
https://www.cio.com/article/227908/what-is-rpa-robotic-process-automation-explained.html article explains what RPA is and discusses both its advantages and disadvantages.
You might also like to check out this article on https://quandarycg.com/automating-workflows/.
---
# Deploying your code to Apify
**In this course learn how to take an existing project of yours and deploy it to the Apify platform as an Actor.**
***
This section will discuss how to use your newfound knowledge of the Apify platform and Actors from the https://docs.apify.com/academy/getting-started.md section to deploy your existing project's code to the Apify platform as an Actor. Any program running in a Docker container can become an Apify Actor.

Apify provides detailed guidance on how to deploy Node.js and Python programs as Actors, but apart from that you're not limited in what programming language you choose for your scraper.

Here are a few examples of Actors in other languages:
* https://apify.com/lukaskrivka/rust-actor-example
* https://apify.com/jirimoravcik/go-actor-example
* https://apify.com/jirimoravcik/julia-actor-example
## The "actorification" workflow
Follow these four main steps to turn a piece of code into an Actor:
1. Handle https://docs.apify.com/academy/deploying-your-code/inputs-outputs.md.
2. Create an https://docs.apify.com/academy/deploying-your-code/input-schema.md **(optional)**.
3. Add a https://docs.apify.com/academy/deploying-your-code/docker-file.md.
4. https://docs.apify.com/academy/deploying-your-code/deploying.md to the Apify platform!
## Our example project
For this section, we'll be turning this example project into an Actor:
* JavaScript
* Python
// index.js const addAllNumbers = (...nums) => nums.reduce((total, curr) => total + curr, 0);
console.log(addAllNumbers(1, 2, 3, 4)); // -> 10
index.py
def add_all_numbers (nums): total = 0
for num in nums:
total += num
return total
print(add_all_numbers([1, 2, 3, 4])) # -> 10
> For all lessons in this section, we'll have examples for both Node.js and Python so that you can follow along in either language.
## Next up
https://docs.apify.com/academy/deploying-your-code/inputs-outputs.md, we'll be learning how to accept input into our Actor as well as deliver output.
---
# Creating dataset schema
**Learn how to generate an appealing Overview table interface to preview your Actor results in real time on the Apify platform.**
***
The dataset schema generates an interface that enables users to instantly preview their Actor results in real time.

In this quick tutorial, you will learn how to set up an output tab for your own Actor.
## Implementation
Firstly, create a `.actor` folder in the root of your Actor's source code. Then, create a `actor.json` file in this folder, after which you'll have .actor/actor.json.

Next, copy-paste the following template code into your `actor.json` file.
{ "actorSpecification": 1, "name": "ENTER_ACTOR_NAME_", "title": "ENTER_ACTOR_TITLE_", "version": "1.0.0", "storages": { "dataset": { "actorSpecification": 1, "views": { "overview": { "title": "Overview", "transformation": { "fields": [ "EXAMPLE_NUMERIC_FIELD", "EXAMPLE_PICTURE_URL_FIELD", "EXAMPLE_LINK_URL_FIELD", "EXAMPLE_TEXT_FIELD", "EXAMPLE_BOOLEAN_FIELD" ] }, "display": { "component": "table", "properties": { "EXAMPLE_NUMERIC_FIELD": { "label": "ID", "format": "number" }, "EXAMPLE_PICTURE_URL_FIELD": { "format": "image" }, "EXAMPLE_LINK_URL_FIELD": { "label": "Clickable link", "format": "link" } } } } } } } }
To configure the dataset schema, replace the fields in the template with the relevant fields to your Actor.
For reference, you can use the https://github.com/PerVillalva/zappos-scraper-actor/blob/main/.actor/actor.json as an example of how the final implementation of the output tab should look in a live Actor.
{ "actorSpecification": 1, "name": "zappos-scraper", "title": "Zappos Scraper", "description": "", "version": "1.0.0", "storages": { "dataset": { "actorSpecification": 1, "title": "Zappos.com Dataset", "description": "", "views": { "products": { "title": "Overview", "description": "It can take about one minute until the first results are available.", "transformation": { "fields": [ "imgUrl", "brand", "name", "SKU", "inStock", "onSale", "price", "url" ] }, "display": { "component": "table", "properties": { "imgUrl": { "label": "Product image", "format": "image" }, "url": { "label": "Link", "format": "link" }, "brand": { "format": "text" }, "name": { "format": "text" }, "SKU": { "format": "text" }, "inStock": { "format": "boolean" }, "onSale": { "format": "boolean" }, "price": { "format": "text" } } } } } } } }
Note that the fields specified in the dataset schema should match the object keys of your resulting dataset.
Also, if your desired label has the same name as the defined object key, then you don't need to specify a label name. The schema will, by default, show a capitalized version of the key and even split camel case into separate words and capitalize all of them.
The matching object for the Zappos Scraper shown in the example above will look something like this:
const results = { url: request.loadedUrl, imgUrl: $('#stage button[data-media="image"] img[itemprop="image"]').attr('src'), brand: $('span[itemprop="brand"]').text().trim(), name: $('meta[itemprop="name"]').attr('content'), SKU: $('*[itemprop~="sku"]').text().trim(), inStock: !request.url.includes('oosRedirected=true'), onSale: !$('div[itemprop="offers"]').text().includes('OFF'), price: $('span[itemprop="price"]').text(), };
## Final result
Great! Now that everything is set up, it's time to run the Actor and admire your Actor's brand new output tab.
> Need some extra guidance? Visit the https://docs.apify.com/platform/actors/development/actor-definition/dataset-schema.md for more detailed information about how to implement this feature.
A few seconds after running the Actor, you should see its results displayed in the `Overview` table.

## Next up
In the https://docs.apify.com/academy/deploying-your-code/docker-file.md, we'll learn about a very important file that is required for our project to run on the Apify platform - the Dockerfile.
---
# Publishing your Actor
**Push local code to the platform, or create a new Actor on the console and integrate it with a Git repository to optionally automatically rebuild any new changes.**
***
Once you've **actorified** your code, there are two ways to deploy it to the Apify platform. You can either push the code directly from your local machine onto the platform, or you can create a blank Actor in the web interface, and then integrate its source code with a GitHub repository.
## With a Git repository
Before we deploy our project onto the Apify platform, let's ensure that we've pushed the changes we made in the last 3 lessons into our remote GitHub repository.
> The benefit of using this method is that any time you push to the Git repository, the code on the platform is also updated and the Actor is automatically rebuilt. Also, you don't have to use a GitHub repository - you can use GitLab or any other service you'd like.
### Creating the Actor
Before anything can be integrated, we've gotta create a new Actor. Let's head over to our https://console.apify.com?asrc=developers_portal, navigate to the **Development** subsection and click on the **Develop new** button, then select the **Empty** template.

### Changing source code location
In the **Source** tab on the new Actor's page, we'll click the dropdown menu under **Source code** and select **Git repository**. By default, this is set to **Web IDE**.

Now we'll paste the link to our GitHub repository into the **Git URL** text field and click **Save**.
### Adding the webhook to the repository
The final step is to click on **API** in the top right corner of our Actor's page:

And scroll through all of the links until we find the **Build Actor** API endpoint. Now we'll copy this endpoint's URL, head back over to our GitHub repository and navigate to **Settings > Webhooks > Add webhook**. The final thing to do is to paste the URL and save the webhook.

That's it! The Actor should now pull its source code from the repository and automatically build.
## Without a GitHub repository (using the Apify CLI)
> If you don't yet have the Apify CLI, learn how to install it and log in by following along with https://docs.apify.com/academy/tools/apify-cli.md about it.
If you're logged in to the Apify CLI, the `apify push` command can be used to push the code straight onto the Apify platform from your local machine (no GitHub repository required), where it will automatically be built for you. Prior to running this command, make sure that you have an **.actor/actor.json** file at the root of the project. If you don't already have one, you can use `apify init .` to automatically generate one for you.
One important thing to note is that you can use a `.gitignore` file to exclude files from being pushed. When you use `apify push` without a `.gitignore`, the full folder contents will be pushed, meaning that even the **storage** and **node\_modules** will be pushed. These files are unnecessary to push, as they are both generated on the platform.
> The `apify push` command should only really be used for quickly pushing and testing Actors on the platform during development. If you are ready to make your Actor public, use a Git repository instead, as you will reap the benefits of using Git and others will be able to contribute to the project.
## Deployed!
Great! Once you've pushed your Actor to the platform, you will find it listed under the **Actors** tab. When using the `apify push` command, you will have access to the multifile editor. For details about using the multifile editor, refer to https://docs.apify.com/academy/getting-started/creating-actors.md#web-ide.

The next step is to test your Actor and experiment with the vast amount of features the platform has to offer.
## Wrap up
That's it! In this short section, you've learned how to take your code written in any programming language and turn it into a usable Actor that can run on the Apify platform! The next step is to start looking into the https://docs.apify.com/platform/actors/publishing.md program, which allows you to monetize your work.
---
# Creating Actor Dockerfile
**Understand how to write a Dockerfile (Docker image blueprint) for your project so that it can be run within a Docker container on the Apify platform.**
***
The **Dockerfile** is a file which gives the Apify platform (or Docker, more specifically) instructions on how to create an environment for your code to run in. Every Actor must have a Dockerfile, as Actors run in Docker containers.
> Actors on the platform are always run in Docker containers; however, they can also be run in local Docker containers. This is not common practice though, as it requires more setup and a deeper understanding of Docker. For testing, it's best to run the Actor on the local OS (this requires you to have the underlying runtime installed, such as Node.js, Python, Rust, GO, etc).
## Base images
If your project doesn’t already contain a Dockerfile, don’t worry! Apify offers https://docs.apify.com/sdk/js/docs/guides/docker-images that are optimized for building and running Actors on the platform, which can be found on https://hub.docker.com/u/apify. When using a language for which Apify doesn't provide a base image, https://hub.docker.com/ provides a ton of free Docker images for most use-cases, upon which you can create your own images.
> Tip: You can see all of Apify's Docker images https://hub.docker.com/u/apify.
At the base level, each Docker image contains a base operating system and usually also a programming language runtime (such as Node.js or Python). You can also find images with preinstalled libraries or install them yourself during the build step.
Once you find the base image you need, you can add it as the initial `FROM` statement:
FROM apify/actor-node:16
> For syntax highlighting in your Dockerfiles, download the https://code.visualstudio.com/docs/containers/overview#_installation.
## Writing the file
The rest of the Dockerfile is about copying the source code from the local filesystem into the container's filesystem, installing libraries, and setting the `RUN` command (which falls back to the parent image).
> If you are not using a base image from Apify, then you should specify how to launch the source code of your Actor with the `CMD` instruction.
Here's the Dockerfile for our Node.js example project's Actor:
* Node.js Dockerfile
* Python Dockerfile
FROM apify/actor-node:16
Second, copy just package.json and package-lock.json since they are the only files
that affect npm install in the next step
COPY package*.json ./
Install npm packages, skip optional and development dependencies to keep the
image small. Avoid logging too much and print the dependency tree for debugging
RUN npm --quiet set progress=false
&& npm install --only=prod --no-optional
&& echo "Installed npm packages:"
&& (npm list --all || true)
&& echo "Node.js version:"
&& node --version
&& echo "npm version:"
&& npm --version
Next, copy the remaining files and directories with the source code.
Since we do this after npm install, quick build will be really fast
for simple source file changes.
COPY . ./
First, specify the base Docker image.
You can also use any other image from Docker Hub.
FROM apify/actor-python:3.9
Second, copy just requirements.txt into the Actor image,
since it should be the only file that affects "pip install" in the next step,
in order to speed up the build
COPY requirements.txt ./
Install the packages specified in requirements.txt,
Print the installed Python version, pip version
and all installed packages with their versions for debugging
RUN echo "Python version:"
&& python --version
&& echo "Pip version:"
&& pip --version
&& echo "Installing dependencies from requirements.txt:"
&& pip install -r requirements.txt
&& echo "All installed Python packages:"
&& pip freeze
Next, copy the remaining files and directories with the source code.
Since we do this after installing the dependencies, quick build will be really fast
for most source file changes.
COPY . ./
Specify how to launch the source code of your Actor.
By default, the main.py file is run
CMD python3 main.py
## Examples
The examples above show how to deploy Actors written in Node.js or Python, but you can use any language. As an inspiration, here are a few examples for other languages: Go, Rust, Julia.
* GO Actor Dockerfile
* Rust Actor Dockerfile
* Julia Actor Dockerfile
FROM golang:1.17.1-alpine
WORKDIR /app COPY . .
RUN go mod download
RUN go build -o /example-actor CMD ["/example-actor"]
Image with prebuilt Rust. We use the newest 1.* version
https://hub.docker.com/_/rust
FROM rust:1
We copy only package setup so we cache building all dependencies
COPY Cargo* ./
We need to have dummy main.rs file to be able to build
RUN mkdir src && echo "fn main() {}" > src/main.rs
Build dependencies only
Since we do this before copying the rest of the files,
the dependencies will be cached by Docker, allowing fast
build times for new code changes
RUN cargo build --release
Delete dummy main.rs
RUN rm -rf src
Copy rest of the files
COPY . ./
Build the source files
RUN cargo build --release
CMD ["./target/release/actor-example"]
FROM julia:1.7.1-alpine
WORKDIR /app COPY . .
RUN julia install.jl
CMD ["julia", "main.jl"]
## Next up
In the https://docs.apify.com/academy/deploying-your-code/deploying.md, we'll push our code directly to the Apify platform, or create and integrate a new Actor on the Apify platform with our project's GitHub repository.
---
# How to write Actor input schema
**Learn how to generate a user interface on the platform for your Actor's input with a single file - the INPUT\_SCHEMA.json file.**
***
Though writing an https://docs.apify.com/platform/actors/development/actor-definition/input-schema.md for an Actor is not a required step, it is most definitely an ideal one. The Apify platform will read the **INPUT\_SCHEMA.json** file within the root of your project and generate a user interface for entering input into your Actor, which makes it significantly easier for non-developers (and even developers) to configure and understand the inputs your Actor can receive. Because of this, we'll be writing an input schema for our example Actor.
> Without an input schema, the users of our Actor will have to provide the input in JSON format, which can be problematic for those who are not familiar with JSON.
## Schema title & description
In the root of our project, we'll create a file named **INPUT\_SCHEMA.json** and start writing the first part of the schema.
{ "title": "Adding Actor input", "description": "Add all values in list of numbers with an arbitrary length.", "type": "object", "schemaVersion": 1 }
The **title** and **description** describe what the input schema is for, and a bit about what the Actor itself does.
## Properties
In order to define all of the properties our Actor is expecting, we must include them within an object with a key of **properties**.
{ "title": "Adding Actor input", "description": "Add all values in list of numbers with an arbitrary length.", "type": "object", "schemaVersion": 1, "properties": { "numbers": { "title": "Number list", "description": "The list of numbers to add up." } } }
Each property's key corresponds to the name we're expecting within our code, while the **title** and **description** are what the user will see when configuring input on the platform.
## Property types & editor types
Within our new **numbers** property, there are two more fields we must specify. Firstly, we must let the platform know that we're expecting an array of numbers with the **type** field. Then, we should also instruct Apify on which UI component to render for this input property. In our case, we have an array of numbers, which means we should use the **json** editor type that we discovered in the https://docs.apify.com/platform/actors/development/actor-definition/input-schema/specification/v1.md#array of the input schema documentation. We could also use **stringList**, but then we'd have to parse out the numbers from the strings.
{ "title": "Adding Actor input", "description": "Add all values in list of numbers with an arbitrary length.", "type": "object", "schemaVersion": 1, "properties": { "numbers": { "title": "Number list", "description": "The list of numbers to add up.", "type": "array", "editor": "json" } } }
## Required fields
The great thing about building an input schema is that it will automatically validate your inputs based on their type, maximum value, minimum value, etc. Sometimes, you want to ensure that the user will always provide input for certain fields, as they are crucial to the Actor's run. This can be done by using the **required** field and passing in the names of the fields you'd like to require.
{ "title": "Adding Actor input", "description": "Add all values in list of numbers with an arbitrary length.", "type": "object", "schemaVersion": 1, "properties": { "numbers": { "title": "Number list", "description": "The list of numbers to add up.", "type": "array", "editor": "json" } }, "required": ["numbers"] }
For our case, we've made the **numbers** field required, as it is crucial to our Actor's run.
## Final thoughts
Here is what the input schema we wrote will render on the platform:

Later on, we'll be building more complex input schemas, as well as discussing how to write quality input schemas that allow the user to understand the Actor and not become overwhelmed.
It's not expected to memorize all of the fields that properties can take or the different editor types available, which is why it's always good to reference the https://docs.apify.com/platform/actors/development/actor-definition/input-schema.md when writing a schema.
## Next up
In the https://docs.apify.com/platform/actors/development/actor-definition/dataset-schema.md, we'll learn how to generate an appealing Overview table to display our Actor's results in real time, so users can get immediate feedback about the data being extracted.
---
# Managing Actor inputs and outputs
**Learn to accept input into your Actor, do something with it, and then return output. Actors can be written in any language, so this concept is language agnostic.**
***
Most of the time when you're creating a project, you are expecting some sort of input from which your software will run off. Oftentimes as well, you want to provide some sort of output once your software has completed running. Apify provides a convenient way to handle inputs and deliver outputs.
An important thing to understand regarding inputs and outputs is that they are read/written differently depending on where the Actor is running:
* If your Actor is running locally, the inputs/outputs are usually provided in the filesystem, and environment variables are injected either by you, the developer, or by the Apify CLI by running the project with the `apify run` command.
* While running in a Docker container on the platform, environment variables are automatically injected, and inputs & outputs are provided and modified using Apify's REST API.
## A bit about storage
You can read/write your inputs/outputs: to the https://docs.apify.com/platform/storage/key-value-store.md, or to the https://docs.apify.com/platform/storage/dataset.md. The key-value store can be used to store any sort of unorganized/unrelated data in any format, while the data pushed to a dataset typically resembles a table with columns (fields) and rows (items). Each Actor's run is allocated both a default dataset and a default key-value store.
When running locally, these storages are accessible through the **storage** folder within your project's root directory, while on the platform they are accessible via Apify's API.
## Accepting input
You can utilize multiple ways to accept input into your project. The option you go with depends on the language you have written your project in. If you are using Node.js for your repo's code, you can use the https://www.npmjs.com/package/apify package. Otherwise, you can use the useful environment variables automatically set up for you by Apify to write utility functions which read the Actor's input and return it.
### Accepting input with the Apify SDK
Since we're using Node.js, let's install the `apify` package by running the following command:
npm install apify
Now, let's import `Actor` from `apify` and use the `Actor.getInput()` function to grab our input.
// index.js import { Actor } from 'apify';
// We must initialize and exit the Actor. The rest of our code // goes in between these two. await Actor.init();
const input = await Actor.getInput(); console.log(input);
await Actor.exit();
If we run this right now, we'll see **null** in our terminal - this is because we never provided any sort of test input, which should be provided in the default key-value store. The `Actor.getInput()` function has detected that there is no **storage** folder and generated one for us.

We'll now add an **INPUT.json** file within **storage/key\_value\_stores/default** to match what we're expecting in our code.
{ "numbers": [5, 5, 5, 5] }
Then we can add our example project code from earlier. It will grab the input and use it to generate a solution which is logged into the console.
// index.js import { Actor } from 'apify';
await Actor.init();
const { numbers } = await Actor.getInput();
const addAllNumbers = (...nums) => nums.reduce((total, curr) => total + curr, 0);
const solution = addAllNumbers(...numbers);
console.log(solution);
await Actor.exit();
Cool! When we run `node index.js`, we see **20**.
### Accepting input without the Apify SDK
Alternatively, when writing in a language other than JavaScript, we can create our own `get_input()` function which utilizes the Apify API when the Actor is running on the platform. For this example, we are using the https://docs.apify.com/academy/getting-started/apify-client.md for Python to access the API.
index.py
from apify_client import ApifyClient from os import environ import json
client = ApifyClient(token='YOUR_TOKEN')
If being run on the platform, the "APIFY_IS_AT_HOME" environment variable
will be "1". Otherwise, it will be undefined/None
def is_on_apify (): return 'APIFY_IS_AT_HOME' in environ
Get the input
def get_input (): if not is_on_apify(): with open('./apify_storage/key_value_stores/default/INPUT.json') as actor_input: return json.load(actor_input)
kv_store = client.key_value_store(environ.get('APIFY_DEFAULT_KEY_VALUE_STORE_ID'))
return kv_store.get_record('INPUT')['value']
def add_all_numbers (nums): total = 0
for num in nums:
total += num
return total
actor_input = get_input()['numbers']
solution = add_all_numbers(actor_input)
print(solution)
> For a better understanding of the API endpoints for reading and modifying key-value stores, check the https://docs.apify.com/api/v2/storage-key-value-stores.md.
## Writing output
Similarly to reading input, you can write the Actor's output either by using the Apify SDK in Node.js or by manually writing a utility function to do so.
### Writing output with the Apify SDK
In the SDK, we can write to the dataset with the `Actor.pushData()` function. Let's go ahead and write the solution of the `addAllNumbers()` function to the dataset store using this function:
// index.js
// This is our example project code from earlier. // We will use the Apify input as its input. import { Actor } from 'apify';
await Actor.init();
const { numbers } = await Actor.getInput();
const addAllNumbers = (...nums) => nums.reduce((total, curr) => total + curr, 0);
const solution = addAllNumbers(...numbers);
// And save its output to the default dataset await Actor.pushData({ solution });
await Actor.exit();
### Writing output without the Apify SDK
Just as with the custom `get_input()` utility function, you can write a custom `set_output()` function as well if you cannot use the Apify SDK.
> You can read and write your output anywhere; however, it is standard practice to use a folder named **storage**.
index.py
from apify_client import ApifyClient from os import environ import json
client = ApifyClient(token='YOUR_TOKEN')
def is_on_apify (): return 'APIFY_IS_AT_HOME' in environ
def get_input (): if not is_on_apify(): with open('./apify_storage/key_value_stores/default/INPUT.json') as actor_input: return json.load(actor_input)
kv_store = client.key_value_store(environ.get('APIFY_DEFAULT_KEY_VALUE_STORE_ID'))
return kv_store.get_record('INPUT')['value']
Push the solution to the dataset
def set_output (data): if not is_on_apify(): with open('./apify_storage/datasets/default/solution.json', 'w') as output: return output.write(json.dumps(data, indent=2))
dataset = client.dataset(environ.get('APIFY_DEFAULT_DATASET_ID'))
dataset.push_items('OUTPUT', value=[json.dumps(data, indent=4)])
def add_all_numbers (nums): total = 0
for num in nums:
total += num
return total
actor_input = get_input()['numbers']
solution = add_all_numbers(actor_input)
set_output({ 'solution': solution })
## Testing locally
Since we've changed our code a lot from the way it originally was by wrapping it in the Apify SDK to accept inputs and return outputs, we most definitely should test it locally before worrying about pushing it to the Apify platform.
After running our script, there should be a single item in the default dataset that looks like this:
{ "solution": 20 }
## Next up
That's it! We've now added all of the files and code necessary to convert our software into an Actor. In the https://docs.apify.com/academy/deploying-your-code/input-schema.md, we'll be learning how to generate a user interface for our Actor's input so that users don't have to provide the input in raw JSON format.
---
# Expert scraping with Apify
**After learning the basics of Actors and Apify, learn to develop pro-level scrapers on the Apify platform with this advanced course.**
***
This course will teach you the nitty gritty of what it takes to build pro-level scrapers with Apify. We recommend that you've at least looked through all of the other courses in the academy prior to taking this one.
## Preparations
Before developing a pro-level Apify scraper, there are some important things you should have at least a bit of knowledge about (knowing the basics of each is enough to continue through this section), as well as some things that you should have installed on your system.
> If you've already gone through the https://docs.apify.com/academy/web-scraping-for-beginners.md and the first courses of the https://docs.apify.com/academy/apify-platform.md, you will be more than well equipped to continue on with the lessons in this course.
### Crawlee, Apify SDK, and the Apify CLI
If you're feeling ambitious, you don't need to have any prior experience with Crawlee to get started with this course; however, at least 5–10 minutes of exposure is recommended. If you haven't yet tried out Crawlee, you can refer to https://docs.apify.com/academy/web-scraping-for-beginners/crawling/pro-scraping.md in the **Web scraping basics for JavaScript devs** course (and ideally follow along). To familiarize yourself with the Apify SDK, you can refer to the https://docs.apify.com/academy/apify-platform.md category.
The Apify CLI will play a core role in the running and testing of the Actor you will build, so if you haven't gotten it installed already, please refer to https://docs.apify.com/academy/tools/apify-cli.md.
### Git
In one of the later lessons, we'll be learning how to integrate our Actor on the Apify platform with a GitHub repository. For this, you'll need to understand at least the basics of https://git-scm.com/docs. Here's a https://product.hubspot.com/blog/git-and-github-tutorial-for-beginners to help you get started with Git.
### Docker
Docker is a massive topic on its own, but don't be worried! We only expect you to know and understand the very basics of it, which can be learned about in https://docs.docker.com/guides/docker-overview/ (10 minute read).
### The basics of Actors
Part of this course will be learning more in-depth about Actors; however, some basic knowledge is already assumed. If you haven't yet gone through the https://docs.apify.com/academy/getting-started/actors.md lesson of the **Apify platform** course, it's highly recommended to at least give it a glance before moving forward.
## First up
https://docs.apify.com/academy/expert-scraping-with-apify/actors-webhooks.md, we'll be learning in-depth about integrating Actors with each other using webhooks.
> Each lesson will have a short *(and optional)* quiz that you can take at home to test your skills and knowledge related to the lesson's content. Some questions have straight factual answers, but some others can have varying opinionated answers.
---
# Webhooks & advanced Actor overview
**Learn more advanced details about Actors, how they work, and the default configurations they can take. Also, learn how to integrate your Actor with webhooks.**
***
Thus far, you've run Actors on the platform and written an Actor of your own, which you published to the platform yourself using the Apify CLI; therefore, it's fair to say that you are becoming more familiar and comfortable with the concept of **Actors**. Within this lesson, we'll take a more in-depth look at Actors and what they can do.
## Advanced Actor overview
In this course, we'll be working out of the Amazon scraper project from the **Web scraping basics for JavaScript devs** course. If you haven't already built that project, you can do it in three short lessons https://docs.apify.com/academy/web-scraping-for-beginners/challenge.md. We've made a few small modifications to the project with the Apify SDK, but 99% of the code is still the same.
Take another look at the files within your Amazon scraper project. You'll notice that there is a **Dockerfile**. Every single Actor has a Dockerfile (the Actor's **Image**) which tells Docker how to spin up a container on the Apify platform which can successfully run the Actor's code. "Apify Actors" is a serverless platform that runs multiple Docker containers. For a deeper understanding of Actor Dockerfiles, refer to the https://docs.apify.com/sdk/js/docs/guides/docker-images#example-dockerfile.
## Webhooks
Webhooks are a powerful tool that can be used for just about anything. You can set up actions to be taken when an Actor reaches a certain state (started, failed, succeeded, etc). These actions usually take the form of an API call (generally a POST request).
## Learning 🧠
Prior to moving forward, please read over these resources:
* Read about https://docs.apify.com/platform/actors/running.md.
* Learn about https://docs.apify.com/platform/integrations/webhooks.md, which we will implement in the next lesson.
* Learn https://docs.apify.com/academy/api/run-actor-and-retrieve-data-via-api.md using Apify's REST API.
## Knowledge check 📝
1. How do you allocate more CPU for an Actor's run?
2. Within itself, can you get the exact time that an Actor was started?
3. What are the types of default storages connected to an Actor's run?
4. Can you change the allocated memory of an Actor while it's running?
5. How can you run an Actor with Puppeteer on the Apify platform with headless mode set to `false`?
## Our task
In this task, we'll be building on top of what we already created in the https://docs.apify.com/academy/web-scraping-for-beginners/challenge.md course's final challenge, so keep those files safe!
Once our Amazon Actor has completed its run, we will, rather than sending an email to ourselves, call an Actor through a webhook. The Actor called will be a new Actor that we will create together, which will take the dataset ID as input, then subsequently filter through all of the results and return only the cheapest one for each product. All of the results of the Actor will be pushed to its default dataset.
https://docs.apify.com/academy/expert-scraping-with-apify/solutions/integrating-webhooks.md
## Next up
This course's https://docs.apify.com/academy/expert-scraping-with-apify/managing-source-code.md is brief, but discusses a very important topic: managing your code and storing it in a safe place.
---
# Apify API & client
**Gain an in-depth understanding of the two main ways of programmatically interacting with the Apify platform - through the API, and through a client.**
***
You can use one of the two main ways to programmatically interact with the Apify platform: by directly using https://docs.apify.com/api/v2.md, or by using the https://docs.apify.com/api/client/js and https://docs.apify.com/api/client/python API clients. In the next two lessons, we'll be focusing on the first two.
> Apify's API and JavaScript API client allow us to do anything a regular user can do when interacting with the platform's web interface, only programmatically.
## Learning 🧠
* Scroll through the https://docs.apify.com/api/v2.md (there's a whole lot there, so you're not expected to memorize everything).
* Read about the Apify client in https://docs.apify.com/api/client/js. It can also be seen on https://github.com/apify/apify-client-js and https://www.npmjs.com/package/apify-client.
* Learn about the https://docs.apify.com/sdk/js/reference/class/Actor#newClient function in the Apify SDK.
* Skim through https://help.apify.com/en/articles/2868670-how-to-pass-data-from-web-scraper-to-another-actor about API integration (this article is old; however, still relevant).
## Knowledge check 📝
1. What is the relationship between the Apify API and the Apify client? Are there any significant differences?
2. How do you pass input when running an Actor or task via API?
3. Do you need to install the `apify-client` npm package when already using the `apify` package?
## Our task
We'll be creating another new Actor, which will have two jobs:
1. Programmatically call the task for the Amazon Actor.
2. Export its results into CSV format under a new key called **OUTPUT.csv** in the default key-value store.
Though it's a bit unintuitive, this is a perfect activity for learning how to use both the Apify API and the Apify JavaScript client.
The new Actor should take the following input values, which be mapped to parameters in the API calls:
{ // How much memory to allocate to the Amazon Actor // Must be a power of 2 "memory": 4096,
// Whether to use the JavaScript client to make the
// call, or to use the API
"useClient": false,
// The fields in each item to return back. All other
// fields should be ommitted
"fields": ["title", "itemUrl", "offer"],
// The maximum number of items to return back
"maxItems": 10
}
https://docs.apify.com/academy/expert-scraping-with-apify/solutions/using-api-and-client.md
## Next up
https://docs.apify.com/academy/expert-scraping-with-apify/migrations-maintaining-state.md will teach us everything we need to know about migrations and how to handle them properly to avoid losing any state; therefore, increasing the reliability of our `demo-actor` Amazon scraper.
---
# Bypassing anti-scraping methods
**Learn about bypassing anti-scraping methods using proxies and proxy/session rotation together with Crawlee and the Apify SDK.**
***
Effectively bypassing anti-scraping software is one of the most crucial, but also one of the most difficult skills to master. The different types of https://docs.apify.com/academy/anti-scraping.md can vary a lot on the web. Some websites aren't even protected at all, some require only moderate IP rotation, and some cannot even be scraped without using advanced techniques and workarounds. Additionally, because the web is evolving, anti-scraping techniques are also evolving and becoming more advanced.
It is generally quite difficult to recognize the anti-scraping protections a page may have when first inspecting it, so it is important to thoroughly investigate a site prior to writing any lines of code, as anti-scraping measures can significantly change your approach as well as complicate the development process of an Actor. As your skills expand, you will be able to spot anti-scraping measures quicker, and better evaluate the complexity of a new project.
You might have already noticed that we've been using the **RESIDENTIAL** proxy group in the `proxyConfiguration` within our Amazon scraping Actor. But what does that mean? This is a proxy group from https://apify.com/proxy which has been preventing us from being blocked by Amazon this entire time. We'll be learning more about proxies and Apify Proxy in this lesson.
## Learning 🧠
* Skim https://apify.com/proxy for a general idea of Apify Proxy.
* Give the https://docs.apify.com/platform/proxy.md a solid readover (feel free to skip most of the examples).
* Check out the https://docs.apify.com/academy/anti-scraping.md.
* Gain a solid understanding of the https://crawlee.dev/api/core/class/SessionPool.
* Look at a few Actors on the https://apify.com/store. How are they utilizing proxies?
## Knowledge check 📝
1. What are the different types of proxies that Apify proxy offers? What are the main differences between them?
2. Which proxy groups do users get on the free plan? Can they access the proxy from their computer?
3. How can you prevent an error from occurring if one of the proxy groups that a user has is removed? What are the best practices for these scenarios?
4. Does it make sense to rotate proxies when you are logged into a website?
5. Construct a proxy URL that will select proxies **only from the US**.
6. What do you need to do to rotate a proxy (one proxy usually has one IP)? How does this differ for CheerioCrawler and PuppeteerCrawler?
7. Name a few different ways how a website can prevent you from scraping it.
## Our task
This time, we're going to build a trivial proxy-session manager for our Amazon scraping Actor. A session should be used a maximum of 5 times before being rotated; however, if a request fails, the IP should be rotated immediately.
Additionally, the proxies used by our scraper should now only be from the US.
https://docs.apify.com/academy/expert-scraping-with-apify/solutions/rotating-proxies.md
## Next up
Up https://docs.apify.com/academy/expert-scraping-with-apify/saving-useful-stats.md, we'll be learning about how to save useful stats about our run, which becomes more and more useful as a project scales.
---
# Managing source code
**Learn how to manage your Actor's source code more efficiently by integrating it with a GitHub repository. This is standard on the Apify platform.**
***
In this brief lesson, we'll discuss how to better manage an Actor's source code. Up 'til now, you've been developing your scripts locally, and then pushing the code directly to the Actor on the Apify platform; however, there is a much more optimal (and standard) way.
## Learning 🧠
Thus far, every time we've updated our code on the Apify platform, we've used the `apify push` CLI command; however, this can be problematic for a few reasons - mainly because, if someone else wants to make a change to/maintain your code, they don't have access to it, as it is on your local machine.
If you're not yet familiar with Git, please get familiar with it through the https://git-scm.com/docs, then take a quick moment to read about https://docs.apify.com/platform/integrations/github.md in the Apify docs.
Also, try to explore the **Multifile editor** in one of the Actors you developed in the previous lessons before moving forward.
## Knowledge check 📝
1. Do you have to rebuild an Actor each time the source code is changed?
2. In Git, what is the difference between **pushing** changes and making a **pull request**?
3. Based on your knowledge and experience, is the `apify push` command worth using (in your opinion)?
https://docs.apify.com/academy/expert-scraping-with-apify/solutions/managing-source.md
## Our task
First, we must initialize a GitHub repository (you can use Gitlab if you like, but this lesson's examples will be using GitHub). Then, after pushing our main Amazon Actor's code to the repo, we must switch its source code to use the content of the GitHub repository instead.
## Integrating GitHub source code
First, let's create a repository. This can be done https://kbroman.org/github_tutorial/pages/init.html, but in this lesson, we'll do it by creating the remote repository on GitHub's website:

Then, we'll run the commands it tells us in our terminal (while within the **demo-actor** directory) to initialize the repository locally, and then push all of the files to the remote one.
After you've created your repo, navigate on the Apify platform to the Actor we called **demo-actor**. In the **Source** tab, click the dropdown menu under **Source code** and select **Git repository**. By default, this is set to **Web IDE**, which is what we've been using so far.

Then, go ahead and paste the link to your repository into the **Git URL** text field and click **Save**.
The final step is to click on **API** in the top right corner of your Actor's page:

And scroll through all of the links until you find the **Build Actor** API endpoint. Copy this endpoint's URL, then head back over to your GitHub repository and navigate to **Settings > Webhooks > Add webhook**. The final thing to do is to paste the URL and save the webhook.

And you're done! 🎉
## Quick chat about code management
This was a bit of overhead, but the good news is that you don't ever have to configure this stuff again for this Actor. Now, every time the content of your **main**/**master** branch changes, the Actor on the Apify platform will rebuild based on the newest code.
Think of it as combining two steps into one! Normally, you'd have to do a `git push` from your terminal in order to get the newest code onto GitHub, then run `apify push` to push it to the platform.
It's also important to know that GitHub/Gitlab repository integration is standard practice. As projects grow and the number of contributors and maintainers increases, it only makes sense to have a GitHub repository integrated with the project's Actor. For the remainder of this course, all Actors created will be integrated with a GitHub repository.
## Next up
https://docs.apify.com/academy/expert-scraping-with-apify/tasks-and-storage.md, you'll learn about the different ways to store scraped data, as well as how to utilize a cool feature to run pre-configured Actors.
---
# Migrations & maintaining state
**Learn about what Actor migrations are and how to handle them properly so that the state is not lost and runs can safely be resurrected.**
***
We already know that Actors are Docker containers that can be run on any server. This means that they can be allocated anywhere there is space available, making them very efficient. Unfortunately, there is one big caveat: Actors move - a lot. When an Actor moves, it is called a **migration**.
On migration, the process inside of an Actor is completely restarted and everything in its memory is lost, meaning that any values stored within variables or classes are lost.
When a migration happens, you want to do a so-called "state transition", which means saving any data you care about so the Actor can continue right where it left off before the migration.
## Learning 🧠
Read this https://docs.apify.com/platform/actors/development/builds-and-runs/state-persistence.md on migrations and dealing with state transitions.
Before moving forward, read about Actor https://docs.apify.com/sdk/js/docs/upgrading/upgrading-to-v3#events and how to listen for them.
## Knowledge check 📝
1. Actors have an option in the **Settings** tab to **Restart on error**. Would you use this feature for regular Actors? When would you use this feature?
2. Migrations happen randomly, but by https://docs.apify.com/platform/actors/running/runs-and-builds.md#aborting-runs, you can simulate a similar situation. Try this out on the platform and observe what happens. What changes occur, and what remains the same for the restarted Actor's run?
3. Why don't you (usually) need to add any special migration handling code for a standard crawling/scraping Actor? Are there any features in the Crawlee/Apify SDK that handle this under the hood?
4. How can you intercept the migration event? How much time do you have after this event happens and before the Actor migrates?
5. When would you persist data to the default key-value store instead of to a named key-value store?
## Our task
Once again returning to our Amazon **demo-actor**, let's say that we need to store an object in memory (as a variable) containing all of the scraped ASINs as keys and the number of offers scraped from each ASIN as values. The object should follow this format:
{ "B079ZJ1BPR": 3, "B07D4R4258": 21 }
Every 10 seconds, we should log the most up-to-date version of this object to the console. Additionally, the object should be able to solve Actor migrations, which means that even if the Actor were to migrate, its data would not be lost upon resurrection.
https://docs.apify.com/academy/expert-scraping-with-apify/solutions/handling-migrations.md
## Next up
You might have already noticed that we've been using the **RESIDENTIAL** proxy group in the `proxyConfiguration` within our Amazon scraping Actor. But what does that mean? Learn why we've used this group, about proxies, and about avoiding anti-scraping measures in the https://docs.apify.com/academy/expert-scraping-with-apify/bypassing-anti-scraping.md.
---
# Saving useful run statistics
**Understand how to save statistics about an Actor's run, what types of statistics you can save, and why you might want to save them for a large-scale scraper.**
***
Using Crawlee and the Apify SDK, we are now able to collect and format data coming directly from websites and save it into a Key-Value store or Dataset. This is great, but sometimes, we want to store some extra data about the run itself, or about each request. We might want to store some extra general run information separately from our results or potentially include statistics about each request within its corresponding dataset item.
The types of values that are saved are totally up to you, but the most common are error scores, number of total saved items, number of request retries, number of captchas hit, etc. Storing these values is not always necessary, but can be valuable when debugging and maintaining an Actor. As your projects scale, this will become more and more useful and important.
## Learning 🧠
Before moving on, give these valuable resources a quick lookover:
* Refamiliarize with the various available data on the https://crawlee.dev/api/core/class/Request.
* Learn about the https://crawlee.dev/api/browser-crawler/interface/BrowserCrawlerOptions#failedRequestHandler.
* Understand how to use the https://crawlee.dev/api/browser-crawler/interface/BrowserCrawlerOptions#errorHandler function to handle request failures.
* Ensure you are comfortable using https://docs.apify.com/sdk/js/docs/guides/result-storage#key-value-store and https://docs.apify.com/sdk/js/docs/guides/result-storage#dataset, and understand the differences between the two storage types.
## Knowledge check 📝
1. Why might you want to store statistics about an Actor's run (or a specific request)?
2. In our Amazon scraper, we are trying to store the number of retries of a request once its data is pushed to the dataset. Where would you get this information? Where would you store it?
3. What is the difference between the `failedRequestHandler` and `errorHandler`?
## Our task
In our Amazon Actor, each dataset result must now have the following extra keys:
{ "dateHandled": "date-here", // the date + time at which the request was handled "numberOfRetries": 4, // the number of retries of the request before running successfully "currentPendingRequests": 24 // the current number of requests left pending in the request queue }
Also, an object including these values should be persisted during the run in th Key-Value store and logged to the console every 10 seconds:
{ "errors": { // all of the errors for every request path "some-site.com/products/123": [ "error1", "error2" ] }, "totalSaved": 43 // total number of saved items throughout the entire run }
https://docs.apify.com/academy/expert-scraping-with-apify/solutions/saving-stats.md
## Wrap up
Wow, you've learned a whole lot in this course, so give yourself the pat on the back that you deserve! If you were able to follow along with this course, that means that you're officially an **Apify pro**, and that you're equipped with all of the knowledge and tools you need to build awesome scalable web-scrapers either for your own personal projects or for the Apify platform.
Congratulations! 🎉
---
# Solutions
**View all of the solutions for all of the activities and tasks of this course. Please try to complete each task on your own before reading the solution!**
***
The final section of each lesson in this course will be a task which you as the course-taker are expected to complete before moving on to the next lesson. Each task's completion and understanding plays an important role in the ability to continue through the course.
If you ever get stuck, or if you feel like your solution could be more optimal, you can always refer to the **Solutions** section of the course. Each solution will have all of the code and explanations needed to understand it.
**Please** try to do each task **on your own** prior to checking out the solution!
---
# Handling migrations
**Get real-world experience of maintaining a stateful object stored in memory, which will be persisted through migrations and even graceful aborts.**
***
Let's first head into our **demo-actor** and create a new file named **asinTracker.js** in the **src** folder. Within this file, we are going to build a utility class which will allow us to store, modify, persist, and log our tracked ASIN data.
Here's the skeleton of our class:
// asinTracker.js class ASINTracker { constructor() { this.state = {};
// Log the state to the console every ten
// seconds
setInterval(() => console.log(this.state), 10000);
}
// Add an offer to the ASIN's offer count
// If ASIN doesn't exist yet, set it to 0
incrementASIN(asin) {
if (this.state[asin] === undefined) {
this.state[asin] = 0;
return;
}
this.state[asin] += 1;
}
}
// It is only a utility class, so we will immediately // create an instance of it and export that. We only // need one instance for our use case. module.exports = new ASINTracker();
Multiple techniques exist for storing data in memory; however, this is the most modular way, as all state-persistence and modification logic will be held in this file.
Here is our updated **routes.js** file which is now utilizing this utility class to track the number of offers for each product ASIN:
// routes.js import { createCheerioRouter } from '@crawlee/cheerio'; import { BASE_URL, OFFERS_URL, labels } from './constants'; import tracker from './asinTracker'; import { dataset } from './main.js';
export const router = createCheerioRouter();
router.addHandler(labels.START, async ({ $, crawler, request }) => { const { keyword } = request.userData;
const products = $('div > div[data-asin]:not([data-asin=""])');
for (const product of products) {
const element = $(product);
const titleElement = $(element.find('.a-text-normal[href]'));
const url = `${BASE_URL}${titleElement.attr('href')}`;
// For each product, add it to the ASIN tracker
// and initialize its collected offers count to 0
tracker.incrementASIN(element.attr('data-asin'));
await crawler.addRequest([{
url,
label: labels.PRODUCT,
userData: {
data: {
title: titleElement.first().text().trim(),
asin: element.attr('data-asin'),
itemUrl: url,
keyword,
},
},
}]);
}
});
router.addHandler(labels.PRODUCT, async ({ $, crawler, request }) => { const { data } = request.userData;
const element = $('div#productDescription');
await crawler.addRequests([{
url: OFFERS_URL(data.asin),
label: labels.OFFERS,
userData: {
data: {
...data,
description: element.text().trim(),
},
},
}]);
});
router.addHandler(labels.OFFERS, async ({ $, request }) => { const { data } = request.userData;
const { asin } = data;
for (const offer of $('#aod-offer')) {
// For each offer, add 1 to the ASIN's
// offer count
tracker.incrementASIN(asin);
const element = $(offer);
await dataset.pushData({
...data,
sellerName: element.find('div[id*="soldBy"] a[aria-label]').text().trim(),
offer: element.find('.a-price .a-offscreen').text().trim(),
});
}
});
## Persisting state
The **persistState** event is automatically fired (by default) every 60 seconds by the Apify SDK while the Actor is running and is also fired when the **migrating** event occurs.
In order to persist our ASIN tracker object, let's use the `Actor.on` function to listen for the **persistState** event and store it in the key-value store each time it is emitted.
// asinTracker.js import { Actor } from 'apify'; // We've updated our constants.js file to include the name // of this new key in the key-value store const { ASIN_TRACKER } = require('./constants');
class ASINTracker { constructor() { this.state = {};
Actor.on('persistState', async () => {
await Actor.setValue(ASIN_TRACKER, this.state);
});
setInterval(() => console.log(this.state), 10000);
}
incrementASIN(asin) {
if (this.state[asin] === undefined) {
this.state[asin] = 0;
return;
}
this.state[asin] += 1;
}
}
module.exports = new ASINTracker();
## Handling resurrections
Great! Now our state will be persisted every 60 seconds in the key-value store. However, we're not done. Let's say that the Actor migrates and is resurrected. We never actually update the `state` variable of our `ASINTracker` class with the state stored in the key-value store, so as our code currently stands, we still don't support state-persistence on migrations.
In order to fix this, let's create a method called `initialize` which will be called at the very beginning of the Actor's run, and will check the key-value store for a previous state under the key **ASIN-TRACKER**. If a previous state does live there, then it will update the class' `state` variable with the value read from the key-value store:
// asinTracker.js import { Actor } from 'apify'; import { ASIN_TRACKER } from './constants';
class ASINTracker { constructor() { this.state = {};
Actor.on('persistState', async () => {
await Actor.setValue(ASIN_TRACKER, this.state);
});
setInterval(() => console.log(this.state), 10000);
}
async initialize() {
// Read the data from the key-value store. If it
// doesn't exist, it will be undefined
const data = await Actor.getValue(ASIN_TRACKER);
// If the data does exist, replace the current state
// (initialized as an empty object) with the data
if (data) this.state = data;
}
incrementASIN(asin) {
if (this.state[asin] === undefined) {
this.state[asin] = 0;
return;
}
this.state[asin] += 1;
}
}
module.exports = new ASINTracker();
We'll now call this function at the top level of the **main.js** file to ensure it is the first thing that gets called when the Actor starts up:
// main.js
// ... import tracker from './asinTracker';
// The Actor.init() function should be executed before // the tracker's initialization await Actor.init();
await tracker.initialize(); // ...
That's everything! Now, even if the Actor migrates (or is gracefully aborted and then resurrected), this `state` object will always be persisted.
## Quiz answers 📝
**Q: Actors have an option in the Settings tab to Restart on error. Would you use this feature for regular Actors? When would you use this feature?**
**A:** It's not best to use this option by default. If it fails, there must be a reason, which would need to be thought through first - meaning that the edge case of failing should be handled when resurrecting the Actor. The state should be persisted beforehand.
**Q: Migrations happen randomly, but by https://docs.apify.com/platform/actors/running/runs-and-builds.md#aborting-runs, you can simulate a similar situation. Try this out on the platform and observe what happens. What changes occur, and what remains the same for the restarted Actor's run?**
**A:** After aborting or throwing an error mid-process, it manages to start back from where it was upon resurrection.
**Q: Why don't you (usually) need to add any special migration handling code for a standard crawling/scraping Actor? Are there any features in Crawlee or Apify SDK that handle this under the hood?**
**A:** Because Apify SDK handles all of the migration handling code for us. If you want to add custom migration-handling code, you can use `Actor.events` to listen for the `migrating` or `persistState` events to save the current state in key-value store (or elsewhere).
**Q: How can you intercept the migration event? How much time do you have after this event happens and before the Actor migrates?**
**A:** By using the `Actor.on` function. You have a maximum of a few seconds before shutdown after the `migrating` event has been fired.
**Q: When would you persist data to the default key-value store instead of to a named key-value store?**
**A:** Persisting data to the default key-value store would help when handling an Actor's run state or with storing metadata about the run (such as results, miscellaneous files, or logs). Using a named key-value store allows you to persist data at the account level to handle data across multiple Actor runs.
## Wrap up
In this activity, we learned how to persist custom values on an interval as well as after Actor migrations by using the `persistState` event and the key-value store. With this knowledge, you can safely increase your Actor's performance by storing data in variables and then pushing them to the dataset periodically/at the end of the Actor's run as opposed to pushing data immediately after it's been collected.
One important thing to note is that this workflow can be used to replace the usage of `userData` to pass data between requests, as it allows for the creation of a "global store" which all requests have access to at any time.
---
# Integrating webhooks
**Learn how to integrate webhooks into your Actors. Webhooks are a super powerful tool, and can be used to do almost anything!**
***
In this lesson we'll be writing a new Actor and integrating it with our beloved Amazon scraping Actor. First, we'll navigate to the same directory where our **demo-actor** folder lives, and run `apify create filter-actor` *(once again, you can name the Actor whatever you want, but for this lesson, we'll be calling the new Actor **filter-actor**)*. When prompted about the programming language, select **JavaScript**:
$ apify create filter-actor ? Choose the programming language of your new Actor: ❯ JavaScript TypeScript Python
Then use the arrow down key to select **Empty JavaScript Project**:
$ apify create filter-actor ✔ Choose the programming language of your new Actor: JavaScript ? Choose a template for your new Actor. Detailed information about the template will be shown in the next step. Crawlee + Playwright + Chrome Crawlee + Playwright + Camoufox Bootstrap CheerioCrawler Cypress ❯ Empty JavaScript Project Standby JavaScript Project ...
As a last step, confirm the choices by **Install template** and wait until our new Actor is ready.
## Building the new Actor
First of all, we should clear out any of the boilerplate code within **main.js** to get a clean slate:
// main.js import { Actor } from 'apify';
await Actor.init();
// ...
await Actor.exit();
We'll be passing the ID of the Amazon Actor's default dataset along to the new Actor, so we can expect that as an input:
const { datasetId } = await Actor.getInput(); const dataset = await Actor.openDataset(datasetId); // ...
Accessing Cloud Datasets Locally
You will need to use `forceCloud` option - `Actor.openDataset(, { forceCloud: true });` - to open dataset from platform storage while running Actor locally.
Next, we'll grab hold of the dataset's items with the `dataset.getData()` function:
const { items } = await dataset.getData();
While several methods can achieve the goal output of this Actor, using the https://developer.mozilla.org/en-US/docs/Web/JavaScript/Reference/Global_Objects/Array/reduce is the most concise approach
const filtered = items.reduce((acc, curr) => { // Grab the price of the item matching our current // item's ASIN in the map. If it doesn't exist, set // "prevPrice" to null const prevPrice = acc?.[curr.asin] ? +acc[curr.asin].offer.slice(1) : null;
// Grab the price of our current offer
const price = +curr.offer.slice(1);
// If the item doesn't yet exist in the map, add it.
// Or, if the current offer's price is less than the
// saved one, replace the saved one
if (!acc[curr.asin] || prevPrice > price) acc[curr.asin] = curr;
// Return the map
return acc;
}, {});
The results should be an array, so we can take the map we just created and push an array of its values to the Actor's default dataset:
await Actor.pushData(Object.values(filtered));
Our final code looks like this:
import { Actor } from 'apify';
await Actor.init();
const { datasetId } = await Actor.getInput(); const dataset = await Actor.openDataset(datasetId);
const { items } = await dataset.getData();
const filtered = items.reduce((acc, curr) => { const prevPrice = acc?.[curr.asin] ? +acc[curr.asin].offer.slice(1) : null; const price = +curr.offer.slice(1);
if (!acc[curr.asin] || prevPrice > price) acc[curr.asin] = curr;
return acc;
}, {});
await Actor.pushData(Object.values(filtered));
await Actor.exit();
Cool! But **wait**, don't forget to configure the **INPUT\_SCHEMA.json** file as well! It's not necessary to do this step, as we'll be calling the Actor through Apify's API within a webhook, but it's still good to get into the habit of writing quality input schemas that describe the input values your Actors are expecting.
{ "title": "Amazon Filter Actor", "type": "object", "schemaVersion": 1, "properties": { "datasetId": { "title": "Dataset ID", "type": "string", "description": "Enter the ID of the dataset.", "editor": "textfield" } }, "required": ["datasetId"] }
Now we're done, and we can push it up to the Apify platform with the `apify push` command:
$ apify push Info: Created Actor with name filter-actor on Apify. Info: Deploying Actor 'filter-actor' to Apify. Run: Updated version 0.0 for Actor filter-actor. Run: Building Actor filter-actor (timestamp) ACTOR: Extracting Actor documentation from README.md (timestamp) ACTOR: Building Docker image. ... (timestamp) ACTOR: Pushing Docker image to repository. (timestamp) ACTOR: Build finished. Actor build detail https://console.apify.com/actors/Yk1bieximsduYDydP#/builds/0.0.1 Actor detail https://console.apify.com/actors/Yk1bieximsduYDydP Success: Actor was deployed to Apify cloud and built there.
## Setting up the webhook
We'll use the https://docs.apify.com/academy/api/run-actor-and-retrieve-data-via-api.md to set up the webhook. To compose the HTTP request, we'll need either the ID of our Actor or its technical name. Let's take a second look at the end of the output of the `apify push` command:
... Actor build detail https://console.apify.com/actors/Yk1bieximsduYDydP#/builds/0.0.1 Actor detail https://console.apify.com/actors/Yk1bieximsduYDydP Success: Actor was deployed to Apify cloud and built there.
The URLs tell us that our Actor's ID is `Yk1bieximsduYDydP`. With this `actorId`, and our `token`, which is retrievable through **Settings > Integrations** on the Apify Console, we can construct a link which will call the Actor:
https://api.apify.com/v2/acts/Yk1bieximsduYDydP/runs?token=YOUR_TOKEN_HERE
We can also use our username and the name of the Actor like this:
https://api.apify.com/v2/acts/USERNAME~filter-actor/runs?token=YOUR_TOKEN_HERE
Whichever one you choose is totally up to your preference.
Next, within the Amazon scraping Actor, we will click the **Integrations** tab and choose **Webhook**, then fill out the details to look like this:

We have chosen to run the webhook once the Actor has succeeded, which means that its default dataset will surely be populated. Since the filtering Actor is expecting the default dataset ID of the Amazon Actor, we use the `resource` variable to grab hold of the `defaultDatasetId`.
Click **Save**, then run the Amazon **demo-actor** again.
## Making sure it worked
If everything worked, then at the end of the **demo-actor**'s run, we should see this within the **Integrations** tab:

Additionally, we should be able to see that our **filter-actor** was run, and have access to its dataset:

## Quiz answers 📝
**Q: How do you allocate more CPU for an Actor's run?**
**A:** On the platform, more memory can be allocated in the Actor's input configuration, and the default allocated CPU can be changed in the Actor's **Settings** tab. When running locally, you can use the **APIFY\_MEMORY\_MBYTES** environment variable to set the allocated CPU. 4GB is equal to 1 CPU core on the Apify platform.
**Q: Within itself, can you get the exact time that an Actor was started?**
**A:** Yes. The time the Actor was started can be retrieved through the `startedAt` property from the `Actor.getEnv()` function, or directly from `process.env.APIFY_STARTED_AT`
**Q: What are the types of default storages connected to an Actor's run?**
Every Actor's run is given a default key-value store and a default dataset. The default key-value store by default has the `INPUT` and `OUTPUT` keys. The Actor's request queue is also stored.
**Q: Can you change the allocated memory of an Actor while it's running?**
**A:** Not while it's running. You'd need to stop it and run a new one. However, there is an option to soft abort an Actor, then resurrect then run with a different memory configuration.
**Q: How can you run an Actor with Puppeteer on the Apify platform with headless mode set to `false`?**
**A:** This can be done by using the `actor-node-puppeteer-chrome` Docker image and making sure that `launchContext.launchOptions.headless` in `PuppeteerCrawlerOptions` is set to `false`.
## Wrap up
See that?! Integrating webhooks is a piece of cake on the Apify platform! You'll soon discover that the platform factors away a lot of complex things and allows you to focus on what's most important - developing and releasing Actors.
---
# Managing source
**View in-depth answers for all three of the quiz questions that were provided in the corresponding lesson about managing source code.**
***
In the lesson corresponding to this solution, we discussed an extremely important topic: source code management. Though we solved the task right in the lesson, we've still included the quiz answers here.
## Quiz answers
**Q: Do you have to rebuild an Actor each time the source code is changed?**
**A:** Yes. It needs to be built into an image, saved in a registry, and later on run in a container.
**Q: In Git, what is the difference between pushing changes and making a pull request?**
**A:** Pushing changes to the remote branch based on the content on the local branch. The pushing of code changes is usually made to a branch parallel to the one you want to eventually push it to.
When creating a pull request, the code is meant to be reviewed, or at least pass all the test suites before being merged into the target branch.
**Q: Based on your knowledge and experience, is the `apify push` command worth using (in your opinion)?**
**A:** The `apify push` command can sometimes be useful when testing ideas; however, it is much more ideal to use GitHub integration rather than directly pushing to the platform.
---
# Rotating proxies/sessions
**Learn firsthand how to rotate proxies and sessions in order to avoid the majority of the most common anti-scraping protections.**
***
If you take a look at our current code for the Amazon scraping Actor, you might notice this snippet:
const proxyConfiguration = await Actor.createProxyConfiguration({ groups: ['RESIDENTIAL'], });
We didn't provide much explanation for this initially, as it was not directly relevant to the lesson at hand. When you https://docs.apify.com/academy/anti-scraping/mitigation/using-proxies.md and pass it to a crawler, Crawlee will make the crawler automatically rotate through the proxies. This entire time, we've been using the **RESIDENTIAL** proxy group to avoid being blocked by Amazon.
> Go ahead and try commenting out the proxy configuration code then running the scraper. What happens?
In order to rotate sessions, we must utilize the https://crawlee.dev/api/core/class/AutoscaledPool, which we've actually also already been using by setting the **useSessionPool** option in our crawler's configuration to **true**. The SessionPool advances the concept of proxy rotation by tying proxies to user-like sessions and rotating those instead. In addition to a proxy, each user-like session has cookies attached to it (and potentially a browser fingerprint as well).
## Configuring SessionPool
Let's go ahead and add a **sessionPoolOptions** key to our crawler's configuration so that we can modify the default settings:
const crawler = new CheerioCrawler({ requestList, requestQueue, proxyConfiguration, useSessionPool: true, // This is where our session pool // configuration lives sessionPoolOptions: { // We can add options for each // session created by the session // pool here sessionOptions: {
},
},
maxConcurrency: 50,
// ...
});
Now, we'll use the **maxUsageCount** key to force each session to be thrown away after 5 uses and **maxErrorScore** to trash a session once it receives an error.
const crawler = new CheerioCrawler({ requestList, requestQueue, proxyConfiguration, useSessionPool: true, sessionPoolOptions: { sessionOptions: { maxUsageCount: 5, maxErrorScore: 1, }, }, maxConcurrency: 50, // ... });
And that's it! We've successfully configured the session pool to match the task's requirements.
## Limiting proxy location
The final requirement was to use proxies only from the US. Back in our **ProxyConfiguration**, we need to add the **countryCode** key and set it to **US**:
const proxyConfiguration = await Actor.createProxyConfiguration({ groups: ['RESIDENTIAL'], countryCode: 'US', });
## Quiz answers
**Q: What are the different types of proxies that Apify proxy offers? What are the main differences between them?**
**A:** Datacenter, residential, and Google SERP proxies with sub-groups. Datacenter proxies are fast and cheap but have a higher chance of being blocked on certain sites in comparison to residential proxies, which are IP addresses located in homes and offices around the world. Google SERP proxies are specifically for Google.
**Q: Which proxy groups do users get on the free plan? Can they access the proxy from their computer?**
**A:** All users have access to the **BUYPROXIES94952**, **GOOGLE\_SERP** and **RESIDENTIAL** groups. Free users cannot access the proxy from outside the Apify platform (paying users can).
**Q: How can you prevent an error from occurring if one of the proxy groups that a user has is removed? What are the best practices for these scenarios?**
**A:** By making the proxy for the scraper to use be configurable by the user through the Actor's input. That way, they can switch proxies if the Actor stops working due to proxy-related issues. It can also be done by using the **AUTO** proxy instead of specific groups.
**Q: Does it make sense to rotate proxies when you are logged into a website?**
**A:** No, because most websites tie an IP address to a session. If you start making requests with cookies used with a different IP address, the website might see it as unusual activity and either block the scraper or automatically log out.
**Q: Construct a proxy URL that will select proxies only from the US.**
**A:** `http://country-US:@proxy.apify.com:8000`
**Q: What do you need to do to rotate a proxy (one proxy usually has one IP)? How does this differ for CheerioCrawler and PuppeteerCrawler?**
**A:** Making a new request with the proxy endpoint above will automatically rotate it. Sessions can also be used to automatically do this. While proxy rotation is fairly straightforward for Cheerio, it's more complex in Puppeteer, as you have to retire the browser each time a new proxy is rotated in. The SessionPool will automatically retire a browser when a session is retired. Sessions can be manually retired with `session.retire()`.
**Q: Name a few different ways how a website can prevent you from scraping it.**
**A:** IP detection and rate-limiting, browser/fingerprint detection, user behavior tracking, etc.
## Wrap up
In this solution, you learned one of the most important concepts in web scraping - proxy/session rotation. With your newfound knowledge of the SessionPool, you'll be (practically) unstoppable!
---
# Saving run stats
**Implement the saving of general statistics about an Actor's run, as well as adding request-specific statistics to dataset items.**
***
The code in this solution will be similar to what we already did in the **Handling migrations** solution; however, we'll be storing and logging different data. First, let's create a new file called **Stats.js** and write a utility class for storing our run stats:
import Actor from 'apify';
class Stats { constructor() { this.state = { errors: {}, totalSaved: 0, }; }
async initialize() {
const data = await Actor.getValue('STATS');
if (data) this.state = data;
Actor.on('persistState', async () => {
await Actor.setValue('STATS', this.state);
});
setInterval(() => console.log(this.state), 10000);
}
addError(url, errorMessage) {
if (!this.state.errors?.[url]) this.state.errors[url] = [];
this.state.errors[url].push(errorMessage);
}
success() {
this.state.totalSaved += 1;
}
}
module.exports = new Stats();
Cool, very similar to the **AsinTracker** class we wrote earlier. We'll now import **Stats** into our **main.js** file and initialize it along with the ASIN tracker:
// ... import Stats from './Stats.js';
await Actor.init(); await asinTracker.initialize(); await Stats.initialize(); // ...
## Tracking errors
In order to keep track of errors, we must write a new function within the crawler's configuration called **errorHandler**. Passed into this function is an object containing an **Error** object for the error which occurred and the **Request** object, as well as information about the session and proxy which were used for the request.
const crawler = new CheerioCrawler({ proxyConfiguration, useSessionPool: true, sessionPoolOptions: { persistStateKey: 'AMAZON-SESSIONS', sessionOptions: { maxUsageCount: 5, maxErrorScore: 1, }, }, maxConcurrency: 50, requestHandler: router, // Handle all failed requests errorHandler: async ({ error, request }) => { // Add an error for this url to our error tracker Stats.addError(request.url, error?.message); }, });
## Tracking total saved
Now, we'll increment our **totalSaved** count for every offer added to the dataset.
router.addHandler(labels.OFFERS, async ({ $, request }) => { const { data } = request.userData;
const { asin } = data;
for (const offer of $('#aod-offer')) {
tracker.incrementASIN(asin);
// Add 1 to totalSaved for every offer
Stats.success();
const element = $(offer);
await dataset.pushData({
...data,
sellerName: element.find('div[id*="soldBy"] a[aria-label]').text().trim(),
offer: element.find('.a-price .a-offscreen').text().trim(),
});
}
});
## Saving stats with dataset items
Still, in the **OFFERS** handler, we need to add a few extra keys to the items which are pushed to the dataset. Luckily, all of the data required by the task is accessible in the context object.
router.addHandler(labels.OFFERS, async ({ $, request }) => { const { data } = request.userData;
const { asin } = data;
for (const offer of $('#aod-offer')) {
tracker.incrementASIN(asin);
// Add 1 to totalSaved for every offer
Stats.success();
const element = $(offer);
await dataset.pushData({
...data,
sellerName: element.find('div[id*="soldBy"] a[aria-label]').text().trim(),
offer: element.find('.a-price .a-offscreen').text().trim(),
// Store the handledAt date or current date if that is undefined
dateHandled: request.handledAt || new Date().toISOString(),
// Access the number of retries on the request object
numberOfRetries: request.retryCount,
// Grab the number of pending requests from the requestQueue
currentPendingRequests: (await requestQueue.getInfo()).pendingRequestCount,
});
}
});
## Quiz answers
**Q: Why might you want to store statistics about an Actor's run (or a specific request)?**
**A:** If certain types of requests are error-prone, you might want to save stats about the run to look at them later to either eliminate or better handle the errors. Things like **dateHandled** can be generally useful information.
**Q: In our Amazon scraper, we are trying to store the number of retries of a request once its data is pushed to the dataset. Where would you get this information? Where would you store it?**
**A:** This information is available directly on the request object under the property **retryCount**.
**Q: What is the difference between the `failedRequestHandler` and `errorHandler`?**
**A:** `failedRequestHandler` runs after a request has failed and reached its `maxRetries` count. `errorHandler` runs on every failure and retry.
---
# Using the Apify API & JavaScript client
**Learn how to interact with the Apify API directly through the well-documented RESTful routes, or by using the proprietary Apify JavaScript client.**
***
Since we need to create another Actor, we'll once again use the `apify create` command and start from an empty template. This time, let's call our project **actor-caller**:
$ apify create filter-caller ? Choose the programming language of your new Actor: ❯ JavaScript TypeScript Python
Again, use the arrow down key to select **Empty JavaScript Project**:
$ apify create filter-actor ✔ Choose the programming language of your new Actor: JavaScript ? Choose a template for your new Actor. Detailed information about the template will be shown in the next step. Crawlee + Playwright + Chrome Crawlee + Playwright + Camoufox Bootstrap CheerioCrawler Cypress ❯ Empty JavaScript Project Standby JavaScript Project ...
Confirm the choices by **Install template** and wait until our new Actor is ready. Now let's also set up some boilerplate, grabbing our inputs and creating a constant variable for the task:
import { Actor } from 'apify'; import axios from 'axios';
await Actor.init();
const { useClient, memory, fields, maxItems } = await Actor.getInput();
const TASK = 'YOUR_USERNAME~demo-actor-task';
// our future code will go here
await Actor.exit();
## Calling a task via JavaScript client
When using the `apify-client` package, you can create a new client instance by using `new ApifyClient()`. Within the Apify SDK however, it is not necessary to even install the `apify-client` package, as the `Actor.newClient()` function is available for use.
We'll start by creating a function called `withClient()` and creating a new client, then calling the task:
const withClient = async () => { const client = Actor.newClient(); const task = client.task(TASK);
const { id } = await task.call({ memory });
};
After the task has run, we'll grab hold of its dataset, then attempt to download the items, plugging in our `maxItems` and `fields` inputs. Then, once the data has been downloaded, we'll push it to the default key-value store under a key named **OUTPUT.csv**.
const withClient = async () => { const client = Actor.newClient(); const task = client.task(TASK);
const { id } = await task.call({ memory });
const dataset = client.run(id).dataset();
const items = await dataset.downloadItems('csv', {
limit: maxItems,
fields,
});
// If the content type is anything other than JSON, it must
// be specified within the third options parameter
return Actor.setValue('OUTPUT', items, { contentType: 'text/csv' });
};
## Calling a task via API
First, we'll create a function (right under the `withClient()`) function named `withAPI` and instantiate a new variable which represents the API endpoint to run our task:
const withAPI = async () => {
const uri = https://api.apify.com/v2/actor-tasks/${TASK}/run-sync-get-dataset-items?;
};
To add the query parameters to the URL, we could create a super long string literal, plugging in all of our input values; however, there is a much better way: https://nodejs.org/api/url.html#new-urlsearchparams. By using `URLSearchParams`, we can add the query parameters in an object:
const withAPI = async () => {
const uri = https://api.apify.com/v2/actor-tasks/${TASK}/run-sync-get-dataset-items?;
const url = new URL(uri);
url.search = new URLSearchParams({
memory,
format: 'csv',
limit: maxItems,
fields: fields.join(','),
token: process.env.APIFY_TOKEN,
});
};
Finally, let's make a `POST` request to our endpoint. You can use any library you want, but in this example, we'll use https://www.npmjs.com/package/axios. Don't forget to run `npm install axios` if you're going to use this package too!
const withAPI = async () => {
const uri = https://api.apify.com/v2/actor-tasks/${TASK}/run-sync-get-dataset-items?;
const url = new URL(uri);
url.search = new URLSearchParams({
memory,
format: 'csv',
limit: maxItems,
fields: fields.join(','),
token: process.env.APIFY_TOKEN,
});
const { data } = await axios.post(url.toString());
return Actor.setValue('OUTPUT', data, { contentType: 'text/csv' });
};
## Finalizing the Actor
Now, since we've written both of these functions, all we have to do is write a conditional statement based on the boolean value from `useClient`:
if (useClient) await withClient(); else await withAPI();
And before we push to the platform, let's not forget to write an input schema in the **INPUT\_SCHEMA.JSON** file:
{ "title": "Actor Caller", "type": "object", "schemaVersion": 1, "properties": { "memory": { "title": "Memory", "type": "integer", "description": "Select memory in megabytes.", "default": 4096, "maximum": 32768, "unit": "MB" }, "useClient": { "title": "Use client?", "type": "boolean", "description": "Specifies whether the Apify JS client, or the pure Apify API should be used.", "default": true }, "fields": { "title": "Fields", "type": "array", "description": "Enter the dataset fields to export to CSV", "prefill": ["title", "url", "price"], "editor": "stringList" }, "maxItems": { "title": "Max items", "type": "integer", "description": "Fill the maximum number of items to export.", "default": 10 } }, "required": ["useClient", "memory", "fields", "maxItems"] }
## Final code
To ensure we're on the same page, here is what the final code looks like:
import { Actor } from 'apify'; import axios from 'axios';
await Actor.init();
const { useClient, memory, fields, maxItems } = await Actor.getInput();
const TASK = 'YOUR_USERNAME~demo-actor-task';
const withClient = async () => { const client = Actor.newClient(); const task = client.task(TASK);
const { id } = await task.call({ memory });
const dataset = client.run(id).dataset();
const items = await dataset.downloadItems('csv', {
limit: maxItems,
fields,
});
return Actor.setValue('OUTPUT', items, { contentType: 'text/csv' });
};
const withAPI = async () => {
const uri = https://api.apify.com/v2/actor-tasks/${TASK}/run-sync-get-dataset-items?;
const url = new URL(uri);
url.search = new URLSearchParams({
memory,
format: 'csv',
limit: maxItems,
fields: fields.join(','),
token: process.env.APIFY_TOKEN,
});
const { data } = await axios.post(url.toString());
return Actor.setValue('OUTPUT', data, { contentType: 'text/csv' });
};
if (useClient) { await withClient(); } else { await withAPI(); }
await Actor.exit();
## Quiz answers 📝
**Q: What is the relationship between the Apify API and Apify client? Are there any significant differences?**
**A:** The Apify client mimics the Apify API, so there aren't any super significant differences. It's super handy as it helps with managing the API calls (parsing, error handling, retries, etc) and even adds convenience functions.
The one main difference is that the Apify client automatically uses https://docs.apify.com/api/client/js/docs#retries-with-exponential-backoff to deal with errors.
**Q: How do you pass input when running an Actor or task via API?**
**A:** The input should be passed into the **body** of the request when running an actor/task via API.
**Q: Do you need to install the `apify-client` npm package when already using the `apify` package?**
**A:** No. The Apify client is available right in the SDK with the `Actor.newClient()` function.
## Wrap up
That's it! Now, if you want to go above and beyond, you should create a GitHub repository for this Actor, integrate it with a new one on the Apify platform, and test if it works there as well (with multiple input configurations).
---
# Using storage & creating tasks
## Quiz answers 📝
**Q: What is the relationship between Actors and tasks?**
**A:** Tasks are pre-configured runs of Actors. The configurations of an Actor can be saved as a task so that it doesn't have to be manually configured every single time.
**Q: What are the differences between default (unnamed) and named storage? Which one would you use for everyday usage?**
**A:** Unnamed storage is persisted for only 7 days, while named storage is persisted indefinitely. For everyday usage, it is best to use default unnamed storages unless the data should explicitly be persisted for more than 7 days.
> With named storages, it's easier to verify that you're using the correct store, as they can be referred to by name rather than by an ID.
**Q: What is data retention, and how does it work for all types of storages (default and named)?**
**A:** Default/unnamed storages expire after 7 days unless otherwise specified. Named storages are retained indefinitely.
## Wrap up
You've learned how to use the different storage options available on Apify, the two different types of storage, as well as how to create tasks for Actors.
---
# Tasks & storage
**Understand how to save the configurations for Actors with Actor tasks. Also, learn about storage and the different types Apify offers.**
***
Both of these are very different things; however, they are also tied together in many ways. **Tasks** run Actors, Actors return data, and data is stored in different types of **Storages**.
## Tasks
Tasks are a very useful feature which allow us to save pre-configured inputs for Actors. This means that rather than configuring the Actor every time, or rather than having to save screenshots of various different Actor configurations, you can store the configurations right in your Apify account instead, and run the Actor at will with them.
## Storage
Storage allows us to save persistent data for further processing. As you'll learn, there are two main storage options on the Apify platform, as well as two main storage types (**named** and **unnamed**) with one big difference between them.
## Learning 🧠
* Check out https://docs.apify.com/platform/actors/running/tasks.md.
* Read about the https://docs.apify.com/platform/storage/dataset.md on the Apify platform.
* Understand the https://docs.apify.com/platform/storage/usage.md#named-and-unnamed-storages.
* Learn about the https://docs.apify.com/sdk/js/reference/class/Dataset and https://docs.apify.com/sdk/js/reference/class/KeyValueStore objects in the Apify SDK.
## Knowledge check 📝
1. What is the relationship between Actors and tasks?
2. What are the differences between default (unnamed) and named storage? Which one would you use for everyday usage?
3. What is data retention, and how does it work for all types of storages (default and named)?
https://docs.apify.com/academy/expert-scraping-with-apify/solutions/using-storage-creating-tasks.md
## Next up
The https://docs.apify.com/academy/expert-scraping-with-apify/apify-api-and-client.md is very exciting, as it will unlock the ability to seamlessly integrate your Apify Actors into your own external projects and applications with the Apify API.
---
# Monetizing your Actor
**Learn how you can monetize your web scraping and automation projects by publishing Actors to users in Apify Store.**
***
When you publish your Actor on the Apify platform, you have the option to make it a *Paid Actor* and earn revenue from users who benefit from your tool. You can choose between two pricing models:
* Rental
* Pay-per-result
## Rental pricing model
With the rental model, you can specify a free trial period and a monthly rental price. After the trial, users with an https://apify.com/pricing can continue using your Actor by paying the monthly fee. You can receive 80% of the total rental fees collected each month.
Example - rental pricing model
You make your Actor rental with 7 days free trial and then $30/month. During the first calendar month, three users start to use your Actor:
1. First user, on Apify paid plan, starts the free trial on 15th
2. Second user, on Apify paid plan, starts the free trial on 25th
3. Third user, on Apify free plan, start the free trial on 20th
The first user pays their first rent 7 days after the free trial, i.e., on 22nd. The second user only starts paying the rent next month. The third user is on Apify free plan, so after the free trial ends on 27th, they are not charged and cannot use the Actor further until they get a paid plan. Your profit is computed only from the first user. They were charged $30, so 80% of this goes to you, i.e., *0.8 \* 30 = $24*.
## Pay-per-result pricing model
In this model, you set a price per 1000 results. Users are charged based on the number of results your Actor produces. Your profit is calculated as 80% of the revenue minus platform usage costs. The formula is:
`(0.8 * revenue) - costs = profit`
### Pay-per-result unit pricing for cost computation
| Service | Unit price |
| ------------------------------- | -------------------------- |
| Compute unit | **$0.3** / CU |
| Residential proxies | **$13** / GB |
| SERPs proxy | **$3** / 1,000 SERPs |
| Data transfer - external | **$0.20** / GB |
| Data transfer - internal | **$0.05** / GB |
| Dataset - timed storage | **$1.00** / 1,000 GB-hours |
| Dataset - reads | **$0.0004** / 1,000 reads |
| Dataset - writes | **$0.005** / 1,000 writes |
| Key-value store - timed storage | **$1.00** / 1,000 GB-hours |
| Key-value store - reads | **$0.005** / 1,000 reads |
| Key-value store - writes | **$0.05** / 1,000 writes |
| Key-value store - lists | **$0.05** / 1,000 lists |
| Request queue - timed storage | **$4.00** / 1,000 GB-hours |
| Request queue - reads | **$0.004** / 1,000 reads |
| Request queue - writes | **$0.02** / 1,000 writes |
Only revenue & cost for Apify customers on paid plans are taken into consideration when computing your profit. Users on free plans are not reflected there, although you can see statistics about the potential revenue of users that are currently on free plans in Actor Insights in the Apify Console.
What are Gigabyte-hours?
Gigabyte-hours (GB-hours) are a unit of measurement used to quantify data storage and processing capacity over time. To calculate GB-hours, multiply the amount of data in gigabytes by the number of hours it's stored or processed.
For example, if you host 50GB of data for 30 days:
* Convert days to hours: *30 \* 24 = 720*
* Multiply data size by hours: *50 \* 720 = 36,000*
This means that storing 50 GB of data for 30 days results in 36,000 GB-hours.
Read more about Actors in the Store and different pricing models from the perspective of your users in the https://docs.apify.com/platform/actors/running/actors-in-store.
Example - pay-per-result pricing model
You make your Actor pay-per-result and set price to be $1/1,000 results. During the first month, two users on Apify paid plans use your Actor to get 50,000 and 20,000 results, costing them $50 and $20 respectively. Let's say the underlying platform usage for the first user is $5 and for the second $2. Third user, this time on Apify free plan, uses the Actor to get 5,000 results, with underlying platform usage $0.5.
Your profit is computed only from the first two users, since they are on Apify paid plans. The revenue for the first user is $50 and for the second $20, i.e., total revenue is $70. The total underlying cost is *$5 + $2 = $7*. Since your profit is 80% of the revenue minus the cost, it would be *0.8 \* 70 - 7 = $49*.
### Best practices for Pay-per-results Actors
To ensure profitable operation:
* Set memory limits in your https://docs.apify.com/platform/actors/development/actor-definition/actor-json file to control platform usage costs
* Implement the `ACTOR_MAX_PAID_DATASET_ITEMS` check to prevent excess result generation
* Test your Actor with various result volumes to determine optimal pricing
## Setting up monetization
Navigate to your https://console.apify.com/actors?tab=my in the Apify Console choose Actor that you want to monetize, and select the Publication tab.  Open the Monetization section and complete your billing and payment details.  Follow the monetization wizard to configure. Follow the monetization wizard to configure your pricing model. 
### Changing monetization
You can change the monetization setting of your Actor by using the same wizard as for the setup in the **Monetization** section of your Actor's **Publication** tab.
Most changes take effect **immediately**. However, **major changes** require a 14-day notice period and are limited to once per month to protect users.
**Major changes** that require 14-day notice include:
* Changing the pricing model (e.g., from rental to pay-per-result)
* Increasing prices
* Adding new pay-per-event charges
All other changes (such as decreasing prices, adjusting descriptions, or removing pay-per-event charges) take effect immediately.
Frequency of major monetization adjustments
You can make major monetization changes to each Actor only **once per month**. After making a major change, you must wait until it takes effect (14 days) plus an additional period before making another major change. For further information & guidelines, please refer to our https://apify.com/store-terms-and-conditions
## Payouts & analytics
Payout invoices are generated automatically on the 14th of each month. Review your invoice in the Settings > Payout section within one week. If not approved by the 20th, the system will auto-approve on the 21st.
Track your Actor's performance through:
* The payout section for financial records
* Actor Analytics for usage statistics

* Individual Actor Insights for detailed performance metrics

## Promoting your Actor
Create SEO-optimized descriptions and README files to improve search engine visibility. Share your Actor on multiple channels:
* Post on Reddit, Quora, and social media platform
* Create tutorial videos demonstrating key features
* Publish articles about your Actor on relevant websites
* Consider creating a product showcase on platforms like Product hunt
Remember to tag Apify in your social media posts for additional exposure. Effective promotion can significantly impact your Actor's success, differentiating between those with many paid users and those with few to none.
Learn more about promoting your Actor from https://apify.notion.site/3fdc9fd4c8164649a2024c9ca7a2d0da?v=6d262c0b026d49bfa45771cd71f8c9ab.
---
# Getting started
**Get started with the Apify platform by creating an account and learning about the Apify Console, which is where all Apify Actors are born!**
***
Your gateway to the Apify platform is your Apify account. The great thing about creating an account is that we support integration with both Google and GitHub, which takes only about 30 seconds!
1. Create your account on the https://console.apify.com/sign-up?asrc=developers_portal page.
2. Check your email, you should have a verification email with a link. Click it!
3. Done! 👍
## Getting to know the platform
Now that you have an account, you have access to the https://console.apify.com?asrc=developers_portal, which is a wonderful place where you utilize all of the features the platform has to offer, as well as manage and test your own projects.
## Next up
In our next lesson, we'll learn about something super exciting - **Actors**. Actors are the living and breathing core of the Apify platform and are an extremely powerful concept. What are you waiting for? Let's jump https://docs.apify.com/academy/getting-started/actors.md!
---
# Actors
**What is an Actor? How do we create them? Learn the basics of what Actors are, how they work, and try out an Actor yourself right on the Apify platform!**
***
After you've followed the **Getting started** lesson, you're almost ready to start creating some Actors! But before we get into that, let's discuss what an Actor is, and a bit about how they work.
## What's an Actor?
When you deploy your script to the Apify platform, it is then called an **Actor**, which is a https://www.datadoghq.com/knowledge-center/serverless-architecture/serverless-microservices/#:~:text=Serverless%20microservices%20are%20cloud-based,suited%20for%20microservice-based%20architectures. that accepts an input and produces an output. Actors can run for a few seconds, hours or even infinitely. An Actor can perform anything from a basic action such as filling out a web form or sending an email, to complex operations such as crawling an entire website and removing duplicates from a large dataset.
Once an Actor has been pushed to the Apify platform, they can be shared to the world through the https://apify.com/store, and even monetized after going public.
> Though the majority of Actors that are currently on the Apify platform are scrapers, crawlers, or automation software, Actors are not limited to scraping. They can be any program running in a Docker container.
## Actors on the Apify platform
For a super quick and dirty understanding of what a published Actor looks like, and how it works, let's run an SEO audit of **apify.com** using the https://apify.com/misceres/seo-audit-tool.
On the front page of the Actor, click the green **Try for free** button. If you're logged into your Apify account which you created during the https://docs.apify.com/academy/getting-started.md lesson, you'll be taken to the Apify Console and greeted with a page that looks like this:

This is where we can provide input to the Actor. The defaults here are just fine, so we'll leave it as is and click the green **Start** button to run it. While the Actor is running, you'll see it log some information about itself.

After the Actor has completed its run (you'll know this when you see **SEO audit for apify.com finished.** in the logs), the results of the run can be viewed by clicking the **Results** tab, then subsequently the **View in another tab** option under **Export**.
## The "Actors" tab
While still on the platform, click on the tab with the **\** icon which says **Actors**. This tab is your one-stop-shop for seeing which Actors you've used recently, and which ones you've developed yourself. You will be frequently using this tab when developing and testing on the Apify platform.

Now that you know the basics of what Actors are and how to use them, it's time to develop **an Actor of your own**!
## Next up
Get ready, because in the https://docs.apify.com/academy/getting-started/creating-actors.md, you'll be writing your very own Actor!
---
# The Apify API
**Learn how to use the Apify API to programmatically call your Actors, retrieve data stored on the platform, view Actor logs, and more!**
***
https://docs.apify.com/api/v2.md is your ticket to the Apify platform without even needing to access the https://console.apify.com?asrc=developers_portal web-interface. The API is organized around RESTful HTTP endpoints.
In this lesson, we'll be learning how to use the Apify API to call an Actor and view its results. We'll be using the Actor we created in the previous lesson, so if you haven't already gotten that one set up, go ahead do that before moving forward if you'd like to follow along.
## Finding your endpoint
Within one of your Actors on the https://console.apify.com?asrc=developers_portal (we'll use the **adding-actor** from the previous lesson), click on the **API** button in the top right-hand corner:

You should see a long list of API endpoints that you can copy and paste elsewhere, or even test right within the **API** modal. Go ahead and copy the endpoint labeled **Run Actor synchronously and get dataset items**. It should look something like this:
https://api.apify.com/v2/acts/YOUR_USERNAME~adding-actor/run-sync?token=YOUR_TOKEN
> In this lesson, we'll only be focusing on this one endpoint, as it is the most popularly used one; however, don't let this limit your curiosity! Take a look at the other endpoints in the **API** window to learn about everything you can do to your Actor programmatically.
Now, let's move over to our favorite HTTP client (in this lesson we'll use https://docs.apify.com/academy/tools/insomnia.md in order to prepare and send the request).
## Providing input
Our **adding-actor** takes in two input values (`num1` and `num2`). When using the Actor on the platform, provide these fields either through the UI generated by the **INPUT\_SCHEMA.json**, or directly in JSON format. When providing input when making an API call to run an Actor, the input must be provided in the **body** of the POST request as a JSON object.

## Parameters
Let's say we want to run our **adding-actor** via API and view its results in CSV format at the end. We'll achieve this by passing the **format** parameter with a value of **csv** to change the output format:
Additional parameters can be passed to this endpoint. You can learn about them in our https://docs.apify.com/api/v2/act-run-sync-get-dataset-items-post.md
> Network components can record visited URLs, so it's more secure to send the token as a HTTP header, not as a parameter. The header should look like `Authorization: Bearer YOUR_TOKEN`. Popular HTTP clients, such as https://docs.apify.com/academy/tools/postman.md or https://docs.apify.com/academy/tools/insomnia.md, provide a convenient way to configure the Authorization header for all your API requests.
## Sending the request
If you're not using an HTTP client, you can send the request through your terminal with this command:
curl -d '{"num1":1, "num2":8}' -H "Content-Type: application/json" -X POST "https://api.apify.com/v2/acts/YOUR_USERNAME~adding-actor/run-sync-get-dataset-items?token=YOUR_TOKEN_HERE&format=csv"
Here's the response we got:

And there it is! The Actor was run with our inputs of **num1** and **num2**, then the dataset results were returned back to us in CSV format.
## Apify API's many features
What we've done in this lesson only scratches the surface of what the Apify API can do. Right from Insomnia, or from any HTTP client, you can https://docs.apify.com/api/v2/storage-datasets.md and https://docs.apify.com/api/v2/storage-key-value-stores.md, \[add to request queues]/api/v2/storage-request-queues), https://docs.apify.com/api/v2/storage-request-queues-requests.md, and much more! Basically, whatever you can do on the platform's web interface, you also do through the API.
## Next up
https://docs.apify.com/academy/getting-started/apify-client.md, we'll be learning about how to use Apify's JavaScript and Python clients to interact with the API right within our code.
---
# Apify client
**Interact with the Apify API in your code by using the apify-client package, which is available for both JavaScript and Python.**
***
Now that you've gotten your toes wet with interacting with the Apify API through raw HTTP requests, you're ready to become familiar with the **Apify client**, which is a package available for both JavaScript and Python that allows you to interact with the API in your code without explicitly needing to make any GET or POST requests.
This lesson will provide code examples for both Node.js and Python, so regardless of the language you are using, you can follow along!
## Examples
You can access `apify-client` examples in the Console Actor detail page. Click the **API** button and then the **API Client** dropdown button.

## Installing and importing
If you are going to use the client in Node.js, use this command within one of your projects to install the package through npm:
npm install apify-client
In Python, you can install it from PyPI with this command:
pip install apify-client
After installing the package, let's make a file named **client** and import the Apify client like so:
* Node.js
* Python
// client.js import { ApifyClient } from 'apify-client';
client.py
from apify_client import ApifyClient
## Running an Actor
In the last lesson, we ran the **adding-actor** and retrieved its dataset items. That's exactly what we're going to do now; however, by using the Apify client instead.
Before we can use the client though, we must create a new instance of the `ApifyClient` class and pass it our API token from the https://console.apify.com/account?tab=integrations&asrc=developers_portal on the Apify Console:
* Node.js
* Python
const client = new ApifyClient({ token: 'YOUR_TOKEN', });
client = ApifyClient(token='YOUR_TOKEN')
> If you are planning on publishing your code to a public GitHub/Gitlab repository or anywhere else online, be sure to set your API token as en environment variable, and never hardcode it directly into your script.
Now that we've got our instance, we can point to an Actor using the https://docs.apify.com/api/client/js/reference/class/ApifyClient#actor function, then call the Actor with some input with the https://docs.apify.com/api/client/js/reference/class/ApifyClient#actor function - the first parameter of which is the input for the Actor.
* Node.js
* Python
const run = await client.actor('YOUR_USERNAME/adding-actor').call({ num1: 4, num2: 2, });
run = client.actor('YOUR_USERNAME/adding-actor').call(run_input={ 'num1': 4, 'num2': 2 })
> Learn more about the `.call()` function in our https://docs.apify.com/api/client/js/reference/class/ApifyClient#actor.
## Downloading dataset items
Once an Actor's run has completed, it will return a **run info** object that looks something like this:

The `run` variable we created in the last section points to the **run info** object of the run we created with the `.call()` function, which means that through this variable, we can access the run's `defaultDatasetId`. This ID can then be passed into the `client.dataset()` function.
* Node.js
* Python
const dataset = client.dataset(run.defaultDatasetId);
dataset = client.dataset(run['defaultDatasetId'])
Finally, we can download the items in the dataset by using the **list items** function, then log them to the console.
* Node.js
* Python
const { items } = await dataset.listItems();
console.log(items);
items = dataset.list_items().items
print(items)
The final code for running the Actor and fetching its dataset items looks like this:
* Node.js
* Python
// client.js import { ApifyClient } from 'apify-client';
const client = new ApifyClient({ token: 'YOUR_TOKEN', });
const run = await client.actor('YOUR_USERNAME/adding-actor').call({ num1: 4, num2: 2, });
const dataset = client.dataset(run.defaultDatasetId);
const { items } = await dataset.listItems();
console.log(items);
client.py
from apify_client import ApifyClient
client = ApifyClient(token='YOUR_TOKEN')
actor = client.actor('YOUR_USERNAME/adding-actor').call(run_input={ 'num1': 4, 'num2': 2 })
dataset = client.dataset(run['defaultDatasetId'])
items = dataset.list_items().items
print(items)
## Updating an Actor
If you check the **Settings** tab within your **adding-actor**, you'll notice that the default timeout being set to the Actor is **360 seconds**. This is a bit overkill considering the fact that the Actor is only adding two numbers together - the run should never take more than 20 seconds (even this is a generous number). The default memory being allocated to the Actor is **256 MB**, which is reasonable for our purposes.
Let's change these two Actor settings via the Apify client using the https://docs.apify.com/api/client/js/reference/class/ActorClient#update function. This function will call the **update Actor** endpoint, which can take `defaultRunOptions` as an input property. You can find the shape of the `defaultRunOptions` in the https://docs.apify.com/api/v2/act-put.md. Perfect!
First, we'll create a pointer to our Actor, similar to before (except this time, we won't be using `.call()` at the end):
* Node.js
* Python
const actor = client.actor('YOUR_USERNAME/adding-actor');
actor = client.actor('YOUR_USERNAME/adding-actor')
Then, we'll call the `.update()` method on the `actor` variable we created and pass in our new **default run options**:
* Node.js
* Python
await actor.update({ defaultRunOptions: { build: 'latest', memoryMbytes: 256, timeoutSecs: 20, }, });
actor.update(default_run_build='latest', default_run_memory_mbytes=256, default_run_timeout_secs=20)
After running the code, go back to the **Settings** page of **adding-actor**. If your default options now look like this, then it worked!:

## Overview
You can do so much more with the Apify client than running Actors, updating Actors, and downloading dataset items. The purpose of this lesson was to get you comfortable using the client in your own projects, as it's the absolute best developer tool for integrating the Apify platform with an external system.
For a more in-depth understanding of the Apify API client, give these a quick lookover:
* https://docs.apify.com/api/client/js
* https://docs.apify.com/api/client/python
## Next up
Now that you're familiar and a bit more comfortable with the Apify platform, you're ready to start deploying your code to Apify! In the https://docs.apify.com/academy/deploying-your-code.md, you'll learn how to take any project written in any programming language and turn it into an Actor.
---
# Creating Actors
**This lesson offers hands-on experience in building and running Actors in Apify Console using a template. By the end of it, you will be able to build and run your first Actor using an Actor template.**
***
You can create an Actor in several ways. You can create one from your own source code hosted in a Git repository or in your local machine, for example. But in this tutorial, we'll focus on the easiest method: selecting an Actor code template. We don't need to install any special software, and everything can be done directly in Apify Console using an Apify account.
## Choose the source
Once you're in Apify Console, go to https://console.apify.com/actors, and click on the **Develop new** button in the top right-hand corner.

You'll be presented with a page featuring two ways to get started with a new Actor.
1. Creating an Actor from existing source code (using Git providers or pushing the code from your local machine using Apify CLI)
2. Creating an Actor from a code template
| Existing source code | Code templates |
| ----------------------------------------------------------------------------------------------------------------------- | ----------------------------------------------------------------------------------------------------------------------- |
|  |  |
## Creating Actor from existing source code
If you already have your code hosted by a Git provider, you can use it to create an Actor by linking the repository. If you use GitHub, you can use our https://docs.apify.com/platform/integrations/github.md to create an Actor from your public or private repository. You can also use GitLab, Bitbucket or other Git providers or external repositories.

You can also push your existing code from your local machine using https://docs.apify.com/cli. This is useful when you develop your code locally and then you want to push it to the Apify Console to run the code as an Actor in the cloud. For this option, you'll need the https://docs.apify.com/cli/docs/installation on your machine. By clicking on the **Push your code using the Apify command-line interface (CLI)** button, you will be presented with instructions on how to push your code to the Apify Console.

## Creating Actor from code template
Python, JavaScript, and TypeScript have several template options that you can use.
> You can select one from the list on this page or you can browse all the templates in the template library by clicking on the **View all templates** button in the right corner.
For example, let's choose the **Start with JavaScript** template and click on the template card.

You will end up on a template detail page where you can see all the important information about the template - description, included features, used technologies, and what is the use-case of this template. More importantly, there is a code preview and also instructions for how the code works.

### Using the template in the Web IDE
By clicking **Use this template** button you will create the Actor in Apify Console and you will be moved to the **Code** tab with the https://docs.apify.com/platform/actors/development/quick-start/web-ide.md where you can see the code of the template and start editing it.
> The Web IDE is a great tool for developing your Actor directly in Apify Console without the need to install or use any other software.

### Using the template locally
If you want to use the template locally, you can again use our https://docs.apify.com/cli to download the template to your local machine.
> Creating an Actor from a template locally is a great option if you want to develop your code using your local environment and IDE and then push the final solution back to the Apify Console.
When you click on the **Use locally** button, you'll be presented with instructions on how to create an Actor from this template in your local environment.
With the Apify CLI installed, you can run the following commands in your terminal:
apify create my-actor -t getting_started_node
cd my-actor apify run

## Start with scraping single page
This template is a great starting point for web scraping as it extracts data from a single website. It uses https://axios-http.com/docs/intro for downloading the page content and https://cheerio.js.org/ for parsing the HTML from the content.
Let's see what's inside the **Start with JavaScript** template. The main logic of the template lives in the `src/main.js` file.
// Axios - Promise based HTTP client for the browser and node.js (Read more at https://axios-http.com/docs/intro). import { Actor } from 'apify'; import axios from 'axios'; // Cheerio - The fast, flexible & elegant library for parsing and manipulating HTML and XML (Read more at https://cheerio.js.org/). import * as cheerio from 'cheerio'; // Apify SDK - toolkit for building Apify Actors (Read more at https://docs.apify.com/sdk/js/).
// The init() call configures the Actor for its environment. It's recommended to start every Actor with an init(). await Actor.init();
// Structure of input is defined in input_schema.json const input = await Actor.getInput(); const { url } = input;
// Fetch the HTML content of the page. const response = await axios.get(url);
// Parse the downloaded HTML with Cheerio to enable data extraction. const $ = cheerio.load(response.data);
// Extract all headings from the page (tag name and text). const headings = []; $('h1, h2, h3, h4, h5, h6').each((i, element) => { const headingObject = { level: $(element).prop('tagName').toLowerCase(), text: $(element).text(), }; console.log('Extracted heading', headingObject); headings.push(headingObject); });
// Save headings to Dataset - a table-like storage. await Actor.pushData(headings);
// Gracefully exit the Actor process. It's recommended to quit all Actors with an exit(). await Actor.exit();
The Actor takes the `url` from the input and then:
1. Sends a request to the URL.
2. Downloads the page's HTML content.
3. Extracts headings (H1 - H6) from the page.
4. Stores the extracted data.
The extracted data is stored in the https://docs.apify.com/platform/storage/dataset.md where you can preview it and download it. We'll show how to do that later in section.
> Feel free to play around with the code and add some more features to it. For example, you can extract all the links from the page or extract all the images or completely change the logic of this template. Keep in mind that this template uses https://docs.apify.com/academy/deploying-your-code/input-schema.md defined in the `.actor/input_schema.json` file and linked to the `.actor/actor.json`. If you want to change the input schema, you need to change it in those files as well. Learn more about the Actor input and output https://docs.apify.com/academy/getting-started/inputs-outputs.md.
## Build the Actor 🧱
In order to run the Actor, you need to https://docs.apify.com/platform/actors/development/builds-and-runs/builds.md it first. Click on the **Build** button at the bottom of the page or **Build now** button right under the code editor.

After you've clicked the **Build** button, it'll take around 5–10 seconds to complete the build. You'll know it's finished when you see a green **Start** button.

## Fill the input
And now we are ready to run the Actor. But before we do that, let's give the Actor some input by going to the `Input` tab.
The input tab is where you can provide the Actor with some meaningful input. In this case, we'll be providing the Actor with a URL to scrape. For now, we'll use the prefilled value of https://apify.com/ (`https://apify.com/`).
You can change the website you want to extract the data from by changing the URL in the input field.

## Run the Actor
Once you have provided the Actor with some URL you want to extract the data from, click **Start** button and wait a few seconds. You should see the Actor run logs in the **Last run** tab.

After the Actor finishes, you can preview or download the extracted data by clicking on the **Export X results** button.

And that's it! You've just created your first Actor and extracted data from a website 🎉.
## Next up
We've created an Actor, but how can we give it more complex inputs and make it do stuff based on these inputs? This is exactly what we'll be discussing in the https://docs.apify.com/academy/getting-started/inputs-outputs.md's activity.
---
# Inputs & outputs
**Create an Actor from scratch which takes an input, processes that input, and then outputs a result that can be used elsewhere.**
***
Actors, as any other programs, take inputs and generate outputs. The Apify platform has a way how to specify what inputs the Actor expects, and a way to temporarily or permanently store its results.
In this lesson, we'll be demonstrating inputs and outputs by building an Actor which takes two numbers as input, adds them up, and then outputs the result.
## Accept input into an Actor
Let's first create another new Actor using the same template as before. Feel free to refer to the https://docs.apify.com/academy/getting-started/creating-actors.md for a refresher on how to do this.
Replace all of the code in **main.js** with this code snippet:
import { Actor } from 'apify';
await Actor.init();
// Grab our numbers which were inputted const { num1, num2 } = await Actor.getInput();
// Calculate the solution const solution = num1 + num2;
// Push the solution to the dataset await Actor.pushData({ solution });
await Actor.exit();
Then, replace everything in **INPUT\_SCHEMA.json** with this:
> This step isn't necessary, as the Actor will still be able to take input in JSON format without it; however, we are providing the content for this Actor's input schema in this lesson, as it will give the Apify platform a blueprint off of which it can generate a nice UI for your inputs, as well as validate their values.
{ "title": "Number adder", "type": "object", "schemaVersion": 1, "properties": { "num1": { "title": "1st Number", "type": "integer", "description": "First number.", "editor": "number" }, "num2": { "title": "2nd Number", "type": "integer", "description": "Second number.", "editor": "number" } }, "required": ["num1", "num2"] }
> If you're interested in learning more about how the code works, and what the **INPUT\_SCHEMA.json** means, read about https://docs.apify.com/sdk/js/docs/examples/accept-user-input and https://docs.apify.com/sdk/js/docs/examples/add-data-to-dataset in the Apify SDK documentation, and refer to the https://docs.apify.com/platform/actors/development/actor-definition/input-schema/specification/v1.md#integer.
Finally, **Save** and **Build** the Actor just as you did in the previous lesson.
## Configuring an Actor with inputs
By default, after running a build, the **Last build** tab will be selected, where you can see all of the logs related to building the Actor. Inputs can be configured within the **Input** tab.

Enter any two numbers you'd like, then press **Start**. The Actor's run should be completed almost immediately.
## View Actor results
Since we've pushed the result into the default dataset, it, and some info about it, can be viewed in two places inside the Last Run tab:
1. **Export** button
2. **Storage** → **Dataset** (scroll below the main view)
On the results tab, there are a whole lot of options for which format to view/download the data in. Keep the default of **JSON** selected, and click on **Preview**.

There's our solution! Did it work for you as well? Now, we can download the data right from the Dataset tab to be used elsewhere, or even programmatically retrieve it by using https://docs.apify.com/api/v2.md (we'll be discussing how to do this in the next lesson).
It's important to note that the default dataset of the Actor, which we pushed our solution to, will be retained for 7 days. If we wanted the data to be retained for an indefinite period of time, we'd have to use a named dataset. For more information about named storages vs unnamed storages, read a bit about https://docs.apify.com/platform/storage/usage.md#data-retention.
## Next up
In https://docs.apify.com/academy/getting-started/apify-api.md's fun activity, you'll learn how to call the Actor we created in this lesson programmatically using one of Apify's most powerful tools - the Apify API.
---
# Why a glossary?
**Browse important web scraping concepts, tools and topics in succinct articles explaining common web development terms in a web scraping and automation context.**
***
Web scraping comes with a lot of terms that are specific to the area. Some of them are tools and libraries, like https://docs.apify.com/academy/puppeteer-playwright.md or Insomnia. Others are general topics that have a special place in web scraping, like headless browsers or browser fingerprints. And some topics are related to all web development, but play a special role in web scraping, such as HTTP headers and cookies.
When writing the academy, we very early on realized that we needed a place to reference these terms, but quickly found out that the usual tutorials and guides available all over the web weren't the most ideal. The explanations were too broad and generic and did not fit the web scraping context. With the **Apify Academy** glossary, we aim to provide you with short articles and lessons that provide the necessary web scraping context for specific terms, then link to other parts of the web for further in-depth reading.
---
# Scraping with Node.js
**A collection of various Node.js tutorials on scraping sitemaps, optimizing your scrapers, using popular Node.js web scraping libraries, and more.**
***
This section contains various web-scraping or web-scraping related tutorials for Node.js. Whether you're trying to scrape from a website with sitemaps, struggling with a dynamic page, want to optimize your slow Puppeteer scraper, or need some general tips for scraping in Node.js, this section is right for you.
---
# How to add external libraries to Web Scraper
Sometimes you need to use some extra JavaScript in your https://apify.com/apify/web-scraper page functions. Whether it is to work with dates and times using https://momentjs.com/, or to manipulate the DOM using https://jquery.com/, libraries save precious time and make your code more concise and readable. Web Scraper already provides a way to add jQuery to your page functions. All you need to do is to check the Inject jQuery input option. There's also the option to Inject Underscore, a popular helper function library.
In this tutorial, we'll learn how to inject any JavaScript library into your page functions, with the only limitation being that the library needs to be available somewhere on the internet as a downloadable file (typically a CDN).
## Injecting Moment.js
Moment.js is a very popular library for working with date and time. It helps you with the parsing, manipulation, and formatting of datetime values in multiple locales and has become the de-facto standard for this kind of work in JavaScript.
To inject Moment.js into our page function (or any other library using the same method), we first need to find a link to download it from. We can find it in https://momentjs.com/docs/#/use-it/browser/ under the CDN links.
> https://cdnjs.cloudflare.com/ajax/libs/moment.js/2.24.0/moment.min.js
Now we have two options. Inject the library using plain JavaScript, or if you prefer working with jQuery, use a jQuery helper.
## Injecting a library with plain JavaScript
async function pageFunction(context) { const libraryUrl = 'https://cdnjs.cloudflare.com/ajax/libs/moment.js/2.24.0/moment.min.js';
// Inject Moment.js\
await new Promise((resolve) => {
const script = document.createElement('script');
script.src = libraryUrl;
script.addEventListener('load', resolve);
document.body.append(script);
});
// Confirm that it works.\
const now = moment().format('ddd, hA');
context.log.info(`NOW: ${now}`);
}
We're creating a script element in the page's DOM and waiting for the script to load. Afterwards, we confirm that the library has been successfully loaded by using one of its functions.
## Injecting a library using jQuery
After you select the Inject jQuery input option, jQuery will become available in your page function as `context.jQuery` .
async function pageFunction(context) { const libraryUrl = 'https://cdnjs.cloudflare.com/ajax/libs/moment.js/2.24.0/moment.min.js';
const $ = context.jQuery;
// Inject Moment.js\
await $.getScript(libraryUrl);
// Confirm that it works.\
const now = moment().format('ddd, hA');
context.log.info(`NOW: ${now}`);
}
With jQuery, we're using the `$.getScript()` helper to fetch the script for us and wait for it to load.
## Dealing with errors
Some websites employ security measures that disallow loading external scripts within their pages. Luckily, those measures can be overridden with Web Scraper. If you are encountering errors saying that your library cannot be loaded due to a security policy, select the Ignore CORS and CSP input option at the very bottom of Web Scraper input and the errors should go away.
Happy scraping!
---
# How to analyze and fix errors when scraping a website
**Learn how to deal with random crashes in your web-scraping and automation jobs. Find out the essentials of debugging and fixing problems in your crawlers.**
***
Debugging is absolutely essential in programming. Even if you don't call yourself a programmer, having basic debugging skills will make building crawlers easier. It will also help you save money by allowing you to avoid hiring an expensive developer to solve your issue for you.
This quick lesson covers the absolute basics by discussing some of the most common problems and the simplest tools for analyzing and fixing them.
## Possible causes
It is often tricky to see the full scope of what can go wrong. We assume that once the code is set up correctly, it will keep working. Unfortunately, that is rarely true in the realm of web scraping and automation.
Websites change, they introduce new https://docs.apify.com/academy/anti-scraping.md, programming tools change and, in addition, people make mistakes.
Here are the most common reasons your working solution may break.
* The website changes its layout or https://www.datafeedwatch.com/academy/data-feed.
* A site's layout changes depending on location or uses https://www.youtube.com/watch?v=XDoKXaGrUxE&feature=youtu.be.
* A page starts to block you (recognizes you as a bot).
* The website https://docs.apify.com/academy/node-js/dealing-with-dynamic-pages.md, so the code works only sometimes, if you are slow or lucky enough.
* You made a mistake when updating your code.
* Your https://docs.apify.com/academy/anti-scraping/mitigation/proxies.md aren't working.
* You have upgraded your https://www.quora.com/What-is-a-dependency-in-coding (other software that your software relies upon), and the new versions no longer work (this is harder to debug).
## Diagnosing/analyzing the issue
Web scraping and automation are very specific types of programming. It is not possible to rely on specialized debugging tools, since the code does not output the same results every time. However, there are still many ways to diagnose issues in a crawler.
> Many issues are edge cases, which occur in one of a thousand pages or are time-dependent. Because of this, you cannot rely only on https://en.wikipedia.org/wiki/Deterministic_algorithm.
### Logging
Logging is an essential tool for any programmer. When used correctly, it helps you capture a surprising amount of information. Here are some general rules for logging:
* Usually, **many logs** is better than **no logs** at all.
* Putting more information into one line, rather than logging multiple short lines, helps reduce the overall log size.
* Focus on numbers. Log how many items you extract from a page, etc.
* Structure your logs and use the same structure in all your logs.
* Append the current page's URL to each log. This lets you immediately open that page and review it.
Here's an example of what a structured log message might look like:
[CATEGORY]: Products: 20, Unique products: 4, Next page: true --- https://apify.com/store
The log begins with the **page type**. Usually, we use labels such as **\[CATEGORY]** and **\[DETAIL]**. Then, we log important numbers and other information. Finally, we add the page's URL, so we can check if the log is correct.
#### Logging errors
Errors require a different approach because, if your code crashes, your usual logs will not be called. Instead, exception handlers will print the error, but these are usually ugly messages with a https://en.wikipedia.org/wiki/Stack_trace that only the experts will understand.
You can overcome this by adding https://developer.mozilla.org/en-US/docs/Web/JavaScript/Reference/Statements/try...catch into your code. In the catch block, explain what happened and re-throw the error (so the request is automatically retried).
try { // Sensitive code block // ... } catch (error) { // You know where the code crashed so you can explain here throw new Error('Request failed during login with an error', { cause: error }); }
Read more information about logging and error handling in our developer https://docs.apify.com/academy/web-scraping-for-beginners/best-practices.md section.
### Saving snapshots
By snapshots, we mean **screenshots** if you use a https://docs.apify.com/academy/puppeteer-playwright.md and HTML saved into a https://crawlee.dev/api/core/class/KeyValueStore that you can display in your own browser. Snapshots are useful throughout your code but especially important in error handling.
Note that an error can happen only in a few pages out of a thousand and look completely random. You cannot do much else than to save and analyze a snapshot.
Snapshots can tell you if:
* A website has changed its layout. This can also mean A/B testing or different content for different locations.
* You have been blocked—you open a https://en.wikipedia.org/wiki/CAPTCHA or an **Access Denied** page.
* Data load later dynamically—the page is empty.
* The page was redirected—the content is different.
You can learn how to take snapshots in Puppeteer or Playwright in https://docs.apify.com/academy/puppeteer-playwright/page/page-methods.md
#### When to save snapshots
The most common approach is to save on error. We can enhance our previous try/catch block like this:
import { puppeteerUtils } from 'crawlee';
// ...
// storeId is ID of current key value store, where we save snapshots
const storeId = Actor.getEnv().defaultKeyValueStoreId;
try {
// Sensitive code block
// ...
} catch (error) {
// Change the way you save it depending on what tool you use
const randomNumber = Math.random();
const key = ERROR-LOGIN-${randomNumber};
await puppeteerUtils.saveSnapshot(page, { key });
const screenshotLink = https://api.apify.com/v2/key-value-stores/${storeId}/records/${key}.jpg;
// You know where the code crashed so you can explain here
throw new Error('Request failed during login with an error', { cause: error });
} // ...
To make the error snapshot descriptive, we name it **ERROR-LOGIN**. We add a random number so the next **ERROR-LOGIN**s would not overwrite this one and we can see all the snapshots. If you can use an ID of some sort, it is even better.
**Beware:**
* The snapshot's **name** (key) can only contain letter, number, dot and dash characters. Other characters will cause an error, which makes the random number a safe pick.
* Do not overdo the snapshots. Once you get out of the testing phase, limit them to critical places. Saving snapshots uses resources.
### Error reporting
Logging and snapshotting are great tools but once you reach a certain run size, it may be hard to read through them all. For a large project, it is handy to create a more sophisticated reporting system.
## With the Apify SDK
This example extends our snapshot solution above by creating a https://docs.apify.com/platform/storage/usage.md#named-and-unnamed-storages (named datasets have infinite retention), where we will accumulate error reports. Those reports will explain what happened and will link to a saved snapshot, so we can do a quick visual check.
import { Actor } from 'apify'; import { puppeteerUtils } from 'crawlee';
await Actor.init(); // ... // Let's create reporting dataset // If you already have one, this will continue adding to it const reportingDataset = await Actor.openDataset('REPORTING');
try {
// Sensitive code block
// ...
} catch (error) {
// Change the way you save it depending on what tool you use
const randomNumber = Math.random();
const key = ERROR-LOGIN-${randomNumber};
// The store gets removed with the run after data retention period so the links will stop working eventually
// You can store the snapshots infinitely in a named KV store by adding keyValueStoreName option
await puppeteerUtils.saveSnapshot(page, { key });
// To create the reporting URLs, we need to know the Key-Value store and run IDs
const { actorRunId, defaultKeyValueStoreId } = Actor.getEnv();
// We create a report object
const report = {
errorType: 'login',
errorMessage: error.toString(),
// .html and .jpg file extensions are added automatically by the saveSnapshot function
htmlSnapshotUrl: `https://api.apify.com/v2/key-value-stores/${defaultKeyValueStoreId}/records/${key}.html`,
screenshotUrl: `https://api.apify.com/v2/key-value-stores/${defaultKeyValueStoreId}/records/${key}.jpg`,
runUrl: `https://console.apify.com/actors/runs/${actorRunId}`,
};
// And we push the report to our reporting dataset
await reportingDataset.pushData(report);
// You know where the code crashed so you can explain here
throw new Error('Request failed during login with an error', { cause: error });
} // ... await Actor.exit();
---
# Apify's free Google SERP API
You need to regularly grab SERP data about your target keywords? Apify provides a free SERP API that includes organic search, ads, people also ask, etc. Free Apify accounts come with unlimited proxy access and $5 of credit. To get started, head over to the https://apify.com/apify/google-search-scraper page and click the `Try me` button. You'll be taken to a page where you can enter the search query, region, language and other settings.

Hit `Save & Run` and you'll have the downloaded data as soon as the query finishes. To have it run at a regular frequency, you can set up the task to run on an https://docs.apify.com/platform/schedules.md#setting-up-a-new-schedule.
To run from the API, send a https://docs.apify.com/api/v2/actor-task-run-sync-get-dataset-items-post.md to an endpoint such as `https://api.apify.com/v2/acts/TASK_NAME_OR_ID/runs?token=YOUR_TOKEN`. Include any required input in a JSON object in the request's body.
Keep in mind that, as Google search uses a non-deterministic algorithm, output results may vary even if the input settings are exactly the same.
---
# Avoid EACCES error in Actor builds with a custom Dockerfile
Sometimes when building an Actor using a custom Dockerfile, you might receive errors like:
Missing write access to ...
or
EACCES: permission denied
This problem is usually caused by the fact that by default, the `COPY` Dockerfile instruction copies files as the root user (with UID and GID of 0), while your Dockerfile probably uses another user to copy files and run commands.
To fix this problem, make sure the `COPY` instruction in Dockerfile uses the `--chown` flag. For example, instead of
COPY . ./
use
COPY --chown=myuser:myuser . ./
where `myuser` is the user and group defined by the `USER` instruction in the base Docker image. To learn more, see https://docs.docker.com/reference/dockerfile/#copy.
Hope this helps!
---
# Block requests in Puppeteer
Improve Performance: Use `blockRequests`
Unfortunately, in the recent version of Puppeteer, request interception disables the native cache and slows down the Actor significantly. Therefore, it's not recommended to follow the examples shown in this article. Instead, use https://crawlee.dev/api/puppeteer-crawler/namespace/puppeteerUtils#BlockRequestsOptions *utility function from* https://crawlee.dev. It works through different paths and doesn't slow down your process.
When using Puppeteer, often a webpage will load many resources that are not actually necessary for your use case. For example page could be loading many tracking libraries, that are completely unnecessary for most crawlers, but will cause the page to use more traffic and load slower.
For example for this web page: https://edition.cnn.com/ If we run an Actor that measures extracted downloaded data from each response until the page is fully loaded, we get these results:

Now if we want to optimize this to keep the webpage looking the same, but ignore unnecessary requests, then after
const page = await browser.newPage();
we could can use this piece of code
await page.setRequestInterception(true); page.on('request', (request) => { if (someCondition) request.abort(); else request.continue(); });
Where `someCondition` is a custom condition (not actually implemented in the code above) that checks whether a request should be aborted.
For our example we will only disable some tracking scripts and then check if everything looks the same.
Here is the code used:
await page.setRequestInterception(true); page.on('request', (request) => { const url = request.url(); const filters = [ 'livefyre', 'moatad', 'analytics', 'controltag', 'chartbeat', ]; const shouldAbort = filters.some((urlPart) => url.includes(urlPart)); if (shouldAbort) request.abort(); else request.continue(); });
With this code set up this is the output:

And except for different ads, the page should look the same.
From this we can see that just by blocking a few analytics and tracking scripts the page was loaded nearly 25 seconds faster and downloaded 35% less data (approximately since the data is measured after it's decompressed).
Hopefully this helps you make your solutions faster and use fewer resources.
---
# How to optimize Puppeteer by caching responses
**Learn why it is important for performance to cache responses in memory when intercepting requests in Puppeteer and how to implement it in your code.**
***
> In the latest version of Puppeteer, the request-interception function inconveniently disables the native cache and significantly slows down the crawler. Therefore, it's not recommended to follow the examples shown in this article unless you have a very specific use-case where the default browser cache is not enough (e.g. cashing over multiple scraper runs)
When running crawlers that go through a single website, each open page has to load all resources again. The problem is that each resource needs to be downloaded through the network, which can be slow and/or unstable (especially when proxies are used).
For this reason, in this article, we will take a look at how to use memory to cache responses in Puppeteer (only those that contain header **cache-control** with **max-age** above **0**).
In this example, we will use a scraper which goes through top stories on the CNN website and takes a screenshot of each opened page. The scraper is very slow right now because it waits till all network requests are finished and because the posts contain videos. If the scraper runs with disabled caching, these statistics will show at the end of the run:

As you can see, we used 177MB of traffic for 10 posts (that is how many posts are in the top-stories column) and 1 main page.
From the screenshot above, it's clear that most of the traffic is coming from script files (124MB) and documents (22.8MB). For this kind of situation, it's always good to check if the content of the page is cache-able. You can do that using Chromes Developer tools.
## Understanding and reproducing the issue
If we go to the CNN website, open up the tools and go to the **Network** tab, we will find an option to disable caching.

Once caching is disabled, we can take a look at how much data is transferred when we open the page. This is visible at the bottom of the developer tools.

If we uncheck the disable-cache checkbox and refresh the page, we will see how much data we can save by caching responses.

By comparison, the data transfer appears to be reduced by 88%!
## Solving the problem by creating an in-memory cache
We can now emulate this and cache responses in Puppeteer. All we have to do is to check, when the response is received, whether it contains the **cache-control** header, and whether it's set with a **max-age** higher than **0**. If so, then we'll save the headers, URL, and body of the response to memory, and on the next request check if the requested URL is already stored in the cache.
The code will look like this:
// On top of your code const cache = {};
// The code below should go between newPage function and goto function
await page.setRequestInterception(true);
page.on('request', async (request) => { const url = request.url(); if (cache[url] && cache[url].expires > Date.now()) { await request.respond(cache[url]); return; } request.continue(); });
page.on('response', async (response) => { const url = response.url(); const headers = response.headers(); const cacheControl = headers['cache-control'] || ''; const maxAgeMatch = cacheControl.match(/max-age=(\d+)/); const maxAge = maxAgeMatch && maxAgeMatch.length > 1 ? parseInt(maxAgeMatch[1], 10) : 0; if (maxAge) { if (cache[url] && cache[url].expires > Date.now()) return;
let buffer;
try {
buffer = await response.buffer();
} catch (error) {
// some responses do not contain buffer and do not need to be catched
return;
}
cache[url] = {
status: response.status(),
headers: response.headers(),
body: buffer,
expires: Date.now() + (maxAge * 1000),
};
}
});
> If the code above looks completely foreign to you, we recommending going through our free https://docs.apify.com/academy/puppeteer-playwright.md.
After implementing this code, we can run the scraper again.

Looking at the statistics, caching responses in Puppeteer brought the traffic down from 177MB to 13.4MB, which is a reduction of data transfer by 92%. The related screenshots can be found https://my.apify.com/storage/key-value/iWQ3mQE2XsLA2eErL.
It did not speed up the crawler, but that is only because the crawler is set to wait until the network is nearly idle, and CNN has a lot of tracking and analytics scripts that keep the network busy.
## Implementation in Crawlee
Since most of you are likely using https://crawlee.dev, here is what response caching would look like using `PuppeteerCrawler`:
https://console.apify.com/actors/7tWSD8hrYzuc9Lte7?runConfig=eyJ1IjoiRWdQdHczb2VqNlRhRHQ1cW4iLCJ2IjoxfQ.eyJpbnB1dCI6IntcImNvZGVcIjpcImltcG9ydCB7IERhdGFzZXQsIFB1cHBldGVlckNyYXdsZXIgfSBmcm9tICdjcmF3bGVlJztcXG5cXG5jb25zdCBjYWNoZSA9IHt9O1xcblxcbmNvbnN0IGNyYXdsZXIgPSBuZXcgUHVwcGV0ZWVyQ3Jhd2xlcih7XFxuICAgIHByZU5hdmlnYXRpb25Ib29rczogW2FzeW5jICh7IHBhZ2UgfSkgPT4ge1xcbiAgICAgICAgYXdhaXQgcGFnZS5zZXRSZXF1ZXN0SW50ZXJjZXB0aW9uKHRydWUpO1xcblxcbiAgICAgICAgcGFnZS5vbigncmVxdWVzdCcsIGFzeW5jIChyZXF1ZXN0KSA9PiB7XFxuICAgICAgICAgICAgY29uc3QgdXJsID0gcmVxdWVzdC51cmwoKTtcXG4gICAgICAgICAgICBpZiAoY2FjaGVbdXJsXSAmJiBjYWNoZVt1cmxdLmV4cGlyZXMgPiBEYXRlLm5vdygpKSB7XFxuICAgICAgICAgICAgICAgIGF3YWl0IHJlcXVlc3QucmVzcG9uZChjYWNoZVt1cmxdKTtcXG4gICAgICAgICAgICAgICAgcmV0dXJuO1xcbiAgICAgICAgICAgIH1cXG4gICAgICAgICAgICByZXF1ZXN0LmNvbnRpbnVlKCk7XFxuICAgICAgICB9KTtcXG5cXG4gICAgICAgIHBhZ2Uub24oJ3Jlc3BvbnNlJywgYXN5bmMgKHJlc3BvbnNlKSA9PiB7XFxuICAgICAgICAgICAgY29uc3QgdXJsID0gcmVzcG9uc2UudXJsKCk7XFxuICAgICAgICAgICAgY29uc3QgaGVhZGVycyA9IHJlc3BvbnNlLmhlYWRlcnMoKTtcXG4gICAgICAgICAgICBjb25zdCBjYWNoZUNvbnRyb2wgPSBoZWFkZXJzWydjYWNoZS1jb250cm9sJ10gfHwgJyc7XFxuICAgICAgICAgICAgY29uc3QgbWF4QWdlTWF0Y2ggPSBjYWNoZUNvbnRyb2wubWF0Y2goL21heC1hZ2U9KFxcXFxkKykvKTtcXG4gICAgICAgICAgICBjb25zdCBtYXhBZ2UgPSBtYXhBZ2VNYXRjaCAmJiBtYXhBZ2VNYXRjaC5sZW5ndGggPiAxID8gcGFyc2VJbnQobWF4QWdlTWF0Y2hbMV0sIDEwKSA6IDA7XFxuXFxuICAgICAgICAgICAgaWYgKG1heEFnZSkge1xcbiAgICAgICAgICAgICAgICBpZiAoIWNhY2hlW3VybF0gfHwgY2FjaGVbdXJsXS5leHBpcmVzID4gRGF0ZS5ub3coKSkgcmV0dXJuO1xcblxcbiAgICAgICAgICAgICAgICBsZXQgYnVmZmVyO1xcbiAgICAgICAgICAgICAgICB0cnkge1xcbiAgICAgICAgICAgICAgICAgICAgYnVmZmVyID0gYXdhaXQgcmVzcG9uc2UuYnVmZmVyKCk7XFxuICAgICAgICAgICAgICAgIH0gY2F0Y2gge1xcbiAgICAgICAgICAgICAgICAgICAgLy8gc29tZSByZXNwb25zZXMgZG8gbm90IGNvbnRhaW4gYnVmZmVyIGFuZCBkbyBub3QgbmVlZCB0byBiZSBjYWNoZWRcXG4gICAgICAgICAgICAgICAgICAgIHJldHVybjtcXG4gICAgICAgICAgICAgICAgfVxcblxcbiAgICAgICAgICAgICAgICBjYWNoZVt1cmxdID0ge1xcbiAgICAgICAgICAgICAgICAgICAgc3RhdHVzOiByZXNwb25zZS5zdGF0dXMoKSxcXG4gICAgICAgICAgICAgICAgICAgIGhlYWRlcnM6IHJlc3BvbnNlLmhlYWRlcnMoKSxcXG4gICAgICAgICAgICAgICAgICAgIGJvZHk6IGJ1ZmZlcixcXG4gICAgICAgICAgICAgICAgICAgIGV4cGlyZXM6IERhdGUubm93KCkgKyBtYXhBZ2UgKiAxMDAwLFxcbiAgICAgICAgICAgICAgICB9O1xcbiAgICAgICAgICAgIH1cXG4gICAgICAgIH0pO1xcbiAgICB9XSxcXG4gICAgcmVxdWVzdEhhbmRsZXI6IGFzeW5jICh7IHBhZ2UsIHJlcXVlc3QgfSkgPT4ge1xcbiAgICAgICAgYXdhaXQgRGF0YXNldC5wdXNoRGF0YSh7XFxuICAgICAgICAgICAgdGl0bGU6IGF3YWl0IHBhZ2UudGl0bGUoKSxcXG4gICAgICAgICAgICB1cmw6IHJlcXVlc3QudXJsLFxcbiAgICAgICAgICAgIHN1Y2NlZWRlZDogdHJ1ZSxcXG4gICAgICAgIH0pO1xcbiAgICB9LFxcbn0pO1xcblxcbmF3YWl0IGNyYXdsZXIucnVuKFsnaHR0cHM6Ly9hcGlmeS5jb20vc3RvcmUnLCAnaHR0cHM6Ly9hcGlmeS5jb20nXSk7XFxuXCJ9Iiwib3B0aW9ucyI6eyJidWlsZCI6ImxhdGVzdCIsImNvbnRlbnRUeXBlIjoiYXBwbGljYXRpb24vanNvbjsgY2hhcnNldD11dGYtOCIsIm1lbW9yeSI6NDA5NiwidGltZW91dCI6MTgwfX0.JN2lYfrYhuU1Kj6T5Ya9YEuVQboRB4s5BbGj-WHjpVw&asrc=run_on_apify
import { Dataset, PuppeteerCrawler } from 'crawlee';
const cache = {};
const crawler = new PuppeteerCrawler({ preNavigationHooks: [async ({ page }) => { await page.setRequestInterception(true);
page.on('request', async (request) => {
const url = request.url();
if (cache[url] && cache[url].expires > Date.now()) {
await request.respond(cache[url]);
return;
}
request.continue();
});
page.on('response', async (response) => {
const url = response.url();
const headers = response.headers();
const cacheControl = headers['cache-control'] || '';
const maxAgeMatch = cacheControl.match(/max-age=(\d+)/);
const maxAge = maxAgeMatch && maxAgeMatch.length > 1 ? parseInt(maxAgeMatch[1], 10) : 0;
if (maxAge) {
if (!cache[url] || cache[url].expires > Date.now()) return;
let buffer;
try {
buffer = await response.buffer();
} catch {
// some responses do not contain buffer and do not need to be cached
return;
}
cache[url] = {
status: response.status(),
headers: response.headers(),
body: buffer,
expires: Date.now() + maxAge * 1000,
};
}
});
}],
requestHandler: async ({ page, request }) => {
await Dataset.pushData({
title: await page.title(),
url: request.url,
succeeded: true,
});
},
});
await crawler.run(['https://apify.com/store', 'https://apify.com']);
---
# How to choose the right scraper for the job
**Learn basic web scraping concepts to help you analyze a website and choose the best scraper for your particular use case.**
***
You can use one of the two main ways to proceed with building your crawler:
1. Using plain HTTP requests.
2. Using an automated browser.
We will briefly go through the pros and cons of both, and also will cover the basic steps on how to determine which one should you go with.
## Performance
First, let's discuss performance. Plain HTTP request-based scraping will **always** be faster than browser-based scraping. When using plain requests, the page's HTML is not rendered, no JavaScript is executed, no images are loaded, etc. Also, there's no memory used by the browser, and there are no CPU-hungry operations.
If it were only a question of performance, you'd of course use request-based scraping every time; however, it's unfortunately not that simple.
## Dynamic pages & blocking
Some websites do not load any data without a browser, as they need to execute some scripts to show it (these are known as https://docs.apify.com/academy/node-js/dealing-with-dynamic-pages.md). Another problem is blocking. If the website collects a https://docs.apify.com/academy/anti-scraping/techniques/fingerprinting.md, it can distinguish between a real user and a bot (crawler) and block access.
## Making the choice
When choosing which scraper to use, we would suggest first checking whether the website works without JavaScript or not. Probably the easiest way to do so is to use the https://docs.apify.com/academy/tools/quick-javascript-switcher.md extension for Chrome. If JavaScript is not needed, or you've spotted some XHR requests in the **Network** tab with the data you need, you probably won't need to use an automated browser browser. You can then check what data is received in response using https://docs.apify.com/academy/tools/postman.md or https://docs.apify.com/academy/tools/insomnia.md or try to send a few requests programmatically. If the data is there and you're not blocked straight away, a request-based scraper is probably the way to go.
It also depends of course on whether you need to fill in some data (like a username and password) or select a location (such as entering a zip code manually). Tasks where interacting with the page is absolutely necessary cannot be done using plain HTTP scraping, and require headless browsers. In some cases, you might also decide to use a browser-based solution in order to better blend in with the rest of the "regular" traffic coming from real users.
---
# How to scrape from dynamic pages
**Learn about dynamic pages and dynamic content. How can we find out if a page is dynamic? How do we programmatically scrape dynamic content?**
***
## A quick experiment
From our adored and beloved https://demo-webstore.apify.org/, we have been tasked to scrape each product's title, price, and image from the https://demo-webstore.apify.org/search/new-arrivals page.

First, create a file called **dynamic.js** and copy-paste the following boiler plate code into it:
import { CheerioCrawler } from 'crawlee';
const crawler = new CheerioCrawler({ requestHandler: async ({ $, request }) => { // We'll put our logic here in a minute }, });
await crawler.addRequests([{ url: 'https://demo-webstore.apify.org/search/new-arrivals' }]);
await crawler.run();
If you're in a brand new project, don't forget to initialize your project, then install the necessary dependencies:
this command will initialize your project
and install the "crawlee" and "cheerio" packages
npm init -y && npm i crawlee
Now, let's write some data extraction code to extract each product's data. This should look familiar if you went through the https://docs.apify.com/academy/web-scraping-for-beginners/data-extraction.md lessons:
import { CheerioCrawler } from 'crawlee';
const BASE_URL = 'https://demo-webstore.apify.org';
const crawler = new CheerioCrawler({ requestHandler: async ({ $, request }) => { const products = $('a[href*="/product/"]');
const results = [...products].map((product) => {
const elem = $(product);
const title = elem.find('h3').text();
const price = elem.find('div[class*="price"]').text();
const image = elem.find('img[src]').attr('src');
return {
title,
price,
image: new URL(image, BASE_URL).href,
};
});
console.log(results);
},
});
await crawler.run([{ url: 'https://demo-webstore.apify.org/search/new-arrivals' }]);
> Here, we are using the https://developer.mozilla.org/en-US/docs/Web/JavaScript/Reference/Global_Objects/Array/map function to loop through all of the product elements and save them into an array we call `results` all at the same time.
After running it, you might say, "Great! It works!" **But wait...** What are those results being logged to console?

Every single image seems to have the same exact "URL," but they are most definitely not the image URLs we are looking for. This is strange, because in the browser, we were getting URLs that looked like this:
https://demo-webstore.apify.org/_next/image?url=https%3A%2F%2Fm.media-amazon.com%2Fimages%2FI%2F81ywGFOb0eL.AC_UL1500.jpg&w=3840&q=85
The reason this is happening is because CheerioCrawler makes static HTTP requests, so it only manages to capture the content from the `DOMContentLoaded` event. Any elements or attributes generated dynamically thereafter using JavaScript (and usually XHR/Fetch requests) are not part of the downloaded HTML, and therefore are not accessible through the `$` object.
What's the solution? We need to use something that is able to allow the page to follow through with the entire load process - a headless browser.
## Scraping dynamic content
Let's change a few lines of our code to switch the crawler type from CheerioCrawler to PuppeteerCrawler, which will run a headless browser, allowing the `load` and `networkidle` events to fire:
> Also, don't forget to run `npm i puppeteer` in order to install the `puppeteer` package!
import { PuppeteerCrawler } from 'crawlee';
const BASE_URL = 'https://demo-webstore.apify.org';
// Switch CheerioCrawler to PuppeteerCrawler const crawler = new PuppeteerCrawler({ // Replace "$" with "page" requestHandler: async ({ parseWithCheerio, request }) => { // Create the $ Cheerio object based on the page's content const $ = await parseWithCheerio();
const products = $('a[href*="/product/"]');
const results = [...products].map((product) => {
const elem = $(product);
const title = elem.find('h3').text();
const price = elem.find('div[class*="price"]').text();
const image = elem.find('img[src]').attr('src');
return {
title,
price,
image: new URL(image, BASE_URL).href,
};
});
console.log(results);
},
});
await crawler.run([{ url: 'https://demo-webstore.apify.org/search/new-arrivals' }]);
After running this one, we can see that our results look different from before. We're getting the image links!

Well... Not quite. It seems that the only images which we got the full links to were the ones that were being displayed within the view of the browser. This means that the images are lazy-loaded. **Lazy-loading** is a common technique used across the web to improve performance. Lazy-loaded items allow the user to load content incrementally, as they perform some action. In most cases, including our current one, this action is scrolling.
We've gotta scroll down the page to load these images. Luckily, because we're using Crawlee, we don't have to write the logic that will achieve that, because a utility function specifically for Puppeteer called https://crawlee.dev/api/puppeteer-crawler/namespace/puppeteerUtils#infiniteScroll already exists right in the library, and can be accessed through `utils.puppeteer`. Let's add it to our code now:
https://console.apify.com/actors/7tWSD8hrYzuc9Lte7?runConfig=eyJ1IjoiRWdQdHczb2VqNlRhRHQ1cW4iLCJ2IjoxfQ.eyJpbnB1dCI6IntcImNvZGVcIjpcImltcG9ydCB7IERhdGFzZXQsIFB1cHBldGVlckNyYXdsZXIgfSBmcm9tICdjcmF3bGVlJztcXG5cXG5jb25zdCBCQVNFX1VSTCA9ICdodHRwczovL2RlbW8td2Vic3RvcmUuYXBpZnkub3JnJztcXG5cXG5jb25zdCBjcmF3bGVyID0gbmV3IFB1cHBldGVlckNyYXdsZXIoe1xcbiAgICByZXF1ZXN0SGFuZGxlcjogYXN5bmMgKHsgcGFyc2VXaXRoQ2hlZXJpbywgaW5maW5pdGVTY3JvbGwgfSkgPT4ge1xcbiAgICAgICAgLy8gQWRkIHRoZSB1dGlsaXR5IGZ1bmN0aW9uXFxuICAgICAgICBhd2FpdCBpbmZpbml0ZVNjcm9sbCgpO1xcblxcbiAgICAgICAgY29uc3QgJCA9IGF3YWl0IHBhcnNlV2l0aENoZWVyaW8oKTtcXG5cXG4gICAgICAgIGNvbnN0IHByb2R1Y3RzID0gJCgnYVtocmVmKj1cXFwiL3Byb2R1Y3QvXFxcIl0nKTtcXG5cXG4gICAgICAgIGNvbnN0IHJlc3VsdHMgPSBbLi4ucHJvZHVjdHNdLm1hcCgocHJvZHVjdCkgPT4ge1xcbiAgICAgICAgICAgIGNvbnN0IGVsZW0gPSAkKHByb2R1Y3QpO1xcblxcbiAgICAgICAgICAgIGNvbnN0IHRpdGxlID0gZWxlbS5maW5kKCdoMycpLnRleHQoKTtcXG4gICAgICAgICAgICBjb25zdCBwcmljZSA9IGVsZW0uZmluZCgnZGl2W2NsYXNzKj1cXFwicHJpY2VcXFwiXScpLnRleHQoKTtcXG4gICAgICAgICAgICBjb25zdCBpbWFnZSA9IGVsZW0uZmluZCgnaW1nW3NyY10nKS5hdHRyKCdzcmMnKTtcXG5cXG4gICAgICAgICAgICByZXR1cm4ge1xcbiAgICAgICAgICAgICAgICB0aXRsZSxcXG4gICAgICAgICAgICAgICAgcHJpY2UsXFxuICAgICAgICAgICAgICAgIGltYWdlOiBuZXcgVVJMKGltYWdlLCBCQVNFX1VSTCkuaHJlZixcXG4gICAgICAgICAgICB9O1xcbiAgICAgICAgfSk7XFxuXFxuICAgICAgICAvLyBQdXNoIG91ciByZXN1bHRzIHRvIHRoZSBkYXRhc2V0XFxuICAgICAgICBhd2FpdCBEYXRhc2V0LnB1c2hEYXRhKHJlc3VsdHMpO1xcbiAgICB9LFxcbn0pO1xcblxcbmF3YWl0IGNyYXdsZXIucnVuKFt7IHVybDogJ2h0dHBzOi8vZGVtby13ZWJzdG9yZS5hcGlmeS5vcmcvc2VhcmNoL25ldy1hcnJpdmFscycgfV0pO1xcblwifSIsIm9wdGlvbnMiOnsiYnVpbGQiOiJsYXRlc3QiLCJjb250ZW50VHlwZSI6ImFwcGxpY2F0aW9uL2pzb247IGNoYXJzZXQ9dXRmLTgiLCJtZW1vcnkiOjQwOTYsInRpbWVvdXQiOjE4MH19.PGZUSPbQL3ooxDjeGftoPaHw-O18NzHba1zVXzq0E6k&asrc=run_on_apify
import { Dataset, PuppeteerCrawler } from 'crawlee';
const BASE_URL = 'https://demo-webstore.apify.org';
const crawler = new PuppeteerCrawler({ requestHandler: async ({ parseWithCheerio, infiniteScroll }) => { // Add the utility function await infiniteScroll();
const $ = await parseWithCheerio();
const products = $('a[href*="/product/"]');
const results = [...products].map((product) => {
const elem = $(product);
const title = elem.find('h3').text();
const price = elem.find('div[class*="price"]').text();
const image = elem.find('img[src]').attr('src');
return {
title,
price,
image: new URL(image, BASE_URL).href,
};
});
// Push our results to the dataset
await Dataset.pushData(results);
},
});
await crawler.run([{ url: 'https://demo-webstore.apify.org/search/new-arrivals' }]);
Let's run this and check our dataset results...
{ "title": "women's shoes", "price": "$40.00 USD", "image": "https://demo-webstore.apify.org/_next/image?url=https%3A%2F%2Fdummyjson.com%2Fimage%2Fi%2Fproducts%2F46%2F1.jpg&w=3840&q=85" }
Each product looks like this, and each image is a valid link that can be visited. These are the results we were after.
## Small Recap
Making static HTTP requests only downloads the HTML content from the `DOMContentLoaded` event. We must use a browser to allow dynamic code to load, or find different means altogether of scraping the data (see https://docs.apify.com/academy/api-scraping.md)
---
A lot of beginners struggle through trial and error while scraping a simple site. They write some code that might work, press the run button, see that error happened and they continue writing more code that might work but probably won't. This is extremely inefficient and gets tedious really fast.
What beginners are missing are basic tools and tricks to get things done quickly. One of these wow tricks is the option to run the JavaScript code directly in your browser.
Pressing F12 while browsing with Chrome, Firefox, or other popular browsers opens up the browser console, the magic toolbox of any web developer. The console allows you to run a code in the context of the website you are in. Don't worry, you cannot mess the site up (well, unless you start doing really nasty tricks) as the page content is downloaded on your computer and any change is only local to your PC.
# Running code in a browser console
> Test your Page Function's code directly in your browser's console.
First, you need to inject jQuery. You can try to paste and run this snippet.
const jq = document.createElement('script'); jq.src = 'https://ajax.googleapis.com/ajax/libs/jquery/2.2.2/jquery.min.js'; document.getElementsByTagName('head')[0].appendChild(jq);
If that doesn't work because of a CORS violation, you can install https://chrome.google.com/webstore/detail/ekkjohcjbjcjjifokpingdbdlfekjcgi that injects jQuery on a button click.
You can test a `pageFunction` code in two ways in your console:
## Pasting and running a small code snippet
Usually, you don't need to paste in the whole pageFunction as you can isolate the critical part of the code you are trying to debug. You will need to remove any references to the `context` object and its properties like `request` and the final return statement but otherwise, the code should work 1:1.
I will also usually remove `const` declarations on the top level variables. This helps you to run the same code many times over without needing to restart the console (you cannot declare constants more than once). My declaration will change from:
const results = []; // Scraping something to fill the results
into
results = [];
You can get all the information you need by running a snippet of your `pageFunction` like this:
results = []; $('.my-list-item').each((i, el) => { results.push({ title: $(el).find('.title').text().trim(), // other fields }); });
Now the `results` variable stays on the page and you can do whatever you wish with it. Log it to analyze if your scraping code is correct. Writing a single expression will also log it in a browser console.
results; // Will log a nicely formatted [{ title: 'my-article-1'}, { title: 'my-article-2'}] etc.
## Pasting and running a full pageFunction
If you don't want to deal with copy/pasting a proper snippet, you can always paste the whole pageFunction. You will have to mock the context object when calling it. If you use some advanced tricks, this might not work but in most cases copy pasting this code should do it. This code is only for debugging your Page Function for a particular page. It does not crawl the website and the output is not saved anywhere.
async function pageFunction(context) { // this is your pageFunction } // Now you will call it with mocked context pageFunction({ request: { url: window.location.href, userData: { label: 'paste-a-label-if-you-use-one' }, }, async waitFor(ms) { console.log('(waitFor)'); await new Promise((res) => setTimeout(res, ms)); }, enqueueRequest() { console.log('(enqueuePage)', arguments); }, skipLinks() { console.log('(skipLinks)', arguments); }, jQuery: $, });
Happy debugging!
---
# Filter out blocked proxies using sessions
*This article explains how the problem was solved before the https://docs.apify.com/sdk/js/docs/api/session-pool class was added into https://docs.apify.com/sdk/js. We are keeping the article here as it might be interesting for people who want to see how to work with sessions on a lower level. For any practical usage of sessions, follow the documentation and examples of SessionPool.*
### Overview of the problem
You want to crawl a website with a proxy pool, but most of your proxies are blocked. It's a very common situation. Proxies can be blocked for many reasons:
1. You overused them in your current Actor run and they got banned.
2. You overused them in some of your previous runs and they are still banned (and may never be unbanned).
3. Some other user with whom you share part of your proxy pool overused them when crawling the same website before you even touched it.
4. The proxies were actually banned before anyone used them to crawl the website because they share a subnetwork in some datacenter and all proxies of that subnet got banned.
5. The proxies actually got banned before anyone used them to crawl the website because they use anti-bot protection that bans proxies across websites (e.g. Cloudflare).
Nobody can make sure that a proxy will work infinitely. The only real solution to this problem is to use https://docs.apify.com/platform/proxy/residential-proxy.md, but they can sometimes be too costly.
However, usually, at least some of our proxies work. To crawl successfully, it is therefore imperative to handle blocked requests properly. You first need to discover that you are blocked, which usually means that either your request returned status greater or equal to 400 (it didn't return the proper response) or that the page displayed a captcha. To ensure that this bad request is retried, you usually throw an error and it gets automatically retried later (our https://docs.apify.com/sdk/js handles this for you). Check out https://docs.apify.com/academy/node-js/handle-blocked-requests-puppeteer as inspiration for how to handle this situation with `PuppeteerCrawler` class.
### Solution
Now we are able to retry bad requests and eventually unless all of our proxies get banned, we should be able to successfully crawl what we want. The problem is that it takes too long and our log is full of errors. Fortunately, we can overcome this with https://docs.apify.com/platform/proxy/datacenter-proxy.md#username-parameters (look at the proxy and SDK documentation for how to use them in your Actors.)
First we define `sessions` object at the top of our code (in global scope) to hold the state of our working sessions.
`let sessions;`
Then we need to define an interval that will ensure our sessions are periodically saved to the key-value store, so if the Actor restarts, we can load them.
setInterval(async () => { await Apify.setValue('SESSIONS', sessions); }, 30 * 1000);
And inside our main function, we load the sessions the same way we load an input. If they were not saved yet (the Actor was not restarted), we instantiate them as an empty object.
Apify.main(async () => { sessions = (await Apify.getValue('SESSIONS')) || {}; // ...the rest of your code });
### Algorithm
You don't necessarily need to understand the solution below - it should be fine to copy/paste it to your Actor.
`sessions` will be an object whose keys will be the names of the sessions and values will be objects with the name of the session (we choose a random number as a name here) and user agent (you can add any other useful properties that you want to match with each session.) This will be created automatically, for example:
{ "0.7870849452667994": { "name": "0.7870849452667994", "userAgent": "Mozilla/5.0 (Windows NT 10.0; Win64; x64) AppleWebKit/537.36 (KHTML, like Gecko) Chrome/70.0.3538.67 Safari/537.36" }, "0.4787584713044999": { "name": "0.4787584713044999", "userAgent": "Mozilla/5.0 (Windows NT 10.0; Win64; x64) AppleWebKit/537.36 (KHTML, like Gecko) Chrome/58.0.3029.110 Safari/537.36 Edge/16.16299" } // ... }
Now let's get to the algorithm that will define which sessions to pick for a request. It can be done in many ways and this is by no means the ideal way, so I encourage you to find a more intelligent algorithm and paste it into the comments of this article.
This function takes `sessions` as an argument and returns a `session` object which will either be a random object from `sessions` or a new one with random user agent.
const pickSession = (sessions, maxSessions = 100) => {
// sessions is our sessions object, at the beginning instantiated as {}
// maxSessions is a constant which should be the number of working proxies we aspire to have.
// The lower the number, the faster you will use the working proxies
// but the faster the new one will not be picked
// 100 is reasonable default
// Since sessions is an object, we prepare an array of the session names
const sessionsKeys = Object.keys(sessions);
console.log(`Currently we have ${sessionsKeys.length} working sessions`);
// We define a random floating number from 0 to 1 that will serve
// both as a chance to pick the session and its possible name
const randomNumber = Math.random();
// The chance to pick a session will be higher when we have more working sessions
const chanceToPickSession = sessionsKeys.length / maxSessions;
console.log(`Chance to pick a working session is ${Math.round(chanceToPickSession * 100)}%`);
// If the chance is higher than the random number, we pick one from the working sessions
const willPickSession = chanceToPickSession > randomNumber;
if (willPickSession) {
// We randomly pick one of the working sessions and return it
const indexToPick = Math.floor(sessionsKeys.length * Math.random());
const nameToPick = sessionsKeys[indexToPick];
console.log(`We picked a working session: ${nameToPick} on index ${indexToPick}`);
return sessions[nameToPick];
}
// We create a new session object, assign a random userAgent to it and return it
console.log(`Creating new session: ${randomNumber}`);
return {
name: randomNumber.toString(),
userAgent: Apify.utils.getRandomUserAgent(),
};
};
### Puppeteer example
We then use this function whenever we want to get the session for our request. Here is an example of how we would use it for bare bones Puppeteer (for example as a part of `BasicCrawler` class).
const session = pickSession(sessions); const browser = await Apify.launchPuppeteer({ useApifyProxy: true, apifyProxySession: session.name, userAgent: session.userAgent, });
Then we only need to add the session if the request was successful or remove it if it was not. It doesn't matter if we add the same session twice or delete a non-existent session (because of how JavaScript objects work).
After success: `sessions[session.name] = session;`
After failure (captcha, blocked request, etc.): `delete sessions[session.name]`
### PuppeteerCrawler example
Now you might start to wonder, "I have already prepared an Actor using PuppeteerCrawler, can I make it work there?". The problem is that with PuppeteerCrawler we don't have everything nicely inside one function scope like when using pure Puppeteer or BasicCrawler. Fortunately, there is a little hack that enables passing the session name to where we need it.
First we define `lauchPuppeteerFunction` which tells the crawler how to create new browser instances and we pass the picked session there.
const crawler = new Apify.PuppeteerCrawler({
launchPuppeteerFunction: async () => {
const session = pickSession(sessions);
return Apify.launchPuppeteer({
useApifyProxy: true,
userAgent: ${session.userAgent} s=${session.name},
apifyProxySession: session.name,
});
},
// handlePageFunction etc.
});
We picked the session and added it to the browser as `apifyProxySession` but for userAgent, we didn't pass the User-Agent as it is but added the session name into it. That is the hack because we can retrieve the user agent from the Puppeteer browser itself.
Now we need to retrieve the session name back in the `gotoFunction`, pass it into userData and fix the hacked userAgent back to normal so it is not suspicious for the website.
const gotoFunction = async ({ request, page }) => { const userAgentWithSession = await page.browser().userAgent(); const match = userAgentWithSession.match(/(.+) s=(.+)/); const session = { name: match[2], userAgent: match[1], }; request.userData.session = session; await page.setUserAgent(session.userAgent); return page.goto(request.url, { timeout: 60000 }); };
Now we have access to the session in the `handlePageFunction` and the rest of the logic is the same as in the first example. We extract the session from the userData, try/catch the whole code and on success we add the session and on error we delete it. Also it is useful to retire the browser completely (check https://docs.apify.com/academy/node-js/handle-blocked-requests-puppeteer for reference) since the other requests will probably have similar problem.
const handlePageFunction = async ({ request, page, puppeteerPool }) => {
const { session } = request.userData;
console.log(URL: ${request.url}, session: ${session.name}, userAgent: ${session.userAgent});
try {
// your main logic that is executed on each page
sessions[session.name] = session;
} catch (e) {
delete sessions[session.name];
await puppeteerPool.retire(page.browser());
throw e;
}
};
Things to consider
1. Since the good and bad proxies are getting filtered over time, this solution only makes sense for crawlers with at least hundreds of requests.
2. This solution will not help you if you don't have enough proxies for your job. It can even get your proxies banned faster (since the good ones will be used more often), so you should be cautious about the speed of your crawl.
3. If you are more concerned about the speed of your crawler and less about banning proxies, set the `maxSessions` parameter of `pickSession` function to a number relatively lower than your total number of proxies. If on the other hand, keeping your proxies alive is more important, set `maxSessions` relatively higher so you will always pick new proxies.
4. Since sessions only last 24 hours, if you have bigger intervals between your crawler runs, they will start fresh each time.
---
One of the main defense mechanisms websites use to ensure they are not scraped by bots is allowing only a limited number of requests from a specific IP address. That's why Apify provides a https://docs.apify.com/platform/proxy component with intelligent rotation. With a large enough pool of proxies, you can multiply the number of allowed requests per day to cover your crawling needs. Let's look at how we can rotate proxies when using our https://github.com/apify/apify-sdk-js.
# BasicCrawler
> Getting around website defense mechanisms when crawling.
You can use `handleRequestFunction` to set up proxy rotation for a https://crawlee.dev/api/basic-crawler/class/BasicCrawler. The following example shows how to use a fresh proxy on each request if you make requests through the popular https://www.npmjs.com/package/request-promise npm package:
const Apify = require('apify'); const requestPromise = require('request-promise');
const PROXY_PASSWORD = process.env.APIFY_PROXY_PASSWORD;
const proxyUrl = http://auto:${PROXY_PASSWORD}@proxy.apify.com;
const crawler = new Apify.BasicCrawler({ requestList: someInitializedRequestList, handleRequestFunction: async ({ request }) => { const response = await requestPromise({ url: request.url, proxy: proxyUrl, }); }, });
Each time `handleRequestFunction` is executed in this example, requestPromise will send a request through the least used proxy for that target domain. This way you will not burn through your proxies.
# Puppeteer Crawler
With https://docs.apify.com/sdk/js/docs/api/puppeteer-crawler the situation is a little more complicated. That's because you have to restart the browser to change the proxy the browser is using. By default, PuppeteerCrawler restarts the browser every 100 requests, which can lead to a number of requests being wasted because the IP address the browser is using is already blocked by the website.
The straightforward solution would be to set the 'retireInstanceAfterRequestCount' option to 1. PuppeteerCrawler would then rotate the proxies in the same way as BasicCrawler. While this approach could sometimes be useful for the toughest websites, the price you pay is in performance. Restarting the browser is an expensive operation.
That's why PuppeteerCrawler offers a utility retire() function through a PuppeteerPool class. You can access PuppeteerPool by passing it into the object parameter of gotoFunction or handlePageFunction.
const crawler = new PuppeteerCrawler({ requestList: someInitializedRequestList, launchPuppeteerOptions: { useApifyProxy: true, }, handlePageFunction: async ({ request, page, puppeteerPool }) => { // you are on the page now },
});
It is really up to a developer to spot if something is wrong with his request. A website can interfere with your crawling in https://docs.apify.com/academy/anti-scraping. Page loading can be cancelled right away, it can timeout, the page can display a captcha, some error or warning message, or the data may be missing or corrupted. The developer can then choose if he will try to handle these problems in the code or focus on receiving the proper data. Either way, if the request went wrong, you should throw a proper error.
Now that we know when the request is blocked, we can use the retire() function and continue crawling with a new proxy. Google is one of the most popular websites for scrapers, so let's code a Google search crawler. The two main blocking mechanisms used by Google is either to display their (in)famous 'sorry' captcha or to not load the page at all so we will focus on covering these.
For example, let's assume we have already initialized a requestList of Google search pages. Let's show how you can use the retire() function in both gotoFunction and handlePageFunction.
const crawler = new Apify.PuppeteerCrawler({
requestList: someInitializedRequestList,
launchPuppeteerOptions: {
useApifyProxy: true,
},
gotoFunction: async ({ request, page, puppeteerPool }) => {
const response = page.goto(request.url).catch(() => null);
if (!response) {
await puppeteerPool.retire(page.browser());
throw new Error(Page didn't load for ${request.url});
}
return response;
},
handlePageFunction: async ({ request, page, puppeteerPool }) => {
if (page.url().includes('sorry')) {
await puppeteerPool.retire(page.browser());
throw new Error(We got captcha for ${request.url});
}
},
retireInstanceAfterRequestCount: 50,
});
Apify.main(async () => { await crawler.run(); });
Now we have a crawler that catches the most common blocking issues on Google. In `gotoFunction` we will catch if the page doesn't load and in the handlePageFunction we check if we were redirected to the 'sorry page'. In both cases we throw an error afterwards so the request is added back to the crawling queue (otherwise the crawler would think everything was okay and would treat that request as handled).
---
# How to fix 'Target closed' error in Puppeteer and Playwright
**Learn about common causes for the 'Target closed' error in browser automation and what you can do to fix it.**
***
The `Target closed` error happens when you try to access the `page` object (or some of its parent objects like the `browser`), but the underlying browser tab has already been closed. The exact error message can appear in several variants, such as `Target page, context or browser has been closed`, but none of them are very helpful for debugging. To debug it, attach logs in multiple places or use the headful mode.
## Out of memory

Browsers create a separate process for each tab. That means each tab lives with a separate memory space. If you have a lot of tabs open, you might run out of memory. The browser cannot close your old tabs to free extra memory so it will usually kill your current memory hungry tab.
### Memory solution
If you use https://crawlee.dev/, your concurrency automatically scales up and down to fit in the allocated memory. You can change the allocated memory using the environment variable or the https://crawlee.dev/docs/guides/configuration class. But very hungry pages can still occasionally cause sudden memory spikes, and you might have to limit the https://crawlee.dev/docs/guides/scaling-crawlers#minconcurrency-and-maxconcurrency of the crawler. This problem is very rare, though.
Without Crawlee, you will need to predict the maximum concurrency the particular use case can handle or increase the allocated memory.
## Page closed prematurely
If you close the page before executing all code that tries to access the page, you will get the 'Target closed' error. The most common cause is that your crawler doesn't properly wait for all actions and instead closes the page earlier than it should. Usually, this is caused by forgotten `await` keyword (floating promise), using event handlers like `page.on` or having wrongly ordered crawling loop.
### Page closed solution
https://docs.apify.com/academy/node-js/analyzing-pages-and-fixing-errors to see exactly at which point the crash occurs. See if you can spot one of the above mentioned problems. Adding missing `await` is simple but if your code runs in an event handler, you will need to wrap it in try/catch block and ensure that you give it enough time to execute before you close the main crawling handler.
If you use Crawlee and utilize https://crawlee.dev/api/playwright-crawler/interface/PlaywrightCrawlerOptions#preNavigationHooks to execute event handlers like `page.on` asynchronously be aware that this can cause the above mentioned problem that the https://crawlee.dev/api/playwright-crawler/interface/PlaywrightCrawlerOptions#requestHandler already finishes before we access the `page` in the event handler. You can solve this issue by making sure the `requestHandler` waits for all promises from the `preNavigationHooks`. This can be achieved by passing the promises to the `context` which is accessible to both functions and awaiting them before the scraping code starts.
const crawler = new PlaywrightCrawler({
// ...other options
preNavigationHooks: [
async ({ page, context }) => {
// Some action that takes time, we don't await here
// Try/catch all non awaited code because it can cause unhandled rejection which crashes the whole process
const responsePromise = page.waitForResponse('https://example.com/resource').catch((e) => e);
// Attach the promise to the context which is accessible to requestHandler
context.responsePromise = responsePromise;
},
],
requestHandler: async ({ request, page, context }) => {
// We first wait for the response before doing anything else
const response = await context.responsePromise;
// Check if it errored out, otherwise proceed with parsing it
if (typeof response === 'string' || response instanceof Error) {
throw new Error(Failed to load resource from response, { cause: response });
}
// Now process the response and continue with the code synchronously
},
});
If you are still unsure what causes your particular error, check with the community and Apify team on https://discord.com/invite/jyEM2PRvMU.
---
# How to save screenshots from puppeteer
A good way to debug your puppeteer crawler in Apify Actors is to save a screenshot of a browser window to the Apify key-value store. You can do that using this function:
/**
- Store screen from puppeteer page to Apify key-value store
- @param page - Instance of puppeteer Page class https://pptr.dev/api/puppeteer.page
- @param [key] - Function stores your screen in Apify key-value store under this key
- @return {Promise} */ const saveScreen = async (page, key = 'debug-screen') => { const screenshotBuffer = await page.screenshot({ fullPage: true }); await Apify.setValue(key, screenshotBuffer, { contentType: 'image/png' }); };
This function takes the parameters page (an instance of a puppeteer page) and key (your screen is stored under this key function in the Apify key-value store).
Because this is so common use-case Apify SDK has a utility function called https://docs.apify.com/sdk/js/docs/api/puppeteer#puppeteersavesnapshot that does exactly this and a little bit more:
* You can choose the quality of your screenshots (high-quality images take more size)
* You can also save the HTML of the page
An example of such Apify Actor:
import { Actor } from 'apify'; import { puppeteerUtils, launchPuppeteer } from 'crawlee';
Actor.main(async () => { const input = await Actor.getValue('INPUT');
console.log('Launching Puppeteer...');
const browser = await launchPuppeteer();
const page = await browser.newPage();
await page.goto(input.url);
await puppeteerUtils.saveSnapshot(page, { key: 'test-screen' });
console.log('Closing Puppeteer...');
await browser.close();
console.log('Done.');
});
After you call the function, your screen appears in the KEY-VALUE STORE tab in the Actor console. You can click on the row with your saved screen and it'll open it in a new window.

If you have any questions, feel free to contact us in chat.
Happy coding!
---
# How to scrape hidden JavaScript objects in HTML
**Learn about "hidden" data found within the JavaScript of certain pages, which can increase the scraper reliability and improve your development experience.**
***
Depending on the technology the target website is using, the data to be collected not only can be found within HTML elements, but also in a JSON format within `` tags in the DOM.
The advantages of using these objects instead of parsing the HTML are that parsing JSON is much simpler, and more reliable than parsing HTML elements. They are much less likely to change, while the CSS selectors are prone to updates and re-namings every time the website is updated.
> **Note:** In this tutorial, we'll be using https://soundcloud.com as an example target, but the techniques described here can be applied to any site.
## Locating JSON objects within script tags
Using our DevTools, we can inspect our https://soundcloud.com/tiesto/tracks, or right click the page and click **View Page Source** to see the DOM. Next, we'll find a value on the page that we can predict would be in a potential API response. For our page, we'll use the **Tracks** count of `845`. On the **View Page Source** page, we'll do **⌘** + **F** and type in this value, which will show all matches for it within the DOM. This method can expose `` tag objects which hold the target data.

These data objects will usually be attached to the window object (often prefixed with two underscores - `__`). When scrolling to the beginning of the script tag on our **View Page Source** page, we see that the name of our target object is `__sc_hydration`. Heading back to DevTools and typing this into the console, the object is displayed.

## Parsing
You can obtain these objects to be used and manipulated in JavaScript in two ways:
### 1. Parsing them directly from the HTML
// same as "document.querySelector('html').innerHTML" const html = $.html();
const string = html.split('window.__sc_hydration = ')[1].split(';')[0];
const data = JSON.parse(string);
console.log(data);
### 2. Retrieving them within the context of the browser
Tools like https://github.com/puppeteer/puppeteer allow us to run code within the context in the browser, as well as return things out of these functions and use the data back in the Node.js context.
const data = await page.evaluate(() => window.__sc_hydration);
console.log(data);
Which of these methods you use totally depends on the type of crawler you are using. Grabbing the data directly from the `window` object within the context of the browser using Puppeteer is of course the most reliable solution; however, it is less efficient than making a static HTTP request and parsing the object directly from the downloaded HTML.
---
# Scrape website in parallel with multiple Actor runs
**Learn how to run multiple instances of an Actor to scrape a website faster. This tutorial will guide you through the process of setting up your scraper.**
***
Imagine a large website that you need to scrape. You have a scraper that works well, but scraping the whole website is slow. You can speed up the scraping process by running multiple instances of the scraper in parallel. This tutorial will guide you through setting up your scraper to run multiple instances in parallel.
In a rush?
You can check https://github.com/apify/apify-docs/tree/master/examples/ts-parallel-scraping right away.
## Managing Multiple Scraper Runs
To manage multiple instances of the scraper, we need to build an Orchestrator Actor to oversee the process. This Orchestrator Actor will initiate several scraper runs and manage their operations. It will set up a request queue and a dataset that the other Actor runs will utilize to crawl the website and store results. In this tutorial, we set up the Orchestrator Actor and the scraper Actor.
## Orchestrator Actor Configuration
The Orchestrator Actor orchestrates the parallel execution of scraper Actor runs. It runs multiple instances of the scraper Actor and passes the request queue and dataset to them. For the Actor's base structure, we use Apify CLI and create a new Actor with the following command and use the https://apify.com/templates/ts-empty.
apify create orchestrator-actor
If you don't have Apify CLI installed, check out our installation https://docs.apify.com/cli/docs/installation.
### Input Configuration
Let's start by defining the Input Schema for the Orchestrator Actor. The input for the Actor will specify configurations needed to initiate and manage multiple scraper Actors in parallel. Here’s the breakdown of the necessary input:
* input\_schema.json
* main.ts
{ "title": "Orchestrator Actor Input", "type": "object", "schemaVersion": 1, "properties": { "parallelRunsCount": { "title": "Parallel Actor runs count", "type": "integer", "description": "Number of parallel runs of the Actor.", "default": 1 }, "targetActorId": { "title": "Actor ID", "type": "string", "editor": "textfield", "description": "ID of the Actor to run." }, "targetActorInput": { "title": "Actor Input", "type": "object", "description": "Input of the Actor to run", "editor": "json", "prefill": {} }, "targetActorRunOptions": { "title": "Actor Run Options", "type": "object", "description": "Options for the Actor run", "editor": "json", "prefill": {} } }, "required": ["parallelRunsCount", "targetActorId"] }
import { Actor, log } from 'apify';
interface Input { parallelRunsCount: number; targetActorId: string; targetActorInput: Record; targetActorRunOptions: Record; }
await Actor.init();
const { parallelRunsCount = 1, targetActorId, targetActorInput = {}, targetActorRunOptions = {}, } = await Actor.getInput() ?? {} as Input; const { apifyClient } = Actor;
if (!targetActorId) throw new Error('Missing the "targetActorId" input!');
### Reusing dataset and request queue
The Orchestrator Actor will reuse its default dataset and request queue. The dataset stores the results of the scraping process, and the request queue is used as shared storage for processing requests.
import { Actor } from 'apify';
const requestQueue = await Actor.openRequestQueue(); const dataset = await Actor.openDataset();
### State
The Orchestrator Actor will maintain the state of the scraping runs to track progress and manage continuity. It will record the state of Actor runs, initializing this tracking with the first run. This persistent state ensures that, in migration or restart (resurrection) cases, the Actor can resume the same runs without losing progress.
import { Actor, log } from 'apify';
const { apifyClient } = Actor; const state = await Actor.useState('actor-state', { parallelRunIds: [], isInitialized: false });
if (state.isInitialized) { for (const runId of state.parallelRunIds) { const runClient = apifyClient.run(runId); const run = await runClient.get();
// This should happen if the run was deleted or the state was incorectly saved.
if (!run) throw new Error(`The run ${runId} from state does not exists.`);
if (run.status === 'RUNNING') {
log.info('Parallel run is already running.', { runId });
} else {
log.info(`Parallel run was in state ${run.status}, resurrecting.`, { runId });
await runClient.resurrect(targetActorRunOptions);
}
}
} else { for (let i = 0; i {const runClient=apifyClient.run(runId);return runClient.waitForFinish();});// Abort parallel runs if the main run is aborted Actor.on('aborting',async()=>{for(const runId of state.parallelRunIds){log.info('Aborting run',{runId});await apifyClient.run(runId).abort();}});// Wait for all parallel runs to finish await Promise.all(parallelRunPromises);// Gracefully exit the Actor process. It's recommended to quit all Actors with an exit() await Actor.exit();
### Pushing to Apify
Once you have the Orchestrator Actor ready, you can push it to Apify using the following command from the root directory of the Actor project:
apify push
First log in
If you are pushing the Actor for the first time, you will need to https://docs.apify.com/cli/docs/reference#apify-login.
By running this command, you will be prompted to provide the Actor ID, which you can find in the Apify Console under the Actors tab.

## Scraper Actor Configuration
The Scraper Actor performs website scraping. It operates using the request queue and dataset provided by the Orchestrator Actor. You will need to integrate your chosen scraper logic into this framework. The only thing you need to do is utilize the request queue and dataset initialized by the Orchestrator Actor.
import { Actor } from 'apify';
interface Input { requestQueueId: string; datasetId: string; }
const { requestQueueId, datasetId, } = await Actor.getInput() ?? {} as Input;
const requestQueue = await Actor.openRequestQueue(requestQueueId); const dataset = await Actor.openDataset(datasetId);
Once you initialized the request queue and dataset, you can start scraping the website. In this example, we will use the CheerioCrawler to scrape https://warehouse-theme-metal.myshopify.com/. You can create your scraper from the https://apify.com/templates/ts-crawlee-cheerio.
* input\_schema.json
* main.ts
{ "title": "Scraper Actor Input", "type": "object", "schemaVersion": 1, "properties": { "requestQueueId": { "title": "Request Queue ID", "type": "string", "editor": "textfield", "description": "Request queue to use in scraper." }, "datasetId": { "title": "Dataset ID", "type": "string", "editor": "textfield", "description": "Dataset to use in scraper." } }, "required": ["requestQueueId", "datasetId"] }
import{Actor}from'apify';import{CheerioCrawler}from'crawlee';await Actor.init();const{requestQueueId,datasetId}=(await Actor.getInput())??{};const requestQueue=await Actor.openRequestQueue(requestQueueId);const dataset=await Actor.openDataset(datasetId);const proxyConfiguration=await Actor.createProxyConfiguration();const crawler=new CheerioCrawler({proxyConfiguration,requestQueue,requestHandler:async({enqueueLinks,request,$,log})=>{log.info('Processing page',{url:request.url});const newPages=await enqueueLinks({selector:'a[href]'});log.info(Enqueued ${newPages.processedRequests.length} new pages.);// If the product page is loaded, save the title and URL to the Dataset.
if(request?.loadedUrl?.includes('/products/')){const title=$('title').text();await dataset.pushData({url:request.loadedUrl,title});}}});await crawler.run(['https://warehouse-theme-metal.myshopify.com/']);// Gracefully exit the Actor process. It's recommended to quit all Actors with an exit()
await Actor.exit();
You can check https://github.com/apify/apify-docs/tree/master/examples/ts-parallel-scraping/scraper.
You need to push the Scraper Actor to Apify using the following command from the root directory of the Actor project:
apify push
After pushing the Scraper Actor to Apify, you must get the Actor ID from the Apify Console.

## Run orchestration in Apify Console
Once you have the Orchestrator Actor and Scraper Actor pushed to Apify, you can run the Orchestrator Actor in the Apify Console. You can set the input for the Orchestrator Actor to specify the number of parallel runs and the target Actor ID, input, and run options. After you hit the **Start** button, the Orchestrator Actor will start the parallel runs of the Scraper Actor.

After starting the Orchestrator Actor, you will see the parallel runs initiated in the Apify Console.

## Summary
In this tutorial, you learned how to run multiple instances of an Actor to scrape a website faster. You created an Orchestrator Actor to manage the parallel execution of the Scraper Actor runs. The Orchestrator Actor initialized the Scraper Actor runs and managed their state. The Scraper Actor utilized the request queue and dataset provided by the Orchestrator Actor to scrape the website. You could speed up the scraping process by running multiple instances of the Scraper Actor in parallel.
The code in this tutorial is for learning purposes and does not cover all specific edge cases. You can modify it to suit your exact requirements and use cases.
---
# How to optimize and speed up your web scraper
**We all want our scrapers to run as cost-effective as possible. Learn how to think about performance in the context of web scraping and automation.**
***
Especially if you are running your scrapers on https://apify.com, performance is directly related to your wallet (or rather bank account). The slower and heavier your program is, the more proxy bandwidth, storage, https://help.apify.com/en/articles/3490384-what-is-a-compute-unit and higher https://apify.com/pricing you'll need.
The goal of optimization is to make the code run as fast as possible while using the least resources possible. On Apify, the resources are memory and CPU usage (don't forget that the more memory you allocate to a run, the bigger share of CPU you get - proportionally). The memory alone should never be a bottleneck though. If it is, that means either a bug (memory leak) or bad architecture of the program (you need to split the computation into smaller parts). The rest of this article will focus only on optimizing CPU usage. You allocate more memory only to get more power from the CPU.
One more thing to remember. Optimization has its own cost: development time. You should always think about how much time you're able to spend on it and if it's worth it.
Before we dive into the practical side of things, let us diverge with an analogy to help us think about the performance of scrapers.
## Game development analogy
Games are extremely complicated beasts. Every frame (usually 60 times a second), the game has to calculate the physics of the world, run AI, user input, and render everything into a beautiful scene. You can imagine that running all of that every 16 ms in a complicated game is a developer's nightmare. That's why a significant portion of game development is spent on optimizations. Every little waste matters.
This is mainly true in the programming heart of the game - the engine. The engine is responsible for the heavy lifting of performance critical parts like physics, animation, AI, and rendering. Once the engine is built, you can design the game on top of it. You can add different spells, conversation chains, items, animations etc. to make your game cool. Those extra things may not run every frame and don't need to be optimized as heavily as the engine itself.
Now, if you want to build your own game and you are not a C/C++ veteran with a team, you will likely use an existing engine (like Unreal or Unity) and focus on the design of the game environment itself. Unless you go crazy, the game will likely run just fine since those engines have already been optimized for you. Your job is to choose an appropriate engine and use it well.
## Back to scrapers
What are the engines of the scraping world? A https://github.com/puppeteer/puppeteer?tab=readme-ov-file#puppeteer, an https://www.npmjs.com/package/@apify/http-request, an https://github.com/cheeriojs/cheerio, and a https://developer.mozilla.org/en-US/docs/Web/JavaScript/Reference/Global_Objects/JSON/parse. The CPU spends more than 99% of its workload in these libraries. As with engines, you are not likely gonna write these from scratch - instead you'll use something like https://crawlee.dev that handles a lot of the overheads for you.
It is about how you use these tools. The small amount of code you write in your https://crawlee.dev/api/http-crawler/interface/HttpCrawlerOptions#requestHandler is absolutely insignificant compared to what is running inside these tools. In other words, it doesn't matter how many functions you call or how many variables you extract. If you want to optimize your scrapers, you need to choose the lightweight option from the tools and use it as little as possible. A crawler scraping only JSON API can be as much as 200 times faster/cheaper than a browser based solution.
**Ranking of the tools from the most efficient to the least:**
1. **JSON API** (HTTP call + JSON parse) - Scraping an API (public or internal) is the best option. The response is usually smaller than the HTML page and the data are already structured and cheap to parse. Usable for about 30% of websites.
2. **Pure HTML** (HTTP call + HTML parse) - All data is on the main single HTML page. Often the HTML contains script and JSON data that are rich and nicely structured. Some pages can be quite big and the parsing is slower than for JSON. But it is still 10–20 times faster than a browser. Usable for about 90% of websites.
3. **Browser** (hundreds of HTTP calls, script execution, rendering) - Browsers are huge beasts. They do so much work to allow for smooth human interaction which makes them really inefficient for scraping. Use a browser only if it helps you bypass anti-scraping protection or if you need to interact with the page.
---
Sometimes you need to process the same URL several times, but each time with a different setup. For example, you may want to submit the same form with different data each time.
Let's illustrate a solution to this problem by creating a scraper which starts with an array of keywords and inputs each of them to Google, one by one. Then it retrieves the results.
> This isn't an efficient solution to searching keywords on Google. You could directly enqueue search URLs like `https://www.google.cz/search?q=KEYWORD`.
# Enqueuing start pages for all keywords
> Solving a common problem with scraper automatically deduplicating the same URLs.
First, we need to start the scraper on the page from which we're going to do our enqueuing. To do that, we create one start URL with the label "enqueue" and URL "https://example.com/". Now we can proceed to enqueue all the pages. The first part of our `pageFunction` will look like this:
async function pageFunction(context) { const $ = context.jQuery;
if (context.request.userData.label === 'enqueue') {
// parse input keywords
const keywords = context.customData;
// process all the keywords
for (const keyword of keywords) {
// enqueue the page and pass the keyword in
// the interceptRequestData attribute
await context.enqueueRequest({
url: 'https://google.com',
uniqueKey: `${Math.random()}`,
userData: {
label: 'fill-form',
keyword,
},
});
}
// No return here because we don't extract any data yet
}
}
To set the keywords, we're using the customData scraper parameter. This is useful for smaller data sets, but may not be perfect for bigger ones. For such cases you may want to use something like https://docs.apify.com/academy/node-js/scraping-urls-list-from-google-sheets.
Since we're enqueuing the same page more than once, we need to set our own uniqueKey so the page will be added to the queue (by default uniqueKey is set to be the same as the URL). The label for the next page will be "fill-form". We're passing the keyword to the next page in the userData field (this can contain any data).
# Inputting the keyword into Google
Now we come to the next page (Google). We need to retrieve the keyword and input it into the Google search bar. This will be the next part of the pageFunction:
async function pageFunction(context) { const $ = context.jQuery;
if (context.request.userData.label === 'enqueue') {
// copy from the previous part
} else if (context.request.userData.label === 'fill-form') {
// retrieve the keyword
const { keyword } = context.request.userData;
// input the keyword into the search bar
$('#lst-ib').val(keyword);
// submit the form
$('#tsf').submit();
}
}
For the next page to correctly enqueue, we're going to need a new pseudoURL. Create a pseudoURL with the label "result" and the URL `https://www.google.com/search?[.+]`.
Now we're on the last page and can finally extract the results.
async function pageFunction(context) { const $ = context.jQuery;
if (context.request.userData.label === 'enqueue') {
// copy from the previous part
} else if (context.request.userData.label === 'result') {
// create result array
const result = [];
// process all the results
$('.rc').each((index, elem) => {
// wrap element in jQuery
const gResult = $(elem);
// lookup link and text
const link = gResult.find('.r a');
const text = gResult.find('.s .st');
// extract data and add it to result array
result.push({
name: link.text(),
link: link.attr('href'),
text: text.text(),
});
});
// Now we finally return
return result;
}
}
To test the scraper, set the customData to something like this `["apple", "orange", "banana"]` and push the Run button to start.
---
# Request labels and how to pass data to other requests
Are you trying to use Actors for the first time and don't know how to deal with the request label or how to pass data to the request?
Here's how to do it.
If you are using the requestQueue, you can do it this way.
When you add a request to the queue, use the userData attribute.
// Create a request list. const requestQueue = await Apify.openRequestQueue(); // Add the request to the queue await requestQueue.addRequest({ url: 'https://www.example.com/', userData: { label: 'START', }, });
Right now, we have one request in the queue that has the label "START". Now we can specify which code should be executed for this request in the handlePageFunction.
if (request.userData.label === 'START') { // your code for the first request for example // enqueue the items of a shop } else if (request.userData.label === 'ITEM') { // other code for the item of a shop }
And in the same way you can keep adding requests in the handlePageFunction.
You can also handle the passing of data to the request like this. For example, when we have extracted the item from the shop above, we want to extract some information about the seller. We need to pass the item object to the seller page, where we save the rating of a seller, e.g..
await requestQueue.addRequest({ url: sellerDetailUrl, userData: { label: 'SELLERDETAIL', data: itemObject, }, });
Now, in the "SELLERDETAIL" url, we can evaluate the page and extracted data merge to the object from the item detail, for example like this
const result = { ...request.userData.data, ...sellerDetail };
Save the results, and we're done!
await Apify.pushData(result);
---
# How to scrape from sitemaps
Processing sitemaps automatically with Crawlee
Crawlee allows you to scrape sitemaps with ease. If you are using Crawlee, you can skip the following steps and just gather all the URLs from the sitemap in a few lines of code.
import { RobotsFile } from 'crawlee';
const robots = await RobotsFile.find('https://www.mysite.com');
const allWebsiteUrls = await robots.parseUrlsFromSitemaps();
**The sitemap.xml file is a jackpot for every web scraper developer. Take advantage of this and learn an easier way to extract data from websites using Crawlee.**
***
Let's say we want to scrape a database of craft beers (https://www.brewbound.com/) before summer starts. If we are lucky, the website will contain a sitemap at https://www.brewbound.com/sitemap.xml.
> Check out https://apify.com/vaclavrut/sitemap-sniffer, which can discover sitemaps in hidden locations!
## Analyzing the sitemap
The sitemap is usually located at the path **/sitemap.xml**. It is always worth trying that URL, as it is rarely linked anywhere on the site. It usually contains a list of all pages in https://en.wikipedia.org/wiki/XML.
http://www.brewbound.com/advertise
2015-03-19
daily
...
The URLs of breweries take this form:
http://www.brewbound.com/breweries/[BREWERY_NAME]
And the URLs of craft beers look like this:
http://www.brewbound.com/breweries/[BREWERY_NAME]/[BEER_NAME]
They can be matched using the following regular expression:
http(s)?://www.brewbound.com/breweries/[^/]+/[^/` tag, which closes each URL.
Scraping the sitemap in Crawlee
If you're scraping sitemaps (or anything else, really), https://crawlee.dev is perfect for the job.
First, let's add the beer URLs from the sitemap to the https://crawlee.dev/api/core/class/RequestList using our regular expression to match only the (craft!!) beer URLs and not pages of breweries, contact page, etc.
const requestList = await RequestList.open(null, [{
requestsFromUrl: 'https://www.brewbound.com/sitemap.xml',
regex: /http(s)?:\/\/www\.brewbound\.com\/breweries\/[^/ {
return document.getElementsByClassName('productreviews').length;
});
if (!beerPage) return;
const data = await page.evaluate(() => {
const title = document.getElementsByTagName('h1')[0].innerText;
const [brewery, beer] = title.split(':');
const description = document.getElementsByClassName('productreviews')[0].innerText;
return { brewery, beer, description };
});
await Dataset.pushData(data);
},
});
Full code
If we create a new Actor using the code below on the https://docs.apify.com/academy/apify-platform.md, it returns a nicely formatted spreadsheet containing a list of breweries with their beers with descriptions.
Make sure to use the apify/actor-node-puppeteer-chrome image for your Dockerfile, otherwise the run will fail.
import { Dataset, PuppeteerCrawler, RequestList } from 'crawlee';
const requestList = await RequestList.open(null, [{
requestsFromUrl: 'https://www.brewbound.com/sitemap.xml',
regex: /http(s)?:\/\/www\.brewbound\.com\/breweries\/[^/ {
return document.getElementsByClassName('productreviews').length;
});
if (!beerPage) return;
const data = await page.evaluate(() => {
const title = document.getElementsByTagName('h1')[0].innerText;
const [brewery, beer] = title.split(':');
const description = document.getElementsByClassName('productreviews')[0].innerText;
return { brewery, beer, description };
});
await Dataset.pushData(data);
},
});
await crawler.run();
How to scrape sites with a shadow DOM
The shadow DOM enables isolation of web components, but causes problems for those building web scrapers. Here's a workaround.
Each website is represented by an HTML DOM, a tree-like structure consisting of HTML elements (e.g. paragraphs, images, videos) and text. https://developer.mozilla.org/en-US/docs/Web/API/Web_components/Using_shadow_DOM allows the separate DOM trees to be attached to the main DOM while remaining isolated in terms of CSS inheritance and JavaScript DOM manipulation. The CSS and JavaScript codes of separate shadow DOM components do not clash, but the downside is that you can't access the content from outside.
Let's take a look at this page https://www.alodokter.com/. If you click on the menu and open a Chrome debugger, you will see that the menu tree is attached to the main DOM as shadow DOM under the element ``.

The rest of the content is rendered the same way. This makes it hard to scrape because document.body.innerText, document.getElementsByTagName('a'), and all others return an empty result.
The content of the menu can be accessed only via the https://developer.mozilla.org/en-US/docs/Web/API/ShadowRoot property. If you use jQuery you can do the following:
// Find element that is shadow root of menu DOM tree.
const { shadowRoot } = document.getElementById('top-navbar-view');
// Create a copy of its HTML and use jQuery find links.
const links = $(shadowRoot.innerHTML).find('a');
// Get URLs from link elements.
const urls = links.map((obj, el) => el.href);
However, this isn't very convenient, because you have to find the root element of each component you want to work with, and you can't take advantage of all the scripts and tools you already have.
Instead of that, we can replace the content of each element containing shadow DOM with the HTML of shadow DOM.
// Iterate over all elements in the main DOM.
for (const el of document.getElementsByTagName('*')) {
// If element contains shadow root then replace its
// content with the HTML of shadow DOM.
if (el.shadowRoot) el.innerHTML = el.shadowRoot.innerHTML;
}
After you run this, you can access all the elements and content using jQuery or plain JavaScript. The downside is that it breaks all the interactive components because you create a new copy of the shadow DOM HTML content without the JavaScript code and CSS attached, so this must be done after all the content has been rendered.
Some websites may contain shadow DOMs recursively inside of shadow DOMs. In these cases, we must replace them with HTML recursively:
// Returns HTML of given shadow DOM.
const getShadowDomHtml = (shadowRoot) => {
let shadowHTML = '';
for (const el of shadowRoot.childNodes) {
shadowHTML += el.nodeValue || el.outerHTML;
}
return shadowHTML;
};
// Recursively replaces shadow DOMs with their HTML.
const replaceShadowDomsWithHtml = (rootElement) => {
for (const el of rootElement.querySelectorAll('*')) {
if (el.shadowRoot) {
replaceShadowDomsWithHtml(shadowRoot);
el.innerHTML += getShadowDomHtml(el.shadowRoot);
}
}
};
replaceShadowDomsWithHtml(document.body);
Scraping a list of URLs from a Google Sheets document
You can export URLs from https://workspace.google.com/products/sheets/ such as https://docs.google.com/spreadsheets/d/1-2mUcRAiBbCTVA5KcpFdEYWflLMLp9DDU3iJutvES4w directly into an https://docs.apify.com/platform/actors.md's Start URLs field.
-
Make sure the spreadsheet has one sheet and a simple structure to help the Actor find the URLs.
-
Add the
/gviz/tq?tqx=out:csvquery parameter to the Google Sheet URL base, right after the long document identifier part. For example, https://docs.google.com/spreadsheets/d/1-2mUcRAiBbCTVA5KcpFdEYWflLMLp9DDU3iJutvES4w/gviz/tq?tqx=out:csv. This automatically exports the spreadsheet to CSV format. -
In the Actor's input, click Link remote text file and paste the URL there:

IMPORTANT: Make sure anyone with the link can view the document. Otherwise, the Actor will not be able to access it.

When doing web automation with Apify, it can sometimes be necessary to submit an HTML form with a file attachment. This article will cover a situation where the file is publicly accessible (e.g. hosted somewhere) and will use an Apify Actor. If it's impossible to use request-promise, it might be necessary to use https://docs.apify.com/academy/puppeteer-playwright/common-use-cases/submitting-a-form-with-a-file-attachment.
Downloading the file to memory
How to submit a form with attachment using request-promise.
After creating a new Actor, the first thing to do is download the file. We can do that using the request-promise module, so make sure it is included.
const request = require('request-promise');
The actual downloading is going to be slightly different for text and binary files. For a text file, do it like this:
const fileData = await request('https://example.com/file.txt');
For a binary file, we need to provide additional parameters so as not to interpret it as text:
const fileData = await request({
uri: 'https://example.com/file.pdf',
encoding: null,
});
In this case, fileData will be a Buffer instead of a String.
Submitting the form
When the file is ready, we can submit the form as follows:
await request({
uri: 'https://example.com/submit-form.php',
method: 'POST',
formData: {
// set any form values
name: 'John',
surname: 'Doe',
email: 'john.doe@example.com',
// add the attachment
attachment: {
value: fileData,
options: {
filename: 'file.pdf',
contentType: 'application/pdf',
},
},
},
});
The header Content-Type: multipart/form-data will be set automatically.
Submitting forms on .ASPX pages
Apify users sometimes need to submit a form on pages created with ASP.NET (URL typically ends with .aspx). These pages have a different approach for how they submit forms and navigate through pages.
This tutorial shows you how to handle these kinds of pages. This approach is based on a https://web.archive.org/web/20230530120937/https://toddhayton.com/2015/05/04/scraping-aspnet-pages-with-ajax-pagination/ from Todd Hayton, where he explains how crawlers for ASP.NET pages should work.
First of all, you need to copy&paste this function to your https://apify.com/apify/web-scraper Page function:
const enqueueAspxForm = async function (request, formSelector, submitButtonSelector, async) {
request.payload = $(formSelector).serialize();
if ($(submitButtonSelector).length) {
request.payload += decodeURIComponent(`&${$(submitButtonSelector).attr('name')}=${$(submitButtonSelector).attr('value')}`);
}
request.payload += decodeURIComponent(`&__ASYNCPOST=${async.toString()}`);
request.method = 'POST';
request.uniqueKey = Math.random();
await context.enqueueRequest(request);
return request;
};
The function has these parameters:
request - the object that describes the next request
formSelector - selector for a form to be submitted e.g 'form[name="test"]'
submitButtonSelector - selector for a button for submit form e.g. '#nextPageButton'
async - if true, request returns only params, not HTML content
Then you can use it in your Page function as follows:
await enqueueAspxForm({
url: 'http://architectfinder.aia.org/frmSearch.aspx',
userData: { label: 'SEARCH-RESULT' },
}, 'form[name="aspnetForm"]', '#ctl00_ContentPlaceHolder1_btnSearch', false);
Using man-in-the-middle proxy to intercept requests in Puppeteer
Sometimes you may need to intercept (or maybe block) requests in headless Chrome / Puppeteer, but page.setRequestInterception() is not 100% reliable when the request is started in a new window.
One possible way to intercept these requests is to use a man-in-the-middle (MITM) proxy, i.e. a proxy server that can intercept and modify HTTP requests, even those over HTTPS. In this example, we're going to use https://github.com/joeferner/node-http-mitm-proxy, since it has all the tools that we need.
First we set up the MITM proxy:
const { promisify } = require('util');
const { exec } = require('child_process');
const Proxy = require('http-mitm-proxy');
const Promise = require('bluebird');
const execPromise = promisify(exec);
const wait = (timeout) => new Promise((resolve) => setTimeout(resolve, timeout));
const setupProxy = async (port) => {
// Setup chromium certs directory
// WARNING: this only works in debian docker images
// modify it for any other use cases or local usage.
await execPromise('mkdir -p $HOME/.pki/nssdb');
await execPromise('certutil -d sql:$HOME/.pki/nssdb -N');
const proxy = Proxy();
proxy.use(Proxy.wildcard);
proxy.use(Proxy.gunzip);
return new Promise((resolve, reject) => {
proxy.listen({ port, silent: true }, (err) => {
if (err) return reject(err);
// Add CA certificate to chromium and return initialize proxy object
execPromise('certutil -d sql:$HOME/.pki/nssdb -A -t "C,," -n mitm-ca -i ./.http-mitm-proxy/certs/ca.pem')
.then(() => resolve(proxy))
.catch(reject);
});
});
};
Then we'll need a Docker image that has the certutil utility. Here is an https://github.com/apify/actor-example-proxy-intercept-request/blob/master/Dockerfile that can create such an image and is based on the https://hub.docker.com/r/apify/actor-node-chrome/ image that contains Puppeteer.
Now we need to specify how the proxy shall handle the intercepted requests:
// Setup blocking of requests in proxy
const proxyPort = 8000;
const proxy = setupProxy(proxyPort);
proxy.onRequest((context, callback) => {
if (blockRequests) {
const request = context.clientToProxyRequest;
// Log out blocked requests
console.log('Blocked request:', request.headers.host, request.url);
// Close the connection with custom content
context.proxyToClientResponse.end('Blocked');
return;
}
return callback();
});
The final step is to let Puppeteer use the local proxy:
// Launch puppeteer with local proxy
const browser = await puppeteer.launch({
args: ['--no-sandbox', `--proxy-server=localhost:${proxyPort}`],
});
And we're done! By adjusting the blockRequests variable, you can allow or block any request initiated through Puppeteer.
Here is a GitHub repository with a full example and all necessary files: https://github.com/apify/actor-example-proxy-intercept-request
If you have any questions, feel free to contact us in the chat.
Happy intercepting!
Waiting for dynamic content
Use these helper functions to wait for data:
-
page.waitForin https://pptr.dev/ (or Puppeteer Scraper (https://apify.com/apify/puppeteer-scraper)). -
context.waitForin Web Scraper (https://apify.com/apify/web-scraper).
Pass in time in milliseconds or a selector to wait for.
Examples:
-
await page.waitFor(10000)- waits for 10 seconds. -
await context.waitFor('my-selector')- waits formy-selectorto appear on the page.
For details, code examples, and advanced use cases, visit our https://docs.apify.com/academy/puppeteer-playwright/page/waiting.md.
When to use Puppeteer Scraper
You may have read in the https://apify.com/apify/web-scraper readme or somewhere else at Apify that https://apify.com/apify/puppeteer-scraper is more powerful and gives you more control over the browser, enabling you to do almost anything. But what does that really mean? In this article, we will talk about the differences in more detail and show you some minimal examples to strengthen that understanding.
What exactly is Puppeteer?
Both the Web Scraper and Puppeteer Scraper use Puppeteer to control the Chrome browser, so, what's the difference? Consider Puppeteer and Chrome as two separate programs.
Puppeteer is a JavaScript program that's used to control the browser and by controlling we mean opening tabs, closing tabs, moving the mouse, clicking buttons, typing on the keyboard, managing network activity, etc. If a website is watching for any of these events, there is no way for it to know that those actions were performed by a robot and not a human user. Chrome is just Chrome as you know it.
Robot browsers can be detected in numerous ways.. But there are no ways to tell if a specific mouse click was made by a user or a robot.
Ok, so both Web Scraper and Puppeteer Scraper use Puppeteer to give commands to Chrome. Where's the difference? It's called the execution environment.
Execution environment
It may sound fancy, but it's just a technical term for "where does my code run". When you open the DevTools and start typing JavaScript in the browser Console, it gets executed in the browser. Browser is the code's execution environment. But you can't control the browser from the inside. For that, you need a different environment. Puppeteer's environment is Node.js. If you don't know what Node.js is, don't worry about it too much. Remember that it's the environment where Puppeteer runs.
By now you probably figured this out on your own, so this will not come as a surprise. The difference between Web Scraper and Puppeteer Scraper is where your page function gets executed. When using the Web Scraper, it's executed in the browser environment. It means that it gets access to all the browser specific features such as the window or document objects, but it cannot control the browser with Puppeteer directly. This is done automatically in the background by the scraper. Whereas in Puppeteer Scraper, the page function is executed in the Node.js environment, giving you full access to Puppeteer and all its features.
 This does not mean that you can't execute in-browser code with Puppeteer Scraper. Keep reading to learn how.
Practical differences
Ok, cool, different environments, but how does that help you scrape stuff? Actually, quite a lot. Some things you just can't do from within the browser, but you can do them with Puppeteer. We will not attempt to create an exhaustive list, but rather show you some very useful features that we use every day in our scraping.
Evaluating in-browser code
In Web Scraper, everything runs in the browser, so there's really not much to talk about there. With Puppeteer Scraper, it's a single function call away.
const bodyHTML = await context.page.evaluate(() => {
console.log('This will be printed in browser console.');
return document.body.innerHTML;
});
The context.page.evaluate() call executes the provided function in the browser environment and passes back the return value back to the Node.js environment. One very important caveat though! Since we're in different environments, we cannot use our existing variables, such as context inside of the evaluated function, because they are not available there. Different environments, different variables.
See the page.evaluate() https://pptr.dev/#?product=Puppeteer&show=api-pageevaluatepagefunction-args for info on how to pass variables from Node.js to browser.
With the help of Apify SDK, we can even inject jQuery into the browser. You can use the Pre goto function input option to manipulate the page's environment before it loads.
async function preGotoFunction({ request, page, Apify }) {
await Apify.utils.puppeteer.injectJQuery(page);
}
This will make jQuery available in all pages. You can then use it in context.page.evaluate() calls:
const bodyText = await context.page.evaluate(() => {
return $('body').text();
});
You can do a lot of DOM manipulation directly from Node.js / Puppeteer, but when you're planning to do a lot of sequential operations, it's often better and faster to do it with jQuery in a single context.page.evaluate() call than using multiple context.page.$, context.page.$eval() and other Puppeteer methods.
Navigation to other pages (URLs)
In Web Scraper, your page function literally runs within a page so it makes sense that when this page gets destroyed, the page function throws an error. Sadly, navigation (going to a different URL) destroys pages, so whenever you click a button in Web Scraper that forces the browser to navigate somewhere else, you end up with an error. In Puppeteer Scraper, this is not an issue, because the page object gets updated with new data seamlessly.
Imagine that you currently have https://example.com/page-1 open and there's a button on the page that will take you to https://example.com/page-2.Or that you're on https://google.com and you fill in the search bar and click on the search button.
Consider the following code inside Web Scraper page function:
await context.waitFor('button');
$('button').click();
With a button that takes you to the next page or launches a Google search (which takes you to the results page), the page function will fail with a nasty error.
However, when using Puppeteer Scraper, this code:
await context.page.waitFor('button');
await Promise.all([
context.page.waitForNavigation(),
context.page.click('button'),
]);
Will work as expected and after the Promise.all() call resolves, you will have the next page loaded and ready for scraping.
Pay special attention to the page.waitForNavigation() (https://pptr.dev/#?product=Puppeteer&show=api-pagewaitfornavigationoptions) call which is very important. It pauses your script until the navigation completes. Without it, the execution would start immediately after the mouse click. It's also important that you place it before the click itself, otherwise it creates a race condition and your script will behave unpredictably.
You can go even further and navigate programmatically by calling:
await context.page.goto('https://some-new-page.com');
Intercepting network activity
Some very useful scraping techniques revolve around listening to network requests and responses and even modifying them on the fly. Web Scraper's page function doesn't have access to the network, besides calling JavaScript APIs such as fetch(). Puppeteer Scraper, on the other hand, has full control over the browser's network activity.
You can listen to all the network requests that are being dispatched from the browser. For example, the following code will print all their URLs to the console.
context.page.on('request', (req) => console.log(req.url()));
This can be useful in many ways, such as blocking unwanted assets or scripts from being downloaded, modifying request methods or faking responses, etc.
Explaining how to do interception properly is out of scope of this article. See https://pptr.dev/#?product=Puppeteer&show=api-pagesetrequestinterceptionvalue and the https://docs.apify.com/sdk/js/docs/api/puppeteer#puppeteeraddinterceptrequesthandler-promise for request interception.
Enqueueing JavaScript links
A large number of websites use either form submissions or JavaScript redirects for navigation and displaying of data. With Web Scraper, you cannot crawl those websites, because there are no links to find and enqueue on those pages. Puppeteer Scraper enables you to automatically click all those elements that cause navigation, intercept the navigation requests and enqueue them to the request queue.
If it seems complicated, don't worry. We've abstracted all the complexity away to a Clickable elements selector input option. When left empty, none of the said clicking and intercepting happens, but once you choose a selector, Puppeteer Scraper will automatically click all the selected elements, watch for page navigations and enqueue them into the RequestQueue.
The Clickable elements selector will also work on regular non-JavaScript links, however, it is significantly slower than using the plain Link selector. Unless you know you need it, use the Link selector for best performance.
Word of caution
Since we're actually clicking in the page, which may or may not trigger some nasty JavaScript, anything can happen really, including the page completely breaking. Three common scenarios exist though.
Plain form submit navigations
This works out of the box. It's typically used on older websites such as https://www.remax.com.tr/ofis-office-franchise-girisimci-agent-arama. For a site like this you can set the Clickable elements selector and you're good to go:
'a[onclick ^= getPage]';
Form submit navigations with side-effects
Those are similar to the ones above with an important caveat. Once you click the first thing, it usually modifies the page in a way that causes more clicking to become impossible. We deal with those by scraping the pages one by one, using the pagination "next" button. See http://www.maxwellrender.com/materials/ and use the following selector:
'li.page-item.next a';
Frontend navigations
Websites often won't navigate away just to fetch the next set of results. They will do it in the background and update the displayed data. You can paginate such websites with either Web Scraper or Puppeteer Scraper. Try it on https://www.udemy.com/topic/javascript/ for example. Click the next button to load the next set of courses.
// Web Scraper\
$('li a span.pagination-next').click();
// Puppeteer Scraper\
await page.click('li a span.pagination-next');
Using Apify SDK
https://docs.apify.com/sdk/js is the library we used to build all of our scrapers. For power users, it is the best tool out there to scrape using JavaScript. If you're not yet ready to start writing your own Actors using SDK, Puppeteer Scraper enables you to use its features without having to worry about building your own Actors.
The possibilities are endless, but to show you some examples:
-
Check out the https://docs.apify.com/sdk/js/docs/api/puppeteer#puppeteer.infiniteScroll function that enables scraping pages with infinite scroll in one line of code.
-
https://docs.apify.com/sdk/js/docs/api/puppeteer#puppeteer.blockRequests allows you to block network requests based on URL patterns.
-
https://docs.apify.com/sdk/js/docs/api/apify#module_Apify.openDataset lets you work with any dataset under your account.
-
Make HTTP requests with
Apify.utils.requestAsBrowser()to fetch external resources.
And we're only scratching the surface here.
Wrapping it up
Many more techniques are available to Puppeteer Scraper that are either too complicated to replicate in Web Scraper or downright impossible to do. Web Scraper is a great tool for basic scraping, because it goes right to the point and uses in-browser JavaScript which is well-known to millions of people, even non-developers.
Once you start hitting some roadblocks, you may find that Puppeteer Scraper is just what you need to overcome them. And if Puppeteer Scraper still doesn't cut it, there's still Apify SDK to rule them all. We hope you found this tutorial helpful and happy scraping.
How to use Apify from PHP
Apify's https://docs.apify.com/api/v2# allows you to use the platform from basically anywhere. Many projects are and will continue to be built using https://www.php.net/. This tutorial enables you to use Apify in these projects in PHP and frameworks built on it.
Apify does not have an official PHP client (yet), so we are going to use https://github.com/guzzle/guzzle, a great library for HTTP requests. By covering a few fundamental endpoints, this tutorial will show you the principles you can use for all Apify API endpoints.
Before you start
Make sure you have an Apify account and API token. You will find the token in the https://console.apify.com/account#/integrations section in Apify Console.
If you don't already have guzzle installed in your project (or just want to try out the code examples), run composer require guzzlehttp/guzzle to install it in the current directory.
Preparing the client
To get a guzzle instance ready to be used with the Apify API, we first need to set up the base endpoint and authentication.
require 'vendor/autoload.php';
$client = new \GuzzleHttp\Client([
'base_uri' => 'https://api.apify.com/v2/',
'headers' => [
// Replace with your actual token
'Authorization' => 'Bearer ',
]
]);
Note that we pass the API token in the header. It can also be passed as a query string token parameter, but passing it in the header is preferred and more secure.
To check whether everything works well, we'll try to get information about the https://docs.apify.com/api/v2/users-me-get.md.
// Call the endpoint using our client
// Note that the path does not have a leading slash
$response = $client->get('users/me');
// Parse the response (most Apify API endpoints return JSON)
$parsedResponse = \json_decode($response->getBody(), true);
// The actual data are usually present under the `data` key
$data = $parsedResponse['data'];
echo \json_encode($data, JSON_PRETTY_PRINT);
If, instead of data, you see an error saying Authentication token is not valid, check if the API token you used to instantiate the client is valid.
Running an Actor
Now that we have our guzzle client ready to go, we can run some Actors. Let's try the Contact Details Scraper (https://apify.com/vdrmota/contact-info-scraper).
The https://docs.apify.com/api/v2/act-runs-post.md states that an Actor's input should be passed as JSON in the request body. Other options are passed as query parameters.
// To run the Actor, we make a POST request to its run's endpoint
// To identify the Actor, you can use its ID, but you can also pass
// the full Actor name [username]~[actorName] or just ~[actorName] for
// your own Actors
$response = $client->post('acts/vdrmota~contact-info-scraper/runs', [
// Actors usually accept JSON as input. When using the `json` key in
// a POST request's options, guzzle sets proper request headers
// and serializes the array we pass in
'json' => [
'startUrls' => [
['url' => 'https://www.apify.com/contact']
],
'maxDepth' => 0,
],
// Other run options are passed in as query parameters
// This is optional since Actors usually have reasonable defaults
'query' => [ 'timeout' => 30 ],
]);
$parsedResponse = \json_decode($response->getBody(), true);
$data = $parsedResponse['data'];
echo \json_encode($data, JSON_PRETTY_PRINT);
You should see information about the run, including its ID and the ID of its default https://docs.apify.com/platform/storage/dataset.md. Take note of these, we will need them later.
Getting the results from dataset
Actors usually store their output in a default dataset. The https://docs.apify.com/api/v2/actor-runs.md lets you get overall info about an Actor run's default dataset.
// Replace with the run ID you from earlier
$response = $client->get('actor-runs//dataset');
$parsedResponse = \json_decode($response->getBody(), true);
$data = $parsedResponse['data'];
echo \json_encode($data, JSON_PRETTY_PRINT);
As you can see, the response contains overall stats about the dataset, like its number of items, but not the actual data. To get those, we have to call the items endpoint.
// Replace with the run ID from earlier
$response = $client->get('actor-runs//dataset/items');
// The dataset items endpoint returns an array of dataset items
// they are not under the `data` key like in other endpoints
$data = \json_decode($response->getBody(), true);
echo \json_encode($data, JSON_PRETTY_PRINT);
Some of the Actors write to datasets other than the default. In these cases, you need to have the dataset ID and call the datasets/ and datasets//items endpoints instead.
For larger datasets, you can paginate through the results by passing query parameters.
$response = $client->get('datasets//items', [
'query' => [
'offset' => 20,
'limit' => 10,
]
]);
$parsedResponse = \json_decode($response->getBody(), true);
echo \json_encode($parsedResponse, JSON_PRETTY_PRINT);
All the available parameters are described in https://docs.apify.com/api/v2/dataset-items-get.md and work both for all datasets.
Getting the results from key-value stores
Datasets are great for structured data, but are not suited for binary files like images or PDFs. In these cases, Actors store their output in https://docs.apify.com/platform/storage/key-value-store.md. One such Actor is the HTML String To PDF (https://apify.com/mhamas/html-string-to-pdf) converter. Let's run it.
$response = $client->post('acts/mhamas~html-string-to-pdf/runs', [
'json' => [
'htmlString' => 'Hello World'
],
]);
$parsedResponse = \json_decode($response->getBody(), true);
$data = $parsedResponse['data'];
echo \json_encode($data, JSON_PRETTY_PRINT);
Keep track of the returned run ID.
Similar to datasets, we can get overall info about the default key-value store.
// Replace with the ID returned by the code above
$response = $client->get('actor-runs//key-value-store');
$parsedResponse = \json_decode($response->getBody(), true);
$data = $parsedResponse['data'];
echo \json_encode($data, JSON_PRETTY_PRINT);
The items in key-value stores are not structured, so we cannot use the same approach as we did with dataset items. We can obtain some information about a store's content using its keys endpoint.
// Don't forget to replace with the ID you got earlier
$response = $client->get('actor-runs//key-value-store/keys');
$parsedResponse = \json_decode($response->getBody(), true);
$data = $parsedResponse['data'];
echo \json_encode($data, JSON_PRETTY_PRINT);
We can see that there are two record keys: INPUT and OUTPUT. The HTML String to PDF Actor's README states that the PDF is stored under the OUTPUT key. Let's download it:
// Don't forget to replace the
$response = $client->get('actor-runs//key-value-store/records/OUTPUT');
// Make sure that the destination (filename) is writable
file_put_contents(__DIR__ . '/hello-world.pdf', $response->getBody());
If you open the generated hello-world.pdf file, you should see... well, "Hello World".
If the Actor stored the data in a key-value store other than the default, we can use the standalone endpoints, key-value-stores/, key-value-stores//keys, and key-value-stores//records/. They behave the same way as the default endpoints. https://docs.apify.com/api/v2/storage-key-value-stores.md.
When are the data ready
It takes some time for an Actor to generate its output. Some even have Actors that run for days! In the previous examples, we chose Actors whose runs only take a few seconds. This meant the runs had enough time to finish before we ran the code to retrieve their dataset or key-value store (so the Actor had time to produce some output). If we ran the code immediately after starting a longer-running Actor, the dataset would probably still be empty.
For Actors that are expected to be quick, we can use the waitForFinish parameter. Then, the running Actor's endpoint does not respond immediately but waits until the run finishes (up to the given limit). Let's try this with the HTML String to PDF Actor.
$response = $client->post('acts/mhamas~html-string-to-pdf/runs', [
'json' => [
'htmlString' => 'Hi World'
],
// Pass in how long we want to wait, in seconds
'query' => [ 'waitForFinish' => 60 ]
]);
$parsedResponse = \json_decode($response->getBody(), true);
$data = $parsedResponse['data'];
echo \json_encode($data, JSON_PRETTY_PRINT);
$runId = $data['id'];
$response = $client->get(sprintf('actor-runs/%s/key-value-store/records/OUTPUT', $runId));
file_put_contents(__DIR__ . '/hi-world.pdf', $response->getBody());
Webhooks
For Actors that take longer to run, we can use https://docs.apify.com/platform/integrations/webhooks.md. A webhook is an HTML POST request that is sent to a specified URL when an Actor's status changes. We can use them as a kind of notification that is sent when your run finishes. You can set them up using query parameters. If we used webhooks in the example above, it would look like this:
// Webhooks need to be passed as a base64-encoded JSON string
$webhooks = \base64_encode(\json_encode([
[
// The webhook can be sent on multiple events
// this one fires when the run succeeds
'eventTypes' => ['ACTOR.RUN.SUCCEEDED'],
// Set this to some url that you can react to
// To see what is sent to the URL,
// you can set up a temporary request bin at https://requestbin.com/r
'requestUrl' => '',
],
]));
$response = $client->post('acts/mhamas~html-string-to-pdf/runs', [
'json' => [
'htmlString' => 'Hello World'
],
'query' => [ 'webhooks' => $webhooks ]
]);
How to use Apify Proxy
Let's use another important feature: https://docs.apify.com/platform/proxy.md. If you want to make sure that your server's IP address won't get blocked somewhere when making requests, you can use the automatic proxy selection mode.
$client = new \GuzzleHttp\Client([
// Replace below with your password
// found at https://console.apify.com/proxy
'proxy' => 'http://auto:@proxy.apify.com:8000'
]);
// This request will be made through an automatically chosen proxy
$response = $client->get("http://proxy.apify.com/?format=json");
echo $response->getBody();
If you want to maintain the same IP between requests, you can use the session mode.
$client = new \GuzzleHttp\Client([
// Replace below with your password
// found at https://console.apify.com/proxy
'proxy' => 'http://session-my_session:@proxy.apify.com:8000'
]);
// Both responses should contain the same clientIp
$response = $client->get("https://api.apify.com/v2/browser-info");
echo $response->getBody();
$response = $client->get("https://api.apify.com/v2/browser-info");
echo $response->getBody();
https://docs.apify.com/platform/proxy/usage.md for more details on using specific proxies.
Feedback
Are you interested in an Apify PHP client or other PHP-related content? Do you have some feedback on this tutorial? https://apify.typeform.com/to/KqhmiJge#source=tutorial_use_apify_from_php!
Puppeteer & Playwright course
Learn in-depth how to use two of the most popular Node.js libraries for controlling a headless browser - Puppeteer and Playwright.
https://pptr.dev/ and https://playwright.dev/ are libraries that allow you to automate browsing. Based on your instructions, they can open a browser window, load a website, click on links, etc. They can also do this headlessly, i.e., in a way that the browser window isn't visible, which is faster.
Both packages were developed by the same team and are very similar, which is why we have combined the Puppeteer course and the Playwright course into one super-course that shows code examples for both technologies. The two differ in only small ways, and those will always be highlighted in the examples.
Each lesson's activity will contain examples for both libraries, but we recommend using Playwright, as it is newer and has more features and better https://playwright.dev/docs/intro
Advantages of using a headless browser
When automating a headless browser, you can do a whole lot more in comparison to making HTTP requests for static content. In fact, you can programmatically do pretty much anything a human could do with a browser, such as clicking elements, taking screenshots, typing into text areas, etc.
Additionally, since the requests aren't static, https://docs.apify.com/academy/concepts/dynamic-pages.md can be rendered and interacted with (or, data from the dynamic content can be scraped). Turn on the https://playwright.dev/docs/api/class-testoptions#test-options-headless (headless: false) to see exactly what the browser is doing.
Browsers can also be effective for https://docs.apify.com/academy/anti-scraping.md, especially if the website is running https://docs.apify.com/academy/anti-scraping/techniques/browser-challenges.md.
Disadvantages of headless browsers
Browsers are slow and expensive to run. In the follow-up courses, the Apify Academy will show you how to scrape websites without a browser. Every website can potentially be reverse-engineered into a series of quick and cheap HTTP calls, but it might require significant effort and specialized knowledge.
Setup
For this course, we'll be jumping right into the features of these awesome libraries and expecting you to already have an environment set up. Here's how we set up our environment:
- Make sure you've installed https://nodejs.org/en/
- Create a new folder called puppeteer-playwright (or whatever you want to call it)
- Run the command
npm init -ywithin your new folder to automatically initialize the project - Add
"type": "module"to the package.json file - Create a new file named index.js
- Install the library you're going to be using during this course:
- Install Playwright
- Install Puppeteer
npm install playwright
npm install puppeteer
For a more in-depth guide on how to set up the basic environment we'll be using in this tutorial, check out the https://docs.apify.com/academy/web-scraping-for-beginners/data-extraction/computer-preparation.md lesson in the Web scraping basics for JavaScript devs course
Course overview
-
https://docs.apify.com/academy/puppeteer-playwright/browser.md
-
https://docs.apify.com/academy/puppeteer-playwright/executing-scripts.md
-
https://docs.apify.com/academy/puppeteer-playwright/reading-intercepting-requests.md
-
https://docs.apify.com/academy/puppeteer-playwright/proxies.md
-
https://docs.apify.com/academy/puppeteer-playwright/browser-contexts.md
-
https://docs.apify.com/academy/puppeteer-playwright/common-use-cases.md
First up
In the https://docs.apify.com/academy/puppeteer-playwright/browser.md of this course, we'll be learning a bit about how to create and use the Browser object.
Browser
Understand what the Browser object is in Puppeteer/Playwright, how to create one, and a bit about how to interact with one.
In order to automate a browser in Playwright or Puppeteer, we need to open one up programmatically. Playwright supports Chromium, Firefox, and Webkit (Safari), while Puppeteer only supports Chromium based browsers. For ease of understanding, we've chosen to use Chromium in the Playwright examples to keep things working on the same plane.
Let's start by using the launch() function in the index.js file we created in the intro to this course:
- Playwright
- Puppeteer
import { chromium } from 'playwright';
await chromium.launch();
console.log('launched!');
import puppeteer from 'puppeteer';
await puppeteer.launch();
console.log('launched!');
When we run this code with the command node index.js, a browser will open up; however, we won't actually see anything. This is because the default mode of a browser after launch()ing it is headless, meaning that it has no visible UI.
If you run this code right now, it will hang. Use control^ + C to force quit the program.
Launch options
In order to see what's actually happening, we can pass an options object (https://pptr.dev/#?product=Puppeteer&version=v13.7.0&show=api-puppeteerlaunchoptions, https://playwright.dev/docs/api/class-browsertype#browser-type-launch) with headless set to false.
- Playwright
- Puppeteer
import { chromium } from 'playwright';
const browser = await chromium.launch({ headless: false });
await browser.newPage();
import puppeteer from 'puppeteer';
const browser = await puppeteer.launch({ headless: false });
await browser.newPage();
Now we'll actually see a browser open up.

You can pass a whole lot more options to the launch() function. We'll be getting into those a little bit later on.
Browser methods
The launch() function also returns a Browser object (https://pptr.dev/#?product=Puppeteer&version=v13.7.0&show=api-class-browser, https://playwright.dev/docs/api/class-browser), which is a representation of the browser. This object has many methods, which allow us to interact with the browser from our code. One of them is close(). Until now, we've been using control^ + C to force quit the process, but with this function, we'll no longer have to do that.
- Playwright
- Puppeteer
import { chromium } from 'playwright';
const browser = await chromium.launch({ headless: false });
await browser.newPage();
// code will be here in the future
await browser.close();
import puppeteer from 'puppeteer';
const browser = await puppeteer.launch({ headless: false });
await browser.newPage();
// code will be here in the future
await browser.close();
Next up
Now that we can open a browser, let's move onto the https://docs.apify.com/academy/puppeteer-playwright/page.md where we will learn how to create pages and visit websites programmatically.
Creating multiple browser contexts
Learn what a browser context is, how to create one, how to emulate devices, and how to use browser contexts to automate multiple sessions at one time.
A https://playwright.dev/docs/api/class-browsercontext is an isolated incognito session within a Browser instance. This means that contexts can have different device/screen size configurations, different language and color scheme settings, etc. It is useful to use multiple browser instances when dealing with automating logging into multiple accounts simultaneously (therefore requiring multiple sessions), or in any cases where multiple sessions are required.
When we create a Browser object by using the launch() function, a single https://playwright.dev/docs/browser-contexts is automatically created. In order to create more, we use the https://playwright.dev/docs/api/class-browser#browser-new-context function in Playwright, and https://pptr.dev/#?product=Puppeteer&version=v14.1.0&show=api-browsercreateincognitobrowsercontextoptions in Puppeteer.
- Playwright
- Puppeteer
const myNewContext = await browser.newContext();
const myNewContext = await browser.createIncognitoBrowserContext();
Persistent vs non-persistent browser contexts
In both examples above, we are creating a new non-persistent browser context, which means that once it closes, all of its cookies, cache, etc. will be lost. For some cases, that's okay, but in most situations, the performance hit from this is too large. This is why we have persistent browser contexts. Persistent browser contexts open up a bit slower and they store all their cache, cookies, session storage, and local storage in a file on disk.
In Puppeteer, the default browser context is the persistent one, while in Playwright we have to use https://playwright.dev/docs/api/class-browsertype#browser-type-launch-persistent-context instead of BrowserType.launch() in order for the default context to be persistent.
- Playwright
- Puppeteer
import { chromium } from 'playwright';
// Here, we launch a persistent browser context. The first
// argument is the location to store the data.
const browser = await chromium.launchPersistentContext('./persistent-context', { headless: false });
const page = await browser.newPage();
await browser.close();
import puppeteer from 'puppeteer';
const browser = await puppeteer.launch({ headless: false });
// This page will be under the default context, which is persistent.
// Cache, cookies, etc. will be stored on disk and persisted
const page = await browser.newPage();
await browser.close();
Using browser contexts
In both Playwright and Puppeteer, various devices (iPhones, iPads, Androids, etc.) can be emulated by using https://playwright.dev/docs/api/class-playwright#playwright-devices or https://pptr.dev/#?product=Puppeteer&version=v14.1.0&show=api-puppeteerdevices. We'll be using this to create two different browser contexts, one emulating an iPhone, and one emulating an Android device:
- Playwright
- Puppeteer
import { chromium, devices } from 'playwright';
// Launch the browser
const browser = await chromium.launch({ headless: false });
const iPhone = devices['iPhone 11 Pro'];
// Create a new context for our iPhone emulation
const iPhoneContext = await browser.newContext({ ...iPhone });
// Open a page on the newly created iPhone context
const iPhonePage = await iPhoneContext.newPage();
const android = devices['Galaxy Note 3'];
// Create a new context for our Android emulation
const androidContext = await browser.newContext({ ...android });
// Open a page on the newly created Android context
const androidPage = await androidContext.newPage();
// The code in the next step will go here
await browser.close();
import puppeteer from 'puppeteer';
// Launch the browser
const browser = await puppeteer.launch({ headless: false });
const iPhone = puppeteer.devices['iPhone 11 Pro'];
// Create a new context for our iPhone emulation
const iPhoneContext = await browser.createIncognitoBrowserContext();
// Open a page on the newly created iPhone context
const iPhonePage = await iPhoneContext.newPage();
// Emulate the device
await iPhonePage.emulate(iPhone);
const android = puppeteer.devices['Galaxy Note 3'];
// Create a new context for our Android emulation
const androidContext = await browser.createIncognitoBrowserContext();
// Open a page on the newly created Android context
const androidPage = await androidContext.newPage();
// Emulate the device
await androidPage.emulate(android);
// The code in the next step will go here
await browser.close();
Then, we'll make both iPhonePage and androidPage visit https://www.deviceinfo.me/, which is a website that displays the type of device you have, the operating system you're using, and more device and location-specific information.
// Go to deviceinfo.me on both at the same time
await Promise.all([iPhonePage.goto('https://www.deviceinfo.me/'), androidPage.goto('https://www.deviceinfo.me/')]);
// Wait for 10 seconds on both before shutting down
await Promise.all([iPhonePage.waitForTimeout(10000), androidPage.waitForTimeout(10000)]);
Let's go ahead and run our code and analyze the data on each deviceinfo.me page. Here's what we see:

We see that deviceinfo.me detects both contexts as using different devices, despite the fact they're visiting the same page at the same time. This shows firsthand that different browser contexts can have totally different configurations, as they all have separate sessions.
Accessing browser contexts
When working with multiple browser contexts, it can be difficult to keep track of all of them and making changes becomes a repetitive job. This is why the Browser instance returned from the launch() function also has a contexts() function (browserContexts() in Puppeteer). This function returns an array of all the contexts that are currently attached to the browser.
Let's go ahead and use this function to loop through all of our browser contexts and make them log Site visited to the console whenever the website is visited:
- Playwright
- Puppeteer
for (const context of browser.contexts()) {
// In Playwright, lots of events are supported in the "on" function of
// a BrowserContext instance
context.on('request', (req) => req.url() === 'https://www.deviceinfo.me/' && console.log('Site visited'));
}
for (const context of browser.browserContexts()) {
// In Puppeteer, only three events are supported in the "on" function
// of a BrowserContext instance
context.on('targetchanged', () => console.log('Site visited'));
}
After adding this above our page.gotos and running the code once again, we see this logged to the console:
Site visited
Site visited
Cool! We've modified both our iPhoneContext and androidContext, as well as our default context, to log the message.
Note that the Puppeteer code and Playwright code are slightly different in the examples above. The Playwright code will log Site visited any time the specific URL is visited, while the Puppeteer code will log any time the target URL is changed to anything.
Finally, in Puppeteer, you can use the browser.defaultBrowserContext() function to grab hold of the default context at any point.
Wrap up
Thus far in this course, you've learned how to launch a browser, open a page, run scripts on a page, extract data from a page, intercept requests made on the page, use proxies, and use multiple browser contexts. Stay tuned for new lessons!
Common use cases
Learn about some of the most common use cases of Playwright and Puppeteer, and how to handle these use cases when you run into them.
You can do about anything with a headless browser, but, there are some extremely common use cases that are important to understand and be prepared for when you might run into them. This short section will be all about solving these common situations. Here's what we'll be covering:
- Login flow (logging into an account)
- Paginating through results on a website
- Solving browser challenges (ex. captchas)
- More!
Next up
The https://docs.apify.com/academy/puppeteer-playwright/common-use-cases/logging-into-a-website.md of this section is all about logging into a website and running multiple concurrent operations within a user's account.
Downloading files
Learn how to automatically download and save files to the disk using two of the most popular web automation libraries, Puppeteer and Playwright.
Downloading a file using Puppeteer can be tricky. On some systems, there can be issues with the usual file saving process that prevent you from doing it in a straightforward way. However, there are different techniques that work (most of the time).
These techniques are only necessary when we don't have a direct file link, which is usually the case when the file being downloaded is based on more complicated data export.
Setting up a download path
Let's start with the easiest technique. This method tells the browser in what folder we want to download a file from Puppeteer after clicking on it.
const client = await page.target().createCDPSession();
await client.send('Page.setDownloadBehavior', { behavior: 'allow', downloadPath: './my-downloads' });
We use the mysterious client API which gives us access to all the functions of the underlying https://pptr.dev/api/puppeteer.cdpsession (Puppeteer & Playwright are built on top of it). Basically, it extends Puppeteer's functionality. Then we can download the file by clicking on the button.
await page.click('.export-button');
Let's wait for one minute. In a real use case, you want to check the state of the file in the file system.
await page.waitFor(60000);
To extract the file from the file system into memory, we have to first find its name, and then we can read it.
import fs from 'fs';
const fileNames = fs.readdirSync('./my-downloads');
// Let's pick the first one
const fileData = fs.readFileSync(`./my-downloads/${fileNames[0]}`);
// ...Now we can do whatever we want with the data
Intercepting and replicating a file download request
For this second option, we can trigger the file download, intercept the request going out, and then replicate it to get the actual data. First, we need to enable request interception. This is done using the following line of code:
await page.setRequestInterception(true);
Next, we need to trigger the actual file export. We might need to fill in some form, select an exported file type, etc. In the end, it will look something like this:
await page.click('.export-button');
We don't need to await this promise since we'll be waiting for the result of this action anyway (the triggered request).
The crucial part is intercepting the request that would result in downloading the file. Since the interception is already enabled, we just need to wait for the request to be sent.
const xRequest = await new Promise((resolve) => {
page.on('request', (interceptedRequest) => {
interceptedRequest.abort(); // stop intercepting requests
resolve(interceptedRequest);
});
});
The last thing is to convert the intercepted Puppeteer request into a request-promise options object. We need to have the request-promise package installed.
import request from 'request-promise';
Since the request interception does not include cookies, we need to add them subsequently.
const options = {
encoding: null,
method: xRequest._method,
uri: xRequest._url,
body: xRequest._postData,
headers: xRequest._headers,
};
// Add the cookies
const cookies = await page.cookies();
options.headers.Cookie = cookies.map((ck) => `${ck.name}=${ck.value}`).join(';');
// Resend the request
const response = await request(options);
Now, the response contains the binary data of the downloaded file. It can be saved to the disk, uploaded somewhere, or https://docs.apify.com/academy/puppeteer-playwright/common-use-cases/submitting-a-form-with-a-file-attachment.md.
Logging into a website
Understand the "login flow" - logging into a website, then maintaining a logged in status within different browser contexts for an efficient automation process.
Whether it's auto-renewing a service, automatically sending a message on an interval, or automatically cancelling a Netflix subscription, one of the most popular things headless browsers are used for is automating things within a user's account on a certain website. Of course, automating anything on a user's account requires the automation of the login process as well. In this lesson, we'll be covering how to build a login flow from start to finish with Playwright or Puppeteer.
In this lesson, we'll be using https://www.yahoo.com/ as an example. Feel free to follow along using the academy Yahoo account credentials, or even deviate from the lesson a bit and try building a login flow for a different website of your choosing!
Inputting credentials
The full logging in process on Yahoo goes like this:
- Accept their cookies policy, then load the main page.
- Click on the Sign in button and load the sign-in page.
- Enter the username and click the button.
- Enter the password and click the button, then load the main page again (but now logged in).
When we lay out the steps like this in https://en.wikipedia.org/wiki/Pseudocode, it makes it significantly easier to translate over into code. Here's the four steps above loop in JavaScript:
- Playwright
- Puppeteer
import { chromium } from 'playwright';
// Launch a browser and open a page
const browser = await chromium.launch({ headless: false });
const page = await browser.newPage();
await page.goto('https://www.yahoo.com/');
// Agree to the cookies terms, then click on the "Sign in" button
await page.click('button[name="agree"]');
await page.waitForSelector('a:has-text("Sign in")');
await page.click('a:has-text("Sign in")');
await page.waitForLoadState('load');
// Type in the username and continue forward
await page.type('input[name="username"]', 'YOUR-LOGIN-HERE');
await page.click('input[name="signin"]');
// Type in the password and continue forward
await page.type('input[name="password"]', 'YOUR-PASSWORD-HERE');
await page.click('button[name="verifyPassword"]');
await page.waitForLoadState('load');
// Wait for 10 seconds so we can see that we have in fact
// successfully logged in
await page.waitForTimeout(10000);
import puppeteer from 'puppeteer';
// Launch a browser and open a page
const browser = await puppeteer.launch({ headless: false });
const page = await browser.newPage();
await page.goto('https://www.yahoo.com/');
// Agree to the cookies terms, then click on the "Sign in" button
await Promise.all([page.waitForSelector('a[data-ylk*="sign-in"]'), page.click('button[name="agree"]')]);
await Promise.all([page.waitForNavigation(), page.click('a[data-ylk*="sign-in"]')]);
// Type in the username and continue forward
await page.type('input[name="username"]', 'YOUR-LOGIN-HERE');
await Promise.all([page.waitForNavigation(), page.click('input[name="signin"]')]);
// Type in the password and continue forward
await page.type('input[name="password"]', 'YOUR-PASSWORD-HERE');
await Promise.all([page.waitForNavigation(), page.click('button[name="verifyPassword"]')]);
// Wait for 10 seconds so we can see that we have in fact
// successfully logged in
await page.waitForTimeout(10000);
Great! If you're following along and you've replaced the placeholder credentials with your own, you should see that on the final navigated page, you're logged into your Yahoo account.

Passing around cookies
Now that we all know how to log into a website let's try and solve a more complex problem. Let's say that we want to send 3 different emails at the same exact time, all from the Academy Yahoo account.
Here is an object we'll create which represents the three different emails we want to send:
const emailsToSend = [
{
to: 'alice@example.com',
subject: 'Hello',
body: 'This is a message.',
},
{
to: 'bob@example.com',
subject: 'Testing',
body: 'I love the academy!',
},
{
to: 'carol@example.com',
subject: 'Apify is awesome!',
body: 'Some content.',
},
];
What we could do is log in 3 different times, then automate the sending of each email; however, this is extremely inefficient. When you log into a website, one of the main things that allows you to stay logged in and perform actions on your account is the https://docs.apify.com/academy/concepts/http-cookies.md stored in your browser. These cookies tell the website that you have been authenticated, and that you have the permissions required to modify your account.
With this knowledge of cookies, it can be concluded that we can pass the cookies generated by the code above right into each new browser context that we use to send each email. That way, we won't have to run the login flow each time.
Retrieving cookies
First, we'll grab the cookies we generated:
- Playwright
- Puppeteer
// Grab the cookies from the default browser context,
// which was used to log in
const cookies = await browser.contexts()[0].cookies();
// Grab the cookies from the page used to log in
const cookies = await page.cookies();
Notice that in Playwright, cookies are tied to a BrowserContext, while in Puppeteer they are tied to a Page.
Passing cookies to a new browser context
Remembering from the section above, we stored our cookies in a variable named cookies. These can now be directly passed into a new browser context like so:
- Playwright
- Puppeteer
// Create a fresh non-persistent browser context
const sendEmailContext = await browser.newContext();
// Add the cookies from the previous one to this one so that
// we'll be logged into Yahoo without having to re-do the
// logging in automation
await sendEmailContext.addCookies(cookies);
const page2 = await sendEmailContext.newPage();
// Notice that we are logged in, even though we didn't
// go through the logging in process again!
await page2.goto('https://mail.yahoo.com/');
await page2.waitForTimeout(10000);
// Create a fresh non-persistent browser context
const sendEmailContext = await browser.createIncognitoBrowserContext();
// Create a new page on the new browser context and set its cookies
// to be the same ones from the page we used to log into the website.
const page2 = await sendEmailContext.newPage();
await page2.setCookie(...cookies);
// Notice that we are logged in, even though we didn't
// go through the logging in process again!
await page2.goto('https://mail.yahoo.com/');
await page2.waitForTimeout(10000);
Completing the flow
Now that passing cookies around is out of the way, we can finally complete the goal at hand and send all three of these emails at once. This can be done by mapping through emailsToSend, creating an array of promises where each function creates a new browser context, adds the initial cookies, and sends the email.
- Playwright
- Puppeteer
// Grab the cookies from the default browser context,
// which was used to log in
const cookies = await browser.contexts()[0].cookies();
await page.close();
// Create an array of promises, running the cookie passing
// and email sending logic each time
const promises = emailsToSend.map(({ to, subject, body }) => (async () => {
// Create a fresh non-persistent browser context
const sendEmailContext = await browser.newContext();
// Add the cookies from the previous one to this one so that
// we'll be logged into Yahoo without having to re-do the
// logging in automation
await sendEmailContext.addCookies(cookies);
const page2 = await sendEmailContext.newPage();
await page2.goto('https://mail.yahoo.com/');
// Compose an email
await page2.click('a[aria-label="Compose"]');
// Populate the fields with the details from the object
await page2.type('input#message-to-field', to);
await page2.type('input[data-test-id="compose-subject"]', subject);
await page2.type('div[data-test-id="compose-editor-container"] div[contenteditable="true"]', body);
// Send the email
await page2.click('button[title="Send this email"]');
await sendEmailContext.close();
})(),
);
// Wait for all emails to be sent
await Promise.all(promises);
// Create an array of promises, running the cookie passing
// and email sending logic each time
const promises = emailsToSend.map(({ to, subject, body }) => (async () => {
// Create a fresh non-persistent browser context
const sendEmailContext = await browser.createIncognitoBrowserContext();
// Create a new page on the new browser context and set its cookies
// to be the same ones from the page we used to log into the website.
const page2 = await sendEmailContext.newPage();
await page2.setCookie(...cookies);
await page2.goto('https://mail.yahoo.com/');
// Compose an email
await page2.click('a[aria-label="Compose"]');
// Populate the fields with the details from the object
await page2.type('input#message-to-field', to);
await page2.type('input[data-test-id="compose-subject"]', subject);
await page2.type('div[data-test-id="compose-editor-container"] div[contenteditable="true"]', body);
// Send the email
await page2.click('button[title="Send this email"]');
await sendEmailContext.close();
})(),
);
// Wait for all emails to be sent
await Promise.all(promises);
Final code overview
To sum up what we've built during this lesson:
- Log into Yahoo.
- Store the login cookies in a variable.
- Concurrently create 3 new browser contexts and inject the cookies into each one.
- Concurrently send 3 emails from the same account logged into in the first step.
Here's what the final code looks like:
- Playwright
- Puppeteer
import { chromium } from 'playwright';
const emailsToSend = [
{
to: 'alice@example.com',
subject: 'Hello',
body: 'This is a message.',
},
{
to: 'bob@example.com',
subject: 'Testing',
body: 'I love the academy!',
},
{
to: 'carol@example.com',
subject: 'Apify is awesome!',
body: 'Some content.',
},
];
const browser = await chromium.launch({ headless: false });
const page = await browser.newPage();
// Login logic
await page.goto('https://www.yahoo.com/');
await page.click('button[name="agree"]');
await page.waitForSelector('a:has-text("Sign in")');
await page.click('a:has-text("Sign in")');
await page.waitForLoadState('load');
await page.type('input[name="username"]', 'YOUR-LOGIN-HERE');
await page.click('input[name="signin"]');
await page.type('input[name="password"]', 'YOUR-PASSWORD-HERE');
await page.click('button[name="verifyPassword"]');
await page.waitForLoadState('load');
const cookies = await browser.contexts()[0].cookies();
await page.close();
// Email sending logic
const promises = emailsToSend.map(({ to, subject, body }) => (async () => {
const sendEmailContext = await browser.newContext();
await sendEmailContext.addCookies(cookies);
const page2 = await sendEmailContext.newPage();
await page2.goto('https://mail.yahoo.com/');
await page2.click('a[aria-label="Compose"]');
await page2.type('input#message-to-field', to);
await page2.type('input[data-test-id="compose-subject"]', subject);
await page2.type('div[data-test-id="compose-editor-container"] div[contenteditable="true"]', body);
await page2.click('button[title="Send this email"]');
await sendEmailContext.close();
})(),
);
await Promise.all(promises);
await browser.close();
import puppeteer from 'puppeteer';
const emailsToSend = [
{
to: 'alice@example.com',
subject: 'Hello',
body: 'This is a message.',
},
{
to: 'bob@example.com',
subject: 'Testing',
body: 'I love the academy!',
},
{
to: 'carol@example.com',
subject: 'Apify is awesome!',
body: 'Some content.',
},
];
const browser = await puppeteer.launch({ headless: false });
const page = await browser.newPage();
// Login logic
await page.goto('https://www.yahoo.com/');
await Promise.all([page.waitForSelector('a[data-ylk*="sign-in"]'), page.click('button[name="agree"]')]);
await Promise.all([page.waitForNavigation(), page.click('a[data-ylk*="sign-in"]')]);
await page.type('input[name="username"]', 'YOUR-LOGIN-HERE');
await Promise.all([page.waitForNavigation(), page.click('input[name="signin"]')]);
await page.type('input[name="password"]', 'YOUR-PASSWORD-HERE');
await Promise.all([page.waitForNavigation(), page.click('button[name="verifyPassword"]')]);
const cookies = await page.cookies();
await page.close();
// Email sending logic
const promises = emailsToSend.map(({ to, subject, body }) => (async () => {
const sendEmailContext = await browser.createIncognitoBrowserContext();
const page2 = await sendEmailContext.newPage();
await page2.setCookie(...cookies);
await page2.goto('https://mail.yahoo.com/');
await page2.click('a[aria-label="Compose"]');
await page2.type('input#message-to-field', to);
await page2.type('input[data-test-id="compose-subject"]', subject);
await page2.type('div[data-test-id="compose-editor-container"] div[contenteditable="true"]', body);
await page2.click('button[title="Send this email"]');
await sendEmailContext.close();
})(),
);
await Promise.all(promises);
await browser.close();
Next up
In the https://docs.apify.com/academy/puppeteer-playwright/common-use-cases/paginating-through-results.md, you'll learn how to paginate through results on a website.
Paginating through results
Learn how to paginate through results on websites that use either pagination based on page numbers or dynamic lazy loading.
If you're trying to https://docs.apify.com/academy/puppeteer-playwright/executing-scripts/collecting-data.md on a website that has millions, thousands, or even hundreds of results, it is very likely that they are paginating their results to reduce strain on their back-end as well as on the users loading and rendering the content.
Page number-based pagination
At the time of writing this lesson, Facebook has https://github.com/orgs/facebook/repositories. By default, GitHub lists repositories in descending order based on when they were last updated (the most recently updated ones are at the top of the list).
We want to scrape the titles, links, and descriptions of all of Facebook's repositories; however, GitHub only displays 30 repositories per page. This means we need to paginate through the results. Let's start by defining some variables:
// This is where we'll store scraped data
const repositories = [];
// This will come handy when resolving relative links
const BASE_URL = 'https://github.com';
// We'll use this URL a couple of times within our code
const REPOSITORIES_URL = `${BASE_URL}/orgs/facebook/repositories`;
Finding the last page
Going through each page is easier if we know in advance when to stop. The good news is that GitHub's pagination is upfront about the number of the last page, so the total number of pages is available to us:

As Facebook adds repositories over time, the number you see in your browser might be different. Let's read the number now with the following code:
- Playwright
- Puppeteer
import { chromium } from 'playwright';
const repositories = [];
const BASE_URL = 'https://github.com';
const REPOSITORIES_URL = `${BASE_URL}/orgs/facebook/repositories`;
const browser = await chromium.launch({ headless: false });
const firstPage = await browser.newPage();
await firstPage.goto(REPOSITORIES_URL);
const lastPageElement = firstPage.locator('a[aria-label*="Page "]:nth-last-child(2)');
const lastPageLabel = await lastPageElement.getAttribute('aria-label');
const lastPageNumber = Number(lastPageLabel.replace(/\D/g, ''));
console.log(lastPageNumber);
await browser.close();
import puppeteer from 'puppeteer';
const repositories = [];
const BASE_URL = 'https://github.com';
const REPOSITORIES_URL = `${BASE_URL}/orgs/facebook/repositories`;
const browser = await puppeteer.launch({ headless: false });
const firstPage = await browser.newPage();
await firstPage.goto(REPOSITORIES_URL);
const lastPageLabel = await firstPage.$eval(
'a[aria-label*="Page "]:nth-last-child(2)',
(element) => element.getAttribute('aria-label'),
);
const lastPageNumber = Number(lastPageLabel.replace(/\D/g, ''));
console.log(lastPageNumber);
await browser.close();
:nth-last-child
https://developer.mozilla.org/en-US/docs/Web/CSS/:nth-last-child about the :nth-last-child pseudo-class. It works like :nth-child, but starts from the bottom of the parent element's children instead of from the top.
When we run the code, it prints the total number of pages, which is 4 at the time of writing this lesson. Now let's scrape repositories from all the pages.
First, we'll add a function that can handle the data extraction for a single page and return an array of results. Then, to start, we'll run this function just for the first page:
- Playwright
- Puppeteer
import { chromium } from 'playwright';
import * as cheerio from 'cheerio';
const repositories = [];
const BASE_URL = 'https://github.com';
const REPOSITORIES_URL = `${BASE_URL}/orgs/facebook/repositories`;
// Scrapes all repositories from a single page
const scrapeRepos = async (page) => {
const $ = cheerio.load(await page.content());
return [...$('.list-view-item')].map((item) => {
const repoElement = $(item);
return {
title: repoElement.find('h4').text().trim(),
description: repoElement.find('.repos-list-description').text().trim(),
link: new URL(repoElement.find('h4 a').attr('href'), BASE_URL).href,
};
});
};
const browser = await chromium.launch({ headless: false });
const firstPage = await browser.newPage();
await firstPage.goto(REPOSITORIES_URL);
const lastPageElement = firstPage.locator('a[aria-label*="Page "]:nth-last-child(2)');
const lastPageLabel = await lastPageElement.getAttribute('aria-label');
const lastPageNumber = Number(lastPageLabel.replace(/\D/g, ''));
// Push all results from the first page to the repositories array
repositories.push(...(await scrapeRepos(firstPage)));
// Log the 30 repositories scraped from the first page
console.log(repositories);
await browser.close();
import puppeteer from 'puppeteer';
import * as cheerio from 'cheerio';
const repositories = [];
const BASE_URL = 'https://github.com';
const REPOSITORIES_URL = `${BASE_URL}/orgs/facebook/repositories`;
// Scrapes all repositories from a single page
const scrapeRepos = async (page) => {
const $ = cheerio.load(await page.content());
return [...$('.list-view-item')].map((item) => {
const repoElement = $(item);
return {
title: repoElement.find('h4').text().trim(),
description: repoElement.find('.repos-list-description').text().trim(),
link: new URL(repoElement.find('h4 a').attr('href'), BASE_URL).href,
};
});
};
const browser = await puppeteer.launch({ headless: false });
const firstPage = await browser.newPage();
await firstPage.goto(REPOSITORIES_URL);
const lastPageLabel = await firstPage.$eval(
'a[aria-label*="Page "]:nth-last-child(2)',
(element) => element.getAttribute('aria-label'),
);
const lastPageNumber = Number(lastPageLabel.replace(/\D/g, ''));
// Push all results from the first page to the repositories array
repositories.push(...(await scrapeRepos(firstPage)));
// Log the 30 repositories scraped from the first page
console.log(repositories);
await browser.close();
If we run the code above, it outputs data about the first 30 repositories listed:
$ node index.js
[
{
title: 'react-native',
description: 'A framework for building native applications using React',
link: 'https://github.com/facebook/react-native'
},
{
title: 'fboss',
description: 'Facebook Open Switching System Software for controlling network switches.',
link: 'https://github.com/facebook/fboss'
},
...
]
Making a request for each results page
If we click around the pagination links, we can observe that all the URLs follow certain format. For example, we can find page number 2 at https://github.com/orgs/facebook/repositories?page=2.
That means we could construct URL for each page if we had an array of numbers with the same range as the pages. If lastPageNumber is 4, the following code creates [0, 1, 2, 3, 4]:
const array = Array(lastPageNumber + 1); // getting an array of certain size
const numbers = [...array.keys()]; // getting the keys (the actual numbers) as another array
Page 0 doesn't exist though and we've already scraped page 1, so we need one more step to remove those:
const pageNumbers = numbers.slice(2); // removes the first two numbers
To have our code examples shorter, we'll squash the above to a single line of code:
const pageNumbers = [...Array(lastPageNumber + 1).keys()].slice(2);
Now let's scrape repositories for each of these numbers. We'll create promises for each request and collect results to a single repositories array:
const pageNumbers = [...Array(lastPageNumber + 1).keys()].slice(2);
const promises = pageNumbers.map((pageNumber) => (async () => {
const paginatedPage = await browser.newPage();
// Construct the URL by setting the ?page=... parameter to value of pageNumber
const url = new URL(REPOSITORIES_URL);
url.searchParams.set('page', pageNumber);
// Scrape the page
await paginatedPage.goto(url.href);
const results = await scrapeRepos(paginatedPage);
// Push results to the repositories array
repositories.push(...results);
await paginatedPage.close();
})(),
);
await Promise.all(promises);
// For brievity logging just the count of repositories scraped
console.log(repositories.length);
Scaling to hundreds of requests
Using Promise.all() is okay for up to ten or maybe tens of requests, but won't work well for large numbers. When scraping hundreds or even thousands of pages, it's necessary to have more robust infrastructure in place, such as a request queue.
Final code
The code below puts all the bits together:
- Playwright
- Puppeteer
import { chromium } from 'playwright';
import * as cheerio from 'cheerio';
const repositories = [];
const BASE_URL = 'https://github.com';
const REPOSITORIES_URL = `${BASE_URL}/orgs/facebook/repositories`;
// Scrapes all repositories from a single page
const scrapeRepos = async (page) => {
const $ = cheerio.load(await page.content());
return [...$('.list-view-item')].map((item) => {
const repoElement = $(item);
return {
title: repoElement.find('h4').text().trim(),
description: repoElement.find('.repos-list-description').text().trim(),
link: new URL(repoElement.find('h4 a').attr('href'), BASE_URL).href,
};
});
};
const browser = await chromium.launch({ headless: false });
const firstPage = await browser.newPage();
await firstPage.goto(REPOSITORIES_URL);
const lastPageElement = firstPage.locator('a[aria-label*="Page "]:nth-last-child(2)');
const lastPageLabel = await lastPageElement.getAttribute('aria-label');
const lastPageNumber = Number(lastPageLabel.replace(/\D/g, ''));
// Push all results from the first page to the repositories array
repositories.push(...(await scrapeRepos(firstPage)));
await firstPage.close();
const pageNumbers = [...Array(lastPageNumber + 1).keys()].slice(2);
const promises = pageNumbers.map((pageNumber) => (async () => {
const paginatedPage = await browser.newPage();
// Construct the URL by setting the ?page=... parameter to value of pageNumber
const url = new URL(REPOSITORIES_URL);
url.searchParams.set('page', pageNumber);
// Scrape the page
await paginatedPage.goto(url.href);
const results = await scrapeRepos(paginatedPage);
// Push results to the repositories array
repositories.push(...results);
await paginatedPage.close();
})(),
);
await Promise.all(promises);
// For brievity logging just the count of repositories scraped
console.log(repositories.length);
await browser.close();
import puppeteer from 'puppeteer';
import * as cheerio from 'cheerio';
const repositories = [];
const BASE_URL = 'https://github.com';
const REPOSITORIES_URL = `${BASE_URL}/orgs/facebook/repositories`;
// Scrapes all repositories from a single page
const scrapeRepos = async (page) => {
const $ = cheerio.load(await page.content());
return [...$('.list-view-item')].map((item) => {
const repoElement = $(item);
return {
title: repoElement.find('h4').text().trim(),
description: repoElement.find('.repos-list-description').text().trim(),
link: new URL(repoElement.find('h4 a').attr('href'), BASE_URL).href,
};
});
};
const browser = await puppeteer.launch({ headless: false });
const firstPage = await browser.newPage();
await firstPage.goto(REPOSITORIES_URL);
const lastPageLabel = await firstPage.$eval(
'a[aria-label*="Page "]:nth-last-child(2)',
(element) => element.getAttribute('aria-label'),
);
const lastPageNumber = Number(lastPageLabel.replace(/\D/g, ''));
// Push all results from the first page to the repositories array
repositories.push(...(await scrapeRepos(page)));
await firstPage.close();
const pageNumbers = [...Array(lastPageNumber + 1).keys()].slice(2);
const promises = pageNumbers.map((pageNumber) => (async () => {
const paginatedPage = await browser.newPage();
// Construct the URL by setting the ?page=... parameter to value of pageNumber
const url = new URL(REPOSITORIES_URL);
url.searchParams.set('page', pageNumber);
// Scrape the page
await paginatedPage.goto(url.href);
const results = await scrapeRepos(paginatedPage);
// Push results to the repositories array
repositories.push(...results);
await paginatedPage.close();
})(),
);
await Promise.all(promises);
// For brievity logging just the count of repositories scraped
console.log(repositories.length);
await browser.close();
At the time of writing this lesson, a summary at the top of the https://github.com/orgs/facebook/repositories claims that Facebook has 115 repositories. Whatever is the number you are seeing, it should be equal to the number you get if you run the program:
$ node index.js
115
Lazy-loading pagination
Pagination based on page numbers is straightforward to automate, but many websites use https://en.wikipedia.org/wiki/Lazy_loading instead.
On websites with lazy-loading pagination, if https://docs.apify.com/academy/api-scraping.md is a viable option, it is a much better approach due to reliability and performance.
Take a moment to look at and scroll through the women's clothing section https://www.aboutyou.com/c/women/clothing-20204. Notice that the items are loaded as you scroll, and that there are no page numbers. Because of how drastically different this pagination implementation is from the previous one, it also requires a different workflow to scrape.
We're going to scrape the brand and price from the first 75 results on the About You page linked above. Here's our basic setup:
- Playwright
- Puppeteer
import { chromium } from 'playwright';
// Create an array where all scraped products will
// be pushed to
const products = [];
const browser = await chromium.launch({ headless: false });
const page = await browser.newPage();
await page.goto('https://www.aboutyou.com/c/women/clothing-20204');
await browser.close();
import puppeteer from 'puppeteer';
// Create an array where all scraped products will
// be pushed to
const products = [];
const browser = await puppeteer.launch({ headless: false });
const page = await browser.newPage();
await page.goto('https://www.aboutyou.com/c/women/clothing-20204');
await browser.close();
Auto scrolling
Now, what we'll do is grab the height in pixels of a result item to have somewhat of a reference to how much we should scroll each time, as well as create a variable for keeping track of how many pixels have been scrolled.
// Grab the height of result item in pixels, which will be used to scroll down
const itemHeight = await page.$eval('a[data-testid*="productTile"]', (elem) => elem.clientHeight);
// Keep track of how many pixels have been scrolled down
const totalScrolled = 0;
Then, within a while loop that ends once the length of the products array has reached 75, we'll run some logic that scrolls down the page and waits 1 second before running again.
- Playwright
- Puppeteer
while (products.length document.body.scrollHeight);
await page.mouse.wheel(0, itemHeight * 3);
totalScrolled += itemHeight * 3;
// Allow the products 1 second to load
await page.waitForTimeout(1000);
// Data extraction login will go here
const innerHeight = await page.evaluate(() => window.innerHeight);
// if the total pixels scrolled is equal to the true available scroll
// height of the page, we've reached the end and should stop scraping.
// even if we haven't reach our goal of 75 products.
if (totalScrolled >= scrollHeight - innerHeight) {
break;
}
}
while (products.length document.body.scrollHeight);
await page.mouse.wheel({ deltaY: itemHeight * 3 });
totalScrolled += itemHeight * 3;
// Allow the products 1 second to load
await page.waitForTimeout(1000);
// Data extraction login will go here
const innerHeight = await page.evaluate(() => window.innerHeight);
// if the total pixels scrolled is equal to the true available scroll
// height of the page, we've reached the end and should stop scraping.
// even if we haven't reach our goal of 75 products.
if (totalScrolled >= scrollHeight - innerHeight) {
break;
}
}
Now, the while loop will exit out if we've reached the bottom of the page.
Generally, you'd want to create a utility function that handles this scrolling logic instead of putting all of the code directly into the while loop.
Extracting data
Within the loop, we can grab hold of the total number of items on the page. To avoid extracting and pushing duplicate items to the products array, we can use the .slice() method to cut out the items we've already scraped.
import * as cheerio from 'cheerio';
const $ = cheerio.load(await page.content());
// Grab the newly loaded items
const items = [...$('a[data-testid*="productTile"]')].slice(products.length);
const newItems = items.map((item) => {
const elem = $(item);
return {
brand: elem.find('p[data-testid="brandName"]').text().trim(),
price: elem.find('span[data-testid="finalPrice"]').text().trim(),
};
});
products.push(...newItems);
Final code
With everything completed, this is what we're left with:
- Playwright
- Puppeteer
import { chromium } from 'playwright';
import * as cheerio from 'cheerio';
const products = [];
const browser = await chromium.launch({ headless: false });
const page = await browser.newPage();
await page.goto('https://www.aboutyou.com/c/women/clothing-20204');
// Grab the height of result item in pixels, which will be used to scroll down
const itemHeight = await page.$eval('a[data-testid*="productTile"]', (elem) => elem.clientHeight);
// Keep track of how many pixels have been scrolled down
let totalScrolled = 0;
while (products.length document.body.scrollHeight);
await page.mouse.wheel(0, itemHeight * 3);
totalScrolled += itemHeight * 3;
// Allow the products 1 second to load
await page.waitForTimeout(1000);
const $ = cheerio.load(await page.content());
// Grab the newly loaded items
const items = [...$('a[data-testid*="productTile"]')].slice(products.length);
const newItems = items.map((item) => {
const elem = $(item);
return {
brand: elem.find('p[data-testid="brandName"]').text().trim(),
price: elem.find('span[data-testid="finalPrice"]').text().trim(),
};
});
products.push(...newItems);
const innerHeight = await page.evaluate(() => window.innerHeight);
// if the total pixels scrolled is equal to the true available scroll
// height of the page, we've reached the end and should stop scraping.
// even if we haven't reach our goal of 75 products.
if (totalScrolled >= scrollHeight - innerHeight) {
break;
}
}
console.log(products.slice(0, 75));
await browser.close();
import puppeteer from 'puppeteer';
import * as cheerio from 'cheerio';
const products = [];
const browser = await puppeteer.launch({ headless: false });
const page = await browser.newPage();
await page.goto('https://www.aboutyou.com/c/women/clothing-20204');
// Grab the height of result item in pixels, which will be used to scroll down
const itemHeight = await page.$eval('a[data-testid*="productTile"]', (elem) => elem.clientHeight);
// Keep track of how many pixels have been scrolled down
let totalScrolled = 0;
while (products.length document.body.scrollHeight);
await page.mouse.wheel({ deltaY: itemHeight * 3 });
totalScrolled += itemHeight * 3;
// Allow the products 1 second to load
await page.waitForTimeout(1000);
const $ = cheerio.load(await page.content());
// Grab the newly loaded items
const items = [...$('a[data-testid*="productTile"]')].slice(products.length);
const newItems = items.map((item) => {
const elem = $(item);
return {
brand: elem.find('p[data-testid="brandName"]').text().trim(),
price: elem.find('span[data-testid="finalPrice"]').text().trim(),
};
});
products.push(...newItems);
const innerHeight = await page.evaluate(() => window.innerHeight);
// if the total pixels scrolled is equal to the true available scroll
// height of the page, we've reached the end and should stop scraping.
// even if we haven't reach our goal of 75 products.
if (totalScrolled >= scrollHeight - innerHeight) {
break;
}
}
console.log(products.slice(0, 75));
await browser.close();
Quick note
The examples shown in this lesson are not the only ways to paginate through websites. They are here to serve as solid examples, but don't view them as the end-all be-all of scraping paginated websites. The methods you use and the algorithms you write might differ to various degrees based on what pages you're scraping and how your specific target website implemented pagination.
Next up
We're actively working in expanding this section of the course, so stay tuned!
Scraping iFrames
Extracting data from iFrames can be frustrating. In this tutorial, we will learn how to scrape information from iFrames using Puppeteer or Playwright.
Getting information from inside iFrames is a known pain, especially for new developers. After spending some time on Stack Overflow, you usually find answers like jQuery's contents() method or native contentDocument property, which can guide you to the insides of an iframe. But still, getting the right identifiers and holding that new context is a little annoying. Fortunately, you can make everything simpler and more straightforward by scraping iFrames with Puppeteer.
Finding the right ``
If you are using basic methods of page objects like page.evaluate(), you are actually already working with frames. Behind the scenes, Puppeteer will call page.mainFrame().evaluate(), so most of the methods you are using with page object can be used the same way with frame object. To access frames, you need to loop over the main frame's child frames and identify the one you want to use.
As a demonstration, we'll scrape the Twitter widget iFrame from https://www.imdb.com/.
import puppeteer from 'puppeteer';
const browser = await puppeteer.launch();
const page = await browser.newPage();
await page.goto('https://www.imdb.com');
await page.waitForTimeout(5000); // we need to wait for Twitter widget to load
let twitterFrame; // this will be populated later by our identified frame
for (const frame of page.mainFrame().childFrames()) {
// Here you can use few identifying methods like url(),name(),title()
if (frame.url().includes('twitter')) {
console.log('we found the Twitter iframe');
twitterFrame = frame;
// we assign this frame to myFrame to use it later
}
}
await browser.close();
If it is hard to identify the iframe you want to access, don't worry. You can already use any Puppeteer method on the frame object to help you identify it, scrape it or manipulate it. You can also go through any nested frames.
let twitterFrame;
for (const frame of page.mainFrame().childFrames()) {
if (frame.url().includes('twitter')) {
for (const nestedFrame of frame.childFrames()) {
const tweetList = await nestedFrame.$('.timeline-TweetList');
if (tweetList) {
console.log('We found the frame with tweet list');
twitterFrame = nestedFrame;
}
}
}
}
Here we used some more advanced techniques to find a nested ``. Now when we have it assigned to our twitterFrame object, the hard work is over and we can start working with it (almost) like with a regular page object.
const textFeed = await twitterFrame.$$eval('.timeline-Tweet-text', (pElements) => pElements.map((elem) => elem.textContent));
for (const text of textFeed) {
console.log(text);
console.log('**********');
}
With a little more effort, we could also follow different links from the feed or even play a video, but that is not within the scope of this article. For all references about page and frame objects (and Puppeteer generally), you should study https://pub.dev/documentation/puppeteer/latest/puppeteer/Frame-class.html. New versions are released quite often, so checking the docs regularly can help you to stay on top of web scraping and automation.
Submitting a form with a file attachment
Understand how to download a file, attach it to a form using a headless browser in Playwright or Puppeteer, then submit the form.
We can use Puppeteer or Playwright to simulate submitting the same way a human-operated browser would.
Downloading the file
The first thing necessary is to download the file, which can be done using the request-promise module. We will also be using the fs/promises module to save it to the disk, so make sure they are included.
import * as fs from 'fs/promises';
import request from 'request-promise';
The actual downloading is slightly different for text and binary files. For a text file, it can be done like this:
const fileData = await request('https://some-site.com/file.txt');
For a binary data file, we need to provide an additional parameter so as not to interpret it as text:
const fileData = await request({
uri: 'https://some-site.com/file.pdf',
encoding: null,
});
In this case, fileData will be a Buffer instead of a string.
To use the file in Puppeteer/Playwright, we need to save it to the disk. This can be done using the fs/promises module.
await fs.writeFile('./file.pdf', fileData);
Submitting the form
The first step necessary is to open the form page in Puppeteer. This can be done as follows:
const browser = await puppeteer.launch();
const page = await browser.newPage();
await page.goto('https://some-site.com/file-upload.php');
To fill in any necessary form inputs, we can use the page.type() function. This works even in cases when elem.value = 'value' is not usable.
await page.type('input[name=firstName]', 'John');
await page.type('input[name=surname]', 'Doe');
await page.type('input[name=email]', 'john.doe@example.com');
To add the file to the appropriate input, we first need to find it and then use the https://pptr.dev/api/puppeteer.elementhandle.uploadfile function.
const fileInput = await page.$('input[type=file]');
await fileInput.uploadFile('./file.pdf');
Now we can finally submit the form.
await page.click('input[type=submit]');
Executing scripts
Understand the two different contexts which your code can be run in, and how to run custom scripts in the context of the browser.
An important concept to understand when dealing with headless browsers is the context in which your code is being run. For example, if you try to use the native fs Node.js module (used in the previous lesson) while running code in the context of the browser, errors will be thrown saying that it is undefined. Similarly, if you are trying to use document.querySelector() or other browser-specific functions in the server-side Node.js context, errors will also be thrown.

Here is an example of a common mistake made by beginners to Puppeteer/Playwright:
// This code is incorrect!
import { chromium } from 'playwright';
const browser = await chromium.launch({ headless: false });
const page = await browser.newPage();
// visit google
await page.goto('https://www.google.com/');
// change background to green
document.body.style.background = 'green';
await page.waitForTimeout(10000);
await browser.close();
When we try and run this, we get this error:
ReferenceError: document is not defined
The reason this is happening is because we're trying to run browser-side code on the server-side where it is not supported. https://developer.mozilla.org/en-US/docs/Web/API/Document is a property of the browser https://developer.mozilla.org/en-US/docs/Web/API/Window instance that holds the rendered website; therefore, this API is not available in Node.js. How are we supposed to run code within the context of the browser?
Running code in the context of the browser
We will use page.evaluate() to run our code in the browser. This method takes a callback as its first parameter, which will be executed within the browser.
- Playwright
- Puppeteer
import { chromium } from 'playwright';
const browser = await chromium.launch({ headless: false });
const page = await browser.newPage();
await page.goto('https://www.google.com/');
await page.evaluate(() => {
document.body.style.background = 'green';
});
await page.waitForTimeout(10000);
await browser.close();
import puppeteer from 'puppeteer';
const browser = await puppeteer.launch({ headless: false });
const page = await browser.newPage();
await page.goto('https://www.google.com/');
await page.evaluate(() => {
document.body.style.background = 'green';
});
await page.waitForTimeout(10000);
await browser.close();
Here's what we see in the automated browser when we run this code:

Using variables in page.evaluate()
Within our code, we generate a randomString in the Node.js context:
const randomString = Math.random().toString(36).slice(2);
Now, let's say we want to change the title of the document to be this random string. To have the random string available in the callback of our page.evaluate(), we'll pass it in a second parameter. It's best practice to have this second parameter as an object, because in real world situations you often need to pass more than one value.
- Playwright
- Puppeteer
import { chromium } from 'playwright';
const browser = await chromium.launch({ headless: false });
const page = await browser.newPage();
await page.goto('https://www.google.com/');
const params = { randomString: Math.random().toString(36).slice(2) };
await page.evaluate(({ randomString }) => {
document.querySelector('title').textContent = randomString;
}, params);
await page.waitForTimeout(10000);
await browser.close();
import puppeteer from 'puppeteer';
const browser = await puppeteer.launch({ headless: false });
const page = await browser.newPage();
await page.goto('https://www.google.com/');
const params = { randomString: Math.random().toString(36).slice(2) };
await page.evaluate(({ randomString }) => {
document.querySelector('title').textContent = randomString;
}, params);
await page.waitForTimeout(10000);
await browser.close();
Now, when we run this code, we can see the title change on the page's tab:
Next up
The https://docs.apify.com/academy/puppeteer-playwright/executing-scripts/injecting-code.md will be a short one discussing two different ways of executing scripts on a page.
Extracting data
Learn how to extract data from a page with evaluate functions, then how to parse it by using a second library called Cheerio.
Now that we know how to execute scripts on a page, we're ready to learn a bit about https://docs.apify.com/academy/web-scraping-for-beginners/data-extraction.md. In this lesson, we'll be scraping all the on-sale products from our https://demo-webstore.apify.org/search/on-sale website. Playwright & Puppeteer offer two main methods for data extraction:
- Directly in
page.evaluate()and other evaluate functions such aspage.$$eval(). - In the Node.js context using a parsing library such as https://www.npmjs.com/package/cheerio
Crawlee and parsing with Cheerio
If you are using Crawlee, we highly recommend the https://crawlee.dev/api/playwright-crawler/interface/PlaywrightCrawlingContext#parseWithCheerio function for unified data extraction syntax. This way, switching between browser and plain HTTP scraping is a breeze.
Setup
Here is the base setup for our code, upon which we'll be building off of in this lesson:
- Playwright
- Puppeteer
import { chromium } from 'playwright';
const browser = await chromium.launch({ headless: false });
const page = await browser.newPage();
await page.goto('https://demo-webstore.apify.org/search/on-sale');
// code will go here
await page.waitForTimeout(10000);
await browser.close();
import puppeteer from 'puppeteer';
const browser = await puppeteer.launch({ headless: false });
const page = await browser.newPage();
await page.goto('https://demo-webstore.apify.org/search/on-sale');
// code will go here
await page.waitForTimeout(10000);
await browser.close();
Extracting from the browser context
Whatever is returned from the callback function in page.evaluate() will be returned by the evaluate function, which means that we can set it to a variable like so:
const products = await page.evaluate(() => ({ foo: 'bar' }));
console.log(products); // -> { foo: 'bar' }
We'll be returning a bunch of product objects from this function, which will be accessible back in our Node.js context after the promise has resolved. Let's now go ahead and write some data extraction code to collect each product:
const products = await page.evaluate(() => {
const productCards = Array.from(document.querySelectorAll('a[class*="ProductCard_root"]'));
return productCards.map((element) => {
const name = element.querySelector('h3[class*="ProductCard_name"]').textContent;
const price = element.querySelector('div[class*="ProductCard_price"]').textContent;
return {
name,
price,
};
});
});
console.log(products);
When we run this code, we see this logged to our console:

Using jQuery
Working with document.querySelector is cumbersome and quite verbose, but with the page.addScriptTag() function and the latest https://releases.jquery.com/, we can inject jQuery into the current page to gain access to its syntactical sweetness:
await page.addScriptTag({ url: 'https://code.jquery.com/jquery-3.6.0.min.js' });
This function will literally append a tag to the element of the current page, allowing access to jQuery's API when using page.evaluate() to run code in the browser context.
Now, since we're able to use jQuery, let's translate our vanilla JavaScript code within the page.evaluate() function to jQuery:
await page.addScriptTag({ url: 'https://code.jquery.com/jquery-3.6.0.min.js' });
const products = await page.evaluate(() => {
const productCards = Array.from($('a[class*="ProductCard_root"]'));
return productCards.map((element) => {
const card = $(element);
const name = card.find('h3[class*="ProductCard_name"]').text();
const price = card.find('div[class*="ProductCard_price"]').text();
return {
name,
price,
};
});
});
console.log(products);
This will output the same exact result as the code in the previous section.
Parsing in the Node.js context
One of the most popular parsing libraries for Node.js is https://www.npmjs.com/package/cheerio, which can be used in tandem with Playwright and Puppeteer. It is extremely beneficial to parse the page's HTML in the Node.js context for a number of reasons:
- You can port the code between headless browser data extraction and plain HTTP data extraction
- You don't have to worry in which context you're working (which can sometimes be confusing)
- Errors are easier to handle when running in the base Node.js context
To install it, we can run the following command within your project's directory:
npm install cheerio
Then, we'll import the load function like so:
import { load } from 'cheerio';
Finally, we can create a Cheerio object based on our page's current content like so:
const $ = load(await page.content());
It's important to note that this
$object is static. If any content on the page changes, the$variable will not automatically be updated. It will need to be re-declared or re-defined.
Here's our full code so far:
- Playwright
- Puppeteer
import { chromium } from 'playwright';
import { load } from 'cheerio';
const browser = await chromium.launch({ headless: false });
const page = await browser.newPage();
await page.goto('https://demo-webstore.apify.org/search/on-sale');
const $ = load(await page.content());
// code will go here
await browser.close();
import puppeteer from 'puppeteer';
import { load } from 'cheerio';
const browser = await puppeteer.launch({ headless: false });
const page = await browser.newPage();
await page.goto('https://demo-webstore.apify.org/search/on-sale');
const $ = load(await page.content());
// code will go here
await browser.close();
Now, to loop through all of the products, we'll make use of the $ object and loop through them while safely in the server-side context rather than running the code in the browser. Notice that this code is nearly exactly the same as the jQuery code above - it is just not running inside of a page.evaluate() in the browser context.
const $ = load(await page.content());
const productCards = Array.from($('a[class*="ProductCard_root"]'));
const products = productCards.map((element) => {
const card = $(element);
const name = card.find('h3[class*="ProductCard_name"]').text();
const price = card.find('div[class*="ProductCard_price"]').text();
return {
name,
price,
};
});
console.log(products);
Final code
Here's what our final optimized code looks like:
- Playwright
- Puppeteer
import { chromium } from 'playwright';
import { load } from 'cheerio';
const browser = await chromium.launch({ headless: false });
const page = await browser.newPage();
await page.goto('https://demo-webstore.apify.org/search/on-sale');
const $ = load(await page.content());
const productCards = Array.from($('a[class*="ProductCard_root"]'));
const products = productCards.map((element) => {
const card = $(element);
const name = card.find('h3[class*="ProductCard_name"]').text();
const price = card.find('div[class*="ProductCard_price"]').text();
return {
name,
price,
};
});
console.log(products);
await browser.close();
import puppeteer from 'puppeteer';
import { load } from 'cheerio';
const browser = await puppeteer.launch({ headless: false });
const page = await browser.newPage();
await page.goto('https://demo-webstore.apify.org/search/on-sale');
const $ = load(await page.content());
const productCards = Array.from($('a[class*="ProductCard_root"]'));
const products = productCards.map((element) => {
const card = $(element);
const name = card.find('h3[class*="ProductCard_name"]').text();
const price = card.find('div[class*="ProductCard_price"]').text();
return {
name,
price,
};
});
console.log(products);
await browser.close();
Next up
Our https://docs.apify.com/academy/puppeteer-playwright/reading-intercepting-requests.md will be discussing something super cool - request interception and reading data from requests and responses. It's like using DevTools, except programmatically!
Injecting code
Learn how to inject scripts prior to a page's load (pre-injecting), as well as how to expose functions to be run at a later time on the page.
In the previous lesson, we learned how to execute code on the page using page.evaluate(), and though this fits the majority of use cases, there are still some more unusual cases. For example, what if we want to execute our custom script prior to the page's load? Or, what if we want to define a function in the page's context to be run at a later time?
We'll be covering both of these cases in this brief lesson.
Pre-injecting scripts
Sometimes, you need your custom code to run before any other code is run on the page. Perhaps you need to modify an object's prototype, or even re-define certain global variables before they are used by the page's native scripts.
Luckily, Puppeteer and Playwright both have functions for this. In Puppeteer, we use the https://pptr.dev/api/puppeteer.page.evaluateonnewdocument function, while in Playwright we use https://playwright.dev/docs/api/class-page#page-add-init-script. We'll use these functions to override the native addEventListener function, setting it to a function that does nothing. This will prevent event listeners from being added to elements.
- Playwright
- Puppeteer
import { chromium } from 'playwright';
const browser = await chromium.launch({ headless: false });
const page = await browser.newPage();
await page.addInitScript(() => {
// Override the prototype
Node.prototype.addEventListener = null; /* do nothing */
});
await page.goto('https://google.com');
await page.waitForTimeout(10000);
await browser.close();
import puppeteer from 'puppeteer';
const browser = await puppeteer.launch({ headless: false });
const page = await browser.newPage();
await page.evaluateOnNewDocument(() => {
// Override the prototype
Node.prototype.addEventListener = null; /* do nothing */
});
await page.goto('https://google.com');
await page.waitForTimeout(10000);
await browser.close();
Go ahead and run this code. Can you click the I accept button to accept Google's cookies policy?
Exposing functions
Here's a super awesome function we've created called returnMessage(), which returns the string Apify Academy!:
const returnMessage = () => 'Apify academy!';
We want to expose this function to our loaded page so that it can be later executed there, which can be done with https://playwright.dev/docs/api/class-page#page-expose-function. This will make returnMessage() available when running scripts not only inside of page.evaluate(), but also directly from DevTools.
- Playwright
- Puppeteer
import { chromium } from 'playwright';
const browser = await chromium.launch({ headless: false });
const page = await browser.newPage();
await page.goto('https://google.com');
const returnMessage = () => 'Apify academy!';
await page.exposeFunction(returnMessage.name, returnMessage);
const msg = await page.evaluate(() => returnMessage());
console.log(msg);
await page.waitForTimeout(10000);
await browser.close();
import puppeteer from 'puppeteer';
const browser = await puppeteer.launch({ headless: false });
const page = await browser.newPage();
await page.goto('https://google.com');
const returnMessage = () => 'Apify academy!';
await page.exposeFunction(returnMessage.name, returnMessage);
const msg = await page.evaluate(() => returnMessage());
console.log(msg);
await page.waitForTimeout(10000);
await browser.close();
Next up
Next, we'll be learning a bit about how to extract data using Playwright/Puppeteer. You can use one of the two main ways to do this, so https://docs.apify.com/academy/puppeteer-playwright/executing-scripts/collecting-data.md will be about both of them!
Opening a page
Learn how to create and open a Page with a Browser, and how to use it to visit and programmatically interact with a website.
When you open up your regular browser and visit a website, you open up a new page (or tab) before entering the URL in the search bar and hitting the Enter key. In Playwright and Puppeteer, you also have to open up a new page before visiting a URL. This can be done with the browser.newPage() function, which will return a Page object (https://pptr.dev/#?product=Puppeteer&version=v13.7.0&show=api-class-page, https://playwright.dev/docs/api/class-page).
- Playwright
- Puppeteer
import { chromium } from 'playwright';
const browser = await chromium.launch({ headless: false });
// Open a new page
const page = await browser.newPage();
await browser.close();
import puppeteer from 'puppeteer';
const browser = await puppeteer.launch({ headless: false });
// Open a new page
const page = await browser.newPage();
await browser.close();
Then, we can visit a website with the page.goto() method. Let's go to https://google.com for now. We'll also use the page.waitForTimeout() function, which will force the program to wait for a number of seconds before quitting (otherwise, everything will flash before our eyes and we won't really be able to tell what's going on):
- Playwright
- Puppeteer
import { chromium } from 'playwright';
const browser = await chromium.launch({ headless: false });
// Open a new page
const page = await browser.newPage();
// Visit Google
await page.goto('https://google.com');
// wait for 10 seconds before shutting down
await page.waitForTimeout(10000);
await browser.close();
import puppeteer from 'puppeteer';
const browser = await puppeteer.launch({ headless: false });
// Open a new page
const page = await browser.newPage();
// Visit Google
await page.goto('https://google.com');
// wait for 10 seconds before shutting down
await page.waitForTimeout(10000);
await browser.close();
If you haven't already, go ahead and run this code to see what happens.
Next up
Now that we know how to open up a page, https://docs.apify.com/academy/puppeteer-playwright/page/interacting-with-a-page.md how to automate page interaction, such as clicking, typing, and pressing keys.
Interacting with a page
Learn how to programmatically do actions on a page such as clicking, typing, and pressing keys. Also, discover a common roadblock that comes up when automating.
The Page object has a whole boat-load of functions which can be used to interact with the loaded page. We're not going to go over every single one of them right now, but we will use a few of the most common ones to add some functionality to our current project.
Let's say that we want to automate searching for hello world on Google, then click on the first result and log the title of the page to the console, then take a screenshot and write it it to the filesystem. In order to understand how we're going to automate this, let's break down how we would do it manually:
- Click on the button which accepts Google's cookies policy (To see how it looks, open Google in an anonymous window.)
- Type hello world into the search bar
- Press Enter
- Wait for the results page to load
- Click on the first result
- Read the title of the clicked result's loaded page
- Screenshot the page
Though it seems complex, the wonderful Page API can help us with all the steps.
Clicking & pressing keys
Let's first focus on the first 3 steps listed above. By using page.click() and the CSS selector of the element to click, we can click an element:
- Playwright
- Puppeteer
// Click the "Accept all" button
await page.click('button:has-text("Accept all")');
// Click the "Accept all" button
await page.click('button + button');
With page.click(), Puppeteer and Playwright actually drag the mouse and click, allowing the bot to act more human-like. This is different from programmatically clicking with Element.click() in vanilla client-side JavaScript.
Notice that in the Playwright example, we are using a different selector than in the Puppeteer example. This is because Playwright supports https://playwright.dev/docs/other-locators#css-elements-matching-one-of-the-conditions, such as the has-text pseudo class. As a rule of thumb, using text selectors is much more preferable to using regular selectors, as they are much less likely to break. If Google makes the sibling above the Accept all button a element instead of a element, our button + button selector will break. However, the button will always have the text Accept all; therefore, button:has-text("Accept all") is more reliable.
If you're not already familiar with CSS selectors and how to find them, we recommend referring to https://docs.apify.com/academy/web-scraping-for-beginners/data-extraction/using-devtools.md in the Web scraping basics for JavaScript devs course.
Then, we can type some text into an input field `` with page.type(); passing a CSS selector as the first, and the string to input as the second parameter:
// Type the query into the search box
await page.type('textarea[title]', 'hello world');
Finally, we can press a single key by accessing the keyboard property of page and calling the press() function on it:
// Press enter
await page.keyboard.press('Enter');
This is what we've got so far:
- Playwright
- Puppeteer
import { chromium } from 'playwright';
const browser = await chromium.launch({ headless: false });
const page = await browser.newPage();
await page.goto('https://www.google.com/');
// Click the "Accept all" button
await page.click('button:has-text("Accept all")');
// Type the query into the search box
await page.type('textarea[title]', 'hello world');
// Press enter
await page.keyboard.press('Enter');
await page.waitForTimeout(10000);
await browser.close();
import puppeteer from 'puppeteer';
const browser = await puppeteer.launch({ headless: false });
const page = await browser.newPage();
await page.goto('https://www.google.com/');
// Click the "Accept all" button
await page.click('button + button');
// Type the query into the search box
await page.type('textarea[title]', 'hello world');
// Press enter
await page.keyboard.press('Enter');
await page.waitForTimeout(10000);
await browser.close();
When we run it, we leave off on the results page:

Great! Now all we have to do is click the first result which matches the CSS selector .g a:
- Playwright
- Puppeteer
import { chromium } from 'playwright';
const browser = await chromium.launch({ headless: false });
const page = await browser.newPage();
await page.goto('https://www.google.com/');
await page.click('button:has-text("Accept all")');
await page.type('textarea[title]', 'hello world');
await page.keyboard.press('Enter');
// Click the first result
await page.click('.g a');
await page.waitForTimeout(10000);
await browser.close();
// This code will throw an error!
import puppeteer from 'puppeteer';
const browser = await puppeteer.launch({ headless: false });
const page = await browser.newPage();
await page.goto('https://www.google.com/');
await page.click('button + button');
await page.type('textarea[title]', 'hello world');
await page.keyboard.press('Enter');
// Click the first result
await page.click('.g a');
await page.waitForTimeout(10000);
await browser.close();
But wait, when we try to run the Puppeteer code, we run into this nasty error:
The following error won't be present if you're following the Playwright examples. You'll learn why in the next lesson.
/Users/me/Desktop/playwright-puppeteer/node_modules/puppeteer/lib/cjs/puppeteer/common/assert.js:26
throw new Error(message);
^
Error: No node found for selector: .g a
at assert (/Users/me/Desktop/playwright-puppeteer/node_modules/puppeteer/lib/cjs/puppeteer/common/assert.js:26:15)
...
We hit this error because we attempted to click an element that wasn't yet present on the page. The results page hadn't even loaded yet!
Next up
In the https://docs.apify.com/academy/puppeteer-playwright/page/waiting.md, we'll be taking a look at how to wait for navigation, events, and content before resuming interactions.
Page methods
Understand that the Page object has many different methods to offer, and learn how to use two of them to capture a page's title and take a screenshot.
Other than having methods for interacting with a page and waiting for events and elements, the Page object also supports various methods for doing other things, such as https://pptr.dev/api/puppeteer.page.reload, https://playwright.dev/docs/api/class-page#page-screenshot, https://playwright.dev/docs/api/class-page#page-set-extra-http-headers, and extracting the https://pptr.dev/api/puppeteer.page.content.
Last lesson, we left off at a point where we were waiting for the page to navigate so that we can extract the page's title and take a screenshot of it. In this lesson, we'll be learning about the two methods we can use to achieve both of those things.
Grabbing the title
Two main page functions exist that will return general data:
page.content()will return the entire HTML content of the page.page.title()will return the title of the current page found in the `` tag.
For our case, we'll utilize the page.title() function to grab the title and log it to the console:
// Grab the title and set it to a variable
const title = await page.title();
// Log the title to the console
console.log(title);
Screenshotting
The page.screenshot() function will return a buffer which can be written to the filesystem as an image:
// Take the screenshot and write it to the filesystem
await page.screenshot({ path: 'screenshot.png' });
The image will by default be .png. To change the image to .jpeg type, set the (optional)
typeoption to jpeg.
Final code
Here's our final code which extracts the page's title, takes a screenshot and saves it to our project's folder as screenshot.png:
- Playwright
- Puppeteer
import { chromium } from 'playwright';
const browser = await chromium.launch({ headless: false });
// Create a page and visit Google
const page = await browser.newPage();
await page.goto('https://google.com');
// Agree to the cookies policy
await page.click('button:has-text("Accept all")');
// Type the query and visit the results page
await page.type('textarea[title]', 'hello world');
await page.keyboard.press('Enter');
// Click on the first result
await page.click('.g a');
await page.waitForLoadState('load');
// Grab the page's title and log it to the console
const title = await page.title();
console.log(title);
// Take a screenshot and write it to the filesystem
await page.screenshot({ path: 'screenshot.png' });
await browser.close();
import puppeteer from 'puppeteer';
const browser = await puppeteer.launch({ headless: false });
// Create a page and visit Google
const page = await browser.newPage();
await page.goto('https://google.com');
// Agree to the cookies policy
await page.click('button + button');
// Type the query and visit the results page
await page.type('textarea[title]', 'hello world');
await page.keyboard.press('Enter');
// Wait for the first result to appear on the page,
// then click on it
await page.waitForSelector('.g a');
await Promise.all([page.waitForNavigation(), page.click('.g a')]);
// Grab the page's title and log it to the console
const title = await page.title();
console.log(title);
// Take a screenshot and write it to the filesystem
await page.screenshot({ path: 'screenshot.png' });
await browser.close();
When you run this code, you should see this logged to the console:
"Hello, World!" program - Wikipedia
Additionally, you should see a new image named screenshot.png in your project's folder that looks something like this:

Next up
In the https://docs.apify.com/academy/puppeteer-playwright/executing-scripts.md, we'll gain a solid understanding of the two different contexts we can run our code in when using Puppeteer and Playwright, as well as how to run code in the context of the browser.
Waiting for elements and events
Learn the importance of waiting for content and events before running interaction or extraction code, as well as the best practices for doing so.
In a perfect world, every piece of content served on a website would be loaded instantaneously. We don't live in a perfect world though, and often times it can take anywhere between 1/10th of a second to a few seconds to load some content onto a page. Certain elements are also https://docs.apify.com/academy/concepts/dynamic-pages.md, which means that they are not present in the initial HTML and that they are created by scripts or data from API calls.
Puppeteer and Playwright don't sit around waiting for a page (or specific elements) to load though - if we tell it to do something with an element that hasn't been rendered yet, it'll start trying to do it (which will result in nasty errors). We've got to tell it to wait.
For a thorough explanation on how dynamic rendering works, give https://docs.apify.com/academy/concepts/dynamic-pages.md a quick readover, and check out the examples.
Different events and elements can be waited for using the various waitFor... methods offered.
Elements
In the previous lesson, we ran into an error with Puppeteer due to the fact that we weren't waiting for the .g a selector to be present on the page before clicking it. The same error didn't occur in Playwright, because page.click() https://playwright.dev/docs/actionability for the element to be visible on the page before clicking it.
Elements with specific selectors can be waited for by using the page.waitForSelector() function. Let's use this knowledge to wait for the first result to be present on the page prior to clicking on it:
// This example is relevant for Puppeteer only!
import puppeteer from 'puppeteer';
const browser = await puppeteer.launch({ headless: false });
const page = await browser.newPage();
await page.goto('https://www.google.com/');
await page.click('button + button');
await page.type('textarea[title]', 'hello world');
await page.keyboard.press('Enter');
// Wait for the element to be present on the page prior to clicking it
await page.waitForSelector('.g a');
await page.click('.g a');
await page.waitForTimeout(10000);
await browser.close();
Now, we won't see the error message anymore, and the first result will be successfully clicked by Puppeteer.
Playwright also has a
page.waitForSelector()function and it's useful in other scenarios than clicking, or for more granular control over the waiting process.
Navigation
If we remember properly, after clicking the first result, we want to console log the title of the result's page and save a screenshot into the filesystem. In order to grab a solid screenshot of the loaded page though, we should wait for navigation before snapping the image. This can be done with https://pptr.dev/#?product=Puppeteer&version=v14.1.0&show=api-pagewaitfornavigationoptions.
A navigation is when a new https://docs.apify.com/academy/concepts/dynamic-pages.md happens. First, the
domcontentloadedevent is fired, then theloadevent.page.waitForNavigation()will wait for theloadevent to fire.
Naively, you might immediately think that this is the way we should wait for navigation after clicking the first result:
await page.click('.g a');
await page.waitForNavigation();
Though in theory this is correct, it can result in a race condition in which the page navigates quickly before the page.waitForNavigation() function is ever run, which means that once it is finally called, it will hang and wait forever for the https://developer.mozilla.org/en-US/docs/Web/API/Window/load_event event to fire even though it already fired. To solve this, we can stick the waiting logic and the clicking logic into a Promise.all() call (placing page.waitForNavigation() first).
await Promise.all([page.waitForNavigation(), page.click('.g a')]);
Though the line of code above is also valid in Playwright, it is recommended to use https://playwright.dev/docs/api/class-page#page-wait-for-load-state instead of page.waitForNavigation(), as it automatically handles the issues being solved by using Promise.all().
await page.click('.g a');
await page.waitForLoadState('load');
This implementation will do the following:
- Begin waiting for the page to navigate without blocking the
page.click()function - Click the element, firing off a navigating event
- Resolve once the page has navigated, allowing further code to run
Our code so far
Here's what our project's code looks like so far:
- Playwright
- Puppeteer
import * as fs from 'fs/promises';
import { chromium } from 'playwright';
const browser = await chromium.launch({ headless: false });
// Create a page and visit Google
const page = await browser.newPage();
await page.goto('https://google.com');
// Agree to the cookies policy
await page.click('button:has-text("Accept all")');
// Type the query and visit the results page
await page.type('textarea[title]', 'hello world');
await page.keyboard.press('Enter');
// Click on the first result
await page.click('.g a');
await page.waitForLoadState('load');
// Our title extraction and screenshotting logic
// will go here
await page.waitForTimeout(10000);
await browser.close();
import * as fs from 'fs/promises';
import puppeteer from 'puppeteer';
const browser = await puppeteer.launch({ headless: false });
// Create a page and visit Google
const page = await browser.newPage();
await page.goto('https://google.com');
// Agree to the cookies policy
await page.click('button + button');
// Type the query and visit the results page
await page.type('textarea[title]', 'hello world');
await page.keyboard.press('Enter');
// Wait for the first result to appear on the page,
// then click on it
await page.waitForSelector('.g a');
await Promise.all([page.waitForNavigation(), page.click('.g a')]);
// Our title extraction and screenshotting logic
// will go here
await page.waitForTimeout(10000);
await browser.close();
Next up
In the https://docs.apify.com/academy/puppeteer-playwright/page/page-methods.md of the Opening & controlling a page section of this course, we'll be learning about various methods on Page which aren't related to directly interacting with a page or waiting for stuff, as well as finally adding the final touches to our mini-project (page title grabbing and screenshotting).
Using proxies
Understand how to use proxies in your Puppeteer and Playwright requests, as well as a couple of the most common use cases for proxies.
https://docs.apify.com/academy/anti-scraping/mitigation/proxies.md are a great way of appearing as if you are making requests from a different location. A common use case for proxies is to avoid https://docs.apify.com/academy/anti-scraping/techniques/geolocation.md restrictions. For example your favorite TV show might not be available on Netflix in your country, but it might be available for Vietnamese Netflix watchers.
In this lesson, we'll be learning how to use proxies with Playwright and Puppeteer. This will be demonstrated with a Vietnamese proxy that we got by running https://apify.com/mstephen190/proxy-scraper proxy-scraping Actor on the Apify platform.
Adding a proxy
First, let's add our familiar boilerplate code for visiting Google and also create a variable called proxy which will point to our proxy server:
Note that this proxy may no longer be working at the time of reading. If you don't have a proxy to use during this lesson, we recommend using Proxy Scraper for a list of free ones, or checking out https://apify.com/proxy
- Playwright
- Puppeteer
import { chromium } from 'playwright';
// our proxy server
const proxy = '103.214.9.13:3128';
const browser = await chromium.launch({ headless: false });
const page = await browser.newPage();
await page.goto('https://google.com');
await page.waitForTimeout(10000);
await browser.close();
import puppeteer from 'puppeteer';
// our proxy server
const proxy = '103.214.9.13:3128';
const browser = await puppeteer.launch({ headless: false });
const page = await browser.newPage();
await page.goto('https://google.com');
await page.waitForTimeout(10000);
await browser.close();
For both Puppeteer and Playwright, the proxy server's URL should be passed into the options of the launch() function; however, it's done a bit differently depending on which library you're using.
In Puppeteer, the server must be passed within the --proxy-server https://peter.sh/experiments/chromium-command-line-switches/, while in Playwright, it can be passed into the proxy option.
- Playwright
- Puppeteer
import { chromium } from 'playwright';
const proxy = '103.214.9.13:3128';
const browser = await chromium.launch({
headless: false,
// Using the "proxy" option
proxy: {
// Pass in the server URL
server: proxy,
},
});
const page = await browser.newPage();
await page.goto('https://google.com');
await page.waitForTimeout(10000);
await browser.close();
import puppeteer from 'puppeteer';
const proxy = '103.214.9.13:3128';
// Using the "args" option, which is an array of Chromium command
// line switches, we pass the server URL in with "--proxy-server"
const browser = await puppeteer.launch({
headless: false,
args: [`--proxy-server=${proxy}`],
});
const page = await browser.newPage();
await page.goto('https://google.com');
await page.waitForTimeout(10000);
await browser.close();
And that's it! Now, when we visit Google, it's in Vietnamese. Depending on the country of your proxy, the language will vary.

Note that in order to rotate through multiple proxies, you must retire a browser instance then create a new one to continue automating with a new proxy.
Authenticating a proxy
The proxy in the last activity didn't require a username and password, but let's say that this one does:
proxy.example.com:3001
One might automatically assume that this would be the solution:
- Playwright
- Puppeteer
// This code is wrong!
import { chromium } from 'playwright';
const proxy = 'proxy.example.com:3001';
const username = 'someUsername';
const password = 'password123';
const browser = await chromium.launch({
headless: false,
proxy: {
server: `http://${username}:${password}@${proxy}`,
},
});
// This code is wrong!
import puppeteer from 'puppeteer';
const proxy = 'proxy.example.com:3001';
const username = 'someUsername';
const password = 'password123';
const browser = await puppeteer.launch({
headless: false,
args: [`--proxy-server=http://${username}:${password}@${proxy}`],
});
However, authentication parameters need to be passed in separately in order to work. In Puppeteer, the username and password need to be passed to the page.authenticate() prior to any navigations being made, while in Playwright they can be passed to the proxy option object.
- Playwright
- Puppeteer
import { chromium } from 'playwright';
const proxy = 'proxy.example.com:3001';
const username = 'someUsername';
const password = 'password123';
const browser = await chromium.launch({
headless: false,
proxy: {
server: proxy,
username,
password,
},
});
// Proxy will now be authenticated
import puppeteer from 'puppeteer';
const proxy = 'proxy.example.com:3001';
const username = 'someUsername';
const password = 'password123';
const browser = await puppeteer.launch({
headless: false,
args: [`--proxy-server=${proxy}`],
});
const page = await browser.newPage();
await page.authenticate({ username, password });
// Proxy will now be authenticated
Next up
You already know how to launch a browser with various configurations, which means you're ready to https://docs.apify.com/academy/puppeteer-playwright/browser-contexts.md. Browser contexts can be used to automate multiple sessions at once with completely different configurations. You'll also learn how to emulate different devices, such as iPhones, iPads, and Androids.
Reading & intercepting requests
You can use DevTools, but did you know that you can do all the same stuff (plus more) programmatically? Read and intercept requests in Puppeteer/Playwright.
On any website that serves up images, makes https://developer.mozilla.org/en-US/docs/Web/API/XMLHttpRequest, or fetches content in some other way, you can see those requests (and their responses) in the https://docs.apify.com/academy/api-scraping/general-api-scraping/locating-and-learning.md of your browser's DevTools. Lots of data about the request can be found there, such as the headers, payload, and response body.
In Playwright and Puppeteer, it is also possible to read (and even intercept) requests being made on the page - programmatically. This is very useful for things like reading dynamic headers, saving API responses, blocking certain resources, and much more.
During this lesson, we'll be using https://soundcloud.com/tiesto/following on SoundCloud to demonstrate request/response reading and interception. Here's our basic setup for opening the page:
- Playwright
- Puppeteer
import { chromium } from 'playwright';
const browser = await chromium.launch({ headless: false });
const page = await browser.newPage();
// Our code will go here
await page.goto('https://soundcloud.com/tiesto/following');
await page.waitForTimeout(10000);
await browser.close();
import puppeteer from 'puppeteer';
const browser = await puppeteer.launch({ headless: false });
const page = await browser.newPage();
// Our code will go here
await page.goto('https://soundcloud.com/tiesto/following');
await page.waitForTimeout(10000);
await browser.close();
Reading requests
We can use the https://pptr.dev/#?product=Puppeteer&version=v14.0.0&show=api-event-close function to listen for the request event, passing in a callback function. The first parameter of the passed in callback function is an object representing the request.
Upon visiting Tiësto's following page, we can see in the Network tab that a request is made to fetch all of the users which he is following.

Let's go ahead and listen for this request in our code:
- Playwright
- Puppeteer
// Listen for all requests
page.on('request', (req) => {
// If the URL doesn't include our keyword, ignore it
if (!req.url().includes('followings')) return;
console.log('Request for followers was made!');
});
// Listen for all requests
page.on('request', (req) => {
// If the URL doesn't include our keyword, ignore it
if (!req.url().includes('followings')) return;
console.log('Request for followers was made!');
});
Note that you should always define any request reading/interception code prior to calling the
page.goto()function.
Cool! Now when we run our code, we'll see this logged to the console:
Request for followers was made!
This request includes some useful query parameters, namely the client_id. Let's go ahead and grab these values from the request URL and print them to the console:
- Playwright
- Puppeteer
import { chromium } from 'playwright';
const browser = await chromium.launch({ headless: false });
const page = await browser.newPage();
// Listen for all requests
page.on('request', (req) => {
// If the URL doesn't include our keyword, ignore it
if (!req.url().includes('followings')) return;
// Convert the request URL into a URL object
const url = new URL(req.url());
// Print the search parameters in object form
console.log(Object.fromEntries(url.searchParams));
});
await page.goto('https://soundcloud.com/tiesto/following');
await page.waitForTimeout(10000);
await browser.close();
import puppeteer from 'puppeteer';
const browser = await puppeteer.launch({ headless: false });
const page = await browser.newPage();
// Listen for all requests
page.on('request', (req) => {
// If the URL doesn't include our keyword, ignore it
if (!req.url().includes('followings')) return;
// Convert the request URL into a URL object
const url = new URL(req.url());
// Print the search parameters in object form
console.log(Object.fromEntries(url.searchParams));
});
await page.goto('https://soundcloud.com/tiesto/following');
await page.waitForTimeout(10000);
await browser.close();
After running this code, we can see this logged to the console:
{
client_id: 'llCGDUjKpxUslgO1yEce7Zh95PXE78Bo',
limit: '12',
offset: '0',
linked_partitioning: '1',
app_version: '1652347025',
app_locale: 'en'
}
Reading responses
Listening for and reading responses is very similar to reading requests. The only difference is that we need to listen for the response event instead of request. Additionally, the object passed into the callback function represents the response instead of the request.
This time, instead of grabbing the query parameters of the request URL, let's grab hold of the response body and print it to the console in JSON format:
- Playwright
- Puppeteer
// Notice that the callback function is now async
page.on('response', async (res) => {
if (!res.request().url().includes('followings')) return;
// Grab the response body in JSON format
try {
const json = await res.json();
console.log(json);
} catch (err) {
console.error('Response wasn\'t JSON or failed to parse response.');
}
});
Take notice of our usage of a
try...catchblock. This is because if the response is not JSON, theres.json()function will fail and throw an error, which we must handle to prevent any unexpected crashes.
Upon running this code, we'll see the API response logged into the console:

Intercepting requests
One of the most popular ways of speeding up website loading in Puppeteer and Playwright is by blocking certain resources from loading. These resources are usually CSS files, images, and other miscellaneous resources that aren't super necessary (mainly because the computer doesn't have eyes - it doesn't care how the website looks!).
In Puppeteer, we must first enable request interception with the page.setRequestInterception() function. Then, we can check whether or not the request's resource ends with one of our blocked file extensions. If so, we'll abort the request. Otherwise, we'll let it continue. All of this logic will still be within the page.on() method.
With Playwright, request interception is a bit different. We use the https://playwright.dev/docs/api/class-page#page-route function instead of page.on(), passing in a string, regular expression, or a function that will match the URL of the request we'd like to read from. The second parameter is also a callback function, but with the https://playwright.dev/docs/api/class-route object passed into it instead.
Blocking resources
We'll first create an array of some file extensions that we'd like to block:
const blockedExtensions = ['.png', '.css', '.jpg', '.jpeg', '.pdf', '.svg'];
Then, we'll abort() all requests that end with any of these extensions.
- Playwright
- Puppeteer
import { chromium } from 'playwright';
const browser = await chromium.launch({ headless: false });
const page = await browser.newPage();
const blockedExtensions = ['.png', '.css', '.jpg', '.jpeg', '.pdf', '.svg'];
// Only listen for requests with one of our blocked extensions
// Abort all matching requests
page.route(`**/*{${blockedExtensions.join(',')}}`, async (route) => route.abort());
await page.goto('https://soundcloud.com/tiesto/following');
await page.waitForTimeout(10000);
await browser.close();
import puppeteer from 'puppeteer';
const browser = await puppeteer.launch({ headless: false });
const page = await browser.newPage();
const blockedExtensions = ['.png', '.css', '.jpg', '.jpeg', '.pdf', '.svg'];
// Enable request interception (skipping this step will result in an error)
await page.setRequestInterception(true);
// Listen for all requests
page.on('request', async (req) => {
// If the request ends in a blocked extension, abort the request
if (blockedExtensions.some((str) => req.url().endsWith(str))) return req.abort();
// Otherwise, continue
await req.continue();
});
await page.goto('https://soundcloud.com/tiesto/following');
await page.waitForTimeout(10000);
await browser.close();
You can also use
request.resourceType()to grab the resource type.
Here's what we see when we run this logic:

This confirms that we've successfully blocked the CSS and image resources from loading.
Quick note about resource blocking
Something very important to note is that by using request interception, the browser's cache is turned off. This means that resources on websites that would normally be cached (and pulled from the cache instead on the next request for those resources) will not be cached, which can have varying negative effects on performance, especially when making many requests to the same domain, which is very common in web scraping. You can learn how to solve this problem in https://docs.apify.com/academy/node-js/caching-responses-in-puppeteer.md.
To block resources, it is better to use a CDP (Chrome DevTools Protocol) Session (https://playwright.dev/docs/api/class-cdpsession/https://pptr.dev/#?product=Puppeteer&version=v14.1.0&show=api-class-cdpsession) to set the blocked URLs. Here is an implementation that achieves the same goal as our above example above; however, the browser's cache remains enabled.
- Playwright
- Puppeteer
// Note, you can't use CDP session in other browsers!
// Only in Chromium.
import { chromium } from 'playwright';
const browser = await chromium.launch({ headless: false });
const page = await browser.newPage();
// Define our blocked extensions
const blockedExtensions = ['.png', '.css', '.jpg', '.jpeg', '.pdf', '.svg'];
// Use CDP session to block resources
const client = await page.context().newCDPSession(page);
await client.send('Network.setBlockedURLs', { urls: blockedExtensions });
await page.goto('https://soundcloud.com/tiesto/following');
await page.waitForTimeout(10000);
await browser.close();
import puppeteer from 'puppeteer';
const browser = await puppeteer.launch({ headless: false });
const page = await browser.newPage();
// Define our blocked extensions
const blockedExtensions = ['.png', '.css', '.jpg', '.jpeg', '.pdf', '.svg'];
// Use CDP session to block resources
await page.client().send('Network.setBlockedURLs', { urls: blockedExtensions });
await page.goto('https://soundcloud.com/tiesto/following');
await page.waitForTimeout(10000);
await browser.close();
Modifying the request
There's much more to intercepting requests than just aborting them though. We can change the payload, headers, query parameters, and even the base URL.
Let's go ahead and intercept and modify the initial request we fire off with the page.goto() by making it go to https://soundcloud.com/mestomusic instead.
- Playwright
- Puppeteer
import { chromium } from 'playwright';
const browser = await chromium.launch({ headless: false });
const page = await browser.newPage();
// Only listen for requests matching this regular expression
page.route(/soundcloud.com\/tiesto/, async (route) => {
// Continue the route, but replace "tiesto" in the URL with "mestomusic"
return route.continue({ url: route.request().url().replace('tiesto', 'mestomusic') });
});
await page.goto('https://soundcloud.com/tiesto/following');
await page.waitForTimeout(10000);
await browser.close();
import puppeteer from 'puppeteer';
const browser = await puppeteer.launch({ headless: false });
const page = await browser.newPage();
await page.setRequestInterception(true);
// Listen for all requests
page.on('request', async (req) => {
// If it doesn't match, continue the route normally
if (!/soundcloud.com\/tiesto/.test(req.url())) return req.continue();
// Otherwise, continue the route, but replace "tiesto"
// in the URL with "mestomusic"
await req.continue({ url: req.url().replace('tiesto', 'mestomusic') });
});
await page.goto('https://soundcloud.com/tiesto/following');
await page.waitForTimeout(10000);
await browser.close();
Note that this is not a redirect, because Tiësto's page was never even visited. The request was changed before it was even fulfilled.
Here's what we see when we run node index.js:

Next up
The https://docs.apify.com/academy/puppeteer-playwright/proxies.md will teach you how to use proxies in Playwright and Puppeteer in order to avoid blocking or to appear as if you are requesting from a different location.
Scraping with Python
A collection of various Python tutorials to aid you in your journey to becoming a master web scraping and automation developer.
This section contains various web-scraping or web-scraping related tutorials for Python. Whether you're trying to scrape from a website with sitemaps, struggling with a dynamic page, want to optimize your slow scraper, or need some general tips for scraping in Python, this section is right for you.
How to process data in Python using Pandas
Learn how to process the resulting data of a web scraper in Python using the Pandas library, and how to visualize the processed data using Matplotlib.
In the https://docs.apify.com/academy/python/scrape-data-python.md, we learned how to scrape data from the web in Python using the https://www.crummy.com/software/BeautifulSoup/ library. The Python ecosystem's strengths lie mainly in data processing, though, so in this tutorial we will learn how to process the data stored in an Apify dataset using the https://pandas.pydata.org/ library, and how to visualize it using https://matplotlib.org/.
In this tutorial, we will use the Actor we created in the https://docs.apify.com/academy/python/scrape-data-python.md, so if you haven't completed that tutorial yet, please do so now.
In a rush? Skip this tutorial and https://github.com/apify/apify-docs/tree/master/examples/python-data-parser/.
Processing previously scraped data
In the previous tutorial, we set out to select our next holiday destination based on the forecast of the upcoming weather there. We have written an Actor that scrapes the BBC Weather forecast for the upcoming two weeks for three destinations: Prague, New York, and Honolulu. It then saves the scraped data to a https://docs.apify.com/platform/storage/dataset.md on the Apify platform.
Now, we need to process the scraped data and make a visualization that will help us decide which location has the best weather, and will therefore become our next holiday destination.
Setting up the Actor
First, we need to create another Actor. You can do it the same way as before - go to the https://console.apify.com/, open the https://console.apify.com/actors, click on the Create new button in the top right, and select the Example: Hello world in Python Actor template.
In the page that opens, you can see your newly created Actor. In the Settings tab, you can give it a name (e.g. bbc-weather-parser) and further customize its settings. We'll skip customizing the settings for now, the defaults should be fine. In the Source tab, you can see the files that are at the heart of the Actor. Although there are several of them, just two are important for us now, main.py and requirements.txt.
First, we'll start with the requirements.txt file. Its purpose is to list all the third-party packages that your Actor will use. We will be using the pandas package for parsing the downloaded weather data, and the matplotlib package for visualizing it. We don't care about versions of these packages, so we list just their names:
# Add your dependencies here.
# See https://pip.pypa.io/en/latest/cli/pip_install/#requirements-file-format
# for how to format them
matplotlib
pandas
The Actor's main logic will live in the main.py file. Let's delete everything currently in it and start from an empty file.
Next, we'll import all the packages we will use in the code:
from io import BytesIO
import os
from apify_client import ApifyClient
from apify_client.consts import ActorJobStatus
import pandas
Scraping the data
Next, we need to run the weather scraping Actor and access its results. We do that through the https://docs.apify.com/api/client/python, which greatly simplifies working with the Apify platform and allows you to use its functions without having to call the Apify API directly.
First, we initialize an ApifyClient instance. All the necessary arguments are automatically provided to the Actor process as environment variables accessible in Python through the os.environ mapping. We need to run the Actor from the previous tutorial, which we have named bbc-weather-scraper, and wait for it to finish. We create a sub-client for working with that Actor and run the Actor through it. We then check whether the Actor run has succeeded. If so, we create a client for working with its default dataset.
# Initialize the main ApifyClient instance
client = ApifyClient(os.environ['APIFY_TOKEN'], api_url=os.environ['APIFY_API_BASE_URL'])
# Run the weather scraper and wait for it to finish
print('Downloading the weather data...')
scraper_run = client.actor('~bbc-weather-scraper').call()
# Check if the scraper finished successfully, otherwise raise an error
if scraper_run['status'] != ActorJobStatus.SUCCEEDED:
raise RuntimeError('The weather scraper run has failed')
# Get the resource sub-client for working with the dataset with the source data
dataset_client = client.dataset(scraper_run['defaultDatasetId'])
Processing the data
Now, we need to load the data from the dataset to a Pandas dataframe. Pandas supports reading data from a CSV file stream, so we create a stream with the dataset items in the right format and supply it to pandas.read_csv().
# Load the dataset items into a pandas dataframe
print('Parsing weather data...')
dataset_items_stream = dataset_client.stream_items(item_format='csv')
weather_data = pandas.read_csv(dataset_items_stream, parse_dates=['datetime'], date_parser=lambda val: pandas.to_datetime(val, utc=True))
Once we have the data loaded, we can process it. Each data row comes as three fields: datetime, location and temperature. We would like to transform the data so that we have the datetimes in one column, and the temperatures for each location at that datetime in separate columns, one for each location. To achieve this, we use the .pivot() method on the dataframe. Since the temperature varies considerably between day and night, and we would like to get an overview of the temperature trends over a longer period of time, we calculate a rolling average of the temperatures with a 24-hour window.
# Transform data to a pivot table for easier plotting
pivot = weather_data.pivot(index='datetime', columns='location', values='temperature')
mean_daily_temperatures = pivot.rolling(window='24h', min_periods=24, center=True).mean()
Visualizing the data
With the data processed, we can then make a plot of the results. For that, we use the .plot() method of the dataframe, which creates a figure with the plot, using the Matplotlib library internally. We set the right titles and labels to the plot, and apply some additional formatting to achieve a nicer result.
# Create a plot of the data
print('Plotting the data...')
axes = mean_daily_temperatures.plot(figsize=(10, 5))
axes.set_title('Weather prediction for holiday destinations')
axes.set_xlabel(None)
axes.yaxis.set_major_formatter(lambda val, _: f'{int(val)} °C')
axes.grid(which='both', linestyle='dotted')
axes.legend(loc='best')
axes.figure.tight_layout()
As the last step, we need to save the plot to a record in a https://docs.apify.com/platform/storage/key-value-store.md on the Apify platform, so that we can access it later. We save the rendered figure with the plot to an in-memory buffer, and then save the contents of that buffer to the default key-value store of the Actor run through its resource subclient.
# Get the resource sub-client for working with the default key-value store of the run
key_value_store_client = client.key_value_store(os.environ['APIFY_DEFAULT_KEY_VALUE_STORE_ID'])
# Save the resulting plot to the key-value store through an in-memory buffer
print('Saving plot to key-value store...')
with BytesIO() as buf:
axes.figure.savefig(buf, format='png', dpi=200, facecolor='w')
buf.seek(0)
key_value_store_client.set_record('prediction.png', buf, 'image/png')
print(f'Result is available at {os.environ["APIFY_API_PUBLIC_BASE_URL"]}'
+ f'/v2/key-value-stores/{os.environ["APIFY_DEFAULT_KEY_VALUE_STORE_ID"]}/records/prediction.png')
And that's it! Now you can save the changes in the editor, and then click Build and run at the bottom of the page. The Actor will get built, the built Actor image will get saved for future re-use, and then it will be executed. You can follow the progress of the Actor build and the Actor run in the Last build and Last run tabs, respectively, in the developer console in the Actor source view. Once the Actor finishes running, it will output the URL where you can access the plot we created in its log.

Looking at the results, Honolulu seems like the right choice now, don't you think? 🙂

How to scrape data in Python using Beautiful Soup
Learn how to create a Python Actor and use Python libraries to scrape, process and visualize data extracted from the web.
Web scraping is not limited to the JavaScript world. The Python ecosystem contains some pretty powerful scraping tools as well. One of those is https://www.crummy.com/software/BeautifulSoup/, a library for parsing HTML and navigating or modifying of its DOM tree.
This tutorial shows you how to write a Python https://docs.apify.com/academy/getting-started/actors.md for scraping the weather forecast from https://www.bbc.com/weather and process the scraped data using https://pandas.pydata.org/.
In a rush? Skip this tutorial and get the https://github.com/apify/apify-docs/tree/master/examples/python-data-scraper/.
Exploring the BBC Weather page
BBC Weather offers you the weather forecast for the upcoming 14 days for a large selection of places around the world. Let's say we want to decide on our next holiday destination. We're choosing between Prague, New York, and Honolulu, and we will pick the destination based on which one has the best weather. To do that, we will scrape the weather forecast for each of our options, and then compare the results.
Understanding the URL format
First, we need to look around the BBC Weather page and understand how the weather data is being retrieved and presented. If we open the https://www.bbc.com/weather page and search for Prague, we can see that it opened a page with a URL ending in a seven-digit number, which we can assume is the ID of the displayed location BBC Weather uses internally. Opening a different location changes only that number in the URL, confirming our assumptions.
The page shows the weather forecast for the upcoming 14 days. If we hover over the days in the displayed carousel, we can see that the link for each day leads to a URL ending with /day{X}, with {X} representing how many days in the future the specific day is.
Combining this information gives us the full format for the URL of a page for a given location and day: https://www.bbc.com/weather/{LOCATION_ID}/day{DAY_OFFSET}.

Determining the forecast's starting date
Looking more closely at the BBC Weather page, we can see that it shows the forecast for each day from 6:00 AM to 5:00 AM the next day. But what happens when we view a location where the current time is between midnight and 5 AM? Trying that, we can see that, in the day represented by Tonight, there are only a few slots for the hours between midnight and 5 AM displayed. This means that the first displayed day can either represent the current date at the location, or the day before the current date. To find out which of these two it is, we will first have to determine the current date and time at the location, and then possibly adjust it by one day based on whether the date matches the first displayed day.

To determine the current date and time at the displayed location, we will need to know the location's timezone. Fortunately, the timezone and its offset to GMT are displayed near the bottom of the page.

Understanding the element structure
To extract data from the page, we need to figure out where exactly in the internal page structure it is stored.
If we right-click on the day title in the top carousel (Today or Tonight) and select Inspect in the popup menu, we can open the Chrome DevTools Inspector with the clicked element highlighted. We can see that the element with the currently displayed day in the top carousel has the class wr-day--active, and that the element with the day's title has the class wr-day__title and the accessibility label attribute aria-label contains the actual date of that day, not just Today or Tonight. Additionally, the timezone information is in an element with the class wr-c-footer-timezone__item. You can see two elements with the same class, so we will need to pick the second one when parsing the page.
Exploring the document tree further, we can see that the element containing all the displayed hours has the class wr-time-slot-container__slots. The elements with the forecast for a given hour have the class wr-time-slot. In each time slot, the element containing the slot's hour has the class wr-time-slot-primary__hours and the element containing the slot's predicted temperature in degrees Celsius has the class wr-value--temperature--c.

Scraping the data from the page
Now that we understand the element structure of the page and know where to find all the data we need, we can start writing the scraper.
Setting up the Actor
First, we need to create a new Actor. To do this, go to https://console.apify.com/, open the https://console.apify.com/actors/development/my-actors, click on the Develop new button in the top right, and select the Example: Hello world in Python Actor template.
In the page that opens, you can see your newly created Actor. In the Settings tab, you can give it a name (e.g. bbc-weather-scraper) and further customize its settings. We'll skip customizing the settings for now, the defaults should be fine. In the Source tab, you can see the files that are at the heart of the Actor. Although there are several of them, just two are important for us now, main.py and requirements.txt.
First we'll start with the requirements.txt file. Its purpose is to list all the third-party packages that your Actor will use. We will be using the requests package for downloading the BBC Weather pages, and the beautifulsoup4 package for parsing and processing the downloaded pages. We don't care about versions of these packages, so we list just their names:
# Add your dependencies here.
# See https://pip.pypa.io/en/latest/cli/pip_install/#requirements-file-format
# for how to format them
beautifulsoup4
requests
Writing the code
Finally, we can get to writing the main logic for the Actor, which will live in the main.py file. Let's delete everything currently in it and start from an empty file.
First, we need to import all the packages we will use in the code:
from datetime import datetime, time, timedelta, timezone
import os
import re
from apify_client import ApifyClient
from bs4 import BeautifulSoup
import requests
Next, let's set up the locations we want to scrape in a constant for easier reference and, optionally, modification.
# Locations which to scrape and their BBC Weather IDs
LOCATIONS = [
('Prague', '3067696'),
('Honolulu', '5856195'),
('New York', '5128581'),
]
Extracting the data
We'll be scraping each location separately. For each location, we need to know in which timezone it resides and what is the first displayed date in the weather forecast for that location. We will scrape each of the 14 forecast days one by one. For each day, we will first download its forecast page using the requests library, and then parse the downloaded HTML using the BeautifulSoup parser:
# List with scraped results
weather_data = []
# Scrape each location separately
for (location_name, location_id) in LOCATIONS:
print(f'Scraping weather from {location_name}...')
location_timezone = None
first_displayed_date = None
for day_offset in range(14):
# Get the BBC Weather page for the given location and day and parse it with BeautifulSoup
response = requests.get(f'https://www.bbc.com/weather/{location_id}/day{day_offset}')
soup = BeautifulSoup(response.content, 'html.parser')
When scraping a location, we need to know in which timezone it lies, and what date the first displayed day of the forecast represents. We can find that out at the beginning, when scraping the first day of the forecast for that location.
To get the necessary data, we will need to find the elements in which it is contained. Let's use the soup.find(...) and soup.findAll(...) methods, which find elements matching some specified conditions in the parsed HTML.
First, we extract the timezone from the second element with class wr-c-footer-timezone__item. The timezone information is described there with a full sentence, but we're only interested in the numerical representation of the timezone offset, so we parse it out using a regular expression. With the timezone offset parsed, we can construct a timezone object and from that get the current datetime at the location.
Afterwards, we can figure out which date is represented by the first displayed day. We find the element with the class wr-day--active containing the header for the currently displayed day. Inside it, we find the element with the title of that day, which has the class wr-day__title. This element has the accessibility label containing the actual date of the day in its aria-label attribute, but it contains only the day and month and not the year, so we can't use it directly. Instead, to get the full date of the first displayed day, we compare the day from the accessibility label and the day from the current datetime at the location. If they match, we know the first displayed date is the current date at the location. If they don't, we know the first displayed date is the day before the current date at the location.
# When parsing the first day, find out what day it represents,
# to know when do the results start
if day_offset == 0:
# Get the timezone offset written in the page footer and parse it
tz_description = soup.find_all(class_='wr-c-footer-timezone__item')[1].text
tz_offset_match = re.search(r'([+-]\d\d)(\d\d)', tz_description)
tz_offset_hours = int(tz_offset_match.group(1))
tz_offset_minutes = int(tz_offset_match.group(2))
# Get the current date and time at the scraped location
timezone_offset = timedelta(hours=tz_offset_hours, minutes=tz_offset_minutes)
location_timezone = timezone(timezone_offset)
location_current_datetime = datetime.now(tz=location_timezone)
# The times displayed for each day are from 6:00 AM that day to 5:00 AM the next day,
# so "today" on BBC Weather might actually mean "yesterday" in actual datetime.
# We have to parse the accessibility label containing the actual date on the header for the first day
# and compare it with the current date at the location, then adjust the date accordingly
day_carousel_item = soup.find(class_='wr-day--active')
day_carousel_title = day_carousel_item.find(class_='wr-day__title')['aria-label']
website_first_displayed_item_day = int(re.search(r'\d{1,2}', day_carousel_title).group(0))
if location_current_datetime.day == website_first_displayed_item_day:
first_displayed_date = location_current_datetime.date()
else:
first_displayed_date = location_current_datetime.date() - timedelta(days=1)
Now that we've figured out the date of the first displayed day, we can extract the predicted weather from each hour of each forecast day. The forecast for the displayed day is in the element with class wr-time-slot-container__slots, and that element contains time slots for each predicted hour represented by elements with the class wr-time-slot. In each time slot, the element with the class wr-time-slot-primary__hours contains the hour of the time slot. The element with the class wr-value--temperature--c contains the temperature in degrees Celsius.
To get the datetime of each slot, we need to combine the date of the first displayed day, the hour displayed in the slot, and the timezone of the currently processed location. Since the page shows the forecast for each day from 6 AM to 5 AM the next day, we need to add one day to the slots from midnight to 5 AM to get the correct datetime.
Finally, we can put all the extracted information together and push them to the array holding the resulting data.
# Go through the elements for each displayed time slot of the displayed day
slot_container = soup.find(class_='wr-time-slot-container__slots')
for slot in slot_container.find_all(class_='wr-time-slot'):
# Find out the date and time of the displayed element from the day offset and the displayed hour.
# The times displayed for each day are from 6:00 AM that day to 5:00 AM the next day,
# so anything between midnight and 6 AM actually represents the next day
slot_hour = int(slot.find(class_='wr-time-slot-primary__hours').text)
slot_datetime = datetime.combine(first_displayed_date, time(hour=slot_hour), tzinfo=location_timezone)
slot_datetime += timedelta(days=day_offset)
if slot_hour In a rush? Skip this tutorial and https://github.com/apify/apify-docs/tree/master/examples/python-data-parser/.
## Processing previously scraped data
In the previous tutorial, we set out to select our next holiday destination based on the forecast of the upcoming weather there. We have written an Actor that scrapes the BBC Weather forecast for the upcoming two weeks for three destinations: Prague, New York, and Honolulu. It then saves the scraped data to a https://docs.apify.com/platform/storage/dataset.md on the Apify platform.
Now, we need to process the scraped data and make a visualization that will help us decide which location has the best weather, and will therefore become our next holiday destination.
### Setting up the Actor
First, we need to create another Actor. You can do it the same way as before - go to the https://console.apify.com/, open the https://console.apify.com/actors, click on the **Create new** button in the top right, and select the **Example: Hello world in Python** Actor template.
In the page that opens, you can see your newly created Actor. In the **Settings** tab, you can give it a name (e.g. `bbc-weather-parser`) and further customize its settings. We'll skip customizing the settings for now, the defaults should be fine. In the **Source** tab, you can see the files that are at the heart of the Actor. Although there are several of them, just two are important for us now, `main.py` and `requirements.txt`.
First, we'll start with the `requirements.txt` file. Its purpose is to list all the third-party packages that your Actor will use. We will be using the `pandas` package for parsing the downloaded weather data, and the `matplotlib` package for visualizing it. We don't care about versions of these packages, so we list just their names:
Add your dependencies here.
See https://pip.pypa.io/en/latest/cli/pip_install/#requirements-file-format
for how to format them
matplotlib pandas
The Actor's main logic will live in the `main.py` file. Let's delete everything currently in it and start from an empty file.
Next, we'll import all the packages we will use in the code:
from io import BytesIO import os
from apify_client import ApifyClient from apify_client.consts import ActorJobStatus import pandas
### Scraping the data
Next, we need to run the weather scraping Actor and access its results. We do that through the https://docs.apify.com/api/client/python, which greatly simplifies working with the Apify platform and allows you to use its functions without having to call the Apify API directly.
First, we initialize an `ApifyClient` instance. All the necessary arguments are automatically provided to the Actor process as environment variables accessible in Python through the `os.environ` mapping. We need to run the Actor from the previous tutorial, which we have named `bbc-weather-scraper`, and wait for it to finish. We create a sub-client for working with that Actor and run the Actor through it. We then check whether the Actor run has succeeded. If so, we create a client for working with its default dataset.
Initialize the main ApifyClient instance
client = ApifyClient(os.environ['APIFY_TOKEN'], api_url=os.environ['APIFY_API_BASE_URL'])
Run the weather scraper and wait for it to finish
print('Downloading the weather data...') scraper_run = client.actor('~bbc-weather-scraper').call()
Check if the scraper finished successfully, otherwise raise an error
if scraper_run['status'] != ActorJobStatus.SUCCEEDED: raise RuntimeError('The weather scraper run has failed')
Get the resource sub-client for working with the dataset with the source data
dataset_client = client.dataset(scraper_run['defaultDatasetId'])
### Processing the data
Now, we need to load the data from the dataset to a Pandas dataframe. Pandas supports reading data from a CSV file stream, so we create a stream with the dataset items in the right format and supply it to `pandas.read_csv()`.
Load the dataset items into a pandas dataframe
print('Parsing weather data...') dataset_items_stream = dataset_client.stream_items(item_format='csv') weather_data = pandas.read_csv(dataset_items_stream, parse_dates=['datetime'], date_parser=lambda val: pandas.to_datetime(val, utc=True))
Once we have the data loaded, we can process it. Each data row comes as three fields: `datetime`, `location` and `temperature`. We would like to transform the data so that we have the datetimes in one column, and the temperatures for each location at that datetime in separate columns, one for each location. To achieve this, we use the `.pivot()` method on the dataframe. Since the temperature varies considerably between day and night, and we would like to get an overview of the temperature trends over a longer period of time, we calculate a rolling average of the temperatures with a 24-hour window.
Transform data to a pivot table for easier plotting
pivot = weather_data.pivot(index='datetime', columns='location', values='temperature') mean_daily_temperatures = pivot.rolling(window='24h', min_periods=24, center=True).mean()
### Visualizing the data
With the data processed, we can then make a plot of the results. For that, we use the `.plot()` method of the dataframe, which creates a figure with the plot, using the Matplotlib library internally. We set the right titles and labels to the plot, and apply some additional formatting to achieve a nicer result.
Create a plot of the data
print('Plotting the data...') axes = mean_daily_temperatures.plot(figsize=(10, 5)) axes.set_title('Weather prediction for holiday destinations') axes.set_xlabel(None) axes.yaxis.set_major_formatter(lambda val, _: f'{int(val)} °C') axes.grid(which='both', linestyle='dotted') axes.legend(loc='best') axes.figure.tight_layout()
As the last step, we need to save the plot to a record in a https://docs.apify.com/platform/storage/key-value-store.md on the Apify platform, so that we can access it later. We save the rendered figure with the plot to an in-memory buffer, and then save the contents of that buffer to the default key-value store of the Actor run through its resource subclient.
Get the resource sub-client for working with the default key-value store of the run
key_value_store_client = client.key_value_store(os.environ['APIFY_DEFAULT_KEY_VALUE_STORE_ID'])
Save the resulting plot to the key-value store through an in-memory buffer
print('Saving plot to key-value store...') with BytesIO() as buf: axes.figure.savefig(buf, format='png', dpi=200, facecolor='w') buf.seek(0) key_value_store_client.set_record('prediction.png', buf, 'image/png')
print(f'Result is available at {os.environ["APIFY_API_PUBLIC_BASE_URL"]}' + f'/v2/key-value-stores/{os.environ["APIFY_DEFAULT_KEY_VALUE_STORE_ID"]}/records/prediction.png')
And that's it! Now you can save the changes in the editor, and then click **Build and run** at the bottom of the page. The Actor will get built, the built Actor image will get saved for future re-use, and then it will be executed. You can follow the progress of the Actor build and the Actor run in the **Last build** and **Last run** tabs, respectively, in the developer console in the Actor source view. Once the Actor finishes running, it will output the URL where you can access the plot we created in its log.

Looking at the results, Honolulu seems like the right choice now, don't you think? 🙂

---
# Run a web server on the Apify platform
**A web server running in an Actor can act as a communication channel with the outside world. Learn how to set one up with Node.js.**
***
Sometimes, an Actor needs a channel for communication with other systems (or humans). This channel might be used to receive commands, to provide info about progress, or both. To implement this, we will run a HTTP web server inside the Actor that will provide:
* An API to receive commands.
* An HTML page displaying output data.
Running a web server in an Actor is a piece of cake! Each Actor run is available at a unique URL (container URL) which always takes the form `https://CONTAINER-KEY.runs.apify.net`. This URL is available in the https://docs.apify.com/api/v2/actor-run-get.md returned by the Apify API, as well as in the Apify console.
If you start a web server on the port defined by the **APIFY\_CONTAINER\_PORT** environment variable (the default value is **4321**), the container URL becomes available and gets displayed in the **Live View** tab in the Actor run console.
For more details, see https://docs.apify.com/platform/actors/development/programming-interface/container-web-server.md.
## Building the Actor
Let's try to build the following Actor:
* The Actor will provide an API to receive URLs to be processed.
* For each URL, the Actor will create a screenshot.
* The screenshot will be stored in the key-value store.
* The Actor will provide a web page displaying thumbnails linked to screenshots and a HTML form to submit new URLs.
To achieve this we will use the following technologies:
* https://expressjs.com framework to create the server
* https://pptr.dev to grab screenshots.
* The https://docs.apify.com/sdk/js to access Apify storages to store the screenshots.
Our server needs two paths:
* `/` - Index path will display a page form to submit a new URL and the thumbnails of processed URLs.
* `/add-url` - Will provide an API to add new URLs using a HTTP POST request.
First, we'll import `express` and create an Express.js app. Then, we'll add some middleware that will allow us to receive form submissions.
import { Actor } from 'apify'; import express from 'express';
await Actor.init();
const app = express();
app.use(express.json()); app.use(express.urlencoded({ extended: true }));
Now we need to read the following environment variables:
* **APIFY\_CONTAINER\_PORT** contains a port number where we must start the server.
* **APIFY\_CONTAINER\_URL** contains a URL under which we can access the container.
* **APIFY\_DEFAULT\_KEY\_VALUE\_STORE\_ID** is the ID of the default key-value store of this Actor where we can store screenshots.
const { APIFY_CONTAINER_PORT, APIFY_CONTAINER_URL, APIFY_DEFAULT_KEY_VALUE_STORE_ID, } = process.env;
Next, we'll create an array of the processed URLs where the **n**th URL has its screenshot stored under the key **n**.jpg in the key-value store.
const processedUrls = [];
After that, the index route is ready to be defined.
app.get('/', (req, res) => { let listItems = '';
// For each of the processed
processedUrls.forEach((url, index) => {
const imageUrl = `https://api.apify.com/v2/key-value-stores/${APIFY_DEFAULT_KEY_VALUE_STORE_ID}/records/${index}.jpg`;
// Display the screenshots below the form
listItems += `
${url}
`; });
const pageHtml = `
Example
URL:
${listItems}
`;
res.send(pageHtml);
});
And then a second path that receives the new URL submitted using the HTML form; after the URL is processed, it redirects the user back to the root path.
import { launchPuppeteer } from 'crawlee';
app.post('/add-url', async (req, res) => {
const { url } = req.body;
console.log(Got new URL: ${url});
// Start chrome browser and open new page ...
const browser = await launchPuppeteer();
const page = await browser.newPage();
// ... go to our URL and grab a screenshot ...
await page.goto(url);
const screenshot = await page.screenshot({ type: 'jpeg' });
// ... close browser ...
await page.close();
await browser.close();
// ... save screenshot to key-value store and add URL to processedUrls.
await Actor.setValue(`${processedUrls.length}.jpg`, screenshot, { contentType: 'image/jpeg' });
processedUrls.push(url);
res.redirect('/');
});
And finally, we need to start the web server.
// Start the web server!
app.listen(APIFY_CONTAINER_PORT, () => {
console.log(Application is listening at URL ${APIFY_CONTAINER_URL}.);
});
### Final code
import { Actor } from 'apify'; import express from 'express';
await Actor.init();
const app = express();
app.use(express.json()); app.use(express.urlencoded({ extended: true }));
const { APIFY_CONTAINER_PORT, APIFY_CONTAINER_URL, APIFY_DEFAULT_KEY_VALUE_STORE_ID, } = process.env;
const processedUrls = [];
app.get('/', (req, res) => { let listItems = '';
// For each of the processed
processedUrls.forEach((url, index) => {
const imageUrl = `https://api.apify.com/v2/key-value-stores/${APIFY_DEFAULT_KEY_VALUE_STORE_ID}/records/${index}.jpg`;
// Display the screenshots below the form
listItems += `
${url}
`; });
const pageHtml = `
Example
URL:
${listItems}
`;
res.send(pageHtml);
});
app.post('/add-url', async (req, res) => {
const { url } = req.body;
console.log(Got new URL: ${url});
// Start chrome browser and open new page ...
const browser = await Actor.launchPuppeteer();
const page = await browser.newPage();
// ... go to our URL and grab a screenshot ...
await page.goto(url);
const screenshot = await page.screenshot({ type: 'jpeg' });
// ... close browser ...
await page.close();
await browser.close();
// ... save screenshot to key-value store and add URL to processedUrls.
await Actor.setValue(`${processedUrls.length}.jpg`, screenshot, { contentType: 'image/jpeg' });
processedUrls.push(url);
res.redirect('/');
});
app.listen(APIFY_CONTAINER_PORT, () => {
console.log(Application is listening at URL ${APIFY_CONTAINER_URL}.);
});
When we deploy and run this Actor on the Apify platform, then we can open the **Live View** tab in the Actor console to submit the URL to your Actor through the form. After the URL is successfully submitted, it appears in the Actor log.
With that, we're done! And our application works like a charm :)
The complete code of this Actor is available on its Store https://apify.com/apify/example-web-server/source-code. You can run it there or copy it to your account.
---
# Web scraping basics for JavaScript devs
**Learn how to use JavaScript to extract information from websites in this practical course, starting from the absolute basics.**
***
In this course we'll use JavaScript to create an application for watching prices. It'll be able to scrape all product pages of an e-commerce website and record prices. Data from several runs of such program would be useful for seeing trends in price changes, detecting discounts, etc.

## What we'll do
* Inspect pages using browser DevTools.
* Download web pages using the Fetch API.
* Extract data from web pages using the Cheerio library.
* Save extracted data in various formats (e.g. CSV which MS Excel or Google Sheets can open) using the json2csv library.
* Follow links programmatically (crawling).
* Save time and effort with frameworks, such as Crawlee, and scraping platforms, such as Apify.
## Who this course is for
Anyone with basic knowledge of developing programs in JavaScript who wants to start with web scraping can take this course. The course does not expect you to have any prior knowledge of other web technologies or scraping.
## Requirements
* A macOS, Linux, or Windows machine with a web browser and Node.js installed.
* Familiarity with JavaScript basics: variables, conditions, loops, functions, strings, arrays, objects, files, classes, promises, imports, and exceptions.
* Comfort with building a Node.js package and installing dependencies with `npm`.
* Familiarity with running commands in Terminal (macOS/Linux) or Command Prompt (Windows).
## You may want to know
Let's explore the key reasons to take this course. What is web scraping good for, and what career opportunities does it enable for you?
### Why learn scraping
The internet is full of useful data, but most of it isn't offered in a structured way that's easy to process programmatically. That's why you need scraping, a set of approaches to download websites and extract data from them.
Scraper development is also a fun and challenging way to learn web development, web technologies, and understand the internet. You'll reverse-engineer websites, understand how they work internally, discover what technologies they use, and learn how they communicate with servers. You'll also master your chosen programming language and core programming concepts. Understanding web scraping gives you a head start in learning web technologies such as HTML, CSS, JavaScript, frontend frameworks (like React or Next.js), HTTP, REST APIs, GraphQL APIs, and more.
### Why build your own scrapers
Scrapers are programs specifically designed to mine data from the internet. Point-and-click or no-code scraping solutions do exist, but they only take you so far. While simple to use, they lack the flexibility and optimization needed to handle advanced cases. Only custom-built scrapers can tackle more difficult challenges. And unlike ready-made solutions, they can be fine-tuned to perform tasks more efficiently, at a lower cost, or with greater precision.
### Why become a scraper dev
As a scraper developer, you are not limited by whether certain data is available programmatically through an official API—the entire web becomes your API! Here are some things you can do if you understand scraping:
* Improve your productivity by building personal tools, such as your own real estate or rare sneakers watchdog.
* Companies can hire you to build custom scrapers mining data important for their business.
* Become an invaluable asset to data journalism, data science, or nonprofit teams working to make the world a better place.
* You can publish your scrapers on platforms like the https://apify.com/store and earn money by renting them out to others.
### Why learn with Apify
We are https://apify.com, a web scraping and automation platform. We do our best to build this course on top of open source technologies. That means what you learn applies to any scraping project, and you'll be able to run your scrapers on any computer. We will show you how a scraping platform can simplify your life, but that lesson is optional and designed to fit within our https://apify.com/pricing.
## Course content
---
# Crawling websites with Node.js
**In this lesson, we'll follow links to individual product pages. We'll use the Fetch API to download them and Cheerio to process them.**
***
In previous lessons we've managed to download the HTML code of a single page, parse it with Cheerio, and extract relevant data from it. We'll do the same now for each of the products.
Thanks to the refactoring, we have functions ready for each of the tasks, so we won't need to repeat ourselves in our code. This is what you should see in your editor now:
import * as cheerio from 'cheerio'; import { writeFile } from 'fs/promises'; import { AsyncParser } from '@json2csv/node';
async function download(url) {
const response = await fetch(url);
if (response.ok) {
const html = await response.text();
return cheerio.load(html);
} else {
throw new Error(HTTP ${response.status});
}
}
function parseProduct($productItem, baseURL) { const $title = $productItem.find(".product-item__title"); const title = $title.text().trim(); const url = new URL($title.attr("href"), baseURL).href;
const $price = $productItem.find(".price").contents().last(); const priceRange = { minPrice: null, price: null }; const priceText = $price .text() .trim() .replace("$", "") .replace(".", "") .replace(",", "");
if (priceText.startsWith("From ")) { priceRange.minPrice = parseInt(priceText.replace("From ", "")); } else { priceRange.minPrice = parseInt(priceText); priceRange.price = priceRange.minPrice; }
return { url, title, ...priceRange }; }
function exportJSON(data) { return JSON.stringify(data, null, 2); }
async function exportCSV(data) { const parser = new AsyncParser(); return await parser.parse(data).promise(); }
const listingURL = "https://warehouse-theme-metal.myshopify.com/collections/sales"; const $ = await download(listingURL);
const data = $(".product-item").toArray().map(element => { const $productItem = $(element); const item = parseProduct($productItem, listingURL); return item; });
await writeFile('products.json', exportJSON(data)); await writeFile('products.csv', await exportCSV(data));
## Extracting vendor name
Each product URL points to a so-called *product detail page*, or PDP. If we open one of the product URLs in the browser, e.g. the one about https://warehouse-theme-metal.myshopify.com/products/sony-xbr-65x950g-65-class-64-5-diag-bravia-4k-hdr-ultra-hd-tv, we can see that it contains a vendor name, https://en.wikipedia.org/wiki/Stock_keeping_unit, number of reviews, product images, product variants, stock availability, description, and perhaps more.

Depending on what's valuable for our use case, we can now use the same techniques as in previous lessons to extract any of the above. As a demonstration, let's scrape the vendor name. In browser DevTools, we can see that the HTML around the vendor name has the following structure:
Sony XBR-950G BRAVIA 4K HDR Ultra HD TV
...
Sony
SKU:
SON-985594-XBR-65
...
3 reviews
...
It looks like using a CSS selector to locate the element with the `product-meta__vendor` class, and then extracting its text, should be enough to get the vendor name as a string:
const vendor = $(".product-meta__vendor").text().trim();
But where do we put this line in our program?
## Crawling product detail pages
In the `.map()` loop, we're already going through all the products. Let's expand it to include downloading the product detail page, parsing it, extracting the vendor's name, and adding it to the item object.
First, we need to make the loop asynchronous so that we can use `await download()` for each product. We'll add the `async` keyword to the inner function and rename the collection to `promises`, since it will now store promises that resolve to items rather than the items themselves. We'll pass it to `await Promise.all()` to resolve all the promises and retrieve the actual items.
const listingURL = "https://warehouse-theme-metal.myshopify.com/collections/sales"; const $ = await download(listingURL);
const promises = $(".product-item").toArray().map(async element => { const $productItem = $(element); const item = parseProduct($productItem, listingURL); return item; }); const data = await Promise.all(promises);
The program behaves the same as before, but now the code is prepared to make HTTP requests from within the inner function. Let's do it:
const listingURL = "https://warehouse-theme-metal.myshopify.com/collections/sales"; const $ = await download(listingURL);
const promises = $(".product-item").toArray().map(async element => { const $productItem = $(element); const item = parseProduct($productItem, listingURL);
const $p = await download(item.url); item.vendor = $p(".product-meta__vendor").text().trim();
return item; }); const data = await Promise.all($promises.get());
We download each product detail page and parse its HTML using Cheerio. The `$p` variable is the root of a Cheerio object tree, similar to but distinct from the `$` used for the listing page. That's why we use `$p()` instead of `$p.find()`.
If we run the program now, it'll take longer to finish since it's making 24 more HTTP requests. But in the end, it should produce exports with a new field containing the vendor's name:
[ { "url": "https://warehouse-theme-metal.myshopify.com/products/jbl-flip-4-waterproof-portable-bluetooth-speaker", "title": "JBL Flip 4 Waterproof Portable Bluetooth Speaker", "minPrice": 7495, "price": 7495, "vendor": "JBL" }, { "url": "https://warehouse-theme-metal.myshopify.com/products/sony-xbr-65x950g-65-class-64-5-diag-bravia-4k-hdr-ultra-hd-tv", "title": "Sony XBR-950G BRAVIA 4K HDR Ultra HD TV", "minPrice": 139800, "price": null, "vendor": "Sony" }, ... ]
## Extracting price
Scraping the vendor's name is nice, but the main reason we started checking the detail pages in the first place was to figure out how to get a price for each product. From the product listing, we could only scrape the min price, and remember—we're building a Node.js app to track prices!
Looking at the https://warehouse-theme-metal.myshopify.com/products/sony-xbr-65x950g-65-class-64-5-diag-bravia-4k-hdr-ultra-hd-tv, it's clear that the listing only shows min prices, because some products have variants, each with a different price. And different stock availability. And different SKUs…

In the next lesson, we'll scrape the product detail pages so that each product variant is represented as a separate item in our dataset.
***
## Exercises
These challenges are here to help you test what you’ve learned in this lesson. Try to resist the urge to peek at the solutions right away. Remember, the best learning happens when you dive in and do it yourself!
Real world
You're about to touch the real web, which is practical and exciting! But websites change, so some exercises might break. If you run into any issues, please leave a comment below or https://github.com/apify/apify-docs/issues.
### Scrape calling codes of African countries
Scrape links to Wikipedia pages for all African states and territories. Follow each link and extract the *calling code* from the info table. Print the URL and the calling code for each country. Start with this URL:
https://en.wikipedia.org/wiki/List_of_sovereign_states_and_dependent_territories_in_Africa
Your program should print the following:
https://en.wikipedia.org/wiki/Algeria +213 https://en.wikipedia.org/wiki/Angola +244 https://en.wikipedia.org/wiki/Benin +229 https://en.wikipedia.org/wiki/Botswana +267 https://en.wikipedia.org/wiki/Burkina_Faso +226 https://en.wikipedia.org/wiki/Burundi null https://en.wikipedia.org/wiki/Cameroon +237 ...
Need a nudge?
Locating cells in tables is sometimes easier if you know how to https://cheerio.js.org/docs/api/classes/Cheerio#filter or https://cheerio.js.org/docs/api/classes/Cheerio#parent in the HTML element tree.
Solution
import * as cheerio from 'cheerio';
async function download(url) {
const response = await fetch(url);
if (response.ok) {
const html = await response.text();
return cheerio.load(html);
} else {
throw new Error(HTTP ${response.status});
}
}
const listingURL = "https://en.wikipedia.org/wiki/List_of_sovereign_states_and_dependent_territories_in_Africa"; const $ = await download(listingURL);
const $cells = $(".wikitable tr td:nth-child(3)"); const promises = $cells.toArray().map(async element => { const $nameCell = $(element); const $link = $nameCell.find("a").first(); const countryURL = new URL($link.attr("href"), listingURL).href;
const $c = await download(countryURL); const $label = $c("th.infobox-label") .filter((i, element) => $c(element).text().trim() == "Calling code") .first(); const callingCode = $label .parent() .find("td.infobox-data") .first() .text() .trim();
console.log(${countryURL} ${callingCode || null});
});
await Promise.all(promises);
### Scrape authors of F1 news articles
Scrape links to the Guardian's latest F1 news articles. For each article, follow the link and extract both the author's name and the article's title. Print the author's name and the title for all the articles. Start with this URL:
https://www.theguardian.com/sport/formulaone
Your program should print something like this:
Daniel Harris: Sports quiz of the week: Johan Neeskens, Bond and airborne antics Colin Horgan: The NHL is getting its own Drive to Survive. But could it backfire? Reuters: US GP ticket sales ‘took off’ after Max Verstappen stopped winning in F1 Giles Richards: Liam Lawson gets F1 chance to replace Pérez alongside Verstappen at Red Bull PA Media: Lewis Hamilton reveals lifelong battle with depression after school bullying ...
Need a nudge?
* You can use https://developer.mozilla.org/en-US/docs/Web/CSS/Attribute_selectors to select HTML elements based on their attribute values.
* Sometimes a person authors the article, but other times it's contributed by a news agency.
Solution
import * as cheerio from 'cheerio';
async function download(url) {
const response = await fetch(url);
if (response.ok) {
const html = await response.text();
return cheerio.load(html);
} else {
throw new Error(HTTP ${response.status});
}
}
const listingURL = "https://www.theguardian.com/sport/formulaone"; const $ = await download(listingURL);
const promises = $("#maincontent ul li").toArray().map(async element => { const $item = $(element); const $link = $item.find("a").first(); const authorURL = new URL($link.attr("href"), listingURL).href;
const $a = await download(authorURL); const title = $a("h1").text().trim();
const author = $a('a[rel="author"]').text().trim(); const address = $a('aside address').text().trim();
console.log(${author || address || null}: ${title});
});
await Promise.all(promises);
---
# Extracting data from a web page with browser DevTools
**In this lesson we'll use the browser tools for developers to manually extract product data from an e-commerce website.**
***
In our pursuit to scrape products from the https://warehouse-theme-metal.myshopify.com/collections/sales, we've been able to locate parent elements containing relevant data. Now how do we extract the data?
## Finding product details
Previously, we've figured out how to save the subwoofer product card to a variable in the **Console**:
products = document.querySelectorAll('.product-item'); subwoofer = products[2];
The product details are within the element as text, so maybe if we extract the text, we could work out the individual values?
subwoofer.textContent;
That indeed outputs all the text, but in a form which would be hard to break down to relevant pieces.

We'll need to first locate relevant child elements and extract the data from each of them individually.
## Extracting title
We'll use the **Elements** tab of DevTools to inspect all child elements of the product card for the Sony subwoofer. We can see that the title of the product is inside an `a` element with several classes. From those the `product-item__title` seems like a great choice to locate the element.

Browser JavaScript represents HTML elements as https://developer.mozilla.org/en-US/docs/Web/API/Element objects. Among properties we've already played with, such as `textContent` or `outerHTML`, it also has the https://developer.mozilla.org/en-US/docs/Web/API/Element/querySelector method. Here the method looks for matches only within children of the element:
title = subwoofer.querySelector('.product-item__title'); title.textContent;
Notice we're calling `querySelector()` on the `subwoofer` variable, not `document`. And just like this, we've scraped our first piece of data! We've extracted the product title:

## Extracting price
To figure out how to get the price, we'll use the **Elements** tab of DevTools again. We notice there are two prices, a regular price and a sale price. For the purposes of watching prices we'll need the sale price. Both are `span` elements with the `price` class.

We could either rely on the fact that the sale price is likely to be always the one which is highlighted, or that it's always the first price. For now we'll rely on the later and we'll let `querySelector()` to simply return the first result:
price = subwoofer.querySelector('.price'); price.textContent;
It works, but the price isn't alone in the result. Before we'd use such data, we'd need to do some **data cleaning**:

But for now that's okay. We're just testing the waters now, so that we have an idea about what our scraper will need to do. Once we'll get to extracting prices in Node.js, we'll figure out how to get the values as numbers.
In the next lesson, we'll start with our Node.js project. First we'll be figuring out how to download the Sales page without browser and make it accessible in a Node.js program.
***
## Exercises
These challenges are here to help you test what you’ve learned in this lesson. Try to resist the urge to peek at the solutions right away. Remember, the best learning happens when you dive in and do it yourself!
Real world
You're about to touch the real web, which is practical and exciting! But websites change, so some exercises might break. If you run into any issues, please leave a comment below or https://github.com/apify/apify-docs/issues.
### Extract the price of IKEA's most expensive artificial plant
At IKEA's https://www.ikea.com/se/en/cat/artificial-plants-flowers-20492/, use CSS selectors and HTML elements manipulation in the **Console** to extract the price of the most expensive artificial plant (sold in Sweden, as you'll be browsing their Swedish offer). Before opening DevTools, use your judgment to adjust the page to make the task as straightforward as possible. Finally, use the https://developer.mozilla.org/en-US/docs/Web/JavaScript/Reference/Global_Objects/parseInt function to convert the price text into a number.
Solution
1. Open the https://www.ikea.com/se/en/cat/artificial-plants-flowers-20492/.
2. Sort the products by price, from high to low, so the most expensive plant appears first in the listing.
3. Activate the element selection tool in your DevTools.
4. Click on the price of the first and most expensive plant.
5. Notice that the price is structured into two elements, with the integer separated from the currency, under a class named `plp-price__integer`. This structure is convenient for extracting the value.
6. In the **Console**, execute `document.querySelector('.plp-price__integer')`. This returns the element representing the first price in the listing. Since `document.querySelector()` returns the first matching element, it directly selects the most expensive plant's price.
7. Save the element in a variable by executing `price = document.querySelector('.plp-price__integer')`.
8. Convert the price text into a number by executing `parseInt(price.textContent)`.
9. At the time of writing, this returns `699`, meaning https://www.google.com/search?q=699%20sek.
### Extract the name of the top wiki on Fandom Movies
On Fandom's https://www.fandom.com/topics/movies, use CSS selectors and HTML element manipulation in the **Console** to extract the name of the top wiki. Use the https://developer.mozilla.org/en-US/docs/Web/JavaScript/Reference/Global_Objects/String/trim method to remove white space around the name.

Solution
1. Open the https://www.fandom.com/topics/movies.
2. Activate the element selection tool in your DevTools.
3. Click on the list item for the top Fandom wiki in the category.
4. Notice that it has a class `topic_explore-wikis__link`.
5. In the **Console**, execute `document.querySelector('.topic_explore-wikis__link')`. This returns the element representing the top list item. They use the selector only for the **Top Wikis** list, and because `document.querySelector()` returns the first matching element, you're almost done.
6. Save the element in a variable by executing `item = document.querySelector('.topic_explore-wikis__link')`.
7. Get the element's text without extra white space by executing `item.textContent.trim()`. At the time of writing, this returns `"Pixar Wiki"`.
### Extract details about the first post on Guardian's F1 news
On the Guardian's https://www.theguardian.com/sport/formulaone, use CSS selectors and HTML manipulation in the **Console** to extract details about the first post. Specifically, extract its title, lead paragraph, and URL of the associated photo.

Solution
1. Open the https://www.theguardian.com/sport/formulaone.
2. Activate the element selection tool in your DevTools.
3. Click on the first post.
4. Notice that the markup does not provide clear, reusable class names for this task. The structure uses generic tag names and randomized classes, requiring you to rely on the element hierarchy and order instead.
5. In the **Console**, execute `post = document.querySelector('#maincontent ul li')`. This returns the element representing the first post.
6. Extract the post's title by executing `post.querySelector('h3').textContent`.
7. Extract the lead paragraph by executing `post.querySelector('span div').textContent`.
8. Extract the photo URL by executing `post.querySelector('img').src`.
---
# Inspecting web pages with browser DevTools
**In this lesson we'll use the browser tools for developers to inspect and manipulate the structure of a website.**
***
A browser is the most complete tool for navigating websites. Scrapers are like automated browsers—and sometimes, they actually are automated browsers. The key difference? There's no user to decide where to go or eyes to see what's displayed. Everything has to be pre-programmed.
All modern browsers provide developer tools, or *DevTools*, for website developers to debug their work. We'll use them to understand how websites are structured and identify the behavior our scraper needs to mimic. Here's the typical workflow for creating a scraper:
1. Inspect the target website in DevTools to understand its structure and determine how to extract the required data.
2. Translate those findings into code.
3. If the scraper fails due to overlooked edge cases or, over time, due to website changes, go back to step 1.
Now let's spend some time figuring out what the detective work in step 1 is about.
## Opening DevTools
Google Chrome is currently the most popular browser, and many others use the same core. That's why we'll focus on https://developer.chrome.com/docs/devtools here. However, the steps are similar in other browsers, as Safari has its https://developer.apple.com/documentation/safari-developer-tools/web-inspector and Firefox also has https://firefox-source-docs.mozilla.org/devtools-user/.
Now let's peek behind the scenes of a real-world website—say, Wikipedia. We'll open Google Chrome and visit https://www.wikipedia.org/. Then, let's press **F12**, or right-click anywhere on the page and select **Inspect**.

Websites are built with three main technologies: HTML, CSS, and JavaScript. In the **Elements** tab, DevTools shows the HTML and CSS of the current page:

Screen adaptations
DevTools may appear differently depending on your screen size. For instance, on smaller screens, the CSS panel might move below the HTML elements panel instead of appearing in the right pane.
Think of https://developer.mozilla.org/en-US/docs/Learn/HTML elements as the frame that defines a page's structure. A basic HTML element includes an opening tag, a closing tag, and attributes. Here's an `article` element with an `id` attribute. It wraps `h1` and `p` elements, both containing text. Some text is emphasized using `em`.
First Level Heading Paragraph with emphasized text.
HTML, a markup language, describes how everything on a page is organized, how elements relate to each other, and what they mean. It doesn't define how elements should look—that's where https://developer.mozilla.org/en-US/docs/Learn/CSS comes in. CSS is like the velvet covering the frame. Using styles, we can select elements and assign rules that tell the browser how they should appear. For instance, we can style all elements with `heading` in their `class` attribute to make the text blue and uppercase.
.heading { color: blue; text-transform: uppercase; }
While HTML and CSS describe what the browser should display, JavaScript adds interaction to the page. In DevTools, the **Console** tab allows ad-hoc experimenting with JavaScript.
If you don't see it, press `ESC` to toggle the Console. Running commands in the Console lets us manipulate the loaded page—we’ll try this shortly.

## Selecting an element
In the top-left corner of DevTools, let's find the icon with an arrow pointing to a square.

We'll click the icon and hover your cursor over Wikipedia's subtitle, **The Free Encyclopedia**. As we move our cursor, DevTools will display information about the HTML element under it. We'll click on the subtitle. In the **Elements** tab, DevTools will highlight the HTML element that represents the subtitle.

The highlighted section should look something like this:
The Free Encyclopedia
If we were experienced creators of scrapers, our eyes would immediately spot what's needed to make a program that fetches Wikipedia's subtitle. The program would need to download the page's source code, find a `strong` element with `localized-slogan` in its `class` attribute, and extract its text.
HTML and whitespace
In HTML, whitespace isn't significant, i.e., it only makes the code readable. The following code snippets are equivalent:
The Free Encyclopedia
The Free Encyclopedia
## Interacting with an element
We won't be creating Node.js scrapers just yet. Let's first get familiar with what we can do in the DevTools console and how we can further interact with HTML elements on the page.
In the **Elements** tab, with the subtitle element highlighted, let's right-click the element to open the context menu. There, we'll choose **Store as global variable**. The **Console** should appear, with a `temp1` variable ready.

The Console allows us to run code in the context of the loaded page. We can use it to play around with elements.
For a start, let's access some of the subtitle's properties. One such property is `textContent`, which contains the text inside the HTML element. The last line in the Console is where your cursor is. We'll type the following and hit **Enter**:
temp1.textContent;
The result should be `'The Free Encyclopedia'`. Now let's try this:
temp1.outerHTML;
This should return the element's HTML tag as a string. Finally, we'll run the next line to change the text of the element:
temp1.textContent = 'Hello World!';
When we change elements in the Console, those changes reflect immediately on the page!

But don't worry—we haven't hacked Wikipedia. The change only happens in our browser. If we reload the page, the change will disappear. This, however, is an easy way to craft a screenshot with fake content. That's why screenshots shouldn't be trusted as evidence.
We're not here for playing around with elements, though—we want to create a scraper for an e-commerce website to watch prices. In the next lesson, we'll examine the website and use CSS selectors to locate HTML elements containing the data we need.
***
## Exercises
These challenges are here to help you test what you’ve learned in this lesson. Try to resist the urge to peek at the solutions right away. Remember, the best learning happens when you dive in and do it yourself!
Real world
You're about to touch the real web, which is practical and exciting! But websites change, so some exercises might break. If you run into any issues, please leave a comment below or https://github.com/apify/apify-docs/issues.
### Find FIFA logo
Open the https://www.fifa.com/ and use the DevTools to figure out the URL of FIFA's logo image file.
Need a nudge?
You're looking for an https://developer.mozilla.org/en-US/docs/Web/HTML/Element/img element with a `src` attribute.
Solution
1. Go to https://www.fifa.com/.
2. Activate the element selection tool.
3. Click on the logo.
4. Send the highlighted element to the **Console** using the **Store as global variable** option from the context menu.
5. In the console, type `temp1.src` and hit **Enter**.

### Make your own news
Open a news website, such as https://cnn.com. Use the Console to change the headings of some articles.
Solution
1. Go to https://cnn.com.
2. Activate the element selection tool.
3. Click on a heading.
4. Send the highlighted element to the **Console** using the **Store as global variable** option from the context menu.
5. In the console, type `temp1.textContent = 'Something something'` and hit **Enter**.

---
# Locating HTML elements on a web page with browser DevTools
**In this lesson we'll use the browser tools for developers to manually find products on an e-commerce website.**
***
Inspecting Wikipedia and tweaking its subtitle is fun, but let's shift gears and focus on building an app to track prices on an e-commerce site. As part of the groundwork, let's check out the site we'll be working with.
## Meeting the Warehouse store
Instead of artificial scraping playgrounds or sandboxes, we'll scrape a real e-commerce site. Shopify, a major e-commerce platform, has a demo store at https://warehouse-theme-metal.myshopify.com/. It strikes a good balance between being realistic and stable enough for a tutorial. Our scraper will track prices for all products listed on the https://warehouse-theme-metal.myshopify.com/collections/sales.
Balancing authenticity and stability
Live sites like Amazon are complex, loaded with promotions, frequently changing, and equipped with anti-scraping measures. While those challenges are manageable, they're advanced topics. For this beginner course, we're sticking to a lightweight, stable environment.
That said, we designed all the additional exercises to work with live websites. This means occasional updates might be needed, but we think it's worth it for a more authentic learning experience.
## Finding a product card
As mentioned in the previous lesson, before building a scraper, we need to understand structure of the target page and identify the specific elements our program should extract. Let's figure out how to select details for each product on the https://warehouse-theme-metal.myshopify.com/collections/sales.

The page displays a grid of product cards, each showing a product's title and picture. Let's open DevTools and locate the title of the **Sony SACS9 Active Subwoofer**. We'll highlight it in the **Elements** tab by clicking on it.

Next, let's find all the elements containing details about this subwoofer—its price, number of reviews, image, and more.
In the **Elements** tab, we'll move our cursor up from the `a` element containing the subwoofer's title. On the way, we'll hover over each element until we highlight the entire product card. Alternatively, we can use the arrow-up key. The `div` element we land on is the **parent element**, and all nested elements are its **child elements**.

At this stage, we could use the **Store as global variable** option to send the element to the **Console**. While helpful for manual inspection, this isn't something a program can do.
Scrapers typically rely on https://developer.mozilla.org/en-US/docs/Web/CSS/CSS_selectors to locate elements on a page, and these selectors often target elements based on their `class` attributes. The product card we highlighted has markup like this:
...
The `class` attribute can hold multiple values separated by whitespace. This particular element has four classes. Let's move to the **Console** and experiment with CSS selectors to locate this element.
## Programmatically locating a product card
Let's jump into the **Console** and write some code. In browsers, JavaScript represents the current page as the https://developer.mozilla.org/en-US/docs/Web/API/Document object, accessible via `document`. This object offers many useful methods, including https://developer.mozilla.org/en-US/docs/Web/API/Document/querySelector. This method takes a CSS selector as a string and returns the first HTML element that matches. We'll try typing this into the **Console**:
document.querySelector('.product-item');
It will return the HTML element for the first product card in the listing:

CSS selectors can get quite complex, but the basics are enough to scrape most of the Warehouse store. Let's cover two simple types and how they can combine.
The https://developer.mozilla.org/en-US/docs/Web/CSS/Type_selectors matches elements by tag name. For example, `h1` would match the highlighted element:
Title Paragraph.
The https://developer.mozilla.org/en-US/docs/Web/CSS/Class_selectors matches elements based on their class attribute. For instance, `.heading` (note the dot) would match the following:
Title Subtitle Paragraph
Heading
You can combine selectors to narrow results. For example, `p.lead` matches `p` elements with the `lead` class, but not `p` elements without the class or elements with the class but a different tag name:
Lead paragraph. Paragraph Paragraph
How did we know `.product-item` selects a product card? By inspecting the markup of the product card element. After checking its classes, we chose the one that best fit our purpose. Testing in the **Console** confirmed it—selecting by the most descriptive class worked.
## Choosing good selectors
Multiple approaches often exist for creating a CSS selector that targets the element we want. We should pick selectors that are simple, readable, unique, and semantically tied to the data. These are **resilient selectors**. They're the most reliable and likely to survive website updates. We better avoid randomly generated attributes like `class="F4jsL8"`, as they tend to change without warning.
The product card has four classes: `product-item`, `product-item--vertical`, `1/3--tablet-and-up`, and `1/4--desk`. Only the first one checks all the boxes. A product card *is* a product item, after all. The others seem more about styling—defining how the element looks on the screen—and are probably tied to CSS rules.
This class is also unique enough in the page's context. If it were something generic like `item`, there would be a higher risk that developers of the website might use it for unrelated elements. In the **Elements** tab, we can see a parent element `product-list` that contains all the product cards marked as `product-item`. This structure aligns with the data we're after.

## Locating all product cards
In the **Console**, hovering our cursor over objects representing HTML elements highlights the corresponding elements on the page. This way we can verify that when we query `.product-item`, the result represents the JBL Flip speaker—the first product card in the list.

But what if we want to scrape details about the Sony subwoofer we inspected earlier? For that, we need a method that selects more than just the first match: https://developer.mozilla.org/en-US/docs/Web/API/Document/querySelectorAll. As the name suggests, it takes a CSS selector string and returns all matching HTML elements. Let's type this into the **Console**:
document.querySelectorAll('.product-item');
The returned value is a https://developer.mozilla.org/en-US/docs/Web/API/NodeList, a collection of nodes. Browsers understand an HTML document as a tree of nodes. Most nodes are HTML elements, but there are also text nodes for plain text, and others.
We'll expand the result by clicking the small arrow, then hover our cursor over the third element in the list. Indexing starts at 0, so the third element is at index 2. There it is—the product card for the subwoofer!

To save the subwoofer in a variable for further inspection, we can use index access with brackets, just like with regular JavaScript arrays:
products = document.querySelectorAll('.product-item'); subwoofer = products[2];
Even though we're just playing in the browser's **Console**, we're inching closer to figuring out what our Node.js program will need to do. In the next lesson, we'll dive into accessing child elements and extracting product details.
***
## Exercises
These challenges are here to help you test what you’ve learned in this lesson. Try to resist the urge to peek at the solutions right away. Remember, the best learning happens when you dive in and do it yourself!
Real world
You're about to touch the real web, which is practical and exciting! But websites change, so some exercises might break. If you run into any issues, please leave a comment below or https://github.com/apify/apify-docs/issues.
### Locate headings on Wikipedia's Main Page
On English Wikipedia's https://en.wikipedia.org/wiki/Main_Page, use CSS selectors in the **Console** to list the HTML elements representing headings of the colored boxes (including the grey ones).

Solution
1. Open the https://en.wikipedia.org/wiki/Main_Page.
2. Activate the element selection tool in your DevTools.
3. Click on several headings to examine the markup.
4. Notice that all headings are `h2` elements with the `mp-h2` class.
5. In the **Console**, execute `document.querySelectorAll('h2')`.
6. At the time of writing, this selector returns 8 headings. Each corresponds to a box, and there are no other `h2` elements on the page. Thus, the selector is sufficient as is.
### Locate products on Shein
Go to Shein's https://shein.com/RecommendSelection/Jewelry-Accessories-sc-017291431.html category. In the **Console**, use CSS selectors to list all HTML elements representing the products.

Solution
1. Visit the https://shein.com/RecommendSelection/Jewelry-Accessories-sc-017291431.html page. Close any pop-ups or promotions.
2. Activate the element selection tool in your DevTools.
3. Click on the first product to inspect its markup. Repeat with a few others.
4. Observe that all products are `section` elements with multiple classes, including `product-card`.
5. Since `section` is a generic wrapper, focus on the `product-card` class.
6. In the **Console**, execute `document.querySelectorAll('.product-card')`.
7. At the time of writing, this selector returns 120 results, all representing products. No further narrowing is necessary.
### Locate articles on Guardian
Go to Guardian's https://www.theguardian.com/sport/formulaone. Use the **Console** to find all HTML elements representing the articles.
Need a nudge?
Learn about the https://developer.mozilla.org/en-US/docs/Web/CSS/Descendant_combinator.

Solution
1. Open the https://www.theguardian.com/sport/formulaone.
2. Activate the element selection tool in your DevTools.
3. Click on an article to inspect its structure. Check several articles, including the ones with smaller cards.
4. Note that all articles are `li` elements, but their classes (e.g., `dcr-1qmyfxi`) are dynamically generated and unreliable.
5. Using `document.querySelectorAll('li')` returns too many results, including unrelated items like navigation links.
6. Inspect the page structure. The `main` element contains the primary content, including articles. Use the descendant combinator to target `li` elements within `main`.
7. In the **Console**, execute `document.querySelectorAll('main li')`.
8. At the time of writing, this selector returns 21 results. All appear to represent articles, so the solution works!
---
# Downloading HTML with Node.js
**In this lesson we'll start building a Node.js application for watching prices. As a first step, we'll use the Fetch API to download HTML code of a product listing page.**
***
Using browser tools for developers is crucial for understanding the structure of a particular page, but it's a manual task. Let's start building our first automation, a JavaScript program which downloads HTML code of the product listing.
## Starting a Node.js project
Before we start coding, we need to set up a Node.js project. Let's create new directory and let's name it `product-scraper`. Inside the directory, we'll initialize new project:
$ npm init This utility will walk you through creating a package.json file. ...
Press ^C at any time to quit. package name: (product-scraper) version: (1.0.0) description: Product scraper entry point: (index.js) test command: git repository: keywords: author: license: (ISC) type: (commonjs) module About to write to /Users/.../product-scraper/package.json:
{ "name": "product-scraper", "version": "1.0.0", "description": "Product scraper", "main": "index.js", "scripts": { "test": "echo "Error: no test specified" && exit 1" }, "author": "", "license": "ISC", "type": "module" }
The above creates a `package.json` file with configuration of our project. While most of the values are arbitrary, it's important that the project's type is set to `module`. Now let's test that all works. Inside the project directory we'll create a new file called `index.js` with the following code:
import process from 'node:process';
console.log(All is OK, ${process.argv[2]});
Running it as a Node.js program will verify that our setup is okay and we've correctly set the type to `module`. The program takes a single word as an argument and will address us with it, so let's pass it "mate", for example:
$ node index.js mate All is OK, mate
Troubleshooting
If you see errors or are otherwise unable to run the code above, it likely means your environment isn't set up correctly. Unfortunately, diagnosing the issue is out of scope for this course.
Make sure that in your `package.json` the type property is set to `module`, otherwise you'll get the following warning:
[MODULE_TYPELESS_PACKAGE_JSON] Warning: Module type of file:///Users/.../product-scraper/index.js is not specified and it doesn't parse as CommonJS. Reparsing as ES module because module syntax was detected. This incurs a performance overhead. To eliminate this warning, add "type": "module" to /Users/.../product-scraper/package.json.
In older versions of Node.js, you may even encounter this error:
SyntaxError: Cannot use import statement outside a module
## Downloading product listing
Now onto coding! Let's change our code so it downloads HTML of the product listing instead of printing `All is OK`. The https://developer.mozilla.org/en-US/docs/Web/API/Fetch_API/Using_Fetch provides us with examples how to use it. Inspired by those, our code will look like this:
const url = "https://warehouse-theme-metal.myshopify.com/collections/sales"; const response = await fetch(url); console.log(await response.text());
Asynchronous flow
First time you see `await`? It's a modern syntax for working with promises. See the https://nodejs.org/en/learn/asynchronous-work/javascript-asynchronous-programming-and-callbacks and https://nodejs.org/en/learn/asynchronous-work/discover-promises-in-nodejs tutorials in the official Node.js documentation for more.
If we run the program now, it should print the downloaded HTML:
$ node index.js
Sales
...
Running `await fetch(url)`, we made a HTTP request and received a response. It's not particularly useful yet, but it's a good start of our scraper.
Client and server, request and response
HTTP is a network protocol powering the internet. Understanding it well is an important foundation for successful scraping, but for this course, it's enough to know just the basic flow and terminology:
* HTTP is an exchange between two participants.
* The *client* sends a *request* to the *server*, which replies with a *response*.
* In our case, `index.js` is the client, and the technology running at `warehouse-theme-metal.myshopify.com` replies to our request as the server.
## Handling errors
Websites can return various errors, such as when the server is temporarily down, applying anti-scraping protections, or simply being buggy. In HTTP, each response has a three-digit *status code* that indicates whether it is an error or a success.
All status codes
If you've never worked with HTTP response status codes before, briefly scan their https://developer.mozilla.org/en-US/docs/Web/HTTP/Status to get at least a basic idea of what you might encounter. For further education on the topic, we recommend https://http.cat/ as a highly professional resource.
A robust scraper skips or retries requests on errors. Given the complexity of this task, it's best to use libraries or frameworks. For now, we'll at least make sure that our program visibly crashes and prints what happened in case there's an error.
First, let's ask for trouble. We'll change the URL in our code to a page that doesn't exist, so that we get a response with https://developer.mozilla.org/en-US/docs/Web/HTTP/Status/404. This could happen, for example, when the product we are scraping is no longer available:
https://warehouse-theme-metal.myshopify.com/does/not/exist
We could check the value of `response.status` against a list of allowed numbers, but the Fetch API already provides `response.ok`, a property which returns `false` if our request wasn't successful:
const url = "https://warehouse-theme-metal.myshopify.com/does/not/exist"; const response = await fetch(url);
if (response.ok) {
console.log(await response.text());
} else {
throw new Error(HTTP ${response.status});
}
If you run the code above, the program should crash:
$ node index.js
file:///Users/.../index.js:7
throw new Error(HTTP ${response.status});
^
Error: HTTP 404 at file:///Users/.../index.js:7:9 at process.processTicksAndRejections (node:internal/process/task_queues:105:5)
Letting our program visibly crash on error is enough for our purposes. Now, let's return to our primary goal. In the next lesson, we'll be looking for a way to extract information about products from the downloaded HTML.
***
## Exercises
These challenges are here to help you test what you’ve learned in this lesson. Try to resist the urge to peek at the solutions right away. Remember, the best learning happens when you dive in and do it yourself!
Real world
You're about to touch the real web, which is practical and exciting! But websites change, so some exercises might break. If you run into any issues, please leave a comment below or https://github.com/apify/apify-docs/issues.
### Scrape AliExpress
Download HTML of a product listing page, but this time from a real world e-commerce website. For example this page with AliExpress search results:
https://www.aliexpress.com/w/wholesale-darth-vader.html
Solution
const url = "https://www.aliexpress.com/w/wholesale-darth-vader.html"; const response = await fetch(url);
if (response.ok) {
console.log(await response.text());
} else {
throw new Error(HTTP ${response.status});
}
### Save downloaded HTML as a file
Download HTML, then save it on your disk as a `products.html` file. You can use the URL we've been already playing with:
https://warehouse-theme-metal.myshopify.com/collections/sales
Solution
Right in your Terminal or Command Prompt, you can create files by *redirecting output* of command line programs:
node index.js > products.html
If you want to use Node.js instead, it offers several ways how to create files. The solution below uses the https://nodejs.org/api/fs.html#promises-api:
import { writeFile } from 'node:fs/promises';
const url = "https://warehouse-theme-metal.myshopify.com/collections/sales"; const response = await fetch(url);
if (response.ok) {
const html = await response.text();
await writeFile('products.html', html);
} else {
throw new Error(HTTP ${response.status});
}
### Download an image as a file
Download a product image, then save it on your disk as a file. While HTML is *textual* content, images are *binary*. You may want to scan through the https://developer.mozilla.org/en-US/docs/Web/API/Fetch_API/Using_Fetch#reading_the_response_body and the https://nodejs.org/en/learn/manipulating-files/writing-files-with-nodejs tutorial for guidance. Especially check `Response.arrayBuffer()`. You can use this URL pointing to an image of a TV:
Solution
Node.js offers several ways how to create files. The solution below uses https://nodejs.org/api/fs.html#promises-api:
import { writeFile } from 'node:fs/promises';
const url = "https://warehouse-theme-metal.myshopify.com/cdn/shop/products/sonyxbr55front_f72cc8ff-fcd6-4141-b9cc-e1320f867785.jpg"; const response = await fetch(url);
if (response.ok) {
const buffer = Buffer.from(await response.arrayBuffer());
await writeFile('tv.jpg', buffer);
} else {
throw new Error(HTTP ${response.status});
}
---
# Extracting data from HTML with Node.js
**In this lesson we'll finish extracting product data from the downloaded HTML. With help of basic string manipulation we'll focus on cleaning and correctly representing the product price.**
***
Locating the right HTML elements is the first step of a successful data extraction, so it's no surprise that we're already close to having the data in the correct form. The last bit that still requires our attention is the price:
$ node index.js JBL Flip 4 Waterproof Portable Bluetooth Speaker | $74.95 Sony XBR-950G BRAVIA 4K HDR Ultra HD TV | From $1,398.00 ...
Let's summarize what stands in our way if we want to have it in our Python program as a number:
* A dollar sign precedes the number,
* the number contains decimal commas for better human readability, and
* some prices start with `From`, which reveals there is a certain complexity in how the shop deals with prices.
## Representing price
The last bullet point is the most important to figure out before we start coding. We thought we'll be scraping numbers, but in the middle of our effort, we discovered that the price is actually a range.
It's because some products have variants with different prices. Later in the course we'll get to crawling, i.e. following links and scraping data from more than just one page. That will allow us to get exact prices for all the products, but for now let's extract just what's in the listing.
Ideally we'd go and discuss the problem with those who are about to use the resulting data. For their purposes, is the fact that some prices are just minimum prices important? What would be the most useful representation of the range for them? Maybe they'd tell us that it's okay if we just remove the `From` prefix?
const priceText = $price.text().replace("From ", "");
In other cases, they'd tell us the data must include the range. And in cases when we just don't know, the safest option is to include all the information we have and leave the decision on what's important to later stages. One approach could be having the exact and minimum prices as separate values. If we don't know the exact price, we leave it empty:
const priceRange = { minPrice: null, price: null }; const priceText = $price.text() if (priceText.startsWith("From ")) { priceRange.minPrice = priceText.replace("From ", ""); } else { priceRange.minPrice = priceText; priceRange.price = priceRange.minPrice; }
Built-in string methods
If you're not proficient in JavaScript's string methods, https://developer.mozilla.org/en-US/docs/Web/JavaScript/Reference/Global_Objects/String/startsWith checks the beginning of a given string, and https://developer.mozilla.org/en-US/docs/Web/JavaScript/Reference/Global_Objects/String/replace changes part of a given string.
The whole program would look like this:
import * as cheerio from 'cheerio';
const url = "https://warehouse-theme-metal.myshopify.com/collections/sales"; const response = await fetch(url);
if (response.ok) { const html = await response.text(); const $ = cheerio.load(html);
for (const element of $(".product-item").toArray()) { const $productItem = $(element);
const $title = $productItem.find(".product-item__title");
const title = $title.text();
const $price = $productItem.find(".price").contents().last();
const priceRange = { minPrice: null, price: null };
const priceText = $price.text();
if (priceText.startsWith("From ")) {
priceRange.minPrice = priceText.replace("From ", "");
} else {
priceRange.minPrice = priceText;
priceRange.price = priceRange.minPrice;
}
console.log(`${title} | ${priceRange.minPrice} | ${priceRange.price}`);
}
} else {
throw new Error(HTTP ${response.status});
}
## Removing white space
Often, the strings we extract from a web page start or end with some amount of whitespace, typically space characters or newline characters, which come from the https://en.wikipedia.org/wiki/Indentation_(typesetting)#Indentation_in_programming of the HTML tags.
We call the operation of removing whitespace *trimming* or *stripping*, and it's so useful in many applications that programming languages and libraries include ready-made tools for it. Let's add JavaScript's built-in https://developer.mozilla.org/en-US/docs/Web/JavaScript/Reference/Global_Objects/String/trim:
const title = $title.text().trim();
const priceText = $price.text().trim();
## Removing dollar sign and commas
We got rid of the `From` and possible whitespace, but we still can't save the price as a number in our JavaScript program:
const priceText = "$1,998.00" parseFloat(priceText) NaN
Interactive JavaScript
The demonstration above is inside the Node.js' https://nodejs.org/en/learn/command-line/how-to-use-the-nodejs-repl. It's similar to running arbitrary code in your browser's DevTools Console, and it's a useful playground where you can try how code behaves before you use it in your program.
We need to remove the dollar sign and the decimal commas. For this type of cleaning, https://developer.mozilla.org/en-US/docs/Web/JavaScript/Guide/Regular_expressions are often the best tool for the job, but in this case https://developer.mozilla.org/en-US/docs/Web/JavaScript/Reference/Global_Objects/String/replace is also sufficient:
const priceText = $price .text() .trim() .replace("$", "") .replace(",", "");
## Representing money in programs
Now we should be able to add `parseFloat()`, so that we have the prices not as a text, but as numbers:
const priceRange = { minPrice: null, price: null }; const priceText = $price.text() if (priceText.startsWith("From ")) { priceRange.minPrice = parseFloat(priceText.replace("From ", "")); } else { priceRange.minPrice = parseFloat(priceText); priceRange.price = priceRange.minPrice; }
Great! Only if we didn't overlook an important pitfall called https://en.wikipedia.org/wiki/Floating-point_error_mitigation. In short, computers save floating point numbers in a way which isn't always reliable:
0.1 + 0.2 0.30000000000000004
These errors are small and usually don't matter, but sometimes they can add up and cause unpleasant discrepancies. That's why it's typically best to avoid floating point numbers when working with money. We won't store dollars, but cents:
const priceText = $price .text() .trim() .replace("$", "") .replace(".", "") .replace(",", "");
In this case, removing the dot from the price text is the same as if we multiplied all the numbers with 100, effectively converting dollars to cents. This is how the whole program looks like now:
import * as cheerio from 'cheerio';
const url = "https://warehouse-theme-metal.myshopify.com/collections/sales"; const response = await fetch(url);
if (response.ok) { const html = await response.text(); const $ = cheerio.load(html);
for (const element of $(".product-item").toArray()) { const $productItem = $(element);
const $title = $productItem.find(".product-item__title");
const titleText = $title.text().trim();
const $price = $productItem.find(".price").contents().last();
const priceRange = { minPrice: null, price: null };
const priceText = $price
.text()
.trim()
.replace("$", "")
.replace(".", "")
.replace(",", "");
if (priceText.startsWith("From ")) {
priceRange.minPrice = parseInt(priceText.replace("From ", ""));
} else {
priceRange.minPrice = parseInt(priceText);
priceRange.price = priceRange.minPrice;
}
console.log(`${title} | ${priceRange.minPrice} | ${priceRange.price}`);
}
} else {
throw new Error(HTTP ${response.status});
}
If we run the code above, we have nice, clean data about all the products!
$ node index.js JBL Flip 4 Waterproof Portable Bluetooth Speaker | 7495 | 7495 Sony XBR-950G BRAVIA 4K HDR Ultra HD TV | 139800 | null ...
Well, not to spoil the excitement, but in its current form, the data isn't very useful. In the next lesson we'll save the product details to a file which data analysts can use or other programs can read.
***
## Exercises
These challenges are here to help you test what you’ve learned in this lesson. Try to resist the urge to peek at the solutions right away. Remember, the best learning happens when you dive in and do it yourself!
Real world
You're about to touch the real web, which is practical and exciting! But websites change, so some exercises might break. If you run into any issues, please leave a comment below or https://github.com/apify/apify-docs/issues.
### Scrape units on stock
Change our scraper so that it extracts how many units of each product are on stock. Your program should print the following. Note the unit amounts at the end of each line:
JBL Flip 4 Waterproof Portable Bluetooth Speaker | 672 Sony XBR-950G BRAVIA 4K HDR Ultra HD TV | 77 Sony SACS9 10" Active Subwoofer | 7 Sony PS-HX500 Hi-Res USB Turntable | 15 Klipsch R-120SW Powerful Detailed Home Speaker - Unit | 0 Denon AH-C720 In-Ear Headphones | 236 ...
Solution
import * as cheerio from 'cheerio';
function parseUnitsText(text) { const count = text .replace("In stock,", "") .replace("Only", "") .replace(" left", "") .replace("units", "") .trim(); return count === "Sold out" ? 0 : parseInt(count); }
const url = "https://warehouse-theme-metal.myshopify.com/collections/sales"; const response = await fetch(url);
if (response.ok) { const html = await response.text(); const $ = cheerio.load(html);
for (const element of $(".product-item").toArray()) { const $productItem = $(element);
const title = $productItem.find(".product-item__title");
const title = $title.text().trim();
const unitsText = $productItem.find(".product-item__inventory").text();
const unitsCount = parseUnitsText(unitsText);
console.log(`${title} | ${unitsCount}`);
}
} else {
throw new Error(HTTP ${response.status});
}
Conditional (ternary) operator
For brevity, the solution uses the https://developer.mozilla.org/en-US/docs/Web/JavaScript/Reference/Operators/Conditional_operator. You can achieve the same with a plain `if` and `else` block.
### Use regular expressions
Simplify the code from previous exercise. Use https://developer.mozilla.org/en-US/docs/Web/JavaScript/Guide/Regular_expressions to parse the number of units. You can match digits using a range like `[0-9]` or by a special sequence `\d`. To match more characters of the same type you can use `+`.
Solution
import * as cheerio from 'cheerio';
function parseUnitsText(text) { const match = text.match(/\d+/); if (match) { return parseInt(match[0]); } return 0; }
const url = "https://warehouse-theme-metal.myshopify.com/collections/sales"; const response = await fetch(url);
if (response.ok) { const html = await response.text(); const $ = cheerio.load(html);
for (const element of $(".product-item").toArray()) { const $productItem = $(element);
const $title = $productItem.find(".product-item__title");
const title = $title.text().trim();
const unitsText = $productItem.find(".product-item__inventory").text();
const unitsCount = parseUnitsText(unitsText);
console.log(`${title} | ${unitsCount}`);
}
} else {
throw new Error(HTTP ${response.status});
}
Conditional (ternary) operator
For brevity, the solution uses the https://developer.mozilla.org/en-US/docs/Web/JavaScript/Reference/Operators/Conditional_operator. You can achieve the same with a plain `if` and `else` block.
### Scrape publish dates of F1 news
Download Guardian's page with the latest F1 news and use Beautiful Soup to parse it. Print titles and publish dates of all the listed articles. This is the URL:
https://www.theguardian.com/sport/formulaone
Your program should print something like the following. Note the dates at the end of each line:
Brad Pitt in the paddock: how F1 the Movie went deep to keep fans coming | Fri Jun 20 2025 Wolff hits out at Red Bull protest after Russell’s Canadian GP win | Tue Jun 17 2025 F1 the Movie review – spectacular macho melodrama handles Brad Pitt with panache | Tue Jun 17 2025 Hamilton reveals distress over ‘devastating’ groundhog accident at Canadian F1 GP | Mon Jun 16 2025 ...
Need a nudge?
* HTML's `time` element can have an attribute `datetime`, which https://developer.mozilla.org/en-US/docs/Web/HTML/Element/time, such as the ISO 8601.
* Cheerio gives you https://cheerio.js.org/docs/api/classes/Cheerio#attr to access attributes.
* In JavaScript you can use an ISO 8601 string to create a https://developer.mozilla.org/en-US/docs/Web/JavaScript/Reference/Global_Objects/Date object.
* To get the date, you can call `.toDateString()` on `Date` objects.
Solution
import * as cheerio from 'cheerio';
const url = "https://www.theguardian.com/sport/formulaone"; const response = await fetch(url);
if (response.ok) { const html = await response.text(); const $ = cheerio.load(html);
for (const element of $("#maincontent ul li").toArray()) { const $article = $(element);
const title = $article
.find("h3")
.text()
.trim();
const dateText = $article
.find("time")
.attr("datetime")
.trim();
const date = new Date(dateText);
console.log(`${title} | ${date.toDateString()}`);
}
} else {
throw new Error(HTTP ${response.status});
}
---
# Using a scraping framework with Node.js
**In this lesson, we'll rework our application for watching prices so that it builds on top of a scraping framework. We'll use Crawlee to make the program simpler, faster, and more robust.**
***
Before rewriting our code, let's point out several caveats in our current solution:
* *Hard to maintain:* All the data we need from the listing page is also available on the product page. By scraping both, we have to maintain selectors for two HTML documents. Instead, we could scrape links from the listing page and process all data on the product pages.
* *Inconsiderate:* The program sends all requests in parallel, which is efficient but inconsiderate to the target website and may result in us getting blocked.
* *No logging:* The scraper gives no sense of progress, making it tedious to use. Debugging issues becomes even more frustrating without proper logs.
* *Boilerplate code:* We implement downloading and parsing HTML, or exporting data to CSV, although we're not the first people to meet and solve these problems.
* *Prone to anti-scraping:* If the target website implemented anti-scraping measures, a bare-bones program like ours would stop working.
* *Browser means rewrite:* We got lucky extracting variants. If the website didn't include a fallback, we might have had no choice but to spin up a browser instance and automate clicking on buttons. Such a change in the underlying technology would require a complete rewrite of our program.
* *No error handling:* The scraper stops if it encounters issues. It should allow for skipping problematic products with warnings or retrying downloads when the website returns temporary errors.
In this lesson, we'll address all of the above issues while keeping the code concise with the help of a scraping framework. We'll use https://crawlee.dev/, not just because we created it, but because it's the most popular JavaScript framework for web scraping.
## Starting with Crawlee
First let's install the Crawlee package. The framework has a lot of dependencies, so expect the installation to take a while.
$ npm install crawlee --save
added 123 packages, and audited 123 packages in 0s ...
Now let's use the framework to create a new version of our scraper. First, let's rename the `index.js` file to `oldindex.js`, so that we can keep peeking at the original implementation while working on the new one. Then, in the same project directory, we'll create a new, empty `index.js`. The initial content will look like this:
import { CheerioCrawler } from 'crawlee';
const crawler = new CheerioCrawler({ async requestHandler({ $, log }) { const title = $('title').text().trim(); log.info(title); }, });
await crawler.run(['https://warehouse-theme-metal.myshopify.com/collections/sales']);
In the code, we do the following:
1. Import the necessary module.
2. Create a crawler object, which manages the scraping process. In this case, it's a `CheerioCrawler`, which requests HTML from websites and parses it with Cheerio. Other crawlers, such as `PlaywrightCrawler`, would be suitable if we wanted to scrape by automating a real browser.
3. Define an asynchronous `requestHandler` function. It receives a context object with Cheerio's `$` instance and a logger.
4. Extract the page title and log it.
5. Run the crawler on a product listing URL and await its completion.
Let's see what it does when we run it:
$ node index.js INFO CheerioCrawler: Starting the crawler. INFO CheerioCrawler: Sales INFO CheerioCrawler: All requests from the queue have been processed, the crawler will shut down. INFO CheerioCrawler: Final request statistics: {"requestsFinished":1,"requestsFailed":0,"retryHistogram":[1],"requestAvgFailedDurationMillis":null,"requestAvgFinishedDurationMillis":388,"requestsFinishedPerMinute":131,"requestsFailedPerMinute":0,"requestTotalDurationMillis":388,"requestsTotal":1,"crawlerRuntimeMillis":458} INFO CheerioCrawler: Finished! Total 1 requests: 1 succeeded, 0 failed. {"terminal":true}
If our previous scraper didn't give us any sense of progress, Crawlee feeds us with perhaps too much information for the purposes of a small program. Among all the logging, notice the line with `Sales`. That's the page title! We managed to create a Crawlee scraper that downloads the product listing page, parses it with Cheerio, extracts the title, and prints it.
## Crawling product detail pages
The code is now less accessible to beginners, and the size of the program is about the same as if we worked without a framework. The tradeoff of using a framework is that primitive scenarios may become unnecessarily complex, while complex scenarios may become surprisingly primitive. As we rewrite the rest of the program, the benefits of using Crawlee will become more apparent.
For example, it takes only a few changes to the code to extract and follow links to all the product detail pages:
import { CheerioCrawler } from 'crawlee';
const crawler = new CheerioCrawler({ async requestHandler({ $, log, request, enqueueLinks }) { if (request.label === 'DETAIL') { log.info(request.url); } else { await enqueueLinks({ label: 'DETAIL', selector: '.product-list a.product-item__title' }); } }, });
await crawler.run(['https://warehouse-theme-metal.myshopify.com/collections/sales']);
First, it's necessary to inspect the page in browser DevTools to figure out the CSS selector that allows us to locate links to all the product detail pages. Then we can use the `enqueueLinks()` method to find the links and add them to Crawlee's internal HTTP request queue. We tell the method to label all the requests as `DETAIL`.
For each request, Crawlee will run the same handler function. That's why now we need to check the label of the request being processed. For those labeled as `DETAIL`, we'll log the URL, otherwise we assume we're processing the listing page.
If we run the code, we should see how Crawlee first downloads the listing page and then makes parallel requests to each of the detail pages, logging their URLs along the way:
$ node index.js INFO CheerioCrawler: Starting the crawler. INFO CheerioCrawler: https://warehouse-theme-metal.myshopify.com/products/sony-xbr55a8f-55-inch-4k-ultra-hd-smart-bravia-oled-tv INFO CheerioCrawler: https://warehouse-theme-metal.myshopify.com/products/klipsch-r-120sw-powerful-detailed-home-speaker-set-of-1 ...
In the final stats, we can see that we made 25 requests (1 listing page + 24 product pages) in just a few seconds. What we cannot see is that these requests are not made all at once without planning, but are scheduled and sent in a way that doesn't overload the target server. And if they do, Crawlee can automatically retry them.
## Extracting data
The `CheerioCrawler` provides the handler with the `$` attribute, which contains the parsed HTML of the handled page. This is the same `$` object we used in our previous program. Let's locate and extract the same data as before:
const crawler = new CheerioCrawler({ async requestHandler({ $, request, enqueueLinks, log }) { if (request.label === 'DETAIL') { const item = { url: request.url, title: $('.product-meta__title').text().trim(), vendor: $('.product-meta__vendor').text().trim(), }; log.info("Item scraped", item); } else { await enqueueLinks({ selector: '.product-list a.product-item__title', label: 'DETAIL' }); } }, });
Now for the price. We're not doing anything new here—just copy-paste the code from our old scraper. The only change will be in the selector.
In `oldindex.js`, we look for `.price` within a `$productItem` object representing a product card. Here, we're looking for `.price` within the entire product detail page. It's better to be more specific so we don't accidentally match another price on the same page:
const crawler = new CheerioCrawler({ async requestHandler({ $, request, enqueueLinks, log }) { if (request.label === 'DETAIL') { const $price = $(".product-form__info-content .price").contents().last(); const priceRange = { minPrice: null, price: null }; const priceText = $price .text() .trim() .replace("$", "") .replace(".", "") .replace(",", "");
if (priceText.startsWith("From ")) {
priceRange.minPrice = parseInt(priceText.replace("From ", ""));
} else {
priceRange.minPrice = parseInt(priceText);
priceRange.price = priceRange.minPrice;
}
const item = {
url: request.url,
title: $(".product-meta__title").text().trim(),
vendor: $('.product-meta__vendor').text().trim(),
...priceRange,
};
log.info("Item scraped", item);
} else {
await enqueueLinks({ selector: '.product-list a.product-item__title', label: 'DETAIL' });
}
},
});
Finally, the variants. We can reuse the `parseVariant()` function as-is. In the handler, we'll take some inspiration from what we have in `oldindex.js`, but since we're just logging the items and don't need to return them, the loop can be simpler. First, in the item data, we'll set `variantName` to `null` as a default value. If there are no variants, we'll log the item data as-is. If there are variants, we'll parse each one, merge the variant data with the item data, and log each resulting object. The full program will look like this:
import { CheerioCrawler } from 'crawlee';
function parseVariant($option) { const [variantName, priceText] = $option .text() .trim() .split(" - "); const price = parseInt( priceText .replace("$", "") .replace(".", "") .replace(",", "") ); return { variantName, price }; }
const crawler = new CheerioCrawler({ async requestHandler({ $, request, enqueueLinks, log }) { if (request.label === 'DETAIL') { const $price = $(".product-form__info-content .price").contents().last(); const priceRange = { minPrice: null, price: null }; const priceText = $price .text() .trim() .replace("$", "") .replace(".", "") .replace(",", "");
if (priceText.startsWith("From ")) {
priceRange.minPrice = parseInt(priceText.replace("From ", ""));
} else {
priceRange.minPrice = parseInt(priceText);
priceRange.price = priceRange.minPrice;
}
const item = {
url: request.url,
title: $(".product-meta__title").text().trim(),
vendor: $('.product-meta__vendor').text().trim(),
...priceRange,
variantName: null,
};
const $variants = $(".product-form__option.no-js option");
if ($variants.length === 0) {
log.info("Item scraped", item);
} else {
for (const element of $variants.toArray()) {
const variant = parseVariant($(element));
log.info("Item scraped", { ...item, ...variant });
}
}
} else {
await enqueueLinks({ selector: '.product-list a.product-item__title', label: 'DETAIL' });
}
},
});
await crawler.run(['https://warehouse-theme-metal.myshopify.com/collections/sales']);
If we run this scraper, we should get the same data for the 24 products as before. Crawlee has saved us a lot of effort by managing downloading, parsing, and parallelization.
Crawlee doesn't do much to help with locating and extracting the data—that part of the code remains almost the same, framework or not. This is because the detective work of finding and extracting the right data is the core value of custom scrapers. With Crawlee, we can focus on just that while letting the framework take care of everything else.
## Saving data
Now that we're *letting the framework take care of everything else*, let's see what it can do about saving data. As of now, the product detail page handler logs each item as soon as it's ready. Instead, we can push the item to Crawlee's default dataset:
const crawler = new CheerioCrawler({ async requestHandler({ $, request, enqueueLinks, pushData, log }) { if (request.label === 'DETAIL') { ...
const $variants = $(".product-form__option.no-js option");
if ($variants.length === 0) {
pushData(item);
} else {
for (const element of $variants.toArray()) {
const variant = parseVariant($(element));
pushData({ ...item, ...variant });
}
}
} else {
...
}
}, });
That's it! If we run the program now, there should be a `storage` directory alongside the `index.js` file. Crawlee uses it to store its internal state. If we go to the `storage/datasets/default` subdirectory, we'll see over 30 JSON files, each representing a single item.

We can also export all the items to a single file of our choice. We'll do it at the end of the program, after the crawler has finished scraping:
await crawler.run(['https://warehouse-theme-metal.myshopify.com/collections/sales']); await crawler.exportData('dataset.json'); await crawler.exportData('dataset.csv');
After running the scraper again, there should be two new files in your directory, `dataset.json` and `dataset.csv`, containing all the data.
## Logging
Crawlee gives us stats about HTTP requests and concurrency, but once we started using `pushData()` instead of `log.info()`, we lost visibility into the pages we're crawling and the items we're saving. Let's add back some custom logging:
import { CheerioCrawler } from 'crawlee';
function parseVariant($option) { const [variantName, priceText] = $option .text() .trim() .split(" - "); const price = parseInt( priceText .replace("$", "") .replace(".", "") .replace(",", "") ); return { variantName, price }; }
const crawler = new CheerioCrawler({
async requestHandler({ $, request, enqueueLinks, pushData, log }) {
if (request.label === 'DETAIL') {
log.info(Product detail page: ${request.url});
const $price = $(".product-form__info-content .price").contents().last();
const priceRange = { minPrice: null, price: null };
const priceText = $price
.text()
.trim()
.replace("$", "")
.replace(".", "")
.replace(",", "");
if (priceText.startsWith("From ")) {
priceRange.minPrice = parseInt(priceText.replace("From ", ""));
} else {
priceRange.minPrice = parseInt(priceText);
priceRange.price = priceRange.minPrice;
}
const item = {
url: request.url,
title: $(".product-meta__title").text().trim(),
vendor: $('.product-meta__vendor').text().trim(),
...priceRange,
variantName: null,
};
const $variants = $(".product-form__option.no-js option");
if ($variants.length === 0) {
log.info('Saving a product');
pushData(item);
} else {
for (const element of $variants.toArray()) {
const variant = parseVariant($(element));
log.info('Saving a product variant');
pushData({ ...item, ...variant });
}
}
} else {
log.info('Looking for product detail pages');
await enqueueLinks({ selector: '.product-list a.product-item__title', label: 'DETAIL' });
}
},
});
await crawler.run(['https://warehouse-theme-metal.myshopify.com/collections/sales']); crawler.log.info('Exporting data'); await crawler.exportData('dataset.json'); await crawler.exportData('dataset.csv');
Depending on what we find helpful, we can tweak the logs to include more or less detail. Check the Crawlee docs on the https://crawlee.dev/js/api/core/class/Log for more details on what you can do with it.
If we compare `index.js` and `oldindex.js` now, it's clear we've cut at least 20 lines of code compared to the original program, even with the extra logging we've added. Throughout this lesson, we've introduced features to match the old scraper's functionality, but at each phase, the code remained clean and readable. Plus, we've been able to focus on what's unique to the website we're scraping and the data we care about.
In the next lesson, we'll use a scraping platform to set up our application to run automatically every day.
***
## Exercises
These challenges are here to help you test what you’ve learned in this lesson. Try to resist the urge to peek at the solutions right away. Remember, the best learning happens when you dive in and do it yourself!
Real world
You're about to touch the real web, which is practical and exciting! But websites change, so some exercises might break. If you run into any issues, please leave a comment below or https://github.com/apify/apify-docs/issues.
### Build a Crawlee scraper of F1 Academy drivers
Scrape information about all https://en.wikipedia.org/wiki/F1_Academy drivers listed on the official https://www.f1academy.com/Racing-Series/Drivers page. Each item you push to Crawlee's default dataset should include the following data:
* URL of the driver's f1academy.com page
* Name
* Team
* Nationality
* Date of birth (as a string in `YYYY-MM-DD` format)
* Instagram URL
If you export the dataset as JSON, it should look something like this:
[ { "url": "https://www.f1academy.com/Racing-Series/Drivers/29/Emely-De-Heus", "name": "Emely De Heus", "team": "MP Motorsport", "nationality": "Dutch", "dob": "2003-02-10", "instagram_url": "https://www.instagram.com/emely.de.heus/", }, { "url": "https://www.f1academy.com/Racing-Series/Drivers/28/Hamda-Al-Qubaisi", "name": "Hamda Al Qubaisi", "team": "MP Motorsport", "nationality": "Emirati", "dob": "2002-08-08", "instagram_url": "https://www.instagram.com/hamdaalqubaisi_official/", }, ... ]
Need a nudge?
* The website uses `DD/MM/YYYY` format for the date of birth. You'll need to change the format to the ISO 8601 standard with dashes: `YYYY-MM-DD`
* To locate the Instagram URL, use the attribute selector `a[href*='instagram']`. Learn more about attribute selectors in the https://developer.mozilla.org/en-US/docs/Web/CSS/Attribute_selectors.
Solution
import { CheerioCrawler } from 'crawlee';
const crawler = new CheerioCrawler({
async requestHandler({ $, request, enqueueLinks, pushData }) {
if (request.label === 'DRIVER') {
const info = {};
for (const itemElement of $('.common-driver-info li').toArray()) {
const name = $(itemElement).find('span').text().trim();
const value = $(itemElement).find('h4').text().trim();
info[name] = value;
}
const detail = {};
for (const linkElement of $('.driver-detail--cta-group a').toArray()) {
const name = $(linkElement).find('p').text().trim();
const value = $(linkElement).find('h2').text().trim();
detail[name] = value;
});
const [dobDay, dobMonth, dobYear] = info['DOB'].split("/");
pushData({
url: request.url,
name: $('h1').text().trim(),
team: detail['Team'],
nationality: info['Nationality'],
dob: ${dobYear}-${dobMonth}-${dobDay},
instagram_url: $(".common-social-share a[href*='instagram']").attr('href'),
});
} else {
await enqueueLinks({ selector: '.teams-driver-item a', label: 'DRIVER' });
}
},
});
await crawler.run(['https://www.f1academy.com/Racing-Series/Drivers']); await crawler.exportData('dataset.json');
### Use Crawlee to find the ratings of the most popular Netflix films
The https://www.netflix.com/tudum/top10 page has a table listing the most popular Netflix films worldwide. Scrape the movie names from this page, then search for each movie on https://www.imdb.com/. Assume the first search result is correct and retrieve the film's rating. Each item you push to Crawlee's default dataset should include the following data:
* URL of the film's IMDb page
* Title
* Rating
If you export the dataset as JSON, it should look something like this:
[ { "url": "https://www.imdb.com/title/tt32368345/?ref_=fn_tt_tt_1", "title": "The Merry Gentlemen", "rating": "5.0/10" }, { "url": "https://www.imdb.com/title/tt32359447/?ref_=fn_tt_tt_1", "title": "Hot Frosty", "rating": "5.4/10" }, ... ]
To scrape IMDb data, you'll need to construct a `Request` object with the appropriate search URL for each movie title. The following code snippet gives you an idea of how to do this:
import { CheerioCrawler, Request } from 'crawlee'; import { escape } from 'node:querystring';
const imdbSearchUrl = https://www.imdb.com/find/?q=${escape(name)}&s=tt&ttype=ft;
const request = new Request({ url: imdbSearchUrl, label: 'IMDB_SEARCH' });
Then use the `addRequests()` function to instruct Crawlee that it should follow an array of these manually constructed requests:
async requestHandler({ ..., addRequests }) { ... await addRequests(requests); },
Need a nudge?
When navigating to the first IMDb search result, you might find it helpful to know that `enqueueLinks()` accepts a `limit` option, letting you specify the max number of HTTP requests to enqueue.
Solution
import { CheerioCrawler, Request } from 'crawlee'; import { escape } from 'node:querystring';
const crawler = new CheerioCrawler({ async requestHandler({ $, request, enqueueLinks, pushData, addRequests }) { if (request.label === 'IMDB') { // handle IMDB film page pushData({ url: request.url, title: $('h1').text().trim(), rating: $("[data-testid='hero-rating-bar__aggregate-rating__score']").first().text().trim(), }); } else if (request.label === 'IMDB_SEARCH') { // handle IMDB search results await enqueueLinks({ selector: '.find-result-item a', label: 'IMDB', limit: 1 });
} else if (request.label === 'NETFLIX') {
// handle Netflix table
const $buttons = $('[data-uia="top10-table-row-title"] button');
const requests = $buttons.toArray().map(buttonElement => {
const name = $(buttonElement).text().trim();
const imdbSearchUrl = `https://www.imdb.com/find/?q=${escape(name)}&s=tt&ttype=ft`;
return new Request({ url: imdbSearchUrl, label: 'IMDB_SEARCH' });
});
await addRequests($requests.get());
} else {
throw new Error(`Unexpected request label: ${request.label}`);
}
}, });
await crawler.run(['https://www.netflix.com/tudum/top10']); await crawler.exportData('dataset.json');
---
# Getting links from HTML with Node.js
**In this lesson, we'll locate and extract links to individual product pages. We'll use Cheerio to find the relevant bits of HTML.**
***
The previous lesson concludes our effort to create a scraper. Our program now downloads HTML, locates and extracts data from the markup, and saves the data in a structured and reusable way.
For some use cases, this is already enough! In other cases, though, scraping just one page is hardly useful. The data is spread across the website, over several pages.
## Crawling websites
We'll use a technique called crawling, i.e. following links to scrape multiple pages. The algorithm goes like this:
1. Visit the start URL.
2. Extract new URLs (and data), and save them.
3. Visit one of the newly found URLs and save data and/or more URLs from it.
4. Repeat steps 2 and 3 until you have everything you need.
This will help us figure out the actual prices of products, as right now, for some, we're only getting the min price. Implementing the algorithm will require quite a few changes to our code, though.
## Restructuring code
Over the course of the previous lessons, the code of our program grew to almost 50 lines containing downloading, parsing, and exporting:
import * as cheerio from 'cheerio'; import { writeFile } from 'fs/promises'; import { AsyncParser } from '@json2csv/node';
const url = "https://warehouse-theme-metal.myshopify.com/collections/sales"; const response = await fetch(url);
if (response.ok) { const html = await response.text(); const $ = cheerio.load(html);
const data = $(".product-item").toArray().map(element => { const $productItem = $(element);
const $title = $productItem.find(".product-item__title");
const title = $title.text().trim();
const $price = $productItem.find(".price").contents().last();
const priceRange = { minPrice: null, price: null };
const priceText = $price
.text()
.trim()
.replace("$", "")
.replace(".", "")
.replace(",", "");
if (priceText.startsWith("From ")) {
priceRange.minPrice = parseInt(priceText.replace("From ", ""));
} else {
priceRange.minPrice = parseInt(priceText);
priceRange.price = priceRange.minPrice;
}
return { title, ...priceRange };
});
const jsonData = JSON.stringify(data); await writeFile('products.json', jsonData);
const parser = new AsyncParser();
const csvData = await parser.parse(data).promise();
await writeFile('products.csv', csvData);
} else {
throw new Error(HTTP ${response.status});
}
Let's introduce several functions to make the whole thing easier to digest. First, we can turn the beginning of our program into this `download()` function, which takes a URL and returns a Cheerio object:
async function download(url) {
const response = await fetch(url);
if (response.ok) {
const html = await response.text();
return cheerio.load(html);
} else {
throw new Error(HTTP ${response.status});
}
}
Next, we can put parsing into a `parseProduct()` function, which takes the product item element and returns the object with data:
function parseProduct($productItem) { const $title = $productItem.find(".product-item__title"); const title = $title.text().trim();
const $price = $productItem.find(".price").contents().last(); const priceRange = { minPrice: null, price: null }; const priceText = $price .text() .trim() .replace("$", "") .replace(".", "") .replace(",", "");
if (priceText.startsWith("From ")) { priceRange.minPrice = parseInt(priceText.replace("From ", "")); } else { priceRange.minPrice = parseInt(priceText); priceRange.price = priceRange.minPrice; }
return { title, ...priceRange }; }
Now the JSON export. For better readability, let's make a small change here and set the indentation level to two spaces:
function exportJSON(data) { return JSON.stringify(data, null, 2); }
The last function we'll add will take care of the CSV export:
async function exportCSV(data) { const parser = new AsyncParser(); return await parser.parse(data).promise(); }
Now let's put it all together:
import * as cheerio from 'cheerio'; import { writeFile } from 'fs/promises'; import { AsyncParser } from '@json2csv/node';
async function download(url) {
const response = await fetch(url);
if (response.ok) {
const html = await response.text();
return cheerio.load(html);
} else {
throw new Error(HTTP ${response.status});
}
}
function parseProduct($productItem) { const $title = $productItem.find(".product-item__title"); const title = $title.text().trim();
const $price = $productItem.find(".price").contents().last(); const priceRange = { minPrice: null, price: null }; const priceText = $price .text() .trim() .replace("$", "") .replace(".", "") .replace(",", "");
if (priceText.startsWith("From ")) { priceRange.minPrice = parseInt(priceText.replace("From ", "")); } else { priceRange.minPrice = parseInt(priceText); priceRange.price = priceRange.minPrice; }
return { title, ...priceRange }; }
function exportJSON(data) { return JSON.stringify(data, null, 2); }
async function exportCSV(data) { const parser = new AsyncParser(); return await parser.parse(data).promise(); }
const listingURL = "https://warehouse-theme-metal.myshopify.com/collections/sales"; const $ = await download(listingURL);
const data = $(".product-item").toArray().map(element => { const $productItem = $(element); const item = parseProduct($productItem); return item; });
await writeFile('products.json', exportJSON(data)); await writeFile('products.csv', await exportCSV(data));
The program is much easier to read now. With the `parseProduct()` function handy, we could also replace the convoluted loop with one that only takes up five lines of code.
Refactoring
We turned the whole program upside down, and at the same time, we didn't make any actual changes! This is https://en.wikipedia.org/wiki/Code_refactoring: improving the structure of existing code without changing its behavior.

## Extracting links
With everything in place, we can now start working on a scraper that also scrapes the product pages. For that, we'll need the links to those pages. Let's open the browser DevTools and remind ourselves of the structure of a single product item:

Several methods exist for transitioning from one page to another, but the most common is a link element, which looks like this:
Text of the link
In DevTools, we can see that each product title is, in fact, also a link element. We already locate the titles, so that makes our task easier. We just need to edit the code so that it extracts not only the text of the element but also the `href` attribute. Cheerio selections support accessing attributes using the `.attr()` method:
function parseProduct($productItem) { const $title = $productItem.find(".product-item__title"); const title = $title.text().trim(); const url = $title.attr("href");
...
return { url, title, ...priceRange }; }
In the previous code example, we've also added the URL to the object returned by the function. If we run the scraper now, it should produce exports where each product contains a link to its product page:
[ { "url": "/products/jbl-flip-4-waterproof-portable-bluetooth-speaker", "title": "JBL Flip 4 Waterproof Portable Bluetooth Speaker", "minPrice": 7495, "price": 7495 }, { "url": "/products/sony-xbr-65x950g-65-class-64-5-diag-bravia-4k-hdr-ultra-hd-tv", "title": "Sony XBR-950G BRAVIA 4K HDR Ultra HD TV", "minPrice": 139800, "price": null }, ... ]
Hmm, but that isn't what we wanted! Where is the beginning of each URL? It turns out the HTML contains so-called *relative links*.
## Turning relative links into absolute
Browsers reading the HTML know the base address and automatically resolve such links, but we'll have to do this manually. The built-in https://developer.mozilla.org/en-US/docs/Web/API/URL object will help us.
We'll change the `parseProduct()` function so that it also takes the base URL as an argument and then joins it with the relative URL to the product page:
function parseProduct($productItem, baseURL) { const $title = $productItem.find(".product-item__title"); const title = $title.text().trim(); const url = new URL($title.attr("href"), baseURL).href;
...
return { url, title, ...priceRange }; }
Now we'll pass the base URL to the function in the main body of our program:
const listingURL = "https://warehouse-theme-metal.myshopify.com/collections/sales"; const $ = await download(listingURL);
const data = $(".product-item").toArray().map(element => { const $productItem = $(element); const item = parseProduct($productItem, listingURL); return item; });
When we run the scraper now, we should see full URLs in our exports:
[ { "url": "https://warehouse-theme-metal.myshopify.com/products/jbl-flip-4-waterproof-portable-bluetooth-speaker", "title": "JBL Flip 4 Waterproof Portable Bluetooth Speaker", "minPrice": 7495, "price": 7495 }, { "url": "https://warehouse-theme-metal.myshopify.com/products/sony-xbr-65x950g-65-class-64-5-diag-bravia-4k-hdr-ultra-hd-tv", "title": "Sony XBR-950G BRAVIA 4K HDR Ultra HD TV", "minPrice": 139800, "price": null }, ... ]
Ta-da! We've managed to get links leading to the product pages. In the next lesson, we'll crawl these URLs so that we can gather more details about the products in our dataset.
***
## Exercises
These challenges are here to help you test what you’ve learned in this lesson. Try to resist the urge to peek at the solutions right away. Remember, the best learning happens when you dive in and do it yourself!
Real world
You're about to touch the real web, which is practical and exciting! But websites change, so some exercises might break. If you run into any issues, please leave a comment below or https://github.com/apify/apify-docs/issues.
### Scrape links to countries in Africa
Download Wikipedia's page with the list of African countries, use Cheerio to parse it, and print links to Wikipedia pages of all the states and territories mentioned in all tables. Start with this URL:
https://en.wikipedia.org/wiki/List_of_sovereign_states_and_dependent_territories_in_Africa
Your program should print the following:
https://en.wikipedia.org/wiki/Algeria https://en.wikipedia.org/wiki/Angola https://en.wikipedia.org/wiki/Benin https://en.wikipedia.org/wiki/Botswana ...
Solution
import * as cheerio from 'cheerio';
const listingURL = "https://en.wikipedia.org/wiki/List_of_sovereign_states_and_dependent_territories_in_Africa"; const response = await fetch(listingURL);
if (response.ok) { const html = await response.text(); const $ = cheerio.load(html);
for (const element of $(".wikitable tr td:nth-child(3)").toArray()) {
const nameCell = $(element);
const link = nameCell.find("a").first();
const url = new URL(link.attr("href"), listingURL).href;
console.log(url);
}
} else {
throw new Error(HTTP ${response.status});
}
### Scrape links to F1 news
Download Guardian's page with the latest F1 news, use Cheerio to parse it, and print links to all the listed articles. Start with this URL:
https://www.theguardian.com/sport/formulaone
Your program should print something like the following:
https://www.theguardian.com/world/2024/sep/13/africa-f1-formula-one-fans-lewis-hamilton-grand-prix https://www.theguardian.com/sport/2024/sep/12/mclaren-lando-norris-oscar-piastri-team-orders-f1-title-race-max-verstappen https://www.theguardian.com/sport/article/2024/sep/10/f1-designer-adrian-newey-signs-aston-martin-deal-after-quitting-red-bull https://www.theguardian.com/sport/article/2024/sep/02/max-verstappen-damns-his-undriveable-monster-how-bad-really-is-it-and-why ...
Solution
import * as cheerio from 'cheerio';
const listingURL = "https://www.theguardian.com/sport/formulaone"; const response = await fetch(listingURL);
if (response.ok) { const html = await response.text(); const $ = cheerio.load(html);
for (const element of $("#maincontent ul li").toArray()) {
const link = $(element).find("a").first();
const url = new URL(link.attr("href"), listingURL).href;
console.log(url);
}
} else {
throw new Error(HTTP ${response.status});
}
Note that some cards contain two links. One leads to the article, and one to the comments. If we selected all the links in the list by `#maincontent ul li a`, we would get incorrect output like this:
https://www.theguardian.com/sport/article/2024/sep/02/example https://www.theguardian.com/sport/article/2024/sep/02/example#comments
---
# Locating HTML elements with Node.js
**In this lesson we'll locate product data in the downloaded HTML. We'll use Cheerio to find those HTML elements which contain details about each product, such as title or price.**
***
In the previous lesson we've managed to print text of the page's main heading or count how many products are in the listing. Let's combine those two. What happens if we print `.text()` for each product card?
import * as cheerio from 'cheerio';
const url = "https://warehouse-theme-metal.myshopify.com/collections/sales"; const response = await fetch(url);
if (response.ok) {
const html = await response.text();
const $ = cheerio.load(html);
for (const element of $(".product-item").toArray()) {
console.log($(element).text());
}
} else {
throw new Error(HTTP ${response.status});
}
Calling https://cheerio.js.org/docs/api/classes/Cheerio#toarray converts the Cheerio selection to a standard JavaScript array. We can then loop over that array and process each selected element.
Cheerio requires us to wrap each element with `$()` again before we can work with it further, and then we call `.text()`. If we run the code, it… well, it definitely prints *something*…
$ node index.js
JBL
JBL Flip 4 Waterproof Portable Bluetooth Speaker
Black
+7
Blue
+6
...
To get details about each product in a structured way, we'll need a different approach.
## Locating child elements
As in the browser DevTools lessons, we need to change the code so that it locates child elements for each product card.

We should be looking for elements which have the `product-item__title` and `price` classes. We already know how that translates to CSS selectors:
import * as cheerio from 'cheerio';
const url = "https://warehouse-theme-metal.myshopify.com/collections/sales"; const response = await fetch(url);
if (response.ok) { const html = await response.text(); const $ = cheerio.load(html);
for (const element of $(".product-item").toArray()) { const $productItem = $(element);
const $title = $productItem.find(".product-item__title");
const title = $title.text();
const $price = $productItem.find(".price");
const price = $price.text();
console.log(`${title} | ${price}`);
}
} else {
throw new Error(HTTP ${response.status});
}
Let's run the program now:
$ python main.py JBL Flip 4 Waterproof Portable Bluetooth Speaker | Sale price$74.95 Sony XBR-950G BRAVIA 4K HDR Ultra HD TV | Sale priceFrom $1,398.00 ...
There's still some room for improvement, but it's already much better!
Dollar sign variable names
In jQuery and Cheerio, the core idea is a collection that wraps selected objects, usually HTML elements. To tell these wrapped selections apart from plain arrays, strings or other objects, it's common to start variable names with a dollar sign. This is just a naming convention to improve readability. The dollar sign has no special meaning and works like any other character in a variable name.
## Precisely locating price
In the output we can see that the price isn't located precisely. For each product, our scraper also prints the text `Sale price`. Let's look at the HTML structure again. Each bit containing the price looks like this:
Sale price $74.95
When translated to a tree of JavaScript objects, the element with class `price` will contain several *nodes*:
* Textual node with white space,
* a `span` HTML element,
* a textual node representing the actual amount and possibly also white space.
We can use Cheerio's https://cheerio.js.org/docs/api/classes/Cheerio#contents method to access individual nodes. It returns a list of nodes like this:
LoadedCheerio { '0': Text { parent: Element { ... }, prev: null, next: Element { ... }, data: '\n ', type: 'text' }, '1': Element { parent: Element { ... }, prev: Text { ... }, next: Text { ... }, children: [ [Text] ], name: 'span', type: 'tag', ... }, '2': Text { parent: Element { ... }, prev: Element { ... }, next: null, data: '$74.95', type: 'text' }, length: 3, ... }
It seems like we can read the last element to get the actual amount. Let's fix our program:
import * as cheerio from 'cheerio';
const url = "https://warehouse-theme-metal.myshopify.com/collections/sales"; const response = await fetch(url);
if (response.ok) { const html = await response.text(); const $ = cheerio.load(html);
for (const element of $(".product-item").toArray()) { const $productItem = $(element);
const $title = $productItem.find(".product-item__title");
const title = $title.text();
const $price = $productItem.find(".price").contents().last();
const price = $price.text();
console.log(`${title} | ${price}`);
}
} else {
throw new Error(HTTP ${response.status});
}
We're enjoying the fact that Cheerio selections provide utility methods for accessing items, such as https://cheerio.js.org/docs/api/classes/Cheerio#first or https://cheerio.js.org/docs/api/classes/Cheerio#last. If we run the scraper now, it should print prices as only amounts:
$ node index.js JBL Flip 4 Waterproof Portable Bluetooth Speaker | $74.95 Sony XBR-950G BRAVIA 4K HDR Ultra HD TV | From $1,398.00 ...
Great! We have managed to use CSS selectors and walk the HTML tree to get a list of product titles and prices. But wait a second—what's `From $1,398.00`? One does not simply scrape a price! We'll need to clean that. But that's a job for the next lesson, which is about extracting data.
***
## Exercises
These challenges are here to help you test what you’ve learned in this lesson. Try to resist the urge to peek at the solutions right away. Remember, the best learning happens when you dive in and do it yourself!
Real world
You're about to touch the real web, which is practical and exciting! But websites change, so some exercises might break. If you run into any issues, please leave a comment below or https://github.com/apify/apify-docs/issues.
### Scrape Wikipedia
Download Wikipedia's page with the list of African countries, use Cheerio to parse it, and print short English names of all the states and territories mentioned in all tables. This is the URL:
https://en.wikipedia.org/wiki/List_of_sovereign_states_and_dependent_territories_in_Africa
Your program should print the following:
Algeria Angola Benin Botswana Burkina Faso Burundi Cameroon Cape Verde Central African Republic Chad Comoros Democratic Republic of the Congo Republic of the Congo Djibouti ...
Solution
import * as cheerio from 'cheerio';
const url = "https://en.wikipedia.org/wiki/List_of_sovereign_states_and_dependent_territories_in_Africa"; const response = await fetch(url);
if (response.ok) { const html = await response.text(); const $ = cheerio.load(html);
for (const tableElement of $(".wikitable").toArray()) { const $table = $(tableElement); const $rows = $table.find("tr");
for (const rowElement of $rows.toArray()) {
const $row = $(rowElement);
const $cells = $row.find("td");
if ($cells.length > 0) {
const $thirdColumn = $($cells[2]);
const $link = $thirdColumn.find("a").first();
console.log($link.text());
}
}
}
} else {
throw new Error(HTTP ${response.status});
}
Because some rows contain https://developer.mozilla.org/en-US/docs/Web/HTML/Element/th, we skip processing a row if `table_row.select("td")` doesn't find any https://developer.mozilla.org/en-US/docs/Web/HTML/Element/td cells.
### Use CSS selectors to their max
Simplify the code from previous exercise. Use a single for loop and a single CSS selector.
Need a nudge?
You may want to check out the following pages:
* https://developer.mozilla.org/en-US/docs/Web/CSS/Descendant_combinator
* https://developer.mozilla.org/en-US/docs/Web/CSS/:nth-child
Solution
import * as cheerio from 'cheerio';
const url = "https://en.wikipedia.org/wiki/List_of_sovereign_states_and_dependent_territories_in_Africa"; const response = await fetch(url);
if (response.ok) { const html = await response.text(); const $ = cheerio.load(html);
for (const element of $(".wikitable tr td:nth-child(3)").toArray()) {
const $nameCell = $(element);
const $link = $nameCell.find("a").first();
console.log($link.text());
}
} else {
throw new Error(HTTP ${response.status});
}
### Scrape F1 news
Download Guardian's page with the latest F1 news, use Cheerio to parse it, and print titles of all the listed articles. This is the URL:
https://www.theguardian.com/sport/formulaone
Your program should print something like the following:
Wolff confident Mercedes are heading to front of grid after Canada improvement Frustrated Lando Norris blames McLaren team for missed chance Max Verstappen wins Canadian Grand Prix: F1 – as it happened ...
Solution
import * as cheerio from 'cheerio';
const url = "https://www.theguardian.com/sport/formulaone"; const response = await fetch(url);
if (response.ok) { const html = await response.text(); const $ = cheerio.load(html);
for (const element of $("#maincontent ul li h3").toArray()) {
console.log($(element).text());
}
} else {
throw new Error(HTTP ${response.status});
}
---
# Parsing HTML with Node.js
**In this lesson we'll look for products in the downloaded HTML. We'll use Cheerio to turn the HTML into objects which we can work with in our Node.js program.**
***
From lessons about browser DevTools we know that the HTML elements representing individual products have a `class` attribute which, among other values, contains `product-item`.

As a first step, let's try counting how many products are on the listing page.
## Processing HTML
After downloading, the entire HTML is available in our program as a string. We can print it to the screen or save it to a file, but not much more. However, since it's a string, could we use https://developer.mozilla.org/en-US/docs/Web/JavaScript/Reference/Global_Objects/String#instance_methods or https://developer.mozilla.org/en-US/docs/Web/JavaScript/Guide/Regular_expressions to count the products?
While somewhat possible, such an approach is tedious, fragile, and unreliable. To work with HTML, we need a robust tool dedicated to the task: an *HTML parser*. It takes a text with HTML markup and turns it into a tree of JavaScript objects.
Why regex can't parse HTML
While https://stackoverflow.com/a/1732454/325365 is funny, it doesn't go very deep into the reasoning:
* In **formal language theory**, HTML's hierarchical, nested structure makes it a https://en.wikipedia.org/wiki/Context-free_language. **Regular expressions**, by contrast, match patterns in https://en.wikipedia.org/wiki/Regular_language, which are much simpler.
* Because of this difference, regex alone struggles with HTML's nested tags. On top of that, HTML has **complex syntax rules** and countless **edge cases**, which only add to the difficulty.
We'll choose https://cheerio.js.org/ as our parser, as it's a popular library which can process even non-standard, broken markup. This is useful for scraping, because real-world websites often contain all sorts of errors and discrepancies. In the project directory, we'll run the following to install the Cheerio package:
$ npm install cheerio --save
added 123 packages, and audited 123 packages in 0s ...
Installing packages
Being comfortable around installing Node.js packages is a prerequisite of this course, but if you wouldn't say no to a recap, we recommend https://nodejs.org/en/learn/getting-started/an-introduction-to-the-npm-package-manager tutorial from the official Node.js documentation.
Now let's import the package and use it for parsing the HTML. The `cheerio` module allows us to work with the HTML elements in a structured way. As a demonstration, we'll first get the `` element, which represents the main heading of the page.

We'll update our code to the following:
import * as cheerio from 'cheerio';
const url = "https://warehouse-theme-metal.myshopify.com/collections/sales"; const response = await fetch(url);
if (response.ok) {
const html = await response.text();
const $ = cheerio.load(html);
console.log($("h1"));
} else {
throw new Error(HTTP ${response.status});
}
Then let's run the program:
$ node index.js LoadedCheerio { '0': Element { parent: Element { ... }, prev: Text { ... }, next: Element { ... }, startIndex: null, endIndex: null, children: [ [Text] ], name: 'h1', attribs: [Object: null prototype] { class: 'collection__title heading h1' }, type: 'tag', namespace: 'http://www.w3.org/1999/xhtml', 'x-attribsNamespace': [Object: null prototype] { class: undefined }, 'x-attribsPrefix': [Object: null prototype] { class: undefined } }, length: 1, ... }
Our code prints a Cheerio object. It's something like an array of all `h1` elements Cheerio can find in the HTML we gave it. It's the case that there's just one, so we can see only a single item in the selection.
The item has many properties, such as references to its parent or sibling elements, but most importantly, its name is `h1` and in the `children` property, it contains a single text element. Now let's print just the text. Let's change our program to the following:
import * as cheerio from 'cheerio';
const url = "https://warehouse-theme-metal.myshopify.com/collections/sales"; const response = await fetch(url);
if (response.ok) {
const html = await response.text();
const $ = cheerio.load(html);
console.log($("h1").text());
} else {
throw new Error(HTTP ${response.status});
}
Thanks to the nature of the Cheerio object we don't have to explicitly find the first element. Calling `.text()` combines texts of all elements in the selection. If we run our scraper again, it prints the text of the `h1` element:
$ node index.js Sales
Dynamic websites
The Warehouse returns full HTML in its initial response, but many other sites add some content after the page loads or after user interaction. In such cases, what we'd see in DevTools could differ from `await response.text()` in Node.js. Learn how to handle these scenarios in our https://docs.apify.com/academy/api-scraping.md and https://docs.apify.com/academy/puppeteer-playwright.md courses.
## Using CSS selectors
Cheerio's `$()` method runs a *CSS selector* against a parsed HTML document and returns all the matching elements. It's like calling `document.querySelectorAll()` in browser DevTools.
Scanning through https://cheerio.js.org/docs/basics/selecting will help us to figure out code for counting the product cards:
import * as cheerio from 'cheerio';
const url = "https://warehouse-theme-metal.myshopify.com/collections/sales"; const response = await fetch(url);
if (response.ok) {
const html = await response.text();
const $ = cheerio.load(html);
console.log($(".product-item").length);
} else {
throw new Error(HTTP ${response.status});
}
In CSS, `.product-item` selects all elements whose `class` attribute contains value `product-item`. We call `$()` with the selector and get back matching elements. Cheerio handles all the complexity of understanding the HTML markup for us. Then we use `.length` to count how many items there is in the selection.
$ node index.js 24
That's it! We've managed to download a product listing, parse its HTML, and count how many products it contains. In the next lesson, we'll be looking for a way to extract detailed information about individual products.
Cheerio and jQuery
The Cheerio documentation frequently mentions jQuery. Back when browsers were wildly inconsistent and basic DOM methods like `document.querySelectorAll()` didn't exist, jQuery was the most popular JavaScript framework for web development. It provided a consistent API that worked across all browsers.
Cheerio was designed to mimic jQuery's interface because nearly every developer knew jQuery at the time. jQuery worked in browsers, Cheerio in Node.js. While jQuery has largely faded from modern web development, we now learn its syntax specifically to use Cheerio for server-side HTML manipulation.
***
## Exercises
These challenges are here to help you test what you’ve learned in this lesson. Try to resist the urge to peek at the solutions right away. Remember, the best learning happens when you dive in and do it yourself!
Real world
You're about to touch the real web, which is practical and exciting! But websites change, so some exercises might break. If you run into any issues, please leave a comment below or https://github.com/apify/apify-docs/issues.
### Scrape F1 Academy teams
Print a total count of F1 Academy teams listed on this page:
https://www.f1academy.com/Racing-Series/Teams
Solution
import * as cheerio from 'cheerio';
const url = "https://www.f1academy.com/Racing-Series/Teams"; const response = await fetch(url);
if (response.ok) {
const html = await response.text();
const $ = cheerio.load(html);
console.log($(".teams-driver-item").length);
} else {
throw new Error(HTTP ${response.status});
}
### Scrape F1 Academy drivers
Use the same URL as in the previous exercise, but this time print a total count of F1 Academy drivers.
Solution
import * as cheerio from 'cheerio';
const url = "https://www.f1academy.com/Racing-Series/Teams"; const response = await fetch(url);
if (response.ok) {
const html = await response.text();
const $ = cheerio.load(html);
console.log($(".driver").length);
} else {
throw new Error(HTTP ${response.status});
}
---
# Using a scraping platform with Node.js
**In this lesson, we'll deploy our application to a scraping platform that automatically runs it daily. We'll also use the platform's API to retrieve and work with the results.**
***
Before starting with a scraping platform, let's highlight a few caveats in our current setup:
* *User-operated:* We have to run the scraper ourselves. If we're tracking price trends, we'd need to remember to run it daily. And if we want alerts for big discounts, manually running the program isn't much better than just checking the site in a browser every day.
* *No monitoring:* If we have a spare server or a Raspberry Pi lying around, we could use https://en.wikipedia.org/wiki/Cron to schedule it. But even then, we'd have little insight into whether it ran successfully, what errors or warnings occurred, how long it took, or what resources it used.
* *Manual data management:* Tracking prices over time means figuring out how to organize the exported data ourselves. Processing the data could also be tricky since different analysis tools often require different formats.
* *Anti-scraping risks:* If the target website detects our scraper, they can rate-limit or block us. Sure, we could run it from a coffee shop's Wi-Fi, but eventually, they'd block that too—risking seriously annoying our barista.
In this lesson, we'll use a platform to address all of these issues. Generic cloud platforms like https://github.com/features/actions can work for simple scenarios. But platforms dedicated to scraping, like https://apify.com/, offer extra features such as monitoring scrapers, managing retrieved data, and overcoming anti-scraping measures.
Why Apify
Scraping platforms come in many varieties, offering a wide range of tools and approaches. As the course authors, we're obviously biased toward Apify—we think it's both powerful and complete.
That said, the main goal of this lesson is to show how deploying to *any platform* can make life easier. Plus, everything we cover here fits within https://apify.com/pricing.
## Registering
First, let's https://console.apify.com/sign-up. We'll go through a few checks to confirm we're human and our email is valid—annoying but necessary to prevent abuse of the platform.
Apify serves both as an infrastructure where to privately deploy and run own scrapers, and as a marketplace, where anyone can offer their ready scrapers to others for rent. But let's hold off on exploring the Apify Store for now.
## Getting access from the command line
To control the platform from our machine and send the code of our program there, we'll need the Apify CLI. The https://docs.apify.com/cli/docs/installation suggests we can install it with `npm` as a global package:
$ npm -g install apify-cli
added 440 packages in 2s ...
We better verify that we installed the tool by printing its version:
$ apify --version apify-cli/0.0.0 system-arch00 node-v0.0.0
Now let's connect the CLI with the cloud platform using our account from previous step:
$ apify login ... Success: You are logged in to Apify as user1234!
## Turning our program to an Actor
Every program that runs on the Apify platform first needs to be packaged as a so-called https://docs.apify.com/platform/actors—a standardized container with designated places for input and output.
Many https://apify.com/templates/categories/javascript simplify the setup for new projects. We'll skip those, as we're about to package an existing program.
Inside the project directory we'll run the `apify init` command followed by a name we want to give to the Actor:
$ apify init warehouse-watchdog Success: The Actor has been initialized in the current directory.
The command creates an `.actor` directory with `actor.json` file inside. This file serves as the configuration of the Actor.
Hidden dot files
Files and folders that start with a dot (like `.actor`) may be hidden by default. To see them:
* In your operating system's file explorer, look for a setting like **Show hidden files**.
* Many editors or IDEs can show hidden files as well. For example, the file explorer in VS Code shows them by default.
We'll also need a few changes to our code. First, let's add the `apify` package, which is the https://docs.apify.com/sdk/js/:
$ npm install apify --save
added 123 packages, and audited 123 packages in 0s ...
Now we'll modify the program so that before it starts, it configures the Actor environment, and after it ends, it gracefully exits the Actor process:
index.js
import { CheerioCrawler } from 'crawlee'; import { Actor } from 'apify';
function parseVariant($option) { ... }
await Actor.init();
const crawler = new CheerioCrawler({ ... });
await crawler.run(['https://warehouse-theme-metal.myshopify.com/collections/sales']); crawler.log.info('Exporting data'); await crawler.exportData('dataset.json'); await crawler.exportData('dataset.csv');
await Actor.exit();
Finally, let's tell others how to start the project. This is not specific to Actors. JavaScript projects usually include this so people and tools like Apify know how to run them. We will add a `start` script to `package.json`:
package.json
{ "name": "academy-example", "version": "1.0.0", ... "scripts": { "start": "node index.js", "test": "echo "Error: no test specified" && exit 1" }, "dependencies": { ... } }
That's it! Before deploying the project to the cloud, let's verify that everything works locally:
$ apify run Run: npm run start
academy-example@1.0.0 start node index.js
INFO System info {"apifyVersion":"0.0.0","apifyClientVersion":"0.0.0","crawleeVersion":"0.0.0","osType":"Darwin","nodeVersion":"v0.0.0"} INFO CheerioCrawler: Starting the crawler. INFO CheerioCrawler: Looking for product detail pages INFO CheerioCrawler: Product detail page: https://warehouse-theme-metal.myshopify.com/products/jbl-flip-4-waterproof-portable-bluetooth-speaker INFO CheerioCrawler: Saving a product variant INFO CheerioCrawler: Saving a product variant ...
## Deploying the scraper
Now we can proceed to deployment:
$ apify push Info: Created Actor with name warehouse-watchdog on Apify. Info: Deploying Actor 'warehouse-watchdog' to Apify. Run: Updated version 0.0 for Actor warehouse-watchdog. Run: Building Actor warehouse-watchdog ... Actor build detail https://console.apify.com/actors/a123bCDefghiJkLMN#/builds/0.0.1 ? Do you want to open the Actor detail in your browser? (Y/n)
After opening the link in our browser, assuming we're logged in, we should see the **Source** screen on the Actor's detail page. We'll go to the **Input** tab of that screen. We won't change anything—just hit **Start**, and we should see logs similar to what we see locally, but this time our scraper will be running in the cloud.

When the run finishes, the interface will turn green. On the **Output** tab, we can preview the results as a table or JSON. We can even export the data to formats like CSV, XML, Excel, RSS, and more.

Accessing data
We don't need to click buttons to download the data. It's possible to retrieve it also using Apify's API, the `apify datasets` CLI command, or the JavaScript SDK. Learn more in the https://docs.apify.com/platform/storage/dataset.
## Running the scraper periodically
Now that our scraper is deployed, let's automate its execution. In the Apify web interface, we'll go to https://console.apify.com/schedules. Let's click **Create new**, review the periodicity (default: daily), and specify the Actor to run. Then we'll click **Enable**—that's it!
From now on, the Actor will execute daily. We can inspect each run, view logs, check collected data, https://docs.apify.com/platform/monitoring, and even set up alerts.

## Adding support for proxies
If monitoring shows that our scraper frequently fails to reach the Warehouse Shop website, it's likely being blocked. To avoid this, we can https://docs.apify.com/platform/proxy so our requests come from different locations, reducing the chances of detection and blocking.
Proxy configuration is a type of https://docs.apify.com/platform/actors/running/input-and-output#input. Crawlee scrapers automatically connect their default dataset to the Actor output, but input must be handled manually. Inside the `.actor` directory we'll create a new file, `inputSchema.json`, with the following content:
.actor/inputSchema.json
{ "title": "Crawlee Cheerio Scraper", "type": "object", "schemaVersion": 1, "properties": { "proxyConfig": { "title": "Proxy config", "description": "Proxy configuration", "type": "object", "editor": "proxy", "prefill": { "useApifyProxy": true, "apifyProxyGroups": [] }, "default": { "useApifyProxy": true, "apifyProxyGroups": [] } } } }
Now let's connect this file to the actor configuration. In `actor.json`, we'll add one more line:
.actor/actor.json
{ "actorSpecification": 1, "name": "warehouse-watchdog", "version": "0.0", "buildTag": "latest", "environmentVariables": {}, "input": "./inputSchema.json" }
Trailing commas in JSON
Make sure there's no trailing comma after the line, or the file won't be valid JSON.
That tells the platform our Actor expects proxy configuration on input. We'll also update the `index.js`. Thanks to the built-in integration between Apify and Crawlee, we can pass the proxy configuration as-is to the `CheerioCrawler`:
... await Actor.init(); const proxyConfiguration = await Actor.createProxyConfiguration();
const crawler = new CheerioCrawler({ proxyConfiguration, async requestHandler({ $, request, enqueueLinks, pushData, log }) { ... }, });
crawler.log.info(Using proxy: ${proxyConfiguration ? 'yes' : 'no'});
await crawler.run(['https://warehouse-theme-metal.myshopify.com/collections/sales']);
...
To verify everything works, we'll run the scraper locally. We'll use the `apify run` command again, but this time with the `--purge` option to ensure we're not reusing data from a previous run:
$ apify run --purge Run: npm run start
academy-example@1.0.0 start node index.js
INFO System info {"apifyVersion":"0.0.0","apifyClientVersion":"0.0.0","crawleeVersion":"0.0.0","osType":"Darwin","nodeVersion":"v0.0.0"} WARN ProxyConfiguration: The "Proxy external access" feature is not enabled for your account. Please upgrade your plan or contact support@apify.com INFO CheerioCrawler: Using proxy: no INFO CheerioCrawler: Starting the crawler. INFO CheerioCrawler: Looking for product detail pages INFO CheerioCrawler: Product detail page: https://warehouse-theme-metal.myshopify.com/products/denon-ah-c720-in-ear-headphones INFO CheerioCrawler: Saving a product variant INFO CheerioCrawler: Saving a product variant ...
In the logs, we should see `Using proxy: no`, because local runs don't include proxy settings. A warning informs us that it's a paid feature we don't have enabled, so all requests will be made from our own location, just as before. Now, let's update the cloud version of our scraper with `apify push`:
$ apify push Info: Deploying Actor 'warehouse-watchdog' to Apify. Run: Updated version 0.0 for Actor warehouse-watchdog. Run: Building Actor warehouse-watchdog (timestamp) ACTOR: Found input schema referenced from .actor/actor.json ... ? Do you want to open the Actor detail in your browser? (Y/n)
Back in the Apify console, we'll go to the **Source** screen and switch to the **Input** tab. We should see the new **Proxy config** option, which defaults to **Datacenter - Automatic**.

We'll leave it as is and click **Start**. This time, the logs should show `Using proxy: yes`, as the scraper uses proxies provided by the platform:
(timestamp) ACTOR: Pulling Docker image of build o6vHvr5KwA1sGNxP0 from registry. (timestamp) ACTOR: Creating Docker container. (timestamp) ACTOR: Starting Docker container. (timestamp) INFO System info {"apifyVersion":"0.0.0","apifyClientVersion":"0.0.0","crawleeVersion":"0.0.0","osType":"Darwin","nodeVersion":"v0.0.0"} (timestamp) INFO CheerioCrawler: Using proxy: yes (timestamp) INFO CheerioCrawler: Starting the crawler. (timestamp) INFO CheerioCrawler: Looking for product detail pages (timestamp) INFO CheerioCrawler: Product detail page: https://warehouse-theme-metal.myshopify.com/products/sony-ps-hx500-hi-res-usb-turntable (timestamp) INFO CheerioCrawler: Saving a product (timestamp) INFO CheerioCrawler: Product detail page: https://warehouse-theme-metal.myshopify.com/products/klipsch-r-120sw-powerful-detailed-home-speaker-set-of-1 (timestamp) INFO CheerioCrawler: Saving a product ...
## Congratulations!
We've reached the end of the course—congratulations! Together, we've built a program that:
* Crawls a shop and extracts product and pricing data.
* Exports the results in several formats.
* Uses a concise code, thanks to a scraping framework.
* Runs on a cloud platform with monitoring and alerts.
* Executes periodically without manual intervention, collecting data over time.
* Uses proxies to avoid being blocked.
We hope this serves as a solid foundation for your next scraping project. Perhaps you'll even https://docs.apify.com/platform/actors/publishing for others to use—for a fee?
---
# Saving data with Node.js
**In this lesson, we'll save the data we scraped in the popular formats, such as CSV or JSON. We'll use the json2csv library to export the files.**
***
We managed to scrape data about products and print it, with each product separated by a new line and each field separated by the `|` character. This already produces structured text that can be parsed, i.e., read programmatically.
$ node index.js JBL Flip 4 Waterproof Portable Bluetooth Speaker | 7495 | 7495 Sony XBR-950G BRAVIA 4K HDR Ultra HD TV | 139800 | null ...
However, the format of this text is rather *ad hoc* and does not adhere to any specific standard that others could follow. It's unclear what to do if a product title already contains the `|` character or how to represent multi-line product descriptions. No ready-made library can handle all the parsing.
We should use widely popular formats that have well-defined solutions for all the corner cases and that other programs can read without much effort. Two such formats are CSV (*Comma-separated values*) and JSON (*JavaScript Object Notation*).
## Collecting data
Producing results line by line is an efficient approach to handling large datasets, but to simplify this lesson, we'll store all our data in one variable. This'll take four changes to our program:
import * as cheerio from 'cheerio';
const url = "https://warehouse-theme-metal.myshopify.com/collections/sales"; const response = await fetch(url);
if (response.ok) { const html = await response.text(); const $ = cheerio.load(html);
const data = $(".product-item").toArray().map(element => { const $productItem = $(element);
const $title = $productItem.find(".product-item__title");
const title = $title.text().trim();
const $price = $productItem.find(".price").contents().last();
const priceRange = { minPrice: null, price: null };
const priceText = $price
.text()
.trim()
.replace("$", "")
.replace(".", "")
.replace(",", "");
if (priceText.startsWith("From ")) {
priceRange.minPrice = parseInt(priceText.replace("From ", ""));
} else {
priceRange.minPrice = parseInt(priceText);
priceRange.price = priceRange.minPrice;
}
return { title, ...priceRange };
});
console.log(data);
} else {
throw new Error(HTTP ${response.status});
}
Instead of printing each line, we now return the data for each product as a JavaScript object. We've replaced the `for` loop with https://developer.mozilla.org/en-US/docs/Web/JavaScript/Reference/Global_Objects/Array/map, which also iterates over the selection but, in addition, collects all the results and returns them as another array. Near the end of the program, we print this entire array.
Advanced syntax
When returning the item object, we use https://developer.mozilla.org/en-US/docs/Web/JavaScript/Reference/Operators/Object_initializer#property_definitions to set the title, and https://developer.mozilla.org/en-US/docs/Web/JavaScript/Reference/Operators/Spread_syntax to set the prices. It's the same as if we wrote the following:
{ title: title, minPrice: priceRange.minPrice, price: priceRange.price, }
The program should now print the results as a single large JavaScript array:
$ node index.js [ { title: 'JBL Flip 4 Waterproof Portable Bluetooth Speaker', minPrice: 7495, price: 7495 }, { title: 'Sony XBR-950G BRAVIA 4K HDR Ultra HD TV', minPrice: 139800, price: null }, ... ]
## Saving data as JSON
The JSON format is popular primarily among developers. We use it for storing data, configuration files, or as a way to transfer data between programs (e.g., APIs). Its origin stems from the syntax of JavaScript objects, but people now use it accross programming languages.
We'll begin with importing the `writeFile` function from the Node.js standard library, so that we can, well, write files:
import * as cheerio from 'cheerio'; import { writeFile } from "fs/promises";
Next, instead of printing the data, we'll finish the program by exporting it to JSON. Let's replace the line `console.log(data)` with the following:
const jsonData = JSON.stringify(data); await writeFile('products.json', jsonData);
That's it! If we run our scraper now, it won't display any output, but it will create a `products.json` file in the current working directory, which contains all the data about the listed products:
[{"title":"JBL Flip 4 Waterproof Portable Bluetooth Speaker","minPrice":7495,"price":7495},{"title":"Sony XBR-950G BRAVIA 4K HDR Ultra HD TV","minPrice":139800,"price":null},...]
If you skim through the data, you'll notice that the `JSON.stringify()` function handled some potential issues, such as escaping double quotes found in one of the titles by adding a backslash:
{"title":"Sony SACS9 10" Active Subwoofer","minPrice":15800,"price":15800}
Pretty JSON
While a compact JSON file without any whitespace is efficient for computers, it can be difficult for humans to read. You can call `JSON.stringify(data, null, 2)` for prettier output. See https://developer.mozilla.org/en-US/docs/Web/JavaScript/Reference/Global_Objects/JSON/stringify for explanation of the parameters and more examples.
## Saving data as CSV
The CSV format is popular among data analysts because a wide range of tools can import it, including spreadsheets apps like LibreOffice Calc, Microsoft Excel, Apple Numbers, and Google Sheets.
Neither JavaScript itself nor Node.js offers anything built-in to read and write CSV, so we'll need to install a library. We'll use https://juanjodiaz.github.io/json2csv/, a *de facto* standard for working with CSV in JavaScript:
$ npm install @json2csv/node --save
added 123 packages, and audited 123 packages in 0s ...
Once installed, we can add the following line to our imports:
import * as cheerio from 'cheerio'; import { writeFile } from "fs/promises"; import { AsyncParser } from '@json2csv/node';
Then, let's add one more data export near the end of the source code of our scraper:
const jsonData = JSON.stringify(data); await writeFile('products.json', jsonData);
const parser = new AsyncParser(); const csvData = await parser.parse(data).promise(); await writeFile("products.csv", csvData);
The program should now also produce a `data.csv` file. When browsing the directory on macOS, we can see a nice preview of the file's contents, which proves that the file is correct and that other programs can read it. If you're using a different operating system, try opening the file with any spreadsheet program you have.

In the CSV format, if a value contains commas, we should enclose it in quotes. If it contains quotes, we should double them. When we open the file in a text editor of our choice, we can see that the library automatically handled this:
"title","minPrice","price" "JBL Flip 4 Waterproof Portable Bluetooth Speaker",7495,7495 "Sony XBR-950G BRAVIA 4K HDR Ultra HD TV",139800, "Sony SACS9 10"" Active Subwoofer",15800,15800 ... "Samsung Surround Sound Bar Home Speaker, Set of 7 (HW-NW700/ZA)",64799,64799 ...
We've built a Node.js application that downloads a product listing, parses the data, and saves it in a structured format for further use. But the data still has gaps: for some products, we only have the min price, not the actual prices. In the next lesson, we'll attempt to scrape more details from all the product pages.
***
## Exercises
In this lesson, we created export files in two formats. The following challenges are designed to help you empathize with the people who'd be working with them.
### Process your JSON
Write a new Node.js program that reads the `products.json` file we created in this lesson, finds all products with a min price greater than $500, and prints each of them.
Solution
import { readFile } from "fs/promises";
const jsonData = await readFile("products.json"); const data = JSON.parse(jsonData); data .filter(row => row.minPrice > 50000) .forEach(row => console.log(row));
### Process your CSV
Open the `products.csv` file we created in the lesson using a spreadsheet application. Then, in the app, find all products with a min price greater than $500.
Solution
Let's use https://www.google.com/sheets/about/, which is free to use. After logging in with a Google account:
1. Go to **File > Import**, choose **Upload**, and select the file. Import the data using the default settings. You should see a table with all the data.
2. Select the header row. Go to **Data > Create filter**.
3. Use the filter icon that appears next to `minPrice`. Choose **Filter by condition**, select **Greater than**, and enter **500** in the text field. Confirm the dialog. You should see only the filtered data.

---
# Scraping product variants with Node.js
**In this lesson, we'll scrape the product detail pages to represent each product variant as a separate item in our dataset.**
***
We'll need to figure out how to extract variants from the product detail page, and then change how we add items to the data list so we can add multiple items after scraping one product URL.
## Locating variants
First, let's extract information about the variants. If we go to https://warehouse-theme-metal.myshopify.com/products/sony-xbr-65x950g-65-class-64-5-diag-bravia-4k-hdr-ultra-hd-tv and open the DevTools, we can see that the buttons for switching between variants look like this:
55"
65"
Nice! We can extract the variant names, but we also need to extract the price for each variant. Switching the variants using the buttons shows us that the HTML changes dynamically. This means the page uses JavaScript to display this information.

If we can't find a workaround, we'd need our scraper to run browser JavaScript. That's not impossible. Scrapers can spin up their own browser instance and automate clicking on buttons, but it's slow and resource-intensive. Ideally, we want to stick to plain HTTP requests and Cheerio as much as possible.
After a bit of detective work, we notice that not far below the `block-swatch-list` there's also a block of HTML with a class `no-js`, which contains all the data!
Variant
55" - $1,398.00
65" - $2,198.00
These elements aren't visible to regular visitors. They're there just in case browser JavaScript fails to work, otherwise they're hidden. This is a great find because it allows us to keep our scraper lightweight.
## Extracting variants
Using our knowledge of Cheerio, we can locate the `option` elements and extract the data we need. We'll loop over the options, extract variant names, and create a corresponding array of items for each product:
const listingURL = "https://warehouse-theme-metal.myshopify.com/collections/sales"; const $ = await download(listingURL);
const promises = $(".product-item").toArray().map(async element => { const $productItem = $(element); const item = parseProduct($productItem, listingURL);
const $p = await download(item.url); item.vendor = $p(".product-meta__vendor").text().trim();
const $options = $p(".product-form__option.no-js option"); const items = $options.toArray().map(optionElement => { const $option = $(optionElement); const variantName = $option.text().trim(); return { variantName, ...item }; });
return item; }); const data = await Promise.all(promises);
The CSS selector `.product-form__option.no-js` targets elements that have both the `product-form__option` and `no-js` classes. We then use the https://developer.mozilla.org/en-US/docs/Web/CSS/Descendant_combinator to match all `option` elements nested within the `.product-form__option.no-js` wrapper.
We loop over the variants using `.map()` method to create an array of item copies for each `variantName`. We now need to pass all these items onward, but the function currently returns just one item per product. And what if there are no variants?
Let's adjust the loop so it returns a promise that resolves to an array of items instead of a single item. If a product has no variants, we'll return an array with a single item, setting `variantName` to `null`:
const listingURL = "https://warehouse-theme-metal.myshopify.com/collections/sales"; const $ = await download(listingURL);
const promises = $(".product-item").toArray().map(async element => { const $productItem = $(element); const item = parseProduct($productItem, listingURL);
const $p = await download(item.url); item.vendor = $p(".product-meta__vendor").text().trim();
const $options = $p(".product-form__option.no-js option"); const items = $options.toArray().map(optionElement => { const $option = $(optionElement); const variantName = $option.text().trim(); return { variantName, ...item }; }); return items.length > 0 ? items : [{ variantName: null, ...item }]; }); const itemLists = await Promise.all(promises); const data = itemLists.flat();
After modifying the loop, we also updated how we collect the items into the `data` array. Since the loop now produces an array of items per product, the result of `await Promise.all()` is an array of arrays. We use https://developer.mozilla.org/en-US/docs/Web/JavaScript/Reference/Global_Objects/Array/flat to merge them into a single, non-nested array.
If we run the program now, we'll see 34 items in total. Some items don't have variants, so they won't have a variant name. However, they should still have a price set—our scraper should already have that info from the product listing page.
[ ... { "variantName": null, "url": "https://warehouse-theme-metal.myshopify.com/products/klipsch-r-120sw-powerful-detailed-home-speaker-set-of-1", "title": "Klipsch R-120SW Powerful Detailed Home Speaker - Unit", "minPrice": 32400, "price": 32400, "vendor": "Klipsch" }, ... ]
Some products will break into several items, each with a different variant name. We don't know their exact prices from the product listing, just the min price. In the next step, we should be able to parse the actual price from the variant name for those items.
[ ... { "variantName": "Red - $178.00", "url": "https://warehouse-theme-metal.myshopify.com/products/sony-xb950-extra-bass-wireless-headphones-with-app-control", "title": "Sony XB-950B1 Extra Bass Wireless Headphones with App Control", "minPrice": 12800, "price": null, "vendor": "Sony" }, { "variantName": "Black - $178.00", "url": "https://warehouse-theme-metal.myshopify.com/products/sony-xb950-extra-bass-wireless-headphones-with-app-control", "title": "Sony XB-950B1 Extra Bass Wireless Headphones with App Control", "minPrice": 12800, "price": null, "vendor": "Sony" }, ... ]
Perhaps surprisingly, some products with variants will have the price field set. That's because the shop sells all variants of the product for the same price, so the product listing shows the price as a fixed amount, like *$74.95*, instead of *from $74.95*.
[ ... { "variantName": "Red - $74.95", "url": "https://warehouse-theme-metal.myshopify.com/products/jbl-flip-4-waterproof-portable-bluetooth-speaker", "title": "JBL Flip 4 Waterproof Portable Bluetooth Speaker", "minPrice": 7495, "price": 7495, "vendor": "JBL" }, ... ]
## Parsing price
The items now contain the variant as text, which is good for a start, but we want the price to be in the `price` property. Let's introduce a new function to handle that:
function parseVariant($option) { const [variantName, priceText] = $option .text() .trim() .split(" - "); const price = parseInt( priceText .replace("$", "") .replace(".", "") .replace(",", "") ); return { variantName, price }; }
First, we split the text into two parts, then we parse the price as a number. This part is similar to what we already do for parsing product listing prices. The function returns an object we can merge with `item`.
## Saving price
Now, if we use our new function, we should finally get a program that can scrape exact prices for all products, even if they have variants. The whole code should look like this now:
import * as cheerio from 'cheerio'; import { writeFile } from 'fs/promises'; import { AsyncParser } from '@json2csv/node';
async function download(url) {
const response = await fetch(url);
if (response.ok) {
const html = await response.text();
return cheerio.load(html);
} else {
throw new Error(HTTP ${response.status});
}
}
function parseProduct($productItem, baseURL) { const $title = $productItem.find(".product-item__title"); const title = $title.text().trim(); const url = new URL($title.attr("href"), baseURL).href;
const $price = $productItem.find(".price").contents().last(); const priceRange = { minPrice: null, price: null }; const priceText = $price .text() .trim() .replace("$", "") .replace(".", "") .replace(",", "");
if (priceText.startsWith("From ")) { priceRange.minPrice = parseInt(priceText.replace("From ", "")); } else { priceRange.minPrice = parseInt(priceText); priceRange.price = priceRange.minPrice; }
return { url, title, ...priceRange }; }
async function exportJSON(data) { return JSON.stringify(data, null, 2); }
async function exportCSV(data) { const parser = new AsyncParser(); return await parser.parse(data).promise(); }
function parseVariant($option) { const [variantName, priceText] = $option .text() .trim() .split(" - "); const price = parseInt( priceText .replace("$", "") .replace(".", "") .replace(",", "") ); return { variantName, price }; }
const listingURL = "https://warehouse-theme-metal.myshopify.com/collections/sales"; const $ = await download(listingURL);
const promises = $(".product-item").toArray().map(async element => { const $productItem = $(element); const item = parseProduct($productItem, listingURL);
const $p = await download(item.url); item.vendor = $p(".product-meta__vendor").text().trim();
const $options = $p(".product-form__option.no-js option"); const items = $options.toArray().map(optionElement => { const variant = parseVariant($(optionElement)); return { ...item, ...variant }; }); return items.length > 0 ? items : [{ variantName: null, ...item }]; }); const itemLists = await Promise.all(promises); const data = itemLists.flat();
await writeFile('products.json', await exportJSON(data)); await writeFile('products.csv', await exportCSV(data));
Let's run the scraper and see if all the items in the data contain prices:
[ ... { "url": "https://warehouse-theme-metal.myshopify.com/products/sony-xb950-extra-bass-wireless-headphones-with-app-control", "title": "Sony XB-950B1 Extra Bass Wireless Headphones with App Control", "minPrice": 12800, "price": 17800, "vendor": "Sony", "variantName": "Red" }, { "url": "https://warehouse-theme-metal.myshopify.com/products/sony-xb950-extra-bass-wireless-headphones-with-app-control", "title": "Sony XB-950B1 Extra Bass Wireless Headphones with App Control", "minPrice": 12800, "price": 17800, "vendor": "Sony", "variantName": "Black" }, ... ]
Success! We managed to build a Node.js application for watching prices!
Is this the end? Maybe! In the next lesson, we'll use a scraping framework to build the same application, but with less code, faster requests, and better visibility into what's happening while we wait for the program to finish.
***
## Exercises
These challenges are here to help you test what you’ve learned in this lesson. Try to resist the urge to peek at the solutions right away. Remember, the best learning happens when you dive in and do it yourself!
Real world
You're about to touch the real web, which is practical and exciting! But websites change, so some exercises might break. If you run into any issues, please leave a comment below or https://github.com/apify/apify-docs/issues.
### Build a scraper for watching npm packages
You can build a scraper now, can't you? Let's build another one! From the registry at https://www.npmjs.com/, scrape information about npm packages that match the following criteria:
* Have the keyword "LLM" (as in *large language model*)
* Updated within the last two years ("2 years ago" is okay; "3 years ago" is too old)
Print an array of the top 5 packages with the most dependents. Each package should be represented by an object containing the following data:
* Name
* Description
* URL to the package detail page
* Number of dependents
* Number of downloads
Your output should look something like this:
[ { name: 'langchain', url: 'https://www.npmjs.com/package/langchain', description: 'Typescript bindings for langchain', dependents: 735, downloads: 3938 }, { name: '@langchain/core', url: 'https://www.npmjs.com/package/@langchain/core', description: 'Core LangChain.js abstractions and schemas', dependents: 730, downloads: 5994 }, ... ]
Solution
After inspecting the registry, you'll notice that packages with the keyword "LLM" have a dedicated URL. Also, changing the sorting dropdown results in a page with its own URL. We'll use that as our starting point, which saves us from having to scrape the whole registry and then filter by keyword or sort by the number of dependents.
import * as cheerio from 'cheerio';
async function download(url) {
const response = await fetch(url);
if (response.ok) {
const html = await response.text();
return cheerio.load(html);
} else {
throw new Error(HTTP ${response.status});
}
}
const listingURL = "https://www.npmjs.com/search?page=0&q=keywords%3Allm&sortBy=dependent_count"; const $ = await download(listingURL);
const promises = $("section").toArray().map(async element => { const $card = $(element);
const details = $card .children() .first() .children() .last() .text() .split("•"); const updatedText = details[2].trim(); const dependents = parseInt(details[3].replace("dependents", "").trim());
if (updatedText.includes("years ago")) { const yearsAgo = parseInt(updatedText.replace("years ago", "").trim()); if (yearsAgo > 2) { return null; } }
const $link = $card.find("a").first(); const name = $link.text().trim(); const url = new URL($link.attr("href"), listingURL).href; const description = $card.find("p").text().trim();
const downloadsText = $card .children() .last() .text() .replace(",", "") .trim(); const downloads = parseInt(downloadsText);
return { name, url, description, dependents, downloads }; });
const data = await Promise.all(promises); console.log(data.filter(item => item !== null).splice(0, 5));
Since the HTML doesn't contain any descriptive classes, we must rely on its structure. We're using https://cheerio.js.org/docs/api/classes/Cheerio#children to carefully navigate the HTML element tree.
For items older than 2 years, we return `null` instead of an item. Before printing the results, we use https://developer.mozilla.org/en-US/docs/Web/JavaScript/Reference/Global_Objects/Array/filter to remove these empty values and https://developer.mozilla.org/en-US/docs/Web/JavaScript/Reference/Global_Objects/Array/splice the array down to just 5 items.
### Find the shortest CNN article which made it to the Sports homepage
Scrape the https://edition.cnn.com/sport homepage. For each linked article, calculate its length in characters:
* Locate the element that holds the main content of the article.
* Use `.text()` to extract all the content as plain text.
* Use `.length` to calculate the character count.
Skip pages without text (like those that only have a video). Sort the results and print the URL of the shortest article that made it to the homepage.
At the time of writing, the shortest article on the CNN Sports homepage is https://edition.cnn.com/2024/10/03/sport/masters-donation-hurricane-helene-relief-spt-intl/, which is just 1,642 characters long.
Solution
import * as cheerio from 'cheerio';
async function download(url) {
const response = await fetch(url);
if (response.ok) {
const html = await response.text();
return cheerio.load(html);
} else {
throw new Error(HTTP ${response.status});
}
}
const listingURL = "https://edition.cnn.com/sport"; const $ = await download(listingURL);
const promises = $(".layout__main .card").toArray().map(async element => { const $link = $(element).find("a").first(); const articleURL = new URL($link.attr("href"), listingURL).href;
const $a = await download(articleURL); const content = $a(".article__content").text().trim();
return { url: articleURL, length: content.length }; });
const data = await Promise.all(promises); const nonZeroData = data.filter(({ url, length }) => length > 0); nonZeroData.sort((a, b) => a.length - b.length); const shortestItem = nonZeroData[0];
console.log(shortestItem.url);
---
# Web scraping basics for Python devs
**Learn how to use Python to extract information from websites in this practical course, starting from the absolute basics.**
***
In this course we'll use Python to create an application for watching prices. It'll be able to scrape all product pages of an e-commerce website and record prices. Data from several runs of such program would be useful for seeing trends in price changes, detecting discounts, etc.

## What we'll do
* Inspect pages using browser DevTools.
* Download web pages using the HTTPX library.
* Extract data from web pages using the Beautiful Soup library.
* Save extracted data in various formats, e.g. CSV which MS Excel or Google Sheets can open.
* Follow links programmatically (crawling).
* Save time and effort with frameworks, such as Crawlee, and scraping platforms, such as Apify.
## Who this course is for
Anyone with basic knowledge of developing programs in Python who wants to start with web scraping can take this course. The course does not expect you to have any prior knowledge of web technologies or scraping.
## Requirements
* A macOS, Linux, or Windows machine with a web browser and Python installed.
* Familiarity with Python basics: variables, conditions, loops, functions, strings, lists, dictionaries, files, classes, and exceptions.
* Comfort with importing from the Python standard library, using virtual environments, and installing dependencies with `pip`.
* Familiarity with running commands in Terminal (macOS/Linux) or Command Prompt (Windows).
## You may want to know
Let's explore the key reasons to take this course. What is web scraping good for, and what career opportunities does it enable for you?
### Why learn scraping
The internet is full of useful data, but most of it isn't offered in a structured way that's easy to process programmatically. That's why you need scraping, a set of approaches to download websites and extract data from them.
Scraper development is also a fun and challenging way to learn web development, web technologies, and understand the internet. You'll reverse-engineer websites, understand how they work internally, discover what technologies they use, and learn how they communicate with servers. You'll also master your chosen programming language and core programming concepts. Understanding web scraping gives you a head start in learning web technologies such as HTML, CSS, JavaScript, frontend frameworks (like React or Next.js), HTTP, REST APIs, GraphQL APIs, and more.
### Why build your own scrapers
Scrapers are programs specifically designed to mine data from the internet. Point-and-click or no-code scraping solutions do exist, but they only take you so far. While simple to use, they lack the flexibility and optimization needed to handle advanced cases. Only custom-built scrapers can tackle more difficult challenges. And unlike ready-made solutions, they can be fine-tuned to perform tasks more efficiently, at a lower cost, or with greater precision.
### Why become a scraper dev
As a scraper developer, you are not limited by whether certain data is available programmatically through an official API—the entire web becomes your API! Here are some things you can do if you understand scraping:
* Improve your productivity by building personal tools, such as your own real estate or rare sneakers watchdog.
* Companies can hire you to build custom scrapers mining data important for their business.
* Become an invaluable asset to data journalism, data science, or nonprofit teams working to make the world a better place.
* You can publish your scrapers on platforms like the https://apify.com/store and earn money by renting them out to others.
### Why learn with Apify
We are https://apify.com, a web scraping and automation platform. We do our best to build this course on top of open source technologies. That means what you learn applies to any scraping project, and you'll be able to run your scrapers on any computer. We will show you how a scraping platform can simplify your life, but that lesson is optional and designed to fit within our https://apify.com/pricing.
## Course content
## https://docs.apify.com/academy/scraping-basics-python/devtools-inspecting.md
https://docs.apify.com/academy/scraping-basics-python/devtools-inspecting.md
## https://docs.apify.com/academy/scraping-basics-python/devtools-locating-elements.md
https://docs.apify.com/academy/scraping-basics-python/devtools-locating-elements.md
## https://docs.apify.com/academy/scraping-basics-python/devtools-extracting-data.md
https://docs.apify.com/academy/scraping-basics-python/devtools-extracting-data.md
## https://docs.apify.com/academy/scraping-basics-python/downloading-html.md
https://docs.apify.com/academy/scraping-basics-python/downloading-html.md
## https://docs.apify.com/academy/scraping-basics-python/parsing-html.md
https://docs.apify.com/academy/scraping-basics-python/parsing-html.md
## https://docs.apify.com/academy/scraping-basics-python/locating-elements.md
https://docs.apify.com/academy/scraping-basics-python/locating-elements.md
## https://docs.apify.com/academy/scraping-basics-python/extracting-data.md
https://docs.apify.com/academy/scraping-basics-python/extracting-data.md
## https://docs.apify.com/academy/scraping-basics-python/saving-data.md
https://docs.apify.com/academy/scraping-basics-python/saving-data.md
## https://docs.apify.com/academy/scraping-basics-python/getting-links.md
https://docs.apify.com/academy/scraping-basics-python/getting-links.md
## https://docs.apify.com/academy/scraping-basics-python/crawling.md
https://docs.apify.com/academy/scraping-basics-python/crawling.md
## https://docs.apify.com/academy/scraping-basics-python/scraping-variants.md
https://docs.apify.com/academy/scraping-basics-python/scraping-variants.md
## https://docs.apify.com/academy/scraping-basics-python/framework.md
https://docs.apify.com/academy/scraping-basics-python/framework.md
## https://docs.apify.com/academy/scraping-basics-python/platform.md
https://docs.apify.com/academy/scraping-basics-python/platform.md
---
# Crawling websites with Python
**In this lesson, we'll follow links to individual product pages. We'll use HTTPX to download them and BeautifulSoup to process them.**
***
In previous lessons we've managed to download the HTML code of a single page, parse it with BeautifulSoup, and extract relevant data from it. We'll do the same now for each of the products.
Thanks to the refactoring, we have functions ready for each of the tasks, so we won't need to repeat ourselves in our code. This is what you should see in your editor now:
import httpx from bs4 import BeautifulSoup import json import csv from urllib.parse import urljoin
def download(url): response = httpx.get(url) response.raise_for_status()
html_code = response.text
return BeautifulSoup(html_code, "html.parser")
def parse_product(product, base_url): title_element = product.select_one(".product-item__title") title = title_element.text.strip() url = urljoin(base_url, title_element["href"])
price_text = (
product
.select_one(".price")
.contents[-1]
.strip()
.replace("$", "")
.replace(".", "")
.replace(",", "")
)
if price_text.startswith("From "):
min_price = int(price_text.removeprefix("From "))
price = None
else:
min_price = int(price_text)
price = min_price
return {"title": title, "min_price": min_price, "price": price, "url": url}
def export_json(file, data): json.dump(data, file, indent=2)
def export_csv(file, data): fieldnames = list(data[0].keys()) writer = csv.DictWriter(file, fieldnames=fieldnames) writer.writeheader() for row in data: writer.writerow(row)
listing_url = "https://warehouse-theme-metal.myshopify.com/collections/sales" listing_soup = download(listing_url)
data = [] for product in listing_soup.select(".product-item"): item = parse_product(product, listing_url) data.append(item)
with open("products.json", "w") as file: export_json(file, data)
with open("products.csv", "w") as file: export_csv(file, data)
## Extracting vendor name
Each product URL points to a so-called *product detail page*, or PDP. If we open one of the product URLs in the browser, e.g. the one about https://warehouse-theme-metal.myshopify.com/products/sony-xbr-65x950g-65-class-64-5-diag-bravia-4k-hdr-ultra-hd-tv, we can see that it contains a vendor name, https://en.wikipedia.org/wiki/Stock_keeping_unit, number of reviews, product images, product variants, stock availability, description, and perhaps more.

Depending on what's valuable for our use case, we can now use the same techniques as in previous lessons to extract any of the above. As a demonstration, let's scrape the vendor name. In browser DevTools, we can see that the HTML around the vendor name has the following structure:
Sony XBR-950G BRAVIA 4K HDR Ultra HD TV
...
Sony
SKU:
SON-985594-XBR-65
...
3 reviews
...
It looks like using a CSS selector to locate the element with the `product-meta__vendor` class, and then extracting its text, should be enough to get the vendor name as a string:
vendor = soup.select_one(".product-meta__vendor").text.strip()
But where do we put this line in our program?
## Crawling product detail pages
In the `data` loop we're already going through all the products. Let's expand it to include downloading the product detail page, parsing it, extracting the vendor's name, and adding it as a new key in the item's dictionary:
listing_url = "https://warehouse-theme-metal.myshopify.com/collections/sales" listing_soup = download(listing_url)
data = [] for product in listing_soup.select(".product-item"): item = parse_product(product, listing_url) product_soup = download(item["url"]) item["vendor"] = product_soup.select_one(".product-meta__vendor").text.strip() data.append(item)
If we run the program now, it'll take longer to finish since it's making 24 more HTTP requests. But in the end, it should produce exports with a new field containing the vendor's name:
[ { "title": "JBL Flip 4 Waterproof Portable Bluetooth Speaker", "min_price": "7495", "price": "7495", "url": "https://warehouse-theme-metal.myshopify.com/products/jbl-flip-4-waterproof-portable-bluetooth-speaker", "vendor": "JBL" }, { "title": "Sony XBR-950G BRAVIA 4K HDR Ultra HD TV", "min_price": "139800", "price": null, "url": "https://warehouse-theme-metal.myshopify.com/products/sony-xbr-65x950g-65-class-64-5-diag-bravia-4k-hdr-ultra-hd-tv", "vendor": "Sony" }, ... ]
## Extracting price
Scraping the vendor's name is nice, but the main reason we started checking the detail pages in the first place was to figure out how to get a price for each product. From the product listing, we could only scrape the min price, and remember—we're building a Python app to track prices!
Looking at the https://warehouse-theme-metal.myshopify.com/products/sony-xbr-65x950g-65-class-64-5-diag-bravia-4k-hdr-ultra-hd-tv, it's clear that the listing only shows min prices, because some products have variants, each with a different price. And different stock availability. And different SKUs…

In the next lesson, we'll scrape the product detail pages so that each product variant is represented as a separate item in our dataset.
***
## Exercises
These challenges are here to help you test what you’ve learned in this lesson. Try to resist the urge to peek at the solutions right away. Remember, the best learning happens when you dive in and do it yourself!
Real world
You're about to touch the real web, which is practical and exciting! But websites change, so some exercises might break. If you run into any issues, please leave a comment below or https://github.com/apify/apify-docs/issues.
### Scrape calling codes of African countries
Scrape links to Wikipedia pages for all African states and territories. Follow each link and extract the *calling code* from the info table. Print the URL and the calling code for each country. Start with this URL:
https://en.wikipedia.org/wiki/List_of_sovereign_states_and_dependent_territories_in_Africa
Your program should print the following:
https://en.wikipedia.org/wiki/Algeria +213 https://en.wikipedia.org/wiki/Angola +244 https://en.wikipedia.org/wiki/Benin +229 https://en.wikipedia.org/wiki/Botswana +267 https://en.wikipedia.org/wiki/Burkina_Faso +226 https://en.wikipedia.org/wiki/Burundi None https://en.wikipedia.org/wiki/Cameroon +237 ...
Need a nudge?
Locating cells in tables is sometimes easier if you know how to https://beautiful-soup-4.readthedocs.io/en/latest/index.html#going-up in the HTML element soup.
Solution
import httpx from bs4 import BeautifulSoup from urllib.parse import urljoin
def download(url): response = httpx.get(url) response.raise_for_status() return BeautifulSoup(response.text, "html.parser")
def parse_calling_code(soup): for label in soup.select("th.infobox-label"): if label.text.strip() == "Calling code": data = label.parent.select_one("td.infobox-data") return data.text.strip() return None
listing_url = "https://en.wikipedia.org/wiki/List_of_sovereign_states_and_dependent_territories_in_Africa" listing_soup = download(listing_url) for name_cell in listing_soup.select(".wikitable tr td:nth-child(3)"): link = name_cell.select_one("a") country_url = urljoin(listing_url, link["href"]) country_soup = download(country_url) calling_code = parse_calling_code(country_soup) print(country_url, calling_code)
### Scrape authors of F1 news articles
Scrape links to the Guardian's latest F1 news articles. For each article, follow the link and extract both the author's name and the article's title. Print the author's name and the title for all the articles. Start with this URL:
https://www.theguardian.com/sport/formulaone
Your program should print something like this:
Daniel Harris: Sports quiz of the week: Johan Neeskens, Bond and airborne antics Colin Horgan: The NHL is getting its own Drive to Survive. But could it backfire? Reuters: US GP ticket sales ‘took off’ after Max Verstappen stopped winning in F1 Giles Richards: Liam Lawson gets F1 chance to replace Pérez alongside Verstappen at Red Bull PA Media: Lewis Hamilton reveals lifelong battle with depression after school bullying ...
Need a nudge?
* You can use https://developer.mozilla.org/en-US/docs/Web/CSS/Attribute_selectors to select HTML elements based on their attribute values.
* Sometimes a person authors the article, but other times it's contributed by a news agency.
Solution
import httpx from bs4 import BeautifulSoup from urllib.parse import urljoin
def download(url): response = httpx.get(url) response.raise_for_status() return BeautifulSoup(response.text, "html.parser")
def parse_author(article_soup): link = article_soup.select_one('a[rel="author"]') if link: return link.text.strip() address = article_soup.select_one('aside address') if address: return address.text.strip() return None
listing_url = "https://www.theguardian.com/sport/formulaone" listing_soup = download(listing_url) for item in listing_soup.select("#maincontent ul li"): link = item.select_one("a") article_url = urljoin(listing_url, link["href"]) article_soup = download(article_url) title = article_soup.select_one("h1").text.strip() author = parse_author(article_soup) print(f"{author}: {title}")
---
# Extracting data from a web page with browser DevTools
**In this lesson we'll use the browser tools for developers to manually extract product data from an e-commerce website.**
***
In our pursuit to scrape products from the https://warehouse-theme-metal.myshopify.com/collections/sales, we've been able to locate parent elements containing relevant data. Now how do we extract the data?
## Finding product details
Previously, we've figured out how to save the subwoofer product card to a variable in the **Console**:
products = document.querySelectorAll('.product-item'); subwoofer = products[2];
The product details are within the element as text, so maybe if we extract the text, we could work out the individual values?
subwoofer.textContent;
That indeed outputs all the text, but in a form which would be hard to break down to relevant pieces.

We'll need to first locate relevant child elements and extract the data from each of them individually.
## Extracting title
We'll use the **Elements** tab of DevTools to inspect all child elements of the product card for the Sony subwoofer. We can see that the title of the product is inside an `a` element with several classes. From those the `product-item__title` seems like a great choice to locate the element.

JavaScript represents HTML elements as https://developer.mozilla.org/en-US/docs/Web/API/Element objects. Among properties we've already played with, such as `textContent` or `outerHTML`, it also has the https://developer.mozilla.org/en-US/docs/Web/API/Element/querySelector method. Here the method looks for matches only within children of the element:
title = subwoofer.querySelector('.product-item__title'); title.textContent;
Notice we're calling `querySelector()` on the `subwoofer` variable, not `document`. And just like this, we've scraped our first piece of data! We've extracted the product title:

## Extracting price
To figure out how to get the price, we'll use the **Elements** tab of DevTools again. We notice there are two prices, a regular price and a sale price. For the purposes of watching prices we'll need the sale price. Both are `span` elements with the `price` class.

We could either rely on the fact that the sale price is likely to be always the one which is highlighted, or that it's always the first price. For now we'll rely on the later and we'll let `querySelector()` to simply return the first result:
price = subwoofer.querySelector('.price'); price.textContent;
It works, but the price isn't alone in the result. Before we'd use such data, we'd need to do some **data cleaning**:

But for now that's okay. We're just testing the waters now, so that we have an idea about what our scraper will need to do. Once we'll get to extracting prices in Python, we'll figure out how to get the values as numbers.
In the next lesson, we'll start with our Python project. First we'll be figuring out how to download the Sales page without browser and make it accessible in a Python program.
***
## Exercises
These challenges are here to help you test what you’ve learned in this lesson. Try to resist the urge to peek at the solutions right away. Remember, the best learning happens when you dive in and do it yourself!
Real world
You're about to touch the real web, which is practical and exciting! But websites change, so some exercises might break. If you run into any issues, please leave a comment below or https://github.com/apify/apify-docs/issues.
### Extract the price of IKEA's most expensive artificial plant
At IKEA's https://www.ikea.com/se/en/cat/artificial-plants-flowers-20492/, use CSS selectors and HTML elements manipulation in the **Console** to extract the price of the most expensive artificial plant (sold in Sweden, as you'll be browsing their Swedish offer). Before opening DevTools, use your judgment to adjust the page to make the task as straightforward as possible. Finally, use JavaScript's https://developer.mozilla.org/en-US/docs/Web/JavaScript/Reference/Global_Objects/parseInt function to convert the price text into a number.
Solution
1. Open the https://www.ikea.com/se/en/cat/artificial-plants-flowers-20492/.
2. Sort the products by price, from high to low, so the most expensive plant appears first in the listing.
3. Activate the element selection tool in your DevTools.
4. Click on the price of the first and most expensive plant.
5. Notice that the price is structured into two elements, with the integer separated from the currency, under a class named `plp-price__integer`. This structure is convenient for extracting the value.
6. In the **Console**, execute `document.querySelector('.plp-price__integer')`. This returns the element representing the first price in the listing. Since `document.querySelector()` returns the first matching element, it directly selects the most expensive plant's price.
7. Save the element in a variable by executing `price = document.querySelector('.plp-price__integer')`.
8. Convert the price text into a number by executing `parseInt(price.textContent)`.
9. At the time of writing, this returns `699`, meaning https://www.google.com/search?q=699%20sek.
### Extract the name of the top wiki on Fandom Movies
On Fandom's https://www.fandom.com/topics/movies, use CSS selectors and HTML element manipulation in the **Console** to extract the name of the top wiki. Use JavaScript's https://developer.mozilla.org/en-US/docs/Web/JavaScript/Reference/Global_Objects/String/trim method to remove white space around the name.

Solution
1. Open the https://www.fandom.com/topics/movies.
2. Activate the element selection tool in your DevTools.
3. Click on the list item for the top Fandom wiki in the category.
4. Notice that it has a class `topic_explore-wikis__link`.
5. In the **Console**, execute `document.querySelector('.topic_explore-wikis__link')`. This returns the element representing the top list item. They use the selector only for the **Top Wikis** list, and because `document.querySelector()` returns the first matching element, you're almost done.
6. Save the element in a variable by executing `item = document.querySelector('.topic_explore-wikis__link')`.
7. Get the element's text without extra white space by executing `item.textContent.trim()`. At the time of writing, this returns `"Pixar Wiki"`.
### Extract details about the first post on Guardian's F1 news
On the Guardian's https://www.theguardian.com/sport/formulaone, use CSS selectors and HTML manipulation in the **Console** to extract details about the first post. Specifically, extract its title, lead paragraph, and URL of the associated photo.

Solution
1. Open the https://www.theguardian.com/sport/formulaone.
2. Activate the element selection tool in your DevTools.
3. Click on the first post.
4. Notice that the markup does not provide clear, reusable class names for this task. The structure uses generic tag names and randomized classes, requiring you to rely on the element hierarchy and order instead.
5. In the **Console**, execute `post = document.querySelector('#maincontent ul li')`. This returns the element representing the first post.
6. Extract the post's title by executing `post.querySelector('h3').textContent`.
7. Extract the lead paragraph by executing `post.querySelector('span div').textContent`.
8. Extract the photo URL by executing `post.querySelector('img').src`.
---
# Inspecting web pages with browser DevTools
**In this lesson we'll use the browser tools for developers to inspect and manipulate the structure of a website.**
***
A browser is the most complete tool for navigating websites. Scrapers are like automated browsers—and sometimes, they actually are automated browsers. The key difference? There's no user to decide where to go or eyes to see what's displayed. Everything has to be pre-programmed.
All modern browsers provide developer tools, or *DevTools*, for website developers to debug their work. We'll use them to understand how websites are structured and identify the behavior our scraper needs to mimic. Here's the typical workflow for creating a scraper:
1. Inspect the target website in DevTools to understand its structure and determine how to extract the required data.
2. Translate those findings into code.
3. If the scraper fails due to overlooked edge cases or, over time, due to website changes, go back to step 1.
Now let's spend some time figuring out what the detective work in step 1 is about.
## Opening DevTools
Google Chrome is currently the most popular browser, and many others use the same core. That's why we'll focus on https://developer.chrome.com/docs/devtools here. However, the steps are similar in other browsers, as Safari has its https://developer.apple.com/documentation/safari-developer-tools/web-inspector and Firefox also has https://firefox-source-docs.mozilla.org/devtools-user/.
Now let's peek behind the scenes of a real-world website—say, Wikipedia. We'll open Google Chrome and visit https://www.wikipedia.org/. Then, let's press **F12**, or right-click anywhere on the page and select **Inspect**.

Websites are built with three main technologies: HTML, CSS, and JavaScript. In the **Elements** tab, DevTools shows the HTML and CSS of the current page:

Screen adaptations
DevTools may appear differently depending on your screen size. For instance, on smaller screens, the CSS panel might move below the HTML elements panel instead of appearing in the right pane.
Think of https://developer.mozilla.org/en-US/docs/Learn/HTML elements as the frame that defines a page's structure. A basic HTML element includes an opening tag, a closing tag, and attributes. Here's an `article` element with an `id` attribute. It wraps `h1` and `p` elements, both containing text. Some text is emphasized using `em`.
First Level Heading Paragraph with emphasized text.
HTML, a markup language, describes how everything on a page is organized, how elements relate to each other, and what they mean. It doesn't define how elements should look—that's where https://developer.mozilla.org/en-US/docs/Learn/CSS comes in. CSS is like the velvet covering the frame. Using styles, we can select elements and assign rules that tell the browser how they should appear. For instance, we can style all elements with `heading` in their `class` attribute to make the text blue and uppercase.
.heading { color: blue; text-transform: uppercase; }
While HTML and CSS describe what the browser should display, https://developer.mozilla.org/en-US/docs/Learn/JavaScript is a general-purpose programming language that adds interaction to the page.
In DevTools, the **Console** tab allows ad-hoc experimenting with JavaScript. If you don't see it, press `ESC` to toggle the Console. Running commands in the Console lets us manipulate the loaded page—we’ll try this shortly.

## Selecting an element
In the top-left corner of DevTools, let's find the icon with an arrow pointing to a square.

We'll click the icon and hover your cursor over Wikipedia's subtitle, **The Free Encyclopedia**. As we move our cursor, DevTools will display information about the HTML element under it. We'll click on the subtitle. In the **Elements** tab, DevTools will highlight the HTML element that represents the subtitle.

The highlighted section should look something like this:
The Free Encyclopedia
If we were experienced creators of scrapers, our eyes would immediately spot what's needed to make a program that fetches Wikipedia's subtitle. The program would need to download the page's source code, find a `strong` element with `localized-slogan` in its `class` attribute, and extract its text.
HTML and whitespace
In HTML, whitespace isn't significant, i.e., it only makes the code readable. The following code snippets are equivalent:
The Free Encyclopedia
The Free Encyclopedia
## Interacting with an element
We won't be creating Python scrapers just yet. Let's first get familiar with what we can do in the JavaScript console and how we can further interact with HTML elements on the page.
In the **Elements** tab, with the subtitle element highlighted, let's right-click the element to open the context menu. There, we'll choose **Store as global variable**. The **Console** should appear, with a `temp1` variable ready.

The Console allows us to run JavaScript in the context of the loaded page, similar to Python's https://realpython.com/interacting-with-python/. We can use it to play around with elements.
For a start, let's access some of the subtitle's properties. One such property is `textContent`, which contains the text inside the HTML element. The last line in the Console is where your cursor is. We'll type the following and hit **Enter**:
temp1.textContent;
The result should be `'The Free Encyclopedia'`. Now let's try this:
temp1.outerHTML;
This should return the element's HTML tag as a string. Finally, we'll run the next line to change the text of the element:
temp1.textContent = 'Hello World!';
When we change elements in the Console, those changes reflect immediately on the page!

But don't worry—we haven't hacked Wikipedia. The change only happens in our browser. If we reload the page, the change will disappear. This, however, is an easy way to craft a screenshot with fake content. That's why screenshots shouldn't be trusted as evidence.
We're not here for playing around with elements, though—we want to create a scraper for an e-commerce website to watch prices. In the next lesson, we'll examine the website and use CSS selectors to locate HTML elements containing the data we need.
***
## Exercises
These challenges are here to help you test what you’ve learned in this lesson. Try to resist the urge to peek at the solutions right away. Remember, the best learning happens when you dive in and do it yourself!
Real world
You're about to touch the real web, which is practical and exciting! But websites change, so some exercises might break. If you run into any issues, please leave a comment below or https://github.com/apify/apify-docs/issues.
### Find FIFA logo
Open the https://www.fifa.com/ and use the DevTools to figure out the URL of FIFA's logo image file.
Need a nudge?
You're looking for an https://developer.mozilla.org/en-US/docs/Web/HTML/Element/img element with a `src` attribute.
Solution
1. Go to https://www.fifa.com/.
2. Activate the element selection tool.
3. Click on the logo.
4. Send the highlighted element to the **Console** using the **Store as global variable** option from the context menu.
5. In the console, type `temp1.src` and hit **Enter**.

### Make your own news
Open a news website, such as https://cnn.com. Use the Console to change the headings of some articles.
Solution
1. Go to https://cnn.com.
2. Activate the element selection tool.
3. Click on a heading.
4. Send the highlighted element to the **Console** using the **Store as global variable** option from the context menu.
5. In the console, type `temp1.textContent = 'Something something'` and hit **Enter**.

---
# Locating HTML elements on a web page with browser DevTools
**In this lesson we'll use the browser tools for developers to manually find products on an e-commerce website.**
***
Inspecting Wikipedia and tweaking its subtitle is fun, but let's shift gears and focus on building an app to track prices on an e-commerce site. As part of the groundwork, let's check out the site we'll be working with.
## Meeting the Warehouse store
Instead of artificial scraping playgrounds or sandboxes, we'll scrape a real e-commerce site. Shopify, a major e-commerce platform, has a demo store at https://warehouse-theme-metal.myshopify.com/. It strikes a good balance between being realistic and stable enough for a tutorial. Our scraper will track prices for all products listed on the https://warehouse-theme-metal.myshopify.com/collections/sales.
Balancing authenticity and stability
Live sites like Amazon are complex, loaded with promotions, frequently changing, and equipped with anti-scraping measures. While those challenges are manageable, they're advanced topics. For this beginner course, we're sticking to a lightweight, stable environment.
That said, we designed all the additional exercises to work with live websites. This means occasional updates might be needed, but we think it's worth it for a more authentic learning experience.
## Finding a product card
As mentioned in the previous lesson, before building a scraper, we need to understand structure of the target page and identify the specific elements our program should extract. Let's figure out how to select details for each product on the https://warehouse-theme-metal.myshopify.com/collections/sales.

The page displays a grid of product cards, each showing a product's title and picture. Let's open DevTools and locate the title of the **Sony SACS9 Active Subwoofer**. We'll highlight it in the **Elements** tab by clicking on it.

Next, let's find all the elements containing details about this subwoofer—its price, number of reviews, image, and more.
In the **Elements** tab, we'll move our cursor up from the `a` element containing the subwoofer's title. On the way, we'll hover over each element until we highlight the entire product card. Alternatively, we can use the arrow-up key. The `div` element we land on is the **parent element**, and all nested elements are its **child elements**.

At this stage, we could use the **Store as global variable** option to send the element to the **Console**. While helpful for manual inspection, this isn't something a program can do.
Scrapers typically rely on https://developer.mozilla.org/en-US/docs/Web/CSS/CSS_selectors to locate elements on a page, and these selectors often target elements based on their `class` attributes. The product card we highlighted has markup like this:
...
The `class` attribute can hold multiple values separated by whitespace. This particular element has four classes. Let's move to the **Console** and experiment with CSS selectors to locate this element.
## Programmatically locating a product card
Let's jump into the **Console** and write some JavaScript. Don't worry—we don't need to know the language, and yes, this is a helpful step on our journey to creating a scraper in Python.
In browsers, JavaScript represents the current page as the https://developer.mozilla.org/en-US/docs/Web/API/Document object, accessible via `document`. This object offers many useful methods, including https://developer.mozilla.org/en-US/docs/Web/API/Document/querySelector. This method takes a CSS selector as a string and returns the first HTML element that matches. We'll try typing this into the **Console**:
document.querySelector('.product-item');
It will return the HTML element for the first product card in the listing:

CSS selectors can get quite complex, but the basics are enough to scrape most of the Warehouse store. Let's cover two simple types and how they can combine.
The https://developer.mozilla.org/en-US/docs/Web/CSS/Type_selectors matches elements by tag name. For example, `h1` would match the highlighted element:
Title Paragraph.
The https://developer.mozilla.org/en-US/docs/Web/CSS/Class_selectors matches elements based on their class attribute. For instance, `.heading` (note the dot) would match the following:
Title Subtitle Paragraph
Heading
You can combine selectors to narrow results. For example, `p.lead` matches `p` elements with the `lead` class, but not `p` elements without the class or elements with the class but a different tag name:
Lead paragraph. Paragraph Paragraph
How did we know `.product-item` selects a product card? By inspecting the markup of the product card element. After checking its classes, we chose the one that best fit our purpose. Testing in the **Console** confirmed it—selecting by the most descriptive class worked.
## Choosing good selectors
Multiple approaches often exist for creating a CSS selector that targets the element we want. We should pick selectors that are simple, readable, unique, and semantically tied to the data. These are **resilient selectors**. They're the most reliable and likely to survive website updates. We better avoid randomly generated attributes like `class="F4jsL8"`, as they tend to change without warning.
The product card has four classes: `product-item`, `product-item--vertical`, `1/3--tablet-and-up`, and `1/4--desk`. Only the first one checks all the boxes. A product card *is* a product item, after all. The others seem more about styling—defining how the element looks on the screen—and are probably tied to CSS rules.
This class is also unique enough in the page's context. If it were something generic like `item`, there would be a higher risk that developers of the website might use it for unrelated elements. In the **Elements** tab, we can see a parent element `product-list` that contains all the product cards marked as `product-item`. This structure aligns with the data we're after.

## Locating all product cards
In the **Console**, hovering our cursor over objects representing HTML elements highlights the corresponding elements on the page. This way we can verify that when we query `.product-item`, the result represents the JBL Flip speaker—the first product card in the list.

But what if we want to scrape details about the Sony subwoofer we inspected earlier? For that, we need a method that selects more than just the first match: https://developer.mozilla.org/en-US/docs/Web/API/Document/querySelectorAll. As the name suggests, it takes a CSS selector string and returns all matching HTML elements. Let's type this into the **Console**:
document.querySelectorAll('.product-item');
The returned value is a https://developer.mozilla.org/en-US/docs/Web/API/NodeList, a collection of nodes. Browsers understand an HTML document as a tree of nodes. Most nodes are HTML elements, but there are also text nodes for plain text, and others.
We'll expand the result by clicking the small arrow, then hover our cursor over the third element in the list. Indexing starts at 0, so the third element is at index 2. There it is—the product card for the subwoofer!

To save the subwoofer in a variable for further inspection, we can use index access with brackets, just like with Python lists (or JavaScript arrays):
products = document.querySelectorAll('.product-item'); subwoofer = products[2];
Even though we're just playing with JavaScript in the browser's **Console**, we're inching closer to figuring out what our Python program will need to do. In the next lesson, we'll dive into accessing child elements and extracting product details.
***
## Exercises
These challenges are here to help you test what you’ve learned in this lesson. Try to resist the urge to peek at the solutions right away. Remember, the best learning happens when you dive in and do it yourself!
Real world
You're about to touch the real web, which is practical and exciting! But websites change, so some exercises might break. If you run into any issues, please leave a comment below or https://github.com/apify/apify-docs/issues.
### Locate headings on Wikipedia's Main Page
On English Wikipedia's https://en.wikipedia.org/wiki/Main_Page, use CSS selectors in the **Console** to list the HTML elements representing headings of the colored boxes (including the grey ones).

Solution
1. Open the https://en.wikipedia.org/wiki/Main_Page.
2. Activate the element selection tool in your DevTools.
3. Click on several headings to examine the markup.
4. Notice that all headings are `h2` elements with the `mp-h2` class.
5. In the **Console**, execute `document.querySelectorAll('h2')`.
6. At the time of writing, this selector returns 8 headings. Each corresponds to a box, and there are no other `h2` elements on the page. Thus, the selector is sufficient as is.
### Locate products on Shein
Go to Shein's https://shein.com/RecommendSelection/Jewelry-Accessories-sc-017291431.html category. In the **Console**, use CSS selectors to list all HTML elements representing the products.

Solution
1. Visit the https://shein.com/RecommendSelection/Jewelry-Accessories-sc-017291431.html page. Close any pop-ups or promotions.
2. Activate the element selection tool in your DevTools.
3. Click on the first product to inspect its markup. Repeat with a few others.
4. Observe that all products are `section` elements with multiple classes, including `product-card`.
5. Since `section` is a generic wrapper, focus on the `product-card` class.
6. In the **Console**, execute `document.querySelectorAll('.product-card')`.
7. At the time of writing, this selector returns 120 results, all representing products. No further narrowing is necessary.
### Locate articles on Guardian
Go to Guardian's https://www.theguardian.com/sport/formulaone. Use the **Console** to find all HTML elements representing the articles.
Need a nudge?
Learn about the https://developer.mozilla.org/en-US/docs/Web/CSS/Descendant_combinator.

Solution
1. Open the https://www.theguardian.com/sport/formulaone.
2. Activate the element selection tool in your DevTools.
3. Click on an article to inspect its structure. Check several articles, including the ones with smaller cards.
4. Note that all articles are `li` elements, but their classes (e.g., `dcr-1qmyfxi`) are dynamically generated and unreliable.
5. Using `document.querySelectorAll('li')` returns too many results, including unrelated items like navigation links.
6. Inspect the page structure. The `main` element contains the primary content, including articles. Use the descendant combinator to target `li` elements within `main`.
7. In the **Console**, execute `document.querySelectorAll('main li')`.
8. At the time of writing, this selector returns 21 results. All appear to represent articles, so the solution works!
---
# Downloading HTML with Python
**In this lesson we'll start building a Python application for watching prices. As a first step, we'll use the HTTPX library to download HTML code of a product listing page.**
***
Using browser tools for developers is crucial for understanding the structure of a particular page, but it's a manual task. Let's start building our first automation, a Python program which downloads HTML code of the product listing.
## Starting a Python project
Before we start coding, we need to set up a Python project. Let's create new directory with a virtual environment. Inside the directory and with the environment activated, we'll install the HTTPX library:
$ pip install httpx ... Successfully installed ... httpx-0.0.0
Installing packages
Being comfortable around Python project setup and installing packages is a prerequisite of this course, but if you wouldn't say no to a recap, we recommend the https://packaging.python.org/en/latest/tutorials/installing-packages/ tutorial from the official Python Packaging User Guide.
Now let's test that all works. Inside the project directory we'll create a new file called `main.py` with the following code:
import httpx
print("OK")
Running it as a Python program will verify that our setup is okay and we've installed HTTPX:
$ python main.py OK
Troubleshooting
If you see errors or for any other reason cannot run the code above, it means that your environment isn't set up correctly. We're sorry, but figuring out the issue is out of scope of this course.
## Downloading product listing
Now onto coding! Let's change our code so it downloads HTML of the product listing instead of printing `OK`. The https://www.python-httpx.org/ provides us with examples how to use it. Inspired by those, our code will look like this:
import httpx
url = "https://warehouse-theme-metal.myshopify.com/collections/sales" response = httpx.get(url) print(response.text)
If we run the program now, it should print the downloaded HTML:
$ python main.py
Sales
...
Running `httpx.get(url)`, we made a HTTP request and received a response. It's not particularly useful yet, but it's a good start of our scraper.
Client and server, request and response
HTTP is a network protocol powering the internet. Understanding it well is an important foundation for successful scraping, but for this course, it's enough to know just the basic flow and terminology:
* HTTP is an exchange between two participants.
* The *client* sends a *request* to the *server*, which replies with a *response*.
* In our case, `main.py` is the client, and the technology running at `warehouse-theme-metal.myshopify.com` replies to our request as the server.
## Handling errors
Websites can return various errors, such as when the server is temporarily down, applying anti-scraping protections, or simply being buggy. In HTTP, each response has a three-digit *status code* that indicates whether it is an error or a success.
All status codes
If you've never worked with HTTP response status codes before, briefly scan their https://developer.mozilla.org/en-US/docs/Web/HTTP/Status to get at least a basic idea of what you might encounter. For further education on the topic, we recommend https://http.cat/ as a highly professional resource.
A robust scraper skips or retries requests on errors. Given the complexity of this task, it's best to use libraries or frameworks. For now, we'll at least make sure that our program visibly crashes and prints what happened in case there's an error.
First, let's ask for trouble. We'll change the URL in our code to a page that doesn't exist, so that we get a response with https://developer.mozilla.org/en-US/docs/Web/HTTP/Status/404. This could happen, for example, when the product we are scraping is no longer available:
https://warehouse-theme-metal.myshopify.com/does/not/exist
We could check the value of `response.status_code` against a list of allowed numbers, but HTTPX already provides `response.raise_for_status()`, a method that analyzes the number and raises the `httpx.HTTPError` exception if our request wasn't successful:
import httpx
url = "https://warehouse-theme-metal.myshopify.com/does/not/exist" response = httpx.get(url) response.raise_for_status() print(response.text)
If you run the code above, the program should crash:
$ python main.py Traceback (most recent call last): File "/Users/.../main.py", line 5, in response.raise_for_status() File "/Users/.../.venv/lib/python3/site-packages/httpx/_models.py", line 761, in raise_for_status raise HTTPStatusError(message, request=request, response=self) httpx.HTTPStatusError: Client error '404 Not Found' for url 'https://warehouse-theme-metal.myshopify.com/does/not/exist' For more information check: https://developer.mozilla.org/en-US/docs/Web/HTTP/Status/404
Letting our program visibly crash on error is enough for our purposes. Now, let's return to our primary goal. In the next lesson, we'll be looking for a way to extract information about products from the downloaded HTML.
***
## Exercises
These challenges are here to help you test what you’ve learned in this lesson. Try to resist the urge to peek at the solutions right away. Remember, the best learning happens when you dive in and do it yourself!
Real world
You're about to touch the real web, which is practical and exciting! But websites change, so some exercises might break. If you run into any issues, please leave a comment below or https://github.com/apify/apify-docs/issues.
### Scrape AliExpress
Download HTML of a product listing page, but this time from a real world e-commerce website. For example this page with AliExpress search results:
https://www.aliexpress.com/w/wholesale-darth-vader.html
Solution
import httpx
url = "https://www.aliexpress.com/w/wholesale-darth-vader.html" response = httpx.get(url) response.raise_for_status() print(response.text)
### Save downloaded HTML as a file
Download HTML, then save it on your disk as a `products.html` file. You can use the URL we've been already playing with:
https://warehouse-theme-metal.myshopify.com/collections/sales
Solution
Right in your Terminal or Command Prompt, you can create files by *redirecting output* of command line programs:
python main.py > products.html
If you want to use Python instead, it offers several ways how to create files. The solution below uses https://docs.python.org/3/library/pathlib.html:
import httpx from pathlib import Path
url = "https://warehouse-theme-metal.myshopify.com/collections/sales" response = httpx.get(url) response.raise_for_status() Path("products.html").write_text(response.text)
### Download an image as a file
Download a product image, then save it on your disk as a file. While HTML is *textual* content, images are *binary*. You may want to scan through the https://www.python-httpx.org/quickstart/ for guidance. You can use this URL pointing to an image of a TV:
Solution
Python offers several ways how to create files. The solution below uses https://docs.python.org/3/library/pathlib.html:
from pathlib import Path import httpx
url = "https://warehouse-theme-metal.myshopify.com/cdn/shop/products/sonyxbr55front_f72cc8ff-fcd6-4141-b9cc-e1320f867785.jpg" response = httpx.get(url) response.raise_for_status() Path("tv.jpg").write_bytes(response.content)
---
# Extracting data from HTML with Python
**In this lesson we'll finish extracting product data from the downloaded HTML. With help of basic string manipulation we'll focus on cleaning and correctly representing the product price.**
***
Locating the right HTML elements is the first step of a successful data extraction, so it's no surprise that we're already close to having the data in the correct form. The last bit that still requires our attention is the price:
$ python main.py JBL Flip 4 Waterproof Portable Bluetooth Speaker | $74.95 Sony XBR-950G BRAVIA 4K HDR Ultra HD TV | From $1,398.00 ...
Let's summarize what stands in our way if we want to have it in our Python program as a number:
* A dollar sign precedes the number,
* the number contains decimal commas for better human readability, and
* some prices start with `From`, which reveals there is a certain complexity in how the shop deals with prices.
## Representing price
The last bullet point is the most important to figure out before we start coding. We thought we'll be scraping numbers, but in the middle of our effort, we discovered that the price is actually a range.
It's because some products have variants with different prices. Later in the course we'll get to crawling, i.e. following links and scraping data from more than just one page. That will allow us to get exact prices for all the products, but for now let's extract just what's in the listing.
Ideally we'd go and discuss the problem with those who are about to use the resulting data. For their purposes, is the fact that some prices are just minimum prices important? What would be the most useful representation of the range for them? Maybe they'd tell us that it's okay if we just remove the `From` prefix?
price_text = product.select_one(".price").contents[-1] price = price_text.removeprefix("From ")
In other cases, they'd tell us the data must include the range. And in cases when we just don't know, the safest option is to include all the information we have and leave the decision on what's important to later stages. One approach could be having the exact and minimum prices as separate values. If we don't know the exact price, we leave it empty:
price_text = product.select_one(".price").contents[-1] if price_text.startswith("From "): min_price = price_text.removeprefix("From ") price = None else: min_price = price_text price = min_price
Built-in string methods
If you're not proficient in Python's string methods, https://docs.python.org/3/library/stdtypes.html#str.startswith checks the beginning of a given string, and https://docs.python.org/3/library/stdtypes.html#str.removeprefix removes something from the beginning of a given string.
The whole program would look like this:
import httpx from bs4 import BeautifulSoup
url = "https://warehouse-theme-metal.myshopify.com/collections/sales" response = httpx.get(url) response.raise_for_status()
html_code = response.text soup = BeautifulSoup(html_code, "html.parser")
for product in soup.select(".product-item"): title = product.select_one(".product-item__title").text
price_text = product.select_one(".price").contents[-1]
if price_text.startswith("From "):
min_price = price_text.removeprefix("From ")
price = None
else:
min_price = price_text
price = min_price
print(title, min_price, price, sep=" | ")
## Removing white space
Often, the strings we extract from a web page start or end with some amount of whitespace, typically space characters or newline characters, which come from the https://en.wikipedia.org/wiki/Indentation_(typesetting)#Indentation_in_programming of the HTML tags.
We call the operation of removing whitespace *stripping* or *trimming*, and it's so useful in many applications that programming languages and libraries include ready-made tools for it. Let's add Python's built-in https://docs.python.org/3/library/stdtypes.html#str.strip:
title = product.select_one(".product-item__title").text.strip()
price_text = product.select_one(".price").contents[-1].strip()
Handling strings in Beautiful Soup
Beautiful Soup offers several attributes when it comes to working with strings:
* `.string`, which often is like `.text`,
* `.strings`, which https://beautiful-soup-4.readthedocs.io/en/latest/#strings-and-stripped-strings,
* `.stripped_strings`, which does the same but with whitespace removed.
These might be useful in some complex scenarios, but in our case, they won't make scraping the title or price any shorter or more elegant.
## Removing dollar sign and commas
We got rid of the `From` and possible whitespace, but we still can't save the price as a number in our Python program:
price = "$1,998.00" float(price) Traceback (most recent call last): File "", line 1, in ValueError: could not convert string to float: '$1,998.00'
Interactive Python
The demonstration above is inside the Python's https://realpython.com/interacting-with-python/. It's a useful playground where you can try how code behaves before you use it in your program.
We need to remove the dollar sign and the decimal commas. For this type of cleaning, https://docs.python.org/3/library/re.html are often the best tool for the job, but in this case https://docs.python.org/3/library/stdtypes.html#str.replace is also sufficient:
price_text = ( product .select_one(".price") .contents[-1] .strip() .replace("$", "") .replace(",", "") )
## Representing money in programs
Now we should be able to add `float()`, so that we have the prices not as a text, but as numbers:
if price_text.startswith("From "): min_price = float(price_text.removeprefix("From ")) price = None else: min_price = float(price_text) price = min_price
Great! Only if we didn't overlook an important pitfall called https://en.wikipedia.org/wiki/Floating-point_error_mitigation. In short, computers save floating point numbers in a way which isn't always reliable:
0.1 + 0.2 0.30000000000000004
These errors are small and usually don't matter, but sometimes they can add up and cause unpleasant discrepancies. That's why it's typically best to avoid floating point numbers when working with money. We won't store dollars, but cents:
price_text = ( product .select_one(".price") .contents[-1] .strip() .replace("$", "") .replace(".", "") .replace(",", "") )
In this case, removing the dot from the price text is the same as if we multiplied all the numbers with 100, effectively converting dollars to cents. For converting the text to a number we'll use `int()` instead of `float()`. This is how the whole program looks like now:
import httpx from bs4 import BeautifulSoup
url = "https://warehouse-theme-metal.myshopify.com/collections/sales" response = httpx.get(url) response.raise_for_status()
html_code = response.text soup = BeautifulSoup(html_code, "html.parser")
for product in soup.select(".product-item"): title = product.select_one(".product-item__title").text.strip()
price_text = (
product
.select_one(".price")
.contents[-1]
.strip()
.replace("$", "")
.replace(".", "")
.replace(",", "")
)
if price_text.startswith("From "):
min_price = int(price_text.removeprefix("From "))
price = None
else:
min_price = int(price_text)
price = min_price
print(title, min_price, price, sep=" | ")
If we run the code above, we have nice, clean data about all the products!
$ python main.py JBL Flip 4 Waterproof Portable Bluetooth Speaker | 7495 | 7495 Sony XBR-950G BRAVIA 4K HDR Ultra HD TV | 139800 | None ...
Well, not to spoil the excitement, but in its current form, the data isn't very useful. In the next lesson we'll save the product details to a file which data analysts can use or other programs can read.
***
## Exercises
These challenges are here to help you test what you’ve learned in this lesson. Try to resist the urge to peek at the solutions right away. Remember, the best learning happens when you dive in and do it yourself!
Real world
You're about to touch the real web, which is practical and exciting! But websites change, so some exercises might break. If you run into any issues, please leave a comment below or https://github.com/apify/apify-docs/issues.
### Scrape units on stock
Change our scraper so that it extracts how many units of each product are on stock. Your program should print the following. Note the unit amounts at the end of each line:
JBL Flip 4 Waterproof Portable Bluetooth Speaker | 672 Sony XBR-950G BRAVIA 4K HDR Ultra HD TV | 77 Sony SACS9 10" Active Subwoofer | 7 Sony PS-HX500 Hi-Res USB Turntable | 15 Klipsch R-120SW Powerful Detailed Home Speaker - Unit | 0 Denon AH-C720 In-Ear Headphones | 236 ...
Solution
import httpx from bs4 import BeautifulSoup
url = "https://warehouse-theme-metal.myshopify.com/collections/sales" response = httpx.get(url) response.raise_for_status()
html_code = response.text soup = BeautifulSoup(html_code, "html.parser")
for product in soup.select(".product-item"): title = product.select_one(".product-item__title").text.strip()
units_text = (
product
.select_one(".product-item__inventory")
.text
.removeprefix("In stock,")
.removeprefix("Only")
.removesuffix(" left")
.removesuffix("units")
.strip()
)
if "Sold out" in units_text:
units = 0
else:
units = int(units_text)
print(title, units, sep=" | ")
### Use regular expressions
Simplify the code from previous exercise. Use https://docs.python.org/3/library/re.html to parse the number of units. You can match digits using a range like `[0-9]` or by a special sequence `\d`. To match more characters of the same type you can use `+`.
Solution
import re import httpx from bs4 import BeautifulSoup
url = "https://warehouse-theme-metal.myshopify.com/collections/sales" response = httpx.get(url) response.raise_for_status()
html_code = response.text soup = BeautifulSoup(html_code, "html.parser")
for product in soup.select(".product-item"): title = product.select_one(".product-item__title").text.strip()
units_text = product.select_one(".product-item__inventory").text
if re_match := re.search(r"\d+", units_text):
units = int(re_match.group())
else:
units = 0
print(title, units, sep=" | ")
### Scrape publish dates of F1 news
Download Guardian's page with the latest F1 news and use Beautiful Soup to parse it. Print titles and publish dates of all the listed articles. This is the URL:
https://www.theguardian.com/sport/formulaone
Your program should print something like the following. Note the dates at the end of each line:
Brad Pitt in the paddock: how F1 the Movie went deep to keep fans coming | Fri Jun 20 2025 Wolff hits out at Red Bull protest after Russell’s Canadian GP win | Tue Jun 17 2025 F1 the Movie review – spectacular macho melodrama handles Brad Pitt with panache | Tue Jun 17 2025 Hamilton reveals distress over ‘devastating’ groundhog accident at Canadian F1 GP | Mon Jun 16 2025 ...
Need a nudge?
* HTML's `time` element can have an attribute `datetime`, which https://developer.mozilla.org/en-US/docs/Web/HTML/Element/time, such as the ISO 8601.
* Beautiful Soup gives you https://beautiful-soup-4.readthedocs.io/en/latest/#attributes.
* In Python you can create `datetime` objects using `datetime.fromisoformat()`, a https://docs.python.org/3/library/datetime.html#datetime.datetime.fromisoformat.
* To get the date, you can call `.strftime('%a %b %d %Y')` on `datetime` objects.
Solution
import httpx from bs4 import BeautifulSoup from datetime import datetime
url = "https://www.theguardian.com/sport/formulaone" response = httpx.get(url) response.raise_for_status()
html_code = response.text soup = BeautifulSoup(html_code, "html.parser")
for article in soup.select("#maincontent ul li"): title = article.select_one("h3").text.strip()
date_iso = article.select_one("time")["datetime"].strip()
date = datetime.fromisoformat(date_iso)
print(title, date.strftime('%a %b %d %Y'), sep=" | ")
---
# Using a scraping framework with Python
**In this lesson, we'll rework our application for watching prices so that it builds on top of a scraping framework. We'll use Crawlee to make the program simpler, faster, and more robust.**
***
Before rewriting our code, let's point out several caveats in our current solution:
* *Hard to maintain:* All the data we need from the listing page is also available on the product page. By scraping both, we have to maintain selectors for two HTML documents. Instead, we could scrape links from the listing page and process all data on the product pages.
* *Slow:* The program runs sequentially, which is generously considerate toward the target website, but extremely inefficient.
* *No logging:* The scraper gives no sense of progress, making it tedious to use. Debugging issues becomes even more frustrating without proper logs.
* *Boilerplate code:* We implement downloading and parsing HTML, or exporting data to CSV, although we're not the first people to meet and solve these problems.
* *Prone to anti-scraping:* If the target website implemented anti-scraping measures, a bare-bones program like ours would stop working.
* *Browser means rewrite:* We got lucky extracting variants. If the website didn't include a fallback, we might have had no choice but to spin up a browser instance and automate clicking on buttons. Such a change in the underlying technology would require a complete rewrite of our program.
* *No error handling:* The scraper stops if it encounters issues. It should allow for skipping problematic products with warnings or retrying downloads when the website returns temporary errors.
In this lesson, we'll address all of the above issues while keeping the code concise with the help of a scraping framework. We'll use https://crawlee.dev/, not only because we created it, but also because we believe it's the best tool for the job.
Why Crawlee and not Scrapy
From the two main open-source options for Python, https://scrapy.org/ and https://crawlee.dev/python/, we chose the latter—not just because we're the company financing its development.
We genuinely believe beginners to scraping will like it more, since it allows to create a scraper with less code and less time spent reading docs. Scrapy's long history ensures it's battle-tested, but it also means its code relies on technologies that aren't really necessary today. Crawlee, on the other hand, builds on modern Python features like asyncio and type hints.
## Installing Crawlee
When starting with the Crawlee framework, we first need to decide which approach to downloading and parsing we prefer. We want the one based on Beautiful Soup, so let's install the `crawlee` package with the `beautifulsoup` extra specified in brackets. The framework has a lot of dependencies, so expect the installation to take a while.
$ pip install crawlee[beautifulsoup] ... Successfully installed Jinja2-0.0.0 ... ... ... crawlee-0.0.0 ... ... ...
## Running Crawlee
Now let's use the framework to create a new version of our scraper. First, let's rename the `main.py` file to `oldmain.py`, so that we can keep peeking at the original implementation while working on the new one. Then, in the same project directory, we'll create a new, empty `main.py`. The initial content will look like this:
import asyncio from crawlee.crawlers import BeautifulSoupCrawler, BeautifulSoupCrawlingContext
async def main(): crawler = BeautifulSoupCrawler()
@crawler.router.default_handler
async def handle_listing(context: BeautifulSoupCrawlingContext):
if title := context.soup.title:
print(title.text.strip())
await crawler.run(["https://warehouse-theme-metal.myshopify.com/collections/sales"])
if name == 'main': asyncio.run(main())
In the code, we do the following:
1. We import the necessary modules and define an asynchronous `main()` function.
2. Inside `main()`, we first create a crawler object, which manages the scraping process. In this case, it's a crawler based on Beautiful Soup.
3. Next, we define a nested asynchronous function called `handle_listing()`. It receives a `context` parameter, and Python type hints show it's of type `BeautifulSoupCrawlingContext`. Type hints help editors suggest what we can do with the object.
4. We use a Python decorator (the line starting with `@`) to register `handle_listing()` as the *default handler* for processing HTTP responses.
5. Inside the handler, we extract the page title from the `soup` object and print its text without whitespace.
6. At the end of the function, we run the crawler on a product listing URL and await its completion.
7. The last two lines ensure that if the file is executed directly, Python will properly run the `main()` function using its asynchronous event loop.
Don't worry if some of this is new. We don't need to know exactly how https://docs.python.org/3/library/asyncio.html, decorators, or type hints work. Let's stick to the practical side and observe what the program does when executed:
$ python main.py [BeautifulSoupCrawler] INFO Current request statistics: ┌───────────────────────────────┬──────────┐ │ requests_finished │ 0 │ │ requests_failed │ 0 │ │ retry_histogram │ [0] │ │ request_avg_failed_duration │ None │ │ request_avg_finished_duration │ None │ │ requests_finished_per_minute │ 0 │ │ requests_failed_per_minute │ 0 │ │ request_total_duration │ 0.0 │ │ requests_total │ 0 │ │ crawler_runtime │ 0.010014 │ └───────────────────────────────┴──────────┘ [crawlee._autoscaling.autoscaled_pool] INFO current_concurrency = 0; desired_concurrency = 2; cpu = 0; mem = 0; event_loop = 0.0; client_info = 0.0 Sales [crawlee._autoscaling.autoscaled_pool] INFO Waiting for remaining tasks to finish [BeautifulSoupCrawler] INFO Final request statistics: ┌───────────────────────────────┬──────────┐ │ requests_finished │ 1 │ │ requests_failed │ 0 │ │ retry_histogram │ [1] │ │ request_avg_failed_duration │ None │ │ request_avg_finished_duration │ 0.308998 │ │ requests_finished_per_minute │ 185 │ │ requests_failed_per_minute │ 0 │ │ request_total_duration │ 0.308998 │ │ requests_total │ 1 │ │ crawler_runtime │ 0.323721 │ └───────────────────────────────┴──────────┘
If our previous scraper didn't give us any sense of progress, Crawlee feeds us with perhaps too much information for the purposes of a small program. Among all the logging, notice the line `Sales`. That's the page title! We managed to create a Crawlee scraper that downloads the product listing page, parses it with Beautiful Soup, extracts the title, and prints it.
Advanced Python features
You don't need to be an expert in asynchronous programming, decorators, or type hints to finish this lesson, but you might find yourself curious for more details. If so, check out https://realpython.com/async-io-python/, https://realpython.com/primer-on-python-decorators/, and https://realpython.com/python-type-checking/.
## Crawling product detail pages
The code now features advanced Python concepts, so it's less accessible to beginners, and the size of the program is about the same as if we worked without a framework. The tradeoff of using a framework is that primitive scenarios may become unnecessarily complex, while complex scenarios may become surprisingly primitive. As we rewrite the rest of the program, the benefits of using Crawlee will become more apparent.
For example, it takes a single line of code to extract and follow links to products. Three more lines, and we have parallel processing of all the product detail pages:
import asyncio from crawlee.crawlers import BeautifulSoupCrawler, BeautifulSoupCrawlingContext
async def main(): crawler = BeautifulSoupCrawler()
@crawler.router.default_handler
async def handle_listing(context: BeautifulSoupCrawlingContext):
await context.enqueue_links(label="DETAIL", selector=".product-list a.product-item__title")
@crawler.router.handler("DETAIL")
async def handle_detail(context: BeautifulSoupCrawlingContext):
print(context.request.url)
await crawler.run(["https://warehouse-theme-metal.myshopify.com/collections/sales"])
if name == 'main': asyncio.run(main())
First, it's necessary to inspect the page in browser DevTools to figure out the CSS selector that allows us to locate links to all the product detail pages. Then we can use the `enqueue_links()` method to find the links and add them to Crawlee's internal HTTP request queue. We tell the method to label all the requests as `DETAIL`.
Below that, we give the crawler another asynchronous function, `handle_detail()`. We again inform the crawler that this function is a handler using a decorator, but this time it's not a default one. This handler will only take care of HTTP requests labeled as `DETAIL`. For now, all it does is print the request URL.
If we run the code, we should see how Crawlee first downloads the listing page and then makes parallel requests to each of the detail pages, printing their URLs along the way:
$ python main.py [BeautifulSoupCrawler] INFO Current request statistics: ┌───────────────────────────────┬──────────┐ ... └───────────────────────────────┴──────────┘ [crawlee._autoscaling.autoscaled_pool] INFO current_concurrency = 0; desired_concurrency = 2; cpu = 0; mem = 0; event_loop = 0.0; client_info = 0.0 https://warehouse-theme-metal.myshopify.com/products/sony-xbr-65x950g-65-class-64-5-diag-bravia-4k-hdr-ultra-hd-tv https://warehouse-theme-metal.myshopify.com/products/jbl-flip-4-waterproof-portable-bluetooth-speaker https://warehouse-theme-metal.myshopify.com/products/sony-sacs9-10-inch-active-subwoofer https://warehouse-theme-metal.myshopify.com/products/sony-ps-hx500-hi-res-usb-turntable ... [crawlee._autoscaling.autoscaled_pool] INFO Waiting for remaining tasks to finish [BeautifulSoupCrawler] INFO Final request statistics: ┌───────────────────────────────┬──────────┐ │ requests_finished │ 25 │ │ requests_failed │ 0 │ │ retry_histogram │ [25] │ │ request_avg_failed_duration │ None │ │ request_avg_finished_duration │ 0.349434 │ │ requests_finished_per_minute │ 318 │ │ requests_failed_per_minute │ 0 │ │ request_total_duration │ 8.735843 │ │ requests_total │ 25 │ │ crawler_runtime │ 4.713262 │ └───────────────────────────────┴──────────┘
In the final stats, we can see that we made 25 requests (1 listing page + 24 product pages) in less than 5 seconds. Your numbers might differ, but regardless, it should be much faster than making the requests sequentially. These requests are not made all at once without planning. They are scheduled and sent in a way that doesn't overload the target server. And if they do, Crawlee can automatically retry them.
## Extracting data
The Beautiful Soup crawler provides handlers with the `context.soup` attribute, which contains the parsed HTML of the handled page. This is the same `soup` object we used in our previous program. Let's locate and extract the same data as before:
async def main(): ...
@crawler.router.handler("DETAIL")
async def handle_detail(context: BeautifulSoupCrawlingContext):
item = {
"url": context.request.url,
"title": context.soup.select_one(".product-meta__title").text.strip(),
"vendor": context.soup.select_one(".product-meta__vendor").text.strip(),
}
print(item)
Fragile code
The code above assumes the `.select_one()` call doesn't return `None`. If your editor checks types, it might even warn that `text` is not a known attribute of `None`. This isn't robust and could break, but in our program, that's fine. We expect the elements to be there, and if they're not, we'd rather the scraper break quickly—it's a sign something's wrong and needs fixing.
Now for the price. We're not doing anything new here—just copy-paste the code from our old scraper. The only change will be in the selector.
The only change will be in the selector. In `oldmain.py`, we look for `.price` within a `product_soup` object representing a product card. Here, we're looking for `.price` within the entire product detail page. It's better to be more specific so we don't accidentally match another price on the same page:
async def main(): ...
@crawler.router.handler("DETAIL")
async def handle_detail(context: BeautifulSoupCrawlingContext):
price_text = (
context.soup
.select_one(".product-form__info-content .price")
.contents[-1]
.strip()
.replace("$", "")
.replace(".", "")
.replace(",", "")
)
item = {
"url": context.request.url,
"title": context.soup.select_one(".product-meta__title").text.strip(),
"vendor": context.soup.select_one(".product-meta__vendor").text.strip(),
"price": int(price_text),
}
print(item)
Finally, the variants. We can reuse the `parse_variant()` function as-is, and in the handler we'll again take inspiration from what we have in `oldmain.py`. The full program will look like this:
import asyncio from crawlee.crawlers import BeautifulSoupCrawler, BeautifulSoupCrawlingContext
async def main(): crawler = BeautifulSoupCrawler()
@crawler.router.default_handler
async def handle_listing(context: BeautifulSoupCrawlingContext):
await context.enqueue_links(selector=".product-list a.product-item__title", label="DETAIL")
@crawler.router.handler("DETAIL")
async def handle_detail(context: BeautifulSoupCrawlingContext):
price_text = (
context.soup
.select_one(".product-form__info-content .price")
.contents[-1]
.strip()
.replace("$", "")
.replace(".", "")
.replace(",", "")
)
item = {
"url": context.request.url,
"title": context.soup.select_one(".product-meta__title").text.strip(),
"vendor": context.soup.select_one(".product-meta__vendor").text.strip(),
"price": int(price_text),
"variant_name": None,
}
if variants := context.soup.select(".product-form__option.no-js option"):
for variant in variants:
print(item | parse_variant(variant))
else:
print(item)
await crawler.run(["https://warehouse-theme-metal.myshopify.com/collections/sales"])
def parse_variant(variant): text = variant.text.strip() name, price_text = text.split(" - ") price = int( price_text .replace("$", "") .replace(".", "") .replace(",", "") ) return {"variant_name": name, "price": price}
if name == 'main': asyncio.run(main())
If we run this scraper, we should get the same data for the 24 products as before. Crawlee has saved us a lot of effort by managing downloading, parsing, and parallelization. The code is also cleaner, with two separate and labeled handlers.
Crawlee doesn't do much to help with locating and extracting the data—that part of the code remains almost the same, framework or not. This is because the detective work of finding and extracting the right data is the core value of custom scrapers. With Crawlee, we can focus on just that while letting the framework take care of everything else.
## Saving data
Now that we're *letting the framework take care of everything else*, let's see what it can do about saving data. As of now, the product detail page handler logs each item as soon as it's ready. Instead, we can push the item to Crawlee's default dataset:
async def main(): ...
@crawler.router.handler("DETAIL")
async def handle_detail(context: BeautifulSoupCrawlingContext):
price_text = (
...
)
item = {
...
}
if variants := context.soup.select(".product-form__option.no-js option"):
for variant in variants:
await context.push_data(item | parse_variant(variant))
else:
await context.push_data(item)
That's it! If we run the program now, there should be a `storage` directory alongside the `main.py` file. Crawlee uses it to store its internal state. If we go to the `storage/datasets/default` subdirectory, we'll see over 30 JSON files, each representing a single item.

We can also export all the items to a single file of our choice. We'll do it at the end of the `main()` function, after the crawler has finished scraping:
async def main(): ...
await crawler.run(["https://warehouse-theme-metal.myshopify.com/collections/sales"])
await crawler.export_data_json(path='dataset.json', ensure_ascii=False, indent=2)
await crawler.export_data_csv(path='dataset.csv')
After running the scraper again, there should be two new files in your directory, `dataset.json` and `dataset.csv`, containing all the data. If we peek into the JSON file, it should have indentation.
## Logging
Crawlee gives us stats about HTTP requests and concurrency, but we don't get much visibility into the pages we're crawling or the items we're saving. Let's add some custom logging:
import asyncio from crawlee.crawlers import BeautifulSoupCrawler, BeautifulSoupCrawlingContext
async def main(): crawler = BeautifulSoupCrawler()
@crawler.router.default_handler
async def handle_listing(context: BeautifulSoupCrawlingContext):
context.log.info("Looking for product detail pages")
await context.enqueue_links(selector=".product-list a.product-item__title", label="DETAIL")
@crawler.router.handler("DETAIL")
async def handle_detail(context: BeautifulSoupCrawlingContext):
context.log.info(f"Product detail page: {context.request.url}")
price_text = (
context.soup
.select_one(".product-form__info-content .price")
.contents[-1]
.strip()
.replace("$", "")
.replace(".", "")
.replace(",", "")
)
item = {
"url": context.request.url,
"title": context.soup.select_one(".product-meta__title").text.strip(),
"vendor": context.soup.select_one(".product-meta__vendor").text.strip(),
"price": int(price_text),
"variant_name": None,
}
if variants := context.soup.select(".product-form__option.no-js option"):
for variant in variants:
context.log.info("Saving a product variant")
await context.push_data(item | parse_variant(variant))
else:
context.log.info("Saving a product")
await context.push_data(item)
await crawler.run(["https://warehouse-theme-metal.myshopify.com/collections/sales"])
crawler.log.info("Exporting data")
await crawler.export_data_json(path='dataset.json', ensure_ascii=False, indent=2)
await crawler.export_data_csv(path='dataset.csv')
def parse_variant(variant): text = variant.text.strip() name, price_text = text.split(" - ") price = int( price_text .replace("$", "") .replace(".", "") .replace(",", "") ) return {"variant_name": name, "price": price}
if name == 'main': asyncio.run(main())
Depending on what we find helpful, we can tweak the logs to include more or less detail. The `context.log` or `crawler.log` objects are https://docs.python.org/3/library/logging.html.
If we compare `main.py` and `oldmain.py` now, it's clear we've cut at least 20 lines of code compared to the original program, even with the extra logging we've added. Throughout this lesson, we've introduced features to match the old scraper's functionality, but at each phase, the code remained clean and readable. Plus, we've been able to focus on what's unique to the website we're scraping and the data we care about.
In the next lesson, we'll use a scraping platform to set up our application to run automatically every day.
***
## Exercises
These challenges are here to help you test what you’ve learned in this lesson. Try to resist the urge to peek at the solutions right away. Remember, the best learning happens when you dive in and do it yourself!
Real world
You're about to touch the real web, which is practical and exciting! But websites change, so some exercises might break. If you run into any issues, please leave a comment below or https://github.com/apify/apify-docs/issues.
### Build a Crawlee scraper of F1 Academy drivers
Scrape information about all https://en.wikipedia.org/wiki/F1_Academy drivers listed on the official https://www.f1academy.com/Racing-Series/Drivers page. Each item you push to Crawlee's default dataset should include the following data:
* URL of the driver's f1academy.com page
* Name
* Team
* Nationality
* Date of birth (as a `date()` object)
* Instagram URL
If you export the dataset as JSON, it should look something like this:
[ { "url": "https://www.f1academy.com/Racing-Series/Drivers/29/Emely-De-Heus", "name": "Emely De Heus", "team": "MP Motorsport", "nationality": "Dutch", "dob": "2003-02-10", "instagram_url": "https://www.instagram.com/emely.de.heus/", }, { "url": "https://www.f1academy.com/Racing-Series/Drivers/28/Hamda-Al-Qubaisi", "name": "Hamda Al Qubaisi", "team": "MP Motorsport", "nationality": "Emirati", "dob": "2002-08-08", "instagram_url": "https://www.instagram.com/hamdaalqubaisi_official/", }, ... ]
Need a nudge?
* Use Python's `datetime.strptime(text, "%d/%m/%Y").date()` to parse dates in the `DD/MM/YYYY` format. Check out the https://docs.python.org/3/library/datetime.html#datetime.datetime.strptime for more details.
* To locate the Instagram URL, use the attribute selector `a[href*='instagram']`. Learn more about attribute selectors in the https://developer.mozilla.org/en-US/docs/Web/CSS/Attribute_selectors.
Solution
import asyncio from datetime import datetime
from crawlee.crawlers import BeautifulSoupCrawler, BeautifulSoupCrawlingContext
async def main(): crawler = BeautifulSoupCrawler()
@crawler.router.default_handler
async def handle_listing(context: BeautifulSoupCrawlingContext):
await context.enqueue_links(selector=".teams-driver-item a", label="DRIVER")
@crawler.router.handler("DRIVER")
async def handle_driver(context: BeautifulSoupCrawlingContext):
info = {}
for row in context.soup.select(".common-driver-info li"):
name = row.select_one("span").text.strip()
value = row.select_one("h4").text.strip()
info[name] = value
detail = {}
for row in context.soup.select(".driver-detail--cta-group a"):
name = row.select_one("p").text.strip()
value = row.select_one("h2").text.strip()
detail[name] = value
await context.push_data({
"url": context.request.url,
"name": context.soup.select_one("h1").text.strip(),
"team": detail["Team"],
"nationality": info["Nationality"],
"dob": datetime.strptime(info["DOB"], "%d/%m/%Y").date(),
"instagram_url": context.soup.select_one(".common-social-share a[href*='instagram']").get("href"),
})
await crawler.run(["https://www.f1academy.com/Racing-Series/Drivers"])
await crawler.export_data_json(path='dataset.json', ensure_ascii=False, indent=2)
if name == 'main': asyncio.run(main())
### Use Crawlee to find the ratings of the most popular Netflix films
The https://www.netflix.com/tudum/top10 page has a table listing the most popular Netflix films worldwide. Scrape the movie names from this page, then search for each movie on https://www.imdb.com/. Assume the first search result is correct and retrieve the film's rating. Each item you push to Crawlee's default dataset should include the following data:
* URL of the film's IMDb page
* Title
* Rating
If you export the dataset as JSON, it should look something like this:
[ { "url": "https://www.imdb.com/title/tt32368345/?ref_=fn_tt_tt_1", "title": "The Merry Gentlemen", "rating": "5.0/10" }, { "url": "https://www.imdb.com/title/tt32359447/?ref_=fn_tt_tt_1", "title": "Hot Frosty", "rating": "5.4/10" }, ... ]
To scrape IMDb data, you'll need to construct a `Request` object with the appropriate search URL for each movie title. The following code snippet gives you an idea of how to do this:
from urllib.parse import quote_plus
async def main(): ...
@crawler.router.default_handler
async def handle_netflix_table(context: BeautifulSoupCrawlingContext):
requests = []
for name_cell in context.soup.select(...):
name = name_cell.text.strip()
imdb_search_url = f"https://www.imdb.com/find/?q={quote_plus(name)}&s=tt&ttype=ft"
requests.append(Request.from_url(imdb_search_url, label="..."))
await context.add_requests(requests)
...
Need a nudge?
When navigating to the first IMDb search result, you might find it helpful to know that `context.enqueue_links()` accepts a `limit` keyword argument, letting you specify the max number of HTTP requests to enqueue.
Solution
import asyncio from urllib.parse import quote_plus
from crawlee import Request from crawlee.crawlers import BeautifulSoupCrawler, BeautifulSoupCrawlingContext
async def main(): crawler = BeautifulSoupCrawler()
@crawler.router.default_handler
async def handle_netflix_table(context: BeautifulSoupCrawlingContext):
requests = []
for name_cell in context.soup.select('[data-uia="top10-table-row-title"] button'):
name = name_cell.text.strip()
imdb_search_url = f"https://www.imdb.com/find/?q={quote_plus(name)}&s=tt&ttype=ft"
requests.append(Request.from_url(imdb_search_url, label="IMDB_SEARCH"))
await context.add_requests(requests)
@crawler.router.handler("IMDB_SEARCH")
async def handle_imdb_search(context: BeautifulSoupCrawlingContext):
await context.enqueue_links(selector=".find-result-item a", label="IMDB", limit=1)
@crawler.router.handler("IMDB")
async def handle_imdb(context: BeautifulSoupCrawlingContext):
rating_selector = "[data-testid='hero-rating-bar__aggregate-rating__score']"
rating_text = context.soup.select_one(rating_selector).text.strip()
await context.push_data({
"url": context.request.url,
"title": context.soup.select_one("h1").text.strip(),
"rating": rating_text,
})
await crawler.run(["https://www.netflix.com/tudum/top10"])
await crawler.export_data_json(path='dataset.json', ensure_ascii=False, indent=2)
if name == 'main': asyncio.run(main())
---
# Getting links from HTML with Python
**In this lesson, we'll locate and extract links to individual product pages. We'll use BeautifulSoup to find the relevant bits of HTML.**
***
The previous lesson concludes our effort to create a scraper. Our program now downloads HTML, locates and extracts data from the markup, and saves the data in a structured and reusable way.
For some use cases, this is already enough! In other cases, though, scraping just one page is hardly useful. The data is spread across the website, over several pages.
## Crawling websites
We'll use a technique called crawling, i.e. following links to scrape multiple pages. The algorithm goes like this:
1. Visit the start URL.
2. Extract new URLs (and data), and save them.
3. Visit one of the newly found URLs and save data and/or more URLs from it.
4. Repeat steps 2 and 3 until you have everything you need.
This will help us figure out the actual prices of products, as right now, for some, we're only getting the min price. Implementing the algorithm will require quite a few changes to our code, though.
## Restructuring code
Over the course of the previous lessons, the code of our program grew to almost 50 lines containing downloading, parsing, and exporting:
import httpx from bs4 import BeautifulSoup import json import csv
url = "https://warehouse-theme-metal.myshopify.com/collections/sales" response = httpx.get(url) response.raise_for_status()
html_code = response.text soup = BeautifulSoup(html_code, "html.parser")
data = [] for product in soup.select(".product-item"): title = product.select_one(".product-item__title").text.strip()
price_text = (
product
.select_one(".price")
.contents[-1]
.strip()
.replace("$", "")
.replace(".", "")
.replace(",", "")
)
if price_text.startswith("From "):
min_price = int(price_text.removeprefix("From "))
price = None
else:
min_price = int(price_text)
price = min_price
data.append({"title": title, "min_price": min_price, "price": price})
with open("products.json", "w") as file: json.dump(data, file)
with open("products.csv", "w") as file: writer = csv.DictWriter(file, fieldnames=["title", "min_price", "price"]) writer.writeheader() for row in data: writer.writerow(row)
Let's introduce several functions to make the whole thing easier to digest. First, we can turn the beginning of our program into this `download()` function, which takes a URL and returns a `BeautifulSoup` instance:
def download(url): response = httpx.get(url) response.raise_for_status()
html_code = response.text
return BeautifulSoup(html_code, "html.parser")
Next, we can put parsing into a `parse_product()` function, which takes the product item element and returns the dictionary with data:
def parse_product(product): title = product.select_one(".product-item__title").text.strip()
price_text = (
product
.select_one(".price")
.contents[-1]
.strip()
.replace("$", "")
.replace(".", "")
.replace(",", "")
)
if price_text.startswith("From "):
min_price = int(price_text.removeprefix("From "))
price = None
else:
min_price = int(price_text)
price = min_price
return {"title": title, "min_price": min_price, "price": price}
Now the JSON export. For better readability, let's make a small change here and set the indentation level to two spaces:
def export_json(file, data): json.dump(data, file, indent=2)
The last function we'll add will take care of the CSV export. We'll make a small change here as well. Having to specify the field names is not ideal. What if we add more field names in the parsing function? We'd always have to remember to go and edit the export function as well. If we could figure out the field names in place, we'd remove this dependency. One way would be to infer the field names from the dictionary keys of the first row:
def export_csv(file, data): fieldnames = list(data[0].keys()) writer = csv.DictWriter(file, fieldnames=fieldnames) writer.writeheader() for row in data: writer.writerow(row)
Fragile code
The code above assumes the `data` variable contains at least one item, and that all the items have the same keys. This isn't robust and could break, but in our program, this isn't a problem, and omitting these corner cases allows us to keep the code examples more succinct.
Now let's put it all together:
import httpx from bs4 import BeautifulSoup import json import csv
def download(url): response = httpx.get(url) response.raise_for_status()
html_code = response.text
return BeautifulSoup(html_code, "html.parser")
def parse_product(product): title = product.select_one(".product-item__title").text.strip()
price_text = (
product
.select_one(".price")
.contents[-1]
.strip()
.replace("$", "")
.replace(".", "")
.replace(",", "")
)
if price_text.startswith("From "):
min_price = int(price_text.removeprefix("From "))
price = None
else:
min_price = int(price_text)
price = min_price
return {"title": title, "min_price": min_price, "price": price}
def export_json(file, data): json.dump(data, file, indent=2)
def export_csv(file, data): fieldnames = list(data[0].keys()) writer = csv.DictWriter(file, fieldnames=fieldnames) writer.writeheader() for row in data: writer.writerow(row)
listing_url = "https://warehouse-theme-metal.myshopify.com/collections/sales" listing_soup = download(listing_url)
data = [] for product in listing_soup.select(".product-item"): item = parse_product(product) data.append(item)
with open("products.json", "w") as file: export_json(file, data)
with open("products.csv", "w") as file: export_csv(file, data)
The program is much easier to read now. With the `parse_product()` function handy, we could also replace the convoluted loop with one that only takes up four lines of code.
Refactoring
We turned the whole program upside down, and at the same time, we didn't make any actual changes! This is https://en.wikipedia.org/wiki/Code_refactoring: improving the structure of existing code without changing its behavior.

## Extracting links
With everything in place, we can now start working on a scraper that also scrapes the product pages. For that, we'll need the links to those pages. Let's open the browser DevTools and remind ourselves of the structure of a single product item:

Several methods exist for transitioning from one page to another, but the most common is a link element, which looks like this:
Text of the link
In DevTools, we can see that each product title is, in fact, also a link element. We already locate the titles, so that makes our task easier. We just need to edit the code so that it extracts not only the text of the element but also the `href` attribute. Beautiful Soup elements support accessing attributes as if they were dictionary keys:
def parse_product(product): title_element = product.select_one(".product-item__title") title = title_element.text.strip() url = title_element["href"]
...
return {"title": title, "min_price": min_price, "price": price, "url": url}
In the previous code example, we've also added the URL to the dictionary returned by the function. If we run the scraper now, it should produce exports where each product contains a link to its product page:
[ { "title": "JBL Flip 4 Waterproof Portable Bluetooth Speaker", "min_price": "7495", "price": "7495", "url": "/products/jbl-flip-4-waterproof-portable-bluetooth-speaker" }, { "title": "Sony XBR-950G BRAVIA 4K HDR Ultra HD TV", "min_price": "139800", "price": null, "url": "/products/sony-xbr-65x950g-65-class-64-5-diag-bravia-4k-hdr-ultra-hd-tv" }, ... ]
Hmm, but that isn't what we wanted! Where is the beginning of each URL? It turns out the HTML contains so-called *relative links*.
## Turning relative links into absolute
Browsers reading the HTML know the base address and automatically resolve such links, but we'll have to do this manually. The function https://docs.python.org/3/library/urllib.parse.html#urllib.parse.urljoin from Python's standard library will help us. Let's add it to our imports first:
import httpx from bs4 import BeautifulSoup import json import csv from urllib.parse import urljoin
Next, we'll change the `parse_product()` function so that it also takes the base URL as an argument and then joins it with the relative URL to the product page:
def parse_product(product, base_url): title_element = product.select_one(".product-item__title") title = title_element.text.strip() url = urljoin(base_url, title_element["href"])
...
return {"title": title, "min_price": min_price, "price": price, "url": url}
Now we'll pass the base URL to the function in the main body of our program:
listing_url = "https://warehouse-theme-metal.myshopify.com/collections/sales" listing_soup = download(listing_url)
data = [] for product in listing_soup.select(".product-item"): item = parse_product(product, listing_url) data.append(item)
When we run the scraper now, we should see full URLs in our exports:
[ { "title": "JBL Flip 4 Waterproof Portable Bluetooth Speaker", "min_price": "7495", "price": "7495", "url": "https://warehouse-theme-metal.myshopify.com/products/jbl-flip-4-waterproof-portable-bluetooth-speaker" }, { "title": "Sony XBR-950G BRAVIA 4K HDR Ultra HD TV", "min_price": "139800", "price": null, "url": "https://warehouse-theme-metal.myshopify.com/products/sony-xbr-65x950g-65-class-64-5-diag-bravia-4k-hdr-ultra-hd-tv" }, ... ]
Ta-da! We've managed to get links leading to the product pages. In the next lesson, we'll crawl these URLs so that we can gather more details about the products in our dataset.
***
## Exercises
These challenges are here to help you test what you’ve learned in this lesson. Try to resist the urge to peek at the solutions right away. Remember, the best learning happens when you dive in and do it yourself!
Real world
You're about to touch the real web, which is practical and exciting! But websites change, so some exercises might break. If you run into any issues, please leave a comment below or https://github.com/apify/apify-docs/issues.
### Scrape links to countries in Africa
Download Wikipedia's page with the list of African countries, use Beautiful Soup to parse it, and print links to Wikipedia pages of all the states and territories mentioned in all tables. Start with this URL:
https://en.wikipedia.org/wiki/List_of_sovereign_states_and_dependent_territories_in_Africa
Your program should print the following:
https://en.wikipedia.org/wiki/Algeria https://en.wikipedia.org/wiki/Angola https://en.wikipedia.org/wiki/Benin https://en.wikipedia.org/wiki/Botswana ...
Solution
import httpx from bs4 import BeautifulSoup from urllib.parse import urljoin
listing_url = "https://en.wikipedia.org/wiki/List_of_sovereign_states_and_dependent_territories_in_Africa" response = httpx.get(listing_url) response.raise_for_status()
html_code = response.text soup = BeautifulSoup(html_code, "html.parser")
for name_cell in soup.select(".wikitable tr td:nth-child(3)"): link = name_cell.select_one("a") url = urljoin(listing_url, link["href"]) print(url)
### Scrape links to F1 news
Download Guardian's page with the latest F1 news, use Beautiful Soup to parse it, and print links to all the listed articles. Start with this URL:
https://www.theguardian.com/sport/formulaone
Your program should print something like the following:
https://www.theguardian.com/world/2024/sep/13/africa-f1-formula-one-fans-lewis-hamilton-grand-prix https://www.theguardian.com/sport/2024/sep/12/mclaren-lando-norris-oscar-piastri-team-orders-f1-title-race-max-verstappen https://www.theguardian.com/sport/article/2024/sep/10/f1-designer-adrian-newey-signs-aston-martin-deal-after-quitting-red-bull https://www.theguardian.com/sport/article/2024/sep/02/max-verstappen-damns-his-undriveable-monster-how-bad-really-is-it-and-why ...
Solution
import httpx from bs4 import BeautifulSoup from urllib.parse import urljoin
listing_url = "https://www.theguardian.com/sport/formulaone" response = httpx.get(listing_url) response.raise_for_status()
html_code = response.text soup = BeautifulSoup(html_code, "html.parser")
for item in soup.select("#maincontent ul li"): link = item.select_one("a") url = urljoin(listing_url, link["href"]) print(url)
Note that some cards contain two links. One leads to the article, and one to the comments. If we selected all the links in the list by `#maincontent ul li a`, we would get incorrect output like this:
https://www.theguardian.com/sport/article/2024/sep/02/example https://www.theguardian.com/sport/article/2024/sep/02/example#comments
---
# Locating HTML elements with Python
**In this lesson we'll locate product data in the downloaded HTML. We'll use BeautifulSoup to find those HTML elements which contain details about each product, such as title or price.**
***
In the previous lesson we've managed to print text of the page's main heading or count how many products are in the listing. Let's combine those two. What happens if we print `.text` for each product card?
import httpx from bs4 import BeautifulSoup
url = "https://warehouse-theme-metal.myshopify.com/collections/sales" response = httpx.get(url) response.raise_for_status()
html_code = response.text soup = BeautifulSoup(html_code, "html.parser")
for product in soup.select(".product-item"): print(product.text)
Well, it definitely prints *something*…
$ python main.py Save $25.00
JBL JBL Flip 4 Waterproof Portable Bluetooth Speaker
Black
+7
Blue
+6
Grey ...
To get details about each product in a structured way, we'll need a different approach.
## Locating child elements
As in the browser DevTools lessons, we need to change the code so that it locates child elements for each product card.

We should be looking for elements which have the `product-item__title` and `price` classes. We already know how that translates to CSS selectors:
import httpx from bs4 import BeautifulSoup
url = "https://warehouse-theme-metal.myshopify.com/collections/sales" response = httpx.get(url) response.raise_for_status()
html_code = response.text soup = BeautifulSoup(html_code, "html.parser")
for product in soup.select(".product-item"): titles = product.select(".product-item__title") first_title = titles[0].text
prices = product.select(".price")
first_price = prices[0].text
print(first_title, first_price)
Let's run the program now:
$ python main.py JBL Flip 4 Waterproof Portable Bluetooth Speaker Sale price$74.95 Sony XBR-950G BRAVIA 4K HDR Ultra HD TV Sale priceFrom $1,398.00 ...
There's still some room for improvement, but it's already much better!
## Locating a single element
Often, we want to assume in our code that a certain element exists only once. It's a bit tedious to work with lists when you know you're looking for a single element. For this purpose, Beautiful Soup offers the `.select_one()` method. Like `document.querySelector()` in browser DevTools, it returns just one result or `None`. Let's simplify our code!
import httpx from bs4 import BeautifulSoup
url = "https://warehouse-theme-metal.myshopify.com/collections/sales" response = httpx.get(url) response.raise_for_status()
html_code = response.text soup = BeautifulSoup(html_code, "html.parser")
for product in soup.select(".product-item"): title = product.select_one(".product-item__title").text price = product.select_one(".price").text print(title, price)
This program does the same as the one we already had, but its code is more concise.
Fragile code
We assume that the selectors we pass to the `select()` or `select_one()` methods return at least one element. If they don't, calling `[0]` on an empty list or `.text` on `None` would crash the program. If you perform type checking on your Python program, the code examples above will trigger warnings about this.
Not handling these cases allows us to keep the code examples more succinct. Additionally, if we expect the selectors to return elements but they suddenly don't, it usually means the website has changed since we wrote our scraper. Letting the program crash in such cases is a valid way to notify ourselves that we need to fix it.
## Precisely locating price
In the output we can see that the price isn't located precisely:
JBL Flip 4 Waterproof Portable Bluetooth Speaker Sale price$74.95 Sony XBR-950G BRAVIA 4K HDR Ultra HD TV Sale priceFrom $1,398.00 ...
For each product, our scraper also prints the text `Sale price`. Let's look at the HTML structure again. Each bit containing the price looks like this:
Sale price $74.95
When translated to a tree of Python objects, the element with class `price` will contain several *nodes*:
* Textual node with white space,
* a `span` HTML element,
* a textual node representing the actual amount and possibly also white space.
We can use Beautiful Soup's `.contents` property to access individual nodes. It returns a list of nodes like this:
["\n", Sale price, "$74.95"]
It seems like we can read the last element to get the actual amount. Let's fix our program:
import httpx from bs4 import BeautifulSoup
url = "https://warehouse-theme-metal.myshopify.com/collections/sales" response = httpx.get(url) response.raise_for_status()
html_code = response.text soup = BeautifulSoup(html_code, "html.parser")
for product in soup.select(".product-item"): title = product.select_one(".product-item__title").text price = product.select_one(".price").contents[-1] print(title, price)
If we run the scraper now, it should print prices as only amounts:
$ python main.py JBL Flip 4 Waterproof Portable Bluetooth Speaker $74.95 Sony XBR-950G BRAVIA 4K HDR Ultra HD TV From $1,398.00 ...
## Formatting output
The results seem to be correct, but they're hard to verify because the prices visually blend with the titles. Let's set a different separator for the `print()` function:
print(title, price, sep=" | ")
The output is much nicer this way:
$ python main.py JBL Flip 4 Waterproof Portable Bluetooth Speaker | $74.95 Sony XBR-950G BRAVIA 4K HDR Ultra HD TV | From $1,398.00 ...
Great! We have managed to use CSS selectors and walk the HTML tree to get a list of product titles and prices. But wait a second—what's `From $1,398.00`? One does not simply scrape a price! We'll need to clean that. But that's a job for the next lesson, which is about extracting data.
***
## Exercises
These challenges are here to help you test what you’ve learned in this lesson. Try to resist the urge to peek at the solutions right away. Remember, the best learning happens when you dive in and do it yourself!
Real world
You're about to touch the real web, which is practical and exciting! But websites change, so some exercises might break. If you run into any issues, please leave a comment below or https://github.com/apify/apify-docs/issues.
### Scrape Wikipedia
Download Wikipedia's page with the list of African countries, use Beautiful Soup to parse it, and print short English names of all the states and territories mentioned in all tables. This is the URL:
https://en.wikipedia.org/wiki/List_of_sovereign_states_and_dependent_territories_in_Africa
Your program should print the following:
Algeria Angola Benin Botswana Burkina Faso Burundi Cameroon Cape Verde Central African Republic Chad Comoros Democratic Republic of the Congo Republic of the Congo Djibouti ...
Solution
import httpx from bs4 import BeautifulSoup
url = "https://en.wikipedia.org/wiki/List_of_sovereign_states_and_dependent_territories_in_Africa" response = httpx.get(url) response.raise_for_status()
html_code = response.text soup = BeautifulSoup(html_code, "html.parser")
for table in soup.select(".wikitable"): for row in table.select("tr"): cells = row.select("td") if cells: third_column = cells[2] title_link = third_column.select_one("a") print(title_link.text)
Because some rows contain https://developer.mozilla.org/en-US/docs/Web/HTML/Element/th, we skip processing a row if `table_row.select("td")` doesn't find any https://developer.mozilla.org/en-US/docs/Web/HTML/Element/td cells.
### Use CSS selectors to their max
Simplify the code from previous exercise. Use a single for loop and a single CSS selector.
Need a nudge?
You may want to check out the following pages:
* https://developer.mozilla.org/en-US/docs/Web/CSS/Descendant_combinator
* https://developer.mozilla.org/en-US/docs/Web/CSS/:nth-child
Solution
import httpx from bs4 import BeautifulSoup
url = "https://en.wikipedia.org/wiki/List_of_sovereign_states_and_dependent_territories_in_Africa" response = httpx.get(url) response.raise_for_status()
html_code = response.text soup = BeautifulSoup(html_code, "html.parser")
for name_cell in soup.select(".wikitable tr td:nth-child(3)"): print(name_cell.select_one("a").text)
### Scrape F1 news
Download Guardian's page with the latest F1 news, use Beautiful Soup to parse it, and print titles of all the listed articles. This is the URL:
https://www.theguardian.com/sport/formulaone
Your program should print something like the following:
Wolff confident Mercedes are heading to front of grid after Canada improvement Frustrated Lando Norris blames McLaren team for missed chance Max Verstappen wins Canadian Grand Prix: F1 – as it happened ...
Solution
import httpx from bs4 import BeautifulSoup
url = "https://www.theguardian.com/sport/formulaone" response = httpx.get(url) response.raise_for_status()
html_code = response.text soup = BeautifulSoup(html_code, "html.parser")
for title in soup.select("#maincontent ul li h3"): print(title.text)
---
# Parsing HTML with Python
**In this lesson we'll look for products in the downloaded HTML. We'll use BeautifulSoup to turn the HTML into objects which we can work with in our Python program.**
***
From lessons about browser DevTools we know that the HTML elements representing individual products have a `class` attribute which, among other values, contains `product-item`.

As a first step, let's try counting how many products are on the listing page.
## Processing HTML
After downloading, the entire HTML is available in our program as a string. We can print it to the screen or save it to a file, but not much more. However, since it's a string, could we use https://docs.python.org/3/library/stdtypes.html#string-methods or https://docs.python.org/3/library/re.html to count the products?
While somewhat possible, such an approach is tedious, fragile, and unreliable. To work with HTML, we need a robust tool dedicated to the task: an *HTML parser*. It takes a text with HTML markup and turns it into a tree of Python objects.
Why regex can't parse HTML
While https://stackoverflow.com/a/1732454/325365 is funny, it doesn't go very deep into the reasoning:
* In **formal language theory**, HTML's hierarchical, nested structure makes it a https://en.wikipedia.org/wiki/Context-free_language. **Regular expressions**, by contrast, match patterns in https://en.wikipedia.org/wiki/Regular_language, which are much simpler.
* Because of this difference, regex alone struggles with HTML's nested tags. On top of that, HTML has **complex syntax rules** and countless **edge cases**, which only add to the difficulty.
We'll choose https://beautiful-soup-4.readthedocs.io/ as our parser, as it's a popular library renowned for its ability to process even non-standard, broken markup. This is useful for scraping, because real-world websites often contain all sorts of errors and discrepancies.
$ pip install beautifulsoup4 ... Successfully installed beautifulsoup4-4.0.0 soupsieve-0.0
Now let's use it for parsing the HTML. The `BeautifulSoup` object allows us to work with the HTML elements in a structured way. As a demonstration, we'll first get the `` element, which represents the main heading of the page.

We'll update our code to the following:
import httpx from bs4 import BeautifulSoup
url = "https://warehouse-theme-metal.myshopify.com/collections/sales" response = httpx.get(url) response.raise_for_status()
html_code = response.text soup = BeautifulSoup(html_code, "html.parser") print(soup.select("h1"))
Then let's run the program:
$ python main.py [Sales]
Our code lists all `h1` elements it can find in the HTML we gave it. It's the case that there's just one, so in the result we can see a list with a single item. What if we want to print just the text? Let's change the end of the program to the following:
headings = soup.select("h1") first_heading = headings[0] print(first_heading.text)
If we run our scraper again, it prints the text of the first `h1` element:
$ python main.py Sales
Dynamic websites
The Warehouse returns full HTML in its initial response, but many other sites add some content after the page loads or after user interaction. In such cases, what we'd see in DevTools could differ from `response.text` in Python. Learn how to handle these scenarios in our https://docs.apify.com/academy/api-scraping.md and https://docs.apify.com/academy/puppeteer-playwright.md courses.
## Using CSS selectors
Beautiful Soup's `.select()` method runs a *CSS selector* against a parsed HTML document and returns all the matching elements. It's like calling `document.querySelectorAll()` in browser DevTools.
Scanning through https://beautiful-soup-4.readthedocs.io/en/latest/#css-selectors will help us to figure out code for counting the product cards:
import httpx from bs4 import BeautifulSoup
url = "https://warehouse-theme-metal.myshopify.com/collections/sales" response = httpx.get(url) response.raise_for_status()
html_code = response.text soup = BeautifulSoup(html_code, "html.parser") products = soup.select(".product-item") print(len(products))
In CSS, `.product-item` selects all elements whose `class` attribute contains value `product-item`. We call `soup.select()` with the selector and get back a list of matching elements. Beautiful Soup handles all the complexity of understanding the HTML markup for us. On the last line, we use `len()` to count how many items there is in the list.
$ python main.py 24
That's it! We've managed to download a product listing, parse its HTML, and count how many products it contains. In the next lesson, we'll be looking for a way to extract detailed information about individual products.
***
## Exercises
These challenges are here to help you test what you’ve learned in this lesson. Try to resist the urge to peek at the solutions right away. Remember, the best learning happens when you dive in and do it yourself!
Real world
You're about to touch the real web, which is practical and exciting! But websites change, so some exercises might break. If you run into any issues, please leave a comment below or https://github.com/apify/apify-docs/issues.
### Scrape F1 Academy teams
Print a total count of F1 Academy teams listed on this page:
https://www.f1academy.com/Racing-Series/Teams
Solution
import httpx from bs4 import BeautifulSoup
url = "https://www.f1academy.com/Racing-Series/Teams" response = httpx.get(url) response.raise_for_status()
html_code = response.text soup = BeautifulSoup(html_code, "html.parser") print(len(soup.select(".teams-driver-item")))
### Scrape F1 Academy drivers
Use the same URL as in the previous exercise, but this time print a total count of F1 Academy drivers.
Solution
import httpx from bs4 import BeautifulSoup
url = "https://www.f1academy.com/Racing-Series/Teams" response = httpx.get(url) response.raise_for_status()
html_code = response.text soup = BeautifulSoup(html_code, "html.parser") print(len(soup.select(".driver")))
---
# Using a scraping platform with Python
**In this lesson, we'll deploy our application to a scraping platform that automatically runs it daily. We'll also use the platform's API to retrieve and work with the results.**
***
Before starting with a scraping platform, let's highlight a few caveats in our current setup:
* *User-operated:* We have to run the scraper ourselves. If we're tracking price trends, we'd need to remember to run it daily. And if we want alerts for big discounts, manually running the program isn't much better than just checking the site in a browser every day.
* *No monitoring:* If we have a spare server or a Raspberry Pi lying around, we could use https://en.wikipedia.org/wiki/Cron to schedule it. But even then, we'd have little insight into whether it ran successfully, what errors or warnings occurred, how long it took, or what resources it used.
* *Manual data management:* Tracking prices over time means figuring out how to organize the exported data ourselves. Processing the data could also be tricky since different analysis tools often require different formats.
* *Anti-scraping risks:* If the target website detects our scraper, they can rate-limit or block us. Sure, we could run it from a coffee shop's Wi-Fi, but eventually, they'd block that too—risking seriously annoying our barista.
In this lesson, we'll use a platform to address all of these issues. Generic cloud platforms like https://github.com/features/actions can work for simple scenarios. But platforms dedicated to scraping, like https://apify.com/, offer extra features such as monitoring scrapers, managing retrieved data, and overcoming anti-scraping measures.
Why Apify
Scraping platforms come in many varieties, offering a wide range of tools and approaches. As the course authors, we're obviously biased toward Apify—we think it's both powerful and complete.
That said, the main goal of this lesson is to show how deploying to *any platform* can make life easier. Plus, everything we cover here fits within https://apify.com/pricing.
## Registering
First, let's https://console.apify.com/sign-up. We'll go through a few checks to confirm we're human and our email is valid—annoying but necessary to prevent abuse of the platform.
Apify serves both as an infrastructure where to privately deploy and run own scrapers, and as a marketplace, where anyone can offer their ready scrapers to others for rent. But let's hold off on exploring the Apify Store for now.
## Getting access from the command line
To control the platform from our machine and send the code of our program there, we'll need the Apify CLI. On macOS, we can install the CLI using https://brew.sh, otherwise we'll first need https://nodejs.org/en/download.
After following the https://docs.apify.com/cli/docs/installation, we'll verify that we installed the tool by printing its version:
$ apify --version apify-cli/0.0.0 system-arch00 node-v0.0.0
Now let's connect the CLI with the cloud platform using our account from previous step:
$ apify login ... Success: You are logged in to Apify as user1234!
## Starting a real-world project
Until now, we've kept our scrapers simple, each with just a single Python module like `main.py`, and we've added dependencies only by installing them with `pip` inside a virtual environment.
If we sent our code to a friend, they wouldn't know what to install to avoid import errors. The same goes for deploying to a cloud platform.
To share our project, we need to package it. The best way is following the official https://packaging.python.org/, but for this course, we'll take a shortcut with the Apify CLI.
In our terminal, let's change to a directory where we usually start new projects. Then, we'll run the following command:
apify create warehouse-watchdog --template=python-crawlee-beautifulsoup
It will create a new subdirectory called `warehouse-watchdog` for the new project, containing all the necessary files:
Info: Python version 0.0.0 detected. Info: Creating a virtual environment in ... ... Success: Actor 'warehouse-watchdog' was created. To run it, run "cd warehouse-watchdog" and "apify run". Info: To run your code in the cloud, run "apify push" and deploy your code to Apify Console. Info: To install additional Python packages, you need to activate the virtual environment in the ".venv" folder in the actor directory.
## Adjusting the template
Inside the `warehouse-watchdog` directory, we should see a `src` subdirectory containing several Python files, including `main.py`. This is a sample Beautiful Soup scraper provided by the template.
The file contains a single asynchronous function, `main()`. At the beginning, it handles https://docs.apify.com/platform/actors/running/input-and-output#input, then passes that input to a small crawler built on top of the Crawlee framework.
Every program that runs on the Apify platform first needs to be packaged as a so-called https://docs.apify.com/platform/actors—a standardized container with designated places for input and output. Crawlee scrapers automatically connect their default dataset to the Actor output, but input must be handled explicitly in the code.

We'll now adjust the template so that it runs our program for watching prices. As the first step, we'll create a new empty file, `crawler.py`, inside the `warehouse-watchdog/src` directory. Then, we'll fill this file with final, unchanged code from the previous lesson:
import asyncio from crawlee.crawlers import BeautifulSoupCrawler
async def main(): crawler = BeautifulSoupCrawler()
@crawler.router.default_handler
async def handle_listing(context):
context.log.info("Looking for product detail pages")
await context.enqueue_links(selector=".product-list a.product-item__title", label="DETAIL")
@crawler.router.handler("DETAIL")
async def handle_detail(context):
context.log.info(f"Product detail page: {context.request.url}")
price_text = (
context.soup
.select_one(".product-form__info-content .price")
.contents[-1]
.strip()
.replace("$", "")
.replace(".", "")
.replace(",", "")
)
item = {
"url": context.request.url,
"title": context.soup.select_one(".product-meta__title").text.strip(),
"vendor": context.soup.select_one(".product-meta__vendor").text.strip(),
"price": int(price_text),
"variant_name": None,
}
if variants := context.soup.select(".product-form__option.no-js option"):
for variant in variants:
context.log.info("Saving a product variant")
await context.push_data(item | parse_variant(variant))
else:
context.log.info("Saving a product")
await context.push_data(item)
await crawler.run(["https://warehouse-theme-metal.myshopify.com/collections/sales"])
crawler.log.info("Exporting data")
await crawler.export_data_json(path='dataset.json', ensure_ascii=False, indent=2)
await crawler.export_data_csv(path='dataset.csv')
def parse_variant(variant): text = variant.text.strip() name, price_text = text.split(" - ") price = int( price_text .replace("$", "") .replace(".", "") .replace(",", "") ) return {"variant_name": name, "price": price}
if name == 'main': asyncio.run(main())
Now, let's replace the contents of `warehouse-watchdog/src/main.py` with this:
from apify import Actor from .crawler import main as crawl
async def main(): async with Actor: await crawl()
We import our scraper as a function and await the result inside the Actor block. Unlike the sample scraper, the one we made in the previous lesson doesn't expect any input data, so we can omit the code that handles that part.
Next, we'll change to the `warehouse-watchdog` directory in our terminal and verify that everything works locally before deploying the project to the cloud:
$ apify run Run: /Users/course/Projects/warehouse-watchdog/.venv/bin/python3 -m src [apify] INFO Initializing Actor... [apify] INFO System info ({"apify_sdk_version": "0.0.0", "apify_client_version": "0.0.0", "crawlee_version": "0.0.0", "python_version": "0.0.0", "os": "xyz"}) [BeautifulSoupCrawler] INFO Current request statistics: ┌───────────────────────────────┬──────────┐ │ requests_finished │ 0 │ │ requests_failed │ 0 │ │ retry_histogram │ [0] │ │ request_avg_failed_duration │ None │ │ request_avg_finished_duration │ None │ │ requests_finished_per_minute │ 0 │ │ requests_failed_per_minute │ 0 │ │ request_total_duration │ 0.0 │ │ requests_total │ 0 │ │ crawler_runtime │ 0.016736 │ └───────────────────────────────┴──────────┘ [crawlee._autoscaling.autoscaled_pool] INFO current_concurrency = 0; desired_concurrency = 2; cpu = 0; mem = 0; event_loop = 0.0; client_info = 0.0 [BeautifulSoupCrawler] INFO Looking for product detail pages [BeautifulSoupCrawler] INFO Product detail page: https://warehouse-theme-metal.myshopify.com/products/jbl-flip-4-waterproof-portable-bluetooth-speaker [BeautifulSoupCrawler] INFO Saving a product variant [BeautifulSoupCrawler] INFO Saving a product variant ...
## Updating the Actor configuration
The Actor configuration from the template tells the platform to expect input, so we need to update that before running our scraper in the cloud.
Inside `warehouse-watchdog`, there's a directory called `.actor`. Within it, we'll edit the `input_schema.json` file, which looks like this by default:
{ "title": "Python Crawlee BeautifulSoup Scraper", "type": "object", "schemaVersion": 1, "properties": { "start_urls": { "title": "Start URLs", "type": "array", "description": "URLs to start with", "prefill": [ { "url": "https://apify.com" } ], "editor": "requestListSources" } }, "required": ["start_urls"] }
Hidden dot files
Files and folders that start with a dot (like `.actor`) may be hidden by default. To see them:
* In your operating system's file explorer, look for a setting like **Show hidden files**.
* Many editors or IDEs can show hidden files as well. For example, the file explorer in VS Code shows them by default.
We'll remove the expected properties and the list of required ones. After our changes, the file should look like this:
{ "title": "Python Crawlee BeautifulSoup Scraper", "type": "object", "schemaVersion": 1, "properties": {} }
Trailing commas in JSON
Make sure there's no trailing comma after `{}`, or the file won't be valid JSON.
## Deploying the scraper
Now we can proceed to deployment:
$ apify push Info: Created Actor with name warehouse-watchdog on Apify. Info: Deploying Actor 'warehouse-watchdog' to Apify. Run: Updated version 0.0 for Actor warehouse-watchdog. Run: Building Actor warehouse-watchdog ... Actor build detail https://console.apify.com/actors/a123bCDefghiJkLMN#/builds/0.0.1 ? Do you want to open the Actor detail in your browser? (Y/n)
After opening the link in our browser, assuming we're logged in, we should see the **Source** screen on the Actor's detail page. We'll go to the **Input** tab of that screen. We won't change anything—just hit **Start**, and we should see logs similar to what we see locally, but this time our scraper will be running in the cloud.

When the run finishes, the interface will turn green. On the **Output** tab, we can preview the results as a table or JSON. We can even export the data to formats like CSV, XML, Excel, RSS, and more.

Accessing data
We don't need to click buttons to download the data. It's possible to retrieve it also using Apify's API, the `apify datasets` CLI command, or the Python SDK. Learn more in the https://docs.apify.com/platform/storage/dataset.
## Running the scraper periodically
Now that our scraper is deployed, let's automate its execution. In the Apify web interface, we'll go to https://console.apify.com/schedules. Let's click **Create new**, review the periodicity (default: daily), and specify the Actor to run. Then we'll click **Enable**—that's it!
From now on, the Actor will execute daily. We can inspect each run, view logs, check collected data, https://docs.apify.com/platform/monitoring, and even set up alerts.

## Adding support for proxies
If monitoring shows that our scraper frequently fails to reach the Warehouse Shop website, it's likely being blocked. To avoid this, we can https://docs.apify.com/platform/proxy so our requests come from different locations, reducing the chances of detection and blocking.
Proxy configuration is a type of Actor input, so let's start by reintroducing the necessary code. We'll update `warehouse-watchdog/src/main.py` like this:
from apify import Actor from .crawler import main as crawl
async def main(): async with Actor: input_data = await Actor.get_input()
if actor_proxy_input := input_data.get("proxyConfig"):
proxy_config = await Actor.create_proxy_configuration(actor_proxy_input=actor_proxy_input)
else:
proxy_config = None
await crawl(proxy_config)
Next, we'll add `proxy_config` as an optional parameter in `warehouse-watchdog/src/crawler.py`. Thanks to the built-in integration between Apify and Crawlee, we only need to pass it to `BeautifulSoupCrawler()`, and the class will handle the rest:
import asyncio from crawlee.crawlers import BeautifulSoupCrawler
async def main(proxy_config = None): crawler = BeautifulSoupCrawler(proxy_configuration=proxy_config) crawler.log.info(f"Using proxy: {'yes' if proxy_config else 'no'}")
@crawler.router.default_handler
async def handle_listing(context):
context.log.info("Looking for product detail pages")
await context.enqueue_links(selector=".product-list a.product-item__title", label="DETAIL")
...
Finally, we'll modify the Actor configuration in `warehouse-watchdog/src/.actor/input_schema.json` to include the `proxyConfig` input parameter:
{ "title": "Crawlee BeautifulSoup Scraper", "type": "object", "schemaVersion": 1, "properties": { "proxyConfig": { "title": "Proxy config", "description": "Proxy configuration", "type": "object", "editor": "proxy", "prefill": { "useApifyProxy": true, "apifyProxyGroups": [] }, "default": { "useApifyProxy": true, "apifyProxyGroups": [] } } } }
To verify everything works, we'll run the scraper locally. We'll use the `apify run` command again, but this time with the `--purge` option to ensure we're not reusing data from a previous run:
$ apify run --purge Info: All default local stores were purged. Run: /Users/course/Projects/warehouse-watchdog/.venv/bin/python3 -m src [apify] INFO Initializing Actor... [apify] INFO System info ({"apify_sdk_version": "0.0.0", "apify_client_version": "0.0.0", "crawlee_version": "0.0.0", "python_version": "0.0.0", "os": "xyz"}) [BeautifulSoupCrawler] INFO Using proxy: no [BeautifulSoupCrawler] INFO Current request statistics: ┌───────────────────────────────┬──────────┐ │ requests_finished │ 0 │ │ requests_failed │ 0 │ │ retry_histogram │ [0] │ │ request_avg_failed_duration │ None │ │ request_avg_finished_duration │ None │ │ requests_finished_per_minute │ 0 │ │ requests_failed_per_minute │ 0 │ │ request_total_duration │ 0.0 │ │ requests_total │ 0 │ │ crawler_runtime │ 0.014976 │ └───────────────────────────────┴──────────┘ [crawlee._autoscaling.autoscaled_pool] INFO current_concurrency = 0; desired_concurrency = 2; cpu = 0; mem = 0; event_loop = 0.0; client_info = 0.0 [BeautifulSoupCrawler] INFO Looking for product detail pages [BeautifulSoupCrawler] INFO Product detail page: https://warehouse-theme-metal.myshopify.com/products/jbl-flip-4-waterproof-portable-bluetooth-speaker [BeautifulSoupCrawler] INFO Saving a product variant [BeautifulSoupCrawler] INFO Saving a product variant ...
In the logs, we should see `Using proxy: no`, because local runs don't include proxy settings. All requests will be made from our own location, just as before. Now, let's update the cloud version of our scraper with `apify push`:
$ apify push Info: Deploying Actor 'warehouse-watchdog' to Apify. Run: Updated version 0.0 for Actor warehouse-watchdog. Run: Building Actor warehouse-watchdog (timestamp) ACTOR: Found input schema referenced from .actor/actor.json ... ? Do you want to open the Actor detail in your browser? (Y/n)
Back in the Apify console, we'll go to the **Source** screen and switch to the **Input** tab. We should see the new **Proxy config** option, which defaults to **Datacenter - Automatic**.

We'll leave it as is and click **Start**. This time, the logs should show `Using proxy: yes`, as the scraper uses proxies provided by the platform:
(timestamp) ACTOR: Pulling Docker image of build o6vHvr5KwA1sGNxP0 from repository. (timestamp) ACTOR: Creating Docker container. (timestamp) ACTOR: Starting Docker container. (timestamp) [apify] INFO Initializing Actor... (timestamp) [apify] INFO System info ({"apify_sdk_version": "0.0.0", "apify_client_version": "0.0.0", "crawlee_version": "0.0.0", "python_version": "0.0.0", "os": "xyz"}) (timestamp) [BeautifulSoupCrawler] INFO Using proxy: yes (timestamp) [BeautifulSoupCrawler] INFO Current request statistics: (timestamp) ┌───────────────────────────────┬──────────┐ (timestamp) │ requests_finished │ 0 │ (timestamp) │ requests_failed │ 0 │ (timestamp) │ retry_histogram │ [0] │ (timestamp) │ request_avg_failed_duration │ None │ (timestamp) │ request_avg_finished_duration │ None │ (timestamp) │ requests_finished_per_minute │ 0 │ (timestamp) │ requests_failed_per_minute │ 0 │ (timestamp) │ request_total_duration │ 0.0 │ (timestamp) │ requests_total │ 0 │ (timestamp) │ crawler_runtime │ 0.036449 │ (timestamp) └───────────────────────────────┴──────────┘ (timestamp) [crawlee._autoscaling.autoscaled_pool] INFO current_concurrency = 0; desired_concurrency = 2; cpu = 0; mem = 0; event_loop = 0.0; client_info = 0.0 (timestamp) [crawlee.storages._request_queue] INFO The queue still contains requests locked by another client (timestamp) [BeautifulSoupCrawler] INFO Looking for product detail pages (timestamp) [BeautifulSoupCrawler] INFO Product detail page: https://warehouse-theme-metal.myshopify.com/products/jbl-flip-4-waterproof-portable-bluetooth-speaker (timestamp) [BeautifulSoupCrawler] INFO Saving a product variant ...
## Congratulations!
We've reached the end of the course—congratulations! Together, we've built a program that:
* Crawls a shop and extracts product and pricing data.
* Exports the results in several formats.
* Uses a concise code, thanks to a scraping framework.
* Runs on a cloud platform with monitoring and alerts.
* Executes periodically without manual intervention, collecting data over time.
* Uses proxies to avoid being blocked.
We hope this serves as a solid foundation for your next scraping project. Perhaps you'll even https://docs.apify.com/platform/actors/publishing for others to use—for a fee?
---
# Saving data with Python
**In this lesson, we'll save the data we scraped in the popular formats, such as CSV or JSON. We'll use Python's standard library to export the files.**
***
We managed to scrape data about products and print it, with each product separated by a new line and each field separated by the `|` character. This already produces structured text that can be parsed, i.e., read programmatically.
$ python main.py JBL Flip 4 Waterproof Portable Bluetooth Speaker | 74.95 | 74.95 Sony XBR-950G BRAVIA 4K HDR Ultra HD TV | 1398.00 | None ...
However, the format of this text is rather *ad hoc* and does not adhere to any specific standard that others could follow. It's unclear what to do if a product title already contains the `|` character or how to represent multi-line product descriptions. No ready-made library can handle all the parsing.
We should use widely popular formats that have well-defined solutions for all the corner cases and that other programs can read without much effort. Two such formats are CSV (*Comma-separated values*) and JSON (*JavaScript Object Notation*).
## Collecting data
Producing results line by line is an efficient approach to handling large datasets, but to simplify this lesson, we'll store all our data in one variable. This'll take three changes to our program:
import httpx from bs4 import BeautifulSoup
url = "https://warehouse-theme-metal.myshopify.com/collections/sales" response = httpx.get(url) response.raise_for_status()
html_code = response.text soup = BeautifulSoup(html_code, "html.parser")
data = [] for product in soup.select(".product-item"): title = product.select_one(".product-item__title").text.strip()
price_text = (
product
.select_one(".price")
.contents[-1]
.strip()
.replace("$", "")
.replace(".", "")
.replace(",", "")
)
if price_text.startswith("From "):
min_price = int(price_text.removeprefix("From "))
price = None
else:
min_price = int(price_text)
price = min_price
data.append({"title": title, "min_price": min_price, "price": price})
print(data)
Before looping over the products, we prepare an empty list. Then, instead of printing each line, we append the data of each product to the list in the form of a Python dictionary. At the end of the program, we print the entire list. The program should now print the results as a single large Python list:
$ python main.py [{'title': 'JBL Flip 4 Waterproof Portable Bluetooth Speaker', 'min_price': 7495, 'price': 7495}, {'title': 'Sony XBR-950G BRAVIA 4K HDR Ultra HD TV', 'min_price': 139800, 'price': None}, ...]
Pretty print
If you find the complex data structures printed by `print()` difficult to read, try using https://docs.python.org/3/library/pprint.html#pprint.pp from the `pprint` module instead.
## Saving data as JSON
The JSON format is popular primarily among developers. We use it for storing data, configuration files, or as a way to transfer data between programs (e.g., APIs). Its origin stems from the syntax of objects in the JavaScript programming language, which is similar to the syntax of Python dictionaries.
In Python, we can read and write JSON using the https://docs.python.org/3/library/json.html standard library module. We'll begin with imports:
import httpx from bs4 import BeautifulSoup import json
Next, instead of printing the data, we'll finish the program by exporting it to JSON. Let's replace the line `print(data)` with the following:
with open("products.json", "w") as file: json.dump(data, file)
That's it! If we run our scraper now, it won't display any output, but it will create a `products.json` file in the current working directory, which contains all the data about the listed products:
[{"title": "JBL Flip 4 Waterproof Portable Bluetooth Speaker", "min_price": "7495", "price": "7495"}, {"title": "Sony XBR-950G BRAVIA 4K HDR Ultra HD TV", "min_price": "139800", "price": null}, ...]
If you skim through the data, you'll notice that the `json.dump()` function handled some potential issues, such as escaping double quotes found in one of the titles by adding a backslash:
{"title": "Sony SACS9 10" Active Subwoofer", "min_price": "15800", "price": "15800"}
Pretty JSON
While a compact JSON file without any whitespace is efficient for computers, it can be difficult for humans to read. You can pass `indent=2` to `json.dump()` for prettier output.
Also, if your data contains non-English characters, set `ensure_ascii=False`. By default, Python encodes everything except https://en.wikipedia.org/wiki/ASCII, which means it would save https://vi.wikipedia.org/wiki/B%C3%BAn_b%C3%B2_Nam_B%E1%BB%99 as `B\\u00fan b\\u00f2 Nam B\\u00f4`.
## Saving data as CSV
The CSV format is popular among data analysts because a wide range of tools can import it, including spreadsheets apps like LibreOffice Calc, Microsoft Excel, Apple Numbers, and Google Sheets.
In Python, we can read and write CSV using the https://docs.python.org/3/library/csv.html standard library module. First let's try something small in the Python's interactive REPL to familiarize ourselves with the basic usage:
import csv with open("data.csv", "w") as file: ... writer = csv.DictWriter(file, fieldnames=["name", "age", "hobbies"]) ... writer.writeheader() ... writer.writerow({"name": "Alice", "age": 24, "hobbies": "kickbox, Python"}) ... writer.writerow({"name": "Bob", "age": 42, "hobbies": "reading, TypeScript"}) ...
We first opened a new file for writing and created a `DictWriter()` instance with the expected field names. We instructed it to write the header row first and then added two more rows containing actual data. The code produced a `data.csv` file in the same directory where we're running the REPL. It has the following contents:
name,age,hobbies Alice,24,"kickbox, Python" Bob,42,"reading, TypeScript"
In the CSV format, if a value contains commas, we should enclose it in quotes. When we open the file in a text editor of our choice, we can see that the writer automatically handled this.
When browsing the directory on macOS, we can see a nice preview of the file's contents, which proves that the file is correct and that other programs can read it. If you're using a different operating system, try opening the file with any spreadsheet program you have.

Now that's nice, but we didn't want Alice, Bob, kickbox, or TypeScript. What we actually want is a CSV containing `Sony XBR-950G BRAVIA 4K HDR Ultra HD TV`, right? Let's do this! First, let's add `csv` to our imports:
import httpx from bs4 import BeautifulSoup import json import csv
Next, let's add one more data export to end of the source code of our scraper:
with open("products.json", "w") as file: json.dump(data, file)
with open("products.csv", "w") as file: writer = csv.DictWriter(file, fieldnames=["title", "min_price", "price"]) writer.writeheader() for row in data: writer.writerow(row)
The program should now also produce a CSV file with the following content:

We've built a Python application that downloads a product listing, parses the data, and saves it in a structured format for further use. But the data still has gaps: for some products, we only have the min price, not the actual prices. In the next lesson, we'll attempt to scrape more details from all the product pages.
***
## Exercises
In this lesson, we created export files in two formats. The following challenges are designed to help you empathize with the people who'd be working with them.
### Process your JSON
Write a new Python program that reads the `products.json` file we created in this lesson, finds all products with a min price greater than $500, and prints each one using https://docs.python.org/3/library/pprint.html#pprint.pp.
Solution
import json from pprint import pp
with open("products.json", "r") as file: products = json.load(file)
for product in products: if int(product["min_price"]) > 500: pp(product)
### Process your CSV
Open the `products.csv` file we created in the lesson using a spreadsheet application. Then, in the app, find all products with a min price greater than $500.
Solution
Let's use https://www.google.com/sheets/about/, which is free to use. After logging in with a Google account:
1. Go to **File > Import**, choose **Upload**, and select the file. Import the data using the default settings. You should see a table with all the data.
2. Select the header row. Go to **Data > Create filter**.
3. Use the filter icon that appears next to `min_price`. Choose **Filter by condition**, select **Greater than**, and enter **500** in the text field. Confirm the dialog. You should see only the filtered data.

---
# Scraping product variants with Python
**In this lesson, we'll scrape the product detail pages to represent each product variant as a separate item in our dataset.**
***
We'll need to figure out how to extract variants from the product detail page, and then change how we add items to the data list so we can add multiple items after scraping one product URL.
## Locating variants
First, let's extract information about the variants. If we go to https://warehouse-theme-metal.myshopify.com/products/sony-xbr-65x950g-65-class-64-5-diag-bravia-4k-hdr-ultra-hd-tv and open the DevTools, we can see that the buttons for switching between variants look like this:
55"
65"
Nice! We can extract the variant names, but we also need to extract the price for each variant. Switching the variants using the buttons shows us that the HTML changes dynamically. This means the page uses JavaScript to display this information.

If we can't find a workaround, we'd need our scraper to run JavaScript. That's not impossible. Scrapers can spin up their own browser instance and automate clicking on buttons, but it's slow and resource-intensive. Ideally, we want to stick to plain HTTP requests and Beautiful Soup as much as possible.
After a bit of detective work, we notice that not far below the `block-swatch-list` there's also a block of HTML with a class `no-js`, which contains all the data!
Variant
55" - $1,398.00
65" - $2,198.00
These elements aren't visible to regular visitors. They're there just in case JavaScript fails to work, otherwise they're hidden. This is a great find because it allows us to keep our scraper lightweight.
## Extracting variants
Using our knowledge of Beautiful Soup, we can locate the options and extract the data we need:
listing_url = "https://warehouse-theme-metal.myshopify.com/collections/sales" listing_soup = download(listing_url)
data = [] for product in listing_soup.select(".product-item"): item = parse_product(product, listing_url) product_soup = download(item["url"]) vendor = product_soup.select_one(".product-meta__vendor").text.strip()
if variants := product_soup.select(".product-form__option.no-js option"):
for variant in variants:
data.append(item | {"variant_name": variant.text.strip()})
else:
item["variant_name"] = None
data.append(item)
The CSS selector `.product-form__option.no-js` targets elements that have both the `product-form__option` and `no-js` classes. We then use the https://developer.mozilla.org/en-US/docs/Web/CSS/Descendant_combinator to match all `option` elements nested within the `.product-form__option.no-js` wrapper.
Python dictionaries are mutable, so if we assigned the variant with `item["variant_name"] = ...`, we'd always overwrite the values. Instead of saving an item for each variant, we'd end up with the last variant repeated several times. To avoid this, we create a new dictionary for each variant and merge it with the `item` data before adding it to `data`. If we don't find any variants, we add the `item` as is, leaving the `variant_name` key empty.
Modern Python syntax
Since Python 3.8, you can use `:=` to simplify checking if an assignment resulted in a non-empty value. It's called an *assignment expression* or *walrus operator*. You can learn more about it in the https://docs.python.org/3/reference/expressions.html#assignment-expressions or in the https://peps.python.org/pep-0572/.
Since Python 3.9, you can use `|` to merge two dictionaries. If the https://docs.python.org/3/library/stdtypes.html#dict aren't clear enough, check out the https://peps.python.org/pep-0584/ for more details.
If we run the program now, we'll see 34 items in total. Some items don't have variants, so they won't have a variant name. However, they should still have a price set—our scraper should already have that info from the product listing page.
[ ... { "variant_name": null, "title": "Klipsch R-120SW Powerful Detailed Home Speaker - Unit", "min_price": "32400", "price": "32400", "url": "https://warehouse-theme-metal.myshopify.com/products/klipsch-r-120sw-powerful-detailed-home-speaker-set-of-1", "vendor": "Klipsch" }, ... ]
Some products will break into several items, each with a different variant name. We don't know their exact prices from the product listing, just the min price. In the next step, we should be able to parse the actual price from the variant name for those items.
[ ... { "variant_name": "Red - $178.00", "title": "Sony XB-950B1 Extra Bass Wireless Headphones with App Control", "min_price": "12800", "price": null, "url": "https://warehouse-theme-metal.myshopify.com/products/sony-xb950-extra-bass-wireless-headphones-with-app-control", "vendor": "Sony" }, { "variant_name": "Black - $178.00", "title": "Sony XB-950B1 Extra Bass Wireless Headphones with App Control", "min_price": "12800", "price": null, "url": "https://warehouse-theme-metal.myshopify.com/products/sony-xb950-extra-bass-wireless-headphones-with-app-control", "vendor": "Sony" }, ... ]
Perhaps surprisingly, some products with variants will have the price field set. That's because the shop sells all variants of the product for the same price, so the product listing shows the price as a fixed amount, like *$74.95*, instead of *from $74.95*.
[ ... { "variant_name": "Red - $74.95", "title": "JBL Flip 4 Waterproof Portable Bluetooth Speaker", "min_price": "7495", "price": "7495", "url": "https://warehouse-theme-metal.myshopify.com/products/jbl-flip-4-waterproof-portable-bluetooth-speaker", "vendor": "JBL" }, ... ]
## Parsing price
The items now contain the variant as text, which is good for a start, but we want the price to be in the `price` key. Let's introduce a new function to handle that:
def parse_variant(variant): text = variant.text.strip() name, price_text = text.split(" - ") price = int( price_text .replace("$", "") .replace(".", "") .replace(",", "") ) return {"variant_name": name, "price": price}
First, we split the text into two parts, then we parse the price as a number. This part is similar to what we already do for parsing product listing prices. The function returns a dictionary we can merge with `item`.
## Saving price
Now, if we use our new function, we should finally get a program that can scrape exact prices for all products, even if they have variants. The whole code should look like this now:
import httpx from bs4 import BeautifulSoup import json import csv from urllib.parse import urljoin
def download(url): response = httpx.get(url) response.raise_for_status()
html_code = response.text
return BeautifulSoup(html_code, "html.parser")
def parse_product(product, base_url): title_element = product.select_one(".product-item__title") title = title_element.text.strip() url = urljoin(base_url, title_element["href"])
price_text = (
product
.select_one(".price")
.contents[-1]
.strip()
.replace("$", "")
.replace(".", "")
.replace(",", "")
)
if price_text.startswith("From "):
min_price = int(price_text.removeprefix("From "))
price = None
else:
min_price = int(price_text)
price = min_price
return {"title": title, "min_price": min_price, "price": price, "url": url}
def parse_variant(variant): text = variant.text.strip() name, price_text = text.split(" - ") price = int( price_text .replace("$", "") .replace(".", "") .replace(",", "") ) return {"variant_name": name, "price": price}
def export_json(file, data): json.dump(data, file, indent=2)
def export_csv(file, data): fieldnames = list(data[0].keys()) writer = csv.DictWriter(file, fieldnames=fieldnames) writer.writeheader() for row in data: writer.writerow(row)
listing_url = "https://warehouse-theme-metal.myshopify.com/collections/sales" listing_soup = download(listing_url)
data = [] for product in listing_soup.select(".product-item"): item = parse_product(product, listing_url) product_soup = download(item["url"]) vendor = product_soup.select_one(".product-meta__vendor").text.strip()
if variants := product_soup.select(".product-form__option.no-js option"):
for variant in variants:
data.append(item | parse_variant(variant))
else:
item["variant_name"] = None
data.append(item)
with open("products.json", "w") as file: export_json(file, data)
with open("products.csv", "w") as file: export_csv(file, data)
Let's run the scraper and see if all the items in the data contain prices:
[ ... { "variant_name": "Red", "title": "Sony XB-950B1 Extra Bass Wireless Headphones with App Control", "min_price": "12800", "price": "17800", "url": "https://warehouse-theme-metal.myshopify.com/products/sony-xb950-extra-bass-wireless-headphones-with-app-control", "vendor": "Sony" }, { "variant_name": "Black", "title": "Sony XB-950B1 Extra Bass Wireless Headphones with App Control", "min_price": "12800", "price": "17800", "url": "https://warehouse-theme-metal.myshopify.com/products/sony-xb950-extra-bass-wireless-headphones-with-app-control", "vendor": "Sony" }, ... ]
Success! We managed to build a Python application for watching prices!
Is this the end? Maybe! In the next lesson, we'll use a scraping framework to build the same application, but with less code, faster requests, and better visibility into what's happening while we wait for the program to finish.
***
## Exercises
These challenges are here to help you test what you’ve learned in this lesson. Try to resist the urge to peek at the solutions right away. Remember, the best learning happens when you dive in and do it yourself!
Real world
You're about to touch the real web, which is practical and exciting! But websites change, so some exercises might break. If you run into any issues, please leave a comment below or https://github.com/apify/apify-docs/issues.
### Build a scraper for watching Python jobs
You can build a scraper now, can't you? Let's build another one! Python's official website has a https://www.python.org/jobs/. Scrape the job postings that match the following criteria:
* Tagged as "Database"
* Posted within the last 60 days
For each job posting found, use https://docs.python.org/3/library/pprint.html#pprint.pp to print a dictionary containing the following data:
* Job title
* Company
* URL to the job posting
* Date of posting
Your output should look something like this:
{'title': 'Senior Full Stack Developer', 'company': 'Baserow', 'url': 'https://www.python.org/jobs/7705/', 'posted_on': datetime.date(2024, 9, 16)} {'title': 'Senior Python Engineer', 'company': 'Active Prime', 'url': 'https://www.python.org/jobs/7699/', 'posted_on': datetime.date(2024, 9, 5)} ...
Need a nudge?
You can find everything you need for working with dates and times in Python's https://docs.python.org/3/library/datetime.html module, including `date.today()`, `datetime.fromisoformat()`, `datetime.date()`, and `timedelta()`.
Solution
After inspecting the job board, you'll notice that job postings tagged as "Database" have a dedicated URL. We'll use that as our starting point, which saves us from having to scrape and check the tags manually.
from pprint import pp import httpx from bs4 import BeautifulSoup from urllib.parse import urljoin from datetime import datetime, date, timedelta
today = date.today() jobs_url = "https://www.python.org/jobs/type/database/" response = httpx.get(jobs_url) response.raise_for_status() soup = BeautifulSoup(response.text, "html.parser")
for job in soup.select(".list-recent-jobs li"): link = job.select_one(".listing-company-name a")
time = job.select_one(".listing-posted time")
posted_at = datetime.fromisoformat(time["datetime"])
posted_on = posted_at.date()
posted_ago = today - posted_on
if posted_ago We've censored out the **User ID** in the image because it is private information which should not be shared with anyone who is not trusted. The same goes for your **Personal API Token**.
Copy the Personal API Token and return to your terminal, entering this command:
apify login -t YOUR_TOKEN_HERE
If you see a log which looks like this,
Success: You are logged in to Apify as YOUR_USERNAME!
If you see a log which looks like Success: You are logged in to Apify as YOUR_USERNAME!, you're in!
What's EditThisCookie?
Learn how to add, delete, and modify different cookies in your browser for testing purposes using the EditThisCookie Chrome extension.
EditThisCookie is a Chrome extension to manage your browser's cookies. It can be added through the https://chromewebstore.google.com/detail/editthiscookie-v3/ojfebgpkimhlhcblbalbfjblapadhbol. After adding it to Chrome, you'll see a button with a delicious cookie icon next to any other Chrome extensions you might have installed. Clicking on it will open a pop-up window with a list of all saved cookies associated with the currently opened page domain.

Functionalities
At the top of the popup, there is a row of buttons. From left to right, here is an explanation for each one:
Delete all cookies
Clicking this button will remove all cookies associated with the current domain. For example, if you're logged into your Apify account and delete all the cookies, the website will ask you to log in again.
Reset
A refresh button.
Add a new cookie
Manually add a new cookie for the current domain.
Import cookies
Allows you to add cookies in bulk. For example, if you have saved some cookies inside your crawler, or someone provided you with some cookies for the purpose of testing a certain website in your browser, they can be imported and automatically applied with this button.
Export cookies
Copies an array of cookies associated with the current domain to the clipboard. The cookies can then be later inspected, added to your crawler, or imported by someone else using EditThisCookie.
Search
Allows you to filter through cookies by name.
Options
Will open a new browser tab with a bunch of EditThisCookie options. The options page allows you to tweak a few settings such as changing the export format, but you will most likely never need to change anything there.

What is Insomnia
Learn about Insomnia, a valuable tool for testing requests and proxies when building scalable web scrapers.
Despite its name, the https://insomnia.rest/download desktop application has absolutely nothing to do with having a lack of sleep. Rather, it is a tool to build and test APIs. If you've already read about https://docs.apify.com/academy/tools/postman.md, you already know what Insomnia can be used for, as they both practically do the same exact things. While Insomnia shares similarities with Postman, such as the ability to send requests with specific headers, cookies, and payloads, it has a few notable differences. One key difference is Insomnia's feature to display the entire request timeline.
Insomnia can be downloaded from its https://insomnia.rest/download, and its features can be read about in the https://docs.insomnia.rest/.
The Insomnia interface
After opening the app, you'll first need to create a new request. After creating the request, you'll see an interface that looks like this:

Let's break down the main sections:
List of requests
You can configure multiple requests with a custom payload, headers, cookies, parameters, etc. They are automatically saved in the list of requests until deleted.
Address bar
The place where you select the type of request to send (GET, POST, PUT, DELETE, etc.), specify the URI of the request and send the request with the Send button.
Request options
Here, you can add a request payload, specify authorization parameters, add query parameters, and attach headers to the request.
Response
Where the response body is displayed after the request has been sent. Like in Postman, the request can be viewed in preview mode, pretty-printed, or in its raw form. This section also has the Headers and Cookies tabs, which respectively show the request headers and cookies.
Request timeline
The one feature of Insomnia that separates it from Postman is the Timeline.

This feature allows you to see information about the request that is not present in the response body.
Using proxies in Insomnia
In order to use a proxy, you need to specify the proxy's parameters in Insomnia's preferences. In preferences, scroll down to the HTTP Network Proxy section under the General tab and specify the full proxy URL there:

Managing the cookies cache
Insomnia keeps the cookies for the requests you have already sent before. This might result in you receiving a different response within your scraper from what you're receiving in Insomnia, as a necessary cookie is not present in the request sent by the scraper. To check whether or not some cookies associated with a certain request have been cached, click on the Cookies button at the top of the list of requests:

This will bring up the Manage cookies window, where all cached cookies can be viewed, edited, or deleted.

Postman or Insomnia
The application you choose to use is completely up to your personal preference, and will not affect your development workflow. If viewing timelines of the requests you send is important to you, then you should go with Insomnia; however, if that doesn't matter, choose the one that has the most intuitive interface for you.
What is ModHeader?
Discover a super useful Chrome extension called ModHeader, which allows you to modify your browser's HTTP request headers.
If you read about https://docs.apify.com/academy/tools/postman.md, you might remember that you can use it to modify request headers before sending a request. This is great, but the main problem is that Postman can only make static requests - meaning, it is unable to load JavaScript or any https://docs.apify.com/academy/concepts/dynamic-pages.md.
https://chrome.google.com/webstore/detail/idgpnmonknjnojddfkpgkljpfnnfcklj is a Chrome extension which can be used to modify the HTTP headers of the requests you make with your browser. This means that, for example, if your scraper using a headless browser Puppeteer is being blocked due to an improper User-Agent header, you can use ModHeader to test the target website and quickly solve the issue.
The ModHeader interface
After you install the ModHeader extension, you should see it pinned in Chrome's task bar. When you click it, you'll see an interface like this pop up:

Here, you can add headers, remove headers, and even save multiple collections of headers that you can toggle between (which are called Profiles within the extension itself).
Use cases
When scraping dynamic websites, sometimes some specific headers are required to access certain pages. The most popularly required headers are generally User-Agent and referer. ModHeader, and other tools like it, make it easy to test requests to these websites right in your browser before writing logic for your scraper.
What is Postman?
Learn about Postman, a valuable tool for testing requests and proxies when building scalable web scrapers.
https://www.postman.com/ is a powerful collaboration platform for API development and testing. For scraping use-cases, it's mainly used to test requests and proxies (such as checking the response body of a raw request, without loading any additional resources such as JavaScript or CSS). This tool can do much more than that, but we will not be discussing all of its capabilities here. Postman allows us to test requests with cookies, headers, and payloads so that we can be entirely sure what the response looks like for a request URL we plan to eventually use in a scraper.
The desktop app can be downloaded from its https://www.postman.com/downloads/, or the web app can be used with a signup - no download required. If this is your first time working with a tool like Postman, we recommend checking out their https://learning.postman.com/docs/introduction/overview/.
Understanding the interface

Following four sections are essential to get familiar with Postman:
Tabs
Multiple test endpoints/requests can be opened at one time, each of which will be held within its own tab.
Address bar
The section in which you select the type of request to send, the URL of the request, and of course, send the request with the Send Request button.
Request options
This is a very useful section where you can view and edit structured query parameters, as well as specify any authorization parameters, headers, or payloads.
Response
After sending a request, the response's body will be found here, along with its cookies and headers. The response body can be viewed in various formats - Pretty-Print, Raw, or Preview.
Using and testing proxies
In order to use a proxy, the proxy's server and configuration must be provided in the Proxy tab in Postman settings.

After configuring a proxy, the next request sent will attempt to use it. To switch off the proxy, its details don't need to be deleted. The Add a custom proxy configuration option in settings needs to be un-ticked to disable it.
Managing the cookies cache
Postman keeps a cache of the cookies from all previous responses of a certain domain, which can be a blessing, but also a curse. Sometimes, you might notice that a request is going through just fine with Postman, but that your scraper is being blocked.
More often than not in these cases, the reason is because the endpoint being reached requires a valid cookie header to be present when sending the request, and because of Postman's cache, it is sending a valid cookie within each request's headers, while your scraper is not. Another reason this may happen is because you are sending Postman requests without a proxy (using your local IP address), while your scraper is using a proxy that could potentially be getting blocked.
In order to check whether there are any cookies associated with a certain request are cached in Postman, click on the Cookies button in any opened request tab:

Clicking on this button opens a MANAGE COOKIES window, where a list of all cached cookies per domain can be seen. If we had been previously sending multiple requests to https://github.com/apify, within this window we would be able to find cached cookies associated with github.com. Cookies can also be edited (to update some specific values), or deleted (to send a "clean" request without any cached data) here.

Some alternatives to Postman
What's Proxyman?
Learn about Proxyman, a tool for viewing all network requests that are coming through your system. Filter by response type, by a keyword, or by application.
Though the name sounds very similar to https://docs.apify.com/academy/tools/postman.md, https://proxyman.io/ is used for a different purpose. Rather than for manually sending and analyzing the responses of requests, Proxyman is a tool for macOS that allows you to view and analyze the HTTP/HTTPS requests that are going through your device. This is done by routing all of your requests through a proxy, which intercepts them and allows you to view data about them. Because it's just a proxy, the HTTP/HTTPS requests going through iOS devices, Android devices, and even iOS simulators can also be viewed with Proxyman.
If you've already gone through the https://docs.apify.com/academy/api-scraping/general-api-scraping/locating-and-learning.md in the API scraping section, you can think of Proxyman as an advanced Network Tab, where you can see requests that you sometimes can't see in regular browser DevTools.
The basics
Though the application offers a whole lot of advanced features, there are only a few main features you'll be utilizing when using Proxyman for scraper development purposes. Let's open up Proxyman and take a look at some of the basic features:
Apps
The Apps tab allows you to both view all of the applications on your machine which are sending requests, as well as filter requests based on application.

Results
Let's open up Safari and visit apify.com, then check back in Proxyman to see all of the requests Safari has made when visiting the website.

We can see all of the requests related to us visiting apify.com. Then, by clicking a request, we can see a whole lot of information about it. The most important information for you, however, will usually be the request and response headers and body.

Filtering
Sometimes, there can be hundreds (or even thousands) of requests that appear in the list. Rather than spending your time rooting through all of them, you can use the plethora of filtering methods that Proxyman offers to find exactly what you are looking for.

Alternatives
Since Proxyman is only available for macOS, it's only appropriate to list some alternatives to it that are accessible to our Windows and Linux friends:
- https://portswigger.net/burp
- https://www.charlesproxy.com/documentation/installation/
- https://www.telerik.com/fiddler
Quick JavaScript Switcher
Discover a handy tool for disabling JavaScript on a certain page to determine how it should be scraped. Great for detecting SPAs.
Quick JavaScript Switcher is a Chrome extension that allows you to switch on/off the JavaScript for the current page with one click. It can be added to your browser via the https://chrome.google.com/webstore/category/extensions. After adding it to Chrome, you'll see its respective button next to any other Chrome extensions you might have installed.
If JavaScript is enabled - clicking the button will switch it off and reload the page. The next click will re-enable JavaScript and refresh the page. This extension is useful for checking whether a certain website will work without JavaScript (and thus could be parsed without using a browser with a plain HTTP request) or not.
What is SwitchyOmega?
Discover SwitchyOmega, a Chrome extension to manage and switch between proxies, which is extremely useful when testing proxies for a scraper.
SwitchyOmega is a Chrome extension for managing and switching between proxies which can be added in the https://chrome.google.com/webstore/detail/padekgcemlokbadohgkifijomclgjgif.
After adding it to Chrome, you can see the SwitchyOmega icon somewhere amongst all your other Chrome extension icons. Clicking on it will display a menu, where you can select various different connection profiles, as well as open the extension's options.

Options
The options page has the following:
- General settings/interface settings (which you can keep to their default values).
- A list of proxy profiles (separate profiles can be added for different proxy groups, or for different countries for the residential proxy group, etc).
- The New profile button
- The main section, which shows the selected settings sub-section or selected proxy profile connection settings.

Adding a new proxy
After clicking on New profile, you'll be greeted with a New profile popup, where you can give the profile a name and select the type of profile you'd like to create. To add a proxy profile, select the respective option and click Create.

Then, you need to fill in the proxy settings:

If the proxy requires authentication, click on the lock icon and fill in the details within the popup.

Don't forget to click on Apply changes within the left-hand side menu under Actions!
Selecting proxy profiles
And that's it! All of your proxy profiles will appear in the menu. When one is chosen, the page you are currently on will be reloaded using the selected proxy profile.

User-Agent Switcher
Learn how to switch your User-Agent header to different values in order to monitor how a certain site responds to the changes.
User-Agent Switcher is a Chrome extension that allows you to quickly change your User-Agent and see how a certain website would behave with different user agents. After adding it to Chrome, you'll see a Chrome UA Spoofer button in the extension icons area. Clicking on it will open up a list of various User-Agent groups.

Clicking on a group will display a list of possible User-Agents to set.

After setting the User-Agent, the page will be refreshed.
Configuration
The extension configuration page allows you to edit the User-Agent list in case you want to add a specific User-Agent that isn't already provided. You can find some other options, but most likely you will never need to modify those.

Tutorials 📚
Learn about various different specific topics related to web-scraping and web-automation with the Apify Academy tutorial lessons!
In web scraping, there are a whole lot of niche cases that you will run into. Because our goal with the Apify Academy is to totally prepare you for any battle you may face in your web-automation projects, we've decided to create the Tutorials area of the Academy.
This area contains various one-off lessons about different specific topics related to web-scraping.
Web scraping basics for JavaScript devs
Learn how to develop web scrapers with this comprehensive and practical course. Go from beginner to expert, all in one place.
Welcome to Web scraping basics for JavaScript devs, a comprehensive, practical and long form web scraping course that will take you from an absolute beginner to a successful web scraper developer. If you're looking for a quick start, we recommend trying https://blog.apify.com/web-scraping-javascript-nodejs/ instead.
This course is made by https://apify.com, the web scraping and automation platform, but we will use only open-source technologies throughout all academy lessons. This means that the skills you learn will be applicable to any scraping project, and you'll be able to run your scrapers on any computer. No Apify account needed.
If you would like to learn about the Apify platform and how it can help you build, run and scale your web scraping and automation projects, see the https://docs.apify.com/academy/apify-platform.md, where we'll teach you all about Apify serverless infrastructure, proxies, API, scheduling, webhooks and much more.
Why learn scraper development?
With so many point-and-click tools and no-code software that can help you extract data from websites, what is the point of learning web scraper development? Contrary to what their marketing departments say, a point-and-click or no-code tool will never be as flexible, as powerful, or as optimized as a custom-built scraper.
Any software can do only what it was programmed to do. If you build your own scraper, it can do anything you want. And you can always quickly change it to do more, less, or the same, but faster or cheaper. The possibilities are endless once you know how scraping really works.
Scraper development is a fun and challenging way to learn web development, web technologies, and understand the internet. You will reverse-engineer websites and understand how they work internally, what technologies they use and how they communicate with their servers. You will also master your chosen programming language and core programming concepts. When you truly understand web scraping, learning other technologies like React or Next.js will be a piece of cake.
Course Summary
When we set out to create the Academy, we wanted to build a complete guide to web scraping - a course that a beginner could use to create their first scraper, as well as a resource that professionals will continuously use to learn about advanced and niche web scraping techniques and technologies. All lessons include code examples and code-along exercises that you can use to immediately put your scraping skills into action.
This is what you'll learn in the Web scraping basics for JavaScript devs course:
Requirements
You don't need to be a developer or a software engineer to complete this course, but basic programming knowledge is recommended. Don't be afraid, though. We explain everything in great detail in the course and provide external references that can help you level up your web scraping and web development skills. If you're new to programming, pay very close attention to the instructions and examples. A seemingly insignificant thing like using [] instead of () can make a lot of difference.
If you don't already have basic programming knowledge and would like to be well-prepared for this course, we recommend learning about https://developer.mozilla.org/en-US/curriculum/core/javascript-fundamentals/ and https://developer.mozilla.org/en-US/docs/Learn/CSS/Building_blocks/Selectors.
As you progress to the more advanced courses, the coding will get more challenging, but will still be manageable to a person with an intermediate level of programming skills.
Ideally, you should have at least a moderate understanding of the following concepts:
JavaScript + Node.js
It is recommended to understand at least the fundamentals of JavaScript and be proficient with Node.js prior to starting this course. If you are not yet comfortable with asynchronous programming (with promises and async...await), loops (and the different types of loops in JavaScript), modularity, or working with external packages, we would recommend studying the following resources before coming back and continuing this section:
- https://www.youtube.com/watch?v=vn3tm0quoqE&ab_channel=Fireship
- https://developer.mozilla.org/en-US/docs/Web/JavaScript/Guide/Loops_and_iteration
- https://javascript.plainenglish.io/how-to-use-modular-patterns-in-nodejs-982f0e5c8f6e
General web development
Throughout the next lessons, we will sometimes use certain technologies and terms related to the web without explaining them. This is because their knowledge will be assumed (unless we're showing something out of the ordinary).
- https://developer.mozilla.org/en-US/docs/Web/HTML
- https://developer.mozilla.org/en-US/docs/Web/HTTP
- https://docs.apify.com/academy/web-scraping-for-beginners/data-extraction/browser-devtools.md
jQuery or Cheerio
We'll be using the https://www.npmjs.com/package/cheerio package a lot to parse data from HTML. This package provides an API using jQuery syntax to help traverse downloaded HTML within Node.js.
Next up
The course begins with a small bit of theory and moves into some realistic and practical examples of extracting data from the most popular websites on the internet using your browser console. https://docs.apify.com/academy/web-scraping-for-beginners/introduction.md
If you already have experience with HTML, CSS, and browser DevTools, feel free to skip to the https://docs.apify.com/academy/web-scraping-for-beginners/crawling.md section.
Best practices when writing scrapers
Understand the standards and best practices that we here at Apify abide by to write readable, scalable, and maintainable code.
Every developer has their own style, which evolves as they grow and learn. While one dev might prefer a more https://en.wikipedia.org/wiki/Functional_programming style, another might find an https://en.wikipedia.org/wiki/Imperative_programming approach to be more intuitive. We at Apify understand this, and have written this best practices lesson with that in mind.
The goal of this lesson is not to force you into a specific paradigm or to make you think that you're doing things wrong, but instead to provide you some insight into the standards and best practices that we at Apify follow to ensure readable, maintainable, scalable code.
Code style
When it comes to your code style when writing scrapers, there are some general things we recommend.
Clean code
Praise https://blog.risingstack.com/javascript-clean-coding-best-practices-node-js-at-scale/! Use proper variable and function names that are descriptive of what they are, and split your code into smaller https://en.wikipedia.org/wiki/Pure_function functions.
Constant variables
Define any https://softwareengineering.stackexchange.com/questions/250619/best-practices-reasons-for-string-constants-in-javascript that globally apply to the scraper in a single file named constants.js, from where they will all be imported. Constant variable names should be in UPPERCASE_WITH_UNDERSCORES style.
If you have a whole lot of constant variables, they can be in a folder named constants organized into different files.
Use ES6 JavaScript
If you're writing your scraper in JavaScript, use https://www.w3schools.com/js/js_es6.asp features and ditch the old ones which they replace. This means using const and let instead of var, includes instead of indexOf, etc.
To learn more about some of the most popular (and awesome) ES6+ features, check out https://medium.com/@matthiasvstephens/why-is-es6-so-awesome-88bff6857849 article.
No magic numbers
Avoid using https://en.wikipedia.org/wiki/Magic_number_(programming) as much as possible. Either declare them as a constant variable in your constants.js file, or if they are only used once, add a comment explaining what the number is.
Don't write code like this:
const x = (y) => (y - 32) * (5 / 9);
That is quite confusing due to the nondescriptive naming and the magic numbers. Do this instead:
// Converts a fahrenheit value to celsius
const fahrenheitToCelsius = (celsius) => (celsius - 32) * (5 / 9);
Use comments!
Don't be shy to add comments to your code! Even when using descriptive function and variable naming, it might still be a good idea to add a comment in places where you had to make a tough decision or chose an unusual choice.
If you're a true pro, use https://jsdoc.app/ to comment and document your code.
Logging
Logging helps you understand exactly what your scraper is doing. Generally, having more logs is better than having fewer. Especially make sure to log your catch blocks - no error should pass unseen unless there is a good reason.
For scrapers that will run longer than usual, keep track of some useful stats (such as itemsScraped or errorsHit) and log them to the console on an interval.
The meaning of your log messages should make sense to an outsider who is not familiar with the inner workings of your scraper. Avoid log lines with just numbers or just URLs - always identify what the number/string means.
Here is an example of an "incorrect" log message:
300 https://example.com/1234 1234
And here is that log message translated into something that makes much more sense to the end user:
Index 1234 --- https://example.com/1234 --- took 300 ms
Input
When it comes to accepting input into a scraper, two main best practices should be followed.
Set limits
When allowing your users to pass input properties which could break the scraper (such as timeout set to 0), be sure to disallow ridiculous values. Set a maximum/minimum number allowed, maximum array input length, etc.
Validate
Validate the input provided by the user! This should be the very first thing your scraper does. If the fields in the input are missing or in an incorrect type/format, either parse the value and correct it programmatically or throw an informative error telling the user how to fix the error.
On the Apify platform, you can use the https://docs.apify.com/academy/deploying-your-code/input-schema.md to both validate inputs and generate a clean UI for those using your scraper.
Error handling
Errors are bound to occur in scrapers. Perhaps it got blocked, or perhaps the data scraped was corrupted in some way.
Whatever the reason, a scraper shouldn't completely crash when an error occurs. Use try...catch blocks to catch errors and log useful messages. The log messages should indicate where the error happened, and what type of error happened.
Bad error log message:
Cannot read property “0” from undefined
Good error log message:
Could not parse an address, skipping the page. Url: https://www.example-website.com/people/1234
This doesn't mean that you should absolutely litter your code with try...catch blocks, but it does mean that they should be placed in error-prone areas (such as API calls or testing a string with a specific regular expression).
If the error that has occurred renders that run of the scraper completely useless, exit the process immediately.
Logging is the minimum you should be doing though. For example, if you have an entire object of scraped data and just the price field fails to be parsed, you might not want to throw away the rest of that data. Rather, it could still be pushed to the output and a log message like this could appear:
We could not parse the price of product: Men's Trainers Orange, pushing anyways.
This really depends on your use case though. If you want 100% clean data, you might not want to push incomplete objects and just retry (ideally) or log an error message instead.
Recap
Wow, that's a whole lot of things to abide by! How will you remember all of them? Try to follow these three points:
- Describe your code as you write it with good naming, constants, and comments. It should read like a book.
- Add log messages at points throughout your code so that when it's running, you (and everyone else) know what's going on.
- Handle errors appropriately. Log the error and either retry, or continue on. Only throw if the error will be caught or if the error is absolutely detrimental to the scraper's run.
Challenge
Test your knowledge acquired in the previous sections of this course by building an Amazon scraper using Crawlee's CheerioCrawler!
Before moving onto the other courses in the academy, we recommend following along with this section, as it combines everything you've learned in the previous lessons into one cohesive project that helps you prove to yourself that you've thoroughly understood the material.
We recommend that you make sure you've gone through both the https://docs.apify.com/academy/web-scraping-for-beginners/data-extraction.md and https://docs.apify.com/academy/web-scraping-for-beginners/crawling.md sections of this course to ensure the smoothest development process.
Learning 🧠
Before continuing, it is highly recommended to do the following:
- Look over https://crawlee.dev/docs/introduction/first-crawler and ideally code along.
- Read https://docs.apify.com/academy/node-js/request-labels-in-apify-actors about https://crawlee.dev/api/core/class/Request#label (this will be extremely useful later on).
- Check out https://docs.apify.com/academy/node-js/dealing-with-dynamic-pages.md about dynamic pages.
- Read about the https://crawlee.dev/api/core/class/RequestQueue.
Our task
On Amazon, we can use this link to get to the results page of any product we want:
https://www.amazon.com/s/ref=nb_sb_noss?url=search-alias%3Daps&field-keywords=KEYWORD
Our crawler's input will look like this:
{
"keyword": "iphone"
}
The goal at hand is to scrape all of the products from the first page of results for whatever keyword was provided (for our test case, it will be iPhone), then to scrape all available offers of each product and push the results to the dataset. For context, the offers for a product look like this:

In the end, we'd like our final output to look something like this:
[
{
"title": "Apple iPhone 6 a1549 16GB Space Gray Unlocked (Certified Refurbished)",
"asin": "B07P6Y7954",
"itemUrl": "https://www.amazon.com/Apple-iPhone-Unlocked-Certified-Refurbished/dp/B00YD547Q6/ref=sr_1_2?s=wireless&ie=UTF8&qid=1539772626&sr=1-2&keywords=iphone",
"description": "What's in the box: Certified Refurbished iPhone 6 Space Gray 16GB Unlocked , USB Cable/Adapter. Comes in a Generic Box with a 1 Year Limited Warranty.",
"keyword": "iphone",
"sellerName": "Blutek Intl",
"offer": "$162.97"
},
{
"title": "Apple iPhone 6 a1549 16GB Space Gray Unlocked (Certified Refurbished)",
"asin": "B07P6Y7954",
"itemUrl": "https://www.amazon.com/Apple-iPhone-Unlocked-Certified-Refurbished/dp/B00YD547Q6/ref=sr_1_2?s=wireless&ie=UTF8&qid=1539772626&sr=1-2&keywords=iphone",
"description": "What's in the box: Certified Refurbished iPhone 6 Space Gray 16GB Unlocked , USB Cable/Adapter. Comes in a Generic Box with a 1 Year Limited Warranty.",
"keyword": "iphone",
"sellerName": "PLATINUM DEALS",
"offer": "$169.98"
},
{
"...": "..."
}
]
The
asinis the ID of the product, which is data present on the Amazon website.
Each of the items in the dataset will represent a scraped offer and will have the same title, asin, itemUrl, and description. The offer-specific fields will be sellerName and offer.
First up
From this course, you should have all the knowledge to build this scraper by yourself. Give it a try, then come back to compare your scraper with our solution.
The challenge can be completed using either https://crawlee.dev/api/cheerio-crawler/class/CheerioCrawler or https://crawlee.dev/api/playwright-crawler/class/PlaywrightCrawler. Playwright is significantly slower but doesn't get blocked as much. You will learn the most by implementing both.
Let's start off this section by https://docs.apify.com/academy/web-scraping-for-beginners/challenge/initializing-and-setting-up.md our project with the Crawlee CLI (don't worry, no additional installation is required).
Initialization & setting up
When you extract links from a web page, you often end up with a lot of irrelevant URLs. Learn how to filter the links to only keep the ones you need.
The Crawlee CLI speeds up the process of setting up a Crawlee project. Navigate to the directory you'd like your project's folder to live, then open up a terminal instance and run the following command:
npx crawlee create amazon-crawler
Once you run this command, you'll get prompted into a menu which you can navigate using your arrow keys. Each of these options will generate a different boilerplate code when selected. We're going to work with CheerioCrawler today, so we'll select the CheerioCrawler template project template, and then press Enter.

Once it's completed, open up the amazon-crawler folder that was generated by the npx crawlee create command. We're going to modify the main.js boilerplate to fit our needs:
// main.js
import { CheerioCrawler, KeyValueStore, log } from 'crawlee';
import { router } from './routes.js';
// Grab our keyword from the input
const { keyword } = await KeyValueStore.getInput();
const crawler = new CheerioCrawler({
requestHandler: router,
// If you have access to Apify Proxy, you can use residential proxies and
// high retry count which helps with blocking
// If you don't, your local IP address will likely be fine for a few requests if you scrape slowly.
// proxyConfiguration: await Actor.createProxyConfiguration({ groups: ['RESIDENTIAL'] }),
// maxRequestRetries: 10,
});
log.info('Starting the crawl.');
await crawler.run([{
// Turn the keyword into a link we can make a request with
url: `https://www.amazon.com/s/ref=nb_sb_noss?url=search-alias%3Daps&field-keywords=${keyword}`,
label: 'START',
userData: {
keyword,
},
}]);
log.info('Crawl finished.');
// routes.js
import { createCheerioRouter } from 'crawlee';
export const router = createCheerioRouter();
router.addDefaultHandler(({ log }) => {
log.info('Route reached.');
});
Finally, we'll add the following input file to INPUT.json in the project's root directory (next to package.json, node_modules and others)
{
"keyword": "iphone"
}
This is how we'll be inputting data into our scraper from now on. Don't worry though, from now on, we'll only need to work in the main.js and routes.js files!
Next up
Cool! We're ready. But https://docs.apify.com/academy/web-scraping-for-beginners/challenge/modularity.md before moving forward!
Modularity
Before you build your first web scraper with Crawlee, it is important to understand the concept of modularity in programming.
Now that we've gotten our first request going, the first challenge is going to be selecting all of the resulting products on the page. Back in the browser, we'll use the DevTools hover tool to inspect a product.

Bingo! Each product seems to have a data-asin attribute, which includes the ASIN (product ID) data we want. Now, we can select each of these elements with this selector: div > div[data-asin]:not([data-asin=""]). Then, we'll scrape some data about each product, and push a request to the main product page so we can grab hold of the description.
But, before we start scraping, let's pause to talk a bit about the important concept of modularity. You may have noticed the src folder inside of your project, which by default has a routes.js file in it. We're going to use this to create modularized functions which can then be conditionally executed by our crawler.
// routes.js
import { createCheerioRouter } from 'crawlee';
import { BASE_URL } from './constants.js';
export const router = createCheerioRouter();
router.addDefaultHandler(({ log }) => {
log.info('Route reached.');
});
// Add a handler to our router to handle requests with the 'START' label
router.addHandler('START', async ({ $, crawler, request }) => {
const { keyword } = request.userData;
const products = $('div > div[data-asin]:not([data-asin=""])');
// loop through the resulting products
for (const product of products) {
const element = $(product);
const titleElement = $(element.find('.a-text-normal[href]'));
const url = `${BASE_URL}${titleElement.attr('href')}`;
// scrape some data from each and to a request
// to the crawler for its page
await crawler.addRequests([{
url,
label: 'PRODUCT',
userData: {
// Pass the scraped data about the product to the next
// request so that it can be used there
data: {
title: titleElement.first().text().trim(),
asin: element.attr('data-asin'),
itemUrl: url,
keyword,
},
},
}]);
}
});
router.addHandler('PRODUCT', ({ log }) => log.info('on a product page!'));
Also notice that we are importing BASE_URL from constants.js. Here is what that file looks like:
// constants.js
export const BASE_URL = 'https://www.amazon.com';
And here is what our main.js file currently looks like:
// main.js
import { CheerioCrawler, log, KeyValueStore } from 'crawlee';
import { router } from './routes.js';
import { BASE_URL } from './constants.js';
const { keyword = 'iphone' } = (await KeyValueStore.getInput()) ?? {};
const crawler = new CheerioCrawler({
requestHandler: router,
});
await crawler.addRequests([
{
// Use BASE_URL here instead
url: `${BASE_URL}/s/ref=nb_sb_noss?url=search-alias%3Daps&field-keywords=${keyword}`,
label: 'START',
userData: {
keyword,
},
},
]);
log.info('Starting the crawl.');
await crawler.run();
log.info('Crawl finished.');
One of the main reasons we modularize our code is to prevent massive and difficult to read files by separating concerns into separate files. In our main.js file, we're handling the initialization, configuration, and running of our crawler. In routes.js, we determine how the crawler should handle different routes, and in constants.js we define non-changing values that will be used throughout the project.
Organized code makes everyone happy, including you - the one developing the scraper! Spaghetti is super awesome, https://www.urbandictionary.com/define.php?term=spaghetti+code 🍝
This can even be optimized further by putting our label items into constants.js, like so:
// constants.js
export const BASE_URL = 'https://www.amazon.com';
export const labels = {
START: 'START',
PRODUCT: 'PRODUCT',
OFFERS: 'OFFERS',
};
Then, the labels can be used by importing labels and accessing labels.START, labels.PRODUCT, or labels.OFFERS.
This is not necessary, but it is best practice, as it can prevent dumb typos that can cause nasty bugs 🐞 For the rest of this lesson, all of the examples using labels will be using the imported versions.
If you haven't already read the Best practices lesson in the Web scraping basics for JavaScript devs course, please https://docs.apify.com/academy/web-scraping-for-beginners/best-practices.md.
Next up
Now that we've gotten that out of the way, we can finally continue with our Amazon scraper. https://docs.apify.com/academy/web-scraping-for-beginners/challenge/scraping-amazon.md!
Scraping Amazon
Build your first web scraper with Crawlee. Let's extract product information from Amazon to give you an idea of what real-world scraping looks like.
In our quick chat about modularity, we finished the code for the results page and added a request for each product to the crawler's RequestQueue. Here, we need to scrape the description, so it shouldn't be too hard:
// routes.js
// ...
router.addHandler(labels.PRODUCT, async ({ $ }) => {
const element = $('div#productDescription');
const description = element.text().trim();
console.log(description); // works!
});
Great! But wait, where do we go from here? We need to go to the offers page next and scrape each offer, but how can we do that? Let's take a small break from writing the scraper and open up https://docs.apify.com/academy/tools/proxyman.md to analyze requests which we might be difficult to find in the network tab, then we'll click the button on the product page that loads up all of the product offers:

After clicking this button and checking back in Proxyman, we discovered this link:
You can find the request below in the network tab just fine, but with Proxyman, it is much easier and faster due to the extended filtering options.
https://www.amazon.com/gp/aod/ajax/ref=auto_load_aod?asin=B07ZPKBL9V&pc=dp
The asin https://www.branch.io/glossary/query-parameters/ matches up with our product's ASIN, which means we can use this for any product of which we have the ASIN.
Here's what this page looks like:

Wow, that's ugly. But for our scenario, this is really great. When we click the View offers button, we usually have to wait for the offers to load and render, which would mean we could have to switch our entire crawler to a PuppeteerCrawler or PlaywrightCrawler. The data on this page we've just found appears to be loaded statically, which means we can still use CheerioCrawler and keep the scraper as efficient as possible 😎
It's totally possible to scrape the same data as this crawler using https://docs.apify.com/academy/puppeteer-playwright.md; however, with this offers link found in Postman, we can follow the same workflow much more quickly with static HTTP requests using CheerioCrawler.
First, we'll create a request for each product's offers page:
// routes.js
// ...
router.addHandler(labels.PRODUCT, async ({ $, crawler, request }) => {
const { data } = request.userData;
const element = $('div#productDescription');
// Add to the request queue
await crawler.addRequests([{
url: `${BASE_URL}/gp/aod/ajax/ref=auto_load_aod?asin=${data.asin}&pc=dp`,
label: labels.OFFERS,
userData: {
data: {
...data,
description: element.text().trim(),
},
},
}]);
});
Finally, we can handle the offers in a separate handler:
// routes.js
router.addHandler(labels.OFFERS, async ({ $, request }) => {
const { data } = request.userData;
for (const offer of $('#aod-offer')) {
const element = $(offer);
await Dataset.pushData({
...data,
sellerName: element.find('div[id*="soldBy"] a[aria-label]').text().trim(),
offer: element.find('.a-price .a-offscreen').text().trim(),
});
}
});
Final code
That should be it! Let's make sure we've all got the same code:
// constants.js
export const BASE_URL = 'https://www.amazon.com';
export const labels = {
START: 'START',
PRODUCT: 'PRODUCT',
OFFERS: 'OFFERS',
};
// routes.js
import { createCheerioRouter, Dataset } from 'crawlee';
import { BASE_URL, labels } from './constants';
export const router = createCheerioRouter();
router.addHandler(labels.START, async ({ $, crawler, request }) => {
const { keyword } = request.userData;
const products = $('div > div[data-asin]:not([data-asin=""])');
for (const product of products) {
const element = $(product);
const titleElement = $(element.find('.a-text-normal[href]'));
const url = `${BASE_URL}${titleElement.attr('href')}`;
await crawler.addRequests([
{
url,
label: labels.PRODUCT,
userData: {
data: {
title: titleElement.first().text().trim(),
asin: element.attr('data-asin'),
itemUrl: url,
keyword,
},
},
},
]);
}
});
router.addHandler(labels.PRODUCT, async ({ $, crawler, request }) => {
const { data } = request.userData;
const element = $('div#productDescription');
await crawler.addRequests([
{
url: `${BASE_URL}/gp/aod/ajax/ref=auto_load_aod?asin=${data.asin}&pc=dp`,
label: labels.OFFERS,
userData: {
data: {
...data,
description: element.text().trim(),
},
},
},
]);
});
router.addHandler(labels.OFFERS, async ({ $, request }) => {
const { data } = request.userData;
for (const offer of $('#aod-offer')) {
const element = $(offer);
await Dataset.pushData({
...data,
sellerName: element.find('div[id*="soldBy"] a[aria-label]').text().trim(),
offer: element.find('.a-price .a-offscreen').text().trim(),
});
}
});
// main.js
import { CheerioCrawler, KeyValueStore, log } from 'crawlee';
import { router } from './routes.js';
// Grab our keyword from the input
const { keyword = 'iphone' } = (await KeyValueStore.getInput()) ?? {};
const crawler = new CheerioCrawler({
requestHandler: router,
});
// Add our initial requests
await crawler.addRequests([
{
// Turn the inputted keyword into a link we can make a request with
url: `https://www.amazon.com/s/ref=nb_sb_noss?url=search-alias%3Daps&field-keywords=${keyword}`,
label: 'START',
userData: {
keyword,
},
},
]);
log.info('Starting the crawl.');
await crawler.run();
log.info('Crawl finished.');
Wrap up 💥
Nice work! You've officially built your first scraper with Crawlee! You're now ready to take on the rest of the Apify Academy with confidence.
For now, this is the last section of the Web scraping basics for JavaScript devs course. If you want to learn more about web scraping, we recommend checking venturing out and following the other lessons in the Academy. We will keep updating the Academy with more content regularly until we cover all the advanced and expert topics we promised at the beginning.
Basics of crawling
Learn how to crawl the web with your scraper. How to extract links and URLs from web pages and how to manage the collected links to visit new pages.
Welcome to the second section of our Web scraping basics for JavaScript devs course. In the https://docs.apify.com/academy/web-scraping-for-beginners/data-extraction.md section, we learned how to extract data from a web page. Specifically, a template Shopify site called https://warehouse-theme-metal.myshopify.com/.

In this section, we will take a look at moving between web pages, which we call crawling. We will extract data about all the on-sale products on https://warehouse-theme-metal.myshopify.com/collections/sales. To do that, we will need to crawl the individual product pages.
How do you crawl?
Crawling websites is a fairly straightforward process. We'll start by opening the first web page and extracting all the links (URLs) that lead to the other pages we want to visit. To do that, we'll use the skills learned in the https://docs.apify.com/academy/web-scraping-for-beginners/data-extraction.md course. We'll add some extra filtering to make sure we only get the correct URLs. Then, we'll save those URLs, so in case our scraper crashes with an error, we won't have to extract them again. And, finally, we will visit those URLs one by one.
At any point, we can extract URLs, data, or both. Crawling can be separate from data extraction, but it's not a requirement and, in most projects, it's actually easier and faster to do both at the same time. To summarize, it goes like this:
- Visit the start URL.
- Extract new URLs (and data) and save them.
- Visit one of the new-found URLs and save data and/or more URLs from them.
- Repeat 2 and 3 until you have everything you need.
Next up
First, let's make sure we all understand the foundations. In the https://docs.apify.com/academy/web-scraping-for-beginners/crawling/recap-extraction-basics.md we will review the scraper code we already have from the https://docs.apify.com/academy/web-scraping-for-beginners/data-extraction.md section of the course.
Exporting data
Learn how to export the data you scraped using Crawlee to CSV or JSON.
In the previous lessons, you learned that:
- You can use
Dataset.pushData()to save data to the default dataset. - The default dataset files are saved in the
./storage/datasets/defaultfolder.
But when we look inside the folder, we see that there are a lot of files, and we don't want to work with those manually. We can use the dataset itself to export the data.
Exporting data to CSV
Crawlee's Dataset provides a way to export all your scraped data into one big CSV file. You can then open it in Excel or any other data processor. To do that, you need to call https://crawlee.dev/api/core/class/Dataset#exportToCSV after collecting all the data. That means, after your crawler run finishes.
// ...
await crawler.run();
// Add this line to export to CSV.
await Dataset.exportToCSV('results');
After you add this one line and run the code, you'll find your CSV with all the scraped products in here:
./storage/key-value-stores/default/results.csv
info
https://crawlee.dev/docs/guides/result-storage#key-value-store is another of Crawlee's storages. It's best for saving files like CSVs, PDFs or images, but also large JSONs or crawler statistics.
Exporting data to JSON
Exporting to JSON is very similar to exporting to CSV, but we'll use a different function: https://crawlee.dev/api/core/class/Dataset#exportToJSON. Exporting to JSON is useful when you don't want to work with each item separately, but would rather have one big JSON file with all the results.
// ...
await crawler.run();
// Add this line to export to JSON.
await Dataset.exportToJSON('results');
You will find the resulting JSON here:
./storage/key-value-stores/default/results.json
Final scraper code
import { PlaywrightCrawler, Dataset } from 'crawlee';
const crawler = new PlaywrightCrawler({
// We removed the headless: false option to hide the browser windows.
requestHandler: async ({ parseWithCheerio, request, enqueueLinks }) => {
console.log(`Fetching URL: ${request.url}`);
if (request.label === 'start-url') {
await enqueueLinks({
selector: 'a.product-item__title',
});
return;
}
// Fourth, parse the browser's page with Cheerio.
const $ = await parseWithCheerio();
const title = $('h1').text().trim();
const vendor = $('a.product-meta__vendor').text().trim();
const price = $('span.price').contents()[2].nodeValue;
const reviewCount = parseInt($('span.rating__caption').text(), 10);
const description = $('div[class*="description"] div.rte').text().trim();
const recommendedProducts = $('.product-recommendations a.product-item__title')
.map((i, el) => $(el).text().trim())
.toArray();
await Dataset.pushData({
title,
vendor,
price,
reviewCount,
description,
recommendedProducts,
});
},
});
await crawler.addRequests([{
url: 'https://warehouse-theme-metal.myshopify.com/collections/sales',
label: 'start-url',
}]);
await crawler.run();
await Dataset.exportToCSV('results');
Next up
And this is it for the https://docs.apify.com/academy/web-scraping-for-beginners/crawling.md section of the https://docs.apify.com/academy/web-scraping-for-beginners.md course. If you want to learn more, test your knowledge of the methods and concepts you learned in this course by moving forward with the https://docs.apify.com/academy/web-scraping-for-beginners/challenge.md.
Filtering links
When you extract links from a web page, you often end up with a lot of irrelevant URLs. Learn how to filter the links to only keep the ones you need.
Web pages are full of links, but frankly, most of them are useless to us when scraping. Filtering links can be approached in two ways: Targeting the links we're interested in by using unique CSS selectors, or extracting all links and then using pattern matching to find the sought after URLs. In real scraping scenarios, both of these two approaches are often combined for the most effective URL filtering.
Filtering with unique CSS selectors
In the previous lesson, we grabbed all the links from the HTML document.
- DevTools
- Node.js with Cheerio
document.querySelectorAll('a');
$('a');
Attribute selector
That's not the only way to do it, however. Since we're interested in the href attributes, a first very reasonable filter is to exclusively target the `` tags that have the href attribute (yes, anchor tags without the attribute can and do exist). You can do that by using the https://developer.mozilla.org/en-US/docs/Web/CSS/Attribute_selectors.
- DevTools
- Node.js
document.querySelectorAll('a[href]');
$('a[href]');
Adding the [href] part of the selector will save you from nasty bug hunts on certain pages.
Link specific selectors
Let's go back to the https://warehouse-theme-metal.myshopify.com/collections/sales and see how we could capture only the links to product detail pages. After inspecting the product cards in DevTools, you'll find that the links are available together with the product's title. Getting them will therefore be very similar to getting the product titles in the previous section.

- DevTools
- Node.js
document.querySelectorAll('a.product-item__title');
$('a.product-item__title');
When we print all the URLs in the DevTools console, we can see that we've correctly filtered only the product detail page URLs.
for (const a of document.querySelectorAll('a.product-item__title')) {
console.log(a.href);
}
info
If you try this in Node.js instead of DevTools, you will not get the full URLs, but only so-called relative links. We will explain what those are and how to work with them in the next lesson.

Filtering with pattern-matching
Another common way to filter links (or any text, really) is by matching patterns with regular expressions.
https://developer.mozilla.org/en-US/docs/Web/JavaScript/Guide/Regular_Expressions
When we inspect the product URLs, we'll find that they all look like the following:
https://warehouse-theme-metal.myshopify.com/products/denon-ah-c720-in-ear-headphones
https://warehouse-theme-metal.myshopify.com/products/sony-sacs9-10-inch-active-subwoofer
https://warehouse-theme-metal.myshopify.com/products/sony-ps-hx500-hi-res-usb-turntable
That is, they all begin with exactly the same pattern and only differ in the last portion of the path. We could write the pattern like this:
https://warehouse-theme-metal.myshopify.com/products/{PRODUCT_NAME}
This means that we can create a regular expression that matches those URLs. You can do it in many ways . For simplicity, let's go with this one:
https?:\/\/warehouse-theme-metal\.myshopify\.com\/products\/[\w\-]+
This regular expression matches all URLs that use either http or https protocol and point to warehouse-theme-metal.myshopify.com/products/ immediately followed with any number of letters or dashes -.
A great way to learn more about regular expression syntax and to test your expressions are tools like https://regex101.com/ or https://regexr.com/. It's okay if you don't get the hang of it right away!
To test our regular expression in the DevTools console, we'll first create a https://developer.mozilla.org/en-US/docs/Web/JavaScript/Reference/Global_Objects/RegExp object and then test the URLs with the https://developer.mozilla.org/en-US/docs/Web/JavaScript/Reference/Global_Objects/RegExp/test function.
// To demonstrate pattern matching, we use only the 'a'
// selector to select all links on the page.
for (const a of document.querySelectorAll('a')) {
const regExp = /https?:\/\/warehouse-theme-metal\.myshopify\.com\/products\/[\w-]+/;
const url = a.href;
if (regExp.test(url)) console.log(url);
}
When you run this code in DevTools Console on the https://warehouse-theme-metal.myshopify.com/collections/sales, you'll see that it produces a slightly different set of URLs than the CSS filter did.

That's because we selected all the links on the page and apparently there are more ways to get to the product detail pages. After careful inspection we can find that we can get there not only by clicking the title, but also by clicking the product's image, which leads to duplicates. Some products also have review links that lead to a specific subsection of the product detail page.
With that said, yes, filtering with CSS selectors is often the better and more reliable option. But sometimes, it's not enough, and knowing about pattern matching with regular expressions expands your scraping toolbox and helps you tackle more complex scenarios.
Next Up
In the https://docs.apify.com/academy/web-scraping-for-beginners/crawling/relative-urls.md we'll see how rewriting this code to Node.js is not so simple and learn about absolute and relative URLs in the process.
Finding links
Learn what a link looks like in HTML and how to find and extract their URLs when web scraping using both DevTools and Node.js.
Many kinds of links exist on the internet, and we'll cover all the types in the advanced Academy courses. For now, let's think of links as https://developer.mozilla.org/en-US/docs/Web/HTML/Element/a with `` tags. A typical link looks like this:
This is a link to example.com
On a webpage, the link above will look like this: https://example.com When you click it, your browser will navigate to the URL in the `` tag's href attribute (https://example.com).
hrefmeans Hypertext REFerence. You don't need to remember this - just know thathreftypically means some sort of link.
Extracting links 🔗
If a link is an HTML element, and the URL is an attribute, this means that we can extract links the same way as we extracted data. To test this theory in the browser, we can try running the following code in our DevTools console on any website.
// Select all the elements.
const links = document.querySelectorAll('a');
// For each of the links...
for (const link of links) {
// get the value of its 'href' attribute...
const url = link.href;
// and print it to console.
console.log(url);
}
Go to the https://warehouse-theme-metal.myshopify.com/collections/sales, open the DevTools Console, paste the above code and run it.

Boom 💥, all the links from the page have now been printed to the console. Most of the links point to other parts of the website, but some links lead to other domains like facebook.com or instagram.com.
Extracting link URLs in Node.js
DevTools Console is a fun playground, but Node.js is way more useful. Let's create a new file in our project called crawler.js and add some basic crawling code that prints all the links from the https://warehouse-theme-metal.myshopify.com/collections/sales.
We'll start from a boilerplate that's very similar to the scraper we built in https://docs.apify.com/academy/web-scraping-for-beginners/data-extraction/node-js-scraper.md.
import * as cheerio from 'cheerio';
import { gotScraping } from 'got-scraping';
const storeUrl = 'https://warehouse-theme-metal.myshopify.com/collections/sales';
const response = await gotScraping(storeUrl);
const html = response.body;
const $ = cheerio.load(html);
// ------- new code below
const links = $('a');
for (const link of links) {
const url = $(link).attr('href');
console.log(url);
}
Aside from importing libraries and downloading HTML, we load the HTML into Cheerio and then use it to retrieve all the `` elements. After that, we iterate over the collected links and print their href attributes, which we access using the https://cheerio.js.org/docs/api/classes/Cheerio#attr method.
When you run the above code, you'll see quite a lot of links in the terminal. Some of them may look wrong, because they don't start with the regular https:// protocol. We'll learn what to do with them in the following lessons.
Next Up
The https://docs.apify.com/academy/web-scraping-for-beginners/crawling/filtering-links.md will teach you how to select and filter links, so that your crawler will always work only with valid and useful URLs.
Your first crawl
Learn how to crawl the web using Node.js, Cheerio and an HTTP client. Extract URLs from pages and use them to visit more websites.
In the previous lessons, we learned what crawling is and how to extract URLs from a page's HTML. The only thing that remains is to write the code—let's get right to it!
If the code starts to look too complex to you, don't worry. We're showing it for educational purposes, so that you can learn how crawling works. Near the end of this course, we'll show you a much easier and faster way to crawl, using a specialized scraping library. If you want, you can skip the details and https://docs.apify.com/academy/web-scraping-for-beginners/crawling/pro-scraping.md.
Processing URLs
In the previous lessons, we collected and filtered all the URLs pointing to individual products in the https://warehouse-theme-metal.myshopify.com/collections/sales. To crawl the URLs, we must take the whole list we collected and download the HTML of each of the pages. See the comments for changes and additions to the code.
import { gotScraping } from 'got-scraping';
import * as cheerio from 'cheerio';
const WEBSITE_URL = 'https://warehouse-theme-metal.myshopify.com';
const storeUrl = `${WEBSITE_URL}/collections/sales`;
const response = await gotScraping(storeUrl);
const html = response.body;
const $ = cheerio.load(html);
const productLinks = $('a.product-item__title');
// Prepare an empty array for our product URLs.
const productUrls = [];
for (const link of productLinks) {
const relativeUrl = $(link).attr('href');
const absoluteUrl = new URL(relativeUrl, WEBSITE_URL);
// Collect absolute product URLs.
productUrls.push(absoluteUrl);
}
// Loop over the stored URLs to process
// each product page individually.
for (const url of productUrls) {
// Download HTML.
const productResponse = await gotScraping(url);
const productHtml = productResponse.body;
// Load into Cheerio to parse the HTML.
const $productPage = cheerio.load(productHtml);
// Extract the product's title from the tag.
const productPageTitle = $productPage('h1').text().trim();
// Print the title to the terminal to see
// confirm we downloaded the correct pages.
console.log(productPageTitle);
}
If you run the crawler from your terminal, it will print the titles of all the products on sale in the Warehouse store.
Handling errors
The code above is correct, but it's not robust. If something goes wrong, it will crash. That something could be a network error, an internet connection error, or the websites you're trying to reach could be experiencing problems at that moment. Hitting any error like that would cause the current crawler to stop entirely, which means we would lose all the data it had collected so far.
In programming, you handle errors by catching and handling them. Typically by printing information that the error occurred and/or retrying.
The scraping library we'll https://docs.apify.com/academy/web-scraping-for-beginners/crawling/pro-scraping.md handles errors and retries automatically for you.
import { gotScraping } from 'got-scraping';
import * as cheerio from 'cheerio';
const WEBSITE_URL = 'https://warehouse-theme-metal.myshopify.com';
const storeUrl = `${WEBSITE_URL}/collections/sales`;
const response = await gotScraping(storeUrl);
const html = response.body;
const $ = cheerio.load(html);
const productLinks = $('a.product-item__title');
const productUrls = [];
for (const link of productLinks) {
const relativeUrl = $(link).attr('href');
const absoluteUrl = new URL(relativeUrl, WEBSITE_URL);
productUrls.push(absoluteUrl);
}
for (const url of productUrls) {
// Everything else is exactly the same.
// We only wrapped the code in try/catch blocks.
// The try block passes all errors into the catch block.
// So, instead of crashing the crawler, they can be handled.
try {
// The try block attempts to execute our code
const productResponse = await gotScraping(url);
const productHtml = productResponse.body;
const $productPage = cheerio.load(productHtml);
const productPageTitle = $productPage('h1').text().trim();
console.log(productPageTitle);
} catch (error) {
// In the catch block, we handle errors.
// This time, we will print
// the error message and the url.
console.error(error.message, url);
}
}
At the time of writing, none of the links have failed; however, as you crawl more pages, you will surely hit a few errors 😉. The important thing is that the crawler will no longer crash if an error does in fact occur, and that it will be able to download the HTML from the working product links.
If you thought that the crawl was taking too long to complete, the https://docs.apify.com/academy/web-scraping-for-beginners/crawling/pro-scraping.md we keep referring to will help once again. It automatically parallelizes the downloads and processing of HTML, which leads to significant speed improvements.
Next up
In the https://docs.apify.com/academy/web-scraping-for-beginners/crawling/scraping-the-data.md, we will complete the scraper by extracting data about all the products from their individual pages.
Headless browsers
Learn how to scrape the web with a headless browser using only a few lines of code. Chrome, Firefox, Safari, Edge - all are supported.
A headless browser is a browser that runs without a user interface (UI). This means that it's normally controlled by automated scripts. Headless browsers are very popular in scraping because they can help you render JavaScript or programmatically behave like a human user to prevent blocking. The two most popular libraries for controlling headless browsers are https://pptr.dev/ and https://playwright.dev/. Crawlee supports both.
Building a Playwright scraper
Our focus will be on Playwright, which boasts additional features and better documentation. Notably, it originates from the same team responsible for Puppeteer.
Crawlee has a built-in support for building Playwright scrapers. Let's reuse code of the Cheerio scraper from the previous lesson. It'll take us just a few changes to turn it into a full headless scraper.
First, we must install Playwright into our project. It's not included in Crawlee, because it's quite large as it bundles all the browsers.
npm install playwright
After Playwright installs, we can proceed with updating the scraper code. Let's create a new file called browser.js and put the new code there. As always, the comments in the example describe changes in the code. Everything else is the same as before.
// First, import PlaywrightCrawler instead of CheerioCrawler
import { PlaywrightCrawler, Dataset } from 'crawlee';
const crawler = new PlaywrightCrawler({
// Second, tell the browser to run with visible UI,
// so that we can see what's going on.
headless: false,
// Third, replace $ with parseWithCheerio function.
requestHandler: async ({ parseWithCheerio, request, enqueueLinks }) => {
console.log(`Fetching URL: ${request.url}`);
if (request.label === 'start-url') {
await enqueueLinks({
selector: 'a.product-item__title',
});
return;
}
// Fourth, parse the browser's page with Cheerio.
const $ = await parseWithCheerio();
const title = $('h1').text().trim();
const vendor = $('a.product-meta__vendor').text().trim();
const price = $('span.price').contents()[2].nodeValue;
const reviewCount = parseInt($('span.rating__caption').text(), 10);
const description = $('div[class*="description"] div.rte').text().trim();
await Dataset.pushData({
title,
vendor,
price,
reviewCount,
description,
});
},
});
await crawler.addRequests([{
url: 'https://warehouse-theme-metal.myshopify.com/collections/sales',
label: 'start-url',
}]);
await crawler.run();
tip
The parseWithCheerio function is available even in CheerioCrawler and all the other Crawlee crawlers. If you think you'll often switch up the crawlers, you can use it to further reduce the number of needed line changes.
When you run the code with node browser.js, you'll see a browser window open and then the individual pages getting scraped, each in a new browser tab.
That's it. In 4 lines of code, we transformed our crawler from a static HTTP crawler to a headless browser crawler. The crawler now runs the same as before, but uses a Chromium browser instead of plain HTTP requests. This isn't possible without Crawlee.
Using Playwright in combination with Cheerio like this is only one of many ways how you can utilize Playwright (and Puppeteer) with Crawlee. In the advanced courses of the Academy, we will go deeper into using headless browsers for scraping and web automation (RPA) use cases.
Running in headless mode
We said that headless browsers didn't have a UI, but while scraping with the above scraper code, you could definitely see the browser. That's because we added the headless: false option. This is useful for debugging and seeing what's going on in the browser. Once your scraper is complete, you can remove the line and the crawler will run without a UI.
You can also switch between headless and headful (with UI) using the https://crawlee.dev/docs/guides/configuration#crawlee_headless environment variable. This allows you to change the mode without touching your code.
- MacOS/Linux
- Windows CMD
- Windows Powershell
CRAWLEE_HEADLESS=1 node browser.js
set CRAWLEE_HEADLESS=1 && node browser.js
$env:CRAWLEE_HEADLESS=1; & node browser.js
Dynamically loaded data
One of the important benefits of using a browser is that it allows you to extract data that's dynamically loaded, such as data that's only fetched after a user scrolls or interacts with the page. In our case, it's the "You may also like" section of the product detail pages. Those products aren't available in the initial HTML, but the browser loads them later using an API.

tip
We discuss dynamic data at length in the https://docs.apify.com/academy/node-js/dealing-with-dynamic-pages.md tutorial, and we also have a special lesson dedicated to it in our https://docs.apify.com/academy/puppeteer-playwright/page/waiting.md.
If we added an appropriate selector to our original CheerioCrawler code, it would not extract the information, but a browser automatically fetches and renders this extra data.
Let's add this new extractor to our code. It collects the names of the recommended products.
// ...
const recommendedProducts = $('.product-recommendations a.product-item__title')
.map((i, el) => $(el).text().trim())
.toArray();
// ...
await Dataset.pushData({
// ...
recommendedProducts,
});
And here's the complete, runnable code:
import { PlaywrightCrawler, Dataset } from 'crawlee';
const crawler = new PlaywrightCrawler({
// We removed the headless: false option to hide the browser windows.
requestHandler: async ({ parseWithCheerio, request, enqueueLinks }) => {
console.log(`Fetching URL: ${request.url}`);
if (request.label === 'start-url') {
await enqueueLinks({
selector: 'a.product-item__title',
});
return;
}
// Fourth, parse the browser's page with Cheerio.
const $ = await parseWithCheerio();
const title = $('h1').text().trim();
const vendor = $('a.product-meta__vendor').text().trim();
const price = $('span.price').contents()[2].nodeValue;
const reviewCount = parseInt($('span.rating__caption').text(), 10);
const description = $('div[class*="description"] div.rte').text().trim();
// We added one more extractor to get all the recommended products.
const recommendedProducts = $('.product-recommendations a.product-item__title')
.map((i, el) => $(el).text().trim())
.toArray();
await Dataset.pushData({
title,
vendor,
price,
reviewCount,
description,
// And we saved the extracted product names.
recommendedProducts,
});
},
});
await crawler.addRequests([{
url: 'https://warehouse-theme-metal.myshopify.com/collections/sales',
label: 'start-url',
}]);
await crawler.run();
When you run the code, you'll find the recommended product names correctly extracted in the dataset files. If you tried the same with our earlier CheerioCrawler code, you would find the recommendedProducts array empty in your results. That's because Cheerio can't make the API call to retrieve the additional data, like a browser can.
Next up
We learned how to scrape with Cheerio and Playwright, but how do we export the data for further processing? Let's learn that in the https://docs.apify.com/academy/web-scraping-for-beginners/crawling/exporting-data.md of the Basics of crawling section.
Professional scraping 👷
Learn how to build scrapers quicker and get better and more robust results by using Crawlee, an open-source library for scraping in Node.js.
While it's definitely an interesting exercise to do all the programming manually, and we hope you enjoyed it, it's neither the most effective, nor the most efficient way of scraping websites. Because we scrape for a living at Apify, we've built a library that we use to scrape tens of millions of pages every day.
It's called https://crawlee.dev/, and it is, and always will be, completely open-source and free to use. You don't need to sign up for an Apify account or use the Apify platform. You can use it on your personal computer, on any server, or in any cloud environment you want.
We mentioned the benefits of developing using a dedicated scraping library in the previous lessons, but to recap:
- Faster development time because you don't have to write boilerplate code.
- Fewer bugs. Crawlee is fully unit-tested and battle-tested on millions of scraper runs.
- Faster and cheaper scrapers because Crawlee automatically scales based on system resources, and we optimize its performance regularly.
- More robust scrapers. Annoying details like retries, proxy management, error handling, and result storage are all handled out-of-the-box by Crawlee.
- Helpful community. You can https://discord.gg/qkMS6pU4cF or talk to us https://github.com/apify/crawlee/discussions. We're almost always there to talk about scraping and programming in general.
tip
If you're still not convinced, https://apify.com/success-stories/daltix-analytics-scrapy-python-to-apify about how a data analytics company saved 90% of scraping costs by switching from Scrapy (a scraping library for Python) to Crawlee. We were pretty surprised ourselves, to be honest.
Crawlee factors away and manages the dull and repetitive parts of web scraper development under the hood, such as:
- Auto-scaling
- Request concurrency
- Queueing requests
- Data storage
- Using and rotating https://docs.apify.com/academy/anti-scraping/mitigation/proxies.md
- Puppeteer/Playwright setup overhead
- https://crawlee.dev/docs/introduction
Crawlee and its resources can be found in various different places:
Install Crawlee
To use Crawlee, we have to install it from npm. Let's add it to our project from the previous lessons by executing this command in your project's folder.
npm install crawlee
After the installation completes, create a new file called crawlee.js and add the following code to it:
import { CheerioCrawler } from 'crawlee';
console.log('Crawlee works!');
We are using the new ESM import syntax here (see https://nodejs.org/dist/latest-v16.x/docs/api/esm.html#enabling). To be able to use it, we need to turn our project to module in the package.json file:
{
"name": "my-scraping-project",
"type": "module",
"dependencies": {
"crawlee": "^3.0.0"
}
}
Then, run the code using node as usual:
node crawlee.js
You'll see "Crawlee works!" printed to the console. If it doesn't work, it means Crawlee didn't install correctly. If that's the case, try deleting the node_modules directory and package-lock.json file in your project and install Crawlee again.
You don't need to
importany other libraries like Cheerio or Got-Scraping. That's because they're both included in Crawlee's https://crawlee.dev/docs/guides/cheerio-crawler-guide.
Prepare the scraper
CheerioCrawler automatically visits URLs, downloads HTML using Got-Scraping, and parses it with Cheerio. The benefit of this over writing the code yourself is that it automatically handles the URL queue, errors, retries, proxies, parallelizes the downloads, and much more. Overall, it removes the need to write a lot of boilerplate code.
To create a crawler with Crawlee, you only need to provide it with a request handler - a function that gets executed for each page it visits.
import { CheerioCrawler } from 'crawlee';
const crawler = new CheerioCrawler({
// This function will run on every page.
// Among other things, it gives you access
// to parsed HTML with the Cheerio $ function.
requestHandler: async ({ $, request }) => {
console.log('URL:', request.url);
// Print the heading of each visited page.
console.log('Title:', $('h1').text().trim());
},
});
But the above code still doesn't crawl anything. We need to provide it with URLs to crawl. To do that, we call the crawler's addRequests function.
import { CheerioCrawler } from 'crawlee';
const crawler = new CheerioCrawler({
requestHandler: async ({ $, request }) => {
console.log('URL:', request.url);
console.log('Title:', $('h1').text().trim());
},
});
// Add the Sales category of Warehouse store to the queue of URLs.
await crawler.addRequests([
'https://warehouse-theme-metal.myshopify.com/collections/sales',
]);
await crawler.run();
When you run the above code, you'll see some internal Crawlee logs and then the two messages your code printed:
URL: https://warehouse-theme-metal.myshopify.com/collections/sales
Title: Sales
crawler.addRequestsuses the https://crawlee.dev/docs/guides/request-storage#request-queue under the hood. It's a persistent storage, which means that if your crawler crashes, it doesn't have to start over, but it can continue from where it left off.
Summary
- We added the first URL to the crawler using the
addRequestsfunction. CheerioCrawlerwill automatically take the URL from the queue, download its HTML using Got Scraping, and parse it using Cheerio.- The crawler executes the https://crawlee.dev/api/cheerio-crawler/interface/CheerioCrawlerOptions#requestHandler, where we extract the page's data using the https://crawlee.dev/api/cheerio-crawler/interface/CheerioCrawlingContext variable. You can also access the request itself using the https://crawlee.dev/api/cheerio-crawler/interface/CheerioCrawlingContext#request variable.
Crawling links
The current scraper only visits the Sales category page, but we want detailed data for all the products. We can use the https://crawlee.dev/api/cheerio-crawler/interface/CheerioCrawlingContext#enqueueLinks function to add more URLs to the queue. The function automatically extracts URLs from the current page based on a provided CSS selector and adds them to the queue. Once added, the crawler will automatically crawl them.
import { CheerioCrawler } from 'crawlee';
const crawler = new CheerioCrawler({
requestHandler: async ({ $, request, enqueueLinks }) => {
console.log('URL:', request.url);
console.log('Title:', $('h1').text().trim());
// We only want to enqueue the URLs from the start URL.
if (request.label === 'start-url') {
// enqueueLinks will add all the links
// that match the provided selector.
await enqueueLinks({
// The selector comes from our earlier code.
selector: 'a.product-item__title',
});
}
},
});
// Instead of using a string with URL, we're now
// using a request object to add more options.
await crawler.addRequests([{
url: 'https://warehouse-theme-metal.myshopify.com/collections/sales',
// We label the Request to identify
// it later in the requestHandler.
label: 'start-url',
}]);
await crawler.run();
When you run the code, you'll see the names and URLs of all the products printed to the console. You'll also see that it crawls faster than the manually written code. This is thanks to the parallelization of the requests.
If the crawler gets stuck for you at the end, it's ok. It's not actually stuck, but waiting to retry any pages that may have failed.
Extracting data
We have the crawler in place, and it's time to extract data. We already have the extraction code from the previous lesson, so we can copy and paste it into the requestHandler with tiny changes. Instead of printing results to the terminal, we will save it to disk.
// To save data to disk, we need to import Dataset.
import { CheerioCrawler, Dataset } from 'crawlee';
const crawler = new CheerioCrawler({
requestHandler: async ({ $, request, enqueueLinks }) => {
console.log(`Fetching URL: ${request.url}`);
if (request.label === 'start-url') {
await enqueueLinks({
selector: 'a.product-item__title',
});
// When on the start URL, we don't want to
// extract any data after we extract the links.
return;
}
// We copied and pasted the extraction code
// from the previous lesson with small
// refactoring: e.g. `$productPage` to `$`.
const title = $('h1').text().trim();
const vendor = $('a.product-meta__vendor').text().trim();
const price = $('span.price').contents()[2].nodeValue;
const reviewCount = parseInt($('span.rating__caption').text(), 10);
const description = $('div[class*="description"] div.rte').text().trim();
// Instead of printing the results to
// console, we save everything to a file.
await Dataset.pushData({
title,
vendor,
price,
reviewCount,
description,
});
},
});
await crawler.addRequests([{
url: 'https://warehouse-theme-metal.myshopify.com/collections/sales',
label: 'start-url',
}]);
await crawler.run();
When you run the code as usual, you'll see the product URLs printed to the terminal and you'll find the scraped data saved to your disk. Thanks to using the https://crawlee.dev/docs/introduction/saving-data#whats-datasetpushdata function, Crawlee automatically created a storage directory in your project's location and saved the results there. Each product has its data stored as a separate JSON file.
./storage/datasets/default/*.json
Thanks to Crawlee, we were able to create a faster and more robust scraper, but with less code than what was needed for the scraper in the earlier lessons.
Next up
In the https://docs.apify.com/academy/web-scraping-for-beginners/crawling/headless-browser.md we'll show you how to turn this plain HTTP crawler into a headless browser scraper in only a few lines of code.
Recap of data extraction basics
Review our e-commerce website scraper and refresh our memory about its code and the programming techniques we used to extract and save the data.
We finished off the https://docs.apify.com/academy/web-scraping-for-beginners/data-extraction.md of the Web scraping basics for JavaScript devs course by creating a web scraper in Node.js. The scraper collected all the on-sale products from https://warehouse-theme-metal.myshopify.com/collections/sales. Let's see the code with some comments added.
// First, we imported all the libraries we needed to
// download, extract, and convert the data we wanted
import { writeFileSync } from 'fs';
import { gotScraping } from 'got-scraping';
import * as cheerio from 'cheerio';
import { parse } from 'json2csv';
// Here, we fetched the website's HTML and saved it to a new variable.
const storeUrl = 'https://warehouse-theme-metal.myshopify.com/collections/sales';
const response = await gotScraping(storeUrl);
const html = response.body;
// We used Cheerio, a popular library, to parse (process)
// the downloaded HTML so that we could manipulate it.
const $ = cheerio.load(html);
// Using the .product-item CSS selector, we collected all the HTML
// elements which contained data about individual products.
const products = $('.product-item');
// Then, we prepared a new array to store the results.
const results = [];
// And looped over all the elements to extract
// information about the individual products.
for (const product of products) {
// The product's title was in an element
// with the CSS class: product-item__title
const titleElement = $(product).find('a.product-item__title');
const title = titleElement.text().trim();
// The product's price was in a element
// with the CSS class: price
const priceElement = $(product).find('span.price');
// Because the also included some useless data,
// we had to extract the price from a specific HTML node.
const price = priceElement.contents()[2].nodeValue.trim();
// We added the data to the results array
// in the form of an object with keys and values.
results.push({ title, price });
}
// Finally, we formatted the results
// as a CSV file instead of a JS object
const csv = parse(results);
// Then, we saved the CSV to the disk
writeFileSync('products.csv', csv);
tip
If some of the code is hard for you to understand, please review the https://docs.apify.com/academy/web-scraping-for-beginners/data-extraction.md section. We will not go through the details again in this section about crawling.
caution
We are using JavaScript features like import statements and top-level await. If you see errors like Cannot use import outside of a module, please review the https://docs.apify.com/academy/web-scraping-for-beginners/data-extraction/project-setup.md#modern-javascript, where we explain how to enable those features.
Next up
The https://docs.apify.com/academy/web-scraping-for-beginners/crawling/finding-links.md is all about finding links to crawl on the https://warehouse-theme-metal.myshopify.com/collections/sales.
Relative URLs
Learn about absolute and relative URLs used on web pages and how to work with them when parsing HTML with Cheerio in your scraper.
You might have noticed in the previous lesson that while printing URLs to the DevTools console, they would always show in full length, like this:
https://warehouse-theme-metal.myshopify.com/products/denon-ah-c720-in-ear-headphones
But in the Elements tab, when checking the `` attributes, the URLs would look like this:
/products/denon-ah-c720-in-ear-headphones
What's up with that? This short version of the URL is called a relative URL, and the full length one is called an absolute URL.
We'll see why the difference between relative URLs and absolute URLs is important a bit later in this lesson.
Browser vs Node.js: The Differences
Let's update the Node.js code from the https://docs.apify.com/academy/web-scraping-for-beginners/crawling/finding-links.md to see why links with relative URLs can be a problem.
import { gotScraping } from 'got-scraping';
import * as cheerio from 'cheerio';
const storeUrl = 'https://warehouse-theme-metal.myshopify.com/collections/sales';
const response = await gotScraping(storeUrl);
const html = response.body;
const $ = cheerio.load(html);
const productLinks = $('a.product-item__title');
for (const link of productLinks) {
const url = $(link).attr('href');
console.log(url);
}
When you run this file in your terminal, you'll immediately see the difference. Unlike in the browser, where looping over elements produced absolute URLs, here in Node.js it only produces the relative ones. This is bad, because we can't use the relative URLs to crawl. They don't include all the necessary information.
Resolving URLs
Luckily, there's a process called resolving URLs that creates absolute URLs from relative ones. We need two things. The relative URL, such as /products/denon-ah-c720-in-ear-headphones, and the URL of the website where we found the relative URL (which is https://warehouse-theme-metal.myshopify.com in our case).
const websiteUrl = 'https://warehouse-theme-metal.myshopify.com';
const relativeUrl = '/products/denon-ah-c720-in-ear-headphones';
const absoluteUrl = new URL(relativeUrl, websiteUrl);
console.log(absoluteUrl.href);
In Node.js, when you create a new URL(), you can optionally pass a second argument, the base URL. When you do, the URL in the first argument will be resolved using the URL in the second argument. Note that the URL created from new URL() is an object, not a string. To get the URL in a string format, we use the url.href property, or alternatively the url.toString() function.
When we plug this into our crawler code, we will get the correct - absolute - URLs.
import { gotScraping } from 'got-scraping';
import * as cheerio from 'cheerio';
// Split the base URL from the category to use it later.
const WEBSITE_URL = 'https://warehouse-theme-metal.myshopify.com';
const storeUrl = `${WEBSITE_URL}/collections/sales`;
const response = await gotScraping(storeUrl);
const html = response.body;
const $ = cheerio.load(html);
const productLinks = $('a.product-item__title');
for (const link of productLinks) {
const relativeUrl = $(link).attr('href');
// Resolve relative URLs using the website's URL
const absoluteUrl = new URL(relativeUrl, WEBSITE_URL);
console.log(absoluteUrl.href);
}
Cheerio can't resolve the URL itself, because until you provide the necessary information - it doesn't know where you originally downloaded the HTML from. The browser always knows which page you're on, so it will resolve the URLs automatically.
Next up
The https://docs.apify.com/academy/web-scraping-for-beginners/crawling/first-crawl.md will teach you how to use the collected URLs to crawl all the individual product pages.
Scraping data
Learn how to add data extraction logic to your crawler, which will allow you to extract data from all the websites you crawled.
At the https://docs.apify.com/academy/web-scraping-for-beginners.md, we learned that the term web scraping usually means a combined process of data extraction and crawling. And this is exactly what we'll do in this lesson. We will take the crawling code from the previous lesson, and we will combine it with data extraction code and turn everything into a web scraper.
Extracting data from a product detail page
The term product detail page (or PDP) is commonly used on e-commerce websites to describe the page where you can find detailed information about a product. In the Warehouse store, there's, for example, https://warehouse-theme-metal.myshopify.com/products/denon-ah-c720-in-ear-headphones.
Let's start writing a script that extracts data from this single PDP. We can use this familiar code as a boilerplate.
import { gotScraping } from 'got-scraping';
import * as cheerio from 'cheerio';
const productUrl = 'https://warehouse-theme-metal.myshopify.com/products/denon-ah-c720-in-ear-headphones';
const response = await gotScraping(productUrl);
const html = response.body;
const $ = cheerio.load(html);
// Attribute extraction code will go here.
We will use the techniques learned in the https://docs.apify.com/academy/web-scraping-for-beginners/data-extraction.md section to find and extract the following product attributes:
- title
- vendor
- price
- number of reviews
- description

For brevity, we won't explain how to extract every attribute step-by-step. Review the https://docs.apify.com/academy/web-scraping-for-beginners/data-extraction.md section to learn about DevTools and extracting data.
Title
Getting the title is quite straightforward. We recommend using h1 for titles where available, because it's the semantically correct way and therefore unlikely to change.
const title = $('h1').text().trim();
Vendor
Vendor name is available as a link with the product-meta__vendor class. We're only interested in the text though.
const vendor = $('a.product-meta__vendor').text().trim();
Price
We will take a shortcut here and only extract the price as a string that includes currency. In production scrapers, you might want to split it into two fields.
const price = $('span.price').contents()[2].nodeValue;
Number of reviews
For the review count, we use the parseInt() function to get only the number. Otherwise, we would receive a string like 2 reviews from this element.
const reviewCount = parseInt($('span.rating__caption').text(), 10);
Description
Getting the description is fairly straightforward as well, but notice the two selectors separated by a space: div[class*="description"] div.rte. This is called a https://developer.mozilla.org/en-US/docs/Web/CSS/Descendant_combinator, and it allows you to search for child elements within parent elements. Using any of the selectors separately would lead to unwanted strings in our result.
const description = $('div[class*="description"] div.rte').text().trim();
Complete extraction code
This is the final code after putting all the extractors together with the initial boilerplate. It will scrape all the requested attributes from the single URL and print them to the terminal.
Save it into a new file called product.js and run it with node product.js to see for yourself.
import { gotScraping } from 'got-scraping';
import * as cheerio from 'cheerio';
const productUrl = 'https://warehouse-theme-metal.myshopify.com/products/denon-ah-c720-in-ear-headphones';
const response = await gotScraping(productUrl);
const html = response.body;
const $ = cheerio.load(html);
const title = $('h1').text().trim();
const vendor = $('a.product-meta__vendor').text().trim();
const price = $('span.price').contents()[2].nodeValue;
const reviewCount = parseInt($('span.rating__caption').text(), 10);
const description = $('div[class*="description"] div.rte').text().trim();
const product = {
title,
vendor,
price,
reviewCount,
description,
};
console.log(product);
Crawling product detail pages
Let's compare the above data extraction example with the crawling code we wrote in the last lesson:
import { gotScraping } from 'got-scraping';
import * as cheerio from 'cheerio';
const WEBSITE_URL = 'https://warehouse-theme-metal.myshopify.com';
const storeUrl = `${WEBSITE_URL}/collections/sales`;
const response = await gotScraping(storeUrl);
const html = response.body;
const $ = cheerio.load(html);
const productLinks = $('a.product-item__title');
const productUrls = [];
for (const link of productLinks) {
const relativeUrl = $(link).attr('href');
const absoluteUrl = new URL(relativeUrl, WEBSITE_URL);
productUrls.push(absoluteUrl);
}
for (const url of productUrls) {
try {
const productResponse = await gotScraping(url);
const productHtml = productResponse.body;
const $productPage = cheerio.load(productHtml);
const productPageTitle = $productPage('h1').text().trim();
console.log(productPageTitle);
} catch (error) {
console.error(error.message, url);
}
}
We can see that the code is quite similar. Both scripts download HTML and then process the HTML. To understand how to put them together, we'll go back to the https://docs.apify.com/academy/web-scraping-for-beginners/crawling.md.
- Visit the start URL.
- Extract the next URLs (and data) and save them.
- Visit one of the collected URLs and save data and/or more URLs.
- Repeat step 3 until you have everything you need.
Using this flow as guidance, we should be able to connect the pieces of code together to build a scraper which crawls through the products found in the https://warehouse-theme-metal.myshopify.com/collections/sales, and then scrapes the title, vendor, price, review count, and description of each of them.
Building the final scraper
Let's create a brand-new file called final.js and write our scraper code there. We'll show the code step by step for easier orientation. At the end, we'll combine the pieces into a runnable example.
We'll start by adding our imports and constants at the top of the file, no changes there.
import { gotScraping } from 'got-scraping';
import * as cheerio from 'cheerio';
const WEBSITE_URL = 'https://warehouse-theme-metal.myshopify.com';
Then we need to visit the start URL. To scrape all the on-sale product links, we need the Sales page as the start URL.
// ...
const storeUrl = `${WEBSITE_URL}/collections/sales`;
const response = await gotScraping(storeUrl);
const html = response.body;
After that, we need to extract the next URLs we want to visit (the product detail page URLs). Thus far, the code is exactly the same as the crawler.js code.
// ...
const $ = cheerio.load(html);
const productLinks = $('a.product-item__title');
const productUrls = [];
for (const link of productLinks) {
const relativeUrl = $(link).attr('href');
const absoluteUrl = new URL(relativeUrl, WEBSITE_URL);
productUrls.push(absoluteUrl);
}
Now the code will start to differ. We will use the crawling logic from earlier to visit all the URLs, but we will replace the placeholder extraction logic we had there. The placeholder logic only extracted the product's title, but we want the vendor, price, number of reviews and description as well.
// ...
// A new array to save each product in.
const results = [];
// An optional array we can save errors to.
const errors = [];
for (const url of productUrls) {
try {
// Download HTML of each product detail.
const productResponse = await gotScraping(url);
const $productPage = cheerio.load(productResponse.body);
// Use the data extraction logic from above.
// If copy pasting, be careful about $ -> $productPage.
const title = $productPage('h1').text().trim();
const vendor = $productPage('a.product-meta__vendor').text().trim();
const price = $productPage('span.price').contents()[2].nodeValue;
const reviewCount = parseInt($productPage('span.rating__caption').text(), 10);
const description = $productPage('div[class*="description"] div.rte').text().trim();
results.push({
title,
vendor,
price,
reviewCount,
description,
});
} catch (error) {
// Save information about the error to the
// "errors" array to see what's happened.
errors.push({ url, msg: error.message });
}
}
Finally, let's combine the above code blocks into a full runnable example. When you run the below code, it will scrape detailed information about all the products on the first page of the https://warehouse-theme-metal.myshopify.com/collections/sales. We added a few console logs throughout the code to see what's going on.
import { gotScraping } from 'got-scraping';
import * as cheerio from 'cheerio';
const WEBSITE_URL = 'https://warehouse-theme-metal.myshopify.com';
const storeUrl = `${WEBSITE_URL}/collections/sales`;
console.log('Fetching products on sale.');
const response = await gotScraping(storeUrl);
const html = response.body;
const $ = cheerio.load(html);
const productLinks = $('a.product-item__title');
const productUrls = [];
for (const link of productLinks) {
const relativeUrl = $(link).attr('href');
const absoluteUrl = new URL(relativeUrl, WEBSITE_URL);
productUrls.push(absoluteUrl);
}
console.log(`Found ${productUrls.length} products.`);
const results = [];
const errors = [];
for (const url of productUrls) {
try {
console.log(`Fetching URL: ${url}`);
const productResponse = await gotScraping(url);
const $productPage = cheerio.load(productResponse.body);
const title = $productPage('h1').text().trim();
const vendor = $productPage('a.product-meta__vendor').text().trim();
const price = $productPage('span.price').contents()[2].nodeValue;
const reviewCount = parseInt($productPage('span.rating__caption').text(), 10);
const description = $productPage('div[class*="description"] div.rte').text().trim();
results.push({
title,
vendor,
price,
reviewCount,
description,
});
} catch (error) {
errors.push({ url, msg: error.message });
}
}
console.log('RESULTS:', results);
console.log('ERRORS:', errors);
And here's an example of the results you will see after running the above code. We truncated the descriptions for readability. There should be 24 products in your list.
[
{
title: 'JBL Flip 4 Waterproof Portable Bluetooth Speaker',
vendor: 'JBL',
price: '$74.95',
reviewCount: 2,
description: 'JBL Flip 4 is the next generation in the ...',
},
{
title: 'Sony XBR-950G BRAVIA 4K HDR Ultra HD TV',
vendor: 'Sony',
price: '$1,398.00',
reviewCount: 3,
description: 'Unlock the world of ultimate colors and ...',
},
{
title: 'Sony SACS9 10" Active Subwoofer',
vendor: 'Sony',
price: '$158.00',
reviewCount: 3,
description: 'Put more punch in your movie ...',
},
];
That's it for the absolute basics of crawling, but we're not done yet. We scraped 24 products from the first page of the Sales category, but the category actually has 50 products on 3 pages. You will learn how to visit all the pages and scrape all the products in the following lessons.
Next up
In the https://docs.apify.com/academy/web-scraping-for-beginners/crawling/pro-scraping.md we will rewrite the scraper using an open-source web scraping library called https://crawlee.dev. It will make the scraper more robust while speeding up development at the same time.
Basics of data extraction
Learn about HTML, CSS, and JavaScript, the basic building blocks of a website, and how to use them in web scraping and data extraction.
Every web scraping project starts with some detective work. To a human, it's completely obvious where the data is on the web page, but a computer needs very precise instructions to find the data we want. We can leverage three elementary components of each website to give those instructions: HTML, CSS, and JavaScript
HTML
For the browser to be able to show you the web page with all its text and images, the data needs to be present somewhere. This data source is called HTML (HyperText Markup Language) and it gets downloaded to your computer whenever you open a website. If you want to extract data from a website, you need to show your computer where to find it in the HTML.
To learn more about markup, we recommend the https://developer.mozilla.org/en-US/docs/Learn/HTML provided by MDN, the official documentation of the web.
CSS
CSS (Cascading Style Sheets) is a language that is used to give websites their style. It controls shapes, colors, positioning and even animations. The style is then added to the page's HTML and together, they define the page's content and structure. In web scraping, we can leverage CSS to find the data we want using CSS selectors.
To learn more about styles and selectors, we recommend the https://developer.mozilla.org/en-US/docs/Learn/CSS provided by MDN, the official documentation of the web.
JavaScript
HTML and CSS give websites their structure and style, but they are static. To be able to meaningfully interact with a website, you need to throw JavaScript into the mix. It is the language of the web, and you don't need to be a programmer to learn the basics. You don't even need any special software, because you can try it right now, in your browser.
To learn more about programming in browser, we recommend the https://developer.mozilla.org/en-US/docs/Learn/JavaScript provided by MDN, the official documentation of the web.
Next up
We will show you https://docs.apify.com/academy/web-scraping-for-beginners/data-extraction/browser-devtools.md to inspect and interact with a web page.
Starting with browser DevTools
Learn about browser DevTools, a valuable tool in the world of web scraping, and how you can use them to extract data from a website.
Even though DevTools stands for developer tools, everyone can use them to inspect a website. Each major browser has its own DevTools. We will use Chrome DevTools as an example, but the advice is applicable to any browser, as the tools are extremely similar. To open Chrome DevTools, you can press F12 or right-click anywhere in the page and choose Inspect. Now go to https://www.wikipedia.org/ and open your DevTools there.

Elements tab
When you first open Chrome DevTools on Wikipedia, you will start on the Elements tab (In Firefox it's called the Inspector). You can use this tab to inspect the page's HTML on the left hand side, and its CSS on the right. The items in the HTML view are called https://docs.apify.com/academy/concepts/html-elements.md.

On a screen that is narrow or has a small resolution, the CSS information can appear under the HTML tab, not on the right.
Each element is enclosed in an HTML tag. For example , , and `` are all tags. When you add something inside of those tags, like Hello! you create an element. You can also see elements inside other elements in the Elements tab. This is called nesting, and it gives the page its structure.
At the bottom, there's the JavaScript console, which is a powerful tool which can be used to manipulate the website. If the console is not there, you can press ESC to toggle it. All of this might look super complicated at first, but don't worry, there's no need to understand everything yet - we'll walk you through all the important things you need to know.

Selecting an element
In the top left corner of DevTools, there's a little arrow icon with a square.

Click it and then hover your mouse over The Free Encyclopedia, Wikipedia's subtitle. DevTools will show you information about the HTML element being hovered over. Now click the element. It will be selected in the Elements tab, which allows for further inspection of the element and its content.

Interacting with an element
After you select the subtitle element, right-click the highlighted element in the Elements tab to show a menu with available actions. For now, select Store as global variable (Use in Console in Firefox). You'll see that a new variable called temp1 (temp0 in Firefox) appeared in your DevTools Console. You can now use the Console to access the element's properties using JavaScript.
For example, if you wanted to scrape the text inside the element, you could use the textContent property to get it. Copy and paste (or type) the following command into your Console and press Enter. The text of your temp1 element - The Free Encyclopedia - will display in the Console.
temp1.textContent;
Now run this command to get the HTML of the element:
temp1.outerHTML;
And finally, run the next command to change the text of the element.
temp1.textContent = 'Hello World!';
By changing HTML elements from the Console, you can change what's displayed on the page. This change only happens on your own computer so don't worry, you haven't hacked Wikipedia.

In JavaScript, the web page is called
document. From the Console you can interact with it in many ways. Go through https://developer.mozilla.org/en-US/docs/Web/API/Document_object_model/Using_the_Document_Object_Model to learn more.
Next up
In this lesson, we learned the absolute basics of interaction with a page using the DevTools. In the https://docs.apify.com/academy/web-scraping-for-beginners/data-extraction/using-devtools.md, you will learn how to extract data from it. We will extract data about the on-sale products on the https://warehouse-theme-metal.myshopify.com.
It isn't a real store, but a full-featured demo of a Shopify online store. And that is perfect for our purposes. Shopify is one of the largest e-commerce platforms in the world, and it uses all the latest technologies that a real e-commerce web application would use. Learning to scrape a Shopify store is useful, because you can immediately apply the learnings to millions of websites.
Prepare your computer for programming
Set up your computer to be able to code scrapers with Node.js and JavaScript. Download Node.js and npm and run a Hello World script.
Before you can start writing scraper code, you need to have your computer set up for it. In this lesson, we will show you all the tools you need to install to successfully write your first scraper.
Install Node.js
Let's start with the installation of Node.js. Node.js is an engine for running JavaScript, quite similar to the browser console we used in the previous lessons. You feed it JavaScript code, and it executes it for you. Why not just use the browser console? Because it's limited in its capabilities. Node.js is way more powerful and is much better suited for coding scrapers.
If you're on macOS, use https://blog.apify.com/how-to-install-nodejs/. If you're using Windows https://nodejs.org/en/download/. And if you're on Linux, use your package manager to install nodejs.
Install a text editor
Many text editors are available for you to choose from when programming. You might already have a preferred one so feel free to use that. Make sure it has syntax highlighting and support for Node.js. If you don't have a text editor, we suggest starting with VSCode. It's free, very popular, and well maintained. https://code.visualstudio.com/download.
Once you downloaded and installed it, you can open a folder where we will build your scraper. We recommend starting with a new, empty folder.

Hello world! 👋
Before we start, let's confirm that Node.js was successfully installed on your computer. To do that, run those two commands in your terminal and see if they correctly print your Node.js and npm versions. The next lessons require Node.js version 16 or higher. If you skipped Node.js installation and want to use your existing version of Node.js, make sure that it's 16 or higher.
node -v
npm -v
If you installed VSCode in the previous paragraph, you can use the integrated terminal.

If you're still wondering what a "terminal" is, we suggest googling for a terminal tutorial for your operating system because individual terminals are different. Sometimes a little, sometimes a lot.
After confirming that node is correctly installed on your computer, use your text editor to create a file called hello.js in your folder.

Now add this piece of code to hello.js and save the file.
console.log('Hello World');
Finally, run the below command in your terminal:
node hello.js
You should see Hello World printed in your terminal. If you do, congratulations, you are now officially a programmer! 🚀

Next up
You have your computer set up correctly for development, and you've run your first script. Great! In the https://docs.apify.com/academy/web-scraping-for-beginners/data-extraction/project-setup.md we'll set up your project to download a website's HTML using Node.js instead of a browser.
Extracting data with DevTools
Continue learning how to extract data from a website using browser DevTools, CSS selectors, and JavaScript via the DevTools console.
In the previous parts of the DevTools tutorial, we were able to extract information about a single product from the Sales collection of the https://warehouse-theme-metal.myshopify.com/collections/sales. If you missed the previous lessons, please go through them to understand the basic concepts. You don't need any of the code from there, though. We will start from scratch.
Find all product elements
First, we will use the querySelectorAll() function from the previous lessons to get a list of all the product elements.
Run this command in your Console:
const products = document.querySelectorAll('.product-item');
products.length;
The length property of products tells us how many products we have in the list. It says 24 and if you count the number of products on the page, you'll find that it's correct. Good, that means our CSS selector is working perfectly to get all the products.

Looping over elements
https://developer.mozilla.org/en-US/docs/Web/JavaScript/Guide/Loops_and_iteration if you need to refresh the concept of loops in programming.
Now, we will loop over each product and print their titles. We will use a so-called for..of loop to do it. It is a loop that iterates through all items of an array.
Run the following command in the Console. Some notes:
- The
a.product-item__titleselector and the extraction code come from the previous lesson. - The
console.log()function prints the results to the Console. - The
trim()function makes sure there are no useless whitespace characters around our data.
for (const product of products) {
const titleElement = product.querySelector('a.product-item__title');
const title = titleElement.textContent.trim();
console.log(title);
}
https://developer.mozilla.org/en-US/docs/Web/JavaScript/Reference/Statements/for...of about the
for..ofloop.

Extracting more data
We will add the price extraction from the previous lesson to the loop. We will also save all the data to an array so that we can work with it. Run this in the Console:
The
results.push()function takes its argument and pushes (adds) it to theresultsarray. https://developer.mozilla.org/en-US/docs/Web/JavaScript/Reference/Global_Objects/Array/push.
const results = [];
for (const product of products) {
const titleElement = product.querySelector('a.product-item__title');
const title = titleElement.textContent.trim();
const priceElement = product.querySelector('span.price');
const price = priceElement.childNodes[2].nodeValue.trim();
results.push({ title, price });
}
After running the code, you'll see 24 printed to the Console. That's because the results array includes 24 products.
Now, run this command in the Console to print all the products:
console.log(results);

You may notice that some prices include the word From, indicating that the price is not final. If you wanted to process this data further, you would want to remove this from the price and instead save this information to another field.
Summary
Let's recap the web scraping process. First, we used DevTools to find the element that holds data about a single product. Then, inside this parent element we found child elements that contained the data (title, price) we were looking for.
Second, we used the document.querySelector() function and its All variant to find the data programmatically, using their CSS selectors.
And third, we wrapped this data extraction logic in a loop to automatically find the data not only for a single product, but for all the products on the page. 🎉
Next up
And that's it! With a bit of trial and error, you will be able to extract data from any webpage that's loaded in your browser. This is a useful skill on its own. It will save you time copy-pasting stuff when you need data for a project.
More importantly though, it taught you the basics to start programming your own scrapers. In the https://docs.apify.com/academy/web-scraping-for-beginners/data-extraction/computer-preparation.md, we will teach you how to create your own web data extraction script using JavaScript and Node.js.
Extracting data with Node.js
Continue learning how to create a web scraper with Node.js and Cheerio. Learn how to parse HTML and print the results of the data your scraper has collected.
In the first part of the Node.js tutorial we downloaded the HTML of our https://warehouse-theme-metal.myshopify.com/collections/sales and parsed it with Cheerio. Now, we will replicate the extraction logic from the https://docs.apify.com/academy/web-scraping-for-beginners/data-extraction/using-devtools.md lessons and finish our scraper.
Querying data with Cheerio
As a reminder, the data we need for each product on the page is available in the elements that have the product-item class attribute.

To get all the elements with that class using Cheerio, we call the $ function with the appropriate CSS selector. Same as we would with the document.querySelectorAll() function.
// In browser DevTools Console
const products = document.querySelectorAll('.product-item');
// In Node.js with Cheerio
const products = $('.product-item');
We will use the same approach as in the previous DevTools lessons. Using a for..of loop we will iterate over the list of products we saved in the products variable. The code is a little different from DevTools, because we're using Node.js and Cheerio instead of a browser's native DOM manipulation functions, but the principle is exactly the same.
Replace the code in your main.js with the following, and run it with node main.js in your terminal.
// main.js
import { gotScraping } from 'got-scraping';
import * as cheerio from 'cheerio';
const storeUrl = 'https://warehouse-theme-metal.myshopify.com/collections/sales';
// Download HTML with Got Scraping
const response = await gotScraping(storeUrl);
const html = response.body;
// Parse HTML with Cheerio
const $ = cheerio.load(html);
// Find all products on the page
const products = $('.product-item');
// Loop through all the products
// and print their text to terminal
for (const product of products) {
const productElement = $(product);
const productText = productElement.text();
console.log(productText);
}
After you run this script, you will see data of all the 24 products printed in your terminal. The output will be messy, but that's ok. Next, we will clean it.
Extracting product data
To clean the output, we need to repeat the process from the DevTools lessons and add individual data point extraction to the loop. From those lessons, we know that each of our product cards includes an element which holds the product's title, and a element which includes the product's price.

We will loop over all the products and extract the data points from each of them using the for..of loop. For reference, this a part of the code from the DevTools lesson, where we collected the data using the browser DevTools Console:
// This code will only work in the browser, and NOT in Node.js
const results = [];
for (const product of products) {
const titleElement = product.querySelector('a.product-item__title');
const title = titleElement.textContent.trim();
const priceElement = subwoofer.querySelector('span.price');
const price = priceElement.childNodes[2].nodeValue.trim();
results.push({ title, price });
}
And this snippet shows the same piece of code when using Node.js and Cheerio:
const results = [];
for (const product of products) {
const titleElement = $(product).find('a.product-item__title');
const title = titleElement.text().trim();
const priceElement = $(product).find('span.price');
const price = priceElement.contents()[2].nodeValue.trim();
results.push({ title, price });
}
The main difference is that we used the https://cheerio.js.org/classes/Cheerio.html#find function to select the title and price elements and also the .contents() function instead of the childNodes attribute. If you find the differences confusing, don't worry about it. It will begin to feel very natural after a bit of practice.
The final scraper code looks like this. Replace the code in your main.js file with this code and run it using node main.js in your terminal.
// main.js
import { gotScraping } from 'got-scraping';
import * as cheerio from 'cheerio';
const storeUrl = 'https://warehouse-theme-metal.myshopify.com/collections/sales';
// Download HTML with Got Scraping
const response = await gotScraping(storeUrl);
const html = response.body;
// Parse HTML with Cheerio
const $ = cheerio.load(html);
// Find all products on the page
const products = $('.product-item');
const results = [];
for (const product of products) {
const titleElement = $(product).find('a.product-item__title');
const title = titleElement.text().trim();
const priceElement = $(product).find('span.price');
const price = priceElement.contents()[2].nodeValue.trim();
results.push({ title, price });
}
console.log(results);
After running the code, you will see this output in your terminal:
[
{
title: 'JBL Flip 4 Waterproof Portable Bluetooth Speaker',
price: '$74.95',
},
{
title: 'Sony XBR-950G BRAVIA 4K HDR Ultra HD TV',
price: 'From $1,398.00',
},
{
title: 'Sony SACS9 10" Active Subwoofer',
price: '$158.00',
},
{
title: 'Sony PS-HX500 Hi-Res USB Turntable',
price: '$398.00',
},
{
title: 'Klipsch R-120SW Powerful Detailed Home Speaker - Unit',
price: '$324.00',
},
// ...and more
];
Congratulations! You completed the Basics of data extraction section of the Web scraping basics for JavaScript devs course. A quick recap of what you learned:
- The basic terminology around web scraping, crawling, HTML, CSS and JavaScript.
- How to use browser DevTools and Console to inspect web pages and manipulate them using CSS and JavaScript.
- How to install Node.js and set up your computer for building scrapers.
- How to download a website's HTML using Got Scraping and then parse it using Cheerio to extract valuable data.
Great job! 👏🎉
Next up
What's next? While we were able to extract the data, it's not super useful to have it printed to the terminal. In the https://docs.apify.com/academy/web-scraping-for-beginners/data-extraction/save-to-csv.md, we will learn how to convert the data to a CSV and save it to a file.
Scraping with Node.js
Learn how to use JavaScript and Node.js to create a web scraper, plus take advantage of the Cheerio and Got-scraping libraries to make your job easier.
Finally, we have everything ready to start scraping! Yes, the setup was a bit daunting, but luckily, you only have to do it once. We have our project, we have our main.js file, so let's add some code to it.
Downloading HTML
We will use the got-scraping library to download the HTML of products that are https://warehouse-theme-metal.myshopify.com/collections/sales. We already worked with this page earlier in the https://docs.apify.com/academy/web-scraping-for-beginners/data-extraction/using-devtools.md lessons.
Replace the contents of your main.js file with this code:
// main.js
import { gotScraping } from 'got-scraping';
const storeUrl = 'https://warehouse-theme-metal.myshopify.com/collections/sales';
const response = await gotScraping(storeUrl);
const html = response.body;
console.log(html);
Now run the script using the node main.js command from the previous lesson. After a brief moment, you should see the page's HTML printed to your terminal.
gotScrapingis anasyncfunction and theawaitkeyword is used to pause execution of the script until it returns theresponse. If you're new to this, go through an https://developer.mozilla.org/en-US/docs/Learn/JavaScript/Asynchronous.
Parsing HTML
Having the HTML printed to the terminal is not very helpful. To extract the data, we first have to parse it. Parsing the HTML allows us to query the individual HTML elements, similarly to the way we did it in the browser in the https://docs.apify.com/academy/web-scraping-for-beginners/data-extraction/using-devtools.md lessons.
To parse the HTML with the cheerio library. Replace the code in your main.js with the following code:
// main.js
import { gotScraping } from 'got-scraping';
import * as cheerio from 'cheerio';
const storeUrl = 'https://warehouse-theme-metal.myshopify.com/collections/sales';
// Download HTML with Got Scraping
const response = await gotScraping(storeUrl);
const html = response.body;
// Parse HTML with Cheerio
const $ = cheerio.load(html);
const headingElement = $('h1');
const headingText = headingElement.text();
// Print page title to terminal
console.log(headingText);
When you run the above script, Sales will be printed to the terminal. That's because it's the heading of the Sales page of the Warehouse Store which is located in a h1 element.

Great, we successfully parsed the HTML and extracted the text of the `` element from it using Node.js and Cheerio. Let's break the code down.
The script first downloaded the page's HTML using the Got Scraping library. Then, it parsed the downloaded html with cheerio using the load() function, and allowed us to work with it using the $ variable (the $ name is an old convention). The next $('h1') function call looked inside the parsed HTML and found the `` element. Finally, the script extracted the text from the element using the .text() function and printed it to the terminal with console.log().
$('h1')is very similar to callingdocument.querySelector('h1')in the browser andelement.text()is similar toelement.textContentfrom the earlier DevTools lessons. https://github.com/cheeriojs/cheerio#readme to learn more about its syntax.
Next up
In the https://docs.apify.com/academy/web-scraping-for-beginners/data-extraction/node-continued.md we will learn more about Cheerio and use it to extract all the products' data from Fakestore.
Setting up your project
Create a new project with npm and Node.js. Install necessary libraries, and test that everything works before starting the next lesson.
When you open a website in a browser, the browser first downloads the page's HTML. To do the same thing with Node.js, we will install a program - an npm module - to help us with it. npm modules are installed using npm, which is another program, automatically installed with Node.js.
The https://www.npmjs.com/ registry offers a huge collection of open-source libraries for Node.js. You can (and you should) utilize it to save time and tap into the amazing open-source community around JavaScript and Node.js.
Creating a new project with npm
Before we can install npm modules, we need to create an npm project. To do that, you can create a new directory or use the one that you already have open in VSCode (you can delete the hello.js file now) and from that directory run this command in your terminal:
npm init -y
It will set up an empty npm project for you and create a file called package.json. This is a very important file in Node.js programming as it contains information about the project.

Use modern JavaScript
Node.js and npm support two types of projects, let's call them legacy and modern. For backwards compatibility, the legacy version is used by default. To switch to the modern version, open your package.json and add this line to the end of the JSON object. Don't forget to add a comma to the end of the previous line 😉
"type": "module"

More recent versions of npm might already have
"type": "commonjs",pre-defined; if so, simply replacecommonjswithmodule.
If you want to learn more about JSON and its syntax, we recommend https://developer.mozilla.org/en-US/docs/Learn/JavaScript/Objects/JSON.
Installing necessary libraries
Now that we have a project set up, we can install npm modules into the project. Let's install libraries that will help us with downloading and processing websites' HTML. In the project directory, run the following command, which will install two libraries into your project. got-scraping and Cheerio.
npm install got-scraping cheerio
https://github.com/apify/got-scraping is a library that's made especially for scraping and downloading page's HTML. It's based on the popular https://github.com/sindresorhus/got, which means any features of got are also available in got-scraping. Both got and got-scraping are HTTP clients. To learn more about HTTP, https://developer.mozilla.org/en-US/docs/Web/HTTP/Basics_of_HTTP.
https://github.com/cheeriojs/cheerio is a popular Node.js library for parsing and processing HTML. If you know how to work with https://jquery.com/, you'll find Cheerio familiar.
Test everything
With the libraries installed, create a new file in the project's folder called main.js. This is where we will put all our code. Before we start scraping, though, let's do a check that everything was installed correctly. Add this piece of code inside main.js.
import { gotScraping } from 'got-scraping';
import * as cheerio from 'cheerio';
console.log('it works!');
Those import statements tell Node.js that it should give you access to the got-scraping library under the gotScraping variable and the Cheerio library under the cheerio variable.
Now run this command in your terminal:
node main.js
If you see it works! printed in your terminal, great job! You set up everything correctly. If you see an error that says Cannot use import statement outside a module, go back to the paragraph and add the type property to your package.json. If you see a different error, try copying and pasting it into Google, and you'll find a solution soon.

Next up
With the project set up, the https://docs.apify.com/academy/web-scraping-for-beginners/data-extraction/node-js-scraper.md will show you how to use got-scraping to download the website's HTML and extract data from it with Cheerio.
Saving results to CSV
Learn how to save the results of your scraper's collected data to a CSV file that can be opened in Excel, Google Sheets, or any other spreadsheets program.
In the last lesson, we were able to extract data about all the on-sale products from https://warehouse-theme-metal.myshopify.com/collections/sales. That's great. But we ended up with results printed to the terminal, which is not very useful for further processing. In this lesson, we'll learn how to save that data into a CSV file that you can then open in Excel or Google Sheets.
Converting to CSV
It might look like a big programming challenge to transform a JavaScript object into a CSV, but thanks to npm, this is going to be a walk in the park. Google search json to csv npm. You will find that there's a library called https://www.npmjs.com/package/json2csv that can convert a JavaScript object to CSV format with a single function call. Perfect!
To install json2csv, run this command in your terminal. You need to be in the project's folder - the folder which has the package.json file.
npm i json2csv
First, we need to import the parse() function from the library.
import { parse } from 'json2csv';
Next, we need to parse the results array from the previous lesson with the imported function.
const csv = parse(results);
The full code including the earlier scraping part now looks like this. Replace the contents of your main.js file with this code:
// main.js
import { gotScraping } from 'got-scraping';
import * as cheerio from 'cheerio';
import { parse } from 'json2csv'; // **Why use a Shopify demo and not a real e-commerce store like Amazon?** Because real websites are usually bulkier, littered with promotions, and they change very often. Many have multiple versions of pages, and you never know in advance which one you will get. It will be important to learn how to deal with these challenges in the future, but for this beginner course, we want to have a light and stable environment.
>
> Some other courses use so-called scraping playgrounds or sandboxes. Those are websites made solely for the purpose of learning scraping. We find those too dumbed down and not representative of real websites. The Shopify demo is a full-featured, real-world website.
## Getting structured data from HTML
When you open up the https://warehouse-theme-metal.myshopify.com/collections/sales, you'll see that there's a grid of products on the page with names and pictures of products. We will learn how to extract all this information.

Open DevTools and select the name of the **Sony SACS9 Active Subwoofer**. When you click on it, it will get highlighted in the Elements tab.

Great, you have selected the element which contains the name of the subwoofer. Now we want to find all the elements that contain all the information about this subwoofer. Price, number of reviews, image and everything else you might need. We will use the **Elements** tab to do that. You can hover over the elements in the Elements tab, and they will get highlighted on the page as you move the mouse.
Start from the previously selected element with the subwoofer's name and move your mouse up, hovering over each element, until you find the one that highlights the entire product card. Alternatively, you can press the up arrow a few times to get the same result.
The element that contains all the information about the subwoofer is called a **parent element**, and all the nested elements, including the subwoofer's name, price and everything else, are **child elements**.

Now that we know how the parent element looks, we can extract its data, including the data of its children. Notice that the element has a `class` attribute with multiple values like `product-item` or `product-item--vertical`. Let's use those classes in the Console to extract data.

## Selecting elements in Console
We know how to find an element manually using the DevTools, but that's not very useful for automated scraping. We need to tell the computer how to find it as well. We can do that using JavaScript and CSS selectors. The function to do that is called https://docs.apify.com/academy/concepts/querying-css-selectors.md and it will find the first element in the page's HTML matching the provided https://docs.apify.com/academy/concepts/css-selectors.md.
For example `document.querySelector('div')` will find the first `` element. And `document.querySelector('.my-class')` (notice the period `.`) will find the first element with the class `my-class`, such as `` or ``.
You can also combine selectors. `document.querySelector('p.my-class')` will find all `` elements, but no ``.
Let's try to use `document.querySelector()` to find the **Sony subwoofer**. Earlier we mentioned that the parent element of the subwoofer had, among others, the `product-item` class. We can use the class to look up the element. Copy or type (don't miss the period `.` in `.product-item`) the following function into the Console and press Enter.
document.querySelector('.product-item');
It will produce a result like this, but it **won't be** the Sony subwoofer.

About the missing semicolon
In the screenshot, there is a missing semicolon `;` at the end of the line. In JavaScript, semicolons are optional, so it makes no difference.
When we look more closely by hovering over the result in the Console, we find that instead of the Sony subwoofer, we found a JBL Flip speaker. Why? Because earlier we explained that `document.querySelector('.product-item')` finds the **first element** with the `product-item` class, and the JBL speaker is the first product in the list.

We need a different function: https://docs.apify.com/academy/concepts/querying-css-selectors.md (notice the `All` at the end). This function does not find only the first element, but all the elements that match the provided selector.
Run the following function in the Console:
document.querySelectorAll('.product-item');
It will return a `NodeList` (a type of array) with many results. Expand the results by clicking the small arrow button and then hover over the third (number 2, indexing starts at 0) element in the list. You'll find that it's the Sony subwoofer we're looking for.

Naturally, this is the method we use mostly in web scraping, because we're usually interested in scraping all the products from a page, not just a single product.
Elements or nodes?
The list is called a `NodeList`, because browsers understand a HTML document as a tree of nodes. Most of the nodes are HTML elements, but there can be also text nodes for plain text, and others.
## How to choose good selectors
Often you can select the same element with different CSS selectors. Try to choose selectors that are **simple**, **human-readable**, **unique** and **semantically connected** to the data. Selectors that meet these criteria are sometimes called **resilient selectors**, because they're the most reliable and least likely to change with website updates. If you can, avoid randomly generated attributes like `class="F4jsL8"`. They change often and without warning.
The `product-item` class is simple, human-readable, and semantically connected with the data. The subwoofer is one of the products. A product item. Those are strong signals that this is a good selector. It's also sufficiently unique in the website's context. If the selector was only an `item`, for example, there would be a higher chance that the website's developers would add this class to something unrelated. Like an advertisement. And it could break your extraction code.
## Extracting data from elements
Now that we found the element, we can start poking into it to extract data. First, let's save the element to a variable so that we can work with it repeatedly. Run these commands in the Console:
const products = document.querySelectorAll('.product-item'); const subwoofer = products[2];
> If you're wondering what an array is or what `products[2]` means, read the https://developer.mozilla.org/en-US/docs/Learn/JavaScript/First_steps/Arrays.
Now that we have the subwoofer saved in a variable, run another command in the Console to print its text:
subwoofer.textContent;

As you can see, we were able to extract information about the subwoofer, but the format is still not very useful - there's a lot of content that we don't need. For further processing (ex. in a spreadsheet), we would like to have each piece of data as a separate field (column). To do that, we will look at the HTML structure in more detail.
### Finding child elements
In the section, we were browsing the elements in the **Elements** tab to find the element that contains all the data. We can use the same approach to find the individual data points as well.
Start from the element that contains all data: `` Then inspect all the elements nested within this element. You'll discover that:
* the product's name is an `` element with the class `product-item__title`, and
* the price is held inside a `` with the class `price`. Note that there are two prices. The sale price and the regular price. We want the sale price.
We will use this knowledge soon to extract the data.

### Selecting child elements
The `document.querySelector()` function looks for a specific element in the whole HTML `document`, so if we called it with `h3`, it would find the first `` node in the `document`. But we can replace the `document` with any other parent element and the function will limit its search to child elements of the chosen parent.
Earlier we selected the parent element of the Sony subwoofer and saved it to a variable called `subwoofer`. Let's use this variable to search inside the subwoofer element and find the product's name and price.
Run two commands in the Console. The first will find the element with the subwoofer's name and save it to a variable called `title`. The second will extract the name and print it.
const title = subwoofer.querySelector('a.product-item__title'); title.textContent;

Great! We found a way how to programmatically extract the name of the product. We're getting somewhere.
Next, run the following two commands in the Console.
const price = subwoofer.querySelector('span.price'); price.textContent;

It worked, but the price was not alone in the result. We extracted it together with some extra text. This is very common in web scraping. Sometimes it's impossible to separate the data we need by element selection alone, and we have to clean the data using other methods.
### Cleaning extracted data
When it comes to data cleaning, there are two main approaches you can take. It's beneficial to understand both, as one approach may be feasible in a given situation while the other is not.
1. Remove the elements that add noise to your data from the selection. Then extract the pre-cleaned data.
2. Extract the data with noise. Use https://developer.mozilla.org/en-US/docs/Web/JavaScript/Guide/Regular_Expressions or other text manipulation techniques to parse the data and keep only the parts we're interested in.
First, let's look at **removing the noise before extraction**. When you look closely at the element that contains the price, you'll see that it includes another `` element with the text **Sale price**. This `` is what adds noise to our data, and we have to get rid of it.

When we call `subwoofer.querySelector('span.price')` it selects the whole `` element. Unfortunately, it also includes the `` element that we're not interested in.
We can, however, use JavaScript to get only the actual text of the selected element, without any child elements. Run this command in the Console:
price.childNodes[2].nodeValue;
Why the third child node? Because the first one represents the empty space before `` itself and the third one is the price. In any case, we were able to extract the clean price.

The second option we have is to **take the noisy price data and clean it with string manipulation**. The data looks like this:
\n Sale price$158.00
This can be approached in a variety of ways. To start let's look at a naive solution:
price.textContent.split('$')[1];

And there you go. Notice that this time we extracted the price without the `$` dollar sign. This could be desirable, because we wanted to convert the price from a string to a number, or not, depending on individual circumstances of the scraping project.
Which method to choose? Neither is the perfect solution. The first method could break if the website's developers change the structure of the `` elements and the price will no longer be in the third position - a very small change that can happen at any moment.
The second method seems more reliable, but only until the website adds prices in other currency or decides to replace `$` with `USD`. It's up to you, the scraping developer to decide which of the methods will be more resilient on the website you scrape.
In production, we would probably use a regular expression like the following, or a specialized library for parsing prices from strings, but for this tutorial, we'll keep it simple.
price.textContent.match(/((\d+,?)+.?(\d+)?)/)[0];
## Next up
This concludes our lesson on extracting and cleaning data using DevTools. Using CSS selectors, we were able to find the HTML element that contains data about our favorite Sony subwoofer and then extract the data. In the https://docs.apify.com/academy/web-scraping-for-beginners/data-extraction/devtools-continued.md, we will learn how to extract information not only about the subwoofer, but about all the products on the page.
---
# Introduction
**Start learning about web scraping, web crawling, data extraction, and popular tools to start developing your own scraper.**
***
Web scraping or crawling? Web data extraction, mining, or collection? You can find various definitions on the web. Let's agree on explanations that we will use throughout this beginner course on web scraping.
## What is web data extraction?
Web data extraction (or collection) is a process that takes a web page, like an Amazon product page, and collects useful information from the page, such as the product's name and price. Web pages are an unstructured data source and the goal of web data extraction is to make information from websites structured, so that it can be processed by data analysis tools or integrated with computer systems. The main sources of data on a web page are HTML documents and API calls, but also images, PDFs, etc.

## What is crawling?
Where web data extraction focuses on a single page, web crawling (sometimes called spidering 🕷) is all about movement between pages or websites. The purpose of crawling is to travel across the website to find pages with the information we want. Crawling and collection can happen either simultaneously, while moving from page to page, or separately, where one scraper focuses solely on finding pages with data, and another scraper collects the data. The main purpose of crawling is to collect URLs or other links that can be used to move around.
## What is web scraping?
We use web scraping as an umbrella term for crawling, web data extraction and all other activities that have the purpose of converting unstructured data from the web to a structured format ready for integration or data analysis. In the advanced courses, you'll learn that web scraping is about much more than just HTML and URLs.
## Next up
In the https://docs.apify.com/academy/web-scraping-for-beginners/data-extraction.md, you will learn about the basic building blocks of each web page. HTML, CSS and JavaScript.
---
Download OpenAPI
* https://docs.apify.com/api/openapi.yaml
* https://docs.apify.com/api/openapi.json
# Apify API
The Apify API (version 2) provides programmatic access to the https://docs.apify.com. The API is organized around https://en.wikipedia.org/wiki/Representational_state_transfer HTTP endpoints.
You can download the complete OpenAPI schema of Apify API in the http://docs.apify.com/api/openapi.yaml or http://docs.apify.com/api/openapi.json formats. The source code is also available on https://github.com/apify/apify-docs/tree/master/apify-api/openapi.
All requests and responses (including errors) are encoded in http://www.json.org/ format with UTF-8 encoding, with a few exceptions that are explicitly described in the reference.
* To access the API using https://nodejs.org/en/, we recommend the https://docs.apify.com/api/client/js https://www.npmjs.com/package/apify-client.
* To access the API using https://www.python.org/, we recommend the https://docs.apify.com/api/client/python https://pypi.org/project/apify-client/.
The clients' functions correspond to the API endpoints and have the same parameters. This simplifies development of apps that depend on the Apify platform.
Important Request Details
* `Content-Type` header: For requests with a JSON body, you must include the `Content-Type: application/json` header.
* Method override: You can override the HTTP method using the `method` query parameter. This is useful for clients that can only send `GET` requests. For example, to call a `POST` endpoint, append `?method=POST` to the URL of your `GET` request.
## Authentication
You can find your API token on the https://console.apify.com/account#/integrations page in the Apify Console.
To use your token in a request, either:
* Add the token to your request's `Authorization` header as `Bearer `. E.g., `Authorization: Bearer xxxxxxx`. https://developer.mozilla.org/en-US/docs/Web/HTTP/Headers/Authorization. (Recommended).
* Add it as the `token` parameter to your request URL. (Less secure).
Using your token in the request header is more secure than using it as a URL parameter because URLs are often stored in browser history and server logs. This creates a chance for someone unauthorized to access your API token.
**Do not share your API token or password with untrusted parties.**
For more information, see our https://docs.apify.com/platform/integrations documentation.
## Basic usage
To run an Actor, send a POST request to the endpoint using either the Actor ID code (e.g. `vKg4IjxZbEYTYeW8T`) or its name (e.g. `janedoe~my-actor`):
`https://api.apify.com/v2/acts/[actor_id]/runs`
If the Actor is not runnable anonymously, you will receive a 401 or 403 https://developer.mozilla.org/en-US/docs/Web/HTTP/Status. This means you need to add your https://console.apify.com/account#/integrations to the request's `Authorization` header () or as a URL query parameter `?token=[your_token]` (less secure).
Optionally, you can include the query parameters described in the section to customize your run.
If you're using Node.js, the best way to run an Actor is using the `Apify.call()` method from the https://sdk.apify.com/docs/api/apify#apifycallactid-input-options. It runs the Actor using the account you are currently logged into (determined by the https://console.apify.com/account#/integrations). The result is an https://sdk.apify.com/docs/typedefs/actor-run and its output (if any).
A typical workflow is as follows:
1. Run an Actor or task using the or API endpoints.
2. Monitor the Actor run by periodically polling its progress using the API endpoint.
3. Fetch the results from the API endpoint using the `defaultDatasetId`, which you receive in the Run request response. Additional data may be stored in a key-value store. You can fetch them from the API endpoint using the `defaultKeyValueStoreId` and the store's `key`.
**Note**: Instead of periodic polling, you can also run your or synchronously. This will ensure that the request waits for 300 seconds (5 minutes) for the run to finish and returns its output. If the run takes longer, the request will time out and throw an error.
## Response structure
Most API endpoints return a JSON object with the `data` property:
{ "data": { ... } }
However, there are a few explicitly described exceptions, such as Dataset or Key-value store API endpoints, which return data in other formats. In case of an error, the response has the HTTP status code in the range of 4xx or 5xx and the `data` property is replaced with `error`. For example:
{ "error": { "type": "record-not-found", "message": "Store was not found." } }
See for more details.
## Pagination
All API endpoints that return a list of records (e.g. ) enforce pagination in order to limit the size of their responses.
Most of these API endpoints are paginated using the `offset` and `limit` query parameters. The only exception is , which is paginated using the `exclusiveStartKey` query parameter.
**IMPORTANT**: Each API endpoint that supports pagination enforces a certain maximum value for the `limit` parameter, in order to reduce the load on Apify servers. The maximum limit could change in future so you should never rely on a specific value and check the responses of these API endpoints.
### Using offset
Most API endpoints that return a list of records enable pagination using the following query parameters:
| | |
| -------- | ----------------------------------------------------------------------------------------------------------------------------------------------------------------------------------------------------------------------------------------------------------------------------------------------------------------------------------------------------------------------------------- |
| `limit` | Limits the response to contain a specific maximum number of items, e.g. `limit=20`. |
| `offset` | Skips a number of items from the beginning of the list, e.g. `offset=100`. |
| `desc` | By default, items are sorted in the order in which they were created or added to the list. This feature is useful when fetching all the items, because it ensures that items created after the client started the pagination will not be skipped. If you specify the `desc=1` parameter, the items will be returned in the reverse order, i.e. from the newest to the oldest items. |
The response of these API endpoints is always a JSON object with the following structure:
{ "data": { "total": 2560, "offset": 250, "limit": 1000, "count": 1000, "desc": false, "items": [ { 1st object }, { 2nd object }, ... { 1000th object } ] } }
The following table describes the meaning of the response properties:
| Property | Description |
| -------- | ----------------------------------------------------------------------------------------------------------------------------------------------------------------------------------------------------------------------- |
| `total` | The total number of items available in the list. |
| `offset` | The number of items that were skipped at the start. This is equal to the `offset` query parameter if it was provided, otherwise it is `0`. |
| `limit` | The maximum number of items that can be returned in the HTTP response. It equals to the `limit` query parameter if it was provided or the maximum limit enforced for the particular API endpoint, whichever is smaller. |
| `count` | The actual number of items returned in the HTTP response. |
| `desc` | `true` if data were requested in descending order and `false` otherwise. |
| `items` | An array of requested items. |
### Using key
The records in the https://docs.apify.com/platform/storage/key-value-store are not ordered based on numerical indexes, but rather by their keys in the UTF-8 binary order. Therefore the API endpoint only supports pagination using the following query parameters:
| | |
| ------------------- | --------------------------------------------------------------------------------------------------- |
| `limit` | Limits the response to contain a specific maximum number items, e.g. `limit=20`. |
| `exclusiveStartKey` | Skips all records with keys up to the given key including the given key, in the UTF-8 binary order. |
The response of the API endpoint is always a JSON object with following structure:
{ "data": { "limit": 1000, "isTruncated": true, "exclusiveStartKey": "my-key", "nextExclusiveStartKey": "some-other-key", "items": [ { 1st object }, { 2nd object }, ... { 1000th object } ] } }
The following table describes the meaning of the response properties:
| Property | Description |
| ----------------------- | ------------------------------------------------------------------------------------------------------------------------------------------------------------------------------------------------------------------- |
| `limit` | The maximum number of items that can be returned in the HTTP response. It equals to the `limit` query parameter if it was provided or the maximum limit enforced for the particular endpoint, whichever is smaller. |
| `isTruncated` | `true` if there are more items left to be queried. Otherwise `false`. |
| `exclusiveStartKey` | The last key that was skipped at the start. Is `null` for the first page. |
| `nextExclusiveStartKey` | The value for the `exclusiveStartKey` parameter to query the next page of items. |
## Errors
The Apify API uses common HTTP status codes: `2xx` range for success, `4xx` range for errors caused by the caller (invalid requests) and `5xx` range for server errors (these are rare). Each error response contains a JSON object defining the `error` property, which is an object with the `type` and `message` properties that contain the error code and a human-readable error description, respectively.
For example:
{ "error": { "type": "record-not-found", "message": "Store was not found." } }
Here is the table of the most common errors that can occur for many API endpoints:
| status | type | message |
| ------ | --------------------- | -------------------------------------------------------------------------------------- |
| `400` | `invalid-request` | POST data must be a JSON object |
| `400` | `invalid-value` | Invalid value provided: Comments required |
| `400` | `invalid-record-key` | Record key contains invalid character |
| `401` | `token-not-provided` | Authentication token was not provided |
| `404` | `record-not-found` | Store was not found |
| `429` | `rate-limit-exceeded` | You have exceeded the rate limit of ... requests per second |
| `405` | `method-not-allowed` | This API endpoint can only be accessed using the following HTTP methods: OPTIONS, POST |
## Rate limiting
All API endpoints limit the rate of requests in order to prevent overloading of Apify servers by misbehaving clients.
There are two kinds of rate limits - a global rate limit and a per-resource rate limit.
### Global rate limit
The global rate limit is set to *250 000 requests per minute*. For requests, it is counted per user, and for unauthenticated requests, it is counted per IP address.
### Per-resource rate limit
The default per-resource rate limit is *60 requests per second per resource*, which in this context means a single Actor, a single Actor run, a single dataset, single key-value store etc. The default rate limit is applied to every API endpoint except a few select ones, which have higher rate limits. Each API endpoint returns its rate limit in `X-RateLimit-Limit` header.
These endpoints have a rate limit of *200 requests per second per resource*:
* CRUD (, , ) operations on key-value store records
These endpoints have a rate limit of *400 requests per second per resource*:
*
*
*
*
* to dataset
* CRUD (, , , ) operations on requests in request queues
### Rate limit exceeded errors
If the client is sending too many requests, the API endpoints respond with the HTTP status code `429 Too Many Requests` and the following body:
{ "error": { "type": "rate-limit-exceeded", "message": "You have exceeded the rate limit of ... requests per second" } }
### Retrying rate-limited requests with exponential backoff
If the client receives the rate limit error, it should wait a certain period of time and then retry the request. If the error happens again, the client should double the wait period and retry the request, and so on. This algorithm is known as *exponential backoff* and it can be described using the following pseudo-code:
1. Define a variable `DELAY=500`
2. Send the HTTP request to the API endpoint
3. If the response has status code not equal to `429` then you are done. Otherwise:
* Wait for a period of time chosen randomly from the interval `DELAY` to `2*DELAY` milliseconds
* Double the future wait period by setting `DELAY = 2*DELAY`
* Continue with step 2
If all requests sent by the client implement the above steps, the client will automatically use the maximum available bandwidth for its requests.
Note that the Apify API clients https://docs.apify.com/api/client/js and https://docs.apify.com/api/client/python use the exponential backoff algorithm transparently, so that you do not need to worry about it.
## Referring to resources
There are three main ways to refer to a resource you're accessing via API.
* the resource ID (e.g. `iKkPcIgVvwmztduf8`)
* `username~resourcename` - when using this access method, you will need to use your API token, and access will only work if you have the correct permissions.
* `~resourcename` - for this, you need to use an API token, and the `resourcename` refers to a resource in the API token owner's account.
## Authentication
* HTTP: Bearer Auth
* API Key: apiKey
Bearer token provided in the `Authorization` header (e.g., `Authorization: Bearer your_token`—recommended). https://developer.mozilla.org/en-US/docs/Web/HTTP/Headers/Authorization.
Use your API token to authenticate requests. You can find it on the https://console.apify.com/account#/integrations in Apify Console. This method is more secure than query parameters, as headers are not logged in browser history or server logs.
Security
Do not share your API token (or account password) with untrusted parties.
*When is authentication required?*
* *Required* for private Actors, tasks, or resources (e.g., builds of private Actors).
* *Required* when using named formats for IDs (e.g., `username~store-name` for stores or `username~queue-name` for queues).
* *Optional* for public Actors or resources (e.g., builds of public Actors can be queried without a token).
For more information, see our https://docs.apify.com/platform/integrations.
| Security Scheme Type: | http |
| -------------------------- | ------ |
| HTTP Authorization Scheme: | bearer |
API token provided as a query parameter (e.g., `?token=your_token`—less secure).
Use your API token to authenticate requests. You can find it on the https://console.apify.com/account#/integrations in Apify Console.
Security
Do not share your API token (or account password) with untrusted parties.
*When is authentication required?*
* *Required* for private Actors, tasks, or resources (e.g., builds of private Actors).
* *Required* when using named formats for IDs (e.g., `username~store-name` for stores or `username~queue-name` for queues).
* *Optional* for public Actors or resources (e.g., builds of public Actors can be queried without a token).
For more information, see our https://docs.apify.com/platform/integrations.
| Security Scheme Type: | apiKey |
| --------------------- | ------ |
| Query parameter name: | token |
---
# Abort build
POST https://api.apify.com/v2/acts/:actorId/builds/:buildId/abort
deprecated
This endpoint has been deprecated and may be replaced or removed in future versions of the API.
**\[DEPRECATED]** API endpoints related to build of the Actor were moved under new namespace . Aborts an Actor build and returns an object that contains all the details about the build.
Only builds that are starting or running are aborted. For builds with status `FINISHED`, `FAILED`, `ABORTING` and `TIMED-OUT` this call does nothing.
## Request
## Responses
* 200
**Response Headers**
---
# Get default build
GET https://api.apify.com/v2/acts/:actorId/builds/default
Clientshttps://docs.apify.com/api/client/python/reference/class/ActorClient#default_buildhttps://docs.apify.com/api/client/js/reference/class/ActorClient#defaultBuildGet the default build for an Actor.
Use the optional `waitForFinish` parameter to synchronously wait for the build to finish. This avoids the need for periodic polling when waiting for the build to complete.
This endpoint does not require an authentication token. Instead, calls are authenticated using the Actor's unique ID. However, if you access the endpoint without a token, certain attributes (e.g., `usageUsd` and `usageTotalUsd`) will be hidden.
## Request
## Responses
* 200
**Response Headers**
---
# Get build
GET https://api.apify.com/v2/acts/:actorId/builds/:buildId
deprecated
API endpoints related to build of the Actor were moved under new namespace . Gets an object that contains all the details about a specific build of an Actor.
By passing the optional `waitForFinish` parameter the API endpoint will synchronously wait for the build to finish. This is useful to avoid periodic polling when waiting for an Actor build to finish.
This endpoint does not require the authentication token. Instead, calls are authenticated using a hard-to-guess ID of the build. However, if you access the endpoint without the token, certain attributes, such as `usageUsd` and `usageTotalUsd`, will be hidden.
## Request
## Responses
* 200
**Response Headers**
---
# Get list of builds
GET https://api.apify.com/v2/acts/:actorId/builds
Clientshttps://docs.apify.com/api/client/python/reference/class/BuildCollectionClientAsync#listhttps://docs.apify.com/api/client/js/reference/class/BuildCollectionClient#listGets the list of builds of a specific Actor. The response is a JSON with the list of objects, where each object contains basic information about a single build.
The endpoint supports pagination using the `limit` and `offset` parameters and it will not return more than 1000 records.
By default, the records are sorted by the `startedAt` field in ascending order, therefore you can use pagination to incrementally fetch all builds while new ones are still being started. To sort the records in descending order, use the `desc=1` parameter.
## Request
## Responses
* 200
**Response Headers**
---
# Build Actor
POST https://api.apify.com/v2/acts/:actorId/builds
Clientshttps://docs.apify.com/api/client/python/reference/class/ActorClientAsync#buildhttps://docs.apify.com/api/client/js/reference/class/ActorClient#buildBuilds an Actor. The response is the build object as returned by the endpoint.
## Request
## Responses
* 201
**Response Headers**
* **Location**
---
# Delete Actor
DELETE https://api.apify.com/v2/acts/:actorId
Clientshttps://docs.apify.com/api/client/js/reference/class/ActorClient#deleteDeletes an Actor.
## Request
## Responses
* 204
**Response Headers**
---
# Get Actor
GET https://api.apify.com/v2/acts/:actorId
Clientshttps://docs.apify.com/api/client/python/reference/class/ActorClientAsync#gethttps://docs.apify.com/api/client/js/reference/class/ActorClient#getGets an object that contains all the details about a specific Actor.
## Request
## Responses
* 200
**Response Headers**
---
# Get OpenAPI definition
GET https://api.apify.com/v2/acts/:actorId/builds/:buildId/openapi.json
Get the OpenAPI definition for Actor builds. Two similar endpoints are available:
* https://docs.apify.com/api/v2/act-openapi-json-get.md: Requires both `actorId` and `buildId`. Use `default` as the `buildId` to get the OpenAPI schema for the default Actor build.
* https://docs.apify.com/api/v2/actor-build-openapi-json-get.md: Requires only `buildId`.
Get the OpenAPI definition for a specific Actor build.
To fetch the default Actor build, simply pass `default` as the `buildId`. Authentication is based on the build's unique ID. No authentication token is required.
note
You can also use the https://docs.apify.com/api/v2/actor-build-openapi-json-get.md endpoint to get the OpenAPI definition for a build.
## Request
## Responses
* 200
**Response Headers**
---
# Update Actor
PUT https://api.apify.com/v2/acts/:actorId
Clientshttps://docs.apify.com/api/client/python/reference/class/ActorClientAsync#updatehttps://docs.apify.com/api/client/js/reference/class/ActorClient#updateUpdates settings of an Actor using values specified by an Actor object passed as JSON in the POST payload. If the object does not define a specific property, its value will not be updated.
The response is the full Actor object as returned by the endpoint.
The request needs to specify the `Content-Type: application/json` HTTP header!
When providing your API authentication token, we recommend using the request's `Authorization` header, rather than the URL. ().
If you want to make your Actor https://docs.apify.com/platform/actors/publishing using `isPublic: true`, you will need to provide the Actor's `title` and the `categories` under which that Actor will be classified in Apify Store. For this, it's best to use the https://github.com/apify/apify-shared-js/blob/2d43ebc41ece9ad31cd6525bd523fb86939bf860/packages/consts/src/consts.ts#L452-L471.
## Request
## Responses
* 200
**Response Headers**
---
# Abort run
POST https://api.apify.com/v2/acts/:actorId/runs/:runId/abort
deprecated
This endpoint has been deprecated and may be replaced or removed in future versions of the API.
**\[DEPRECATED]** API endpoints related to run of the Actor were moved under new namespace . Aborts an Actor run and returns an object that contains all the details about the run.
Only runs that are starting or running are aborted. For runs with status `FINISHED`, `FAILED`, `ABORTING` and `TIMED-OUT` this call does nothing.
## Request
## Responses
* 200
**Response Headers**
---
# Get run
GET https://api.apify.com/v2/acts/:actorId/runs/:runId
deprecated
This endpoint has been deprecated and may be replaced or removed in future versions of the API.
**\[DEPRECATED]** API endpoints related to run of the Actor were moved under new namespace .
Gets an object that contains all the details about a specific run of an Actor.
By passing the optional `waitForFinish` parameter the API endpoint will synchronously wait for the run to finish. This is useful to avoid periodic polling when waiting for Actor run to complete.
This endpoint does not require the authentication token. Instead, calls are authenticated using a hard-to-guess ID of the run. However, if you access the endpoint without the token, certain attributes, such as `usageUsd` and `usageTotalUsd`, will be hidden.
## Request
## Responses
* 200
**Response Headers**
---
# Metamorph run
POST https://api.apify.com/v2/acts/:actorId/runs/:runId/metamorph
deprecated
This endpoint has been deprecated and may be replaced or removed in future versions of the API.
**\[DEPRECATED]** API endpoints related to run of the Actor were moved under new namespace .Transforms an Actor run into a run of another Actor with a new input.
This is useful if you want to use another Actor to finish the work of your current Actor run, without the need to create a completely new run and waiting for its finish. For the users of your Actors, the metamorph operation is transparent, they will just see your Actor got the work done.
There is a limit on how many times you can metamorph a single run. You can check the limit in https://docs.apify.com/platform/limits#actor-limits.
Internally, the system stops the Docker container corresponding to the Actor run and starts a new container using a different Docker image. All the default storages are preserved and the new input is stored under the `INPUT-METAMORPH-1` key in the same default key-value store.
For more information, see the https://docs.apify.com/platform/actors/development/programming-interface/metamorph.
## Request
## Responses
* 200
**Response Headers**
---
# Resurrect run
POST https://api.apify.com/v2/acts/:actorId/runs/:runId/resurrect
**\[DEPRECATED]** API endpoints related to run of the Actor were moved under new namespace .Resurrects a finished Actor run and returns an object that contains all the details about the resurrected run.
Only finished runs, i.e. runs with status `FINISHED`, `FAILED`, `ABORTED` and `TIMED-OUT` can be resurrected. Run status will be updated to RUNNING and its container will be restarted with the same storages (the same behaviour as when the run gets migrated to the new server).
For more information, see the https://docs.apify.com/platform/actors/running/runs-and-builds#resurrection-of-finished-run.
## Request
## Responses
* 200
**Response Headers**
---
# Without input
GET https://api.apify.com/v2/acts/:actorId/run-sync
Runs a specific Actor and returns its output. The run must finish in 300 seconds otherwise the API endpoint returns a timeout error. The Actor is not passed any input.
Beware that it might be impossible to maintain an idle HTTP connection for a long period of time, due to client timeout or network conditions. Make sure your HTTP client is configured to have a long enough connection timeout. If the connection breaks, you will not receive any information about the run and its status.
To run the Actor asynchronously, use the API endpoint instead.
## Request
## Responses
* 201
* 400
* 408
**Response Headers**
**Response Headers**
**Response Headers**
---
# Run Actor synchronously without input and get dataset items
GET https://api.apify.com/v2/acts/:actorId/run-sync-get-dataset-items
Runs a specific Actor and returns its dataset items. The run must finish in 300 seconds otherwise the API endpoint returns a timeout error. The Actor is not passed any input.
It allows to send all possible options in parameters from API endpoint.
Beware that it might be impossible to maintain an idle HTTP connection for a long period of time, due to client timeout or network conditions. Make sure your HTTP client is configured to have a long enough connection timeout. If the connection breaks, you will not receive any information about the run and its status.
To run the Actor asynchronously, use the API endpoint instead.
## Request
## Responses
* 201
* 400
* 408
**Response Headers**
* **X-Apify-Pagination-Offset**
**X-Apify-Pagination-Limit**
**X-Apify-Pagination-Count**
**X-Apify-Pagination-Total**
**Response Headers**
**Response Headers**
---
# Run Actor synchronously with input and get dataset items
POST https://api.apify.com/v2/acts/:actorId/run-sync-get-dataset-items
Runs a specific Actor and returns its dataset items.
The POST payload including its `Content-Type` header is passed as `INPUT` to the Actor (usually `application/json`). The HTTP response contains the Actors dataset items, while the format of items depends on specifying dataset items' `format` parameter.
You can send all the same options in parameters as the API endpoint.
The Actor is started with the default options; you can override them using URL query parameters. If the Actor run exceeds 300 seconds, the HTTP response will return the 408 status code (Request Timeout).
Beware that it might be impossible to maintain an idle HTTP connection for a long period of time, due to client timeout or network conditions. Make sure your HTTP client is configured to have a long enough connection timeout. If the connection breaks, you will not receive any information about the run and its status.
To run the Actor asynchronously, use the API endpoint instead.
## Request
## Responses
* 201
* 400
* 408
**Response Headers**
* **X-Apify-Pagination-Offset**
**X-Apify-Pagination-Limit**
**X-Apify-Pagination-Count**
**X-Apify-Pagination-Total**
**Response Headers**
**Response Headers**
---
# Run Actor synchronously with input and return output
POST https://api.apify.com/v2/acts/:actorId/run-sync
Runs a specific Actor and returns its output.
The POST payload including its `Content-Type` header is passed as `INPUT` to the Actor (usually `application/json`). The HTTP response contains Actors `OUTPUT` record from its default key-value store.
The Actor is started with the default options; you can override them using various URL query parameters. If the Actor run exceeds 300 seconds, the HTTP response will have status 408 (Request Timeout).
Beware that it might be impossible to maintain an idle HTTP connection for a long period of time, due to client timeout or network conditions. Make sure your HTTP client is configured to have a long enough connection timeout. If the connection breaks, you will not receive any information about the run and its status.
To run the Actor asynchronously, use the API endpoint instead.
## Request
## Responses
* 201
* 400
* 408
**Response Headers**
**Response Headers**
**Response Headers**
---
# Get list of runs
GET https://api.apify.com/v2/acts/:actorId/runs
Clientshttps://docs.apify.com/api/client/python/reference/class/RunCollectionClientAsync#listhttps://docs.apify.com/api/client/js/reference/class/RunCollectionClient#listGets the list of runs of a specific Actor. The response is a list of objects, where each object contains basic information about a single Actor run.
The endpoint supports pagination using the `limit` and `offset` parameters and it will not return more than 1000 array elements.
By default, the records are sorted by the `startedAt` field in ascending order, therefore you can use pagination to incrementally fetch all records while new ones are still being created. To sort the records in descending order, use `desc=1` parameter. You can also filter runs by status (https://docs.apify.com/platform/actors/running/runs-and-builds#lifecycle).
## Request
## Responses
* 200
**Response Headers**
---
# Get last run
GET https://api.apify.com/v2/acts/:actorId/runs/last
This is not a single endpoint, but an entire group of endpoints that lets you to retrieve and manage the last run of given Actor or any of its default storages. All the endpoints require an authentication token.
The endpoints accept the same HTTP methods and query parameters as the respective storage endpoints. The base path represents the last Actor run object is:
`/v2/acts/{actorId}/runs/last{?token,status}`
Using the `status` query parameter you can ensure to only get a run with a certain status (e.g. `status=SUCCEEDED`). The output of this endpoint and other query parameters are the same as in the endpoint.
In order to access the default storages of the last Actor run, i.e. log, key-value store, dataset and request queue, use the following endpoints:
* `/v2/acts/{actorId}/runs/last/log{?token,status}`
* `/v2/acts/{actorId}/runs/last/key-value-store{?token,status}`
* `/v2/acts/{actorId}/runs/last/dataset{?token,status}`
* `/v2/acts/{actorId}/runs/last/request-queue{?token,status}`
These API endpoints have the same usage as the equivalent storage endpoints. For example, `/v2/acts/{actorId}/runs/last/key-value-store` has the same HTTP method and parameters as the endpoint.
Additionally, each of the above API endpoints supports all sub-endpoints of the original one:
#### Key-value store
* `/v2/acts/{actorId}/runs/last/key-value-store/keys{?token,status}`
* `/v2/acts/{actorId}/runs/last/key-value-store/records/{recordKey}{?token,status}`
#### Dataset
* `/v2/acts/{actorId}/runs/last/dataset/items{?token,status}`
#### Request queue
* `/v2/acts/{actorId}/runs/last/request-queue/requests{?token,status}`
* `/v2/acts/{actorId}/runs/last/request-queue/requests/{requestId}{?token,status}`
* `/v2/acts/{actorId}/runs/last/request-queue/head{?token,status}`
For example, to download data from a dataset of the last succeeded Actor run in XML format, send HTTP GET request to the following URL:
In order to save new items to the dataset, send HTTP POST request with JSON payload to the same URL.
## Request
## Responses
* 200
**Response Headers**
---
# Run Actor
POST https://api.apify.com/v2/acts/:actorId/runs
Clientshttps://docs.apify.com/api/client/python/reference/class/ActorClientAsync#callhttps://docs.apify.com/api/client/js/reference/class/ActorClient#startRuns an Actor and immediately returns without waiting for the run to finish.
The POST payload including its `Content-Type` header is passed as `INPUT` to the Actor (usually `application/json`).
The Actor is started with the default options; you can override them using various URL query parameters.
The response is the Run object as returned by the API endpoint.
If you want to wait for the run to finish and receive the actual output of the Actor as the response, please use one of the API endpoints instead.
To fetch the Actor run results that are typically stored in the default dataset, you'll need to pass the ID received in the `defaultDatasetId` field received in the response JSON to the API endpoint.
## Request
## Responses
* 201
**Response Headers**
* **Location**
---
# Delete version
DELETE https://api.apify.com/v2/acts/:actorId/versions/:versionNumber
Deletes a specific version of Actor's source code.
## Request
## Responses
* 204
**Response Headers**
---
# Delete environment variable
DELETE https://api.apify.com/v2/acts/:actorId/versions/:versionNumber/env-vars/:envVarName
Deletes a specific environment variable.
## Request
## Responses
* 204
**Response Headers**
---
# Get environment variable
GET https://api.apify.com/v2/acts/:actorId/versions/:versionNumber/env-vars/:envVarName
Clientshttps://docs.apify.com/api/client/python/reference/class/ActorEnvVarClientAsync#getGets a that contains all the details about a specific environment variable of an Actor.
If `isSecret` is set to `true`, then `value` will never be returned.
## Request
## Responses
* 200
**Response Headers**
---
# Update environment variable
PUT https://api.apify.com/v2/acts/:actorId/versions/:versionNumber/env-vars/:envVarName
Clientshttps://docs.apify.com/api/client/python/reference/class/ActorEnvVarClientAsync#updateUpdates Actor environment variable using values specified by a passed as JSON in the POST payload. If the object does not define a specific property, its value will not be updated.
The request needs to specify the `Content-Type: application/json` HTTP header!
When providing your API authentication token, we recommend using the request's `Authorization` header, rather than the URL. ().
The response is the as returned by the endpoint.
## Request
## Responses
* 200
**Response Headers**
---
# Get list of environment variables
GET https://api.apify.com/v2/acts/:actorId/versions/:versionNumber/env-vars
Clientshttps://docs.apify.com/api/client/python/reference/class/ActorEnvVarCollectionClientAsync#listGets the list of environment variables for a specific version of an Actor. The response is a JSON object with the list of , where each contains basic information about a single environment variable.
## Request
## Responses
* 200
**Response Headers**
---
# Create environment variable
POST https://api.apify.com/v2/acts/:actorId/versions/:versionNumber/env-vars
Clientshttps://docs.apify.com/api/client/python/reference/class/ActorEnvVarCollectionClientAsync#createCreates an environment variable of an Actor using values specified in a passed as JSON in the POST payload.
The request must specify `name` and `value` parameters (as strings) in the JSON payload and a `Content-Type: application/json` HTTP header.
{ "name": "ENV_VAR_NAME", "value": "my-env-var" }
The response is the as returned by the endpoint.
## Request
## Responses
* 201
**Response Headers**
* **Location**
---
# Get version
GET https://api.apify.com/v2/acts/:actorId/versions/:versionNumber
Clientshttps://docs.apify.com/api/client/python/reference/class/ActorVersionClientAsync#getGets a that contains all the details about a specific version of an Actor.
## Request
## Responses
* 200
**Response Headers**
---
# Update version
PUT https://api.apify.com/v2/acts/:actorId/versions/:versionNumber
Clientshttps://docs.apify.com/api/client/python/reference/class/ActorVersionClientAsync#updateUpdates Actor version using values specified by a passed as JSON in the POST payload.
If the object does not define a specific property, its value will not be updated.
The request needs to specify the `Content-Type: application/json` HTTP header!
When providing your API authentication token, we recommend using the request's `Authorization` header, rather than the URL. ().
The response is the as returned by the endpoint.
## Request
## Responses
* 200
**Response Headers**
---
# Get list of versions
GET https://api.apify.com/v2/acts/:actorId/versions
Clientshttps://docs.apify.com/api/client/python/reference/class/ActorVersionCollectionClientAsync#listGets the list of versions of a specific Actor. The response is a JSON object with the list of , where each contains basic information about a single version.
## Request
## Responses
* 200
**Response Headers**
---
# Create version
POST https://api.apify.com/v2/acts/:actorId/versions
Clientshttps://docs.apify.com/api/client/python/reference/class/ActorVersionCollectionClientAsync#createCreates a version of an Actor using values specified in a passed as JSON in the POST payload.
The request must specify `versionNumber` and `sourceType` parameters (as strings) in the JSON payload and a `Content-Type: application/json` HTTP header.
Each `sourceType` requires its own additional properties to be passed to the JSON payload object. These are outlined in the table below and in more detail in the https://docs.apify.com/platform/actors/development/deployment/source-types.
For example, if an Actor's source code is stored in a https://docs.apify.com/platform/actors/development/deployment/source-types#git-repository, you will set the `sourceType` to `GIT_REPO` and pass the repository's URL in the `gitRepoUrl` property.
{ "versionNumber": "0.1", "sourceType": "GIT_REPO", "gitRepoUrl": "https://github.com/my-github-account/actor-repo" }
The response is the as returned by the endpoint.
## Request
## Responses
* 201
**Response Headers**
* **Location**
---
# Get list of webhooks
GET https://api.apify.com/v2/acts/:actorId/webhooks
Gets the list of webhooks of a specific Actor. The response is a JSON with the list of objects, where each object contains basic information about a single webhook.
The endpoint supports pagination using the `limit` and `offset` parameters and it will not return more than 1000 records.
By default, the records are sorted by the `createdAt` field in ascending order, to sort the records in descending order, use the `desc=1` parameter.
## Request
## Responses
* 200
**Response Headers**
---
# Abort build
POST https://api.apify.com/v2/actor-builds/:buildId/abort
Clientshttps://docs.apify.com/api/client/python/reference/class/BuildClientAsync#aborthttps://docs.apify.com/api/client/js/reference/class/BuildClient#abortAborts an Actor build and returns an object that contains all the details about the build.
Only builds that are starting or running are aborted. For builds with status `FINISHED`, `FAILED`, `ABORTING` and `TIMED-OUT` this call does nothing.
## Request
## Responses
* 200
**Response Headers**
---
# Delete build
DELETE https://api.apify.com/v2/actor-builds/:buildId
Clientshttps://docs.apify.com/api/client/js/reference/class/BuildClient#deleteDelete the build. The build that is the current default build for the Actor cannot be deleted.
Only users with build permissions for the Actor can delete builds.
## Request
## Responses
* 204
**Response Headers**
---
# Get build
GET https://api.apify.com/v2/actor-builds/:buildId
Clientshttps://docs.apify.com/api/client/python/reference/class/BuildClientAsync#gethttps://docs.apify.com/api/client/js/reference/class/BuildClient#getGets an object that contains all the details about a specific build of an Actor.
By passing the optional `waitForFinish` parameter the API endpoint will synchronously wait for the build to finish. This is useful to avoid periodic polling when waiting for an Actor build to finish.
This endpoint does not require the authentication token. Instead, calls are authenticated using a hard-to-guess ID of the build. However, if you access the endpoint without the token, certain attributes, such as `usageUsd` and `usageTotalUsd`, will be hidden.
## Request
## Responses
* 200
**Response Headers**
---
# Get log
GET https://api.apify.com/v2/actor-builds/:buildId/log
Check out for full reference.
## Request
## Responses
* 200
**Response Headers**
---
# Get OpenAPI definition
GET https://api.apify.com/v2/actor-builds/:buildId/openapi.json
Clientshttps://docs.apify.com/api/client/python/reference/class/BuildClient#get_open_api_definitionhttps://docs.apify.com/api/client/js/reference/class/BuildClient#getOpenApiDefinitionGet the OpenAPI definition for Actor builds. Two similar endpoints are available:
* https://docs.apify.com/api/v2/act-openapi-json-get.md: Requires both `actorId` and `buildId`. Use `default` as the `buildId` to get the OpenAPI schema for the default Actor build.
* https://docs.apify.com/api/v2/actor-build-openapi-json-get.md: Requires only `buildId`.
Get the OpenAPI definition for a specific Actor build. Authentication is based on the build's unique ID. No authentication token is required.
note
You can also use the https://docs.apify.com/api/v2/act-openapi-json-get.md endpoint to get the OpenAPI definition for a build.
## Request
## Responses
* 200
**Response Headers**
---
# Actor builds - Introduction
The API endpoints described in this section enable you to manage, and delete Apify Actor builds.
Note that if any returned build object contains usage in dollars, your effective unit pricing at the time of query has been used for computation of this dollar equivalent, and hence it should be used only for informative purposes.
You can learn more about platform usage in the https://docs.apify.com/platform/actors/running/usage-and-resources#usage.
## https://docs.apify.com/api/v2/actor-builds-get.md
https://docs.apify.com/api/v2/actor-builds-get.md
## https://docs.apify.com/api/v2/actor-build-get.md
https://docs.apify.com/api/v2/actor-build-get.md
## https://docs.apify.com/api/v2/actor-build-delete.md
https://docs.apify.com/api/v2/actor-build-delete.md
## https://docs.apify.com/api/v2/actor-build-abort-post.md
https://docs.apify.com/api/v2/actor-build-abort-post.md
## https://docs.apify.com/api/v2/actor-build-log-get.md
https://docs.apify.com/api/v2/actor-build-log-get.md
## https://docs.apify.com/api/v2/actor-build-openapi-json-get.md
https://docs.apify.com/api/v2/actor-build-openapi-json-get.md
---
# Get user builds list
GET https://api.apify.com/v2/actor-builds
Gets a list of all builds for a user. The response is a JSON array of objects, where each object contains basic information about a single build.
The endpoint supports pagination using the `limit` and `offset` parameters and it will not return more than 1000 records.
By default, the records are sorted by the `startedAt` field in ascending order. Therefore, you can use pagination to incrementally fetch all builds while new ones are still being started. To sort the records in descending order, use the `desc=1` parameter.
## Request
## Responses
* 200
**Response Headers**
---
# Abort run
POST https://api.apify.com/v2/actor-runs/:runId/abort
Clientshttps://docs.apify.com/api/client/python/reference/class/RunClientAsync#aborthttps://docs.apify.com/api/client/js/reference/class/RunClient#abortAborts an Actor run and returns an object that contains all the details about the run.
Only runs that are starting or running are aborted. For runs with status `FINISHED`, `FAILED`, `ABORTING` and `TIMED-OUT` this call does nothing.
## Request
## Responses
* 200
**Response Headers**
---
# Delete run
DELETE https://api.apify.com/v2/actor-runs/:runId
Clientshttps://docs.apify.com/api/client/js/reference/class/RunClient#deleteDelete the run. Only finished runs can be deleted. Only the person or organization that initiated the run can delete it.
## Request
## Responses
* 204
**Response Headers**
---
# Get run
GET https://api.apify.com/v2/actor-runs/:runId
This is not a single endpoint, but an entire group of endpoints that lets you retrieve the run or any of its default storages.
The endpoints accept the same HTTP methods and query parameters as the respective storage endpoints.
The base path that represents the Actor run object is:
`/v2/actor-runs/{runId}{?token}`
In order to access the default storages of the Actor run, i.e. log, key-value store, dataset and request queue, use the following endpoints:
* `/v2/actor-runs/{runId}/log{?token}`
* `/v2/actor-runs/{runId}/key-value-store{?token}`
* `/v2/actor-runs/{runId}/dataset{?token}`
* `/v2/actor-runs/{runId}/request-queue{?token}`
These API endpoints have the same usage as the equivalent storage endpoints.
For example, `/v2/actor-runs/{runId}/key-value-store` has the same HTTP method and parameters as the endpoint.
Additionally, each of the above API endpoints supports all sub-endpoints of the original one:
#### Log
* `/v2/actor-runs/{runId}/log`
#### Key-value store
* `/v2/actor-runs/{runId}/key-value-store/keys{?token}`
* `/v2/actor-runs/{runId}/key-value-store/records/{recordKey}{?token}`
#### Dataset
* `/v2/actor-runs/{runId}/dataset/items{?token}`
#### Request queue
* `/v2/actor-runs/{runId}/request-queue/requests{?token}`
* `/v2/actor-runs/{runId}/request-queue/requests/{requestId}{?token}`
* `/v2/actor-runs/{runId}/request-queue/head{?token}`
For example, to download data from a dataset of the Actor run in XML format, send HTTP GET request to the following URL:
https://api.apify.com/v2/actor-runs/{runId}/dataset/items?format=xml
In order to save new items to the dataset, send HTTP POST request with JSON payload to the same URL.
Gets an object that contains all the details about a specific run of an Actor.
By passing the optional `waitForFinish` parameter the API endpoint will synchronously wait for the run to finish. This is useful to avoid periodic polling when waiting for Actor run to complete.
This endpoint does not require the authentication token. Instead, calls are authenticated using a hard-to-guess ID of the run. However, if you access the endpoint without the token, certain attributes, such as `usageUsd` and `usageTotalUsd`, will be hidden.
## Request
## Responses
* 200
**Response Headers**
---
# Metamorph run
POST https://api.apify.com/v2/actor-runs/:runId/metamorph
Clientshttps://docs.apify.com/api/client/python/reference/class/RunClientAsync#metamorphhttps://docs.apify.com/api/client/js/reference/class/RunClient#metamorphTransforms an Actor run into a run of another Actor with a new input.
This is useful if you want to use another Actor to finish the work of your current Actor run, without the need to create a completely new run and waiting for its finish.
For the users of your Actors, the metamorph operation is transparent, they will just see your Actor got the work done.
Internally, the system stops the Docker container corresponding to the Actor run and starts a new container using a different Docker image.
All the default storages are preserved and the new input is stored under the `INPUT-METAMORPH-1` key in the same default key-value store.
For more information, see the https://docs.apify.com/platform/actors/development/programming-interface/metamorph.
## Request
## Responses
* 200
**Response Headers**
---
# Update status message
PUT https://api.apify.com/v2/actor-runs/:runId
You can set a single status message on your run that will be displayed in the Apify Console UI. During an Actor run, you will typically do this in order to inform users of your Actor about the Actor's progress.
The request body must contain `runId` and `statusMessage` properties. The `isStatusMessageTerminal` property is optional and it indicates if the status message is the very last one. In the absence of a status message, the platform will try to substitute sensible defaults.
## Request
## Responses
* 200
**Response Headers**
---
# Reboot run
POST https://api.apify.com/v2/actor-runs/:runId/reboot
Clientshttps://docs.apify.com/api/client/python/reference/class/RunClientAsync#reboothttps://docs.apify.com/api/client/js/reference/class/RunClient#rebootReboots an Actor run and returns an object that contains all the details about the rebooted run.
Only runs that are running, i.e. runs with status `RUNNING` can be rebooted.
The run's container will be restarted, so any data not persisted in the key-value store, dataset, or request queue will be lost.
## Request
## Responses
* 200
**Response Headers**
---
# Actor runs - Introduction
The API endpoints described in this section enable you to manage, and delete Apify Actor runs.
If any returned run object contains usage in dollars, your effective unit pricing at the time of query has been used for computation of this dollar equivalent, and hence it should be used only for informative purposes.
You can learn more about platform usage in the https://docs.apify.com/platform/actors/running/usage-and-resources#usage.
## https://docs.apify.com/api/v2/actor-runs-get.md
https://docs.apify.com/api/v2/actor-runs-get.md
## https://docs.apify.com/api/v2/actor-run-get.md
https://docs.apify.com/api/v2/actor-run-get.md
## https://docs.apify.com/api/v2/actor-run-put.md
https://docs.apify.com/api/v2/actor-run-put.md
## https://docs.apify.com/api/v2/actor-run-delete.md
https://docs.apify.com/api/v2/actor-run-delete.md
## https://docs.apify.com/api/v2/actor-run-abort-post.md
https://docs.apify.com/api/v2/actor-run-abort-post.md
## https://docs.apify.com/api/v2/actor-run-metamorph-post.md
https://docs.apify.com/api/v2/actor-run-metamorph-post.md
## https://docs.apify.com/api/v2/actor-run-reboot-post.md
https://docs.apify.com/api/v2/actor-run-reboot-post.md
## https://docs.apify.com/api/v2/post-resurrect-run.md
https://docs.apify.com/api/v2/post-resurrect-run.md
## https://docs.apify.com/api/v2/post-charge-run.md
https://docs.apify.com/api/v2/post-charge-run.md
---
# Get user runs list
GET https://api.apify.com/v2/actor-runs
Gets a list of all runs for a user. The response is a list of objects, where each object contains basic information about a single Actor run.
The endpoint supports pagination using the `limit` and `offset` parameters and it will not return more than 1000 array elements.
By default, the records are sorted by the `startedAt` field in ascending order. Therefore, you can use pagination to incrementally fetch all records while new ones are still being created. To sort the records in descending order, use `desc=1` parameter. You can also filter runs by `startedAt`` and `status\`\` fields (https://docs.apify.com/platform/actors/running/runs-and-builds#lifecycle).
## Request
## Responses
* 200
**Response Headers**
---
# Delete task
DELETE https://api.apify.com/v2/actor-tasks/:actorTaskId
Clientshttps://docs.apify.com/api/client/js/reference/class/TaskClient#deleteDelete the task specified through the `actorTaskId` parameter.
## Request
## Responses
* 204
**Response Headers**
---
# Get task
GET https://api.apify.com/v2/actor-tasks/:actorTaskId
Clientshttps://docs.apify.com/api/client/python/reference/class/TaskClientAsync#gethttps://docs.apify.com/api/client/js/reference/class/TaskClient#getGet an object that contains all the details about a task.
## Request
## Responses
* 200
**Response Headers**
---
# Get task input
GET https://api.apify.com/v2/actor-tasks/:actorTaskId/input
Clientshttps://docs.apify.com/api/client/python/reference/class/TaskClientAsync#get_inputhttps://docs.apify.com/api/client/js/reference/class/TaskClient#getInputReturns the input of a given task.
## Request
## Responses
* 200
**Response Headers**
---
# Update task input
PUT https://api.apify.com/v2/actor-tasks/:actorTaskId/input
Clientshttps://docs.apify.com/api/client/python/reference/class/TaskClientAsync#update_inputhttps://docs.apify.com/api/client/js/reference/class/TaskClient#updateInputUpdates the input of a task using values specified by an object passed as JSON in the PUT payload.
If the object does not define a specific property, its value is not updated.
The response is the full task input as returned by the endpoint.
The request needs to specify the `Content-Type: application/json` HTTP header!
When providing your API authentication token, we recommend using the request's `Authorization` header, rather than the URL. ().
## Request
## Responses
* 200
**Response Headers**
---
# Update task
PUT https://api.apify.com/v2/actor-tasks/:actorTaskId
Clientshttps://docs.apify.com/api/client/python/reference/class/TaskClientAsync#updatehttps://docs.apify.com/api/client/js/reference/class/TaskClient#updateUpdate settings of a task using values specified by an object passed as JSON in the POST payload.
If the object does not define a specific property, its value is not updated.
The response is the full task object as returned by the endpoint.
The request needs to specify the `Content-Type: application/json` HTTP header!
When providing your API authentication token, we recommend using the request's `Authorization` header, rather than the URL. ().
## Request
## Responses
* 200
**Response Headers**
---
# Run task synchronously
GET https://api.apify.com/v2/actor-tasks/:actorTaskId/run-sync
Run a specific task and return its output.
The run must finish in 300 seconds otherwise the HTTP request fails with a timeout error (this won't abort the run itself).
Beware that it might be impossible to maintain an idle HTTP connection for an extended period, due to client timeout or network conditions. Make sure your HTTP client is configured to have a long enough connection timeout.
If the connection breaks, you will not receive any information about the run and its status.
To run the Task asynchronously, use the endpoint instead.
## Request
## Responses
* 201
* 400
* 408
**Response Headers**
**Response Headers**
Request Timeout: the HTTP request exceeded the 300 second limit
**Response Headers**
---
# Run task synchronously and get dataset items
GET https://api.apify.com/v2/actor-tasks/:actorTaskId/run-sync-get-dataset-items
Run a specific task and return its dataset items.
The run must finish in 300 seconds otherwise the HTTP request fails with a timeout error (this won't abort the run itself).
You can send all the same options in parameters as the API endpoint.
Beware that it might be impossible to maintain an idle HTTP connection for an extended period, due to client timeout or network conditions. Make sure your HTTP client is configured to have a long enough connection timeout.
If the connection breaks, you will not receive any information about the run and its status.
To run the Task asynchronously, use the endpoint instead.
## Request
## Responses
* 201
* 400
* 408
**Response Headers**
* **X-Apify-Pagination-Offset**
**X-Apify-Pagination-Limit**
**X-Apify-Pagination-Count**
**X-Apify-Pagination-Total**
**Response Headers**
Request Timeout: the HTTP request exceeded the 300 second limit
**Response Headers**
---
# Run task synchronously and get dataset items
POST https://api.apify.com/v2/actor-tasks/:actorTaskId/run-sync-get-dataset-items
Runs an Actor task and synchronously returns its dataset items.
The run must finish in 300 seconds otherwise the HTTP request fails with a timeout error (this won't abort the run itself).
Optionally, you can override the Actor input configuration by passing a JSON object as the POST payload and setting the `Content-Type: application/json` HTTP header.
Note that if the object in the POST payload does not define a particular input property, the Actor run uses the default value defined by the task (or the Actor's input schema if not defined by the task).
You can send all the same options in parameters as the API endpoint.
Beware that it might be impossible to maintain an idle HTTP connection for an extended period, due to client timeout or network conditions. Make sure your HTTP client is configured to have a long enough connection timeout.
If the connection breaks, you will not receive any information about the run and its status.
Input fields from Actor task configuration can be overloaded with values passed as the POST payload.
Just make sure to specify the `Content-Type` header as `application/json` and that the input is an object.
To run the task asynchronously, use the API endpoint instead.
## Request
## Responses
* 201
* 400
**Response Headers**
* **X-Apify-Pagination-Offset**
**X-Apify-Pagination-Limit**
**X-Apify-Pagination-Count**
**X-Apify-Pagination-Total**
**Response Headers**
---
# Run task synchronously
POST https://api.apify.com/v2/actor-tasks/:actorTaskId/run-sync
Runs an Actor task and synchronously returns its output.
The run must finish in 300 seconds otherwise the HTTP request fails with a timeout error (this won't abort the run itself).
Optionally, you can override the Actor input configuration by passing a JSON object as the POST payload and setting the `Content-Type: application/json` HTTP header.
Note that if the object in the POST payload does not define a particular input property, the Actor run uses the default value defined by the task (or Actor's input schema if not defined by the task).
Beware that it might be impossible to maintain an idle HTTP connection for an extended period, due to client timeout or network conditions. Make sure your HTTP client is configured to have a long enough connection timeout.
If the connection breaks, you will not receive any information about the run and its status.
Input fields from Actor task configuration can be overloaded with values passed as the POST payload.
Just make sure to specify `Content-Type` header to be `application/json` and input to be an object.
To run the task asynchronously, use the API endpoint instead.
## Request
## Responses
* 201
* 400
**Response Headers**
**Response Headers**
---
# Get list of task runs
GET https://api.apify.com/v2/actor-tasks/:actorTaskId/runs
Get a list of runs of a specific task. The response is a list of objects, where each object contains essential information about a single task run.
The endpoint supports pagination using the `limit` and `offset` parameters, and it does not return more than a 1000 array elements.
By default, the records are sorted by the `startedAt` field in ascending order; therefore you can use pagination to incrementally fetch all records while new ones are still being created. To sort the records in descending order, use the `desc=1` parameter. You can also filter runs by status (https://docs.apify.com/platform/actors/running/runs-and-builds#lifecycle).
## Request
## Responses
* 200
**Response Headers**
---
# Get last run
GET https://api.apify.com/v2/actor-tasks/:actorTaskId/runs/last
This is not a single endpoint, but an entire group of endpoints that lets you to retrieve and manage the last run of given actor task or any of its default storages. All the endpoints require an authentication token.
The endpoints accept the same HTTP methods and query parameters as the respective storage endpoints. The base path represents the last actor task run object is:
`/v2/actor-tasks/{actorTaskId}/runs/last{?token,status}`
Using the `status` query parameter you can ensure to only get a run with a certain status (e.g. `status=SUCCEEDED`). The output of this endpoint and other query parameters are the same as in the https://docs.apify.com/api/v2/actor-run-get.md endpoint.
In order to access the default storages of the last actor task run, i.e. log, key-value store, dataset and request queue, use the following endpoints:
* `/v2/actor-tasks/{actorTaskId}/runs/last/log{?token,status}`
* `/v2/actor-tasks/{actorTaskId}/runs/last/key-value-store{?token,status}`
* `/v2/actor-tasks/{actorTaskId}/runs/last/dataset{?token,status}`
* `/v2/actor-tasks/{actorTaskId}/runs/last/request-queue{?token,status}`
These API endpoints have the same usage as the equivalent storage endpoints. For example, `/v2/actor-tasks/{actorTaskId}/runs/last/key-value-store` has the same HTTP method and parameters as the https://docs.apify.com/api/v2/storage-key-value-stores.md endpoint.
Additionally, each of the above API endpoints supports all sub-endpoints of the original one:
##### Storage endpoints
* https://docs.apify.com/api/v2/storage-datasets.md
* https://docs.apify.com/api/v2/storage-key-value-stores.md
* https://docs.apify.com/api/v2/storage-request-queues.md
For example, to download data from a dataset of the last succeeded actor task run in XML format, send HTTP GET request to the following URL:
In order to save new items to the dataset, send HTTP POST request with JSON payload to the same URL.
## Request
## Responses
* 200
**Response Headers**
---
# Run task
POST https://api.apify.com/v2/actor-tasks/:actorTaskId/runs
Clientshttps://docs.apify.com/api/client/python/reference/class/TaskClientAsync#callhttps://docs.apify.com/api/client/js/reference/class/TaskClient#startRuns an Actor task and immediately returns without waiting for the run to finish.
Optionally, you can override the Actor input configuration by passing a JSON object as the POST payload and setting the `Content-Type: application/json` HTTP header.
Note that if the object in the POST payload does not define a particular input property, the Actor run uses the default value defined by the task (or Actor's input schema if not defined by the task).
The response is the Actor Run object as returned by the endpoint.
If you want to wait for the run to finish and receive the actual output of the Actor run as the response, use one of the API endpoints instead.
To fetch the Actor run results that are typically stored in the default dataset, you'll need to pass the ID received in the `defaultDatasetId` field received in the response JSON to the API endpoint.
## Request
## Responses
* 201
**Response Headers**
* **Location**
---
# Get list of webhooks
GET https://api.apify.com/v2/actor-tasks/:actorTaskId/webhooks
Gets the list of webhooks of a specific Actor task. The response is a JSON with the list of objects, where each object contains basic information about a single webhook.
The endpoint supports pagination using the `limit` and `offset` parameters and it will not return more than 1000 records.
By default, the records are sorted by the `createdAt` field in ascending order, to sort the records in descending order, use the `desc=1` parameter.
## Request
## Responses
* 200
**Response Headers**
---
# Actor tasks - Introduction
The API endpoints described in this section enable you to create, manage, delete, and run Apify Actor tasks. For more information, see the https://docs.apify.com/platform/actors/running/tasks.
note
For all the API endpoints that accept the `actorTaskId` parameter to specify a task, you can pass either the task ID (e.g. `HG7ML7M8z78YcAPEB`) or a tilde-separated username of the task's owner and the task's name (e.g. `janedoe~my-task`).
Some of the API endpoints return run objects. If any such run object contains usage in dollars, your effective unit pricing at the time of query has been used for computation of this dollar equivalent, and hence it should be used only for informative purposes.
You can learn more about platform usage in the https://docs.apify.com/platform/actors/running/usage-and-resources#usage.
## https://docs.apify.com/api/v2/actor-tasks-get.md
https://docs.apify.com/api/v2/actor-tasks-get.md
## https://docs.apify.com/api/v2/actor-tasks-post.md
https://docs.apify.com/api/v2/actor-tasks-post.md
## https://docs.apify.com/api/v2/actor-task-get.md
https://docs.apify.com/api/v2/actor-task-get.md
## https://docs.apify.com/api/v2/actor-task-put.md
https://docs.apify.com/api/v2/actor-task-put.md
## https://docs.apify.com/api/v2/actor-task-delete.md
https://docs.apify.com/api/v2/actor-task-delete.md
## https://docs.apify.com/api/v2/actor-task-input-get.md
https://docs.apify.com/api/v2/actor-task-input-get.md
## https://docs.apify.com/api/v2/actor-task-input-put.md
https://docs.apify.com/api/v2/actor-task-input-put.md
## https://docs.apify.com/api/v2/actor-task-webhooks-get.md
https://docs.apify.com/api/v2/actor-task-webhooks-get.md
## https://docs.apify.com/api/v2/actor-task-runs-get.md
https://docs.apify.com/api/v2/actor-task-runs-get.md
## https://docs.apify.com/api/v2/actor-task-runs-post.md
https://docs.apify.com/api/v2/actor-task-runs-post.md
## https://docs.apify.com/api/v2/actor-task-run-sync-get.md
https://docs.apify.com/api/v2/actor-task-run-sync-get.md
## https://docs.apify.com/api/v2/actor-task-run-sync-post.md
https://docs.apify.com/api/v2/actor-task-run-sync-post.md
## https://docs.apify.com/api/v2/actor-task-run-sync-get-dataset-items-get.md
https://docs.apify.com/api/v2/actor-task-run-sync-get-dataset-items-get.md
## https://docs.apify.com/api/v2/actor-task-run-sync-get-dataset-items-post.md
https://docs.apify.com/api/v2/actor-task-run-sync-get-dataset-items-post.md
## https://docs.apify.com/api/v2/actor-task-runs-last-get.md
https://docs.apify.com/api/v2/actor-task-runs-last-get.md
---
# Get list of tasks
GET https://api.apify.com/v2/actor-tasks
Clientshttps://docs.apify.com/api/client/python/reference/class/TaskCollectionClientAsync#listhttps://docs.apify.com/api/client/js/reference/class/TaskCollectionClient#listGets the complete list of tasks that a user has created or used.
The response is a list of objects in which each object contains essential information about a single task.
The endpoint supports pagination using the `limit` and `offset` parameters, and it does not return more than a 1000 records.
By default, the records are sorted by the `createdAt` field in ascending order; therefore you can use pagination to incrementally fetch all tasks while new ones are still being created. To sort the records in descending order, use the `desc=1` parameter.
## Request
## Responses
* 200
**Response Headers**
---
# Create task
POST https://api.apify.com/v2/actor-tasks
Clientshttps://docs.apify.com/api/client/python/reference/class/TaskCollectionClientAsync#createhttps://docs.apify.com/api/client/js/reference/class/TaskCollectionClient#createCreate a new task with settings specified by the object passed as JSON in the POST payload.
The response is the full task object as returned by the endpoint.
The request needs to specify the `Content-Type: application/json` HTTP header!
When providing your API authentication token, we recommend using the request's `Authorization` header, rather than the URL. ().
## Request
## Responses
* 201
**Response Headers**
* **Location**
---
# Actors - Introduction
The API endpoints in this section allow you to manage Apify Actors. For more details about Actors, refer to the https://docs.apify.com/platform/actors.
For API endpoints that require the `actorId` parameter to identify an Actor, you can provide either:
* The Actor ID (e.g., `HG7ML7M8z78YcAPEB`), or
* A tilde-separated combination of the Actor owner's username and the Actor name (e.g., `janedoe~my-actor`).
## https://docs.apify.com/api/v2/acts-get.md
https://docs.apify.com/api/v2/acts-get.md
## https://docs.apify.com/api/v2/acts-post.md
https://docs.apify.com/api/v2/acts-post.md
## https://docs.apify.com/api/v2/act-get.md
https://docs.apify.com/api/v2/act-get.md
## https://docs.apify.com/api/v2/act-put.md
https://docs.apify.com/api/v2/act-put.md
## https://docs.apify.com/api/v2/act-delete.md
https://docs.apify.com/api/v2/act-delete.md
---
# Actor builds - Introduction
The API endpoints in this section allow you to manage your Apify Actors builds.
## https://docs.apify.com/api/v2/act-builds-get.md
https://docs.apify.com/api/v2/act-builds-get.md
## https://docs.apify.com/api/v2/act-builds-post.md
https://docs.apify.com/api/v2/act-builds-post.md
## https://docs.apify.com/api/v2/act-build-default-get.md
https://docs.apify.com/api/v2/act-build-default-get.md
## https://docs.apify.com/api/v2/act-openapi-json-get.md
https://docs.apify.com/api/v2/act-openapi-json-get.md
## https://docs.apify.com/api/v2/act-build-get.md
https://docs.apify.com/api/v2/act-build-get.md
## https://docs.apify.com/api/v2/act-build-abort-post.md
https://docs.apify.com/api/v2/act-build-abort-post.md
---
# Actor runs - Introduction
The API endpoints in this section allow you to manage your Apify Actors runs.
Some API endpoints return run objects. If a run object includes usage costs in dollars, note that these values are calculated based on your effective unit pricing at the time of the query. As a result, the dollar amounts should be treated as informational only and not as exact figures.
For more information about platform usage and resource calculations, see the https://docs.apify.com/platform/actors/running/usage-and-resources#usage.
## https://docs.apify.com/api/v2/act-runs-get.md
https://docs.apify.com/api/v2/act-runs-get.md
## https://docs.apify.com/api/v2/act-runs-post.md
https://docs.apify.com/api/v2/act-runs-post.md
## https://docs.apify.com/api/v2/act-run-sync-post.md
https://docs.apify.com/api/v2/act-run-sync-post.md
## https://docs.apify.com/api/v2/act-run-sync-get.md
https://docs.apify.com/api/v2/act-run-sync-get.md
## https://docs.apify.com/api/v2/act-run-sync-get-dataset-items-post.md
https://docs.apify.com/api/v2/act-run-sync-get-dataset-items-post.md
## https://docs.apify.com/api/v2/act-run-sync-get-dataset-items-get.md
https://docs.apify.com/api/v2/act-run-sync-get-dataset-items-get.md
## https://docs.apify.com/api/v2/act-run-resurrect-post.md
https://docs.apify.com/api/v2/act-run-resurrect-post.md
## https://docs.apify.com/api/v2/act-runs-last-get.md
https://docs.apify.com/api/v2/act-runs-last-get.md
## https://docs.apify.com/api/v2/act-run-get.md
https://docs.apify.com/api/v2/act-run-get.md
## https://docs.apify.com/api/v2/act-run-abort-post.md
https://docs.apify.com/api/v2/act-run-abort-post.md
## https://docs.apify.com/api/v2/act-run-metamorph-post.md
https://docs.apify.com/api/v2/act-run-metamorph-post.md
---
# Actor versions - Introduction
The API endpoints in this section allow you to manage your Apify Actors versions.
* The version object contains the source code of a specific version of an Actor.
* The `sourceType` property indicates where the source code is hosted, and based on its value the Version object has the following additional property:
| **Value** | **Description** |
| ---------------- | ----------------------------------------------------------------------------------------------------------------------------------------------------------------------------------------------------------------------------------------------------------------------------------------------------------------------------------------------------------------------------- |
| `"SOURCE_FILES"` | Source code is comprised of multiple files specified in the `sourceFiles` array. Each item of the array is an object with the following fields:- `name`: File path and name- `format`: Format of the content, can be either `"TEXT"` or `"BASE64"`- `content`: File contentSource files can be shown and edited in the Apify Console's Web IDE. |
| `"GIT_REPO"` | Source code is cloned from a Git repository, whose URL is specified in the `gitRepoUrl` field. |
| `"TARBALL"` | Source code is downloaded using a tarball or Zip file from a URL specified in the `tarballUrl` field. |
| `"GITHUB_GIST"` | Source code is taken from a GitHub Gist, whose URL is specified in the `gitHubGistUrl` field. |
For more information about source code and Actor versions, check out https://docs.apify.com/platform/actors/development/actor-definition/source-code in Actors documentation.
## https://docs.apify.com/api/v2/act-versions-get.md
https://docs.apify.com/api/v2/act-versions-get.md
## https://docs.apify.com/api/v2/act-versions-post.md
https://docs.apify.com/api/v2/act-versions-post.md
## https://docs.apify.com/api/v2/act-version-get.md
https://docs.apify.com/api/v2/act-version-get.md
## https://docs.apify.com/api/v2/act-version-put.md
https://docs.apify.com/api/v2/act-version-put.md
## https://docs.apify.com/api/v2/act-version-delete.md
https://docs.apify.com/api/v2/act-version-delete.md
## https://docs.apify.com/api/v2/act-version-env-vars-get.md
https://docs.apify.com/api/v2/act-version-env-vars-get.md
## https://docs.apify.com/api/v2/act-version-env-vars-post.md
https://docs.apify.com/api/v2/act-version-env-vars-post.md
## https://docs.apify.com/api/v2/act-version-env-var-get.md
https://docs.apify.com/api/v2/act-version-env-var-get.md
## https://docs.apify.com/api/v2/act-version-env-var-put.md
https://docs.apify.com/api/v2/act-version-env-var-put.md
## https://docs.apify.com/api/v2/act-version-env-var-delete.md
https://docs.apify.com/api/v2/act-version-env-var-delete.md
---
# Webhook collection - Introduction
The API endpoint in this section allows you to get a list of webhooks of a specific Actor.
## https://docs.apify.com/api/v2/act-webhooks-get.md
https://docs.apify.com/api/v2/act-webhooks-get.md
---
# Get list of Actors
GET https://api.apify.com/v2/acts
Clientshttps://docs.apify.com/api/client/python/reference/class/ActorCollectionClientAsync#listhttps://docs.apify.com/api/client/js/reference/class/ActorCollectionClient#listGets the list of all Actors that the user created or used. The response is a list of objects, where each object contains a basic information about a single Actor.
To only get Actors created by the user, add the `my=1` query parameter.
The endpoint supports pagination using the `limit` and `offset` parameters and it will not return more than 1000 records.
By default, the records are sorted by the `createdAt` field in ascending order, therefore you can use pagination to incrementally fetch all Actors while new ones are still being created. To sort the records in descending order, use the `desc=1` parameter.
You can also sort by your last run by using the `sortBy=stats.lastRunStartedAt` query parameter. In this case, descending order means the most recently run Actor appears first.
## Request
## Responses
* 200
**Response Headers**
---
# Create Actor
POST https://api.apify.com/v2/acts
Clientshttps://docs.apify.com/api/client/python/reference/class/ActorCollectionClientAsync#createhttps://docs.apify.com/api/client/js/reference/class/ActorCollectionClient#createCreates a new Actor with settings specified in an Actor object passed as JSON in the POST payload. The response is the full Actor object as returned by the endpoint.
The HTTP request must have the `Content-Type: application/json` HTTP header!
The Actor needs to define at least one version of the source code. For more information, see .
If you want to make your Actor https://docs.apify.com/platform/actors/publishing using `isPublic: true`, you will need to provide the Actor's `title` and the `categories` under which that Actor will be classified in Apify Store. For this, it's best to use the https://github.com/apify/apify-shared-js/blob/2d43ebc41ece9ad31cd6525bd523fb86939bf860/packages/consts/src/consts.ts#L452-L471.
## Request
## Responses
* 201
**Response Headers**
* **Location**
---
# Delete dataset
DELETE https://api.apify.com/v2/datasets/:datasetId
Clientshttps://docs.apify.com/api/client/js/reference/class/DatasetClient#deleteDeletes a specific dataset.
## Request
## Responses
* 204
**Response Headers**
---
# Get dataset
GET https://api.apify.com/v2/datasets/:datasetId
Clientshttps://docs.apify.com/api/client/python/reference/class/DatasetClientAsync#gethttps://docs.apify.com/api/client/js/reference/class/DatasetClient#getReturns dataset object for given dataset ID.
This does not return dataset items, only information about the storage itself. To retrieve dataset items, use the https://docs.apify.com/api/v2/dataset-items-get.md endpoint.
note
Keep in mind that attributes `itemCount` and `cleanItemCount` are not propagated right away after data are pushed into a dataset.
There is a short period (up to 5 seconds) during which these counters may not match with exact counts in dataset items.
## Request
## Responses
* 200
**Response Headers**
---
# Get items
GET https://api.apify.com/v2/datasets/:datasetId/items
Clientshttps://docs.apify.com/api/client/python/reference/class/DatasetClientAsync#stream_itemshttps://docs.apify.com/api/client/js/reference/class/DatasetClient#listItemsReturns data stored in the dataset in a desired format.
### Response format
The format of the response depends on `format` query parameter.
The `format` parameter can have one of the following values: `json`, `jsonl`, `xml`, `html`, `csv`, `xlsx` and `rss`.
The following table describes how each format is treated.
| Format | Items | |
| ------- | ------------------------------------------------------------------------------------------------------------------------------------------- | - |
| `json` | The response is a JSON, JSONL or XML array of raw item objects. | |
| `jsonl` | | |
| `xml` | | |
| `html` | The response is a HTML, CSV or XLSX table, where columns correspond to the properties of the item and rows correspond to each dataset item. | |
| `csv` | | |
| `xlsx` | | |
| `rss` | The response is a RSS file. Each item is displayed as child elements of one ``. | |
Note that CSV, XLSX and HTML tables are limited to 2000 columns and the column names cannot be longer than 200 characters. JSON, XML and RSS formats do not have such restrictions.
### Hidden fields
The top-level fields starting with the `#` character are considered hidden. These are useful to store debugging information and can be omitted from the output by providing the `skipHidden=1` or `clean=1` query parameters. For example, if you store the following object to the dataset:
{ productName: "iPhone Xs", description: "Welcome to the big screens." #debug: { url: "https://www.apple.com/lae/iphone-xs/", crawledAt: "2019-01-21T16:06:03.683Z" } }
The `#debug` field will be considered as hidden and can be omitted from the results. This is useful to provide nice cleaned data to end users, while keeping debugging info available if needed. The Dataset object returned by the API contains the number of such clean items in the`dataset.cleanItemCount` property.
### XML format extension
When exporting results to XML or RSS formats, the names of object properties become XML tags and the corresponding values become tag's children. For example, the following JavaScript object:
{ name: "Paul Newman", address: [ { type: "home", street: "21st", city: "Chicago" }, { type: "office", street: null, city: null } ] }
will be transformed to the following XML snippet:
Paul Newman
home 21st Chicago
office
If the JavaScript object contains a property named `@` then its sub-properties are exported as attributes of the parent XML element. If the parent XML element does not have any child elements then its value is taken from a JavaScript object property named `#`.
For example, the following JavaScript object:
{ "address": [{ "@": { "type": "home" }, "street": "21st", "city": "Chicago" }, { "@": { "type": "office" }, "#": 'unknown' }] }
will be transformed to the following XML snippet:
21st Chicago
unknown
This feature is also useful to customize your RSS feeds generated for various websites.
By default the whole result is wrapped in a `` element and each page object is wrapped in a `` element. You can change this using `xmlRoot` and `xmlRow` url parameters.
### Pagination
The generated response supports . The pagination is always performed with the granularity of a single item, regardless whether `unwind` parameter was provided. By default, the **Items** in the response are sorted by the time they were stored to the database, therefore you can use pagination to incrementally fetch the items as they are being added. No limit exists to how many items can be returned in one response.
If you specify `desc=1` query parameter, the results are returned in the reverse order than they were stored (i.e. from newest to oldest items). Note that only the order of **Items** is reversed, but not the order of the `unwind` array elements.
## Request
## Responses
* 200
**Response Headers**
* **X-Apify-Pagination-Offset**
**X-Apify-Pagination-Limit**
**X-Apify-Pagination-Count**
**X-Apify-Pagination-Total**
---
# Store items
POST https://api.apify.com/v2/datasets/:datasetId/items
Clientshttps://docs.apify.com/api/client/python/reference/class/DatasetClientAsync#push_itemshttps://docs.apify.com/api/client/js/reference/class/DatasetClient#pushItemsAppends an item or an array of items to the end of the dataset. The POST payload is a JSON object or a JSON array of objects to save into the dataset.
If the data you attempt to store in the dataset is invalid (meaning any of the items received by the API fails the validation), the whole request is discarded and the API will return a response with status code 400. For more information about dataset schema validation, see https://docs.apify.com/platform/actors/development/actor-definition/dataset-schema/validation.
**IMPORTANT:** The limit of request payload size for the dataset is 5 MB. If the array exceeds the size, you'll need to split it into a number of smaller arrays.
## Request
## Responses
* 201
* 400
**Response Headers**
* **Location**
**Response Headers**
---
# Update dataset
PUT https://api.apify.com/v2/datasets/:datasetId
Clientshttps://docs.apify.com/api/client/python/reference/class/DatasetClientAsync#updatehttps://docs.apify.com/api/client/js/reference/class/DatasetClient#updateUpdates a dataset's name using a value specified by a JSON object passed in the PUT payload. The response is the updated dataset object, as returned by the API endpoint.
## Request
## Responses
* 200
**Response Headers**
---
# Get dataset statistics
GET https://api.apify.com/v2/datasets/:datasetId/statistics
Returns statistics for given dataset.
Provides only https://docs.apify.com/platform/actors/development/actor-definition/dataset-schema/validation#dataset-field-statistics.
## Request
## Responses
* 200
---
# Get list of datasets
GET https://api.apify.com/v2/datasets
Clientshttps://docs.apify.com/api/client/python/reference/class/DatasetCollectionClientAsync#listhttps://docs.apify.com/api/client/js/reference/class/DatasetCollectionClient#listLists all of a user's datasets.
The response is a JSON array of objects, where each object contains basic information about one dataset.
By default, the objects are sorted by the `createdAt` field in ascending order, therefore you can use pagination to incrementally fetch all datasets while new ones are still being created. To sort them in descending order, use `desc=1` parameter. The endpoint supports pagination using `limit` and `offset` parameters and it will not return more than 1000 array elements.
## Request
## Responses
* 200
**Response Headers**
---
# Create dataset
POST https://api.apify.com/v2/datasets
Clientshttps://docs.apify.com/api/client/python/reference/class/DatasetCollectionClientAsync#get_or_createhttps://docs.apify.com/api/client/js/reference/class/DatasetCollectionClient#getOrCreateCreates a dataset and returns its object. Keep in mind that data stored under unnamed dataset follows https://docs.apify.com/platform/storage#data-retention. It creates a dataset with the given name if the parameter name is used. If a dataset with the given name already exists then returns its object.
## Request
## Responses
* 201
**Response Headers**
* **Location**
---
# Getting started with Apify API
The Apify API provides programmatic access to the https://docs.apify.com. The API is organized around https://en.wikipedia.org/wiki/Representational_state_transfer HTTP endpoints.
The diagram illustrates the basic workflow when using the Apify API:
1. Your application communicates with the Apify API by sending requests to run Actors and receiving results back.
2. When you request to run an Actor, the Apify API creates and manages an Actor run instance on the platform.
3. The Actor processes data and stores results in Apify's storage systems:
* **Dataset**: Structured storage optimized for tabular or list-type data, ideal for scraped items or processed results.
* **Key-Value Store**: Flexible storage for various data types (including images, JSON, HTML, and text), perfect for configuration settings and non-tabular outputs.
## Prerequisites
Before you can start using the API, check if you have all the necessary prerequisites:
* An Apify account with an API token.
* A tool to make HTTP requests (cURL, Postman, or your preferred programming language).
## Authentication
You must authenticate all API requests presented on this page. You can authenticate using your API token:
Authorization: Bearer YOUR_API_TOKEN
You can find your API token in the Apify Console under **https://console.apify.com/settings/integrations**.
### Verify your account
To check your API credentials or account details:
Endpoint
GET https://api.apify.com/v2/users/me
Expected response codes:
* `200`
## Basic workflow
The most common workflow involving Apify API consists of the following steps:
1. Running an Actor.
2. Retrieving the results.
### 1. Run an Actor
#### Synchronously
For shorter runs where you need immediate results:
Endpoint
POST https://api.apify.com/v2/acts/:actorId/run-sync
Expected response codes:
* `201`
* `400`
* `408`
#### Asynchronously
For longer-running operations or when you don't need immediate results.
Endpoint
POST https://api.apify.com/v2/acts/:actorId/runs
Expected response codes:
* `201`
### 2. Retrieve results
#### From a Dataset
Most Actors store their results in a dataset:
Endpoint
GET https://api.apify.com/v2/datasets/:datasetId/items
Optional query parameters:
* `format=json` (default), other possible formats are:
* jsonl
* xml
* html
* csv
* xlsx
* rss
* `limit=100` (number of items to retrieve)
* `offset=0` (pagination offset)
Expected response codes:
* `200`
#### From a Key-value store
Endpoint
GET https://api.apify.com/v2/key-value-stores/:storeId/records/:recordKey
Expected response codes:
* `200`
* `302`
### Additional operations
#### Get log
You can get a log for a specific run or build of an Actor.
Endpoint
GET https://api.apify.com/v2/logs/:buildOrRunId
Expected response codes:
* `200`
#### Monitor run status
Endpoint
GET https://api.apify.com/v2/actor-runs/:runId
Expected response codes:
* `200`
#### Store data in Dataset
To store your own data in a Dataset:
Endpoint
POST https://api.apify.com/v2/datasets/:datasetId/items
If any item in the request fails validation, the entire request will be rejected.
Expected response codes:
* `201`
* `400`
#### Store data in Key-value store
To store your own data in a Key-value store:
Endpoint
PUT https://api.apify.com/v2/key-value-stores/:storeId/records/:recordKey
Include your data in the request body and set the appropriate `Content-Type` header.
Expected response codes:
* `201`
## HTTP Status Code Descriptions
### `200` OK
The request has succeeded.
### `201` Created
The request has been fulfilled and a new resource has been created.
### `302` Found
A redirection response indicating that the requested resource has been temporarily moved to a different URL.
### `400` Bad Request
The server cannot process the request due to client error, such as request syntax, invalid request parameters, or invalid data format. This occurs when:
* The request body contains invalid data
* Required parameters are missing
* Data validation fails for Dataset items
### `408` Request Timeout
The server timed out waiting for the request to complete.
## Next steps
* Explore more advanced API endpoints in our full https://docs.apify.com/api/v2.md.
* Learn about webhooks to get notified when your runs finish.
* Check out Apify client libraries for the following programming languages:
* https://docs.apify.com/api/client/js
* https://docs.apify.com/api/client/python
---
# Delete store
DELETE https://api.apify.com/v2/key-value-stores/:storeId
Clientshttps://docs.apify.com/api/client/js/reference/class/KeyValueStoreClient#deleteDeletes a key-value store.
## Request
## Responses
* 204
**Response Headers**
---
# Get store
GET https://api.apify.com/v2/key-value-stores/:storeId
Clientshttps://docs.apify.com/api/client/python/reference/class/KeyValueStoreClientAsync#gethttps://docs.apify.com/api/client/js/reference/class/KeyValueStoreClient#getGets an object that contains all the details about a specific key-value store.
## Request
## Responses
* 200
**Response Headers**
---
# Get list of keys
GET https://api.apify.com/v2/key-value-stores/:storeId/keys
Clientshttps://docs.apify.com/api/client/python/reference/class/KeyValueStoreClientAsync#list_keyshttps://docs.apify.com/api/client/js/reference/class/KeyValueStoreClient#listKeysReturns a list of objects describing keys of a given key-value store, as well as some information about the values (e.g. size).
This endpoint is paginated using `exclusiveStartKey` and `limit` parameters
* see https://docs.apify.com/api/v2.md#using-key for more details.
## Request
## Responses
* 200
**Response Headers**
---
# Update store
PUT https://api.apify.com/v2/key-value-stores/:storeId
Clientshttps://docs.apify.com/api/client/python/reference/class/KeyValueStoreClientAsync#updatehttps://docs.apify.com/api/client/js/reference/class/KeyValueStoreClient#updateUpdates a key-value store's name using a value specified by a JSON object passed in the PUT payload.
The response is the updated key-value store object, as returned by the API endpoint.
## Request
## Responses
* 200
**Response Headers**
---
# Delete record
DELETE https://api.apify.com/v2/key-value-stores/:storeId/records/:recordKey
Clientshttps://docs.apify.com/api/client/python/reference/class/KeyValueStoreClientAsync#delete_recordhttps://docs.apify.com/api/client/js/reference/class/KeyValueStoreClient#deleteRecordRemoves a record specified by a key from the key-value store.
## Request
## Responses
* 204
**Response Headers**
---
# Get record
GET https://api.apify.com/v2/key-value-stores/:storeId/records/:recordKey
Clientshttps://docs.apify.com/api/client/python/reference/class/KeyValueStoreClientAsync#get_recordhttps://docs.apify.com/api/client/js/reference/class/KeyValueStoreClient#getRecordGets a value stored in the key-value store under a specific key.
The response body has the same `Content-Encoding` header as it was set in .
If the request does not define the `Accept-Encoding` HTTP header with the right encoding, the record will be decompressed.
Most HTTP clients support decompression by default. After using the HTTP client with decompression support, the `Accept-Encoding` header is set by the client and body is decompressed automatically.
## Request
## Responses
* 200
* 302
**Response Headers**
**Response Headers**
* **Location**
---
# Check if a record exists
HEAD https://api.apify.com/v2/key-value-stores/:storeId/records/:recordKey
Clientshttps://docs.apify.com/api/client/python/reference/class/KeyValueStoreClientAsync#record_existshttps://docs.apify.com/api/client/js/reference/class/KeyValueStoreClient#recordExistsCheck if a value is stored in the key-value store under a specific key.
## Request
## Responses
* 200
* 404
The record exists
**Response Headers**
The record does not exist
**Response Headers**
---
# Store record
PUT https://api.apify.com/v2/key-value-stores/:storeId/records/:recordKey
Clientshttps://docs.apify.com/api/client/python/reference/class/KeyValueStoreClientAsync#set_recordhttps://docs.apify.com/api/client/js/reference/class/KeyValueStoreClient#setRecordStores a value under a specific key to the key-value store.
The value is passed as the PUT payload and it is stored with a MIME content type defined by the `Content-Type` header and with encoding defined by the `Content-Encoding` header.
To save bandwidth, storage, and speed up your upload, send the request payload compressed with Gzip compression and add the `Content-Encoding: gzip` header. It is possible to set up another compression type with `Content-Encoding` request header.
Below is a list of supported `Content-Encoding` types.
* Gzip compression: `Content-Encoding: gzip`
* Deflate compression: `Content-Encoding: deflate`
* Brotli compression: `Content-Encoding: br`
## Request
## Responses
* 201
**Response Headers**
* **Location**
---
# Get list of key-value stores
GET https://api.apify.com/v2/key-value-stores
Clientshttps://docs.apify.com/api/client/python/reference/class/KeyValueStoreCollectionClientAsync#listhttps://docs.apify.com/api/client/js/reference/class/KeyValueStoreCollectionClient#listGets the list of key-value stores owned by the user.
The response is a list of objects, where each objects contains a basic information about a single key-value store.
The endpoint supports pagination using the `limit` and `offset` parameters and it will not return more than 1000 array elements.
By default, the records are sorted by the `createdAt` field in ascending order, therefore you can use pagination to incrementally fetch all key-value stores while new ones are still being created. To sort the records in descending order, use the `desc=1` parameter.
## Request
## Responses
* 200
**Response Headers**
---
# Create key-value store
POST https://api.apify.com/v2/key-value-stores
Clientshttps://docs.apify.com/api/client/python/reference/class/KeyValueStoreCollectionClientAsync#get_or_createhttps://docs.apify.com/api/client/js/reference/class/KeyValueStoreCollectionClient#getOrCreateCreates a key-value store and returns its object. The response is the same object as returned by the endpoint.
Keep in mind that data stored under unnamed store follows https://docs.apify.com/platform/storage#data-retention.
It creates a store with the given name if the parameter name is used. If there is another store with the same name, the endpoint does not create a new one and returns the existing object instead.
## Request
## Responses
* 201
**Response Headers**
* **Location**
---
# Get log
GET https://api.apify.com/v2/logs/:buildOrRunId
Clientshttps://docs.apify.com/api/client/python/reference/class/LogClientAsync#streamhttps://docs.apify.com/api/client/js/reference/class/LogClient#streamRetrieves logs for a specific Actor build or run.
## Request
## Responses
* 200
**Response Headers**
---
# Logs - Introduction
The API endpoints described in this section are used the download the logs generated by Actor builds and runs. Note that only the trailing 5M characters of the log are stored, the rest is discarded.
note
Note that the endpoints do not require the authentication token, the calls are authenticated using a hard-to-guess ID of the Actor build or run.
## https://docs.apify.com/api/v2/log-get.md
https://docs.apify.com/api/v2/log-get.md
---
# Charge events in run
POST https://api.apify.com/v2/actor-runs/:runId/charge
Clientshttps://docs.apify.com/api/client/python/reference/class/RunClientAsync#chargehttps://docs.apify.com/api/client/js/reference/class/RunClient#chargeCharge for events in the run of your https://docs.apify.com/platform/actors/running/actors-in-store#pay-per-event. The event you are charging for must be one of the configured events in your Actor. If the Actor is not set up as pay per event, or if the event is not configured, the endpoint will return an error. The endpoint must be called from the Actor run itself, with the same API token that the run was started with.
Learn more about pay-per-event pricing
For more details about pay-per-event (PPE) pricing, refer to our https://docs.apify.com/platform/actors/publishing/monetize/pay-per-event.md.
## Request
## Responses
* 201
The charge was successful. Note that you still have to make sure in your Actor that the total charge for the run respects the maximum value set by the user, as the API does not check this. Above the limit, the charges reported as successful in API will not be added to your payouts, but you will still bear the associated costs. Use the Apify charge manager or SDK to avoid having to deal with this manually.
---
# Resurrect run
POST https://api.apify.com/v2/actor-runs/:runId/resurrect
Clientshttps://docs.apify.com/api/client/python/reference/class/RunClientAsync#resurrecthttps://docs.apify.com/api/client/js/reference/class/RunClient#resurrectResurrects a finished Actor run and returns an object that contains all the details about the resurrected run. Only finished runs, i.e. runs with status `FINISHED`, `FAILED`, `ABORTED` and `TIMED-OUT` can be resurrected. Run status will be updated to RUNNING and its container will be restarted with the same storages (the same behaviour as when the run gets migrated to the new server).
For more information, see the https://docs.apify.com/platform/actors/running/runs-and-builds#resurrection-of-finished-run.
## Request
## Responses
* 200
**Response Headers**
---
# Delete request queue
DELETE https://api.apify.com/v2/request-queues/:queueId
Clientshttps://docs.apify.com/api/client/js/reference/class/RequestQueueClient#deleteDeletes given queue.
## Request
## Responses
* 204
**Response Headers**
---
# Get request queue
GET https://api.apify.com/v2/request-queues/:queueId
Clientshttps://docs.apify.com/api/client/python/reference/class/RequestQueueClientAsync#gethttps://docs.apify.com/api/client/js/reference/class/RequestQueueClient#getReturns queue object for given queue ID.
## Request
## Responses
* 200
**Response Headers**
---
# Get head
GET https://api.apify.com/v2/request-queues/:queueId/head
Clientshttps://docs.apify.com/api/client/python/reference/class/RequestQueueClientAsync#list_headhttps://docs.apify.com/api/client/js/reference/class/RequestQueueClient#listHeadReturns given number of first requests from the queue.
The response contains the `hadMultipleClients` boolean field which indicates that the queue was accessed by more than one client (with unique or empty `clientKey`). This field is used by https://sdk.apify.com to determine whether the local cache is consistent with the request queue, and thus optimize performance of certain operations.
## Request
## Responses
* 200
**Response Headers**
---
# Get head and lock
POST https://api.apify.com/v2/request-queues/:queueId/head/lock
Clientshttps://docs.apify.com/api/client/python/reference/class/RequestQueueClientAsync#list_and_lock_headhttps://docs.apify.com/api/client/js/reference/class/RequestQueueClient#listAndLockHeadReturns the given number of first requests from the queue and locks them for the given time.
If this endpoint locks the request, no other client or run will be able to get and lock these requests.
The response contains the `hadMultipleClients` boolean field which indicates that the queue was accessed by more than one client (with unique or empty `clientKey`).
## Request
## Responses
* 200
**Response Headers**
---
# Update request queue
PUT https://api.apify.com/v2/request-queues/:queueId
Clientshttps://docs.apify.com/api/client/python/reference/class/RequestQueueClientAsync#updatehttps://docs.apify.com/api/client/js/reference/class/RequestQueueClient#updateUpdates a request queue's name using a value specified by a JSON object passed in the PUT payload.
The response is the updated request queue object, as returned by the API endpoint.
## Request
## Responses
* 200
**Response Headers**
---
# Delete request
DELETE https://api.apify.com/v2/request-queues/:queueId/requests/:requestId
Clientshttps://docs.apify.com/api/client/js/reference/class/RequestQueueClient#deleteDeletes given request from queue.
## Request
## Responses
* 204
**Response Headers**
---
# Get request
GET https://api.apify.com/v2/request-queues/:queueId/requests/:requestId
Clientshttps://docs.apify.com/api/client/python/reference/class/RequestQueueClientAsync#gethttps://docs.apify.com/api/client/js/reference/class/RequestQueueClient#getReturns request from queue.
## Request
## Responses
* 200
**Response Headers**
---
# Delete request lock
DELETE https://api.apify.com/v2/request-queues/:queueId/requests/:requestId/lock
Clientshttps://docs.apify.com/api/client/python/reference/class/RequestQueueClientAsync#delete_request_lockhttps://docs.apify.com/api/client/js/reference/class/RequestQueueClient#deleteRequestLockDeletes a request lock. The request lock can be deleted only by the client that has locked it using .
## Request
## Responses
* 204
**Response Headers**
---
# Prolong request lock
PUT https://api.apify.com/v2/request-queues/:queueId/requests/:requestId/lock
Clientshttps://docs.apify.com/api/client/python/reference/class/RequestQueueClientAsync#prolong_request_lockhttps://docs.apify.com/api/client/js/reference/class/RequestQueueClient#prolongRequestLockProlongs request lock. The request lock can be prolonged only by the client that has locked it using .
## Request
## Responses
* 200
**Response Headers**
---
# Update request
PUT https://api.apify.com/v2/request-queues/:queueId/requests/:requestId
Clientshttps://docs.apify.com/api/client/python/reference/class/RequestQueueClientAsync#updatehttps://docs.apify.com/api/client/js/reference/class/RequestQueueClient#updateUpdates a request in a queue. Mark request as handled by setting `request.handledAt = new Date()`. If `handledAt` is set, the request will be removed from head of the queue (and unlocked, if applicable).
## Request
## Responses
* 200
**Response Headers**
---
# Delete requests
DELETE https://api.apify.com/v2/request-queues/:queueId/requests/batch
Clientshttps://docs.apify.com/api/client/python/reference/class/RequestQueueClientAsync#batch_delete_requestshttps://docs.apify.com/api/client/js/reference/class/RequestQueueClient#batchDeleteRequestsBatch-deletes given requests from the queue. The number of requests in a batch is limited to 25. The response contains an array of unprocessed and processed requests. If any delete operation fails because the request queue rate limit is exceeded or an internal failure occurs, the failed request is returned in the `unprocessedRequests` response parameter. You can re-send these delete requests. It is recommended to use an exponential backoff algorithm for these retries. Each request is identified by its ID or uniqueKey parameter. You can use either of them to identify the request.
## Request
## Responses
* 204
**Response Headers**
---
# Add requests
POST https://api.apify.com/v2/request-queues/:queueId/requests/batch
Clientshttps://docs.apify.com/api/client/python/reference/class/RequestQueueClientAsync#batch_add_requestshttps://docs.apify.com/api/client/js/reference/class/RequestQueueClient#batchAddRequestsAdds requests to the queue in batch. The maximum requests in batch is limit to 25. The response contains an array of unprocessed and processed requests. If any add operation fails because the request queue rate limit is exceeded or an internal failure occurs, the failed request is returned in the unprocessedRequests response parameter. You can resend these requests to add. It is recommended to use exponential backoff algorithm for these retries. If a request with the same `uniqueKey` was already present in the queue, then it returns an ID of the existing request.
## Request
## Responses
* 201
**Response Headers**
---
# List requests
GET https://api.apify.com/v2/request-queues/:queueId/requests
Clientshttps://docs.apify.com/api/client/python/reference/class/RequestQueueClientAsync#list_requestshttps://docs.apify.com/api/client/js/reference/class/RequestQueueClient#paginateRequestsReturns a list of requests. This endpoint is paginated using exclusiveStartId and limit parameters.
## Request
## Responses
* 200
**Response Headers**
---
# Add request
POST https://api.apify.com/v2/request-queues/:queueId/requests
Clientshttps://docs.apify.com/api/client/python/reference/class/RequestQueueClientAsync#add_requesthttps://docs.apify.com/api/client/js/reference/class/RequestQueueClient#addRequestAdds request to the queue. Response contains ID of the request and info if request was already present in the queue or handled.
If request with same `uniqueKey` was already present in the queue then returns an ID of existing request.
## Request
## Responses
* 201
**Response Headers**
---
# Unlock requests
POST https://api.apify.com/v2/request-queues/:queueId/requests/unlock
Clientshttps://docs.apify.com/api/client/python/reference/class/RequestQueueClientAsync#unlock_requestshttps://docs.apify.com/api/client/js/reference/class/RequestQueueClient#unlockRequestsUnlocks requests in the queue that are currently locked by the client.
* If the client is within an Actor run, it unlocks all requests locked by that specific run plus all requests locked by the same clientKey.
* If the client is outside of an Actor run, it unlocks all requests locked using the same clientKey.
## Request
## Responses
* 200
Number of requests that were unlocked
---
# Get list of request queues
GET https://api.apify.com/v2/request-queues
Clientshttps://docs.apify.com/api/client/python/reference/class/RequestQueueCollectionClientAsync#listhttps://docs.apify.com/api/client/js/reference/class/RequestQueueCollectionClient#listLists all of a user's request queues. The response is a JSON array of objects, where each object contains basic information about one queue.
By default, the objects are sorted by the `createdAt` field in ascending order, therefore you can use pagination to incrementally fetch all queues while new ones are still being created. To sort them in descending order, use `desc=1` parameter. The endpoint supports pagination using `limit` and `offset` parameters and it will not return more than 1000 array elements.
## Request
## Responses
* 200
**Response Headers**
---
# Create request queue
POST https://api.apify.com/v2/request-queues
Clientshttps://docs.apify.com/api/client/python/reference/class/RequestQueueCollectionClientAsync#get_or_createhttps://docs.apify.com/api/client/js/reference/class/RequestQueueCollectionClient#getOrCreateCreates a request queue and returns its object. Keep in mind that requests stored under unnamed queue follows https://docs.apify.com/platform/storage#data-retention.
It creates a queue of given name if the parameter name is used. If a queue with the given name already exists then the endpoint returns its object.
## Request
## Responses
* 201
**Response Headers**
* **Location**
---
# Delete schedule
DELETE https://api.apify.com/v2/schedules/:scheduleId
Clientshttps://docs.apify.com/api/client/js/reference/class/ScheduleClient#deleteDeletes a schedule.
## Request
## Responses
* 204
**Response Headers**
---
# Get schedule
GET https://api.apify.com/v2/schedules/:scheduleId
Clientshttps://docs.apify.com/api/client/python/reference/class/ScheduleClientAsync#gethttps://docs.apify.com/api/client/js/reference/class/ScheduleClient#getGets the schedule object with all details.
## Request
## Responses
* 200
**Response Headers**
---
# Get schedule log
GET https://api.apify.com/v2/schedules/:scheduleId/log
Clientshttps://docs.apify.com/api/client/python/reference/class/ScheduleClientAsync#get_loghttps://docs.apify.com/api/client/js/reference/class/ScheduleClient#getLogGets the schedule log as a JSON array containing information about up to a 1000 invocations of the schedule.
## Request
## Responses
* 200
**Response Headers**
---
# Update schedule
PUT https://api.apify.com/v2/schedules/:scheduleId
Clientshttps://docs.apify.com/api/client/python/reference/class/ScheduleClientAsync#updatehttps://docs.apify.com/api/client/js/reference/class/ScheduleClient#updateUpdates a schedule using values specified by a schedule object passed as JSON in the POST payload. If the object does not define a specific property, its value will not be updated.
The response is the full schedule object as returned by the endpoint.
**The request needs to specify the `Content-Type: application/json` HTTP header!**
When providing your API authentication token, we recommend using the request's `Authorization` header, rather than the URL. ().
## Request
## Responses
* 200
**Response Headers**
---
# Schedules - Introduction
This section describes API endpoints for managing schedules.
Schedules are used to automatically start your Actors at certain times. Each schedule can be associated with a number of Actors and Actor tasks. It is also possible to override the settings of each Actor (task) similarly to when invoking the Actor (task) using the API. For more information, see https://docs.apify.com/platform/schedules.
Each schedule is assigned actions for it to perform. Actions can be of two types
* `RUN_ACTOR` and `RUN_ACTOR_TASK`.
For details, see the documentation of the endpoint.
## https://docs.apify.com/api/v2/schedules-get.md
https://docs.apify.com/api/v2/schedules-get.md
## https://docs.apify.com/api/v2/schedules-post.md
https://docs.apify.com/api/v2/schedules-post.md
## https://docs.apify.com/api/v2/schedule-get.md
https://docs.apify.com/api/v2/schedule-get.md
## https://docs.apify.com/api/v2/schedule-put.md
https://docs.apify.com/api/v2/schedule-put.md
## https://docs.apify.com/api/v2/schedule-delete.md
https://docs.apify.com/api/v2/schedule-delete.md
## https://docs.apify.com/api/v2/schedule-log-get.md
https://docs.apify.com/api/v2/schedule-log-get.md
---
# Get list of schedules
GET https://api.apify.com/v2/schedules
Clientshttps://docs.apify.com/api/client/python/reference/class/ScheduleCollectionClientAsync#listhttps://docs.apify.com/api/client/js/reference/class/ScheduleCollectionClient#listGets the list of schedules that the user created.
The endpoint supports pagination using the `limit` and `offset` parameters. It will not return more than 1000 records.
By default, the records are sorted by the `createdAt` field in ascending order. To sort the records in descending order, use the `desc=1` parameter.
## Request
## Responses
* 200
**Response Headers**
---
# Create schedule
POST https://api.apify.com/v2/schedules
Clientshttps://docs.apify.com/api/client/python/reference/class/ScheduleCollectionClientAsync#createhttps://docs.apify.com/api/client/js/reference/class/ScheduleCollectionClient#createCreates a new schedule with settings provided by the schedule object passed as JSON in the payload. The response is the created schedule object.
The request needs to specify the `Content-Type: application/json` HTTP header!
When providing your API authentication token, we recommend using the request's `Authorization` header, rather than the URL. ().
## Request
## Responses
* 201
**Response Headers**
* **Location**
---
# Datasets - Introduction
This section describes API endpoints to manage Datasets.
Dataset is a storage for structured data, where each record stored has the same attributes, such as online store products or real estate offers. You can imagine it as a table, where each object is a row and its attributes are columns. Dataset is an append-only storage - you can only add new records to it but you cannot modify or remove existing records. Typically it is used to store crawling results.
For more information, see the https://docs.apify.com/platform/storage/dataset.
note
Some of the endpoints do not require the authentication token, the calls are authenticated using the hard-to-guess ID of the dataset.
## https://docs.apify.com/api/v2/datasets-get.md
https://docs.apify.com/api/v2/datasets-get.md
## https://docs.apify.com/api/v2/datasets-post.md
https://docs.apify.com/api/v2/datasets-post.md
## https://docs.apify.com/api/v2/dataset-get.md
https://docs.apify.com/api/v2/dataset-get.md
## https://docs.apify.com/api/v2/dataset-put.md
https://docs.apify.com/api/v2/dataset-put.md
## https://docs.apify.com/api/v2/dataset-delete.md
https://docs.apify.com/api/v2/dataset-delete.md
## https://docs.apify.com/api/v2/dataset-items-get.md
https://docs.apify.com/api/v2/dataset-items-get.md
## https://docs.apify.com/api/v2/dataset-items-post.md
https://docs.apify.com/api/v2/dataset-items-post.md
## https://docs.apify.com/api/v2/dataset-statistics-get.md
https://docs.apify.com/api/v2/dataset-statistics-get.md
---
# Key-value stores - Introduction
This section describes API endpoints to manage Key-value stores. Key-value store is a simple storage for saving and reading data records or files. Each data record is represented by a unique key and associated with a MIME content type. Key-value stores are ideal for saving screenshots, Actor inputs and outputs, web pages, PDFs or to persist the state of crawlers.
For more information, see the https://docs.apify.com/platform/storage/key-value-store.
note
Some of the endpoints do not require the authentication token, the calls are authenticated using a hard-to-guess ID of the key-value store.
## https://docs.apify.com/api/v2/key-value-stores-get.md
https://docs.apify.com/api/v2/key-value-stores-get.md
## https://docs.apify.com/api/v2/key-value-stores-post.md
https://docs.apify.com/api/v2/key-value-stores-post.md
## https://docs.apify.com/api/v2/key-value-store-get.md
https://docs.apify.com/api/v2/key-value-store-get.md
## https://docs.apify.com/api/v2/key-value-store-put.md
https://docs.apify.com/api/v2/key-value-store-put.md
## https://docs.apify.com/api/v2/key-value-store-delete.md
https://docs.apify.com/api/v2/key-value-store-delete.md
## https://docs.apify.com/api/v2/key-value-store-keys-get.md
https://docs.apify.com/api/v2/key-value-store-keys-get.md
## https://docs.apify.com/api/v2/key-value-store-record-get.md
https://docs.apify.com/api/v2/key-value-store-record-get.md
## https://docs.apify.com/api/v2/key-value-store-record-head.md
https://docs.apify.com/api/v2/key-value-store-record-head.md
## https://docs.apify.com/api/v2/key-value-store-record-put.md
https://docs.apify.com/api/v2/key-value-store-record-put.md
## https://docs.apify.com/api/v2/key-value-store-record-delete.md
https://docs.apify.com/api/v2/key-value-store-record-delete.md
---
# Request queues - Introduction
This section describes API endpoints to create, manage, and delete request queues.
Request queue is a storage for a queue of HTTP URLs to crawl, which is typically used for deep crawling of websites where you start with several URLs and then recursively follow links to other pages. The storage supports both breadth-first and depth-first crawling orders.
For more information, see the https://docs.apify.com/platform/storage/request-queue.
note
Some of the endpoints do not require the authentication token, the calls are authenticated using the hard-to-guess ID of the queue.
## https://docs.apify.com/api/v2/request-queues-get.md
https://docs.apify.com/api/v2/request-queues-get.md
## https://docs.apify.com/api/v2/request-queues-post.md
https://docs.apify.com/api/v2/request-queues-post.md
## https://docs.apify.com/api/v2/request-queue-get.md
https://docs.apify.com/api/v2/request-queue-get.md
## https://docs.apify.com/api/v2/request-queue-put.md
https://docs.apify.com/api/v2/request-queue-put.md
## https://docs.apify.com/api/v2/request-queue-delete.md
https://docs.apify.com/api/v2/request-queue-delete.md
## https://docs.apify.com/api/v2/request-queue-requests-batch-post.md
https://docs.apify.com/api/v2/request-queue-requests-batch-post.md
## https://docs.apify.com/api/v2/request-queue-requests-batch-delete.md
https://docs.apify.com/api/v2/request-queue-requests-batch-delete.md
---
# Requests- Introduction
This section describes API endpoints to create, manage, and delete requests within request queues.
Request queue is a storage for a queue of HTTP URLs to crawl, which is typically used for deep crawling of websites where you start with several URLs and then recursively follow links to other pages. The storage supports both breadth-first and depth-first crawling orders.
For more information, see the https://docs.apify.com/platform/storage/request-queue.
note
Some of the endpoints do not require the authentication token, the calls are authenticated using the hard-to-guess ID of the queue.
## https://docs.apify.com/api/v2/request-queue-requests-get.md
https://docs.apify.com/api/v2/request-queue-requests-get.md
## https://docs.apify.com/api/v2/request-queue-requests-post.md
https://docs.apify.com/api/v2/request-queue-requests-post.md
## https://docs.apify.com/api/v2/request-queue-request-get.md
https://docs.apify.com/api/v2/request-queue-request-get.md
## https://docs.apify.com/api/v2/request-queue-request-put.md
https://docs.apify.com/api/v2/request-queue-request-put.md
## https://docs.apify.com/api/v2/request-queue-request-delete.md
https://docs.apify.com/api/v2/request-queue-request-delete.md
---
# Requests locks - Introduction
This section describes API endpoints to create, manage, and delete request locks within request queues.
Request queue is a storage for a queue of HTTP URLs to crawl, which is typically used for deep crawling of websites where you start with several URLs and then recursively follow links to other pages. The storage supports both breadth-first and depth-first crawling orders.
For more information, see the https://docs.apify.com/platform/storage/request-queue.
note
Some of the endpoints do not require the authentication token, the calls are authenticated using the hard-to-guess ID of the queue.
## https://docs.apify.com/api/v2/request-queue-requests-unlock-post.md
https://docs.apify.com/api/v2/request-queue-requests-unlock-post.md
## https://docs.apify.com/api/v2/request-queue-head-get.md
https://docs.apify.com/api/v2/request-queue-head-get.md
## https://docs.apify.com/api/v2/request-queue-head-lock-post.md
https://docs.apify.com/api/v2/request-queue-head-lock-post.md
## https://docs.apify.com/api/v2/request-queue-request-lock-put.md
https://docs.apify.com/api/v2/request-queue-request-lock-put.md
## https://docs.apify.com/api/v2/request-queue-request-lock-delete.md
https://docs.apify.com/api/v2/request-queue-request-lock-delete.md
---
# Store - Introduction
https://apify.com/store is home to thousands of public Actors available to the Apify community. The API endpoints described in this section are used to retrieve these Actors.
note
These endpoints do not require the authentication token.
## https://docs.apify.com/api/v2/store-get.md
https://docs.apify.com/api/v2/store-get.md
---
# Get list of Actors in store
GET https://api.apify.com/v2/store
Gets the list of public Actors in Apify Store. You can use `search` parameter to search Actors by string in title, name, description, username and readme. If you need detailed info about a specific Actor, use the endpoint.
The endpoint supports pagination using the `limit` and `offset` parameters. It will not return more than 1,000 records.
## Request
## Responses
* 200
**Response Headers**
---
# Get public user data
GET https://api.apify.com/v2/users/:userId
Returns public information about a specific user account, similar to what can be seen on public profile pages (e.g. https://apify.com/apify).
This operation requires no authentication token.
## Request
## Responses
* 200
**Response Headers**
---
# Users - Introduction
The API endpoints described in this section return information about user accounts.
## https://docs.apify.com/api/v2/user-get.md
https://docs.apify.com/api/v2/user-get.md
## https://docs.apify.com/api/v2/users-me-get.md
https://docs.apify.com/api/v2/users-me-get.md
## https://docs.apify.com/api/v2/users-me-usage-monthly-get.md
https://docs.apify.com/api/v2/users-me-usage-monthly-get.md
## https://docs.apify.com/api/v2/users-me-limits-get.md
https://docs.apify.com/api/v2/users-me-limits-get.md
## https://docs.apify.com/api/v2/users-me-limits-put.md
https://docs.apify.com/api/v2/users-me-limits-put.md
---
# Get private user data
GET https://api.apify.com/v2/users/me
Returns information about the current user account, including both public and private information.
The user account is identified by the provided authentication token.
The fields `plan`, `email` and `profile` are omitted when this endpoint is accessed from Actor run.
## Responses
* 200
**Response Headers**
---
# Get limits
GET https://api.apify.com/v2/users/me/limits
Returns a complete summary of your account's limits. It is the same information you will see on your account's https://console.apify.com/billing#/limits. The returned data includes the current usage cycle, a summary of your limits, and your current usage.
## Responses
* 200
**Response Headers**
---
# Update limits
PUT https://api.apify.com/v2/users/me/limits
Updates the account's limits manageable on your account's https://console.apify.com/billing#/limits. Specifically the: `maxMonthlyUsageUsd` and `dataRetentionDays` limits (see request body schema for more details).
## Request
## Responses
* 201
**Response Headers**
---
# Get monthly usage
GET https://api.apify.com/v2/users/me/usage/monthly
Returns a complete summary of your usage for the current usage cycle, an overall sum, as well as a daily breakdown of usage. It is the same information you will see on your account's https://console.apify.com/billing#/usage. The information includes your use of storage, data transfer, and request queue usage.
Using the `date` parameter will show your usage in the usage cycle that includes that date.
## Request
## Responses
* 200
**Response Headers**
---
# Delete webhook
DELETE https://api.apify.com/v2/webhooks/:webhookId
Clientshttps://docs.apify.com/api/client/js/reference/class/WebhookClient#deleteDeletes a webhook.
## Request
## Responses
* 204
**Response Headers**
---
# Get webhook dispatch
GET https://api.apify.com/v2/webhook-dispatches/:dispatchId
Clientshttps://docs.apify.com/api/client/python/reference/class/WebhookDispatchClientAsync#gethttps://docs.apify.com/api/client/js/reference/class/WebhookDispatchClient#getGets webhook dispatch object with all details.
## Request
## Responses
* 200
**Response Headers**
---
# Get list of webhook dispatches
GET https://api.apify.com/v2/webhook-dispatches
Clientshttps://docs.apify.com/api/client/python/reference/class/WebhookDispatchCollectionClientAsync#listhttps://docs.apify.com/api/client/js/reference/class/WebhookDispatchCollectionClient#listGets the list of webhook dispatches that the user have.
The endpoint supports pagination using the `limit` and `offset` parameters and it will not return more than 1000 records. By default, the records are sorted by the `createdAt` field in ascending order. To sort the records in descending order, use the `desc=1` parameter.
## Request
## Responses
* 200
**Response Headers**
---
# Get webhook
GET https://api.apify.com/v2/webhooks/:webhookId
Clientshttps://docs.apify.com/api/client/python/reference/class/WebhookClientAsync#gethttps://docs.apify.com/api/client/js/reference/class/WebhookClient#getGets webhook object with all details.
## Request
## Responses
* 200
**Response Headers**
---
# Update webhook
PUT https://api.apify.com/v2/webhooks/:webhookId
Clientshttps://docs.apify.com/api/client/python/reference/class/WebhookClientAsync#updatehttps://docs.apify.com/api/client/js/reference/class/WebhookClient#updateUpdates a webhook using values specified by a webhook object passed as JSON in the POST payload. If the object does not define a specific property, its value will not be updated.
The response is the full webhook object as returned by the endpoint.
The request needs to specify the `Content-Type: application/json` HTTP header!
When providing your API authentication token, we recommend using the request's `Authorization` header, rather than the URL. ().
## Request
## Responses
* 200
**Response Headers**
---
# Test webhook
POST https://api.apify.com/v2/webhooks/:webhookId/test
Clientshttps://docs.apify.com/api/client/python/reference/class/WebhookClientAsync#testhttps://docs.apify.com/api/client/js/reference/class/WebhookClient#testTests a webhook. Creates a webhook dispatch with a dummy payload.
## Request
## Responses
* 201
**Response Headers**
---
# Get collection
GET https://api.apify.com/v2/webhooks/:webhookId/dispatches
Clientshttps://docs.apify.com/api/client/python/reference/class/WebhookClientAsync#dispatchesGets a given webhook's list of dispatches.
## Request
## Responses
* 200
**Response Headers**
---
# Get list of webhooks
GET https://api.apify.com/v2/webhooks
Clientshttps://docs.apify.com/api/client/python/reference/class/WebhookCollectionClientAsync#listhttps://docs.apify.com/api/client/js/reference/class/WebhookCollectionClient#listGets the list of webhooks that the user created.
The endpoint supports pagination using the `limit` and `offset` parameters and it will not return more than 1000 records. By default, the records are sorted by the `createdAt` field in ascending order. To sort the records in descending order, use the `desc=1` parameter.
## Request
## Responses
* 200
**Response Headers**
---
# Create webhook
POST https://api.apify.com/v2/webhooks
Clientshttps://docs.apify.com/api/client/python/reference/class/WebhookCollectionClientAsync#createhttps://docs.apify.com/api/client/js/reference/class/WebhookCollectionClient#createCreates a new webhook with settings provided by the webhook object passed as JSON in the payload. The response is the created webhook object.
To avoid duplicating a webhook, use the `idempotencyKey` parameter in the request body. Multiple calls to create a webhook with the same `idempotencyKey` will only create the webhook with the first call and return the existing webhook on subsequent calls. Idempotency keys must be unique, so use a UUID or another random string with enough entropy.
To assign the new webhook to an Actor or task, the request body must contain `requestUrl`, `eventTypes`, and `condition` properties.
* `requestUrl` is the webhook's target URL, to which data is sent as a POST request with a JSON payload.
* `eventTypes` is a list of events that will trigger the webhook, e.g. when the Actor run succeeds.
* `condition` should be an object containing the ID of the Actor or task to which the webhook will be assigned.
* `payloadTemplate` is a JSON-like string, whose syntax is extended with the use of variables.
* `headersTemplate` is a JSON-like string, whose syntax is extended with the use of variables. Following values will be re-written to defaults: "host", "Content-Type", "X-Apify-Webhook", "X-Apify-Webhook-Dispatch-Id", "X-Apify-Request-Origin"
* `description` is an optional string.
* `shouldInterpolateStrings` is a boolean indicating whether to interpolate variables contained inside strings in the `payloadTemplate`
"isAdHoc" : false, "requestUrl" : "https://example.com", "eventTypes" : [ "ACTOR.RUN.SUCCEEDED", "ACTOR.RUN.ABORTED" ], "condition" : { "actorId": "janedoe~my-actor", "actorTaskId" : "W9bs9JE9v7wprjAnJ" }, "payloadTemplate": "", "headersTemplate": "", "description": "my awesome webhook", "shouldInterpolateStrings": false,
**Important**: The request must specify the `Content-Type: application/json` HTTP header.
## Request
## Responses
* 201
**Response Headers**
* **Location**
---
# Webhook dispatches - Introduction
This section describes API endpoints to get webhook dispatches.
## https://docs.apify.com/api/v2/webhook-dispatches-get.md
https://docs.apify.com/api/v2/webhook-dispatches-get.md
## https://docs.apify.com/api/v2/webhook-dispatch-get.md
https://docs.apify.com/api/v2/webhook-dispatch-get.md
---
# Webhooks - Introduction
This section describes API endpoints to manage webhooks.
Webhooks provide an easy and reliable way to configure the Apify platform to carry out an action (e.g. a HTTP request to another service) when a certain system event occurs. For example, you can use webhooks to start another Actor when an Actor run finishes or fails.
For more information see https://docs.apify.com/platform/integrations/webhooks.
## https://docs.apify.com/api/v2/webhooks-get.md
https://docs.apify.com/api/v2/webhooks-get.md
## https://docs.apify.com/api/v2/webhooks-post.md
https://docs.apify.com/api/v2/webhooks-post.md
## https://docs.apify.com/api/v2/webhook-get.md
https://docs.apify.com/api/v2/webhook-get.md
## https://docs.apify.com/api/v2/webhook-put.md
https://docs.apify.com/api/v2/webhook-put.md
## https://docs.apify.com/api/v2/webhook-delete.md
https://docs.apify.com/api/v2/webhook-delete.md
## https://docs.apify.com/api/v2/webhook-test-post.md
https://docs.apify.com/api/v2/webhook-test-post.md
## https://docs.apify.com/api/v2/webhook-webhook-dispatches-get.md
https://docs.apify.com/api/v2/webhook-webhook-dispatches-get.md
---
# Apify Legal
## Company details (Impressum)
**Apify Technologies s.r.o.**Registered seat: Vodickova 704/36, 110 00 Prague 1, Czech RepublicVAT ID: CZ04788290 (EU), GB373153700 (UK)Company ID: 04788290Czech limited liability company registered in the https://or.justice.cz/ias/ui/rejstrik-firma.vysledky?subjektId=924944&typ=PLATNY kept by the Municipal Court of Prague, File No.: C 253224Represented by managing director Jan ČurnIBAN: CZ0355000000000027434378SWIFT / BIC: RZBCCZPP
### Contacts
General: mailto:hello@apify.comLegal team contact: mailto:legal@apify.comPrivacy team contact: mailto:privacy@apify.comApify Trust Center: https://trust.apify.com/
### Trademarks
"APIFY" is a word trademark registered with USPTO (4517178), EUIPO (011628377), UKIPO (UK00911628377), and DPMA (3020120477984).
## Terms and Conditions
* https://docs.apify.com/legal/general-terms-and-conditions.md
* https://docs.apify.com/legal/store-publishing-terms-and-conditions.md
* https://docs.apify.com/legal/affiliate-program-terms-and-conditions.md
* https://docs.apify.com/legal/data-processing-addendum.md
* https://docs.apify.com/legal/event-terms-and-conditions.md
* https://docs.apify.com/legal/candidate-referral-program-terms.md
## Policies
* https://docs.apify.com/legal/acceptable-use-policy.md
* https://docs.apify.com/legal/privacy-policy.md
* https://docs.apify.com/legal/cookie-policy.md
* https://docs.apify.com/legal/gdpr-information.md
* https://docs.apify.com/legal/whistleblowing-policy.md
* https://docs.apify.com/legal/community-code-of-conduct.md
---
# Apify Acceptable Use Policy
Apify Technologies s.r.o., with its registered seat at Vodičkova 704/36, Nové Město, 110 00 Prague 1, Czech Republic, Company ID No.: 04788290, registered in the Commercial Register kept by the Municipal Court of Prague, File No.: C 253224 (hereinafter referred to as “**we**” or “**Apify**”), is committed to making sure that the Platform and the Website are being used only for legitimate and legal purposes.
By agreeing to our General Terms and Conditions or simply by using the Platform or the Website, you also agree to be bound by this Acceptable Use Policy.
## 1. General Provisions
**1.1.** Apify takes firm action against any illegal or non-compliant use of the Platform and the Website and will assist law enforcement in investigating any illegal activities. Any use of the Platform or the Website for illegal, fraudulent, or otherwise unacceptable activities is strictly prohibited.
**1.2.** You agree to use the Platform and the Website only for legal and legitimate purposes and to avoid the Prohibited Activities under Article 2.1.
**1.3.** Any capitalized terms that are not defined in this Acceptable Use Policy shall have the meaning ascribed to them in the General Terms and Conditions.
## 2. Prohibited Activities
**2.1.** Prohibited activities include, but are not limited to:
1. denial-of-service (DDoS) attacks or any other actions that cause undue burden on any servers or infrastructure;
2. unsolicited mass messaging;
3. any fraudulent or deceptive behavior (such as phishing, malware, impersonation, spoofing, ad fraud, click fraud, etc.);
4. any artificial interaction (such as upvotes, shares, etc.);
5. creating fake accounts or deceptive content (such as disinformation, clickbait, misleading ad, scam emails, etc.);
6. any manipulation of Search Engine Optimization (i.e., fake clicks in search engine results);
7. engaging in surveys in exchange for any financial or in-kind benefit;
8. resale of any Platform features without obtaining Apify’s prior written approval;
9. engaging in activities that contravene applicable laws, regulations, or the rights of any third party;
10. any activity that may harm the reputation, goodwill or interests of Apify;
11. any additional activity that Apify deems immoral or undesirable on its Platform or Website
(together as the “**Prohibited Activities**”).
## 3. Our Rights
**3.1.** In case Apify identifies any of the Prohibited Activities on the Platform or the Website, it is authorized to block, delete, or otherwise restrict any such non-compliant User or Actor from the Platform or Website without notice. Apify may limit the use of the Platform or the Website in its sole discretion to prevent any direct or indirect damage to Apify or any third party.
**3.2.** Apify shall not be liable towards you or any third party for exercising its rights according to this Acceptable Use Policy.
## 4. Reporting
**4.1.** We encourage users to report any misuse or suspicious activity on our Platform through our contact email mailto:hello@apify.com.
---
# Apify Affiliate Program Terms and Conditions
Effective date: May 14, 2024
Latest version effective from: July 5, 2025
***
**Apify Technologies s.r.o.**, with its registered seat at Vodičkova 704/36, 110 00 Prague 1, Czech Republic, Company reg. no. 04788290, recorded in the Commercial Register kept by the Municipal Court of Prague, File No.: C 253224 ("**we**" or "**Apify**") thanks you ("**you**" or the "**Affiliate Partner**") for your interest in joining the Apify's Affiliate Program (the "**Affiliate Program**"). These terms and conditions (the "**Affiliate Program Terms**") shall govern your rights and obligations in relation to your participation in the Affiliate Program in addition to https://docs.apify.com/legal/general-terms-and-conditions.md (the "**General Terms**").
Terms starting with a capital letter used in these Affiliate Program Terms have the meaning defined either here or in the General Terms. Provisions of the General Terms regarding liability, indemnity, governing law and choice of jurisdiction are incorporated herein by reference.
## 1. Joining the Affiliate Program
1.1. You may join the Affiliate Program by creating an account on Apify's https://apify.firstpromoter.com/ ("**FirstPromoter**"). By ticking the box "*I agree to the Apify Affiliate Program terms*", you claim that you are over 18 years old and agree to adhere to these Affiliate Program Terms, in addition to the General Terms. If you act on behalf of a company when accepting these Affiliate Program Terms, you also hereby declare to be authorized to perform such legal actions on behalf of the company (herein the term "**you**" shall mean the relevant company).
## 2. Apify's obligations
2.1. Upon joining the Affiliate Program, Apify will make available to you your unique referral link (the "**Referral Link**") and promotional materials, which you may use in promoting Apify's services.
2.2. Apify shall pay to the Affiliate Partner a commission (the "**Commission**") for referred users' use of the Platform according to the provisions below.
## 3. Referred Customers
3.1. "**Referred Customer**" is a natural person or a company who subscribed to Apify's Platform using the Referral Link in compliance with these Affiliate Program Terms.
3.2. Tracking of the potential Referred Customer is performed by cookies lasting 45 days. If the cookies expire or are deleted, a customer may not be recognised as a Referred Customer.
3.3. If the Affiliate Partner identifies any customer that, in their opinion, shall be considered Referred Customer but has not been recognised by the tracking, the Affiliate Partner may report this information to Apify together with sufficient evidence. Apify shall in its discretion in good faith consider the Affiliate Partner's report and evidence, and decide whether or not such a customer shall be deemed Referred Customer.
3.4. In case of any uncertain or suspicious circumstances, Apify shall have the right to ultimately decide whether a customer is to be deemed Referred Customer or not, in its sole discretion.
## 4. Commission
4.1. Unless agreed otherwise, the Commission shall be computed as 20% of all payments made by each Referred Customer to Apify in the first 3 months from the date when that Referred Customer started paying for Services (as defined in the General Terms) and then increased to 30% for all payments made by each Referred Customer to Apify, up to 2,500 USD per Referred Customer.
## 5. Payment terms
**5.1.** Apify shall pay the earned Commission to the Affiliate Partner monthly, within 15 business days after the end of each calendar month, based on an invoice that shall be issued to Apify. The minimum Commission payable is 100 USD. Commission in any given calendar month lower than 100 USD will be rolled over to the following month.
5.2. The Commission may be paid either via PayPal or bank transfer. The Affiliate Partner shall specify the chosen payment method.
5.3. Invoices are generated automatically through FirstPromoter by Apify. The Affiliate Partner shall provide and maintain up-to-date information required for this purpose in the portal. Apify may request that the Affiliate Partner issues an invoice using a different method, if the method through FirstPromoter portal is not available (e.g. due to missing Affiliate Partner's personal information). Apify shall not be obliged to pay any Commission until a valid invoice has been issued or generated.
5.4. Affiliate acknowledges and agrees that Apify makes no representation or guarantee of any kind regarding revenue, business, profit, or customers under these Affiliate Program Terms.
## 6. Affiliate Partner's obligations
6.1. The Affiliate Partner must not promote Apify or use its Referral Link in any of the following ways:
1. in any materials or in connection with any services that are illegal, infringing on third party rights, fraudulent, harassing, defamatory, discriminatory or violent;
2. use any paid advertisements and/or advertise via any pay-per-click advertisement systems (e.g., Google Ads, Facebook Ads or LinkedIn Ads);
3. bid on the "Apify" keyword for any pay-per-click advertisement systems (e.g., Google Ads), including any misspellings, capitalizations or in combination with any other text;
4. for self-referral, i.e., its own or its friends, affiliates, related persons or business partners sign-ups to the Platform;
5. in any content that's available on the Platform, Website or any other assets owned, operated or maintained by Apify; or
6. for any illegal activity, including, without limitation, fraud or money laundering.
Any customer referred in breach of this clause 6.1 shall not be considered a Referred Customer.
6.2. For avoidance of doubt, the Affiliate Partner shall not be an agent of Apify. Nothing in these Affiliate Program Terms shall be construed as authorization to act or make representations on behalf of Apify.
## 7. License
7.1. Apify hereby grants to the Affiliate Partner a limited, worldwide, revocable, non-exclusive, non-sublicensable and non-transferable license to use Apify's trademark, logo, trade name, service names and copyrighted material (the "**Intellectual Property Assets**") in its marketing, advertising or other content while promoting Apify services in accordance with this Affiliate Program Terms.
7.2. The Affiliate Partner shall not alter, modify, adapt, translate, or create derivative works from the whole or any part of the Intellectual Property Assets or permit any part of the Intellectual Property Assets to be merged, combined with, or otherwise incorporated into any other product, unless the Affiliate Partner obtained prior written consent from Apify. The Affiliate Partner shall not use any language or display the Intellectual Property Assets in such a way as to create the impression that the Intellectual Property Assets belong to the Affiliate Partner.
7.3. The Affiliate Partner shall not attack, question, or contest the validity of Apify's ownership of Intellectual Property Assets.
7.4. If any infringement of any Intellectual Property Assets comes to the Affiliate Partner's attention, whether actual or threatened, the Affiliate Partner agrees to inform Apify as soon as possible. The Affiliate Partner also agrees to notify us of any claim by anyone that our products infringe the rights of any other person. The Affiliate Partner shall, at our request and expense, provide its cooperation to Apify in doing any reasonably required steps to address such claims.
7.5. Apify reserves all rights not expressly granted in this Agreement, and does not transfer any right, title, or interest to any intellectual property rights.
## 8. Apify Open Source Fair Share Program Additional Terms
8.1. If your Referral Links are placed on your open-source GitHub repository (e.g. as Apify badge or "Run of Apify" button), your Commission for Referred Customers can also be paid via corresponding GitHub Sponsors account, if requested by you.
8.2. We will automatically attribute Users who sign up for Apify through your open-source Actor page in Apify Store to you as Referred Customers.
## 9. Termination
9.1. The Affiliate Partner may terminate its participation in the Affiliate Program at any time and for any reason by providing Apify a written notice. Commission earned during that calendar month when the Affiliate ceased to be part of the Affiliate Program will be paid out in the usual term after the end of that calendar month.
9.2. Apify may terminate the Affiliate Partner's participation in the Affiliate Program with immediate effect if the Affiliate Partner breaches any provision of these Affiliate Program Terms or any other terms agreed between the Affiliate Partner and Apify. All commissions shall be forfeited and the Affiliate Partner will not be entitled to any reimbursement.
9.3. Apify may terminate the Affiliate Partner's participation in the Affiliate Program at any time and for any reason by providing the Affiliate Partner with at least a thirty (30) days written notice. Commission earned during that calendar month when the Affiliate Partner ceased to be a part of the Affiliate Program will be paid out in the usual term after the end of that calendar month.
9.4. These Affiliate Program Terms shall terminate together with the termination of the Affiliate Partner's participation in the Affiliate Program.
## 10. Amendments
10.1. We may unilaterally amend the Affiliate Program Terms. We shall notify you of such an amendment at least 30 days in advance before its effectiveness. Should you disagree with such an amendment, you may withdraw from the Affiliate Program until the effective date of the amendments. Otherwise, you will be deemed to agree with the announced amendments.
---
# Apify Candidate Referral Program
Last Updated: April 14, 2025
***
Apify Technologies s.r.o., as the announcer (“**Apify**”), is constantly looking for new employees and prefers to recruit people based on credible references.Therefore, Apify is announcing this public candidate referral program.
Apify undertakes that any individual (“**You**”) who:
is neither:
* currently employed by Apify;
* a person who carries out business in human resources;
* a recruiting agency, or a person cooperating with recruiting agency in any other capacity;
and recommends to Apify a suitable job candidate (“**Candidate**”):
* for any open full-time position published on the Apify Job page available at: https://apify.com/jobs;
* who is not already in Apify’s applicant database, and is not active in the recruitment process (in which case you will be informed by Apify);
* with whom Apify concludes an employment contract that establishes full-time employment between Apify and the Candidate (any candidates hired on a “DPP/DPČ” basis are excluded from this program);
* who confirms that he/she was recommended to Apify by you and
* whose employment with Apify is not terminated during the probationary period;
will receive a reward of **CZK 20,000** from Apify for each such Candidate.
If the Candidate is hired in a capacity other than full-time engagement, the reward will be prorated accordingly. If the Candidate transfers from part-time and/or “DPP/DPČ” to full-time engagement, you will not be entitled to any additional reward.
A person will be considered a Candidate recommended by you only if you send the Candidate’s CV and contact details to the email address jobs\[at]apify\[dot]com. As it’s very important for Apify to respond promptly and avoid any inconveniences, Apify cannot accept any other method of recommendation. Sending resumes and information directly to jobs\[at]apify\[dot]com ensures that the entire Apify recruiting team receives the referral and can take care of the Candidate. When submitting the resume, please provide as much supporting information as possible about why Apify should hire the Candidate.
You shall become entitled to the reward after the Candidate’s probationary period successfully passes. Apify will issue a protocol confirming the payout of the reward. Reward payment is based on your signature of the protocol. It is payable by bank transfer to the account specified in the protocol within thirty (30) days from the date of the protocol signature.
Please note that the reward is subject to the applicable taxes. You are solely responsible for any related tax obligations (such as tax returns, etc.).
You may recommend more than one Candidate. If you and someone else recommend one Candidate for the same open position in parallel, the reward will be provided to the individual who recommended the Candidate first for that specific open position.
The current list of open positions is available on the Apify Job page: https://apify.com/jobs.
This Apify Candidate Referral Program is effective from its publication and remains in effect as long as it is published on the website http://www.apify.com. Apify reserves the right to modify or revoke this Candidate Referral Program and its terms at any time and at its sole discretion by removing it from the website http://www.apify.com.
---
# Apify $1M Challenge Terms and Conditions
Effective date: November 3, 2025
Apify Technologies s.r.o., a company registered in the Czech Republic, with its registered office at Vodičkova 704/36, 110 00 Prague 1, Czech Republic, Company ID No.: 04788290 ("**Apify**", "**we**", "**us**") offers you (also referred to as "**participant**") the opportunity to enroll in the "Apify $1M Challenge" ("**Challenge**"), which is subject to the following "Apify 1M Challenge Terms and Conditions" ("**Challenge Terms**").
As part of the Challenge requires publishing Actors in Apify Store, the Challenge is further governed by https://docs.apify.com/legal/store-publishing-terms-and-conditions.md ("**Store Publishing Terms**"), which are incorporated herein by reference. In case of a conflict, these Challenge Terms shall prevail.
Terms starting with a capital letter used in these Challenge Terms have the meaning defined either here or in Store Publishing Terms.
By joining the Challenge, you accept and agree to be bound by these Challenge Terms. If you agree to these Challenge Terms on behalf of an entity, you represent and warrant that you have the authority to bind that entity to these Challenge Terms, and your agreement to these Challenge Terms will be treated as the agreement of the entity. In that event, "you", "your", or “participant” refer herein to that entity.
Participation in this Challenge is free and does not require the purchase of any product or service.
## 1. Participant Eligibility
1.1. The Challenge is open to all Apify Users, regardless of whether they are new to Apify or have an existing account. Notwithstanding the foregoing, Apify employees, individual contractors, and their immediate family members, as well as those in close relationships with Apify employees or individual contractors (a "close person" as defined by the Czech Civil Code), are not eligible to participate.
1.2. To participate in the Challenge, you must register at https://apify.com/challenge and agree to these Challenge Terms.
1.3. You will be disqualified from the Challenge if you do not comply with Store Publishing Terms or if you conduct any of the following activities:
* Fraud and Gaming: Any attempt to manipulate the Actor Quality score, inflate active user numbers, or engage in any fraudulent activity.
* Spamming: Promote your new Actors via Apify's Discord, Apify Console messaging, or Actor reviews.
* Low-Quality Submissions: Publish too many low-quality or spammy Actors, notwithstanding the fact that you may have published other Actors that are high-quality.
1.4. Individuals or entities are not eligible to participate in the Challenge if they fail our KYC/KYB verification, are listed on any sanctions list, or are incorporated, headquartered, or controlled by residents in Russia.
## 2. Actor Requirements
2.1. Only the first five (5) of your Actors published in Apify Store following your registration for the Challenge will be enrolled in the Challenge. Any exceptions to this rule are at our sole discretion.
2.2. Actors must meet a set of "hygienic" criteria, which will be evaluated by us at our sole discretion, such as a unique, legitimate README, a well-defined input and output schema (or using the standby mode), and a minimum "Actor Quality score" of 65/100 as further described in the Documentation. Actor Quality score will be visible in your Insights tab in Apify Console.
2.3. **Ineligible Actors**. The following types of Actors are not eligible for any rewards and may result in disqualification:
* Actors that use third-party software under a license that prohibits commercial use or redistribution of the resulting Actor.
* Actors for scraping the following services or websites: YouTube, LinkedIn, Instagram, Facebook, TikTok, X, Apollo.io, Amazon, Google Maps, Google Search, Google Trends. Notwithstanding the foregoing, Actors that perform non-scraping functionality (e.g., AI agents, etc.) may be eligible.
* "Rental" or Pay per Result Actors. (Eligible Actors must be Pay per Usage or Pay per Event (or both).)
* Any existing Actors that have been renamed, substantially re-used, or based on a project existing prior to the Challenge start date.
## 3. Rewards
3.1. **Challenge Bonus (New Actors Reward)**.
3.1.1. The reward shall be $2.00 per Monthly Active User. "Monthly Active User" means any User who ran the submitted Actor within the 30 days immediately preceding the calculation date, provided that the activity occurred on or after the eighth (8th) day following that User's signup date. Excluded from this definition are: (i) Apify internal accounts, (ii) test accounts, and (iii) Users blocked by Apify.
3.1.2. The minimum reward is $100 (at least 50 Monthly Active Users). The maximum reward is $2,000 (for 1,000 or more Monthly Active Users).
3.1.3. On January 31, 2026, a final usage snapshot will be taken. We will create a list of all submitted Actors that meet all Challenge requirements (Sections 2 and 3), ranked by the highest number of Monthly Active Users.
3.1.4. Payouts will be distributed sequentially, starting with the highest-ranked Actor on the list, and continuing down the list until the total distributed rewards reach the Challenge Bonus Pool of $920,000. Once the Challenge Bonus Pool is depleted, no further Actors will receive this reward, regardless of their Monthly Active User count.
3.2. **Weekly Spotlight Reward**. Every week starting from November 17, 2025, we will select one exceptional Actor to receive a one-time $2,000 reward. There are no hard criteria for this reward; it will be either based on the Apify jury's or industry expert's assessment of the Actor's concept, technical solution, or user experience, and/or Apify Community vote. For the avoidance of doubt, Actor requirements and other general conditions according to these Challenge Terms still apply.
3.3. **Top 3 Prizes**. After the Challenge concludes on January 31, 2026, the Apify jury will award a total of $60,000 to the three top participants who demonstrate the highest overall success in the Challenge. Awards will be distributed as follows:
* First Place: $30,000
* Second Place: $20,000
* Third Place: $10,000.
There are no hard criteria for this reward. For the avoidance of doubt, Actor requirements and other general conditions according to these Challenge Terms still apply.
## 4. Payout Terms
4.1. To receive any payout, you must complete our Know Your Customer (KYC) verification process. If you fail to go through our KYC process within 30 days from receiving the notification about your win, the reward will be forfeited.
4.2. You are responsible for any applicable taxes, payment processing fees, or other charges related to receiving a reward. We are not responsible for covering these costs. We reserve the right to withhold taxes and/or require tax reporting documentation as mandated by law.
4.3. All earned rewards will be paid in US dollars and exclusively via wire transfer or a PayPal account, as specified in the payout billing details provided in your account associated with the rewarded Actor. Our obligation for the payout is fully discharged upon the funds being successfully transferred to the selected payment method.
4.4. We shall have no responsibility or liability whatsoever for the distribution, allocation, or remittance of rewards among multiple contributors, developers, or associated third parties involved in creating the rewarded Actor. All such internal distribution remains the sole responsibility of the participant owning the account associated with the awarded Actor.
## 5. General Terms
5.1. By participating in the Challenge, you grant us the right to use your name and likeness, Apify public profile information, or statements relating to your submitted Actors for advertising and promotional purposes, and promote your submitted Actors, display them on a leaderboard, and use them for marketing purposes related to the Challenge, without any additional compensation.
5.2. By submitting an Actor to the Challenge, you grant us a worldwide, perpetual, royalty-free, transferable, and sublicensable license to modify, publicly perform, and display the Actor (in whole or in part) for purposes of promotion, marketing, evaluation, and operation of the Challenge. Actors will be enrolled automatically. If you want to withdraw your Actor from the Challenge, contact us at mailto:support@apify.com.
5.3. We will use the personal information you provide to facilitate your participation in the Challenge.
5.4. If the rewarded participant fails to comply with these Challenge Terms or is found to be ineligible for the reward, we reserve the right to cancel the reward and select an alternative participant to receive the reward. All decisions regarding eligibility, disqualification, and rewards are made at Apify’s sole discretion and are final and binding.
5.5. We reserve the right to modify, suspend, or terminate the Challenge at any time, with or without prior notice. Any changes will be posted on our Website, and continued participation constitutes acceptance of the updated Challenge Terms.
5.6. Participation in the Challenge does not create any employment, partnership, or agency relationship between the participant and Apify. Any rewards or payments are discretionary and contingent upon meeting the eligibility criteria, and do not constitute salary or compensation for services rendered.
5.7. In no event will we be liable to you for any special, incidental, exemplary, punitive or consequential damages arising out of or in connection with your participation in the Challenge, whether such liability arises from any claim based upon contract, warranty, tort (including negligence), strict liability or otherwise, and whether or not we have been advised of the possibility of such loss or damage. Our aggregate liability for direct damages arising with respect to the Challenge will not exceed $25.00.
5.8. These Challenge Terms shall be governed by and construed in accordance with the laws of the Czech Republic, without regard to conflict of law principles. Any disputes shall be resolved exclusively in the courts of Prague, Czech Republic.
---
# Apify Community Code of Conduct
Effective Date: August 18, 2025
***
## Overview and Purpose
Apify community is intended to be a place for further collaboration, support, and brainstorming. This is a civilized place for connecting with other users, learning new skills, sharing feedback and ideas, and finding all the support you need for your Apify projects. By participating in the Apify community, you are agreeing to the https://docs.apify.com/legal/general-terms-and-conditions.md that apply to use of our Website and Services, as well as this Apify Community Code of Conduct. With this Apify Community Code of Conduct, we hope to help you understand how best to collaborate in the Apify community, what you can expect from moderators, and what type of actions or content may result in temporary or permanent suspension from community participation. We will investigate any abuse reports and may moderate public content within the Apify community that we determine to be in violation of either the Apify General Terms and Conditions or this Apify Community Code of Conduct. Our diverse user base brings different perspectives, ideas, and experiences, and ranges from people who created their first "Hello World" project last week to the most well-known software developers in the world. We are committed to making Apify an environment that welcomes all the different voices and perspectives our community has to offer, while maintaining a safe place for developers to do their best work.
## Pledge
In the interest of fostering an open and welcoming environment, we as contributors and maintainers pledge to making participation in the Apify community a harassment-free experience for everyone, regardless of age, body size, disability, ethnicity, gender identity and expression, level of experience, nationality, personal appearance, race, religion, or sexual identity and orientation.
## Standards
Treat the Apify community with respect. We are a shared resource, a place to share skills, knowledge, and interests through ongoing conversation. The following are not hard and fast rules, merely aids to the human judgment of our community. Use these guidelines to keep this a clean, well-lighted place for civilized public discourse.
### Best practices for maintaining a strong community
We are committed to maintaining a community where users are free to express themselves and challenge one another's ideas, both technical and otherwise. At the same time, it's important that users remain respectful and allow space for others to contribute openly. In order to foster both a safe and productive environment, we encourage our community members to look to these guidelines to inform how they interact on our platform. Below, you’ll find some suggestions for how to have successful interactions as a valued member of the Apify community.
* **Engage with consideration and respect**.
* **Be welcoming and open-minded**. - New users join our community each day. Some are well-established developers, while others are just beginning. Be open to other ideas and experience levels. Make room for opinions other than your own and be welcoming to new collaborators and those just getting started.
* **Be respectful**. - Working in a collaborative environment means disagreements may happen. But remember to criticize ideas, not people. Share thoughtful, constructive criticism and be courteous to those you interact with. If you’re unable to engage respectfully, consider taking a step back or using some of our moderation tools to deescalate a tense situation.
* **Be empathetic**. - Apify is a global community with people from a wide variety of backgrounds and perspectives, many of which may not be your own. Try to put yourself in others’ shoes and understand their feelings before you address them. Do your best to help make Apify a community where others feel safe to make contributions, participate in discussions, and share different ideas.
* **Contribute in a positive and constructive way**.
* **Improve the discussion**. Help us make this a great place for discussion by always working to improve the discussion in some way, however small. If you are not sure your post adds to the conversation, think over what you want to say and try again later. The topics discussed here matter to us, and we want you to act as if they matter to you, too. Be respectful of the topics and the people discussing them, even if you disagree with some of what is being said.
* **Be clear and stay on topic**. The Apify community is for collaboration, sharing ideas, and helping each other get stuff done. Off-topic comments are a distraction (sometimes welcome, but usually not) from getting work done and being productive. Staying on topic helps produce positive and productive discussions. This applies to sharing links, as well. Any links shared in Apify community discussions should be shared with the intent of providing relevant and appropriate information. Links should not be posted to simply drive traffic or attention to a site. Links should always be accompanied by a full explanation of the content and purpose of the link. Posting links, especially unsolicited ones, without relevant and valuable context, can come across as advertising or serving even more malicious purposes.
* **Share mindfully**. When asking others to give you feedback or collaborate on a project, only share valuable and relevant resources to provide context. Don't post links that don't add value to the discussion, and don't post unsolicited links to your own projects or sites on other user's threads. Additionally, don't share sensitive information. This includes your own email address. We don't allow the sharing of such information in Apify community, as it can create security and privacy risks for the poster, as well as other users.
* **Keep it tidy**. Make the effort to put things in the right place, so that we can spend more time discussing and less time cleaning up. So:
* Don’t start a discussion in the wrong category.
* Don’t cross-post the same thing in multiple discussions.
* Don’t post no-content replies.
* Don't "bump" posts, unless you have new and relevant information to share.
* Don’t divert a discussion by changing it midstream.
* **Be trustworthy**.
* **Always be honest**. Don’t knowingly share incorrect information or intentionally mislead other Apify community participants. If you don’t know the answer to someone’s question but still want to help, you can try helping them research or find resources instead. Apify staff will also be active in Apify community, so if you’re unsure of an answer, it’s likely a moderator will be able to help.
## What is not allowed
The https://docs.apify.com/legal/acceptable-use-policy.md, which is part of https://docs.apify.com/legal/general-terms-and-conditions.md, sets a baseline for what is not allowed on Apify. Since Apify community is on apify.com, these terms and restrictions apply to Apify community, including the following restrictions:
* **Anyone under the age of 18**. If you're under the age of 18, you may not have an account on Apify. Apify does not knowingly collect information from or direct any of our content specifically to children under 18. If we learn or have reason to suspect that you are a user who is under the age of 18, we will unfortunately have to close your user account. We don't want to discourage you from learning to code, but those are the rules. Please see Apify General Terms and Conditions for information about account termination.
* **Creating new account after account restriction**. Apify General Terms and Conditions state that "each user may create and use one user account at the most" Additional user accounts created to inquire about flagged or suspended accounts in Apify will be removed.
* **Other conduct which could reasonably be considered inappropriate in a professional setting**. Apify community is a professional space and should be treated as such.
* **Violation of General Terms and Conditions**. If your user account is identified in violation of https://docs.apify.com/legal/general-terms-and-conditions.md we will have to close your user account.
## Reasonable use of AI generated content
We love experimenting with new technologies. But as with all new technology, many of us are still getting accustomed to using generative AI tools the most effectively. Here are important guidelines to follow when using generative AI to answer questions in the community:
* Take personal responsibility for everything you post.
* Read and revise the content before you post it; use your own authentic voice.
* Use your expertise as a developer to verify that the answer works and makes sense.
* Do not just post AI-generated content verbatim to inflate your reputation or give a false impression of product expertise.
* AI tools will often answer in an authoritative tone that sounds like a tech support professional. Be careful not to mislead other users into thinking that this authoritative tone means they are receiving an official response from Apify.
Additionally, all of the guidelines listed in the previous section (Best Practices for Maintaining a Strong Community) also apply here.
The community is here for users to build trust through authentic reputations. Not adhering to these guidelines may, in some cases, constitute a Apify Community Code of Conduct violation. Refer to the enforcement section below for more information.
## Enforcement
### **What Apify community participants can do**
**If you see a problem, report it**. Moderators have special authority; they are responsible for the Apify community. But so are you. With your help, moderators can be community facilitators, not just janitors or police.
When you see bad behavior, don’t reply. It encourages bad behavior by acknowledging it, consumes your energy, and wastes everyone’s time. You can report a disruptive user or disruptive content to Apify through our contact email mailto:support@apify.com.
## **Our responsibilities**
There are a variety of actions that we may take in response to inappropriate behavior or content. It usually depends on the exact circumstances of a particular case. We recognize that sometimes people may say or do inappropriate things for any number of reasons. Perhaps they did not realize how their words would be perceived. Or maybe they just let their emotions get the best of them. Of course, sometimes, there are folks who just want to spam or cause trouble.
Each case requires a different approach, and we try to tailor our response to meet the needs of the situation. We'll review each situation on a case-by-case basis. In each case, we will have a diverse team investigate the content and surrounding facts and respond as appropriate, using this Apify Community Code of Conduct to guide our decision. Actions we may take in response to a flag or abuse report include, but are not limited to:
* Content removal
* Content blocking
* Apify user account suspension
* Apify user account termination.
Apify community moderators who do not follow or enforce the Apify Community Code of Conduct in good faith may face temporary or permanent repercussions as determined by other members of the Apify community's leadership.
## Contacting Apify Staff
If you encounter a violation of our Apify Community Code of Conduct before Apify staff sees it, please let us know right away by at-mentioning a member of our team or by sending an email to mailto:community@apify.com.
We'll review, investigate, and respond to complaints promptly and fairly, and we'll take any necessary and appropriate actions. If helpful to the community as a whole, we may post further details of specific enforcement policies, decision-making processes, or updated guidelines. We put your privacy and security first, and we'll respect the privacy of anyone who submits a report.
## Legal Notices
Yes, legalese is boring, but we must protect ourselves – and by extension, you and your data – against unfriendly folks. We have https://docs.apify.com/legal/general-terms-and-conditions.md, which include our https://docs.apify.com/legal/acceptable-use-policy.md, and our Privacy Policy describing your (and our) behavior and rights related to content, privacy, and laws. To use this service, you must agree to abide by our Terms and Conditions, Acceptable Use Policies and the Privacy Policy.
This Apify Community Code of Conduct does not modify our https://docs.apify.com/legal/general-terms-and-conditions.md and is not intended to be a complete list. Apify retains full discretion under the General Terms and Conditions to remove or restrict any content or accounts for activity that violates our policies, including because it is unlawful, offensive, threatening, libelous, defamatory, pornographic, obscene or otherwise objectionable, or violates any party's intellectual property or Apify General Terms and Conditions. This Apify Community Code of Conduct describes when we will exercise that discretion.
## Data Retention and Deletion
If you're a Apify user, you may access, update, alter, or delete your personal user profile information by editing your user profile. We will retain and use your information as necessary to comply with our legal obligations, resolve disputes, and enforce our agreements. For more information please see our https://docs.apify.com/legal/privacy-policy.md.
---
# Apify Cookie Policy
**Apify Technologies s.r.o.**, with its registered seat at Vodičkova 704/36, 110 00 Prague 1, Czech Republic, Company reg. no. 04788290, recorded in the Commercial Register kept by the Municipal Court of Prague, File No.: C 253224 ("**we**", "**us**" or the "**Provider**") welcomes you (“**you**” or the “**User**”) on our website apify.com (the “**Website**”).
This Cookie Policy (the “**Policy**” or “**Cookie Policy**”) describes the way we use cookies on our Website and on our platform on console.apify.com (the “**Platform**”). Terms starting with a capital letter used in this Policy have the meaning defined in our https://docs.apify.com/legal/general-terms-and-conditions.md (the “**Terms**”). By accessing the Website, Platform or using our Services, you acknowledge and agree to this Policy. If you do not agree to the terms of this Policy, please do not use the Website, Platform or any of our Services. Each time you use the Website, Platform or our Services, the current version of the Cookie Policy will apply.
## Cookies
When you access our Website, Platform or use our Services, we may collect information regarding your IP address for the purposes of administering the Website or Platform and tracking Website or Platform usage. However, your IP address may vary each time you visit, or it may remain the same depending on the type of Internet connection you are using or the location from which you access the Website or Platform.
We may also collect information about the websites that directed you to our Website or Platform after you clicked on a text or banner link or an ad from another website, or the day and time you visited our Website or Platform and how long you spent on the Website or Platform. We aggregate such information to help us to compile reports as to trends and other behavior about users visiting our Website. However, such information is anonymous and cannot be tied directly to you.
We may also use “cookies” and your personal information to enhance your experience on the Website, Platform and with the Services and to provide you with personalized offers. A cookie is a small data file placed on your computer's hard drive that contains information that allows us to track your activity on the Website or Platform. The cookie itself does not contain any personal information; however, if you provide us with any personal information, the cookie may act as an identifier to tie your personal information to your IP address or computer. You may choose to delete cookies from your computer's hard drive at any time or to disable cookies on your computer. If you delete cookies that relate to the Website, we may not be able to identify you upon your return to the Website. Additionally, if you disable your computer's cookies, you may not be able to access certain features of the Website, Platform or Services that require that cookies be enabled.
The Website's or Platform's cookies cannot be used to read data from your hard drive and cannot retrieve information from any other cookies created by other websites. Additionally, our cookies cannot be used as a virus, Trojan horse, worm, or any other malicious tool that could impair your use of your computer. Our cookies are used to help us better understand how you and other users use the Website or Platform, so we can continue to provide a better, more personalized user experience on the Website. We also share website usage information about our Website or Platform with those interested in running targeted promotional campaigns on the Website. For this purpose, we and our advertisers track some of the pages that you visit on the Website through the use of pixel tags (also called clear gifs).
## What types of cookies do we use?
### Strictly Necessary Cookies
These cookies are necessary for the website to function and cannot be switched off in our systems. They are usually only set in response to actions made by you which amount to a request for services, such as setting your privacy preferences, logging in or filling in forms. You can set your browser to block or alert you about these cookies, but some parts of the site will not then work. These cookies do not store any personally identifiable information.
### Performance Cookies
These cookies allow us to count visits and traffic sources, so we can measure and improve the performance of our site. They help us to know which pages are the most and least popular and see how visitors move around the site. All information these cookies collect is aggregated and therefore anonymous. If you do not allow these cookies, we will not know when you have visited our site, and will not be able to monitor its performance.
### Functional Cookies
These cookies enable the website to provide enhanced functionality and personalisation. They may be set by us or by third party providers whose services we have added to our pages. If you do not allow these cookies then some or all of these services may not function properly.
### Targeting Cookies
These cookies may be set through our site by our advertising partners. They may be used by those companies to build a profile of your interests and show you relevant adverts on other sites. They do not store directly personal information, but are based on uniquely identifying your browser and internet device. If you do not allow these cookies, you will experience less targeted advertising.
## How long do cookies last?
None of our cookies last forever. You can always choose to delete cookies from your computer at any time. Even if you do not delete them yourself, our cookies are set to expire automatically after some time. Some cookies will be deleted as soon as you close your browser (so-called “session cookies”), some cookies will stay on your device until you delete them or they expire (so called “persistent cookies”). You can see from the table below the lifespan of each type of cookie that we use; session cookies are those marked with 0 days' expiration, all other cookies are persistent, and you can see the number of days they last before they automatically expire. The expiration periods work on a rolling basis, i.e., each time you visit our website again, the period restarts.
| Cookie name | Cookie description | Type | Expiration (in days) |
| ---------------------------------------- | ---------------------------------------------------------------------------------------------------------------------------------------------------------------------------------------------------------------------------------------------------------------------------------------------------------------------------------------------------------------------------------------------------------------------------------------------------------------------------------------------------------------------------------------------------- | ------------------ | -------------------- |
| AWSALB | AWS ELB application load balancer | Strictly necessary | 6 |
| OptanonConsent | This cookie is set by the cookie compliance solution from OneTrust. It stores information about the categories of cookies the site uses and whether visitors have given or withdrawn consent for the use of each category. This enables site owners to prevent cookies in each category from being set in the user's browser, when consent is not given. The cookie has a normal lifespan of one year, so that returning visitors to the site will have their preferences remembered. It contains no information that can identify the site visitor. | Strictly necessary | 364 |
| AWSALBCORS | This cookie is managed by AWS and is used for load balancing. | Strictly necessary | 6 |
| ApifyProdUserId | This cookie is created by Apify after a user signs into their account and is used across Apify domains to identify if the user is signed in. | Strictly necessary | 0 |
| ApifyProdUser | This cookie is created by Apify after a user signs into their account and is used across Apify domains to identify if the user is signed in. | Strictly necessary | 0 |
| intercom-id-kod1r788 | This cookie is used by Intercom service to identify user sessions for customer support chat. | Strictly necessary | 270 |
| intercom-session-kod1r788 | This cookie is used by Intercom service to identify user sessions for customer support chat. | Strictly necessary | 6 |
| \_gaexp\_rc | \_ga | Performance | 0 |
| \_hjTLDTest | When the Hotjar script executes we try to determine the most generic cookie path we should use, instead of the page hostname. This is done so that cookies can be shared across subdomains (where applicable). To determine this, we try to store the \_hjTLDTest cookie for different URL substring alternatives until it fails. After this check, the cookie is removed. | Performance | 0 |
| \_hjSessionUser\_1441872 | Hotjar cookie that is set when a user first lands on a page with the Hotjar script. It is used to persist the Hotjar User ID, unique to that site on the browser. This ensures that behavior in subsequent visits to the same site will be attributed to the same user ID. | Performance | 364 |
| \_hjIncludedInPageviewSample | This cookie is set to let Hotjar know whether that visitor is included in the data sampling defined by your site's pageview limit. | Performance | 0 |
| \_ga | This cookie name is associated with Google Universal Analytics - which is a significant update to Google's more commonly used analytics service. This cookie is used to distinguish unique users by assigning a randomly generated number as a client identifier. It is included in each page request in a site and used to calculate visitor, session and campaign data for the sites analytics reports. By default it is set to expire after 2 years, although this is customisable by website owners. \_ga | Performance | 729 |
| \_ga\_F50Z86TBGX | \_ga | Performance | 729 |
| \_hjIncludedInSessionSample | This cookie is set to let Hotjar know whether that visitor is included in the data sampling defined by your site's daily session limit. | Performance | 0 |
| \_hjFirstSeen | Identifies a new user's first session on a website, indicating whether or not Hotjar's seeing this user for the first time. | Performance | 0 |
| \_gclxxxx | Google conversion tracking cookie | Performance | 89 |
| \_hjAbsoluteSessionInProgress | This cookie is used by HotJar to detect the first pageview session of a user. This is a True/False flag set by the cookie. | Performance | 0 |
| \_\_hssc | This cookie name is associated with websites built on the HubSpot platform. It is reported by them as being used for website analytics. | Performance | 0 |
| \_gaexp | Used to determine a user's inclusion in an experiment and the expiry of experiments a user has been included in.\_ga | Performance | 43 |
| \_hjIncludedInPageviewSample | This cookie is set to let Hotjar know whether that visitor is included in the data sampling defined by your site's pageview limit. | Performance | 0 |
| \_gat\_UA-nnnnnnn-nn | This is a pattern type cookie set by Google Analytics, where the pattern element on the name contains the unique identity number of the account or website it relates to. It appears to be a variation of the \_gat cookie which is used to limit the amount of data recorded by Google on high traffic volume websites. | Performance | 0 |
| \_\_hstc | This cookie name is associated with websites built on the HubSpot platform. It is reported by them as being used for website analytics. | Performance | 389 |
| \_hjIncludedInSessionSample | This cookie is set to let Hotjar know whether that visitor is included in the data sampling defined by your site's daily session limit. | Performance | 0 |
| \_hjSession\_1441872 | A cookie that holds the current session data. This ensures that subsequent requests within the session window will be attributed to the same Hotjar session. | Performance | 0 |
| \_gid | This cookie name is associated with Google Universal Analytics. This appears to be a new cookie and as of Spring 2017 no information is available from Google. It appears to store and update a unique value for each page visited.\_gid | Performance | 0 |
| \_gat | This cookie name is associated with Google Universal Analytics, according to documentation it is used to throttle the request rate - limiting the collection of data on high traffic sites. It expires after 10 minutes.\_ga | Performance | 0 |
| \_\_hssrc | This cookie name is associated with websites built on the HubSpot platform. It is reported by them as being used for website analytics. | Performance | 0 |
| ApifyAcqRef | This cookie is used by Apify to identify from which website the user came to Apify. | Performance | 364 |
| ApifyAcqSrc | This cookie is used by Apify to identify from which website the user came to Apify. | Performance | 364 |
| hubspotutk | This cookie name is associated with websites built on the HubSpot platform. HubSpot report that its purpose is user authentication. As a persistent rather than a session cookie it cannot be classified as Strictly Necessary. | Functional | 389 |
| \_ALGOLIA | This cookie name is associated with websites built on the HubSpot platform. HubSpot report that its purpose is user authentication. As a persistent rather than a session cookie it cannot be classified as Strictly Necessary. | Functional | 179 |
| kvcd | Social Media sharing tracking cookie. | Targeting | 0 |
| \_gat\_gtag\_xxxxxxxxxxxxxxxxxxxxxxxxxxx | Google Analytics | Targeting | 0 |
| km\_vs | Social Media sharing tracking cookie. | Targeting | 0 |
*\*Please note that the table serves for general information purposes. The information included in it may change over time and the table may be updated from time to time accordingly.*
---
# Apify Data Processing Addendum
Last Updated: January 13, 2025
***
*If you wish to execute this DPA, continue https://eform.pandadoc.com/?eform=5344745e-5f8e-44eb-bcbd-1a2f45dbd692 and follow instructions in the PandaDoc form.*
***
This Apify Data Processing Addendum ("**DPA**") forms part of the Apify General Terms of Service and/or the Master Service Agreement ("**Agreement**") between Apify Technologies s.r.o. ("**Apify**") and Customer identified in the Agreement (referred to as the "**Parties**" or individually as the "**Party**"), and sets forth the Parties' obligations with respect to the Processing of Personal Data (definitions below).
## 1. Definitions
All capitalized terms not otherwise defined herein shall have the meaning set forth in the Agreement or the Data Protection Law, as applicable. In the event of a conflict between the terms of the Agreement and this DPA, the DPA will prevail.
1.1. "**Data Protection Law**" means all applicable laws, regulations, and other legally binding requirements in any jurisdiction relating to privacy, data protection, data security, breach notification, or the Processing of Personal Data, including, to the extent applicable, the General Data Protection Regulation, Regulation (EU) 2016/679 ("**GDPR**"), the United Kingdom Data Protection Act of 2018 ("**UK Privacy Act**"), the California Consumer Privacy Act, Cal. Civ. Code § 1798.100 et seq. and associated amendments and regulations thereto ("**CCPA**"). For the avoidance of any doubt, if Apify's Processing activities involving Personal Data are not within the scope of a given Data Protection Law, such law is not applicable for purposes of this DPA.
1.2. "**EU SCCs**" means the Standard Contractual Clauses issued pursuant to Commission Implementing Decision (EU) 2021/914 of 4 June 2021 on standard contractual clauses for the transfer of personal data to third countries pursuant to Regulation (EU) 2016/679 of the European Parliament and of the Council (available as of the DPA effective date at https://eur-lex.europa.eu/eli/dec_impl/2021/914/oj or any subsequent link published by the competent EU authorities).
1.3. "**Personal Data**" includes "personal data," "personal information," "personally identifiable information," and similar terms, and such terms will have the same meaning as defined by applicable Data Protection Laws, that are Processed by Apify on behalf of Customer in the course of providing Apify Platform and other Services under the Agreement.
1.4. "**UK Addendum**" means the International Data Transfer Addendum to the EU Commission Standard Contractual Clauses, as published by the UK Information Commissioner's Office and in force as of 21 March 2022.
## 2. Roles and Details of Processing
2.1. **Customer as a Controller**
2.1.1. Under this DPA, Customer acts as a Controller or Processor (as applicable) of Personal Data and Apify will act as a (Sub)Processor or Service Provider (as defined in and as applicable under the Data Protection Laws) and will Process Personal Data in connection with the Apify Platform and other Services solely to fulfill Apify obligations to Customer under the Agreement, including this DPA; on Customer's behalf, pursuant to Customer's documented instructions; and in compliance with applicable Data Protection Laws ("**Permitted Purpose**").
2.1.2. The scope, nature, purposes, and duration of the Processing, the types of Personal Data Processed, and the Data Subjects concerned are set forth in this DPA, including without limitation Schedule C to this DPA.
2.1.3. It is Customer's responsibility to ensure that Customer's instructions comply with Data Protection Laws. Apify is not responsible for determining what laws or regulations apply to Customer's business, or for determining whether Apify Platform or other Services meet the requirements of such laws. Customer will ensure that Processing Personal Data in accordance with its instructions will not cause Apify to violate any law or regulation, including Data Protection Laws.
2.1.4. Unless Parties mutually agree otherwise in writing, Customer shall not provide Apify any Personal Data for Processing that is subject to strict privacy regimes outside of the scope of this DPA, including but not limited to Family Educational Rights and Privacy Act, 20 U.S.C. § 1232g (FERPA), relating to criminal convictions and offenses or Personal Data collected or otherwise Processed by Customer subject to or in connection with FBI Criminal Justice Information Services or the related Security Policy; constituting protected health information subject to the Health Insurance Portability and Accountability Act of 1996 (HIPAA) or data subject to Payment Card Industry Data Security Standard (PCI-DSS).
2.2. **Apify as an Independent Controller**. Apify Processes some Personal Data as an independent Controller. Apify conducts such Processing outside of the scope of this DPA, however, in compliance with Data Protection Laws, and in a manner consistent with the purposes outlined in the https://docs.apify.com/legal/privacy-policy. Those exhaustive purposes are restated here for transparency and convenience:
2.2.1. user accounts provisioning, management and removal, customer support; account, billing, and customer relationship management and related customer correspondence;
2.2.2. complying with and resolving legal obligations, including responding to Data Subject requests for Personal Data Processed by Apify as Controller (for example, website data), tax requirements, agreements, and disputes;
2.2.3. abuse detection, prevention, and protection, and scanning to detect violations of Apify Terms and Conditions and,
2.2.4. creating aggregated statistical data for internal reporting, financial reporting, revenue planning, capacity planning, and forecast modeling (including product strategy).
## 3. Confidentiality of Processing
3.1. Apify shall ensure that any person it authorizes to Process the Personal Data (including Apify affiliates and their staff, agents, and subcontractors) (an "**Authorized Person**") shall be subject to a strict duty of confidentiality (whether a contractual duty or a statutory duty), and shall not permit any person to Process the Personal Data who is not under such a duty of confidentiality.
3.2. Apify shall ensure that only Authorized Persons will Process the Personal Data, and that such Processing shall be limited to the extent necessary to achieve the Permitted Purpose. Apify accepts responsibility for any breach of this DPA caused by the act, error or omission of an Authorized Person.
## 4. Security Measures
4.1. Apify has adopted a variety of administrative, technical, physical, and organizational measures designed to protect the Apify Platform against accidental or unlawful destruction, loss, alteration, disclosure or access (collectively the "**Security Measures**").
4.2. Apify will maintain its Security Measures to provide a level of protection that is appropriate to the risks concerning confidentiality, integrity, availability, and resilience of our systems and the Apify Platform while also taking into account the state of the art, implementation costs, the nature, scope, and purposes of Processing, as well as the probability of occurrence and the severity of the risk to the rights and freedoms of Data Subjects. Apify Security Measures are described in Schedule D.
## 5. Security Incidents
5.1. Apify will notify Customer without undue delay (and in any event within 72 hours) of any known breach of security leading to the accidental or unlawful destruction, loss, alteration, unauthorized disclosure of, or access to, Personal Data Processed by Apify on Customer's behalf (a "**Security Incident**"). For clarity, the term Security Incident always excludes (a) unsuccessful attempts to penetrate computer networks or servers maintained by or for Apify; and (b) immaterial incidents that occur on a routine basis, such as security scans, brute-force attempts or "denial of service" attacks.
5.2. Apify will also provide reasonable assistance to Customer in its compliance with Customer's Security Incident-related obligations, including without limitation by:
5.2.1. taking steps to mitigate the effects of the Security Incident and reduce the risk to Data Subjects whose Personal Data was involved (such steps to be determined by Apify in its sole discretion); and
5.2.2. providing Customer with the following information, to the extent known:
(i) the nature of the Security Incident, including, where possible, how the Security Incident occurred, the categories and approximate number of Data Subjects concerned, and the categories and approximate number of Personal Data records concerned;
(ii) the likely consequences of the Security Incident; and
(iii) the measures we have taken or propose to take to address the Security Incident, including where appropriate measures to mitigate its possible adverse effects. Where, and in so far as, it is not possible to provide all information at the same time, the initial notification will contain the information then available and further information will, as it becomes available, subsequently be provided without undue delay.
5.3. Apify's notification of or response to a Security Incident under this Section is not an acknowledgement of any fault or liability.
5.4. Customer is solely responsible for complying with its obligations under any incident notification laws. Customer must notify Apify promptly about any possible misuse of its user accounts or authentication credentials, or any Security Incident related to Apify Platform or other Services provided by Apify under the Agreement.
## 6. Subprocessors
6.1. Customer authorizes Apify to engage third parties to Process Personal Data ("**Subprocessors**") listed in Schedule E ("**Apify Subprocessor(s)**"), provided that Apify provides at least ten (10) days' prior written notice of the addition of any Subprocessor (including the categories of Personal Data Processed, details of the Processing it performs or will perform, and the location of such Processing) by means of a notice on the Apify Subprocessors website.
6.2. Apify encourages Customer to periodically review the Apify Subprocessors website for the latest information on Apify Subprocessors, and especially before Customer provides Apify with any Personal Data. The Apify Subprocessors website contains a mechanism to subscribe to notifications of updates to the Subprocessor list, and Apify will provide details of any such changes solely via this subscription mechanism. Customer has the opportunity to object to such changes within ten (10) days after written notification. Suppose Customer objects to Apify's appointment of a new Subprocessor on reasonable grounds relating to the protection of its Personal Data. In that case, the Parties will promptly confer and discuss alternative arrangements to enable Apify to continue Processing of Personal Data.
6.3. In all cases, Apify shall impose in writing the same data protection obligations on any Subprocessor it appoints as those provided for by this DPA and Apify shall remain liable for any breach of this DPA that is caused by an act, error or omission of its Subprocessor to the extent it is liable for its own acts and omissions under the Agreement.
## 7. International Data Transfers
7.1. Customer appoints Apify to transfer Personal Data to the United States or any other country in which Apify or its Subprocessors operate as specified hereunder, and to store and Process Personal Data for Permitted Purpose, subject to the safeguards below and described elsewhere in this DPA.
7.2. Where Apify engages in an onward transfer of Personal Data, Apify shall ensure that, where legally required, a lawful data transfer mechanism is in place prior to transferring Personal Data from one country to another.
7.3. To the extent legally required, the EU SCCs form part of this DPA and will be deemed completed as set forth in Schedule A. In the event of a conflict between the terms of the EU SCCs and this DPA, the EU SCCs will prevail.
7.4. If, as a Controller, the Customer is situated in the United Kingdom (UK), the EU SCCs shall apply together with the UK Addendum to the SCCs, as specified in Schedule A, in relation to the transfer of Personal Data from the United Kingdom and shall be incorporated in this DPA.
## 8. Auditing Compliance
8.1. Upon Customer's written request, and no more than once per twelve (12) calendar months, Apify will provide Customer with its most recent security review reports and/or applicable certifications for the Apify Platform and provide reasonable assistance and information to Customer to understand the information in such reports.
8.2. If Customer has a reasonable objection that the information provided is not sufficient to demonstrate Apify compliance with this DPA, Customer may conduct an audit, or select a mutually-agreed upon third-party to conduct an audit, of Apify practices related to Processing Personal Data in compliance with this DPA, at Customer's sole expense (an "**Audit**"). General compliance Audits shall occur not more than once every twelve (12) calendar months.
8.3. To the extent you use a third-party representative to conduct the Audit, Customer will ensure that such third-party representative is bound by obligations of confidentiality no less protective than those contained in this DPA and the Agreement. Customer will provide Apify with at least thirty (30) days prior written notice of its intention to conduct an Audit. Before any Audit, the Parties will mutually agree upon the scope, timing, and duration of the Audit, as well as the Apify reimbursement rate for which Customer will be responsible. All reimbursement rates will be reasonable, taking into account the resources expended by or on behalf of Apify.
8.4. Customer and its third-party representatives will conduct Audits:
(i) acting reasonably, in good faith, and in a proportional manner, taking into account the nature and complexity of the Apify Platform; and
(ii) in a manner that will result in minimal disruption to Apify's business operations and during Apify's regular business hours.
Neither Customer nor its third-party representatives will be entitled to receive data or information of other Apify customers or any other Apify Confidential Information that is not directly relevant for the authorized purposes of the Audit in accordance with this provision.
8.5. Customer will promptly provide Apify with the Audit results upon completion of the Audit. All Audit related materials will be considered "Confidential Information" subject to the confidentiality provisions of the Agreement.
## 9. Personal Data Retention; Return and Destruction
9.1. Apify will retain Personal Data in accordance with its standard data retention policies and procedures. Customer shall ensure to retrieve all Personal Data before termination or expiration of the Agreement. If Customer deletes its user account or following the termination of Agreement, Apify will have no obligation to maintain or provide Customer with copies of its Personal Data.
9.2. Except to the extent required otherwise by Data Protection Laws, Apify will, at Customer's choice and upon its written request, return to Customer or securely destroy all Personal Data upon such request or at termination or expiration of the Agreement. Apify will provide Customer with a certificate of destruction only upon Customer's written request. In case of local laws applicable to Apify that prohibit the return or deletion of Personal Data, Apify warrants that it will continue to ensure compliance with this DPA and will only Process the Personal Data to the extent and for as long as required under such local laws.
## 10. Data Subject Requests
10.1. If Apify receives any requests from Data Subjects seeking to exercise any rights afforded to them under Data Protection Laws regarding their Personal Data, and to the extent legally permitted, will promptly notify Customer or refer the Data Subjects to Customer for handling. Such requests related to Personal Data may include: access, rectification, restriction of Processing, erasure ("right to be forgotten"), data portability, objection to the Processing, or to not be subject to automated individual decision making (each, a "**Data Subject Request**").
10.2. Apify will not respond to such Data Subject Requests itself, and Customer authorizes Apify to redirect the Data Subject Request as necessary to Customer for handling. If Customer is unable to directly respond to a Data Subject Request made by a Data Subject itself, Apify will, upon your request, provide commercially reasonable efforts to assist Customer in responding to the Data Subject Request, to the extent Apify is legally permitted to do so and the response to such Data Subject Request is required under Data Protection Laws.
10.3. To the extent legally permitted, Customer will be responsible for any costs arising from Apify's provision of this additional support to assist Customer with a Data Subject Request.
## 11. Data Protection Impact Assessment
11.1. Apify will provide reasonable assistance to and cooperation with the other party for their performance of a data protection impact assessment or privacy impact assessment of Processing or proposed Processing activities, when required by applicable Data Protection Laws.
## 12. General Cooperation to Remediate
12.1. If Apify believes or becomes aware that (i) its Processing of the Personal Data is likely to result in a high risk to the data protection rights and freedoms of Data Subjects; (ii) it can no longer meet its obligations under this DPA or applicable Data Protection Laws; or (iii) in its opinion an instruction from Customer infringes applicable Data Protection Laws; it shall promptly inform Customer of the same and await Customer's further instructions. Apify shall, taking into account the nature of Processing and the information available to Apify, provide Customer with all such reasonable and timely assistance as Customer may require in order to conduct a data protection impact assessment, and, if necessary, to consult with its relevant data protection authority.
12.2. Each Party shall promptly notify the other Party of any proceedings, in particular administrative or court proceedings, relating to Personal Data Processing hereunder, and of any administrative decision or judgment concerning the Processing of that Personal Data, as well as of any inspections pertaining to Personal Data Processing.
12.3. In the event that Data Protection Law, or a data protection authority or regulator, provides that the transfer or Processing of Personal Data under this DPA is no longer lawful or otherwise permitted, then the Parties shall agree to remediate the Processing (by amendment to this DPA or otherwise) in order to meet the necessary standards or requirements.
## 13. Representations and Warranties; Liability
13.1. Customer represents and warrants that it is authorized to enter into this DPA, issue instructions, and make and receive any communications or notifications in relation to this DPA on behalf of Customer Affiliates. Customer further represents and guarantees that it has acquired all necessary consents from the Data Subjects for the Processing of their Personal Data or is subject to any other lawful basis under the applicable Data Protection Laws. Customer is fully responsible for compliance of the instructions, requests and recommendations issued to Apify with the Permitted Purpose of the Processing and any applicable Data Protection Laws.
13.2. Each Party represents, warrants, and covenants that it understands and will comply with the restrictions and obligations set forth in this DPA. Each Party further represents, warrants, and covenants that it will comply with all Data Protection Laws applicable to such Party in its role as Data Controller, Business, Data Processor, Service Provider, or Subprocessor (as applicable under Data Protection Laws).
13.3. Customer agrees to indemnify and hold Apify harmless against all claims, actions, third-party claims, losses, damages and expenses incurred by Apify in its capacity as Processor of the Personal Data of the Customer arising from (i) any Security Incident in terms of this Agreement if such Security Incident was caused by the Customer or (ii) any negligent act or omission by Customer in the exercise of the rights granted to it under the Privacy Protection Law and arising directly or indirectly out of or in connection with a breach of this DPA.
13.4. Except for Customer's indemnification obligations hereunder, each Party’s liability arising out of or related to this DPA is subject to the liability limitation provisions of the Agreement, and any reference in such section to the liability of a Party means the aggregate liability of that Party under the Agreement and this DPA together.
## 14. Final Provisions
14.1. This DPA is effective from the date of its execution or from the Effective Date of the Agreement, which incorporates the DPA. The obligations placed upon Apify under this DPA shall survive so long as Apify and/or its Subprocessors Process Personal Data as described herein and/or under the terms of the Agreement.
14.2. Apify may update this DPA from time to time as laws, regulations, and industry standards evolve, or as Apify makes changes to its business or the Apify Platform.
14.3. If Apify makes changes that materially change the Parties’ rights or obligations under this DPA, Apify will provide additional notice in accordance with applicable legal requirements, such as via our website or through the Apify Platform. By continuing to access and use the Apify Platform and other Services after the "last updated" date of the revised DPA, Customer agrees to be bound by the revised DPA.
14.4. If any provision hereof is deemed to be invalid or unenforceable for any reason, all other provisions shall remain in force and the Parties shall be obliged to replace such invalid (unenforceable) provisions at the request of either Party with a provision which is valid and the economic effect of which is as close as possible to the economic effect of the replaced provision.
**Schedules**: Schedule A: EU SCCs & UK Addendum Schedule B: CCPA Additional Terms Schedule C: Details of Processing Schedule D: Security Measures Schedule E: List of Apify Subprocessors
## Schedule A: EU SCCs and UK Addendum
Article 46 of the GDPR requires that a Processor that transfers data outside of the EEA to a non-adequate country must utilize a safeguard.
Therefore, where: (a) Customer is not established in the EU and Personal Data Processing by Customer is not subject to GDPR (pursuant to Article 3(2) thereof); and (b) GDPR applies to international data transfer from EEA to countries outside the EEA (where Apify is involved in Processing data within the EEA on behalf of Customer); and (c) an international transfer of Personal Data cannot take place on the basis of an adequacy decision pursuant to Art 45 (3) GDPR;
Parties will comply with the obligations in the EU SCCs, which shall form an integral part of this Addendum. Any undefined capitalized terms used in this Schedule A have the meanings assigned to such terms in the EU SCCs.
For the purposes of EU Standard Contractual Clauses: 1.1. Module Four of the EU SCCs will apply. 1.2. The docking option under Clause 7 (Optional - Docking Clause) will not apply. 1.3. Clause 17 (Governing law) shall be completed as follows: "These Clauses shall be governed by the law of a country allowing for third-party beneficiary rights. The Parties agree that this shall be the law of the Czech Republic." 1.4. Clause 18 (Choice of forum and jurisdiction), shall be completed as follows: "Any dispute arising from these Clauses shall be resolved by the courts of the Czech Republic."
### Annex I(A): List of Parties
Data exporter: Name: Apify Technologies s.r.o. Address: Vodičkova 704/36, Nové Město, 110 00 Praha 1 Contact person’s name, position and contact details: Apify Privacy Team, privacy\[at]apify\[dot]com Activities relevant to the data transferred under these Clauses: Processing necessary to provide the Apify Platform and other Services by Apify to Customer and for any disclosures of Personal Data in accordance with the Agreement. Role: Processor or Subprocessor, as applicable
Data importer: Name: Customer's name identified in the Agreement Address: Customer's address as provided in the Agreement Contact person’s name, position and contact details: As provided in Customer's user account at Apify Platform Activities relevant to the data transferred under these Clauses: Processing necessary to provide the Apify Platform and other Services by Apify to Customer and for any disclosures of Personal Data in accordance with the Agreement. Role: Controller or Processor, as applicable Annex I(B): Description of Processing & Transfer As provided in Schedule C to this DPA.
### UK Addendum
In relation to Personal Data that is protected by the UK GDPR, the UK Addendum will apply, completed as follows: The Module 4 of the EU SCCs shall also apply to transfers of such Personal Data, subject to sub-section (b) below; Tables 1 to 3 of the UK Addendum shall be deemed completed with relevant information from the EU SCCs,completed as set out in Schedule A of this DPA, and the option "neither party" shall be deemed checked in Table 4; and, The start date of the UK Addendum (as set out in Table 1) shall be the date of this DPA.
## Schedule B: CCPA Additional Terms
If and to the extent Apify is Processing Personal Data within the scope of the CCPA on Customer's behalf and in accordance with Customer's documented instructions, Apify will not: (a) sell the Personal Data as the term "selling" is defined in the CCPA; (b) share, rent, release, disclose, disseminate, make available, transfer, or otherwise communicate orally, in writing, or by electronic or other means, the Personal Data to a third party for cross-context behavioral advertising, whether or not for monetary or other valuable consideration, including transactions for cross-context behavioral advertising in which no money is exchanged; (c) retain, use, or disclose the Personal Data for any purpose other than for the business purposes specified in this DPA and the Agreement, or as otherwise permitted by the CCPA; (d) retain, use, or disclose the Personal Data outside of the direct business relationship with Customer; or (e) combine the Personal Data with personal information that it receives from or on behalf of a third party or collects from California residents, except that Apify may combine Personal Data to perform any business purpose as permitted by the CCPA or any regulations adopted or issued under the CCPA.
The Parties acknowledge and agree that the exchange of Personal Data between them does not constitute a "sale" of Personal Data under the CCPA and does not form part of any monetary or other valuable consideration exchanged between them with respect to the Agreement or this DPA.
## Schedule C: Details of Processing
### Categories of Data Subjects
Data Subjects may be any individuals about which Customer collects and instructs Apify to Process Personal Data, including its prospects, customers, vendors, employees, contact persons, website users, etc.
### Categories of Personal Data
Categories of Personal Data collected are solely at Customer's own discretion, resulting from Customer's use of Apify Platform and other Services, and may include name, title, contact details, ID data, professional or personal life data, connection data, localization data, etc.
### Sensitive Data Transferred
Customer agrees not to transfer sensitive data without informing Apify. Transfer of sensitive data, if applicable and agreed upon in the Agreement, is done subject to additional safeguards that fully take into account the nature of such data and risks involved.
### Frequency of the Transfer
Continuous during the term of the DPA.
### Nature of Processing
The nature of processing is storage and retrieval of Personal Data relating to the provision of Apify Platform and other Services by Apify to Customer.
### Purpose of Processing
As specified in Section 2.1.1. of the DPA above.
### The period for which the personal data will be retained, or, if that is not possible, the criteria used to determine that period
As described in Section 9 of the DPA.
### For transfers to (sub-) Processors, also specify subject matter, nature and duration of the processing
The Personal Data are transferred to further Subprocessors for the purposes of provision of infrastructure and/or software as a service in relation to the Permitted Purpose, for as long as needed in order to deliver the functionality.
## Schedule D: Security Measures
Apify shall implement appropriate technical and organizational measures in accordance with Data Protection Laws to ensure a level of security appropriate to the risk, which may include as appropriate:
(a) the encryption of personal data; (b) the ability to ensure the ongoing confidentiality, integrity, availability and resilience of Processing systems and services; (c) the ability to restore the availability and access to personal data in a timely manner in the event of a physical or technical incident; (d) a process for regularly testing, accessing and evaluating the effectiveness of technical and organizational measures for ensuring the security of the Processing.
## Schedule E: List of Apify Subprocessors
List of Apify Subprocessor is available at: https://trust.apify.com/subprocessors
---
# Apify Event Terms and Conditions
Effective date: November 3, 2025
These Event Terms and Conditions ("**Terms**") apply to all Events organized or co-organized by Apify Technologies s.r.o., a company registered in the Czech Republic, with its registered office at Vodičkova 704/36, 110 00 Prague 1, Czech Republic, Company ID No.: 04788290 ("**Apify**", "**we**", "**us**"), whether in-person, hybrid, or online ("**Events**").
**By registering for, or participating in, any Event, you agree to these Terms. If you disagree with these Terms, please do not register or attend any Event.**
## 1. Event Information
1.1. Event details — including name, date, time, format, location (if applicable), registration process, and fees (if applicable) — will be specified on the Event registration page or ticketing portal (e.g., Lu.ma, Eventbrite, etc.).
1.2. You agree to comply with all applicable terms and conditions or codes of conduct set by any third-party platform or venue used to host the Event. If these Terms differ from the specific Event details, the Event-specific information prevails for that Event only.
## 2. Registration and Attendance
2.1. Registration is required unless stated otherwise. You must provide accurate and complete information when registering.
2.2. We reserve the right to limit attendance capacity or close registration once the capacity is reached.
2.3. Tickets or registrations are personal unless explicitly stated as transferable.
## 3. Payments
3.1. Where applicable, Event fees are payable at registration through the platform indicated. Unless stated otherwise, Event fees are non-cancellable and non-refundable.
## 4. Event Changes and Cancellations
4.1. We reserve the right to modify the Event program, speakers, timing, or venue, or switch to an online or hybrid format if necessary due to organizational or external circumstances. We reserve the right to cancel the Event at any time. In such a case, any paid registration fees will be fully refunded. However, Apify will not be liable for changes or cancellations caused by circumstances beyond its reasonable control, including but not limited to natural disasters, pandemics, governmental restrictions, or technical outages.
4.2. We are not responsible for any services provided by third parties (including, but not limited to, accommodations, transportation, or catering), even if recommended or facilitated by us.
## 5. Conduct and Compliance
5.1. We are committed to providing a welcoming and safe environment for all attendees.
5.2. Similarly, you are responsible for:
(i) Treating others with respect and professionalism. (ii) Following instructions and safety rules provided by Apify or venue staff. (iii) Adhering to the https://docs.apify.com/legal/community-code-of-conduct, as applicable. (iv) Your compliance with applicable laws and regulations.
5.3. We reserve the right to deny entry or remove any attendee without refund if their behavior is inappropriate, disruptive, or violates these Terms or the rules of any given Event.
## 6. Liability
6.1. You are responsible for any damage you cause to property, equipment, or injury to other participants. Apify accepts no responsibility for loss or theft of personal belongings during the Event.
6.2. Apify is not liable for damages caused by other attendees, third parties, or force majeure events (including but not limited to natural disasters, pandemics, or government restrictions).
6.3. Apify makes no warranties or representations regarding the information or content presented by speakers or other third parties at the Event. All materials are provided on an “as-is” basis. Apify’s maximum aggregate liability to any attendee in connection with the Event shall not exceed the amount of the registration fee paid by that attendee.
## 7. Privacy
7.1. Personal data collected during registration or participation will be processed in accordance with the https://docs.apify.com/legal/privacy-policy. We process this data to manage Event participation, communication, and feedback, and may use third-party service providers (such as event platforms) as processors.
7.2. We may take photographs, videos, or recordings during the Event for documentation, reporting, and promotional purposes, which may be shared publicly (e.g., on websites or social media). If you do not wish to appear in such materials, please notify us in writing before the Event. We will make reasonable efforts to accommodate your request.
## 8. Miscellaneous
8.1. Apify may update these Terms from time to time. The latest version will always be published at docs.apify.com/legal/event-terms-and-conditions. The version in effect at the time of registration applies to your participation.
8.2. These Terms are governed by the laws of the Czech Republic. Any disputes arising from or relating to these Terms shall be submitted to the exclusive jurisdiction of the Czech courts.
---
# Apify Open Source Fair Share Program Terms and Conditions
You are reading terms and conditions that are no longer effective.
Effective Date: February 14, 2025
***
We offer you the opportunity to enroll in our Apify Open Source Fair Share Program ("**Fair Share Program**"), which is subject to the following Apify Open Source Fair Share Program Terms and Conditions ("**Fair Share Program Terms**"). Fair Share Program is further governed by the https://docs.apify.com/legal/affiliate-program-terms-and-conditions.md and, to the extent applicable, by https://docs.apify.com/legal/store-publishing-terms-and-conditions.md which are both incorporated herein by the reference. In case of a conflict, these Apify Fair Share Program Terms shall prevail.
Terms starting with a capital letter used in these Fair Share Program Terms have the meaning defined either here or in the Affiliate Program Terms and Conditions.
## 1. Eligibility
The Fair Share Program is open to maintainers of GitHub repositories with projects suitable for web automation, data extraction, or related purposes (“**you**” or "**Participant**"). Participation is subject to review and approval by Apify.
## 2. Tiers
The Fair Share Program offers three different tiers, each with varying levels of involvement and benefits:
### 2.1. Passive Tier
2.1.1. **Joining Passive Tier**. You can join the Passive Tier only by accepting a pull request from Apify for your GitHub repository. To participate, your GitHub repository must have the GitHub Sponsor button enabled. Participants in the Passive Tier will not have access to the FirstPromoter account and, therefore, will not have visibility into the traffic or detailed performance metrics.
2.1.2. **Commission**. Notwithstanding anything to the contrary in Section 4.1. of the Affiliate Program Terms, the Commission shall be calculated as 10% of all payments made by each Referred Customer to Apify in the first 3 months from the date when that Referred Customer started paying for Services (as defined in the General Terms) and then increased to 20% for all payments made by each Referred Customer to Apify, up to 2,500 USD per Referred Customer.
2.1.3. **Payment Terms**. Notwithstanding anything to the contrary in Sections 5.2. and 5.3, Commission for Referred Customers in the Passive Tier is paid monthly, exclusively via the GitHub Sponsor button.
### 2.2. Maintainer Tier
2.2.1. **Joining Maintainer Tier**. To join the Maintainer Tier, you must first: (i) https://apify.firstpromoter.com/signup/28997, (ii) https://console.apify.com/sign-up at apify.com, and (iii) either successfully claim ownership of the Actor in Apify Store or link your GitHub OSS Public Repository containing an Actor code to the same Actor in Apify Store, subject to the Apify Store Publishing Terms.
2.2.2. **Commission & Remuneration**. In the Maintainer Tier you may receive standard Commission as outlined in the Affiliate Program. Additionally, you may also be eligible to receive remuneration under the Apify Store Publishing Terms in case you monetize your Actor.
### 2.3. Active Developer Tier
2.3.1. **Joining Active Developer Tier**. In order to benefit from the Active Developer Tier, you must: (i) join the Maintainer Tier, (ii) monetize your Actor through the Pay-Per-Event monetization model which allows you to set custom pricing for each use of your Actor by Apify Users (you are required to optimize your Actor’s performance and configure it for Pay-Per-Event usage).
2.3.2. **Additional Incentive under Active Developer Tier**. In addition to the benefits arising from the Maintainer Tier, as an Active Developer you may receive a temporary discount on computing resources or other incentives for your open-source Actor subject to a separate agreement with Apify.
## 3. General
3.1. Participants are responsible for any applicable taxes, payment processing fees, or other charges related to receiving Commission under the Fair Share Program. Apify is not responsible for covering such costs.
3.2. Apify reserves the right to modify, suspend, or terminate the Fair Share Program at any time, with or without prior notice. Any changes will be posted on our Website, and continued participation constitutes acceptance of the updated Terms.
---
# Apify GDPR Information
The European Union (“**EU**”) General Data Protection Regulation (“**GDPR**”) replaces the 1995 EU Data Protection Directive. The GDPR strengthens the rights that individuals have regarding personal data relating to them and seeks to unify data protection laws across Europe, regardless of where that data is processed. Besides strengthening and standardizing user data privacy across the EU nations, the GDPR requires new or additional obligations from all organizations that handle the personal data of EU citizens, regardless of where the organizations themselves are located.
Apify Technologies s.r.o., with its registered seat at Vodičkova 704/36, 110 00 Prague 1, Czech Republic, Company reg. no. 04788290 (also referred to as “**Apify**”, “**we**”, “**us**” or “**our**”), is deeply committed to providing its users with the maximum security and privacy, and is committed to comply with the GDPR. On this page, we will explain our methods to achieve GDPR compliance, both for ourselves and for our customers.
Please note that this document is not a legal contract - the legal relation between Apify and its users is governed by the https://docs.apify.com/legal/general-terms-and-conditions.md and Apify's https://docs.apify.com/legal/privacy-policy.md. Privacy Policy specifies in detail the extent of personal data we collect and process, retention period of personal data and other details regarding personal data processing.
## Apify as the data controller
Apify acts as the data controller for the personal data we collect about you, the user of our Website, Platform or Services. Apify can also use various suppliers who process personal data as processors. These are always entities that provide sufficient guarantees for the implementation of appropriate technical and organizational measures to ensure proper and sufficient protection of your personal data (see also further below). Upon request, we will provide you with information about specific processors. Apify may also transmit personal data to state authorities or third parties if it has such statutory obligation or it is allowed to do so under statutory regulations.
First and foremost, we process data that is necessary for us to perform our contract with you (GDPR Article 6(1)(b)). Second, we process data to meet our obligations under the law (GDPR Article 6(1)(c)) — this primarily involves financial data and information that we need to meet our accountability obligations under the GDPR. Third, we process your personal data for our legitimate interests in line with GDPR Article 6(1)(f).
### What are these ‘legitimate interests’?
* Improving our Website, Platform and Services to help you reach new levels of productivity.
* Making sure that your data and Apify's systems are safe and secure.
* Responsible marketing of our product and its features.
### What rights do you have in connection with your personal data processing?
1. **Right of access to personal data:** you have the right to obtain information on whether personal data is processed and, if so, the right to access to this personal data.
2. **Right to rectification of inaccurate personal data and the right to have incomplete personal data completed:** if you believe that Apify processes inaccurate or incomplete personal data, you have the right to rectification of inaccurate data and the right to have incomplete data completed; the rectification or completion takes place without undue delay, and always with regard to technical possibilities.
3. **Right to erasure:** you have the right to have your personal data erased if (i) they are no longer necessary in relation to the purposes for which they were collected or otherwise processed (ii) the processing was unlawful, (iii) you object to the processing and there are no overriding legitimate grounds for processing your personal data, or the law requires erasure, (iv) we are required to erase data under our legal obligation, or (v) you withdrew your consent to the processing of personal data (if processed based on such consent).
4. **Right to restriction of processing:** if you request to obtain restriction of processing, we are only allowed to store personal data, not further process it, with the exceptions set out in the GDPR. You may exercise the right to restriction in the following cases:
* If you contest the accuracy of your personal data; in this case, the restrictions apply for the time necessary for us to verify the accuracy of the personal data.
* If we process your personal data unlawfully, but instead of erasure you request only restriction of their use.
* If we no longer need your personal data for the above-mentioned purposes of processing, but you request the data for the establishment, exercise, or defense of legal claims.
* If you object to processing, the data processing is restricted pending the verification whether our legitimate interest override yours.
5. **Right to data portability:** if you wish us to transmit your personal data to another controller, you may exercise your right to data portability, if technically feasible. If the exercise of your right would adversely affect the rights and freedoms of other persons, we will not be able to comply with the request.
6. **Right to object:** you have the right to object to the processing of personal data which are processed for the purpose of protecting our legitimate interests or for the purpose of fulfilling a task performed in the public interest or in the exercise of public power. If Apify does not prove that there is a justified legitimate reason for the processing which overrides your interest or rights and freedoms, we shall terminate the processing on the basis of the objection without an undue delay.
7. **Right to file a complaint:** you can file a complaint with the Office for Personal Data Protection if you claim that processing of data has violated your right to personal data protection during their processing or related legislation, including violating the above-mentioned rights. The Office for Personal Data Protection is located at the address Pplk. Sochora 27, 170 00 Prague 7. More information about its activities is available on the website https://uoou.gov.cz/.
As the controller for your personal data, Apify is committed to respecting all your rights under the GDPR. If you have any questions or feedback, please reach out to us by email at mailto:legal@apify.com.
## Apify as the data processor
The data that you collect, store and process using Apify might contain personal data of your data subjects, and you are considered the data controller for this personal data.
Using the Apify Platform to process the personal data of your customers means that you have engaged Apify as a data processor to carry out certain processing activities on your behalf. According to Article 28 of the GDPR, the relationship between the controller and the processor needs to be made in writing (electronic form is acceptable under subsection (9) of the same Article). This is where our https://docs.apify.com/legal/general-terms-and-conditions.md and https://docs.apify.com/legal/privacy-policy.md come in. These two documents also serve as your data processing contract, setting out the instructions that you are giving to Apify with regard to processing the personal data you control and establishing the rights and responsibilities of both parties. Apify will only process your data based on your instructions as the data controller.
Apify is based in the EU, therefore all our customers including customers in the EU have a contractual relationship with our EU legal entity, based in the Czech Republic.
### Data transfers
One topic that often comes up with customers is data transfers outside of the European Economic Area (EEA). The GDPR establishes strict requirements for moving data outside of its scope of protection. This is only natural - otherwise it would be impossible for the law to fulfill its purpose.
When Apify engages sub-processors outside the EU and EEA, it is our job to ensure that we transfer the data lawfully. We keep an up-to-date list of sub-processors and guarantee that the data is adequately protected even after it leaves the EU or EEA. To ensure that all the personal data are protected when they are being transferred outside the EU or EEA, Apify is using a legal mechanism based on Standard Contractual Clauses (SCC) approved by European Commission. These clauses provide sufficient safeguards for the protection of data when they are being transferred internationally. SCC represents a contractual commitment between Apify, as a company transferring the data, and a third-party service provider, which is obliged to maintain the personal data secure and protected at all time.
Hopefully this information helps you to better navigate the EU's data protection requirements. If you have any questions with regard to the above, you are welcome to reach out to us at mailto:legal@apify.com and we will do our best to explain things further. Upon signing a non-disclosure agreement with us, we will provide you with our GDPR Audit document where we provide the list of sub-processors, information about what kind of data we send to them and how we verify their compliance with the GDPR.
## What Apify is doing for GDPR compliance
As a company based in Europe, Apify is very much up to speed with the implications that the EU General Data Protection Regulation has for businesses. We appreciate the privacy needs of our users as well as their customers and, as such, have implemented — and will continue to improve — technical and organizational measures in line with the GDPR to safeguard the personal data processed by Apify.
### Internal processes, security and data transfers
A large part of GDPR compliance is making sure that there are procedures in place that ensure that data processes are mapped and auditable. We have added elements to our application development cycle to build features in accordance with the principles of Privacy by Design. Any access to the personal data that we process on your behalf is strictly limited. Our internal procedures and logs make sure that we meet the GDPR accountability requirements in this regard.
We have established a process for onboarding third-party service providers and adopting tools that makes sure that these third-parties meet the high expectations that Apify and its customers have when it comes to privacy and security.
### Readiness to comply with subject access requests
Data subjects' ownership of their personal data is at the heart of the GDPR. We have created a readiness to respond to data subject requests to delete, modify, or transfer their data. This means that our Customer Support specialists along with the Engineers that assist them in their work are well-prepared to help you in any matters involving your personal data, in addition to providing the excellent customer support experience that you are accustomed to.
### Documentation
Our https://docs.apify.com/legal/general-terms-and-conditions.md and https://docs.apify.com/legal/privacy-policy.md are constantly being revised to increase transparency and to make sure the documents meet GDPR requirements. As these are the basis for our relationship for you, it is very important for us to comprehensively and openly explain our commitments and your rights in these documents. Additionally, we are constantly mapping all our data processing activities to be able to comply with the GDPR accountability requirements.
### Training
All of the above is supported by extensive training efforts within the company so that the GDPR-compliant processes we have put in place are followed. Sessions on data privacy and security are an integral part of our onboarding process, and each department receives training that is tailored to their work involving personal data.
---
# Apify General Terms and Conditions
Effective date: May 14, 2024
***
Apify Technologies s.r.o., with its registered seat at Vodičkova 704/36, 110 00 Prague 1, Czech Republic, Company reg. no. 04788290, recorded in the Commercial Register kept by the Municipal Court of Prague, File No.: C 253224 ("**we**", "**us**" or the "**Provider**") welcomes you ("**you**" or the "**User**") on our website apify.com (the "**Website**"). These terms and conditions of use (the "**Terms**”) shall govern your access to the Website, its use, and use of the Platform and the Services (as defined below).
## Summary
The Terms are the key document governing the relationship between you and us, please read the whole text of the Terms. For your convenience, we have presented these terms in a short non-binding summary followed by the full legal terms.
| Section | What can you find there? |
| ------- | ------------------------------------------------------------------------------------------------------------------------------------------------------------------------------------------------------------------------------------------------------------------------------------------------------ |
| | These Terms become a binding contract at the moment you sign-up on our Website. |
| | Overview of the Services that we are providing. |
| | In order to use our Services you will create a user account. You must use true and accurate information when creating a user account. |
| | In order to use our Services, we are granting you a non-exclusive license. You must respect and adhere to copyright law protecting our Website, Platform and/or Services. |
| | Using our Platform or Services for illegal or illegitimate purposes is prohibited. Should you use the Platform and/or the Services in breach of the Terms or the law, we will not be liable for any damage caused as a result. You must not allow anyone else to use your user account. |
| | We are limiting our liability towards you in relation to specified situations. |
| | We are providing our Services as is and do not make any representations, warranties or guarantees to you. |
| | We are limiting the liability of both parties - you and us - for less predictable legal types of damages. Our overall limit of liability isset as the aggregate of amounts paid by you for the Services. Neither of us shall be liable for situations beyond one's reasonable control (force majeure). |
| | If you use our Services in breach of these Terms and as a result a third party will claim our liability, you agree to indemnify us against any such claim. |
| | If any of your targeted websites demands that we cease the respective automated activities or processes, we may need to suspend your use of the Services accordingly and/or obey by any related court order that we receive. |
| | Find out about the payment terms for the Services; the up-to-date prices can be found at apify.com/pricing. |
| | Personal Data Protection is regulated by the Privacy Policy available at apify.com/privacy-policy. For the duration of our agreement and 2 years after, you and us both agree to maintain mutual confidentiality. |
| | The Terms remain effective until your account is terminated. We can terminate the agreement immediately in case of non-payment for the Services or breach of the Terms and/or Privacy Policy. We may amend the Terms in the future, in such case you will be notified 30 days in advance. |
| | These Terms are governed by Czech law. 'Apify' is a registered trademark. |
## 1. Acceptance of these Terms
By clicking the button “Sign up” during registration on our Website, you claim that you are over 18 years old and agree to adhere to these Terms and also to our:
* https://docs.apify.com/legal/privacy-policy.md, and
* https://docs.apify.com/legal/acceptable-use-policy.md.
If you act on behalf of a company when accepting these Terms, you also declare to be authorized to perform such legal actions on behalf of the company (herein the term “you” shall mean the relevant company). You agree to adhere to these Terms also by the fact that you visit or use the Website, Platform (as defined below), any software, application or any other service running or available on the Platform or a service we provide or make accessible to you.
## 2. Our Services
By means of our Website or by other means, we enable you to use the computer platform “Apify” (the "**Platform**") and some other services and functions (the "**Services**").
The Platform is a computer system operated by the Provider, remote access to which is available by means of servers within the apify.com domain or other domains (so-called “cloud system”). In addition to other things, the Platform makes it possible to:
* Download and extract structured data from the websites;
* Download, save, process, and publish data;
* Create, run, amend, and publish software programs and applications;
* Provide servers for remote access to other servers (so-called ”proxy servers” or “proxies”);
* Publish the public user profile, including data.
Our other Services also include:
* Creation and adjustment of the Platform configuration and configuration of software programs or applications running on the Platform (for example, so-called “Actors”) according to your instructions, for instance, in order to perform the extraction of data specified by you from the websites designated by you (the "**Configuration**");
* Assistance to users with respect to the use of the Platform, including the analysis of data sources on third-party websites;
* Downloading, saving, processing, and publishing of your data, according to your instructions;
* Switching the Configuration or applications running on the Platform on or off whether manually or automatically, and their monitoring.
Some functions of the Platform as well as some other Services may be used free of charge upon registration on the Website (i.e., upon clicking “Sign up”). Use of other functions of the Platform and Services within the expanded Configuration is available against payment as is managed hereby and by the terms stipulated on the Website.
## 3. User Account
Upon registration on the Website, a user account shall be created for you. During Sign-up as well as at any later time you use the account and/or communicate with us, you are obliged to provide us with accurate and true data. Should any of the identification information be amended in the future, your obligation is to update such information in the Platform or in your user account without undue delay. You are also obliged to protect the login details of your account and to prevent any third parties from using your account. We shall not be liable for any misuse of your account due to the breach of the aforementioned obligations. Moreover, we shall be authorised to block your account or delete it completely including all the data provided therein; you agree that such action shall be followed by no compensation.
Unless otherwise agreed by us in writing (i.e. also by email), each user may create and use one user account at the most. Creating (directly or by means of a third party) and/or using multiple personal accounts (even for the use of various email addresses) without our written (incl. email) consent shall be considered a breach of this section with the same consequences as stipulated in the paragraph above. Use of organization accounts shall not be limited by this paragraph.
You shall: (i) notify us immediately of any unauthorized use of any password or account or any other known or suspected breach of security; (ii) report to us immediately and use reasonable efforts to stop immediately any copying or distribution of content or infringement of our Platform, Website, Configurations and/or Services that is known or suspected by you; and (iii) not impersonate our another user or provide false identity information to gain access to or use the Platform, Website, Configurations or Services.
You acknowledge that when you contact our support team and request their help with some issue you are having with our Platform, Custom Solutions and/or Services, the members of the support team may access your account in order to help you with resolving that issue. The support team limits its actions on your account only to those necessary for providing the requested support.
## 4. License and Copyright
You acknowledge that our Website, the Platform (and software and applications associated therewith) and Services provided by us are protected by Act No. 121/2000 Sb., on Copyright and on Related Rights and on Amendments to Certain Acts (the Copyright Act), as amended, and by other related legal regulations (the "**Copyright Act**" or the "**Copyright**"). We alone shall own all right, title and interest, including all intellectual property rights to the Website, Platform and other Services (or any outcome of such Services) within the maximum scope admissible by law (except for the rights that we exercise in compliance with a license granted to us by third parties). Furthermore, we shall own any suggestions, ideas, enhancement requests, feedback, recommendations or other information related to the Website, Platform, and other Services. You acknowledge that any use of the software, systems, and functionalities of third parties available on the Website or the Platform shall be governed by special license terms of owners of the relevant copyright or open-source licenses that you must adhere to (by using the relevant software, system or functionality, you confirm to have been familiarised and agree with the license terms of the relevant third parties). Should you breach any of those terms, we shall not be liable for any such action.
In order to use the Website, Platform or Services provided by us, we provide you with a non-exclusive license without territorial restriction (i.e. worldwide license). Within the scope of the license, you may use the Website or the Platform in their unchanged form (excluding the amendments, modifications, and updates of the Website or the Platform performed by us) for the purpose for which the Website or the Platform has been designed (as defined in Article 2 hereof) and in the manner and within the scope of these Terms. We shall grant you the license exclusively for the use of the Website and the Platform on our servers, or the servers maintained by us or designed for such purpose (e.g. Amazon Web Services or GitHub).
Within the license you may not modify, adjust or connect the Website or the Platform (or any parts of it whatsoever) or its name with any other copyrighted work or use it in a collective work. Your right to use the Website and the Platform in compliance herewith and within the scope of their common functionality (i.e. to create your own work within their scope, e.g. the Configuration) shall not be affected. Furthermore, you may not create any reproductions of the Website or the Platform (or any parts of it whatsoever), of our software, and of applications (in any form), or to disseminate them except such parts of them that are open-source (i.e. so-called free license). You may neither provide the license as a whole or any authorisations forming the part thereof wholly or partially to a third person (to provide a sublicense), nor may you assign any rights and obligations arising from the license.
In addition to the license above, if we are providing you with a Custom Solution then, unless agreed otherwise, we provide you with a non-exclusive license without territorial restriction (i.e. worldwide license) to use, modify and adjust the source code of the Actor(s) provided to you. The intellectual property rights to the source code are not transferred and belong to us or our contractors. You acknowledge that we may use (part of) the source code in other Services, Custom Solutions and/or public Actors in the Apify Store.
The provided license or the Terms shall not transfer any of our intellectual property rights to you (including the rights to trade-marks or brands or names). We neither provide you with any other license than the license specified explicitly hereby.
Should you breach these Terms in any way or had you breached them in the past, we may reject or disable your license provision, use of the Website, Platform or other Services.
## 5. Terms of Use of the Website, Platform, and Services
You may use the Platform and other Services solely for the purposes of data extraction from publicly accessible websites (including websites that may require the user's login) or from other sources you are authorised to access. The Platform or Services functionalities may be used solely on such publicly accessible websites or other sources where their use (including data extraction) is permitted explicitly or where you are authorised to do so. Should you instruct us to use the Platform or the Services on certain publicly accessible websites or other sources and to send you the extracted data subsequently, you hereby declare and guarantee that use of the functionalities of the Platform and/or Services as well as the data extraction on such websites is expressly permitted or authorised to you. Should the extracted data be comprised of any sensitive data, confidential data or data protected by the Copyright or by other intellectual property right or any third-party right, you must not breach such rights by using the Platform or the Service in any way. Should you breach this prohibition, or should you use the Platform or Service functionalities directly or by means of our company on websites or other sources that do not permit their use, you shall be fully liable for such a breach and solely responsible for compensation of any damages incurred by and/or any claims of the affected third parties; we shall not be liable for any breach of third-party rights with respect to the usage of the Website, Platform or any Services.
You may not take any actions which could lead to unauthorised use of the Platform or the Services. The actions you are not authorised to take include, but are not limited to, the circumvention, elimination or limitation of any mechanisms possibly serving to the protection of our rights or of any information with respect to the Copyright to the Platform (e.g. our logo or any other designation).
You may not allow any third parties to use and/or access the Platform or Services by using your user account. Use of the Platform and Services shall only be possible on the grounds of the license provided by us hereunder. Should you take such unauthorised actions, you agree to compensate us for any damages incurred by us in this respect.
Furthermore, during the use of the Website, Platform (or any of its functionalities) and the Services you may not use them in violation of our https://docs.apify.com/legal/acceptable-use-policy.md;
You acknowledge that the Website, Platform or the Services may not be available constantly. We may perform their planned or unplanned downtime in order to perform the inspection, maintenance, update or replacement of hardware or software. Their availability may also be limited due to other reasons, including but not limited to, power cuts, data network loss, other failures caused by third parties or caused to the devices of third parties or due to Force Majeure. We shall not be liable for the limitation of availability of the Website, Platform or the Services.
Provided that we mediate to you provision of services by any third parties, you are obliged to adhere to the terms of use of the respective providers.
## 6. Liability
We are not obliged to verify the manner in which you or other users use the Website, Platform, Configuration or Services and we shall not be liable for the manner of such usage. We assume that you use the Website Platform and Services legally and ethically and that you have obtained permission, if necessary, to use it on the targeted websites and/or other data sources.
We shall not be liable for the outcomes of activities for which you use our Website, Platform, Configuration or Services. Provided that a third-party service or product is established on the Platform or on any of its functionalities, we shall not be liable for such a service or product, their functioning or manner and consequences of their usage.
In compliance with the provision of Section 5 of Act No. 480/2004 Sb., on certain Information Society Services and on Amendments to some Acts (Act on Certain Information Society Services), as amended, we shall not be liable for the contents of the information that you save on our Website, Platform or by means of them, or by means of the Configuration.
We shall not be liable for any of your unlawful actions in connection to the usage of the Website, Platform, Configuration or Services with respect to third parties (e.g. breach of intellectual property rights, rights to the name or company name, unfair competition, breach of terms of websites or applications and programs of third parties).
We shall not guarantee or be liable for the availability of the Website, Platform or Services (or products arising therefrom) or for their performance, reliability or responsiveness or any other performance or time parameters. We shall neither be liable for the functionality or availability of the services of other providers that we mediate to you solely. We shall neither be liable for your breach of service usage terms of such providers.
## 7. Warranty
WE MAKE NO REPRESENTATION, WARRANTY, OR GUARANTY AS TO THE RELIABILITY, TIMELINESS, QUALITY, SUITABILITY, AVAILABILITY, ACCURACY OR COMPLETENESS OF THE PLATFORM AND ITS FUNCTIONALITIES, SERVICES OR ANY CONTENT. WE DO NOT REPRESENT OR WARRANT THAT (A) THE USE OF THE WEBSITE OR PLATFORM OR SERVICES WILL BE COMPLETELY SECURE, TIMELY, UNINTERRUPTED OR ERROR-FREE OR OPERATE IN COMBINATION WITH ANY OTHER HARDWARE, SOFTWARE, SYSTEM OR DATA, (B) THE WEBSITE, PLATFORM (AND ITS FUNCTIONALITIES), CONFIGURATIONS AND SERVICES WILL MEET YOUR REQUIREMENTS OR EXPECTATIONS, (C) ANY STORED DATA WILL BE ACCURATE OR RELIABLE, (D) THE QUALITY OF ANY PRODUCTS, SERVICES, INFORMATION, OR OTHER MATERIAL PURCHASED OR OBTAINED BY YOU THROUGH THE WEBSITE OR PLATFORM, CONFIGURATIONS OR SERVICES WILL MEET YOUR REQUIREMENTS OR EXPECTATIONS, (E) ERRORS OR DEFECTS WILL BE CORRECTED, OR (F) THE SERVICES OR THE SERVER(S) THAT MAKE THE WEBSITE, PLATFORM AND SERVICES AVAILABLE ARE FREE OF VIRUSES OR OTHER HARMFUL COMPONENTS. THE WEBSITE, PLATFORM (AND ITS FUNCTIONALITIES), CONFIGURATIONS AND SERVICES AND ALL CONTENT IS PROVIDED TO YOU STRICTLY ON AN “AS IS” BASIS. ALL CONDITIONS, REPRESENTATIONS AND WARRANTIES, WHETHER EXPRESS, IMPLIED, STATUTORY OR OTHERWISE, INCLUDING, WITHOUT LIMITATION, ANY IMPLIED WARRANTY OF MERCHANTABILITY, FITNESS FOR A PARTICULAR PURPOSE, OR NON-INFRINGEMENT OF THIRD PARTY RIGHTS, ARE HEREBY DISCLAIMED TO THE MAXIMUM EXTENT PERMITTED BY APPLICABLE LAW BY US.
We shall not be liable for any defects of the Website, Platform (or its functionalities), Configuration or Services arising due to unauthorised interference with the Website, Platform, Configuration or the use of Platform or Configuration contradictory hereto. We shall neither be liable for errors with respect to the function or non-function of the Configurations arising due to the changes of third-party websites (i.e. website from which the relevant Configuration is to extract data) upon the Configuration creation.
## 8. Limitation of Liability; Force Majeure
EXCEPT FOR ANY INDEMNIFICATION AND CONFIDENTIALITY OBLIGATIONS HEREUNDER, (i) IN NO EVENT SHALL EITHER PARTY BE LIABLE UNDER THESE TERMS FOR ANY CONSEQUENTIAL, SPECIAL, INDIRECT, EXEMPLARY, OR PUNITIVE DAMAGES WHETHER IN CONTRACT, TORT OR ANY OTHER LEGAL THEORY, EVEN IF SUCH PARTY HAS BEEN ADVISED OF THE POSSIBILITY OF SUCH DAMAGES AND NOTWITHSTANDING ANY FAILURE OF ESSENTIAL PURPOSE OF ANY LIMITED REMEDY AND (ii) OUR AGGREGATE LIABILITY TO YOU UNDER THIS AGREEMENT FOR ANY CLAIM IS LIMITED TO THE AMOUNT PAID TO US BY YOU FOR THE SERVICES GIVING RISE TO THE CLAIM. Each party acknowledges that the other party has agreed to these terms relying on the limitations of liability stated herein and that those limitations are an essential basis of the bargain between the parties. Without limiting the foregoing and except for payment obligations, neither party shall have any liability for any failure or delay resulting from any condition beyond the reasonable control of such party, including but not limited to governmental action or acts of terrorism, earthquake or other acts of God, labour conditions, and power failures.
## 9. Your Obligation to Indemnify
You agree to indemnify, defend and hold us, our agents, affiliates, subsidiaries, directors, officers, employees, and applicable third parties (e.g., all relevant partner(s), licensors, licensees, consultants and contractors) (“Indemnified Person(s)”) harmless from and against any third-party claim, liability, loss, and expense (including damage awards, settlement amounts, and reasonable legal fees), brought against any Indemnified Person(s), arising out of your use of the Website, Platform, Configurations or Services and/or your breach of any of these terms. You acknowledge and agree that each Indemnified Person has the right to assert and enforce its rights under this section directly on its own behalf as a third-party beneficiary.
## 10. Legal Disclaimer and Warning
We may immediately suspend your use of the Website, Platform, Configurations and/or Services if we are contacted by your targeted data extraction source, website, or repository and asked to cease all extraction activity. If such an event occurs, we will not disclose your information without a court order mandating us to do so unless we in our best judgment determine that there would be an adverse consequence if we do not. If, however, we receive a court order demanding the release of your information to a third party, we will comply. If such action becomes necessary, you agree to indemnify and hold us and (as applicable) our parent(s), subsidiaries, affiliates, officers, directors, agents, contractors and employees, harmless from any claim or demand, including reasonable attorneys' fees, made by any third party arising from any complaint, suit, disagreement or other repercussions resulting from your use of the Website, Platform, Configurations or Services.
Should any third party claim its rights against us in connection to your actions, we may immediately eliminate any contents gathered, saved or disseminated by you from servers used by us. In the event of a judicial dispute with a third party related to your actions, you are obliged to provide us with all necessary cooperation in order to resolve such a dispute successfully and you are also obliged to reimburse continuously any purposeful expenses arising to us due to such a dispute. With respect to this, should an obligation arise to reimburse any claim of a third party, you agree to pay us the full scope of the damages.
## 11. Payment Terms
Within the scope of your user account on the Website or by means of the Website, you may order a paid license to use the Platform (an extended paid version as opposed to the basic version that is free of charge) or other Services in compliance with the up-to-date information and prices provided for the given license or Service on the Website or as agreed with us individually.
Your orders made by means of the Website shall be binding. By entering the relevant details of your debit or credit card during the order-making process, you agree that the price of the ordered license (including the Overages as defined below) or Service (the price of the ordered license and the price of the ordered Service collectively as the “**Fees**”) shall be deducted from the card.
Unless agreed otherwise, you shall pay the Fees on a monthly or yearly basis or another basis selected when making the order (the “**Billing Period**”). The Billing Period shall commence on the date of your first payment. The Fees are payable at the first date of the Billing Period for which it is valid except for the Overages as provided for in the following paragraph. You agree that the Fees for the relevant Billing Period shall be deducted by us from the debit or credit card the details of which were provided by you when ordering the relevant license.
In case your actual use of the Platform features exceeds your prepaid subscription, you shall be automatically charged for overages in compliance with the up-to-date information and prices provided for the given license or Service on the Website or as agreed with us elsewhere (the “**Overages**”).
Overages not exceeding in aggregate a certain threshold (the "**Overage Threshold**"), will be added as a part of the invoice issued by us at the beginning of the next Billing Period. The default value of the Overage Threshold is USD 200 in any given Billing Period, but it may be modified by us in our sole discretion.
In case you cancel your subscription, the Overages will be invoiced as a part of the final invoice. Any Overages exceeding in aggregate the Overage Threshold in any given Billing Period may be invoiced separately as soon as the Overage Threshold has been reached. For the avoidance of doubt, you may be invoiced for Overages multiple times if you exceed the Overage Threshold according to the previous sentence multiple times in any given Billing Period.
Should you order an upgrade of the license you are currently using, you shall pay the pro rata difference for the previously paid price of the currently used license and the price of the new license for the rest of the current Billing Period. The upgrade shall be performed immediately upon payment of the difference. Should you select a downgrade of the currently used license, you may not request the return of the paid remuneration for the current Billing Period (or its part); until the end of the current Billing Period you may use the license for the version already paid for. Upon the effectiveness of the upgrade or downgrade, the remuneration deducted for the following Billing Period shall amount to the newly selected license version similarly to the definition above.
We are a value-added tax (VAT) payer in compliance with the tax laws of the Czech Republic. VAT shall therefore always be added to the Fees payable in the amount stipulated by the respective tax laws.
The Fees shall always be deemed as paid for when credited to our bank account or our other electronic accounts held with a provider of payment services (e.g., PayPal or Braintree).
We shall not refund any Fees or other amounts paid by you to us.
You hereby agree to pay all applicable Fees and/or charges under these terms, including any applicable taxes or charges imposed by any government entity, and that we may change its pricing at any time. There are no refunds for payments made once Services have been rendered or license provided. If you dispute any charge made for your use of the Platform, licenses or Services, you must notify us in writing within fifteen (15) days of any such charge; failure to so notify us shall result in the waiver by you of any claim relating to any such disputed charge. Charges shall be calculated solely based on invoicing records maintained by us for purposes of billing. No other measurements or statistics of any kind shall be accepted by us or have any effect under these terms
## 12. Personal Data Protection, Commercial Offers, Confidentiality
Personal Data Protection is regulated by the https://docs.apify.com/legal/privacy-policy.md.
During the term of your use of the Website or Platform, licenses granted under these terms and Services and for a period of two (2) years following the termination or expiration of your subscription, each party agrees not to disclose Confidential Information of the other party to any third party without prior written consent except as provided herein (the "**Confidential Information**"). Confidential Information includes (i) subscription account data, including agent definitions, Customer Data, and User Content, (ii) except as provided in subsection (i) above, any other Website, Platform or Services information or access to technology prior to public disclosure provided by us to you and identified at the time of disclosure in writing as “Confidential.” Confidential Information does not include information that has become publicly known through no breach by a party, or has been (i) independently developed without access to the other party's Confidential Information; (ii) rightfully received from a third party; or (iii) required to be disclosed by law or by a governmental authority.
## 13. Term, Amendment, and Termination
Unless mutually agreed otherwise in writing, the license agreement and the agreement on the provision of other Services concluded by and between us shall be for an indefinite period of time. Either we or you may terminate any such agreement by cancelling your user account on the Platform (user account may be cancelled in the account settings). In the event of the agreement termination or user account cancellation, you shall not be entitled to the refund of any remuneration you already paid to us (see Article 11, Payment Terms).
In the following cases we may further withdraw from an agreement concluded with you (by cancelling your user account) with immediate effect:
* Should you be in delay with payment of any amounts due to us for more than three days;
* Should you breach these Terms and/or Privacy Policy in any way whatsoever (including, but not limited to, the breach of our Copyright, terms of the provided license, terms of use of the Website, Platform or Services, or should you create more than one user account without our prior written consent)
When terminating the license agreement or cancelling your user account, we may eliminate any data entered in the user account and gathered there.
If necessary (including but not limited to the market development, development of the Platform and related technologies and with respect to new risks associated with the Platform and the safety of its use), we may unilaterally amend the version hereof. Similarly, with respect to the market development we may unilaterally amend the remuneration amount of the license for use of the Platform or the remuneration for the Services. We shall notify you of such an amendment at least 30 days in advance before its effectiveness by displaying the notification in your user account or otherwise on the Website or the Platform. Should you disagree with such an amendment, you may withdraw from the relevant agreement effective as at the date of the effectiveness of the announced amendments by cancelling your user account (cancellation may be performed in your account settings). In the event of the agreement termination and user account cancellation you shall not be entitled to a refund of any remuneration paid to us already (see Art. 11, Payment Terms). Provided you shall not cancel your user account before the effective date of the amendment, you shall be deemed to agree with such an amendment.
## 14. Final Provisions
These Terms and any other contracts and legal relationships concluded by and between us (unless otherwise explicitly provided) shall be governed by the laws of the Czech Republic. Any disputes arising here from between us shall be resolved by the courts of general jurisdiction in the Czech Republic.
You agree that we may use your name, company name and logo as a reference in all types of promotion materials for marketing purposes free of charge.
Apify is a trademark of Apify Technologies s.r.o., registered in the United States and other countries.
Provided that we enter into a separate written license agreement or another contract with you provisions of which deviate herefrom, such different provisions shall take precedence over the respective provisions of these Terms.
Should any of the provisions hereof be ascertained as invalid, ineffective or unenforceable, upon mutual agreement such a provision shall be replaced by a provision whose sense and purpose comes as closely as possible to the original provision. The invalidity, ineffectiveness or unenforceability of one provision shall not affect the validity and effectiveness of the remaining provisions hereof.
Unless otherwise provided hereby, any changes and amendments hereto may only be made in writing.
## Version History
This is the history of Apify General Terms and Conditions. If you're a new user, the latest Terms apply. If you're an existing user, see the table below to identify which terms and conditions were applicable to you at a given date.
| Version | Effective from | Effective until |
| ----------------------------------------------------------------------------- | --------------- | ------------------ |
| Latest (this document) | May 14, 2024 | |
| https://docs.apify.com/legal/old/general-terms-and-conditions-october-2022.md | October 1, 2022 | June 13, 2024 |
| Older T\&Cs available upon request | | September 30, 2022 |
---
# Apify General Terms and Conditions October 2022
## Version History
You are reading terms and conditions that are no longer effective. If you're a new user, the https://docs.apify.com/legal/general-terms-and-conditions.md apply. If you're an existing user, see the table below to identify which terms and conditions were applicable to you at a given date.
| Version | Effective from | Effective until |
| ------------------------------------------------------------ | --------------- | ------------------ |
| https://docs.apify.com/legal/general-terms-and-conditions.md | May 13, 2024 | |
| Oct 2022 (This document) | October 1, 2022 | June 12, 2024 |
| Older T\&Cs available upon request | | September 30, 2022 |
# Apify General Terms and Conditions October 2022
Apify Technologies s.r.o., with its registered seat at Vodičkova 704/36, 110 00 Prague 1, Czech Republic, Company reg. no. 04788290, recorded in the Commercial Register kept by the Municipal Court of Prague, File No.: C 253224 (hereinafter referred to as “**we**” or the “**Provider**”) welcomes you (hereinafter referred to as “**you**” or the “**User**”) on our website apify.com (hereinafter referred to as the “**Website**”). These terms and conditions of use (hereinafter referred to as the “**Terms**”) shall govern your access to the Website, its use, and use of the Platform and the Services (as defined below).
## Summary
The Terms are the key document governing our relationship between you and us, please read the whole text of the Terms. For your convenience, below is a short summary of each section of the Terms.
| Section | What can you find there? |
| ------- | ------------------------------------------------------------------------------------------------------------------------------------------------------------------------------------------------------------------------------------------------------------------------------------------------------ |
| | These Terms become a binding contract at the moment you sign-up on our Website. |
| | Overview of the Services that we are providing. |
| | In order to use our Services you will create a user account. You must use true and accurate information when creating a user account. |
| | In order to use our Services, we are granting you a non-exclusive license. You must respect and adhere to copyright law protecting our Website, Platform and/or Services. |
| | Using our Platform or Services for illegal or illegitimate purposes is prohibited. Should you use the Platform and/or the Services in breach of the Terms or the law, we will not be liable for any damage caused as a result. You must not allow anyone else to use your user account. |
| | We are limiting our liability towards you in relation to specified situations. |
| | We are providing our Services as is and do not make any representations, warranties or guarantees to you. |
| | We are limiting the liability of both parties - you and us - for less predictable legal types of damages. Our overall limit of liability isset as the aggregate of amounts paid by you for the Services. Neither of us shall be liable for situations beyond one's reasonable control (force majeure). |
| | If you use our Services in breach of these Terms and as a result a third party will claim our liability, you agree to indemnify us against any such claim. |
| | If any of your targeted websites demands that we cease the respective automated activities or processes, we may need to suspend your use of the Services accordingly and/or obey by any related court order that we receive. |
| | Find out about the payment terms for the Services; the up-to-date prices can be found at apify.com/pricing. |
| | Personal Data Protection is regulated by the Privacy Policy available at apify.com/privacy-policy. For the duration of our agreement and 2 years after, you and us both agree to maintain mutual confidentiality. |
| | The Terms remain effective until your account is terminated. We can terminate the agreement immediately in case of non-payment for the Services or breach of the Terms and/or Privacy Policy. We may amend the Terms in the future, in such case you will be notified 30 days in advance. |
| | These Terms are governed by Czech law. 'Apify' is a registered trademark. |
## 1. Acceptance of these Terms
By clicking the button “Sign up” during registration on our Website, you claim that you are over 18 years old and agree to adhere to these Terms and also to the https://apify.com/privacy-policy (hereinafter referred to as the “**Privacy Policy**”). If you act on behalf of a company when accepting these Terms and the Privacy Policy, you also hereby declare to be authorized to perform such legal actions on behalf of the company (herein the term “you” shall mean the relevant company). You agree to adhere to these Terms also by the fact that you visit or use the Website, Platform (as defined below), any software, application or any other service running or available on the Platform or a service we provide or make accessible to you.
## 2. Our Services
By means of our Website or by other means, we enable you to use the computer platform “Apify” (hereinafter referred to as the “**Platform**”) and some other services and functions (hereinafter referred to as the “**Services**”).
The Platform is a computer system operated by the Provider, remote access to which is available by means of servers within the apify.com domain or other domains (so-called “cloud system”). In addition to other things, the Platform makes it possible to:
* Download and extract structured data from the websites;
* Download, save, process, and publish data;
* Create, run, amend, and publish software programs and applications;
* Provide servers for remote access to other servers (so-called ”proxy servers” or “proxies”);
* Publish the public user profile, including data.
Our other Services also include:
* Creation and adjustment of the Platform configuration and configuration of software programs or applications running on the Platform (for example, so-called “Crawlers” or “Acts” or “Actors”) according to your instructions, for instance, in order to perform the extraction of data specified by you from the websites designated by you (hereinafter referred to as the “**Configuration**”);
* Assistance to users with respect to the use of the Platform, including the analysis of data sources on third-party websites;
* Downloading, saving, processing, and publishing of your data according to your instructions;
* Switching the Configuration or applications running on the Platform on or off whether manually or automatically, and their monitoring.
Some functions of the Platform as well as some other Services may be used free of charge upon registration on the Website (i.e. upon clicking “Sign up”). Use of other functions of the Platform and Services within the expanded Configuration is available against payment as is managed hereby and by the terms stipulated on the Website.
## 3. User Account
Upon registration on the Website, a user account shall be created for you. During Sign-up as well as at any later time you use the account and/or communicate with us, you are obliged to provide us with accurate and true data. Should any of the identification information be amended in the future, your obligation is to update such information in the Platform or in your user account without undue delay. You are also obliged to protect the login details of your account and to prevent any third parties from using your account. We shall not be liable for any misuse of your account due to the breach of the aforementioned obligations. Moreover, we shall be authorised to block your account or delete it completely including all the data provided therein; you agree that such action shall be followed by no compensation.
Unless otherwise agreed by us in writing (i.e. also by email), each user may create and use one user account at the most. Creating (directly or by means of a third party) and/or using multiple personal accounts (even for the use of various email addresses) without our written (incl. email) consent shall be considered a breach of this section with the same consequences as stipulated in the paragraph above. Use of organization accounts shall not be limited by this paragraph.
You shall: (i) notify us immediately of any unauthorized use of any password or account or any other known or suspected breach of security; (ii) report to us immediately and use reasonable efforts to stop immediately any copying or distribution of content or infringement of our Platform, Website, Configurations and/or Services that is known or suspected by you; and (iii) not impersonate our another user or provide false identity information to gain access to or use the Platform, Website, Configurations or Services.
You acknowledge that when you contact our support team and request their help with some issue you are having with our Platform, Custom Solutions and/or Services, the members of the support team may access your account in order to help you with resolving that issue. The support team limits its actions on your account only to those necessary for providing the requested support.
## 4. License and Copyright
You acknowledge that our Website, the Platform (and software and applications associated therewith) and Services provided by us are protected by Act No. 121/2000 Sb., on Copyright and on Related Rights and on Amendments to Certain Acts (the Copyright Act), as amended, and by other related legal regulations (hereinafter referred to as the “**Copyright Act**” or the “**Copyright**”). We alone shall own all right, title and interest, including all intellectual property rights to the Website, Platform and other Services (or any outcome of such Services) within the maximum scope admissible by law (except for the rights that we exercise in compliance with a license granted to us by third parties). Furthermore, we shall own any suggestions, ideas, enhancement requests, feedback, recommendations or other information related to the Website, Platform, and other Services. You acknowledge that any use of the software, systems, and functionalities of third parties available on the Website or the Platform shall be governed by special license terms of owners of the relevant copyright or open-source licenses that you must adhere to (by using the relevant software, system or functionality, you confirm to have been familiarised and agree with the license terms of the relevant third parties). Should you breach any of those terms, we shall not be liable for any such action.
In order to use the Website, Platform or Services provided by us, we provide you with a non-exclusive license without territorial restriction (i.e. worldwide license). Within the scope of the license, you may use the Website or the Platform in their unchanged form (excluding the amendments, modifications, and updates of the Website or the Platform performed by us) for the purpose for which the Website or the Platform has been designed (as defined in Article 2 hereof) and in the manner and within the scope of these Terms. We shall grant you the license exclusively for the use of the Website and the Platform on our servers, or the servers maintained by us or designed for such purpose (e.g. Amazon Web Services or GitHub).
Within the license you may not modify, adjust or connect the Website or the Platform (or any parts of it whatsoever) or its name with any other copyrighted work or use it in a collective work. Your right to use the Website and the Platform in compliance herewith and within the scope of their common functionality (i.e. to create your own work within their scope, e.g. the Configuration) shall not be affected. Furthermore, you may not create any reproductions of the Website or the Platform (or any parts of it whatsoever), of our software, and of applications (in any form), or to disseminate them except such parts of them that are open-source (i.e. so-called free license). You may not provide the license as a whole or any authorisations forming the part thereof wholly or partially to a third person (to provide a sub-license) and neither may you assign any rights and obligations arising from the license.
In addition to the license above, if we are providing you with a Custom Solution then, unless agreed otherwise, we provide you with a non-exclusive license without territorial restriction (i.e. worldwide license) to use, modify and adjust the source code of the Actor(s) provided to you. The intellectual property rights to the source code are not transferred and belong to us or our contractors. You acknowledge that we may use (part of) the source code in other Services, Custom Solutions and/or public Actors in the Apify Store.
The provided license or the Terms shall not transfer any of our intellectual property rights to you (including the rights to trade-marks or brands or names). We neither provide you with any other license than the license specified explicitly hereby.
Should you breach these Terms in any way or had you breached them in the past, we may reject or disable your license provision, use of the Website, Platform or other Services.
## 5. Terms of Use of the Website, Platform, and Services
You may use the Platform and other Services solely for the purposes of data extraction from publicly accessible websites (including websites that may require the user's login) or from other sources you are authorised to access. The Platform or Services functionalities may be used solely on such publicly accessible websites or other sources where their use (including data extraction) is permitted explicitly or where you are authorised to do so. Should you instruct us to use the Platform or the Services on certain publicly accessible websites or other sources and to send you the extracted data subsequently, you hereby declare and guarantee that use of the functionalities of the Platform and/or Services as well as the data extraction on such websites is expressly permitted or authorised to you. Should the extracted data be comprised of any sensitive data, confidential data or data protected by the Copyright or by other intellectual property right or any third-party right, you must not breach such rights by using the Platform or the Service in any way. Should you breach this prohibition, or should you use the Platform or Service functionalities directly or by means of our company on websites or other sources that do not permit their use, you shall be fully liable for such a breach and solely responsible for compensation of any damages incurred by and/or any claims of the affected third parties; we shall not be liable for any breach of third-party rights with respect to the usage of the Website, Platform or any Services.
You may not take any actions which could lead to unauthorised use of the Platform or the Services. The actions you are not authorised to take include, but are not limited to, the circumvention, elimination or limitation of any mechanisms possibly serving to the protection of our rights or of any information with respect to the Copyright to the Platform (e.g. our logo or any other designation).
You may not allow any third parties to use and/or access the Platform or Services by using your user account. Use of the Platform and Services shall only be possible on the grounds of the license provided by us hereunder. Should you take such unauthorised actions, you agree to compensate us for any damages incurred by us in this respect.
Furthermore, during the use of the Website, Platform (or any of its functionalities) and the Services you may not:
* Use them in a manner likely to unreasonably limit usage by our other customers, including but not limited to burdening the server on which the Platform is located by automated requests outside the interface designed for such a purpose;
* Gather, save, enable the transmission to third parties or enable access to the content that is (themselves or their accessibility) contradictory to the generally binding legal regulations effective in the Czech Republic and in any country in which you are a resident where the Website, Platform or Services are used or where detrimental consequences could arise by taking such actions, including but not limited to the content that:
* interferes with the Copyright, with rights related to Copyright or with other intellectual property rights and/or confidential or any sensitive information;
* breaches the applicable legal rules relevant to the protection from hatred for a nation, ethnic group, race, religion, class or another group of people or relevant to the limitation of rights and freedoms of its members or invasion of privacy, promotion of violence and animosity, gambling or the sales or usage of drugs;
* interferes with the rights to the protection of competition law;
* Gather, save, enable the transmission to third parties or enable access to the content that is pornographic, humiliating or that refer to pornographic or humiliating materials;
* Gather, save, enable the transmission to third parties or enable access to the contents that make conspicuous resemblance to the contents, services or third-party applications for the purposes of confusing or deceiving Internet users (so-called phishing);
* Gather, save, enable the transmission to third parties or enable access to the contents that harm our good reputation or authorised interests (including hypertext links to the contents that harm our good reputation or authorised interests);
* Disseminate computer viruses or other harmful software;
* Use mechanisms, instruments or computer equipment or processes that have or potentially have a negative effect on the operation of devices used by us, on the security of the internet or internet users;
* Generate fraudulent impressions of or fraudulent clicks on your ad(s) or third-party ad(s) through any automated, deceptive, fraudulent or other invalid means, including but not limited to through repeated manual clicks, the use of robots, agents or other automated query tools and/or computer generated search requests, and/or the unauthorized use of other search engine optimization services and/or software.
You acknowledge that the Website, Platform or the Services may not be available constantly. We may perform their planned or unplanned downtime in order to perform the inspection, maintenance, update or replacement of hardware or software. Their availability may also be limited due to other reasons, including but not limited to, power cuts, data network loss, other failures caused by third parties or caused to the devices of third parties or due to Force Majeure. We shall not be liable for the limitation of availability of the Website, Platform or the Services.
Provided that we mediate to you provision of services by any third parties, you are obliged to adhere to the terms of use of the respective providers.
## 6. Liability
We are not obliged to verify the manner in which you or other users use the Website, Platform, Configuration or Services and we shall not be liable for the manner of such usage. We assume that you use the Website Platform and Services legally and ethically and that you have obtained permission, if necessary, to use it on the targeted websites and/or other data sources.
We shall not be liable for the outcomes of activities for which you use our Website, Platform, Configuration or Services. Provided that a third-party service or product is established on the Platform or on any of its functionalities, we shall not be liable for such a service or product, their functioning or manner and consequences of their usage.
In compliance with the provision of Section 5 of Act No. 480/2004 Sb., on certain Information Society Services and on Amendments to some Acts (Act on Certain Information Society Services), as amended, we shall not be liable for the contents of the information that you save on our Website, Platform or by means of them, or by means of the Configuration.
We shall not be liable for any of your unlawful actions in connection to the usage of the Website, Platform, Configuration or Services with respect to third parties (e.g. breach of intellectual property rights, rights to the name or company name, unfair competition, breach of terms of websites or applications and programs of third parties).
We shall not guarantee or be liable for the availability of the Website, Platform or Services (or products arising therefrom) or for their performance, reliability or responsiveness or any other performance or time parameters. We shall neither be liable for the functionality or availability of the services of other providers that we mediate to you solely. We shall neither be liable for your breach of service usage terms of such providers.
## 7. Warranty
WE MAKE NO REPRESENTATION, WARRANTY, OR GUARANTY AS TO THE RELIABILITY, TIMELINESS, QUALITY, SUITABILITY, AVAILABILITY, ACCURACY OR COMPLETENESS OF THE PLATFORM AND ITS FUNCTIONALITIES, SERVICES OR ANY CONTENT. WE DO NOT REPRESENT OR WARRANT THAT (A) THE USE OF THE WEBSITE OR PLATFORM OR SERVICES WILL BE COMPLETELY SECURE, TIMELY, UNINTERRUPTED OR ERROR-FREE OR OPERATE IN COMBINATION WITH ANY OTHER HARDWARE, SOFTWARE, SYSTEM OR DATA, (B) THE WEBSITE, PLATFORM (AND ITS FUNCTIONALITIES), CONFIGURATIONS AND SERVICES WILL MEET YOUR REQUIREMENTS OR EXPECTATIONS, (C) ANY STORED DATA WILL BE ACCURATE OR RELIABLE, (D) THE QUALITY OF ANY PRODUCTS, SERVICES, INFORMATION, OR OTHER MATERIAL PURCHASED OR OBTAINED BY YOU THROUGH THE WEBSITE OR PLATFORM, CONFIGURATIONS OR SERVICES WILL MEET YOUR REQUIREMENTS OR EXPECTATIONS, (E) ERRORS OR DEFECTS WILL BE CORRECTED, OR (F) THE SERVICES OR THE SERVER(S) THAT MAKE THE WEBSITE, PLATFORM AND SERVICES AVAILABLE ARE FREE OF VIRUSES OR OTHER HARMFUL COMPONENTS. THE WEBSITE, PLATFORM (AND ITS FUNCTIONALITIES), CONFIGURATIONS AND SERVICES AND ALL CONTENT IS PROVIDED TO YOU STRICTLY ON AN “AS IS” BASIS. ALL CONDITIONS, REPRESENTATIONS AND WARRANTIES, WHETHER EXPRESS, IMPLIED, STATUTORY OR OTHERWISE, INCLUDING, WITHOUT LIMITATION, ANY IMPLIED WARRANTY OF MERCHANTABILITY, FITNESS FOR A PARTICULAR PURPOSE, OR NON-INFRINGEMENT OF THIRD PARTY RIGHTS, ARE HEREBY DISCLAIMED TO THE MAXIMUM EXTENT PERMITTED BY APPLICABLE LAW BY US.
We shall not be liable for any defects of the Website, Platform (or its functionalities), Configuration or Services arising due to unauthorised interference with the Website, Platform, Configuration or the use of Platform or Configuration contradictory hereto. We shall neither be liable for errors with respect to the function or non-function of the Configurations arising due to the changes of third-party websites (i.e. website from which the relevant Configuration is to extract data) upon the Configuration creation.
## 8. Limitation of Liability; Force Majeure
EXCEPT FOR ANY INDEMNIFICATION AND CONFIDENTIALITY OBLIGATIONS HEREUNDER, (i) IN NO EVENT SHALL EITHER PARTY BE LIABLE UNDER THESE TERMS FOR ANY CONSEQUENTIAL, SPECIAL, INDIRECT, EXEMPLARY, OR PUNITIVE DAMAGES WHETHER IN CONTRACT, TORT OR ANY OTHER LEGAL THEORY, EVEN IF SUCH PARTY HAS BEEN ADVISED OF THE POSSIBILITY OF SUCH DAMAGES AND NOTWITHSTANDING ANY FAILURE OF ESSENTIAL PURPOSE OF ANY LIMITED REMEDY AND (ii) OUR AGGREGATE LIABILITY TO YOU UNDER THIS AGREEMENT FOR ANY CLAIM IS LIMITED TO THE AMOUNT PAID TO US BY YOU FOR THE SERVICES GIVING RISE TO THE CLAIM. Each party acknowledges that the other party has agreed to these terms relying on the limitations of liability stated herein and that those limitations are an essential basis of the bargain between the parties. Without limiting the foregoing and except for payment obligations, neither party shall have any liability for any failure or delay resulting from any condition beyond the reasonable control of such party, including but not limited to governmental action or acts of terrorism, earthquake or other acts of God, labour conditions, and power failures.
## 9. Your Obligation to Indemnify
You agree to indemnify, defend and hold us, our agents, affiliates, subsidiaries, directors, officers, employees, and applicable third parties (e.g., all relevant partner(s), licensors, licensees, consultants and contractors) (“Indemnified Person(s)”) harmless from and against any third-party claim, liability, loss, and expense (including damage awards, settlement amounts, and reasonable legal fees), brought against any Indemnified Person(s), arising out of your use of the Website, Platform, Configurations or Services and/or your breach of any of these terms. You acknowledge and agree that each Indemnified Person has the right to assert and enforce its rights under this section directly on its own behalf as a third-party beneficiary.
## 10. Legal Disclaimer and Warning
We may immediately suspend your use of the Website, Platform, Configurations and/or Services if we are contacted by your targeted data extraction source, website, or repository and asked to cease all extraction activity. If such an event occurs, we will not disclose your information without a court order mandating us to do so unless we in our best judgment determine that there would be an adverse consequence if we do not. If, however, we receive a court order demanding the release of your information to a third party, we will comply. If such action becomes necessary, you agree to indemnify and hold us and (as applicable) our parent(s), subsidiaries, affiliates, officers, directors, agents, contractors and employees, harmless from any claim or demand, including reasonable attorneys' fees, made by any third party arising from any complaint, suit, disagreement or other repercussions resulting from your use of the Website, Platform, Configurations or Services.
Should any third party claim its rights against us in connection to your actions, we may immediately eliminate any contents gathered, saved or disseminated by you from servers used by us. In the event of a judicial dispute with a third party related to your actions, you are obliged to provide us with all necessary cooperation in order to resolve such a dispute successfully and you are also obliged to reimburse continuously any purposeful expenses arising to us due to such a dispute. With respect to this, should an obligation arise to reimburse any claim of a third party, you agree to pay us the full scope of the damages.
## 11. Payment Terms
Within the scope of your user account on the Website or by means of the Website, you may order a paid license to use the Platform (an extended paid version as opposed to the basic version that is free of charge) or other Services in compliance with the up-to-date information and prices provided for the given license or Service on the Website or as agreed with us individually.
Your orders made by means of the Website shall be binding. By entering the relevant details of your debit or credit card during the order-making process, you agree that the price of the ordered license or Service shall be deducted from the card.
Unless agreed otherwise , you shall pay the remuneration for the license to use the Platform on a monthly or yearly basis or another basis selected when making the order (“Billing Period”). The Billing Period shall commence on the date of your first payment. The remuneration is payable at the first date of the Billing Period for which it is valid. You agree that the remuneration for the relevant Billing Period shall be deducted by us from the debit or credit card the details of which were provided by you when ordering the relevant license.
Should you order an upgrade of the license you are currently using, you shall pay the pro rata difference for the previously paid price of the currently used license and the price of the new license for the rest of the current Billing Period. The upgrade shall be performed immediately upon payment of the difference. Should you select a downgrade of the currently used license, you may not request the return of the paid remuneration for the current Billing Period (or its part); until the end of the current Billing Period you may use the license for the version already paid for. Upon the effectiveness of the upgrade or downgrade, the remuneration deducted for the following Billing Period shall amount to the newly selected license version similarly to the definition above.
We are a value-added tax (VAT) payer in compliance with the tax laws of the Czech Republic. VAT shall be therefore always added to our price in the amount stipulated by the respective tax laws.
The amount you are to pay shall always be deemed as paid for when credited to our bank account or our other electronic accounts held with a provider of payment services (e.g. PayPal or Braintree).
We shall not refund any remuneration or other amounts paid by you to us.
You hereby agree to pay all applicable fees and/or charges under these terms, including any applicable taxes or charges imposed by any government entity, and that we may change its pricing at any time. There are no refunds for payments made once Services have been rendered or license provided. If you dispute any charge made for your use of the Platform, licenses or Services, you must notify us in writing within fifteen (15) days of any such charge; failure to so notify us shall result in the waiver by you of any claim relating to any such disputed charge. Charges shall be calculated solely based on invoicing records maintained by us for purposes of billing. No other measurements or statistics of any kind shall be accepted by us or have any effect under these terms
## 12. Personal Data Protection, Commercial Offers, Confidentiality
Personal Data Protection is regulated by the Privacy Policy available on our Website (https://apify.com/privacy-policy). You are obliged to adhere to the Privacy Policy.
During the term of your use of the Website or Platform, licenses granted under these terms and Services and for a period of two (2) years following the termination or expiration of your subscription, each party agrees not to disclose Confidential Information of the other party to any third party without prior written consent except as provided herein (hereinafter referred to as the “**Confidential Information**”). Confidential Information includes (i) subscription account data, including agent definitions, Customer Data, and User Content, (ii) except as provided in subsection (i) above, any other Website, Platform or Services information or access to technology prior to public disclosure provided by us to you and identified at the time of disclosure in writing as “Confidential.” Confidential Information does not include information that has become publicly known through no breach by a party, or has been (i) independently developed without access to the other party's Confidential Information; (ii) rightfully received from a third party; or (iii) required to be disclosed by law or by a governmental authority.
## 13. Term, Amendment, and Termination
Unless mutually agreed otherwise in writing, the license agreement and the agreement on the provision of other Services concluded by and between us shall be for an indefinite period of time. Either we or you may terminate any such agreement by cancelling your user account on the Platform (user account may be cancelled in the account settings). In the event of the agreement termination or user account cancellation, you shall not be entitled to the refund of any remuneration you already paid to us (see Article 11, Payment Terms).
In the following cases we may further withdraw from an agreement concluded with you (by cancelling your user account) with immediate effect:
* Should you be in delay with payment of any amounts due to us for more than three days;
* Should you breach these Terms and/or Privacy Policy in any way whatsoever (including, but not limited to, the breach of our Copyright, terms of the provided license, terms of use of the Website, Platform or Services, or should you create more than one user account without our prior written consent)
When terminating the license agreement or cancelling your user account, we may eliminate any data entered in the user account and gathered there.
If necessary (including but not limited to the market development, development of the Platform and related technologies and with respect to new risks associated with the Platform and the safety of its use), we may unilaterally amend the version hereof. Similarly, with respect to the market development we may unilaterally amend the remuneration amount of the license for use of the Platform or the remuneration for the Services. We shall notify you of such an amendment at least 30 days in advance before its effectiveness by displaying the notification in your user account or otherwise on the Website or the Platform. Should you disagree with such an amendment, you may withdraw from the relevant agreement effective as at the date of the effectiveness of the announced amendments by cancelling your user account (cancellation may be performed in your account settings). In the event of the agreement termination and user account cancellation you shall not be entitled to a refund of any remuneration paid to us already (see Art. 11, Payment Terms). Provided you shall not cancel your user account before the effective date of the amendment, you shall be deemed to agree with such an amendment.
## 14. Final Provisions
These Terms and any other contracts and legal relationships concluded by and between us (unless otherwise explicitly provided) shall be governed by the laws of the Czech Republic. Any disputes arising here from between us shall be resolved by the courts of general jurisdiction in the Czech Republic.
You agree that we may use your name, company name and logo as a reference in all types of promotion materials for marketing purposes free of charge.
Apify is a trademark of Apify Technologies s.r.o., registered in the United States and other countries.
Provided that we enter into a separate written license agreement or another contract with you provisions of which deviate herefrom, such different provisions shall take precedence over the respective provisions of these Terms.
Should any of the provisions hereof be ascertained as invalid, ineffective or unenforceable, upon mutual agreement such a provision shall be replaced by a provision whose sense and purpose comes as closely as possible to the original provision. The invalidity, ineffectiveness or unenforceability of one provision shall not affect the validity and effectiveness of the remaining provisions hereof.
Unless otherwise provided hereby, any changes and amendments hereto may only be made in writing.
---
# Apify Store Publishing Terms and Conditions December 2022
## Version History
You are reading terms and conditions that are no longer effective. If you're a new user, the https://docs.apify.com/legal/store-publishing-terms-and-conditions.md apply. If you're an existing user, see the table below to identify which terms and conditions were applicable to you at a given date.
| Version | Effective from | Effective until |
| --------------------------------------------------------------------- | ---------------- | --------------- |
| https://docs.apify.com/legal/store-publishing-terms-and-conditions.md | May 13, 2024 | |
| December 2022 (This document) | December 1, 2022 | June 12, 2024 |
# Apify Store Publishing Terms and Conditions December 2022
Apify Technologies s.r.o., with its registered seat at Vodičkova 704/36, 110 00 Prague 1, Czech Republic, Company reg. no. 04788290, recorded in the Commercial Register kept by the Municipal Court of Prague, File No.: C 253224 (hereinafter referred to as “**we**” or the “**Provider**”) thanks you (hereinafter referred to as “**you**” or the “**User**”) for using our Platform console.apify.com (the “**Platform**”). These terms and conditions of use (the “**Apify Store Terms**”) shall govern your rights and obligations in relation to publishing and maintaining a public Actor in Apify Store at console.apify.com/store (“**Apify Store**”) in addition to our https://docs.apify.com/legal/general-terms-and-conditions.md of use (the “**Terms**”).
Terms starting with a capital letter used in this Apify Store Terms have the meaning defined in the Terms. Provisions of the Terms regarding liability, indemnity, amendments, governing law and choice of jurisdiction are incorporated herein by reference.
## 1. Publishing your Actor
Actors (i.e. the serverless cloud programs running on the Platform as defined in the Terms) can be either private or public. Public Actors are shown in Apify Store and can be run by anyone. Private Actors can only be accessed and started by their owner. If you decide to make your Actor public, the following rules apply.
## 2. Acceptance of these Terms
By clicking a button “I agree”, you claim that you are over 18 years old and agree to adhere to these Apify Store Terms, in addition to the https://docs.apify.com/legal/privacy-policy.md. If you act on behalf of a company when accepting these Apify Store Terms, you also hereby declare to be authorized to perform such legal actions on behalf of the company (herein the term “you” shall mean the relevant company).
## 3. Actor name, description and price
**3.1.** Each Actor has its own unique name. When you publish an Actor, you agree to assign to it a relevant, non-deceiving name
**3.2.** When publishing your Actor, you agree to create, publish and maintain an up-to-date, pertinent description, documentation or other sources of information, allowing the users to use the Actor.
**3.3.** The Actor, its name, price, description and other information connected to it published in Apify Store can be changed at any time in the future. However, changes to the Actor's name and price are limited to a maximum of one change per calendar month.
## 4. Competition
We encourage healthy competition. Creating an Actor that offers a similar functionality or outcome as another Actor is permitted. However, you must avoid simply copying another's Actor and claiming it as yours.
## 5. Prohibited content
**5.1.** You may create and publish an Actor of any kind, however to maintain a safe, legal and respectful environment on the Platform, we are asking you to avoid content and activities that are prohibited by the Terms (the “**Prohibited Content**”).
**5.2.** While we are not obliged to monitor the content of all the Actors, if we find out that your Actor contains any of the Prohibited Content, we are entitled to unpublish and/or delete such Actor, in our sole discretion.
## 6. Provider's right to intervene
Without limitation to clause 5.2 above, we reserve the right to delete, unpublish, restrict or modify any unlawful, offensive, harmful or misleading content or public information in Apify Store or any Public Actor breaching this Apify Store Terms as we may see fit.
## 7. Privacy of the code
By publishing your Actor on the Platform you are allowing us to view the code of that Actor. We may only access and inspect the code in limited circumstances where our interference is necessary for legal, compliance or security reasons, e.g. when investigating presence of any Prohibited Content, suspicion of credentials stealing or account hacking.
## 8. Maintenance of the Actor
By publishing your Actor you agree to use your best effort to maintain it in working condition and make updates to it from time to time as needed, in order to maintain a continuing functionality.
## 9. Testing
Please note that we are performing regular automated testing of the functionality and performance of all Actors published in Apify Store. Failing the testing may lead to the consequences described in clause 10 below.
## 10. Faulty Actor
If your Actor does not provide the declared functionality (a “**Faulty Actor**”) we are authorized to mark that Faulty Actor as “under maintenance” in the Apify Store. If you do not update or make changes to the Faulty Actor to recover its functionality and the Actor remains a Faulty Actor for the period of 30 days or more, we are authorized to mark that Faulty Actor as “deprecated” and/or remove that Faulty Actor from the Apify Store. You will not be reimbursed for removing the Faulty Actor if the removal is made in accordance with this Apify Store Terms.
## 11. Notified issues with an Actor
**11.1.** The Platform users have the option to report an issue with a Public Actor. The issue is then notified by an email to the author of that Actor. Should you receive such a notification email about an issue with your Actor, you agree to address the issue by either fixing the issue, updating the Actor, its description or other information, or by responding to us with explanation as soon as possible, however no later than within 14 days. If you do not respond to the notified issue in accordance with this clause, your Actor may be treated as a Faulty Actor with the consequences as per clause 10 above.
**11.2.** In addition to responding according to clause 11.1 above, you agree to respond to us, should we contact you regarding your Actor via email marked “urgent” in its subject, within three business days.
## 12. Pricing options
When you decide to set your Actor as paid, you may choose one of the two following options for setting its price:
**12.1. Monthly Rental** which means that each user of your Actor will pay a flat monthly rental fee for any their use of that Actor. You will set the price as X USD per month; or
**12.2. Price per Result** model which means that each user of your Actor will pay a fee calculated according to the number of results for each run of that Actor; You will set the price as X USD per 1,000 results. In this model the users do not pay for the Platform usage.
## 13. Payments to you
**13.1.** If you set your Actor as paid, you will be entitled to receive remuneration calculated as follows:
**13.1.1** 80% of the aggregate of the monthly rental fees paid by the users of the Actor; or
**13.1.2** 80% of the aggregate of Price per Result fees paid by the users of the Actor, further reduced by the cost of Platform usage.
You acknowledge that the remaining portion of the users' fees paid for the Actor shall belong to us.
*Example: You set the price for your paid Actor under Price per Result model as USD 5 per 1,000 results. The Actor has one paying user who runs it once and gets 1,000 results. The Platform usage costs of the Actor run are USD 0.5 You will be entitled to remuneration of USD 3.5 (i.e. (80% of 5) - 0.5).*
**13.2.** You are responsible for filling in your correct payment details in your user account and keeping them up-to-date to enable us to make the payments to you.
**13.3.** Your entitlement to remuneration for the Actor will cease for the time that the Actor will be a Faulty Actor. If the Faulty Actor will be repaired or updated by you and becomes operating in the desired manner again, your entitlement to remuneration in relation to the Actor will resume again. As a result you will receive the portion of the monthly rental fees corresponding to the portion of the month for which the Actor was not a Faulty Actor.
**13.4.** We shall pay you the remuneration monthly. The minimum amount payable is USD 20 for PayPal and USD 100 for any other payout option. Remuneration in any given month lower than 20 or 100 USD (respectively) will be rolled over to the following month.
---
# Apify Privacy Policy
Last Updated: February 10, 2025
Welcome to the Apify Privacy Policy!
Apify Technologies s.r.o. ("**Apify**," "**we**," "**our**" or "**us**") operates website apify.com (“**Website**”), provides its customers with the computer platform “Apify” (the "**Platform**") and some other services and functions, as specified in the https://docs.apify.com/legal/general-terms-and-conditions.md (the "**Services**").
Apify is committed to transparency in the processing of information. This is where we describe how we handle your personal data. “**Personal data**” is any information that is directly linked or can be linked to you. Capitalized terms not otherwise defined in this Privacy Policy will have the meaning outlined in the https://docs.apify.com/legal/general-terms-and-conditions.md.
## When the Privacy Policy applies
Please note that this Privacy Policy applies where Apify is a “data controller” of your personal data. This includes when we collect information from and about visitors to our websites, job candidates, prospective users and customers, and users of the Platform, collectively referred to herein as “**you**.”
## When the Privacy Policy does not apply
You may collect and manage personal data when using Platform or other Services. In such a scenario, Apify is a “**data processor**", not a “**data controller**” (as defined by applicable privacy laws) of personal data that we process under your instructions and on your behalf. For clarity, this Privacy Policy does not apply to where Apify processes personal data as a data processor. Such processing activities are governed by a separately executed data processing agreement(s) between Apify and you. We are not responsible for your privacy or data security practices. You represent and warrant that you have all necessary rights, consents, or other legal basis for processing such personal data and instructing us to process them on your behalf.
This Privacy Policy also does not apply to personal data about current and former Apify employees or contractors and agents acting in similar roles.
**PLEASE READ THIS PRIVACY POLICY CAREFULLY TO UNDERSTAND HOW WE HANDLE YOUR PERSONAL DATA. IF YOU DO NOT AGREE TO THIS PRIVACY POLICY, PLEASE DO NOT USE OUR WEBSITE OR THE SERVICES.**
## Table of Contents
*
*
*
*
*
*
*
*
*
*
*
*
*
## Personal Data We Collect
### Personal Data You Provide to Us
We collect a variety of personal data that you provide directly to us. For example, we collect information from you when you:
* create a user account to log into and use Platform and Services, including communicating with support or sales teams
* register for a demo, webinar, conference, or other events
* apply to a job offer.
We need, including but not limited to, your name, email address, username, business information, billing information, information about your professional career and educational background, including current and old job positions, degrees, qualifications, and payment information. Additionally, you may provide us voluntarily with a short bio, homepage URL, GitHub username, Twitter username, and profile picture, which will be added to your public profile on the Platform.
### Personal Data We Collect through Automated Means
Like most websites and technology services delivered over the internet, we automatically collect and store various information about your computer hardware and software when you visit our Websites and use our Platform and Services, including but not limited to the device name; relevant operating system type; hostname; IP address; language settings; date and time of access to the Platform; logs describing connections and containing statistics about data sent to and from other devices including page scraping activities.
### Cookies
When you visit our Website or use our Platform or our Services, we may collect some personal data in the form of cookies (a cookie is a small data file placed on your computer's hard drive that contains information that allows us to track your activity on the Website and Platform). The cookie does not contain personal data; however, if you provide us with some personal data, the cookies may act as an identifier to tie your personal data to your IP address or computer. We are committed to following the highest standards of privacy protection in relation to cookies. Other than the cookies necessary for the Website to function, you can always choose not to allow the cookies while using our Website or Platform. Read more information about the cookies we use and how we use them and ensure your privacy at the same time in our https://docs.apify.com/legal/cookie-policy.md.
## How We Use Your Personal Data
At Apify, it is extremely important to us to process personal data securely, fairly, and transparently. We do so in accordance with applicable privacy laws, including the European Union's and the United Kingdom's General Data Protection Regulation (“**GDPR**”).
We process your personal data for various purposes:
* **Provide Platform and other Services**: Authenticate you and provide you with access to Platform and to administer our Services
* **Provide paid Services**: We use secure third-party payment service providers to manage payment processing, which is collected through a secure payment process.
* **Create your publicly visible Apify profile** but only populated with personal data and additional information that you choose to provide
* **Provide customer support**: Respond to your requests for information and provide you with more effective and efficient customer support
* **Send marketing communications**: Contact you by email, postal mail, or phone with news, updates, information, promotions, surveys, or contests relating to the Services or other services that may be of interest to you, in accordance with applicable legal requirements related to such communications
* **Customize and optimize the content** you see on our Website
* **Improve Platform and the Services**: Assessing trends and usage across the Website and Platform to help us determine what new features or integrations our Users may be interested in
* **Conduct customer research**: Engage in analysis and research regarding the use of the Services, and improve our Services
* **Secure our Services** and resolve technical issues being reported
* **Meet legal requirements**: Comply with any procedures, laws, and regulations that apply to us where it is necessary for our legitimate interests or the legitimate interests of others
* **Establish, exercise, or defend our legal rights** where it is needed for our legitimate interests or the legitimate interests of others
* **Recruiting**: Evaluation and selection of applicants; including, for example, setting up and conducting interviews and tests, evaluating and assessing the results thereto, and as is otherwise needed in the recruitment processes, including the final recruitment. Additionally, we may process your personal data to include you in our talent pool and contact you should a suitable position be available if you have consented to this; such processing is legally permissible under Art. 6 (1)(a) of the GDPR.
## How We Disclose Your Personal Data
We may disclose your personal data:
* **Service Providers**: We provide access to or disclose your personal data to selected third parties who help us run our Website, provide Platform, or deliver our other Services, including billing and credit card verification, advertising and marketing, content and features, analytics, research, customer support, data storage, security, web hosting, fraud prevention, applicants tracking and legal services.
* **Protection of Apify and Others**: By using the Services, you acknowledge and agree that we may access, retain, and disclose the personal data we collect and maintain about you if required to do so by applicable law or in a good faith belief that such access, retention or disclosure is reasonably necessary to: (a) enforce any contracts with you; (b) respond to claims that any content violates the rights of third parties; (c) protect the rights, property or personal safety of Apify, its agents and affiliates, its other users and/or the public; and/or (d) comply with legal process (e.g. a subpoena or court order).
* **Joint Offerings**: From time to time, Apify may partner with other companies to offer products or services jointly. If you purchase or specifically express interest in a jointly offered product or service from us, Apify may share certain personal data collected in connection with your purchase or expression of interest with our joint promotion partner(s). Apify does not control its business partners' use of the personal data we share with them, and their use of the personal data will be in accordance with their own privacy policies. If you do not wish for your personal data to be shared in connection with any joint offerings, you may opt not to purchase or specifically express interest in a jointly offered product or service.
* **Public Forums**: Our websites may offer publicly accessible message boards, blogs, and community forums. Please keep in mind that if you directly disclose any personal data through our public message boards, blogs, or forums (including profile information associated with your user account), it may be read, collected, and used by any member of the public who accesses these Websites. Your posts and profile information may remain available even after terminating your user account. We urge you to consider the sensitivity of any information you may disclose in this way.
* **Compelled Disclosure**: We reserve the right to use or disclose your personal data if required by law or if we reasonably believe that use or disclosure is necessary to protect our rights, protect your safety or the safety of others, investigate fraud, or comply with a law, court order, or legal process.
* **Business transfers**: If Apify sells substantially all of its assets or one of Apify’s business units is acquired, your personal data will likely be one of the transferred assets
* **Otherwise with Your Consent or at Your Direction**. In addition to the disclosures described in this Privacy Policy, we may disclose your personal information with third parties whenever you consent to or direct such disclosure.
## How We Retain and Dispose Your Personal Data
We keep your personal data for no longer than necessary for the purposes for which it is processed. The length of time for which we retain information depends on the purposes for which we collect and use it and/or as required to comply with applicable laws.
## Your Rights and Your Choices
### Correcting, Updating, and Accessing
Upon your request and authentication of your identity, Apify will provide you with information about the personal data we have collected from you, whether we hold your personal data or process your personal data on behalf of a third party. Requests to access, change, or delete personal data made to Apify will be addressed within 30 days or earlier if required by applicable laws or regulations.
If your name, e-mail or postal address, telephone number, or other personal data changes, you may update, correct, or omit the relevant information by contacting Apify at privacy\[at]apify\[dot]com or by updating your personal data on the Account settings page on the Website. In some situations, we may not be able to provide access to certain personal data. Where an access request is refused, we will notify you in writing, document the reasons for refusal and outline further steps which are available to you. When a challenge regarding the accuracy of personal data is not resolved to your satisfaction, We will annotate the personal data under our control with a note that the correction was requested but not made.
### Removal and Objection
If you prefer not to receive newsletters or other marketing emails from Apify, please let us know by clicking on the unsubscribe link within any newsletter or marketing email you receive. Please note that, regardless of your request, we may still use and disclose certain personal data as permitted by this Privacy Policy or as required by applicable law. For example, you may not opt out of certain transactional emails from us, such as those confirming your requests or providing you with updates regarding our legal terms.
If you prefer not to receive marketing mail via the mail carrier, please let us know by contacting User service at support\[at]apify\[dot]com. Please note that such requests may take up to ten (10) days to become effective. For more information about your rights under EEA and U.K. GDPR, please refer to Clause “Territory-Specific Terms” below.
## Third-Party Links and Features
The Website and Platform may contain links to third-party websites and features (such as the share and/or "like" button or interactive mini-programs). These features may collect your IP address, and which page you are visiting on our sites and may set a cookie to enable the feature to function properly. These features and widgets are hosted by a third party or hosted directly on our websites. This Privacy Policy does not apply to these features. Your interactions with these features are governed by the privacy policy and other policies of the companies providing them. Those websites may have their own privacy policies or no privacy policies at all. Apify is not responsible for those websites, and we provide the links solely for your convenience.
## International Transfer of Your Personal Data
Your personal data is maintained and processed by us and our third-party service providers in the European Union and the United States and may also be maintained, processed, and stored in other jurisdictions that may have different data protection laws than those in your country of residence. If your information is transferred in these ways, please note that we comply with applicable legal requirements governing the transfer of information across borders. By using the Platform or Services, you agree to and acknowledge these transfers.
## How We Protect Your Personal Data
We take appropriate security measures to protect against unauthorized access to or unauthorized alteration, disclosure, or destruction of personal data. These include internal reviews of our data collection, storage, and processing practices, security measures, and physical security measures to guard against unauthorized access to systems where we store personal data.
We restrict access to collected information to Apify employees, service providers, and agents who need to know that information in order to operate, develop, or improve our services. These individuals are bound by confidentiality obligations. If you wish to learn more about our security practices, please see our Security Whitepaper.
If you become aware of or suspect any unauthorized use of your Apify account, please contact us immediately using the information in the "Contact Us" section below.
## Children and Privacy
Our Website, Platform, and Services are not directed to children, and we will not request personal data from anyone who we know to be under the age of 18 unless we have obtained verifiable parental consent from a parent or legal guardian. If we become aware that a user under the age of 18 has registered with our Website, Platform, or Services, provided personal data, and Apify has not obtained prior verifiable consent from a parent or legal guardian, we will immediately remove the user’s personal data from our files.
## Aggregate Data
Apify may also collect aggregate data. Aggregate data does not contain any personal data. It only contains usage statistics about your activities on the Website and Platform or in connection with the Services that cannot be used to identify, locate, or contact you (such as frequency of visits to the Website, data entered when using the Website, Website pages most frequently accessed, browser type, etc.). Generally, aggregate information is used collectively, and no single person can be identified by that compiled information. Apify uses aggregate information to provide its Services, determine the use of our Website (Platform), and monitor, audit, and analyze information pertaining to our business metrics. We may use aggregate information to improve the Website and Services, to monitor traffic and general usage patterns, and for other general business purposes. We may disclose aggregate information to third parties for various business reasons. Aggregate information will not include any personal information, and we will not disclose any personal information except as expressly stated elsewhere in this Privacy Policy.
## Territory-Specific Terms
### EEA and the UK
#### Legal Basis for Processing
The legal bases for using your personal data as set out in this Privacy Policy are as follows:
* Where we need to perform the contract we are about to enter into or have entered into with you for the Services
* Where it is necessary for our legitimate interests (or those of a third party) and your interests and fundamental rights, do not override those interests
* Where we need to comply with a legal or regulatory obligation
* Where we have your consent to process your personal data in a certain way
#### Your Data Protection Rights
Under applicable data protection laws, you may exercise certain rights regarding your personal data:
* Right to Access. You have the right to obtain confirmation from us whether we are processing your personal data, as well as the right to obtain a copy of your personal data undergoing processing.
* Right to Data Portability. You may receive the personal data that you have provided to us in a structured, commonly used, and machine-readable format, and you may have the right to transmit it to other data controllers without hindrance. This right only exists if the processing is based on your consent or a contract and is carried out by automated means.
* Right to Rectification. You have the right to request the rectification of inaccurate personal data and to have incomplete data completed.
* Right to Objection. In some instances, you have the right to object to the processing of your personal data.
* Right to Restrict Processing. In certain cases, you may request that we restrict the processing of your personal data.
* Right to Erasure. You may request that we erase your personal data in some instances.
* Right to Lodge a Complaint. You have the right to lodge a complaint with a supervisory authority.
* Right to Refuse or Withdraw Consent. If we ask for your consent to process your personal data, you are free to refuse to give it. If you have given your consent, you may withdraw it at any time without any adverse consequences. The lawfulness of any processing of your personal data that occurred prior to the withdrawal of your consent will not be affected.
* Right to Not Be Subject to Automated Decision-making. The types of automated decision-making referred to in Article 22(1) and (4) EU/UK General Data Protection Regulation (“**GDPR**”) do not take place in connection with your personal data. Should this change, we will inform you about why and how any such decision was made, the significance of it, and the possible consequences of it. You will also have the right to human intervention, to express your point of view, and to contest the decision.
You may exercise these rights by contacting us using the details provided in Section “Contact Us” below. Please note that we may refuse to act on requests to exercise data protection rights in certain cases, such as where providing access might infringe someone else’s privacy rights or impact our legal obligations.
#### International Transfers of Personal Data
Due to the global nature of our operations, some of the recipients mentioned in Section 2 of the Notice may be located in countries outside the EEA, or the U.K., which do not provide an adequate level of data protection as defined by data protection laws in the EEA, and the U.K. Transfers to third parties located in such third countries take place using a valid data transfer mechanism, such as the EU Standard Contractual Clauses and/or the U.K. Addendum to such clauses, on the basis of permissible statutory derogations, or any other valid data transfer mechanism issued or approved by the EEA, or U.K. authorities. Certain third countries have been officially recognized by the EEA, and U.K. authorities as providing an adequate level of protection and no further safeguards are necessary. Please reach out to us using the contact information in Section “Contact Us” below, if you wish to receive further information about how we transfer personal data or, where available, a copy of the relevant data transfer mechanism.
## Changes to our Privacy Policy
We update this Privacy Policy from time to time and encourage you to review it periodically. We will post any changes on this page. This Privacy Policy was last updated on the date indicated at the top of this Privacy Policy. Your continued use of the Website, Platform, and its Services after any changes or revisions to this Privacy Policy have been published shall indicate your agreement with the terms of such revised Privacy Policy.
## Contact Us
Any notices or requests to Apify under this Privacy Policy shall be made to privacy\[at]apify\[dot]com or:
By mail:
Apify Technologies s.r.o. Vodičkova 704/36, Nové Město 110 00 Praha 1 Czech Republic Attn: Apify Legal Team
---
# Apify Store Publishing Terms and Conditions
Last updated: February 26, 2025
***
Apify Technologies s.r.o., with its registered seat at Vodičkova 704/36, 110 00 Prague 1, Czech Republic, Company reg. no. 04788290, recorded in the Commercial Register kept by the Municipal Court of Prague, File No.: C 253224 (“**we**” or the “**Provider**”) thanks you (“**you**” or the “**User**”) for using our Platform console.apify.com (the “**Platform**”). These terms and conditions (the “**Apify Store Publishing Terms**”) shall govern your rights and obligations in relation to publishing and maintaining a public Actor in Apify Store at console.apify.com/store (“**Apify Store**”) in addition to our https://docs.apify.com/legal/general-terms-and-conditions.md (the “**General Terms**”).
Terms starting with a capital letter used in these Apify Store Publishing Terms have the meaning defined either here or in the General Terms. Provisions of the General Terms regarding liability, indemnity, governing law and choice of jurisdiction are incorporated herein by reference.
## 1. Publishing your Actor
**1.1.** Actors (i.e., the serverless cloud programs running on the Platform as defined in the General Terms) can be either private or public. Public Actors are shown in Apify Store and can be run by anyone. Private Actors can only be accessed and started by their owner. If you decide to make your Actor public, the following rules apply.
## 2. Acceptance of these terms
**2.1.** By publishing an Actor in Apify Store, you represent that you are over 18 years old and agree to adhere to these Apify Store Publishing Terms, in addition to the General Terms. If you act on behalf of a company when accepting these Apify Store Publishing Terms, you also hereby declare to be authorized to perform such legal actions on behalf of the company (herein the term “**you**” shall mean the relevant company).
## 3. Actor name, description and price
**3.1.** Each Actor has its own unique name. When you publish an Actor, you agree to assign to it a relevant, non-deceiving name.
**3.2.** When publishing your Actor, you agree to create, publish and maintain an up-to-date, pertinent description, documentation or other sources of information, allowing Apify users to use the Actor.
**3.3.** The Actor, its name, price, description and other information connected to it published in Apify Store can be changed at any time in the future. However, changes to the Actor's price that might potentially lead to a price increase for the end user, including pricing model changes, are limited to a maximum of one change per month.
## 4. Competition
**4.1.** We encourage healthy competition. Creating an Actor that offers similar functionality or outcome as another Actor is permitted. However, you must avoid simply copying another's Actor and claiming it as yours.
**4.2.** We reserve the right to immediately unpublish and/or delete any Actor that, in our sole discretion, infringes on any rights of other Apify users and/or third parties, including, but not limited to, copyright infringement caused by copying content of other Apify users, such as their Actors' readmes, descriptions or parts thereof.
## 5. Prohibited activities
**5.1.** You may create and publish an Actor of any kind. However, to maintain a safe, legal and respectful environment on the Platform, we are asking you to avoid content and activities that are prohibited by any terms agreed between both parties and the https://docs.apify.com/legal/acceptable-use-policy.md (the “**Prohibited Activities**”).
**5.2.** While we are not obliged to monitor the content of all Actors, if we find out that your Actor:
1. contains any content falling under the Prohibited Activities;
2. has been created (at least in part) by performing the Prohibited Activities; or
3. the Actor itself performs any of the Prohibited Activities.
We are authorized to unpublish and/or delete such an Actor, in our sole discretion.
**5.3.** On Apify Store, you are not allowed to directly or indirectly offer, link to, or otherwise promote any product or service outside of the Platform unless we explicitly agree to it in writing. If you violate this prohibition in your Actors (including its accessories, e.g., the “read me” section of the Actor page on the Platform) or in any other content you publish on Apify Store, we are entitled to unpublish, modify, and/or delete such Actor and its accessories or content, in our sole discretion.
## 6. Provider's right to intervene
**6.1.** Without limitation to clause 5.2 above, we reserve the right to delete, unpublish, restrict or modify any unlawful, offensive, harmful or misleading content or public information in Apify Store or any Actor as we may see fit to protect legitimate interests of Apify, its users, or any third parties.
## 7. Privacy of the code
**7.1.** By publishing your Actor on Apify Store you are allowing us to view the source code of that Actor. We may only access and inspect the source code in limited circumstances where our interference is necessary for legal, compliance or security reasons, for example, when investigating the presence of any Prohibited Activities.
## 8. Maintenance of the Actor
**8.1.** By publishing your Actor you agree to use your best effort to maintain it in working condition and make updates to it from time to time as needed, in order to maintain a continuing functionality.
## 9. Testing
**9.1.** We are performing regular automated testing of the functionality and performance of all Actors published in Apify Store. Failing the test may lead to the consequences described in clause 10 below.
## 10. Faulty Actor
**10.1.** If your Actor does not provide the declared functionality (a “**Faulty Actor**”) we are authorized to mark that Faulty Actor as “under maintenance” in Apify Store. If you do not update or make changes to the Faulty Actor to recover its functionality and the Actor remains a Faulty Actor for the period of 30 days or more, we are authorized to mark that Faulty Actor as “deprecated” and/or remove that Faulty Actor from Apify Store. You will not be reimbursed for the removal of the Faulty Actor.
## 11. Notified issues with an Actor
**11.1.** Platform users have the option to report an issue with an Actor. The issue is then notified by email to the author of that Actor. Should you receive such a notification email about an issue with your Actor, you agree to address the issue by either fixing the issue, updating the Actor, its description or other information, or by contacting us with an explanation as soon as possible, however, no later than within 14 days. If you do not address the notified issue in accordance with this clause, we are authorized to declare your Actor a Faulty Actor.
**11.2.** In addition to addressing the issues according to clause 11.1 above, you agree to respond to us, should we contact you regarding your Actor via email marked “urgent” in its subject, within three business days.
## 12. Pricing options
**12.1.** When you decide to set your Actor as monetized, you may choose one of the following options for setting its price:
1. **Monthly Rental** which means that each user of your Actor will pay a flat monthly rental fee for use of that Actor. You will set the price as X USD per month;
2. **Price per Result** model which means that each user of your Actor will pay a fee calculated according to the number of results of each run of that Actor. You will set the price as X USD per 1,000 results. In this model the users do not pay for the Platform usage; or
3. **Price per Event** model which allows you to programatically charge for events in your Actor source code. You need to pre-define the events first when setting the Actor pricing. In this model, the users do not pay for the Platform usage.
**12.2.** If you set your Actor as monetized, you will be entitled to receive remuneration calculated as follows:
1. 80% of the sum of the Monthly Rental fees paid by the users of the Actor; or
2. 80% of the sum of Price per Result or Pay per Event fees paid by the users of the Actor, further reduced by the cost of Platform usage of the corresponding Actor runs.
You acknowledge that the remaining portion of the users' fees paid for the Actor shall belong to us.
*Example: You set the price for your monetized Actor under the Price per Result model as USD 5 per 1,000 results. The Actor has one paying user who runs it once and gets 1,000 results. The Platform usage costs of the Actor run are USD 0.5 You will be entitled to remuneration of USD 3.5 (i.e. (80% of 5) - 0.5).*
**12.3.** You acknowledge that the amount of fees paid by the users and the Platform usage costs can change throughout the month thanks to unpaid invoices or refunds, and that any information about future or past profits or remuneration available to you in the Platform UI are only estimates. Apify shall not be liable for the outcomes of any actions made based on those estimates.
## 13. Payment terms
**13.1.** You are responsible for filling in your correct payment details in your user account and keeping them up-to-date to enable us to make payments to you.
**13.2.** Your entitlement to remuneration for an Actor will cease for the time that the Actor is a Faulty Actor. If you fix or update the Faulty Actor, and it becomes functional again as advertised, your entitlement to remuneration in relation to the Actor will resume.
**13.3.** Unless both parties have agreed otherwise, your remuneration will be paid on the basis of an invoice that we will issue on your behalf. The invoice will be issued without an undue delay after the end of each calendar month. You may approve or dispute the invoice within 7 days of issuance. An invoice that's neither accepted nor disputed within that period shall be deemed approved.
**13.4.** The minimum amount payable is USD 20 for PayPal and USD 100 for any other payout option (the "**Minimum payout**"). Remuneration in any given month lower than the Minimum payout will be rolled over to the following month until the sum of approved invoices exceeds the Minimum payout. Attributes of an invoice such as due date do not override the Minimum payout rule.
**13.5.** We may, in our sole discretion, block, remove, deprecate, or otherwise restrict your Actor from the Platform, if your Actor contains, requires, or refers the users to any payment method, other than the Apify payment gateway. This includes, without limitation, any method that (i) directly or indirectly circumvents the system of remuneration according to these Apify Store Publishing Terms; or (ii) poses a security risk to us, the Platform, the users, or any third party (e.g., by creating a false impression that the user pays any fees or other payments for the Actor to Apify). We reserve the right to withhold any and all outstanding payments due to you for such Actor until we determine whether the Actor complies with these Apify Store Publishing Terms.
**13.6.** In case any suspicions arise regarding the legitimacy of any user’s payment for your Actor (e.g., suspicions of a fraudulent payment) or if the user is past due with its payment obligations, before we pay you the remuneration for such user’s payment, we shall have the right, but not the obligation, to withhold the remuneration for such user’s payment for a period necessary for us to investigate any suspicious activity related to it or until paid by the user. You agree to provide us and/or any authorized third party (e.g., PayPal) with all reasonably requested cooperation.
**13.7.** If any fraudulent or otherwise non-compliant activity is identified regarding a user’s account or payments, we may ban the user from using the Platform. If we ban such a user, we shall not be obligated to pay you any remuneration resulting from such fraudulent user’s payments. In case such activities are identified after we already paid you the remuneration for such user's payment, you shall be obligated, at our written request, to refund the corresponding part of the remuneration.
**13.8.** If a payment of remuneration is withheld in accordance with these Apify Store Publishing Terms, you shall not be entitled to any interest or additional payments.
## 14. Amendments
**14.1.** We may unilaterally amend the Apify Store Publishing Terms. We shall notify you of such an amendment in advance. Should you disagree with such an amendment, you may unpublish all your Actors from Apify Store within 30 days from the notification. Otherwise, you will be deemed to agree with the announced amendments.
---
# Apify Whistleblowing Policy
\[verze v českém jazyce níže]
Last updated: April 14, 2025
At Apify, we are committed to upholding the highest standards of integrity, ethics, and accountability. As part of this commitment and to comply with the EU Directive and Czech Republic laws, we have implemented an internal whistleblowing system to ensure prompt and transparent reporting of any concerns related to unethical behavior, violations of company policies, or any other wrongdoing.
## Applicability
In compliance with the applicable law, Apify excludes the possibility for reports to be submitted by persons other than those performing or having performed:
* dependent work for Apify in the employment relationship (i.e., both under an employment contract and agreements made outside of employment, so-called “DPP/DPČ”);
* voluntary activities; or
* professional practice or internship.
The exclusion does not apply to job applicants. **Apify does not accept anonymous reports.**
## Who can help you?
Your report will be received by our incident resolver. The incident resolver is bound by confidentiality and will protect your identity and the information you have provided.
However, please note that if we find that the report is knowingly false, the protection does not apply, and you may be subject to a fine under the Whistleblower Protection Act. Apify may also take additional measures (protection under the Whistleblower Protection Act does not apply to you in such a case).
## How to submit a report?
You can submit a report to the incident resolver in writing via:
* email at whistleblowing\[at]apify\[dot]com;
* mail at Apify’s registered office address: Vodičkova 704/36, Nové Město, 110 00 Praha 1 (label the letter as “TO: SR. COUNSEL - CONFIDENTIAL”);
Or verbally:
* by calling 770627132; or
* in-person at a location agreed upon with the incident resolver (you can arrange this through the contact details provided for the incident resolvers above), where the report submission will be allowed within a reasonable period after your request, but no later than 14 days.
The incident resolver will write a transcript of the verbal report.
If you make a report in a way other than through the channels mentioned above (for example, by emailing another colleague within Apify), such a report will not be considered a report within the meaning of the Whistleblower Protection Act.
Apify may handle it differently, and you will not be entitled to protection under the Whistleblower Protection Act.
### Reporting at the Ministry of Justice
Apart from the internal reporting system, the Whistleblower Protection Act provides additional reporting means. These external reporting avenues encompass: Utilizing the Czech Ministry of Justice reporting system, available at the following address: https://oznamovatel.justice.cz/. Making a report through public disclosure, such as in the media (limited to cases explicitly outlined in § 7 para. 1 letter (c) of the Whistleblower Protection Act).
## What happens after a report is submitted?
Within seven calendar days of receiving your report, Apify incident resolver will provide you with written confirmation of its receipt unless you have explicitly indicated a preference not to be informed. This confirmation also does not apply where disclosure could compromise your identity.
The incident resolver will thoroughly investigate the circumstances of the reported conduct within Apify based on the information provided. Following this, provided the report is qualified as reasonable, they will propose measures to prevent the reported conduct from continuing and rectify the situation. The incident resolver will monitor the acceptance and implementation of these measures. We assure you that Apify will not take any negative (retaliatory) actions against you as a result of the report, such as termination of employment, salary reduction, or other disadvantages. The resolver will inform you of the investigation findings within 30 days of receiving the report, indicating whether it was deemed reasonable. In more complex cases, the deadline may be extended by up to 30 days, but not more than twice. After specific measures are implemented, the incident resolver will promptly provide you with an update.
## Processing personal data in the whistleblowing agenda
In connection with whistleblowing, Apify primarily receives personal data from the whistleblower, or based on Apify's own activities in assessing the reports.
The purpose of processing personal data is to receive, assess, and handle cases of reports, maintain a record of reports, prevent illegal activities (especially corruption, fraud, or unethical behaviour), and enforce compliance with legal and internal regulations and obligations.
Following personal data categories are typically processed in connection with whistleblowing: name, surname, date of birth, and contact address of the whistleblower; personal data present in the content of the report, including, for example, the identification of the person against whom the report is directed.
The recipient of the personal data related to whistleblowing is the designated incident resolver, who receives individual reports, records them, assesses their validity, investigates, etc. Some personal data (excluding the identification of the whistleblower) may also be accessible to Apify's authorized employees (appropriately informed), based on the discretion of the incident resolver.
External incident resolvers act as Apify's processors of personal data processed in connection with the whistleblowing agenda.
Personal data may be further disclosed to a court, public prosecutor, police authority, National Security Office, Tax Office and Tax Directorate, Office for Personal Data Protection, and other entities based on legal obligations.
The incident resolver is obliged to retain reports submitted through the internal reporting system and keep a record of data on received reports for a period of 5 years from the date of its receipt.
**NOTE: Due to the specificity of processing in this area, Apify notes that the exercise of certain rights related to the processing of personal data (especially the right to access) and information obligations may be restricted due to the legal obligation to protect the identity of the whistleblower and other individuals mentioned in the report to avoid possible disruption of the investigation of reported information.**
***
# Ochrana oznamovatelů v Apify
V Apify jsme se zavázali dodržovat nejvyšší standardy integrity, etiky a odpovědnosti. Jako součást tohoto závazku a pro účely plnění směrnice EU a relevantních zákonů České republiky jsme zavedli systém pro podávání a posuzování oznámení o možném protiprávním jednání s cílem zajistit promptní a transparentní řešení takových podnětů.
## Kdo je oprávněn podávat oznámení?
V souladu se zákonem Apify vylučuje možnost přijímání oznámení od jiných osob než těch, které pro Apify vykonávají nebo vykonávaly:
* závislou práci v rámci základního pracovněprávního vztahu (tzn., jak v rámci pracovního poměru, tak dohod uzavřených mimo pracovní poměr, tzv. DPP/DPČ);
* dobrovolnickou činnost; nebo
* odborné praxe či stáže.
Toto vyloučení se nevztahuje na uchazeče o zaměstnání. **Apify nepřijímá anonymní oznámení.**
## Kdo bude řešit Vaše oznámení?
Vaši zprávu obdrží příslušná osoba, a to Apify Sr. Counsel.
Příslušná osoba je vázána mlčenlivostí a bude chránit Vaši identitu a poskytnuté informace.
Nicméně, je třeba zdůraznit, že v případě zjištění, že poskytnuté oznámení je vědomě nepravdivé, nebude na Vás vztahována ochrana a může dojít k uložení pokuty podle zákona o ochraně oznamovatelů. Kromě toho může Apify přijmout i jiná dodatečná opatření. Ochrana podle zákona o ochraně oznamovatelů se tedy v případě vědomě nepravdivého oznámení neuplatní.
## Jak podat oznámení?
Oznámení můžete podat výše uvedené příslušné osobě buďto písemně:
* e-mailem na whistleblowing\[zavináč]apify\[tečka]com;
* poštou zasláním na adresu sídla Apify: Vodičkova 704/36, Nové Město, 110 00 Praha 1 (dopis označte jako “K RUKÁM SR. COUNSEL - DŮVĚRNÉ”);
nebo ústně, a to:
* telefonicky na 770627132 v době mezi 10:00 - 12:00 v pondělí či ve středu (vyjma státních svátků);
* osobně na předem dohodnutém místě s příslušnou osobou (schůzku si můžete domluvit s příslušnou osobou prostřednictvím uvedených kontaktních údajů výše). Schůzka s Vámi bude uskutečněna v rozumné lhůtě po oznámení Vašeho požadavku, nejpozději však do 14 dnů.
O ústním oznámení sepíše příslušná osoba protokol.
Pokud podáte oznámení jiným způsobem než prostřednictvím výše uvedených kanálů (např. e-mailem jinému kolegovi v Apify), taková zpráva nebude považována za oznámení ve smyslu zákona o ochraně oznamovatelů. Apify s ní může nakládat v jiném režimu, avšak nebudete mít nárok na ochranu podle zákona o ochraně oznamovatelů.
### Oznámení na Ministerstvo spravedlnosti
Apify je dále povinna Vás informovat o skutečnosti, že kromě interního oznamovacího systému implementovaného Apify existuje i možnost podat oznámení prostřednictvím systému Ministerstva spravedlnosti dostupného na následující adrese https://oznamovatel.justice.cz/. Veřejného zveřejnění, a to například v médiích. Tato možnost je však omezena na případy explicitně uvedené v § 7 odst. 1 písm. (c) zákona o ochraně oznamovatelů.
## Jak budou Vaše oznámení zpracována?
Do sedmi kalendářních dnů od obdržení Vašeho oznámení Vám příslušná osoba potvrdí jeho přijetí, ledaže jste v oznámení explicitně uvedli, že o přijetí oznámení nechcete být vyrozuměn(a). Toto potvrzení Vám nebude zasláno také v případě, pokud by mohlo dojít k prozrazení Vaší identity jiné osobě.
Příslušná osoba důkladně prozkoumá okolnosti uvedené v podaném oznámení. Shledá-li příslušná osoba oznámení jako důvodné, navrhne následně opatření k zabránění pokračování hlášeného chování a k nápravě situace. Přijetí a provedení těchto opatření bude monitorováno příslušnou osobou. Ujišťujeme vás, že Apify nevykoná žádné negativní (represivní) kroky vůči Vám v důsledku oznámení, jako je ukončení zaměstnání, snížení mzdy nebo jiné nevýhody. Příslušná osoba Vás informuje o výsledcích vyšetřování do 30 dnů od obdržení oznámení, a to včetně vyjádření, zda bylo posouzeno jako důvodné, či nikoli. V případě složitějších situací může lhůta být prodloužena o maximálně 30 dnů, avšak nikoli více než dvakrát za sebou. O konkrétních opatření, která byla provedena v návaznosti na Vaše oznámení, Vás bude příslušná osoba bez zbytečného odkladu informovat.
## Zpracování osobních údajů
V souvislosti s agendou ochrany oznamovatelů získává Apify osobní údaje především od oznamovatele, případně na základě vlastní činnosti Apify při posuzování oznámení.
Účelem zpracování osobních údajů je přijímání, posuzování a vyřizování případů oznámení, vedení evidence oznámení, předcházení protiprávní činnosti (zejména korupci, podvodům nebo neetickému jednání) a vymáhání dodržování právních a interních předpisů a povinností.
V souvislosti s agendou ochrany oznamovatelů jsou obvykle zpracovávány následující kategorie osobních údajů: jméno, příjmení, datum narození a kontaktní adresa oznamovatele; osobní údaje vyskytující se v obsahu oznámení, včetně např. identifikace osoby, proti které oznámení směřuje.
Příjemcem osobních údajů týkajících se agendy ochrany oznamovatelů je určená příslušná osoba, která jednotlivá oznámení přijímá, eviduje, posuzuje jejich oprávněnost, prošetřuje apod. K některým osobním údajům (s výjimkou identifikace oznamovatele) mohou mít na základě rozhodnutí příslušné osoby přístup také pověření a náležitě poučení zaměstnanci Apify.
Osobní údaje mohou být dále poskytnuty soudu, státnímu zastupitelství, policejnímu orgánu, Národnímu bezpečnostnímu úřadu, finančnímu úřadu a finančnímu ředitelství, Úřadu pro ochranu osobních údajů a dalším subjektům na základě zákonných povinností.
Příslušná osoba je povinna uchovávat oznámení podaná prostřednictvím interního oznamovacího systému a evidovat údaje o přijatých oznámeních po dobu 5 let ode dne jejich přijetí.
**UPOZORNĚNÍ: Vzhledem ke specifičnosti zpracování v této oblasti Apify upozorňuje, že výkon některých práv souvisejících se zpracováním osobních údajů (zejména práva na přístup) a informačních povinností může být omezen z důvodu zákonné povinnosti chránit identitu oznamovatele a dalších osob uvedených v oznámení, aby nedošlo k případnému narušení šetření oznámených informací.**
---
# Apify platform
> **Apify** is a cloud platform that helps you build reliable web scrapers, fast, and automate anything you can do manually in a web browser.
>
> **Actors** are serverless cloud programs running on the Apify platform that can easily crawl websites with millions of pages, but also perform arbitrary computing jobs such as sending emails or data transformations. They can be started manually, using our API or scheduler, and they can be easily integrated with other apps.
## Getting started
**Learn how to run any Actor in Apify Store or create your own. A step-by-step guides through your first steps on the Apify platform.**
#### https://docs.apify.com/platform/actors/running.md
https://docs.apify.com/platform/actors/running.md
#### https://docs.apify.com/platform/actors/development.md
https://docs.apify.com/platform/actors/development.md
#### https://docs.apify.com/academy.md
https://docs.apify.com/academy.md
## Contents
#### https://docs.apify.com/platform/actors.md
https://docs.apify.com/platform/actors.md
#### https://docs.apify.com/platform/storage.md
https://docs.apify.com/platform/storage.md
#### https://docs.apify.com/platform/proxy.md
https://docs.apify.com/platform/proxy.md
#### https://docs.apify.com/platform/schedules.md
https://docs.apify.com/platform/schedules.md
#### https://docs.apify.com/platform/integrations.md
https://docs.apify.com/platform/integrations.md
#### https://docs.apify.com/platform/monitoring.md
https://docs.apify.com/platform/monitoring.md
---
# Actors
**Learn how to develop, run and share serverless cloud programs. Create your own web scraping and automation tools and publish them on the Apify platform.**
***
#### https://docs.apify.com/platform/actors/running.md
https://docs.apify.com/platform/actors/running.md
#### https://docs.apify.com/platform/actors/development.md
https://docs.apify.com/platform/actors/development.md
#### https://docs.apify.com/platform/actors/publishing.md
https://docs.apify.com/platform/actors/publishing.md
## Actors overview
Actors are serverless cloud programs that can perform anything from a simple action, like filling out a web form, to a complex operation, like crawling an entire website or removing duplicates from a large dataset. Because Actors can persist their state and be restarted, their runs can be as short or as long as necessary, from seconds to hours, or even indefinitely.
Basically, Actors are programs packaged as Docker images, which accept a well-defined JSON input, perform an action, and optionally produce a well-defined JSON output.
Additional context
For more context, read the https://whitepaper.actor/.
## Actor components
Actors consist of these elements:
* *Dockerfile* which specifies where the Actor's source code is, how to build it, and run it.
* *Documentation* in a form of a README.md file.
* *Input and output schemas* that describe what input the Actor requires, and what results it produces.
* Access to an out-of-the-box *storage system* for Actor data, results, and files.
* *Metadata* such as the Actor name, description, author, and version.
The documentation and input/output schemas help people understand what the Actor does, enter required inputs in the user interface or API, and integrate results into other workflows. Actors can call and interact with each other to build more complex systems from simple ones.

## Build Actors
Build Actors to automate tasks, scrape data, or create custom workflows. The Apify platform gives you everything you need to develop, test, and deploy your code.
Ready to start? Check out the https://docs.apify.com/platform/actors/development.md.
## Running Actors
You can run Actors manually in https://console.apify.com/actors, using the https://docs.apify.com/api.md, https://docs.apify.com/cli, or https://docs.apify.com/platform/schedules.md. You can easily https://docs.apify.com/platform/integrations.md with other apps, https://docs.apify.com/platform/collaboration/access-rights.md them with other people, https://docs.apify.com/platform/actors/publishing.md them in https://apify.com/store, and even https://docs.apify.com/platform/actors/publishing/monetize.md.
Try Actors
To get a better idea of what Apify Actors are, visit https://apify.com/store and try out some of them!

## Public and private Actors
Actors can be https://docs.apify.com/platform/actors/running/actors-in-store.md or private. Private Actors are yours to use and keep; no one will see them if you don't want them to. Public Actors are https://docs.apify.com/platform/actors/running/actors-in-store.md in https://apify.com/store. You can make them free to use, or you can https://blog.apify.com/make-regular-passive-income-developing-web-automation-actors-b0392278d085/.
---
# Actor development
**Read about the technical part of building Apify Actors. Learn to define Actor inputs, build new versions, persist Actor state, and choose base Docker images.**
***
This section will guide you through the whole story of https://docs.apify.com/platform/actors.md development.
You can follow chapters sequentially from https://docs.apify.com/platform/actors/development/quick-start.md, where you learn how to create your first Actor in just a few minutes, through the more technical sections describing the whole Actor model, up to the https://docs.apify.com/platform/actors/development/performance.md section, where you learn how to fine-tune your Actor to get the most out of the Apify platform.
#### https://docs.apify.com/platform/actors/development/quick-start.md
https://docs.apify.com/platform/actors/development/quick-start.md
#### https://docs.apify.com/platform/actors/development/actor-definition.md
https://docs.apify.com/platform/actors/development/actor-definition.md
#### https://docs.apify.com/platform/actors/development/programming-interface.md
https://docs.apify.com/platform/actors/development/programming-interface.md
#### https://docs.apify.com/platform/actors/development/deployment.md
https://docs.apify.com/platform/actors/development/deployment.md
#### https://docs.apify.com/platform/actors/development/builds-and-runs.md
https://docs.apify.com/platform/actors/development/builds-and-runs.md
#### https://docs.apify.com/platform/actors/development/performance.md
https://docs.apify.com/platform/actors/development/performance.md
***
If your Actor allows for integration with external services, or performs some post-processing of datasets generated by other Actors, check out the section https://docs.apify.com/platform/integrations/actors/integration-ready-actors.md.
After your development, you can jump to the section https://docs.apify.com/platform/actors/publishing.md to learn about how to publish your Actor in https://apify.com/store and monetize it by renting it out to users of the platform.
---
# Actor definition
**Learn how to turn your arbitrary code into an Actor simply by adding an Actor definition directory.**
***
A single isolated Actor consists of source code and various settings. You can think of an Actor as a cloud app or service that runs on the Apify platform. The run of an Actor is not limited to the lifetime of a single HTTP transaction. It can run for as long as necessary, even forever.
Basically, Actors are programs packaged as https://hub.docker.com/, which accept a well-defined JSON input, perform an action, and optionally produce an output.
Actors have the following elements:
* The main **https://docs.apify.com/platform/actors/development/actor-definition/actor-json.md** file contains **metadata** such as the Actor name, description, author, version, and links pointing to the other definition files below.
* **https://docs.apify.com/platform/actors/development/actor-definition/dockerfile.md** which specifies where is the Actor's source code, how to build it, and run it.
* **Documentation** in the form of a **README.md** file.
* **https://docs.apify.com/platform/actors/development/actor-definition/input-schema.md** and **https://docs.apify.com/platform/actors/development/actor-definition/dataset-schema.md** that describe what input the Actor requires and what results it produces.
* Access to an out-of-box **https://docs.apify.com/platform/storage.md** system for Actor data, results, and files.
The documentation and the input/dataset schemas make it possible for people to easily understand what the Actor does, enter the required inputs both in the user interface or API, and integrate the Actor's results with their other workflows. Actors can easily call and interact with each other, enabling building more complex systems on top of simple ones.
The Apify platform provides an open https://docs.apify.com/api/v2.md, cron-style https://docs.apify.com/platform/schedules.md, https://docs.apify.com/platform/integrations/webhooks.md, and https://docs.apify.com/platform/integrations.md to services such as Zapier or Make, which make it easy for users to integrate Actors with their existing workflows. Anyone is welcome to https://docs.apify.com/platform/actors/publishing.md in https://apify.com/store, and you can even https://docs.apify.com/platform/actors/publishing/monetize.md.
Actors can be developed and run locally and then easily deployed to the Apify platform using the https://docs.apify.com/cli or a https://docs.apify.com/platform/integrations/github.md. For more details, see the https://docs.apify.com/platform/actors/development/deployment.md section.
> **To get a better idea of what Apify Actors are, visit https://apify.com/store, and try out some of them!**
---
# actor.json
**Learn how to write the main Actor configuration in the `.actor/actor.json` file.**
***
Your main Actor configuration is in the `.actor/actor.json` file at the root of your Actor's directory. This file links your local development project to an Actor on the Apify platform. It should include details like the Actor's name, version, build tag, and environment variables. Make sure to commit this file to your Git repository.
For example, the `.actor/actor.json` file can look like this:
* Full actor.json
* Minimal actor.json
{ "actorSpecification": 1, // always 1 "name": "name-of-my-scraper", "version": "0.0", "buildTag": "latest", "minMemoryMbytes": 256, "maxMemoryMbytes": 4096, "environmentVariables": { "MYSQL_USER": "my_username", "MYSQL_PASSWORD": "@mySecretPassword" }, "usesStandbyMode": false, "dockerfile": "./Dockerfile", "readme": "./ACTOR.md", "input": "./input_schema.json", "storages": { "dataset": "./dataset_schema.json" }, "webServerSchema": "./web_server_openapi.json" }
{ "actorSpecification": 1, // always 1 "name": "name-of-my-scraper", "version": "0.0" }
## Reference
Deployment metadata
Actor `name`, `version`, `buildTag`, and `environmentVariables` are currently only used when you deploy your Actor using the https://docs.apify.com/cli and not when deployed, for example, via GitHub integration. There, it serves for informative purposes only.
| Property | Type | Description |
| ---------------------- | -------- | ------------------------------------------------------------------------------------------------------------------------------------------------------------------------------------------------------------------------------------------------------------------------------------------------------------------------------------------------------------------------------ |
| `actorSpecification` | Required | The version of the Actor specification. This property must be set to `1`, which is the only version available. |
| `name` | Required | The name of the Actor. |
| `version` | Required | The version of the Actor, specified in the format `[Number].[Number]`, e.g., `0.1`, `0.3`, `1.0`, `1.3`, etc. |
| `buildTag` | Optional | The tag name to be applied to a successful build of the Actor. If not specified, defaults to `latest`. Refer to the https://docs.apify.com/platform/actors/development/builds-and-runs/builds.md for more information. |
| `environmentVariables` | Optional | A map of environment variables to be used during local development. These variables will also be applied to the Actor when deployed on the Apify platform. For more details, see the https://docs.apify.com/cli/docs/vars section of Apify CLI documentation. |
| `dockerfile` | Optional | The path to the Dockerfile to be used for building the Actor on the platform. If not specified, the system will search for Dockerfiles in the `.actor/Dockerfile` and `Dockerfile` paths, in that order. Refer to the https://docs.apify.com/platform/actors/development/actor-definition/dockerfile.md section for more information. |
| `dockerContextDir` | Optional | The path to the directory to be used as the Docker context when building the Actor. The path is relative to the location of the `actor.json` file. This property is useful for monorepos containing multiple Actors. Refer to the https://docs.apify.com/platform/actors/development/deployment/source-types.md#actor-monorepos section for more details. |
| `readme` | Optional | The path to the README file to be used on the platform. If not specified, the system will look for README files in the `.actor/README.md` and `README.md` paths, in that order of preference. Check out https://apify.notion.site/How-to-create-an-Actor-README-759a1614daa54bee834ee39fe4d98bc2 guidance. |
| `input` | Optional | You can embed your https://docs.apify.com/platform/actors/development/actor-definition/input-schema.md object directly in `actor.json` under the `input` field. You can also provide a path to a custom input schema. If not provided, the input schema at `.actor/INPUT_SCHEMA.json` or `INPUT_SCHEMA.json` is used, in this order of preference. |
| `changelog` | Optional | The path to the CHANGELOG file displayed in the Information tab of the Actor in Apify Console next to Readme. If not provided, the CHANGELOG at `.actor/CHANGELOG.md` or `CHANGELOG.md` is used, in this order of preference. Your Actor doesn't need to have a CHANGELOG but it is a good practice to keep it updated for published Actors. |
| `storages.dataset` | Optional | You can define the schema of the items in your dataset under the `storages.dataset` field. This can be either an embedded object or a path to a JSON schema file. https://docs.apify.com/platform/actors/development/actor-definition/dataset-schema.md about Actor dataset schemas. |
| `minMemoryMbytes` | Optional | Specifies the minimum amount of memory in megabytes required by the Actor to run. Requires an *integer* value. If both `minMemoryMbytes` and `maxMemoryMbytes` are set, then `minMemoryMbytes` must be equal or lower than `maxMemoryMbytes`. Refer to the https://docs.apify.com/platform/actors/running/usage-and-resources#memory for more details about memory allocation. |
| `maxMemoryMbytes` | Optional | Specifies the maximum amount of memory in megabytes required by the Actor to run. It can be used to control the costs of run, especially when developing pay per result Actors. Requires an *integer* value. Refer to the https://docs.apify.com/platform/actors/running/usage-and-resources#memory for more details about memory allocation. |
| `usesStandbyMode` | Optional | Boolean specifying whether the Actor will have https://docs.apify.com/platform/actors/development/programming-interface/standby.md enabled. |
| `webServerSchema` | Optional | Defines an OpenAPI v3 schema for the web server running in the Actor. This can be either an embedded object or a path to a JSON schema file. Use this when your Actor starts its own HTTP server and you want to describe its interface. |
---
# Dataset schema specification
**Learn how to define and present your dataset schema in an user-friendly output UI.**
***
The dataset schema defines the structure and representation of data produced by an Actor, both in the API and the visual user interface.
## Example
Let's consider an example Actor that calls `Actor.pushData()` to store data into dataset:
main.js
import { Actor } from 'apify'; // Initialize the JavaScript SDK await Actor.init();
/**
- Actor code */ await Actor.pushData({ numericField: 10, pictureUrl: 'https://www.google.com/images/branding/googlelogo/2x/googlelogo_color_92x30dp.png', linkUrl: 'https://google.com', textField: 'Google', booleanField: true, dateField: new Date(), arrayField: ['#hello', '#world'], objectField: {}, });
// Exit successfully await Actor.exit();
To set up the Actor's output tab UI using a single configuration file, use the following template for the `.actor/actor.json` configuration:
.actor/actor.json
{ "actorSpecification": 1, "name": "Actor Name", "title": "Actor Title", "version": "1.0.0", "storages": { "dataset": { "actorSpecification": 1, "views": { "overview": { "title": "Overview", "transformation": { "fields": [ "pictureUrl", "linkUrl", "textField", "booleanField", "arrayField", "objectField", "dateField", "numericField" ] }, "display": { "component": "table", "properties": { "pictureUrl": { "label": "Image", "format": "image" }, "linkUrl": { "label": "Link", "format": "link" }, "textField": { "label": "Text", "format": "text" }, "booleanField": { "label": "Boolean", "format": "boolean" }, "arrayField": { "label": "Array", "format": "array" }, "objectField": { "label": "Object", "format": "object" }, "dateField": { "label": "Date", "format": "date" }, "numericField": { "label": "Number", "format": "number" } } } } } } } }
The template above defines the configuration for the default dataset output view. Under the `views` property, there is one view titled *Overview*. The view configuration consists of two main steps:
1. `transformation` - set up how to fetch the data.
2. `display` - set up how to visually present the fetched data.
The default behavior of the Output tab UI table is to display all fields from `transformation.fields` in the specified order. You can customize the display properties for specific formats or column labels if needed.

## Structure
Output configuration files need to be located in the `.actor` folder within the Actor's root directory.
You have two choices of how to organize files within the `.actor` folder.
### Single configuration file
.actor/actor.json
{ "actorSpecification": 1, "name": "this-is-book-library-scraper", "title": "Book Library scraper", "version": "1.0.0", "storages": { "dataset": { "actorSpecification": 1, "fields": {}, "views": { "overview": { "title": "Overview", "transformation": {}, "display": {} } } } } }
### Separate configuration files
.actor/actor.json
{ "actorSpecification": 1, "name": "this-is-book-library-scraper", "title": "Book Library scraper", "version": "1.0.0", "storages": { "dataset": "./dataset_schema.json" } }
.actor/dataset\_schema.json
{ "actorSpecification": 1, "fields": {}, "views": { "overview": { "title": "Overview", "transformation": {}, "display": { "component": "table" } } } }
Both of these methods are valid so choose one that suits your needs best.
## Handle nested structures
The most frequently used data formats present the data in a tabular format (Output tab table, Excel, CSV). If your Actor produces nested JSON structures, you need to transform the nested data into a flat tabular format. You can flatten the data in the following ways:
* Use `transformation.flatten` to flatten the nested structure of specified fields. This transforms the nested object into a flat structure. e.g. with `flatten:["foo"]`, the object `{"foo": {"bar": "hello"}}` is turned into `{"foo.bar": "hello"}`. Once the structure is flattened, it's necessary to use the flattened property name in both `transformation.fields` and `display.properties`, otherwise, fields might not be fetched or configured properly in the UI visualization.
* Use `transformation.unwind` to deconstruct the nested children into parent objects.
* Change the output structure in an Actor from nested to flat before the results are saved in the dataset.
## Dataset schema structure definitions
The dataset schema structure defines the various components and properties that govern the organization and representation of the output data produced by an Actor. It specifies the structure of the data, the transformations to be applied, and the visual display configurations for the Output tab UI.
### DatasetSchema object definition
| Property | Type | Required | Description |
| -------------------- | ---------------------------- | -------- | ------------------------------------------------------------------------------------------------------------ |
| `actorSpecification` | integer | true | Specifies the version of dataset schemastructure document.Currently only version 1 is available. |
| `fields` | JSONSchema compatible object | true | Schema of one dataset object.Use JsonSchema Draft 2020–12 orother compatible formats. |
| `views` | DatasetView object | true | An object with a description of an APIand UI views. |
### DatasetView object definition
| Property | Type | Required | Description |
| ---------------- | ------------------------- | -------- | ----------------------------------------------------------------------------------------------------- |
| `title` | string | true | The title is visible in UI in the Output taband in the API. |
| `description` | string | false | The description is only available in the API response. |
| `transformation` | ViewTransformation object | true | The definition of data transformationapplied when dataset data is loaded fromDataset API. |
| `display` | ViewDisplay object | true | The definition of Output tab UI visualization. |
### ViewTransformation object definition
| Property | Type | Required | Description |
| --------- | --------- | -------- | ---------------------------------------------------------------------------------------------------------------------------------------------------------------------------------------------------------------- |
| `fields` | string\[] | true | Selects fields to be presented in the output.The order of fields matches the order of columnsin visualization UI. If a field valueis missing, it will be presented as **undefined** in the UI. |
| `unwind` | string\[] | false | Deconstructs nested children into parent object,For example, with `unwind:["foo"]`, the object `{"foo": {"bar": "hello"}}`is transformed into `{"bar": "hello"}`. |
| `flatten` | string\[] | false | Transforms nested object into flat structure.For example, with `flatten:["foo"]` the object `{"foo":{"bar": "hello"}}`is transformed into `{"foo.bar": "hello"}`. |
| `omit` | string\[] | false | Removes the specified fields from the output.Nested fields names can be used as well. |
| `limit` | integer | false | The maximum number of results returned.Default is all results. |
| `desc` | boolean | false | By default, results are sorted in ascending based on the write event into the dataset.If `desc:true`, the newest writes to the dataset will be returned first. |
### ViewDisplay object definition
| Property | Type | Required | Description |
| ------------ | ------ | -------- | --------------------------------------------------------------------------------------------------------------------------------------------------------------------------------------------------------------------------------- |
| `component` | string | true | Only the `table` component is available. |
| `properties` | Object | false | An object with keys matching the `transformation.fields`and `ViewDisplayProperty` as values. If properties are not set, the table will be rendered automatically with fields formatted as `strings`, `arrays` or `objects`. |
### ViewDisplayProperty object definition
| Property | Type | Required | Description |
| -------- | -------------------------------------------------------------------------------------------------------------------------- | -------- | ----------------------------------------------------------------------------------- |
| `label` | string | false | In the Table view, the label will be visible as the table column's header. |
| `format` | One of - `text`- `number`- `date`- `link`- `boolean`- `image`- `array`- `object` | false | Describes how output data values are formatted to be rendered in the Output tab UI. |
---
# Dataset validation
**Specify the dataset schema within the Actors so you can add monitoring and validation at the field level.**
***
To define a schema for a default dataset of an Actor run, you need to set `fields` property in the dataset schema.
info
The schema defines a single item in the dataset. Be careful not to define the schema as an array, it always needs to be a schema of an object.
Schema configuration is not available for named datasets or dataset views.
You can either do that directly through `actor.json`:
.actor.json
{ "actorSpecification": 1, "storages": { "dataset": { "actorSpecification": 1, "fields": { "$schema": "http://json-schema.org/draft-07/schema#", "type": "object", "properties": { "name": { "type": "string" } }, "required": ["name"] }, "views": {} } } }
Or in a separate file linked from the `.actor.json`:
.actor.json
{ "actorSpecification": 1, "storages": { "dataset": "./dataset_schema.json" } }
dataset\_schema.json
{ "actorSpecification": 1, "fields": { "$schema": "http://json-schema.org/draft-07/schema#", "type": "object", "properties": { "name": { "type": "string" } }, "required": ["name"] }, "views": {} }
important
Dataset schema needs to be a valid JSON schema draft-07, so the `$schema` line is important and must be exactly this value or it must be omitted:
`"$schema": "http://json-schema.org/draft-07/schema#"`
## Dataset validation
When you define a schema of your default dataset, the schema is then always used when you insert data into the dataset to perform validation (we use https://ajv.js.org/).
If the validation succeeds, nothing changes from the current behavior, data is stored and an empty response with status code `201` is returned.
If the data you attempt to store in the dataset is *invalid* (meaning any of the items received by the API fails validation), *the entire request will be discarded*, The API will return a response with status code `400` and the following JSON response:
{ "error": { "type": "schema-validation-error", "message": "Schema validation failed", "data": { "invalidItems": [{ "itemPosition": "", "validationErrors": "" }] } } }
For the complete AJV validation error object type definition, refer to the https://github.com/ajv-validator/ajv/blob/master/lib/types/index.ts#L86.
If you use the Apify JS client or Apify SDK and call `pushData` function you can access the validation errors in a `try catch` block like this:
* Javascript
* Python
try { const response = await Actor.pushData(items); } catch (error) { if (!error.data?.invalidItems) throw error; error.data.invalidItems.forEach((item) => { const { itemPosition, validationErrors } = item; }); }
from apify import Actor from apify_client.errors import ApifyApiError
async with Actor: try: await Actor.push_data(items) except ApifyApiError as error: if 'invalidItems' in error.data: validation_errors = error.data['invalidItems']
## Examples of common types of validation
Optional field (price is optional in this case):
{ "$schema": "http://json-schema.org/draft-07/schema#", "type": "object", "properties": { "name": { "type": "string" }, "price": { "type": "number" } }, "required": ["name"] }
Field with multiple types:
{ "price": { "type": ["string", "number"] } }
Field with type `any`:
{ "price": { "type": ["string", "number", "object", "array", "boolean"] } }
Enabling fields to be `null` :
{ "name": { "type": "string", "nullable": true } }
Define type of objects in array:
{ "comments": { "type": "array", "items": { "type": "object", "properties": { "author_name": { "type": "string" } } } } }
Define specific fields, but allow anything else to be added to the item:
{ "$schema": "http://json-schema.org/draft-07/schema#", "type": "object", "properties": { "name": { "type": "string" } }, "additionalProperties": true }
See https://json-schema.org/understanding-json-schema/reference for additional options.
You can also use https://www.liquid-technologies.com/online-json-to-schema-converter to convert an existing JSON document into it's JSON schema.
## Dataset field statistics
When you configure the dataset fields schema, we generate a field list and measure the following statistics:
* **Null count:** how many items in the dataset have the field set to null
* **Empty count:** how many items in the dataset are `undefined` , meaning that for example empty string is not considered empty
* **Minimum and maximum**
* For numbers, this is calculated directly
* For strings, this field tracks string length
* For arrays, this field tracks the number of items in the array
* For objects, this tracks the number of keys
* For booleans, this tracks whether the boolean was set to true. Minimum is always 0, but maximum can be either 1 or 0 based on whether at least one item in the dataset has the boolean field set to true.
You can use them in https://docs.apify.com/platform/monitoring.md#alert-configuration.
---
# Dockerfile
**Learn about the available Docker images you can use as a base for your Apify Actors. Choose the right base image based on your Actor's requirements and the programming language you're using.**
***
When developing an https://docs.apify.com/platform/actors.md on the Apify platform, you can choose from a variety of pre-built Docker images to serve as the base for your Actor. These base images come with pre-installed dependencies and tools, making it easier to set up your development environment and ensuring consistent behavior across different environments.
## Base Docker images
Apify provides several Docker images that can serve as base images for Actors. All images come in two versions:
* `latest` - This version represents the stable and production-ready release of the base image.
* `beta` - This version is intended for testing new features. Use at your own risk.
Pre-cached Docker images
All Apify Docker images are pre-cached on Apify servers to speed up Actor builds and runs. The source code for generating these images is available in the https://github.com/apify/apify-actor-docker repository.
### Node.js base images
These images come with Node.js (versions `20`, `22`, or `24`) the https://docs.apify.com/sdk/js, and https://crawlee.dev/ preinstalled. The `latest` tag corresponds to the latest LTS version of Node.js.
| Image | Description |
| ------------------------------------------------------------- | -------------------------------------------------------------------------------------------------------------------------- |
| https://hub.docker.com/r/apify/actor-node/ | Slim Alpine Linux image with only essential tools. Does not include headless browsers. |
| https://hub.docker.com/r/apify/actor-node-puppeteer-chrome/ | Debian image with Chromium, Google Chrome, and the https://github.com/puppeteer/puppeteer library. |
| https://hub.docker.com/r/apify/actor-node-playwright-chrome/ | Debian image with Chromium, Google Chrome, and the https://github.com/microsoft/playwright library. |
| https://hub.docker.com/r/apify/actor-node-playwright-firefox/ | Debian image with Firefox and the https://github.com/microsoft/playwright library . |
| https://hub.docker.com/r/apify/actor-node-playwright-webkit/ | Ubuntu image with WebKit and the https://github.com/microsoft/playwright library. |
| https://hub.docker.com/r/apify/actor-node-playwright/ | Ubuntu image with https://github.com/microsoft/playwright and all its browsers (Chromium, Google Chrome, Firefox, WebKit). |
See the https://docs.apify.com/sdk/js/docs/guides/docker-images for more details.
### Python base images
These images come with Python (version `3.9`, `3.10`, `3.11`, `3.12`, or `3.13`) and the https://docs.apify.com/sdk/python preinstalled. The `latest` tag corresponds to the latest Python 3 version supported by the Apify SDK.
| Image | Description |
| ------------------------------------------------------ | ----------------------------------------------------------------------------------------------------------------------------- |
| https://hub.docker.com/r/apify/actor-python | Slim Debian image with only the Apify SDK for Python. Does not include headless browsers. |
| https://hub.docker.com/r/apify/actor-python-playwright | Debian image with https://github.com/microsoft/playwright and all its browsers. |
| https://hub.docker.com/r/apify/actor-python-selenium | Debian image with https://github.com/seleniumhq/selenium, Google Chrome, and https://developer.chrome.com/docs/chromedriver/. |
## Custom Dockerfile
Apify uses Docker to build and run Actors. If you create an Actor from a template, it already contains an optimized `Dockerfile` for the given use case.
To use a custom `Dockerfile`, you can either:
* Reference it from the `dockerfile` field in `.actor/actor.json`,
* Store it in `.actor/Dockerfile` or `Dockerfile` in the root directory (searched in this order of preference).
If no `Dockerfile` is provided, the system uses the following default:
FROM apify/actor-node:24
COPY --chown=myuser:myuser package*.json ./
RUN npm --quiet set progress=false
&& npm install --only=prod --no-optional
&& echo "Installed NPM packages:"
&& (npm list --only=prod --no-optional --all || true)
&& echo "Node.js version:"
&& node --version
&& echo "NPM version:"
&& npm --version
COPY --chown=myuser:myuser . ./
For more information about `Dockerfile` syntax and commands, see the https://docs.docker.com/reference/dockerfile/.
Custom base images
While `apify/actor-node` is a base Docker image provided by Apify, you can use other Docker images as the base for your Actors.However, using the Apify images has some performance advantages, as they are pre-caches on Apify servers.
By default, Apify base Docker images with the Apify SDK and Crawlee start your Node.js application the same way as `npm start`, i.e, by running the command specified in `package.json` under `scripts` - `start`. The default `package.json` is similar to:
{ "description": "Anonymous Actor on the Apify platform", "version": "0.0.1", "license": "UNLICENSED", "main": "main.js", "scripts": { "start": "node main.js" }, "dependencies": { "apify": "^3.0.0", "crawlee": "^3.0.0" }, "repository": {} }
This means the system expects the source code to be in `main.js` by default. If you want to override this behavior, use a custom `package.json` and/or `Dockerfile`.
Optimization tips
You can check out various optimization tips for Dockerfile in our https://docs.apify.com/platform/actors/development/performance.md documentation.
## Updating older Dockerfiles
All Apify base Docker images now use a non-root user to enhance security. This change requires updates to existing Actor `Dockerfile`s that use the `apify/actor-node`, `apify/actor-python`, `apify/actor-python-playwright`, or `apify/actor-python-selenium` images. This section provides guidance on resolving common issues that may arise during this migration.
If you encounter an issue that is not listed here, or need more guidance on how to update your Dockerfile, please https://github.com/apify/apify-actor-docker/issues/new.
Action required
As of **August 25, 2025** the base Docker images display a deprecation warning that links you here. This warning will be removed start of **February 2026**, so you should update your Dockerfiles to ensure forward compatibility.
### User and working directory
To improve security, the affected images no longer run as the `root` user. Instead, they use a dedicated non-root user, `myuser`, and a consistent working directory at `/home/myuser`. This configuration is now the standard for all Apify base Docker images.
### Common issues
#### Crawlee templates automatically installing `git` in Python images
If you've built your Actor using a https://crawlee.dev/ template, you might have the following line in your `Dockerfile`:
RUN apt update && apt install -yq git && rm -rf /var/lib/apt/lists/*
You can safely remove this line, as the `git` package is now installed in the base image.
#### `uv` package manager fails to install dependencies
If you are using the `uv` package manager, you might have the following line in your `Dockerfile`:
ENV UV_PROJECT_ENVIRONMENT="/usr/local"
With the move to a non-root user, this variable will cause `uv` to throw a permission error. You can safely remove this line, or, if you need it set to a custom path, adjust it to point to a location in the `/home/myuser` directory.
#### Copying files with the correct permissions
When using the `COPY` instruction to copy your files to the container, you should append the `--chown=myuser:myuser` flag to the command to ensure the `myuser` user owns the files.
Here are a few common examples:
COPY --chown=myuser:myuser requirements.txt ./
COPY --chown=myuser:myuser . ./
warning
If your `Dockerfile` contains a `RUN` instruction similar to the following one, you should remove it:
RUN chown -R myuser:myuser /home/myuser
Instead, add the `--chown` flag to the `COPY` instruction:
COPY --chown=myuser:myuser . ./
Running `chown` across multiple files needlessly slows down the build process. Using the flag on `COPY` is much more efficient.
#### An `apify` user is being added by a template
If your `Dockerfile` has instructions similar to the following, they were likely added by an older template:
Create and run as a non-root user.
RUN adduser -h /home/apify -D apify &&
chown -R apify:apify ./
USER apify
You should remove these lines, as the new user is now `myuser`. Don't forget to update your `COPY` instructions to use the `--chown` flag with the `myuser` user.
COPY --chown=myuser:myuser . ./
#### Installing dependencies that require root access
The `root` user is still available in the Docker images. If you must run steps that require root access (like installing system packages with `apt` or `apk`), you can temporarily switch to the `root` user.
FROM apify/actor-node:24
Switch to root temporarily to install dependencies
USER root
RUN apt update
&& apt install -y
Switch back to the non-root user
USER myuser
... your other instructions
If your Actor needs to run as `root` for a specific reason, you can add the `USER root` instruction after `FROM`. However, for a majority of Actors, this is not necessary.
---
# Actor input schema
**Learn how to define and validate a schema for your Actor's input with code examples. Provide an autogenerated input UI for your Actor's users.**
***
The input schema defines the input parameters for an Actor. It's a `JSON` object comprising various field types supported by the Apify platform. Based on the input schema, the Apify platform automatically generates a user interface for the Actor. It also validates the input data passed to the Actor when it's executed through the API or the Apify Console UI.
The following is an example of an auto-generated UI for the https://apify.com/apify/website-content-crawler Actor.

With an input schema defined as follows:
{
"title": "Input schema for Website Content Crawler",
"description": "Enter the start URL(s) of the website(s) to crawl, configure other optional settings, and run the Actor to crawl the pages and extract their text content.",
"type": "object",
"schemaVersion": 1,
"properties": {
"startUrls": {
"title": "Start URLs",
"type": "array",
"description": "One or more URLs of the pages where the crawler will start. Note that the Actor will additionally only crawl sub-pages of these URLs. For example, for the start URL https://www.example.com/blog, it will crawl pages like https://example.com/blog/article-1, but will skip https://example.com/docs/something-else.",
"editor": "requestListSources",
"prefill": [{ "url": "https://docs.apify.com/" }]
},
"crawlerType": {
"sectionCaption": "Crawler settings",
"title": "Crawler type",
"type": "string",
"enum": ["playwright:chrome", "cheerio", "jsdom"],
"enumTitles": ["Headless web browser (Chrome+Playwright)", "Raw HTTP client (Cheerio)", "Raw HTTP client with JS execution (JSDOM) (experimental!)"],
"description": "Select the crawling engine:\n- Headless web browser (default) - Useful for modern websites with anti-scraping protections and JavaScript rendering. It recognizes common blocking patterns like CAPTCHAs and automatically retries blocked requests through new sessions. However, running web browsers is more expensive as it requires more computing resources and is slower. It is recommended to use at least 8 GB of RAM.\n- Raw HTTP client - High-performance crawling mode that uses raw HTTP requests to fetch the pages. It is faster and cheaper, but it might not work on all websites.",
"default": "playwright:chrome"
},
"maxCrawlDepth": {
"title": "Max crawling depth",
"type": "integer",
"description": "The maximum number of links starting from the start URL that the crawler will recursively descend. The start URLs have a depth of 0, the pages linked directly from the start URLs have a depth of 1, and so on.\n\nThis setting is useful to prevent accidental crawler runaway. By setting it to 0, the Actor will only crawl start URLs.",
"minimum": 0,
"default": 20
},
"maxCrawlPages": {
"title": "Max pages",
"type": "integer",
"description": "The maximum number pages to crawl. It includes the start URLs, pagination pages, pages with no content, etc. The crawler will automatically finish after reaching this number. This setting is useful to prevent accidental crawler runaway.",
"minimum": 0,
"default": 9999999
},
// ...
}
}
The actual input object passed from the autogenerated input UI to the Actor then looks like this:
{ "debugMode": false, "proxyConfiguration": { "useApifyProxy": true }, "saveHtml": false, "saveMarkdown": false, "saveScreenshots": false, "startUrls": [ { "url": "https://docs.apify.com/" } ] }
Next, let's take a look at https://docs.apify.com/platform/actors/development/actor-definition/input-schema/specification/v1.md, and the possibility of using input schema to enable users to pass https://docs.apify.com/platform/actors/development/actor-definition/input-schema/secret-input.md.
---
# Secret input
**Learn about making some Actor input fields secret and encrypted. Ideal for passing passwords, API tokens, or login cookies to Actors.**
***
The secret input feature lets you mark specific input fields of an Actor as sensitive. When you save the Actor's input configuration, the values of these marked fields get encrypted. The encrypted input data can only be decrypted within the Actor. This provides an extra layer of security for sensitive information like API keys, passwords, or other confidential data.
## How to set a secret input field
To make an input field secret, you need to add a `"isSecret": true` setting to the input field in the Actor's https://docs.apify.com/platform/actors/development/actor-definition/input-schema.md, like this:
{ // ... "properties": { // ... "password": { "title": "Password", "type": "string", "description": "A secret, encrypted input field", "editor": "textfield", "isSecret": true }, // ... }, // ... }
The editor for this input field will then turn into a secret input, and when you edit the field value, it will be stored encrypted.

When you run the Actor through the API, the system automatically encrypts any input fields marked as secret before saving them to the Actor run's default key-value store.
Type restriction
This feature supports `string`, `object`, and `array` input types. Available editor types include:
* `hidden` (for any supported input type)
* `textfield` and `textarea` (for string inputs)
* `json` (for `object` and `array` inputs)
## Read secret input fields
When you read the Actor input through `Actor.getInput()`, the encrypted fields are automatically decrypted. Decryption of string fields is supported since https://docs.apify.com/sdk/js/ 3.1.0; support for objects and arrays was added in https://docs.apify.com/sdk/js/ 3.4.2 and https://docs.apify.com/sdk/python/ 2.7.0.
await Actor.getInput(); { username: 'username', password: 'password' }
If you read the `INPUT` key from the Actor run's default key-value store directly, you will still get the original, encrypted input value.
await Actor.getValue('INPUT'); { username: 'username', password: 'ENCRYPTED_VALUE:Hw/uqRMRNHmxXYYDJCyaQX6xcwUnVYQnH4fWIlKZL2Vhtq1rZmtoGXQSnhIXmF58+DjKlMZpTlK2zN3YUXk1ylzU6LfXyysOG/PISAfwm27FUgy3IfdgMyQggQ4MydLzdlzefX0mPRyixBviRcFhRTC+K7nK9lkATt3wJpj91YAZm104ZYkcd5KmsU2JX39vxN0A0lX53NjIenzs3wYPaPYLdjKIe+nqG9fHlL7kALyi7Htpy91ZgnQJ1s9saJRkKfWXvmLYIo5db69zU9dGCeJzUc0ca154O+KYYP7QTebJxqZNQsC8EH6sVMQU3W0qYKjuN8fUm1fRzyw/kKFacQ==:VfQd2ZbUt3S0RZ2ciywEWYVBbTTZOTiy' }
## Encryption mechanism
The encryption mechanism used for encrypting the secret input fields is the same dual encryption as in https://en.wikipedia.org/wiki/Pretty_Good_Privacy#/media/File:PGP_diagram.svg. The secret input field is encrypted using a random key, using the `aes-256-gcm` cipher, and then the key is encrypted using a 2048-bit RSA key.
The RSA key is unique for each combination of user and Actor, ensuring that no Actor can decrypt input intended for runs of another Actor by the same user, and no user can decrypt input runs of the same Actor by a different user. This isolation of decryption keys enhances the security of sensitive input data.
During Actor execution, the decryption keys are passed as environment variables, restricting the decryption of secret input fields to occur solely within the context of the Actor run. This approach prevents unauthorized access to sensitive input data outside the Actor's execution environment.
## Example Actor
If you want to test the secret input live, check out the https://console.apify.com/actors/O3S2UlSKzkcnFHRRA Actor in Apify Console. If you want to dig in deeper, you can check out its https://github.com/apify/actor-example-secret-input on GitHub.
---
# Actor input schema specification
**Learn how to define and validate a schema for your Actor's input with code examples. Provide an autogenerated input UI for your Actor's users.**
***
The Actor input schema serves three main purposes:
* It ensures the input data supplied to the Actor adhere to specified requirements and validation rules.
* It is used by the Apify platform to generate a user-friendly interface for configuring and running your Actor.
* It simplifies invoking your Actors from external systems by generating calling code and connectors for integrations.
To define an input schema for an Actor, set `input` field in the `.actor/actor.json` file to an input schema object (described below), or path to a JSON file containing the input schema object. For backwards compatibility, if the `input` field is omitted, the system looks for an `INPUT_SCHEMA.json` file either in the `.actor` directory or the Actor's top-level directory—but note that this functionality is deprecated and might be removed in the future. The maximum allowed size for the input schema file is 500 kB.
When you provide an input schema, the Apify platform will validate the input data passed to the Actor on start (via the API or Apify Console) to ensure compliance before starting the Actor. If the input object doesn't conform the schema, the caller receives an error and the Actor is not started.
Validation aid
You can use our https://apify.github.io/input-schema-editor-react/ to guide you through the creation of the `INPUT_SCHEMA.json` file.
To ensure the input schema is valid, here's a corresponding https://github.com/apify/apify-shared-js/blob/master/packages/json_schemas/schemas/input.schema.json.
You can also use the https://docs.apify.com/cli/docs/reference#apify-validate-schema-path command in the Apify CLI.
## Example
Imagine a simple web crawler that accepts an array of start URLs and a JavaScript function to execute on each visited page. The input schema for such a crawler could be defined as follows:
{ "title": "Cheerio Crawler input", "description": "To update crawler to another site, you need to change startUrls and pageFunction options!", "type": "object", "schemaVersion": 1, "properties": { "startUrls": { "title": "Start URLs", "type": "array", "description": "URLs to start with", "prefill": [ { "url": "http://example.com" }, { "url": "http://example.com/some-path" } ], "editor": "requestListSources" }, "pageFunction": { "title": "Page function", "type": "string", "description": "Function executed for each request", "prefill": "async () => { return $('title').text(); }", "editor": "javascript" } }, "required": ["startUrls", "pageFunction"] }
The generated input UI will be:

If you switch the input to the **JSON** display using the toggle, then you will see the entered input stringified to `JSON`, as it will be passed to the Actor:
{ "startUrls": [ { "url": "http://example.com" }, { "url": "http://example.com/some-path" } ], "pageFunction": "async () => { return $('title').text(); }" }
## Structure
{ "title": "Cheerio Crawler input", "type": "object", "schemaVersion": 1, "properties": { /* define input fields here */ }, "required": [] }
| Property | Type | Required | Description |
| ---------------------- | ------- | -------- | --------------------------------------------------------------------------------------------------------------------------------------------------- |
| `title` | String | Yes | Any text describing your input schema. |
| `description` | String | No | Help text for the input that will bedisplayed above the UI fields. |
| `type` | String | Yes | This is fixed and must be setto string `object`. |
| `schemaVersion` | Integer | Yes | The version of the input schemaspecification against whichyour schema is written.Currently, only version `1` is out. |
| `properties` | Object | Yes | This is an object mapping each field keyto its specification. |
| `required` | String | No | An array of field keys that are required. |
| `additionalProperties` | Boolean | No | Controls if properties not listed in `properties` are allowed. Defaults to `true`.Set to `false` to make requests with extra properties fail. |
Input schema differences
Even though the structure of the Actor input schema is similar to JSON schema, there are some differences. We cannot guarantee that JSON schema tooling will work on input schema documents. For a more precise technical understanding of the matter, feel free to browse the code of the https://github.com/apify/apify-shared-js/tree/master/packages/input_schema/src package.
## Fields
Each field of your input is described under its key in the `inputSchema.properties` object. The field might have `integer`, `string`, `array`, `object`, or `boolean` type, and its specification contains the following properties:
| Property | Value | Required | Description |
| -------------------- | ---------------------------------------------------------------------------------- | -------- | -------------------------------------------------------------------------------------------------------------------------------------------------------------------------------------------------------------------------------------------------------------------------------------------------------- |
| `type` | One of - `string`- `array`- `object`- `boolean`- `integer` | Yes | Allowed type for the input value.Cannot be mixed. |
| `title` | String | Yes | Title of the field in UI. |
| `description` | String | Yes | Description of the field that will bedisplayed as help text in Actor input UI. |
| `default` | Must match `type` property. | No | Default value that will beused when no value is provided. |
| `prefill` | Must match `type` property. | No | Value that will be prefilledin the Actor input interface. |
| `example` | Must match `type` property. | No | Sample value of this fieldfor the Actor to be displayed whenActor is published in Apify Store. |
| `sectionCaption` | String | No | If this property is set,then all fields following this field(this field included) will be separatedinto a collapsible sectionwith the value set as its caption.The section ends at the last fieldor the next field which has the`sectionCaption` property set. |
| `sectionDescription` | String | No | If the `sectionCaption` property is set,then you can use this property toprovide additional description to the section.The description will be visible right underthe caption when the section is open. |
### Prefill vs. default vs. required
Here is a rule of thumb for whether an input field should have a `prefill`, `default`, or be required:
* **Prefill** - Use for fields that don't have a reasonable default. The provided value is prefilled for the user to show them an example of using the field and to make it easy to test the Actor (e.g., search keyword, start URLs). In other words, this field is only used in the user interface but does not affect the Actor functionality and API. Note that if you add a new input option to your Actor, the Prefill value won't be used by existing integrations such as Actor tasks or API calls, but the Default will be if specified. This is useful for keeping backward compatibility when introducing a new flag or feature that you prefer new users to use.
* **Required** - Use for fields that don't have a reasonable default and MUST be entered by the user (e.g., API token, password).
* **Default** - Use for fields that MUST be set for the Actor run to some value, but where you don't need the user to change the default behavior (e.g., max pages to crawl, proxy settings). If the user omits the value when starting the Actor via any means (API, CLI, scheduler, or user interface), the platform automatically passes the Actor this default value.
* **No particular setting** - Use for purely optional fields where it makes no sense to prefill any value (e.g., flags like debug mode or download files).
In summary, you can use each option independently or use a combination of **Prefill + Required** or **Prefill + Default**, but the combination of **Default + Required** doesn't make sense to use.
## Additional properties
Most types also support additional properties defining, for example, the UI input editor.
### String
#### Code input
Example of a code input:
{ "title": "Page function", "type": "string", "description": "Function executed for each request", "editor": "javascript", "prefill": "async () => { return $('title').text(); }" }
Rendered input:

#### Country selection
Example of country selection using a select input:
{ "title": "Country", "type": "string", "description": "Select your country", "editor": "select", "default": "us", "enum": ["us", "de", "fr"], "enumTitles": ["USA", "Germany", "France"] }
Rendered input:

#### `datepicker` editor
Example of date selection using absolute and relative `datepicker` editor:
{ "absoluteDate": { "title": "Date", "type": "string", "description": "Select absolute date in format YYYY-MM-DD", "editor": "datepicker", "pattern": "^(\d{4})-(0[1-9]|1[0-2])-(0[1-9]|[12]\d|3[01])$" }, "relativeDate": { "title": "Relative date", "type": "string", "description": "Select relative date in format: {number} {unit}", "editor": "datepicker", "dateType": "relative", "pattern": "^(\d+)\s*(day|week|month|year)s?$" }, "anyDate": { "title": "Any date", "type": "string", "description": "Select date in format YYYY-MM-DD or {number} {unit}", "editor": "datepicker", "dateType": "absoluteOrRelative", "pattern": "^(\d{4})-(0[1-9]|1[0-2])-(0[1-9]|[12]\d|3[01])$|^(\d+)\s*(day|week|month|year)s?$" } }
The `absoluteDate` property renders a date picker that allows selection of a specific date and returns string value in `YYYY-MM-DD` format. Validation is ensured thanks to `pattern` field. In this case the `dateType` property is omitted, as it defaults to `"absolute"`.

The `relativeDate` property renders an input field that enables the user to choose the relative date and returns the value in `{number} {unit}` format, for example `"2 days"`. The `dateType` parameter is set to `"relative"` to restrict input to relative dates only.

The `anyDate` property renders a date picker that accepts both absolute and relative dates. The Actor author is responsible for parsing and interpreting the selected date format.

#### `fileupload` editor
The `fileupload` editor enables users to specify a file as input. The input is passed to the Actor as a string. It is the Actor author's responsibility to interpret this string, including validating its existence and format.
The editor makes it easier to users to upload the file to a key-value store of their choice.

The user provides either a URL or uploads the file to a key-value store (existing or new).

Properties:
| Property | Value | Required | Description |
| ------------ | -------------------------------------------------------------------------------------------------------------------------------------------------------- | -------------------------------- | --------------------------------------------------------------------------------------------------------------------------------------------------------------------------------------------------------------------------------------------------------------------------------------------------------------------------------------------------------------------------------------------------------------------------------------------------------------------------------------------------------------------------------------------------------------------------------------------------------------------------------------------------------------------------------------------------------------------------------------------------------------------------------------------------------------------------------------------------------------------------------------------------------------------------------------------------------------------------------- |
| `editor` | One of:- `textfield`- `textarea`- `javascript`- `python`- `select`- `datepicker`- `fileupload`- `hidden` | Yes | Visual editor used for the input field. |
| `pattern` | String | No | Regular expression that will be used to validate the input. If validation fails, the Actor will not run. |
| `minLength` | Integer | No | Minimum length of the string. |
| `maxLength` | Integer | No | Maximum length of the string. |
| `enum` | \[String] | Required if `editor` is `select` | Using this field, you can limit values to the given array of strings. Input will be displayed as select box. |
| `enumTitles` | \[String] | No | Titles for the `enum` keys described. |
| `nullable` | Boolean | No | Specifies whether `null` is an allowed value. |
| `isSecret` | Boolean | No | Specifies whether the input field will be stored encrypted. Only available with `textfield`, `textarea` and `hidden` editors. |
| `dateType` | One of - `absolute`- `relative`- `absoluteOrRelative` | No | This property, which is only available with `datepicker` editor, specifies what date format should visual editor accept (The JSON editor accepts any string without validation.).- `absolute` value enables date input in `YYYY-MM-DD` format. To parse returned string regex like this can be used: `^(\d{4})-(0[1-9]\|1[0-2])-(0[1-9]\|[12]\d\|3[01])$`.- `relative` value enables relative date input in`{number} {unit}` format.Supported units are: days, weeks, months, years.The input is passed to the Actor as plain text (e.g., "3 weeks"). To parse it, regex like this can be used: `^(\d+)\s*(day\|week\|month\|year)s?$`.- `absoluteOrRelative` value enables both absolute and relative formats and user can switch between them. It's up to Actor author to parse a determine actual used format - regexes above can be used to check whether the returned string match one of them.Defaults to `absolute`. |
Regex escape
When using escape characters `\` for the regular expression in the `pattern` field, be sure to escape them to avoid invalid JSON issues. For example, the regular expression `https:\/\/(www\.)?apify\.com\/.+` would become `https:\\/\\/(www\\.)?apify\\.com\\/.+`.
#### Advanced date and time handling
While the `datepicker` editor doesn't support setting time values visually, you can allow users to handle more complex datetime formats and pass them via JSON. The following regex allows users to optionally extend the date with full ISO datetime format or pass `hours` and `minutes` as a relative date:
`"pattern": "^(\\d{4})-(0[1-9]|1[0-2])-(0[1-9]|[12]\\d|3[01])(T[0-2]\\d:[0-5]\\d(:[0-5]\\d)?(\\.\\d+)?Z?)?$|^(\\d+)\\s*(minute|hour|day|week|month|year)s?$"`
When implementing time-based fields, make sure to explain to your users through the description that the time values should be provided in UTC. This helps prevent timezone-related issues.
### Boolean
Example options with group caption:
{ "verboseLog": { "title": "Verbose log", "type": "boolean", "description": "Debug messages will be included in the log.", "default": true, "groupCaption": "Options", "groupDescription": "Various options for this Actor" }, "lightspeed": { "title": "Lightspeed", "type": "boolean", "description": "If checked then actors runs at the speed of light.", "prefill": true } }
Rendered input:

Properties:
| Property | Value | Required | Description |
| ------------------ | ----------------------------------- | -------- | ------------------------------------------------------------------------------------------------------------ |
| `editor` | One of - `checkbox`- `hidden` | No | Visual editor used for the input field. |
| `groupCaption` | String | No | If you want to groupmultiple checkboxes together,add this option to the firstof the group. |
| `groupDescription` | String | No | Description displayed as help textdisplayed of group title. |
| `nullable` | Boolean | No | Specifies whether null isan allowed value. |
### Numeric types
There are two numeric types supported in the input schema: `integer` and `number`.
* The `integer` type represents whole numbers.
* The `number` type can represent both integers and floating-point numbers.
Example:
{ "title": "Memory", "type": "integer", "description": "Select memory in megabytes", "default": 64, "maximum": 1024, "unit": "MB" }
Rendered input:

Properties:
| Property | Value | Required | Description |
| ---------- | -------------------------------------------- | -------- | ----------------------------------------------------------------------------- |
| `type` | One of - `integer`- `number` | Yes | Defines the type of the field — either an integer or a floating-point number. |
| `editor` | One of: - `number`- `hidden` | No | Visual editor used for input field. |
| `maximum` | Integer or Number(based on the `type`) | No | Maximum allowed value. |
| `minimum` | Integer or Number(based on the `type`) | No | Minimum allowed value. |
| `unit` | String | No | Unit displayed next to the field in UI,for example *second*, *MB*, etc. |
| `nullable` | Boolean | No | Specifies whether null is an allowed value. |
### Object
Example of proxy configuration:
{ "title": "Proxy configuration", "type": "object", "description": "Select proxies to be used by your crawler.", "prefill": { "useApifyProxy": true }, "editor": "proxy" }
Rendered input:

The object where the proxy configuration is stored has the following structure:
{ // Indicates whether Apify Proxy was selected. "useApifyProxy": Boolean,
// Array of Apify Proxy groups. Is missing or null if
// Apify Proxy's automatic mode was selected
// or if proxies are not used.
"apifyProxyGroups": String[],
// Array of custom proxy URLs.
// Is missing or null if custom proxies were not used.
"proxyUrls": String[],
}
Example of a black box object:
{ "title": "User object", "type": "object", "description": "Enter object representing user", "prefill": { "name": "John Doe", "email": "janedoe@gmail.com" }, "editor": "json" }
Rendered input:

Properties:
| Property | Value | Required | Description |
| ---------------------- | ------------------------------------------------------------------- | -------- | ------------------------------------------------------------------------------------------------------------------------------------------------------------------------------------------------------------------------------- |
| `editor` | One of - `json`- `proxy`- `schemaBased`- `hidden` | Yes | UI editor used for input. |
| `patternKey` | String | No | Regular expression that will be usedto validate the keys of the object. |
| `patternValue` | String | No | Regular expression that will be usedto validate the values of object. |
| `maxProperties` | Integer | No | Maximum number of propertiesthe object can have. |
| `minProperties` | Integer | No | Minimum number of propertiesthe object can have. |
| `nullable` | Boolean | No | Specifies whether null isan allowed value. |
| `isSecret` | Boolean | No | Specifies whether the input field will be stored encrypted. Only available with `json` and `hidden` editors. |
| `properties` | Object | No | Defines the sub-schema properties for the object used for validation and UI rendering (`schemaBased` editor). See more info below. |
| `additionalProperties` | Boolean | No | Controls if sub-properties not listed in `properties` are allowed. Defaults to `true`. Set to `false` to make requests with extra properties fail. |
| `required` | String array | No | An array of sub-properties keys that are required.Note: This applies only if the object field itself is present. If the object field is optional and not included in the input, its required subfields are not validated. |
#### Object fields validation
Like root-level input schemas, you can define a schema for sub-properties of an object using the `properties` field.
Each sub-property within this sub-schema can define the same fields as those available at the root level of the input schema, except for the fields that apply only at the root level: `sectionCaption` and `sectionDescription`.
Validation is performed both in the UI and during Actor execution via the API. Sub-schema validation works independently of the editor selected for the parent object. It also respects the `additionalProperties` and `required` fields, giving you precise control over whether properties not defined in `properties` are permitted and which properties are mandatory.
Recursive nesting
Object sub-properties can define their own sub-schemas recursively with no nesting depth limit.
Example of an object property with sub-schema properties
{ "title": "Configuration", "type": "object", "description": "Advanced configuration options", "editor": "json", "properties": { "locale": { "title": "Locale", "type": "string", "description": "Locale identifier.", "pattern": "^[a-z]{2,3}-[A-Z]{2}$" }, "timeout": { "title": "Timeout", "type": "integer", "description": "Request timeout in seconds", "minimum": 1, "maximum": 300 }, "debugMode": { "title": "Debug Mode", "type": "boolean", "description": "Enable verbose logging during scraping" } }, "required": ["locale", "timeout"], "additionalProperties": false }
Rendered input: 
In this example, the object has validation rules for its properties:
* The `timeout` property must be an integer between 1 and 300
* The `locale` property must be a string matching the pattern `^[a-z]{2,3}-[A-Z]{2}$`
* The `debugMode` property is optional and can be either `true` or `false`
* The `timeout` and `locale` properties are required
* No additional properties beyond those defined are allowed
##### Handling default and prefill values for object sub-properties
When defining object with sub-properties, it's possible to set `default` and `prefill` values in two ways:
1. *At the parent object level*: You can provide a complete object as the `default` or `prefill` value, which will set values for all sub-properties at once.
2. *At the individual sub-property level*: You can specify `default` or `prefill` values for each sub-property separately within the `properties` definition.
When both methods are used, the values defined at the parent object level take precedence over those defined at the sub-property level. For example, in the input schema like this:
{ "title": "Configuration", "type": "object", "description": "Advanced configuration options", "editor": "schemaBased", "default": { "timeout": 60 }, "properties": { "locale": { "title": "Locale", "type": "string", "description": "Locale identifier.", "pattern": "^[a-z]{2,3}-[A-Z]{2}$", "editor": "textfield", "default": "en-US" }, "timeout": { "title": "Timeout", "type": "integer", "description": "Request timeout in seconds", "minimum": 1, "maximum": 300, "editor": "number", "default": 120 } } }
The `timeout` sub-property will have a default value of `60` (from the parent object), while the `locale` sub-property will have a default value of `"en-US"` (from its own definition).
#### `schemaBased` editor
Object with sub-schema defined can use the `schemaBased` editor, which provides a user-friendly interface for editing each property individually. It renders all properties based on their type (and `editor` field), providing a user-friendly interface for complex objects. This feature works for objects (and arrays of objects), enabling each property to have its own input field in the UI.
Objects with a defined sub-schema can use the `schemaBased` editor, which provides a user-friendly interface for editing each property individually. It renders all properties based on their type (and optionally the `editor` field), making it ideal for visually managing complex object structures. This editor supports both single objects and arrays of objects (see ), allowing each property to be represented with an appropriate input field in the UI.
Example of an object property with sub-schema properties using schemaBased editor
{ "title": "Configuration", "type": "object", "description": "Advanced configuration options", "editor": "schemaBased", "properties": { "locale": { "title": "Locale", "type": "string", "description": "Locale identifier.", "pattern": "^[a-z]{2,3}-[A-Z]{2}$", "editor": "textfield" }, "timeout": { "title": "Timeout", "type": "integer", "description": "Request timeout in seconds", "minimum": 1, "maximum": 300, "editor": "number" }, "debugMode": { "title": "Debug Mode", "type": "boolean", "description": "Enable verbose logging during scraping", "editor": "checkbox" } }, "required": ["locale", "timeout"], "additionalProperties": false }
Rendered input: 
Each sub-property is rendered with its own input field according to its type and `editor` configuration:
* The `locale` property is rendered as a text field.
* The `timeout` property is rendered as a numeric input with validation limits.
* The `debugMode` property is rendered as a checkbox toggle.
##### Limitations
The `schemaBased` editor supports only **top-level sub-properties** (level 1 nesting). While deeper nested properties can still define sub-schemas for validation, they cannot use the `schemaBased` editor for rendering. For example, if the Configuration object above included a property that was itself an object with its own sub-properties, those deeper levels would need to use a different editor, such as `json`.
### Array
Example of request list sources configuration:
{ "title": "Start URLs", "type": "array", "description": "URLs to start with", "prefill": [{ "url": "https://apify.com" }], "editor": "requestListSources" }
Rendered input:

Example of an array:
{ "title": "Colors", "type": "array", "description": "Enter colors you know", "prefill": ["Red", "White"], "editor": "json" }
Rendered input:

Properties:
| Property | Value | Required | Description |
| ------------------ | --------------------------------------------------------------------------------------------------------------------------------------------------------------------------------------------- | -------- | ----------------------------------------------------------------------------------------------------------------------------------------------------------- |
| `editor` | One of - `json`- `requestListSources`- `pseudoUrls`- `globs`- `keyValue`- `stringList`- `fileupload`- `select`- `schemaBased`- `hidden` | Yes | UI editor used for input. |
| `placeholderKey` | String | No | Placeholder displayed forkey field when no value is specified.Works only with `keyValue` editor. |
| `placeholderValue` | String | No | Placeholder displayed in value fieldwhen no value is provided.Works only with `keyValue` and`stringList` editors. |
| `patternKey` | String | No | Regular expression thatwill be used to validatethe keys of items in the array.Works only with `keyValue`editor. |
| `patternValue` | String | No | Regular expression thatwill be used to validate the valuesof items in the array.Works only with `keyValue` and`stringList` editors. |
| `maxItems` | Integer | No | Maximum number of itemsthe array can contain. |
| `minItems` | Integer | No | Minimum number of itemsthe array can contain. |
| `uniqueItems` | Boolean | No | Specifies whether the arrayshould contain only unique values. |
| `nullable` | Boolean | No | Specifies whether null isan allowed value. |
| `items` | object | No | Specifies format of the items of the array, useful mainly for multiselect and for `schemaBased` editor (see below). |
| `isSecret` | Boolean | No | Specifies whether the input field will be stored encrypted. Only available with `json` and `hidden` editors. |
Usage of this field is based on the selected editor:
* `requestListSources` - value from this field can be used as input for the https://crawlee.dev/api/core/class/RequestList class from Crawlee.
* `pseudoUrls` - is intended to be used with a combination of the https://crawlee.dev/api/core/class/PseudoUrl class and the https://crawlee.dev/api/core/function/enqueueLinks function from Crawlee.
Editor type `requestListSources` supports input in formats defined by the https://crawlee.dev/api/core/interface/RequestListOptions#sources property of https://crawlee.dev/api/core/interface/RequestListOptions.
Editor type `globs` maps to the Crawlee's https://crawlee.dev/api/core#GlobInput used by the https://crawlee.dev/api/core#UrlPatternObject.
Editor type `fileupload` enables users to specify a list of files as input. The input is passed to the Actor as an array of strings. The Actor author is responsible for interpreting the strings, including validating file existence and format. This editor simplifies the process for users to upload files to a key-value store of their choice. Editor type `select` allows the user to pick items from a select, providing multiple choices. Please check this example of how to define the multiselect field:
{ "title": "Multiselect field", "description": "My multiselect field", "type": "array", "editor": "select", "items": { "type": "string", "enum": ["value1", "value2", "value3"], "enumTitles": ["Label of value1", "Label of value2", "Label of value3"] } }
To correctly define options for multiselect, you need to define the `items` property and then provide values and (optionally) labels in `enum` and `enumTitles` properties.
#### Array items validation
Arrays in the input schema can define an `items` field to specify the type and validation rules for each item. Each array item is validated according to its `type` and inside the `items` field it's also possible to define additional validation rules such as `pattern`, `minimum`, `maximum`, etc., depending on the item type.
If the item type is an `object`, it can define its own `properties`, `required`, and `additionalProperties` fields, working in the same way as a single object field (see ).
Validation is performed both in the UI and during Actor execution via the API. Array items can themselves be objects with sub-schemas, and objects within objects, recursively, without any limit on nesting depth.
Example of an array of objects property with sub-schema
{ "title": "Request Headers", "type": "array", "description": "List of custom HTTP headers", "editor": "json", "items": { "type": "object", "properties": { "name": { "title": "Header Name", "description": "Name of the HTTP header", "type": "string", "minLength": 1 }, "value": { "title": "Header Value", "description": "Value of the HTTP header", "type": "string", "minLength": 1 } }, "required": ["name", "value"], "additionalProperties": false }, "minItems": 1, "maxItems": 20 }
Rendered input: 
In this example:
* The array must contain between 1 and 20 items.
* Each item must be an object with `name` and `value` properties.
* Both `name` and `value` are required.
* No additional properties beyond those defined are allowed.
* The validation of each object item works the same as for a single object field (see ).
##### Handling default and prefill values array with object sub-properties
When defining an array of objects with sub-properties, it's possible to set `default` and `prefill` values in two ways:
1. *At the parent array level*: You can provide an array of complete objects as the `default` or `prefill` value, which will be used only if there is no value specified for the field.
2. *At the individual sub-property level*: You can specify `default` or `prefill` values for each sub-property within the `properties` definition of the object items. These values will be applied to each object in the array value.
For example, having an input schema like this:
{ "title": "Requests", "type": "array", "description": "List of HTTP requests", "editor": "schemaBased", "default": [ { "url": "https://apify.com", "port": 80 } ], "items": { "type": "object", "properties": { "url": { "title": "URL", "type": "string", "description": "Request URL", "editor": "textfield" }, "port": { "title": "Port", "type": "integer", "description": "Request port", "editor": "number", "default": 8080 } }, "required": ["url", "port"], "additionalProperties": false } }
If there is no value specified for the field, the array will default to containing one object:
[ { "url": "https://apify.com", "port": 80 } ]
However, if the user adds a new item to the array, the `port` sub-property of that new object will default to `8080`, as defined in the sub-property itself.
#### `schemaBased` editor
Arrays can use the `schemaBased` editor to provide a user-friendly interface for editing each item individually. It works for arrays of primitive types (like strings or numbers) as well as arrays of objects, rendering each item according to its type and optional `editor` configuration.
This makes it easy to manage complex arrays in the UI while still enforcing validation rules defined in the items field.
Example of an array of strings property with sub-schema
{ "title": "Start URLs", "type": "array", "description": "List of URLs for the scraper to visit", "editor": "schemaBased", "items": { "type": "string", "pattern": "^https?:\/\/(?:[a-zA-Z0-9-]+\.)+[a-zA-Z]{2,}(?:\/\S*)?$" }, "minItems": 1, "maxItems": 50, "uniqueItems": true }
Rendered input: 
* Each item is rendered as a text field.
* The array must contain between 1 and 50 items.
* Duplicate values are not allowed.
Example of an array of objects property with sub-schema
{ "title": "Request Headers", "type": "array", "description": "List of custom HTTP headers", "editor": "schemaBased", "items": { "type": "object", "properties": { "name": { "title": "Header Name", "description": "Name of the HTTP header", "type": "string", "minLength": 1, "editor": "textfield" }, "value": { "title": "Header Value", "description": "Value of the HTTP header", "type": "string", "minLength": 1, "editor": "textfield" } }, "required": ["name", "value"], "additionalProperties": false }, "minItems": 1, "maxItems": 20 }
Rendered input: 
* Each array item is represented as a group of input fields (`name` and `value`).
* Validation ensures all required sub-properties are filled and no extra properties are allowed.
* New items can be added up to the `maxItems` limit, and each item is validated individually.
##### Limitations
As with objects, the sub-schema feature for arrays only works for level 1 sub-properties. While the objects in the array can have properties with their own schema definitions, those properties cannot themselves use the `schemaBased` editor.
### Resource type
Resource type identifies what kind of Apify Platform object is referred to in the input field. For example, the Key-value store resource type can be referred to using a string ID. Currently, it supports storage resources only, allowing the reference of a Dataset, Key-Value Store or Request Queue.
For Actor developers, the resource input value is a string representing either the resource ID or (unique) name. The type of the property is either `string` or `array`. In case of `array` (for multiple resources) the return value is an array of IDs or names. In the user interface, a picker (`resourcePicker` editor) is provided for easy selection, where users can search and choose from their own resources or those they have access to.
Example of a Dataset input:
{ "title": "Dataset", "type": "string", "description": "Select a dataset", "resourceType": "dataset" }
Rendered input:

The returned value is resource reference, in this example it's the dataset ID as can be seen in the JSON tab:

Example of multiple datasets input:
{ "title": "Datasets", "type": "array", "description": "Select multiple datasets", "resourceType": "dataset" }
Rendered input:

#### Single value properties
| Property | Value | Required | Description |
| -------------- | --------------------------------------------------------------- | -------- | -------------------------------------------------------------------------------------------------------- |
| `type` | `string` | Yes | Specifies the type of input - `string` for single value. |
| `editor` | One of - `resourcePicker`- `textfield`- `hidden` | No | Visual editor used forthe input field. Defaults to `resourcePicker`. |
| `resourceType` | One of - `dataset`- `keyValueStore`- `requestQueue` | Yes | Type of Apify Platform resource |
| `pattern` | String | No | Regular expression that will be used to validate the input. If validation fails, the Actor will not run. |
| `minLength` | Integer | No | Minimum length of the string. |
| `maxLength` | Integer | No | Maximum length of the string. |
#### Multiple values properties
| Property | Value | Required | Description |
| -------------- | --------------------------------------------------------------- | -------- | -------------------------------------------------------------------------- |
| `type` | `array` | Yes | Specifies the type of input - `array` for multiple values. |
| `editor` | One of - `resourcePicker`- `hidden` | No | Visual editor used forthe input field. Defaults to `resourcePicker`. |
| `resourceType` | One of - `dataset`- `keyValueStore`- `requestQueue` | Yes | Type of Apify Platform resource |
| `minItems` | Integer | No | Minimum number of items the array can contain. |
| `maxItems` | Integer | No | Maximum number of items the array can contain. |
---
# Key-value store schema specification
**Learn how to define and present your key-value store schema to organize records into collections.**
***
The key‑value store schema organizes keys into logical groups called collections, which can be used to filter and categorize data both in the API and the visual user interface. This organization helps users navigate and find specific data more efficiently, while schema‑defined rules (such as content types and JSON schema) ensure that stored values remain consistent and valid.
## Example
Consider an example Actor that calls `Actor.setValue()` to save a record into the key-value store:
main.js
import { Actor } from 'apify'; // Initialize the JavaScript SDK await Actor.init();
/**
- Actor code */ await Actor.setValue('document-1', 'my text data', { contentType: 'text/plain' });
// ...
await Actor.setValue(image-${imageID}, imageBuffer, { contentType: 'image/jpeg' });
// Exit successfully await Actor.exit();
To configure the key-value store schema, use the following template for the `.actor/actor.json` configuration:
.actor/actor.json
{ "actorSpecification": 1, "name": "Actor Name", "title": "Actor Title", "version": "1.0.0", "storages": { "keyValueStore": { "actorKeyValueStoreSchemaVersion": 1, "title": "Key-Value Store Schema", "collections": { "documents": { "title": "Documents", "description": "Text documents stored by the Actor.", "keyPrefix": "document-" }, "images": { "title": "Images", "description": "Images stored by the Actor.", "keyPrefix": "image-", "contentTypes": ["image/jpeg"] } } } } }
The template above defines the configuration for the default key-value store. Each collection can define its member keys using one of the following properties:
* `keyPrefix` - All keys starting with the specified prefix will be included in the collection (e.g., all keys starting with "document-").
* `key` - A specific individual key that will be included in the collection.
You must use either `key` or `keyPrefix` for each collection, but not both.
Once the schema is defined, tabs for each collection will appear in the **Storage** tab of the Actor's run:

The tabs also appear in the storage detail view:

### API Example
With the key-value store schema defined, you can use the API to list keys from a specific collection by using the `collection` query parameter when calling the https://docs.apify.com/api/v2/key-value-store-keys-get endpoint:
Get list of keys from a collection
GET https://api.apify.com/v2/key-value-stores/{storeId}/keys?collection=documents
Example response:
{ "data": { "items": [ { "key": "document-1", "size": 254 }, { "key": "document-2", "size": 368 } ], "count": 2, "limit": 1000, "exclusiveStartKey": null, "isTruncated": false } }
You can also filter by key prefix using the `prefix` parameter:
Get list of keys with prefix
GET https://api.apify.com/v2/key-value-stores/{storeId}/keys?prefix=document-
### Schema Validation
When you define a key-value store schema with specific `contentTypes` for collections, the Apify platform validates any data being stored against these specifications. For example, if you've specified that a collection should only contain JSON data with content type `application/json`, attempts to store data with other content types in that collection will be rejected.
The validation happens automatically when you call `Actor.setValue()` or use the https://docs.apify.com/api/v2/key-value-store-record-put API endpoint.
If you've defined a `jsonSchema` for a collection with content type `application/json`, the platform will also validate that the JSON data conforms to the specified schema. This helps ensure data consistency and prevents storing malformed data.
## Structure
Output configuration files need to be located in the `.actor` folder within the Actor's root directory.
You have two choices of how to organize files within the `.actor` folder.
### Single configuration file
.actor/actor.json
{ "actorSpecification": 1, "name": "this-is-book-library-scraper", "title": "Book Library scraper", "version": "1.0.0", "storages": { "keyValueStore": { "actorKeyValueStoreSchemaVersion": 1, "title": "Key-Value Store Schema", "collections": { /* Define your collections here */ } } } }
### Separate configuration files
.actor/actor.json
{ "actorSpecification": 1, "name": "this-is-book-library-scraper", "title": "Book Library scraper", "version": "1.0.0", "storages": { "keyValueStore": "./key_value_store_schema.json" } }
.actor/key\_value\_store\_schema.json
{ "actorKeyValueStoreSchemaVersion": 1, "title": "Key-Value Store Schema", "collections": { /* Define your collections here */ } }
Choose the method that best suits your configuration.
## Key-value store schema structure definitions
The key-value store schema defines the collections of keys and their properties. It allows you to organize and validate data stored by the Actor, making it easier to manage and retrieve specific records.
### Key-value store schema object definition
| Property | Type | Required | Description |
| --------------------------------- | ------- | -------- | --------------------------------------------------------------------------------------------------------------- |
| `actorKeyValueStoreSchemaVersion` | integer | true | Specifies the version of key-value store schema structure document.Currently only version 1 is available. |
| `title` | string | true | Title of the schema |
| `description` | string | false | Description of the schema |
| `collections` | Object | true | An object where each key is a collection ID and its value is a collection definition object (see below). |
### Collection object definition
| Property | Type | Required | Description |
| -------------- | ------------ | ------------- | ------------------------------------------------------------------------------------------------------------------------------------------------ |
| `title` | string | true | The collection’s title, shown in the run's storage tab and in the storage detail view, where it appears as a tab for filtering records. |
| `description` | string | false | A description of the collection that appears in UI tooltips. |
| `key` | string | conditional\* | Defines a single specific key that will be part of this collection. |
| `keyPrefix` | string | conditional\* | Defines a prefix for keys that should be included in this collection. |
| `contentTypes` | string array | false | Allowed content types for records in this collection. Used for validation when storing data. |
| `jsonSchema` | object | false | For collections with content type `application/json`, you can define a JSON schema to validate structure.Uses JSON Schema Draft 07 format. |
\* Either `key` or `keyPrefix` must be specified for each collection, but not both.
---
# Actor output schema
**Learn how to define and present the output of your Actor.**
***
The Actor output schema builds upon the schemas for the https://docs.apify.com/platform/actors/development/actor-definition/dataset-schema.md and https://docs.apify.com/platform/actors/development/actor-definition/key-value-store-schema.md. It specifies where an Actor stores its output and defines templates for accessing that output. Apify Console uses these output definitions to display run results, and the Actor run's `GET` endpoint includes them in the output property.
## Structure
Place the output configuration files in the `.actor` folder in the Actor's root directory.
You can organize the files using one of these structures:
### Single configuration file
.actor/actor.json
{ "actorSpecification": 1, "name": "files-scraper", "title": "Files scraper", "version": "1.0.0", "output": { "actorOutputSchemaVersion": 1, "title": "Output schema of the files scraper", "properties": { /* define your outputs here */ } } }
### Separate configuration files
.actor/actor.json
{ "actorSpecification": 1, "name": "files-scraper", "title": "Files scraper", "version": "1.0.0", "output": "./output_schema.json" }
.actor/output\_schema.json
{ "actorOutputSchemaVersion": 1, "title": "Output schema of the files scraper", "properties": { /* define your outputs here */ } }
## Definitions
The output schema defines the collections of keys and their properties. It allows you to organize and validate data stored by the Actor, making it easier to manage and retrieve specific records.
### Output schema object definition
| Property | Type | Required | Description |
| -------------------------- | ------- | -------- | ------------------------------------------------------------------------------------------------------ |
| `actorOutputSchemaVersion` | integer | true | Specifies the version of output schema structure document.Currently only version 1 is available. |
| `title` | string | true | Title of the schema |
| `description` | string | false | Description of the schema |
| `properties` | Object | true | An object where each key is an output ID and its value is an output object definition (see below). |
### Property object definition
| Property | Type | Required | Description |
| ------------- | ------ | -------- | ------------------------------------------------------------------------------------------------------------------------------- |
| `title` | string | true | The output's title, shown in the run's output tab if there are multiple outputs and in API as key for the generated output URL. |
| `description` | string | false | A description of the output. Only used when reading the schema (useful for LLMs) |
| `template` | string | true | Defines a template which will be translated into output URL. The template can use variables (see below) |
### Available template variables
| Variable | Type | Description |
| ---------------------------------- | ------ | ---------------------------------------------------------------------------------------------------------------- |
| `links` | object | Contains quick links to most commonly used URLs |
| `links.publicRunUrl` | string | Public run url in format `https://console.apify.com/view/runs/:runId` |
| `links.consoleRunUrl` | string | Console run url in format `https://console.apify.com/actors/runs/:runId` |
| `links.apiRunUrl` | string | API run url in format `https://api.apify.com/v2/actor-runs/:runId` |
| `links.apiDefaultDatasetUrl` | string | API url of default dataset in format `https://api.apify.com/v2/datasets/:defaultDatasetId` |
| `links.apiDefaultKeyValueStoreUrl` | string | API url of default key-value store in format `https://api.apify.com/v2/key-value-stores/:defaultKeyValueStoreId` |
| `run` | object | Contains information about the run same as it is returned from the `GET Run` API endpoint |
| `run.containerUrl` | string | URL of a webserver running inside the run in format `https://.runs.apify.net/` |
| `run.defaultDatasetId` | string | ID of the default dataset |
| `run.defaultKeyValueStoreId` | string | ID of the default key-value store |
## Examples
### Linking default dataset
The following example Actor calls `Actor.pushData()` to store results in the default dataset:
main.js
import { Actor } from 'apify'; // Initialize the JavaScript SDK await Actor.init();
/**
- Store data in default dataset */ await Actor.pushData({ title: 'Some product', url: 'https://example.com/product/1', price: 9.99 }); await Actor.pushData({ title: 'Another product', url: 'https://example.com/product/2', price: 4.99 });
// Exit successfully await Actor.exit();
To specify that the Actor is using output schema, update the `.actor/actor.json` file:
.actor/actor.json
{ "actorSpecification": 1, "name": "Actor Name", "title": "Actor Title", "version": "1.0.0", "output": "./output_schema.json" }
Then to specify that output is stored in the default dataset, create `.actor/output_schema.json`:
.actor/output\_schema.json
{ "actorOutputSchemaVersion": 1, "title": "Output schema of the Actor", "properties": { "results": { "type": "string", "title": "Results", "template": "{{links.apiDefaultDatasetUrl}}/items" } } }
To show that the output is stored in the default dataset, the schema defines a property called `results`.
The `title` is a human-readable name for the output, shown in the Apify Console.
The `template` uses a variable `{{links.apiDefaultDatasetUrl}}`, which is replaced with the URL of the default dataset when the Actor run finishes.
Apify Console uses this configuration to display dataset data.
The **Output** tab will then display the contents of the dataset:

The `GET Run` API endpoint response will include an `output` property.
"output": { "results": "https://api.apify.com/v2/datasets//items" }
### Linking to key-value store
Similar to the example of linking to default dataset, the following example Actor calls `Actor.setValue()` to store files in the default key-value store:
main.js
import { Actor } from 'apify'; // Initialize the JavaScript SDK await Actor.init();
/**
- Store data in key-value store
*/
await Actor.setValue('document-1.txt', 'my text data', { contentType: 'text/plain' });
await Actor.setValue(
image-1.jpeg, imageBuffer, { contentType: 'image/jpeg' });
// Exit successfully await Actor.exit();
To specify that the Actor is using output schema, update the `.actor/actor.json` file:
.actor/actor.json
{ "actorSpecification": 1, "name": "Actor Name", "title": "Actor Title", "version": "1.0.0", "output": "./output_schema.json" }
Then to specify that output is stored in the key-value store, update `.actor/output_schema.json`:
.actor/output\_schema.json
{ "actorOutputSchemaVersion": 1, "title": "Output schema of the Actor", "properties": { "files": { "type": "string", "title": "Files", "template": "{{links.apiDefaultKeyValueStoreUrl}}/keys" } } }
To show that the output is stored in the default key-value store, the schema defines a property called `files`.
The `template` uses a variable `{{links.apiDefaultKeyValueStoreUrl}}`, which is replaced with the URL of the default key-value store API endpoints when the Actor run finishes.
Apify Console uses this configuration to display key-value store data.
The **Output** tab will then display the contents of the key-value store:

The `GET Run` API endpoint response will include an `output` property.
"output": { "files": "https://api.apify.com/v2/key-value-stores//keys" }
### Linking dataset views and key-value store collections
This example shows a schema definition for a basic social media scraper. The scraper downloads post data into the dataset, and video and subtitle files into the key-value store.
After you define `views` and `collections` in `dataset_schema.json` and `key_value_store.json`, you can use them in the output schema.
.actor/output\_schema.json
{ "actorOutputSchemaVersion": 1, "title": "Output schema of Social media scraper", "properties": { "overview": { "type": "string", "title": "Overview 🔎", "template": "{{links.apiDefaultDatasetUrl}}/items?view=overview" }, "posts": { "type": "string", "title": "Posts ✉️", "template": "{{links.apiDefaultDatasetUrl}}/items?view=posts" }, "author": { "type": "string", "title": "Authors 🧑🎤", "template": "{{links.apiDefaultDatasetUrl}}/items?view=author" }, "music": { "type": "string", "title": "Music 🎶", "template": "{{links.apiDefaultDatasetUrl}}/items?view=music" }, "video": { "type": "string", "title": "Video 🎞️", "template": "{{links.apiDefaultDatasetUrl}}/items?view=video" }, "subtitleFiles": { "type": "string", "title": "Subtitle files", "template": "{{links.apiDefaultKeyValueStoreUrl}}/keys?collection=subtitles" }, "videoFiles": { "type": "string", "title": "Video files", "template": "{{links.apiDefaultKeyValueStoreUrl}}/keys?collection=videos" } } }
The schema above defines five dataset outputs and two key-value store outputs. The dataset outputs link to views, and the key-value store output link to collections, both defined in their respective schema files.
When a user runs the Actor in the Console, the UI will look like this:

### Using container URL to display chat client
In this example, an Actor runs a web server that provides a chat interface to an LLM. The conversation history is then stored in the dataset.
.actor/output\_schema.json
{ "actorOutputSchemaVersion": 1,
"title": "Chat client output",
"description": "Chat client provides interactive view to converse with LLM and chat history in dataset",
"type": "object",
"properties": {
"clientUrl": {
"type": "string",
"title": "Chat client",
"template": "{{run.containerUrl}}"
},
"chatHistory": {
"type": "string",
"title": "Conversation history",
"template": "{{links.apiDefaultDatasetUrl}}/items"
}
}
}
In the schema above we have two outputs. The `clientUrl` output will return a link to the web server running inside the run. The `chatHistory` links to the default dataset and contains the history of the whole conversation, with each message as a separate item.
When the run in the Console, the user will then see this:

### Custom HTML as Actor run output
This example shows an output schema of an Actor that runs Cypress tests. When the run finishes, the Actor generates an HTML report and store it in the key-value store. You can link to this file and show it as an output:
.actor/output\_schema.json
{ "actorOutputSchemaVersion": 1,
"title": "Cypress test report output",
"description": "Test report from Cypress",
"type": "object",
"properties": {
"reportUrl": {
"type": "string",
"title": "HTML Report",
"template": "{{links.apiDefaultKeyValueStoreUrl}}/records/report.html"
}
}
}
The `reportUrl` in this case links directly to the key-value store record stored in the default key-value store.
When the run finishes, Apify Console displays the HTML report in an iframe:

### Actor with no output
If your Actor produces no output (for example, an integration Actor that performs an action), users might see the empty **Output** tab and think the Actor failed. To avoid this, specify that the Actor produces no output.
You can specify that the Actor produces no output and define an output schema with no properties:
.actor/output\_schema.json
{ "actorOutputSchemaVersion": 1,
"title": "Send mail output",
"description": "Send mail Actor does not generate any output.",
"type": "object",
"properties": {}
}
When the output schema contains no properties, Apify Console displays the **Log** tab instead of the **Output** tab.
---
# Source code
**Learn about the Actor's source code placement and its structure.**
***
The Apify Actor's source code placement is defined by its https://docs.apify.com/platform/actors/development/actor-definition/dockerfile.md. If you have created the Actor from one of Apify's https://apify.com/templates then it's by convention placed in the `/src` directory.
You have the flexibility to choose any programming language, technologies, and dependencies (such as Chrome browser, Selenium, Cypress, or others) for your projects. The only requirement is to define a Dockerfile that builds the image for your Actor, including all dependencies and your source code.
## Example setup
Let's take a look at the example JavaScript Actor's source code. The following Dockerfile:
FROM apify/actor-node:20
COPY package*.json ./
RUN npm --quiet set progress=false
&& npm install --omit=dev --omit=optional
&& echo "Installed NPM packages:"
&& (npm list --omit=dev --all || true)
&& echo "Node.js version:"
&& node --version
&& echo "NPM version:"
&& npm --version
&& rm -r ~/.npm
COPY . ./
CMD npm start --silent
This `Dockerfile` does the following tasks:
1. Builds the Actor from the `apify/actor-node:20` base image.
FROM apify/actor-node:20
2. Copies the `package.json` and `package-lock.json` files to the image.
COPY package*.json ./
3. Installs the npm packages specified in package.json, omitting development and optional dependencies.
RUN npm --quiet set progress=false
&& npm install --omit=dev --omit=optional
&& echo "Installed NPM packages:"
&& (npm list --omit=dev --all || true)
&& echo "Node.js version:"
&& node --version
&& echo "NPM version:"
&& npm --version
&& rm -r ~/.npm
4. Copies the rest of the source code to the image
COPY . ./
5. Runs the `npm start` command defined in `package.json`
CMD npm start --silent
Optimized build cache
By copying the `package.json` and `package-lock.json` files and installing dependencies before the rest of the source code, you can take advantage of Docker's caching mechanism. This approach ensures that dependencies are only reinstalled when the `package.json` or `package-lock.json` files change, significantly reducing build times. Since the installation of dependencies is often the most time-consuming part of the build process, this optimization can lead to substantial performance improvements, especially for larger projects with many dependencies.
### `package.json`
The `package.json` file defines the `npm start` command:
{ "name": "getting-started-node", "version": "0.0.1", "type": "module", "description": "This is an example of an Apify Actor.", "dependencies": { "apify": "^3.0.0" }, "devDependencies": {}, "scripts": { "start": "node src/main.js", "test": "echo "Error: oops, the Actor has no tests yet, sad!" && exit 1" }, "author": "It's not you; it's me", "license": "ISC" }
When the Actor starts, the `src/main.js` file is executed.
---
# Automated tests for Actors
**Learn how to automate ongoing testing and make sure your Actors perform over time. See code examples for configuring the Actor Testing Actor.**
***
Automated testing is crucial for maintaining the reliability and performance of your Actors over time. This guide will help you set up automated tests using the https://apify.com/pocesar/actor-testing.
## Set up automated tests
1. Prepare test tasks - Create 1–5 separate testing tasks for your Actor.
2. Configure Actor testing - Set up a task using the Actor Testing Actor.
3. Validate tests - Run the test task multiple times until all tests pass.
4. Schedule tests - Set up a recurring schedule for your tests.
5. Monitor results - Review and address any issues on a weekly basis.
## Create test tasks
Example of Actor testing tasks
When creating test tasks:
* Include a test for your Actor's default configuration
* Set a low `maxItem` value to conserve credits
* For large data tests, reduce test frequency to conserve credits
## Configure the Actor Testing Actor
Follow the https://apify.com/pocesar/actor-testing in the Actor's README.
Here are some recommended test scenarios:
* Run status
* Crash information from the log
* Information from statistics (runtime, retries)
* Information about and from within the dataset
* Information about the key-value store
await expectAsync(runResult).toHaveStatus('SUCCEEDED');
await expectAsync(runResult).withLog((log) => { // Neither ReferenceError or TypeErrors should ever occur // in production code – they mean the code is over-optimistic // The errors must be dealt with gracefully and displayed with a helpful message to the user expect(log) .withContext(runResult.format('ReferenceError')) .not.toContain('ReferenceError');
expect(log)
.withContext(runResult.format('TypeError'))
.not.toContain('TypeError');
});
await expectAsync(runResult).withStatistics((stats) => { // In most cases, you want it to be as close to zero as possible expect(stats.requestsRetries) .withContext(runResult.format('Request retries')) .toBeLessThan(3);
// What is the expected run time for the number of items?
expect(stats.crawlerRuntimeMillis)
.withContext(runResult.format('Run time'))
.toBeWithinRange(1 * 60000, 10 * 60000);
});
await expectAsync(runResult).withDataset(({ dataset, info }) => { // If you're sure, always set this number to be your exact maxItems expect(info.cleanItemCount) .withContext(runResult.format('Dataset cleanItemCount')) .toBe(3); // or toBeGreaterThan(1) or toBeWithinRange(1,3)
// Make sure the dataset isn't empty
expect(dataset.items)
.withContext(runResult.format('Dataset items array'))
.toBeNonEmptyArray();
const results = dataset.items;
// Check dataset items to have the expected data format
for (const result of results) {
expect(result.directUrl)
.withContext(runResult.format('Direct url'))
.toStartWith('https://www.yelp.com/biz/');
expect(result.bizId)
.withContext(runResult.format('Biz ID'))
.toBeNonEmptyString();
}
});
await expectAsync(runResult).withKeyValueStore(({ contentType }) => { // Check for the proper content type of the saved key-value item expect(contentType) .withContext(runResult.format('KVS contentType')) .toBe('image/gif'); },
// This also checks for existence of the key-value key { keyName: 'apify.com-scroll_losless-comp' }, );
---
# Builds and runs
**Learn about Actor builds and runs, their lifecycle, versioning, and other properties.**
***
Actor **builds** and **runs** are fundamental concepts within the Apify platform. Understanding them is crucial for effective use of the platform.
## Building an Actor
When you start the build process for your Actor, you create a *build*. A build is a Docker image containing your source code and the required dependencies needed to run the Actor:
## Running an Actor
To create a *run*, you take your *build* and start it with some input:
## Lifecycle
Actor builds and runs share a common lifecycle. Each build and run begins with the initial status **READY** and progress through one or more transitional statuses to reach a terminal status.
***
| Status | Type | Description |
| ---------- | ------------ | ------------------------------------------- |
| READY | initial | Started but not allocated to any worker yet |
| RUNNING | transitional | Executing on a worker machine |
| SUCCEEDED | terminal | Finished successfully |
| FAILED | terminal | Run failed |
| TIMING-OUT | transitional | Timing out now |
| TIMED-OUT | terminal | Timed out |
| ABORTING | transitional | Being aborted by user |
| ABORTED | terminal | Aborted by user |
---
# Builds
**Learn about Actor build numbers, versioning, and how to use specific Actor version in runs. Understand an Actor's lifecycle and manage its cache.**
***
## Understand Actor builds
Before an Actor can be run, it needs to be built. The build process creates a snapshot of a specific version of the Actor's settings, including its https://docs.apify.com/platform/actors/development/actor-definition/source-code.md and https://docs.apify.com/platform/actors/development/programming-interface/environment-variables.md. This snapshot is then used to create a Docker image containing everything the Actor needs for its run, such as `npm` packages, web browsers, etc.
### Build numbers
Each build is assigned a unique build number in the format *MAJOR.MINOR.BUILD* (e.g. *1.2.345*):
* *MAJOR.MINOR* corresponds to the Actor version number
* *BUILD* is an automatically incremented number starting at **1**.
### Build resources
By default, builds have the following resource allocations:
* Timeout: *1800* seconds
* Memory: `4096 MB`
Check out the https://docs.apify.com/platform/actors/running.md section for more details.
## Versioning
To support active development, Actors can have multiple versions of source code and associated settings, such as the base image and environment. Each version is denoted by a version number of the form *MAJOR.MINOR*, following https://semver.org/ principles.
For example, an Actor might have:
* Production version *1.1*
* Beta version *1.2* that contains new features but is still backward compatible
* Development version *2.0* that contains breaking changes.
## Tags
Tags simplify the process of specifying which build to use when running an Actor. Instead of using a version number, you can use a tag such as *latest* or *beta*. Tags are unique, meaning only one build can be associated with a specific tag.
To set a tag for builds of a specific Actor version:
1. Set the `Build tag` property.
2. When a new build of that version is successfully finished, it's automatically assigned the tag.
By default, the builds are set to the *latest* tag.
## Cache
To speed up builds triggered via API, you can use the `useCache=1` parameter. This instructs the build process to use cached Docker images and layers instead of pulling the latest copies and building each layer from scratch. Note that the cached images and layers might not always be available on the server building the image, the `useCache` parameter only functions on a best-effort basis.
Clean builds
Running builds from the Console By default, the Console uses cached data when starting a build. You can also run a clean build without using the cache. To run a clean build:
1. Go to your Actor page.
2. Select **Source** > **Code**.
3. Locate the **Start** button. Next to it, click on the arrow & choose **Clean build**
---
# Runs
**Learn about Actor runs, how to start them, and how to manage them.**
***
When you start an Actor, you create a run. A run is a single execution of your Actor with a specific input in a Docker container.
## Starting an Actor
You can start an Actor in several ways:
* Manually from the https://console.apify.com/actors UI
* Via the https://docs.apify.com/api/v2/act-runs-post.md
* Using the https://docs.apify.com/platform/schedules.md provided by the Apify platform
* By one of the available https://docs.apify.com/platform/integrations.md
## Input and environment variables
The run receives input via the `INPUT` record of its default https://docs.apify.com/platform/storage/key-value-store.md. Environment variables are also passed to the run. For more information about environment variables check the https://docs.apify.com/platform/actors/development/programming-interface/environment-variables.md section.
## Run duration and timeout
Actor runs can be short or long-running. To prevent infinite runs, you can set a timeout. The timeout is specified in seconds, and the default timeout varies based on the template from which you create your Actor. If the run doesn't finish within the timeout, it's automatically stopped, and its status is set to `TIMED-OUT`.
---
# State persistence
**Learn how to maintain an Actor's state to prevent data loss during unexpected restarts. Includes code examples for handling server migrations.**
***
Long-running https://docs.apify.com/platform/actors.md jobs may need to migrate between servers. Without state persistence, your job's progress is lost during migration, causing it to restart from the beginning on the new server. This can be costly and time-consuming.
To prevent data loss, long-running Actors should:
* Periodically save (persist) their state.
* Listen for https://docs.apify.com/sdk/js/api/apify/class/PlatformEventManager
* Check for persisted state when starting, allowing them to resume from where they left off.
For short-running Actors, the risk of restarts and the cost of repeated runs are low, so you can typically ignore state persistence.
## Understanding migrations
A migration occurs when a process running on one server must stop and move to another. During this process:
* All in-progress processes on the current server are stopped
* Unless you've saved your state, the Actor run will restart on the new server with an empty internal state
* You only have a few seconds to save your work when a migration event occurs
### Causes of migration
Migrations can happen for several reasons:
* Server workload optimization
* Server crashes (rare)
* New feature releases and bug fixes
### Frequency of migrations
Migrations don't follow a specific schedule. They can occur at any time due to the events mentioned above.
## Why state is lost during migration
By default, an Actor keeps its state in the server's memory. During a server switch, the run loses access to the previous server's memory. Even if data were saved on the server's disk, access to that would also be lost. Note that the Actor run's default dataset, key-value store and request queue are preserved across migrations, by state we mean the contents of runtime variables in the Actor's code.
## Implementing state persistence
The https://docs.apify.com/sdk.md handle state persistence automatically.
This is done using the `Actor.on()` method and the `migrating` event.
* The `migrating` event is triggered just before a migration occurs, allowing you to save your state.
* To retrieve previously saved state, you can use the https://docs.apify.com/sdk/js/reference/class/Actor#getValue/https://docs.apify.com/sdk/python/reference/class/Actor#get_value methods.
### Code examples
To manually persist state, use the `Actor.on` method in the Apify SDK:
* JavaScript
* Python
import { Actor } from 'apify';
await Actor.init(); // ... Actor.on('migrating', () => { Actor.setValue('my-crawling-state', { foo: 'bar', }); }); // ... await Actor.exit();
from apify import Actor, Event
async def actor_migrate(_event_data): await Actor.set_value('my-crawling-state', {'foo': 'bar'})
async def main(): async with Actor: # ... Actor.on(Event.MIGRATING, actor_migrate) # ...
To check for state saved in a previous run:
* JavaScript
* Python
import { Actor } from 'apify';
await Actor.init(); // ... const previousCrawlingState = await Actor.getValue('my-crawling-state') || {}; // ... await Actor.exit();
from apify import Actor
async def main(): async with Actor: # ... previous_crawling_state = await Actor.get_value('my-crawling-state') # ...
For improved Actor performance consider https://docs.apify.com/academy/expert-scraping-with-apify/saving-useful-stats.md.
## Speeding up migrations
Once your Actor receives the `migrating` event, the Apify platform will shut it down and restart it on a new server within one minute. To speed this process up, once you have persisted the Actor state, you can manually reboot the Actor in the `migrating` event handler using the `Actor.reboot()` method available in the https://docs.apify.com/sdk/js/reference/class/Actor#reboot or https://docs.apify.com/sdk/python/reference/class/Actor#reboot.
* JavaScript
* Python
import { Actor } from 'apify';
await Actor.init(); // ... Actor.on('migrating', async () => { // ... // save state // ... await Actor.reboot(); }); // ... await Actor.exit();
from apify import Actor, Event
async def actor_migrate(_event_data): # ... # save state # ... await Actor.reboot()
async def main(): async with Actor: # ... Actor.on(Event.MIGRATING, actor_migrate) # ...
---
# Deployment
**Learn how to deploy your Actors to the Apify platform and build them.**
***
Deploying an Actor involves uploading your https://docs.apify.com/platform/actors/development/actor-definition.md and https://docs.apify.com/platform/actors/development/builds-and-runs/builds.md it on the Apify platform. Once deployed, you can run and scale your Actor in the cloud.
## Deploy using Apify CLI
The fastest way to deploy and build your Actor is by using the https://docs.apify.com/cli. If you've completed one of the tutorials from the https://docs.apify.com/academy.md, you should have already have it installed. If not, follow the https://docs.apify.com/cli/docs/installation.
To deploy your Actor using Apify CLI:
1. Log in to your Apify account:
apify login
2. Navigate to the directory of your Actor on your local machine.
3. Deploy your Actor by running:
apify push
When you deploy using the CLI, your source code is uploaded as "multiple source files" and is visible and editable in the Web IDE.

Source files size limit
The CLI deploys code as multiple source files up to 3 MB. Beyond that, it deploys as a Zip file.
### Pull an existing Actor
You can also pull an existing Actor from the Apify platform to your local machine using `apify pull` command
apify pull [ACTORID]
This command fetches the Actor's files to your current directory. If the Actor is defined as a Git repository, it will be cloned, for Actors defined in the Web IDE, the command will fetch the files directly.
You can specify a particular version of the Actor to pull by using the `--version` flag:
apify pull [ACTORID] --version=1.2
If you don't provide the `ACTORID`, the command will update the Actor in the current directory based on its name in the `.actor/actor.json` file.
## Alternative deployment methods
To deploy using other methods, first create the Actor manually through Apify CLI or Apify Console, then change its source type:

You can link your Actor to a Git repository, Gist, or a Zip file.
For more information on alternative source types, check out next chapter.
---
# Continuous integration for Actors
**Learn how to set up automated builds, deploys, and testing for your Actors.**
***
Automating your Actor development process can save time and reduce errors, especially for projects with multiple Actors or frequent updates. Instead of manually pushing code, building Actors, and running tests, you can automate these steps to run whenever you push code to your repository.
You can automate Actor builds and tests using your Git repository's automated workflows like https://github.com/features/actions or https://www.atlassian.com/software/bitbucket/features/pipelines.
Using Bitbucket?
Follow our step-by-step guide to set up continuous integration for your Actors with Bitbucket Pipelines: https://help.apify.com/en/articles/6988586-setting-up-continuous-integration-for-apify-actors-on-bitbucket.
Set up continuous integration for your Actors using one of these methods:
*
*
Choose the method that best fits your workflow.
## Option 1: Trigger builds with a Webhook
1. Push your Actor to a GitHub repository.
2. Go to your Actor's detail page in Apify Console, click on the API tab in the top right, then select API Endpoints. Copy the **Build Actor** API endpoint URL. The format is as follows:
API token
Make sure you select the correct API token from the dropdown.
3. In your GitHub repository, go to Settings > Webhooks > Add webhook.
4. Paste the API URL into the Payload URL field and add the webhook.

Now your Actor will automatically rebuild on every push to the GitHub repository.
## Option 2: Set up automated builds and tests with GitHub Actions
1. Push your Actor to a GitHub repository.
2. Get your Apify API token from the https://console.apify.com/settings/integrations

3. Add your Apify token to GitHub secrets
1. Go to your repository > Settings > Secrets and variables > Actions > New repository secret
2. Name the secret and paste in your token

4. Add the Build Actor API endpoint URL to GitHub secrets
1. Go to your repository > Settings > Secrets and variables > Actions > New repository secret
2. In Apify Console, go to your Actor's detail page, click the API tab in the top right, and then select API Endpoints. Copy the **Build Actor** API endpoint URL. The format is as follows:
API token
Make sure you select the correct API token from the dropdown.
```
https://api.apify.com/v2/acts/YOUR-ACTOR-NAME/builds?token=YOUR-TOKEN-HERE&version=0.0&tag=latest&waitForFinish=60
```
3. Name the secret & paste in your API endpoint

5. Create GitHub Actions workflow files:
1. In your repository, create the `.github/workflows` directory
2. Add `latest.yml`. If you want, you can also add `beta.yml` to build Actors from the develop branch (or other branches).
* latest.yml
* beta.yml
Use your secret names
Make sure to use the exact secret names you set in the previous step.
name: Test and build latest version on: push: branches: - master - main jobs: test-and-build: runs-on: ubuntu-latest steps: # Install dependencies and run tests - uses: actions/checkout@v2 - run: npm install && npm run test # Build latest version - uses: distributhor/workflow-webhook@v1 env: webhook_url: ${{ secrets.BUILD_ACTOR_URL }} webhook_secret: ${{ secrets.APIFY_TOKEN }}
With this setup, pushing to the `main` or `master` branch tests the code and builds a new latest version.
Use your secret names
Make sure to use the exact secret names you set in the previous step.
name: Test and build beta version on: push: branches: - develop jobs: test-and-build: runs-on: ubuntu-latest steps: # Install dependencies and run tests - uses: actions/checkout@v2 - run: npm install && npm run test # Build beta version - uses: distributhor/workflow-webhook@v1 env: webhook_url: ${{ secrets.BUILD_ACTOR_URL }} webhook_secret: ${{ secrets.APIFY_TOKEN }}
With this setup, pushing to the `develop` branch tests the code and builds a new beta version.
## Conclusion
Setting up continuous integration (CI) for your Apify Actors ensures that CI automatically tests and builds your code whenever you push changes to your repository. This helps catch issues early and streamlines your deployment process, whether you're releasing to production or maintaining a beta branch.
You can also integrate directly with GitHub, check out the https://docs.apify.com/platform/integrations/github.md.
---
# Source types
**Learn about Apify Actor source types and how to deploy an Actor from GitHub using CLI or Gist.**
***
This section explains the various sources types available for Apify Actors and how to deploy an Actor from GitHub using CLI or Gist. Apify Actors supports four source types:
*
*
*
*
*
*
*
## Web IDE
This is the default option when your Actor's source code is hosted on the Apify platform. It offers quick previews and updates to your source code, easy file and directory browsing, and direct testing of the https://docs.apify.com/platform/actors/development/actor-definition/input-schema.md on the Apify platform.
A `Dockerfile` is mandatory for all Actors. When using the default NodeJS Dockerfile, you'll typically need `main.js` for your source code and `package.json` for https://www.npmjs.com/ package configurations.
For more information on creating custom Dockerfiles or using Apify's base images, refer to the https://docs.apify.com/platform/actors/development/actor-definition/dockerfile.md#custom-dockerfile and https://docs.apify.com/platform/actors/development/actor-definition/dockerfile.md#base-docker-images documentation.
## Git repository
https://www.youtube-nocookie.com/embed/NEzT_p_RE1Q
Hosting your Actor's source code in a Git repository allows for multiple files and directories, a custom `Dockerfile` for build process control, and a user description fetched from `README.md`. Specify the repository location using the **Git URL** setting with `https`, `git`, or `ssh` protocols.
To deploy an Actor from GitHub, set the **Source Type** to **Git repository** and enter the GitHub repository URL in the **Git URL** field. You can optionally specify a branch or tag by adding a URL fragment (e.g., `#develop`).
To use a specific directory, add it after the branch/tag, separated by a colon (e.g., `#develop:some/dir`)
GitHub integration
You can easily set up an integration where the Actor is automatically rebuilt on every commit to the Git repository. For more details, see https://docs.apify.com/platform/integrations/github.md.
### Private repositories
When using a private Git repository for your Actor's source code, you need to configure a deployment key. This key grants Apify secure, read-only access to your repository.
What are deployment keys
Deployment keys are unique SSH keys that allow Apify to clone and build your Actor from a private repository.
#### How to configure deployment keys
To configure the deployment key for your Actor's source code you need to:
1. In your Actor's settings, find the **Git URL** input field
2. Click the **deployment key** link below the input field
3. Follow the instruction to add the key to your Git hosting service.

By using deployment keys, you enable secure, automated builds of your Actor from private repositories.
Key usage limitations
Remember that each key can only be used once per Git hosting service (GitHub, Bitbucket, GitLab)
### Actor monorepos
To manage multiple Actors in a single repository, use the `dockerContextDir` property in the https://docs.apify.com/platform/actors/development/actor-definition/actor-json.md to set the Docker context directory (if not provided then the repository root is used). In the Dockerfile, copy both the Actor's source and any shared code into the Docker image.
To enable sharing Dockerfiles between multiple Actors, the Actor build process passes the `ACTOR_PATH_IN_DOCKER_CONTEXT` build argument to the Docker build. It contains the relative path from `dockerContextDir` to the directory selected as the root of the Actor in the Apify Console (the "directory" part of the Actor's git URL).
For an example, see the https://github.com/apify/actor-monorepo-example repository. To build Actors from this monorepo, you would set the source URL (including branch name and folder) as `https://github.com/apify/actor-monorepo-example#main:actors/javascript-actor` and `https://github.com/apify/actor-monorepo-example#main:actors/typescript-actor` respectively.
## Zip file
Actors can also use source code from a Zip archive hosted on an external URL. This option supports multiple files and directories, allows for custom `Dockerfile`, and uses `README.md` for the Actor description. If not using a https://docs.apify.com/platform/actors/development/actor-definition/dockerfile.md#custom-dockerfile, ensure your main file is named `main.js`.
Automatic use of ZIP file
This source type is used automatically when you are using Apify-CLI and the source size exceeds `3MB`.
## GitHub Gist
For smaller projects, GitHub Gist offers a simpler alternative to full Git repositories or hosted Zip files. To use a GitHub Gist, create your Gist at https://gist.github.com/, set the **Source type** to **GitHub Gist**, and paste the Gist URL in the provided field.
Like other source types, Gists can include multiple files, directories, and a custom Dockerfile. The Actor description is taken from `README.md`.
By understanding these source types, you can choose the most appropriate option for hosting and deploying your Apify Actors. Each type offers unique advantages, allowing you to select the best fit for your project's size, complexity, and collaboration needs.
---
# Performance
**Learn how to get the maximum value out of your Actors, minimize costs, and maximize results.**
***
## Optimization Tips
This guide provides tips to help you maximize the performance of your Actors, minimize costs, and achieve optimal results.
### Run batch jobs instead of single jobs
Running a single job causes the Actor to start and stop for each execution, which is an expensive operation. If your Actor runs a web browser or other resource-intensive dependencies, their startup times further contribute to the cost. To minimize costs, we recommend running batch jobs instead of single jobs.
For example, instead of starting an Actor for every URL you want to process, group the URLs into batches and run the Actor once for each batch. This approach reuses the browser instance, resulting in a more cost-efficient implementation.
### Leverage Docker layer caching to speed up builds
When you build a Docker image, Docker caches the layers that haven't changed. This means that if you modify only a small part of your Dockerfile, Docker doesn't need to rebuild the entire image but only the changed layers. This can save significant time and money.
Consider the following Dockerfile:
FROM apify/actor-node:16
COPY package*.json ./
RUN npm --quiet set progress=false
&& npm install --omit=dev --omit=optional
&& echo "Installed NPM packages:"
&& (npm list --omit=dev --all || true)
&& echo "Node.js version:"
&& node --version
&& echo "NPM version:"
&& npm --version
&& rm -r ~/.npm
COPY . ./
CMD npm start --silent
We first copy the `package.json`, `package-lock.json` files , and install the dependencies before copying the rest of the source code. This way, we can take advantage of Docker's caching mechanism and only install the dependencies when the `package.json` or `package-lock.json` files change, making the build process much faster.
Further optimization tips
* We recommend using as few layers as possible in your Docker images. This helps to reduce overall image sizes and improve build times.
* Use the https://github.com/wagoodman/dive CLI tool to analyze the layers of a built Docker image. This tool provides insights into the composition of each layer, allowing you to understand what was added and helps you find ways to minimize their size.
### Use standardized images to accelerate Actor startup times
Using one of https://github.com/apify/apify-actor-docker, can accelerate the Actor startup time. These images are cached on each worker machine, so only the layers you added in your Actor's https://docs.apify.com/platform/actors/development/actor-definition/dockerfile.md need to be pulled.
---
# Programming interface
**Learn about the programming interface of Apify Actors, important commands and features provided by the Apify SDK, and how to use them in your Actors.**
***
This chapter will guide you through all the commands you need to build your first Actor. This interface is provided by https://docs.apify.com/sdk.md. The chapter starts with basic commands and guides you through system events and environment variables that are available to your Actor both locally and when running on Apify platform.
#### https://docs.apify.com/platform/actors/development/programming-interface/basic-commands.md
https://docs.apify.com/platform/actors/development/programming-interface/basic-commands.md
#### https://docs.apify.com/platform/actors/development/programming-interface/container-web-server.md
https://docs.apify.com/platform/actors/development/programming-interface/container-web-server.md
#### https://docs.apify.com/platform/actors/development/programming-interface/status-messages.md
https://docs.apify.com/platform/actors/development/programming-interface/status-messages.md
#### https://docs.apify.com/platform/actors/development/programming-interface/status-messages.md
https://docs.apify.com/platform/actors/development/programming-interface/status-messages.md
#### https://docs.apify.com/platform/actors/development/programming-interface/container-web-server.md
https://docs.apify.com/platform/actors/development/programming-interface/container-web-server.md
#### https://docs.apify.com/platform/actors/development/programming-interface/metamorph.md
https://docs.apify.com/platform/actors/development/programming-interface/metamorph.md
#### https://docs.apify.com/platform/actors/development/programming-interface/standby.md
https://docs.apify.com/platform/actors/development/programming-interface/standby.md
---
# Basic commands
**Learn how to use basic commands of the Apify SDK for both JavaScript and Python.**
***
This page covers essential commands for the Apify SDK in JavaScript & Python. These commands are designed to be used within a running Actor, either in a local environment or on the Apify platform.
## Initialize your Actor
Before using any Apify SDK methods, initialize your Actor. This step prepares the Actor to receive events from the Apify platform, sets up machine and storage configurations, and clears previous local storage states.
* JavaScript
* Python
Use the `init()` method to initialize your Actor. Pair it with `exit()` to properly terminate the Actor. For more information on `exit()`, go to .
import { Actor } from 'apify';
await Actor.init(); console.log('Actor starting...'); // ... await Actor.exit();
Alternatively, use the `main()` function for environments that don't support top-level awaits. The `main()` function is syntax-sugar for `init()` and `exit()`. It will call `init()` before it executes its callback and `exit()` after the callback resolves.
import { Actor } from 'apify';
Actor.main(async () => { console.log('Actor starting...'); // ... });
In Python, use an asynchronous context manager with the `with` keyword. The `init()` method will be called before the code block is executed, and the `exit()` method will be called after the code block is finished.
from apify import Actor
async def main(): async with Actor: Actor.log.info('Actor starting...') # ...
## Get input
Access the Actor's input object, which is stored as a JSON file in the Actor's default key-value store. The input is an object with properties. If the Actor defines the input schema, the input object is guaranteed to conform to it.
* JavaScript
* Python
import { Actor } from 'apify';
await Actor.init();
const input = await Actor.getInput(); console.log(input); // prints: {'option1': 'aaa', 'option2': 456}
await Actor.exit();
from apify import Actor
async def main(): async with Actor: actor_input: dict = await Actor.get_input() or {} Actor.log.info(actor_input) # prints: {'option1': 'aaa', 'option2': 456}
Usually, the file is called `INPUT`, but the exact key is defined in the `ACTOR_INPUT_KEY` environment variable.
## Key-value store access
Use the https://docs.apify.com/platform/storage/key-value-store.md to read and write arbitrary files
* JavaScript
* Python
import { Actor } from 'apify';
await Actor.init();
// Save object to store (stringified to JSON) await Actor.setValue('my_state', { something: 123 });
// Save binary file to store with content type await Actor.setValue('screenshot.png', buffer, { contentType: 'image/png' });
// Get a record from the store (automatically parsed from JSON) const value = await Actor.getValue('my_state');
// Access another key-value store by its name const store = await Actor.openKeyValueStore('screenshots-store'); await store.setValue('screenshot.png', buffer, { contentType: 'image/png' });
await Actor.exit();
from apify import Actor
async def main(): async with Actor: # Save object to store (stringified to JSON) await Actor.set_value('my_state', {'something': 123})
# Get a record from the store (automatically parsed from JSON)
value = await Actor.get_value('my_state')
# Log the obtained value
Actor.log.info(f'value = {value}')
# prints: value = {'something': 123}
## Push results to the dataset
Store larger results in a https://docs.apify.com/platform/storage/dataset.md, an append-only object storage
Note that Datasets can optionally be equipped with the schema that ensures only certain kinds of objects are stored in them.
* JavaScript
* Python
import { Actor } from 'apify';
await Actor.init();
// Append result object to the default dataset associated with the run await Actor.pushData({ someResult: 123 });
await Actor.exit();
from apify import Actor
async def main(): async with Actor: # Append result object to the default dataset associated with the run await Actor.push_data({'some_result': 123})
## Exit Actor
When an Actor's main process terminates, the Actor run is considered finished. The process exit code determines Actor's final status:
* Exit code `0`: Status `SUCCEEDED`
* Exit code not equal to `0`: Status `FAILED`
By default, the platform sets a generic status message like *Actor exit with exit code 0*. However, you can provide more informative message using the SDK's exit methods.
### Basic exit
Use the `exit()` method to terminate the Actor with a custom status message:
* JavaScript
* Python
import { Actor } from 'apify';
await Actor.init(); // ... // Actor will finish with 'SUCCEEDED' status await Actor.exit('Succeeded, crawled 50 pages');
from apify import Actor
async def main(): async with Actor: # Actor will finish with 'SUCCEEDED' status await Actor.exit(status_message='Succeeded, crawled 50 pages') # INFO Exiting actor ({"exit_code": 0}) # INFO [Terminal status message]: Succeeded, crawled 50 pages
### Immediate exit
To exit immediately without calling exit handlers:
* JavaScript
* Python
import { Actor } from 'apify';
await Actor.init();
// ...
// Exit right away without calling exit handlers at all
await Actor.exit('Done right now', { timeoutSecs: 0 });
from apify import Actor
async def main():
async with Actor:
# Exit right away without calling exit handlers at all
await Actor.exit(event_listeners_timeout_secs=0, status_message='Done right now')
# INFO Exiting actor ({"exit_code": 0})
# INFO [Terminal status message]: Done right now
### Failed exit
To indicate a failed run:
* JavaScript
* Python
import { Actor } from 'apify';
await Actor.init(); // ... // Actor will finish with 'FAILED' status await Actor.exit('Could not finish the crawl, try increasing memory', { exitCode: 1 });
from apify import Actor
async def main(): async with Actor: # Actor will finish with 'FAILED' status await Actor.exit(status_message='Could not finish the crawl, try increasing memory', exit_code=1) # INFO Exiting actor ({"exit_code": 1}) # INFO [Terminal status message]: Could not finish the crawl, try increasing memory
### Preferred exit methods
The SDK provides convenient methods for exiting Actors:
* Use `exit()` with custom messages to inform users about the Actor's achievements or issues.
* Use `fail()` as a shortcut for `exit()` when indicating an error. It defaults to an exit code of `1` and emits the `exit` event, allowing components to perform cleanup or state persistence.
* The `exit()` method also emits the `exit` event, enabling cleanup or state persistence.
Example of a failed exit using a shorthand method:
* JavaScript
* Python
import { Actor } from 'apify';
await Actor.init(); // ... // Or nicer way using this syntactic sugar: await Actor.fail('Could not finish the crawl, try increasing memory');
from apify import Actor
async def main(): async with Actor: # ... or nicer way using this syntactic sugar: await Actor.fail(status_message='Could not finish the crawl. Try increasing memory') # INFO Exiting actor ({"exit_code": 1}) # INFO [Terminal status message]: Could not finish the crawl. Try increasing memory
### Exit event handlers (JavaScript only)
In JavaScript, you can register handlers for the `exit` event:
* JavaScript
* Python
import { Actor } from 'apify';
await Actor.init();
// Register a handler to be called on exit.
// Note that the handler has timeoutSecs to finish its job.
Actor.on('exit', ({ statusMessage, exitCode, timeoutSecs }) => {
// Perform cleanup...
});
await Actor.exit();
😔 Custom handlers are not supported in the Python SDK yet.
---
# Container web server
**Learn about how to run a web server inside your Actor to enable communication with the outside world through both UI and API.**
***
Each Actor run is assigned a unique URL (e.g. `kmdo7wpzlshygi.runs.apify.net`) that allows HTTP access to an optional web server running inside the Actor's Docker container. This feature enhances your Actor's capabilities by enabling external communication.
Using Actors as an API
The container web server provides a way how to connect to one specific Actor run. To enable using your Actor as an API, with a pre-defined hostname, load balancing and autoscaling, check out https://docs.apify.com/platform/actors/development/programming-interface/standby.md.
## Access the container URL
You can find the container URL in three locations:
* In the web application, on the Actor run details page as the **Container URL** field.
* In the API as the `containerUrl` property of the https://docs.apify.com/api/v2/actor-run-get.md.
* In the Actor run's container as the `ACTOR_WEB_SERVER_URL` environment variable.
## Set up the web server
The web server inside the container must listen on the port specified by the `ACTOR_WEB_SERVER_PORT` environment variable (typically: *4321*). To use a different port:
1. Go to your Actor version configuration
2. Define the `ACTOR_WEB_SERVER_PORT` environment variable with your desired port number.
Check out https://docs.apify.com/platform/actors/development/programming-interface/environment-variables.md for more details.
## Example: Start a simple web server
* JavaScript
* Python
Here's how to start a basic web server in your Actor using Express.js:
// npm install express import { Actor } from 'apify'; import express from 'express';
await Actor.init();
const app = express(); const port = process.env.ACTOR_WEB_SERVER_PORT;
app.get('/', (req, res) => { res.send('Hello world from Express app!'); });
app.listen(port, () => console.log(Web server is listening and can be accessed at ${process.env.ACTOR_WEB_SERVER_URL}!));
// Let the Actor run for an hour await new Promise((r) => setTimeout(r, 60 * 60 * 1000));
await Actor.exit();
Here's how to start a basic web server in your Actor using Flask:
pip install flask
import asyncio import os from apify import Actor from apify_shared.consts import ActorEnvVars from flask import Flask
async def main(): async with Actor: # Create a Flask app app = Flask(name)
# Define a route
@app.route('/')
def hello_world():
return 'Hello world from Flask app!'
# Log the public URL
url = os.environ.get(ActorEnvVars.WEB_SERVER_URL)
Actor.log.info(f'Web server is listening and can be accessed at {url}')
# Start the web server
port = os.environ.get(ActorEnvVars.WEB_SERVER_PORT)
app.run(host='0.0.0.0', port=port)
---
# Actor environment variables
**Learn how to provide your Actor with context that determines its behavior through a plethora of pre-defined environment variables set by the Apify platform.**
***
## How to use environment variables in an Actor
You can set up environment variables for your Actor in two ways:
*
*
Environment variable precedence
Your local `.actor/actor.json` file overrides variables set in Apify Console. To use Console variables, remove the `environmentVariables` key from the local file.
Check out how you can .
## System environment variables
Apify sets several system environment variables for each Actor run. These variables provide essential context and information about the Actor's execution environment.
Here's a table of key system environment variables:
| Environment Variable | Description |
| ------------------------------------ | ----------------------------------------------------------------------------------------------------------------------------------------------------------------------------------------------------------------------------------------------------------------------------------------- |
| `ACTOR_ID` | ID of the Actor. |
| `ACTOR_FULL_NAME` | Full technical name of the Actor, in the format `owner-username/actor-name`. |
| `ACTOR_RUN_ID` | ID of the Actor run. |
| `ACTOR_BUILD_ID` | ID of the Actor build used in the run. |
| `ACTOR_BUILD_NUMBER` | Build number of the Actor build used in the run. |
| `ACTOR_BUILD_TAGS` | A comma-separated list of tags of the Actor build used in the run. Note that this environment variable is assigned at the time of start of the Actor and doesn't change over time, even if the assigned build tags change. |
| `ACTOR_TASK_ID` | ID of the Actor task. Empty if Actor is run outside of any task, e.g. directly using the API. |
| `ACTOR_EVENTS_WEBSOCKET_URL` | Websocket URL where Actor may listen for https://docs.apify.com/platform/actors/development/programming-interface/system-events.md from Actor platform. |
| `ACTOR_DEFAULT_DATASET_ID` | Unique identifier for the default dataset associated with the current Actor run. |
| `ACTOR_DEFAULT_KEY_VALUE_STORE_ID` | Unique identifier for the default key-value store associated with the current Actor run. |
| `ACTOR_DEFAULT_REQUEST_QUEUE_ID` | Unique identifier for the default request queue associated with the current Actor run. |
| `ACTOR_INPUT_KEY` | Key of the record in the default key-value store that holds the https://docs.apify.com/platform/actors/running/input-and-output.md#input. |
| `ACTOR_MAX_PAID_DATASET_ITEMS` | For paid-per-result Actors, the user-set limit on returned results. Do not exceed this limit. |
| `ACTOR_MAX_TOTAL_CHARGE_USD` | For pay-per-event Actors, the user-set limit on run cost. Do not exceed this limit. |
| `ACTOR_RESTART_ON_ERROR` | If **1**, the Actor run will be restarted if it fails. |
| `APIFY_HEADLESS` | If **1**, web browsers inside the Actor should run in headless mode (no windowing system available). |
| `APIFY_IS_AT_HOME` | Contains **1** if the Actor is running on Apify servers. |
| `ACTOR_MEMORY_MBYTES` | Size of memory allocated for the Actor run, in megabytes. Can be used to optimize memory usage or finetuning of low-level external libraries. |
| `APIFY_PROXY_PASSWORD` | Password for accessing Apify Proxy services. This password enables the Actor to utilize proxy servers on behalf of the user who initiated the Actor run. |
| `APIFY_PROXY_PORT` | TCP port number to be used for connecting to the Apify Proxy. |
| `APIFY_PROXY_STATUS_URL` | URL for retrieving proxy status information. Appending `?format=json` to this URL returns the data in JSON format for programmatic processing. |
| `ACTOR_STANDBY_URL` | URL for accessing web servers of Actor runs in the https://docs.apify.com/platform/actors/development/programming-interface/standby.md mode. |
| `ACTOR_STARTED_AT` | Date when the Actor was started. |
| `ACTOR_TIMEOUT_AT` | Date when the Actor will time out. |
| `APIFY_TOKEN` | API token of the user who started the Actor. |
| `APIFY_USER_ID` | ID of the user who started the Actor. May differ from the Actor owner. |
| `APIFY_USER_IS_PAYING` | If it is `1`, it means that the user who started the Actor is a paying user. |
| `ACTOR_WEB_SERVER_PORT` | TCP port for the Actor to start an HTTP server on. This server can be used to receive external messages or expose monitoring and control interfaces. The server also receives messages from the https://docs.apify.com/platform/actors/development/programming-interface/standby.md mode. |
| `ACTOR_WEB_SERVER_URL` | Unique public URL for accessing the Actor run web server from the outside world. |
| `APIFY_API_PUBLIC_BASE_URL` | Public URL of the Apify API. May be used to interact with the platform programmatically. Typically set to `api.apify.com`. |
| `APIFY_DEDICATED_CPUS` | Number of CPU cores reserved for the Actor, based on allocated memory. |
| `APIFY_WORKFLOW_KEY` | Identifier used for grouping related runs and API calls together. |
| `APIFY_META_ORIGIN` | Specifies how an Actor run was started. Possible values are in https://docs.apify.com/platform/actors/running/runs-and-builds.md#origin documentation. |
| `APIFY_INPUT_SECRETS_KEY_FILE` | Path to the secret key used to decrypt https://docs.apify.com/platform/actors/development/actor-definition/input-schema/secret-input.md. |
| `APIFY_INPUT_SECRETS_KEY_PASSPHRASE` | Passphrase for the input secret key specified in `APIFY_INPUT_SECRETS_KEY_FILE`. |
Date format
All date-related variables use the UTC timezone and are in https://en.wikipedia.org/wiki/ISO_8601 format (e.g., *2022-07-13T14:23:37.281Z*).
## Set up environment variables in `actor.json`
Actor owners can define custom environment variables in `.actor/actor.json`. All keys from `environmentVariables` will be set as environment variables into the Apify platform after you push Actor to Apify.
{ "actorSpecification": 1, "name": "dataset-to-mysql", "version": "0.1", "buildTag": "latest", "environmentVariables": { "MYSQL_USER": "my_username", } }
Git-workflow with actor.json
Be aware that if you define `environmentVariables` in `.actor/actor.json`, it only works with https://docs.apify.com/cli. If you use a Git workflow for Actor development, the environment variables will not be set from `.actor/actor.json` and you need to define them in Apify Console.
## Set up environment variables in Apify Console
Actor owners can define custom environment variables to pass additional configuration to their Actors. To set custom variables:
1. Go to your Actor's **Source** page in the Apify Console
2. Navigate to the **Environment variables** section.
3. Add your custom variables.
For sensitive data like API keys or passwords, enable the **Secret** option. This will encrypt the value and redact it from logs to prevent accidental exposure.
Build-time variables
Once you start a build, you cannot change its environment variables. To use different variables, you must create a new build.
Learn more in https://docs.apify.com/platform/actors/development/builds-and-runs/builds.md.
## Access environment variables
You can access environment variables in your code as follows:
* JavaScript
* Python
In Node.js, use the `process.env` object:
import { Actor } from 'apify';
await Actor.init();
// get MYSQL_USER const mysql_user = process.env.MYSQL_USER
// print MYSQL_USER to console console.log(mysql_user);
await Actor.exit();
In Python, use the `os.environ` dictionary:
import os print(os.environ['MYSQL_USER'])
from apify import Actor
async def main(): async with Actor: # get MYSQL_USER mysql_user = os.environ['MYSQL_USER']
# print MYSQL_USER to console
print(mysql_user)
## Use the `Configuration` class
For more convenient access to Actor configuration, use the https://docs.apify.com/sdk/js/reference/class/Configuration class
* JavaScript
* Python
import { Actor } from 'apify';
await Actor.init();
// get current token const token = Actor.config.get('token'); // use different token Actor.config.set('token', 's0m3n3wt0k3n');
await Actor.exit();
from apify import Actor
async def main(): async with Actor: old_token = Actor.config.token Actor.log.info(f'old_token = {old_token}')
# use different token
Actor.config.token = 's0m3n3wt0k3n'
new_token = Actor.config.token
Actor.log.info(f'new_token = {new_token}')
## Build-time environment variables
You can also use environment variables during the Actor's build process. In this case, they function as Docker build arguments. To use them in your Dockerfile, include `ARG` instruction:
ARG MY_BUILD_VARIABLE RUN echo $MY_BUILD_VARIABLE
Variables set during the build
Build-time environment variables are not suitable for secrets, as they are not encrypted.
By leveraging environment variables effectively, you can create more flexible and configurable Actors that adapt to different execution contexts and user requirements.
---
# Metamorph
**The metamorph operation transforms an Actor run into the run of another Actor with a new input.**
***
## Transform Actor runs
Metamorph is a powerful operation that transforms an Actor run into the run of another Actor with a new input. This feature enables you to leverage existing Actors and create more efficient workflows.
## Understand metamorph
The metamorph process involves several key steps. It stops the current Actor's Docker container, then starts a new container using a different Docker image. During this transition, all default storages are preserved. The new input is stored under the `INPUT-METAMORPH-1` key in the default key-value store, ensuring seamless data transfer between Actor runs.
## Benefits of metamorph
Metamorph offers several benefits for developers:
* Seamless transition between Actors without starting a new run
* Building new Actors on top of existing ones
* Providing users with an improved input structure and interface
* Maintaining transparency for end-users
These benefits make metamorph a valuable tool for creating complex, efficient workflows.
## Implementation guidelines
To make your Actor compatible with metamorph, use `Actor.getInput()` instead of `Actor.getValue('INPUT')`. This method fetches the input using the correct key (*INPUT-METAMORPH-1*) for metamorphed runs, ensuring proper data retrieval in transformed Actor runs.
Runtime limits
There's a limit to how many times you can metamorph a single run. Refer to the https://docs.apify.com/platform/limits.md#actor-limits for more details.
## Example
Let's walk through an example of using metamorph to create a hotel review scraper:
1. Create an Actor that accepts a hotel URL as input.
2. Use the https://apify.com/apify/web-scraper Actor to scrape reviews.
3. Use the metamorph operation to transform into a run of apify/web-scraper.
* JavaScript
* Python
Here's the JavaScript code to achieve this:
import { Actor } from 'apify';
await Actor.init();
// Get input of your Actor. const { hotelUrl } = await Actor.getInput();
// Create input for apify/web-scraper const newInput = { startUrls: [{ url: hotelUrl }], pageFunction: () => { // Here you pass the page function that // scrapes all the reviews ... }, // ... and here would be all the additional // input parameters. };
// Transform the Actor run to apify/web-scraper // with the new input. await Actor.metamorph('apify/web-scraper', newInput);
// The line here will never be reached, because the // Actor run will be interrupted. await Actor.exit();
Here's the Python code to achieve this:
from apify import Actor
async def main(): async with Actor: # Get input of your Actor actor_input = await Actor.get_input() or {}
# Create input for apify/web-scraper
new_input = {
'startUrls': [{'url': actor_input['url']}],
'pageFunction': """
# Here you pass the page function that
# scrapes all the reviews ...
""",
# ... and here would be all the additional input parameters
}
# Transform the Actor run to apify/web-scraper with the new input
await Actor.metamorph('apify/web-scraper', new_input)
# The line here will never be reached, because the Actor run will be interrupted
Actor.log.info('This should not be printed')
By following these steps, you can create a powerful hotel review scraper that leverages the capabilities of existing Actors through the metamorph operation.
---
# Standby mode
**Use Actors as an API server for fast response times.**
***
Traditional Actors are designed to run a single task and then stop. They're mostly intended for batch jobs, such as when you need to perform a large scrape or data processing task. However, in some applications, waiting for an Actor to start is not an option. Actor Standby mode solves this problem by letting you have the Actor ready in the background, waiting for the incoming HTTP requests. In a sense, the Actor behaves like a real-time web server or standard API server.
## Developing Actors using Standby mode
The best way to start developing Standby Actors is to use the predefined templates in the https://console.apify.com/actors/templates or in https://docs.apify.com/cli/ via `apify create`. The templates contain minimal code to get you up to speed for development in JavaScript, TypeScript or Python. Standby mode will automatically be enabled with default settings.
If you already have an existing Actor, or you just want to tweak the configuration of Standby mode, you can head to the Settings tab of your Actor, where the Actor Standby settings are located. 
Actors using Standby mode must run a HTTP server listening on a specific port. The user requests will then be proxied to the HTTP server. You can use any of the existing https://developer.mozilla.org/en-US/docs/Web/HTTP/Methods like GET, POST, PUT, DELETE, etc. You can pass the input via https://en.wikipedia.org/wiki/Query_string or via https://developer.mozilla.org/en-US/docs/Web/HTTP/Messages#body.
Sometimes, you want the HTTP server to listen on a specific port and cannot change it yourself. You can use `ACTOR_WEB_SERVER_PORT` environment variable to override the port so that Actor Standby will work with your code.
You can get the port using the Actor configuration available in Apify SDK. See example below with a simple Actor using Standby mode.
* JavaScript
* Python
import http from 'http'; import { Actor } from 'apify';
await Actor.init();
const server = http.createServer((req, res) => { res.writeHead(200, { 'Content-Type': 'text/plain' }); res.end('Hello from Actor Standby!\n'); });
server.listen(Actor.config.get('containerPort'));
from http.server import HTTPServer, SimpleHTTPRequestHandler from apify import Actor
class GetHandler(SimpleHTTPRequestHandler): def do_GET(self): self.send_response(200) self.end_headers() self.wfile.write(b'Hello from Actor Standby!')
async def main() -> None: async with Actor: with HTTPServer(('', Actor.config.web_server_port), GetHandler) as http_server: http_server.serve_forever()
Please make sure to describe your Actors, their endpoints, and the schema for their inputs and outputs in your README.
### Readiness probe
Before Actor standby runs are ready to serve requests, the Apify platform checks the web server's readiness using a readiness probe. The platform sends a GET request to the path `/` with a header `x-apify-container-server-readiness-probe`. If the header is present in the request, you can perform an early return with a simple response to prevent wasting resources.
Return a response
You must return a response; otherwise, the Actor run will never be marked as ready and won't process requests.
See example code below that distinguishes between "normal" and "readiness probe" requests.
* JavaScript
* Python
import http from 'http'; import { Actor } from 'apify';
await Actor.init();
const server = http.createServer((req, res) => { res.writeHead(200, { 'Content-Type': 'text/plain' }); if (req.headers['x-apify-container-server-readiness-probe']) { console.log('Readiness probe'); res.end('Hello, readiness probe!\n'); } else { console.log('Normal request'); res.end('Hello from Actor Standby!\n'); } });
server.listen(Actor.config.get('standbyPort'));
from http.server import HTTPServer, SimpleHTTPRequestHandler from apify import Actor
class GetHandler(SimpleHTTPRequestHandler): def do_GET(self) -> None: self.send_response(200) self.end_headers() if self.headers['x-apify-container-server-readiness-probe']: print('Readiness probe') self.wfile.write(b'Hello, readiness probe!') else: print('Normal request') self.wfile.write(b'Hello, normal request!')
async def main() -> None: async with Actor: with HTTPServer(('', Actor.config.standby_port), GetHandler) as http_server: http_server.serve_forever()
## Determining an Actor is started in Standby
Actors that support Actor Standby can still be started in standard mode, for example from the Console or via the API. To find out in which mode was the Actor started, you can read the `metaOrigin` option in `Actor.config`, or the `APIFY_META_ORIGIN` environment variable in case you're not using the Apify SDK. If it is equal to `STANDBY`, the Actor was started in Standby mode, otherwise it was started in standard mode.
* JavaScript
* Python
import { Actor } from 'apify';
await Actor.init();
if (Actor.config.get('metaOrigin') === 'STANDBY') { // Start your Standby server here } else { // Perform the standard Actor operations here }
from apify import Actor
async def main() -> None: async with Actor: if Actor.config.meta_origin == 'STANDBY': # Start your Standby server here else: # Perform the standard Actor operations here
## Timeouts
When you send a request to an Actor in Standby mode, the total timeout for receiving the first response is *5 minutes*. Before the platform forwards the request to a specific Actor run, it performs a *run selection* process to determine the specific Actor run that will handle it. This process has internal timeout of *2 minutes*.
## Getting the URL of the Standby Actor
The URL is exposed as an environment variable `ACTOR_STANDBY_URL`. You can also use `Actor.config`, where the `standbyUrl` option is available.
## Monetization of Actors with the Standby mode?
You can monetize Standby Actors just like any other Actor. For best results with Standby workflows, use pay-per-event monetization model. When monetizing your Actor in Standby mode using pay per event mode, you are not responsible for covering the platform usage costs of your users' runs. Users will need to cover both the platform usage costs (paid to Apify) and event costs (paid to you).
---
# Status messages
**Learn how to use custom status messages to inform users about an Actor's progress.**
***
Each Actor run has a status, represented by the `status` field. The following table describes the possible values:
| Status | Type | Description |
| ------------ | ------------ | ------------------------------------------- |
| `READY` | initial | Started but not allocated to any worker yet |
| `RUNNING` | transitional | Executing on a worker |
| `SUCCEEDED` | terminal | Finished successfully |
| `FAILED` | terminal | Run failed |
| `TIMING-OUT` | transitional | Timing out now |
| `TIMED-OUT` | terminal | Timed out |
| `ABORTING` | transitional | Being aborted by user |
| `ABORTED` | terminal | Aborted by user |
## Status messages
In addition to the status, each Actor run has a status message (the `statusMessage` field). This message informs users about the Actor's current activity, enhancing the user experience.

## Exit status message
When an Actor exits, the status message is set to either:
* A default text (e.g., *Actor finished with exit code 1*)
* A custom message (see the https://docs.apify.com/platform/actors/development/programming-interface/basic-commands.md#exit-actor method for details)
## Update status message
To keep users informed during the Actor's execution, update the status message periodically. Use the following code to set a status message:
* JavaScript
* Python
import { Actor } from 'apify';
await Actor.init();
// ... await Actor.setStatusMessage('Crawled 45 of 100 pages');
await Actor.exit();
Update frequency
You can call the `setStatusMessage` function as often as needed. The SDK only invokes the API if the status changes, simplifying usage.
from apify import Actor
async def main(): async with Actor: await Actor.set_status_message('Crawled 45 of 100 pages') # INFO [Status message]: Crawled 45 of 100 pages
---
# System events in Apify Actors
**Learn about system events sent to your Actor and how to benefit from them.**
***
## Understand system events
Apify's system notifies Actors about various events, such as:
* Migration to another server
* Abort operations triggered by another Actor
* CPU overload
These events help you manage your Actor's behavior and resources effectively.
## System events
The following table outlines the system events available:
| Event name | Payload | Description |
| -------------- | ------------------------------ | ----------------------------------------------------------------------------------------------------------- |
| `cpuInfo` | `{ isCpuOverloaded: Boolean }` | Emitted approximately every second, indicating whether the Actor is using maximum available CPU resources. |
| `migrating` | `{ timeRemainingSecs: Float }` | Signals that the Actor will soon migrate to another worker server on the Apify platform. |
| `aborting` | N/A | Triggered when a user initiates a graceful abort of an Actor run, allowing time for cleanup. |
| `persistState` | `{ isMigrating: Boolean }` | Emitted at regular intervals (default: *60 seconds*) to notify Apify SDK components to persist their state. |
## How system events work
Actors receive system events through a WebSocket connection. The address is specified by the `ACTOR_EVENTS_WEBSOCKET_URL` environment variable. Messages are sent in JSON format with the following structure:
{ // Event name name: String,
// Time when the event was created, in ISO format
createdAt: String,
// Optional object with payload
data: Object,
}
Virtual events
Some events like `persistState`, are generated virtually at the Actor SDK level, not sent via WebSocket.
## Handle system events
To work with system events in your Actor, use the following methods:
* JavaScript
* Python
import { Actor } from 'apify';
await Actor.init();
// Add event handler Actor.on('cpuInfo', (data) => { if (data.isCpuOverloaded) console.log('Oh no, we need to slow down!'); });
// Remove all handlers for a specific event Actor.off('systemInfo');
// Remove a specific event handler Actor.off('systemInfo', handler);
await Actor.exit();
from apify import Actor from apify_shared.consts import ActorEventTypes
def handler_foo(arg: dict): Actor.log.info(f'handler_foo: arg = {arg}')
def handler_boo(arg: dict): pass
async def main(): async with Actor: # Add event handler Actor.on(ActorEventTypes.ABORTING, handler_foo)
# Remove all handlers for a specific event
Actor.off('systemInfo')
# Remove a specific event handler
Actor.off('systemInfo', handler_boo)
By utilizing these system events, you can create more robust and efficient Actors that respond dynamically to changes in their environment.
---
# Quick start
**Create your first Actor using the Apify Web IDE or locally in your IDE.**
***
Before you build
Before you start building your own Actor, try out a couple of existing Actors from https://apify.com/store. See the https://docs.apify.com/platform/actors/running.md section for more information on running existing Actors.
## Technology stack
Any code that can run inside of a Docker container can be turned into Apify https://docs.apify.com/platform/actors.md. This gives you freedom in choosing your technical stack, including programming language and technologies.
But to fully benefit from running on top of the Apify platform, we recommend you choose either JavaScript/Node.js or Python, where Apify provides first-level support regarding its SDK, API clients, and learning materials.
For these languages, you can also https://apify.com/templates that help you to kickstart your project quickly.

## Development paths
You can develop Actor in two ways:
### Local development
Develop your Actor locally in your IDE and only deploy to the Apify platform when it is production ready.
This way, you benefit from your local setup for a better development and debugging experience. After you are done with the development, you can https://docs.apify.com/platform/actors/development/deployment.md your Actor to the Apify platform.
#### https://docs.apify.com/platform/actors/development/quick-start/locally.md
### Web IDE
Using the Web IDE in https://console.apify.com.
This is the fastest way to kick-start your Actor development and try out the Apify platform.
#### https://docs.apify.com/platform/actors/development/quick-start/web-ide.md
## Build with AI
Use the Apify toolset to build with AI:
#### https://docs.apify.com/platform/actors/development/quick-start/build-with-ai.md
---
# Build with AI
**Use pre-built prompts, reference Apify docs via llms.txt, and follow best practices to build Actors efficiently with AI coding assistants.**
***
You will learn several approaches to building Apify Actors with the help of AI coding assistants. This guide includes independent instructions, tools, and best practices that you can use individually or combine together. Each section focuses on a specific part of the process such as prompt usage, Actor templates, Apify MCP server tools, or documentation integration, so you can follow only the parts that fit your development style.
## AI coding assistant instructions
Use the following prompt in your AI coding assistant such as https://www.cursor.com/, https://www.claude.com/product/claude-code or https://github.com/features/copilot:
Use pre-built prompt for your AI coding assistant
Show promptCopy prompt
The prompt guides AI coding assistants such as Cursor, Claude Code or GitHub Copilot to help users create and deploy an Apify Actor step by step. It walks through setting up the Actor structure, configuring all required files, installing dependencies, running it locally, logging in, and pushing it to the Apify platform and following Apify’s best practices.
### Quick Start
1. Create directory: `mkdir my-new-actor`
2. Open the directory in *Cursor*, *Claude Code*, *VS Code with GitHub Copilot*, etc.
3. Copy the prompt above and paste it into your AI coding assistant (Agent or Chat)
4. Run it, and develop your first actor with the help of AI
Avoid copy-pasting
The AI will follow the guide step-by-step, and you'll avoid copy-pasting from tools like ChatGPT or Claude.
## Use Actor templates with AGENTS.md
All https://apify.com/templates have AGENTS.md that will help you with AI coding. You can use the https://docs.apify.com/cli/docs to create Actors from Actor Templates.
apify create
If you do not have Apify CLI installed, see the https://docs.apify.com/cli/docs/installation.
The command above will guide you through Apify Actor initialization, where you select an Actor Template that works for you. The result is an initialized Actor (with AGENTS.md) ready for development.
## Use Apify MCP Server
The Apify MCP Server has tools to search and fetch documentation. If you set it up in your AI editor, it will help you improve the generated code by providing additional context to the AI.
Use Apify MCP server configuration
We have prepared the https://mcp.apify.com/, which you can configure for your needs.
## Provide context to assistants
Every page in the Apify documentation has a **** button. You can use it to add additional context to your AI assistant, or even open the page in ChatGPT, Claude, or Perplexity and ask additional questions.

## Use `llms.txt` and `llms-full.txt`
Search engines weren't built for Large Language Models (LLMs), but LLMs need context. That's why we've created https://docs.apify.com/llms.txt and https://docs.apify.com/llms-full.txt for our documentation. These files can provide additional context if you link them.
| File | Purpose |
| --------------- | ------------------------------------------------------------------------------------ |
| `llms.txt` | Contains index of the docs page in Markdown, with links to all subpages in Markdown. |
| `llms-full.txt` | Contains a full dump of documentation in Markdown. |
Provide link to AI assistants
LLMs don't automatically discover `llms.txt` files, you need to add the link manually to improve the quality of answers.
## Best practices
* *Small tasks*: Don't ask AI for many tasks at once. Break complex problems into smaller pieces. Solve them step by step.
* *Iterative approach*: Work iteratively with clear steps. Start with a basic implementation and gradually add complexity.
* *Versioning*: Version your changes often using git. This lets you track changes, roll back if needed, and maintain a clear history.
* *Security*: Don't expose API keys, secrets, or sensitive information in your code or conversations with LLM assistants.
---
# Local development
**Create your first Actor locally on your machine, deploy it to the Apify platform, and run it in the cloud.**
***
Use pre-built prompt to get started faster.
Show promptCopy prompt
## What you'll learn
This guide walks you through the full lifecycle of an Actor. You'll start by creating and running it locally with the Apify CLI, then learn to configure its input and data storage. Finally, you will deploy the Actor to the Apify platform, making it ready to run in the cloud.
### Prerequisites
* https://nodejs.org/en/ version 16 or higher with `npm` installed on your computer.
* The https://docs.apify.com/cli/docs/installation installed.
* Optional: To deploy your Actor, https://console.apify.com/sign-in.
### Step 1: Create your Actor
Use Apify CLI to create a new Actor:
apify create
The CLI will ask you to:
1. Name your Actor (e.g., `your-actor-name`)
2. Choose a programming language (`JavaScript`, `TypeScript`, or `Python`)
3. Select a development template
Explore Actor templates
Browse the https://apify.com/templates to find the best fit for your Actor.
The CLI will:
* Create a `your-actor-name` directory with boilerplate code
* Install all project dependencies
Now, you can navigate to your new Actor directory:
cd your-actor-name
### Step 2: Run your Actor
Run your Actor with:
apify run
Clear data with --purge
During development, use `apify run --purge`. This clears all results from previous runs, so it's as if you're running the Actor for the first time.
You'll see output similar to this in your terminal:
INFO System info {"apifyVersion":"3.4.3","apifyClientVersion":"2.12.6","crawleeVersion":"3.13.10","osType":"Darwin","nodeVersion":"v22.17.0"} Extracted heading { level: 'h1', text: 'Your full‑stack platform for web scraping' } Extracted heading { level: 'h3', text: 'TikTok Scraper' } Extracted heading { level: 'h3', text: 'Google Maps Scraper' } Extracted heading { level: 'h3', text: 'Instagram Scraper' }
As you can see in the logs, the Actor extracts text from a web page. The main logic lives in `src/main.js`. Depending on your template, this file may be `src/main.ts` (TypeScript) or `src/main.py` (Python).
In the next step, we’ll explore the results in more detail.
### Step 3: Explore the Actor
Let's explore the Actor structure.
#### The `.actor` folder
The `.actor` folder contains the Actor configuration. The `actor.json` file defines the Actor's name, description, and other settings. Find more info in the https://docs.apify.com/platform/actors/development/actor-definition/actor-json definition.
#### Actor's `input`
Each Actor accepts an `input object` that tells it what to do. The object uses JSON format and lives in `storage/key_value_stores/default/INPUT.json`.
Edit the schema to change input
To change the `INPUT.json`, edit the `input_schema.json` in the `.actor` folder first.
This JSON Schema validates input automatically (no error handling needed), powers the Actor's user interface, generates API docs, and enables smart integration with tools like Zapier or Make by auto-linking input fields.
Find more info in the https://docs.apify.com/platform/actors/development/actor-definition/input-schema.md documentation.
#### Actor's `storage`
The Actor system provides two storage types for files and results: https://docs.apify.com/platform/storage/key-value-store.md store and https://docs.apify.com/platform/storage/dataset.md.
##### Key-value store
The key-value store saves and reads files or data records. Key-value stores work well for screenshots, PDFs, or persisting Actor state as JSON files.
##### Dataset
The dataset stores a series of data objects from web scraping, crawling, or data processing jobs. You can export datasets to JSON, CSV, XML, RSS, Excel, or HTML formats.
#### Actor's `output`
You define the Actor output using the Output schema files:
* https://docs.apify.com/platform/actors/development/actor-definition/dataset-schema.md
* https://docs.apify.com/platform/actors/development/actor-definition/key-value-store-schema.md
The system uses this to generate an immutable JSON file that tells users where to find the Actor's results.
### Step 4: Deploy your Actor
Let's now deploy your Actor to the Apify platform, where you can run the Actor on a scheduled basis, or you can make the Actor public for other users.
1. Login first:
apify login
Your Apify token location
After you successfully login, your Apify token is stored in `~/.apify/auth.json`, or `C:\Users\\.apify` based on your system.
2. Push your Actor to the Apify platform:
apify push
### Step 5: It's Time to Iterate!
Good job! 🎉 You're ready to develop your Actor. You can make changes to your Actor and implement your use case.
## Next steps
* Visit the https://docs.apify.com/academy.md to access a comprehensive collection of tutorials, documentation, and learning resources.
* To understand Actors in detail, read the https://whitepaper.actor/.
* Check https://docs.apify.com/platform/actors/development/deployment/continuous-integration.md documentation to automate your Actor development process.
* After you finish building your first Actor, you can https://docs.apify.com/platform/actors/publishing.md.
---
# Web IDE
**Create your first Actor using the web IDE in Apify Console.**
***
## What you'll learn
This guide walks you through the full lifecycle of an Actor. You'll start by creating and running it locally with the Apify CLI, then learn to configure its input and data storage. Finally, you will deploy the Actor to the Apify platform, making it ready to run in the cloud.
### Prerequisites
* An Apify account. https://console.apify.com/sign-up on the Apify website.
### Step 1: Create your Actor
Log in to https://console.apify.com, navigate to https://console.apify.com/actors/development/my-actors, then click the **Develop new** button.

You'll see Actor development templates for `JavaScript`, `TypeScript`, and `Python`.
These templates provide boilerplate code and a preconfigured environment. Choose the template that best suits your needs. For the following demo, we'll proceed with **Crawlee + Puppeteer + Chrome**.
Explore Actor templates
Browse the https://apify.com/templates to find the best fit for your Actor.

After choosing the template, your Actor will be automatically named and you'll be redirected to its page.
### Step 2: Explore the Actor
The provided boilerplate code utilizes the https://docs.apify.com/sdk/js/ combined with https://crawlee.dev/, Apify's popular open-source Node.js web scraping library.
By default, the code crawls the https://apify.com website, but you can change it to any website.
Crawlee
https://crawlee.dev/ is an open-source Node.js library designed for web scraping and browser automation. It helps you build reliable crawlers quickly and efficiently.
### Step 3: Build the Actor
To run your Actor, build it first. Click the **Build** button below the source code.

Once the build starts, the UI transitions to the **Last build** tab, showing build progress and Docker build logs.

Actor creation flow
The UI includes four tabs:
* **Code**
* **Last build**
* **Input**
* **Last Run**
This represents the Actor creation flow, where you first build the Actor from the source code. Once the build is successful, you can provide input parameters and initiate an Actor run.
### Step 4: Run the Actor
Once the Actor is built, you can look at its input, which consists of one field - **Start URL**, the URL where the crawling starts. Below the input, you can adjust the **Run options**:
* **Build**
* **Timeout**
* **Memory limit**

To initiate an Actor run, click the **Start** button at the bottom of the page. Once the run is created, you can monitor its progress and view the log in real-time. The **Output** tab will display the results of the Actor's execution, which will be populated as the run progresses. You can abort the run at any time using the **Abort** button.

### Step 5: Pull the Actor
To continue development locally, pull the Actor's source code to your machine.
Prerequisites
Install `apify-cli` :
* macOS/Linux
* Other platforms
brew install apify-cli
npm -g install apify-cli
To pull your Actor:
1. Log in to the Apify platform
apify login
2. Pull your Actor:
apify pull your-actor-name
Or with a specific version:
apify pull your-actor-name --version [version_number]
As `your-actor-name`, you can use either:
* The unique name of the Actor (e.g., `apify/hello-world`)
* The ID of the Actor (e.g., `E2jjCZBezvAZnX8Rb`)
You can find both by clicking on the Actor title at the top of the page, which will open a new window containing the Actor's unique name and ID.
### Step 6: It's time to iterate!
After pulling the Actor's source code to your local machine, you can modify and customize it to match your specific requirements. Leverage your preferred code editor or development environment to make the necessary changes and enhancements.
Once you've made the desired changes, you can push the updated code back to the Apify platform for deployment & execution, leveraging the platform's scalability and reliability.
## Next steps
* Visit the https://docs.apify.com/academy.md to access a comprehensive collection of tutorials, documentation, and learning resources.
* To understand Actors in detail, read the https://whitepaper.actor/.
* Check https://docs.apify.com/platform/actors/development/deployment/continuous-integration.md documentation to automate your Actor development process.
* After you finish building your first Actor, you can https://docs.apify.com/platform/actors/publishing.md.
---
# Publishing and monetization
**Apify provides a platform for developing, publishing, and monetizing web automation solutions called Actors. This guide covers the key stages involved in publishing and monetizing your Actors on the Apify platform.**
***
> Sharing is caring but you can also make money from your Actors. Check out our https://blog.apify.com/make-regular-passive-income-developing-web-automation-actors-b0392278d085/ for more context.
## Publish process
To build & publish an Actor on https://apify.com/store, you'll go through the following main stages:
1. https://docs.apify.com/platform/actors/development.md.
2. https://docs.apify.com/platform/actors/publishing/publish.md and set up of https://docs.apify.com/platform/actors/publishing/monetize.md.
3. https://docs.apify.com/platform/actors/development/automated-tests.md.
4. https://apify.notion.site/3fdc9fd4c8164649a2024c9ca7a2d0da?v=6d262c0b026d49bfa45771cd71f8c9ab.
## Benefits of publishing and monetization
Publishing your Actor on the Apify Store transforms your code, eliminating traditional SaaS development overhead. When you publish your Actor you gain access to:
* Streamlined product delivery
* Dedicated landing page for your Actor
* Built-in documentation hosting through seamless README integration
* Direct exposure to organic user traffic through Apify Store
* Reduced operational burden
* No need for separate domains or websites
* Built-in cloud infrastructure with automatic scaling
* Multiple payment options with automated billing & transactions
* Minimal marketing efforts required due to marketplace presence
Packaging your software as an Actor allows you to launch new SaaS product faster and earn income through various monetization models that match your Actor's value proposition like:
* Fixed rental fee for continuous access
* Pay-per-result for usage-based pricing
* Pay-per-event for specific operations
To learn more visit our https://docs.apify.com/platform/actors/running/actors-in-store#pricing-models page.
## Maintain public Actors
While private Actors don't necessarily require ongoing maintenance, public Actors demand a higher level of responsibility. Since public Actors are available on the https://apify.com/store and may be used by other users, an unmaintained public Actor could negatively impact those who depend on it.
To ensure long-term quality and improve your chances of successfully monetizing your Actors, we recommend reserving approximately 2 hours per week for maintenance tasks, such as:
* Addressing bug reports & issues
* Implementing updates & improvements
* Responding to user inquireies & feedback

If you decide to make your Actor's code publicly available on https://github.com, code quality becomes even more crucial, as your Actor may be the first experience some users have with Apify.
### Handling breaking changes
While refactoring and updating your Actor's code is encouraged, be cautious of making changes that could break the Actor for existing users. If you plan to introduce breaking change, please contact us at mailto:community@apify.com beforehand, and we'll assist you in communicating the change to your users.
### Documentation and testing
Pay special attention to your Actor's documentation (https://apify.notion.site/How-to-create-an-Actor-README-759a1614daa54bee834ee39fe4d98bc2). It should be clear, detailed, concise and, readable, using simple language and avoiding technical jargon whenever possible, as your users may not be developers.
Ensure periodic testing, either manually or by https://docs.apify.com/platform/actors/development/automated-tests.md and https://apify.com/apify/monitoring. This can help prevent users from encountering issues with your Actor.
## Inspiration for new Actors
To find ideas for new Actor, consider the following sources:
* Your own experiences with friends, colleagues, and customers
* SEO tools to identify search terms, websites related to web scrapint, web automation, or web integrations (see the https://apify.notion.site/SEO-990259fe88a84fd0a85ce6d3b394d8c1 for more details)
* The https://apify.com/ideas to find Actors in demand by the Apify community
* Our https://discord.com/invite/jyEM2PRvMU, especially the https://discord.com/channels/801163717915574323/1022804760484659210 channel can offer great insights
Additionally, you can refer to our https://blog.apify.com/ for examples of how we write about and present Actors, such as the:
* https://blog.apify.com/set-up-alert-when-webpage-changes/
* https://blog.apify.com/kickstarter-search-actor-create-your-own-kickstarter-api/
* https://blog.apify.com/google-sheets-import-data/
---
# Monetize your Actor
**Learn how you can monetize your web scraping and automation projects by publishing Actors to users in Apify Store.**
***
Apify Store allows you to monetize your web scraping, automation and AI Agent projects by publishing them as paid Actors. This guide explains the available pricing models and how to get started.
## Pricing models
Actors in Apify Store can be published under one of the following pricing models:
1. *Free*: Users can run the Actor without any additional charges beyond the platform usage costs generated by the Actor.
2. *Rental*: Users pay for the platform usage costs. However, after a trial period, they need to pay a flat monthly fee to the developer to continue using the Actor.
3. *Pay per result (PPR)*: Users don't pay for the platform usage costs. Instead, they pay the developer based on the number of results produced by the Actor.
4. *Pay per event (PPE)*: Users don't pay for the platform usage cost the Actor generates. Instead, they pay based on specific events that are programmatically triggered from the Actor's source code. These events are defined by the developer and can include actions such as generating a single result or starting an Actor.
For a detailed comparison of pricing models from the perspective of your users, refer to https://docs.apify.com/platform/actors/running/actors-in-store.md page.
## Key benefits
The following table compares the two main pricing models available for monetizing your Actors:
| Feature/Category | Rental | Pay-per-result (PPR) | Pay-per-event (PPE) |
| ------------------------ | ------------------------------ | ---------------------------- | ---------------------------------------------------------------- |
| Revenue scalability | Capped at monthly fee | Unlimited, scales with usage | Unlimited, scales with usage |
| AI/MCP compatibility | ❌ Not compatible | ✅ Fully compatible | ✅ Fully compatible |
| User cost predictability | Unpredictable (rental + usage) | Predictable | Predictable |
| Store discounts | ❌ Single price only | ✅ Store discounts available | ✅ Store discounts available |
| Marketing boost | Standard visibility | Standard visibility | Priority store placement |
| Commission opportunities | Standard 20% | Standard 20% | Promotional 0% periods (until 01/11/2025) |
| Custom event billing | Not available | Not available | ✅ Charge for any event |
| Per-result billing | Not available | ✅ Charge per dataset item | Optional (via event; automatic via `apify-default-dataset-item`) |
## Setting up monetization
Navigate to your https://console.apify.com/actors?tab=my in Apify Console, choose the Actor that you want to monetize, and select the Publication tab.  Open the Monetization section and complete your billing and payment details.  Choose the pricing model for your Actor.  Follow the monetization wizard to configure your pricing model.
* Rental
* Pay-per-result
* Pay-per-event


### Changing monetization
You can change the monetization setting of your Actor by using the same wizard as for the setup in the **Monetization** section of your Actor's **Publication** tab.
Most changes take effect **immediately**. However, **major changes** require a 14-day notice period and are limited to once per month to protect users.
**Major changes** that require 14-day notice include:
* Changing the pricing model (e.g., from rental to pay-per-result)
* Increasing prices
* Adding new pay-per-event charges
All other changes (such as decreasing prices, adjusting descriptions, or removing pay-per-event charges) take effect immediately.
Frequency of major monetization adjustments
You can make major monetization changes to each Actor only **once per month**. After making a major change, you must wait until it takes effect (14 days) plus an additional period before making another major change. For further information & guidelines, please refer to our https://apify.com/store-terms-and-conditions
## Monthly payouts and analytics
Payout invoices are automatically generated on the 11th of each month, summarizing the profits from all your Actors for the previous month. In accordance with our https://apify.com/store-terms-and-conditions, only funds from legitimate users who have already paid are included in the payout invoice.
How negative profits are handled
If your PPR or PPE Actor's price doesn't cover its monthly platform usage costs, it will have a negative profit. When this occurs, we automatically set that Actor's profit to $0 for the month. This ensures a single Actor's loss never reduces your total payout.
You have 3 days to review your payout invoice in the **Development >Insights > Payout** section. During this period, you can either approve the invoice or request a revision, which we will process promptly. If no action is taken, the payout will be automatically approved on the 14th, with funds disbursed shortly after. Payouts require meeting minimum thresholds of either:
* $20 for PayPal
* $100 for other payout methods
If the monthly profit does not meet these thresholds, as per our https://apify.com/store-terms-and-conditions, the funds will roll over to the next month until the threshold is reached.
## Actor analytics
Monitor your Actors' performance through the https://console.apify.com/actors/insights/analytics dashboard under **Development > Insights > Analytics**.
The analytics dashboard allows you to select specific Actors and view key metrics aggregated across all user runs:
* Revenue, costs and profit trends over time
* User growth metrics (both paid and free users)
* Cost per 1,000 results to optimize pricing
* Run success rate statistics
* User acquisition funnel analytics
* Shared debug runs from users
All metrics can be exported as JSON for custom analysis and reporting.
## Promoting your Actor
Create search-engine-optimized descriptions and README files to improve search engine visibility. Share your Actor on multiple channels:
* Post on Reddit, Quora, and social media platforms
* Create tutorial videos demonstrating key features
* Publish articles about your Actor on relevant websites
* Consider creating a product showcase on platforms like Product Hunt
Remember to tag Apify in your social media posts for additional exposure. Effective promotion can significantly impact your Actor's success, differentiating between those with many paid users and those with few to none.
Learn more about promoting your Actor in the https://docs.apify.com/academy/actor-marketing-playbook.md.
---
# Pay per event
**Learn how to monetize your Actor with pay-per-event (PPE) pricing, charging users for specific actions like Actor starts, dataset items, or API calls, and understand how to set profitable, transparent event-based pricing.**
***
The PPE pricing model offers a flexible monetization option for Actors on Apify Store. Unlike pay per result, PPE allows you to charge users based on specific events triggered programmatically by your Actor's code.
PPE lets you define pricing for individual events. You can charge for specific events directly from your Actor using the https://docs.apify.com/sdk/js/reference/class/Actor#charge/https://docs.apify.com/sdk/python/reference/class/Actor#charge SDK, or by calling the https://docs.apify.com/api/v2/post-charge-run.md directly. Common events include Actor start, dataset item creation, and external API calls.
The details on how your cost is computed can be found in .
Additional benefits
Actors that implement PPE pricing receive additional benefits, including increased visibility in Apify Store and enhanced discoverability.
## How is profit computed
Your profit is calculated from the mentioned formula:
`profit = (0.8 * revenue) - platform costs`
where:
* *Revenue*: The amount charged for events via the PPE charging API or through JS/Python SDK. You receive 80% of this revenue.
* *Platform costs*: The underlying platform usage costs for running the Actor, calculated in the same way as for PPR. For more details, visit the section.
Only revenue and cost for Apify customers on paid plans are taken into consideration when computing your profit. Users on free plans are not reflected there.
Negative profit isolation
An Actor's negative net profit does not affect the positive profit of another Actor. For aggregation purposes, any Actor with a negative net profit is considered to have a profit of $0.
* *Previously:* `Total Profit = (-$90) + $100 = $10`
* *Now:* `Total Profit = $0 + $100 = $100`
## How to set pricing for PPE Actors
1. *Understand your costs*: Analyze resource usage (e.g CPU, memory, proxies, external APIs) and identify cost drivers
2. *Define clear events*: break your Actor's functionality into measurable, chargeable events.
3. *Common use cases*:
1. *For scraping*: combine Actor start and dataset items pricing to reflect setup and per-result cost.
2. *Beyond scraping*: Account for integrations with external systems or external API calls.
4. *External API costs*: Account for additional processing costs.
5. *Test your pricing*: Run your Actor and analyze cost-effectiveness using a special dataset.
6. *Communicate value*: Ensure pricing reflects the value provided and is competitive.
## Respect user spending limits
Finish the Actor run once charging reaches user-configured maximum cost per run. Apify SDKs (JS and Python) return `ChargeResult` that helps determine when to finish.
The `eventChargeLimitReached` property checks if the current event type can be charged more. If you have multiple event types, analyze the `chargeableWithinLimit` property to see if other events can still be charged before stopping the Actor.
ACTOR\_MAX\_TOTAL\_CHARGE\_USD environment variable
For pay-per-event Actors, users set a spending limit through the Apify Console. This limit is available in your Actor code as the `ACTOR_MAX_TOTAL_CHARGE_USD` https://docs.apify.com/platform/actors/development/programming-interface/environment-variables.md, which contains the user's maximum cost.
* JavaScript
* Python
import { Actor } from 'apify';
const chargeForApiProductDetail = async () => { const chargeResult = await Actor.charge({ eventName: "product-detail" });
return chargeResult; };
await Actor.init();
// API call, or any other logic that you want to charge for const chargeResult = await chargeForApiProductDetail();
if (chargeResult.eventChargeLimitReached) { await Actor.exit(); }
// Rest of the Actor logic
await Actor.exit();
from apify import Actor
async def charge_for_api_product_detail(): charge_result = await Actor.charge(event_name='product-detail')
return charge_result
async def main(): await Actor.init()
# API call, or any other logic that you want to charge for
charge_result = await charge_for_api_product_detail()
if charge_result.event_charge_limit_reached:
await Actor.exit()
# Rest of the Actor logic
await Actor.exit()
Crawlee integration and spending limits
When using https://crawlee.dev/, use `crawler.autoscaledPool.abort()` instead of `Actor.exit()` to gracefully finish the crawler and allow the rest of your code to process normally.
## Best practices for PPE Actors
Use our https://docs.apify.com/sdk.md (JS and, Python or use https://docs.apify.com/cli/docs/next/reference#apify-actor-charge-eventname when using our Apify CLI) to simplify PPE implementation into your Actor. SDKs help you handle pricing, usage tracking, idempotency keys, API errors, and, event charging via an API. You can also choose not to use it, but then you must handle API integration and possible edge cases manually.
### Use synthetic start event `apify-actor-start`
Synthetic Actor start event recommended
We recommend using the synthetic Actor start event in PPE Actors. It benefits both you and your users.
Starting an Actor takes time, and creates additional cost for the Actor creator, because the profit equals revenue minus platform costs.
One of the options to charge for the time spent on starting the Actor is to charge an “Actor start” event. Unfortunately, this makes your Actor comparably expensive with other tools on the market (outside of https://docs.apify.com/platform/console/store.md) that do not incur this startup cost.
We want to make it easier for Actor creators to stay competitive, but also help them to be profitable. Therefore, we have the Apify Actor synthetic start event `apify-actor-start`. This event is enabled by default for all new PPE Actors, and when you use it Apify will cover the compute unit cost of the first 5 seconds of every Actor run.
The default price of the event is set intentionally low. This pricing means that the free 5 seconds of compute we provide costs us more than the revenue generated from the event. We've made this investment to *support our creator community* by reducing your startup costs while keeping your Actors competitively priced for users.
#### How the synthetic start event works
* The Apify Actor start event is *automatically enabled* for all new PPE Actors. For existing Actors, you can enable it in Apify Console.
* Apify *automatically charges* the event.
* You must *not* manually charge for the synthetic start event (`apify-actor-start`) in your Actor code. If you attempt to charge this event yourself, the operation will fail.
* The default price of the event is *$0.00005*, which equals *$0.05 per 1,000 starts*. We recommend keeping the default price to keep your Actors competitive.
* The number of events charged *depends on the memory* of the Actor run. Up to and including 1 GB of RAM, the event is charged once. Then it's charged once for each extra GB of memory. For example:
* 128 MB RAM: 1 event, $0.00005
* 1 GB RAM: 1 event, $0.00005
* 4 GB RAM: 4 events, $0.0002
* You can increase the price of the event if you wish, but you *won't get more free compute*.
* You can delete the event if you wish, but if you do, you will *lose the free 5 seconds* of compute.
#### Synthetic start event for new Actors
For new Actors, this event is added automatically as you can see on the following screen:

#### Synthetic start event for existing Actors
If you have existing Actors, you can add this event manually in Apify Console in the **Publication** tab.
#### Synthetic start event for Actors with start event
Your Actor might already have a start event defined, such as `actor-start` or another variant of the event name. In this case, you can choose whether to use the synthetic start event or keep the existing start event.
If you want to use the synthetic start event, remove the existing start event from your Actor and add the synthetic start event in Apify Console in the **Publication** tab.
### Use synthetic default dataset item event `apify-default-dataset-item`
The `apify-default-dataset-item` synthetic event charges users for each item written to the run's default dataset. It lets you align PPE pricing with per-result use cases without adding charging code to your Actor.
This event simplifies migration from pay-per-result (PPR) Actors to the pay-per-event (PPE) model. No code changes are required.
#### How the synthetic default dataset item event works
* Apify automatically charges this event whenever your Actor writes an item to the default dataset (for example, when using `Actor.pushData`).
* No code changes are required to charge this event.
* You can remove the event in Apify Console if you don't want automatic charging for default dataset items. If you remove it, default dataset writes will no longer be charged automatically.
* The event applies only to the default dataset of the run. Writes to other (non-default) datasets are not charged by this synthetic event.
### Set memory limits
Set memory limits using `minMemoryMbytes` and `maxMemoryMbytes` in your https://docs.apify.com/platform/actors/development/actor-definition/actor-json file to control platform usage costs.
{ "actorSpecification": 1, "name": "name-of-my-scraper", "version": "0.0", "minMemoryMbytes": 512, "maxMemoryMbytes": 1024, }
Memory requirements for browser-based scraping
When using browser automation tools like Puppeteer or Playwright for web scraping, increase the memory limits to accommodate the browser's memory usage.
### Charge for invalid input
Charge for things like URLs that appear valid but lead to errors (like 404s) since you had to open the page to discover the error. Return error items with proper error codes and messages instead of failing the entire Actor run.
The snippet below shows how you can charge for invalid inputs using `Actor.pushData` when a dataset item is created and the `scraped-result` event is charged.
* JavaScript
* Python
import { Actor } from 'apify';
const processUrl = async (url) => { const response = await fetch(url);
if (response.status === 404) { // Charge for the work done and return error item in one call await Actor.pushData({ url: url, error: "404", errorMessage: "Page not found" }, 'scraped-result');
return;
}
// Rest of the process_url function };
await Actor.init();
const input = await Actor.getInput(); const { urls } = input;
for (const url of urls) { await processUrl(url); }
// Rest of the Actor logic
await Actor.exit();
from apify import Actor import requests
async def process_url(url): response = requests.get(url)
if response.status_code == 404:
# Charge for the work done and return error item in one call
await Actor.push_data({
'url': url,
'error': '404',
'errorMessage': 'Page not found'
}, 'scraped-result')
return
# Rest of the process_url function
async def main(): await Actor.init()
input_data = await Actor.get_input()
urls = input_data.get('urls', [])
for url in urls:
await process_url(url)
# Rest of the Actor logic
await Actor.exit()
### Keep pricing simple with fewer events
Try to limit the number of events. Fewer events make it easier for users to understand your pricing and predict their costs.
### Make events produce visible results
For Actors that produce data, events should map to something concrete in the user's dataset or storage.
However, we acknowledge that some events don't produce tangible results (such as running AI workflows or processing external API calls). This flexibility gives you the freedom to charge for special operations, complex workflows, and unique value propositions.
Examples:
* *`post` event*: Each charge adds one social media post to the dataset
* *`profile` event*: Each charge adds one user profile to the dataset
* *`processed-image` event*: Each charge adds one processed image to the dataset
* *`ai-analysis` event*: Each charge processes one document through an AI workflow (no tangible output, but valuable processing)
Additional context
You can display a status message or push a record to the dataset to inform users about non-data actions performed by your Actor. This helps users understand what actions were charged for, even if those actions do not produce tangible output.
### Use idempotency keys to prevent double charges
If you're not using the Apify SDKs (JS/Python), you need to handle idempotency (ensuring the same operation produces the same result when called multiple times) manually to prevent charging the same event multiple times.
## Example of a PPE pricing
You create a social media monitoring Actor with the following pricing:
* `post`: $0.002 per post - count every social media post you extract.
* `profile`: $0.005 per profile - count every user profile you extract.
* `sentiment-analysis`: $0.01 per post - count every post analyzed for sentiment, engagement metrics, and content classification using external LLM APIs.
Fixed pricing vs. usage-based pricing
You have two main strategies for charging AI-related operations:
1. *Fixed event pricing* (like `sentiment-analysis` above): Charge a fixed amount per operation, regardless of actual LLM costs
2. *Usage-based pricing*: Use events like `llm-token` that charge based on actual LLM usage costs
Fixed pricing is simpler for users to predict, while usage-based pricing more accurately reflects your actual costs.
### Pricing breakdown by user
| User | Plan | Events | Charges | Total | Platform cost |
| ---- | --------- | ------------------------------------------ | --------------------------- | ------- | ------------- |
| 1 | Paid plan | 5,000 × `post`1,000 × `sentiment-analysis` | 5,000 × $0.0021,000 × $0.01 | **$20** | $2.50 |
| 2 | Paid plan | 3,000 × `post`500 × `sentiment-analysis` | 3,000 × $0.002500 × $0.01 | **$11** | $1.50 |
| 3 | Free plan | 1,000 × `post`100 × `sentiment-analysis` | 1,000 × $0.002100 × $0.01 | **$3** | $0.40 |
Your profit and costs are computed *only from the first two users* since they are on Apify paid plans.
The platform usage costs are just examples, but you can see the actual costs in the https://docs.apify.com/platform/actors/publishing/monetize/pricing-and-costs.md#computing-your-costs-for-ppe-and-ppr-actors section.
### Revenue breakdown
* *Revenue (paid users only)*: $20 + $11 = *$31*
* *Platform cost (paid users only)*: $2.50 + $1.50 = *$4*
* *Profit*: 0.8 × $31 − $4 = *$20.80*
## Event names
If you need to know your event names, you can retrieve the list of available pricing event names using the https://apify.com/docs/api/v2/act-get API endpoint.
## Next steps
* Check out the https://docs.apify.com/platform/actors/publishing/monetize/pricing-and-costs.md section to learn how to compute your costs.
---
# Pay per result
**Learn how to monetize your Actor with pay-per-result (PPR) pricing, charging users based on the number of results produced and stored in the dataset, and understand how to set profitable, transparent result-based pricing.**
***
In this model, you set a price per 1,000 results. Users are charged based on the number of results your Actor produces and stores in the run's default dataset. Your profit is calculated as 80% of the revenue minus platform usage costs.
The details on how your cost is computed can be found in .
## How is profit computed
Your profit is calculated from the mentioned formula:
`profit = (0.8 * revenue) - platform costs`
where:
* *Revenue*: The amount charged for results via the PPR pricing API or through JS/Python SDK. You receive 80% of this revenue.
* *Platform costs*: The underlying platform usage costs for running the Actor, calculated in the same way as for PPE. For more details, visit the section.
Only revenue and cost for Apify customers on paid plans are taken into consideration when computing your profit. Users on free plans are not reflected there.
## PPR vs PPE
PPR charges based on the number of results produced. PPE lets you define pricing for individual events, and help you to make your pricing more flexible. You can charge for specific events directly from your Actor by calling the PPE charging API.
Learn more about PPE
If you want to learn more about PPE, refer to the https://docs.apify.com/platform/actors/publishing/monetize/pay-per-event.md section.
## Best practices for PPR Actors
To ensure profitability, check the following best practices.
### Set memory limits
Set memory limits using `minMemoryMbytes` and `maxMemoryMbytes` in your https://docs.apify.com/platform/actors/development/actor-definition/actor-json file to control platform usage costs.
{ "actorSpecification": 1, "name": "name-of-my-scraper", "version": "0.0", "minMemoryMbytes": 512, "maxMemoryMbytes": 1024, }
Memory requirements for browser-based scraping
When using browser automation tools like https://pptr.dev/ or https://playwright.dev/ for web scraping, increase the memory limits to accommodate the browser's memory usage.
### Implement the `ACTOR_MAX_PAID_DATASET_ITEMS` check
This check prevents your Actor from generating more results than the user has paid for, protecting both you and your users from unexpected costs.
The `ACTOR_MAX_PAID_DATASET_ITEMS` environment variable contains the user-set limit on returned results for PPR Actors. Do not exceed this limit. You can see the example implementation in the following code snippets.
* JavaScript
* Python
import { Actor } from 'apify';
// Use top-level variables with a closure so you don't have to initialize anything const MAX_ITEMS: number | undefined = Number(process.env.ACTOR_MAX_PAID_DATASET_ITEMS) || undefined;
let isInitialized = false; let isGettingItemCount = false; let pushedItemCount = 0;
export const pushDataMaxAware = async (data: Parameters[0]): Promise => { // If this isn't PPR, just push like normally if (!MAX_ITEMS) { await Actor.pushData(data); return { shouldStop: false }; }
// Initialize on the first call so it as standalone function
if (!isInitialized && !isGettingItemCount) {
isGettingItemCount = true;
const dataset = await Actor.openDataset();
const { itemCount } = (await dataset.getInfo())!;
pushedItemCount = itemCount;
isGettingItemCount = false;
isInitialized = true;
}
// Others handlers will wait until initialized which should be few milliseconds
while (!isInitialized) {
await new Promise((resolve) => setTimeout(resolve, 50));
}
const dataAsArray = Array.isArray(data) ? data : [data];
const dataToPush = dataAsArray.slice(0, MAX_ITEMS - pushedItemCount);
if (dataToPush.length) {
// Update the state before 'await' to avoid race conditions
pushedItemCount += dataToPush.length;
await Actor.pushData(dataToPush);
}
return { shouldStop: pushedItemCount >= MAX_ITEMS };
};
import os import asyncio from apify import Actor from typing import Union, List, Dict, Any
class PayPerResultManager: def init(self): self.max_items = int(os.getenv('ACTOR_MAX_PAID_DATASET_ITEMS', 0)) or None self.is_initialized = False self.is_getting_item_count = False self.pushed_item_count = 0
async def push_data_max_aware(self, data: Union[Dict[Any, Any], List[Dict[Any, Any]]]) -> Dict[str, bool]:
# If this isn't PPR, just push like normally
if not self.max_items:
await Actor.push_data(data)
return {'shouldStop': False}
# Initialize on the first call
if not self.is_initialized and not self.is_getting_item_count:
self.is_getting_item_count = True
dataset = await Actor.open_dataset()
dataset_info = await dataset.get_info()
self.pushed_item_count = dataset_info['itemCount']
self.is_getting_item_count = False
self.is_initialized = True
# Wait until initialized
while not self.is_initialized:
await asyncio.sleep(0.05) # 50ms
data_as_array = data if isinstance(data, list) else [data]
data_to_push = data_as_array[:self.max_items - self.pushed_item_count]
if data_to_push:
# Update the state before 'await' to avoid race conditions
self.pushed_item_count += len(data_to_push)
await Actor.push_data(data_to_push)
return {'shouldStop': self.pushed_item_count >= self.max_items}
Create a singleton instance
ppr_manager = PayPerResultManager()
Convenience function that uses the singleton
async def push_data_max_aware(data: Union[Dict[Any, Any], List[Dict[Any, Any]]]) -> Dict[str, bool]: return await ppr_manager.push_data_max_aware(data)
### Test your Actor
Test your Actor with various result volumes to determine optimal pricing. Start with minimal datasets (1-100 results) to understand your base costs and ensure the Actor works correctly with small inputs. Then test with typical usage volumes (1,000-10,000 results) to simulate real-world scenarios and identify any performance bottlenecks.
Throughout all testing, monitor platform usage costs for each test run to calculate the true cost per result. This cost analysis is crucial for setting profitable pricing that covers your expenses while remaining competitive in the market.
Use Actor analytics for cost estimation
Check the **cost per 1000 results** chart in your Actor's analytics in Apify Console. This chart is computed from all runs of both paying and free users, giving you a comprehensive view of platform usage costs across different usage patterns. Use this data to better estimate the adequate price for your Actor.
### Push at least one "error item" to the dataset
In PPR Actors, users are only charged when your Actor produces results in the dataset. If your Actor encounters invalid input or finds no results, it should still push at least one item to the dataset to ensure the user is charged for the attempt.
Why this matters:
* *Prevents free usage*: Without pushing any items, users could run your Actor repeatedly with invalid inputs without being charged
* *Ensures fair billing*: Users should pay for the processing attempt, even if no valid results are found
* *Maintains profitability*: Every run should generate some revenue to cover your platform costs
Example scenarios:
* *User provides invalid search terms*: Push an error item explaining the issue
* *Target website returns no results*: Push an item indicating "No results found"
* *Input validation fails*: Push an item with validation error details
This ensures that every run generates at least one result, guaranteeing that users are charged appropriately for using your Actor.
## Example of PPR pricing
You make your Actor PPR and set the price to be *$1/1,000 results*. During the first month, three users use your Actor.
### Pricing breakdown by user
| User | Plan | Results | Charges | Total | Platform cost |
| ---- | --------- | -------------- | ---------------------- | ---------- | ------------- |
| 1 | Paid plan | 50,000 results | 50,000 ÷ 1,000 × $1.00 | **$50.00** | $5.00 |
| 2 | Paid plan | 20,000 results | 20,000 ÷ 1,000 × $1.00 | **$20.00** | $2.00 |
| 3 | Free plan | 5,000 results | 5,000 ÷ 1,000 × $1.00 | **$5.00** | $0.50 |
Your profit and costs are computed *only from the first two users* since they are on Apify paid plans.
The platform usage costs are just examples, but you can see the actual costs in the https://docs.apify.com/platform/actors/publishing/monetize/pricing-and-costs.md#computing-your-costs-for-ppe-and-ppr-actors section.
### Revenue breakdown
* *Revenue (paid users only): $50.00 + $20.00 = $70.00*
* *Platform cost (paid users only): $5.00 + $2.00 = $7.00*
* *Profit: 0.8 × $70.00 − $7.00 = $49.00*
## Next steps
* Check out the https://docs.apify.com/platform/actors/publishing/monetize/pricing-and-costs.md section to learn how to compute your costs.
---
# Pricing and costs
**Learn how to set Actor pricing and calculate your costs, including platform usage rates, discount tiers, and profit formulas for PPE and PPR monetization models.**
***
## Computing your costs for PPE and PPR Actors
For both PPE and PPR Actors, profit is computed using the formula `(0.8 * revenue) - costs`. In this section, we'll explain how the `costs` component is calculated.
When paying users run your Actor, it generates platform usage in the form of compute units, data traffic, API operations etc. This usage determines the `costs` in the profit formula above.
*FREE* tier usage
Platform usage by *FREE* tier users is covered by Apify and does not contribute to your costs.
To calculate your costs for a specific run by paying user, multiply the unit cost of each service by the quantity consumed. For example, if a *BRONZE* tier user run uses 10 compute units (CUs) at $0.3/CU, your cost would be $3.
As highlighted in the section, if your Actor uses tiered pricing, the user's discount tier determines the unit costs applied to their runs. Your costs are lower for higher tiers, enabling you to offer more competitive pricing to these customers, while sustaining healthy profit margins.
The following table summarizes the platform unit costs used for your cost computation across different discount tiers.
| Service (unit) | *FREE* | *BRONZE* | *SILVER* | *GOLD* |
| ------------------------------------ | ------- | -------- | -------- | -------- |
| Compute unit (per CU) | $0.3 | $0.3 | $0.25 | $0.2 |
| Residential proxies (per GB) | $8 | $8 | $7.5 | $7 |
| SERPs proxy (per 1,000 SERPs) | $2.5 | $2.5 | $2 | $1.7 |
| Data transfer - external (per GB) | $0.2 | $0.2 | $0.19 | $0.18 |
| Data transfer - internal (per GB) | $0.05 | $0.05 | $0.045 | $0.04 |
| Dataset - reads (per 1,000 reads) | $0.0004 | $0.0004 | $0.00036 | $0.00032 |
| Dataset - writes (per 1,000 writes) | $0.005 | $0.005 | $0.0045 | $0.004 |
| Key-value store - reads (per 1,000) | $0.005 | $0.005 | $0.0045 | $0.004 |
| Key-value store - writes (per 1,000) | $0.05 | $0.05 | $0.045 | $0.04 |
| Key-value store - lists (per 1,000) | $0.05 | $0.05 | $0.045 | $0.04 |
| Request queue - reads (per 1,000) | $0.004 | $0.004 | $0.0036 | $0.0032 |
| Request queue - writes (per 1,000) | $0.02 | $0.02 | $0.018 | $0.016 |
If you decide not to offer tiered discounts on your Actor, the unit prices for *FREE* tier apply. To offer enterprise level services and unlock even cheaper unit prices for enterprise customers, please reach out to us.
Cost of PPE Actors in Standby mode
When you monetize your Actor in Standby mode using pay per event mode only, you are not responsible for covering platform usage costs of your users' runs.
## Discount tiers and pricing strategy
Each user running your PPE or PPR Actor belongs to a discount tier:
* *FREE*
* *BRONZE*
* *SILVER*
* *GOLD*
You can define different prices for different tiers. While optional, we recommend offering progressively lower prices for higher discount tiers. This approach can significantly improve attractiveness of your Actor to large enterprise customers who may spend thousands or tens of thousands of dollars on it.
Your platform costs are also lower for these higher tier, which helps maintain healthy profit margins. This is further detailed in the section.
## Implementing discount tiers
By default, we advise against setting excessively high prices for *FREE* tier users, as this can limit the ability to evaluate your Actor thoroughly. However, in certain situations, such as protecting your Actor from fraudulent activity or excessive use of your internal APIs, a higher price for *FREE* tier users might be justified.
During an Actor run, you can identify the user's discount tier through Actor run environment variables or by querying user data via the Apify API. This capability allows you to offer premium features or differentiated service levels to users in higher discount tiers.
## Additional benefits and enterprise tiers
Actors that implement tiered pricing also receive additional benefits like enhanced visibility in the Apify Store, making your Actor more discoverable to potential users.
In addition to the standard tiers, Apify provides further tiers specifically for enterprise customers, including *PLATINUM* and *DIAMOND* tiers. If you are interested in offering enterprise-level services and attracting major clients, please contact us.
---
# Rental pricing model
**Learn how to monetize your Actor with the rental pricing model, offering users a free trial and a flat monthly fee, and understand how profit is calculated and the limitations of this approach.**
***
With the rental model, you can specify a free trial period and a monthly rental price. After the trial, users with an https://apify.com/pricing can continue using your Actor by paying the monthly fee. You can receive 80% of the total rental fees collected each month.
## How is profit computed
Your profit is calculated from the mentioned formula:
`profit = 0.8 × rental fees`
where:
* *Rental fees*: The monthly rental fee set by the developer (for example, $30/month).
Only revenue and cost for Apify customers on paid plans are taken into consideration when computing your profit. Users on free plans are not reflected there.
## Disadvantages of the rental pricing model
### User cost confusion
Users consistently report confusion about rental pricing because they pay both the *monthly rental fee and platform usage costs*. A user might see an Actor priced at $20/month, only to discover their actual costs are $35-50 depending on usage. This can create confusion about total costs and make budgeting more difficult.
### Limited revenue scalability
The rental model, while easy to set up, is less profitable because its pricing doesn't scale with usage. Your revenue is capped at the monthly fee regardless of how much value users extract from your Actor.
### AI compatibility limitations
The growing limitation is AI compatibility. https://docs.apify.com/platform/integrations/mcp.md explicitly excludes rental Actors from search results, making them invisible to AI systems that dynamically select and execute tools. This significantly reduces your Actor's discoverability in AI workflows.
## Consider pay-per-result or pay-per-event pricing models
We recommend using the https://docs.apify.com/platform/actors/publishing/monetize/pay-per-result.md or https://docs.apify.com/platform/actors/publishing/monetize/pay-per-event.md models instead.
## Example of a rental pricing model
You make your Actor rental with *7-day free trial* and then *$30/month*. During the first calendar month, three users start to use your Actor:
* *User 1 (paid plan)*: Starts free trial on the 15th
* *User 2 (paid plan)*: Starts free trial on the 25th
* *User 3 (free plan)*: Starts free trial on the 20th
The first user pays their first rent 7 days after the free trial, i.e., on the 22nd of the month. The second user only starts paying the rent next month. The third user is on the Apify free plan, so after the free trial ends on the 27th of the month, they are not charged and cannot use the Actor further until they get a paid plan.
Your profit is computed only from the first user, since they are the only one who paid during this month. The revenue breakdown is:
* *Total revenue*: $30 (from User 1 only)
* *Your profit*: 80% of revenue = 0.8 × $30 = $24
---
# Publish your Actor
**Prepare your Actor for Apify Store with a description and README file, and learn how to make your Actor available to the public.**
***
Before making your Actor public, it's important to ensure your Actor has a clear **Description** and comprehensive **README** section. This will help users understand your Actor's purpose, how to configure its inputs, and the type of output it generates. This guide we'll review the essential fields you must complete before publishing your Actor. For more detailed information on https://apify.notion.site/SEO-990259fe88a84fd0a85ce6d3b394d8c1 and https://apify.notion.site/How-to-create-an-Actor-README-759a1614daa54bee834ee39fe4d98bc2,refer to guides available at the https://apify.notion.site/3fdc9fd4c8164649a2024c9ca7a2d0da?v=6d262c0b026d49bfa45771cd71f8c9ab.
## Make your Actor public
Once you've finished coding and testing your Actor, it's time to publish it. Follow these steps:
1. From your Actor's page in the Apify Console, go to **Publication** > **Display information**
2. Fill in all the relevaent fields for your Actor (e.g., **Icon**, **Actor name**, **Description**, **Categories**)
3. Save your changes

After filling in all the required fields, the **Publish to Store** button will turn green. Click on it to make your Actor available to the public on the Apify Store.

To verity that your Actor has been published successfully, go to the https://apify.com/store, search for your Actor's name. Click on your Actor's card, to view its dedicated page. This is the page where users will likely have their first interaction with your ACtor, so carefully review it and ensure everything is set up correctly.


### Logo
We strongly recommend adding a unique image to your Actor that visually represents the service it provides. This helps users quickly understand its purpose. However, do not use official logos or branded images from the sites you're scraping, as this can lead to copyright or trademark issues.
### Description
The Actor's description is a short paragraph that explains its purpose. It will be displayed on the Actor's page, right below its title.

When writing your Actor's description, you also have the option to provide an SEO title & description. These will be used in search engine result pages instead of Actor's name & description. Effective SEO titles & descriptions should:
* Utilize popular keywords related to your Actor's functionality
* Summarize the Actor's purpose concisely
* Be between *40* to *50* characters for the title and *140* to *156* characters for description

### README
The next step is to include a comprehensive **README** detailing your Actor's features, reasons for scraping the target website, and instructions on how to use the Actor effectively.
Remember that the Actor's README is generated from your `README.md` file, and you can apply the same https://apify.notion.site/SEO-990259fe88a84fd0a85ce6d3b394d8c1 mentioned earlier to optimize you README for search engines.
To save time when writing your Actor's README, you can use the following template as a starting point:
https://github.com/zpelechova/readme-template
Note that the complexity of your README should match the complexity of your Actor. Feel free to adapt the template to fit your Actor's specific requirements.
---
# Actor quality score
The Actor quality score is a metric that evaluates your Actor's performance across multiple dimensions, including reliability, ease of use, popularity, and other quality indicators. Scores range from 0 to 100 and influence your Actor's visibility and placement in the Apify Store.
***
## How to view your score
Navigate to **Console > Insights > Actor quality**, and then select your Actor.

## Overview
The Actor quality score aggregates multiple performance and quality metrics into a single numerical rating. This score indicates your Actor's health and user satisfaction. A higher score improves your Actor's discoverability in the Apify Store.
The platform provides in-app recommendations to help you identify improvement opportunities and optimize your Actor's quality score.
### Score updates
The Actor quality score recalculates several times per day. Changes you make to your Actor may not immediately reflect in your score. Improvement recommendations may continue to appear in the Actor quality dashboard even after you have addressed the underlying issues.
### Score fluctuations
Your quality score may change even without you modifying your Actor. This happens for two reasons: First, your score is influenced by how well your Actor performs relative to other Actors on the platform. As other Actors improve or decline, your relative position may shift. Second, the quality score algorithm continues to evolve with new properties being added and adjustments to existing calculations.
There are eight quality categories:
* Reliability
* Popularity
* Feedback and community
* Ease of use
* Pricing transparency
* Trustworthiness
* History of success
* Congruency of texts
## Quality score categories
### Reliability
Reliability measures your Actor's operational stability and consistency. A reliable Actor maintains high run success rates and passes automated quality assurance tests. Poor reliability significantly impacts your quality score. For more information on testing requirements, see https://docs.apify.com/platform/actors/publishing/test.
Implementing an https://docs.apify.com/platform/actors/development/actor-definition/input-schema helps prevent runtime failures by validating user input before execution begins, reducing errors caused by invalid or malformed inputs.
### Popularity
Popularity reflects user engagement and adoption of your Actor. This metric considers factors such as the number of users running your Actor, save counts, and return usage patterns. Building an Actor that addresses a clear use case and provides a seamless user experience is fundamental to achieving strong popularity metrics.
### Feedback and community
Users who have run your Actor multiple times are invited to provide reviews and ratings. User feedback significantly influences your quality score, making it essential to deliver a positive experience from the first run. Focus on creating clear onboarding flows and intuitive interfaces. Negative reviews impact your score, so prioritize addressing critical issues promptly and maintaining active communication with your user base to foster long-term success.
### Ease of use
Ease of use evaluates how quickly users can understand and successfully run your Actor. Provide clear, concise titles and descriptions that accurately convey your Actor's functionality. Input field descriptions should be self-explanatory and guide users toward correct usage. A https://docs.apify.com/academy/actor-marketing-playbook/actor-basics/how-to-create-an-actor-readme is equally important, particularly for Actors with complex use cases or configuration options. Strong ease of use facilitates user onboarding and improves retention rates.
### Pricing transparency
Pricing transparency evaluates how clearly users can understand and predict the costs of running your Actor. Transparent pricing models help users make informed decisions and budget accordingly. The https://docs.apify.com/platform/actors/publishing/monetize/pay-per-event monetization model provides predictable, event-based pricing that makes costs explicit and easier to estimate.
Consider offering discounts for Bronze, Silver, and Gold subscription tiers. These incentives reward committed platform users and can increase your Actor's adoption among engaged customers.
### History of success
Developers with a proven track record of publishing successful Actors receive recognition in their quality scores. This factor acknowledges the value of experienced developers who consistently deliver high-quality Actors to the platform.
### Congruency
Congruency measures the consistency and coherence across your Actor's components. A well-designed Actor maintains alignment between its title, description, documentation, and schemas. Ensure that your https://docs.apify.com/platform/actors/development/actor-definition/input-schema, https://docs.apify.com/platform/actors/development/actor-definition/dataset-schema, https://docs.apify.com/platform/actors/development/actor-definition/key-value-store-schema, and README documentation all reflect consistent terminology and accurately describe the Actor's behavior. This coherence reduces user confusion and improves the overall experience.
---
# Actor status badge
The Actor status badge can be embedded in the README or documentation to show users the current status and usage of your Actor on the Apify platform.
***
This is the badge generated for the https://apify.com/apify/website-content-crawler Actor:
https://apify.com/apify/website-content-crawler
This is how such a badge looks in a GitHub repository README:

### How to embed the badge
The Badge is a dynamic SVG image loaded from the Apify platform. The Badge is served from the URL Template:
https://apify.com/actor-badge?actor=/
In order to embed the badge in the HTML documentation, just use it as an image wrapped in a link as shown in the example below. Don't froget to use the `username` and `actor-name` of your Actor.
#### Example
* HTML
* Markdown
### Supported Actor states
The badge indicates the state of the Actor in the Apify platform as the result of the https://docs.apify.com/platform/actors/development/automated-tests.md.
#### Actor OK

#### Actor under maintenance

#### Actor deprecated

#### Actor not found

---
# Automated testing
**Apify has a QA system that regularly runs automated tests to ensure that all Actors in the store are functional.**
***
### Why we test
We want to make sure that all Actors in Apify Store are top-notch, or at least as top-notch as they can be. Since there are many of them, we have an automated testing procedure in place that tests all Actors daily. This helps us to flag Actors that temporarily don't work as expected `under maintenance`, and to automatically `deprecate` Actors that have been broken for more than a month.
### How we test
The test runs the Actor with its default input (defined by the https://docs.apify.com/platform/actors/development/actor-definition/input-schema/specification/v1#prefill-vs-default-vs-required option in the input schema file) and expects it to finish with a **Succeeded** status and non-empty default dataset within 5 minutes of the beginning of the run.

If the Actor fails to complete successful runs for three consecutive days, the developer will be notified, and the Actor will be labeled `under maintenance` until it is fixed. After another 14 days of failing runs, you will receive another notification. Finally, if the runs continue to fail after yet another 14 days, the Actor will be `deprecated`.
### How can I make my Actor healthy again?
The best course of action is to fix the Actor and rebuild it. The automatic testing system will pick this up within 24 hours and mark it as healthy. In some cases, your Actor might break because of issues with the target website. In such a case, if your Actor passes the majority of test runs in the next 7 days, it will be marked as healthy automatically.
## What if my Actor cannot comply with the test logic?
Actors that require some sort of authentication will always fail the tests despite being fully functional. Also, some Actors inherently run for longer than 5 minutes. If that's the case with your Actor, please contact support at mailto:support@apify.com and explain your specific use case that justifies why the Actor should be excluded from the automated tests.
## Advanced Actor testing
You can easily implement your own tests and customize them to fit your Actor's particularities by using our public https://apify.com/pocesar/actor-testing tool available in Apify Store. For more information, see the https://docs.apify.com/platform/actors/development/automated-tests.md section.
---
# Running Actors
**In this section, you learn how to run Apify Actors using Apify Console or programmatically. You will learn about their configuration, versioning, data retention, usage, and pricing.**
***
## Run your first Apify Actor
Before you can run an Actor, you have to either choose one of the existing ones from https://apify.com/store or https://docs.apify.com/platform/actors/development.md. To get started, we recommend trying out an Actor from the https://apify.com/store. Once you have chosen an Actor, you can start it in a number of ways.
> **You will need an Apify account to complete this tutorial. If you don't have one, https://console.apify.com/sign-up first. Don't worry about the price - it's free.**
### 1. Choose your Actor
After you sign-in to Apify Console, navigate to https://console.apify.com/store. We'll pick the https://console.apify.com/actors/aYG0l9s7dbB7j3gbS/information/version-0/readme:

### 2. Configure it
On the Actor's page, head over to the **Input** tab. Don't be put off by all the boxes - the Actor is pre-configured to run without any extra input. Just click the **Start** button in the bottom-left corner.
Alternatively, you can play around with the settings to make the results more interesting for you.

### 3. Wait for the results
The Actor might take a while to gather its first results and finish its run. Meanwhile, let's take some time to explore the platform options:
* Note the other tabs, which provide you with information about the Actor run. For example, you can access the run **Log** and **Storage**.
* At the top right, you can click on the API button to explore the related API endpoints

### 4. Get the results
Shortly you will see the first results popping up:

And you can use the export button at the bottom left to export the data in multiple formats:

And that's it! Now you can get back to the Actor's input, play with it, and try out more of the https://apify.com/store or https://docs.apify.com/platform/actors/development.md.
## Running via Apify API
Actors can also be invoked using the Apify API by sending an HTTP POST request to the https://docs.apify.com/api/v2.md#/reference/actors/run-collection/run-actor endpoint, such as:
https://api.apify.com/v2/acts/compass~crawler-google-places/runs?token=
An Actor's input and its content type can be passed as a payload of the POST request, and additional options can be specified using URL query parameters. For more details, see the https://docs.apify.com/api/v2.md#/reference/actors/run-collection/run-actor section in the API reference.
> To learn more about this, read the https://docs.apify.com/academy/api/run-actor-and-retrieve-data-via-api.md tutorial.
## Running programmatically
Actors can also be invoked programmatically from your own applications or from other Actors.
To start an Actor from your own application, we recommend using our API client libraries for https://docs.apify.com/api/client/js/reference/class/ActorClient#call or https://docs.apify.com/api/client/python/reference/class/ActorClient#call.
* JavaScript
* Python
import { ApifyClient } from 'apify-client';
const client = new ApifyClient({ token: 'MY-API-TOKEN', });
// Start the Google Maps Scraper Actor and wait for it to finish. const actorRun = await client.actor('compass/crawler-google-places').call({ queries: 'apify', }); // Fetch scraped results from the Actor's dataset. const { items } = await client.dataset(actorRun.defaultDatasetId).listItems(); console.dir(items);
from apify_client import ApifyClient
apify_client = ApifyClient('MY-API-TOKEN')
Start the Google Maps Scraper Actor and wait for it to finish.
actor_run = apify_client.actor('compass/crawler-google-places').call( run_input={ 'queries': 'apify' } )
Fetch scraped results from the Actor's dataset.
dataset_items = apify_client.dataset(actor_run['defaultDatasetId']).list_items().items print(dataset_items)
The newly started Actor runs under the account associated with the provided `token`, and therefore all resources consumed are charged to this user account.
Internally, the `call()` function invokes the https://docs.apify.com/api/v2.md#/reference/actors/run-collection/run-actor API endpoint, waits for the Actor to finish, and reads its output using the https://docs.apify.com/api/v2.md#/reference/datasets/item-collection/get-items API endpoint.
---
# Actors in Store
**https://apify.com/store is home to thousands of public Actors available to the Apify community. It's the easiest way for you to start with Apify.**
***
Publishing and monetizing Actors
Anyone is welcome to https://docs.apify.com/platform/actors/publishing.md in the store, and you can even https://docs.apify.com/platform/actors/publishing/monetize.md. For more information about how to monetize your Actor, best practices, SEO, and promotion tips and tricks, head over to the https://docs.apify.com/academy/actor-marketing-playbook.md section of the Apify Developers Academy.
## Pricing models
All Actors in https://apify.com/store fall into one of the four pricing models:
1. - to continue using the Actor after the trial period, you must rent the Actor from the developer and pay a flat monthly fee in addition to the costs associated with the platform usage that the Actor generates.
2. - you do not pay for platform usage the Actor generates and instead just pay for the results it produces.
3. - you can run the Actor and you do not pay for platform usage the Actor generates. Instead you pay for the specific events the Actor creator defines, such as for generating a single result or starting the Actor.
4. - you can run the Actor and you pay for the platform usage the Actor generates.
### Rental Actors
Rental Actors are Actors for which you have to pay a recurring fee to the developer after your trial period ends. This empowers the developer to dedicate more time and effort to their Actors, thus ensuring they are of the *highest quality* and receive *ongoing maintenance*.

Most rental Actors have a *free trial* period. The length of the trial is displayed on each Actor's page.

After a trial period, a flat monthly *Actor rental* fee is automatically subtracted from your prepaid platform usage in advance for the following month. Most of this fee goes directly to the developer and is paid on top of the platform usage generated by the Actor. You can read more about our motivation for releasing rental Actors in https://blog.apify.com/make-regular-passive-income-developing-web-automation-actors-b0392278d085/ from Apify's CEO Jan Čurn.
#### Rental Actors - Frequently Asked Questions
##### Can I run rental Actors via API or the Apify client?
Yes, when you are renting an Actor, you can run it using either our https://docs.apify.com/api/v2.md, https://docs.apify.com/api/client/js or https://docs.apify.com/api/client/python clients as you would do with private or free public Actors.
##### Do I pay platform costs for running rental Actors?
Yes, you will pay normal https://apify.com/pricing on top of the monthly Actor rental fee. The platform costs work exactly the same way as for free public Actors or your private Actors. You should find estimates of the cost of usage in each individual rental Actor's README (https://apify.com/compass/crawler-google-places#how-much-will-it-cost).
##### Do I need an Apify paid plan to use rental Actors?
You don't need a paid plan to start a rental Actor's free trial. Just activate the trial, and you are good to go. After that, you will need to subscribe to one of https://apify.com/pricing in order to keep renting the Actor and continue using it.
##### When will I be charged for the Actor rental?
You always prepay the Actor rental for the following month. The first payment happens when the trial expires, and then recurs monthly. When you open the Actor in the Apify Console, you will see when the next rental payment is due, and you will also receive a notification when it happens.
*Example*: You activate a 7-day trial of an Actor at *noon of April 1, 2021*. If you don't turn off auto-renewal, you will be charged at *noon on April 8, 2021*, then *May 8, 2021*.
##### How am I charged for Actor rental?
The rental fee for an Actor is automatically subtracted from your prepaid platform usage, similarly to, e.g. https://docs.apify.com/platform/actors/running/usage-and-resources.md. If you don't have enough usage prepaid, you will need to cover any overage in the next invoice.
##### Will I be automatically charged at the end of the free trial?
If you have an https://apify.com/pricing, the monthly rental fee will be automatically subtracted from your plan's prepaid usage at the end of your free trial, and you will be able to run the Actor for another month. If you are not subscribed to any of https://apify.com/pricing, you will need to subscribe to one in order to continue using the Actor after the trial has ended.
##### Can I cancel my Actor rental?
*You can cancel the Actor rental* during your trial or any time after that so you don't get charged when your current Actor rental period expires. You can always turn it back on later if you want.
##### Where can I see how much I have paid for Actor rental?
Since Actor rental fees are paid from prepaid platform usage, these fees conceptually belong under platform usage.
You can find the breakdown of how much you have been charged for rental Actors in the **Actors** tab, which you will find within the **Current period** tab in the https://console.apify.com/billing section.

### Pay per result
When you run an Actor that is *paid per result*, you pay for the successful results that an Actor returns when you run it, and you are not charged for the underlying platform usage.
Estimation simplified
This makes it transparent and easy to estimate upfront costs. If you have any feedback or would like to ask something, please join our https://discord.gg/qkMS6pU4cF community and let us know!
#### Pay per result Actors - Frequently Asked Questions
##### How do I know an Actor is paid per result?
When you try the Actor on the platform, you will see that the Actor is paid per result next to the Actor name.

##### Do I need to pay a monthly rental fee to run the Actor?
No, the Actor is free to run. You only pay for the results.
##### What happens when I interact with the dataset after the run finishes?
Under the **pay per result** model, all platform costs generated *during the run of an Actor* are not charged towards your account; you pay for the results instead. After the run finishes, any interactions with the default dataset storing the results, such as reading the results or writing additional data, will incur the standard platform usage costs. But do not worry, in the vast majority of cases, you only want to read the result from the dataset and that costs near to nothing.
##### Do I pay for the storage of results on the Apify platform?
You will still be charged for the timed storage of the data in the same fashion as with any other Actor. You can always decide to delete the dataset to reduce your costs after you export the data from the platform. By default, any unnamed dataset will be automatically removed after your data retention period, so usually, this is nothing to worry about.
##### Can I set a cap on how many results an Actor should return?
You can set a limit on how many items an Actor should return and the amount you will be charged in Options on the Actor detail page in the section below the Actor input.

##### Can I publish an Actor that is paid per result?
Yes, you can publish an Actor that is paid per result.
##### Where do I see how much I was charged for the pay per result Actors?
You can see the overview of how much you have been charged for Actors paid by result on your invoices and in the https://console.apify.com/billing of the Billing section in Console. It will be shown there as a separate service.

On the top of that, you can see how much you have been charged for a specific run in the detail of that run and also in the overview table showing all runs.


If you wish to see how much you have been charged for a particular Actor, you will find this information at the bottom of the https://console.apify.com/billing.

### Pay per event
Pay per event Actor pricing model is very similar to the pay per result model. You still do not pay the underlying platform usage. Instead of results, you pay for specific events defined by the creator of the Actor. These events will vary between Actors, and will always be described, together with their pricing, on each Actor. Example events might be producing a single result, doing a unit piece of work (e.g. uploading a file) or starting an Actor.
#### Pay per event Actors - Frequently Asked Questions
#### How do I know Actor is paid per events?
You will the that the Actor is paid per events next to the Actor name.

#### Do I need to pay a monthly rental fee to run the Actor?
No, you only pay for the events.
#### What happens when I interact with the dataset after the run finishes?
You would still pay for all interactions after the Actor run finishes, same as for pay per result Actors.
#### Do I pay for the storage of results on the Apify platform?
You would still pay for the long term storage of results, same as for pay per result Actors.
#### Some Actors declare that I still need to pay for usage, how come?
When an Actor operates in https://docs.apify.com/platform/actors/running/standby, you control how the background runs scale and how efficiently they are utilized. In this case, you are responsible for paying the platform usage costs of these runs in addition to the event charges. Some selected Standby Actors may have this usage component waived, so always check the pricing page of the specific Actor to determine whether you will be charged for usage or only for events.
#### Where do I see how much I was charged for the pay per result Actors?
Similarly to pay per result Actors, you can see how much you have been charged on your invoices, and on the https://console.apify.com/billing of the Billing section in the Console.

You can also see the cost of each run on the run detail itself.

#### Can I put a cap on a cost of a single Actor run?
Yes, when starting an Actor run, you can define the maximum limit on the cost of that run. When the Actor reaches the defined limit, it should terminate gracefully. Even if it didn't, for any reason, and kept producing results, we make always sure you are never charged more that your defined limit.

#### How do I raise a dispute if the charges for an Actor seem off?
Please, in such a case, do not hesitate to contact the Actor author or our support team. If you suspect a bug in the Actor, you can also always create an issue on the Actor detail in the Apify Console.
### Pay per usage
When you use a pay per usage Actor, you are only charged for the platform usage that the runs of this Actor generate. https://docs.apify.com/platform/actors/running/usage-and-resources.md includes components such as compute units, operations on https://docs.apify.com/platform/storage.md, and usage of https://docs.apify.com/platform/proxy/residential-proxy.md or https://docs.apify.com/platform/proxy/google-serp-proxy.md.

Estimating Actor usage cost
With this model, it's very easy to see how many platform resources each Actor run consumed, but it is quite difficult to estimate their usage beforehand. The best way to find the costs of free Actors upfront is to try out the Actor on a limited scope (for example, on a small number of pages) and evaluate the consumption. You can easily do that using our https://apify.com/pricing.
*For more information on platform usage cost see the https://docs.apify.com/platform/actors/running/usage-and-resources.md page.*
## Reporting issues with Actors
Each Actor has an **Issues** tab in Apify Console. There, you can open an issue (ticket) and chat with the Actor's author, platform admins, and other users of this Actor. Please feel free to use the tab to ask any questions, request new features, or give feedback. Alternatively, you can always write to mailto:community@apify.com.

## Apify Store discounts
Each Apify subscription plan includes a discount tier (*BRONZE*, *SILVER*, *GOLD*) that provides access to increasingly lower prices on selected Actors.
Discount participation
Discount offers are optional and determined by Actor owners. Not all Actors participate in the discount program.
Additional discounts are available for Enterprise customers.
To check an Actor's pricing and available discounts, visit the Pricing section on the Actor's detail page in the Apify Store.

In the Apify Console, you can find information about pricing and available discounts in the Actor's header section.


---
# Input and output
**Configure your Actor's input parameters using Apify Console, locally or via API. Access parameters in key-value stores from your Actor's code.**
***
## Input
Each Actor accepts input, which tells it what to do. You can run an Actor using the https://console.apify.com UI, then configure the input using the autogenerated UI:

When running an Actor using the https://docs.apify.com/api/v2 you can pass the same input as the JSON object. In this case, the corresponding JSON input looks as follows:
{ "maxRequestsPerCrawl": 10, "proxy": { "useApifyProxy": true }, "startUrl": "https://apify.com" }
### Options - Build, Timeout, and Memory
As part of the input, you can also specify run options such as https://docs.apify.com/platform/actors/development/builds-and-runs/builds.md, Timeout, and https://docs.apify.com/platform/actors/running/usage-and-resources.md for your Actor run.

| Option | Description |
| ------- | --------------------------------------------------------------------------- |
| Build | Tag or number of the build to run (e.g. **latest** or **1.2.34**). |
| Timeout | Timeout for the Actor run in seconds. Zero value means there is no timeout. |
| Memory | Amount of memory allocated for the Actor run, in megabytes. |
## Output
While the input object provides a way to instruct Actors, an Actor can also generate an output, usually stored in its default https://docs.apify.com/platform/storage/dataset.md, but some additional files might be stored in its https://docs.apify.com/platform/storage/key-value-store.md. Always read the Actor's README to learn more about its output.
For more details about storages, visit the https://docs.apify.com/platform/storage.md section.
You can quickly access the Actor's output from the run detail page:

And to access all the data associated with the run, see the **Storage** tab, where you can explore the Actor's default https://docs.apify.com/platform/storage/dataset.md, https://docs.apify.com/platform/storage/key-value-store.md, and https://docs.apify.com/platform/storage/request-queue.md:

You can also use https://docs.apify.com/api/v2 to retrieve the output. To learn more about this, read the https://docs.apify.com/academy/api/run-actor-and-retrieve-data-via-api.md tutorial.
---
# Runs and builds
**Learn about Actor builds and runs, their lifecycle, sharing, and data retention policy.**
***
## Builds
An Actor is a combination of source code and various settings in a Docker container. To run, it needs to be built. An Actor build consists of the source code built as a Docker image, making the Actor ready to run on the Apify platform.
What is Docker image?
A Docker image is a lightweight, standalone, executable package of software that includes everything needed to run an application: code, runtime, system tools, system libraries, and settings. For more information visit Docker's https://www.docker.com/resources/what-container/.
With every new version of an Actor, a new build is created. Each Actor build has its number (for example, **1.2.34**), and some builds are tagged for easier use (for example, *latest* or *beta*). When running an Actor, you can choose what build you want to run by selecting a tag or number in the run options. To change which build a tag refers to, you can reassign it using the https://docs.apify.com/api/v2/act-put.md API endpoint.

Each build may have different features, input, or output. By fixing the build to an exact version, you can ensure that you won't be affected by a breaking change in a new Actor version. However, you will lose updates.
## Runs
When you start an Actor, an Actor run is created. An Actor run is a Docker container created from the build's Docker image with dedicated resources (CPU, memory, disk space). For more on this topic, see https://docs.apify.com/platform/actors/running/usage-and-resources.md.
Each run has its own (default) https://docs.apify.com/platform/storage.md assigned, which it may but not necessarily need to use:
* https://docs.apify.com/platform/storage/key-value-store.md containing the input and enabling Actor to store other files.
* https://docs.apify.com/platform/storage/dataset.md enabling Actor to store the results.
* https://docs.apify.com/platform/storage/request-queue.md to maintain a queue of URLs to be processed.
What's happening inside of an Actor is visible on the Actor run log in the Actor run detail:

### Origin
Both **Actor runs** and **builds** have the **Origin** field indicating how the Actor run or build was invoked, respectively. The origin is displayed in Apify Console and available via https://docs.apify.com/api/v2/actor-run-get in the `meta.origin` field.
| Name | Origin |
| ------------- | --------------------------------------------------------------------------- |
| `DEVELOPMENT` | Manually from Apify Console in the Development mode (own Actor) |
| `WEB` | Manually from Apify Console in "normal" mode (someone else's Actor or task) |
| `API` | From https://docs.apify.com/api |
| `CLI` | From https://docs.apify.com/cli/ |
| `SCHEDULER` | Using a schedule |
| `WEBHOOK` | Using a webhook |
| `ACTOR` | From another Actor run |
| `STANDBY` | From https://docs.apify.com/platform/actors/running/standby.md |
## Lifecycle
Each run and build starts with the initial status **READY** and goes through one or more transitional statuses to one of the terminal statuses.
***
| Status | Type | Description |
| ---------- | ------------ | ------------------------------------------- |
| READY | initial | Started but not allocated to any worker yet |
| RUNNING | transitional | Executing on a worker machine |
| SUCCEEDED | terminal | Finished successfully |
| FAILED | terminal | Run failed |
| TIMING-OUT | transitional | Timing out now |
| TIMED-OUT | terminal | Timed out |
| ABORTING | transitional | Being aborted by the user |
| ABORTED | terminal | Aborted by the user |
### Aborting runs
You can abort runs with the statuses **READY**, **RUNNING**, or **TIMING-OUT** in two ways:
* *Immediately* - this is the default option. The Actor process is killed immediately with no grace period.
* *Gracefully* - the Actor run receives a signal about aborting via the `aborting` event and is granted a 30-second window to finish in-progress tasks before getting aborted. This is helpful in cases where you plan to resurrect the run later because it gives the Actor a chance to persist its state. When resurrected, the Actor can restart where it left off.
You can abort a run in Apify Console using the **Abort** button or via API using the https://docs.apify.com/api/v2/actor-run-abort-post.md endpoint.
### Resurrection of finished run
Any Actor run in a terminal state, i.e., run with status **FINISHED**, **FAILED**, **ABORTED**, and **TIMED-OUT**, might be resurrected back to a **RUNNING** state. This is helpful in many cases, for example, when the timeout for an Actor run was too low or in case of an unexpected error.
The whole process of resurrection looks as follows:
* Run status will be updated to **RUNNING**, and its container will be restarted with the same storage (the same behavior as when the run gets migrated to the new server).
* Updated duration will not include the time when the Actor was not running.
* Timeout will be counted from the point when this Actor run was resurrected.
Resurrection can be performed in Apify Console using the **resurrect** button or via API using the https://docs.apify.com/api/v2/act-run-resurrect-post.md API endpoint.
Settings adjustments
You can also adjust timeout and memory or change Actor build before the resurrection. This is especially helpful in case of an error in the Actor's source code as it enables you to:
1. Abort a broken run
2. Update the Actor's code and build the new version
3. Resurrect the run using the new build
### Data retention
Apify securely stores your ten most recent runs indefinitely, ensuring your records are always accessible. All **Actor runs** beyond the latest ten are deleted along with their default storages (Key-value store, Dataset, Request queue) after the data retention period based on your https://apify.com/pricing.
**Actor builds** are deleted only when they are *not tagged* and have not been used for over 90 days.
## Sharing
Share your Actor runs with other Apify users via the https://docs.apify.com/platform/collaboration.md system.
---
# Standby mode
**Use Actors in lightweight Standby mode for fast API responses.**
***
Traditional Actors are designed to run a single job and then stop. They're mostly intended for batch jobs, such as when you need to perform a large scrape or data processing task. However, in some applications, waiting for an Actor to start is not an option. Actor Standby mode solves this problem by letting you have the Actor ready in the background, waiting for the incoming HTTP requests. In a sense, the Actor behaves like a real-time web server or standard API server.
## How do I know if Standby mode is enabled
You will know that the Actor is enabled for Standby mode if you see the **Standby** tab on the Actor's detail page. In the tab, you will find the hostname of the server, the description of the Actor's endpoints, the parameters they accept, and what they return in the Actor README.
To use the Actor in Standby mode, you don't need to click a start button or not need to do anything else. Simply use the provided hostname and endpoint in your application, hit the API endpoint and get results.

## How do I pass input to Actors in Standby mode
If you're using an Actor built by someone else, see its Information tab to find out how the input should be passed.
Generally speaking, Actors in Standby mode behave as standard HTTP servers. You can use any of the existing https://developer.mozilla.org/en-US/docs/Web/HTTP/Methods like GET, POST, PUT, DELETE, etc. You can pass the input via https://en.wikipedia.org/wiki/Query_string or via https://developer.mozilla.org/en-US/docs/Web/HTTP/Messages#body.
## How do I authenticate my requests
To authenticate requests to Actor Standby, follow the same process as https://docs.apify.com/platform/integrations/api.md. You can provide your https://docs.apify.com/platform/integrations/api.md#api-token in one of two ways:
1. *Recommended*: Include the token in the `Authorization` header of your request as `Bearer `. This approach is recommended because it prevents your token from being logged in server logs.
curl -H "Authorization: Bearer my_apify_token"
https://rag-web-browser.apify.actor/search?query=apify
2. Append the token as a query parameter named `token` to the request URL. This approach can be useful if you cannot modify the request headers.
https://rag-web-browser.apify.actor/search?query=apify&token=my_apify_token
tip
You can use https://docs.apify.com/platform/integrations/api.md#limited-permissions to send standby requests. This is useful for allowing third-party services to interact with your Actor without granting access to your entire account.
However, https://docs.apify.com/platform/integrations/api.md#restricted-access-restrict-what-actors-can-access-using-the-scope-of-this-actor using a scoped token is not supported when running in Standby mode.
## Can I still run the Actor in normal mode
Yes, you can still modify the input and click the Start button to run the Actor in normal mode. However, note that the Standby Actor might not support this mode; the run might fail or return empty results. The normal mode is always supported in Standby Beta, even for Actors that don't handle it well. Please head to the Actor README to learn more about the capabilities of your chosen Actor.
## Is there any scaling to accommodate the incoming requests
When you use the Actor in Standby mode, the system automatically scales the Actor to accommodate the incoming requests. Under the hood, the system starts new Actor runs, which you will see in the Actor runs tab, with the origin set to Standby.
## What is the timeout for incoming requests
For requests sent to an Actor in Standby mode, the maximum time allowed until receiving the first response is *5 minutes*. This represents the overall timeout for the operation.
## What is the rate limit for incoming requests
The rate limit for incoming requests to a Standby Actor is *2000 requests per second* per user account.
## How do I customize Standby configuration
The Standby configuration currently consists of the following properties:
* **Max requests per run** - The maximum number of concurrent HTTP requests a single Standby Actor run can accept. If this limit is exceeded, the system starts a new Actor run to handle the request, which may take a few seconds.
* **Desired requests per run** - The number of concurrent HTTP requests a single Standby Actor run is configured to handle. If this limit is exceeded, the system preemptively starts a new Actor run to handle the additional requests.
* **Memory (MB)** - The amount of memory (RAM) allocated for the Actor in Standby mode, in megabytes. With more memory, the Actor can typically handle more requests in parallel, but this also increases the number of compute units consumed and the associated cost.
* **Idle timeout (seconds)** - If a Standby Actor run doesn’t receive any HTTP requests within this time, the system will terminate the run. When a new request arrives, the system might need to start a new Standby Actor run to handle it, which can take a few seconds. A higher idle timeout improves responsiveness but increases costs, as the Actor remains active for a longer period.
* **Build** - The Actor build that the runs of the Standby Actor will use. Can be either a build tag (e.g. `latest.`), or a build number (e.g. `0.1.2`).
You can see these in the Standby tab of the Actor detail page. However, note that these properties are not configurable at the Actor level. If you wish to use the Actor-level hostname, this will always use the default configuration. To override this configuration, just create a new Task from the Actor. You can then head to the Standby tab of the created Task and modify the configuration as needed. Note that the task has a specific hostname, so make sure to use that in your application if you wish to use the custom configuration.
## Are the Standby runs billed differently
No, the Standby runs are billed in the same fashion as the normal runs. However, running Actors in Standby mode might have unexpected costs, as the Actors run in the background and consume resources even when no requests are being sent until they are terminated after the idle timeout period.
## Are the Standby runs shared among users
No, even if you use the Actor-level hostname with the default configuration, the background Actor runs for your requests are not shared with other users.
## How can I develop Actors using Standby mode
See the https://docs.apify.com/platform/actors/development/programming-interface/standby.md.
---
# Actor tasks
**Create and save reusable configurations of Apify Actors tailored to specific use cases.**
***
Actor tasks let you create multiple reusable configurations of a single Actor, adapted for specific use cases. For example, you can create one https://apify.com/apify/web-scraper configuration (task) that scrapes the latest reviews from https://www.imdb.com/, another that scrapes nike.com for the latest sneakers, and a third that scrapes your competitor's e-shop. You can then use and reuse these configurations directly from https://console.apify.com/actors/tasks, https://docs.apify.com/platform/schedules.md, or https://docs.apify.com/api/v2/actor-task-runs-post.md.
You can find all your tasks in the https://console.apify.com/actors/tasks.
## Create
To create a task, open any Actor from https://console.apify.com/store or your list of https://console.apify.com/actors in Apify Console. At the top-right section of the page, click the **Create task** button.

## Configure
You can set up your task's input under the **Input** tab. A task's input configuration works just like an Actor's. After all, it's just a copy of an Actor you can pre-configure for a specific scenario. You can use either JSON or the visual input UI.

An Actors' input fields may vary depending on their purpose, but they all follow the same principle: *you provide an Actor with the information it needs so it can do what you want it to do.*
You can set run options such as timeout and https://docs.apify.com/platform/actors/running/usage-and-resources.md in the **Run options** tab of the task's input configuration.
### Naming
To make a task easier to identify, you can give it a name, title, and description by clicking its caption on the detail page. A task's name should be at least `3` characters long with a limit of `63` characters.
## Run
Once you've configured your task, you can run it using the **Start** button on the top-right side of the screen.

Or using the **Start** button positioned following the input configuration.

You can also run tasks using:
* https://docs.apify.com/platform/schedules.md.
* Directly via the https://docs.apify.com/api/v2/actor-task-runs-post.md.
* The https://docs.apify.com/api/client/js/reference/class/TaskClient.
* The https://docs.apify.com/api/client/python/reference/class/TaskClient.
## Share
Like any other resource, you can share your Actor tasks with other Apify users via the https://docs.apify.com/platform/collaboration.md system.
---
# Usage and resources
**Learn about your Actors' memory and processing power requirements, their relationship with Docker resources, minimum requirements for different use cases and its impact on the cost.**
***
## Resources
https://docs.apify.com/platform/actors.md run in https://www.docker.com/resources/what-container/, which have a https://phoenixnap.com/kb/docker-memory-and-cpu-limit (memory, CPU, disk size, etc). When starting, the Actor needs to be allocated a certain share of those resources, such as CPU capacity that is necessary for the Actor to run.

Assigning an Actor a specific **Memory** capacity, also determines the allocated CPU power and its disk size.
Check out the https://docs.apify.com/platform/limits.md page for detailed information on Actor memory, CPU limits, disk size and other limits.
### Memory
When invoking an Actor, the caller must specify the memory allocation for the Actor run. The memory allocation must follow these requirements:
* It must be a power of 2.
* The minimum allowed value is `128MB`
* The maximum allowed value is `32768MB`
* Acceptable values include: `128MB`, `256MB`, `512MB`, `1024MB`, `2048MB`, `4096MB`, `8192MB`, `16384MB`, and `32768MB`
Additionally, each user has a certain total limit of memory for running Actors. The sum of memory allocated for all running Actors and builds needs to be within this limit, otherwise the user cannot start a new Actor. For more details, see https://docs.apify.com/platform/limits.md.
### CPU
The CPU allocation for an Actor is automatically computed based on the assigned memory, following these rules:
* For every `4096MB` of memory, the Actor receives one full CPU core
* If the memory allocation is not a multiple of `4096MB`, the CPU core allocation is calculated proportionally
* Examples:
* `512MB` = 1/8 of a CPU core
* `1024MB` = 1/4 of a CPU core
* `8192MB` = 2 CPU cores
#### CPU usage spikes

Sometimes, you see the Actor's CPU use go over 100%. This is not unusual. To help an Actor start up faster, it is allocated a free CPU boost. For example, if an Actor is assigned 1GB (25% of a core), it will temporarily be allowed to use 100% of the core, so it gets started quicker.
### Disk
The Actor has hard disk space limited by twice the amount of memory. For example, an Actor with `1024MB` of memory will have `2048MB` of disk available.
## Requirements
Actors built with https://crawlee.dev/ use autoscaling. This means that they will always run as efficiently as they can based on the allocated memory. If you double the allocated memory, the run should be twice as fast and consume the same amount of (1 \* 1 = 0.5 \* 2).
A good middle ground is `4096MB`. If you need the results faster, increase the memory (bear in mind the , though). You can also try decreasing it to lower the pressure on the target site.
Autoscaling only applies to solutions that run multiple tasks (URLs) for at least 30 seconds. If you need to scrape just one URL or use Actors like https://apify.com/lukaskrivka/google-sheets that do just a single isolated job, we recommend you lower the memory.
If the Actor doesn't have this information, or you want to use your own solution, just run your solution like you want to use it long term. Let's say that you want to scrape the data **every hour for the whole month**. You set up a reasonable memory allocation like `4096MB`, and the whole run takes 15 minutes. That should consume 1 CU (4 \* 0.25 = 1). Now, you just need to multiply that by the number of hours in the day and by the number of days in the month, and you get an estimated usage of 720 (1 \* 24 \* 30) monthly.
Estimating usage
Check out our article on https://help.apify.com/en/articles/3470975-how-to-estimate-compute-unit-usage-for-your-project for more details.
### Memory requirements
Each use case has its own memory requirements. The larger and more complex your project, the more memory/CPU power it will require. Some examples which have minimum requirements are:
* Actors using https://pptr.dev/ or https://playwright.dev/ for real web browser rendering require at least `1024MB` of memory.
* Large and complex sites like https://apify.com/compass/crawler-google-places require at least `4096MB` for optimal speed and https://crawlee.dev/api/core/class/AutoscaledPool#minConcurrency.
* Projects involving large amount of data in memory.
### Maximum memory
Apify Actors are most commonly written in https://nodejs.org/en/, which uses a https://dev.to/arealesramirez/is-node-js-single-threaded-or-multi-threaded-and-why-ab1. Unless you use external binaries such as the Chrome browser, Puppeteer, Playwright, or other multi-threaded libraries you will not gain more CPU power from assigning your Actor more than `4096MB` of memory because Node.js cannot use more than 1 core.
In other words, giving a https://apify.com/apify/cheerio-scraper `16384MB` of memory (4 CPU cores) will not improve its performance, because these crawlers cannot use more than 1 CPU core.
Multi-threaded Node.js configuration
It's possible to https://dev.to/reevranj/multiple-threads-in-nodejs-how-and-what-s-new-b23 with some configuration. This can be useful if you need to offload a part of your workload.
## Usage
When you run an Actor it generates platform usage that's charged to the user account. Platform usage comprises four main parts:
* ****: CPU and memory resources consumed by the Actor.
* **Data transfer**: The amount of data transferred between the web, Apify platform, and other external systems.
* **Proxy costs**: Residential or SERP proxy usage.
* **Storage operations**: Read, write, and other operations performed on the Key-value store, Dataset, and Request queue.
The platform usage can be represented either in raw units (e.g. gigabytes for data transfer, or number of writes for dataset operations), or in the dollar equivalents.
To view the usage of an Actor run, navigate to the **Runs** section and check out the **Usage** column.

For a more detailed breakdown, click on the specific run you want to examine and then on the **?** icon next to the **Usage** label.

Usage billing elements
For technical reasons, when viewing the usage in dollars for a specific historical Actor run or build in the API or Apify Console, your current service pricing is used to compute the dollar amount. This should be used for informational purposes only.
For detailed information, FAQ, and, pricing check out the https://apify.com/pricing.
### What is a compute unit
A compute unit (CU) is the unit of measurement for the resources consumed by Actor runs and builds. You are charged for using Actors based on CU consumption.
For example, running an Actor with`1024MB` of allocated memory for 1 hour will consume 1 CU. The cost of this CU depends on your subscription plan.
You can check each Actor run's exact CU usage in the run's details.

You can https://console.apify.com/billing in the **Billing** section of Apify Console.
#### Compute unit calculation
CUs are calculated by multiplying two factors:
* **Memory** (MB) - The size of the allocated server for your Actor or task run.
* **Duration** (hours) - The duration for which the server is used (Actor or task run). For example, if your run took 6 minutes, you would use 0.1 (hours) as the second number to calculate CUs. The minimum granularity is a second.
Example: *1024MB memory x 1 hour = 1 CU*
### What determines consumption
The factors that influence resource consumption, in order of importance, are:
* *Browser vs. Plain HTTP*: Launching a browser (e.g., https://pptr.dev//https://playwright.dev/) is resource-intensive and slower compared to working with plain HTML (https://cheerio.js.org/). Using Cheerio can be up to *20 times* faster.
* *Run size and frequency*: Large runs can use full resource scaling and are not subjected to repeated Actor start-ups (as opposed to many short runs). Whenever possible, opt for larger batches.
* *Page type*: Heavy pages, such as Amazon or Facebook will take more time to load regardless whether you use a browser or Cheerio. Large pages can take up to *3 times* more resources to load and parse than average pages.
You can check out our https://help.apify.com/en/articles/3470975-how-to-estimate-compute-unit-usage-for-your-project for more details on what determines consumption.
---
# Collaboration
**Learn how to collaborate with other users and manage permissions for organizations or private resources such as Actors, Actor runs, and storages.**
***
Apify was built from the ground up as a collaborative platform. Whether you’re publishing your Actor in Apify Store or sharing a dataset with a teammate, collaboration is deeply integrated into how Apify works. You can share your resources (like Actors, runs, or storages) with others, manage permissions, or invite collaborators to your organization. By default, each system resource you create is only available to you, the owner. However, you can grant access to other users, making it easy to collaborate effectively and securely.
While most resources can be shared by assigning permissions (see https://docs.apify.com/platform/collaboration/access-rights.md), some resources can also be shared simply by using their unique links or IDs. There are two types of resources in terms of sharing:
* *Resources that require explicit access by default:*
* https://docs.apify.com/platform/actors/running.md, https://docs.apify.com/platform/actors/running/tasks.md
* Can be shared only by inviting collaborators using https://docs.apify.com/platform/collaboration/access-rights.md) or using https://docs.apify.com/platform/collaboration/organization-account.md
* *Resources supporting both explicit access and link sharing:*
* Actor runs, Actor builds and storage resources (datasets, key-value stores, request queues)
* Can be shared by inviting collaborators or simply by sharing a unique direct link
You can control access to your resources in four ways:
| | |
| ---------------------------------------------------------------------------- | -------------------------------------------------------------------------------------------------------------------------------------------------------------------------------------------------------------------------------------------------------------------------------------------------------- |
| **https://docs.apify.com/platform/collaboration/access-rights.md** | Enables you to grant access to another user for a certain resource you own. This way, you can share results with your client, or two engineers can collaborate on developing one Actor. |
| **https://docs.apify.com/platform/collaboration/general-resource-access.md** | Certain resources (runs, builds and storages) can by shared just by their link. Anyone with their ID is able to access them. This is configurable via https://docs.apify.com/platform/collaboration/general-resource-access.md |
| **https://docs.apify.com/platform/collaboration/organization-account.md** | Apify's organization account allows multiple engineers to collaborate on team projects with role-specific access permissions. |
| **https://docs.apify.com/platform/actors/publishing.md** | Another way to share your Actor with other users is to publish it in https://apify.com/store. When publishing your Actor, you can make it a Paid Actor and get paid by the users benefiting from your tool. For more information, read the https://docs.apify.com/platform/actors/publishing.md section. |
---
# Access rights
**Manage permissions for your private resources such as Actors, Actor runs, and storages. Allow other users to read, run, modify, or build new versions.**
***
You can easily and securely share your own resources - Actors, tasks, key-value stores, datasets, and request queues - with other users by using a https://www.google.com/search?q=define+granular+permissions permissions system. This enables you, for example, to let your colleague run an https://docs.apify.com/platform/actors.md or view a https://docs.apify.com/platform/storage/dataset.md but not modify it.
You can also grant permission to update an Actor and build a new version. https://docs.apify.com/platform/storage.md (key-value stores, request queues, and datasets) are sharable in the same way as a **read** permission or a combination of both **read** and **write** permissions.
To share an Actor, task, key-value store, request queue, or dataset, click on the **Actions** button in the top-right corner and select **Share**. You can add a collaborator by using their **user ID**, **email**, or **username**. Once you have added the collaborator, you can configure their permissions.

---
# General resource access
Some resources, like storages, Actor runs or Actor builds, can be shared simply by sending their unique resource ID or Console link and the recipient can then view the data in Console or fetch it via API without needing an API token. This is very useful for ad-hoc collaboration, integrating third party tools that connect to data in your Apify account or quick prototypes.
Thanks to the hard-to-guess, unique IDs, it’s also secure enough for most use cases. However, it doesn't offer features like access revocation and in some cases, you may want to have more direct control over data access and require users to have explicit permissions to your resources.
**General resource access** is an account setting that defines the default access policy at the account level. You can find General resource access in Apify Console under **Settings → Security & Privacy**. The two following options are supported:
* **Anyone with ID can read (default)**: Selected resources can be accessed using just their unique resource ID. This means if you share the resource ID with someone, they would be able to view it without providing an API token or viewing the resource by visiting the Console URL.
* **Restricted**: With this setting, only signed-in users with an explicit access to the resources can access them. To access restricted resources via API, a valid token needs to be provided.
This setting affects the following resources:
* Actor runs
* Actor builds
* Storages:
* Datasets
* Key-value stores
* Request queues
Access to resources that require explicit access — such as Actors, tasks or schedules are not affected by this setting.

## How Restricted Access works
If your **General resource access** is set to **Anyone with ID can read**, you can just send this link to anybody, and they will be able to download the data even if they don’t have an Apify account. However, once you change the setting to **Restricted**, this API call will require a valid token with access in order to work. In other words, you’ll have to explicitly share the dataset and you can only do that with people who have an Apify account.
Access Setting Changes May Be Delayed
When you change the access for a resource it may take a minute for the change to take effect.
### What is the best setting for me
Sharing by link is quick, convenient, and secure enough for most use cases -- thanks to the use of hard-to-guess unique IDs.
That said, link-based sharing doesn’t support access revocation, audit trails, or fine-grained permission controls. If you need tighter control over who can access your data or require elevated security because of the domain you're working in we recommend enabling **Restricted** access.
The default setting strikes a good balance for casual or internal use, but **Restricted** access is a better fit for teams with stricter security policies, integrations using scoped API tokens, or audit requirements.
You can switch to **Restricted** access at any time. If it causes issues in your workflow, you can revert to the default setting just as easily.
Support in public Actors
Because this is a new setting, some existing public Actors and integrations might not support it yet. Their authors need to update them to provide a valid token on all API calls.
### Exceptions
Even if your access is set to **Restricted** there are a few built-in exceptions that make collaboration and platform features work seamlessly. These are explained in the sections below.
#### Builds of public Actors
Builds of public Actors are always accessible to anyone who can view the Actor — regardless of the Actor owner’s account **General resource access** setting.
This ensures that public Actors in the Apify Store continue to work as expected. For example, if you open a public Actor in Console, you’ll also be able to view its build details, download logs, or inspect the source package — without needing extra permissions or a token.
This exception exists to maintain usability and avoid breaking workflows that rely on public Actors. It only applies to builds of Actors that are marked as **public**. For private Actors, build access still follows the general resource access setting of the owner’s account.
#### Automatically share owner runs of shared Actors & Tasks with collaborators
When you share an Actor with a collaborator, you can choose to share read-only access to your (the owner’s) runs of that Actor. This makes it easier for them to help with debugging, monitoring, or reviewing outputs.
* This access includes logs, input, and default storages (dataset, key-value store, request queue)
* Access is one-way: you won’t see the collaborator’s runs unless they share them
* Collaborators can’t see each other’s runs
* This works even if your account uses **restricted general resource access** — permissions are applied automatically.
#### Automatically sharing runs with public Actor creators
If you’re using a public Actor from the Apify Store, you can choose to automatically share your runs of that Actor with its creator. This helps developers monitor usage and troubleshoot issues more effectively.
* This setting is opt-in and can be enabled under **Account Settings → Privacy**
* When enabled, your runs of public Actors are automatically visible to the Actor’s creator
* Shared runs include logs, input, and output storages (dataset, key-value store, request queue)
This sharing works even if your account has **General resource access** set to **Restricted** — the platform applies specific permission checks to ensure the Actor creator can access only the relevant runs.
You can disable this behavior at any time by turning off the setting in your account.
#### Automatically sharing runs via Actor Issues
When you report an issue on an Actor and include a **run URL**, that run is automatically shared with the Actor developer — **even if your account uses restricted general resource access**.
This automatic sharing ensures the developer can view all the context they need to troubleshoot the issue effectively. That includes:
* Full access to the run itself (logs, input, status)
* Automatic access to the run’s default storages:
* Dataset
* Key-value store
* Request queue
The access is granted through explicit, behind-the-scenes permissions (not anonymous or public access), and is limited to just that run and its related storages. No other resources in your account are affected.
This means you don’t need to manually adjust permissions or share multiple links when reporting an Actor issue — **just including the run URL in your issue is enough**

## Per-resource access control
The account level access control can be changed on individual resources. This can be done by setting the general access level to other than Restricted in the share dialog for a given resource. This way the resource level setting takes precedence over the account setting.

Using Apify API
You can also set the general access on a resource programmatically using the Apify API or Apify client. Read more in the API reference and client documentation.
const datasetClient = apifyClient.dataset(datasetId); await datasetClient.update({ generalAccess: STORAGE_GENERAL_ACCESS.ANYONE_WITH_ID_CAN_READ });
### Sharing restricted resources with pre-signed URLs
Even when a resource is restricted, you might still want to share it with someone outside your team — for example, to send a PDF report to a client, or include a screenshot in an automated email or Slack message. In these cases, *storage resources* (like key-value stores, datasets, and request queues) support generating *pre-signed URLs*. These are secure, time-limited links that let others access individual files without needing an Apify account or authentication.
#### How pre-signed URLs work
A pre-signed URL is a regular HTTPS link that includes a cryptographic signature verifying that access has been explicitly granted by someone with valid permissions. When a pre-signed URL is used, Apify validates the signature and grants access without requiring an API token.
The signature can be temporary (set to expire after a specified duration) or permanent, depending on the expiration date set when it's generated.
#### What links can be pre-signed
Only selected *dataset* and *key-value store* endpoints support pre-signed URLs.This allows fine-grained control over what data can be shared without authentication.
| Resource | Link | Validity | Notes |
| ------------------ | ---------------------------------------------------------------------------------------------------------------- | ---------------------- | ------------------------------------------------------------------------------------------------------- |
| *Datasets* | https://docs.apify.com/api/v2/dataset-items-get.md (`/v2/datasets/:datasetId/items`) | Temporary or Permanent | The link provides access to all dataset items. |
| *Key-value stores* | https://docs.apify.com/api/v2/key-value-store-keys-get.md (`/v2/key-value-stores/:storeId/keys`) | Temporary or Permanent | Returns the list of keys in a store. |
| *Key-value stores* | https://docs.apify.com/api/v2/key-value-store-record-get.md (`/v2/key-value-stores/:storeId/records/:recordKey`) | *Permanent only* | The public URL for a specific record is always permanent - it stays valid as long as the record exists. |
Automatically generated signed URLs
When you retrieve dataset or key-value store details using:
* `GET https://api.apify.com/v2/datasets/:datasetId`
* `GET https://api.apify.com/v2/key-value-stores/:storeId`
the API response includes automatically generated fields:
* `itemsPublicUrl` – a pre-signed URL providing access to dataset items
* `keysPublicUrl` – a pre-signed URL providing access to key-value store keys
These automatically generated URLs are *valid for 14 days*.
The response also contains:
* `consoleUrl` - provides a stable link to the resource's page in the Apify Console. Unlike a direct API link, Console link will prompt unauthenticated users to sign in, ensuring they have required permissions to view the resource.
You can create pre-signed URLs either through the Apify Console or programmatically via the Apify API client.
#### How to generate pre-signed URLs in Apify Console
To generate a pre-signed link, you can use the **Export** button in Console.
note
The link will include a signature *only if the general resource access is set to Restricted*. For unrestricted datasets, the link will work without a signature.
##### Dataset items
1. Click the **Export** button.
2. In the modal that appears, click **Copy shareable link**.

##### Key-value store records
1. Open a key-value store.
2. Navigate to the record you want to share.
3. In the **Actions** column, click the link icon to copy signed link.

#### How to generate pre-signed URLs using Apify Client
You can generate pre-signed URLs programmatically for datasets and key-value stores:
##### Dataset items
import { ApifyClient } from "apify-client"; const client = new ApifyClient({ token: process.env.APIFY_TOKEN }); const datasetClient = client.dataset('my-dataset-id');
// Creates pre-signed URL for items (expires in 7 days) const itemsUrl = await datasetClient.createItemsPublicUrl({ expiresInSecs: 7 * 24 * 3600 });
// Creates permanent pre-signed URL for items const permanentItemsUrl = await datasetClient.createItemsPublicUrl();
##### Key-value store list of keys
const storeClient = client.keyValueStore('my-store-id');
// Create pre-signed URL for list of keys (expires in 1 day) const keysPublicUrl = await storeClient.createKeysPublicUrl({ expiresInSecs: 24 * 3600 });
// Create permanent pre-signed URL for list of keys const permanentKeysPublicUrl = await storeClient.createKeysPublicUrl();
##### Key-value store record
// Get permanent URL for a single record const recordUrl = await storeClient.getRecordPublicUrl('report.pdf');
Permanent signed URL
If the `expiresInSecs` option is not specified, the generated link will be *permanent*.
#### Signing URLs manually
If you need finer control — for example, generating links without using Apify client — you can sign URLs manually using our reference implementation.
https://github.com/apify/apify-client-js/blob/5efd68a3bc78c0173a62775f79425fad78f0e6d1/src/resource_clients/dataset.ts#L179
Manual signing uses standard *HMAC (SHA-256)* with `urlSigningSecretKey` of the resource and can be easily integrated.
### Sharing storages by name
A convenient feature of storages is that you can name them. If you choose to do so there is an extra access level setting that applies to storages only, which is **Anyone with name or ID can read**. In that case anyone that knows the storage name is able to read it via API or view it using the storages Console URL.
Exposing public named datasets
This is very useful if you wish to expose a storage publicly with an easy to remember URL.
## Implications for public Actor developers
If you own a public Actor in the Apify Store, you need to make sure that your Actor will work even for users who have restricted access to their resources. Over time, you might see a growing number of users with *General resource access* set to *Restricted*.
In practice, this means that all API calls originating from the Actor need to have a valid API token. If you are using Apify SDK, this should be the default behavior. See the detailed guide below for more information.
Actor runs inherit user permissions
Keep in mind that when users run your public Actor, the Actor makes API calls under the user account, not your developer account. This means that it follows the *General resource access* configuration of the user account. The configuration of your developer account has no effect on the Actor users.
### Migration guide to support restricted general resource access
This section provides a practical guide and best practices to help you update your public Actors so they fully support *Restricted general resource access*.
***
#### Always authenticate API requests
All API requests from your Actor should be authenticated. When using the https://docs.apify.com/sdk/js/ or https://docs.apify.com/api/client/js/, this is done automatically.
If your Actor makes direct API calls, include the API token manually:
const response = await fetch(https://api.apify.com/v2/key-value-stores/${storeId}, {
headers: { Authorization: Bearer ${process.env.APIFY_TOKEN} },
});
#### Generate pre-signed URLs for external sharing
If your Actor outputs or shares links to storages (such as datasets or key-value store records), make sure to generate pre-signed URLs instead of hardcoding API URLs.
For example:
import { ApifyClient } from "apify-client";
// ❌ Avoid hardcoding raw API URLs
const recordUrl = https://api.apify.com/v2/key-value-stores/${storeId}/records/${recordKey};
// ✅ Use Apify Client methods instead const storeClient = client.keyValueStore(storeId); const recordUrl = await storeClient.getRecordPublicUrl(recordKey);
// Save pre-signed URL — accessible without authentication await Actor.pushData({ recordUrl });
To learn more about generating pre-signed URLs, refer to the section https://docs.apify.com/platform/collaboration/general-resource-access.md#pre-signed-urls.
Using Console URLs
Datasets and key-value stores also include a `consoleUrl` property. Console URLs provide stable links to the resource’s page in Apify Console. Unauthenticated users will be prompted to sign in, ensuring they have required permissions.
#### Test your Actor under restricted access
Before publishing or updating your Actor, it’s important to verify that it works correctly for users with *restricted general resource access*.
You can easily test this by switching your own account’s setting to *Restricted*, or by creating an organization under your account and enabling restricted access there. This approach ensures your tests accurately reflect how your public Actor will behave for end users.
Make sure links work as expected
Once you’ve enabled restricted access, run your Actor and confirm that all links generated in logs, datasets, key-value stores, and status messages remain accessible as expected. Make sure any shared URLs — especially those stored in results or notifications — work without requiring an API token.
---
# List of permissions
**Learn about the access rights you can grant to other users. See a list of all access options for Apify resources such as Actors, actActoror runs/tasks and storage.**
***
This document contains all the access options that can be granted to resources on the Apify platform.
## Actors
To learn about Apify Actors, check out the https://docs.apify.com/platform/actors.md.
### Actor
| Permission | Description |
| -------------------- | ---------------------------------------------------------- |
| Read | View Actor settings, source code and builds. |
| Write | Edit Actor settings and source code, and delete the Actor. |
| Run | Run any of an Actor's builds. |
| View runs | View a list of Actor runs and their details. |
| Manage access rights | Manage Actor access rights. |
### Actor task
| Permission | Description |
| -------------------- | ---------------------------------------------------------- |
| Read | View task configuration. |
| Write | Edit task configuration and settings, and delete the task. |
| View runs | View a list of Actor task runs and their details. |
| Manage access rights | Manage Actor task access rights. |
To learn about Actor tasks, see the https://docs.apify.com/platform/actors/running/tasks.md.
## Storage
For more information about Storage, see its https://docs.apify.com/platform/storage.md.
### Dataset
| Permission | Description |
| -------------------- | --------------------------------------------------------------- |
| Read | View dataset information and its data. |
| Write | Edit dataset settings, push data to it, and remove the dataset. |
| Manage access rights | Manage dataset access rights. |
To learn about dataset storage, see its https://docs.apify.com/platform/storage/dataset.md.
### Key-value-store
| Permission | Description |
| -------------------- | ------------------------------------------------------------------------------------------------- |
| Read | View key-value store details and records. |
| Write | Edit key-value store settings, add, update or remove its records, and delete the key-value store. |
| Manage access rights | Manage key-value store access rights. |
To learn about key-value stores, see the https://docs.apify.com/platform/storage/key-value-store.md.
### Request queue
| Permission | Description |
| -------------------- | ---------------------------------------------------------------------------------------------- |
| Read | View request queue details and records. |
| Write | Edit request queue settings, add, update, or remove its records, and delete the request queue. |
| Manage access rights | Manage request queue access rights. |
To learn about request queue storage, see the https://docs.apify.com/platform/storage/request-queue.md.
## Proxy
| Permission | Description |
| ---------- | ------------------------- |
| Proxy | Allow to use Apify Proxy. |
To learn about Apify Proxy, see its https://docs.apify.com/platform/proxy.md.
## User permissions
Permissions that can be granted to members of organizations. To learn about the organization account, see its https://docs.apify.com/platform/collaboration/organization-account.md.
| Permission | Description |
| ------------------- | --------------------------------------------------------------------- |
| Manage access keys | Manage account access keys, i.e. API token and proxy password. |
| Update subscription | Update the type of subscription, billing details and payment methods. |
| Update profile | Make changes in profile information. |
| Update email | Update the contact email for the account. |
| Reset password | Reset the account's password. |
| View invoices | See the account's invoices. |
| Manage organization | Change the organization's settings. |
---
# Organization account
**Create a specialized account for your organization to encourage collaboration and manage permissions. Convert an existing account, or create one from scratch.**
***
Organization accounts allow groups to collaborate on projects. It enables you to manage your team members' https://docs.apify.com/platform/collaboration/list-of-permissions.md and to centralize your billing without having to share the credentials of a single personal account.
You can https://docs.apify.com/platform/collaboration/organization-account/how-to-use.md between your personal and organization accounts in just two clicks: in https://console.apify.com, click the account button in the top-left corner, then select the organization.
You can set up an organization in two ways.
* . If you don't have integrations set up yet, or if they are easy to change, you can create a new organization, preserving your personal account.
* into an organization. If your Actors and https://docs.apify.com/platform/integrations.md are set up in a personal account, it is probably best to convert that account into an organization. This will preserve all your integrations but means you will have a new personal account created for you.
> Prefer video to reading? https://www.youtube.com/watch?v=BIL6HqtnvKk for organization accounts.
## Availability and pricing
The organization account is available on all our plans. https://apify.com/pricing for more information.
## Create a new organization
You can create a new organization by clicking the **Create new organization** button under the **Organizations** tab in your https://console.apify.com/account#/myorganizations. If you want the organization to have a separate email address (used for notifications), enter it here. Otherwise, leave the **email** field empty and the owner's email will be used for notifications.

**You can own up to 5 and be a member of as many organizations as you need.**
## Convert an existing account
> **When you convert an existing user account into an organization,**
>
> * **You will no longer be able to sign in to the converted user account.**
> * **An organization cannot be converted back to a personal account.**
> * **During conversion, a new account (with the same login credentials) will be created for you. You can then use that account to https://docs.apify.com/platform/collaboration/organization-account/setup.md the organization.**
Before converting your personal account into an organization, make sure it has a **username**.
An organization can't be a member of other organizations. If you want to convert your account to one, you'll first need to **leave all the organizations you are a part of**.
Then, under the **Organizations** https://console.apify.com/account#/myorganizations, click the **Convert this user account to an organization** button.

Next, set the organization's name and click **Convert**.
And that's it! Your personal account becomes the organization, and you will be logged out automatically. You can now log into your new personal account with the same credentials as you are currently logged in with. This applies to both **password** and **OAuth** methods.
For information on https://docs.apify.com/platform/collaboration/organization-account/setup.md, see the Setup page.
## Billing
Actor and task runs are billed to the account they are started from. **Always make sure you start your runs from the correct account** to avoid having an organization's runs billed to your personal account.
To find out about organization pricing, get in touch at mailto:support@apify.com?subject=Organization%20account%20pricing or https://apify.com/pricing.
---
# Using the organization account
**Learn to use and manage your organization account using the Apify Console or API. View the organizations you are in and manage your memberships.**
***
Once an account becomes an organization, you can no longer log into it. Instead, you can switch into the organization from one of its member accounts to manage account information, memberships, and Actor runs.
While you can't manage an organization account via https://docs.apify.com/api/v2.md, you can still manage its runs and resources via API like you would with any other account.
**https://www.youtube.com/watch?v=BIL6HqtnvKk on organization accounts.**
## In the Apify Console
You can switch into **Organization account** view using the account button in the top-left corner.

In the menu, the account you are currently using is displayed at the top, with all the accounts you can switch to displayed below. When you need to get back to your personal account, you can just switch right back to it—no need to log in and out.
The resources you can access and account details you can edit will depend on your https://docs.apify.com/platform/collaboration/list-of-permissions.md in the organization.
> When switching between accounts, beware which account you start an Actor run in. If you accidentally start an organization's Actor run in your personal account, the run will be billed to your account (and vice versa).
### Manage your organizations
You can view and manage the organizations you are a member of from the **Organizations** tab on your https://console.apify.com/account#/myorganization.
If you want to leave an organization you own, you must first transfer ownership to someone else.

### Transfer ownership
The organization, its Actors, and its integrations will keep running as they are. The original owner will either leave the organization or become a member with permissions defined by the new owner. Only the new owner will have complete access to the organization.
## Via API
While you cannot manage an organization account's settings and members via API, you can access its Actor and task runs, webhooks, schedules, and storages just as you would with any other account.
As a member of an organization, you are assigned an https://docs.apify.com/platform/integrations.md (under the **Integrations** tab) and proxy password (click the **Proxy** button in the left menu) for accessing the Apify platform via REST API.

The API tokens' functionality reflects your account's permissions in the organization, so if you only have the **read** and **run** permissions for Actors, you will only be able to view and run Actors via API. Only you can view your API token and password.
> Do not share your API token or password with untrusted parties.
If you have the **manage organization access keys** permission, you are able to view and use organization-wide API tokens. These are shared across the organization, so everyone with the **manage organization access keys** permission can use them for organization-wide integrations.
For a https://docs.apify.com/api/v2.md and help on using them, visit the API.
---
# Setup
**Configure your organization account by inviting new members and assigning their roles. Manage team members' access permissions to the organization's resources.**
***
After creating your organization, you can configure its settings. The **Account** tab allows you to:
* Set the organization's email address
* Change the username
* Configure security settings
* Delete the account.
The **Members** tab lets you to update your organization's members and set its owner.
In the **Account** tab's **Security** section, you can set security requirements for organization members. These include:
* Maximum session lifespan
* Two-factor authentication requirement
**https://www.youtube.com/watch?v=BIL6HqtnvKk on organization accounts.**
## Add users to your organization
You can add members to your organization in the **Members** tab. You can use their **User ID**, **username**, or **email**. When adding a member to the organization, you must assign them a **Role** so their permissions are known right away.

## Define roles and permissions
Roles allow you to define permissions to your organization's resources by group. Every new organization comes with three pre-defined roles, which you can customize or remove.
To edit the permissions for each role, click on the **Configure permissions** button in the top-right corner.

> Each member can only have one role to avoid conflicting permissions.
You can configure individual permissions for each resource type such as Actors, Actor tasks or storage. Bear in mind that if a user has the **read** permission for https://docs.apify.com/platform/storage.md, you cannot prevent them from accessing a particular storage (e.g. a certain https://docs.apify.com/platform/storage.md) - they will have access to all of the organization's storages.
**Some permissions have dependencies**. For example, if someone has the **Actor run** permission, it is likely they will also need the **storage write** permission, so they can store the results from their Actor runs.

https://docs.apify.com/platform/collaboration/list-of-permissions.md that can be granted to Apify resources.
---
# Apify Console
**Learn about Apify Console's easy account creation and user-friendly homepage for efficient web scraping management.**
***
## Sign-up
To use Apify Console, you first need to create an account. To create it please go to the https://console.apify.com/sign-up. At the moment we support 3 different methods of creating an account:

### Email and password
This is the most common way of creating an account. You just need to provide your email address and a password. The password needs to be at least 8 characters, should not be your email address, and should either contain special characters or be long enough to be secure. The password field has a strength indicator below it that will tell you if your password is strong enough.
After you click the **Sign up** button, we will send you a verification email. The email contains a link that you need to click on or copy to your browser to proceed to automated email verification. After we verify your email, you will proceed to Apify Console.
CAPTCHA
We are using Google reCaptcha to prevent spam accounts. Usually, you will not see it, but if Google evaluates your browser as suspicious, they will ask you to solve a reCaptcha before we create your account and send you the verification email.
If you did not receive the email, you can visit the https://console.apify.com/sign-in. There, you will either proceed to our verification page right away, or you can sign in and will be redirected afterward. On the verification page, you can click on the **Resend verification email** button to send the email again.

### Google or GitHub
If you do not want to create a new password for Apify Console, you can also use your Google or GitHub account to sign up. To do that, click the **Sign up with Google** or **Sign up with GitHub** buttons. You will proceed to the corresponding authentication page, where you must sign in and authorize Apify to access your account. Then, when you come back to Apify Console, we will create your account.
If you used Google to sign up, there is no verification step after this, and you can start using Apify Console right away. On the other hand, if you used GitHub to create your account and your GitHub account does not have a verified email, we will ask you to verify your email address before you can start using Apify Console. The process works the same as the process for email and password authentication.
If you already have an account in Apify Console connected to Google or GitHub, clicking on these buttons on the sign-up page will not create a new account but will directly sign you in.
## Sign-in
To sign in to your account, please go to the https://console.apify.com/sign-in. There, you can use any of the authentication methods you have set up for your account. If you have multiple authentication methods, you can choose which one you want to use by using the corresponding button or form.
If you sign in through email and password and have two-factor authentication enabled on your account, you will proceed to the two-factor authentication page after you enter your password. There, you will need to enter the code from your authenticator app to sign in. If you do not have two-factor authentication enabled, you will be directly redirected to Apify Console.

### Forgotten password
In case you forgot your password, you can click on the **Forgot your password?** link, which will redirect you to the https://console.apify.com/forgot-password. There, you will need to enter your email address and click on the **Reset password** button. We will then send an email to the address connected to your account with a link to the password reset page, which will allow you to change your password.

## Adding different authentication methods
After you create your account, you might still want to use the other authentication methods. To do that, go to the https://console.apify.com/settings/security section of your account settings. There, you will see all available authentication methods and their configuration.

## Resetting your password
This section also allows you to reset your password if you ever forget it. To do that, click the **Send email to reset password** button. We will then send an email to the address connected to your account with a link to the password reset page. After you click on the link (or copy it to your browser), you will proceed to a page where you can set up a new password.

## Homepage overview

The Apify Console homepage provides an overview of your account setup. The header displays your account name and current plan level. The homepage features several sections:
* **Recently Viewed**: This section displays Actors you have recently accessed. If you haven't used any Actors yet, you will see suggestions instead.
* **Suggested Actors for You**: Based on your and other users' recent activities, this section recommends Actors that might interest you.
* **Actor Runs**: This section is divided into two tabs:
* **Recent**: View your latest Actor runs.
* **Scheduled**: Check your upcoming scheduled runs and tasks.
Use the side menu to navigate other parts of Apify Console easily.
#### Keyboard shortcuts
You can also navigate Apify Console via keyboard shortcuts.
Keyboard Shortcuts
| Shortcut | Tab |
| -------------- | ------ |
| Show shortcuts | Shift? |
| Home | GH |
| Store | GO |
| Actors | GA |
| Development | GD |
| Saved tasks | GT |
| Runs | GR |
| Integrations | GI |
| Schedules | GU |
| Storage | GE |
| Proxy | GP |
| Settings | GS |
| Billing | GB |
| Tab name | Description |
| ----------------------------------------------------------------- | ---------------------------------------------------------------------------------------------------------------------------------------------------------------------------------------------- |
| https://docs.apify.com/platform/console/store.md | Search for Actors that suit your web-scraping needs. |
| https://docs.apify.com/platform/actors.md | View recent & bookmarked Actors. |
| https://docs.apify.com/platform/actors/running/runs-and-builds.md | View your recent runs. |
| https://docs.apify.com/platform/actors/running/tasks.md | View your saved tasks. |
| https://docs.apify.com/platform/schedules.md | Schedule Actor runs & tasks to run at specified time. |
| https://docs.apify.com/platform/integrations.md | View your integrations. |
| https://docs.apify.com/platform/actors/development.md | • My Actors - See Actors developed by you.• Insights - see analytics for your Actors.• Messaging - check on issues reported in your Actors or send emails to users of your Actors. |
| https://docs.apify.com/platform/proxy.md | View your proxy usage & credentials |
| https://docs.apify.com/platform/storage.md | View stored results of your runs in various data formats. |
| https://docs.apify.com/platform/console/billing.md | Billing information, statistics and invoices. |
| https://docs.apify.com/platform/console/settings.md | Settings of your account. |
---
# Billing
**The Billings page is the central place for all information regarding your invoices, billing information regarding usage in the current billing cycle, historical usage, subscriptions & limits.**
***
## Current period
The **Current period** tab is a comprehensive resource for understanding your platform usage during the ongoing billing cycle. It provides an overview of your total usage and indicates the start and end dates of the current billing period.
In addition to this, the tab features a **Plan Consumption** Graph. It shows how much of your free or paid plan has been utilized up to this point. The graph offers a broad perspective of your overall usage.
Apart from the platform usage breakdown graph, this tab provides more detailed information on the usage of different platform services. You can explore the sections under the graph. You can access detailed statistics related to **Actors**, **Data transfer**, **Proxy**, and **Storage**.

## Historical usage
The **Historical usage** tab provides a detailed view of your monthly platform usage, excluding any free Actor compute units or discounts from your subscription plan. You can navigate through the months by selecting from a dropdown list or using arrows to move one month backward or forward.
The tab features an adjustable bar chart. This chart can be customized to display statistics either on a monthly or daily basis. Additionally, you can view these statistics as absolute or cumulative numbers, providing flexibility in how you analyze your usage data.
Monthly usage data
Since billing cycles can shift, the data in the **Historical usage** tab is shown for calendar months.

Below the bar chart, there is a table titled **Usage by Actors**. This table presents a detailed breakdown of the Compute units used per Actor and the associated costs. It clearly explains how each Actor contributes to your overall platform usage and expenses.

## Subscription
The **Subscriptions** tab offers a central location to manage various aspects of your subscription plan. Here, you can access details about your current plan and explore options to upgrade to a different one.
Unused credits
Unused prepaid usage does not rollover, it expires at the end of the billing cycle.
This tab also allows you to manage your payment methods. Additionally, you can adjust your billing details to ensure they remain up-to-date. Another feature of this tab is the visibility of any special offers currently applied to your account.
Plan add-ons
*This option is available only if you are on a subscription plan*.
You can extend your subscription plans with add-ons, like extra proxies, Actor memory, and more. Navigate to https://console.apify.com/billing/subscription section in Apify Console, and click the **Buy add-ons** button to explore the available options.

## Pricing
The **Pricing** tab offers a way to quickly check all unit pricing for various platform services related to Apify usage for your account.

## Invoices
The **Invoices** tab is where you can find your current and previous invoices for Apify platform usage. This is your source of truth for any questions regarding previous charges and subscriptions.

## Limits
The **Limits** tab displays the usage limits for the Apify platform based on your current subscription plan. As you approach the defined limits, you will receive a notification about potential service suspension or overage charges. If your usage exceeds the specified limits, Apify platform services will be suspended to prevent incurring charges beyond your subscription plan.
You can adjust the platform usage limits and enable overage, allowing you to continue using the platform beyond your subscription plan on a *pay-as-you-go* basis. Any usage, beyond your plan will be charged as overage to your account.
Immediate overage invoicing
If your overage platform usage reaches *200$* before your next billing cycle, you will be invoiced for the overage charges immediately. Otherwise, the overage charges will be added to your next subscription invoice.

---
# Account settings
**Learn how to manage your Apify account, configure integrations, create and manage organizations, and set notification preferences in the Settings tab.**
***
## Account
By clicking the **Settings** tab on the side menu, you will be presented with an Account page where you can view & edit various settings regarding your account, such as:
* account email
* username
* profile information
* theme
* login information
* session information
* account delete
Verify your identity
The **Login & Privacy** tab (**Security & Privacy** for organization accounts) contains sensitive settings. As a security measure, fresh user session is required. If it has been too long since you logged in, you need to sign-in again to be able to view and edit the settings.
### Session Information
In the **Session Information** section, you can adjust the session configuration. You can modify the default session lifespan of 90 days, this customization helps ensure compliance with organization security policies.
## Integrations
The **Integrations** tab provides essential tools for enhancing your interaction with our platform. Here, you can access your **Personal API Tokens**, which are necessary for using our https://docs.apify.com/api/v2. This page also facilitates the integration of your Slack workspace and lists your **Actor Integration Accounts**. This section represents any third-party integrations added by you or your team. For detailed guidance on utilizing these integrations, refer to our https://docs.apify.com/platform/integrations.
## Organization
The **Organizations** tab is where you can view your accounts' current organizations, create new organizations, or convert your user account into an organization account. For more information on how to set up an organization check out this https://help.apify.com/en/articles/8698948-how-to-set-up-an-organization-account.
## Notifications
The **Notifications** tab allows you to customize your notification preferences. Here, you can specify the types of updates you wish to receive and select the methods by which you receive them.
---
# Apify Store
**Explore Apify Store, browse and select Actors, search by criteria, sort by relevance, and adjust settings for immediate or future runs.**
***

Apify Store is a place where you can explore a variety of Actors, both created and maintained by Apify or our community members. Use the search box at the top of the page to find Actors by service names, such as TikTok, Google, Facebook, or by their authors. Alternatively, you can explore Actors grouped under predefined categories below the search box. You can also organize the results from the store by different criteria, including:
* Category
* Pricing model
* Developers
* Relevance
Once you select an Actor from the store, you'll be directed to its specific page. Here, you can configure the settings for your future Actor run, save these configurations for later use, or run the Actor immediately.
For more information on Actors in Apify Store, visit our https://docs.apify.com/platform/actors/running/actors-in-store.md.
---
# Two-factor authentication setup
**Learn about Apify Console's account two-factor authentication process and how to set it up.**
***
If you use your email and password to sign in to Apify Console, you can enable two-factor authentication for your account. This will add an extra layer of security to your account and prevent anyone who gains access to your password from signing in to your account.
Some organizations might require two-factor authentication (2FA) to access their resources. Members of such an organization, must enable 2FA on their account in order to continue accessing shared resources and maintain compliance with their security policies.
## Setting up two-factor authentication
To set up two-factor authentication, go to the https://console.apify.com/settings/security section of your account settings. There, look for the **Two-factor authentication** section. Currently, there is only one option, which is the **Authenticator app**. If you have two-factor authentication already enabled, there will be a label **enabled** next to it.

If it's not enabled, click on the **Enable** button. You should see the two-factor setup view.
### Authenticator app setup

In this view, you can use your favorite authenticator app to scan the QR code. We recommend using Google Authenticator (https://play.google.com/store/apps/details?id=com.google.android.apps.authenticator2&hl=en_US/https://apps.apple.com/us/app/google-authenticator/id388497605) or https://authy.com/(https://play.google.com/store/apps/details?id=com.authy.authy/https://apps.apple.com/us/app/twilio-authy/id494168017 but any other authenticator app should work as well.
You can also set up your app/browser extension manually without the QR code. To do that, click on the **Setup key** link below the QR code. This view with the key will pop up:

A new pop-up window will appear where you can copy the two-factor `secret` key, which you can use in your authenticator app to set up the account. You can also use this key to set up your authenticator app on multiple devices.
After you scan the QR code or set up your app manually, the app will generate a code that you need to enter into the **Verify the code from the app** field. After you enter the code, click on the **Continue** button to get to the next step of the setup process.
### Recovery settings

In this step, you will see 16 recovery codes. If you ever lose access to your authenticated app, you will be able to use these codes to access the Apify Console. We recommend saving these codes in a safe place; ideally, you should store them in a secure password manager or print them out and keep them separate from your device.
Under the recovery codes, you will find two fields for your recovery information. These two fields are what the support team will ask you to provide in case you lose access to your authenticator app and also to your recovery codes. We will never use the phone number for anything other than to verify your identity and help you regain access to your account, only as a last resort. Ideally, the personal information you provide will be enough to verify your identity. Always provide both the kind of personal information you provide and the actual information.
Personal information
What kind of personal information you provide is completely up to you. It does not even have to be personal, as long as it's secure and easy to remember. For example, it can be the name of your pet, the name of your favorite book, some secret code, or anything else. Keep in mind who has access to that information. While you can use the name of your pet, if you share information about your pet on public social media, it's not a good choice because anyone on the internet can access it. The same goes for any other information you provide.
You will not be able to enable the two-factor authentication until you click on the **Download** / **Copy** buttons or copy the codes manually. After you do that, the **Continue** button will light up, and you can click on it to enable the two-factor authentication. The authentication process will then enable the two-factor authentication for your account and show a confirmation.
### Confirmation
When you close the setup process, you should see that your two-factor authentication is enabled in the account settings.

## Verification after sign-in
After you enable two-factor authentication, the next time you attempt to sign in, you'll need to enter a code before you can get into the Apify Console. To do that, open your authenticator app and enter the code for your Apify account into the **Code** field. After you enter the code, click on the **Verify** button, and if the provided code is correct, you will proceed to Apify Console.

## Using recovery codes
In case you lose access to your authenticator app, you can use the recovery codes to sign in to your account. To do that, click on the **recovery code or begin 2FA account recovery** link below the **Verify** button. This will redirect you to a view similar to the current one, but instead of code from the authenticator app, you will need to enter one of the 16 recovery codes you received during the setup process.
If the provided recovery code is correct, you will proceed to Apify Console, the same as if you provided the code from the authenticator app. After gaining access to Apify Console, we recommend going to the https://console.apify.com/settings/security section of your account settings, disabling the two-factor authentication there, and then enabling it again with the new authenticator app.
Removal of recovery codes
When you successfully use a recovery code, we remove the code from the original list as it's no longer possible to use it again. If you use all of your recovery codes, you will not be able to sign in to your account with them anymore, and you will need to either use your authenticator app or contact our support to help you regain access to your account.

## Disabling two-factor authentication
If you no longer want to use the two-factor authentication or lose access to your authenticator app, you can disable the two-factor authentication in the https://console.apify.com/settings/security section of your. See the **Two-factor authentication** section and click on the **Disable** button. We will ask you to enter either your verification code from the authenticator app or, if you do not have access to it anymore, you can use one of your recovery codes. After entering the code, click on the **Remove app** button to verify the provided code. If it's valid, it will disable the two-factor authentication and remove the configuration from your account.
After you disable the two-factor authentication you will be able to sign in to your account without providing the verification code.

## What to do when you get locked out
If you lose access to your authenticator app and do not have any recovery codes left, or you lost them as well, you will not be able to sign in to your account. In this case, you will need to contact our support. To do that, you can either send us an email to mailto:support@apify.com?subject='Locked%20out%20of%20account%20with%202FA%20enabled' or you can go to the https://console.apify.com/sign-in and sign in with your email and password. Then, on the two-factor authentication page, click on the **recovery code or begin 2FA account recovery** link. On the two-factor recovery page, click on the **Contact our support** link. This link will open up our online chat, and our support team can help you from there.
For our support team to help you recover your account, you will need to provide them with the personal information you have configured during the two-factor authentication setup. If you provide the correct information, the support team will help you regain access to your account.
caution
The support team will not give you any clues about the information you provided; they will only verify if it is correct.
You can always check what information you provided by going to the https://console.apify.com/settings/security section of your account settings, to the **Two-factor authentication** section, and clicking on the **Recovery settings** button, then you should see a view like this:

After you enter a verification code from your authenticator app, you will see the recovery settings you provided during the two-factor authentication setup.

---
# Integrations
**Learn how to integrate the Apify platform with other services, your systems, data pipelines, and other web automation workflows.**
***
> The whole is greater than the sum of its parts.
>
> 👴 *Aristotle*
Integrations allow you to combine separate applications and take advantage of their combined capabilities. Automation of these online processes increases your productivity. That's why we made Apify in a way that allows you to connect it with practically any cloud service or web app and make it part of your larger projects.
If you are building a service and your users could benefit from integrating with Apify or wise-versa then ready the https://docs.apify.com/platform/integrations/integrate.md.
## Built-in integrations
Apify‘s RESTful API allows you to interact with the platform programmatically. HTTP webhooks notify you and your services when important events happen. By using the API, you can start Actors, retrieve their results, or basically do anything you can do on a platform UI
#### https://docs.apify.com/platform/integrations/api.md
https://docs.apify.com/platform/integrations/api.md
#### https://docs.apify.com/platform/integrations/actors.md
https://docs.apify.com/platform/integrations/actors.md
#### https://docs.apify.com/platform/integrations/webhooks.md
https://docs.apify.com/platform/integrations/webhooks.md
Apify offers easy-to-set-up solutions for common scenarios, like uploading your datasets to Google Drive when the run succeeds or creating an issue on GitHub when it fails.
https://docs.apify.com/platform/integrations/slack.md
#### https://docs.apify.com/platform/integrations/slack.md
https://docs.apify.com/platform/integrations/drive.md
#### https://docs.apify.com/platform/integrations/drive.md
https://docs.apify.com/platform/integrations/gmail.md
#### https://docs.apify.com/platform/integrations/gmail.md
https://docs.apify.com/platform/integrations/github.md
#### https://docs.apify.com/platform/integrations/github.md
https://docs.apify.com/platform/integrations/airtable.md
#### https://docs.apify.com/platform/integrations/airtable.md
## Integration platforms
If you use one of the main integration platforms, Apify's support is here for you. The main advantage of these platforms is that you can integrate Apify into very complex workflows with the choice of thousands of supported services.
https://docs.apify.com/platform/integrations/make.md
#### https://docs.apify.com/platform/integrations/make.md
https://docs.apify.com/platform/integrations/gumloop.md
#### https://docs.apify.com/platform/integrations/gumloop.md
https://docs.apify.com/platform/integrations/zapier.md
#### https://docs.apify.com/platform/integrations/zapier.md
https://docs.apify.com/platform/integrations/telegram.md
#### https://docs.apify.com/platform/integrations/telegram.md
https://docs.apify.com/platform/integrations/n8n.md
#### https://docs.apify.com/platform/integrations/n8n.md
https://docs.apify.com/platform/integrations/ifttt.md
#### https://docs.apify.com/platform/integrations/ifttt.md
## Data pipelines, ETLs, and AI/LLM tools
The Apify platform integrates with popular ETL and data pipeline services, enabling you to integrate Apify Actors directly into your data integration processes.
https://docs.apify.com/platform/integrations/keboola.md
#### https://docs.apify.com/platform/integrations/keboola.md
https://docs.airbyte.com/integrations/sources/apify-dataset
#### https://docs.airbyte.com/integrations/sources/apify-dataset
If you are working on AI/LLM-related applications, we recommend looking into the many integrations with popular AI/LLM ecosystems. These integrations allow you to use Apify Actors as tools and data sources.
https://docs.apify.com/platform/integrations/crewai.md
#### https://docs.apify.com/platform/integrations/crewai.md
https://docs.apify.com/platform/integrations/langgraph.md
#### https://docs.apify.com/platform/integrations/langgraph.md
https://docs.apify.com/platform/integrations/mastra.md
#### https://docs.apify.com/platform/integrations/mastra.md
https://docs.apify.com/platform/integrations/lindy.md
#### https://docs.apify.com/platform/integrations/lindy.md
https://docs.apify.com/platform/integrations/langflow.md
#### https://docs.apify.com/platform/integrations/langflow.md
https://docs.apify.com/platform/integrations/flowise.md
#### https://docs.apify.com/platform/integrations/flowise.md
https://docs.apify.com/platform/integrations/langchain.md
#### https://docs.apify.com/platform/integrations/langchain.md
https://docs.apify.com/platform/integrations/llama-index.md
#### https://docs.apify.com/platform/integrations/llama-index.md
https://docs.apify.com/platform/integrations/haystack.md
#### https://docs.apify.com/platform/integrations/haystack.md
https://docs.apify.com/platform/integrations/pinecone.md
#### https://docs.apify.com/platform/integrations/pinecone.md
https://docs.apify.com/platform/integrations/qdrant.md
#### https://docs.apify.com/platform/integrations/qdrant.md
https://docs.apify.com/platform/integrations/milvus.md
#### https://docs.apify.com/platform/integrations/milvus.md
https://docs.apify.com/platform/integrations/mcp.md
#### https://docs.apify.com/platform/integrations/mcp.md
https://docs.apify.com/platform/integrations/aws_bedrock.md
#### https://docs.apify.com/platform/integrations/aws_bedrock.md
https://docs.apify.com/platform/integrations/openai-assistants.md
#### https://docs.apify.com/platform/integrations/openai-assistants.md
## Other Actors
Explore https://apify.com/store for Actors that may help you with integrations, for example, https://apify.com/drobnikj/mongodb-import or https://apify.com/petr_cermak/mysql-insert.

---
# What are Actor integrations?
**Learn how to integrate with other Actors and tasks.**
***
Integration Actors
You can check out a catalogue of our Integration Actors within https://apify.com/store/categories/integrations.
Actor integrations provide a way to connect your Actors with other Actors or tasks easily. They provide a new level of flexibility, as adding a new integration simply means creating https://docs.apify.com/platform/integrations/actors/integration-ready-actors.md. Thus, new integrations can be created by the community itself.
https://www.youtube-nocookie.com/embed/zExnYbvFoBM
## How to integrate an Actor with other Actors?
To integrate one Actor with another:
1. Navigate to the **Integrations** tab in the Actor's detail page.
2. Select `Apify (Connect Actor or Task)`. 
3. Find the Actor or task you want to integrate with and click `Connect`.
This leads you to a setup screen, where you can provide:
* **Triggers**: Events that will trigger the integrated Actor. These are the same as webhook https://docs.apify.com/platform/integrations/webhooks/events.md (*run succeeded*, *build failed*, etc.)

* **Input for the integrated Actor**: Typically, the input has two parts. The information that is independent of the run triggering it and information that is specific for that run. The "independent" information (e.g. connection string to database or table name) can be added to the input as is. The information specific to the run (e.g. dataset ID) is either obtained from the implicit `payload` field (this is the case for most Actors that are integration-ready), or they can be provided using variables.
* **Available variables** are the same ones as in webhooks. The one that you probably are going to need the most is `{{resource}}`, which is the Run object in the same shape you get from the https://docs.apify.com/api/v2/actor-run-get.md (for build event types, it will be the Build object). The variables can make use of dot notation, so you will most likely just need `{{resource.defaultDatasetId}}` or `{{resource.defaultKeyValueStoreId}}`.
## Testing your integration
When adding a new integration, you can test it using a past run or build as a trigger. This will trigger a run of your target Actor or task as if your desired trigger event just occurred. The only difference between a test run and regular run is that the trigger's event type will be set to 'TEST'. The test run will still consume compute units.
To test your integration, first set your desired input and options and save. You can then select one of the options from the menu. If the source of your integration is a task, you can test it using a past run. For Actors, you can use a past run or build. Alternatively, if the source of your integration has neither, you can test your integration with a random joke in the webhook's payload.

When testing with a custom run or build, you will need to enter its ID. You can find it on the run's or build's detail page. Ensure that the run or build belongs to the **source** Actor, since that is where the trigger will be coming from.
## Implementation details
Under the hood, the Actor integrations use regular https://www.redhat.com/en/topics/automation/what-is-a-webhook and target the Apify API, for which this feature provides a friendlier UI. The UI allows you to fill the payload template using the Actor input UI rather than plain text and constructs the URL to start your Actor with the given options.
The UI ensures that the variables are enclosed in strings, meaning that even the payload template is a valid JSON, not just the resulting interpolation. It also automatically adds the `payload` field that contains the default webhook payload. Thanks to this, when using Actors that are meant to be used as integrations, users don't have to fill in the variables: the Actor takes the data from this field by itself.
## Blog tutorial
You can read a complete example of integrating two Actors in https://blog.apify.com/connecting-scrapers-apify-integration/.
---
# Integrating Actors via API
**Learn how to integrate with other Actors and tasks using the Apify API.**
***
You can integrate Actors via API using the https://docs.apify.com/api/v2/webhooks-post.md endpoint. It's the same as any other webhook, but to make sure you see it in Apify Console, you need to make sure of a few things.
* The `requestUrl` field needs to point to the **Run Actor** or **Run task** endpoints and needs to use their IDs as identifiers (i.e. not their technical names).
* The `payloadTemplate` field should be valid JSON - i.e. it should only use variables enclosed in strings. You will also need to make sure that it contains a `payload` field.
* The `shouldInterpolateStrings` field needs to be set to `true`, otherwise the variables won't work.
* Add `isApifyIntegration` field with the value `true`. This is a helper that turns on the Actor integration UI, if the above conditions are met.
Not meeting the conditions does not mean that the webhook won't work; it will just be displayed as a regular HTTP webhook in Apify Console.
The webhook should look something like this:
{ "requestUrl": "https://api.apify.com/v2/acts//runs", "eventTypes": ["ACTOR.RUN.SUCCEEDED"], "condition": { "actorId": "", }, "shouldInterpolateStrings": true, "isApifyIntegration": true, "payloadTemplate": "{"field":"value","payload":{"resource":"{{resource}}"}}", }
It's usually enough to just include the `resource` field in the payload template, but some Actors might also need other fields. Keep in mind that the `payloadTemplate` is a string, not an object.
---
# Creating integration Actors
**Learn how to create Actors that are ready to be integrated with other Actors and tasks.**
***
Any Actor can be used in integrations. In order to provide a smooth experience for its users, there are few things to keep in mind.
## General guidelines
If your Actor is supposed to be used as an integration, it will most likely have an input that can be described as two groups of fields. The first group is the "static" part of the input - the fields that have the same value whenever the integration is triggered. The second, "dynamic", group are fields that are specific to the triggering event - information from the run or build that triggered the integration.
The Actor should ideally try to hide its complexity from users and take all the "dynamic" fields from the implicit `payload` field - it is attached automatically. This way, users don't have to take care of passing in variables on their own and only need to take care of the static part of the input.
An important thing to remember is that only the **dataset ID** is passed to the Actor as input, not the **dataset contents**. This means that the Actor needs to take care of getting the actual contents of the dataset. And, ideally, it should not load the full dataset while doing so, as it might be too large to fit to memory, but rather process it in batches.
## Example
To illustrate the above, here is a simplified example of an Actor that uploads a dataset to a table/collection in some database.
We would start with an input that looks something like this:
* `datasetId: string` - Id of dataset that should be uploaded
* `connectionString: string` - Credentials for the database connection
* `tableName: string` - Name of table / collection
With this input schema, users have to provide an input that looks like this:
{ "datasetId": "{{resource.defaultDatasetId}}", "connectionString": "****", "tableName": "results" }
And in the Actor code, we'd use this to get the values:
const { datasetId, connectionString, tableName } = await Actor.getInput();
To make the integration process smoother, it's possible to define an input that's going to be prefilled when your Actor is being used as an integration. You can do that in the Actor's **Settings** tab, on the **Integrations** form. In our example, we'd use:
{ "datasetId": "{{resource.defaultDatasetId}}" }
This means that users will see that the `defaultDatasetId` of the triggering run is going to be used right away.
Explicitly stating what is the expected input when Actor is being used as an integration is a preferred way.
However, if the Actor is **only** supposed to be used as integration, we can use a different input schema:
* `connectionString: string` - Credentials for the database connection
* `tableName: string` - Name of table / collection
In this case, users only need to provide the "static" part of the input:
{ "connectionString": "****", "tableName": "results" }
In the Actor's code, the `datasetId` (the dynamic part) would be obtained from the `payload` field:
const { payload, connectionString, tableName } = await Actor.getInput(); const datasetId = payload.resource.defaultDatasetId;
It's also possible to combine both approaches, which is useful for development purposes or advanced usage. It would mean keeping the `datasetId` in the input, only hidden under an "Advanced options" section, and using it like this:
const { payload, datasetId } = await Actor.getInput(); const datasetIdToProcess = datasetId || payload?.resource?.defaultDatasetId;
In the above example, we're focusing on accessing a run's default dataset, but the approach would be similar for any other field.
## Making your Actor available to other users
To allow other users to use your Actor as an integration, all you need to do is https://docs.apify.com/platform/actors/publishing.md, so users can then integrate it using the **Connect Actor or task** button on the **Integrations** tab of any Actor. While publishing the Actor is enough, there are two ways to make it more visible to users.
For Actors that are generic enough to be used with most other Actors, it's possible to have them listed under **Generic integrations** in the **Integrations** tab. This includes (but is not limited to) Actors that upload datasets to databases, send notifications through various messaging systems, create issues in ticketing systems, etc. To have your Actor listed under our generic integrations, mailto:support@apify.com?subject=Actor%20generic%20integration.
Some Actors can only be integrated with a few or even just one other Actor. Let's say that you have an Actor that's capable of scraping profiles from a social network. It makes sense to show it for Actors that produce usernames from the social network but not for Actors that produce lists of products. In this case, it's possible to have the Actor listed as **Specific to this Actor** under the Actor's **Integrations** tab. To have your Actor listed as specific to another Actor, mailto:support@apify.com?subject=Actor%specific%20integration.

---
# Agno Integration
**Integrate Apify with Agno to power AI agents with web scraping, automation, and data insights.**
***
## What is Agno?
https://docs.agno.com/ is an open-source framework for building intelligent AI agents. It provides a flexible architecture to create agents with custom tools, enabling seamless integration with external services like Apify for tasks such as web scraping, data extraction and automation.
Agno documentation
Check out the https://docs.agno.com/introduction for more details on building AI agents.
## How to use Apify with Agno
This guide shows how to integrate Apify Actors with Agno to empower your AI agents with real-time web data. We'll use the https://apify.com/apify/rag-web-browser Actor to fetch web content and the https://apify.com/compass/crawler-google-places Actor to extract location-based data. It is very easy to use with any other Actor by just passing the name of the Actor. See and choose from thousands of Actors in the https://apify.com/store.
### Prerequisites
* *Apify API token*: Obtain your API token from the https://console.apify.com/account/integrations.
* *OpenAI API key*: Get your API key from the https://platform.openai.com/account/api-keys.
Alternative LLM providers
While our examples use OpenAI, Agno supports other LLM providers as well. You'll need to adjust the environment variables and configuration according to your chosen provider. Check out the https://docs.agno.com/models/introduction for details on supported providers and configuration.
* *Python environment*: Ensure Python is installed (version 3.8+ recommended).
* *Required packages*: Install the following dependencies in your terminal:
pip install agno apify-client
## Basic integration example
Start by setting up an Agno agent with Apify tools. This example uses the RAG Web Browser Actor to extract content from a specific URL.
import os
from agno.agent import Agent from agno.tools.apify import ApifyTools
os.environ["APIFY_API_TOKEN"] = "YOUR_APIFY_API_TOKEN" # Replace with your Apify API token os.environ["OPENAI_API_KEY"] = "YOUR_OPENAI_API_KEY" # Replace with your OpenAI API key
Initialize the agent with Apify tools
agent = Agent( tools=[ApifyTools( actors=["apify/rag-web-browser"])], show_tool_calls=True, markdown=True )
Fetch and display web content
agent.print_response("Extract key details from https://docs.agno.com/introduction", markdown=True)
Running this code will scrape the specified URL and return formatted content your agent can use.
### Advanced scenario: Travel planning agent
Combine multiple Apify Actors to create a powerful travel planning agent. This example uses the RAG Web Browser and Google Places Crawler to gather travel insights and local business data.
import os
from agno.agent import Agent from agno.tools.apify import ApifyTools
os.environ["APIFY_API_TOKEN"] = "YOUR_APIFY_API_TOKEN" # Replace with your Apify API token os.environ["OPENAI_API_KEY"] = "YOUR_OPENAI_API_KEY" # Replace with your OpenAI API key
Create a travel planning agent
agent = Agent( name="Travel Planner", instructions=[ "You are a travel planning assistant. Use web data and location insights to provide detailed travel recommendations." ], tools=[ ApifyTools( actors=[ "apify/rag-web-browser", # For general web research "compass/crawler-google-places" # For location-based data ] ) ], show_tool_calls=True, markdown=True )
Plan a trip to Tokyo
agent.print_response( """ I'm traveling to Tokyo next month. 1. Research the best time to visit and top attractions. 2. Find a highly rated sushi restaurant near Shinjuku. Compile a travel guide with this information. """, markdown=True )
This agent will fetch travel-related data and restaurant recommendations, providing a comprehensive travel guide:
1. Use the RAG Web Browser to research Tokyo travel details.
2. Use the Google Places Crawler to find a top sushi restaurant.
3. Combine the results into a comprehensive guide.
Apify Store
Browse the https://apify.com/store to find additional Actors for tasks like social media scraping, e-commerce data extraction, or news aggregation.
### Available Apify tools
Agno supports any Apify Actor via the ApifyTools class. You can specify a single Actor ID or a list of Actor IDs to register multiple tools for your agent at once.
## Configuration options
`apify_api_token` (string, default: `None`) : Apify API token (or set via APIFY\_API\_TOKEN environment variable)
`actors` (string or List\[string], default: `None`) : Single Actor ID or list of Actor IDs to register
## Resources
* https://blog.apify.com/how-to-build-an-ai-agent/
* https://docs.agno.com
* https://docs.apify.com
* https://docs.apify.com/actors
* https://apify.com/store
* https://docs.agno.com/tools/toolkits/others/apify#apify
---
# Airbyte integration
**Learn how to integrate your Apify datasets with Airbyte.**
***
Airbyte is an open-source data integration platform that allows you to move your data between different sources and destinations using pre-built connectors, which are maintained either by Airbyte itself or by its community. One of these connectors is the Apify Dataset connector, which makes it simple to move data from Apify datasets to any supported destination.
To use Airbyte's Apify connector you need to:
* Have an Apify account.
* Have an Airbyte account.
## Set up Apify connector in Airbyte
Once you have all the necessary accounts set up, you need to set up the Apify connector. To do so, you will need to navigate to **Sources** tab in Airbyte and select **Apify Dataset**

You will need to provide a **dataset ID** and your Apify API Token. You can find both of these in https://console.apify.com.

To find your **dataset ID**, you need to navigate to the **Storage** tab in Apify Console. Copy it and paste it in Airbyte.

To find your Apify API token, you need to navigate to the **Settings** tab and select **Integrations**. Copy it and paste it in the relevant field in Airbyte.

And that's it! You now have Apify datasets set up as a Source, and you can use Airbyte to transfer your datasets to one of the available destinations.
To learn more about how to setup a Connection, visit https://docs.airbyte.com/using-airbyte/getting-started/set-up-a-connection
---
# Airtable integration
**Learn how to integrate your Apify Actors with Airtable. This article shows you how to automatically upload results to your Airtable when an Actor run succeeds.**
***
https://www.airtable.com/ is a cloud-based platform for organizing, managing, and collaborating on data. With Apify integration for Airtable, you can automatically upload Actor run results to Airtable after a successful run.
This integration uses OAuth 2.0, a secure authorization protocol, to connect your Airtable account to Apify and manage data transfers.
## Connect Apify with Airtable
To use the Apify integration for Airtable, ensure you have:
* An https://console.apify.com/
* An https://www.airtable.com/
### Set up connection within Apify Console
1. In Apify Console, go to the https://console.apify.com/settings/integrations in the **Settings** section.
2. Under **Account-level integrations**, click **Add account**.

3. Select **Airtable** from the list of available services.

4. Follow the OAuth 2.0 authorization flow to securely connect your Airtable account.
5. Grant Apify access to the workspaces and bases you want to use.
### Set up Airtable integration
1. https://console.apify.com/actors to integrate with Airtable.
2. Go to the **Integrations** tab and click **Upload data to Airtable**.

3. Select the upload mode:
* **CREATE**: New table is created for each run of this integration.
* **APPEND**: New records are added to the specified table. If the table does not yet exist, new one is created.
* **OVERWRITE**: All records in the specified table are replaced with new data. If the table does not yet exist, new one is created.
4. Select a connected Airtable account and choose the base where the Actor run results will be uploaded.
5. Enter a table name or select an existing one.
To ensure uniqueness when using CREATE mode, use dynamic variables. If a table with the same name already exists in CREATE mode, a random token will be appended.

6. Save the integration. Once your Actor runs, you'll see its results uploaded to Airtable.

---
# API integration
**Learn how to integrate with Apify using the REST API.**
***
All aspects of the Apify platform can be controlled via a REST API, which is described in detail in the https://docs.apify.com/api/v2.md. If you want to use the Apify API from JavaScript/Node.js or Python, we strongly recommend to use one of our API clients:
* https://docs.apify.com/api/client/js `npm` package for JavaScript, supporting both browser and server
* https://docs.apify.com/api/client/python PyPI package for Python.
You are not required to those packages—the REST API works with any HTTP client—but the official API clients implement best practices such as exponential backoff and rate limiting.
## API token
To access the Apify API in your integrations, you need to authenticate using your secret API token. You can find it on the https://console.apify.com/settings/integrations page in Apify Console. Give your token a reasonable description, and never use one token for several services, much like you shouldn't use the same password for different accounts.

caution
Do not share the API token with untrusted parties, or use it directly from client-side code, unless you fully understand the consequences! You can also consider of the token, so that it can only access what it really needs.
## Authentication
You can authenticate the Apify API in two ways. You can either pass the token via the `Authorization` HTTP header or the URL `token` query parameter. We always recommend you use the authentication via the HTTP header as this method is more secure.
Note that some API endpoints, such as https://docs.apify.com/api/v2/key-value-store-keys-get.md, do not require an authentication token because they contain a hard-to-guess identifier that effectively serves as an authentication key.
## Expiration
API tokens include security features to protect your account and data. You can set an expiration date for your API tokens, ensuring they become invalid after a specified period. This is particularly useful for temporary access or when working with third-party services.

## Rotation
If you suspect that a token has been compromised or accidentally exposed, you can rotate it through the Apify Console. When rotating a token, you have the option to keep the old token active for 24 hours, allowing you to update your applications with the new token before the old one becomes invalid. After the rotation period, the token will be regenerated, and any applications connected to the old token will need to be updated with the new token to continue functioning.

For better security awareness, the UI marks tokens identified as compromised, making it easy to identify and take action on them.

## Organization accounts
When working under an organization account, you will see two types of API tokens on the Integrations page.

The Personal API tokens are different from your own Personal API tokens mentioned above. If you use this token in an integration, it will have the same permissions that you have within the organization, and all the operations you use it for will be ascribed to you.
On the other hand the Organization API tokens (only visible if you are the owner or have Manage access tokens permission) have full permissions and are not tied to a specific member of the organization.
## API tokens with limited permissions
By default, tokens can access all data in your account. If that is not desirable, you can choose to limit the permissions of your token, so that it can only access data needed for the particular use case. We call these tokens **scoped**.
**A scoped token can access only those resources that you'll explicitly allow it to.**
info
We do not allow scoped tokens to create or modify Actors. If you do need to create or modify Actors through Apify API, use an unscoped token.
### How to create a scoped token
Scoped tokens behave like standard API tokens and are managed through the https://console.apify.com/settings/integrations page in Apify Console. When creating a token (or updating an existing one), simply toggle "Limit token permissions" to make the token scoped.
Once the token is scoped, you can specify the token's permissions.

### Account-level vs resource-specific permissions
We support two different types of permissions for tokens:
* **Account-level permissions**: These will apply to all resources in the entire account. For example, you can use these to allow the token to run *all* your Actors.
* **Resource-specific permissions**: These will apply only to specific, existing resources. For example, you can use these to allow the token to read from a particular dataset.
tip
A single token can combine both types. You can create a token that can *read* any data storage, but *write* only to one specific key-value store.

### Allowing tokens to create resources
If you need to create new resources with the token (for example, create a new task, or storage), you need to explicitly allow that as well.
Once you create a new resource with the token, *the token will gain full access to that resource*, regardless of other permissions. It is not possible to create a token that can create a dataset, but not write to it.
tip
This is useful if you want to for example create a token that can dynamically create & populate datasets, but without the need to access other datasets in your account.
### Permission dependencies
Some permissions require other permissions to be granted alongside them. These are called *permission dependencies*.
#### Automatic dependencies
The form enforces certain dependencies automatically. For example, when you grant the **Write** permission for a dataset, the **Read** permission is automatically selected. This ensures that when you can write to a dataset you can also read from it.

#### Manual dependencies
Other dependencies are more complicated, so it is up to you to ensure that the token is configured correctly.
Specifically:
* To create or update a Schedule, the token needs access not only to the Schedule itself, but also to the Actor (the **Run** permission) or task (the **Read** permission) that is being scheduled.
* Similarly, to create, update or run a task, the token needs the **Run** permission on the task's Actor itself.
tip
Let's say that you have an Actor and you want to programmatically create schedules for that Actor. Then you can create a token that has the account level **Create** permission on schedules, but only the resource-specific **Run** permission on the Actor. Such a token has exactly the permissions it needs, and nothing more.
### Actor execution
When you run an Actor, Apify creates a new, short-lived run API token, and injects it into the Actor environment. This applies to scoped tokens as well, so when you run an Actor with a scoped token, **the Actor is executed with a different token with a different scope.**
In the scoped token configuration you can choose what scope the run API token gets, effectively determining what the Actor can access during its run.
Apify currently supports two modes:
* **Full access**: Allow Actors to access all your account's data.
* **Restricted access**: Restrict what Actors can access using the scope of this Actor.

#### Full access: Allow Actors to access all your account's data
When you run an Actor with a scoped token in this mode, Apify will inject an *unscoped* token to the Actor runtime.
This way you can be sure that once you give a token the permission to run an Actor, it will just work, and you don't have to worry about the exact permissions the Actor might need. However, this also means that you need to trust the Actor.
tip
Use this mode if you want to integrate with a 3rd-party service to run your Actors. Create a scoped token that can only run the Actor you need, and share it with the service. Even if the token is leaked, it can't be used to access your other data.
#### Restricted access: Restrict what Actors can access using the scope of this Actor
When you run an Actor with a scoped token in this mode, Apify will inject a token with the same scope as the scope of the original token.
This way you can be sure that Actors won't accidentally—or intentionally—access any data they shouldn't. However, Actors might not function properly if the scope is not sufficient.
caution
Restricted access mode is not supported for Actors running in https://docs.apify.com/platform/actors/running/standby.md. While you can send standby requests using a scoped token configured with restricted access, functionality is not guaranteed.
tip
This restriction is *transitive*, which means that if the Actor runs another Actor, its access will be restricted as well.
#### Default run storages
When Apify https://docs.apify.com/platform/actors/running/runs-and-builds.md#runs, it automatically creates a set of default storages (a dataset, a key-value store and request queue) that the Actor can use in runtime.
You can configure whether the scoped token you are going use to run the Actor should get access to these default storages.

If it’s **on**, the token can implicitly access the default storage of the Actor runs it triggers, or in general, of any Actor run in your account that falls within its scope. This is useful if you want to allow a third-party service to run an Actor and then read the Actor’s output (think AI agents).
If the toggle is **off**, the token can still trigger and inspect runs, but access to the default storages is restricted:
* For accounts with **Restricted general resource access**, the token cannot read or write to default storages. https://docs.apify.com/platform/collaboration/general-resource-access.md.
* For accounts with **Unrestricted general resource access**, the default storages can still be read anonymously using their IDs, but writing is prevented.
tip
Let's say your Actor produces a lot of data that you want to delete just after the Actor finishes. If you enable this toggle, your scoped token will be allowed to do that.
### Schedules
You can use scoped tokens to schedule Actor and Tasks. Each schedule invocation triggers a new Actor run, creating and injecting a new run API token into the Actor.
However, **this token is always unscoped, which means that the scheduled Actor has access to all your account data**, regardless of the scope of the token that scheduled it.
### Webhooks configuration
If you allow a token to run an Actor, it'll also be able to manage the Actor's webhooks (similarly for tasks).
If you set up a webhook pointing to the Apify API, the Apify platform will automatically inject a token when dispatching that webhook. However, if you set up such a webhook with a scoped token, **that webhook will be dispatched with a token with the same limited permissions**.
Therefore, you need to make sure the token has sufficient permissions not only to set up the webhook, but also to perform the actual operation.
tip
Let's say you want to create a webhook that pushes an item to a dataset every time an Actor successfully finishes. Then such a scoped token needs to be allowed to both run the Actor (to create the webhook), and write to that dataset.
### Troubleshooting
#### How do I allow a token to run a task?
Tasks don't have a dedicated **Run** permission. Instead, you should configure the token with the following permissions:
* **Run** on the Actor that the task is executing
* **Read** on the task
See the following example:

Refer to to understand how permission dependencies work.
#### My run failed and I can see `insufficient permissions` in the logs
When a run fails with insufficient permissions in the logs, it typically means the Actor is using a scoped token with **Restricted access** configured.

What is happening is that the Actor is trying to access a resource (such as a dataset, or a key-value store) or perform an operation that it does not have sufficient permissions for.
If you know what it is, you can add the permission to the scope of your token. If you don't, you can switch the permission mode on the token to **Full access**. This means that the Actor will be able to access all your account data.
Refer to section to understand how executing Actors with scoped tokens works.
---
# Amazon Bedrock integrations
**Learn how to integrate Apify with Amazon Bedrock Agents to provide web data for AI agents.**
***
https://aws.amazon.com/bedrock/ is a fully managed service that provides access to large language models (LLMs), allowing users to create and manage retrieval-augmented generative (RAG) pipelines, and create AI agents to plan and perform actions. AWS Bedrock supports a wide range of models from providers such as A21 Labs, Anthropic, Cohere, Meta, and Mistral AI. These models are designed to handle complex, multistep tasks across systems, knowledge bases, and APIs, making them versatile for various use cases.
In this tutorial, we’ll demonstrate how to create and use AWS Bedrock AI agent and integrate it with Apify Actors. The AI agent will be configured to either answer questions from an internal LLM knowledge or to leverage the https://apify.com/apify/rag-web-browser to perform internet searches for relevant information. This approach enables the agent to provide more comprehensive and accurate responses by combining internal knowledge with real-time data from the web.
## AWS Bedrock AI agents
Amazon Bedrock allows you to create AI agents powered by large language models to analyze user input and determine the required data sources, and execute actions needed to fulfill the user requests.
Before getting started, ensure you have:
* An active AWS Account.
* An Apify account and an https://docs.apify.com/platform/integrations/api#api-token.
* Granted access to any Large Language Model from Amazon Bedrock. To add access to a LLM, follow this https://docs.aws.amazon.com/bedrock/latest/userguide/model-access-modify.html. We'll use **Anthropic Claude 3.5 Sonnet** in this example.
The overall process for creating an agent includes the following https://docs.aws.amazon.com/bedrock/latest/userguide/agents.html:
* Provide a name and description for the agent.
* Specify instructions for the agent.
* Set up actions in action groups by defining function details or using an OpenAPI schema.
* Configure a Lambda function to implement the defined function or OpenAPI schema.
* Select a model for the agent to orchestrate with.
* (Optional) Add knowledge bases for the agent.
* (Optional) Configure advanced prompts for the agent for better control.
The following image illustrates the key components of an AWS Bedrock AI agent:

### Building an Agent
To begin, open the Amazon Bedrock console and select agents from the left navigation panel. On the next screen, click Create agent to start building your agent.

#### Step 1: Provide agent details
Enter a name and description for your agent. This will create a new agent and open the Agent Builder page. On this page, you can:
* Select the LLM model to use.
* Add knowledge bases.
* Set up actions.
* Provide instructions for the agent.
For example, you can use the following instructions:
You are a smart and helpful assistant. Answer question based on the search results. Use an expert, friendly, and informative tone Always use RAG Web Browser if you need to retrieve the latest search results and answer questions.

#### Step 2: Create actions
After saving the agent, preparing it, and testing it in the embedded chat window, you’ll notice that it cannot yet retrieve real-time search data from the internet. To enable this functionality, you need to create actions that integrate the agent with Apify and provide the necessary search data.
Navigate to the **Actions Groups**, where you can define a set of actions. Actions can be created by either:
* Providing function details, or
* Using an OpenAPI schema, which will be implemented via a Lambda function.
For this example, use the following settings:
* Action type - Define with API schema
* Action group invocation - Create a new Lambda function
* Action group schema - Define via in-line editor

In the in-line editor, paste the OpenAPI schema of the https://raw.githubusercontent.com/apify/rag-web-browser/refs/heads/master/docs/standby-openapi-3.0.0.json. At this point, the Agent is almost ready to integrate with Apify. Save the action to create a new, empty Lambda function. The final step is to update the Lambda function to implement the OpenAPI schema and enable real-time web search capabilities.
#### Step 3: Lambda function
1. Open the Lambda function you created and copy-paste the https://raw.githubusercontent.com/apify/rag-web-browser/refs/heads/master/docs/aws-lambda-call-rag-web-browser.py.
2. Replace `APIFY_API_TOKEN` in the code with your Apify API token. Alternatively, store the token as an environment variable:
* Go to the Configuration tab.
* Select Environment Variables.
* Add a new variable by specifying a key and value.
3. Configure the Lambda function:
* Set the memory allocation to 128 MB and timeout duration to 60 seconds.
4. Save the Lambda function and deploy it.
#### Step 4: Test the agent
1. Return to the **AWS Bedrock console** and prepare the agent for testing in the embedded chat window.
2. Test the agent by entering a query, for example: "What is the latest news about AWS Bedrock"
3. Based on your query, the agent will determine the appropriate action to take. You can view the agent's reasoning in the **Trace Step view**. For instance:
{ "rationale": { "text": "To answer this question about the latest news for AWS Bedrock, I'll need to use the RAG Web Browser function to search for and retrieve the most recent information. I'll craft a search query that specifically targets AWS Bedrock news.", "traceId": "845d524a-b82c-445b-9e36-66d887b3b25e-0" } }
The agent will use the RAG Web Browser to gather relevant information and provide a response to the user query.

### Limitations and debugging
When integrating agent in AWS Bedrock, you may encounter some limitations and issues.
* **Model access**: Ensure that you have access to the model you want to use in the agent. If you don't have access, you can request it from the model provider.
* **Lambda function**: Ensure that the Lambda function is correctly implemented and deployed. Check the function logs for any errors.
* **Environment variables**: Ensure that the `APIFY_API_TOKEN` is correctly set in the Lambda function.
* **Memory and timeout**: Ensure that the Lambda function has enough memory and timeout to call the RAG Web Browser.
* **Agent trace**: Use the agent trace view to debug the agent's reasoning and actions.
* **Response Size**: AWS Bedrock enforces a 25KB limit on response bodies. Limit results and truncate text as needed to stay within this constraint.
## Resources
* https://aws.amazon.com/bedrock/agents/
* https://github.com/build-on-aws/amazon-bedrock-agents-quickstart
* https://apify.com/apify/rag-web-browser
---
# Bubble integration
**Learn how to integrate your Apify Actors with Bubble for automated workflows and notifications.**
***
https://bubble.io/ is a no-code platform that allows you to build web applications without writing code. With the https://bubble.io/plugin/apify-1749639212621x698168698147962900, you can easily connect your Apify Actors to your Bubble applications to automate workflows and display scraped data.
Explore the live demo
Open the demo Bubble app to check out the integration end-to-end before building your own: https://apify-28595.bubbleapps.io
## Get started
To use the Apify integration for Bubble, you will need:
* An https://console.apify.com/
* A https://bubble.io/
* A Bubble application where you want to use the integration
## Install the Apify plugin for Bubble
To integrate Apify with your Bubble application, you first need to install the Apify plugin from the Bubble plugin marketplace.

1. Go to your Bubble application dashboard and navigate to the **Plugins** tab.
2. Click the **Add plugins** button.
3. Search for **Apify** in the plugin marketplace.
4. And then click **Install**.
## Configure the Apify plugin
After installing the plugin, you'll need to provide your API token when setting up Apify actions.
### Get your Apify API token
In Apify Console, go to **Settings → API & Integrations** and copy your API token. 
### Store the token securely in Bubble
For security, avoid hardcoding the token in action settings. Store it on the `User` data type with Privacy rules so only the current user can access their own token.
1. In Bubble, go to **Data → Data types**, open `User`.
2. Add a new field, for example `apify_api_token` (type: text).
* 
3. Go to **Data → Privacy** and check if only the **Current User** is allowed to view their own `apify_api_token`.
* 
### Point Apify actions to the saved token
When configuring Apify actions in a workflow (check out screenshot below), set the token field dynamically to:
* `Current User's apify_api_token`
* 
## Using the integration
Once the plugin is configured, you can start building automated workflows.
### Actions vs data calls
Apify's Bubble plugin exposes two ways to interact with Apify:
* **Actions (workflow steps)**: Executed inside a Bubble workflow (both page workflows and backend workflows). Use these to trigger side effects like running an Actor or Task, or creating a webhook. They run during the workflow execution and can optionally wait for the result (if timeout is greater than 0).
* Examples: **Run Actor**, **Run Actor Task**, **Create Webhook**, **Delete Webhook**.
* Location in Bubble: **Workflow editor → Add an action → Plugins → Apify**
* 
* **Data calls (data sources)**: Used as data sources in element properties and expressions. They fetch data from Apify and return it as lists/objects that you can bind to UI (for example, a repeating group) or use inside expressions.
* Examples: **Fetch Data From Dataset JSON As Data**, **List Actor Runs**, **Get Record As Text/Image/File** from key-value store, **List User Datasets/Actors/Tasks**.
* Location in Bubble: In any property input where a data source is expected click **Insert dynamic data**, under **Data sources** select **Get Data from an External API**, and choose the desired Apify data call.
* 
Inline documentation
Each Apify plugin action and data call input in Bubble includes inline documentation describing what the parameter is for and the expected format. If you're unsure, check the field's help text in the Bubble editor.
### Dynamic values in inputs and data calls
Dynamic values are available across Apify plugin fields. Use Bubble's **Insert dynamic data** to bind values from your app.
* For instance you can source values from:
* **Page/UI elements**: inputs, dropdowns, multi-selects, radio buttons, checkboxes
* **Database Things and fields**
* **Current User**
* **Previous workflow steps** (e.g., Step 2's Run Actor result's `defaultDatasetId` or `runId`)
* **Get Data from an External API**: data calls
#### Examples
##### Use a page input in an Action's JSON field (Input overrides)
{ "url": "Input URL's value" }
Inserting dynamic data
When inserting dynamic data, Bubble replaces the selected text. Place your cursor exactly where you want the expression in the JSON; avoid selecting the entire field.
## Run Apify plugin actions from Bubble events
Create workflows that run Apify plugin actions in response to events in your Bubble app, such as button clicks or form submissions.
1. Open the **Workflow** tab and create a new workflow (for example, **When Run button is clicked**).
* You can also click `Add workflow` button:
* 
* Or you can create it manually: `Workflows` → `+ New` → `An element is clicked`
* 
* Then select the correct UI button.
* 
2. Click `Add an action` → `Plugins` → choose one of the Apify actions:
* For example `Run Actor` (run a specific Actor by ID)
* 
3. Configure the action:
* **API token**: set to `Current User's apify_api_token` ()
* **Actor or Task**: paste an Actor ID
* **Input overrides**: provide JSON and use dynamic expressions from page elements or things
* **Timeout**: set in seconds (0 means no limit). Due to Bubble workflow time limits, set this explicitly. If you do not want to restrict the call duration, set it to 0.
### Where to find your IDs
Find IDs directly in Apify Console. Each resource page shows the ID in the API panel and in the page URL.
* **Actor ID**: Actor detail page → API panel or URL.
* Example URL: `https://console.apify.com/actors/`
* Actor name format: owner/name (e.g., `apify/website-scraper`)
* **Task ID**: Task detail page → API panel or URL.
* Example URL: `https://console.apify.com/actors/tasks/`
* **Dataset ID**: Storage → Datasets → Dataset detail → API panel or URL.
* Example URL: `https://console.apify.com/storage/datasets/`
* Also available in the table in `Storage → Datasets` page
* **Key-value store ID**: Storage → Key-value stores → Store detail → API panel or URL.
* Example URL: `https://console.apify.com/storage/key-value-stores/`
* Also available in the table in `Storage → Key-value stores` page
* **Webhook ID**: Actors → Actor → Integrations.
* Example URL: `https://console.apify.com/actors//integrations/`
You can also discover IDs via the plugin responses and data calls (e.g., **List User Datasets**, **List Actor Runs**), which return objects with `id` fields you can pass into other actions/data calls.
## Display Apify data in your application
Populate elements in your Bubble application with information from your Apify account or Actor run data.
There are two common approaches:
### Display data
* This example appends the text result of an Actor run; it's a basic bind to the element’s text.
* Create / select the UI visual element — in this example, `Text`.
* In the Appearance tab, click the input area, select Insert dynamic data, and, according to your case, find the source — in this example, it's the `key_value_storages's recordContentText` custom state, where I set the result of the API call
* 
### Display list of data
* This example lists the current user's datasets and displays them in a repeating group.
* Add a **Repeating group** to the page.
1. Add data to a variable: create a custom state (for example, on the page) that will hold the list of datasets, and set it to the plugin's **List User Datasets** data call.
* 
2. Set the type: in the repeating group's settings, set **Type of content** to match the dataset object your variable returns.
* 
3. Bind the variable: set the repeating group's **Data source** to the variable from Step 1.
* 
* Inside the repeating group cell, bind dataset fields (for example, `Current cell's item name`, `id`, `createdAt`).
* 
## Long‑running scrapes and Bubble time limits (async pattern)
Bubble workflows have execution time limits. Long scrapes (for example, **Scrape Single URL**) may time out if you wait for them. Use this asynchronous pattern.
### Prerequisite: Enable Bubble API and construct the webhook URL
To receive webhooks from Apify, enable Bubble's public API workflows and copy your API root URL:
1. In Bubble, go to **Settings → API** and enable **This app exposes a Workflow API**.
2. Copy the **Workflow API root URL**. It looks like `https://your-app.bubbleapps.io/version-test/api/1.1/wf`.
3. Create a backend workflow named `webhook`. Its full URL will be `https://your-app.bubbleapps.io/version-test/api/1.1/wf/webhook`.
Use this URL as the Apify webhook target. Configure the webhook's authentication as needed (e.g., a shared secret or query string token) and verify it inside your Bubble workflow before processing.
1. Trigger the scrape without waiting
* In a workflow, add **Run Actor** (or **Run Actor Task**) and set **timeout** to 0.
* Actor ID: `aYG0l9s7dbB7j3gbS` (`apify/website-content-crawler`).
* Input: copy the Actor's input from the Actor's Input page, and map `crawlerType` and `url` to values from your UI.
* 
2. Notify Bubble when the run finishes
* Create an Apify **Webhook** with event `ACTOR.RUN.SUCCEEDED`.
* Set `actorId` from the Step 1 result.
* Set `databaseId` from the Step 1 result, where Actor will store the result.
* Set `idempotencyKey` to random value.
* Set `requestUrl` to your Bubble backend workflow URL, for example: `https://your-app.bubbleapps.io/version-test/api/1.1/wf/webhook`.
* 
3. Receive the webhook in Bubble and store the dataset ID
* Create a public data type, for example, `ScrapingResults`.
* Add a text field, for example, `result`, to store the dataset ID from the webhook.
* 
* Create the backend workflow (`webhook`) that Bubble exposes at `/api/1.1/wf/webhook`. The workflow name defines the API route.
* 
* In that workflow, for each received webhook call, create a new thing in `ScrapingResults` and set `result` to the dataset ID from the request body. This stores one `datasetId` per call for later processing.
* 
4. Pick up the results asynchronously
* In a (periodic) backend workflow, search `ScrapingResults` for pending entries (or for the expected `datasetId`).
* If found, read its `result` (the `datasetId`), fetch items via the appropriate action (for example, **Fetch Data From Dataset JSON As Action**), update the UI or save to your DB, and then delete that `ScrapingResults` entry to avoid reprocessing.
* If not found yet, do nothing and check again later.
* 
This approach avoids Bubble timeouts, keeps the UI responsive, and scales to larger scrapes.
## Example use cases
* *E-commerce price monitoring* - Schedule a daily workflow to run a price-scraping Actor on competitor sites. Store the results in your Bubble database, display them in a dashboard, and set up alerts for significant price changes.
* *Lead generation automation* - Trigger a workflow on form submission to run an Actor that enriches lead data, such as pulling company details from a domain. Save the enriched information to your database and automate follow-up actions like email campaigns.
* *Content aggregation* - Configure regular Actor runs to gather articles or posts from multiple sources.
## Available Apify actions and data sources
::: tip Check out the documentation
Each API call links to the Apify documentation. To learn more about any plugin action or data call, go to the **Plugins** page in your app, select the Apify plugin, and use the documentation links in the field descriptions.
:::
The Apify plugin provides two main types of operations:
**Data calls** (data sources):
* https://docs.apify.com/api/v2/dataset-items-get
* https://docs.apify.com/api/v2/dataset-items-get
* https://docs.apify.com/api/v2/dataset-items-get
* https://docs.apify.com/api/v2/datasets-get
* https://docs.apify.com/api/v2/key-value-stores-get
* https://docs.apify.com/api/v2/key-value-store-keys-get
* https://docs.apify.com/api/v2/key-value-store-record-get
* https://docs.apify.com/api/v2/key-value-store-record-get
* https://docs.apify.com/api/v2/store-get
* https://docs.apify.com/api/v2/acts-get
* https://docs.apify.com/api/v2/actor-tasks-get
* https://docs.apify.com/api/v2/act-run-sync-get-dataset-items-post
* https://docs.apify.com/api/v2/act-run-sync-get-dataset-items-post
* https://docs.apify.com/api/v2/act-runs-get
* https://docs.apify.com/api/v2/act-runs-get
* https://docs.apify.com/api/v2/webhooks-get
**Actions** (workflow steps):
* https://docs.apify.com/api/v2/dataset-items-get
* https://docs.apify.com/api/v2/dataset-items-get
* https://docs.apify.com/api/v2/key-value-store-record-get
* https://docs.apify.com/api/v2/act-run-sync-get-dataset-items-post
* https://docs.apify.com/api/v2/act-run-sync-get-dataset-items-post
* https://docs.apify.com/api/v2/act-runs-post
* https://docs.apify.com/api/v2/actor-task-runs-post
* https://docs.apify.com/api/v2/webhooks-post
* https://docs.apify.com/api/v2/webhook-delete
## Use the latest version of the plugin
To stay up to date with new features, make sure you're using the latest version of the plugin. You can check this on the **Plugins** page by selecting the Apify plugin and choosing the latest version from the drop-down menu. You'll also see a brief note describing what's changed in that version.
## Troubleshooting
### Authentication errors
Ensure your API token is correctly set in the action (preferably as `Current User's apify_api_token`) and that it has the necessary permissions.
### Missing Actors or Tasks
If your Actor or Task doesn't appear in list responses, run it at least once in the Apify Console so it becomes discoverable.
### Timeout errors
Bubble workflows have execution time limits. For long‑running Actors, set the **timeout** to 0 and process results asynchronously via a webhook and a backend workflow or scheduled event. See the section for a step‑by‑step guide.
### Data format issues
Check that your JSON input is valid when providing **Input overrides** and that dynamic expressions resolve to valid JSON values. Verify the structure of the dataset output when displaying it in your app.
If you have any questions or need help, feel free to reach out to us on our https://discord.com/invite/jyEM2PRvMU.
---
# 🤖🚀 CrewAI integration
**Learn how to build AI Agents with Apify and CrewAI.**
***
## What is CrewAI
https://www.crewai.com/ is an open-source Python framework designed to orchestrate autonomous, role-playing AI agents that collaborate as a "crew" to tackle complex tasks. It enables developers to define agents with specific roles, assign tasks, and integrate tools—like Apify Actors—for real-world data retrieval and automation.
Explore CrewAI
For more in-depth details on CrewAI, check out its https://docs.crewai.com/.
## How to use Apify with CrewAI
This guide demonstrates how to integrate Apify Actors with CrewAI by building a crew of agents that uses the https://apify.com/apify/rag-web-browser Actor to search Google for TikTok profiles and the https://apify.com/clockworks/free-tiktok-scraper Actor to extract and analyze data from the TikTok profiles.
### Prerequisites
* **Apify API token**: To use Apify Actors in CrewAI, you need an Apify API token. Learn how to obtain it in the https://docs.apify.com/platform/integrations/api.
* **OpenAI API key**: To power the agents in CrewAI, you need an OpenAI API key. Get one from the https://platform.openai.com/account/api-keys.
* **Python packages**: Install the following Python packages:
pip install 'crewai[tools]' langchain-apify langchain-openai
### Building the TikTok profile search and analysis crew
First, import all required packages:
import os from crewai import Agent, Task, Crew from crewai_tools import ApifyActorsTool from langchain_openai import ChatOpenAI
Next, set the environment variables for the Apify API token and OpenAI API key:
os.environ["OPENAI_API_KEY"] = "Your OpenAI API key" os.environ["APIFY_API_TOKEN"] = "Your Apify API token"
Instantiate the LLM and Apify Actors tools:
llm = ChatOpenAI(model="gpt-4o-mini")
browser_tool = ApifyActorsTool(actor_name="apify/rag-web-browser") tiktok_tool = ApifyActorsTool(actor_name="clockworks/free-tiktok-scraper")
Define the agents with roles, goals, and tools:
search_agent = Agent( role="Web Search Specialist", goal="Find the TikTok profile URL on the web", backstory="Expert in web searching and data retrieval", tools=[browser_tool], llm=llm, verbose=True )
analysis_agent = Agent( role="TikTok Profile Analyst", goal="Extract and analyze data from the TikTok profile", backstory="Skilled in social media data extraction and analysis", tools=[tiktok_tool], llm=llm, verbose=True )
Define the tasks for the agents:
search_task = Task( description="Search the web for the OpenAI TikTok profile URL.", agent=search_agent, expected_output="A URL linking to the OpenAI TikTok profile." )
analysis_task = Task( description="Extract data from the OpenAI TikTok profile URL and provide a profile summary and details about the latest post.", agent=analysis_agent, context=[search_task], expected_output="A summary of the OpenAI TikTok profile including followers and likes, plus details about their most recent post." )
Create and run the crew:
crew = Crew( agents=[search_agent, analysis_agent], tasks=[search_task, analysis_task], process="sequential" )
result = crew.kickoff() print(result)
Search and analysis may take some time
The agent tasks may take some time as they search the web for the OpenAI TikTok profile and extract data from it.
You will see the crew’s output in the console, showing the results of the search and analysis.
Profile Summary:
- Username: OpenAI
- Profile URL: OpenAI TikTok Profile
- Followers: 605,000
- Likes: 3,400,000
- Number of Videos: 152
- Verified: Yes
- Signature: low key research previews
- Bio Link: OpenAI Website
Latest Post Details:
- Post ID: 7474019216346287406
- Post Text: "@Adeline Mai is a photographer..."
- Creation Time: February 21, 2025
- Number of Likes: 863
- Number of Shares: 26
- Number of Comments: 33
- Number of Plays: 20,400
- Number of Collects: 88
- Music Used: Original Sound by OpenAI
- Web Video URL: Watch Here
If you want to test the whole example, create a new file, `crewai_integration.py`, and copy the full code into it:
import os from crewai import Agent, Task, Crew from crewai_tools import ApifyActorsTool from langchain_openai import ChatOpenAI
os.environ["OPENAI_API_KEY"] = "Your OpenAI API key" os.environ["APIFY_API_TOKEN"] = "Your Apify API token"
llm = ChatOpenAI(model="gpt-4o-mini")
browser_tool = ApifyActorsTool(actor_name="apify/rag-web-browser") tiktok_tool = ApifyActorsTool(actor_name="clockworks/free-tiktok-scraper")
search_agent = Agent( role="Web Search Specialist", goal="Find the TikTok profile URL on the web", backstory="Expert in web searching and data retrieval", tools=[browser_tool], llm=llm, verbose=True )
analysis_agent = Agent( role="TikTok Profile Analyst", goal="Extract and analyze data from the TikTok profile", backstory="Skilled in social media data extraction and analysis", tools=[tiktok_tool], llm=llm, verbose=True )
search_task = Task( description="Search the web for the OpenAI TikTok profile URL.", agent=search_agent, expected_output="A URL linking to the OpenAI TikTok profile." ) analysis_task = Task( description="Extract data from the OpenAI TikTok profile URL and provide a profile summary and details about the latest post.", agent=analysis_agent, context=[search_task], expected_output="A summary of the OpenAI TikTok profile including followers and likes, plus details about their most recent post." )
crew = Crew( agents=[search_agent, analysis_agent], tasks=[search_task, analysis_task], process="sequential" )
result = crew.kickoff() print(result)
## Resources
* https://docs.apify.com/platform/actors
* https://docs.crewai.com/
* https://blog.apify.com/what-are-ai-agents/
* https://blog.apify.com/how-to-build-an-ai-agent/
---
# Google Drive integration
**Learn how to integrate your Apify Actors with Google Drive. This article shows you how to automatically save results to your drive when an Actor run succeeds.**
***
## Get started
To use the Apify integration for Google Drive, you will need:
* An https://console.apify.com/.
* A Google account
* A saved Actor Task
## Set up Google Drive integration
1. Head over to **Integrations** tab in your saved task and click on the **Upload file** integration.

2. Click on **Connect with Google** button and select the account with which you want to use the integration.

3. Set up the integration details. You can choose the **Filename** and **Format** , which can make use of available variables. The file will be uploaded to your Google Drive account to `Apify Uploads` folder. By default, the integration is triggered by successful runs only.

4. Click on **Save** & enable the integration.
Once this is done, run your Actor to test whether the integration is working.
You can manage your connected accounts at **https://console.apify.com/settings/integrations**.

---
# Flowise integration
**Learn how to integrate Apify with Flowise.**
***
## What is Flowise?
Flowise is an open-source UI visual tool to build your customized LLM flow using Langchain.
## How to use Apify with Flowise
### Installation
To use Flowise you have to download and run it locally. The quickest way to do so is to use the following commands:
1. To install Flowise globally on your device:
npm install -g flowise
2. To start Flowise locally:
npx flowise start
It will be available on `https://localhost:3000`
Other methods of using Flowise can be found in their https://docs.flowiseai.com/getting-started#quick-start
### Building your flow
After running Flowise, you can start building your flow with Apify.
The first step is to create a new flow in the web UI.
In the left menu, you need to find Apify Website Content Crawler under Document Loaders.

Now you need to configure the crawler. You can find more information about at https://apify.com/apify/website-content-crawler.

In the configuration, provide your Apify API token, which you can find in your https://console.apify.com/settings/integrations.

You can add more loaders, or you can add some processors to process the data. In our case, we create the flow that loads data from the Apify docs using Website Content Crawler and save them into the in-memory vector database. Connect the ChatOpenAI and the OpenAI embeddings and QA retrieval into the chatbot.
The final flow can answer questions about Apify docs.

For more information visit the Flowise https://flowiseai.com/.
## Resources
* https://flowiseai.com/
* https://github.com/FlowiseAI/Flowise#quick-start
---
# GitHub integration
**Learn how to integrate your Apify Actors with GitHub. This article shows you several possible integrations.**
***
## Get started
To use the Apify integration for GitHub, you will need:
* An https://console.apify.com/.
* A GitHub repository.
### Create an Actor from a GitHub repository
Learn how to create an Actor from a GitHub repository. This is useful if you want to automatically deploy and build your code or push to your GitHub repository.

Selecting *Link Git repository* will open a new modal to select a provider to use. Selecting *GitHub* will open a new window with GitHub authentication and select a GitHub repository.

To link an account, click on *Add GitHub account* and follow the instructions on github.com. Certain organizations or users can be selected.

You can switch among all authorized users and organizations.

If the required repository is missing, try finding it with *Search*.

An Actor is created immediately from the selected repository.
### Create an issue when a run fails
https://www.youtube-nocookie.com/embed/jZUp-rRbayc
---
# Gmail integration
**Learn how to integrate your Apify Actors with Gmail. This article shows you how to automatically send an email with results when an Actor run succeeds.**
***
## Get started
To use the Apify integration for Gmail, you will need:
* An https://console.apify.com/.
* A Google account
* A saved Actor Task
## Set up Gmail integration
1. Head over to **Integrations** tab in your task and click on Send email generic integration.

2. Click on **Connect with Google** button and select the account with which you want to use the integration.

3. Set up the integration details. **Subject** and **Body** fields can make use of available variables. Dataset can be attached in several formats. By default, the integration is triggered by successful runs only.

4. Click on **Save** & enable the integration.
Once this is done, run your Actor to test whether the integration is working.
You can manage your connected accounts at **https://console.apify.com/settings/integrations**.

---
# Gumloop integration
With the Gumloop Apify integration you can retrieve key data for your AI-powered workflows in a flash.
Gumloop supports two types of integrations with Apify:
* Direct integrations with Apify Actors through MCP nodes, where you can prompt the data you need (Recommended)
* General Apify integration using the Apify task runner node
## Direct integrations with Apify Actors (recommended)
Gumloop offers native nodes for popular Apify use cases that provide enhanced functionality and easier configuration.
These native nodes eliminate the complexity of managing Apify tasks while providing more powerful features for specific platforms. They are pre-configured with no need to manage Apify tasks or API keys, enhanced features like built-in data validation and formatting, better performance optimized for Gumloop, and full customizability using a prompt.
The following data sources are available natively in Gumloop:
* https://docs.apify.com/platform/integrations/gumloop/instagram.md
* https://docs.apify.com/platform/integrations/gumloop/maps.md
* https://docs.apify.com/platform/integrations/gumloop/tiktok.md
* https://docs.apify.com/platform/integrations/gumloop/youtube.md
### Gumloop credits
Retrieving data from Apify Actors is included in your Gumloop subscription. Apify Actors natively integrated into Gumloop (YouTube, TikTok, Google Maps, Instagram) have a list of tools (data points) you can retrieve.
Each tool has a corresponding Gumloop credit cost. Each Gumloop subscription comes with a set of credits.
| Sample prompt | Tool | Credit cost per use |
| ---------------------------------------------- | ------------------- | ------------------- |
| Retrieve profile details for an Instagram user | Get Profile Details | 5 credits/profile |
| Get videos for a specific hashtag | Get Hashtag Videos | 3 credits/video |
| Show 5 most recent reviews for a restaurant | Get Place Reviews | 3 credits/review |
## General integration (Apify Task Runner)
Gumloop's Apify task runner lets you run your Apify tasks directly inside Gumloop workflows. Scrape data with Apify, then process it with AI, send results via email, update spreadsheets, or connect to any of Gumloop's 100+ integrations.
Build workflows that automatically collect data from websites and deliver insights to your team through Slack, Gmail, Google Sheets, or wherever you need them.
### Connect Apify with Gumloop
To use the Apify integration in Gumloop, you need an Apify account, a Gumloop account, and at least one Apify task that has been run previously.
1. *Get your Apify API Key*
To get started, navigate to https://console.apify.com/settings/integrations in Apify Console and copy your API token.

2. *Add Apify credentials to Gumloop*
Next, go to https://www.gumloop.com/settings/profile/credentials and click **Add New Credentials**. Search for Apify in the credentials list, add your Apify API key, and save the credential.

3. *Add Apify Task Runner node to your workflow*
Open a new Gumloop pipeline page. Search for **Apify Task Runner** in the **Node Library**, and drag and drop the node onto your canvas.

4. *Create and save tasks in Apify*
The Apify Task Runner node fetches tasks from your saved tasks in Apify Console. To create a task, navigate to https://console.apify.com/actors, click on the Actor you want to use, and then click **Create a task** next to the Run button. Configure your task settings and save.

important
The Task Runner only displays tasks that have been saved in your Apify Console, not individual Actors.
5. *Run your tasks*
Before tasks appear in Gumloop, they must be executed at least once in Apify. Go to your https://console.apify.com/actors/tasks, click on the task you want to use, and click **Start** to execute it. Wait for the task to complete.
This step is required because Gumloop needs to understand the output structure of your task to properly configure data fields.

6. *Configure your Gumloop workflow*
Configure maximum run time and output limits. Select your task from the dropdown menu. Choose the output fields you want to use. Connect the node to other workflow components.

## Example workflow
Here's a simple example of how to use Apify with Gumloop:
Web Scraping + AI Analysis + Email Report
The Apify task runner scrapes product prices from an e-commerce site. Ask AI analyzes price trends and identifies opportunities. Combine text formats the analysis into a readable report. Gmail Sender emails the report to stakeholders.
This workflow runs automatically and delivers actionable insights directly to your inbox.
---
# Gumloop - Instagram Actor integration
Get Instagram profile posts, details, stories, reels, post comments and hashtags, users, and tagged posts in Gumloop.
***
The Gumloop integration for Instagram provides a direct interface for running Apify’s Instagram scrapers directly in your workflows. No API tokens or manual polling required. All you need is a Gumloop account.
Using the Gumloop Instagram MCP node, you can prompt the Instagram data you need and Gumloop will retrieve it from relevant Apify Actors. From there you can connect this data to other tools and AI models to process the information.
## Available actions
You can pull the following types of data from public Instagram accounts using Gumloop’s Instagram node (via Apify). Each action has a credit cost.
| Tool/Action | Description | Credit Cost |
| ------------------- | --------------------------------------------------------------------------------------------------------------- | ------------------ |
| Get profile posts | Fetch posts from a public Instagram profile, including captions, images, like and comment counts, and metadata. | 3 credits per item |
| Get post comments | Retrieve all comments on a specific post, with author info, timestamps, and like counts. | 3 credits per item |
| Get hashtag posts | Search by hashtag and return matching posts with full details. | 3 credits per item |
| Find users | Look up Instagram users by name or handle and return profile metadata like bio, follower/following counts, etc. | 3 credits per item |
| Get profile details | Extract detailed metadata from a profile, including follower count, bio, and verification status. | 5 credits per item |
| Get profile stories | Get media URLs, timestamps, and view counts from an Instagram profile’s stories. | 3 credits per item |
| Get profile reels | Fetch reels with captions, engagement metrics, play counts, and music info. | 3 credits per item |
| Get tagged posts | Return posts where a specific user is tagged, with full post details. | 3 credits per item |
## Retrieve Instagram data in Gumloop
1. *Add the Gumloop Instagram MCP node*
First, add the Instagram node from the node library to your workflow canvas.

2. *Prompt the data you need.*
In the node's configuration panel, write a clear, specific prompt that describes the data you want to retrieve.

Prompting tips
* MCP nodes only have access to the tools listed so your prompt should be scoped to Instagram.
* You can mix and match different tools (get 10 latest videos for a hashtag and retrieve profile data for each post).
3. *Define the inputs and outputs*
Once you’ve entered your prompt, you will go through the AI assisted node creation process starting with defining inputs, parameters and outputs of your Instagram node.
Gummie (Gumloop’s AI assistant) will suggest inputs (information coming from previous steps, ie hashtag to scrape), parameters (user defined choices, ie number of posts to retrieve) and outputs (information used in future steps, ie number of followers of users and list of recent videos).

4. *Generate and test the node*
With inputs, parameters and outputs defined, Gummie will generate the code to retrieve the data from the Apify Instagram node. There is no requirement for you to review or understand the code, Gummie takes care of it.
After the code is written, enter test values to confirm the outputs of the node and save.
Once saved, you can access this node in any of your flows.

## Other integrations
* https://docs.apify.com/platform/integrations/gumloop/tiktok.md
* https://docs.apify.com/platform/integrations/gumloop/youtube.md
* https://docs.apify.com/platform/integrations/gumloop/maps.md
---
# Gumloop - Google maps Actor integration
Search, extract, and enrich business data from Google Maps in Gumloop.
***
The Gumloop Google Maps integration provides a native interface for running Apify’s Google Maps scrapers directly in your workflows. No API keys or manual polling required. All you need is a Gumloop account.
Using the Gumloop Google Maps MCP node, you can simply prompt the location data you need and Gumloop will retrieve it from relevant Apify Actors. From there, you can connect it to your favorite tools and AI agents to process the information.
## Available actions
You can pull the following types of place data from Google Maps using Gumloop’s Google Maps node (via Apify). Each action has a credit cost.
| Tool/Action | Description | Credit Cost |
| ------------------- | -------------------------------------------------------------------------------- | ------------------ |
| Search places | Search for places on Google Maps using location and search terms. | 3 credits per item |
| Get place details | Retrieve detailed information about a specific place using its URL or place ID. | 5 credits per item |
| Search by category | Search for places by a specific category (e.g. cafes, gyms) on Google Maps. | 3 credits per item |
| Get place reviews | Fetch reviews for specific locations, including text, rating, and reviewer info. | 3 credits per item |
| Find places in area | Return all visible places within a defined map area or bounding box. | 3 credits per item |
## Retrieve Google Maps data in Gumloop
1. *Add the Gumloop Google Maps MCP node.*
First, add the Google Maps node from the node library to your workflow canvas.

2. *Prompt the data you need*
In the node's configuration panel, write a clear, specific prompt that describes the data you want to retrieve.

Prompting tips
* MCP nodes only have access to the tools listed so your prompt should be scoped to Google Maps.
* You can mix and match different tools (e.g., search for gyms in Vancouver → get place details → pull reviews).
3. *Define inputs/outputs*
Once you’ve entered your prompt, you will go through the AI assisted node creation process starting with defining inputs, parameters and outputs of your Google Maps node.
Gummie (Gumloop’s AI assistant) will suggest inputs (information coming from previous steps, ie location, keyword, category), parameters (user defined choices, ie number of results or radius) and outputs (information used in future steps, ie business name, review count, ratings).

4. *Generate and test the node*
With inputs, parameters and outputs defined, Gummie will generate the code to retrieve the data from the Apify Google Maps node. There is no requirement for you to review or understand the code, Gummie takes care of it.
After the code is written, enter test values to confirm the outputs of the node and save.
Once saved, you can access this node in any of your flows.

## Other integrations
* https://docs.apify.com/platform/integrations/gumloop/tiktok.md
* https://docs.apify.com/platform/integrations/gumloop/instagram.md
* https://docs.apify.com/platform/integrations/gumloop/youtube.md
---
# Gumloop - TikTok Actor integration
Get TikTok hashtag videos, profile videos, followers, video details, and search results in Gumloop.
***
The Gumloop TikTok integration provides a native interface for running Apify’s TikTok scrapers directly in your workflows. No API tokens or manual polling required. All you need is a Gumloop account. Using the Gumloop TikTok MCP node, you can simply prompt the TikTok data you need and Gumloop will retrieve it from relevant Apify Actors. From there, you can connect it to your favorite tools and AI agents to process the information.
## Available actions
You can pull the following types of data from TikTok using Gumloop’s TikTok node (via Apify). Each action has a credits cost.
| Tool/Action | Description | Credit Cost |
| --------------------- | ------------------------------------------------------------------------------------------------------------ | ------------------ |
| Get hashtag videos | Fetch videos from TikTok hashtags with captions, engagement metrics, play counts, and author information. | 3 credits per item |
| Get profile videos | Get videos from TikTok user profiles with video metadata, engagement stats, music info, and timestamps. | 3 credits per item |
| Get profile followers | Retrieve followers or following lists from TikTok profiles, including usernames, follower counts, and bios. | 3 credits per item |
| Get video details | Get comprehensive data on a specific TikTok video using its URL—includes engagement and video-level metrics. | 5 credits per item |
| Search videos | Search TikTok for videos and users using queries. Returns video details and user profile info. | 3 credits per item |
## Retrieve Tiktok Data in Gumloop
1. *Add the Gumloop TikTok MCP node*
First, add the TikTok node from the node library to your workflow canvas.

2. *Prompt the data you need*
In the node's configuration panel, write a clear, specific prompt that describes the data you want to retrieve.

Prompting tips
* MCP nodes only have access to the tools listed so your prompt should be scoped to TikTok.
* You can mix and match different tools (e.g., search a hashtag → get profile videos → retrieve engagement data).
3. *Define inputs/outputs*
Once you’ve entered your prompt, you will go through the AI assisted node creation process starting with defining inputs, parameters and outputs of your TikTok node.
Gummie (Gumloop’s AI assistant) will suggest inputs (information coming from previous steps, ie search keyword, video URL), parameters (user defined choices, number of videos to retrieve) and outputs (information used in future steps, ie follower count, video engagement, music info).

4. *Generate and test the node*
With inputs, parameters and outputs defined, Gummie will generate the code to retrieve the data from the Apify TikTok node. There is no requirement for you to review or understand the code, Gummie takes care of it.
After the code is written, enter test values to confirm the outputs of the node and save.
Once saved, you can access this node in any of your flows.

## Other integrations
* https://docs.apify.com/platform/integrations/gumloop/instagram.md
* https://docs.apify.com/platform/integrations/gumloop/youtube.md
* https://docs.apify.com/platform/integrations/gumloop/maps.md
---
# Gumloop - YouTube Actor integration
Get YouTube search results, video details, channel videos, playlists, and channel metadata in Gumloop.
***
The Gumloop YouTube integration provides a native interface for running Apify’s YouTube scrapers directly in your workflows. No API keys or manual polling required. All you need is a Gumloop account.
Using the Gumloop YouTube MCP node, you can simply prompt the YouTube data you need and Gumloop will retrieve it from relevant Apify Actors. From there, you can connect it to your favorite tools and AI agents to process the information.
## Available actions
You can pull the following types of data from YouTube using Gumloop’s YouTube node (via Apify). Each action has a credit cost:
| Tool/Action | Description | Credit Cost |
| ------------------- | -------------------------------------------------------------------------------------------- | ----------------- |
| Search videos | Search YouTube by keywords and get video results with filtering, metadata, and content info. | 3 credit per item |
| Get video details | Retrieve detailed stats and content info for specific videos via URL or ID. | 4 credit per item |
| Get channel videos | Get videos from a specific YouTube channel with full metadata and context. | 3 credit per item |
| Get playlist videos | Fetch videos from a YouTube playlist with metadata and playlist details. | 3 credit per item |
| Get channel details | Get channel metadata including subscriber count, total videos, description, and more. | 5 credit per item |
## Retrieve YouTube data in Gumloop
1. *Add the Gumloop YouTube MCP node*
First, add the YouTube node from the node library to your workflow canvas.

2. *Prompt the data you need*
In the node's configuration panel, write a clear, specific prompt that describes the data you want to retrieve.

Prompting tips
* MCP nodes only have access to the tools listed so your prompt should be scoped to YouTube.
* You can mix and match different tools (e.g., search for videos → get video details → extract channel info).
3. *Define the inputs and outputs*
Once you’ve entered your prompt, you will go through the AI assisted node creation process starting with defining inputs, parameters and outputs of your YouTube node.
Gummie (Gumloop’s AI assistant) will suggest inputs (information coming from previous steps, ie search terms, video URLs), parameters (user defined choices, ie number of videos to retrieve) and outputs (information used in future steps, title, view count, channel name).

4. *Generate and test the node*
With inputs, parameters and outputs defined, Gummie will generate the code to retrieve the data from the Apify YouTube node. There is no requirement for you to review or understand the code, Gummie takes care of it.
After the code is written, enter test values to confirm the outputs of the node and save.
Once saved, you can access this node in any of your flows.

## Other integrations
* https://docs.apify.com/platform/integrations/gumloop/tiktok.md
* https://docs.apify.com/platform/integrations/gumloop/instagram.md
* https://docs.apify.com/platform/integrations/gumloop/maps.md
---
# Haystack integration
**Learn how to integrate Apify with Haystack to work with web data in the Haystack ecosystem.**
***
https://haystack.deepset.ai/ is an open source framework for building production-ready LLM applications, agents, advanced retrieval-augmented generative pipelines, and state-of-the-art search systems that work intelligently over large document collections. For more information on Haystack, visit its https://docs.haystack.deepset.ai/docs/intro.
In this example, we'll use the https://apify.com/apify/website-content-crawler Actor, which can deeply crawl websites such as documentation sites, knowledge bases, or blogs, and extract text content from the web pages. Then, we'll use the `OpenAIDocumentEmbedder` to compute text embeddings and the `InMemoryDocumentStore` to store documents in a temporary in-memory database. The last step will be to retrieve the most similar documents.
This example uses the Apify-Haystack Python integration published on https://pypi.org/project/apify-haystack/. Before we start with the integration, we need to install all dependencies:
pip install apify-haystack haystack-ai
Import all required packages:
from haystack import Document, Pipeline from haystack.components.embedders import OpenAIDocumentEmbedder, OpenAITextEmbedder from haystack.components.preprocessors import DocumentCleaner, DocumentSplitter from haystack.components.retrievers import InMemoryBM25Retriever, InMemoryEmbeddingRetriever from haystack.components.writers import DocumentWriter from haystack.document_stores.in_memory import InMemoryDocumentStore from haystack.utils.auth import Secret
from apify_haystack import ApifyDatasetFromActorCall
Find your https://console.apify.com/account/integrations and https://platform.openai.com/account/api-keys and initialize these into environment variable:
import os
os.environ["APIFY_API_TOKEN"] = "YOUR-APIFY-API-TOKEN" os.environ["OPENAI_API_KEY"] = "YOUR-OPENAI-API-KEY"
First, you need to create a document loader that will crawl the haystack website using the Website Content Crawler:
document_loader = ApifyDatasetFromActorCall( actor_id="apify/website-content-crawler", run_input={ "maxCrawlPages": 3, # limit the number of pages to crawl "startUrls": [{"url": "https://haystack.deepset.ai/"}], }, dataset_mapping_function=lambda item: Document(content=item["text"] or "", meta={"url": item["url"]}), )
You can learn more about input parameters on the https://apify.com/apify/website-content-crawler/input-schema. The dataset mapping function is described in more detail in the https://colab.research.google.com/github/deepset-ai/haystack-cookbook/blob/main/notebooks/apify_haystack_rag.ipynb.
Next, you can utilize the https://docs.haystack.deepset.ai/docs/pipelines, which helps you connect several processing components together. I n this example, we connect the document loader with the document splitter, document embedder, and document writer components.
document_store = InMemoryDocumentStore()
document_splitter = DocumentSplitter(split_by="word", split_length=150, split_overlap=50) document_embedder = OpenAIDocumentEmbedder() document_writer = DocumentWriter(document_store)
pipe = Pipeline() pipe.add_component("document_loader", document_loader) pipe.add_component("document_splitter", document_splitter) pipe.add_component("document_embedder", document_embedder) pipe.add_component("document_writer", document_writer)
pipe.connect("document_loader", "document_splitter") pipe.connect("document_splitter", "document_embedder") pipe.connect("document_embedder", "document_writer")
Run all the components in the pipeline:
pipe.run({})
Crawling may take some time
The Actor call may take some time as it crawls the Haystack website.
After running the pipeline code, you can print the results
print(f"Added {document_store.count_documents()} to vector from Website Content Crawler")
print("Retrieving documents from the document store using BM25") print("query='Haystack'") bm25_retriever = InMemoryBM25Retriever(document_store) for doc in bm25_retriever.run("Haystack", top_k=1)["documents"]: print(doc.content)
If you want to test the whole example, you can simply create a new file, `apify_integration.py`, and copy the whole code into it.
import os
from haystack import Document, Pipeline from haystack.components.embedders import OpenAIDocumentEmbedder, OpenAITextEmbedder from haystack.components.preprocessors import DocumentSplitter from haystack.components.retrievers import InMemoryBM25Retriever, InMemoryEmbeddingRetriever from haystack.components.writers import DocumentWriter from haystack.document_stores.in_memory import InMemoryDocumentStore
from apify_haystack import ApifyDatasetFromActorCall
os.environ["APIFY_API_TOKEN"] = "YOUR-APIFY-API-TOKEN" os.environ["OPENAI_API_KEY"] = "YOUR-OPENAI-API-KEY"
document_loader = ApifyDatasetFromActorCall( actor_id="apify/website-content-crawler", run_input={ "maxCrawlPages": 3, # limit the number of pages to crawl "startUrls": [{"url": "https://haystack.deepset.ai/"}], }, dataset_mapping_function=lambda item: Document(content=item["text"] or "", meta={"url": item["url"]}), )
document_store = InMemoryDocumentStore() print(f"Initialized InMemoryDocumentStore with {document_store.count_documents()} documents")
document_splitter = DocumentSplitter(split_by="word", split_length=150, split_overlap=50) document_embedder = OpenAIDocumentEmbedder() document_writer = DocumentWriter(document_store)
pipe = Pipeline() pipe.add_component("document_loader", document_loader) pipe.add_component("document_splitter", document_splitter) pipe.add_component("document_embedder", document_embedder) pipe.add_component("document_writer", document_writer)
pipe.connect("document_loader", "document_splitter") pipe.connect("document_splitter", "document_embedder") pipe.connect("document_embedder", "document_writer")
print("\nCrawling will take some time ...") print("You can visit https://console.apify.com/actors/runs to monitor the progress\n")
pipe.run({}) print(f"Added {document_store.count_documents()} to vector from Website Content Crawler")
print("\n ### Retrieving documents from the document store using BM25 ###\n") print("query='Haystack'\n")
bm25_retriever = InMemoryBM25Retriever(document_store)
for doc in bm25_retriever.run("Haystack", top_k=1)["documents"]: print(doc.content)
print("\n ### Retrieving documents from the document store using vector similarity ###\n") retrieval_pipe = Pipeline() retrieval_pipe.add_component("embedder", OpenAITextEmbedder()) retrieval_pipe.add_component("retriever", InMemoryEmbeddingRetriever(document_store, top_k=1))
retrieval_pipe.connect("embedder.embedding", "retriever.query_embedding")
results = retrieval_pipe.run({"embedder": {"text": "What is Haystack?"}})
for doc in results["retriever"]["documents"]: print(doc.content)
To run it, you can use the following command: `python apify_integration.py`
## Resources
* https://haystack.deepset.ai/integrations/apify
* https://github.com/apify/apify-haystack
* https://haystack.deepset.ai/cookbook/apify_haystack_rag
* https://haystack.deepset.ai/cookbook/apify_haystack_rag_web_browser
* https://haystack.deepset.ai/cookbook/apify_haystack_instagram_comments_analysis
---
# IFTTT integration
**Connect Apify Actors with IFTTT to automate workflows using Actor run events, data queries, and task actions.**
***
https://ifttt.com is a service that helps you create automated workflows called Applets. With the https://ifttt.com/apify, you can connect your Apify Actors to hundreds of services like Twitter, Gmail, Google Sheets, Slack, and more.
This guide shows you how to integrate Apify Actors with IFTTT to build automated workflows. You'll learn how to create IFTTT Applets that can be triggered by Apify events or that can execute Apify tasks.
An IFTTT Applet consists of three key parts:
* A *trigger* that starts the workflow
* Optional *queries* that retrieve data
* One or more *actions* that execute when the Applet runs
The Apify integration lets you trigger workflows when an Actor or task run finishes, start Actor or task runs from other triggers, or retrieve data from datasets and key-value stores.
## Prerequisites
Before using the Apify integration with IFTTT, you need:
* An https://console.apify.com/
* An https://ifttt.com/
## Connect Apify with IFTTT
To connect your Apify account to IFTTT:
1. Visit the https://ifttt.com/apify on IFTTT.
2. Click the **Connect** button.
3. When redirected to the Apify login page, sign in to your Apify account.

## Create an Applet with Apify
### Create an Applet
To create an Applet that starts when Apify event occurs:
1. Go to the https://ifttt.com/explore section on IFTTT.
2. Click the **Create** button.
3. In the **If this** section, click **Add**.
4. Search for and select **Apify** in the service list.

1. Select a trigger from the available options:
* **Actor Run Finished**: Triggers when a selected Actor run completes
* **Task Run Finished**: Triggers when a selected Actor task run completes

1. Configure the trigger by selecting the specific Actor or task.
2. Click **Create trigger** to continue.
In case you didn't connect to the Apify account, you will be prompted to do so when you select a trigger.
### Set up an Apify Action
To use Apify as an action in your Applet:
1. In the **Then That** section of your Applet, click **Add**.
2. Search for and select **Apify**.
3. Choose an action:
* **Run Actor**: Starts an Actor run
* **Run Task**: Starts an Actor Task run

1. Select the Actor or task you want to use from the dropdown menu.
note
IFTTT displays up to 50 recent items in a dropdown. If your Actor or task isn't visible, try using it at least once via API or in the Apify Console to make it appear in the list.

1. Configure the action parameters:
| Parameter | Description | Example Values |
| --------------------------- | ------------------------------------------------------------------------------------------------------------------------------------------------------------------------ | --------------------- |
| **Wait until run finishes** | Defines how the Actor should be executed. | `yes`, `no` |
| **Input overrides** | JSON input that overrides the Actor's default input. | `{"key": "value"}` |
| **Build** | Specifies the Actor build to run. Can be a build tag or build number. See https://docs.apify.com/platform/actors/running/runs-and-builds.md#builds for more information. | `0.2.10`, `version-0` |
| **Memory** | Memory limit for the run in megabytes. See https://docs.apify.com/platform/actors/running/usage-and-resources.md#memory for more information. | `256` |
2. Click **Create action** to finish setting up the action.

1. Give your Applet a name and click **Finish** to save it.
## Monitor your Applet
To check if your Applet is working properly:
1. Go to your Applet's detail page.
2. Clicke the **View activity** button to see the execution history.

## Available triggers, actions, and queries
### Triggers
* **Actor Run Finished**: Activates when a selected Actor run completes
* **Task Run Finished**: Activates when a selected Actor task run completes
### Actions
* **Run Actor**: Starts a specified Actor with customizable parameters
* **Run Task**: Executes a specified Actor task
### Queries
* **Get Dataset Items**: Retrieves items from a https://docs.apify.com/platform/storage/dataset.md
* **Scrape Single URL**: Runs a scraper for a specified website and returns its content
* **Get Key-Value Store Record**: Retrieves a value from a https://docs.apify.com/platform/storage/key-value-store.md
## Troubleshooting
* Ensure your JSON inputs in the "Input overrides" field are valid and properly formatted.
* If an Applet fails to trigger, check your Apify API token permissions.
If you have any questions or need help, feel free to reach out to us on our https://discord.com/invite/jyEM2PRvMU.
---
# Integrate with Apify
If you are building a service and your users could benefit from integrating with Apify or vice versa, we would love to hear from you! Contact us at mailto:integrations@apify.com to discuss potential collaboration. We are always looking for ways to make our platform more useful and powerful for our users.
## Why integrate with Apify
Apify is the leading platform for web scraping, AI agents, and automation tools. By integrating Apify into your platform, you enable users to incorporate real-time, structured data from the web with zero scraping infrastructure on your side.
https://apify.com/store contains thousands of pre-built Actors, ready-made tools for web scraping and automation.
## Integration types
An Apify integration can be *general*, allowing users to integrate any Actor from Apify Store into their workflows (or their own Actors), or *Actor-specific*, enabling targeted automation like integrating https://apify.com/apify/instagram-scraper for use cases like social media monitoring.
### General integrations
General integrations allow users to integrate Actors into their workflows by connecting Apify with other platforms. Examples include:
* https://docs.apify.com/platform/integrations/zapier.md integration allows Zapier users to enrich their automation workflows with data from the web or to add additional Actions performed by https://apify.com/store.
* https://docs.apify.com/platform/integrations/keboola.md integration enables Keboola users to easily pull data crawled from the web into their data pipelines.
### Actor-specific integrations
Actor-specific integrations are designed for targeted use cases. While they work similarly to general integrations, they help users find the right Apify tools more easily and provide a better experience. Examples include:
* https://www.make.com/en/integrations/apify-instagram-scraper
* https://www.lindy.ai/integrations/instagram
For more examples both general and Actor-specific, check https://docs.apify.com/platform/integrations.md.
## Integrating with Apify
To integrate your service with Apify, you have two options:
* Build an external integration using the https://docs.apify.com/api/v2
* Build an https://docs.apify.com/platform/actors that will be used as integration within https://console.apify.com

### Building an integration Actor
One way to reach out to Apify users is directly within https://console.apify.com. To do that, you need to build an integrable Actor that can be piped into other Actors to upload existing data into a database. This can then be easily configured within Apify Console. Follow the https://docs.apify.com/platform/integrations/actors/integration-ready-actors.md.
### Building an external integration
An alternative way is to let your users manage the connection directly on your side using https://docs.apify.com/api/v2 and our API clients for https://docs.apify.com/api/client/js or https://docs.apify.com/api/client/python. This way, users can manage the connection directly from your service.

### Authentication methods
Apify supports two main authentication methods for secure API access.
*OAuth 2.0* - Use OAuth 2.0 to allow users to authorize your integration without sharing their credentials.
*API token* - Apify user generates personal API token from Apify account settings page. For more information, see https://docs.apify.com/platform/integrations/api#api-token.
### API implementation
To build an integration, core API endpoints can be mapped as **actions and triggers** inside your platform.
#### Action endpoints
##### Run an Actor
Triggers the execution of any Apify Actor by ID, allowing users to start custom or public web scraping and automation Actors with specified input parameters.
Recommended features:
* Select Actor: The Actor list will be pre-populated with Actors that the user created or used, using the https://docs.apify.com/api/v2/acts-get and enriched with Actors from the store, which the user has not run already using https://docs.apify.com/api/v2/store-get.
* Synchronous vs. asynchronous run: flow will wait until the run/task finishes (consider a timeout on your platform side)
* Input UI: upon selecting an Actor, dynamically display specific Actor input and preload default example values based on the Actor Input schema. Alternatively, allow users to insert a JSON input for the Actor.
* Additionally, it should include the option to choose https://docs.apify.com/platform/actors/running/runs-and-builds, https://docs.apify.com/platform/actors/running/usage-and-resources#memory, and https://docs.apify.com/platform/actors/running/usage-and-resources#memory.
* Field mapping: allowing users to map fields to data acquired in previous steps of the workflow.
##### Run a task
Starts a predefined task (a saved Actor configuration), making it easy for users to run recurring or templated workflows without redefining inputs each time.
Recommended features:
* *Select task*: The task list will be pre-populated with tasks that the user created, using the https://docs.apify.com/api/v2/actor-tasks-get API.
* *Synchronous vs. asynchronous run*: the flow will wait until the run/task finishes (considering timeout on your platform side)
* *JSON input field*: possibility to add a JSON input to override the task input.
##### Get dataset items
Fetches structured results (JSON, CSV, etc.) generated by a previously run Actor or task, which can be used as input for further workflow steps.
Recommended features:
* *Dataset*: Dropdown (user's datasets) or ID/String input. Populated via https://docs.apify.com/api/v2/datasets-get.
* *Limit (optional)*: The maximum number of dataset items to fetch. If empty, the default limit will be used.
* *Offset (optional)*: The offset in the dataset from where to start fetching the items. If empty, it will be from the beginning.
##### Get a key-value store item
Retrieves a specific item from a key-value store, commonly used to access metadata, snapshots, logs, or one-off results generated during Actor execution.
Recommended features:
* *Key-value store*: Dropdown (user's KV stores) or ID/String input. Populated via https://docs.apify.com/api/v2/key-value-stores-get.
* *Record key*: value (string)
##### Scrape a single URL
Runs Apify's https://apify.com/apify/website-content-crawler in synchronous mode to extract structured data from a single web page - ideal for on-demand URL scraping inside agents or automation flows.
Recommended features:
* *URL*: that you intend to scrape (string)
* *Crawler type*: Dropdown menu, allowing users to choose from the following options:
* *Headless web browser* - Useful for websites with anti-scraping protections and JavaScript rendering. It recognizes common blocking patterns like CAPTCHAs and automatically retries blocked requests through new sessions.
* *Stealthy web browser (default)* - Another headless web browser with anti-blocking measures enabled. Try this if you encounter anti-bot protections while scraping.
* *Raw HTTP client* - High-performance crawling mode that uses raw HTTP requests to fetch pages. It's faster and cheaper, but might not work on all websites.
##### Universal API call
A node to send API requests to Apify, allowing advanced users to configure or query Actors, tasks, datasets, or other API endpoints programmatically.
#### Trigger endpoints
##### Watch Actor runs
Monitors the status of an Actor run by ID, useful for triggering follow-up steps once a job has completed. Triggered when a specific Actor run reaches terminal status (succeeded, failed, timed out, aborted).
Recommended features:
* *Select Actor runs to watch*: Dropdown (list of user's Actors). Populated via https://docs.apify.com/api/v2/acts-get
##### Watch task runs
Similar to watching Actor runs, this tracks the progress and completion status of a specific task run to allow event-driven actions in a workflow.
Recommended features:
* *Select Actor tasks to watch*: Dropdown (list of user's tasks). Populated via https://docs.apify.com/api/v2/actor-tasks-get.
### Pricing options
Choose between two pricing models based on your integration setup.
#### Direct user billing
Users create their own Apify accounts and are billed directly by Apify for their usage. This model gives users full control over their Apify usage and billing.
#### Whitelabel access
Users access Apify through your platform without needing an Apify account. Apify bills you based on consumption, and you factor costs into your pricing.
### Monitoring and tracking
To help Apify monitor and support your integration, every API request should identify your platform. You can do this in one of two ways:
* Preferred:
* Use the `x-apify-integration-platform` header with your platform name (e.g., make.com, zapier).
* If your platform has multiple Apify apps, also include the `x-apify-integration-app-id` header with the unique app ID.
* Alternative:
* Set a custom `User-Agent` header that identifies your platform.
These identifiers enable better analytics and support for your integration.
## Technical resources
### Apify API
https://docs.apify.com/api provides an extensive REST API that covers all the features of the Apify platform. You can download the complete OpenAPI schema of Apify API in the https://docs.apify.com/api/openapi.yaml or https://docs.apify.com/api/openapi.json formats. Apify provides official libraries for JavaScript and Python to access API.
* https://docs.apify.com/api/v2
* Client libraries
* https://docs.apify.com/api/client/js/
* https://docs.apify.com/api/client/python/
### Reference implementations
For inspiration, check out the public repositories of Apify's existing external integrations:
* Zapier
* https://docs.apify.com/platform/integrations/zapier
* https://github.com/apify/apify-zapier-integration
* Make.com
* https://docs.apify.com/platform/integrations/make
* Keboola
* https://docs.apify.com/platform/integrations/keboola
* https://github.com/apify/keboola-ex-apify/ (JavaScript)
* https://github.com/apify/keboola-gmrs/ (Actor-specific)
* Airbyte
* https://github.com/airbytehq/airbyte/tree/master/airbyte-integrations/connectors/source-apify-dataset (Python)
* Pipedream
* https://github.com/PipedreamHQ/pipedream/tree/65e79d1d66cf0f2fca5ad20a18acd001f5eea069/components/apify
For technical support, please contact us at mailto:integrations@apify.com.
---
# Keboola integration
**Integrate your Apify Actors with Keboola, a cloud-based data integration platform that consolidates data from various sources into a centralized storage.**
***
With Apify integration for https://www.keboola.com/, you can extract data from various sources using your Apify Actors and load it into Keboola for further processing, transformation, and integration with other platforms.
The Keboola integration allows you to run your Actors, fetch items from datasets, and retrieve results, all within the Keboola platform.
## Connect Apify with Keboola
To use the Apify integration on Keboola, you will need to:
* Have an https://console.apify.com/.
* Have a https://www.keboola.com/.
### Step 1: Create a new Data Source in Keboola
Once your Keboola account is ready and you are logged in, navigate to the **Components** section in the top menu and click the **Add Component** button.

In the list of available Components, find and select the **Apify** from Data Sources and click on the **Create configuration** button.

Provide a name and description for your configuration, then click the **Create Configuration** button.

### Step 2: Configure the Apify Data Source
With the new configuration created, you can now configure the data source to retrieve the needed data. Click on the **Configure Component** button to begin the setup process.

#### Choose an action
In the next step, you can choose the action you want to perform:
* **Run Actor**: This action runs the selected Actor, waits until it finishes, and then pushes all items from the default dataset to Keboola Storage.
* **Retrieve dataset items from the last Actor run** - This action takes the dataset of a specific Actor's last run.
* **Run Task** - This action runs the selected task, waits until it finishes, and then pushes all items from the default dataset to Keboola Storage.
* **Retrieve items from the last task run** - This action takes the dataset of a specific task last run.
* **Retrieve items from Dataset**: This action takes the dataset ID or dataset name and retrieves all items from that dataset.

#### Authentication
After selecting the action, you will need to provide your Apify API credentials. You can find these credentials on your Apify account page by navigating to **Settings > Integrations** and copying them into the provided form.

#### Specifications
In the specifications step, you can set up various options for your Actor run:
* **Actor**: Select the Actor you want to run from your Apify account.
* **Input Table**: Choose a table from the Keboola platform to be sent to the Actor as input data.
* **Output field**: Comma-separated list of fields to be picked from the dataset.
* **Memory**: Adjust the memory settings if needed (the default values can be kept).
* **Build**: Adjust if you want to run a specific build of an Actor. Tag or number of the build to run.
* **Actor Input**: Pass any JSON data as input to the Actor.
Once you have filled in all the necessary options, click the **Save** button to save your configuration.

### Step 3: Run the configured Data Source
After your data source has been configured, you can run it by clicking the **Run** button in the upper-right corner of your configuration.

You can monitor the progress of your run in the job detail section on the right-hand side of the page.
Once the run finishes successfully, you can find the results by following the link in the Storage Stats section of the job detail page.
## Next steps
With your data now in Keboola, you can integrate it with dozens of other services that Keboola supports. Check out the https://www.keboola.com/product/integrations to explore your options.
You can set up a writer for a selected service using Keboola Writer or create https://help.keboola.com/orchestrator/ to transform, merge, or split your data.
Keboola Helper
In Apify Store, you'll find the https://apify.com/drobnikj/keboola-input-mapping, designed to streamline the integration between Apify and Keboola. This helper Actor parses the input table received from the Apify Keboola Data Source and maps the data into the required input format for another task or Actor within the Keboola platform.
If you have any questions or need assistance, feel free to contact us at mailto:info@apify.com, through our live chat, or in our https://discord.com/invite/jyEM2PRvMU.
---
# 🦜🔗 LangChain integration
**Learn how to integrate Apify with LangChain, in order to feed vector databases and LLMs with data crawled from the web.**
***
> For more information on LangChain visit its https://python.langchain.com/docs/.
In this example, we'll use the https://apify.com/apify/website-content-crawler Actor, which can deeply crawl websites such as documentation, knowledge bases, help centers, or blogs and extract text content from the web pages. Then we feed the documents into a vector index and answer questions from it.
This example demonstrates how to integrate Apify with LangChain using the Python language. If you prefer to use JavaScript, you can follow the https://js.langchain.com/docs/integrations/document_loaders/web_loaders/apify_dataset/.
Before we start with the integration, we need to install all dependencies:
`pip install langchain langchain-openai langchain-apify`
After successful installation of all dependencies, we can start writing code.
First, import all required packages:
import os
from langchain.indexes import VectorstoreIndexCreator from langchain_apify import ApifyWrapper from langchain_core.documents import Document from langchain_core.vectorstores import InMemoryVectorStore from langchain_openai import ChatOpenAI from langchain_openai.embeddings import OpenAIEmbeddings
Find your https://console.apify.com/account/integrations and https://platform.openai.com/account/api-keys and initialize these into environment variable:
os.environ["OPENAI_API_KEY"] = "Your OpenAI API key" os.environ["APIFY_API_TOKEN"] = "Your Apify API token"
Run the Actor, wait for it to finish, and fetch its results from the Apify dataset into a LangChain document loader.
Note that if you already have some results in an Apify dataset, you can load them directly using `ApifyDatasetLoader`, as shown in https://github.com/langchain-ai/langchain/blob/fe1eb8ca5f57fcd7c566adfc01fa1266349b72f3/docs/modules/indexes/document_loaders/examples/apify_dataset.ipynb. In that notebook, you'll also find the explanation of the `dataset_mapping_function`, which is used to map fields from the Apify dataset records to LangChain `Document` fields.
apify = ApifyWrapper() llm = ChatOpenAI(model="gpt-4o-mini")
loader = apify.call_actor( actor_id="apify/website-content-crawler", run_input={"startUrls": [{"url": "https://python.langchain.com/docs/get_started/introduction"}], "maxCrawlPages": 10, "crawlerType": "cheerio"}, dataset_mapping_function=lambda item: Document( page_content=item["text"] or "", metadata={"source": item["url"]} ), )
Crawling may take some time
The Actor call may take some time as it crawls the LangChain documentation website.
Initialize the vector index from the crawled documents:
index = VectorstoreIndexCreator( vectorstore_cls=InMemoryVectorStore, embedding=OpenAIEmbeddings() ).from_loaders([loader])
And finally, query the vector index:
query = "What is LangChain?" result = index.query_with_sources(query, llm=llm)
print("answer:", result["answer"]) print("source:", result["sources"])
If you want to test the whole example, you can simply create a new file, `langchain_integration.py`, and copy the whole code into it.
import os
from langchain.indexes import VectorstoreIndexCreator from langchain_apify import ApifyWrapper from langchain_core.documents import Document from langchain_core.vectorstores import InMemoryVectorStore from langchain_openai import ChatOpenAI from langchain_openai.embeddings import OpenAIEmbeddings
os.environ["OPENAI_API_KEY"] = "Your OpenAI API key" os.environ["APIFY_API_TOKEN"] = "Your Apify API token"
apify = ApifyWrapper() llm = ChatOpenAI(model="gpt-4o-mini")
print("Call website content crawler ...") loader = apify.call_actor( actor_id="apify/website-content-crawler", run_input={"startUrls": [{"url": "https://python.langchain.com/docs/get_started/introduction"}], "maxCrawlPages": 10, "crawlerType": "cheerio"}, dataset_mapping_function=lambda item: Document(page_content=item["text"] or "", metadata={"source": item["url"]}), ) print("Compute embeddings...") index = VectorstoreIndexCreator( vectorstore_cls=InMemoryVectorStore, embedding=OpenAIEmbeddings() ).from_loaders([loader]) query = "What is LangChain?" result = index.query_with_sources(query, llm=llm)
print("answer:", result["answer"]) print("source:", result["sources"])
To run it, you can use the following command: `python langchain_integration.py`
After running the code, you should see the following output:
answer: LangChain is a framework designed for developing applications powered by large language models (LLMs). It simplifies the entire application lifecycle, from development to productionization and deployment. LangChain provides open-source components a nd integrates with various third-party tools, making it easier to build and optimize applications using language models.
source: https://python.langchain.com/docs/get_started/introduction
LangChain is a standard interface through which you can interact with a variety of large language models (LLMs). It provides modules you can use to build language model applications as well as chains and agents with memory capabilities.
You can use all of Apify’s Actors as document loaders in LangChain. For example, to incorporate web browsing functionality, you can use the https://apify.com/apify/rag-web-browser. This allows you to either crawl and scrape top pages from Google Search results or directly scrape text content from a URL and return it as Markdown. To set this up, change the `actor_id` to `apify/rag-web-browser` and specify the `run_input`.
loader = apify.call_actor( actor_id="apify/rag-web-browser", run_input={"query": "apify langchain web browser", "maxResults": 3}, dataset_mapping_function=lambda item: Document(page_content=item["text"] or "", metadata={"source": item["metadata"]["url"]}), ) print("Documents:", loader.load())
Similarly, you can use other Apify Actors to load data into LangChain and query the vector index.
## Resources
* https://python.langchain.com/docs/get_started/introduction
* https://python.langchain.com/docs/integrations/document_loaders/apify_dataset
* https://python.langchain.com/docs/integrations/providers/apify
---
# Langflow integration
**Learn how to integrate Apify with Langflow to run complex AI agent workflows.**
***
## What is Langflow
https://langflow.org/ is a low-code, visual tool that enables developers to build powerful AI agents and workflows that can use any API, models, or databases.
Explore Langflow
For more information on Langflow, visit its https://docs.langflow.org/.
## How to use Apify with Langflow
This guide will demonstrate two different ways to use Apify Actors with Langflow:
* **Calling Apify Actors in Langflow**: We will use the https://apify.com/apify/rag-web-browser Actor to search Google for a query and extract the search results.
* **Building a flow to search for a company's social media profiles**: We will use the https://apify.com/apify/google-search-scraper Actor to search the web for social media profiles of a given company. Then, we will use the https://apify.com/clockworks/free-tiktok-scraper Actor to extract data from the TikTok profiles.
### Prerequisites
* **Apify API token**: To use Apify Actors in Langflow, you need an Apify API token. If you don't have one, you can learn how to get it in the https://docs.apify.com/platform/integrations/api.
* **OpenAI API key**: To work with agents in Langflow, you need an OpenAI API key. If you don't have one, you can get it from the https://platform.openai.com/account/api-keys.
#### Langflow
Cloud vs local setup
Langflow can either be installed locally or used in the cloud. The cloud version is available on the http://langflow.org/ website. If you are using the cloud version, you can skip the installation step, and go straight to
First, install the Langflow platform using Python package and project manager https://docs.astral.sh/uv/:
uv pip install langflow
After installing Langflow, you can start the platform:
uv run langflow run
When the platform is started, open the Langflow UI using `http://127.0.0.1:7860` in your browser.
> Other installation methods can be found in the https://docs.langflow.org/get-started-installation.
### Creating a new flow
On the Langflow welcome screen, click the **New Flow** button and then create **Blank Flow**: 
Now, you can start building your flow.
### Calling Apify Actors in Langflow
To call Apify Actors in Langflow, you need to add the **Apify Actors** component to the flow. From the bundle menu, add **Apify Actors** component: 
Next, configure the Apify Actors components. First, input your API token (learn how to get it at https://docs.apify.com/platform/integrations/api). Then, set the Actor ID of the component to `apify/rag-web-browser` to use the https://apify.com/apify/rag-web-browser. Set the **Run input** field to pass arguments to the Actor run, allowing it to search Google with the query `"what is monero?"` (full Actor input schema can be found in the https://apify.com/apify/rag-web-browser/input-schema):
{"query": "what is monero?", "maxResults": 3}
Click **Run**. 
After the run finishes, click **Output** to view the results. 
The output should look similar to this: 
To filter only the `metadata` and `markdown` fields, set **Output fields** to `metadata,markdown`. Additionally, enable **Flatten output** by setting it to `true`. This will output only the metadata and text content from the search results.
> Flattening is necessary when you need to access nested dictionary fields in the output data object; they cannot be accessed directly otherwise in the Data object.

When you run the component again, the output contains only the `markdown` and flattened `metadata` fields:

Now that you understand how to call Apify Actors, let's build a practical example where you search for a company's social media profiles and extract data from them.
### Building a flow to search for a company's social media profiles
Create a new flow and add two **Apify Actors** components from the menu.
Input your API token (learn how to get it in the https://docs.apify.com/platform/integrations/api) and set the Actor ID of the first component to `apify/google-search-scraper` and the second one to `clockworks/free-tiktok-scraper`: 
Add the **Agent** component from the menu and set your OpenAI API key (get it from the https://platform.openai.com/account/api-keys):
Optimize Agent results
For better results, switch the model to `gpt-4o` instead of `gpt-4o-mini` in the Agent configuration

To be able to interact with the agent, add **Chat Input** and **Chat Output** components from the menu and connect them to the Agent component **Input** and **Response**. Then connect both Apify Actor components **Tool** outputs to the Agent component **Tools** input so that the agent can call the Apify Actors. The final flow that can search the web for a company's social media profiles and extract data from them should look like this: 
Click the **Playground** button and chat with the agent to test the flow: 
Here is an example agent output for the following query:
find tiktok profile of company openai using google search and then show me the profile bio and their latest video

---
# 🦜🔘➡️ LangGraph integration
**Learn how to build AI Agents with Apify and LangGraph.**
***
## What is LangGraph
https://www.langchain.com/langgraph is a framework designed for constructing stateful, multi-agent applications with Large Language Models (LLMs), allowing developers to build complex AI agent workflows that can leverage tools, APIs, and databases.
Explore LangGraph
For more in-depth details on LangGraph, check out its https://langchain-ai.github.io/langgraph/.
## How to use Apify with LangGraph
This guide will demonstrate how to use Apify Actors with LangGraph by building a ReAct agent that will use the https://apify.com/apify/rag-web-browser Actor to search Google for TikTok profiles and https://apify.com/clockworks/free-tiktok-scraper Actor to extract data from the TikTok profiles to analyze the profiles.
### Prerequisites
* **Apify API token**: To use Apify Actors in LangGraph, you need an Apify API token. If you don't have one, you can learn how to obtain it in the https://docs.apify.com/platform/integrations/api.
* **OpenAI API key**: In order to work with agents in LangGraph, you need an OpenAI API key. If you don't have one, you can get it from the https://platform.openai.com/account/api-keys.
* **Python packages**: You need to install the following Python packages:
pip install langgraph langchain-apify langchain-openai
### Building the TikTok profile search and analysis agent
First, import all required packages:
import os
from langchain_apify import ApifyActorsTool from langchain_core.messages import HumanMessage from langchain_openai import ChatOpenAI from langgraph.prebuilt import create_react_agent
Next, set the environment variables for the Apify API token and OpenAI API key:
os.environ["OPENAI_API_KEY"] = "Your OpenAI API key" os.environ["APIFY_API_TOKEN"] = "Your Apify API token"
Instantiate LLM and Apify Actors tools:
llm = ChatOpenAI(model="gpt-4o-mini")
browser = ApifyActorsTool("apify/rag-web-browser") tiktok = ApifyActorsTool("clockworks/free-tiktok-scraper")
Create the ReAct agent with the LLM and Apify Actors tools:
tools = [browser, tiktok] agent_executor = create_react_agent(llm, tools)
Finally, run the agent and stream the messages:
for state in agent_executor.stream( stream_mode="values", input={ "messages": [ HumanMessage(content="Search the web for OpenAI TikTok profile and analyze their profile.") ] }): state["messages"][-1].pretty_print()
Search and analysis may take some time
The agent tool call may take some time as it searches the web for OpenAI TikTok profiles and analyzes them.
You will see the agent's messages in the console, which will show each step of the agent's workflow.
================================ Human Message =================================
Search the web for OpenAI TikTok profile and analyze their profile. ================================== AI Message ================================== Tool Calls: apify_actor_apify_rag-web-browser (call_y2rbmQ6gYJYC2lHzWJAoKDaq) Call ID: call_y2rbmQ6gYJYC2lHzWJAoKDaq Args: run_input: {"query":"OpenAI TikTok profile","maxResults":1}
...
================================== AI Message ==================================
The OpenAI TikTok profile is titled "OpenAI (@openai) Official." Here are some key details about the profile:
- Followers: 592.3K
- Likes: 3.3M
- Description: The profile features "low key research previews" and includes videos that showcase their various projects and research developments.
Profile Overview:
- Profile URL: OpenAI TikTok Profile
- Content Focus: The posts primarily involve previews of OpenAI's research and various AI-related innovations.
...
If you want to test the whole example, you can simply create a new file, `langgraph_integration.py`, and copy the whole code into it.
import os
from langchain_apify import ApifyActorsTool from langchain_core.messages import HumanMessage from langchain_openai import ChatOpenAI from langgraph.prebuilt import create_react_agent
os.environ["OPENAI_API_KEY"] = "Your OpenAI API key" os.environ["APIFY_API_TOKEN"] = "Your Apify API token"
llm = ChatOpenAI(model="gpt-4o-mini")
browser = ApifyActorsTool("apify/rag-web-browser") tiktok = ApifyActorsTool("clockworks/free-tiktok-scraper")
tools = [browser, tiktok] agent_executor = create_react_agent(llm, tools)
for state in agent_executor.stream( stream_mode="values", input={ "messages": [ HumanMessage(content="Search the web for OpenAI TikTok profile and analyze their profile.") ] }): state["messages"][-1].pretty_print()
## Resources
* https://docs.apify.com/platform/actors
* https://langchain-ai.github.io/langgraph/how-tos/create-react-agent/
---
# Lindy integration
**Learn how to integrate your Apify Actors with Lindy.**
***
https://www.lindy.ai/ is an AI-powered automation platform that lets you create intelligent workflows and automate complex tasks. By integrating Apify with Lindy, you can leverage Apify's web scraping capabilities within Lindy's AI-driven automation workflows to extract data, monitor websites, and trigger actions based on scraped information.
## Prerequisites
To use the Apify integration with Lindy, you need:
* A Lindy account with access to premium actions (required for certain integrations or higher usage limits).
## How to Run an Apify Actor from Lindy
This section demonstrates how to integrate Apify's data extraction capabilities into Lindy's AI automation.
1. Start a new Lindy workflow by clicking the **+ New Lindy** button.

Select **Start from scratch** to build a custom workflow.

2. Choose a trigger that will initiate your automation. For this demonstration, we will select **Chat with Lindy/Message received**. This allows you to trigger the Apify Actor simply by sending a message to Lindy.
 
3. After setting the trigger, select **Perform an Action**.

In the action search box, search for "Apify" or navigate to the **Scrapers** category and choose **Run Actor**.

4. Configure the Apify "Run Actor" Module. In the Apify "Run Actor" configuration, choose the Actor you want to execute. For example, select the **Instagram profile scraper**.

Actor Availability
You have access to thousands of Actors available on the https://apify.com/store. Please note that Actors using the *rental pricing model* are not available for use with this integration. For details on Actor pricing models, refer to our https://docs.apify.com/platform/actors/publishing/monetize.md#rental-pricing-model.
This establishes the fundamental workflow:*Chatting with Lindy can now trigger the Apify Instagram Profile Scraper.*
### Extending Your Workflow
Lindy offers different triggers (e.g., *email received*, *Slack message received*, etc.) and actions beyond running an Actor.
After the Apify Actor run is initiated, you can define what happens next, depending on your needs:
* **When Actor Run Starts:**
* You might want to send a notification.
* Log the start time.
* Run a pre-processing step.
* **After Results Are Available:** Once the Apify Actor completes and its results are ready, you can:
* Retrieve the Actor's output data from its dataset.
* Pass the extracted data to Lindy's AI for summarization, analysis, content generation, or other AI-driven tasks.
* Route the data to other services (e.g., Google Sheets, databases, email notifications) using Lindy's action modules.
## Available Actions in Lindy for Apify
While Lindy's specific module names may evolve, the core Apify functionalities typically exposed are:
* **Run Actor:** Initiates a specific Apify Actor and can optionally wait for its completion.
---
# LlamaIndex integration
**Learn how to integrate Apify with LlamaIndex to feed vector databases and LLMs with data crawled from the web.**
***
> For more information on LlamaIndex, visit its https://docs.llamaindex.ai/en/stable/.
## What is LlamaIndex?
LlamaIndex is a platform that allows you to create and manage vector databases and LLMs.
## How to integrate Apify with LlamaIndex?
You can integrate Apify dataset or Apify Actor with LlamaIndex.
Before we start with the integration, we need to install all dependencies:
`pip install apify-client llama-index-core llama-index-readers-apify`
After successfully installing all dependencies, we can start writing Python code.
### Apify Actor
To use the Apify Actor, import `ApifyActor` and `Document`, and set your https://docs.apify.com/platform/integrations/api#api-token in the code. The following example uses the https://apify.com/apify/website-content-crawler Actor to crawl an entire website, which will extract text content from the web pages. The extracted text is formatted as a llama\_index `Document` and can be fed to a vector store or language model like GPT.
from llama_index.core import Document from llama_index.readers.apify import ApifyActor
reader = ApifyActor("")
documents = reader.load_data( actor_id="apify/website-content-crawler", run_input={ "startUrls": [{"url": "https://docs.llamaindex.ai/en/latest/"}] }, dataset_mapping_function=lambda item: Document( text=item.get("text"), metadata={ "url": item.get("url"), }, ), )
### Apify Dataset
To download Apify Dataset, import `ApifyDataset` and `Document` and load the dataset using a dataset ID.
from llama_index.core import Document from llama_index.readers.apify import ApifyDataset
reader = ApifyDataset("") documents = reader.load_data( dataset_id="my_dataset_id", dataset_mapping_function=lambda item: Document( text=item.get("text"), metadata={ "url": item.get("url"), }, ), )
## Resources
* https://llamahub.ai/l/readers/llama-index-readers-apify
* https://docs.llamaindex.ai/en/stable/
---
# Make integration
**Learn how to integrate your Apify Actors with Make.**
***
https://www.make.com/ *(formerly Integromat)* allows you to create scenarios where you can integrate various services (modules) to automate and centralize jobs. Apify has its own module you can use to run Apify Actors, get notified about run statuses, and receive Actor results directly in your Make scenario.
## Connect Apify to Make
To use the Apify integration on Make, you will need:
* An https://console.apify.com/.
* A Make account (and a https://www.make.com/en/help/scenarios/creating-a-scenario).
### Add the Apify module to scenario
Add the Apify module to your scenario. You can find this module by searching for "Apify" in the module search bar.
Next, select one of the available options under Triggers, Actions and Searches, then click on the Apify module to open its configuration window.

### Create a connection to Apify
In the Connection configuration window, you'll authorize the connection between Make and Apify. The recommended method is to use an OAuth connection. Alternatively, you can choose to connect using Apify API token:
1. You will need to provide your Apify API token in the designated field.

2. You can find this token in the Apify Console by navigating to **https://console.apify.com/settings/integrations**

3. Finally, copy your API token from Apify, paste it into the Make module, and save to create the connection.
Congratulations! You have successfully connected the Apify app and can now use it in your scenarios.
## Run an Actor or task with Output
We have two methods to run an Actor or task and retrieve its data in Make.com, depending on your needs and the complexity of the Actor:
* **Synchronous run using the action module**
* **Asynchronous run using the trigger module**
info
Make.com imposes a hard timeout for synchronous runs, the timeout varies based on your plan. If the Actor or task takes longer than the timeout to complete, the data will not be fully returned. If you anticipate that the Actor run will exceed the timeout, use the asynchronous method with a trigger module instead.
The primary difference between the two methods is that the synchronous run waits for the Actor or task to finish and retrieves its output using the "Get Dataset Items" module. By contrast, the asynchronous run watches for the run of an Actor or task (which could have been triggered from another scenario, manually from Apify console or elsewhere) and gets its output once it finishes.
### Synchronous run using the action module
In this example, we will demonstrate how to run an Actor synchronously and export the output to Google Sheets. The same principle applies to module that runs a task.
#### Step 1: Add the Apify "Run an Actor" Module
First, ensure that you have . Next, add the Apify module called "Run an Actor" to your scenario and configure it.
For this example, we will use the "Google Maps Review Scraper" Actor. Make sure to set the "Run synchronously" option to "Yes," so the module waits for the Actor to finish run.

#### Step 2: Add the Apify "Get Dataset Items" module
In the next step, add the "Get Dataset Items" module to your scenario, which is responsible for retrieving the output data from the Actor run.
In the "Dataset ID" field, provide the default dataset ID from the Actor run. You can find this dataset ID in the variables generated by the previous "Run an Actor" module. If the variables do not appear, run the scenario first, then check again.

#### Step 3: Add the Google Sheets "Create Spreadsheet Rows" module
Finally, add the Google Sheets "Bulk Add Rows" module to your scenario. This module will automatically create new rows in a Google Sheets file to store the Actor's output.
In the "Spreadsheet ID" field, provide the ID of the target Google Sheets file, which you can find in its URL. Configure the column range (e.g., "A-Z") and map the data retrieved from the "Get Dataset Items" module to the row values.

You’re all set! Once the scenario is started, it will run the Actor synchronously and export its output to your Google Sheets file.
### Asynchronous run using the trigger module
In this example, we will demonstrate how to run an Actor asynchronously and export its output to Google Sheets. Before starting, decide where you want to initiate the Actor run. You can do this manually via the Apify console, on a schedule, or from a separate Make.com scenario.
#### Step 1: Add the Apify "Watch Actor Runs" Module
First, ensure that you have . Next, add the Apify module called "Watch Actor Runs" to your scenario. This module will set up a webhook to listen for the finished runs of the selected Actor.
For this example, we will use the "Google Maps Review Scraper" Actor.

#### Step 2: Add the Apify "Get Dataset Items" module
Add the "Get Dataset Items" module to your scenario to retrieve the output of the Actor run.
In the "Dataset ID" field, provide the default dataset ID from the Actor run. You can find the dataset ID in the variables generated by the "Watch Actor Runs" module.

#### Step 3: Add the Google Sheets "Create Spreadsheet Rows" module
Finally, add the Google Sheets "Bulk Add Rows" module to your scenario, which will create new rows in the specified Google Sheets file to store the Actor's output.
In the "Spreadsheet ID" field, enter the ID of the target Google Sheets file, which you can find in its URL. Configure the column range (e.g., "A-Z") and map the data retrieved from the "Get Dataset Items" module to the row values.

That’s it! Once the Actor run is complete, its data will be exported to the Google Sheets file. You can initiate the Actor run via the Apify console, a scheduler, or from another Make.com scenario.
## Available modules and triggers
### Triggers
* **Watch Actor Runs:** Triggers when a selected Actor run is finished.
* **Watch Task Runs:** Triggers when a selected task run is finished.
### Actions
* **Run a Task:** Runs a selected Actor task.
* **Run an Actor:** Runs a selected Actor.
* **Scrape Single URL:** Runs a scraper for the website and returns its content as text, markdown and HTML.
* **Make an API Call:** Makes an arbitrary authorized API call.
### Searches
* **Get Dataset Items:** Retrieves items from a https://docs.apify.com/platform/storage/dataset.md.
---
# Make - AI crawling Actor integration
## Apify Scraper for AI Crawling
Apify Scraper for AI Crawling from https://apify.com/ lets you extract text content from websites to feed AI models, LLM applications, vector databases, or Retrieval Augmented Generation (RAG) pipelines. It supports rich formatting using Markdown, cleans the HTML of irrelevant elements, downloads linked files, and integrates with AI ecosystems like LangChain, LlamaIndex, and other LLM frameworks.
To use these modules, you need an https://console.apify.com and an https://docs.apify.com/platform/integrations/api#api-token. You can find your token in the https://console.apify.com/ under **Settings > Integrations**. After connecting, you can automate content extraction at scale and incorporate the results into your AI workflows.
## Connect Apify Scraper for AI Crawling
1. Create an account at https://console.apify.com/. You can sign up using your email, Gmail, or GitHub account.

2. To connect your Apify account to Make, you can use an OAuth connection (recommended) or an Apify API token. To get the Apify API token, navigate to **https://console.apify.com/settings/integrations** in the Apify Console.

3. Find your token under **Personal API tokens** section. You can also create a new API token with multiple customizable permissions by clicking on **+ Create a new token**.
4. Click the **Copy** icon next to your API token to copy it to your clipboard. Then, return to your Make scenario interface.

5. In Make, click **Add** to open the **Create a connection** dialog of the chosen Apify Scraper module.
6. In the **API token** field, paste the API token you copied from Apify. Provide a clear **Connection name**, and click **Save**.

Once connected, you can build workflows to automate website extraction and integrate results into your AI applications.
## Apify Scraper for Website Content modules
After connecting the app, you can use one of the two modules as native scrapers to extract website content.
### Standard Settings Module
The Standard Settings module is a streamlined component of the Website Content Crawler that allows you to quickly extract content from websites using optimized default settings. This module is perfect for extracting content from blogs, documentation sites, knowledge bases, or any text-rich website to feed into AI models.
#### How it works
The crawler starts with one or more **Start URLs** you provide, typically the top-level URL of a documentation site, blog, or knowledge base. It then:
* Crawls these start URLs
* Finds links to other pages on the site
* Recursively crawls those pages as long as their URL is under the start URL
* Respects URL patterns for inclusion/exclusion
* Automatically skips duplicate pages with the same canonical URL
* Provides various settings to customize crawling behavior (crawler type, max pages, depth, concurrency, etc.)
Once a web page is loaded, the Actor processes its HTML to ensure quality content extraction:
* Waits for dynamic content to load if using a headless browser
* Can scroll to a certain height to ensure all page content is loaded
* Can expand clickable elements to reveal hidden content
* Removes DOM nodes matching specific CSS selectors (like navigation, headers, footers)
* Optionally keeps only content matching specific CSS selectors
* Removes cookie warnings using browser extensions
* Transforms the page using the selected HTML transformer to extract the main content
#### Output data
For each crawled web page, you'll receive:
* *Page metadata*: URL, title, description, canonical URL
* *Cleaned text content*: The main article content with irrelevant elements removed
* *Markdown formatting*: Structured content with headers, lists, links, and other formatting preserved
* *Crawl information*: Loaded URL, referrer URL, timestamp, HTTP status
* *Optional file downloads*: PDFs, DOCs, and other linked documents
Sample output (shortened)
{ "url": "https://docs.apify.com/academy/web-scraping-for-beginners", "crawl": { "loadedUrl": "https://docs.apify.com/academy/web-scraping-for-beginners", "loadedTime": "2025-04-22T14:33:20.514Z", "referrerUrl": "https://docs.apify.com/academy", "depth": 1, "httpStatusCode": 200 }, "metadata": { "canonicalUrl": "https://docs.apify.com/academy/web-scraping-for-beginners", "title": "Web scraping for beginners | Apify Documentation", "description": "Learn the basics of web scraping with a step-by-step tutorial and practical exercises.", "languageCode": "en", "markdown": "# Web scraping for beginners\n\nWelcome to our comprehensive web scraping tutorial for beginners. This guide will take you through the fundamentals of extracting data from websites, with practical examples and exercises.\n\n## What is web scraping?\n\nWeb scraping is the process of extracting data from websites. It involves making HTTP requests to web servers, downloading HTML pages, and parsing them to extract the desired information.\n\n## Why learn web scraping?\n\n- Data collection: Gather information for research, analysis, or business intelligence\n- Automation: Save time by automating repetitive data collection tasks\n- Integration: Connect web data with your applications or databases\n- Monitoring: Track changes on websites automatically\n\n## Getting started\n\nTo begin web scraping, you'll need to understand the basics of HTML, CSS selectors, and HTTP. This tutorial will guide you through these concepts step by step.\n\n...", "text": "Web scraping for beginners\n\nWelcome to our comprehensive web scraping tutorial for beginners. This guide will take you through the fundamentals of extracting data from websites, with practical examples and exercises.\n\nWhat is web scraping?\n\nWeb scraping is the process of extracting data from websites. It involves making HTTP requests to web servers, downloading HTML pages, and parsing them to extract the desired information.\n\nWhy learn web scraping?\n\n- Data collection: Gather information for research, analysis, or business intelligence\n- Automation: Save time by automating repetitive data collection tasks\n- Integration: Connect web data with your applications or databases\n- Monitoring: Track changes on websites automatically\n\nGetting started\n\nTo begin web scraping, you'll need to understand the basics of HTML, CSS selectors, and HTTP. This tutorial will guide you through these concepts step by step.\n\n..." } }
### Advanced Settings Module
The Advanced Settings module provides complete control over the content extraction process, allowing you to fine-tune every aspect of the crawling and transformation pipeline. This module is ideal for complex websites, JavaScript-heavy applications, or when you need precise control over content extraction.
#### Key features
* *Multiple Crawler Options*: Choose between headless browsers (Playwright) or faster HTTP clients (Cheerio)
* *Custom Content Selection*: Specify exactly which elements to keep or remove
* *Advanced Navigation Control*: Set crawling depth, scope, and URL patterns
* *Dynamic Content Handling*: Wait for JavaScript-rendered content to load
* *Interactive Element Support*: Click expandable sections to reveal hidden content
* *Multiple Output Formats*: Save content as Markdown, HTML, or plain text
* *Proxy Configuration*: Use proxies to handle geo-restrictions or avoid IP blocks
* *Content Transformation Options*: Multiple algorithms for optimal content extraction
#### How it works
The Advanced Settings module provides granular control over the entire crawling process:
1. *Crawler Selection*: Choose from Playwright (Firefox/Chrome), or Cheerio based on website complexity
2. *URL Management*: Define precise scoping with include/exclude URL patterns
3. *DOM Manipulation*: Control which HTML elements to keep or remove
4. *Content Transformation*: Apply specialized algorithms for content extraction
5. *Output Formatting*: Select from multiple formats for AI model compatibility
#### Configuration options
Advanced Settings offers numerous configuration options, including:
* *Crawler Type*: Select the rendering engine (browser or HTTP client)
* *Content Extraction Algorithm*: Choose from multiple HTML transformers
* *Element Selectors*: Specify which elements to keep, remove, or click
* *URL Patterns*: Define URL inclusion/exclusion patterns with glob syntax
* *Crawling Parameters*: Set concurrency, depth, timeouts, and retries
* *Proxy Configuration*: Configure proxy settings for robust crawling
* *Output Options*: Select content formats and storage options
#### Output data
In addition to the standard output fields, Advanced Settings provides:
* *Multiple Format Options*: Content in Markdown, HTML, or plain text
* *Debug Information*: Detailed extraction diagnostics and snapshots
* *HTML Transformations*: Results from different content extraction algorithms
* *File Storage Options*: Flexible storage for HTML, screenshots, or downloaded files
Looking for more than just AI crawling? You can use other native Make apps powered by Apify:
* https://docs.apify.com/platform/integrations/make/tiktok.md
* https://docs.apify.com/platform/integrations/make/search.md
* https://docs.apify.com/platform/integrations/make/maps.md
* https://docs.apify.com/platform/integrations/make/youtube.md
* https://docs.apify.com/platform/integrations/make/amazon.md
And more! Because you can access any of thousands of our scrapers on Apify Store by using the https://www.make.com/en/integrations/apify.
---
# Make - Amazon Actor integration
## Apify Scraper for Amazon Data
The Amazon Scraper module from https://apify.com allows you to extract product, search, or category data from Amazon.
To use the module, you need an https://console.apify.com and an https://docs.apify.com/platform/integrations/api#api-token, which you can find in the Apify Console under **Settings > Integrations**. After connecting, you can automate data extraction and incorporate the results into your workflows.
## Connect Apify Scraper for Amazon Data modules to Make
1. Create an account at https://console.apify.com/. You can sign up using your email, Gmail, or GitHub account.

2. To connect your Apify account to Make, you can use an OAuth connection (recommended) or an Apify API token. To get the Apify API token, navigate to **https://console.apify.com/settings/integrations** in the Apify Console.

3. Find your token under **Personal API tokens** section. You can also create a new API token with multiple customizable permissions by clicking on **+ Create a new token**.
4. Click the **Copy** icon next to your API token to copy it to your clipboard. Then, return to your Make scenario interface.

5. In Make, click **Add** to open the **Create a connection** dialog of the chosen Apify Scraper module.
6. In the **API token** field, paste the API token you copied from Apify. Provide a clear **Connection name**, and click **Save**.

Once connected, you can build workflows to automate Amazon data extraction and integrate results into your applications.
## Apify Scraper for Amazon Data module
After connecting the app, you can use the Search module as a native scraper to extract public Amazon data. Here’s what you get:
### Extract Amazon data
Get data via https://apify.com/junglee/free-amazon-product-scraper. Fill in the URLs of products, searches, or categories you want to gather information about.
For Amazon URLs, you can extract:
* *Product title*
* *Amazon ASIN number*
* *Brand name*
* *Number of reviews*
* *Image*
* *Description*
* *Price value and currency*
Example
[ { "title": "Logitech M185 Wireless Mouse, 2.4GHz with USB Mini Receiver, 12-Month Battery Life, 1000 DPI Optical Tracking, Ambidextrous PC/Mac/Laptop - Swift Grey", "asin": "B004YAVF8I", "brand": "Logitech", "stars": 4.5, "reviewsCount": 37418, "thumbnailImage": "https://m.media-amazon.com/images/I/5181UFuvoBL._AC_SX300_SY300_QL70_FMwebp.jpg", "breadCrumbs": "Electronics›Computers & Accessories›Computer Accessories & Peripherals›Keyboards, Mice & Accessories›Mice", "description": "Logitech Wireless Mouse M185. A simple, reliable mouse with plug-and-play wireless, a 1-year battery life and 3-year limited hardware warranty.(Battery life may vary based on user and computing conditions.) System Requirements: Windows Vista Windows 7 Windows 8 Windows 10|Mac OS X 10.5 or later|Chrome OS|Linux kernel 2.6+|USB port", "price": { "value": 13.97, "currency": "$" }, "url": "https://www.amazon.com/dp/B004YAVF8I" }, { "title": "Logitech MX Master 3S - Wireless Performance Mouse with Ultra-fast Scrolling, Ergo, 8K DPI, Track on Glass, Quiet Clicks, USB-C, Bluetooth, Windows, Linux, Chrome - Graphite", "asin": "B09HM94VDS", "brand": "Logitech", "stars": 4.5, "reviewsCount": 9333, "thumbnailImage": "https://m.media-amazon.com/images/I/41+eEANAv3L.AC_SY300_SX300.jpg", "breadCrumbs": "Electronics›Computers & Accessories›Computer Accessories & Peripherals›Keyboards, Mice & Accessories›Mice", "description": "Logitech MX Master 3S Performance Wireless Mouse Introducing Logitech MX Master 3S – an iconic mouse remastered. Now with Quiet Clicks(2) and 8K DPI any-surface tracking for more feel and performance than ever before. Product details: Weight: 4.97 oz (141 g) Dimensions: 2 x 3.3 x 4.9 in (51 x 84.3 x 124.9 mm) Compatible with Windows, macOS, Linux, Chrome OS, iPadOS, Android operating systems (8) Rechargeable Li-Po (500 mAh) battery Sensor technology: Darkfield high precision Buttons: 7 buttons (Left/Right-click, Back/Forward, App-Switch, Wheel mode-shift, Middle click), Scroll Wheel, Thumbwheel, Gesture button Wireless operating distance: 33 ft (10 m) (9)Footnotes: (1) 4 mm minimum glass thickness (2) Compared to MX Master 3, MX Master 3S has 90% less Sound Power Level left and right click, measured at 1m (3) Compared to regular Logitech mouse without an electromagnetic scroll wheel (4) Compared to Logitech Master 2S mouse with Logitech Options installed and Smooth scrolling enabled (5) Requires Logi Options+ software, available for Windows and macOS (6) Not compatible with Logitech Unifying technology (7) Battery life may vary based on user and computing conditions. (8) Device basic functions will be supported without software for operating systems other than Windows and macOS (9) Wireless range may vary depending on operating environment and computer setup", "price": { "value": 89.99, "currency": "$" }, "url": "https://www.amazon.com/dp/B09HM94VDS" }, { "title": "Apple Magic Mouse - White Multi-Touch Surface ", "asin": "B0DL72PK1P", "brand": "Apple", "stars": 4.6, "reviewsCount": 18594, "thumbnailImage": "", "breadCrumbs": "", "description": null, "price": { "value": 78.99, "currency": "$" }, "url": "https://www.amazon.com/dp/B0DL72PK1P" } ]
Search data sample
[ { "title": "Logitech MK270 Wireless Keyboard And Mouse Combo For Windows, 2.4 GHz Wireless, Compact Mouse, 8 Multimedia And Shortcut Keys, For PC, Laptop - Black", "asin": "B079JLY5M5", "brand": "Logitech", "stars": 4.5, "reviewsCount": 107637, "thumbnailImage": "https://m.media-amazon.com/images/I/61gSpxZTZZL._AC_SX300_SY300_QL70_ML2.jpg", "breadCrumbs": "Electronics›Computers & Accessories›Computer Accessories & Peripherals›Keyboards, Mice & Accessories›Keyboard & Mouse Combos", "description": "The stylish Logitech MK270 Wireless Keyboard and Mouse Combo is perfect for the home office or workplace. Ditch the touchpad for this full size keyboard and mouse. Easily connect using Logitech's plug and forget receiver—just plug it into the USB port, and you're ready to work. There's no lengthy installation procedure to slow you down. When you're on the move, the receiver stores comfortably inside the mouse. Both the keyboard and mouse included in the MK270 combo use wireless 2.4GHz connectivity to provide seamless, interruption free use. Use the keyboard within a 10 m range without keyboard lag. Work for longer with the MK270's long battery life. The keyboard can be used for up to 24 months, and the mouse for 12 months, without replacing batteries. The Logitech MK270 keyboard includes 8 hotkeys that are programmable to your most used applications to boost your productivity.", "price": { "value": 21.98, "currency": "$" }, "url": "https://www.amazon.com/dp/B079JLY5M5" }, { "title": "Wireless Keyboard and Mouse Combo - Round Keycaps, Full-Size Retro Typewriter Keyboard with Detachable Wrist Rest, Sleep Mode & Tilt Legs, 2.4GHz Cordless Connection for Mac/Windows/PC (Hot Pink)", "asin": "B0CQJV4BW3", "brand": "SABLUTE", "stars": 4.3, "reviewsCount": 928, "thumbnailImage": "https://m.media-amazon.com/images/I/61NOammUF2L._AC_SY300_SX300_QL70_FMwebp.jpg", "breadCrumbs": "Electronics›Computers & Accessories›Computer Accessories & Peripherals›Keyboards, Mice & Accessories›Keyboard & Mouse Combos", "description": null, "price": { "value": 39.99, "currency": "$" }, "url": "https://www.amazon.com/dp/B0CQJV4BW3" }, { "title": "Redragon S101 Gaming Keyboard, M601 Mouse, RGB Backlit Gaming Keyboard, Programmable Backlit Gaming Mouse, Value Combo Set [New Version]", "asin": "B00NLZUM36", "brand": "Redragon", "stars": 4.6, "reviewsCount": 46346, "thumbnailImage": "https://m.media-amazon.com/images/I/71QDJHG1PqL._AC_SX300_SY300_QL70_FMwebp.jpg", "breadCrumbs": "Video Games›PC›Accessories›Gaming Keyboards", "description": null, "price": { "value": 39.99, "currency": "$" }, "url": "https://www.amazon.com/dp/B00NLZUM36" } ]
Product data sample
[ { "title": "Amazon Basics Wired Keyboard, Full-Sized, QWERTY Layout, Black", "asin": "B07WJ5D3H4", "brand": "Amazon Basics", "stars": 4.5, "reviewsCount": 7606, "thumbnailImage": "https://m.media-amazon.com/images/I/71ehwfAM4-L._AC_SY300_SX300_QL70_FMwebp.jpg", "breadCrumbs": "Electronics›Computers & Accessories›Computer Accessories & Peripherals›Keyboards, Mice & Accessories›Keyboards", "description": "Product DescriptionFeaturing a standard US QWERTY layout, the keyboard provides comfort and familiarity, while the sleek black design complements any tech setup or decor seamlessly. This wired keyboard and mouse set is great for those seeking a wired keyboard and mouse for home or office use. The mouse and keyboard combo offers a practical plug-and-play solution, compatible with multiple versions of Windows, including 2000, XP, Vista, 7, 8, and 10/11.From the ManufacturerAmazon Basics", "price": { "value": 18.04, "currency": "$" }, "url": "https://www.amazon.com/dp/B07WJ5D3H4" } ]
Category data sample
[ { "title": "Logitech M185 Wireless Mouse, 2.4GHz with USB Mini Receiver, 12-Month Battery Life, 1000 DPI Optical Tracking, Ambidextrous PC/Mac/Laptop - Swift Grey", "asin": "B004YAVF8I", "brand": "Logitech", "stars": 4.5, "reviewsCount": 37418, "thumbnailImage": "https://m.media-amazon.com/images/I/5181UFuvoBL._AC_SX300_SY300_QL70_FMwebp.jpg", "breadCrumbs": "Electronics›Computers & Accessories›Computer Accessories & Peripherals›Keyboards, Mice & Accessories›Mice", "description": "Logitech Wireless Mouse M185. A simple, reliable mouse with plug-and-play wireless, a 1-year battery life and 3-year limited hardware warranty.(Battery life may vary based on user and computing conditions.) System Requirements: Windows Vista Windows 7 Windows 8 Windows 10|Mac OS X 10.5 or later|Chrome OS|Linux kernel 2.6+|USB port", "price": { "value": 13.97, "currency": "$" }, "url": "https://www.amazon.com/dp/B004YAVF8I" }, { "title": "Logitech MX Master 3S - Wireless Performance Mouse with Ultra-fast Scrolling, Ergo, 8K DPI, Track on Glass, Quiet Clicks, USB-C, Bluetooth, Windows, Linux, Chrome - Graphite", "asin": "B09HM94VDS", "brand": "Logitech", "stars": 4.5, "reviewsCount": 9333, "thumbnailImage": "https://m.media-amazon.com/images/I/41+eEANAv3L.AC_SY300_SX300.jpg", "breadCrumbs": "Electronics›Computers & Accessories›Computer Accessories & Peripherals›Keyboards, Mice & Accessories›Mice", "description": "Logitech MX Master 3S Performance Wireless Mouse Introducing Logitech MX Master 3S – an iconic mouse remastered. Now with Quiet Clicks(2) and 8K DPI any-surface tracking for more feel and performance than ever before. Product details: Weight: 4.97 oz (141 g) Dimensions: 2 x 3.3 x 4.9 in (51 x 84.3 x 124.9 mm) Compatible with Windows, macOS, Linux, Chrome OS, iPadOS, Android operating systems (8) Rechargeable Li-Po (500 mAh) battery Sensor technology: Darkfield high precision Buttons: 7 buttons (Left/Right-click, Back/Forward, App-Switch, Wheel mode-shift, Middle click), Scroll Wheel, Thumbwheel, Gesture button Wireless operating distance: 33 ft (10 m) (9)Footnotes: (1) 4 mm minimum glass thickness (2) Compared to MX Master 3, MX Master 3S has 90% less Sound Power Level left and right click, measured at 1m (3) Compared to regular Logitech mouse without an electromagnetic scroll wheel (4) Compared to Logitech Master 2S mouse with Logitech Options installed and Smooth scrolling enabled (5) Requires Logi Options+ software, available for Windows and macOS (6) Not compatible with Logitech Unifying technology (7) Battery life may vary based on user and computing conditions. (8) Device basic functions will be supported without software for operating systems other than Windows and macOS (9) Wireless range may vary depending on operating environment and computer setup", "price": { "value": 89.99, "currency": "$" }, "url": "https://www.amazon.com/dp/B09HM94VDS" }, { "title": "Apple Magic Mouse - White Multi-Touch Surface ", "asin": "B0DL72PK1P", "brand": "Apple", "stars": 4.6, "reviewsCount": 18594, "thumbnailImage": "https://m.media-amazon.com/images/I/41U6Q0T5toL._AC_SY445_SX342_QL70_FMwebp.jpg", "breadCrumbs": "", "description": null, "price": { "value": 78.99, "currency": "$" }, "url": "https://www.amazon.com/dp/B0DL72PK1P" } ]
## Other scrapers available
There are other native Make Apps powered by Apify. You can check out Apify Scraper for:
* https://docs.apify.com/platform/integrations/make/tiktok.md
* https://docs.apify.com/platform/integrations/make/search.md
* https://docs.apify.com/platform/integrations/make/maps.md
* https://docs.apify.com/platform/integrations/make/youtube.md
* https://docs.apify.com/platform/integrations/make/ai-crawling.md
And more! Because you can access any of thousands of our scrapers on Apify Store by using the https://www.make.com/en/integrations/apify.
---
# Make - Facebook Actor integration
## Apify Scraper for Facebook Data
The Facebook Scraper modules from https://apify.com/ allow you to extract posts, comments, and profile data from Facebook.
To use these modules, you need an https://console.apify.com and an https://docs.apify.com/platform/integrations/api#api-token. You can find your token in the https://console.apify.com/ under **Settings > Integrations**. After connecting, you can automate data extraction and incorporate the results into your workflows.
## Connect Apify Scraper for Facebook Data modules to Make
1. Create an account at https://console.apify.com/. You can sign up using your email, Gmail, or GitHub account.

2. To connect your Apify account to Make, you can use an OAuth connection (recommended) or an Apify API token. To get the Apify API token, navigate to **https://console.apify.com/settings/integrations** in the Apify Console.

3. Review the trial details. You won't be charged during the trial unless you actively switch to a paid plan. Click **Rent Actor** to activate your trial.

4. Connect your Apify account with Make, you need to get the Apify API token. In the Apify Console, navigate to **https://console.apify.com/settings/integrations**.

5. Find your token under **Personal API tokens** section. You can also create a new API token with multiple customizable permissions by clicking on **+ Create a new token**.
6. Click the **Copy** icon next to your API token to copy it to your clipboard. Then, return to your Make scenario interface.

7. In Make, click **Add** to open the **Create a connection** dialog of the chosen Apify Scraper module.
8. In the **API token** field, paste the API token you copied from Apify. Provide a clear **Connection name**, and click **Save**.

Once connected, you can build workflows to automate Facebook data extraction and integrate results into your applications.
## Apify Scraper for Facebook Data modules
After connecting the app, you can use one of the three existing Search modules as native scrapers to extract public data from Facebook.
### Extract Facebook groups
Get data via Apify's Facebook Groups Scraper. Just add one or multiple URLs of public groups you want to extract data from, then indicate a number of posts, and optionally, choose a sorting order and date filter.
For each given Facebook group URL, you will extract:
* *Post details*: post ID, legacy ID, Facebook group URL, direct post URL, post text, timestamp, and Facebook feedback ID.
* *Engagement metrics*: likes, shares, comments, top reactions, and breakdown by type (like, love, wow, care, haha).
* *User (post author)*: user ID and name.
* *Attachments*: media set URL, image thumbnail, full image URL, dimensions, OCR text (if any), media ID, and owner ID.
* *Top comments*: comment ID, comment URL, timestamp, text, feedback ID, commenter ID and name, profile picture, likes count, and threading depth.
Profile data, shortened sample
[ { "facebookUrl": "https://www.facebook.com/groups/WeirdSecondhandFinds", "url": "https://www.facebook.com/groups/WeirdSecondhandFinds/permalink/3348022435381946/", "time": "2025-04-09T15:34:31.000Z", "user": { "name": "Author name" }, "text": "4/9/2025 - This glass fish was found at a friend's yard sale and for some reason it had to come home with me. Any ideas on how to display it?", "reactionLikeCount": 704, "reactionLoveCount": 185, "reactionWowCount": 10, "reactionCareCount": 6, "reactionHahaCount": 3, "attachments": [ { "url": "https://www.facebook.com/media/set/?set=pcb.3348022435381946&type=1", "thumbnail": "https://scontent.fcgh33-1.fna.fbcdn.net/v/t39.30808-6/490077910_10228674979643758_5977579619381197326_n.jpg?stp=dst-jpg_s600x600_tt6" } ], "likesCount": 908, "sharesCount": 3, "commentsCount": 852, "topComments": [ { "commentUrl": "https://www.facebook.com/groups/WeirdSecondhandFinds/permalink/3348022435381946/?comment_id=3348201365364053", "text": "Would this work okay? Water and floating candle?", "profileName": "Bonnie FireUrchin Lambourn", "likesCount": 2 } ], "facebookId": "650812835102933", "groupTitle": "Weird (and Wonderful) Secondhand Finds That Just Need To Be Shared" } ]
### Extract Facebook comments
Use the Facebook Comment Scraper to collect comments from Facebook posts. Add the post URLs, set the number of comments you want, and optionally choose comment order and whether to include replies.
You’ll get:
* *Text*: Comment text
* *Timestamp*: Date and time of the comment
* *Like count*: Number of likes on the comment
* *Commenter info*: Username, profile picture, profile URL, user ID
* *Number of replies*: Number of replies to the comment (not included in this example)
* *Post URL*: Link to the post the comment is associated with
* *Nested replies*: Nested replies to the comment (not included in this example)
Free plan limitations
Features like *replies* and *comment sorting* are limited for users on Apify's Free Plan. Consider upgrading to a https://apify.com/pricing.
Example (shortened)
[ { "facebookUrl": "https://www.facebook.com/NASAJSC/posts/pfbid0ohxEG5cJnm3JNFodkvsehRUY3yfLx5Vis8cude7xRdmrXV9EMDxsuScPaSCtX9KNl?locale=cs_CZ", "commentUrl": "https://www.facebook.com/NASAJSC/posts/pfbid0ohxEG5cJnm3JNFodkvsehRUY3yfLx5Vis8cude7xRdmrXV9EMDxsuScPaSCtX9KNl?comment_id=2386082985122451", "id": "Y29tbWVudDoxMDU1NDAzMDgzMzY4Mzk1XzIzODYwODI5ODUxMjI0NTE=", "feedbackId": "ZmVlZGJhY2s6MTA1NTQwMzA4MzM2ODM5NV8yMzg2MDgyOTg1MTIyNDUx", "date": "2025-04-09T18:39:23.000Z", "text": "Green is my favorite color. The beach my peaceful place. When I visited I was amazed at all the green and to see the beach area. Very cool", "profileUrl": "https://www.facebook.com/people/Elizabeth-Grindrod/pfbid022LryhRGvvGeZrrHq6SeS95doHdjDg7WHfaJHErzcEiNF8KPHiTx3drT9pw3oKMKTl/", "profilePicture": "https://scontent-bkk1-1.xx.fbcdn.net/v/t39.30808-1/489953042_122145581006424177_4615090019565194474_n.jpg?stp=cp0_dst-jpg_s32x32_tt6&_nc_cat=109&ccb=1-7&_nc_sid=e99d92&_nc_ohc=fJU9pA6IZpkQ7kNvwFulSHc&_nc_oc=AdldBxtJX_EilisOewldRrGT1dHWEFd690Wt6nWFTEVLY9-rlYNGHFTlMjgjB5bDsAM&_nc_zt=24&_nc_ht=scontent-bkk1-1.xx&_nc_gid=Kbf_nt_NCH2lzg1SIjTdHg&oh=00_AfGKLaCo8R4odY5OLT4esFDzvURJ46R6dxwCE0fD8jJR2A&oe=67FCA025", "profileId": "pfbid022LryhRGvvGeZrrHq6SeS95doHdjDg7WHfaJHErzcEiNF8KPHiTx3drT9pw3oKMKTl", "profileName": "Elizabeth Grindrod", "likesCount": "2", "threadingDepth": 0, "facebookId": "1055403083368395", ]
### Extract Facebook posts
Use the Facebook Post Scraper to get post data by adding one or multiple page URLs and the amount of posts you want to scrape.
You’ll get:
* *Post URL*: Link to the post
* *Shortcode*: Unique identifier for the post
* *Timestamp*: Date and time of the post
* *Content type*: Whether it’s an image, video, or carousel
* *Caption*: Text content of the post
* *Hashtags*: List of hashtags used in the post
* *Mentions*: Usernames of mentioned accounts
* *Likes*: Number of likes on the post
* *Comments*: Number of comments on the post
* *Shares*: Number of times the post has been shared
* *Media info*:
* *URLs*: Links to media files
* *Type*: Whether it's an image or video
* *Dimensions*: Size of the media
* *Owner info*:
* *Username*: Account name of the post owner
* *User ID*: Unique identifier for the owner
* *Full name*: Full name of the account holder
* *Tags*: Hashtags used in the post
* *Location*: Geographic location tagged in the post (if available)
Example (shortened)
[ { "facebookUrl": "https://www.facebook.com/nasa", "postId": "1215784396583601", "pageName": "NASA", "url": "https://www.facebook.com/NASA/posts/pfbid029aLb3sDGnXuYA5P7DK5uRT7Upf39X5fwCBFcRz9C3M4EMShwJWNwLLaXA5RdYeyKl", "time": "2025-04-07T19:09:00.000Z", "user": { "id": "100044561550831", "name": "NASA - National Aeronautics and Space Administration", "profileUrl": "https://www.facebook.com/NASA", "profilePic": "https://scontent.fbog3-2.fna.fbcdn.net/v/t39.30808-1/243095782_416661036495945_3843362260429099279_n.png?stp=cp0_dst-png_s40x40&_nc_cat=1&ccb=1-7&_nc_sid=2d3e12&_nc_ohc=pGNKYYiG82gQ7kNvwGLgqmB&_nc_oc=AdmpIOT7GNKe9qxJgFM-EEuF78UvDx97YygzhxiRXW5nXDyZmQScZzHnWAFlGmn8VBk" }, "text": "It’s your time to shine! This Citizen Science Month, contribute to a NASA Citizen Science project that will help improve life on Earth and solve cosmic mysteries.", "link": "https://science.nasa.gov/citizen-science/", "likes": 2016, "comments": 171, "shares": 217, "media": [ { "thumbnail": "https://scontent.fbog3-3.fna.fbcdn.net/v/t39.30808-6/489419147_1215784366583604_2492050236576327908_n.jpg?stp=dst-jpg_s720x720_tt6&_nc_cat=110&ccb=1-7&_nc_sid=127cfc&_nc_ohc=YI6mnyIKJmwQ7kNvwGVLR7C&_nc_oc=AdklMZgJuQZ-r924q5F9ikY0F5E_LF2gbzNnepx75qTmtJ-jDnq6Ve-VkIQ1hcaCDhA" } ] }, { "facebookUrl": "https://www.facebook.com/nasa", "postId": "1215717559923618", "pageName": "NASA", "url": "https://www.facebook.com/NASA/posts/pfbid01SDwDikd344679WW4Er1F1UAB3cfpBH4Ud54RJEaTtD1Fih2xSzjtsCsYXgbh93Ll", "time": "2025-04-07T17:04:00.000Z", "user": { "id": "100044561550831", "name": "NASA - National Aeronautics and Space Administration", "profileUrl": "https://www.facebook.com/NASA", "profilePic": "https://scontent.fbog3-2.fna.fbcdn.net/v/t39.30808-1/243095782_416661036495945_3843362260429099279_n.png?stp=cp0_dst-png_s40x40&_nc_cat=1&ccb=1-7&_nc_sid=2d3e12&_nc_ohc=pGNKYYiG82gQ7kNvwGLgqmB&_nc_oc=AdmpIOT7GNKe9qxJgFM-EEuF78UvDx97YygzhxiRXW5nXDyZmQScZzHnWAFlGmn8VBk" }, "text": "NASA's Hubble Space Telescope has studied Uranus for more than 20 years and is still learning more about its gas.", "link": "https://go.nasa.gov/3RIapAw", "likes": 1878, "comments": 144, "shares": 215, "media": [ { "thumbnail": "https://scontent.fbog3-1.fna.fbcdn.net/v/t39.30808-6/489532065_1215717536590287_873488674466633974_n.jpg?stp=dst-jpg_p180x540_tt6&_nc_cat=109&ccb=1-7&_nc_sid=127cfc&_nc_ohc=kAiP3avgomkQ7kNvwGOb-YS&_nc_oc=Adn31Ca9oiQ5ieTtUtFqcr45R4jdJdVxei1kMR1kj-RLDehS-fyEVJD1fY2-5IItLe0" } ] }, { "facebookUrl": "https://www.facebook.com/nasa", "postId": "1212614090233965", "pageName": "NASA", "url": "https://www.facebook.com/NASA/videos/958890849561531/", "time": "2025-04-03T18:06:29.000Z", "user": { "id": "100044561550831", "name": "NASA - National Aeronautics and Space Administration", "profileUrl": "https://www.facebook.com/NASA", "profilePic": "https://scontent.fssz1-1.fna.fbcdn.net/v/t39.30808-1/243095782_416661036495945_3843362260429099279_n.png?stp=cp0_dst-png_s40x40&_nc_cat=1&ccb=1-7&_nc_sid=2d3e12&_nc_ohc=pGNKYYiG82gQ7kNvwGLgqmB&_nc_oc=AdmpIOT7GNKe9qxJgFM-EEuF78UvDx97YygzhxiRXW5nXDyZmQScZzHnWAFlGmn8VBk" }, "text": "Rocket? Stacking. Crew training? Underway. Mission patch? Ready to go.", "link": "https://go.nasa.gov/41ZErWJ", "likes": 1813, "comments": 190, "shares": 456, "media": [ { "thumbnail": "https://scontent.fssz1-1.fna.fbcdn.net/v/t15.5256-10/488073346_1027101039315356_6805938007276905855_n.jpg?_nc_cat=109&ccb=1-7&_nc_sid=7965db&_nc_ohc=M4hIzfAIbdAQ7kNvwFnbXVw&_nc_oc=AdmJODt8am5l58TuwIbYLbEMK_w9IFb6uaUqiq7SCtNI9ouf4Xd_nZcifKpRLWSsclg" } ] } ]
## Other scrapers available
Looking for more than just Facebook? You can use other native Make apps powered by Apify:
* https://docs.apify.com/platform/integrations/make/tiktok.md
* https://docs.apify.com/platform/integrations/make/search.md
* https://docs.apify.com/platform/integrations/make/maps.md
* https://docs.apify.com/platform/integrations/make/youtube.md
* https://docs.apify.com/platform/integrations/make/ai-crawling.md
* https://docs.apify.com/platform/integrations/make/amazon.md
And more! Because you can access any of thousands of our scrapers on Apify Store by using the https://www.make.com/en/integrations/apify.
---
# Make - Instagram Actor integration
**Learn about Instagram scraper modules. Extract posts, comments, and profile data.**
***
## Apify Scraper for Instagram Data
The Instagram Scraper modules from https://apify.com allow you to extract posts, comments, and profile data from Instagram.
To use these modules, you need an https://console.apify.com and an https://docs.apify.com/platform/integrations/api#api-token. You can find your token in the https://console.apify.com/ under **Settings > Integrations**. After connecting, you can automate data extraction and incorporate the results into your workflows.
## Connect Apify Scraper for Instagram Data modules to Make
1. Create an account at https://console.apify.com/. You can sign up using your email, Gmail, or GitHub account.

2. To connect your Apify account to Make, you can use an OAuth connection (recommended) or an Apify API token. To get the Apify API token, navigate to **https://console.apify.com/settings/integrations** in the Apify Console.

3. Find your token under **Personal API tokens** section. You can also create a new API token with multiple customizable permissions by clicking on **+ Create a new token**.
4. Click the **Copy** icon next to your API token to copy it to your clipboard. Then, return to your Make scenario interface.

5. In Make, click **Add** to open the **Create a connection** dialog of the chosen Apify Scraper module.
6. In the **API token** field, paste the API token you copied from Apify. Provide a clear **Connection name**, and click **Save**.

Once connected, you can build workflows to automate Instagram data extraction and integrate results into your applications.
## Apify Scraper for Instagram Data modules
After connecting, you can use one of the three existing Search modules as native scrapers to extract public data from Instagram.
### Extract Instagram profiles
Get profile details via https://apify.com/apify/instagram-profile-scraper. All you need to set up is usernames or URLs you want to extract data from.
For each Instagram profile, you will extract:
* *Basic profile details*: username, full name, biography, and profile URL.
* *Account status*: verification status, whether the account is private or public, and if it's a business account.
* *Follower and engagement metrics*: number of followers and accounts followed.
* *Profile pictures*: standard and HD profile picture URLs.
* *External links*: website URL (if provided).
* *Content information*: number of IGTV videos and highlight reels.
* *Related profiles*: suggested accounts, including their username, full name, profile picture URL, and verification status.
Profile data, shortened sample
[ { "fullName": "NASA", "profilePicUrl": "https://scontent-atl3-2.cdninstagram.com/v/t51.2885-19/29090066_159271188110124_1152068159029641216_n.jpg?stp=dst-jpg_e0_s150x150_tt6&_nc_ht=scontent-atl3-2.cdninstagram.com&_nc_cat=1&_nc_oc=Q6cZ2AHA8W2z8Q8c-m6E-NgP2su5m59iPYiKVnQlhOBQsfJhVbSzs1AMZMECpvJPB_LanuQ&_nc_ohc=1vXGhkEoh-oQ7kNvgErK0o3&_nc_gid=f2687478a00141a1b759031727c45f9c&edm=AOQ1c0wBAAAA&ccb=7-5&oh=00_AYBBdI58EkpbDvplnxGKsqMUNzd7IYS1GzG-F3fb493okg&oe=67B983E9&_nc_sid=8b3546", "username": "nasa", "postsCount": 4381, "followersCount": 96718778, "followsCount": 81, "private": false, "verified": true, "isBusinessAccount": true, "biography": "🚀 🌎 Exploring the universe and our home planet. Verification: nasa.gov/socialmedia" }, { "fullName": "National Geographic", "profilePicUrl": "https://scontent-lga3-3.cdninstagram.com/v/t51.2885-19/476424694_3911047592506753_8995392926225146489_n.jpg?stp=dst-jpg_e0_s150x150_tt6&_nc_ht=scontent-lga3-3.cdninstagram.com&_nc_cat=1&_nc_oc=Q6cZ2AHN-FkuOj4TjoJuFvCdSEHSAA2nPN9hSjUK1b1phJY5bDOJjsQVtvzHguB7UvZVA78&_nc_ohc=Nw5ra__Z3vEQ7kNvgG9nmDU&_nc_gid=dfd92e92eeda46f99367b1eaa093ff3a&edm=AOQ1c0wBAAAA&ccb=7-5&oh=00_AYDUu2rnJb1CKhHODZr7GGg142G24F_Sxb0cVh7gRqUn1g&oe=67B97B88&_nc_sid=8b3546", "username": "natgeo", "postsCount": 30103, "followersCount": 279573878, "followsCount": 167, "private": false, "verified": true, "isBusinessAccount": true, "biography": "Inspiring the explorer in everyone 🌎" } ]
### Extract Instagram comments
Retrieve comments from posts by calling https://apify.com/apify/instagram-comment-scraper. To set up this module, you will need to add Instagram posts or reels to extract the comments from, the desired number of comments, and optionally, the order of comments, and replies.
For each Instagram post, you will extract:
* *Comment details*: comment text, timestamp, and number of likes.
* *Commenter profile*: username, full name, profile picture URL, and account status (private or public).
* *Engagement data*: number of replies and whether the commenter is verified.
* *Post association*: URL of the Instagram post the comment belongs to.
* *Replies (if any)*: nested replies under the main comment.
Free plan limitations
Features like *replies* and *newest comments first* are limited for users on Apify's Free Plan. To access the newest comment sorting or more than 20 replies per comment, consider upgrading to a https://apify.com/pricing.
Comment data, shortened sample
[ { "text": "So beautiful 🥲🥹✨", "timestamp": "2024-10-24T10:16:00.000Z", "ownerUsername": "im_sanaz3", "ownerProfilePicUrl": "https://scontent-ber1-1.cdninstagram.com/v/t51.2885-19/475976048_1321670355521757_8632924050781709835_n.jpg?stp=dst-jpg_e0_s150x150_tt6&_nc_ht=scontent-ber1-1.cdninstagram.com&_nc_cat=109&_nc_oc=Q6cZ2AHRZYgJDKz3fcI9QKX0mLmjyXeZOpQxGcUhRqH71pVWJMe0YOr2d7BqTu5-kLCdJsU&_nc_ohc=Z8izKMKm5QAQ7kNvgGSfNLs&_nc_gid=f12dbe88e285431d800ffc93637264f1&edm=AId3EpQBAAAA&ccb=7-5&oh=00_AYAacAhAy2-oAy8D-_z_MP_2sI59yqf9t5tdz5uvrlH3NA&oe=67B9A2A2&nc_sid=f5838a", "postUrl": "https://www.instagram.com/p/DBea8-8Jn2z/" }, "text": "So something gonna hit earth? Since we see stories all over internet. Please give us the details 😂", "timestamp": "2025-02-11T19:01:03.000Z", "ownerUsername": "isabellain", "ownerProfilePicUrl": "https://scontent-ber1-1.cdninstagram.com/v/t51.2885-19/477089999_1404980843702640_3169514283121086597_n.jpg?stp=dst-jpg_e0_s150x150_tt6&_nc_ht=scontent-ber1-1.cdninstagram.com&_nc_cat=100&_nc_oc=Q6cZ2AHRZYgJDKz3fcI9QKX0mLmjyXeZOpQxGcUhRqH71pVWJMe0YOr2d7BqTu5-kLCdJsU&_nc_ohc=f3WerXJOT3IQ7kNvgGSWaW3&_nc_gid=f12dbe88e285431d800ffc93637264f1&edm=AId3EpQBAAAA&ccb=7-5&oh=00_AYAXqkREDSM9YNfa14dKLPp8uuHQgwAIb_zKvYA4W_I_Pg&oe=67B98B5E&_nc_sid=f5838a", "postUrl": "https://www.instagram.com/p/DBea8-8Jn2z/" }, { "text": "Please archive ALL of your articles and research with and about women making history with NASA before you remove the data from your websites. And while you’re at it, remove the word men and stick to just names, fair is fair and there won’t be any sex called out in any of your articles.", "timestamp": "2025-02-11T15:40:44.000Z", "ownerUsername": "hippiesoulmo", "ownerProfilePicUrl": "https://scontent-ber1-1.cdninstagram.com/v/t51.2885-19/471553535_3637106739845033_7912985502669751019_n.jpg?stp=dst-jpg_e0_s150x150_tt6&_nc_ht=scontent-ber1-1.cdninstagram.com&_nc_cat=105&_nc_oc=Q6cZ2AHRZYgJDKz3fcI9QKX0mLmjyXeZOpQxGcUhRqH71pVWJMe0YOr2d7BqTu5-kLCdJsU&_nc_ohc=2NKox-3InPkQ7kNvgHMdSEH&_nc_gid=f12dbe88e285431d800ffc93637264f1&edm=AId3EpQBAAAA&ccb=7-5&oh=00_AYD1tLwbEVW58ey9hxlvkO6nFKVr-VmIgzbZFPnF3mL83w&oe=67B9942E&_nc_sid=f5838a", "postUrl": "https://www.instagram.com/p/DBea8-8Jn2z/" } ]
### Extract Instagram posts
Gather post data with https://apify.com/apify/instagram-post-scraper. To set up this module, you will need to add Instagram usernames to extract the post from, the desired number of posts, and the timeframe of the posts.
For each Instagram post, you will extract:
* *Post details*: post URL, content type (image, video, carousel), shortcode, post ID, and timestamp.
* *Text content*: caption, hashtags, and mentions.
* *Engagement metrics*: number of likes and comments, including a few latest comments.
* *Media details*: image dimensions (height and width), display URL, and alternative text (if available).
* *User information*: owner’s username, full name (if available), and user ID.
* *Additional data*: tagged users, child posts (for carousel posts), and location details (if available).
Post data, shortened sample
[ { "caption": "A supernova glowing in the dark 🌟\n \nWhen supernova remnant SN 1006 first appeared in the sky in 1006 C.E., it was far brighter than Venus and visible during the daytime for weeks. From that moment on, it occupied the hearts of astronomers all over the world; it has been studied from the ground and from space many times.\n \nIn this image, visible, radio, and X-ray data combine to give us that blue (and red) view of the remnant’s full shell – the debris field that was created when a white dwarf star exploded and sent material hurtling into space.\n \nScientists believe SN 1006 is a Type Ia supernova. This class of supernova is caused when a white dwarf never lets another star go: either it pulls too much mass from a companion star and explodes, or it merges with another white dwarf and explodes. Understanding Type Ia supernovas is especially important because astronomers use observations of these explosions in distant galaxies as mileposts to mark the expansion of the universe.\n \nImage description: This supernova remnant looks like a bubble filled with blue and red clouds of dust and gas, floating amid a million stars. These stars are visible all around the bubble and even can be seen peeking through it.\n \nCredit: NASA, ESA, and Z. Levay (STScI)\n \n#NASA #Supernova #Stars #IVE #Astronomy #Hubble #Chandra #Clouds #아이브 #SupernovaLove #DavidGuetta", "ownerFullName": "NASA", "ownerUsername": "nasa", "url": "https://www.instagram.com/p/DCHmqs1NoaJ/", "commentsCount": 3565, "firstComment": "🔥🙌❤️👏", "likesCount": 1214485, "timestamp": "2024-11-08T17:30:07.000Z" }, { "caption": "Take a deep breath...\n\nX-ray images from our Chandra X-ray Observatory helped astronomers confirm that most of the oxygen in the universe is synthesized in massive stars. So, everybody say "thank you" to supernova remnants (SNRs) like this one, which has enough oxygen for thousands of solar systems.\n\nSupernova remnants are, naturally, the remains of exploded stars. They're extremely important for understanding our galaxy. If it weren't for SNRs, there would be no Earth, no plants, animals, or people. This is because all the elements heavier than iron were made in a supernova explosion, so the only reason we find these elements on Earth or in our solar system — or any other extrasolar planetary system — is because those elements were formed during a supernova.\n\n@nasachandraxray's data is represented in this image by blue and purple, while optical data from @nasahubble and the Very Large Telescope in Chile are in red and green.\n\nImage description: The darkness of space is almost covered by the array of objects in this image. Stars of different sizes are strewn about, while a blue and red bubble of gas is at the center. An area of pink and green covers the bottom-right corner.\n\nCredit: X-ray (NASA/CXC/ESO/F.Vogt et al); Optical (ESO/VLT/MUSE), Optical (NASA/STScI)\n\n#NASA #Supernova #Space #Universe #Astronomy #Astrophotography #Telescope #Xray", "ownerFullName": "NASA", "ownerUsername": "nasa", "url": "https://www.instagram.com/p/DBKBByizDHZ/", "commentsCount": 2050, "firstComment": "👍", "likesCount": 1020495, "timestamp": "2024-10-15T19:27:29.000Z" }, { "caption": "It’s giving rainbows and unicorns, like a middle school binder 🦄🌈 \n\nMeet NGC 602, a young star cluster in the Small Magellanic Cloud (one of our satellite galaxies), where astronomers using @NASAWebb have found candidates for the first brown dwarfs outside of our galaxy. This star cluster has a similar environment to the kinds of star-forming regions that would have existed in the early universe—with very low amounts of elements heavier than hydrogen and helium. It’s drastically different from our own solar neighborhood and close enough to study in detail. \n \nBrown dwarfs are… not quite stars, but also not quite gas giant planets either. Typically they range from about 13 to 75 Jupiter masses. They are sometimes free-floating and not gravitationally bound to a star, like a planet would be. But they do share some characteristics with exoplanets, like storm patterns and atmospheric composition. \n\n@NASAHubble showed us that NGC 602 harbors some very young low-mass stars; Webb is showing us how significant and extensive objects like brown dwarfs are in this cluster. Scientists are excited to better be able to understand how they form, particularly in an environment similar to the harsh conditions of the early universe.\n \nRead more at the link in @ESAWebb’s bio. \n \nImage description: A two image swipe-through of a star cluster is shown inside a large nebula of many-coloured gas and dust. The material forms dark ridges and peaks of gas and dust surrounding the cluster, lit on the inner side, while layers of diffuse, translucent clouds blanket over them. Around and within the gas, a huge number of distant galaxies can be seen, some quite large, as well as a few stars nearer to us which are very large and bright.\n \nImage Credit: ESA/Webb, NASA & CSA, P. Zeidler, E. Sabbi, A. Nota, M. Zamani (ESA/Webb)\n \n#JWST #Webb #JamesWebbSpaceTelescope #NGC602 #browndwarf #space #NASA #ESA", "ownerFullName": "NASA", "ownerUsername": "nasa", "url": "https://www.instagram.com/p/DBea8-8Jn2z/", "commentsCount": 3356, "firstComment": "🔥🌍", "likesCount": 1092162, "timestamp": "2024-10-23T17:38:49.000Z" } ]
## Other scrapers available
There are other native Make Apps powered by Apify. You can check out Apify Scraper for:
* https://docs.apify.com/platform/integrations/make/tiktok.md
* https://docs.apify.com/platform/integrations/make/search.md
* https://docs.apify.com/platform/integrations/make/maps.md
* https://docs.apify.com/platform/integrations/make/youtube.md
* https://docs.apify.com/platform/integrations/make/ai-crawling.md
* https://docs.apify.com/platform/integrations/make/amazon.md
And more! Because you can access any of thousands of our scrapers on Apify Store by using the https://www.make.com/en/integrations/apify.
---
# Make - LLMs Actor integration
## Apify Scraper for LLMs
Apify Scraper for LLMs from https://apify.com is a web browsing module for OpenAI Assistants, RAG pipelines, and AI agents. It can query Google Search, scrape the top results, and return page content as Markdown for downstream AI processing.
To use these modules, you need an https://console.apify.com and an https://docs.apify.com/platform/integrations/api#api-token. You can find your token in the Apify Console under **Settings > Integrations**. After connecting, you can automate content extraction and integrate results into your AI workflows.
## Connect Apify Scraper for LLMs
1. Create an account at https://console.apify.com/. You can sign up using your email, Gmail, or GitHub account.

2. To connect your Apify account to Make, you can use an OAuth connection (recommended) or an Apify API token. To get the token, go to **https://console.apify.com/settings/integrations** in the Apify Console.

3. Find your token under **Personal API tokens**. You can also create a new token with custom permissions by clicking **+ Create a new token**.
4. Click the **Copy** icon to copy your API token, then return to your Make scenario.

5. In Make, click **Add** to open the **Create a connection** dialog of the chosen Apify Scraper module.
6. In the **API token** field, paste your token, provide a clear **Connection name**, and click **Save**.

Once connected, you can build workflows that search the web, extract content, and pass it to your AI applications.
## Apify Scraper for LLMs modules
After connecting the app, you can use two modules to search and extract content.
### Standard Settings module
Use Standard Settings to quickly search the web and extract content with optimized defaults. This is ideal for AI agents that need to answer questions or gather information from multiple sources.
The module supports two modes:
* *Search mode* (keywords)
* Queries Google Search with your keywords (supports advanced operators)
* Retrieves the top N organic results
* Loads each result and extracts the main content
* Returns Markdown-formatted content
* *Direct URL mode* (URL)
* Navigates to a specific URL
* Extracts page content
* Skips Google Search
#### How it works
When you provide keywords, the module runs Google Search, parses the results, and collects organic URLs. For content extraction, it loads pages, waits for dynamic content to render, removes clutter, extracts the main content, and converts it to Markdown. Finally, it generates output by combining content, adding metadata and sources, and formatting everything for AI consumption.
#### Output data
Standard Settings output (shortened)
{ "query": "web browser for RAG pipelines -site:reddit.com", "crawl": { "httpStatusCode": 200, "httpStatusMessage": "OK", "loadedAt": "2025-06-30T10:15:23.456Z", "uniqueKey": "https://example.com/article", "requestStatus": "handled" }, "searchResult": { "title": "Building RAG Pipelines with Web Browsers", "description": "Integrate web browsing into your RAG pipeline for real-time retrieval.", "url": "https://example.com/article", "resultType": "organic", "rank": 1 }, "metadata": { "title": "Building RAG Pipelines with Web Browsers", "description": "Add web browsing to RAG systems", "languageCode": "en", "url": "https://example.com/article" }, "markdown": "# Building RAG Pipelines with Web Browsers\n\n..." }
#### Configuration (Standard Settings)
* *Search query*: Google Search keywords or a direct URL
* *Maximum results*: Number of top search results to process (default: 3)
* *Output formats*: Markdown, text, or HTML
* *Remove cookie warnings*: Dismiss cookie consent dialogs
* *Debug mode*: Enable extraction diagnostics
### Advanced Settings module
Advanced Settings give you full control over search and extraction. Use it for complex sites or production RAG pipelines.
#### Key features
* *Advanced search options*: full Google operator support
* *Flexible crawling tools*: browser-based (Playwright) or HTTP-based (Cheerio)
* *Proxy configuration*: handle geo-restrictions and rate limits
* *Granular content control*: include, remove, and click selectors
* *Dynamic content handling*: wait strategies for JavaScript rendering
* *Multiple output formats*: Markdown, HTML, or text
* *Request management*: timeouts, retries, and concurrency
#### Configuration options
* *Search*: query, max results (1–100), SERP proxy group, SERP retries
* *Scraping*: tool (browser-playwright, raw-http), HTML transformer, selectors (remove/keep/click), expand clickable elements
* *Requests*: timeouts, retries, dynamic content wait
* *Proxy*: use Apify Proxy, proxy groups, countries
* *Output*: formats, save HTML/Markdown, debug mode, save screenshots
#### Output data
Advanced Settings output (shortened)
{ "query": "advanced RAG implementation strategies", "crawl": { "httpStatusCode": 200, "httpStatusMessage": "OK", "loadedUrl": "https://ai-research.com/rag-strategies", "loadedTime": "2025-06-30T10:45:12.789Z", "referrerUrl": "https://www.google.com/search?q=advanced+RAG+implementation+strategies", "uniqueKey": "https://ai-research.com/rag-strategies", "requestStatus": "handled", "depth": 0 }, "searchResult": { "title": "Advanced RAG Implementation: A Complete Guide", "description": "Cutting-edge strategies for RAG systems.", "url": "https://ai-research.com/rag-strategies", "resultType": "organic", "rank": 1 }, "metadata": { "canonicalUrl": "https://ai-research.com/rag-strategies", "title": "Advanced RAG Implementation: A Complete Guide | AI Research", "description": "Vector DBs, chunking, and optimization techniques.", "languageCode": "en" }, "markdown": "# Advanced RAG Implementation: A Complete Guide\n\n...", "debug": { "extractorUsed": "readableText", "elementsRemoved": 47, "elementsClicked": 3 } }
### Use cases
* Quick information retrieval for AI assistants
* General web search integration and Q\&A
* Production RAG pipelines that need reliability
* Extracting content from JavaScript-heavy sites
* Building specialized knowledge bases and research workflows
### Best practices
To get the best search results, use specific keywords and operators, and exclude unwanted domains with `-site:`. For better performance, use HTTP mode for static sites and only switch to browser mode when necessary. You can also tune concurrency settings based on your needs. To maintain content quality, remove non-content elements, choose the right HTML transformer, and enable debug mode when troubleshooting. Finally, ensure reliable operation by setting appropriate timeouts and retries, and monitoring HTTP status codes for errors.
## Other scrapers available
There are other native Make Apps powered by Apify. You can check out Apify Scraper for:
* https://docs.apify.com/platform/integrations/make/tiktok.md
* https://docs.apify.com/platform/integrations/make/search.md
* https://docs.apify.com/platform/integrations/make/maps.md
* https://docs.apify.com/platform/integrations/make/youtube.md
* https://docs.apify.com/platform/integrations/make/ai-crawling.md
* https://docs.apify.com/platform/integrations/make/amazon.md
And more! Because you can access any of thousands of our scrapers on Apify Store by using the https://www.make.com/en/integrations/apify.
---
# Make - Google Maps Leads Actor integration
## Apify Scraper for Google Maps Leads
The Google Maps Leads Scraper modules from http://apify.com/ allow you to extract valuable business lead data from Google Maps, including contact information, email addresses, social media profiles, business websites, phone numbers, and detailed location data. Perfect for sales teams, marketers, and business developers looking to build targeted lead lists, marketers or other commercial teams looking to data mine reviews or assess sentiment analysis wide geographies.
To use these modules, you need an https://console.apify.com/sign-up and an https://docs.apify.com/platform/integrations/api#api-token, which you can find under **Settings > Integrations** in Apify Console. After connecting, you can automate lead generation at scale and incorporate the results into your sales and marketing workflows.
For more details, follow the tutorial below.
## Connect Apify Scraper for Google Maps Leads
1. Create an account at https://console.apify.com/. You can sign up using your email, Gmail, or GitHub account.

2. To connect your Apify account to Make, you can use an OAuth connection (recommended) or an Apify API token. To get the Apify API token, navigate to **https://console.apify.com/settings/integrations** in the Apify Console.

3. Find your token under **Personal API tokens** section. You can also create a new API token with multiple customizable permissions by clicking on **+ Create a new token**.
4. Click the **Copy** icon next to your API token to copy it to your clipboard. Then, return to your Make scenario interface.

5. In Make, click **Add** to open the **Create a connection** dialog of the chosen Apify Scraper module.
6. In the **API token** field, paste the API token you copied from Apify. Provide a clear **Connection name**, and click **Save**.

Once connected, you can build workflows to automate Google Maps extraction and integrate results into your applications.
## Apify Scraper for Google Maps modules
After connecting the app, you can use one of the four existing Search modules as native scrapers to extract Google Maps Data.
### Search with Categories
The Search with Categories module is a component of the Google Maps Leads Scraper that allows you to discover and extract business leads by filtering places based on both search terms and categories.
#### Key Features
* *Category-Based Filtering*: Filter businesses using Google Maps' extensive category system with over 4,000 available options
* *Location Targeting*: Define your target market using simple location queries (city + country format)
* *Customizable Result Limit*: Control exactly how many leads to extract per search term or category
* *Language Selection*: View business information in your preferred language
* *Quality Filters*: Focus on high-quality leads by setting minimum star ratings
* *Website Availability Filter*: Target only businesses with (or without) websites
* *Exact Name Matching*: Find businesses with exact or partial name matches
* *Operational Status Filter*: Exclude temporarily or permanently closed businesses
#### How It Works
The module allows you to combine category filtering with location parameters to discover relevant business leads, data mine reviews, or extract relevant Google Maps information. You can use categories alone or with specific search terms to create precisely targeted lead lists.
Categories can be general (e.g., "restaurant") which includes all variations like "Asian restaurant" or "family restaurant," or they can be specific (e.g., "restaurant terrace"). Using broader categories with a few specific search terms typically yields the best results without excluding potentially valuable leads.
* *Business identification*: name, category, place ID for unique identification.
* *Full contact details*: phone number, website URL, email addresses (with email enrichment).
* *Complete address information*: street, city, state, postal code, country for direct mail campaigns.
* *Geographic data*: precise coordinates, neighborhood, plus codes for territory planning.
* *Business quality indicators*: ratings, number of reviews, price level to qualify leads.
* *Operational insights*: opening hours, popular times, serviceability to better target outreach.
* *Competitive intelligence*: nearby businesses, related places.
* *Additional lead qualification data (optional)*: customer reviews, business photos, social media profiles.
Business lead data, shortened sample
{ "searchString": "Restaurant in Staten Island", "rank": 3, "title": "Kim's Island", "placeId": "ChIJJaKM4pyKwokRCZ8XaBNj_Gw", "categoryName": "Chinese restaurant", "price": "$10–20", "rating": 4.6, "reviewsCount": 182, "featuredInLists": ["Best Chinese Food", "Top Rated Restaurants"],
// Complete address information for targeted outreach "address": "175 Main St, Staten Island, NY 10307", "neighborhood": "Tottenville", "street": "175 Main St", "city": "Staten Island", "postalCode": "10307", "state": "New York", "countryCode": "US", "plusCode": "GQ62+8M Staten Island, New York",
// Multiple contact channels "website": "http://kimsislandsi.com/", "phone": "(718) 356-5168", "phoneUnformatted": "+17183565168", "email": "info@kimsislandsi.com", // From website enrichment
// Business qualification data "yearsInBusiness": 12, "claimThisBusiness": false, // Verified listing "popular": true, "temporarilyClosed": false,
// Precise location for territory planning "location": { "lat": 40.5107736, "lng": -74.2482624 },
// Operational insights for scheduling outreach "openingHours": { "Monday": "11:00 AM - 10:00 PM", "Tuesday": "11:00 AM - 10:00 PM", "Wednesday": "11:00 AM - 10:00 PM", "Thursday": "11:00 AM - 10:00 PM", "Friday": "11:00 AM - 11:00 PM", "Saturday": "11:00 AM - 11:00 PM", "Sunday": "12:00 PM - 9:30 PM" } }
### Search with Search Terms Module
The Search Terms module is a component of the Google Maps Leads Scraper designed to discover and extract business leads by using specific search queries, similar to how you'd search on Google Maps directly.
#### Key Features
* *Keyword-Based Discovery*: Find businesses using the same search terms you'd enter in Google Maps
* *Location Targeting*: Define your target market using simple location queries (city + country format)
* *Customizable Result Limit*: Control exactly how many leads to extract per search term
* *Language Selection*: View business information in your preferred language
* *Quality Filters*: Focus on high-quality leads by setting minimum star ratings
* *Website Availability Filter*: Target only businesses with (or without) websites
* *Exact Name Matching*: Find businesses with exact or partial name matches
* *Operational Status Filter*: Exclude temporarily or permanently closed businesses
#### How It Works
This module allows you to enter search terms that match what you would typically type into the Google Maps search bar. You can search for general business types (like "coffee shop"), specific services ("dog grooming"), or product offerings ("organic produce").
The search results can be further refined using optional category filters, which help ensure you're capturing precisely the type of businesses you're targeting. For maximum efficiency, you can combine broader search terms with strategic category filters to capture the most relevant leads without excluding valuable prospects.
### Advanced and Custom Search Module - Google Maps Leads Scraper
The Advanced and Custom Search module is the most powerful component of the Google Maps Leads Scraper, designed for sophisticated lead generation campaigns that require precise geographic targeting and advanced search capabilities. This module gives you complete control over your lead discovery process with multiple location definition methods and advanced filtering options.
#### Key Features
* *Multiple Location Definition Methods*: Define target areas using free-text location queries, country/state/city selections, postal codes, or custom polygon coordinates
* *Custom Geographic Targeting*: Draw precise search areas using longitude/latitude coordinates for highly targeted campaigns
* *Direct URL Importing*: Extract leads from specific Google Maps search URLs, CID links, or shortened map links
* *Keyword-Based Discovery*: Find businesses using search terms, just like in Google Maps
* *Category Filtering*: Further refine results with optional category filters
* *Comprehensive Lead Filtering*: Apply multiple quality filters simultaneously for precise lead targeting
#### How It Works
This module provides the most flexible options for defining where and how to search for business leads:
### Geographic Targeting Options
* *Simple Location Query*: Use natural language location inputs like "New York, USA"
* *Structured Location Components*: Build precise locations using country, state, city, or county parameters
* *Postal Code Targeting*: Target specific postal/ZIP code areas for direct mail campaigns
* *Custom Polygon Areas*: Define exact geographic boundaries using coordinate pairs for ultra-precise targeting
### Search and Filter Capabilities
* *Keyword-Based Search*: Discover businesses using industry, service, or product terms
* *Category-Based Filtering*: Apply Google's category system to refine results
* *Quality Filters*: Target businesses with specific ratings, website presence, and operational status
Advances output data, shortened sample
{ "searchString": "coffee shop", "rank": 9, "searchPageUrl": "https://www.google.com/maps/search/coffee%20shop/@40.748508724216016,-74.0186770781978,17z?hl=en", "searchPageLoadedUrl": "https://www.google.com/maps/search/coffee%20shop/@40.748508724216016,-74.0186770781978,17z?hl=en", "isAdvertisement": false, "title": "Bluestone Lane Chelsea Piers Café", "price": "$20–30", "categoryName": "Coffee shop",
// Address and location data "address": "62 Chelsea Piers Pier 62, New York, NY 10011", "neighborhood": "Manhattan", "street": "62 Chelsea Piers Pier 62", "city": "New York", "postalCode": "10011", "state": "New York", "countryCode": "US", "location": { "lat": 40.7485378, "lng": -74.0087457 }, "plusCode": "GQ62+8M Staten Island, New York",
// Contact information "website": "https://bluestonelane.com/?y_source=1_MjMwNjk1NDAtNzE1LWxvY2F0aW9uLndlYnNpdGU%3D", "phone": "(718) 374-6858", "phoneUnformatted": "+17183746858",
// Rating and reviews "totalScore": 4.3, "reviewsCount": 425, "imagesCount": 659,
// Business identifiers "claimThisBusiness": false, "permanentlyClosed": false, "temporarilyClosed": false, "placeId": "ChIJDTUgz1dZwokRtsQ97Tbf0cA", "categories": ["Coffee shop", "Cafe"], "fid": "0x89c25957cf20350d:0xc0d1df36ed3dc4b6", "cid": "13894131752416167094",
// Operating hours "openingHours": [ {"day": "Monday", "hours": "7 AM to 6 PM"}, {"day": "Tuesday", "hours": "7 AM to 6 PM"}, {"day": "Wednesday", "hours": "7 AM to 6 PM"}, {"day": "Thursday", "hours": "7 AM to 6 PM"}, {"day": "Friday", "hours": "7 AM to 6 PM"}, {"day": "Saturday", "hours": "7 AM to 6 PM"}, {"day": "Sunday", "hours": "7 AM to 6 PM"} ],
// Business attributes and amenities "additionalInfo": { "Service options": [ {"Outdoor seating": true}, {"Curbside pickup": true}, {"No-contact delivery": true}, {"Delivery": true}, {"Onsite services": true}, {"Takeout": true}, {"Dine-in": true} ], "Highlights": [ {"Great coffee": true}, {"Great tea selection": true}, {"Live music": true}, {"Live performances": true}, {"Rooftop seating": true} ], "Popular for": [ {"Breakfast": true}, {"Lunch": true}, {"Solo dining": true}, {"Good for working on laptop": true} ], "Accessibility": [ {"Wheelchair accessible entrance": true}, {"Wheelchair accessible parking lot": true}, {"Wheelchair accessible restroom": true}, {"Wheelchair accessible seating": true} ], "Offerings": [ {"Coffee": true}, {"Comfort food": true}, {"Organic dishes": true}, {"Prepared foods": true}, {"Quick bite": true}, {"Small plates": true}, {"Vegetarian options": true} ], "Dining options": [ {"Breakfast": true}, {"Brunch": true}, {"Lunch": true}, {"Catering": true}, {"Dessert": true}, {"Seating": true} ], "Amenities": [ {"Restroom": true}, {"Wi-Fi": true}, {"Free Wi-Fi": true} ], "Atmosphere": [ {"Casual": true}, {"Cozy": true}, {"Trendy": true} ], "Crowd": [ {"Family-friendly": true}, {"LGBTQ+ friendly": true}, {"Transgender safespace": true} ], "Planning": [ {"Accepts reservations": true} ], "Payments": [ {"Credit cards": true}, {"Debit cards": true}, {"NFC mobile payments": true} ], "Children": [ {"Good for kids": true}, {"High chairs": true} ] },
// Image and metadata "imageUrl": "https://lh3.googleusercontent.com/p/AF1QipMl6-SnuqYEeE3mD54M0q5D5nysRUZQj1BB0g8=w408-h272-k-no", "kgmid": "/g/11ph8zh6sg", "url": "https://www.google.com/maps/search/?api=1&query=Bluestone%20Lane%20Chelsea%20Piers%20Caf%C3%A9&query_place_id=ChIJDTUgz1dZwokRtsQ97Tbf0cA", "scrapedAt": "2025-04-22T14:23:34.961Z" }
## Best Practices
1. *Choose the right location method* for your campaign:
* Free-text location queries for quick, general area targeting
* Country/State/City combinations for administrative boundary targeting
* Postal codes for direct mail campaign areas
* Custom polygons for precise neighborhood or business district targeting
2. *Layer search parameters effectively*:
* Start with broader geographic targeting
* Apply search terms to identify relevant business types
* Use category filters to further refine results
* Apply quality filters (ratings, website presence) as the final step
3. *Consider URL-based extraction* for specific scenarios:
* When you have existing Google Maps searches with desired filters
* For capturing specific business types Google has already grouped
* When working with curated Google Maps lists
4. *Optimize polygon definitions* for complex areas:
* Use 4-8 coordinate pairs for most areas
* Ensure coordinates form a closed shape
* Test with smaller areas before scaling to large regions
## Advanced Features
* *Multi-Location Campaigns*: Configure separate runs for each territory and combine results
* *Direct Place ID Targeting*: Extract data from specific businesses using place IDs
* *Custom Boundary Definitions*: Use longitude/latitude coordinates to define precise areas like neighborhoods, business districts, or sales territories
* *URL Parameter Extraction*: Capture lead data from complex Google Maps search URLs with multiple parameters
## Important Notes
* Different location methods should not be combined (use either free-text location OR country/state/city parameters)
* Custom polygon areas take precedence over other location methods when defined
* Always verify location coverage before running large-scale extractions
* Direct URL imports are limited to approximately 300 results per URL
* For complex geographic areas, breaking into multiple targeted searches yields better results
There are other native Make Apps powered by Apify. You can check out Apify Scraper for:
* https://docs.apify.com/platform/integrations/make/tiktok.md
* https://docs.apify.com/platform/integrations/make/search.md
* https://docs.apify.com/platform/integrations/make/youtube.md
* https://docs.apify.com/platform/integrations/make/ai-crawling.md
* https://docs.apify.com/platform/integrations/make/amazon.md
And more! Because you can access any of thousands of our scrapers on Apify Store by using the https://www.make.com/en/integrations/apify.
---
# Make - Google Search Actor integration
## Apify Scraper for Google Search
The Google search modules from https://apify.com allows you to crawl Google Search Results Pages (SERPs) and extract data from those web pages in structured format such as JSON, XML, CSV, or Excel.
To use the module, you need an https://console.apify.com and an https://docs.apify.com/platform/integrations/api#api-token, which you can find in the Apify Console under **Settings > Integrations**. After connecting, you can automate data extraction and incorporate the results into your workflows.
## Connect Apify Scraper for Google Search modules to Make
1. Create an account at https://console.apify.com/. You can sign up using your email, Gmail, or GitHub account.

1. To connect your Apify account to Make, you can use an OAuth connection (recommended) or an Apify API token. To get the Apify API token, navigate to **https://console.apify.com/settings/integrations** in the Apify Console.

1. Find your token under **Personal API tokens** section. You can also create a new API token with multiple customizable permissions by clicking on **+ Create a new token**.
2. Click the **Copy** icon next to your API token to copy it to your clipboard. Then, return to your Make scenario interface.

3. On Make, click **Add** to open the **Create a connection** dialog of the chosen Apify Scraper module.
4. In the **API token** field, paste the API token you copied from Apify. Provide a clear **Connection name**, and click **Save**.
![Make API token]()
Once connected, you can build workflows to automate Google Search extraction and integrate results into your applications.
## Apify Scraper for Google Search Data modules
After connecting the app, you can use one of the primary modules as native scrapers to extract public Google Search data:
### Extract Google Search Results
Get comprehensive search results via https://apify.com/apify/google-search-scraper. Enter your search terms or Google Search URLs, one per line.
For each Google Search query, you will extract:
* *Organic results*: comprehensive listings with titles, descriptions, URLs, and position data.
* *Paid results*: sponsored listings and advertisements that appear in search results.
* *AI Overviews*: Google’s AI-generated summaries that appear at the top of results.
* *People Also Ask*: related questions and their expandable answers.
* *Related queries*: suggested search terms related to your original query.
* *Featured snippets*: highlighted content that directly answers search queries.
* *Additional data*: prices, review ratings, product information, and more where available.
Search results data, shortened sample
{ "searchQuery": { "term": "javascript", "page": 1, "type": "SEARCH", "countryCode": "us", "languageCode": "en", "locationUule": null, "device": "DESKTOP" }, "url": "https://www.google.com/search?q=javascript&hl=en&gl=us&num=10", "hasNextPage": true, "resultsCount": 13600000000, "organicResults": [ { "title": "JavaScript Tutorial", "url": "https://www.w3schools.com/js/", "displayedUrl": "https://www.w3schools.com › js", "description": "JavaScript is the world's most popular programming language. JavaScript is the programming language of the Web. JavaScript is easy to learn.", "position": 1, "emphasizedKeywords": ["JavaScript", "JavaScript", "JavaScript", "JavaScript"], "siteLinks": [] } ], "paidResults": [ { "title": "JavaScript Online Course - Start Learning JavaScript", "url": "https://www.example-ad.com/javascript", "displayedUrl": "https://www.example-ad.com", "description": "Learn JavaScript from scratch with our comprehensive online course. Start your coding journey today!", "position": 1, "type": "SHOPPING" } ], "peopleAlsoAsk": [ { "question": "What is JavaScript used for?", "answer": "JavaScript is used for creating interactive elements on websites, browser games, frontend of web applications, mobile applications, and server applications...", "url": "https://www.example.com/javascript-uses" } ] }
#### Advanced Search Capabilities
Customize your searches with powerful filtering options:
* *Regional targeting*: Select specific countries and languages for localized results
* *Device simulation*: Get results as they would appear on desktop or mobile devices
* *Site filtering*: Restrict results to specific domains with `site:example.com`
* *Exclusion operators*: Remove unwanted sources with `site:reddit.com`
* *Exact phrase matching*: Search for precise phrases with quotation marks
* *Date filtering*: Limit results to specific time periods
* *File type filtering*: Target specific document formats like PDF, DOC, or XLSX
* *Content location targeting*: Find keywords in specific parts of pages with `intext:`, `intitle:`, and `inurl:`
* *UULE parameters*: Target searches to exact geographic locations
The scraper exports data in various formats including JSON, CSV, Excel, and XML, enabling integration with your workflows and applications.
There are other native Make Apps powered by Apify. You can check out Apify Scraper for:
* https://docs.apify.com/platform/integrations/make/tiktok.md
* https://docs.apify.com/platform/integrations/make/maps.md
* https://docs.apify.com/platform/integrations/make/youtube.md
* https://docs.apify.com/platform/integrations/make/ai-crawling.md
* https://docs.apify.com/platform/integrations/make/amazon.md
And more! Because you can access any of thousands of our scrapers on Apify Store by using the https://www.make.com/en/integrations/apify.
---
# Make - TikTok Actor integration
## Apify Scraper for TikTok Data
The TikTok Scraper modules from https://apify.com allow you to extract hashtag, comments, and profile data from TikTok.
To use these modules, you need an https://console.apify.com and an https://docs.apify.com/platform/integrations/api#api-token. You can find your token in the https://console.apify.com/ under **Settings > Integrations**. After connecting, you can automate data extraction and incorporate the results into your workflows.
## Connect Apify Scraper for TikTok Data modules to Make
1. Create an account at https://console.apify.com/. You can sign up using your email, Gmail, or GitHub account.

2. To connect your Apify account to Make, you can use an OAuth connection (recommended) or an Apify API token. To get the Apify API token, navigate to **https://console.apify.com/settings/integrations** in the Apify Console.

3. Find your token under **Personal API tokens** section. You can also create a new API token with multiple customizable permissions by clicking on **+ Create a new token**.
4. Click the **Copy** icon next to your API token to copy it to your clipboard. Then, return to your Make scenario interface.

5. In Make, click **Add** to open the **Create a connection** dialog of the chosen Apify Scraper module.
6. In the **API token** field, paste the API token you copied from Apify. Provide a clear **Connection name**, and click **Save**.

Once connected, you can build workflows to automate TikTok data extraction and integrate results into your applications.
## Apify Scraper for TikTok Data modules
After connecting the app, you can use one of the three existing Search modules as native scrapers to extract public TikTok data:
### Extract TikTok profiles
Get profile details via https://apify.com/clockworks/tiktok-profile-scraper. To use this module, fill in the profile names you want to gather information about.
For each TikTok profile, you will extract:
* *Basic profile details*: name, nickname, bio, ID, and profile URL.
* *Account status*: whether the account is verified or not, and if it's a business and seller account.
* *Follower and engagement metrics*: number of followers and accounts followed.
* *Profile avatar*: avatar URLs.
* *Content information*: number of videos, fans, hearts, friends, and likes.
Profile data, shortened sample
[
{
"authorMeta": {
"id": "6987048613642159109",
"name": "nasaofficial",
"profileUrl": "https://www.tiktok.com/@nasaofficial",
"nickName": "NASA",
"verified": false,
"signature": "National Aeronautics Space Association",
"bioLink": null,
"originalAvatarUrl": "https://p16-sign-va.tiktokcdn.com/tos-maliva-avt-0068/6f0cf6a7e7d410e3a624f0af8fa4d314tplv-tiktokx-cropcenter:720:720.jpeg?dr=10399&nonce=84125&refresh_token=05118aa7a7b44a43f792d1a09d7bfecf&x-expires=1740060000&x-signature=NKl%2Fc2Ma6bNAhN2pHpCRWflSejQ%3D&idc=no1a&ps=13740610&shcp=81f88b70&shp=a5d48078&t=4d5b0474",
"avatar": "https://p16-sign-va.tiktokcdn.com/tos-maliva-avt-0068/6f0cf6a7e7d410e3a624f0af8fa4d314tplv-tiktokx-cropcenter:720:720.jpeg?dr=10399&nonce=84125&refresh_token=05118aa7a7b44a43f792d1a09d7bfecf&x-expires=1740060000&x-signature=NKl%2Fc2Ma6bNAhN2pHpCRWflSejQ%3D&idc=no1a&ps=13740610&shcp=81f88b70&shp=a5d48078&t=4d5b0474",
"commerceUserInfo": {
"commerceUser": true,
"category": "Education & Training",
"categoryButton": false
},
"privateAccount": false,
"region": "US",
"roomId": "",
"ttSeller": false,
"following": 4,
"friends": 0,
"fans": 2049,
"heart": 135,
"video": 0,
"digg": 0
},
"input": "https://www.tiktok.com/@nasaofficial",
}
]
### Extract TikTok comments
Retrieve comments from videos by calling https://apify.com/clockworks/tiktok-comments-scraper. To set up this module, you will need to add TikTok video URLs to extract the comments from, the desired number of comments, and optionally, the maximum number of replies per comment.
For each TikTok video, you will extract:
* *Comment details*: comment text, timestamp, and number of likes.
* *Commenter profile*: username, ID, and avatar URL.
* *Engagement data*: number of replies.
* *Post association*: URL of the TikTok video the comment belongs to.
Comment data, shortened sample
[
{
"text": "Free lunches??!!!",
"diggCount": 1,
"replyCommentTotal": 1,
"createTimeISO": "2024-02-21T16:10:50.000Z",
"uniqueId": "abdmohimnhareth99",
"videoWebUrl": "https://www.tiktok.com/@apifyoffice/video/7338085038258457889",
"uid": "7114813797776491525",
"cid": "7338088354673640225",
"avatarThumbnail": "https://p77-sign-va.tiktokcdn.com/tos-maliva-avt-0068/e678ece1460eac51f1c4ed95db9a8e31tplv-tiktokx-cropcenter:100:100.jpg?dr=10399&nonce=21560&refresh_token=3d45927e8ec8daaf4c27956e2fdaa849&x-expires=1739973600&x-signature=aFYfAqAMHdHdad9pNzOgThjcgds%3D&idc=no1a&ps=13740610&shcp=ff37627b&shp=30310797&t=4d5b0474"
},
{
"text": "Every day🤭",
"diggCount": 0,
"replyCommentTotal": null,
"createTimeISO": "2024-02-21T16:24:09.000Z",
"uniqueId": "apifyoffice",
"videoWebUrl": "https://www.tiktok.com/@apifyoffice/video/7338085038258457889",
"uid": "7095709566285480965",
"cid": "7338091744464978720",
"avatarThumbnail": "https://p16-sign-useast2a.tiktokcdn.com/tos-useast2a-avt-0068-euttp/2c511269b14f70cca0c11c3285ddc668tplv-tiktokx-cropcenter:100:100.jpg?dr=10399&nonce=11659&refresh_token=c2a577eebaa68fc73aac11e9b99fefcb&x-expires=1739973600&x-signature=LUTudhynytGwrfL9MKFHKO8v7EA%3D&idc=no1a&ps=13740610&shcp=ff37627b&shp=30310797&t=4d5b0474"
},
]
### Extract TikTok hashtags
Gather post data with https://apify.com/clockworks/tiktok-hashtag-scraper. To set up this module, you will need to add the TikTok hashtags from which you want to extract videos and the desired number of videos per hashtag.
For each TikTok hashtag, you will extract:
* *All TikToks posted with chosen hashtags*: caption, video URL, number of plays, hearts, comments, shares, country of creation, timestamp, paid status, video and music metadata.
* *Basic creator info from TikToks posted with chosen hashtags*: name, ID, avatar, bio, account status, total followers/following numbers, given/received likes count, etc.
* *Total number of views for a chosen hashtag*
Hashtag data, shortened sample
[ { "videoMeta.coverUrl": "https://p77-sign-va.tiktokcdn.com/obj/tos-maliva-p-0068/1824f891fd0e48e7bf46513f27383e20_1727638068?lk3s=b59d6b55&x-expires=1740060000&x-signature=PNotHaeJ5nqiyt6zbbZqi4RljzA%3D&shp=b59d6b55&shcp=-", "text": "y como es tu hijo?🥰#trendslab #CapCut #hijo #bebe #capcutamor #amordemivida #parati ", "diggCount": 56500, "shareCount": 5968, "playCount": 5500000, "commentCount": 0, "videoMeta.duration": 9, "isAd": false, "isMuted": false, "hashtags": [ { "id": "1662966768289798", "name": "trendslab", "title": "", "cover": "" }, { "id": "1663935709411330", "name": "capcut", "title": "CapCut is a new, easy-to-use video editing tool designed for mobile platforms. CapCut provides users with a wide range of video editing functions, filters, audio & visual effects, video templates, while keeping it free of charge and ads-free. Everyone can be a creator by using CapCut. \n\nStart creating your cool videos today: \nhttps://capcut.onelink.me/XKqI/228cad85", "cover": "" }, ]
## Other scrapers available
There are other native Make Apps powered by Apify. You can check out Apify Scraper for:
* https://docs.apify.com/platform/integrations/make/search.md
* https://docs.apify.com/platform/integrations/make/maps.md
* https://docs.apify.com/platform/integrations/make/youtube.md
* https://docs.apify.com/platform/integrations/make/ai-crawling.md
* https://docs.apify.com/platform/integrations/make/amazon.md
And more! Because you can access any of thousands of our scrapers on Apify Store by using the https://www.make.com/en/integrations/apify.
---
# Make - YouTube Actor integration
## Apify Scraper for YouTube Data
The YouTube Scraper module from https://apify.com allows you to extract channel, video, streams, shorts, and search data from YouTube.
To use this module, you need an https://console.apify.com and an https://docs.apify.com/platform/integrations/api#api-token, which you can find in the Apify Console under **Settings > Integrations**. After connecting, you can automate data extraction and incorporate the results into your workflows.
For more details, follow the tutorial below.
## Connect Apify Scraper for YouTube Data modules to Make
1. Create an account at https://console.apify.com/. You can sign up using your email, Gmail, or GitHub account.

2. To connect your Apify account to Make, you can use an OAuth connection (recommended) or an Apify API token. To get the Apify API token, navigate to **https://console.apify.com/settings/integrations** in the Apify Console.

3. Find your token under **Personal API tokens** section. You can also create a new API token with multiple customizable permissions by clicking on **+ Create a new token**.
4. Click the **Copy** icon next to your API token to copy it to your clipboard. Then, return to your Make scenario interface.

5. In Make, click **Add** to open the **Create a connection** dialog of the chosen Apify Scraper module.
6. In the **API token** field, paste the API token you copied from Apify. Provide a clear **Connection name**, and click **Save**.

Once connected, you can build workflows to automate YouTube data extraction and integrate results into your applications.
## Apify Scraper for YouTube Data module
After connecting the app, you can use the Search module as a native scraper to extract public YouTube data. Here’s what you get:
### Extract YouTube data
Get data via https://apify.com/streamers/youtube-scraper. To do so, simply fill in the URLs of videos, streams, shorts, searches, or channels you want to gather information about.
For YouTube URLs, you can extract:
* *Basic channel details*: name, number of subscribers, total videos, location, social media links
* *Video and search details*: author name, number of likes, comments, views, title, URL, subtitles, duration, release date
Channel data sample
{ "id": "HV6OlMPn5sI", "title": "Raimu - The Spirit Within 🍃 [lofi hip hop/relaxing beats]", "duration": "29:54", "channelName": "Lofi Girl", "channelUrl": "https://www.youtube.com/channel/UCSJ4gkVC6NrvII8umztf0Ow", "date": "10 months ago", "url": "https://www.youtube.com/watch?v=HV6OlMPn5sI", "viewCount": 410458, "fromYTUrl": "https://www.youtube.com/@LofiGirl/videos", "channelDescription": ""That girl studying by the window non-stop"\n\n🎧 | Listen on Spotify, Apple music and more\n→ https://bit.ly/lofigirl-playlists\n\n💬 | Join the Lofi Girl community \n→ https://bit.ly/lofigirl-discord\n→ https://bit.ly/lofigirl-reddit\n\n🌎 | Lofi Girl on all social media\n→ https://bit.ly/lofigirl-sociaI", "channelDescriptionLinks": [ { "text": "Discord", "url": "https://discord.com/invite/hUKvJnw" }, { "text": "Tiktok", "url": "https://www.tiktok.com/@lofigirl/" }, { "text": "Instagram", "url": "https://www.instagram.com/lofigirl/" }, { "text": "Twitter", "url": "https://twitter.com/lofigirl" }, { "text": "Spotify", "url": "https://open.spotify.com/playlist/0vvXsWCC9xrXsKd4FyS8kM" }, { "text": "Apple music", "url": "https://music.apple.com/fr/playlist/lofi-hip-hop-music-beats-to-relax-study-to/pl.u-2aoq8mqiGo7J6A0" }, { "text": "Merch", "url": "https://lofigirlshop.com/" } ], "channelJoinedDate": "Mar 18, 2015", "channelLocation": "France", "channelTotalVideos": 409, "channelTotalViews": "1,710,167,563", "numberOfSubscribers": 13100000, "isMonetized": true, "inputChannelUrl": "https://www.youtube.com/@LofiGirl/about" }
Video data sample
{ "title": "Stromae - Santé (Live From The Tonight Show Starring Jimmy Fallon)", "id": "CW7gfrTlr0Y", "url": "https://www.youtube.com/watch?v=CW7gfrTlr0Y", "thumbnailUrl": "https://i.ytimg.com/vi/CW7gfrTlr0Y/maxresdefault.jpg", "viewCount": 35582192, "date": "2021-12-21", "likes": 512238, "location": null, "channelName": "StromaeVEVO", "channelUrl": "http://www.youtube.com/@StromaeVEVO", "numberOfSubscribers": 6930000, "duration": "00:03:17", "commentsCount": 14, "text": "Stromae - Santé (Live From The Tonight Show Starring Jimmy Fallon on NBC)\nListen to "La solassitude" here: https://stromae.lnk.to/la-solassitude\nOrder my new album "Multitude" here: https://stromae.lnk.to/multitudeID\n--\nhttps://www.stromae.com/fr/\nhttps://www.tiktok.com/@stromae\nhttps://www.facebook.com/stromae\nhttps://www.instagram.com/stromae\nhttps://twitter.com/stromae\n / @stromae \n--\nMosaert\nPaul Van Haver (Stromae) : creative direction\nCoralie Barbier : creative direction and fashion design\nLuc Van Haver : creative direction\nGaëlle Birenbaum : communication & project manager\nEvence Guinet-Dannonay : executive assistant\nGaëlle Cools : content & community manager\nRoxane Hauzeur : textile product manager\nDiego Mitrugno : office manager\n\nPartizan\nProducer : Auguste Bas\nLine Producer : Zélie Deletrain \nProduction coordinator : Lou Bardou-Jacquet \nProduction assistant : Hugo Dao\nProduction assistant : Adrien Bossa\nProduction assistant : Basile Jan\n\nDirector : Julien Soulier \n1st assistant director : Mathieu Perez \n2nd assistant director : Leila Gentet \n\nDirector of Photography : Kaname Onoyama \n1st assistant operator : Micaela albanese\n2nd assistant operator : Florian Rey \nDoP Mantee : Zhaopeng Zhong\nMaking of : Adryen Barreyat\n\nHead Gaffer : Sophie Delorme \nElectrician : Sacha Brauman\nElectrician: Tom Devianne\nLighting designer : Aurélien Dayot\nPrelight electrician : Emmanuel Malherbe\n\nHead Grip : Dioclès Desrieux \nBest Boy grip : Eloi Perrin \nPrelight Grip : Vladimir Duranovic \n\nLocation manager : Léo Rodriguez \nLocation manager assistant : Grégoire Décatoire \nLocation manager assistant : Mathieu Barazer \n\nStylist : Sandra Gonzalez \nStylist assistant : Sarah Bernard\n\nMake Up and Hair Artist : Camille Roche \nMake up Artist : Carla Lange \nMake Up and Hair Artist : Victoria Pinto \n\nSound Engineer : Lionel Capouillez \nBackliner : Nicolas Fradet \n\nProduction Designer : Penelope Hemon \n\nChoreographer : Marion Motin \nChoreographer assistant : Jeanne Michel \n\nPost production : Royal Post\nPost-Production Director : Cindy Durand Paucsik\nEditor : Marco Novoa\nEditor assistant : Térence Nury \nGrader : Vincent Amor\nVFX Supervisor : Julien Laudicina\nGraphic designer : Quentin Mesureux \nGraphic designer : Lucas Ponçon \nFilm Lab Assistant : Hadrian Kalmbach\n\nMusicians:\nFlorian Rossi \nManoli Avgoustinatos\nSimon Schoovaerts \nYoshi Masuda \n\nDancers: \nJuliana Casas\nLydie Alberto \nRobinson Cassarino\nYohann Hebi daher\nChris Fargeot \nAudrey Hurtis \nElodie Hilsum\nDaya jones \nThéophile Bensusan \nBrandon Masele \nJean Michel Premier \nKevin Bago\nAchraf Bouzefour\nPauline Journe \nCaroline Bouquet \nManon Bouquet\nAshley Biscette \nJocelyn Laurent \nOumrata Konan\nKylian Toto\nEnzo Lesne \nSalomon Mpondo-Dicka\nSandrine Monar \nKarl-Ruben Noel\n\n#Stromae #Sante #JimmyFallon", "descriptionLinks": [ { "url": "https://stromae.lnk.to/la-solassitude", "text": "https://stromae.lnk.to/la-solassitude" }, { "url": "https://stromae.lnk.to/multitudeID", "text": "https://stromae.lnk.to/multitudeID" }, { "url": "https://www.stromae.com/fr/", "text": "https://www.stromae.com/fr/" }, { "url": "https://www.tiktok.com/@stromae", "text": "https://www.tiktok.com/@stromae" }, { "url": "https://www.facebook.com/stromae", "text": "https://www.facebook.com/stromae" }, { "url": "https://www.instagram.com/stromae", "text": "https://www.instagram.com/stromae" }, { "url": "https://twitter.com/stromae", "text": "https://twitter.com/stromae" }, { "url": "https://www.youtube.com/channel/UCXF0YCBWewAj3RytJUAivGA", "text": " / @stromae " }, { "url": "https://www.youtube.com/hashtag/stromae", "text": "#Stromae" }, { "url": "https://www.youtube.com/hashtag/sante", "text": "#Sante" }, { "url": "https://www.youtube.com/hashtag/jimmyfallon", "text": "#JimmyFallon" } ], "subtitles": null, "comments": null, "isMonetized": true, "commentsTurnedOff": false }
Search results data sample
{ "id": "CwRMBKk8St0", "title": "LET'S ARGUE: Beyoncé Fails the Bechdel Test!", "duration": "13:48", "channelName": "fantano", "channelUrl": "https://www.youtube.com/@fantano", "date": "5 years ago", "url": "https://www.youtube.com/watch?v=CwRMBKk8St0", "viewCount": 635379, "fromYTUrl": "https://www.youtube.com/results?search_query=bechdel+test" }, { "id": "k86TWcdjQuM", "title": "This scene is the anti-Bechdel test", "duration": "1:00", "channelName": "Newbie Star Trek", "channelUrl": "https://www.youtube.com/@NewbieStarTrek", "date": "2 months ago", "url": "https://www.youtube.com/shorts/k86TWcdjQuM", "viewCount": 6907, "fromYTUrl": "https://www.youtube.com/results?search_query=bechdel+test" }, { "id": "vKlakrW50QU", "title": "Inside Job passes the bechdel test", "duration": "0:15", "channelName": "Random Daydreamer", "channelUrl": "https://www.youtube.com/@randomdaydreamer9970", "date": "1 year ago", "url": "https://www.youtube.com/watch?v=vKlakrW50QU", "viewCount": 121824, "fromYTUrl": "https://www.youtube.com/results?search_query=bechdel+test" }, { "id": "mL5hgNu4y3A", "title": "Jessica Chastain Describes the Importance of the 'Bechdel Test'", "duration": "3:05", "channelName": "theoffcamerashow", "channelUrl": "https://www.youtube.com/@theoffcamerashow", "date": "2 years ago", "url": "https://www.youtube.com/watch?v=mL5hgNu4y3A", "viewCount": 24145, "fromYTUrl": "https://www.youtube.com/results?search_query=bechdel+test" }
## Other scrapers available
There are other native Make Apps powered by Apify. You can check out Apify Scraper for:
* https://docs.apify.com/platform/integrations/make/tiktok.md
* https://docs.apify.com/platform/integrations/make/search.md
* https://docs.apify.com/platform/integrations/make/maps.md
* https://docs.apify.com/platform/integrations/make/ai-crawling.md
* https://docs.apify.com/platform/integrations/make/amazon.md
And more! Because you can access any of thousands of our scrapers on Apify Store by using the https://www.make.com/en/integrations/apify.
---
# Mastra MCP integration
**Learn how to build AI agents with Mastra and Apify Actors MCP Server.**
***
## What is Mastra
https://mastra.ai is an open-source TypeScript framework for building AI applications efficiently. It provides essential tools like agents, workflows, retrieval-augmented generation (RAG), integrations, and evaluations. Supporting any LLM (e.g., GPT-4, Claude, Gemini). You can run it locally or deploy it to a serverless cloud like https://apify.com.
Explore Mastra
Check out the https://mastra.ai/docs for more information.
## What is MCP server
A https://modelcontextprotocol.io (MCP) server exposes specific data sources or tools to agents via a standardized protocol. It acts as a bridge, connecting large language models (LLMs) to external systems like databases, APIs, or local filesystems. Built on a client-server architecture, MCP servers enable secure, real-time interaction, allowing agents to fetch context or execute actions without custom integrations. Think of it as a modular plugin system for agents, simplifying how they access and process data. Apify provides https://mcp.apify.com/ to expose https://docs.apify.com/platform/actors from the https://apify.com/store as tools via the MCP protocol.
## How to use Apify with Mastra via MCP
This guide demonstrates how to integrate Apify Actors with Mastra by building an agent that uses the https://apify.com/apify/rag-web-browser Actor to search Google for TikTok profiles and the https://apify.com/clockworks/free-tiktok-scraper Actor to extract and analyze data from the TikTok profiles via MCP.
### Prerequisites
* *Apify API token*: To use Apify Actors, you need an Apify API token. Learn how to obtain it in the https://docs.apify.com/platform/integrations/api.
* *LLM provider API key*: To power the agents, you need an LLM provider API key. For example, get one from the https://platform.openai.com/account/api-keys or https://console.anthropic.com/settings/keys.
* *Node.js*: Ensure you have Node.js installed.
* *Packages*: Install the following packages:
npm install @mastra/core @mastra/mcp @ai-sdk/openai
### Building the TikTok profile search and analysis agent
First, import all required packages:
import { Agent } from '@mastra/core/agent'; import { MastraMCPClient } from '@mastra/mcp'; import { openai } from '@ai-sdk/openai'; // For Anthropic use // import { anthropic } from '@ai-sdk/anthropic';
Next, set the environment variables for the Apify API token and OpenAI API key:
process.env.APIFY_TOKEN = "your-apify-token"; process.env.OPENAI_API_KEY = "your-openai-api-key"; // For Anthropic use // process.env.ANTHROPIC_API_KEY = "your-anthropic-api-key";
Instantiate the Mastra MCP client:
const mcpClient = new MastraMCPClient({
name: 'apify-client',
server: {
url: new URL('https://mcp.apify.com/sse'),
requestInit: {
headers: { Authorization: Bearer ${process.env.APIFY_TOKEN} }
},
// The EventSource package augments EventSourceInit with a "fetch" parameter.
// You can use this to set additional headers on the outgoing request.
// Based on this example: https://github.com/modelcontextprotocol/typescript-sdk/issues/118
eventSourceInit: {
async fetch(input: Request | URL | string, init?: RequestInit) {
const headers = new Headers(init?.headers || {});
headers.set('authorization', Bearer ${process.env.APIFY_TOKEN});
return fetch(input, { ...init, headers });
}
}
},
timeout: 300_000, // 5 minutes tool call timeout
});
Connect to the MCP server and fetch the tools:
console.log('Connecting to Mastra MCP server...'); await mcpClient.connect(); console.log('Fetching tools...'); const tools = await mcpClient.tools();
Instantiate the agent with the OpenAI model:
const agent = new Agent({ name: 'Social Media Agent', instructions: 'You’re a social media data extractor. Find TikTok URLs and analyze profiles with precision.', // You can swap to any other AI-SDK LLM provider model: openai('gpt-4o-mini') });
Generate a response using the agent and the Apify tools:
const prompt = 'Search the web for the OpenAI TikTok profile URL, then extract and summarize its data.';
console.log(Generating response for prompt: ${prompt});
const response = await agent.generate(prompt, {
toolsets: { apify: tools }
});
Print the response and disconnect from the MCP server:
console.log(response.text); await mcpClient.disconnect();
Use any Apify Actor
Since it uses the https://mcp.apify.com, swap in any Apify Actor from the https://apify.com/store by updating the startup request’s `actors` parameter. No other changes are needed in the agent code.
Run the agent:
npx tsx mastra-agent.ts
Search and analysis may take some time
The agent's execution may take some time as it searches the web for the OpenAI TikTok profile and extracts data from it.
You will see the agent’s output in the console, showing the results of the search and analysis.
Connecting to Mastra MCP server... Fetching tools... Generating response for prompt: Search the web for the OpenAI TikTok profile URL, then extract and summarize its data.
OpenAI TikTok Profile Summary
- Profile URL: OpenAI on TikTok - Followers: 608,100
- Likes: 3.4 million
- Videos Posted: 156
- Bio: "low key research previews" ...
If you want to test the whole example, create a new file, `mastra-agent.ts`, and copy the full code into it:
import { Agent } from '@mastra/core/agent'; import { MastraMCPClient } from '@mastra/mcp'; import { openai } from '@ai-sdk/openai'; // For Anthropic use // import { anthropic } from '@ai-sdk/anthropic';
process.env.APIFY_TOKEN = "your-apify-token"; process.env.OPENAI_API_KEY = "your-openai-api-key"; // For Anthropic use // process.env.ANTHROPIC_API_KEY = "your-anthropic-api-key";
const mcpClient = new MastraMCPClient({
name: 'apify-client',
server: {
url: new URL('https://mcp.apify.com/sse'),
requestInit: {
headers: { Authorization: Bearer ${process.env.APIFY_TOKEN} }
},
// The EventSource package augments EventSourceInit with a "fetch" parameter.
// You can use this to set additional headers on the outgoing request.
// Based on this example: https://github.com/modelcontextprotocol/typescript-sdk/issues/118
eventSourceInit: {
async fetch(input: Request | URL | string, init?: RequestInit) {
const headers = new Headers(init?.headers || {});
headers.set('authorization', Bearer ${process.env.APIFY_TOKEN});
return fetch(input, { ...init, headers });
}
}
},
timeout: 300_000, // 5 minutes tool call timeout
});
console.log('Connecting to Mastra MCP server...'); await mcpClient.connect(); console.log('Fetching tools...'); const tools = await mcpClient.tools();
const agent = new Agent({ name: 'Social Media Agent', instructions: 'You’re a social media data extractor. Find TikTok URLs and analyze profiles with precision.', // You can swap to any other AI-SDK LLM provider model: openai('gpt-4o-mini') });
const prompt = 'Search the web for the OpenAI TikTok profile URL, then extract and summarize its data.';
console.log(Generating response for prompt: ${prompt});
const response = await agent.generate(prompt, {
toolsets: { apify: tools }
});
console.log(response.text); await mcpClient.disconnect();
## Resources
* https://docs.apify.com/platform/actors
* https://mastra.ai/docs
* https://mcp.apify.com
* https://blog.apify.com/how-to-use-mcp/
* https://apify.com/store
* https://blog.apify.com/what-are-ai-agents/
* https://blog.apify.com/how-to-build-an-ai-agent/
---
# Apify MCP server
The *Apify Model Context Protocol (MCP) Server* enables AI applications to connect to Apify's extensive library of Actors. Tools allowing your AI agents to perform web scraping, data extraction, and automation tasks in real time.

## Prerequisites
Before connecting your AI to Apify, you'll need three things:
* *An Apify account* - Sign up for an Apify account, if you don't have one.
* *Apify API token* - Get your API token from the **Integrations** section in https://console.apify.com/account#/integrations. This token authorizes the MCP server to run Actors on your behalf. Make sure to keep it secure.
* *MCP client* - An AI agent or client that supports Model Context Protocol (MCP) This could be Anthropic's Claude for Desktop, a VS Code extension with MCP support, or any application that implements the MCP specification. The https://modelcontextprotocol.io/clients maintains a list of compatible clients.
## Quick start
You can connect to the Apify MCP server in two ways: use our hosted service for a quick and easy setup using , or run the server locally for development and testing using .
### Streamable HTTP with OAuth (recommended)
Provide the server URL `https://mcp.apify.com`. You will be redirected to your browser to sign in to your Apify account and approve the connection.
* OAuth
* Bearer token
When you connect for the first time, you'll be redirected to your browser to sign in to Apify and authorize the connection. This OAuth flow ensures secure authentication without exposing your API token.
{ "mcpServers": { "apify": { "url": "https://mcp.apify.com" } } }
You can also use your Apify token directly, instead of OAuth, by setting the `Authorization: Bearer ` header in the MCP server configuration.
{ "mcpServers": { "apify": { "url": "https://mcp.apify.com", "headers": { "Authorization": "Bearer " } } } }
Replace `` with your actual Apify API token from the https://console.apify.com/account#/integrations.
Quick setup options
*MCP server configuration for other clients*: Use the https://mcp.apify.com/ to select Actors and tools, then copy the configuration to your client.
#### Client configuration
Here's how to add the Apify MCP server to popular text editors and AI assistants:
* Cursor
* VS Code
* Claude Desktop
One-click installation
The https://mcp.apify.com/ offers a one-click install button for Cursor that automatically applies the configuration to your client.
To add Apify MCP server to Cursor manually:
1. Create or open the `.cursor/mcp.json` file.
2. Add the following to the configuration file:
* OAuth
* Bearer token
{ "mcpServers": { "apify": { "url": "https://mcp.apify.com" } } }
When you connect for the first time, you'll be redirected to your browser to sign in to Apify and authorize the connection. This OAuth flow ensures secure authentication without exposing your API token.
You can also use your Apify token directly, instead of OAuth, by setting the `Authorization: Bearer ` header in the MCP server configuration.
{ "mcpServers": { "apify": { "url": "https://mcp.apify.com", "headers": { "Authorization": "Bearer " } } } }
Replace `` with your actual Apify API token from the https://console.apify.com/account#/integrations.
One-click installation
The https://mcp.apify.com/ offers a one-click install button for VS Code that automatically applies the configuration to your client.
VS Code supports MCP through GitHub Copilot's agent mode (requires Copilot subscription):
1. Ensure you have GitHub Copilot installed
2. Open Command Palette (`CMD`/`CTRL` + `Shift` + `P`) and run *MCP: Open User Configuration* command.
* This will open `mcp.json` file in your user profile. If the file does not exist, VS Code creates it for you.
3. Add the following to the configuration file:
* OAuth
* Bearer token
{ "mcpServers": { "apify": { "url": "https://mcp.apify.com" } } }
When you connect for the first time, you'll be redirected to your browser to sign in to Apify and authorize the connection. This OAuth flow ensures secure authentication without exposing your API token.
You can also use your Apify token directly, instead of OAuth, by setting the `Authorization: Bearer ` header in the MCP server configuration.
{ "mcpServers": { "apify": { "url": "https://mcp.apify.com", "headers": { "Authorization": "Bearer " } } } }
Replace `` with your actual Apify API token from the https://console.apify.com/account#/integrations.
One-click installation
Download and run the https://github.com/apify/actors-mcp-server/releases/latest/download/apify-mcp-server.mcpb for one-click installation.
To manually configure Apify's MCP server for Claude Desktop:
1. Open Claude Desktop settings.
2. Navigate to the **Developer** section.
3. Add the following to the configuration file:
{ "mcpServers": { "actors-mcp-server": { "command": "npx", "args": ["-y", "@apify/actors-mcp-server"], "env": { "APIFY_TOKEN": "" } } } }
Replace `` with your actual Apify API token from the https://console.apify.com/account#/integrations.
### Local stdio
If your client doesn't support remote MCP servers using the `https://mcp.apify.com` URL, you can run the server locally instead. This method uses the stdio transport to connect directly through your local environment.
Add this to your configuration file:
{ "mcpServers": { "actors-mcp-server": { "command": "npx", "args": ["-y", "@apify/actors-mcp-server"], "env": { "APIFY_TOKEN": "YOUR_APIFY_TOKEN" } } } }
The server will download automatically on first use and connect using your API token.
## Tool selection
By default, the MCP server loads essential tools for Actor discovery, documentation search, and the RAG Web Browser Actor. You can customize which tools are available by adding parameters to the server URL:
`https://mcp.apify.com?tools=actors,docs,apify/rag-web-browser`
For minimal setups where you only need specific Actors:
`https://mcp.apify.com?tools=apify/instagram-scraper,apify/google-search-scraper`
This configuration approach works for both hosted and local setups. For the CLI version:
`npx @apify/actors-mcp-server --tools actors,docs,apify/web-scraper`
Easy configuration
Use the UI configurator `https://mcp.apify.com/` to select your tools visually, then copy the configuration to your client.
### Available tools
| Tool name | Category | Enabled by default | Description |
| --------------------------------------- | ------------ | ------------------ | ----------------------------------------------------------------------------------------------------- |
| `search-actors` | actors | ✅ | Search for Actors in Apify Store |
| `fetch-actor-details` | actors | ✅ | Retrieve detailed information about a specific Actor |
| `call-actor`\* | actors | ❔ | Call an Actor and get its run results |
| https://apify.com/apify/rag-web-browser | Actor | ✅ | Browse and extract web data |
| `search-apify-docs` | docs | ✅ | Search the Apify documentation for relevant pages |
| `fetch-apify-docs` | docs | ✅ | Fetch the full content of an Apify documentation page by its URL |
| `get-actor-run` | runs | | Get detailed information about a specific Actor run |
| `get-actor-run-list` | runs | | Get a list of an Actor's runs, filterable by status |
| `get-actor-log` | runs | | Retrieve the logs for a specific Actor run |
| `get-dataset` | storage | | Get metadata about a specific dataset |
| `get-dataset-items` | storage | | Retrieve items from a dataset with support for filtering and pagination |
| `get-dataset-schema` | storage | | Generate a JSON schema from dataset items |
| `get-key-value-store` | storage | | Get metadata about a specific key-value store |
| `get-key-value-store-keys` | storage | | List the keys within a specific key-value store |
| `get-key-value-store-record` | storage | | Get the value associated with a specific key in a key-value store |
| `get-dataset-list` | storage | | List all available datasets for the user |
| `get-key-value-store-list` | storage | | List all available key-value stores for the user |
| `add-actor`\* | experimental | ❔ | Add an Actor as a new tool for the user to call |
| `get-actor-output`\* | - | ✅ | Retrieve the output from an Actor call which is not included in the output preview of the Actor tool. |
Retrieving full output
The `get-actor-output` tool is automatically included with any Actor-related tool, such as `call-actor`, `add-actor`, or specific Actor tools like `apify-slash-rag-web-browser`. When you call an Actor, you receive an output preview. Depending on the output format and length, the preview may contain the complete output or only a limited version to avoid overwhelming the LLM. To retrieve the full output, use the `get-actor-output` tool with the `datasetId` from the Actor call. This tool supports limit, offset, and field filtering.
#### Dynamic tool discovery
One of the most powerful features is the ability to discover and use new Actors on demand. It can search Apify Store for relevant Actors using the `search-actors` tool, inspect Actor details to understand required inputs, add the Actor as a new tool, and execute it with appropriate parameters.
This dynamic discovery means your AI can adapt to new tasks without manual configuration. Each discovered Actor becomes immediately available for future use in the conversation.
Dynamic tool discovery
When you use the `actors` tool category, clients that support dynamic tool discovery (such as Claude.ai web and VS Code) will automatically receive the `add-actor` tool instead of `call-actor` for enhanced Actor discovery capabilities. For a detailed overview of client support for dynamic discovery, see the https://github.com/apify/mcp-client-capabilities.
## Advanced usage
### Production best practices
* For production deployments, explicitly specify which tools to load rather than relying on defaults. This ensures consistent behavior across updates:
`https://mcp.apify.com?tools=actors,docs,apify/rag-web-browser`
* For a local stdio server, always use the latest version of the server by appending `@latest` to your npm commands.
* Monitor your API usage through Apify Console to stay within your plan limits.
## Rate limits and performance
The Apify MCP server allows up to *30* requests per second per user. This limit applies to all operations including Actor runs, storage access, and documentation queries. If you exceed this limit, you'll receive a `429` response and should implement appropriate retry logic.
## Troubleshooting
##### Authentication errors
* *Check your API token*: Verify that your Apify API token is correct. You can find it in the **Integrations** section of the https://console.apify.com/account#/integrations. Without a valid token, the server cannot start Actor runs.
* *Set environment variable for local development*: When running the MCP server locally, ensure you have set the `APIFY_TOKEN` environment variable.
##### Local environment setup
* *The MCP server requires Node.js v18 or higher*. Check your installed version by running `node -v` in your terminal.
* *Using the latest server version*: To ensure you have the latest features and bug fixes, use the latest version of the `@apify/actors-mcp-server` package. You can do this by appending `@latest` to the package name in your `npx` command or configuration file.
##### Actor execution issues
* *No response or long delays*: Actor runs can take time to complete depending on their task. If you're experiencing long delays, check the Actor's logs in Apify Console. The logs will provide insight into the Actor's status and show if it's processing a long operation or has encountered an error.
## Support and resources
The Apify MCP Server is an open-source project. Report bugs, suggest features, or ask questions in the https://github.com/apify/apify-mcp-server/issues.
If you find this project useful, please star it on https://github.com/apify/apify-mcp-server to show your support!
To learn more about MCP and Apify integration:
* https://modelcontextprotocol.io - Learn about the open standard on the official MCP website – understanding the protocol can help you build custom agents.
* https://blog.apify.com/how-to-use-mcp/ - Learn how to expose over thousands of Apify Actors to AI agents with Claude and LangGraph, and configure MCP clients and servers.
* https://www.youtube.com/watch?v=BKu8H91uCTg - Integrate thousands of Apify Actors and Agents with Claude.
* https://apify.com/jiri.spilka/tester-mcp-client - A specialized client Actor that you can run to simulate an AI agent in your browser. Useful for testing your setup with a chat UI.
---
# Milvus integration
**Learn how to integrate Apify with Milvus (Zilliz) to save data scraped from websites into the Milvus vector database.**
***
https://milvus.io/ is an open-source vector database optimized for performing similarity searches on large datasets of high-dimensional vectors. Its focus on efficient vector similarity search allows for the creation of powerful and scalable retrieval systems.
The Apify integration for Milvus allows exporting results from Apify Actors and Dataset items into a Milvus collection. It can also be connected to a managed Milvus instance on https://cloud.zilliz.com.
## Prerequisites
Before you begin, ensure that you have the following:
* A Milvus/Zilliz database universal resource identifier (URI) and Token to setup the client. Optionally, you can use a username and password in the URI. You can run Milvus on Docker or Kubernetes, but in this example, we'll use the hosted Milvus service at https://cloud.zilliz.com.
* An https://openai.com/index/openai-api/ to compute text embeddings.
* An https://docs.apify.com/platform/integrations/api#api-token to access https://apify.com/store.
### How to set up Milvus/Zilliz database
1. Sign up or log in to your Zilliz account and create a new cluster.
2. Find the `uri` and `token`, which correspond to the https://docs.zilliz.com/docs/on-zilliz-cloud-console#cluster-details in Zilliz Cloud.
Note that the collection does not need to exist beforehand. It will be automatically created when data is uploaded to the database.
Once the cluster is ready, and you have the `URI` and `Token`, you can set up the integration with Apify.
### Integration Methods
You can integrate Apify with Milvus using either the Apify Console or the Apify Python SDK.
Website Content Crawler usage
These examples use the Website Content Crawler Actor, which performs deep website crawling, cleans HTML by removing modals and navigation elements, and converts the content into Markdown.
#### Apify Console
1. Set up the https://apify.com/apify/website-content-crawler Actor in the https://console.apify.com. Refer to this guide on how to set up https://blog.apify.com/talk-to-your-website-with-large-language-models/.
2. After setting up the crawler, go to the **integration** section, select **Connect Actor or Task**, and search for the Milvus integration.
3. Select when to trigger this integration (typically when a run succeeds) and fill in all the required fields. If you haven't created a collection, it will be created automatically. You can learn more about the input parameters at the https://apify.com/apify/milvus-integration/input-schema.
* For a detailed explanation of the input parameters, including dataset settings, incremental updates, and examples, see the https://apify.com/apify/milvus-integration.
* For an explanation on how to combine Actors to accomplish more complex tasks, refer to the guide on https://blog.apify.com/connecting-scrapers-apify-integration/ integrations.
#### Python
Another way to interact with Milvus is through the https://docs.apify.com/sdk/python/.
1. Install the Apify Python SDK by running the following command:
pip install apify-client
2. Create a Python script and import all the necessary modules:
from apify_client import ApifyClient
APIFY_API_TOKEN = "YOUR-APIFY-TOKEN" OPENAI_API_KEY = "YOUR-OPENAI-API-KEY"
MILVUS_COLLECTION_NAME = "YOUR-MILVUS-COLLECTION-NAME" MILVUS_URI = "YOUR-MILVUS-URI" MILVUS_TOKEN = "YOUR-MILVUS-TOKEN" client = ApifyClient(APIFY_API_TOKEN)
3. Call the https://apify.com/apify/website-content-crawler Actor to crawl the Milvus documentation and Zilliz website and extract text content from the web pages:
actor_call = client.actor("apify/website-content-crawler").call( run_input={"maxCrawlPages": 10, "startUrls": [{"url": "https://milvus.io/"}, {"url": "https://zilliz.com/"}]} )
4. Call Apify's Milvus integration and store all data in the Milvus Vector Database:
milvus_integration_inputs = { "milvusUri": MILVUS_URI, "milvusToken": MILVUS_TOKEN, "milvusCollectionName": MILVUS_COLLECTION_NAME, "datasetFields": ["text"], "datasetId": actor_call["defaultDatasetId"], "deltaUpdatesPrimaryDatasetFields": ["url"], "expiredObjectDeletionPeriodDays": 30, "embeddingsApiKey": OPENAI_API_KEY, "embeddingsProvider": "OpenAI", } actor_call = client.actor("apify/milvus-integration").call(run_input=milvus_integration_inputs)
Congratulations! You've successfully integrated Apify with Milvus, and the scraped data is now stored in your Milvus database. For a complete example of Retrieval-Augmented Generation (RAG), check out the Additional Resources below.
## Additional Resources
* https://apify.com/apify/milvus-integration
* https://milvus.io/docs
* https://milvus.io/docs/apify_milvus_rag.md
---
# n8n integration
**Connect Apify with n8n to automate workflows by running Actors, extracting structured data, and responding to Actor or task events.**
***
https://n8n.io/ is an open source, fair-code licensed tool for workflow automation. With the https://github.com/apify/n8n-nodes-apify, you can connect Apify Actors and storage to hundreds of services You can run scrapers, extract data, and trigger workflows based on Actor or task events.
In this guide, you'll learn how to install the Apify node, set up authentication, and incorporate it into your n8n workflows as either a trigger or an action.
## Prerequisites
Before you begin, make sure you have:
* An https://console.apify.com/
* An https://docs.n8n.io/learning-path/ (self‑hosted or cloud)
## Install the Apify Node (self-hosted)
If you're running a self-hosted n8n instance, you can install the Apify community node directly from the editor. This process adds the node to your available tools, enabling Apify operations in workflows.
1. Open your n8n instance.
2. Go to **Settings > Community Nodes**.
3. Select **Install**.
4. Enter the npm package name: `@apify/n8n-nodes-apify` (for latest version). To install a specific https://www.npmjs.com/package/@apify/n8n-nodes-apify?activeTab=versions enter e.g `@apify/n8n-nodes-apify@0.4.4`.
5. Agree to the https://docs.n8n.io/integrations/community-nodes/risks/ of using community nodes and select **Install**.
6. You can now use the node in your workflows.

## Install the Apify Node (n8n Cloud)
For n8n Cloud users, installation is even simpler and doesn't require manual package entry. Just search and add the node from the canvas.
1. Go to the **Canvas** and open the **nodes panel**
2. Search for **Apify** in the community node registry
3. Click **Install node** to add the Apify node to your instance

Verified community nodes visibility
On n8n Cloud, instance owners can toggle visibility of verified community nodes in the Cloud Admin Panel. Ensure this setting is enabled to install the Apify node.
Once installed, the next step is authentication.
## Authentication
The Apify node offers two authentication methods to securely connect to your Apify account. Choose based on your setup - API key works for both self-hosted and cloud instances, while OAuth2 is cloud-only.
### API Key (cloud & self-hosted instance)
1. In the n8n Editor UI, click on **Create Credential**.
2. Search for Apify API and click **Continue**.
3. Enter your Apify API token. (find it in the https://console.apify.com/settings/integrations).
4. Click **Save**.

### OAuth2 (cloud instance only)
1. In n8n Cloud, select **Create Credential**.
2. Search for Apify OAuth2 API and select **Continue**.
3. Select **Connect my account** and authorize with your Apify account.
4. n8n automatically retrieves and stores the OAuth2 tokens.

Credential Control
For simplicity on n8n Cloud, use the API key method if you prefer manual control over credentials.
With authentication set up, you can now create workflows that incorporate the Apify node.
## Create a Workflow with the Apify Node
Start by building a basic workflow in n8n, then add the Apify node to handle tasks like running Actors or fetching data.
1. Create a new workflow in n8n.
2. Select **Add Node**, search for **Apify**, and select it.
3. Choose the desired **Resource** and **Operation**.
4. In the node's **Credentials** dropdown, choose the Apify credential you configured earlier. If you haven't configured any credentials, you can do so in this step. The process will be the same.
5. You can now use Apify node as a trigger or action in your workflow.

## Use Apify node as trigger
Triggers let your workflow respond automatically to events in Apify, such as when an Actor run finishes. This is ideal for real-time automation, like processing scraped data as soon as it's available.
1. Create a new workflow.
2. Click **Add Node**, search for **Apify**, and select it.
3. Select **On new Apify Event** trigger.
4. Configure the trigger:
* **Actor or Actor task**: select the Actor or task to listen for terminal events.
* **Event Type**: the status of the Actor or task run that should trigger the workflow.
5. Add subsequent nodes (e.g., HTTP Request, Google Sheets) to process or store the output.
6. Save and execute the workflow.

## Use Apify node as an action
Actions allow you to perform operations like running an Actor within a workflow. For instance, you could trigger a scraper and then retrieve its results.
1. Create a new workflow.
2. Click **Add Node**, search for **Apify**, and select it.
3. Select any operation. In this example we will use **Run Actor**.
4. Configure it:
* **Custom input**: JSON input for the Actor run, which you can find on the Actor input page in Apify Console. See https://docs.apify.com/platform/actors/running/input-and-output.md#input for more information. If empty, the run uses the input specified in the default run configuration
* **Timeout**: Timeout for the Actor run in seconds. Zero value means there is no timeout
* **Memory**: Amount of memory allocated for the Actor run, in megabytes
* **Build Tag**: Specifies the Actor build tag to run. By default, the run uses the build specified in the default run configuration for the Actor (typically `latest`)
* **Wait for finish**: Whether to wait for the run to finish before continuing. If true, the node will wait for the run to complete (successfully or not) before moving to the next node 
5. Add another Apify operation called **Get Dataset Items**.
* Set **Dataset ID** parameter as **defaultDatasetId** value received from the previous **Run Actor** node. This will give you the output of the Actor run 
6. Add any subsequent nodes (e.g. Google Sheets) to process or store the output
7. Save and execute the workflow 
## Use Apify Node as an AI tool
You can run Apify operations, retrieve the results, and use AI to process, analyze, and summarize the data, or generate insights and recommendations.

1. Create a new workflow.
2. **Add a trigger**: Search for and select **Chat Trigger**.
3. **Add the AI Agent node**: Click **Add Node**, search for **AI Agent**, and select it.
4. Configure the AI Agent:
* **Chat Model**: Choose the language model you want to use.
* **Memory (optional)**: Enables the AI model to remember and reference past interactions.
* **Tools**: Search for **Apify**, select **Apify Tool**, and click **Add to Workflow**. Choose any available operation and configure it.
5. **Run the workflow**: Save it, then provide a prompt instructing the Agent to use the Apify tool with the operations you configured earlier.
note
Let the AI model define the parameters in your node when possible. Click the *sparkle* icon next to a parameter to have the AI fill it in for you.

## Available Operations
The Apify node provides a range of operations for managing Actors, tasks, runs, and storage. These can be used as actions in your workflows. For triggers, focus on event-based activations to start workflows automatically.
### Actors
Run and manage Actors directly.
* **Run Actor**: Starts a specified Actor with customizable parameters
* **Scrape Single URL**: Runs a scraper for a specified website and returns its content
* **Get Last Run**: Retrieve metadata for the most recent run of an Actor
### Actor Tasks
Execute predefined tasks efficiently.
* **Run Task**: Executes a specified Actor task
### Actor Runs
Retrieve run details.
* **Get User Runs List**: Retrieve a list of all runs for a user
* **Get Run**: Retrieve detailed information for a specific run ID
* **Get Runs**: Retrieve all runs for a specific Actor
### Storage
Pull data from Apify storage.
#### Datasets
* **Get Items**: Retrieves items from a https://docs.apify.com/platform/storage/dataset.md
#### Key-Value Stores
* **Get Record**: Retrieves a value from a https://docs.apify.com/platform/storage/key-value-store.md
### Triggers
Automatically start an n8n workflow when an Actor or task run finishes:
* **Actor Run Finished**: Activates when a selected Actor run completes
* **Task Run Finished**: Activates when a selected Actor task run completes
## Resources
* https://docs.n8n.io/integrations/community-nodes/
* https://docs.apify.com
* https://docs.n8n.io
## Troubleshooting
If you encounter issues, start by double-checking basics.
* **Authentication errors**: Verify your API token or OAuth2 settings in **Credentials**.
* **Operation failures**: Check input parameters, JSON syntax, and resource IDs in your Apify account.
Feel free to explore other resources and contribute to the integration on https://github.com/apify/n8n-nodes-apify.
---
# n8n - Website Content Crawler by Apify
Website Content Crawler from https://apify.com/apify/website-content-crawler lets you extract text content from websites to feed AI models, LLM applications, vector databases, or Retrieval Augmented Generation (RAG) pipelines. It supports rich formatting using Markdown, cleans the HTML of irrelevant elements, downloads linked files, and integrates with AI ecosystems like Langchain, LlamaIndex, and other LLM frameworks.
To use these modules, you need an https://docs.apify.com/platform/integrations/api#api-token. You can find your token in the https://console.apify.com/ under **Settings > Integrations**. After connecting, you can automate content extraction at scale and incorporate the results into your AI workflows.
## Prerequisites
Before you begin, make sure you have:
* An https://console.apify.com/
* An https://docs.n8n.io/learning-path/ (self‑hosted or cloud)
## n8n Cloud setup
This section explains how to install and connect the Apify node when using n8n Cloud.
### Install
For n8n Cloud users, installation is even simpler and doesn't require manual package entry. Just search and add the node from the canvas.
1. Go to the **Canvas** and open the **nodes panel**
2. Search for **Website Content Crawler by Apify** in the community node registry
3. Click **Install node** to add the Apify node to your instance

Verified community nodes visibility
On n8n Cloud, instance owners can toggle visibility of verified community nodes in the Cloud Admin Panel. Ensure this setting is enabled to install the Website Content Crawler by Apify node.
### Connect
1. In n8n Cloud, select **Create Credential**.
2. Search for Apify OAuth2 API and select **Continue**.
3. Select **Connect my account** and authorize with your Apify account.
4. n8n automatically retrieves and stores the OAuth2 tokens.

Cloud API Key management
On n8n Cloud, you can use the API key method if you prefer to manage your credentials manually. See the for detailed API configuration instructions.
With authentication set up, you can now create workflows that incorporate the Apify node.
## n8n self-hosted setup
This section explains how to install and connect the Apify node when running your own n8n instance.
### Install
If you're running a self-hosted n8n instance, you can install the Apify community node directly from the editor. This process adds the node to your available tools, enabling Apify operations in workflows.
1. Open your n8n instance.
2. Go to **Settings > Community Nodes**.
3. Select **Install**.
4. Enter the npm package name: `@apify/n8n-nodes-apify-content-crawler` (for latest version). To install a specific https://www.npmjs.com/package/@apify/n8n-nodes-apify-content-crawler?activeTab=versions enter e.g `@apify/n8n-nodes-apify-content-crawler@0.0.1`.
5. Agree to the https://docs.n8n.io/integrations/community-nodes/risks/ of using community nodes and select **Install**.
6. You can now use the node in your workflows.

### Connect
1. Create an account at https://console.apify.com/. You can sign up using your email, Gmail, or GitHub account.

2. To connect your Apify account to n8n, you can use an OAuth connection (recommended) or an Apify API token. To get the Apify API token, navigate to **https://console.apify.com/settings/integrations** in the Apify Console.

3. Find your token under **Personal API tokens** section. You can also create a new API token with multiple customizable permissions by clicking on **+ Create a new token**.
4. Click the **Copy** icon next to your API token to copy it to your clipboard. Then, return to your n8n workflow interface.

5. In n8n, click **Create new credential** of the chosen Apify Scraper module.
6. In the **API key** field, paste the API token you copied from Apify and click **Save**.

## Website Content Crawler by Apify module
This module provides complete control over the content extraction process, allowing you to fine-tune every aspect of the crawling and transformation pipeline. This module is ideal for complex websites, JavaScript-heavy applications, or when you need precise control over content extraction.
### Key features
* *Multiple Crawler Options*: Choose between headless browsers (Playwright) or faster HTTP clients (Cheerio)
* *Custom Content Selection*: Specify exactly which elements to keep or remove
* *Advanced Navigation Control*: Set crawling depth, scope, and URL patterns
* *Dynamic Content Handling*: Wait for JavaScript-rendered content to load
* *Interactive Element Support*: Click expandable sections to reveal hidden content
* *Multiple Output Formats*: Save content as Markdown, HTML, or plain text
* *Proxy Configuration*: Use proxies to handle geo-restrictions or avoid IP blocks
* *Content Transformation Options*: Multiple algorithms for optimal content extraction
### How it works
the Website Content Crawler by Apify module provides granular control over the entire crawling process. For *Crawler selection*, you can choose from Playwright (Firefox/Chrome) or Cheerio, depending on the complexity of the target website. *URL management* allows you to define the crawling scope with include and exclude URL patterns. You can also exercise precise *DOM manipulation* by controlling which HTML elements to keep or remove. To ensure the best results, you can apply specialized algorithms for *Content transformation* and select from various *Output formatting* options for better AI model compatibility.
### Output data
For each crawled web page, you'll receive:
* *Page metadata*: URL, title, description, canonical URL
* *Cleaned text content*: The main article content with irrelevant elements removed
* *Markdown formatting*: Structured content with headers, lists, links, and other formatting preserved
* *Crawl information*: Loaded URL, referrer URL, timestamp, HTTP status
* *Optional file downloads*: PDFs, DOCs, and other linked documents
* *Multiple format options*: Content in Markdown, HTML, or plain text
* *Debug information*: Detailed extraction diagnostics and snapshots
* *HTML transformations*: Results from different content extraction algorithms
* *File storage options*: Flexible storage for HTML, screenshots, or downloaded files
Sample output (shortened)
{ "url": "https://docs.apify.com/academy/web-scraping-for-beginners", "crawl": { "loadedUrl": "https://docs.apify.com/academy/web-scraping-for-beginners", "loadedTime": "2025-04-22T14:33:20.514Z", "referrerUrl": "https://docs.apify.com/academy", "depth": 1, "httpStatusCode": 200 }, "metadata": { "canonicalUrl": "https://docs.apify.com/academy/web-scraping-for-beginners", "title": "Web scraping for beginners | Apify Documentation", "description": "Learn the basics of web scraping with a step-by-step tutorial and practical exercises.", "languageCode": "en", "markdown": "# Web scraping for beginners\n\nWelcome to our comprehensive web scraping tutorial for beginners. This guide will take you through the fundamentals of extracting data from websites, with practical examples and exercises.\n\n## What is web scraping?\n\nWeb scraping is the process of extracting data from websites. It involves making HTTP requests to web servers, downloading HTML pages, and parsing them to extract the desired information.\n\n## Why learn web scraping?\n\n- Data collection: Gather information for research, analysis, or business intelligence\n- Automation: Save time by automating repetitive data collection tasks\n- Integration: Connect web data with your applications or databases\n- Monitoring: Track changes on websites automatically\n\n## Getting started\n\nTo begin web scraping, you'll need to understand the basics of HTML, CSS selectors, and HTTP. This tutorial will guide you through these concepts step by step.\n\n...", "text": "Web scraping for beginners\n\nWelcome to our comprehensive web scraping tutorial for beginners. This guide will take you through the fundamentals of extracting data from websites, with practical examples and exercises.\n\nWhat is web scraping?\n\nWeb scraping is the process of extracting data from websites. It involves making HTTP requests to web servers, downloading HTML pages, and parsing them to extract the desired information.\n\nWhy learn web scraping?\n\n- Data collection: Gather information for research, analysis, or business intelligence\n- Automation: Save time by automating repetitive data collection tasks\n- Integration: Connect web data with your applications or databases\n- Monitoring: Track changes on websites automatically\n\nGetting started\n\nTo begin web scraping, you'll need to understand the basics of HTML, CSS selectors, and HTTP. This tutorial will guide you through these concepts step by step.\n\n..." } }
You can access any of thousands of our scrapers on Apify Store by using the https://n8n.io/integrations/apify.
### Configuration options
You can select the *Crawler type* by choosing the rendering engine (browser or HTTP client) and the *Content extraction algorithm* from multiple HTML transformers. *Element selectors* allow you to specify which elements to keep, remove, or click, while *URL patterns* let you define inclusion and exclusion rules with glob syntax. You can also set *Crawling parameters* like concurrency, depth, timeouts, and retries. For robust crawling, you can configure *Proxy configuration* settings and select from various *Output options* for content formats and storage.
## Usage as an AI Agent Tool
You can setup Apify's Scraper for AI Crawling node as a tool for your AI Agents.

### Dynamic URL crawling
In the Website Content Crawler module you can set the **Start URLs** to be filled in by your AI Agent dynamically. This allows the Agent to decide on which pages to scrape off the internet.
Two key parameters to configure for optimized AI Agent usage are **Max crawling depth** and **Max pages**. Remember that the scraping results are passed into the AI Agent’s context, so using smaller values helps stay within context limits.

### Example usage
Here, the agent was used to find information about Apify's latest blog post. It correctly filled in the URL for the blog and summarized its content.

---
# OpenAI Assistants integration
**Learn how to integrate Apify with OpenAI Assistants to provide real-time search data and to save them into OpenAI Vector Store.**
***
https://platform.openai.com/docs/assistants/overview allows you to build your own AI applications such as chatbots, virtual assistants, and more. The OpenAI Assistants can access OpenAI knowledge base (https://platform.openai.com/docs/api-reference/vector-stores) via file search and use function calling for dynamic interaction and data retrieval.
Unlike Custom GPT, OpenAI Assistants are available via API, enabling integration with Apify to automatically update assistant data and deliver real-time information, improving the quality of answers.
In this tutorial, we’ll start by demonstrating how to create an assistant and integrate real-time data using function calling with the https://apify.com/apify/rag-web-browser. Next, we’ll show how to save data from Apify Actors into the OpenAI Vector Store for easy retrieval through https://platform.openai.com/docs/assistants/tools/file-search.
## Real-time search data for OpenAI Assistant
We'll use the https://apify.com/apify/rag-web-browser Actor to fetch the latest information from the web and provide it to the OpenAI Assistant through https://platform.openai.com/docs/assistants/tools/function-calling?context=without-streaming. To begin, we need to create an OpenAI Assistant with the appropriate instructions. After that, we can initiate a conversation with the assistant by creating a thread, adding messages, and running the assistant to receive responses. The image below provides an overview of the entire process:

Before we start creating the assistant, we need to install all dependencies:
pip install apify-client openai
Import all required packages:
import json import time
from apify_client import ApifyClient from openai import OpenAI, Stream from openai.types.beta.threads.run_submit_tool_outputs_params import ToolOutput
Find your https://console.apify.com/account/integrations and https://platform.openai.com/account/api-keys and initialize OpenAI and Apify clients:
client = OpenAI(api_key="YOUR OPENAI API KEY") apify_client = ApifyClient("YOUR APIFY API TOKEN")
First, let us specify assistant's instructions. Here, we ask the assistant to always provide answers based on the latest information from the internet and include relevant sources whenever possible. In a real-world scenario, you can customize the instructions based on your requirements.
INSTRUCTIONS = """ You are a smart and helpful assistant. Maintain an expert, friendly, and informative tone in your responses. Your task is to answer questions based on information from the internet. Always call call_rag_web_browser function to retrieve the latest and most relevant online results. Never provide answers based solely on your own knowledge. For each answer, always include relevant sources whenever possible. """
Next, we define a function description with two parameters, search query (`query`) and number of results we need to retrieve (`maxResults`). RAG Web Browser can be called with more parameters, check the https://apify.com/apify/rag-web-browser/input-schema for details.
rag_web_browser_function = { "type": "function", "function": { "name": "call_rag_web_browser", "description": "Query Google search, scrape the top N pages from the results, and returns their cleaned content as markdown", "parameters": { "type": "object", "properties": { "query": { "type": "string", "description": "Use regular search words or enter Google Search URLs. "}, "maxResults": {"type": "integer", "description": "The number of top organic search results to return and scrape text from"} }, "required": ["query"] } } }
We also need to implement the `call_rag_web_browser` function, which will be used to retrieve the search data.
def call_rag_web_browser(query: str, max_results: int) -> list[dict]: """ Query Google search, scrape the top N pages from the results, and returns their cleaned content as markdown. First start the Actor and wait for it to finish. Then fetch results from the Actor run's default dataset. """ actor_call = apify_client.actor("apify/rag-web-browser").call(run_input={"query": query, "maxResults": max_results}) return apify_client.dataset(actor_call["defaultDatasetId"]).list_items().items
Now, we can create an assistant with the specified instructions and function description:
my_assistant = client.beta.assistants.create( instructions=INSTRUCTIONS, name="OpenAI Assistant with Web Browser", tools=[rag_web_browser_function], model="gpt-4o-mini", )
Once the assistant is created, we can initiate a conversation. Start by creating a thread and adding messages to it, and then calling the run method. Since runs are asynchronous, we need to continuously poll the `Run` object until it reaches a terminal status. To simplify this, we use the `create_and_poll` convenience function, which both initiates the run and polls it until completion.
thread = client.beta.threads.create() message = client.beta.threads.messages.create( thread_id=thread.id, role="user", content="What are the latest LLM news?" )
run = client.beta.threads.runs.create_and_poll(thread_id=thread.id, assistant_id=my_assistant.id)
Finally, we need to check the run status to determine if the assistant requires any action to retrieve the search data. If it does, we must submit the results using the `submit_tool_outputs` function. This function will trigger RAG Web Browser to fetch the search data and submit it to the assistant for processing.
Let's implement the `submit_tool_outputs` function:
def submit_tool_outputs(run_): """ Submit tool outputs to continue the run """ tool_output = [] for tool in run_.required_action.submit_tool_outputs.tool_calls: if tool.function.name == "call_rag_web_browser": d = json.loads(tool.function.arguments) output = call_rag_web_browser(query=d["query"], max_results=d["maxResults"]) tool_output.append(ToolOutput(tool_call_id=tool.id, output=json.dumps(output))) print("RAG Web Browser added as a tool output.")
return client.beta.threads.runs.submit_tool_outputs_and_poll(thread_id=run_.thread_id, run_id=run_.id, tool_outputs=tool_output)
Now, we can check the run status and submit the tool outputs if required:
if run.status == "requires_action": run = submit_tool_outputs(run)
The function `submit_tool_output` also poll the run until it reaches a terminal status. After the run is completed, we can print the assistant's response:
print("Assistant response:") for m in client.beta.threads.messages.list(thread_id=run.thread_id): print(m.content[0].text.value)
For the question "What are the latest LLM news?" the assistant's response might look like this:
Assistant response: The latest news on LLM is as follows:
- OpenAI has released a new version of GPT-4.
- Hugging Face has updated their Transformers library.
- Apify has released a new RAG Web Browser.
Complete example of real-time search data for OpenAI Assistant
import json
from apify_client import ApifyClient from openai import OpenAI, Stream from openai.types.beta.threads.run_submit_tool_outputs_params import ToolOutput
client = OpenAI(api_key="YOUR-OPENAI-API-KEY") apify_client = ApifyClient("YOUR-APIFY-API-TOKEN")
INSTRUCTIONS = """ You are a smart and helpful assistant. Maintain an expert, friendly, and informative tone in your responses. Your task is to answer questions based on information from the internet. Always call call_rag_web_browser function to retrieve the latest and most relevant online results. Never provide answers based solely on your own knowledge. For each answer, always include relevant sources whenever possible. """
rag_web_browser_function = { "type": "function", "function": { "name": "call_rag_web_browser", "description": "Query Google search, scrape the top N pages from the results, and returns their cleaned content as markdown", "parameters": { "type": "object", "properties": { "query": {"type": "string", "description": "Use regular search words or enter Google Search URLs. "}, "maxResults": {"type": "integer", "description": "The number of top organic search results to return and scrape text from"} }, "required": ["query"] } } }
def call_rag_web_browser(query: str, max_results: int) -> list[dict]: """ Query Google search, scrape the top N pages from the results, and returns their cleaned content as markdown. First start the Actor and wait for it to finish. Then fetch results from the Actor run's default dataset. """ actor_call = apify_client.actor("apify/rag-web-browser").call(run_input={"query": query, "maxResults": max_results}) return apify_client.dataset(actor_call["defaultDatasetId"]).list_items().items
def submit_tool_outputs(run_): """ Submit tool outputs to continue the run """ tool_output = [] for tool in run_.required_action.submit_tool_outputs.tool_calls: if tool.function.name == "call_rag_web_browser": d = json.loads(tool.function.arguments) output = call_rag_web_browser(query=d["query"], max_results=d["maxResults"]) tool_output.append(ToolOutput(tool_call_id=tool.id, output=json.dumps(output))) print("RAG Web Browser added as a tool output.")
return client.beta.threads.runs.submit_tool_outputs_and_poll(thread_id=run_.thread_id, run_id=run_.id, tool_outputs=tool_output)
Runs are asynchronous, which means you'll want to monitor their status by polling the Run object until a terminal status is reached.
thread = client.beta.threads.create() message = client.beta.threads.messages.create( thread_id=thread.id, role="user", content="What are the latest LLM news?" )
Run with assistant and poll for the results
run = client.beta.threads.runs.create_and_poll(thread_id=thread.id, assistant_id=my_assistant.id)
if run.status == "requires_action": run = submit_tool_outputs(run)
print("Assistant response:") for m in client.beta.threads.messages.list(thread_id=run.thread_id): print(m.content[0].text.value)
## Save data into OpenAI Vector Store and use it in the assistant
To provide real-time or proprietary data, OpenAI Assistants can access the https://platform.openai.com/docs/assistants/tools/file-search/vector-stores to retrieve information for their answers. With the https://apify.com/jiri.spilka/openai-vector-store-integration, data saving and updating the OpenAI Vector Store can be fully automated. The following image illustrates the Apify-OpenAI Vector Store integration:

In this example, we'll demonstrate how to save data into the OpenAI Vector Store and use it in the assistant. For more information on automating this process, check out the blog post https://blog.apify.com/enterprise-support-openai-assistant/.
Before we start, we need to install all dependencies:
pip install apify-client openai
Find your https://console.apify.com/account/integrations and https://platform.openai.com/account/api-keys and initialize OpenAI and Apify clients:
from apify_client import ApifyClient from openai import OpenAI
client = OpenAI(api_key="YOUR OPENAI API KEY") apify_client = ApifyClient("YOUR APIFY API TOKEN")
Create an assistant with the instructions and `file-search` tool:
my_assistant = client.beta.assistants.create( instructions="As a customer support agent at Apify, your role is to assist customers", name="Support assistant", tools=[{"type": "file_search"}], model="gpt-4o-mini", )
Next, create a vector store and attach it to the assistant:
vector_store = client.beta.vector_stores.create(name="Support assistant vector store")
assistant = client.beta.assistants.update( assistant_id=my_assistant.id, tool_resources={"file_search": {"vector_store_ids": [vector_store.id]}}, )
Now, use https://apify.com/apify/website-content-crawler to crawl the web and save the data into Apify's dataset:
run_input = {"startUrls": [{"url": "https://docs.apify.com/platform"}], "maxCrawlPages": 10, "crawlerType": "cheerio"} actor_call_website_crawler = apify_client.actor("apify/website-content-crawler").call(run_input=run_input)
dataset_id = actor_call_website_crawler["defaultDatasetId"]
Finally, save the data into the OpenAI Vector Store using https://apify.com/jiri.spilka/openai-vector-store-integration
run_input_vs = { "datasetId": dataset_id, "assistantId": my_assistant.id, "datasetFields": ["text", "url"], "openaiApiKey": "YOUR-OPENAI-API-KEY", "vectorStoreId": vector_store.id, }
apify_client.actor("jiri.spilka/openai-vector-store-integration").call(run_input=run_input_vs)
Now, the assistant can access the data stored in the OpenAI Vector Store and use it in its responses. Start by creating a thread and adding messages to it. Then, initiate a run and poll for the results. Once the run is completed, you can print the assistant's response.
thread = client.beta.threads.create() message = client.beta.threads.messages.create( thread_id=thread.id, role="user", content="How can I scrape a website using Apify?" )
run = client.beta.threads.runs.create_and_poll( thread_id=thread.id, assistant_id=assistant.id, tool_choice={"type": "file_search"} )
print("Assistant response:") for m in client.beta.threads.messages.list(thread_id=run.thread_id): print(m.content[0].text.value)
For the question "How can I scrape a website using Apify?" the assistant's response might look like this:
Assistant response: You can scrape a website using Apify by following these steps:
- Visit the Apify website and create an account.
- Go to the Apify Store and choose a web scraper.
- Configure the web scraper with the URL of the website you want to scrape.
- Run the web scraper and download the data.
Complete example of saving data into OpenAI Vector Store and using it in the assistant
from apify_client import ApifyClient from openai import OpenAI
client = OpenAI(api_key="YOUR-OPENAI-API-KEY") apify_client = ApifyClient("YOUR-APIFY-API-TOKEN")
my_assistant = client.beta.assistants.create( instructions="As a customer support agent at Apify, your role is to assist customers", name="Support assistant", tools=[{"type": "file_search"}], model="gpt-4o-mini", )
Create a vector store
vector_store = client.beta.vector_stores.create(name="Support assistant vector store")
Update the assistant to use the new Vector Store
assistant = client.beta.assistants.update( assistant_id=my_assistant.id, tool_resources={"file_search": {"vector_store_ids": [vector_store.id]}}, )
run_input = {"startUrls": [{"url": "https://docs.apify.com/platform"}], "maxCrawlPages": 10, "crawlerType": "cheerio"} actor_call_website_crawler = apify_client.actor("apify/website-content-crawler").call(run_input=run_input)
dataset_id = actor_call_website_crawler["defaultDatasetId"]
run_input_vs = { "datasetId": dataset_id, "assistantId": my_assistant.id, "datasetFields": ["text", "url"], "openaiApiKey": "YOUR-OPENAI-API-KEY", "vectorStoreId": vector_store.id, }
apify_client.actor("jiri.spilka/openai-vector-store-integration").call(run_input=run_input_vs)
Create a thread and a message
thread = client.beta.threads.create() message = client.beta.threads.messages.create( thread_id=thread.id, role="user", content="How can I scrape a website using Apify?" )
Run with assistant and poll for the results
run = client.beta.threads.runs.create_and_poll( thread_id=thread.id, assistant_id=assistant.id, tool_choice={"type": "file_search"} )
print("Assistant response:") for m in client.beta.threads.messages.list(thread_id=run.thread_id): print(m.content[0].text.value)
## Resources
* https://platform.openai.com/docs/assistants/overview
* https://platform.openai.com/docs/assistants/tools/function-calling
* https://apify.com/apify/rag-web-browser Actor
* https://apify.com/jiri.spilka/openai-vector-store-integration Actor
---
# Pinecone integration
**Learn how to integrate Apify with Pinecone to feed data crawled from the web into the Pinecone vector database.**
***
https://www.pinecone.io is a managed vector database that allows users to store and query dense vectors for AI applications such as recommendation systems, semantic search, and retrieval augmented generation (RAG).
The Apify integration for Pinecone enables you to export results from Apify Actors and Dataset items into a specific Pinecone vector index.
## Prerequisites
Before you begin, ensure that you have the following:
* A https://www.pinecone.io/ and index set up.
* A Pinecone index created & Pinecone API token obtained.
* An https://openai.com/index/openai-api/ to compute text embeddings.
* An https://docs.apify.com/platform/integrations/api#api-token to access https://apify.com/store.
### How to setup Pinecone database and create an index
1. Sign up or log in to your Pinecone account and click on **Create Index**.
2. Specify the following details: index name, vector dimension, vector distance metric, deployment type (serverless or pod), and cloud provider.

Once the index is created and ready, you can proceed with integrating Apify.
### Integration Methods
You can integrate Apify with Pinecone using either the Apify Console or the Apify Python SDK.
Website Content Crawler usage
The examples utilize the Website Content Crawler Actor, which deeply crawls websites, cleans HTML by removing modals and navigation elements, and converts HTML to Markdown for training AI models or providing web content to LLMs and generative AI applications.
#### Apify Console
1. Set up the https://apify.com/apify/website-content-crawler Actor in the https://console.apify.com. Refer to this guide on how to set up https://blog.apify.com/talk-to-your-website-with-large-language-models/.
2. Once you have the crawler ready, navigate to the integration section and add Apify’s Pinecone integration.

3. Select when to trigger this integration (typically when a run succeeds) and fill in all the required fields for the Pinecone integration. You can learn more about the input parameters at the https://apify.com/apify/pinecone-integration/input-schema.

Pinecone index configuration
You need to ensure that your embedding model in the Pinecone index configuration matches the Actor settings. For example, the `text-embedding-3-small` model from OpenAI generates vectors of size `1536`, so your Pinecone index should be configured for vectors of the same size.
* For a detailed explanation of the input parameters, including dataset settings, incremental updates, and examples, see the https://apify.com/apify/pinecone-integration.
* For an explanation on how to combine Actors to accomplish more complex tasks, refer to the guide on https://blog.apify.com/connecting-scrapers-apify-integration/ integrations.
#### Python
Another way to interact with Pinecone is through the https://docs.apify.com/sdk/python/.
1. Install the Apify Python SDK by running the following command:
`pip install apify-client`
2. Create a Python script and import all the necessary modules:
from apify_client import ApifyClient
APIFY_API_TOKEN = "YOUR-APIFY-TOKEN" OPENAI_API_KEY = "YOUR-OPENAI-API-KEY" PINECONE_API_KEY = "YOUR-PINECONE-API-KEY" PINECONE_INDEX_NAME = "YOUR-PINECONE-INDEX-NAME"
client = ApifyClient(APIFY_API_TOKEN)
3. Call the https://apify.com/apify/website-content-crawler Actor to crawl the Pinecone documentation and extract text content from the web pages:
actor_call = client.actor("apify/website-content-crawler").call( run_input={"startUrls": [{"url": "https://docs.pinecone.io/home"}]} )
print("Website Content Crawler Actor has finished") print(actor_call)
4. Use Apify's https://apify.com/apify/pinecone-integration to store all the selected data from the dataset (provided by `datasetId` from the Actor call) into the Pinecone vector database.
pinecone_integration_inputs = { "pineconeApiKey": PINECONE_API_KEY, "pineconeIndexName": PINECONE_INDEX_NAME, "datasetFields": ["text"], "datasetId": actor_call["defaultDatasetId"], "enableDeltaUpdates": True, "deltaUpdatesPrimaryDatasetFields": ["url"], "deleteExpiredObjects": True, "expiredObjectDeletionPeriodDays": 30, "embeddingsApiKey": OPENAI_API_KEY, "embeddingsProvider": "OpenAI", "performChunking": True, "chunkSize": 1000, "chunkOverlap": 0, }
actor_call = client.actor("apify/pinecone-integration").call(run_input=pinecone_integration_inputs) print("Apify's Pinecone Integration has finished") print(actor_call)
You have successfully integrated Apify with Pinecone and the data is now stored in the Pinecone vector database.
## Additional Resources
* https://apify.com/apify/pinecone-integration
* https://blog.apify.com/what-is-pinecone-why-use-it-with-llms/
* https://docs.pinecone.io/
---
# Qdrant integration
**Learn how to integrate Apify with Qdrant to transfer crawled data into the Qdrant vector database.**
***
https://qdrant.tech is a high performance managed vector database that allows users to store and query dense vectors for next generation AI applications such as recommendation systems, semantic search, and retrieval augmented generation (RAG).
The Apify integration for Qdrant enables you to export results from Apify Actors and Dataset items into a specific Qdrant collection.
## Prerequisites
Before you begin, ensure that you have the following:
* A https://qdrant.tech set up.
* A Qdrant URL to the database and Qdrant API token.
* An https://openai.com/index/openai-api/ to compute text embeddings.
* An https://docs.apify.com/platform/integrations/api#api-token to access https://apify.com/store.
### How to setup Qdrant database and create a cluster
1. Sign up or log in to your Qdrant account and create a new cluster.
2. Specify the following details: provider, region, and name.
3. Set up an API key for the cluster once it is created and its status is healthy.
With the cluster ready and its URL and API key in hand, you can proceed with integrating Apify.
### Integration Methods
You can integrate Apify with Qdrant using either the Apify Console or the Apify Python SDK.
Website Content Crawler usage
The examples utilize the Website Content Crawler Actor, which deeply crawls websites, cleans HTML by removing modals and navigation elements, and converts HTML to Markdown for training AI models or providing web content to LLMs and generative AI applications.
#### Apify Console
1. Set up the https://apify.com/apify/website-content-crawler Actor in the https://console.apify.com. Refer to this guide on how to set up https://blog.apify.com/talk-to-your-website-with-large-language-models/.
2. Once you have the crawler ready, navigate to the integration section and add Apify's Qdrant integration.

3. Select when to trigger this integration (typically when a run succeeds) and fill in all the required fields for the Qdrant integration. If you haven't created a collection, it can be created automatically with the specified model. You can learn more about the input parameters at the https://apify.com/apify/qdrant-integration.

* For a detailed explanation of the input parameters, including dataset settings, incremental updates, and examples, see the https://apify.com/apify/qdrant-integration.
* For an explanation on how to combine Actors to accomplish more complex tasks, refer to the guide on https://blog.apify.com/connecting-scrapers-apify-integration/ integrations.
#### Python
Another way to interact with Qdrant is through the https://docs.apify.com/sdk/python/.
1. Install the Apify Python SDK by running the following command:
pip install apify-client
2. Create a Python script and import all the necessary modules:
from apify_client import ApifyClient
APIFY_API_TOKEN = "YOUR-APIFY-TOKEN" OPENAI_API_KEY = "YOUR-OPENAI-API-KEY"
QDRANT_URL = "YOUR-QDRANT-URL" QDRANT_API_KEY = "YOUR-QDRANT-API-KEY" QDRANT_COLLECTION_NAME = "YOUR-QDRANT-COLLECTION-NAME"
client = ApifyClient(APIFY_API_TOKEN)
3. Call the https://apify.com/apify/website-content-crawler Actor to crawl the Qdrant documentation and extract text content from the web pages:
actor_call = client.actor("apify/website-content-crawler").call( run_input={"startUrls": [{"url": "https://qdrant.tech/documentation/"}]} )
4. Call Apify's Qdrant integration and store all data in the Qdrant Vector Database:
qdrant_integration_inputs = { "qdrantUrl": QDRANT_URL, "qdrantApiKey": QDRANT_API_KEY, "qdrantCollectionName": QDRANT_COLLECTION_NAME, "qdrantAutoCreateCollection": True, "datasetId": actor_call["defaultDatasetId"], "datasetFields": ["text"], "enableDeltaUpdates": True, "deltaUpdatesPrimaryDatasetFields": ["url"], "deleteExpiredObjects": True, "expiredObjectDeletionPeriodDays": 30, "embeddingsProvider": "OpenAI", "embeddingsApiKey": OPENAI_API_KEY, "performChunking": True, "chunkSize": 1000, "chunkOverlap": 0, } actor_call = client.actor("apify/qdrant-integration").call(run_input=qdrant_integration_inputs)
You have successfully integrated Apify with Qdrant and the data is now stored in the Qdrant vector database.
## Additional Resources
* https://apify.com/apify/qdrant-integration
* https://qdrant.tech/documentation/
---
# Slack integration
**Learn how to integrate your Apify Actors with Slack. This article guides you from installation through to automating your whole workflow in Slack.**
A tutorial can be found on https://help.apify.com/en/articles/6454058-apify-integration-for-slack.
***
> Explore the https://help.apify.com/en/articles/6454058-apify-integration-for-slack.
https://slack.com/ allows you to install various services in your workspace in order to automate and centralize jobs. Apify is one of these services, and it allows you to run your Apify Actors, get notified about their run statuses, and receive your results, all without opening your browser.
## Get started
To use the Apify integration for Slack, you will need:
* An https://console.apify.com/.
* A Slack account (and workspace).
## Step 1: Set up the integration for Slack
You can find all integrations on an Actor's or task's **Integrations** tab. For example, you can try using the https://console.apify.com/actors/aLTexEuCetoJNL9bL.
Find the integration for Slack, then click the **Configure** button. You will be prompted to log in with your Slack account and select your workspace in the **Settings > Integrations** window.

Then, head back to your task to finish the setup. Select what type of events you would like to be notified of (e.g., when a run is created, when a run succeeds, when a run fails, etc.), your workspace, and the channel you want to receive the notifications in (you can set up an ad-hoc channel for this test). In the **Message** field, you can see how the notification will look, or you can craft a new custom one.

Once you are done, click the **Save** button.
## Step 2: Give the Apify integration a trial run
Click the **Start** button and head to the Slack channel you selected to see your first Apify integration notifications.
## Step 3: Start your run directly from Slack
You can now run the same Actor or task directly from Slack by typing `/apify call [Actor or task ID]` into the Slack message box.

When an Actor doesn't require you to fill in any input fields, you can run it by simply typing `/apify call [Actor or task ID]`.
You're all set! If you have any questions or need help, feel free to reach out to us on our https://discord.com/invite/jyEM2PRvMU.
---
# Telegram integration through Zapier
**Learn how to integrate your Apify Actors with Telegram through Zapier.**
***
With https://zapier.com/apps/apify/integrations, you can connect your Apify Actors to Slack, Trello, Google Sheets, Dropbox, Salesforce, and loads more.
Your Zapier workflows can start Apify Actors or tasks, fetch items from a dataset, set and get records from key-value stores, or find Actor or task runs.
You can use the Zapier integration to trigger a workflow whenever an Actor or a task finishes.
Complementary to the following guide we've created a detailed video, that will guide you through the process of setting up your Telegram integration through Zapier.
https://www.youtube.com/embed/XldEuQleq3c?si=86qbdrzWpVLoY_fr
## Connect Apify with Zapier
To use the Apify integration on Zapier, you will need to:
* Have an https://console.apify.com/.
* Have a https://zapier.com/.
### Step 1: Create Zap and find Apify on Zapier
Once you have your Zapier account ready and you are successfully logged in, you can create your first Zap.
Go to the Zaps section and find the **Create Zap** button.
In the create Zap form, you can choose whether you want to use Apify as the trigger or action for the Zap.
Click on Trigger and find Apify using the search box.

You have two possible triggers that you can choose while setting up your Telegram integration
* Finished Actor Run - triggers upon the completion of a selected Actor run.
* Finished Task Run - triggers upon the completion of a selected Actor task run.

Available Actors & Tasks
Please note that only Actors or Actor tasks that you previously run will be available to choose from.
### Step 2: Create a connection to your Apify account
The next step is to connect your Apify account.
Click on the "Sign in" button next to the Connect to Apify title. Or you can select an account if you already have one connected.
The connection configuration options open in a new tab in your browser or in a modal window.

In connection configuration, you need to provide your Apify API Token. You can find the token in Apify Console by navigating to **Settings > Integrations**.

Copy the token and paste it into the configuration form and continue with the "Yes, Continue to Apify" button.
The connection is now created and the configuration form closed.
## Connect Telegram bot with Zapier
### Step 1: Create & connect new bot on Telegram
After setting up Apify as your trigger within Zapier, it's time to set up Telegram as the action that will occur based on the trigger.

You have two possible actions that you can choose while setting up your Telegram integration
* Send Message - sends a message from your bot when trigger activates.
* Send Poll - sends a poll from your bot when trigger activates.

After you choose your event that will be happening after trigger, you need to connect your Telegram bot that will be responsible for sending the message or sending polls.

The best way to do it's to:
1. Start conversation with Telegrams BotFather, a bot that manages bots on Telegram.

2. Issue the `/newbot` command in conversation with it and follow the instructions, until you get your HTTP API token.

### Step 2: Create action for your new Telegram bot
Once you've setup your new bot within Zapier, it's time to setup an action.
Start new conversation with your bot and copy the **Chat-Id** and input it within Zapier.
Select **Chat-Id**, **Text Format**, and a **Message Text** that suits your need for example

Once you fill all required fields, you can test your integration and if everything works hit **Publish** and you are done!
---
# 🔺 Vercel AI SDK integration
**Learn how to integrate Apify Actors as tools for AI with Vercel AI SDK.**
***
## What is the Vercel AI SDK
https://ai-sdk.dev/ is the TypeScript toolkit designed to help developers build AI-powered applications and agents with React, Next.js, Vue, Svelte, Node.js, and more.
Explore Vercel AI SDK
For more in-depth details, check out https://ai-sdk.dev/docs/introduction.
## How to use Apify with Vercel AI SDK
Apify is a marketplace of ready-to-use web scraping and automation tools, AI agents, and MCP servers that you can equip your own AI with. This guide demonstrates how to use Apify tools with a simple AI agent built with Vercel AI SDK.
### Prerequisites
* *Apify API token*: To use Apify Actors in Vercel AI SDK, you need an Apify API token. To obtain your token check https://docs.apify.com/platform/integrations/api.
* *Node.js packages*: Install the following Node.js packages:
npm install @modelcontextprotocol/sdk @openrouter/ai-sdk-provider ai
### Building a simple pub search AI agent using Apify Google Maps scraper
First, import all required packages:
import { experimental_createMCPClient as createMCPClient, generateText, stepCountIs } from 'ai'; import { StreamableHTTPClientTransport } from '@modelcontextprotocol/sdk/client/streamableHttp.js'; import { createOpenRouter } from '@openrouter/ai-sdk-provider';
Connect to the Apify MCP server and get all available tools for the AI agent:
Required setup
Make sure to set the `APIFY_TOKEN` environment variable with your Apify API token before running the code.
// Connect to the Apify MCP server and get the available tools
const url = new URL('https://mcp.apify.com');
const mcpClient = await createMCPClient({
transport: new StreamableHTTPClientTransport(url, {
requestInit: {
headers: {
"Authorization": Bearer ${process.env.APIFY_TOKEN}
}
}
}),
});
const tools = await mcpClient.tools();
console.log('Tools available:', Object.keys(tools).join(', '));
Create Apify OpenRouter LLM provider so we can run the AI agent:
Single token
By using the https://apify.com/apify/openrouter you don't need to provide a separate API key for OpenRouter or any other LLM provider. Only your Apify token is needed. All token costs go to your Apify account.
// Configure the Apify OpenRouter LLM provider
const openrouter = createOpenRouter({
baseURL: 'https://openrouter.apify.actor/api/v1',
apiKey: 'api-key-not-required',
headers: {
"Authorization": Bearer ${process.env.APIFY_TOKEN}
}
});
Run the AI agent with the Apify Google Maps scraper tool to find a pub near the Ferry Building in San Francisco:
// Run the AI agent and generate a response const response = await generateText({ model: openrouter('x-ai/grok-4-fast'), tools, stopWhen: stepCountIs(5), messages: [ { role: 'user', content: [{ type: 'text', text: 'Find a pub near the Ferry Building in San Francisco using the Google Maps scraper.' }], }, ], }); console.log('Response:', response.text); console.log('\nDone!'); await mcpClient.close();
## Resources
* https://docs.apify.com/platform/actors
* https://ai-sdk.dev/docs/introduction
* https://blog.apify.com/what-are-ai-agents/
* https://mcp.apify.com
* https://docs.apify.com/platform/integrations/mcp
* https://apify.com/apify/openrouter
---
# Webhook integration
**Learn how to integrate multiple Apify Actors or external systems with your Actor or task run. Send alerts when your Actor run succeeds or fails.**
***
Webhooks allow you to configure the Apify platform to perform an action when a certain system event occurs. For example, you can use them to start another Actor when the current run finishes or fails.
You can find webhooks under the **Integrations** tab on an Actor's page in https://console.apify.com/actors.

To define a webhook, select a system **event** that triggers the webhook. Then, provide the **action** to execute after the event. When the event occurs, the system executes the action.
Current webhook limitations
Currently, the only available action is to send a POST HTTP request to a URL specified in the webhook.
* https://docs.apify.com/platform/integrations/webhooks/events.md
* https://docs.apify.com/platform/integrations/webhooks/actions.md
* https://docs.apify.com/platform/integrations/webhooks/ad-hoc-webhooks.md
---
# Webhook actions
**Send notifications when specific events occur in your Actor/task run or build. Dynamically add data to the notification payload.**
***
## Send HTTP request
To send notification, you can use the HTTP request action, which sends an HTTP POST request to a specified URL with a JSON payload. The payload is defined using a payload template, which is a JSON-like syntax that allows you to include variables enclosed in double curly braces `{{variable}}`. This enables the dynamic injection of data into the payload when the webhook is triggered.
Webhook delivery
Webhooks are sent from servers that use static IP addresses. If your webhook destination is secured by a firewall, you can add the following IP addresses to your allow list to ensure Apify webhooks are delivered successfully.
IP list
* `3.215.64.207`
* `13.216.80.7`
* `13.216.180.86`
* `34.224.107.31`
* `34.236.208.85`
* `44.198.219.104`
* `44.207.71.44`
* `44.207.141.205`
* `52.4.20.206`
* `52.203.255.236`
### Response management
The response to the POST request must have an HTTP status code in the `2XX` range. If the response has a different status code, it is considered an error, and the request will be retried periodically with an exponential back-off:
* First retry: after approximately *1 minute*
* Second retry: after *2 minutes*
* Third retry: after *4 minutes*
* ...
* Eleventh retry: after approximately *32 hours*
If the request fails after *11 retries*, the system stops retrying.
### Security considerations
For security reasons, include a secret token in the webhook URL to ensure that only Apify can invoke it. You can use the **Test** button in the user interface to test your endpoint.
Headers template
You can also use https://docs.apify.com/platform/integrations/webhooks/actions.md#headers-template for this purpose.
Note that webhook HTTP requests have a timeout of *30 seconds*. If your endpoint performs a time-consuming operation, respond to the request immediately to prevent timeouts before Apify receives the response. To ensure reliable completion of the time-consuming operation, consider using a message queue internally to retry the operation on internal failure.
In rare cases, the webhook might be invoked more than once. Design your code to be idempotent to handle duplicate calls.
Apify requests: auto-added tokens
If the URL of your request points toward Apify, you don't need to add a token, since it will be added automatically.
## Payload template
The payload template is a JSON-like string that allows you to define a custom payload structure and inject dynamic data known only at the time of the webhook's invocation. Apart from the variables, the string must be a valid JSON.
Variables must be enclosed in double curly braces and can only use the pre-defined variables listed in the section. Using any other variable will result in a validation error.
The syntax of a variable is: `{{oneOfAvailableVariables}}`. Variables support accessing nested properties using dot notation: `{{variable.property}}`.
### Default payload template
{ "userId": {{userId}}, "createdAt": {{createdAt}}, "eventType": {{eventType}}, "eventData": {{eventData}}, "resource": {{resource}} }
### Default payload example
{ "userId": "abf6vtB2nvQZ4nJzo", "createdAt": "2019-01-09T15:59:56.408Z", "eventType": "ACTOR.RUN.SUCCEEDED", "eventData": { "actorId": "fW4MyDhgwtMLrB987", "actorRunId": "uPBN9qaKd2iLs5naZ" }, "resource": { "id": "uPBN9qaKd2iLs5naZ", "actId": "fW4MyDhgwtMLrB987", "userId": "abf6vtB2nvQZ4nJzo", "startedAt": "2019-01-09T15:59:40.750Z", "finishedAt": "2019-01-09T15:59:56.408Z", "status": "SUCCEEDED", // ... } }
#### String interpolation
The payload template is *not* a valid JSON by default, but the resulting payload is. To use templates that provide the same functionality and are valid JSON at the same time, you can use string interpolation.
With string interpolation, the default payload template looks like this:
{ "userId": "{{userId}}", "createdAt": "{{createdAt}}", "eventType": "{{eventType}}", "eventData": "{{eventData}}", "resource": "{{resource}}" }
If the string being interpolated contains only the variable, the actual variable value is used in the payload. For example `"{{eventData}}"` results in an object. If the string contains more than just the variable, the string value of the variable will appear in the payload:
{ "text": "My user id is {{userId}}" } { "text": "My user id is abf6vtB2nvQZ4nJzo" }
To enable string interpolation, use **Interpolate variables in string fields** switch within the Apify Console. In JS API Client it's called `shouldInterpolateStrings`. This field is always `true` when integrating Actors or tasks.
### Payload template example
This example shows how to use payload template variables to send a custom object that displays the status of a run, its ID and a custom property:
{ "runId": {{resource.id}}, "runStatus": {{resource.status}}, "myProp": "hello world" }
Note that the `eventData` and `resource` properties contain redundant data for backward compatibility. You can use either `eventData` or `resource` in your templates, depending on your use case.
## Headers template
The headers template is a JSON-like text where you can add additional information to the default HTTP header of the webhook request. You can pass the variables in the same way as in , including the use of string interpolation and the available variables. The resulting interpolated text need to be a valid JSON object, and values can be strings only.
Note that the following HTTP headers are always set by the system and your changes will always be rewritten:
| Variable | Value |
| ----------------------------- | ------------------------- |
| `Host` | Request URL |
| `Content-Type` | `application/json` |
| `X-Apify-Webhook` | Apify internal value |
| `X-Apify-Webhook-Dispatch-Id` | Apify webhook dispatch ID |
| `X-Apify-Request-Origin` | Apify origin |
## Description
The description is an optional string that you can add to the webhook. It serves for your information and is not sent with the HTTP request when the webhook is dispatched.
## Available variables
| Variable | Type | Description |
| ----------- | ------ | ------------------------------------------------------------------------------------------------------------------------------------------------------------------------ |
| `userId` | string | ID of the Apify user who owns the webhook. |
| `createdAt` | string | ISO string date of the webhook's trigger event. |
| `eventType` | string | Type of the trigger event, see https://docs.apify.com/platform/integrations/webhooks/events.md. |
| `eventData` | Object | Data associated with the trigger event, see https://docs.apify.com/platform/integrations/webhooks/events.md. |
| `resource` | Object | The resource that caused the trigger event. |
| `globals` | Object | Data available in global context. Contains `dateISO` (date of webhook's trigger event in ISO 8601 format) and `dateUnix` (date of trigger event in Unix time in seconds) |
### Resource
The `resource` variable represents the triggering system resource. For example, when using the `ACTOR.RUN.SUCCEEDED` event, the resource is the Actor run. The variable will be replaced by the `Object` that you would receive as a response from the relevant API at the moment when the webhook is triggered. For the Actor run resource, it would be the response of the https://docs.apify.com/api/v2/actor-run-get.md API endpoint.
In addition to Actor runs, webhooks also support various events related to Actor builds. In such cases, the resource object will look like the response of the https://docs.apify.com/api/v2/actor-build-get.md API endpoint.
---
# Ad-hoc webhooks
**Set up one-time webhooks for Actor runs initiated through the Apify API or from the Actor's code. Trigger events when the run reaches a specific state.**
***
An ad-hoc webhook is a single-use webhook created for a specific Actor run when starting the run using the https://docs.apify.com/api/v2.md. The webhook triggers once when the run transitions to the specified state. Define ad-hoc webhooks using the `webhooks` URL parameter added to the API endpoint that starts an Actor or Actor task:
https://api.apify.com/v2/acts/[ACTOR_ID]/runs?token=[YOUR_API_TOKEN]&webhooks=[AD_HOC_WEBHOOKS]
replace `AD_HOC_WEBHOOKS` with a base64 encoded stringified JSON array of webhook definitions:
[ { eventTypes: ['ACTOR.RUN.FAILED'], requestUrl: 'https://example.com/run-failed', }, { eventTypes: ['ACTOR.RUN.SUCCEEDED'], requestUrl: 'https://example.com/run-succeeded', payloadTemplate: '{"hello": "world", "resource":{{resource}}}', }, ];
## Create an ad-hoc webhook dynamically
You can also create a webhook dynamically from your Actor's code using the Actor's add webhook method:
* JavaScript
* Python
import { Actor } from 'apify';
await Actor.init(); // ... await Actor.addWebhook({ eventTypes: ['ACTOR.RUN.FAILED'], requestUrl: 'https://example.com/run-failed', }); // ... await Actor.exit();
from apify import Actor
async def main(): async with Actor: await Actor.add_webhook( event_types=['ACTOR.RUN.FAILED'], request_url='https://example.com/run-failed', ) # ...
For more information, check out the https://docs.apify.com/sdk/js/reference/class/Actor#addWebhook or the https://docs.apify.com/sdk/python/reference/class/Actor#add_webhook.
To prevent duplicate ad-hoc webhooks in case of Actor restart, use the idempotency key parameter. The idempotency key must be unique across all user webhooks to ensure only one webhook is created for a given value. For example, use the Actor run ID as an idempotency key:
* JavaScript
* Python
import { Actor } from 'apify';
await Actor.init(); // ... await Actor.addWebhook({ eventTypes: ['ACTOR.RUN.FAILED'], requestUrl: 'https://example.com/run-failed', idempotencyKey: process.env.APIFY_ACTOR_RUN_ID, }); // ... await Actor.exit();
import os from apify import Actor
async def main(): async with Actor: await Actor.add_webhook( event_types=['ACTOR.RUN.FAILED'], request_url='https://example.com/run-failed', idempotency_key=os.environ['APIFY_ACTOR_RUN_ID'], ) # ...
---
# Events types for webhooks
**Specify the types of events that trigger a webhook in an Actor or task run. Trigger an action on Actor or task run creation, success, failure, termination or timeout.**
***
You can configure webhooks to trigger actions based on specific events that occur during Actor runs or builds.
## Actor run events
Actor run events are triggered when an Actor run is created or transitions to a new state. You can define webhooks for all runs of an Actor on its detail page or for a specific Actor task on its detail page. In the latter case, the webhook is invoked only for runs started for that task.
### Event types
* `ACTOR.RUN.CREATED` - A new Actor run has been created.
* `ACTOR.RUN.SUCCEEDED` - An Actor run finished with status `SUCCEEDED`.
* `ACTOR.RUN.FAILED` - An Actor run finished with status `FAILED`.
* `ACTOR.RUN.ABORTED` - An Actor run finished with status `ABORTED`.
* `ACTOR.RUN.TIMED_OUT` - An Actor run finished with status `TIMED-OUT`.
* `ACTOR.RUN.RESURRECTED` - An Actor run has been resurrected.
### Event data
The following data is provided for Actor run events:
{ "actorId": "ID of the triggering Actor.", "actorTaskId": "If task was used, its ID.", "actorRunId": "ID of the triggering Actor run.", }
To fetch the results from the Actor run, you can use the `actorRunId` event property and call one of the https://docs.apify.com/api/v2/actor-runs.md API endpoints. For example:
https://api.apify.com/v2/actor-runs/[ACTOR_RUN_ID]/dataset/items?token=[TOKEN]
Apart from the event data, actions also have the `resource` object available, which can provide more details about the object that triggered the event. For more information about the `resource` objects, see the https://docs.apify.com/platform/integrations/webhooks/actions.md#resource
## Actor build events
Actor build events are triggered when an Actor build is created or transitions into a new state. You can define webhooks for all builds on its detail page.
### Event types
* `ACTOR.BUILD.CREATED` - A new Actor build has been created.
* `ACTOR.BUILD.SUCCEEDED` - An Actor build finished with the status `SUCCEEDED`.
* `ACTOR.BUILD.FAILED` - An Actor build finished with the status `FAILED`.
* `ACTOR.BUILD.ABORTED` - An Actor build finished with the status `ABORTED`.
* `ACTOR.BUILD.TIMED_OUT` - An Actor build finished with the status `TIMED-OUT`.
### Event Data
The following data is provided for Actor build events:
{ "actorId": "ID of the triggering Actor.", "actorBuildId": "ID of the triggering Actor build.", }
---
# Zapier integration
**Learn how to integrate your Apify Actors with Zapier.**
***
With https://zapier.com/apps/apify/integrations, you can connect your Apify Actors to Slack, Trello, Google Sheets, Dropbox, Salesforce, and loads more.
Your Zapier workflows can start Apify Actors or tasks, fetch items from a dataset, set and get records from key-value stores, or find Actor or task runs.
You can use the Zapier integration to trigger a workflow whenever an Actor or a task finishes.
## Connect Apify with Zapier
To use the Apify integration on Zapier, you will need to:
* Have an https://console.apify.com/.
* Have a https://zapier.com/.
### Step 1: Create Zap and find Apify on Zapier
Once you have your Zapier account ready and you are successfully logged in, you can create your first Zap.
Go to the Zaps section and find the "Create Zap" button.
In the create Zap form, you can choose whether you want to use Apify as the trigger or action for the Zap.
Click on Trigger and find Apify using the search box.

Then select which trigger you want to use.

### Step 2: Create a connection to your Apify account
Next, connect your Apify account.
Click the **Select** button next to the **Connect to Apify** title. Or you can select an account if you already have one connected.
The connection configuration options open in a new tab in your browser.

Choose the account that you want to connect with Zapier. A new window will appear displaying the information that will be shared between Zapier and Apify.

Continue by clicking **Allow Access** button.
The connection is now created and the configuration form closes. You can continue with the Zap configuration and select the Actor you want to use as trigger.
The last step is to test the connection. The **Test Trigger** button lets you test the trigger. The test should prefill data from existing Actor runs you have in Apify. If you don't have any runs, you can create one in Apify Console and then test the connection again.
After a successful test, you can continue with the Zap configuration and set up the action for the Zap.
### Step 3: Set up your Apify action in Zapier
You are able to use any action to follow your Apify trigger. For example, you can use Gmail to send an email about a finished Actor run.
In this guide we'll show you how to use Apify as an action to start an Actor run.
After you select Apify as an action, you need to select the action you want to use. Let's use the "Run Actor" action for this example.

You need to select the connection you want to use. If you don't have any connections, you can create a new one by clicking on the "Sign in" button and follow the steps in Step 2.
In the next step, you need to select the Actor you want to use. You can use the search box to find the Actor.
We will use the Web Scraper Actor in this example.

You need to fill the input for the Actor and use the **Continue** button to advance to the next step.
> You can choose to run Actor synchronously or asynchronously. If you choose to run Actor synchronously, the Zap will wait until the Actor finishes and the Actor output and data will be available in next steps. Beware that the hard timeout for the run is 30 seconds. If the Actor doesn't finish in 30 seconds, the run will be terminated and the Actor output will not be available in next steps.
In the next step, you can test the action and check if everything is using the **Test step** button.
This button runs the Actor run on Apify and you can see the data in Zapier.

Once you are happy with the test, you can publish the Zap. When it is turned on, it will run the Actor every time the trigger is fired.
## Triggers
### Finished Actor Run
> Triggers when a selected Actor run is finished.
### Finished Task Run
> Triggers when a selected Actor task run is finished.
## Actions
### Run Actor
> Runs a selected Actor.
### Run Task
> Runs a selected Actor task.
### Scrape Single URL
> Runs a scraper for the website and returns its content as text, markdown and HTML. This action is for getting content of a single page to use, for example, in LLM flows.
### Set Key-Value Store Record
> Sets a value to a https://docs.apify.com/platform/storage/key-value-store.md.
## Searches
### Fetch Dataset Items
> Retrieves items from a https://docs.apify.com/platform/storage/dataset.md.
### Find Last Actor Run
> Finds the most recent Actor run.
### Find Last Task Run
> Finds the most recent Actor task run.
### Get Key-Value Store Record
> Retrieves value from a https://docs.apify.com/platform/storage/key-value-store.md.
If you have any questions or need help, feel free to reach out to us on our https://discord.com/invite/jyEM2PRvMU.
---
# Limits
**Learn the Apify platform's resource capability and limitations such as max memory, disk size and number of Actors and tasks per user.**
***
The tables below demonstrate the Apify platform's default resource limits. For API limits such as rate limits and max payload size, see the https://docs.apify.com/api/v2.md#rate-limiting.
> If needed, the limits shown below can be increased on paid accounts. For details, contact us at **mailto:hello@apify.com** or using the chat in https://console.apify.com/ under the "Help & Resources → Contact Support".
## Actor runtime limits
| Description | Limit for plan | | | |
| ------------------------------------------- | --------------------- | --------- | ---------- | -------- |
| | Free | Starter | Scale | Business |
| Build memory size | 4,096 MB | | | |
| Run minimum memory | 128 MB | 128 MB | | |
| Run maximum memory | 8,192 MB | 32,768 MB | | |
| Maximum combined memory of all running jobs | 8,192 MB | 32,768 MB | 131,072 MB | |
| Build timeout | 1800 secs | | | |
| Build/run disk size | 2× job memory limit | | | |
| Memory per CPU core | 4,096 MB | | | |
| Maximum log size | 10,485,760 characters | | | |
| Maximum number of metamorphs | 10 metamorphs per run | | | |
## Apify platform limits
| Description | Limit for plan | | | |
| ---------------------------------------------------------------------- | -------------- | ------- | ----- | -------- |
| | Free | Starter | Scale | Business |
| Maximum number of dataset columns for tabular formats (XLSX, CSV, ...) | 2000 columns | | | |
| Maximum size of Actor input schema | 500 kB | | | |
| Maximum number of Actors per user | 100 | | | |
| Maximum number of tasks per user | 1000 | | | |
| Maximum number of schedules per user | 100 | | | |
| Maximum number of webhooks per user | 100 | | | |
| Maximum number of Actors per schedule | 10 | | | |
| Maximum number of tasks per schedule | 10 | | | |
| Maximum number of concurrent Actor runs per user | 25 | 32 | 128 | 256 |
## Usage limit
The Apify platform also introduces usage limits based on the billing plan to protect users from accidental overspending. To learn more about usage limits, head over to the https://docs.apify.com/platform/console/billing.md#limits section of our docs.
View these limits and adjust your maximum usage limit in https://console.apify.com/billing#/limits:

---
# Monitoring
**Learn how to continuously make sure that your Actors and tasks perform as expected and retrieve correct results. Receive alerts when your jobs or their metrics are not as you expect.**
***
The web is continuously evolving, and so are the websites you interact with. If you implement Apify Actors or the data they provide into your daily workflows, you need to make sure that everything runs as expected.
> Monitoring allows you to track and observe how the software works. It enables you to measure and compare your programs' performance over time and to be notified when something goes wrong.
Also, you can use the data you gain from monitoring to optimize your software and maximize its potential.
## Built-in monitoring
Monitoring is an option you can find on any Actor or saved task in Apify Console. It allows you to display metric statistics about your solution's runs and set up alerts for when your solution behaves differently than you expect.
The monitoring system is free for all users. You can use it to monitor as many Actors and tasks as you want, and it does not use any additional resources on top of your usage when running them.

### Features
Currently, the monitoring option offers the following features:
1. Chart showing **statuses** of runs of the Actor or saved task over last 30 days. 
2. Chart displaying **metrics** of the last 200 runs of the Actor or saved task. 
3. Option to set up **alerts** with notifications based on the run metrics. 
> Both charts can also be added to your Apify Console home page so you can quickly see if there are any issues every time you open Apify Console.
### Alert configuration
When you set up an alert, you have four choices for how you want the metrics to be evaluated. And depending on your choices, the alerting system will behave differently:
1. **Alert, when the metric is lower than** - This type of alert is checked after the run finishes. If the metric is lower than the value you set, the alert will be triggered and you will receive a notification.
2. **Alert, when the metric is higher than** - This type of alert is checked both during the run and after the run finishes. During the run, we do periodic checks (approximately every 5 minutes) so that we can notify you as soon as possible if the metric is higher than the value you set. After the run finishes, we do a final check to make sure that the metric does not go over the limit in the last few minutes of the run.
3. **Alert, when run status is one of following** - This type of alert is checked only after the run finishes. It makes possible to track the status of your finished runs and send an alert if the run finishes in a state you do not expect. If your Actor runs very often and suddenly starts failing, you will receive a single alert after the first failed run in 1 minute, and then aggregated alert every 15 minutes.
4. **Alert for dataset field statistics** - If you have a https://docs.apify.com/platform/actors/development/actor-definition/dataset-schema/validation.md set up, then you can use the field statistics to set up an alert. You can use field statistics for example to track if some field is filled in all records, if some numeric value is too low/high (for example when tracking the price of a product over multiple sources), if the number of items in an array is too low/high (for example alert on Instagram Actor if post has a lot of comments) and many other tasks like these.
important
Available dataset fields are taken from the last successful build of the monitored Actor. If different versions have different fields, currently the solution will always display only those from the default version.

You can get notified by email, Slack, or in Apify Console. If you use Slack, we suggest using Slack notifications instead of email because they are more reliable, and you can also get notified quicker.
1. **Email** - You can set up one or more emails to receive alert notifications. To do that, you just have to separate them by commas. You can also disable email notifications if you don't want to receive them.
2. **Slack** - To set up Slack notifications, you first need to connect your Slack workspace to Apify. To do that, go to your https://console.apify.com/account/integrations and click on the **+ Add** button in the Slack section. Once you have your workspace connected, you can choose the workspace when setting up alert notifications and then pick a channel to which you want the notifications to be delivered.
3. **In Console** - You can also get notified in Apify Console. This is useful if you access Apify Console often, and you do not need to be notified as soon as possible.

### Alert notification
The email and Slack alert notifications both contain the same information. You will receive a notification with the following information:
1. **Alert name**
2. **Condition** - The condition that was violated.
3. **Value** - The value of the metric violating the condition and triggering the alert.
4. **Run ID** - The ID of the run that triggered the alert, which links directly to the run detail in Apify Console.
5. **Actor** - The full name of the Actor that triggered the alert which links to the Actor detail in Apify Console.
6. **Task** - If the monitoring alert was set up for a task, then this field will contain the name of the task which links to the task detail in Apify Console.

While the in-app notification will contain less information, it will point you directly to the Actor or task that triggered the alert:

## Other
### What should I monitor when scraping?
You might want to monitor various metrics when you're scraping the web. Here are some examples:
**Data quality**:
1. **Number of results** returned by your solution. This is useful if you are scraping a list of products, for example. You can set up an alert to notify you if the number of results is lower than expected. Which indicates that something changed on the website you are scraping.
2. **Number of fields** returned. This is something that indicates a change in the website. For example, the manufacturer name moved to another place.
**Performance**:
1. **Duration** of the run. If your solution is taking longer than usual to finish, you can set up an alert to notify you. This will help you prevent your solution from being stuck and from wasting resources.
**Usage and cost**:
1. **Usage cost** may change when the robot blocking solution gets implemented. An increase of the cost may indicate that many URLs are being retried.
2. **Proxy usage.** Seeing how your solution uses a proxy and if there are any changes can help you optimize your usage and prevent increased costs if your solution starts behaving differently than expected.
These are just a few examples of what you can monitor. It's always recommended to start small, iterate, and get more complex over time based on your experience.
### Alternative solutions
For more complex monitoring, you can use the https://apify.com/apify/monitoring, which is a collection of https://docs.apify.com/platform/actors.md that allows you to automate the monitoring of jobs you have running on the https://apify.com. The monitoring suite offers some features that are not **currently** available in Apify Console, such as:
1. Schema validation of the output
2. Duplicate checks in the output
3. Dashboards with data grouping
4. Daily/weekly/monthly monitoring instead of after every run
> Please note that this solution is more complex and requires more time to set up. Also, it uses schedules, Actors, tasks, and webhooks, so using it will increase your overall usage on the Apify platform.
---
# Proxy
**Learn to anonymously access websites in scraping/automation jobs. Improve data outputs and efficiency of bots, and access websites from various geographies.**
***
> https://apify.com/proxy allows you to change your IP address when web scraping to reduce the chance of being https://docs.apify.com/academy/anti-scraping/techniques.md because of your geographical location.
You can use proxies in your https://docs.apify.com/platform/actors.md or any other application that supports HTTP proxies. Apify Proxy monitors the health of your IP pool and intelligently rotates addresses to prevent IP address-based blocking.
You can view your proxy settings and password on the https://console.apify.com/proxy page in Apify Console. For pricing information, visit https://apify.com/pricing.
## Quickstart
Usage of Apify Proxy means just a couple of lines of code, thanks to our https://docs.apify.com/sdk.md:
* JavaScript SDK with PuppeteerCrawler
* Python SDK with requests
import { Actor } from 'apify'; import { PuppeteerCrawler } from 'crawlee';
await Actor.init();
const proxyConfiguration = await Actor.createProxyConfiguration();
const crawler = new PuppeteerCrawler({ proxyConfiguration, async requestHandler({ page }) { console.log(await page.content()); }, });
await crawler.run(['https://proxy.apify.com/?format=json']);
await Actor.exit();
import requests, asyncio from apify import Actor
async def main(): async with Actor: proxy_configuration = await Actor.create_proxy_configuration() proxy_url = await proxy_configuration.new_url()
proxies = {
'http': proxy_url,
'https': proxy_url,
}
response = requests.get('https://api.apify.com/v2/browser-info', proxies=proxies)
print(response.text)
if name == 'main': asyncio.run(main())
## Proxy types
Several types of proxy servers exist, each offering distinct advantages, disadvantages, and varying pricing structures. You can use them to access websites from various geographies and with different levels of anonymity.
#### https://docs.apify.com/platform/proxy/datacenter-proxy.md
https://docs.apify.com/platform/proxy/datacenter-proxy.md
#### https://docs.apify.com/platform/proxy/residential-proxy.md
https://docs.apify.com/platform/proxy/residential-proxy.md
#### https://docs.apify.com/platform/proxy/google-serp-proxy.md
https://docs.apify.com/platform/proxy/google-serp-proxy.md
---
# Datacenter proxy
**Learn how to reduce blocking when web scraping using IP address rotation. See proxy parameters and learn to implement Apify Proxy in an application.**
***
Datacenter proxies are a cheap, fast and stable way to mask your identity online. When you access a website using a datacenter proxy, the site can only see the proxy center's credentials, not yours.
Datacenter proxies allow you to mask and https://docs.apify.com/platform/proxy/usage.md#ip-address-rotation your IP address during web scraping and automation jobs, reducing the possibility of them being https://docs.apify.com/academy/anti-scraping/techniques.md#access-denied. For each https://developer.mozilla.org/en-US/docs/Web/HTTP/Methods, the proxy takes the list of all available IP addresses and selects the one used the longest time ago for the specific hostname.
You can refer to our https://blog.apify.com/datacenter-proxies-when-to-use-them-and-how-to-make-the-most-of-them/ for tips on how to make the most out of datacenter proxies.
## Features
* Periodic health checks of proxies in the pool so requests are not forwarded via dead proxies.
* Intelligent rotation of IP addresses so target hosts are accessed via proxies that have accessed them the longest time ago, to reduce the chance of blocking.
* Periodically checks whether proxies are banned by selected target websites. If they are, stops forwarding traffic to them to get the proxies unbanned as soon as possible.
* Ensures proxies are located in specific countries using IP geolocation.
* Allows selection of groups of proxy servers with specific characteristics.
* Supports persistent sessions that enable you to keep the same IP address for certain parts of your crawls.
* Measures statistics of traffic for specific users and hostnames.
* Allows selection of proxy servers by country.
## Datacenter proxy types
When using Apify's datacenter proxies, you can either select a proxy group, or the `auto` mode. https://apify.com/proxy offers either proxy groups that are shared across multiple customers or dedicated ones.
### Shared proxy groups
Each user has access to a selected number of proxy servers from a shared pool. These servers are spread into groups (called proxy groups). Each group shares a common feature (location, provider, speed, etc.).
For a full list of plans and number of allocated proxy servers for each plan, see our https://apify.com/pricing. To get access to more servers, you can upgrade your plan in the https://console.apify.com/billing/subscription;
### Dedicated proxy groups
When you purchase access to dedicated proxy groups, they are assigned to you, and only you can use them. You gain access to a range of static IP addresses from these groups.
This feature is also useful if you have your own pool of proxy servers and still want to benefit from the features of Apify Proxy (like https://docs.apify.com/platform/proxy/usage.md#ip-address-rotation, , and health checking). If you do not have your own pool, the https://apify.com/contact team can set up a dedicated group for you based on your needs and requirements.
Prices for dedicated proxy servers are mainly based on the number of proxy servers, their type, and location. https://apify.com/contact for more information.
## Connecting to datacenter proxies
By default, each proxied HTTP request is potentially sent via a different target proxy server, which adds overhead and could be potentially problematic for websites which save cookies based on IP address.
If you want to pick an IP address and pass all subsequent connections via that same IP address, you can use the `session` https://docs.apify.com/platform/proxy/usage.md#sessions.
### Username parameters
The `username` field enables you to pass various https://docs.apify.com/platform/proxy/usage.md#connection-settings, such as groups, session and country, for your proxy connection.
**This parameter is optional**. By default, the proxy uses all available proxy servers from all groups you have access to.
If you do not want to specify either `groups` or `session` parameters and therefore use the default behavior for both, set the username to `auto`.
### Examples
* PuppeteerCrawler
* CheerioCrawler
* Python SDK with requests
* gotScraping()
import { Actor } from 'apify'; import { PuppeteerCrawler } from 'crawlee';
await Actor.init();
const proxyConfiguration = await Actor.createProxyConfiguration();
const crawler = new PuppeteerCrawler({ proxyConfiguration, async requestHandler({ page }) { console.log(await page.content()); }, });
await crawler.run(['https://proxy.apify.com/?format=json']);
await Actor.exit();
import { Actor } from 'apify'; import { CheerioCrawler } from 'crawlee';
await Actor.init();
const proxyConfiguration = await Actor.createProxyConfiguration();
const crawler = new CheerioCrawler({ proxyConfiguration, async requestHandler({ body }) { // ... console.log(body); }, });
await crawler.run(['https://proxy.apify.com']);
await Actor.exit();
from apify import Actor import requests, asyncio
async def main(): async with Actor: proxy_configuration = await Actor.create_proxy_configuration() proxy_url = await proxy_configuration.new_url() proxies = { 'http': proxy_url, 'https': proxy_url, }
for _ in range(10):
response = requests.get('https://api.apify.com/v2/browser-info', proxies=proxies)
print(response.text)
if name == 'main': asyncio.run(main())
import { Actor } from 'apify'; import { gotScraping } from 'got-scraping';
await Actor.init();
const proxyConfiguration = await Actor.createProxyConfiguration(); const proxyUrl = await proxyConfiguration.newUrl();
const url = 'https://api.apify.com/v2/browser-info';
const response1 = await gotScraping({ url, proxyUrl, responseType: 'json', });
const response2 = await gotScraping({ url, proxyUrl, responseType: 'json', });
console.log(response1.body.clientIp); console.log('Should be different than'); console.log(response2.body.clientIp);
await Actor.exit();
## Session persistence
When you use datacenter proxy with the `session` https://docs.apify.com/platform/proxy/usage.md#sessions set in the `username` , a single IP is assigned to the `session ID` provided after you make the first request.
**Session IDs represent IP addresses. Therefore, you can manage the IP addresses you use by managing sessions.** \[https://docs.apify.com/platform/proxy/usage.md#sessions]
This IP/session ID combination is persisted and expires 26 hours later. Each additional request resets the expiration time to 26 hours.
If you use the session at least once a day, it will never expire, with two possible exceptions:
* The proxy server stops responding and is marked as dead during a health check.
* If the proxy server is part of a proxy group that is refreshed monthly and is rotated out.
If the session is discarded due to the reasons above, it is assigned a new IP address.
To learn more about https://docs.apify.com/platform/proxy/usage.md#sessions and https://docs.apify.com/platform/proxy/usage.md#ip-address-rotation, see the https://docs.apify.com/platform/proxy.md.
### Examples using sessions
* PuppeteerCrawler
* CheerioCrawler
* Python SDK with requests
* gotScraping()
import { Actor } from 'apify'; import { PuppeteerCrawler } from 'crawlee';
await Actor.init();
const proxyConfiguration = await Actor.createProxyConfiguration();
const crawler = new PuppeteerCrawler({ proxyConfiguration, sessionPoolOptions: { maxPoolSize: 1 }, async requestHandler({ page }) { console.log(await page.content()); }, });
await crawler.run([ 'https://proxy.apify.com/?format=json', 'https://proxy.apify.com', ]);
await Actor.exit();
import { Actor } from 'apify'; import { CheerioCrawler } from 'crawlee';
await Actor.init();
const proxyConfiguration = await Actor.createProxyConfiguration();
const crawler = new CheerioCrawler({ proxyConfiguration, sessionPoolOptions: { maxPoolSize: 1 }, async requestHandler({ json }) { // ... console.log(json); }, });
await crawler.run([ 'https://api.apify.com/v2/browser-info', 'https://proxy.apify.com/?format=json', ]);
await Actor.exit();
from apify import Actor import requests, asyncio
async def main(): async with Actor: proxy_configuration = await Actor.create_proxy_configuration() proxy_url = await proxy_configuration.new_url('my_session') proxies = { 'http': proxy_url, 'https': proxy_url, }
# each request uses the same IP address
for _ in range(10):
response = requests.get('https://api.apify.com/v2/browser-info', proxies=proxies)
print(response.text)
if name == 'main': asyncio.run(main())
import { Actor } from 'apify'; import { gotScraping } from 'got-scraping';
await Actor.init();
const proxyConfiguration = await Actor.createProxyConfiguration(); const proxyUrl = await proxyConfiguration.newUrl('my_session');
const response1 = await gotScraping({ url: 'https://api.apify.com/v2/browser-info', proxyUrl, responseType: 'json', });
const response2 = await gotScraping({ url: 'https://api.apify.com/v2/browser-info', proxyUrl, responseType: 'json', });
console.log(response1.body.clientIp); console.log('Should be the same as'); console.log(response2.body.clientIp);
await Actor.exit();
## Examples using standard libraries and languages
You can find your proxy password on the https://console.apify.com/proxy of the Apify Console.
> The `username` field is **not** your Apify username.Instead, you specify proxy settings (e.g. `groups-BUYPROXIES94952`, `session-123`).Use `auto` for default settings.
For examples using https://www.php.net/, you need to have the https://www.php.net/manual/en/book.curl.php extension enabled in your PHP installation. See https://www.php.net/manual/en/curl.installation.php for more information.
Examples in https://www.python.org/download/releases/2.0/ use the https://pypi.org/project/six/ library. Run `pip install six` to enable it.
* Node.js (axios)
* Python 3
* Python 2
* PHP
* PHP (Guzzle)
import axios from 'axios';
const proxy = { protocol: 'http', host: 'proxy.apify.com', port: 8000, // Replace below with your password // found at https://console.apify.com/proxy auth: { username: 'auto', password: '' }, };
const url = 'http://proxy.apify.com/?format=json';
const { data } = await axios.get(url, { proxy });
console.log(data);
import urllib.request as request import ssl
Replace below with your password
found at https://console.apify.com/proxy
password = "" proxy_url = f"http://auto:{password}@proxy.apify.com:8000" proxy_handler = request.ProxyHandler({ "http": proxy_url, "https": proxy_url, })
ctx = ssl.create_default_context() ctx.check_hostname = False ctx.verify_mode = ssl.CERT_NONE httpHandler = request.HTTPSHandler(context=ctx)
opener = request.build_opener(httpHandler,proxy_handler) print(opener.open("http://proxy.apify.com/?format=json").read())
import six from six.moves.urllib import request
Replace below with your password
found at https://console.apify.com/proxy
password = "" proxy_url = ( "http://auto:%s@proxy.apify.com:8000" % (password) ) proxy_handler = request.ProxyHandler({ "http": proxy_url, "https": proxy_url, }) opener = request.build_opener(proxy_handler) print(opener.open("http://proxy.apify.com/?format=json").read())
below with your password // found at https://console.apify.com/proxy curl_setopt($curl, CURLOPT_PROXYUSERPWD, "auto:"); $response = curl_exec($curl); curl_close($curl); if ($response) echo $response; ?>
below with your password // found at https://console.apify.com/proxy 'proxy' => 'http://auto:@proxy.apify.com:8000' ]);
$response = $client->get("http://proxy.apify.com/?format=json"); echo $response->getBody();
---
# Google SERP proxy
**Learn how to collect search results from Google Search-powered tools. Get search results from localized domains in multiple countries, e.g. the US and Germany.**
***
Google SERP proxy allows you to extract search results from Google Search-powered services. It allows searching in and to dynamically switch between country domains.
Our Google SERP proxy currently supports the below services.
* Google Search (`http://www.google./search`).
* Google Shopping (`http://www.google./shopping/product/`).
* Google Shopping Search (`http://www.google./search?tbm=shop`).
> Google SERP proxy can **only** be used for Google Search and Shopping. It cannot be used to access other websites.
When using the proxy, **pricing is based on the number of requests made**.
## Connecting to Google SERP proxy
Requests made through the proxy are automatically routed through a proxy server from the selected country and pure **HTML code of the search result page is returned**.
**Important:** Only HTTP requests are allowed, and the Google hostname needs to start with the `www.` prefix.
For code examples on how to connect to Google SERP proxies, see the section.
### Username parameters
The `username` field enables you to pass various https://docs.apify.com/platform/proxy/usage.md#username-parameters, such as groups and country, for your proxy connection.
When using Google SERP proxy, the username should always be:
groups-GOOGLE_SERP
Unlike https://docs.apify.com/platform/proxy/datacenter-proxy.md or https://docs.apify.com/platform/proxy/residential-proxy.md proxies, there is no https://docs.apify.com/platform/proxy/usage.md#sessions parameter.
If you use the `country` https://docs.apify.com/platform/proxy/usage.md, the Google proxy location is used if you access a website whose hostname (stripped of `www.`) starts with **google**.
## Country selection
You must use the correct Google domain to get results for your desired country code.
For example:
* Search results from the USA: `http://www.google.com/search?q=`
* Shopping results from Great Britain: `http://www.google.co.uk/seach?tbm=shop&q=`
See a https://ipfs.io/ipfs/QmXoypizjW3WknFiJnKLwHCnL72vedxjQkDDP1mXWo6uco/wiki/List_of_Google_domains.html of available domain names for specific countries. When using them, remember to prepend the domain name with the `www.` prefix.
## Examples
### Using the Apify SDK
If you are developing your own Apify https://docs.apify.com/platform/actors.md using the https://docs.apify.com/sdk.md and https://crawlee.dev/, the most efficient way to use Google SERP proxy is https://crawlee.dev/api/cheerio-crawler/class/CheerioCrawler. This is because Google SERP proxy https://docs.apify.com/platform/proxy.md. Alternatively, you can use the https://github.com/apify/got-scraping https://www.npmjs.com/package/got-scraping by specifying the proxy URL in the options. For Python, you can leverage the https://pypi.org/project/requests/ library along with the Apify SDK.
The following examples get a list of search results for the keyword **wikipedia** from the USA (`google.com`).
* CheerioCrawler
* Python SDK with requests
* gotScraping()
import { Actor } from 'apify'; import { CheerioCrawler } from 'crawlee';
await Actor.init();
const proxyConfiguration = await Actor.createProxyConfiguration({ groups: ['GOOGLE_SERP'], });
const crawler = new CheerioCrawler({ proxyConfiguration, async requestHandler({ body }) { // ... console.log(body); }, });
await crawler.run(['http://www.google.com/search?q=wikipedia']);
await Actor.exit();
from apify import Actor import requests, asyncio
async def main(): async with Actor: proxy_configuration = await Actor.create_proxy_configuration(groups=['GOOGLE_SERP']) proxy_url = await proxy_configuration.new_url() proxies = { 'http': proxy_url, 'https': proxy_url, }
response = requests.get('http://www.google.com/search?q=wikipedia', proxies=proxies)
print(response.text)
if name == 'main': asyncio.run(main())
import { Actor } from 'apify'; import { gotScraping } from 'got-scraping';
await Actor.init();
const proxyConfiguration = await Actor.createProxyConfiguration({ groups: ['GOOGLE_SERP'], }); const proxyUrl = await proxyConfiguration.newUrl();
const { body } = await gotScraping({ url: 'http://www.google.com/search?q=wikipedia', proxyUrl, });
console.log(body);
await Actor.exit();
### Using standard libraries and languages
You can find your proxy password on the https://console.apify.com/proxy/access of Apify Console.
> The `username` field is **not** your Apify username.Instead, you specify proxy settings (e.g. `groups-GOOGLE_SERP`).Use `groups-GOOGLE_SERP` to use proxies from all available countries.
For examples using https://www.php.net/, you need to have the https://www.php.net/manual/en/book.curl.php extension enabled in your PHP installation. See https://www.php.net/manual/en/curl.installation.php for more information.
Examples in https://www.python.org/download/releases/2.0/ use the https://pypi.org/project/six/ library. Run `pip install six` to enable it.
The following examples get the HTML of search results for the keyword **wikipedia** from the USA (**google.com**).
Select this option by setting the `username` parameter to `groups-GOOGLE_SERP`. Add the item you want to search to the `query` parameter.
* Node.js (axios)
* Python 3
* Python 2
* PHP
* PHP (Guzzle)
import axios from 'axios';
const proxy = { protocol: 'http', host: 'proxy.apify.com', port: 8000, // Replace below with your password // found at https://console.apify.com/proxy auth: { username: 'groups-GOOGLE_SERP', password: '' }, };
const url = 'http://www.google.com/search'; const params = { q: 'wikipedia' };
const { data } = await axios.get(url, { proxy, params });
console.log(data);
import urllib.request as request import urllib.parse as parse
Replace below with your password
found at https://console.apify.com/proxy
password = '' proxy_url = f"http://groups-GOOGLE_SERP:{password}@proxy.apify.com:8000"
proxy_handler = request.ProxyHandler({ 'http': proxy_url, })
opener = request.build_opener(proxy_handler)
query = parse.urlencode({ 'q': 'wikipedia' }) print(opener.open(f"http://www.google.com/search?{query}").read())
import six from six.moves.urllib import request, urlencode
Replace below with your password
found at https://console.apify.com/proxy
password = '' proxy_url = ( 'http://groups-GOOGLE_SERP:%s@proxy.apify.com:8000' % (password) ) proxy_handler = request.ProxyHandler({ 'http': proxy_url, }) opener = request.build_opener(proxy_handler) query = parse.urlencode({ 'q': 'wikipedia' }) url = ( 'http://www.google.com/search?%s' % (query) ) print(opener.open(url).read())
below with your password // found at https://console.apify.com/proxy curl_setopt($curl, CURLOPT_PROXYUSERPWD, 'groups-GOOGLE_SERP:'); $response = curl_exec($curl); curl_close($curl); echo $response; ?>
below with your password // found at https://console.apify.com/proxy 'proxy' => 'http://groups-GOOGLE_SERP:@proxy.apify.com:8000' ]);
$response = $client->get("http://www.google.com/search", [ 'query' => ['q' => 'wikipedia'] ]); echo $response->getBody();
---
# Residential proxy
**Achieve a higher level of anonymity using IP addresses from human users. Access a wider pool of proxies and reduce blocking by websites' anti-scraping measures.**
***
Residential proxies use IP addresses assigned by Internet Service Providers to the homes and offices of actual users. Unlike https://docs.apify.com/platform/proxy/datacenter-proxy.md, traffic from residential proxies is indistinguishable from that of legitimate users.
This solution allows you to access a larger pool of servers than datacenter proxy. This makes it a better option in cases when you need a large number of different IP addresses.
Residential proxies support https://docs.apify.com/platform/proxy/usage.md#ip-address-rotation and .
**Pricing is based on data traffic**. It is measured for each connection made and displayed on your https://console.apify.com/proxy/usage in the Apify Console.
## Connecting to residential proxy
Connecting to residential proxy works the same way as https://docs.apify.com/platform/proxy/datacenter-proxy.md, with two differences.
1. The `groups` https://docs.apify.com/platform/proxy/usage.md#username-parameters should always specify `RESIDENTIAL`.
2. You can specify the country in which you want your proxies to be.
### How to set a proxy group
When using https://docs.apify.com/platform/proxy/datacenter-proxy.md, specify the `groups` parameter in the https://docs.apify.com/platform/proxy/usage.md#username-parameters as `groups-RESIDENTIAL`.
For example, your **proxy URL** when using the https://www.npmjs.com/package/got-scraping JavaScript library will look like this:
const proxyUrl = 'http://groups-RESIDENTIAL:@proxy.apify.com:8000';
In the https://docs.apify.com/sdk.md you set the **groups** in your proxy configuration:
* JavaScript
* Python
import { Actor } from 'apify';
await Actor.init(); // ... const proxyConfiguration = await Actor.createProxyConfiguration({ groups: ['RESIDENTIAL'], }); // ... await Actor.exit();
from apify import Actor
async def main(): async with Actor: # ... proxy_configuration = await Actor.create_proxy_configuration(groups=['RESIDENTIAL']) # ...
### How to set a proxy country
When using https://docs.apify.com/platform/proxy/datacenter-proxy.md, specify the `country` parameter in the https://docs.apify.com/platform/proxy/usage.md#username-parameters as `country-COUNTRY-CODE`.
For example, your `username` parameter when using https://docs.python.org/3/ will look like this:
username = "groups-RESIDENTIAL,country-JP"
In the https://docs.apify.com/sdk.md you set the country in your proxy configuration using two-letter https://laendercode.net/en/2-letter-list.html. Specify the groups as `RESIDENTIAL`, then add a `countryCode`/`country_code` parameter:
* JavaScript
* Python
import { Actor } from 'apify';
await Actor.init(); // ... const proxyConfiguration = await Actor.createProxyConfiguration({ groups: ['RESIDENTIAL'], countryCode: 'FR', }); // ... await Actor.exit();
from apify import Actor
async def main(): async with Actor: # ... proxy_configuration = await Actor.create_proxy_configuration( groups=['RESIDENTIAL'], country_code='FR', ) # ...
## Session persistence
When using residential proxy with the `session` https://docs.apify.com/platform/proxy/usage.md#sessions set in the https://docs.apify.com/platform/proxy/usage.md#username-parameters, a single IP address is assigned to the **session ID** provided after you make the first request.
**Session IDs represent IP addresses. Therefore, you can manage the IP addresses you use by managing sessions.** \[https://docs.apify.com/platform/proxy/usage.md#sessions]
This IP/session ID combination is persisted for 1 minute. Each subsequent request resets the expiration time to 1 minute.
If the proxy server becomes unresponsive or the session expires, a new IP address is selected for the next request.
> If you really need to persist the same session, you can try sending some data using that session (e.g. every 20 seconds) to keep it alive.Providing the connection is not interrupted, this will let you keep the IP address for longer.
To learn more about https://docs.apify.com/platform/proxy/usage.md#sessions and https://docs.apify.com/platform/proxy/usage.md#ip-address-rotation, see the proxy https://docs.apify.com/platform/proxy.md.
## Tips to keep in mind
https://docs.apify.com/platform/proxy.md proxies are less predictable than https://docs.apify.com/platform/proxy/datacenter-proxy.md proxies and are priced differently (by number of IPs vs traffic used). Because of this, there are some important things to consider before using residential proxy in your solutions.
### Control traffic used by automated browsers
Residential proxy is priced by data traffic used. Thus, it's easy to quickly use up all your prepaid traffic. In particular, when accessing websites with large files loaded on every page.
To reduce your traffic use, we recommend using the `blockRequests()` function of https://crawlee.dev/api/playwright-crawler/namespace/playwrightUtils#blockRequests/https://crawlee.dev/api/puppeteer-crawler/namespace/puppeteerUtils#blockRequests (depending on the library used).
### Connected proxy speed variation
Each host on the residential proxy network uses a different device. They have different network speeds and different latencies. This means that requests made with one https://docs.apify.com/platform/proxy/usage.md#sessions can be extremely fast, while another request with a different session can be extremely slow. The difference can range from a few milliseconds to a few seconds.
If your solution requires quickly loaded content, the best option is to set a https://docs.apify.com/platform/proxy/usage.md#sessions, try a small request and see if the response time is acceptable. If it is, you can use this session for other requests. Otherwise, repeat the attempt with a different session.
### Connection interruptions
While sessions are persistent, they can be destroyed at any time if the host devices are turned off or disconnected.
For this problem there is no easy solution. One option is to not use residential proxy for larger requests (and use https://docs.apify.com/platform/proxy/datacenter-proxy.md proxy instead). If you have no other choice, expect that interruptions might happen and write your solution with this in mind.
---
# Proxy usage
**Learn how to configure and use Apify Proxy. See the required parameters such as the correct username and password.**
***
## Connection settings
To connect to Apify Proxy, you use the https://en.wikipedia.org/wiki/Proxy_server#Web_proxy_servers. This means that you need to configure your HTTP client to use the proxy server at the Apify Proxy hostname and provide it with your Apify Proxy password and the other parameters described below.
The full connection string has the following format:
http://:@:
caution
All usage of Apify Proxy with your password is charged towards your account. Do not share the password with untrusted parties or use it from insecure networks, as **the password is sent unencrypted** due to the HTTP protocol's https://www.guru99.com/difference-http-vs-https.html.
### External connection
If you want to connect to Apify Proxy from outside of the Apify Platform, you need to have a paid Apify plan (to prevent abuse). If you need to test Apify Proxy before you subscribe, please https://apify.com/contact.
| Parameter | Value / explanation |
| --------- | ----------------------------------------------------------------------------------------------------------------------------------------------------------------------------- |
| Hostname | `proxy.apify.com` |
| Port | `8000` |
| Username | Specifies the proxy parameters such as groups, and location. See below for details.**Note**: this is not your Apify username. |
| Password | Apify Proxy password. Your password is displayed on the https://console.apify.com/proxy/groups page in Apify Console.**Note**: this is not your Apify account password. |
caution
If you use these connection parameters for connecting to Apify Proxy from your Actors running on the Apify Platform, the connection will still be considered external, it will not work on the Free plan, and on paid plans you will be charged for external data transfer. Please use the connection parameters from the section when using Apify Proxy from Actors.
Example connection string for external connections:
http://auto:apify_proxy_EaAFg6CFhc4eKk54Q1HbGDEiUTrk480uZv03@proxy.apify.com:8000
### Connection from Actors
If you want to connect to Apify Proxy from Actors running on the Apify Platform, the recommended way is to use built-in proxy configuration tools in the https://docs.apify.com/sdk/js/docs/guides/proxy-management or https://docs.apify.com/sdk/python/docs/concepts/proxy-management
If you don't want to use these helpers, and want to connect to Apify Proxy manually, you can find the right configuration values in https://docs.apify.com/platform/actors/development/programming-interface/environment-variables.md provided to the Actor. By using this configuration, you ensure that you connect to Apify Proxy directly through the Apify infrastructure, bypassing any external connection via the Internet, thereby improving the connection speed, and ensuring you don't pay for external data transfer.
| Parameter | Source / explanation |
| --------- | ------------------------------------------------------------------------------------------------------------------------------------- |
| Hostname | `APIFY_PROXY_HOSTNAME` environment variable |
| Port | `APIFY_PROXY_PORT` environment variable |
| Username | Specifies the proxy parameters such as groups, and location. See below for details.**Note**: this is not your Apify username. |
| Password | `APIFY_PROXY_PASSWORD` environment variable |
Example connection string creation:
const { APIFY_PROXY_HOSTNAME, APIFY_PROXY_PORT, APIFY_PROXY_PASSWORD } = process.env;
const connectionString = http://auto:${APIFY_PROXY_PASSWORD}@${APIFY_PROXY_HOSTNAME}:${APIFY_PROXY_PORT};
### Username parameters
The `username` field enables you to pass parameters like ****, **** and **country** for your proxy connection.
For example, if you're using https://docs.apify.com/platform/proxy/datacenter-proxy.md and want to use the `new_job_123` session using the `SHADER` group, the username will be:
groups-SHADER,session-new_job_123
The table below describes the available parameters.
| Parameter | Type | Description |
| --------- | -------- | --------------------------------------------------------------------------------------------------------------------------------------------------------------------------------------------------------------------------------------------------------------------------------------------------------------------------------------------------------------------------------------------------------------------------------------------------------------------------------------------------------------------------- |
| `groups` | Required | Set proxied requests to use servers from the selected groups:- `groups-[group name]` or `auto` when using datacenter proxies.- `groups-RESIDENTIAL` when using residential proxies.- `groups-GOOGLE_SERP` when using Google SERP proxies. |
| `session` | Optional | If specified to `session-new_job_123`, for example, all proxied requests with the same session identifier are routed through the same IP address. If not specified, each proxied request is assigned a randomly picked least used IP address.The session string can only contain numbers (0–9), letters (a-z or A-Z), dot (.), underscore (\_), a tilde (\~). The maximum length is 50 characters.Session management may work differently for residential and SERP proxies. Check relevant documentations for more details. |
| `country` | Optional | If specified, all proxied requests will use proxy servers from a selected country. Note that if there are no proxy servers from the specified country, the connection will fail. For example `groups-SHADER,country-US` uses proxies from the `SHADER` group located in the USA. By default, the proxy uses all available proxy servers from all countries. |
If you want to specify one parameter and not the others, just provide that parameter and omit the others. To use the default behavior (not specifying either `groups`, `session`, or `country`), set the username to `auto`, which serves as a default placeholder, because the proxy username cannot be empty.
## Code examples
We have code examples for connecting to our proxy using the https://docs.apify.com/sdk.md and https://crawlee.dev/ and other libraries, as well as examples in PHP.
* https://docs.apify.com/platform/proxy/datacenter-proxy.md#examples
* https://docs.apify.com/platform/proxy/residential-proxy.md#connecting-to-residential-proxy
* https://docs.apify.com/platform/proxy/google-serp-proxy.md#examples
For code examples related to proxy management in Apify SDK and Crawlee, see:
* https://docs.apify.com/sdk/js/docs/guides/proxy-management
* https://docs.apify.com/sdk/python/docs/concepts/proxy-management
* https://crawlee.dev/docs/guides/proxy-management
## IP address rotation
Web scrapers can rotate the IP addresses they use to access websites. They assign each request a different IP address, which makes it appear like they are all coming from different users. This greatly enhances performance and data throughout.
Depending on whether you use a https://apify.com/apify/web-scraper or https://apify.com/apify/cheerio-scraper for your scraping jobs, IP address rotation works differently.
* Browser—a different IP address is used for each browser.
* HTTP request—a different IP address is used for each request.
Use to control how you rotate IP addresses. See our guide https://docs.apify.com/academy/anti-scraping/techniques.md to learn more about IP address rotation and our findings on how blocking works.
## Sessions
Sessions allow you to use the same IP address for multiple connections. In cases where you need to keep the same session (e.g. when you need to log in to a website), it is best to keep the same proxy and so the IP address. On the other hand by switching the IP address, you can avoid being blocked by the website.
To set a new session, pass the `session` parameter in your https://docs.apify.com/platform/proxy/usage.md#username-parameters field when connecting to a proxy. This will serve as the session's ID and an IP address will be assigned to it. To https://docs.apify.com/platform/proxy/datacenter-proxy.md#connecting-to-datacenter-proxies, pass that same session ID in the username field.
We recommend you to use https://crawlee.dev/api/core/class/SessionPool abstraction when managing sessions. The created session will then store information such as cookies and can be used to generate https://docs.apify.com/academy/anti-scraping/mitigation/generating-fingerprints.md. You can also assign custom user data such as authorization tokens and specific headers. Sessions are available for https://docs.apify.com/platform/proxy/datacenter-proxy.md and \[residential]\(./ residential\_proxy.md#session-persistence) proxies. For datacenter proxies, a session persists for **26 hours** (https://docs.apify.com/platform/proxy/datacenter-proxy.md). For residential proxies, it persists for **1 minute** (https://docs.apify.com/platform/proxy/residential-proxy.md#session-persistence) but you can prolong the lifetime by regularly using the session. Google SERP proxies do not support sessions.
## Proxy groups
You can see which proxy groups you have access to on the https://console.apify.com/proxy/groups in the Apify Console. To use a specific proxy group (or multiple groups), specify it in the `username` parameter.
## Proxy IP addresses
If you need to allow communication to `apify.proxy.com`, add the following IP addresses to your firewall rule or whitelist:
* `18.208.102.16`
* `35.171.134.41`
## Troubleshooting
To view your connection status to https://apify.com/proxy, open the URL below in the browser using the proxy. http://proxy.apify.com/. If the proxy connection is working, the page should look something like this:

To test that your requests are proxied and IP addresses are being https://docs.apify.com/academy/anti-scraping/techniques.md correctly, open the following API endpoint via the proxy. It shows information about the client IP address.
https://api.apify.com/v2/browser-info/
### A different approach to `502 Bad Gateway`
Sometimes when the `502` status code is not comprehensive enough. Therefore, we have modified our server with `590-599` codes instead to provide more insight:
* `590 Non Successful`: upstream responded with non-200 status code.
* `591 RESERVED`: *this status code is reserved for further use.*
* `592 Status Code Out Of Range`: upstream responded with status code different than 100–999.
* `593 Not Found`: DNS lookup failed, indicating either https://github.com/libuv/libuv/blob/cdbba74d7a756587a696fb3545051f9a525b85ac/include/uv.h#L82 or https://github.com/libuv/libuv/blob/cdbba74d7a756587a696fb3545051f9a525b85ac/include/uv.h#L83.
* `594 Connection Refused`: upstream refused connection.
* `595 Connection Reset`: connection reset due to loss of connection or timeout.
* `596 Broken Pipe`: trying to write on a closed socket.
* `597 Auth Failed`: incorrect upstream credentials.
* `598 RESERVED`: *this status code is reserved for further use.*
* `599 Upstream Error`: generic upstream error.
The typical issues behind these codes are:
* `590` and `592` indicate an issue on the upstream side.
* `593` indicates an incorrect `proxy-chain` configuration.
* `594`, `595` and `596` may occur due to connection loss.
* `597` indicates incorrect upstream credentials.
* `599` is a generic error, where the above is not applicable.
Note that the Apify Proxy is based on the https://github.com/apify/proxy-chain open-source `npm` package developed and maintained by Apify. You can find the details of the above errors and their implementation there.
---
# Using your own proxies
**Learn how to use your own proxies while using the Apify platform.**
***
In addition to our proxies, you can use your own both in Apify Console and SDK.
## Custom proxies in console
To use your own proxies with Apify Console, in your Actor's **Input and options** tab, scroll down and open the **Proxy and browser configuration** section. Enter your proxy URLs, and you're good to go.

## Custom proxies in SDK
In the Apify SDK, use the `proxyConfiguration.newUrl(sessionId)` (JavaScript) or `proxy_configuration.new_url(session_id)` (Python) command to add your custom proxy URLs to the proxy configuration. See the https://docs.apify.com/sdk/js/api/apify/class/ProxyConfiguration#newUrl or https://docs.apify.com/sdk/python/reference/class/ProxyConfiguration#new_url SDK docs for more details.
---
# Schedules
**Learn how to automatically start your Actor and task runs and the basics of cron expressions. Set up and manage your schedules from Apify Console or via API.**
***
Schedules allow you to run your Actors and tasks at specific times. You schedule the run frequency using .
Timezone & Daylight Savings Time
Schedules allow timezone settings and support daylight saving time shifts (DST).
You can set up and manage your Schedules using:
* https://console.apify.com/schedules
* https://docs.apify.com/api/v2/schedules.md
* https://docs.apify.com/api/client/js/reference/class/ScheduleClient
* https://docs.apify.com/api/client/python/reference/class/ScheduleClient
When scheduling a new Actor or task run, you can override its input settings using a JSON object similarly to when invoking an Actor or task using the https://docs.apify.com/api/v2/schedules.md.
Events Startup Variability
In most cases, scheduled events are fired within one second of their scheduled time.However, runs can be delayed because of a system overload or a server shutting down.
Each schedule can be associated with a maximum of *10* Actors and *10* Actor tasks.
## Setting up a new schedule
Before setting up a new schedule, you should have the https://docs.apify.com/platform/actors.md or https://docs.apify.com/platform/actors/running/tasks.md you want to schedule prepared and tested.
To schedule an Actor, you need to have run it at least once before. To run the Actor, navigate to the Actor's page through https://console.apify.com/store, where you can configure and initiate the Actor's run with your preferred settings by clicking the **Start** button. After this initial run, you can then use Schedules to automate future runs.
Name Length
Your schedule's name should be 3–63 characters long.
### Apify Console
In https://console.apify.com/schedules, click on the **Schedules** in the navigation menu, then click the **Create new** button.
Click on the name (by default it is **My Schedule**), there you can change its name, add a description, as well as check its *Unique name* or *ID*.
You can adjust how often your Actor or task runs using the . You can find it by clicking on the **Schedule setup** card.

Next, you'll need to give the schedule something to run. This is where the Actor or task you prepared earlier comes in. Click on the **Add** dropdown and select whether you want to schedule an Actor or task.
If you're scheduling an Actor run, you'll be able to specify the Actor's https://docs.apify.com/platform/actors/running/input-and-output.md and running options like https://docs.apify.com/platform/actors/development/builds-and-runs/builds.md, timeout, https://docs.apify.com/platform/actors/running/usage-and-resources.md. The **timeout** value is specified in seconds; a value of *0* means there is no timeout, and the Actor runs until it finishes.
If you don't provide an input, then the Actor's default input is used. If you provide an input with some fields missing, the missing fields are filled in with values from the default input. If input options are not provided, the default options values are used.

If you're scheduling a task, just select the task you prepared earlier using the drop-down. If you need to override the task's input, you can pass it as a JSON object in the **Input JSON overrides** field.

To add more Actors or tasks, just repeat the process.
Now, all you need to do is click **Save & activate** and let the scheduler take care of running your jobs on time.
For integrations, you can also add a https://docs.apify.com/platform/integrations/webhooks.md to your tasks, which will notify you (or perform an action of your choice) every time the task runs.
### Apify API
To create a new https://docs.apify.com/api/v2/schedules.md using the Apify API, send a `POST` request to the https://docs.apify.com/api/v2/schedules-post.md endpoint.
You can find your https://docs.apify.com/platform/integrations.md under the https://console.apify.com/account?tab=integrations tab of your Apify account settings.
API authentication recommendations
When providing your API authentication token, we recommend using the request's `Authorization` header, rather than the URL (https://docs.apify.com/api/v2.md#authentication).
In the `POST` request's payload should be a JSON object specifying the schedule's name, your https://console.apify.com/account#/integrations, and the schedule's *actions*.
The following JSON object creates a schedule which runs an SEO audit of the Apify domain once a month.
{ "name": "apify-domain-monthly-seo-audit", "userId": "7AxwNO4kCDZxsMHip", "isEnabled": true, "isExclusive": true, "cronExpression": "@monthly", "timezone": "UTC", "description": "A monthly audit of the Apify domain's SEO", "actions": [ { "type": "RUN_ACTOR_TASK", "actorTaskId": "6rHoK2zjYJkmYhSug", "input": { "startUrl": "https://apify.com" } } ] }
If the request is successful, you will receive a `201` https://developer.mozilla.org/en-US/docs/Web/HTTP/Status and a JSON object in the response body containing the details of your new schedule. If you receive an error (`4**` code), you will need to check your API token, user ID, or `POST` request body.
You can add multiple Actor and task runs to a schedule with a single `POST` request. Simply add another object with the run's details to the **actions** array in your `POST` request's payload object.
For more information, refer to the https://docs.apify.com/api/v2/schedule-get.md section in our API documentation.
## Schedule setup
The schedule setup tool uses https://en.wikipedia.org/wiki/Cron#CRON_expression to specify run times. If you're familiar with how to use them and need a specific run schedule, you can dive right in. If not, don't worry - the setup tool has a visual custom schedule builder that provides a similar level of control as cron expressions, though it's not quite as powerful.

The **Next runs** section shows when the next run will be, if you click on **Show more** button it will expand and show you the next five runs. You can use this live feedback to experiment until you find the correct configuration.
You can find more information and examples of cron expressions on https://crontab.guru/. For additional and non-standard characters, see https://en.wikipedia.org/wiki/Cron#CRON_expression Wikipedia article.
### Notifications
The schedule setup tool allows you to control the schedule's notifications. All schedules have notifications enabled by default. When one of the scheduled Actors or tasks fails to start due to being configured incorrectly, you will receive an email notification.
If you want to manage the notifications for your schedules in bulk, you can do this from the https://console.apify.com/settings/notifications settings tab. As long as you have 15 schedules or less, you can manage their notifications all at once by clicking the **Manage notifications for specific schedules** button.

## Cron expressions
A cron expression has the following structure:
| Position | Field | Values | Wildcards | Optional |
| -------- | ------------ | ----------------------------- | --------- | -------- |
| 1 | second | 0 - 59 | , - \* / | yes |
| 2 | minute | 0 - 59 | , - \* / | no |
| 3 | hour | 0 - 23 | , - \* / | no |
| 4 | day of month | 1 - 31 | , - \* / | no |
| 5 | month | 1 - 12 | , - \* / | no |
| 6 | day of week | 0 - 7(0 or 7 is Sunday) | , - \* / | no |
For example, the expression `30 5 16 * * 1` will start an Actor at 16:05:30 every Monday.
The minimum interval between runs is 10 seconds; if your next run is scheduled sooner than 10 seconds after the previous run, the next run will be skipped.
### Examples of cron expressions
* `0 8 * * *` - every day at 8 AM.
* `0 0 * * 0` - every 7 days (at 00:00 on Sunday).
* `*/3 * * * *` - every 3rd minute.
* `0 0 1 */2 *` - every other month (at 00:00 on the first day of month, every 2nd month).
Additionally, you can use the following shortcut expressions:
* `@yearly` = `0 0 1 1 *` - once a year, on Jan 1st at midnight.
* `@monthly` = `0 0 1 * *` - once a month, on the 1st at midnight.
* `@weekly` = `0 0 * * 0` - once a week, on Sunday at midnight.
* `@daily` = `0 0 * * *` - run once a day, at midnight.
* `@hourly` = `0 * * * *` - on the hour, every hour.
---
# Security
**Learn more about Apify's security practices and data protection measures that are used to protect your Actors, their data, and the Apify platform in general.**
***
## SOC 2 type II compliance
The Apify platform is SOC 2 Type II compliant. This means that we have undergone an independent audit to ensure that our information security practices, policies, procedures, and operations comply with SOC 2 standards for security, availability, and confidentiality of customer data.
[AICPA SOC 2](https://www.aicpa-cima.com/topic/audit-assurance/audit-and-assurance-greater-than-soc-2)
To learn more, read the https://blog.apify.com/apify-soc2/ and visit our https://trust.apify.com for additional information or to request a copy of our SOC 2 Type II report.
## Trust center
To learn more about Apify's security practices, data protection measures, and compliance certifications, please visit our https://trust.apify.com. The Trust Center includes:
* List of our security certifications and compliance reports
* Information about Apify's data protection controls
* List of Apify's data subprocessors
* An AI chatbot to answer your security-related questions
## Security Whitepaper
At Apify, security is our top priority every day. Security best practices are reflected in our development, deployment, monitoring, and project management processes. Read the Apify Security Whitepaper for a comprehensive description of Apify's security measures and commitments:
[Apify Security Whitepaper](https://apify.com/security-whitepaper.pdf)
## Vulnerability disclosure policy
We invite security researchers, ethical hackers, and the broader community to help us keep Apify safe by reporting any potential security vulnerabilities or weaknesses. Your responsible disclosure helps protect our users and strengthen the Apify platform.
*Scope:* The following Apify services and domains are eligible for security research and responsible reporting:
* https://apify.com
* https://console.apify.com
* https://api.apify.com
* https://console-backend.apify.com
Please use your personal account for research purposes. Free accounts are sufficient for most testing.
*Out-of-scope:*
* Issues with third-party systems
* Clickjacking on non-sensitive pages
* SPF/DKIM/DMARC or other email configuration issues
* Best practices or informational findings without impact
* Denial of Service (DoS), brute-force attacks, and resource exhaustion
* Social engineering, phishing, or physical attacks
* Attacks requiring MITM or stolen credentials
*We are especially interested in reports that demonstrate:*
* Unauthorized access to data
* Elevation of privileges
* Server-side vulnerabilities (e.g., SSRF, RCE)
* Cross-site scripting (XSS) and injection attacks
* Logic flaws impacting account integrity or billing
* Authentication/authorization issues
* Data leaks due to misconfiguration
### Reporting process
If you notice or suspect a potential security issue, please report it to our security team at mailto:security@apify.com with as much detail as possible, including the following:
* Clear description of the issue
* Step-by-step reproduction instructions
* PoC (screenshots or code snippets)
* Impact analysis
* Affected URL or endpoint
Voluntary disclosures
Thank you for helping us keep Apify secure! Please note that we don’t offer financial or other rewards for vulnerability reports. Participation in our VDP is entirely voluntary, and we sincerely appreciate your contribution to the safety of the platform and the community.
### Rules of engagement
* Only target accounts or data you control (test accounts)
* Never disrupt our services or other users
* Avoid privacy violations and do not destroy or alter data
* Automated scanners are not permitted without prior approval
* No spam, DoS, or social engineering
* Submit one vulnerability per report (unless chaining is required)
If you follow these guidelines and act in good faith, we will not take legal action against you for responsibly reporting a security issue.
Crucial rules and legal obligations
Please adhere strictly to the following rules. Failure to do so may result in legal action:
* *Do not publicly disclose vulnerabilities until resolved.* This ensures that the issue can be properly evaluated and mitigated before being exposed to potential exploitation.
* *Treat all related information as confidential.* Any details about a vulnerability you are reporting are considered confidential information and cannot be disclosed unless explicitly approved by Apify in writing.
* *Comply with all legal terms.* As per our https://docs.apify.com/legal, you must not take any action that might cause an overload, disruption, or denial of service, result in unauthorized access to another user's data, or have a similar adverse effect on Apify's services or other users.
## Securing your data
The Apify platform provides you with multiple ways to secure your data, including https://docs.apify.com/platform/actors/development/programming-interface/environment-variables.md for storing your configuration secrets and https://docs.apify.com/platform/actors/development/actor-definition/input-schema/secret-input.md for securing the input parameters of your Actors.
---
# Storage
**Store anything from images and key-value pairs to structured output data. Learn how to access and manage your stored data on the Apify Console or via the API.**
***
The Apify platform provides three types of storage accessible both within our https://console.apify.com/storage and externally through our https://docs.apify.com/api/v2.md https://docs.apify.com/api.md or https://docs.apify.com/sdk.md.
#### https://docs.apify.com/platform/storage/dataset.md
https://docs.apify.com/platform/storage/dataset.md
#### https://docs.apify.com/platform/storage/key-value-store.md
https://docs.apify.com/platform/storage/key-value-store.md
#### https://docs.apify.com/platform/storage/request-queue.md
https://docs.apify.com/platform/storage/request-queue.md
---
# Dataset
**Store and export web scraping, crawling or data processing job results. Learn how to access and manage datasets in Apify Console or via API.**
***
Dataset storage enables you to sequentially save and retrieve data. A unique dataset is automatically created and assigned to each Actor run when the first item is stored.
Typically, datasets comprise results from web scraping, crawling, and data processing jobs. You can visualize this data in a table, where each object is forming a row and its attributes are represented as columns. You have the option to export data in various formats, including JSON, CSV, XML, Excel, HTML Table, RSS or JSONL.
> Named datasets are retained indefinitely. Unnamed datasets expire after 7 days unless otherwise specified. https://docs.apify.com/platform/storage/usage.md#named-and-unnamed-storages
Dataset storage is *append-only* - data can only be added and cannot be modified or deleted once stored.
## Basic usage
You can access your datasets in several ways:
* https://console.apify.com - provides an easy-to-understand interface.
* https://docs.apify.com/api/v2.md - to access your datasets programmatically.
* https://docs.apify.com/api.md - to access your datasets from any Node.js/Python application.
* https://docs.apify.com/sdk.md - when building your own JavaScript/Python Actor.
### Apify Console
In https://console.apify.com, you can view your datasets in the https://console.apify.com/storage section under the https://console.apify.com/storage?tab=datasets tab.

To view or download a dataset:
1. Click on its **Dataset ID**.
2. Select the format & configure other options if desired in **Export dataset** section.
3. Click **Download**.
Utilize the **Actions** menu to modify the dataset's name, which also affects its https://docs.apify.com/platform/storage/usage.md#data-retention, and to adjust https://docs.apify.com/platform/collaboration.md. The **API** button allows you to explore and test the dataset's https://docs.apify.com/api/v2/storage-datasets.md.

### Apify API
The https://docs.apify.com/api/v2/storage-datasets.md enables you programmatic access to your datasets using https://developer.mozilla.org/en-US/docs/Web/HTTP/Methods.
If you are accessing your datasets using the `username~store-name` https://docs.apify.com/platform/storage.md, you will need to use your secret API token. You can find the token (and your user ID) on the https://console.apify.com/account#/integrationstab of **Settings** page of your Apify account.
> When providing your API authentication token, we recommend using the request's `Authorization` header, rather than the URL. (https://docs.apify.com/platform/integrations/api.md#authentication).
To retrieve a list of your datasets, send a GET request to the https://docs.apify.com/api/v2/datasets-get.md endpoint.
https://api.apify.com/v2/datasets
To get information about a dataset such as its creation time and item count, send a GET request to the https://docs.apify.com/api/v2/dataset-get.md endpoint.
https://api.apify.com/v2/datasets/{DATASET_ID}
To view a dataset's data, send a GET request to the https://docs.apify.com/api/v2/dataset-items-get.md Apify API endpoint.
https://api.apify.com/v2/datasets/{DATASET_ID}/items
Control the data export by appending a comma-separated list of fields to the `fields` query parameter. Likewise, you can also omit certain fields using the `omit` parameter.
> If you fill both `omit` and `field` parameters with the same value, then >`omit` parameter will take precedence and the field is excluded from the >results.
In addition, you can set the format in which you retrieve the data using the `?format=` parameter. The available formats are `json`, `jsonl`, `csv`, `html`, `xlsx`, `xml` and `rss`. The default value is `json`.
To retrieve the `hotel` and `cafe` fields, you would send your GET request to the URL below.
https://api.apify.com/v2/datasets/{DATASET_ID}/items?format=json&fields=hotel%2Ccafe
> Use `%2C` instead of commas for URL encoding, as `%2C` represent a comma. For more on URL encoding check out https://www.url-encode-decode.com
To add data to a dataset, issue a POST request to the https://docs.apify.com/api/v2/dataset-items-post.md endpoint with the data as a JSON object payload.
https://api.apify.com/v2/datasets/{DATASET_ID}/items
> API data push to a dataset is capped at *400 requests per second* to avoid overloading our servers.
Example payload:
[ { "foo": "bar" }, { "foo": "hotel" }, { "foo": "cafe" } ]
For further details and a breakdown of each storage API endpoint, refer to the https://docs.apify.com/api/v2/storage-datasets.md.
### Apify API Clients
#### JavaScript API client
The https://docs.apify.com/api/client/js/reference/class/DatasetClient (`apify-client`) enables you access to your datasets from any Node.js application, whether hosted on the Apify platform or externally.
After importing and initiating the client, you can save each dataset to a variable for easier access.
const myDatasetClient = apifyClient.dataset('jane-doe/my-dataset');
You can then use that variable to https://docs.apify.com/api/client/js/reference/class/DatasetClient.
> When using the https://docs.apify.com/api/client/js/reference/class/DatasetClient#listItems method, if you fill both `omit` and `field` parameters with the same value, then `omit` parameter will take precedence and the field is excluded from the results.
Check out the https://docs.apify.com/api/client/js/reference/class/DatasetClient for https://docs.apify.com/api/client/js/docs and more details.
#### Python API client
The https://docs.apify.com/api/client/python/reference/class/DatasetClient (`apify-client`) enables you access to your datasets from any Python application, whether it is running on the Apify platform or externally.
After importing and initiating the client, you can save each dataset to a variable for easier access.
my_dataset_client = apify_client.dataset('jane-doe/my-dataset')
You can then use that variable to https://docs.apify.com/api/client/python/reference/class/DatasetClient.
> When using the https://docs.apify.com/api/client/python/reference/class/DatasetClient#list_items method, if you fill both `omit` and `field` parameters with the same value, then `omit` parameter will take precedence and the field is excluded from the results.
Check out the https://docs.apify.com/api/client/python/reference/class/DatasetClient for https://docs.apify.com/api/client/python/docs/overview/introduction and more details.
### Apify SDKs
#### JavaScript SDK
When working with a JavaScript https://docs.apify.com/platform/actors.md, the https://docs.apify.com/sdk/js/docs/guides/result-storage#dataset is an essential tool, especially for dataset management. It simplifies the tasks of storing and retrieving data, seamlessly integrating with the Actor's workflow. Key features of the SDK include the ability to append data, retrieve what is stored, and manage dataset properties effectively. Central to this functionality is the https://docs.apify.com/sdk/js/reference/class/Dataset class. This class allows you to determine where your data is stored - locally or in the Apify cloud. To add data to your chosen datasets, use the https://docs.apify.com/sdk/js/reference/class/Dataset#pushData method.
Additionally the SDK offers other methods like https://docs.apify.com/sdk/js/reference/class/Dataset#getData, https://docs.apify.com/sdk/js/reference/class/Dataset#map, and https://docs.apify.com/sdk/js/reference/class/Dataset#reduce. For practical applications of these methods, refer to the https://docs.apify.com/sdk/js/docs/examples/map-and-reduce section.
If you have chosen to store your dataset locally, you can find it in the location below.
{APIFY_LOCAL_STORAGE_DIR}/datasets/{DATASET_ID}/{INDEX}.json
`DATASET_ID` refers to the dataset's *name* or *ID*. The default dataset will be stored in the *default* directory.
To add data to the default dataset, you can use the example below:
// Import the JavaScript SDK into your project import { Actor } from 'apify';
await Actor.init(); // ...
// Add one item to the default dataset await Actor.pushData({ foo: 'bar' });
// Add multiple items to the default dataset await Actor.pushData([{ foo: 'hotel' }, { foo: 'cafe' }]);
// ... await Actor.exit();
> It's crucial to use the `await` keyword when calling `pushData()`, to ensure data storage completes before the Actor process terminates.
If you want to use something other than the default dataset, e.g. a dataset that you share between Actors or between Actor runs, you can use the https://docs.apify.com/sdk/js/reference/class/Actor#openDataset method.
import { Actor } from 'apify';
await Actor.init(); // ...
// Save a named dataset to a variable const dataset = await Actor.openDataset('some-name');
// Add data to the named dataset await dataset.pushData({ foo: 'bar' });
// ... await Actor.exit();
Utilize the `fields` option in the https://docs.apify.com/sdk/js/reference/class/Dataset#getData method to specify which data fields to retrieve. This option accepts an array of fields names (string) to include in your results.
import { Actor } from 'apify';
await Actor.init(); // ...
const dataset = await Actor.openDataset();
// Only get the 'hotel' and 'cafe' fields const hotelAndCafeData = await dataset.getData({ fields: ['hotel', 'cafe'], });
// ... await Actor.exit();
Check out the https://docs.apify.com/sdk/js/docs/guides/result-storage#dataset and the `Dataset` class's https://docs.apify.com/sdk/js/reference/class/Dataset for details on managing datasets with the JavaScript SDK.
#### Python SDK
For Python https://docs.apify.com/platform/actors.md, the https://docs.apify.com/sdk/python/docs/concepts/storages#working-with-datasets is essential. The dataset is represented by a https://docs.apify.com/sdk/python/reference/class/Dataset class. You can use this class to specify whether your data is stored locally or in the Apify cloud and push data to the datasets of your choice using the https://docs.apify.com/sdk/python/reference/class/Dataset#push_data method. For further data manipulation you could also use other methods such as https://docs.apify.com/sdk/python/reference/class/Dataset#get_data, https://docs.apify.com/sdk/python/reference/class/Dataset#map and https://docs.apify.com/sdk/python/reference/class/Dataset#reduce.
For datasets stored locally, the data is located at the following path:
{APIFY_LOCAL_STORAGE_DIR}/datasets/{DATASET_ID}/{INDEX}.json
The `DATASET_ID` refers to the dataset's *name* or *ID*. The default dataset will be stored in the *default* directory.
To add data to the default dataset, you can use the example below:
from apify import Actor
async def main(): async with Actor: # Add one item to the default dataset await Actor.push_data({'foo': 'bar'})
# Add multiple items to the default dataset
await Actor.push_data([{'foo': 'hotel'}, {'foo': 'cafe'}])
If you want to use something other than the default dataset, e.g. a dataset that you share between Actors or between Actor runs, you can use the https://docs.apify.com/sdk/python/reference/class/Actor#open_dataset method.
from apify import Actor
async def main(): async with Actor: # Save a named dataset to a variable dataset = await Actor.open_dataset(name='some-name')
# Add data to the named dataset
await dataset.push_data({'foo': 'bar'})
Utilize the `fields` option in the https://docs.apify.com/sdk/python/reference/class/Dataset#get_data method to specify which data fields to retrieve. This option accepts an array of fields names (string) to include in your results.
from apify import Actor
async def main(): async with Actor: dataset = await Actor.open_dataset()
# Only get the 'hotel' and 'cafe' fields
hotel_and_cafe_data = await dataset.get_data(fields=['hotel', 'cafe'])
For more information, visit our https://docs.apify.com/sdk/python/docs/concepts/storages#working-with-datasets and the `Dataset` class's https://docs.apify.com/sdk/python/reference/class/Dataset for details on managing datasets with the Python SDK.
## Hidden fields
Fields in a dataset that begin with a `#` are treated as hidden. You can exclude these fields when downloading data by using either `skipHidden=1` or `clean=1` in your query parameters. This feature is useful for excluding debug information from the final dataset output.
The following example demonstrates a dataset record with hidden fields, including HTTP response and error details.
{ "url": "https://example.com", "title": "Example page", "data": { "foo": "bar" }, "#error": null, "#response": { "statusCode": 201 } }
Data excluding hidden fields, termed as "clean" data, can be downloaded from the https://console.apify.com/storage?tab=datasets using the **Clean items** option. Alternatively, you can download it via API by applying `clean=true` or `clean=1` as https://docs.apify.com/api/v2/dataset-items-get.md.
## XML format extension
In `XML` and `RSS` export formats, object property name are converted into XML tags, and their corresponding values are represented as children of these tags.
For example, the JavaScript object:
{ name: 'Rashida Jones', address: [ { type: 'home', street: '21st', city: 'Chicago', }, { type: 'office', street: null, city: null, }, ], }
becomes the following XML snippet:
Rashida Jones
home
21st
Chicago
office
In a JavaScript object, if a property is named `@`, its sub-properties are exported as attributes of the corresponding parent XML element. Additionally, when the parent XML element lacks child elements, its value is sourced from a property named `#` in the JavaScript Object.
For example, the following JavaScript object:
{ address: [ { '@': { type: 'home', }, street: '21st', city: 'Chicago', }, { '@': { type: 'office', }, '#': 'unknown', }, ], }
will be transformed to the following XML snippet:
21st
Chicago
unknown
This feature is also useful when customizing your RSS feeds generated for various websites.
By default, the whole result is wrapped in an `` element, while each page object is contained in an `` element. You can change this using the `xmlRoot` and `xmlRow` URL parameters when retrieving your data with a GET request.
## Sharing
You can grant https://docs.apify.com/platform/collaboration.md to your dataset through the **Share** button under the **Actions** menu. For more details, check the https://docs.apify.com/platform/collaboration/list-of-permissions.md.
You can also share datasets by link using their ID or name, depending on your account or resource-level general access setting. Learn how link-based access works in https://docs.apify.com/platform/collaboration/general-resource-access.md.
For one-off sharing of specific records when access is restricted, you can generate time-limited pre-signed URLs. See https://docs.apify.com/platform/collaboration/general-resource-access.md#pre-signed-urls.
### Sharing datasets between runs
You can access a dataset from any https://docs.apify.com/platform/actors.md or https://docs.apify.com/platform/actors/running/tasks.md run as long as you know its *name* or *ID*.
To access a dataset from another run using the https://docs.apify.com/sdk.md, open it using the same method as you would with any other dataset.
* JavaScript
* Python
import { Actor } from 'apify';
await Actor.init();
const otherDataset = await Actor.openDataset('old-dataset'); // ...
await Actor.exit();
from apify import Actor
async def main(): async with Actor: other_dataset = await Actor.open_dataset(name='old-dataset') # ...
In the https://docs.apify.com/api/client/js/reference/class/DatasetClient as well as in https://docs.apify.com/api/client/python/reference/class/DatasetClient , you can access a dataset using its client. Once you've opened the dataset, you can read its contents and add new data in the same manner as you would for a dataset from your current run.
* JavaScript
* Python
const otherDatasetClient = apifyClient.dataset('jane-doe/old-dataset');
other_dataset_client = apify_client.dataset('jane-doe/old-dataset')
The same applies for the - you can use as you would normally do.
See the https://docs.apify.com/platform/storage/usage.md#sharing-storages-between-runs for details on sharing storages between runs.
## Limits
* Data storage formats that use tabulation (like HTML, CSV, and EXCEL) are limited to a maximum of *3000* columns. Data exceeding this limit will not be retrieved.
* The `pushData()`method is constrained by the receiving API's size limit. It accepts objects with JSON size under *9MB*. While individual objects within an array must not exceed *9MB*, the overall size has no restriction.
* The maximum length for dataset names is 63 characters.
### Rate limiting
The rate limit for pushing data to a dataset through the https://docs.apify.com/api/v2/dataset-items-post.md is capped at *400 requests per second* for each dataset, a measure to prevent overloading Apify servers.
For all other dataset https://docs.apify.com/api/v2/storage-datasets.md , the rate limit is *60 requests per second* for each dataset.
Check out the https://docs.apify.com/api/v2.md#rate-limiting for more information and guidance on actions to take if you exceed these rate limits.
---
# Key-value store
**Store anything from Actor or task run results, JSON documents, or images. Learn how to access and manage key-value stores from Apify Console or via API.**
***
The key-value store is simple storage that can be used for storing any kind of data. It can be JSON or HTML documents, zip files, images, or strings. The data are stored along with their https://developer.mozilla.org/en-US/docs/Web/HTTP/Basics_of_HTTP/MIME_types/Common_types.
Each Actor run is assigned its own key-value store when it is created. The store contains the Actor's input, and, if necessary, other data such as its output.
Key-value stores are mutable–you can both add entries and delete them.
> Named key-value stores are retained indefinitely.Unnamed key-value stores expire after 7 days unless otherwise specified.> https://docs.apify.com/platform/storage/usage.md#named-and-unnamed-storages
## Basic usage
You can access key-value stores through several methods
* https://console.apify.com - provides an easy-to-understand interface.
* https://docs.apify.com/api/v2.md - for accessing your key-value stores programmatically.
* https://docs.apify.com/api.md - to access your key-value stores from any Node.js/Python application.
* https://docs.apify.com/sdk.md - when building your own JavaScript/Python Actor.
### Apify Console
In https://console.apify.com, you can view your key-value stores in the https://console.apify.com/storage section under the https://console.apify.com/storage?tab=keyValueStores tab.

To view a key-value store's content, click on its **Store ID**. Under the **Actions** menu, you can rename your store (and, in turn extend its https://docs.apify.com/platform/storage/usage.md#named-and-unnamed-storages) and grant https://docs.apify.com/platform/collaboration.md using the **Share** button. Click on the **API** button to view and test a store's https://docs.apify.com/api/v2/storage-key-value-stores.md.

On the bottom of the page, you can view, download, and delete the individual records.

### Apify API
The https://docs.apify.com/api/v2/storage-key-value-stores.md enables you programmatic access to your key-value stores using https://developer.mozilla.org/en-US/docs/Web/HTTP/Methods.
If you are accessing your datasets using the `username~store-name` https://docs.apify.com/platform/storage.md, you will need to use your secret API token. You can find the token (and your user ID) on the https://console.apify.com/account#/integrations tab of **Settings** page of your Apify account.
> When providing your API authentication token, we recommend using the request's `Authorization` header, rather than the URL. (https://docs.apify.com/platform/integrations/api.md#authentication).
To retrieve a list of your key-value stores, send a GET request to the https://docs.apify.com/api/v2/key-value-stores-get.md endpoint.
https://api.apify.com/v2/key-value-stores
To get information about a key-value store such as its creation time and item count, send a GET request to the https://docs.apify.com/api/v2/key-value-store-get.md endpoint.
https://api.apify.com/v2/key-value-stores/{STORE_ID}
To get a record (its value) from a key-value store, send a GET request to the https://docs.apify.com/api/v2/key-value-store-record-get.md endpoint.
https://api.apify.com/v2/key-value-stores/{STORE_ID}/records/{KEY_ID}
To add a record with a specific key in a key-value store, send a PUT request to the https://docs.apify.com/api/v2/key-value-store-record-put.md endpoint.
https://api.apify.com/v2/key-value-stores/{STORE_ID}/records/{KEY_ID}
Example payload:
{ "foo": "bar", "fos": "baz" }
To delete a record, send a DELETE request specifying the key from a key-value store to the https://docs.apify.com/api/v2/key-value-store-record-delete.md endpoint.
https://api.apify.com/v2/key-value-stores/{STORE_ID}/records/{KEY_ID}
For further details and a breakdown of each storage API endpoint, refer to the https://docs.apify.com/api/v2/storage-key-value-stores.md.
### Apify API Clients
#### JavaScript API client
The Apify https://docs.apify.com/api/client/js/reference/class/KeyValueStoreClient (`apify-client`) enables you to access your key-value stores from any Node.js application, whether hosted on the Apify platform or externally.
After importing and initiating the client, you can save each key-value store to a variable for easier access.
const myKeyValStoreClient = apifyClient.keyValueStore( 'jane-doe/my-key-val-store', );
You can then use that variable to https://docs.apify.com/api/client/js/reference/class/KeyValueStoreClient.
Check out the https://docs.apify.com/api/client/js/reference/class/KeyValueStoreClient for https://docs.apify.com/api/client/js/docs and more details.
#### Python API client
The Apify https://docs.apify.com/api/client/python/reference/class/KeyValueStoreClient (`apify-client`) allows you to access your key-value stores from any Python application, whether it is running on the Apify platform or externally.
After importing and initiating the client, you can save each key-value store to a variable for easier access.
my_key_val_store_client = apify_client.key_value_store('jane-doe/my-key-val-store')
You can then use that variable to https://docs.apify.com/api/client/python/reference/class/KeyValueStoreClient.
Check out the https://docs.apify.com/api/client/python/reference/class/KeyValueStoreClient for https://docs.apify.com/api/client/python/docs/overview/introduction and more details.
### Apify SDKs
#### JavaScript SDK
When working with a JavaScript https://docs.apify.com/platform/actors.md, the https://docs.apify.com/sdk/js/docs/guides/result-storage#key-value-store is an essential tool, especially for key-value store management. The primary class for this purpose is the https://docs.apify.com/sdk/js/reference/class/KeyValueStore. This class allows you to decide whether your data will be stored locally or in the Apify cloud. For data manipulation, it offers the https://docs.apify.com/sdk/js/reference/class/KeyValueStore#getValue and https://docs.apify.com/sdk/js/reference/class/KeyValueStore#setValue methods to retrieve and assign values, respectively.
Additionally, you can iterate over the keys in your store using the https://docs.apify.com/sdk/js/reference/class/KeyValueStore#forEachKey method.
Every Actor run is linked to a default key-value store that is automatically created for that specific run. If you're running your Actors and opt to store data locally, you can easily supply the https://docs.apify.com/platform/actors/running/input-and-output.md by placing an *INPUT.json* file in the corresponding directory of the default key-value store. This method ensures that you Actor has all the necessary data readily available for its execution.
You can find *INPUT.json* and other key-value store files in the location below.
{APIFY_LOCAL_STORAGE_DIR}/key_value_stores/{STORE_ID}/{KEY}.{EXT}
The default key-value store's ID is *default*. The `{KEY}` is the record's *key* and `{EXT}` corresponds to the record value's MIME content type.
To manage your key-value stores, you can use the following methods. See the `KeyValueStore` class's https://docs.apify.com/sdk/js/reference/class/KeyValueStore for the full list.
import { Actor } from 'apify';
await Actor.init(); // ...
// Get the default input const input = await Actor.getInput();
// Open a named key-value store const exampleStore = await Actor.openKeyValueStore('my-store');
// Read a record in the exampleStore storage const value = await exampleStore.getValue('some-key');
// Write a record to exampleStore await exampleStore.setValue('some-key', { foo: 'bar' });
// Delete a record from exampleStore await exampleStore.setValue('some-key', null);
// ... await Actor.exit();
> Note that JSON is automatically parsed to a JavaScript object, text data returned as a string and other data is returned as binary buffer.
import { Actor } from 'apify';
await Actor.init(); // ...
// Get input of your Actor const input = await Actor.getInput(); const value = await Actor.getValue('my-key');
// ... await Actor.setValue('OUTPUT', imageBuffer, { contentType: 'image/jpeg' });
// ... await Actor.exit();
The `Actor.getInput()` method is not only a shortcut to `Actor.getValue('INPUT')`; it is also compatible with https://docs.apify.com/platform/actors/development/programming-interface/metamorph.md. This is because a metamorphed Actor run's input is stored in the *INPUT-METAMORPH-1* key instead of *INPUT*, which hosts the original input.
Check out the https://docs.apify.com/sdk/js/docs/guides/result-storage#key-value-store and the `KeyValueStore` class's https://docs.apify.com/sdk/js/reference/class/KeyValueStore for details on managing your key-value stores with the JavaScript SDK.
#### Python SDK
For Python https://docs.apify.com/platform/actors.md, the https://docs.apify.com/sdk/python/docs/concepts/storages#working-with-key-value-stores is essential. The key-value store is represented by a https://docs.apify.com/sdk/python/reference/class/KeyValueStore class. You can use this class to specify whether your data is stored locally or in the Apify cloud. For further data manipulation it offers https://docs.apify.com/sdk/python/reference/class/KeyValueStore#get_value and https://docs.apify.com/sdk/python/reference/class/KeyValueStore#set_value methods to retrieve and assign values, respectively.
Every Actor run is linked to a default key-value store that is automatically created for that specific run. If you're running your Actors and opt to store data locally, you can easily supply the https://docs.apify.com/platform/actors/running/input-and-output.md by placing an *INPUT.json* file in the corresponding directory of the default key-value store. This method ensures that you Actor has all the necessary data readily available for its execution.
You can find *INPUT.json* and other key-value store files in the location below.
{APIFY_LOCAL_STORAGE_DIR}/key_value_stores/{STORE_ID}/{KEY}.{EXT}
The default key-value store's ID is *default*. The {KEY} is the record's *key* and {EXT} corresponds to the record value's MIME content type.
To manage your key-value stores, you can use the following methods. See the `KeyValueStore` class https://docs.apify.com/sdk/python/reference/class/KeyValueStore for the full list.
from apify import Actor from apify.storages import KeyValueStore
async def main(): async with Actor: # Open a named key-value store example_store: KeyValueStore = await Actor.open_key_value_store(name='my-store')
# Read a record in the example_store storage
value = await example_store.get_value('some-key')
# Write a record to example_store
await example_store.set_value('some-key', {'foo': 'bar'})
# Delete a record from example_store
await example_store.set_value('some-key', None)
> Note that JSON is automatically parsed to a Python dictionary, text data returned as a string and other data is returned as binary buffer.
from apify import Actor
async def main(): async with Actor: value = await Actor.get_value('my-key') # ... image_buffer = ... # Get image data await Actor.set_value(key='OUTPUT', value=image_buffer, content_type='image/jpeg')
The `Actor.get_input()` method is not only a shortcut to `Actor.get_value('INPUT')`; it is also compatible with https://docs.apify.com/platform/actors/development/programming-interface/metamorph.md. This is because a metamorphed Actor run's input is stored in the *INPUT-METAMORPH-1* key instead of *INPUT*, which hosts the original input.
Check out the https://docs.apify.com/sdk/python/docs/concepts/storages#working-with-key-value-stores and the `KeyValueStore` class's https://docs.apify.com/sdk/python/reference/class/KeyValueStore for details on managing your key-value stores with the Python SDK.
## Compression
Previously, when using the https://docs.apify.com/api/v2/key-value-store-record-put.md endpoint, every record was automatically compressed with Gzip before being uploaded. However, this process has been updated. *Now, records are stored exactly as you upload them.* This change means that it is up to you whether the record is stored compressed or uncompressed.
You can compress a record and use the https://developer.mozilla.org/en-US/docs/Web/HTTP/Headers/Content-Encoding to let our platform know which compression it uses. We recommend compressing large key-value records to save storage space and network traffic.
*Using the https://docs.apify.com/sdk/js/reference/class/KeyValueStore#setValue or our https://docs.apify.com/api/client/js/reference/class/KeyValueStoreClient#setRecord automatically compresses your files.* We advise utilizing the JavaScript API client for data compression prior to server upload and decompression upon retrieval, minimizing storage costs.
## Sharing
You can grant https://docs.apify.com/platform/collaboration.md to your key-value store through the **Share** button under the **Actions** menu. For more details check the https://docs.apify.com/platform/collaboration/list-of-permissions.md.
You can also share key-value stores by link using their ID or name, depending on your account or resource-level general access setting. Learn how link-based access works in https://docs.apify.com/platform/collaboration/general-resource-access.md.
For one-off sharing of specific records when access is restricted, you can generate time-limited pre-signed URLs. See https://docs.apify.com/platform/collaboration/general-resource-access.md#pre-signed-urls.
### Sharing key-value stores between runs
You can access a key-value store from any https://docs.apify.com/platform/actors.md or https://docs.apify.com/platform/actors/running/tasks.md run as long as you know its *name* or *ID*.
To access a key-value store from another run using the https://docs.apify.com/sdk.md, open it using the same method as you would do with any other store.
* JavaScript
* Python
import { Actor } from 'apify';
await Actor.init();
const otherStore = await Actor.openKeyValueStore('old-store'); // ...
await Actor.exit();
from apify import Actor
async def main(): async with Actor: other_store = await Actor.open_key_value_store(name='old-store') # ...
In the https://docs.apify.com/api/client/js/reference/class/KeyValueStoreClient as well as in https://docs.apify.com/api/client/python/reference/class/KeyValueStoreClient, you can access a store using its client. Once you've opened a store, read and manage its contents like you would do with a key-value store from your current run.
* JavaScript
* Python
const otherStoreClient = apifyClient.keyValueStore('jane-doe/old-store');
other_store_client = apify_client.key_value_store('jane-doe/old-store')
The same applies for the - you can use as you would normally do.
Check out the https://docs.apify.com/platform/storage/usage.md#sharing-storages-between-runs for details on sharing storages between runs.
## Data consistency
Key-value storage uses the https://aws.amazon.com/s3/ service. According to the https://aws.amazon.com/s3/consistency/, it provides *strong read-after-write* consistency.
## Limits
* The maximum length for key of key-value store is 63 characters.
---
# Request queue
**Queue URLs for an Actor to visit in its run. Learn how to share your queues between Actor runs. Access and manage request queues from Apify Console or via API.**
***
Request queues enable you to enqueue and retrieve requests such as URLs with an https://developer.mozilla.org/en-US/docs/Web/HTTP/Methods and other parameters. They prove essential not only in web crawling scenarios but also in any situation requiring the management of a large number of URLs and the addition of new links.
The storage system for request queues accommodates both breadth-first and depth-first crawling strategies, along with the inclusion of custom data attributes. This system enables you to check if certain URLs have already been encountered, add new URLs to the queue, and retrieve the next set of URLs for processing.
> Named request queues are retained indefinitely.Unnamed request queues expire after 7 days unless otherwise specified.> https://docs.apify.com/platform/storage/usage.md#named-and-unnamed-storages
## Basic usage
You can access your request queues in several ways:
* https://console.apify.com - provides an easy-to-understand interface.
* https://docs.apify.com/api/v2.md - for accessing your request queues programmatically.
* https://docs.apify.com/api.md - to access your request queues from any Node.js application.
* https://docs.apify.com/sdk.md - when building your own JavaScript Actor.
### Apify Console
In the https://console.apify.com, you can view your request queues in the https://console.apify.com/storage section under the https://console.apify.com/storage?tab=requestQueues tab.

To view a request queue, click on its **Queue ID**. Under the **Actions** menu, you can rename your queue's name (and, in turn, its https://docs.apify.com/platform/storage/usage.md#named-and-unnamed-storages) and https://docs.apify.com/platform/collaboration.md using the **Share** button. Click on the **API** button to view and test a queue's https://docs.apify.com/api/v2/storage-request-queues.md.

### Apify API
The https://docs.apify.com/api/v2/storage-request-queues.md allows you programmatic access to your request queues using https://developer.mozilla.org/en-US/docs/Web/HTTP/Methods.
If you are accessing your datasets using the `username~store-name` https://docs.apify.com/platform/storage.md, you will need to use your secret API token. You can find the token (and your user ID) on the https://console.apify.com/account#/integrations page of your Apify account.
> When providing your API authentication token, we recommend using the request's `Authorization` header, rather than the URL. (https://docs.apify.com/platform/integrations/api.md#authentication).
To get a list of your request queues, send a GET request to the https://docs.apify.com/api/v2/request-queues-get.md endpoint.
https://api.apify.com/v2/request-queues
To get information about a request queue such as its creation time and item count, send a GET request to the https://docs.apify.com/api/v2/request-queue-get.md endpoint.
https://api.apify.com/v2/request-queues/{QUEUE_ID}
To get a request from a queue, send a GET request to the https://docs.apify.com/api/v2/request-queue-request-get.md endpoint.
https://api.apify.com/v2/request-queues/{QUEUE_ID}/requests/{REQUEST_ID}
To add a request to a queue, send a POST request with the request to be added as a JSON object in the request's payload to the https://docs.apify.com/api/v2/request-queue-requests-post.md endpoint.
https://api.apify.com/v2/request-queues/{QUEUE_ID}/requests
Example payload:
{ "uniqueKey": "http://example.com", "url": "http://example.com", "method": "GET" }
To update a request in a queue, send a PUT request with the request to update as a JSON object in the request's payload to the https://docs.apify.com/api/v2/request-queue-request-put.md endpoint. In the payload, specify the request's ID and add the information you want to update.
https://api.apify.com/v2/request-queues/{QUEUE_ID}/requests/{REQUEST_ID}
Example payload:
{ "id": "dnjkDMKLmdlkmlkmld", "uniqueKey": "http://example.com", "url": "http://example.com", "method": "GET" }
> When adding or updating requests, you can optionally provide a `clientKey` parameter to your request. It must be a string between 1 and 32 characters in length. This identifier is used to determine whether the queue was accessed by . If `clientKey` is not provided, the system considers this API call to come from a new client. See the `hadMultipleClients` field returned by the https://docs.apify.com/api/v2/request-queue-head-get.md operation for details.
>
> Example: `client-abc`
For further details and a breakdown of each storage API endpoint, refer to the https://docs.apify.com/api/v2/storage-key-value-stores.md.
### Apify API Clients
#### JavaScript API client
The Apify https://docs.apify.com/api/client/js/reference/class/RequestQueueClient (`apify-client`) enables you to access your request queues from any Node.js application, whether it is running on the Apify platform or externally.
After importing and initiating the client, you can save each request queue to a variable for easier access.
const myQueueClient = apifyClient.requestQueue('jane-doe/my-request-queue');
You can then use that variable to https://docs.apify.com/api/client/js/reference/class/RequestQueueClient.
Check out the https://docs.apify.com/api/client/js/reference/class/RequestQueueClient for https://docs.apify.com/api/client/js/docs and more details.
#### Python API client
The Apify https://docs.apify.com/api/client/python (`apify-client`) allows you to access your request queues from any Python application, whether it's running on the Apify platform or externally.
After importing and initiating the client, you can save each request queue to a variable for easier access.
my_queue_client = apify_client.request_queue('jane-doe/my-request-queue')
You can then use that variable to https://docs.apify.com/api/client/python/reference/class/RequestQueueClient.
Check out the https://docs.apify.com/api/client/python/reference/class/RequestQueueClient for https://docs.apify.com/api/client/python/docs/overview/introduction and more details.
### Apify SDKs
#### JavaScript SDK
When working with a JavaScript https://docs.apify.com/platform/actors.md, the https://docs.apify.com/sdk/js/docs/guides/request-storage#request-queue is an essential tool, especially for request queue management. The primary class for this purpose is the https://docs.apify.com/sdk/js/reference/class/RequestQueue class. Use this class to decide whether your data is stored locally or in the Apify cloud.
If you are building a JavaScript https://docs.apify.com/platform/actors.md, you will be using the https://docs.apify.com/sdk/js/docs/guides/request-storage#request-queue. The request queue is represented by a https://docs.apify.com/sdk/js/reference/class/RequestQueue class. You can use the class to specify whether your data is stored locally or in the Apify cloud and https://docs.apify.com/sdk/js/reference/class/RequestQueue#addRequests.
Every Actor run is automatically linked with a default request queue, initiated upon adding the first request. This queue is primarily utilized for storing URLs to be crawled during the particular Actor run, though its use is not mandatory. For enhanced flexibility, you can establish named queues. These named queues offer the advantage of being shareable across different Actors or various Actor runs, facilitating a more interconnected and efficient process.
If you are storing your data locally, you can find your request queue at the following location.
{APIFY_LOCAL_STORAGE_DIR}/request_queues/{QUEUE_ID}/{ID}.json
The default request queue's ID is *default*. Each request in the queue is stored as a separate JSON file, where `{ID}` is a request ID.
To open a request queue, use the https://docs.apify.com/sdk/js/reference/class/Actor#openRequestQueue method.
// Import the JavaScript SDK into your project import { Actor } from 'apify';
await Actor.init(); // ...
// Open the default request queue associated with // the Actor run const queue = await Actor.openRequestQueue();
// Open the 'my-queue' request queue const queueWithName = await Actor.openRequestQueue('my-queue');
// ... await Actor.exit();
Once a queue is open, you can manage it using the following methods. Check out the `RequestQueue` class's https://docs.apify.com/sdk/js/reference/class/RequestQueue for the full list.
// Import the JavaScript SDK into your project import { Actor } from 'apify';
await Actor.init(); // ...
const queue = await Actor.openRequestQueue();
// Enqueue requests await queue.addRequests([{ url: 'http://example.com/aaa' }]); await queue.addRequests(['http://example.com/foo', 'http://example.com/bar'], { forefront: true, });
// Get the next request from queue const request1 = await queue.fetchNextRequest(); const request2 = await queue.fetchNextRequest();
// Get a specific request const specificRequest = await queue.getRequest('shi6Nh3bfs3');
// Reclaim a failed request back to the queue // and process it again await queue.reclaimRequest(request2);
// Remove a queue await queue.drop();
// ... await Actor.exit();
Check out the https://docs.apify.com/sdk/js/docs/guides/request-storage#request-queue and the `RequestQueue` class's https://docs.apify.com/sdk/js/reference/class/RequestQueue for details on managing your request queues with the JavaScript SDK.
#### Python SDK
For Python https://docs.apify.com/platform/actors.md development, the https://docs.apify.com/sdk/python/docs/concepts/storages#working-with-request-queues the in essential. The request queue is represented by https://docs.apify.com/sdk/python/reference/class/RequestQueue class. Utilize this class to determine whether your data is stored locally or in the Apify cloud. For managing your data, it provides the capability to https://docs.apify.com/sdk/python/reference/class/RequestQueue#add_requests, facilitating seamless integration and operation within your Actor.
Every Actor run is automatically connected to a default request queue, established specifically for that run upon the addition of the first request. If you're operating your Actors and choose to utilize this queue, it typically serves to store URLs for crawling in the respective Actor run, though its use is not mandatory. To extend functionality, you have the option to create named queue, which offer the flexibility to be shared among different Actors or across multiple Actor runs.
If you are storing your data locally, you can find your request queue at the following location.
{APIFY_LOCAL_STORAGE_DIR}/request_queues/{QUEUE_ID}/{ID}.json
The default request queue's ID is *default*. Each request in the queue is stored as a separate JSON file, where `{ID}` is a request ID.
To *open a request queue*, use the https://docs.apify.com/sdk/python/reference/class/Actor#open_request_queue method.
from apify import Actor
async def main(): async with Actor: # Open the default request queue associated with the Actor run queue = await Actor.open_request_queue()
# Open the 'my-queue' request queue
queue_with_name = await Actor.open_request_queue(name='my-queue')
# ...
Once a queue is open, you can manage it using the following methods. See the `RequestQueue` class's https://docs.apify.com/sdk/python/reference/class/RequestQueue for the full list.
from apify import Actor from apify.storages import RequestQueue
async def main(): async with Actor: queue: RequestQueue = await Actor.open_request_queue()
# Enqueue requests
await queue.add_request(request={'url': 'http:#example.com/aaa'})
await queue.add_request(request={'url': 'http:#example.com/foo'})
await queue.add_request(request={'url': 'http:#example.com/bar'}, forefront=True)
# Get the next requests from queue
request1 = await queue.fetch_next_request()
request2 = await queue.fetch_next_request()
# Get a specific request
specific_request = await queue.get_request('shi6Nh3bfs3')
# Reclaim a failed request back to the queue and process it again
await queue.reclaim_request(request2)
# Remove a queue
await queue.drop()
Check out the https://docs.apify.com/sdk/python/docs/concepts/storages#working-with-request-queues and the `RequestQueue` class's https://docs.apify.com/sdk/python/reference/class/RequestQueue for details on managing your request queues with the Python SDK.
## Features
Request queue is a storage type built with scraping in mind, enabling developers to write scraping logic efficiently and scalably. The Apify tooling, including https://crawlee.dev/, https://docs.apify.com/sdk/js/, and https://docs.apify.com/sdk/python/, incorporates all these features, enabling users to leverage them effortlessly without extra configuration.
In the following section, we will discuss each of the main features in depth.
### Persistence and retention
Request queues prioritize persistence, ensuring indefinite retention of your requests in named request queues, and for the data retention period in your subscription in unnamed request queues. This capability facilitates incremental crawling, where you can append new URLs to the queue and resume from where you stopped in subsequent Actor runs. Consider the scenario of scraping an e-commerce website with thousands of products. Incremental scraping allows you to scrape only the products added since the last product discovery.
In the following code example, we demonstrate how to use the Apify SDK and Crawlee to create an incremental crawler that saves the title of each new found page in Apify Docs to a dataset. By running this Actor multiple times, you can incrementally crawl the source website and save only pages added since the last crawl, as reusing a single request queue ensures that only URLs not yet visited are processed.
// Basic example of incremental crawling with Crawlee. import { Actor } from 'apify'; import { CheerioCrawler, Dataset } from 'crawlee';
interface Input { startUrls: string[]; persistRquestQueueName: string; }
await Actor.init();
// Structure of input is defined in input_schema.json const { startUrls = ['https://docs.apify.com/'], persistRequestQueueName = 'persist-request-queue', } = (await Actor.getInput()) ?? ({} as Input);
// Open or create request queue for incremental scrape. // By opening same request queue, the crawler will continue where it left off and skips already visited URLs. const requestQueue = await Actor.openRequestQueue(persistRequestQueueName);
const proxyConfiguration = await Actor.createProxyConfiguration();
const crawler = new CheerioCrawler({ proxyConfiguration, requestQueue, // Pass incremental request queue to the crawler. requestHandler: async ({ enqueueLinks, request, $, log }) => { log.info('enqueueing new URLs'); await enqueueLinks();
// Extract title from the page.
const title = $('title').text();
log.info(`New page with ${title}`, { url: request.loadedUrl });
// Save the URL and title of the loaded page to the output dataset.
await Dataset.pushData({ url: request.loadedUrl, title });
},
});
await crawler.run(startUrls);
await Actor.exit();
### Batch operations
Request queues support batch operations on requests to enqueue or retrieve multiple requests in bulk, to cut down on network latency and enable easier parallel processing of requests. You can find the batch operations in the https://docs.apify.com/api/v2/storage-request-queues.md, as well in the Apify API client for https://docs.apify.com/api/client/js/reference/class/RequestQueueClient#batchAddRequests and https://docs.apify.com/api/client/python/reference/class/RequestQueueClient#batch_add_requests.
* JavaScript
* Python
const { ApifyClient } = require('apify-client');
const client = new ApifyClient({ token: 'MY-APIFY-TOKEN', });
const requestQueueClient = client.requestQueue('my-queue-id');
// Add multiple requests to the queue await requestQueueClient.batchAddRequests([ { url: 'http://example.com/foo', uniqueKey: 'http://example.com/foo', method: 'GET', }, { url: 'http://example.com/bar', uniqueKey: 'http://example.com/bar', method: 'GET', }, ]);
// Remove multiple requests from the queue await requestQueueClient.batchDeleteRequests([ { uniqueKey: 'http://example.com/foo' }, { uniqueKey: 'http://example.com/bar' }, ]);
from apify_client import ApifyClient
apify_client = ApifyClient('MY-APIFY-TOKEN')
request_queue_client = apify_client.request_queue('my-queue-id')
Add multiple requests to the queue
request_queue_client.batch_add_requests([ {'url': 'http://example.com/foo', 'uniqueKey': 'http://example.com/foo', 'method': 'GET'}, {'url': 'http://example.com/bar', 'uniqueKey': 'http://example.com/bar', 'method': 'GET'}, ])
Remove multiple requests from the queue
request_queue_client.batch_delete_requests([ {'uniqueKey': 'http://example.com/foo'}, {'uniqueKey': 'http://example.com/bar'}, ])
### Distributivity
Request queue includes a locking mechanism to avoid concurrent processing of one request by multiple clients (for example Actor runs). You can lock a request so that no other clients receive it when they fetch the queue head, with an expiration period on the lock so that requests which fail processing are eventually unlocked and retried.
This feature is seamlessly integrated into Crawlee, requiring minimal extra setup. By default, requests are locked for the same duration as the timeout for processing requests in the crawler (https://crawlee.dev/api/next/basic-crawler/interface/BasicCrawlerOptions#requestHandlerTimeoutSecs). If the Actor processing the request fails, the lock expires, and the request is processed again eventually. For more details, refer to the https://crawlee.dev/docs/next/experiments/experiments-request-locking.
In the following example, we demonstrate how you can use locking mechanisms to avoid concurrent processing of the same request across multiple Actor runs.
info
The lock mechanism works on the client level, as well as the run level, when running the Actor on the Apify platform.
This means you can unlock or prolong the lock the locked request only if:
* You are using the same client key, or
* The operation is being called from the same Actor run.
- Actor 1
- Actor 2
import { Actor, ApifyClient } from 'apify';
await Actor.init();
const client = new ApifyClient({ token: 'MY-APIFY-TOKEN', });
// Creates a new request queue. const requestQueue = await client.requestQueues().getOrCreate('example-queue');
// Creates two clients with different keys for the same request queue. const requestQueueClient = client.requestQueue(requestQueue.id, { clientKey: 'requestqueueone', });
// Adds multiple requests to the queue. await requestQueueClient.batchAddRequests([ { url: 'http://example.com/foo', uniqueKey: 'http://example.com/foo', method: 'GET', }, { url: 'http://example.com/bar', uniqueKey: 'http://example.com/bar', method: 'GET', }, { url: 'http://example.com/baz', uniqueKey: 'http://example.com/baz', method: 'GET', }, { url: 'http://example.com/qux', uniqueKey: 'http://example.com/qux', method: 'GET', }, ]);
// Locks the first two requests at the head of the queue. const processingRequestsClientOne = await requestQueueClient.listAndLockHead( { limit: 2, lockSecs: 120, }, );
// Checks when the lock will expire. The locked request will have a lockExpiresAt attribute.
const lockedRequest = processingRequestsClientOne.items[0];
const lockedRequestDetail = await requestQueueClient.getRequest(
lockedRequest.id,
);
console.log(Request locked until ${lockedRequestDetail?.lockExpiresAt});
// Prolongs the lock of the first request or unlocks it. await requestQueueClient.prolongRequestLock( lockedRequest.id, { lockSecs: 120 }, ); await requestQueueClient.deleteRequestLock( lockedRequest.id, );
await Actor.exit();
import { Actor, ApifyClient } from 'apify';
await Actor.init();
const client = new ApifyClient({ token: 'MY-APIFY-TOKEN', });
// Waits for the first Actor to lock the requests. await new Promise((resolve) => setTimeout(resolve, 5000));
// Get the same request queue in different Actor run and with a different client key. const requestQueue = await client.requestQueues().getOrCreate('example-queue');
const requestQueueClient = client.requestQueue(requestQueue.id, { clientKey: 'requestqueuetwo', });
// Get all requests from the queue and check one locked by the first Actor. const requests = await requestQueueClient.listRequests(); const requestsLockedByAnotherRun = requests.items.filter((request) => request.lockByClient === 'requestqueueone'); const requestLockedByAnotherRunDetail = await requestQueueClient.getRequest( requestsLockedByAnotherRun[0].id, );
// Other clients cannot list and lock these requests; the listAndLockHead call returns other requests from the queue. const processingRequestsClientTwo = await requestQueueClient.listAndLockHead( { limit: 10, lockSecs: 60, }, ); const wasBothRunsLockedSameRequest = !!processingRequestsClientTwo.items.find( (request) => request.id === requestLockedByAnotherRunDetail.id, );
console.log(Was the request locked by the first run locked by the second run? ${wasBothRunsLockedSameRequest});
console.log(Request locked until ${requestLockedByAnotherRunDetail?.lockExpiresAt});
// Other clients cannot modify the lock; attempting to do so will throw an error. try { await requestQueueClient.prolongRequestLock( requestLockedByAnotherRunDetail.id, { lockSecs: 60 }, ); } catch (err) { // This will throw an error. }
// Cleans up the queue. await requestQueueClient.delete();
await Actor.exit();
A detailed tutorial on how to process one request queue with multiple Actor runs can be found in https://docs.apify.com/academy/node-js/multiple-runs-scrape.
## Sharing
You can grant https://docs.apify.com/platform/collaboration.md to your request queue through the **Share** button under the **Actions** menu. For more details check the https://docs.apify.com/platform/collaboration/list-of-permissions.md.
You can also share request queues by link using their ID or name, depending on your account or resource-level general access setting. Learn how link-based access works in https://docs.apify.com/platform/collaboration/general-resource-access.md.
For one-off sharing of specific records when access is restricted, you can generate time-limited pre-signed URLs. See https://docs.apify.com/platform/collaboration/general-resource-access.md#pre-signed-urls.
### Sharing request queues between runs
You can access a request queue from any https://docs.apify.com/platform/actors.md or https://docs.apify.com/platform/actors/running/tasks.md run as long as you know its *name* or *ID*.
To access a request queue from another run using the https://docs.apify.com/sdk.md, open it using the same method like you would do with any other request queue.
* JavaScript
* Python
import { Actor } from 'apify';
await Actor.init();
const otherQueue = await Actor.openRequestQueue('old-queue'); // ...
await Actor.exit();
from apify import Actor
async def main(): async with Actor: other_queue = await Actor.open_request_queue(name='old-queue') # ...
In the https://docs.apify.com/api/client/js/reference/class/RequestQueueClient as well as in https://docs.apify.com/api/client/python/reference/class/RequestQueueClient, you can access a request queue using its respective client. Once you've opened the request queue, you can use it in your crawler or add new requests like you would do with a queue from your current run.
* JavaScript
* Python
const otherQueueClient = apifyClient.requestQueue('jane-doe/old-queue');
other_queue_client = apify_client.request_queue('jane-doe/old-queue')
The same applies for the - you can use as you would normally do.
Check out the https://docs.apify.com/platform/storage/usage.md#sharing-storages-between-runs for details on sharing storages between runs.
## Limits
* The maximum length for request queue name is 63 characters.
### Rate limiting
When managing request queues via https://docs.apify.com/api/v2/storage-request-queues-requests.md, CRUD (https://docs.apify.com/api/v2/request-queue-requests-post.md, https://docs.apify.com/api/v2/request-queue-request-get.md, https://docs.apify.com/api/v2/request-queue-request-put.md, https://docs.apify.com/api/v2/request-queue-request-delete.md) operation requests are limited to *400 requests per second* per request queue. This helps protect Apify servers from being overloaded.
All other request queue API https://docs.apify.com/api/v2/storage-request-queues.md are limited to *60 requests per second* per request queue.
Check out the https://docs.apify.com/api/v2.md#rate-limiting for more information and guidance on actions to take if you exceed these rate limits.
---
# Storage usage
**Learn how to effectively use Apify's storage options. Understand key aspects of data retention, rate limiting, and secure sharing.**
***
## Dataset
https://docs.apify.com/platform/storage/dataset.md storage allows you to store a series of data objects, such as results from web scraping, crawling, or data processing jobs. You can export your datasets in JSON, CSV, XML, RSS, Excel, or HTML formats.

## Key-value store
The https://docs.apify.com/platform/storage/key-value-store.md is ideal for saving data records such as files, screenshots of web pages, and PDFs or for persisting your Actor's state. The records are accessible under a unique name and can be written and read quickly.

## Request queue
https://docs.apify.com/platform/storage/request-queue.md allow you to dynamically maintain a queue of URLs of web pages. You can use this when recursively crawling websites: you start from initial URLs and add new links as they are found while skipping duplicates.

## Basic usage
You can access your storage in several ways:
* https://console.apify.com/storage - provides an easy-to-use interface.
* https://docs.apify.com/api/v2/storage-key-value-stores.md - to access your storages programmatically.
* https://docs.apify.com/api.md - to access your storages from any Node.js/Python application.
* https://docs.apify.com/sdk.md - when building your own JavaScript/Python Actor.
### Apify Console
To access your storages via Apify Console, navigate to the https://console.apify.com/storage section in the left-side menu. From there, you can click through the tabs to view your key-value stores, datasets, and request queues, and you can click on the **API** button in the top right corner to view related API endpoints. To view a storage, click its **ID**.

> Use the **Include unnamed storages** checkbox to either display or hide unnamed storages. By default Apify Console will display them.
You can edit your store's name by clicking on the **Actions** menu and selecting **Rename**.
Additionally, you can quickly share the contents and details of your storage by selecting **Share** under the **Actions** menu and providing either email, username or user ID.

These URLs link to API *endpoints*—the places where your data is stored. Endpoints that allow you to *read* stored information do not require an https://docs.apify.com/api/v2.md#authentication. Calls are authenticated using a hard-to-guess ID, allowing for secure sharing. However, operations such as *update* or *delete* require the authentication token.
> Never share a URL containing your authentication token, to avoid compromising your account's security.If the data you want to share requires a token, first download the data, then share it as a file.
### Apify API
The https://docs.apify.com/api/v2/storage-key-value-stores.md allows you to access your storages programmatically using https://developer.mozilla.org/en-US/docs/Web/HTTP/Methods and easily share your crawling results.
In most cases, when accessing your storages via API, you will need to provide a `store ID`, which you can do in the following formats:
* `WkzbQMuFYuamGv3YF` - the store's alphanumerical ID if the store is unnamed.
* `~store-name` - the store's name prefixed with tilde (`~`) character if the store is named (e.g. `~ecommerce-scraping-results`)
* `username~store-name` - username and the store's name separated by a tilde (`~`) character if the store is named and belongs to a different account (e.g. `janedoe~ecommerce-scraping-results`). Note that in this case, the store's owner needs to grant you access first.
For read (GET) requests, it is enough to use a store's alphanumerical ID, since the ID is hard to guess and effectively serves as an authentication key.
With other request types and when using the `username~store-name`, however, you will need to provide your secret API token in your request's https://docs.apify.com/api/v2.md#authentication header or as a query parameter. You can find your token on the https://console.apify.com/account?tab=integrations page of your Apify account.
For further details and a breakdown of each storage API endpoint, refer to the https://docs.apify.com/api/v2/storage-datasets.md.
### Apify API Clients
The Apify API Clients allow you to access your datasets from any Node.js or Python application, whether it's running on the Apify platform or externally.
You can visit https://docs.apify.com/api.md documentations for more information.
### Apify SDKs
The Apify SDKs are libraries in JavaScript or Python that provide tools for building your own Actors.
* JavaScript SDK requires https://nodejs.org/en/ 16 or later.
* Python SDK requires https://www.python.org/downloads/release/python-380/ 3.8 or above.
## Estimate your costs
Use this tool to estimate storage costs by plan and storage type.
Estimate your storage costs
1. Select a storage type.
2. Choose a plan.
3. Enter storage, duration, and operation counts.
4. Review the estimated total and breakdown.
### Storage Pricing
Estimate costs for your storage usage
This is an estimate
This is an estimate based on current pricing. Actual costs may vary.
#### Storage Type
\[x]
**Dataset**Stores results from web scraping and data processing
\[ ]
**Key-value Store**Stores various data types like JSON, HTML, images, and strings
\[ ]
**Request Queue**Manages URL processing for web crawling and other tasks
#### Plan
\[x]
**Free/Starter**$0/month & $39/month
\[ ]
**Scale**$199/month
\[ ]
**Business**$999/month
#### Usage
Storage (GB)1
Reads (count)1000
Duration (hours)24
Writes (count)1000
#### Estimated Costs
Storage (
1
GB ×
24
hours)$
0.0240
Reads (
1,000
operations)$
0.0004
Writes (
1,000
operations)$
0.0050
**Total Estimated Cost****$0.0294**
## Rate limiting
All API endpoints limit their rate of requests to protect Apify servers from overloading. The default rate limit for storage objects is *60 requests per second*. However, there are exceptions limited to *400 requests per second* per storage object, including:
* https://docs.apify.com/api/v2/dataset-items-post.md to dataset.
* CRUD (https://docs.apify.com/api/v2/request-queue-requests-post.md, https://docs.apify.com/api/v2/request-queue-request-get.md, https://docs.apify.com/api/v2/request-queue-request-put.md, https://docs.apify.com/api/v2/request-queue-request-delete.md) operations of *request queue* requests.
If a client exceeds this limit, the API endpoints respond with the HTTP status code `429 Too Many Requests` and the following body:
{ "error": { "type": "rate-limit-exceeded", "message": "You have exceeded the rate limit of ... requests per second" } }
Go to the https://docs.apify.com/api/v2.md#rate-limiting for details and to learn what to do if you exceed the rate limit.
## Data retention
Apify securely stores your ten most recent runs indefinitely, ensuring your records are always accessible. Unnamed datasets and runs beyond the latest ten will be automatically deleted after 7 days unless otherwise specified. Named datasets are retained indefinitely.
### Preserving your storages
To ensure indefinite retention of your storages, assign them a name. This can be done via Apify Console or through our API. First, you'll need your store's ID. You can find it in the details of the run that created it. In Apify Console, head over to your run's details and select the **Dataset**, **Key-value store**, or **Request queue** tab as appropriate. Check that store's details, and you will find its ID among them.

Find and open your storage by clicking the ID, click on the **Actions** menu, choose **Rename**, and enter its new name in the field. Your storage will now be preserved indefinitely.
To name your storage via API, get its ID from the run that generated it using the https://docs.apify.com/api/v2/actor-run-get.md endpoint. You can then give it a new name using the `Update \[storage\]` endpoint. For example, https://docs.apify.com/api/v2/dataset-put.md.
Our SDKs and clients each have unique naming conventions for storages. For more information check out documentation:
* https://docs.apify.com/sdk.md
* https://docs.apify.com/api.md
## Named and unnamed storages
The default storages for an Actor run are unnamed, identified only by an *ID*. This allows them to expire after 7 days (or longer on paid plans) conserving your storage space. If you want to preserve a storage, , and it will be retained indefinitely.
> Storages' names can be up to 63 characters long.
Named and unnamed storages are identical in all aspects except for their retention period. The key advantage of named storages is their ease in identifying and verifying the correct store.
For example, storage names `janedoe~my-storage-1` and `janedoe~web-scrape-results` are easier to tell apart than the alphanumerical IDs `cAbcYOfuXemTPwnIB` and `CAbcsuZbp7JHzkw1B`.
## Sharing
You can grant https://docs.apify.com/platform/collaboration.md to other Apify users to view or modify your storages. Check the https://docs.apify.com/platform/collaboration/list-of-permissions.md.
You can also share storages by link using their ID or name, depending on your account or resource-level general access setting. Learn how link-based access works in https://docs.apify.com/platform/collaboration/general-resource-access.md.
For one-off sharing when access is restricted, generate time-limited pre-signed URLs. See https://docs.apify.com/platform/collaboration/general-resource-access.md#pre-signed-urls.
Accessing restricted storage resources via API
If your storage resource is set to *restricted*, all API calls must include a valid authentication token in the `Authorization` header. If you're using **apify-client** the header is passed in automatically.
### Sharing storages between runs
Storage can be accessed from any https://docs.apify.com/platform/actors.md or https://docs.apify.com/platform/actors/running/tasks.md run, provided you have its *name* or *ID*. You can access and manage storages from other runs using the same methods or endpoints as with storages from your current run.
https://docs.apify.com/platform/storage/dataset.md and https://docs.apify.com/platform/storage/key-value-store.md support concurrent use by multiple Actors. Thus, several Actors or tasks can simultaneously write data to a single dataset or key-value store. Similarly, multiple runs can read data from datasets and key-value stores at the same time.
https://docs.apify.com/platform/storage/request-queue.md, on the other hand, only allow multiple runs to add new data. A request queue can only be processed by one Actor or task run at any one time.
> When multiple runs try to write data to a storage simultaneously, the order of data writing cannot be controlled. Data is written as each request is processed.Similar principle applies in key-value stores and request queues, when a delete request for a record precedes a read request for the same record, the read request will fail.
Accessing restricted storage resources between runs
If a storage resource access is set to **Restricted**,the run from which it's accessed must have explicit access to it. Learn how restricted access works in https://docs.apify.com/platform/collaboration/general-resource-access.md.
## Deleting storages
Named storages are only removed upon your request.You can delete storages in the following ways:
* https://console.apify.com/storage - using the **Actions** button in the store's detail page.
* https://docs.apify.com/sdk/js - using the `.drop()` method of the https://docs.apify.com/sdk/js/api/apify/class/Dataset#drop, https://docs.apify.com/sdk/js/api/apify/class/KeyValueStore#drop, or https://docs.apify.com/sdk/js/api/apify/class/RequestQueue#drop class.
* https://docs.apify.com/sdk/python - using the `.drop()` method of the https://docs.apify.com/sdk/python/reference/class/Dataset#drop, https://docs.apify.com/sdk/python/reference/class/KeyValueStore#drop, or https://docs.apify.com/sdk/python/reference/class/RequestQueue#drop class.
* https://docs.apify.com/api/client/js - using the `.delete()` method in the https://docs.apify.com/api/client/js/reference/class/DatasetClient, https://docs.apify.com/api/client/js/reference/class/KeyValueStoreClient, or https://docs.apify.com/api/client/js/reference/class/RequestQueueClient clients.
* https://docs.apify.com/api/client/python - using the `.delete()` method in the https://docs.apify.com/api/client/python#datasetclient, https://docs.apify.com/api/client/python/reference/class/KeyValueStoreClient, or https://docs.apify.com/api/client/python/reference/class/RequestQueueClient clients.
* https://docs.apify.com/api/v2/key-value-store-delete.md using the - `Delete [store]` endpoint, where `[store]` is the type of storage you want to delete.
---
# API client for JavaScript | Apify Documentation
## api
- [Search the documentation](https://docs.apify.com/api/client/js/search.md)
- [Apify API client for JavaScript](https://docs.apify.com/api/client/js/docs.md): apify-client is the official library to access the Apify REST API from your JavaScript/TypeScript applications. It runs both in Node.js and browser and provides useful features like automatic retries and convenience functions that improve the experience of using the Apify API. All requests and responses (including errors) are encoded in JSON format with UTF-8 encoding.
- [Changelog](https://docs.apify.com/api/client/js/docs/changelog.md): It seems that the changelog is not available.
- [Code examples](https://docs.apify.com/api/client/js/docs/examples.md): Passing an input to the Actor
- [apify-client](https://docs.apify.com/api/client/js/reference.md)
- [ActorClient](https://docs.apify.com/api/client/js/reference/class/ActorClient.md)
- [ActorCollectionClient](https://docs.apify.com/api/client/js/reference/class/ActorCollectionClient.md)
- [ActorEnvVarClient](https://docs.apify.com/api/client/js/reference/class/ActorEnvVarClient.md)
- [ActorEnvVarCollectionClient](https://docs.apify.com/api/client/js/reference/class/ActorEnvVarCollectionClient.md)
- [ActorVersionClient](https://docs.apify.com/api/client/js/reference/class/ActorVersionClient.md)
- [ActorVersionCollectionClient](https://docs.apify.com/api/client/js/reference/class/ActorVersionCollectionClient.md)
- [ApifyApiError](https://docs.apify.com/api/client/js/reference/class/ApifyApiError.md): An `ApifyApiError` is thrown for successful HTTP requests that reach the API,
- [ApifyClient](https://docs.apify.com/api/client/js/reference/class/ApifyClient.md): ApifyClient is the official library to access [Apify API](https://docs.apify.com/api/v2) from your
- [BuildClient](https://docs.apify.com/api/client/js/reference/class/BuildClient.md)
- [BuildCollectionClient](https://docs.apify.com/api/client/js/reference/class/BuildCollectionClient.md)
- [DatasetClient <Data>](https://docs.apify.com/api/client/js/reference/class/DatasetClient.md)
- [DatasetCollectionClient](https://docs.apify.com/api/client/js/reference/class/DatasetCollectionClient.md)
- [InvalidResponseBodyError](https://docs.apify.com/api/client/js/reference/class/InvalidResponseBodyError.md): This error exists for the quite common situation, where only a partial JSON response is received and
- [KeyValueStoreClient](https://docs.apify.com/api/client/js/reference/class/KeyValueStoreClient.md)
- [KeyValueStoreCollectionClient](https://docs.apify.com/api/client/js/reference/class/KeyValueStoreCollectionClient.md)
- [LogClient](https://docs.apify.com/api/client/js/reference/class/LogClient.md)
- [RequestQueueClient](https://docs.apify.com/api/client/js/reference/class/RequestQueueClient.md)
- [RequestQueueCollectionClient](https://docs.apify.com/api/client/js/reference/class/RequestQueueCollectionClient.md)
- [RunClient](https://docs.apify.com/api/client/js/reference/class/RunClient.md)
- [RunCollectionClient](https://docs.apify.com/api/client/js/reference/class/RunCollectionClient.md)
- [ScheduleClient](https://docs.apify.com/api/client/js/reference/class/ScheduleClient.md)
- [ScheduleCollectionClient](https://docs.apify.com/api/client/js/reference/class/ScheduleCollectionClient.md)
- [StoreCollectionClient](https://docs.apify.com/api/client/js/reference/class/StoreCollectionClient.md)
- [TaskClient](https://docs.apify.com/api/client/js/reference/class/TaskClient.md)
- [TaskCollectionClient](https://docs.apify.com/api/client/js/reference/class/TaskCollectionClient.md)
- [UserClient](https://docs.apify.com/api/client/js/reference/class/UserClient.md)
- [WebhookClient](https://docs.apify.com/api/client/js/reference/class/WebhookClient.md)
- [WebhookCollectionClient](https://docs.apify.com/api/client/js/reference/class/WebhookCollectionClient.md)
- [WebhookDispatchClient](https://docs.apify.com/api/client/js/reference/class/WebhookDispatchClient.md)
- [WebhookDispatchCollectionClient](https://docs.apify.com/api/client/js/reference/class/WebhookDispatchCollectionClient.md)
- [ActorListSortBy](https://docs.apify.com/api/client/js/reference/enum/ActorListSortBy.md)
- [ActorSourceType](https://docs.apify.com/api/client/js/reference/enum/ActorSourceType.md)
- [DownloadItemsFormat](https://docs.apify.com/api/client/js/reference/enum/DownloadItemsFormat.md)
- [PlatformFeature](https://docs.apify.com/api/client/js/reference/enum/PlatformFeature.md)
- [ScheduleActions](https://docs.apify.com/api/client/js/reference/enum/ScheduleActions.md)
- [WebhookDispatchStatus](https://docs.apify.com/api/client/js/reference/enum/WebhookDispatchStatus.md)
- [AccountAndUsageLimits](https://docs.apify.com/api/client/js/reference/interface/AccountAndUsageLimits.md)
- [Actor](https://docs.apify.com/api/client/js/reference/interface/Actor.md)
- [ActorBuildOptions](https://docs.apify.com/api/client/js/reference/interface/ActorBuildOptions.md)
- [ActorCallOptions](https://docs.apify.com/api/client/js/reference/interface/ActorCallOptions.md)
- [ActorChargeEvent](https://docs.apify.com/api/client/js/reference/interface/ActorChargeEvent.md)
- [ActorCollectionCreateOptions](https://docs.apify.com/api/client/js/reference/interface/ActorCollectionCreateOptions.md)
- [ActorCollectionListItem](https://docs.apify.com/api/client/js/reference/interface/ActorCollectionListItem.md)
- [ActorCollectionListOptions](https://docs.apify.com/api/client/js/reference/interface/ActorCollectionListOptions.md)
- [ActorDefaultRunOptions](https://docs.apify.com/api/client/js/reference/interface/ActorDefaultRunOptions.md)
- [ActorDefinition](https://docs.apify.com/api/client/js/reference/interface/ActorDefinition.md)
- [ActorEnvironmentVariable](https://docs.apify.com/api/client/js/reference/interface/ActorEnvironmentVariable.md)
- [ActorEnvVarCollectionListOptions](https://docs.apify.com/api/client/js/reference/interface/ActorEnvVarCollectionListOptions.md)
- [ActorExampleRunInput](https://docs.apify.com/api/client/js/reference/interface/ActorExampleRunInput.md)
- [ActorLastRunOptions](https://docs.apify.com/api/client/js/reference/interface/ActorLastRunOptions.md)
- [ActorRun](https://docs.apify.com/api/client/js/reference/interface/ActorRun.md)
- [ActorRunListItem](https://docs.apify.com/api/client/js/reference/interface/ActorRunListItem.md)
- [ActorRunMeta](https://docs.apify.com/api/client/js/reference/interface/ActorRunMeta.md)
- [ActorRunOptions](https://docs.apify.com/api/client/js/reference/interface/ActorRunOptions.md)
- [ActorRunStats](https://docs.apify.com/api/client/js/reference/interface/ActorRunStats.md)
- [ActorRunUsage](https://docs.apify.com/api/client/js/reference/interface/ActorRunUsage.md)
- [ActorStandby](https://docs.apify.com/api/client/js/reference/interface/ActorStandby.md)
- [ActorStartOptions](https://docs.apify.com/api/client/js/reference/interface/ActorStartOptions.md)
- [ActorStats](https://docs.apify.com/api/client/js/reference/interface/ActorStats.md)
- [ActorStoreList](https://docs.apify.com/api/client/js/reference/interface/ActorStoreList.md)
- [ActorTaggedBuild](https://docs.apify.com/api/client/js/reference/interface/ActorTaggedBuild.md)
- [ActorVersionCollectionListOptions](https://docs.apify.com/api/client/js/reference/interface/ActorVersionCollectionListOptions.md)
- [ActorVersionGitHubGist](https://docs.apify.com/api/client/js/reference/interface/ActorVersionGitHubGist.md)
- [ActorVersionGitRepo](https://docs.apify.com/api/client/js/reference/interface/ActorVersionGitRepo.md)
- [ActorVersionSourceFile](https://docs.apify.com/api/client/js/reference/interface/ActorVersionSourceFile.md)
- [ActorVersionSourceFiles](https://docs.apify.com/api/client/js/reference/interface/ActorVersionSourceFiles.md)
- [ActorVersionTarball](https://docs.apify.com/api/client/js/reference/interface/ActorVersionTarball.md)
- [ApifyClientOptions](https://docs.apify.com/api/client/js/reference/interface/ApifyClientOptions.md)
- [BaseActorVersion <SourceType>](https://docs.apify.com/api/client/js/reference/interface/BaseActorVersion.md)
- [Build](https://docs.apify.com/api/client/js/reference/interface/Build.md)
- [BuildClientGetOptions](https://docs.apify.com/api/client/js/reference/interface/BuildClientGetOptions.md)
- [BuildClientWaitForFinishOptions](https://docs.apify.com/api/client/js/reference/interface/BuildClientWaitForFinishOptions.md)
- [BuildCollectionClientListOptions](https://docs.apify.com/api/client/js/reference/interface/BuildCollectionClientListOptions.md)
- [BuildMeta](https://docs.apify.com/api/client/js/reference/interface/BuildMeta.md)
- [BuildOptions](https://docs.apify.com/api/client/js/reference/interface/BuildOptions.md)
- [BuildStats](https://docs.apify.com/api/client/js/reference/interface/BuildStats.md)
- [BuildUsage](https://docs.apify.com/api/client/js/reference/interface/BuildUsage.md)
- [Current](https://docs.apify.com/api/client/js/reference/interface/Current.md)
- [Dataset](https://docs.apify.com/api/client/js/reference/interface/Dataset.md)
- [DatasetClientCreateItemsUrlOptions](https://docs.apify.com/api/client/js/reference/interface/DatasetClientCreateItemsUrlOptions.md)
- [DatasetClientDownloadItemsOptions](https://docs.apify.com/api/client/js/reference/interface/DatasetClientDownloadItemsOptions.md)
- [DatasetClientListItemOptions](https://docs.apify.com/api/client/js/reference/interface/DatasetClientListItemOptions.md)
- [DatasetClientUpdateOptions](https://docs.apify.com/api/client/js/reference/interface/DatasetClientUpdateOptions.md)
- [DatasetCollectionClientGetOrCreateOptions](https://docs.apify.com/api/client/js/reference/interface/DatasetCollectionClientGetOrCreateOptions.md)
- [DatasetCollectionClientListOptions](https://docs.apify.com/api/client/js/reference/interface/DatasetCollectionClientListOptions.md)
- [DatasetStatistics](https://docs.apify.com/api/client/js/reference/interface/DatasetStatistics.md)
- [DatasetStats](https://docs.apify.com/api/client/js/reference/interface/DatasetStats.md)
- [FieldStatistics](https://docs.apify.com/api/client/js/reference/interface/FieldStatistics.md)
- [FlatPricePerMonthActorPricingInfo](https://docs.apify.com/api/client/js/reference/interface/FlatPricePerMonthActorPricingInfo.md)
- [FreeActorPricingInfo](https://docs.apify.com/api/client/js/reference/interface/FreeActorPricingInfo.md)
- [KeyValueClientCreateKeysUrlOptions](https://docs.apify.com/api/client/js/reference/interface/KeyValueClientCreateKeysUrlOptions.md)
- [KeyValueClientGetRecordOptions](https://docs.apify.com/api/client/js/reference/interface/KeyValueClientGetRecordOptions.md)
- [KeyValueClientListKeysOptions](https://docs.apify.com/api/client/js/reference/interface/KeyValueClientListKeysOptions.md)
- [KeyValueClientListKeysResult](https://docs.apify.com/api/client/js/reference/interface/KeyValueClientListKeysResult.md)
- [KeyValueClientUpdateOptions](https://docs.apify.com/api/client/js/reference/interface/KeyValueClientUpdateOptions.md)
- [KeyValueListItem](https://docs.apify.com/api/client/js/reference/interface/KeyValueListItem.md)
- [KeyValueStore](https://docs.apify.com/api/client/js/reference/interface/KeyValueStore.md)
- [KeyValueStoreCollectionClientGetOrCreateOptions](https://docs.apify.com/api/client/js/reference/interface/KeyValueStoreCollectionClientGetOrCreateOptions.md)
- [KeyValueStoreCollectionClientListOptions](https://docs.apify.com/api/client/js/reference/interface/KeyValueStoreCollectionClientListOptions.md)
- [KeyValueStoreRecord <T>](https://docs.apify.com/api/client/js/reference/interface/KeyValueStoreRecord.md)
- [KeyValueStoreRecordOptions](https://docs.apify.com/api/client/js/reference/interface/KeyValueStoreRecordOptions.md)
- [KeyValueStoreStats](https://docs.apify.com/api/client/js/reference/interface/KeyValueStoreStats.md)
- [Limits](https://docs.apify.com/api/client/js/reference/interface/Limits.md)
- [MonthlyUsage](https://docs.apify.com/api/client/js/reference/interface/MonthlyUsage.md)
- [MonthlyUsageCycle](https://docs.apify.com/api/client/js/reference/interface/MonthlyUsageCycle.md)
- [OpenApiDefinition](https://docs.apify.com/api/client/js/reference/interface/OpenApiDefinition.md)
- [PaginatedList <Data>](https://docs.apify.com/api/client/js/reference/interface/PaginatedList.md)
- [PricePerDatasetItemActorPricingInfo](https://docs.apify.com/api/client/js/reference/interface/PricePerDatasetItemActorPricingInfo.md)
- [PricePerEventActorPricingInfo](https://docs.apify.com/api/client/js/reference/interface/PricePerEventActorPricingInfo.md)
- [PricingInfo](https://docs.apify.com/api/client/js/reference/interface/PricingInfo.md)
- [ProxyGroup](https://docs.apify.com/api/client/js/reference/interface/ProxyGroup.md)
- [RequestQueue](https://docs.apify.com/api/client/js/reference/interface/RequestQueue.md)
- [RequestQueueClientAddRequestOptions](https://docs.apify.com/api/client/js/reference/interface/RequestQueueClientAddRequestOptions.md)
- [RequestQueueClientAddRequestResult](https://docs.apify.com/api/client/js/reference/interface/RequestQueueClientAddRequestResult.md)
- [RequestQueueClientBatchAddRequestWithRetriesOptions](https://docs.apify.com/api/client/js/reference/interface/RequestQueueClientBatchAddRequestWithRetriesOptions.md)
- [RequestQueueClientBatchRequestsOperationResult](https://docs.apify.com/api/client/js/reference/interface/RequestQueueClientBatchRequestsOperationResult.md)
- [RequestQueueClientDeleteRequestLockOptions](https://docs.apify.com/api/client/js/reference/interface/RequestQueueClientDeleteRequestLockOptions.md)
- [RequestQueueClientListAndLockHeadOptions](https://docs.apify.com/api/client/js/reference/interface/RequestQueueClientListAndLockHeadOptions.md)
- [RequestQueueClientListAndLockHeadResult](https://docs.apify.com/api/client/js/reference/interface/RequestQueueClientListAndLockHeadResult.md)
- [RequestQueueClientListHeadOptions](https://docs.apify.com/api/client/js/reference/interface/RequestQueueClientListHeadOptions.md)
- [RequestQueueClientListHeadResult](https://docs.apify.com/api/client/js/reference/interface/RequestQueueClientListHeadResult.md)
- [RequestQueueClientListItem](https://docs.apify.com/api/client/js/reference/interface/RequestQueueClientListItem.md)
- [RequestQueueClientListRequestsOptions](https://docs.apify.com/api/client/js/reference/interface/RequestQueueClientListRequestsOptions.md)
- [RequestQueueClientListRequestsResult](https://docs.apify.com/api/client/js/reference/interface/RequestQueueClientListRequestsResult.md)
- [RequestQueueClientPaginateRequestsOptions](https://docs.apify.com/api/client/js/reference/interface/RequestQueueClientPaginateRequestsOptions.md)
- [RequestQueueClientProlongRequestLockOptions](https://docs.apify.com/api/client/js/reference/interface/RequestQueueClientProlongRequestLockOptions.md)
- [RequestQueueClientProlongRequestLockResult](https://docs.apify.com/api/client/js/reference/interface/RequestQueueClientProlongRequestLockResult.md)
- [RequestQueueClientRequestSchema](https://docs.apify.com/api/client/js/reference/interface/RequestQueueClientRequestSchema.md)
- [RequestQueueClientUnlockRequestsResult](https://docs.apify.com/api/client/js/reference/interface/RequestQueueClientUnlockRequestsResult.md)
- [RequestQueueClientUpdateOptions](https://docs.apify.com/api/client/js/reference/interface/RequestQueueClientUpdateOptions.md)
- [RequestQueueCollectionListOptions](https://docs.apify.com/api/client/js/reference/interface/RequestQueueCollectionListOptions.md)
- [RequestQueueStats](https://docs.apify.com/api/client/js/reference/interface/RequestQueueStats.md)
- [RequestQueueUserOptions](https://docs.apify.com/api/client/js/reference/interface/RequestQueueUserOptions.md)
- [RunAbortOptions](https://docs.apify.com/api/client/js/reference/interface/RunAbortOptions.md)
- [RunChargeOptions](https://docs.apify.com/api/client/js/reference/interface/RunChargeOptions.md)
- [RunCollectionListOptions](https://docs.apify.com/api/client/js/reference/interface/RunCollectionListOptions.md)
- [RunGetOptions](https://docs.apify.com/api/client/js/reference/interface/RunGetOptions.md)
- [RunMetamorphOptions](https://docs.apify.com/api/client/js/reference/interface/RunMetamorphOptions.md)
- [RunResurrectOptions](https://docs.apify.com/api/client/js/reference/interface/RunResurrectOptions.md)
- [RunUpdateOptions](https://docs.apify.com/api/client/js/reference/interface/RunUpdateOptions.md)
- [RunWaitForFinishOptions](https://docs.apify.com/api/client/js/reference/interface/RunWaitForFinishOptions.md)
- [Schedule](https://docs.apify.com/api/client/js/reference/interface/Schedule.md)
- [ScheduleActionRunActor](https://docs.apify.com/api/client/js/reference/interface/ScheduleActionRunActor.md)
- [ScheduleActionRunActorTask](https://docs.apify.com/api/client/js/reference/interface/ScheduleActionRunActorTask.md)
- [ScheduleCollectionListOptions](https://docs.apify.com/api/client/js/reference/interface/ScheduleCollectionListOptions.md)
- [ScheduledActorRunInput](https://docs.apify.com/api/client/js/reference/interface/ScheduledActorRunInput.md)
- [ScheduledActorRunOptions](https://docs.apify.com/api/client/js/reference/interface/ScheduledActorRunOptions.md)
- [StoreCollectionListOptions](https://docs.apify.com/api/client/js/reference/interface/StoreCollectionListOptions.md)
- [Task](https://docs.apify.com/api/client/js/reference/interface/Task.md)
- [TaskCallOptions](https://docs.apify.com/api/client/js/reference/interface/TaskCallOptions.md)
- [TaskCollectionListOptions](https://docs.apify.com/api/client/js/reference/interface/TaskCollectionListOptions.md)
- [TaskCreateData](https://docs.apify.com/api/client/js/reference/interface/TaskCreateData.md)
- [TaskLastRunOptions](https://docs.apify.com/api/client/js/reference/interface/TaskLastRunOptions.md)
- [TaskOptions](https://docs.apify.com/api/client/js/reference/interface/TaskOptions.md)
- [TaskStats](https://docs.apify.com/api/client/js/reference/interface/TaskStats.md)
- [UsageCycle](https://docs.apify.com/api/client/js/reference/interface/UsageCycle.md)
- [User](https://docs.apify.com/api/client/js/reference/interface/User.md)
- [UserPlan](https://docs.apify.com/api/client/js/reference/interface/UserPlan.md)
- [UserProxy](https://docs.apify.com/api/client/js/reference/interface/UserProxy.md)
- [Webhook](https://docs.apify.com/api/client/js/reference/interface/Webhook.md)
- [WebhookAnyRunOfActorCondition](https://docs.apify.com/api/client/js/reference/interface/WebhookAnyRunOfActorCondition.md)
- [WebhookAnyRunOfActorTaskCondition](https://docs.apify.com/api/client/js/reference/interface/WebhookAnyRunOfActorTaskCondition.md)
- [WebhookCertainRunCondition](https://docs.apify.com/api/client/js/reference/interface/WebhookCertainRunCondition.md)
- [WebhookCollectionListOptions](https://docs.apify.com/api/client/js/reference/interface/WebhookCollectionListOptions.md)
- [WebhookDispatch](https://docs.apify.com/api/client/js/reference/interface/WebhookDispatch.md)
- [WebhookDispatchCall](https://docs.apify.com/api/client/js/reference/interface/WebhookDispatchCall.md)
- [WebhookDispatchCollectionListOptions](https://docs.apify.com/api/client/js/reference/interface/WebhookDispatchCollectionListOptions.md)
- [WebhookDispatchEventData](https://docs.apify.com/api/client/js/reference/interface/WebhookDispatchEventData.md)
- [WebhookIdempotencyKey](https://docs.apify.com/api/client/js/reference/interface/WebhookIdempotencyKey.md)
- [WebhookStats](https://docs.apify.com/api/client/js/reference/interface/WebhookStats.md)
- [Apify API client for JavaScript](https://docs.apify.com/api/client/js/index.md)
---
# Full Documentation Content
[Skip to main content](#__docusaurus_skipToContent_fallback)
[](https://docs.apify.com)
[Academy](https://docs.apify.com/academy)[Platform](https://docs.apify.com/platform)
[API](https://docs.apify.com/api)
* [Reference](https://docs.apify.com/api/v2)
* [Client for JavaScript](https://docs.apify.com/api/client/js/)
* [Client for Python](https://docs.apify.com/api/client/python/)
[SDK](https://docs.apify.com/sdk)
* [SDK for JavaScript](https://docs.apify.com/sdk/js/)
* [SDK for Python](https://docs.apify.com/sdk/python/)
[CLI](https://docs.apify.com/cli/)
[Open source](https://docs.apify.com/open-source)
* [Crawlee](https://crawlee.dev)
* [Got Scraping](https://github.com/apify/got-scraping)
* [Fingerprint Suite](https://github.com/apify/fingerprint-suite)
* [Apify on GitHub](https://github.com/apify)
* [Actor whitepaper](https://whitepaper.actor)
[Discord](https://discord.com/invite/jyEM2PRvMU "Chat on Discord")[Get started](https://console.apify.com)
[API client for JavaScript](https://docs.apify.com/api/client/js/api/client/js/.md)
[Docs](https://docs.apify.com/api/client/js/api/client/js/docs.md)[Reference](https://docs.apify.com/api/client/js/api/client/js/reference.md)[Changelog](https://docs.apify.com/api/client/js/api/client/js/docs/changelog.md)[GitHub](https://github.com/apify/apify-client-js)
[2.19.1](https://docs.apify.com/api/client/js/api/client/js/docs.md)
* [Next](https://docs.apify.com/api/client/js/api/client/js/docs/next)
* [2.19.1](https://docs.apify.com/api/client/js/api/client/js/docs.md)
# Search the documentation
Type your search here
Next (current)
[](https://www.algolia.com/)
Learn
* [Academy](https://docs.apify.com/academy)
* [Platform](https://docs.apify.com/platform)
API
* [Reference](https://docs.apify.com/api/v2)
* [Client for JavaScript](https://docs.apify.com/api/client/js/)
* [Client for Python](https://docs.apify.com/api/client/python/)
SDK
* [SDK for JavaScript](https://docs.apify.com/sdk/js/)
* [SDK for Python](https://docs.apify.com/sdk/python/)
Other
* [CLI](https://docs.apify.com/cli/)
* [Open source](https://docs.apify.com/open-source)
More
* [Crawlee](https://crawlee.dev)
* [GitHub](https://github.com/apify)
* [Discord](https://discord.com/invite/jyEM2PRvMU)
* [Trust Center](https://trust.apify.com)
[](https://apify.com)
---
# Apify API client for JavaScript
Copy for LLM
`apify-client` is the official library to access the [Apify REST API](https://docs.apify.com/api/v2) from your JavaScript/TypeScript applications. It runs both in Node.js and browser and provides useful features like automatic retries and convenience functions that improve the experience of using the Apify API. All requests and responses (including errors) are encoded in JSON format with UTF-8 encoding.
## Pre-requisites[](#pre-requisites)
`apify-client` requires Node.js version 16 or higher. Node.js is available for download on the [official website](https://nodejs.org/). Check for your current node version by running:
node -v
## Installation[](#installation)
You can install the client via [NPM](https://www.npmjs.com/) or use any other package manager of your choice.
* NPM
* Yarn
* PNPM
* Bun
npm i apify-client
yarn add apify-client
pnpm add apify-client
bun add apify-client
## Authentication and Initialization[](#authentication-and-initialization)
To use the client, you need an [API token](https://docs.apify.com/platform/integrations/api#api-token). You can find your token under [Integrations](https://console.apify.com/account/integrations) tab in Apify Console. Copy the token and initialize the client by providing the token (`MY-APIFY-TOKEN`) as a parameter to the `ApifyClient` constructor.
// import Apify client import { ApifyClient } from 'apify-client';
// Client initialization with the API token const client = new ApifyClient({ token: 'MY-APIFY-TOKEN', });
Secure access
The API token is used to authorize your requests to the Apify API. You can be charged for the usage of the underlying services, so do not share your API token with untrusted parties or expose it on the client side of your applications
## Quick start[](#quick-start)
One of the most common use cases is starting [Actors](https://docs.apify.com/platform/actors) (serverless programs running in the [Apify cloud](https://docs.apify.com/platform)) and getting results from their [datasets](https://docs.apify.com/platform/storage/dataset) (storage) after they finish the job (usually scraping, automation processes or data processing).
import { ApifyClient } from 'apify-client';
const client = new ApifyClient({ token: 'MY-APIFY-TOKEN' });
// Starts an Actor and waits for it to finish const { defaultDatasetId } = await client.actor('username/actor-name').call();
// Lists items from the Actor's dataset const { items } = await client.dataset(defaultDatasetId).listItems();
### Running Actors[](#running-actors)
To start an Actor, you can use the [ActorClient](https://docs.apify.com/api/client/js/api/client/js/reference/class/ActorClient.md) (`client.actor()`) and pass the Actor's ID (e.g. `john-doe/my-cool-actor`) to define which Actor you want to run. The Actor's ID is a combination of the username and the Actor owner’s username. You can run both your own Actors and [Actors from Apify Store](https://docs.apify.com/platform/actors/running/actors-in-store).
#### Passing input to the Actor[](#passing-input-to-the-actor)
To define the Actor's input, you can pass an object to the [`call()`](https://docs.apify.com/api/client/js/api/client/js/reference/class/ActorClient.md#call) method. The input object can be any JSON object that the Actor expects (respects the Actor's [input schema](https://docs.apify.com/platform/actors/development/actor-definition/input-schema)). The input object is used to pass configuration to the Actor, such as URLs to scrape, search terms, or any other data.
import { ApifyClient } from 'apify-client';
const client = new ApifyClient({ token: 'MY-APIFY-TOKEN' });
// Runs an Actor with an input and waits for it to finish. const { defaultDatasetId } = await client.actor('username/actor-name').call({ some: 'input', });
### Getting results from the dataset[](#getting-results-from-the-dataset)
To get the results from the dataset, you can use the [DatasetClient](https://docs.apify.com/api/client/js/api/client/js/reference/class/DatasetClient.md) (`client.dataset()`) and [`listItems()`](https://docs.apify.com/api/client/js/api/client/js/reference/class/DatasetClient.md#listItems) method. You need to pass the dataset ID to define which dataset you want to access. You can get the dataset ID from the Actor's run object (represented by `defaultDatasetId`).
import { ApifyClient } from 'apify-client';
const client = new ApifyClient({ token: 'MY-APIFY-TOKEN' });
// Lists items from the Actor's dataset. const { items } = await client.dataset('dataset-id').listItems();
Dataset access
Running an Actor might take time, depending on the Actor's complexity and the amount of data it processes. If you want only to get data and have an immediate response you should access the existing dataset of the finished [Actor run](https://docs.apify.com/platform/actors/running/runs-and-builds#runs).
## Usage concepts[](#usage-concepts)
The `ApifyClient` interface follows a generic pattern that applies to all of its components. By calling individual methods of `ApifyClient`, specific clients that target individual API resources are created. There are two types of those clients:
* [`actorClient`](https://docs.apify.com/api/client/js/api/client/js/reference/class/ActorClient.md): a client for the management of a single resource
* [`actorCollectionClient`](https://docs.apify.com/api/client/js/api/client/js/reference/class/ActorCollectionClient.md): a client for the collection of resources
import { ApifyClient } from 'apify-client';
const client = new ApifyClient({ token: 'MY-APIFY-TOKEN' });
// Collection clients do not require a parameter. const actorCollectionClient = client.actors(); // Creates an actor with the name: my-actor. const myActor = await actorCollectionClient.create({ name: 'my-actor-name' }); // List all your used Actors (both own and from Apify Store) const { items } = await actorCollectionClient.list();
Resource identification
The resource ID can be either the `id` of the said resource, or a combination of your `username/resource-name`.
import { ApifyClient } from 'apify-client';
const client = new ApifyClient({ token: 'MY-APIFY-TOKEN' });
// Resource clients accept an ID of the resource. const actorClient = client.actor('username/actor-name'); // Fetches the john-doe/my-actor object from the API. const myActor = await actorClient.get(); // Starts the run of john-doe/my-actor and returns the Run object. const myActorRun = await actorClient.start();
### Nested clients[](#nested-clients)
Sometimes clients return other clients. That's to simplify working with nested collections, such as runs of a given Actor.
import { ApifyClient } from 'apify-client';
const client = new ApifyClient({ token: 'MY-APIFY-TOKEN' });
const actorClient = client.actor('username/actor-name'); const runsClient = actorClient.runs(); // Lists the last 10 runs of your Actor. const { items } = await runsClient.list({ limit: 10, desc: true, });
// Select the last run of your Actor that finished // with a SUCCEEDED status. const lastSucceededRunClient = actorClient.lastRun({ status: 'SUCCEEDED' }); // Fetches items from the run's dataset. const { items } = await lastSucceededRunClient.dataset().listItems();
The quick access to `dataset` and other storage directly from the run client can be used with the [`lastRun()`](https://docs.apify.com/api/client/js/api/client/js/reference/class/ActorClient.md#lastRun) method.
## Features[](#features)
Based on the endpoint, the client automatically extracts the relevant data and returns it in the expected format. Date strings are automatically converted to `Date` objects. For exceptions, the client throws an [`ApifyApiError`](https://docs.apify.com/api/client/js/api/client/js/reference/class/ApifyApiError.md), which wraps the plain JSON errors returned by API and enriches them with other contexts for easier debugging.
import { ApifyClient } from 'apify-client';
const client = new ApifyClient({ token: 'MY-APIFY-TOKEN' });
try { const { items } = await client.dataset('non-existing-dataset-id').listItems(); } catch (error) { // The error is an instance of ApifyApiError const { message, type, statusCode, clientMethod, path } = error; // Log error for easier debugging console.log({ message, statusCode, clientMethod, type }); }
### Retries with exponential backoff[](#retries-with-exponential-backoff)
Network communication sometimes fails. That's a given. The client will automatically retry requests that failed due to a network error, an internal error of the Apify API (HTTP 500+), or a rate limit error (HTTP 429). By default, it will retry up to 8 times. The first retry will be attempted after \~500ms, the second after \~1000ms, and so on. You can configure those parameters using the `maxRetries` and `minDelayBetweenRetriesMillis` options of the `ApifyClient` constructor.
import { ApifyClient } from 'apify-client';
const client = new ApifyClient({ token: 'MY-APIFY-TOKEN', maxRetries: 8, minDelayBetweenRetriesMillis: 500, // 0.5s timeoutSecs: 360, // 6 mins });
### Convenience functions and options[](#convenience-functions-and-options)
Some actions can't be performed by the API itself, such as indefinite waiting for an Actor run to finish (because of network timeouts). The client provides convenient `call()` and `waitForFinish()` functions that do that. If the limit is reached, the returned promise is resolved to a run object that will have status `READY` or `RUNNING` and it will not contain the Actor run output.
[Key-value store](https://docs.apify.com/platform/storage/key-value-store) records can be retrieved as objects, buffers, or streams via the respective options, dataset items can be fetched as individual objects or serialized data.
import { ApifyClient } from 'apify-client';
const client = new ApifyClient({ token: 'MY-APIFY-TOKEN' });
// Starts an Actor and waits for it to finish. const finishedActorRun = await client.actor('username/actor-name').call();
// Starts an Actor and waits maximum 60s for the finish const { status } = await client.actor('username/actor-name').start({ waitForFinish: 60, // 1 minute });
### Pagination[](#pagination)
Most methods named `list` or `listSomething` return a [`Promise<PaginatedList>`](https://docs.apify.com/api/client/js/api/client/js/reference/interface/PaginatedList.md). There are some exceptions though, like `listKeys` or `listHead` which paginate differently. The results you're looking for are always stored under `items` and you can use the `limit` property to get only a subset of results. Other props are also available, depending on the method.
import { ApifyClient } from 'apify-client';
const client = new ApifyClient({ token: 'MY-APIFY-TOKEN' });
// Resource clients accept an ID of the resource. const datasetClient = client.dataset('dataset-id');
// Number of items per page const limit = 1000; // Initial offset let offset = 0; // Array to store all items let allItems = [];
while (true) { const { items, total } = await datasetClient.listItems({ limit, offset });
console.log(`Fetched ${items.length} items`);
// Merge new items with other already loaded items
allItems.push(...items);
// If there are no more items to fetch, exit the loading
if (offset + limit >= total) {
break;
}
offset += limit;
}
console.log(Overall fetched ${allItems.length} items);
---
# Changelog
### [2.19.0](https://github.com/apify/apify-client-js/releases/tag/v2.19.0)[](#2190)
##### [2.19.0](https://github.com/apify/apify-client-js/releases/tag/v2.19.0) (2025-10-20)[](#2190-2025-10-20)
###### 🚀 Features[](#-features)
* Move restartOnError from Actor to Run options ([#760](https://github.com/apify/apify-client-js/pull/760)) ([8f80f82](https://github.com/apify/apify-client-js/commit/8f80f82c22128fd3378ba00ad29766cf4cc8e3c0)) by [@DaveHanns](https://github.com/DaveHanns)
### [2.18.0](https://github.com/apify/apify-client-js/releases/tag/v2.18.0)[](#2180)
##### [2.18.0](https://github.com/apify/apify-client-js/releases/tag/v2.18.0) (2025-10-09)[](#2180-2025-10-09)
###### 🚀 Features[](#-features-1)
* Allowed signature to be passed in kv-store/datasets ([#761](https://github.com/apify/apify-client-js/pull/761)) ([a31e36d](https://github.com/apify/apify-client-js/commit/a31e36d6201f90136da362af2aa10b29efb80bad)) by [@gippy](https://github.com/gippy)
* Add startedBefore and startedAfter to run list ([#763](https://github.com/apify/apify-client-js/pull/763)) ([2345999](https://github.com/apify/apify-client-js/commit/23459990598ba01833a21bfe969a1c64f775be00)) by [@danpoletaev](https://github.com/danpoletaev)
###### 🐛 Bug Fixes[](#-bug-fixes)
* Export missing symbols from env vars and version client ([#756](https://github.com/apify/apify-client-js/pull/756)) ([86b591f](https://github.com/apify/apify-client-js/commit/86b591fe8d2f07b4e746561ee9e055fca6639e1d)) by [@B4nan](https://github.com/B4nan)
### [2.17.0](https://github.com/apify/apify-client-js/releases/tag/v2.17.0)[](#2170)
##### [2.17.0](https://github.com/apify/apify-client-js/releases/tag/v2.17.0) (2025-09-11)[](#2170-2025-09-11)
###### 🚀 Features[](#-features-2)
* Add forcePermissionLevel run option ([#743](https://github.com/apify/apify-client-js/pull/743)) ([693808c](https://github.com/apify/apify-client-js/commit/693808c6dbbf24542f8f86f3d49673b75309e9f6)) by [@tobice](https://github.com/tobice)
###### 🐛 Bug Fixes[](#-bug-fixes-1)
* Signed storage URLs avoid adding expiresInSecs to query params ([#734](https://github.com/apify/apify-client-js/pull/734)) ([70aff4f](https://github.com/apify/apify-client-js/commit/70aff4fedefc02a1c8c6e5155057e213a8ad6c81)) by [@danpoletaev](https://github.com/danpoletaev)
* Presigned resource urls shouldn't follow `baseUrl` ([#745](https://github.com/apify/apify-client-js/pull/745)) ([07b36fb](https://github.com/apify/apify-client-js/commit/07b36fbd46ed74e9c4ad3977cac883af55ad525d)) by [@barjin](https://github.com/barjin)
### [2.16.0](https://github.com/apify/apify-client-js/releases/tag/v2.16.0)[](#2160)
##### [2.16.0](https://github.com/apify/apify-client-js/releases/tag/v2.16.0) (2025-08-26)[](#2160-2025-08-26)
###### Refactor[](#refactor)
* \[**breaking**] Rename expiresInMillis to expiresInSecs in create storage content URL ([#733](https://github.com/apify/apify-client-js/pull/733)) ([a190b72](https://github.com/apify/apify-client-js/commit/a190b72f6f62ffb54898fd74c80981a6967d573f)) by [@danpoletaev](https://github.com/danpoletaev)
### [2.15.1](https://github.com/apify/apify-client-js/releases/tag/v2.15.1)[](#2151)
##### [2.15.1](https://github.com/apify/apify-client-js/releases/tag/v2.15.1) (2025-08-20)[](#2151-2025-08-20)
###### 🐛 Bug Fixes[](#-bug-fixes-2)
* Add recordPublicUrl to KeyValueListItem type ([#730](https://github.com/apify/apify-client-js/pull/730)) ([42dfe64](https://github.com/apify/apify-client-js/commit/42dfe6484e3504aaf46c516bade3d7ff989782ea)) by [@danpoletaev](https://github.com/danpoletaev)
### [2.15.0](https://github.com/apify/apify-client-js/releases/tag/v2.15.0)[](#2150)
##### [2.15.0](https://github.com/apify/apify-client-js/releases/tag/v2.15.0) (2025-08-12)[](#2150-2025-08-12)
###### 🚀 Features[](#-features-3)
* Extend status parameter to an array of possible statuses ([#723](https://github.com/apify/apify-client-js/pull/723)) ([0be893f](https://github.com/apify/apify-client-js/commit/0be893f2401a652908aff1ed305736068ee0b421)) by [@JanHranicky](https://github.com/JanHranicky)
### [2.14.0](https://github.com/apify/apify-client-js/releases/tag/v2.14.0)[](#2140)
##### [2.14.0](https://github.com/apify/apify-client-js/releases/tag/v2.14.0) (2025-08-11)[](#2140-2025-08-11)
###### 🚀 Features[](#-features-4)
* Add keyValueStore.getRecordPublicUrl ([#725](https://github.com/apify/apify-client-js/pull/725)) ([d84a03a](https://github.com/apify/apify-client-js/commit/d84a03afe6fd49e38d4ca9a6821681e852c73a2a)) by [@danpoletaev](https://github.com/danpoletaev)
### [2.13.0](https://github.com/apify/apify-client-js/releases/tag/v2.13.0)[](#2130)
##### [2.13.0](https://github.com/apify/apify-client-js/releases/tag/v2.13.0) (2025-08-06)[](#2130-2025-08-06)
###### 🚀 Features[](#-features-5)
* Add new methods Dataset.createItemsPublicUrl & KeyValueStore.createKeysPublicUrl ([#720](https://github.com/apify/apify-client-js/pull/720)) ([62554e4](https://github.com/apify/apify-client-js/commit/62554e48a8bf6bf1853f356ac84f046fed5945c1)) by [@danpoletaev](https://github.com/danpoletaev)
###### 🐛 Bug Fixes[](#-bug-fixes-3)
* Add `eventData` to `WebhookDispatch` type ([#714](https://github.com/apify/apify-client-js/pull/714)) ([351f11f](https://github.com/apify/apify-client-js/commit/351f11f268a54532c7003ab099bc0d7d8d9c9ad7)) by [@valekjo](https://github.com/valekjo)
* KV store createKeysPublicUrl wrong URL ([#724](https://github.com/apify/apify-client-js/pull/724)) ([a48ec58](https://github.com/apify/apify-client-js/commit/a48ec58e16a36cc8aa188524e4a738c40f5b74e9)) by [@danpoletaev](https://github.com/danpoletaev)
### [2.12.6](https://github.com/apify/apify-client-js/releases/tag/v2.12.6)[](#2126)
##### [2.12.6](https://github.com/apify/apify-client-js/releases/tag/v2.12.6) (2025-06-30)[](#2126-2025-06-30)
###### 🚀 Features[](#-features-6)
* Allow sorting of Actors collection ([#708](https://github.com/apify/apify-client-js/pull/708)) ([562a193](https://github.com/apify/apify-client-js/commit/562a193b90ce4f2b05bf166da8fe2dddaa87eb6b)) by [@protoss70](https://github.com/protoss70)
###### 🐛 Bug Fixes[](#-bug-fixes-4)
* Use appropriate timeouts ([#704](https://github.com/apify/apify-client-js/pull/704)) ([b896bf2](https://github.com/apify/apify-client-js/commit/b896bf2e653e0766ef297f29a35304c1a5f27598)) by [@janbuchar](https://github.com/janbuchar)
* Rename option for new sortBy parameter ([#711](https://github.com/apify/apify-client-js/pull/711)) ([f45dd03](https://github.com/apify/apify-client-js/commit/f45dd037c581a6c0e27fd8c036033b99cec1ba89)) by [@protoss70](https://github.com/protoss70)
### [2.12.5](https://github.com/apify/apify-client-js/releases/tag/v2.12.5)[](#2125)
##### [2.12.5](https://github.com/apify/apify-client-js/releases/tag/v2.12.5) (2025-05-28)[](#2125-2025-05-28)
###### 🚀 Features[](#-features-7)
* List kv store keys by collection of prefix ([#688](https://github.com/apify/apify-client-js/pull/688)) ([be25137](https://github.com/apify/apify-client-js/commit/be25137575435547aaf2c3849fc772daf0537450)) by [@MFori](https://github.com/MFori)
* Add unlockRequests endpoint to RequestQueue client ([#700](https://github.com/apify/apify-client-js/pull/700)) ([7c52c64](https://github.com/apify/apify-client-js/commit/7c52c645e2eb66ad97c8daa9791b080bfc747288)) by [@drobnikj](https://github.com/drobnikj)
###### 🐛 Bug Fixes[](#-bug-fixes-5)
* Add missing 'effectivePlatformFeatures', 'createdAt', 'isPaying' to User interface ([#691](https://github.com/apify/apify-client-js/pull/691)) ([e138093](https://github.com/apify/apify-client-js/commit/e1380933476e5336469e5da083d2017147518f88)) by [@metalwarrior665](https://github.com/metalwarrior665)
* Move prettier into `devDependencies` ([#695](https://github.com/apify/apify-client-js/pull/695)) ([1ba903a](https://github.com/apify/apify-client-js/commit/1ba903a1bfa7a95a8c54ef53951db502dfa4b276)) by [@hudson-worden](https://github.com/hudson-worden)
### [2.12.4](https://github.com/apify/apify-client-js/releases/tag/v2.12.4)[](#2124)
##### [2.12.4](https://github.com/apify/apify-client-js/releases/tag/v2.12.4) (2025-05-13)[](#2124-2025-05-13)
###### 🚀 Features[](#-features-8)
* Allow overriding timeout of `KVS.setRecord` calls ([#692](https://github.com/apify/apify-client-js/pull/692)) ([105bd68](https://github.com/apify/apify-client-js/commit/105bd6888117a6c64b21a725c536d4992dff099c)) by [@B4nan](https://github.com/B4nan)
###### 🐛 Bug Fixes[](#-bug-fixes-6)
* Fix `RunCollectionListOptions` status type ([#681](https://github.com/apify/apify-client-js/pull/681)) ([8fbcf82](https://github.com/apify/apify-client-js/commit/8fbcf82bfaca57d087719cf079fc850c6d31daa5)) by [@MatousMarik](https://github.com/MatousMarik)
* **actor:** Add missing 'pricingInfos' field to Actor object ([#683](https://github.com/apify/apify-client-js/pull/683)) ([4bd4853](https://github.com/apify/apify-client-js/commit/4bd485369ac42d0b72597638c0316a6ca60f9847)) by [@metalwarrior665](https://github.com/metalwarrior665)
### [2.12.3](https://github.com/apify/apify-client-js/releases/tag/v2.12.3)[](#2123)
##### [2.12.3](https://github.com/apify/apify-client-js/releases/tag/v2.12.3) (2025-04-24)[](#2123-2025-04-24)
###### 🐛 Bug Fixes[](#-bug-fixes-7)
* DefaultBuild() returns BuildClient ([#677](https://github.com/apify/apify-client-js/pull/677)) ([8ce72a4](https://github.com/apify/apify-client-js/commit/8ce72a4c90aac421281d14ad0ff25fdecba1d094)) by [@danpoletaev](https://github.com/danpoletaev)
### [2.12.2](https://github.com/apify/apify-client-js/releases/tag/v2.12.2)[](#2122)
##### [2.12.2](https://github.com/apify/apify-client-js/releases/tag/v2.12.2) (2025-04-14)[](#2122-2025-04-14)
###### 🚀 Features[](#-features-9)
* Add support for general resource access ([#669](https://github.com/apify/apify-client-js/pull/669)) ([7deba52](https://github.com/apify/apify-client-js/commit/7deba52a5ff96c990254687d6b965fc1a5bf3467)) by [@tobice](https://github.com/tobice)
* Add defaultBuild method ([#668](https://github.com/apify/apify-client-js/pull/668)) ([c494b3b](https://github.com/apify/apify-client-js/commit/c494b3b8b664a88620e9f41c902acba533d636cf)) by [@danpoletaev](https://github.com/danpoletaev)
### [2.12.1](https://github.com/apify/apify-client-js/releases/tag/v2.12.1)[](#2121)
##### [2.12.1](https://github.com/apify/apify-client-js/releases/tag/v2.12.1) (2025-03-11)[](#2121-2025-03-11)
###### 🚀 Features[](#-features-10)
* Add maxItems and maxTotalChargeUsd to resurrect ([#652](https://github.com/apify/apify-client-js/pull/652)) ([5fb9c9a](https://github.com/apify/apify-client-js/commit/5fb9c9a35d6ccb7313c5cbbd7d09b19a64d70d8e)) by [@novotnyj](https://github.com/novotnyj)
### [2.11.2](https://github.com/apify/apify-client-js/releases/tag/v2.11.2)[](#2112)
##### [2.11.2](https://github.com/apify/apify-client-js/releases/tag/v2.11.2) (2025-02-03)[](#2112-2025-02-03)
###### 🚀 Features[](#-features-11)
* Add dataset.statistics ([#621](https://github.com/apify/apify-client-js/pull/621)) ([6aeb2b7](https://github.com/apify/apify-client-js/commit/6aeb2b7fae041468d125a0c8bbb00804e290143a)) by [@MFori](https://github.com/MFori)
* Added getOpenApiSpecification() to BuildClient ([#626](https://github.com/apify/apify-client-js/pull/626)) ([6248b28](https://github.com/apify/apify-client-js/commit/6248b2844796f93e22404ddea85ee77c1a5b7d50)) by [@danpoletaev](https://github.com/danpoletaev)
### [2.11.1](https://github.com/apify/apify-client-js/releases/tag/v2.11.1)[](#2111)
##### [2.11.1](https://github.com/apify/apify-client-js/releases/tag/v2.11.1) (2025-01-10)[](#2111-2025-01-10)
###### 🐛 Bug Fixes[](#-bug-fixes-8)
* Change type `Build.actorDefinitions` to `Build.actorDefinition` ([#624](https://github.com/apify/apify-client-js/pull/624)) ([611f313](https://github.com/apify/apify-client-js/commit/611f31365727e70f58d899009ff5a05c6b888253)) by [@jirispilka](https://github.com/jirispilka)
* Add ActorRunPricingInfo type ([#623](https://github.com/apify/apify-client-js/pull/623)) ([8880295](https://github.com/apify/apify-client-js/commit/8880295f13c1664ab6ae0b8b3f171025317ea011)) by [@janbuchar](https://github.com/janbuchar)
### [2.11.0](https://github.com/apify/apify-client-js/releases/tag/v2.11.0)[](#2110)
##### [2.11.0](https://github.com/apify/apify-client-js/releases/tag/v2.11.0) (2024-12-16)[](#2110-2024-12-16)
###### 🚀 Features[](#-features-12)
* **actor-build:** Add actorDefinition type for actor build detail, deprecate inputSchema and readme. ([#611](https://github.com/apify/apify-client-js/pull/611)) ([123c2b8](https://github.com/apify/apify-client-js/commit/123c2b81c945a0ca6922221598aa73c42cc298d6)) by [@drobnikj](https://github.com/drobnikj)
* Add `charge` method to the run client for "pay per event" ([#613](https://github.com/apify/apify-client-js/pull/613)) ([3d9c64d](https://github.com/apify/apify-client-js/commit/3d9c64d5442b4f8f27c2b19dd98dd3b758944287)) by [@Jkuzz](https://github.com/Jkuzz)
* **request-queue:** Add queueHasLockedRequests and clientKey into RequestQueueClientListAndLockHeadResult ([#617](https://github.com/apify/apify-client-js/pull/617)) ([f58ce98](https://github.com/apify/apify-client-js/commit/f58ce989e431de54eb673e561e407a7066ea2b64)) by [@drobnikj](https://github.com/drobnikj)
###### 🐛 Bug Fixes[](#-bug-fixes-9)
* **actor:** Correctly set type for ActorTaggedBuilds ([#612](https://github.com/apify/apify-client-js/pull/612)) ([3bda7ee](https://github.com/apify/apify-client-js/commit/3bda7ee741caf2ccfea249a42ed7512cda36bf0b)) by [@metalwarrior665](https://github.com/metalwarrior665)
### [2.10.0](https://github.com/apify/apify-client-js/releases/tag/v2.10.0)[](#2100)
##### [2.10.0](https://github.com/apify/apify-client-js/releases/tag/v2.10.0) (2024-11-01)[](#2100-2024-11-01)
###### 🚀 Features[](#-features-13)
* Add user.updateLimits ([#595](https://github.com/apify/apify-client-js/pull/595)) ([bf97c0f](https://github.com/apify/apify-client-js/commit/bf97c0f5bf8d0cbd8decb60382f0605243b00dd5)) by [@MFori](https://github.com/MFori)
* Allow appending custom parts to the user agent ([#602](https://github.com/apify/apify-client-js/pull/602)) ([d07452b](https://github.com/apify/apify-client-js/commit/d07452b7bff83d16b48bf3cfba5b88aa564ffe2b)) by [@B4nan](https://github.com/B4nan)
###### 🐛 Bug Fixes[](#-bug-fixes-10)
* Allow `null` when updating dataset/kvs/rq `name` ([#604](https://github.com/apify/apify-client-js/pull/604)) ([0034c2e](https://github.com/apify/apify-client-js/commit/0034c2ee63d6d1c6856c4e7786da43d86a3d63ce)) by [@B4nan](https://github.com/B4nan)
### [v2.9.7](https://github.com/apify/apify-client-js/releases/tag/v2.9.7)[](#v297)
##### What's Changed[](#whats-changed)
* feat: Rename maxCostPerRunUsd to maxTotalChargeUsd by [@novotnyj](https://github.com/novotnyj) in [#592](https://github.com/apify/apify-client-js/pull/592)
**Full Changelog**: <https://github.com/apify/apify-client-js/compare/v2.9.6...v2.9.7>
### [v2.9.6](https://github.com/apify/apify-client-js/releases/tag/v2.9.6)[](#v296)
##### What's Changed[](#whats-changed-1)
* fix: Rename maxCostPerRun by [@novotnyj](https://github.com/novotnyj) in [#589](https://github.com/apify/apify-client-js/pull/589)
**Full Changelog**: <https://github.com/apify/apify-client-js/compare/v2.9.5...v2.9.6>
### [v2.9.5](https://github.com/apify/apify-client-js/releases/tag/v2.9.5)[](#v295)
##### What's Changed[](#whats-changed-2)
* fix: add `isDeprecated` to actor update type by [@Jkuzz](https://github.com/Jkuzz) in [#566](https://github.com/apify/apify-client-js/pull/566)
* feat: add Actor Standby types by [@jirimoravcik](https://github.com/jirimoravcik) in [#569](https://github.com/apify/apify-client-js/pull/569)
* feat: allow `unwind` param to `DatasetClient.listItems()` to be an array by [@fnesveda](https://github.com/fnesveda) in [#576](https://github.com/apify/apify-client-js/pull/576)
* feat: add maxCostPerRun param by [@stetizu1](https://github.com/stetizu1) in [#578](https://github.com/apify/apify-client-js/pull/578)
##### New Contributors[](#new-contributors)
* [@stetizu1](https://github.com/stetizu1) made their first contribution in [#578](https://github.com/apify/apify-client-js/pull/578)
**Full Changelog**: <https://github.com/apify/apify-client-js/compare/v2.9.4...v2.9.5>
### [v2.9.4](https://github.com/apify/apify-client-js/releases/tag/v2.9.4)[](#v294)
##### What's Changed[](#whats-changed-3)
* fix: add missing `isApifyIntegration` field to `Webhook` type by [@omikader](https://github.com/omikader) in [#523](https://github.com/apify/apify-client-js/pull/523)
* feat: add notifications field to Schedule by [@m-murasovs](https://github.com/m-murasovs) in [#545](https://github.com/apify/apify-client-js/pull/545)
* feat: added data property to API error object by [@gippy](https://github.com/gippy) in [#559](https://github.com/apify/apify-client-js/pull/559)
**Full Changelog**: <https://github.com/apify/apify-client-js/compare/v2.9.3...v2.9.4>
### [v2.9.3](https://github.com/apify/apify-client-js/releases/tag/v2.9.3)[](#v293)
##### What's Changed[](#whats-changed-4)
* chore: remove warning when parseDateFields reaches depth limit by [@tobice](https://github.com/tobice) in [#521](https://github.com/apify/apify-client-js/pull/521)
**Full Changelog**: <https://github.com/apify/apify-client-js/compare/v2.9.2...v2.9.3>
### [v2.9.2](https://github.com/apify/apify-client-js/releases/tag/v2.9.2)[](#v292)
##### What's Changed[](#whats-changed-5)
* feat: add monthlyUsage() and limits() endpoints to UserClients by [@tobice](https://github.com/tobice) in [#517](https://github.com/apify/apify-client-js/pull/517)
* feat: parse monthlyUsage.dailyServiceUsages\[].date as Date by [@tobice](https://github.com/tobice) in [#519](https://github.com/apify/apify-client-js/pull/519)
**Full Changelog**: <https://github.com/apify/apify-client-js/compare/v2.9.1...v2.9.2>
### [v2.9.1](https://github.com/apify/apify-client-js/releases/tag/v2.9.1)[](#v291)
##### What's Changed[](#whats-changed-6)
* fix: ensure axios headers are instance of AxiosHeaders via interceptor by [@B4nan](https://github.com/B4nan) in [#515](https://github.com/apify/apify-client-js/pull/515)
**Full Changelog**: <https://github.com/apify/apify-client-js/compare/v2.9.0...v2.9.1>
### [v2.9.0](https://github.com/apify/apify-client-js/releases/tag/v2.9.0)[](#v290)
##### What's Changed[](#whats-changed-7)
* fix: publish browser bundle by [@B4nan](https://github.com/B4nan) in [#506](https://github.com/apify/apify-client-js/pull/506)
* fix: update axios to v1.6 by [@B4nan](https://github.com/B4nan) in [#505](https://github.com/apify/apify-client-js/pull/505)
* feat: add `KeyValueStore.recordExists()` method by [@barjin](https://github.com/barjin) in [#510](https://github.com/apify/apify-client-js/pull/510)
* feat: add `log()` method to BuildClient by [@tobice](https://github.com/tobice) in [#509](https://github.com/apify/apify-client-js/pull/509)
* feat: add `runs()` and `builds()` top level endpoints by [@foxt451](https://github.com/foxt451) in [#468](https://github.com/apify/apify-client-js/pull/468)
##### New Contributors[](#new-contributors-1)
* [@tobice](https://github.com/tobice) made their first contribution in [#509](https://github.com/apify/apify-client-js/pull/509)
**Full Changelog**: <https://github.com/apify/apify-client-js/compare/v2.8.6...v2.9.0>
### [v2.8.6](https://github.com/apify/apify-client-js/releases/tag/v2.8.6)[](#v286)
##### What's Changed[](#whats-changed-8)
* fix: replace ReadableStream with Readable by [@foxt451](https://github.com/foxt451) in [#463](https://github.com/apify/apify-client-js/pull/463)
* fix: add missing properties to `ActorCollectionCreateOptions` type by [@jirimoravcik](https://github.com/jirimoravcik) in [#486](https://github.com/apify/apify-client-js/pull/486)
* feat(request-queue): Limit payload size for batchAddRequests() by [@drobnikj](https://github.com/drobnikj) in [#489](https://github.com/apify/apify-client-js/pull/489)
* docs: add code owner for documentation by [@TC-MO](https://github.com/TC-MO) in [#488](https://github.com/apify/apify-client-js/pull/488)
##### New Contributors[](#new-contributors-2)
* [@foxt451](https://github.com/foxt451) made their first contribution in [#463](https://github.com/apify/apify-client-js/pull/463)
* [@TC-MO](https://github.com/TC-MO) made their first contribution in [#488](https://github.com/apify/apify-client-js/pull/488)
**Full Changelog**: <https://github.com/apify/apify-client-js/compare/v2.8.4...v2.8.6>
### [v2.8.4](https://github.com/apify/apify-client-js/releases/tag/v2.8.4)[](#v284)
##### What's Changed[](#whats-changed-9)
* fix(schedule): expose other fields when id optional by [@omikader](https://github.com/omikader) in [#451](https://github.com/apify/apify-client-js/pull/451)
##### New Contributors[](#new-contributors-3)
* [@omikader](https://github.com/omikader) made their first contribution in [#451](https://github.com/apify/apify-client-js/pull/451)
**Full Changelog**: <https://github.com/apify/apify-client-js/compare/v2.8.2...v2.8.4>
### [v.2.8.2](https://github.com/apify/apify-client-js/releases/tag/v2.8.2)[](#v282)
##### What's Changed[](#whats-changed-10)
* ci: test on node 20 + improve tests workflow by [@B4nan](https://github.com/B4nan) in [#430](https://github.com/apify/apify-client-js/pull/430)
* feat: Add how to install javascript Apify client by [@webrdaniel](https://github.com/webrdaniel) in [#440](https://github.com/apify/apify-client-js/pull/440)
* fix: ScheduleUpdateData type by [@magne4000](https://github.com/magne4000) in [#276](https://github.com/apify/apify-client-js/pull/276)
##### New Contributors[](#new-contributors-4)
* [@webrdaniel](https://github.com/webrdaniel) made their first contribution in [#440](https://github.com/apify/apify-client-js/pull/440)
* [@magne4000](https://github.com/magne4000) made their first contribution in [#276](https://github.com/apify/apify-client-js/pull/276)
**Full Changelog**: <https://github.com/apify/apify-client-js/compare/v2.8.1...v2.8.2>
### [v2.8.1](https://github.com/apify/apify-client-js/releases/tag/v2.8.1)[](#v281)
##### What's Changed[](#whats-changed-11)
* fix: don't parse non-date strings by [@barjin](https://github.com/barjin) in [#412](https://github.com/apify/apify-client-js/pull/412)
* chore: Removed references to issuesEnabled by [@Jkuzz](https://github.com/Jkuzz) in [#416](https://github.com/apify/apify-client-js/pull/416)
* feat: add new webhook fields by [@m-murasovs](https://github.com/m-murasovs) in [#426](https://github.com/apify/apify-client-js/pull/426)
* feat: Add delete to runs and builds by [@Jkuzz](https://github.com/Jkuzz) in [#428](https://github.com/apify/apify-client-js/pull/428)
##### New Contributors[](#new-contributors-5)
* [@Jkuzz](https://github.com/Jkuzz) made their first contribution in [#416](https://github.com/apify/apify-client-js/pull/416)
**Full Changelog**: <https://github.com/apify/apify-client-js/compare/v2.8.0...v2.8.1>
---
# Code examples
Copy for LLM
## Passing an input to the Actor[](#passing-an-input-to-the-actor)
The fastest way to get results from an Actor is to pass input directly to the `call` function. Input can be passed to `call` function and the reference of running Actor (or wait for finish) is available in `runData` variable.
This example starts an Actor that scrapes 20 posts from the Instagram website based on the hashtag.
import { ApifyClient } from 'apify-client';
// Client initialization with the API token const client = new ApifyClient({ token: 'MY_APIFY_TOKEN' });
const actorClient = client.actor('apify/instagram-hashtag-scraper');
const input = { hashtags: ['rainbow'], resultsLimit: 20 };
// Run the Actor and wait for it to finish up to 60 seconds. // Input is not persisted for next runs. const runData = await actorClient.call(input, { waitSecs: 60 });
console.log('Run data:'); console.log(runData);
To run multiple inputs with the same Actor, most convenient way is to create multiple [tasks](https://docs.apify.com/platform/actors/running/tasks) with different inputs. Task input is persisted on Apify platform when task is created.
import { ApifyClient } from 'apify-client';
// Client initialization with the API token const client = new ApifyClient({ token: 'MY_APIFY_TOKEN' });
const animalsHashtags = ['zebra', 'lion', 'hippo'];
// Multiple input schemas for one Actor can be persisted in tasks.
// Tasks are saved in the Apify platform and can be run multiple times.
const socialsTasksPromises = animalsHashtags.map((hashtag) =>
client.tasks().create({
actId: 'apify/instagram-hashtag-scraper',
name: hashtags-${hashtag},
input: { hashtags: [hashtag], resultsLimit: 20 },
options: { memoryMbytes: 1024 },
}),
);
// Create all tasks in parallel const createdTasks = await Promise.all(socialsTasksPromises);
console.log('Created tasks:'); console.log(createdTasks);
// Run all tasks in parallel await Promise.all(createdTasks.map((task) => client.task(task.id).call()));
## Getting latest data from an Actor, joining datasets[](#getting-latest-data-from-an-actor-joining-datasets)
Actor data are stored to [datasets](https://docs.apify.com/platform/storage/dataset). Datasets can be retrieved from Actor runs. Dataset items can be listed with pagination. Also, datasets can be merged together to make analysis further on with single file as dataset can be exported to various data format (CSV, JSON, XSLX, XML). [Integrations](https://docs.apify.com/platform/integrations) can do the trick as well.
import { ApifyClient } from 'apify-client';
// Client initialization with the API token const client = new ApifyClient({ token: 'MY_APIFY_TOKEN' });
const actorClient = client.actor('apify/instagram-hashtag-scraper');
const actorRuns = actorClient.runs();
// See pagination to understand how to get more datasets const actorDatasets = await actorRuns.list({ limit: 20 });
console.log('Actor datasets:'); console.log(actorDatasets);
const mergingDataset = await client.datasets().getOrCreate('merge-dataset');
for (const datasetItem of actorDatasets.items) { // Dataset items can be handled here. Dataset items can be paginated const datasetItems = await client.dataset(datasetItem.defaultDatasetId).listItems({ limit: 1000 });
// Items can be pushed to single dataset
await client.dataset(mergingDataset.id).pushItems(datasetItems.items);
// ...
}
## Handling webhooks[](#handling-webhooks)
[Webhooks](https://docs.apify.com/platform/integrations/webhooks) can be used to get notifications about Actor runs. For example, a webhook can be triggered when an Actor run finishes successfully. Webhook can receive dataset ID for further processing.
Initialization of webhook:
import { ApifyClient } from 'apify-client';
// Client initialization with the API token const client = new ApifyClient({ token: 'MY_APIFY_TOKEN' });
const webhooksClient = client.webhooks();
await webhooksClient.create({ description: 'Instagram hashtag actor succeeded', condition: { actorId: 'reGe1ST3OBgYZSsZJ' }, // Actor ID of apify/instagram-hashtag-scraper // Request URL can be generated using https://webhook.site. Any REST server can be used requestUrl: 'https://webhook.site/CUSTOM_WEBHOOK_ID', eventTypes: ['ACTOR.RUN.SUCCEEDED'], });
Simple webhook listener can be built on [`express`](https://expressjs.com/) library, which can helps to create a REST server for handling webhooks:
import express from 'express'; import bodyParser from 'body-parser'; import { ApifyClient, DownloadItemsFormat } from 'apify-client';
// Initialize Apify client, express and define server port const client = new ApifyClient({ token: 'MY_APIFY_TOKEN' }); const app = express(); const PORT = 3000;
// Tell express to use body-parser's JSON parsing app.use(bodyParser.json());
app.post('apify-webhook', async (req, res) => { // Log the payload from the webhook console.log(req.body);
const runDataset = await client.dataset(req.body.resource.defaultDatasetId);
// e.g. Save dataset locally as JSON
await runDataset.downloadItems(DownloadItemsFormat.JSON);
// Respond to the webhook
res.send('Webhook received');
});
// Start express on the defined port
app.listen(PORT, () => console.log(🚀 Server running on port ${PORT}));
---
# apify-client<!-- -->
## Index[**](#Index)
### Enumerations
* [**ActorListSortBy](https://docs.apify.com/api/client/js/api/client/js/reference/enum/ActorListSortBy.md)
* [**ActorSourceType](https://docs.apify.com/api/client/js/api/client/js/reference/enum/ActorSourceType.md)
* [**DownloadItemsFormat](https://docs.apify.com/api/client/js/api/client/js/reference/enum/DownloadItemsFormat.md)
* [**PlatformFeature](https://docs.apify.com/api/client/js/api/client/js/reference/enum/PlatformFeature.md)
* [**ScheduleActions](https://docs.apify.com/api/client/js/api/client/js/reference/enum/ScheduleActions.md)
* [**WebhookDispatchStatus](https://docs.apify.com/api/client/js/api/client/js/reference/enum/WebhookDispatchStatus.md)
### Classes
* [**ActorClient](https://docs.apify.com/api/client/js/api/client/js/reference/class/ActorClient.md)
* [**ActorCollectionClient](https://docs.apify.com/api/client/js/api/client/js/reference/class/ActorCollectionClient.md)
* [**ActorEnvVarClient](https://docs.apify.com/api/client/js/api/client/js/reference/class/ActorEnvVarClient.md)
* [**ActorEnvVarCollectionClient](https://docs.apify.com/api/client/js/api/client/js/reference/class/ActorEnvVarCollectionClient.md)
* [**ActorVersionClient](https://docs.apify.com/api/client/js/api/client/js/reference/class/ActorVersionClient.md)
* [**ActorVersionCollectionClient](https://docs.apify.com/api/client/js/api/client/js/reference/class/ActorVersionCollectionClient.md)
* [**ApifyApiError](https://docs.apify.com/api/client/js/api/client/js/reference/class/ApifyApiError.md)
* [**ApifyClient](https://docs.apify.com/api/client/js/api/client/js/reference/class/ApifyClient.md)
* [**BuildClient](https://docs.apify.com/api/client/js/api/client/js/reference/class/BuildClient.md)
* [**BuildCollectionClient](https://docs.apify.com/api/client/js/api/client/js/reference/class/BuildCollectionClient.md)
* [**DatasetClient](https://docs.apify.com/api/client/js/api/client/js/reference/class/DatasetClient.md)
* [**DatasetCollectionClient](https://docs.apify.com/api/client/js/api/client/js/reference/class/DatasetCollectionClient.md)
* [**InvalidResponseBodyError](https://docs.apify.com/api/client/js/api/client/js/reference/class/InvalidResponseBodyError.md)
* [**KeyValueStoreClient](https://docs.apify.com/api/client/js/api/client/js/reference/class/KeyValueStoreClient.md)
* [**KeyValueStoreCollectionClient](https://docs.apify.com/api/client/js/api/client/js/reference/class/KeyValueStoreCollectionClient.md)
* [**LogClient](https://docs.apify.com/api/client/js/api/client/js/reference/class/LogClient.md)
* [**RequestQueueClient](https://docs.apify.com/api/client/js/api/client/js/reference/class/RequestQueueClient.md)
* [**RequestQueueCollectionClient](https://docs.apify.com/api/client/js/api/client/js/reference/class/RequestQueueCollectionClient.md)
* [**RunClient](https://docs.apify.com/api/client/js/api/client/js/reference/class/RunClient.md)
* [**RunCollectionClient](https://docs.apify.com/api/client/js/api/client/js/reference/class/RunCollectionClient.md)
* [**ScheduleClient](https://docs.apify.com/api/client/js/api/client/js/reference/class/ScheduleClient.md)
* [**ScheduleCollectionClient](https://docs.apify.com/api/client/js/api/client/js/reference/class/ScheduleCollectionClient.md)
* [**StoreCollectionClient](https://docs.apify.com/api/client/js/api/client/js/reference/class/StoreCollectionClient.md)
* [**TaskClient](https://docs.apify.com/api/client/js/api/client/js/reference/class/TaskClient.md)
* [**TaskCollectionClient](https://docs.apify.com/api/client/js/api/client/js/reference/class/TaskCollectionClient.md)
* [**UserClient](https://docs.apify.com/api/client/js/api/client/js/reference/class/UserClient.md)
* [**WebhookClient](https://docs.apify.com/api/client/js/api/client/js/reference/class/WebhookClient.md)
* [**WebhookCollectionClient](https://docs.apify.com/api/client/js/api/client/js/reference/class/WebhookCollectionClient.md)
* [**WebhookDispatchClient](https://docs.apify.com/api/client/js/api/client/js/reference/class/WebhookDispatchClient.md)
* [**WebhookDispatchCollectionClient](https://docs.apify.com/api/client/js/api/client/js/reference/class/WebhookDispatchCollectionClient.md)
### Interfaces
* [**AccountAndUsageLimits](https://docs.apify.com/api/client/js/api/client/js/reference/interface/AccountAndUsageLimits.md)
* [**Actor](https://docs.apify.com/api/client/js/api/client/js/reference/interface/Actor.md)
* [**ActorBuildOptions](https://docs.apify.com/api/client/js/api/client/js/reference/interface/ActorBuildOptions.md)
* [**ActorCallOptions](https://docs.apify.com/api/client/js/api/client/js/reference/interface/ActorCallOptions.md)
* [**ActorChargeEvent](https://docs.apify.com/api/client/js/api/client/js/reference/interface/ActorChargeEvent.md)
* [**ActorCollectionCreateOptions](https://docs.apify.com/api/client/js/api/client/js/reference/interface/ActorCollectionCreateOptions.md)
* [**ActorCollectionListItem](https://docs.apify.com/api/client/js/api/client/js/reference/interface/ActorCollectionListItem.md)
* [**ActorCollectionListOptions](https://docs.apify.com/api/client/js/api/client/js/reference/interface/ActorCollectionListOptions.md)
* [**ActorDefaultRunOptions](https://docs.apify.com/api/client/js/api/client/js/reference/interface/ActorDefaultRunOptions.md)
* [**ActorDefinition](https://docs.apify.com/api/client/js/api/client/js/reference/interface/ActorDefinition.md)
* [**ActorEnvironmentVariable](https://docs.apify.com/api/client/js/api/client/js/reference/interface/ActorEnvironmentVariable.md)
* [**ActorEnvVarCollectionListOptions](https://docs.apify.com/api/client/js/api/client/js/reference/interface/ActorEnvVarCollectionListOptions.md)
* [**ActorExampleRunInput](https://docs.apify.com/api/client/js/api/client/js/reference/interface/ActorExampleRunInput.md)
* [**ActorLastRunOptions](https://docs.apify.com/api/client/js/api/client/js/reference/interface/ActorLastRunOptions.md)
* [**ActorRun](https://docs.apify.com/api/client/js/api/client/js/reference/interface/ActorRun.md)
* [**ActorRunListItem](https://docs.apify.com/api/client/js/api/client/js/reference/interface/ActorRunListItem.md)
* [**ActorRunMeta](https://docs.apify.com/api/client/js/api/client/js/reference/interface/ActorRunMeta.md)
* [**ActorRunOptions](https://docs.apify.com/api/client/js/api/client/js/reference/interface/ActorRunOptions.md)
* [**ActorRunStats](https://docs.apify.com/api/client/js/api/client/js/reference/interface/ActorRunStats.md)
* [**ActorRunUsage](https://docs.apify.com/api/client/js/api/client/js/reference/interface/ActorRunUsage.md)
* [**ActorStandby](https://docs.apify.com/api/client/js/api/client/js/reference/interface/ActorStandby.md)
* [**ActorStartOptions](https://docs.apify.com/api/client/js/api/client/js/reference/interface/ActorStartOptions.md)
* [**ActorStats](https://docs.apify.com/api/client/js/api/client/js/reference/interface/ActorStats.md)
* [**ActorStoreList](https://docs.apify.com/api/client/js/api/client/js/reference/interface/ActorStoreList.md)
* [**ActorTaggedBuild](https://docs.apify.com/api/client/js/api/client/js/reference/interface/ActorTaggedBuild.md)
* [**ActorVersionCollectionListOptions](https://docs.apify.com/api/client/js/api/client/js/reference/interface/ActorVersionCollectionListOptions.md)
* [**ActorVersionGitHubGist](https://docs.apify.com/api/client/js/api/client/js/reference/interface/ActorVersionGitHubGist.md)
* [**ActorVersionGitRepo](https://docs.apify.com/api/client/js/api/client/js/reference/interface/ActorVersionGitRepo.md)
* [**ActorVersionSourceFile](https://docs.apify.com/api/client/js/api/client/js/reference/interface/ActorVersionSourceFile.md)
* [**ActorVersionSourceFiles](https://docs.apify.com/api/client/js/api/client/js/reference/interface/ActorVersionSourceFiles.md)
* [**ActorVersionTarball](https://docs.apify.com/api/client/js/api/client/js/reference/interface/ActorVersionTarball.md)
* [**ApifyClientOptions](https://docs.apify.com/api/client/js/api/client/js/reference/interface/ApifyClientOptions.md)
* [**BaseActorVersion](https://docs.apify.com/api/client/js/api/client/js/reference/interface/BaseActorVersion.md)
* [**Build](https://docs.apify.com/api/client/js/api/client/js/reference/interface/Build.md)
* [**BuildClientGetOptions](https://docs.apify.com/api/client/js/api/client/js/reference/interface/BuildClientGetOptions.md)
* [**BuildClientWaitForFinishOptions](https://docs.apify.com/api/client/js/api/client/js/reference/interface/BuildClientWaitForFinishOptions.md)
* [**BuildCollectionClientListOptions](https://docs.apify.com/api/client/js/api/client/js/reference/interface/BuildCollectionClientListOptions.md)
* [**BuildMeta](https://docs.apify.com/api/client/js/api/client/js/reference/interface/BuildMeta.md)
* [**BuildOptions](https://docs.apify.com/api/client/js/api/client/js/reference/interface/BuildOptions.md)
* [**BuildStats](https://docs.apify.com/api/client/js/api/client/js/reference/interface/BuildStats.md)
* [**BuildUsage](https://docs.apify.com/api/client/js/api/client/js/reference/interface/BuildUsage.md)
* [**Current](https://docs.apify.com/api/client/js/api/client/js/reference/interface/Current.md)
* [**Dataset](https://docs.apify.com/api/client/js/api/client/js/reference/interface/Dataset.md)
* [**DatasetClientCreateItemsUrlOptions](https://docs.apify.com/api/client/js/api/client/js/reference/interface/DatasetClientCreateItemsUrlOptions.md)
* [**DatasetClientDownloadItemsOptions](https://docs.apify.com/api/client/js/api/client/js/reference/interface/DatasetClientDownloadItemsOptions.md)
* [**DatasetClientListItemOptions](https://docs.apify.com/api/client/js/api/client/js/reference/interface/DatasetClientListItemOptions.md)
* [**DatasetClientUpdateOptions](https://docs.apify.com/api/client/js/api/client/js/reference/interface/DatasetClientUpdateOptions.md)
* [**DatasetCollectionClientGetOrCreateOptions](https://docs.apify.com/api/client/js/api/client/js/reference/interface/DatasetCollectionClientGetOrCreateOptions.md)
* [**DatasetCollectionClientListOptions](https://docs.apify.com/api/client/js/api/client/js/reference/interface/DatasetCollectionClientListOptions.md)
* [**DatasetStatistics](https://docs.apify.com/api/client/js/api/client/js/reference/interface/DatasetStatistics.md)
* [**DatasetStats](https://docs.apify.com/api/client/js/api/client/js/reference/interface/DatasetStats.md)
* [**FieldStatistics](https://docs.apify.com/api/client/js/api/client/js/reference/interface/FieldStatistics.md)
* [**FlatPricePerMonthActorPricingInfo](https://docs.apify.com/api/client/js/api/client/js/reference/interface/FlatPricePerMonthActorPricingInfo.md)
* [**FreeActorPricingInfo](https://docs.apify.com/api/client/js/api/client/js/reference/interface/FreeActorPricingInfo.md)
* [**KeyValueClientCreateKeysUrlOptions](https://docs.apify.com/api/client/js/api/client/js/reference/interface/KeyValueClientCreateKeysUrlOptions.md)
* [**KeyValueClientGetRecordOptions](https://docs.apify.com/api/client/js/api/client/js/reference/interface/KeyValueClientGetRecordOptions.md)
* [**KeyValueClientListKeysOptions](https://docs.apify.com/api/client/js/api/client/js/reference/interface/KeyValueClientListKeysOptions.md)
* [**KeyValueClientListKeysResult](https://docs.apify.com/api/client/js/api/client/js/reference/interface/KeyValueClientListKeysResult.md)
* [**KeyValueClientUpdateOptions](https://docs.apify.com/api/client/js/api/client/js/reference/interface/KeyValueClientUpdateOptions.md)
* [**KeyValueListItem](https://docs.apify.com/api/client/js/api/client/js/reference/interface/KeyValueListItem.md)
* [**KeyValueStore](https://docs.apify.com/api/client/js/api/client/js/reference/interface/KeyValueStore.md)
* [**KeyValueStoreCollectionClientGetOrCreateOptions](https://docs.apify.com/api/client/js/api/client/js/reference/interface/KeyValueStoreCollectionClientGetOrCreateOptions.md)
* [**KeyValueStoreCollectionClientListOptions](https://docs.apify.com/api/client/js/api/client/js/reference/interface/KeyValueStoreCollectionClientListOptions.md)
* [**KeyValueStoreRecord](https://docs.apify.com/api/client/js/api/client/js/reference/interface/KeyValueStoreRecord.md)
* [**KeyValueStoreRecordOptions](https://docs.apify.com/api/client/js/api/client/js/reference/interface/KeyValueStoreRecordOptions.md)
* [**KeyValueStoreStats](https://docs.apify.com/api/client/js/api/client/js/reference/interface/KeyValueStoreStats.md)
* [**Limits](https://docs.apify.com/api/client/js/api/client/js/reference/interface/Limits.md)
* [**MonthlyUsage](https://docs.apify.com/api/client/js/api/client/js/reference/interface/MonthlyUsage.md)
* [**MonthlyUsageCycle](https://docs.apify.com/api/client/js/api/client/js/reference/interface/MonthlyUsageCycle.md)
* [**OpenApiDefinition](https://docs.apify.com/api/client/js/api/client/js/reference/interface/OpenApiDefinition.md)
* [**PaginatedList](https://docs.apify.com/api/client/js/api/client/js/reference/interface/PaginatedList.md)
* [**PricePerDatasetItemActorPricingInfo](https://docs.apify.com/api/client/js/api/client/js/reference/interface/PricePerDatasetItemActorPricingInfo.md)
* [**PricePerEventActorPricingInfo](https://docs.apify.com/api/client/js/api/client/js/reference/interface/PricePerEventActorPricingInfo.md)
* [**PricingInfo](https://docs.apify.com/api/client/js/api/client/js/reference/interface/PricingInfo.md)
* [**ProxyGroup](https://docs.apify.com/api/client/js/api/client/js/reference/interface/ProxyGroup.md)
* [**RequestQueue](https://docs.apify.com/api/client/js/api/client/js/reference/interface/RequestQueue.md)
* [**RequestQueueClientAddRequestOptions](https://docs.apify.com/api/client/js/api/client/js/reference/interface/RequestQueueClientAddRequestOptions.md)
* [**RequestQueueClientAddRequestResult](https://docs.apify.com/api/client/js/api/client/js/reference/interface/RequestQueueClientAddRequestResult.md)
* [**RequestQueueClientBatchAddRequestWithRetriesOptions](https://docs.apify.com/api/client/js/api/client/js/reference/interface/RequestQueueClientBatchAddRequestWithRetriesOptions.md)
* [**RequestQueueClientBatchRequestsOperationResult](https://docs.apify.com/api/client/js/api/client/js/reference/interface/RequestQueueClientBatchRequestsOperationResult.md)
* [**RequestQueueClientDeleteRequestLockOptions](https://docs.apify.com/api/client/js/api/client/js/reference/interface/RequestQueueClientDeleteRequestLockOptions.md)
* [**RequestQueueClientListAndLockHeadOptions](https://docs.apify.com/api/client/js/api/client/js/reference/interface/RequestQueueClientListAndLockHeadOptions.md)
* [**RequestQueueClientListAndLockHeadResult](https://docs.apify.com/api/client/js/api/client/js/reference/interface/RequestQueueClientListAndLockHeadResult.md)
* [**RequestQueueClientListHeadOptions](https://docs.apify.com/api/client/js/api/client/js/reference/interface/RequestQueueClientListHeadOptions.md)
* [**RequestQueueClientListHeadResult](https://docs.apify.com/api/client/js/api/client/js/reference/interface/RequestQueueClientListHeadResult.md)
* [**RequestQueueClientListItem](https://docs.apify.com/api/client/js/api/client/js/reference/interface/RequestQueueClientListItem.md)
* [**RequestQueueClientListRequestsOptions](https://docs.apify.com/api/client/js/api/client/js/reference/interface/RequestQueueClientListRequestsOptions.md)
* [**RequestQueueClientListRequestsResult](https://docs.apify.com/api/client/js/api/client/js/reference/interface/RequestQueueClientListRequestsResult.md)
* [**RequestQueueClientPaginateRequestsOptions](https://docs.apify.com/api/client/js/api/client/js/reference/interface/RequestQueueClientPaginateRequestsOptions.md)
* [**RequestQueueClientProlongRequestLockOptions](https://docs.apify.com/api/client/js/api/client/js/reference/interface/RequestQueueClientProlongRequestLockOptions.md)
* [**RequestQueueClientProlongRequestLockResult](https://docs.apify.com/api/client/js/api/client/js/reference/interface/RequestQueueClientProlongRequestLockResult.md)
* [**RequestQueueClientRequestSchema](https://docs.apify.com/api/client/js/api/client/js/reference/interface/RequestQueueClientRequestSchema.md)
* [**RequestQueueClientUnlockRequestsResult](https://docs.apify.com/api/client/js/api/client/js/reference/interface/RequestQueueClientUnlockRequestsResult.md)
* [**RequestQueueClientUpdateOptions](https://docs.apify.com/api/client/js/api/client/js/reference/interface/RequestQueueClientUpdateOptions.md)
* [**RequestQueueCollectionListOptions](https://docs.apify.com/api/client/js/api/client/js/reference/interface/RequestQueueCollectionListOptions.md)
* [**RequestQueueStats](https://docs.apify.com/api/client/js/api/client/js/reference/interface/RequestQueueStats.md)
* [**RequestQueueUserOptions](https://docs.apify.com/api/client/js/api/client/js/reference/interface/RequestQueueUserOptions.md)
* [**RunAbortOptions](https://docs.apify.com/api/client/js/api/client/js/reference/interface/RunAbortOptions.md)
* [**RunChargeOptions](https://docs.apify.com/api/client/js/api/client/js/reference/interface/RunChargeOptions.md)
* [**RunCollectionListOptions](https://docs.apify.com/api/client/js/api/client/js/reference/interface/RunCollectionListOptions.md)
* [**RunGetOptions](https://docs.apify.com/api/client/js/api/client/js/reference/interface/RunGetOptions.md)
* [**RunMetamorphOptions](https://docs.apify.com/api/client/js/api/client/js/reference/interface/RunMetamorphOptions.md)
* [**RunResurrectOptions](https://docs.apify.com/api/client/js/api/client/js/reference/interface/RunResurrectOptions.md)
* [**RunUpdateOptions](https://docs.apify.com/api/client/js/api/client/js/reference/interface/RunUpdateOptions.md)
* [**RunWaitForFinishOptions](https://docs.apify.com/api/client/js/api/client/js/reference/interface/RunWaitForFinishOptions.md)
* [**Schedule](https://docs.apify.com/api/client/js/api/client/js/reference/interface/Schedule.md)
* [**ScheduleActionRunActor](https://docs.apify.com/api/client/js/api/client/js/reference/interface/ScheduleActionRunActor.md)
* [**ScheduleActionRunActorTask](https://docs.apify.com/api/client/js/api/client/js/reference/interface/ScheduleActionRunActorTask.md)
* [**ScheduleCollectionListOptions](https://docs.apify.com/api/client/js/api/client/js/reference/interface/ScheduleCollectionListOptions.md)
* [**ScheduledActorRunInput](https://docs.apify.com/api/client/js/api/client/js/reference/interface/ScheduledActorRunInput.md)
* [**ScheduledActorRunOptions](https://docs.apify.com/api/client/js/api/client/js/reference/interface/ScheduledActorRunOptions.md)
* [**StoreCollectionListOptions](https://docs.apify.com/api/client/js/api/client/js/reference/interface/StoreCollectionListOptions.md)
* [**Task](https://docs.apify.com/api/client/js/api/client/js/reference/interface/Task.md)
* [**TaskCallOptions](https://docs.apify.com/api/client/js/api/client/js/reference/interface/TaskCallOptions.md)
* [**TaskCollectionListOptions](https://docs.apify.com/api/client/js/api/client/js/reference/interface/TaskCollectionListOptions.md)
* [**TaskCreateData](https://docs.apify.com/api/client/js/api/client/js/reference/interface/TaskCreateData.md)
* [**TaskLastRunOptions](https://docs.apify.com/api/client/js/api/client/js/reference/interface/TaskLastRunOptions.md)
* [**TaskOptions](https://docs.apify.com/api/client/js/api/client/js/reference/interface/TaskOptions.md)
* [**TaskStats](https://docs.apify.com/api/client/js/api/client/js/reference/interface/TaskStats.md)
* [**UsageCycle](https://docs.apify.com/api/client/js/api/client/js/reference/interface/UsageCycle.md)
* [**User](https://docs.apify.com/api/client/js/api/client/js/reference/interface/User.md)
* [**UserPlan](https://docs.apify.com/api/client/js/api/client/js/reference/interface/UserPlan.md)
* [**UserProxy](https://docs.apify.com/api/client/js/api/client/js/reference/interface/UserProxy.md)
* [**Webhook](https://docs.apify.com/api/client/js/api/client/js/reference/interface/Webhook.md)
* [**WebhookAnyRunOfActorCondition](https://docs.apify.com/api/client/js/api/client/js/reference/interface/WebhookAnyRunOfActorCondition.md)
* [**WebhookAnyRunOfActorTaskCondition](https://docs.apify.com/api/client/js/api/client/js/reference/interface/WebhookAnyRunOfActorTaskCondition.md)
* [**WebhookCertainRunCondition](https://docs.apify.com/api/client/js/api/client/js/reference/interface/WebhookCertainRunCondition.md)
* [**WebhookCollectionListOptions](https://docs.apify.com/api/client/js/api/client/js/reference/interface/WebhookCollectionListOptions.md)
* [**WebhookDispatch](https://docs.apify.com/api/client/js/api/client/js/reference/interface/WebhookDispatch.md)
* [**WebhookDispatchCall](https://docs.apify.com/api/client/js/api/client/js/reference/interface/WebhookDispatchCall.md)
* [**WebhookDispatchCollectionListOptions](https://docs.apify.com/api/client/js/api/client/js/reference/interface/WebhookDispatchCollectionListOptions.md)
* [**WebhookDispatchEventData](https://docs.apify.com/api/client/js/api/client/js/reference/interface/WebhookDispatchEventData.md)
* [**WebhookIdempotencyKey](https://docs.apify.com/api/client/js/api/client/js/reference/interface/WebhookIdempotencyKey.md)
* [**WebhookStats](https://docs.apify.com/api/client/js/api/client/js/reference/interface/WebhookStats.md)
### Type Aliases
* [**ActorChargeEvents](https://docs.apify.com/api/client/js/api/client/js/reference.md#ActorChargeEvents)
* [**ActorCollectionListResult](https://docs.apify.com/api/client/js/api/client/js/reference.md#ActorCollectionListResult)
* [**ActorEnvVarListResult](https://docs.apify.com/api/client/js/api/client/js/reference.md#ActorEnvVarListResult)
* [**ActorRunPricingInfo](https://docs.apify.com/api/client/js/api/client/js/reference.md#ActorRunPricingInfo)
* [**ActorTaggedBuilds](https://docs.apify.com/api/client/js/api/client/js/reference.md#ActorTaggedBuilds)
* [**ActorUpdateOptions](https://docs.apify.com/api/client/js/api/client/js/reference.md#ActorUpdateOptions)
* [**ActorVersion](https://docs.apify.com/api/client/js/api/client/js/reference.md#ActorVersion)
* [**ActorVersionListResult](https://docs.apify.com/api/client/js/api/client/js/reference.md#ActorVersionListResult)
* [**AllowedHttpMethods](https://docs.apify.com/api/client/js/api/client/js/reference.md#AllowedHttpMethods)
* [**BuildCollectionClientListItem](https://docs.apify.com/api/client/js/api/client/js/reference.md#BuildCollectionClientListItem)
* [**BuildCollectionClientListResult](https://docs.apify.com/api/client/js/api/client/js/reference.md#BuildCollectionClientListResult)
* [**DatasetCollectionClientListResult](https://docs.apify.com/api/client/js/api/client/js/reference.md#DatasetCollectionClientListResult)
* [**Dictionary](https://docs.apify.com/api/client/js/api/client/js/reference.md#Dictionary)
* [**FinalActorVersion](https://docs.apify.com/api/client/js/api/client/js/reference.md#FinalActorVersion)
* [**KeyValueStoreCollectionListResult](https://docs.apify.com/api/client/js/api/client/js/reference.md#KeyValueStoreCollectionListResult)
* [**LimitsUpdateOptions](https://docs.apify.com/api/client/js/api/client/js/reference.md#LimitsUpdateOptions)
* [**RequestQueueClientGetRequestResult](https://docs.apify.com/api/client/js/api/client/js/reference.md#RequestQueueClientGetRequestResult)
* [**RequestQueueClientRequestToDelete](https://docs.apify.com/api/client/js/api/client/js/reference.md#RequestQueueClientRequestToDelete)
* [**RequestQueueCollectionListResult](https://docs.apify.com/api/client/js/api/client/js/reference.md#RequestQueueCollectionListResult)
* [**RequestQueueRequestsAsyncIterable](https://docs.apify.com/api/client/js/api/client/js/reference.md#RequestQueueRequestsAsyncIterable)
* [**ReturnTypeFromOptions](https://docs.apify.com/api/client/js/api/client/js/reference.md#ReturnTypeFromOptions)
* [**ScheduleAction](https://docs.apify.com/api/client/js/api/client/js/reference.md#ScheduleAction)
* [**ScheduleCreateOrUpdateData](https://docs.apify.com/api/client/js/api/client/js/reference.md#ScheduleCreateOrUpdateData)
* [**TaskList](https://docs.apify.com/api/client/js/api/client/js/reference.md#TaskList)
* [**TaskStartOptions](https://docs.apify.com/api/client/js/api/client/js/reference.md#TaskStartOptions)
* [**TaskUpdateData](https://docs.apify.com/api/client/js/api/client/js/reference.md#TaskUpdateData)
* [**WebhookCondition](https://docs.apify.com/api/client/js/api/client/js/reference.md#WebhookCondition)
* [**WebhookEventType](https://docs.apify.com/api/client/js/api/client/js/reference.md#WebhookEventType)
* [**WebhookUpdateData](https://docs.apify.com/api/client/js/api/client/js/reference.md#WebhookUpdateData)
## Type Aliases<!-- -->[**](<#Type Aliases>)
### [**](#ActorChargeEvents)[**](https://github.com/apify/apify-client-js/blob/master/src/resource_clients/actor.ts#L578)ActorChargeEvents
**ActorChargeEvents: Record\<string, [ActorChargeEvent](https://docs.apify.com/api/client/js/api/client/js/reference/interface/ActorChargeEvent.md)>
### [**](#ActorCollectionListResult)[**](https://github.com/apify/apify-client-js/blob/master/src/resource_clients/actor_collection.ts#L69)ActorCollectionListResult
**ActorCollectionListResult: [PaginatedList](https://docs.apify.com/api/client/js/api/client/js/reference/interface/PaginatedList.md)<[ActorCollectionListItem](https://docs.apify.com/api/client/js/api/client/js/reference/interface/ActorCollectionListItem.md)>
### [**](#ActorEnvVarListResult)[**](https://github.com/apify/apify-client-js/blob/master/src/resource_clients/actor_env_var_collection.ts#L49)ActorEnvVarListResult
**ActorEnvVarListResult: Pick<[PaginatedList](https://docs.apify.com/api/client/js/api/client/js/reference/interface/PaginatedList.md)<[ActorEnvironmentVariable](https://docs.apify.com/api/client/js/api/client/js/reference/interface/ActorEnvironmentVariable.md)>, total | items>
### [**](#ActorRunPricingInfo)[**](https://github.com/apify/apify-client-js/blob/master/src/resource_clients/actor.ts#L588)ActorRunPricingInfo
**ActorRunPricingInfo: [PricePerEventActorPricingInfo](https://docs.apify.com/api/client/js/api/client/js/reference/interface/PricePerEventActorPricingInfo.md) | [PricePerDatasetItemActorPricingInfo](https://docs.apify.com/api/client/js/api/client/js/reference/interface/PricePerDatasetItemActorPricingInfo.md) | [FlatPricePerMonthActorPricingInfo](https://docs.apify.com/api/client/js/api/client/js/reference/interface/FlatPricePerMonthActorPricingInfo.md) | [FreeActorPricingInfo](https://docs.apify.com/api/client/js/api/client/js/reference/interface/FreeActorPricingInfo.md)
### [**](#ActorTaggedBuilds)[**](https://github.com/apify/apify-client-js/blob/master/src/resource_clients/actor.ts#L329)ActorTaggedBuilds
**ActorTaggedBuilds: Record\<string, [ActorTaggedBuild](https://docs.apify.com/api/client/js/api/client/js/reference/interface/ActorTaggedBuild.md)>
### [**](#ActorUpdateOptions)[**](https://github.com/apify/apify-client-js/blob/master/src/resource_clients/actor.ts#L337)ActorUpdateOptions
**ActorUpdateOptions: Partial\<Pick<[Actor](https://docs.apify.com/api/client/js/api/client/js/reference/interface/Actor.md), name | description | isPublic | isDeprecated | seoTitle | seoDescription | title | restartOnError | versions | categories | defaultRunOptions | actorStandby>>
### [**](#ActorVersion)[**](https://github.com/apify/apify-client-js/blob/master/src/resource_clients/actor_version.ts#L106)ActorVersion
**ActorVersion: [ActorVersionSourceFiles](https://docs.apify.com/api/client/js/api/client/js/reference/interface/ActorVersionSourceFiles.md) | [ActorVersionGitRepo](https://docs.apify.com/api/client/js/api/client/js/reference/interface/ActorVersionGitRepo.md) | [ActorVersionTarball](https://docs.apify.com/api/client/js/api/client/js/reference/interface/ActorVersionTarball.md) | [ActorVersionGitHubGist](https://docs.apify.com/api/client/js/api/client/js/reference/interface/ActorVersionGitHubGist.md)
### [**](#ActorVersionListResult)[**](https://github.com/apify/apify-client-js/blob/master/src/resource_clients/actor_version_collection.ts#L51)ActorVersionListResult
**ActorVersionListResult: Pick<[PaginatedList](https://docs.apify.com/api/client/js/api/client/js/reference/interface/PaginatedList.md)<[FinalActorVersion](https://docs.apify.com/api/client/js/api/client/js/reference.md#FinalActorVersion)>, total | items>
### [**](#AllowedHttpMethods)[**](https://github.com/apify/apify-client-js/blob/master/src/resource_clients/request_queue.ts#L710)AllowedHttpMethods
**AllowedHttpMethods: GET | HEAD | POST | PUT | DELETE | TRACE | OPTIONS | CONNECT | PATCH
### [**](#BuildCollectionClientListItem)[**](https://github.com/apify/apify-client-js/blob/master/src/resource_clients/build_collection.ts#L42)BuildCollectionClientListItem
**BuildCollectionClientListItem: Required\<Pick<[Build](https://docs.apify.com/api/client/js/api/client/js/reference/interface/Build.md), id | status | startedAt | finishedAt>> & Partial\<Pick<[Build](https://docs.apify.com/api/client/js/api/client/js/reference/interface/Build.md), meta | usageTotalUsd>>
### [**](#BuildCollectionClientListResult)[**](https://github.com/apify/apify-client-js/blob/master/src/resource_clients/build_collection.ts#L45)BuildCollectionClientListResult
**BuildCollectionClientListResult: [PaginatedList](https://docs.apify.com/api/client/js/api/client/js/reference/interface/PaginatedList.md)<[BuildCollectionClientListItem](https://docs.apify.com/api/client/js/api/client/js/reference.md#BuildCollectionClientListItem)>
### [**](#DatasetCollectionClientListResult)[**](https://github.com/apify/apify-client-js/blob/master/src/resource_clients/dataset_collection.ts#L58)DatasetCollectionClientListResult
**DatasetCollectionClientListResult: [PaginatedList](https://docs.apify.com/api/client/js/api/client/js/reference/interface/PaginatedList.md)<[Dataset](https://docs.apify.com/api/client/js/api/client/js/reference/interface/Dataset.md)>
### [**](#Dictionary)[**](https://github.com/apify/apify-client-js/blob/master/src/utils.ts#L260)Dictionary
**Dictionary\<T>: Record\<PropertyKey, T>
#### Type parameters
* **T** = unknown
### [**](#FinalActorVersion)[**](https://github.com/apify/apify-client-js/blob/master/src/resource_clients/actor_version.ts#L108)FinalActorVersion
**FinalActorVersion: [ActorVersion](https://docs.apify.com/api/client/js/api/client/js/reference.md#ActorVersion) & Required\<Pick<[ActorVersion](https://docs.apify.com/api/client/js/api/client/js/reference.md#ActorVersion), versionNumber | buildTag>>
### [**](#KeyValueStoreCollectionListResult)[**](https://github.com/apify/apify-client-js/blob/master/src/resource_clients/key_value_store_collection.ts#L63)KeyValueStoreCollectionListResult
**KeyValueStoreCollectionListResult: Omit<[KeyValueStore](https://docs.apify.com/api/client/js/api/client/js/reference/interface/KeyValueStore.md), stats> & { username?
<!-- -->
: string }
### [**](#LimitsUpdateOptions)[**](https://github.com/apify/apify-client-js/blob/master/src/resource_clients/user.ts#L251)LimitsUpdateOptions
**LimitsUpdateOptions: Pick<[Limits](https://docs.apify.com/api/client/js/api/client/js/reference/interface/Limits.md), maxMonthlyUsageUsd | dataRetentionDays>
### [**](#RequestQueueClientGetRequestResult)[**](https://github.com/apify/apify-client-js/blob/master/src/resource_clients/request_queue.ts#L708)RequestQueueClientGetRequestResult
**RequestQueueClientGetRequestResult: Omit<[RequestQueueClientListItem](https://docs.apify.com/api/client/js/api/client/js/reference/interface/RequestQueueClientListItem.md), retryCount>
### [**](#RequestQueueClientRequestToDelete)[**](https://github.com/apify/apify-client-js/blob/master/src/resource_clients/request_queue.ts#L704)RequestQueueClientRequestToDelete
**RequestQueueClientRequestToDelete: Pick<[RequestQueueClientRequestSchema](https://docs.apify.com/api/client/js/api/client/js/reference/interface/RequestQueueClientRequestSchema.md), id> | Pick<[RequestQueueClientRequestSchema](https://docs.apify.com/api/client/js/api/client/js/reference/interface/RequestQueueClientRequestSchema.md), uniqueKey>
### [**](#RequestQueueCollectionListResult)[**](https://github.com/apify/apify-client-js/blob/master/src/resource_clients/request_queue_collection.ts#L53)RequestQueueCollectionListResult
**RequestQueueCollectionListResult: [PaginatedList](https://docs.apify.com/api/client/js/api/client/js/reference/interface/PaginatedList.md)<[RequestQueue](https://docs.apify.com/api/client/js/api/client/js/reference/interface/RequestQueue.md) & { username?
<!-- -->
: string }> & { unnamed: boolean }
### [**](#RequestQueueRequestsAsyncIterable)[**](https://github.com/apify/apify-client-js/blob/master/src/resource_clients/request_queue.ts#L712)RequestQueueRequestsAsyncIterable
**RequestQueueRequestsAsyncIterable\<T>: AsyncIterable\<T>
#### Type parameters
* **T**
### [**](#ReturnTypeFromOptions)[**](https://github.com/apify/apify-client-js/blob/master/src/resource_clients/key_value_store.ts#L400)ReturnTypeFromOptions
**ReturnTypeFromOptions\<Options>: Options\[stream] extends true ? Readable : Options\[buffer] extends true ? Buffer : JsonValue
#### Type parameters
* **Options**: [KeyValueClientGetRecordOptions](https://docs.apify.com/api/client/js/api/client/js/reference/interface/KeyValueClientGetRecordOptions.md)
### [**](#ScheduleAction)[**](https://github.com/apify/apify-client-js/blob/master/src/resource_clients/schedule.ts#L103)ScheduleAction
**ScheduleAction: [ScheduleActionRunActor](https://docs.apify.com/api/client/js/api/client/js/reference/interface/ScheduleActionRunActor.md) | [ScheduleActionRunActorTask](https://docs.apify.com/api/client/js/api/client/js/reference/interface/ScheduleActionRunActorTask.md)
### [**](#ScheduleCreateOrUpdateData)[**](https://github.com/apify/apify-client-js/blob/master/src/resource_clients/schedule.ts#L84)ScheduleCreateOrUpdateData
**ScheduleCreateOrUpdateData: Partial\<Pick<[Schedule](https://docs.apify.com/api/client/js/api/client/js/reference/interface/Schedule.md), name | title | cronExpression | timezone | isEnabled | isExclusive | description | notifications> & { actions: DistributiveOptional<[ScheduleAction](https://docs.apify.com/api/client/js/api/client/js/reference.md#ScheduleAction), id>\[] }>
### [**](#TaskList)[**](https://github.com/apify/apify-client-js/blob/master/src/resource_clients/task_collection.ts#L56)TaskList
**TaskList: Omit<[Task](https://docs.apify.com/api/client/js/api/client/js/reference/interface/Task.md), options | input>
### [**](#TaskStartOptions)[**](https://github.com/apify/apify-client-js/blob/master/src/resource_clients/task.ts#L239)TaskStartOptions
**TaskStartOptions: Omit<[ActorStartOptions](https://docs.apify.com/api/client/js/api/client/js/reference/interface/ActorStartOptions.md), contentType | forcePermissionLevel>
### [**](#TaskUpdateData)[**](https://github.com/apify/apify-client-js/blob/master/src/resource_clients/task.ts#L231)TaskUpdateData
**TaskUpdateData: Partial\<Pick<[Task](https://docs.apify.com/api/client/js/api/client/js/reference/interface/Task.md), name | title | description | options | input | actorStandby>>
### [**](#WebhookCondition)[**](https://github.com/apify/apify-client-js/blob/master/src/resource_clients/webhook.ts#L127)WebhookCondition
**WebhookCondition: [WebhookAnyRunOfActorCondition](https://docs.apify.com/api/client/js/api/client/js/reference/interface/WebhookAnyRunOfActorCondition.md) | [WebhookAnyRunOfActorTaskCondition](https://docs.apify.com/api/client/js/api/client/js/reference/interface/WebhookAnyRunOfActorTaskCondition.md) | [WebhookCertainRunCondition](https://docs.apify.com/api/client/js/api/client/js/reference/interface/WebhookCertainRunCondition.md)
### [**](#WebhookEventType)[**](https://github.com/apify/apify-client-js/blob/master/src/resource_clients/webhook.ts#L125)WebhookEventType
**WebhookEventType: typeof WEBHOOK\_EVENT\_TYPES\[keyof
<!-- -->
typeof WEBHOOK\_EVENT\_TYPES]
### [**](#WebhookUpdateData)[**](https://github.com/apify/apify-client-js/blob/master/src/resource_clients/webhook.ts#L103)WebhookUpdateData
**WebhookUpdateData: Partial\<Pick<[Webhook](https://docs.apify.com/api/client/js/api/client/js/reference/interface/Webhook.md), isAdHoc | eventTypes | condition | ignoreSslErrors | doNotRetry | requestUrl | payloadTemplate | shouldInterpolateStrings | isApifyIntegration | headersTemplate | description>> & [WebhookIdempotencyKey](https://docs.apify.com/api/client/js/api/client/js/reference/interface/WebhookIdempotencyKey.md)
---
# ActorClient<!-- -->
### Hierarchy
* ResourceClient
* *ActorClient*
## Index[**](#Index)
### Properties
* [**apifyClient](#apifyClient)
* [**baseUrl](#baseUrl)
* [**httpClient](#httpClient)
* [**id](#id)
* [**params](#params)
* [**publicBaseUrl](#publicBaseUrl)
* [**resourcePath](#resourcePath)
* [**safeId](#safeId)
* [**url](#url)
### Methods
* [**build](#build)
* [**builds](#builds)
* [**call](#call)
* [**defaultBuild](#defaultBuild)
* [**delete](#delete)
* [**get](#get)
* [**lastRun](#lastRun)
* [**runs](#runs)
* [**start](#start)
* [**update](#update)
* [**version](#version)
* [**versions](#versions)
* [**webhooks](#webhooks)
## Properties<!-- -->[**](#Properties)
### [**](#apifyClient)[**](https://github.com/apify/apify-client-js/blob/master/src/base/api_client.ts#L35)inheritedapifyClient
**apifyClient: [ApifyClient](https://docs.apify.com/api/client/js/api/client/js/reference/class/ApifyClient.md)
Inherited from ResourceClient.apifyClient
### [**](#baseUrl)[**](https://github.com/apify/apify-client-js/blob/master/src/base/api_client.ts#L27)inheritedbaseUrl
**baseUrl: string
Inherited from ResourceClient.baseUrl
### [**](#httpClient)[**](https://github.com/apify/apify-client-js/blob/master/src/base/api_client.ts#L37)inheritedhttpClient
**httpClient: HttpClient
Inherited from ResourceClient.httpClient
### [**](#id)[**](https://github.com/apify/apify-client-js/blob/master/src/base/api_client.ts#L23)optionalinheritedid
**id?
<!-- -->
: string
Inherited from ResourceClient.id
### [**](#params)[**](https://github.com/apify/apify-client-js/blob/master/src/base/api_client.ts#L39)optionalinheritedparams
**params?
<!-- -->
: Record\<string, unknown>
Inherited from ResourceClient.params
### [**](#publicBaseUrl)[**](https://github.com/apify/apify-client-js/blob/master/src/base/api_client.ts#L29)inheritedpublicBaseUrl
**publicBaseUrl: string
Inherited from ResourceClient.publicBaseUrl
### [**](#resourcePath)[**](https://github.com/apify/apify-client-js/blob/master/src/base/api_client.ts#L31)inheritedresourcePath
**resourcePath: string
Inherited from ResourceClient.resourcePath
### [**](#safeId)[**](https://github.com/apify/apify-client-js/blob/master/src/base/api_client.ts#L25)optionalinheritedsafeId
**safeId?
<!-- -->
: string
Inherited from ResourceClient.safeId
### [**](#url)[**](https://github.com/apify/apify-client-js/blob/master/src/base/api_client.ts#L33)inheritedurl
**url: string
Inherited from ResourceClient.url
## Methods<!-- -->[**](#Methods)
### [**](#build)[**](https://github.com/apify/apify-client-js/blob/master/src/resource_clients/actor.ts#L160)build
* ****build**(versionNumber, options): Promise<[Build](https://docs.apify.com/api/client/js/api/client/js/reference/interface/Build.md)>
- <https://docs.apify.com/api/v2#/reference/actors/build-collection/build-actor>
***
#### Parameters
* ##### versionNumber: string
* ##### options: [ActorBuildOptions](https://docs.apify.com/api/client/js/api/client/js/reference/interface/ActorBuildOptions.md) = <!-- -->{}
#### Returns Promise<[Build](https://docs.apify.com/api/client/js/api/client/js/reference/interface/Build.md)>
### [**](#builds)[**](https://github.com/apify/apify-client-js/blob/master/src/resource_clients/actor.ts#L229)builds
* ****builds**(): [BuildCollectionClient](https://docs.apify.com/api/client/js/api/client/js/reference/class/BuildCollectionClient.md)
- <https://docs.apify.com/api/v2#/reference/actors/build-collection>
***
#### Returns [BuildCollectionClient](https://docs.apify.com/api/client/js/api/client/js/reference/class/BuildCollectionClient.md)
### [**](#call)[**](https://github.com/apify/apify-client-js/blob/master/src/resource_clients/actor.ts#L128)call
* ****call**(input, options): Promise<[ActorRun](https://docs.apify.com/api/client/js/api/client/js/reference/interface/ActorRun.md)>
- Starts an actor and waits for it to finish before returning the Run object. It waits indefinitely, unless the `waitSecs` option is provided. <https://docs.apify.com/api/v2#/reference/actors/run-collection/run-actor>
***
#### Parameters
* ##### optionalinput: unknown
* ##### options: [ActorCallOptions](https://docs.apify.com/api/client/js/api/client/js/reference/interface/ActorCallOptions.md) = <!-- -->{}
#### Returns Promise<[ActorRun](https://docs.apify.com/api/client/js/api/client/js/reference/interface/ActorRun.md)>
### [**](#defaultBuild)[**](https://github.com/apify/apify-client-js/blob/master/src/resource_clients/actor.ts#L187)defaultBuild
* ****defaultBuild**(options): Promise<[BuildClient](https://docs.apify.com/api/client/js/api/client/js/reference/class/BuildClient.md)>
- <https://docs.apify.com/api/v2/act-build-default-get>
***
#### Parameters
* ##### options: [BuildClientGetOptions](https://docs.apify.com/api/client/js/api/client/js/reference/interface/BuildClientGetOptions.md) = <!-- -->{}
#### Returns Promise<[BuildClient](https://docs.apify.com/api/client/js/api/client/js/reference/class/BuildClient.md)>
### [**](#delete)[**](https://github.com/apify/apify-client-js/blob/master/src/resource_clients/actor.ts#L51)delete
* ****delete**(): Promise\<void>
- <https://docs.apify.com/api/v2#/reference/actors/actor-object/delete-actor>
***
#### Returns Promise\<void>
### [**](#get)[**](https://github.com/apify/apify-client-js/blob/master/src/resource_clients/actor.ts#L35)get
* ****get**(): Promise\<undefined | [Actor](https://docs.apify.com/api/client/js/api/client/js/reference/interface/Actor.md)>
- <https://docs.apify.com/api/v2#/reference/actors/actor-object/get-actor>
***
#### Returns Promise\<undefined | [Actor](https://docs.apify.com/api/client/js/api/client/js/reference/interface/Actor.md)>
### [**](#lastRun)[**](https://github.com/apify/apify-client-js/blob/master/src/resource_clients/actor.ts#L208)lastRun
* ****lastRun**(options): [RunClient](https://docs.apify.com/api/client/js/api/client/js/reference/class/RunClient.md)
- <https://docs.apify.com/api/v2#/reference/actors/last-run-object-and-its-storages>
***
#### Parameters
* ##### options: [ActorLastRunOptions](https://docs.apify.com/api/client/js/api/client/js/reference/interface/ActorLastRunOptions.md) = <!-- -->{}
#### Returns [RunClient](https://docs.apify.com/api/client/js/api/client/js/reference/class/RunClient.md)
### [**](#runs)[**](https://github.com/apify/apify-client-js/blob/master/src/resource_clients/actor.ts#L240)runs
* ****runs**(): [RunCollectionClient](https://docs.apify.com/api/client/js/api/client/js/reference/class/RunCollectionClient.md)
- <https://docs.apify.com/api/v2#/reference/actors/run-collection>
***
#### Returns [RunCollectionClient](https://docs.apify.com/api/client/js/api/client/js/reference/class/RunCollectionClient.md)
### [**](#start)[**](https://github.com/apify/apify-client-js/blob/master/src/resource_clients/actor.ts#L59)start
* ****start**(input, options): Promise<[ActorRun](https://docs.apify.com/api/client/js/api/client/js/reference/interface/ActorRun.md)>
- Starts an actor and immediately returns the Run object. <https://docs.apify.com/api/v2#/reference/actors/run-collection/run-actor>
***
#### Parameters
* ##### optionalinput: unknown
* ##### options: [ActorStartOptions](https://docs.apify.com/api/client/js/api/client/js/reference/interface/ActorStartOptions.md) = <!-- -->{}
#### Returns Promise<[ActorRun](https://docs.apify.com/api/client/js/api/client/js/reference/interface/ActorRun.md)>
### [**](#update)[**](https://github.com/apify/apify-client-js/blob/master/src/resource_clients/actor.ts#L42)update
* ****update**(newFields): Promise<[Actor](https://docs.apify.com/api/client/js/api/client/js/reference/interface/Actor.md)>
- <https://docs.apify.com/api/v2#/reference/actors/actor-object/update-actor>
***
#### Parameters
* ##### newFields: Partial\<Pick<[Actor](https://docs.apify.com/api/client/js/api/client/js/reference/interface/Actor.md), name | description | isPublic | isDeprecated | seoTitle | seoDescription | title | restartOnError | versions | categories | defaultRunOptions | actorStandby>>
#### Returns Promise<[Actor](https://docs.apify.com/api/client/js/api/client/js/reference/interface/Actor.md)>
### [**](#version)[**](https://github.com/apify/apify-client-js/blob/master/src/resource_clients/actor.ts#L251)version
* ****version**(versionNumber): [ActorVersionClient](https://docs.apify.com/api/client/js/api/client/js/reference/class/ActorVersionClient.md)
- <https://docs.apify.com/api/v2#/reference/actors/version-object>
***
#### Parameters
* ##### versionNumber: string
#### Returns [ActorVersionClient](https://docs.apify.com/api/client/js/api/client/js/reference/class/ActorVersionClient.md)
### [**](#versions)[**](https://github.com/apify/apify-client-js/blob/master/src/resource_clients/actor.ts#L264)versions
* ****versions**(): [ActorVersionCollectionClient](https://docs.apify.com/api/client/js/api/client/js/reference/class/ActorVersionCollectionClient.md)
- <https://docs.apify.com/api/v2#/reference/actors/version-collection>
***
#### Returns [ActorVersionCollectionClient](https://docs.apify.com/api/client/js/api/client/js/reference/class/ActorVersionCollectionClient.md)
### [**](#webhooks)[**](https://github.com/apify/apify-client-js/blob/master/src/resource_clients/actor.ts#L272)webhooks
* ****webhooks**(): [WebhookCollectionClient](https://docs.apify.com/api/client/js/api/client/js/reference/class/WebhookCollectionClient.md)
- <https://docs.apify.com/api/v2#/reference/actors/webhook-collection>
***
#### Returns [WebhookCollectionClient](https://docs.apify.com/api/client/js/api/client/js/reference/class/WebhookCollectionClient.md)
---
# ActorCollectionClient<!-- -->
### Hierarchy
* ResourceCollectionClient
* *ActorCollectionClient*
## Index[**](#Index)
### Properties
* [**apifyClient](#apifyClient)
* [**baseUrl](#baseUrl)
* [**httpClient](#httpClient)
* [**id](#id)
* [**params](#params)
* [**publicBaseUrl](#publicBaseUrl)
* [**resourcePath](#resourcePath)
* [**safeId](#safeId)
* [**url](#url)
### Methods
* [**create](#create)
* [**list](#list)
## Properties<!-- -->[**](#Properties)
### [**](#apifyClient)[**](https://github.com/apify/apify-client-js/blob/master/src/base/api_client.ts#L35)inheritedapifyClient
**apifyClient: [ApifyClient](https://docs.apify.com/api/client/js/api/client/js/reference/class/ApifyClient.md)
Inherited from ResourceCollectionClient.apifyClient
### [**](#baseUrl)[**](https://github.com/apify/apify-client-js/blob/master/src/base/api_client.ts#L27)inheritedbaseUrl
**baseUrl: string
Inherited from ResourceCollectionClient.baseUrl
### [**](#httpClient)[**](https://github.com/apify/apify-client-js/blob/master/src/base/api_client.ts#L37)inheritedhttpClient
**httpClient: HttpClient
Inherited from ResourceCollectionClient.httpClient
### [**](#id)[**](https://github.com/apify/apify-client-js/blob/master/src/base/api_client.ts#L23)optionalinheritedid
**id?
<!-- -->
: string
Inherited from ResourceCollectionClient.id
### [**](#params)[**](https://github.com/apify/apify-client-js/blob/master/src/base/api_client.ts#L39)optionalinheritedparams
**params?
<!-- -->
: Record\<string, unknown>
Inherited from ResourceCollectionClient.params
### [**](#publicBaseUrl)[**](https://github.com/apify/apify-client-js/blob/master/src/base/api_client.ts#L29)inheritedpublicBaseUrl
**publicBaseUrl: string
Inherited from ResourceCollectionClient.publicBaseUrl
### [**](#resourcePath)[**](https://github.com/apify/apify-client-js/blob/master/src/base/api_client.ts#L31)inheritedresourcePath
**resourcePath: string
Inherited from ResourceCollectionClient.resourcePath
### [**](#safeId)[**](https://github.com/apify/apify-client-js/blob/master/src/base/api_client.ts#L25)optionalinheritedsafeId
**safeId?
<!-- -->
: string
Inherited from ResourceCollectionClient.safeId
### [**](#url)[**](https://github.com/apify/apify-client-js/blob/master/src/base/api_client.ts#L33)inheritedurl
**url: string
Inherited from ResourceCollectionClient.url
## Methods<!-- -->[**](#Methods)
### [**](#create)[**](https://github.com/apify/apify-client-js/blob/master/src/resource_clients/actor_collection.ts#L41)create
* ****create**(actor): Promise<[Actor](https://docs.apify.com/api/client/js/api/client/js/reference/interface/Actor.md)>
- <https://docs.apify.com/api/v2#/reference/actors/actor-collection/create-actor>
***
#### Parameters
* ##### actor: [ActorCollectionCreateOptions](https://docs.apify.com/api/client/js/api/client/js/reference/interface/ActorCollectionCreateOptions.md)
#### Returns Promise<[Actor](https://docs.apify.com/api/client/js/api/client/js/reference/interface/Actor.md)>
### [**](#list)[**](https://github.com/apify/apify-client-js/blob/master/src/resource_clients/actor_collection.ts#L23)list
* ****list**(options): Promise<[ActorCollectionListResult](https://docs.apify.com/api/client/js/api/client/js/reference.md#ActorCollectionListResult)>
- <https://docs.apify.com/api/v2#/reference/actors/actor-collection/get-list-of-actors>
***
#### Parameters
* ##### options: [ActorCollectionListOptions](https://docs.apify.com/api/client/js/api/client/js/reference/interface/ActorCollectionListOptions.md) = <!-- -->{}
#### Returns Promise<[ActorCollectionListResult](https://docs.apify.com/api/client/js/api/client/js/reference.md#ActorCollectionListResult)>
---
# ActorEnvVarClient<!-- -->
### Hierarchy
* ResourceClient
* *ActorEnvVarClient*
## Index[**](#Index)
### Properties
* [**apifyClient](#apifyClient)
* [**baseUrl](#baseUrl)
* [**httpClient](#httpClient)
* [**id](#id)
* [**params](#params)
* [**publicBaseUrl](#publicBaseUrl)
* [**resourcePath](#resourcePath)
* [**safeId](#safeId)
* [**url](#url)
### Methods
* [**delete](#delete)
* [**get](#get)
* [**update](#update)
## Properties<!-- -->[**](#Properties)
### [**](#apifyClient)[**](https://github.com/apify/apify-client-js/blob/master/src/base/api_client.ts#L35)inheritedapifyClient
**apifyClient: [ApifyClient](https://docs.apify.com/api/client/js/api/client/js/reference/class/ApifyClient.md)
Inherited from ResourceClient.apifyClient
### [**](#baseUrl)[**](https://github.com/apify/apify-client-js/blob/master/src/base/api_client.ts#L27)inheritedbaseUrl
**baseUrl: string
Inherited from ResourceClient.baseUrl
### [**](#httpClient)[**](https://github.com/apify/apify-client-js/blob/master/src/base/api_client.ts#L37)inheritedhttpClient
**httpClient: HttpClient
Inherited from ResourceClient.httpClient
### [**](#id)[**](https://github.com/apify/apify-client-js/blob/master/src/base/api_client.ts#L23)optionalinheritedid
**id?
<!-- -->
: string
Inherited from ResourceClient.id
### [**](#params)[**](https://github.com/apify/apify-client-js/blob/master/src/base/api_client.ts#L39)optionalinheritedparams
**params?
<!-- -->
: Record\<string, unknown>
Inherited from ResourceClient.params
### [**](#publicBaseUrl)[**](https://github.com/apify/apify-client-js/blob/master/src/base/api_client.ts#L29)inheritedpublicBaseUrl
**publicBaseUrl: string
Inherited from ResourceClient.publicBaseUrl
### [**](#resourcePath)[**](https://github.com/apify/apify-client-js/blob/master/src/base/api_client.ts#L31)inheritedresourcePath
**resourcePath: string
Inherited from ResourceClient.resourcePath
### [**](#safeId)[**](https://github.com/apify/apify-client-js/blob/master/src/base/api_client.ts#L25)optionalinheritedsafeId
**safeId?
<!-- -->
: string
Inherited from ResourceClient.safeId
### [**](#url)[**](https://github.com/apify/apify-client-js/blob/master/src/base/api_client.ts#L33)inheritedurl
**url: string
Inherited from ResourceClient.url
## Methods<!-- -->[**](#Methods)
### [**](#delete)[**](https://github.com/apify/apify-client-js/blob/master/src/resource_clients/actor_env_var.ts#L36)delete
* ****delete**(): Promise\<void>
- <https://docs.apify.com/api/v2#/reference/actors/environment-variable-object/delete-environment-variable>
***
#### Returns Promise\<void>
### [**](#get)[**](https://github.com/apify/apify-client-js/blob/master/src/resource_clients/actor_env_var.ts#L21)get
* ****get**(): Promise\<undefined | [ActorEnvironmentVariable](https://docs.apify.com/api/client/js/api/client/js/reference/interface/ActorEnvironmentVariable.md)>
- <https://docs.apify.com/api/v2#/reference/actors/environment-variable-object/get-environment-variable>
***
#### Returns Promise\<undefined | [ActorEnvironmentVariable](https://docs.apify.com/api/client/js/api/client/js/reference/interface/ActorEnvironmentVariable.md)>
### [**](#update)[**](https://github.com/apify/apify-client-js/blob/master/src/resource_clients/actor_env_var.ts#L28)update
* ****update**(actorEnvVar): Promise<[ActorEnvironmentVariable](https://docs.apify.com/api/client/js/api/client/js/reference/interface/ActorEnvironmentVariable.md)>
- <https://docs.apify.com/api/v2#/reference/actors/environment-variable-object/update-environment-variable>
***
#### Parameters
* ##### actorEnvVar: [ActorEnvironmentVariable](https://docs.apify.com/api/client/js/api/client/js/reference/interface/ActorEnvironmentVariable.md)
#### Returns Promise<[ActorEnvironmentVariable](https://docs.apify.com/api/client/js/api/client/js/reference/interface/ActorEnvironmentVariable.md)>
---
# ActorEnvVarCollectionClient<!-- -->
### Hierarchy
* ResourceCollectionClient
* *ActorEnvVarCollectionClient*
## Index[**](#Index)
### Properties
* [**apifyClient](#apifyClient)
* [**baseUrl](#baseUrl)
* [**httpClient](#httpClient)
* [**id](#id)
* [**params](#params)
* [**publicBaseUrl](#publicBaseUrl)
* [**resourcePath](#resourcePath)
* [**safeId](#safeId)
* [**url](#url)
### Methods
* [**create](#create)
* [**list](#list)
## Properties<!-- -->[**](#Properties)
### [**](#apifyClient)[**](https://github.com/apify/apify-client-js/blob/master/src/base/api_client.ts#L35)inheritedapifyClient
**apifyClient: [ApifyClient](https://docs.apify.com/api/client/js/api/client/js/reference/class/ApifyClient.md)
Inherited from ResourceCollectionClient.apifyClient
### [**](#baseUrl)[**](https://github.com/apify/apify-client-js/blob/master/src/base/api_client.ts#L27)inheritedbaseUrl
**baseUrl: string
Inherited from ResourceCollectionClient.baseUrl
### [**](#httpClient)[**](https://github.com/apify/apify-client-js/blob/master/src/base/api_client.ts#L37)inheritedhttpClient
**httpClient: HttpClient
Inherited from ResourceCollectionClient.httpClient
### [**](#id)[**](https://github.com/apify/apify-client-js/blob/master/src/base/api_client.ts#L23)optionalinheritedid
**id?
<!-- -->
: string
Inherited from ResourceCollectionClient.id
### [**](#params)[**](https://github.com/apify/apify-client-js/blob/master/src/base/api_client.ts#L39)optionalinheritedparams
**params?
<!-- -->
: Record\<string, unknown>
Inherited from ResourceCollectionClient.params
### [**](#publicBaseUrl)[**](https://github.com/apify/apify-client-js/blob/master/src/base/api_client.ts#L29)inheritedpublicBaseUrl
**publicBaseUrl: string
Inherited from ResourceCollectionClient.publicBaseUrl
### [**](#resourcePath)[**](https://github.com/apify/apify-client-js/blob/master/src/base/api_client.ts#L31)inheritedresourcePath
**resourcePath: string
Inherited from ResourceCollectionClient.resourcePath
### [**](#safeId)[**](https://github.com/apify/apify-client-js/blob/master/src/base/api_client.ts#L25)optionalinheritedsafeId
**safeId?
<!-- -->
: string
Inherited from ResourceCollectionClient.safeId
### [**](#url)[**](https://github.com/apify/apify-client-js/blob/master/src/base/api_client.ts#L33)inheritedurl
**url: string
Inherited from ResourceCollectionClient.url
## Methods<!-- -->[**](#Methods)
### [**](#create)[**](https://github.com/apify/apify-client-js/blob/master/src/resource_clients/actor_env_var_collection.ts#L37)create
* ****create**(actorEnvVar): Promise<[ActorEnvironmentVariable](https://docs.apify.com/api/client/js/api/client/js/reference/interface/ActorEnvironmentVariable.md)>
- <https://docs.apify.com/api/v2#/reference/actors/environment-variable-collection/create-environment-variable>
***
#### Parameters
* ##### actorEnvVar: [ActorEnvironmentVariable](https://docs.apify.com/api/client/js/api/client/js/reference/interface/ActorEnvironmentVariable.md)
#### Returns Promise<[ActorEnvironmentVariable](https://docs.apify.com/api/client/js/api/client/js/reference/interface/ActorEnvironmentVariable.md)>
### [**](#list)[**](https://github.com/apify/apify-client-js/blob/master/src/resource_clients/actor_env_var_collection.ts#L22)list
* ****list**(options): Promise<[ActorEnvVarListResult](https://docs.apify.com/api/client/js/api/client/js/reference.md#ActorEnvVarListResult)>
- <https://docs.apify.com/api/v2#/reference/actors/environment-variable-collection/get-list-of-environment-variables>
***
#### Parameters
* ##### options: [ActorEnvVarCollectionListOptions](https://docs.apify.com/api/client/js/api/client/js/reference/interface/ActorEnvVarCollectionListOptions.md) = <!-- -->{}
#### Returns Promise<[ActorEnvVarListResult](https://docs.apify.com/api/client/js/api/client/js/reference.md#ActorEnvVarListResult)>
---
# ActorVersionClient<!-- -->
### Hierarchy
* ResourceClient
* *ActorVersionClient*
## Index[**](#Index)
### Properties
* [**apifyClient](#apifyClient)
* [**baseUrl](#baseUrl)
* [**httpClient](#httpClient)
* [**id](#id)
* [**params](#params)
* [**publicBaseUrl](#publicBaseUrl)
* [**resourcePath](#resourcePath)
* [**safeId](#safeId)
* [**url](#url)
### Methods
* [**delete](#delete)
* [**envVar](#envVar)
* [**envVars](#envVars)
* [**get](#get)
* [**update](#update)
## Properties<!-- -->[**](#Properties)
### [**](#apifyClient)[**](https://github.com/apify/apify-client-js/blob/master/src/base/api_client.ts#L35)inheritedapifyClient
**apifyClient: [ApifyClient](https://docs.apify.com/api/client/js/api/client/js/reference/class/ApifyClient.md)
Inherited from ResourceClient.apifyClient
### [**](#baseUrl)[**](https://github.com/apify/apify-client-js/blob/master/src/base/api_client.ts#L27)inheritedbaseUrl
**baseUrl: string
Inherited from ResourceClient.baseUrl
### [**](#httpClient)[**](https://github.com/apify/apify-client-js/blob/master/src/base/api_client.ts#L37)inheritedhttpClient
**httpClient: HttpClient
Inherited from ResourceClient.httpClient
### [**](#id)[**](https://github.com/apify/apify-client-js/blob/master/src/base/api_client.ts#L23)optionalinheritedid
**id?
<!-- -->
: string
Inherited from ResourceClient.id
### [**](#params)[**](https://github.com/apify/apify-client-js/blob/master/src/base/api_client.ts#L39)optionalinheritedparams
**params?
<!-- -->
: Record\<string, unknown>
Inherited from ResourceClient.params
### [**](#publicBaseUrl)[**](https://github.com/apify/apify-client-js/blob/master/src/base/api_client.ts#L29)inheritedpublicBaseUrl
**publicBaseUrl: string
Inherited from ResourceClient.publicBaseUrl
### [**](#resourcePath)[**](https://github.com/apify/apify-client-js/blob/master/src/base/api_client.ts#L31)inheritedresourcePath
**resourcePath: string
Inherited from ResourceClient.resourcePath
### [**](#safeId)[**](https://github.com/apify/apify-client-js/blob/master/src/base/api_client.ts#L25)optionalinheritedsafeId
**safeId?
<!-- -->
: string
Inherited from ResourceClient.safeId
### [**](#url)[**](https://github.com/apify/apify-client-js/blob/master/src/base/api_client.ts#L33)inheritedurl
**url: string
Inherited from ResourceClient.url
## Methods<!-- -->[**](#Methods)
### [**](#delete)[**](https://github.com/apify/apify-client-js/blob/master/src/resource_clients/actor_version.ts#L38)delete
* ****delete**(): Promise\<void>
- <https://docs.apify.com/api/v2#/reference/actors/version-object/delete-version>
***
#### Returns Promise\<void>
### [**](#envVar)[**](https://github.com/apify/apify-client-js/blob/master/src/resource_clients/actor_version.ts#L45)envVar
* ****envVar**(envVarName): [ActorEnvVarClient](https://docs.apify.com/api/client/js/api/client/js/reference/class/ActorEnvVarClient.md)
- TODO: <https://docs.apify.com/api/v2#/reference/actors/env-var-object>
***
#### Parameters
* ##### envVarName: string
#### Returns [ActorEnvVarClient](https://docs.apify.com/api/client/js/api/client/js/reference/class/ActorEnvVarClient.md)
### [**](#envVars)[**](https://github.com/apify/apify-client-js/blob/master/src/resource_clients/actor_version.ts#L58)envVars
* ****envVars**(): [ActorEnvVarCollectionClient](https://docs.apify.com/api/client/js/api/client/js/reference/class/ActorEnvVarCollectionClient.md)
- TODO: <https://docs.apify.com/api/v2#/reference/actors/env-var-collection>
***
#### Returns [ActorEnvVarCollectionClient](https://docs.apify.com/api/client/js/api/client/js/reference/class/ActorEnvVarCollectionClient.md)
### [**](#get)[**](https://github.com/apify/apify-client-js/blob/master/src/resource_clients/actor_version.ts#L22)get
* ****get**(): Promise\<undefined | [FinalActorVersion](https://docs.apify.com/api/client/js/api/client/js/reference.md#FinalActorVersion)>
- <https://docs.apify.com/api/v2#/reference/actors/version-object/get-version>
***
#### Returns Promise\<undefined | [FinalActorVersion](https://docs.apify.com/api/client/js/api/client/js/reference.md#FinalActorVersion)>
### [**](#update)[**](https://github.com/apify/apify-client-js/blob/master/src/resource_clients/actor_version.ts#L29)update
* ****update**(newFields): Promise<[FinalActorVersion](https://docs.apify.com/api/client/js/api/client/js/reference.md#FinalActorVersion)>
- <https://docs.apify.com/api/v2#/reference/actors/version-object/update-version>
***
#### Parameters
* ##### newFields: [ActorVersion](https://docs.apify.com/api/client/js/api/client/js/reference.md#ActorVersion)
#### Returns Promise<[FinalActorVersion](https://docs.apify.com/api/client/js/api/client/js/reference.md#FinalActorVersion)>
---
# ActorVersionCollectionClient<!-- -->
### Hierarchy
* ResourceCollectionClient
* *ActorVersionCollectionClient*
## Index[**](#Index)
### Properties
* [**apifyClient](#apifyClient)
* [**baseUrl](#baseUrl)
* [**httpClient](#httpClient)
* [**id](#id)
* [**params](#params)
* [**publicBaseUrl](#publicBaseUrl)
* [**resourcePath](#resourcePath)
* [**safeId](#safeId)
* [**url](#url)
### Methods
* [**create](#create)
* [**list](#list)
## Properties<!-- -->[**](#Properties)
### [**](#apifyClient)[**](https://github.com/apify/apify-client-js/blob/master/src/base/api_client.ts#L35)inheritedapifyClient
**apifyClient: [ApifyClient](https://docs.apify.com/api/client/js/api/client/js/reference/class/ApifyClient.md)
Inherited from ResourceCollectionClient.apifyClient
### [**](#baseUrl)[**](https://github.com/apify/apify-client-js/blob/master/src/base/api_client.ts#L27)inheritedbaseUrl
**baseUrl: string
Inherited from ResourceCollectionClient.baseUrl
### [**](#httpClient)[**](https://github.com/apify/apify-client-js/blob/master/src/base/api_client.ts#L37)inheritedhttpClient
**httpClient: HttpClient
Inherited from ResourceCollectionClient.httpClient
### [**](#id)[**](https://github.com/apify/apify-client-js/blob/master/src/base/api_client.ts#L23)optionalinheritedid
**id?
<!-- -->
: string
Inherited from ResourceCollectionClient.id
### [**](#params)[**](https://github.com/apify/apify-client-js/blob/master/src/base/api_client.ts#L39)optionalinheritedparams
**params?
<!-- -->
: Record\<string, unknown>
Inherited from ResourceCollectionClient.params
### [**](#publicBaseUrl)[**](https://github.com/apify/apify-client-js/blob/master/src/base/api_client.ts#L29)inheritedpublicBaseUrl
**publicBaseUrl: string
Inherited from ResourceCollectionClient.publicBaseUrl
### [**](#resourcePath)[**](https://github.com/apify/apify-client-js/blob/master/src/base/api_client.ts#L31)inheritedresourcePath
**resourcePath: string
Inherited from ResourceCollectionClient.resourcePath
### [**](#safeId)[**](https://github.com/apify/apify-client-js/blob/master/src/base/api_client.ts#L25)optionalinheritedsafeId
**safeId?
<!-- -->
: string
Inherited from ResourceCollectionClient.safeId
### [**](#url)[**](https://github.com/apify/apify-client-js/blob/master/src/base/api_client.ts#L33)inheritedurl
**url: string
Inherited from ResourceCollectionClient.url
## Methods<!-- -->[**](#Methods)
### [**](#create)[**](https://github.com/apify/apify-client-js/blob/master/src/resource_clients/actor_version_collection.ts#L38)create
* ****create**(actorVersion): Promise<[FinalActorVersion](https://docs.apify.com/api/client/js/api/client/js/reference.md#FinalActorVersion)>
- <https://docs.apify.com/api/v2#/reference/actors/version-collection/create-version>
***
#### Parameters
* ##### actorVersion: [ActorVersion](https://docs.apify.com/api/client/js/api/client/js/reference.md#ActorVersion)
#### Returns Promise<[FinalActorVersion](https://docs.apify.com/api/client/js/api/client/js/reference.md#FinalActorVersion)>
### [**](#list)[**](https://github.com/apify/apify-client-js/blob/master/src/resource_clients/actor_version_collection.ts#L22)list
* ****list**(options): Promise<[ActorVersionListResult](https://docs.apify.com/api/client/js/api/client/js/reference.md#ActorVersionListResult)>
- <https://docs.apify.com/api/v2#/reference/actors/version-collection/get-list-of-versions>
***
#### Parameters
* ##### options: [ActorVersionCollectionListOptions](https://docs.apify.com/api/client/js/api/client/js/reference/interface/ActorVersionCollectionListOptions.md) = <!-- -->{}
#### Returns Promise<[ActorVersionListResult](https://docs.apify.com/api/client/js/api/client/js/reference.md#ActorVersionListResult)>
---
# ApifyApiError<!-- -->
An `ApifyApiError` is thrown for successful HTTP requests that reach the API, but the API responds with an error response. Typically, those are rate limit errors and internal errors, which are automatically retried, or validation errors, which are thrown immediately, because a correction by the user is needed.
### Hierarchy
* Error
* *ApifyApiError*
## Index[**](#Index)
### Properties
* [**attempt](#attempt)
* [**cause](#cause)
* [**clientMethod](#clientMethod)
* [**data](#data)
* [**httpMethod](#httpMethod)
* [**message](#message)
* [**name](#name)
* [**originalStack](#originalStack)
* [**path](#path)
* [**stack](#stack)
* [**statusCode](#statusCode)
* [**type](#type)
* [**stackTraceLimit](#stackTraceLimit)
### Methods
* [**captureStackTrace](#captureStackTrace)
* [**prepareStackTrace](#prepareStackTrace)
## Properties<!-- -->[**](#Properties)
### [**](#attempt)[**](https://github.com/apify/apify-client-js/blob/master/src/apify_api_error.ts#L46)attempt
**attempt: number
Number of the API call attempt.
### [**](#cause)[**](https://undefined/apify/apify-client-js/blob/master/website/node_modules/typescript/src/lib.es2022.error.d.ts#L24)externaloptionalinheritedcause
**cause?
<!-- -->
: unknown
Inherited from Error.cause
### [**](#clientMethod)[**](https://github.com/apify/apify-client-js/blob/master/src/apify_api_error.ts#L31)clientMethod
**clientMethod: string
The invoked resource client and the method. Known issue: Sometimes it displays as `unknown` because it can't be parsed from a stack trace.
### [**](#data)[**](https://github.com/apify/apify-client-js/blob/master/src/apify_api_error.ts#L67)optionaldata
**data?
<!-- -->
: Record\<string, unknown>
Additional data provided by the API about the error
### [**](#httpMethod)[**](https://github.com/apify/apify-client-js/blob/master/src/apify_api_error.ts#L51)optionalhttpMethod
**httpMethod?
<!-- -->
: string
HTTP method of the API call.
### [**](#message)[**](https://undefined/apify/apify-client-js/blob/master/website/node_modules/typescript/src/lib.es5.d.ts#L1077)externalinheritedmessage
**message: string
Inherited from Error.message
### [**](#name)[**](https://github.com/apify/apify-client-js/blob/master/src/apify_api_error.ts#L25)name
**name: string
Overrides Error.name
### [**](#originalStack)[**](https://github.com/apify/apify-client-js/blob/master/src/apify_api_error.ts#L62)originalStack
**originalStack: string
Original stack trace of the exception. It is replaced by a more informative stack with API call information.
### [**](#path)[**](https://github.com/apify/apify-client-js/blob/master/src/apify_api_error.ts#L56)optionalpath
**path?
<!-- -->
: string
Full path of the API endpoint (URL excluding origin).
### [**](#stack)[**](https://undefined/apify/apify-client-js/blob/master/website/node_modules/typescript/src/lib.es5.d.ts#L1078)externaloptionalinheritedstack
**stack?
<!-- -->
: string
Inherited from Error.stack
### [**](#statusCode)[**](https://github.com/apify/apify-client-js/blob/master/src/apify_api_error.ts#L36)statusCode
**statusCode: number
HTTP status code of the error.
### [**](#type)[**](https://github.com/apify/apify-client-js/blob/master/src/apify_api_error.ts#L41)optionaltype
**type?
<!-- -->
: string
The type of the error, as returned by the API.
### [**](#stackTraceLimit)[**](https://undefined/apify/apify-client-js/blob/master/node_modules/@types/node/globals.d.ts#L68)staticexternalinheritedstackTraceLimit
**stackTraceLimit: number
Inherited from Error.stackTraceLimit
The `Error.stackTraceLimit` property specifies the number of stack frames collected by a stack trace (whether generated by `new Error().stack` or `Error.captureStackTrace(obj)`).
The default value is `10` but may be set to any valid JavaScript number. Changes will affect any stack trace captured *after* the value has been changed.
If set to a non-number value, or set to a negative number, stack traces will not capture any frames.
## Methods<!-- -->[**](#Methods)
### [**](#captureStackTrace)[**](https://undefined/apify/apify-client-js/blob/master/node_modules/@types/node/globals.d.ts#L52)staticexternalinheritedcaptureStackTrace
* ****captureStackTrace**(targetObject, constructorOpt): void
- Inherited from Error.captureStackTrace
Creates a `.stack` property on `targetObject`, which when accessed returns a string representing the location in the code at which `Error.captureStackTrace()` was called.
const myObject = {};
Error.captureStackTrace(myObject);
myObject.stack; // Similar to new Error().stack
The first line of the trace will be prefixed with `${myObject.name}: ${myObject.message}`.
The optional `constructorOpt` argument accepts a function. If given, all frames above `constructorOpt`, including `constructorOpt`, will be omitted from the generated stack trace.
The `constructorOpt` argument is useful for hiding implementation details of error generation from the user. For instance:
function a() { b(); }
function b() { c(); }
function c() { // Create an error without stack trace to avoid calculating the stack trace twice. const { stackTraceLimit } = Error; Error.stackTraceLimit = 0; const error = new Error(); Error.stackTraceLimit = stackTraceLimit;
// Capture the stack trace above function b
Error.captureStackTrace(error, b); // Neither function c, nor b is included in the stack trace
throw error;
}
a();
***
#### Parameters
* ##### externaltargetObject: object
* ##### externaloptionalconstructorOpt: Function
#### Returns void
### [**](#prepareStackTrace)[**](https://undefined/apify/apify-client-js/blob/master/node_modules/@types/node/globals.d.ts#L56)staticexternalinheritedprepareStackTrace
* ****prepareStackTrace**(err, stackTraces): any
- Inherited from Error.prepareStackTrace
* **@see**
<https://v8.dev/docs/stack-trace-api#customizing-stack-traces>
***
#### Parameters
* ##### externalerr: Error
* ##### externalstackTraces: CallSite\[]
#### Returns any
---
# ApifyClient<!-- -->
ApifyClient is the official library to access [Apify API](https://docs.apify.com/api/v2) from your JavaScript applications. It runs both in Node.js and browser.
## Index[**](#Index)
### Constructors
* [**constructor](#constructor)
### Properties
* [**baseUrl](#baseUrl)
* [**httpClient](#httpClient)
* [**logger](#logger)
* [**publicBaseUrl](#publicBaseUrl)
* [**stats](#stats)
* [**token](#token)
### Methods
* [**actor](#actor)
* [**actors](#actors)
* [**build](#build)
* [**builds](#builds)
* [**dataset](#dataset)
* [**datasets](#datasets)
* [**keyValueStore](#keyValueStore)
* [**keyValueStores](#keyValueStores)
* [**log](#log)
* [**requestQueue](#requestQueue)
* [**requestQueues](#requestQueues)
* [**run](#run)
* [**runs](#runs)
* [**schedule](#schedule)
* [**schedules](#schedules)
* [**setStatusMessage](#setStatusMessage)
* [**store](#store)
* [**task](#task)
* [**tasks](#tasks)
* [**user](#user)
* [**webhook](#webhook)
* [**webhookDispatch](#webhookDispatch)
* [**webhookDispatches](#webhookDispatches)
* [**webhooks](#webhooks)
## Constructors<!-- -->[**](#Constructors)
### [**](#constructor)[**](https://github.com/apify/apify-client-js/blob/master/src/apify_client.ts#L55)constructor
* ****new ApifyClient**(options): [ApifyClient](https://docs.apify.com/api/client/js/api/client/js/reference/class/ApifyClient.md)
- #### Parameters
* ##### options: [ApifyClientOptions](https://docs.apify.com/api/client/js/api/client/js/reference/interface/ApifyClientOptions.md) = <!-- -->{}
#### Returns [ApifyClient](https://docs.apify.com/api/client/js/api/client/js/reference/class/ApifyClient.md)
## Properties<!-- -->[**](#Properties)
### [**](#baseUrl)[**](https://github.com/apify/apify-client-js/blob/master/src/apify_client.ts#L43)baseUrl
**baseUrl: string
### [**](#httpClient)[**](https://github.com/apify/apify-client-js/blob/master/src/apify_client.ts#L53)httpClient
**httpClient: HttpClient
### [**](#logger)[**](https://github.com/apify/apify-client-js/blob/master/src/apify_client.ts#L51)logger
**logger: Log
### [**](#publicBaseUrl)[**](https://github.com/apify/apify-client-js/blob/master/src/apify_client.ts#L45)publicBaseUrl
**publicBaseUrl: string
### [**](#stats)[**](https://github.com/apify/apify-client-js/blob/master/src/apify_client.ts#L49)stats
**stats: Statistics
### [**](#token)[**](https://github.com/apify/apify-client-js/blob/master/src/apify_client.ts#L47)optionaltoken
**token?
<!-- -->
: string
## Methods<!-- -->[**](#Methods)
### [**](#actor)[**](https://github.com/apify/apify-client-js/blob/master/src/apify_client.ts#L120)actor
* ****actor**(id): [ActorClient](https://docs.apify.com/api/client/js/api/client/js/reference/class/ActorClient.md)
- <https://docs.apify.com/api/v2#/reference/actors/actor-object>
***
#### Parameters
* ##### id: string
#### Returns [ActorClient](https://docs.apify.com/api/client/js/api/client/js/reference/class/ActorClient.md)
### [**](#actors)[**](https://github.com/apify/apify-client-js/blob/master/src/apify_client.ts#L113)actors
* ****actors**(): [ActorCollectionClient](https://docs.apify.com/api/client/js/api/client/js/reference/class/ActorCollectionClient.md)
- <https://docs.apify.com/api/v2#/reference/actors/actor-collection>
***
#### Returns [ActorCollectionClient](https://docs.apify.com/api/client/js/api/client/js/reference/class/ActorCollectionClient.md)
### [**](#build)[**](https://github.com/apify/apify-client-js/blob/master/src/apify_client.ts#L139)build
* ****build**(id): [BuildClient](https://docs.apify.com/api/client/js/api/client/js/reference/class/BuildClient.md)
- <https://docs.apify.com/api/v2#/reference/actor-builds/build-object>
***
#### Parameters
* ##### id: string
#### Returns [BuildClient](https://docs.apify.com/api/client/js/api/client/js/reference/class/BuildClient.md)
### [**](#builds)[**](https://github.com/apify/apify-client-js/blob/master/src/apify_client.ts#L132)builds
* ****builds**(): [BuildCollectionClient](https://docs.apify.com/api/client/js/api/client/js/reference/class/BuildCollectionClient.md)
- <https://docs.apify.com/api/v2#/reference/actor-builds/build-collection>
***
#### Returns [BuildCollectionClient](https://docs.apify.com/api/client/js/api/client/js/reference/class/BuildCollectionClient.md)
### [**](#dataset)[**](https://github.com/apify/apify-client-js/blob/master/src/apify_client.ts#L158)dataset
* ****dataset**\<Data>(id): [DatasetClient](https://docs.apify.com/api/client/js/api/client/js/reference/class/DatasetClient.md)\<Data>
- <https://docs.apify.com/api/v2#/reference/datasets/dataset>
***
#### Parameters
* ##### id: string
#### Returns [DatasetClient](https://docs.apify.com/api/client/js/api/client/js/reference/class/DatasetClient.md)\<Data>
### [**](#datasets)[**](https://github.com/apify/apify-client-js/blob/master/src/apify_client.ts#L151)datasets
* ****datasets**(): [DatasetCollectionClient](https://docs.apify.com/api/client/js/api/client/js/reference/class/DatasetCollectionClient.md)
- <https://docs.apify.com/api/v2#/reference/datasets/dataset-collection>
***
#### Returns [DatasetCollectionClient](https://docs.apify.com/api/client/js/api/client/js/reference/class/DatasetCollectionClient.md)
### [**](#keyValueStore)[**](https://github.com/apify/apify-client-js/blob/master/src/apify_client.ts#L179)keyValueStore
* ****keyValueStore**(id): [KeyValueStoreClient](https://docs.apify.com/api/client/js/api/client/js/reference/class/KeyValueStoreClient.md)
- <https://docs.apify.com/api/v2#/reference/key-value-stores/store-object>
***
#### Parameters
* ##### id: string
#### Returns [KeyValueStoreClient](https://docs.apify.com/api/client/js/api/client/js/reference/class/KeyValueStoreClient.md)
### [**](#keyValueStores)[**](https://github.com/apify/apify-client-js/blob/master/src/apify_client.ts#L172)keyValueStores
* ****keyValueStores**(): [KeyValueStoreCollectionClient](https://docs.apify.com/api/client/js/api/client/js/reference/class/KeyValueStoreCollectionClient.md)
- <https://docs.apify.com/api/v2#/reference/key-value-stores/store-collection>
***
#### Returns [KeyValueStoreCollectionClient](https://docs.apify.com/api/client/js/api/client/js/reference/class/KeyValueStoreCollectionClient.md)
### [**](#log)[**](https://github.com/apify/apify-client-js/blob/master/src/apify_client.ts#L191)log
* ****log**(buildOrRunId): [LogClient](https://docs.apify.com/api/client/js/api/client/js/reference/class/LogClient.md)
- <https://docs.apify.com/api/v2#/reference/logs>
***
#### Parameters
* ##### buildOrRunId: string
#### Returns [LogClient](https://docs.apify.com/api/client/js/api/client/js/reference/class/LogClient.md)
### [**](#requestQueue)[**](https://github.com/apify/apify-client-js/blob/master/src/apify_client.ts#L210)requestQueue
* ****requestQueue**(id, options): [RequestQueueClient](https://docs.apify.com/api/client/js/api/client/js/reference/class/RequestQueueClient.md)
- <https://docs.apify.com/api/v2#/reference/request-queues/queue>
***
#### Parameters
* ##### id: string
* ##### options: [RequestQueueUserOptions](https://docs.apify.com/api/client/js/api/client/js/reference/interface/RequestQueueUserOptions.md) = <!-- -->{}
#### Returns [RequestQueueClient](https://docs.apify.com/api/client/js/api/client/js/reference/class/RequestQueueClient.md)
### [**](#requestQueues)[**](https://github.com/apify/apify-client-js/blob/master/src/apify_client.ts#L203)requestQueues
* ****requestQueues**(): [RequestQueueCollectionClient](https://docs.apify.com/api/client/js/api/client/js/reference/class/RequestQueueCollectionClient.md)
- <https://docs.apify.com/api/v2#/reference/request-queues/queue-collection>
***
#### Returns [RequestQueueCollectionClient](https://docs.apify.com/api/client/js/api/client/js/reference/class/RequestQueueCollectionClient.md)
### [**](#run)[**](https://github.com/apify/apify-client-js/blob/master/src/apify_client.ts#L240)run
* ****run**(id): [RunClient](https://docs.apify.com/api/client/js/api/client/js/reference/class/RunClient.md)
- <https://docs.apify.com/api/v2#/reference/actor-runs/run-object-and-its-storages>
***
#### Parameters
* ##### id: string
#### Returns [RunClient](https://docs.apify.com/api/client/js/api/client/js/reference/class/RunClient.md)
### [**](#runs)[**](https://github.com/apify/apify-client-js/blob/master/src/apify_client.ts#L230)runs
* ****runs**(): [RunCollectionClient](https://docs.apify.com/api/client/js/api/client/js/reference/class/RunCollectionClient.md)
- <https://docs.apify.com/api/v2#/reference/actor-runs/run-collection>
***
#### Returns [RunCollectionClient](https://docs.apify.com/api/client/js/api/client/js/reference/class/RunCollectionClient.md)
### [**](#schedule)[**](https://github.com/apify/apify-client-js/blob/master/src/apify_client.ts#L278)schedule
* ****schedule**(id): [ScheduleClient](https://docs.apify.com/api/client/js/api/client/js/reference/class/ScheduleClient.md)
- <https://docs.apify.com/api/v2#/reference/schedules/schedule-object>
***
#### Parameters
* ##### id: string
#### Returns [ScheduleClient](https://docs.apify.com/api/client/js/api/client/js/reference/class/ScheduleClient.md)
### [**](#schedules)[**](https://github.com/apify/apify-client-js/blob/master/src/apify_client.ts#L271)schedules
* ****schedules**(): [ScheduleCollectionClient](https://docs.apify.com/api/client/js/api/client/js/reference/class/ScheduleCollectionClient.md)
- <https://docs.apify.com/api/v2#/reference/schedules/schedules-collection>
***
#### Returns [ScheduleCollectionClient](https://docs.apify.com/api/client/js/api/client/js/reference/class/ScheduleCollectionClient.md)
### [**](#setStatusMessage)[**](https://github.com/apify/apify-client-js/blob/master/src/apify_client.ts#L344)setStatusMessage
* ****setStatusMessage**(message, options): Promise\<void>
- #### Parameters
* ##### message: string
* ##### optionaloptions: SetStatusMessageOptions
#### Returns Promise\<void>
### [**](#store)[**](https://github.com/apify/apify-client-js/blob/master/src/apify_client.ts#L340)store
* ****store**(): [StoreCollectionClient](https://docs.apify.com/api/client/js/api/client/js/reference/class/StoreCollectionClient.md)
- <https://docs.apify.com/api/v2/#/reference/store>
***
#### Returns [StoreCollectionClient](https://docs.apify.com/api/client/js/api/client/js/reference/class/StoreCollectionClient.md)
### [**](#task)[**](https://github.com/apify/apify-client-js/blob/master/src/apify_client.ts#L259)task
* ****task**(id): [TaskClient](https://docs.apify.com/api/client/js/api/client/js/reference/class/TaskClient.md)
- <https://docs.apify.com/api/v2#/reference/actor-tasks/task-object>
***
#### Parameters
* ##### id: string
#### Returns [TaskClient](https://docs.apify.com/api/client/js/api/client/js/reference/class/TaskClient.md)
### [**](#tasks)[**](https://github.com/apify/apify-client-js/blob/master/src/apify_client.ts#L252)tasks
* ****tasks**(): [TaskCollectionClient](https://docs.apify.com/api/client/js/api/client/js/reference/class/TaskCollectionClient.md)
- <https://docs.apify.com/api/v2#/reference/actor-tasks/task-collection>
***
#### Returns [TaskCollectionClient](https://docs.apify.com/api/client/js/api/client/js/reference/class/TaskCollectionClient.md)
### [**](#user)[**](https://github.com/apify/apify-client-js/blob/master/src/apify_client.ts#L290)user
* ****user**(id): [UserClient](https://docs.apify.com/api/client/js/api/client/js/reference/class/UserClient.md)
- <https://docs.apify.com/api/v2#/reference/users>
***
#### Parameters
* ##### id: string = <!-- -->ME\_USER\_NAME\_PLACEHOLDER
#### Returns [UserClient](https://docs.apify.com/api/client/js/api/client/js/reference/class/UserClient.md)
### [**](#webhook)[**](https://github.com/apify/apify-client-js/blob/master/src/apify_client.ts#L309)webhook
* ****webhook**(id): [WebhookClient](https://docs.apify.com/api/client/js/api/client/js/reference/class/WebhookClient.md)
- <https://docs.apify.com/api/v2#/reference/webhooks/webhook-object>
***
#### Parameters
* ##### id: string
#### Returns [WebhookClient](https://docs.apify.com/api/client/js/api/client/js/reference/class/WebhookClient.md)
### [**](#webhookDispatch)[**](https://github.com/apify/apify-client-js/blob/master/src/apify_client.ts#L328)webhookDispatch
* ****webhookDispatch**(id): [WebhookDispatchClient](https://docs.apify.com/api/client/js/api/client/js/reference/class/WebhookDispatchClient.md)
- <https://docs.apify.com/api/v2#/reference/webhook-dispatches/webhook-dispatch-object>
***
#### Parameters
* ##### id: string
#### Returns [WebhookDispatchClient](https://docs.apify.com/api/client/js/api/client/js/reference/class/WebhookDispatchClient.md)
### [**](#webhookDispatches)[**](https://github.com/apify/apify-client-js/blob/master/src/apify_client.ts#L321)webhookDispatches
* ****webhookDispatches**(): [WebhookDispatchCollectionClient](https://docs.apify.com/api/client/js/api/client/js/reference/class/WebhookDispatchCollectionClient.md)
- <https://docs.apify.com/api/v2#/reference/webhook-dispatches>
***
#### Returns [WebhookDispatchCollectionClient](https://docs.apify.com/api/client/js/api/client/js/reference/class/WebhookDispatchCollectionClient.md)
### [**](#webhooks)[**](https://github.com/apify/apify-client-js/blob/master/src/apify_client.ts#L302)webhooks
* ****webhooks**(): [WebhookCollectionClient](https://docs.apify.com/api/client/js/api/client/js/reference/class/WebhookCollectionClient.md)
- <https://docs.apify.com/api/v2#/reference/webhooks/webhook-collection>
***
#### Returns [WebhookCollectionClient](https://docs.apify.com/api/client/js/api/client/js/reference/class/WebhookCollectionClient.md)
---
# BuildClient<!-- -->
### Hierarchy
* ResourceClient
* *BuildClient*
## Index[**](#Index)
### Properties
* [**apifyClient](#apifyClient)
* [**baseUrl](#baseUrl)
* [**httpClient](#httpClient)
* [**id](#id)
* [**params](#params)
* [**publicBaseUrl](#publicBaseUrl)
* [**resourcePath](#resourcePath)
* [**safeId](#safeId)
* [**url](#url)
### Methods
* [**abort](#abort)
* [**delete](#delete)
* [**get](#get)
* [**getOpenApiDefinition](#getOpenApiDefinition)
* [**log](#log)
* [**waitForFinish](#waitForFinish)
## Properties<!-- -->[**](#Properties)
### [**](#apifyClient)[**](https://github.com/apify/apify-client-js/blob/master/src/base/api_client.ts#L35)inheritedapifyClient
**apifyClient: [ApifyClient](https://docs.apify.com/api/client/js/api/client/js/reference/class/ApifyClient.md)
Inherited from ResourceClient.apifyClient
### [**](#baseUrl)[**](https://github.com/apify/apify-client-js/blob/master/src/base/api_client.ts#L27)inheritedbaseUrl
**baseUrl: string
Inherited from ResourceClient.baseUrl
### [**](#httpClient)[**](https://github.com/apify/apify-client-js/blob/master/src/base/api_client.ts#L37)inheritedhttpClient
**httpClient: HttpClient
Inherited from ResourceClient.httpClient
### [**](#id)[**](https://github.com/apify/apify-client-js/blob/master/src/base/api_client.ts#L23)optionalinheritedid
**id?
<!-- -->
: string
Inherited from ResourceClient.id
### [**](#params)[**](https://github.com/apify/apify-client-js/blob/master/src/base/api_client.ts#L39)optionalinheritedparams
**params?
<!-- -->
: Record\<string, unknown>
Inherited from ResourceClient.params
### [**](#publicBaseUrl)[**](https://github.com/apify/apify-client-js/blob/master/src/base/api_client.ts#L29)inheritedpublicBaseUrl
**publicBaseUrl: string
Inherited from ResourceClient.publicBaseUrl
### [**](#resourcePath)[**](https://github.com/apify/apify-client-js/blob/master/src/base/api_client.ts#L31)inheritedresourcePath
**resourcePath: string
Inherited from ResourceClient.resourcePath
### [**](#safeId)[**](https://github.com/apify/apify-client-js/blob/master/src/base/api_client.ts#L25)optionalinheritedsafeId
**safeId?
<!-- -->
: string
Inherited from ResourceClient.safeId
### [**](#url)[**](https://github.com/apify/apify-client-js/blob/master/src/base/api_client.ts#L33)inheritedurl
**url: string
Inherited from ResourceClient.url
## Methods<!-- -->[**](#Methods)
### [**](#abort)[**](https://github.com/apify/apify-client-js/blob/master/src/resource_clients/build.ts#L39)abort
* ****abort**(): Promise<[Build](https://docs.apify.com/api/client/js/api/client/js/reference/interface/Build.md)>
- <https://docs.apify.com/api/v2#/reference/actor-builds/abort-build/abort-build>
***
#### Returns Promise<[Build](https://docs.apify.com/api/client/js/api/client/js/reference/interface/Build.md)>
### [**](#delete)[**](https://github.com/apify/apify-client-js/blob/master/src/resource_clients/build.ts#L52)delete
* ****delete**(): Promise\<void>
- <https://docs.apify.com/api/v2#/reference/actor-builds/delete-build/delete-build>
***
#### Returns Promise\<void>
### [**](#get)[**](https://github.com/apify/apify-client-js/blob/master/src/resource_clients/build.ts#L25)get
* ****get**(options): Promise\<undefined | [Build](https://docs.apify.com/api/client/js/api/client/js/reference/interface/Build.md)>
- <https://docs.apify.com/api/v2#/reference/actor-builds/build-object/get-build>
***
#### Parameters
* ##### options: [BuildClientGetOptions](https://docs.apify.com/api/client/js/api/client/js/reference/interface/BuildClientGetOptions.md) = <!-- -->{}
#### Returns Promise\<undefined | [Build](https://docs.apify.com/api/client/js/api/client/js/reference/interface/Build.md)>
### [**](#getOpenApiDefinition)[**](https://github.com/apify/apify-client-js/blob/master/src/resource_clients/build.ts#L59)getOpenApiDefinition
* ****getOpenApiDefinition**(): Promise<[OpenApiDefinition](https://docs.apify.com/api/client/js/api/client/js/reference/interface/OpenApiDefinition.md)>
- <https://docs.apify.com/api/v2/actor-build-openapi-json-get>
***
#### Returns Promise<[OpenApiDefinition](https://docs.apify.com/api/client/js/api/client/js/reference/interface/OpenApiDefinition.md)>
### [**](#log)[**](https://github.com/apify/apify-client-js/blob/master/src/resource_clients/build.ts#L94)log
* ****log**(): [LogClient](https://docs.apify.com/api/client/js/api/client/js/reference/class/LogClient.md)
- <https://docs.apify.com/api/v2#/reference/actor-builds/build-log>
***
#### Returns [LogClient](https://docs.apify.com/api/client/js/api/client/js/reference/class/LogClient.md)
### [**](#waitForFinish)[**](https://github.com/apify/apify-client-js/blob/master/src/resource_clients/build.ts#L80)waitForFinish
* ****waitForFinish**(options): Promise<[Build](https://docs.apify.com/api/client/js/api/client/js/reference/interface/Build.md)>
- Returns a promise that resolves with the finished Build object when the provided actor build finishes or with the unfinished Build object when the `waitSecs` timeout lapses. The promise is NOT rejected based on run status. You can inspect the `status` property of the Build object to find out its status.
The difference between this function and the `waitForFinish` parameter of the `get` method is the fact that this function can wait indefinitely. Its use is preferable to the `waitForFinish` parameter alone, which it uses internally.
This is useful when you need to immediately start a run after a build finishes.
***
#### Parameters
* ##### options: [BuildClientWaitForFinishOptions](https://docs.apify.com/api/client/js/api/client/js/reference/interface/BuildClientWaitForFinishOptions.md) = <!-- -->{}
#### Returns Promise<[Build](https://docs.apify.com/api/client/js/api/client/js/reference/interface/Build.md)>
---
# BuildCollectionClient<!-- -->
### Hierarchy
* ResourceCollectionClient
* *BuildCollectionClient*
## Index[**](#Index)
### Properties
* [**apifyClient](#apifyClient)
* [**baseUrl](#baseUrl)
* [**httpClient](#httpClient)
* [**id](#id)
* [**params](#params)
* [**publicBaseUrl](#publicBaseUrl)
* [**resourcePath](#resourcePath)
* [**safeId](#safeId)
* [**url](#url)
### Methods
* [**list](#list)
## Properties<!-- -->[**](#Properties)
### [**](#apifyClient)[**](https://github.com/apify/apify-client-js/blob/master/src/base/api_client.ts#L35)inheritedapifyClient
**apifyClient: [ApifyClient](https://docs.apify.com/api/client/js/api/client/js/reference/class/ApifyClient.md)
Inherited from ResourceCollectionClient.apifyClient
### [**](#baseUrl)[**](https://github.com/apify/apify-client-js/blob/master/src/base/api_client.ts#L27)inheritedbaseUrl
**baseUrl: string
Inherited from ResourceCollectionClient.baseUrl
### [**](#httpClient)[**](https://github.com/apify/apify-client-js/blob/master/src/base/api_client.ts#L37)inheritedhttpClient
**httpClient: HttpClient
Inherited from ResourceCollectionClient.httpClient
### [**](#id)[**](https://github.com/apify/apify-client-js/blob/master/src/base/api_client.ts#L23)optionalinheritedid
**id?
<!-- -->
: string
Inherited from ResourceCollectionClient.id
### [**](#params)[**](https://github.com/apify/apify-client-js/blob/master/src/base/api_client.ts#L39)optionalinheritedparams
**params?
<!-- -->
: Record\<string, unknown>
Inherited from ResourceCollectionClient.params
### [**](#publicBaseUrl)[**](https://github.com/apify/apify-client-js/blob/master/src/base/api_client.ts#L29)inheritedpublicBaseUrl
**publicBaseUrl: string
Inherited from ResourceCollectionClient.publicBaseUrl
### [**](#resourcePath)[**](https://github.com/apify/apify-client-js/blob/master/src/base/api_client.ts#L31)inheritedresourcePath
**resourcePath: string
Inherited from ResourceCollectionClient.resourcePath
### [**](#safeId)[**](https://github.com/apify/apify-client-js/blob/master/src/base/api_client.ts#L25)optionalinheritedsafeId
**safeId?
<!-- -->
: string
Inherited from ResourceCollectionClient.safeId
### [**](#url)[**](https://github.com/apify/apify-client-js/blob/master/src/base/api_client.ts#L33)inheritedurl
**url: string
Inherited from ResourceCollectionClient.url
## Methods<!-- -->[**](#Methods)
### [**](#list)[**](https://github.com/apify/apify-client-js/blob/master/src/resource_clients/build_collection.ts#L22)list
* ****list**(options): Promise<[BuildCollectionClientListResult](https://docs.apify.com/api/client/js/api/client/js/reference.md#BuildCollectionClientListResult)>
- <https://docs.apify.com/api/v2#/reference/actors/build-collection/get-list-of-builds>
***
#### Parameters
* ##### options: [BuildCollectionClientListOptions](https://docs.apify.com/api/client/js/api/client/js/reference/interface/BuildCollectionClientListOptions.md) = <!-- -->{}
#### Returns Promise<[BuildCollectionClientListResult](https://docs.apify.com/api/client/js/api/client/js/reference.md#BuildCollectionClientListResult)>
---
# DatasetClient<!-- --> \<Data>
### Hierarchy
* ResourceClient
* *DatasetClient*
## Index[**](#Index)
### Properties
* [**apifyClient](#apifyClient)
* [**baseUrl](#baseUrl)
* [**httpClient](#httpClient)
* [**id](#id)
* [**params](#params)
* [**publicBaseUrl](#publicBaseUrl)
* [**resourcePath](#resourcePath)
* [**safeId](#safeId)
* [**url](#url)
### Methods
* [**createItemsPublicUrl](#createItemsPublicUrl)
* [**delete](#delete)
* [**downloadItems](#downloadItems)
* [**get](#get)
* [**getStatistics](#getStatistics)
* [**listItems](#listItems)
* [**pushItems](#pushItems)
* [**update](#update)
## Properties<!-- -->[**](#Properties)
### [**](#apifyClient)[**](https://github.com/apify/apify-client-js/blob/master/src/base/api_client.ts#L35)inheritedapifyClient
**apifyClient: [ApifyClient](https://docs.apify.com/api/client/js/api/client/js/reference/class/ApifyClient.md)
Inherited from ResourceClient.apifyClient
### [**](#baseUrl)[**](https://github.com/apify/apify-client-js/blob/master/src/base/api_client.ts#L27)inheritedbaseUrl
**baseUrl: string
Inherited from ResourceClient.baseUrl
### [**](#httpClient)[**](https://github.com/apify/apify-client-js/blob/master/src/base/api_client.ts#L37)inheritedhttpClient
**httpClient: HttpClient
Inherited from ResourceClient.httpClient
### [**](#id)[**](https://github.com/apify/apify-client-js/blob/master/src/base/api_client.ts#L23)optionalinheritedid
**id?
<!-- -->
: string
Inherited from ResourceClient.id
### [**](#params)[**](https://github.com/apify/apify-client-js/blob/master/src/base/api_client.ts#L39)optionalinheritedparams
**params?
<!-- -->
: Record\<string, unknown>
Inherited from ResourceClient.params
### [**](#publicBaseUrl)[**](https://github.com/apify/apify-client-js/blob/master/src/base/api_client.ts#L29)inheritedpublicBaseUrl
**publicBaseUrl: string
Inherited from ResourceClient.publicBaseUrl
### [**](#resourcePath)[**](https://github.com/apify/apify-client-js/blob/master/src/base/api_client.ts#L31)inheritedresourcePath
**resourcePath: string
Inherited from ResourceClient.resourcePath
### [**](#safeId)[**](https://github.com/apify/apify-client-js/blob/master/src/base/api_client.ts#L25)optionalinheritedsafeId
**safeId?
<!-- -->
: string
Inherited from ResourceClient.safeId
### [**](#url)[**](https://github.com/apify/apify-client-js/blob/master/src/base/api_client.ts#L33)inheritedurl
**url: string
Inherited from ResourceClient.url
## Methods<!-- -->[**](#Methods)
### [**](#createItemsPublicUrl)[**](https://github.com/apify/apify-client-js/blob/master/src/resource_clients/dataset.ts#L181)createItemsPublicUrl
* ****createItemsPublicUrl**(options): Promise\<string>
- Generates a URL that can be used to access dataset items.
If the client has permission to access the dataset's URL signing key, the URL will include a signature which will allow the link to work even without authentication.
You can optionally control how long the signed URL should be valid using the `expiresInSecs` option. This value sets the expiration duration in seconds from the time the URL is generated. If not provided, the URL will not expire.
Any other options (like `limit` or `prefix`) will be included as query parameters in the URL.
***
#### Parameters
* ##### options: [DatasetClientCreateItemsUrlOptions](https://docs.apify.com/api/client/js/api/client/js/reference/interface/DatasetClientCreateItemsUrlOptions.md) = <!-- -->{}
#### Returns Promise\<string>
### [**](#delete)[**](https://github.com/apify/apify-client-js/blob/master/src/resource_clients/dataset.ts#L50)delete
* ****delete**(): Promise\<void>
- <https://docs.apify.com/api/v2#/reference/datasets/dataset/delete-dataset>
***
#### Returns Promise\<void>
### [**](#downloadItems)[**](https://github.com/apify/apify-client-js/blob/master/src/resource_clients/dataset.ts#L91)downloadItems
* ****downloadItems**(format, options): Promise\<Buffer>
- Unlike `listItems` which returns a PaginationList with an array of individual dataset items, `downloadItems` returns the items serialized to the provided format. <https://docs.apify.com/api/v2#/reference/datasets/item-collection/get-items>
***
#### Parameters
* ##### format: [DownloadItemsFormat](https://docs.apify.com/api/client/js/api/client/js/reference/enum/DownloadItemsFormat.md)
* ##### options: [DatasetClientDownloadItemsOptions](https://docs.apify.com/api/client/js/api/client/js/reference/interface/DatasetClientDownloadItemsOptions.md) = <!-- -->{}
#### Returns Promise\<Buffer>
### [**](#get)[**](https://github.com/apify/apify-client-js/blob/master/src/resource_clients/dataset.ts#L34)get
* ****get**(): Promise\<undefined | [Dataset](https://docs.apify.com/api/client/js/api/client/js/reference/interface/Dataset.md)>
- <https://docs.apify.com/api/v2#/reference/datasets/dataset/get-dataset>
***
#### Returns Promise\<undefined | [Dataset](https://docs.apify.com/api/client/js/api/client/js/reference/interface/Dataset.md)>
### [**](#getStatistics)[**](https://github.com/apify/apify-client-js/blob/master/src/resource_clients/dataset.ts#L153)getStatistics
* ****getStatistics**(): Promise\<undefined | [DatasetStatistics](https://docs.apify.com/api/client/js/api/client/js/reference/interface/DatasetStatistics.md)>
- <https://docs.apify.com/api/v2#tag/DatasetsStatistics/operation/dataset_statistics_get>
***
#### Returns Promise\<undefined | [DatasetStatistics](https://docs.apify.com/api/client/js/api/client/js/reference/interface/DatasetStatistics.md)>
### [**](#listItems)[**](https://github.com/apify/apify-client-js/blob/master/src/resource_clients/dataset.ts#L57)listItems
* ****listItems**(options): Promise<[PaginatedList](https://docs.apify.com/api/client/js/api/client/js/reference/interface/PaginatedList.md)\<Data>>
- <https://docs.apify.com/api/v2#/reference/datasets/item-collection/get-items>
***
#### Parameters
* ##### options: [DatasetClientListItemOptions](https://docs.apify.com/api/client/js/api/client/js/reference/interface/DatasetClientListItemOptions.md) = <!-- -->{}
#### Returns Promise<[PaginatedList](https://docs.apify.com/api/client/js/api/client/js/reference/interface/PaginatedList.md)\<Data>>
### [**](#pushItems)[**](https://github.com/apify/apify-client-js/blob/master/src/resource_clients/dataset.ts#L134)pushItems
* ****pushItems**(items): Promise\<void>
- <https://docs.apify.com/api/v2#/reference/datasets/item-collection/put-items>
***
#### Parameters
* ##### items: string | Data | string\[] | Data\[]
#### Returns Promise\<void>
### [**](#update)[**](https://github.com/apify/apify-client-js/blob/master/src/resource_clients/dataset.ts#L41)update
* ****update**(newFields): Promise<[Dataset](https://docs.apify.com/api/client/js/api/client/js/reference/interface/Dataset.md)>
- <https://docs.apify.com/api/v2#/reference/datasets/dataset/update-dataset>
***
#### Parameters
* ##### newFields: [DatasetClientUpdateOptions](https://docs.apify.com/api/client/js/api/client/js/reference/interface/DatasetClientUpdateOptions.md)
#### Returns Promise<[Dataset](https://docs.apify.com/api/client/js/api/client/js/reference/interface/Dataset.md)>
---
# DatasetCollectionClient<!-- -->
### Hierarchy
* ResourceCollectionClient
* *DatasetCollectionClient*
## Index[**](#Index)
### Properties
* [**apifyClient](#apifyClient)
* [**baseUrl](#baseUrl)
* [**httpClient](#httpClient)
* [**id](#id)
* [**params](#params)
* [**publicBaseUrl](#publicBaseUrl)
* [**resourcePath](#resourcePath)
* [**safeId](#safeId)
* [**url](#url)
### Methods
* [**getOrCreate](#getOrCreate)
* [**list](#list)
## Properties<!-- -->[**](#Properties)
### [**](#apifyClient)[**](https://github.com/apify/apify-client-js/blob/master/src/base/api_client.ts#L35)inheritedapifyClient
**apifyClient: [ApifyClient](https://docs.apify.com/api/client/js/api/client/js/reference/class/ApifyClient.md)
Inherited from ResourceCollectionClient.apifyClient
### [**](#baseUrl)[**](https://github.com/apify/apify-client-js/blob/master/src/base/api_client.ts#L27)inheritedbaseUrl
**baseUrl: string
Inherited from ResourceCollectionClient.baseUrl
### [**](#httpClient)[**](https://github.com/apify/apify-client-js/blob/master/src/base/api_client.ts#L37)inheritedhttpClient
**httpClient: HttpClient
Inherited from ResourceCollectionClient.httpClient
### [**](#id)[**](https://github.com/apify/apify-client-js/blob/master/src/base/api_client.ts#L23)optionalinheritedid
**id?
<!-- -->
: string
Inherited from ResourceCollectionClient.id
### [**](#params)[**](https://github.com/apify/apify-client-js/blob/master/src/base/api_client.ts#L39)optionalinheritedparams
**params?
<!-- -->
: Record\<string, unknown>
Inherited from ResourceCollectionClient.params
### [**](#publicBaseUrl)[**](https://github.com/apify/apify-client-js/blob/master/src/base/api_client.ts#L29)inheritedpublicBaseUrl
**publicBaseUrl: string
Inherited from ResourceCollectionClient.publicBaseUrl
### [**](#resourcePath)[**](https://github.com/apify/apify-client-js/blob/master/src/base/api_client.ts#L31)inheritedresourcePath
**resourcePath: string
Inherited from ResourceCollectionClient.resourcePath
### [**](#safeId)[**](https://github.com/apify/apify-client-js/blob/master/src/base/api_client.ts#L25)optionalinheritedsafeId
**safeId?
<!-- -->
: string
Inherited from ResourceCollectionClient.safeId
### [**](#url)[**](https://github.com/apify/apify-client-js/blob/master/src/base/api_client.ts#L33)inheritedurl
**url: string
Inherited from ResourceCollectionClient.url
## Methods<!-- -->[**](#Methods)
### [**](#getOrCreate)[**](https://github.com/apify/apify-client-js/blob/master/src/resource_clients/dataset_collection.ts#L39)getOrCreate
* ****getOrCreate**(name, options): Promise<[Dataset](https://docs.apify.com/api/client/js/api/client/js/reference/interface/Dataset.md)>
- <https://docs.apify.com/api/v2#/reference/datasets/dataset-collection/create-dataset>
***
#### Parameters
* ##### optionalname: string
* ##### optionaloptions: [DatasetCollectionClientGetOrCreateOptions](https://docs.apify.com/api/client/js/api/client/js/reference/interface/DatasetCollectionClientGetOrCreateOptions.md)
#### Returns Promise<[Dataset](https://docs.apify.com/api/client/js/api/client/js/reference/interface/Dataset.md)>
### [**](#list)[**](https://github.com/apify/apify-client-js/blob/master/src/resource_clients/dataset_collection.ts#L22)list
* ****list**(options): Promise<[DatasetCollectionClientListResult](https://docs.apify.com/api/client/js/api/client/js/reference.md#DatasetCollectionClientListResult)>
- <https://docs.apify.com/api/v2#/reference/datasets/dataset-collection/get-list-of-datasets>
***
#### Parameters
* ##### options: [DatasetCollectionClientListOptions](https://docs.apify.com/api/client/js/api/client/js/reference/interface/DatasetCollectionClientListOptions.md) = <!-- -->{}
#### Returns Promise<[DatasetCollectionClientListResult](https://docs.apify.com/api/client/js/api/client/js/reference.md#DatasetCollectionClientListResult)>
---
# InvalidResponseBodyError<!-- -->
This error exists for the quite common situation, where only a partial JSON response is received and an attempt to parse the JSON throws an error. In most cases this can be resolved by retrying the request. We do that by identifying this error in HttpClient.
The properties mimic AxiosError for easier integration in HttpClient error handling.
### Hierarchy
* Error
* *InvalidResponseBodyError*
## Index[**](#Index)
### Constructors
* [**constructor](#constructor)
### Properties
* [**cause](#cause)
* [**code](#code)
* [**message](#message)
* [**name](#name)
* [**response](#response)
* [**stack](#stack)
* [**stackTraceLimit](#stackTraceLimit)
### Methods
* [**captureStackTrace](#captureStackTrace)
* [**prepareStackTrace](#prepareStackTrace)
## Constructors<!-- -->[**](#Constructors)
### [**](#constructor)[**](https://github.com/apify/apify-client-js/blob/master/src/interceptors.ts#L24)constructor
* ****new InvalidResponseBodyError**(response, cause): [InvalidResponseBodyError](https://docs.apify.com/api/client/js/api/client/js/reference/class/InvalidResponseBodyError.md)
- Overrides Error.constructor
#### Parameters
* ##### response: AxiosResponse\<any, any, {}>
* ##### cause: Error
#### Returns [InvalidResponseBodyError](https://docs.apify.com/api/client/js/api/client/js/reference/class/InvalidResponseBodyError.md)
## Properties<!-- -->[**](#Properties)
### [**](#cause)[**](https://github.com/apify/apify-client-js/blob/master/src/interceptors.ts#L22)cause
**cause: Error
Overrides Error.cause
### [**](#code)[**](https://github.com/apify/apify-client-js/blob/master/src/interceptors.ts#L18)code
**code: string
### [**](#message)[**](https://undefined/apify/apify-client-js/blob/master/website/node_modules/typescript/src/lib.es5.d.ts#L1077)externalinheritedmessage
**message: string
Inherited from Error.message
### [**](#name)[**](https://undefined/apify/apify-client-js/blob/master/website/node_modules/typescript/src/lib.es5.d.ts#L1076)externalinheritedname
**name: string
Inherited from Error.name
### [**](#response)[**](https://github.com/apify/apify-client-js/blob/master/src/interceptors.ts#L20)response
**response: AxiosResponse\<any, any, {}>
### [**](#stack)[**](https://undefined/apify/apify-client-js/blob/master/website/node_modules/typescript/src/lib.es5.d.ts#L1078)externaloptionalinheritedstack
**stack?
<!-- -->
: string
Inherited from Error.stack
### [**](#stackTraceLimit)[**](https://undefined/apify/apify-client-js/blob/master/node_modules/@types/node/globals.d.ts#L68)staticexternalinheritedstackTraceLimit
**stackTraceLimit: number
Inherited from Error.stackTraceLimit
The `Error.stackTraceLimit` property specifies the number of stack frames collected by a stack trace (whether generated by `new Error().stack` or `Error.captureStackTrace(obj)`).
The default value is `10` but may be set to any valid JavaScript number. Changes will affect any stack trace captured *after* the value has been changed.
If set to a non-number value, or set to a negative number, stack traces will not capture any frames.
## Methods<!-- -->[**](#Methods)
### [**](#captureStackTrace)[**](https://undefined/apify/apify-client-js/blob/master/node_modules/@types/node/globals.d.ts#L52)staticexternalinheritedcaptureStackTrace
* ****captureStackTrace**(targetObject, constructorOpt): void
- Inherited from Error.captureStackTrace
Creates a `.stack` property on `targetObject`, which when accessed returns a string representing the location in the code at which `Error.captureStackTrace()` was called.
const myObject = {};
Error.captureStackTrace(myObject);
myObject.stack; // Similar to new Error().stack
The first line of the trace will be prefixed with `${myObject.name}: ${myObject.message}`.
The optional `constructorOpt` argument accepts a function. If given, all frames above `constructorOpt`, including `constructorOpt`, will be omitted from the generated stack trace.
The `constructorOpt` argument is useful for hiding implementation details of error generation from the user. For instance:
function a() { b(); }
function b() { c(); }
function c() { // Create an error without stack trace to avoid calculating the stack trace twice. const { stackTraceLimit } = Error; Error.stackTraceLimit = 0; const error = new Error(); Error.stackTraceLimit = stackTraceLimit;
// Capture the stack trace above function b
Error.captureStackTrace(error, b); // Neither function c, nor b is included in the stack trace
throw error;
}
a();
***
#### Parameters
* ##### externaltargetObject: object
* ##### externaloptionalconstructorOpt: Function
#### Returns void
### [**](#prepareStackTrace)[**](https://undefined/apify/apify-client-js/blob/master/node_modules/@types/node/globals.d.ts#L56)staticexternalinheritedprepareStackTrace
* ****prepareStackTrace**(err, stackTraces): any
- Inherited from Error.prepareStackTrace
* **@see**
<https://v8.dev/docs/stack-trace-api#customizing-stack-traces>
***
#### Parameters
* ##### externalerr: Error
* ##### externalstackTraces: CallSite\[]
#### Returns any
---
# KeyValueStoreClient<!-- -->
### Hierarchy
* ResourceClient
* *KeyValueStoreClient*
## Index[**](#Index)
### Properties
* [**apifyClient](#apifyClient)
* [**baseUrl](#baseUrl)
* [**httpClient](#httpClient)
* [**id](#id)
* [**params](#params)
* [**publicBaseUrl](#publicBaseUrl)
* [**resourcePath](#resourcePath)
* [**safeId](#safeId)
* [**url](#url)
### Methods
* [**createKeysPublicUrl](#createKeysPublicUrl)
* [**delete](#delete)
* [**deleteRecord](#deleteRecord)
* [**get](#get)
* [**getRecord](#getRecord)
* [**getRecordPublicUrl](#getRecordPublicUrl)
* [**listKeys](#listKeys)
* [**recordExists](#recordExists)
* [**setRecord](#setRecord)
* [**update](#update)
## Properties<!-- -->[**](#Properties)
### [**](#apifyClient)[**](https://github.com/apify/apify-client-js/blob/master/src/base/api_client.ts#L35)inheritedapifyClient
**apifyClient: [ApifyClient](https://docs.apify.com/api/client/js/api/client/js/reference/class/ApifyClient.md)
Inherited from ResourceClient.apifyClient
### [**](#baseUrl)[**](https://github.com/apify/apify-client-js/blob/master/src/base/api_client.ts#L27)inheritedbaseUrl
**baseUrl: string
Inherited from ResourceClient.baseUrl
### [**](#httpClient)[**](https://github.com/apify/apify-client-js/blob/master/src/base/api_client.ts#L37)inheritedhttpClient
**httpClient: HttpClient
Inherited from ResourceClient.httpClient
### [**](#id)[**](https://github.com/apify/apify-client-js/blob/master/src/base/api_client.ts#L23)optionalinheritedid
**id?
<!-- -->
: string
Inherited from ResourceClient.id
### [**](#params)[**](https://github.com/apify/apify-client-js/blob/master/src/base/api_client.ts#L39)optionalinheritedparams
**params?
<!-- -->
: Record\<string, unknown>
Inherited from ResourceClient.params
### [**](#publicBaseUrl)[**](https://github.com/apify/apify-client-js/blob/master/src/base/api_client.ts#L29)inheritedpublicBaseUrl
**publicBaseUrl: string
Inherited from ResourceClient.publicBaseUrl
### [**](#resourcePath)[**](https://github.com/apify/apify-client-js/blob/master/src/base/api_client.ts#L31)inheritedresourcePath
**resourcePath: string
Inherited from ResourceClient.resourcePath
### [**](#safeId)[**](https://github.com/apify/apify-client-js/blob/master/src/base/api_client.ts#L25)optionalinheritedsafeId
**safeId?
<!-- -->
: string
Inherited from ResourceClient.safeId
### [**](#url)[**](https://github.com/apify/apify-client-js/blob/master/src/base/api_client.ts#L33)inheritedurl
**url: string
Inherited from ResourceClient.url
## Methods<!-- -->[**](#Methods)
### [**](#createKeysPublicUrl)[**](https://github.com/apify/apify-client-js/blob/master/src/resource_clients/key_value_store.ts#L122)createKeysPublicUrl
* ****createKeysPublicUrl**(options): Promise\<string>
- Generates a URL that can be used to access key-value store keys.
If the client has permission to access the key-value store's URL signing key, the URL will include a signature which will allow the link to work even without authentication.
You can optionally control how long the signed URL should be valid using the `expiresInSecs` option. This value sets the expiration duration in seconds from the time the URL is generated. If not provided, the URL will not expire.
Any other options (like `limit` or `prefix`) will be included as query parameters in the URL.
***
#### Parameters
* ##### options: [KeyValueClientCreateKeysUrlOptions](https://docs.apify.com/api/client/js/api/client/js/reference/interface/KeyValueClientCreateKeysUrlOptions.md) = <!-- -->{}
#### Returns Promise\<string>
### [**](#delete)[**](https://github.com/apify/apify-client-js/blob/master/src/resource_clients/key_value_store.ts#L60)delete
* ****delete**(): Promise\<void>
- <https://docs.apify.com/api/v2#/reference/key-value-stores/store-object/delete-store>
***
#### Returns Promise\<void>
### [**](#deleteRecord)[**](https://github.com/apify/apify-client-js/blob/master/src/resource_clients/key_value_store.ts#L314)deleteRecord
* ****deleteRecord**(key): Promise\<void>
- <https://docs.apify.com/api/v2#/reference/key-value-stores/record/delete-record>
***
#### Parameters
* ##### key: string
#### Returns Promise\<void>
### [**](#get)[**](https://github.com/apify/apify-client-js/blob/master/src/resource_clients/key_value_store.ts#L44)get
* ****get**(): Promise\<undefined | [KeyValueStore](https://docs.apify.com/api/client/js/api/client/js/reference/interface/KeyValueStore.md)>
- <https://docs.apify.com/api/v2#/reference/key-value-stores/store-object/get-store>
***
#### Returns Promise\<undefined | [KeyValueStore](https://docs.apify.com/api/client/js/api/client/js/reference/interface/KeyValueStore.md)>
### [**](#getRecord)[**](https://github.com/apify/apify-client-js/blob/master/src/resource_clients/key_value_store.ts#L187)[**](https://github.com/apify/apify-client-js/blob/master/src/resource_clients/key_value_store.ts#L189)[**](https://github.com/apify/apify-client-js/blob/master/src/resource_clients/key_value_store.ts#L194)getRecord
* ****getRecord**(key): Promise\<undefined | [KeyValueStoreRecord](https://docs.apify.com/api/client/js/api/client/js/reference/interface/KeyValueStoreRecord.md)\<JsonValue>>
* ****getRecord**\<Options>(key, options): Promise\<undefined | [KeyValueStoreRecord](https://docs.apify.com/api/client/js/api/client/js/reference/interface/KeyValueStoreRecord.md)<[ReturnTypeFromOptions](https://docs.apify.com/api/client/js/api/client/js/reference.md#ReturnTypeFromOptions)\<Options>>>
- You can use the `buffer` option to get the value in a Buffer (Node.js) or ArrayBuffer (browser) format. In Node.js (not in browser) you can also use the `stream` option to get a Readable stream.
When the record does not exist, the function resolves to `undefined`. It does NOT resolve to a `KeyValueStore` record with an `undefined` value. <https://docs.apify.com/api/v2#/reference/key-value-stores/record/get-record>
***
#### Parameters
* ##### key: string
#### Returns Promise\<undefined | [KeyValueStoreRecord](https://docs.apify.com/api/client/js/api/client/js/reference/interface/KeyValueStoreRecord.md)\<JsonValue>>
### [**](#getRecordPublicUrl)[**](https://github.com/apify/apify-client-js/blob/master/src/resource_clients/key_value_store.ts#L95)getRecordPublicUrl
* ****getRecordPublicUrl**(key): Promise\<string>
- Generates a URL that can be used to access key-value store record.
If the client has permission to access the key-value store's URL signing key, the URL will include a signature to verify its authenticity.
***
#### Parameters
* ##### key: string
#### Returns Promise\<string>
### [**](#listKeys)[**](https://github.com/apify/apify-client-js/blob/master/src/resource_clients/key_value_store.ts#L67)listKeys
* ****listKeys**(options): Promise<[KeyValueClientListKeysResult](https://docs.apify.com/api/client/js/api/client/js/reference/interface/KeyValueClientListKeysResult.md)>
- <https://docs.apify.com/api/v2#/reference/key-value-stores/key-collection/get-list-of-keys>
***
#### Parameters
* ##### options: [KeyValueClientListKeysOptions](https://docs.apify.com/api/client/js/api/client/js/reference/interface/KeyValueClientListKeysOptions.md) = <!-- -->{}
#### Returns Promise<[KeyValueClientListKeysResult](https://docs.apify.com/api/client/js/api/client/js/reference/interface/KeyValueClientListKeysResult.md)>
### [**](#recordExists)[**](https://github.com/apify/apify-client-js/blob/master/src/resource_clients/key_value_store.ts#L161)recordExists
* ****recordExists**(key): Promise\<boolean>
- Tests whether a record with the given key exists in the key-value store without retrieving its value.
<https://docs.apify.com/api/v2#/reference/key-value-stores/record/get-record>
***
#### Parameters
* ##### key: string
The queried record key.
#### Returns Promise\<boolean>
`true` if the record exists, `false` if it does not.
### [**](#setRecord)[**](https://github.com/apify/apify-client-js/blob/master/src/resource_clients/key_value_store.ts#L258)setRecord
* ****setRecord**(record, options): Promise\<void>
- The value in the record can be a stream object (detected by having the `.pipe` and `.on` methods). However, note that in that case following redirects or retrying the request if it fails (for example due to rate limiting) isn't possible. If you want to keep that behavior, you need to collect the whole stream contents into a Buffer and then send the full buffer. See [this StackOverflow answer](https://stackoverflow.com/a/14269536/7292139) for an example how to do that.
<https://docs.apify.com/api/v2#/reference/key-value-stores/record/put-record>
***
#### Parameters
* ##### record: [KeyValueStoreRecord](https://docs.apify.com/api/client/js/api/client/js/reference/interface/KeyValueStoreRecord.md)\<JsonValue>
* ##### options: [KeyValueStoreRecordOptions](https://docs.apify.com/api/client/js/api/client/js/reference/interface/KeyValueStoreRecordOptions.md) = <!-- -->{}
#### Returns Promise\<void>
### [**](#update)[**](https://github.com/apify/apify-client-js/blob/master/src/resource_clients/key_value_store.ts#L51)update
* ****update**(newFields): Promise<[KeyValueStore](https://docs.apify.com/api/client/js/api/client/js/reference/interface/KeyValueStore.md)>
- <https://docs.apify.com/api/v2#/reference/key-value-stores/store-object/update-store>
***
#### Parameters
* ##### newFields: [KeyValueClientUpdateOptions](https://docs.apify.com/api/client/js/api/client/js/reference/interface/KeyValueClientUpdateOptions.md)
#### Returns Promise<[KeyValueStore](https://docs.apify.com/api/client/js/api/client/js/reference/interface/KeyValueStore.md)>
---
# KeyValueStoreCollectionClient<!-- -->
### Hierarchy
* ResourceCollectionClient
* *KeyValueStoreCollectionClient*
## Index[**](#Index)
### Properties
* [**apifyClient](#apifyClient)
* [**baseUrl](#baseUrl)
* [**httpClient](#httpClient)
* [**id](#id)
* [**params](#params)
* [**publicBaseUrl](#publicBaseUrl)
* [**resourcePath](#resourcePath)
* [**safeId](#safeId)
* [**url](#url)
### Methods
* [**getOrCreate](#getOrCreate)
* [**list](#list)
## Properties<!-- -->[**](#Properties)
### [**](#apifyClient)[**](https://github.com/apify/apify-client-js/blob/master/src/base/api_client.ts#L35)inheritedapifyClient
**apifyClient: [ApifyClient](https://docs.apify.com/api/client/js/api/client/js/reference/class/ApifyClient.md)
Inherited from ResourceCollectionClient.apifyClient
### [**](#baseUrl)[**](https://github.com/apify/apify-client-js/blob/master/src/base/api_client.ts#L27)inheritedbaseUrl
**baseUrl: string
Inherited from ResourceCollectionClient.baseUrl
### [**](#httpClient)[**](https://github.com/apify/apify-client-js/blob/master/src/base/api_client.ts#L37)inheritedhttpClient
**httpClient: HttpClient
Inherited from ResourceCollectionClient.httpClient
### [**](#id)[**](https://github.com/apify/apify-client-js/blob/master/src/base/api_client.ts#L23)optionalinheritedid
**id?
<!-- -->
: string
Inherited from ResourceCollectionClient.id
### [**](#params)[**](https://github.com/apify/apify-client-js/blob/master/src/base/api_client.ts#L39)optionalinheritedparams
**params?
<!-- -->
: Record\<string, unknown>
Inherited from ResourceCollectionClient.params
### [**](#publicBaseUrl)[**](https://github.com/apify/apify-client-js/blob/master/src/base/api_client.ts#L29)inheritedpublicBaseUrl
**publicBaseUrl: string
Inherited from ResourceCollectionClient.publicBaseUrl
### [**](#resourcePath)[**](https://github.com/apify/apify-client-js/blob/master/src/base/api_client.ts#L31)inheritedresourcePath
**resourcePath: string
Inherited from ResourceCollectionClient.resourcePath
### [**](#safeId)[**](https://github.com/apify/apify-client-js/blob/master/src/base/api_client.ts#L25)optionalinheritedsafeId
**safeId?
<!-- -->
: string
Inherited from ResourceCollectionClient.safeId
### [**](#url)[**](https://github.com/apify/apify-client-js/blob/master/src/base/api_client.ts#L33)inheritedurl
**url: string
Inherited from ResourceCollectionClient.url
## Methods<!-- -->[**](#Methods)
### [**](#getOrCreate)[**](https://github.com/apify/apify-client-js/blob/master/src/resource_clients/key_value_store_collection.ts#L41)getOrCreate
* ****getOrCreate**(name, options): Promise<[KeyValueStore](https://docs.apify.com/api/client/js/api/client/js/reference/interface/KeyValueStore.md)>
- <https://docs.apify.com/api/v2#/reference/key-value-stores/store-collection/create-key-value-store>
***
#### Parameters
* ##### optionalname: string
* ##### optionaloptions: [KeyValueStoreCollectionClientGetOrCreateOptions](https://docs.apify.com/api/client/js/api/client/js/reference/interface/KeyValueStoreCollectionClientGetOrCreateOptions.md)
#### Returns Promise<[KeyValueStore](https://docs.apify.com/api/client/js/api/client/js/reference/interface/KeyValueStore.md)>
### [**](#list)[**](https://github.com/apify/apify-client-js/blob/master/src/resource_clients/key_value_store_collection.ts#L22)list
* ****list**(options): Promise<[PaginatedList](https://docs.apify.com/api/client/js/api/client/js/reference/interface/PaginatedList.md)<[KeyValueStoreCollectionListResult](https://docs.apify.com/api/client/js/api/client/js/reference.md#KeyValueStoreCollectionListResult)>>
- <https://docs.apify.com/api/v2#/reference/key-value-stores/store-collection/get-list-of-key-value-stores>
***
#### Parameters
* ##### options: [KeyValueStoreCollectionClientListOptions](https://docs.apify.com/api/client/js/api/client/js/reference/interface/KeyValueStoreCollectionClientListOptions.md) = <!-- -->{}
#### Returns Promise<[PaginatedList](https://docs.apify.com/api/client/js/api/client/js/reference/interface/PaginatedList.md)<[KeyValueStoreCollectionListResult](https://docs.apify.com/api/client/js/api/client/js/reference.md#KeyValueStoreCollectionListResult)>>
---
# LogClient<!-- -->
### Hierarchy
* ResourceClient
* *LogClient*
## Index[**](#Index)
### Properties
* [**apifyClient](#apifyClient)
* [**baseUrl](#baseUrl)
* [**httpClient](#httpClient)
* [**id](#id)
* [**params](#params)
* [**publicBaseUrl](#publicBaseUrl)
* [**resourcePath](#resourcePath)
* [**safeId](#safeId)
* [**url](#url)
### Methods
* [**get](#get)
* [**stream](#stream)
## Properties<!-- -->[**](#Properties)
### [**](#apifyClient)[**](https://github.com/apify/apify-client-js/blob/master/src/base/api_client.ts#L35)inheritedapifyClient
**apifyClient: [ApifyClient](https://docs.apify.com/api/client/js/api/client/js/reference/class/ApifyClient.md)
Inherited from ResourceClient.apifyClient
### [**](#baseUrl)[**](https://github.com/apify/apify-client-js/blob/master/src/base/api_client.ts#L27)inheritedbaseUrl
**baseUrl: string
Inherited from ResourceClient.baseUrl
### [**](#httpClient)[**](https://github.com/apify/apify-client-js/blob/master/src/base/api_client.ts#L37)inheritedhttpClient
**httpClient: HttpClient
Inherited from ResourceClient.httpClient
### [**](#id)[**](https://github.com/apify/apify-client-js/blob/master/src/base/api_client.ts#L23)optionalinheritedid
**id?
<!-- -->
: string
Inherited from ResourceClient.id
### [**](#params)[**](https://github.com/apify/apify-client-js/blob/master/src/base/api_client.ts#L39)optionalinheritedparams
**params?
<!-- -->
: Record\<string, unknown>
Inherited from ResourceClient.params
### [**](#publicBaseUrl)[**](https://github.com/apify/apify-client-js/blob/master/src/base/api_client.ts#L29)inheritedpublicBaseUrl
**publicBaseUrl: string
Inherited from ResourceClient.publicBaseUrl
### [**](#resourcePath)[**](https://github.com/apify/apify-client-js/blob/master/src/base/api_client.ts#L31)inheritedresourcePath
**resourcePath: string
Inherited from ResourceClient.resourcePath
### [**](#safeId)[**](https://github.com/apify/apify-client-js/blob/master/src/base/api_client.ts#L25)optionalinheritedsafeId
**safeId?
<!-- -->
: string
Inherited from ResourceClient.safeId
### [**](#url)[**](https://github.com/apify/apify-client-js/blob/master/src/base/api_client.ts#L33)inheritedurl
**url: string
Inherited from ResourceClient.url
## Methods<!-- -->[**](#Methods)
### [**](#get)[**](https://github.com/apify/apify-client-js/blob/master/src/resource_clients/log.ts#L23)get
* ****get**(): Promise\<undefined | string>
- <https://docs.apify.com/api/v2#/reference/logs/log/get-log>
***
#### Returns Promise\<undefined | string>
### [**](#stream)[**](https://github.com/apify/apify-client-js/blob/master/src/resource_clients/log.ts#L44)stream
* ****stream**(): Promise\<undefined | Readable>
- Gets the log in a Readable stream format. Only works in Node.js. <https://docs.apify.com/api/v2#/reference/logs/log/get-log>
***
#### Returns Promise\<undefined | Readable>
---
# RequestQueueClient<!-- -->
### Hierarchy
* ResourceClient
* *RequestQueueClient*
## Index[**](#Index)
### Properties
* [**apifyClient](#apifyClient)
* [**baseUrl](#baseUrl)
* [**httpClient](#httpClient)
* [**id](#id)
* [**params](#params)
* [**publicBaseUrl](#publicBaseUrl)
* [**resourcePath](#resourcePath)
* [**safeId](#safeId)
* [**url](#url)
### Methods
* [**addRequest](#addRequest)
* [**batchAddRequests](#batchAddRequests)
* [**batchDeleteRequests](#batchDeleteRequests)
* [**delete](#delete)
* [**deleteRequest](#deleteRequest)
* [**deleteRequestLock](#deleteRequestLock)
* [**get](#get)
* [**getRequest](#getRequest)
* [**listAndLockHead](#listAndLockHead)
* [**listHead](#listHead)
* [**listRequests](#listRequests)
* [**paginateRequests](#paginateRequests)
* [**prolongRequestLock](#prolongRequestLock)
* [**unlockRequests](#unlockRequests)
* [**update](#update)
* [**updateRequest](#updateRequest)
## Properties<!-- -->[**](#Properties)
### [**](#apifyClient)[**](https://github.com/apify/apify-client-js/blob/master/src/base/api_client.ts#L35)inheritedapifyClient
**apifyClient: [ApifyClient](https://docs.apify.com/api/client/js/api/client/js/reference/class/ApifyClient.md)
Inherited from ResourceClient.apifyClient
### [**](#baseUrl)[**](https://github.com/apify/apify-client-js/blob/master/src/base/api_client.ts#L27)inheritedbaseUrl
**baseUrl: string
Inherited from ResourceClient.baseUrl
### [**](#httpClient)[**](https://github.com/apify/apify-client-js/blob/master/src/base/api_client.ts#L37)inheritedhttpClient
**httpClient: HttpClient
Inherited from ResourceClient.httpClient
### [**](#id)[**](https://github.com/apify/apify-client-js/blob/master/src/base/api_client.ts#L23)optionalinheritedid
**id?
<!-- -->
: string
Inherited from ResourceClient.id
### [**](#params)[**](https://github.com/apify/apify-client-js/blob/master/src/base/api_client.ts#L39)optionalinheritedparams
**params?
<!-- -->
: Record\<string, unknown>
Inherited from ResourceClient.params
### [**](#publicBaseUrl)[**](https://github.com/apify/apify-client-js/blob/master/src/base/api_client.ts#L29)inheritedpublicBaseUrl
**publicBaseUrl: string
Inherited from ResourceClient.publicBaseUrl
### [**](#resourcePath)[**](https://github.com/apify/apify-client-js/blob/master/src/base/api_client.ts#L31)inheritedresourcePath
**resourcePath: string
Inherited from ResourceClient.resourcePath
### [**](#safeId)[**](https://github.com/apify/apify-client-js/blob/master/src/base/api_client.ts#L25)optionalinheritedsafeId
**safeId?
<!-- -->
: string
Inherited from ResourceClient.safeId
### [**](#url)[**](https://github.com/apify/apify-client-js/blob/master/src/base/api_client.ts#L33)inheritedurl
**url: string
Inherited from ResourceClient.url
## Methods<!-- -->[**](#Methods)
### [**](#addRequest)[**](https://github.com/apify/apify-client-js/blob/master/src/resource_clients/request_queue.ts#L123)addRequest
* ****addRequest**(request, options): Promise<[RequestQueueClientAddRequestResult](https://docs.apify.com/api/client/js/api/client/js/reference/interface/RequestQueueClientAddRequestResult.md)>
- <https://docs.apify.com/api/v2#/reference/request-queues/request-collection/add-request>
***
#### Parameters
* ##### request: Omit<[RequestQueueClientRequestSchema](https://docs.apify.com/api/client/js/api/client/js/reference/interface/RequestQueueClientRequestSchema.md), id>
* ##### options: [RequestQueueClientAddRequestOptions](https://docs.apify.com/api/client/js/api/client/js/reference/interface/RequestQueueClientAddRequestOptions.md) = <!-- -->{}
#### Returns Promise<[RequestQueueClientAddRequestResult](https://docs.apify.com/api/client/js/api/client/js/reference/interface/RequestQueueClientAddRequestResult.md)>
### [**](#batchAddRequests)[**](https://github.com/apify/apify-client-js/blob/master/src/resource_clients/request_queue.ts#L266)batchAddRequests
* ****batchAddRequests**(requests, options): Promise<[RequestQueueClientBatchRequestsOperationResult](https://docs.apify.com/api/client/js/api/client/js/reference/interface/RequestQueueClientBatchRequestsOperationResult.md)>
- <https://docs.apify.com/api/v2#/reference/request-queues/batch-request-operations/add-requests>
***
#### Parameters
* ##### requests: Omit<[RequestQueueClientRequestSchema](https://docs.apify.com/api/client/js/api/client/js/reference/interface/RequestQueueClientRequestSchema.md), id>\[]
* ##### options: [RequestQueueClientBatchAddRequestWithRetriesOptions](https://docs.apify.com/api/client/js/api/client/js/reference/interface/RequestQueueClientBatchAddRequestWithRetriesOptions.md) = <!-- -->{}
#### Returns Promise<[RequestQueueClientBatchRequestsOperationResult](https://docs.apify.com/api/client/js/api/client/js/reference/interface/RequestQueueClientBatchRequestsOperationResult.md)>
### [**](#batchDeleteRequests)[**](https://github.com/apify/apify-client-js/blob/master/src/resource_clients/request_queue.ts#L330)batchDeleteRequests
* ****batchDeleteRequests**(requests): Promise<[RequestQueueClientBatchRequestsOperationResult](https://docs.apify.com/api/client/js/api/client/js/reference/interface/RequestQueueClientBatchRequestsOperationResult.md)>
- <https://docs.apify.com/api/v2#/reference/request-queues/batch-request-operations/delete-requests>
***
#### Parameters
* ##### requests: [RequestQueueClientRequestToDelete](https://docs.apify.com/api/client/js/api/client/js/reference.md#RequestQueueClientRequestToDelete)\[]
#### Returns Promise<[RequestQueueClientBatchRequestsOperationResult](https://docs.apify.com/api/client/js/api/client/js/reference/interface/RequestQueueClientBatchRequestsOperationResult.md)>
### [**](#delete)[**](https://github.com/apify/apify-client-js/blob/master/src/resource_clients/request_queue.ts#L64)delete
* ****delete**(): Promise\<void>
- <https://docs.apify.com/api/v2#/reference/request-queues/queue/delete-request-queue>
***
#### Returns Promise\<void>
### [**](#deleteRequest)[**](https://github.com/apify/apify-client-js/blob/master/src/resource_clients/request_queue.ts#L412)deleteRequest
* ****deleteRequest**(id): Promise\<void>
- #### Parameters
* ##### id: string
#### Returns Promise\<void>
### [**](#deleteRequestLock)[**](https://github.com/apify/apify-client-js/blob/master/src/resource_clients/request_queue.ts#L458)deleteRequestLock
* ****deleteRequestLock**(id, options): Promise\<void>
- <https://docs.apify.com/api/v2#/reference/request-queues/request-lock/delete-request-lock>
***
#### Parameters
* ##### id: string
* ##### options: [RequestQueueClientDeleteRequestLockOptions](https://docs.apify.com/api/client/js/api/client/js/reference/interface/RequestQueueClientDeleteRequestLockOptions.md) = <!-- -->{}
#### Returns Promise\<void>
### [**](#get)[**](https://github.com/apify/apify-client-js/blob/master/src/resource_clients/request_queue.ts#L48)get
* ****get**(): Promise\<undefined | [RequestQueue](https://docs.apify.com/api/client/js/api/client/js/reference/interface/RequestQueue.md)>
- <https://docs.apify.com/api/v2#/reference/request-queues/queue/get-request-queue>
***
#### Returns Promise\<undefined | [RequestQueue](https://docs.apify.com/api/client/js/api/client/js/reference/interface/RequestQueue.md)>
### [**](#getRequest)[**](https://github.com/apify/apify-client-js/blob/master/src/resource_clients/request_queue.ts#L359)getRequest
* ****getRequest**(id): Promise\<undefined | [RequestQueueClientGetRequestResult](https://docs.apify.com/api/client/js/api/client/js/reference.md#RequestQueueClientGetRequestResult)>
- <https://docs.apify.com/api/v2#/reference/request-queues/request/get-request>
***
#### Parameters
* ##### id: string
#### Returns Promise\<undefined | [RequestQueueClientGetRequestResult](https://docs.apify.com/api/client/js/api/client/js/reference.md#RequestQueueClientGetRequestResult)>
### [**](#listAndLockHead)[**](https://github.com/apify/apify-client-js/blob/master/src/resource_clients/request_queue.ts#L95)listAndLockHead
* ****listAndLockHead**(options): Promise<[RequestQueueClientListAndLockHeadResult](https://docs.apify.com/api/client/js/api/client/js/reference/interface/RequestQueueClientListAndLockHeadResult.md)>
- <https://docs.apify.com/api/v2#/reference/request-queues/queue-head-with-locks/get-head-and-lock>
***
#### Parameters
* ##### options: [RequestQueueClientListAndLockHeadOptions](https://docs.apify.com/api/client/js/api/client/js/reference/interface/RequestQueueClientListAndLockHeadOptions.md)
#### Returns Promise<[RequestQueueClientListAndLockHeadResult](https://docs.apify.com/api/client/js/api/client/js/reference/interface/RequestQueueClientListAndLockHeadResult.md)>
### [**](#listHead)[**](https://github.com/apify/apify-client-js/blob/master/src/resource_clients/request_queue.ts#L71)listHead
* ****listHead**(options): Promise<[RequestQueueClientListHeadResult](https://docs.apify.com/api/client/js/api/client/js/reference/interface/RequestQueueClientListHeadResult.md)>
- <https://docs.apify.com/api/v2#/reference/request-queues/queue-head/get-head>
***
#### Parameters
* ##### options: [RequestQueueClientListHeadOptions](https://docs.apify.com/api/client/js/api/client/js/reference/interface/RequestQueueClientListHeadOptions.md) = <!-- -->{}
#### Returns Promise<[RequestQueueClientListHeadResult](https://docs.apify.com/api/client/js/api/client/js/reference/interface/RequestQueueClientListHeadResult.md)>
### [**](#listRequests)[**](https://github.com/apify/apify-client-js/blob/master/src/resource_clients/request_queue.ts#L481)listRequests
* ****listRequests**(options): Promise<[RequestQueueClientListRequestsResult](https://docs.apify.com/api/client/js/api/client/js/reference/interface/RequestQueueClientListRequestsResult.md)>
- <https://docs.apify.com/api/v2#/reference/request-queues/request-collection/list-requests>
***
#### Parameters
* ##### options: [RequestQueueClientListRequestsOptions](https://docs.apify.com/api/client/js/api/client/js/reference/interface/RequestQueueClientListRequestsOptions.md) = <!-- -->{}
#### Returns Promise<[RequestQueueClientListRequestsResult](https://docs.apify.com/api/client/js/api/client/js/reference/interface/RequestQueueClientListRequestsResult.md)>
### [**](#paginateRequests)[**](https://github.com/apify/apify-client-js/blob/master/src/resource_clients/request_queue.ts#L530)paginateRequests
* ****paginateRequests**(options): [RequestQueueRequestsAsyncIterable](https://docs.apify.com/api/client/js/api/client/js/reference.md#RequestQueueRequestsAsyncIterable)<[RequestQueueClientListRequestsResult](https://docs.apify.com/api/client/js/api/client/js/reference/interface/RequestQueueClientListRequestsResult.md)>
- <https://docs.apify.com/api/v2#/reference/request-queues/request-collection/list-requests>
Usage: for await (const { items } of client.paginateRequests({ limit: 10 })) { items.forEach((request) => console.log(request)); }
***
#### Parameters
* ##### options: [RequestQueueClientPaginateRequestsOptions](https://docs.apify.com/api/client/js/api/client/js/reference/interface/RequestQueueClientPaginateRequestsOptions.md) = <!-- -->{}
#### Returns [RequestQueueRequestsAsyncIterable](https://docs.apify.com/api/client/js/api/client/js/reference.md#RequestQueueRequestsAsyncIterable)<[RequestQueueClientListRequestsResult](https://docs.apify.com/api/client/js/api/client/js/reference/interface/RequestQueueClientListRequestsResult.md)>
### [**](#prolongRequestLock)[**](https://github.com/apify/apify-client-js/blob/master/src/resource_clients/request_queue.ts#L428)prolongRequestLock
* ****prolongRequestLock**(id, options): Promise<[RequestQueueClientProlongRequestLockResult](https://docs.apify.com/api/client/js/api/client/js/reference/interface/RequestQueueClientProlongRequestLockResult.md)>
- <https://docs.apify.com/api/v2#/reference/request-queues/request-lock/prolong-request-lock>
***
#### Parameters
* ##### id: string
* ##### options: [RequestQueueClientProlongRequestLockOptions](https://docs.apify.com/api/client/js/api/client/js/reference/interface/RequestQueueClientProlongRequestLockOptions.md)
#### Returns Promise<[RequestQueueClientProlongRequestLockResult](https://docs.apify.com/api/client/js/api/client/js/reference/interface/RequestQueueClientProlongRequestLockResult.md)>
### [**](#unlockRequests)[**](https://github.com/apify/apify-client-js/blob/master/src/resource_clients/request_queue.ts#L509)unlockRequests
* ****unlockRequests**(): Promise<[RequestQueueClientUnlockRequestsResult](https://docs.apify.com/api/client/js/api/client/js/reference/interface/RequestQueueClientUnlockRequestsResult.md)>
- <https://docs.apify.com/api/v2/request-queue-requests-unlock-post>
***
#### Returns Promise<[RequestQueueClientUnlockRequestsResult](https://docs.apify.com/api/client/js/api/client/js/reference/interface/RequestQueueClientUnlockRequestsResult.md)>
### [**](#update)[**](https://github.com/apify/apify-client-js/blob/master/src/resource_clients/request_queue.ts#L55)update
* ****update**(newFields): Promise<[RequestQueue](https://docs.apify.com/api/client/js/api/client/js/reference/interface/RequestQueue.md)>
- <https://docs.apify.com/api/v2#/reference/request-queues/queue/update-request-queue>
***
#### Parameters
* ##### newFields: [RequestQueueClientUpdateOptions](https://docs.apify.com/api/client/js/api/client/js/reference/interface/RequestQueueClientUpdateOptions.md)
#### Returns Promise<[RequestQueue](https://docs.apify.com/api/client/js/api/client/js/reference/interface/RequestQueue.md)>
### [**](#updateRequest)[**](https://github.com/apify/apify-client-js/blob/master/src/resource_clients/request_queue.ts#L380)updateRequest
* ****updateRequest**(request, options): Promise<[RequestQueueClientAddRequestResult](https://docs.apify.com/api/client/js/api/client/js/reference/interface/RequestQueueClientAddRequestResult.md)>
- <https://docs.apify.com/api/v2#/reference/request-queues/request/update-request>
***
#### Parameters
* ##### request: [RequestQueueClientRequestSchema](https://docs.apify.com/api/client/js/api/client/js/reference/interface/RequestQueueClientRequestSchema.md)
* ##### options: [RequestQueueClientAddRequestOptions](https://docs.apify.com/api/client/js/api/client/js/reference/interface/RequestQueueClientAddRequestOptions.md) = <!-- -->{}
#### Returns Promise<[RequestQueueClientAddRequestResult](https://docs.apify.com/api/client/js/api/client/js/reference/interface/RequestQueueClientAddRequestResult.md)>
---
# RequestQueueCollectionClient<!-- -->
### Hierarchy
* ResourceCollectionClient
* *RequestQueueCollectionClient*
## Index[**](#Index)
### Properties
* [**apifyClient](#apifyClient)
* [**baseUrl](#baseUrl)
* [**httpClient](#httpClient)
* [**id](#id)
* [**params](#params)
* [**publicBaseUrl](#publicBaseUrl)
* [**resourcePath](#resourcePath)
* [**safeId](#safeId)
* [**url](#url)
### Methods
* [**getOrCreate](#getOrCreate)
* [**list](#list)
## Properties<!-- -->[**](#Properties)
### [**](#apifyClient)[**](https://github.com/apify/apify-client-js/blob/master/src/base/api_client.ts#L35)inheritedapifyClient
**apifyClient: [ApifyClient](https://docs.apify.com/api/client/js/api/client/js/reference/class/ApifyClient.md)
Inherited from ResourceCollectionClient.apifyClient
### [**](#baseUrl)[**](https://github.com/apify/apify-client-js/blob/master/src/base/api_client.ts#L27)inheritedbaseUrl
**baseUrl: string
Inherited from ResourceCollectionClient.baseUrl
### [**](#httpClient)[**](https://github.com/apify/apify-client-js/blob/master/src/base/api_client.ts#L37)inheritedhttpClient
**httpClient: HttpClient
Inherited from ResourceCollectionClient.httpClient
### [**](#id)[**](https://github.com/apify/apify-client-js/blob/master/src/base/api_client.ts#L23)optionalinheritedid
**id?
<!-- -->
: string
Inherited from ResourceCollectionClient.id
### [**](#params)[**](https://github.com/apify/apify-client-js/blob/master/src/base/api_client.ts#L39)optionalinheritedparams
**params?
<!-- -->
: Record\<string, unknown>
Inherited from ResourceCollectionClient.params
### [**](#publicBaseUrl)[**](https://github.com/apify/apify-client-js/blob/master/src/base/api_client.ts#L29)inheritedpublicBaseUrl
**publicBaseUrl: string
Inherited from ResourceCollectionClient.publicBaseUrl
### [**](#resourcePath)[**](https://github.com/apify/apify-client-js/blob/master/src/base/api_client.ts#L31)inheritedresourcePath
**resourcePath: string
Inherited from ResourceCollectionClient.resourcePath
### [**](#safeId)[**](https://github.com/apify/apify-client-js/blob/master/src/base/api_client.ts#L25)optionalinheritedsafeId
**safeId?
<!-- -->
: string
Inherited from ResourceCollectionClient.safeId
### [**](#url)[**](https://github.com/apify/apify-client-js/blob/master/src/base/api_client.ts#L33)inheritedurl
**url: string
Inherited from ResourceCollectionClient.url
## Methods<!-- -->[**](#Methods)
### [**](#getOrCreate)[**](https://github.com/apify/apify-client-js/blob/master/src/resource_clients/request_queue_collection.ts#L39)getOrCreate
* ****getOrCreate**(name): Promise<[RequestQueue](https://docs.apify.com/api/client/js/api/client/js/reference/interface/RequestQueue.md)>
- <https://docs.apify.com/api/v2#/reference/request-queues/queue-collection/create-request-queue>
***
#### Parameters
* ##### optionalname: string
#### Returns Promise<[RequestQueue](https://docs.apify.com/api/client/js/api/client/js/reference/interface/RequestQueue.md)>
### [**](#list)[**](https://github.com/apify/apify-client-js/blob/master/src/resource_clients/request_queue_collection.ts#L22)list
* ****list**(options): Promise<[RequestQueueCollectionListResult](https://docs.apify.com/api/client/js/api/client/js/reference.md#RequestQueueCollectionListResult)>
- <https://docs.apify.com/api/v2#/reference/request-queues/queue-collection/get-list-of-request-queues>
***
#### Parameters
* ##### options: [RequestQueueCollectionListOptions](https://docs.apify.com/api/client/js/api/client/js/reference/interface/RequestQueueCollectionListOptions.md) = <!-- -->{}
#### Returns Promise<[RequestQueueCollectionListResult](https://docs.apify.com/api/client/js/api/client/js/reference.md#RequestQueueCollectionListResult)>
---
# RunClient<!-- -->
### Hierarchy
* ResourceClient
* *RunClient*
## Index[**](#Index)
### Properties
* [**apifyClient](#apifyClient)
* [**baseUrl](#baseUrl)
* [**httpClient](#httpClient)
* [**id](#id)
* [**params](#params)
* [**publicBaseUrl](#publicBaseUrl)
* [**resourcePath](#resourcePath)
* [**safeId](#safeId)
* [**url](#url)
### Methods
* [**abort](#abort)
* [**charge](#charge)
* [**dataset](#dataset)
* [**delete](#delete)
* [**get](#get)
* [**keyValueStore](#keyValueStore)
* [**log](#log)
* [**metamorph](#metamorph)
* [**reboot](#reboot)
* [**requestQueue](#requestQueue)
* [**resurrect](#resurrect)
* [**update](#update)
* [**waitForFinish](#waitForFinish)
## Properties<!-- -->[**](#Properties)
### [**](#apifyClient)[**](https://github.com/apify/apify-client-js/blob/master/src/base/api_client.ts#L35)inheritedapifyClient
**apifyClient: [ApifyClient](https://docs.apify.com/api/client/js/api/client/js/reference/class/ApifyClient.md)
Inherited from ResourceClient.apifyClient
### [**](#baseUrl)[**](https://github.com/apify/apify-client-js/blob/master/src/base/api_client.ts#L27)inheritedbaseUrl
**baseUrl: string
Inherited from ResourceClient.baseUrl
### [**](#httpClient)[**](https://github.com/apify/apify-client-js/blob/master/src/base/api_client.ts#L37)inheritedhttpClient
**httpClient: HttpClient
Inherited from ResourceClient.httpClient
### [**](#id)[**](https://github.com/apify/apify-client-js/blob/master/src/base/api_client.ts#L23)optionalinheritedid
**id?
<!-- -->
: string
Inherited from ResourceClient.id
### [**](#params)[**](https://github.com/apify/apify-client-js/blob/master/src/base/api_client.ts#L39)optionalinheritedparams
**params?
<!-- -->
: Record\<string, unknown>
Inherited from ResourceClient.params
### [**](#publicBaseUrl)[**](https://github.com/apify/apify-client-js/blob/master/src/base/api_client.ts#L29)inheritedpublicBaseUrl
**publicBaseUrl: string
Inherited from ResourceClient.publicBaseUrl
### [**](#resourcePath)[**](https://github.com/apify/apify-client-js/blob/master/src/base/api_client.ts#L31)inheritedresourcePath
**resourcePath: string
Inherited from ResourceClient.resourcePath
### [**](#safeId)[**](https://github.com/apify/apify-client-js/blob/master/src/base/api_client.ts#L25)optionalinheritedsafeId
**safeId?
<!-- -->
: string
Inherited from ResourceClient.safeId
### [**](#url)[**](https://github.com/apify/apify-client-js/blob/master/src/base/api_client.ts#L33)inheritedurl
**url: string
Inherited from ResourceClient.url
## Methods<!-- -->[**](#Methods)
### [**](#abort)[**](https://github.com/apify/apify-client-js/blob/master/src/resource_clients/run.ts#L46)abort
* ****abort**(options): Promise<[ActorRun](https://docs.apify.com/api/client/js/api/client/js/reference/interface/ActorRun.md)>
- <https://docs.apify.com/api/v2#/reference/actor-runs/abort-run/abort-run>
***
#### Parameters
* ##### options: [RunAbortOptions](https://docs.apify.com/api/client/js/api/client/js/reference/interface/RunAbortOptions.md) = <!-- -->{}
#### Returns Promise<[ActorRun](https://docs.apify.com/api/client/js/api/client/js/reference/interface/ActorRun.md)>
### [**](#charge)[**](https://github.com/apify/apify-client-js/blob/master/src/resource_clients/run.ts#L160)charge
* ****charge**(options): Promise\<ApifyResponse\<Record\<string, never>>>
- <https://docs.apify.com/api/v2#/reference/actor-runs/charge-events-in-run>
***
#### Parameters
* ##### options: [RunChargeOptions](https://docs.apify.com/api/client/js/api/client/js/reference/interface/RunChargeOptions.md)
#### Returns Promise\<ApifyResponse\<Record\<string, never>>>
### [**](#dataset)[**](https://github.com/apify/apify-client-js/blob/master/src/resource_clients/run.ts#L220)dataset
* ****dataset**(): [DatasetClient](https://docs.apify.com/api/client/js/api/client/js/reference/class/DatasetClient.md)\<Record\<string | number, unknown>>
- <https://docs.apify.com/api/v2#/reference/actor-runs/run-object-and-its-storages>
This also works through `actorClient.lastRun().dataset()`. <https://docs.apify.com/api/v2#/reference/actors/last-run-object-and-its-storages>
***
#### Returns [DatasetClient](https://docs.apify.com/api/client/js/api/client/js/reference/class/DatasetClient.md)\<Record\<string | number, unknown>>
### [**](#delete)[**](https://github.com/apify/apify-client-js/blob/master/src/resource_clients/run.ts#L66)delete
* ****delete**(): Promise\<void>
- <https://docs.apify.com/api/v2#/reference/actor-runs/delete-run/delete-run>
***
#### Returns Promise\<void>
### [**](#get)[**](https://github.com/apify/apify-client-js/blob/master/src/resource_clients/run.ts#L32)get
* ****get**(options): Promise\<undefined | [ActorRun](https://docs.apify.com/api/client/js/api/client/js/reference/interface/ActorRun.md)>
- <https://docs.apify.com/api/v2#/reference/actor-runs/run-object/get-run>
***
#### Parameters
* ##### options: [RunGetOptions](https://docs.apify.com/api/client/js/api/client/js/reference/interface/RunGetOptions.md) = <!-- -->{}
#### Returns Promise\<undefined | [ActorRun](https://docs.apify.com/api/client/js/api/client/js/reference/interface/ActorRun.md)>
### [**](#keyValueStore)[**](https://github.com/apify/apify-client-js/blob/master/src/resource_clients/run.ts#L234)keyValueStore
* ****keyValueStore**(): [KeyValueStoreClient](https://docs.apify.com/api/client/js/api/client/js/reference/class/KeyValueStoreClient.md)
- <https://docs.apify.com/api/v2#/reference/actor-runs/run-object-and-its-storages>
This also works through `actorClient.lastRun().keyValueStore()`. <https://docs.apify.com/api/v2#/reference/actors/last-run-object-and-its-storages>
***
#### Returns [KeyValueStoreClient](https://docs.apify.com/api/client/js/api/client/js/reference/class/KeyValueStoreClient.md)
### [**](#log)[**](https://github.com/apify/apify-client-js/blob/master/src/resource_clients/run.ts#L262)log
* ****log**(): [LogClient](https://docs.apify.com/api/client/js/api/client/js/reference/class/LogClient.md)
- <https://docs.apify.com/api/v2#/reference/actor-runs/run-object-and-its-storages>
This also works through `actorClient.lastRun().log()`. <https://docs.apify.com/api/v2#/reference/actors/last-run-object-and-its-storages>
***
#### Returns [LogClient](https://docs.apify.com/api/client/js/api/client/js/reference/class/LogClient.md)
### [**](#metamorph)[**](https://github.com/apify/apify-client-js/blob/master/src/resource_clients/run.ts#L73)metamorph
* ****metamorph**(targetActorId, input, options): Promise<[ActorRun](https://docs.apify.com/api/client/js/api/client/js/reference/interface/ActorRun.md)>
- <https://docs.apify.com/api/v2#/reference/actor-runs/metamorph-run/metamorph-run>
***
#### Parameters
* ##### targetActorId: string
* ##### input: unknown
* ##### options: [RunMetamorphOptions](https://docs.apify.com/api/client/js/api/client/js/reference/interface/RunMetamorphOptions.md) = <!-- -->{}
#### Returns Promise<[ActorRun](https://docs.apify.com/api/client/js/api/client/js/reference/interface/ActorRun.md)>
### [**](#reboot)[**](https://github.com/apify/apify-client-js/blob/master/src/resource_clients/run.ts#L116)reboot
* ****reboot**(): Promise<[ActorRun](https://docs.apify.com/api/client/js/api/client/js/reference/interface/ActorRun.md)>
- <https://docs.apify.com/api/v2#/reference/actor-runs/reboot-run/reboot-run>
***
#### Returns Promise<[ActorRun](https://docs.apify.com/api/client/js/api/client/js/reference/interface/ActorRun.md)>
### [**](#requestQueue)[**](https://github.com/apify/apify-client-js/blob/master/src/resource_clients/run.ts#L248)requestQueue
* ****requestQueue**(): [RequestQueueClient](https://docs.apify.com/api/client/js/api/client/js/reference/class/RequestQueueClient.md)
- <https://docs.apify.com/api/v2#/reference/actor-runs/run-object-and-its-storages>
This also works through `actorClient.lastRun().requestQueue()`. <https://docs.apify.com/api/v2#/reference/actors/last-run-object-and-its-storages>
***
#### Returns [RequestQueueClient](https://docs.apify.com/api/client/js/api/client/js/reference/class/RequestQueueClient.md)
### [**](#resurrect)[**](https://github.com/apify/apify-client-js/blob/master/src/resource_clients/run.ts#L135)resurrect
* ****resurrect**(options): Promise<[ActorRun](https://docs.apify.com/api/client/js/api/client/js/reference/interface/ActorRun.md)>
- <https://docs.apify.com/api/v2#/reference/actor-runs/resurrect-run/resurrect-run>
***
#### Parameters
* ##### options: [RunResurrectOptions](https://docs.apify.com/api/client/js/api/client/js/reference/interface/RunResurrectOptions.md) = <!-- -->{}
#### Returns Promise<[ActorRun](https://docs.apify.com/api/client/js/api/client/js/reference/interface/ActorRun.md)>
### [**](#update)[**](https://github.com/apify/apify-client-js/blob/master/src/resource_clients/run.ts#L126)update
* ****update**(newFields): Promise<[ActorRun](https://docs.apify.com/api/client/js/api/client/js/reference/interface/ActorRun.md)>
- #### Parameters
* ##### newFields: [RunUpdateOptions](https://docs.apify.com/api/client/js/api/client/js/reference/interface/RunUpdateOptions.md)
#### Returns Promise<[ActorRun](https://docs.apify.com/api/client/js/api/client/js/reference/interface/ActorRun.md)>
### [**](#waitForFinish)[**](https://github.com/apify/apify-client-js/blob/master/src/resource_clients/run.ts#L203)waitForFinish
* ****waitForFinish**(options): Promise<[ActorRun](https://docs.apify.com/api/client/js/api/client/js/reference/interface/ActorRun.md)>
- Returns a promise that resolves with the finished Run object when the provided actor run finishes or with the unfinished Run object when the `waitSecs` timeout lapses. The promise is NOT rejected based on run status. You can inspect the `status` property of the Run object to find out its status.
The difference between this function and the `waitForFinish` parameter of the `get` method is the fact that this function can wait indefinitely. Its use is preferable to the `waitForFinish` parameter alone, which it uses internally.
This is useful when you need to chain actor executions. Similar effect can be achieved by using webhooks, so be sure to review which technique fits your use-case better.
***
#### Parameters
* ##### options: [RunWaitForFinishOptions](https://docs.apify.com/api/client/js/api/client/js/reference/interface/RunWaitForFinishOptions.md) = <!-- -->{}
#### Returns Promise<[ActorRun](https://docs.apify.com/api/client/js/api/client/js/reference/interface/ActorRun.md)>
---
# RunCollectionClient<!-- -->
### Hierarchy
* ResourceCollectionClient
* *RunCollectionClient*
## Index[**](#Index)
### Properties
* [**apifyClient](#apifyClient)
* [**baseUrl](#baseUrl)
* [**httpClient](#httpClient)
* [**id](#id)
* [**params](#params)
* [**publicBaseUrl](#publicBaseUrl)
* [**resourcePath](#resourcePath)
* [**safeId](#safeId)
* [**url](#url)
### Methods
* [**list](#list)
## Properties<!-- -->[**](#Properties)
### [**](#apifyClient)[**](https://github.com/apify/apify-client-js/blob/master/src/base/api_client.ts#L35)inheritedapifyClient
**apifyClient: [ApifyClient](https://docs.apify.com/api/client/js/api/client/js/reference/class/ApifyClient.md)
Inherited from ResourceCollectionClient.apifyClient
### [**](#baseUrl)[**](https://github.com/apify/apify-client-js/blob/master/src/base/api_client.ts#L27)inheritedbaseUrl
**baseUrl: string
Inherited from ResourceCollectionClient.baseUrl
### [**](#httpClient)[**](https://github.com/apify/apify-client-js/blob/master/src/base/api_client.ts#L37)inheritedhttpClient
**httpClient: HttpClient
Inherited from ResourceCollectionClient.httpClient
### [**](#id)[**](https://github.com/apify/apify-client-js/blob/master/src/base/api_client.ts#L23)optionalinheritedid
**id?
<!-- -->
: string
Inherited from ResourceCollectionClient.id
### [**](#params)[**](https://github.com/apify/apify-client-js/blob/master/src/base/api_client.ts#L39)optionalinheritedparams
**params?
<!-- -->
: Record\<string, unknown>
Inherited from ResourceCollectionClient.params
### [**](#publicBaseUrl)[**](https://github.com/apify/apify-client-js/blob/master/src/base/api_client.ts#L29)inheritedpublicBaseUrl
**publicBaseUrl: string
Inherited from ResourceCollectionClient.publicBaseUrl
### [**](#resourcePath)[**](https://github.com/apify/apify-client-js/blob/master/src/base/api_client.ts#L31)inheritedresourcePath
**resourcePath: string
Inherited from ResourceCollectionClient.resourcePath
### [**](#safeId)[**](https://github.com/apify/apify-client-js/blob/master/src/base/api_client.ts#L25)optionalinheritedsafeId
**safeId?
<!-- -->
: string
Inherited from ResourceCollectionClient.safeId
### [**](#url)[**](https://github.com/apify/apify-client-js/blob/master/src/base/api_client.ts#L33)inheritedurl
**url: string
Inherited from ResourceCollectionClient.url
## Methods<!-- -->[**](#Methods)
### [**](#list)[**](https://github.com/apify/apify-client-js/blob/master/src/resource_clients/run_collection.ts#L24)list
* ****list**(options): Promise<[PaginatedList](https://docs.apify.com/api/client/js/api/client/js/reference/interface/PaginatedList.md)<[ActorRunListItem](https://docs.apify.com/api/client/js/api/client/js/reference/interface/ActorRunListItem.md)>>
- <https://docs.apify.com/api/v2#/reference/actors/run-collection/get-list-of-runs>
***
#### Parameters
* ##### options: [RunCollectionListOptions](https://docs.apify.com/api/client/js/api/client/js/reference/interface/RunCollectionListOptions.md) = <!-- -->{}
#### Returns Promise<[PaginatedList](https://docs.apify.com/api/client/js/api/client/js/reference/interface/PaginatedList.md)<[ActorRunListItem](https://docs.apify.com/api/client/js/api/client/js/reference/interface/ActorRunListItem.md)>>
---
# ScheduleClient<!-- -->
### Hierarchy
* ResourceClient
* *ScheduleClient*
## Index[**](#Index)
### Properties
* [**apifyClient](#apifyClient)
* [**baseUrl](#baseUrl)
* [**httpClient](#httpClient)
* [**id](#id)
* [**params](#params)
* [**publicBaseUrl](#publicBaseUrl)
* [**resourcePath](#resourcePath)
* [**safeId](#safeId)
* [**url](#url)
### Methods
* [**delete](#delete)
* [**get](#get)
* [**getLog](#getLog)
* [**update](#update)
## Properties<!-- -->[**](#Properties)
### [**](#apifyClient)[**](https://github.com/apify/apify-client-js/blob/master/src/base/api_client.ts#L35)inheritedapifyClient
**apifyClient: [ApifyClient](https://docs.apify.com/api/client/js/api/client/js/reference/class/ApifyClient.md)
Inherited from ResourceClient.apifyClient
### [**](#baseUrl)[**](https://github.com/apify/apify-client-js/blob/master/src/base/api_client.ts#L27)inheritedbaseUrl
**baseUrl: string
Inherited from ResourceClient.baseUrl
### [**](#httpClient)[**](https://github.com/apify/apify-client-js/blob/master/src/base/api_client.ts#L37)inheritedhttpClient
**httpClient: HttpClient
Inherited from ResourceClient.httpClient
### [**](#id)[**](https://github.com/apify/apify-client-js/blob/master/src/base/api_client.ts#L23)optionalinheritedid
**id?
<!-- -->
: string
Inherited from ResourceClient.id
### [**](#params)[**](https://github.com/apify/apify-client-js/blob/master/src/base/api_client.ts#L39)optionalinheritedparams
**params?
<!-- -->
: Record\<string, unknown>
Inherited from ResourceClient.params
### [**](#publicBaseUrl)[**](https://github.com/apify/apify-client-js/blob/master/src/base/api_client.ts#L29)inheritedpublicBaseUrl
**publicBaseUrl: string
Inherited from ResourceClient.publicBaseUrl
### [**](#resourcePath)[**](https://github.com/apify/apify-client-js/blob/master/src/base/api_client.ts#L31)inheritedresourcePath
**resourcePath: string
Inherited from ResourceClient.resourcePath
### [**](#safeId)[**](https://github.com/apify/apify-client-js/blob/master/src/base/api_client.ts#L25)optionalinheritedsafeId
**safeId?
<!-- -->
: string
Inherited from ResourceClient.safeId
### [**](#url)[**](https://github.com/apify/apify-client-js/blob/master/src/base/api_client.ts#L33)inheritedurl
**url: string
Inherited from ResourceClient.url
## Methods<!-- -->[**](#Methods)
### [**](#delete)[**](https://github.com/apify/apify-client-js/blob/master/src/resource_clients/schedule.ts#L40)delete
* ****delete**(): Promise\<void>
- <https://docs.apify.com/api/v2#/reference/schedules/schedule-object/delete-schedule>
***
#### Returns Promise\<void>
### [**](#get)[**](https://github.com/apify/apify-client-js/blob/master/src/resource_clients/schedule.ts#L25)get
* ****get**(): Promise\<undefined | [Schedule](https://docs.apify.com/api/client/js/api/client/js/reference/interface/Schedule.md)>
- <https://docs.apify.com/api/v2#/reference/schedules/schedule-object/get-schedule>
***
#### Returns Promise\<undefined | [Schedule](https://docs.apify.com/api/client/js/api/client/js/reference/interface/Schedule.md)>
### [**](#getLog)[**](https://github.com/apify/apify-client-js/blob/master/src/resource_clients/schedule.ts#L47)getLog
* ****getLog**(): Promise\<undefined | string>
- <https://docs.apify.com/api/v2#/reference/schedules/schedule-log/get-schedule-log>
***
#### Returns Promise\<undefined | string>
### [**](#update)[**](https://github.com/apify/apify-client-js/blob/master/src/resource_clients/schedule.ts#L32)update
* ****update**(newFields): Promise<[Schedule](https://docs.apify.com/api/client/js/api/client/js/reference/interface/Schedule.md)>
- <https://docs.apify.com/api/v2#/reference/schedules/schedule-object/update-schedule>
***
#### Parameters
* ##### newFields: Partial\<Pick<[Schedule](https://docs.apify.com/api/client/js/api/client/js/reference/interface/Schedule.md), name | description | title | cronExpression | timezone | isEnabled | isExclusive | notifications> & { actions: DistributiveOptional<[ScheduleAction](https://docs.apify.com/api/client/js/api/client/js/reference.md#ScheduleAction), id>\[] }>
#### Returns Promise<[Schedule](https://docs.apify.com/api/client/js/api/client/js/reference/interface/Schedule.md)>
---
# ScheduleCollectionClient<!-- -->
### Hierarchy
* ResourceCollectionClient
* *ScheduleCollectionClient*
## Index[**](#Index)
### Properties
* [**apifyClient](#apifyClient)
* [**baseUrl](#baseUrl)
* [**httpClient](#httpClient)
* [**id](#id)
* [**params](#params)
* [**publicBaseUrl](#publicBaseUrl)
* [**resourcePath](#resourcePath)
* [**safeId](#safeId)
* [**url](#url)
### Methods
* [**create](#create)
* [**list](#list)
## Properties<!-- -->[**](#Properties)
### [**](#apifyClient)[**](https://github.com/apify/apify-client-js/blob/master/src/base/api_client.ts#L35)inheritedapifyClient
**apifyClient: [ApifyClient](https://docs.apify.com/api/client/js/api/client/js/reference/class/ApifyClient.md)
Inherited from ResourceCollectionClient.apifyClient
### [**](#baseUrl)[**](https://github.com/apify/apify-client-js/blob/master/src/base/api_client.ts#L27)inheritedbaseUrl
**baseUrl: string
Inherited from ResourceCollectionClient.baseUrl
### [**](#httpClient)[**](https://github.com/apify/apify-client-js/blob/master/src/base/api_client.ts#L37)inheritedhttpClient
**httpClient: HttpClient
Inherited from ResourceCollectionClient.httpClient
### [**](#id)[**](https://github.com/apify/apify-client-js/blob/master/src/base/api_client.ts#L23)optionalinheritedid
**id?
<!-- -->
: string
Inherited from ResourceCollectionClient.id
### [**](#params)[**](https://github.com/apify/apify-client-js/blob/master/src/base/api_client.ts#L39)optionalinheritedparams
**params?
<!-- -->
: Record\<string, unknown>
Inherited from ResourceCollectionClient.params
### [**](#publicBaseUrl)[**](https://github.com/apify/apify-client-js/blob/master/src/base/api_client.ts#L29)inheritedpublicBaseUrl
**publicBaseUrl: string
Inherited from ResourceCollectionClient.publicBaseUrl
### [**](#resourcePath)[**](https://github.com/apify/apify-client-js/blob/master/src/base/api_client.ts#L31)inheritedresourcePath
**resourcePath: string
Inherited from ResourceCollectionClient.resourcePath
### [**](#safeId)[**](https://github.com/apify/apify-client-js/blob/master/src/base/api_client.ts#L25)optionalinheritedsafeId
**safeId?
<!-- -->
: string
Inherited from ResourceCollectionClient.safeId
### [**](#url)[**](https://github.com/apify/apify-client-js/blob/master/src/base/api_client.ts#L33)inheritedurl
**url: string
Inherited from ResourceCollectionClient.url
## Methods<!-- -->[**](#Methods)
### [**](#create)[**](https://github.com/apify/apify-client-js/blob/master/src/resource_clients/schedule_collection.ts#L38)create
* ****create**(schedule): Promise<[Schedule](https://docs.apify.com/api/client/js/api/client/js/reference/interface/Schedule.md)>
- <https://docs.apify.com/api/v2#/reference/schedules/schedules-collection/create-schedule>
***
#### Parameters
* ##### optionalschedule: Partial\<Pick<[Schedule](https://docs.apify.com/api/client/js/api/client/js/reference/interface/Schedule.md), name | description | title | cronExpression | timezone | isEnabled | isExclusive | notifications> & { actions: DistributiveOptional<[ScheduleAction](https://docs.apify.com/api/client/js/api/client/js/reference.md#ScheduleAction), id>\[] }>
#### Returns Promise<[Schedule](https://docs.apify.com/api/client/js/api/client/js/reference/interface/Schedule.md)>
### [**](#list)[**](https://github.com/apify/apify-client-js/blob/master/src/resource_clients/schedule_collection.ts#L22)list
* ****list**(options): Promise<[PaginatedList](https://docs.apify.com/api/client/js/api/client/js/reference/interface/PaginatedList.md)<[Schedule](https://docs.apify.com/api/client/js/api/client/js/reference/interface/Schedule.md)>>
- <https://docs.apify.com/api/v2#/reference/schedules/schedules-collection/get-list-of-schedules>
***
#### Parameters
* ##### options: [ScheduleCollectionListOptions](https://docs.apify.com/api/client/js/api/client/js/reference/interface/ScheduleCollectionListOptions.md) = <!-- -->{}
#### Returns Promise<[PaginatedList](https://docs.apify.com/api/client/js/api/client/js/reference/interface/PaginatedList.md)<[Schedule](https://docs.apify.com/api/client/js/api/client/js/reference/interface/Schedule.md)>>
---
# StoreCollectionClient<!-- -->
### Hierarchy
* ResourceCollectionClient
* *StoreCollectionClient*
## Index[**](#Index)
### Properties
* [**apifyClient](#apifyClient)
* [**baseUrl](#baseUrl)
* [**httpClient](#httpClient)
* [**id](#id)
* [**params](#params)
* [**publicBaseUrl](#publicBaseUrl)
* [**resourcePath](#resourcePath)
* [**safeId](#safeId)
* [**url](#url)
### Methods
* [**list](#list)
## Properties<!-- -->[**](#Properties)
### [**](#apifyClient)[**](https://github.com/apify/apify-client-js/blob/master/src/base/api_client.ts#L35)inheritedapifyClient
**apifyClient: [ApifyClient](https://docs.apify.com/api/client/js/api/client/js/reference/class/ApifyClient.md)
Inherited from ResourceCollectionClient.apifyClient
### [**](#baseUrl)[**](https://github.com/apify/apify-client-js/blob/master/src/base/api_client.ts#L27)inheritedbaseUrl
**baseUrl: string
Inherited from ResourceCollectionClient.baseUrl
### [**](#httpClient)[**](https://github.com/apify/apify-client-js/blob/master/src/base/api_client.ts#L37)inheritedhttpClient
**httpClient: HttpClient
Inherited from ResourceCollectionClient.httpClient
### [**](#id)[**](https://github.com/apify/apify-client-js/blob/master/src/base/api_client.ts#L23)optionalinheritedid
**id?
<!-- -->
: string
Inherited from ResourceCollectionClient.id
### [**](#params)[**](https://github.com/apify/apify-client-js/blob/master/src/base/api_client.ts#L39)optionalinheritedparams
**params?
<!-- -->
: Record\<string, unknown>
Inherited from ResourceCollectionClient.params
### [**](#publicBaseUrl)[**](https://github.com/apify/apify-client-js/blob/master/src/base/api_client.ts#L29)inheritedpublicBaseUrl
**publicBaseUrl: string
Inherited from ResourceCollectionClient.publicBaseUrl
### [**](#resourcePath)[**](https://github.com/apify/apify-client-js/blob/master/src/base/api_client.ts#L31)inheritedresourcePath
**resourcePath: string
Inherited from ResourceCollectionClient.resourcePath
### [**](#safeId)[**](https://github.com/apify/apify-client-js/blob/master/src/base/api_client.ts#L25)optionalinheritedsafeId
**safeId?
<!-- -->
: string
Inherited from ResourceCollectionClient.safeId
### [**](#url)[**](https://github.com/apify/apify-client-js/blob/master/src/base/api_client.ts#L33)inheritedurl
**url: string
Inherited from ResourceCollectionClient.url
## Methods<!-- -->[**](#Methods)
### [**](#list)[**](https://github.com/apify/apify-client-js/blob/master/src/resource_clients/store_collection.ts#L22)list
* ****list**(options): Promise<[PaginatedList](https://docs.apify.com/api/client/js/api/client/js/reference/interface/PaginatedList.md)<[ActorStoreList](https://docs.apify.com/api/client/js/api/client/js/reference/interface/ActorStoreList.md)>>
- <https://docs.apify.com/api/v2/#/reference/store/store-actors-collection/get-list-of-actors-in-store>
***
#### Parameters
* ##### options: [StoreCollectionListOptions](https://docs.apify.com/api/client/js/api/client/js/reference/interface/StoreCollectionListOptions.md) = <!-- -->{}
#### Returns Promise<[PaginatedList](https://docs.apify.com/api/client/js/api/client/js/reference/interface/PaginatedList.md)<[ActorStoreList](https://docs.apify.com/api/client/js/api/client/js/reference/interface/ActorStoreList.md)>>
---
# TaskClient<!-- -->
### Hierarchy
* ResourceClient
* *TaskClient*
## Index[**](#Index)
### Properties
* [**apifyClient](#apifyClient)
* [**baseUrl](#baseUrl)
* [**httpClient](#httpClient)
* [**id](#id)
* [**params](#params)
* [**publicBaseUrl](#publicBaseUrl)
* [**resourcePath](#resourcePath)
* [**safeId](#safeId)
* [**url](#url)
### Methods
* [**call](#call)
* [**delete](#delete)
* [**get](#get)
* [**getInput](#getInput)
* [**lastRun](#lastRun)
* [**runs](#runs)
* [**start](#start)
* [**update](#update)
* [**updateInput](#updateInput)
* [**webhooks](#webhooks)
## Properties<!-- -->[**](#Properties)
### [**](#apifyClient)[**](https://github.com/apify/apify-client-js/blob/master/src/base/api_client.ts#L35)inheritedapifyClient
**apifyClient: [ApifyClient](https://docs.apify.com/api/client/js/api/client/js/reference/class/ApifyClient.md)
Inherited from ResourceClient.apifyClient
### [**](#baseUrl)[**](https://github.com/apify/apify-client-js/blob/master/src/base/api_client.ts#L27)inheritedbaseUrl
**baseUrl: string
Inherited from ResourceClient.baseUrl
### [**](#httpClient)[**](https://github.com/apify/apify-client-js/blob/master/src/base/api_client.ts#L37)inheritedhttpClient
**httpClient: HttpClient
Inherited from ResourceClient.httpClient
### [**](#id)[**](https://github.com/apify/apify-client-js/blob/master/src/base/api_client.ts#L23)optionalinheritedid
**id?
<!-- -->
: string
Inherited from ResourceClient.id
### [**](#params)[**](https://github.com/apify/apify-client-js/blob/master/src/base/api_client.ts#L39)optionalinheritedparams
**params?
<!-- -->
: Record\<string, unknown>
Inherited from ResourceClient.params
### [**](#publicBaseUrl)[**](https://github.com/apify/apify-client-js/blob/master/src/base/api_client.ts#L29)inheritedpublicBaseUrl
**publicBaseUrl: string
Inherited from ResourceClient.publicBaseUrl
### [**](#resourcePath)[**](https://github.com/apify/apify-client-js/blob/master/src/base/api_client.ts#L31)inheritedresourcePath
**resourcePath: string
Inherited from ResourceClient.resourcePath
### [**](#safeId)[**](https://github.com/apify/apify-client-js/blob/master/src/base/api_client.ts#L25)optionalinheritedsafeId
**safeId?
<!-- -->
: string
Inherited from ResourceClient.safeId
### [**](#url)[**](https://github.com/apify/apify-client-js/blob/master/src/base/api_client.ts#L33)inheritedurl
**url: string
Inherited from ResourceClient.url
## Methods<!-- -->[**](#Methods)
### [**](#call)[**](https://github.com/apify/apify-client-js/blob/master/src/resource_clients/task.ts#L105)call
* ****call**(input, options): Promise<[ActorRun](https://docs.apify.com/api/client/js/api/client/js/reference/interface/ActorRun.md)>
- Starts a task and waits for it to finish before returning the Run object. It waits indefinitely, unless the `waitSecs` option is provided. <https://docs.apify.com/api/v2#/reference/actor-tasks/run-collection/run-task>
***
#### Parameters
* ##### optionalinput: [Dictionary](https://docs.apify.com/api/client/js/api/client/js/reference.md#Dictionary)
* ##### options: [TaskCallOptions](https://docs.apify.com/api/client/js/api/client/js/reference/interface/TaskCallOptions.md) = <!-- -->{}
#### Returns Promise<[ActorRun](https://docs.apify.com/api/client/js/api/client/js/reference/interface/ActorRun.md)>
### [**](#delete)[**](https://github.com/apify/apify-client-js/blob/master/src/resource_clients/task.ts#L46)delete
* ****delete**(): Promise\<void>
- <https://docs.apify.com/api/v2#/reference/actor-tasks/task-object/delete-task>
***
#### Returns Promise\<void>
### [**](#get)[**](https://github.com/apify/apify-client-js/blob/master/src/resource_clients/task.ts#L30)get
* ****get**(): Promise\<undefined | [Task](https://docs.apify.com/api/client/js/api/client/js/reference/interface/Task.md)>
- <https://docs.apify.com/api/v2#/reference/actor-tasks/task-object/get-task>
***
#### Returns Promise\<undefined | [Task](https://docs.apify.com/api/client/js/api/client/js/reference/interface/Task.md)>
### [**](#getInput)[**](https://github.com/apify/apify-client-js/blob/master/src/resource_clients/task.ts#L134)getInput
* ****getInput**(): Promise\<undefined | [Dictionary](https://docs.apify.com/api/client/js/api/client/js/reference.md#Dictionary) | [Dictionary](https://docs.apify.com/api/client/js/api/client/js/reference.md#Dictionary)\[]>
- <https://docs.apify.com/api/v2#/reference/actor-tasks/task-input-object/get-task-input>
***
#### Returns Promise\<undefined | [Dictionary](https://docs.apify.com/api/client/js/api/client/js/reference.md#Dictionary) | [Dictionary](https://docs.apify.com/api/client/js/api/client/js/reference.md#Dictionary)\[]>
### [**](#lastRun)[**](https://github.com/apify/apify-client-js/blob/master/src/resource_clients/task.ts#L167)lastRun
* ****lastRun**(options): [RunClient](https://docs.apify.com/api/client/js/api/client/js/reference/class/RunClient.md)
- <https://docs.apify.com/api/v2#/reference/actor-tasks/last-run-object-and-its-storages>
***
#### Parameters
* ##### options: [TaskLastRunOptions](https://docs.apify.com/api/client/js/api/client/js/reference/interface/TaskLastRunOptions.md) = <!-- -->{}
#### Returns [RunClient](https://docs.apify.com/api/client/js/api/client/js/reference/class/RunClient.md)
### [**](#runs)[**](https://github.com/apify/apify-client-js/blob/master/src/resource_clients/task.ts#L188)runs
* ****runs**(): [RunCollectionClient](https://docs.apify.com/api/client/js/api/client/js/reference/class/RunCollectionClient.md)
- <https://docs.apify.com/api/v2#/reference/actor-tasks/run-collection>
***
#### Returns [RunCollectionClient](https://docs.apify.com/api/client/js/api/client/js/reference/class/RunCollectionClient.md)
### [**](#start)[**](https://github.com/apify/apify-client-js/blob/master/src/resource_clients/task.ts#L54)start
* ****start**(input, options): Promise<[ActorRun](https://docs.apify.com/api/client/js/api/client/js/reference/interface/ActorRun.md)>
- Starts a task and immediately returns the Run object. <https://docs.apify.com/api/v2#/reference/actor-tasks/run-collection/run-task>
***
#### Parameters
* ##### optionalinput: [Dictionary](https://docs.apify.com/api/client/js/api/client/js/reference.md#Dictionary)
* ##### options: [TaskStartOptions](https://docs.apify.com/api/client/js/api/client/js/reference.md#TaskStartOptions) = <!-- -->{}
#### Returns Promise<[ActorRun](https://docs.apify.com/api/client/js/api/client/js/reference/interface/ActorRun.md)>
### [**](#update)[**](https://github.com/apify/apify-client-js/blob/master/src/resource_clients/task.ts#L37)update
* ****update**(newFields): Promise<[Task](https://docs.apify.com/api/client/js/api/client/js/reference/interface/Task.md)>
- <https://docs.apify.com/api/v2#/reference/actor-tasks/task-object/update-task>
***
#### Parameters
* ##### newFields: Partial\<Pick<[Task](https://docs.apify.com/api/client/js/api/client/js/reference/interface/Task.md), name | description | title | actorStandby | input | options>>
#### Returns Promise<[Task](https://docs.apify.com/api/client/js/api/client/js/reference/interface/Task.md)>
### [**](#updateInput)[**](https://github.com/apify/apify-client-js/blob/master/src/resource_clients/task.ts#L153)updateInput
* ****updateInput**(newFields): Promise<[Dictionary](https://docs.apify.com/api/client/js/api/client/js/reference.md#Dictionary) | [Dictionary](https://docs.apify.com/api/client/js/api/client/js/reference.md#Dictionary)\[]>
- <https://docs.apify.com/api/v2#/reference/actor-tasks/task-input-object/update-task-input>
***
#### Parameters
* ##### newFields: [Dictionary](https://docs.apify.com/api/client/js/api/client/js/reference.md#Dictionary) | [Dictionary](https://docs.apify.com/api/client/js/api/client/js/reference.md#Dictionary)\[]
#### Returns Promise<[Dictionary](https://docs.apify.com/api/client/js/api/client/js/reference.md#Dictionary) | [Dictionary](https://docs.apify.com/api/client/js/api/client/js/reference.md#Dictionary)\[]>
### [**](#webhooks)[**](https://github.com/apify/apify-client-js/blob/master/src/resource_clients/task.ts#L199)webhooks
* ****webhooks**(): [WebhookCollectionClient](https://docs.apify.com/api/client/js/api/client/js/reference/class/WebhookCollectionClient.md)
- <https://docs.apify.com/api/v2#/reference/actor-tasks/webhook-collection>
***
#### Returns [WebhookCollectionClient](https://docs.apify.com/api/client/js/api/client/js/reference/class/WebhookCollectionClient.md)
---
# TaskCollectionClient<!-- -->
### Hierarchy
* ResourceCollectionClient
* *TaskCollectionClient*
## Index[**](#Index)
### Properties
* [**apifyClient](#apifyClient)
* [**baseUrl](#baseUrl)
* [**httpClient](#httpClient)
* [**id](#id)
* [**params](#params)
* [**publicBaseUrl](#publicBaseUrl)
* [**resourcePath](#resourcePath)
* [**safeId](#safeId)
* [**url](#url)
### Methods
* [**create](#create)
* [**list](#list)
## Properties<!-- -->[**](#Properties)
### [**](#apifyClient)[**](https://github.com/apify/apify-client-js/blob/master/src/base/api_client.ts#L35)inheritedapifyClient
**apifyClient: [ApifyClient](https://docs.apify.com/api/client/js/api/client/js/reference/class/ApifyClient.md)
Inherited from ResourceCollectionClient.apifyClient
### [**](#baseUrl)[**](https://github.com/apify/apify-client-js/blob/master/src/base/api_client.ts#L27)inheritedbaseUrl
**baseUrl: string
Inherited from ResourceCollectionClient.baseUrl
### [**](#httpClient)[**](https://github.com/apify/apify-client-js/blob/master/src/base/api_client.ts#L37)inheritedhttpClient
**httpClient: HttpClient
Inherited from ResourceCollectionClient.httpClient
### [**](#id)[**](https://github.com/apify/apify-client-js/blob/master/src/base/api_client.ts#L23)optionalinheritedid
**id?
<!-- -->
: string
Inherited from ResourceCollectionClient.id
### [**](#params)[**](https://github.com/apify/apify-client-js/blob/master/src/base/api_client.ts#L39)optionalinheritedparams
**params?
<!-- -->
: Record\<string, unknown>
Inherited from ResourceCollectionClient.params
### [**](#publicBaseUrl)[**](https://github.com/apify/apify-client-js/blob/master/src/base/api_client.ts#L29)inheritedpublicBaseUrl
**publicBaseUrl: string
Inherited from ResourceCollectionClient.publicBaseUrl
### [**](#resourcePath)[**](https://github.com/apify/apify-client-js/blob/master/src/base/api_client.ts#L31)inheritedresourcePath
**resourcePath: string
Inherited from ResourceCollectionClient.resourcePath
### [**](#safeId)[**](https://github.com/apify/apify-client-js/blob/master/src/base/api_client.ts#L25)optionalinheritedsafeId
**safeId?
<!-- -->
: string
Inherited from ResourceCollectionClient.safeId
### [**](#url)[**](https://github.com/apify/apify-client-js/blob/master/src/base/api_client.ts#L33)inheritedurl
**url: string
Inherited from ResourceCollectionClient.url
## Methods<!-- -->[**](#Methods)
### [**](#create)[**](https://github.com/apify/apify-client-js/blob/master/src/resource_clients/task_collection.ts#L43)create
* ****create**(task): Promise<[Task](https://docs.apify.com/api/client/js/api/client/js/reference/interface/Task.md)>
- <https://docs.apify.com/api/v2#/reference/actor-tasks/task-collection/create-task>
***
#### Parameters
* ##### task: [TaskCreateData](https://docs.apify.com/api/client/js/api/client/js/reference/interface/TaskCreateData.md)
#### Returns Promise<[Task](https://docs.apify.com/api/client/js/api/client/js/reference/interface/Task.md)>
### [**](#list)[**](https://github.com/apify/apify-client-js/blob/master/src/resource_clients/task_collection.ts#L27)list
* ****list**(options): Promise<[PaginatedList](https://docs.apify.com/api/client/js/api/client/js/reference/interface/PaginatedList.md)<[TaskList](https://docs.apify.com/api/client/js/api/client/js/reference.md#TaskList)>>
- <https://docs.apify.com/api/v2#/reference/actor-tasks/task-collection/get-list-of-tasks>
***
#### Parameters
* ##### optionaloptions: [TaskCollectionListOptions](https://docs.apify.com/api/client/js/api/client/js/reference/interface/TaskCollectionListOptions.md) = <!-- -->{}
#### Returns Promise<[PaginatedList](https://docs.apify.com/api/client/js/api/client/js/reference/interface/PaginatedList.md)<[TaskList](https://docs.apify.com/api/client/js/api/client/js/reference.md#TaskList)>>
---
# UserClient<!-- -->
### Hierarchy
* ResourceClient
* *UserClient*
## Index[**](#Index)
### Properties
* [**apifyClient](#apifyClient)
* [**baseUrl](#baseUrl)
* [**httpClient](#httpClient)
* [**id](#id)
* [**params](#params)
* [**publicBaseUrl](#publicBaseUrl)
* [**resourcePath](#resourcePath)
* [**safeId](#safeId)
* [**url](#url)
### Methods
* [**get](#get)
* [**limits](#limits)
* [**monthlyUsage](#monthlyUsage)
* [**updateLimits](#updateLimits)
## Properties<!-- -->[**](#Properties)
### [**](#apifyClient)[**](https://github.com/apify/apify-client-js/blob/master/src/base/api_client.ts#L35)inheritedapifyClient
**apifyClient: [ApifyClient](https://docs.apify.com/api/client/js/api/client/js/reference/class/ApifyClient.md)
Inherited from ResourceClient.apifyClient
### [**](#baseUrl)[**](https://github.com/apify/apify-client-js/blob/master/src/base/api_client.ts#L27)inheritedbaseUrl
**baseUrl: string
Inherited from ResourceClient.baseUrl
### [**](#httpClient)[**](https://github.com/apify/apify-client-js/blob/master/src/base/api_client.ts#L37)inheritedhttpClient
**httpClient: HttpClient
Inherited from ResourceClient.httpClient
### [**](#id)[**](https://github.com/apify/apify-client-js/blob/master/src/base/api_client.ts#L23)optionalinheritedid
**id?
<!-- -->
: string
Inherited from ResourceClient.id
### [**](#params)[**](https://github.com/apify/apify-client-js/blob/master/src/base/api_client.ts#L39)optionalinheritedparams
**params?
<!-- -->
: Record\<string, unknown>
Inherited from ResourceClient.params
### [**](#publicBaseUrl)[**](https://github.com/apify/apify-client-js/blob/master/src/base/api_client.ts#L29)inheritedpublicBaseUrl
**publicBaseUrl: string
Inherited from ResourceClient.publicBaseUrl
### [**](#resourcePath)[**](https://github.com/apify/apify-client-js/blob/master/src/base/api_client.ts#L31)inheritedresourcePath
**resourcePath: string
Inherited from ResourceClient.resourcePath
### [**](#safeId)[**](https://github.com/apify/apify-client-js/blob/master/src/base/api_client.ts#L25)optionalinheritedsafeId
**safeId?
<!-- -->
: string
Inherited from ResourceClient.safeId
### [**](#url)[**](https://github.com/apify/apify-client-js/blob/master/src/base/api_client.ts#L33)inheritedurl
**url: string
Inherited from ResourceClient.url
## Methods<!-- -->[**](#Methods)
### [**](#get)[**](https://github.com/apify/apify-client-js/blob/master/src/resource_clients/user.ts#L23)get
* ****get**(): Promise<[User](https://docs.apify.com/api/client/js/api/client/js/reference/interface/User.md)>
- Depending on whether ApifyClient was created with a token, the method will either return public or private user data. <https://docs.apify.com/api/v2#/reference/users>
***
#### Returns Promise<[User](https://docs.apify.com/api/client/js/api/client/js/reference/interface/User.md)>
### [**](#limits)[**](https://github.com/apify/apify-client-js/blob/master/src/resource_clients/user.ts#L55)limits
* ****limits**(): Promise\<undefined | [AccountAndUsageLimits](https://docs.apify.com/api/client/js/api/client/js/reference/interface/AccountAndUsageLimits.md)>
- <https://docs.apify.com/api/v2/#/reference/users/account-and-usage-limits>
***
#### Returns Promise\<undefined | [AccountAndUsageLimits](https://docs.apify.com/api/client/js/api/client/js/reference/interface/AccountAndUsageLimits.md)>
### [**](#monthlyUsage)[**](https://github.com/apify/apify-client-js/blob/master/src/resource_clients/user.ts#L30)monthlyUsage
* ****monthlyUsage**(): Promise\<undefined | [MonthlyUsage](https://docs.apify.com/api/client/js/api/client/js/reference/interface/MonthlyUsage.md)>
- <https://docs.apify.com/api/v2/#/reference/users/monthly-usage>
***
#### Returns Promise\<undefined | [MonthlyUsage](https://docs.apify.com/api/client/js/api/client/js/reference/interface/MonthlyUsage.md)>
### [**](#updateLimits)[**](https://github.com/apify/apify-client-js/blob/master/src/resource_clients/user.ts#L74)updateLimits
* ****updateLimits**(options): Promise\<void>
- <https://docs.apify.com/api/v2/#/reference/users/account-and-usage-limits>
***
#### Parameters
* ##### options: [LimitsUpdateOptions](https://docs.apify.com/api/client/js/api/client/js/reference.md#LimitsUpdateOptions)
#### Returns Promise\<void>
---
# WebhookClient<!-- -->
### Hierarchy
* ResourceClient
* *WebhookClient*
## Index[**](#Index)
### Properties
* [**apifyClient](#apifyClient)
* [**baseUrl](#baseUrl)
* [**httpClient](#httpClient)
* [**id](#id)
* [**params](#params)
* [**publicBaseUrl](#publicBaseUrl)
* [**resourcePath](#resourcePath)
* [**safeId](#safeId)
* [**url](#url)
### Methods
* [**delete](#delete)
* [**dispatches](#dispatches)
* [**get](#get)
* [**test](#test)
* [**update](#update)
## Properties<!-- -->[**](#Properties)
### [**](#apifyClient)[**](https://github.com/apify/apify-client-js/blob/master/src/base/api_client.ts#L35)inheritedapifyClient
**apifyClient: [ApifyClient](https://docs.apify.com/api/client/js/api/client/js/reference/class/ApifyClient.md)
Inherited from ResourceClient.apifyClient
### [**](#baseUrl)[**](https://github.com/apify/apify-client-js/blob/master/src/base/api_client.ts#L27)inheritedbaseUrl
**baseUrl: string
Inherited from ResourceClient.baseUrl
### [**](#httpClient)[**](https://github.com/apify/apify-client-js/blob/master/src/base/api_client.ts#L37)inheritedhttpClient
**httpClient: HttpClient
Inherited from ResourceClient.httpClient
### [**](#id)[**](https://github.com/apify/apify-client-js/blob/master/src/base/api_client.ts#L23)optionalinheritedid
**id?
<!-- -->
: string
Inherited from ResourceClient.id
### [**](#params)[**](https://github.com/apify/apify-client-js/blob/master/src/base/api_client.ts#L39)optionalinheritedparams
**params?
<!-- -->
: Record\<string, unknown>
Inherited from ResourceClient.params
### [**](#publicBaseUrl)[**](https://github.com/apify/apify-client-js/blob/master/src/base/api_client.ts#L29)inheritedpublicBaseUrl
**publicBaseUrl: string
Inherited from ResourceClient.publicBaseUrl
### [**](#resourcePath)[**](https://github.com/apify/apify-client-js/blob/master/src/base/api_client.ts#L31)inheritedresourcePath
**resourcePath: string
Inherited from ResourceClient.resourcePath
### [**](#safeId)[**](https://github.com/apify/apify-client-js/blob/master/src/base/api_client.ts#L25)optionalinheritedsafeId
**safeId?
<!-- -->
: string
Inherited from ResourceClient.safeId
### [**](#url)[**](https://github.com/apify/apify-client-js/blob/master/src/base/api_client.ts#L33)inheritedurl
**url: string
Inherited from ResourceClient.url
## Methods<!-- -->[**](#Methods)
### [**](#delete)[**](https://github.com/apify/apify-client-js/blob/master/src/resource_clients/webhook.ts#L43)delete
* ****delete**(): Promise\<void>
- <https://docs.apify.com/api/v2#/reference/webhooks/webhook-object/delete-webhook>
***
#### Returns Promise\<void>
### [**](#dispatches)[**](https://github.com/apify/apify-client-js/blob/master/src/resource_clients/webhook.ts#L70)dispatches
* ****dispatches**(): [WebhookDispatchCollectionClient](https://docs.apify.com/api/client/js/api/client/js/reference/class/WebhookDispatchCollectionClient.md)
- <https://docs.apify.com/api/v2#/reference/webhooks/dispatches-collection>
***
#### Returns [WebhookDispatchCollectionClient](https://docs.apify.com/api/client/js/api/client/js/reference/class/WebhookDispatchCollectionClient.md)
### [**](#get)[**](https://github.com/apify/apify-client-js/blob/master/src/resource_clients/webhook.ts#L27)get
* ****get**(): Promise\<undefined | [Webhook](https://docs.apify.com/api/client/js/api/client/js/reference/interface/Webhook.md)>
- <https://docs.apify.com/api/v2#/reference/webhooks/webhook-object/get-webhook>
***
#### Returns Promise\<undefined | [Webhook](https://docs.apify.com/api/client/js/api/client/js/reference/interface/Webhook.md)>
### [**](#test)[**](https://github.com/apify/apify-client-js/blob/master/src/resource_clients/webhook.ts#L50)test
* ****test**(): Promise\<undefined | [WebhookDispatch](https://docs.apify.com/api/client/js/api/client/js/reference/interface/WebhookDispatch.md)>
- <https://docs.apify.com/api/v2#/reference/webhooks/webhook-test/test-webhook>
***
#### Returns Promise\<undefined | [WebhookDispatch](https://docs.apify.com/api/client/js/api/client/js/reference/interface/WebhookDispatch.md)>
### [**](#update)[**](https://github.com/apify/apify-client-js/blob/master/src/resource_clients/webhook.ts#L34)update
* ****update**(newFields): Promise<[Webhook](https://docs.apify.com/api/client/js/api/client/js/reference/interface/Webhook.md)>
- <https://docs.apify.com/api/v2#/reference/webhooks/webhook-object/update-webhook>
***
#### Parameters
* ##### newFields: [WebhookUpdateData](https://docs.apify.com/api/client/js/api/client/js/reference.md#WebhookUpdateData)
#### Returns Promise<[Webhook](https://docs.apify.com/api/client/js/api/client/js/reference/interface/Webhook.md)>
---
# WebhookCollectionClient<!-- -->
### Hierarchy
* ResourceCollectionClient
* *WebhookCollectionClient*
## Index[**](#Index)
### Properties
* [**apifyClient](#apifyClient)
* [**baseUrl](#baseUrl)
* [**httpClient](#httpClient)
* [**id](#id)
* [**params](#params)
* [**publicBaseUrl](#publicBaseUrl)
* [**resourcePath](#resourcePath)
* [**safeId](#safeId)
* [**url](#url)
### Methods
* [**create](#create)
* [**list](#list)
## Properties<!-- -->[**](#Properties)
### [**](#apifyClient)[**](https://github.com/apify/apify-client-js/blob/master/src/base/api_client.ts#L35)inheritedapifyClient
**apifyClient: [ApifyClient](https://docs.apify.com/api/client/js/api/client/js/reference/class/ApifyClient.md)
Inherited from ResourceCollectionClient.apifyClient
### [**](#baseUrl)[**](https://github.com/apify/apify-client-js/blob/master/src/base/api_client.ts#L27)inheritedbaseUrl
**baseUrl: string
Inherited from ResourceCollectionClient.baseUrl
### [**](#httpClient)[**](https://github.com/apify/apify-client-js/blob/master/src/base/api_client.ts#L37)inheritedhttpClient
**httpClient: HttpClient
Inherited from ResourceCollectionClient.httpClient
### [**](#id)[**](https://github.com/apify/apify-client-js/blob/master/src/base/api_client.ts#L23)optionalinheritedid
**id?
<!-- -->
: string
Inherited from ResourceCollectionClient.id
### [**](#params)[**](https://github.com/apify/apify-client-js/blob/master/src/base/api_client.ts#L39)optionalinheritedparams
**params?
<!-- -->
: Record\<string, unknown>
Inherited from ResourceCollectionClient.params
### [**](#publicBaseUrl)[**](https://github.com/apify/apify-client-js/blob/master/src/base/api_client.ts#L29)inheritedpublicBaseUrl
**publicBaseUrl: string
Inherited from ResourceCollectionClient.publicBaseUrl
### [**](#resourcePath)[**](https://github.com/apify/apify-client-js/blob/master/src/base/api_client.ts#L31)inheritedresourcePath
**resourcePath: string
Inherited from ResourceCollectionClient.resourcePath
### [**](#safeId)[**](https://github.com/apify/apify-client-js/blob/master/src/base/api_client.ts#L25)optionalinheritedsafeId
**safeId?
<!-- -->
: string
Inherited from ResourceCollectionClient.safeId
### [**](#url)[**](https://github.com/apify/apify-client-js/blob/master/src/base/api_client.ts#L33)inheritedurl
**url: string
Inherited from ResourceCollectionClient.url
## Methods<!-- -->[**](#Methods)
### [**](#create)[**](https://github.com/apify/apify-client-js/blob/master/src/resource_clients/webhook_collection.ts#L40)create
* ****create**(webhook): Promise<[Webhook](https://docs.apify.com/api/client/js/api/client/js/reference/interface/Webhook.md)>
- <https://docs.apify.com/api/v2#/reference/webhooks/webhook-collection/create-webhook>
***
#### Parameters
* ##### optionalwebhook: [WebhookUpdateData](https://docs.apify.com/api/client/js/api/client/js/reference.md#WebhookUpdateData)
#### Returns Promise<[Webhook](https://docs.apify.com/api/client/js/api/client/js/reference/interface/Webhook.md)>
### [**](#list)[**](https://github.com/apify/apify-client-js/blob/master/src/resource_clients/webhook_collection.ts#L22)list
* ****list**(options): Promise<[PaginatedList](https://docs.apify.com/api/client/js/api/client/js/reference/interface/PaginatedList.md)\<Omit<[Webhook](https://docs.apify.com/api/client/js/api/client/js/reference/interface/Webhook.md), payloadTemplate | headersTemplate>>>
- <https://docs.apify.com/api/v2#/reference/webhooks/webhook-collection/get-list-of-webhooks>
***
#### Parameters
* ##### options: [WebhookCollectionListOptions](https://docs.apify.com/api/client/js/api/client/js/reference/interface/WebhookCollectionListOptions.md) = <!-- -->{}
#### Returns Promise<[PaginatedList](https://docs.apify.com/api/client/js/api/client/js/reference/interface/PaginatedList.md)\<Omit<[Webhook](https://docs.apify.com/api/client/js/api/client/js/reference/interface/Webhook.md), payloadTemplate | headersTemplate>>>
---
# WebhookDispatchClient<!-- -->
### Hierarchy
* ResourceClient
* *WebhookDispatchClient*
## Index[**](#Index)
### Properties
* [**apifyClient](#apifyClient)
* [**baseUrl](#baseUrl)
* [**httpClient](#httpClient)
* [**id](#id)
* [**params](#params)
* [**publicBaseUrl](#publicBaseUrl)
* [**resourcePath](#resourcePath)
* [**safeId](#safeId)
* [**url](#url)
### Methods
* [**get](#get)
## Properties<!-- -->[**](#Properties)
### [**](#apifyClient)[**](https://github.com/apify/apify-client-js/blob/master/src/base/api_client.ts#L35)inheritedapifyClient
**apifyClient: [ApifyClient](https://docs.apify.com/api/client/js/api/client/js/reference/class/ApifyClient.md)
Inherited from ResourceClient.apifyClient
### [**](#baseUrl)[**](https://github.com/apify/apify-client-js/blob/master/src/base/api_client.ts#L27)inheritedbaseUrl
**baseUrl: string
Inherited from ResourceClient.baseUrl
### [**](#httpClient)[**](https://github.com/apify/apify-client-js/blob/master/src/base/api_client.ts#L37)inheritedhttpClient
**httpClient: HttpClient
Inherited from ResourceClient.httpClient
### [**](#id)[**](https://github.com/apify/apify-client-js/blob/master/src/base/api_client.ts#L23)optionalinheritedid
**id?
<!-- -->
: string
Inherited from ResourceClient.id
### [**](#params)[**](https://github.com/apify/apify-client-js/blob/master/src/base/api_client.ts#L39)optionalinheritedparams
**params?
<!-- -->
: Record\<string, unknown>
Inherited from ResourceClient.params
### [**](#publicBaseUrl)[**](https://github.com/apify/apify-client-js/blob/master/src/base/api_client.ts#L29)inheritedpublicBaseUrl
**publicBaseUrl: string
Inherited from ResourceClient.publicBaseUrl
### [**](#resourcePath)[**](https://github.com/apify/apify-client-js/blob/master/src/base/api_client.ts#L31)inheritedresourcePath
**resourcePath: string
Inherited from ResourceClient.resourcePath
### [**](#safeId)[**](https://github.com/apify/apify-client-js/blob/master/src/base/api_client.ts#L25)optionalinheritedsafeId
**safeId?
<!-- -->
: string
Inherited from ResourceClient.safeId
### [**](#url)[**](https://github.com/apify/apify-client-js/blob/master/src/base/api_client.ts#L33)inheritedurl
**url: string
Inherited from ResourceClient.url
## Methods<!-- -->[**](#Methods)
### [**](#get)[**](https://github.com/apify/apify-client-js/blob/master/src/resource_clients/webhook_dispatch.ts#L19)get
* ****get**(): Promise\<undefined | [WebhookDispatch](https://docs.apify.com/api/client/js/api/client/js/reference/interface/WebhookDispatch.md)>
- <https://docs.apify.com/api/v2#/reference/webhook-dispatches/webhook-dispatch-object/get-webhook-dispatch>
***
#### Returns Promise\<undefined | [WebhookDispatch](https://docs.apify.com/api/client/js/api/client/js/reference/interface/WebhookDispatch.md)>
---
# WebhookDispatchCollectionClient<!-- -->
### Hierarchy
* ResourceCollectionClient
* *WebhookDispatchCollectionClient*
## Index[**](#Index)
### Properties
* [**apifyClient](#apifyClient)
* [**baseUrl](#baseUrl)
* [**httpClient](#httpClient)
* [**id](#id)
* [**params](#params)
* [**publicBaseUrl](#publicBaseUrl)
* [**resourcePath](#resourcePath)
* [**safeId](#safeId)
* [**url](#url)
### Methods
* [**list](#list)
## Properties<!-- -->[**](#Properties)
### [**](#apifyClient)[**](https://github.com/apify/apify-client-js/blob/master/src/base/api_client.ts#L35)inheritedapifyClient
**apifyClient: [ApifyClient](https://docs.apify.com/api/client/js/api/client/js/reference/class/ApifyClient.md)
Inherited from ResourceCollectionClient.apifyClient
### [**](#baseUrl)[**](https://github.com/apify/apify-client-js/blob/master/src/base/api_client.ts#L27)inheritedbaseUrl
**baseUrl: string
Inherited from ResourceCollectionClient.baseUrl
### [**](#httpClient)[**](https://github.com/apify/apify-client-js/blob/master/src/base/api_client.ts#L37)inheritedhttpClient
**httpClient: HttpClient
Inherited from ResourceCollectionClient.httpClient
### [**](#id)[**](https://github.com/apify/apify-client-js/blob/master/src/base/api_client.ts#L23)optionalinheritedid
**id?
<!-- -->
: string
Inherited from ResourceCollectionClient.id
### [**](#params)[**](https://github.com/apify/apify-client-js/blob/master/src/base/api_client.ts#L39)optionalinheritedparams
**params?
<!-- -->
: Record\<string, unknown>
Inherited from ResourceCollectionClient.params
### [**](#publicBaseUrl)[**](https://github.com/apify/apify-client-js/blob/master/src/base/api_client.ts#L29)inheritedpublicBaseUrl
**publicBaseUrl: string
Inherited from ResourceCollectionClient.publicBaseUrl
### [**](#resourcePath)[**](https://github.com/apify/apify-client-js/blob/master/src/base/api_client.ts#L31)inheritedresourcePath
**resourcePath: string
Inherited from ResourceCollectionClient.resourcePath
### [**](#safeId)[**](https://github.com/apify/apify-client-js/blob/master/src/base/api_client.ts#L25)optionalinheritedsafeId
**safeId?
<!-- -->
: string
Inherited from ResourceCollectionClient.safeId
### [**](#url)[**](https://github.com/apify/apify-client-js/blob/master/src/base/api_client.ts#L33)inheritedurl
**url: string
Inherited from ResourceCollectionClient.url
## Methods<!-- -->[**](#Methods)
### [**](#list)[**](https://github.com/apify/apify-client-js/blob/master/src/resource_clients/webhook_dispatch_collection.ts#L22)list
* ****list**(options): Promise<[PaginatedList](https://docs.apify.com/api/client/js/api/client/js/reference/interface/PaginatedList.md)<[WebhookDispatch](https://docs.apify.com/api/client/js/api/client/js/reference/interface/WebhookDispatch.md)>>
- <https://docs.apify.com/api/v2#/reference/webhook-dispatches/webhook-dispatches-collection/get-list-of-webhook-dispatches>
***
#### Parameters
* ##### options: [WebhookDispatchCollectionListOptions](https://docs.apify.com/api/client/js/api/client/js/reference/interface/WebhookDispatchCollectionListOptions.md) = <!-- -->{}
#### Returns Promise<[PaginatedList](https://docs.apify.com/api/client/js/api/client/js/reference/interface/PaginatedList.md)<[WebhookDispatch](https://docs.apify.com/api/client/js/api/client/js/reference/interface/WebhookDispatch.md)>>
---
# ActorListSortBy<!-- -->
## Index[**](#Index)
### Enumeration Members
* [**CREATED\_AT](#CREATED_AT)
* [**LAST\_RUN\_STARTED\_AT](#LAST_RUN_STARTED_AT)
## Enumeration Members<!-- -->[**](<#Enumeration Members>)
### [**](#CREATED_AT)[**](https://github.com/apify/apify-client-js/blob/master/src/resource_clients/actor_collection.ts#L49)CREATED\_AT
**CREATED\_AT: createdAt
### [**](#LAST_RUN_STARTED_AT)[**](https://github.com/apify/apify-client-js/blob/master/src/resource_clients/actor_collection.ts#L50)LAST\_RUN\_STARTED\_AT
**LAST\_RUN\_STARTED\_AT: stats.lastRunStartedAt
---
# ActorSourceType<!-- -->
## Index[**](#Index)
### Enumeration Members
* [**GitHubGist](#GitHubGist)
* [**GitRepo](#GitRepo)
* [**SourceFiles](#SourceFiles)
* [**Tarball](#Tarball)
## Enumeration Members<!-- -->[**](<#Enumeration Members>)
### [**](#GitHubGist)[**](https://github.com/apify/apify-client-js/blob/master/src/resource_clients/actor_version.ts#L97)GitHubGist
**GitHubGist: GITHUB\_GIST
### [**](#GitRepo)[**](https://github.com/apify/apify-client-js/blob/master/src/resource_clients/actor_version.ts#L95)GitRepo
**GitRepo: GIT\_REPO
### [**](#SourceFiles)[**](https://github.com/apify/apify-client-js/blob/master/src/resource_clients/actor_version.ts#L94)SourceFiles
**SourceFiles: SOURCE\_FILES
### [**](#Tarball)[**](https://github.com/apify/apify-client-js/blob/master/src/resource_clients/actor_version.ts#L96)Tarball
**Tarball: TARBALL
---
# DownloadItemsFormat<!-- -->
## Index[**](#Index)
### Enumeration Members
* [**CSV](#CSV)
* [**HTML](#HTML)
* [**JSON](#JSON)
* [**JSONL](#JSONL)
* [**RSS](#RSS)
* [**XLSX](#XLSX)
* [**XML](#XML)
## Enumeration Members<!-- -->[**](<#Enumeration Members>)
### [**](#CSV)[**](https://github.com/apify/apify-client-js/blob/master/src/resource_clients/dataset.ts#L289)CSV
**CSV: csv
### [**](#HTML)[**](https://github.com/apify/apify-client-js/blob/master/src/resource_clients/dataset.ts#L288)HTML
**HTML: html
### [**](#JSON)[**](https://github.com/apify/apify-client-js/blob/master/src/resource_clients/dataset.ts#L285)JSON
**JSON: json
### [**](#JSONL)[**](https://github.com/apify/apify-client-js/blob/master/src/resource_clients/dataset.ts#L286)JSONL
**JSONL: jsonl
### [**](#RSS)[**](https://github.com/apify/apify-client-js/blob/master/src/resource_clients/dataset.ts#L291)RSS
**RSS: rss
### [**](#XLSX)[**](https://github.com/apify/apify-client-js/blob/master/src/resource_clients/dataset.ts#L290)XLSX
**XLSX: xlsx
### [**](#XML)[**](https://github.com/apify/apify-client-js/blob/master/src/resource_clients/dataset.ts#L287)XML
**XML: xml
---
# PlatformFeature<!-- -->
## Index[**](#Index)
### Enumeration Members
* [**Actors](#Actors)
* [**Proxy](#Proxy)
* [**ProxyExternalAccess](#ProxyExternalAccess)
* [**ProxySERPS](#ProxySERPS)
* [**Scheduler](#Scheduler)
* [**Storage](#Storage)
* [**Webhooks](#Webhooks)
## Enumeration Members<!-- -->[**](<#Enumeration Members>)
### [**](#Actors)[**](https://github.com/apify/apify-client-js/blob/master/src/resource_clients/user.ts#L146)Actors
**Actors: ACTORS
### [**](#Proxy)[**](https://github.com/apify/apify-client-js/blob/master/src/resource_clients/user.ts#L151)Proxy
**Proxy: PROXY
### [**](#ProxyExternalAccess)[**](https://github.com/apify/apify-client-js/blob/master/src/resource_clients/user.ts#L152)ProxyExternalAccess
**ProxyExternalAccess: PROXY\_EXTERNAL\_ACCESS
### [**](#ProxySERPS)[**](https://github.com/apify/apify-client-js/blob/master/src/resource_clients/user.ts#L148)ProxySERPS
**ProxySERPS: PROXY\_SERPS
### [**](#Scheduler)[**](https://github.com/apify/apify-client-js/blob/master/src/resource_clients/user.ts#L149)Scheduler
**Scheduler: SCHEDULER
### [**](#Storage)[**](https://github.com/apify/apify-client-js/blob/master/src/resource_clients/user.ts#L147)Storage
**Storage: STORAGE
### [**](#Webhooks)[**](https://github.com/apify/apify-client-js/blob/master/src/resource_clients/user.ts#L150)Webhooks
**Webhooks: WEBHOOKS
---
# ScheduleActions<!-- -->
## Index[**](#Index)
### Enumeration Members
* [**RunActor](#RunActor)
* [**RunActorTask](#RunActorTask)
## Enumeration Members<!-- -->[**](<#Enumeration Members>)
### [**](#RunActor)[**](https://github.com/apify/apify-client-js/blob/master/src/resource_clients/schedule.ts#L94)RunActor
**RunActor: RUN\_ACTOR
### [**](#RunActorTask)[**](https://github.com/apify/apify-client-js/blob/master/src/resource_clients/schedule.ts#L95)RunActorTask
**RunActorTask: RUN\_ACTOR\_TASK
---
# WebhookDispatchStatus<!-- -->
## Index[**](#Index)
### Enumeration Members
* [**Active](#Active)
* [**Failed](#Failed)
* [**Succeeded](#Succeeded)
## Enumeration Members<!-- -->[**](<#Enumeration Members>)
### [**](#Active)[**](https://github.com/apify/apify-client-js/blob/master/src/resource_clients/webhook_dispatch.ts#L37)Active
**Active: ACTIVE
### [**](#Failed)[**](https://github.com/apify/apify-client-js/blob/master/src/resource_clients/webhook_dispatch.ts#L39)Failed
**Failed: FAILED
### [**](#Succeeded)[**](https://github.com/apify/apify-client-js/blob/master/src/resource_clients/webhook_dispatch.ts#L38)Succeeded
**Succeeded: SUCCEEDED
---
# AccountAndUsageLimits<!-- -->
## Index[**](#Index)
### Properties
* [**current](#current)
* [**limits](#limits)
* [**monthlyUsageCycle](#monthlyUsageCycle)
## Properties<!-- -->[**](#Properties)
### [**](#current)[**](https://github.com/apify/apify-client-js/blob/master/src/resource_clients/user.ts#L229)current
**current: [Current](https://docs.apify.com/api/client/js/api/client/js/reference/interface/Current.md)
### [**](#limits)[**](https://github.com/apify/apify-client-js/blob/master/src/resource_clients/user.ts#L228)limits
**limits: [Limits](https://docs.apify.com/api/client/js/api/client/js/reference/interface/Limits.md)
### [**](#monthlyUsageCycle)[**](https://github.com/apify/apify-client-js/blob/master/src/resource_clients/user.ts#L227)monthlyUsageCycle
**monthlyUsageCycle: [MonthlyUsageCycle](https://docs.apify.com/api/client/js/api/client/js/reference/interface/MonthlyUsageCycle.md)
---
# Actor<!-- -->
## Index[**](#Index)
### Properties
* [**actorStandby](#actorStandby)
* [**categories](#categories)
* [**createdAt](#createdAt)
* [**defaultRunOptions](#defaultRunOptions)
* [**deploymentKey](#deploymentKey)
* [**description](#description)
* [**exampleRunInput](#exampleRunInput)
* [**id](#id)
* [**isAnonymouslyRunnable](#isAnonymouslyRunnable)
* [**isDeprecated](#isDeprecated)
* [**isPublic](#isPublic)
* [**modifiedAt](#modifiedAt)
* [**name](#name)
* [**pricingInfos](#pricingInfos)
* [**restartOnError](#restartOnError)
* [**seoDescription](#seoDescription)
* [**seoTitle](#seoTitle)
* [**stats](#stats)
* [**taggedBuilds](#taggedBuilds)
* [**title](#title)
* [**userId](#userId)
* [**username](#username)
* [**versions](#versions)
## Properties<!-- -->[**](#Properties)
### [**](#actorStandby)[**](https://github.com/apify/apify-client-js/blob/master/src/resource_clients/actor.ts#L301)optionalactorStandby
**actorStandby?
<!-- -->
: [ActorStandby](https://docs.apify.com/api/client/js/api/client/js/reference/interface/ActorStandby.md) & { isEnabled: boolean }
### [**](#categories)[**](https://github.com/apify/apify-client-js/blob/master/src/resource_clients/actor.ts#L300)optionalcategories
**categories?
<!-- -->
: string\[]
### [**](#createdAt)[**](https://github.com/apify/apify-client-js/blob/master/src/resource_clients/actor.ts#L287)createdAt
**createdAt: Date
### [**](#defaultRunOptions)[**](https://github.com/apify/apify-client-js/blob/master/src/resource_clients/actor.ts#L292)defaultRunOptions
**defaultRunOptions: [ActorDefaultRunOptions](https://docs.apify.com/api/client/js/api/client/js/reference/interface/ActorDefaultRunOptions.md)
### [**](#deploymentKey)[**](https://github.com/apify/apify-client-js/blob/master/src/resource_clients/actor.ts#L295)deploymentKey
**deploymentKey: string
### [**](#description)[**](https://github.com/apify/apify-client-js/blob/master/src/resource_clients/actor.ts#L282)optionaldescription
**description?
<!-- -->
: string
### [**](#exampleRunInput)[**](https://github.com/apify/apify-client-js/blob/master/src/resource_clients/actor.ts#L293)optionalexampleRunInput
**exampleRunInput?
<!-- -->
: [ActorExampleRunInput](https://docs.apify.com/api/client/js/api/client/js/reference/interface/ActorExampleRunInput.md)
### [**](#id)[**](https://github.com/apify/apify-client-js/blob/master/src/resource_clients/actor.ts#L278)id
**id: string
### [**](#isAnonymouslyRunnable)[**](https://github.com/apify/apify-client-js/blob/master/src/resource_clients/actor.ts#L286)optionalisAnonymouslyRunnable
**isAnonymouslyRunnable?
<!-- -->
: boolean
### [**](#isDeprecated)[**](https://github.com/apify/apify-client-js/blob/master/src/resource_clients/actor.ts#L294)optionalisDeprecated
**isDeprecated?
<!-- -->
: boolean
### [**](#isPublic)[**](https://github.com/apify/apify-client-js/blob/master/src/resource_clients/actor.ts#L285)isPublic
**isPublic: boolean
### [**](#modifiedAt)[**](https://github.com/apify/apify-client-js/blob/master/src/resource_clients/actor.ts#L288)modifiedAt
**modifiedAt: Date
### [**](#name)[**](https://github.com/apify/apify-client-js/blob/master/src/resource_clients/actor.ts#L280)name
**name: string
### [**](#pricingInfos)[**](https://github.com/apify/apify-client-js/blob/master/src/resource_clients/actor.ts#L291)optionalpricingInfos
**pricingInfos?
<!-- -->
: [ActorRunPricingInfo](https://docs.apify.com/api/client/js/api/client/js/reference.md#ActorRunPricingInfo)\[]
### [**](#restartOnError)[**](https://github.com/apify/apify-client-js/blob/master/src/resource_clients/actor.ts#L284)optionalrestartOnError
**restartOnError?
<!-- -->
: boolean
* **@deprecated**
Use defaultRunOptions.restartOnError instead
### [**](#seoDescription)[**](https://github.com/apify/apify-client-js/blob/master/src/resource_clients/actor.ts#L299)optionalseoDescription
**seoDescription?
<!-- -->
: string
### [**](#seoTitle)[**](https://github.com/apify/apify-client-js/blob/master/src/resource_clients/actor.ts#L298)optionalseoTitle
**seoTitle?
<!-- -->
: string
### [**](#stats)[**](https://github.com/apify/apify-client-js/blob/master/src/resource_clients/actor.ts#L289)stats
**stats: [ActorStats](https://docs.apify.com/api/client/js/api/client/js/reference/interface/ActorStats.md)
### [**](#taggedBuilds)[**](https://github.com/apify/apify-client-js/blob/master/src/resource_clients/actor.ts#L297)optionaltaggedBuilds
**taggedBuilds?
<!-- -->
: [ActorTaggedBuilds](https://docs.apify.com/api/client/js/api/client/js/reference.md#ActorTaggedBuilds)
### [**](#title)[**](https://github.com/apify/apify-client-js/blob/master/src/resource_clients/actor.ts#L296)optionaltitle
**title?
<!-- -->
: string
### [**](#userId)[**](https://github.com/apify/apify-client-js/blob/master/src/resource_clients/actor.ts#L279)userId
**userId: string
### [**](#username)[**](https://github.com/apify/apify-client-js/blob/master/src/resource_clients/actor.ts#L281)username
**username: string
### [**](#versions)[**](https://github.com/apify/apify-client-js/blob/master/src/resource_clients/actor.ts#L290)versions
**versions: [ActorVersion](https://docs.apify.com/api/client/js/api/client/js/reference.md#ActorVersion)\[]
---
# ActorBuildOptions<!-- -->
## Index[**](#Index)
### Properties
* [**betaPackages](#betaPackages)
* [**tag](#tag)
* [**useCache](#useCache)
* [**waitForFinish](#waitForFinish)
## Properties<!-- -->[**](#Properties)
### [**](#betaPackages)[**](https://github.com/apify/apify-client-js/blob/master/src/resource_clients/actor.ts#L512)optionalbetaPackages
**betaPackages?
<!-- -->
: boolean
### [**](#tag)[**](https://github.com/apify/apify-client-js/blob/master/src/resource_clients/actor.ts#L513)optionaltag
**tag?
<!-- -->
: string
### [**](#useCache)[**](https://github.com/apify/apify-client-js/blob/master/src/resource_clients/actor.ts#L514)optionaluseCache
**useCache?
<!-- -->
: boolean
### [**](#waitForFinish)[**](https://github.com/apify/apify-client-js/blob/master/src/resource_clients/actor.ts#L515)optionalwaitForFinish
**waitForFinish?
<!-- -->
: number
---
# ActorCallOptions<!-- -->
### Hierarchy
* Omit<[ActorStartOptions](https://docs.apify.com/api/client/js/api/client/js/reference/interface/ActorStartOptions.md), waitForFinish>
* *ActorCallOptions*
## Index[**](#Index)
### Properties
* [**build](#build)
* [**contentType](#contentType)
* [**forcePermissionLevel](#forcePermissionLevel)
* [**maxItems](#maxItems)
* [**memory](#memory)
* [**restartOnError](#restartOnError)
* [**timeout](#timeout)
* [**waitSecs](#waitSecs)
* [**webhooks](#webhooks)
## Properties<!-- -->[**](#Properties)
### [**](#build)[**](https://github.com/apify/apify-client-js/blob/master/src/resource_clients/actor.ts#L368)optionalinheritedbuild
**build?
<!-- -->
: string
Inherited from Omit.build
Tag or number of the actor build to run (e.g. `beta` or `1.2.345`). If not provided, the run uses build tag or number from the default actor run configuration (typically `latest`).
### [**](#contentType)[**](https://github.com/apify/apify-client-js/blob/master/src/resource_clients/actor.ts#L376)optionalinheritedcontentType
**contentType?
<!-- -->
: string
Inherited from Omit.contentType
Content type for the `input`. If not specified, `input` is expected to be an object that will be stringified to JSON and content type set to `application/json; charset=utf-8`. If `options.contentType` is specified, then `input` must be a `String` or `Buffer`.
### [**](#forcePermissionLevel)[**](https://github.com/apify/apify-client-js/blob/master/src/resource_clients/actor.ts#L424)optionalinheritedforcePermissionLevel
**forcePermissionLevel?
<!-- -->
: string
Inherited from Omit.forcePermissionLevel
Override the Actor's permissions for this run. If not set, the Actor will run with permissions configured in the Actor settings.
### [**](#maxItems)[**](https://github.com/apify/apify-client-js/blob/master/src/resource_clients/actor.ts#L411)optionalinheritedmaxItems
**maxItems?
<!-- -->
: number
Inherited from Omit.maxItems
Specifies maximum number of items that the actor run should return. This is used by pay per result actors to limit the maximum number of results that will be charged to customer. Value can be accessed in actor run using `ACTOR_MAX_PAID_DATASET_ITEMS` environment variable.
### [**](#memory)[**](https://github.com/apify/apify-client-js/blob/master/src/resource_clients/actor.ts#L382)optionalinheritedmemory
**memory?
<!-- -->
: number
Inherited from Omit.memory
Memory in megabytes which will be allocated for the new actor run. If not provided, the run uses memory of the default actor run configuration.
### [**](#restartOnError)[**](https://github.com/apify/apify-client-js/blob/master/src/resource_clients/actor.ts#L416)optionalinheritedrestartOnError
**restartOnError?
<!-- -->
: boolean
Inherited from Omit.restartOnError
Determines whether the run will be restarted if it fails.
### [**](#timeout)[**](https://github.com/apify/apify-client-js/blob/master/src/resource_clients/actor.ts#L387)optionalinheritedtimeout
**timeout?
<!-- -->
: number
Inherited from Omit.timeout
Timeout for the actor run in seconds. Zero value means there is no timeout. If not provided, the run uses timeout of the default actor run configuration.
### [**](#waitSecs)[**](https://github.com/apify/apify-client-js/blob/master/src/resource_clients/actor.ts#L428)optionalwaitSecs
**waitSecs?
<!-- -->
: number
### [**](#webhooks)[**](https://github.com/apify/apify-client-js/blob/master/src/resource_clients/actor.ts#L404)optionalinheritedwebhooks
**webhooks?
<!-- -->
: readonly
<!-- -->
[WebhookUpdateData](https://docs.apify.com/api/client/js/api/client/js/reference.md#WebhookUpdateData)\[]
Inherited from Omit.webhooks
Specifies optional webhooks associated with the actor run, which can be used to receive a notification e.g. when the actor finished or failed, see [ad hook webhooks documentation](https://docs.apify.com/webhooks/ad-hoc-webhooks) for detailed description.
---
# ActorChargeEvent<!-- -->
## Index[**](#Index)
### Properties
* [**eventDescription](#eventDescription)
* [**eventPriceUsd](#eventPriceUsd)
* [**eventTitle](#eventTitle)
## Properties<!-- -->[**](#Properties)
### [**](#eventDescription)[**](https://github.com/apify/apify-client-js/blob/master/src/resource_clients/actor.ts#L575)optionaleventDescription
**eventDescription?
<!-- -->
: string
### [**](#eventPriceUsd)[**](https://github.com/apify/apify-client-js/blob/master/src/resource_clients/actor.ts#L573)eventPriceUsd
**eventPriceUsd: number
### [**](#eventTitle)[**](https://github.com/apify/apify-client-js/blob/master/src/resource_clients/actor.ts#L574)eventTitle
**eventTitle: string
---
# ActorCollectionCreateOptions<!-- -->
## Index[**](#Index)
### Properties
* [**actorStandby](#actorStandby)
* [**categories](#categories)
* [**defaultRunOptions](#defaultRunOptions)
* [**description](#description)
* [**exampleRunInput](#exampleRunInput)
* [**isDeprecated](#isDeprecated)
* [**isPublic](#isPublic)
* [**name](#name)
* [**restartOnError](#restartOnError)
* [**seoDescription](#seoDescription)
* [**seoTitle](#seoTitle)
* [**title](#title)
* [**versions](#versions)
## Properties<!-- -->[**](#Properties)
### [**](#actorStandby)[**](https://github.com/apify/apify-client-js/blob/master/src/resource_clients/actor_collection.ts#L85)optionalactorStandby
**actorStandby?
<!-- -->
: [ActorStandby](https://docs.apify.com/api/client/js/api/client/js/reference/interface/ActorStandby.md) & { isEnabled: boolean }
### [**](#categories)[**](https://github.com/apify/apify-client-js/blob/master/src/resource_clients/actor_collection.ts#L72)optionalcategories
**categories?
<!-- -->
: string\[]
### [**](#defaultRunOptions)[**](https://github.com/apify/apify-client-js/blob/master/src/resource_clients/actor_collection.ts#L73)optionaldefaultRunOptions
**defaultRunOptions?
<!-- -->
: [ActorDefaultRunOptions](https://docs.apify.com/api/client/js/api/client/js/reference/interface/ActorDefaultRunOptions.md)
### [**](#description)[**](https://github.com/apify/apify-client-js/blob/master/src/resource_clients/actor_collection.ts#L74)optionaldescription
**description?
<!-- -->
: string
### [**](#exampleRunInput)[**](https://github.com/apify/apify-client-js/blob/master/src/resource_clients/actor_collection.ts#L75)optionalexampleRunInput
**exampleRunInput?
<!-- -->
: [ActorExampleRunInput](https://docs.apify.com/api/client/js/api/client/js/reference/interface/ActorExampleRunInput.md)
### [**](#isDeprecated)[**](https://github.com/apify/apify-client-js/blob/master/src/resource_clients/actor_collection.ts#L76)optionalisDeprecated
**isDeprecated?
<!-- -->
: boolean
### [**](#isPublic)[**](https://github.com/apify/apify-client-js/blob/master/src/resource_clients/actor_collection.ts#L77)optionalisPublic
**isPublic?
<!-- -->
: boolean
### [**](#name)[**](https://github.com/apify/apify-client-js/blob/master/src/resource_clients/actor_collection.ts#L78)optionalname
**name?
<!-- -->
: string
### [**](#restartOnError)[**](https://github.com/apify/apify-client-js/blob/master/src/resource_clients/actor_collection.ts#L80)optionalrestartOnError
**restartOnError?
<!-- -->
: boolean
* **@deprecated**
Use defaultRunOptions.restartOnError instead
### [**](#seoDescription)[**](https://github.com/apify/apify-client-js/blob/master/src/resource_clients/actor_collection.ts#L82)optionalseoDescription
**seoDescription?
<!-- -->
: string
### [**](#seoTitle)[**](https://github.com/apify/apify-client-js/blob/master/src/resource_clients/actor_collection.ts#L81)optionalseoTitle
**seoTitle?
<!-- -->
: string
### [**](#title)[**](https://github.com/apify/apify-client-js/blob/master/src/resource_clients/actor_collection.ts#L83)optionaltitle
**title?
<!-- -->
: string
### [**](#versions)[**](https://github.com/apify/apify-client-js/blob/master/src/resource_clients/actor_collection.ts#L84)optionalversions
**versions?
<!-- -->
: [ActorVersion](https://docs.apify.com/api/client/js/api/client/js/reference.md#ActorVersion)\[]
---
# ActorCollectionListItem<!-- -->
## Index[**](#Index)
### Properties
* [**createdAt](#createdAt)
* [**id](#id)
* [**modifiedAt](#modifiedAt)
* [**name](#name)
* [**username](#username)
## Properties<!-- -->[**](#Properties)
### [**](#createdAt)[**](https://github.com/apify/apify-client-js/blob/master/src/resource_clients/actor_collection.ts#L63)createdAt
**createdAt: Date
### [**](#id)[**](https://github.com/apify/apify-client-js/blob/master/src/resource_clients/actor_collection.ts#L62)id
**id: string
### [**](#modifiedAt)[**](https://github.com/apify/apify-client-js/blob/master/src/resource_clients/actor_collection.ts#L64)modifiedAt
**modifiedAt: Date
### [**](#name)[**](https://github.com/apify/apify-client-js/blob/master/src/resource_clients/actor_collection.ts#L65)name
**name: string
### [**](#username)[**](https://github.com/apify/apify-client-js/blob/master/src/resource_clients/actor_collection.ts#L66)username
**username: string
---
# ActorCollectionListOptions<!-- -->
## Index[**](#Index)
### Properties
* [**desc](#desc)
* [**limit](#limit)
* [**my](#my)
* [**offset](#offset)
* [**sortBy](#sortBy)
## Properties<!-- -->[**](#Properties)
### [**](#desc)[**](https://github.com/apify/apify-client-js/blob/master/src/resource_clients/actor_collection.ts#L57)optionaldesc
**desc?
<!-- -->
: boolean
### [**](#limit)[**](https://github.com/apify/apify-client-js/blob/master/src/resource_clients/actor_collection.ts#L55)optionallimit
**limit?
<!-- -->
: number
### [**](#my)[**](https://github.com/apify/apify-client-js/blob/master/src/resource_clients/actor_collection.ts#L54)optionalmy
**my?
<!-- -->
: boolean
### [**](#offset)[**](https://github.com/apify/apify-client-js/blob/master/src/resource_clients/actor_collection.ts#L56)optionaloffset
**offset?
<!-- -->
: number
### [**](#sortBy)[**](https://github.com/apify/apify-client-js/blob/master/src/resource_clients/actor_collection.ts#L58)optionalsortBy
**sortBy?
<!-- -->
: [ActorListSortBy](https://docs.apify.com/api/client/js/api/client/js/reference/enum/ActorListSortBy.md)
---
# ActorDefaultRunOptions<!-- -->
## Index[**](#Index)
### Properties
* [**build](#build)
* [**memoryMbytes](#memoryMbytes)
* [**restartOnError](#restartOnError)
* [**timeoutSecs](#timeoutSecs)
## Properties<!-- -->[**](#Properties)
### [**](#build)[**](https://github.com/apify/apify-client-js/blob/master/src/resource_clients/actor.ts#L318)build
**build: string
### [**](#memoryMbytes)[**](https://github.com/apify/apify-client-js/blob/master/src/resource_clients/actor.ts#L320)memoryMbytes
**memoryMbytes: number
### [**](#restartOnError)[**](https://github.com/apify/apify-client-js/blob/master/src/resource_clients/actor.ts#L321)optionalrestartOnError
**restartOnError?
<!-- -->
: boolean
### [**](#timeoutSecs)[**](https://github.com/apify/apify-client-js/blob/master/src/resource_clients/actor.ts#L319)timeoutSecs
**timeoutSecs: number
---
# ActorDefinition<!-- -->
## Index[**](#Index)
### Properties
* [**actorSpecification](#actorSpecification)
* [**buildTag](#buildTag)
* [**changelog](#changelog)
* [**dockerContextDir](#dockerContextDir)
* [**dockerfile](#dockerfile)
* [**environmentVariables](#environmentVariables)
* [**input](#input)
* [**maxMemoryMbytes](#maxMemoryMbytes)
* [**minMemoryMbytes](#minMemoryMbytes)
* [**name](#name)
* [**readme](#readme)
* [**storages](#storages)
* [**usesStandbyMode](#usesStandbyMode)
* [**version](#version)
## Properties<!-- -->[**](#Properties)
### [**](#actorSpecification)[**](https://github.com/apify/apify-client-js/blob/master/src/resource_clients/actor.ts#L523)actorSpecification
**actorSpecification: number
### [**](#buildTag)[**](https://github.com/apify/apify-client-js/blob/master/src/resource_clients/actor.ts#L526)optionalbuildTag
**buildTag?
<!-- -->
: string
### [**](#changelog)[**](https://github.com/apify/apify-client-js/blob/master/src/resource_clients/actor.ts#L532)optionalchangelog
**changelog?
<!-- -->
: null | string
### [**](#dockerContextDir)[**](https://github.com/apify/apify-client-js/blob/master/src/resource_clients/actor.ts#L529)optionaldockerContextDir
**dockerContextDir?
<!-- -->
: string
### [**](#dockerfile)[**](https://github.com/apify/apify-client-js/blob/master/src/resource_clients/actor.ts#L528)optionaldockerfile
**dockerfile?
<!-- -->
: string
### [**](#environmentVariables)[**](https://github.com/apify/apify-client-js/blob/master/src/resource_clients/actor.ts#L527)optionalenvironmentVariables
**environmentVariables?
<!-- -->
: Record\<string, string>
### [**](#input)[**](https://github.com/apify/apify-client-js/blob/master/src/resource_clients/actor.ts#L531)optionalinput
**input?
<!-- -->
: null | object
### [**](#maxMemoryMbytes)[**](https://github.com/apify/apify-client-js/blob/master/src/resource_clients/actor.ts#L537)optionalmaxMemoryMbytes
**maxMemoryMbytes?
<!-- -->
: number
### [**](#minMemoryMbytes)[**](https://github.com/apify/apify-client-js/blob/master/src/resource_clients/actor.ts#L536)optionalminMemoryMbytes
**minMemoryMbytes?
<!-- -->
: number
### [**](#name)[**](https://github.com/apify/apify-client-js/blob/master/src/resource_clients/actor.ts#L524)name
**name: string
### [**](#readme)[**](https://github.com/apify/apify-client-js/blob/master/src/resource_clients/actor.ts#L530)optionalreadme
**readme?
<!-- -->
: null | string
### [**](#storages)[**](https://github.com/apify/apify-client-js/blob/master/src/resource_clients/actor.ts#L533)optionalstorages
**storages?
<!-- -->
: { dataset?
<!-- -->
: object }
#### Type declaration
* ##### optionaldataset?<!-- -->: object
### [**](#usesStandbyMode)[**](https://github.com/apify/apify-client-js/blob/master/src/resource_clients/actor.ts#L538)optionalusesStandbyMode
**usesStandbyMode?
<!-- -->
: boolean
### [**](#version)[**](https://github.com/apify/apify-client-js/blob/master/src/resource_clients/actor.ts#L525)version
**version: string
---
# ActorEnvironmentVariable<!-- -->
## Index[**](#Index)
### Properties
* [**isSecret](#isSecret)
* [**name](#name)
* [**value](#value)
## Properties<!-- -->[**](#Properties)
### [**](#isSecret)[**](https://github.com/apify/apify-client-js/blob/master/src/resource_clients/actor_version.ts#L103)optionalisSecret
**isSecret?
<!-- -->
: boolean
### [**](#name)[**](https://github.com/apify/apify-client-js/blob/master/src/resource_clients/actor_version.ts#L101)optionalname
**name?
<!-- -->
: string
### [**](#value)[**](https://github.com/apify/apify-client-js/blob/master/src/resource_clients/actor_version.ts#L102)optionalvalue
**value?
<!-- -->
: string
---
# ActorEnvVarCollectionListOptions<!-- -->
## Index[**](#Index)
### Properties
* [**desc](#desc)
* [**limit](#limit)
* [**offset](#offset)
## Properties<!-- -->[**](#Properties)
### [**](#desc)[**](https://github.com/apify/apify-client-js/blob/master/src/resource_clients/actor_env_var_collection.ts#L46)optionaldesc
**desc?
<!-- -->
: boolean
### [**](#limit)[**](https://github.com/apify/apify-client-js/blob/master/src/resource_clients/actor_env_var_collection.ts#L44)optionallimit
**limit?
<!-- -->
: number
### [**](#offset)[**](https://github.com/apify/apify-client-js/blob/master/src/resource_clients/actor_env_var_collection.ts#L45)optionaloffset
**offset?
<!-- -->
: number
---
# ActorExampleRunInput<!-- -->
## Index[**](#Index)
### Properties
* [**body](#body)
* [**contentType](#contentType)
## Properties<!-- -->[**](#Properties)
### [**](#body)[**](https://github.com/apify/apify-client-js/blob/master/src/resource_clients/actor.ts#L325)body
**body: string
### [**](#contentType)[**](https://github.com/apify/apify-client-js/blob/master/src/resource_clients/actor.ts#L326)contentType
**contentType: string
---
# ActorLastRunOptions<!-- -->
## Index[**](#Index)
### Properties
* [**status](#status)
## Properties<!-- -->[**](#Properties)
### [**](#status)[**](https://github.com/apify/apify-client-js/blob/master/src/resource_clients/actor.ts#L519)optionalstatus
**status?
<!-- -->
: READY | RUNNING | SUCCEEDED | FAILED | TIMING\_OUT | TIMED\_OUT | ABORTING | ABORTED
---
# ActorRun<!-- -->
### Hierarchy
* [ActorRunListItem](https://docs.apify.com/api/client/js/api/client/js/reference/interface/ActorRunListItem.md)
* *ActorRun*
## Index[**](#Index)
### Properties
* [**actId](#actId)
* [**actorTaskId](#actorTaskId)
* [**buildId](#buildId)
* [**buildNumber](#buildNumber)
* [**chargedEventCounts](#chargedEventCounts)
* [**containerUrl](#containerUrl)
* [**defaultDatasetId](#defaultDatasetId)
* [**defaultKeyValueStoreId](#defaultKeyValueStoreId)
* [**defaultRequestQueueId](#defaultRequestQueueId)
* [**exitCode](#exitCode)
* [**finishedAt](#finishedAt)
* [**generalAccess](#generalAccess)
* [**gitBranchName](#gitBranchName)
* [**id](#id)
* [**isContainerServerReady](#isContainerServerReady)
* [**meta](#meta)
* [**options](#options)
* [**pricingInfo](#pricingInfo)
* [**startedAt](#startedAt)
* [**stats](#stats)
* [**status](#status)
* [**statusMessage](#statusMessage)
* [**usage](#usage)
* [**usageTotalUsd](#usageTotalUsd)
* [**usageUsd](#usageUsd)
* [**userId](#userId)
## Properties<!-- -->[**](#Properties)
### [**](#actId)[**](https://github.com/apify/apify-client-js/blob/master/src/resource_clients/actor.ts#L433)inheritedactId
**actId: string
Inherited from ActorRunListItem.actId
### [**](#actorTaskId)[**](https://github.com/apify/apify-client-js/blob/master/src/resource_clients/actor.ts#L434)optionalinheritedactorTaskId
**actorTaskId?
<!-- -->
: string
Inherited from ActorRunListItem.actorTaskId
### [**](#buildId)[**](https://github.com/apify/apify-client-js/blob/master/src/resource_clients/actor.ts#L439)inheritedbuildId
**buildId: string
Inherited from ActorRunListItem.buildId
### [**](#buildNumber)[**](https://github.com/apify/apify-client-js/blob/master/src/resource_clients/actor.ts#L440)inheritedbuildNumber
**buildNumber: string
Inherited from ActorRunListItem.buildNumber
### [**](#chargedEventCounts)[**](https://github.com/apify/apify-client-js/blob/master/src/resource_clients/actor.ts#L459)optionalchargedEventCounts
**chargedEventCounts?
<!-- -->
: Record\<string, number>
### [**](#containerUrl)[**](https://github.com/apify/apify-client-js/blob/master/src/resource_clients/actor.ts#L453)containerUrl
**containerUrl: string
### [**](#defaultDatasetId)[**](https://github.com/apify/apify-client-js/blob/master/src/resource_clients/actor.ts#L442)inheriteddefaultDatasetId
**defaultDatasetId: string
Inherited from ActorRunListItem.defaultDatasetId
### [**](#defaultKeyValueStoreId)[**](https://github.com/apify/apify-client-js/blob/master/src/resource_clients/actor.ts#L441)inheriteddefaultKeyValueStoreId
**defaultKeyValueStoreId: string
Inherited from ActorRunListItem.defaultKeyValueStoreId
### [**](#defaultRequestQueueId)[**](https://github.com/apify/apify-client-js/blob/master/src/resource_clients/actor.ts#L443)inheriteddefaultRequestQueueId
**defaultRequestQueueId: string
Inherited from ActorRunListItem.defaultRequestQueueId
### [**](#exitCode)[**](https://github.com/apify/apify-client-js/blob/master/src/resource_clients/actor.ts#L452)optionalexitCode
**exitCode?
<!-- -->
: number
### [**](#finishedAt)[**](https://github.com/apify/apify-client-js/blob/master/src/resource_clients/actor.ts#L436)inheritedfinishedAt
**finishedAt: Date
Inherited from ActorRunListItem.finishedAt
### [**](#generalAccess)[**](https://github.com/apify/apify-client-js/blob/master/src/resource_clients/actor.ts#L460)optionalgeneralAccess
**generalAccess?
<!-- -->
: null | RUN\_GENERAL\_ACCESS
### [**](#gitBranchName)[**](https://github.com/apify/apify-client-js/blob/master/src/resource_clients/actor.ts#L455)optionalgitBranchName
**gitBranchName?
<!-- -->
: string
### [**](#id)[**](https://github.com/apify/apify-client-js/blob/master/src/resource_clients/actor.ts#L432)inheritedid
**id: string
Inherited from ActorRunListItem.id
### [**](#isContainerServerReady)[**](https://github.com/apify/apify-client-js/blob/master/src/resource_clients/actor.ts#L454)optionalisContainerServerReady
**isContainerServerReady?
<!-- -->
: boolean
### [**](#meta)[**](https://github.com/apify/apify-client-js/blob/master/src/resource_clients/actor.ts#L438)inheritedmeta
**meta: [ActorRunMeta](https://docs.apify.com/api/client/js/api/client/js/reference/interface/ActorRunMeta.md)
Inherited from ActorRunListItem.meta
### [**](#options)[**](https://github.com/apify/apify-client-js/blob/master/src/resource_clients/actor.ts#L451)options
**options: [ActorRunOptions](https://docs.apify.com/api/client/js/api/client/js/reference/interface/ActorRunOptions.md)
### [**](#pricingInfo)[**](https://github.com/apify/apify-client-js/blob/master/src/resource_clients/actor.ts#L458)optionalpricingInfo
**pricingInfo?
<!-- -->
: [ActorRunPricingInfo](https://docs.apify.com/api/client/js/api/client/js/reference.md#ActorRunPricingInfo)
### [**](#startedAt)[**](https://github.com/apify/apify-client-js/blob/master/src/resource_clients/actor.ts#L435)inheritedstartedAt
**startedAt: Date
Inherited from ActorRunListItem.startedAt
### [**](#stats)[**](https://github.com/apify/apify-client-js/blob/master/src/resource_clients/actor.ts#L450)stats
**stats: [ActorRunStats](https://docs.apify.com/api/client/js/api/client/js/reference/interface/ActorRunStats.md)
### [**](#status)[**](https://github.com/apify/apify-client-js/blob/master/src/resource_clients/actor.ts#L437)inheritedstatus
**status: READY | RUNNING | SUCCEEDED | FAILED | ABORTING | ABORTED | TIMING-OUT | TIMED-OUT
Inherited from ActorRunListItem.status
### [**](#statusMessage)[**](https://github.com/apify/apify-client-js/blob/master/src/resource_clients/actor.ts#L449)optionalstatusMessage
**statusMessage?
<!-- -->
: string
### [**](#usage)[**](https://github.com/apify/apify-client-js/blob/master/src/resource_clients/actor.ts#L456)optionalusage
**usage?
<!-- -->
: [ActorRunUsage](https://docs.apify.com/api/client/js/api/client/js/reference/interface/ActorRunUsage.md)
### [**](#usageTotalUsd)[**](https://github.com/apify/apify-client-js/blob/master/src/resource_clients/actor.ts#L444)optionalinheritedusageTotalUsd
**usageTotalUsd?
<!-- -->
: number
Inherited from ActorRunListItem.usageTotalUsd
### [**](#usageUsd)[**](https://github.com/apify/apify-client-js/blob/master/src/resource_clients/actor.ts#L457)optionalusageUsd
**usageUsd?
<!-- -->
: [ActorRunUsage](https://docs.apify.com/api/client/js/api/client/js/reference/interface/ActorRunUsage.md)
### [**](#userId)[**](https://github.com/apify/apify-client-js/blob/master/src/resource_clients/actor.ts#L448)userId
**userId: string
---
# ActorRunListItem<!-- -->
### Hierarchy
* *ActorRunListItem*
* [ActorRun](https://docs.apify.com/api/client/js/api/client/js/reference/interface/ActorRun.md)
## Index[**](#Index)
### Properties
* [**actId](#actId)
* [**actorTaskId](#actorTaskId)
* [**buildId](#buildId)
* [**buildNumber](#buildNumber)
* [**defaultDatasetId](#defaultDatasetId)
* [**defaultKeyValueStoreId](#defaultKeyValueStoreId)
* [**defaultRequestQueueId](#defaultRequestQueueId)
* [**finishedAt](#finishedAt)
* [**id](#id)
* [**meta](#meta)
* [**startedAt](#startedAt)
* [**status](#status)
* [**usageTotalUsd](#usageTotalUsd)
## Properties<!-- -->[**](#Properties)
### [**](#actId)[**](https://github.com/apify/apify-client-js/blob/master/src/resource_clients/actor.ts#L433)actId
**actId: string
### [**](#actorTaskId)[**](https://github.com/apify/apify-client-js/blob/master/src/resource_clients/actor.ts#L434)optionalactorTaskId
**actorTaskId?
<!-- -->
: string
### [**](#buildId)[**](https://github.com/apify/apify-client-js/blob/master/src/resource_clients/actor.ts#L439)buildId
**buildId: string
### [**](#buildNumber)[**](https://github.com/apify/apify-client-js/blob/master/src/resource_clients/actor.ts#L440)buildNumber
**buildNumber: string
### [**](#defaultDatasetId)[**](https://github.com/apify/apify-client-js/blob/master/src/resource_clients/actor.ts#L442)defaultDatasetId
**defaultDatasetId: string
### [**](#defaultKeyValueStoreId)[**](https://github.com/apify/apify-client-js/blob/master/src/resource_clients/actor.ts#L441)defaultKeyValueStoreId
**defaultKeyValueStoreId: string
### [**](#defaultRequestQueueId)[**](https://github.com/apify/apify-client-js/blob/master/src/resource_clients/actor.ts#L443)defaultRequestQueueId
**defaultRequestQueueId: string
### [**](#finishedAt)[**](https://github.com/apify/apify-client-js/blob/master/src/resource_clients/actor.ts#L436)finishedAt
**finishedAt: Date
### [**](#id)[**](https://github.com/apify/apify-client-js/blob/master/src/resource_clients/actor.ts#L432)id
**id: string
### [**](#meta)[**](https://github.com/apify/apify-client-js/blob/master/src/resource_clients/actor.ts#L438)meta
**meta: [ActorRunMeta](https://docs.apify.com/api/client/js/api/client/js/reference/interface/ActorRunMeta.md)
### [**](#startedAt)[**](https://github.com/apify/apify-client-js/blob/master/src/resource_clients/actor.ts#L435)startedAt
**startedAt: Date
### [**](#status)[**](https://github.com/apify/apify-client-js/blob/master/src/resource_clients/actor.ts#L437)status
**status: READY | RUNNING | SUCCEEDED | FAILED | ABORTING | ABORTED | TIMING-OUT | TIMED-OUT
### [**](#usageTotalUsd)[**](https://github.com/apify/apify-client-js/blob/master/src/resource_clients/actor.ts#L444)optionalusageTotalUsd
**usageTotalUsd?
<!-- -->
: number
---
# ActorRunMeta<!-- -->
## Index[**](#Index)
### Properties
* [**clientIp](#clientIp)
* [**origin](#origin)
* [**userAgent](#userAgent)
## Properties<!-- -->[**](#Properties)
### [**](#clientIp)[**](https://github.com/apify/apify-client-js/blob/master/src/resource_clients/actor.ts#L480)optionalclientIp
**clientIp?
<!-- -->
: string
### [**](#origin)[**](https://github.com/apify/apify-client-js/blob/master/src/resource_clients/actor.ts#L479)origin
**origin: string
### [**](#userAgent)[**](https://github.com/apify/apify-client-js/blob/master/src/resource_clients/actor.ts#L481)userAgent
**userAgent: string
---
# ActorRunOptions<!-- -->
## Index[**](#Index)
### Properties
* [**build](#build)
* [**diskMbytes](#diskMbytes)
* [**maxTotalChargeUsd](#maxTotalChargeUsd)
* [**memoryMbytes](#memoryMbytes)
* [**restartOnError](#restartOnError)
* [**timeoutSecs](#timeoutSecs)
## Properties<!-- -->[**](#Properties)
### [**](#build)[**](https://github.com/apify/apify-client-js/blob/master/src/resource_clients/actor.ts#L503)build
**build: string
### [**](#diskMbytes)[**](https://github.com/apify/apify-client-js/blob/master/src/resource_clients/actor.ts#L506)diskMbytes
**diskMbytes: number
### [**](#maxTotalChargeUsd)[**](https://github.com/apify/apify-client-js/blob/master/src/resource_clients/actor.ts#L507)optionalmaxTotalChargeUsd
**maxTotalChargeUsd?
<!-- -->
: number
### [**](#memoryMbytes)[**](https://github.com/apify/apify-client-js/blob/master/src/resource_clients/actor.ts#L505)memoryMbytes
**memoryMbytes: number
### [**](#restartOnError)[**](https://github.com/apify/apify-client-js/blob/master/src/resource_clients/actor.ts#L508)optionalrestartOnError
**restartOnError?
<!-- -->
: boolean
### [**](#timeoutSecs)[**](https://github.com/apify/apify-client-js/blob/master/src/resource_clients/actor.ts#L504)timeoutSecs
**timeoutSecs: number
---
# ActorRunStats<!-- -->
## Index[**](#Index)
### Properties
* [**computeUnits](#computeUnits)
* [**cpuAvgUsage](#cpuAvgUsage)
* [**cpuCurrentUsage](#cpuCurrentUsage)
* [**cpuMaxUsage](#cpuMaxUsage)
* [**durationMillis](#durationMillis)
* [**inputBodyLen](#inputBodyLen)
* [**memAvgBytes](#memAvgBytes)
* [**memCurrentBytes](#memCurrentBytes)
* [**memMaxBytes](#memMaxBytes)
* [**metamorph](#metamorph)
* [**netRxBytes](#netRxBytes)
* [**netTxBytes](#netTxBytes)
* [**restartCount](#restartCount)
* [**resurrectCount](#resurrectCount)
* [**runTimeSecs](#runTimeSecs)
## Properties<!-- -->[**](#Properties)
### [**](#computeUnits)[**](https://github.com/apify/apify-client-js/blob/master/src/resource_clients/actor.ts#L499)computeUnits
**computeUnits: number
### [**](#cpuAvgUsage)[**](https://github.com/apify/apify-client-js/blob/master/src/resource_clients/actor.ts#L491)cpuAvgUsage
**cpuAvgUsage: number
### [**](#cpuCurrentUsage)[**](https://github.com/apify/apify-client-js/blob/master/src/resource_clients/actor.ts#L493)cpuCurrentUsage
**cpuCurrentUsage: number
### [**](#cpuMaxUsage)[**](https://github.com/apify/apify-client-js/blob/master/src/resource_clients/actor.ts#L492)cpuMaxUsage
**cpuMaxUsage: number
### [**](#durationMillis)[**](https://github.com/apify/apify-client-js/blob/master/src/resource_clients/actor.ts#L496)durationMillis
**durationMillis: number
### [**](#inputBodyLen)[**](https://github.com/apify/apify-client-js/blob/master/src/resource_clients/actor.ts#L485)inputBodyLen
**inputBodyLen: number
### [**](#memAvgBytes)[**](https://github.com/apify/apify-client-js/blob/master/src/resource_clients/actor.ts#L488)memAvgBytes
**memAvgBytes: number
### [**](#memCurrentBytes)[**](https://github.com/apify/apify-client-js/blob/master/src/resource_clients/actor.ts#L490)memCurrentBytes
**memCurrentBytes: number
### [**](#memMaxBytes)[**](https://github.com/apify/apify-client-js/blob/master/src/resource_clients/actor.ts#L489)memMaxBytes
**memMaxBytes: number
### [**](#metamorph)[**](https://github.com/apify/apify-client-js/blob/master/src/resource_clients/actor.ts#L498)metamorph
**metamorph: number
### [**](#netRxBytes)[**](https://github.com/apify/apify-client-js/blob/master/src/resource_clients/actor.ts#L494)netRxBytes
**netRxBytes: number
### [**](#netTxBytes)[**](https://github.com/apify/apify-client-js/blob/master/src/resource_clients/actor.ts#L495)netTxBytes
**netTxBytes: number
### [**](#restartCount)[**](https://github.com/apify/apify-client-js/blob/master/src/resource_clients/actor.ts#L486)restartCount
**restartCount: number
### [**](#resurrectCount)[**](https://github.com/apify/apify-client-js/blob/master/src/resource_clients/actor.ts#L487)resurrectCount
**resurrectCount: number
### [**](#runTimeSecs)[**](https://github.com/apify/apify-client-js/blob/master/src/resource_clients/actor.ts#L497)runTimeSecs
**runTimeSecs: number
---
# ActorRunUsage<!-- -->
## Index[**](#Index)
### Properties
* [**ACTOR\_COMPUTE\_UNITS](#ACTOR_COMPUTE_UNITS)
* [**DATA\_TRANSFER\_EXTERNAL\_GBYTES](#DATA_TRANSFER_EXTERNAL_GBYTES)
* [**DATA\_TRANSFER\_INTERNAL\_GBYTES](#DATA_TRANSFER_INTERNAL_GBYTES)
* [**DATASET\_READS](#DATASET_READS)
* [**DATASET\_WRITES](#DATASET_WRITES)
* [**KEY\_VALUE\_STORE\_LISTS](#KEY_VALUE_STORE_LISTS)
* [**KEY\_VALUE\_STORE\_READS](#KEY_VALUE_STORE_READS)
* [**KEY\_VALUE\_STORE\_WRITES](#KEY_VALUE_STORE_WRITES)
* [**PROXY\_RESIDENTIAL\_TRANSFER\_GBYTES](#PROXY_RESIDENTIAL_TRANSFER_GBYTES)
* [**PROXY\_SERPS](#PROXY_SERPS)
* [**REQUEST\_QUEUE\_READS](#REQUEST_QUEUE_READS)
* [**REQUEST\_QUEUE\_WRITES](#REQUEST_QUEUE_WRITES)
## Properties<!-- -->[**](#Properties)
### [**](#ACTOR_COMPUTE_UNITS)[**](https://github.com/apify/apify-client-js/blob/master/src/resource_clients/actor.ts#L464)optionalACTOR\_COMPUTE\_UNITS
**ACTOR\_COMPUTE\_UNITS?
<!-- -->
: number
### [**](#DATA_TRANSFER_EXTERNAL_GBYTES)[**](https://github.com/apify/apify-client-js/blob/master/src/resource_clients/actor.ts#L473)optionalDATA\_TRANSFER\_EXTERNAL\_GBYTES
**DATA\_TRANSFER\_EXTERNAL\_GBYTES?
<!-- -->
: number
### [**](#DATA_TRANSFER_INTERNAL_GBYTES)[**](https://github.com/apify/apify-client-js/blob/master/src/resource_clients/actor.ts#L472)optionalDATA\_TRANSFER\_INTERNAL\_GBYTES
**DATA\_TRANSFER\_INTERNAL\_GBYTES?
<!-- -->
: number
### [**](#DATASET_READS)[**](https://github.com/apify/apify-client-js/blob/master/src/resource_clients/actor.ts#L465)optionalDATASET\_READS
**DATASET\_READS?
<!-- -->
: number
### [**](#DATASET_WRITES)[**](https://github.com/apify/apify-client-js/blob/master/src/resource_clients/actor.ts#L466)optionalDATASET\_WRITES
**DATASET\_WRITES?
<!-- -->
: number
### [**](#KEY_VALUE_STORE_LISTS)[**](https://github.com/apify/apify-client-js/blob/master/src/resource_clients/actor.ts#L469)optionalKEY\_VALUE\_STORE\_LISTS
**KEY\_VALUE\_STORE\_LISTS?
<!-- -->
: number
### [**](#KEY_VALUE_STORE_READS)[**](https://github.com/apify/apify-client-js/blob/master/src/resource_clients/actor.ts#L467)optionalKEY\_VALUE\_STORE\_READS
**KEY\_VALUE\_STORE\_READS?
<!-- -->
: number
### [**](#KEY_VALUE_STORE_WRITES)[**](https://github.com/apify/apify-client-js/blob/master/src/resource_clients/actor.ts#L468)optionalKEY\_VALUE\_STORE\_WRITES
**KEY\_VALUE\_STORE\_WRITES?
<!-- -->
: number
### [**](#PROXY_RESIDENTIAL_TRANSFER_GBYTES)[**](https://github.com/apify/apify-client-js/blob/master/src/resource_clients/actor.ts#L474)optionalPROXY\_RESIDENTIAL\_TRANSFER\_GBYTES
**PROXY\_RESIDENTIAL\_TRANSFER\_GBYTES?
<!-- -->
: number
### [**](#PROXY_SERPS)[**](https://github.com/apify/apify-client-js/blob/master/src/resource_clients/actor.ts#L475)optionalPROXY\_SERPS
**PROXY\_SERPS?
<!-- -->
: number
### [**](#REQUEST_QUEUE_READS)[**](https://github.com/apify/apify-client-js/blob/master/src/resource_clients/actor.ts#L470)optionalREQUEST\_QUEUE\_READS
**REQUEST\_QUEUE\_READS?
<!-- -->
: number
### [**](#REQUEST_QUEUE_WRITES)[**](https://github.com/apify/apify-client-js/blob/master/src/resource_clients/actor.ts#L471)optionalREQUEST\_QUEUE\_WRITES
**REQUEST\_QUEUE\_WRITES?
<!-- -->
: number
---
# ActorStandby<!-- -->
## Index[**](#Index)
### Properties
* [**build](#build)
* [**desiredRequestsPerActorRun](#desiredRequestsPerActorRun)
* [**idleTimeoutSecs](#idleTimeoutSecs)
* [**maxRequestsPerActorRun](#maxRequestsPerActorRun)
* [**memoryMbytes](#memoryMbytes)
## Properties<!-- -->[**](#Properties)
### [**](#build)[**](https://github.com/apify/apify-client-js/blob/master/src/resource_clients/actor.ts#L359)build
**build: string
### [**](#desiredRequestsPerActorRun)[**](https://github.com/apify/apify-client-js/blob/master/src/resource_clients/actor.ts#L356)desiredRequestsPerActorRun
**desiredRequestsPerActorRun: number
### [**](#idleTimeoutSecs)[**](https://github.com/apify/apify-client-js/blob/master/src/resource_clients/actor.ts#L358)idleTimeoutSecs
**idleTimeoutSecs: number
### [**](#maxRequestsPerActorRun)[**](https://github.com/apify/apify-client-js/blob/master/src/resource_clients/actor.ts#L357)maxRequestsPerActorRun
**maxRequestsPerActorRun: number
### [**](#memoryMbytes)[**](https://github.com/apify/apify-client-js/blob/master/src/resource_clients/actor.ts#L360)memoryMbytes
**memoryMbytes: number
---
# ActorStartOptions<!-- -->
## Index[**](#Index)
### Properties
* [**build](#build)
* [**contentType](#contentType)
* [**forcePermissionLevel](#forcePermissionLevel)
* [**maxItems](#maxItems)
* [**memory](#memory)
* [**restartOnError](#restartOnError)
* [**timeout](#timeout)
* [**waitForFinish](#waitForFinish)
* [**webhooks](#webhooks)
## Properties<!-- -->[**](#Properties)
### [**](#build)[**](https://github.com/apify/apify-client-js/blob/master/src/resource_clients/actor.ts#L368)optionalbuild
**build?
<!-- -->
: string
Tag or number of the actor build to run (e.g. `beta` or `1.2.345`). If not provided, the run uses build tag or number from the default actor run configuration (typically `latest`).
### [**](#contentType)[**](https://github.com/apify/apify-client-js/blob/master/src/resource_clients/actor.ts#L376)optionalcontentType
**contentType?
<!-- -->
: string
Content type for the `input`. If not specified, `input` is expected to be an object that will be stringified to JSON and content type set to `application/json; charset=utf-8`. If `options.contentType` is specified, then `input` must be a `String` or `Buffer`.
### [**](#forcePermissionLevel)[**](https://github.com/apify/apify-client-js/blob/master/src/resource_clients/actor.ts#L424)optionalforcePermissionLevel
**forcePermissionLevel?
<!-- -->
: string
Override the Actor's permissions for this run. If not set, the Actor will run with permissions configured in the Actor settings.
### [**](#maxItems)[**](https://github.com/apify/apify-client-js/blob/master/src/resource_clients/actor.ts#L411)optionalmaxItems
**maxItems?
<!-- -->
: number
Specifies maximum number of items that the actor run should return. This is used by pay per result actors to limit the maximum number of results that will be charged to customer. Value can be accessed in actor run using `ACTOR_MAX_PAID_DATASET_ITEMS` environment variable.
### [**](#memory)[**](https://github.com/apify/apify-client-js/blob/master/src/resource_clients/actor.ts#L382)optionalmemory
**memory?
<!-- -->
: number
Memory in megabytes which will be allocated for the new actor run. If not provided, the run uses memory of the default actor run configuration.
### [**](#restartOnError)[**](https://github.com/apify/apify-client-js/blob/master/src/resource_clients/actor.ts#L416)optionalrestartOnError
**restartOnError?
<!-- -->
: boolean
Determines whether the run will be restarted if it fails.
### [**](#timeout)[**](https://github.com/apify/apify-client-js/blob/master/src/resource_clients/actor.ts#L387)optionaltimeout
**timeout?
<!-- -->
: number
Timeout for the actor run in seconds. Zero value means there is no timeout. If not provided, the run uses timeout of the default actor run configuration.
### [**](#waitForFinish)[**](https://github.com/apify/apify-client-js/blob/master/src/resource_clients/actor.ts#L397)optionalwaitForFinish
**waitForFinish?
<!-- -->
: number
Maximum time to wait for the actor run to finish, in seconds. If the limit is reached, the returned promise is resolved to a run object that will have status `READY` or `RUNNING` and it will not contain the actor run output. By default (or when `waitForFinish` is set to `0`), the function resolves immediately without waiting. The wait is limited to 60s and happens on the API directly, as opposed to the `call` method and its `waitSecs` option, which is implemented via polling on the client side instead (and has no limit like that).
### [**](#webhooks)[**](https://github.com/apify/apify-client-js/blob/master/src/resource_clients/actor.ts#L404)optionalwebhooks
**webhooks?
<!-- -->
: readonly
<!-- -->
[WebhookUpdateData](https://docs.apify.com/api/client/js/api/client/js/reference.md#WebhookUpdateData)\[]
Specifies optional webhooks associated with the actor run, which can be used to receive a notification e.g. when the actor finished or failed, see [ad hook webhooks documentation](https://docs.apify.com/webhooks/ad-hoc-webhooks) for detailed description.
---
# ActorStats<!-- -->
## Index[**](#Index)
### Properties
* [**lastRunStartedAt](#lastRunStartedAt)
* [**totalBuilds](#totalBuilds)
* [**totalMetamorphs](#totalMetamorphs)
* [**totalRuns](#totalRuns)
* [**totalUsers](#totalUsers)
* [**totalUsers30Days](#totalUsers30Days)
* [**totalUsers7Days](#totalUsers7Days)
* [**totalUsers90Days](#totalUsers90Days)
## Properties<!-- -->[**](#Properties)
### [**](#lastRunStartedAt)[**](https://github.com/apify/apify-client-js/blob/master/src/resource_clients/actor.ts#L314)lastRunStartedAt
**lastRunStartedAt: Date
### [**](#totalBuilds)[**](https://github.com/apify/apify-client-js/blob/master/src/resource_clients/actor.ts#L307)totalBuilds
**totalBuilds: number
### [**](#totalMetamorphs)[**](https://github.com/apify/apify-client-js/blob/master/src/resource_clients/actor.ts#L313)totalMetamorphs
**totalMetamorphs: number
### [**](#totalRuns)[**](https://github.com/apify/apify-client-js/blob/master/src/resource_clients/actor.ts#L308)totalRuns
**totalRuns: number
### [**](#totalUsers)[**](https://github.com/apify/apify-client-js/blob/master/src/resource_clients/actor.ts#L309)totalUsers
**totalUsers: number
### [**](#totalUsers30Days)[**](https://github.com/apify/apify-client-js/blob/master/src/resource_clients/actor.ts#L311)totalUsers30Days
**totalUsers30Days: number
### [**](#totalUsers7Days)[**](https://github.com/apify/apify-client-js/blob/master/src/resource_clients/actor.ts#L310)totalUsers7Days
**totalUsers7Days: number
### [**](#totalUsers90Days)[**](https://github.com/apify/apify-client-js/blob/master/src/resource_clients/actor.ts#L312)totalUsers90Days
**totalUsers90Days: number
---
# ActorStoreList<!-- -->
## Index[**](#Index)
### Properties
* [**currentPricingInfo](#currentPricingInfo)
* [**description](#description)
* [**id](#id)
* [**name](#name)
* [**pictureUrl](#pictureUrl)
* [**stats](#stats)
* [**title](#title)
* [**url](#url)
* [**username](#username)
* [**userPictureUrl](#userPictureUrl)
## Properties<!-- -->[**](#Properties)
### [**](#currentPricingInfo)[**](https://github.com/apify/apify-client-js/blob/master/src/resource_clients/store_collection.ts#L51)currentPricingInfo
**currentPricingInfo: [PricingInfo](https://docs.apify.com/api/client/js/api/client/js/reference/interface/PricingInfo.md)
### [**](#description)[**](https://github.com/apify/apify-client-js/blob/master/src/resource_clients/store_collection.ts#L49)optionaldescription
**description?
<!-- -->
: string
### [**](#id)[**](https://github.com/apify/apify-client-js/blob/master/src/resource_clients/store_collection.ts#L45)id
**id: string
### [**](#name)[**](https://github.com/apify/apify-client-js/blob/master/src/resource_clients/store_collection.ts#L46)name
**name: string
### [**](#pictureUrl)[**](https://github.com/apify/apify-client-js/blob/master/src/resource_clients/store_collection.ts#L52)optionalpictureUrl
**pictureUrl?
<!-- -->
: string
### [**](#stats)[**](https://github.com/apify/apify-client-js/blob/master/src/resource_clients/store_collection.ts#L50)stats
**stats: [ActorStats](https://docs.apify.com/api/client/js/api/client/js/reference/interface/ActorStats.md)
### [**](#title)[**](https://github.com/apify/apify-client-js/blob/master/src/resource_clients/store_collection.ts#L48)optionaltitle
**title?
<!-- -->
: string
### [**](#url)[**](https://github.com/apify/apify-client-js/blob/master/src/resource_clients/store_collection.ts#L54)url
**url: string
### [**](#username)[**](https://github.com/apify/apify-client-js/blob/master/src/resource_clients/store_collection.ts#L47)username
**username: string
### [**](#userPictureUrl)[**](https://github.com/apify/apify-client-js/blob/master/src/resource_clients/store_collection.ts#L53)optionaluserPictureUrl
**userPictureUrl?
<!-- -->
: string
---
# ActorTaggedBuild<!-- -->
## Index[**](#Index)
### Properties
* [**buildId](#buildId)
* [**buildNumber](#buildNumber)
* [**finishedAt](#finishedAt)
## Properties<!-- -->[**](#Properties)
### [**](#buildId)[**](https://github.com/apify/apify-client-js/blob/master/src/resource_clients/actor.ts#L332)optionalbuildId
**buildId?
<!-- -->
: string
### [**](#buildNumber)[**](https://github.com/apify/apify-client-js/blob/master/src/resource_clients/actor.ts#L333)optionalbuildNumber
**buildNumber?
<!-- -->
: string
### [**](#finishedAt)[**](https://github.com/apify/apify-client-js/blob/master/src/resource_clients/actor.ts#L334)optionalfinishedAt
**finishedAt?
<!-- -->
: Date
---
# ActorVersionCollectionListOptions<!-- -->
## Index[**](#Index)
### Properties
* [**desc](#desc)
* [**limit](#limit)
* [**offset](#offset)
## Properties<!-- -->[**](#Properties)
### [**](#desc)[**](https://github.com/apify/apify-client-js/blob/master/src/resource_clients/actor_version_collection.ts#L48)optionaldesc
**desc?
<!-- -->
: boolean
### [**](#limit)[**](https://github.com/apify/apify-client-js/blob/master/src/resource_clients/actor_version_collection.ts#L46)optionallimit
**limit?
<!-- -->
: number
### [**](#offset)[**](https://github.com/apify/apify-client-js/blob/master/src/resource_clients/actor_version_collection.ts#L47)optionaloffset
**offset?
<!-- -->
: number
---
# ActorVersionGitHubGist<!-- -->
### Hierarchy
* [BaseActorVersion](https://docs.apify.com/api/client/js/api/client/js/reference/interface/BaseActorVersion.md)\<ActorSourceType.GitHubGist>
* *ActorVersionGitHubGist*
## Index[**](#Index)
### Properties
* [**applyEnvVarsToBuild](#applyEnvVarsToBuild)
* [**buildTag](#buildTag)
* [**envVars](#envVars)
* [**gitHubGistUrl](#gitHubGistUrl)
* [**sourceType](#sourceType)
* [**versionNumber](#versionNumber)
## Properties<!-- -->[**](#Properties)
### [**](#applyEnvVarsToBuild)[**](https://github.com/apify/apify-client-js/blob/master/src/resource_clients/actor_version.ts#L67)optionalinheritedapplyEnvVarsToBuild
**applyEnvVarsToBuild?
<!-- -->
: boolean
Inherited from BaseActorVersion.applyEnvVarsToBuild
### [**](#buildTag)[**](https://github.com/apify/apify-client-js/blob/master/src/resource_clients/actor_version.ts#L68)optionalinheritedbuildTag
**buildTag?
<!-- -->
: string
Inherited from BaseActorVersion.buildTag
### [**](#envVars)[**](https://github.com/apify/apify-client-js/blob/master/src/resource_clients/actor_version.ts#L66)optionalinheritedenvVars
**envVars?
<!-- -->
: [ActorEnvironmentVariable](https://docs.apify.com/api/client/js/api/client/js/reference/interface/ActorEnvironmentVariable.md)\[]
Inherited from BaseActorVersion.envVars
### [**](#gitHubGistUrl)[**](https://github.com/apify/apify-client-js/blob/master/src/resource_clients/actor_version.ts#L90)gitHubGistUrl
**gitHubGistUrl: string
### [**](#sourceType)[**](https://github.com/apify/apify-client-js/blob/master/src/resource_clients/actor_version.ts#L65)inheritedsourceType
**sourceType: GitHubGist
Inherited from BaseActorVersion.sourceType
### [**](#versionNumber)[**](https://github.com/apify/apify-client-js/blob/master/src/resource_clients/actor_version.ts#L64)optionalinheritedversionNumber
**versionNumber?
<!-- -->
: string
Inherited from BaseActorVersion.versionNumber
---
# ActorVersionGitRepo<!-- -->
### Hierarchy
* [BaseActorVersion](https://docs.apify.com/api/client/js/api/client/js/reference/interface/BaseActorVersion.md)\<ActorSourceType.GitRepo>
* *ActorVersionGitRepo*
## Index[**](#Index)
### Properties
* [**applyEnvVarsToBuild](#applyEnvVarsToBuild)
* [**buildTag](#buildTag)
* [**envVars](#envVars)
* [**gitRepoUrl](#gitRepoUrl)
* [**sourceType](#sourceType)
* [**versionNumber](#versionNumber)
## Properties<!-- -->[**](#Properties)
### [**](#applyEnvVarsToBuild)[**](https://github.com/apify/apify-client-js/blob/master/src/resource_clients/actor_version.ts#L67)optionalinheritedapplyEnvVarsToBuild
**applyEnvVarsToBuild?
<!-- -->
: boolean
Inherited from BaseActorVersion.applyEnvVarsToBuild
### [**](#buildTag)[**](https://github.com/apify/apify-client-js/blob/master/src/resource_clients/actor_version.ts#L68)optionalinheritedbuildTag
**buildTag?
<!-- -->
: string
Inherited from BaseActorVersion.buildTag
### [**](#envVars)[**](https://github.com/apify/apify-client-js/blob/master/src/resource_clients/actor_version.ts#L66)optionalinheritedenvVars
**envVars?
<!-- -->
: [ActorEnvironmentVariable](https://docs.apify.com/api/client/js/api/client/js/reference/interface/ActorEnvironmentVariable.md)\[]
Inherited from BaseActorVersion.envVars
### [**](#gitRepoUrl)[**](https://github.com/apify/apify-client-js/blob/master/src/resource_clients/actor_version.ts#L82)gitRepoUrl
**gitRepoUrl: string
### [**](#sourceType)[**](https://github.com/apify/apify-client-js/blob/master/src/resource_clients/actor_version.ts#L65)inheritedsourceType
**sourceType: GitRepo
Inherited from BaseActorVersion.sourceType
### [**](#versionNumber)[**](https://github.com/apify/apify-client-js/blob/master/src/resource_clients/actor_version.ts#L64)optionalinheritedversionNumber
**versionNumber?
<!-- -->
: string
Inherited from BaseActorVersion.versionNumber
---
# ActorVersionSourceFile<!-- -->
## Index[**](#Index)
### Properties
* [**content](#content)
* [**format](#format)
* [**name](#name)
## Properties<!-- -->[**](#Properties)
### [**](#content)[**](https://github.com/apify/apify-client-js/blob/master/src/resource_clients/actor_version.ts#L78)content
**content: string
### [**](#format)[**](https://github.com/apify/apify-client-js/blob/master/src/resource_clients/actor_version.ts#L77)format
**format: TEXT | BASE64
### [**](#name)[**](https://github.com/apify/apify-client-js/blob/master/src/resource_clients/actor_version.ts#L76)name
**name: string
---
# ActorVersionSourceFiles<!-- -->
### Hierarchy
* [BaseActorVersion](https://docs.apify.com/api/client/js/api/client/js/reference/interface/BaseActorVersion.md)\<ActorSourceType.SourceFiles>
* *ActorVersionSourceFiles*
## Index[**](#Index)
### Properties
* [**applyEnvVarsToBuild](#applyEnvVarsToBuild)
* [**buildTag](#buildTag)
* [**envVars](#envVars)
* [**sourceFiles](#sourceFiles)
* [**sourceType](#sourceType)
* [**versionNumber](#versionNumber)
## Properties<!-- -->[**](#Properties)
### [**](#applyEnvVarsToBuild)[**](https://github.com/apify/apify-client-js/blob/master/src/resource_clients/actor_version.ts#L67)optionalinheritedapplyEnvVarsToBuild
**applyEnvVarsToBuild?
<!-- -->
: boolean
Inherited from BaseActorVersion.applyEnvVarsToBuild
### [**](#buildTag)[**](https://github.com/apify/apify-client-js/blob/master/src/resource_clients/actor_version.ts#L68)optionalinheritedbuildTag
**buildTag?
<!-- -->
: string
Inherited from BaseActorVersion.buildTag
### [**](#envVars)[**](https://github.com/apify/apify-client-js/blob/master/src/resource_clients/actor_version.ts#L66)optionalinheritedenvVars
**envVars?
<!-- -->
: [ActorEnvironmentVariable](https://docs.apify.com/api/client/js/api/client/js/reference/interface/ActorEnvironmentVariable.md)\[]
Inherited from BaseActorVersion.envVars
### [**](#sourceFiles)[**](https://github.com/apify/apify-client-js/blob/master/src/resource_clients/actor_version.ts#L72)sourceFiles
**sourceFiles: [ActorVersionSourceFile](https://docs.apify.com/api/client/js/api/client/js/reference/interface/ActorVersionSourceFile.md)\[]
### [**](#sourceType)[**](https://github.com/apify/apify-client-js/blob/master/src/resource_clients/actor_version.ts#L65)inheritedsourceType
**sourceType: SourceFiles
Inherited from BaseActorVersion.sourceType
### [**](#versionNumber)[**](https://github.com/apify/apify-client-js/blob/master/src/resource_clients/actor_version.ts#L64)optionalinheritedversionNumber
**versionNumber?
<!-- -->
: string
Inherited from BaseActorVersion.versionNumber
---
# ActorVersionTarball<!-- -->
### Hierarchy
* [BaseActorVersion](https://docs.apify.com/api/client/js/api/client/js/reference/interface/BaseActorVersion.md)\<ActorSourceType.Tarball>
* *ActorVersionTarball*
## Index[**](#Index)
### Properties
* [**applyEnvVarsToBuild](#applyEnvVarsToBuild)
* [**buildTag](#buildTag)
* [**envVars](#envVars)
* [**sourceType](#sourceType)
* [**tarballUrl](#tarballUrl)
* [**versionNumber](#versionNumber)
## Properties<!-- -->[**](#Properties)
### [**](#applyEnvVarsToBuild)[**](https://github.com/apify/apify-client-js/blob/master/src/resource_clients/actor_version.ts#L67)optionalinheritedapplyEnvVarsToBuild
**applyEnvVarsToBuild?
<!-- -->
: boolean
Inherited from BaseActorVersion.applyEnvVarsToBuild
### [**](#buildTag)[**](https://github.com/apify/apify-client-js/blob/master/src/resource_clients/actor_version.ts#L68)optionalinheritedbuildTag
**buildTag?
<!-- -->
: string
Inherited from BaseActorVersion.buildTag
### [**](#envVars)[**](https://github.com/apify/apify-client-js/blob/master/src/resource_clients/actor_version.ts#L66)optionalinheritedenvVars
**envVars?
<!-- -->
: [ActorEnvironmentVariable](https://docs.apify.com/api/client/js/api/client/js/reference/interface/ActorEnvironmentVariable.md)\[]
Inherited from BaseActorVersion.envVars
### [**](#sourceType)[**](https://github.com/apify/apify-client-js/blob/master/src/resource_clients/actor_version.ts#L65)inheritedsourceType
**sourceType: Tarball
Inherited from BaseActorVersion.sourceType
### [**](#tarballUrl)[**](https://github.com/apify/apify-client-js/blob/master/src/resource_clients/actor_version.ts#L86)tarballUrl
**tarballUrl: string
### [**](#versionNumber)[**](https://github.com/apify/apify-client-js/blob/master/src/resource_clients/actor_version.ts#L64)optionalinheritedversionNumber
**versionNumber?
<!-- -->
: string
Inherited from BaseActorVersion.versionNumber
---
# ApifyClientOptions<!-- -->
## Index[**](#Index)
### Properties
* [**baseUrl](#baseUrl)
* [**maxRetries](#maxRetries)
* [**minDelayBetweenRetriesMillis](#minDelayBetweenRetriesMillis)
* [**publicBaseUrl](#publicBaseUrl)
* [**requestInterceptors](#requestInterceptors)
* [**timeoutSecs](#timeoutSecs)
* [**token](#token)
* [**userAgentSuffix](#userAgentSuffix)
## Properties<!-- -->[**](#Properties)
### [**](#baseUrl)[**](https://github.com/apify/apify-client-js/blob/master/src/apify_client.ts#L358)optionalbaseUrl
**baseUrl?
<!-- -->
: string = https\://api.apify.com
### [**](#maxRetries)[**](https://github.com/apify/apify-client-js/blob/master/src/apify_client.ts#L362)optionalmaxRetries
**maxRetries?
<!-- -->
: number = 8
### [**](#minDelayBetweenRetriesMillis)[**](https://github.com/apify/apify-client-js/blob/master/src/apify_client.ts#L364)optionalminDelayBetweenRetriesMillis
**minDelayBetweenRetriesMillis?
<!-- -->
: number = 500
### [**](#publicBaseUrl)[**](https://github.com/apify/apify-client-js/blob/master/src/apify_client.ts#L360)optionalpublicBaseUrl
**publicBaseUrl?
<!-- -->
: string = https\://api.apify.com
### [**](#requestInterceptors)[**](https://github.com/apify/apify-client-js/blob/master/src/apify_client.ts#L366)optionalrequestInterceptors
**requestInterceptors?
<!-- -->
: (undefined | null | (value) => ApifyRequestConfig | Promise\<ApifyRequestConfig>)\[] = \[]
### [**](#timeoutSecs)[**](https://github.com/apify/apify-client-js/blob/master/src/apify_client.ts#L368)optionaltimeoutSecs
**timeoutSecs?
<!-- -->
: number = 360
### [**](#token)[**](https://github.com/apify/apify-client-js/blob/master/src/apify_client.ts#L369)optionaltoken
**token?
<!-- -->
: string
### [**](#userAgentSuffix)[**](https://github.com/apify/apify-client-js/blob/master/src/apify_client.ts#L370)optionaluserAgentSuffix
**userAgentSuffix?
<!-- -->
: string | string\[]
---
# BaseActorVersion<!-- --> \<SourceType>
### Hierarchy
* *BaseActorVersion*
* [ActorVersionSourceFiles](https://docs.apify.com/api/client/js/api/client/js/reference/interface/ActorVersionSourceFiles.md)
* [ActorVersionGitRepo](https://docs.apify.com/api/client/js/api/client/js/reference/interface/ActorVersionGitRepo.md)
* [ActorVersionTarball](https://docs.apify.com/api/client/js/api/client/js/reference/interface/ActorVersionTarball.md)
* [ActorVersionGitHubGist](https://docs.apify.com/api/client/js/api/client/js/reference/interface/ActorVersionGitHubGist.md)
## Index[**](#Index)
### Properties
* [**applyEnvVarsToBuild](#applyEnvVarsToBuild)
* [**buildTag](#buildTag)
* [**envVars](#envVars)
* [**sourceType](#sourceType)
* [**versionNumber](#versionNumber)
## Properties<!-- -->[**](#Properties)
### [**](#applyEnvVarsToBuild)[**](https://github.com/apify/apify-client-js/blob/master/src/resource_clients/actor_version.ts#L67)optionalapplyEnvVarsToBuild
**applyEnvVarsToBuild?
<!-- -->
: boolean
### [**](#buildTag)[**](https://github.com/apify/apify-client-js/blob/master/src/resource_clients/actor_version.ts#L68)optionalbuildTag
**buildTag?
<!-- -->
: string
### [**](#envVars)[**](https://github.com/apify/apify-client-js/blob/master/src/resource_clients/actor_version.ts#L66)optionalenvVars
**envVars?
<!-- -->
: [ActorEnvironmentVariable](https://docs.apify.com/api/client/js/api/client/js/reference/interface/ActorEnvironmentVariable.md)\[]
### [**](#sourceType)[**](https://github.com/apify/apify-client-js/blob/master/src/resource_clients/actor_version.ts#L65)sourceType
**sourceType: SourceType
### [**](#versionNumber)[**](https://github.com/apify/apify-client-js/blob/master/src/resource_clients/actor_version.ts#L64)optionalversionNumber
**versionNumber?
<!-- -->
: string
---
# Build<!-- -->
## Index[**](#Index)
### Properties
* [**actId](#actId)
* [**actorDefinition](#actorDefinition)
* [**buildNumber](#buildNumber)
* [**finishedAt](#finishedAt)
* [**id](#id)
* [**inputSchema](#inputSchema)
* [**meta](#meta)
* [**options](#options)
* [**readme](#readme)
* [**startedAt](#startedAt)
* [**stats](#stats)
* [**status](#status)
* [**usage](#usage)
* [**usageTotalUsd](#usageTotalUsd)
* [**usageUsd](#usageUsd)
* [**userId](#userId)
## Properties<!-- -->[**](#Properties)
### [**](#actId)[**](https://github.com/apify/apify-client-js/blob/master/src/resource_clients/build.ts#L124)actId
**actId: string
### [**](#actorDefinition)[**](https://github.com/apify/apify-client-js/blob/master/src/resource_clients/build.ts#L144)optionalactorDefinition
**actorDefinition?
<!-- -->
: [ActorDefinition](https://docs.apify.com/api/client/js/api/client/js/reference/interface/ActorDefinition.md)
### [**](#buildNumber)[**](https://github.com/apify/apify-client-js/blob/master/src/resource_clients/build.ts#L140)buildNumber
**buildNumber: string
### [**](#finishedAt)[**](https://github.com/apify/apify-client-js/blob/master/src/resource_clients/build.ts#L127)optionalfinishedAt
**finishedAt?
<!-- -->
: Date
### [**](#id)[**](https://github.com/apify/apify-client-js/blob/master/src/resource_clients/build.ts#L123)id
**id: string
### [**](#inputSchema)[**](https://github.com/apify/apify-client-js/blob/master/src/resource_clients/build.ts#L135)optionalinputSchema
**inputSchema?
<!-- -->
: string
* **@deprecated**
This property is deprecated in favor of `actorDefinition.input`.
### [**](#meta)[**](https://github.com/apify/apify-client-js/blob/master/src/resource_clients/build.ts#L129)meta
**meta: [BuildMeta](https://docs.apify.com/api/client/js/api/client/js/reference/interface/BuildMeta.md)
### [**](#options)[**](https://github.com/apify/apify-client-js/blob/master/src/resource_clients/build.ts#L131)optionaloptions
**options?
<!-- -->
: [BuildOptions](https://docs.apify.com/api/client/js/api/client/js/reference/interface/BuildOptions.md)
### [**](#readme)[**](https://github.com/apify/apify-client-js/blob/master/src/resource_clients/build.ts#L139)optionalreadme
**readme?
<!-- -->
: string
* **@deprecated**
This property is deprecated in favor of `actorDefinition.readme`.
### [**](#startedAt)[**](https://github.com/apify/apify-client-js/blob/master/src/resource_clients/build.ts#L126)startedAt
**startedAt: Date
### [**](#stats)[**](https://github.com/apify/apify-client-js/blob/master/src/resource_clients/build.ts#L130)optionalstats
**stats?
<!-- -->
: [BuildStats](https://docs.apify.com/api/client/js/api/client/js/reference/interface/BuildStats.md)
### [**](#status)[**](https://github.com/apify/apify-client-js/blob/master/src/resource_clients/build.ts#L128)status
**status: SUCCEEDED | FAILED | ABORTED | TIMED-OUT
### [**](#usage)[**](https://github.com/apify/apify-client-js/blob/master/src/resource_clients/build.ts#L141)optionalusage
**usage?
<!-- -->
: [BuildUsage](https://docs.apify.com/api/client/js/api/client/js/reference/interface/BuildUsage.md)
### [**](#usageTotalUsd)[**](https://github.com/apify/apify-client-js/blob/master/src/resource_clients/build.ts#L142)optionalusageTotalUsd
**usageTotalUsd?
<!-- -->
: number
### [**](#usageUsd)[**](https://github.com/apify/apify-client-js/blob/master/src/resource_clients/build.ts#L143)optionalusageUsd
**usageUsd?
<!-- -->
: [BuildUsage](https://docs.apify.com/api/client/js/api/client/js/reference/interface/BuildUsage.md)
### [**](#userId)[**](https://github.com/apify/apify-client-js/blob/master/src/resource_clients/build.ts#L125)userId
**userId: string
---
# BuildClientGetOptions<!-- -->
## Index[**](#Index)
### Properties
* [**waitForFinish](#waitForFinish)
## Properties<!-- -->[**](#Properties)
### [**](#waitForFinish)[**](https://github.com/apify/apify-client-js/blob/master/src/resource_clients/build.ts#L104)optionalwaitForFinish
**waitForFinish?
<!-- -->
: number
---
# BuildClientWaitForFinishOptions<!-- -->
## Index[**](#Index)
### Properties
* [**waitSecs](#waitSecs)
## Properties<!-- -->[**](#Properties)
### [**](#waitSecs)[**](https://github.com/apify/apify-client-js/blob/master/src/resource_clients/build.ts#L113)optionalwaitSecs
**waitSecs?
<!-- -->
: number
Maximum time to wait for the build to finish, in seconds. If the limit is reached, the returned promise is resolved to a build object that will have status `READY` or `RUNNING`. If `waitSecs` omitted, the function waits indefinitely.
---
# BuildCollectionClientListOptions<!-- -->
## Index[**](#Index)
### Properties
* [**desc](#desc)
* [**limit](#limit)
* [**offset](#offset)
## Properties<!-- -->[**](#Properties)
### [**](#desc)[**](https://github.com/apify/apify-client-js/blob/master/src/resource_clients/build_collection.ts#L39)optionaldesc
**desc?
<!-- -->
: boolean
### [**](#limit)[**](https://github.com/apify/apify-client-js/blob/master/src/resource_clients/build_collection.ts#L37)optionallimit
**limit?
<!-- -->
: number
### [**](#offset)[**](https://github.com/apify/apify-client-js/blob/master/src/resource_clients/build_collection.ts#L38)optionaloffset
**offset?
<!-- -->
: number
---
# BuildMeta<!-- -->
## Index[**](#Index)
### Properties
* [**clientIp](#clientIp)
* [**origin](#origin)
* [**userAgent](#userAgent)
## Properties<!-- -->[**](#Properties)
### [**](#clientIp)[**](https://github.com/apify/apify-client-js/blob/master/src/resource_clients/build.ts#L118)clientIp
**clientIp: string
### [**](#origin)[**](https://github.com/apify/apify-client-js/blob/master/src/resource_clients/build.ts#L117)origin
**origin: string
### [**](#userAgent)[**](https://github.com/apify/apify-client-js/blob/master/src/resource_clients/build.ts#L119)userAgent
**userAgent: string
---
# BuildOptions<!-- -->
## Index[**](#Index)
### Properties
* [**betaPackages](#betaPackages)
* [**diskMbytes](#diskMbytes)
* [**memoryMbytes](#memoryMbytes)
* [**useCache](#useCache)
## Properties<!-- -->[**](#Properties)
### [**](#betaPackages)[**](https://github.com/apify/apify-client-js/blob/master/src/resource_clients/build.ts#L159)optionalbetaPackages
**betaPackages?
<!-- -->
: boolean
### [**](#diskMbytes)[**](https://github.com/apify/apify-client-js/blob/master/src/resource_clients/build.ts#L161)optionaldiskMbytes
**diskMbytes?
<!-- -->
: number
### [**](#memoryMbytes)[**](https://github.com/apify/apify-client-js/blob/master/src/resource_clients/build.ts#L160)optionalmemoryMbytes
**memoryMbytes?
<!-- -->
: number
### [**](#useCache)[**](https://github.com/apify/apify-client-js/blob/master/src/resource_clients/build.ts#L158)optionaluseCache
**useCache?
<!-- -->
: boolean
---
# BuildStats<!-- -->
## Index[**](#Index)
### Properties
* [**computeUnits](#computeUnits)
* [**durationMillis](#durationMillis)
* [**runTimeSecs](#runTimeSecs)
## Properties<!-- -->[**](#Properties)
### [**](#computeUnits)[**](https://github.com/apify/apify-client-js/blob/master/src/resource_clients/build.ts#L154)computeUnits
**computeUnits: number
### [**](#durationMillis)[**](https://github.com/apify/apify-client-js/blob/master/src/resource_clients/build.ts#L152)durationMillis
**durationMillis: number
### [**](#runTimeSecs)[**](https://github.com/apify/apify-client-js/blob/master/src/resource_clients/build.ts#L153)runTimeSecs
**runTimeSecs: number
---
# BuildUsage<!-- -->
## Index[**](#Index)
### Properties
* [**ACTOR\_COMPUTE\_UNITS](#ACTOR_COMPUTE_UNITS)
## Properties<!-- -->[**](#Properties)
### [**](#ACTOR_COMPUTE_UNITS)[**](https://github.com/apify/apify-client-js/blob/master/src/resource_clients/build.ts#L148)optionalACTOR\_COMPUTE\_UNITS
**ACTOR\_COMPUTE\_UNITS?
<!-- -->
: number
---
# Current<!-- -->
## Index[**](#Index)
### Properties
* [**activeActorJobCount](#activeActorJobCount)
* [**actorCount](#actorCount)
* [**actorMemoryGbytes](#actorMemoryGbytes)
* [**actorTaskCount](#actorTaskCount)
* [**monthlyActorComputeUnits](#monthlyActorComputeUnits)
* [**monthlyExternalDataTransferGbytes](#monthlyExternalDataTransferGbytes)
* [**monthlyProxySerps](#monthlyProxySerps)
* [**monthlyResidentialProxyGbytes](#monthlyResidentialProxyGbytes)
* [**monthlyUsageUsd](#monthlyUsageUsd)
* [**teamAccountSeatCount](#teamAccountSeatCount)
## Properties<!-- -->[**](#Properties)
### [**](#activeActorJobCount)[**](https://github.com/apify/apify-client-js/blob/master/src/resource_clients/user.ts#L262)activeActorJobCount
**activeActorJobCount: number
### [**](#actorCount)[**](https://github.com/apify/apify-client-js/blob/master/src/resource_clients/user.ts#L260)actorCount
**actorCount: number
### [**](#actorMemoryGbytes)[**](https://github.com/apify/apify-client-js/blob/master/src/resource_clients/user.ts#L259)actorMemoryGbytes
**actorMemoryGbytes: number
### [**](#actorTaskCount)[**](https://github.com/apify/apify-client-js/blob/master/src/resource_clients/user.ts#L261)actorTaskCount
**actorTaskCount: number
### [**](#monthlyActorComputeUnits)[**](https://github.com/apify/apify-client-js/blob/master/src/resource_clients/user.ts#L255)monthlyActorComputeUnits
**monthlyActorComputeUnits: number
### [**](#monthlyExternalDataTransferGbytes)[**](https://github.com/apify/apify-client-js/blob/master/src/resource_clients/user.ts#L256)monthlyExternalDataTransferGbytes
**monthlyExternalDataTransferGbytes: number
### [**](#monthlyProxySerps)[**](https://github.com/apify/apify-client-js/blob/master/src/resource_clients/user.ts#L257)monthlyProxySerps
**monthlyProxySerps: number
### [**](#monthlyResidentialProxyGbytes)[**](https://github.com/apify/apify-client-js/blob/master/src/resource_clients/user.ts#L258)monthlyResidentialProxyGbytes
**monthlyResidentialProxyGbytes: number
### [**](#monthlyUsageUsd)[**](https://github.com/apify/apify-client-js/blob/master/src/resource_clients/user.ts#L254)monthlyUsageUsd
**monthlyUsageUsd: number
### [**](#teamAccountSeatCount)[**](https://github.com/apify/apify-client-js/blob/master/src/resource_clients/user.ts#L263)teamAccountSeatCount
**teamAccountSeatCount: number
---
# Dataset<!-- -->
## Index[**](#Index)
### Properties
* [**accessedAt](#accessedAt)
* [**actId](#actId)
* [**actRunId](#actRunId)
* [**cleanItemCount](#cleanItemCount)
* [**createdAt](#createdAt)
* [**fields](#fields)
* [**generalAccess](#generalAccess)
* [**id](#id)
* [**itemCount](#itemCount)
* [**itemsPublicUrl](#itemsPublicUrl)
* [**modifiedAt](#modifiedAt)
* [**name](#name)
* [**stats](#stats)
* [**title](#title)
* [**urlSigningSecretKey](#urlSigningSecretKey)
* [**userId](#userId)
## Properties<!-- -->[**](#Properties)
### [**](#accessedAt)[**](https://github.com/apify/apify-client-js/blob/master/src/resource_clients/dataset.ts#L240)accessedAt
**accessedAt: Date
### [**](#actId)[**](https://github.com/apify/apify-client-js/blob/master/src/resource_clients/dataset.ts#L243)optionalactId
**actId?
<!-- -->
: string
### [**](#actRunId)[**](https://github.com/apify/apify-client-js/blob/master/src/resource_clients/dataset.ts#L244)optionalactRunId
**actRunId?
<!-- -->
: string
### [**](#cleanItemCount)[**](https://github.com/apify/apify-client-js/blob/master/src/resource_clients/dataset.ts#L242)cleanItemCount
**cleanItemCount: number
### [**](#createdAt)[**](https://github.com/apify/apify-client-js/blob/master/src/resource_clients/dataset.ts#L238)createdAt
**createdAt: Date
### [**](#fields)[**](https://github.com/apify/apify-client-js/blob/master/src/resource_clients/dataset.ts#L246)fields
**fields: string\[]
### [**](#generalAccess)[**](https://github.com/apify/apify-client-js/blob/master/src/resource_clients/dataset.ts#L247)optionalgeneralAccess
**generalAccess?
<!-- -->
: null | STORAGE\_GENERAL\_ACCESS
### [**](#id)[**](https://github.com/apify/apify-client-js/blob/master/src/resource_clients/dataset.ts#L234)id
**id: string
### [**](#itemCount)[**](https://github.com/apify/apify-client-js/blob/master/src/resource_clients/dataset.ts#L241)itemCount
**itemCount: number
### [**](#itemsPublicUrl)[**](https://github.com/apify/apify-client-js/blob/master/src/resource_clients/dataset.ts#L249)itemsPublicUrl
**itemsPublicUrl: string
### [**](#modifiedAt)[**](https://github.com/apify/apify-client-js/blob/master/src/resource_clients/dataset.ts#L239)modifiedAt
**modifiedAt: Date
### [**](#name)[**](https://github.com/apify/apify-client-js/blob/master/src/resource_clients/dataset.ts#L235)optionalname
**name?
<!-- -->
: string
### [**](#stats)[**](https://github.com/apify/apify-client-js/blob/master/src/resource_clients/dataset.ts#L245)stats
**stats: [DatasetStats](https://docs.apify.com/api/client/js/api/client/js/reference/interface/DatasetStats.md)
### [**](#title)[**](https://github.com/apify/apify-client-js/blob/master/src/resource_clients/dataset.ts#L236)optionaltitle
**title?
<!-- -->
: string
### [**](#urlSigningSecretKey)[**](https://github.com/apify/apify-client-js/blob/master/src/resource_clients/dataset.ts#L248)optionalurlSigningSecretKey
**urlSigningSecretKey?
<!-- -->
: null | string
### [**](#userId)[**](https://github.com/apify/apify-client-js/blob/master/src/resource_clients/dataset.ts#L237)userId
**userId: string
---
# DatasetClientCreateItemsUrlOptions<!-- -->
### Hierarchy
* [DatasetClientListItemOptions](https://docs.apify.com/api/client/js/api/client/js/reference/interface/DatasetClientListItemOptions.md)
* *DatasetClientCreateItemsUrlOptions*
## Index[**](#Index)
### Properties
* [**clean](#clean)
* [**desc](#desc)
* [**expiresInSecs](#expiresInSecs)
* [**fields](#fields)
* [**flatten](#flatten)
* [**limit](#limit)
* [**offset](#offset)
* [**omit](#omit)
* [**signature](#signature)
* [**skipEmpty](#skipEmpty)
* [**skipHidden](#skipHidden)
* [**unwind](#unwind)
* [**view](#view)
## Properties<!-- -->[**](#Properties)
### [**](#clean)[**](https://github.com/apify/apify-client-js/blob/master/src/resource_clients/dataset.ts#L266)optionalinheritedclean
**clean?
<!-- -->
: boolean
Inherited from DatasetClientListItemOptions.clean
### [**](#desc)[**](https://github.com/apify/apify-client-js/blob/master/src/resource_clients/dataset.ts#L267)optionalinheriteddesc
**desc?
<!-- -->
: boolean
Inherited from DatasetClientListItemOptions.desc
### [**](#expiresInSecs)[**](https://github.com/apify/apify-client-js/blob/master/src/resource_clients/dataset.ts#L281)optionalexpiresInSecs
**expiresInSecs?
<!-- -->
: number
### [**](#fields)[**](https://github.com/apify/apify-client-js/blob/master/src/resource_clients/dataset.ts#L269)optionalinheritedfields
**fields?
<!-- -->
: string\[]
Inherited from DatasetClientListItemOptions.fields
### [**](#flatten)[**](https://github.com/apify/apify-client-js/blob/master/src/resource_clients/dataset.ts#L268)optionalinheritedflatten
**flatten?
<!-- -->
: string\[]
Inherited from DatasetClientListItemOptions.flatten
### [**](#limit)[**](https://github.com/apify/apify-client-js/blob/master/src/resource_clients/dataset.ts#L271)optionalinheritedlimit
**limit?
<!-- -->
: number
Inherited from DatasetClientListItemOptions.limit
### [**](#offset)[**](https://github.com/apify/apify-client-js/blob/master/src/resource_clients/dataset.ts#L272)optionalinheritedoffset
**offset?
<!-- -->
: number
Inherited from DatasetClientListItemOptions.offset
### [**](#omit)[**](https://github.com/apify/apify-client-js/blob/master/src/resource_clients/dataset.ts#L270)optionalinheritedomit
**omit?
<!-- -->
: string\[]
Inherited from DatasetClientListItemOptions.omit
### [**](#signature)[**](https://github.com/apify/apify-client-js/blob/master/src/resource_clients/dataset.ts#L277)optionalinheritedsignature
**signature?
<!-- -->
: string
Inherited from DatasetClientListItemOptions.signature
### [**](#skipEmpty)[**](https://github.com/apify/apify-client-js/blob/master/src/resource_clients/dataset.ts#L273)optionalinheritedskipEmpty
**skipEmpty?
<!-- -->
: boolean
Inherited from DatasetClientListItemOptions.skipEmpty
### [**](#skipHidden)[**](https://github.com/apify/apify-client-js/blob/master/src/resource_clients/dataset.ts#L274)optionalinheritedskipHidden
**skipHidden?
<!-- -->
: boolean
Inherited from DatasetClientListItemOptions.skipHidden
### [**](#unwind)[**](https://github.com/apify/apify-client-js/blob/master/src/resource_clients/dataset.ts#L275)optionalinheritedunwind
**unwind?
<!-- -->
: string | string\[]
Inherited from DatasetClientListItemOptions.unwind
### [**](#view)[**](https://github.com/apify/apify-client-js/blob/master/src/resource_clients/dataset.ts#L276)optionalinheritedview
**view?
<!-- -->
: string
Inherited from DatasetClientListItemOptions.view
---
# DatasetClientDownloadItemsOptions<!-- -->
### Hierarchy
* [DatasetClientListItemOptions](https://docs.apify.com/api/client/js/api/client/js/reference/interface/DatasetClientListItemOptions.md)
* *DatasetClientDownloadItemsOptions*
## Index[**](#Index)
### Properties
* [**attachment](#attachment)
* [**bom](#bom)
* [**clean](#clean)
* [**delimiter](#delimiter)
* [**desc](#desc)
* [**fields](#fields)
* [**flatten](#flatten)
* [**limit](#limit)
* [**offset](#offset)
* [**omit](#omit)
* [**signature](#signature)
* [**skipEmpty](#skipEmpty)
* [**skipHeaderRow](#skipHeaderRow)
* [**skipHidden](#skipHidden)
* [**unwind](#unwind)
* [**view](#view)
* [**xmlRoot](#xmlRoot)
* [**xmlRow](#xmlRow)
## Properties<!-- -->[**](#Properties)
### [**](#attachment)[**](https://github.com/apify/apify-client-js/blob/master/src/resource_clients/dataset.ts#L297)optionalattachment
**attachment?
<!-- -->
: boolean
### [**](#bom)[**](https://github.com/apify/apify-client-js/blob/master/src/resource_clients/dataset.ts#L298)optionalbom
**bom?
<!-- -->
: boolean
### [**](#clean)[**](https://github.com/apify/apify-client-js/blob/master/src/resource_clients/dataset.ts#L266)optionalinheritedclean
**clean?
<!-- -->
: boolean
Inherited from DatasetClientListItemOptions.clean
### [**](#delimiter)[**](https://github.com/apify/apify-client-js/blob/master/src/resource_clients/dataset.ts#L299)optionaldelimiter
**delimiter?
<!-- -->
: string
### [**](#desc)[**](https://github.com/apify/apify-client-js/blob/master/src/resource_clients/dataset.ts#L267)optionalinheriteddesc
**desc?
<!-- -->
: boolean
Inherited from DatasetClientListItemOptions.desc
### [**](#fields)[**](https://github.com/apify/apify-client-js/blob/master/src/resource_clients/dataset.ts#L269)optionalinheritedfields
**fields?
<!-- -->
: string\[]
Inherited from DatasetClientListItemOptions.fields
### [**](#flatten)[**](https://github.com/apify/apify-client-js/blob/master/src/resource_clients/dataset.ts#L268)optionalinheritedflatten
**flatten?
<!-- -->
: string\[]
Inherited from DatasetClientListItemOptions.flatten
### [**](#limit)[**](https://github.com/apify/apify-client-js/blob/master/src/resource_clients/dataset.ts#L271)optionalinheritedlimit
**limit?
<!-- -->
: number
Inherited from DatasetClientListItemOptions.limit
### [**](#offset)[**](https://github.com/apify/apify-client-js/blob/master/src/resource_clients/dataset.ts#L272)optionalinheritedoffset
**offset?
<!-- -->
: number
Inherited from DatasetClientListItemOptions.offset
### [**](#omit)[**](https://github.com/apify/apify-client-js/blob/master/src/resource_clients/dataset.ts#L270)optionalinheritedomit
**omit?
<!-- -->
: string\[]
Inherited from DatasetClientListItemOptions.omit
### [**](#signature)[**](https://github.com/apify/apify-client-js/blob/master/src/resource_clients/dataset.ts#L277)optionalinheritedsignature
**signature?
<!-- -->
: string
Inherited from DatasetClientListItemOptions.signature
### [**](#skipEmpty)[**](https://github.com/apify/apify-client-js/blob/master/src/resource_clients/dataset.ts#L273)optionalinheritedskipEmpty
**skipEmpty?
<!-- -->
: boolean
Inherited from DatasetClientListItemOptions.skipEmpty
### [**](#skipHeaderRow)[**](https://github.com/apify/apify-client-js/blob/master/src/resource_clients/dataset.ts#L300)optionalskipHeaderRow
**skipHeaderRow?
<!-- -->
: boolean
### [**](#skipHidden)[**](https://github.com/apify/apify-client-js/blob/master/src/resource_clients/dataset.ts#L274)optionalinheritedskipHidden
**skipHidden?
<!-- -->
: boolean
Inherited from DatasetClientListItemOptions.skipHidden
### [**](#unwind)[**](https://github.com/apify/apify-client-js/blob/master/src/resource_clients/dataset.ts#L275)optionalinheritedunwind
**unwind?
<!-- -->
: string | string\[]
Inherited from DatasetClientListItemOptions.unwind
### [**](#view)[**](https://github.com/apify/apify-client-js/blob/master/src/resource_clients/dataset.ts#L276)optionalinheritedview
**view?
<!-- -->
: string
Inherited from DatasetClientListItemOptions.view
### [**](#xmlRoot)[**](https://github.com/apify/apify-client-js/blob/master/src/resource_clients/dataset.ts#L301)optionalxmlRoot
**xmlRoot?
<!-- -->
: string
### [**](#xmlRow)[**](https://github.com/apify/apify-client-js/blob/master/src/resource_clients/dataset.ts#L302)optionalxmlRow
**xmlRow?
<!-- -->
: string
---
# DatasetClientListItemOptions<!-- -->
### Hierarchy
* *DatasetClientListItemOptions*
* [DatasetClientCreateItemsUrlOptions](https://docs.apify.com/api/client/js/api/client/js/reference/interface/DatasetClientCreateItemsUrlOptions.md)
* [DatasetClientDownloadItemsOptions](https://docs.apify.com/api/client/js/api/client/js/reference/interface/DatasetClientDownloadItemsOptions.md)
## Index[**](#Index)
### Properties
* [**clean](#clean)
* [**desc](#desc)
* [**fields](#fields)
* [**flatten](#flatten)
* [**limit](#limit)
* [**offset](#offset)
* [**omit](#omit)
* [**signature](#signature)
* [**skipEmpty](#skipEmpty)
* [**skipHidden](#skipHidden)
* [**unwind](#unwind)
* [**view](#view)
## Properties<!-- -->[**](#Properties)
### [**](#clean)[**](https://github.com/apify/apify-client-js/blob/master/src/resource_clients/dataset.ts#L266)optionalclean
**clean?
<!-- -->
: boolean
### [**](#desc)[**](https://github.com/apify/apify-client-js/blob/master/src/resource_clients/dataset.ts#L267)optionaldesc
**desc?
<!-- -->
: boolean
### [**](#fields)[**](https://github.com/apify/apify-client-js/blob/master/src/resource_clients/dataset.ts#L269)optionalfields
**fields?
<!-- -->
: string\[]
### [**](#flatten)[**](https://github.com/apify/apify-client-js/blob/master/src/resource_clients/dataset.ts#L268)optionalflatten
**flatten?
<!-- -->
: string\[]
### [**](#limit)[**](https://github.com/apify/apify-client-js/blob/master/src/resource_clients/dataset.ts#L271)optionallimit
**limit?
<!-- -->
: number
### [**](#offset)[**](https://github.com/apify/apify-client-js/blob/master/src/resource_clients/dataset.ts#L272)optionaloffset
**offset?
<!-- -->
: number
### [**](#omit)[**](https://github.com/apify/apify-client-js/blob/master/src/resource_clients/dataset.ts#L270)optionalomit
**omit?
<!-- -->
: string\[]
### [**](#signature)[**](https://github.com/apify/apify-client-js/blob/master/src/resource_clients/dataset.ts#L277)optionalsignature
**signature?
<!-- -->
: string
### [**](#skipEmpty)[**](https://github.com/apify/apify-client-js/blob/master/src/resource_clients/dataset.ts#L273)optionalskipEmpty
**skipEmpty?
<!-- -->
: boolean
### [**](#skipHidden)[**](https://github.com/apify/apify-client-js/blob/master/src/resource_clients/dataset.ts#L274)optionalskipHidden
**skipHidden?
<!-- -->
: boolean
### [**](#unwind)[**](https://github.com/apify/apify-client-js/blob/master/src/resource_clients/dataset.ts#L275)optionalunwind
**unwind?
<!-- -->
: string | string\[]
### [**](#view)[**](https://github.com/apify/apify-client-js/blob/master/src/resource_clients/dataset.ts#L276)optionalview
**view?
<!-- -->
: string
---
# DatasetClientUpdateOptions<!-- -->
## Index[**](#Index)
### Properties
* [**generalAccess](#generalAccess)
* [**name](#name)
* [**title](#title)
## Properties<!-- -->[**](#Properties)
### [**](#generalAccess)[**](https://github.com/apify/apify-client-js/blob/master/src/resource_clients/dataset.ts#L262)optionalgeneralAccess
**generalAccess?
<!-- -->
: null | STORAGE\_GENERAL\_ACCESS
### [**](#name)[**](https://github.com/apify/apify-client-js/blob/master/src/resource_clients/dataset.ts#L260)optionalname
**name?
<!-- -->
: null | string
### [**](#title)[**](https://github.com/apify/apify-client-js/blob/master/src/resource_clients/dataset.ts#L261)optionaltitle
**title?
<!-- -->
: string
---
# DatasetCollectionClientGetOrCreateOptions<!-- -->
## Index[**](#Index)
### Properties
* [**schema](#schema)
## Properties<!-- -->[**](#Properties)
### [**](#schema)[**](https://github.com/apify/apify-client-js/blob/master/src/resource_clients/dataset_collection.ts#L55)optionalschema
**schema?
<!-- -->
: Record\<string, unknown>
---
# DatasetCollectionClientListOptions<!-- -->
## Index[**](#Index)
### Properties
* [**desc](#desc)
* [**limit](#limit)
* [**offset](#offset)
* [**unnamed](#unnamed)
## Properties<!-- -->[**](#Properties)
### [**](#desc)[**](https://github.com/apify/apify-client-js/blob/master/src/resource_clients/dataset_collection.ts#L51)optionaldesc
**desc?
<!-- -->
: boolean
### [**](#limit)[**](https://github.com/apify/apify-client-js/blob/master/src/resource_clients/dataset_collection.ts#L49)optionallimit
**limit?
<!-- -->
: number
### [**](#offset)[**](https://github.com/apify/apify-client-js/blob/master/src/resource_clients/dataset_collection.ts#L50)optionaloffset
**offset?
<!-- -->
: number
### [**](#unnamed)[**](https://github.com/apify/apify-client-js/blob/master/src/resource_clients/dataset_collection.ts#L48)optionalunnamed
**unnamed?
<!-- -->
: boolean
---
# DatasetStatistics<!-- -->
## Index[**](#Index)
### Properties
* [**fieldStatistics](#fieldStatistics)
## Properties<!-- -->[**](#Properties)
### [**](#fieldStatistics)[**](https://github.com/apify/apify-client-js/blob/master/src/resource_clients/dataset.ts#L306)fieldStatistics
**fieldStatistics: Record\<string, [FieldStatistics](https://docs.apify.com/api/client/js/api/client/js/reference/interface/FieldStatistics.md)>
---
# DatasetStats<!-- -->
## Index[**](#Index)
### Properties
* [**deleteCount](#deleteCount)
* [**readCount](#readCount)
* [**storageBytes](#storageBytes)
* [**writeCount](#writeCount)
## Properties<!-- -->[**](#Properties)
### [**](#deleteCount)[**](https://github.com/apify/apify-client-js/blob/master/src/resource_clients/dataset.ts#L255)optionaldeleteCount
**deleteCount?
<!-- -->
: number
### [**](#readCount)[**](https://github.com/apify/apify-client-js/blob/master/src/resource_clients/dataset.ts#L253)optionalreadCount
**readCount?
<!-- -->
: number
### [**](#storageBytes)[**](https://github.com/apify/apify-client-js/blob/master/src/resource_clients/dataset.ts#L256)optionalstorageBytes
**storageBytes?
<!-- -->
: number
### [**](#writeCount)[**](https://github.com/apify/apify-client-js/blob/master/src/resource_clients/dataset.ts#L254)optionalwriteCount
**writeCount?
<!-- -->
: number
---
# FieldStatistics<!-- -->
## Index[**](#Index)
### Properties
* [**emptyCount](#emptyCount)
* [**max](#max)
* [**min](#min)
* [**nullCount](#nullCount)
## Properties<!-- -->[**](#Properties)
### [**](#emptyCount)[**](https://github.com/apify/apify-client-js/blob/master/src/resource_clients/dataset.ts#L313)optionalemptyCount
**emptyCount?
<!-- -->
: number
### [**](#max)[**](https://github.com/apify/apify-client-js/blob/master/src/resource_clients/dataset.ts#L311)optionalmax
**max?
<!-- -->
: number
### [**](#min)[**](https://github.com/apify/apify-client-js/blob/master/src/resource_clients/dataset.ts#L310)optionalmin
**min?
<!-- -->
: number
### [**](#nullCount)[**](https://github.com/apify/apify-client-js/blob/master/src/resource_clients/dataset.ts#L312)optionalnullCount
**nullCount?
<!-- -->
: number
---
# FlatPricePerMonthActorPricingInfo<!-- -->
### Hierarchy
* CommonActorPricingInfo
* *FlatPricePerMonthActorPricingInfo*
## Index[**](#Index)
### Properties
* [**apifyMarginPercentage](#apifyMarginPercentage)
* [**createdAt](#createdAt)
* [**notifiedAboutChangeAt](#notifiedAboutChangeAt)
* [**notifiedAboutFutureChangeAt](#notifiedAboutFutureChangeAt)
* [**pricePerUnitUsd](#pricePerUnitUsd)
* [**pricingModel](#pricingModel)
* [**reasonForChange](#reasonForChange)
* [**startedAt](#startedAt)
* [**trialMinutes](#trialMinutes)
## Properties<!-- -->[**](#Properties)
### [**](#apifyMarginPercentage)[**](https://github.com/apify/apify-client-js/blob/master/src/resource_clients/actor.ts#L543)inheritedapifyMarginPercentage
**apifyMarginPercentage: number
Inherited from CommonActorPricingInfo.apifyMarginPercentage
In \[0, 1], fraction of pricePerUnitUsd that goes to Apify
### [**](#createdAt)[**](https://github.com/apify/apify-client-js/blob/master/src/resource_clients/actor.ts#L545)inheritedcreatedAt
**createdAt: Date
Inherited from CommonActorPricingInfo.createdAt
When this pricing info record has been created
### [**](#notifiedAboutChangeAt)[**](https://github.com/apify/apify-client-js/blob/master/src/resource_clients/actor.ts#L549)optionalinheritednotifiedAboutChangeAt
**notifiedAboutChangeAt?
<!-- -->
: Date
Inherited from CommonActorPricingInfo.notifiedAboutChangeAt
### [**](#notifiedAboutFutureChangeAt)[**](https://github.com/apify/apify-client-js/blob/master/src/resource_clients/actor.ts#L548)optionalinheritednotifiedAboutFutureChangeAt
**notifiedAboutFutureChangeAt?
<!-- -->
: Date
Inherited from CommonActorPricingInfo.notifiedAboutFutureChangeAt
### [**](#pricePerUnitUsd)[**](https://github.com/apify/apify-client-js/blob/master/src/resource_clients/actor.ts#L562)pricePerUnitUsd
**pricePerUnitUsd: number
Monthly flat price in USD
### [**](#pricingModel)[**](https://github.com/apify/apify-client-js/blob/master/src/resource_clients/actor.ts#L558)pricingModel
**pricingModel: FLAT\_PRICE\_PER\_MONTH
### [**](#reasonForChange)[**](https://github.com/apify/apify-client-js/blob/master/src/resource_clients/actor.ts#L550)optionalinheritedreasonForChange
**reasonForChange?
<!-- -->
: string
Inherited from CommonActorPricingInfo.reasonForChange
### [**](#startedAt)[**](https://github.com/apify/apify-client-js/blob/master/src/resource_clients/actor.ts#L547)inheritedstartedAt
**startedAt: Date
Inherited from CommonActorPricingInfo.startedAt
Since when is this pricing info record effective for a given Actor
### [**](#trialMinutes)[**](https://github.com/apify/apify-client-js/blob/master/src/resource_clients/actor.ts#L560)optionaltrialMinutes
**trialMinutes?
<!-- -->
: number
For how long this Actor can be used for free in trial period
---
# FreeActorPricingInfo<!-- -->
### Hierarchy
* CommonActorPricingInfo
* *FreeActorPricingInfo*
## Index[**](#Index)
### Properties
* [**apifyMarginPercentage](#apifyMarginPercentage)
* [**createdAt](#createdAt)
* [**notifiedAboutChangeAt](#notifiedAboutChangeAt)
* [**notifiedAboutFutureChangeAt](#notifiedAboutFutureChangeAt)
* [**pricingModel](#pricingModel)
* [**reasonForChange](#reasonForChange)
* [**startedAt](#startedAt)
## Properties<!-- -->[**](#Properties)
### [**](#apifyMarginPercentage)[**](https://github.com/apify/apify-client-js/blob/master/src/resource_clients/actor.ts#L543)inheritedapifyMarginPercentage
**apifyMarginPercentage: number
Inherited from CommonActorPricingInfo.apifyMarginPercentage
In \[0, 1], fraction of pricePerUnitUsd that goes to Apify
### [**](#createdAt)[**](https://github.com/apify/apify-client-js/blob/master/src/resource_clients/actor.ts#L545)inheritedcreatedAt
**createdAt: Date
Inherited from CommonActorPricingInfo.createdAt
When this pricing info record has been created
### [**](#notifiedAboutChangeAt)[**](https://github.com/apify/apify-client-js/blob/master/src/resource_clients/actor.ts#L549)optionalinheritednotifiedAboutChangeAt
**notifiedAboutChangeAt?
<!-- -->
: Date
Inherited from CommonActorPricingInfo.notifiedAboutChangeAt
### [**](#notifiedAboutFutureChangeAt)[**](https://github.com/apify/apify-client-js/blob/master/src/resource_clients/actor.ts#L548)optionalinheritednotifiedAboutFutureChangeAt
**notifiedAboutFutureChangeAt?
<!-- -->
: Date
Inherited from CommonActorPricingInfo.notifiedAboutFutureChangeAt
### [**](#pricingModel)[**](https://github.com/apify/apify-client-js/blob/master/src/resource_clients/actor.ts#L554)pricingModel
**pricingModel: FREE
### [**](#reasonForChange)[**](https://github.com/apify/apify-client-js/blob/master/src/resource_clients/actor.ts#L550)optionalinheritedreasonForChange
**reasonForChange?
<!-- -->
: string
Inherited from CommonActorPricingInfo.reasonForChange
### [**](#startedAt)[**](https://github.com/apify/apify-client-js/blob/master/src/resource_clients/actor.ts#L547)inheritedstartedAt
**startedAt: Date
Inherited from CommonActorPricingInfo.startedAt
Since when is this pricing info record effective for a given Actor
---
# KeyValueClientCreateKeysUrlOptions<!-- -->
### Hierarchy
* [KeyValueClientListKeysOptions](https://docs.apify.com/api/client/js/api/client/js/reference/interface/KeyValueClientListKeysOptions.md)
* *KeyValueClientCreateKeysUrlOptions*
## Index[**](#Index)
### Properties
* [**collection](#collection)
* [**exclusiveStartKey](#exclusiveStartKey)
* [**expiresInSecs](#expiresInSecs)
* [**limit](#limit)
* [**prefix](#prefix)
* [**signature](#signature)
## Properties<!-- -->[**](#Properties)
### [**](#collection)[**](https://github.com/apify/apify-client-js/blob/master/src/resource_clients/key_value_store.ts#L359)optionalinheritedcollection
**collection?
<!-- -->
: string
Inherited from KeyValueClientListKeysOptions.collection
### [**](#exclusiveStartKey)[**](https://github.com/apify/apify-client-js/blob/master/src/resource_clients/key_value_store.ts#L358)optionalinheritedexclusiveStartKey
**exclusiveStartKey?
<!-- -->
: string
Inherited from KeyValueClientListKeysOptions.exclusiveStartKey
### [**](#expiresInSecs)[**](https://github.com/apify/apify-client-js/blob/master/src/resource_clients/key_value_store.ts#L365)optionalexpiresInSecs
**expiresInSecs?
<!-- -->
: number
### [**](#limit)[**](https://github.com/apify/apify-client-js/blob/master/src/resource_clients/key_value_store.ts#L357)optionalinheritedlimit
**limit?
<!-- -->
: number
Inherited from KeyValueClientListKeysOptions.limit
### [**](#prefix)[**](https://github.com/apify/apify-client-js/blob/master/src/resource_clients/key_value_store.ts#L360)optionalinheritedprefix
**prefix?
<!-- -->
: string
Inherited from KeyValueClientListKeysOptions.prefix
### [**](#signature)[**](https://github.com/apify/apify-client-js/blob/master/src/resource_clients/key_value_store.ts#L361)optionalinheritedsignature
**signature?
<!-- -->
: string
Inherited from KeyValueClientListKeysOptions.signature
---
# KeyValueClientGetRecordOptions<!-- -->
## Index[**](#Index)
### Properties
* [**buffer](#buffer)
* [**signature](#signature)
* [**stream](#stream)
## Properties<!-- -->[**](#Properties)
### [**](#buffer)[**](https://github.com/apify/apify-client-js/blob/master/src/resource_clients/key_value_store.ts#L384)optionalbuffer
**buffer?
<!-- -->
: boolean
### [**](#signature)[**](https://github.com/apify/apify-client-js/blob/master/src/resource_clients/key_value_store.ts#L386)optionalsignature
**signature?
<!-- -->
: string
### [**](#stream)[**](https://github.com/apify/apify-client-js/blob/master/src/resource_clients/key_value_store.ts#L385)optionalstream
**stream?
<!-- -->
: boolean
---
# KeyValueClientListKeysOptions<!-- -->
### Hierarchy
* *KeyValueClientListKeysOptions*
* [KeyValueClientCreateKeysUrlOptions](https://docs.apify.com/api/client/js/api/client/js/reference/interface/KeyValueClientCreateKeysUrlOptions.md)
## Index[**](#Index)
### Properties
* [**collection](#collection)
* [**exclusiveStartKey](#exclusiveStartKey)
* [**limit](#limit)
* [**prefix](#prefix)
* [**signature](#signature)
## Properties<!-- -->[**](#Properties)
### [**](#collection)[**](https://github.com/apify/apify-client-js/blob/master/src/resource_clients/key_value_store.ts#L359)optionalcollection
**collection?
<!-- -->
: string
### [**](#exclusiveStartKey)[**](https://github.com/apify/apify-client-js/blob/master/src/resource_clients/key_value_store.ts#L358)optionalexclusiveStartKey
**exclusiveStartKey?
<!-- -->
: string
### [**](#limit)[**](https://github.com/apify/apify-client-js/blob/master/src/resource_clients/key_value_store.ts#L357)optionallimit
**limit?
<!-- -->
: number
### [**](#prefix)[**](https://github.com/apify/apify-client-js/blob/master/src/resource_clients/key_value_store.ts#L360)optionalprefix
**prefix?
<!-- -->
: string
### [**](#signature)[**](https://github.com/apify/apify-client-js/blob/master/src/resource_clients/key_value_store.ts#L361)optionalsignature
**signature?
<!-- -->
: string
---
# KeyValueClientListKeysResult<!-- -->
## Index[**](#Index)
### Properties
* [**count](#count)
* [**exclusiveStartKey](#exclusiveStartKey)
* [**isTruncated](#isTruncated)
* [**items](#items)
* [**limit](#limit)
* [**nextExclusiveStartKey](#nextExclusiveStartKey)
## Properties<!-- -->[**](#Properties)
### [**](#count)[**](https://github.com/apify/apify-client-js/blob/master/src/resource_clients/key_value_store.ts#L369)count
**count: number
### [**](#exclusiveStartKey)[**](https://github.com/apify/apify-client-js/blob/master/src/resource_clients/key_value_store.ts#L371)exclusiveStartKey
**exclusiveStartKey: string
### [**](#isTruncated)[**](https://github.com/apify/apify-client-js/blob/master/src/resource_clients/key_value_store.ts#L372)isTruncated
**isTruncated: boolean
### [**](#items)[**](https://github.com/apify/apify-client-js/blob/master/src/resource_clients/key_value_store.ts#L374)items
**items: [KeyValueListItem](https://docs.apify.com/api/client/js/api/client/js/reference/interface/KeyValueListItem.md)\[]
### [**](#limit)[**](https://github.com/apify/apify-client-js/blob/master/src/resource_clients/key_value_store.ts#L370)limit
**limit: number
### [**](#nextExclusiveStartKey)[**](https://github.com/apify/apify-client-js/blob/master/src/resource_clients/key_value_store.ts#L373)nextExclusiveStartKey
**nextExclusiveStartKey: string
---
# KeyValueClientUpdateOptions<!-- -->
## Index[**](#Index)
### Properties
* [**generalAccess](#generalAccess)
* [**name](#name)
* [**title](#title)
## Properties<!-- -->[**](#Properties)
### [**](#generalAccess)[**](https://github.com/apify/apify-client-js/blob/master/src/resource_clients/key_value_store.ts#L353)optionalgeneralAccess
**generalAccess?
<!-- -->
: null | STORAGE\_GENERAL\_ACCESS
### [**](#name)[**](https://github.com/apify/apify-client-js/blob/master/src/resource_clients/key_value_store.ts#L351)optionalname
**name?
<!-- -->
: null | string
### [**](#title)[**](https://github.com/apify/apify-client-js/blob/master/src/resource_clients/key_value_store.ts#L352)optionaltitle
**title?
<!-- -->
: string
---
# KeyValueListItem<!-- -->
## Index[**](#Index)
### Properties
* [**key](#key)
* [**recordPublicUrl](#recordPublicUrl)
* [**size](#size)
## Properties<!-- -->[**](#Properties)
### [**](#key)[**](https://github.com/apify/apify-client-js/blob/master/src/resource_clients/key_value_store.ts#L378)key
**key: string
### [**](#recordPublicUrl)[**](https://github.com/apify/apify-client-js/blob/master/src/resource_clients/key_value_store.ts#L380)recordPublicUrl
**recordPublicUrl: string
### [**](#size)[**](https://github.com/apify/apify-client-js/blob/master/src/resource_clients/key_value_store.ts#L379)size
**size: number
---
# KeyValueStore<!-- -->
## Index[**](#Index)
### Properties
* [**accessedAt](#accessedAt)
* [**actId](#actId)
* [**actRunId](#actRunId)
* [**createdAt](#createdAt)
* [**generalAccess](#generalAccess)
* [**id](#id)
* [**keysPublicUrl](#keysPublicUrl)
* [**modifiedAt](#modifiedAt)
* [**name](#name)
* [**stats](#stats)
* [**title](#title)
* [**urlSigningSecretKey](#urlSigningSecretKey)
* [**userId](#userId)
## Properties<!-- -->[**](#Properties)
### [**](#accessedAt)[**](https://github.com/apify/apify-client-js/blob/master/src/resource_clients/key_value_store.ts#L333)accessedAt
**accessedAt: Date
### [**](#actId)[**](https://github.com/apify/apify-client-js/blob/master/src/resource_clients/key_value_store.ts#L334)optionalactId
**actId?
<!-- -->
: string
### [**](#actRunId)[**](https://github.com/apify/apify-client-js/blob/master/src/resource_clients/key_value_store.ts#L335)optionalactRunId
**actRunId?
<!-- -->
: string
### [**](#createdAt)[**](https://github.com/apify/apify-client-js/blob/master/src/resource_clients/key_value_store.ts#L331)createdAt
**createdAt: Date
### [**](#generalAccess)[**](https://github.com/apify/apify-client-js/blob/master/src/resource_clients/key_value_store.ts#L337)optionalgeneralAccess
**generalAccess?
<!-- -->
: null | STORAGE\_GENERAL\_ACCESS
### [**](#id)[**](https://github.com/apify/apify-client-js/blob/master/src/resource_clients/key_value_store.ts#L327)id
**id: string
### [**](#keysPublicUrl)[**](https://github.com/apify/apify-client-js/blob/master/src/resource_clients/key_value_store.ts#L339)keysPublicUrl
**keysPublicUrl: string
### [**](#modifiedAt)[**](https://github.com/apify/apify-client-js/blob/master/src/resource_clients/key_value_store.ts#L332)modifiedAt
**modifiedAt: Date
### [**](#name)[**](https://github.com/apify/apify-client-js/blob/master/src/resource_clients/key_value_store.ts#L328)optionalname
**name?
<!-- -->
: string
### [**](#stats)[**](https://github.com/apify/apify-client-js/blob/master/src/resource_clients/key_value_store.ts#L336)optionalstats
**stats?
<!-- -->
: [KeyValueStoreStats](https://docs.apify.com/api/client/js/api/client/js/reference/interface/KeyValueStoreStats.md)
### [**](#title)[**](https://github.com/apify/apify-client-js/blob/master/src/resource_clients/key_value_store.ts#L329)optionaltitle
**title?
<!-- -->
: string
### [**](#urlSigningSecretKey)[**](https://github.com/apify/apify-client-js/blob/master/src/resource_clients/key_value_store.ts#L338)optionalurlSigningSecretKey
**urlSigningSecretKey?
<!-- -->
: null | string
### [**](#userId)[**](https://github.com/apify/apify-client-js/blob/master/src/resource_clients/key_value_store.ts#L330)userId
**userId: string
---
# KeyValueStoreCollectionClientGetOrCreateOptions<!-- -->
## Index[**](#Index)
### Properties
* [**schema](#schema)
## Properties<!-- -->[**](#Properties)
### [**](#schema)[**](https://github.com/apify/apify-client-js/blob/master/src/resource_clients/key_value_store_collection.ts#L60)optionalschema
**schema?
<!-- -->
: Record\<string, unknown>
---
# KeyValueStoreCollectionClientListOptions<!-- -->
## Index[**](#Index)
### Properties
* [**desc](#desc)
* [**limit](#limit)
* [**offset](#offset)
* [**unnamed](#unnamed)
## Properties<!-- -->[**](#Properties)
### [**](#desc)[**](https://github.com/apify/apify-client-js/blob/master/src/resource_clients/key_value_store_collection.ts#L56)optionaldesc
**desc?
<!-- -->
: boolean
### [**](#limit)[**](https://github.com/apify/apify-client-js/blob/master/src/resource_clients/key_value_store_collection.ts#L54)optionallimit
**limit?
<!-- -->
: number
### [**](#offset)[**](https://github.com/apify/apify-client-js/blob/master/src/resource_clients/key_value_store_collection.ts#L55)optionaloffset
**offset?
<!-- -->
: number
### [**](#unnamed)[**](https://github.com/apify/apify-client-js/blob/master/src/resource_clients/key_value_store_collection.ts#L53)optionalunnamed
**unnamed?
<!-- -->
: boolean
---
# KeyValueStoreRecord<!-- --> \<T>
## Index[**](#Index)
### Properties
* [**contentType](#contentType)
* [**key](#key)
* [**value](#value)
## Properties<!-- -->[**](#Properties)
### [**](#contentType)[**](https://github.com/apify/apify-client-js/blob/master/src/resource_clients/key_value_store.ts#L392)optionalcontentType
**contentType?
<!-- -->
: string
### [**](#key)[**](https://github.com/apify/apify-client-js/blob/master/src/resource_clients/key_value_store.ts#L390)key
**key: string
### [**](#value)[**](https://github.com/apify/apify-client-js/blob/master/src/resource_clients/key_value_store.ts#L391)value
**value: T
---
# KeyValueStoreRecordOptions<!-- -->
## Index[**](#Index)
### Properties
* [**doNotRetryTimeouts](#doNotRetryTimeouts)
* [**timeoutSecs](#timeoutSecs)
## Properties<!-- -->[**](#Properties)
### [**](#doNotRetryTimeouts)[**](https://github.com/apify/apify-client-js/blob/master/src/resource_clients/key_value_store.ts#L397)optionaldoNotRetryTimeouts
**doNotRetryTimeouts?
<!-- -->
: boolean
### [**](#timeoutSecs)[**](https://github.com/apify/apify-client-js/blob/master/src/resource_clients/key_value_store.ts#L396)optionaltimeoutSecs
**timeoutSecs?
<!-- -->
: number
---
# KeyValueStoreStats<!-- -->
## Index[**](#Index)
### Properties
* [**deleteCount](#deleteCount)
* [**listCount](#listCount)
* [**readCount](#readCount)
* [**storageBytes](#storageBytes)
* [**writeCount](#writeCount)
## Properties<!-- -->[**](#Properties)
### [**](#deleteCount)[**](https://github.com/apify/apify-client-js/blob/master/src/resource_clients/key_value_store.ts#L345)optionaldeleteCount
**deleteCount?
<!-- -->
: number
### [**](#listCount)[**](https://github.com/apify/apify-client-js/blob/master/src/resource_clients/key_value_store.ts#L346)optionallistCount
**listCount?
<!-- -->
: number
### [**](#readCount)[**](https://github.com/apify/apify-client-js/blob/master/src/resource_clients/key_value_store.ts#L343)optionalreadCount
**readCount?
<!-- -->
: number
### [**](#storageBytes)[**](https://github.com/apify/apify-client-js/blob/master/src/resource_clients/key_value_store.ts#L347)optionalstorageBytes
**storageBytes?
<!-- -->
: number
### [**](#writeCount)[**](https://github.com/apify/apify-client-js/blob/master/src/resource_clients/key_value_store.ts#L344)optionalwriteCount
**writeCount?
<!-- -->
: number
---
# Limits<!-- -->
## Index[**](#Index)
### Properties
* [**dataRetentionDays](#dataRetentionDays)
* [**maxActorCount](#maxActorCount)
* [**maxActorMemoryGbytes](#maxActorMemoryGbytes)
* [**maxActorTaskCount](#maxActorTaskCount)
* [**maxConcurrentActorJobs](#maxConcurrentActorJobs)
* [**maxMonthlyActorComputeUnits](#maxMonthlyActorComputeUnits)
* [**maxMonthlyExternalDataTransferGbytes](#maxMonthlyExternalDataTransferGbytes)
* [**maxMonthlyProxySerps](#maxMonthlyProxySerps)
* [**maxMonthlyResidentialProxyGbytes](#maxMonthlyResidentialProxyGbytes)
* [**maxMonthlyUsageUsd](#maxMonthlyUsageUsd)
* [**maxTeamAccountSeatCount](#maxTeamAccountSeatCount)
## Properties<!-- -->[**](#Properties)
### [**](#dataRetentionDays)[**](https://github.com/apify/apify-client-js/blob/master/src/resource_clients/user.ts#L248)dataRetentionDays
**dataRetentionDays: number
### [**](#maxActorCount)[**](https://github.com/apify/apify-client-js/blob/master/src/resource_clients/user.ts#L244)maxActorCount
**maxActorCount: number
### [**](#maxActorMemoryGbytes)[**](https://github.com/apify/apify-client-js/blob/master/src/resource_clients/user.ts#L243)maxActorMemoryGbytes
**maxActorMemoryGbytes: number
### [**](#maxActorTaskCount)[**](https://github.com/apify/apify-client-js/blob/master/src/resource_clients/user.ts#L245)maxActorTaskCount
**maxActorTaskCount: number
### [**](#maxConcurrentActorJobs)[**](https://github.com/apify/apify-client-js/blob/master/src/resource_clients/user.ts#L246)maxConcurrentActorJobs
**maxConcurrentActorJobs: number
### [**](#maxMonthlyActorComputeUnits)[**](https://github.com/apify/apify-client-js/blob/master/src/resource_clients/user.ts#L239)maxMonthlyActorComputeUnits
**maxMonthlyActorComputeUnits: number
### [**](#maxMonthlyExternalDataTransferGbytes)[**](https://github.com/apify/apify-client-js/blob/master/src/resource_clients/user.ts#L240)maxMonthlyExternalDataTransferGbytes
**maxMonthlyExternalDataTransferGbytes: number
### [**](#maxMonthlyProxySerps)[**](https://github.com/apify/apify-client-js/blob/master/src/resource_clients/user.ts#L241)maxMonthlyProxySerps
**maxMonthlyProxySerps: number
### [**](#maxMonthlyResidentialProxyGbytes)[**](https://github.com/apify/apify-client-js/blob/master/src/resource_clients/user.ts#L242)maxMonthlyResidentialProxyGbytes
**maxMonthlyResidentialProxyGbytes: number
### [**](#maxMonthlyUsageUsd)[**](https://github.com/apify/apify-client-js/blob/master/src/resource_clients/user.ts#L238)maxMonthlyUsageUsd
**maxMonthlyUsageUsd: number
### [**](#maxTeamAccountSeatCount)[**](https://github.com/apify/apify-client-js/blob/master/src/resource_clients/user.ts#L247)maxTeamAccountSeatCount
**maxTeamAccountSeatCount: number
---
# MonthlyUsage<!-- -->
## Index[**](#Index)
### Properties
* [**dailyServiceUsages](#dailyServiceUsages)
* [**monthlyServiceUsage](#monthlyServiceUsage)
* [**totalUsageCreditsUsdAfterVolumeDiscount](#totalUsageCreditsUsdAfterVolumeDiscount)
* [**totalUsageCreditsUsdBeforeVolumeDiscount](#totalUsageCreditsUsdBeforeVolumeDiscount)
* [**usageCycle](#usageCycle)
## Properties<!-- -->[**](#Properties)
### [**](#dailyServiceUsages)[**](https://github.com/apify/apify-client-js/blob/master/src/resource_clients/user.ts#L183)dailyServiceUsages
**dailyServiceUsages: DailyServiceUsage\[]
### [**](#monthlyServiceUsage)[**](https://github.com/apify/apify-client-js/blob/master/src/resource_clients/user.ts#L182)monthlyServiceUsage
**monthlyServiceUsage:
<!-- -->
{}
#### Type declaration
### [**](#totalUsageCreditsUsdAfterVolumeDiscount)[**](https://github.com/apify/apify-client-js/blob/master/src/resource_clients/user.ts#L185)totalUsageCreditsUsdAfterVolumeDiscount
**totalUsageCreditsUsdAfterVolumeDiscount: number
### [**](#totalUsageCreditsUsdBeforeVolumeDiscount)[**](https://github.com/apify/apify-client-js/blob/master/src/resource_clients/user.ts#L184)totalUsageCreditsUsdBeforeVolumeDiscount
**totalUsageCreditsUsdBeforeVolumeDiscount: number
### [**](#usageCycle)[**](https://github.com/apify/apify-client-js/blob/master/src/resource_clients/user.ts#L181)usageCycle
**usageCycle: [UsageCycle](https://docs.apify.com/api/client/js/api/client/js/reference/interface/UsageCycle.md)
---
# MonthlyUsageCycle<!-- -->
## Index[**](#Index)
### Properties
* [**endAt](#endAt)
* [**startAt](#startAt)
## Properties<!-- -->[**](#Properties)
### [**](#endAt)[**](https://github.com/apify/apify-client-js/blob/master/src/resource_clients/user.ts#L234)endAt
**endAt: Date
### [**](#startAt)[**](https://github.com/apify/apify-client-js/blob/master/src/resource_clients/user.ts#L233)startAt
**startAt: Date
---
# OpenApiDefinition<!-- -->
## Index[**](#Index)
### Properties
* [**components](#components)
* [**info](#info)
* [**openapi](#openapi)
* [**paths](#paths)
* [**servers](#servers)
## Properties<!-- -->[**](#Properties)
### [**](#components)[**](https://github.com/apify/apify-client-js/blob/master/src/resource_clients/build.ts#L174)components
**components: { schemas: {} }
#### Type declaration
* ##### schemas: {}
### [**](#info)[**](https://github.com/apify/apify-client-js/blob/master/src/resource_clients/build.ts#L166)info
**info: { description?
<!-- -->
: string; title: string; version?
<!-- -->
: string; x-build-id: string }
#### Type declaration
* ##### optionaldescription?<!-- -->: string
* ##### title: string
* ##### optionalversion?<!-- -->: string
* ##### x-build-id: string
### [**](#openapi)[**](https://github.com/apify/apify-client-js/blob/master/src/resource_clients/build.ts#L165)openapi
**openapi: string
### [**](#paths)[**](https://github.com/apify/apify-client-js/blob/master/src/resource_clients/build.ts#L173)paths
**paths:
<!-- -->
{}
#### Type declaration
### [**](#servers)[**](https://github.com/apify/apify-client-js/blob/master/src/resource_clients/build.ts#L172)servers
**servers: { url: string }\[]
---
# PaginatedList<!-- --> \<Data>
## Index[**](#Index)
### Properties
* [**count](#count)
* [**desc](#desc)
* [**items](#items)
* [**limit](#limit)
* [**offset](#offset)
* [**total](#total)
## Properties<!-- -->[**](#Properties)
### [**](#count)[**](https://github.com/apify/apify-client-js/blob/master/src/utils.ts#L237)count
**count: number
Count of dataset entries returned in this set.
### [**](#desc)[**](https://github.com/apify/apify-client-js/blob/master/src/utils.ts#L243)desc
**desc: boolean
Should the results be in descending order.
### [**](#items)[**](https://github.com/apify/apify-client-js/blob/master/src/utils.ts#L245)items
**items: Data\[]
Dataset entries based on chosen format parameter.
### [**](#limit)[**](https://github.com/apify/apify-client-js/blob/master/src/utils.ts#L241)limit
**limit: number
Maximum number of dataset entries requested.
### [**](#offset)[**](https://github.com/apify/apify-client-js/blob/master/src/utils.ts#L239)offset
**offset: number
Position of the first returned entry in the dataset.
### [**](#total)[**](https://github.com/apify/apify-client-js/blob/master/src/utils.ts#L235)total
**total: number
Total count of entries in the dataset.
---
# PricePerDatasetItemActorPricingInfo<!-- -->
### Hierarchy
* CommonActorPricingInfo
* *PricePerDatasetItemActorPricingInfo*
## Index[**](#Index)
### Properties
* [**apifyMarginPercentage](#apifyMarginPercentage)
* [**createdAt](#createdAt)
* [**notifiedAboutChangeAt](#notifiedAboutChangeAt)
* [**notifiedAboutFutureChangeAt](#notifiedAboutFutureChangeAt)
* [**pricePerUnitUsd](#pricePerUnitUsd)
* [**pricingModel](#pricingModel)
* [**reasonForChange](#reasonForChange)
* [**startedAt](#startedAt)
* [**unitName](#unitName)
## Properties<!-- -->[**](#Properties)
### [**](#apifyMarginPercentage)[**](https://github.com/apify/apify-client-js/blob/master/src/resource_clients/actor.ts#L543)inheritedapifyMarginPercentage
**apifyMarginPercentage: number
Inherited from CommonActorPricingInfo.apifyMarginPercentage
In \[0, 1], fraction of pricePerUnitUsd that goes to Apify
### [**](#createdAt)[**](https://github.com/apify/apify-client-js/blob/master/src/resource_clients/actor.ts#L545)inheritedcreatedAt
**createdAt: Date
Inherited from CommonActorPricingInfo.createdAt
When this pricing info record has been created
### [**](#notifiedAboutChangeAt)[**](https://github.com/apify/apify-client-js/blob/master/src/resource_clients/actor.ts#L549)optionalinheritednotifiedAboutChangeAt
**notifiedAboutChangeAt?
<!-- -->
: Date
Inherited from CommonActorPricingInfo.notifiedAboutChangeAt
### [**](#notifiedAboutFutureChangeAt)[**](https://github.com/apify/apify-client-js/blob/master/src/resource_clients/actor.ts#L548)optionalinheritednotifiedAboutFutureChangeAt
**notifiedAboutFutureChangeAt?
<!-- -->
: Date
Inherited from CommonActorPricingInfo.notifiedAboutFutureChangeAt
### [**](#pricePerUnitUsd)[**](https://github.com/apify/apify-client-js/blob/master/src/resource_clients/actor.ts#L569)pricePerUnitUsd
**pricePerUnitUsd: number
### [**](#pricingModel)[**](https://github.com/apify/apify-client-js/blob/master/src/resource_clients/actor.ts#L566)pricingModel
**pricingModel: PRICE\_PER\_DATASET\_ITEM
### [**](#reasonForChange)[**](https://github.com/apify/apify-client-js/blob/master/src/resource_clients/actor.ts#L550)optionalinheritedreasonForChange
**reasonForChange?
<!-- -->
: string
Inherited from CommonActorPricingInfo.reasonForChange
### [**](#startedAt)[**](https://github.com/apify/apify-client-js/blob/master/src/resource_clients/actor.ts#L547)inheritedstartedAt
**startedAt: Date
Inherited from CommonActorPricingInfo.startedAt
Since when is this pricing info record effective for a given Actor
### [**](#unitName)[**](https://github.com/apify/apify-client-js/blob/master/src/resource_clients/actor.ts#L568)optionalunitName
**unitName?
<!-- -->
: string
Name of the unit that is being charged
---
# PricePerEventActorPricingInfo<!-- -->
### Hierarchy
* CommonActorPricingInfo
* *PricePerEventActorPricingInfo*
## Index[**](#Index)
### Properties
* [**apifyMarginPercentage](#apifyMarginPercentage)
* [**createdAt](#createdAt)
* [**minimalMaxTotalChargeUsd](#minimalMaxTotalChargeUsd)
* [**notifiedAboutChangeAt](#notifiedAboutChangeAt)
* [**notifiedAboutFutureChangeAt](#notifiedAboutFutureChangeAt)
* [**pricingModel](#pricingModel)
* [**pricingPerEvent](#pricingPerEvent)
* [**reasonForChange](#reasonForChange)
* [**startedAt](#startedAt)
## Properties<!-- -->[**](#Properties)
### [**](#apifyMarginPercentage)[**](https://github.com/apify/apify-client-js/blob/master/src/resource_clients/actor.ts#L543)inheritedapifyMarginPercentage
**apifyMarginPercentage: number
Inherited from CommonActorPricingInfo.apifyMarginPercentage
In \[0, 1], fraction of pricePerUnitUsd that goes to Apify
### [**](#createdAt)[**](https://github.com/apify/apify-client-js/blob/master/src/resource_clients/actor.ts#L545)inheritedcreatedAt
**createdAt: Date
Inherited from CommonActorPricingInfo.createdAt
When this pricing info record has been created
### [**](#minimalMaxTotalChargeUsd)[**](https://github.com/apify/apify-client-js/blob/master/src/resource_clients/actor.ts#L585)optionalminimalMaxTotalChargeUsd
**minimalMaxTotalChargeUsd?
<!-- -->
: number
### [**](#notifiedAboutChangeAt)[**](https://github.com/apify/apify-client-js/blob/master/src/resource_clients/actor.ts#L549)optionalinheritednotifiedAboutChangeAt
**notifiedAboutChangeAt?
<!-- -->
: Date
Inherited from CommonActorPricingInfo.notifiedAboutChangeAt
### [**](#notifiedAboutFutureChangeAt)[**](https://github.com/apify/apify-client-js/blob/master/src/resource_clients/actor.ts#L548)optionalinheritednotifiedAboutFutureChangeAt
**notifiedAboutFutureChangeAt?
<!-- -->
: Date
Inherited from CommonActorPricingInfo.notifiedAboutFutureChangeAt
### [**](#pricingModel)[**](https://github.com/apify/apify-client-js/blob/master/src/resource_clients/actor.ts#L581)pricingModel
**pricingModel: PAY\_PER\_EVENT
### [**](#pricingPerEvent)[**](https://github.com/apify/apify-client-js/blob/master/src/resource_clients/actor.ts#L582)pricingPerEvent
**pricingPerEvent: { actorChargeEvents: [ActorChargeEvents](https://docs.apify.com/api/client/js/api/client/js/reference.md#ActorChargeEvents) }
#### Type declaration
* ##### actorChargeEvents: [ActorChargeEvents](https://docs.apify.com/api/client/js/api/client/js/reference.md#ActorChargeEvents)
### [**](#reasonForChange)[**](https://github.com/apify/apify-client-js/blob/master/src/resource_clients/actor.ts#L550)optionalinheritedreasonForChange
**reasonForChange?
<!-- -->
: string
Inherited from CommonActorPricingInfo.reasonForChange
### [**](#startedAt)[**](https://github.com/apify/apify-client-js/blob/master/src/resource_clients/actor.ts#L547)inheritedstartedAt
**startedAt: Date
Inherited from CommonActorPricingInfo.startedAt
Since when is this pricing info record effective for a given Actor
---
# PricingInfo<!-- -->
## Index[**](#Index)
### Properties
* [**pricingModel](#pricingModel)
## Properties<!-- -->[**](#Properties)
### [**](#pricingModel)[**](https://github.com/apify/apify-client-js/blob/master/src/resource_clients/store_collection.ts#L41)pricingModel
**pricingModel: string
---
# ProxyGroup<!-- -->
## Index[**](#Index)
### Properties
* [**availableCount](#availableCount)
* [**description](#description)
* [**name](#name)
## Properties<!-- -->[**](#Properties)
### [**](#availableCount)[**](https://github.com/apify/apify-client-js/blob/master/src/resource_clients/user.ts#L119)availableCount
**availableCount: number
### [**](#description)[**](https://github.com/apify/apify-client-js/blob/master/src/resource_clients/user.ts#L118)description
**description: string
### [**](#name)[**](https://github.com/apify/apify-client-js/blob/master/src/resource_clients/user.ts#L117)name
**name: string
---
# RequestQueue<!-- -->
## Index[**](#Index)
### Properties
* [**accessedAt](#accessedAt)
* [**actId](#actId)
* [**actRunId](#actRunId)
* [**createdAt](#createdAt)
* [**expireAt](#expireAt)
* [**generalAccess](#generalAccess)
* [**hadMultipleClients](#hadMultipleClients)
* [**handledRequestCount](#handledRequestCount)
* [**id](#id)
* [**modifiedAt](#modifiedAt)
* [**name](#name)
* [**pendingRequestCount](#pendingRequestCount)
* [**stats](#stats)
* [**title](#title)
* [**totalRequestCount](#totalRequestCount)
* [**userId](#userId)
## Properties<!-- -->[**](#Properties)
### [**](#accessedAt)[**](https://github.com/apify/apify-client-js/blob/master/src/resource_clients/request_queue.ts#L563)accessedAt
**accessedAt: Date
### [**](#actId)[**](https://github.com/apify/apify-client-js/blob/master/src/resource_clients/request_queue.ts#L568)optionalactId
**actId?
<!-- -->
: string
### [**](#actRunId)[**](https://github.com/apify/apify-client-js/blob/master/src/resource_clients/request_queue.ts#L569)optionalactRunId
**actRunId?
<!-- -->
: string
### [**](#createdAt)[**](https://github.com/apify/apify-client-js/blob/master/src/resource_clients/request_queue.ts#L561)createdAt
**createdAt: Date
### [**](#expireAt)[**](https://github.com/apify/apify-client-js/blob/master/src/resource_clients/request_queue.ts#L564)optionalexpireAt
**expireAt?
<!-- -->
: string
### [**](#generalAccess)[**](https://github.com/apify/apify-client-js/blob/master/src/resource_clients/request_queue.ts#L572)optionalgeneralAccess
**generalAccess?
<!-- -->
: null | STORAGE\_GENERAL\_ACCESS
### [**](#hadMultipleClients)[**](https://github.com/apify/apify-client-js/blob/master/src/resource_clients/request_queue.ts#L570)hadMultipleClients
**hadMultipleClients: boolean
### [**](#handledRequestCount)[**](https://github.com/apify/apify-client-js/blob/master/src/resource_clients/request_queue.ts#L566)handledRequestCount
**handledRequestCount: number
### [**](#id)[**](https://github.com/apify/apify-client-js/blob/master/src/resource_clients/request_queue.ts#L557)id
**id: string
### [**](#modifiedAt)[**](https://github.com/apify/apify-client-js/blob/master/src/resource_clients/request_queue.ts#L562)modifiedAt
**modifiedAt: Date
### [**](#name)[**](https://github.com/apify/apify-client-js/blob/master/src/resource_clients/request_queue.ts#L558)optionalname
**name?
<!-- -->
: string
### [**](#pendingRequestCount)[**](https://github.com/apify/apify-client-js/blob/master/src/resource_clients/request_queue.ts#L567)pendingRequestCount
**pendingRequestCount: number
### [**](#stats)[**](https://github.com/apify/apify-client-js/blob/master/src/resource_clients/request_queue.ts#L571)stats
**stats: [RequestQueueStats](https://docs.apify.com/api/client/js/api/client/js/reference/interface/RequestQueueStats.md)
### [**](#title)[**](https://github.com/apify/apify-client-js/blob/master/src/resource_clients/request_queue.ts#L559)optionaltitle
**title?
<!-- -->
: string
### [**](#totalRequestCount)[**](https://github.com/apify/apify-client-js/blob/master/src/resource_clients/request_queue.ts#L565)totalRequestCount
**totalRequestCount: number
### [**](#userId)[**](https://github.com/apify/apify-client-js/blob/master/src/resource_clients/request_queue.ts#L560)userId
**userId: string
---
# RequestQueueClientAddRequestOptions<!-- -->
## Index[**](#Index)
### Properties
* [**forefront](#forefront)
## Properties<!-- -->[**](#Properties)
### [**](#forefront)[**](https://github.com/apify/apify-client-js/blob/master/src/resource_clients/request_queue.ts#L638)optionalforefront
**forefront?
<!-- -->
: boolean
---
# RequestQueueClientAddRequestResult<!-- -->
## Index[**](#Index)
### Properties
* [**requestId](#requestId)
* [**wasAlreadyHandled](#wasAlreadyHandled)
* [**wasAlreadyPresent](#wasAlreadyPresent)
## Properties<!-- -->[**](#Properties)
### [**](#requestId)[**](https://github.com/apify/apify-client-js/blob/master/src/resource_clients/request_queue.ts#L677)requestId
**requestId: string
### [**](#wasAlreadyHandled)[**](https://github.com/apify/apify-client-js/blob/master/src/resource_clients/request_queue.ts#L679)wasAlreadyHandled
**wasAlreadyHandled: boolean
### [**](#wasAlreadyPresent)[**](https://github.com/apify/apify-client-js/blob/master/src/resource_clients/request_queue.ts#L678)wasAlreadyPresent
**wasAlreadyPresent: boolean
---
# RequestQueueClientBatchAddRequestWithRetriesOptions<!-- -->
## Index[**](#Index)
### Properties
* [**forefront](#forefront)
* [**maxParallel](#maxParallel)
* [**maxUnprocessedRequestsRetries](#maxUnprocessedRequestsRetries)
* [**minDelayBetweenUnprocessedRequestsRetriesMillis](#minDelayBetweenUnprocessedRequestsRetriesMillis)
## Properties<!-- -->[**](#Properties)
### [**](#forefront)[**](https://github.com/apify/apify-client-js/blob/master/src/resource_clients/request_queue.ts#L655)optionalforefront
**forefront?
<!-- -->
: boolean
### [**](#maxParallel)[**](https://github.com/apify/apify-client-js/blob/master/src/resource_clients/request_queue.ts#L657)optionalmaxParallel
**maxParallel?
<!-- -->
: number
### [**](#maxUnprocessedRequestsRetries)[**](https://github.com/apify/apify-client-js/blob/master/src/resource_clients/request_queue.ts#L656)optionalmaxUnprocessedRequestsRetries
**maxUnprocessedRequestsRetries?
<!-- -->
: number
### [**](#minDelayBetweenUnprocessedRequestsRetriesMillis)[**](https://github.com/apify/apify-client-js/blob/master/src/resource_clients/request_queue.ts#L658)optionalminDelayBetweenUnprocessedRequestsRetriesMillis
**minDelayBetweenUnprocessedRequestsRetriesMillis?
<!-- -->
: number
---
# RequestQueueClientBatchRequestsOperationResult<!-- -->
## Index[**](#Index)
### Properties
* [**processedRequests](#processedRequests)
* [**unprocessedRequests](#unprocessedRequests)
## Properties<!-- -->[**](#Properties)
### [**](#processedRequests)[**](https://github.com/apify/apify-client-js/blob/master/src/resource_clients/request_queue.ts#L700)processedRequests
**processedRequests: ProcessedRequest\[]
### [**](#unprocessedRequests)[**](https://github.com/apify/apify-client-js/blob/master/src/resource_clients/request_queue.ts#L701)unprocessedRequests
**unprocessedRequests: UnprocessedRequest\[]
---
# RequestQueueClientDeleteRequestLockOptions<!-- -->
## Index[**](#Index)
### Properties
* [**forefront](#forefront)
## Properties<!-- -->[**](#Properties)
### [**](#forefront)[**](https://github.com/apify/apify-client-js/blob/master/src/resource_clients/request_queue.ts#L647)optionalforefront
**forefront?
<!-- -->
: boolean
---
# RequestQueueClientListAndLockHeadOptions<!-- -->
## Index[**](#Index)
### Properties
* [**limit](#limit)
* [**lockSecs](#lockSecs)
## Properties<!-- -->[**](#Properties)
### [**](#limit)[**](https://github.com/apify/apify-client-js/blob/master/src/resource_clients/request_queue.ts#L619)optionallimit
**limit?
<!-- -->
: number
### [**](#lockSecs)[**](https://github.com/apify/apify-client-js/blob/master/src/resource_clients/request_queue.ts#L618)lockSecs
**lockSecs: number
---
# RequestQueueClientListAndLockHeadResult<!-- -->
### Hierarchy
* [RequestQueueClientListHeadResult](https://docs.apify.com/api/client/js/api/client/js/reference/interface/RequestQueueClientListHeadResult.md)
* *RequestQueueClientListAndLockHeadResult*
## Index[**](#Index)
### Properties
* [**clientKey](#clientKey)
* [**hadMultipleClients](#hadMultipleClients)
* [**items](#items)
* [**limit](#limit)
* [**lockSecs](#lockSecs)
* [**queueHasLockedRequests](#queueHasLockedRequests)
* [**queueModifiedAt](#queueModifiedAt)
## Properties<!-- -->[**](#Properties)
### [**](#clientKey)[**](https://github.com/apify/apify-client-js/blob/master/src/resource_clients/request_queue.ts#L625)clientKey
**clientKey: string
### [**](#hadMultipleClients)[**](https://github.com/apify/apify-client-js/blob/master/src/resource_clients/request_queue.ts#L596)inheritedhadMultipleClients
**hadMultipleClients: boolean
Inherited from RequestQueueClientListHeadResult.hadMultipleClients
### [**](#items)[**](https://github.com/apify/apify-client-js/blob/master/src/resource_clients/request_queue.ts#L597)inheriteditems
**items: [RequestQueueClientListItem](https://docs.apify.com/api/client/js/api/client/js/reference/interface/RequestQueueClientListItem.md)\[]
Inherited from RequestQueueClientListHeadResult.items
### [**](#limit)[**](https://github.com/apify/apify-client-js/blob/master/src/resource_clients/request_queue.ts#L594)inheritedlimit
**limit: number
Inherited from RequestQueueClientListHeadResult.limit
### [**](#lockSecs)[**](https://github.com/apify/apify-client-js/blob/master/src/resource_clients/request_queue.ts#L623)lockSecs
**lockSecs: number
### [**](#queueHasLockedRequests)[**](https://github.com/apify/apify-client-js/blob/master/src/resource_clients/request_queue.ts#L624)queueHasLockedRequests
**queueHasLockedRequests: boolean
### [**](#queueModifiedAt)[**](https://github.com/apify/apify-client-js/blob/master/src/resource_clients/request_queue.ts#L595)inheritedqueueModifiedAt
**queueModifiedAt: Date
Inherited from RequestQueueClientListHeadResult.queueModifiedAt
---
# RequestQueueClientListHeadOptions<!-- -->
## Index[**](#Index)
### Properties
* [**limit](#limit)
## Properties<!-- -->[**](#Properties)
### [**](#limit)[**](https://github.com/apify/apify-client-js/blob/master/src/resource_clients/request_queue.ts#L590)optionallimit
**limit?
<!-- -->
: number
---
# RequestQueueClientListHeadResult<!-- -->
### Hierarchy
* *RequestQueueClientListHeadResult*
* [RequestQueueClientListAndLockHeadResult](https://docs.apify.com/api/client/js/api/client/js/reference/interface/RequestQueueClientListAndLockHeadResult.md)
## Index[**](#Index)
### Properties
* [**hadMultipleClients](#hadMultipleClients)
* [**items](#items)
* [**limit](#limit)
* [**queueModifiedAt](#queueModifiedAt)
## Properties<!-- -->[**](#Properties)
### [**](#hadMultipleClients)[**](https://github.com/apify/apify-client-js/blob/master/src/resource_clients/request_queue.ts#L596)hadMultipleClients
**hadMultipleClients: boolean
### [**](#items)[**](https://github.com/apify/apify-client-js/blob/master/src/resource_clients/request_queue.ts#L597)items
**items: [RequestQueueClientListItem](https://docs.apify.com/api/client/js/api/client/js/reference/interface/RequestQueueClientListItem.md)\[]
### [**](#limit)[**](https://github.com/apify/apify-client-js/blob/master/src/resource_clients/request_queue.ts#L594)limit
**limit: number
### [**](#queueModifiedAt)[**](https://github.com/apify/apify-client-js/blob/master/src/resource_clients/request_queue.ts#L595)queueModifiedAt
**queueModifiedAt: Date
---
# RequestQueueClientListItem<!-- -->
## Index[**](#Index)
### Properties
* [**id](#id)
* [**lockExpiresAt](#lockExpiresAt)
* [**method](#method)
* [**retryCount](#retryCount)
* [**uniqueKey](#uniqueKey)
* [**url](#url)
## Properties<!-- -->[**](#Properties)
### [**](#id)[**](https://github.com/apify/apify-client-js/blob/master/src/resource_clients/request_queue.ts#L629)id
**id: string
### [**](#lockExpiresAt)[**](https://github.com/apify/apify-client-js/blob/master/src/resource_clients/request_queue.ts#L634)optionallockExpiresAt
**lockExpiresAt?
<!-- -->
: Date
### [**](#method)[**](https://github.com/apify/apify-client-js/blob/master/src/resource_clients/request_queue.ts#L633)method
**method: [AllowedHttpMethods](https://docs.apify.com/api/client/js/api/client/js/reference.md#AllowedHttpMethods)
### [**](#retryCount)[**](https://github.com/apify/apify-client-js/blob/master/src/resource_clients/request_queue.ts#L630)retryCount
**retryCount: number
### [**](#uniqueKey)[**](https://github.com/apify/apify-client-js/blob/master/src/resource_clients/request_queue.ts#L631)uniqueKey
**uniqueKey: string
### [**](#url)[**](https://github.com/apify/apify-client-js/blob/master/src/resource_clients/request_queue.ts#L632)url
**url: string
---
# RequestQueueClientListRequestsOptions<!-- -->
## Index[**](#Index)
### Properties
* [**exclusiveStartId](#exclusiveStartId)
* [**limit](#limit)
## Properties<!-- -->[**](#Properties)
### [**](#exclusiveStartId)[**](https://github.com/apify/apify-client-js/blob/master/src/resource_clients/request_queue.ts#L602)optionalexclusiveStartId
**exclusiveStartId?
<!-- -->
: string
### [**](#limit)[**](https://github.com/apify/apify-client-js/blob/master/src/resource_clients/request_queue.ts#L601)optionallimit
**limit?
<!-- -->
: number
---
# RequestQueueClientListRequestsResult<!-- -->
## Index[**](#Index)
### Properties
* [**exclusiveStartId](#exclusiveStartId)
* [**items](#items)
* [**limit](#limit)
## Properties<!-- -->[**](#Properties)
### [**](#exclusiveStartId)[**](https://github.com/apify/apify-client-js/blob/master/src/resource_clients/request_queue.ts#L613)optionalexclusiveStartId
**exclusiveStartId?
<!-- -->
: string
### [**](#items)[**](https://github.com/apify/apify-client-js/blob/master/src/resource_clients/request_queue.ts#L614)items
**items: [RequestQueueClientRequestSchema](https://docs.apify.com/api/client/js/api/client/js/reference/interface/RequestQueueClientRequestSchema.md)\[]
### [**](#limit)[**](https://github.com/apify/apify-client-js/blob/master/src/resource_clients/request_queue.ts#L612)limit
**limit: number
---
# RequestQueueClientPaginateRequestsOptions<!-- -->
## Index[**](#Index)
### Properties
* [**exclusiveStartId](#exclusiveStartId)
* [**limit](#limit)
* [**maxPageLimit](#maxPageLimit)
## Properties<!-- -->[**](#Properties)
### [**](#exclusiveStartId)[**](https://github.com/apify/apify-client-js/blob/master/src/resource_clients/request_queue.ts#L608)optionalexclusiveStartId
**exclusiveStartId?
<!-- -->
: string
### [**](#limit)[**](https://github.com/apify/apify-client-js/blob/master/src/resource_clients/request_queue.ts#L606)optionallimit
**limit?
<!-- -->
: number
### [**](#maxPageLimit)[**](https://github.com/apify/apify-client-js/blob/master/src/resource_clients/request_queue.ts#L607)optionalmaxPageLimit
**maxPageLimit?
<!-- -->
: number
---
# RequestQueueClientProlongRequestLockOptions<!-- -->
## Index[**](#Index)
### Properties
* [**forefront](#forefront)
* [**lockSecs](#lockSecs)
## Properties<!-- -->[**](#Properties)
### [**](#forefront)[**](https://github.com/apify/apify-client-js/blob/master/src/resource_clients/request_queue.ts#L642)optionalforefront
**forefront?
<!-- -->
: boolean
### [**](#lockSecs)[**](https://github.com/apify/apify-client-js/blob/master/src/resource_clients/request_queue.ts#L643)lockSecs
**lockSecs: number
---
# RequestQueueClientProlongRequestLockResult<!-- -->
## Index[**](#Index)
### Properties
* [**lockExpiresAt](#lockExpiresAt)
## Properties<!-- -->[**](#Properties)
### [**](#lockExpiresAt)[**](https://github.com/apify/apify-client-js/blob/master/src/resource_clients/request_queue.ts#L651)lockExpiresAt
**lockExpiresAt: Date
---
# RequestQueueClientRequestSchema<!-- -->
## Index[**](#Index)
### Properties
* [**errorMessages](#errorMessages)
* [**handledAt](#handledAt)
* [**headers](#headers)
* [**id](#id)
* [**loadedUrl](#loadedUrl)
* [**method](#method)
* [**noRetry](#noRetry)
* [**payload](#payload)
* [**retryCount](#retryCount)
* [**uniqueKey](#uniqueKey)
* [**url](#url)
* [**userData](#userData)
## Properties<!-- -->[**](#Properties)
### [**](#errorMessages)[**](https://github.com/apify/apify-client-js/blob/master/src/resource_clients/request_queue.ts#L668)optionalerrorMessages
**errorMessages?
<!-- -->
: string\[]
### [**](#handledAt)[**](https://github.com/apify/apify-client-js/blob/master/src/resource_clients/request_queue.ts#L671)optionalhandledAt
**handledAt?
<!-- -->
: string
### [**](#headers)[**](https://github.com/apify/apify-client-js/blob/master/src/resource_clients/request_queue.ts#L669)optionalheaders
**headers?
<!-- -->
: Record\<string, string>
### [**](#id)[**](https://github.com/apify/apify-client-js/blob/master/src/resource_clients/request_queue.ts#L662)id
**id: string
### [**](#loadedUrl)[**](https://github.com/apify/apify-client-js/blob/master/src/resource_clients/request_queue.ts#L673)optionalloadedUrl
**loadedUrl?
<!-- -->
: string
### [**](#method)[**](https://github.com/apify/apify-client-js/blob/master/src/resource_clients/request_queue.ts#L665)optionalmethod
**method?
<!-- -->
: [AllowedHttpMethods](https://docs.apify.com/api/client/js/api/client/js/reference.md#AllowedHttpMethods)
### [**](#noRetry)[**](https://github.com/apify/apify-client-js/blob/master/src/resource_clients/request_queue.ts#L672)optionalnoRetry
**noRetry?
<!-- -->
: boolean
### [**](#payload)[**](https://github.com/apify/apify-client-js/blob/master/src/resource_clients/request_queue.ts#L666)optionalpayload
**payload?
<!-- -->
: string
### [**](#retryCount)[**](https://github.com/apify/apify-client-js/blob/master/src/resource_clients/request_queue.ts#L667)optionalretryCount
**retryCount?
<!-- -->
: number
### [**](#uniqueKey)[**](https://github.com/apify/apify-client-js/blob/master/src/resource_clients/request_queue.ts#L663)uniqueKey
**uniqueKey: string
### [**](#url)[**](https://github.com/apify/apify-client-js/blob/master/src/resource_clients/request_queue.ts#L664)url
**url: string
### [**](#userData)[**](https://github.com/apify/apify-client-js/blob/master/src/resource_clients/request_queue.ts#L670)optionaluserData
**userData?
<!-- -->
: Record\<string, unknown>
---
# RequestQueueClientUnlockRequestsResult<!-- -->
## Index[**](#Index)
### Properties
* [**unlockedCount](#unlockedCount)
## Properties<!-- -->[**](#Properties)
### [**](#unlockedCount)[**](https://github.com/apify/apify-client-js/blob/master/src/resource_clients/request_queue.ts#L696)unlockedCount
**unlockedCount: number
---
# RequestQueueClientUpdateOptions<!-- -->
## Index[**](#Index)
### Properties
* [**generalAccess](#generalAccess)
* [**name](#name)
* [**title](#title)
## Properties<!-- -->[**](#Properties)
### [**](#generalAccess)[**](https://github.com/apify/apify-client-js/blob/master/src/resource_clients/request_queue.ts#L586)optionalgeneralAccess
**generalAccess?
<!-- -->
: null | STORAGE\_GENERAL\_ACCESS
### [**](#name)[**](https://github.com/apify/apify-client-js/blob/master/src/resource_clients/request_queue.ts#L584)optionalname
**name?
<!-- -->
: null | string
### [**](#title)[**](https://github.com/apify/apify-client-js/blob/master/src/resource_clients/request_queue.ts#L585)optionaltitle
**title?
<!-- -->
: string
---
# RequestQueueCollectionListOptions<!-- -->
## Index[**](#Index)
### Properties
* [**desc](#desc)
* [**limit](#limit)
* [**offset](#offset)
* [**unnamed](#unnamed)
## Properties<!-- -->[**](#Properties)
### [**](#desc)[**](https://github.com/apify/apify-client-js/blob/master/src/resource_clients/request_queue_collection.ts#L50)optionaldesc
**desc?
<!-- -->
: boolean
### [**](#limit)[**](https://github.com/apify/apify-client-js/blob/master/src/resource_clients/request_queue_collection.ts#L48)optionallimit
**limit?
<!-- -->
: number
### [**](#offset)[**](https://github.com/apify/apify-client-js/blob/master/src/resource_clients/request_queue_collection.ts#L49)optionaloffset
**offset?
<!-- -->
: number
### [**](#unnamed)[**](https://github.com/apify/apify-client-js/blob/master/src/resource_clients/request_queue_collection.ts#L47)optionalunnamed
**unnamed?
<!-- -->
: boolean
---
# RequestQueueStats<!-- -->
## Index[**](#Index)
### Properties
* [**deleteCount](#deleteCount)
* [**headItemReadCount](#headItemReadCount)
* [**readCount](#readCount)
* [**storageBytes](#storageBytes)
* [**writeCount](#writeCount)
## Properties<!-- -->[**](#Properties)
### [**](#deleteCount)[**](https://github.com/apify/apify-client-js/blob/master/src/resource_clients/request_queue.ts#L578)optionaldeleteCount
**deleteCount?
<!-- -->
: number
### [**](#headItemReadCount)[**](https://github.com/apify/apify-client-js/blob/master/src/resource_clients/request_queue.ts#L579)optionalheadItemReadCount
**headItemReadCount?
<!-- -->
: number
### [**](#readCount)[**](https://github.com/apify/apify-client-js/blob/master/src/resource_clients/request_queue.ts#L576)optionalreadCount
**readCount?
<!-- -->
: number
### [**](#storageBytes)[**](https://github.com/apify/apify-client-js/blob/master/src/resource_clients/request_queue.ts#L580)optionalstorageBytes
**storageBytes?
<!-- -->
: number
### [**](#writeCount)[**](https://github.com/apify/apify-client-js/blob/master/src/resource_clients/request_queue.ts#L577)optionalwriteCount
**writeCount?
<!-- -->
: number
---
# RequestQueueUserOptions<!-- -->
## Index[**](#Index)
### Properties
* [**clientKey](#clientKey)
* [**timeoutSecs](#timeoutSecs)
## Properties<!-- -->[**](#Properties)
### [**](#clientKey)[**](https://github.com/apify/apify-client-js/blob/master/src/resource_clients/request_queue.ts#L552)optionalclientKey
**clientKey?
<!-- -->
: string
### [**](#timeoutSecs)[**](https://github.com/apify/apify-client-js/blob/master/src/resource_clients/request_queue.ts#L553)optionaltimeoutSecs
**timeoutSecs?
<!-- -->
: number
---
# RunAbortOptions<!-- -->
## Index[**](#Index)
### Properties
* [**gracefully](#gracefully)
## Properties<!-- -->[**](#Properties)
### [**](#gracefully)[**](https://github.com/apify/apify-client-js/blob/master/src/resource_clients/run.ts#L276)optionalgracefully
**gracefully?
<!-- -->
: boolean
---
# RunChargeOptions<!-- -->
## Index[**](#Index)
### Properties
* [**count](#count)
* [**eventName](#eventName)
* [**idempotencyKey](#idempotencyKey)
## Properties<!-- -->[**](#Properties)
### [**](#count)[**](https://github.com/apify/apify-client-js/blob/master/src/resource_clients/run.ts#L302)optionalcount
**count?
<!-- -->
: number
Defaults to 1
### [**](#eventName)[**](https://github.com/apify/apify-client-js/blob/master/src/resource_clients/run.ts#L300)eventName
**eventName: string
Name of the event to charge. Must be defined in the Actor's pricing info else the API will throw.
### [**](#idempotencyKey)[**](https://github.com/apify/apify-client-js/blob/master/src/resource_clients/run.ts#L304)optionalidempotencyKey
**idempotencyKey?
<!-- -->
: string
Defaults to runId-eventName-timestamp
---
# RunCollectionListOptions<!-- -->
## Index[**](#Index)
### Properties
* [**desc](#desc)
* [**limit](#limit)
* [**offset](#offset)
* [**startedAfter](#startedAfter)
* [**startedBefore](#startedBefore)
* [**status](#status)
## Properties<!-- -->[**](#Properties)
### [**](#desc)[**](https://github.com/apify/apify-client-js/blob/master/src/resource_clients/run_collection.ts#L47)optionaldesc
**desc?
<!-- -->
: boolean
### [**](#limit)[**](https://github.com/apify/apify-client-js/blob/master/src/resource_clients/run_collection.ts#L45)optionallimit
**limit?
<!-- -->
: number
### [**](#offset)[**](https://github.com/apify/apify-client-js/blob/master/src/resource_clients/run_collection.ts#L46)optionaloffset
**offset?
<!-- -->
: number
### [**](#startedAfter)[**](https://github.com/apify/apify-client-js/blob/master/src/resource_clients/run_collection.ts#L52)optionalstartedAfter
**startedAfter?
<!-- -->
: string | Date
### [**](#startedBefore)[**](https://github.com/apify/apify-client-js/blob/master/src/resource_clients/run_collection.ts#L51)optionalstartedBefore
**startedBefore?
<!-- -->
: string | Date
### [**](#status)[**](https://github.com/apify/apify-client-js/blob/master/src/resource_clients/run_collection.ts#L48)optionalstatus
**status?
<!-- -->
: READY | RUNNING | SUCCEEDED | FAILED | ABORTING | ABORTED | TIMING-OUT | TIMED-OUT | (READY | RUNNING | SUCCEEDED | FAILED | ABORTING | ABORTED | TIMING-OUT | TIMED-OUT)\[]
---
# RunGetOptions<!-- -->
## Index[**](#Index)
### Properties
* [**waitForFinish](#waitForFinish)
## Properties<!-- -->[**](#Properties)
### [**](#waitForFinish)[**](https://github.com/apify/apify-client-js/blob/master/src/resource_clients/run.ts#L272)optionalwaitForFinish
**waitForFinish?
<!-- -->
: number
---
# RunMetamorphOptions<!-- -->
## Index[**](#Index)
### Properties
* [**build](#build)
* [**contentType](#contentType)
## Properties<!-- -->[**](#Properties)
### [**](#build)[**](https://github.com/apify/apify-client-js/blob/master/src/resource_clients/run.ts#L281)optionalbuild
**build?
<!-- -->
: string
### [**](#contentType)[**](https://github.com/apify/apify-client-js/blob/master/src/resource_clients/run.ts#L280)optionalcontentType
**contentType?
<!-- -->
: string
---
# RunResurrectOptions<!-- -->
## Index[**](#Index)
### Properties
* [**build](#build)
* [**maxItems](#maxItems)
* [**maxTotalChargeUsd](#maxTotalChargeUsd)
* [**memory](#memory)
* [**restartOnError](#restartOnError)
* [**timeout](#timeout)
## Properties<!-- -->[**](#Properties)
### [**](#build)[**](https://github.com/apify/apify-client-js/blob/master/src/resource_clients/run.ts#L290)optionalbuild
**build?
<!-- -->
: string
### [**](#maxItems)[**](https://github.com/apify/apify-client-js/blob/master/src/resource_clients/run.ts#L293)optionalmaxItems
**maxItems?
<!-- -->
: number
### [**](#maxTotalChargeUsd)[**](https://github.com/apify/apify-client-js/blob/master/src/resource_clients/run.ts#L294)optionalmaxTotalChargeUsd
**maxTotalChargeUsd?
<!-- -->
: number
### [**](#memory)[**](https://github.com/apify/apify-client-js/blob/master/src/resource_clients/run.ts#L291)optionalmemory
**memory?
<!-- -->
: number
### [**](#restartOnError)[**](https://github.com/apify/apify-client-js/blob/master/src/resource_clients/run.ts#L295)optionalrestartOnError
**restartOnError?
<!-- -->
: boolean
### [**](#timeout)[**](https://github.com/apify/apify-client-js/blob/master/src/resource_clients/run.ts#L292)optionaltimeout
**timeout?
<!-- -->
: number
---
# RunUpdateOptions<!-- -->
## Index[**](#Index)
### Properties
* [**generalAccess](#generalAccess)
* [**isStatusMessageTerminal](#isStatusMessageTerminal)
* [**statusMessage](#statusMessage)
## Properties<!-- -->[**](#Properties)
### [**](#generalAccess)[**](https://github.com/apify/apify-client-js/blob/master/src/resource_clients/run.ts#L286)optionalgeneralAccess
**generalAccess?
<!-- -->
: null | RUN\_GENERAL\_ACCESS
### [**](#isStatusMessageTerminal)[**](https://github.com/apify/apify-client-js/blob/master/src/resource_clients/run.ts#L285)optionalisStatusMessageTerminal
**isStatusMessageTerminal?
<!-- -->
: boolean
### [**](#statusMessage)[**](https://github.com/apify/apify-client-js/blob/master/src/resource_clients/run.ts#L284)optionalstatusMessage
**statusMessage?
<!-- -->
: string
---
# RunWaitForFinishOptions<!-- -->
## Index[**](#Index)
### Properties
* [**waitSecs](#waitSecs)
## Properties<!-- -->[**](#Properties)
### [**](#waitSecs)[**](https://github.com/apify/apify-client-js/blob/master/src/resource_clients/run.ts#L313)optionalwaitSecs
**waitSecs?
<!-- -->
: number
Maximum time to wait for the run to finish, in seconds. If the limit is reached, the returned promise is resolved to a run object that will have status `READY` or `RUNNING`. If `waitSecs` omitted, the function waits indefinitely.
---
# Schedule<!-- -->
## Index[**](#Index)
### Properties
* [**actions](#actions)
* [**createdAt](#createdAt)
* [**cronExpression](#cronExpression)
* [**description](#description)
* [**id](#id)
* [**isEnabled](#isEnabled)
* [**isExclusive](#isExclusive)
* [**lastRunAt](#lastRunAt)
* [**modifiedAt](#modifiedAt)
* [**name](#name)
* [**nextRunAt](#nextRunAt)
* [**notifications](#notifications)
* [**timezone](#timezone)
* [**title](#title)
* [**userId](#userId)
## Properties<!-- -->[**](#Properties)
### [**](#actions)[**](https://github.com/apify/apify-client-js/blob/master/src/resource_clients/schedule.ts#L78)actions
**actions: [ScheduleAction](https://docs.apify.com/api/client/js/api/client/js/reference.md#ScheduleAction)\[]
### [**](#createdAt)[**](https://github.com/apify/apify-client-js/blob/master/src/resource_clients/schedule.ts#L74)createdAt
**createdAt: Date
### [**](#cronExpression)[**](https://github.com/apify/apify-client-js/blob/master/src/resource_clients/schedule.ts#L69)cronExpression
**cronExpression: string
### [**](#description)[**](https://github.com/apify/apify-client-js/blob/master/src/resource_clients/schedule.ts#L73)optionaldescription
**description?
<!-- -->
: string
### [**](#id)[**](https://github.com/apify/apify-client-js/blob/master/src/resource_clients/schedule.ts#L65)id
**id: string
### [**](#isEnabled)[**](https://github.com/apify/apify-client-js/blob/master/src/resource_clients/schedule.ts#L71)isEnabled
**isEnabled: boolean
### [**](#isExclusive)[**](https://github.com/apify/apify-client-js/blob/master/src/resource_clients/schedule.ts#L72)isExclusive
**isExclusive: boolean
### [**](#lastRunAt)[**](https://github.com/apify/apify-client-js/blob/master/src/resource_clients/schedule.ts#L77)lastRunAt
**lastRunAt: string
### [**](#modifiedAt)[**](https://github.com/apify/apify-client-js/blob/master/src/resource_clients/schedule.ts#L75)modifiedAt
**modifiedAt: Date
### [**](#name)[**](https://github.com/apify/apify-client-js/blob/master/src/resource_clients/schedule.ts#L67)name
**name: string
### [**](#nextRunAt)[**](https://github.com/apify/apify-client-js/blob/master/src/resource_clients/schedule.ts#L76)nextRunAt
**nextRunAt: string
### [**](#notifications)[**](https://github.com/apify/apify-client-js/blob/master/src/resource_clients/schedule.ts#L79)notifications
**notifications: { email: boolean }
#### Type declaration
* ##### email: boolean
### [**](#timezone)[**](https://github.com/apify/apify-client-js/blob/master/src/resource_clients/schedule.ts#L70)timezone
**timezone: Africa/Abidjan | Africa/Accra | Africa/Addis\_Ababa | Africa/Algiers | Africa/Asmara | Africa/Asmera | Africa/Bamako | Africa/Bangui | Africa/Banjul | Africa/Bissau | Africa/Blantyre | Africa/Brazzaville | Africa/Bujumbura | Africa/Cairo | Africa/Casablanca | Africa/Ceuta | Africa/Conakry | Africa/Dakar | Africa/Dar\_es\_Salaam | Africa/Djibouti | Africa/Douala | Africa/El\_Aaiun | Africa/Freetown | Africa/Gaborone | Africa/Harare | Africa/Johannesburg | Africa/Juba | Africa/Kampala | Africa/Khartoum | Africa/Kigali | Africa/Kinshasa | Africa/Lagos | Africa/Libreville | Africa/Lome | Africa/Luanda | Africa/Lubumbashi | Africa/Lusaka | Africa/Malabo | Africa/Maputo | Africa/Maseru | Africa/Mbabane | Africa/Mogadishu | Africa/Monrovia | Africa/Nairobi | Africa/Ndjamena | Africa/Niamey | Africa/Nouakchott | Africa/Ouagadougou | Africa/Porto-Novo | Africa/Sao\_Tome | Africa/Timbuktu | Africa/Tripoli | Africa/Tunis | Africa/Windhoek | America/Adak | America/Anchorage | America/Anguilla | America/Antigua | America/Araguaina | America/Argentina/Buenos\_Aires | America/Argentina/Catamarca | America/Argentina/ComodRivadavia | America/Argentina/Cordoba | America/Argentina/Jujuy | America/Argentina/La\_Rioja | America/Argentina/Mendoza | America/Argentina/Rio\_Gallegos | America/Argentina/Salta | America/Argentina/San\_Juan | America/Argentina/San\_Luis | America/Argentina/Tucuman | America/Argentina/Ushuaia | America/Aruba | America/Asuncion | America/Atikokan | America/Atka | America/Bahia | America/Bahia\_Banderas | America/Barbados | America/Belem | America/Belize | America/Blanc-Sablon | America/Boa\_Vista | America/Bogota | America/Boise | America/Buenos\_Aires | America/Cambridge\_Bay | America/Campo\_Grande | America/Cancun | America/Caracas | America/Catamarca | America/Cayenne | America/Cayman | America/Chicago | America/Chihuahua | America/Coral\_Harbour | America/Cordoba | America/Costa\_Rica | America/Creston | America/Cuiaba | America/Curacao | America/Danmarkshavn | America/Dawson | America/Dawson\_Creek | America/Denver | America/Detroit | America/Dominica | America/Edmonton | America/Eirunepe | America/El\_Salvador | America/Ensenada | America/Fort\_Nelson | America/Fort\_Wayne | America/Fortaleza | America/Glace\_Bay | America/Godthab | America/Goose\_Bay | America/Grand\_Turk | America/Grenada | America/Guadeloupe | America/Guatemala | America/Guayaquil | America/Guyana | America/Halifax | America/Havana | America/Hermosillo | America/Indiana/Indianapolis | America/Indiana/Knox | America/Indiana/Marengo | America/Indiana/Petersburg | America/Indiana/Tell\_City | America/Indiana/Vevay | America/Indiana/Vincennes | America/Indiana/Winamac | America/Indianapolis | America/Inuvik | America/Iqaluit | America/Jamaica | America/Jujuy | America/Juneau | America/Kentucky/Louisville | America/Kentucky/Monticello | America/Knox\_IN | America/Kralendijk | America/La\_Paz | America/Lima | America/Los\_Angeles | America/Louisville | America/Lower\_Princes | America/Maceio | America/Managua | America/Manaus | America/Marigot | America/Martinique | America/Matamoros | America/Mazatlan | America/Mendoza | America/Menominee | America/Merida | America/Metlakatla | America/Mexico\_City | America/Miquelon | America/Moncton | America/Monterrey | America/Montevideo | America/Montreal | America/Montserrat | America/Nassau | America/New\_York | America/Nipigon | America/Nome | America/Noronha | America/North\_Dakota/Beulah | America/North\_Dakota/Center | America/North\_Dakota/New\_Salem | America/Nuuk | America/Ojinaga | America/Panama | America/Pangnirtung | America/Paramaribo | America/Phoenix | America/Port-au-Prince | America/Port\_of\_Spain | America/Porto\_Acre | America/Porto\_Velho | America/Puerto\_Rico | America/Punta\_Arenas | America/Rainy\_River | America/Rankin\_Inlet | America/Recife | America/Regina | America/Resolute | America/Rio\_Branco | America/Rosario | America/Santa\_Isabel | America/Santarem | America/Santiago | America/Santo\_Domingo | America/Sao\_Paulo | America/Scoresbysund | America/Shiprock | America/Sitka | America/St\_Barthelemy | America/St\_Johns | America/St\_Kitts | America/St\_Lucia | America/St\_Thomas | America/St\_Vincent | America/Swift\_Current | America/Tegucigalpa | America/Thule | America/Thunder\_Bay | America/Tijuana | America/Toronto | America/Tortola | America/Vancouver | America/Virgin | America/Whitehorse | America/Winnipeg | America/Yakutat | America/Yellowknife | Antarctica/Casey | Antarctica/Davis | Antarctica/DumontDUrville | Antarctica/Macquarie | Antarctica/Mawson | Antarctica/McMurdo | Antarctica/Palmer | Antarctica/Rothera | Antarctica/South\_Pole | Antarctica/Syowa | Antarctica/Troll | Antarctica/Vostok | Arctic/Longyearbyen | Asia/Aden | Asia/Almaty | Asia/Amman | Asia/Anadyr | Asia/Aqtau | Asia/Aqtobe | Asia/Ashgabat | Asia/Ashkhabad | Asia/Atyrau | Asia/Baghdad | Asia/Bahrain | Asia/Baku | Asia/Bangkok | Asia/Barnaul | Asia/Beirut | Asia/Bishkek | Asia/Brunei | Asia/Calcutta | Asia/Chita | Asia/Choibalsan | Asia/Chongqing | Asia/Chungking | Asia/Colombo | Asia/Dacca | Asia/Damascus | Asia/Dhaka | Asia/Dili | Asia/Dubai | Asia/Dushanbe | Asia/Famagusta | Asia/Gaza | Asia/Harbin | Asia/Hebron | Asia/Ho\_Chi\_Minh | Asia/Hong\_Kong | Asia/Hovd | Asia/Irkutsk | Asia/Istanbul | Asia/Jakarta | Asia/Jayapura | Asia/Jerusalem | Asia/Kabul | Asia/Kamchatka | Asia/Karachi | Asia/Kashgar | Asia/Kathmandu | Asia/Katmandu | Asia/Khandyga | Asia/Kolkata | Asia/Krasnoyarsk | Asia/Kuala\_Lumpur | Asia/Kuching | Asia/Kuwait | Asia/Macao | Asia/Macau | Asia/Magadan | Asia/Makassar | Asia/Manila | Asia/Muscat | Asia/Nicosia | Asia/Novokuznetsk | Asia/Novosibirsk | Asia/Omsk | Asia/Oral | Asia/Phnom\_Penh | Asia/Pontianak | Asia/Pyongyang | Asia/Qatar | Asia/Qostanay | Asia/Qyzylorda | Asia/Rangoon | Asia/Riyadh | Asia/Saigon | Asia/Sakhalin | Asia/Samarkand | Asia/Seoul | Asia/Shanghai | Asia/Singapore | Asia/Srednekolymsk | Asia/Taipei | Asia/Tashkent | Asia/Tbilisi | Asia/Tehran | Asia/Tel\_Aviv | Asia/Thimbu | Asia/Thimphu | Asia/Tokyo | Asia/Tomsk | Asia/Ujung\_Pandang | Asia/Ulaanbaatar | Asia/Ulan\_Bator | Asia/Urumqi | Asia/Ust-Nera | Asia/Vientiane | Asia/Vladivostok | Asia/Yakutsk | Asia/Yangon | Asia/Yekaterinburg | Asia/Yerevan | Atlantic/Azores | Atlantic/Bermuda | Atlantic/Canary | Atlantic/Cape\_Verde | Atlantic/Faeroe | Atlantic/Faroe | Atlantic/Jan\_Mayen | Atlantic/Madeira | Atlantic/Reykjavik | Atlantic/South\_Georgia | Atlantic/St\_Helena | Atlantic/Stanley | Australia/ACT | Australia/Adelaide | Australia/Brisbane | Australia/Broken\_Hill | Australia/Canberra | Australia/Currie | Australia/Darwin | Australia/Eucla | Australia/Hobart | Australia/LHI | Australia/Lindeman | Australia/Lord\_Howe | Australia/Melbourne | Australia/NSW | Australia/North | Australia/Perth | Australia/Queensland | Australia/South | Australia/Sydney | Australia/Tasmania | Australia/Victoria | Australia/West | Australia/Yancowinna | Brazil/Acre | Brazil/DeNoronha | Brazil/East | Brazil/West | CET | CST6CDT | Canada/Atlantic | Canada/Central | Canada/Eastern | Canada/Mountain | Canada/Newfoundland | Canada/Pacific | Canada/Saskatchewan | Canada/Yukon | Chile/Continental | Chile/EasterIsland | Cuba | EET | EST | EST5EDT | Egypt | Eire | Etc/GMT | Etc/GMT+0 | Etc/GMT+1 | Etc/GMT+10 | Etc/GMT+11 | Etc/GMT+12 | Etc/GMT+2 | Etc/GMT+3 | Etc/GMT+4 | Etc/GMT+5 | Etc/GMT+6 | Etc/GMT+7 | Etc/GMT+8 | Etc/GMT+9 | Etc/GMT-0 | Etc/GMT-1 | Etc/GMT-10 | Etc/GMT-11 | Etc/GMT-12 | Etc/GMT-13 | Etc/GMT-14 | Etc/GMT-2 | Etc/GMT-3 | Etc/GMT-4 | Etc/GMT-5 | Etc/GMT-6 | Etc/GMT-7 | Etc/GMT-8 | Etc/GMT-9 | Etc/GMT0 | Etc/Greenwich | Etc/UCT | Etc/UTC | Etc/Universal | Etc/Zulu | Europe/Amsterdam | Europe/Andorra | Europe/Astrakhan | Europe/Athens | Europe/Belfast | Europe/Belgrade | Europe/Berlin | Europe/Bratislava | Europe/Brussels | Europe/Bucharest | Europe/Budapest | Europe/Busingen | Europe/Chisinau | Europe/Copenhagen | Europe/Dublin | Europe/Gibraltar | Europe/Guernsey | Europe/Helsinki | Europe/Isle\_of\_Man | Europe/Istanbul | Europe/Jersey | Europe/Kaliningrad | Europe/Kiev | Europe/Kirov | Europe/Lisbon | Europe/Ljubljana | Europe/London | Europe/Luxembourg | Europe/Madrid | Europe/Malta | Europe/Mariehamn | Europe/Minsk | Europe/Monaco | Europe/Moscow | Europe/Nicosia | Europe/Oslo | Europe/Paris | Europe/Podgorica | Europe/Prague | Europe/Riga | Europe/Rome | Europe/Samara | Europe/San\_Marino | Europe/Sarajevo | Europe/Saratov | Europe/Simferopol | Europe/Skopje | Europe/Sofia | Europe/Stockholm | Europe/Tallinn | Europe/Tirane | Europe/Tiraspol | Europe/Ulyanovsk | Europe/Uzhgorod | Europe/Vaduz | Europe/Vatican | Europe/Vienna | Europe/Vilnius | Europe/Volgograd | Europe/Warsaw | Europe/Zagreb | Europe/Zaporozhye | Europe/Zurich | GB | GB-Eire | GMT | GMT+0 | GMT-0 | GMT0 | Greenwich | HST | Hongkong | Iceland | Indian/Antananarivo | Indian/Chagos | Indian/Christmas | Indian/Cocos | Indian/Comoro | Indian/Kerguelen | Indian/Mahe | Indian/Maldives | Indian/Mauritius | Indian/Mayotte | Indian/Reunion | Iran | Israel | Jamaica | Japan | Kwajalein | Libya | MET | MST | MST7MDT | Mexico/BajaNorte | Mexico/BajaSur | Mexico/General | NZ | NZ-CHAT | Navajo | PRC | PST8PDT | Pacific/Apia | Pacific/Auckland | Pacific/Bougainville | Pacific/Chatham | Pacific/Chuuk | Pacific/Easter | Pacific/Efate | Pacific/Enderbury | Pacific/Fakaofo | Pacific/Fiji | Pacific/Funafuti | Pacific/Galapagos | Pacific/Gambier | Pacific/Guadalcanal | Pacific/Guam | Pacific/Honolulu | Pacific/Johnston | Pacific/Kiritimati | Pacific/Kosrae | Pacific/Kwajalein | Pacific/Majuro | Pacific/Marquesas | Pacific/Midway | Pacific/Nauru | Pacific/Niue | Pacific/Norfolk | Pacific/Noumea | Pacific/Pago\_Pago | Pacific/Palau | Pacific/Pitcairn | Pacific/Pohnpei | Pacific/Ponape | Pacific/Port\_Moresby | Pacific/Rarotonga | Pacific/Saipan | Pacific/Samoa | Pacific/Tahiti | Pacific/Tarawa | Pacific/Tongatapu | Pacific/Truk | Pacific/Wake | Pacific/Wallis | Pacific/Yap | Poland | Portugal | ROC | ROK | Singapore | Turkey | UCT | US/Alaska | US/Aleutian | US/Arizona | US/Central | US/East-Indiana | US/Eastern | US/Hawaii | US/Indiana-Starke | US/Michigan | US/Mountain | US/Pacific | US/Samoa | UTC | Universal | W-SU | WET | Zulu
### [**](#title)[**](https://github.com/apify/apify-client-js/blob/master/src/resource_clients/schedule.ts#L68)optionaltitle
**title?
<!-- -->
: string
### [**](#userId)[**](https://github.com/apify/apify-client-js/blob/master/src/resource_clients/schedule.ts#L66)userId
**userId: string
---
# ScheduleActionRunActor<!-- -->
### Hierarchy
* BaseScheduleAction\<ScheduleActions.RunActor>
* *ScheduleActionRunActor*
## Index[**](#Index)
### Properties
* [**actorId](#actorId)
* [**id](#id)
* [**runInput](#runInput)
* [**runOptions](#runOptions)
* [**type](#type)
## Properties<!-- -->[**](#Properties)
### [**](#actorId)[**](https://github.com/apify/apify-client-js/blob/master/src/resource_clients/schedule.ts#L106)actorId
**actorId: string
### [**](#id)[**](https://github.com/apify/apify-client-js/blob/master/src/resource_clients/schedule.ts#L99)inheritedid
**id: string
Inherited from BaseScheduleAction.id
### [**](#runInput)[**](https://github.com/apify/apify-client-js/blob/master/src/resource_clients/schedule.ts#L107)optionalrunInput
**runInput?
<!-- -->
: [ScheduledActorRunInput](https://docs.apify.com/api/client/js/api/client/js/reference/interface/ScheduledActorRunInput.md)
### [**](#runOptions)[**](https://github.com/apify/apify-client-js/blob/master/src/resource_clients/schedule.ts#L108)optionalrunOptions
**runOptions?
<!-- -->
: [ScheduledActorRunOptions](https://docs.apify.com/api/client/js/api/client/js/reference/interface/ScheduledActorRunOptions.md)
### [**](#type)[**](https://github.com/apify/apify-client-js/blob/master/src/resource_clients/schedule.ts#L100)inheritedtype
**type: RunActor
Inherited from BaseScheduleAction.type
---
# ScheduleActionRunActorTask<!-- -->
### Hierarchy
* BaseScheduleAction\<ScheduleActions.RunActorTask>
* *ScheduleActionRunActorTask*
## Index[**](#Index)
### Properties
* [**actorTaskId](#actorTaskId)
* [**id](#id)
* [**input](#input)
* [**type](#type)
## Properties<!-- -->[**](#Properties)
### [**](#actorTaskId)[**](https://github.com/apify/apify-client-js/blob/master/src/resource_clients/schedule.ts#L124)actorTaskId
**actorTaskId: string
### [**](#id)[**](https://github.com/apify/apify-client-js/blob/master/src/resource_clients/schedule.ts#L99)inheritedid
**id: string
Inherited from BaseScheduleAction.id
### [**](#input)[**](https://github.com/apify/apify-client-js/blob/master/src/resource_clients/schedule.ts#L125)optionalinput
**input?
<!-- -->
: string
### [**](#type)[**](https://github.com/apify/apify-client-js/blob/master/src/resource_clients/schedule.ts#L100)inheritedtype
**type: RunActorTask
Inherited from BaseScheduleAction.type
---
# ScheduleCollectionListOptions<!-- -->
## Index[**](#Index)
### Properties
* [**desc](#desc)
* [**limit](#limit)
* [**offset](#offset)
## Properties<!-- -->[**](#Properties)
### [**](#desc)[**](https://github.com/apify/apify-client-js/blob/master/src/resource_clients/schedule_collection.ts#L48)optionaldesc
**desc?
<!-- -->
: boolean
### [**](#limit)[**](https://github.com/apify/apify-client-js/blob/master/src/resource_clients/schedule_collection.ts#L46)optionallimit
**limit?
<!-- -->
: number
### [**](#offset)[**](https://github.com/apify/apify-client-js/blob/master/src/resource_clients/schedule_collection.ts#L47)optionaloffset
**offset?
<!-- -->
: number
---
# ScheduledActorRunInput<!-- -->
## Index[**](#Index)
### Properties
* [**body](#body)
* [**contentType](#contentType)
## Properties<!-- -->[**](#Properties)
### [**](#body)[**](https://github.com/apify/apify-client-js/blob/master/src/resource_clients/schedule.ts#L112)body
**body: string
### [**](#contentType)[**](https://github.com/apify/apify-client-js/blob/master/src/resource_clients/schedule.ts#L113)contentType
**contentType: string
---
# ScheduledActorRunOptions<!-- -->
## Index[**](#Index)
### Properties
* [**build](#build)
* [**memoryMbytes](#memoryMbytes)
* [**restartOnError](#restartOnError)
* [**timeoutSecs](#timeoutSecs)
## Properties<!-- -->[**](#Properties)
### [**](#build)[**](https://github.com/apify/apify-client-js/blob/master/src/resource_clients/schedule.ts#L117)build
**build: string
### [**](#memoryMbytes)[**](https://github.com/apify/apify-client-js/blob/master/src/resource_clients/schedule.ts#L119)memoryMbytes
**memoryMbytes: number
### [**](#restartOnError)[**](https://github.com/apify/apify-client-js/blob/master/src/resource_clients/schedule.ts#L120)optionalrestartOnError
**restartOnError?
<!-- -->
: boolean
### [**](#timeoutSecs)[**](https://github.com/apify/apify-client-js/blob/master/src/resource_clients/schedule.ts#L118)timeoutSecs
**timeoutSecs: number
---
# StoreCollectionListOptions<!-- -->
## Index[**](#Index)
### Properties
* [**category](#category)
* [**limit](#limit)
* [**offset](#offset)
* [**pricingModel](#pricingModel)
* [**search](#search)
* [**sortBy](#sortBy)
* [**username](#username)
## Properties<!-- -->[**](#Properties)
### [**](#category)[**](https://github.com/apify/apify-client-js/blob/master/src/resource_clients/store_collection.ts#L62)optionalcategory
**category?
<!-- -->
: string
### [**](#limit)[**](https://github.com/apify/apify-client-js/blob/master/src/resource_clients/store_collection.ts#L58)optionallimit
**limit?
<!-- -->
: number
### [**](#offset)[**](https://github.com/apify/apify-client-js/blob/master/src/resource_clients/store_collection.ts#L59)optionaloffset
**offset?
<!-- -->
: number
### [**](#pricingModel)[**](https://github.com/apify/apify-client-js/blob/master/src/resource_clients/store_collection.ts#L64)optionalpricingModel
**pricingModel?
<!-- -->
: string
### [**](#search)[**](https://github.com/apify/apify-client-js/blob/master/src/resource_clients/store_collection.ts#L60)optionalsearch
**search?
<!-- -->
: string
### [**](#sortBy)[**](https://github.com/apify/apify-client-js/blob/master/src/resource_clients/store_collection.ts#L61)optionalsortBy
**sortBy?
<!-- -->
: string
### [**](#username)[**](https://github.com/apify/apify-client-js/blob/master/src/resource_clients/store_collection.ts#L63)optionalusername
**username?
<!-- -->
: string
---
# Task<!-- -->
## Index[**](#Index)
### Properties
* [**actId](#actId)
* [**actorStandby](#actorStandby)
* [**createdAt](#createdAt)
* [**description](#description)
* [**id](#id)
* [**input](#input)
* [**modifiedAt](#modifiedAt)
* [**name](#name)
* [**options](#options)
* [**stats](#stats)
* [**title](#title)
* [**userId](#userId)
* [**username](#username)
## Properties<!-- -->[**](#Properties)
### [**](#actId)[**](https://github.com/apify/apify-client-js/blob/master/src/resource_clients/task.ts#L207)actId
**actId: string
### [**](#actorStandby)[**](https://github.com/apify/apify-client-js/blob/master/src/resource_clients/task.ts#L217)optionalactorStandby
**actorStandby?
<!-- -->
: Partial<[ActorStandby](https://docs.apify.com/api/client/js/api/client/js/reference/interface/ActorStandby.md)>
### [**](#createdAt)[**](https://github.com/apify/apify-client-js/blob/master/src/resource_clients/task.ts#L212)createdAt
**createdAt: Date
### [**](#description)[**](https://github.com/apify/apify-client-js/blob/master/src/resource_clients/task.ts#L210)optionaldescription
**description?
<!-- -->
: string
### [**](#id)[**](https://github.com/apify/apify-client-js/blob/master/src/resource_clients/task.ts#L205)id
**id: string
### [**](#input)[**](https://github.com/apify/apify-client-js/blob/master/src/resource_clients/task.ts#L216)optionalinput
**input?
<!-- -->
: [Dictionary](https://docs.apify.com/api/client/js/api/client/js/reference.md#Dictionary) | [Dictionary](https://docs.apify.com/api/client/js/api/client/js/reference.md#Dictionary)\[]
### [**](#modifiedAt)[**](https://github.com/apify/apify-client-js/blob/master/src/resource_clients/task.ts#L213)modifiedAt
**modifiedAt: Date
### [**](#name)[**](https://github.com/apify/apify-client-js/blob/master/src/resource_clients/task.ts#L208)name
**name: string
### [**](#options)[**](https://github.com/apify/apify-client-js/blob/master/src/resource_clients/task.ts#L215)optionaloptions
**options?
<!-- -->
: [TaskOptions](https://docs.apify.com/api/client/js/api/client/js/reference/interface/TaskOptions.md)
### [**](#stats)[**](https://github.com/apify/apify-client-js/blob/master/src/resource_clients/task.ts#L214)stats
**stats: [TaskStats](https://docs.apify.com/api/client/js/api/client/js/reference/interface/TaskStats.md)
### [**](#title)[**](https://github.com/apify/apify-client-js/blob/master/src/resource_clients/task.ts#L209)optionaltitle
**title?
<!-- -->
: string
### [**](#userId)[**](https://github.com/apify/apify-client-js/blob/master/src/resource_clients/task.ts#L206)userId
**userId: string
### [**](#username)[**](https://github.com/apify/apify-client-js/blob/master/src/resource_clients/task.ts#L211)optionalusername
**username?
<!-- -->
: string
---
# TaskCallOptions<!-- -->
### Hierarchy
* Omit<[TaskStartOptions](https://docs.apify.com/api/client/js/api/client/js/reference.md#TaskStartOptions), waitForFinish>
* *TaskCallOptions*
## Index[**](#Index)
### Properties
* [**build](#build)
* [**maxItems](#maxItems)
* [**memory](#memory)
* [**restartOnError](#restartOnError)
* [**timeout](#timeout)
* [**waitSecs](#waitSecs)
* [**webhooks](#webhooks)
## Properties<!-- -->[**](#Properties)
### [**](#build)[**](https://github.com/apify/apify-client-js/blob/master/src/resource_clients/actor.ts#L368)optionalinheritedbuild
**build?
<!-- -->
: string
Inherited from Omit.build
Tag or number of the actor build to run (e.g. `beta` or `1.2.345`). If not provided, the run uses build tag or number from the default actor run configuration (typically `latest`).
### [**](#maxItems)[**](https://github.com/apify/apify-client-js/blob/master/src/resource_clients/actor.ts#L411)optionalinheritedmaxItems
**maxItems?
<!-- -->
: number
Inherited from Omit.maxItems
Specifies maximum number of items that the actor run should return. This is used by pay per result actors to limit the maximum number of results that will be charged to customer. Value can be accessed in actor run using `ACTOR_MAX_PAID_DATASET_ITEMS` environment variable.
### [**](#memory)[**](https://github.com/apify/apify-client-js/blob/master/src/resource_clients/actor.ts#L382)optionalinheritedmemory
**memory?
<!-- -->
: number
Inherited from Omit.memory
Memory in megabytes which will be allocated for the new actor run. If not provided, the run uses memory of the default actor run configuration.
### [**](#restartOnError)[**](https://github.com/apify/apify-client-js/blob/master/src/resource_clients/actor.ts#L416)optionalinheritedrestartOnError
**restartOnError?
<!-- -->
: boolean
Inherited from Omit.restartOnError
Determines whether the run will be restarted if it fails.
### [**](#timeout)[**](https://github.com/apify/apify-client-js/blob/master/src/resource_clients/actor.ts#L387)optionalinheritedtimeout
**timeout?
<!-- -->
: number
Inherited from Omit.timeout
Timeout for the actor run in seconds. Zero value means there is no timeout. If not provided, the run uses timeout of the default actor run configuration.
### [**](#waitSecs)[**](https://github.com/apify/apify-client-js/blob/master/src/resource_clients/task.ts#L242)optionalwaitSecs
**waitSecs?
<!-- -->
: number
### [**](#webhooks)[**](https://github.com/apify/apify-client-js/blob/master/src/resource_clients/actor.ts#L404)optionalinheritedwebhooks
**webhooks?
<!-- -->
: readonly
<!-- -->
[WebhookUpdateData](https://docs.apify.com/api/client/js/api/client/js/reference.md#WebhookUpdateData)\[]
Inherited from Omit.webhooks
Specifies optional webhooks associated with the actor run, which can be used to receive a notification e.g. when the actor finished or failed, see [ad hook webhooks documentation](https://docs.apify.com/webhooks/ad-hoc-webhooks) for detailed description.
---
# TaskCollectionListOptions<!-- -->
## Index[**](#Index)
### Properties
* [**desc](#desc)
* [**limit](#limit)
* [**offset](#offset)
## Properties<!-- -->[**](#Properties)
### [**](#desc)[**](https://github.com/apify/apify-client-js/blob/master/src/resource_clients/task_collection.ts#L53)optionaldesc
**desc?
<!-- -->
: boolean
### [**](#limit)[**](https://github.com/apify/apify-client-js/blob/master/src/resource_clients/task_collection.ts#L51)optionallimit
**limit?
<!-- -->
: number
### [**](#offset)[**](https://github.com/apify/apify-client-js/blob/master/src/resource_clients/task_collection.ts#L52)optionaloffset
**offset?
<!-- -->
: number
---
# TaskCreateData<!-- -->
### Hierarchy
* [TaskUpdateData](https://docs.apify.com/api/client/js/api/client/js/reference.md#TaskUpdateData)
* *TaskCreateData*
## Index[**](#Index)
### Properties
* [**actId](#actId)
* [**actorStandby](#actorStandby)
* [**description](#description)
* [**input](#input)
* [**name](#name)
* [**options](#options)
* [**title](#title)
## Properties<!-- -->[**](#Properties)
### [**](#actId)[**](https://github.com/apify/apify-client-js/blob/master/src/resource_clients/task_collection.ts#L59)actId
**actId: string
### [**](#actorStandby)[**](https://github.com/apify/apify-client-js/blob/master/src/resource_clients/task.ts#L217)optionalinheritedactorStandby
**actorStandby?
<!-- -->
: Partial<[ActorStandby](https://docs.apify.com/api/client/js/api/client/js/reference/interface/ActorStandby.md)>
Inherited from TaskUpdateData.actorStandby
### [**](#description)[**](https://github.com/apify/apify-client-js/blob/master/src/resource_clients/task.ts#L210)optionalinheriteddescription
**description?
<!-- -->
: string
Inherited from TaskUpdateData.description
### [**](#input)[**](https://github.com/apify/apify-client-js/blob/master/src/resource_clients/task.ts#L216)optionalinheritedinput
**input?
<!-- -->
: [Dictionary](https://docs.apify.com/api/client/js/api/client/js/reference.md#Dictionary) | [Dictionary](https://docs.apify.com/api/client/js/api/client/js/reference.md#Dictionary)\[]
Inherited from TaskUpdateData.input
### [**](#name)[**](https://github.com/apify/apify-client-js/blob/master/src/resource_clients/task.ts#L208)optionalinheritedname
**name?
<!-- -->
: string
Inherited from TaskUpdateData.name
### [**](#options)[**](https://github.com/apify/apify-client-js/blob/master/src/resource_clients/task.ts#L215)optionalinheritedoptions
**options?
<!-- -->
: [TaskOptions](https://docs.apify.com/api/client/js/api/client/js/reference/interface/TaskOptions.md)
Inherited from TaskUpdateData.options
### [**](#title)[**](https://github.com/apify/apify-client-js/blob/master/src/resource_clients/task.ts#L209)optionalinheritedtitle
**title?
<!-- -->
: string
Inherited from TaskUpdateData.title
---
# TaskLastRunOptions<!-- -->
## Index[**](#Index)
### Properties
* [**status](#status)
## Properties<!-- -->[**](#Properties)
### [**](#status)[**](https://github.com/apify/apify-client-js/blob/master/src/resource_clients/task.ts#L236)optionalstatus
**status?
<!-- -->
: READY | RUNNING | SUCCEEDED | FAILED | TIMING\_OUT | TIMED\_OUT | ABORTING | ABORTED
---
# TaskOptions<!-- -->
## Index[**](#Index)
### Properties
* [**build](#build)
* [**memoryMbytes](#memoryMbytes)
* [**restartOnError](#restartOnError)
* [**timeoutSecs](#timeoutSecs)
## Properties<!-- -->[**](#Properties)
### [**](#build)[**](https://github.com/apify/apify-client-js/blob/master/src/resource_clients/task.ts#L225)optionalbuild
**build?
<!-- -->
: string
### [**](#memoryMbytes)[**](https://github.com/apify/apify-client-js/blob/master/src/resource_clients/task.ts#L227)optionalmemoryMbytes
**memoryMbytes?
<!-- -->
: number
### [**](#restartOnError)[**](https://github.com/apify/apify-client-js/blob/master/src/resource_clients/task.ts#L228)optionalrestartOnError
**restartOnError?
<!-- -->
: boolean
### [**](#timeoutSecs)[**](https://github.com/apify/apify-client-js/blob/master/src/resource_clients/task.ts#L226)optionaltimeoutSecs
**timeoutSecs?
<!-- -->
: number
---
# TaskStats<!-- -->
## Index[**](#Index)
### Properties
* [**totalRuns](#totalRuns)
## Properties<!-- -->[**](#Properties)
### [**](#totalRuns)[**](https://github.com/apify/apify-client-js/blob/master/src/resource_clients/task.ts#L221)totalRuns
**totalRuns: number
---
# UsageCycle<!-- -->
## Index[**](#Index)
### Properties
* [**endAt](#endAt)
* [**startAt](#startAt)
## Properties<!-- -->[**](#Properties)
### [**](#endAt)[**](https://github.com/apify/apify-client-js/blob/master/src/resource_clients/user.ts#L190)endAt
**endAt: Date
### [**](#startAt)[**](https://github.com/apify/apify-client-js/blob/master/src/resource_clients/user.ts#L189)startAt
**startAt: Date
---
# User<!-- -->
## Index[**](#Index)
### Properties
* [**createdAt](#createdAt)
* [**effectivePlatformFeatures](#effectivePlatformFeatures)
* [**email](#email)
* [**id](#id)
* [**isPaying](#isPaying)
* [**plan](#plan)
* [**profile](#profile)
* [**proxy](#proxy)
* [**username](#username)
## Properties<!-- -->[**](#Properties)
### [**](#createdAt)[**](https://github.com/apify/apify-client-js/blob/master/src/resource_clients/user.ts#L107)optionalcreatedAt
**createdAt?
<!-- -->
: Date
### [**](#effectivePlatformFeatures)[**](https://github.com/apify/apify-client-js/blob/master/src/resource_clients/user.ts#L106)optionaleffectivePlatformFeatures
**effectivePlatformFeatures?
<!-- -->
: EffectivePlatformFeatures
### [**](#email)[**](https://github.com/apify/apify-client-js/blob/master/src/resource_clients/user.ts#L103)optionalemail
**email?
<!-- -->
: string
### [**](#id)[**](https://github.com/apify/apify-client-js/blob/master/src/resource_clients/user.ts#L102)optionalid
**id?
<!-- -->
: string
### [**](#isPaying)[**](https://github.com/apify/apify-client-js/blob/master/src/resource_clients/user.ts#L108)optionalisPaying
**isPaying?
<!-- -->
: boolean
### [**](#plan)[**](https://github.com/apify/apify-client-js/blob/master/src/resource_clients/user.ts#L105)optionalplan
**plan?
<!-- -->
: [UserPlan](https://docs.apify.com/api/client/js/api/client/js/reference/interface/UserPlan.md)
### [**](#profile)[**](https://github.com/apify/apify-client-js/blob/master/src/resource_clients/user.ts#L93)profile
**profile: { bio?
<!-- -->
: string; githubUsername?
<!-- -->
: string; name?
<!-- -->
: string; pictureUrl?
<!-- -->
: string; twitterUsername?
<!-- -->
: string; websiteUrl?
<!-- -->
: string }
#### Type declaration
* ##### optionalbio?<!-- -->: string
* ##### optionalgithubUsername?<!-- -->: string
* ##### optionalname?<!-- -->: string
* ##### optionalpictureUrl?<!-- -->: string
* ##### optionaltwitterUsername?<!-- -->: string
* ##### optionalwebsiteUrl?<!-- -->: string
### [**](#proxy)[**](https://github.com/apify/apify-client-js/blob/master/src/resource_clients/user.ts#L104)optionalproxy
**proxy?
<!-- -->
: [UserProxy](https://docs.apify.com/api/client/js/api/client/js/reference/interface/UserProxy.md)
### [**](#username)[**](https://github.com/apify/apify-client-js/blob/master/src/resource_clients/user.ts#L92)username
**username: string
---
# UserPlan<!-- -->
## Index[**](#Index)
### Properties
* [**availableAddOns](#availableAddOns)
* [**availableProxyGroups](#availableProxyGroups)
* [**dataRetentionDays](#dataRetentionDays)
* [**description](#description)
* [**enabledPlatformFeatures](#enabledPlatformFeatures)
* [**id](#id)
* [**isEnabled](#isEnabled)
* [**maxActorCount](#maxActorCount)
* [**maxActorMemoryGbytes](#maxActorMemoryGbytes)
* [**maxActorTaskCount](#maxActorTaskCount)
* [**maxMonthlyActorComputeUnits](#maxMonthlyActorComputeUnits)
* [**maxMonthlyExternalDataTransferGbytes](#maxMonthlyExternalDataTransferGbytes)
* [**maxMonthlyProxySerps](#maxMonthlyProxySerps)
* [**maxMonthlyResidentialProxyGbytes](#maxMonthlyResidentialProxyGbytes)
* [**maxMonthlyUsageUsd](#maxMonthlyUsageUsd)
* [**monthlyBasePriceUsd](#monthlyBasePriceUsd)
* [**monthlyUsageCreditsUsd](#monthlyUsageCreditsUsd)
* [**supportLevel](#supportLevel)
* [**teamAccountSeatCount](#teamAccountSeatCount)
* [**usageDiscountPercent](#usageDiscountPercent)
## Properties<!-- -->[**](#Properties)
### [**](#availableAddOns)[**](https://github.com/apify/apify-client-js/blob/master/src/resource_clients/user.ts#L142)availableAddOns
**availableAddOns: unknown\[]
### [**](#availableProxyGroups)[**](https://github.com/apify/apify-client-js/blob/master/src/resource_clients/user.ts#L139)availableProxyGroups
**availableProxyGroups: Record\<string, number>
### [**](#dataRetentionDays)[**](https://github.com/apify/apify-client-js/blob/master/src/resource_clients/user.ts#L138)dataRetentionDays
**dataRetentionDays: number
### [**](#description)[**](https://github.com/apify/apify-client-js/blob/master/src/resource_clients/user.ts#L124)description
**description: string
### [**](#enabledPlatformFeatures)[**](https://github.com/apify/apify-client-js/blob/master/src/resource_clients/user.ts#L129)enabledPlatformFeatures
**enabledPlatformFeatures: [PlatformFeature](https://docs.apify.com/api/client/js/api/client/js/reference/enum/PlatformFeature.md)\[]
### [**](#id)[**](https://github.com/apify/apify-client-js/blob/master/src/resource_clients/user.ts#L123)id
**id: string
### [**](#isEnabled)[**](https://github.com/apify/apify-client-js/blob/master/src/resource_clients/user.ts#L125)isEnabled
**isEnabled: boolean
### [**](#maxActorCount)[**](https://github.com/apify/apify-client-js/blob/master/src/resource_clients/user.ts#L136)maxActorCount
**maxActorCount: number
### [**](#maxActorMemoryGbytes)[**](https://github.com/apify/apify-client-js/blob/master/src/resource_clients/user.ts#L131)maxActorMemoryGbytes
**maxActorMemoryGbytes: number
### [**](#maxActorTaskCount)[**](https://github.com/apify/apify-client-js/blob/master/src/resource_clients/user.ts#L137)maxActorTaskCount
**maxActorTaskCount: number
### [**](#maxMonthlyActorComputeUnits)[**](https://github.com/apify/apify-client-js/blob/master/src/resource_clients/user.ts#L132)maxMonthlyActorComputeUnits
**maxMonthlyActorComputeUnits: number
### [**](#maxMonthlyExternalDataTransferGbytes)[**](https://github.com/apify/apify-client-js/blob/master/src/resource_clients/user.ts#L135)maxMonthlyExternalDataTransferGbytes
**maxMonthlyExternalDataTransferGbytes: number
### [**](#maxMonthlyProxySerps)[**](https://github.com/apify/apify-client-js/blob/master/src/resource_clients/user.ts#L134)maxMonthlyProxySerps
**maxMonthlyProxySerps: number
### [**](#maxMonthlyResidentialProxyGbytes)[**](https://github.com/apify/apify-client-js/blob/master/src/resource_clients/user.ts#L133)maxMonthlyResidentialProxyGbytes
**maxMonthlyResidentialProxyGbytes: number
### [**](#maxMonthlyUsageUsd)[**](https://github.com/apify/apify-client-js/blob/master/src/resource_clients/user.ts#L130)maxMonthlyUsageUsd
**maxMonthlyUsageUsd: number
### [**](#monthlyBasePriceUsd)[**](https://github.com/apify/apify-client-js/blob/master/src/resource_clients/user.ts#L126)monthlyBasePriceUsd
**monthlyBasePriceUsd: number
### [**](#monthlyUsageCreditsUsd)[**](https://github.com/apify/apify-client-js/blob/master/src/resource_clients/user.ts#L127)monthlyUsageCreditsUsd
**monthlyUsageCreditsUsd: number
### [**](#supportLevel)[**](https://github.com/apify/apify-client-js/blob/master/src/resource_clients/user.ts#L141)supportLevel
**supportLevel: string
### [**](#teamAccountSeatCount)[**](https://github.com/apify/apify-client-js/blob/master/src/resource_clients/user.ts#L140)teamAccountSeatCount
**teamAccountSeatCount: number
### [**](#usageDiscountPercent)[**](https://github.com/apify/apify-client-js/blob/master/src/resource_clients/user.ts#L128)usageDiscountPercent
**usageDiscountPercent: number
---
# UserProxy<!-- -->
## Index[**](#Index)
### Properties
* [**groups](#groups)
* [**password](#password)
## Properties<!-- -->[**](#Properties)
### [**](#groups)[**](https://github.com/apify/apify-client-js/blob/master/src/resource_clients/user.ts#L113)groups
**groups: [ProxyGroup](https://docs.apify.com/api/client/js/api/client/js/reference/interface/ProxyGroup.md)\[]
### [**](#password)[**](https://github.com/apify/apify-client-js/blob/master/src/resource_clients/user.ts#L112)password
**password: string
---
# Webhook<!-- -->
## Index[**](#Index)
### Properties
* [**condition](#condition)
* [**createdAt](#createdAt)
* [**description](#description)
* [**doNotRetry](#doNotRetry)
* [**eventTypes](#eventTypes)
* [**headersTemplate](#headersTemplate)
* [**id](#id)
* [**ignoreSslErrors](#ignoreSslErrors)
* [**isAdHoc](#isAdHoc)
* [**isApifyIntegration](#isApifyIntegration)
* [**lastDispatch](#lastDispatch)
* [**modifiedAt](#modifiedAt)
* [**payloadTemplate](#payloadTemplate)
* [**requestUrl](#requestUrl)
* [**shouldInterpolateStrings](#shouldInterpolateStrings)
* [**stats](#stats)
* [**userId](#userId)
## Properties<!-- -->[**](#Properties)
### [**](#condition)[**](https://github.com/apify/apify-client-js/blob/master/src/resource_clients/webhook.ts#L86)condition
**condition: [WebhookCondition](https://docs.apify.com/api/client/js/api/client/js/reference.md#WebhookCondition)
### [**](#createdAt)[**](https://github.com/apify/apify-client-js/blob/master/src/resource_clients/webhook.ts#L82)createdAt
**createdAt: Date
### [**](#description)[**](https://github.com/apify/apify-client-js/blob/master/src/resource_clients/webhook.ts#L96)optionaldescription
**description?
<!-- -->
: string
### [**](#doNotRetry)[**](https://github.com/apify/apify-client-js/blob/master/src/resource_clients/webhook.ts#L88)doNotRetry
**doNotRetry: boolean
### [**](#eventTypes)[**](https://github.com/apify/apify-client-js/blob/master/src/resource_clients/webhook.ts#L85)eventTypes
**eventTypes: [WebhookEventType](https://docs.apify.com/api/client/js/api/client/js/reference.md#WebhookEventType)\[]
### [**](#headersTemplate)[**](https://github.com/apify/apify-client-js/blob/master/src/resource_clients/webhook.ts#L95)optionalheadersTemplate
**headersTemplate?
<!-- -->
: string
### [**](#id)[**](https://github.com/apify/apify-client-js/blob/master/src/resource_clients/webhook.ts#L80)id
**id: string
### [**](#ignoreSslErrors)[**](https://github.com/apify/apify-client-js/blob/master/src/resource_clients/webhook.ts#L87)ignoreSslErrors
**ignoreSslErrors: boolean
### [**](#isAdHoc)[**](https://github.com/apify/apify-client-js/blob/master/src/resource_clients/webhook.ts#L84)isAdHoc
**isAdHoc: boolean
### [**](#isApifyIntegration)[**](https://github.com/apify/apify-client-js/blob/master/src/resource_clients/webhook.ts#L94)optionalisApifyIntegration
**isApifyIntegration?
<!-- -->
: boolean
### [**](#lastDispatch)[**](https://github.com/apify/apify-client-js/blob/master/src/resource_clients/webhook.ts#L91)lastDispatch
**lastDispatch: string
### [**](#modifiedAt)[**](https://github.com/apify/apify-client-js/blob/master/src/resource_clients/webhook.ts#L83)modifiedAt
**modifiedAt: Date
### [**](#payloadTemplate)[**](https://github.com/apify/apify-client-js/blob/master/src/resource_clients/webhook.ts#L90)payloadTemplate
**payloadTemplate: string
### [**](#requestUrl)[**](https://github.com/apify/apify-client-js/blob/master/src/resource_clients/webhook.ts#L89)requestUrl
**requestUrl: string
### [**](#shouldInterpolateStrings)[**](https://github.com/apify/apify-client-js/blob/master/src/resource_clients/webhook.ts#L93)shouldInterpolateStrings
**shouldInterpolateStrings: boolean
### [**](#stats)[**](https://github.com/apify/apify-client-js/blob/master/src/resource_clients/webhook.ts#L92)stats
**stats: [WebhookStats](https://docs.apify.com/api/client/js/api/client/js/reference/interface/WebhookStats.md)
### [**](#userId)[**](https://github.com/apify/apify-client-js/blob/master/src/resource_clients/webhook.ts#L81)userId
**userId: string
---
# WebhookAnyRunOfActorCondition<!-- -->
## Index[**](#Index)
### Properties
* [**actorId](#actorId)
## Properties<!-- -->[**](#Properties)
### [**](#actorId)[**](https://github.com/apify/apify-client-js/blob/master/src/resource_clients/webhook.ts#L133)actorId
**actorId: string
---
# WebhookAnyRunOfActorTaskCondition<!-- -->
## Index[**](#Index)
### Properties
* [**actorTaskId](#actorTaskId)
## Properties<!-- -->[**](#Properties)
### [**](#actorTaskId)[**](https://github.com/apify/apify-client-js/blob/master/src/resource_clients/webhook.ts#L137)actorTaskId
**actorTaskId: string
---
# WebhookCertainRunCondition<!-- -->
## Index[**](#Index)
### Properties
* [**actorRunId](#actorRunId)
## Properties<!-- -->[**](#Properties)
### [**](#actorRunId)[**](https://github.com/apify/apify-client-js/blob/master/src/resource_clients/webhook.ts#L141)actorRunId
**actorRunId: string
---
# WebhookCollectionListOptions<!-- -->
## Index[**](#Index)
### Properties
* [**desc](#desc)
* [**limit](#limit)
* [**offset](#offset)
## Properties<!-- -->[**](#Properties)
### [**](#desc)[**](https://github.com/apify/apify-client-js/blob/master/src/resource_clients/webhook_collection.ts#L50)optionaldesc
**desc?
<!-- -->
: boolean
### [**](#limit)[**](https://github.com/apify/apify-client-js/blob/master/src/resource_clients/webhook_collection.ts#L48)optionallimit
**limit?
<!-- -->
: number
### [**](#offset)[**](https://github.com/apify/apify-client-js/blob/master/src/resource_clients/webhook_collection.ts#L49)optionaloffset
**offset?
<!-- -->
: number
---
# WebhookDispatch<!-- -->
## Index[**](#Index)
### Properties
* [**calls](#calls)
* [**createdAt](#createdAt)
* [**eventData](#eventData)
* [**eventType](#eventType)
* [**id](#id)
* [**status](#status)
* [**userId](#userId)
* [**webhook](#webhook)
* [**webhookId](#webhookId)
## Properties<!-- -->[**](#Properties)
### [**](#calls)[**](https://github.com/apify/apify-client-js/blob/master/src/resource_clients/webhook_dispatch.ts#L31)calls
**calls: [WebhookDispatchCall](https://docs.apify.com/api/client/js/api/client/js/reference/interface/WebhookDispatchCall.md)\[]
### [**](#createdAt)[**](https://github.com/apify/apify-client-js/blob/master/src/resource_clients/webhook_dispatch.ts#L28)createdAt
**createdAt: Date
### [**](#eventData)[**](https://github.com/apify/apify-client-js/blob/master/src/resource_clients/webhook_dispatch.ts#L33)eventData
**eventData: null | [WebhookDispatchEventData](https://docs.apify.com/api/client/js/api/client/js/reference/interface/WebhookDispatchEventData.md)
### [**](#eventType)[**](https://github.com/apify/apify-client-js/blob/master/src/resource_clients/webhook_dispatch.ts#L30)eventType
**eventType: [WebhookEventType](https://docs.apify.com/api/client/js/api/client/js/reference.md#WebhookEventType)
### [**](#id)[**](https://github.com/apify/apify-client-js/blob/master/src/resource_clients/webhook_dispatch.ts#L25)id
**id: string
### [**](#status)[**](https://github.com/apify/apify-client-js/blob/master/src/resource_clients/webhook_dispatch.ts#L29)status
**status: [WebhookDispatchStatus](https://docs.apify.com/api/client/js/api/client/js/reference/enum/WebhookDispatchStatus.md)
### [**](#userId)[**](https://github.com/apify/apify-client-js/blob/master/src/resource_clients/webhook_dispatch.ts#L26)userId
**userId: string
### [**](#webhook)[**](https://github.com/apify/apify-client-js/blob/master/src/resource_clients/webhook_dispatch.ts#L32)webhook
**webhook: Pick<[Webhook](https://docs.apify.com/api/client/js/api/client/js/reference/interface/Webhook.md), isAdHoc | requestUrl>
### [**](#webhookId)[**](https://github.com/apify/apify-client-js/blob/master/src/resource_clients/webhook_dispatch.ts#L27)webhookId
**webhookId: string
---
# WebhookDispatchCall<!-- -->
## Index[**](#Index)
### Properties
* [**errorMessage](#errorMessage)
* [**finishedAt](#finishedAt)
* [**responseBody](#responseBody)
* [**responseStatus](#responseStatus)
* [**startedAt](#startedAt)
## Properties<!-- -->[**](#Properties)
### [**](#errorMessage)[**](https://github.com/apify/apify-client-js/blob/master/src/resource_clients/webhook_dispatch.ts#L45)errorMessage
**errorMessage: null | string
### [**](#finishedAt)[**](https://github.com/apify/apify-client-js/blob/master/src/resource_clients/webhook_dispatch.ts#L44)finishedAt
**finishedAt: Date
### [**](#responseBody)[**](https://github.com/apify/apify-client-js/blob/master/src/resource_clients/webhook_dispatch.ts#L47)responseBody
**responseBody: null | string
### [**](#responseStatus)[**](https://github.com/apify/apify-client-js/blob/master/src/resource_clients/webhook_dispatch.ts#L46)responseStatus
**responseStatus: null | number
### [**](#startedAt)[**](https://github.com/apify/apify-client-js/blob/master/src/resource_clients/webhook_dispatch.ts#L43)startedAt
**startedAt: Date
---
# WebhookDispatchCollectionListOptions<!-- -->
## Index[**](#Index)
### Properties
* [**desc](#desc)
* [**limit](#limit)
* [**offset](#offset)
## Properties<!-- -->[**](#Properties)
### [**](#desc)[**](https://github.com/apify/apify-client-js/blob/master/src/resource_clients/webhook_dispatch_collection.ts#L39)optionaldesc
**desc?
<!-- -->
: boolean
### [**](#limit)[**](https://github.com/apify/apify-client-js/blob/master/src/resource_clients/webhook_dispatch_collection.ts#L37)optionallimit
**limit?
<!-- -->
: number
### [**](#offset)[**](https://github.com/apify/apify-client-js/blob/master/src/resource_clients/webhook_dispatch_collection.ts#L38)optionaloffset
**offset?
<!-- -->
: number
---
# WebhookDispatchEventData<!-- -->
## Index[**](#Index)
### Properties
* [**actorBuildId](#actorBuildId)
* [**actorId](#actorId)
* [**actorRunId](#actorRunId)
* [**actorTaskId](#actorTaskId)
## Properties<!-- -->[**](#Properties)
### [**](#actorBuildId)[**](https://github.com/apify/apify-client-js/blob/master/src/resource_clients/webhook_dispatch.ts#L54)optionalactorBuildId
**actorBuildId?
<!-- -->
: string
### [**](#actorId)[**](https://github.com/apify/apify-client-js/blob/master/src/resource_clients/webhook_dispatch.ts#L52)optionalactorId
**actorId?
<!-- -->
: string
### [**](#actorRunId)[**](https://github.com/apify/apify-client-js/blob/master/src/resource_clients/webhook_dispatch.ts#L51)optionalactorRunId
**actorRunId?
<!-- -->
: string
### [**](#actorTaskId)[**](https://github.com/apify/apify-client-js/blob/master/src/resource_clients/webhook_dispatch.ts#L53)optionalactorTaskId
**actorTaskId?
<!-- -->
: string
---
# WebhookIdempotencyKey<!-- -->
## Index[**](#Index)
### Properties
* [**idempotencyKey](#idempotencyKey)
## Properties<!-- -->[**](#Properties)
### [**](#idempotencyKey)[**](https://github.com/apify/apify-client-js/blob/master/src/resource_clients/webhook.ts#L100)optionalidempotencyKey
**idempotencyKey?
<!-- -->
: string
---
# WebhookStats<!-- -->
## Index[**](#Index)
### Properties
* [**totalDispatches](#totalDispatches)
## Properties<!-- -->[**](#Properties)
### [**](#totalDispatches)[**](https://github.com/apify/apify-client-js/blob/master/src/resource_clients/webhook.ts#L122)totalDispatches
**totalDispatches: number
---
[Skip to main content](#__docusaurus_skipToContent_fallback)
[](https://docs.apify.com)
[Academy](https://docs.apify.com/academy)[Platform](https://docs.apify.com/platform)
[API](https://docs.apify.com/api)
* [Reference](https://docs.apify.com/api/v2)
* [Client for JavaScript](https://docs.apify.com/api/client/js/)
* [Client for Python](https://docs.apify.com/api/client/python/)
[SDK](https://docs.apify.com/sdk)
* [SDK for JavaScript](https://docs.apify.com/sdk/js/)
* [SDK for Python](https://docs.apify.com/sdk/python/)
[CLI](https://docs.apify.com/cli/)
[Open source](https://docs.apify.com/open-source)
* [Crawlee](https://crawlee.dev)
* [Got Scraping](https://github.com/apify/got-scraping)
* [Fingerprint Suite](https://github.com/apify/fingerprint-suite)
* [Apify on GitHub](https://github.com/apify)
* [Actor whitepaper](https://whitepaper.actor)
[Discord](https://discord.com/invite/jyEM2PRvMU "Chat on Discord")[Get started](https://console.apify.com)
[API client for JavaScript](https://docs.apify.com/api/client/js/api/client/js/.md)
[Docs](https://docs.apify.com/api/client/js/api/client/js/docs.md)[Reference](https://docs.apify.com/api/client/js/api/client/js/reference.md)[Changelog](https://docs.apify.com/api/client/js/api/client/js/docs/changelog.md)[GitHub](https://github.com/apify/apify-client-js)
[2.19.1](https://docs.apify.com/api/client/js/api/client/js/docs.md)
* [Next](https://docs.apify.com/api/client/js/api/client/js/docs/next)
* [2.19.1](https://docs.apify.com/api/client/js/api/client/js/docs.md)
# Apify API client for JavaScript
# Apify API client for JavaScript
##
## The official library to interact with Apify API from a web browser, Node.js, JavaScript, or TypeScript applications, providing convenience functions and automatic retries on errors.
[Get Started](https://docs.apify.com/api/client/js/api/client/js/docs.md)[GitHub](https://ghbtns.com/github-btn.html?user=apify\&repo=apify-client-js\&type=star\&count=true\&size=large)

npm install apify-client
Easily run Actors, await them to finish using the convenient `.call()` <!-- -->method, and retrieve results from the resulting dataset.
const { ApifyClient } = require('apify-client');
const client = new ApifyClient({ token: 'MY-APIFY-TOKEN', });
// Starts an actor and waits for it to finish. const { defaultDatasetId } = await client.actor('john-doe/my-cool-actor').call();
// Fetches results from the actor's dataset. const { items } = await client.dataset(defaultDatasetId).listItems();
Learn
* [Academy](https://docs.apify.com/academy)
* [Platform](https://docs.apify.com/platform)
API
* [Reference](https://docs.apify.com/api/v2)
* [Client for JavaScript](https://docs.apify.com/api/client/js/)
* [Client for Python](https://docs.apify.com/api/client/python/)
SDK
* [SDK for JavaScript](https://docs.apify.com/sdk/js/)
* [SDK for Python](https://docs.apify.com/sdk/python/)
Other
* [CLI](https://docs.apify.com/cli/)
* [Open source](https://docs.apify.com/open-source)
More
* [Crawlee](https://crawlee.dev)
* [GitHub](https://github.com/apify)
* [Discord](https://discord.com/invite/jyEM2PRvMU)
* [Trust Center](https://trust.apify.com)
[](https://apify.com)
---
# API client for Python | Apify Documentation
## api
- [Search the documentation](https://docs.apify.com/api/client/python/search.md)
- [Changelog](https://docs.apify.com/api/client/python/docs/changelog.md): All notable changes to this project will be documented in this file.
- [Asyncio support](https://docs.apify.com/api/client/python/docs/concepts/asyncio-support.md): The package provides an asynchronous version of the client, ApifyClientAsync, which allows you to interact with the Apify API using Python's standard async/await syntax. This enables you to perform non-blocking operations, see the Python asyncio documentation for more information.
- [Convenience methods](https://docs.apify.com/api/client/python/docs/concepts/convenience-methods.md): The Apify client provides several convenience methods to handle actions that the API alone cannot perform efficiently, such as waiting for an Actor run to finish without running into network timeouts. These methods simplify common tasks and enhance the usability of the client.
- [Error handling](https://docs.apify.com/api/client/python/docs/concepts/error-handling.md): When you use the Apify client, it automatically extracts all relevant data from the endpoint and returns it in the expected format. Date strings, for instance, are seamlessly converted to Python datetime.datetime objects. If an error occurs, the client raises an ApifyApiError. This exception wraps the raw JSON errors returned by the API and provides additional context, making it easier to debug any issues that arise.
- [Logging](https://docs.apify.com/api/client/python/docs/concepts/logging.md): The library logs useful debug information to the apify_client logger whenever it sends requests to the Apify API. You can configure this logger to print debug information to the standard output by adding a handler:
- [Nested clients](https://docs.apify.com/api/client/python/docs/concepts/nested-clients.md): In some cases, the Apify client provides nested clients to simplify working with related collections. For example, you can easily manage the runs of a specific Actor without having to construct multiple endpoints or client instances manually.
- [Pagination](https://docs.apify.com/api/client/python/docs/concepts/pagination.md): Most methods named list or list_something in the Apify client return a ListPage object. This object provides a consistent interface for working with paginated data and includes the following properties:
- [Retries](https://docs.apify.com/api/client/python/docs/concepts/retries.md): When dealing with network communication, failures can occasionally occur. The Apify client automatically retries requests that fail due to:
- [Single and collection clients](https://docs.apify.com/api/client/python/docs/concepts/single-and-collection-clients.md): The Apify client interface is designed to be consistent and intuitive across all of its components. When you call specific methods on the main client, you create specialized clients to manage individual API resources. There are two main types of clients:
- [Streaming resources](https://docs.apify.com/api/client/python/docs/concepts/streaming-resources.md): Certain resources, such as dataset items, key-value store records, and logs, support streaming directly from the Apify API. This allows you to process large resources incrementally without downloading them entirely into memory, making it ideal for handling large or continuously updated data.
- [Integration with data libraries](https://docs.apify.com/api/client/python/docs/examples/integration-with-data-libraries.md): The Apify client for Python seamlessly integrates with data analysis libraries like Pandas. This allows you to load dataset items directly into a Pandas DataFrame for efficient manipulation and analysis. Pandas provides robust data structures and tools for handling large datasets, making it a powerful addition to your Apify workflows.
- [Manage tasks for reusable input](https://docs.apify.com/api/client/python/docs/examples/manage-tasks-for-reusable-input.md): When you need to run multiple inputs with the same Actor, the most convenient approach is to create multiple tasks, each with different input configurations. Task inputs are stored on the Apify platform when the task is created, allowing you to reuse them easily.
- [Passing input to Actor](https://docs.apify.com/api/client/python/docs/examples/passing-input-to-actor.md): The efficient way to run an Actor and retrieve results is by passing input data directly to the call method. This method allows you to configure the Actor's input, execute it, and either get a reference to the running Actor or wait for its completion.
- [Retrieve Actor data](https://docs.apify.com/api/client/python/docs/examples/retrieve-actor-data.md): Actor output data is stored in datasets, which can be retrieved from individual Actor runs. Dataset items support pagination for efficient retrieval, and multiple datasets can be merged into a single dataset for further analysis. This merged dataset can then be exported into various formats such as CSV, JSON, XLSX, or XML. Additionally, integrations provide powerful tools to automate data workflows.
- [Getting started](https://docs.apify.com/api/client/python/docs/overview/getting-started.md): This guide will walk you through how to use the Apify Client for Python to run Actors on the Apify platform, provide input to them, and retrieve results from their datasets. You'll learn the basics of running serverless programs (we're calling them Actors) and managing their output efficiently.
- [Introduction](https://docs.apify.com/api/client/python/docs/overview/introduction.md): The Apify client for Python is the official library to access the Apify REST API from your Python applications. It provides useful features like automatic retries and convenience functions that improve the experience of using the Apify API. All requests and responses (including errors) are encoded in JSON format with UTF-8 encoding. The client provides both synchronous and asynchronous interfaces.
- [Setting up](https://docs.apify.com/api/client/python/docs/overview/setting-up.md): This guide will help you get started with Apify client for Python by setting it up on your computer. Follow the steps below to ensure a smooth installation process.
- [Upgrading to v2](https://docs.apify.com/api/client/python/docs/upgrading/upgrading-to-v2.md): This page summarizes the breaking changes between Apify Python API Client v1.x and v2.0.
- [apify-client-python](https://docs.apify.com/api/client/python/reference.md)
- [_BaseApifyClient](https://docs.apify.com/api/client/python/reference/class/_BaseApifyClient.md)
- [_BaseBaseClient](https://docs.apify.com/api/client/python/reference/class/_BaseBaseClient.md)
- [_BaseHTTPClient](https://docs.apify.com/api/client/python/reference/class/_BaseHTTPClient.md)
- [_ContextInjectingFilter](https://docs.apify.com/api/client/python/reference/class/_ContextInjectingFilter.md)
- [_DebugLogFormatter](https://docs.apify.com/api/client/python/reference/class/_DebugLogFormatter.md)
- [ActorClient](https://docs.apify.com/api/client/python/reference/class/ActorClient.md): Sub-client for manipulating a single Actor.
- [ActorClientAsync](https://docs.apify.com/api/client/python/reference/class/ActorClientAsync.md): Async sub-client for manipulating a single Actor.
- [ActorCollectionClient](https://docs.apify.com/api/client/python/reference/class/ActorCollectionClient.md): Sub-client for manipulating Actors.
- [ActorCollectionClientAsync](https://docs.apify.com/api/client/python/reference/class/ActorCollectionClientAsync.md): Async sub-client for manipulating Actors.
- [ActorEnvVarClient](https://docs.apify.com/api/client/python/reference/class/ActorEnvVarClient.md): Sub-client for manipulating a single Actor environment variable.
- [ActorEnvVarClientAsync](https://docs.apify.com/api/client/python/reference/class/ActorEnvVarClientAsync.md): Async sub-client for manipulating a single Actor environment variable.
- [ActorEnvVarCollectionClient](https://docs.apify.com/api/client/python/reference/class/ActorEnvVarCollectionClient.md): Sub-client for manipulating actor env vars.
- [ActorEnvVarCollectionClientAsync](https://docs.apify.com/api/client/python/reference/class/ActorEnvVarCollectionClientAsync.md): Async sub-client for manipulating actor env vars.
- [ActorJobBaseClient](https://docs.apify.com/api/client/python/reference/class/ActorJobBaseClient.md): Base sub-client class for Actor runs and Actor builds.
- [ActorJobBaseClientAsync](https://docs.apify.com/api/client/python/reference/class/ActorJobBaseClientAsync.md): Base async sub-client class for Actor runs and Actor builds.
- [ActorVersionClient](https://docs.apify.com/api/client/python/reference/class/ActorVersionClient.md): Sub-client for manipulating a single Actor version.
- [ActorVersionClientAsync](https://docs.apify.com/api/client/python/reference/class/ActorVersionClientAsync.md): Async sub-client for manipulating a single Actor version.
- [ActorVersionCollectionClient](https://docs.apify.com/api/client/python/reference/class/ActorVersionCollectionClient.md): Sub-client for manipulating Actor versions.
- [ActorVersionCollectionClientAsync](https://docs.apify.com/api/client/python/reference/class/ActorVersionCollectionClientAsync.md): Async sub-client for manipulating Actor versions.
- [ApifyApiError](https://docs.apify.com/api/client/python/reference/class/ApifyApiError.md): Error specific to requests to the Apify API.
- [ApifyClient](https://docs.apify.com/api/client/python/reference/class/ApifyClient.md): The Apify API client.
- [ApifyClientAsync](https://docs.apify.com/api/client/python/reference/class/ApifyClientAsync.md): The asynchronous version of the Apify API client.
- [ApifyClientError](https://docs.apify.com/api/client/python/reference/class/ApifyClientError.md): Base class for errors specific to the Apify API Client.
- [BaseClient](https://docs.apify.com/api/client/python/reference/class/BaseClient.md): Base class for sub-clients.
- [BaseClientAsync](https://docs.apify.com/api/client/python/reference/class/BaseClientAsync.md): Base class for async sub-clients.
- [BatchAddRequestsResult](https://docs.apify.com/api/client/python/reference/class/BatchAddRequestsResult.md): Result of the batch add requests operation.
- [BuildClient](https://docs.apify.com/api/client/python/reference/class/BuildClient.md): Sub-client for manipulating a single Actor build.
- [BuildClientAsync](https://docs.apify.com/api/client/python/reference/class/BuildClientAsync.md): Async sub-client for manipulating a single Actor build.
- [BuildCollectionClient](https://docs.apify.com/api/client/python/reference/class/BuildCollectionClient.md): Sub-client for listing Actor builds.
- [BuildCollectionClientAsync](https://docs.apify.com/api/client/python/reference/class/BuildCollectionClientAsync.md): Async sub-client for listing Actor builds.
- [DatasetClient](https://docs.apify.com/api/client/python/reference/class/DatasetClient.md): Sub-client for manipulating a single dataset.
- [DatasetClientAsync](https://docs.apify.com/api/client/python/reference/class/DatasetClientAsync.md): Async sub-client for manipulating a single dataset.
- [DatasetCollectionClient](https://docs.apify.com/api/client/python/reference/class/DatasetCollectionClient.md): Sub-client for manipulating datasets.
- [DatasetCollectionClientAsync](https://docs.apify.com/api/client/python/reference/class/DatasetCollectionClientAsync.md): Async sub-client for manipulating datasets.
- [HTTPClient](https://docs.apify.com/api/client/python/reference/class/HTTPClient.md)
- [HTTPClientAsync](https://docs.apify.com/api/client/python/reference/class/HTTPClientAsync.md)
- [InvalidResponseBodyError](https://docs.apify.com/api/client/python/reference/class/InvalidResponseBodyError.md): Error caused by the response body failing to be parsed.
- [KeyValueStoreClient](https://docs.apify.com/api/client/python/reference/class/KeyValueStoreClient.md): Sub-client for manipulating a single key-value store.
- [KeyValueStoreClientAsync](https://docs.apify.com/api/client/python/reference/class/KeyValueStoreClientAsync.md): Async sub-client for manipulating a single key-value store.
- [KeyValueStoreCollectionClient](https://docs.apify.com/api/client/python/reference/class/KeyValueStoreCollectionClient.md): Sub-client for manipulating key-value stores.
- [KeyValueStoreCollectionClientAsync](https://docs.apify.com/api/client/python/reference/class/KeyValueStoreCollectionClientAsync.md): Async sub-client for manipulating key-value stores.
- [ListPage](https://docs.apify.com/api/client/python/reference/class/ListPage.md): A single page of items returned from a list() method.
- [ListPage](https://docs.apify.com/api/client/python/reference/class/ListPage.md): A single page of items returned from a list() method.
- [LogClient](https://docs.apify.com/api/client/python/reference/class/LogClient.md): Sub-client for manipulating logs.
- [LogClientAsync](https://docs.apify.com/api/client/python/reference/class/LogClientAsync.md): Async sub-client for manipulating logs.
- [LogContext](https://docs.apify.com/api/client/python/reference/class/LogContext.md)
- [RedirectLogFormatter](https://docs.apify.com/api/client/python/reference/class/RedirectLogFormatter.md): Formater applied to default redirect logger.
- [RequestQueueClient](https://docs.apify.com/api/client/python/reference/class/RequestQueueClient.md): Sub-client for manipulating a single request queue.
- [RequestQueueClientAsync](https://docs.apify.com/api/client/python/reference/class/RequestQueueClientAsync.md): Async sub-client for manipulating a single request queue.
- [RequestQueueCollectionClient](https://docs.apify.com/api/client/python/reference/class/RequestQueueCollectionClient.md): Sub-client for manipulating request queues.
- [RequestQueueCollectionClientAsync](https://docs.apify.com/api/client/python/reference/class/RequestQueueCollectionClientAsync.md): Async sub-client for manipulating request queues.
- [ResourceClient](https://docs.apify.com/api/client/python/reference/class/ResourceClient.md): Base class for sub-clients manipulating a single resource.
- [ResourceClientAsync](https://docs.apify.com/api/client/python/reference/class/ResourceClientAsync.md): Base class for async sub-clients manipulating a single resource.
- [ResourceCollectionClient](https://docs.apify.com/api/client/python/reference/class/ResourceCollectionClient.md): Base class for sub-clients manipulating a resource collection.
- [ResourceCollectionClientAsync](https://docs.apify.com/api/client/python/reference/class/ResourceCollectionClientAsync.md): Base class for async sub-clients manipulating a resource collection.
- [RunClient](https://docs.apify.com/api/client/python/reference/class/RunClient.md): Sub-client for manipulating a single Actor run.
- [RunClientAsync](https://docs.apify.com/api/client/python/reference/class/RunClientAsync.md): Async sub-client for manipulating a single Actor run.
- [RunCollectionClient](https://docs.apify.com/api/client/python/reference/class/RunCollectionClient.md): Sub-client for listing Actor runs.
- [RunCollectionClientAsync](https://docs.apify.com/api/client/python/reference/class/RunCollectionClientAsync.md): Async sub-client for listing Actor runs.
- [ScheduleClient](https://docs.apify.com/api/client/python/reference/class/ScheduleClient.md): Sub-client for manipulating a single schedule.
- [ScheduleClientAsync](https://docs.apify.com/api/client/python/reference/class/ScheduleClientAsync.md): Async sub-client for manipulating a single schedule.
- [ScheduleCollectionClient](https://docs.apify.com/api/client/python/reference/class/ScheduleCollectionClient.md): Sub-client for manipulating schedules.
- [ScheduleCollectionClientAsync](https://docs.apify.com/api/client/python/reference/class/ScheduleCollectionClientAsync.md): Async sub-client for manipulating schedules.
- [Statistics](https://docs.apify.com/api/client/python/reference/class/Statistics.md): Statistics about API client usage and rate limit errors.
- [StatusMessageWatcher](https://docs.apify.com/api/client/python/reference/class/StatusMessageWatcher.md): Utility class for logging status messages from another Actor run.
- [StatusMessageWatcherAsync](https://docs.apify.com/api/client/python/reference/class/StatusMessageWatcherAsync.md): Async variant of `StatusMessageWatcher` that is logging in task.
- [StatusMessageWatcherSync](https://docs.apify.com/api/client/python/reference/class/StatusMessageWatcherSync.md): Sync variant of `StatusMessageWatcher` that is logging in thread.
- [StoreCollectionClient](https://docs.apify.com/api/client/python/reference/class/StoreCollectionClient.md): Sub-client for Apify store.
- [StoreCollectionClientAsync](https://docs.apify.com/api/client/python/reference/class/StoreCollectionClientAsync.md): Async sub-client for Apify store.
- [StreamedLog](https://docs.apify.com/api/client/python/reference/class/StreamedLog.md): Utility class for streaming logs from another Actor.
- [StreamedLogAsync](https://docs.apify.com/api/client/python/reference/class/StreamedLogAsync.md): Async variant of `StreamedLog` that is logging in tasks.
- [StreamedLogSync](https://docs.apify.com/api/client/python/reference/class/StreamedLogSync.md): Sync variant of `StreamedLog` that is logging in threads.
- [TaskClient](https://docs.apify.com/api/client/python/reference/class/TaskClient.md): Sub-client for manipulating a single task.
- [TaskClientAsync](https://docs.apify.com/api/client/python/reference/class/TaskClientAsync.md): Async sub-client for manipulating a single task.
- [TaskCollectionClient](https://docs.apify.com/api/client/python/reference/class/TaskCollectionClient.md): Sub-client for manipulating tasks.
- [TaskCollectionClientAsync](https://docs.apify.com/api/client/python/reference/class/TaskCollectionClientAsync.md): Async sub-client for manipulating tasks.
- [UserClient](https://docs.apify.com/api/client/python/reference/class/UserClient.md): Sub-client for querying user data.
- [UserClientAsync](https://docs.apify.com/api/client/python/reference/class/UserClientAsync.md): Async sub-client for querying user data.
- [WebhookClient](https://docs.apify.com/api/client/python/reference/class/WebhookClient.md): Sub-client for manipulating a single webhook.
- [WebhookClientAsync](https://docs.apify.com/api/client/python/reference/class/WebhookClientAsync.md): Async sub-client for manipulating a single webhook.
- [WebhookCollectionClient](https://docs.apify.com/api/client/python/reference/class/WebhookCollectionClient.md): Sub-client for manipulating webhooks.
- [WebhookCollectionClientAsync](https://docs.apify.com/api/client/python/reference/class/WebhookCollectionClientAsync.md): Async sub-client for manipulating webhooks.
- [WebhookDispatchClient](https://docs.apify.com/api/client/python/reference/class/WebhookDispatchClient.md): Sub-client for querying information about a webhook dispatch.
- [WebhookDispatchClientAsync](https://docs.apify.com/api/client/python/reference/class/WebhookDispatchClientAsync.md): Async sub-client for querying information about a webhook dispatch.
- [WebhookDispatchCollectionClient](https://docs.apify.com/api/client/python/reference/class/WebhookDispatchCollectionClient.md): Sub-client for listing webhook dispatches.
- [WebhookDispatchCollectionClientAsync](https://docs.apify.com/api/client/python/reference/class/WebhookDispatchCollectionClientAsync.md): Async sub-client for listing webhook dispatches.
- [WithLogDetailsClient](https://docs.apify.com/api/client/python/reference/class/WithLogDetailsClient.md)
- [Apify API client for Python](https://docs.apify.com/api/client/python/index.md)
---
# Full Documentation Content
[Skip to main content](#__docusaurus_skipToContent_fallback)
[](https://docs.apify.com)
[Academy](https://docs.apify.com/academy)[Platform](https://docs.apify.com/platform)
[API](https://docs.apify.com/api)
* [Reference](https://docs.apify.com/api/v2)
* [Client for JavaScript](https://docs.apify.com/api/client/js/)
* [Client for Python](https://docs.apify.com/api/client/python/)
[SDK](https://docs.apify.com/sdk)
* [SDK for JavaScript](https://docs.apify.com/sdk/js/)
* [SDK for Python](https://docs.apify.com/sdk/python/)
[CLI](https://docs.apify.com/cli/)
[Open source](https://docs.apify.com/open-source)
* [Crawlee](https://crawlee.dev)
* [Got Scraping](https://github.com/apify/got-scraping)
* [Fingerprint Suite](https://github.com/apify/fingerprint-suite)
* [Apify on GitHub](https://github.com/apify)
* [Actor whitepaper](https://whitepaper.actor)
[Discord](https://discord.com/invite/jyEM2PRvMU "Chat on Discord")[Get started](https://console.apify.com)
[API Client for Python](https://docs.apify.com/api/client/python/api/client/python/.md)
[Docs](https://docs.apify.com/api/client/python/api/client/python/docs/overview/introduction.md)[Reference](https://docs.apify.com/api/client/python/api/client/python/reference.md)[Changelog](https://docs.apify.com/api/client/python/api/client/python/docs/changelog.md)[GitHub](https://github.com/apify/apify-client-python)
# Search the documentation
Type your search here
[](https://www.algolia.com/)
Learn
* [Academy](https://docs.apify.com/academy)
* [Platform](https://docs.apify.com/platform)
API
* [Reference](https://docs.apify.com/api/v2)
* [Client for JavaScript](https://docs.apify.com/api/client/js/)
* [Client for Python](https://docs.apify.com/api/client/python/)
SDK
* [SDK for JavaScript](https://docs.apify.com/sdk/js/)
* [SDK for Python](https://docs.apify.com/sdk/python/)
Other
* [CLI](https://docs.apify.com/cli/)
* [Open source](https://docs.apify.com/open-source)
More
* [Crawlee](https://crawlee.dev)
* [GitHub](https://github.com/apify)
* [Discord](https://discord.com/invite/jyEM2PRvMU)
* [Trust Center](https://trust.apify.com)
[](https://apify.com)
---
# Changelog
All notable changes to this project will be documented in this file.
### 2.2.2 - **not yet released**[](#222---not-yet-released)
#### 🚀 Features[](#-features)
* Add support for Python 3.14 ([#520](https://github.com/apify/apify-client-python/pull/520)) ([68ebbd9](https://github.com/apify/apify-client-python/commit/68ebbd9162f076a20a4a02dd1ebe0dac7ece696a)) by [@vdusek](https://github.com/vdusek)
### [2.2.1](https://github.com/apify/apify-client-python/releases/tag/v2.2.1) (2025-10-20)[](#221-2025-10-20)
#### 🐛 Bug Fixes[](#-bug-fixes)
* Move restart on error Actor option to Run options ([#508](https://github.com/apify/apify-client-python/pull/508)) ([8f73420](https://github.com/apify/apify-client-python/commit/8f73420ba2b9f2045bfdf3a224b6573ca2941b85)) by [@DaveHanns](https://github.com/DaveHanns)
### [2.2.0](https://github.com/apify/apify-client-python/releases/tag/v2.2.0) (2025-10-13)[](#220-2025-10-13)
#### 🚀 Features[](#-features-1)
* Add `KeyValueStoreClient(Async).get_record_public_url` ([#506](https://github.com/apify/apify-client-python/pull/506)) ([6417d26](https://github.com/apify/apify-client-python/commit/6417d26f90af2113247b73a42a5909510a3a1a16)) by [@Pijukatel](https://github.com/Pijukatel), closes [#497](https://github.com/apify/apify-client-python/issues/497)
* Add started\_before and started\_after to run list ([#513](https://github.com/apify/apify-client-python/pull/513)) ([3aaa056](https://github.com/apify/apify-client-python/commit/3aaa056a651f773638b6847c846117365bae6309)) by [@danpoletaev](https://github.com/danpoletaev)
### [2.1.0](https://github.com/apify/apify-client-python/releases/tag/v2.1.0) (2025-09-15)[](#210-2025-09-15)
#### 🚀 Features[](#-features-2)
* Add forcePermissionLevel run option ([#498](https://github.com/apify/apify-client-python/pull/498)) ([b297523](https://github.com/apify/apify-client-python/commit/b2975233c30f47883dbcfc716fc6bb77ce388306)) by [@tobice](https://github.com/tobice)
#### 🐛 Bug Fixes[](#-bug-fixes-1)
* Casing in `exclusiveStartKey` API param ([#495](https://github.com/apify/apify-client-python/pull/495)) ([5e96f71](https://github.com/apify/apify-client-python/commit/5e96f71cc6d3290d161fa46fc8cd9adef478088e)) by [@barjin](https://github.com/barjin), closes [#484](https://github.com/apify/apify-client-python/issues/484)
* Presigned resource urls shouldn't follow base url ([#500](https://github.com/apify/apify-client-python/pull/500)) ([b224218](https://github.com/apify/apify-client-python/commit/b2242185f7eb0891bda29c361c7f5cf6f7dcba20)) by [@Pijukatel](https://github.com/Pijukatel), closes [#496](https://github.com/apify/apify-client-python/issues/496)
### [2.0.0](https://github.com/apify/apify-client-python/releases/tag/v2.0.0) (2025-08-15)[](#200-2025-08-15)
* Check out the [Upgrading guide](https://docs.apify.com/api/client/python/api/client/python/docs/upgrading/upgrading-to-v2.md) to ensure a smooth update.
#### 🚀 Features[](#-features-3)
* Extend status parameter to an array of possible statuses ([#455](https://github.com/apify/apify-client-python/pull/455)) ([76f6769](https://github.com/apify/apify-client-python/commit/76f676973d067ce8af398d8e6ceea55595da5ecf)) by [@JanHranicky](https://github.com/JanHranicky)
* Expose apify\_client.errors module ([#468](https://github.com/apify/apify-client-python/pull/468)) ([c0cc147](https://github.com/apify/apify-client-python/commit/c0cc147fd0c5a60e5a025db6b6c761e811efe1da)) by [@Mantisus](https://github.com/Mantisus), closes [#158](https://github.com/apify/apify-client-python/issues/158)
* Add dataset.create\_items\_public\_url and key\_value\_store.create\_keys\_public\_url ([#453](https://github.com/apify/apify-client-python/pull/453)) ([2b1e110](https://github.com/apify/apify-client-python/commit/2b1e1104c15c987b0024010df41d6d356ea37dd3)) by [@danpoletaev](https://github.com/danpoletaev)
#### Chore[](#chore)
* \[**breaking**] Bump minimum Python version to 3.10 ([#469](https://github.com/apify/apify-client-python/pull/469)) ([92b4789](https://github.com/apify/apify-client-python/commit/92b47895eb48635e2d573b99d59bb077999c5b27)) by [@vdusek](https://github.com/vdusek)
#### Refactor[](#refactor)
* \[**breaking**] Remove support for passing a single string to the `unwind` parameter in `DatasetClient` ([#467](https://github.com/apify/apify-client-python/pull/467)) ([e8aea2c](https://github.com/apify/apify-client-python/commit/e8aea2c8f3833082bf78562f3fa981a1f8e88b26)) by [@Mantisus](https://github.com/Mantisus), closes [#255](https://github.com/apify/apify-client-python/issues/255)
* \[**breaking**] Remove deprecated constant re-exports from `consts.py` ([#466](https://github.com/apify/apify-client-python/pull/466)) ([7731f0b](https://github.com/apify/apify-client-python/commit/7731f0b3a4ca8c99be9392517d36f841cb293ed5)) by [@Mantisus](https://github.com/Mantisus), closes [#163](https://github.com/apify/apify-client-python/issues/163)
* \[**breaking**] Replace `httpx` HTTP client with `impit` ([#456](https://github.com/apify/apify-client-python/pull/456)) ([1df6792](https://github.com/apify/apify-client-python/commit/1df6792386398b28eb565dfbc58c7eba13f451a4)) by [@Mantisus](https://github.com/Mantisus)
* \[**breaking**] Remove deprecated `as_bytes` and `as_file` parameters from `KeyValueStoreClient.get_record` ([#463](https://github.com/apify/apify-client-python/pull/463)) ([b880231](https://github.com/apify/apify-client-python/commit/b88023125a41d02f95f687b8fd6090e7080efe3e)) by [@Mantisus](https://github.com/Mantisus)
* \[**breaking**] Remove `parse_response` arg from the `call` method ([#462](https://github.com/apify/apify-client-python/pull/462)) ([840d51a](https://github.com/apify/apify-client-python/commit/840d51af12a7e53decf9d3294d0e0c3c848e9c08)) by [@Mantisus](https://github.com/Mantisus), closes [#166](https://github.com/apify/apify-client-python/issues/166)
### [1.12.2](https://github.com/apify/apify-client-python/releases/tag/v1.12.2) (2025-08-08)[](#1122-2025-08-08)
#### 🐛 Bug Fixes[](#-bug-fixes-2)
* Fix API error with stream ([#459](https://github.com/apify/apify-client-python/pull/459)) ([0c91ca5](https://github.com/apify/apify-client-python/commit/0c91ca516a01a6fca7bc8fa07f7bf9c15c75bf9d)) by [@Pijukatel](https://github.com/Pijukatel)
### [1.12.1](https://github.com/apify/apify-client-python/releases/tag/v1.12.1) (2025-07-30)[](#1121-2025-07-30)
#### 🐛 Bug Fixes[](#-bug-fixes-3)
* Restrict apify-shared version ([#447](https://github.com/apify/apify-client-python/pull/447)) ([22cd220](https://github.com/apify/apify-client-python/commit/22cd220e8f22af01f5fdfcedc684015c006b6fe6)) by [@vdusek](https://github.com/vdusek)
### [1.12.0](https://github.com/apify/apify-client-python/releases/tag/v1.12.0) (2025-06-26)[](#1120-2025-06-26)
#### 🚀 Features[](#-features-4)
* Allow sorting of Actors collection ([#422](https://github.com/apify/apify-client-python/pull/422)) ([df6e47d](https://github.com/apify/apify-client-python/commit/df6e47d3b72e0aa5563f1ece7abc9d9da50b77a2)) by [@protoss70](https://github.com/protoss70)
* Add `KeyValueStoreClient.record_exists` ([#427](https://github.com/apify/apify-client-python/pull/427)) ([519529b](https://github.com/apify/apify-client-python/commit/519529b01895958aa33516d8ec4853290c388d05)) by [@janbuchar](https://github.com/janbuchar)
#### 🐛 Bug Fixes[](#-bug-fixes-4)
* Enable to add headers template in webhooks created dynamically ([#419](https://github.com/apify/apify-client-python/pull/419)) ([b84d1ec](https://github.com/apify/apify-client-python/commit/b84d1ec0491ad2623defcfba5fe1aa06274cf533)) by [@gaelloyoly](https://github.com/gaelloyoly)
* Rename sortBy parameters option ([#426](https://github.com/apify/apify-client-python/pull/426)) ([a270409](https://github.com/apify/apify-client-python/commit/a2704095928651bf183743bf85fb365c65480d80)) by [@protoss70](https://github.com/protoss70)
### [1.11.0](https://github.com/apify/apify-client-python/releases/tag/v1.11.0) (2025-06-13)[](#1110-2025-06-13)
#### 🚀 Features[](#-features-5)
* Add `validate_input` endpoint ([#396](https://github.com/apify/apify-client-python/pull/396)) ([1c5bf85](https://github.com/apify/apify-client-python/commit/1c5bf8550ffd91b94ea83694f7c933cf2767fadc)) by [@Pijukatel](https://github.com/Pijukatel), closes [#151](https://github.com/apify/apify-client-python/issues/151)
* Add list kv store keys by collection or prefix ([#397](https://github.com/apify/apify-client-python/pull/397)) ([6747c20](https://github.com/apify/apify-client-python/commit/6747c201cd654953a97a4c3fe8256756eb7568c7)) by [@MFori](https://github.com/MFori)
* Add redirected actor logs ([#403](https://github.com/apify/apify-client-python/pull/403)) ([fd02cd8](https://github.com/apify/apify-client-python/commit/fd02cd8726f1664677a47dcb946a0186080d7839)) by [@Pijukatel](https://github.com/Pijukatel), closes [#402](https://github.com/apify/apify-client-python/issues/402)
* Add `unlock_requests` method to RequestQueue clients ([#408](https://github.com/apify/apify-client-python/pull/408)) ([d4f0018](https://github.com/apify/apify-client-python/commit/d4f00186016fab4e909a7886467e619b23e627e5)) by [@drobnikj](https://github.com/drobnikj)
* Add `StatusMessageWatcher` ([#407](https://github.com/apify/apify-client-python/pull/407)) ([a535512](https://github.com/apify/apify-client-python/commit/a53551217b62a2a6ca2ccbc81130043560fbc475)) by [@Pijukatel](https://github.com/Pijukatel), closes [#404](https://github.com/apify/apify-client-python/issues/404)
### [1.10.0](https://github.com/apify/apify-client-python/releases/tag/v1.10.0) (2025-04-29)[](#1100-2025-04-29)
#### 🚀 Features[](#-features-6)
* Add support for general resource access ([#394](https://github.com/apify/apify-client-python/pull/394)) ([cc79c30](https://github.com/apify/apify-client-python/commit/cc79c30a7d0b57d21a5fc7efb94c08cc4035c8b4)) by [@tobice](https://github.com/tobice)
### [1.9.4](https://github.com/apify/apify-client-python/releases/tag/v1.9.4) (2025-04-24)[](#194-2025-04-24)
#### 🐛 Bug Fixes[](#-bug-fixes-5)
* Default\_build() returns BuildClient ([#389](https://github.com/apify/apify-client-python/pull/389)) ([8149052](https://github.com/apify/apify-client-python/commit/8149052a97032f1336147a48c8a8f6cd5e076b95)) by [@danpoletaev](https://github.com/danpoletaev)
### [1.9.3](https://github.com/apify/apify-client-python/releases/tag/v1.9.3) (2025-04-14)[](#193-2025-04-14)
#### 🚀 Features[](#-features-7)
* Add maxItems and maxTotalChargeUsd to resurrect ([#360](https://github.com/apify/apify-client-python/pull/360)) ([a020807](https://github.com/apify/apify-client-python/commit/a0208073ef93804358e4377959a56d8342f83447)) by [@novotnyj](https://github.com/novotnyj)
* Add get default build method ([#385](https://github.com/apify/apify-client-python/pull/385)) ([f818b95](https://github.com/apify/apify-client-python/commit/f818b95fec1c4e57e98b28ad0b2b346ee2f64602)) by [@danpoletaev](https://github.com/danpoletaev)
### [1.9.2](https://github.com/apify/apify-client-python/releases/tag/v1.9.2) (2025-02-14)[](#192-2025-02-14)
#### 🐛 Bug Fixes[](#-bug-fixes-6)
* Add missing PPE-related Actor parameters ([#351](https://github.com/apify/apify-client-python/pull/351)) ([75b1c6c](https://github.com/apify/apify-client-python/commit/75b1c6c4d26c21d69ce10ef4424c6ba458bd5a33)) by [@janbuchar](https://github.com/janbuchar)
### [1.9.1](https://github.com/apify/apify-client-python/releases/tag/v1.9.1) (2025-02-07)[](#191-2025-02-07)
#### 🐛 Bug Fixes[](#-bug-fixes-7)
* Add `stats` attribute for `ApifyClientAsync` ([#348](https://github.com/apify/apify-client-python/pull/348)) ([6631f8c](https://github.com/apify/apify-client-python/commit/6631f8ccbd56107647a6b886ddcd5cbae378069d)) by [@Mantisus](https://github.com/Mantisus)
* Fix return type of charge API call ([#350](https://github.com/apify/apify-client-python/pull/350)) ([28102fe](https://github.com/apify/apify-client-python/commit/28102fe42039df2f1f2bb3c4e4aa652e37933456)) by [@janbuchar](https://github.com/janbuchar)
### [1.9.0](https://github.com/apify/apify-client-python/releases/tag/v1.9.0) (2025-02-04)[](#190-2025-02-04)
#### 🚀 Features[](#-features-8)
* Add user.update\_limits ([#279](https://github.com/apify/apify-client-python/pull/279)) ([7aed9c9](https://github.com/apify/apify-client-python/commit/7aed9c928958831168ac8d293538d6fd3adbc5e5)) by [@MFori](https://github.com/MFori), closes [#329](https://github.com/apify/apify-client-python/issues/329)
* Add charge method to the run client for "pay per event" ([#304](https://github.com/apify/apify-client-python/pull/304)) ([3bd6bbb](https://github.com/apify/apify-client-python/commit/3bd6bbb86d2b777863f0c3d0459b61da9a7f15ff)) by [@Jkuzz](https://github.com/Jkuzz)
* Add error data to ApifyApiError ([#314](https://github.com/apify/apify-client-python/pull/314)) ([df2398b](https://github.com/apify/apify-client-python/commit/df2398b51d774c5f8653a80f83b320d0f5394dde)) by [@Pijukatel](https://github.com/Pijukatel), closes [#306](https://github.com/apify/apify-client-python/issues/306)
* Add GET: dataset.statistics ([#324](https://github.com/apify/apify-client-python/pull/324)) ([19ea4ad](https://github.com/apify/apify-client-python/commit/19ea4ad46068520885bd098739a9b64d1f17e1fc)) by [@MFori](https://github.com/MFori)
* Add `get_open_api_specification` method to `BuildClient` ([#336](https://github.com/apify/apify-client-python/pull/336)) ([9ebcedb](https://github.com/apify/apify-client-python/commit/9ebcedbaede53add167f1c51ec6196e793e67917)) by [@danpoletaev](https://github.com/danpoletaev)
* Add rate limit statistics ([#343](https://github.com/apify/apify-client-python/pull/343)) ([f35c68f](https://github.com/apify/apify-client-python/commit/f35c68ff824ce83bf9aca893589381782a1a48c7)) by [@Mantisus](https://github.com/Mantisus)
### [1.8.1](https://github.com/apify/apify-client-python/releases/tags/v1.8.1) (2024-09-17)[](#181-2024-09-17)
#### 🐛 Bug Fixes[](#-bug-fixes-8)
* Batch add requests can handle more than 25 requests ([#268](https://github.com/apify/apify-client-python/pull/268)) ([9110ee0](https://github.com/apify/apify-client-python/commit/9110ee08954762aed00ac09cd042e802c1d041f7)) by [@vdusek](https://github.com/vdusek), closes [#264](https://github.com/apify/apify-client-python/issues/264)
### [1.8.0](https://github.com/apify/apify-client-python/releases/tags/v1.8.0) (2024-08-30)[](#180-2024-08-30)
* drop support for Python 3.8
#### 🚀 Features[](#-features-9)
* Adds headers\_template to webhooks and webhooks\_collection ([#239](https://github.com/apify/apify-client-python/pull/239)) ([6dbd781](https://github.com/apify/apify-client-python/commit/6dbd781d24d9deb6a7669193ce4d5a4190fe5026)) by [@jakerobers](https://github.com/jakerobers)
* Add actor standby ([#248](https://github.com/apify/apify-client-python/pull/248)) ([dd4bf90](https://github.com/apify/apify-client-python/commit/dd4bf9072a4caa189af5f90e513e37df325dc929)) by [@jirimoravcik](https://github.com/jirimoravcik)
* Allow passing list of fields to unwind parameter ([#256](https://github.com/apify/apify-client-python/pull/256)) ([036b455](https://github.com/apify/apify-client-python/commit/036b455c51243e0ef81cb74a44fe670abc085ce7)) by [@fnesveda](https://github.com/fnesveda)
### [1.7.1](https://github.com/apify/apify-client-python/releases/tag/v1.7.1) (2024-07-11)[](#171-2024-07-11)
#### 🐛 Bug Fixes[](#-bug-fixes-9)
* Fix breaking change (sync -> async) in 1.7.0
* Fix getting storages of last run
### [1.7.0](https://github.com/apify/apify-client-python/releases/tag/v1.7.0) (2024-05-20)[](#170-2024-05-20)
#### 🐛 Bug Fixes[](#-bug-fixes-10)
* Fix abort of last task run
* Fix abort of last Actor run
* `ActorClient`'s and `TaskClient`'s `last_run` methods are asynchronous
### [1.6.4](https://github.com/apify/apify-client-python/releases/tag/v1.6.4) (2024-02-27)[](#164-2024-02-27)
#### 🚀 Features[](#-features-10)
* Add `monthlyUsage()` and `limits()` methods to `UserClient`
### [1.6.3](https://github.com/apify/apify-client-python/releases/tag/v1.6.3) (2023-02-16)[](#163-2023-02-16)
#### 🚀 Features[](#-features-11)
* Add `log()` method to `BuildClient`
### [1.6.2](https://github.com/apify/apify-client-python/releases/tag/v1.6.2) (2023-01-08)[](#162-2023-01-08)
#### Chore[](#chore-1)
* Relative imports were replaced for absolute imports
### [1.6.1](https://github.com/apify/apify-client-python/releases/tag/v1.6.1) (2023-12-11)[](#161-2023-12-11)
#### 🐛 Bug Fixes[](#-bug-fixes-11)
* Fix `_BaseHTTPClient._parse_params()` method to ensure correct conversion of API list parameters
### [1.6.0](https://github.com/apify/apify-client-python/releases/tag/v1.6.0) (2023-11-16)[](#160-2023-11-16)
#### Chore[](#chore-2)
* Migrate from Autopep8 and Flake8 to Ruff
### [1.5.0](https://github.com/apify/apify-client-python/releases/tag/v1.5.0) (2023-10-18)[](#150-2023-10-18)
#### 🚀 Features[](#-features-12)
* Add support for Python 3.12
* Add DELETE to Actor runs
* Add DELETE to Actor builds
#### Chore[](#chore-3)
* Rewrite documentation publication to use Docusaurus
* Remove PR Toolkit workflow
### [1.4.1](https://github.com/apify/apify-client-python/releases/tag/v1.4.1) (2023-09-06)[](#141-2023-09-06)
#### 🚀 Features[](#-features-13)
* Add `StoreCollectionClient` for listing Actors in the Apify Store
* Add support for specifying the `max_items` parameter for pay-per result Actors and their runs
#### Chore[](#chore-4)
* Improve logging of HTTP requests
* Remove `pytest-randomly` Pytest plugin
### [1.4.0](https://github.com/apify/apify-client-python/releases/tag/v1.4.0) (2023-08-23)[](#140-2023-08-23)
#### 🚀 Features[](#-features-14)
* Add `RunClient.reboot` method to reboot Actor runs
#### Chore[](#chore-5)
* Simplify code via `flake8-simplify`
* Unify indentation in configuration files
### [1.3.1](https://github.com/apify/apify-client-python/releases/tag/v1.3.1) (2023-07-28)[](#131-2023-07-28)
#### Chore[](#chore-6)
* Start importing general constants and utilities from the `apify-shared` library
### [1.3.0](https://github.com/apify/apify-client-python/releases/tag/v1.3.0) (2023-07-24)[](#130-2023-07-24)
#### 🚀 Features[](#-features-15)
* Add `list_and_lock_head`, `delete_request_lock`, `prolong_request_lock` methods to `RequestQueueClient`
* Add `batch_add_requests`, `batch_delete_requests`, `list_requests` methods `RequestQueueClient`
### [1.2.2](https://github.com/apify/apify-client-python/releases/tag/v1.2.2) (2023-05-31)[](#122-2023-05-31)
#### 🐛 Bug Fixes[](#-bug-fixes-12)
* Fix encoding webhook lists in request parameters
### [1.2.1](https://github.com/apify/apify-client-python/releases/tag/v1.2.1) (2023-05-23)[](#121-2023-05-23)
#### 🐛 Bug Fixes[](#-bug-fixes-13)
* Relax dependency requirements to improve compatibility with other libraries
### [1.2.0](https://github.com/apify/apify-client-python/releases/tag/v1.2.0) (2023-05-23)[](#120-2023-05-23)
#### 🚀 Features[](#-features-16)
* Add option to change the build, memory limit and timeout when resurrecting a run
#### Chore[](#chore-7)
* Update dependencies
### [1.1.1](https://github.com/apify/apify-client-python/releases/tag/v1.1.1) (2023-05-05)[](#111-2023-05-05)
#### Chore[](#chore-8)
* Change GitHub workflows to use new secrets
### [1.1.0](https://github.com/apify/apify-client-python/releases/tag/v1.1.0) (2023-05-05)[](#110-2023-05-05)
#### 🚀 Features[](#-features-17)
* Add support for `is_status_message_terminal` flag in Actor run status message update
#### Chore[](#chore-9)
* Switch from `setup.py` to `pyproject.toml` for specifying project setup
### [1.0.0](https://github.com/apify/apify-client-python/releases/tag/v1.0.0) (2023-03-13)[](#100-2023-03-13)
#### Breaking changes[](#breaking-changes)
* Drop support for Python 3.7, add support for Python 3.11
* Unify methods for streaming resources
* Switch underlying HTTP library from `requests` to `httpx`
#### 🚀 Features[](#-features-18)
* Add support for asynchronous usage via `ApifyClientAsync`
* Add configurable socket timeout for requests to the Apify API
* Add `py.typed` file to signal type checkers that this package is typed
* Add method to update status message for a run
* Add option to set up webhooks for Actor builds
* Add logger with basic debugging info
* Add support for `schema` parameter in `get_or_create` method for datasets and key-value stores
* Add support for `title` parameter in task and schedule methods
* Add `x-apify-workflow-key` header support
* Add support for `flatten` and `view` parameters in dataset items methods
* Add support for `origin` parameter in Actor/task run methods
* Add clients for Actor version environment variables
#### 🐛 Bug Fixes[](#-bug-fixes-14)
* Disallow `NaN` and `Infinity` values in JSONs sent to the Apify API
#### Chore[](#chore-10)
* Simplify retrying with exponential backoff
* Improve checks for "not found" errors
* Simplify flake8 config
* Update development dependencies
* Simplify development scripts
* Update GitHub Actions versions to fix deprecations
* Unify unit test style
* Unify preparing resource representation
* Update output management in GitHub Workflows to fix deprecations
* Improve type hints across codebase
* Add option to manually publish the package with a workflow dispatch
* Add `pre-commit` to run code quality checks before committing
* Convert `unittest`-style tests to `pytest`-style tests
* Backport project setup improvements from `apify-sdk-python`
### [0.6.0](https://github.com/apify/apify-client-python/releases/tag/v0.6.0) (2022-06-27)[](#060-2022-06-27)
#### Removed[](#removed)
* Drop support for single-file Actors
#### Chore[](#chore-11)
* Update dependencies
* Fix some lint issues in shell scripts and `setup.py`
* Add Python 3.10 to unit test roster
### [0.5.0](https://github.com/apify/apify-client-python/releases/tag/v0.5.0) (2021-09-16)[](#050-2021-09-16)
#### Changed[](#changed)
* Improve retrying broken API server connections
#### 🐛 Bug Fixes[](#-bug-fixes-15)
* Fix timeout value in actively waiting for a run to finish
#### Chore[](#chore-12)
* Update development dependencies
### [0.4.0](https://github.com/apify/apify-client-python/releases/tag/v0.4.0) (2021-09-07)[](#040-2021-09-07)
#### Changed[](#changed-1)
* Improve handling of `Enum` arguments
* Improve support for storing more data types in key-value stores
#### 🐛 Bug Fixes[](#-bug-fixes-16)
* Fix values of some `ActorJobStatus` `Enum` members
### [0.3.0](https://github.com/apify/apify-client-python/releases/tag/v0.3.0) (2021-08-26)[](#030-2021-08-26)
#### 🚀 Features[](#-features-19)
* Add the `test()` method to the webhook client
* Add support for indicating the pagination direction in the `ListPage` objects
#### Changed[](#changed-2)
* Improve support for storing more data types in datasets
#### 🐛 Bug Fixes[](#-bug-fixes-17)
* Fix return type in the `DatasetClient.list_items()` method docs
#### Chore[](#chore-13)
* Add human-friendly names to the jobs in Github Action workflows
* Update development dependencies
### [0.2.0](https://github.com/apify/apify-client-python/releases/tag/v0.2.0) (2021-08-09)[](#020-2021-08-09)
#### 🚀 Features[](#-features-20)
* Add the `gracefully` parameter to the "Abort run" method
#### Changed[](#changed-3)
* Replace `base_url` with `api_url` in the client constructor to enable easier passing of the API server url from environment variables available to Actors on the Apify platform
#### Chore[](#chore-14)
* Change tags for Actor images with this client on Docker Hub to be aligned with the Apify SDK Node.js images
* Update the `requests` dependency to 2.26.0
* Update development dependencies
### [0.1.0](https://github.com/apify/apify-client-python/releases/tag/v0.1.0) (2021-08-02)[](#010-2021-08-02)
#### Changed[](#changed-4)
* Methods using specific option values for arguments now use well-defined and documented `Enum`s for those arguments instead of generic strings
* Make the submodule `apify_client.consts` containing those `Enum`s available
#### Chore[](#chore-15)
* Update development dependencies
* Enforce unified use of single quotes and double quotes
* Add repository dispatch to build Actor images with this client when publishing a new version
### [0.0.1](https://github.com/apify/apify-client-python/releases/tag/v0.0.1) (2021-05-13)[](#001-2021-05-13)
* Initial release of the package.
---
# Asyncio support
Copy for LLM
The package provides an asynchronous version of the client, [`ApifyClientAsync`](https://docs.apify.com/api/client/python/api/client/python/reference/class/ApifyClientAsync.md), which allows you to interact with the Apify API using Python's standard async/await syntax. This enables you to perform non-blocking operations, see the Python [asyncio documentation](https://docs.python.org/3/library/asyncio-task.html) for more information.
The following example demonstrates how to run an Actor asynchronously and stream its logs while it is running:
import asyncio
from apify_client import ApifyClientAsync
TOKEN = 'MY-APIFY-TOKEN'
async def main() -> None: apify_client = ApifyClientAsync(TOKEN) actor_client = apify_client.actor('my-actor-id')
# Start the Actor and get the run ID
run_result = await actor_client.start()
run_client = apify_client.run(run_result['id'])
log_client = run_client.log()
# Stream the logs
async with log_client.stream() as async_log_stream:
if async_log_stream:
async for bytes_chunk in async_log_stream.aiter_bytes():
print(bytes_chunk)
if name == 'main': asyncio.run(main())
---
# Convenience methods
Copy for LLM
The Apify client provides several convenience methods to handle actions that the API alone cannot perform efficiently, such as waiting for an Actor run to finish without running into network timeouts. These methods simplify common tasks and enhance the usability of the client.
* [`ActorClient.call`](https://docs.apify.com/api/client/python/api/client/python/reference/class/ActorClient.md#call) - Starts an Actor and waits for it to finish, handling network timeouts internally.
* [`ActorClient.start`](https://docs.apify.com/api/client/python/api/client/python/reference/class/ActorClient.md#start) - Explicitly waits for an Actor run to finish with customizable timeouts.
Additionally, storage-related resources offer flexible options for data retrieval:
* [Key-value store](https://docs.apify.com/platform/storage/key-value-store) records can be retrieved as objects, buffers, or streams.
* [Dataset](https://docs.apify.com/platform/storage/dataset) items can be fetched as individual objects, serialized data, or iterated asynchronously.
- Async client
- Sync client
from apify_client import ApifyClientAsync
TOKEN = 'MY-APIFY-TOKEN'
async def main() -> None: apify_client = ApifyClientAsync(TOKEN) actor_client = apify_client.actor('username/actor-name')
# Start an Actor and waits for it to finish
finished_actor_run = await actor_client.call()
# Starts an Actor and waits maximum 60s (1 minute) for the finish
actor_run = await actor_client.start(wait_for_finish=60)
from apify_client import ApifyClient
TOKEN = 'MY-APIFY-TOKEN'
def main() -> None: apify_client = ApifyClient(TOKEN) actor_client = apify_client.actor('username/actor-name')
# Start an Actor and waits for it to finish
finished_actor_run = actor_client.call()
# Starts an Actor and waits maximum 60s (1 minute) for the finish
actor_run = actor_client.start(wait_for_finish=60)
---
# Error handling
Copy for LLM
When you use the Apify client, it automatically extracts all relevant data from the endpoint and returns it in the expected format. Date strings, for instance, are seamlessly converted to Python `datetime.datetime` objects. If an error occurs, the client raises an [`ApifyApiError`](https://docs.apify.com/api/client/python/api/client/python/reference/class/ApifyApiError.md). This exception wraps the raw JSON errors returned by the API and provides additional context, making it easier to debug any issues that arise.
* Async client
* Sync client
from apify_client import ApifyClientAsync
TOKEN = 'MY-APIFY-TOKEN'
async def main() -> None: apify_client = ApifyClientAsync(TOKEN)
try:
# Try to list items from non-existing dataset
dataset_client = apify_client.dataset('not-existing-dataset-id')
dataset_items = (await dataset_client.list_items()).items
except Exception as ApifyApiError:
# The exception is an instance of ApifyApiError
print(ApifyApiError)
from apify_client import ApifyClient
TOKEN = 'MY-APIFY-TOKEN'
def main() -> None: apify_client = ApifyClient(TOKEN)
try:
# Try to list items from non-existing dataset
dataset_client = apify_client.dataset('not-existing-dataset-id')
dataset_items = dataset_client.list_items().items
except Exception as ApifyApiError:
# The exception is an instance of ApifyApiError
print(ApifyApiError)
---
# Logging
Copy for LLM
The library logs useful debug information to the `apify_client` logger whenever it sends requests to the Apify API. You can configure this logger to print debug information to the standard output by adding a handler:
import logging
Configure the Apify client logger
apify_client_logger = logging.getLogger('apify_client') apify_client_logger.setLevel(logging.DEBUG) apify_client_logger.addHandler(logging.StreamHandler())
The log records include additional properties, provided via the extra argument, which can be helpful for debugging. Some of these properties are:
* `attempt` - Number of retry attempts for the request.
* `status_code` - HTTP status code of the response.
* `url` - URL of the API endpoint being called.
* `client_method` - Method name of the client that initiated the request.
* `resource_id` - Identifier of the resource being accessed.
To display these additional properties in the log output, you need to use a custom log formatter. Here's a basic example:
import logging
Configure the Apify client logger
apify_client_logger = logging.getLogger('apify_client') apify_client_logger.setLevel(logging.DEBUG) apify_client_logger.addHandler(logging.StreamHandler())
Create a custom logging formatter
formatter = logging.Formatter( '%(asctime)s - %(name)s - %(levelname)s - %(message)s - ' '%(attempt)s - %(status_code)s - %(url)s' ) handler = logging.StreamHandler() handler.setFormatter(formatter) apify_client_logger.addHandler(handler)
For more information on creating and using custom log formatters, refer to the official Python [logging documentation](https://docs.python.org/3/howto/logging.html#formatters).
---
# Nested clients
Copy for LLM
In some cases, the Apify client provides nested clients to simplify working with related collections. For example, you can easily manage the runs of a specific Actor without having to construct multiple endpoints or client instances manually.
* Async client
* Sync client
from apify_client import ApifyClientAsync
TOKEN = 'MY-APIFY-TOKEN'
async def main() -> None: apify_client = ApifyClientAsync(TOKEN)
actor_client = apify_client.actor('username/actor-name')
runs_client = actor_client.runs()
# List the last 10 runs of the Actor
actor_runs = (await runs_client.list(limit=10, desc=True)).items
# Select the last run of the Actor that finished with a SUCCEEDED status
last_succeeded_run_client = actor_client.last_run(status='SUCCEEDED') # type: ignore[arg-type]
# Get dataset
actor_run_dataset_client = last_succeeded_run_client.dataset()
# Fetch items from the run's dataset
dataset_items = (await actor_run_dataset_client.list_items()).items
from apify_client import ApifyClient
TOKEN = 'MY-APIFY-TOKEN'
def main() -> None: apify_client = ApifyClient(TOKEN)
actor_client = apify_client.actor('username/actor-name')
runs_client = actor_client.runs()
# List the last 10 runs of the Actor
actor_runs = runs_client.list(limit=10, desc=True).items
# Select the last run of the Actor that finished with a SUCCEEDED status
last_succeeded_run_client = actor_client.last_run(status='SUCCEEDED') # type: ignore[arg-type]
# Get dataset
actor_run_dataset_client = last_succeeded_run_client.dataset()
# Fetch items from the run's dataset
dataset_items = actor_run_dataset_client.list_items().items
This direct access to [Dataset](https://docs.apify.com/platform/storage/dataset) (and other storage resources) from the [`RunClient`](https://docs.apify.com/api/client/python/api/client/python/reference/class/RunClient.md) is especially convenient when used alongside the [`ActorClient.last_run`](https://docs.apify.com/api/client/python/api/client/python/reference/class/ActorClient.md#last_run) method.
---
# Pagination
Copy for LLM
Most methods named `list` or `list_something` in the Apify client return a [`ListPage`](https://docs.apify.com/api/client/python/api/client/python/reference/class/ListPage.md) object. This object provides a consistent interface for working with paginated data and includes the following properties:
* `items` - The main results you're looking for.
* `total` - The total number of items available.
* `offset` - The starting point of the current page.
* `count` - The number of items in the current page.
* `limit` - The maximum number of items per page.
Some methods, such as `list_keys` or `list_head`, paginate differently. Regardless, the primary results are always stored under the items property, and the limit property can be used to control the number of results returned.
The following example demonstrates how to fetch all items from a dataset using pagination:
* Async client
* Sync client
from apify_client import ApifyClientAsync
TOKEN = 'MY-APIFY-TOKEN'
async def main() -> None: apify_client = ApifyClientAsync(TOKEN)
# Initialize the dataset client
dataset_client = apify_client.dataset('dataset-id')
# Define the pagination parameters
limit = 1000 # Number of items per page
offset = 0 # Starting offset
all_items = [] # List to store all fetched items
while True:
# Fetch a page of items
response = await dataset_client.list_items(limit=limit, offset=offset)
items = response.items
total = response.total
print(f'Fetched {len(items)} items')
# Add the fetched items to the complete list
all_items.extend(items)
# Exit the loop if there are no more items to fetch
if offset + limit >= total:
break
# Increment the offset for the next page
offset += limit
print(f'Overall fetched {len(all_items)} items')
from apify_client import ApifyClient
TOKEN = 'MY-APIFY-TOKEN'
def main() -> None: apify_client = ApifyClient(TOKEN)
# Initialize the dataset client
dataset_client = apify_client.dataset('dataset-id')
# Define the pagination parameters
limit = 1000 # Number of items per page
offset = 0 # Starting offset
all_items = [] # List to store all fetched items
while True:
# Fetch a page of items
response = dataset_client.list_items(limit=limit, offset=offset)
items = response.items
total = response.total
print(f'Fetched {len(items)} items')
# Add the fetched items to the complete list
all_items.extend(items)
# Exit the loop if there are no more items to fetch
if offset + limit >= total:
break
# Increment the offset for the next page
offset += limit
print(f'Overall fetched {len(all_items)} items')
The [`ListPage`](https://docs.apify.com/api/client/python/api/client/python/reference/class/ListPage.md) interface offers several key benefits. Its consistent structure ensures predictable results for most `list` methods, providing a uniform way to work with paginated data. It also offers flexibility, allowing you to customize the `limit` and `offset` parameters to control data fetching according to your needs. Additionally, it provides scalability, enabling you to efficiently handle large datasets through pagination. This approach ensures efficient data retrieval while keeping memory usage under control, making it ideal for managing and processing large collections.
---
# Retries
Copy for LLM
When dealing with network communication, failures can occasionally occur. The Apify client automatically retries requests that fail due to:
* Network errors
* Internal errors in the Apify API (HTTP status codes 500 and above)
* Rate limit errors (HTTP status code 429)
By default, the client will retry a failed request up to 8 times. The retry intervals use an exponential backoff strategy:
* The first retry occurs after approximately 500 milliseconds.
* The second retry occurs after approximately 1,000 milliseconds, and so on.
You can customize this behavior using the following options in the [`ApifyClient`](https://docs.apify.com/api/client/python/api/client/python/reference/class/ApifyClient.md) constructor:
* `max_retries`: Defines the maximum number of retry attempts.
* `min_delay_between_retries_millis`: Sets the minimum delay between retries (in milliseconds).
Retries with exponential backoff are a common strategy for handling network errors. They help to reduce the load on the server and increase the chances of a successful request.
* Async client
* Sync client
from apify_client import ApifyClientAsync
TOKEN = 'MY-APIFY-TOKEN'
async def main() -> None: apify_client = ApifyClientAsync( token=TOKEN, max_retries=8, min_delay_between_retries_millis=500, # 0.5s timeout_secs=360, # 6 mins )
from apify_client import ApifyClient
TOKEN = 'MY-APIFY-TOKEN'
async def main() -> None: apify_client = ApifyClient( token=TOKEN, max_retries=8, min_delay_between_retries_millis=500, # 0.5s timeout_secs=360, # 6 mins )
---
# Single and collection clients
Copy for LLM
The Apify client interface is designed to be consistent and intuitive across all of its components. When you call specific methods on the main client, you create specialized clients to manage individual API resources. There are two main types of clients:
* [`ActorClient`](https://docs.apify.com/api/client/python/api/client/python/reference/class/ActorClient.md) - Manages a single resource.
* [`ActorCollectionClient`](https://docs.apify.com/api/client/python/api/client/python/reference/class/ActorCollectionClient.md) - Manages a collection of resources.
- Async client
- Sync client
from apify_client import ApifyClientAsync
TOKEN = 'MY-APIFY-TOKEN'
async def main() -> None: apify_client = ApifyClientAsync(TOKEN)
# Collection clients do not require a parameter
actor_collection_client = apify_client.actors()
# Create an Actor with the name: my-actor
my_actor = await actor_collection_client.create(name='my-actor')
# List all of your Actors
actor_list = (await actor_collection_client.list()).items
from apify_client import ApifyClient
TOKEN = 'MY-APIFY-TOKEN'
def main() -> None: apify_client = ApifyClient(TOKEN)
# Collection clients do not require a parameter
actor_collection_client = apify_client.actors()
# Create an Actor with the name: my-actor
my_actor = actor_collection_client.create(name='my-actor')
# List all of your Actors
actor_list = actor_collection_client.list().items
The resource ID can be the resource's `id` or a combination of `username/resource-name`.
* Async client
* Sync client
from apify_client import ApifyClientAsync
TOKEN = 'MY-APIFY-TOKEN'
async def main() -> None: apify_client = ApifyClientAsync(TOKEN)
# Resource clients accept an ID of the resource
actor_client = apify_client.actor('username/actor-name')
# Fetch the 'username/actor-name' object from the API
my_actor = await actor_client.get()
# Start the run of 'username/actor-name' and return the Run object
my_actor_run = await actor_client.start()
from apify_client import ApifyClient
TOKEN = 'MY-APIFY-TOKEN'
def main() -> None: apify_client = ApifyClient(TOKEN)
# Resource clients accept an ID of the resource
actor_client = apify_client.actor('username/actor-name')
# Fetch the 'username/actor-name' object from the API
my_actor = actor_client.get()
# Start the run of 'username/actor-name' and return the Run object
my_actor_run = actor_client.start()
By utilizing the appropriate collection or resource client, you can simplify how you interact with the Apify API.
---
# Streaming resources
Copy for LLM
Certain resources, such as dataset items, key-value store records, and logs, support streaming directly from the Apify API. This allows you to process large resources incrementally without downloading them entirely into memory, making it ideal for handling large or continuously updated data.
Supported streaming methods:
* [`DatasetClient.stream_items`](https://docs.apify.com/api/client/python/api/client/python/reference/class/DatasetClient.md#stream_items) - Stream dataset items incrementally.
* [`KeyValueStoreClient.stream_record`](https://docs.apify.com/api/client/python/api/client/python/reference/class/KeyValueStoreClient.md#stream_record) - Stream key-value store records as raw data.
* [`LogClient.stream`](https://docs.apify.com/api/client/python/api/client/python/reference/class/LogClient.md#stream) - Stream logs in real time.
These methods return a raw, context-managed `impit.Response` object. The response must be consumed within a with block to ensure that the connection is closed automatically, preventing memory leaks or unclosed connections.
The following example demonstrates how to stream the logs of an Actor run incrementally:
* Async client
* Sync client
from apify_client import ApifyClientAsync
TOKEN = 'MY-APIFY-TOKEN'
async def main() -> None: apify_client = ApifyClientAsync(TOKEN) run_client = apify_client.run('MY-RUN-ID') log_client = run_client.log()
async with log_client.stream() as log_stream:
if log_stream:
async for bytes_chunk in log_stream.aiter_bytes():
print(bytes_chunk)
from apify_client import ApifyClient
TOKEN = 'MY-APIFY-TOKEN'
def main() -> None: apify_client = ApifyClient(TOKEN) run_client = apify_client.run('MY-RUN-ID') log_client = run_client.log()
with log_client.stream() as log_stream:
if log_stream:
for bytes_chunk in log_stream.iter_bytes():
print(bytes_chunk)
Streaming offers several key benefits. It ensures memory efficiency by loading only a small portion of the resource into memory at any given time, making it ideal for handling large data. It enables real-time processing, allowing you to start working with data immediately as it is received. With automatic resource management, using the `with` statement ensures that connections are properly closed, preventing memory leaks or unclosed connections. This approach is valuable for processing large logs, datasets, or files on the fly without the need to download them entirely.
---
# Integration with data libraries
Copy for LLM
The Apify client for Python seamlessly integrates with data analysis libraries like [Pandas](https://pandas.pydata.org/). This allows you to load dataset items directly into a Pandas [DataFrame](https://pandas.pydata.org/docs/reference/api/pandas.DataFrame.html) for efficient manipulation and analysis. Pandas provides robust data structures and tools for handling large datasets, making it a powerful addition to your Apify workflows.
The following example demonstrates how to retrieve items from the most recent dataset of an Actor run and load them into a Pandas DataFrame for further analysis:
* Async client
* Sync client
import asyncio
import pandas as pd
from apify_client import ApifyClientAsync
TOKEN = 'MY-APIFY-TOKEN'
async def main() -> None: # Initialize the Apify client apify_client = ApifyClientAsync(token=TOKEN) actor_client = apify_client.actor('apify/web-scraper') run_client = actor_client.last_run() dataset_client = run_client.dataset()
# Load items from last dataset run
dataset_data = await dataset_client.list_items()
# Pass dataset items to Pandas DataFrame
data_frame = pd.DataFrame(dataset_data.items)
print(data_frame.info)
if name == 'main': asyncio.run(main())
import pandas as pd
from apify_client import ApifyClient
TOKEN = 'MY-APIFY-TOKEN'
def main() -> None: # Initialize the Apify client apify_client = ApifyClient(token=TOKEN) actor_client = apify_client.actor('apify/web-scraper') run_client = actor_client.last_run() dataset_client = run_client.dataset()
# Load items from last dataset run
dataset_data = dataset_client.list_items()
# Pass dataset items to Pandas DataFrame
data_frame = pd.DataFrame(dataset_data.items)
print(data_frame.info)
if name == 'main': main()
---
# Manage tasks for reusable input
Copy for LLM
When you need to run multiple inputs with the same Actor, the most convenient approach is to create multiple [tasks](https://docs.apify.com/platform/actors/running/tasks), each with different input configurations. Task inputs are stored on the Apify platform when the task is created, allowing you to reuse them easily.
The following example demonstrates how to create tasks for the `apify/instagram-hashtag-scraper` Actor with different inputs, manage task clients, and execute them asynchronously:
* Async client
* Sync client
import asyncio
from apify_client import ApifyClientAsync from apify_client.clients.resource_clients import TaskClientAsync
TOKEN = 'MY-APIFY-TOKEN' HASHTAGS = ['zebra', 'lion', 'hippo']
async def run_apify_task(client: TaskClientAsync) -> dict: result = await client.call() return result or {}
async def main() -> None: apify_client = ApifyClientAsync(token=TOKEN)
# Create Apify tasks
apify_tasks = list[dict]()
apify_tasks_client = apify_client.tasks()
for hashtag in HASHTAGS:
apify_task = await apify_tasks_client.create(
name=f'hashtags-{hashtag}',
actor_id='apify/instagram-hashtag-scraper',
task_input={'hashtags': [hashtag], 'resultsLimit': 20},
memory_mbytes=1024,
)
apify_tasks.append(apify_task)
print('Tasks created:', apify_tasks)
# Create Apify task clients
apify_task_clients = list[TaskClientAsync]()
for apify_task in apify_tasks:
task_id = apify_task['id']
apify_task_client = apify_client.task(task_id)
apify_task_clients.append(apify_task_client)
print('Task clients created:', apify_task_clients)
# Execute Apify tasks
run_apify_tasks = [run_apify_task(client) for client in apify_task_clients]
task_run_results = await asyncio.gather(*run_apify_tasks)
print('Task results:', task_run_results)
if name == 'main': asyncio.run(main())
from apify_client import ApifyClient from apify_client.clients.resource_clients import TaskClient
TOKEN = 'MY-APIFY-TOKEN' HASHTAGS = ['zebra', 'lion', 'hippo']
def run_apify_task(client: TaskClient) -> dict: result = client.call() return result or {}
def main() -> None: apify_client = ApifyClient(token=TOKEN)
# Create Apify tasks
apify_tasks = list[dict]()
apify_tasks_client = apify_client.tasks()
for hashtag in HASHTAGS:
apify_task = apify_tasks_client.create(
name=f'hashtags-{hashtag}',
actor_id='apify/instagram-hashtag-scraper',
task_input={'hashtags': [hashtag], 'resultsLimit': 20},
memory_mbytes=1024,
)
apify_tasks.append(apify_task)
print('Tasks created:', apify_tasks)
# Create Apify task clients
apify_task_clients = list[TaskClient]()
for apify_task in apify_tasks:
task_id = apify_task['id']
apify_task_client = apify_client.task(task_id)
apify_task_clients.append(apify_task_client)
print('Task clients created:', apify_task_clients)
# Execute Apify tasks
task_run_results = list[dict]()
for client in apify_task_clients:
result = run_apify_task(client)
task_run_results.append(result)
print('Task results:', task_run_results)
if name == 'main': main()
---
# Passing input to Actor
Copy for LLM
The efficient way to run an Actor and retrieve results is by passing input data directly to the `call` method. This method allows you to configure the Actor's input, execute it, and either get a reference to the running Actor or wait for its completion.
The following example demonstrates how to pass input to the `apify/instagram-hashtag-scraper` Actor and wait for it to finish.
* Async client
* Sync client
import asyncio
from apify_client import ApifyClientAsync
TOKEN = 'MY-APIFY-TOKEN'
async def main() -> None: # Client initialization with the API token apify_client = ApifyClientAsync(token=TOKEN)
# Get the Actor client
actor_client = apify_client.actor('apify/instagram-hashtag-scraper')
input_data = {'hashtags': ['rainbow'], 'resultsLimit': 20}
# Run the Actor and wait for it to finish up to 60 seconds.
# Input is not persisted for next runs.
run_result = await actor_client.call(run_input=input_data, timeout_secs=60)
if name == 'main': asyncio.run(main())
from apify_client import ApifyClient
TOKEN = 'MY-APIFY-TOKEN'
def main() -> None: # Client initialization with the API token apify_client = ApifyClient(token=TOKEN)
# Get the Actor client
actor_client = apify_client.actor('apify/instagram-hashtag-scraper')
input_data = {'hashtags': ['rainbow'], 'resultsLimit': 20}
# Run the Actor and wait for it to finish up to 60 seconds.
# Input is not persisted for next runs.
run_result = actor_client.call(run_input=input_data, timeout_secs=60)
if name == 'main': main()
---
# Retrieve Actor data
Copy for LLM
Actor output data is stored in [datasets](https://docs.apify.com/platform/storage/dataset), which can be retrieved from individual Actor runs. Dataset items support pagination for efficient retrieval, and multiple datasets can be merged into a single dataset for further analysis. This merged dataset can then be exported into various formats such as CSV, JSON, XLSX, or XML. Additionally, [integrations](https://docs.apify.com/platform/integrations) provide powerful tools to automate data workflows.
The following example demonstrates how to fetch datasets from an Actor's runs, paginate through their items, and merge them into a single dataset for unified analysis:
* Async client
* Sync client
import asyncio
from apify_client import ApifyClientAsync
TOKEN = 'MY-APIFY-TOKEN'
async def main() -> None: # Client initialization with the API token apify_client = ApifyClientAsync(token=TOKEN) actor_client = apify_client.actor('apify/instagram-hashtag-scraper') runs_client = actor_client.runs()
# See pagination to understand how to get more datasets
actor_datasets = await runs_client.list(limit=20)
datasets_client = apify_client.datasets()
merging_dataset = await datasets_client.get_or_create(name='merge-dataset')
for dataset_item in actor_datasets.items:
# Dataset items can be handled here. Dataset items can be paginated
dataset_client = apify_client.dataset(dataset_item['id'])
dataset_items = await dataset_client.list_items(limit=1000)
# Items can be pushed to single dataset
merging_dataset_client = apify_client.dataset(merging_dataset['id'])
await merging_dataset_client.push_items(dataset_items.items)
# ...
if name == 'main': asyncio.run(main())
from apify_client import ApifyClient
TOKEN = 'MY-APIFY-TOKEN'
def main() -> None: # Client initialization with the API token apify_client = ApifyClient(token=TOKEN) actor_client = apify_client.actor('apify/instagram-hashtag-scraper') runs_client = actor_client.runs()
# See pagination to understand how to get more datasets
actor_datasets = runs_client.list(limit=20)
datasets_client = apify_client.datasets()
merging_dataset = datasets_client.get_or_create(name='merge-dataset')
for dataset_item in actor_datasets.items:
# Dataset items can be handled here. Dataset items can be paginated
dataset_client = apify_client.dataset(dataset_item['id'])
dataset_items = dataset_client.list_items(limit=1000)
# Items can be pushed to single dataset
merging_dataset_client = apify_client.dataset(merging_dataset['id'])
merging_dataset_client.push_items(dataset_items.items)
# ...
if name == 'main': main()
---
# Getting started
Copy for LLM
This guide will walk you through how to use the [Apify Client for Python](https://github.com/apify/apify-client-python) to run [Actors](https://apify.com/actors) on the [Apify platform](https://docs.apify.com/platform), provide input to them, and retrieve results from their datasets. You'll learn the basics of running serverless programs (we're calling them Actors) and managing their output efficiently.
## Running your first Actor[](#running-your-first-actor)
To start an Actor, you need its ID (e.g., `john-doe/my-cool-actor`) and an API token. The Actor's ID is a combination of the username and the Actor owner's username. Use the [`ActorClient`](https://docs.apify.com/api/client/python/api/client/python/reference/class/ActorClient.md) to run the Actor and wait for it to complete. You can run both your own Actors and [Actors from Apify store](https://docs.apify.com/platform/actors/running/actors-in-store).
* Async client
* Sync client
from apify_client import ApifyClientAsync
You can find your API token at https://console.apify.com/settings/integrations.
TOKEN = 'MY-APIFY-TOKEN'
async def main() -> None: apify_client = ApifyClientAsync(TOKEN)
# Start an Actor and wait for it to finish.
actor_client = apify_client.actor('john-doe/my-cool-actor')
call_result = await actor_client.call()
if call_result is None:
print('Actor run failed.')
return
# Fetch results from the Actor run's default dataset.
dataset_client = apify_client.dataset(call_result['defaultDatasetId'])
list_items_result = await dataset_client.list_items()
print(f'Dataset: {list_items_result}')
from apify_client import ApifyClient
You can find your API token at https://console.apify.com/settings/integrations.
TOKEN = 'MY-APIFY-TOKEN'
def main() -> None: apify_client = ApifyClient(TOKEN)
# Start an Actor and wait for it to finish.
actor_client = apify_client.actor('john-doe/my-cool-actor')
call_result = actor_client.call()
if call_result is None:
print('Actor run failed.')
return
# Fetch results from the Actor run's default dataset.
dataset_client = apify_client.dataset(call_result['defaultDatasetId'])
list_items_result = dataset_client.list_items()
print(f'Dataset: {list_items_result}')
## Providing input to Actor[](#providing-input-to-actor)
Actors often require input, such as URLs to scrape, search terms, or other configuration data. You can pass input as a JSON object when starting the Actor using the [`ActorClient.call`](https://docs.apify.com/api/client/python/api/client/python/reference/class/ActorClient.md#call) method. Actors respect the input schema defined in the Actor's [input schema](https://docs.apify.com/platform/actors/development/actor-definition/input-schema).
* Async client
* Sync client
from apify_client import ApifyClientAsync
TOKEN = 'MY-APIFY-TOKEN'
async def main() -> None: apify_client = ApifyClientAsync(TOKEN) actor_client = apify_client.actor('username/actor-name')
# Define the input for the Actor.
run_input = {
'some': 'input',
}
# Start an Actor and waits for it to finish.
call_result = await actor_client.call(run_input=run_input)
from apify_client import ApifyClient
TOKEN = 'MY-APIFY-TOKEN'
def main() -> None: apify_client = ApifyClient(TOKEN) actor_client = apify_client.actor('username/actor-name')
# Define the input for the Actor.
run_input = {
'some': 'input',
}
# Start an Actor and waits for it to finish.
call_result = actor_client.call(run_input=run_input)
## Getting results from the dataset[](#getting-results-from-the-dataset)
To get the results from the dataset, you can use the [`DatasetClient`](https://docs.apify.com/api/client/python/api/client/python/reference/class/DatasetClient.md) ([`ApifyClient.dataset`](https://docs.apify.com/api/client/python/api/client/python/reference/class/ApifyClient.md#dataset) ) and [`DatasetClient.list_items`](https://docs.apify.com/api/client/python/api/client/python/reference/class/DatasetClient.md#list_items) method. You need to pass the dataset ID to define which dataset you want to access. You can get the dataset ID from the Actor's run dictionary (represented by `defaultDatasetId`).
* Async client
* Sync client
from apify_client import ApifyClientAsync
TOKEN = 'MY-APIFY-TOKEN'
async def main() -> None: apify_client = ApifyClientAsync(TOKEN) actor_client = apify_client.actor('username/actor-name')
# Define the input for the Actor.
run_input = {
'some': 'input',
}
# Start an Actor and waits for it to finish.
call_result = await actor_client.call(run_input=run_input)
from apify_client import ApifyClient
TOKEN = 'MY-APIFY-TOKEN'
def main() -> None: apify_client = ApifyClient(TOKEN) actor_client = apify_client.actor('username/actor-name')
# Define the input for the Actor.
run_input = {
'some': 'input',
}
# Start an Actor and waits for it to finish.
call_result = actor_client.call(run_input=run_input)
Dataset access
Running an Actor might take time, depending on the Actor's complexity and the amount of data it processes. If you want only to get data and have an immediate response you should access the existing dataset of the finished [Actor run](https://docs.apify.com/platform/actors/running/runs-and-builds#runs).
---
# Introduction
Copy for LLM
The [Apify client for Python](https://github.com/apify/apify-client-python) is the official library to access the [Apify REST API](https://docs.apify.com/api/v2) from your Python applications. It provides useful features like automatic retries and convenience functions that improve the experience of using the Apify API. All requests and responses (including errors) are encoded in JSON format with UTF-8 encoding. The client provides both synchronous and asynchronous interfaces.
* Async client
* Sync client
from apify_client import ApifyClientAsync
You can find your API token at https://console.apify.com/settings/integrations.
TOKEN = 'MY-APIFY-TOKEN'
async def main() -> None: apify_client = ApifyClientAsync(TOKEN)
# Start an Actor and wait for it to finish.
actor_client = apify_client.actor('john-doe/my-cool-actor')
call_result = await actor_client.call()
if call_result is None:
print('Actor run failed.')
return
# Fetch results from the Actor run's default dataset.
dataset_client = apify_client.dataset(call_result['defaultDatasetId'])
list_items_result = await dataset_client.list_items()
print(f'Dataset: {list_items_result}')
from apify_client import ApifyClient
You can find your API token at https://console.apify.com/settings/integrations.
TOKEN = 'MY-APIFY-TOKEN'
def main() -> None: apify_client = ApifyClient(TOKEN)
# Start an Actor and wait for it to finish.
actor_client = apify_client.actor('john-doe/my-cool-actor')
call_result = actor_client.call()
if call_result is None:
print('Actor run failed.')
return
# Fetch results from the Actor run's default dataset.
dataset_client = apify_client.dataset(call_result['defaultDatasetId'])
list_items_result = dataset_client.list_items()
print(f'Dataset: {list_items_result}')
---
# Setting up
Copy for LLM
This guide will help you get started with [Apify client for Python](https://github.com/apify/apify-client-python) by setting it up on your computer. Follow the steps below to ensure a smooth installation process.
## Prerequisites[](#prerequisites)
Before installing `apify-client` itself, make sure that your system meets the following requirements:
* **Python 3.10 or higher**: `apify-client` requires Python 3.10 or a newer version. You can download Python from the [official website](https://www.python.org/downloads/).
* **Python package manager**: While this guide uses Pip (the most common package manager), you can also use any package manager you want. You can download Pip from the [official website](https://pip.pypa.io/en/stable/installation/).
### Verifying prerequisites[](#verifying-prerequisites)
To check if Python and the Pip package manager are installed, run the following commands:
python --version
pip --version
If these commands return the respective versions, you're ready to continue.
## Installation[](#installation)
Apify client for Python is available as the [`apify-client`](https://pypi.org/project/apify-client/) package on PyPI. To install it, run:
pip install apify-client
After installation, verify that `apify-client` is installed correctly by checking its version:
python -c 'import apify_client; print(apify_client.version)'
## Authentication and initialization[](#authentication-and-initialization)
To use the client, you need an [API token](https://docs.apify.com/platform/integrations/api#api-token). You can find your token under [Integrations](https://console.apify.com/account/integrations) tab in Apify Console. Copy the token and initialize the client by providing the token (`MY-APIFY-TOKEN`) as a parameter to the `ApifyClient` constructor.
* Async client
* Sync client
from apify_client import ApifyClientAsync
TOKEN = 'MY-APIFY-TOKEN'
async def main() -> None: # Client initialization with the API token. apify_client = ApifyClientAsync(TOKEN)
from apify_client import ApifyClient
TOKEN = 'MY-APIFY-TOKEN'
def main() -> None: # Client initialization with the API token. apify_client = ApifyClient(TOKEN)
Secure access
The API token is used to authorize your requests to the Apify API. You can be charged for the usage of the underlying services, so do not share your API token with untrusted parties or expose it on the client side of your applications.
---
# Upgrading to v2
Copy for LLM
This page summarizes the breaking changes between Apify Python API Client v1.x and v2.0.
## Python version support[](#python-version-support)
Support for Python 3.9 has been dropped. The Apify Python API Client v2.x now requires Python 3.10 or later. Make sure your environment is running a compatible version before upgrading.
## New underlying HTTP library[](#new-underlying-http-library)
In v2.0, the Apify Python API client switched from using [`httpx`](https://www.python-httpx.org/) to [`impit`](https://github.com/apify/impit) as the underlying HTTP library. However, this change shouldn't have much impact on the end user.
## API method changes[](#api-method-changes)
Several public methods have changed their signatures or behavior.
### Removed parameters and attributes[](#removed-parameters-and-attributes)
* The `parse_response` parameter has been removed from the `HTTPClient.call()` method. This was an internal parameter that added a private attribute to the `Response` object.
* The private `_maybe_parsed_body` attribute has been removed from the `Response` object.
### KeyValueStoreClient[](#keyvaluestoreclient)
* The deprecated parameters `as_bytes` and `as_file` have been removed from `KeyValueStoreClient.get_record()`. Use the dedicated methods `get_record_as_bytes()` and `stream_record()` instead.
### DatasetClient[](#datasetclient)
* The `unwind` parameter no longer accepts a single string value. Use a list of strings instead: `unwind=['items']` rather than `unwind='items'`.
## Module reorganization[](#module-reorganization)
Some modules have been restructured.
### Constants[](#constants)
* Deprecated constant re-exports from `consts.py` have been removed. Constants should now be imported from the [apify-shared-python](https://github.com/apify/apify-shared-python) package if needed.
### Errors[](#errors)
* Error classes are now accessible from the public `apify_client.errors` module. See the [API documentation](https://docs.apify.com/api/client/python/api/client/python/reference/class/ApifyApiError.md) for a complete list of available error classes.
---
# apify-client-python<!-- -->
## Index[**](#Index)
### Async Resource Clients
* [**retry\_with\_exp\_backoff\_async](https://docs.apify.com/api/client/python/api/client/python/reference.md#retry_with_exp_backoff_async)
### Classes
* [**\_BaseApifyClient](https://docs.apify.com/api/client/python/api/client/python/reference/class/_BaseApifyClient.md)
* [**\_BaseBaseClient](https://docs.apify.com/api/client/python/api/client/python/reference/class/_BaseBaseClient.md)
* [**\_BaseHTTPClient](https://docs.apify.com/api/client/python/api/client/python/reference/class/_BaseHTTPClient.md)
* [**\_ContextInjectingFilter](https://docs.apify.com/api/client/python/api/client/python/reference/class/_ContextInjectingFilter.md)
* [**\_DebugLogFormatter](https://docs.apify.com/api/client/python/api/client/python/reference/class/_DebugLogFormatter.md)
* [**ActorClient](https://docs.apify.com/api/client/python/api/client/python/reference/class/ActorClient.md)
* [**ActorClientAsync](https://docs.apify.com/api/client/python/api/client/python/reference/class/ActorClientAsync.md)
* [**ActorCollectionClient](https://docs.apify.com/api/client/python/api/client/python/reference/class/ActorCollectionClient.md)
* [**ActorCollectionClientAsync](https://docs.apify.com/api/client/python/api/client/python/reference/class/ActorCollectionClientAsync.md)
* [**ActorEnvVarClient](https://docs.apify.com/api/client/python/api/client/python/reference/class/ActorEnvVarClient.md)
* [**ActorEnvVarClientAsync](https://docs.apify.com/api/client/python/api/client/python/reference/class/ActorEnvVarClientAsync.md)
* [**ActorEnvVarCollectionClient](https://docs.apify.com/api/client/python/api/client/python/reference/class/ActorEnvVarCollectionClient.md)
* [**ActorEnvVarCollectionClientAsync](https://docs.apify.com/api/client/python/api/client/python/reference/class/ActorEnvVarCollectionClientAsync.md)
* [**ActorJobBaseClient](https://docs.apify.com/api/client/python/api/client/python/reference/class/ActorJobBaseClient.md)
* [**ActorJobBaseClientAsync](https://docs.apify.com/api/client/python/api/client/python/reference/class/ActorJobBaseClientAsync.md)
* [**ActorVersionClient](https://docs.apify.com/api/client/python/api/client/python/reference/class/ActorVersionClient.md)
* [**ActorVersionClientAsync](https://docs.apify.com/api/client/python/api/client/python/reference/class/ActorVersionClientAsync.md)
* [**ActorVersionCollectionClient](https://docs.apify.com/api/client/python/api/client/python/reference/class/ActorVersionCollectionClient.md)
* [**ActorVersionCollectionClientAsync](https://docs.apify.com/api/client/python/api/client/python/reference/class/ActorVersionCollectionClientAsync.md)
* [**ApifyClient](https://docs.apify.com/api/client/python/api/client/python/reference/class/ApifyClient.md)
* [**ApifyClientAsync](https://docs.apify.com/api/client/python/api/client/python/reference/class/ApifyClientAsync.md)
* [**BaseClient](https://docs.apify.com/api/client/python/api/client/python/reference/class/BaseClient.md)
* [**BaseClientAsync](https://docs.apify.com/api/client/python/api/client/python/reference/class/BaseClientAsync.md)
* [**BatchAddRequestsResult](https://docs.apify.com/api/client/python/api/client/python/reference/class/BatchAddRequestsResult.md)
* [**BuildClient](https://docs.apify.com/api/client/python/api/client/python/reference/class/BuildClient.md)
* [**BuildClientAsync](https://docs.apify.com/api/client/python/api/client/python/reference/class/BuildClientAsync.md)
* [**BuildCollectionClient](https://docs.apify.com/api/client/python/api/client/python/reference/class/BuildCollectionClient.md)
* [**BuildCollectionClientAsync](https://docs.apify.com/api/client/python/api/client/python/reference/class/BuildCollectionClientAsync.md)
* [**DatasetClient](https://docs.apify.com/api/client/python/api/client/python/reference/class/DatasetClient.md)
* [**DatasetClientAsync](https://docs.apify.com/api/client/python/api/client/python/reference/class/DatasetClientAsync.md)
* [**DatasetCollectionClient](https://docs.apify.com/api/client/python/api/client/python/reference/class/DatasetCollectionClient.md)
* [**DatasetCollectionClientAsync](https://docs.apify.com/api/client/python/api/client/python/reference/class/DatasetCollectionClientAsync.md)
* [**HTTPClient](https://docs.apify.com/api/client/python/api/client/python/reference/class/HTTPClient.md)
* [**HTTPClientAsync](https://docs.apify.com/api/client/python/api/client/python/reference/class/HTTPClientAsync.md)
* [**KeyValueStoreClient](https://docs.apify.com/api/client/python/api/client/python/reference/class/KeyValueStoreClient.md)
* [**KeyValueStoreClientAsync](https://docs.apify.com/api/client/python/api/client/python/reference/class/KeyValueStoreClientAsync.md)
* [**KeyValueStoreCollectionClient](https://docs.apify.com/api/client/python/api/client/python/reference/class/KeyValueStoreCollectionClient.md)
* [**KeyValueStoreCollectionClientAsync](https://docs.apify.com/api/client/python/api/client/python/reference/class/KeyValueStoreCollectionClientAsync.md)
* [**ListPage](https://docs.apify.com/api/client/python/api/client/python/reference/class/ListPage.md)
* [**ListPage](https://docs.apify.com/api/client/python/api/client/python/reference/class/ListPage.md)
* [**LogClient](https://docs.apify.com/api/client/python/api/client/python/reference/class/LogClient.md)
* [**LogClientAsync](https://docs.apify.com/api/client/python/api/client/python/reference/class/LogClientAsync.md)
* [**LogContext](https://docs.apify.com/api/client/python/api/client/python/reference/class/LogContext.md)
* [**RedirectLogFormatter](https://docs.apify.com/api/client/python/api/client/python/reference/class/RedirectLogFormatter.md)
* [**RequestQueueClient](https://docs.apify.com/api/client/python/api/client/python/reference/class/RequestQueueClient.md)
* [**RequestQueueClientAsync](https://docs.apify.com/api/client/python/api/client/python/reference/class/RequestQueueClientAsync.md)
* [**RequestQueueCollectionClient](https://docs.apify.com/api/client/python/api/client/python/reference/class/RequestQueueCollectionClient.md)
* [**RequestQueueCollectionClientAsync](https://docs.apify.com/api/client/python/api/client/python/reference/class/RequestQueueCollectionClientAsync.md)
* [**ResourceClient](https://docs.apify.com/api/client/python/api/client/python/reference/class/ResourceClient.md)
* [**ResourceClientAsync](https://docs.apify.com/api/client/python/api/client/python/reference/class/ResourceClientAsync.md)
* [**ResourceCollectionClient](https://docs.apify.com/api/client/python/api/client/python/reference/class/ResourceCollectionClient.md)
* [**ResourceCollectionClientAsync](https://docs.apify.com/api/client/python/api/client/python/reference/class/ResourceCollectionClientAsync.md)
* [**RunClient](https://docs.apify.com/api/client/python/api/client/python/reference/class/RunClient.md)
* [**RunClientAsync](https://docs.apify.com/api/client/python/api/client/python/reference/class/RunClientAsync.md)
* [**RunCollectionClient](https://docs.apify.com/api/client/python/api/client/python/reference/class/RunCollectionClient.md)
* [**RunCollectionClientAsync](https://docs.apify.com/api/client/python/api/client/python/reference/class/RunCollectionClientAsync.md)
* [**ScheduleClient](https://docs.apify.com/api/client/python/api/client/python/reference/class/ScheduleClient.md)
* [**ScheduleClientAsync](https://docs.apify.com/api/client/python/api/client/python/reference/class/ScheduleClientAsync.md)
* [**ScheduleCollectionClient](https://docs.apify.com/api/client/python/api/client/python/reference/class/ScheduleCollectionClient.md)
* [**ScheduleCollectionClientAsync](https://docs.apify.com/api/client/python/api/client/python/reference/class/ScheduleCollectionClientAsync.md)
* [**StatusMessageWatcher](https://docs.apify.com/api/client/python/api/client/python/reference/class/StatusMessageWatcher.md)
* [**StatusMessageWatcherAsync](https://docs.apify.com/api/client/python/api/client/python/reference/class/StatusMessageWatcherAsync.md)
* [**StatusMessageWatcherSync](https://docs.apify.com/api/client/python/api/client/python/reference/class/StatusMessageWatcherSync.md)
* [**StoreCollectionClient](https://docs.apify.com/api/client/python/api/client/python/reference/class/StoreCollectionClient.md)
* [**StoreCollectionClientAsync](https://docs.apify.com/api/client/python/api/client/python/reference/class/StoreCollectionClientAsync.md)
* [**StreamedLog](https://docs.apify.com/api/client/python/api/client/python/reference/class/StreamedLog.md)
* [**StreamedLogAsync](https://docs.apify.com/api/client/python/api/client/python/reference/class/StreamedLogAsync.md)
* [**StreamedLogSync](https://docs.apify.com/api/client/python/api/client/python/reference/class/StreamedLogSync.md)
* [**TaskClient](https://docs.apify.com/api/client/python/api/client/python/reference/class/TaskClient.md)
* [**TaskClientAsync](https://docs.apify.com/api/client/python/api/client/python/reference/class/TaskClientAsync.md)
* [**TaskCollectionClient](https://docs.apify.com/api/client/python/api/client/python/reference/class/TaskCollectionClient.md)
* [**TaskCollectionClientAsync](https://docs.apify.com/api/client/python/api/client/python/reference/class/TaskCollectionClientAsync.md)
* [**UserClient](https://docs.apify.com/api/client/python/api/client/python/reference/class/UserClient.md)
* [**UserClientAsync](https://docs.apify.com/api/client/python/api/client/python/reference/class/UserClientAsync.md)
* [**WebhookClient](https://docs.apify.com/api/client/python/api/client/python/reference/class/WebhookClient.md)
* [**WebhookClientAsync](https://docs.apify.com/api/client/python/api/client/python/reference/class/WebhookClientAsync.md)
* [**WebhookCollectionClient](https://docs.apify.com/api/client/python/api/client/python/reference/class/WebhookCollectionClient.md)
* [**WebhookCollectionClientAsync](https://docs.apify.com/api/client/python/api/client/python/reference/class/WebhookCollectionClientAsync.md)
* [**WebhookDispatchClient](https://docs.apify.com/api/client/python/api/client/python/reference/class/WebhookDispatchClient.md)
* [**WebhookDispatchClientAsync](https://docs.apify.com/api/client/python/api/client/python/reference/class/WebhookDispatchClientAsync.md)
* [**WebhookDispatchCollectionClient](https://docs.apify.com/api/client/python/api/client/python/reference/class/WebhookDispatchCollectionClient.md)
* [**WebhookDispatchCollectionClientAsync](https://docs.apify.com/api/client/python/api/client/python/reference/class/WebhookDispatchCollectionClientAsync.md)
* [**WithLogDetailsClient](https://docs.apify.com/api/client/python/api/client/python/reference/class/WithLogDetailsClient.md)
### Data structures
* [**Statistics](https://docs.apify.com/api/client/python/api/client/python/reference/class/Statistics.md)
### Errors
* [**ApifyApiError](https://docs.apify.com/api/client/python/api/client/python/reference/class/ApifyApiError.md)
* [**ApifyClientError](https://docs.apify.com/api/client/python/api/client/python/reference/class/ApifyClientError.md)
* [**InvalidResponseBodyError](https://docs.apify.com/api/client/python/api/client/python/reference/class/InvalidResponseBodyError.md)
### Methods
* [**catch\_not\_found\_or\_throw](https://docs.apify.com/api/client/python/api/client/python/reference.md#catch_not_found_or_throw)
* [**create\_redirect\_logger](https://docs.apify.com/api/client/python/api/client/python/reference.md#create_redirect_logger)
* [**encode\_key\_value\_store\_record\_value](https://docs.apify.com/api/client/python/api/client/python/reference.md#encode_key_value_store_record_value)
* [**encode\_webhook\_list\_to\_base64](https://docs.apify.com/api/client/python/api/client/python/reference.md#encode_webhook_list_to_base64)
* [**filter\_out\_none\_values\_recursively](https://docs.apify.com/api/client/python/api/client/python/reference.md#filter_out_none_values_recursively)
* [**filter\_out\_none\_values\_recursively\_internal](https://docs.apify.com/api/client/python/api/client/python/reference.md#filter_out_none_values_recursively_internal)
* [**get\_actor\_env\_var\_representation](https://docs.apify.com/api/client/python/api/client/python/reference.md#get_actor_env_var_representation)
* [**get\_actor\_representation](https://docs.apify.com/api/client/python/api/client/python/reference.md#get_actor_representation)
* [**get\_task\_representation](https://docs.apify.com/api/client/python/api/client/python/reference.md#get_task_representation)
* [**get\_webhook\_representation](https://docs.apify.com/api/client/python/api/client/python/reference.md#get_webhook_representation)
* [**is\_content\_type\_json](https://docs.apify.com/api/client/python/api/client/python/reference.md#is_content_type_json)
* [**is\_content\_type\_text](https://docs.apify.com/api/client/python/api/client/python/reference.md#is_content_type_text)
* [**is\_content\_type\_xml](https://docs.apify.com/api/client/python/api/client/python/reference.md#is_content_type_xml)
* [**is\_file\_or\_bytes](https://docs.apify.com/api/client/python/api/client/python/reference.md#is_file_or_bytes)
* [**is\_retryable\_error](https://docs.apify.com/api/client/python/api/client/python/reference.md#is_retryable_error)
* [**json\_dumps](https://docs.apify.com/api/client/python/api/client/python/reference.md#json_dumps)
* [**maybe\_extract\_enum\_member\_value](https://docs.apify.com/api/client/python/api/client/python/reference.md#maybe_extract_enum_member_value)
* [**maybe\_parse\_response](https://docs.apify.com/api/client/python/api/client/python/reference.md#maybe_parse_response)
* [**parse\_date\_fields](https://docs.apify.com/api/client/python/api/client/python/reference.md#parse_date_fields)
* [**pluck\_data](https://docs.apify.com/api/client/python/api/client/python/reference.md#pluck_data)
* [**pluck\_data\_as\_list](https://docs.apify.com/api/client/python/api/client/python/reference.md#pluck_data_as_list)
* [**retry\_with\_exp\_backoff](https://docs.apify.com/api/client/python/api/client/python/reference.md#retry_with_exp_backoff)
* [**to\_safe\_id](https://docs.apify.com/api/client/python/api/client/python/reference.md#to_safe_id)
### Properties
* [**\_\_version\_\_](https://docs.apify.com/api/client/python/api/client/python/reference.md#__version__)
* [**API\_VERSION](https://docs.apify.com/api/client/python/api/client/python/reference.md#API_VERSION)
* [**DEFAULT\_API\_URL](https://docs.apify.com/api/client/python/api/client/python/reference.md#DEFAULT_API_URL)
* [**DEFAULT\_BACKOFF\_EXPONENTIAL\_FACTOR](https://docs.apify.com/api/client/python/api/client/python/reference.md#DEFAULT_BACKOFF_EXPONENTIAL_FACTOR)
* [**DEFAULT\_BACKOFF\_RANDOM\_FACTOR](https://docs.apify.com/api/client/python/api/client/python/reference.md#DEFAULT_BACKOFF_RANDOM_FACTOR)
* [**DEFAULT\_TIMEOUT](https://docs.apify.com/api/client/python/api/client/python/reference.md#DEFAULT_TIMEOUT)
* [**DEFAULT\_WAIT\_FOR\_FINISH\_SEC](https://docs.apify.com/api/client/python/api/client/python/reference.md#DEFAULT_WAIT_FOR_FINISH_SEC)
* [**DEFAULT\_WAIT\_WHEN\_JOB\_NOT\_EXIST\_SEC](https://docs.apify.com/api/client/python/api/client/python/reference.md#DEFAULT_WAIT_WHEN_JOB_NOT_EXIST_SEC)
* [**JSONSerializable](https://docs.apify.com/api/client/python/api/client/python/reference.md#JSONSerializable)
* [**ListOrDict](https://docs.apify.com/api/client/python/api/client/python/reference.md#ListOrDict)
* [**log\_context](https://docs.apify.com/api/client/python/api/client/python/reference.md#log_context)
* [**logger](https://docs.apify.com/api/client/python/api/client/python/reference.md#logger)
* [**logger](https://docs.apify.com/api/client/python/api/client/python/reference.md#logger)
* [**logger](https://docs.apify.com/api/client/python/api/client/python/reference.md#logger)
* [**logger\_name](https://docs.apify.com/api/client/python/api/client/python/reference.md#logger_name)
* [**PARSE\_DATE\_FIELDS\_KEY\_SUFFIX](https://docs.apify.com/api/client/python/api/client/python/reference.md#PARSE_DATE_FIELDS_KEY_SUFFIX)
* [**PARSE\_DATE\_FIELDS\_MAX\_DEPTH](https://docs.apify.com/api/client/python/api/client/python/reference.md#PARSE_DATE_FIELDS_MAX_DEPTH)
* [**RECORD\_NOT\_FOUND\_EXCEPTION\_TYPES](https://docs.apify.com/api/client/python/api/client/python/reference.md#RECORD_NOT_FOUND_EXCEPTION_TYPES)
* [**StopRetryingType](https://docs.apify.com/api/client/python/api/client/python/reference.md#StopRetryingType)
* [**T](https://docs.apify.com/api/client/python/api/client/python/reference.md#T)
* [**T](https://docs.apify.com/api/client/python/api/client/python/reference.md#T)
* [**T](https://docs.apify.com/api/client/python/api/client/python/reference.md#T)
## Async Resource Clients<!-- -->[**](<#Async Resource Clients>)
### [**](#retry_with_exp_backoff_async)[**](https://undefined/apify/apify-client-python/blob/master//src/apify_client/_utils.py#L183)retry\_with\_exp\_backoff\_async
* **async **retry\_with\_exp\_backoff\_async**(async\_func, \*, max\_retries, backoff\_base\_millis, backoff\_factor, random\_factor): [T](https://docs.apify.com/api/client/python/api/client/python/reference.md#T)
- #### Parameters
* ##### async\_func: Callable\[\[StopRetryingType, int], Awaitable\[[T](https://docs.apify.com/api/client/python/api/client/python/reference.md#T)]]
* ##### optionalkeyword-onlymax\_retries: int = <!-- -->8
* ##### optionalkeyword-onlybackoff\_base\_millis: int = <!-- -->500
* ##### optionalkeyword-onlybackoff\_factor: float = <!-- -->2
* ##### optionalkeyword-onlyrandom\_factor: float = <!-- -->1
#### Returns [T](https://docs.apify.com/api/client/python/api/client/python/reference.md#T)
## Methods<!-- -->[**](#Methods)
### [**](#catch_not_found_or_throw)[**](https://undefined/apify/apify-client-python/blob/master//src/apify_client/_utils.py#L216)catch\_not\_found\_or\_throw
* ****catch\_not\_found\_or\_throw**(exc): None
- #### Parameters
* ##### exc: [ApifyApiError](https://docs.apify.com/api/client/python/api/client/python/reference/class/ApifyApiError.md)
#### Returns None
### [**](#create_redirect_logger)[**](https://undefined/apify/apify-client-python/blob/master//src/apify_client/_logging.py#L129)create\_redirect\_logger
* ****create\_redirect\_logger**(name): logging.Logger
- Create a logger for redirecting logs from another Actor.
***
#### Parameters
* ##### name: str
The name of the logger. It can be used to inherit from other loggers. Example: `apify.xyz` will use logger named `xyz` and make it a children of `apify` logger.
#### Returns logging.Logger
### [**](#encode_key_value_store_record_value)[**](https://undefined/apify/apify-client-python/blob/master//src/apify_client/_utils.py#L240)encode\_key\_value\_store\_record\_value
* ****encode\_key\_value\_store\_record\_value**(value, content\_type): tuple\[Any, str]
- #### Parameters
* ##### value: Any
* ##### optionalcontent\_type: str | None = <!-- -->None
#### Returns tuple\[Any, str]
### [**](#encode_webhook_list_to_base64)[**](https://undefined/apify/apify-client-python/blob/master//src/apify_client/_utils.py#L223)encode\_webhook\_list\_to\_base64
* ****encode\_webhook\_list\_to\_base64**(webhooks): str
- Encode a list of dictionaries representing webhooks to their base64-encoded representation for the API.
***
#### Parameters
* ##### webhooks: [list](https://docs.apify.com/api/client/python/api/client/python/reference/class/RequestQueueCollectionClient.md#list)\[dict]
#### Returns str
### [**](#filter_out_none_values_recursively)[**](https://undefined/apify/apify-client-python/blob/master//src/apify_client/_utils.py#L38)filter\_out\_none\_values\_recursively
* ****filter\_out\_none\_values\_recursively**(dictionary): dict
- Return copy of the dictionary, recursively omitting all keys for which values are None.
***
#### Parameters
* ##### dictionary: dict
#### Returns dict
### [**](#filter_out_none_values_recursively_internal)[**](https://undefined/apify/apify-client-python/blob/master//src/apify_client/_utils.py#L43)filter\_out\_none\_values\_recursively\_internal
* ****filter\_out\_none\_values\_recursively\_internal**(dictionary, \*, remove\_empty\_dicts): dict | None
- Recursively filters out None values from a dictionary.
Unfortunately, it's necessary to have an internal function for the correct result typing, without having to create complicated overloads
***
#### Parameters
* ##### dictionary: dict
* ##### optionalkeyword-onlyremove\_empty\_dicts: bool | None = <!-- -->None
#### Returns dict | None
### [**](#get_actor_env_var_representation)[**](https://undefined/apify/apify-client-python/blob/master//src/apify_client/clients/resource_clients/actor_env_var.py#L9)get\_actor\_env\_var\_representation
* ****get\_actor\_env\_var\_representation**(\*, is\_secret, name, value): dict
- Return an environment variable representation of the Actor in a dictionary.
***
#### Parameters
* ##### optionalkeyword-onlyis\_secret: bool | None = <!-- -->None
* ##### optionalkeyword-onlyname: str | None = <!-- -->None
* ##### optionalkeyword-onlyvalue: str | None = <!-- -->None
#### Returns dict
### [**](#get_actor_representation)[**](https://undefined/apify/apify-client-python/blob/master//src/apify_client/clients/resource_clients/actor.py#L35)get\_actor\_representation
* ****get\_actor\_representation**(\*, name, title, description, seo\_title, seo\_description, versions, restart\_on\_error, is\_public, is\_deprecated, is\_anonymously\_runnable, categories, default\_run\_build, default\_run\_max\_items, default\_run\_memory\_mbytes, default\_run\_timeout\_secs, default\_run\_force\_permission\_level, example\_run\_input\_body, example\_run\_input\_content\_type, actor\_standby\_is\_enabled, actor\_standby\_desired\_requests\_per\_actor\_run, actor\_standby\_max\_requests\_per\_actor\_run, actor\_standby\_idle\_timeout\_secs, actor\_standby\_build, actor\_standby\_memory\_mbytes, pricing\_infos): dict
- Get dictionary representation of the Actor.
***
#### Parameters
* ##### keyword-onlyname: str | None
* ##### optionalkeyword-onlytitle: str | None = <!-- -->None
* ##### optionalkeyword-onlydescription: str | None = <!-- -->None
* ##### optionalkeyword-onlyseo\_title: str | None = <!-- -->None
* ##### optionalkeyword-onlyseo\_description: str | None = <!-- -->None
* ##### optionalkeyword-onlyversions: [list](https://docs.apify.com/api/client/python/api/client/python/reference/class/RequestQueueCollectionClient.md#list)\[dict] | None = <!-- -->None
* ##### optionalkeyword-onlyrestart\_on\_error: bool | None = <!-- -->None
* ##### optionalkeyword-onlyis\_public: bool | None = <!-- -->None
* ##### optionalkeyword-onlyis\_deprecated: bool | None = <!-- -->None
* ##### optionalkeyword-onlyis\_anonymously\_runnable: bool | None = <!-- -->None
* ##### optionalkeyword-onlycategories: [list](https://docs.apify.com/api/client/python/api/client/python/reference/class/RequestQueueCollectionClient.md#list)\[str] | None = <!-- -->None
* ##### optionalkeyword-onlydefault\_run\_build: str | None = <!-- -->None
* ##### optionalkeyword-onlydefault\_run\_max\_items: int | None = <!-- -->None
* ##### optionalkeyword-onlydefault\_run\_memory\_mbytes: int | None = <!-- -->None
* ##### optionalkeyword-onlydefault\_run\_timeout\_secs: int | None = <!-- -->None
* ##### optionalkeyword-onlydefault\_run\_force\_permission\_level: ActorPermissionLevel | None = <!-- -->None
* ##### optionalkeyword-onlyexample\_run\_input\_body: Any = <!-- -->None
* ##### optionalkeyword-onlyexample\_run\_input\_content\_type: str | None = <!-- -->None
* ##### optionalkeyword-onlyactor\_standby\_is\_enabled: bool | None = <!-- -->None
* ##### optionalkeyword-onlyactor\_standby\_desired\_requests\_per\_actor\_run: int | None = <!-- -->None
* ##### optionalkeyword-onlyactor\_standby\_max\_requests\_per\_actor\_run: int | None = <!-- -->None
* ##### optionalkeyword-onlyactor\_standby\_idle\_timeout\_secs: int | None = <!-- -->None
* ##### optionalkeyword-onlyactor\_standby\_build: str | None = <!-- -->None
* ##### optionalkeyword-onlyactor\_standby\_memory\_mbytes: int | None = <!-- -->None
* ##### optionalkeyword-onlypricing\_infos: [list](https://docs.apify.com/api/client/python/api/client/python/reference/class/RequestQueueCollectionClient.md#list)\[dict] | None = <!-- -->None
#### Returns dict
### [**](#get_task_representation)[**](https://undefined/apify/apify-client-python/blob/master//src/apify_client/clients/resource_clients/task.py#L26)get\_task\_representation
* ****get\_task\_representation**(actor\_id, name, task\_input, build, max\_items, memory\_mbytes, timeout\_secs, title, actor\_standby\_desired\_requests\_per\_actor\_run, actor\_standby\_max\_requests\_per\_actor\_run, actor\_standby\_idle\_timeout\_secs, actor\_standby\_build, actor\_standby\_memory\_mbytes, \*, restart\_on\_error): dict
- Get the dictionary representation of a task.
***
#### Parameters
* ##### optionalactor\_id: str | None = <!-- -->None
* ##### optionalname: str | None = <!-- -->None
* ##### optionaltask\_input: dict | None = <!-- -->None
* ##### optionalbuild: str | None = <!-- -->None
* ##### optionalmax\_items: int | None = <!-- -->None
* ##### optionalmemory\_mbytes: int | None = <!-- -->None
* ##### optionaltimeout\_secs: int | None = <!-- -->None
* ##### optionaltitle: str | None = <!-- -->None
* ##### optionalactor\_standby\_desired\_requests\_per\_actor\_run: int | None = <!-- -->None
* ##### optionalactor\_standby\_max\_requests\_per\_actor\_run: int | None = <!-- -->None
* ##### optionalactor\_standby\_idle\_timeout\_secs: int | None = <!-- -->None
* ##### optionalactor\_standby\_build: str | None = <!-- -->None
* ##### optionalactor\_standby\_memory\_mbytes: int | None = <!-- -->None
* ##### optionalkeyword-onlyrestart\_on\_error: bool | None = <!-- -->None
#### Returns dict
### [**](#get_webhook_representation)[**](https://undefined/apify/apify-client-python/blob/master//src/apify_client/clients/resource_clients/webhook.py#L23)get\_webhook\_representation
* ****get\_webhook\_representation**(\*, event\_types, request\_url, payload\_template, headers\_template, actor\_id, actor\_task\_id, actor\_run\_id, ignore\_ssl\_errors, do\_not\_retry, idempotency\_key, is\_ad\_hoc): dict
- Prepare webhook dictionary representation for clients.
***
#### Parameters
* ##### optionalkeyword-onlyevent\_types: [list](https://docs.apify.com/api/client/python/api/client/python/reference/class/RequestQueueCollectionClient.md#list)\[WebhookEventType] | None = <!-- -->None
* ##### optionalkeyword-onlyrequest\_url: str | None = <!-- -->None
* ##### optionalkeyword-onlypayload\_template: str | None = <!-- -->None
* ##### optionalkeyword-onlyheaders\_template: str | None = <!-- -->None
* ##### optionalkeyword-onlyactor\_id: str | None = <!-- -->None
* ##### optionalkeyword-onlyactor\_task\_id: str | None = <!-- -->None
* ##### optionalkeyword-onlyactor\_run\_id: str | None = <!-- -->None
* ##### optionalkeyword-onlyignore\_ssl\_errors: bool | None = <!-- -->None
* ##### optionalkeyword-onlydo\_not\_retry: bool | None = <!-- -->None
* ##### optionalkeyword-onlyidempotency\_key: str | None = <!-- -->None
* ##### optionalkeyword-onlyis\_ad\_hoc: bool | None = <!-- -->None
#### Returns dict
### [**](#is_content_type_json)[**](https://undefined/apify/apify-client-python/blob/master//src/apify_client/_utils.py#L92)is\_content\_type\_json
* ****is\_content\_type\_json**(content\_type): bool
- Check if the given content type is JSON.
***
#### Parameters
* ##### content\_type: str
#### Returns bool
### [**](#is_content_type_text)[**](https://undefined/apify/apify-client-python/blob/master//src/apify_client/_utils.py#L102)is\_content\_type\_text
* ****is\_content\_type\_text**(content\_type): bool
- Check if the given content type is text.
***
#### Parameters
* ##### content\_type: str
#### Returns bool
### [**](#is_content_type_xml)[**](https://undefined/apify/apify-client-python/blob/master//src/apify_client/_utils.py#L97)is\_content\_type\_xml
* ****is\_content\_type\_xml**(content\_type): bool
- Check if the given content type is XML.
***
#### Parameters
* ##### content\_type: str
#### Returns bool
### [**](#is_file_or_bytes)[**](https://undefined/apify/apify-client-python/blob/master//src/apify_client/_utils.py#L107)is\_file\_or\_bytes
* ****is\_file\_or\_bytes**(value): bool
- Check if the input value is a file-like object or bytes.
The check for IOBase is not ideal, it would be better to use duck typing, but then the check would be super complex, judging from how the 'requests' library does it. This way should be good enough for the vast majority of use cases, if it causes issues, we can improve it later.
***
#### Parameters
* ##### value: Any
#### Returns bool
### [**](#is_retryable_error)[**](https://undefined/apify/apify-client-python/blob/master//src/apify_client/_utils.py#L276)is\_retryable\_error
* ****is\_retryable\_error**(exc): bool
- Check if the given error is retryable.
***
#### Parameters
* ##### exc: Exception
#### Returns bool
### [**](#json_dumps)[**](https://undefined/apify/apify-client-python/blob/master//src/apify_client/_utils.py#L117)json\_dumps
* ****json\_dumps**(obj): str
- Dump JSON to a string with the correct settings and serializer.
***
#### Parameters
* ##### obj: Any
#### Returns str
### [**](#maybe_extract_enum_member_value)[**](https://undefined/apify/apify-client-python/blob/master//src/apify_client/_utils.py#L122)maybe\_extract\_enum\_member\_value
* ****maybe\_extract\_enum\_member\_value**(maybe\_enum\_member): Any
- Extract the value of an enumeration member if it is an Enum, otherwise return the original value.
***
#### Parameters
* ##### maybe\_enum\_member: Any
#### Returns Any
### [**](#maybe_parse_response)[**](https://undefined/apify/apify-client-python/blob/master//src/apify_client/_utils.py#L255)maybe\_parse\_response
* ****maybe\_parse\_response**(response): Any
- #### Parameters
* ##### response: Response
#### Returns Any
### [**](#parse_date_fields)[**](https://undefined/apify/apify-client-python/blob/master//src/apify_client/_utils.py#L66)parse\_date\_fields
* ****parse\_date\_fields**(data, max\_depth): [ListOrDict](https://docs.apify.com/api/client/python/api/client/python/reference.md#ListOrDict)
- Recursively parse date fields in a list or dictionary up to the specified depth.
***
#### Parameters
* ##### data: [ListOrDict](https://docs.apify.com/api/client/python/api/client/python/reference.md#ListOrDict)
* ##### optionalmax\_depth: int = <!-- -->PARSE\_DATE\_FIELDS\_MAX\_DEPTH
#### Returns [ListOrDict](https://docs.apify.com/api/client/python/api/client/python/reference.md#ListOrDict)
### [**](#pluck_data)[**](https://undefined/apify/apify-client-python/blob/master//src/apify_client/_utils.py#L136)pluck\_data
* ****pluck\_data**(parsed\_response): dict
- #### Parameters
* ##### parsed\_response: Any
#### Returns dict
### [**](#pluck_data_as_list)[**](https://undefined/apify/apify-client-python/blob/master//src/apify_client/_utils.py#L143)pluck\_data\_as\_list
* ****pluck\_data\_as\_list**(parsed\_response): [list](https://docs.apify.com/api/client/python/api/client/python/reference/class/RequestQueueCollectionClient.md#list)
- #### Parameters
* ##### parsed\_response: Any
#### Returns [list](https://docs.apify.com/api/client/python/api/client/python/reference/class/RequestQueueCollectionClient.md#list)
### [**](#retry_with_exp_backoff)[**](https://undefined/apify/apify-client-python/blob/master//src/apify_client/_utils.py#L150)retry\_with\_exp\_backoff
* ****retry\_with\_exp\_backoff**(func, \*, max\_retries, backoff\_base\_millis, backoff\_factor, random\_factor): [T](https://docs.apify.com/api/client/python/api/client/python/reference.md#T)
- #### Parameters
* ##### func: Callable\[\[StopRetryingType, int], [T](https://docs.apify.com/api/client/python/api/client/python/reference.md#T)]
* ##### optionalkeyword-onlymax\_retries: int = <!-- -->8
* ##### optionalkeyword-onlybackoff\_base\_millis: int = <!-- -->500
* ##### optionalkeyword-onlybackoff\_factor: float = <!-- -->2
* ##### optionalkeyword-onlyrandom\_factor: float = <!-- -->1
#### Returns [T](https://docs.apify.com/api/client/python/api/client/python/reference.md#T)
### [**](#to_safe_id)[**](https://undefined/apify/apify-client-python/blob/master//src/apify_client/_utils.py#L129)to\_safe\_id
* ****to\_safe\_id**(id): str
- #### Parameters
* ##### id: str
#### Returns str
## Properties<!-- -->[**](#Properties)
### [**](#__version__)[**](https://undefined/apify/apify-client-python/blob/master//src/apify_client/__init__.py#L5)\_\_version\_\_
**\_\_version\_\_: Undefined
### [**](#API_VERSION)[**](https://undefined/apify/apify-client-python/blob/master//src/apify_client/client.py#L56)API\_VERSION
**API\_VERSION: Undefined
### [**](#DEFAULT_API_URL)[**](https://undefined/apify/apify-client-python/blob/master//src/apify_client/client.py#L54)DEFAULT\_API\_URL
**DEFAULT\_API\_URL: Undefined
### [**](#DEFAULT_BACKOFF_EXPONENTIAL_FACTOR)[**](https://undefined/apify/apify-client-python/blob/master//src/apify_client/_http_client.py#L26)DEFAULT\_BACKOFF\_EXPONENTIAL\_FACTOR
**DEFAULT\_BACKOFF\_EXPONENTIAL\_FACTOR: Undefined
### [**](#DEFAULT_BACKOFF_RANDOM_FACTOR)[**](https://undefined/apify/apify-client-python/blob/master//src/apify_client/_http_client.py#L27)DEFAULT\_BACKOFF\_RANDOM\_FACTOR
**DEFAULT\_BACKOFF\_RANDOM\_FACTOR: Undefined
### [**](#DEFAULT_TIMEOUT)[**](https://undefined/apify/apify-client-python/blob/master//src/apify_client/client.py#L55)DEFAULT\_TIMEOUT
**DEFAULT\_TIMEOUT: Undefined
### [**](#DEFAULT_WAIT_FOR_FINISH_SEC)[**](https://undefined/apify/apify-client-python/blob/master//src/apify_client/clients/base/actor_job_base_client.py#L14)DEFAULT\_WAIT\_FOR\_FINISH\_SEC
**DEFAULT\_WAIT\_FOR\_FINISH\_SEC: Undefined
### [**](#DEFAULT_WAIT_WHEN_JOB_NOT_EXIST_SEC)[**](https://undefined/apify/apify-client-python/blob/master//src/apify_client/clients/base/actor_job_base_client.py#L17)DEFAULT\_WAIT\_WHEN\_JOB\_NOT\_EXIST\_SEC
**DEFAULT\_WAIT\_WHEN\_JOB\_NOT\_EXIST\_SEC: Undefined
### [**](#JSONSerializable)[**](https://undefined/apify/apify-client-python/blob/master//src/apify_client/_types.py#L5)JSONSerializable
**JSONSerializable: Undefined
Type for representing json-serializable values. It's close enough to the real thing supported by json.parse, and the best we can do until mypy supports recursive types. It was suggested in a discussion with (and approved by) Guido van Rossum, so I'd consider it correct enough.
### [**](#ListOrDict)[**](https://undefined/apify/apify-client-python/blob/master//src/apify_client/_utils.py#L35)ListOrDict
**ListOrDict: Undefined
### [**](#log_context)[**](https://undefined/apify/apify-client-python/blob/master//src/apify_client/_logging.py#L34)log\_context
**log\_context: Undefined
### [**](#logger)[**](https://undefined/apify/apify-client-python/blob/master//src/apify_client/_http_client.py#L29)logger
**logger: Undefined
### [**](#logger)[**](https://undefined/apify/apify-client-python/blob/master//src/apify_client/_logging.py#L22)logger
**logger: Undefined
### [**](#logger)[**](https://undefined/apify/apify-client-python/blob/master//src/apify_client/clients/resource_clients/request_queue.py#L26)logger
**logger: Undefined
### [**](#logger_name)[**](https://undefined/apify/apify-client-python/blob/master//src/apify_client/_logging.py#L19)logger\_name
**logger\_name: Undefined
### [**](#PARSE_DATE_FIELDS_KEY_SUFFIX)[**](https://undefined/apify/apify-client-python/blob/master//src/apify_client/_utils.py#L30)PARSE\_DATE\_FIELDS\_KEY\_SUFFIX
**PARSE\_DATE\_FIELDS\_KEY\_SUFFIX: Undefined
### [**](#PARSE_DATE_FIELDS_MAX_DEPTH)[**](https://undefined/apify/apify-client-python/blob/master//src/apify_client/_utils.py#L29)PARSE\_DATE\_FIELDS\_MAX\_DEPTH
**PARSE\_DATE\_FIELDS\_MAX\_DEPTH: Undefined
### [**](#RECORD_NOT_FOUND_EXCEPTION_TYPES)[**](https://undefined/apify/apify-client-python/blob/master//src/apify_client/_utils.py#L31)RECORD\_NOT\_FOUND\_EXCEPTION\_TYPES
**RECORD\_NOT\_FOUND\_EXCEPTION\_TYPES: Undefined
### [**](#StopRetryingType)[**](https://undefined/apify/apify-client-python/blob/master//src/apify_client/_utils.py#L34)StopRetryingType
**StopRetryingType: Undefined
### [**](#T)[**](https://undefined/apify/apify-client-python/blob/master//src/apify_client/_utils.py#L33)T
**T: Undefined
### [**](#T)[**](https://undefined/apify/apify-client-python/blob/master//src/apify_client/_types.py#L11)T
**T: Undefined
### [**](#T)[**](https://undefined/apify/apify-client-python/blob/master//src/apify_client/clients/base/resource_collection_client.py#L8)T
**T: Undefined
---
# \_BaseApifyClient<!-- -->
### Hierarchy
* *\_BaseApifyClient*
* [ApifyClient](https://docs.apify.com/api/client/python/api/client/python/reference/class/ApifyClient.md)
* [ApifyClientAsync](https://docs.apify.com/api/client/python/api/client/python/reference/class/ApifyClientAsync.md)
## Index[**](#Index)
### Methods
* [**\_\_init\_\_](https://docs.apify.com/api/client/python/api/client/python/reference/class/_BaseApifyClient.md#__init__)
### Properties
* [**http\_client](https://docs.apify.com/api/client/python/api/client/python/reference/class/_BaseApifyClient.md#http_client)
## Methods<!-- -->[**](#Methods)
### [**](#__init__)[**](https://undefined/apify/apify-client-python/blob/master//src/apify_client/client.py#L62)\_\_init\_\_
* ****\_\_init\_\_**(token, \*, api\_url, api\_public\_url, max\_retries, min\_delay\_between\_retries\_millis, timeout\_secs): None
- Initialize a new instance.
***
#### Parameters
* ##### optionaltoken: str | None = <!-- -->None
The Apify API token.
* ##### optionalkeyword-onlyapi\_url: str | None = <!-- -->None
The URL of the Apify API server to which to connect. Defaults to <https://api.apify.com>. It can be an internal URL that is not globally accessible, in such case `api_public_url` should be set as well.
* ##### optionalkeyword-onlyapi\_public\_url: str | None = <!-- -->None
The globally accessible URL of the Apify API server. It should be set only if the `api_url` is an internal URL that is not globally accessible.
* ##### optionalkeyword-onlymax\_retries: int | None = <!-- -->8
How many times to retry a failed request at most.
* ##### optionalkeyword-onlymin\_delay\_between\_retries\_millis: int | None = <!-- -->500
How long will the client wait between retrying requests (increases exponentially from this value).
* ##### optionalkeyword-onlytimeout\_secs: int | None = <!-- -->DEFAULT\_TIMEOUT
The socket timeout of the HTTP requests sent to the Apify API.
#### Returns None
## Properties<!-- -->[**](#Properties)
### [**](#http_client)[**](https://undefined/apify/apify-client-python/blob/master//src/apify_client/client.py#L60)http\_client
**http\_client: [HTTPClient](https://docs.apify.com/api/client/python/api/client/python/reference/class/HTTPClient.md) | [HTTPClientAsync](https://docs.apify.com/api/client/python/api/client/python/reference/class/HTTPClientAsync.md)
---
# \_BaseBaseClient<!-- -->
### Hierarchy
* *\_BaseBaseClient*
* [BaseClient](https://docs.apify.com/api/client/python/api/client/python/reference/class/BaseClient.md)
* [BaseClientAsync](https://docs.apify.com/api/client/python/api/client/python/reference/class/BaseClientAsync.md)
## Index[**](#Index)
### Properties
* [**http\_client](https://docs.apify.com/api/client/python/api/client/python/reference/class/_BaseBaseClient.md#http_client)
* [**params](https://docs.apify.com/api/client/python/api/client/python/reference/class/_BaseBaseClient.md#params)
* [**resource\_id](https://docs.apify.com/api/client/python/api/client/python/reference/class/_BaseBaseClient.md#resource_id)
* [**root\_client](https://docs.apify.com/api/client/python/api/client/python/reference/class/_BaseBaseClient.md#root_client)
* [**url](https://docs.apify.com/api/client/python/api/client/python/reference/class/_BaseBaseClient.md#url)
## Properties<!-- -->[**](#Properties)
### [**](#http_client)[**](https://undefined/apify/apify-client-python/blob/master//src/apify_client/clients/base/base_client.py#L18)http\_client
**http\_client: [HTTPClient](https://docs.apify.com/api/client/python/api/client/python/reference/class/HTTPClient.md) | [HTTPClientAsync](https://docs.apify.com/api/client/python/api/client/python/reference/class/HTTPClientAsync.md)
### [**](#params)[**](https://undefined/apify/apify-client-python/blob/master//src/apify_client/clients/base/base_client.py#L17)params
**params: dict
### [**](#resource_id)[**](https://undefined/apify/apify-client-python/blob/master//src/apify_client/clients/base/base_client.py#L15)resource\_id
**resource\_id: str | None
### [**](#root_client)[**](https://undefined/apify/apify-client-python/blob/master//src/apify_client/clients/base/base_client.py#L19)root\_client
**root\_client: [ApifyClient](https://docs.apify.com/api/client/python/api/client/python/reference/class/ApifyClient.md) | [ApifyClientAsync](https://docs.apify.com/api/client/python/api/client/python/reference/class/ApifyClientAsync.md)
### [**](#url)[**](https://undefined/apify/apify-client-python/blob/master//src/apify_client/clients/base/base_client.py#L16)url
**url: str
---
# \_BaseHTTPClient<!-- -->
### Hierarchy
* *\_BaseHTTPClient*
* [HTTPClient](https://docs.apify.com/api/client/python/api/client/python/reference/class/HTTPClient.md)
* [HTTPClientAsync](https://docs.apify.com/api/client/python/api/client/python/reference/class/HTTPClientAsync.md)
## Index[**](#Index)
### Methods
* [**\_\_init\_\_](https://docs.apify.com/api/client/python/api/client/python/reference/class/_BaseHTTPClient.md#__init__)
## Methods<!-- -->[**](#Methods)
### [**](#__init__)[**](https://undefined/apify/apify-client-python/blob/master//src/apify_client/_http_client.py#L33)\_\_init\_\_
* ****\_\_init\_\_**(\*, token, max\_retries, min\_delay\_between\_retries\_millis, timeout\_secs, stats): None
- Inherited from [\_BaseHTTPClient.\_\_init\_\_](https://docs.apify.com/api/client/python/api/client/python/reference/class/_BaseHTTPClient.md#__init__)
#### Parameters
* ##### optionalkeyword-onlytoken: str | None = <!-- -->None
* ##### optionalkeyword-onlymax\_retries: int = <!-- -->8
* ##### optionalkeyword-onlymin\_delay\_between\_retries\_millis: int = <!-- -->500
* ##### optionalkeyword-onlytimeout\_secs: int = <!-- -->360
* ##### optionalkeyword-onlystats: [Statistics](https://docs.apify.com/api/client/python/api/client/python/reference/class/Statistics.md) | None = <!-- -->None
#### Returns None
---
# \_ContextInjectingFilter<!-- -->
## Index[**](#Index)
### Methods
* [**filter](https://docs.apify.com/api/client/python/api/client/python/reference/class/_ContextInjectingFilter.md#filter)
## Methods<!-- -->[**](#Methods)
### [**](#filter)[**](https://undefined/apify/apify-client-python/blob/master//src/apify_client/_logging.py#L94)filter
* ****filter**(record): bool
- #### Parameters
* ##### record: logging.LogRecord
#### Returns bool
---
# \_DebugLogFormatter<!-- -->
## Index[**](#Index)
### Methods
* [**format](https://docs.apify.com/api/client/python/api/client/python/reference/class/_DebugLogFormatter.md#format)
### Properties
* [**empty\_record](https://docs.apify.com/api/client/python/api/client/python/reference/class/_DebugLogFormatter.md#empty_record)
## Methods<!-- -->[**](#Methods)
### [**](#format)[**](https://undefined/apify/apify-client-python/blob/master//src/apify_client/_logging.py#L120)format
* ****format**(record): str
- #### Parameters
* ##### record: logging.LogRecord
#### Returns str
## Properties<!-- -->[**](#Properties)
### [**](#empty_record)[**](https://undefined/apify/apify-client-python/blob/master//src/apify_client/_logging.py#L109)empty\_record
**empty\_record: Undefined
---
# ActorClient<!-- -->
Sub-client for manipulating a single Actor.
### Hierarchy
* [ResourceClient](https://docs.apify.com/api/client/python/api/client/python/reference/class/ResourceClient.md)
* *ActorClient*
## Index[**](#Index)
### Methods
* [**\_\_init\_\_](https://docs.apify.com/api/client/python/api/client/python/reference/class/ActorClient.md#__init__)
* [**build](https://docs.apify.com/api/client/python/api/client/python/reference/class/ActorClient.md#build)
* [**builds](https://docs.apify.com/api/client/python/api/client/python/reference/class/ActorClient.md#builds)
* [**call](https://docs.apify.com/api/client/python/api/client/python/reference/class/ActorClient.md#call)
* [**default\_build](https://docs.apify.com/api/client/python/api/client/python/reference/class/ActorClient.md#default_build)
* [**delete](https://docs.apify.com/api/client/python/api/client/python/reference/class/ActorClient.md#delete)
* [**get](https://docs.apify.com/api/client/python/api/client/python/reference/class/ActorClient.md#get)
* [**last\_run](https://docs.apify.com/api/client/python/api/client/python/reference/class/ActorClient.md#last_run)
* [**runs](https://docs.apify.com/api/client/python/api/client/python/reference/class/ActorClient.md#runs)
* [**start](https://docs.apify.com/api/client/python/api/client/python/reference/class/ActorClient.md#start)
* [**update](https://docs.apify.com/api/client/python/api/client/python/reference/class/ActorClient.md#update)
* [**validate\_input](https://docs.apify.com/api/client/python/api/client/python/reference/class/ActorClient.md#validate_input)
* [**version](https://docs.apify.com/api/client/python/api/client/python/reference/class/ActorClient.md#version)
* [**versions](https://docs.apify.com/api/client/python/api/client/python/reference/class/ActorClient.md#versions)
* [**webhooks](https://docs.apify.com/api/client/python/api/client/python/reference/class/ActorClient.md#webhooks)
### Properties
* [**http\_client](https://docs.apify.com/api/client/python/api/client/python/reference/class/ActorClient.md#http_client)
* [**params](https://docs.apify.com/api/client/python/api/client/python/reference/class/ActorClient.md#params)
* [**resource\_id](https://docs.apify.com/api/client/python/api/client/python/reference/class/ActorClient.md#resource_id)
* [**root\_client](https://docs.apify.com/api/client/python/api/client/python/reference/class/ActorClient.md#root_client)
* [**url](https://docs.apify.com/api/client/python/api/client/python/reference/class/ActorClient.md#url)
## Methods<!-- -->[**](#Methods)
### [**](#__init__)[**](https://undefined/apify/apify-client-python/blob/master//src/apify_client/clients/resource_clients/actor.py#L102)\_\_init\_\_
* ****\_\_init\_\_**(\*, base\_url, root\_client, http\_client, resource\_id, resource\_path, params): None
- Overrides [ResourceClient.\_\_init\_\_](https://docs.apify.com/api/client/python/api/client/python/reference/class/ResourceClient.md#__init__)
Initialize a new instance.
***
#### Parameters
* ##### keyword-onlybase\_url: str
Base URL of the API server.
* ##### keyword-onlyroot\_client: [ApifyClient](https://docs.apify.com/api/client/python/api/client/python/reference/class/ApifyClient.md)
The ApifyClient instance under which this resource client exists.
* ##### keyword-onlyhttp\_client: [HTTPClient](https://docs.apify.com/api/client/python/api/client/python/reference/class/HTTPClient.md)
The HTTPClient instance to be used in this client.
* ##### optionalkeyword-onlyresource\_id: str | None = <!-- -->None
ID of the manipulated resource, in case of a single-resource client.
* ##### keyword-onlyresource\_path: str
Path to the resource's endpoint on the API server.
* ##### optionalkeyword-onlyparams: dict | None = <!-- -->None
Parameters to include in all requests from this client.
#### Returns None
### [**](#build)[**](https://undefined/apify/apify-client-python/blob/master//src/apify_client/clients/resource_clients/actor.py#L364)build
* ****build**(\*, version\_number, beta\_packages, tag, use\_cache, wait\_for\_finish): dict
- Build the Actor.
<https://docs.apify.com/api/v2#/reference/actors/build-collection/build-actor>
***
#### Parameters
* ##### keyword-onlyversion\_number: str
Actor version number to be built.
* ##### optionalkeyword-onlybeta\_packages: bool | None = <!-- -->None
If True, then the Actor is built with beta versions of Apify NPM packages. By default, the build uses latest stable packages.
* ##### optionalkeyword-onlytag: str | None = <!-- -->None
Tag to be applied to the build on success. By default, the tag is taken from the Actor version's build tag property.
* ##### optionalkeyword-onlyuse\_cache: bool | None = <!-- -->None
If true, the Actor's Docker container will be rebuilt using layer cache (<https://docs.docker.com/develop/develop-images/dockerfile_best-practices/`leverage`-build-cache>). This is to enable quick rebuild during development. By default, the cache is not used.
* ##### optionalkeyword-onlywait\_for\_finish: int | None = <!-- -->None
The maximum number of seconds the server waits for the build to finish before returning. By default it is 0, the maximum value is 60.
#### Returns dict
### [**](#builds)[**](https://undefined/apify/apify-client-python/blob/master//src/apify_client/clients/resource_clients/actor.py#L408)builds
* ****builds**(): [BuildCollectionClient](https://docs.apify.com/api/client/python/api/client/python/reference/class/BuildCollectionClient.md)
- Retrieve a client for the builds of this Actor.
***
#### Returns [BuildCollectionClient](https://docs.apify.com/api/client/python/api/client/python/reference/class/BuildCollectionClient.md)
### [**](#call)[**](https://undefined/apify/apify-client-python/blob/master//src/apify_client/clients/resource_clients/actor.py#L290)call
* ****call**(\*, run\_input, content\_type, build, max\_items, max\_total\_charge\_usd, restart\_on\_error, memory\_mbytes, timeout\_secs, webhooks, force\_permission\_level, wait\_secs, logger): dict | None
- Start the Actor and wait for it to finish before returning the Run object.
It waits indefinitely, unless the wait\_secs argument is provided.
<https://docs.apify.com/api/v2#/reference/actors/run-collection/run-actor>
***
#### Parameters
* ##### optionalkeyword-onlyrun\_input: Any = <!-- -->None
The input to pass to the Actor run.
* ##### optionalkeyword-onlycontent\_type: str | None = <!-- -->None
The content type of the input.
* ##### optionalkeyword-onlybuild: str | None = <!-- -->None
Specifies the Actor build to run. It can be either a build tag or build number. By default, the run uses the build specified in the default run configuration for the Actor (typically latest).
* ##### optionalkeyword-onlymax\_items: int | None = <!-- -->None
Maximum number of results that will be returned by this run. If the Actor is charged per result, you will not be charged for more results than the given limit.
* ##### optionalkeyword-onlymax\_total\_charge\_usd: Decimal | None = <!-- -->None
A limit on the total charged amount for pay-per-event actors.
* ##### optionalkeyword-onlyrestart\_on\_error: bool | None = <!-- -->None
If true, the Actor run process will be restarted whenever it exits with a non-zero status code.
* ##### optionalkeyword-onlymemory\_mbytes: int | None = <!-- -->None
Memory limit for the run, in megabytes. By default, the run uses a memory limit specified in the default run configuration for the Actor.
* ##### optionalkeyword-onlytimeout\_secs: int | None = <!-- -->None
Optional timeout for the run, in seconds. By default, the run uses timeout specified in the default run configuration for the Actor.
* ##### optionalkeyword-onlywebhooks: [list](https://docs.apify.com/api/client/python/api/client/python/reference/class/RequestQueueCollectionClient.md#list)\[dict] | None = <!-- -->None
Optional webhooks (<https://docs.apify.com/webhooks>) associated with the Actor run, which can be used to receive a notification, e.g. when the Actor finished or failed. If you already have a webhook set up for the Actor, you do not have to add it again here.
* ##### optionalkeyword-onlyforce\_permission\_level: ActorPermissionLevel | None = <!-- -->None
Override the Actor's permissions for this run. If not set, the Actor will run with permissions configured in the Actor settings.
* ##### optionalkeyword-onlywait\_secs: int | None = <!-- -->None
The maximum number of seconds the server waits for the run to finish. If not provided, waits indefinitely.
* ##### optionalkeyword-onlylogger: (Logger | None) | Literal\[default] = <!-- -->'default'
Logger used to redirect logs from the Actor run. Using "default" literal means that a predefined default logger will be used. Setting `None` will disable any log propagation. Passing custom logger will redirect logs to the provided logger. The logger is also used to capture status and status message of the other Actor run.
#### Returns dict | None
### [**](#default_build)[**](https://undefined/apify/apify-client-python/blob/master//src/apify_client/clients/resource_clients/actor.py#L416)default\_build
* **async **default\_build**(\*, wait\_for\_finish): [BuildClient](https://docs.apify.com/api/client/python/api/client/python/reference/class/BuildClient.md)
- Retrieve Actor's default build.
<https://docs.apify.com/api/v2/act-build-default-get>
***
#### Parameters
* ##### optionalkeyword-onlywait\_for\_finish: int | None = <!-- -->None
The maximum number of seconds the server waits for the build to finish before returning. By default it is 0, the maximum value is 60.
#### Returns [BuildClient](https://docs.apify.com/api/client/python/api/client/python/reference/class/BuildClient.md)
### [**](#delete)[**](https://undefined/apify/apify-client-python/blob/master//src/apify_client/clients/resource_clients/actor.py#L211)delete
* ****delete**(): None
- Delete the Actor.
<https://docs.apify.com/api/v2#/reference/actors/actor-object/delete-actor>
***
#### Returns None
### [**](#get)[**](https://undefined/apify/apify-client-python/blob/master//src/apify_client/clients/resource_clients/actor.py#L106)get
* ****get**(): dict | None
- Retrieve the Actor.
<https://docs.apify.com/api/v2#/reference/actors/actor-object/get-actor>
***
#### Returns dict | None
### [**](#last_run)[**](https://undefined/apify/apify-client-python/blob/master//src/apify_client/clients/resource_clients/actor.py#L446)last\_run
* ****last\_run**(\*, status, origin): [RunClient](https://docs.apify.com/api/client/python/api/client/python/reference/class/RunClient.md)
- Retrieve the client for the last run of this Actor.
Last run is retrieved based on the start time of the runs.
***
#### Parameters
* ##### optionalkeyword-onlystatus: ActorJobStatus | None = <!-- -->None
Consider only runs with this status.
* ##### optionalkeyword-onlyorigin: MetaOrigin | None = <!-- -->None
Consider only runs started with this origin.
#### Returns [RunClient](https://docs.apify.com/api/client/python/api/client/python/reference/class/RunClient.md)
### [**](#runs)[**](https://undefined/apify/apify-client-python/blob/master//src/apify_client/clients/resource_clients/actor.py#L412)runs
* ****runs**(): [RunCollectionClient](https://docs.apify.com/api/client/python/api/client/python/reference/class/RunCollectionClient.md)
- Retrieve a client for the runs of this Actor.
***
#### Returns [RunCollectionClient](https://docs.apify.com/api/client/python/api/client/python/reference/class/RunCollectionClient.md)
### [**](#start)[**](https://undefined/apify/apify-client-python/blob/master//src/apify_client/clients/resource_clients/actor.py#L218)start
* ****start**(\*, run\_input, content\_type, build, max\_items, max\_total\_charge\_usd, restart\_on\_error, memory\_mbytes, timeout\_secs, force\_permission\_level, wait\_for\_finish, webhooks): dict
- Start the Actor and immediately return the Run object.
<https://docs.apify.com/api/v2#/reference/actors/run-collection/run-actor>
***
#### Parameters
* ##### optionalkeyword-onlyrun\_input: Any = <!-- -->None
The input to pass to the Actor run.
* ##### optionalkeyword-onlycontent\_type: str | None = <!-- -->None
The content type of the input.
* ##### optionalkeyword-onlybuild: str | None = <!-- -->None
Specifies the Actor build to run. It can be either a build tag or build number. By default, the run uses the build specified in the default run configuration for the Actor (typically latest).
* ##### optionalkeyword-onlymax\_items: int | None = <!-- -->None
Maximum number of results that will be returned by this run. If the Actor is charged per result, you will not be charged for more results than the given limit.
* ##### optionalkeyword-onlymax\_total\_charge\_usd: Decimal | None = <!-- -->None
A limit on the total charged amount for pay-per-event actors.
* ##### optionalkeyword-onlyrestart\_on\_error: bool | None = <!-- -->None
If true, the Actor run process will be restarted whenever it exits with a non-zero status code.
* ##### optionalkeyword-onlymemory\_mbytes: int | None = <!-- -->None
Memory limit for the run, in megabytes. By default, the run uses a memory limit specified in the default run configuration for the Actor.
* ##### optionalkeyword-onlytimeout\_secs: int | None = <!-- -->None
Optional timeout for the run, in seconds. By default, the run uses timeout specified in the default run configuration for the Actor.
* ##### optionalkeyword-onlyforce\_permission\_level: ActorPermissionLevel | None = <!-- -->None
Override the Actor's permissions for this run. If not set, the Actor will run with permissions configured in the Actor settings.
* ##### optionalkeyword-onlywait\_for\_finish: int | None = <!-- -->None
The maximum number of seconds the server waits for the run to finish. By default, it is 0, the maximum value is 60.
* ##### optionalkeyword-onlywebhooks: [list](https://docs.apify.com/api/client/python/api/client/python/reference/class/RequestQueueCollectionClient.md#list)\[dict] | None = <!-- -->None
Optional ad-hoc webhooks (<https://docs.apify.com/webhooks/ad-hoc-webhooks>) associated with the Actor run which can be used to receive a notification, e.g. when the Actor finished or failed. If you already have a webhook set up for the Actor or task, you do not have to add it again here. Each webhook is represented by a dictionary containing these items:
* `event_types`: List of `WebhookEventType` values which trigger the webhook.
* `request_url`: URL to which to send the webhook HTTP request.
* `payload_template`: Optional template for the request payload.
#### Returns dict
### [**](#update)[**](https://undefined/apify/apify-client-python/blob/master//src/apify_client/clients/resource_clients/actor.py#L116)update
* ****update**(\*, name, title, description, seo\_title, seo\_description, versions, restart\_on\_error, is\_public, is\_deprecated, is\_anonymously\_runnable, categories, default\_run\_build, default\_run\_max\_items, default\_run\_memory\_mbytes, default\_run\_timeout\_secs, example\_run\_input\_body, example\_run\_input\_content\_type, actor\_standby\_is\_enabled, actor\_standby\_desired\_requests\_per\_actor\_run, actor\_standby\_max\_requests\_per\_actor\_run, actor\_standby\_idle\_timeout\_secs, actor\_standby\_build, actor\_standby\_memory\_mbytes, pricing\_infos): dict
- Update the Actor with the specified fields.
<https://docs.apify.com/api/v2#/reference/actors/actor-object/update-actor>
***
#### Parameters
* ##### optionalkeyword-onlyname: str | None = <!-- -->None
The name of the Actor.
* ##### optionalkeyword-onlytitle: str | None = <!-- -->None
The title of the Actor (human-readable).
* ##### optionalkeyword-onlydescription: str | None = <!-- -->None
The description for the Actor.
* ##### optionalkeyword-onlyseo\_title: str | None = <!-- -->None
The title of the Actor optimized for search engines.
* ##### optionalkeyword-onlyseo\_description: str | None = <!-- -->None
The description of the Actor optimized for search engines.
* ##### optionalkeyword-onlyversions: [list](https://docs.apify.com/api/client/python/api/client/python/reference/class/RequestQueueCollectionClient.md#list)\[dict] | None = <!-- -->None
The list of Actor versions.
* ##### optionalkeyword-onlyrestart\_on\_error: bool | None = <!-- -->None
If true, the Actor run process will be restarted whenever it exits with a non-zero status code.
* ##### optionalkeyword-onlyis\_public: bool | None = <!-- -->None
Whether the Actor is public.
* ##### optionalkeyword-onlyis\_deprecated: bool | None = <!-- -->None
Whether the Actor is deprecated.
* ##### optionalkeyword-onlyis\_anonymously\_runnable: bool | None = <!-- -->None
Whether the Actor is anonymously runnable.
* ##### optionalkeyword-onlycategories: [list](https://docs.apify.com/api/client/python/api/client/python/reference/class/RequestQueueCollectionClient.md#list)\[str] | None = <!-- -->None
The categories to which the Actor belongs to.
* ##### optionalkeyword-onlydefault\_run\_build: str | None = <!-- -->None
Tag or number of the build that you want to run by default.
* ##### optionalkeyword-onlydefault\_run\_max\_items: int | None = <!-- -->None
Default limit of the number of results that will be returned by runs of this Actor, if the Actor is charged per result.
* ##### optionalkeyword-onlydefault\_run\_memory\_mbytes: int | None = <!-- -->None
Default amount of memory allocated for the runs of this Actor, in megabytes.
* ##### optionalkeyword-onlydefault\_run\_timeout\_secs: int | None = <!-- -->None
Default timeout for the runs of this Actor in seconds.
* ##### optionalkeyword-onlyexample\_run\_input\_body: Any = <!-- -->None
Input to be prefilled as default input to new users of this Actor.
* ##### optionalkeyword-onlyexample\_run\_input\_content\_type: str | None = <!-- -->None
The content type of the example run input.
* ##### optionalkeyword-onlyactor\_standby\_is\_enabled: bool | None = <!-- -->None
Whether the Actor Standby is enabled.
* ##### optionalkeyword-onlyactor\_standby\_desired\_requests\_per\_actor\_run: int | None = <!-- -->None
The desired number of concurrent HTTP requests for a single Actor Standby run.
* ##### optionalkeyword-onlyactor\_standby\_max\_requests\_per\_actor\_run: int | None = <!-- -->None
The maximum number of concurrent HTTP requests for a single Actor Standby run.
* ##### optionalkeyword-onlyactor\_standby\_idle\_timeout\_secs: int | None = <!-- -->None
If the Actor run does not receive any requests for this time, it will be shut down.
* ##### optionalkeyword-onlyactor\_standby\_build: str | None = <!-- -->None
The build tag or number to run when the Actor is in Standby mode.
* ##### optionalkeyword-onlyactor\_standby\_memory\_mbytes: int | None = <!-- -->None
The memory in megabytes to use when the Actor is in Standby mode.
* ##### optionalkeyword-onlypricing\_infos: [list](https://docs.apify.com/api/client/python/api/client/python/reference/class/RequestQueueCollectionClient.md#list)\[dict] | None = <!-- -->None
A list of objects that describes the pricing of the Actor.
#### Returns dict
### [**](#validate_input)[**](https://undefined/apify/apify-client-python/blob/master//src/apify_client/clients/resource_clients/actor.py#L493)validate\_input
* ****validate\_input**(run\_input, \*, build\_tag, content\_type): bool
- Validate an input for the Actor that defines an input schema.
***
#### Parameters
* ##### optionalrun\_input: Any = <!-- -->None
The input to validate.
* ##### optionalkeyword-onlybuild\_tag: str | None = <!-- -->None
The actor's build tag.
* ##### optionalkeyword-onlycontent\_type: str | None = <!-- -->None
The content type of the input.
#### Returns bool
### [**](#version)[**](https://undefined/apify/apify-client-python/blob/master//src/apify_client/clients/resource_clients/actor.py#L478)version
* ****version**(version\_number): [ActorVersionClient](https://docs.apify.com/api/client/python/api/client/python/reference/class/ActorVersionClient.md)
- Retrieve the client for the specified version of this Actor.
***
#### Parameters
* ##### version\_number: str
The version number for which to retrieve the resource client.
#### Returns [ActorVersionClient](https://docs.apify.com/api/client/python/api/client/python/reference/class/ActorVersionClient.md)
### [**](#versions)[**](https://undefined/apify/apify-client-python/blob/master//src/apify_client/clients/resource_clients/actor.py#L474)versions
* ****versions**(): [ActorVersionCollectionClient](https://docs.apify.com/api/client/python/api/client/python/reference/class/ActorVersionCollectionClient.md)
- Retrieve a client for the versions of this Actor.
***
#### Returns [ActorVersionCollectionClient](https://docs.apify.com/api/client/python/api/client/python/reference/class/ActorVersionCollectionClient.md)
### [**](#webhooks)[**](https://undefined/apify/apify-client-python/blob/master//src/apify_client/clients/resource_clients/actor.py#L489)webhooks
* ****webhooks**(): [WebhookCollectionClient](https://docs.apify.com/api/client/python/api/client/python/reference/class/WebhookCollectionClient.md)
- Retrieve a client for webhooks associated with this Actor.
***
#### Returns [WebhookCollectionClient](https://docs.apify.com/api/client/python/api/client/python/reference/class/WebhookCollectionClient.md)
## Properties<!-- -->[**](#Properties)
### [**](#http_client)[**](https://undefined/apify/apify-client-python/blob/master//src/apify_client/clients/base/base_client.py#L53)http\_client
**http\_client: [HTTPClient](https://docs.apify.com/api/client/python/api/client/python/reference/class/HTTPClient.md) | [HTTPClientAsync](https://docs.apify.com/api/client/python/api/client/python/reference/class/HTTPClientAsync.md)
Inherited from [BaseClient.http\_client](https://docs.apify.com/api/client/python/api/client/python/reference/class/BaseClient.md#http_client)
Overrides [\_BaseBaseClient.http\_client](https://docs.apify.com/api/client/python/api/client/python/reference/class/_BaseBaseClient.md#http_client)
### [**](#params)[**](https://undefined/apify/apify-client-python/blob/master//src/apify_client/clients/base/base_client.py#L17)params
**params: dict
Inherited from [\_BaseBaseClient.params](https://docs.apify.com/api/client/python/api/client/python/reference/class/_BaseBaseClient.md#params)
### [**](#resource_id)[**](https://undefined/apify/apify-client-python/blob/master//src/apify_client/clients/base/base_client.py#L15)resource\_id
**resource\_id: str | None
Inherited from [\_BaseBaseClient.resource\_id](https://docs.apify.com/api/client/python/api/client/python/reference/class/_BaseBaseClient.md#resource_id)
### [**](#root_client)[**](https://undefined/apify/apify-client-python/blob/master//src/apify_client/clients/base/base_client.py#L54)root\_client
**root\_client: [ApifyClient](https://docs.apify.com/api/client/python/api/client/python/reference/class/ApifyClient.md) | [ApifyClientAsync](https://docs.apify.com/api/client/python/api/client/python/reference/class/ApifyClientAsync.md)
Inherited from [BaseClient.root\_client](https://docs.apify.com/api/client/python/api/client/python/reference/class/BaseClient.md#root_client)
Overrides [\_BaseBaseClient.root\_client](https://docs.apify.com/api/client/python/api/client/python/reference/class/_BaseBaseClient.md#root_client)
### [**](#url)[**](https://undefined/apify/apify-client-python/blob/master//src/apify_client/clients/base/base_client.py#L16)url
**url: str
Inherited from [\_BaseBaseClient.url](https://docs.apify.com/api/client/python/api/client/python/reference/class/_BaseBaseClient.md#url)
---
# ActorClientAsync<!-- -->
Async sub-client for manipulating a single Actor.
### Hierarchy
* [ResourceClientAsync](https://docs.apify.com/api/client/python/api/client/python/reference/class/ResourceClientAsync.md)
* *ActorClientAsync*
## Index[**](#Index)
### Methods
* [**\_\_init\_\_](https://docs.apify.com/api/client/python/api/client/python/reference/class/ActorClientAsync.md#__init__)
* [**build](https://docs.apify.com/api/client/python/api/client/python/reference/class/ActorClientAsync.md#build)
* [**builds](https://docs.apify.com/api/client/python/api/client/python/reference/class/ActorClientAsync.md#builds)
* [**call](https://docs.apify.com/api/client/python/api/client/python/reference/class/ActorClientAsync.md#call)
* [**default\_build](https://docs.apify.com/api/client/python/api/client/python/reference/class/ActorClientAsync.md#default_build)
* [**delete](https://docs.apify.com/api/client/python/api/client/python/reference/class/ActorClientAsync.md#delete)
* [**get](https://docs.apify.com/api/client/python/api/client/python/reference/class/ActorClientAsync.md#get)
* [**last\_run](https://docs.apify.com/api/client/python/api/client/python/reference/class/ActorClientAsync.md#last_run)
* [**runs](https://docs.apify.com/api/client/python/api/client/python/reference/class/ActorClientAsync.md#runs)
* [**start](https://docs.apify.com/api/client/python/api/client/python/reference/class/ActorClientAsync.md#start)
* [**update](https://docs.apify.com/api/client/python/api/client/python/reference/class/ActorClientAsync.md#update)
* [**validate\_input](https://docs.apify.com/api/client/python/api/client/python/reference/class/ActorClientAsync.md#validate_input)
* [**version](https://docs.apify.com/api/client/python/api/client/python/reference/class/ActorClientAsync.md#version)
* [**versions](https://docs.apify.com/api/client/python/api/client/python/reference/class/ActorClientAsync.md#versions)
* [**webhooks](https://docs.apify.com/api/client/python/api/client/python/reference/class/ActorClientAsync.md#webhooks)
### Properties
* [**http\_client](https://docs.apify.com/api/client/python/api/client/python/reference/class/ActorClientAsync.md#http_client)
* [**params](https://docs.apify.com/api/client/python/api/client/python/reference/class/ActorClientAsync.md#params)
* [**resource\_id](https://docs.apify.com/api/client/python/api/client/python/reference/class/ActorClientAsync.md#resource_id)
* [**root\_client](https://docs.apify.com/api/client/python/api/client/python/reference/class/ActorClientAsync.md#root_client)
* [**url](https://docs.apify.com/api/client/python/api/client/python/reference/class/ActorClientAsync.md#url)
## Methods<!-- -->[**](#Methods)
### [**](#__init__)[**](https://undefined/apify/apify-client-python/blob/master//src/apify_client/clients/resource_clients/actor.py#L522)\_\_init\_\_
* ****\_\_init\_\_**(\*, base\_url, root\_client, http\_client, resource\_id, resource\_path, params): None
- Overrides [ResourceClientAsync.\_\_init\_\_](https://docs.apify.com/api/client/python/api/client/python/reference/class/ResourceClientAsync.md#__init__)
Initialize a new instance.
***
#### Parameters
* ##### keyword-onlybase\_url: str
Base URL of the API server.
* ##### keyword-onlyroot\_client: [ApifyClientAsync](https://docs.apify.com/api/client/python/api/client/python/reference/class/ApifyClientAsync.md)
The ApifyClientAsync instance under which this resource client exists.
* ##### keyword-onlyhttp\_client: [HTTPClientAsync](https://docs.apify.com/api/client/python/api/client/python/reference/class/HTTPClientAsync.md)
The HTTPClientAsync instance to be used in this client.
* ##### optionalkeyword-onlyresource\_id: str | None = <!-- -->None
ID of the manipulated resource, in case of a single-resource client.
* ##### keyword-onlyresource\_path: str
Path to the resource's endpoint on the API server.
* ##### optionalkeyword-onlyparams: dict | None = <!-- -->None
Parameters to include in all requests from this client.
#### Returns None
### [**](#build)[**](https://undefined/apify/apify-client-python/blob/master//src/apify_client/clients/resource_clients/actor.py#L788)build
* **async **build**(\*, version\_number, beta\_packages, tag, use\_cache, wait\_for\_finish): dict
- Build the Actor.
<https://docs.apify.com/api/v2#/reference/actors/build-collection/build-actor>
***
#### Parameters
* ##### keyword-onlyversion\_number: str
Actor version number to be built.
* ##### optionalkeyword-onlybeta\_packages: bool | None = <!-- -->None
If True, then the Actor is built with beta versions of Apify NPM packages. By default, the build uses latest stable packages.
* ##### optionalkeyword-onlytag: str | None = <!-- -->None
Tag to be applied to the build on success. By default, the tag is taken from the Actor version's build tag property.
* ##### optionalkeyword-onlyuse\_cache: bool | None = <!-- -->None
If true, the Actor's Docker container will be rebuilt using layer cache (<https://docs.docker.com/develop/develop-images/dockerfile_best-practices/`leverage`-build-cache>). This is to enable quick rebuild during development. By default, the cache is not used.
* ##### optionalkeyword-onlywait\_for\_finish: int | None = <!-- -->None
The maximum number of seconds the server waits for the build to finish before returning. By default it is 0, the maximum value is 60.
#### Returns dict
### [**](#builds)[**](https://undefined/apify/apify-client-python/blob/master//src/apify_client/clients/resource_clients/actor.py#L832)builds
* ****builds**(): [BuildCollectionClientAsync](https://docs.apify.com/api/client/python/api/client/python/reference/class/BuildCollectionClientAsync.md)
- Retrieve a client for the builds of this Actor.
***
#### Returns [BuildCollectionClientAsync](https://docs.apify.com/api/client/python/api/client/python/reference/class/BuildCollectionClientAsync.md)
### [**](#call)[**](https://undefined/apify/apify-client-python/blob/master//src/apify_client/clients/resource_clients/actor.py#L710)call
* **async **call**(\*, run\_input, content\_type, build, max\_items, max\_total\_charge\_usd, restart\_on\_error, memory\_mbytes, timeout\_secs, webhooks, force\_permission\_level, wait\_secs, logger): dict | None
- Start the Actor and wait for it to finish before returning the Run object.
It waits indefinitely, unless the wait\_secs argument is provided.
<https://docs.apify.com/api/v2#/reference/actors/run-collection/run-actor>
***
#### Parameters
* ##### optionalkeyword-onlyrun\_input: Any = <!-- -->None
The input to pass to the Actor run.
* ##### optionalkeyword-onlycontent\_type: str | None = <!-- -->None
The content type of the input.
* ##### optionalkeyword-onlybuild: str | None = <!-- -->None
Specifies the Actor build to run. It can be either a build tag or build number. By default, the run uses the build specified in the default run configuration for the Actor (typically latest).
* ##### optionalkeyword-onlymax\_items: int | None = <!-- -->None
Maximum number of results that will be returned by this run. If the Actor is charged per result, you will not be charged for more results than the given limit.
* ##### optionalkeyword-onlymax\_total\_charge\_usd: Decimal | None = <!-- -->None
A limit on the total charged amount for pay-per-event actors.
* ##### optionalkeyword-onlyrestart\_on\_error: bool | None = <!-- -->None
If true, the Actor run process will be restarted whenever it exits with a non-zero status code.
* ##### optionalkeyword-onlymemory\_mbytes: int | None = <!-- -->None
Memory limit for the run, in megabytes. By default, the run uses a memory limit specified in the default run configuration for the Actor.
* ##### optionalkeyword-onlytimeout\_secs: int | None = <!-- -->None
Optional timeout for the run, in seconds. By default, the run uses timeout specified in the default run configuration for the Actor.
* ##### optionalkeyword-onlywebhooks: [list](https://docs.apify.com/api/client/python/api/client/python/reference/class/RequestQueueCollectionClient.md#list)\[dict] | None = <!-- -->None
Optional webhooks (<https://docs.apify.com/webhooks>) associated with the Actor run, which can be used to receive a notification, e.g. when the Actor finished or failed. If you already have a webhook set up for the Actor, you do not have to add it again here.
* ##### optionalkeyword-onlyforce\_permission\_level: ActorPermissionLevel | None = <!-- -->None
Override the Actor's permissions for this run. If not set, the Actor will run with permissions configured in the Actor settings.
* ##### optionalkeyword-onlywait\_secs: int | None = <!-- -->None
The maximum number of seconds the server waits for the run to finish. If not provided, waits indefinitely.
* ##### optionalkeyword-onlylogger: (Logger | None) | Literal\[default] = <!-- -->'default'
Logger used to redirect logs from the Actor run. Using "default" literal means that a predefined default logger will be used. Setting `None` will disable any log propagation. Passing custom logger will redirect logs to the provided logger. The logger is also used to capture status and status message of the other Actor run.
#### Returns dict | None
### [**](#default_build)[**](https://undefined/apify/apify-client-python/blob/master//src/apify_client/clients/resource_clients/actor.py#L840)default\_build
* **async **default\_build**(\*, wait\_for\_finish): [BuildClientAsync](https://docs.apify.com/api/client/python/api/client/python/reference/class/BuildClientAsync.md)
- Retrieve Actor's default build.
<https://docs.apify.com/api/v2/act-build-default-get>
***
#### Parameters
* ##### optionalkeyword-onlywait\_for\_finish: int | None = <!-- -->None
The maximum number of seconds the server waits for the build to finish before returning. By default it is 0, the maximum value is 60.
#### Returns [BuildClientAsync](https://docs.apify.com/api/client/python/api/client/python/reference/class/BuildClientAsync.md)
### [**](#delete)[**](https://undefined/apify/apify-client-python/blob/master//src/apify_client/clients/resource_clients/actor.py#L631)delete
* **async **delete**(): None
- Delete the Actor.
<https://docs.apify.com/api/v2#/reference/actors/actor-object/delete-actor>
***
#### Returns None
### [**](#get)[**](https://undefined/apify/apify-client-python/blob/master//src/apify_client/clients/resource_clients/actor.py#L526)get
* **async **get**(): dict | None
- Retrieve the Actor.
<https://docs.apify.com/api/v2#/reference/actors/actor-object/get-actor>
***
#### Returns dict | None
### [**](#last_run)[**](https://undefined/apify/apify-client-python/blob/master//src/apify_client/clients/resource_clients/actor.py#L874)last\_run
* ****last\_run**(\*, status, origin): [RunClientAsync](https://docs.apify.com/api/client/python/api/client/python/reference/class/RunClientAsync.md)
- Retrieve the client for the last run of this Actor.
Last run is retrieved based on the start time of the runs.
***
#### Parameters
* ##### optionalkeyword-onlystatus: ActorJobStatus | None = <!-- -->None
Consider only runs with this status.
* ##### optionalkeyword-onlyorigin: MetaOrigin | None = <!-- -->None
Consider only runs started with this origin.
#### Returns [RunClientAsync](https://docs.apify.com/api/client/python/api/client/python/reference/class/RunClientAsync.md)
### [**](#runs)[**](https://undefined/apify/apify-client-python/blob/master//src/apify_client/clients/resource_clients/actor.py#L836)runs
* ****runs**(): [RunCollectionClientAsync](https://docs.apify.com/api/client/python/api/client/python/reference/class/RunCollectionClientAsync.md)
- Retrieve a client for the runs of this Actor.
***
#### Returns [RunCollectionClientAsync](https://docs.apify.com/api/client/python/api/client/python/reference/class/RunCollectionClientAsync.md)
### [**](#start)[**](https://undefined/apify/apify-client-python/blob/master//src/apify_client/clients/resource_clients/actor.py#L638)start
* **async **start**(\*, run\_input, content\_type, build, max\_items, max\_total\_charge\_usd, restart\_on\_error, memory\_mbytes, timeout\_secs, force\_permission\_level, wait\_for\_finish, webhooks): dict
- Start the Actor and immediately return the Run object.
<https://docs.apify.com/api/v2#/reference/actors/run-collection/run-actor>
***
#### Parameters
* ##### optionalkeyword-onlyrun\_input: Any = <!-- -->None
The input to pass to the Actor run.
* ##### optionalkeyword-onlycontent\_type: str | None = <!-- -->None
The content type of the input.
* ##### optionalkeyword-onlybuild: str | None = <!-- -->None
Specifies the Actor build to run. It can be either a build tag or build number. By default, the run uses the build specified in the default run configuration for the Actor (typically latest).
* ##### optionalkeyword-onlymax\_items: int | None = <!-- -->None
Maximum number of results that will be returned by this run. If the Actor is charged per result, you will not be charged for more results than the given limit.
* ##### optionalkeyword-onlymax\_total\_charge\_usd: Decimal | None = <!-- -->None
A limit on the total charged amount for pay-per-event actors.
* ##### optionalkeyword-onlyrestart\_on\_error: bool | None = <!-- -->None
If true, the Actor run process will be restarted whenever it exits with a non-zero status code.
* ##### optionalkeyword-onlymemory\_mbytes: int | None = <!-- -->None
Memory limit for the run, in megabytes. By default, the run uses a memory limit specified in the default run configuration for the Actor.
* ##### optionalkeyword-onlytimeout\_secs: int | None = <!-- -->None
Optional timeout for the run, in seconds. By default, the run uses timeout specified in the default run configuration for the Actor.
* ##### optionalkeyword-onlyforce\_permission\_level: ActorPermissionLevel | None = <!-- -->None
Override the Actor's permissions for this run. If not set, the Actor will run with permissions configured in the Actor settings.
* ##### optionalkeyword-onlywait\_for\_finish: int | None = <!-- -->None
The maximum number of seconds the server waits for the run to finish. By default, it is 0, the maximum value is 60.
* ##### optionalkeyword-onlywebhooks: [list](https://docs.apify.com/api/client/python/api/client/python/reference/class/RequestQueueCollectionClient.md#list)\[dict] | None = <!-- -->None
Optional ad-hoc webhooks (<https://docs.apify.com/webhooks/ad-hoc-webhooks>) associated with the Actor run which can be used to receive a notification, e.g. when the Actor finished or failed. If you already have a webhook set up for the Actor or task, you do not have to add it again here. Each webhook is represented by a dictionary containing these items:
* `event_types`: List of `WebhookEventType` values which trigger the webhook.
* `request_url`: URL to which to send the webhook HTTP request.
* `payload_template`: Optional template for the request payload.
#### Returns dict
### [**](#update)[**](https://undefined/apify/apify-client-python/blob/master//src/apify_client/clients/resource_clients/actor.py#L536)update
* **async **update**(\*, name, title, description, seo\_title, seo\_description, versions, restart\_on\_error, is\_public, is\_deprecated, is\_anonymously\_runnable, categories, default\_run\_build, default\_run\_max\_items, default\_run\_memory\_mbytes, default\_run\_timeout\_secs, example\_run\_input\_body, example\_run\_input\_content\_type, actor\_standby\_is\_enabled, actor\_standby\_desired\_requests\_per\_actor\_run, actor\_standby\_max\_requests\_per\_actor\_run, actor\_standby\_idle\_timeout\_secs, actor\_standby\_build, actor\_standby\_memory\_mbytes, pricing\_infos): dict
- Update the Actor with the specified fields.
<https://docs.apify.com/api/v2#/reference/actors/actor-object/update-actor>
***
#### Parameters
* ##### optionalkeyword-onlyname: str | None = <!-- -->None
The name of the Actor.
* ##### optionalkeyword-onlytitle: str | None = <!-- -->None
The title of the Actor (human-readable).
* ##### optionalkeyword-onlydescription: str | None = <!-- -->None
The description for the Actor.
* ##### optionalkeyword-onlyseo\_title: str | None = <!-- -->None
The title of the Actor optimized for search engines.
* ##### optionalkeyword-onlyseo\_description: str | None = <!-- -->None
The description of the Actor optimized for search engines.
* ##### optionalkeyword-onlyversions: [list](https://docs.apify.com/api/client/python/api/client/python/reference/class/RequestQueueCollectionClient.md#list)\[dict] | None = <!-- -->None
The list of Actor versions.
* ##### optionalkeyword-onlyrestart\_on\_error: bool | None = <!-- -->None
If true, the Actor run process will be restarted whenever it exits with a non-zero status code.
* ##### optionalkeyword-onlyis\_public: bool | None = <!-- -->None
Whether the Actor is public.
* ##### optionalkeyword-onlyis\_deprecated: bool | None = <!-- -->None
Whether the Actor is deprecated.
* ##### optionalkeyword-onlyis\_anonymously\_runnable: bool | None = <!-- -->None
Whether the Actor is anonymously runnable.
* ##### optionalkeyword-onlycategories: [list](https://docs.apify.com/api/client/python/api/client/python/reference/class/RequestQueueCollectionClient.md#list)\[str] | None = <!-- -->None
The categories to which the Actor belongs to.
* ##### optionalkeyword-onlydefault\_run\_build: str | None = <!-- -->None
Tag or number of the build that you want to run by default.
* ##### optionalkeyword-onlydefault\_run\_max\_items: int | None = <!-- -->None
Default limit of the number of results that will be returned by runs of this Actor, if the Actor is charged per result.
* ##### optionalkeyword-onlydefault\_run\_memory\_mbytes: int | None = <!-- -->None
Default amount of memory allocated for the runs of this Actor, in megabytes.
* ##### optionalkeyword-onlydefault\_run\_timeout\_secs: int | None = <!-- -->None
Default timeout for the runs of this Actor in seconds.
* ##### optionalkeyword-onlyexample\_run\_input\_body: Any = <!-- -->None
Input to be prefilled as default input to new users of this Actor.
* ##### optionalkeyword-onlyexample\_run\_input\_content\_type: str | None = <!-- -->None
The content type of the example run input.
* ##### optionalkeyword-onlyactor\_standby\_is\_enabled: bool | None = <!-- -->None
Whether the Actor Standby is enabled.
* ##### optionalkeyword-onlyactor\_standby\_desired\_requests\_per\_actor\_run: int | None = <!-- -->None
The desired number of concurrent HTTP requests for a single Actor Standby run.
* ##### optionalkeyword-onlyactor\_standby\_max\_requests\_per\_actor\_run: int | None = <!-- -->None
The maximum number of concurrent HTTP requests for a single Actor Standby run.
* ##### optionalkeyword-onlyactor\_standby\_idle\_timeout\_secs: int | None = <!-- -->None
If the Actor run does not receive any requests for this time, it will be shut down.
* ##### optionalkeyword-onlyactor\_standby\_build: str | None = <!-- -->None
The build tag or number to run when the Actor is in Standby mode.
* ##### optionalkeyword-onlyactor\_standby\_memory\_mbytes: int | None = <!-- -->None
The memory in megabytes to use when the Actor is in Standby mode.
* ##### optionalkeyword-onlypricing\_infos: [list](https://docs.apify.com/api/client/python/api/client/python/reference/class/RequestQueueCollectionClient.md#list)\[dict] | None = <!-- -->None
A list of objects that describes the pricing of the Actor.
#### Returns dict
### [**](#validate_input)[**](https://undefined/apify/apify-client-python/blob/master//src/apify_client/clients/resource_clients/actor.py#L921)validate\_input
* **async **validate\_input**(run\_input, \*, build\_tag, content\_type): bool
- Validate an input for the Actor that defines an input schema.
***
#### Parameters
* ##### optionalrun\_input: Any = <!-- -->None
The input to validate.
* ##### optionalkeyword-onlybuild\_tag: str | None = <!-- -->None
The actor's build tag.
* ##### optionalkeyword-onlycontent\_type: str | None = <!-- -->None
The content type of the input.
#### Returns bool
### [**](#version)[**](https://undefined/apify/apify-client-python/blob/master//src/apify_client/clients/resource_clients/actor.py#L906)version
* ****version**(version\_number): [ActorVersionClientAsync](https://docs.apify.com/api/client/python/api/client/python/reference/class/ActorVersionClientAsync.md)
- Retrieve the client for the specified version of this Actor.
***
#### Parameters
* ##### version\_number: str
The version number for which to retrieve the resource client.
#### Returns [ActorVersionClientAsync](https://docs.apify.com/api/client/python/api/client/python/reference/class/ActorVersionClientAsync.md)
### [**](#versions)[**](https://undefined/apify/apify-client-python/blob/master//src/apify_client/clients/resource_clients/actor.py#L902)versions
* ****versions**(): [ActorVersionCollectionClientAsync](https://docs.apify.com/api/client/python/api/client/python/reference/class/ActorVersionCollectionClientAsync.md)
- Retrieve a client for the versions of this Actor.
***
#### Returns [ActorVersionCollectionClientAsync](https://docs.apify.com/api/client/python/api/client/python/reference/class/ActorVersionCollectionClientAsync.md)
### [**](#webhooks)[**](https://undefined/apify/apify-client-python/blob/master//src/apify_client/clients/resource_clients/actor.py#L917)webhooks
* ****webhooks**(): [WebhookCollectionClientAsync](https://docs.apify.com/api/client/python/api/client/python/reference/class/WebhookCollectionClientAsync.md)
- Retrieve a client for webhooks associated with this Actor.
***
#### Returns [WebhookCollectionClientAsync](https://docs.apify.com/api/client/python/api/client/python/reference/class/WebhookCollectionClientAsync.md)
## Properties<!-- -->[**](#Properties)
### [**](#http_client)[**](https://undefined/apify/apify-client-python/blob/master//src/apify_client/clients/base/base_client.py#L94)http\_client
**http\_client: [HTTPClient](https://docs.apify.com/api/client/python/api/client/python/reference/class/HTTPClient.md) | [HTTPClientAsync](https://docs.apify.com/api/client/python/api/client/python/reference/class/HTTPClientAsync.md)
Inherited from [BaseClientAsync.http\_client](https://docs.apify.com/api/client/python/api/client/python/reference/class/BaseClientAsync.md#http_client)
Overrides [\_BaseBaseClient.http\_client](https://docs.apify.com/api/client/python/api/client/python/reference/class/_BaseBaseClient.md#http_client)
### [**](#params)[**](https://undefined/apify/apify-client-python/blob/master//src/apify_client/clients/base/base_client.py#L17)params
**params: dict
Inherited from [\_BaseBaseClient.params](https://docs.apify.com/api/client/python/api/client/python/reference/class/_BaseBaseClient.md#params)
### [**](#resource_id)[**](https://undefined/apify/apify-client-python/blob/master//src/apify_client/clients/base/base_client.py#L15)resource\_id
**resource\_id: str | None
Inherited from [\_BaseBaseClient.resource\_id](https://docs.apify.com/api/client/python/api/client/python/reference/class/_BaseBaseClient.md#resource_id)
### [**](#root_client)[**](https://undefined/apify/apify-client-python/blob/master//src/apify_client/clients/base/base_client.py#L95)root\_client
**root\_client: [ApifyClient](https://docs.apify.com/api/client/python/api/client/python/reference/class/ApifyClient.md) | [ApifyClientAsync](https://docs.apify.com/api/client/python/api/client/python/reference/class/ApifyClientAsync.md)
Inherited from [BaseClientAsync.root\_client](https://docs.apify.com/api/client/python/api/client/python/reference/class/BaseClientAsync.md#root_client)
Overrides [\_BaseBaseClient.root\_client](https://docs.apify.com/api/client/python/api/client/python/reference/class/_BaseBaseClient.md#root_client)
### [**](#url)[**](https://undefined/apify/apify-client-python/blob/master//src/apify_client/clients/base/base_client.py#L16)url
**url: str
Inherited from [\_BaseBaseClient.url](https://docs.apify.com/api/client/python/api/client/python/reference/class/_BaseBaseClient.md#url)
---
# ActorCollectionClient<!-- -->
Sub-client for manipulating Actors.
### Hierarchy
* [ResourceCollectionClient](https://docs.apify.com/api/client/python/api/client/python/reference/class/ResourceCollectionClient.md)
* *ActorCollectionClient*
## Index[**](#Index)
### Methods
* [**\_\_init\_\_](https://docs.apify.com/api/client/python/api/client/python/reference/class/ActorCollectionClient.md#__init__)
* [**create](https://docs.apify.com/api/client/python/api/client/python/reference/class/ActorCollectionClient.md#create)
* [**list](https://docs.apify.com/api/client/python/api/client/python/reference/class/ActorCollectionClient.md#list)
### Properties
* [**http\_client](https://docs.apify.com/api/client/python/api/client/python/reference/class/ActorCollectionClient.md#http_client)
* [**params](https://docs.apify.com/api/client/python/api/client/python/reference/class/ActorCollectionClient.md#params)
* [**resource\_id](https://docs.apify.com/api/client/python/api/client/python/reference/class/ActorCollectionClient.md#resource_id)
* [**root\_client](https://docs.apify.com/api/client/python/api/client/python/reference/class/ActorCollectionClient.md#root_client)
* [**url](https://docs.apify.com/api/client/python/api/client/python/reference/class/ActorCollectionClient.md#url)
## Methods<!-- -->[**](#Methods)
### [**](#__init__)[**](https://undefined/apify/apify-client-python/blob/master//src/apify_client/clients/resource_clients/actor_collection.py#L16)\_\_init\_\_
* ****\_\_init\_\_**(\*, base\_url, root\_client, http\_client, resource\_id, resource\_path, params): None
- Overrides [ResourceCollectionClient.\_\_init\_\_](https://docs.apify.com/api/client/python/api/client/python/reference/class/ResourceCollectionClient.md#__init__)
Initialize a new instance.
***
#### Parameters
* ##### keyword-onlybase\_url: str
Base URL of the API server.
* ##### keyword-onlyroot\_client: [ApifyClient](https://docs.apify.com/api/client/python/api/client/python/reference/class/ApifyClient.md)
The ApifyClient instance under which this resource client exists.
* ##### keyword-onlyhttp\_client: [HTTPClient](https://docs.apify.com/api/client/python/api/client/python/reference/class/HTTPClient.md)
The HTTPClient instance to be used in this client.
* ##### optionalkeyword-onlyresource\_id: str | None = <!-- -->None
ID of the manipulated resource, in case of a single-resource client.
* ##### keyword-onlyresource\_path: str
Path to the resource's endpoint on the API server.
* ##### optionalkeyword-onlyparams: dict | None = <!-- -->None
Parameters to include in all requests from this client.
#### Returns None
### [**](#create)[**](https://undefined/apify/apify-client-python/blob/master//src/apify_client/clients/resource_clients/actor_collection.py#L45)create
* ****create**(\*, name, title, description, seo\_title, seo\_description, versions, restart\_on\_error, is\_public, is\_deprecated, is\_anonymously\_runnable, categories, default\_run\_build, default\_run\_max\_items, default\_run\_memory\_mbytes, default\_run\_timeout\_secs, example\_run\_input\_body, example\_run\_input\_content\_type, actor\_standby\_is\_enabled, actor\_standby\_desired\_requests\_per\_actor\_run, actor\_standby\_max\_requests\_per\_actor\_run, actor\_standby\_idle\_timeout\_secs, actor\_standby\_build, actor\_standby\_memory\_mbytes): dict
- Create a new Actor.
<https://docs.apify.com/api/v2#/reference/actors/actor-collection/create-actor>
***
#### Parameters
* ##### keyword-onlyname: str
The name of the Actor.
* ##### optionalkeyword-onlytitle: str | None = <!-- -->None
The title of the Actor (human-readable).
* ##### optionalkeyword-onlydescription: str | None = <!-- -->None
The description for the Actor.
* ##### optionalkeyword-onlyseo\_title: str | None = <!-- -->None
The title of the Actor optimized for search engines.
* ##### optionalkeyword-onlyseo\_description: str | None = <!-- -->None
The description of the Actor optimized for search engines.
* ##### optionalkeyword-onlyversions: [list](https://docs.apify.com/api/client/python/api/client/python/reference/class/RequestQueueCollectionClient.md#list)\[dict] | None = <!-- -->None
The list of Actor versions.
* ##### optionalkeyword-onlyrestart\_on\_error: bool | None = <!-- -->None
If true, the Actor run process will be restarted whenever it exits with a non-zero status code.
* ##### optionalkeyword-onlyis\_public: bool | None = <!-- -->None
Whether the Actor is public.
* ##### optionalkeyword-onlyis\_deprecated: bool | None = <!-- -->None
Whether the Actor is deprecated.
* ##### optionalkeyword-onlyis\_anonymously\_runnable: bool | None = <!-- -->None
Whether the Actor is anonymously runnable.
* ##### optionalkeyword-onlycategories: [list](https://docs.apify.com/api/client/python/api/client/python/reference/class/RequestQueueCollectionClient.md#list)\[str] | None = <!-- -->None
The categories to which the Actor belongs to.
* ##### optionalkeyword-onlydefault\_run\_build: str | None = <!-- -->None
Tag or number of the build that you want to run by default.
* ##### optionalkeyword-onlydefault\_run\_max\_items: int | None = <!-- -->None
Default limit of the number of results that will be returned by runs of this Actor, if the Actor is charged per result.
* ##### optionalkeyword-onlydefault\_run\_memory\_mbytes: int | None = <!-- -->None
Default amount of memory allocated for the runs of this Actor, in megabytes.
* ##### optionalkeyword-onlydefault\_run\_timeout\_secs: int | None = <!-- -->None
Default timeout for the runs of this Actor in seconds.
* ##### optionalkeyword-onlyexample\_run\_input\_body: Any = <!-- -->None
Input to be prefilled as default input to new users of this Actor.
* ##### optionalkeyword-onlyexample\_run\_input\_content\_type: str | None = <!-- -->None
The content type of the example run input.
* ##### optionalkeyword-onlyactor\_standby\_is\_enabled: bool | None = <!-- -->None
Whether the Actor Standby is enabled.
* ##### optionalkeyword-onlyactor\_standby\_desired\_requests\_per\_actor\_run: int | None = <!-- -->None
The desired number of concurrent HTTP requests for a single Actor Standby run.
* ##### optionalkeyword-onlyactor\_standby\_max\_requests\_per\_actor\_run: int | None = <!-- -->None
The maximum number of concurrent HTTP requests for a single Actor Standby run.
* ##### optionalkeyword-onlyactor\_standby\_idle\_timeout\_secs: int | None = <!-- -->None
If the Actor run does not receive any requests for this time, it will be shut down.
* ##### optionalkeyword-onlyactor\_standby\_build: str | None = <!-- -->None
The build tag or number to run when the Actor is in Standby mode.
* ##### optionalkeyword-onlyactor\_standby\_memory\_mbytes: int | None = <!-- -->None
The memory in megabytes to use when the Actor is in Standby mode.
#### Returns dict
### [**](#list)[**](https://undefined/apify/apify-client-python/blob/master//src/apify_client/clients/resource_clients/actor_collection.py#L20)list
* ****list**(\*, my, limit, offset, desc, sort\_by): [ListPage](https://docs.apify.com/api/client/python/api/client/python/reference/class/ListPage.md)\[dict]
- List the Actors the user has created or used.
<https://docs.apify.com/api/v2#/reference/actors/actor-collection/get-list-of-actors>
***
#### Parameters
* ##### optionalkeyword-onlymy: bool | None = <!-- -->None
If True, will return only Actors which the user has created themselves.
* ##### optionalkeyword-onlylimit: int | None = <!-- -->None
How many Actors to list.
* ##### optionalkeyword-onlyoffset: int | None = <!-- -->None
What Actor to include as first when retrieving the list.
* ##### optionalkeyword-onlydesc: bool | None = <!-- -->None
Whether to sort the Actors in descending order based on their creation date.
* ##### optionalkeyword-onlysort\_by: Literal\[createdAt, stats.lastRunStartedAt] | None = <!-- -->'createdAt'
Field to sort the results by.
#### Returns [ListPage](https://docs.apify.com/api/client/python/api/client/python/reference/class/ListPage.md)\[dict]
## Properties<!-- -->[**](#Properties)
### [**](#http_client)[**](https://undefined/apify/apify-client-python/blob/master//src/apify_client/clients/base/base_client.py#L53)http\_client
**http\_client: [HTTPClient](https://docs.apify.com/api/client/python/api/client/python/reference/class/HTTPClient.md) | [HTTPClientAsync](https://docs.apify.com/api/client/python/api/client/python/reference/class/HTTPClientAsync.md)
Inherited from [BaseClient.http\_client](https://docs.apify.com/api/client/python/api/client/python/reference/class/BaseClient.md#http_client)
Overrides [\_BaseBaseClient.http\_client](https://docs.apify.com/api/client/python/api/client/python/reference/class/_BaseBaseClient.md#http_client)
### [**](#params)[**](https://undefined/apify/apify-client-python/blob/master//src/apify_client/clients/base/base_client.py#L17)params
**params: dict
Inherited from [\_BaseBaseClient.params](https://docs.apify.com/api/client/python/api/client/python/reference/class/_BaseBaseClient.md#params)
### [**](#resource_id)[**](https://undefined/apify/apify-client-python/blob/master//src/apify_client/clients/base/base_client.py#L15)resource\_id
**resource\_id: str | None
Inherited from [\_BaseBaseClient.resource\_id](https://docs.apify.com/api/client/python/api/client/python/reference/class/_BaseBaseClient.md#resource_id)
### [**](#root_client)[**](https://undefined/apify/apify-client-python/blob/master//src/apify_client/clients/base/base_client.py#L54)root\_client
**root\_client: [ApifyClient](https://docs.apify.com/api/client/python/api/client/python/reference/class/ApifyClient.md) | [ApifyClientAsync](https://docs.apify.com/api/client/python/api/client/python/reference/class/ApifyClientAsync.md)
Inherited from [BaseClient.root\_client](https://docs.apify.com/api/client/python/api/client/python/reference/class/BaseClient.md#root_client)
Overrides [\_BaseBaseClient.root\_client](https://docs.apify.com/api/client/python/api/client/python/reference/class/_BaseBaseClient.md#root_client)
### [**](#url)[**](https://undefined/apify/apify-client-python/blob/master//src/apify_client/clients/base/base_client.py#L16)url
**url: str
Inherited from [\_BaseBaseClient.url](https://docs.apify.com/api/client/python/api/client/python/reference/class/_BaseBaseClient.md#url)
---
# ActorCollectionClientAsync<!-- -->
Async sub-client for manipulating Actors.
### Hierarchy
* [ResourceCollectionClientAsync](https://docs.apify.com/api/client/python/api/client/python/reference/class/ResourceCollectionClientAsync.md)
* *ActorCollectionClientAsync*
## Index[**](#Index)
### Methods
* [**\_\_init\_\_](https://docs.apify.com/api/client/python/api/client/python/reference/class/ActorCollectionClientAsync.md#__init__)
* [**create](https://docs.apify.com/api/client/python/api/client/python/reference/class/ActorCollectionClientAsync.md#create)
* [**list](https://docs.apify.com/api/client/python/api/client/python/reference/class/ActorCollectionClientAsync.md#list)
### Properties
* [**http\_client](https://docs.apify.com/api/client/python/api/client/python/reference/class/ActorCollectionClientAsync.md#http_client)
* [**params](https://docs.apify.com/api/client/python/api/client/python/reference/class/ActorCollectionClientAsync.md#params)
* [**resource\_id](https://docs.apify.com/api/client/python/api/client/python/reference/class/ActorCollectionClientAsync.md#resource_id)
* [**root\_client](https://docs.apify.com/api/client/python/api/client/python/reference/class/ActorCollectionClientAsync.md#root_client)
* [**url](https://docs.apify.com/api/client/python/api/client/python/reference/class/ActorCollectionClientAsync.md#url)
## Methods<!-- -->[**](#Methods)
### [**](#__init__)[**](https://undefined/apify/apify-client-python/blob/master//src/apify_client/clients/resource_clients/actor_collection.py#L141)\_\_init\_\_
* ****\_\_init\_\_**(\*, base\_url, root\_client, http\_client, resource\_id, resource\_path, params): None
- Overrides [ResourceCollectionClientAsync.\_\_init\_\_](https://docs.apify.com/api/client/python/api/client/python/reference/class/ResourceCollectionClientAsync.md#__init__)
Initialize a new instance.
***
#### Parameters
* ##### keyword-onlybase\_url: str
Base URL of the API server.
* ##### keyword-onlyroot\_client: [ApifyClientAsync](https://docs.apify.com/api/client/python/api/client/python/reference/class/ApifyClientAsync.md)
The ApifyClientAsync instance under which this resource client exists.
* ##### keyword-onlyhttp\_client: [HTTPClientAsync](https://docs.apify.com/api/client/python/api/client/python/reference/class/HTTPClientAsync.md)
The HTTPClientAsync instance to be used in this client.
* ##### optionalkeyword-onlyresource\_id: str | None = <!-- -->None
ID of the manipulated resource, in case of a single-resource client.
* ##### keyword-onlyresource\_path: str
Path to the resource's endpoint on the API server.
* ##### optionalkeyword-onlyparams: dict | None = <!-- -->None
Parameters to include in all requests from this client.
#### Returns None
### [**](#create)[**](https://undefined/apify/apify-client-python/blob/master//src/apify_client/clients/resource_clients/actor_collection.py#L170)create
* **async **create**(\*, name, title, description, seo\_title, seo\_description, versions, restart\_on\_error, is\_public, is\_deprecated, is\_anonymously\_runnable, categories, default\_run\_build, default\_run\_max\_items, default\_run\_memory\_mbytes, default\_run\_timeout\_secs, example\_run\_input\_body, example\_run\_input\_content\_type, actor\_standby\_is\_enabled, actor\_standby\_desired\_requests\_per\_actor\_run, actor\_standby\_max\_requests\_per\_actor\_run, actor\_standby\_idle\_timeout\_secs, actor\_standby\_build, actor\_standby\_memory\_mbytes): dict
- Create a new Actor.
<https://docs.apify.com/api/v2#/reference/actors/actor-collection/create-actor>
***
#### Parameters
* ##### keyword-onlyname: str
The name of the Actor.
* ##### optionalkeyword-onlytitle: str | None = <!-- -->None
The title of the Actor (human-readable).
* ##### optionalkeyword-onlydescription: str | None = <!-- -->None
The description for the Actor.
* ##### optionalkeyword-onlyseo\_title: str | None = <!-- -->None
The title of the Actor optimized for search engines.
* ##### optionalkeyword-onlyseo\_description: str | None = <!-- -->None
The description of the Actor optimized for search engines.
* ##### optionalkeyword-onlyversions: [list](https://docs.apify.com/api/client/python/api/client/python/reference/class/RequestQueueCollectionClient.md#list)\[dict] | None = <!-- -->None
The list of Actor versions.
* ##### optionalkeyword-onlyrestart\_on\_error: bool | None = <!-- -->None
If true, the Actor run process will be restarted whenever it exits with a non-zero status code.
* ##### optionalkeyword-onlyis\_public: bool | None = <!-- -->None
Whether the Actor is public.
* ##### optionalkeyword-onlyis\_deprecated: bool | None = <!-- -->None
Whether the Actor is deprecated.
* ##### optionalkeyword-onlyis\_anonymously\_runnable: bool | None = <!-- -->None
Whether the Actor is anonymously runnable.
* ##### optionalkeyword-onlycategories: [list](https://docs.apify.com/api/client/python/api/client/python/reference/class/RequestQueueCollectionClient.md#list)\[str] | None = <!-- -->None
The categories to which the Actor belongs to.
* ##### optionalkeyword-onlydefault\_run\_build: str | None = <!-- -->None
Tag or number of the build that you want to run by default.
* ##### optionalkeyword-onlydefault\_run\_max\_items: int | None = <!-- -->None
Default limit of the number of results that will be returned by runs of this Actor, if the Actor is charged per result.
* ##### optionalkeyword-onlydefault\_run\_memory\_mbytes: int | None = <!-- -->None
Default amount of memory allocated for the runs of this Actor, in megabytes.
* ##### optionalkeyword-onlydefault\_run\_timeout\_secs: int | None = <!-- -->None
Default timeout for the runs of this Actor in seconds.
* ##### optionalkeyword-onlyexample\_run\_input\_body: Any = <!-- -->None
Input to be prefilled as default input to new users of this Actor.
* ##### optionalkeyword-onlyexample\_run\_input\_content\_type: str | None = <!-- -->None
The content type of the example run input.
* ##### optionalkeyword-onlyactor\_standby\_is\_enabled: bool | None = <!-- -->None
Whether the Actor Standby is enabled.
* ##### optionalkeyword-onlyactor\_standby\_desired\_requests\_per\_actor\_run: int | None = <!-- -->None
The desired number of concurrent HTTP requests for a single Actor Standby run.
* ##### optionalkeyword-onlyactor\_standby\_max\_requests\_per\_actor\_run: int | None = <!-- -->None
The maximum number of concurrent HTTP requests for a single Actor Standby run.
* ##### optionalkeyword-onlyactor\_standby\_idle\_timeout\_secs: int | None = <!-- -->None
If the Actor run does not receive any requests for this time, it will be shut down.
* ##### optionalkeyword-onlyactor\_standby\_build: str | None = <!-- -->None
The build tag or number to run when the Actor is in Standby mode.
* ##### optionalkeyword-onlyactor\_standby\_memory\_mbytes: int | None = <!-- -->None
The memory in megabytes to use when the Actor is in Standby mode.
#### Returns dict
### [**](#list)[**](https://undefined/apify/apify-client-python/blob/master//src/apify_client/clients/resource_clients/actor_collection.py#L145)list
* **async **list**(\*, my, limit, offset, desc, sort\_by): [ListPage](https://docs.apify.com/api/client/python/api/client/python/reference/class/ListPage.md)\[dict]
- List the Actors the user has created or used.
<https://docs.apify.com/api/v2#/reference/actors/actor-collection/get-list-of-actors>
***
#### Parameters
* ##### optionalkeyword-onlymy: bool | None = <!-- -->None
If True, will return only Actors which the user has created themselves.
* ##### optionalkeyword-onlylimit: int | None = <!-- -->None
How many Actors to list.
* ##### optionalkeyword-onlyoffset: int | None = <!-- -->None
What Actor to include as first when retrieving the list.
* ##### optionalkeyword-onlydesc: bool | None = <!-- -->None
Whether to sort the Actors in descending order based on their creation date.
* ##### optionalkeyword-onlysort\_by: Literal\[createdAt, stats.lastRunStartedAt] | None = <!-- -->'createdAt'
Field to sort the results by.
#### Returns [ListPage](https://docs.apify.com/api/client/python/api/client/python/reference/class/ListPage.md)\[dict]
## Properties<!-- -->[**](#Properties)
### [**](#http_client)[**](https://undefined/apify/apify-client-python/blob/master//src/apify_client/clients/base/base_client.py#L94)http\_client
**http\_client: [HTTPClient](https://docs.apify.com/api/client/python/api/client/python/reference/class/HTTPClient.md) | [HTTPClientAsync](https://docs.apify.com/api/client/python/api/client/python/reference/class/HTTPClientAsync.md)
Inherited from [BaseClientAsync.http\_client](https://docs.apify.com/api/client/python/api/client/python/reference/class/BaseClientAsync.md#http_client)
Overrides [\_BaseBaseClient.http\_client](https://docs.apify.com/api/client/python/api/client/python/reference/class/_BaseBaseClient.md#http_client)
### [**](#params)[**](https://undefined/apify/apify-client-python/blob/master//src/apify_client/clients/base/base_client.py#L17)params
**params: dict
Inherited from [\_BaseBaseClient.params](https://docs.apify.com/api/client/python/api/client/python/reference/class/_BaseBaseClient.md#params)
### [**](#resource_id)[**](https://undefined/apify/apify-client-python/blob/master//src/apify_client/clients/base/base_client.py#L15)resource\_id
**resource\_id: str | None
Inherited from [\_BaseBaseClient.resource\_id](https://docs.apify.com/api/client/python/api/client/python/reference/class/_BaseBaseClient.md#resource_id)
### [**](#root_client)[**](https://undefined/apify/apify-client-python/blob/master//src/apify_client/clients/base/base_client.py#L95)root\_client
**root\_client: [ApifyClient](https://docs.apify.com/api/client/python/api/client/python/reference/class/ApifyClient.md) | [ApifyClientAsync](https://docs.apify.com/api/client/python/api/client/python/reference/class/ApifyClientAsync.md)
Inherited from [BaseClientAsync.root\_client](https://docs.apify.com/api/client/python/api/client/python/reference/class/BaseClientAsync.md#root_client)
Overrides [\_BaseBaseClient.root\_client](https://docs.apify.com/api/client/python/api/client/python/reference/class/_BaseBaseClient.md#root_client)
### [**](#url)[**](https://undefined/apify/apify-client-python/blob/master//src/apify_client/clients/base/base_client.py#L16)url
**url: str
Inherited from [\_BaseBaseClient.url](https://docs.apify.com/api/client/python/api/client/python/reference/class/_BaseBaseClient.md#url)
---
# ActorEnvVarClient<!-- -->
Sub-client for manipulating a single Actor environment variable.
### Hierarchy
* [ResourceClient](https://docs.apify.com/api/client/python/api/client/python/reference/class/ResourceClient.md)
* *ActorEnvVarClient*
## Index[**](#Index)
### Methods
* [**\_\_init\_\_](https://docs.apify.com/api/client/python/api/client/python/reference/class/ActorEnvVarClient.md#__init__)
* [**delete](https://docs.apify.com/api/client/python/api/client/python/reference/class/ActorEnvVarClient.md#delete)
* [**get](https://docs.apify.com/api/client/python/api/client/python/reference/class/ActorEnvVarClient.md#get)
* [**update](https://docs.apify.com/api/client/python/api/client/python/reference/class/ActorEnvVarClient.md#update)
### Properties
* [**http\_client](https://docs.apify.com/api/client/python/api/client/python/reference/class/ActorEnvVarClient.md#http_client)
* [**params](https://docs.apify.com/api/client/python/api/client/python/reference/class/ActorEnvVarClient.md#params)
* [**resource\_id](https://docs.apify.com/api/client/python/api/client/python/reference/class/ActorEnvVarClient.md#resource_id)
* [**root\_client](https://docs.apify.com/api/client/python/api/client/python/reference/class/ActorEnvVarClient.md#root_client)
* [**url](https://docs.apify.com/api/client/python/api/client/python/reference/class/ActorEnvVarClient.md#url)
## Methods<!-- -->[**](#Methods)
### [**](#__init__)[**](https://undefined/apify/apify-client-python/blob/master//src/apify_client/clients/resource_clients/actor_env_var.py#L26)\_\_init\_\_
* ****\_\_init\_\_**(\*, base\_url, root\_client, http\_client, resource\_id, resource\_path, params): None
- Overrides [ResourceClient.\_\_init\_\_](https://docs.apify.com/api/client/python/api/client/python/reference/class/ResourceClient.md#__init__)
Initialize a new instance.
***
#### Parameters
* ##### keyword-onlybase\_url: str
Base URL of the API server.
* ##### keyword-onlyroot\_client: [ApifyClient](https://docs.apify.com/api/client/python/api/client/python/reference/class/ApifyClient.md)
The ApifyClient instance under which this resource client exists.
* ##### keyword-onlyhttp\_client: [HTTPClient](https://docs.apify.com/api/client/python/api/client/python/reference/class/HTTPClient.md)
The HTTPClient instance to be used in this client.
* ##### optionalkeyword-onlyresource\_id: str | None = <!-- -->None
ID of the manipulated resource, in case of a single-resource client.
* ##### keyword-onlyresource\_path: str
Path to the resource's endpoint on the API server.
* ##### optionalkeyword-onlyparams: dict | None = <!-- -->None
Parameters to include in all requests from this client.
#### Returns None
### [**](#delete)[**](https://undefined/apify/apify-client-python/blob/master//src/apify_client/clients/resource_clients/actor_env_var.py#L67)delete
* ****delete**(): None
- Delete the Actor environment variable.
<https://docs.apify.com/api/v2#/reference/actors/environment-variable-object/delete-environment-variable>
***
#### Returns None
### [**](#get)[**](https://undefined/apify/apify-client-python/blob/master//src/apify_client/clients/resource_clients/actor_env_var.py#L30)get
* ****get**(): dict | None
- Return information about the Actor environment variable.
<https://docs.apify.com/api/v2#/reference/actors/environment-variable-object/get-environment-variable>
***
#### Returns dict | None
### [**](#update)[**](https://undefined/apify/apify-client-python/blob/master//src/apify_client/clients/resource_clients/actor_env_var.py#L40)update
* ****update**(\*, is\_secret, name, value): dict
- Update the Actor environment variable with specified fields.
<https://docs.apify.com/api/v2#/reference/actors/environment-variable-object/update-environment-variable>
***
#### Parameters
* ##### optionalkeyword-onlyis\_secret: bool | None = <!-- -->None
Whether the environment variable is secret or not.
* ##### keyword-onlyname: str
The name of the environment variable.
* ##### keyword-onlyvalue: str
The value of the environment variable.
#### Returns dict
## Properties<!-- -->[**](#Properties)
### [**](#http_client)[**](https://undefined/apify/apify-client-python/blob/master//src/apify_client/clients/base/base_client.py#L53)http\_client
**http\_client: [HTTPClient](https://docs.apify.com/api/client/python/api/client/python/reference/class/HTTPClient.md) | [HTTPClientAsync](https://docs.apify.com/api/client/python/api/client/python/reference/class/HTTPClientAsync.md)
Inherited from [BaseClient.http\_client](https://docs.apify.com/api/client/python/api/client/python/reference/class/BaseClient.md#http_client)
Overrides [\_BaseBaseClient.http\_client](https://docs.apify.com/api/client/python/api/client/python/reference/class/_BaseBaseClient.md#http_client)
### [**](#params)[**](https://undefined/apify/apify-client-python/blob/master//src/apify_client/clients/base/base_client.py#L17)params
**params: dict
Inherited from [\_BaseBaseClient.params](https://docs.apify.com/api/client/python/api/client/python/reference/class/_BaseBaseClient.md#params)
### [**](#resource_id)[**](https://undefined/apify/apify-client-python/blob/master//src/apify_client/clients/base/base_client.py#L15)resource\_id
**resource\_id: str | None
Inherited from [\_BaseBaseClient.resource\_id](https://docs.apify.com/api/client/python/api/client/python/reference/class/_BaseBaseClient.md#resource_id)
### [**](#root_client)[**](https://undefined/apify/apify-client-python/blob/master//src/apify_client/clients/base/base_client.py#L54)root\_client
**root\_client: [ApifyClient](https://docs.apify.com/api/client/python/api/client/python/reference/class/ApifyClient.md) | [ApifyClientAsync](https://docs.apify.com/api/client/python/api/client/python/reference/class/ApifyClientAsync.md)
Inherited from [BaseClient.root\_client](https://docs.apify.com/api/client/python/api/client/python/reference/class/BaseClient.md#root_client)
Overrides [\_BaseBaseClient.root\_client](https://docs.apify.com/api/client/python/api/client/python/reference/class/_BaseBaseClient.md#root_client)
### [**](#url)[**](https://undefined/apify/apify-client-python/blob/master//src/apify_client/clients/base/base_client.py#L16)url
**url: str
Inherited from [\_BaseBaseClient.url](https://docs.apify.com/api/client/python/api/client/python/reference/class/_BaseBaseClient.md#url)
---
# ActorEnvVarClientAsync<!-- -->
Async sub-client for manipulating a single Actor environment variable.
### Hierarchy
* [ResourceClientAsync](https://docs.apify.com/api/client/python/api/client/python/reference/class/ResourceClientAsync.md)
* *ActorEnvVarClientAsync*
## Index[**](#Index)
### Methods
* [**\_\_init\_\_](https://docs.apify.com/api/client/python/api/client/python/reference/class/ActorEnvVarClientAsync.md#__init__)
* [**delete](https://docs.apify.com/api/client/python/api/client/python/reference/class/ActorEnvVarClientAsync.md#delete)
* [**get](https://docs.apify.com/api/client/python/api/client/python/reference/class/ActorEnvVarClientAsync.md#get)
* [**update](https://docs.apify.com/api/client/python/api/client/python/reference/class/ActorEnvVarClientAsync.md#update)
### Properties
* [**http\_client](https://docs.apify.com/api/client/python/api/client/python/reference/class/ActorEnvVarClientAsync.md#http_client)
* [**params](https://docs.apify.com/api/client/python/api/client/python/reference/class/ActorEnvVarClientAsync.md#params)
* [**resource\_id](https://docs.apify.com/api/client/python/api/client/python/reference/class/ActorEnvVarClientAsync.md#resource_id)
* [**root\_client](https://docs.apify.com/api/client/python/api/client/python/reference/class/ActorEnvVarClientAsync.md#root_client)
* [**url](https://docs.apify.com/api/client/python/api/client/python/reference/class/ActorEnvVarClientAsync.md#url)
## Methods<!-- -->[**](#Methods)
### [**](#__init__)[**](https://undefined/apify/apify-client-python/blob/master//src/apify_client/clients/resource_clients/actor_env_var.py#L78)\_\_init\_\_
* ****\_\_init\_\_**(\*, base\_url, root\_client, http\_client, resource\_id, resource\_path, params): None
- Overrides [ResourceClientAsync.\_\_init\_\_](https://docs.apify.com/api/client/python/api/client/python/reference/class/ResourceClientAsync.md#__init__)
Initialize a new instance.
***
#### Parameters
* ##### keyword-onlybase\_url: str
Base URL of the API server.
* ##### keyword-onlyroot\_client: [ApifyClientAsync](https://docs.apify.com/api/client/python/api/client/python/reference/class/ApifyClientAsync.md)
The ApifyClientAsync instance under which this resource client exists.
* ##### keyword-onlyhttp\_client: [HTTPClientAsync](https://docs.apify.com/api/client/python/api/client/python/reference/class/HTTPClientAsync.md)
The HTTPClientAsync instance to be used in this client.
* ##### optionalkeyword-onlyresource\_id: str | None = <!-- -->None
ID of the manipulated resource, in case of a single-resource client.
* ##### keyword-onlyresource\_path: str
Path to the resource's endpoint on the API server.
* ##### optionalkeyword-onlyparams: dict | None = <!-- -->None
Parameters to include in all requests from this client.
#### Returns None
### [**](#delete)[**](https://undefined/apify/apify-client-python/blob/master//src/apify_client/clients/resource_clients/actor_env_var.py#L119)delete
* **async **delete**(): None
- Delete the Actor environment variable.
<https://docs.apify.com/api/v2#/reference/actors/environment-variable-object/delete-environment-variable>
***
#### Returns None
### [**](#get)[**](https://undefined/apify/apify-client-python/blob/master//src/apify_client/clients/resource_clients/actor_env_var.py#L82)get
* **async **get**(): dict | None
- Return information about the Actor environment variable.
<https://docs.apify.com/api/v2#/reference/actors/environment-variable-object/get-environment-variable>
***
#### Returns dict | None
### [**](#update)[**](https://undefined/apify/apify-client-python/blob/master//src/apify_client/clients/resource_clients/actor_env_var.py#L92)update
* **async **update**(\*, is\_secret, name, value): dict
- Update the Actor environment variable with specified fields.
<https://docs.apify.com/api/v2#/reference/actors/environment-variable-object/update-environment-variable>
***
#### Parameters
* ##### optionalkeyword-onlyis\_secret: bool | None = <!-- -->None
Whether the environment variable is secret or not.
* ##### keyword-onlyname: str
The name of the environment variable.
* ##### keyword-onlyvalue: str
The value of the environment variable.
#### Returns dict
## Properties<!-- -->[**](#Properties)
### [**](#http_client)[**](https://undefined/apify/apify-client-python/blob/master//src/apify_client/clients/base/base_client.py#L94)http\_client
**http\_client: [HTTPClient](https://docs.apify.com/api/client/python/api/client/python/reference/class/HTTPClient.md) | [HTTPClientAsync](https://docs.apify.com/api/client/python/api/client/python/reference/class/HTTPClientAsync.md)
Inherited from [BaseClientAsync.http\_client](https://docs.apify.com/api/client/python/api/client/python/reference/class/BaseClientAsync.md#http_client)
Overrides [\_BaseBaseClient.http\_client](https://docs.apify.com/api/client/python/api/client/python/reference/class/_BaseBaseClient.md#http_client)
### [**](#params)[**](https://undefined/apify/apify-client-python/blob/master//src/apify_client/clients/base/base_client.py#L17)params
**params: dict
Inherited from [\_BaseBaseClient.params](https://docs.apify.com/api/client/python/api/client/python/reference/class/_BaseBaseClient.md#params)
### [**](#resource_id)[**](https://undefined/apify/apify-client-python/blob/master//src/apify_client/clients/base/base_client.py#L15)resource\_id
**resource\_id: str | None
Inherited from [\_BaseBaseClient.resource\_id](https://docs.apify.com/api/client/python/api/client/python/reference/class/_BaseBaseClient.md#resource_id)
### [**](#root_client)[**](https://undefined/apify/apify-client-python/blob/master//src/apify_client/clients/base/base_client.py#L95)root\_client
**root\_client: [ApifyClient](https://docs.apify.com/api/client/python/api/client/python/reference/class/ApifyClient.md) | [ApifyClientAsync](https://docs.apify.com/api/client/python/api/client/python/reference/class/ApifyClientAsync.md)
Inherited from [BaseClientAsync.root\_client](https://docs.apify.com/api/client/python/api/client/python/reference/class/BaseClientAsync.md#root_client)
Overrides [\_BaseBaseClient.root\_client](https://docs.apify.com/api/client/python/api/client/python/reference/class/_BaseBaseClient.md#root_client)
### [**](#url)[**](https://undefined/apify/apify-client-python/blob/master//src/apify_client/clients/base/base_client.py#L16)url
**url: str
Inherited from [\_BaseBaseClient.url](https://docs.apify.com/api/client/python/api/client/python/reference/class/_BaseBaseClient.md#url)
---
# ActorEnvVarCollectionClient<!-- -->
Sub-client for manipulating actor env vars.
### Hierarchy
* [ResourceCollectionClient](https://docs.apify.com/api/client/python/api/client/python/reference/class/ResourceCollectionClient.md)
* *ActorEnvVarCollectionClient*
## Index[**](#Index)
### Methods
* [**\_\_init\_\_](https://docs.apify.com/api/client/python/api/client/python/reference/class/ActorEnvVarCollectionClient.md#__init__)
* [**create](https://docs.apify.com/api/client/python/api/client/python/reference/class/ActorEnvVarCollectionClient.md#create)
* [**list](https://docs.apify.com/api/client/python/api/client/python/reference/class/ActorEnvVarCollectionClient.md#list)
### Properties
* [**http\_client](https://docs.apify.com/api/client/python/api/client/python/reference/class/ActorEnvVarCollectionClient.md#http_client)
* [**params](https://docs.apify.com/api/client/python/api/client/python/reference/class/ActorEnvVarCollectionClient.md#params)
* [**resource\_id](https://docs.apify.com/api/client/python/api/client/python/reference/class/ActorEnvVarCollectionClient.md#resource_id)
* [**root\_client](https://docs.apify.com/api/client/python/api/client/python/reference/class/ActorEnvVarCollectionClient.md#root_client)
* [**url](https://docs.apify.com/api/client/python/api/client/python/reference/class/ActorEnvVarCollectionClient.md#url)
## Methods<!-- -->[**](#Methods)
### [**](#__init__)[**](https://undefined/apify/apify-client-python/blob/master//src/apify_client/clients/resource_clients/actor_env_var_collection.py#L16)\_\_init\_\_
* ****\_\_init\_\_**(\*, base\_url, root\_client, http\_client, resource\_id, resource\_path, params): None
- Overrides [ResourceCollectionClient.\_\_init\_\_](https://docs.apify.com/api/client/python/api/client/python/reference/class/ResourceCollectionClient.md#__init__)
Initialize a new instance.
***
#### Parameters
* ##### keyword-onlybase\_url: str
Base URL of the API server.
* ##### keyword-onlyroot\_client: [ApifyClient](https://docs.apify.com/api/client/python/api/client/python/reference/class/ApifyClient.md)
The ApifyClient instance under which this resource client exists.
* ##### keyword-onlyhttp\_client: [HTTPClient](https://docs.apify.com/api/client/python/api/client/python/reference/class/HTTPClient.md)
The HTTPClient instance to be used in this client.
* ##### optionalkeyword-onlyresource\_id: str | None = <!-- -->None
ID of the manipulated resource, in case of a single-resource client.
* ##### keyword-onlyresource\_path: str
Path to the resource's endpoint on the API server.
* ##### optionalkeyword-onlyparams: dict | None = <!-- -->None
Parameters to include in all requests from this client.
#### Returns None
### [**](#create)[**](https://undefined/apify/apify-client-python/blob/master//src/apify_client/clients/resource_clients/actor_env_var_collection.py#L30)create
* ****create**(\*, is\_secret, name, value): dict
- Create a new actor environment variable.
<https://docs.apify.com/api/v2#/reference/actors/environment-variable-collection/create-environment-variable>
***
#### Parameters
* ##### optionalkeyword-onlyis\_secret: bool | None = <!-- -->None
Whether the environment variable is secret or not.
* ##### keyword-onlyname: str
The name of the environment variable.
* ##### keyword-onlyvalue: str
The value of the environment variable.
#### Returns dict
### [**](#list)[**](https://undefined/apify/apify-client-python/blob/master//src/apify_client/clients/resource_clients/actor_env_var_collection.py#L20)list
* ****list**(): [ListPage](https://docs.apify.com/api/client/python/api/client/python/reference/class/ListPage.md)\[dict]
- List the available actor environment variables.
<https://docs.apify.com/api/v2#/reference/actors/environment-variable-collection/get-list-of-environment-variables>
***
#### Returns [ListPage](https://docs.apify.com/api/client/python/api/client/python/reference/class/ListPage.md)\[dict]
## Properties<!-- -->[**](#Properties)
### [**](#http_client)[**](https://undefined/apify/apify-client-python/blob/master//src/apify_client/clients/base/base_client.py#L53)http\_client
**http\_client: [HTTPClient](https://docs.apify.com/api/client/python/api/client/python/reference/class/HTTPClient.md) | [HTTPClientAsync](https://docs.apify.com/api/client/python/api/client/python/reference/class/HTTPClientAsync.md)
Inherited from [BaseClient.http\_client](https://docs.apify.com/api/client/python/api/client/python/reference/class/BaseClient.md#http_client)
Overrides [\_BaseBaseClient.http\_client](https://docs.apify.com/api/client/python/api/client/python/reference/class/_BaseBaseClient.md#http_client)
### [**](#params)[**](https://undefined/apify/apify-client-python/blob/master//src/apify_client/clients/base/base_client.py#L17)params
**params: dict
Inherited from [\_BaseBaseClient.params](https://docs.apify.com/api/client/python/api/client/python/reference/class/_BaseBaseClient.md#params)
### [**](#resource_id)[**](https://undefined/apify/apify-client-python/blob/master//src/apify_client/clients/base/base_client.py#L15)resource\_id
**resource\_id: str | None
Inherited from [\_BaseBaseClient.resource\_id](https://docs.apify.com/api/client/python/api/client/python/reference/class/_BaseBaseClient.md#resource_id)
### [**](#root_client)[**](https://undefined/apify/apify-client-python/blob/master//src/apify_client/clients/base/base_client.py#L54)root\_client
**root\_client: [ApifyClient](https://docs.apify.com/api/client/python/api/client/python/reference/class/ApifyClient.md) | [ApifyClientAsync](https://docs.apify.com/api/client/python/api/client/python/reference/class/ApifyClientAsync.md)
Inherited from [BaseClient.root\_client](https://docs.apify.com/api/client/python/api/client/python/reference/class/BaseClient.md#root_client)
Overrides [\_BaseBaseClient.root\_client](https://docs.apify.com/api/client/python/api/client/python/reference/class/_BaseBaseClient.md#root_client)
### [**](#url)[**](https://undefined/apify/apify-client-python/blob/master//src/apify_client/clients/base/base_client.py#L16)url
**url: str
Inherited from [\_BaseBaseClient.url](https://docs.apify.com/api/client/python/api/client/python/reference/class/_BaseBaseClient.md#url)
---
# ActorEnvVarCollectionClientAsync<!-- -->
Async sub-client for manipulating actor env vars.
### Hierarchy
* [ResourceCollectionClientAsync](https://docs.apify.com/api/client/python/api/client/python/reference/class/ResourceCollectionClientAsync.md)
* *ActorEnvVarCollectionClientAsync*
## Index[**](#Index)
### Methods
* [**\_\_init\_\_](https://docs.apify.com/api/client/python/api/client/python/reference/class/ActorEnvVarCollectionClientAsync.md#__init__)
* [**create](https://docs.apify.com/api/client/python/api/client/python/reference/class/ActorEnvVarCollectionClientAsync.md#create)
* [**list](https://docs.apify.com/api/client/python/api/client/python/reference/class/ActorEnvVarCollectionClientAsync.md#list)
### Properties
* [**http\_client](https://docs.apify.com/api/client/python/api/client/python/reference/class/ActorEnvVarCollectionClientAsync.md#http_client)
* [**params](https://docs.apify.com/api/client/python/api/client/python/reference/class/ActorEnvVarCollectionClientAsync.md#params)
* [**resource\_id](https://docs.apify.com/api/client/python/api/client/python/reference/class/ActorEnvVarCollectionClientAsync.md#resource_id)
* [**root\_client](https://docs.apify.com/api/client/python/api/client/python/reference/class/ActorEnvVarCollectionClientAsync.md#root_client)
* [**url](https://docs.apify.com/api/client/python/api/client/python/reference/class/ActorEnvVarCollectionClientAsync.md#url)
## Methods<!-- -->[**](#Methods)
### [**](#__init__)[**](https://undefined/apify/apify-client-python/blob/master//src/apify_client/clients/resource_clients/actor_env_var_collection.py#L61)\_\_init\_\_
* ****\_\_init\_\_**(\*, base\_url, root\_client, http\_client, resource\_id, resource\_path, params): None
- Overrides [ResourceCollectionClientAsync.\_\_init\_\_](https://docs.apify.com/api/client/python/api/client/python/reference/class/ResourceCollectionClientAsync.md#__init__)
Initialize a new instance.
***
#### Parameters
* ##### keyword-onlybase\_url: str
Base URL of the API server.
* ##### keyword-onlyroot\_client: [ApifyClientAsync](https://docs.apify.com/api/client/python/api/client/python/reference/class/ApifyClientAsync.md)
The ApifyClientAsync instance under which this resource client exists.
* ##### keyword-onlyhttp\_client: [HTTPClientAsync](https://docs.apify.com/api/client/python/api/client/python/reference/class/HTTPClientAsync.md)
The HTTPClientAsync instance to be used in this client.
* ##### optionalkeyword-onlyresource\_id: str | None = <!-- -->None
ID of the manipulated resource, in case of a single-resource client.
* ##### keyword-onlyresource\_path: str
Path to the resource's endpoint on the API server.
* ##### optionalkeyword-onlyparams: dict | None = <!-- -->None
Parameters to include in all requests from this client.
#### Returns None
### [**](#create)[**](https://undefined/apify/apify-client-python/blob/master//src/apify_client/clients/resource_clients/actor_env_var_collection.py#L75)create
* **async **create**(\*, is\_secret, name, value): dict
- Create a new actor environment variable.
<https://docs.apify.com/api/v2#/reference/actors/environment-variable-collection/create-environment-variable>
***
#### Parameters
* ##### optionalkeyword-onlyis\_secret: bool | None = <!-- -->None
Whether the environment variable is secret or not.
* ##### keyword-onlyname: str
The name of the environment variable.
* ##### keyword-onlyvalue: str
The value of the environment variable.
#### Returns dict
### [**](#list)[**](https://undefined/apify/apify-client-python/blob/master//src/apify_client/clients/resource_clients/actor_env_var_collection.py#L65)list
* **async **list**(): [ListPage](https://docs.apify.com/api/client/python/api/client/python/reference/class/ListPage.md)\[dict]
- List the available actor environment variables.
<https://docs.apify.com/api/v2#/reference/actors/environment-variable-collection/get-list-of-environment-variables>
***
#### Returns [ListPage](https://docs.apify.com/api/client/python/api/client/python/reference/class/ListPage.md)\[dict]
## Properties<!-- -->[**](#Properties)
### [**](#http_client)[**](https://undefined/apify/apify-client-python/blob/master//src/apify_client/clients/base/base_client.py#L94)http\_client
**http\_client: [HTTPClient](https://docs.apify.com/api/client/python/api/client/python/reference/class/HTTPClient.md) | [HTTPClientAsync](https://docs.apify.com/api/client/python/api/client/python/reference/class/HTTPClientAsync.md)
Inherited from [BaseClientAsync.http\_client](https://docs.apify.com/api/client/python/api/client/python/reference/class/BaseClientAsync.md#http_client)
Overrides [\_BaseBaseClient.http\_client](https://docs.apify.com/api/client/python/api/client/python/reference/class/_BaseBaseClient.md#http_client)
### [**](#params)[**](https://undefined/apify/apify-client-python/blob/master//src/apify_client/clients/base/base_client.py#L17)params
**params: dict
Inherited from [\_BaseBaseClient.params](https://docs.apify.com/api/client/python/api/client/python/reference/class/_BaseBaseClient.md#params)
### [**](#resource_id)[**](https://undefined/apify/apify-client-python/blob/master//src/apify_client/clients/base/base_client.py#L15)resource\_id
**resource\_id: str | None
Inherited from [\_BaseBaseClient.resource\_id](https://docs.apify.com/api/client/python/api/client/python/reference/class/_BaseBaseClient.md#resource_id)
### [**](#root_client)[**](https://undefined/apify/apify-client-python/blob/master//src/apify_client/clients/base/base_client.py#L95)root\_client
**root\_client: [ApifyClient](https://docs.apify.com/api/client/python/api/client/python/reference/class/ApifyClient.md) | [ApifyClientAsync](https://docs.apify.com/api/client/python/api/client/python/reference/class/ApifyClientAsync.md)
Inherited from [BaseClientAsync.root\_client](https://docs.apify.com/api/client/python/api/client/python/reference/class/BaseClientAsync.md#root_client)
Overrides [\_BaseBaseClient.root\_client](https://docs.apify.com/api/client/python/api/client/python/reference/class/_BaseBaseClient.md#root_client)
### [**](#url)[**](https://undefined/apify/apify-client-python/blob/master//src/apify_client/clients/base/base_client.py#L16)url
**url: str
Inherited from [\_BaseBaseClient.url](https://docs.apify.com/api/client/python/api/client/python/reference/class/_BaseBaseClient.md#url)
---
# ActorJobBaseClient<!-- -->
Base sub-client class for Actor runs and Actor builds.
### Hierarchy
* [ResourceClient](https://docs.apify.com/api/client/python/api/client/python/reference/class/ResourceClient.md)
* *ActorJobBaseClient*
* [BuildClient](https://docs.apify.com/api/client/python/api/client/python/reference/class/BuildClient.md)
* [RunClient](https://docs.apify.com/api/client/python/api/client/python/reference/class/RunClient.md)
## Index[**](#Index)
### Methods
* [**\_\_init\_\_](https://docs.apify.com/api/client/python/api/client/python/reference/class/ActorJobBaseClient.md#__init__)
### Properties
* [**http\_client](https://docs.apify.com/api/client/python/api/client/python/reference/class/ActorJobBaseClient.md#http_client)
* [**params](https://docs.apify.com/api/client/python/api/client/python/reference/class/ActorJobBaseClient.md#params)
* [**resource\_id](https://docs.apify.com/api/client/python/api/client/python/reference/class/ActorJobBaseClient.md#resource_id)
* [**root\_client](https://docs.apify.com/api/client/python/api/client/python/reference/class/ActorJobBaseClient.md#root_client)
* [**url](https://docs.apify.com/api/client/python/api/client/python/reference/class/ActorJobBaseClient.md#url)
## Methods<!-- -->[**](#Methods)
### [**](#__init__)[**](https://undefined/apify/apify-client-python/blob/master//src/apify_client/clients/base/base_client.py#L56)\_\_init\_\_
* ****\_\_init\_\_**(\*, base\_url, root\_client, http\_client, resource\_id, resource\_path, params): None
- Overrides [ActorJobBaseClient.\_\_init\_\_](https://docs.apify.com/api/client/python/api/client/python/reference/class/ActorJobBaseClient.md#__init__)
Initialize a new instance.
***
#### Parameters
* ##### keyword-onlybase\_url: str
Base URL of the API server.
* ##### keyword-onlyroot\_client: [ApifyClient](https://docs.apify.com/api/client/python/api/client/python/reference/class/ApifyClient.md)
The ApifyClient instance under which this resource client exists.
* ##### keyword-onlyhttp\_client: [HTTPClient](https://docs.apify.com/api/client/python/api/client/python/reference/class/HTTPClient.md)
The HTTPClient instance to be used in this client.
* ##### optionalkeyword-onlyresource\_id: str | None = <!-- -->None
ID of the manipulated resource, in case of a single-resource client.
* ##### keyword-onlyresource\_path: str
Path to the resource's endpoint on the API server.
* ##### optionalkeyword-onlyparams: dict | None = <!-- -->None
Parameters to include in all requests from this client.
#### Returns None
## Properties<!-- -->[**](#Properties)
### [**](#http_client)[**](https://undefined/apify/apify-client-python/blob/master//src/apify_client/clients/base/base_client.py#L53)http\_client
**http\_client: [HTTPClient](https://docs.apify.com/api/client/python/api/client/python/reference/class/HTTPClient.md) | [HTTPClientAsync](https://docs.apify.com/api/client/python/api/client/python/reference/class/HTTPClientAsync.md)
Inherited from [BaseClient.http\_client](https://docs.apify.com/api/client/python/api/client/python/reference/class/BaseClient.md#http_client)
Overrides [\_BaseBaseClient.http\_client](https://docs.apify.com/api/client/python/api/client/python/reference/class/_BaseBaseClient.md#http_client)
### [**](#params)[**](https://undefined/apify/apify-client-python/blob/master//src/apify_client/clients/base/base_client.py#L17)params
**params: dict
Inherited from [\_BaseBaseClient.params](https://docs.apify.com/api/client/python/api/client/python/reference/class/_BaseBaseClient.md#params)
### [**](#resource_id)[**](https://undefined/apify/apify-client-python/blob/master//src/apify_client/clients/base/base_client.py#L15)resource\_id
**resource\_id: str | None
Inherited from [\_BaseBaseClient.resource\_id](https://docs.apify.com/api/client/python/api/client/python/reference/class/_BaseBaseClient.md#resource_id)
### [**](#root_client)[**](https://undefined/apify/apify-client-python/blob/master//src/apify_client/clients/base/base_client.py#L54)root\_client
**root\_client: [ApifyClient](https://docs.apify.com/api/client/python/api/client/python/reference/class/ApifyClient.md) | [ApifyClientAsync](https://docs.apify.com/api/client/python/api/client/python/reference/class/ApifyClientAsync.md)
Inherited from [BaseClient.root\_client](https://docs.apify.com/api/client/python/api/client/python/reference/class/BaseClient.md#root_client)
Overrides [\_BaseBaseClient.root\_client](https://docs.apify.com/api/client/python/api/client/python/reference/class/_BaseBaseClient.md#root_client)
### [**](#url)[**](https://undefined/apify/apify-client-python/blob/master//src/apify_client/clients/base/base_client.py#L16)url
**url: str
Inherited from [\_BaseBaseClient.url](https://docs.apify.com/api/client/python/api/client/python/reference/class/_BaseBaseClient.md#url)
---
# ActorJobBaseClientAsync<!-- -->
Base async sub-client class for Actor runs and Actor builds.
### Hierarchy
* [ResourceClientAsync](https://docs.apify.com/api/client/python/api/client/python/reference/class/ResourceClientAsync.md)
* *ActorJobBaseClientAsync*
* [BuildClientAsync](https://docs.apify.com/api/client/python/api/client/python/reference/class/BuildClientAsync.md)
* [RunClientAsync](https://docs.apify.com/api/client/python/api/client/python/reference/class/RunClientAsync.md)
## Index[**](#Index)
### Methods
* [**\_\_init\_\_](https://docs.apify.com/api/client/python/api/client/python/reference/class/ActorJobBaseClientAsync.md#__init__)
### Properties
* [**http\_client](https://docs.apify.com/api/client/python/api/client/python/reference/class/ActorJobBaseClientAsync.md#http_client)
* [**params](https://docs.apify.com/api/client/python/api/client/python/reference/class/ActorJobBaseClientAsync.md#params)
* [**resource\_id](https://docs.apify.com/api/client/python/api/client/python/reference/class/ActorJobBaseClientAsync.md#resource_id)
* [**root\_client](https://docs.apify.com/api/client/python/api/client/python/reference/class/ActorJobBaseClientAsync.md#root_client)
* [**url](https://docs.apify.com/api/client/python/api/client/python/reference/class/ActorJobBaseClientAsync.md#url)
## Methods<!-- -->[**](#Methods)
### [**](#__init__)[**](https://undefined/apify/apify-client-python/blob/master//src/apify_client/clients/base/base_client.py#L97)\_\_init\_\_
* ****\_\_init\_\_**(\*, base\_url, root\_client, http\_client, resource\_id, resource\_path, params): None
- Overrides [ActorJobBaseClientAsync.\_\_init\_\_](https://docs.apify.com/api/client/python/api/client/python/reference/class/ActorJobBaseClientAsync.md#__init__)
Initialize a new instance.
***
#### Parameters
* ##### keyword-onlybase\_url: str
Base URL of the API server.
* ##### keyword-onlyroot\_client: [ApifyClientAsync](https://docs.apify.com/api/client/python/api/client/python/reference/class/ApifyClientAsync.md)
The ApifyClientAsync instance under which this resource client exists.
* ##### keyword-onlyhttp\_client: [HTTPClientAsync](https://docs.apify.com/api/client/python/api/client/python/reference/class/HTTPClientAsync.md)
The HTTPClientAsync instance to be used in this client.
* ##### optionalkeyword-onlyresource\_id: str | None = <!-- -->None
ID of the manipulated resource, in case of a single-resource client.
* ##### keyword-onlyresource\_path: str
Path to the resource's endpoint on the API server.
* ##### optionalkeyword-onlyparams: dict | None = <!-- -->None
Parameters to include in all requests from this client.
#### Returns None
## Properties<!-- -->[**](#Properties)
### [**](#http_client)[**](https://undefined/apify/apify-client-python/blob/master//src/apify_client/clients/base/base_client.py#L94)http\_client
**http\_client: [HTTPClient](https://docs.apify.com/api/client/python/api/client/python/reference/class/HTTPClient.md) | [HTTPClientAsync](https://docs.apify.com/api/client/python/api/client/python/reference/class/HTTPClientAsync.md)
Inherited from [BaseClientAsync.http\_client](https://docs.apify.com/api/client/python/api/client/python/reference/class/BaseClientAsync.md#http_client)
Overrides [\_BaseBaseClient.http\_client](https://docs.apify.com/api/client/python/api/client/python/reference/class/_BaseBaseClient.md#http_client)
### [**](#params)[**](https://undefined/apify/apify-client-python/blob/master//src/apify_client/clients/base/base_client.py#L17)params
**params: dict
Inherited from [\_BaseBaseClient.params](https://docs.apify.com/api/client/python/api/client/python/reference/class/_BaseBaseClient.md#params)
### [**](#resource_id)[**](https://undefined/apify/apify-client-python/blob/master//src/apify_client/clients/base/base_client.py#L15)resource\_id
**resource\_id: str | None
Inherited from [\_BaseBaseClient.resource\_id](https://docs.apify.com/api/client/python/api/client/python/reference/class/_BaseBaseClient.md#resource_id)
### [**](#root_client)[**](https://undefined/apify/apify-client-python/blob/master//src/apify_client/clients/base/base_client.py#L95)root\_client
**root\_client: [ApifyClient](https://docs.apify.com/api/client/python/api/client/python/reference/class/ApifyClient.md) | [ApifyClientAsync](https://docs.apify.com/api/client/python/api/client/python/reference/class/ApifyClientAsync.md)
Inherited from [BaseClientAsync.root\_client](https://docs.apify.com/api/client/python/api/client/python/reference/class/BaseClientAsync.md#root_client)
Overrides [\_BaseBaseClient.root\_client](https://docs.apify.com/api/client/python/api/client/python/reference/class/_BaseBaseClient.md#root_client)
### [**](#url)[**](https://undefined/apify/apify-client-python/blob/master//src/apify_client/clients/base/base_client.py#L16)url
**url: str
Inherited from [\_BaseBaseClient.url](https://docs.apify.com/api/client/python/api/client/python/reference/class/_BaseBaseClient.md#url)
---
# ActorVersionClient<!-- -->
Sub-client for manipulating a single Actor version.
### Hierarchy
* [ResourceClient](https://docs.apify.com/api/client/python/api/client/python/reference/class/ResourceClient.md)
* *ActorVersionClient*
## Index[**](#Index)
### Methods
* [**\_\_init\_\_](https://docs.apify.com/api/client/python/api/client/python/reference/class/ActorVersionClient.md#__init__)
* [**delete](https://docs.apify.com/api/client/python/api/client/python/reference/class/ActorVersionClient.md#delete)
* [**env\_var](https://docs.apify.com/api/client/python/api/client/python/reference/class/ActorVersionClient.md#env_var)
* [**env\_vars](https://docs.apify.com/api/client/python/api/client/python/reference/class/ActorVersionClient.md#env_vars)
* [**get](https://docs.apify.com/api/client/python/api/client/python/reference/class/ActorVersionClient.md#get)
* [**update](https://docs.apify.com/api/client/python/api/client/python/reference/class/ActorVersionClient.md#update)
### Properties
* [**http\_client](https://docs.apify.com/api/client/python/api/client/python/reference/class/ActorVersionClient.md#http_client)
* [**params](https://docs.apify.com/api/client/python/api/client/python/reference/class/ActorVersionClient.md#params)
* [**resource\_id](https://docs.apify.com/api/client/python/api/client/python/reference/class/ActorVersionClient.md#resource_id)
* [**root\_client](https://docs.apify.com/api/client/python/api/client/python/reference/class/ActorVersionClient.md#root_client)
* [**url](https://docs.apify.com/api/client/python/api/client/python/reference/class/ActorVersionClient.md#url)
## Methods<!-- -->[**](#Methods)
### [**](#__init__)[**](https://undefined/apify/apify-client-python/blob/master//src/apify_client/clients/resource_clients/actor_version.py#L45)\_\_init\_\_
* ****\_\_init\_\_**(\*, base\_url, root\_client, http\_client, resource\_id, resource\_path, params): None
- Overrides [ResourceClient.\_\_init\_\_](https://docs.apify.com/api/client/python/api/client/python/reference/class/ResourceClient.md#__init__)
Initialize a new instance.
***
#### Parameters
* ##### keyword-onlybase\_url: str
Base URL of the API server.
* ##### keyword-onlyroot\_client: [ApifyClient](https://docs.apify.com/api/client/python/api/client/python/reference/class/ApifyClient.md)
The ApifyClient instance under which this resource client exists.
* ##### keyword-onlyhttp\_client: [HTTPClient](https://docs.apify.com/api/client/python/api/client/python/reference/class/HTTPClient.md)
The HTTPClient instance to be used in this client.
* ##### optionalkeyword-onlyresource\_id: str | None = <!-- -->None
ID of the manipulated resource, in case of a single-resource client.
* ##### keyword-onlyresource\_path: str
Path to the resource's endpoint on the API server.
* ##### optionalkeyword-onlyparams: dict | None = <!-- -->None
Parameters to include in all requests from this client.
#### Returns None
### [**](#delete)[**](https://undefined/apify/apify-client-python/blob/master//src/apify_client/clients/resource_clients/actor_version.py#L107)delete
* ****delete**(): None
- Delete the Actor version.
<https://docs.apify.com/api/v2#/reference/actors/version-object/delete-version>
***
#### Returns None
### [**](#env_var)[**](https://undefined/apify/apify-client-python/blob/master//src/apify_client/clients/resource_clients/actor_version.py#L118)env\_var
* ****env\_var**(env\_var\_name): [ActorEnvVarClient](https://docs.apify.com/api/client/python/api/client/python/reference/class/ActorEnvVarClient.md)
- Retrieve the client for the specified environment variable of this Actor version.
***
#### Parameters
* ##### env\_var\_name: str
The name of the environment variable for which to retrieve the resource client.
#### Returns [ActorEnvVarClient](https://docs.apify.com/api/client/python/api/client/python/reference/class/ActorEnvVarClient.md)
### [**](#env_vars)[**](https://undefined/apify/apify-client-python/blob/master//src/apify_client/clients/resource_clients/actor_version.py#L114)env\_vars
* ****env\_vars**(): [ActorEnvVarCollectionClient](https://docs.apify.com/api/client/python/api/client/python/reference/class/ActorEnvVarCollectionClient.md)
- Retrieve a client for the environment variables of this Actor version.
***
#### Returns [ActorEnvVarCollectionClient](https://docs.apify.com/api/client/python/api/client/python/reference/class/ActorEnvVarCollectionClient.md)
### [**](#get)[**](https://undefined/apify/apify-client-python/blob/master//src/apify_client/clients/resource_clients/actor_version.py#L49)get
* ****get**(): dict | None
- Return information about the Actor version.
<https://docs.apify.com/api/v2#/reference/actors/version-object/get-version>
***
#### Returns dict | None
### [**](#update)[**](https://undefined/apify/apify-client-python/blob/master//src/apify_client/clients/resource_clients/actor_version.py#L59)update
* ****update**(\*, build\_tag, env\_vars, apply\_env\_vars\_to\_build, source\_type, source\_files, git\_repo\_url, tarball\_url, github\_gist\_url): dict
- Update the Actor version with specified fields.
<https://docs.apify.com/api/v2#/reference/actors/version-object/update-version>
***
#### Parameters
* ##### optionalkeyword-onlybuild\_tag: str | None = <!-- -->None
Tag that is automatically set to the latest successful build of the current version.
* ##### optionalkeyword-onlyenv\_vars: [list](https://docs.apify.com/api/client/python/api/client/python/reference/class/RequestQueueCollectionClient.md#list)\[dict] | None = <!-- -->None
Environment variables that will be available to the Actor run process, and optionally also to the build process. See the API docs for their exact structure.
* ##### optionalkeyword-onlyapply\_env\_vars\_to\_build: bool | None = <!-- -->None
Whether the environment variables specified for the Actor run will also be set to the Actor build process.
* ##### optionalkeyword-onlysource\_type: ActorSourceType | None = <!-- -->None
What source type is the Actor version using.
* ##### optionalkeyword-onlysource\_files: [list](https://docs.apify.com/api/client/python/api/client/python/reference/class/RequestQueueCollectionClient.md#list)\[dict] | None = <!-- -->None
Source code comprised of multiple files, each an item of the array. Required when `source_type` is `ActorSourceType.SOURCE_FILES`. See the API docs for the exact structure.
* ##### optionalkeyword-onlygit\_repo\_url: str | None = <!-- -->None
The URL of a Git repository from which the source code will be cloned. Required when `source_type` is `ActorSourceType.GIT_REPO`.
* ##### optionalkeyword-onlytarball\_url: str | None = <!-- -->None
The URL of a tarball or a zip archive from which the source code will be downloaded. Required when `source_type` is `ActorSourceType.TARBALL`.
* ##### optionalkeyword-onlygithub\_gist\_url: str | None = <!-- -->None
The URL of a GitHub Gist from which the source will be downloaded. Required when `source_type` is `ActorSourceType.GITHUB_GIST`.
#### Returns dict
## Properties<!-- -->[**](#Properties)
### [**](#http_client)[**](https://undefined/apify/apify-client-python/blob/master//src/apify_client/clients/base/base_client.py#L53)http\_client
**http\_client: [HTTPClient](https://docs.apify.com/api/client/python/api/client/python/reference/class/HTTPClient.md) | [HTTPClientAsync](https://docs.apify.com/api/client/python/api/client/python/reference/class/HTTPClientAsync.md)
Inherited from [BaseClient.http\_client](https://docs.apify.com/api/client/python/api/client/python/reference/class/BaseClient.md#http_client)
Overrides [\_BaseBaseClient.http\_client](https://docs.apify.com/api/client/python/api/client/python/reference/class/_BaseBaseClient.md#http_client)
### [**](#params)[**](https://undefined/apify/apify-client-python/blob/master//src/apify_client/clients/base/base_client.py#L17)params
**params: dict
Inherited from [\_BaseBaseClient.params](https://docs.apify.com/api/client/python/api/client/python/reference/class/_BaseBaseClient.md#params)
### [**](#resource_id)[**](https://undefined/apify/apify-client-python/blob/master//src/apify_client/clients/base/base_client.py#L15)resource\_id
**resource\_id: str | None
Inherited from [\_BaseBaseClient.resource\_id](https://docs.apify.com/api/client/python/api/client/python/reference/class/_BaseBaseClient.md#resource_id)
### [**](#root_client)[**](https://undefined/apify/apify-client-python/blob/master//src/apify_client/clients/base/base_client.py#L54)root\_client
**root\_client: [ApifyClient](https://docs.apify.com/api/client/python/api/client/python/reference/class/ApifyClient.md) | [ApifyClientAsync](https://docs.apify.com/api/client/python/api/client/python/reference/class/ApifyClientAsync.md)
Inherited from [BaseClient.root\_client](https://docs.apify.com/api/client/python/api/client/python/reference/class/BaseClient.md#root_client)
Overrides [\_BaseBaseClient.root\_client](https://docs.apify.com/api/client/python/api/client/python/reference/class/_BaseBaseClient.md#root_client)
### [**](#url)[**](https://undefined/apify/apify-client-python/blob/master//src/apify_client/clients/base/base_client.py#L16)url
**url: str
Inherited from [\_BaseBaseClient.url](https://docs.apify.com/api/client/python/api/client/python/reference/class/_BaseBaseClient.md#url)
---
# ActorVersionClientAsync<!-- -->
Async sub-client for manipulating a single Actor version.
### Hierarchy
* [ResourceClientAsync](https://docs.apify.com/api/client/python/api/client/python/reference/class/ResourceClientAsync.md)
* *ActorVersionClientAsync*
## Index[**](#Index)
### Methods
* [**\_\_init\_\_](https://docs.apify.com/api/client/python/api/client/python/reference/class/ActorVersionClientAsync.md#__init__)
* [**delete](https://docs.apify.com/api/client/python/api/client/python/reference/class/ActorVersionClientAsync.md#delete)
* [**env\_var](https://docs.apify.com/api/client/python/api/client/python/reference/class/ActorVersionClientAsync.md#env_var)
* [**env\_vars](https://docs.apify.com/api/client/python/api/client/python/reference/class/ActorVersionClientAsync.md#env_vars)
* [**get](https://docs.apify.com/api/client/python/api/client/python/reference/class/ActorVersionClientAsync.md#get)
* [**update](https://docs.apify.com/api/client/python/api/client/python/reference/class/ActorVersionClientAsync.md#update)
### Properties
* [**http\_client](https://docs.apify.com/api/client/python/api/client/python/reference/class/ActorVersionClientAsync.md#http_client)
* [**params](https://docs.apify.com/api/client/python/api/client/python/reference/class/ActorVersionClientAsync.md#params)
* [**resource\_id](https://docs.apify.com/api/client/python/api/client/python/reference/class/ActorVersionClientAsync.md#resource_id)
* [**root\_client](https://docs.apify.com/api/client/python/api/client/python/reference/class/ActorVersionClientAsync.md#root_client)
* [**url](https://docs.apify.com/api/client/python/api/client/python/reference/class/ActorVersionClientAsync.md#url)
## Methods<!-- -->[**](#Methods)
### [**](#__init__)[**](https://undefined/apify/apify-client-python/blob/master//src/apify_client/clients/resource_clients/actor_version.py#L133)\_\_init\_\_
* ****\_\_init\_\_**(\*, base\_url, root\_client, http\_client, resource\_id, resource\_path, params): None
- Overrides [ResourceClientAsync.\_\_init\_\_](https://docs.apify.com/api/client/python/api/client/python/reference/class/ResourceClientAsync.md#__init__)
Initialize a new instance.
***
#### Parameters
* ##### keyword-onlybase\_url: str
Base URL of the API server.
* ##### keyword-onlyroot\_client: [ApifyClientAsync](https://docs.apify.com/api/client/python/api/client/python/reference/class/ApifyClientAsync.md)
The ApifyClientAsync instance under which this resource client exists.
* ##### keyword-onlyhttp\_client: [HTTPClientAsync](https://docs.apify.com/api/client/python/api/client/python/reference/class/HTTPClientAsync.md)
The HTTPClientAsync instance to be used in this client.
* ##### optionalkeyword-onlyresource\_id: str | None = <!-- -->None
ID of the manipulated resource, in case of a single-resource client.
* ##### keyword-onlyresource\_path: str
Path to the resource's endpoint on the API server.
* ##### optionalkeyword-onlyparams: dict | None = <!-- -->None
Parameters to include in all requests from this client.
#### Returns None
### [**](#delete)[**](https://undefined/apify/apify-client-python/blob/master//src/apify_client/clients/resource_clients/actor_version.py#L195)delete
* **async **delete**(): None
- Delete the Actor version.
<https://docs.apify.com/api/v2#/reference/actors/version-object/delete-version>
***
#### Returns None
### [**](#env_var)[**](https://undefined/apify/apify-client-python/blob/master//src/apify_client/clients/resource_clients/actor_version.py#L206)env\_var
* ****env\_var**(env\_var\_name): [ActorEnvVarClientAsync](https://docs.apify.com/api/client/python/api/client/python/reference/class/ActorEnvVarClientAsync.md)
- Retrieve the client for the specified environment variable of this Actor version.
***
#### Parameters
* ##### env\_var\_name: str
The name of the environment variable for which to retrieve the resource client.
#### Returns [ActorEnvVarClientAsync](https://docs.apify.com/api/client/python/api/client/python/reference/class/ActorEnvVarClientAsync.md)
### [**](#env_vars)[**](https://undefined/apify/apify-client-python/blob/master//src/apify_client/clients/resource_clients/actor_version.py#L202)env\_vars
* ****env\_vars**(): [ActorEnvVarCollectionClientAsync](https://docs.apify.com/api/client/python/api/client/python/reference/class/ActorEnvVarCollectionClientAsync.md)
- Retrieve a client for the environment variables of this Actor version.
***
#### Returns [ActorEnvVarCollectionClientAsync](https://docs.apify.com/api/client/python/api/client/python/reference/class/ActorEnvVarCollectionClientAsync.md)
### [**](#get)[**](https://undefined/apify/apify-client-python/blob/master//src/apify_client/clients/resource_clients/actor_version.py#L137)get
* **async **get**(): dict | None
- Return information about the Actor version.
<https://docs.apify.com/api/v2#/reference/actors/version-object/get-version>
***
#### Returns dict | None
### [**](#update)[**](https://undefined/apify/apify-client-python/blob/master//src/apify_client/clients/resource_clients/actor_version.py#L147)update
* **async **update**(\*, build\_tag, env\_vars, apply\_env\_vars\_to\_build, source\_type, source\_files, git\_repo\_url, tarball\_url, github\_gist\_url): dict
- Update the Actor version with specified fields.
<https://docs.apify.com/api/v2#/reference/actors/version-object/update-version>
***
#### Parameters
* ##### optionalkeyword-onlybuild\_tag: str | None = <!-- -->None
Tag that is automatically set to the latest successful build of the current version.
* ##### optionalkeyword-onlyenv\_vars: [list](https://docs.apify.com/api/client/python/api/client/python/reference/class/RequestQueueCollectionClient.md#list)\[dict] | None = <!-- -->None
Environment variables that will be available to the Actor run process, and optionally also to the build process. See the API docs for their exact structure.
* ##### optionalkeyword-onlyapply\_env\_vars\_to\_build: bool | None = <!-- -->None
Whether the environment variables specified for the Actor run will also be set to the Actor build process.
* ##### optionalkeyword-onlysource\_type: ActorSourceType | None = <!-- -->None
What source type is the Actor version using.
* ##### optionalkeyword-onlysource\_files: [list](https://docs.apify.com/api/client/python/api/client/python/reference/class/RequestQueueCollectionClient.md#list)\[dict] | None = <!-- -->None
Source code comprised of multiple files, each an item of the array. Required when `source_type` is `ActorSourceType.SOURCE_FILES`. See the API docs for the exact structure.
* ##### optionalkeyword-onlygit\_repo\_url: str | None = <!-- -->None
The URL of a Git repository from which the source code will be cloned. Required when `source_type` is `ActorSourceType.GIT_REPO`.
* ##### optionalkeyword-onlytarball\_url: str | None = <!-- -->None
The URL of a tarball or a zip archive from which the source code will be downloaded. Required when `source_type` is `ActorSourceType.TARBALL`.
* ##### optionalkeyword-onlygithub\_gist\_url: str | None = <!-- -->None
The URL of a GitHub Gist from which the source will be downloaded. Required when `source_type` is `ActorSourceType.GITHUB_GIST`.
#### Returns dict
## Properties<!-- -->[**](#Properties)
### [**](#http_client)[**](https://undefined/apify/apify-client-python/blob/master//src/apify_client/clients/base/base_client.py#L94)http\_client
**http\_client: [HTTPClient](https://docs.apify.com/api/client/python/api/client/python/reference/class/HTTPClient.md) | [HTTPClientAsync](https://docs.apify.com/api/client/python/api/client/python/reference/class/HTTPClientAsync.md)
Inherited from [BaseClientAsync.http\_client](https://docs.apify.com/api/client/python/api/client/python/reference/class/BaseClientAsync.md#http_client)
Overrides [\_BaseBaseClient.http\_client](https://docs.apify.com/api/client/python/api/client/python/reference/class/_BaseBaseClient.md#http_client)
### [**](#params)[**](https://undefined/apify/apify-client-python/blob/master//src/apify_client/clients/base/base_client.py#L17)params
**params: dict
Inherited from [\_BaseBaseClient.params](https://docs.apify.com/api/client/python/api/client/python/reference/class/_BaseBaseClient.md#params)
### [**](#resource_id)[**](https://undefined/apify/apify-client-python/blob/master//src/apify_client/clients/base/base_client.py#L15)resource\_id
**resource\_id: str | None
Inherited from [\_BaseBaseClient.resource\_id](https://docs.apify.com/api/client/python/api/client/python/reference/class/_BaseBaseClient.md#resource_id)
### [**](#root_client)[**](https://undefined/apify/apify-client-python/blob/master//src/apify_client/clients/base/base_client.py#L95)root\_client
**root\_client: [ApifyClient](https://docs.apify.com/api/client/python/api/client/python/reference/class/ApifyClient.md) | [ApifyClientAsync](https://docs.apify.com/api/client/python/api/client/python/reference/class/ApifyClientAsync.md)
Inherited from [BaseClientAsync.root\_client](https://docs.apify.com/api/client/python/api/client/python/reference/class/BaseClientAsync.md#root_client)
Overrides [\_BaseBaseClient.root\_client](https://docs.apify.com/api/client/python/api/client/python/reference/class/_BaseBaseClient.md#root_client)
### [**](#url)[**](https://undefined/apify/apify-client-python/blob/master//src/apify_client/clients/base/base_client.py#L16)url
**url: str
Inherited from [\_BaseBaseClient.url](https://docs.apify.com/api/client/python/api/client/python/reference/class/_BaseBaseClient.md#url)
---
# ActorVersionCollectionClient<!-- -->
Sub-client for manipulating Actor versions.
### Hierarchy
* [ResourceCollectionClient](https://docs.apify.com/api/client/python/api/client/python/reference/class/ResourceCollectionClient.md)
* *ActorVersionCollectionClient*
## Index[**](#Index)
### Methods
* [**\_\_init\_\_](https://docs.apify.com/api/client/python/api/client/python/reference/class/ActorVersionCollectionClient.md#__init__)
* [**create](https://docs.apify.com/api/client/python/api/client/python/reference/class/ActorVersionCollectionClient.md#create)
* [**list](https://docs.apify.com/api/client/python/api/client/python/reference/class/ActorVersionCollectionClient.md#list)
### Properties
* [**http\_client](https://docs.apify.com/api/client/python/api/client/python/reference/class/ActorVersionCollectionClient.md#http_client)
* [**params](https://docs.apify.com/api/client/python/api/client/python/reference/class/ActorVersionCollectionClient.md#params)
* [**resource\_id](https://docs.apify.com/api/client/python/api/client/python/reference/class/ActorVersionCollectionClient.md#resource_id)
* [**root\_client](https://docs.apify.com/api/client/python/api/client/python/reference/class/ActorVersionCollectionClient.md#root_client)
* [**url](https://docs.apify.com/api/client/python/api/client/python/reference/class/ActorVersionCollectionClient.md#url)
## Methods<!-- -->[**](#Methods)
### [**](#__init__)[**](https://undefined/apify/apify-client-python/blob/master//src/apify_client/clients/resource_clients/actor_version_collection.py#L18)\_\_init\_\_
* ****\_\_init\_\_**(\*, base\_url, root\_client, http\_client, resource\_id, resource\_path, params): None
- Overrides [ResourceCollectionClient.\_\_init\_\_](https://docs.apify.com/api/client/python/api/client/python/reference/class/ResourceCollectionClient.md#__init__)
Initialize a new instance.
***
#### Parameters
* ##### keyword-onlybase\_url: str
Base URL of the API server.
* ##### keyword-onlyroot\_client: [ApifyClient](https://docs.apify.com/api/client/python/api/client/python/reference/class/ApifyClient.md)
The ApifyClient instance under which this resource client exists.
* ##### keyword-onlyhttp\_client: [HTTPClient](https://docs.apify.com/api/client/python/api/client/python/reference/class/HTTPClient.md)
The HTTPClient instance to be used in this client.
* ##### optionalkeyword-onlyresource\_id: str | None = <!-- -->None
ID of the manipulated resource, in case of a single-resource client.
* ##### keyword-onlyresource\_path: str
Path to the resource's endpoint on the API server.
* ##### optionalkeyword-onlyparams: dict | None = <!-- -->None
Parameters to include in all requests from this client.
#### Returns None
### [**](#create)[**](https://undefined/apify/apify-client-python/blob/master//src/apify_client/clients/resource_clients/actor_version_collection.py#L32)create
* ****create**(\*, version\_number, build\_tag, env\_vars, apply\_env\_vars\_to\_build, source\_type, source\_files, git\_repo\_url, tarball\_url, github\_gist\_url): dict
- Create a new Actor version.
<https://docs.apify.com/api/v2#/reference/actors/version-collection/create-version>
***
#### Parameters
* ##### keyword-onlyversion\_number: str
Major and minor version of the Actor (e.g. `1.0`).
* ##### optionalkeyword-onlybuild\_tag: str | None = <!-- -->None
Tag that is automatically set to the latest successful build of the current version.
* ##### optionalkeyword-onlyenv\_vars: [list](https://docs.apify.com/api/client/python/api/client/python/reference/class/RequestQueueCollectionClient.md#list)\[dict] | None = <!-- -->None
Environment variables that will be available to the Actor run process, and optionally also to the build process. See the API docs for their exact structure.
* ##### optionalkeyword-onlyapply\_env\_vars\_to\_build: bool | None = <!-- -->None
Whether the environment variables specified for the Actor run will also be set to the Actor build process.
* ##### keyword-onlysource\_type: ActorSourceType
What source type is the Actor version using.
* ##### optionalkeyword-onlysource\_files: [list](https://docs.apify.com/api/client/python/api/client/python/reference/class/RequestQueueCollectionClient.md#list)\[dict] | None = <!-- -->None
Source code comprised of multiple files, each an item of the array. Required when `source_type` is `ActorSourceType.SOURCE_FILES`. See the API docs for the exact structure.
* ##### optionalkeyword-onlygit\_repo\_url: str | None = <!-- -->None
The URL of a Git repository from which the source code will be cloned. Required when `source_type` is `ActorSourceType.GIT_REPO`.
* ##### optionalkeyword-onlytarball\_url: str | None = <!-- -->None
The URL of a tarball or a zip archive from which the source code will be downloaded. Required when `source_type` is `ActorSourceType.TARBALL`.
* ##### optionalkeyword-onlygithub\_gist\_url: str | None = <!-- -->None
The URL of a GitHub Gist from which the source will be downloaded. Required when `source_type` is `ActorSourceType.GITHUB_GIST`.
#### Returns dict
### [**](#list)[**](https://undefined/apify/apify-client-python/blob/master//src/apify_client/clients/resource_clients/actor_version_collection.py#L22)list
* ****list**(): [ListPage](https://docs.apify.com/api/client/python/api/client/python/reference/class/ListPage.md)\[dict]
- List the available Actor versions.
<https://docs.apify.com/api/v2#/reference/actors/version-collection/get-list-of-versions>
***
#### Returns [ListPage](https://docs.apify.com/api/client/python/api/client/python/reference/class/ListPage.md)\[dict]
## Properties<!-- -->[**](#Properties)
### [**](#http_client)[**](https://undefined/apify/apify-client-python/blob/master//src/apify_client/clients/base/base_client.py#L53)http\_client
**http\_client: [HTTPClient](https://docs.apify.com/api/client/python/api/client/python/reference/class/HTTPClient.md) | [HTTPClientAsync](https://docs.apify.com/api/client/python/api/client/python/reference/class/HTTPClientAsync.md)
Inherited from [BaseClient.http\_client](https://docs.apify.com/api/client/python/api/client/python/reference/class/BaseClient.md#http_client)
Overrides [\_BaseBaseClient.http\_client](https://docs.apify.com/api/client/python/api/client/python/reference/class/_BaseBaseClient.md#http_client)
### [**](#params)[**](https://undefined/apify/apify-client-python/blob/master//src/apify_client/clients/base/base_client.py#L17)params
**params: dict
Inherited from [\_BaseBaseClient.params](https://docs.apify.com/api/client/python/api/client/python/reference/class/_BaseBaseClient.md#params)
### [**](#resource_id)[**](https://undefined/apify/apify-client-python/blob/master//src/apify_client/clients/base/base_client.py#L15)resource\_id
**resource\_id: str | None
Inherited from [\_BaseBaseClient.resource\_id](https://docs.apify.com/api/client/python/api/client/python/reference/class/_BaseBaseClient.md#resource_id)
### [**](#root_client)[**](https://undefined/apify/apify-client-python/blob/master//src/apify_client/clients/base/base_client.py#L54)root\_client
**root\_client: [ApifyClient](https://docs.apify.com/api/client/python/api/client/python/reference/class/ApifyClient.md) | [ApifyClientAsync](https://docs.apify.com/api/client/python/api/client/python/reference/class/ApifyClientAsync.md)
Inherited from [BaseClient.root\_client](https://docs.apify.com/api/client/python/api/client/python/reference/class/BaseClient.md#root_client)
Overrides [\_BaseBaseClient.root\_client](https://docs.apify.com/api/client/python/api/client/python/reference/class/_BaseBaseClient.md#root_client)
### [**](#url)[**](https://undefined/apify/apify-client-python/blob/master//src/apify_client/clients/base/base_client.py#L16)url
**url: str
Inherited from [\_BaseBaseClient.url](https://docs.apify.com/api/client/python/api/client/python/reference/class/_BaseBaseClient.md#url)
---
# ActorVersionCollectionClientAsync<!-- -->
Async sub-client for manipulating Actor versions.
### Hierarchy
* [ResourceCollectionClientAsync](https://docs.apify.com/api/client/python/api/client/python/reference/class/ResourceCollectionClientAsync.md)
* *ActorVersionCollectionClientAsync*
## Index[**](#Index)
### Methods
* [**\_\_init\_\_](https://docs.apify.com/api/client/python/api/client/python/reference/class/ActorVersionCollectionClientAsync.md#__init__)
* [**create](https://docs.apify.com/api/client/python/api/client/python/reference/class/ActorVersionCollectionClientAsync.md#create)
* [**list](https://docs.apify.com/api/client/python/api/client/python/reference/class/ActorVersionCollectionClientAsync.md#list)
### Properties
* [**http\_client](https://docs.apify.com/api/client/python/api/client/python/reference/class/ActorVersionCollectionClientAsync.md#http_client)
* [**params](https://docs.apify.com/api/client/python/api/client/python/reference/class/ActorVersionCollectionClientAsync.md#params)
* [**resource\_id](https://docs.apify.com/api/client/python/api/client/python/reference/class/ActorVersionCollectionClientAsync.md#resource_id)
* [**root\_client](https://docs.apify.com/api/client/python/api/client/python/reference/class/ActorVersionCollectionClientAsync.md#root_client)
* [**url](https://docs.apify.com/api/client/python/api/client/python/reference/class/ActorVersionCollectionClientAsync.md#url)
## Methods<!-- -->[**](#Methods)
### [**](#__init__)[**](https://undefined/apify/apify-client-python/blob/master//src/apify_client/clients/resource_clients/actor_version_collection.py#L87)\_\_init\_\_
* ****\_\_init\_\_**(\*, base\_url, root\_client, http\_client, resource\_id, resource\_path, params): None
- Overrides [ResourceCollectionClientAsync.\_\_init\_\_](https://docs.apify.com/api/client/python/api/client/python/reference/class/ResourceCollectionClientAsync.md#__init__)
Initialize a new instance.
***
#### Parameters
* ##### keyword-onlybase\_url: str
Base URL of the API server.
* ##### keyword-onlyroot\_client: [ApifyClientAsync](https://docs.apify.com/api/client/python/api/client/python/reference/class/ApifyClientAsync.md)
The ApifyClientAsync instance under which this resource client exists.
* ##### keyword-onlyhttp\_client: [HTTPClientAsync](https://docs.apify.com/api/client/python/api/client/python/reference/class/HTTPClientAsync.md)
The HTTPClientAsync instance to be used in this client.
* ##### optionalkeyword-onlyresource\_id: str | None = <!-- -->None
ID of the manipulated resource, in case of a single-resource client.
* ##### keyword-onlyresource\_path: str
Path to the resource's endpoint on the API server.
* ##### optionalkeyword-onlyparams: dict | None = <!-- -->None
Parameters to include in all requests from this client.
#### Returns None
### [**](#create)[**](https://undefined/apify/apify-client-python/blob/master//src/apify_client/clients/resource_clients/actor_version_collection.py#L101)create
* **async **create**(\*, version\_number, build\_tag, env\_vars, apply\_env\_vars\_to\_build, source\_type, source\_files, git\_repo\_url, tarball\_url, github\_gist\_url): dict
- Create a new Actor version.
<https://docs.apify.com/api/v2#/reference/actors/version-collection/create-version>
***
#### Parameters
* ##### keyword-onlyversion\_number: str
Major and minor version of the Actor (e.g. `1.0`).
* ##### optionalkeyword-onlybuild\_tag: str | None = <!-- -->None
Tag that is automatically set to the latest successful build of the current version.
* ##### optionalkeyword-onlyenv\_vars: [list](https://docs.apify.com/api/client/python/api/client/python/reference/class/RequestQueueCollectionClient.md#list)\[dict] | None = <!-- -->None
Environment variables that will be available to the Actor run process, and optionally also to the build process. See the API docs for their exact structure.
* ##### optionalkeyword-onlyapply\_env\_vars\_to\_build: bool | None = <!-- -->None
Whether the environment variables specified for the Actor run will also be set to the Actor build process.
* ##### keyword-onlysource\_type: ActorSourceType
What source type is the Actor version using.
* ##### optionalkeyword-onlysource\_files: [list](https://docs.apify.com/api/client/python/api/client/python/reference/class/RequestQueueCollectionClient.md#list)\[dict] | None = <!-- -->None
Source code comprised of multiple files, each an item of the array. Required when `source_type` is `ActorSourceType.SOURCE_FILES`. See the API docs for the exact structure.
* ##### optionalkeyword-onlygit\_repo\_url: str | None = <!-- -->None
The URL of a Git repository from which the source code will be cloned. Required when `source_type` is `ActorSourceType.GIT_REPO`.
* ##### optionalkeyword-onlytarball\_url: str | None = <!-- -->None
The URL of a tarball or a zip archive from which the source code will be downloaded. Required when `source_type` is `ActorSourceType.TARBALL`.
* ##### optionalkeyword-onlygithub\_gist\_url: str | None = <!-- -->None
The URL of a GitHub Gist from which the source will be downloaded. Required when `source_type` is `ActorSourceType.GITHUB_GIST`.
#### Returns dict
### [**](#list)[**](https://undefined/apify/apify-client-python/blob/master//src/apify_client/clients/resource_clients/actor_version_collection.py#L91)list
* **async **list**(): [ListPage](https://docs.apify.com/api/client/python/api/client/python/reference/class/ListPage.md)\[dict]
- List the available Actor versions.
<https://docs.apify.com/api/v2#/reference/actors/version-collection/get-list-of-versions>
***
#### Returns [ListPage](https://docs.apify.com/api/client/python/api/client/python/reference/class/ListPage.md)\[dict]
## Properties<!-- -->[**](#Properties)
### [**](#http_client)[**](https://undefined/apify/apify-client-python/blob/master//src/apify_client/clients/base/base_client.py#L94)http\_client
**http\_client: [HTTPClient](https://docs.apify.com/api/client/python/api/client/python/reference/class/HTTPClient.md) | [HTTPClientAsync](https://docs.apify.com/api/client/python/api/client/python/reference/class/HTTPClientAsync.md)
Inherited from [BaseClientAsync.http\_client](https://docs.apify.com/api/client/python/api/client/python/reference/class/BaseClientAsync.md#http_client)
Overrides [\_BaseBaseClient.http\_client](https://docs.apify.com/api/client/python/api/client/python/reference/class/_BaseBaseClient.md#http_client)
### [**](#params)[**](https://undefined/apify/apify-client-python/blob/master//src/apify_client/clients/base/base_client.py#L17)params
**params: dict
Inherited from [\_BaseBaseClient.params](https://docs.apify.com/api/client/python/api/client/python/reference/class/_BaseBaseClient.md#params)
### [**](#resource_id)[**](https://undefined/apify/apify-client-python/blob/master//src/apify_client/clients/base/base_client.py#L15)resource\_id
**resource\_id: str | None
Inherited from [\_BaseBaseClient.resource\_id](https://docs.apify.com/api/client/python/api/client/python/reference/class/_BaseBaseClient.md#resource_id)
### [**](#root_client)[**](https://undefined/apify/apify-client-python/blob/master//src/apify_client/clients/base/base_client.py#L95)root\_client
**root\_client: [ApifyClient](https://docs.apify.com/api/client/python/api/client/python/reference/class/ApifyClient.md) | [ApifyClientAsync](https://docs.apify.com/api/client/python/api/client/python/reference/class/ApifyClientAsync.md)
Inherited from [BaseClientAsync.root\_client](https://docs.apify.com/api/client/python/api/client/python/reference/class/BaseClientAsync.md#root_client)
Overrides [\_BaseBaseClient.root\_client](https://docs.apify.com/api/client/python/api/client/python/reference/class/_BaseBaseClient.md#root_client)
### [**](#url)[**](https://undefined/apify/apify-client-python/blob/master//src/apify_client/clients/base/base_client.py#L16)url
**url: str
Inherited from [\_BaseBaseClient.url](https://docs.apify.com/api/client/python/api/client/python/reference/class/_BaseBaseClient.md#url)
---
# ApifyApiError<!-- -->
Error specific to requests to the Apify API.
An `ApifyApiError` is thrown for successful HTTP requests that reach the API, but the API responds with an error response. Typically, those are rate limit errors and internal errors, which are automatically retried, or validation errors, which are thrown immediately, because a correction by the user is needed.
### Hierarchy
* [ApifyClientError](https://docs.apify.com/api/client/python/api/client/python/reference/class/ApifyClientError.md)
* *ApifyApiError*
## Index[**](#Index)
### Methods
* [**\_\_init\_\_](https://docs.apify.com/api/client/python/api/client/python/reference/class/ApifyApiError.md#__init__)
## Methods<!-- -->[**](#Methods)
### [**](#__init__)[**](https://undefined/apify/apify-client-python/blob/master//src/apify_client/errors.py#L21)\_\_init\_\_
* ****\_\_init\_\_**(response, attempt, method): None
- Initialize a new instance.
***
#### Parameters
* ##### response: impit.Response
The response to the failed API call.
* ##### attempt: int
Which attempt was the request that failed.
* ##### optionalmethod: str = <!-- -->'GET'
The HTTP method used for the request.
#### Returns None
---
# ApifyClient<!-- -->
The Apify API client.
### Hierarchy
* [\_BaseApifyClient](https://docs.apify.com/api/client/python/api/client/python/reference/class/_BaseApifyClient.md)
* *ApifyClient*
## Index[**](#Index)
### Methods
* [**\_\_init\_\_](https://docs.apify.com/api/client/python/api/client/python/reference/class/ApifyClient.md#__init__)
* [**actor](https://docs.apify.com/api/client/python/api/client/python/reference/class/ApifyClient.md#actor)
* [**actors](https://docs.apify.com/api/client/python/api/client/python/reference/class/ApifyClient.md#actors)
* [**build](https://docs.apify.com/api/client/python/api/client/python/reference/class/ApifyClient.md#build)
* [**builds](https://docs.apify.com/api/client/python/api/client/python/reference/class/ApifyClient.md#builds)
* [**dataset](https://docs.apify.com/api/client/python/api/client/python/reference/class/ApifyClient.md#dataset)
* [**datasets](https://docs.apify.com/api/client/python/api/client/python/reference/class/ApifyClient.md#datasets)
* [**key\_value\_store](https://docs.apify.com/api/client/python/api/client/python/reference/class/ApifyClient.md#key_value_store)
* [**key\_value\_stores](https://docs.apify.com/api/client/python/api/client/python/reference/class/ApifyClient.md#key_value_stores)
* [**log](https://docs.apify.com/api/client/python/api/client/python/reference/class/ApifyClient.md#log)
* [**request\_queue](https://docs.apify.com/api/client/python/api/client/python/reference/class/ApifyClient.md#request_queue)
* [**request\_queues](https://docs.apify.com/api/client/python/api/client/python/reference/class/ApifyClient.md#request_queues)
* [**run](https://docs.apify.com/api/client/python/api/client/python/reference/class/ApifyClient.md#run)
* [**runs](https://docs.apify.com/api/client/python/api/client/python/reference/class/ApifyClient.md#runs)
* [**schedule](https://docs.apify.com/api/client/python/api/client/python/reference/class/ApifyClient.md#schedule)
* [**schedules](https://docs.apify.com/api/client/python/api/client/python/reference/class/ApifyClient.md#schedules)
* [**store](https://docs.apify.com/api/client/python/api/client/python/reference/class/ApifyClient.md#store)
* [**task](https://docs.apify.com/api/client/python/api/client/python/reference/class/ApifyClient.md#task)
* [**tasks](https://docs.apify.com/api/client/python/api/client/python/reference/class/ApifyClient.md#tasks)
* [**user](https://docs.apify.com/api/client/python/api/client/python/reference/class/ApifyClient.md#user)
* [**webhook](https://docs.apify.com/api/client/python/api/client/python/reference/class/ApifyClient.md#webhook)
* [**webhook\_dispatch](https://docs.apify.com/api/client/python/api/client/python/reference/class/ApifyClient.md#webhook_dispatch)
* [**webhook\_dispatches](https://docs.apify.com/api/client/python/api/client/python/reference/class/ApifyClient.md#webhook_dispatches)
* [**webhooks](https://docs.apify.com/api/client/python/api/client/python/reference/class/ApifyClient.md#webhooks)
### Properties
* [**http\_client](https://docs.apify.com/api/client/python/api/client/python/reference/class/ApifyClient.md#http_client)
## Methods<!-- -->[**](#Methods)
### [**](#__init__)[**](https://undefined/apify/apify-client-python/blob/master//src/apify_client/client.py#L107)\_\_init\_\_
* ****\_\_init\_\_**(token, \*, api\_url, api\_public\_url, max\_retries, min\_delay\_between\_retries\_millis, timeout\_secs): None
- Overrides [\_BaseApifyClient.\_\_init\_\_](https://docs.apify.com/api/client/python/api/client/python/reference/class/_BaseApifyClient.md#__init__)
Initialize a new instance.
***
#### Parameters
* ##### optionaltoken: str | None = <!-- -->None
The Apify API token.
* ##### optionalkeyword-onlyapi\_url: str | None = <!-- -->None
The URL of the Apify API server to which to connect. Defaults to <https://api.apify.com>. It can be an internal URL that is not globally accessible, in such case `api_public_url` should be set as well.
* ##### optionalkeyword-onlyapi\_public\_url: str | None = <!-- -->None
The globally accessible URL of the Apify API server. It should be set only if the `api_url` is an internal URL that is not globally accessible.
* ##### optionalkeyword-onlymax\_retries: int | None = <!-- -->8
How many times to retry a failed request at most.
* ##### optionalkeyword-onlymin\_delay\_between\_retries\_millis: int | None = <!-- -->500
How long will the client wait between retrying requests (increases exponentially from this value).
* ##### optionalkeyword-onlytimeout\_secs: int | None = <!-- -->DEFAULT\_TIMEOUT
The socket timeout of the HTTP requests sent to the Apify API.
#### Returns None
### [**](#actor)[**](https://undefined/apify/apify-client-python/blob/master//src/apify_client/client.py#L148)actor
* ****actor**(actor\_id): [ActorClient](https://docs.apify.com/api/client/python/api/client/python/reference/class/ActorClient.md)
- Retrieve the sub-client for manipulating a single Actor.
***
#### Parameters
* ##### actor\_id: str
ID of the Actor to be manipulated.
#### Returns [ActorClient](https://docs.apify.com/api/client/python/api/client/python/reference/class/ActorClient.md)
### [**](#actors)[**](https://undefined/apify/apify-client-python/blob/master//src/apify_client/client.py#L156)actors
* ****actors**(): [ActorCollectionClient](https://docs.apify.com/api/client/python/api/client/python/reference/class/ActorCollectionClient.md)
- Retrieve the sub-client for manipulating Actors.
***
#### Returns [ActorCollectionClient](https://docs.apify.com/api/client/python/api/client/python/reference/class/ActorCollectionClient.md)
### [**](#build)[**](https://undefined/apify/apify-client-python/blob/master//src/apify_client/client.py#L160)build
* ****build**(build\_id): [BuildClient](https://docs.apify.com/api/client/python/api/client/python/reference/class/BuildClient.md)
- Retrieve the sub-client for manipulating a single Actor build.
***
#### Parameters
* ##### build\_id: str
ID of the Actor build to be manipulated.
#### Returns [BuildClient](https://docs.apify.com/api/client/python/api/client/python/reference/class/BuildClient.md)
### [**](#builds)[**](https://undefined/apify/apify-client-python/blob/master//src/apify_client/client.py#L168)builds
* ****builds**(): [BuildCollectionClient](https://docs.apify.com/api/client/python/api/client/python/reference/class/BuildCollectionClient.md)
- Retrieve the sub-client for querying multiple builds of a user.
***
#### Returns [BuildCollectionClient](https://docs.apify.com/api/client/python/api/client/python/reference/class/BuildCollectionClient.md)
### [**](#dataset)[**](https://undefined/apify/apify-client-python/blob/master//src/apify_client/client.py#L184)dataset
* ****dataset**(dataset\_id): [DatasetClient](https://docs.apify.com/api/client/python/api/client/python/reference/class/DatasetClient.md)
- Retrieve the sub-client for manipulating a single dataset.
***
#### Parameters
* ##### dataset\_id: str
ID of the dataset to be manipulated.
#### Returns [DatasetClient](https://docs.apify.com/api/client/python/api/client/python/reference/class/DatasetClient.md)
### [**](#datasets)[**](https://undefined/apify/apify-client-python/blob/master//src/apify_client/client.py#L192)datasets
* ****datasets**(): [DatasetCollectionClient](https://docs.apify.com/api/client/python/api/client/python/reference/class/DatasetCollectionClient.md)
- Retrieve the sub-client for manipulating datasets.
***
#### Returns [DatasetCollectionClient](https://docs.apify.com/api/client/python/api/client/python/reference/class/DatasetCollectionClient.md)
### [**](#key_value_store)[**](https://undefined/apify/apify-client-python/blob/master//src/apify_client/client.py#L196)key\_value\_store
* ****key\_value\_store**(key\_value\_store\_id): [KeyValueStoreClient](https://docs.apify.com/api/client/python/api/client/python/reference/class/KeyValueStoreClient.md)
- Retrieve the sub-client for manipulating a single key-value store.
***
#### Parameters
* ##### key\_value\_store\_id: str
ID of the key-value store to be manipulated.
#### Returns [KeyValueStoreClient](https://docs.apify.com/api/client/python/api/client/python/reference/class/KeyValueStoreClient.md)
### [**](#key_value_stores)[**](https://undefined/apify/apify-client-python/blob/master//src/apify_client/client.py#L204)key\_value\_stores
* ****key\_value\_stores**(): [KeyValueStoreCollectionClient](https://docs.apify.com/api/client/python/api/client/python/reference/class/KeyValueStoreCollectionClient.md)
- Retrieve the sub-client for manipulating key-value stores.
***
#### Returns [KeyValueStoreCollectionClient](https://docs.apify.com/api/client/python/api/client/python/reference/class/KeyValueStoreCollectionClient.md)
### [**](#log)[**](https://undefined/apify/apify-client-python/blob/master//src/apify_client/client.py#L257)log
* ****log**(build\_or\_run\_id): [LogClient](https://docs.apify.com/api/client/python/api/client/python/reference/class/LogClient.md)
- Retrieve the sub-client for retrieving logs.
***
#### Parameters
* ##### build\_or\_run\_id: str
ID of the Actor build or run for which to access the log.
#### Returns [LogClient](https://docs.apify.com/api/client/python/api/client/python/reference/class/LogClient.md)
### [**](#request_queue)[**](https://undefined/apify/apify-client-python/blob/master//src/apify_client/client.py#L208)request\_queue
* ****request\_queue**(request\_queue\_id, \*, client\_key): [RequestQueueClient](https://docs.apify.com/api/client/python/api/client/python/reference/class/RequestQueueClient.md)
- Retrieve the sub-client for manipulating a single request queue.
***
#### Parameters
* ##### request\_queue\_id: str
ID of the request queue to be manipulated.
* ##### optionalkeyword-onlyclient\_key: str | None = <!-- -->None
A unique identifier of the client accessing the request queue.
#### Returns [RequestQueueClient](https://docs.apify.com/api/client/python/api/client/python/reference/class/RequestQueueClient.md)
### [**](#request_queues)[**](https://undefined/apify/apify-client-python/blob/master//src/apify_client/client.py#L217)request\_queues
* ****request\_queues**(): [RequestQueueCollectionClient](https://docs.apify.com/api/client/python/api/client/python/reference/class/RequestQueueCollectionClient.md)
- Retrieve the sub-client for manipulating request queues.
***
#### Returns [RequestQueueCollectionClient](https://docs.apify.com/api/client/python/api/client/python/reference/class/RequestQueueCollectionClient.md)
### [**](#run)[**](https://undefined/apify/apify-client-python/blob/master//src/apify_client/client.py#L172)run
* ****run**(run\_id): [RunClient](https://docs.apify.com/api/client/python/api/client/python/reference/class/RunClient.md)
- Retrieve the sub-client for manipulating a single Actor run.
***
#### Parameters
* ##### run\_id: str
ID of the Actor run to be manipulated.
#### Returns [RunClient](https://docs.apify.com/api/client/python/api/client/python/reference/class/RunClient.md)
### [**](#runs)[**](https://undefined/apify/apify-client-python/blob/master//src/apify_client/client.py#L180)runs
* ****runs**(): [RunCollectionClient](https://docs.apify.com/api/client/python/api/client/python/reference/class/RunCollectionClient.md)
- Retrieve the sub-client for querying multiple Actor runs of a user.
***
#### Returns [RunCollectionClient](https://docs.apify.com/api/client/python/api/client/python/reference/class/RunCollectionClient.md)
### [**](#schedule)[**](https://undefined/apify/apify-client-python/blob/master//src/apify_client/client.py#L245)schedule
* ****schedule**(schedule\_id): [ScheduleClient](https://docs.apify.com/api/client/python/api/client/python/reference/class/ScheduleClient.md)
- Retrieve the sub-client for manipulating a single schedule.
***
#### Parameters
* ##### schedule\_id: str
ID of the schedule to be manipulated.
#### Returns [ScheduleClient](https://docs.apify.com/api/client/python/api/client/python/reference/class/ScheduleClient.md)
### [**](#schedules)[**](https://undefined/apify/apify-client-python/blob/master//src/apify_client/client.py#L253)schedules
* ****schedules**(): [ScheduleCollectionClient](https://docs.apify.com/api/client/python/api/client/python/reference/class/ScheduleCollectionClient.md)
- Retrieve the sub-client for manipulating schedules.
***
#### Returns [ScheduleCollectionClient](https://docs.apify.com/api/client/python/api/client/python/reference/class/ScheduleCollectionClient.md)
### [**](#store)[**](https://undefined/apify/apify-client-python/blob/master//src/apify_client/client.py#L285)store
* ****store**(): [StoreCollectionClient](https://docs.apify.com/api/client/python/api/client/python/reference/class/StoreCollectionClient.md)
- Retrieve the sub-client for Apify store.
***
#### Returns [StoreCollectionClient](https://docs.apify.com/api/client/python/api/client/python/reference/class/StoreCollectionClient.md)
### [**](#task)[**](https://undefined/apify/apify-client-python/blob/master//src/apify_client/client.py#L265)task
* ****task**(task\_id): [TaskClient](https://docs.apify.com/api/client/python/api/client/python/reference/class/TaskClient.md)
- Retrieve the sub-client for manipulating a single task.
***
#### Parameters
* ##### task\_id: str
ID of the task to be manipulated.
#### Returns [TaskClient](https://docs.apify.com/api/client/python/api/client/python/reference/class/TaskClient.md)
### [**](#tasks)[**](https://undefined/apify/apify-client-python/blob/master//src/apify_client/client.py#L273)tasks
* ****tasks**(): [TaskCollectionClient](https://docs.apify.com/api/client/python/api/client/python/reference/class/TaskCollectionClient.md)
- Retrieve the sub-client for manipulating tasks.
***
#### Returns [TaskCollectionClient](https://docs.apify.com/api/client/python/api/client/python/reference/class/TaskCollectionClient.md)
### [**](#user)[**](https://undefined/apify/apify-client-python/blob/master//src/apify_client/client.py#L277)user
* ****user**(user\_id): [UserClient](https://docs.apify.com/api/client/python/api/client/python/reference/class/UserClient.md)
- Retrieve the sub-client for querying users.
***
#### Parameters
* ##### optionaluser\_id: str | None = <!-- -->None
ID of user to be queried. If None, queries the user belonging to the token supplied to the client.
#### Returns [UserClient](https://docs.apify.com/api/client/python/api/client/python/reference/class/UserClient.md)
### [**](#webhook)[**](https://undefined/apify/apify-client-python/blob/master//src/apify_client/client.py#L221)webhook
* ****webhook**(webhook\_id): [WebhookClient](https://docs.apify.com/api/client/python/api/client/python/reference/class/WebhookClient.md)
- Retrieve the sub-client for manipulating a single webhook.
***
#### Parameters
* ##### webhook\_id: str
ID of the webhook to be manipulated.
#### Returns [WebhookClient](https://docs.apify.com/api/client/python/api/client/python/reference/class/WebhookClient.md)
### [**](#webhook_dispatch)[**](https://undefined/apify/apify-client-python/blob/master//src/apify_client/client.py#L233)webhook\_dispatch
* ****webhook\_dispatch**(webhook\_dispatch\_id): [WebhookDispatchClient](https://docs.apify.com/api/client/python/api/client/python/reference/class/WebhookDispatchClient.md)
- Retrieve the sub-client for accessing a single webhook dispatch.
***
#### Parameters
* ##### webhook\_dispatch\_id: str
ID of the webhook dispatch to access.
#### Returns [WebhookDispatchClient](https://docs.apify.com/api/client/python/api/client/python/reference/class/WebhookDispatchClient.md)
### [**](#webhook_dispatches)[**](https://undefined/apify/apify-client-python/blob/master//src/apify_client/client.py#L241)webhook\_dispatches
* ****webhook\_dispatches**(): [WebhookDispatchCollectionClient](https://docs.apify.com/api/client/python/api/client/python/reference/class/WebhookDispatchCollectionClient.md)
- Retrieve the sub-client for querying multiple webhook dispatches of a user.
***
#### Returns [WebhookDispatchCollectionClient](https://docs.apify.com/api/client/python/api/client/python/reference/class/WebhookDispatchCollectionClient.md)
### [**](#webhooks)[**](https://undefined/apify/apify-client-python/blob/master//src/apify_client/client.py#L229)webhooks
* ****webhooks**(): [WebhookCollectionClient](https://docs.apify.com/api/client/python/api/client/python/reference/class/WebhookCollectionClient.md)
- Retrieve the sub-client for querying multiple webhooks of a user.
***
#### Returns [WebhookCollectionClient](https://docs.apify.com/api/client/python/api/client/python/reference/class/WebhookCollectionClient.md)
## Properties<!-- -->[**](#Properties)
### [**](#http_client)[**](https://undefined/apify/apify-client-python/blob/master//src/apify_client/client.py#L105)http\_client
**http\_client: [HTTPClient](https://docs.apify.com/api/client/python/api/client/python/reference/class/HTTPClient.md) | [HTTPClientAsync](https://docs.apify.com/api/client/python/api/client/python/reference/class/HTTPClientAsync.md)
Overrides [\_BaseApifyClient.http\_client](https://docs.apify.com/api/client/python/api/client/python/reference/class/_BaseApifyClient.md#http_client)
---
# ApifyClientAsync<!-- -->
The asynchronous version of the Apify API client.
### Hierarchy
* [\_BaseApifyClient](https://docs.apify.com/api/client/python/api/client/python/reference/class/_BaseApifyClient.md)
* *ApifyClientAsync*
## Index[**](#Index)
### Methods
* [**\_\_init\_\_](https://docs.apify.com/api/client/python/api/client/python/reference/class/ApifyClientAsync.md#__init__)
* [**actor](https://docs.apify.com/api/client/python/api/client/python/reference/class/ApifyClientAsync.md#actor)
* [**actors](https://docs.apify.com/api/client/python/api/client/python/reference/class/ApifyClientAsync.md#actors)
* [**build](https://docs.apify.com/api/client/python/api/client/python/reference/class/ApifyClientAsync.md#build)
* [**builds](https://docs.apify.com/api/client/python/api/client/python/reference/class/ApifyClientAsync.md#builds)
* [**dataset](https://docs.apify.com/api/client/python/api/client/python/reference/class/ApifyClientAsync.md#dataset)
* [**datasets](https://docs.apify.com/api/client/python/api/client/python/reference/class/ApifyClientAsync.md#datasets)
* [**key\_value\_store](https://docs.apify.com/api/client/python/api/client/python/reference/class/ApifyClientAsync.md#key_value_store)
* [**key\_value\_stores](https://docs.apify.com/api/client/python/api/client/python/reference/class/ApifyClientAsync.md#key_value_stores)
* [**log](https://docs.apify.com/api/client/python/api/client/python/reference/class/ApifyClientAsync.md#log)
* [**request\_queue](https://docs.apify.com/api/client/python/api/client/python/reference/class/ApifyClientAsync.md#request_queue)
* [**request\_queues](https://docs.apify.com/api/client/python/api/client/python/reference/class/ApifyClientAsync.md#request_queues)
* [**run](https://docs.apify.com/api/client/python/api/client/python/reference/class/ApifyClientAsync.md#run)
* [**runs](https://docs.apify.com/api/client/python/api/client/python/reference/class/ApifyClientAsync.md#runs)
* [**schedule](https://docs.apify.com/api/client/python/api/client/python/reference/class/ApifyClientAsync.md#schedule)
* [**schedules](https://docs.apify.com/api/client/python/api/client/python/reference/class/ApifyClientAsync.md#schedules)
* [**store](https://docs.apify.com/api/client/python/api/client/python/reference/class/ApifyClientAsync.md#store)
* [**task](https://docs.apify.com/api/client/python/api/client/python/reference/class/ApifyClientAsync.md#task)
* [**tasks](https://docs.apify.com/api/client/python/api/client/python/reference/class/ApifyClientAsync.md#tasks)
* [**user](https://docs.apify.com/api/client/python/api/client/python/reference/class/ApifyClientAsync.md#user)
* [**webhook](https://docs.apify.com/api/client/python/api/client/python/reference/class/ApifyClientAsync.md#webhook)
* [**webhook\_dispatch](https://docs.apify.com/api/client/python/api/client/python/reference/class/ApifyClientAsync.md#webhook_dispatch)
* [**webhook\_dispatches](https://docs.apify.com/api/client/python/api/client/python/reference/class/ApifyClientAsync.md#webhook_dispatches)
* [**webhooks](https://docs.apify.com/api/client/python/api/client/python/reference/class/ApifyClientAsync.md#webhooks)
### Properties
* [**http\_client](https://docs.apify.com/api/client/python/api/client/python/reference/class/ApifyClientAsync.md#http_client)
## Methods<!-- -->[**](#Methods)
### [**](#__init__)[**](https://undefined/apify/apify-client-python/blob/master//src/apify_client/client.py#L295)\_\_init\_\_
* ****\_\_init\_\_**(token, \*, api\_url, api\_public\_url, max\_retries, min\_delay\_between\_retries\_millis, timeout\_secs): None
- Overrides [\_BaseApifyClient.\_\_init\_\_](https://docs.apify.com/api/client/python/api/client/python/reference/class/_BaseApifyClient.md#__init__)
Initialize a new instance.
***
#### Parameters
* ##### optionaltoken: str | None = <!-- -->None
The Apify API token.
* ##### optionalkeyword-onlyapi\_url: str | None = <!-- -->None
The URL of the Apify API server to which to connect. Defaults to <https://api.apify.com>. It can be an internal URL that is not globally accessible, in such case `api_public_url` should be set as well.
* ##### optionalkeyword-onlyapi\_public\_url: str | None = <!-- -->None
The globally accessible URL of the Apify API server. It should be set only if the `api_url` is an internal URL that is not globally accessible.
* ##### optionalkeyword-onlymax\_retries: int | None = <!-- -->8
How many times to retry a failed request at most.
* ##### optionalkeyword-onlymin\_delay\_between\_retries\_millis: int | None = <!-- -->500
How long will the client wait between retrying requests (increases exponentially from this value).
* ##### optionalkeyword-onlytimeout\_secs: int | None = <!-- -->DEFAULT\_TIMEOUT
The socket timeout of the HTTP requests sent to the Apify API.
#### Returns None
### [**](#actor)[**](https://undefined/apify/apify-client-python/blob/master//src/apify_client/client.py#L336)actor
* ****actor**(actor\_id): [ActorClientAsync](https://docs.apify.com/api/client/python/api/client/python/reference/class/ActorClientAsync.md)
- Retrieve the sub-client for manipulating a single Actor.
***
#### Parameters
* ##### actor\_id: str
ID of the Actor to be manipulated.
#### Returns [ActorClientAsync](https://docs.apify.com/api/client/python/api/client/python/reference/class/ActorClientAsync.md)
### [**](#actors)[**](https://undefined/apify/apify-client-python/blob/master//src/apify_client/client.py#L344)actors
* ****actors**(): [ActorCollectionClientAsync](https://docs.apify.com/api/client/python/api/client/python/reference/class/ActorCollectionClientAsync.md)
- Retrieve the sub-client for manipulating Actors.
***
#### Returns [ActorCollectionClientAsync](https://docs.apify.com/api/client/python/api/client/python/reference/class/ActorCollectionClientAsync.md)
### [**](#build)[**](https://undefined/apify/apify-client-python/blob/master//src/apify_client/client.py#L348)build
* ****build**(build\_id): [BuildClientAsync](https://docs.apify.com/api/client/python/api/client/python/reference/class/BuildClientAsync.md)
- Retrieve the sub-client for manipulating a single Actor build.
***
#### Parameters
* ##### build\_id: str
ID of the Actor build to be manipulated.
#### Returns [BuildClientAsync](https://docs.apify.com/api/client/python/api/client/python/reference/class/BuildClientAsync.md)
### [**](#builds)[**](https://undefined/apify/apify-client-python/blob/master//src/apify_client/client.py#L356)builds
* ****builds**(): [BuildCollectionClientAsync](https://docs.apify.com/api/client/python/api/client/python/reference/class/BuildCollectionClientAsync.md)
- Retrieve the sub-client for querying multiple builds of a user.
***
#### Returns [BuildCollectionClientAsync](https://docs.apify.com/api/client/python/api/client/python/reference/class/BuildCollectionClientAsync.md)
### [**](#dataset)[**](https://undefined/apify/apify-client-python/blob/master//src/apify_client/client.py#L372)dataset
* ****dataset**(dataset\_id): [DatasetClientAsync](https://docs.apify.com/api/client/python/api/client/python/reference/class/DatasetClientAsync.md)
- Retrieve the sub-client for manipulating a single dataset.
***
#### Parameters
* ##### dataset\_id: str
ID of the dataset to be manipulated.
#### Returns [DatasetClientAsync](https://docs.apify.com/api/client/python/api/client/python/reference/class/DatasetClientAsync.md)
### [**](#datasets)[**](https://undefined/apify/apify-client-python/blob/master//src/apify_client/client.py#L380)datasets
* ****datasets**(): [DatasetCollectionClientAsync](https://docs.apify.com/api/client/python/api/client/python/reference/class/DatasetCollectionClientAsync.md)
- Retrieve the sub-client for manipulating datasets.
***
#### Returns [DatasetCollectionClientAsync](https://docs.apify.com/api/client/python/api/client/python/reference/class/DatasetCollectionClientAsync.md)
### [**](#key_value_store)[**](https://undefined/apify/apify-client-python/blob/master//src/apify_client/client.py#L384)key\_value\_store
* ****key\_value\_store**(key\_value\_store\_id): [KeyValueStoreClientAsync](https://docs.apify.com/api/client/python/api/client/python/reference/class/KeyValueStoreClientAsync.md)
- Retrieve the sub-client for manipulating a single key-value store.
***
#### Parameters
* ##### key\_value\_store\_id: str
ID of the key-value store to be manipulated.
#### Returns [KeyValueStoreClientAsync](https://docs.apify.com/api/client/python/api/client/python/reference/class/KeyValueStoreClientAsync.md)
### [**](#key_value_stores)[**](https://undefined/apify/apify-client-python/blob/master//src/apify_client/client.py#L392)key\_value\_stores
* ****key\_value\_stores**(): [KeyValueStoreCollectionClientAsync](https://docs.apify.com/api/client/python/api/client/python/reference/class/KeyValueStoreCollectionClientAsync.md)
- Retrieve the sub-client for manipulating key-value stores.
***
#### Returns [KeyValueStoreCollectionClientAsync](https://docs.apify.com/api/client/python/api/client/python/reference/class/KeyValueStoreCollectionClientAsync.md)
### [**](#log)[**](https://undefined/apify/apify-client-python/blob/master//src/apify_client/client.py#L445)log
* ****log**(build\_or\_run\_id): [LogClientAsync](https://docs.apify.com/api/client/python/api/client/python/reference/class/LogClientAsync.md)
- Retrieve the sub-client for retrieving logs.
***
#### Parameters
* ##### build\_or\_run\_id: str
ID of the Actor build or run for which to access the log.
#### Returns [LogClientAsync](https://docs.apify.com/api/client/python/api/client/python/reference/class/LogClientAsync.md)
### [**](#request_queue)[**](https://undefined/apify/apify-client-python/blob/master//src/apify_client/client.py#L396)request\_queue
* ****request\_queue**(request\_queue\_id, \*, client\_key): [RequestQueueClientAsync](https://docs.apify.com/api/client/python/api/client/python/reference/class/RequestQueueClientAsync.md)
- Retrieve the sub-client for manipulating a single request queue.
***
#### Parameters
* ##### request\_queue\_id: str
ID of the request queue to be manipulated.
* ##### optionalkeyword-onlyclient\_key: str | None = <!-- -->None
A unique identifier of the client accessing the request queue.
#### Returns [RequestQueueClientAsync](https://docs.apify.com/api/client/python/api/client/python/reference/class/RequestQueueClientAsync.md)
### [**](#request_queues)[**](https://undefined/apify/apify-client-python/blob/master//src/apify_client/client.py#L405)request\_queues
* ****request\_queues**(): [RequestQueueCollectionClientAsync](https://docs.apify.com/api/client/python/api/client/python/reference/class/RequestQueueCollectionClientAsync.md)
- Retrieve the sub-client for manipulating request queues.
***
#### Returns [RequestQueueCollectionClientAsync](https://docs.apify.com/api/client/python/api/client/python/reference/class/RequestQueueCollectionClientAsync.md)
### [**](#run)[**](https://undefined/apify/apify-client-python/blob/master//src/apify_client/client.py#L360)run
* ****run**(run\_id): [RunClientAsync](https://docs.apify.com/api/client/python/api/client/python/reference/class/RunClientAsync.md)
- Retrieve the sub-client for manipulating a single Actor run.
***
#### Parameters
* ##### run\_id: str
ID of the Actor run to be manipulated.
#### Returns [RunClientAsync](https://docs.apify.com/api/client/python/api/client/python/reference/class/RunClientAsync.md)
### [**](#runs)[**](https://undefined/apify/apify-client-python/blob/master//src/apify_client/client.py#L368)runs
* ****runs**(): [RunCollectionClientAsync](https://docs.apify.com/api/client/python/api/client/python/reference/class/RunCollectionClientAsync.md)
- Retrieve the sub-client for querying multiple Actor runs of a user.
***
#### Returns [RunCollectionClientAsync](https://docs.apify.com/api/client/python/api/client/python/reference/class/RunCollectionClientAsync.md)
### [**](#schedule)[**](https://undefined/apify/apify-client-python/blob/master//src/apify_client/client.py#L433)schedule
* ****schedule**(schedule\_id): [ScheduleClientAsync](https://docs.apify.com/api/client/python/api/client/python/reference/class/ScheduleClientAsync.md)
- Retrieve the sub-client for manipulating a single schedule.
***
#### Parameters
* ##### schedule\_id: str
ID of the schedule to be manipulated.
#### Returns [ScheduleClientAsync](https://docs.apify.com/api/client/python/api/client/python/reference/class/ScheduleClientAsync.md)
### [**](#schedules)[**](https://undefined/apify/apify-client-python/blob/master//src/apify_client/client.py#L441)schedules
* ****schedules**(): [ScheduleCollectionClientAsync](https://docs.apify.com/api/client/python/api/client/python/reference/class/ScheduleCollectionClientAsync.md)
- Retrieve the sub-client for manipulating schedules.
***
#### Returns [ScheduleCollectionClientAsync](https://docs.apify.com/api/client/python/api/client/python/reference/class/ScheduleCollectionClientAsync.md)
### [**](#store)[**](https://undefined/apify/apify-client-python/blob/master//src/apify_client/client.py#L473)store
* ****store**(): [StoreCollectionClientAsync](https://docs.apify.com/api/client/python/api/client/python/reference/class/StoreCollectionClientAsync.md)
- Retrieve the sub-client for Apify store.
***
#### Returns [StoreCollectionClientAsync](https://docs.apify.com/api/client/python/api/client/python/reference/class/StoreCollectionClientAsync.md)
### [**](#task)[**](https://undefined/apify/apify-client-python/blob/master//src/apify_client/client.py#L453)task
* ****task**(task\_id): [TaskClientAsync](https://docs.apify.com/api/client/python/api/client/python/reference/class/TaskClientAsync.md)
- Retrieve the sub-client for manipulating a single task.
***
#### Parameters
* ##### task\_id: str
ID of the task to be manipulated.
#### Returns [TaskClientAsync](https://docs.apify.com/api/client/python/api/client/python/reference/class/TaskClientAsync.md)
### [**](#tasks)[**](https://undefined/apify/apify-client-python/blob/master//src/apify_client/client.py#L461)tasks
* ****tasks**(): [TaskCollectionClientAsync](https://docs.apify.com/api/client/python/api/client/python/reference/class/TaskCollectionClientAsync.md)
- Retrieve the sub-client for manipulating tasks.
***
#### Returns [TaskCollectionClientAsync](https://docs.apify.com/api/client/python/api/client/python/reference/class/TaskCollectionClientAsync.md)
### [**](#user)[**](https://undefined/apify/apify-client-python/blob/master//src/apify_client/client.py#L465)user
* ****user**(user\_id): [UserClientAsync](https://docs.apify.com/api/client/python/api/client/python/reference/class/UserClientAsync.md)
- Retrieve the sub-client for querying users.
***
#### Parameters
* ##### optionaluser\_id: str | None = <!-- -->None
ID of user to be queried. If None, queries the user belonging to the token supplied to the client.
#### Returns [UserClientAsync](https://docs.apify.com/api/client/python/api/client/python/reference/class/UserClientAsync.md)
### [**](#webhook)[**](https://undefined/apify/apify-client-python/blob/master//src/apify_client/client.py#L409)webhook
* ****webhook**(webhook\_id): [WebhookClientAsync](https://docs.apify.com/api/client/python/api/client/python/reference/class/WebhookClientAsync.md)
- Retrieve the sub-client for manipulating a single webhook.
***
#### Parameters
* ##### webhook\_id: str
ID of the webhook to be manipulated.
#### Returns [WebhookClientAsync](https://docs.apify.com/api/client/python/api/client/python/reference/class/WebhookClientAsync.md)
### [**](#webhook_dispatch)[**](https://undefined/apify/apify-client-python/blob/master//src/apify_client/client.py#L421)webhook\_dispatch
* ****webhook\_dispatch**(webhook\_dispatch\_id): [WebhookDispatchClientAsync](https://docs.apify.com/api/client/python/api/client/python/reference/class/WebhookDispatchClientAsync.md)
- Retrieve the sub-client for accessing a single webhook dispatch.
***
#### Parameters
* ##### webhook\_dispatch\_id: str
ID of the webhook dispatch to access.
#### Returns [WebhookDispatchClientAsync](https://docs.apify.com/api/client/python/api/client/python/reference/class/WebhookDispatchClientAsync.md)
### [**](#webhook_dispatches)[**](https://undefined/apify/apify-client-python/blob/master//src/apify_client/client.py#L429)webhook\_dispatches
* ****webhook\_dispatches**(): [WebhookDispatchCollectionClientAsync](https://docs.apify.com/api/client/python/api/client/python/reference/class/WebhookDispatchCollectionClientAsync.md)
- Retrieve the sub-client for querying multiple webhook dispatches of a user.
***
#### Returns [WebhookDispatchCollectionClientAsync](https://docs.apify.com/api/client/python/api/client/python/reference/class/WebhookDispatchCollectionClientAsync.md)
### [**](#webhooks)[**](https://undefined/apify/apify-client-python/blob/master//src/apify_client/client.py#L417)webhooks
* ****webhooks**(): [WebhookCollectionClientAsync](https://docs.apify.com/api/client/python/api/client/python/reference/class/WebhookCollectionClientAsync.md)
- Retrieve the sub-client for querying multiple webhooks of a user.
***
#### Returns [WebhookCollectionClientAsync](https://docs.apify.com/api/client/python/api/client/python/reference/class/WebhookCollectionClientAsync.md)
## Properties<!-- -->[**](#Properties)
### [**](#http_client)[**](https://undefined/apify/apify-client-python/blob/master//src/apify_client/client.py#L293)http\_client
**http\_client: [HTTPClient](https://docs.apify.com/api/client/python/api/client/python/reference/class/HTTPClient.md) | [HTTPClientAsync](https://docs.apify.com/api/client/python/api/client/python/reference/class/HTTPClientAsync.md)
Overrides [\_BaseApifyClient.http\_client](https://docs.apify.com/api/client/python/api/client/python/reference/class/_BaseApifyClient.md#http_client)
---
# ApifyClientError<!-- -->
Base class for errors specific to the Apify API Client.
### Hierarchy
* *ApifyClientError*
* [ApifyApiError](https://docs.apify.com/api/client/python/api/client/python/reference/class/ApifyApiError.md)
* [InvalidResponseBodyError](https://docs.apify.com/api/client/python/api/client/python/reference/class/InvalidResponseBodyError.md)
---
# BaseClient<!-- -->
Base class for sub-clients.
### Hierarchy
* [\_BaseBaseClient](https://docs.apify.com/api/client/python/api/client/python/reference/class/_BaseBaseClient.md)
* *BaseClient*
* [ResourceCollectionClient](https://docs.apify.com/api/client/python/api/client/python/reference/class/ResourceCollectionClient.md)
* [ResourceClient](https://docs.apify.com/api/client/python/api/client/python/reference/class/ResourceClient.md)
## Index[**](#Index)
### Methods
* [**\_\_init\_\_](https://docs.apify.com/api/client/python/api/client/python/reference/class/BaseClient.md#__init__)
### Properties
* [**http\_client](https://docs.apify.com/api/client/python/api/client/python/reference/class/BaseClient.md#http_client)
* [**params](https://docs.apify.com/api/client/python/api/client/python/reference/class/BaseClient.md#params)
* [**resource\_id](https://docs.apify.com/api/client/python/api/client/python/reference/class/BaseClient.md#resource_id)
* [**root\_client](https://docs.apify.com/api/client/python/api/client/python/reference/class/BaseClient.md#root_client)
* [**url](https://docs.apify.com/api/client/python/api/client/python/reference/class/BaseClient.md#url)
## Methods<!-- -->[**](#Methods)
### [**](#__init__)[**](https://undefined/apify/apify-client-python/blob/master//src/apify_client/clients/base/base_client.py#L56)\_\_init\_\_
* ****\_\_init\_\_**(\*, base\_url, root\_client, http\_client, resource\_id, resource\_path, params): None
- Initialize a new instance.
***
#### Parameters
* ##### keyword-onlybase\_url: str
Base URL of the API server.
* ##### keyword-onlyroot\_client: [ApifyClient](https://docs.apify.com/api/client/python/api/client/python/reference/class/ApifyClient.md)
The ApifyClient instance under which this resource client exists.
* ##### keyword-onlyhttp\_client: [HTTPClient](https://docs.apify.com/api/client/python/api/client/python/reference/class/HTTPClient.md)
The HTTPClient instance to be used in this client.
* ##### optionalkeyword-onlyresource\_id: str | None = <!-- -->None
ID of the manipulated resource, in case of a single-resource client.
* ##### keyword-onlyresource\_path: str
Path to the resource's endpoint on the API server.
* ##### optionalkeyword-onlyparams: dict | None = <!-- -->None
Parameters to include in all requests from this client.
#### Returns None
## Properties<!-- -->[**](#Properties)
### [**](#http_client)[**](https://undefined/apify/apify-client-python/blob/master//src/apify_client/clients/base/base_client.py#L53)http\_client
**http\_client: [HTTPClient](https://docs.apify.com/api/client/python/api/client/python/reference/class/HTTPClient.md) | [HTTPClientAsync](https://docs.apify.com/api/client/python/api/client/python/reference/class/HTTPClientAsync.md)
Overrides [\_BaseBaseClient.http\_client](https://docs.apify.com/api/client/python/api/client/python/reference/class/_BaseBaseClient.md#http_client)
### [**](#params)[**](https://undefined/apify/apify-client-python/blob/master//src/apify_client/clients/base/base_client.py#L17)params
**params: dict
Inherited from [\_BaseBaseClient.params](https://docs.apify.com/api/client/python/api/client/python/reference/class/_BaseBaseClient.md#params)
### [**](#resource_id)[**](https://undefined/apify/apify-client-python/blob/master//src/apify_client/clients/base/base_client.py#L15)resource\_id
**resource\_id: str | None
Inherited from [\_BaseBaseClient.resource\_id](https://docs.apify.com/api/client/python/api/client/python/reference/class/_BaseBaseClient.md#resource_id)
### [**](#root_client)[**](https://undefined/apify/apify-client-python/blob/master//src/apify_client/clients/base/base_client.py#L54)root\_client
**root\_client: [ApifyClient](https://docs.apify.com/api/client/python/api/client/python/reference/class/ApifyClient.md) | [ApifyClientAsync](https://docs.apify.com/api/client/python/api/client/python/reference/class/ApifyClientAsync.md)
Overrides [\_BaseBaseClient.root\_client](https://docs.apify.com/api/client/python/api/client/python/reference/class/_BaseBaseClient.md#root_client)
### [**](#url)[**](https://undefined/apify/apify-client-python/blob/master//src/apify_client/clients/base/base_client.py#L16)url
**url: str
Inherited from [\_BaseBaseClient.url](https://docs.apify.com/api/client/python/api/client/python/reference/class/_BaseBaseClient.md#url)
---
# BaseClientAsync<!-- -->
Base class for async sub-clients.
### Hierarchy
* [\_BaseBaseClient](https://docs.apify.com/api/client/python/api/client/python/reference/class/_BaseBaseClient.md)
* *BaseClientAsync*
* [ResourceCollectionClientAsync](https://docs.apify.com/api/client/python/api/client/python/reference/class/ResourceCollectionClientAsync.md)
* [ResourceClientAsync](https://docs.apify.com/api/client/python/api/client/python/reference/class/ResourceClientAsync.md)
## Index[**](#Index)
### Methods
* [**\_\_init\_\_](https://docs.apify.com/api/client/python/api/client/python/reference/class/BaseClientAsync.md#__init__)
### Properties
* [**http\_client](https://docs.apify.com/api/client/python/api/client/python/reference/class/BaseClientAsync.md#http_client)
* [**params](https://docs.apify.com/api/client/python/api/client/python/reference/class/BaseClientAsync.md#params)
* [**resource\_id](https://docs.apify.com/api/client/python/api/client/python/reference/class/BaseClientAsync.md#resource_id)
* [**root\_client](https://docs.apify.com/api/client/python/api/client/python/reference/class/BaseClientAsync.md#root_client)
* [**url](https://docs.apify.com/api/client/python/api/client/python/reference/class/BaseClientAsync.md#url)
## Methods<!-- -->[**](#Methods)
### [**](#__init__)[**](https://undefined/apify/apify-client-python/blob/master//src/apify_client/clients/base/base_client.py#L97)\_\_init\_\_
* ****\_\_init\_\_**(\*, base\_url, root\_client, http\_client, resource\_id, resource\_path, params): None
- Initialize a new instance.
***
#### Parameters
* ##### keyword-onlybase\_url: str
Base URL of the API server.
* ##### keyword-onlyroot\_client: [ApifyClientAsync](https://docs.apify.com/api/client/python/api/client/python/reference/class/ApifyClientAsync.md)
The ApifyClientAsync instance under which this resource client exists.
* ##### keyword-onlyhttp\_client: [HTTPClientAsync](https://docs.apify.com/api/client/python/api/client/python/reference/class/HTTPClientAsync.md)
The HTTPClientAsync instance to be used in this client.
* ##### optionalkeyword-onlyresource\_id: str | None = <!-- -->None
ID of the manipulated resource, in case of a single-resource client.
* ##### keyword-onlyresource\_path: str
Path to the resource's endpoint on the API server.
* ##### optionalkeyword-onlyparams: dict | None = <!-- -->None
Parameters to include in all requests from this client.
#### Returns None
## Properties<!-- -->[**](#Properties)
### [**](#http_client)[**](https://undefined/apify/apify-client-python/blob/master//src/apify_client/clients/base/base_client.py#L94)http\_client
**http\_client: [HTTPClient](https://docs.apify.com/api/client/python/api/client/python/reference/class/HTTPClient.md) | [HTTPClientAsync](https://docs.apify.com/api/client/python/api/client/python/reference/class/HTTPClientAsync.md)
Overrides [\_BaseBaseClient.http\_client](https://docs.apify.com/api/client/python/api/client/python/reference/class/_BaseBaseClient.md#http_client)
### [**](#params)[**](https://undefined/apify/apify-client-python/blob/master//src/apify_client/clients/base/base_client.py#L17)params
**params: dict
Inherited from [\_BaseBaseClient.params](https://docs.apify.com/api/client/python/api/client/python/reference/class/_BaseBaseClient.md#params)
### [**](#resource_id)[**](https://undefined/apify/apify-client-python/blob/master//src/apify_client/clients/base/base_client.py#L15)resource\_id
**resource\_id: str | None
Inherited from [\_BaseBaseClient.resource\_id](https://docs.apify.com/api/client/python/api/client/python/reference/class/_BaseBaseClient.md#resource_id)
### [**](#root_client)[**](https://undefined/apify/apify-client-python/blob/master//src/apify_client/clients/base/base_client.py#L95)root\_client
**root\_client: [ApifyClient](https://docs.apify.com/api/client/python/api/client/python/reference/class/ApifyClient.md) | [ApifyClientAsync](https://docs.apify.com/api/client/python/api/client/python/reference/class/ApifyClientAsync.md)
Overrides [\_BaseBaseClient.root\_client](https://docs.apify.com/api/client/python/api/client/python/reference/class/_BaseBaseClient.md#root_client)
### [**](#url)[**](https://undefined/apify/apify-client-python/blob/master//src/apify_client/clients/base/base_client.py#L16)url
**url: str
Inherited from [\_BaseBaseClient.url](https://docs.apify.com/api/client/python/api/client/python/reference/class/_BaseBaseClient.md#url)
---
# BatchAddRequestsResult<!-- -->
Result of the batch add requests operation.
## Index[**](#Index)
### Properties
* [**processedRequests](https://docs.apify.com/api/client/python/api/client/python/reference/class/BatchAddRequestsResult.md#processedRequests)
* [**unprocessedRequests](https://docs.apify.com/api/client/python/api/client/python/reference/class/BatchAddRequestsResult.md#unprocessedRequests)
## Properties<!-- -->[**](#Properties)
### [**](#processedRequests)[**](https://undefined/apify/apify-client-python/blob/master//src/apify_client/clients/resource_clients/request_queue.py#L44)processedRequests
**processedRequests: [list](https://docs.apify.com/api/client/python/api/client/python/reference/class/RequestQueueCollectionClient.md#list)\[dict]
List of successfully added requests.
### [**](#unprocessedRequests)[**](https://undefined/apify/apify-client-python/blob/master//src/apify_client/clients/resource_clients/request_queue.py#L45)unprocessedRequests
**unprocessedRequests: [list](https://docs.apify.com/api/client/python/api/client/python/reference/class/RequestQueueCollectionClient.md#list)\[dict]
List of requests that failed to be added.
---
# BuildClient<!-- -->
Sub-client for manipulating a single Actor build.
### Hierarchy
* [ActorJobBaseClient](https://docs.apify.com/api/client/python/api/client/python/reference/class/ActorJobBaseClient.md)
* *BuildClient*
## Index[**](#Index)
### Methods
* [**\_\_init\_\_](https://docs.apify.com/api/client/python/api/client/python/reference/class/BuildClient.md#__init__)
* [**abort](https://docs.apify.com/api/client/python/api/client/python/reference/class/BuildClient.md#abort)
* [**delete](https://docs.apify.com/api/client/python/api/client/python/reference/class/BuildClient.md#delete)
* [**get](https://docs.apify.com/api/client/python/api/client/python/reference/class/BuildClient.md#get)
* [**get\_open\_api\_definition](https://docs.apify.com/api/client/python/api/client/python/reference/class/BuildClient.md#get_open_api_definition)
* [**log](https://docs.apify.com/api/client/python/api/client/python/reference/class/BuildClient.md#log)
* [**wait\_for\_finish](https://docs.apify.com/api/client/python/api/client/python/reference/class/BuildClient.md#wait_for_finish)
### Properties
* [**http\_client](https://docs.apify.com/api/client/python/api/client/python/reference/class/BuildClient.md#http_client)
* [**params](https://docs.apify.com/api/client/python/api/client/python/reference/class/BuildClient.md#params)
* [**resource\_id](https://docs.apify.com/api/client/python/api/client/python/reference/class/BuildClient.md#resource_id)
* [**root\_client](https://docs.apify.com/api/client/python/api/client/python/reference/class/BuildClient.md#root_client)
* [**url](https://docs.apify.com/api/client/python/api/client/python/reference/class/BuildClient.md#url)
## Methods<!-- -->[**](#Methods)
### [**](#__init__)[**](https://undefined/apify/apify-client-python/blob/master//src/apify_client/clients/resource_clients/build.py#L12)\_\_init\_\_
* ****\_\_init\_\_**(\*, base\_url, root\_client, http\_client, resource\_id, resource\_path, params): None
- Overrides [ActorJobBaseClient.\_\_init\_\_](https://docs.apify.com/api/client/python/api/client/python/reference/class/ActorJobBaseClient.md#__init__)
Initialize a new instance.
***
#### Parameters
* ##### keyword-onlybase\_url: str
Base URL of the API server.
* ##### keyword-onlyroot\_client: [ApifyClient](https://docs.apify.com/api/client/python/api/client/python/reference/class/ApifyClient.md)
The ApifyClient instance under which this resource client exists.
* ##### keyword-onlyhttp\_client: [HTTPClient](https://docs.apify.com/api/client/python/api/client/python/reference/class/HTTPClient.md)
The HTTPClient instance to be used in this client.
* ##### optionalkeyword-onlyresource\_id: str | None = <!-- -->None
ID of the manipulated resource, in case of a single-resource client.
* ##### keyword-onlyresource\_path: str
Path to the resource's endpoint on the API server.
* ##### optionalkeyword-onlyparams: dict | None = <!-- -->None
Parameters to include in all requests from this client.
#### Returns None
### [**](#abort)[**](https://undefined/apify/apify-client-python/blob/master//src/apify_client/clients/resource_clients/build.py#L33)abort
* ****abort**(): dict
- Abort the Actor build which is starting or currently running and return its details.
<https://docs.apify.com/api/v2#/reference/actor-builds/abort-build/abort-build>
***
#### Returns dict
### [**](#delete)[**](https://undefined/apify/apify-client-python/blob/master//src/apify_client/clients/resource_clients/build.py#L26)delete
* ****delete**(): None
- Delete the build.
<https://docs.apify.com/api/v2#/reference/actor-builds/delete-build/delete-build>
***
#### Returns None
### [**](#get)[**](https://undefined/apify/apify-client-python/blob/master//src/apify_client/clients/resource_clients/build.py#L16)get
* ****get**(): dict | None
- Return information about the Actor build.
<https://docs.apify.com/api/v2#/reference/actor-builds/build-object/get-build>
***
#### Returns dict | None
### [**](#get_open_api_definition)[**](https://undefined/apify/apify-client-python/blob/master//src/apify_client/clients/resource_clients/build.py#L43)get\_open\_api\_definition
* ****get\_open\_api\_definition**(): dict | None
- Return OpenAPI definition of the Actor's build.
<https://docs.apify.com/api/v2/actor-build-openapi-json-get>
***
#### Returns dict | None
### [**](#log)[**](https://undefined/apify/apify-client-python/blob/master//src/apify_client/clients/resource_clients/build.py#L72)log
* ****log**(): [LogClient](https://docs.apify.com/api/client/python/api/client/python/reference/class/LogClient.md)
- Get the client for the log of the Actor build.
<https://docs.apify.com/api/v2/#/reference/actor-builds/build-log/get-log>
***
#### Returns [LogClient](https://docs.apify.com/api/client/python/api/client/python/reference/class/LogClient.md)
### [**](#wait_for_finish)[**](https://undefined/apify/apify-client-python/blob/master//src/apify_client/clients/resource_clients/build.py#L60)wait\_for\_finish
* ****wait\_for\_finish**(\*, wait\_secs): dict | None
- Wait synchronously until the build finishes or the server times out.
***
#### Parameters
* ##### optionalkeyword-onlywait\_secs: int | None = <!-- -->None
How long does the client wait for build to finish. None for indefinite.
#### Returns dict | None
## Properties<!-- -->[**](#Properties)
### [**](#http_client)[**](https://undefined/apify/apify-client-python/blob/master//src/apify_client/clients/base/base_client.py#L53)http\_client
**http\_client: [HTTPClient](https://docs.apify.com/api/client/python/api/client/python/reference/class/HTTPClient.md) | [HTTPClientAsync](https://docs.apify.com/api/client/python/api/client/python/reference/class/HTTPClientAsync.md)
Inherited from [BaseClient.http\_client](https://docs.apify.com/api/client/python/api/client/python/reference/class/BaseClient.md#http_client)
Overrides [\_BaseBaseClient.http\_client](https://docs.apify.com/api/client/python/api/client/python/reference/class/_BaseBaseClient.md#http_client)
### [**](#params)[**](https://undefined/apify/apify-client-python/blob/master//src/apify_client/clients/base/base_client.py#L17)params
**params: dict
Inherited from [\_BaseBaseClient.params](https://docs.apify.com/api/client/python/api/client/python/reference/class/_BaseBaseClient.md#params)
### [**](#resource_id)[**](https://undefined/apify/apify-client-python/blob/master//src/apify_client/clients/base/base_client.py#L15)resource\_id
**resource\_id: str | None
Inherited from [\_BaseBaseClient.resource\_id](https://docs.apify.com/api/client/python/api/client/python/reference/class/_BaseBaseClient.md#resource_id)
### [**](#root_client)[**](https://undefined/apify/apify-client-python/blob/master//src/apify_client/clients/base/base_client.py#L54)root\_client
**root\_client: [ApifyClient](https://docs.apify.com/api/client/python/api/client/python/reference/class/ApifyClient.md) | [ApifyClientAsync](https://docs.apify.com/api/client/python/api/client/python/reference/class/ApifyClientAsync.md)
Inherited from [BaseClient.root\_client](https://docs.apify.com/api/client/python/api/client/python/reference/class/BaseClient.md#root_client)
Overrides [\_BaseBaseClient.root\_client](https://docs.apify.com/api/client/python/api/client/python/reference/class/_BaseBaseClient.md#root_client)
### [**](#url)[**](https://undefined/apify/apify-client-python/blob/master//src/apify_client/clients/base/base_client.py#L16)url
**url: str
Inherited from [\_BaseBaseClient.url](https://docs.apify.com/api/client/python/api/client/python/reference/class/_BaseBaseClient.md#url)
---
# BuildClientAsync<!-- -->
Async sub-client for manipulating a single Actor build.
### Hierarchy
* [ActorJobBaseClientAsync](https://docs.apify.com/api/client/python/api/client/python/reference/class/ActorJobBaseClientAsync.md)
* *BuildClientAsync*
## Index[**](#Index)
### Methods
* [**\_\_init\_\_](https://docs.apify.com/api/client/python/api/client/python/reference/class/BuildClientAsync.md#__init__)
* [**abort](https://docs.apify.com/api/client/python/api/client/python/reference/class/BuildClientAsync.md#abort)
* [**delete](https://docs.apify.com/api/client/python/api/client/python/reference/class/BuildClientAsync.md#delete)
* [**get](https://docs.apify.com/api/client/python/api/client/python/reference/class/BuildClientAsync.md#get)
* [**get\_open\_api\_definition](https://docs.apify.com/api/client/python/api/client/python/reference/class/BuildClientAsync.md#get_open_api_definition)
* [**log](https://docs.apify.com/api/client/python/api/client/python/reference/class/BuildClientAsync.md#log)
* [**wait\_for\_finish](https://docs.apify.com/api/client/python/api/client/python/reference/class/BuildClientAsync.md#wait_for_finish)
### Properties
* [**http\_client](https://docs.apify.com/api/client/python/api/client/python/reference/class/BuildClientAsync.md#http_client)
* [**params](https://docs.apify.com/api/client/python/api/client/python/reference/class/BuildClientAsync.md#params)
* [**resource\_id](https://docs.apify.com/api/client/python/api/client/python/reference/class/BuildClientAsync.md#resource_id)
* [**root\_client](https://docs.apify.com/api/client/python/api/client/python/reference/class/BuildClientAsync.md#root_client)
* [**url](https://docs.apify.com/api/client/python/api/client/python/reference/class/BuildClientAsync.md#url)
## Methods<!-- -->[**](#Methods)
### [**](#__init__)[**](https://undefined/apify/apify-client-python/blob/master//src/apify_client/clients/resource_clients/build.py#L88)\_\_init\_\_
* ****\_\_init\_\_**(\*, base\_url, root\_client, http\_client, resource\_id, resource\_path, params): None
- Overrides [ActorJobBaseClientAsync.\_\_init\_\_](https://docs.apify.com/api/client/python/api/client/python/reference/class/ActorJobBaseClientAsync.md#__init__)
Initialize a new instance.
***
#### Parameters
* ##### keyword-onlybase\_url: str
Base URL of the API server.
* ##### keyword-onlyroot\_client: [ApifyClientAsync](https://docs.apify.com/api/client/python/api/client/python/reference/class/ApifyClientAsync.md)
The ApifyClientAsync instance under which this resource client exists.
* ##### keyword-onlyhttp\_client: [HTTPClientAsync](https://docs.apify.com/api/client/python/api/client/python/reference/class/HTTPClientAsync.md)
The HTTPClientAsync instance to be used in this client.
* ##### optionalkeyword-onlyresource\_id: str | None = <!-- -->None
ID of the manipulated resource, in case of a single-resource client.
* ##### keyword-onlyresource\_path: str
Path to the resource's endpoint on the API server.
* ##### optionalkeyword-onlyparams: dict | None = <!-- -->None
Parameters to include in all requests from this client.
#### Returns None
### [**](#abort)[**](https://undefined/apify/apify-client-python/blob/master//src/apify_client/clients/resource_clients/build.py#L102)abort
* **async **abort**(): dict
- Abort the Actor build which is starting or currently running and return its details.
<https://docs.apify.com/api/v2#/reference/actor-builds/abort-build/abort-build>
***
#### Returns dict
### [**](#delete)[**](https://undefined/apify/apify-client-python/blob/master//src/apify_client/clients/resource_clients/build.py#L112)delete
* **async **delete**(): None
- Delete the build.
<https://docs.apify.com/api/v2#/reference/actor-builds/delete-build/delete-build>
***
#### Returns None
### [**](#get)[**](https://undefined/apify/apify-client-python/blob/master//src/apify_client/clients/resource_clients/build.py#L92)get
* **async **get**(): dict | None
- Return information about the Actor build.
<https://docs.apify.com/api/v2#/reference/actor-builds/build-object/get-build>
***
#### Returns dict | None
### [**](#get_open_api_definition)[**](https://undefined/apify/apify-client-python/blob/master//src/apify_client/clients/resource_clients/build.py#L119)get\_open\_api\_definition
* **async **get\_open\_api\_definition**(): dict | None
- Return OpenAPI definition of the Actor's build.
<https://docs.apify.com/api/v2/actor-build-openapi-json-get>
***
#### Returns dict | None
### [**](#log)[**](https://undefined/apify/apify-client-python/blob/master//src/apify_client/clients/resource_clients/build.py#L148)log
* ****log**(): [LogClientAsync](https://docs.apify.com/api/client/python/api/client/python/reference/class/LogClientAsync.md)
- Get the client for the log of the Actor build.
<https://docs.apify.com/api/v2/#/reference/actor-builds/build-log/get-log>
***
#### Returns [LogClientAsync](https://docs.apify.com/api/client/python/api/client/python/reference/class/LogClientAsync.md)
### [**](#wait_for_finish)[**](https://undefined/apify/apify-client-python/blob/master//src/apify_client/clients/resource_clients/build.py#L136)wait\_for\_finish
* **async **wait\_for\_finish**(\*, wait\_secs): dict | None
- Wait synchronously until the build finishes or the server times out.
***
#### Parameters
* ##### optionalkeyword-onlywait\_secs: int | None = <!-- -->None
How long does the client wait for build to finish. None for indefinite.
#### Returns dict | None
## Properties<!-- -->[**](#Properties)
### [**](#http_client)[**](https://undefined/apify/apify-client-python/blob/master//src/apify_client/clients/base/base_client.py#L94)http\_client
**http\_client: [HTTPClient](https://docs.apify.com/api/client/python/api/client/python/reference/class/HTTPClient.md) | [HTTPClientAsync](https://docs.apify.com/api/client/python/api/client/python/reference/class/HTTPClientAsync.md)
Inherited from [BaseClientAsync.http\_client](https://docs.apify.com/api/client/python/api/client/python/reference/class/BaseClientAsync.md#http_client)
Overrides [\_BaseBaseClient.http\_client](https://docs.apify.com/api/client/python/api/client/python/reference/class/_BaseBaseClient.md#http_client)
### [**](#params)[**](https://undefined/apify/apify-client-python/blob/master//src/apify_client/clients/base/base_client.py#L17)params
**params: dict
Inherited from [\_BaseBaseClient.params](https://docs.apify.com/api/client/python/api/client/python/reference/class/_BaseBaseClient.md#params)
### [**](#resource_id)[**](https://undefined/apify/apify-client-python/blob/master//src/apify_client/clients/base/base_client.py#L15)resource\_id
**resource\_id: str | None
Inherited from [\_BaseBaseClient.resource\_id](https://docs.apify.com/api/client/python/api/client/python/reference/class/_BaseBaseClient.md#resource_id)
### [**](#root_client)[**](https://undefined/apify/apify-client-python/blob/master//src/apify_client/clients/base/base_client.py#L95)root\_client
**root\_client: [ApifyClient](https://docs.apify.com/api/client/python/api/client/python/reference/class/ApifyClient.md) | [ApifyClientAsync](https://docs.apify.com/api/client/python/api/client/python/reference/class/ApifyClientAsync.md)
Inherited from [BaseClientAsync.root\_client](https://docs.apify.com/api/client/python/api/client/python/reference/class/BaseClientAsync.md#root_client)
Overrides [\_BaseBaseClient.root\_client](https://docs.apify.com/api/client/python/api/client/python/reference/class/_BaseBaseClient.md#root_client)
### [**](#url)[**](https://undefined/apify/apify-client-python/blob/master//src/apify_client/clients/base/base_client.py#L16)url
**url: str
Inherited from [\_BaseBaseClient.url](https://docs.apify.com/api/client/python/api/client/python/reference/class/_BaseBaseClient.md#url)
---
# BuildCollectionClient<!-- -->
Sub-client for listing Actor builds.
### Hierarchy
* [ResourceCollectionClient](https://docs.apify.com/api/client/python/api/client/python/reference/class/ResourceCollectionClient.md)
* *BuildCollectionClient*
## Index[**](#Index)
### Methods
* [**\_\_init\_\_](https://docs.apify.com/api/client/python/api/client/python/reference/class/BuildCollectionClient.md#__init__)
* [**list](https://docs.apify.com/api/client/python/api/client/python/reference/class/BuildCollectionClient.md#list)
### Properties
* [**http\_client](https://docs.apify.com/api/client/python/api/client/python/reference/class/BuildCollectionClient.md#http_client)
* [**params](https://docs.apify.com/api/client/python/api/client/python/reference/class/BuildCollectionClient.md#params)
* [**resource\_id](https://docs.apify.com/api/client/python/api/client/python/reference/class/BuildCollectionClient.md#resource_id)
* [**root\_client](https://docs.apify.com/api/client/python/api/client/python/reference/class/BuildCollectionClient.md#root_client)
* [**url](https://docs.apify.com/api/client/python/api/client/python/reference/class/BuildCollectionClient.md#url)
## Methods<!-- -->[**](#Methods)
### [**](#__init__)[**](https://undefined/apify/apify-client-python/blob/master//src/apify_client/clients/resource_clients/build_collection.py#L14)\_\_init\_\_
* ****\_\_init\_\_**(\*, base\_url, root\_client, http\_client, resource\_id, resource\_path, params): None
- Overrides [ResourceCollectionClient.\_\_init\_\_](https://docs.apify.com/api/client/python/api/client/python/reference/class/ResourceCollectionClient.md#__init__)
Initialize a new instance.
***
#### Parameters
* ##### keyword-onlybase\_url: str
Base URL of the API server.
* ##### keyword-onlyroot\_client: [ApifyClient](https://docs.apify.com/api/client/python/api/client/python/reference/class/ApifyClient.md)
The ApifyClient instance under which this resource client exists.
* ##### keyword-onlyhttp\_client: [HTTPClient](https://docs.apify.com/api/client/python/api/client/python/reference/class/HTTPClient.md)
The HTTPClient instance to be used in this client.
* ##### optionalkeyword-onlyresource\_id: str | None = <!-- -->None
ID of the manipulated resource, in case of a single-resource client.
* ##### keyword-onlyresource\_path: str
Path to the resource's endpoint on the API server.
* ##### optionalkeyword-onlyparams: dict | None = <!-- -->None
Parameters to include in all requests from this client.
#### Returns None
### [**](#list)[**](https://undefined/apify/apify-client-python/blob/master//src/apify_client/clients/resource_clients/build_collection.py#L18)list
* ****list**(\*, limit, offset, desc): [ListPage](https://docs.apify.com/api/client/python/api/client/python/reference/class/ListPage.md)\[dict]
- List all Actor builds.
List all Actor builds, either of a single Actor, or all user's Actors, depending on where this client was initialized from.
<https://docs.apify.com/api/v2#/reference/actors/build-collection/get-list-of-builds> <https://docs.apify.com/api/v2#/reference/actor-builds/build-collection/get-user-builds-list>
***
#### Parameters
* ##### optionalkeyword-onlylimit: int | None = <!-- -->None
How many builds to retrieve.
* ##### optionalkeyword-onlyoffset: int | None = <!-- -->None
What build to include as first when retrieving the list.
* ##### optionalkeyword-onlydesc: bool | None = <!-- -->None
Whether to sort the builds in descending order based on their start date.
#### Returns [ListPage](https://docs.apify.com/api/client/python/api/client/python/reference/class/ListPage.md)\[dict]
## Properties<!-- -->[**](#Properties)
### [**](#http_client)[**](https://undefined/apify/apify-client-python/blob/master//src/apify_client/clients/base/base_client.py#L53)http\_client
**http\_client: [HTTPClient](https://docs.apify.com/api/client/python/api/client/python/reference/class/HTTPClient.md) | [HTTPClientAsync](https://docs.apify.com/api/client/python/api/client/python/reference/class/HTTPClientAsync.md)
Inherited from [BaseClient.http\_client](https://docs.apify.com/api/client/python/api/client/python/reference/class/BaseClient.md#http_client)
Overrides [\_BaseBaseClient.http\_client](https://docs.apify.com/api/client/python/api/client/python/reference/class/_BaseBaseClient.md#http_client)
### [**](#params)[**](https://undefined/apify/apify-client-python/blob/master//src/apify_client/clients/base/base_client.py#L17)params
**params: dict
Inherited from [\_BaseBaseClient.params](https://docs.apify.com/api/client/python/api/client/python/reference/class/_BaseBaseClient.md#params)
### [**](#resource_id)[**](https://undefined/apify/apify-client-python/blob/master//src/apify_client/clients/base/base_client.py#L15)resource\_id
**resource\_id: str | None
Inherited from [\_BaseBaseClient.resource\_id](https://docs.apify.com/api/client/python/api/client/python/reference/class/_BaseBaseClient.md#resource_id)
### [**](#root_client)[**](https://undefined/apify/apify-client-python/blob/master//src/apify_client/clients/base/base_client.py#L54)root\_client
**root\_client: [ApifyClient](https://docs.apify.com/api/client/python/api/client/python/reference/class/ApifyClient.md) | [ApifyClientAsync](https://docs.apify.com/api/client/python/api/client/python/reference/class/ApifyClientAsync.md)
Inherited from [BaseClient.root\_client](https://docs.apify.com/api/client/python/api/client/python/reference/class/BaseClient.md#root_client)
Overrides [\_BaseBaseClient.root\_client](https://docs.apify.com/api/client/python/api/client/python/reference/class/_BaseBaseClient.md#root_client)
### [**](#url)[**](https://undefined/apify/apify-client-python/blob/master//src/apify_client/clients/base/base_client.py#L16)url
**url: str
Inherited from [\_BaseBaseClient.url](https://docs.apify.com/api/client/python/api/client/python/reference/class/_BaseBaseClient.md#url)
---
# BuildCollectionClientAsync<!-- -->
Async sub-client for listing Actor builds.
### Hierarchy
* [ResourceCollectionClientAsync](https://docs.apify.com/api/client/python/api/client/python/reference/class/ResourceCollectionClientAsync.md)
* *BuildCollectionClientAsync*
## Index[**](#Index)
### Methods
* [**\_\_init\_\_](https://docs.apify.com/api/client/python/api/client/python/reference/class/BuildCollectionClientAsync.md#__init__)
* [**list](https://docs.apify.com/api/client/python/api/client/python/reference/class/BuildCollectionClientAsync.md#list)
### Properties
* [**http\_client](https://docs.apify.com/api/client/python/api/client/python/reference/class/BuildCollectionClientAsync.md#http_client)
* [**params](https://docs.apify.com/api/client/python/api/client/python/reference/class/BuildCollectionClientAsync.md#params)
* [**resource\_id](https://docs.apify.com/api/client/python/api/client/python/reference/class/BuildCollectionClientAsync.md#resource_id)
* [**root\_client](https://docs.apify.com/api/client/python/api/client/python/reference/class/BuildCollectionClientAsync.md#root_client)
* [**url](https://docs.apify.com/api/client/python/api/client/python/reference/class/BuildCollectionClientAsync.md#url)
## Methods<!-- -->[**](#Methods)
### [**](#__init__)[**](https://undefined/apify/apify-client-python/blob/master//src/apify_client/clients/resource_clients/build_collection.py#L47)\_\_init\_\_
* ****\_\_init\_\_**(\*, base\_url, root\_client, http\_client, resource\_id, resource\_path, params): None
- Overrides [ResourceCollectionClientAsync.\_\_init\_\_](https://docs.apify.com/api/client/python/api/client/python/reference/class/ResourceCollectionClientAsync.md#__init__)
Initialize a new instance.
***
#### Parameters
* ##### keyword-onlybase\_url: str
Base URL of the API server.
* ##### keyword-onlyroot\_client: [ApifyClientAsync](https://docs.apify.com/api/client/python/api/client/python/reference/class/ApifyClientAsync.md)
The ApifyClientAsync instance under which this resource client exists.
* ##### keyword-onlyhttp\_client: [HTTPClientAsync](https://docs.apify.com/api/client/python/api/client/python/reference/class/HTTPClientAsync.md)
The HTTPClientAsync instance to be used in this client.
* ##### optionalkeyword-onlyresource\_id: str | None = <!-- -->None
ID of the manipulated resource, in case of a single-resource client.
* ##### keyword-onlyresource\_path: str
Path to the resource's endpoint on the API server.
* ##### optionalkeyword-onlyparams: dict | None = <!-- -->None
Parameters to include in all requests from this client.
#### Returns None
### [**](#list)[**](https://undefined/apify/apify-client-python/blob/master//src/apify_client/clients/resource_clients/build_collection.py#L51)list
* **async **list**(\*, limit, offset, desc): [ListPage](https://docs.apify.com/api/client/python/api/client/python/reference/class/ListPage.md)\[dict]
- List all Actor builds.
List all Actor builds, either of a single Actor, or all user's Actors, depending on where this client was initialized from.
<https://docs.apify.com/api/v2#/reference/actors/build-collection/get-list-of-builds> <https://docs.apify.com/api/v2#/reference/actor-builds/build-collection/get-user-builds-list>
***
#### Parameters
* ##### optionalkeyword-onlylimit: int | None = <!-- -->None
How many builds to retrieve.
* ##### optionalkeyword-onlyoffset: int | None = <!-- -->None
What build to include as first when retrieving the list.
* ##### optionalkeyword-onlydesc: bool | None = <!-- -->None
Whether to sort the builds in descending order based on their start date.
#### Returns [ListPage](https://docs.apify.com/api/client/python/api/client/python/reference/class/ListPage.md)\[dict]
## Properties<!-- -->[**](#Properties)
### [**](#http_client)[**](https://undefined/apify/apify-client-python/blob/master//src/apify_client/clients/base/base_client.py#L94)http\_client
**http\_client: [HTTPClient](https://docs.apify.com/api/client/python/api/client/python/reference/class/HTTPClient.md) | [HTTPClientAsync](https://docs.apify.com/api/client/python/api/client/python/reference/class/HTTPClientAsync.md)
Inherited from [BaseClientAsync.http\_client](https://docs.apify.com/api/client/python/api/client/python/reference/class/BaseClientAsync.md#http_client)
Overrides [\_BaseBaseClient.http\_client](https://docs.apify.com/api/client/python/api/client/python/reference/class/_BaseBaseClient.md#http_client)
### [**](#params)[**](https://undefined/apify/apify-client-python/blob/master//src/apify_client/clients/base/base_client.py#L17)params
**params: dict
Inherited from [\_BaseBaseClient.params](https://docs.apify.com/api/client/python/api/client/python/reference/class/_BaseBaseClient.md#params)
### [**](#resource_id)[**](https://undefined/apify/apify-client-python/blob/master//src/apify_client/clients/base/base_client.py#L15)resource\_id
**resource\_id: str | None
Inherited from [\_BaseBaseClient.resource\_id](https://docs.apify.com/api/client/python/api/client/python/reference/class/_BaseBaseClient.md#resource_id)
### [**](#root_client)[**](https://undefined/apify/apify-client-python/blob/master//src/apify_client/clients/base/base_client.py#L95)root\_client
**root\_client: [ApifyClient](https://docs.apify.com/api/client/python/api/client/python/reference/class/ApifyClient.md) | [ApifyClientAsync](https://docs.apify.com/api/client/python/api/client/python/reference/class/ApifyClientAsync.md)
Inherited from [BaseClientAsync.root\_client](https://docs.apify.com/api/client/python/api/client/python/reference/class/BaseClientAsync.md#root_client)
Overrides [\_BaseBaseClient.root\_client](https://docs.apify.com/api/client/python/api/client/python/reference/class/_BaseBaseClient.md#root_client)
### [**](#url)[**](https://undefined/apify/apify-client-python/blob/master//src/apify_client/clients/base/base_client.py#L16)url
**url: str
Inherited from [\_BaseBaseClient.url](https://docs.apify.com/api/client/python/api/client/python/reference/class/_BaseBaseClient.md#url)
---
# DatasetClient<!-- -->
Sub-client for manipulating a single dataset.
### Hierarchy
* [ResourceClient](https://docs.apify.com/api/client/python/api/client/python/reference/class/ResourceClient.md)
* *DatasetClient*
## Index[**](#Index)
### Methods
* [**\_\_init\_\_](https://docs.apify.com/api/client/python/api/client/python/reference/class/DatasetClient.md#__init__)
* [**create\_items\_public\_url](https://docs.apify.com/api/client/python/api/client/python/reference/class/DatasetClient.md#create_items_public_url)
* [**delete](https://docs.apify.com/api/client/python/api/client/python/reference/class/DatasetClient.md#delete)
* [**download\_items](https://docs.apify.com/api/client/python/api/client/python/reference/class/DatasetClient.md#download_items)
* [**get](https://docs.apify.com/api/client/python/api/client/python/reference/class/DatasetClient.md#get)
* [**get\_items\_as\_bytes](https://docs.apify.com/api/client/python/api/client/python/reference/class/DatasetClient.md#get_items_as_bytes)
* [**get\_statistics](https://docs.apify.com/api/client/python/api/client/python/reference/class/DatasetClient.md#get_statistics)
* [**iterate\_items](https://docs.apify.com/api/client/python/api/client/python/reference/class/DatasetClient.md#iterate_items)
* [**list\_items](https://docs.apify.com/api/client/python/api/client/python/reference/class/DatasetClient.md#list_items)
* [**push\_items](https://docs.apify.com/api/client/python/api/client/python/reference/class/DatasetClient.md#push_items)
* [**stream\_items](https://docs.apify.com/api/client/python/api/client/python/reference/class/DatasetClient.md#stream_items)
* [**update](https://docs.apify.com/api/client/python/api/client/python/reference/class/DatasetClient.md#update)
### Properties
* [**http\_client](https://docs.apify.com/api/client/python/api/client/python/reference/class/DatasetClient.md#http_client)
* [**params](https://docs.apify.com/api/client/python/api/client/python/reference/class/DatasetClient.md#params)
* [**resource\_id](https://docs.apify.com/api/client/python/api/client/python/reference/class/DatasetClient.md#resource_id)
* [**root\_client](https://docs.apify.com/api/client/python/api/client/python/reference/class/DatasetClient.md#root_client)
* [**url](https://docs.apify.com/api/client/python/api/client/python/reference/class/DatasetClient.md#url)
## Methods<!-- -->[**](#Methods)
### [**](#__init__)[**](https://undefined/apify/apify-client-python/blob/master//src/apify_client/clients/resource_clients/dataset.py#L34)\_\_init\_\_
* ****\_\_init\_\_**(\*, base\_url, root\_client, http\_client, resource\_id, resource\_path, params): None
- Overrides [ResourceClient.\_\_init\_\_](https://docs.apify.com/api/client/python/api/client/python/reference/class/ResourceClient.md#__init__)
Initialize a new instance.
***
#### Parameters
* ##### keyword-onlybase\_url: str
Base URL of the API server.
* ##### keyword-onlyroot\_client: [ApifyClient](https://docs.apify.com/api/client/python/api/client/python/reference/class/ApifyClient.md)
The ApifyClient instance under which this resource client exists.
* ##### keyword-onlyhttp\_client: [HTTPClient](https://docs.apify.com/api/client/python/api/client/python/reference/class/HTTPClient.md)
The HTTPClient instance to be used in this client.
* ##### optionalkeyword-onlyresource\_id: str | None = <!-- -->None
ID of the manipulated resource, in case of a single-resource client.
* ##### keyword-onlyresource\_path: str
Path to the resource's endpoint on the API server.
* ##### optionalkeyword-onlyparams: dict | None = <!-- -->None
Parameters to include in all requests from this client.
#### Returns None
### [**](#create_items_public_url)[**](https://undefined/apify/apify-client-python/blob/master//src/apify_client/clients/resource_clients/dataset.py#L567)create\_items\_public\_url
* ****create\_items\_public\_url**(\*, offset, limit, clean, desc, fields, omit, unwind, skip\_empty, skip\_hidden, flatten, view, expires\_in\_secs): str
- Generate a URL that can be used to access dataset items.
If the client has permission to access the dataset's URL signing key, the URL will include a signature to verify its authenticity.
You can optionally control how long the signed URL should be valid using the `expires_in_secs` option. This value sets the expiration duration in seconds from the time the URL is generated. If not provided, the URL will not expire.
Any other options (like `limit` or `offset`) will be included as query parameters in the URL.
***
#### Parameters
* ##### optionalkeyword-onlyoffset: int | None = <!-- -->None
* ##### optionalkeyword-onlylimit: int | None = <!-- -->None
* ##### optionalkeyword-onlyclean: bool | None = <!-- -->None
* ##### optionalkeyword-onlydesc: bool | None = <!-- -->None
* ##### optionalkeyword-onlyfields: [list](https://docs.apify.com/api/client/python/api/client/python/reference/class/RequestQueueCollectionClient.md#list)\[str] | None = <!-- -->None
* ##### optionalkeyword-onlyomit: [list](https://docs.apify.com/api/client/python/api/client/python/reference/class/RequestQueueCollectionClient.md#list)\[str] | None = <!-- -->None
* ##### optionalkeyword-onlyunwind: [list](https://docs.apify.com/api/client/python/api/client/python/reference/class/RequestQueueCollectionClient.md#list)\[str] | None = <!-- -->None
* ##### optionalkeyword-onlyskip\_empty: bool | None = <!-- -->None
* ##### optionalkeyword-onlyskip\_hidden: bool | None = <!-- -->None
* ##### optionalkeyword-onlyflatten: [list](https://docs.apify.com/api/client/python/api/client/python/reference/class/RequestQueueCollectionClient.md#list)\[str] | None = <!-- -->None
* ##### optionalkeyword-onlyview: str | None = <!-- -->None
* ##### optionalkeyword-onlyexpires\_in\_secs: int | None = <!-- -->None
#### Returns str
### [**](#delete)[**](https://undefined/apify/apify-client-python/blob/master//src/apify_client/clients/resource_clients/dataset.py#L67)delete
* ****delete**(): None
- Delete the dataset.
<https://docs.apify.com/api/v2#/reference/datasets/dataset/delete-dataset>
***
#### Returns None
### [**](#download_items)[**](https://undefined/apify/apify-client-python/blob/master//src/apify_client/clients/resource_clients/dataset.py#L240)download\_items
* ****download\_items**(\*, item\_format, offset, limit, desc, clean, bom, delimiter, fields, omit, unwind, skip\_empty, skip\_header\_row, skip\_hidden, xml\_root, xml\_row, flatten): bytes
- Get the items in the dataset as raw bytes.
Deprecated: this function is a deprecated alias of `get_items_as_bytes`. It will be removed in a future version.
<https://docs.apify.com/api/v2#/reference/datasets/item-collection/get-items>
***
#### Parameters
* ##### optionalkeyword-onlyitem\_format: str = <!-- -->'json'
Format of the results, possible values are: json, jsonl, csv, html, xlsx, xml and rss. The default value is json.
* ##### optionalkeyword-onlyoffset: int | None = <!-- -->None
Number of items that should be skipped at the start. The default value is 0.
* ##### optionalkeyword-onlylimit: int | None = <!-- -->None
Maximum number of items to return. By default there is no limit.
* ##### optionalkeyword-onlydesc: bool | None = <!-- -->None
By default, results are returned in the same order as they were stored. To reverse the order, set this parameter to True.
* ##### optionalkeyword-onlyclean: bool | None = <!-- -->None
If True, returns only non-empty items and skips hidden fields (i.e. fields starting with the # character). The clean parameter is just a shortcut for skip\_hidden=True and skip\_empty=True parameters. Note that since some objects might be skipped from the output, that the result might contain less items than the limit value.
* ##### optionalkeyword-onlybom: bool | None = <!-- -->None
All text responses are encoded in UTF-8 encoding. By default, csv files are prefixed with the UTF-8 Byte Order Mark (BOM), while json, jsonl, xml, html and rss files are not. If you want to override this default behavior, specify bom=True query parameter to include the BOM or bom=False to skip it.
* ##### optionalkeyword-onlydelimiter: str | None = <!-- -->None
A delimiter character for CSV files. The default delimiter is a simple comma (,).
* ##### optionalkeyword-onlyfields: [list](https://docs.apify.com/api/client/python/api/client/python/reference/class/RequestQueueCollectionClient.md#list)\[str] | None = <!-- -->None
A list of fields which should be picked from the items, only these fields will remain in the resulting record objects. Note that the fields in the outputted items are sorted the same way as they are specified in the fields parameter. You can use this feature to effectively fix the output format.
* ##### optionalkeyword-onlyomit: [list](https://docs.apify.com/api/client/python/api/client/python/reference/class/RequestQueueCollectionClient.md#list)\[str] | None = <!-- -->None
A list of fields which should be omitted from the items.
* ##### optionalkeyword-onlyunwind: [list](https://docs.apify.com/api/client/python/api/client/python/reference/class/RequestQueueCollectionClient.md#list)\[str] | None = <!-- -->None
A list of fields which should be unwound, in order which they should be processed. Each field should be either an array or an object. If the field is an array then every element of the array will become a separate record and merged with parent object. If the unwound field is an object then it is merged with the parent object. If the unwound field is missing or its value is neither an array nor an object and therefore cannot be merged with a parent object, then the item gets preserved as it is. Note that the unwound items ignore the desc parameter.
* ##### optionalkeyword-onlyskip\_empty: bool | None = <!-- -->None
If True, then empty items are skipped from the output. Note that if used, the results might contain less items than the limit value.
* ##### optionalkeyword-onlyskip\_header\_row: bool | None = <!-- -->None
If True, then header row in the csv format is skipped.
* ##### optionalkeyword-onlyskip\_hidden: bool | None = <!-- -->None
If True, then hidden fields are skipped from the output, i.e. fields starting with the # character.
* ##### optionalkeyword-onlyxml\_root: str | None = <!-- -->None
Overrides default root element name of xml output. By default the root element is items.
* ##### optionalkeyword-onlyxml\_row: str | None = <!-- -->None
Overrides default element name that wraps each page or page function result object in xml output. By default the element name is item.
* ##### optionalkeyword-onlyflatten: [list](https://docs.apify.com/api/client/python/api/client/python/reference/class/RequestQueueCollectionClient.md#list)\[str] | None = <!-- -->None
A list of fields that should be flattened.
#### Returns bytes
### [**](#get)[**](https://undefined/apify/apify-client-python/blob/master//src/apify_client/clients/resource_clients/dataset.py#L38)get
* ****get**(): dict | None
- Retrieve the dataset.
<https://docs.apify.com/api/v2#/reference/datasets/dataset/get-dataset>
***
#### Returns dict | None
### [**](#get_items_as_bytes)[**](https://undefined/apify/apify-client-python/blob/master//src/apify_client/clients/resource_clients/dataset.py#L332)get\_items\_as\_bytes
* ****get\_items\_as\_bytes**(\*, item\_format, offset, limit, desc, clean, bom, delimiter, fields, omit, unwind, skip\_empty, skip\_header\_row, skip\_hidden, xml\_root, xml\_row, flatten): bytes
- Get the items in the dataset as raw bytes.
<https://docs.apify.com/api/v2#/reference/datasets/item-collection/get-items>
***
#### Parameters
* ##### optionalkeyword-onlyitem\_format: str = <!-- -->'json'
Format of the results, possible values are: json, jsonl, csv, html, xlsx, xml and rss. The default value is json.
* ##### optionalkeyword-onlyoffset: int | None = <!-- -->None
Number of items that should be skipped at the start. The default value is 0.
* ##### optionalkeyword-onlylimit: int | None = <!-- -->None
Maximum number of items to return. By default there is no limit.
* ##### optionalkeyword-onlydesc: bool | None = <!-- -->None
By default, results are returned in the same order as they were stored. To reverse the order, set this parameter to True.
* ##### optionalkeyword-onlyclean: bool | None = <!-- -->None
If True, returns only non-empty items and skips hidden fields (i.e. fields starting with the # character). The clean parameter is just a shortcut for skip\_hidden=True and skip\_empty=True parameters. Note that since some objects might be skipped from the output, that the result might contain less items than the limit value.
* ##### optionalkeyword-onlybom: bool | None = <!-- -->None
All text responses are encoded in UTF-8 encoding. By default, csv files are prefixed with the UTF-8 Byte Order Mark (BOM), while json, jsonl, xml, html and rss files are not. If you want to override this default behavior, specify bom=True query parameter to include the BOM or bom=False to skip it.
* ##### optionalkeyword-onlydelimiter: str | None = <!-- -->None
A delimiter character for CSV files. The default delimiter is a simple comma (,).
* ##### optionalkeyword-onlyfields: [list](https://docs.apify.com/api/client/python/api/client/python/reference/class/RequestQueueCollectionClient.md#list)\[str] | None = <!-- -->None
A list of fields which should be picked from the items, only these fields will remain in the resulting record objects. Note that the fields in the outputted items are sorted the same way as they are specified in the fields parameter. You can use this feature to effectively fix the output format. You can use this feature to effectively fix the output format.
* ##### optionalkeyword-onlyomit: [list](https://docs.apify.com/api/client/python/api/client/python/reference/class/RequestQueueCollectionClient.md#list)\[str] | None = <!-- -->None
A list of fields which should be omitted from the items.
* ##### optionalkeyword-onlyunwind: [list](https://docs.apify.com/api/client/python/api/client/python/reference/class/RequestQueueCollectionClient.md#list)\[str] | None = <!-- -->None
A list of fields which should be unwound, in order which they should be processed. Each field should be either an array or an object. If the field is an array then every element of the array will become a separate record and merged with parent object. If the unwound field is an object then it is merged with the parent object. If the unwound field is missing or its value is neither an array nor an object and therefore cannot be merged with a parent object, then the item gets preserved as it is. Note that the unwound items ignore the desc parameter.
* ##### optionalkeyword-onlyskip\_empty: bool | None = <!-- -->None
If True, then empty items are skipped from the output. Note that if used, the results might contain less items than the limit value.
* ##### optionalkeyword-onlyskip\_header\_row: bool | None = <!-- -->None
If True, then header row in the csv format is skipped.
* ##### optionalkeyword-onlyskip\_hidden: bool | None = <!-- -->None
If True, then hidden fields are skipped from the output, i.e. fields starting with the # character.
* ##### optionalkeyword-onlyxml\_root: str | None = <!-- -->None
Overrides default root element name of xml output. By default the root element is items.
* ##### optionalkeyword-onlyxml\_row: str | None = <!-- -->None
Overrides default element name that wraps each page or page function result object in xml output. By default the element name is item.
* ##### optionalkeyword-onlyflatten: [list](https://docs.apify.com/api/client/python/api/client/python/reference/class/RequestQueueCollectionClient.md#list)\[str] | None = <!-- -->None
A list of fields that should be flattened.
#### Returns bytes
### [**](#get_statistics)[**](https://undefined/apify/apify-client-python/blob/master//src/apify_client/clients/resource_clients/dataset.py#L546)get\_statistics
* ****get\_statistics**(): dict | None
- Get the dataset statistics.
<https://docs.apify.com/api/v2#tag/DatasetsStatistics/operation/dataset_statistics_get>
***
#### Returns dict | None
### [**](#iterate_items)[**](https://undefined/apify/apify-client-python/blob/master//src/apify_client/clients/resource_clients/dataset.py#L160)iterate\_items
* ****iterate\_items**(\*, offset, limit, clean, desc, fields, omit, unwind, skip\_empty, skip\_hidden): Iterator\[dict]
- Iterate over the items in the dataset.
<https://docs.apify.com/api/v2#/reference/datasets/item-collection/get-items>
***
#### Parameters
* ##### optionalkeyword-onlyoffset: int = <!-- -->0
Number of items that should be skipped at the start. The default value is 0.
* ##### optionalkeyword-onlylimit: int | None = <!-- -->None
Maximum number of items to return. By default there is no limit.
* ##### optionalkeyword-onlyclean: bool | None = <!-- -->None
If True, returns only non-empty items and skips hidden fields (i.e. fields starting with the # character). The clean parameter is just a shortcut for skip\_hidden=True and skip\_empty=True parameters. Note that since some objects might be skipped from the output, that the result might contain less items than the limit value.
* ##### optionalkeyword-onlydesc: bool | None = <!-- -->None
By default, results are returned in the same order as they were stored. To reverse the order, set this parameter to True.
* ##### optionalkeyword-onlyfields: [list](https://docs.apify.com/api/client/python/api/client/python/reference/class/RequestQueueCollectionClient.md#list)\[str] | None = <!-- -->None
A list of fields which should be picked from the items, only these fields will remain in the resulting record objects. Note that the fields in the outputted items are sorted the same way as they are specified in the fields parameter. You can use this feature to effectively fix the output format.
* ##### optionalkeyword-onlyomit: [list](https://docs.apify.com/api/client/python/api/client/python/reference/class/RequestQueueCollectionClient.md#list)\[str] | None = <!-- -->None
A list of fields which should be omitted from the items.
* ##### optionalkeyword-onlyunwind: [list](https://docs.apify.com/api/client/python/api/client/python/reference/class/RequestQueueCollectionClient.md#list)\[str] | None = <!-- -->None
A list of fields which should be unwound, in order which they should be processed. Each field should be either an array or an object. If the field is an array then every element of the array will become a separate record and merged with parent object. If the unwound field is an object then it is merged with the parent object. If the unwound field is missing or its value is neither an array nor an object and therefore cannot be merged with a parent object, then the item gets preserved as it is. Note that the unwound items ignore the desc parameter.
* ##### optionalkeyword-onlyskip\_empty: bool | None = <!-- -->None
If True, then empty items are skipped from the output. Note that if used, the results might contain less items than the limit value.
* ##### optionalkeyword-onlyskip\_hidden: bool | None = <!-- -->None
If True, then hidden fields are skipped from the output, i.e. fields starting with the # character.
#### Returns Iterator\[dict]
### [**](#list_items)[**](https://undefined/apify/apify-client-python/blob/master//src/apify_client/clients/resource_clients/dataset.py#L74)list\_items
* ****list\_items**(\*, offset, limit, clean, desc, fields, omit, unwind, skip\_empty, skip\_hidden, flatten, view): [ListPage](https://docs.apify.com/api/client/python/api/client/python/reference/class/ListPage.md)
- List the items of the dataset.
<https://docs.apify.com/api/v2#/reference/datasets/item-collection/get-items>
***
#### Parameters
* ##### optionalkeyword-onlyoffset: int | None = <!-- -->None
Number of items that should be skipped at the start. The default value is 0.
* ##### optionalkeyword-onlylimit: int | None = <!-- -->None
Maximum number of items to return. By default there is no limit.
* ##### optionalkeyword-onlyclean: bool | None = <!-- -->None
If True, returns only non-empty items and skips hidden fields (i.e. fields starting with the # character). The clean parameter is just a shortcut for skip\_hidden=True and skip\_empty=True parameters. Note that since some objects might be skipped from the output, that the result might contain less items than the limit value.
* ##### optionalkeyword-onlydesc: bool | None = <!-- -->None
By default, results are returned in the same order as they were stored. To reverse the order, set this parameter to True.
* ##### optionalkeyword-onlyfields: [list](https://docs.apify.com/api/client/python/api/client/python/reference/class/RequestQueueCollectionClient.md#list)\[str] | None = <!-- -->None
A list of fields which should be picked from the items, only these fields will remain in the resulting record objects. Note that the fields in the outputted items are sorted the same way as they are specified in the fields parameter. You can use this feature to effectively fix the output format.
* ##### optionalkeyword-onlyomit: [list](https://docs.apify.com/api/client/python/api/client/python/reference/class/RequestQueueCollectionClient.md#list)\[str] | None = <!-- -->None
A list of fields which should be omitted from the items.
* ##### optionalkeyword-onlyunwind: [list](https://docs.apify.com/api/client/python/api/client/python/reference/class/RequestQueueCollectionClient.md#list)\[str] | None = <!-- -->None
A list of fields which should be unwound, in order which they should be processed. Each field should be either an array or an object. If the field is an array then every element of the array will become a separate record and merged with parent object. If the unwound field is an object then it is merged with the parent object. If the unwound field is missing or its value is neither an array nor an object and therefore cannot be merged with a parent object, then the item gets preserved as it is. Note that the unwound items ignore the desc parameter.
* ##### optionalkeyword-onlyskip\_empty: bool | None = <!-- -->None
If True, then empty items are skipped from the output. Note that if used, the results might contain less items than the limit value.
* ##### optionalkeyword-onlyskip\_hidden: bool | None = <!-- -->None
If True, then hidden fields are skipped from the output, i.e. fields starting with the # character.
* ##### optionalkeyword-onlyflatten: [list](https://docs.apify.com/api/client/python/api/client/python/reference/class/RequestQueueCollectionClient.md#list)\[str] | None = <!-- -->None
A list of fields that should be flattened.
* ##### optionalkeyword-onlyview: str | None = <!-- -->None
Name of the dataset view to be used.
#### Returns [ListPage](https://docs.apify.com/api/client/python/api/client/python/reference/class/ListPage.md)
### [**](#push_items)[**](https://undefined/apify/apify-client-python/blob/master//src/apify_client/clients/resource_clients/dataset.py#L519)push\_items
* ****push\_items**(items): None
- Push items to the dataset.
<https://docs.apify.com/api/v2#/reference/datasets/item-collection/put-items>
***
#### Parameters
* ##### items: [JSONSerializable](https://docs.apify.com/api/client/python/api/client/python/reference.md#JSONSerializable)
The items which to push in the dataset. Either a stringified JSON, a dictionary, or a list of strings or dictionaries.
#### Returns None
### [**](#stream_items)[**](https://undefined/apify/apify-client-python/blob/master//src/apify_client/clients/resource_clients/dataset.py#L425)stream\_items
* ****stream\_items**(\*, item\_format, offset, limit, desc, clean, bom, delimiter, fields, omit, unwind, skip\_empty, skip\_header\_row, skip\_hidden, xml\_root, xml\_row): Iterator\[impit.Response]
- Retrieve the items in the dataset as a stream.
<https://docs.apify.com/api/v2#/reference/datasets/item-collection/get-items>
***
#### Parameters
* ##### optionalkeyword-onlyitem\_format: str = <!-- -->'json'
Format of the results, possible values are: json, jsonl, csv, html, xlsx, xml and rss. The default value is json.
* ##### optionalkeyword-onlyoffset: int | None = <!-- -->None
Number of items that should be skipped at the start. The default value is 0.
* ##### optionalkeyword-onlylimit: int | None = <!-- -->None
Maximum number of items to return. By default there is no limit.
* ##### optionalkeyword-onlydesc: bool | None = <!-- -->None
By default, results are returned in the same order as they were stored. To reverse the order, set this parameter to True.
* ##### optionalkeyword-onlyclean: bool | None = <!-- -->None
If True, returns only non-empty items and skips hidden fields (i.e. fields starting with the # character). The clean parameter is just a shortcut for skip\_hidden=True and skip\_empty=True parameters. Note that since some objects might be skipped from the output, that the result might contain less items than the limit value.
* ##### optionalkeyword-onlybom: bool | None = <!-- -->None
All text responses are encoded in UTF-8 encoding. By default, csv files are prefixed with the UTF-8 Byte Order Mark (BOM), while json, jsonl, xml, html and rss files are not. If you want to override this default behavior, specify bom=True query parameter to include the BOM or bom=False to skip it.
* ##### optionalkeyword-onlydelimiter: str | None = <!-- -->None
A delimiter character for CSV files. The default delimiter is a simple comma (,).
* ##### optionalkeyword-onlyfields: [list](https://docs.apify.com/api/client/python/api/client/python/reference/class/RequestQueueCollectionClient.md#list)\[str] | None = <!-- -->None
A list of fields which should be picked from the items, only these fields will remain in the resulting record objects. Note that the fields in the outputted items are sorted the same way as they are specified in the fields parameter. You can use this feature to effectively fix the output format. You can use this feature to effectively fix the output format.
* ##### optionalkeyword-onlyomit: [list](https://docs.apify.com/api/client/python/api/client/python/reference/class/RequestQueueCollectionClient.md#list)\[str] | None = <!-- -->None
A list of fields which should be omitted from the items.
* ##### optionalkeyword-onlyunwind: [list](https://docs.apify.com/api/client/python/api/client/python/reference/class/RequestQueueCollectionClient.md#list)\[str] | None = <!-- -->None
A list of fields which should be unwound, in order which they should be processed. Each field should be either an array or an object. If the field is an array then every element of the array will become a separate record and merged with parent object. If the unwound field is an object then it is merged with the parent object. If the unwound field is missing or its value is neither an array nor an object and therefore cannot be merged with a parent object, then the item gets preserved as it is. Note that the unwound items ignore the desc parameter.
* ##### optionalkeyword-onlyskip\_empty: bool | None = <!-- -->None
If True, then empty items are skipped from the output. Note that if used, the results might contain less items than the limit value.
* ##### optionalkeyword-onlyskip\_header\_row: bool | None = <!-- -->None
If True, then header row in the csv format is skipped.
* ##### optionalkeyword-onlyskip\_hidden: bool | None = <!-- -->None
If True, then hidden fields are skipped from the output, i.e. fields starting with the # character.
* ##### optionalkeyword-onlyxml\_root: str | None = <!-- -->None
Overrides default root element name of xml output. By default the root element is items.
* ##### optionalkeyword-onlyxml\_row: str | None = <!-- -->None
Overrides default element name that wraps each page or page function result object in xml output. By default the element name is item.
#### Returns Iterator\[impit.Response]
### [**](#update)[**](https://undefined/apify/apify-client-python/blob/master//src/apify_client/clients/resource_clients/dataset.py#L48)update
* ****update**(\*, name, general\_access): dict
- Update the dataset with specified fields.
<https://docs.apify.com/api/v2#/reference/datasets/dataset/update-dataset>
***
#### Parameters
* ##### optionalkeyword-onlyname: str | None = <!-- -->None
The new name for the dataset.
* ##### optionalkeyword-onlygeneral\_access: StorageGeneralAccess | None = <!-- -->None
Determines how others can access the dataset.
#### Returns dict
## Properties<!-- -->[**](#Properties)
### [**](#http_client)[**](https://undefined/apify/apify-client-python/blob/master//src/apify_client/clients/base/base_client.py#L53)http\_client
**http\_client: [HTTPClient](https://docs.apify.com/api/client/python/api/client/python/reference/class/HTTPClient.md) | [HTTPClientAsync](https://docs.apify.com/api/client/python/api/client/python/reference/class/HTTPClientAsync.md)
Inherited from [BaseClient.http\_client](https://docs.apify.com/api/client/python/api/client/python/reference/class/BaseClient.md#http_client)
Overrides [\_BaseBaseClient.http\_client](https://docs.apify.com/api/client/python/api/client/python/reference/class/_BaseBaseClient.md#http_client)
### [**](#params)[**](https://undefined/apify/apify-client-python/blob/master//src/apify_client/clients/base/base_client.py#L17)params
**params: dict
Inherited from [\_BaseBaseClient.params](https://docs.apify.com/api/client/python/api/client/python/reference/class/_BaseBaseClient.md#params)
### [**](#resource_id)[**](https://undefined/apify/apify-client-python/blob/master//src/apify_client/clients/base/base_client.py#L15)resource\_id
**resource\_id: str | None
Inherited from [\_BaseBaseClient.resource\_id](https://docs.apify.com/api/client/python/api/client/python/reference/class/_BaseBaseClient.md#resource_id)
### [**](#root_client)[**](https://undefined/apify/apify-client-python/blob/master//src/apify_client/clients/base/base_client.py#L54)root\_client
**root\_client: [ApifyClient](https://docs.apify.com/api/client/python/api/client/python/reference/class/ApifyClient.md) | [ApifyClientAsync](https://docs.apify.com/api/client/python/api/client/python/reference/class/ApifyClientAsync.md)
Inherited from [BaseClient.root\_client](https://docs.apify.com/api/client/python/api/client/python/reference/class/BaseClient.md#root_client)
Overrides [\_BaseBaseClient.root\_client](https://docs.apify.com/api/client/python/api/client/python/reference/class/_BaseBaseClient.md#root_client)
### [**](#url)[**](https://undefined/apify/apify-client-python/blob/master//src/apify_client/clients/base/base_client.py#L16)url
**url: str
Inherited from [\_BaseBaseClient.url](https://docs.apify.com/api/client/python/api/client/python/reference/class/_BaseBaseClient.md#url)
---
# DatasetClientAsync<!-- -->
Async sub-client for manipulating a single dataset.
### Hierarchy
* [ResourceClientAsync](https://docs.apify.com/api/client/python/api/client/python/reference/class/ResourceClientAsync.md)
* *DatasetClientAsync*
## Index[**](#Index)
### Methods
* [**\_\_init\_\_](https://docs.apify.com/api/client/python/api/client/python/reference/class/DatasetClientAsync.md#__init__)
* [**create\_items\_public\_url](https://docs.apify.com/api/client/python/api/client/python/reference/class/DatasetClientAsync.md#create_items_public_url)
* [**delete](https://docs.apify.com/api/client/python/api/client/python/reference/class/DatasetClientAsync.md#delete)
* [**get](https://docs.apify.com/api/client/python/api/client/python/reference/class/DatasetClientAsync.md#get)
* [**get\_items\_as\_bytes](https://docs.apify.com/api/client/python/api/client/python/reference/class/DatasetClientAsync.md#get_items_as_bytes)
* [**get\_statistics](https://docs.apify.com/api/client/python/api/client/python/reference/class/DatasetClientAsync.md#get_statistics)
* [**iterate\_items](https://docs.apify.com/api/client/python/api/client/python/reference/class/DatasetClientAsync.md#iterate_items)
* [**list\_items](https://docs.apify.com/api/client/python/api/client/python/reference/class/DatasetClientAsync.md#list_items)
* [**push\_items](https://docs.apify.com/api/client/python/api/client/python/reference/class/DatasetClientAsync.md#push_items)
* [**stream\_items](https://docs.apify.com/api/client/python/api/client/python/reference/class/DatasetClientAsync.md#stream_items)
* [**update](https://docs.apify.com/api/client/python/api/client/python/reference/class/DatasetClientAsync.md#update)
### Properties
* [**http\_client](https://docs.apify.com/api/client/python/api/client/python/reference/class/DatasetClientAsync.md#http_client)
* [**params](https://docs.apify.com/api/client/python/api/client/python/reference/class/DatasetClientAsync.md#params)
* [**resource\_id](https://docs.apify.com/api/client/python/api/client/python/reference/class/DatasetClientAsync.md#resource_id)
* [**root\_client](https://docs.apify.com/api/client/python/api/client/python/reference/class/DatasetClientAsync.md#root_client)
* [**url](https://docs.apify.com/api/client/python/api/client/python/reference/class/DatasetClientAsync.md#url)
## Methods<!-- -->[**](#Methods)
### [**](#__init__)[**](https://undefined/apify/apify-client-python/blob/master//src/apify_client/clients/resource_clients/dataset.py#L632)\_\_init\_\_
* ****\_\_init\_\_**(\*, base\_url, root\_client, http\_client, resource\_id, resource\_path, params): None
- Overrides [ResourceClientAsync.\_\_init\_\_](https://docs.apify.com/api/client/python/api/client/python/reference/class/ResourceClientAsync.md#__init__)
Initialize a new instance.
***
#### Parameters
* ##### keyword-onlybase\_url: str
Base URL of the API server.
* ##### keyword-onlyroot\_client: [ApifyClientAsync](https://docs.apify.com/api/client/python/api/client/python/reference/class/ApifyClientAsync.md)
The ApifyClientAsync instance under which this resource client exists.
* ##### keyword-onlyhttp\_client: [HTTPClientAsync](https://docs.apify.com/api/client/python/api/client/python/reference/class/HTTPClientAsync.md)
The HTTPClientAsync instance to be used in this client.
* ##### optionalkeyword-onlyresource\_id: str | None = <!-- -->None
ID of the manipulated resource, in case of a single-resource client.
* ##### keyword-onlyresource\_path: str
Path to the resource's endpoint on the API server.
* ##### optionalkeyword-onlyparams: dict | None = <!-- -->None
Parameters to include in all requests from this client.
#### Returns None
### [**](#create_items_public_url)[**](https://undefined/apify/apify-client-python/blob/master//src/apify_client/clients/resource_clients/dataset.py#L1074)create\_items\_public\_url
* **async **create\_items\_public\_url**(\*, offset, limit, clean, desc, fields, omit, unwind, skip\_empty, skip\_hidden, flatten, view, expires\_in\_secs): str
- Generate a URL that can be used to access dataset items.
If the client has permission to access the dataset's URL signing key, the URL will include a signature to verify its authenticity.
You can optionally control how long the signed URL should be valid using the `expires_in_secs` option. This value sets the expiration duration in seconds from the time the URL is generated. If not provided, the URL will not expire.
Any other options (like `limit` or `offset`) will be included as query parameters in the URL.
***
#### Parameters
* ##### optionalkeyword-onlyoffset: int | None = <!-- -->None
* ##### optionalkeyword-onlylimit: int | None = <!-- -->None
* ##### optionalkeyword-onlyclean: bool | None = <!-- -->None
* ##### optionalkeyword-onlydesc: bool | None = <!-- -->None
* ##### optionalkeyword-onlyfields: [list](https://docs.apify.com/api/client/python/api/client/python/reference/class/RequestQueueCollectionClient.md#list)\[str] | None = <!-- -->None
* ##### optionalkeyword-onlyomit: [list](https://docs.apify.com/api/client/python/api/client/python/reference/class/RequestQueueCollectionClient.md#list)\[str] | None = <!-- -->None
* ##### optionalkeyword-onlyunwind: [list](https://docs.apify.com/api/client/python/api/client/python/reference/class/RequestQueueCollectionClient.md#list)\[str] | None = <!-- -->None
* ##### optionalkeyword-onlyskip\_empty: bool | None = <!-- -->None
* ##### optionalkeyword-onlyskip\_hidden: bool | None = <!-- -->None
* ##### optionalkeyword-onlyflatten: [list](https://docs.apify.com/api/client/python/api/client/python/reference/class/RequestQueueCollectionClient.md#list)\[str] | None = <!-- -->None
* ##### optionalkeyword-onlyview: str | None = <!-- -->None
* ##### optionalkeyword-onlyexpires\_in\_secs: int | None = <!-- -->None
#### Returns str
### [**](#delete)[**](https://undefined/apify/apify-client-python/blob/master//src/apify_client/clients/resource_clients/dataset.py#L665)delete
* **async **delete**(): None
- Delete the dataset.
<https://docs.apify.com/api/v2#/reference/datasets/dataset/delete-dataset>
***
#### Returns None
### [**](#get)[**](https://undefined/apify/apify-client-python/blob/master//src/apify_client/clients/resource_clients/dataset.py#L636)get
* **async **get**(): dict | None
- Retrieve the dataset.
<https://docs.apify.com/api/v2#/reference/datasets/dataset/get-dataset>
***
#### Returns dict | None
### [**](#get_items_as_bytes)[**](https://undefined/apify/apify-client-python/blob/master//src/apify_client/clients/resource_clients/dataset.py#L839)get\_items\_as\_bytes
* **async **get\_items\_as\_bytes**(\*, item\_format, offset, limit, desc, clean, bom, delimiter, fields, omit, unwind, skip\_empty, skip\_header\_row, skip\_hidden, xml\_root, xml\_row, flatten): bytes
- Get the items in the dataset as raw bytes.
<https://docs.apify.com/api/v2#/reference/datasets/item-collection/get-items>
***
#### Parameters
* ##### optionalkeyword-onlyitem\_format: str = <!-- -->'json'
Format of the results, possible values are: json, jsonl, csv, html, xlsx, xml and rss. The default value is json.
* ##### optionalkeyword-onlyoffset: int | None = <!-- -->None
Number of items that should be skipped at the start. The default value is 0.
* ##### optionalkeyword-onlylimit: int | None = <!-- -->None
Maximum number of items to return. By default there is no limit.
* ##### optionalkeyword-onlydesc: bool | None = <!-- -->None
By default, results are returned in the same order as they were stored. To reverse the order, set this parameter to True.
* ##### optionalkeyword-onlyclean: bool | None = <!-- -->None
If True, returns only non-empty items and skips hidden fields (i.e. fields starting with the # character). The clean parameter is just a shortcut for skip\_hidden=True and skip\_empty=True parameters. Note that since some objects might be skipped from the output, that the result might contain less items than the limit value.
* ##### optionalkeyword-onlybom: bool | None = <!-- -->None
All text responses are encoded in UTF-8 encoding. By default, csv files are prefixed with the UTF-8 Byte Order Mark (BOM), while json, jsonl, xml, html and rss files are not. If you want to override this default behavior, specify bom=True query parameter to include the BOM or bom=False to skip it.
* ##### optionalkeyword-onlydelimiter: str | None = <!-- -->None
A delimiter character for CSV files. The default delimiter is a simple comma (,).
* ##### optionalkeyword-onlyfields: [list](https://docs.apify.com/api/client/python/api/client/python/reference/class/RequestQueueCollectionClient.md#list)\[str] | None = <!-- -->None
A list of fields which should be picked from the items, only these fields will remain in the resulting record objects. Note that the fields in the outputted items are sorted the same way as they are specified in the fields parameter. You can use this feature to effectively fix the output format. You can use this feature to effectively fix the output format.
* ##### optionalkeyword-onlyomit: [list](https://docs.apify.com/api/client/python/api/client/python/reference/class/RequestQueueCollectionClient.md#list)\[str] | None = <!-- -->None
A list of fields which should be omitted from the items.
* ##### optionalkeyword-onlyunwind: [list](https://docs.apify.com/api/client/python/api/client/python/reference/class/RequestQueueCollectionClient.md#list)\[str] | None = <!-- -->None
A list of fields which should be unwound, in order which they should be processed. Each field should be either an array or an object. If the field is an array then every element of the array will become a separate record and merged with parent object. If the unwound field is an object then it is merged with the parent object. If the unwound field is missing or its value is neither an array nor an object and therefore cannot be merged with a parent object, then the item gets preserved as it is. Note that the unwound items ignore the desc parameter.
* ##### optionalkeyword-onlyskip\_empty: bool | None = <!-- -->None
If True, then empty items are skipped from the output. Note that if used, the results might contain less items than the limit value.
* ##### optionalkeyword-onlyskip\_header\_row: bool | None = <!-- -->None
If True, then header row in the csv format is skipped.
* ##### optionalkeyword-onlyskip\_hidden: bool | None = <!-- -->None
If True, then hidden fields are skipped from the output, i.e. fields starting with the # character.
* ##### optionalkeyword-onlyxml\_root: str | None = <!-- -->None
Overrides default root element name of xml output. By default the root element is items.
* ##### optionalkeyword-onlyxml\_row: str | None = <!-- -->None
Overrides default element name that wraps each page or page function result object in xml output. By default the element name is item.
* ##### optionalkeyword-onlyflatten: [list](https://docs.apify.com/api/client/python/api/client/python/reference/class/RequestQueueCollectionClient.md#list)\[str] | None = <!-- -->None
A list of fields that should be flattened.
#### Returns bytes
### [**](#get_statistics)[**](https://undefined/apify/apify-client-python/blob/master//src/apify_client/clients/resource_clients/dataset.py#L1053)get\_statistics
* **async **get\_statistics**(): dict | None
- Get the dataset statistics.
<https://docs.apify.com/api/v2#tag/DatasetsStatistics/operation/dataset_statistics_get>
***
#### Returns dict | None
### [**](#iterate_items)[**](https://undefined/apify/apify-client-python/blob/master//src/apify_client/clients/resource_clients/dataset.py#L758)iterate\_items
* **async **iterate\_items**(\*, offset, limit, clean, desc, fields, omit, unwind, skip\_empty, skip\_hidden): AsyncIterator\[dict]
- Iterate over the items in the dataset.
<https://docs.apify.com/api/v2#/reference/datasets/item-collection/get-items>
***
#### Parameters
* ##### optionalkeyword-onlyoffset: int = <!-- -->0
Number of items that should be skipped at the start. The default value is 0.
* ##### optionalkeyword-onlylimit: int | None = <!-- -->None
Maximum number of items to return. By default there is no limit.
* ##### optionalkeyword-onlyclean: bool | None = <!-- -->None
If True, returns only non-empty items and skips hidden fields (i.e. fields starting with the # character). The clean parameter is just a shortcut for skip\_hidden=True and skip\_empty=True parameters. Note that since some objects might be skipped from the output, that the result might contain less items than the limit value.
* ##### optionalkeyword-onlydesc: bool | None = <!-- -->None
By default, results are returned in the same order as they were stored. To reverse the order, set this parameter to True.
* ##### optionalkeyword-onlyfields: [list](https://docs.apify.com/api/client/python/api/client/python/reference/class/RequestQueueCollectionClient.md#list)\[str] | None = <!-- -->None
A list of fields which should be picked from the items, only these fields will remain in the resulting record objects. Note that the fields in the outputted items are sorted the same way as they are specified in the fields parameter. You can use this feature to effectively fix the output format.
* ##### optionalkeyword-onlyomit: [list](https://docs.apify.com/api/client/python/api/client/python/reference/class/RequestQueueCollectionClient.md#list)\[str] | None = <!-- -->None
A list of fields which should be omitted from the items.
* ##### optionalkeyword-onlyunwind: [list](https://docs.apify.com/api/client/python/api/client/python/reference/class/RequestQueueCollectionClient.md#list)\[str] | None = <!-- -->None
A list of fields which should be unwound, in order which they should be processed. Each field should be either an array or an object. If the field is an array then every element of the array will become a separate record and merged with parent object. If the unwound field is an object then it is merged with the parent object. If the unwound field is missing or its value is neither an array nor an object and therefore cannot be merged with a parent object, then the item gets preserved as it is. Note that the unwound items ignore the desc parameter.
* ##### optionalkeyword-onlyskip\_empty: bool | None = <!-- -->None
If True, then empty items are skipped from the output. Note that if used, the results might contain less items than the limit value.
* ##### optionalkeyword-onlyskip\_hidden: bool | None = <!-- -->None
If True, then hidden fields are skipped from the output, i.e. fields starting with the # character.
#### Returns AsyncIterator\[dict]
### [**](#list_items)[**](https://undefined/apify/apify-client-python/blob/master//src/apify_client/clients/resource_clients/dataset.py#L672)list\_items
* **async **list\_items**(\*, offset, limit, clean, desc, fields, omit, unwind, skip\_empty, skip\_hidden, flatten, view): [ListPage](https://docs.apify.com/api/client/python/api/client/python/reference/class/ListPage.md)
- List the items of the dataset.
<https://docs.apify.com/api/v2#/reference/datasets/item-collection/get-items>
***
#### Parameters
* ##### optionalkeyword-onlyoffset: int | None = <!-- -->None
Number of items that should be skipped at the start. The default value is 0.
* ##### optionalkeyword-onlylimit: int | None = <!-- -->None
Maximum number of items to return. By default there is no limit.
* ##### optionalkeyword-onlyclean: bool | None = <!-- -->None
If True, returns only non-empty items and skips hidden fields (i.e. fields starting with the # character). The clean parameter is just a shortcut for skip\_hidden=True and skip\_empty=True parameters. Note that since some objects might be skipped from the output, that the result might contain less items than the limit value.
* ##### optionalkeyword-onlydesc: bool | None = <!-- -->None
By default, results are returned in the same order as they were stored. To reverse the order, set this parameter to True.
* ##### optionalkeyword-onlyfields: [list](https://docs.apify.com/api/client/python/api/client/python/reference/class/RequestQueueCollectionClient.md#list)\[str] | None = <!-- -->None
A list of fields which should be picked from the items, only these fields will remain in the resulting record objects. Note that the fields in the outputted items are sorted the same way as they are specified in the fields parameter. You can use this feature to effectively fix the output format.
* ##### optionalkeyword-onlyomit: [list](https://docs.apify.com/api/client/python/api/client/python/reference/class/RequestQueueCollectionClient.md#list)\[str] | None = <!-- -->None
A list of fields which should be omitted from the items.
* ##### optionalkeyword-onlyunwind: [list](https://docs.apify.com/api/client/python/api/client/python/reference/class/RequestQueueCollectionClient.md#list)\[str] | None = <!-- -->None
A list of fields which should be unwound, in order which they should be processed. Each field should be either an array or an object. If the field is an array then every element of the array will become a separate record and merged with parent object. If the unwound field is an object then it is merged with the parent object. If the unwound field is missing or its value is neither an array nor an object and therefore cannot be merged with a parent object, then the item gets preserved as it is. Note that the unwound items ignore the desc parameter.
* ##### optionalkeyword-onlyskip\_empty: bool | None = <!-- -->None
If True, then empty items are skipped from the output. Note that if used, the results might contain less items than the limit value.
* ##### optionalkeyword-onlyskip\_hidden: bool | None = <!-- -->None
If True, then hidden fields are skipped from the output, i.e. fields starting with the # character.
* ##### optionalkeyword-onlyflatten: [list](https://docs.apify.com/api/client/python/api/client/python/reference/class/RequestQueueCollectionClient.md#list)\[str] | None = <!-- -->None
A list of fields that should be flattened.
* ##### optionalkeyword-onlyview: str | None = <!-- -->None
Name of the dataset view to be used.
#### Returns [ListPage](https://docs.apify.com/api/client/python/api/client/python/reference/class/ListPage.md)
### [**](#push_items)[**](https://undefined/apify/apify-client-python/blob/master//src/apify_client/clients/resource_clients/dataset.py#L1026)push\_items
* **async **push\_items**(items): None
- Push items to the dataset.
<https://docs.apify.com/api/v2#/reference/datasets/item-collection/put-items>
***
#### Parameters
* ##### items: [JSONSerializable](https://docs.apify.com/api/client/python/api/client/python/reference.md#JSONSerializable)
The items which to push in the dataset. Either a stringified JSON, a dictionary, or a list of strings or dictionaries.
#### Returns None
### [**](#stream_items)[**](https://undefined/apify/apify-client-python/blob/master//src/apify_client/clients/resource_clients/dataset.py#L932)stream\_items
* **async **stream\_items**(\*, item\_format, offset, limit, desc, clean, bom, delimiter, fields, omit, unwind, skip\_empty, skip\_header\_row, skip\_hidden, xml\_root, xml\_row): AsyncIterator\[impit.Response]
- Retrieve the items in the dataset as a stream.
<https://docs.apify.com/api/v2#/reference/datasets/item-collection/get-items>
***
#### Parameters
* ##### optionalkeyword-onlyitem\_format: str = <!-- -->'json'
Format of the results, possible values are: json, jsonl, csv, html, xlsx, xml and rss. The default value is json.
* ##### optionalkeyword-onlyoffset: int | None = <!-- -->None
Number of items that should be skipped at the start. The default value is 0.
* ##### optionalkeyword-onlylimit: int | None = <!-- -->None
Maximum number of items to return. By default there is no limit.
* ##### optionalkeyword-onlydesc: bool | None = <!-- -->None
By default, results are returned in the same order as they were stored. To reverse the order, set this parameter to True.
* ##### optionalkeyword-onlyclean: bool | None = <!-- -->None
If True, returns only non-empty items and skips hidden fields (i.e. fields starting with the # character). The clean parameter is just a shortcut for skip\_hidden=True and skip\_empty=True parameters. Note that since some objects might be skipped from the output, that the result might contain less items than the limit value.
* ##### optionalkeyword-onlybom: bool | None = <!-- -->None
All text responses are encoded in UTF-8 encoding. By default, csv files are prefixed with the UTF-8 Byte Order Mark (BOM), while json, jsonl, xml, html and rss files are not. If you want to override this default behavior, specify bom=True query parameter to include the BOM or bom=False to skip it.
* ##### optionalkeyword-onlydelimiter: str | None = <!-- -->None
A delimiter character for CSV files. The default delimiter is a simple comma (,).
* ##### optionalkeyword-onlyfields: [list](https://docs.apify.com/api/client/python/api/client/python/reference/class/RequestQueueCollectionClient.md#list)\[str] | None = <!-- -->None
A list of fields which should be picked from the items, only these fields will remain in the resulting record objects. Note that the fields in the outputted items are sorted the same way as they are specified in the fields parameter. You can use this feature to effectively fix the output format. You can use this feature to effectively fix the output format.
* ##### optionalkeyword-onlyomit: [list](https://docs.apify.com/api/client/python/api/client/python/reference/class/RequestQueueCollectionClient.md#list)\[str] | None = <!-- -->None
A list of fields which should be omitted from the items.
* ##### optionalkeyword-onlyunwind: [list](https://docs.apify.com/api/client/python/api/client/python/reference/class/RequestQueueCollectionClient.md#list)\[str] | None = <!-- -->None
A list of fields which should be unwound, in order which they should be processed. Each field should be either an array or an object. If the field is an array then every element of the array will become a separate record and merged with parent object. If the unwound field is an object then it is merged with the parent object. If the unwound field is missing or its value is neither an array nor an object and therefore cannot be merged with a parent object, then the item gets preserved as it is. Note that the unwound items ignore the desc parameter.
* ##### optionalkeyword-onlyskip\_empty: bool | None = <!-- -->None
If True, then empty items are skipped from the output. Note that if used, the results might contain less items than the limit value.
* ##### optionalkeyword-onlyskip\_header\_row: bool | None = <!-- -->None
If True, then header row in the csv format is skipped.
* ##### optionalkeyword-onlyskip\_hidden: bool | None = <!-- -->None
If True, then hidden fields are skipped from the output, i.e. fields starting with the # character.
* ##### optionalkeyword-onlyxml\_root: str | None = <!-- -->None
Overrides default root element name of xml output. By default the root element is items.
* ##### optionalkeyword-onlyxml\_row: str | None = <!-- -->None
Overrides default element name that wraps each page or page function result object in xml output. By default the element name is item.
#### Returns AsyncIterator\[impit.Response]
### [**](#update)[**](https://undefined/apify/apify-client-python/blob/master//src/apify_client/clients/resource_clients/dataset.py#L646)update
* **async **update**(\*, name, general\_access): dict
- Update the dataset with specified fields.
<https://docs.apify.com/api/v2#/reference/datasets/dataset/update-dataset>
***
#### Parameters
* ##### optionalkeyword-onlyname: str | None = <!-- -->None
The new name for the dataset.
* ##### optionalkeyword-onlygeneral\_access: StorageGeneralAccess | None = <!-- -->None
Determines how others can access the dataset.
#### Returns dict
## Properties<!-- -->[**](#Properties)
### [**](#http_client)[**](https://undefined/apify/apify-client-python/blob/master//src/apify_client/clients/base/base_client.py#L94)http\_client
**http\_client: [HTTPClient](https://docs.apify.com/api/client/python/api/client/python/reference/class/HTTPClient.md) | [HTTPClientAsync](https://docs.apify.com/api/client/python/api/client/python/reference/class/HTTPClientAsync.md)
Inherited from [BaseClientAsync.http\_client](https://docs.apify.com/api/client/python/api/client/python/reference/class/BaseClientAsync.md#http_client)
Overrides [\_BaseBaseClient.http\_client](https://docs.apify.com/api/client/python/api/client/python/reference/class/_BaseBaseClient.md#http_client)
### [**](#params)[**](https://undefined/apify/apify-client-python/blob/master//src/apify_client/clients/base/base_client.py#L17)params
**params: dict
Inherited from [\_BaseBaseClient.params](https://docs.apify.com/api/client/python/api/client/python/reference/class/_BaseBaseClient.md#params)
### [**](#resource_id)[**](https://undefined/apify/apify-client-python/blob/master//src/apify_client/clients/base/base_client.py#L15)resource\_id
**resource\_id: str | None
Inherited from [\_BaseBaseClient.resource\_id](https://docs.apify.com/api/client/python/api/client/python/reference/class/_BaseBaseClient.md#resource_id)
### [**](#root_client)[**](https://undefined/apify/apify-client-python/blob/master//src/apify_client/clients/base/base_client.py#L95)root\_client
**root\_client: [ApifyClient](https://docs.apify.com/api/client/python/api/client/python/reference/class/ApifyClient.md) | [ApifyClientAsync](https://docs.apify.com/api/client/python/api/client/python/reference/class/ApifyClientAsync.md)
Inherited from [BaseClientAsync.root\_client](https://docs.apify.com/api/client/python/api/client/python/reference/class/BaseClientAsync.md#root_client)
Overrides [\_BaseBaseClient.root\_client](https://docs.apify.com/api/client/python/api/client/python/reference/class/_BaseBaseClient.md#root_client)
### [**](#url)[**](https://undefined/apify/apify-client-python/blob/master//src/apify_client/clients/base/base_client.py#L16)url
**url: str
Inherited from [\_BaseBaseClient.url](https://docs.apify.com/api/client/python/api/client/python/reference/class/_BaseBaseClient.md#url)
---
# DatasetCollectionClient<!-- -->
Sub-client for manipulating datasets.
### Hierarchy
* [ResourceCollectionClient](https://docs.apify.com/api/client/python/api/client/python/reference/class/ResourceCollectionClient.md)
* *DatasetCollectionClient*
## Index[**](#Index)
### Methods
* [**\_\_init\_\_](https://docs.apify.com/api/client/python/api/client/python/reference/class/DatasetCollectionClient.md#__init__)
* [**get\_or\_create](https://docs.apify.com/api/client/python/api/client/python/reference/class/DatasetCollectionClient.md#get_or_create)
* [**list](https://docs.apify.com/api/client/python/api/client/python/reference/class/DatasetCollectionClient.md#list)
### Properties
* [**http\_client](https://docs.apify.com/api/client/python/api/client/python/reference/class/DatasetCollectionClient.md#http_client)
* [**params](https://docs.apify.com/api/client/python/api/client/python/reference/class/DatasetCollectionClient.md#params)
* [**resource\_id](https://docs.apify.com/api/client/python/api/client/python/reference/class/DatasetCollectionClient.md#resource_id)
* [**root\_client](https://docs.apify.com/api/client/python/api/client/python/reference/class/DatasetCollectionClient.md#root_client)
* [**url](https://docs.apify.com/api/client/python/api/client/python/reference/class/DatasetCollectionClient.md#url)
## Methods<!-- -->[**](#Methods)
### [**](#__init__)[**](https://undefined/apify/apify-client-python/blob/master//src/apify_client/clients/resource_clients/dataset_collection.py#L15)\_\_init\_\_
* ****\_\_init\_\_**(\*, base\_url, root\_client, http\_client, resource\_id, resource\_path, params): None
- Overrides [ResourceCollectionClient.\_\_init\_\_](https://docs.apify.com/api/client/python/api/client/python/reference/class/ResourceCollectionClient.md#__init__)
Initialize a new instance.
***
#### Parameters
* ##### keyword-onlybase\_url: str
Base URL of the API server.
* ##### keyword-onlyroot\_client: [ApifyClient](https://docs.apify.com/api/client/python/api/client/python/reference/class/ApifyClient.md)
The ApifyClient instance under which this resource client exists.
* ##### keyword-onlyhttp\_client: [HTTPClient](https://docs.apify.com/api/client/python/api/client/python/reference/class/HTTPClient.md)
The HTTPClient instance to be used in this client.
* ##### optionalkeyword-onlyresource\_id: str | None = <!-- -->None
ID of the manipulated resource, in case of a single-resource client.
* ##### keyword-onlyresource\_path: str
Path to the resource's endpoint on the API server.
* ##### optionalkeyword-onlyparams: dict | None = <!-- -->None
Parameters to include in all requests from this client.
#### Returns None
### [**](#get_or_create)[**](https://undefined/apify/apify-client-python/blob/master//src/apify_client/clients/resource_clients/dataset_collection.py#L42)get\_or\_create
* ****get\_or\_create**(\*, name, schema): dict
- Retrieve a named dataset, or create a new one when it doesn't exist.
<https://docs.apify.com/api/v2#/reference/datasets/dataset-collection/create-dataset>
***
#### Parameters
* ##### optionalkeyword-onlyname: str | None = <!-- -->None
The name of the dataset to retrieve or create.
* ##### optionalkeyword-onlyschema: dict | None = <!-- -->None
The schema of the dataset.
#### Returns dict
### [**](#list)[**](https://undefined/apify/apify-client-python/blob/master//src/apify_client/clients/resource_clients/dataset_collection.py#L19)list
* ****list**(\*, unnamed, limit, offset, desc): [ListPage](https://docs.apify.com/api/client/python/api/client/python/reference/class/ListPage.md)\[dict]
- List the available datasets.
<https://docs.apify.com/api/v2#/reference/datasets/dataset-collection/get-list-of-datasets>
***
#### Parameters
* ##### optionalkeyword-onlyunnamed: bool | None = <!-- -->None
Whether to include unnamed datasets in the list.
* ##### optionalkeyword-onlylimit: int | None = <!-- -->None
How many datasets to retrieve.
* ##### optionalkeyword-onlyoffset: int | None = <!-- -->None
What dataset to include as first when retrieving the list.
* ##### optionalkeyword-onlydesc: bool | None = <!-- -->None
Whether to sort the datasets in descending order based on their modification date.
#### Returns [ListPage](https://docs.apify.com/api/client/python/api/client/python/reference/class/ListPage.md)\[dict]
## Properties<!-- -->[**](#Properties)
### [**](#http_client)[**](https://undefined/apify/apify-client-python/blob/master//src/apify_client/clients/base/base_client.py#L53)http\_client
**http\_client: [HTTPClient](https://docs.apify.com/api/client/python/api/client/python/reference/class/HTTPClient.md) | [HTTPClientAsync](https://docs.apify.com/api/client/python/api/client/python/reference/class/HTTPClientAsync.md)
Inherited from [BaseClient.http\_client](https://docs.apify.com/api/client/python/api/client/python/reference/class/BaseClient.md#http_client)
Overrides [\_BaseBaseClient.http\_client](https://docs.apify.com/api/client/python/api/client/python/reference/class/_BaseBaseClient.md#http_client)
### [**](#params)[**](https://undefined/apify/apify-client-python/blob/master//src/apify_client/clients/base/base_client.py#L17)params
**params: dict
Inherited from [\_BaseBaseClient.params](https://docs.apify.com/api/client/python/api/client/python/reference/class/_BaseBaseClient.md#params)
### [**](#resource_id)[**](https://undefined/apify/apify-client-python/blob/master//src/apify_client/clients/base/base_client.py#L15)resource\_id
**resource\_id: str | None
Inherited from [\_BaseBaseClient.resource\_id](https://docs.apify.com/api/client/python/api/client/python/reference/class/_BaseBaseClient.md#resource_id)
### [**](#root_client)[**](https://undefined/apify/apify-client-python/blob/master//src/apify_client/clients/base/base_client.py#L54)root\_client
**root\_client: [ApifyClient](https://docs.apify.com/api/client/python/api/client/python/reference/class/ApifyClient.md) | [ApifyClientAsync](https://docs.apify.com/api/client/python/api/client/python/reference/class/ApifyClientAsync.md)
Inherited from [BaseClient.root\_client](https://docs.apify.com/api/client/python/api/client/python/reference/class/BaseClient.md#root_client)
Overrides [\_BaseBaseClient.root\_client](https://docs.apify.com/api/client/python/api/client/python/reference/class/_BaseBaseClient.md#root_client)
### [**](#url)[**](https://undefined/apify/apify-client-python/blob/master//src/apify_client/clients/base/base_client.py#L16)url
**url: str
Inherited from [\_BaseBaseClient.url](https://docs.apify.com/api/client/python/api/client/python/reference/class/_BaseBaseClient.md#url)
---
# DatasetCollectionClientAsync<!-- -->
Async sub-client for manipulating datasets.
### Hierarchy
* [ResourceCollectionClientAsync](https://docs.apify.com/api/client/python/api/client/python/reference/class/ResourceCollectionClientAsync.md)
* *DatasetCollectionClientAsync*
## Index[**](#Index)
### Methods
* [**\_\_init\_\_](https://docs.apify.com/api/client/python/api/client/python/reference/class/DatasetCollectionClientAsync.md#__init__)
* [**get\_or\_create](https://docs.apify.com/api/client/python/api/client/python/reference/class/DatasetCollectionClientAsync.md#get_or_create)
* [**list](https://docs.apify.com/api/client/python/api/client/python/reference/class/DatasetCollectionClientAsync.md#list)
### Properties
* [**http\_client](https://docs.apify.com/api/client/python/api/client/python/reference/class/DatasetCollectionClientAsync.md#http_client)
* [**params](https://docs.apify.com/api/client/python/api/client/python/reference/class/DatasetCollectionClientAsync.md#params)
* [**resource\_id](https://docs.apify.com/api/client/python/api/client/python/reference/class/DatasetCollectionClientAsync.md#resource_id)
* [**root\_client](https://docs.apify.com/api/client/python/api/client/python/reference/class/DatasetCollectionClientAsync.md#root_client)
* [**url](https://docs.apify.com/api/client/python/api/client/python/reference/class/DatasetCollectionClientAsync.md#url)
## Methods<!-- -->[**](#Methods)
### [**](#__init__)[**](https://undefined/apify/apify-client-python/blob/master//src/apify_client/clients/resource_clients/dataset_collection.py#L60)\_\_init\_\_
* ****\_\_init\_\_**(\*, base\_url, root\_client, http\_client, resource\_id, resource\_path, params): None
- Overrides [ResourceCollectionClientAsync.\_\_init\_\_](https://docs.apify.com/api/client/python/api/client/python/reference/class/ResourceCollectionClientAsync.md#__init__)
Initialize a new instance.
***
#### Parameters
* ##### keyword-onlybase\_url: str
Base URL of the API server.
* ##### keyword-onlyroot\_client: [ApifyClientAsync](https://docs.apify.com/api/client/python/api/client/python/reference/class/ApifyClientAsync.md)
The ApifyClientAsync instance under which this resource client exists.
* ##### keyword-onlyhttp\_client: [HTTPClientAsync](https://docs.apify.com/api/client/python/api/client/python/reference/class/HTTPClientAsync.md)
The HTTPClientAsync instance to be used in this client.
* ##### optionalkeyword-onlyresource\_id: str | None = <!-- -->None
ID of the manipulated resource, in case of a single-resource client.
* ##### keyword-onlyresource\_path: str
Path to the resource's endpoint on the API server.
* ##### optionalkeyword-onlyparams: dict | None = <!-- -->None
Parameters to include in all requests from this client.
#### Returns None
### [**](#get_or_create)[**](https://undefined/apify/apify-client-python/blob/master//src/apify_client/clients/resource_clients/dataset_collection.py#L87)get\_or\_create
* **async **get\_or\_create**(\*, name, schema): dict
- Retrieve a named dataset, or create a new one when it doesn't exist.
<https://docs.apify.com/api/v2#/reference/datasets/dataset-collection/create-dataset>
***
#### Parameters
* ##### optionalkeyword-onlyname: str | None = <!-- -->None
The name of the dataset to retrieve or create.
* ##### optionalkeyword-onlyschema: dict | None = <!-- -->None
The schema of the dataset.
#### Returns dict
### [**](#list)[**](https://undefined/apify/apify-client-python/blob/master//src/apify_client/clients/resource_clients/dataset_collection.py#L64)list
* **async **list**(\*, unnamed, limit, offset, desc): [ListPage](https://docs.apify.com/api/client/python/api/client/python/reference/class/ListPage.md)\[dict]
- List the available datasets.
<https://docs.apify.com/api/v2#/reference/datasets/dataset-collection/get-list-of-datasets>
***
#### Parameters
* ##### optionalkeyword-onlyunnamed: bool | None = <!-- -->None
Whether to include unnamed datasets in the list.
* ##### optionalkeyword-onlylimit: int | None = <!-- -->None
How many datasets to retrieve.
* ##### optionalkeyword-onlyoffset: int | None = <!-- -->None
What dataset to include as first when retrieving the list.
* ##### optionalkeyword-onlydesc: bool | None = <!-- -->None
Whether to sort the datasets in descending order based on their modification date.
#### Returns [ListPage](https://docs.apify.com/api/client/python/api/client/python/reference/class/ListPage.md)\[dict]
## Properties<!-- -->[**](#Properties)
### [**](#http_client)[**](https://undefined/apify/apify-client-python/blob/master//src/apify_client/clients/base/base_client.py#L94)http\_client
**http\_client: [HTTPClient](https://docs.apify.com/api/client/python/api/client/python/reference/class/HTTPClient.md) | [HTTPClientAsync](https://docs.apify.com/api/client/python/api/client/python/reference/class/HTTPClientAsync.md)
Inherited from [BaseClientAsync.http\_client](https://docs.apify.com/api/client/python/api/client/python/reference/class/BaseClientAsync.md#http_client)
Overrides [\_BaseBaseClient.http\_client](https://docs.apify.com/api/client/python/api/client/python/reference/class/_BaseBaseClient.md#http_client)
### [**](#params)[**](https://undefined/apify/apify-client-python/blob/master//src/apify_client/clients/base/base_client.py#L17)params
**params: dict
Inherited from [\_BaseBaseClient.params](https://docs.apify.com/api/client/python/api/client/python/reference/class/_BaseBaseClient.md#params)
### [**](#resource_id)[**](https://undefined/apify/apify-client-python/blob/master//src/apify_client/clients/base/base_client.py#L15)resource\_id
**resource\_id: str | None
Inherited from [\_BaseBaseClient.resource\_id](https://docs.apify.com/api/client/python/api/client/python/reference/class/_BaseBaseClient.md#resource_id)
### [**](#root_client)[**](https://undefined/apify/apify-client-python/blob/master//src/apify_client/clients/base/base_client.py#L95)root\_client
**root\_client: [ApifyClient](https://docs.apify.com/api/client/python/api/client/python/reference/class/ApifyClient.md) | [ApifyClientAsync](https://docs.apify.com/api/client/python/api/client/python/reference/class/ApifyClientAsync.md)
Inherited from [BaseClientAsync.root\_client](https://docs.apify.com/api/client/python/api/client/python/reference/class/BaseClientAsync.md#root_client)
Overrides [\_BaseBaseClient.root\_client](https://docs.apify.com/api/client/python/api/client/python/reference/class/_BaseBaseClient.md#root_client)
### [**](#url)[**](https://undefined/apify/apify-client-python/blob/master//src/apify_client/clients/base/base_client.py#L16)url
**url: str
Inherited from [\_BaseBaseClient.url](https://docs.apify.com/api/client/python/api/client/python/reference/class/_BaseBaseClient.md#url)
---
# HTTPClient<!-- -->
### Hierarchy
* [\_BaseHTTPClient](https://docs.apify.com/api/client/python/api/client/python/reference/class/_BaseHTTPClient.md)
* *HTTPClient*
## Index[**](#Index)
### Methods
* [**\_\_init\_\_](https://docs.apify.com/api/client/python/api/client/python/reference/class/HTTPClient.md#__init__)
* [**call](https://docs.apify.com/api/client/python/api/client/python/reference/class/HTTPClient.md#call)
## Methods<!-- -->[**](#Methods)
### [**](#__init__)[**](https://undefined/apify/apify-client-python/blob/master//src/apify_client/_http_client.py#L33)\_\_init\_\_
* ****\_\_init\_\_**(\*, token, max\_retries, min\_delay\_between\_retries\_millis, timeout\_secs, stats): None
- Inherited from [\_BaseHTTPClient.\_\_init\_\_](https://docs.apify.com/api/client/python/api/client/python/reference/class/_BaseHTTPClient.md#__init__)
#### Parameters
* ##### optionalkeyword-onlytoken: str | None = <!-- -->None
* ##### optionalkeyword-onlymax\_retries: int = <!-- -->8
* ##### optionalkeyword-onlymin\_delay\_between\_retries\_millis: int = <!-- -->500
* ##### optionalkeyword-onlytimeout\_secs: int = <!-- -->360
* ##### optionalkeyword-onlystats: [Statistics](https://docs.apify.com/api/client/python/api/client/python/reference/class/Statistics.md) | None = <!-- -->None
#### Returns None
### [**](#call)[**](https://undefined/apify/apify-client-python/blob/master//src/apify_client/_http_client.py#L141)call
* ****call**(\*, method, url, headers, params, data, json, stream, timeout\_secs): impit.Response
- #### Parameters
* ##### keyword-onlymethod: str
* ##### keyword-onlyurl: str
* ##### optionalkeyword-onlyheaders: dict | None = <!-- -->None
* ##### optionalkeyword-onlyparams: dict | None = <!-- -->None
* ##### optionalkeyword-onlydata: Any = <!-- -->None
* ##### optionalkeyword-onlyjson: [JSONSerializable](https://docs.apify.com/api/client/python/api/client/python/reference.md#JSONSerializable) | None = <!-- -->None
* ##### optionalkeyword-onlystream: bool | None = <!-- -->None
* ##### optionalkeyword-onlytimeout\_secs: int | None = <!-- -->None
#### Returns impit.Response
---
# HTTPClientAsync<!-- -->
### Hierarchy
* [\_BaseHTTPClient](https://docs.apify.com/api/client/python/api/client/python/reference/class/_BaseHTTPClient.md)
* *HTTPClientAsync*
## Index[**](#Index)
### Methods
* [**\_\_init\_\_](https://docs.apify.com/api/client/python/api/client/python/reference/class/HTTPClientAsync.md#__init__)
* [**call](https://docs.apify.com/api/client/python/api/client/python/reference/class/HTTPClientAsync.md#call)
## Methods<!-- -->[**](#Methods)
### [**](#__init__)[**](https://undefined/apify/apify-client-python/blob/master//src/apify_client/_http_client.py#L33)\_\_init\_\_
* ****\_\_init\_\_**(\*, token, max\_retries, min\_delay\_between\_retries\_millis, timeout\_secs, stats): None
- Inherited from [\_BaseHTTPClient.\_\_init\_\_](https://docs.apify.com/api/client/python/api/client/python/reference/class/_BaseHTTPClient.md#__init__)
#### Parameters
* ##### optionalkeyword-onlytoken: str | None = <!-- -->None
* ##### optionalkeyword-onlymax\_retries: int = <!-- -->8
* ##### optionalkeyword-onlymin\_delay\_between\_retries\_millis: int = <!-- -->500
* ##### optionalkeyword-onlytimeout\_secs: int = <!-- -->360
* ##### optionalkeyword-onlystats: [Statistics](https://docs.apify.com/api/client/python/api/client/python/reference/class/Statistics.md) | None = <!-- -->None
#### Returns None
### [**](#call)[**](https://undefined/apify/apify-client-python/blob/master//src/apify_client/_http_client.py#L220)call
* **async **call**(\*, method, url, headers, params, data, json, stream, timeout\_secs): impit.Response
- #### Parameters
* ##### keyword-onlymethod: str
* ##### keyword-onlyurl: str
* ##### optionalkeyword-onlyheaders: dict | None = <!-- -->None
* ##### optionalkeyword-onlyparams: dict | None = <!-- -->None
* ##### optionalkeyword-onlydata: Any = <!-- -->None
* ##### optionalkeyword-onlyjson: [JSONSerializable](https://docs.apify.com/api/client/python/api/client/python/reference.md#JSONSerializable) | None = <!-- -->None
* ##### optionalkeyword-onlystream: bool | None = <!-- -->None
* ##### optionalkeyword-onlytimeout\_secs: int | None = <!-- -->None
#### Returns impit.Response
---
# InvalidResponseBodyError<!-- -->
Error caused by the response body failing to be parsed.
This error exists for the quite common situation, where only a partial JSON response is received and an attempt to parse the JSON throws an error. In most cases this can be resolved by retrying the request. We do that by identifying this error in the HTTPClient.
### Hierarchy
* [ApifyClientError](https://docs.apify.com/api/client/python/api/client/python/reference/class/ApifyClientError.md)
* *InvalidResponseBodyError*
## Index[**](#Index)
### Methods
* [**\_\_init\_\_](https://docs.apify.com/api/client/python/api/client/python/reference/class/InvalidResponseBodyError.md#__init__)
## Methods<!-- -->[**](#Methods)
### [**](#__init__)[**](https://undefined/apify/apify-client-python/blob/master//src/apify_client/errors.py#L65)\_\_init\_\_
* ****\_\_init\_\_**(response): None
- Initialize a new instance.
***
#### Parameters
* ##### response: impit.Response
The response which failed to be parsed.
#### Returns None
---
# KeyValueStoreClient<!-- -->
Sub-client for manipulating a single key-value store.
### Hierarchy
* [ResourceClient](https://docs.apify.com/api/client/python/api/client/python/reference/class/ResourceClient.md)
* *KeyValueStoreClient*
## Index[**](#Index)
### Methods
* [**\_\_init\_\_](https://docs.apify.com/api/client/python/api/client/python/reference/class/KeyValueStoreClient.md#__init__)
* [**create\_keys\_public\_url](https://docs.apify.com/api/client/python/api/client/python/reference/class/KeyValueStoreClient.md#create_keys_public_url)
* [**delete](https://docs.apify.com/api/client/python/api/client/python/reference/class/KeyValueStoreClient.md#delete)
* [**delete\_record](https://docs.apify.com/api/client/python/api/client/python/reference/class/KeyValueStoreClient.md#delete_record)
* [**get](https://docs.apify.com/api/client/python/api/client/python/reference/class/KeyValueStoreClient.md#get)
* [**get\_record](https://docs.apify.com/api/client/python/api/client/python/reference/class/KeyValueStoreClient.md#get_record)
* [**get\_record\_as\_bytes](https://docs.apify.com/api/client/python/api/client/python/reference/class/KeyValueStoreClient.md#get_record_as_bytes)
* [**get\_record\_public\_url](https://docs.apify.com/api/client/python/api/client/python/reference/class/KeyValueStoreClient.md#get_record_public_url)
* [**list\_keys](https://docs.apify.com/api/client/python/api/client/python/reference/class/KeyValueStoreClient.md#list_keys)
* [**record\_exists](https://docs.apify.com/api/client/python/api/client/python/reference/class/KeyValueStoreClient.md#record_exists)
* [**set\_record](https://docs.apify.com/api/client/python/api/client/python/reference/class/KeyValueStoreClient.md#set_record)
* [**stream\_record](https://docs.apify.com/api/client/python/api/client/python/reference/class/KeyValueStoreClient.md#stream_record)
* [**update](https://docs.apify.com/api/client/python/api/client/python/reference/class/KeyValueStoreClient.md#update)
### Properties
* [**http\_client](https://docs.apify.com/api/client/python/api/client/python/reference/class/KeyValueStoreClient.md#http_client)
* [**params](https://docs.apify.com/api/client/python/api/client/python/reference/class/KeyValueStoreClient.md#params)
* [**resource\_id](https://docs.apify.com/api/client/python/api/client/python/reference/class/KeyValueStoreClient.md#resource_id)
* [**root\_client](https://docs.apify.com/api/client/python/api/client/python/reference/class/KeyValueStoreClient.md#root_client)
* [**url](https://docs.apify.com/api/client/python/api/client/python/reference/class/KeyValueStoreClient.md#url)
## Methods<!-- -->[**](#Methods)
### [**](#__init__)[**](https://undefined/apify/apify-client-python/blob/master//src/apify_client/clients/resource_clients/key_value_store.py#L33)\_\_init\_\_
* ****\_\_init\_\_**(\*, base\_url, root\_client, http\_client, resource\_id, resource\_path, params): None
- Overrides [ResourceClient.\_\_init\_\_](https://docs.apify.com/api/client/python/api/client/python/reference/class/ResourceClient.md#__init__)
Initialize a new instance.
***
#### Parameters
* ##### keyword-onlybase\_url: str
Base URL of the API server.
* ##### keyword-onlyroot\_client: [ApifyClient](https://docs.apify.com/api/client/python/api/client/python/reference/class/ApifyClient.md)
The ApifyClient instance under which this resource client exists.
* ##### keyword-onlyhttp\_client: [HTTPClient](https://docs.apify.com/api/client/python/api/client/python/reference/class/HTTPClient.md)
The HTTPClient instance to be used in this client.
* ##### optionalkeyword-onlyresource\_id: str | None = <!-- -->None
ID of the manipulated resource, in case of a single-resource client.
* ##### keyword-onlyresource\_path: str
Path to the resource's endpoint on the API server.
* ##### optionalkeyword-onlyparams: dict | None = <!-- -->None
Parameters to include in all requests from this client.
#### Returns None
### [**](#create_keys_public_url)[**](https://undefined/apify/apify-client-python/blob/master//src/apify_client/clients/resource_clients/key_value_store.py#L299)create\_keys\_public\_url
* ****create\_keys\_public\_url**(\*, limit, exclusive\_start\_key, collection, prefix, expires\_in\_secs): str
- Generate a URL that can be used to access key-value store keys.
If the client has permission to access the key-value store's URL signing key, the URL will include a signature to verify its authenticity.
You can optionally control how long the signed URL should be valid using the `expires_in_secs` option. This value sets the expiration duration in seconds from the time the URL is generated. If not provided, the URL will not expire.
Any other options (like `limit` or `prefix`) will be included as query parameters in the URL.
***
#### Parameters
* ##### optionalkeyword-onlylimit: int | None = <!-- -->None
* ##### optionalkeyword-onlyexclusive\_start\_key: str | None = <!-- -->None
* ##### optionalkeyword-onlycollection: str | None = <!-- -->None
* ##### optionalkeyword-onlyprefix: str | None = <!-- -->None
* ##### optionalkeyword-onlyexpires\_in\_secs: int | None = <!-- -->None
#### Returns str
### [**](#delete)[**](https://undefined/apify/apify-client-python/blob/master//src/apify_client/clients/resource_clients/key_value_store.py#L66)delete
* ****delete**(): None
- Delete the key-value store.
<https://docs.apify.com/api/v2#/reference/key-value-stores/store-object/delete-store>
***
#### Returns None
### [**](#delete_record)[**](https://undefined/apify/apify-client-python/blob/master//src/apify_client/clients/resource_clients/key_value_store.py#L254)delete\_record
* ****delete\_record**(key): None
- Delete the specified record from the key-value store.
<https://docs.apify.com/api/v2#/reference/key-value-stores/record/delete-record>
***
#### Parameters
* ##### key: str
The key of the record which to delete.
#### Returns None
### [**](#get)[**](https://undefined/apify/apify-client-python/blob/master//src/apify_client/clients/resource_clients/key_value_store.py#L37)get
* ****get**(): dict | None
- Retrieve the key-value store.
<https://docs.apify.com/api/v2#/reference/key-value-stores/store-object/get-store>
***
#### Returns dict | None
### [**](#get_record)[**](https://undefined/apify/apify-client-python/blob/master//src/apify_client/clients/resource_clients/key_value_store.py#L110)get\_record
* ****get\_record**(key): dict | None
- Retrieve the given record from the key-value store.
<https://docs.apify.com/api/v2#/reference/key-value-stores/record/get-record>
***
#### Parameters
* ##### key: str
Key of the record to retrieve.
#### Returns dict | None
### [**](#get_record_as_bytes)[**](https://undefined/apify/apify-client-python/blob/master//src/apify_client/clients/resource_clients/key_value_store.py#L164)get\_record\_as\_bytes
* ****get\_record\_as\_bytes**(key): dict | None
- Retrieve the given record from the key-value store, without parsing it.
<https://docs.apify.com/api/v2#/reference/key-value-stores/record/get-record>
***
#### Parameters
* ##### key: str
Key of the record to retrieve.
#### Returns dict | None
### [**](#get_record_public_url)[**](https://undefined/apify/apify-client-python/blob/master//src/apify_client/clients/resource_clients/key_value_store.py#L269)get\_record\_public\_url
* ****get\_record\_public\_url**(key): str
- Generate a URL that can be used to access key-value store record.
If the client has permission to access the key-value store's URL signing key, the URL will include a signature to verify its authenticity.
***
#### Parameters
* ##### key: str
The key for which the URL should be generated.
#### Returns str
### [**](#list_keys)[**](https://undefined/apify/apify-client-python/blob/master//src/apify_client/clients/resource_clients/key_value_store.py#L73)list\_keys
* ****list\_keys**(\*, limit, exclusive\_start\_key, collection, prefix): dict
- List the keys in the key-value store.
<https://docs.apify.com/api/v2#/reference/key-value-stores/key-collection/get-list-of-keys>
***
#### Parameters
* ##### optionalkeyword-onlylimit: int | None = <!-- -->None
Number of keys to be returned. Maximum value is 1000.
* ##### optionalkeyword-onlyexclusive\_start\_key: str | None = <!-- -->None
All keys up to this one (including) are skipped from the result.
* ##### optionalkeyword-onlycollection: str | None = <!-- -->None
The name of the collection in store schema to list keys from.
* ##### optionalkeyword-onlyprefix: str | None = <!-- -->None
The prefix of the keys to be listed.
#### Returns dict
### [**](#record_exists)[**](https://undefined/apify/apify-client-python/blob/master//src/apify_client/clients/resource_clients/key_value_store.py#L139)record\_exists
* ****record\_exists**(key): bool
- Check if given record is present in the key-value store.
<https://docs.apify.com/api/v2/key-value-store-record-head>
***
#### Parameters
* ##### key: str
Key of the record to check.
#### Returns bool
### [**](#set_record)[**](https://undefined/apify/apify-client-python/blob/master//src/apify_client/clients/resource_clients/key_value_store.py#L227)set\_record
* ****set\_record**(key, value, content\_type): None
- Set a value to the given record in the key-value store.
<https://docs.apify.com/api/v2#/reference/key-value-stores/record/put-record>
***
#### Parameters
* ##### key: str
The key of the record to save the value to.
* ##### value: Any
The value to save into the record.
* ##### optionalcontent\_type: str | None = <!-- -->None
The content type of the saved value.
#### Returns None
### [**](#stream_record)[**](https://undefined/apify/apify-client-python/blob/master//src/apify_client/clients/resource_clients/key_value_store.py#L194)stream\_record
* ****stream\_record**(key): Iterator\[dict | None]
- Retrieve the given record from the key-value store, as a stream.
<https://docs.apify.com/api/v2#/reference/key-value-stores/record/get-record>
***
#### Parameters
* ##### key: str
Key of the record to retrieve.
#### Returns Iterator\[dict | None]
### [**](#update)[**](https://undefined/apify/apify-client-python/blob/master//src/apify_client/clients/resource_clients/key_value_store.py#L47)update
* ****update**(\*, name, general\_access): dict
- Update the key-value store with specified fields.
<https://docs.apify.com/api/v2#/reference/key-value-stores/store-object/update-store>
***
#### Parameters
* ##### optionalkeyword-onlyname: str | None = <!-- -->None
The new name for key-value store.
* ##### optionalkeyword-onlygeneral\_access: StorageGeneralAccess | None = <!-- -->None
Determines how others can access the key-value store.
#### Returns dict
## Properties<!-- -->[**](#Properties)
### [**](#http_client)[**](https://undefined/apify/apify-client-python/blob/master//src/apify_client/clients/base/base_client.py#L53)http\_client
**http\_client: [HTTPClient](https://docs.apify.com/api/client/python/api/client/python/reference/class/HTTPClient.md) | [HTTPClientAsync](https://docs.apify.com/api/client/python/api/client/python/reference/class/HTTPClientAsync.md)
Inherited from [BaseClient.http\_client](https://docs.apify.com/api/client/python/api/client/python/reference/class/BaseClient.md#http_client)
Overrides [\_BaseBaseClient.http\_client](https://docs.apify.com/api/client/python/api/client/python/reference/class/_BaseBaseClient.md#http_client)
### [**](#params)[**](https://undefined/apify/apify-client-python/blob/master//src/apify_client/clients/base/base_client.py#L17)params
**params: dict
Inherited from [\_BaseBaseClient.params](https://docs.apify.com/api/client/python/api/client/python/reference/class/_BaseBaseClient.md#params)
### [**](#resource_id)[**](https://undefined/apify/apify-client-python/blob/master//src/apify_client/clients/base/base_client.py#L15)resource\_id
**resource\_id: str | None
Inherited from [\_BaseBaseClient.resource\_id](https://docs.apify.com/api/client/python/api/client/python/reference/class/_BaseBaseClient.md#resource_id)
### [**](#root_client)[**](https://undefined/apify/apify-client-python/blob/master//src/apify_client/clients/base/base_client.py#L54)root\_client
**root\_client: [ApifyClient](https://docs.apify.com/api/client/python/api/client/python/reference/class/ApifyClient.md) | [ApifyClientAsync](https://docs.apify.com/api/client/python/api/client/python/reference/class/ApifyClientAsync.md)
Inherited from [BaseClient.root\_client](https://docs.apify.com/api/client/python/api/client/python/reference/class/BaseClient.md#root_client)
Overrides [\_BaseBaseClient.root\_client](https://docs.apify.com/api/client/python/api/client/python/reference/class/_BaseBaseClient.md#root_client)
### [**](#url)[**](https://undefined/apify/apify-client-python/blob/master//src/apify_client/clients/base/base_client.py#L16)url
**url: str
Inherited from [\_BaseBaseClient.url](https://docs.apify.com/api/client/python/api/client/python/reference/class/_BaseBaseClient.md#url)
---
# KeyValueStoreClientAsync<!-- -->
Async sub-client for manipulating a single key-value store.
### Hierarchy
* [ResourceClientAsync](https://docs.apify.com/api/client/python/api/client/python/reference/class/ResourceClientAsync.md)
* *KeyValueStoreClientAsync*
## Index[**](#Index)
### Methods
* [**\_\_init\_\_](https://docs.apify.com/api/client/python/api/client/python/reference/class/KeyValueStoreClientAsync.md#__init__)
* [**create\_keys\_public\_url](https://docs.apify.com/api/client/python/api/client/python/reference/class/KeyValueStoreClientAsync.md#create_keys_public_url)
* [**delete](https://docs.apify.com/api/client/python/api/client/python/reference/class/KeyValueStoreClientAsync.md#delete)
* [**delete\_record](https://docs.apify.com/api/client/python/api/client/python/reference/class/KeyValueStoreClientAsync.md#delete_record)
* [**get](https://docs.apify.com/api/client/python/api/client/python/reference/class/KeyValueStoreClientAsync.md#get)
* [**get\_record](https://docs.apify.com/api/client/python/api/client/python/reference/class/KeyValueStoreClientAsync.md#get_record)
* [**get\_record\_as\_bytes](https://docs.apify.com/api/client/python/api/client/python/reference/class/KeyValueStoreClientAsync.md#get_record_as_bytes)
* [**get\_record\_public\_url](https://docs.apify.com/api/client/python/api/client/python/reference/class/KeyValueStoreClientAsync.md#get_record_public_url)
* [**list\_keys](https://docs.apify.com/api/client/python/api/client/python/reference/class/KeyValueStoreClientAsync.md#list_keys)
* [**record\_exists](https://docs.apify.com/api/client/python/api/client/python/reference/class/KeyValueStoreClientAsync.md#record_exists)
* [**set\_record](https://docs.apify.com/api/client/python/api/client/python/reference/class/KeyValueStoreClientAsync.md#set_record)
* [**stream\_record](https://docs.apify.com/api/client/python/api/client/python/reference/class/KeyValueStoreClientAsync.md#stream_record)
* [**update](https://docs.apify.com/api/client/python/api/client/python/reference/class/KeyValueStoreClientAsync.md#update)
### Properties
* [**http\_client](https://docs.apify.com/api/client/python/api/client/python/reference/class/KeyValueStoreClientAsync.md#http_client)
* [**params](https://docs.apify.com/api/client/python/api/client/python/reference/class/KeyValueStoreClientAsync.md#params)
* [**resource\_id](https://docs.apify.com/api/client/python/api/client/python/reference/class/KeyValueStoreClientAsync.md#resource_id)
* [**root\_client](https://docs.apify.com/api/client/python/api/client/python/reference/class/KeyValueStoreClientAsync.md#root_client)
* [**url](https://docs.apify.com/api/client/python/api/client/python/reference/class/KeyValueStoreClientAsync.md#url)
## Methods<!-- -->[**](#Methods)
### [**](#__init__)[**](https://undefined/apify/apify-client-python/blob/master//src/apify_client/clients/resource_clients/key_value_store.py#L351)\_\_init\_\_
* ****\_\_init\_\_**(\*, base\_url, root\_client, http\_client, resource\_id, resource\_path, params): None
- Overrides [ResourceClientAsync.\_\_init\_\_](https://docs.apify.com/api/client/python/api/client/python/reference/class/ResourceClientAsync.md#__init__)
Initialize a new instance.
***
#### Parameters
* ##### keyword-onlybase\_url: str
Base URL of the API server.
* ##### keyword-onlyroot\_client: [ApifyClientAsync](https://docs.apify.com/api/client/python/api/client/python/reference/class/ApifyClientAsync.md)
The ApifyClientAsync instance under which this resource client exists.
* ##### keyword-onlyhttp\_client: [HTTPClientAsync](https://docs.apify.com/api/client/python/api/client/python/reference/class/HTTPClientAsync.md)
The HTTPClientAsync instance to be used in this client.
* ##### optionalkeyword-onlyresource\_id: str | None = <!-- -->None
ID of the manipulated resource, in case of a single-resource client.
* ##### keyword-onlyresource\_path: str
Path to the resource's endpoint on the API server.
* ##### optionalkeyword-onlyparams: dict | None = <!-- -->None
Parameters to include in all requests from this client.
#### Returns None
### [**](#create_keys_public_url)[**](https://undefined/apify/apify-client-python/blob/master//src/apify_client/clients/resource_clients/key_value_store.py#L617)create\_keys\_public\_url
* **async **create\_keys\_public\_url**(\*, limit, exclusive\_start\_key, collection, prefix, expires\_in\_secs): str
- Generate a URL that can be used to access key-value store keys.
If the client has permission to access the key-value store's URL signing key, the URL will include a signature to verify its authenticity.
You can optionally control how long the signed URL should be valid using the `expires_in_secs` option. This value sets the expiration duration in seconds from the time the URL is generated. If not provided, the URL will not expire.
Any other options (like `limit` or `prefix`) will be included as query parameters in the URL.
***
#### Parameters
* ##### optionalkeyword-onlylimit: int | None = <!-- -->None
* ##### optionalkeyword-onlyexclusive\_start\_key: str | None = <!-- -->None
* ##### optionalkeyword-onlycollection: str | None = <!-- -->None
* ##### optionalkeyword-onlyprefix: str | None = <!-- -->None
* ##### optionalkeyword-onlyexpires\_in\_secs: int | None = <!-- -->None
#### Returns str
### [**](#delete)[**](https://undefined/apify/apify-client-python/blob/master//src/apify_client/clients/resource_clients/key_value_store.py#L384)delete
* **async **delete**(): None
- Delete the key-value store.
<https://docs.apify.com/api/v2#/reference/key-value-stores/store-object/delete-store>
***
#### Returns None
### [**](#delete_record)[**](https://undefined/apify/apify-client-python/blob/master//src/apify_client/clients/resource_clients/key_value_store.py#L572)delete\_record
* **async **delete\_record**(key): None
- Delete the specified record from the key-value store.
<https://docs.apify.com/api/v2#/reference/key-value-stores/record/delete-record>
***
#### Parameters
* ##### key: str
The key of the record which to delete.
#### Returns None
### [**](#get)[**](https://undefined/apify/apify-client-python/blob/master//src/apify_client/clients/resource_clients/key_value_store.py#L355)get
* **async **get**(): dict | None
- Retrieve the key-value store.
<https://docs.apify.com/api/v2#/reference/key-value-stores/store-object/get-store>
***
#### Returns dict | None
### [**](#get_record)[**](https://undefined/apify/apify-client-python/blob/master//src/apify_client/clients/resource_clients/key_value_store.py#L428)get\_record
* **async **get\_record**(key): dict | None
- Retrieve the given record from the key-value store.
<https://docs.apify.com/api/v2#/reference/key-value-stores/record/get-record>
***
#### Parameters
* ##### key: str
Key of the record to retrieve.
#### Returns dict | None
### [**](#get_record_as_bytes)[**](https://undefined/apify/apify-client-python/blob/master//src/apify_client/clients/resource_clients/key_value_store.py#L482)get\_record\_as\_bytes
* **async **get\_record\_as\_bytes**(key): dict | None
- Retrieve the given record from the key-value store, without parsing it.
<https://docs.apify.com/api/v2#/reference/key-value-stores/record/get-record>
***
#### Parameters
* ##### key: str
Key of the record to retrieve.
#### Returns dict | None
### [**](#get_record_public_url)[**](https://undefined/apify/apify-client-python/blob/master//src/apify_client/clients/resource_clients/key_value_store.py#L587)get\_record\_public\_url
* **async **get\_record\_public\_url**(key): str
- Generate a URL that can be used to access key-value store record.
If the client has permission to access the key-value store's URL signing key, the URL will include a signature to verify its authenticity.
***
#### Parameters
* ##### key: str
The key for which the URL should be generated.
#### Returns str
### [**](#list_keys)[**](https://undefined/apify/apify-client-python/blob/master//src/apify_client/clients/resource_clients/key_value_store.py#L391)list\_keys
* **async **list\_keys**(\*, limit, exclusive\_start\_key, collection, prefix): dict
- List the keys in the key-value store.
<https://docs.apify.com/api/v2#/reference/key-value-stores/key-collection/get-list-of-keys>
***
#### Parameters
* ##### optionalkeyword-onlylimit: int | None = <!-- -->None
Number of keys to be returned. Maximum value is 1000.
* ##### optionalkeyword-onlyexclusive\_start\_key: str | None = <!-- -->None
All keys up to this one (including) are skipped from the result.
* ##### optionalkeyword-onlycollection: str | None = <!-- -->None
The name of the collection in store schema to list keys from.
* ##### optionalkeyword-onlyprefix: str | None = <!-- -->None
The prefix of the keys to be listed.
#### Returns dict
### [**](#record_exists)[**](https://undefined/apify/apify-client-python/blob/master//src/apify_client/clients/resource_clients/key_value_store.py#L457)record\_exists
* **async **record\_exists**(key): bool
- Check if given record is present in the key-value store.
<https://docs.apify.com/api/v2/key-value-store-record-head>
***
#### Parameters
* ##### key: str
Key of the record to check.
#### Returns bool
### [**](#set_record)[**](https://undefined/apify/apify-client-python/blob/master//src/apify_client/clients/resource_clients/key_value_store.py#L545)set\_record
* **async **set\_record**(key, value, content\_type): None
- Set a value to the given record in the key-value store.
<https://docs.apify.com/api/v2#/reference/key-value-stores/record/put-record>
***
#### Parameters
* ##### key: str
The key of the record to save the value to.
* ##### value: Any
The value to save into the record.
* ##### optionalcontent\_type: str | None = <!-- -->None
The content type of the saved value.
#### Returns None
### [**](#stream_record)[**](https://undefined/apify/apify-client-python/blob/master//src/apify_client/clients/resource_clients/key_value_store.py#L512)stream\_record
* **async **stream\_record**(key): AsyncIterator\[dict | None]
- Retrieve the given record from the key-value store, as a stream.
<https://docs.apify.com/api/v2#/reference/key-value-stores/record/get-record>
***
#### Parameters
* ##### key: str
Key of the record to retrieve.
#### Returns AsyncIterator\[dict | None]
### [**](#update)[**](https://undefined/apify/apify-client-python/blob/master//src/apify_client/clients/resource_clients/key_value_store.py#L365)update
* **async **update**(\*, name, general\_access): dict
- Update the key-value store with specified fields.
<https://docs.apify.com/api/v2#/reference/key-value-stores/store-object/update-store>
***
#### Parameters
* ##### optionalkeyword-onlyname: str | None = <!-- -->None
The new name for key-value store.
* ##### optionalkeyword-onlygeneral\_access: StorageGeneralAccess | None = <!-- -->None
Determines how others can access the key-value store.
#### Returns dict
## Properties<!-- -->[**](#Properties)
### [**](#http_client)[**](https://undefined/apify/apify-client-python/blob/master//src/apify_client/clients/base/base_client.py#L94)http\_client
**http\_client: [HTTPClient](https://docs.apify.com/api/client/python/api/client/python/reference/class/HTTPClient.md) | [HTTPClientAsync](https://docs.apify.com/api/client/python/api/client/python/reference/class/HTTPClientAsync.md)
Inherited from [BaseClientAsync.http\_client](https://docs.apify.com/api/client/python/api/client/python/reference/class/BaseClientAsync.md#http_client)
Overrides [\_BaseBaseClient.http\_client](https://docs.apify.com/api/client/python/api/client/python/reference/class/_BaseBaseClient.md#http_client)
### [**](#params)[**](https://undefined/apify/apify-client-python/blob/master//src/apify_client/clients/base/base_client.py#L17)params
**params: dict
Inherited from [\_BaseBaseClient.params](https://docs.apify.com/api/client/python/api/client/python/reference/class/_BaseBaseClient.md#params)
### [**](#resource_id)[**](https://undefined/apify/apify-client-python/blob/master//src/apify_client/clients/base/base_client.py#L15)resource\_id
**resource\_id: str | None
Inherited from [\_BaseBaseClient.resource\_id](https://docs.apify.com/api/client/python/api/client/python/reference/class/_BaseBaseClient.md#resource_id)
### [**](#root_client)[**](https://undefined/apify/apify-client-python/blob/master//src/apify_client/clients/base/base_client.py#L95)root\_client
**root\_client: [ApifyClient](https://docs.apify.com/api/client/python/api/client/python/reference/class/ApifyClient.md) | [ApifyClientAsync](https://docs.apify.com/api/client/python/api/client/python/reference/class/ApifyClientAsync.md)
Inherited from [BaseClientAsync.root\_client](https://docs.apify.com/api/client/python/api/client/python/reference/class/BaseClientAsync.md#root_client)
Overrides [\_BaseBaseClient.root\_client](https://docs.apify.com/api/client/python/api/client/python/reference/class/_BaseBaseClient.md#root_client)
### [**](#url)[**](https://undefined/apify/apify-client-python/blob/master//src/apify_client/clients/base/base_client.py#L16)url
**url: str
Inherited from [\_BaseBaseClient.url](https://docs.apify.com/api/client/python/api/client/python/reference/class/_BaseBaseClient.md#url)
---
# KeyValueStoreCollectionClient<!-- -->
Sub-client for manipulating key-value stores.
### Hierarchy
* [ResourceCollectionClient](https://docs.apify.com/api/client/python/api/client/python/reference/class/ResourceCollectionClient.md)
* *KeyValueStoreCollectionClient*
## Index[**](#Index)
### Methods
* [**\_\_init\_\_](https://docs.apify.com/api/client/python/api/client/python/reference/class/KeyValueStoreCollectionClient.md#__init__)
* [**get\_or\_create](https://docs.apify.com/api/client/python/api/client/python/reference/class/KeyValueStoreCollectionClient.md#get_or_create)
* [**list](https://docs.apify.com/api/client/python/api/client/python/reference/class/KeyValueStoreCollectionClient.md#list)
### Properties
* [**http\_client](https://docs.apify.com/api/client/python/api/client/python/reference/class/KeyValueStoreCollectionClient.md#http_client)
* [**params](https://docs.apify.com/api/client/python/api/client/python/reference/class/KeyValueStoreCollectionClient.md#params)
* [**resource\_id](https://docs.apify.com/api/client/python/api/client/python/reference/class/KeyValueStoreCollectionClient.md#resource_id)
* [**root\_client](https://docs.apify.com/api/client/python/api/client/python/reference/class/KeyValueStoreCollectionClient.md#root_client)
* [**url](https://docs.apify.com/api/client/python/api/client/python/reference/class/KeyValueStoreCollectionClient.md#url)
## Methods<!-- -->[**](#Methods)
### [**](#__init__)[**](https://undefined/apify/apify-client-python/blob/master//src/apify_client/clients/resource_clients/key_value_store_collection.py#L15)\_\_init\_\_
* ****\_\_init\_\_**(\*, base\_url, root\_client, http\_client, resource\_id, resource\_path, params): None
- Overrides [ResourceCollectionClient.\_\_init\_\_](https://docs.apify.com/api/client/python/api/client/python/reference/class/ResourceCollectionClient.md#__init__)
Initialize a new instance.
***
#### Parameters
* ##### keyword-onlybase\_url: str
Base URL of the API server.
* ##### keyword-onlyroot\_client: [ApifyClient](https://docs.apify.com/api/client/python/api/client/python/reference/class/ApifyClient.md)
The ApifyClient instance under which this resource client exists.
* ##### keyword-onlyhttp\_client: [HTTPClient](https://docs.apify.com/api/client/python/api/client/python/reference/class/HTTPClient.md)
The HTTPClient instance to be used in this client.
* ##### optionalkeyword-onlyresource\_id: str | None = <!-- -->None
ID of the manipulated resource, in case of a single-resource client.
* ##### keyword-onlyresource\_path: str
Path to the resource's endpoint on the API server.
* ##### optionalkeyword-onlyparams: dict | None = <!-- -->None
Parameters to include in all requests from this client.
#### Returns None
### [**](#get_or_create)[**](https://undefined/apify/apify-client-python/blob/master//src/apify_client/clients/resource_clients/key_value_store_collection.py#L42)get\_or\_create
* ****get\_or\_create**(\*, name, schema): dict
- Retrieve a named key-value store, or create a new one when it doesn't exist.
<https://docs.apify.com/api/v2#/reference/key-value-stores/store-collection/create-key-value-store>
***
#### Parameters
* ##### optionalkeyword-onlyname: str | None = <!-- -->None
The name of the key-value store to retrieve or create.
* ##### optionalkeyword-onlyschema: dict | None = <!-- -->None
The schema of the key-value store.
#### Returns dict
### [**](#list)[**](https://undefined/apify/apify-client-python/blob/master//src/apify_client/clients/resource_clients/key_value_store_collection.py#L19)list
* ****list**(\*, unnamed, limit, offset, desc): [ListPage](https://docs.apify.com/api/client/python/api/client/python/reference/class/ListPage.md)\[dict]
- List the available key-value stores.
<https://docs.apify.com/api/v2#/reference/key-value-stores/store-collection/get-list-of-key-value-stores>
***
#### Parameters
* ##### optionalkeyword-onlyunnamed: bool | None = <!-- -->None
Whether to include unnamed key-value stores in the list.
* ##### optionalkeyword-onlylimit: int | None = <!-- -->None
How many key-value stores to retrieve.
* ##### optionalkeyword-onlyoffset: int | None = <!-- -->None
What key-value store to include as first when retrieving the list.
* ##### optionalkeyword-onlydesc: bool | None = <!-- -->None
Whether to sort the key-value stores in descending order based on their modification date.
#### Returns [ListPage](https://docs.apify.com/api/client/python/api/client/python/reference/class/ListPage.md)\[dict]
## Properties<!-- -->[**](#Properties)
### [**](#http_client)[**](https://undefined/apify/apify-client-python/blob/master//src/apify_client/clients/base/base_client.py#L53)http\_client
**http\_client: [HTTPClient](https://docs.apify.com/api/client/python/api/client/python/reference/class/HTTPClient.md) | [HTTPClientAsync](https://docs.apify.com/api/client/python/api/client/python/reference/class/HTTPClientAsync.md)
Inherited from [BaseClient.http\_client](https://docs.apify.com/api/client/python/api/client/python/reference/class/BaseClient.md#http_client)
Overrides [\_BaseBaseClient.http\_client](https://docs.apify.com/api/client/python/api/client/python/reference/class/_BaseBaseClient.md#http_client)
### [**](#params)[**](https://undefined/apify/apify-client-python/blob/master//src/apify_client/clients/base/base_client.py#L17)params
**params: dict
Inherited from [\_BaseBaseClient.params](https://docs.apify.com/api/client/python/api/client/python/reference/class/_BaseBaseClient.md#params)
### [**](#resource_id)[**](https://undefined/apify/apify-client-python/blob/master//src/apify_client/clients/base/base_client.py#L15)resource\_id
**resource\_id: str | None
Inherited from [\_BaseBaseClient.resource\_id](https://docs.apify.com/api/client/python/api/client/python/reference/class/_BaseBaseClient.md#resource_id)
### [**](#root_client)[**](https://undefined/apify/apify-client-python/blob/master//src/apify_client/clients/base/base_client.py#L54)root\_client
**root\_client: [ApifyClient](https://docs.apify.com/api/client/python/api/client/python/reference/class/ApifyClient.md) | [ApifyClientAsync](https://docs.apify.com/api/client/python/api/client/python/reference/class/ApifyClientAsync.md)
Inherited from [BaseClient.root\_client](https://docs.apify.com/api/client/python/api/client/python/reference/class/BaseClient.md#root_client)
Overrides [\_BaseBaseClient.root\_client](https://docs.apify.com/api/client/python/api/client/python/reference/class/_BaseBaseClient.md#root_client)
### [**](#url)[**](https://undefined/apify/apify-client-python/blob/master//src/apify_client/clients/base/base_client.py#L16)url
**url: str
Inherited from [\_BaseBaseClient.url](https://docs.apify.com/api/client/python/api/client/python/reference/class/_BaseBaseClient.md#url)
---
# KeyValueStoreCollectionClientAsync<!-- -->
Async sub-client for manipulating key-value stores.
### Hierarchy
* [ResourceCollectionClientAsync](https://docs.apify.com/api/client/python/api/client/python/reference/class/ResourceCollectionClientAsync.md)
* *KeyValueStoreCollectionClientAsync*
## Index[**](#Index)
### Methods
* [**\_\_init\_\_](https://docs.apify.com/api/client/python/api/client/python/reference/class/KeyValueStoreCollectionClientAsync.md#__init__)
* [**get\_or\_create](https://docs.apify.com/api/client/python/api/client/python/reference/class/KeyValueStoreCollectionClientAsync.md#get_or_create)
* [**list](https://docs.apify.com/api/client/python/api/client/python/reference/class/KeyValueStoreCollectionClientAsync.md#list)
### Properties
* [**http\_client](https://docs.apify.com/api/client/python/api/client/python/reference/class/KeyValueStoreCollectionClientAsync.md#http_client)
* [**params](https://docs.apify.com/api/client/python/api/client/python/reference/class/KeyValueStoreCollectionClientAsync.md#params)
* [**resource\_id](https://docs.apify.com/api/client/python/api/client/python/reference/class/KeyValueStoreCollectionClientAsync.md#resource_id)
* [**root\_client](https://docs.apify.com/api/client/python/api/client/python/reference/class/KeyValueStoreCollectionClientAsync.md#root_client)
* [**url](https://docs.apify.com/api/client/python/api/client/python/reference/class/KeyValueStoreCollectionClientAsync.md#url)
## Methods<!-- -->[**](#Methods)
### [**](#__init__)[**](https://undefined/apify/apify-client-python/blob/master//src/apify_client/clients/resource_clients/key_value_store_collection.py#L65)\_\_init\_\_
* ****\_\_init\_\_**(\*, base\_url, root\_client, http\_client, resource\_id, resource\_path, params): None
- Overrides [ResourceCollectionClientAsync.\_\_init\_\_](https://docs.apify.com/api/client/python/api/client/python/reference/class/ResourceCollectionClientAsync.md#__init__)
Initialize a new instance.
***
#### Parameters
* ##### keyword-onlybase\_url: str
Base URL of the API server.
* ##### keyword-onlyroot\_client: [ApifyClientAsync](https://docs.apify.com/api/client/python/api/client/python/reference/class/ApifyClientAsync.md)
The ApifyClientAsync instance under which this resource client exists.
* ##### keyword-onlyhttp\_client: [HTTPClientAsync](https://docs.apify.com/api/client/python/api/client/python/reference/class/HTTPClientAsync.md)
The HTTPClientAsync instance to be used in this client.
* ##### optionalkeyword-onlyresource\_id: str | None = <!-- -->None
ID of the manipulated resource, in case of a single-resource client.
* ##### keyword-onlyresource\_path: str
Path to the resource's endpoint on the API server.
* ##### optionalkeyword-onlyparams: dict | None = <!-- -->None
Parameters to include in all requests from this client.
#### Returns None
### [**](#get_or_create)[**](https://undefined/apify/apify-client-python/blob/master//src/apify_client/clients/resource_clients/key_value_store_collection.py#L92)get\_or\_create
* **async **get\_or\_create**(\*, name, schema): dict
- Retrieve a named key-value store, or create a new one when it doesn't exist.
<https://docs.apify.com/api/v2#/reference/key-value-stores/store-collection/create-key-value-store>
***
#### Parameters
* ##### optionalkeyword-onlyname: str | None = <!-- -->None
The name of the key-value store to retrieve or create.
* ##### optionalkeyword-onlyschema: dict | None = <!-- -->None
The schema of the key-value store.
#### Returns dict
### [**](#list)[**](https://undefined/apify/apify-client-python/blob/master//src/apify_client/clients/resource_clients/key_value_store_collection.py#L69)list
* **async **list**(\*, unnamed, limit, offset, desc): [ListPage](https://docs.apify.com/api/client/python/api/client/python/reference/class/ListPage.md)\[dict]
- List the available key-value stores.
<https://docs.apify.com/api/v2#/reference/key-value-stores/store-collection/get-list-of-key-value-stores>
***
#### Parameters
* ##### optionalkeyword-onlyunnamed: bool | None = <!-- -->None
Whether to include unnamed key-value stores in the list.
* ##### optionalkeyword-onlylimit: int | None = <!-- -->None
How many key-value stores to retrieve.
* ##### optionalkeyword-onlyoffset: int | None = <!-- -->None
What key-value store to include as first when retrieving the list.
* ##### optionalkeyword-onlydesc: bool | None = <!-- -->None
Whether to sort the key-value stores in descending order based on their modification date.
#### Returns [ListPage](https://docs.apify.com/api/client/python/api/client/python/reference/class/ListPage.md)\[dict]
## Properties<!-- -->[**](#Properties)
### [**](#http_client)[**](https://undefined/apify/apify-client-python/blob/master//src/apify_client/clients/base/base_client.py#L94)http\_client
**http\_client: [HTTPClient](https://docs.apify.com/api/client/python/api/client/python/reference/class/HTTPClient.md) | [HTTPClientAsync](https://docs.apify.com/api/client/python/api/client/python/reference/class/HTTPClientAsync.md)
Inherited from [BaseClientAsync.http\_client](https://docs.apify.com/api/client/python/api/client/python/reference/class/BaseClientAsync.md#http_client)
Overrides [\_BaseBaseClient.http\_client](https://docs.apify.com/api/client/python/api/client/python/reference/class/_BaseBaseClient.md#http_client)
### [**](#params)[**](https://undefined/apify/apify-client-python/blob/master//src/apify_client/clients/base/base_client.py#L17)params
**params: dict
Inherited from [\_BaseBaseClient.params](https://docs.apify.com/api/client/python/api/client/python/reference/class/_BaseBaseClient.md#params)
### [**](#resource_id)[**](https://undefined/apify/apify-client-python/blob/master//src/apify_client/clients/base/base_client.py#L15)resource\_id
**resource\_id: str | None
Inherited from [\_BaseBaseClient.resource\_id](https://docs.apify.com/api/client/python/api/client/python/reference/class/_BaseBaseClient.md#resource_id)
### [**](#root_client)[**](https://undefined/apify/apify-client-python/blob/master//src/apify_client/clients/base/base_client.py#L95)root\_client
**root\_client: [ApifyClient](https://docs.apify.com/api/client/python/api/client/python/reference/class/ApifyClient.md) | [ApifyClientAsync](https://docs.apify.com/api/client/python/api/client/python/reference/class/ApifyClientAsync.md)
Inherited from [BaseClientAsync.root\_client](https://docs.apify.com/api/client/python/api/client/python/reference/class/BaseClientAsync.md#root_client)
Overrides [\_BaseBaseClient.root\_client](https://docs.apify.com/api/client/python/api/client/python/reference/class/_BaseBaseClient.md#root_client)
### [**](#url)[**](https://undefined/apify/apify-client-python/blob/master//src/apify_client/clients/base/base_client.py#L16)url
**url: str
Inherited from [\_BaseBaseClient.url](https://docs.apify.com/api/client/python/api/client/python/reference/class/_BaseBaseClient.md#url)
---
# ListPage<!-- -->
A single page of items returned from a list() method.
## Index[**](#Index)
### Methods
* [**\_\_init\_\_](https://docs.apify.com/api/client/python/api/client/python/reference/class/ListPage.md#__init__)
### Properties
* [**count](https://docs.apify.com/api/client/python/api/client/python/reference/class/ListPage.md#count)
* [**desc](https://docs.apify.com/api/client/python/api/client/python/reference/class/ListPage.md#desc)
* [**items](https://docs.apify.com/api/client/python/api/client/python/reference/class/ListPage.md#items)
* [**limit](https://docs.apify.com/api/client/python/api/client/python/reference/class/ListPage.md#limit)
* [**offset](https://docs.apify.com/api/client/python/api/client/python/reference/class/ListPage.md#offset)
* [**total](https://docs.apify.com/api/client/python/api/client/python/reference/class/ListPage.md#total)
## Methods<!-- -->[**](#Methods)
### [**](#__init__)[**](https://undefined/apify/apify-client-python/blob/master//src/apify_client/_types.py#L35)\_\_init\_\_
* ****\_\_init\_\_**(data): None
- Initialize a ListPage instance from the API response data.
***
#### Parameters
* ##### data: dict
#### Returns None
## Properties<!-- -->[**](#Properties)
### [**](#count)[**](https://undefined/apify/apify-client-python/blob/master//src/apify_client/_types.py#L20)count
**count: int
Count of the returned objects on this page.
### [**](#desc)[**](https://undefined/apify/apify-client-python/blob/master//src/apify_client/_types.py#L32)desc
**desc: bool
Whether the listing is descending or not.
### [**](#items)[**](https://undefined/apify/apify-client-python/blob/master//src/apify_client/_types.py#L17)items
**items: [list](https://docs.apify.com/api/client/python/api/client/python/reference/class/RequestQueueCollectionClient.md#list)\[[T](https://docs.apify.com/api/client/python/api/client/python/reference.md#T)]
List of returned objects on this page.
### [**](#limit)[**](https://undefined/apify/apify-client-python/blob/master//src/apify_client/_types.py#L26)limit
**limit: int
The offset of the first object specified in the API call
### [**](#offset)[**](https://undefined/apify/apify-client-python/blob/master//src/apify_client/_types.py#L23)offset
**offset: int
The limit on the number of returned objects offset specified in the API call.
### [**](#total)[**](https://undefined/apify/apify-client-python/blob/master//src/apify_client/_types.py#L29)total
**total: int
Total number of objects matching the API call criteria.
---
# LogClient<!-- -->
Sub-client for manipulating logs.
### Hierarchy
* [ResourceClient](https://docs.apify.com/api/client/python/api/client/python/reference/class/ResourceClient.md)
* *LogClient*
## Index[**](#Index)
### Methods
* [**\_\_init\_\_](https://docs.apify.com/api/client/python/api/client/python/reference/class/LogClient.md#__init__)
* [**get](https://docs.apify.com/api/client/python/api/client/python/reference/class/LogClient.md#get)
* [**get\_as\_bytes](https://docs.apify.com/api/client/python/api/client/python/reference/class/LogClient.md#get_as_bytes)
* [**stream](https://docs.apify.com/api/client/python/api/client/python/reference/class/LogClient.md#stream)
### Properties
* [**http\_client](https://docs.apify.com/api/client/python/api/client/python/reference/class/LogClient.md#http_client)
* [**params](https://docs.apify.com/api/client/python/api/client/python/reference/class/LogClient.md#params)
* [**resource\_id](https://docs.apify.com/api/client/python/api/client/python/reference/class/LogClient.md#resource_id)
* [**root\_client](https://docs.apify.com/api/client/python/api/client/python/reference/class/LogClient.md#root_client)
* [**url](https://docs.apify.com/api/client/python/api/client/python/reference/class/LogClient.md#url)
## Methods<!-- -->[**](#Methods)
### [**](#__init__)[**](https://undefined/apify/apify-client-python/blob/master//src/apify_client/clients/resource_clients/log.py#L31)\_\_init\_\_
* ****\_\_init\_\_**(\*, base\_url, root\_client, http\_client, resource\_id, resource\_path, params): None
- Overrides [ResourceClient.\_\_init\_\_](https://docs.apify.com/api/client/python/api/client/python/reference/class/ResourceClient.md#__init__)
Initialize a new instance.
***
#### Parameters
* ##### keyword-onlybase\_url: str
Base URL of the API server.
* ##### keyword-onlyroot\_client: [ApifyClient](https://docs.apify.com/api/client/python/api/client/python/reference/class/ApifyClient.md)
The ApifyClient instance under which this resource client exists.
* ##### keyword-onlyhttp\_client: [HTTPClient](https://docs.apify.com/api/client/python/api/client/python/reference/class/HTTPClient.md)
The HTTPClient instance to be used in this client.
* ##### optionalkeyword-onlyresource\_id: str | None = <!-- -->None
ID of the manipulated resource, in case of a single-resource client.
* ##### keyword-onlyresource\_path: str
Path to the resource's endpoint on the API server.
* ##### optionalkeyword-onlyparams: dict | None = <!-- -->None
Parameters to include in all requests from this client.
#### Returns None
### [**](#get)[**](https://undefined/apify/apify-client-python/blob/master//src/apify_client/clients/resource_clients/log.py#L35)get
* ****get**(\*, raw): str | None
- Retrieve the log as text.
<https://docs.apify.com/api/v2#/reference/logs/log/get-log>
***
#### Parameters
* ##### optionalkeyword-onlyraw: bool = <!-- -->False
If true, the log will include formating. For example, coloring character sequences.
#### Returns str | None
### [**](#get_as_bytes)[**](https://undefined/apify/apify-client-python/blob/master//src/apify_client/clients/resource_clients/log.py#L60)get\_as\_bytes
* ****get\_as\_bytes**(\*, raw): bytes | None
- Retrieve the log as raw bytes.
<https://docs.apify.com/api/v2#/reference/logs/log/get-log>
***
#### Parameters
* ##### optionalkeyword-onlyraw: bool = <!-- -->False
If true, the log will include formating. For example, coloring character sequences.
#### Returns bytes | None
### [**](#stream)[**](https://undefined/apify/apify-client-python/blob/master//src/apify_client/clients/resource_clients/log.py#L86)stream
* ****stream**(\*, raw): Iterator\[impit.Response | None]
- Retrieve the log as a stream.
<https://docs.apify.com/api/v2#/reference/logs/log/get-log>
***
#### Parameters
* ##### optionalkeyword-onlyraw: bool = <!-- -->False
If true, the log will include formating. For example, coloring character sequences.
#### Returns Iterator\[impit.Response | None]
## Properties<!-- -->[**](#Properties)
### [**](#http_client)[**](https://undefined/apify/apify-client-python/blob/master//src/apify_client/clients/base/base_client.py#L53)http\_client
**http\_client: [HTTPClient](https://docs.apify.com/api/client/python/api/client/python/reference/class/HTTPClient.md) | [HTTPClientAsync](https://docs.apify.com/api/client/python/api/client/python/reference/class/HTTPClientAsync.md)
Inherited from [BaseClient.http\_client](https://docs.apify.com/api/client/python/api/client/python/reference/class/BaseClient.md#http_client)
Overrides [\_BaseBaseClient.http\_client](https://docs.apify.com/api/client/python/api/client/python/reference/class/_BaseBaseClient.md#http_client)
### [**](#params)[**](https://undefined/apify/apify-client-python/blob/master//src/apify_client/clients/base/base_client.py#L17)params
**params: dict
Inherited from [\_BaseBaseClient.params](https://docs.apify.com/api/client/python/api/client/python/reference/class/_BaseBaseClient.md#params)
### [**](#resource_id)[**](https://undefined/apify/apify-client-python/blob/master//src/apify_client/clients/base/base_client.py#L15)resource\_id
**resource\_id: str | None
Inherited from [\_BaseBaseClient.resource\_id](https://docs.apify.com/api/client/python/api/client/python/reference/class/_BaseBaseClient.md#resource_id)
### [**](#root_client)[**](https://undefined/apify/apify-client-python/blob/master//src/apify_client/clients/base/base_client.py#L54)root\_client
**root\_client: [ApifyClient](https://docs.apify.com/api/client/python/api/client/python/reference/class/ApifyClient.md) | [ApifyClientAsync](https://docs.apify.com/api/client/python/api/client/python/reference/class/ApifyClientAsync.md)
Inherited from [BaseClient.root\_client](https://docs.apify.com/api/client/python/api/client/python/reference/class/BaseClient.md#root_client)
Overrides [\_BaseBaseClient.root\_client](https://docs.apify.com/api/client/python/api/client/python/reference/class/_BaseBaseClient.md#root_client)
### [**](#url)[**](https://undefined/apify/apify-client-python/blob/master//src/apify_client/clients/base/base_client.py#L16)url
**url: str
Inherited from [\_BaseBaseClient.url](https://docs.apify.com/api/client/python/api/client/python/reference/class/_BaseBaseClient.md#url)
---
# LogClientAsync<!-- -->
Async sub-client for manipulating logs.
### Hierarchy
* [ResourceClientAsync](https://docs.apify.com/api/client/python/api/client/python/reference/class/ResourceClientAsync.md)
* *LogClientAsync*
## Index[**](#Index)
### Methods
* [**\_\_init\_\_](https://docs.apify.com/api/client/python/api/client/python/reference/class/LogClientAsync.md#__init__)
* [**get](https://docs.apify.com/api/client/python/api/client/python/reference/class/LogClientAsync.md#get)
* [**get\_as\_bytes](https://docs.apify.com/api/client/python/api/client/python/reference/class/LogClientAsync.md#get_as_bytes)
* [**stream](https://docs.apify.com/api/client/python/api/client/python/reference/class/LogClientAsync.md#stream)
### Properties
* [**http\_client](https://docs.apify.com/api/client/python/api/client/python/reference/class/LogClientAsync.md#http_client)
* [**params](https://docs.apify.com/api/client/python/api/client/python/reference/class/LogClientAsync.md#params)
* [**resource\_id](https://docs.apify.com/api/client/python/api/client/python/reference/class/LogClientAsync.md#resource_id)
* [**root\_client](https://docs.apify.com/api/client/python/api/client/python/reference/class/LogClientAsync.md#root_client)
* [**url](https://docs.apify.com/api/client/python/api/client/python/reference/class/LogClientAsync.md#url)
## Methods<!-- -->[**](#Methods)
### [**](#__init__)[**](https://undefined/apify/apify-client-python/blob/master//src/apify_client/clients/resource_clients/log.py#L118)\_\_init\_\_
* ****\_\_init\_\_**(\*, base\_url, root\_client, http\_client, resource\_id, resource\_path, params): None
- Overrides [ResourceClientAsync.\_\_init\_\_](https://docs.apify.com/api/client/python/api/client/python/reference/class/ResourceClientAsync.md#__init__)
Initialize a new instance.
***
#### Parameters
* ##### keyword-onlybase\_url: str
Base URL of the API server.
* ##### keyword-onlyroot\_client: [ApifyClientAsync](https://docs.apify.com/api/client/python/api/client/python/reference/class/ApifyClientAsync.md)
The ApifyClientAsync instance under which this resource client exists.
* ##### keyword-onlyhttp\_client: [HTTPClientAsync](https://docs.apify.com/api/client/python/api/client/python/reference/class/HTTPClientAsync.md)
The HTTPClientAsync instance to be used in this client.
* ##### optionalkeyword-onlyresource\_id: str | None = <!-- -->None
ID of the manipulated resource, in case of a single-resource client.
* ##### keyword-onlyresource\_path: str
Path to the resource's endpoint on the API server.
* ##### optionalkeyword-onlyparams: dict | None = <!-- -->None
Parameters to include in all requests from this client.
#### Returns None
### [**](#get)[**](https://undefined/apify/apify-client-python/blob/master//src/apify_client/clients/resource_clients/log.py#L122)get
* **async **get**(\*, raw): str | None
- Retrieve the log as text.
<https://docs.apify.com/api/v2#/reference/logs/log/get-log>
***
#### Parameters
* ##### optionalkeyword-onlyraw: bool = <!-- -->False
If true, the log will include formating. For example, coloring character sequences.
#### Returns str | None
### [**](#get_as_bytes)[**](https://undefined/apify/apify-client-python/blob/master//src/apify_client/clients/resource_clients/log.py#L147)get\_as\_bytes
* **async **get\_as\_bytes**(\*, raw): bytes | None
- Retrieve the log as raw bytes.
<https://docs.apify.com/api/v2#/reference/logs/log/get-log>
***
#### Parameters
* ##### optionalkeyword-onlyraw: bool = <!-- -->False
If true, the log will include formating. For example, coloring character sequences.
#### Returns bytes | None
### [**](#stream)[**](https://undefined/apify/apify-client-python/blob/master//src/apify_client/clients/resource_clients/log.py#L173)stream
* **async **stream**(\*, raw): AsyncIterator\[impit.Response | None]
- Retrieve the log as a stream.
<https://docs.apify.com/api/v2#/reference/logs/log/get-log>
***
#### Parameters
* ##### optionalkeyword-onlyraw: bool = <!-- -->False
If true, the log will include formating. For example, coloring character sequences.
#### Returns AsyncIterator\[impit.Response | None]
## Properties<!-- -->[**](#Properties)
### [**](#http_client)[**](https://undefined/apify/apify-client-python/blob/master//src/apify_client/clients/base/base_client.py#L94)http\_client
**http\_client: [HTTPClient](https://docs.apify.com/api/client/python/api/client/python/reference/class/HTTPClient.md) | [HTTPClientAsync](https://docs.apify.com/api/client/python/api/client/python/reference/class/HTTPClientAsync.md)
Inherited from [BaseClientAsync.http\_client](https://docs.apify.com/api/client/python/api/client/python/reference/class/BaseClientAsync.md#http_client)
Overrides [\_BaseBaseClient.http\_client](https://docs.apify.com/api/client/python/api/client/python/reference/class/_BaseBaseClient.md#http_client)
### [**](#params)[**](https://undefined/apify/apify-client-python/blob/master//src/apify_client/clients/base/base_client.py#L17)params
**params: dict
Inherited from [\_BaseBaseClient.params](https://docs.apify.com/api/client/python/api/client/python/reference/class/_BaseBaseClient.md#params)
### [**](#resource_id)[**](https://undefined/apify/apify-client-python/blob/master//src/apify_client/clients/base/base_client.py#L15)resource\_id
**resource\_id: str | None
Inherited from [\_BaseBaseClient.resource\_id](https://docs.apify.com/api/client/python/api/client/python/reference/class/_BaseBaseClient.md#resource_id)
### [**](#root_client)[**](https://undefined/apify/apify-client-python/blob/master//src/apify_client/clients/base/base_client.py#L95)root\_client
**root\_client: [ApifyClient](https://docs.apify.com/api/client/python/api/client/python/reference/class/ApifyClient.md) | [ApifyClientAsync](https://docs.apify.com/api/client/python/api/client/python/reference/class/ApifyClientAsync.md)
Inherited from [BaseClientAsync.root\_client](https://docs.apify.com/api/client/python/api/client/python/reference/class/BaseClientAsync.md#root_client)
Overrides [\_BaseBaseClient.root\_client](https://docs.apify.com/api/client/python/api/client/python/reference/class/_BaseBaseClient.md#root_client)
### [**](#url)[**](https://undefined/apify/apify-client-python/blob/master//src/apify_client/clients/base/base_client.py#L16)url
**url: str
Inherited from [\_BaseBaseClient.url](https://docs.apify.com/api/client/python/api/client/python/reference/class/_BaseBaseClient.md#url)
---
# LogContext<!-- -->
## Index[**](#Index)
### Properties
* [**attempt](https://docs.apify.com/api/client/python/api/client/python/reference/class/LogContext.md#attempt)
* [**client\_method](https://docs.apify.com/api/client/python/api/client/python/reference/class/LogContext.md#client_method)
* [**method](https://docs.apify.com/api/client/python/api/client/python/reference/class/LogContext.md#method)
* [**resource\_id](https://docs.apify.com/api/client/python/api/client/python/reference/class/LogContext.md#resource_id)
* [**url](https://docs.apify.com/api/client/python/api/client/python/reference/class/LogContext.md#url)
## Properties<!-- -->[**](#Properties)
### [**](#attempt)[**](https://undefined/apify/apify-client-python/blob/master//src/apify_client/_logging.py#L27)attempt
**attempt: ContextVar\[int | None]
### [**](#client_method)[**](https://undefined/apify/apify-client-python/blob/master//src/apify_client/_logging.py#L28)client\_method
**client\_method: ContextVar\[str | None]
### [**](#method)[**](https://undefined/apify/apify-client-python/blob/master//src/apify_client/_logging.py#L29)method
**method: ContextVar\[str | None]
### [**](#resource_id)[**](https://undefined/apify/apify-client-python/blob/master//src/apify_client/_logging.py#L30)resource\_id
**resource\_id: ContextVar\[str | None]
### [**](#url)[**](https://undefined/apify/apify-client-python/blob/master//src/apify_client/_logging.py#L31)url
**url: ContextVar\[str | None]
---
# RedirectLogFormatter<!-- -->
Formater applied to default redirect logger.
## Index[**](#Index)
### Methods
* [**format](https://docs.apify.com/api/client/python/api/client/python/reference/class/RedirectLogFormatter.md#format)
## Methods<!-- -->[**](#Methods)
### [**](#format)[**](https://undefined/apify/apify-client-python/blob/master//src/apify_client/_logging.py#L160)format
* ****format**(record): str
- Format the log by prepending logger name to the original message.
***
#### Parameters
* ##### record: logging.LogRecord
Log record to be formated.
#### Returns str
---
# RequestQueueClient<!-- -->
Sub-client for manipulating a single request queue.
### Hierarchy
* [ResourceClient](https://docs.apify.com/api/client/python/api/client/python/reference/class/ResourceClient.md)
* *RequestQueueClient*
## Index[**](#Index)
### Methods
* [**\_\_init\_\_](https://docs.apify.com/api/client/python/api/client/python/reference/class/RequestQueueClient.md#__init__)
* [**add\_request](https://docs.apify.com/api/client/python/api/client/python/reference/class/RequestQueueClient.md#add_request)
* [**batch\_add\_requests](https://docs.apify.com/api/client/python/api/client/python/reference/class/RequestQueueClient.md#batch_add_requests)
* [**batch\_delete\_requests](https://docs.apify.com/api/client/python/api/client/python/reference/class/RequestQueueClient.md#batch_delete_requests)
* [**delete](https://docs.apify.com/api/client/python/api/client/python/reference/class/RequestQueueClient.md#delete)
* [**delete\_request](https://docs.apify.com/api/client/python/api/client/python/reference/class/RequestQueueClient.md#delete_request)
* [**delete\_request\_lock](https://docs.apify.com/api/client/python/api/client/python/reference/class/RequestQueueClient.md#delete_request_lock)
* [**get](https://docs.apify.com/api/client/python/api/client/python/reference/class/RequestQueueClient.md#get)
* [**get\_request](https://docs.apify.com/api/client/python/api/client/python/reference/class/RequestQueueClient.md#get_request)
* [**list\_and\_lock\_head](https://docs.apify.com/api/client/python/api/client/python/reference/class/RequestQueueClient.md#list_and_lock_head)
* [**list\_head](https://docs.apify.com/api/client/python/api/client/python/reference/class/RequestQueueClient.md#list_head)
* [**list\_requests](https://docs.apify.com/api/client/python/api/client/python/reference/class/RequestQueueClient.md#list_requests)
* [**prolong\_request\_lock](https://docs.apify.com/api/client/python/api/client/python/reference/class/RequestQueueClient.md#prolong_request_lock)
* [**unlock\_requests](https://docs.apify.com/api/client/python/api/client/python/reference/class/RequestQueueClient.md#unlock_requests)
* [**update](https://docs.apify.com/api/client/python/api/client/python/reference/class/RequestQueueClient.md#update)
* [**update\_request](https://docs.apify.com/api/client/python/api/client/python/reference/class/RequestQueueClient.md#update_request)
### Properties
* [**http\_client](https://docs.apify.com/api/client/python/api/client/python/reference/class/RequestQueueClient.md#http_client)
* [**params](https://docs.apify.com/api/client/python/api/client/python/reference/class/RequestQueueClient.md#params)
* [**resource\_id](https://docs.apify.com/api/client/python/api/client/python/reference/class/RequestQueueClient.md#resource_id)
* [**root\_client](https://docs.apify.com/api/client/python/api/client/python/reference/class/RequestQueueClient.md#root_client)
* [**url](https://docs.apify.com/api/client/python/api/client/python/reference/class/RequestQueueClient.md#url)
## Methods<!-- -->[**](#Methods)
### [**](#__init__)[**](https://undefined/apify/apify-client-python/blob/master//src/apify_client/clients/resource_clients/request_queue.py#L51)\_\_init\_\_
* ****\_\_init\_\_**(args, \*, client\_key, kwargs): None
- Overrides [ResourceClient.\_\_init\_\_](https://docs.apify.com/api/client/python/api/client/python/reference/class/ResourceClient.md#__init__)
Initialize a new instance.
***
#### Parameters
* ##### args: Any
* ##### optionalkeyword-onlyclient\_key: str | None = <!-- -->None
A unique identifier of the client accessing the request queue.
* ##### kwargs: Any
#### Returns None
### [**](#add_request)[**](https://undefined/apify/apify-client-python/blob/master//src/apify_client/clients/resource_clients/request_queue.py#L147)add\_request
* ****add\_request**(request, \*, forefront): dict
- Add a request to the queue.
<https://docs.apify.com/api/v2#/reference/request-queues/request-collection/add-request>
***
#### Parameters
* ##### request: dict
The request to add to the queue.
* ##### optionalkeyword-onlyforefront: bool | None = <!-- -->None
Whether to add the request to the head or the end of the queue.
#### Returns dict
### [**](#batch_add_requests)[**](https://undefined/apify/apify-client-python/blob/master//src/apify_client/clients/resource_clients/request_queue.py#L286)batch\_add\_requests
* ****batch\_add\_requests**(requests, \*, forefront, max\_parallel, max\_unprocessed\_requests\_retries, min\_delay\_between\_unprocessed\_requests\_retries): [BatchAddRequestsResult](https://docs.apify.com/api/client/python/api/client/python/reference/class/BatchAddRequestsResult.md)
- Add requests to the request queue in batches.
Requests are split into batches based on size and processed in parallel.
<https://docs.apify.com/api/v2#/reference/request-queues/batch-request-operations/add-requests>
***
#### Parameters
* ##### requests: [list](https://docs.apify.com/api/client/python/api/client/python/reference/class/RequestQueueCollectionClient.md#list)\[dict]
List of requests to be added to the queue.
* ##### optionalkeyword-onlyforefront: bool = <!-- -->False
Whether to add requests to the front of the queue.
* ##### optionalkeyword-onlymax\_parallel: int = <!-- -->1
Specifies the maximum number of parallel tasks for API calls. This is only applicable to the async client. For the sync client, this value must be set to 1, as parallel execution is not supported.
* ##### optionalkeyword-onlymax\_unprocessed\_requests\_retries: int | None = <!-- -->None
Deprecated argument. Will be removed in next major release.
* ##### optionalkeyword-onlymin\_delay\_between\_unprocessed\_requests\_retries: timedelta | None = <!-- -->None
Deprecated argument. Will be removed in next major release.
#### Returns [BatchAddRequestsResult](https://docs.apify.com/api/client/python/api/client/python/reference/class/BatchAddRequestsResult.md)
### [**](#batch_delete_requests)[**](https://undefined/apify/apify-client-python/blob/master//src/apify_client/clients/resource_clients/request_queue.py#L364)batch\_delete\_requests
* ****batch\_delete\_requests**(requests): dict
- Delete given requests from the queue.
<https://docs.apify.com/api/v2#/reference/request-queues/batch-request-operations/delete-requests>
***
#### Parameters
* ##### requests: [list](https://docs.apify.com/api/client/python/api/client/python/reference/class/RequestQueueCollectionClient.md#list)\[dict]
List of the requests to delete.
#### Returns dict
### [**](#delete)[**](https://undefined/apify/apify-client-python/blob/master//src/apify_client/clients/resource_clients/request_queue.py#L95)delete
* ****delete**(): None
- Delete the request queue.
<https://docs.apify.com/api/v2#/reference/request-queues/queue/delete-request-queue>
***
#### Returns None
### [**](#delete_request)[**](https://undefined/apify/apify-client-python/blob/master//src/apify_client/clients/resource_clients/request_queue.py#L222)delete\_request
* ****delete\_request**(request\_id): None
- Delete a request from the queue.
<https://docs.apify.com/api/v2#/reference/request-queues/request/delete-request>
***
#### Parameters
* ##### request\_id: str
ID of the request to delete.
#### Returns None
### [**](#delete_request_lock)[**](https://undefined/apify/apify-client-python/blob/master//src/apify_client/clients/resource_clients/request_queue.py#L268)delete\_request\_lock
* ****delete\_request\_lock**(request\_id, \*, forefront): None
- Delete the lock on a request.
<https://docs.apify.com/api/v2#/reference/request-queues/request-lock/delete-request-lock>
***
#### Parameters
* ##### request\_id: str
ID of the request to delete the lock.
* ##### optionalkeyword-onlyforefront: bool | None = <!-- -->None
Whether to put the request in the beginning or the end of the queue after the lock is deleted.
#### Returns None
### [**](#get)[**](https://undefined/apify/apify-client-python/blob/master//src/apify_client/clients/resource_clients/request_queue.py#L66)get
* ****get**(): dict | None
- Retrieve the request queue.
<https://docs.apify.com/api/v2#/reference/request-queues/queue/get-request-queue>
***
#### Returns dict | None
### [**](#get_request)[**](https://undefined/apify/apify-client-python/blob/master//src/apify_client/clients/resource_clients/request_queue.py#L171)get\_request
* ****get\_request**(request\_id): dict | None
- Retrieve a request from the queue.
<https://docs.apify.com/api/v2#/reference/request-queues/request/get-request>
***
#### Parameters
* ##### request\_id: str
ID of the request to retrieve.
#### Returns dict | None
### [**](#list_and_lock_head)[**](https://undefined/apify/apify-client-python/blob/master//src/apify_client/clients/resource_clients/request_queue.py#L124)list\_and\_lock\_head
* ****list\_and\_lock\_head**(\*, lock\_secs, limit): dict
- Retrieve a given number of unlocked requests from the beginning of the queue and lock them for a given time.
<https://docs.apify.com/api/v2#/reference/request-queues/queue-head-with-locks/get-head-and-lock>
***
#### Parameters
* ##### keyword-onlylock\_secs: int
How long the requests will be locked for, in seconds.
* ##### optionalkeyword-onlylimit: int | None = <!-- -->None
How many requests to retrieve.
#### Returns dict
### [**](#list_head)[**](https://undefined/apify/apify-client-python/blob/master//src/apify_client/clients/resource_clients/request_queue.py#L102)list\_head
* ****list\_head**(\*, limit): dict
- Retrieve a given number of requests from the beginning of the queue.
<https://docs.apify.com/api/v2#/reference/request-queues/queue-head/get-head>
***
#### Parameters
* ##### optionalkeyword-onlylimit: int | None = <!-- -->None
How many requests to retrieve.
#### Returns dict
### [**](#list_requests)[**](https://undefined/apify/apify-client-python/blob/master//src/apify_client/clients/resource_clients/request_queue.py#L384)list\_requests
* ****list\_requests**(\*, limit, exclusive\_start\_id): dict
- List requests in the queue.
<https://docs.apify.com/api/v2#/reference/request-queues/request-collection/list-requests>
***
#### Parameters
* ##### optionalkeyword-onlylimit: int | None = <!-- -->None
How many requests to retrieve.
* ##### optionalkeyword-onlyexclusive\_start\_id: str | None = <!-- -->None
All requests up to this one (including) are skipped from the result.
#### Returns dict
### [**](#prolong_request_lock)[**](https://undefined/apify/apify-client-python/blob/master//src/apify_client/clients/resource_clients/request_queue.py#L241)prolong\_request\_lock
* ****prolong\_request\_lock**(request\_id, \*, forefront, lock\_secs): dict
- Prolong the lock on a request.
<https://docs.apify.com/api/v2#/reference/request-queues/request-lock/prolong-request-lock>
***
#### Parameters
* ##### request\_id: str
ID of the request to prolong the lock.
* ##### optionalkeyword-onlyforefront: bool | None = <!-- -->None
Whether to put the request in the beginning or the end of the queue after lock expires.
* ##### keyword-onlylock\_secs: int
By how much to prolong the lock, in seconds.
#### Returns dict
### [**](#unlock_requests)[**](https://undefined/apify/apify-client-python/blob/master//src/apify_client/clients/resource_clients/request_queue.py#L409)unlock\_requests
* ****unlock\_requests**(): dict
- Unlock all requests in the queue, which were locked by the same clientKey or from the same Actor run.
<https://docs.apify.com/api/v2#/reference/request-queues/request-collection/unlock-requests>
***
#### Returns dict
### [**](#update)[**](https://undefined/apify/apify-client-python/blob/master//src/apify_client/clients/resource_clients/request_queue.py#L76)update
* ****update**(\*, name, general\_access): dict
- Update the request queue with specified fields.
<https://docs.apify.com/api/v2#/reference/request-queues/queue/update-request-queue>
***
#### Parameters
* ##### optionalkeyword-onlyname: str | None = <!-- -->None
The new name for the request queue.
* ##### optionalkeyword-onlygeneral\_access: StorageGeneralAccess | None = <!-- -->None
Determines how others can access the request queue.
#### Returns dict
### [**](#update_request)[**](https://undefined/apify/apify-client-python/blob/master//src/apify_client/clients/resource_clients/request_queue.py#L196)update\_request
* ****update\_request**(request, \*, forefront): dict
- Update a request in the queue.
<https://docs.apify.com/api/v2#/reference/request-queues/request/update-request>
***
#### Parameters
* ##### request: dict
The updated request.
* ##### optionalkeyword-onlyforefront: bool | None = <!-- -->None
Whether to put the updated request in the beginning or the end of the queue.
#### Returns dict
## Properties<!-- -->[**](#Properties)
### [**](#http_client)[**](https://undefined/apify/apify-client-python/blob/master//src/apify_client/clients/base/base_client.py#L53)http\_client
**http\_client: [HTTPClient](https://docs.apify.com/api/client/python/api/client/python/reference/class/HTTPClient.md) | [HTTPClientAsync](https://docs.apify.com/api/client/python/api/client/python/reference/class/HTTPClientAsync.md)
Inherited from [BaseClient.http\_client](https://docs.apify.com/api/client/python/api/client/python/reference/class/BaseClient.md#http_client)
Overrides [\_BaseBaseClient.http\_client](https://docs.apify.com/api/client/python/api/client/python/reference/class/_BaseBaseClient.md#http_client)
### [**](#params)[**](https://undefined/apify/apify-client-python/blob/master//src/apify_client/clients/base/base_client.py#L17)params
**params: dict
Inherited from [\_BaseBaseClient.params](https://docs.apify.com/api/client/python/api/client/python/reference/class/_BaseBaseClient.md#params)
### [**](#resource_id)[**](https://undefined/apify/apify-client-python/blob/master//src/apify_client/clients/base/base_client.py#L15)resource\_id
**resource\_id: str | None
Inherited from [\_BaseBaseClient.resource\_id](https://docs.apify.com/api/client/python/api/client/python/reference/class/_BaseBaseClient.md#resource_id)
### [**](#root_client)[**](https://undefined/apify/apify-client-python/blob/master//src/apify_client/clients/base/base_client.py#L54)root\_client
**root\_client: [ApifyClient](https://docs.apify.com/api/client/python/api/client/python/reference/class/ApifyClient.md) | [ApifyClientAsync](https://docs.apify.com/api/client/python/api/client/python/reference/class/ApifyClientAsync.md)
Inherited from [BaseClient.root\_client](https://docs.apify.com/api/client/python/api/client/python/reference/class/BaseClient.md#root_client)
Overrides [\_BaseBaseClient.root\_client](https://docs.apify.com/api/client/python/api/client/python/reference/class/_BaseBaseClient.md#root_client)
### [**](#url)[**](https://undefined/apify/apify-client-python/blob/master//src/apify_client/clients/base/base_client.py#L16)url
**url: str
Inherited from [\_BaseBaseClient.url](https://docs.apify.com/api/client/python/api/client/python/reference/class/_BaseBaseClient.md#url)
---
# RequestQueueClientAsync<!-- -->
Async sub-client for manipulating a single request queue.
### Hierarchy
* [ResourceClientAsync](https://docs.apify.com/api/client/python/api/client/python/reference/class/ResourceClientAsync.md)
* *RequestQueueClientAsync*
## Index[**](#Index)
### Methods
* [**\_\_init\_\_](https://docs.apify.com/api/client/python/api/client/python/reference/class/RequestQueueClientAsync.md#__init__)
* [**add\_request](https://docs.apify.com/api/client/python/api/client/python/reference/class/RequestQueueClientAsync.md#add_request)
* [**batch\_add\_requests](https://docs.apify.com/api/client/python/api/client/python/reference/class/RequestQueueClientAsync.md#batch_add_requests)
* [**batch\_delete\_requests](https://docs.apify.com/api/client/python/api/client/python/reference/class/RequestQueueClientAsync.md#batch_delete_requests)
* [**delete](https://docs.apify.com/api/client/python/api/client/python/reference/class/RequestQueueClientAsync.md#delete)
* [**delete\_request](https://docs.apify.com/api/client/python/api/client/python/reference/class/RequestQueueClientAsync.md#delete_request)
* [**delete\_request\_lock](https://docs.apify.com/api/client/python/api/client/python/reference/class/RequestQueueClientAsync.md#delete_request_lock)
* [**get](https://docs.apify.com/api/client/python/api/client/python/reference/class/RequestQueueClientAsync.md#get)
* [**get\_request](https://docs.apify.com/api/client/python/api/client/python/reference/class/RequestQueueClientAsync.md#get_request)
* [**list\_and\_lock\_head](https://docs.apify.com/api/client/python/api/client/python/reference/class/RequestQueueClientAsync.md#list_and_lock_head)
* [**list\_head](https://docs.apify.com/api/client/python/api/client/python/reference/class/RequestQueueClientAsync.md#list_head)
* [**list\_requests](https://docs.apify.com/api/client/python/api/client/python/reference/class/RequestQueueClientAsync.md#list_requests)
* [**prolong\_request\_lock](https://docs.apify.com/api/client/python/api/client/python/reference/class/RequestQueueClientAsync.md#prolong_request_lock)
* [**unlock\_requests](https://docs.apify.com/api/client/python/api/client/python/reference/class/RequestQueueClientAsync.md#unlock_requests)
* [**update](https://docs.apify.com/api/client/python/api/client/python/reference/class/RequestQueueClientAsync.md#update)
* [**update\_request](https://docs.apify.com/api/client/python/api/client/python/reference/class/RequestQueueClientAsync.md#update_request)
### Properties
* [**http\_client](https://docs.apify.com/api/client/python/api/client/python/reference/class/RequestQueueClientAsync.md#http_client)
* [**params](https://docs.apify.com/api/client/python/api/client/python/reference/class/RequestQueueClientAsync.md#params)
* [**resource\_id](https://docs.apify.com/api/client/python/api/client/python/reference/class/RequestQueueClientAsync.md#resource_id)
* [**root\_client](https://docs.apify.com/api/client/python/api/client/python/reference/class/RequestQueueClientAsync.md#root_client)
* [**url](https://docs.apify.com/api/client/python/api/client/python/reference/class/RequestQueueClientAsync.md#url)
## Methods<!-- -->[**](#Methods)
### [**](#__init__)[**](https://undefined/apify/apify-client-python/blob/master//src/apify_client/clients/resource_clients/request_queue.py#L431)\_\_init\_\_
* ****\_\_init\_\_**(args, \*, client\_key, kwargs): None
- Overrides [ResourceClientAsync.\_\_init\_\_](https://docs.apify.com/api/client/python/api/client/python/reference/class/ResourceClientAsync.md#__init__)
Initialize a new instance.
***
#### Parameters
* ##### args: Any
* ##### optionalkeyword-onlyclient\_key: str | None = <!-- -->None
A unique identifier of the client accessing the request queue.
* ##### kwargs: Any
#### Returns None
### [**](#add_request)[**](https://undefined/apify/apify-client-python/blob/master//src/apify_client/clients/resource_clients/request_queue.py#L527)add\_request
* **async **add\_request**(request, \*, forefront): dict
- Add a request to the queue.
<https://docs.apify.com/api/v2#/reference/request-queues/request-collection/add-request>
***
#### Parameters
* ##### request: dict
The request to add to the queue.
* ##### optionalkeyword-onlyforefront: bool | None = <!-- -->None
Whether to add the request to the head or the end of the queue.
#### Returns dict
### [**](#batch_add_requests)[**](https://undefined/apify/apify-client-python/blob/master//src/apify_client/clients/resource_clients/request_queue.py#L713)batch\_add\_requests
* **async **batch\_add\_requests**(requests, \*, forefront, max\_parallel, max\_unprocessed\_requests\_retries, min\_delay\_between\_unprocessed\_requests\_retries): [BatchAddRequestsResult](https://docs.apify.com/api/client/python/api/client/python/reference/class/BatchAddRequestsResult.md)
- Add requests to the request queue in batches.
Requests are split into batches based on size and processed in parallel.
<https://docs.apify.com/api/v2#/reference/request-queues/batch-request-operations/add-requests>
***
#### Parameters
* ##### requests: [list](https://docs.apify.com/api/client/python/api/client/python/reference/class/RequestQueueCollectionClient.md#list)\[dict]
List of requests to be added to the queue.
* ##### optionalkeyword-onlyforefront: bool = <!-- -->False
Whether to add requests to the front of the queue.
* ##### optionalkeyword-onlymax\_parallel: int = <!-- -->5
Specifies the maximum number of parallel tasks for API calls. This is only applicable to the async client. For the sync client, this value must be set to 1, as parallel execution is not supported.
* ##### optionalkeyword-onlymax\_unprocessed\_requests\_retries: int | None = <!-- -->None
Deprecated argument. Will be removed in next major release.
* ##### optionalkeyword-onlymin\_delay\_between\_unprocessed\_requests\_retries: timedelta | None = <!-- -->None
Deprecated argument. Will be removed in next major release.
#### Returns [BatchAddRequestsResult](https://docs.apify.com/api/client/python/api/client/python/reference/class/BatchAddRequestsResult.md)
### [**](#batch_delete_requests)[**](https://undefined/apify/apify-client-python/blob/master//src/apify_client/clients/resource_clients/request_queue.py#L793)batch\_delete\_requests
* **async **batch\_delete\_requests**(requests): dict
- Delete given requests from the queue.
<https://docs.apify.com/api/v2#/reference/request-queues/batch-request-operations/delete-requests>
***
#### Parameters
* ##### requests: [list](https://docs.apify.com/api/client/python/api/client/python/reference/class/RequestQueueCollectionClient.md#list)\[dict]
List of the requests to delete.
#### Returns dict
### [**](#delete)[**](https://undefined/apify/apify-client-python/blob/master//src/apify_client/clients/resource_clients/request_queue.py#L475)delete
* **async **delete**(): None
- Delete the request queue.
<https://docs.apify.com/api/v2#/reference/request-queues/queue/delete-request-queue>
***
#### Returns None
### [**](#delete_request)[**](https://undefined/apify/apify-client-python/blob/master//src/apify_client/clients/resource_clients/request_queue.py#L602)delete\_request
* **async **delete\_request**(request\_id): None
- Delete a request from the queue.
<https://docs.apify.com/api/v2#/reference/request-queues/request/delete-request>
***
#### Parameters
* ##### request\_id: str
ID of the request to delete.
#### Returns None
### [**](#delete_request_lock)[**](https://undefined/apify/apify-client-python/blob/master//src/apify_client/clients/resource_clients/request_queue.py#L646)delete\_request\_lock
* **async **delete\_request\_lock**(request\_id, \*, forefront): None
- Delete the lock on a request.
<https://docs.apify.com/api/v2#/reference/request-queues/request-lock/delete-request-lock>
***
#### Parameters
* ##### request\_id: str
ID of the request to delete the lock.
* ##### optionalkeyword-onlyforefront: bool | None = <!-- -->None
Whether to put the request in the beginning or the end of the queue after the lock is deleted.
#### Returns None
### [**](#get)[**](https://undefined/apify/apify-client-python/blob/master//src/apify_client/clients/resource_clients/request_queue.py#L446)get
* **async **get**(): dict | None
- Retrieve the request queue.
<https://docs.apify.com/api/v2#/reference/request-queues/queue/get-request-queue>
***
#### Returns dict | None
### [**](#get_request)[**](https://undefined/apify/apify-client-python/blob/master//src/apify_client/clients/resource_clients/request_queue.py#L551)get\_request
* **async **get\_request**(request\_id): dict | None
- Retrieve a request from the queue.
<https://docs.apify.com/api/v2#/reference/request-queues/request/get-request>
***
#### Parameters
* ##### request\_id: str
ID of the request to retrieve.
#### Returns dict | None
### [**](#list_and_lock_head)[**](https://undefined/apify/apify-client-python/blob/master//src/apify_client/clients/resource_clients/request_queue.py#L504)list\_and\_lock\_head
* **async **list\_and\_lock\_head**(\*, lock\_secs, limit): dict
- Retrieve a given number of unlocked requests from the beginning of the queue and lock them for a given time.
<https://docs.apify.com/api/v2#/reference/request-queues/queue-head-with-locks/get-head-and-lock>
***
#### Parameters
* ##### keyword-onlylock\_secs: int
How long the requests will be locked for, in seconds.
* ##### optionalkeyword-onlylimit: int | None = <!-- -->None
How many requests to retrieve.
#### Returns dict
### [**](#list_head)[**](https://undefined/apify/apify-client-python/blob/master//src/apify_client/clients/resource_clients/request_queue.py#L482)list\_head
* **async **list\_head**(\*, limit): dict
- Retrieve a given number of requests from the beginning of the queue.
<https://docs.apify.com/api/v2#/reference/request-queues/queue-head/get-head>
***
#### Parameters
* ##### optionalkeyword-onlylimit: int | None = <!-- -->None
How many requests to retrieve.
#### Returns dict
### [**](#list_requests)[**](https://undefined/apify/apify-client-python/blob/master//src/apify_client/clients/resource_clients/request_queue.py#L812)list\_requests
* **async **list\_requests**(\*, limit, exclusive\_start\_id): dict
- List requests in the queue.
<https://docs.apify.com/api/v2#/reference/request-queues/request-collection/list-requests>
***
#### Parameters
* ##### optionalkeyword-onlylimit: int | None = <!-- -->None
How many requests to retrieve.
* ##### optionalkeyword-onlyexclusive\_start\_id: str | None = <!-- -->None
All requests up to this one (including) are skipped from the result.
#### Returns dict
### [**](#prolong_request_lock)[**](https://undefined/apify/apify-client-python/blob/master//src/apify_client/clients/resource_clients/request_queue.py#L619)prolong\_request\_lock
* **async **prolong\_request\_lock**(request\_id, \*, forefront, lock\_secs): dict
- Prolong the lock on a request.
<https://docs.apify.com/api/v2#/reference/request-queues/request-lock/prolong-request-lock>
***
#### Parameters
* ##### request\_id: str
ID of the request to prolong the lock.
* ##### optionalkeyword-onlyforefront: bool | None = <!-- -->None
Whether to put the request in the beginning or the end of the queue after lock expires.
* ##### keyword-onlylock\_secs: int
By how much to prolong the lock, in seconds.
#### Returns dict
### [**](#unlock_requests)[**](https://undefined/apify/apify-client-python/blob/master//src/apify_client/clients/resource_clients/request_queue.py#L837)unlock\_requests
* **async **unlock\_requests**(): dict
- Unlock all requests in the queue, which were locked by the same clientKey or from the same Actor run.
<https://docs.apify.com/api/v2#/reference/request-queues/request-collection/unlock-requests>
***
#### Returns dict
### [**](#update)[**](https://undefined/apify/apify-client-python/blob/master//src/apify_client/clients/resource_clients/request_queue.py#L456)update
* **async **update**(\*, name, general\_access): dict
- Update the request queue with specified fields.
<https://docs.apify.com/api/v2#/reference/request-queues/queue/update-request-queue>
***
#### Parameters
* ##### optionalkeyword-onlyname: str | None = <!-- -->None
The new name for the request queue.
* ##### optionalkeyword-onlygeneral\_access: StorageGeneralAccess | None = <!-- -->None
Determines how others can access the request queue.
#### Returns dict
### [**](#update_request)[**](https://undefined/apify/apify-client-python/blob/master//src/apify_client/clients/resource_clients/request_queue.py#L576)update\_request
* **async **update\_request**(request, \*, forefront): dict
- Update a request in the queue.
<https://docs.apify.com/api/v2#/reference/request-queues/request/update-request>
***
#### Parameters
* ##### request: dict
The updated request.
* ##### optionalkeyword-onlyforefront: bool | None = <!-- -->None
Whether to put the updated request in the beginning or the end of the queue.
#### Returns dict
## Properties<!-- -->[**](#Properties)
### [**](#http_client)[**](https://undefined/apify/apify-client-python/blob/master//src/apify_client/clients/base/base_client.py#L94)http\_client
**http\_client: [HTTPClient](https://docs.apify.com/api/client/python/api/client/python/reference/class/HTTPClient.md) | [HTTPClientAsync](https://docs.apify.com/api/client/python/api/client/python/reference/class/HTTPClientAsync.md)
Inherited from [BaseClientAsync.http\_client](https://docs.apify.com/api/client/python/api/client/python/reference/class/BaseClientAsync.md#http_client)
Overrides [\_BaseBaseClient.http\_client](https://docs.apify.com/api/client/python/api/client/python/reference/class/_BaseBaseClient.md#http_client)
### [**](#params)[**](https://undefined/apify/apify-client-python/blob/master//src/apify_client/clients/base/base_client.py#L17)params
**params: dict
Inherited from [\_BaseBaseClient.params](https://docs.apify.com/api/client/python/api/client/python/reference/class/_BaseBaseClient.md#params)
### [**](#resource_id)[**](https://undefined/apify/apify-client-python/blob/master//src/apify_client/clients/base/base_client.py#L15)resource\_id
**resource\_id: str | None
Inherited from [\_BaseBaseClient.resource\_id](https://docs.apify.com/api/client/python/api/client/python/reference/class/_BaseBaseClient.md#resource_id)
### [**](#root_client)[**](https://undefined/apify/apify-client-python/blob/master//src/apify_client/clients/base/base_client.py#L95)root\_client
**root\_client: [ApifyClient](https://docs.apify.com/api/client/python/api/client/python/reference/class/ApifyClient.md) | [ApifyClientAsync](https://docs.apify.com/api/client/python/api/client/python/reference/class/ApifyClientAsync.md)
Inherited from [BaseClientAsync.root\_client](https://docs.apify.com/api/client/python/api/client/python/reference/class/BaseClientAsync.md#root_client)
Overrides [\_BaseBaseClient.root\_client](https://docs.apify.com/api/client/python/api/client/python/reference/class/_BaseBaseClient.md#root_client)
### [**](#url)[**](https://undefined/apify/apify-client-python/blob/master//src/apify_client/clients/base/base_client.py#L16)url
**url: str
Inherited from [\_BaseBaseClient.url](https://docs.apify.com/api/client/python/api/client/python/reference/class/_BaseBaseClient.md#url)
---
# RequestQueueCollectionClient<!-- -->
Sub-client for manipulating request queues.
### Hierarchy
* [ResourceCollectionClient](https://docs.apify.com/api/client/python/api/client/python/reference/class/ResourceCollectionClient.md)
* *RequestQueueCollectionClient*
## Index[**](#Index)
### Methods
* [**\_\_init\_\_](https://docs.apify.com/api/client/python/api/client/python/reference/class/RequestQueueCollectionClient.md#__init__)
* [**get\_or\_create](https://docs.apify.com/api/client/python/api/client/python/reference/class/RequestQueueCollectionClient.md#get_or_create)
* [**list](https://docs.apify.com/api/client/python/api/client/python/reference/class/RequestQueueCollectionClient.md#list)
### Properties
* [**http\_client](https://docs.apify.com/api/client/python/api/client/python/reference/class/RequestQueueCollectionClient.md#http_client)
* [**params](https://docs.apify.com/api/client/python/api/client/python/reference/class/RequestQueueCollectionClient.md#params)
* [**resource\_id](https://docs.apify.com/api/client/python/api/client/python/reference/class/RequestQueueCollectionClient.md#resource_id)
* [**root\_client](https://docs.apify.com/api/client/python/api/client/python/reference/class/RequestQueueCollectionClient.md#root_client)
* [**url](https://docs.apify.com/api/client/python/api/client/python/reference/class/RequestQueueCollectionClient.md#url)
## Methods<!-- -->[**](#Methods)
### [**](#__init__)[**](https://undefined/apify/apify-client-python/blob/master//src/apify_client/clients/resource_clients/request_queue_collection.py#L14)\_\_init\_\_
* ****\_\_init\_\_**(\*, base\_url, root\_client, http\_client, resource\_id, resource\_path, params): None
- Overrides [ResourceCollectionClient.\_\_init\_\_](https://docs.apify.com/api/client/python/api/client/python/reference/class/ResourceCollectionClient.md#__init__)
Initialize a new instance.
***
#### Parameters
* ##### keyword-onlybase\_url: str
Base URL of the API server.
* ##### keyword-onlyroot\_client: [ApifyClient](https://docs.apify.com/api/client/python/api/client/python/reference/class/ApifyClient.md)
The ApifyClient instance under which this resource client exists.
* ##### keyword-onlyhttp\_client: [HTTPClient](https://docs.apify.com/api/client/python/api/client/python/reference/class/HTTPClient.md)
The HTTPClient instance to be used in this client.
* ##### optionalkeyword-onlyresource\_id: str | None = <!-- -->None
ID of the manipulated resource, in case of a single-resource client.
* ##### keyword-onlyresource\_path: str
Path to the resource's endpoint on the API server.
* ##### optionalkeyword-onlyparams: dict | None = <!-- -->None
Parameters to include in all requests from this client.
#### Returns None
### [**](#get_or_create)[**](https://undefined/apify/apify-client-python/blob/master//src/apify_client/clients/resource_clients/request_queue_collection.py#L41)get\_or\_create
* ****get\_or\_create**(\*, name): dict
- Retrieve a named request queue, or create a new one when it doesn't exist.
<https://docs.apify.com/api/v2#/reference/request-queues/queue-collection/create-request-queue>
***
#### Parameters
* ##### optionalkeyword-onlyname: str | None = <!-- -->None
The name of the request queue to retrieve or create.
#### Returns dict
### [**](#list)[**](https://undefined/apify/apify-client-python/blob/master//src/apify_client/clients/resource_clients/request_queue_collection.py#L18)list
* ****list**(\*, unnamed, limit, offset, desc): [ListPage](https://docs.apify.com/api/client/python/api/client/python/reference/class/ListPage.md)\[dict]
- List the available request queues.
<https://docs.apify.com/api/v2#/reference/request-queues/queue-collection/get-list-of-request-queues>
***
#### Parameters
* ##### optionalkeyword-onlyunnamed: bool | None = <!-- -->None
Whether to include unnamed request queues in the list.
* ##### optionalkeyword-onlylimit: int | None = <!-- -->None
How many request queues to retrieve.
* ##### optionalkeyword-onlyoffset: int | None = <!-- -->None
What request queue to include as first when retrieving the list.
* ##### optionalkeyword-onlydesc: bool | None = <!-- -->None
Whether to sort therequest queues in descending order based on their modification date.
#### Returns [ListPage](https://docs.apify.com/api/client/python/api/client/python/reference/class/ListPage.md)\[dict]
## Properties<!-- -->[**](#Properties)
### [**](#http_client)[**](https://undefined/apify/apify-client-python/blob/master//src/apify_client/clients/base/base_client.py#L53)http\_client
**http\_client: [HTTPClient](https://docs.apify.com/api/client/python/api/client/python/reference/class/HTTPClient.md) | [HTTPClientAsync](https://docs.apify.com/api/client/python/api/client/python/reference/class/HTTPClientAsync.md)
Inherited from [BaseClient.http\_client](https://docs.apify.com/api/client/python/api/client/python/reference/class/BaseClient.md#http_client)
Overrides [\_BaseBaseClient.http\_client](https://docs.apify.com/api/client/python/api/client/python/reference/class/_BaseBaseClient.md#http_client)
### [**](#params)[**](https://undefined/apify/apify-client-python/blob/master//src/apify_client/clients/base/base_client.py#L17)params
**params: dict
Inherited from [\_BaseBaseClient.params](https://docs.apify.com/api/client/python/api/client/python/reference/class/_BaseBaseClient.md#params)
### [**](#resource_id)[**](https://undefined/apify/apify-client-python/blob/master//src/apify_client/clients/base/base_client.py#L15)resource\_id
**resource\_id: str | None
Inherited from [\_BaseBaseClient.resource\_id](https://docs.apify.com/api/client/python/api/client/python/reference/class/_BaseBaseClient.md#resource_id)
### [**](#root_client)[**](https://undefined/apify/apify-client-python/blob/master//src/apify_client/clients/base/base_client.py#L54)root\_client
**root\_client: [ApifyClient](https://docs.apify.com/api/client/python/api/client/python/reference/class/ApifyClient.md) | [ApifyClientAsync](https://docs.apify.com/api/client/python/api/client/python/reference/class/ApifyClientAsync.md)
Inherited from [BaseClient.root\_client](https://docs.apify.com/api/client/python/api/client/python/reference/class/BaseClient.md#root_client)
Overrides [\_BaseBaseClient.root\_client](https://docs.apify.com/api/client/python/api/client/python/reference/class/_BaseBaseClient.md#root_client)
### [**](#url)[**](https://undefined/apify/apify-client-python/blob/master//src/apify_client/clients/base/base_client.py#L16)url
**url: str
Inherited from [\_BaseBaseClient.url](https://docs.apify.com/api/client/python/api/client/python/reference/class/_BaseBaseClient.md#url)
---
# RequestQueueCollectionClientAsync<!-- -->
Async sub-client for manipulating request queues.
### Hierarchy
* [ResourceCollectionClientAsync](https://docs.apify.com/api/client/python/api/client/python/reference/class/ResourceCollectionClientAsync.md)
* *RequestQueueCollectionClientAsync*
## Index[**](#Index)
### Methods
* [**\_\_init\_\_](https://docs.apify.com/api/client/python/api/client/python/reference/class/RequestQueueCollectionClientAsync.md#__init__)
* [**get\_or\_create](https://docs.apify.com/api/client/python/api/client/python/reference/class/RequestQueueCollectionClientAsync.md#get_or_create)
* [**list](https://docs.apify.com/api/client/python/api/client/python/reference/class/RequestQueueCollectionClientAsync.md#list)
### Properties
* [**http\_client](https://docs.apify.com/api/client/python/api/client/python/reference/class/RequestQueueCollectionClientAsync.md#http_client)
* [**params](https://docs.apify.com/api/client/python/api/client/python/reference/class/RequestQueueCollectionClientAsync.md#params)
* [**resource\_id](https://docs.apify.com/api/client/python/api/client/python/reference/class/RequestQueueCollectionClientAsync.md#resource_id)
* [**root\_client](https://docs.apify.com/api/client/python/api/client/python/reference/class/RequestQueueCollectionClientAsync.md#root_client)
* [**url](https://docs.apify.com/api/client/python/api/client/python/reference/class/RequestQueueCollectionClientAsync.md#url)
## Methods<!-- -->[**](#Methods)
### [**](#__init__)[**](https://undefined/apify/apify-client-python/blob/master//src/apify_client/clients/resource_clients/request_queue_collection.py#L58)\_\_init\_\_
* ****\_\_init\_\_**(\*, base\_url, root\_client, http\_client, resource\_id, resource\_path, params): None
- Overrides [ResourceCollectionClientAsync.\_\_init\_\_](https://docs.apify.com/api/client/python/api/client/python/reference/class/ResourceCollectionClientAsync.md#__init__)
Initialize a new instance.
***
#### Parameters
* ##### keyword-onlybase\_url: str
Base URL of the API server.
* ##### keyword-onlyroot\_client: [ApifyClientAsync](https://docs.apify.com/api/client/python/api/client/python/reference/class/ApifyClientAsync.md)
The ApifyClientAsync instance under which this resource client exists.
* ##### keyword-onlyhttp\_client: [HTTPClientAsync](https://docs.apify.com/api/client/python/api/client/python/reference/class/HTTPClientAsync.md)
The HTTPClientAsync instance to be used in this client.
* ##### optionalkeyword-onlyresource\_id: str | None = <!-- -->None
ID of the manipulated resource, in case of a single-resource client.
* ##### keyword-onlyresource\_path: str
Path to the resource's endpoint on the API server.
* ##### optionalkeyword-onlyparams: dict | None = <!-- -->None
Parameters to include in all requests from this client.
#### Returns None
### [**](#get_or_create)[**](https://undefined/apify/apify-client-python/blob/master//src/apify_client/clients/resource_clients/request_queue_collection.py#L85)get\_or\_create
* **async **get\_or\_create**(\*, name): dict
- Retrieve a named request queue, or create a new one when it doesn't exist.
<https://docs.apify.com/api/v2#/reference/request-queues/queue-collection/create-request-queue>
***
#### Parameters
* ##### optionalkeyword-onlyname: str | None = <!-- -->None
The name of the request queue to retrieve or create.
#### Returns dict
### [**](#list)[**](https://undefined/apify/apify-client-python/blob/master//src/apify_client/clients/resource_clients/request_queue_collection.py#L62)list
* **async **list**(\*, unnamed, limit, offset, desc): [ListPage](https://docs.apify.com/api/client/python/api/client/python/reference/class/ListPage.md)\[dict]
- List the available request queues.
<https://docs.apify.com/api/v2#/reference/request-queues/queue-collection/get-list-of-request-queues>
***
#### Parameters
* ##### optionalkeyword-onlyunnamed: bool | None = <!-- -->None
Whether to include unnamed request queues in the list.
* ##### optionalkeyword-onlylimit: int | None = <!-- -->None
How many request queues to retrieve.
* ##### optionalkeyword-onlyoffset: int | None = <!-- -->None
What request queue to include as first when retrieving the list.
* ##### optionalkeyword-onlydesc: bool | None = <!-- -->None
Whether to sort therequest queues in descending order based on their modification date.
#### Returns [ListPage](https://docs.apify.com/api/client/python/api/client/python/reference/class/ListPage.md)\[dict]
## Properties<!-- -->[**](#Properties)
### [**](#http_client)[**](https://undefined/apify/apify-client-python/blob/master//src/apify_client/clients/base/base_client.py#L94)http\_client
**http\_client: [HTTPClient](https://docs.apify.com/api/client/python/api/client/python/reference/class/HTTPClient.md) | [HTTPClientAsync](https://docs.apify.com/api/client/python/api/client/python/reference/class/HTTPClientAsync.md)
Inherited from [BaseClientAsync.http\_client](https://docs.apify.com/api/client/python/api/client/python/reference/class/BaseClientAsync.md#http_client)
Overrides [\_BaseBaseClient.http\_client](https://docs.apify.com/api/client/python/api/client/python/reference/class/_BaseBaseClient.md#http_client)
### [**](#params)[**](https://undefined/apify/apify-client-python/blob/master//src/apify_client/clients/base/base_client.py#L17)params
**params: dict
Inherited from [\_BaseBaseClient.params](https://docs.apify.com/api/client/python/api/client/python/reference/class/_BaseBaseClient.md#params)
### [**](#resource_id)[**](https://undefined/apify/apify-client-python/blob/master//src/apify_client/clients/base/base_client.py#L15)resource\_id
**resource\_id: str | None
Inherited from [\_BaseBaseClient.resource\_id](https://docs.apify.com/api/client/python/api/client/python/reference/class/_BaseBaseClient.md#resource_id)
### [**](#root_client)[**](https://undefined/apify/apify-client-python/blob/master//src/apify_client/clients/base/base_client.py#L95)root\_client
**root\_client: [ApifyClient](https://docs.apify.com/api/client/python/api/client/python/reference/class/ApifyClient.md) | [ApifyClientAsync](https://docs.apify.com/api/client/python/api/client/python/reference/class/ApifyClientAsync.md)
Inherited from [BaseClientAsync.root\_client](https://docs.apify.com/api/client/python/api/client/python/reference/class/BaseClientAsync.md#root_client)
Overrides [\_BaseBaseClient.root\_client](https://docs.apify.com/api/client/python/api/client/python/reference/class/_BaseBaseClient.md#root_client)
### [**](#url)[**](https://undefined/apify/apify-client-python/blob/master//src/apify_client/clients/base/base_client.py#L16)url
**url: str
Inherited from [\_BaseBaseClient.url](https://docs.apify.com/api/client/python/api/client/python/reference/class/_BaseBaseClient.md#url)
---
# ResourceClient<!-- -->
Base class for sub-clients manipulating a single resource.
### Hierarchy
* [BaseClient](https://docs.apify.com/api/client/python/api/client/python/reference/class/BaseClient.md)
* *ResourceClient*
* [RequestQueueClient](https://docs.apify.com/api/client/python/api/client/python/reference/class/RequestQueueClient.md)
* [DatasetClient](https://docs.apify.com/api/client/python/api/client/python/reference/class/DatasetClient.md)
* [UserClient](https://docs.apify.com/api/client/python/api/client/python/reference/class/UserClient.md)
* [ScheduleClient](https://docs.apify.com/api/client/python/api/client/python/reference/class/ScheduleClient.md)
* [WebhookDispatchClient](https://docs.apify.com/api/client/python/api/client/python/reference/class/WebhookDispatchClient.md)
* [ActorEnvVarClient](https://docs.apify.com/api/client/python/api/client/python/reference/class/ActorEnvVarClient.md)
* [TaskClient](https://docs.apify.com/api/client/python/api/client/python/reference/class/TaskClient.md)
* [ActorClient](https://docs.apify.com/api/client/python/api/client/python/reference/class/ActorClient.md)
* [ActorVersionClient](https://docs.apify.com/api/client/python/api/client/python/reference/class/ActorVersionClient.md)
* [WebhookClient](https://docs.apify.com/api/client/python/api/client/python/reference/class/WebhookClient.md)
* [KeyValueStoreClient](https://docs.apify.com/api/client/python/api/client/python/reference/class/KeyValueStoreClient.md)
* [LogClient](https://docs.apify.com/api/client/python/api/client/python/reference/class/LogClient.md)
* [ActorJobBaseClient](https://docs.apify.com/api/client/python/api/client/python/reference/class/ActorJobBaseClient.md)
## Index[**](#Index)
### Methods
* [**\_\_init\_\_](https://docs.apify.com/api/client/python/api/client/python/reference/class/ResourceClient.md#__init__)
### Properties
* [**http\_client](https://docs.apify.com/api/client/python/api/client/python/reference/class/ResourceClient.md#http_client)
* [**params](https://docs.apify.com/api/client/python/api/client/python/reference/class/ResourceClient.md#params)
* [**resource\_id](https://docs.apify.com/api/client/python/api/client/python/reference/class/ResourceClient.md#resource_id)
* [**root\_client](https://docs.apify.com/api/client/python/api/client/python/reference/class/ResourceClient.md#root_client)
* [**url](https://docs.apify.com/api/client/python/api/client/python/reference/class/ResourceClient.md#url)
## Methods<!-- -->[**](#Methods)
### [**](#__init__)[**](https://undefined/apify/apify-client-python/blob/master//src/apify_client/clients/base/base_client.py#L56)\_\_init\_\_
* ****\_\_init\_\_**(\*, base\_url, root\_client, http\_client, resource\_id, resource\_path, params): None
- Overrides [ResourceClient.\_\_init\_\_](https://docs.apify.com/api/client/python/api/client/python/reference/class/ResourceClient.md#__init__)
Initialize a new instance.
***
#### Parameters
* ##### keyword-onlybase\_url: str
Base URL of the API server.
* ##### keyword-onlyroot\_client: [ApifyClient](https://docs.apify.com/api/client/python/api/client/python/reference/class/ApifyClient.md)
The ApifyClient instance under which this resource client exists.
* ##### keyword-onlyhttp\_client: [HTTPClient](https://docs.apify.com/api/client/python/api/client/python/reference/class/HTTPClient.md)
The HTTPClient instance to be used in this client.
* ##### optionalkeyword-onlyresource\_id: str | None = <!-- -->None
ID of the manipulated resource, in case of a single-resource client.
* ##### keyword-onlyresource\_path: str
Path to the resource's endpoint on the API server.
* ##### optionalkeyword-onlyparams: dict | None = <!-- -->None
Parameters to include in all requests from this client.
#### Returns None
## Properties<!-- -->[**](#Properties)
### [**](#http_client)[**](https://undefined/apify/apify-client-python/blob/master//src/apify_client/clients/base/base_client.py#L53)http\_client
**http\_client: [HTTPClient](https://docs.apify.com/api/client/python/api/client/python/reference/class/HTTPClient.md) | [HTTPClientAsync](https://docs.apify.com/api/client/python/api/client/python/reference/class/HTTPClientAsync.md)
Inherited from [BaseClient.http\_client](https://docs.apify.com/api/client/python/api/client/python/reference/class/BaseClient.md#http_client)
Overrides [\_BaseBaseClient.http\_client](https://docs.apify.com/api/client/python/api/client/python/reference/class/_BaseBaseClient.md#http_client)
### [**](#params)[**](https://undefined/apify/apify-client-python/blob/master//src/apify_client/clients/base/base_client.py#L17)params
**params: dict
Inherited from [\_BaseBaseClient.params](https://docs.apify.com/api/client/python/api/client/python/reference/class/_BaseBaseClient.md#params)
### [**](#resource_id)[**](https://undefined/apify/apify-client-python/blob/master//src/apify_client/clients/base/base_client.py#L15)resource\_id
**resource\_id: str | None
Inherited from [\_BaseBaseClient.resource\_id](https://docs.apify.com/api/client/python/api/client/python/reference/class/_BaseBaseClient.md#resource_id)
### [**](#root_client)[**](https://undefined/apify/apify-client-python/blob/master//src/apify_client/clients/base/base_client.py#L54)root\_client
**root\_client: [ApifyClient](https://docs.apify.com/api/client/python/api/client/python/reference/class/ApifyClient.md) | [ApifyClientAsync](https://docs.apify.com/api/client/python/api/client/python/reference/class/ApifyClientAsync.md)
Inherited from [BaseClient.root\_client](https://docs.apify.com/api/client/python/api/client/python/reference/class/BaseClient.md#root_client)
Overrides [\_BaseBaseClient.root\_client](https://docs.apify.com/api/client/python/api/client/python/reference/class/_BaseBaseClient.md#root_client)
### [**](#url)[**](https://undefined/apify/apify-client-python/blob/master//src/apify_client/clients/base/base_client.py#L16)url
**url: str
Inherited from [\_BaseBaseClient.url](https://docs.apify.com/api/client/python/api/client/python/reference/class/_BaseBaseClient.md#url)
---
# ResourceClientAsync<!-- -->
Base class for async sub-clients manipulating a single resource.
### Hierarchy
* [BaseClientAsync](https://docs.apify.com/api/client/python/api/client/python/reference/class/BaseClientAsync.md)
* *ResourceClientAsync*
* [RequestQueueClientAsync](https://docs.apify.com/api/client/python/api/client/python/reference/class/RequestQueueClientAsync.md)
* [DatasetClientAsync](https://docs.apify.com/api/client/python/api/client/python/reference/class/DatasetClientAsync.md)
* [UserClientAsync](https://docs.apify.com/api/client/python/api/client/python/reference/class/UserClientAsync.md)
* [ScheduleClientAsync](https://docs.apify.com/api/client/python/api/client/python/reference/class/ScheduleClientAsync.md)
* [WebhookDispatchClientAsync](https://docs.apify.com/api/client/python/api/client/python/reference/class/WebhookDispatchClientAsync.md)
* [ActorEnvVarClientAsync](https://docs.apify.com/api/client/python/api/client/python/reference/class/ActorEnvVarClientAsync.md)
* [TaskClientAsync](https://docs.apify.com/api/client/python/api/client/python/reference/class/TaskClientAsync.md)
* [ActorClientAsync](https://docs.apify.com/api/client/python/api/client/python/reference/class/ActorClientAsync.md)
* [ActorVersionClientAsync](https://docs.apify.com/api/client/python/api/client/python/reference/class/ActorVersionClientAsync.md)
* [WebhookClientAsync](https://docs.apify.com/api/client/python/api/client/python/reference/class/WebhookClientAsync.md)
* [KeyValueStoreClientAsync](https://docs.apify.com/api/client/python/api/client/python/reference/class/KeyValueStoreClientAsync.md)
* [LogClientAsync](https://docs.apify.com/api/client/python/api/client/python/reference/class/LogClientAsync.md)
* [ActorJobBaseClientAsync](https://docs.apify.com/api/client/python/api/client/python/reference/class/ActorJobBaseClientAsync.md)
## Index[**](#Index)
### Methods
* [**\_\_init\_\_](https://docs.apify.com/api/client/python/api/client/python/reference/class/ResourceClientAsync.md#__init__)
### Properties
* [**http\_client](https://docs.apify.com/api/client/python/api/client/python/reference/class/ResourceClientAsync.md#http_client)
* [**params](https://docs.apify.com/api/client/python/api/client/python/reference/class/ResourceClientAsync.md#params)
* [**resource\_id](https://docs.apify.com/api/client/python/api/client/python/reference/class/ResourceClientAsync.md#resource_id)
* [**root\_client](https://docs.apify.com/api/client/python/api/client/python/reference/class/ResourceClientAsync.md#root_client)
* [**url](https://docs.apify.com/api/client/python/api/client/python/reference/class/ResourceClientAsync.md#url)
## Methods<!-- -->[**](#Methods)
### [**](#__init__)[**](https://undefined/apify/apify-client-python/blob/master//src/apify_client/clients/base/base_client.py#L97)\_\_init\_\_
* ****\_\_init\_\_**(\*, base\_url, root\_client, http\_client, resource\_id, resource\_path, params): None
- Overrides [ResourceClientAsync.\_\_init\_\_](https://docs.apify.com/api/client/python/api/client/python/reference/class/ResourceClientAsync.md#__init__)
Initialize a new instance.
***
#### Parameters
* ##### keyword-onlybase\_url: str
Base URL of the API server.
* ##### keyword-onlyroot\_client: [ApifyClientAsync](https://docs.apify.com/api/client/python/api/client/python/reference/class/ApifyClientAsync.md)
The ApifyClientAsync instance under which this resource client exists.
* ##### keyword-onlyhttp\_client: [HTTPClientAsync](https://docs.apify.com/api/client/python/api/client/python/reference/class/HTTPClientAsync.md)
The HTTPClientAsync instance to be used in this client.
* ##### optionalkeyword-onlyresource\_id: str | None = <!-- -->None
ID of the manipulated resource, in case of a single-resource client.
* ##### keyword-onlyresource\_path: str
Path to the resource's endpoint on the API server.
* ##### optionalkeyword-onlyparams: dict | None = <!-- -->None
Parameters to include in all requests from this client.
#### Returns None
## Properties<!-- -->[**](#Properties)
### [**](#http_client)[**](https://undefined/apify/apify-client-python/blob/master//src/apify_client/clients/base/base_client.py#L94)http\_client
**http\_client: [HTTPClient](https://docs.apify.com/api/client/python/api/client/python/reference/class/HTTPClient.md) | [HTTPClientAsync](https://docs.apify.com/api/client/python/api/client/python/reference/class/HTTPClientAsync.md)
Inherited from [BaseClientAsync.http\_client](https://docs.apify.com/api/client/python/api/client/python/reference/class/BaseClientAsync.md#http_client)
Overrides [\_BaseBaseClient.http\_client](https://docs.apify.com/api/client/python/api/client/python/reference/class/_BaseBaseClient.md#http_client)
### [**](#params)[**](https://undefined/apify/apify-client-python/blob/master//src/apify_client/clients/base/base_client.py#L17)params
**params: dict
Inherited from [\_BaseBaseClient.params](https://docs.apify.com/api/client/python/api/client/python/reference/class/_BaseBaseClient.md#params)
### [**](#resource_id)[**](https://undefined/apify/apify-client-python/blob/master//src/apify_client/clients/base/base_client.py#L15)resource\_id
**resource\_id: str | None
Inherited from [\_BaseBaseClient.resource\_id](https://docs.apify.com/api/client/python/api/client/python/reference/class/_BaseBaseClient.md#resource_id)
### [**](#root_client)[**](https://undefined/apify/apify-client-python/blob/master//src/apify_client/clients/base/base_client.py#L95)root\_client
**root\_client: [ApifyClient](https://docs.apify.com/api/client/python/api/client/python/reference/class/ApifyClient.md) | [ApifyClientAsync](https://docs.apify.com/api/client/python/api/client/python/reference/class/ApifyClientAsync.md)
Inherited from [BaseClientAsync.root\_client](https://docs.apify.com/api/client/python/api/client/python/reference/class/BaseClientAsync.md#root_client)
Overrides [\_BaseBaseClient.root\_client](https://docs.apify.com/api/client/python/api/client/python/reference/class/_BaseBaseClient.md#root_client)
### [**](#url)[**](https://undefined/apify/apify-client-python/blob/master//src/apify_client/clients/base/base_client.py#L16)url
**url: str
Inherited from [\_BaseBaseClient.url](https://docs.apify.com/api/client/python/api/client/python/reference/class/_BaseBaseClient.md#url)
---
# ResourceCollectionClient<!-- -->
Base class for sub-clients manipulating a resource collection.
### Hierarchy
* [BaseClient](https://docs.apify.com/api/client/python/api/client/python/reference/class/BaseClient.md)
* *ResourceCollectionClient*
* [RequestQueueCollectionClient](https://docs.apify.com/api/client/python/api/client/python/reference/class/RequestQueueCollectionClient.md)
* [StoreCollectionClient](https://docs.apify.com/api/client/python/api/client/python/reference/class/StoreCollectionClient.md)
* [DatasetCollectionClient](https://docs.apify.com/api/client/python/api/client/python/reference/class/DatasetCollectionClient.md)
* [KeyValueStoreCollectionClient](https://docs.apify.com/api/client/python/api/client/python/reference/class/KeyValueStoreCollectionClient.md)
* [ScheduleCollectionClient](https://docs.apify.com/api/client/python/api/client/python/reference/class/ScheduleCollectionClient.md)
* [ActorVersionCollectionClient](https://docs.apify.com/api/client/python/api/client/python/reference/class/ActorVersionCollectionClient.md)
* [WebhookCollectionClient](https://docs.apify.com/api/client/python/api/client/python/reference/class/WebhookCollectionClient.md)
* [ActorCollectionClient](https://docs.apify.com/api/client/python/api/client/python/reference/class/ActorCollectionClient.md)
* [ActorEnvVarCollectionClient](https://docs.apify.com/api/client/python/api/client/python/reference/class/ActorEnvVarCollectionClient.md)
* [BuildCollectionClient](https://docs.apify.com/api/client/python/api/client/python/reference/class/BuildCollectionClient.md)
* [TaskCollectionClient](https://docs.apify.com/api/client/python/api/client/python/reference/class/TaskCollectionClient.md)
* [RunCollectionClient](https://docs.apify.com/api/client/python/api/client/python/reference/class/RunCollectionClient.md)
* [WebhookDispatchCollectionClient](https://docs.apify.com/api/client/python/api/client/python/reference/class/WebhookDispatchCollectionClient.md)
## Index[**](#Index)
### Methods
* [**\_\_init\_\_](https://docs.apify.com/api/client/python/api/client/python/reference/class/ResourceCollectionClient.md#__init__)
### Properties
* [**http\_client](https://docs.apify.com/api/client/python/api/client/python/reference/class/ResourceCollectionClient.md#http_client)
* [**params](https://docs.apify.com/api/client/python/api/client/python/reference/class/ResourceCollectionClient.md#params)
* [**resource\_id](https://docs.apify.com/api/client/python/api/client/python/reference/class/ResourceCollectionClient.md#resource_id)
* [**root\_client](https://docs.apify.com/api/client/python/api/client/python/reference/class/ResourceCollectionClient.md#root_client)
* [**url](https://docs.apify.com/api/client/python/api/client/python/reference/class/ResourceCollectionClient.md#url)
## Methods<!-- -->[**](#Methods)
### [**](#__init__)[**](https://undefined/apify/apify-client-python/blob/master//src/apify_client/clients/base/base_client.py#L56)\_\_init\_\_
* ****\_\_init\_\_**(\*, base\_url, root\_client, http\_client, resource\_id, resource\_path, params): None
- Overrides [ResourceCollectionClient.\_\_init\_\_](https://docs.apify.com/api/client/python/api/client/python/reference/class/ResourceCollectionClient.md#__init__)
Initialize a new instance.
***
#### Parameters
* ##### keyword-onlybase\_url: str
Base URL of the API server.
* ##### keyword-onlyroot\_client: [ApifyClient](https://docs.apify.com/api/client/python/api/client/python/reference/class/ApifyClient.md)
The ApifyClient instance under which this resource client exists.
* ##### keyword-onlyhttp\_client: [HTTPClient](https://docs.apify.com/api/client/python/api/client/python/reference/class/HTTPClient.md)
The HTTPClient instance to be used in this client.
* ##### optionalkeyword-onlyresource\_id: str | None = <!-- -->None
ID of the manipulated resource, in case of a single-resource client.
* ##### keyword-onlyresource\_path: str
Path to the resource's endpoint on the API server.
* ##### optionalkeyword-onlyparams: dict | None = <!-- -->None
Parameters to include in all requests from this client.
#### Returns None
## Properties<!-- -->[**](#Properties)
### [**](#http_client)[**](https://undefined/apify/apify-client-python/blob/master//src/apify_client/clients/base/base_client.py#L53)http\_client
**http\_client: [HTTPClient](https://docs.apify.com/api/client/python/api/client/python/reference/class/HTTPClient.md) | [HTTPClientAsync](https://docs.apify.com/api/client/python/api/client/python/reference/class/HTTPClientAsync.md)
Inherited from [BaseClient.http\_client](https://docs.apify.com/api/client/python/api/client/python/reference/class/BaseClient.md#http_client)
Overrides [\_BaseBaseClient.http\_client](https://docs.apify.com/api/client/python/api/client/python/reference/class/_BaseBaseClient.md#http_client)
### [**](#params)[**](https://undefined/apify/apify-client-python/blob/master//src/apify_client/clients/base/base_client.py#L17)params
**params: dict
Inherited from [\_BaseBaseClient.params](https://docs.apify.com/api/client/python/api/client/python/reference/class/_BaseBaseClient.md#params)
### [**](#resource_id)[**](https://undefined/apify/apify-client-python/blob/master//src/apify_client/clients/base/base_client.py#L15)resource\_id
**resource\_id: str | None
Inherited from [\_BaseBaseClient.resource\_id](https://docs.apify.com/api/client/python/api/client/python/reference/class/_BaseBaseClient.md#resource_id)
### [**](#root_client)[**](https://undefined/apify/apify-client-python/blob/master//src/apify_client/clients/base/base_client.py#L54)root\_client
**root\_client: [ApifyClient](https://docs.apify.com/api/client/python/api/client/python/reference/class/ApifyClient.md) | [ApifyClientAsync](https://docs.apify.com/api/client/python/api/client/python/reference/class/ApifyClientAsync.md)
Inherited from [BaseClient.root\_client](https://docs.apify.com/api/client/python/api/client/python/reference/class/BaseClient.md#root_client)
Overrides [\_BaseBaseClient.root\_client](https://docs.apify.com/api/client/python/api/client/python/reference/class/_BaseBaseClient.md#root_client)
### [**](#url)[**](https://undefined/apify/apify-client-python/blob/master//src/apify_client/clients/base/base_client.py#L16)url
**url: str
Inherited from [\_BaseBaseClient.url](https://docs.apify.com/api/client/python/api/client/python/reference/class/_BaseBaseClient.md#url)
---
# ResourceCollectionClientAsync<!-- -->
Base class for async sub-clients manipulating a resource collection.
### Hierarchy
* [BaseClientAsync](https://docs.apify.com/api/client/python/api/client/python/reference/class/BaseClientAsync.md)
* *ResourceCollectionClientAsync*
* [RequestQueueCollectionClientAsync](https://docs.apify.com/api/client/python/api/client/python/reference/class/RequestQueueCollectionClientAsync.md)
* [StoreCollectionClientAsync](https://docs.apify.com/api/client/python/api/client/python/reference/class/StoreCollectionClientAsync.md)
* [DatasetCollectionClientAsync](https://docs.apify.com/api/client/python/api/client/python/reference/class/DatasetCollectionClientAsync.md)
* [KeyValueStoreCollectionClientAsync](https://docs.apify.com/api/client/python/api/client/python/reference/class/KeyValueStoreCollectionClientAsync.md)
* [ScheduleCollectionClientAsync](https://docs.apify.com/api/client/python/api/client/python/reference/class/ScheduleCollectionClientAsync.md)
* [ActorVersionCollectionClientAsync](https://docs.apify.com/api/client/python/api/client/python/reference/class/ActorVersionCollectionClientAsync.md)
* [WebhookCollectionClientAsync](https://docs.apify.com/api/client/python/api/client/python/reference/class/WebhookCollectionClientAsync.md)
* [ActorCollectionClientAsync](https://docs.apify.com/api/client/python/api/client/python/reference/class/ActorCollectionClientAsync.md)
* [ActorEnvVarCollectionClientAsync](https://docs.apify.com/api/client/python/api/client/python/reference/class/ActorEnvVarCollectionClientAsync.md)
* [BuildCollectionClientAsync](https://docs.apify.com/api/client/python/api/client/python/reference/class/BuildCollectionClientAsync.md)
* [TaskCollectionClientAsync](https://docs.apify.com/api/client/python/api/client/python/reference/class/TaskCollectionClientAsync.md)
* [RunCollectionClientAsync](https://docs.apify.com/api/client/python/api/client/python/reference/class/RunCollectionClientAsync.md)
* [WebhookDispatchCollectionClientAsync](https://docs.apify.com/api/client/python/api/client/python/reference/class/WebhookDispatchCollectionClientAsync.md)
## Index[**](#Index)
### Methods
* [**\_\_init\_\_](https://docs.apify.com/api/client/python/api/client/python/reference/class/ResourceCollectionClientAsync.md#__init__)
### Properties
* [**http\_client](https://docs.apify.com/api/client/python/api/client/python/reference/class/ResourceCollectionClientAsync.md#http_client)
* [**params](https://docs.apify.com/api/client/python/api/client/python/reference/class/ResourceCollectionClientAsync.md#params)
* [**resource\_id](https://docs.apify.com/api/client/python/api/client/python/reference/class/ResourceCollectionClientAsync.md#resource_id)
* [**root\_client](https://docs.apify.com/api/client/python/api/client/python/reference/class/ResourceCollectionClientAsync.md#root_client)
* [**url](https://docs.apify.com/api/client/python/api/client/python/reference/class/ResourceCollectionClientAsync.md#url)
## Methods<!-- -->[**](#Methods)
### [**](#__init__)[**](https://undefined/apify/apify-client-python/blob/master//src/apify_client/clients/base/base_client.py#L97)\_\_init\_\_
* ****\_\_init\_\_**(\*, base\_url, root\_client, http\_client, resource\_id, resource\_path, params): None
- Overrides [ResourceCollectionClientAsync.\_\_init\_\_](https://docs.apify.com/api/client/python/api/client/python/reference/class/ResourceCollectionClientAsync.md#__init__)
Initialize a new instance.
***
#### Parameters
* ##### keyword-onlybase\_url: str
Base URL of the API server.
* ##### keyword-onlyroot\_client: [ApifyClientAsync](https://docs.apify.com/api/client/python/api/client/python/reference/class/ApifyClientAsync.md)
The ApifyClientAsync instance under which this resource client exists.
* ##### keyword-onlyhttp\_client: [HTTPClientAsync](https://docs.apify.com/api/client/python/api/client/python/reference/class/HTTPClientAsync.md)
The HTTPClientAsync instance to be used in this client.
* ##### optionalkeyword-onlyresource\_id: str | None = <!-- -->None
ID of the manipulated resource, in case of a single-resource client.
* ##### keyword-onlyresource\_path: str
Path to the resource's endpoint on the API server.
* ##### optionalkeyword-onlyparams: dict | None = <!-- -->None
Parameters to include in all requests from this client.
#### Returns None
## Properties<!-- -->[**](#Properties)
### [**](#http_client)[**](https://undefined/apify/apify-client-python/blob/master//src/apify_client/clients/base/base_client.py#L94)http\_client
**http\_client: [HTTPClient](https://docs.apify.com/api/client/python/api/client/python/reference/class/HTTPClient.md) | [HTTPClientAsync](https://docs.apify.com/api/client/python/api/client/python/reference/class/HTTPClientAsync.md)
Inherited from [BaseClientAsync.http\_client](https://docs.apify.com/api/client/python/api/client/python/reference/class/BaseClientAsync.md#http_client)
Overrides [\_BaseBaseClient.http\_client](https://docs.apify.com/api/client/python/api/client/python/reference/class/_BaseBaseClient.md#http_client)
### [**](#params)[**](https://undefined/apify/apify-client-python/blob/master//src/apify_client/clients/base/base_client.py#L17)params
**params: dict
Inherited from [\_BaseBaseClient.params](https://docs.apify.com/api/client/python/api/client/python/reference/class/_BaseBaseClient.md#params)
### [**](#resource_id)[**](https://undefined/apify/apify-client-python/blob/master//src/apify_client/clients/base/base_client.py#L15)resource\_id
**resource\_id: str | None
Inherited from [\_BaseBaseClient.resource\_id](https://docs.apify.com/api/client/python/api/client/python/reference/class/_BaseBaseClient.md#resource_id)
### [**](#root_client)[**](https://undefined/apify/apify-client-python/blob/master//src/apify_client/clients/base/base_client.py#L95)root\_client
**root\_client: [ApifyClient](https://docs.apify.com/api/client/python/api/client/python/reference/class/ApifyClient.md) | [ApifyClientAsync](https://docs.apify.com/api/client/python/api/client/python/reference/class/ApifyClientAsync.md)
Inherited from [BaseClientAsync.root\_client](https://docs.apify.com/api/client/python/api/client/python/reference/class/BaseClientAsync.md#root_client)
Overrides [\_BaseBaseClient.root\_client](https://docs.apify.com/api/client/python/api/client/python/reference/class/_BaseBaseClient.md#root_client)
### [**](#url)[**](https://undefined/apify/apify-client-python/blob/master//src/apify_client/clients/base/base_client.py#L16)url
**url: str
Inherited from [\_BaseBaseClient.url](https://docs.apify.com/api/client/python/api/client/python/reference/class/_BaseBaseClient.md#url)
---
# RunClient<!-- -->
Sub-client for manipulating a single Actor run.
### Hierarchy
* [ActorJobBaseClient](https://docs.apify.com/api/client/python/api/client/python/reference/class/ActorJobBaseClient.md)
* *RunClient*
## Index[**](#Index)
### Methods
* [**\_\_init\_\_](https://docs.apify.com/api/client/python/api/client/python/reference/class/RunClient.md#__init__)
* [**abort](https://docs.apify.com/api/client/python/api/client/python/reference/class/RunClient.md#abort)
* [**charge](https://docs.apify.com/api/client/python/api/client/python/reference/class/RunClient.md#charge)
* [**dataset](https://docs.apify.com/api/client/python/api/client/python/reference/class/RunClient.md#dataset)
* [**delete](https://docs.apify.com/api/client/python/api/client/python/reference/class/RunClient.md#delete)
* [**get](https://docs.apify.com/api/client/python/api/client/python/reference/class/RunClient.md#get)
* [**get\_status\_message\_watcher](https://docs.apify.com/api/client/python/api/client/python/reference/class/RunClient.md#get_status_message_watcher)
* [**get\_streamed\_log](https://docs.apify.com/api/client/python/api/client/python/reference/class/RunClient.md#get_streamed_log)
* [**key\_value\_store](https://docs.apify.com/api/client/python/api/client/python/reference/class/RunClient.md#key_value_store)
* [**log](https://docs.apify.com/api/client/python/api/client/python/reference/class/RunClient.md#log)
* [**metamorph](https://docs.apify.com/api/client/python/api/client/python/reference/class/RunClient.md#metamorph)
* [**reboot](https://docs.apify.com/api/client/python/api/client/python/reference/class/RunClient.md#reboot)
* [**request\_queue](https://docs.apify.com/api/client/python/api/client/python/reference/class/RunClient.md#request_queue)
* [**resurrect](https://docs.apify.com/api/client/python/api/client/python/reference/class/RunClient.md#resurrect)
* [**update](https://docs.apify.com/api/client/python/api/client/python/reference/class/RunClient.md#update)
* [**wait\_for\_finish](https://docs.apify.com/api/client/python/api/client/python/reference/class/RunClient.md#wait_for_finish)
### Properties
* [**http\_client](https://docs.apify.com/api/client/python/api/client/python/reference/class/RunClient.md#http_client)
* [**params](https://docs.apify.com/api/client/python/api/client/python/reference/class/RunClient.md#params)
* [**resource\_id](https://docs.apify.com/api/client/python/api/client/python/reference/class/RunClient.md#resource_id)
* [**root\_client](https://docs.apify.com/api/client/python/api/client/python/reference/class/RunClient.md#root_client)
* [**url](https://docs.apify.com/api/client/python/api/client/python/reference/class/RunClient.md#url)
## Methods<!-- -->[**](#Methods)
### [**](#__init__)[**](https://undefined/apify/apify-client-python/blob/master//src/apify_client/clients/resource_clients/run.py#L42)\_\_init\_\_
* ****\_\_init\_\_**(\*, base\_url, root\_client, http\_client, resource\_id, resource\_path, params): None
- Overrides [ActorJobBaseClient.\_\_init\_\_](https://docs.apify.com/api/client/python/api/client/python/reference/class/ActorJobBaseClient.md#__init__)
Initialize a new instance.
***
#### Parameters
* ##### keyword-onlybase\_url: str
Base URL of the API server.
* ##### keyword-onlyroot\_client: [ApifyClient](https://docs.apify.com/api/client/python/api/client/python/reference/class/ApifyClient.md)
The ApifyClient instance under which this resource client exists.
* ##### keyword-onlyhttp\_client: [HTTPClient](https://docs.apify.com/api/client/python/api/client/python/reference/class/HTTPClient.md)
The HTTPClient instance to be used in this client.
* ##### optionalkeyword-onlyresource\_id: str | None = <!-- -->None
ID of the manipulated resource, in case of a single-resource client.
* ##### keyword-onlyresource\_path: str
Path to the resource's endpoint on the API server.
* ##### optionalkeyword-onlyparams: dict | None = <!-- -->None
Parameters to include in all requests from this client.
#### Returns None
### [**](#abort)[**](https://undefined/apify/apify-client-python/blob/master//src/apify_client/clients/resource_clients/run.py#L90)abort
* ****abort**(\*, gracefully): dict
- Abort the Actor run which is starting or currently running and return its details.
<https://docs.apify.com/api/v2#/reference/actor-runs/abort-run/abort-run>
***
#### Parameters
* ##### optionalkeyword-onlygracefully: bool | None = <!-- -->None
If True, the Actor run will abort gracefully. It will send `aborting` and `persistStates` events into the run and force-stop the run after 30 seconds. It is helpful in cases where you plan to resurrect the run later.
#### Returns dict
### [**](#charge)[**](https://undefined/apify/apify-client-python/blob/master//src/apify_client/clients/resource_clients/run.py#L296)charge
* ****charge**(event\_name, count, idempotency\_key): None
- Charge for an event of a Pay-Per-Event Actor run.
<https://docs.apify.com/api/v2#/reference/actor-runs/charge-events-in-run>
***
#### Parameters
* ##### event\_name: str
* ##### optionalcount: int | None = <!-- -->None
* ##### optionalidempotency\_key: str | None = <!-- -->None
#### Returns None
### [**](#dataset)[**](https://undefined/apify/apify-client-python/blob/master//src/apify_client/clients/resource_clients/run.py#L221)dataset
* ****dataset**(): [DatasetClient](https://docs.apify.com/api/client/python/api/client/python/reference/class/DatasetClient.md)
- Get the client for the default dataset of the Actor run.
<https://docs.apify.com/api/v2#/reference/actors/last-run-object-and-its-storages>
***
#### Returns [DatasetClient](https://docs.apify.com/api/client/python/api/client/python/reference/class/DatasetClient.md)
### [**](#delete)[**](https://undefined/apify/apify-client-python/blob/master//src/apify_client/clients/resource_clients/run.py#L83)delete
* ****delete**(): None
- Delete the run.
<https://docs.apify.com/api/v2#/reference/actor-runs/delete-run/delete-run>
***
#### Returns None
### [**](#get)[**](https://undefined/apify/apify-client-python/blob/master//src/apify_client/clients/resource_clients/run.py#L46)get
* ****get**(): dict | None
- Return information about the Actor run.
<https://docs.apify.com/api/v2#/reference/actor-runs/run-object/get-run>
***
#### Returns dict | None
### [**](#get_status_message_watcher)[**](https://undefined/apify/apify-client-python/blob/master//src/apify_client/clients/resource_clients/run.py#L332)get\_status\_message\_watcher
* ****get\_status\_message\_watcher**(to\_logger, check\_period): [StatusMessageWatcherSync](https://docs.apify.com/api/client/python/api/client/python/reference/class/StatusMessageWatcherSync.md)
- Get `StatusMessageWatcher` instance that can be used to redirect status and status messages to logs.
`StatusMessageWatcher` can be explicitly started and stopped or used as a context manager.
***
#### Parameters
* ##### optionalto\_logger: logging.Logger | None = <!-- -->None
`Logger` used for logging the status and status messages. If not provided, a new logger is created.
* ##### optionalcheck\_period: timedelta = <!-- -->timedelta(seconds=1)
The period with which the status message will be polled.
#### Returns [StatusMessageWatcherSync](https://docs.apify.com/api/client/python/api/client/python/reference/class/StatusMessageWatcherSync.md)
### [**](#get_streamed_log)[**](https://undefined/apify/apify-client-python/blob/master//src/apify_client/clients/resource_clients/run.py#L269)get\_streamed\_log
* ****get\_streamed\_log**(to\_logger, \*, from\_start): [StreamedLogSync](https://docs.apify.com/api/client/python/api/client/python/reference/class/StreamedLogSync.md)
- Get `StreamedLog` instance that can be used to redirect logs.
`StreamedLog` can be explicitly started and stopped or used as a context manager.
***
#### Parameters
* ##### optionalto\_logger: logging.Logger | None = <!-- -->None
`Logger` used for logging the redirected messages. If not provided, a new logger is created
* ##### optionalkeyword-onlyfrom\_start: bool = <!-- -->True
If `True`, all logs from the start of the actor run will be redirected. If `False`, only newly arrived logs will be redirected. This can be useful for redirecting only a small portion of relevant logs for long-running actors in stand-by.
#### Returns [StreamedLogSync](https://docs.apify.com/api/client/python/api/client/python/reference/class/StreamedLogSync.md)
### [**](#key_value_store)[**](https://undefined/apify/apify-client-python/blob/master//src/apify_client/clients/resource_clients/run.py#L233)key\_value\_store
* ****key\_value\_store**(): [KeyValueStoreClient](https://docs.apify.com/api/client/python/api/client/python/reference/class/KeyValueStoreClient.md)
- Get the client for the default key-value store of the Actor run.
<https://docs.apify.com/api/v2#/reference/actors/last-run-object-and-its-storages>
***
#### Returns [KeyValueStoreClient](https://docs.apify.com/api/client/python/api/client/python/reference/class/KeyValueStoreClient.md)
### [**](#log)[**](https://undefined/apify/apify-client-python/blob/master//src/apify_client/clients/resource_clients/run.py#L257)log
* ****log**(): [LogClient](https://docs.apify.com/api/client/python/api/client/python/reference/class/LogClient.md)
- Get the client for the log of the Actor run.
<https://docs.apify.com/api/v2#/reference/actors/last-run-object-and-its-storages>
***
#### Returns [LogClient](https://docs.apify.com/api/client/python/api/client/python/reference/class/LogClient.md)
### [**](#metamorph)[**](https://undefined/apify/apify-client-python/blob/master//src/apify_client/clients/resource_clients/run.py#L117)metamorph
* ****metamorph**(\*, target\_actor\_id, target\_actor\_build, run\_input, content\_type): dict
- Transform an Actor run into a run of another Actor with a new input.
<https://docs.apify.com/api/v2#/reference/actor-runs/metamorph-run/metamorph-run>
***
#### Parameters
* ##### keyword-onlytarget\_actor\_id: str
ID of the target Actor that the run should be transformed into.
* ##### optionalkeyword-onlytarget\_actor\_build: str | None = <!-- -->None
The build of the target Actor. It can be either a build tag or build number. By default, the run uses the build specified in the default run configuration for the target Actor (typically the latest build).
* ##### optionalkeyword-onlyrun\_input: Any = <!-- -->None
The input to pass to the new run.
* ##### optionalkeyword-onlycontent\_type: str | None = <!-- -->None
The content type of the input.
#### Returns dict
### [**](#reboot)[**](https://undefined/apify/apify-client-python/blob/master//src/apify_client/clients/resource_clients/run.py#L207)reboot
* ****reboot**(): dict
- Reboot an Actor run. Only runs that are running, i.e. runs with status RUNNING can be rebooted.
<https://docs.apify.com/api/v2#/reference/actor-runs/reboot-run/reboot-run>
***
#### Returns dict
### [**](#request_queue)[**](https://undefined/apify/apify-client-python/blob/master//src/apify_client/clients/resource_clients/run.py#L245)request\_queue
* ****request\_queue**(): [RequestQueueClient](https://docs.apify.com/api/client/python/api/client/python/reference/class/RequestQueueClient.md)
- Get the client for the default request queue of the Actor run.
<https://docs.apify.com/api/v2#/reference/actors/last-run-object-and-its-storages>
***
#### Returns [RequestQueueClient](https://docs.apify.com/api/client/python/api/client/python/reference/class/RequestQueueClient.md)
### [**](#resurrect)[**](https://undefined/apify/apify-client-python/blob/master//src/apify_client/clients/resource_clients/run.py#L156)resurrect
* ****resurrect**(\*, build, memory\_mbytes, timeout\_secs, max\_items, max\_total\_charge\_usd, restart\_on\_error): dict
- Resurrect a finished Actor run.
Only finished runs, i.e. runs with status FINISHED, FAILED, ABORTED and TIMED-OUT can be resurrected. Run status will be updated to RUNNING and its container will be restarted with the same default storages.
<https://docs.apify.com/api/v2#/reference/actor-runs/resurrect-run/resurrect-run>
***
#### Parameters
* ##### optionalkeyword-onlybuild: str | None = <!-- -->None
Which Actor build the resurrected run should use. It can be either a build tag or build number. By default, the resurrected run uses the same build as before.
* ##### optionalkeyword-onlymemory\_mbytes: int | None = <!-- -->None
New memory limit for the resurrected run, in megabytes. By default, the resurrected run uses the same memory limit as before.
* ##### optionalkeyword-onlytimeout\_secs: int | None = <!-- -->None
New timeout for the resurrected run, in seconds. By default, the resurrected run uses the same timeout as before.
* ##### optionalkeyword-onlymax\_items: int | None = <!-- -->None
Maximum number of items that the resurrected pay-per-result run will return. By default, the resurrected run uses the same limit as before. Limit can be only increased.
* ##### optionalkeyword-onlymax\_total\_charge\_usd: Decimal | None = <!-- -->None
Maximum cost for the resurrected pay-per-event run in USD. By default, the resurrected run uses the same limit as before. Limit can be only increased.
* ##### optionalkeyword-onlyrestart\_on\_error: bool | None = <!-- -->None
Determines whether the resurrected run will be restarted if it fails. By default, the resurrected run uses the same setting as before.
#### Returns dict
### [**](#update)[**](https://undefined/apify/apify-client-python/blob/master//src/apify_client/clients/resource_clients/run.py#L56)update
* ****update**(\*, status\_message, is\_status\_message\_terminal, general\_access): dict
- Update the run with the specified fields.
<https://docs.apify.com/api/v2#/reference/actor-runs/run-object/update-run>
***
#### Parameters
* ##### optionalkeyword-onlystatus\_message: str | None = <!-- -->None
The new status message for the run.
* ##### optionalkeyword-onlyis\_status\_message\_terminal: bool | None = <!-- -->None
Set this flag to True if this is the final status message of the Actor run.
* ##### optionalkeyword-onlygeneral\_access: RunGeneralAccess | None = <!-- -->None
Determines how others can access the run and its storages.
#### Returns dict
### [**](#wait_for_finish)[**](https://undefined/apify/apify-client-python/blob/master//src/apify_client/clients/resource_clients/run.py#L105)wait\_for\_finish
* ****wait\_for\_finish**(\*, wait\_secs): dict | None
- Wait synchronously until the run finishes or the server times out.
***
#### Parameters
* ##### optionalkeyword-onlywait\_secs: int | None = <!-- -->None
How long does the client wait for run to finish. None for indefinite.
#### Returns dict | None
## Properties<!-- -->[**](#Properties)
### [**](#http_client)[**](https://undefined/apify/apify-client-python/blob/master//src/apify_client/clients/base/base_client.py#L53)http\_client
**http\_client: [HTTPClient](https://docs.apify.com/api/client/python/api/client/python/reference/class/HTTPClient.md) | [HTTPClientAsync](https://docs.apify.com/api/client/python/api/client/python/reference/class/HTTPClientAsync.md)
Inherited from [BaseClient.http\_client](https://docs.apify.com/api/client/python/api/client/python/reference/class/BaseClient.md#http_client)
Overrides [\_BaseBaseClient.http\_client](https://docs.apify.com/api/client/python/api/client/python/reference/class/_BaseBaseClient.md#http_client)
### [**](#params)[**](https://undefined/apify/apify-client-python/blob/master//src/apify_client/clients/base/base_client.py#L17)params
**params: dict
Inherited from [\_BaseBaseClient.params](https://docs.apify.com/api/client/python/api/client/python/reference/class/_BaseBaseClient.md#params)
### [**](#resource_id)[**](https://undefined/apify/apify-client-python/blob/master//src/apify_client/clients/base/base_client.py#L15)resource\_id
**resource\_id: str | None
Inherited from [\_BaseBaseClient.resource\_id](https://docs.apify.com/api/client/python/api/client/python/reference/class/_BaseBaseClient.md#resource_id)
### [**](#root_client)[**](https://undefined/apify/apify-client-python/blob/master//src/apify_client/clients/base/base_client.py#L54)root\_client
**root\_client: [ApifyClient](https://docs.apify.com/api/client/python/api/client/python/reference/class/ApifyClient.md) | [ApifyClientAsync](https://docs.apify.com/api/client/python/api/client/python/reference/class/ApifyClientAsync.md)
Inherited from [BaseClient.root\_client](https://docs.apify.com/api/client/python/api/client/python/reference/class/BaseClient.md#root_client)
Overrides [\_BaseBaseClient.root\_client](https://docs.apify.com/api/client/python/api/client/python/reference/class/_BaseBaseClient.md#root_client)
### [**](#url)[**](https://undefined/apify/apify-client-python/blob/master//src/apify_client/clients/base/base_client.py#L16)url
**url: str
Inherited from [\_BaseBaseClient.url](https://docs.apify.com/api/client/python/api/client/python/reference/class/_BaseBaseClient.md#url)
---
# RunClientAsync<!-- -->
Async sub-client for manipulating a single Actor run.
### Hierarchy
* [ActorJobBaseClientAsync](https://docs.apify.com/api/client/python/api/client/python/reference/class/ActorJobBaseClientAsync.md)
* *RunClientAsync*
## Index[**](#Index)
### Methods
* [**\_\_init\_\_](https://docs.apify.com/api/client/python/api/client/python/reference/class/RunClientAsync.md#__init__)
* [**abort](https://docs.apify.com/api/client/python/api/client/python/reference/class/RunClientAsync.md#abort)
* [**charge](https://docs.apify.com/api/client/python/api/client/python/reference/class/RunClientAsync.md#charge)
* [**dataset](https://docs.apify.com/api/client/python/api/client/python/reference/class/RunClientAsync.md#dataset)
* [**delete](https://docs.apify.com/api/client/python/api/client/python/reference/class/RunClientAsync.md#delete)
* [**get](https://docs.apify.com/api/client/python/api/client/python/reference/class/RunClientAsync.md#get)
* [**get\_status\_message\_watcher](https://docs.apify.com/api/client/python/api/client/python/reference/class/RunClientAsync.md#get_status_message_watcher)
* [**get\_streamed\_log](https://docs.apify.com/api/client/python/api/client/python/reference/class/RunClientAsync.md#get_streamed_log)
* [**key\_value\_store](https://docs.apify.com/api/client/python/api/client/python/reference/class/RunClientAsync.md#key_value_store)
* [**log](https://docs.apify.com/api/client/python/api/client/python/reference/class/RunClientAsync.md#log)
* [**metamorph](https://docs.apify.com/api/client/python/api/client/python/reference/class/RunClientAsync.md#metamorph)
* [**reboot](https://docs.apify.com/api/client/python/api/client/python/reference/class/RunClientAsync.md#reboot)
* [**request\_queue](https://docs.apify.com/api/client/python/api/client/python/reference/class/RunClientAsync.md#request_queue)
* [**resurrect](https://docs.apify.com/api/client/python/api/client/python/reference/class/RunClientAsync.md#resurrect)
* [**update](https://docs.apify.com/api/client/python/api/client/python/reference/class/RunClientAsync.md#update)
* [**wait\_for\_finish](https://docs.apify.com/api/client/python/api/client/python/reference/class/RunClientAsync.md#wait_for_finish)
### Properties
* [**http\_client](https://docs.apify.com/api/client/python/api/client/python/reference/class/RunClientAsync.md#http_client)
* [**params](https://docs.apify.com/api/client/python/api/client/python/reference/class/RunClientAsync.md#params)
* [**resource\_id](https://docs.apify.com/api/client/python/api/client/python/reference/class/RunClientAsync.md#resource_id)
* [**root\_client](https://docs.apify.com/api/client/python/api/client/python/reference/class/RunClientAsync.md#root_client)
* [**url](https://docs.apify.com/api/client/python/api/client/python/reference/class/RunClientAsync.md#url)
## Methods<!-- -->[**](#Methods)
### [**](#__init__)[**](https://undefined/apify/apify-client-python/blob/master//src/apify_client/clients/resource_clients/run.py#L364)\_\_init\_\_
* ****\_\_init\_\_**(\*, base\_url, root\_client, http\_client, resource\_id, resource\_path, params): None
- Overrides [ActorJobBaseClientAsync.\_\_init\_\_](https://docs.apify.com/api/client/python/api/client/python/reference/class/ActorJobBaseClientAsync.md#__init__)
Initialize a new instance.
***
#### Parameters
* ##### keyword-onlybase\_url: str
Base URL of the API server.
* ##### keyword-onlyroot\_client: [ApifyClientAsync](https://docs.apify.com/api/client/python/api/client/python/reference/class/ApifyClientAsync.md)
The ApifyClientAsync instance under which this resource client exists.
* ##### keyword-onlyhttp\_client: [HTTPClientAsync](https://docs.apify.com/api/client/python/api/client/python/reference/class/HTTPClientAsync.md)
The HTTPClientAsync instance to be used in this client.
* ##### optionalkeyword-onlyresource\_id: str | None = <!-- -->None
ID of the manipulated resource, in case of a single-resource client.
* ##### keyword-onlyresource\_path: str
Path to the resource's endpoint on the API server.
* ##### optionalkeyword-onlyparams: dict | None = <!-- -->None
Parameters to include in all requests from this client.
#### Returns None
### [**](#abort)[**](https://undefined/apify/apify-client-python/blob/master//src/apify_client/clients/resource_clients/run.py#L405)abort
* **async **abort**(\*, gracefully): dict
- Abort the Actor run which is starting or currently running and return its details.
<https://docs.apify.com/api/v2#/reference/actor-runs/abort-run/abort-run>
***
#### Parameters
* ##### optionalkeyword-onlygracefully: bool | None = <!-- -->None
If True, the Actor run will abort gracefully. It will send `aborting` and `persistStates` events into the run and force-stop the run after 30 seconds. It is helpful in cases where you plan to resurrect the run later.
#### Returns dict
### [**](#charge)[**](https://undefined/apify/apify-client-python/blob/master//src/apify_client/clients/resource_clients/run.py#L623)charge
* **async **charge**(event\_name, count, idempotency\_key): None
- Charge for an event of a Pay-Per-Event Actor run.
<https://docs.apify.com/api/v2#/reference/actor-runs/charge-events-in-run>
***
#### Parameters
* ##### event\_name: str
* ##### optionalcount: int | None = <!-- -->None
* ##### optionalidempotency\_key: str | None = <!-- -->None
#### Returns None
### [**](#dataset)[**](https://undefined/apify/apify-client-python/blob/master//src/apify_client/clients/resource_clients/run.py#L546)dataset
* ****dataset**(): [DatasetClientAsync](https://docs.apify.com/api/client/python/api/client/python/reference/class/DatasetClientAsync.md)
- Get the client for the default dataset of the Actor run.
<https://docs.apify.com/api/v2#/reference/actors/last-run-object-and-its-storages>
***
#### Returns [DatasetClientAsync](https://docs.apify.com/api/client/python/api/client/python/reference/class/DatasetClientAsync.md)
### [**](#delete)[**](https://undefined/apify/apify-client-python/blob/master//src/apify_client/clients/resource_clients/run.py#L432)delete
* **async **delete**(): None
- Delete the run.
<https://docs.apify.com/api/v2#/reference/actor-runs/delete-run/delete-run>
***
#### Returns None
### [**](#get)[**](https://undefined/apify/apify-client-python/blob/master//src/apify_client/clients/resource_clients/run.py#L368)get
* **async **get**(): dict | None
- Return information about the Actor run.
<https://docs.apify.com/api/v2#/reference/actor-runs/run-object/get-run>
***
#### Returns dict | None
### [**](#get_status_message_watcher)[**](https://undefined/apify/apify-client-python/blob/master//src/apify_client/clients/resource_clients/run.py#L658)get\_status\_message\_watcher
* **async **get\_status\_message\_watcher**(to\_logger, check\_period): [StatusMessageWatcherAsync](https://docs.apify.com/api/client/python/api/client/python/reference/class/StatusMessageWatcherAsync.md)
- Get `StatusMessageWatcher` instance that can be used to redirect status and status messages to logs.
`StatusMessageWatcher` can be explicitly started and stopped or used as a context manager.
***
#### Parameters
* ##### optionalto\_logger: logging.Logger | None = <!-- -->None
`Logger` used for logging the status and status messages. If not provided, a new logger is created.
* ##### optionalcheck\_period: timedelta = <!-- -->timedelta(seconds=1)
The period with which the status message will be polled.
#### Returns [StatusMessageWatcherAsync](https://docs.apify.com/api/client/python/api/client/python/reference/class/StatusMessageWatcherAsync.md)
### [**](#get_streamed_log)[**](https://undefined/apify/apify-client-python/blob/master//src/apify_client/clients/resource_clients/run.py#L594)get\_streamed\_log
* **async **get\_streamed\_log**(to\_logger, \*, from\_start): [StreamedLogAsync](https://docs.apify.com/api/client/python/api/client/python/reference/class/StreamedLogAsync.md)
- Get `StreamedLog` instance that can be used to redirect logs.
`StreamedLog` can be explicitly started and stopped or used as a context manager.
***
#### Parameters
* ##### optionalto\_logger: logging.Logger | None = <!-- -->None
`Logger` used for logging the redirected messages. If not provided, a new logger is created
* ##### optionalkeyword-onlyfrom\_start: bool = <!-- -->True
If `True`, all logs from the start of the actor run will be redirected. If `False`, only newly arrived logs will be redirected. This can be useful for redirecting only a small portion of relevant logs for long-running actors in stand-by.
#### Returns [StreamedLogAsync](https://docs.apify.com/api/client/python/api/client/python/reference/class/StreamedLogAsync.md)
### [**](#key_value_store)[**](https://undefined/apify/apify-client-python/blob/master//src/apify_client/clients/resource_clients/run.py#L558)key\_value\_store
* ****key\_value\_store**(): [KeyValueStoreClientAsync](https://docs.apify.com/api/client/python/api/client/python/reference/class/KeyValueStoreClientAsync.md)
- Get the client for the default key-value store of the Actor run.
<https://docs.apify.com/api/v2#/reference/actors/last-run-object-and-its-storages>
***
#### Returns [KeyValueStoreClientAsync](https://docs.apify.com/api/client/python/api/client/python/reference/class/KeyValueStoreClientAsync.md)
### [**](#log)[**](https://undefined/apify/apify-client-python/blob/master//src/apify_client/clients/resource_clients/run.py#L582)log
* ****log**(): [LogClientAsync](https://docs.apify.com/api/client/python/api/client/python/reference/class/LogClientAsync.md)
- Get the client for the log of the Actor run.
<https://docs.apify.com/api/v2#/reference/actors/last-run-object-and-its-storages>
***
#### Returns [LogClientAsync](https://docs.apify.com/api/client/python/api/client/python/reference/class/LogClientAsync.md)
### [**](#metamorph)[**](https://undefined/apify/apify-client-python/blob/master//src/apify_client/clients/resource_clients/run.py#L439)metamorph
* **async **metamorph**(\*, target\_actor\_id, target\_actor\_build, run\_input, content\_type): dict
- Transform an Actor run into a run of another Actor with a new input.
<https://docs.apify.com/api/v2#/reference/actor-runs/metamorph-run/metamorph-run>
***
#### Parameters
* ##### keyword-onlytarget\_actor\_id: str
ID of the target Actor that the run should be transformed into.
* ##### optionalkeyword-onlytarget\_actor\_build: str | None = <!-- -->None
The build of the target Actor. It can be either a build tag or build number. By default, the run uses the build specified in the default run configuration for the target Actor (typically the latest build).
* ##### optionalkeyword-onlyrun\_input: Any = <!-- -->None
The input to pass to the new run.
* ##### optionalkeyword-onlycontent\_type: str | None = <!-- -->None
The content type of the input.
#### Returns dict
### [**](#reboot)[**](https://undefined/apify/apify-client-python/blob/master//src/apify_client/clients/resource_clients/run.py#L532)reboot
* **async **reboot**(): dict
- Reboot an Actor run. Only runs that are running, i.e. runs with status RUNNING can be rebooted.
<https://docs.apify.com/api/v2#/reference/actor-runs/reboot-run/reboot-run>
***
#### Returns dict
### [**](#request_queue)[**](https://undefined/apify/apify-client-python/blob/master//src/apify_client/clients/resource_clients/run.py#L570)request\_queue
* ****request\_queue**(): [RequestQueueClientAsync](https://docs.apify.com/api/client/python/api/client/python/reference/class/RequestQueueClientAsync.md)
- Get the client for the default request queue of the Actor run.
<https://docs.apify.com/api/v2#/reference/actors/last-run-object-and-its-storages>
***
#### Returns [RequestQueueClientAsync](https://docs.apify.com/api/client/python/api/client/python/reference/class/RequestQueueClientAsync.md)
### [**](#resurrect)[**](https://undefined/apify/apify-client-python/blob/master//src/apify_client/clients/resource_clients/run.py#L481)resurrect
* **async **resurrect**(\*, build, memory\_mbytes, timeout\_secs, max\_items, max\_total\_charge\_usd, restart\_on\_error): dict
- Resurrect a finished Actor run.
Only finished runs, i.e. runs with status FINISHED, FAILED, ABORTED and TIMED-OUT can be resurrected. Run status will be updated to RUNNING and its container will be restarted with the same default storages.
<https://docs.apify.com/api/v2#/reference/actor-runs/resurrect-run/resurrect-run>
***
#### Parameters
* ##### optionalkeyword-onlybuild: str | None = <!-- -->None
Which Actor build the resurrected run should use. It can be either a build tag or build number. By default, the resurrected run uses the same build as before.
* ##### optionalkeyword-onlymemory\_mbytes: int | None = <!-- -->None
New memory limit for the resurrected run, in megabytes. By default, the resurrected run uses the same memory limit as before.
* ##### optionalkeyword-onlytimeout\_secs: int | None = <!-- -->None
New timeout for the resurrected run, in seconds. By default, the resurrected run uses the same timeout as before.
* ##### optionalkeyword-onlymax\_items: int | None = <!-- -->None
Maximum number of items that the resurrected pay-per-result run will return. By default, the resurrected run uses the same limit as before. Limit can be only increased.
* ##### optionalkeyword-onlymax\_total\_charge\_usd: Decimal | None = <!-- -->None
Maximum cost for the resurrected pay-per-event run in USD. By default, the resurrected run uses the same limit as before. Limit can be only increased.
* ##### optionalkeyword-onlyrestart\_on\_error: bool | None = <!-- -->None
Determines whether the resurrected run will be restarted if it fails. By default, the resurrected run uses the same setting as before.
#### Returns dict
### [**](#update)[**](https://undefined/apify/apify-client-python/blob/master//src/apify_client/clients/resource_clients/run.py#L378)update
* **async **update**(\*, status\_message, is\_status\_message\_terminal, general\_access): dict
- Update the run with the specified fields.
<https://docs.apify.com/api/v2#/reference/actor-runs/run-object/update-run>
***
#### Parameters
* ##### optionalkeyword-onlystatus\_message: str | None = <!-- -->None
The new status message for the run.
* ##### optionalkeyword-onlyis\_status\_message\_terminal: bool | None = <!-- -->None
Set this flag to True if this is the final status message of the Actor run.
* ##### optionalkeyword-onlygeneral\_access: RunGeneralAccess | None = <!-- -->None
Determines how others can access the run and its storages.
#### Returns dict
### [**](#wait_for_finish)[**](https://undefined/apify/apify-client-python/blob/master//src/apify_client/clients/resource_clients/run.py#L420)wait\_for\_finish
* **async **wait\_for\_finish**(\*, wait\_secs): dict | None
- Wait synchronously until the run finishes or the server times out.
***
#### Parameters
* ##### optionalkeyword-onlywait\_secs: int | None = <!-- -->None
How long does the client wait for run to finish. None for indefinite.
#### Returns dict | None
## Properties<!-- -->[**](#Properties)
### [**](#http_client)[**](https://undefined/apify/apify-client-python/blob/master//src/apify_client/clients/base/base_client.py#L94)http\_client
**http\_client: [HTTPClient](https://docs.apify.com/api/client/python/api/client/python/reference/class/HTTPClient.md) | [HTTPClientAsync](https://docs.apify.com/api/client/python/api/client/python/reference/class/HTTPClientAsync.md)
Inherited from [BaseClientAsync.http\_client](https://docs.apify.com/api/client/python/api/client/python/reference/class/BaseClientAsync.md#http_client)
Overrides [\_BaseBaseClient.http\_client](https://docs.apify.com/api/client/python/api/client/python/reference/class/_BaseBaseClient.md#http_client)
### [**](#params)[**](https://undefined/apify/apify-client-python/blob/master//src/apify_client/clients/base/base_client.py#L17)params
**params: dict
Inherited from [\_BaseBaseClient.params](https://docs.apify.com/api/client/python/api/client/python/reference/class/_BaseBaseClient.md#params)
### [**](#resource_id)[**](https://undefined/apify/apify-client-python/blob/master//src/apify_client/clients/base/base_client.py#L15)resource\_id
**resource\_id: str | None
Inherited from [\_BaseBaseClient.resource\_id](https://docs.apify.com/api/client/python/api/client/python/reference/class/_BaseBaseClient.md#resource_id)
### [**](#root_client)[**](https://undefined/apify/apify-client-python/blob/master//src/apify_client/clients/base/base_client.py#L95)root\_client
**root\_client: [ApifyClient](https://docs.apify.com/api/client/python/api/client/python/reference/class/ApifyClient.md) | [ApifyClientAsync](https://docs.apify.com/api/client/python/api/client/python/reference/class/ApifyClientAsync.md)
Inherited from [BaseClientAsync.root\_client](https://docs.apify.com/api/client/python/api/client/python/reference/class/BaseClientAsync.md#root_client)
Overrides [\_BaseBaseClient.root\_client](https://docs.apify.com/api/client/python/api/client/python/reference/class/_BaseBaseClient.md#root_client)
### [**](#url)[**](https://undefined/apify/apify-client-python/blob/master//src/apify_client/clients/base/base_client.py#L16)url
**url: str
Inherited from [\_BaseBaseClient.url](https://docs.apify.com/api/client/python/api/client/python/reference/class/_BaseBaseClient.md#url)
---
# RunCollectionClient<!-- -->
Sub-client for listing Actor runs.
### Hierarchy
* [ResourceCollectionClient](https://docs.apify.com/api/client/python/api/client/python/reference/class/ResourceCollectionClient.md)
* *RunCollectionClient*
## Index[**](#Index)
### Methods
* [**\_\_init\_\_](https://docs.apify.com/api/client/python/api/client/python/reference/class/RunCollectionClient.md#__init__)
* [**list](https://docs.apify.com/api/client/python/api/client/python/reference/class/RunCollectionClient.md#list)
### Properties
* [**http\_client](https://docs.apify.com/api/client/python/api/client/python/reference/class/RunCollectionClient.md#http_client)
* [**params](https://docs.apify.com/api/client/python/api/client/python/reference/class/RunCollectionClient.md#params)
* [**resource\_id](https://docs.apify.com/api/client/python/api/client/python/reference/class/RunCollectionClient.md#resource_id)
* [**root\_client](https://docs.apify.com/api/client/python/api/client/python/reference/class/RunCollectionClient.md#root_client)
* [**url](https://docs.apify.com/api/client/python/api/client/python/reference/class/RunCollectionClient.md#url)
## Methods<!-- -->[**](#Methods)
### [**](#__init__)[**](https://undefined/apify/apify-client-python/blob/master//src/apify_client/clients/resource_clients/run_collection.py#L19)\_\_init\_\_
* ****\_\_init\_\_**(\*, base\_url, root\_client, http\_client, resource\_id, resource\_path, params): None
- Overrides [ResourceCollectionClient.\_\_init\_\_](https://docs.apify.com/api/client/python/api/client/python/reference/class/ResourceCollectionClient.md#__init__)
Initialize a new instance.
***
#### Parameters
* ##### keyword-onlybase\_url: str
Base URL of the API server.
* ##### keyword-onlyroot\_client: [ApifyClient](https://docs.apify.com/api/client/python/api/client/python/reference/class/ApifyClient.md)
The ApifyClient instance under which this resource client exists.
* ##### keyword-onlyhttp\_client: [HTTPClient](https://docs.apify.com/api/client/python/api/client/python/reference/class/HTTPClient.md)
The HTTPClient instance to be used in this client.
* ##### optionalkeyword-onlyresource\_id: str | None = <!-- -->None
ID of the manipulated resource, in case of a single-resource client.
* ##### keyword-onlyresource\_path: str
Path to the resource's endpoint on the API server.
* ##### optionalkeyword-onlyparams: dict | None = <!-- -->None
Parameters to include in all requests from this client.
#### Returns None
### [**](#list)[**](https://undefined/apify/apify-client-python/blob/master//src/apify_client/clients/resource_clients/run_collection.py#L23)list
* ****list**(\*, limit, offset, desc, status, started\_before, started\_after): [ListPage](https://docs.apify.com/api/client/python/api/client/python/reference/class/ListPage.md)\[dict]
- List all Actor runs.
List all Actor runs, either of a single Actor, or all user's Actors, depending on where this client was initialized from.
<https://docs.apify.com/api/v2#/reference/actors/run-collection/get-list-of-runs> <https://docs.apify.com/api/v2#/reference/actor-runs/run-collection/get-user-runs-list>
***
#### Parameters
* ##### optionalkeyword-onlylimit: int | None = <!-- -->None
How many runs to retrieve.
* ##### optionalkeyword-onlyoffset: int | None = <!-- -->None
What run to include as first when retrieving the list.
* ##### optionalkeyword-onlydesc: bool | None = <!-- -->None
Whether to sort the runs in descending order based on their start date.
* ##### optionalkeyword-onlystatus: (ActorJobStatus | [list](https://docs.apify.com/api/client/python/api/client/python/reference/class/RequestQueueCollectionClient.md#list)\[ActorJobStatus]) | None = <!-- -->None
Retrieve only runs with the provided statuses.
* ##### optionalkeyword-onlystarted\_before: (str | datetime) | None = <!-- -->None
Only return runs started before this date (inclusive).
* ##### optionalkeyword-onlystarted\_after: (str | datetime) | None = <!-- -->None
Only return runs started after this date (inclusive).
#### Returns [ListPage](https://docs.apify.com/api/client/python/api/client/python/reference/class/ListPage.md)\[dict]
## Properties<!-- -->[**](#Properties)
### [**](#http_client)[**](https://undefined/apify/apify-client-python/blob/master//src/apify_client/clients/base/base_client.py#L53)http\_client
**http\_client: [HTTPClient](https://docs.apify.com/api/client/python/api/client/python/reference/class/HTTPClient.md) | [HTTPClientAsync](https://docs.apify.com/api/client/python/api/client/python/reference/class/HTTPClientAsync.md)
Inherited from [BaseClient.http\_client](https://docs.apify.com/api/client/python/api/client/python/reference/class/BaseClient.md#http_client)
Overrides [\_BaseBaseClient.http\_client](https://docs.apify.com/api/client/python/api/client/python/reference/class/_BaseBaseClient.md#http_client)
### [**](#params)[**](https://undefined/apify/apify-client-python/blob/master//src/apify_client/clients/base/base_client.py#L17)params
**params: dict
Inherited from [\_BaseBaseClient.params](https://docs.apify.com/api/client/python/api/client/python/reference/class/_BaseBaseClient.md#params)
### [**](#resource_id)[**](https://undefined/apify/apify-client-python/blob/master//src/apify_client/clients/base/base_client.py#L15)resource\_id
**resource\_id: str | None
Inherited from [\_BaseBaseClient.resource\_id](https://docs.apify.com/api/client/python/api/client/python/reference/class/_BaseBaseClient.md#resource_id)
### [**](#root_client)[**](https://undefined/apify/apify-client-python/blob/master//src/apify_client/clients/base/base_client.py#L54)root\_client
**root\_client: [ApifyClient](https://docs.apify.com/api/client/python/api/client/python/reference/class/ApifyClient.md) | [ApifyClientAsync](https://docs.apify.com/api/client/python/api/client/python/reference/class/ApifyClientAsync.md)
Inherited from [BaseClient.root\_client](https://docs.apify.com/api/client/python/api/client/python/reference/class/BaseClient.md#root_client)
Overrides [\_BaseBaseClient.root\_client](https://docs.apify.com/api/client/python/api/client/python/reference/class/_BaseBaseClient.md#root_client)
### [**](#url)[**](https://undefined/apify/apify-client-python/blob/master//src/apify_client/clients/base/base_client.py#L16)url
**url: str
Inherited from [\_BaseBaseClient.url](https://docs.apify.com/api/client/python/api/client/python/reference/class/_BaseBaseClient.md#url)
---
# RunCollectionClientAsync<!-- -->
Async sub-client for listing Actor runs.
### Hierarchy
* [ResourceCollectionClientAsync](https://docs.apify.com/api/client/python/api/client/python/reference/class/ResourceCollectionClientAsync.md)
* *RunCollectionClientAsync*
## Index[**](#Index)
### Methods
* [**\_\_init\_\_](https://docs.apify.com/api/client/python/api/client/python/reference/class/RunCollectionClientAsync.md#__init__)
* [**list](https://docs.apify.com/api/client/python/api/client/python/reference/class/RunCollectionClientAsync.md#list)
### Properties
* [**http\_client](https://docs.apify.com/api/client/python/api/client/python/reference/class/RunCollectionClientAsync.md#http_client)
* [**params](https://docs.apify.com/api/client/python/api/client/python/reference/class/RunCollectionClientAsync.md#params)
* [**resource\_id](https://docs.apify.com/api/client/python/api/client/python/reference/class/RunCollectionClientAsync.md#resource_id)
* [**root\_client](https://docs.apify.com/api/client/python/api/client/python/reference/class/RunCollectionClientAsync.md#root_client)
* [**url](https://docs.apify.com/api/client/python/api/client/python/reference/class/RunCollectionClientAsync.md#url)
## Methods<!-- -->[**](#Methods)
### [**](#__init__)[**](https://undefined/apify/apify-client-python/blob/master//src/apify_client/clients/resource_clients/run_collection.py#L70)\_\_init\_\_
* ****\_\_init\_\_**(\*, base\_url, root\_client, http\_client, resource\_id, resource\_path, params): None
- Overrides [ResourceCollectionClientAsync.\_\_init\_\_](https://docs.apify.com/api/client/python/api/client/python/reference/class/ResourceCollectionClientAsync.md#__init__)
Initialize a new instance.
***
#### Parameters
* ##### keyword-onlybase\_url: str
Base URL of the API server.
* ##### keyword-onlyroot\_client: [ApifyClientAsync](https://docs.apify.com/api/client/python/api/client/python/reference/class/ApifyClientAsync.md)
The ApifyClientAsync instance under which this resource client exists.
* ##### keyword-onlyhttp\_client: [HTTPClientAsync](https://docs.apify.com/api/client/python/api/client/python/reference/class/HTTPClientAsync.md)
The HTTPClientAsync instance to be used in this client.
* ##### optionalkeyword-onlyresource\_id: str | None = <!-- -->None
ID of the manipulated resource, in case of a single-resource client.
* ##### keyword-onlyresource\_path: str
Path to the resource's endpoint on the API server.
* ##### optionalkeyword-onlyparams: dict | None = <!-- -->None
Parameters to include in all requests from this client.
#### Returns None
### [**](#list)[**](https://undefined/apify/apify-client-python/blob/master//src/apify_client/clients/resource_clients/run_collection.py#L74)list
* **async **list**(\*, limit, offset, desc, status, started\_before, started\_after): [ListPage](https://docs.apify.com/api/client/python/api/client/python/reference/class/ListPage.md)\[dict]
- List all Actor runs.
List all Actor runs, either of a single Actor, or all user's Actors, depending on where this client was initialized from.
<https://docs.apify.com/api/v2#/reference/actors/run-collection/get-list-of-runs> <https://docs.apify.com/api/v2#/reference/actor-runs/run-collection/get-user-runs-list>
***
#### Parameters
* ##### optionalkeyword-onlylimit: int | None = <!-- -->None
How many runs to retrieve.
* ##### optionalkeyword-onlyoffset: int | None = <!-- -->None
What run to include as first when retrieving the list.
* ##### optionalkeyword-onlydesc: bool | None = <!-- -->None
Whether to sort the runs in descending order based on their start date.
* ##### optionalkeyword-onlystatus: (ActorJobStatus | [list](https://docs.apify.com/api/client/python/api/client/python/reference/class/RequestQueueCollectionClient.md#list)\[ActorJobStatus]) | None = <!-- -->None
Retrieve only runs with the provided statuses.
* ##### optionalkeyword-onlystarted\_before: (str | datetime) | None = <!-- -->None
Only return runs started before this date (inclusive).
* ##### optionalkeyword-onlystarted\_after: (str | datetime) | None = <!-- -->None
Only return runs started after this date (inclusive).
#### Returns [ListPage](https://docs.apify.com/api/client/python/api/client/python/reference/class/ListPage.md)\[dict]
## Properties<!-- -->[**](#Properties)
### [**](#http_client)[**](https://undefined/apify/apify-client-python/blob/master//src/apify_client/clients/base/base_client.py#L94)http\_client
**http\_client: [HTTPClient](https://docs.apify.com/api/client/python/api/client/python/reference/class/HTTPClient.md) | [HTTPClientAsync](https://docs.apify.com/api/client/python/api/client/python/reference/class/HTTPClientAsync.md)
Inherited from [BaseClientAsync.http\_client](https://docs.apify.com/api/client/python/api/client/python/reference/class/BaseClientAsync.md#http_client)
Overrides [\_BaseBaseClient.http\_client](https://docs.apify.com/api/client/python/api/client/python/reference/class/_BaseBaseClient.md#http_client)
### [**](#params)[**](https://undefined/apify/apify-client-python/blob/master//src/apify_client/clients/base/base_client.py#L17)params
**params: dict
Inherited from [\_BaseBaseClient.params](https://docs.apify.com/api/client/python/api/client/python/reference/class/_BaseBaseClient.md#params)
### [**](#resource_id)[**](https://undefined/apify/apify-client-python/blob/master//src/apify_client/clients/base/base_client.py#L15)resource\_id
**resource\_id: str | None
Inherited from [\_BaseBaseClient.resource\_id](https://docs.apify.com/api/client/python/api/client/python/reference/class/_BaseBaseClient.md#resource_id)
### [**](#root_client)[**](https://undefined/apify/apify-client-python/blob/master//src/apify_client/clients/base/base_client.py#L95)root\_client
**root\_client: [ApifyClient](https://docs.apify.com/api/client/python/api/client/python/reference/class/ApifyClient.md) | [ApifyClientAsync](https://docs.apify.com/api/client/python/api/client/python/reference/class/ApifyClientAsync.md)
Inherited from [BaseClientAsync.root\_client](https://docs.apify.com/api/client/python/api/client/python/reference/class/BaseClientAsync.md#root_client)
Overrides [\_BaseBaseClient.root\_client](https://docs.apify.com/api/client/python/api/client/python/reference/class/_BaseBaseClient.md#root_client)
### [**](#url)[**](https://undefined/apify/apify-client-python/blob/master//src/apify_client/clients/base/base_client.py#L16)url
**url: str
Inherited from [\_BaseBaseClient.url](https://docs.apify.com/api/client/python/api/client/python/reference/class/_BaseBaseClient.md#url)
---
# ScheduleClient<!-- -->
Sub-client for manipulating a single schedule.
### Hierarchy
* [ResourceClient](https://docs.apify.com/api/client/python/api/client/python/reference/class/ResourceClient.md)
* *ScheduleClient*
## Index[**](#Index)
### Methods
* [**\_\_init\_\_](https://docs.apify.com/api/client/python/api/client/python/reference/class/ScheduleClient.md#__init__)
* [**delete](https://docs.apify.com/api/client/python/api/client/python/reference/class/ScheduleClient.md#delete)
* [**get](https://docs.apify.com/api/client/python/api/client/python/reference/class/ScheduleClient.md#get)
* [**get\_log](https://docs.apify.com/api/client/python/api/client/python/reference/class/ScheduleClient.md#get_log)
* [**update](https://docs.apify.com/api/client/python/api/client/python/reference/class/ScheduleClient.md#update)
### Properties
* [**http\_client](https://docs.apify.com/api/client/python/api/client/python/reference/class/ScheduleClient.md#http_client)
* [**params](https://docs.apify.com/api/client/python/api/client/python/reference/class/ScheduleClient.md#params)
* [**resource\_id](https://docs.apify.com/api/client/python/api/client/python/reference/class/ScheduleClient.md#resource_id)
* [**root\_client](https://docs.apify.com/api/client/python/api/client/python/reference/class/ScheduleClient.md#root_client)
* [**url](https://docs.apify.com/api/client/python/api/client/python/reference/class/ScheduleClient.md#url)
## Methods<!-- -->[**](#Methods)
### [**](#__init__)[**](https://undefined/apify/apify-client-python/blob/master//src/apify_client/clients/resource_clients/schedule.py#L36)\_\_init\_\_
* ****\_\_init\_\_**(\*, base\_url, root\_client, http\_client, resource\_id, resource\_path, params): None
- Overrides [ResourceClient.\_\_init\_\_](https://docs.apify.com/api/client/python/api/client/python/reference/class/ResourceClient.md#__init__)
Initialize a new instance.
***
#### Parameters
* ##### keyword-onlybase\_url: str
Base URL of the API server.
* ##### keyword-onlyroot\_client: [ApifyClient](https://docs.apify.com/api/client/python/api/client/python/reference/class/ApifyClient.md)
The ApifyClient instance under which this resource client exists.
* ##### keyword-onlyhttp\_client: [HTTPClient](https://docs.apify.com/api/client/python/api/client/python/reference/class/HTTPClient.md)
The HTTPClient instance to be used in this client.
* ##### optionalkeyword-onlyresource\_id: str | None = <!-- -->None
ID of the manipulated resource, in case of a single-resource client.
* ##### keyword-onlyresource\_path: str
Path to the resource's endpoint on the API server.
* ##### optionalkeyword-onlyparams: dict | None = <!-- -->None
Parameters to include in all requests from this client.
#### Returns None
### [**](#delete)[**](https://undefined/apify/apify-client-python/blob/master//src/apify_client/clients/resource_clients/schedule.py#L94)delete
* ****delete**(): None
- Delete the schedule.
<https://docs.apify.com/api/v2#/reference/schedules/schedule-object/delete-schedule>
***
#### Returns None
### [**](#get)[**](https://undefined/apify/apify-client-python/blob/master//src/apify_client/clients/resource_clients/schedule.py#L40)get
* ****get**(): dict | None
- Return information about the schedule.
<https://docs.apify.com/api/v2#/reference/schedules/schedule-object/get-schedule>
***
#### Returns dict | None
### [**](#get_log)[**](https://undefined/apify/apify-client-python/blob/master//src/apify_client/clients/resource_clients/schedule.py#L101)get\_log
* ****get\_log**(): [list](https://docs.apify.com/api/client/python/api/client/python/reference/class/RequestQueueCollectionClient.md#list) | None
- Return log for the given schedule.
<https://docs.apify.com/api/v2#/reference/schedules/schedule-log/get-schedule-log>
***
#### Returns [list](https://docs.apify.com/api/client/python/api/client/python/reference/class/RequestQueueCollectionClient.md#list) | None
### [**](#update)[**](https://undefined/apify/apify-client-python/blob/master//src/apify_client/clients/resource_clients/schedule.py#L50)update
* ****update**(\*, cron\_expression, is\_enabled, is\_exclusive, name, actions, description, timezone, title): dict
- Update the schedule with specified fields.
<https://docs.apify.com/api/v2#/reference/schedules/schedule-object/update-schedule>
***
#### Parameters
* ##### optionalkeyword-onlycron\_expression: str | None = <!-- -->None
The cron expression used by this schedule.
* ##### optionalkeyword-onlyis\_enabled: bool | None = <!-- -->None
True if the schedule should be enabled.
* ##### optionalkeyword-onlyis\_exclusive: bool | None = <!-- -->None
When set to true, don't start Actor or Actor task if it's still running from the previous schedule.
* ##### optionalkeyword-onlyname: str | None = <!-- -->None
The name of the schedule to create.
* ##### optionalkeyword-onlyactions: [list](https://docs.apify.com/api/client/python/api/client/python/reference/class/RequestQueueCollectionClient.md#list)\[dict] | None = <!-- -->None
Actors or tasks that should be run on this schedule. See the API documentation for exact structure.
* ##### optionalkeyword-onlydescription: str | None = <!-- -->None
Description of this schedule.
* ##### optionalkeyword-onlytimezone: str | None = <!-- -->None
Timezone in which your cron expression runs (TZ database name from <https://en.wikipedia.org/wiki/List_of_tz_database_time_zones>).
* ##### optionalkeyword-onlytitle: str | None = <!-- -->None
A human-friendly equivalent of the name.
#### Returns dict
## Properties<!-- -->[**](#Properties)
### [**](#http_client)[**](https://undefined/apify/apify-client-python/blob/master//src/apify_client/clients/base/base_client.py#L53)http\_client
**http\_client: [HTTPClient](https://docs.apify.com/api/client/python/api/client/python/reference/class/HTTPClient.md) | [HTTPClientAsync](https://docs.apify.com/api/client/python/api/client/python/reference/class/HTTPClientAsync.md)
Inherited from [BaseClient.http\_client](https://docs.apify.com/api/client/python/api/client/python/reference/class/BaseClient.md#http_client)
Overrides [\_BaseBaseClient.http\_client](https://docs.apify.com/api/client/python/api/client/python/reference/class/_BaseBaseClient.md#http_client)
### [**](#params)[**](https://undefined/apify/apify-client-python/blob/master//src/apify_client/clients/base/base_client.py#L17)params
**params: dict
Inherited from [\_BaseBaseClient.params](https://docs.apify.com/api/client/python/api/client/python/reference/class/_BaseBaseClient.md#params)
### [**](#resource_id)[**](https://undefined/apify/apify-client-python/blob/master//src/apify_client/clients/base/base_client.py#L15)resource\_id
**resource\_id: str | None
Inherited from [\_BaseBaseClient.resource\_id](https://docs.apify.com/api/client/python/api/client/python/reference/class/_BaseBaseClient.md#resource_id)
### [**](#root_client)[**](https://undefined/apify/apify-client-python/blob/master//src/apify_client/clients/base/base_client.py#L54)root\_client
**root\_client: [ApifyClient](https://docs.apify.com/api/client/python/api/client/python/reference/class/ApifyClient.md) | [ApifyClientAsync](https://docs.apify.com/api/client/python/api/client/python/reference/class/ApifyClientAsync.md)
Inherited from [BaseClient.root\_client](https://docs.apify.com/api/client/python/api/client/python/reference/class/BaseClient.md#root_client)
Overrides [\_BaseBaseClient.root\_client](https://docs.apify.com/api/client/python/api/client/python/reference/class/_BaseBaseClient.md#root_client)
### [**](#url)[**](https://undefined/apify/apify-client-python/blob/master//src/apify_client/clients/base/base_client.py#L16)url
**url: str
Inherited from [\_BaseBaseClient.url](https://docs.apify.com/api/client/python/api/client/python/reference/class/_BaseBaseClient.md#url)
---
# ScheduleClientAsync<!-- -->
Async sub-client for manipulating a single schedule.
### Hierarchy
* [ResourceClientAsync](https://docs.apify.com/api/client/python/api/client/python/reference/class/ResourceClientAsync.md)
* *ScheduleClientAsync*
## Index[**](#Index)
### Methods
* [**\_\_init\_\_](https://docs.apify.com/api/client/python/api/client/python/reference/class/ScheduleClientAsync.md#__init__)
* [**delete](https://docs.apify.com/api/client/python/api/client/python/reference/class/ScheduleClientAsync.md#delete)
* [**get](https://docs.apify.com/api/client/python/api/client/python/reference/class/ScheduleClientAsync.md#get)
* [**get\_log](https://docs.apify.com/api/client/python/api/client/python/reference/class/ScheduleClientAsync.md#get_log)
* [**update](https://docs.apify.com/api/client/python/api/client/python/reference/class/ScheduleClientAsync.md#update)
### Properties
* [**http\_client](https://docs.apify.com/api/client/python/api/client/python/reference/class/ScheduleClientAsync.md#http_client)
* [**params](https://docs.apify.com/api/client/python/api/client/python/reference/class/ScheduleClientAsync.md#params)
* [**resource\_id](https://docs.apify.com/api/client/python/api/client/python/reference/class/ScheduleClientAsync.md#resource_id)
* [**root\_client](https://docs.apify.com/api/client/python/api/client/python/reference/class/ScheduleClientAsync.md#root_client)
* [**url](https://docs.apify.com/api/client/python/api/client/python/reference/class/ScheduleClientAsync.md#url)
## Methods<!-- -->[**](#Methods)
### [**](#__init__)[**](https://undefined/apify/apify-client-python/blob/master//src/apify_client/clients/resource_clients/schedule.py#L125)\_\_init\_\_
* ****\_\_init\_\_**(\*, base\_url, root\_client, http\_client, resource\_id, resource\_path, params): None
- Overrides [ResourceClientAsync.\_\_init\_\_](https://docs.apify.com/api/client/python/api/client/python/reference/class/ResourceClientAsync.md#__init__)
Initialize a new instance.
***
#### Parameters
* ##### keyword-onlybase\_url: str
Base URL of the API server.
* ##### keyword-onlyroot\_client: [ApifyClientAsync](https://docs.apify.com/api/client/python/api/client/python/reference/class/ApifyClientAsync.md)
The ApifyClientAsync instance under which this resource client exists.
* ##### keyword-onlyhttp\_client: [HTTPClientAsync](https://docs.apify.com/api/client/python/api/client/python/reference/class/HTTPClientAsync.md)
The HTTPClientAsync instance to be used in this client.
* ##### optionalkeyword-onlyresource\_id: str | None = <!-- -->None
ID of the manipulated resource, in case of a single-resource client.
* ##### keyword-onlyresource\_path: str
Path to the resource's endpoint on the API server.
* ##### optionalkeyword-onlyparams: dict | None = <!-- -->None
Parameters to include in all requests from this client.
#### Returns None
### [**](#delete)[**](https://undefined/apify/apify-client-python/blob/master//src/apify_client/clients/resource_clients/schedule.py#L183)delete
* **async **delete**(): None
- Delete the schedule.
<https://docs.apify.com/api/v2#/reference/schedules/schedule-object/delete-schedule>
***
#### Returns None
### [**](#get)[**](https://undefined/apify/apify-client-python/blob/master//src/apify_client/clients/resource_clients/schedule.py#L129)get
* **async **get**(): dict | None
- Return information about the schedule.
<https://docs.apify.com/api/v2#/reference/schedules/schedule-object/get-schedule>
***
#### Returns dict | None
### [**](#get_log)[**](https://undefined/apify/apify-client-python/blob/master//src/apify_client/clients/resource_clients/schedule.py#L190)get\_log
* **async **get\_log**(): [list](https://docs.apify.com/api/client/python/api/client/python/reference/class/RequestQueueCollectionClient.md#list) | None
- Return log for the given schedule.
<https://docs.apify.com/api/v2#/reference/schedules/schedule-log/get-schedule-log>
***
#### Returns [list](https://docs.apify.com/api/client/python/api/client/python/reference/class/RequestQueueCollectionClient.md#list) | None
### [**](#update)[**](https://undefined/apify/apify-client-python/blob/master//src/apify_client/clients/resource_clients/schedule.py#L139)update
* **async **update**(\*, cron\_expression, is\_enabled, is\_exclusive, name, actions, description, timezone, title): dict
- Update the schedule with specified fields.
<https://docs.apify.com/api/v2#/reference/schedules/schedule-object/update-schedule>
***
#### Parameters
* ##### optionalkeyword-onlycron\_expression: str | None = <!-- -->None
The cron expression used by this schedule.
* ##### optionalkeyword-onlyis\_enabled: bool | None = <!-- -->None
True if the schedule should be enabled.
* ##### optionalkeyword-onlyis\_exclusive: bool | None = <!-- -->None
When set to true, don't start Actor or Actor task if it's still running from the previous schedule.
* ##### optionalkeyword-onlyname: str | None = <!-- -->None
The name of the schedule to create.
* ##### optionalkeyword-onlyactions: [list](https://docs.apify.com/api/client/python/api/client/python/reference/class/RequestQueueCollectionClient.md#list)\[dict] | None = <!-- -->None
Actors or tasks that should be run on this schedule. See the API documentation for exact structure.
* ##### optionalkeyword-onlydescription: str | None = <!-- -->None
Description of this schedule.
* ##### optionalkeyword-onlytimezone: str | None = <!-- -->None
Timezone in which your cron expression runs (TZ database name from <https://en.wikipedia.org/wiki/List_of_tz_database_time_zones>).
* ##### optionalkeyword-onlytitle: str | None = <!-- -->None
A human-friendly equivalent of the name.
#### Returns dict
## Properties<!-- -->[**](#Properties)
### [**](#http_client)[**](https://undefined/apify/apify-client-python/blob/master//src/apify_client/clients/base/base_client.py#L94)http\_client
**http\_client: [HTTPClient](https://docs.apify.com/api/client/python/api/client/python/reference/class/HTTPClient.md) | [HTTPClientAsync](https://docs.apify.com/api/client/python/api/client/python/reference/class/HTTPClientAsync.md)
Inherited from [BaseClientAsync.http\_client](https://docs.apify.com/api/client/python/api/client/python/reference/class/BaseClientAsync.md#http_client)
Overrides [\_BaseBaseClient.http\_client](https://docs.apify.com/api/client/python/api/client/python/reference/class/_BaseBaseClient.md#http_client)
### [**](#params)[**](https://undefined/apify/apify-client-python/blob/master//src/apify_client/clients/base/base_client.py#L17)params
**params: dict
Inherited from [\_BaseBaseClient.params](https://docs.apify.com/api/client/python/api/client/python/reference/class/_BaseBaseClient.md#params)
### [**](#resource_id)[**](https://undefined/apify/apify-client-python/blob/master//src/apify_client/clients/base/base_client.py#L15)resource\_id
**resource\_id: str | None
Inherited from [\_BaseBaseClient.resource\_id](https://docs.apify.com/api/client/python/api/client/python/reference/class/_BaseBaseClient.md#resource_id)
### [**](#root_client)[**](https://undefined/apify/apify-client-python/blob/master//src/apify_client/clients/base/base_client.py#L95)root\_client
**root\_client: [ApifyClient](https://docs.apify.com/api/client/python/api/client/python/reference/class/ApifyClient.md) | [ApifyClientAsync](https://docs.apify.com/api/client/python/api/client/python/reference/class/ApifyClientAsync.md)
Inherited from [BaseClientAsync.root\_client](https://docs.apify.com/api/client/python/api/client/python/reference/class/BaseClientAsync.md#root_client)
Overrides [\_BaseBaseClient.root\_client](https://docs.apify.com/api/client/python/api/client/python/reference/class/_BaseBaseClient.md#root_client)
### [**](#url)[**](https://undefined/apify/apify-client-python/blob/master//src/apify_client/clients/base/base_client.py#L16)url
**url: str
Inherited from [\_BaseBaseClient.url](https://docs.apify.com/api/client/python/api/client/python/reference/class/_BaseBaseClient.md#url)
---
# ScheduleCollectionClient<!-- -->
Sub-client for manipulating schedules.
### Hierarchy
* [ResourceCollectionClient](https://docs.apify.com/api/client/python/api/client/python/reference/class/ResourceCollectionClient.md)
* *ScheduleCollectionClient*
## Index[**](#Index)
### Methods
* [**\_\_init\_\_](https://docs.apify.com/api/client/python/api/client/python/reference/class/ScheduleCollectionClient.md#__init__)
* [**create](https://docs.apify.com/api/client/python/api/client/python/reference/class/ScheduleCollectionClient.md#create)
* [**list](https://docs.apify.com/api/client/python/api/client/python/reference/class/ScheduleCollectionClient.md#list)
### Properties
* [**http\_client](https://docs.apify.com/api/client/python/api/client/python/reference/class/ScheduleCollectionClient.md#http_client)
* [**params](https://docs.apify.com/api/client/python/api/client/python/reference/class/ScheduleCollectionClient.md#params)
* [**resource\_id](https://docs.apify.com/api/client/python/api/client/python/reference/class/ScheduleCollectionClient.md#resource_id)
* [**root\_client](https://docs.apify.com/api/client/python/api/client/python/reference/class/ScheduleCollectionClient.md#root_client)
* [**url](https://docs.apify.com/api/client/python/api/client/python/reference/class/ScheduleCollectionClient.md#url)
## Methods<!-- -->[**](#Methods)
### [**](#__init__)[**](https://undefined/apify/apify-client-python/blob/master//src/apify_client/clients/resource_clients/schedule_collection.py#L16)\_\_init\_\_
* ****\_\_init\_\_**(\*, base\_url, root\_client, http\_client, resource\_id, resource\_path, params): None
- Overrides [ResourceCollectionClient.\_\_init\_\_](https://docs.apify.com/api/client/python/api/client/python/reference/class/ResourceCollectionClient.md#__init__)
Initialize a new instance.
***
#### Parameters
* ##### keyword-onlybase\_url: str
Base URL of the API server.
* ##### keyword-onlyroot\_client: [ApifyClient](https://docs.apify.com/api/client/python/api/client/python/reference/class/ApifyClient.md)
The ApifyClient instance under which this resource client exists.
* ##### keyword-onlyhttp\_client: [HTTPClient](https://docs.apify.com/api/client/python/api/client/python/reference/class/HTTPClient.md)
The HTTPClient instance to be used in this client.
* ##### optionalkeyword-onlyresource\_id: str | None = <!-- -->None
ID of the manipulated resource, in case of a single-resource client.
* ##### keyword-onlyresource\_path: str
Path to the resource's endpoint on the API server.
* ##### optionalkeyword-onlyparams: dict | None = <!-- -->None
Parameters to include in all requests from this client.
#### Returns None
### [**](#create)[**](https://undefined/apify/apify-client-python/blob/master//src/apify_client/clients/resource_clients/schedule_collection.py#L41)create
* ****create**(\*, cron\_expression, is\_enabled, is\_exclusive, name, actions, description, timezone, title): dict
- Create a new schedule.
<https://docs.apify.com/api/v2#/reference/schedules/schedules-collection/create-schedule>
***
#### Parameters
* ##### keyword-onlycron\_expression: str
The cron expression used by this schedule.
* ##### keyword-onlyis\_enabled: bool
True if the schedule should be enabled.
* ##### keyword-onlyis\_exclusive: bool
When set to true, don't start Actor or Actor task if it's still running from the previous schedule.
* ##### optionalkeyword-onlyname: str | None = <!-- -->None
The name of the schedule to create.
* ##### optionalkeyword-onlyactions: [list](https://docs.apify.com/api/client/python/api/client/python/reference/class/RequestQueueCollectionClient.md#list)\[dict] | None = <!-- -->None
Actors or tasks that should be run on this schedule. See the API documentation for exact structure.
* ##### optionalkeyword-onlydescription: str | None = <!-- -->None
Description of this schedule.
* ##### optionalkeyword-onlytimezone: str | None = <!-- -->None
Timezone in which your cron expression runs (TZ database name from <https://en.wikipedia.org/wiki/List_of_tz_database_time_zones>).
* ##### optionalkeyword-onlytitle: str | None = <!-- -->None
Title of this schedule.
#### Returns dict
### [**](#list)[**](https://undefined/apify/apify-client-python/blob/master//src/apify_client/clients/resource_clients/schedule_collection.py#L20)list
* ****list**(\*, limit, offset, desc): [ListPage](https://docs.apify.com/api/client/python/api/client/python/reference/class/ListPage.md)\[dict]
- List the available schedules.
<https://docs.apify.com/api/v2#/reference/schedules/schedules-collection/get-list-of-schedules>
***
#### Parameters
* ##### optionalkeyword-onlylimit: int | None = <!-- -->None
How many schedules to retrieve.
* ##### optionalkeyword-onlyoffset: int | None = <!-- -->None
What schedules to include as first when retrieving the list.
* ##### optionalkeyword-onlydesc: bool | None = <!-- -->None
Whether to sort the schedules in descending order based on their modification date.
#### Returns [ListPage](https://docs.apify.com/api/client/python/api/client/python/reference/class/ListPage.md)\[dict]
## Properties<!-- -->[**](#Properties)
### [**](#http_client)[**](https://undefined/apify/apify-client-python/blob/master//src/apify_client/clients/base/base_client.py#L53)http\_client
**http\_client: [HTTPClient](https://docs.apify.com/api/client/python/api/client/python/reference/class/HTTPClient.md) | [HTTPClientAsync](https://docs.apify.com/api/client/python/api/client/python/reference/class/HTTPClientAsync.md)
Inherited from [BaseClient.http\_client](https://docs.apify.com/api/client/python/api/client/python/reference/class/BaseClient.md#http_client)
Overrides [\_BaseBaseClient.http\_client](https://docs.apify.com/api/client/python/api/client/python/reference/class/_BaseBaseClient.md#http_client)
### [**](#params)[**](https://undefined/apify/apify-client-python/blob/master//src/apify_client/clients/base/base_client.py#L17)params
**params: dict
Inherited from [\_BaseBaseClient.params](https://docs.apify.com/api/client/python/api/client/python/reference/class/_BaseBaseClient.md#params)
### [**](#resource_id)[**](https://undefined/apify/apify-client-python/blob/master//src/apify_client/clients/base/base_client.py#L15)resource\_id
**resource\_id: str | None
Inherited from [\_BaseBaseClient.resource\_id](https://docs.apify.com/api/client/python/api/client/python/reference/class/_BaseBaseClient.md#resource_id)
### [**](#root_client)[**](https://undefined/apify/apify-client-python/blob/master//src/apify_client/clients/base/base_client.py#L54)root\_client
**root\_client: [ApifyClient](https://docs.apify.com/api/client/python/api/client/python/reference/class/ApifyClient.md) | [ApifyClientAsync](https://docs.apify.com/api/client/python/api/client/python/reference/class/ApifyClientAsync.md)
Inherited from [BaseClient.root\_client](https://docs.apify.com/api/client/python/api/client/python/reference/class/BaseClient.md#root_client)
Overrides [\_BaseBaseClient.root\_client](https://docs.apify.com/api/client/python/api/client/python/reference/class/_BaseBaseClient.md#root_client)
### [**](#url)[**](https://undefined/apify/apify-client-python/blob/master//src/apify_client/clients/base/base_client.py#L16)url
**url: str
Inherited from [\_BaseBaseClient.url](https://docs.apify.com/api/client/python/api/client/python/reference/class/_BaseBaseClient.md#url)
---
# ScheduleCollectionClientAsync<!-- -->
Async sub-client for manipulating schedules.
### Hierarchy
* [ResourceCollectionClientAsync](https://docs.apify.com/api/client/python/api/client/python/reference/class/ResourceCollectionClientAsync.md)
* *ScheduleCollectionClientAsync*
## Index[**](#Index)
### Methods
* [**\_\_init\_\_](https://docs.apify.com/api/client/python/api/client/python/reference/class/ScheduleCollectionClientAsync.md#__init__)
* [**create](https://docs.apify.com/api/client/python/api/client/python/reference/class/ScheduleCollectionClientAsync.md#create)
* [**list](https://docs.apify.com/api/client/python/api/client/python/reference/class/ScheduleCollectionClientAsync.md#list)
### Properties
* [**http\_client](https://docs.apify.com/api/client/python/api/client/python/reference/class/ScheduleCollectionClientAsync.md#http_client)
* [**params](https://docs.apify.com/api/client/python/api/client/python/reference/class/ScheduleCollectionClientAsync.md#params)
* [**resource\_id](https://docs.apify.com/api/client/python/api/client/python/reference/class/ScheduleCollectionClientAsync.md#resource_id)
* [**root\_client](https://docs.apify.com/api/client/python/api/client/python/reference/class/ScheduleCollectionClientAsync.md#root_client)
* [**url](https://docs.apify.com/api/client/python/api/client/python/reference/class/ScheduleCollectionClientAsync.md#url)
## Methods<!-- -->[**](#Methods)
### [**](#__init__)[**](https://undefined/apify/apify-client-python/blob/master//src/apify_client/clients/resource_clients/schedule_collection.py#L92)\_\_init\_\_
* ****\_\_init\_\_**(\*, base\_url, root\_client, http\_client, resource\_id, resource\_path, params): None
- Overrides [ResourceCollectionClientAsync.\_\_init\_\_](https://docs.apify.com/api/client/python/api/client/python/reference/class/ResourceCollectionClientAsync.md#__init__)
Initialize a new instance.
***
#### Parameters
* ##### keyword-onlybase\_url: str
Base URL of the API server.
* ##### keyword-onlyroot\_client: [ApifyClientAsync](https://docs.apify.com/api/client/python/api/client/python/reference/class/ApifyClientAsync.md)
The ApifyClientAsync instance under which this resource client exists.
* ##### keyword-onlyhttp\_client: [HTTPClientAsync](https://docs.apify.com/api/client/python/api/client/python/reference/class/HTTPClientAsync.md)
The HTTPClientAsync instance to be used in this client.
* ##### optionalkeyword-onlyresource\_id: str | None = <!-- -->None
ID of the manipulated resource, in case of a single-resource client.
* ##### keyword-onlyresource\_path: str
Path to the resource's endpoint on the API server.
* ##### optionalkeyword-onlyparams: dict | None = <!-- -->None
Parameters to include in all requests from this client.
#### Returns None
### [**](#create)[**](https://undefined/apify/apify-client-python/blob/master//src/apify_client/clients/resource_clients/schedule_collection.py#L117)create
* **async **create**(\*, cron\_expression, is\_enabled, is\_exclusive, name, actions, description, timezone, title): dict
- Create a new schedule.
<https://docs.apify.com/api/v2#/reference/schedules/schedules-collection/create-schedule>
***
#### Parameters
* ##### keyword-onlycron\_expression: str
The cron expression used by this schedule.
* ##### keyword-onlyis\_enabled: bool
True if the schedule should be enabled.
* ##### keyword-onlyis\_exclusive: bool
When set to true, don't start Actor or Actor task if it's still running from the previous schedule.
* ##### optionalkeyword-onlyname: str | None = <!-- -->None
The name of the schedule to create.
* ##### optionalkeyword-onlyactions: [list](https://docs.apify.com/api/client/python/api/client/python/reference/class/RequestQueueCollectionClient.md#list)\[dict] | None = <!-- -->None
Actors or tasks that should be run on this schedule. See the API documentation for exact structure.
* ##### optionalkeyword-onlydescription: str | None = <!-- -->None
Description of this schedule.
* ##### optionalkeyword-onlytimezone: str | None = <!-- -->None
Timezone in which your cron expression runs (TZ database name from <https://en.wikipedia.org/wiki/List_of_tz_database_time_zones>).
* ##### optionalkeyword-onlytitle: str | None = <!-- -->None
Title of this schedule.
#### Returns dict
### [**](#list)[**](https://undefined/apify/apify-client-python/blob/master//src/apify_client/clients/resource_clients/schedule_collection.py#L96)list
* **async **list**(\*, limit, offset, desc): [ListPage](https://docs.apify.com/api/client/python/api/client/python/reference/class/ListPage.md)\[dict]
- List the available schedules.
<https://docs.apify.com/api/v2#/reference/schedules/schedules-collection/get-list-of-schedules>
***
#### Parameters
* ##### optionalkeyword-onlylimit: int | None = <!-- -->None
How many schedules to retrieve.
* ##### optionalkeyword-onlyoffset: int | None = <!-- -->None
What schedules to include as first when retrieving the list.
* ##### optionalkeyword-onlydesc: bool | None = <!-- -->None
Whether to sort the schedules in descending order based on their modification date.
#### Returns [ListPage](https://docs.apify.com/api/client/python/api/client/python/reference/class/ListPage.md)\[dict]
## Properties<!-- -->[**](#Properties)
### [**](#http_client)[**](https://undefined/apify/apify-client-python/blob/master//src/apify_client/clients/base/base_client.py#L94)http\_client
**http\_client: [HTTPClient](https://docs.apify.com/api/client/python/api/client/python/reference/class/HTTPClient.md) | [HTTPClientAsync](https://docs.apify.com/api/client/python/api/client/python/reference/class/HTTPClientAsync.md)
Inherited from [BaseClientAsync.http\_client](https://docs.apify.com/api/client/python/api/client/python/reference/class/BaseClientAsync.md#http_client)
Overrides [\_BaseBaseClient.http\_client](https://docs.apify.com/api/client/python/api/client/python/reference/class/_BaseBaseClient.md#http_client)
### [**](#params)[**](https://undefined/apify/apify-client-python/blob/master//src/apify_client/clients/base/base_client.py#L17)params
**params: dict
Inherited from [\_BaseBaseClient.params](https://docs.apify.com/api/client/python/api/client/python/reference/class/_BaseBaseClient.md#params)
### [**](#resource_id)[**](https://undefined/apify/apify-client-python/blob/master//src/apify_client/clients/base/base_client.py#L15)resource\_id
**resource\_id: str | None
Inherited from [\_BaseBaseClient.resource\_id](https://docs.apify.com/api/client/python/api/client/python/reference/class/_BaseBaseClient.md#resource_id)
### [**](#root_client)[**](https://undefined/apify/apify-client-python/blob/master//src/apify_client/clients/base/base_client.py#L95)root\_client
**root\_client: [ApifyClient](https://docs.apify.com/api/client/python/api/client/python/reference/class/ApifyClient.md) | [ApifyClientAsync](https://docs.apify.com/api/client/python/api/client/python/reference/class/ApifyClientAsync.md)
Inherited from [BaseClientAsync.root\_client](https://docs.apify.com/api/client/python/api/client/python/reference/class/BaseClientAsync.md#root_client)
Overrides [\_BaseBaseClient.root\_client](https://docs.apify.com/api/client/python/api/client/python/reference/class/_BaseBaseClient.md#root_client)
### [**](#url)[**](https://undefined/apify/apify-client-python/blob/master//src/apify_client/clients/base/base_client.py#L16)url
**url: str
Inherited from [\_BaseBaseClient.url](https://docs.apify.com/api/client/python/api/client/python/reference/class/_BaseBaseClient.md#url)
---
# Statistics<!-- -->
Statistics about API client usage and rate limit errors.
## Index[**](#Index)
### Methods
* [**add\_rate\_limit\_error](https://docs.apify.com/api/client/python/api/client/python/reference/class/Statistics.md#add_rate_limit_error)
### Properties
* [**calls](https://docs.apify.com/api/client/python/api/client/python/reference/class/Statistics.md#calls)
* [**rate\_limit\_errors](https://docs.apify.com/api/client/python/api/client/python/reference/class/Statistics.md#rate_limit_errors)
* [**requests](https://docs.apify.com/api/client/python/api/client/python/reference/class/Statistics.md#requests)
## Methods<!-- -->[**](#Methods)
### [**](#add_rate_limit_error)[**](https://undefined/apify/apify-client-python/blob/master//src/apify_client/_statistics.py#L18)add\_rate\_limit\_error
* ****add\_rate\_limit\_error**(attempt): None
- Add rate limit error for specific attempt.
***
#### Parameters
* ##### attempt: int
The attempt number (1-based indexing).
#### Returns None
## Properties<!-- -->[**](#Properties)
### [**](#calls)[**](https://undefined/apify/apify-client-python/blob/master//src/apify_client/_statistics.py#L9)calls
**calls: int
Total number of API method calls made by the client.
### [**](#rate_limit_errors)[**](https://undefined/apify/apify-client-python/blob/master//src/apify_client/_statistics.py#L15)rate\_limit\_errors
**rate\_limit\_errors: defaultdict\[int, int]
List tracking which retry attempts encountered rate limit (429) errors.
### [**](#requests)[**](https://undefined/apify/apify-client-python/blob/master//src/apify_client/_statistics.py#L12)requests
**requests: int
Total number of HTTP requests sent, including retries.
---
# StatusMessageWatcher<!-- -->
Utility class for logging status messages from another Actor run.
Status message is logged at fixed time intervals, and there is no guarantee that all messages will be logged, especially in cases of frequent status message changes.
### Hierarchy
* *StatusMessageWatcher*
* [StatusMessageWatcherAsync](https://docs.apify.com/api/client/python/api/client/python/reference/class/StatusMessageWatcherAsync.md)
* [StatusMessageWatcherSync](https://docs.apify.com/api/client/python/api/client/python/reference/class/StatusMessageWatcherSync.md)
## Index[**](#Index)
### Methods
* [**\_\_init\_\_](https://docs.apify.com/api/client/python/api/client/python/reference/class/StatusMessageWatcher.md#__init__)
## Methods<!-- -->[**](#Methods)
### [**](#__init__)[**](https://undefined/apify/apify-client-python/blob/master//src/apify_client/clients/resource_clients/log.py#L394)\_\_init\_\_
* ****\_\_init\_\_**(\*, to\_logger, check\_period): None
- Initialize `StatusMessageWatcher`.
***
#### Parameters
* ##### keyword-onlyto\_logger: logging.Logger
The logger to which the status message will be redirected.
* ##### optionalkeyword-onlycheck\_period: timedelta = <!-- -->timedelta(seconds=5)
The period with which the status message will be polled.
#### Returns None
---
# StatusMessageWatcherAsync<!-- -->
Async variant of `StatusMessageWatcher` that is logging in task.
### Hierarchy
* [StatusMessageWatcher](https://docs.apify.com/api/client/python/api/client/python/reference/class/StatusMessageWatcher.md)
* *StatusMessageWatcherAsync*
## Index[**](#Index)
### Methods
* [**\_\_aenter\_\_](https://docs.apify.com/api/client/python/api/client/python/reference/class/StatusMessageWatcherAsync.md#__aenter__)
* [**\_\_aexit\_\_](https://docs.apify.com/api/client/python/api/client/python/reference/class/StatusMessageWatcherAsync.md#__aexit__)
* [**\_\_init\_\_](https://docs.apify.com/api/client/python/api/client/python/reference/class/StatusMessageWatcherAsync.md#__init__)
* [**start](https://docs.apify.com/api/client/python/api/client/python/reference/class/StatusMessageWatcherAsync.md#start)
* [**stop](https://docs.apify.com/api/client/python/api/client/python/reference/class/StatusMessageWatcherAsync.md#stop)
## Methods<!-- -->[**](#Methods)
### [**](#__aenter__)[**](https://undefined/apify/apify-client-python/blob/master//src/apify_client/clients/resource_clients/log.py#L464)\_\_aenter\_\_
* **async **\_\_aenter\_\_**(): Self
- Start the logging task within the context. Exiting the context will cancel the logging task.
***
#### Returns Self
### [**](#__aexit__)[**](https://undefined/apify/apify-client-python/blob/master//src/apify_client/clients/resource_clients/log.py#L469)\_\_aexit\_\_
* **async **\_\_aexit\_\_**(exc\_type, exc\_val, exc\_tb): None
- Cancel the logging task.
***
#### Parameters
* ##### exc\_type: type\[BaseException] | None
* ##### exc\_val: BaseException | None
* ##### exc\_tb: TracebackType | None
#### Returns None
### [**](#__init__)[**](https://undefined/apify/apify-client-python/blob/master//src/apify_client/clients/resource_clients/log.py#L432)\_\_init\_\_
* ****\_\_init\_\_**(\*, run\_client, to\_logger, check\_period): None
- Overrides [StatusMessageWatcher.\_\_init\_\_](https://docs.apify.com/api/client/python/api/client/python/reference/class/StatusMessageWatcher.md#__init__)
Initialize `StatusMessageWatcherAsync`.
***
#### Parameters
* ##### keyword-onlyrun\_client: [RunClientAsync](https://docs.apify.com/api/client/python/api/client/python/reference/class/RunClientAsync.md)
The client for run that will be used to get a status and message.
* ##### keyword-onlyto\_logger: logging.Logger
The logger to which the status message will be redirected.
* ##### optionalkeyword-onlycheck\_period: timedelta = <!-- -->timedelta(seconds=1)
The period with which the status message will be polled.
#### Returns None
### [**](#start)[**](https://undefined/apify/apify-client-python/blob/master//src/apify_client/clients/resource_clients/log.py#L446)start
* ****start**(): Task
- Start the logging task. The caller has to handle any cleanup by manually calling the `stop` method.
***
#### Returns Task
### [**](#stop)[**](https://undefined/apify/apify-client-python/blob/master//src/apify_client/clients/resource_clients/log.py#L453)stop
* **async **stop**(): None
- Stop the logging task.
***
#### Returns None
---
# StatusMessageWatcherSync<!-- -->
Sync variant of `StatusMessageWatcher` that is logging in thread.
### Hierarchy
* [StatusMessageWatcher](https://docs.apify.com/api/client/python/api/client/python/reference/class/StatusMessageWatcher.md)
* *StatusMessageWatcherSync*
## Index[**](#Index)
### Methods
* [**\_\_enter\_\_](https://docs.apify.com/api/client/python/api/client/python/reference/class/StatusMessageWatcherSync.md#__enter__)
* [**\_\_exit\_\_](https://docs.apify.com/api/client/python/api/client/python/reference/class/StatusMessageWatcherSync.md#__exit__)
* [**\_\_init\_\_](https://docs.apify.com/api/client/python/api/client/python/reference/class/StatusMessageWatcherSync.md#__init__)
* [**start](https://docs.apify.com/api/client/python/api/client/python/reference/class/StatusMessageWatcherSync.md#start)
* [**stop](https://docs.apify.com/api/client/python/api/client/python/reference/class/StatusMessageWatcherSync.md#stop)
## Methods<!-- -->[**](#Methods)
### [**](#__enter__)[**](https://undefined/apify/apify-client-python/blob/master//src/apify_client/clients/resource_clients/log.py#L521)\_\_enter\_\_
* ****\_\_enter\_\_**(): Self
- Start the logging task within the context. Exiting the context will cancel the logging task.
***
#### Returns Self
### [**](#__exit__)[**](https://undefined/apify/apify-client-python/blob/master//src/apify_client/clients/resource_clients/log.py#L526)\_\_exit\_\_
* ****\_\_exit\_\_**(exc\_type, exc\_val, exc\_tb): None
- Cancel the logging task.
***
#### Parameters
* ##### exc\_type: type\[BaseException] | None
* ##### exc\_val: BaseException | None
* ##### exc\_tb: TracebackType | None
#### Returns None
### [**](#__init__)[**](https://undefined/apify/apify-client-python/blob/master//src/apify_client/clients/resource_clients/log.py#L487)\_\_init\_\_
* ****\_\_init\_\_**(\*, run\_client, to\_logger, check\_period): None
- Overrides [StatusMessageWatcher.\_\_init\_\_](https://docs.apify.com/api/client/python/api/client/python/reference/class/StatusMessageWatcher.md#__init__)
Initialize `StatusMessageWatcherSync`.
***
#### Parameters
* ##### keyword-onlyrun\_client: [RunClient](https://docs.apify.com/api/client/python/api/client/python/reference/class/RunClient.md)
The client for run that will be used to get a status and message.
* ##### keyword-onlyto\_logger: logging.Logger
The logger to which the status message will be redirected.
* ##### optionalkeyword-onlycheck\_period: timedelta = <!-- -->timedelta(seconds=1)
The period with which the status message will be polled.
#### Returns None
### [**](#start)[**](https://undefined/apify/apify-client-python/blob/master//src/apify_client/clients/resource_clients/log.py#L502)start
* ****start**(): Thread
- Start the logging thread. The caller has to handle any cleanup by manually calling the `stop` method.
***
#### Returns Thread
### [**](#stop)[**](https://undefined/apify/apify-client-python/blob/master//src/apify_client/clients/resource_clients/log.py#L511)stop
* ****stop**(): None
- Signal the \_logging\_thread thread to stop logging and wait for it to finish.
***
#### Returns None
---
# StoreCollectionClient<!-- -->
Sub-client for Apify store.
### Hierarchy
* [ResourceCollectionClient](https://docs.apify.com/api/client/python/api/client/python/reference/class/ResourceCollectionClient.md)
* *StoreCollectionClient*
## Index[**](#Index)
### Methods
* [**\_\_init\_\_](https://docs.apify.com/api/client/python/api/client/python/reference/class/StoreCollectionClient.md#__init__)
* [**list](https://docs.apify.com/api/client/python/api/client/python/reference/class/StoreCollectionClient.md#list)
### Properties
* [**http\_client](https://docs.apify.com/api/client/python/api/client/python/reference/class/StoreCollectionClient.md#http_client)
* [**params](https://docs.apify.com/api/client/python/api/client/python/reference/class/StoreCollectionClient.md#params)
* [**resource\_id](https://docs.apify.com/api/client/python/api/client/python/reference/class/StoreCollectionClient.md#resource_id)
* [**root\_client](https://docs.apify.com/api/client/python/api/client/python/reference/class/StoreCollectionClient.md#root_client)
* [**url](https://docs.apify.com/api/client/python/api/client/python/reference/class/StoreCollectionClient.md#url)
## Methods<!-- -->[**](#Methods)
### [**](#__init__)[**](https://undefined/apify/apify-client-python/blob/master//src/apify_client/clients/resource_clients/store_collection.py#L14)\_\_init\_\_
* ****\_\_init\_\_**(\*, base\_url, root\_client, http\_client, resource\_id, resource\_path, params): None
- Overrides [ResourceCollectionClient.\_\_init\_\_](https://docs.apify.com/api/client/python/api/client/python/reference/class/ResourceCollectionClient.md#__init__)
Initialize a new instance.
***
#### Parameters
* ##### keyword-onlybase\_url: str
Base URL of the API server.
* ##### keyword-onlyroot\_client: [ApifyClient](https://docs.apify.com/api/client/python/api/client/python/reference/class/ApifyClient.md)
The ApifyClient instance under which this resource client exists.
* ##### keyword-onlyhttp\_client: [HTTPClient](https://docs.apify.com/api/client/python/api/client/python/reference/class/HTTPClient.md)
The HTTPClient instance to be used in this client.
* ##### optionalkeyword-onlyresource\_id: str | None = <!-- -->None
ID of the manipulated resource, in case of a single-resource client.
* ##### keyword-onlyresource\_path: str
Path to the resource's endpoint on the API server.
* ##### optionalkeyword-onlyparams: dict | None = <!-- -->None
Parameters to include in all requests from this client.
#### Returns None
### [**](#list)[**](https://undefined/apify/apify-client-python/blob/master//src/apify_client/clients/resource_clients/store_collection.py#L18)list
* ****list**(\*, limit, offset, search, sort\_by, category, username, pricing\_model): [ListPage](https://docs.apify.com/api/client/python/api/client/python/reference/class/ListPage.md)\[dict]
- List Actors in Apify store.
<https://docs.apify.com/api/v2/#/reference/store/store-actors-collection/get-list-of-actors-in-store>
***
#### Parameters
* ##### optionalkeyword-onlylimit: int | None = <!-- -->None
How many Actors to list.
* ##### optionalkeyword-onlyoffset: int | None = <!-- -->None
What Actor to include as first when retrieving the list.
* ##### optionalkeyword-onlysearch: str | None = <!-- -->None
String to search by. The search runs on the following fields: title, name, description, username, readme.
* ##### optionalkeyword-onlysort\_by: str | None = <!-- -->None
Specifies the field by which to sort the results.
* ##### optionalkeyword-onlycategory: str | None = <!-- -->None
Filter by this category.
* ##### optionalkeyword-onlyusername: str | None = <!-- -->None
Filter by this username.
* ##### optionalkeyword-onlypricing\_model: str | None = <!-- -->None
Filter by this pricing model.
#### Returns [ListPage](https://docs.apify.com/api/client/python/api/client/python/reference/class/ListPage.md)\[dict]
## Properties<!-- -->[**](#Properties)
### [**](#http_client)[**](https://undefined/apify/apify-client-python/blob/master//src/apify_client/clients/base/base_client.py#L53)http\_client
**http\_client: [HTTPClient](https://docs.apify.com/api/client/python/api/client/python/reference/class/HTTPClient.md) | [HTTPClientAsync](https://docs.apify.com/api/client/python/api/client/python/reference/class/HTTPClientAsync.md)
Inherited from [BaseClient.http\_client](https://docs.apify.com/api/client/python/api/client/python/reference/class/BaseClient.md#http_client)
Overrides [\_BaseBaseClient.http\_client](https://docs.apify.com/api/client/python/api/client/python/reference/class/_BaseBaseClient.md#http_client)
### [**](#params)[**](https://undefined/apify/apify-client-python/blob/master//src/apify_client/clients/base/base_client.py#L17)params
**params: dict
Inherited from [\_BaseBaseClient.params](https://docs.apify.com/api/client/python/api/client/python/reference/class/_BaseBaseClient.md#params)
### [**](#resource_id)[**](https://undefined/apify/apify-client-python/blob/master//src/apify_client/clients/base/base_client.py#L15)resource\_id
**resource\_id: str | None
Inherited from [\_BaseBaseClient.resource\_id](https://docs.apify.com/api/client/python/api/client/python/reference/class/_BaseBaseClient.md#resource_id)
### [**](#root_client)[**](https://undefined/apify/apify-client-python/blob/master//src/apify_client/clients/base/base_client.py#L54)root\_client
**root\_client: [ApifyClient](https://docs.apify.com/api/client/python/api/client/python/reference/class/ApifyClient.md) | [ApifyClientAsync](https://docs.apify.com/api/client/python/api/client/python/reference/class/ApifyClientAsync.md)
Inherited from [BaseClient.root\_client](https://docs.apify.com/api/client/python/api/client/python/reference/class/BaseClient.md#root_client)
Overrides [\_BaseBaseClient.root\_client](https://docs.apify.com/api/client/python/api/client/python/reference/class/_BaseBaseClient.md#root_client)
### [**](#url)[**](https://undefined/apify/apify-client-python/blob/master//src/apify_client/clients/base/base_client.py#L16)url
**url: str
Inherited from [\_BaseBaseClient.url](https://docs.apify.com/api/client/python/api/client/python/reference/class/_BaseBaseClient.md#url)
---
# StoreCollectionClientAsync<!-- -->
Async sub-client for Apify store.
### Hierarchy
* [ResourceCollectionClientAsync](https://docs.apify.com/api/client/python/api/client/python/reference/class/ResourceCollectionClientAsync.md)
* *StoreCollectionClientAsync*
## Index[**](#Index)
### Methods
* [**\_\_init\_\_](https://docs.apify.com/api/client/python/api/client/python/reference/class/StoreCollectionClientAsync.md#__init__)
* [**list](https://docs.apify.com/api/client/python/api/client/python/reference/class/StoreCollectionClientAsync.md#list)
### Properties
* [**http\_client](https://docs.apify.com/api/client/python/api/client/python/reference/class/StoreCollectionClientAsync.md#http_client)
* [**params](https://docs.apify.com/api/client/python/api/client/python/reference/class/StoreCollectionClientAsync.md#params)
* [**resource\_id](https://docs.apify.com/api/client/python/api/client/python/reference/class/StoreCollectionClientAsync.md#resource_id)
* [**root\_client](https://docs.apify.com/api/client/python/api/client/python/reference/class/StoreCollectionClientAsync.md#root_client)
* [**url](https://docs.apify.com/api/client/python/api/client/python/reference/class/StoreCollectionClientAsync.md#url)
## Methods<!-- -->[**](#Methods)
### [**](#__init__)[**](https://undefined/apify/apify-client-python/blob/master//src/apify_client/clients/resource_clients/store_collection.py#L60)\_\_init\_\_
* ****\_\_init\_\_**(\*, base\_url, root\_client, http\_client, resource\_id, resource\_path, params): None
- Overrides [ResourceCollectionClientAsync.\_\_init\_\_](https://docs.apify.com/api/client/python/api/client/python/reference/class/ResourceCollectionClientAsync.md#__init__)
Initialize a new instance.
***
#### Parameters
* ##### keyword-onlybase\_url: str
Base URL of the API server.
* ##### keyword-onlyroot\_client: [ApifyClientAsync](https://docs.apify.com/api/client/python/api/client/python/reference/class/ApifyClientAsync.md)
The ApifyClientAsync instance under which this resource client exists.
* ##### keyword-onlyhttp\_client: [HTTPClientAsync](https://docs.apify.com/api/client/python/api/client/python/reference/class/HTTPClientAsync.md)
The HTTPClientAsync instance to be used in this client.
* ##### optionalkeyword-onlyresource\_id: str | None = <!-- -->None
ID of the manipulated resource, in case of a single-resource client.
* ##### keyword-onlyresource\_path: str
Path to the resource's endpoint on the API server.
* ##### optionalkeyword-onlyparams: dict | None = <!-- -->None
Parameters to include in all requests from this client.
#### Returns None
### [**](#list)[**](https://undefined/apify/apify-client-python/blob/master//src/apify_client/clients/resource_clients/store_collection.py#L64)list
* **async **list**(\*, limit, offset, search, sort\_by, category, username, pricing\_model): [ListPage](https://docs.apify.com/api/client/python/api/client/python/reference/class/ListPage.md)\[dict]
- List Actors in Apify store.
<https://docs.apify.com/api/v2/#/reference/store/store-actors-collection/get-list-of-actors-in-store>
***
#### Parameters
* ##### optionalkeyword-onlylimit: int | None = <!-- -->None
How many Actors to list.
* ##### optionalkeyword-onlyoffset: int | None = <!-- -->None
What Actor to include as first when retrieving the list.
* ##### optionalkeyword-onlysearch: str | None = <!-- -->None
String to search by. The search runs on the following fields: title, name, description, username, readme.
* ##### optionalkeyword-onlysort\_by: str | None = <!-- -->None
Specifies the field by which to sort the results.
* ##### optionalkeyword-onlycategory: str | None = <!-- -->None
Filter by this category.
* ##### optionalkeyword-onlyusername: str | None = <!-- -->None
Filter by this username.
* ##### optionalkeyword-onlypricing\_model: str | None = <!-- -->None
Filter by this pricing model.
#### Returns [ListPage](https://docs.apify.com/api/client/python/api/client/python/reference/class/ListPage.md)\[dict]
## Properties<!-- -->[**](#Properties)
### [**](#http_client)[**](https://undefined/apify/apify-client-python/blob/master//src/apify_client/clients/base/base_client.py#L94)http\_client
**http\_client: [HTTPClient](https://docs.apify.com/api/client/python/api/client/python/reference/class/HTTPClient.md) | [HTTPClientAsync](https://docs.apify.com/api/client/python/api/client/python/reference/class/HTTPClientAsync.md)
Inherited from [BaseClientAsync.http\_client](https://docs.apify.com/api/client/python/api/client/python/reference/class/BaseClientAsync.md#http_client)
Overrides [\_BaseBaseClient.http\_client](https://docs.apify.com/api/client/python/api/client/python/reference/class/_BaseBaseClient.md#http_client)
### [**](#params)[**](https://undefined/apify/apify-client-python/blob/master//src/apify_client/clients/base/base_client.py#L17)params
**params: dict
Inherited from [\_BaseBaseClient.params](https://docs.apify.com/api/client/python/api/client/python/reference/class/_BaseBaseClient.md#params)
### [**](#resource_id)[**](https://undefined/apify/apify-client-python/blob/master//src/apify_client/clients/base/base_client.py#L15)resource\_id
**resource\_id: str | None
Inherited from [\_BaseBaseClient.resource\_id](https://docs.apify.com/api/client/python/api/client/python/reference/class/_BaseBaseClient.md#resource_id)
### [**](#root_client)[**](https://undefined/apify/apify-client-python/blob/master//src/apify_client/clients/base/base_client.py#L95)root\_client
**root\_client: [ApifyClient](https://docs.apify.com/api/client/python/api/client/python/reference/class/ApifyClient.md) | [ApifyClientAsync](https://docs.apify.com/api/client/python/api/client/python/reference/class/ApifyClientAsync.md)
Inherited from [BaseClientAsync.root\_client](https://docs.apify.com/api/client/python/api/client/python/reference/class/BaseClientAsync.md#root_client)
Overrides [\_BaseBaseClient.root\_client](https://docs.apify.com/api/client/python/api/client/python/reference/class/_BaseBaseClient.md#root_client)
### [**](#url)[**](https://undefined/apify/apify-client-python/blob/master//src/apify_client/clients/base/base_client.py#L16)url
**url: str
Inherited from [\_BaseBaseClient.url](https://docs.apify.com/api/client/python/api/client/python/reference/class/_BaseBaseClient.md#url)
---
# StreamedLog<!-- -->
Utility class for streaming logs from another Actor.
It uses buffer to deal with possibly chunked logs. Chunked logs are stored in buffer. Chunks are expected to contain specific markers that indicate the start of the log message. Each time a new chunk with complete split marker arrives, the buffer is processed, logged and emptied.
This works only if the logs have datetime marker in ISO format. For example, `2025-05-12T15:35:59.429Z` This is the default log standard for the actors.
### Hierarchy
* *StreamedLog*
* [StreamedLogSync](https://docs.apify.com/api/client/python/api/client/python/reference/class/StreamedLogSync.md)
* [StreamedLogAsync](https://docs.apify.com/api/client/python/api/client/python/reference/class/StreamedLogAsync.md)
## Index[**](#Index)
### Methods
* [**\_\_init\_\_](https://docs.apify.com/api/client/python/api/client/python/reference/class/StreamedLog.md#__init__)
## Methods<!-- -->[**](#Methods)
### [**](#__init__)[**](https://undefined/apify/apify-client-python/blob/master//src/apify_client/clients/resource_clients/log.py#L216)\_\_init\_\_
* ****\_\_init\_\_**(to\_logger, \*, from\_start): None
- Overrides [StreamedLog.\_\_init\_\_](https://docs.apify.com/api/client/python/api/client/python/reference/class/StreamedLog.md#__init__)
Initialize `StreamedLog`.
***
#### Parameters
* ##### to\_logger: logging.Logger
The logger to which the logs will be redirected.
* ##### optionalkeyword-onlyfrom\_start: bool = <!-- -->True
If `True`, all logs from the start of the actor run will be redirected. If `False`, only newly arrived logs will be redirected. This can be useful for redirecting only a small portion of relevant logs for long-running actors in stand-by.
#### Returns None
---
# StreamedLogAsync<!-- -->
Async variant of `StreamedLog` that is logging in tasks.
### Hierarchy
* [StreamedLog](https://docs.apify.com/api/client/python/api/client/python/reference/class/StreamedLog.md)
* *StreamedLogAsync*
## Index[**](#Index)
### Methods
* [**\_\_aenter\_\_](https://docs.apify.com/api/client/python/api/client/python/reference/class/StreamedLogAsync.md#__aenter__)
* [**\_\_aexit\_\_](https://docs.apify.com/api/client/python/api/client/python/reference/class/StreamedLogAsync.md#__aexit__)
* [**\_\_init\_\_](https://docs.apify.com/api/client/python/api/client/python/reference/class/StreamedLogAsync.md#__init__)
* [**start](https://docs.apify.com/api/client/python/api/client/python/reference/class/StreamedLogAsync.md#start)
* [**stop](https://docs.apify.com/api/client/python/api/client/python/reference/class/StreamedLogAsync.md#stop)
## Methods<!-- -->[**](#Methods)
### [**](#__aenter__)[**](https://undefined/apify/apify-client-python/blob/master//src/apify_client/clients/resource_clients/log.py#L359)\_\_aenter\_\_
* **async **\_\_aenter\_\_**(): Self
- Start the streaming task within the context. Exiting the context will cancel the streaming task.
***
#### Returns Self
### [**](#__aexit__)[**](https://undefined/apify/apify-client-python/blob/master//src/apify_client/clients/resource_clients/log.py#L364)\_\_aexit\_\_
* **async **\_\_aexit\_\_**(exc\_type, exc\_val, exc\_tb): None
- Cancel the streaming task.
***
#### Parameters
* ##### exc\_type: type\[BaseException] | None
* ##### exc\_val: BaseException | None
* ##### exc\_tb: TracebackType | None
#### Returns None
### [**](#__init__)[**](https://undefined/apify/apify-client-python/blob/master//src/apify_client/clients/resource_clients/log.py#L336)\_\_init\_\_
* ****\_\_init\_\_**(to\_logger, \*, from\_start): None
- Overrides [StreamedLog.\_\_init\_\_](https://docs.apify.com/api/client/python/api/client/python/reference/class/StreamedLog.md#__init__)
Initialize `StreamedLog`.
***
#### Parameters
* ##### to\_logger: logging.Logger
The logger to which the logs will be redirected.
* ##### optionalkeyword-onlyfrom\_start: bool = <!-- -->True
If `True`, all logs from the start of the actor run will be redirected. If `False`, only newly arrived logs will be redirected. This can be useful for redirecting only a small portion of relevant logs for long-running actors in stand-by.
#### Returns None
### [**](#start)[**](https://undefined/apify/apify-client-python/blob/master//src/apify_client/clients/resource_clients/log.py#L341)start
* ****start**(): Task
- Start the streaming task. The caller has to handle any cleanup by manually calling the `stop` method.
***
#### Returns Task
### [**](#stop)[**](https://undefined/apify/apify-client-python/blob/master//src/apify_client/clients/resource_clients/log.py#L348)stop
* **async **stop**(): None
- Stop the streaming task.
***
#### Returns None
---
# StreamedLogSync<!-- -->
Sync variant of `StreamedLog` that is logging in threads.
### Hierarchy
* [StreamedLog](https://docs.apify.com/api/client/python/api/client/python/reference/class/StreamedLog.md)
* *StreamedLogSync*
## Index[**](#Index)
### Methods
* [**\_\_enter\_\_](https://docs.apify.com/api/client/python/api/client/python/reference/class/StreamedLogSync.md#__enter__)
* [**\_\_exit\_\_](https://docs.apify.com/api/client/python/api/client/python/reference/class/StreamedLogSync.md#__exit__)
* [**\_\_init\_\_](https://docs.apify.com/api/client/python/api/client/python/reference/class/StreamedLogSync.md#__init__)
* [**start](https://docs.apify.com/api/client/python/api/client/python/reference/class/StreamedLogSync.md#start)
* [**stop](https://docs.apify.com/api/client/python/api/client/python/reference/class/StreamedLogSync.md#stop)
## Methods<!-- -->[**](#Methods)
### [**](#__enter__)[**](https://undefined/apify/apify-client-python/blob/master//src/apify_client/clients/resource_clients/log.py#L308)\_\_enter\_\_
* ****\_\_enter\_\_**(): Self
- Start the streaming thread within the context. Exiting the context will finish the streaming thread.
***
#### Returns Self
### [**](#__exit__)[**](https://undefined/apify/apify-client-python/blob/master//src/apify_client/clients/resource_clients/log.py#L313)\_\_exit\_\_
* ****\_\_exit\_\_**(exc\_type, exc\_val, exc\_tb): None
- Stop the streaming thread.
***
#### Parameters
* ##### exc\_type: type\[BaseException] | None
* ##### exc\_val: BaseException | None
* ##### exc\_tb: TracebackType | None
#### Returns None
### [**](#__init__)[**](https://undefined/apify/apify-client-python/blob/master//src/apify_client/clients/resource_clients/log.py#L284)\_\_init\_\_
* ****\_\_init\_\_**(to\_logger, \*, from\_start): None
- Overrides [StreamedLog.\_\_init\_\_](https://docs.apify.com/api/client/python/api/client/python/reference/class/StreamedLog.md#__init__)
Initialize `StreamedLog`.
***
#### Parameters
* ##### to\_logger: logging.Logger
The logger to which the logs will be redirected.
* ##### optionalkeyword-onlyfrom\_start: bool = <!-- -->True
If `True`, all logs from the start of the actor run will be redirected. If `False`, only newly arrived logs will be redirected. This can be useful for redirecting only a small portion of relevant logs for long-running actors in stand-by.
#### Returns None
### [**](#start)[**](https://undefined/apify/apify-client-python/blob/master//src/apify_client/clients/resource_clients/log.py#L290)start
* ****start**(): Thread
- Start the streaming thread. The caller has to handle any cleanup by manually calling the `stop` method.
***
#### Returns Thread
### [**](#stop)[**](https://undefined/apify/apify-client-python/blob/master//src/apify_client/clients/resource_clients/log.py#L299)stop
* ****stop**(): None
- Signal the streaming thread to stop logging and wait for it to finish.
***
#### Returns None
---
# TaskClient<!-- -->
Sub-client for manipulating a single task.
### Hierarchy
* [ResourceClient](https://docs.apify.com/api/client/python/api/client/python/reference/class/ResourceClient.md)
* *TaskClient*
## Index[**](#Index)
### Methods
* [**\_\_init\_\_](https://docs.apify.com/api/client/python/api/client/python/reference/class/TaskClient.md#__init__)
* [**call](https://docs.apify.com/api/client/python/api/client/python/reference/class/TaskClient.md#call)
* [**delete](https://docs.apify.com/api/client/python/api/client/python/reference/class/TaskClient.md#delete)
* [**get](https://docs.apify.com/api/client/python/api/client/python/reference/class/TaskClient.md#get)
* [**get\_input](https://docs.apify.com/api/client/python/api/client/python/reference/class/TaskClient.md#get_input)
* [**last\_run](https://docs.apify.com/api/client/python/api/client/python/reference/class/TaskClient.md#last_run)
* [**runs](https://docs.apify.com/api/client/python/api/client/python/reference/class/TaskClient.md#runs)
* [**start](https://docs.apify.com/api/client/python/api/client/python/reference/class/TaskClient.md#start)
* [**update](https://docs.apify.com/api/client/python/api/client/python/reference/class/TaskClient.md#update)
* [**update\_input](https://docs.apify.com/api/client/python/api/client/python/reference/class/TaskClient.md#update_input)
* [**webhooks](https://docs.apify.com/api/client/python/api/client/python/reference/class/TaskClient.md#webhooks)
### Properties
* [**http\_client](https://docs.apify.com/api/client/python/api/client/python/reference/class/TaskClient.md#http_client)
* [**params](https://docs.apify.com/api/client/python/api/client/python/reference/class/TaskClient.md#params)
* [**resource\_id](https://docs.apify.com/api/client/python/api/client/python/reference/class/TaskClient.md#resource_id)
* [**root\_client](https://docs.apify.com/api/client/python/api/client/python/reference/class/TaskClient.md#root_client)
* [**url](https://docs.apify.com/api/client/python/api/client/python/reference/class/TaskClient.md#url)
## Methods<!-- -->[**](#Methods)
### [**](#__init__)[**](https://undefined/apify/apify-client-python/blob/master//src/apify_client/clients/resource_clients/task.py#L69)\_\_init\_\_
* ****\_\_init\_\_**(\*, base\_url, root\_client, http\_client, resource\_id, resource\_path, params): None
- Overrides [ResourceClient.\_\_init\_\_](https://docs.apify.com/api/client/python/api/client/python/reference/class/ResourceClient.md#__init__)
Initialize a new instance.
***
#### Parameters
* ##### keyword-onlybase\_url: str
Base URL of the API server.
* ##### keyword-onlyroot\_client: [ApifyClient](https://docs.apify.com/api/client/python/api/client/python/reference/class/ApifyClient.md)
The ApifyClient instance under which this resource client exists.
* ##### keyword-onlyhttp\_client: [HTTPClient](https://docs.apify.com/api/client/python/api/client/python/reference/class/HTTPClient.md)
The HTTPClient instance to be used in this client.
* ##### optionalkeyword-onlyresource\_id: str | None = <!-- -->None
ID of the manipulated resource, in case of a single-resource client.
* ##### keyword-onlyresource\_path: str
Path to the resource's endpoint on the API server.
* ##### optionalkeyword-onlyparams: dict | None = <!-- -->None
Parameters to include in all requests from this client.
#### Returns None
### [**](#call)[**](https://undefined/apify/apify-client-python/blob/master//src/apify_client/clients/resource_clients/task.py#L216)call
* ****call**(\*, task\_input, build, max\_items, memory\_mbytes, timeout\_secs, restart\_on\_error, webhooks, wait\_secs): dict | None
- Start a task and wait for it to finish before returning the Run object.
It waits indefinitely, unless the wait\_secs argument is provided.
<https://docs.apify.com/api/v2#/reference/actor-tasks/run-collection/run-task>
***
#### Parameters
* ##### optionalkeyword-onlytask\_input: dict | None = <!-- -->None
Task input dictionary.
* ##### optionalkeyword-onlybuild: str | None = <!-- -->None
Specifies the Actor build to run. It can be either a build tag or build number. By default, the run uses the build specified in the task settings (typically latest).
* ##### optionalkeyword-onlymax\_items: int | None = <!-- -->None
Maximum number of results that will be returned by this run. If the Actor is charged per result, you will not be charged for more results than the given limit.
* ##### optionalkeyword-onlymemory\_mbytes: int | None = <!-- -->None
Memory limit for the run, in megabytes. By default, the run uses a memory limit specified in the task settings.
* ##### optionalkeyword-onlytimeout\_secs: int | None = <!-- -->None
Optional timeout for the run, in seconds. By default, the run uses timeout specified in the task settings.
* ##### optionalkeyword-onlyrestart\_on\_error: bool | None = <!-- -->None
If true, the Task run process will be restarted whenever it exits with a non-zero status code.
* ##### optionalkeyword-onlywebhooks: [list](https://docs.apify.com/api/client/python/api/client/python/reference/class/RequestQueueCollectionClient.md#list)\[dict] | None = <!-- -->None
Specifies optional webhooks associated with the Actor run, which can be used to receive a notification e.g. when the Actor finished or failed. Note: if you already have a webhook set up for the Actor or task, you do not have to add it again here.
* ##### optionalkeyword-onlywait\_secs: int | None = <!-- -->None
The maximum number of seconds the server waits for the task run to finish. If not provided, waits indefinitely.
#### Returns dict | None
### [**](#delete)[**](https://undefined/apify/apify-client-python/blob/master//src/apify_client/clients/resource_clients/task.py#L148)delete
* ****delete**(): None
- Delete the task.
<https://docs.apify.com/api/v2#/reference/actor-tasks/task-object/delete-task>
***
#### Returns None
### [**](#get)[**](https://undefined/apify/apify-client-python/blob/master//src/apify_client/clients/resource_clients/task.py#L73)get
* ****get**(): dict | None
- Retrieve the task.
<https://docs.apify.com/api/v2#/reference/actor-tasks/task-object/get-task>
***
#### Returns dict | None
### [**](#get_input)[**](https://undefined/apify/apify-client-python/blob/master//src/apify_client/clients/resource_clients/task.py#L267)get\_input
* ****get\_input**(): dict | None
- Retrieve the default input for this task.
<https://docs.apify.com/api/v2#/reference/actor-tasks/task-input-object/get-task-input>
***
#### Returns dict | None
### [**](#last_run)[**](https://undefined/apify/apify-client-python/blob/master//src/apify_client/clients/resource_clients/task.py#L306)last\_run
* ****last\_run**(\*, status, origin): [RunClient](https://docs.apify.com/api/client/python/api/client/python/reference/class/RunClient.md)
- Retrieve the client for the last run of this task.
Last run is retrieved based on the start time of the runs.
***
#### Parameters
* ##### optionalkeyword-onlystatus: ActorJobStatus | None = <!-- -->None
Consider only runs with this status.
* ##### optionalkeyword-onlyorigin: MetaOrigin | None = <!-- -->None
Consider only runs started with this origin.
#### Returns [RunClient](https://docs.apify.com/api/client/python/api/client/python/reference/class/RunClient.md)
### [**](#runs)[**](https://undefined/apify/apify-client-python/blob/master//src/apify_client/clients/resource_clients/task.py#L302)runs
* ****runs**(): [RunCollectionClient](https://docs.apify.com/api/client/python/api/client/python/reference/class/RunCollectionClient.md)
- Retrieve a client for the runs of this task.
***
#### Returns [RunCollectionClient](https://docs.apify.com/api/client/python/api/client/python/reference/class/RunCollectionClient.md)
### [**](#start)[**](https://undefined/apify/apify-client-python/blob/master//src/apify_client/clients/resource_clients/task.py#L155)start
* ****start**(\*, task\_input, build, max\_items, memory\_mbytes, timeout\_secs, restart\_on\_error, wait\_for\_finish, webhooks): dict
- Start the task and immediately return the Run object.
<https://docs.apify.com/api/v2#/reference/actor-tasks/run-collection/run-task>
***
#### Parameters
* ##### optionalkeyword-onlytask\_input: dict | None = <!-- -->None
Task input dictionary.
* ##### optionalkeyword-onlybuild: str | None = <!-- -->None
Specifies the Actor build to run. It can be either a build tag or build number. By default, the run uses the build specified in the task settings (typically latest).
* ##### optionalkeyword-onlymax\_items: int | None = <!-- -->None
Maximum number of results that will be returned by this run. If the Actor is charged per result, you will not be charged for more results than the given limit.
* ##### optionalkeyword-onlymemory\_mbytes: int | None = <!-- -->None
Memory limit for the run, in megabytes. By default, the run uses a memory limit specified in the task settings.
* ##### optionalkeyword-onlytimeout\_secs: int | None = <!-- -->None
Optional timeout for the run, in seconds. By default, the run uses timeout specified in the task settings.
* ##### optionalkeyword-onlyrestart\_on\_error: bool | None = <!-- -->None
If true, the Task run process will be restarted whenever it exits with a non-zero status code.
* ##### optionalkeyword-onlywait\_for\_finish: int | None = <!-- -->None
The maximum number of seconds the server waits for the run to finish. By default, it is 0, the maximum value is 60.
* ##### optionalkeyword-onlywebhooks: [list](https://docs.apify.com/api/client/python/api/client/python/reference/class/RequestQueueCollectionClient.md#list)\[dict] | None = <!-- -->None
Optional ad-hoc webhooks (<https://docs.apify.com/webhooks/ad-hoc-webhooks>) associated with the Actor run which can be used to receive a notification, e.g. when the Actor finished or failed. If you already have a webhook set up for the Actor or task, you do not have to add it again here. Each webhook is represented by a dictionary containing these items:
* `event_types`: List of `` `WebhookEventType` `` values which trigger the webhook.
* `request_url`: URL to which to send the webhook HTTP request.
* `payload_template`: Optional template for the request payload.
#### Returns dict
### [**](#update)[**](https://undefined/apify/apify-client-python/blob/master//src/apify_client/clients/resource_clients/task.py#L83)update
* ****update**(\*, name, task\_input, build, max\_items, memory\_mbytes, timeout\_secs, restart\_on\_error, title, actor\_standby\_desired\_requests\_per\_actor\_run, actor\_standby\_max\_requests\_per\_actor\_run, actor\_standby\_idle\_timeout\_secs, actor\_standby\_build, actor\_standby\_memory\_mbytes): dict
- Update the task with specified fields.
<https://docs.apify.com/api/v2#/reference/actor-tasks/task-object/update-task>
***
#### Parameters
* ##### optionalkeyword-onlyname: str | None = <!-- -->None
Name of the task.
* ##### optionalkeyword-onlytask\_input: dict | None = <!-- -->None
Task input dictionary.
* ##### optionalkeyword-onlybuild: str | None = <!-- -->None
Actor build to run. It can be either a build tag or build number. By default, the run uses the build specified in the task settings (typically latest).
* ##### optionalkeyword-onlymax\_items: int | None = <!-- -->None
Maximum number of results that will be returned by this run. If the Actor is charged per result, you will not be charged for more results than the given limit.
* ##### optionalkeyword-onlymemory\_mbytes: int | None = <!-- -->None
Memory limit for the run, in megabytes. By default, the run uses a memory limit specified in the task settings.
* ##### optionalkeyword-onlytimeout\_secs: int | None = <!-- -->None
Optional timeout for the run, in seconds. By default, the run uses timeout specified in the task settings.
* ##### optionalkeyword-onlyrestart\_on\_error: bool | None = <!-- -->None
If true, the Task run process will be restarted whenever it exits with a non-zero status code.
* ##### optionalkeyword-onlytitle: str | None = <!-- -->None
A human-friendly equivalent of the name.
* ##### optionalkeyword-onlyactor\_standby\_desired\_requests\_per\_actor\_run: int | None = <!-- -->None
The desired number of concurrent HTTP requests for a single Actor Standby run.
* ##### optionalkeyword-onlyactor\_standby\_max\_requests\_per\_actor\_run: int | None = <!-- -->None
The maximum number of concurrent HTTP requests for a single Actor Standby run.
* ##### optionalkeyword-onlyactor\_standby\_idle\_timeout\_secs: int | None = <!-- -->None
If the Actor run does not receive any requests for this time, it will be shut down.
* ##### optionalkeyword-onlyactor\_standby\_build: str | None = <!-- -->None
The build tag or number to run when the Actor is in Standby mode.
* ##### optionalkeyword-onlyactor\_standby\_memory\_mbytes: int | None = <!-- -->None
The memory in megabytes to use when the Actor is in Standby mode.
#### Returns dict
### [**](#update_input)[**](https://undefined/apify/apify-client-python/blob/master//src/apify_client/clients/resource_clients/task.py#L286)update\_input
* ****update\_input**(\*, task\_input): dict
- Update the default input for this task.
<https://docs.apify.com/api/v2#/reference/actor-tasks/task-input-object/update-task-input>
***
#### Parameters
* ##### keyword-onlytask\_input: dict
#### Returns dict
### [**](#webhooks)[**](https://undefined/apify/apify-client-python/blob/master//src/apify_client/clients/resource_clients/task.py#L329)webhooks
* ****webhooks**(): [WebhookCollectionClient](https://docs.apify.com/api/client/python/api/client/python/reference/class/WebhookCollectionClient.md)
- Retrieve a client for webhooks associated with this task.
***
#### Returns [WebhookCollectionClient](https://docs.apify.com/api/client/python/api/client/python/reference/class/WebhookCollectionClient.md)
## Properties<!-- -->[**](#Properties)
### [**](#http_client)[**](https://undefined/apify/apify-client-python/blob/master//src/apify_client/clients/base/base_client.py#L53)http\_client
**http\_client: [HTTPClient](https://docs.apify.com/api/client/python/api/client/python/reference/class/HTTPClient.md) | [HTTPClientAsync](https://docs.apify.com/api/client/python/api/client/python/reference/class/HTTPClientAsync.md)
Inherited from [BaseClient.http\_client](https://docs.apify.com/api/client/python/api/client/python/reference/class/BaseClient.md#http_client)
Overrides [\_BaseBaseClient.http\_client](https://docs.apify.com/api/client/python/api/client/python/reference/class/_BaseBaseClient.md#http_client)
### [**](#params)[**](https://undefined/apify/apify-client-python/blob/master//src/apify_client/clients/base/base_client.py#L17)params
**params: dict
Inherited from [\_BaseBaseClient.params](https://docs.apify.com/api/client/python/api/client/python/reference/class/_BaseBaseClient.md#params)
### [**](#resource_id)[**](https://undefined/apify/apify-client-python/blob/master//src/apify_client/clients/base/base_client.py#L15)resource\_id
**resource\_id: str | None
Inherited from [\_BaseBaseClient.resource\_id](https://docs.apify.com/api/client/python/api/client/python/reference/class/_BaseBaseClient.md#resource_id)
### [**](#root_client)[**](https://undefined/apify/apify-client-python/blob/master//src/apify_client/clients/base/base_client.py#L54)root\_client
**root\_client: [ApifyClient](https://docs.apify.com/api/client/python/api/client/python/reference/class/ApifyClient.md) | [ApifyClientAsync](https://docs.apify.com/api/client/python/api/client/python/reference/class/ApifyClientAsync.md)
Inherited from [BaseClient.root\_client](https://docs.apify.com/api/client/python/api/client/python/reference/class/BaseClient.md#root_client)
Overrides [\_BaseBaseClient.root\_client](https://docs.apify.com/api/client/python/api/client/python/reference/class/_BaseBaseClient.md#root_client)
### [**](#url)[**](https://undefined/apify/apify-client-python/blob/master//src/apify_client/clients/base/base_client.py#L16)url
**url: str
Inherited from [\_BaseBaseClient.url](https://docs.apify.com/api/client/python/api/client/python/reference/class/_BaseBaseClient.md#url)
---
# TaskClientAsync<!-- -->
Async sub-client for manipulating a single task.
### Hierarchy
* [ResourceClientAsync](https://docs.apify.com/api/client/python/api/client/python/reference/class/ResourceClientAsync.md)
* *TaskClientAsync*
## Index[**](#Index)
### Methods
* [**\_\_init\_\_](https://docs.apify.com/api/client/python/api/client/python/reference/class/TaskClientAsync.md#__init__)
* [**call](https://docs.apify.com/api/client/python/api/client/python/reference/class/TaskClientAsync.md#call)
* [**delete](https://docs.apify.com/api/client/python/api/client/python/reference/class/TaskClientAsync.md#delete)
* [**get](https://docs.apify.com/api/client/python/api/client/python/reference/class/TaskClientAsync.md#get)
* [**get\_input](https://docs.apify.com/api/client/python/api/client/python/reference/class/TaskClientAsync.md#get_input)
* [**last\_run](https://docs.apify.com/api/client/python/api/client/python/reference/class/TaskClientAsync.md#last_run)
* [**runs](https://docs.apify.com/api/client/python/api/client/python/reference/class/TaskClientAsync.md#runs)
* [**start](https://docs.apify.com/api/client/python/api/client/python/reference/class/TaskClientAsync.md#start)
* [**update](https://docs.apify.com/api/client/python/api/client/python/reference/class/TaskClientAsync.md#update)
* [**update\_input](https://docs.apify.com/api/client/python/api/client/python/reference/class/TaskClientAsync.md#update_input)
* [**webhooks](https://docs.apify.com/api/client/python/api/client/python/reference/class/TaskClientAsync.md#webhooks)
### Properties
* [**http\_client](https://docs.apify.com/api/client/python/api/client/python/reference/class/TaskClientAsync.md#http_client)
* [**params](https://docs.apify.com/api/client/python/api/client/python/reference/class/TaskClientAsync.md#params)
* [**resource\_id](https://docs.apify.com/api/client/python/api/client/python/reference/class/TaskClientAsync.md#resource_id)
* [**root\_client](https://docs.apify.com/api/client/python/api/client/python/reference/class/TaskClientAsync.md#root_client)
* [**url](https://docs.apify.com/api/client/python/api/client/python/reference/class/TaskClientAsync.md#url)
## Methods<!-- -->[**](#Methods)
### [**](#__init__)[**](https://undefined/apify/apify-client-python/blob/master//src/apify_client/clients/resource_clients/task.py#L337)\_\_init\_\_
* ****\_\_init\_\_**(\*, base\_url, root\_client, http\_client, resource\_id, resource\_path, params): None
- Overrides [ResourceClientAsync.\_\_init\_\_](https://docs.apify.com/api/client/python/api/client/python/reference/class/ResourceClientAsync.md#__init__)
Initialize a new instance.
***
#### Parameters
* ##### keyword-onlybase\_url: str
Base URL of the API server.
* ##### keyword-onlyroot\_client: [ApifyClientAsync](https://docs.apify.com/api/client/python/api/client/python/reference/class/ApifyClientAsync.md)
The ApifyClientAsync instance under which this resource client exists.
* ##### keyword-onlyhttp\_client: [HTTPClientAsync](https://docs.apify.com/api/client/python/api/client/python/reference/class/HTTPClientAsync.md)
The HTTPClientAsync instance to be used in this client.
* ##### optionalkeyword-onlyresource\_id: str | None = <!-- -->None
ID of the manipulated resource, in case of a single-resource client.
* ##### keyword-onlyresource\_path: str
Path to the resource's endpoint on the API server.
* ##### optionalkeyword-onlyparams: dict | None = <!-- -->None
Parameters to include in all requests from this client.
#### Returns None
### [**](#call)[**](https://undefined/apify/apify-client-python/blob/master//src/apify_client/clients/resource_clients/task.py#L484)call
* **async **call**(\*, task\_input, build, max\_items, memory\_mbytes, timeout\_secs, restart\_on\_error, webhooks, wait\_secs): dict | None
- Start a task and wait for it to finish before returning the Run object.
It waits indefinitely, unless the wait\_secs argument is provided.
<https://docs.apify.com/api/v2#/reference/actor-tasks/run-collection/run-task>
***
#### Parameters
* ##### optionalkeyword-onlytask\_input: dict | None = <!-- -->None
Task input dictionary.
* ##### optionalkeyword-onlybuild: str | None = <!-- -->None
Specifies the Actor build to run. It can be either a build tag or build number. By default, the run uses the build specified in the task settings (typically latest).
* ##### optionalkeyword-onlymax\_items: int | None = <!-- -->None
Maximum number of results that will be returned by this run. If the Actor is charged per result, you will not be charged for more results than the given limit.
* ##### optionalkeyword-onlymemory\_mbytes: int | None = <!-- -->None
Memory limit for the run, in megabytes. By default, the run uses a memory limit specified in the task settings.
* ##### optionalkeyword-onlytimeout\_secs: int | None = <!-- -->None
Optional timeout for the run, in seconds. By default, the run uses timeout specified in the task settings.
* ##### optionalkeyword-onlyrestart\_on\_error: bool | None = <!-- -->None
If true, the Task run process will be restarted whenever it exits with a non-zero status code.
* ##### optionalkeyword-onlywebhooks: [list](https://docs.apify.com/api/client/python/api/client/python/reference/class/RequestQueueCollectionClient.md#list)\[dict] | None = <!-- -->None
Specifies optional webhooks associated with the Actor run, which can be used to receive a notification e.g. when the Actor finished or failed. Note: if you already have a webhook set up for the Actor or task, you do not have to add it again here.
* ##### optionalkeyword-onlywait\_secs: int | None = <!-- -->None
The maximum number of seconds the server waits for the task run to finish. If not provided, waits indefinitely.
#### Returns dict | None
### [**](#delete)[**](https://undefined/apify/apify-client-python/blob/master//src/apify_client/clients/resource_clients/task.py#L416)delete
* **async **delete**(): None
- Delete the task.
<https://docs.apify.com/api/v2#/reference/actor-tasks/task-object/delete-task>
***
#### Returns None
### [**](#get)[**](https://undefined/apify/apify-client-python/blob/master//src/apify_client/clients/resource_clients/task.py#L341)get
* **async **get**(): dict | None
- Retrieve the task.
<https://docs.apify.com/api/v2#/reference/actor-tasks/task-object/get-task>
***
#### Returns dict | None
### [**](#get_input)[**](https://undefined/apify/apify-client-python/blob/master//src/apify_client/clients/resource_clients/task.py#L535)get\_input
* **async **get\_input**(): dict | None
- Retrieve the default input for this task.
<https://docs.apify.com/api/v2#/reference/actor-tasks/task-input-object/get-task-input>
***
#### Returns dict | None
### [**](#last_run)[**](https://undefined/apify/apify-client-python/blob/master//src/apify_client/clients/resource_clients/task.py#L574)last\_run
* ****last\_run**(\*, status, origin): [RunClientAsync](https://docs.apify.com/api/client/python/api/client/python/reference/class/RunClientAsync.md)
- Retrieve the client for the last run of this task.
Last run is retrieved based on the start time of the runs.
***
#### Parameters
* ##### optionalkeyword-onlystatus: ActorJobStatus | None = <!-- -->None
Consider only runs with this status.
* ##### optionalkeyword-onlyorigin: MetaOrigin | None = <!-- -->None
Consider only runs started with this origin.
#### Returns [RunClientAsync](https://docs.apify.com/api/client/python/api/client/python/reference/class/RunClientAsync.md)
### [**](#runs)[**](https://undefined/apify/apify-client-python/blob/master//src/apify_client/clients/resource_clients/task.py#L570)runs
* ****runs**(): [RunCollectionClientAsync](https://docs.apify.com/api/client/python/api/client/python/reference/class/RunCollectionClientAsync.md)
- Retrieve a client for the runs of this task.
***
#### Returns [RunCollectionClientAsync](https://docs.apify.com/api/client/python/api/client/python/reference/class/RunCollectionClientAsync.md)
### [**](#start)[**](https://undefined/apify/apify-client-python/blob/master//src/apify_client/clients/resource_clients/task.py#L423)start
* **async **start**(\*, task\_input, build, max\_items, memory\_mbytes, timeout\_secs, restart\_on\_error, wait\_for\_finish, webhooks): dict
- Start the task and immediately return the Run object.
<https://docs.apify.com/api/v2#/reference/actor-tasks/run-collection/run-task>
***
#### Parameters
* ##### optionalkeyword-onlytask\_input: dict | None = <!-- -->None
Task input dictionary.
* ##### optionalkeyword-onlybuild: str | None = <!-- -->None
Specifies the Actor build to run. It can be either a build tag or build number. By default, the run uses the build specified in the task settings (typically latest).
* ##### optionalkeyword-onlymax\_items: int | None = <!-- -->None
Maximum number of results that will be returned by this run. If the Actor is charged per result, you will not be charged for more results than the given limit.
* ##### optionalkeyword-onlymemory\_mbytes: int | None = <!-- -->None
Memory limit for the run, in megabytes. By default, the run uses a memory limit specified in the task settings.
* ##### optionalkeyword-onlytimeout\_secs: int | None = <!-- -->None
Optional timeout for the run, in seconds. By default, the run uses timeout specified in the task settings.
* ##### optionalkeyword-onlyrestart\_on\_error: bool | None = <!-- -->None
If true, the Task run process will be restarted whenever it exits with a non-zero status code.
* ##### optionalkeyword-onlywait\_for\_finish: int | None = <!-- -->None
The maximum number of seconds the server waits for the run to finish. By default, it is 0, the maximum value is 60.
* ##### optionalkeyword-onlywebhooks: [list](https://docs.apify.com/api/client/python/api/client/python/reference/class/RequestQueueCollectionClient.md#list)\[dict] | None = <!-- -->None
Optional ad-hoc webhooks (<https://docs.apify.com/webhooks/ad-hoc-webhooks>) associated with the Actor run which can be used to receive a notification, e.g. when the Actor finished or failed. If you already have a webhook set up for the Actor or task, you do not have to add it again here. Each webhook is represented by a dictionary containing these items:
* `event_types`: List of `` `WebhookEventType` `` values which trigger the webhook.
* `request_url`: URL to which to send the webhook HTTP request.
* `payload_template`: Optional template for the request payload.
#### Returns dict
### [**](#update)[**](https://undefined/apify/apify-client-python/blob/master//src/apify_client/clients/resource_clients/task.py#L351)update
* **async **update**(\*, name, task\_input, build, max\_items, memory\_mbytes, timeout\_secs, restart\_on\_error, title, actor\_standby\_desired\_requests\_per\_actor\_run, actor\_standby\_max\_requests\_per\_actor\_run, actor\_standby\_idle\_timeout\_secs, actor\_standby\_build, actor\_standby\_memory\_mbytes): dict
- Update the task with specified fields.
<https://docs.apify.com/api/v2#/reference/actor-tasks/task-object/update-task>
***
#### Parameters
* ##### optionalkeyword-onlyname: str | None = <!-- -->None
Name of the task.
* ##### optionalkeyword-onlytask\_input: dict | None = <!-- -->None
Task input dictionary.
* ##### optionalkeyword-onlybuild: str | None = <!-- -->None
Actor build to run. It can be either a build tag or build number. By default, the run uses the build specified in the task settings (typically latest).
* ##### optionalkeyword-onlymax\_items: int | None = <!-- -->None
Maximum number of results that will be returned by this run. If the Actor is charged per result, you will not be charged for more results than the given limit.
* ##### optionalkeyword-onlymemory\_mbytes: int | None = <!-- -->None
Memory limit for the run, in megabytes. By default, the run uses a memory limit specified in the task settings.
* ##### optionalkeyword-onlytimeout\_secs: int | None = <!-- -->None
Optional timeout for the run, in seconds. By default, the run uses timeout specified in the task settings.
* ##### optionalkeyword-onlyrestart\_on\_error: bool | None = <!-- -->None
If true, the Task run process will be restarted whenever it exits with a non-zero status code.
* ##### optionalkeyword-onlytitle: str | None = <!-- -->None
A human-friendly equivalent of the name.
* ##### optionalkeyword-onlyactor\_standby\_desired\_requests\_per\_actor\_run: int | None = <!-- -->None
The desired number of concurrent HTTP requests for a single Actor Standby run.
* ##### optionalkeyword-onlyactor\_standby\_max\_requests\_per\_actor\_run: int | None = <!-- -->None
The maximum number of concurrent HTTP requests for a single Actor Standby run.
* ##### optionalkeyword-onlyactor\_standby\_idle\_timeout\_secs: int | None = <!-- -->None
If the Actor run does not receive any requests for this time, it will be shut down.
* ##### optionalkeyword-onlyactor\_standby\_build: str | None = <!-- -->None
The build tag or number to run when the Actor is in Standby mode.
* ##### optionalkeyword-onlyactor\_standby\_memory\_mbytes: int | None = <!-- -->None
The memory in megabytes to use when the Actor is in Standby mode.
#### Returns dict
### [**](#update_input)[**](https://undefined/apify/apify-client-python/blob/master//src/apify_client/clients/resource_clients/task.py#L554)update\_input
* **async **update\_input**(\*, task\_input): dict
- Update the default input for this task.
<https://docs.apify.com/api/v2#/reference/actor-tasks/task-input-object/update-task-input>
***
#### Parameters
* ##### keyword-onlytask\_input: dict
#### Returns dict
### [**](#webhooks)[**](https://undefined/apify/apify-client-python/blob/master//src/apify_client/clients/resource_clients/task.py#L597)webhooks
* ****webhooks**(): [WebhookCollectionClientAsync](https://docs.apify.com/api/client/python/api/client/python/reference/class/WebhookCollectionClientAsync.md)
- Retrieve a client for webhooks associated with this task.
***
#### Returns [WebhookCollectionClientAsync](https://docs.apify.com/api/client/python/api/client/python/reference/class/WebhookCollectionClientAsync.md)
## Properties<!-- -->[**](#Properties)
### [**](#http_client)[**](https://undefined/apify/apify-client-python/blob/master//src/apify_client/clients/base/base_client.py#L94)http\_client
**http\_client: [HTTPClient](https://docs.apify.com/api/client/python/api/client/python/reference/class/HTTPClient.md) | [HTTPClientAsync](https://docs.apify.com/api/client/python/api/client/python/reference/class/HTTPClientAsync.md)
Inherited from [BaseClientAsync.http\_client](https://docs.apify.com/api/client/python/api/client/python/reference/class/BaseClientAsync.md#http_client)
Overrides [\_BaseBaseClient.http\_client](https://docs.apify.com/api/client/python/api/client/python/reference/class/_BaseBaseClient.md#http_client)
### [**](#params)[**](https://undefined/apify/apify-client-python/blob/master//src/apify_client/clients/base/base_client.py#L17)params
**params: dict
Inherited from [\_BaseBaseClient.params](https://docs.apify.com/api/client/python/api/client/python/reference/class/_BaseBaseClient.md#params)
### [**](#resource_id)[**](https://undefined/apify/apify-client-python/blob/master//src/apify_client/clients/base/base_client.py#L15)resource\_id
**resource\_id: str | None
Inherited from [\_BaseBaseClient.resource\_id](https://docs.apify.com/api/client/python/api/client/python/reference/class/_BaseBaseClient.md#resource_id)
### [**](#root_client)[**](https://undefined/apify/apify-client-python/blob/master//src/apify_client/clients/base/base_client.py#L95)root\_client
**root\_client: [ApifyClient](https://docs.apify.com/api/client/python/api/client/python/reference/class/ApifyClient.md) | [ApifyClientAsync](https://docs.apify.com/api/client/python/api/client/python/reference/class/ApifyClientAsync.md)
Inherited from [BaseClientAsync.root\_client](https://docs.apify.com/api/client/python/api/client/python/reference/class/BaseClientAsync.md#root_client)
Overrides [\_BaseBaseClient.root\_client](https://docs.apify.com/api/client/python/api/client/python/reference/class/_BaseBaseClient.md#root_client)
### [**](#url)[**](https://undefined/apify/apify-client-python/blob/master//src/apify_client/clients/base/base_client.py#L16)url
**url: str
Inherited from [\_BaseBaseClient.url](https://docs.apify.com/api/client/python/api/client/python/reference/class/_BaseBaseClient.md#url)
---
# TaskCollectionClient<!-- -->
Sub-client for manipulating tasks.
### Hierarchy
* [ResourceCollectionClient](https://docs.apify.com/api/client/python/api/client/python/reference/class/ResourceCollectionClient.md)
* *TaskCollectionClient*
## Index[**](#Index)
### Methods
* [**\_\_init\_\_](https://docs.apify.com/api/client/python/api/client/python/reference/class/TaskCollectionClient.md#__init__)
* [**create](https://docs.apify.com/api/client/python/api/client/python/reference/class/TaskCollectionClient.md#create)
* [**list](https://docs.apify.com/api/client/python/api/client/python/reference/class/TaskCollectionClient.md#list)
### Properties
* [**http\_client](https://docs.apify.com/api/client/python/api/client/python/reference/class/TaskCollectionClient.md#http_client)
* [**params](https://docs.apify.com/api/client/python/api/client/python/reference/class/TaskCollectionClient.md#params)
* [**resource\_id](https://docs.apify.com/api/client/python/api/client/python/reference/class/TaskCollectionClient.md#resource_id)
* [**root\_client](https://docs.apify.com/api/client/python/api/client/python/reference/class/TaskCollectionClient.md#root_client)
* [**url](https://docs.apify.com/api/client/python/api/client/python/reference/class/TaskCollectionClient.md#url)
## Methods<!-- -->[**](#Methods)
### [**](#__init__)[**](https://undefined/apify/apify-client-python/blob/master//src/apify_client/clients/resource_clients/task_collection.py#L16)\_\_init\_\_
* ****\_\_init\_\_**(\*, base\_url, root\_client, http\_client, resource\_id, resource\_path, params): None
- Overrides [ResourceCollectionClient.\_\_init\_\_](https://docs.apify.com/api/client/python/api/client/python/reference/class/ResourceCollectionClient.md#__init__)
Initialize a new instance.
***
#### Parameters
* ##### keyword-onlybase\_url: str
Base URL of the API server.
* ##### keyword-onlyroot\_client: [ApifyClient](https://docs.apify.com/api/client/python/api/client/python/reference/class/ApifyClient.md)
The ApifyClient instance under which this resource client exists.
* ##### keyword-onlyhttp\_client: [HTTPClient](https://docs.apify.com/api/client/python/api/client/python/reference/class/HTTPClient.md)
The HTTPClient instance to be used in this client.
* ##### optionalkeyword-onlyresource\_id: str | None = <!-- -->None
ID of the manipulated resource, in case of a single-resource client.
* ##### keyword-onlyresource\_path: str
Path to the resource's endpoint on the API server.
* ##### optionalkeyword-onlyparams: dict | None = <!-- -->None
Parameters to include in all requests from this client.
#### Returns None
### [**](#create)[**](https://undefined/apify/apify-client-python/blob/master//src/apify_client/clients/resource_clients/task_collection.py#L41)create
* ****create**(\*, actor\_id, name, build, timeout\_secs, memory\_mbytes, max\_items, restart\_on\_error, task\_input, title, actor\_standby\_desired\_requests\_per\_actor\_run, actor\_standby\_max\_requests\_per\_actor\_run, actor\_standby\_idle\_timeout\_secs, actor\_standby\_build, actor\_standby\_memory\_mbytes): dict
- Create a new task.
<https://docs.apify.com/api/v2#/reference/actor-tasks/task-collection/create-task>
***
#### Parameters
* ##### keyword-onlyactor\_id: str
Id of the Actor that should be run.
* ##### keyword-onlyname: str
Name of the task.
* ##### optionalkeyword-onlybuild: str | None = <!-- -->None
Actor build to run. It can be either a build tag or build number. By default, the run uses the build specified in the task settings (typically latest).
* ##### optionalkeyword-onlytimeout\_secs: int | None = <!-- -->None
Optional timeout for the run, in seconds. By default, the run uses timeout specified in the task settings.
* ##### optionalkeyword-onlymemory\_mbytes: int | None = <!-- -->None
Memory limit for the run, in megabytes. By default, the run uses a memory limit specified in the task settings.
* ##### optionalkeyword-onlymax\_items: int | None = <!-- -->None
Maximum number of results that will be returned by runs of this task. If the Actor of this task is charged per result, you will not be charged for more results than the given limit.
* ##### optionalkeyword-onlyrestart\_on\_error: bool | None = <!-- -->None
If true, the Task run process will be restarted whenever it exits with a non-zero status code.
* ##### optionalkeyword-onlytask\_input: dict | None = <!-- -->None
Task input object.
* ##### optionalkeyword-onlytitle: str | None = <!-- -->None
A human-friendly equivalent of the name.
* ##### optionalkeyword-onlyactor\_standby\_desired\_requests\_per\_actor\_run: int | None = <!-- -->None
The desired number of concurrent HTTP requests for a single Actor Standby run.
* ##### optionalkeyword-onlyactor\_standby\_max\_requests\_per\_actor\_run: int | None = <!-- -->None
The maximum number of concurrent HTTP requests for a single Actor Standby run.
* ##### optionalkeyword-onlyactor\_standby\_idle\_timeout\_secs: int | None = <!-- -->None
If the Actor run does not receive any requests for this time, it will be shut down.
* ##### optionalkeyword-onlyactor\_standby\_build: str | None = <!-- -->None
The build tag or number to run when the Actor is in Standby mode.
* ##### optionalkeyword-onlyactor\_standby\_memory\_mbytes: int | None = <!-- -->None
The memory in megabytes to use when the Actor is in Standby mode.
#### Returns dict
### [**](#list)[**](https://undefined/apify/apify-client-python/blob/master//src/apify_client/clients/resource_clients/task_collection.py#L20)list
* ****list**(\*, limit, offset, desc): [ListPage](https://docs.apify.com/api/client/python/api/client/python/reference/class/ListPage.md)\[dict]
- List the available tasks.
<https://docs.apify.com/api/v2#/reference/actor-tasks/task-collection/get-list-of-tasks>
***
#### Parameters
* ##### optionalkeyword-onlylimit: int | None = <!-- -->None
How many tasks to list.
* ##### optionalkeyword-onlyoffset: int | None = <!-- -->None
What task to include as first when retrieving the list.
* ##### optionalkeyword-onlydesc: bool | None = <!-- -->None
Whether to sort the tasks in descending order based on their creation date.
#### Returns [ListPage](https://docs.apify.com/api/client/python/api/client/python/reference/class/ListPage.md)\[dict]
## Properties<!-- -->[**](#Properties)
### [**](#http_client)[**](https://undefined/apify/apify-client-python/blob/master//src/apify_client/clients/base/base_client.py#L53)http\_client
**http\_client: [HTTPClient](https://docs.apify.com/api/client/python/api/client/python/reference/class/HTTPClient.md) | [HTTPClientAsync](https://docs.apify.com/api/client/python/api/client/python/reference/class/HTTPClientAsync.md)
Inherited from [BaseClient.http\_client](https://docs.apify.com/api/client/python/api/client/python/reference/class/BaseClient.md#http_client)
Overrides [\_BaseBaseClient.http\_client](https://docs.apify.com/api/client/python/api/client/python/reference/class/_BaseBaseClient.md#http_client)
### [**](#params)[**](https://undefined/apify/apify-client-python/blob/master//src/apify_client/clients/base/base_client.py#L17)params
**params: dict
Inherited from [\_BaseBaseClient.params](https://docs.apify.com/api/client/python/api/client/python/reference/class/_BaseBaseClient.md#params)
### [**](#resource_id)[**](https://undefined/apify/apify-client-python/blob/master//src/apify_client/clients/base/base_client.py#L15)resource\_id
**resource\_id: str | None
Inherited from [\_BaseBaseClient.resource\_id](https://docs.apify.com/api/client/python/api/client/python/reference/class/_BaseBaseClient.md#resource_id)
### [**](#root_client)[**](https://undefined/apify/apify-client-python/blob/master//src/apify_client/clients/base/base_client.py#L54)root\_client
**root\_client: [ApifyClient](https://docs.apify.com/api/client/python/api/client/python/reference/class/ApifyClient.md) | [ApifyClientAsync](https://docs.apify.com/api/client/python/api/client/python/reference/class/ApifyClientAsync.md)
Inherited from [BaseClient.root\_client](https://docs.apify.com/api/client/python/api/client/python/reference/class/BaseClient.md#root_client)
Overrides [\_BaseBaseClient.root\_client](https://docs.apify.com/api/client/python/api/client/python/reference/class/_BaseBaseClient.md#root_client)
### [**](#url)[**](https://undefined/apify/apify-client-python/blob/master//src/apify_client/clients/base/base_client.py#L16)url
**url: str
Inherited from [\_BaseBaseClient.url](https://docs.apify.com/api/client/python/api/client/python/reference/class/_BaseBaseClient.md#url)
---
# TaskCollectionClientAsync<!-- -->
Async sub-client for manipulating tasks.
### Hierarchy
* [ResourceCollectionClientAsync](https://docs.apify.com/api/client/python/api/client/python/reference/class/ResourceCollectionClientAsync.md)
* *TaskCollectionClientAsync*
## Index[**](#Index)
### Methods
* [**\_\_init\_\_](https://docs.apify.com/api/client/python/api/client/python/reference/class/TaskCollectionClientAsync.md#__init__)
* [**create](https://docs.apify.com/api/client/python/api/client/python/reference/class/TaskCollectionClientAsync.md#create)
* [**list](https://docs.apify.com/api/client/python/api/client/python/reference/class/TaskCollectionClientAsync.md#list)
### Properties
* [**http\_client](https://docs.apify.com/api/client/python/api/client/python/reference/class/TaskCollectionClientAsync.md#http_client)
* [**params](https://docs.apify.com/api/client/python/api/client/python/reference/class/TaskCollectionClientAsync.md#params)
* [**resource\_id](https://docs.apify.com/api/client/python/api/client/python/reference/class/TaskCollectionClientAsync.md#resource_id)
* [**root\_client](https://docs.apify.com/api/client/python/api/client/python/reference/class/TaskCollectionClientAsync.md#root_client)
* [**url](https://docs.apify.com/api/client/python/api/client/python/reference/class/TaskCollectionClientAsync.md#url)
## Methods<!-- -->[**](#Methods)
### [**](#__init__)[**](https://undefined/apify/apify-client-python/blob/master//src/apify_client/clients/resource_clients/task_collection.py#L113)\_\_init\_\_
* ****\_\_init\_\_**(\*, base\_url, root\_client, http\_client, resource\_id, resource\_path, params): None
- Overrides [ResourceCollectionClientAsync.\_\_init\_\_](https://docs.apify.com/api/client/python/api/client/python/reference/class/ResourceCollectionClientAsync.md#__init__)
Initialize a new instance.
***
#### Parameters
* ##### keyword-onlybase\_url: str
Base URL of the API server.
* ##### keyword-onlyroot\_client: [ApifyClientAsync](https://docs.apify.com/api/client/python/api/client/python/reference/class/ApifyClientAsync.md)
The ApifyClientAsync instance under which this resource client exists.
* ##### keyword-onlyhttp\_client: [HTTPClientAsync](https://docs.apify.com/api/client/python/api/client/python/reference/class/HTTPClientAsync.md)
The HTTPClientAsync instance to be used in this client.
* ##### optionalkeyword-onlyresource\_id: str | None = <!-- -->None
ID of the manipulated resource, in case of a single-resource client.
* ##### keyword-onlyresource\_path: str
Path to the resource's endpoint on the API server.
* ##### optionalkeyword-onlyparams: dict | None = <!-- -->None
Parameters to include in all requests from this client.
#### Returns None
### [**](#create)[**](https://undefined/apify/apify-client-python/blob/master//src/apify_client/clients/resource_clients/task_collection.py#L138)create
* **async **create**(\*, actor\_id, name, build, timeout\_secs, memory\_mbytes, max\_items, restart\_on\_error, task\_input, title, actor\_standby\_desired\_requests\_per\_actor\_run, actor\_standby\_max\_requests\_per\_actor\_run, actor\_standby\_idle\_timeout\_secs, actor\_standby\_build, actor\_standby\_memory\_mbytes): dict
- Create a new task.
<https://docs.apify.com/api/v2#/reference/actor-tasks/task-collection/create-task>
***
#### Parameters
* ##### keyword-onlyactor\_id: str
Id of the Actor that should be run.
* ##### keyword-onlyname: str
Name of the task.
* ##### optionalkeyword-onlybuild: str | None = <!-- -->None
Actor build to run. It can be either a build tag or build number. By default, the run uses the build specified in the task settings (typically latest).
* ##### optionalkeyword-onlytimeout\_secs: int | None = <!-- -->None
Optional timeout for the run, in seconds. By default, the run uses timeout specified in the task settings.
* ##### optionalkeyword-onlymemory\_mbytes: int | None = <!-- -->None
Memory limit for the run, in megabytes. By default, the run uses a memory limit specified in the task settings.
* ##### optionalkeyword-onlymax\_items: int | None = <!-- -->None
Maximum number of results that will be returned by runs of this task. If the Actor of this task is charged per result, you will not be charged for more results than the given limit.
* ##### optionalkeyword-onlyrestart\_on\_error: bool | None = <!-- -->None
If true, the Task run process will be restarted whenever it exits with a non-zero status code.
* ##### optionalkeyword-onlytask\_input: dict | None = <!-- -->None
Task input object.
* ##### optionalkeyword-onlytitle: str | None = <!-- -->None
A human-friendly equivalent of the name.
* ##### optionalkeyword-onlyactor\_standby\_desired\_requests\_per\_actor\_run: int | None = <!-- -->None
The desired number of concurrent HTTP requests for a single Actor Standby run.
* ##### optionalkeyword-onlyactor\_standby\_max\_requests\_per\_actor\_run: int | None = <!-- -->None
The maximum number of concurrent HTTP requests for a single Actor Standby run.
* ##### optionalkeyword-onlyactor\_standby\_idle\_timeout\_secs: int | None = <!-- -->None
If the Actor run does not receive any requests for this time, it will be shut down.
* ##### optionalkeyword-onlyactor\_standby\_build: str | None = <!-- -->None
The build tag or number to run when the Actor is in Standby mode.
* ##### optionalkeyword-onlyactor\_standby\_memory\_mbytes: int | None = <!-- -->None
The memory in megabytes to use when the Actor is in Standby mode.
#### Returns dict
### [**](#list)[**](https://undefined/apify/apify-client-python/blob/master//src/apify_client/clients/resource_clients/task_collection.py#L117)list
* **async **list**(\*, limit, offset, desc): [ListPage](https://docs.apify.com/api/client/python/api/client/python/reference/class/ListPage.md)\[dict]
- List the available tasks.
<https://docs.apify.com/api/v2#/reference/actor-tasks/task-collection/get-list-of-tasks>
***
#### Parameters
* ##### optionalkeyword-onlylimit: int | None = <!-- -->None
How many tasks to list.
* ##### optionalkeyword-onlyoffset: int | None = <!-- -->None
What task to include as first when retrieving the list.
* ##### optionalkeyword-onlydesc: bool | None = <!-- -->None
Whether to sort the tasks in descending order based on their creation date.
#### Returns [ListPage](https://docs.apify.com/api/client/python/api/client/python/reference/class/ListPage.md)\[dict]
## Properties<!-- -->[**](#Properties)
### [**](#http_client)[**](https://undefined/apify/apify-client-python/blob/master//src/apify_client/clients/base/base_client.py#L94)http\_client
**http\_client: [HTTPClient](https://docs.apify.com/api/client/python/api/client/python/reference/class/HTTPClient.md) | [HTTPClientAsync](https://docs.apify.com/api/client/python/api/client/python/reference/class/HTTPClientAsync.md)
Inherited from [BaseClientAsync.http\_client](https://docs.apify.com/api/client/python/api/client/python/reference/class/BaseClientAsync.md#http_client)
Overrides [\_BaseBaseClient.http\_client](https://docs.apify.com/api/client/python/api/client/python/reference/class/_BaseBaseClient.md#http_client)
### [**](#params)[**](https://undefined/apify/apify-client-python/blob/master//src/apify_client/clients/base/base_client.py#L17)params
**params: dict
Inherited from [\_BaseBaseClient.params](https://docs.apify.com/api/client/python/api/client/python/reference/class/_BaseBaseClient.md#params)
### [**](#resource_id)[**](https://undefined/apify/apify-client-python/blob/master//src/apify_client/clients/base/base_client.py#L15)resource\_id
**resource\_id: str | None
Inherited from [\_BaseBaseClient.resource\_id](https://docs.apify.com/api/client/python/api/client/python/reference/class/_BaseBaseClient.md#resource_id)
### [**](#root_client)[**](https://undefined/apify/apify-client-python/blob/master//src/apify_client/clients/base/base_client.py#L95)root\_client
**root\_client: [ApifyClient](https://docs.apify.com/api/client/python/api/client/python/reference/class/ApifyClient.md) | [ApifyClientAsync](https://docs.apify.com/api/client/python/api/client/python/reference/class/ApifyClientAsync.md)
Inherited from [BaseClientAsync.root\_client](https://docs.apify.com/api/client/python/api/client/python/reference/class/BaseClientAsync.md#root_client)
Overrides [\_BaseBaseClient.root\_client](https://docs.apify.com/api/client/python/api/client/python/reference/class/_BaseBaseClient.md#root_client)
### [**](#url)[**](https://undefined/apify/apify-client-python/blob/master//src/apify_client/clients/base/base_client.py#L16)url
**url: str
Inherited from [\_BaseBaseClient.url](https://docs.apify.com/api/client/python/api/client/python/reference/class/_BaseBaseClient.md#url)
---
# UserClient<!-- -->
Sub-client for querying user data.
### Hierarchy
* [ResourceClient](https://docs.apify.com/api/client/python/api/client/python/reference/class/ResourceClient.md)
* *UserClient*
## Index[**](#Index)
### Methods
* [**\_\_init\_\_](https://docs.apify.com/api/client/python/api/client/python/reference/class/UserClient.md#__init__)
* [**get](https://docs.apify.com/api/client/python/api/client/python/reference/class/UserClient.md#get)
* [**limits](https://docs.apify.com/api/client/python/api/client/python/reference/class/UserClient.md#limits)
* [**monthly\_usage](https://docs.apify.com/api/client/python/api/client/python/reference/class/UserClient.md#monthly_usage)
* [**update\_limits](https://docs.apify.com/api/client/python/api/client/python/reference/class/UserClient.md#update_limits)
### Properties
* [**http\_client](https://docs.apify.com/api/client/python/api/client/python/reference/class/UserClient.md#http_client)
* [**params](https://docs.apify.com/api/client/python/api/client/python/reference/class/UserClient.md#params)
* [**resource\_id](https://docs.apify.com/api/client/python/api/client/python/reference/class/UserClient.md#resource_id)
* [**root\_client](https://docs.apify.com/api/client/python/api/client/python/reference/class/UserClient.md#root_client)
* [**url](https://docs.apify.com/api/client/python/api/client/python/reference/class/UserClient.md#url)
## Methods<!-- -->[**](#Methods)
### [**](#__init__)[**](https://undefined/apify/apify-client-python/blob/master//src/apify_client/clients/resource_clients/user.py#L18)\_\_init\_\_
* ****\_\_init\_\_**(\*, base\_url, root\_client, http\_client, resource\_id, resource\_path, params): None
- Overrides [ResourceClient.\_\_init\_\_](https://docs.apify.com/api/client/python/api/client/python/reference/class/ResourceClient.md#__init__)
Initialize a new instance.
***
#### Parameters
* ##### keyword-onlybase\_url: str
Base URL of the API server.
* ##### keyword-onlyroot\_client: [ApifyClient](https://docs.apify.com/api/client/python/api/client/python/reference/class/ApifyClient.md)
The ApifyClient instance under which this resource client exists.
* ##### keyword-onlyhttp\_client: [HTTPClient](https://docs.apify.com/api/client/python/api/client/python/reference/class/HTTPClient.md)
The HTTPClient instance to be used in this client.
* ##### optionalkeyword-onlyresource\_id: str | None = <!-- -->None
ID of the manipulated resource, in case of a single-resource client.
* ##### keyword-onlyresource\_path: str
Path to the resource's endpoint on the API server.
* ##### optionalkeyword-onlyparams: dict | None = <!-- -->None
Parameters to include in all requests from this client.
#### Returns None
### [**](#get)[**](https://undefined/apify/apify-client-python/blob/master//src/apify_client/clients/resource_clients/user.py#L25)get
* ****get**(): dict | None
- Return information about user account.
You receive all or only public info based on your token permissions.
<https://docs.apify.com/api/v2#/reference/users>
***
#### Returns dict | None
### [**](#limits)[**](https://undefined/apify/apify-client-python/blob/master//src/apify_client/clients/resource_clients/user.py#L62)limits
* ****limits**(): dict | None
- Return a complete summary of the user account's limits.
It is the same information which is available on the account's Limits page. The returned data includes the current usage cycle, a summary of the account's limits, and the current usage.
<https://docs.apify.com/api/v2#/reference/request-queues/request/get-request>
***
#### Returns dict | None
### [**](#monthly_usage)[**](https://undefined/apify/apify-client-python/blob/master//src/apify_client/clients/resource_clients/user.py#L37)monthly\_usage
* ****monthly\_usage**(): dict | None
- Return monthly usage of the user account.
This includes a complete usage summary for the current usage cycle, an overall sum, as well as a daily breakdown of usage. It is the same information which is available on the account's Billing page. The information includes use of storage, data transfer, and request queue usage.
<https://docs.apify.com/api/v2/#/reference/users/monthly-usage>
***
#### Returns dict | None
### [**](#update_limits)[**](https://undefined/apify/apify-client-python/blob/master//src/apify_client/clients/resource_clients/user.py#L86)update\_limits
* ****update\_limits**(\*, max\_monthly\_usage\_usd, data\_retention\_days): None
- Update the account's limits manageable on your account's Limits page.
***
#### Parameters
* ##### optionalkeyword-onlymax\_monthly\_usage\_usd: int | None = <!-- -->None
* ##### optionalkeyword-onlydata\_retention\_days: int | None = <!-- -->None
#### Returns None
## Properties<!-- -->[**](#Properties)
### [**](#http_client)[**](https://undefined/apify/apify-client-python/blob/master//src/apify_client/clients/base/base_client.py#L53)http\_client
**http\_client: [HTTPClient](https://docs.apify.com/api/client/python/api/client/python/reference/class/HTTPClient.md) | [HTTPClientAsync](https://docs.apify.com/api/client/python/api/client/python/reference/class/HTTPClientAsync.md)
Inherited from [BaseClient.http\_client](https://docs.apify.com/api/client/python/api/client/python/reference/class/BaseClient.md#http_client)
Overrides [\_BaseBaseClient.http\_client](https://docs.apify.com/api/client/python/api/client/python/reference/class/_BaseBaseClient.md#http_client)
### [**](#params)[**](https://undefined/apify/apify-client-python/blob/master//src/apify_client/clients/base/base_client.py#L17)params
**params: dict
Inherited from [\_BaseBaseClient.params](https://docs.apify.com/api/client/python/api/client/python/reference/class/_BaseBaseClient.md#params)
### [**](#resource_id)[**](https://undefined/apify/apify-client-python/blob/master//src/apify_client/clients/base/base_client.py#L15)resource\_id
**resource\_id: str | None
Inherited from [\_BaseBaseClient.resource\_id](https://docs.apify.com/api/client/python/api/client/python/reference/class/_BaseBaseClient.md#resource_id)
### [**](#root_client)[**](https://undefined/apify/apify-client-python/blob/master//src/apify_client/clients/base/base_client.py#L54)root\_client
**root\_client: [ApifyClient](https://docs.apify.com/api/client/python/api/client/python/reference/class/ApifyClient.md) | [ApifyClientAsync](https://docs.apify.com/api/client/python/api/client/python/reference/class/ApifyClientAsync.md)
Inherited from [BaseClient.root\_client](https://docs.apify.com/api/client/python/api/client/python/reference/class/BaseClient.md#root_client)
Overrides [\_BaseBaseClient.root\_client](https://docs.apify.com/api/client/python/api/client/python/reference/class/_BaseBaseClient.md#root_client)
### [**](#url)[**](https://undefined/apify/apify-client-python/blob/master//src/apify_client/clients/base/base_client.py#L16)url
**url: str
Inherited from [\_BaseBaseClient.url](https://docs.apify.com/api/client/python/api/client/python/reference/class/_BaseBaseClient.md#url)
---
# UserClientAsync<!-- -->
Async sub-client for querying user data.
### Hierarchy
* [ResourceClientAsync](https://docs.apify.com/api/client/python/api/client/python/reference/class/ResourceClientAsync.md)
* *UserClientAsync*
## Index[**](#Index)
### Methods
* [**\_\_init\_\_](https://docs.apify.com/api/client/python/api/client/python/reference/class/UserClientAsync.md#__init__)
* [**get](https://docs.apify.com/api/client/python/api/client/python/reference/class/UserClientAsync.md#get)
* [**limits](https://docs.apify.com/api/client/python/api/client/python/reference/class/UserClientAsync.md#limits)
* [**monthly\_usage](https://docs.apify.com/api/client/python/api/client/python/reference/class/UserClientAsync.md#monthly_usage)
* [**update\_limits](https://docs.apify.com/api/client/python/api/client/python/reference/class/UserClientAsync.md#update_limits)
### Properties
* [**http\_client](https://docs.apify.com/api/client/python/api/client/python/reference/class/UserClientAsync.md#http_client)
* [**params](https://docs.apify.com/api/client/python/api/client/python/reference/class/UserClientAsync.md#params)
* [**resource\_id](https://docs.apify.com/api/client/python/api/client/python/reference/class/UserClientAsync.md#resource_id)
* [**root\_client](https://docs.apify.com/api/client/python/api/client/python/reference/class/UserClientAsync.md#root_client)
* [**url](https://docs.apify.com/api/client/python/api/client/python/reference/class/UserClientAsync.md#url)
## Methods<!-- -->[**](#Methods)
### [**](#__init__)[**](https://undefined/apify/apify-client-python/blob/master//src/apify_client/clients/resource_clients/user.py#L109)\_\_init\_\_
* ****\_\_init\_\_**(\*, base\_url, root\_client, http\_client, resource\_id, resource\_path, params): None
- Overrides [ResourceClientAsync.\_\_init\_\_](https://docs.apify.com/api/client/python/api/client/python/reference/class/ResourceClientAsync.md#__init__)
Initialize a new instance.
***
#### Parameters
* ##### keyword-onlybase\_url: str
Base URL of the API server.
* ##### keyword-onlyroot\_client: [ApifyClientAsync](https://docs.apify.com/api/client/python/api/client/python/reference/class/ApifyClientAsync.md)
The ApifyClientAsync instance under which this resource client exists.
* ##### keyword-onlyhttp\_client: [HTTPClientAsync](https://docs.apify.com/api/client/python/api/client/python/reference/class/HTTPClientAsync.md)
The HTTPClientAsync instance to be used in this client.
* ##### optionalkeyword-onlyresource\_id: str | None = <!-- -->None
ID of the manipulated resource, in case of a single-resource client.
* ##### keyword-onlyresource\_path: str
Path to the resource's endpoint on the API server.
* ##### optionalkeyword-onlyparams: dict | None = <!-- -->None
Parameters to include in all requests from this client.
#### Returns None
### [**](#get)[**](https://undefined/apify/apify-client-python/blob/master//src/apify_client/clients/resource_clients/user.py#L116)get
* **async **get**(): dict | None
- Return information about user account.
You receive all or only public info based on your token permissions.
<https://docs.apify.com/api/v2#/reference/users>
***
#### Returns dict | None
### [**](#limits)[**](https://undefined/apify/apify-client-python/blob/master//src/apify_client/clients/resource_clients/user.py#L153)limits
* **async **limits**(): dict | None
- Return a complete summary of the user account's limits.
It is the same information which is available on the account's Limits page. The returned data includes the current usage cycle, a summary of the account's limits, and the current usage.
<https://docs.apify.com/api/v2#/reference/request-queues/request/get-request>
***
#### Returns dict | None
### [**](#monthly_usage)[**](https://undefined/apify/apify-client-python/blob/master//src/apify_client/clients/resource_clients/user.py#L128)monthly\_usage
* **async **monthly\_usage**(): dict | None
- Return monthly usage of the user account.
This includes a complete usage summary for the current usage cycle, an overall sum, as well as a daily breakdown of usage. It is the same information which is available on the account's Billing page. The information includes use of storage, data transfer, and request queue usage.
<https://docs.apify.com/api/v2/#/reference/users/monthly-usage>
***
#### Returns dict | None
### [**](#update_limits)[**](https://undefined/apify/apify-client-python/blob/master//src/apify_client/clients/resource_clients/user.py#L177)update\_limits
* **async **update\_limits**(\*, max\_monthly\_usage\_usd, data\_retention\_days): None
- Update the account's limits manageable on your account's Limits page.
***
#### Parameters
* ##### optionalkeyword-onlymax\_monthly\_usage\_usd: int | None = <!-- -->None
* ##### optionalkeyword-onlydata\_retention\_days: int | None = <!-- -->None
#### Returns None
## Properties<!-- -->[**](#Properties)
### [**](#http_client)[**](https://undefined/apify/apify-client-python/blob/master//src/apify_client/clients/base/base_client.py#L94)http\_client
**http\_client: [HTTPClient](https://docs.apify.com/api/client/python/api/client/python/reference/class/HTTPClient.md) | [HTTPClientAsync](https://docs.apify.com/api/client/python/api/client/python/reference/class/HTTPClientAsync.md)
Inherited from [BaseClientAsync.http\_client](https://docs.apify.com/api/client/python/api/client/python/reference/class/BaseClientAsync.md#http_client)
Overrides [\_BaseBaseClient.http\_client](https://docs.apify.com/api/client/python/api/client/python/reference/class/_BaseBaseClient.md#http_client)
### [**](#params)[**](https://undefined/apify/apify-client-python/blob/master//src/apify_client/clients/base/base_client.py#L17)params
**params: dict
Inherited from [\_BaseBaseClient.params](https://docs.apify.com/api/client/python/api/client/python/reference/class/_BaseBaseClient.md#params)
### [**](#resource_id)[**](https://undefined/apify/apify-client-python/blob/master//src/apify_client/clients/base/base_client.py#L15)resource\_id
**resource\_id: str | None
Inherited from [\_BaseBaseClient.resource\_id](https://docs.apify.com/api/client/python/api/client/python/reference/class/_BaseBaseClient.md#resource_id)
### [**](#root_client)[**](https://undefined/apify/apify-client-python/blob/master//src/apify_client/clients/base/base_client.py#L95)root\_client
**root\_client: [ApifyClient](https://docs.apify.com/api/client/python/api/client/python/reference/class/ApifyClient.md) | [ApifyClientAsync](https://docs.apify.com/api/client/python/api/client/python/reference/class/ApifyClientAsync.md)
Inherited from [BaseClientAsync.root\_client](https://docs.apify.com/api/client/python/api/client/python/reference/class/BaseClientAsync.md#root_client)
Overrides [\_BaseBaseClient.root\_client](https://docs.apify.com/api/client/python/api/client/python/reference/class/_BaseBaseClient.md#root_client)
### [**](#url)[**](https://undefined/apify/apify-client-python/blob/master//src/apify_client/clients/base/base_client.py#L16)url
**url: str
Inherited from [\_BaseBaseClient.url](https://docs.apify.com/api/client/python/api/client/python/reference/class/_BaseBaseClient.md#url)
---
# WebhookClient<!-- -->
Sub-client for manipulating a single webhook.
### Hierarchy
* [ResourceClient](https://docs.apify.com/api/client/python/api/client/python/reference/class/ResourceClient.md)
* *WebhookClient*
## Index[**](#Index)
### Methods
* [**\_\_init\_\_](https://docs.apify.com/api/client/python/api/client/python/reference/class/WebhookClient.md#__init__)
* [**delete](https://docs.apify.com/api/client/python/api/client/python/reference/class/WebhookClient.md#delete)
* [**dispatches](https://docs.apify.com/api/client/python/api/client/python/reference/class/WebhookClient.md#dispatches)
* [**get](https://docs.apify.com/api/client/python/api/client/python/reference/class/WebhookClient.md#get)
* [**test](https://docs.apify.com/api/client/python/api/client/python/reference/class/WebhookClient.md#test)
* [**update](https://docs.apify.com/api/client/python/api/client/python/reference/class/WebhookClient.md#update)
### Properties
* [**http\_client](https://docs.apify.com/api/client/python/api/client/python/reference/class/WebhookClient.md#http_client)
* [**params](https://docs.apify.com/api/client/python/api/client/python/reference/class/WebhookClient.md#params)
* [**resource\_id](https://docs.apify.com/api/client/python/api/client/python/reference/class/WebhookClient.md#resource_id)
* [**root\_client](https://docs.apify.com/api/client/python/api/client/python/reference/class/WebhookClient.md#root_client)
* [**url](https://docs.apify.com/api/client/python/api/client/python/reference/class/WebhookClient.md#url)
## Methods<!-- -->[**](#Methods)
### [**](#__init__)[**](https://undefined/apify/apify-client-python/blob/master//src/apify_client/clients/resource_clients/webhook.py#L65)\_\_init\_\_
* ****\_\_init\_\_**(\*, base\_url, root\_client, http\_client, resource\_id, resource\_path, params): None
- Overrides [ResourceClient.\_\_init\_\_](https://docs.apify.com/api/client/python/api/client/python/reference/class/ResourceClient.md#__init__)
Initialize a new instance.
***
#### Parameters
* ##### keyword-onlybase\_url: str
Base URL of the API server.
* ##### keyword-onlyroot\_client: [ApifyClient](https://docs.apify.com/api/client/python/api/client/python/reference/class/ApifyClient.md)
The ApifyClient instance under which this resource client exists.
* ##### keyword-onlyhttp\_client: [HTTPClient](https://docs.apify.com/api/client/python/api/client/python/reference/class/HTTPClient.md)
The HTTPClient instance to be used in this client.
* ##### optionalkeyword-onlyresource\_id: str | None = <!-- -->None
ID of the manipulated resource, in case of a single-resource client.
* ##### keyword-onlyresource\_path: str
Path to the resource's endpoint on the API server.
* ##### optionalkeyword-onlyparams: dict | None = <!-- -->None
Parameters to include in all requests from this client.
#### Returns None
### [**](#delete)[**](https://undefined/apify/apify-client-python/blob/master//src/apify_client/clients/resource_clients/webhook.py#L128)delete
* ****delete**(): None
- Delete the webhook.
<https://docs.apify.com/api/v2#/reference/webhooks/webhook-object/delete-webhook>
***
#### Returns None
### [**](#dispatches)[**](https://undefined/apify/apify-client-python/blob/master//src/apify_client/clients/resource_clients/webhook.py#L159)dispatches
* ****dispatches**(): [WebhookDispatchCollectionClient](https://docs.apify.com/api/client/python/api/client/python/reference/class/WebhookDispatchCollectionClient.md)
- Get dispatches of the webhook.
<https://docs.apify.com/api/v2#/reference/webhooks/dispatches-collection/get-collection>
***
#### Returns [WebhookDispatchCollectionClient](https://docs.apify.com/api/client/python/api/client/python/reference/class/WebhookDispatchCollectionClient.md)
### [**](#get)[**](https://undefined/apify/apify-client-python/blob/master//src/apify_client/clients/resource_clients/webhook.py#L69)get
* ****get**(): dict | None
- Retrieve the webhook.
<https://docs.apify.com/api/v2#/reference/webhooks/webhook-object/get-webhook>
***
#### Returns dict | None
### [**](#test)[**](https://undefined/apify/apify-client-python/blob/master//src/apify_client/clients/resource_clients/webhook.py#L135)test
* ****test**(): dict | None
- Test a webhook.
Creates a webhook dispatch with a dummy payload.
<https://docs.apify.com/api/v2#/reference/webhooks/webhook-test/test-webhook>
***
#### Returns dict | None
### [**](#update)[**](https://undefined/apify/apify-client-python/blob/master//src/apify_client/clients/resource_clients/webhook.py#L79)update
* ****update**(\*, event\_types, request\_url, payload\_template, headers\_template, actor\_id, actor\_task\_id, actor\_run\_id, ignore\_ssl\_errors, do\_not\_retry, is\_ad\_hoc): dict
- Update the webhook.
<https://docs.apify.com/api/v2#/reference/webhooks/webhook-object/update-webhook>
***
#### Parameters
* ##### optionalkeyword-onlyevent\_types: [list](https://docs.apify.com/api/client/python/api/client/python/reference/class/RequestQueueCollectionClient.md#list)\[WebhookEventType] | None = <!-- -->None
List of event types that should trigger the webhook. At least one is required.
* ##### optionalkeyword-onlyrequest\_url: str | None = <!-- -->None
URL that will be invoked once the webhook is triggered.
* ##### optionalkeyword-onlypayload\_template: str | None = <!-- -->None
Specification of the payload that will be sent to request\_url.
* ##### optionalkeyword-onlyheaders\_template: str | None = <!-- -->None
Headers that will be sent to the request\_url.
* ##### optionalkeyword-onlyactor\_id: str | None = <!-- -->None
Id of the Actor whose runs should trigger the webhook.
* ##### optionalkeyword-onlyactor\_task\_id: str | None = <!-- -->None
Id of the Actor task whose runs should trigger the webhook.
* ##### optionalkeyword-onlyactor\_run\_id: str | None = <!-- -->None
Id of the Actor run which should trigger the webhook.
* ##### optionalkeyword-onlyignore\_ssl\_errors: bool | None = <!-- -->None
Whether the webhook should ignore SSL errors returned by request\_url.
* ##### optionalkeyword-onlydo\_not\_retry: bool | None = <!-- -->None
Whether the webhook should retry sending the payload to request\_url upon failure.
* ##### optionalkeyword-onlyis\_ad\_hoc: bool | None = <!-- -->None
Set to True if you want the webhook to be triggered only the first time the condition is fulfilled. Only applicable when actor\_run\_id is filled.
#### Returns dict
## Properties<!-- -->[**](#Properties)
### [**](#http_client)[**](https://undefined/apify/apify-client-python/blob/master//src/apify_client/clients/base/base_client.py#L53)http\_client
**http\_client: [HTTPClient](https://docs.apify.com/api/client/python/api/client/python/reference/class/HTTPClient.md) | [HTTPClientAsync](https://docs.apify.com/api/client/python/api/client/python/reference/class/HTTPClientAsync.md)
Inherited from [BaseClient.http\_client](https://docs.apify.com/api/client/python/api/client/python/reference/class/BaseClient.md#http_client)
Overrides [\_BaseBaseClient.http\_client](https://docs.apify.com/api/client/python/api/client/python/reference/class/_BaseBaseClient.md#http_client)
### [**](#params)[**](https://undefined/apify/apify-client-python/blob/master//src/apify_client/clients/base/base_client.py#L17)params
**params: dict
Inherited from [\_BaseBaseClient.params](https://docs.apify.com/api/client/python/api/client/python/reference/class/_BaseBaseClient.md#params)
### [**](#resource_id)[**](https://undefined/apify/apify-client-python/blob/master//src/apify_client/clients/base/base_client.py#L15)resource\_id
**resource\_id: str | None
Inherited from [\_BaseBaseClient.resource\_id](https://docs.apify.com/api/client/python/api/client/python/reference/class/_BaseBaseClient.md#resource_id)
### [**](#root_client)[**](https://undefined/apify/apify-client-python/blob/master//src/apify_client/clients/base/base_client.py#L54)root\_client
**root\_client: [ApifyClient](https://docs.apify.com/api/client/python/api/client/python/reference/class/ApifyClient.md) | [ApifyClientAsync](https://docs.apify.com/api/client/python/api/client/python/reference/class/ApifyClientAsync.md)
Inherited from [BaseClient.root\_client](https://docs.apify.com/api/client/python/api/client/python/reference/class/BaseClient.md#root_client)
Overrides [\_BaseBaseClient.root\_client](https://docs.apify.com/api/client/python/api/client/python/reference/class/_BaseBaseClient.md#root_client)
### [**](#url)[**](https://undefined/apify/apify-client-python/blob/master//src/apify_client/clients/base/base_client.py#L16)url
**url: str
Inherited from [\_BaseBaseClient.url](https://docs.apify.com/api/client/python/api/client/python/reference/class/_BaseBaseClient.md#url)
---
# WebhookClientAsync<!-- -->
Async sub-client for manipulating a single webhook.
### Hierarchy
* [ResourceClientAsync](https://docs.apify.com/api/client/python/api/client/python/reference/class/ResourceClientAsync.md)
* *WebhookClientAsync*
## Index[**](#Index)
### Methods
* [**\_\_init\_\_](https://docs.apify.com/api/client/python/api/client/python/reference/class/WebhookClientAsync.md#__init__)
* [**delete](https://docs.apify.com/api/client/python/api/client/python/reference/class/WebhookClientAsync.md#delete)
* [**dispatches](https://docs.apify.com/api/client/python/api/client/python/reference/class/WebhookClientAsync.md#dispatches)
* [**get](https://docs.apify.com/api/client/python/api/client/python/reference/class/WebhookClientAsync.md#get)
* [**test](https://docs.apify.com/api/client/python/api/client/python/reference/class/WebhookClientAsync.md#test)
* [**update](https://docs.apify.com/api/client/python/api/client/python/reference/class/WebhookClientAsync.md#update)
### Properties
* [**http\_client](https://docs.apify.com/api/client/python/api/client/python/reference/class/WebhookClientAsync.md#http_client)
* [**params](https://docs.apify.com/api/client/python/api/client/python/reference/class/WebhookClientAsync.md#params)
* [**resource\_id](https://docs.apify.com/api/client/python/api/client/python/reference/class/WebhookClientAsync.md#resource_id)
* [**root\_client](https://docs.apify.com/api/client/python/api/client/python/reference/class/WebhookClientAsync.md#root_client)
* [**url](https://docs.apify.com/api/client/python/api/client/python/reference/class/WebhookClientAsync.md#url)
## Methods<!-- -->[**](#Methods)
### [**](#__init__)[**](https://undefined/apify/apify-client-python/blob/master//src/apify_client/clients/resource_clients/webhook.py#L175)\_\_init\_\_
* ****\_\_init\_\_**(\*, base\_url, root\_client, http\_client, resource\_id, resource\_path, params): None
- Overrides [ResourceClientAsync.\_\_init\_\_](https://docs.apify.com/api/client/python/api/client/python/reference/class/ResourceClientAsync.md#__init__)
Initialize a new instance.
***
#### Parameters
* ##### keyword-onlybase\_url: str
Base URL of the API server.
* ##### keyword-onlyroot\_client: [ApifyClientAsync](https://docs.apify.com/api/client/python/api/client/python/reference/class/ApifyClientAsync.md)
The ApifyClientAsync instance under which this resource client exists.
* ##### keyword-onlyhttp\_client: [HTTPClientAsync](https://docs.apify.com/api/client/python/api/client/python/reference/class/HTTPClientAsync.md)
The HTTPClientAsync instance to be used in this client.
* ##### optionalkeyword-onlyresource\_id: str | None = <!-- -->None
ID of the manipulated resource, in case of a single-resource client.
* ##### keyword-onlyresource\_path: str
Path to the resource's endpoint on the API server.
* ##### optionalkeyword-onlyparams: dict | None = <!-- -->None
Parameters to include in all requests from this client.
#### Returns None
### [**](#delete)[**](https://undefined/apify/apify-client-python/blob/master//src/apify_client/clients/resource_clients/webhook.py#L238)delete
* **async **delete**(): None
- Delete the webhook.
<https://docs.apify.com/api/v2#/reference/webhooks/webhook-object/delete-webhook>
***
#### Returns None
### [**](#dispatches)[**](https://undefined/apify/apify-client-python/blob/master//src/apify_client/clients/resource_clients/webhook.py#L269)dispatches
* ****dispatches**(): [WebhookDispatchCollectionClientAsync](https://docs.apify.com/api/client/python/api/client/python/reference/class/WebhookDispatchCollectionClientAsync.md)
- Get dispatches of the webhook.
<https://docs.apify.com/api/v2#/reference/webhooks/dispatches-collection/get-collection>
***
#### Returns [WebhookDispatchCollectionClientAsync](https://docs.apify.com/api/client/python/api/client/python/reference/class/WebhookDispatchCollectionClientAsync.md)
### [**](#get)[**](https://undefined/apify/apify-client-python/blob/master//src/apify_client/clients/resource_clients/webhook.py#L179)get
* **async **get**(): dict | None
- Retrieve the webhook.
<https://docs.apify.com/api/v2#/reference/webhooks/webhook-object/get-webhook>
***
#### Returns dict | None
### [**](#test)[**](https://undefined/apify/apify-client-python/blob/master//src/apify_client/clients/resource_clients/webhook.py#L245)test
* **async **test**(): dict | None
- Test a webhook.
Creates a webhook dispatch with a dummy payload.
<https://docs.apify.com/api/v2#/reference/webhooks/webhook-test/test-webhook>
***
#### Returns dict | None
### [**](#update)[**](https://undefined/apify/apify-client-python/blob/master//src/apify_client/clients/resource_clients/webhook.py#L189)update
* **async **update**(\*, event\_types, request\_url, payload\_template, headers\_template, actor\_id, actor\_task\_id, actor\_run\_id, ignore\_ssl\_errors, do\_not\_retry, is\_ad\_hoc): dict
- Update the webhook.
<https://docs.apify.com/api/v2#/reference/webhooks/webhook-object/update-webhook>
***
#### Parameters
* ##### optionalkeyword-onlyevent\_types: [list](https://docs.apify.com/api/client/python/api/client/python/reference/class/RequestQueueCollectionClient.md#list)\[WebhookEventType] | None = <!-- -->None
List of event types that should trigger the webhook. At least one is required.
* ##### optionalkeyword-onlyrequest\_url: str | None = <!-- -->None
URL that will be invoked once the webhook is triggered.
* ##### optionalkeyword-onlypayload\_template: str | None = <!-- -->None
Specification of the payload that will be sent to request\_url.
* ##### optionalkeyword-onlyheaders\_template: str | None = <!-- -->None
Headers that will be sent to the request\_url.
* ##### optionalkeyword-onlyactor\_id: str | None = <!-- -->None
Id of the Actor whose runs should trigger the webhook.
* ##### optionalkeyword-onlyactor\_task\_id: str | None = <!-- -->None
Id of the Actor task whose runs should trigger the webhook.
* ##### optionalkeyword-onlyactor\_run\_id: str | None = <!-- -->None
Id of the Actor run which should trigger the webhook.
* ##### optionalkeyword-onlyignore\_ssl\_errors: bool | None = <!-- -->None
Whether the webhook should ignore SSL errors returned by request\_url.
* ##### optionalkeyword-onlydo\_not\_retry: bool | None = <!-- -->None
Whether the webhook should retry sending the payload to request\_url upon failure.
* ##### optionalkeyword-onlyis\_ad\_hoc: bool | None = <!-- -->None
Set to True if you want the webhook to be triggered only the first time the condition is fulfilled. Only applicable when actor\_run\_id is filled.
#### Returns dict
## Properties<!-- -->[**](#Properties)
### [**](#http_client)[**](https://undefined/apify/apify-client-python/blob/master//src/apify_client/clients/base/base_client.py#L94)http\_client
**http\_client: [HTTPClient](https://docs.apify.com/api/client/python/api/client/python/reference/class/HTTPClient.md) | [HTTPClientAsync](https://docs.apify.com/api/client/python/api/client/python/reference/class/HTTPClientAsync.md)
Inherited from [BaseClientAsync.http\_client](https://docs.apify.com/api/client/python/api/client/python/reference/class/BaseClientAsync.md#http_client)
Overrides [\_BaseBaseClient.http\_client](https://docs.apify.com/api/client/python/api/client/python/reference/class/_BaseBaseClient.md#http_client)
### [**](#params)[**](https://undefined/apify/apify-client-python/blob/master//src/apify_client/clients/base/base_client.py#L17)params
**params: dict
Inherited from [\_BaseBaseClient.params](https://docs.apify.com/api/client/python/api/client/python/reference/class/_BaseBaseClient.md#params)
### [**](#resource_id)[**](https://undefined/apify/apify-client-python/blob/master//src/apify_client/clients/base/base_client.py#L15)resource\_id
**resource\_id: str | None
Inherited from [\_BaseBaseClient.resource\_id](https://docs.apify.com/api/client/python/api/client/python/reference/class/_BaseBaseClient.md#resource_id)
### [**](#root_client)[**](https://undefined/apify/apify-client-python/blob/master//src/apify_client/clients/base/base_client.py#L95)root\_client
**root\_client: [ApifyClient](https://docs.apify.com/api/client/python/api/client/python/reference/class/ApifyClient.md) | [ApifyClientAsync](https://docs.apify.com/api/client/python/api/client/python/reference/class/ApifyClientAsync.md)
Inherited from [BaseClientAsync.root\_client](https://docs.apify.com/api/client/python/api/client/python/reference/class/BaseClientAsync.md#root_client)
Overrides [\_BaseBaseClient.root\_client](https://docs.apify.com/api/client/python/api/client/python/reference/class/_BaseBaseClient.md#root_client)
### [**](#url)[**](https://undefined/apify/apify-client-python/blob/master//src/apify_client/clients/base/base_client.py#L16)url
**url: str
Inherited from [\_BaseBaseClient.url](https://docs.apify.com/api/client/python/api/client/python/reference/class/_BaseBaseClient.md#url)
---
# WebhookCollectionClient<!-- -->
Sub-client for manipulating webhooks.
### Hierarchy
* [ResourceCollectionClient](https://docs.apify.com/api/client/python/api/client/python/reference/class/ResourceCollectionClient.md)
* *WebhookCollectionClient*
## Index[**](#Index)
### Methods
* [**\_\_init\_\_](https://docs.apify.com/api/client/python/api/client/python/reference/class/WebhookCollectionClient.md#__init__)
* [**create](https://docs.apify.com/api/client/python/api/client/python/reference/class/WebhookCollectionClient.md#create)
* [**list](https://docs.apify.com/api/client/python/api/client/python/reference/class/WebhookCollectionClient.md#list)
### Properties
* [**http\_client](https://docs.apify.com/api/client/python/api/client/python/reference/class/WebhookCollectionClient.md#http_client)
* [**params](https://docs.apify.com/api/client/python/api/client/python/reference/class/WebhookCollectionClient.md#params)
* [**resource\_id](https://docs.apify.com/api/client/python/api/client/python/reference/class/WebhookCollectionClient.md#resource_id)
* [**root\_client](https://docs.apify.com/api/client/python/api/client/python/reference/class/WebhookCollectionClient.md#root_client)
* [**url](https://docs.apify.com/api/client/python/api/client/python/reference/class/WebhookCollectionClient.md#url)
## Methods<!-- -->[**](#Methods)
### [**](#__init__)[**](https://undefined/apify/apify-client-python/blob/master//src/apify_client/clients/resource_clients/webhook_collection.py#L18)\_\_init\_\_
* ****\_\_init\_\_**(\*, base\_url, root\_client, http\_client, resource\_id, resource\_path, params): None
- Overrides [ResourceCollectionClient.\_\_init\_\_](https://docs.apify.com/api/client/python/api/client/python/reference/class/ResourceCollectionClient.md#__init__)
Initialize a new instance.
***
#### Parameters
* ##### keyword-onlybase\_url: str
Base URL of the API server.
* ##### keyword-onlyroot\_client: [ApifyClient](https://docs.apify.com/api/client/python/api/client/python/reference/class/ApifyClient.md)
The ApifyClient instance under which this resource client exists.
* ##### keyword-onlyhttp\_client: [HTTPClient](https://docs.apify.com/api/client/python/api/client/python/reference/class/HTTPClient.md)
The HTTPClient instance to be used in this client.
* ##### optionalkeyword-onlyresource\_id: str | None = <!-- -->None
ID of the manipulated resource, in case of a single-resource client.
* ##### keyword-onlyresource\_path: str
Path to the resource's endpoint on the API server.
* ##### optionalkeyword-onlyparams: dict | None = <!-- -->None
Parameters to include in all requests from this client.
#### Returns None
### [**](#create)[**](https://undefined/apify/apify-client-python/blob/master//src/apify_client/clients/resource_clients/webhook_collection.py#L43)create
* ****create**(\*, event\_types, request\_url, payload\_template, headers\_template, actor\_id, actor\_task\_id, actor\_run\_id, ignore\_ssl\_errors, do\_not\_retry, idempotency\_key, is\_ad\_hoc): dict
- Create a new webhook.
You have to specify exactly one out of actor\_id, actor\_task\_id or actor\_run\_id.
<https://docs.apify.com/api/v2#/reference/webhooks/webhook-collection/create-webhook>
***
#### Parameters
* ##### keyword-onlyevent\_types: [list](https://docs.apify.com/api/client/python/api/client/python/reference/class/RequestQueueCollectionClient.md#list)\[WebhookEventType]
List of event types that should trigger the webhook. At least one is required.
* ##### keyword-onlyrequest\_url: str
URL that will be invoked once the webhook is triggered.
* ##### optionalkeyword-onlypayload\_template: str | None = <!-- -->None
Specification of the payload that will be sent to request\_url.
* ##### optionalkeyword-onlyheaders\_template: str | None = <!-- -->None
Headers that will be sent to the request\_url.
* ##### optionalkeyword-onlyactor\_id: str | None = <!-- -->None
Id of the Actor whose runs should trigger the webhook.
* ##### optionalkeyword-onlyactor\_task\_id: str | None = <!-- -->None
Id of the Actor task whose runs should trigger the webhook.
* ##### optionalkeyword-onlyactor\_run\_id: str | None = <!-- -->None
Id of the Actor run which should trigger the webhook.
* ##### optionalkeyword-onlyignore\_ssl\_errors: bool | None = <!-- -->None
Whether the webhook should ignore SSL errors returned by request\_url.
* ##### optionalkeyword-onlydo\_not\_retry: bool | None = <!-- -->None
Whether the webhook should retry sending the payload to request\_url upon failure.
* ##### optionalkeyword-onlyidempotency\_key: str | None = <!-- -->None
A unique identifier of a webhook. You can use it to ensure that you won't create the same webhook multiple times.
* ##### optionalkeyword-onlyis\_ad\_hoc: bool | None = <!-- -->None
Set to True if you want the webhook to be triggered only the first time the condition is fulfilled. Only applicable when actor\_run\_id is filled.
#### Returns dict
### [**](#list)[**](https://undefined/apify/apify-client-python/blob/master//src/apify_client/clients/resource_clients/webhook_collection.py#L22)list
* ****list**(\*, limit, offset, desc): [ListPage](https://docs.apify.com/api/client/python/api/client/python/reference/class/ListPage.md)\[dict]
- List the available webhooks.
<https://docs.apify.com/api/v2#/reference/webhooks/webhook-collection/get-list-of-webhooks>
***
#### Parameters
* ##### optionalkeyword-onlylimit: int | None = <!-- -->None
How many webhooks to retrieve.
* ##### optionalkeyword-onlyoffset: int | None = <!-- -->None
What webhook to include as first when retrieving the list.
* ##### optionalkeyword-onlydesc: bool | None = <!-- -->None
Whether to sort the webhooks in descending order based on their date of creation.
#### Returns [ListPage](https://docs.apify.com/api/client/python/api/client/python/reference/class/ListPage.md)\[dict]
## Properties<!-- -->[**](#Properties)
### [**](#http_client)[**](https://undefined/apify/apify-client-python/blob/master//src/apify_client/clients/base/base_client.py#L53)http\_client
**http\_client: [HTTPClient](https://docs.apify.com/api/client/python/api/client/python/reference/class/HTTPClient.md) | [HTTPClientAsync](https://docs.apify.com/api/client/python/api/client/python/reference/class/HTTPClientAsync.md)
Inherited from [BaseClient.http\_client](https://docs.apify.com/api/client/python/api/client/python/reference/class/BaseClient.md#http_client)
Overrides [\_BaseBaseClient.http\_client](https://docs.apify.com/api/client/python/api/client/python/reference/class/_BaseBaseClient.md#http_client)
### [**](#params)[**](https://undefined/apify/apify-client-python/blob/master//src/apify_client/clients/base/base_client.py#L17)params
**params: dict
Inherited from [\_BaseBaseClient.params](https://docs.apify.com/api/client/python/api/client/python/reference/class/_BaseBaseClient.md#params)
### [**](#resource_id)[**](https://undefined/apify/apify-client-python/blob/master//src/apify_client/clients/base/base_client.py#L15)resource\_id
**resource\_id: str | None
Inherited from [\_BaseBaseClient.resource\_id](https://docs.apify.com/api/client/python/api/client/python/reference/class/_BaseBaseClient.md#resource_id)
### [**](#root_client)[**](https://undefined/apify/apify-client-python/blob/master//src/apify_client/clients/base/base_client.py#L54)root\_client
**root\_client: [ApifyClient](https://docs.apify.com/api/client/python/api/client/python/reference/class/ApifyClient.md) | [ApifyClientAsync](https://docs.apify.com/api/client/python/api/client/python/reference/class/ApifyClientAsync.md)
Inherited from [BaseClient.root\_client](https://docs.apify.com/api/client/python/api/client/python/reference/class/BaseClient.md#root_client)
Overrides [\_BaseBaseClient.root\_client](https://docs.apify.com/api/client/python/api/client/python/reference/class/_BaseBaseClient.md#root_client)
### [**](#url)[**](https://undefined/apify/apify-client-python/blob/master//src/apify_client/clients/base/base_client.py#L16)url
**url: str
Inherited from [\_BaseBaseClient.url](https://docs.apify.com/api/client/python/api/client/python/reference/class/_BaseBaseClient.md#url)
---
# WebhookCollectionClientAsync<!-- -->
Async sub-client for manipulating webhooks.
### Hierarchy
* [ResourceCollectionClientAsync](https://docs.apify.com/api/client/python/api/client/python/reference/class/ResourceCollectionClientAsync.md)
* *WebhookCollectionClientAsync*
## Index[**](#Index)
### Methods
* [**\_\_init\_\_](https://docs.apify.com/api/client/python/api/client/python/reference/class/WebhookCollectionClientAsync.md#__init__)
* [**create](https://docs.apify.com/api/client/python/api/client/python/reference/class/WebhookCollectionClientAsync.md#create)
* [**list](https://docs.apify.com/api/client/python/api/client/python/reference/class/WebhookCollectionClientAsync.md#list)
### Properties
* [**http\_client](https://docs.apify.com/api/client/python/api/client/python/reference/class/WebhookCollectionClientAsync.md#http_client)
* [**params](https://docs.apify.com/api/client/python/api/client/python/reference/class/WebhookCollectionClientAsync.md#params)
* [**resource\_id](https://docs.apify.com/api/client/python/api/client/python/reference/class/WebhookCollectionClientAsync.md#resource_id)
* [**root\_client](https://docs.apify.com/api/client/python/api/client/python/reference/class/WebhookCollectionClientAsync.md#root_client)
* [**url](https://docs.apify.com/api/client/python/api/client/python/reference/class/WebhookCollectionClientAsync.md#url)
## Methods<!-- -->[**](#Methods)
### [**](#__init__)[**](https://undefined/apify/apify-client-python/blob/master//src/apify_client/clients/resource_clients/webhook_collection.py#L102)\_\_init\_\_
* ****\_\_init\_\_**(\*, base\_url, root\_client, http\_client, resource\_id, resource\_path, params): None
- Overrides [ResourceCollectionClientAsync.\_\_init\_\_](https://docs.apify.com/api/client/python/api/client/python/reference/class/ResourceCollectionClientAsync.md#__init__)
Initialize a new instance.
***
#### Parameters
* ##### keyword-onlybase\_url: str
Base URL of the API server.
* ##### keyword-onlyroot\_client: [ApifyClientAsync](https://docs.apify.com/api/client/python/api/client/python/reference/class/ApifyClientAsync.md)
The ApifyClientAsync instance under which this resource client exists.
* ##### keyword-onlyhttp\_client: [HTTPClientAsync](https://docs.apify.com/api/client/python/api/client/python/reference/class/HTTPClientAsync.md)
The HTTPClientAsync instance to be used in this client.
* ##### optionalkeyword-onlyresource\_id: str | None = <!-- -->None
ID of the manipulated resource, in case of a single-resource client.
* ##### keyword-onlyresource\_path: str
Path to the resource's endpoint on the API server.
* ##### optionalkeyword-onlyparams: dict | None = <!-- -->None
Parameters to include in all requests from this client.
#### Returns None
### [**](#create)[**](https://undefined/apify/apify-client-python/blob/master//src/apify_client/clients/resource_clients/webhook_collection.py#L127)create
* **async **create**(\*, event\_types, request\_url, payload\_template, headers\_template, actor\_id, actor\_task\_id, actor\_run\_id, ignore\_ssl\_errors, do\_not\_retry, idempotency\_key, is\_ad\_hoc): dict
- Create a new webhook.
You have to specify exactly one out of actor\_id, actor\_task\_id or actor\_run\_id.
<https://docs.apify.com/api/v2#/reference/webhooks/webhook-collection/create-webhook>
***
#### Parameters
* ##### keyword-onlyevent\_types: [list](https://docs.apify.com/api/client/python/api/client/python/reference/class/RequestQueueCollectionClient.md#list)\[WebhookEventType]
List of event types that should trigger the webhook. At least one is required.
* ##### keyword-onlyrequest\_url: str
URL that will be invoked once the webhook is triggered.
* ##### optionalkeyword-onlypayload\_template: str | None = <!-- -->None
Specification of the payload that will be sent to request\_url.
* ##### optionalkeyword-onlyheaders\_template: str | None = <!-- -->None
Headers that will be sent to the request\_url.
* ##### optionalkeyword-onlyactor\_id: str | None = <!-- -->None
Id of the Actor whose runs should trigger the webhook.
* ##### optionalkeyword-onlyactor\_task\_id: str | None = <!-- -->None
Id of the Actor task whose runs should trigger the webhook.
* ##### optionalkeyword-onlyactor\_run\_id: str | None = <!-- -->None
Id of the Actor run which should trigger the webhook.
* ##### optionalkeyword-onlyignore\_ssl\_errors: bool | None = <!-- -->None
Whether the webhook should ignore SSL errors returned by request\_url.
* ##### optionalkeyword-onlydo\_not\_retry: bool | None = <!-- -->None
Whether the webhook should retry sending the payload to request\_url upon failure.
* ##### optionalkeyword-onlyidempotency\_key: str | None = <!-- -->None
A unique identifier of a webhook. You can use it to ensure that you won't create the same webhook multiple times.
* ##### optionalkeyword-onlyis\_ad\_hoc: bool | None = <!-- -->None
Set to True if you want the webhook to be triggered only the first time the condition is fulfilled. Only applicable when actor\_run\_id is filled.
#### Returns dict
### [**](#list)[**](https://undefined/apify/apify-client-python/blob/master//src/apify_client/clients/resource_clients/webhook_collection.py#L106)list
* **async **list**(\*, limit, offset, desc): [ListPage](https://docs.apify.com/api/client/python/api/client/python/reference/class/ListPage.md)\[dict]
- List the available webhooks.
<https://docs.apify.com/api/v2#/reference/webhooks/webhook-collection/get-list-of-webhooks>
***
#### Parameters
* ##### optionalkeyword-onlylimit: int | None = <!-- -->None
How many webhooks to retrieve.
* ##### optionalkeyword-onlyoffset: int | None = <!-- -->None
What webhook to include as first when retrieving the list.
* ##### optionalkeyword-onlydesc: bool | None = <!-- -->None
Whether to sort the webhooks in descending order based on their date of creation.
#### Returns [ListPage](https://docs.apify.com/api/client/python/api/client/python/reference/class/ListPage.md)\[dict]
## Properties<!-- -->[**](#Properties)
### [**](#http_client)[**](https://undefined/apify/apify-client-python/blob/master//src/apify_client/clients/base/base_client.py#L94)http\_client
**http\_client: [HTTPClient](https://docs.apify.com/api/client/python/api/client/python/reference/class/HTTPClient.md) | [HTTPClientAsync](https://docs.apify.com/api/client/python/api/client/python/reference/class/HTTPClientAsync.md)
Inherited from [BaseClientAsync.http\_client](https://docs.apify.com/api/client/python/api/client/python/reference/class/BaseClientAsync.md#http_client)
Overrides [\_BaseBaseClient.http\_client](https://docs.apify.com/api/client/python/api/client/python/reference/class/_BaseBaseClient.md#http_client)
### [**](#params)[**](https://undefined/apify/apify-client-python/blob/master//src/apify_client/clients/base/base_client.py#L17)params
**params: dict
Inherited from [\_BaseBaseClient.params](https://docs.apify.com/api/client/python/api/client/python/reference/class/_BaseBaseClient.md#params)
### [**](#resource_id)[**](https://undefined/apify/apify-client-python/blob/master//src/apify_client/clients/base/base_client.py#L15)resource\_id
**resource\_id: str | None
Inherited from [\_BaseBaseClient.resource\_id](https://docs.apify.com/api/client/python/api/client/python/reference/class/_BaseBaseClient.md#resource_id)
### [**](#root_client)[**](https://undefined/apify/apify-client-python/blob/master//src/apify_client/clients/base/base_client.py#L95)root\_client
**root\_client: [ApifyClient](https://docs.apify.com/api/client/python/api/client/python/reference/class/ApifyClient.md) | [ApifyClientAsync](https://docs.apify.com/api/client/python/api/client/python/reference/class/ApifyClientAsync.md)
Inherited from [BaseClientAsync.root\_client](https://docs.apify.com/api/client/python/api/client/python/reference/class/BaseClientAsync.md#root_client)
Overrides [\_BaseBaseClient.root\_client](https://docs.apify.com/api/client/python/api/client/python/reference/class/_BaseBaseClient.md#root_client)
### [**](#url)[**](https://undefined/apify/apify-client-python/blob/master//src/apify_client/clients/base/base_client.py#L16)url
**url: str
Inherited from [\_BaseBaseClient.url](https://docs.apify.com/api/client/python/api/client/python/reference/class/_BaseBaseClient.md#url)
---
# WebhookDispatchClient<!-- -->
Sub-client for querying information about a webhook dispatch.
### Hierarchy
* [ResourceClient](https://docs.apify.com/api/client/python/api/client/python/reference/class/ResourceClient.md)
* *WebhookDispatchClient*
## Index[**](#Index)
### Methods
* [**\_\_init\_\_](https://docs.apify.com/api/client/python/api/client/python/reference/class/WebhookDispatchClient.md#__init__)
* [**get](https://docs.apify.com/api/client/python/api/client/python/reference/class/WebhookDispatchClient.md#get)
### Properties
* [**http\_client](https://docs.apify.com/api/client/python/api/client/python/reference/class/WebhookDispatchClient.md#http_client)
* [**params](https://docs.apify.com/api/client/python/api/client/python/reference/class/WebhookDispatchClient.md#params)
* [**resource\_id](https://docs.apify.com/api/client/python/api/client/python/reference/class/WebhookDispatchClient.md#resource_id)
* [**root\_client](https://docs.apify.com/api/client/python/api/client/python/reference/class/WebhookDispatchClient.md#root_client)
* [**url](https://docs.apify.com/api/client/python/api/client/python/reference/class/WebhookDispatchClient.md#url)
## Methods<!-- -->[**](#Methods)
### [**](#__init__)[**](https://undefined/apify/apify-client-python/blob/master//src/apify_client/clients/resource_clients/webhook_dispatch.py#L11)\_\_init\_\_
* ****\_\_init\_\_**(\*, base\_url, root\_client, http\_client, resource\_id, resource\_path, params): None
- Overrides [ResourceClient.\_\_init\_\_](https://docs.apify.com/api/client/python/api/client/python/reference/class/ResourceClient.md#__init__)
Initialize a new instance.
***
#### Parameters
* ##### keyword-onlybase\_url: str
Base URL of the API server.
* ##### keyword-onlyroot\_client: [ApifyClient](https://docs.apify.com/api/client/python/api/client/python/reference/class/ApifyClient.md)
The ApifyClient instance under which this resource client exists.
* ##### keyword-onlyhttp\_client: [HTTPClient](https://docs.apify.com/api/client/python/api/client/python/reference/class/HTTPClient.md)
The HTTPClient instance to be used in this client.
* ##### optionalkeyword-onlyresource\_id: str | None = <!-- -->None
ID of the manipulated resource, in case of a single-resource client.
* ##### keyword-onlyresource\_path: str
Path to the resource's endpoint on the API server.
* ##### optionalkeyword-onlyparams: dict | None = <!-- -->None
Parameters to include in all requests from this client.
#### Returns None
### [**](#get)[**](https://undefined/apify/apify-client-python/blob/master//src/apify_client/clients/resource_clients/webhook_dispatch.py#L15)get
* ****get**(): dict | None
- Retrieve the webhook dispatch.
<https://docs.apify.com/api/v2#/reference/webhook-dispatches/webhook-dispatch-object/get-webhook-dispatch>
***
#### Returns dict | None
## Properties<!-- -->[**](#Properties)
### [**](#http_client)[**](https://undefined/apify/apify-client-python/blob/master//src/apify_client/clients/base/base_client.py#L53)http\_client
**http\_client: [HTTPClient](https://docs.apify.com/api/client/python/api/client/python/reference/class/HTTPClient.md) | [HTTPClientAsync](https://docs.apify.com/api/client/python/api/client/python/reference/class/HTTPClientAsync.md)
Inherited from [BaseClient.http\_client](https://docs.apify.com/api/client/python/api/client/python/reference/class/BaseClient.md#http_client)
Overrides [\_BaseBaseClient.http\_client](https://docs.apify.com/api/client/python/api/client/python/reference/class/_BaseBaseClient.md#http_client)
### [**](#params)[**](https://undefined/apify/apify-client-python/blob/master//src/apify_client/clients/base/base_client.py#L17)params
**params: dict
Inherited from [\_BaseBaseClient.params](https://docs.apify.com/api/client/python/api/client/python/reference/class/_BaseBaseClient.md#params)
### [**](#resource_id)[**](https://undefined/apify/apify-client-python/blob/master//src/apify_client/clients/base/base_client.py#L15)resource\_id
**resource\_id: str | None
Inherited from [\_BaseBaseClient.resource\_id](https://docs.apify.com/api/client/python/api/client/python/reference/class/_BaseBaseClient.md#resource_id)
### [**](#root_client)[**](https://undefined/apify/apify-client-python/blob/master//src/apify_client/clients/base/base_client.py#L54)root\_client
**root\_client: [ApifyClient](https://docs.apify.com/api/client/python/api/client/python/reference/class/ApifyClient.md) | [ApifyClientAsync](https://docs.apify.com/api/client/python/api/client/python/reference/class/ApifyClientAsync.md)
Inherited from [BaseClient.root\_client](https://docs.apify.com/api/client/python/api/client/python/reference/class/BaseClient.md#root_client)
Overrides [\_BaseBaseClient.root\_client](https://docs.apify.com/api/client/python/api/client/python/reference/class/_BaseBaseClient.md#root_client)
### [**](#url)[**](https://undefined/apify/apify-client-python/blob/master//src/apify_client/clients/base/base_client.py#L16)url
**url: str
Inherited from [\_BaseBaseClient.url](https://docs.apify.com/api/client/python/api/client/python/reference/class/_BaseBaseClient.md#url)
---
# WebhookDispatchClientAsync<!-- -->
Async sub-client for querying information about a webhook dispatch.
### Hierarchy
* [ResourceClientAsync](https://docs.apify.com/api/client/python/api/client/python/reference/class/ResourceClientAsync.md)
* *WebhookDispatchClientAsync*
## Index[**](#Index)
### Methods
* [**\_\_init\_\_](https://docs.apify.com/api/client/python/api/client/python/reference/class/WebhookDispatchClientAsync.md#__init__)
* [**get](https://docs.apify.com/api/client/python/api/client/python/reference/class/WebhookDispatchClientAsync.md#get)
### Properties
* [**http\_client](https://docs.apify.com/api/client/python/api/client/python/reference/class/WebhookDispatchClientAsync.md#http_client)
* [**params](https://docs.apify.com/api/client/python/api/client/python/reference/class/WebhookDispatchClientAsync.md#params)
* [**resource\_id](https://docs.apify.com/api/client/python/api/client/python/reference/class/WebhookDispatchClientAsync.md#resource_id)
* [**root\_client](https://docs.apify.com/api/client/python/api/client/python/reference/class/WebhookDispatchClientAsync.md#root_client)
* [**url](https://docs.apify.com/api/client/python/api/client/python/reference/class/WebhookDispatchClientAsync.md#url)
## Methods<!-- -->[**](#Methods)
### [**](#__init__)[**](https://undefined/apify/apify-client-python/blob/master//src/apify_client/clients/resource_clients/webhook_dispatch.py#L29)\_\_init\_\_
* ****\_\_init\_\_**(\*, base\_url, root\_client, http\_client, resource\_id, resource\_path, params): None
- Overrides [ResourceClientAsync.\_\_init\_\_](https://docs.apify.com/api/client/python/api/client/python/reference/class/ResourceClientAsync.md#__init__)
Initialize a new instance.
***
#### Parameters
* ##### keyword-onlybase\_url: str
Base URL of the API server.
* ##### keyword-onlyroot\_client: [ApifyClientAsync](https://docs.apify.com/api/client/python/api/client/python/reference/class/ApifyClientAsync.md)
The ApifyClientAsync instance under which this resource client exists.
* ##### keyword-onlyhttp\_client: [HTTPClientAsync](https://docs.apify.com/api/client/python/api/client/python/reference/class/HTTPClientAsync.md)
The HTTPClientAsync instance to be used in this client.
* ##### optionalkeyword-onlyresource\_id: str | None = <!-- -->None
ID of the manipulated resource, in case of a single-resource client.
* ##### keyword-onlyresource\_path: str
Path to the resource's endpoint on the API server.
* ##### optionalkeyword-onlyparams: dict | None = <!-- -->None
Parameters to include in all requests from this client.
#### Returns None
### [**](#get)[**](https://undefined/apify/apify-client-python/blob/master//src/apify_client/clients/resource_clients/webhook_dispatch.py#L33)get
* **async **get**(): dict | None
- Retrieve the webhook dispatch.
<https://docs.apify.com/api/v2#/reference/webhook-dispatches/webhook-dispatch-object/get-webhook-dispatch>
***
#### Returns dict | None
## Properties<!-- -->[**](#Properties)
### [**](#http_client)[**](https://undefined/apify/apify-client-python/blob/master//src/apify_client/clients/base/base_client.py#L94)http\_client
**http\_client: [HTTPClient](https://docs.apify.com/api/client/python/api/client/python/reference/class/HTTPClient.md) | [HTTPClientAsync](https://docs.apify.com/api/client/python/api/client/python/reference/class/HTTPClientAsync.md)
Inherited from [BaseClientAsync.http\_client](https://docs.apify.com/api/client/python/api/client/python/reference/class/BaseClientAsync.md#http_client)
Overrides [\_BaseBaseClient.http\_client](https://docs.apify.com/api/client/python/api/client/python/reference/class/_BaseBaseClient.md#http_client)
### [**](#params)[**](https://undefined/apify/apify-client-python/blob/master//src/apify_client/clients/base/base_client.py#L17)params
**params: dict
Inherited from [\_BaseBaseClient.params](https://docs.apify.com/api/client/python/api/client/python/reference/class/_BaseBaseClient.md#params)
### [**](#resource_id)[**](https://undefined/apify/apify-client-python/blob/master//src/apify_client/clients/base/base_client.py#L15)resource\_id
**resource\_id: str | None
Inherited from [\_BaseBaseClient.resource\_id](https://docs.apify.com/api/client/python/api/client/python/reference/class/_BaseBaseClient.md#resource_id)
### [**](#root_client)[**](https://undefined/apify/apify-client-python/blob/master//src/apify_client/clients/base/base_client.py#L95)root\_client
**root\_client: [ApifyClient](https://docs.apify.com/api/client/python/api/client/python/reference/class/ApifyClient.md) | [ApifyClientAsync](https://docs.apify.com/api/client/python/api/client/python/reference/class/ApifyClientAsync.md)
Inherited from [BaseClientAsync.root\_client](https://docs.apify.com/api/client/python/api/client/python/reference/class/BaseClientAsync.md#root_client)
Overrides [\_BaseBaseClient.root\_client](https://docs.apify.com/api/client/python/api/client/python/reference/class/_BaseBaseClient.md#root_client)
### [**](#url)[**](https://undefined/apify/apify-client-python/blob/master//src/apify_client/clients/base/base_client.py#L16)url
**url: str
Inherited from [\_BaseBaseClient.url](https://docs.apify.com/api/client/python/api/client/python/reference/class/_BaseBaseClient.md#url)
---
# WebhookDispatchCollectionClient<!-- -->
Sub-client for listing webhook dispatches.
### Hierarchy
* [ResourceCollectionClient](https://docs.apify.com/api/client/python/api/client/python/reference/class/ResourceCollectionClient.md)
* *WebhookDispatchCollectionClient*
## Index[**](#Index)
### Methods
* [**\_\_init\_\_](https://docs.apify.com/api/client/python/api/client/python/reference/class/WebhookDispatchCollectionClient.md#__init__)
* [**list](https://docs.apify.com/api/client/python/api/client/python/reference/class/WebhookDispatchCollectionClient.md#list)
### Properties
* [**http\_client](https://docs.apify.com/api/client/python/api/client/python/reference/class/WebhookDispatchCollectionClient.md#http_client)
* [**params](https://docs.apify.com/api/client/python/api/client/python/reference/class/WebhookDispatchCollectionClient.md#params)
* [**resource\_id](https://docs.apify.com/api/client/python/api/client/python/reference/class/WebhookDispatchCollectionClient.md#resource_id)
* [**root\_client](https://docs.apify.com/api/client/python/api/client/python/reference/class/WebhookDispatchCollectionClient.md#root_client)
* [**url](https://docs.apify.com/api/client/python/api/client/python/reference/class/WebhookDispatchCollectionClient.md#url)
## Methods<!-- -->[**](#Methods)
### [**](#__init__)[**](https://undefined/apify/apify-client-python/blob/master//src/apify_client/clients/resource_clients/webhook_dispatch_collection.py#L14)\_\_init\_\_
* ****\_\_init\_\_**(\*, base\_url, root\_client, http\_client, resource\_id, resource\_path, params): None
- Overrides [ResourceCollectionClient.\_\_init\_\_](https://docs.apify.com/api/client/python/api/client/python/reference/class/ResourceCollectionClient.md#__init__)
Initialize a new instance.
***
#### Parameters
* ##### keyword-onlybase\_url: str
Base URL of the API server.
* ##### keyword-onlyroot\_client: [ApifyClient](https://docs.apify.com/api/client/python/api/client/python/reference/class/ApifyClient.md)
The ApifyClient instance under which this resource client exists.
* ##### keyword-onlyhttp\_client: [HTTPClient](https://docs.apify.com/api/client/python/api/client/python/reference/class/HTTPClient.md)
The HTTPClient instance to be used in this client.
* ##### optionalkeyword-onlyresource\_id: str | None = <!-- -->None
ID of the manipulated resource, in case of a single-resource client.
* ##### keyword-onlyresource\_path: str
Path to the resource's endpoint on the API server.
* ##### optionalkeyword-onlyparams: dict | None = <!-- -->None
Parameters to include in all requests from this client.
#### Returns None
### [**](#list)[**](https://undefined/apify/apify-client-python/blob/master//src/apify_client/clients/resource_clients/webhook_dispatch_collection.py#L18)list
* ****list**(\*, limit, offset, desc): [ListPage](https://docs.apify.com/api/client/python/api/client/python/reference/class/ListPage.md)\[dict]
- List all webhook dispatches of a user.
<https://docs.apify.com/api/v2#/reference/webhook-dispatches/webhook-dispatches-collection/get-list-of-webhook-dispatches>
***
#### Parameters
* ##### optionalkeyword-onlylimit: int | None = <!-- -->None
How many webhook dispatches to retrieve.
* ##### optionalkeyword-onlyoffset: int | None = <!-- -->None
What webhook dispatch to include as first when retrieving the list.
* ##### optionalkeyword-onlydesc: bool | None = <!-- -->None
Whether to sort the webhook dispatches in descending order based on the date of their creation.
#### Returns [ListPage](https://docs.apify.com/api/client/python/api/client/python/reference/class/ListPage.md)\[dict]
## Properties<!-- -->[**](#Properties)
### [**](#http_client)[**](https://undefined/apify/apify-client-python/blob/master//src/apify_client/clients/base/base_client.py#L53)http\_client
**http\_client: [HTTPClient](https://docs.apify.com/api/client/python/api/client/python/reference/class/HTTPClient.md) | [HTTPClientAsync](https://docs.apify.com/api/client/python/api/client/python/reference/class/HTTPClientAsync.md)
Inherited from [BaseClient.http\_client](https://docs.apify.com/api/client/python/api/client/python/reference/class/BaseClient.md#http_client)
Overrides [\_BaseBaseClient.http\_client](https://docs.apify.com/api/client/python/api/client/python/reference/class/_BaseBaseClient.md#http_client)
### [**](#params)[**](https://undefined/apify/apify-client-python/blob/master//src/apify_client/clients/base/base_client.py#L17)params
**params: dict
Inherited from [\_BaseBaseClient.params](https://docs.apify.com/api/client/python/api/client/python/reference/class/_BaseBaseClient.md#params)
### [**](#resource_id)[**](https://undefined/apify/apify-client-python/blob/master//src/apify_client/clients/base/base_client.py#L15)resource\_id
**resource\_id: str | None
Inherited from [\_BaseBaseClient.resource\_id](https://docs.apify.com/api/client/python/api/client/python/reference/class/_BaseBaseClient.md#resource_id)
### [**](#root_client)[**](https://undefined/apify/apify-client-python/blob/master//src/apify_client/clients/base/base_client.py#L54)root\_client
**root\_client: [ApifyClient](https://docs.apify.com/api/client/python/api/client/python/reference/class/ApifyClient.md) | [ApifyClientAsync](https://docs.apify.com/api/client/python/api/client/python/reference/class/ApifyClientAsync.md)
Inherited from [BaseClient.root\_client](https://docs.apify.com/api/client/python/api/client/python/reference/class/BaseClient.md#root_client)
Overrides [\_BaseBaseClient.root\_client](https://docs.apify.com/api/client/python/api/client/python/reference/class/_BaseBaseClient.md#root_client)
### [**](#url)[**](https://undefined/apify/apify-client-python/blob/master//src/apify_client/clients/base/base_client.py#L16)url
**url: str
Inherited from [\_BaseBaseClient.url](https://docs.apify.com/api/client/python/api/client/python/reference/class/_BaseBaseClient.md#url)
---
# WebhookDispatchCollectionClientAsync<!-- -->
Async sub-client for listing webhook dispatches.
### Hierarchy
* [ResourceCollectionClientAsync](https://docs.apify.com/api/client/python/api/client/python/reference/class/ResourceCollectionClientAsync.md)
* *WebhookDispatchCollectionClientAsync*
## Index[**](#Index)
### Methods
* [**\_\_init\_\_](https://docs.apify.com/api/client/python/api/client/python/reference/class/WebhookDispatchCollectionClientAsync.md#__init__)
* [**list](https://docs.apify.com/api/client/python/api/client/python/reference/class/WebhookDispatchCollectionClientAsync.md#list)
### Properties
* [**http\_client](https://docs.apify.com/api/client/python/api/client/python/reference/class/WebhookDispatchCollectionClientAsync.md#http_client)
* [**params](https://docs.apify.com/api/client/python/api/client/python/reference/class/WebhookDispatchCollectionClientAsync.md#params)
* [**resource\_id](https://docs.apify.com/api/client/python/api/client/python/reference/class/WebhookDispatchCollectionClientAsync.md#resource_id)
* [**root\_client](https://docs.apify.com/api/client/python/api/client/python/reference/class/WebhookDispatchCollectionClientAsync.md#root_client)
* [**url](https://docs.apify.com/api/client/python/api/client/python/reference/class/WebhookDispatchCollectionClientAsync.md#url)
## Methods<!-- -->[**](#Methods)
### [**](#__init__)[**](https://undefined/apify/apify-client-python/blob/master//src/apify_client/clients/resource_clients/webhook_dispatch_collection.py#L43)\_\_init\_\_
* ****\_\_init\_\_**(\*, base\_url, root\_client, http\_client, resource\_id, resource\_path, params): None
- Overrides [ResourceCollectionClientAsync.\_\_init\_\_](https://docs.apify.com/api/client/python/api/client/python/reference/class/ResourceCollectionClientAsync.md#__init__)
Initialize a new instance.
***
#### Parameters
* ##### keyword-onlybase\_url: str
Base URL of the API server.
* ##### keyword-onlyroot\_client: [ApifyClientAsync](https://docs.apify.com/api/client/python/api/client/python/reference/class/ApifyClientAsync.md)
The ApifyClientAsync instance under which this resource client exists.
* ##### keyword-onlyhttp\_client: [HTTPClientAsync](https://docs.apify.com/api/client/python/api/client/python/reference/class/HTTPClientAsync.md)
The HTTPClientAsync instance to be used in this client.
* ##### optionalkeyword-onlyresource\_id: str | None = <!-- -->None
ID of the manipulated resource, in case of a single-resource client.
* ##### keyword-onlyresource\_path: str
Path to the resource's endpoint on the API server.
* ##### optionalkeyword-onlyparams: dict | None = <!-- -->None
Parameters to include in all requests from this client.
#### Returns None
### [**](#list)[**](https://undefined/apify/apify-client-python/blob/master//src/apify_client/clients/resource_clients/webhook_dispatch_collection.py#L47)list
* **async **list**(\*, limit, offset, desc): [ListPage](https://docs.apify.com/api/client/python/api/client/python/reference/class/ListPage.md)\[dict]
- List all webhook dispatches of a user.
<https://docs.apify.com/api/v2#/reference/webhook-dispatches/webhook-dispatches-collection/get-list-of-webhook-dispatches>
***
#### Parameters
* ##### optionalkeyword-onlylimit: int | None = <!-- -->None
How many webhook dispatches to retrieve.
* ##### optionalkeyword-onlyoffset: int | None = <!-- -->None
What webhook dispatch to include as first when retrieving the list.
* ##### optionalkeyword-onlydesc: bool | None = <!-- -->None
Whether to sort the webhook dispatches in descending order based on the date of their creation.
#### Returns [ListPage](https://docs.apify.com/api/client/python/api/client/python/reference/class/ListPage.md)\[dict]
## Properties<!-- -->[**](#Properties)
### [**](#http_client)[**](https://undefined/apify/apify-client-python/blob/master//src/apify_client/clients/base/base_client.py#L94)http\_client
**http\_client: [HTTPClient](https://docs.apify.com/api/client/python/api/client/python/reference/class/HTTPClient.md) | [HTTPClientAsync](https://docs.apify.com/api/client/python/api/client/python/reference/class/HTTPClientAsync.md)
Inherited from [BaseClientAsync.http\_client](https://docs.apify.com/api/client/python/api/client/python/reference/class/BaseClientAsync.md#http_client)
Overrides [\_BaseBaseClient.http\_client](https://docs.apify.com/api/client/python/api/client/python/reference/class/_BaseBaseClient.md#http_client)
### [**](#params)[**](https://undefined/apify/apify-client-python/blob/master//src/apify_client/clients/base/base_client.py#L17)params
**params: dict
Inherited from [\_BaseBaseClient.params](https://docs.apify.com/api/client/python/api/client/python/reference/class/_BaseBaseClient.md#params)
### [**](#resource_id)[**](https://undefined/apify/apify-client-python/blob/master//src/apify_client/clients/base/base_client.py#L15)resource\_id
**resource\_id: str | None
Inherited from [\_BaseBaseClient.resource\_id](https://docs.apify.com/api/client/python/api/client/python/reference/class/_BaseBaseClient.md#resource_id)
### [**](#root_client)[**](https://undefined/apify/apify-client-python/blob/master//src/apify_client/clients/base/base_client.py#L95)root\_client
**root\_client: [ApifyClient](https://docs.apify.com/api/client/python/api/client/python/reference/class/ApifyClient.md) | [ApifyClientAsync](https://docs.apify.com/api/client/python/api/client/python/reference/class/ApifyClientAsync.md)
Inherited from [BaseClientAsync.root\_client](https://docs.apify.com/api/client/python/api/client/python/reference/class/BaseClientAsync.md#root_client)
Overrides [\_BaseBaseClient.root\_client](https://docs.apify.com/api/client/python/api/client/python/reference/class/_BaseBaseClient.md#root_client)
### [**](#url)[**](https://undefined/apify/apify-client-python/blob/master//src/apify_client/clients/base/base_client.py#L16)url
**url: str
Inherited from [\_BaseBaseClient.url](https://docs.apify.com/api/client/python/api/client/python/reference/class/_BaseBaseClient.md#url)
---
# WithLogDetailsClient<!-- -->
## Index[**](#Index)
### Methods
* [**\_\_new\_\_](https://docs.apify.com/api/client/python/api/client/python/reference/class/WithLogDetailsClient.md#__new__)
## Methods<!-- -->[**](#Methods)
### [**](#__new__)[**](https://undefined/apify/apify-client-python/blob/master//src/apify_client/_logging.py#L46)\_\_new\_\_
* ****\_\_new\_\_**(name, bases, attrs): [WithLogDetailsClient](https://docs.apify.com/api/client/python/api/client/python/reference/class/WithLogDetailsClient.md)
- #### Parameters
* ##### name: str
* ##### bases: tuple
* ##### attrs: dict
#### Returns [WithLogDetailsClient](https://docs.apify.com/api/client/python/api/client/python/reference/class/WithLogDetailsClient.md)
---
[Skip to main content](#__docusaurus_skipToContent_fallback)
[](https://docs.apify.com)
[Academy](https://docs.apify.com/academy)[Platform](https://docs.apify.com/platform)
[API](https://docs.apify.com/api)
* [Reference](https://docs.apify.com/api/v2)
* [Client for JavaScript](https://docs.apify.com/api/client/js/)
* [Client for Python](https://docs.apify.com/api/client/python/)
[SDK](https://docs.apify.com/sdk)
* [SDK for JavaScript](https://docs.apify.com/sdk/js/)
* [SDK for Python](https://docs.apify.com/sdk/python/)
[CLI](https://docs.apify.com/cli/)
[Open source](https://docs.apify.com/open-source)
* [Crawlee](https://crawlee.dev)
* [Got Scraping](https://github.com/apify/got-scraping)
* [Fingerprint Suite](https://github.com/apify/fingerprint-suite)
* [Apify on GitHub](https://github.com/apify)
* [Actor whitepaper](https://whitepaper.actor)
[Discord](https://discord.com/invite/jyEM2PRvMU "Chat on Discord")[Get started](https://console.apify.com)
[API Client for Python](https://docs.apify.com/api/client/python/api/client/python/.md)
[Docs](https://docs.apify.com/api/client/python/api/client/python/docs/overview/introduction.md)[Reference](https://docs.apify.com/api/client/python/api/client/python/reference.md)[Changelog](https://docs.apify.com/api/client/python/api/client/python/docs/changelog.md)[GitHub](https://github.com/apify/apify-client-python)
# Apify API client for Python
# Apify API client for Python.
##
## The Apify API Client for Python is the official library to access Apify API from your Python applications. It provides useful features like automatic retries and convenience functions to improve your experience with the Apify API.
[Get Started](https://docs.apify.com/api/client/python/api/client/python/docs/overview/introduction.md)[GitHub](https://ghbtns.com/github-btn.html?user=apify\&repo=apify-client-python\&type=star\&count=true\&size=large)

pip install apify-client
For example, the Apify API Client for Python makes it easy to run your own Actors or Actors from the [Apify Store](https://apify.com/store) <!-- -->by simply using the `.call()` method to start an Actor and wait for it to finish.
from apify_client import ApifyClientAsync
async def main() -> None: apify_client = ApifyClientAsync('MY-APIFY-TOKEN')
# Start an Actor and wait for it to finish.
actor_client = apify_client.actor('john-doe/my-cool-actor')
call_result = await actor_client.call()
if call_result is None:
print('Actor run failed.')
return
# Fetch results from the Actor run's default dataset.
dataset_client = apify_client.dataset(call_result['defaultDatasetId'])
list_items_result = await dataset_client.list_items()
print(f'Dataset: {list_items_result}')
Learn
* [Academy](https://docs.apify.com/academy)
* [Platform](https://docs.apify.com/platform)
API
* [Reference](https://docs.apify.com/api/v2)
* [Client for JavaScript](https://docs.apify.com/api/client/js/)
* [Client for Python](https://docs.apify.com/api/client/python/)
SDK
* [SDK for JavaScript](https://docs.apify.com/sdk/js/)
* [SDK for Python](https://docs.apify.com/sdk/python/)
Other
* [CLI](https://docs.apify.com/cli/)
* [Open source](https://docs.apify.com/open-source)
More
* [Crawlee](https://crawlee.dev)
* [GitHub](https://github.com/apify)
* [Discord](https://discord.com/invite/jyEM2PRvMU)
* [Trust Center](https://trust.apify.com)
[](https://apify.com)
---
# SDK for JavaScript | Apify Documentation
## sdk
- [Search the documentation](https://docs.apify.com/sdk/js/search.md)
- [Changelog](https://docs.apify.com/sdk/js/docs/changelog.md): Change Log
- [Accept user input](https://docs.apify.com/sdk/js/docs/examples/accept-user-input.md): This example accepts and logs user input:
- [Add data to dataset](https://docs.apify.com/sdk/js/docs/examples/add-data-to-dataset.md): This example saves data to the default dataset. If the dataset doesn't exist, it will be created.
- [Basic crawler](https://docs.apify.com/sdk/js/docs/examples/basic-crawler.md): This is the most bare-bones example of the Apify SDK, which demonstrates some of its building blocks such as the BasicCrawler. You probably don't need to go this deep though, and it would be better to start with one of the full-featured crawlers
- [Call actor](https://docs.apify.com/sdk/js/docs/examples/call-actor.md): This example demonstrates how to start an Apify actor using
- [Capture a screenshot using Puppeteer](https://docs.apify.com/sdk/js/docs/examples/capture-screenshot.md): To run this example on the Apify Platform, select the apify/actor-node-puppeteer-chrome image for your Dockerfile.
- [Cheerio crawler](https://docs.apify.com/sdk/js/docs/examples/cheerio-crawler.md): This example demonstrates how to use CheerioCrawler to crawl a list of URLs from an external file, load each URL using a plain HTTP request, parse the HTML using the Cheerio library and extract some data from it: the page title and all h1 tags.
- [Crawl all links on a website](https://docs.apify.com/sdk/js/docs/examples/crawl-all-links.md): This example uses the enqueueLinks() method to add new links to the RequestQueue as the crawler navigates from page to page. If only the
- [Crawl multiple URLs](https://docs.apify.com/sdk/js/docs/examples/crawl-multiple-urls.md): This example crawls the specified list of URLs.
- [Crawl a website with relative links](https://docs.apify.com/sdk/js/docs/examples/crawl-relative-links.md): When crawling a website, you may encounter different types of links present that you may want to crawl.
- [Crawl a single URL](https://docs.apify.com/sdk/js/docs/examples/crawl-single-url.md): This example uses the got-scraping npm package
- [Crawl a sitemap](https://docs.apify.com/sdk/js/docs/examples/crawl-sitemap.md): This example downloads and crawls the URLs from a sitemap.
- [Crawl some links on a website](https://docs.apify.com/sdk/js/docs/examples/crawl-some-links.md): This CheerioCrawler example uses the pseudoUrls property in the enqueueLinks() method to only add links to the RequestQueue queue if they match the specified regular expression.
- [Forms](https://docs.apify.com/sdk/js/docs/examples/forms.md): This example demonstrates how to use PuppeteerCrawler to
- [Dataset Map and Reduce methods](https://docs.apify.com/sdk/js/docs/examples/map-and-reduce.md): This example shows an easy use-case of the Dataset map
- [Playwright crawler](https://docs.apify.com/sdk/js/docs/examples/playwright-crawler.md): This example demonstrates how to use PlaywrightCrawler
- [Puppeteer crawler](https://docs.apify.com/sdk/js/docs/examples/puppeteer-crawler.md): This example demonstrates how to use PuppeteerCrawler in combination
- [Puppeteer recursive crawl](https://docs.apify.com/sdk/js/docs/examples/puppeteer-recursive-crawl.md): Run the following example to perform a recursive crawl of a website using PuppeteerCrawler.
- [Puppeteer with proxy](https://docs.apify.com/sdk/js/docs/examples/puppeteer-with-proxy.md): This example demonstrates how to load pages in headless Chrome / Puppeteer over Apify Proxy.
- [Apify Platform](https://docs.apify.com/sdk/js/docs/guides/apify-platform.md): Apify platform - large-scale and high-performance web scraping
- [Running in Docker](https://docs.apify.com/sdk/js/docs/guides/docker-images.md): Example Docker images to run your crawlers
- [Environment Variables](https://docs.apify.com/sdk/js/docs/guides/environment-variables.md): The following is a list of the environment variables used by Apify SDK that are available to the user.
- [Pay-per-event Monetization](https://docs.apify.com/sdk/js/docs/guides/pay-per-event.md): Monetize your Actors using the pay-per-event pricing model
- [Proxy Management](https://docs.apify.com/sdk/js/docs/guides/proxy-management.md): IP address blocking is one of the oldest
- [Request Storage](https://docs.apify.com/sdk/js/docs/guides/request-storage.md): The Apify SDK has several request storage types that are useful for specific tasks. The requests are stored either on local disk to a directory defined by the
- [Result Storage](https://docs.apify.com/sdk/js/docs/guides/result-storage.md): The Apify SDK has several result storage types that are useful for specific tasks. The data is stored either on local disk to a directory defined by the
- [Session Management](https://docs.apify.com/sdk/js/docs/guides/session-management.md): SessionPool is a
- [Setting up a TypeScript project](https://docs.apify.com/sdk/js/docs/guides/type-script-actor.md): Apify SDK supports TypeScript by covering public APIs with type declarations. This
- [Apify SDK: The scalable web crawling and scraping library for JavaScript](https://docs.apify.com/sdk/js/docs/readme/introduction.md): npm version
- [overview](https://docs.apify.com/sdk/js/docs/readme/overview.md): Overview
- [support](https://docs.apify.com/sdk/js/docs/readme/support.md): Support
- [Upgrading to v1](https://docs.apify.com/sdk/js/docs/upgrading/upgrading-to-v1.md): Summary
- [Upgrading to v2](https://docs.apify.com/sdk/js/docs/upgrading/upgrading-to-v2.md): - BREAKING: Require Node.js >=15.10.0 because HTTP2 support on lower Node.js versions is very buggy.
- [Upgrading to v3](https://docs.apify.com/sdk/js/docs/upgrading/upgrading-to-v3.md): This page summarizes most of the breaking changes between Crawlee (v3) and Apify SDK (v2). Crawlee is the spiritual successor to Apify SDK, so we decided to keep the versioning and release Crawlee as v3.
- [apify](https://docs.apify.com/sdk/js/reference.md)
- [Changelog](https://docs.apify.com/sdk/js/reference/changelog.md): Change Log
- [Actor <Data>](https://docs.apify.com/sdk/js/reference/class/Actor.md): `Actor` class serves as an alternative approach to the static helpers exported from the package. It allows to pass configuration
- [externalApifyClient](https://docs.apify.com/sdk/js/reference/class/ApifyClient.md): ApifyClient is the official library to access [Apify API](https://docs.apify.com/api/v2) from your
- [ChargingManager](https://docs.apify.com/sdk/js/reference/class/ChargingManager.md): Handles pay-per-event charging.
- [Configuration](https://docs.apify.com/sdk/js/reference/class/Configuration.md): `Configuration` is a value object holding the SDK configuration. We can use it in two ways:
- [externalDataset <Data>](https://docs.apify.com/sdk/js/reference/class/Dataset.md): The `Dataset` class represents a store for structured data where each object stored has the same attributes,
- [KeyValueStore](https://docs.apify.com/sdk/js/reference/class/KeyValueStore.md)
- [externalLog](https://docs.apify.com/sdk/js/reference/class/Log.md): The log instance enables level aware logging of messages and we advise
- [externalLogger](https://docs.apify.com/sdk/js/reference/class/Logger.md): This is an abstract class that should
- [externalLoggerJson](https://docs.apify.com/sdk/js/reference/class/LoggerJson.md): This is an abstract class that should
- [externalLoggerText](https://docs.apify.com/sdk/js/reference/class/LoggerText.md): This is an abstract class that should
- [PlatformEventManager](https://docs.apify.com/sdk/js/reference/class/PlatformEventManager.md): Gets an instance of a Node.js'
- [ProxyConfiguration](https://docs.apify.com/sdk/js/reference/class/ProxyConfiguration.md): Configures connection to a proxy server with the provided options. Proxy servers are used to prevent target websites from blocking
- [externalRequestQueue](https://docs.apify.com/sdk/js/reference/class/RequestQueue.md): Represents a queue of URLs to crawl, which is used for deep crawling of websites
- [externalLogLevel](https://docs.apify.com/sdk/js/reference/enum/LogLevel.md)
- [AbortOptions](https://docs.apify.com/sdk/js/reference/interface/AbortOptions.md)
- [ActorPricingInfo](https://docs.apify.com/sdk/js/reference/interface/ActorPricingInfo.md)
- [externalActorRun](https://docs.apify.com/sdk/js/reference/interface/ActorRun.md)
- [externalApifyClientOptions](https://docs.apify.com/sdk/js/reference/interface/ApifyClientOptions.md)
- [ApifyEnv](https://docs.apify.com/sdk/js/reference/interface/ApifyEnv.md): Parsed representation of the Apify environment variables.
- [CallOptions](https://docs.apify.com/sdk/js/reference/interface/CallOptions.md)
- [CallTaskOptions](https://docs.apify.com/sdk/js/reference/interface/CallTaskOptions.md)
- [ChargeOptions](https://docs.apify.com/sdk/js/reference/interface/ChargeOptions.md)
- [ChargeResult](https://docs.apify.com/sdk/js/reference/interface/ChargeResult.md)
- [ConfigurationOptions](https://docs.apify.com/sdk/js/reference/interface/ConfigurationOptions.md)
- [externalDatasetConsumer <Data>](https://docs.apify.com/sdk/js/reference/interface/DatasetConsumer.md): User-function used in the `Dataset.forEach()` API.
- [externalDatasetContent <Data>](https://docs.apify.com/sdk/js/reference/interface/DatasetContent.md)
- [externalDatasetDataOptions](https://docs.apify.com/sdk/js/reference/interface/DatasetDataOptions.md)
- [externalDatasetIteratorOptions](https://docs.apify.com/sdk/js/reference/interface/DatasetIteratorOptions.md)
- [externalDatasetMapper <Data, R>](https://docs.apify.com/sdk/js/reference/interface/DatasetMapper.md): User-function used in the `Dataset.map()` API.
- [externalDatasetOptions](https://docs.apify.com/sdk/js/reference/interface/DatasetOptions.md)
- [externalDatasetReducer <T, Data>](https://docs.apify.com/sdk/js/reference/interface/DatasetReducer.md): User-function used in the `Dataset.reduce()` API.
- [ExitOptions](https://docs.apify.com/sdk/js/reference/interface/ExitOptions.md)
- [InitOptions](https://docs.apify.com/sdk/js/reference/interface/InitOptions.md)
- [externalKeyConsumer](https://docs.apify.com/sdk/js/reference/interface/KeyConsumer.md): User-function used in the {@apilink KeyValueStore.forEachKey} method.
- [externalKeyValueStoreIteratorOptions](https://docs.apify.com/sdk/js/reference/interface/KeyValueStoreIteratorOptions.md)
- [externalKeyValueStoreOptions](https://docs.apify.com/sdk/js/reference/interface/KeyValueStoreOptions.md)
- [externalLoggerOptions](https://docs.apify.com/sdk/js/reference/interface/LoggerOptions.md)
- [MainOptions](https://docs.apify.com/sdk/js/reference/interface/MainOptions.md)
- [MetamorphOptions](https://docs.apify.com/sdk/js/reference/interface/MetamorphOptions.md)
- [OpenStorageOptions](https://docs.apify.com/sdk/js/reference/interface/OpenStorageOptions.md)
- [ProxyConfigurationOptions](https://docs.apify.com/sdk/js/reference/interface/ProxyConfigurationOptions.md)
- [ProxyInfo](https://docs.apify.com/sdk/js/reference/interface/ProxyInfo.md): The main purpose of the ProxyInfo object is to provide information
- [externalQueueOperationInfo](https://docs.apify.com/sdk/js/reference/interface/QueueOperationInfo.md): A helper class that is used to report results from various
- [RebootOptions](https://docs.apify.com/sdk/js/reference/interface/RebootOptions.md)
- [externalRecordOptions](https://docs.apify.com/sdk/js/reference/interface/RecordOptions.md)
- [externalRequestQueueOperationOptions](https://docs.apify.com/sdk/js/reference/interface/RequestQueueOperationOptions.md)
- [externalRequestQueueOptions](https://docs.apify.com/sdk/js/reference/interface/RequestQueueOptions.md)
- [WebhookOptions](https://docs.apify.com/sdk/js/reference/interface/WebhookOptions.md)
- [Apify SDK for JavaScript and Node.js](https://docs.apify.com/sdk/js/index.md)
---
# Full Documentation Content
[Skip to main content](#__docusaurus_skipToContent_fallback)
[](https://docs.apify.com)
[Academy](https://docs.apify.com/academy)[Platform](https://docs.apify.com/platform)
[API](https://docs.apify.com/api)
* [Reference](https://docs.apify.com/api/v2)
* [Client for JavaScript](https://docs.apify.com/api/client/js/)
* [Client for Python](https://docs.apify.com/api/client/python/)
[SDK](https://docs.apify.com/sdk)
* [SDK for JavaScript](https://docs.apify.com/sdk/js/)
* [SDK for Python](https://docs.apify.com/sdk/python/)
[CLI](https://docs.apify.com/cli/)
[Open source](https://docs.apify.com/open-source)
* [Crawlee](https://crawlee.dev)
* [Got Scraping](https://github.com/apify/got-scraping)
* [Fingerprint Suite](https://github.com/apify/fingerprint-suite)
* [Apify on GitHub](https://github.com/apify)
* [Actor whitepaper](https://whitepaper.actor)
[Discord](https://discord.com/invite/jyEM2PRvMU "Chat on Discord")[Get started](https://console.apify.com)
[SDK for JavaScript](https://docs.apify.com/sdk/js/sdk/js/.md)
[Docs](https://docs.apify.com/sdk/js/sdk/js/docs/guides/apify-platform.md)[Examples](https://docs.apify.com/sdk/js/sdk/js/docs/examples)[Reference](https://docs.apify.com/sdk/js/sdk/js/reference.md)[Changelog](https://docs.apify.com/sdk/js/sdk/js/docs/changelog.md)[GitHub](https://github.com/apify/apify-sdk-js)
[3.4](https://docs.apify.com/sdk/js/sdk/js/docs/guides/apify-platform.md)
* [Next](https://docs.apify.com/sdk/js/sdk/js/docs/next/guides/apify-platform)
* [3.4](https://docs.apify.com/sdk/js/sdk/js/docs/guides/apify-platform.md)
* [3.3](https://docs.apify.com/sdk/js/sdk/js/docs/3.3/guides/apify-platform)
* [3.2](https://docs.apify.com/sdk/js/sdk/js/docs/3.2/guides/apify-platform)
* [3.1](https://docs.apify.com/sdk/js/sdk/js/docs/3.1/guides/apify-platform)
* [3.0](https://docs.apify.com/sdk/js/sdk/js/docs/3.0/guides/apify-platform)
* [2.3](https://docs.apify.com/sdk/js/sdk/js/docs/2.3/guides/motivation)
* [1.3](https://docs.apify.com/sdk/js/sdk/js/docs/1.3/guides/motivation)
# Search the documentation
Type your search here
Next (current)
[](https://www.algolia.com/)
Learn
* [Academy](https://docs.apify.com/academy)
* [Platform](https://docs.apify.com/platform)
API
* [Reference](https://docs.apify.com/api/v2)
* [Client for JavaScript](https://docs.apify.com/api/client/js/)
* [Client for Python](https://docs.apify.com/api/client/python/)
SDK
* [SDK for JavaScript](https://docs.apify.com/sdk/js/)
* [SDK for Python](https://docs.apify.com/sdk/python/)
Other
* [CLI](https://docs.apify.com/cli/)
* [Open source](https://docs.apify.com/open-source)
More
* [Crawlee](https://crawlee.dev)
* [GitHub](https://github.com/apify)
* [Discord](https://discord.com/invite/jyEM2PRvMU)
* [Trust Center](https://trust.apify.com)
[](https://apify.com)
---
# Changelog
## Change Log[](#change-log)
All notable changes to this project will be documented in this file. See [Conventional Commits](https://conventionalcommits.org) for commit guidelines.
### [3.5.1](https://github.com/apify/apify-sdk-js/compare/apify@3.5.0...apify@3.5.1) (2025-10-20)[](#351-2025-10-20)
#### Performance Improvements[](#performance-improvements)
* Use Apify-provided environment variables to obtain PPE pricing information ([#483](https://github.com/apify/apify-sdk-js/issues/483)) ([98dd09b](https://github.com/apify/apify-sdk-js/commit/98dd09b7d28f073e5cf35143634068b28d767d24)), closes [#481](https://github.com/apify/apify-sdk-js/issues/481)
## [3.5.0](https://github.com/apify/apify-sdk-js/compare/apify@3.4.5...apify@3.5.0) (2025-10-06)[](#350-2025-10-06)
#### Bug Fixes[](#bug-fixes)
* adjust `ProxyConfiguration` to support crawlee v3.15 ([#473](https://github.com/apify/apify-sdk-js/issues/473)) ([f5c7feb](https://github.com/apify/apify-sdk-js/commit/f5c7febb8566e48d850cf27e4d2e2b048177394b))
* ensure the `Actor` instance is initialized while calling its methods ([#471](https://github.com/apify/apify-sdk-js/issues/471)) ([70465f7](https://github.com/apify/apify-sdk-js/commit/70465f7a5ab722b41c82e71a0a1addb0c8612ad0))
#### Features[](#features)
* allow skipping access checks when initializing ProxyConfiguration ([#474](https://github.com/apify/apify-sdk-js/issues/474)) ([c87a228](https://github.com/apify/apify-sdk-js/commit/c87a2289598c094e6700374f176fb91e4246aead)), closes [#472](https://github.com/apify/apify-sdk-js/issues/472)
* respect input schema defaults in `Actor.getInput()` ([#409](https://github.com/apify/apify-sdk-js/issues/409)) ([bd9181d](https://github.com/apify/apify-sdk-js/commit/bd9181d11044e66b56120c37a6813fe11a37556e)), closes [#287](https://github.com/apify/apify-sdk-js/issues/287)
### [3.4.5](https://github.com/apify/apify-sdk-js/compare/apify@3.4.4...apify@3.4.5) (2025-09-11)[](#345-2025-09-11)
#### Bug Fixes[](#bug-fixes-1)
* consistent parameters for platform event listeners ([#451](https://github.com/apify/apify-sdk-js/issues/451)) ([705ae50](https://github.com/apify/apify-sdk-js/commit/705ae502495a6c2716552f16b8e1dc16e847ebcf)), closes [#405](https://github.com/apify/apify-sdk-js/issues/405)
* force quit stuck `Actor.exit()` calls ([#420](https://github.com/apify/apify-sdk-js/issues/420)) ([483fc43](https://github.com/apify/apify-sdk-js/commit/483fc4399890f3b2c00869c85c295b8c5aee8826))
* respect `forceCloud` in `KeyValueStore.getPublicUrl()` calls ([#462](https://github.com/apify/apify-sdk-js/issues/462)) ([12e5f9f](https://github.com/apify/apify-sdk-js/commit/12e5f9f877465e04829e390ed1dff2a0b34e66e8)), closes [#302](https://github.com/apify/apify-sdk-js/issues/302) [#459](https://github.com/apify/apify-sdk-js/issues/459)
### [3.4.4](https://github.com/apify/apify-sdk-js/compare/apify@3.4.3...apify@3.4.4) (2025-07-28)[](#344-2025-07-28)
**Note:** Version bump only for package apify
### [3.4.3](https://github.com/apify/apify-sdk-js/compare/apify@3.4.2...apify@3.4.3) (2025-07-14)[](#343-2025-07-14)
#### Bug Fixes[](#bug-fixes-2)
* Return eventChargeLimitReached=false for charge calls with count=0 ([#395](https://github.com/apify/apify-sdk-js/issues/395)) ([4f97da0](https://github.com/apify/apify-sdk-js/commit/4f97da0cf4bbda33dcaa3d91f0f543f080dbab8b)), closes [#372](https://github.com/apify/apify-sdk-js/issues/372)
### [3.4.2](https://github.com/apify/apify-sdk-js/compare/apify@3.4.1...apify@3.4.2) (2025-05-19)[](#342-2025-05-19)
#### Bug Fixes[](#bug-fixes-3)
* improve extension of `Configuration` class to fix issues in native ESM projects ([#394](https://github.com/apify/apify-sdk-js/issues/394)) ([8842706](https://github.com/apify/apify-sdk-js/commit/884270611e09a0fec40903958f74d458ba454300))
### [3.4.1](https://github.com/apify/apify-sdk-js/compare/apify@3.4.0...apify@3.4.1) (2025-05-07)[](#341-2025-05-07)
#### Bug Fixes[](#bug-fixes-4)
* convert `[@apilink](https://github.com/apilink)` to `[@link](https://github.com/link)` on build ([#383](https://github.com/apify/apify-sdk-js/issues/383)) ([ccae1ac](https://github.com/apify/apify-sdk-js/commit/ccae1ac9737dfc5bfc64e4586846e413ddb54a37))
* improve check for crawlee version mismatch ([#386](https://github.com/apify/apify-sdk-js/issues/386)) ([721e67d](https://github.com/apify/apify-sdk-js/commit/721e67dbde367b01e1347900b73394221bca0c9d)), closes [#375](https://github.com/apify/apify-sdk-js/issues/375)
* prefer proxy password from env var ([#385](https://github.com/apify/apify-sdk-js/issues/385)) ([132b5dc](https://github.com/apify/apify-sdk-js/commit/132b5dc5b0c5b77cad357b4d022b53ab6801a3a2)), closes [#20502](https://github.com/apify/apify-sdk-js/issues/20502)
## [3.4.0](https://github.com/apify/apify-sdk-js/compare/apify@3.3.2...apify@3.4.0) (2025-04-01)[](#340-2025-04-01)
#### Features[](#features-1)
* sign record's public url ([#358](https://github.com/apify/apify-sdk-js/issues/358)) ([6274cc0](https://github.com/apify/apify-sdk-js/commit/6274cc018ab3b02787c234eacbb025d4d973a95d))
### [3.3.2](https://github.com/apify/apify-sdk-js/compare/apify@3.3.1...apify@3.3.2) (2025-02-20)[](#332-2025-02-20)
#### Bug Fixes[](#bug-fixes-5)
* ensure `maxTotalChargeUsd` is correctly mapped to number, consider empty string as infinity ([#361](https://github.com/apify/apify-sdk-js/issues/361)) ([bb65f70](https://github.com/apify/apify-sdk-js/commit/bb65f70be4750c8dc1bee368f849fafa924add39))
### [3.3.1](https://github.com/apify/apify-sdk-js/compare/apify@3.3.0...apify@3.3.1) (2025-02-19)[](#331-2025-02-19)
#### Bug Fixes[](#bug-fixes-6)
* Add workaround for incorrect handling of maxTotalChargeUsd ([#360](https://github.com/apify/apify-sdk-js/issues/360)) ([acb2abe](https://github.com/apify/apify-sdk-js/commit/acb2abe9a3422e5b0b28972085377664173fd3ff))
## [3.3.0](https://github.com/apify/apify-sdk-js/compare/apify@3.2.6...apify@3.3.0) (2025-02-06)[](#330-2025-02-06)
#### Bug Fixes[](#bug-fixes-7)
* load `initialCount` in `openRequestQueue()` ([#339](https://github.com/apify/apify-sdk-js/issues/339)) ([48548cd](https://github.com/apify/apify-sdk-js/commit/48548cd088365b84a0178ba38c5d3da7f4922ade))
* prevent reboot loops ([#345](https://github.com/apify/apify-sdk-js/issues/345)) ([271bc99](https://github.com/apify/apify-sdk-js/commit/271bc999c1a6c75f8e8359214237b51f8ade03c7))
#### Features[](#features-2)
* Actor.charge() ([#346](https://github.com/apify/apify-sdk-js/issues/346)) ([e26e496](https://github.com/apify/apify-sdk-js/commit/e26e49669cae04df11f2138b80549e5cd8611b3c))
* add SDK and Crawlee version to the `ApifyClient`'s user agent ([#335](https://github.com/apify/apify-sdk-js/issues/335)) ([9c069a1](https://github.com/apify/apify-sdk-js/commit/9c069a1643f0a5f417765e9391550ae06c50160f)), closes [#331](https://github.com/apify/apify-sdk-js/issues/331)
* add standby URL, change default port ([#328](https://github.com/apify/apify-sdk-js/issues/328)) ([7d265f3](https://github.com/apify/apify-sdk-js/commit/7d265f3e2a7dfdda232e0bbf7c6bb73736112950))
### [3.2.6](https://github.com/apify/apify-sdk-js/compare/apify@3.2.5...apify@3.2.6) (2024-10-07)[](#326-2024-10-07)
#### Bug Fixes[](#bug-fixes-8)
* decode special characters in proxy `username` and `password` ([#326](https://github.com/apify/apify-sdk-js/issues/326)) ([9a7a4d0](https://github.com/apify/apify-sdk-js/commit/9a7a4d0ecc30f21d2be607840ce28903dbf1d191))
### [3.2.5](https://github.com/apify/apify-sdk-js/compare/apify@3.2.4...apify@3.2.5) (2024-08-14)[](#325-2024-08-14)
#### Features[](#features-3)
* add `metaOrigin` to `Actor.config` ([#320](https://github.com/apify/apify-sdk-js/issues/320)) ([5a4d2eb](https://github.com/apify/apify-sdk-js/commit/5a4d2ebb9218bd342438f740d035a563444037d3))
### [3.2.4](https://github.com/apify/apify-sdk-js/compare/apify@3.2.3...apify@3.2.4) (2024-07-04)[](#324-2024-07-04)
#### Bug Fixes[](#bug-fixes-9)
* add `standbyPort` to `ConfigurationOptions` ([#311](https://github.com/apify/apify-sdk-js/issues/311)) ([530b8a1](https://github.com/apify/apify-sdk-js/commit/530b8a133f2808c61e079449156e5ed1fe73ce64))
#### Features[](#features-4)
* add standby port to configuration ([#310](https://github.com/apify/apify-sdk-js/issues/310)) ([cc26098](https://github.com/apify/apify-sdk-js/commit/cc26098da862a7338fdf776956b904d5672a5daf))
### [3.2.3](https://github.com/apify/apify-sdk-js/compare/apify@3.2.2...apify@3.2.3) (2024-06-03)[](#323-2024-06-03)
#### Bug Fixes[](#bug-fixes-10)
* respect `KVS.getPublicUrl()` from core when not on apify platform ([#302](https://github.com/apify/apify-sdk-js/issues/302)) ([a4d80bb](https://github.com/apify/apify-sdk-js/commit/a4d80bbeee2fd2db145638b17757fa5f673e7452))
### [3.2.2](https://github.com/apify/apify-sdk-js/compare/apify@3.2.1...apify@3.2.2) (2024-05-23)[](#322-2024-05-23)
#### Bug Fixes[](#bug-fixes-11)
* dont fail on resolution of not installed packages ([0cea251](https://github.com/apify/apify-sdk-js/commit/0cea251b35c652d529320a0570d6b283f52f0ac1))
### [3.2.1](https://github.com/apify/apify-sdk-js/compare/apify@3.2.0...apify@3.2.1) (2024-05-23)[](#321-2024-05-23)
#### Features[](#features-5)
* validate crawlee versions in `Actor.init` ([#301](https://github.com/apify/apify-sdk-js/issues/301)) ([66ff6a9](https://github.com/apify/apify-sdk-js/commit/66ff6a9090e9e3321a217e14019e8c3001e3df4d)), closes [#237](https://github.com/apify/apify-sdk-js/issues/237)
## [3.2.0](https://github.com/apify/apify-sdk-js/compare/apify@3.1.16...apify@3.2.0) (2024-04-11)[](#320-2024-04-11)
#### Features[](#features-6)
* support for proxy tiers ([#290](https://github.com/apify/apify-sdk-js/issues/290)) ([fff3a66](https://github.com/apify/apify-sdk-js/commit/fff3a66d3a0fe5080121cc083e27f59db3d979b5))
### [3.1.16](https://github.com/apify/apify-sdk-js/compare/apify@3.1.15...apify@3.1.16) (2024-02-23)[](#3116-2024-02-23)
**Note:** Version bump only for package apify
### [3.1.15](https://github.com/apify/apify-sdk-js/compare/apify@3.1.14...apify@3.1.15) (2024-01-08)[](#3115-2024-01-08)
#### Features[](#features-7)
* ignore proxy configuration locally if no valid token or password is found ([#272](https://github.com/apify/apify-sdk-js/issues/272)) ([0931c2e](https://github.com/apify/apify-sdk-js/commit/0931c2e27e48425bfc58c5df80cd42ed66b9395d)), closes [#262](https://github.com/apify/apify-sdk-js/issues/262)
### [3.1.14](https://github.com/apify/apify-sdk-js/compare/apify@3.1.13...apify@3.1.14) (2023-11-27)[](#3114-2023-11-27)
**Note:** Version bump only for package apify
### [3.1.13](https://github.com/apify/apify-sdk-js/compare/apify@3.1.12...apify@3.1.13) (2023-11-15)[](#3113-2023-11-15)
#### Bug Fixes[](#bug-fixes-12)
* **apify:** declare got-scraping as dependency ([#252](https://github.com/apify/apify-sdk-js/issues/252)) ([a6bcf1d](https://github.com/apify/apify-sdk-js/commit/a6bcf1d578a7c7ebbb23b3768e8bbf9e94e2b404))
### [3.1.12](https://github.com/apify/apify-sdk-js/compare/apify@3.1.11...apify@3.1.12) (2023-10-05)[](#3112-2023-10-05)
#### Bug Fixes[](#bug-fixes-13)
* add more logging to `Actor.init` and `Actor.exit` ([#236](https://github.com/apify/apify-sdk-js/issues/236)) ([b7e01fc](https://github.com/apify/apify-sdk-js/commit/b7e01fc649de84d6f1391bf95e0f349f7ca32536))
### [3.1.11](https://github.com/apify/apify-sdk-js/compare/apify@3.1.10...apify@3.1.11) (2023-10-04)[](#3111-2023-10-04)
#### Bug Fixes[](#bug-fixes-14)
* run the whole `Actor.exit()` code inside a timeout handler ([#235](https://github.com/apify/apify-sdk-js/issues/235)) ([c8aabae](https://github.com/apify/apify-sdk-js/commit/c8aabaee5f2de1ab40947f47f95f54ccff37cad0))
#### Features[](#features-8)
* Use `.reboot()` instead of `.metamorph()` for reboot ([#227](https://github.com/apify/apify-sdk-js/issues/227)) ([8c0bff5](https://github.com/apify/apify-sdk-js/commit/8c0bff5a8d3ea65e532b3700b34b9c563856158a))
### [3.1.10](https://github.com/apify/apify-sdk-js/compare/apify@3.1.9...apify@3.1.10) (2023-09-07)[](#3110-2023-09-07)
#### Bug Fixes[](#bug-fixes-15)
* require newer version of crawlee to fix possible issues with `purgeDefaultStorages` ([#226](https://github.com/apify/apify-sdk-js/issues/226)) ([95cf31f](https://github.com/apify/apify-sdk-js/commit/95cf31f3d1d054a1c8e3daac89f41bbb0aaddbba))
### [3.1.9](https://github.com/apify/apify-sdk-js/compare/apify@3.1.8...apify@3.1.9) (2023-09-06)[](#319-2023-09-06)
**Note:** Version bump only for package apify
### [3.1.8](https://github.com/apify/apify-sdk-js/compare/apify@3.1.7...apify@3.1.8) (2023-07-20)[](#318-2023-07-20)
#### Bug Fixes[](#bug-fixes-16)
* require newer version of apify-client and other packages ([24a3a4b](https://github.com/apify/apify-sdk-js/commit/24a3a4b5bf2f61e690348727e7f24c06c45a0999))
#### Features[](#features-9)
* Use Actor env vars ([#216](https://github.com/apify/apify-sdk-js/issues/216)) ([11ff740](https://github.com/apify/apify-sdk-js/commit/11ff740ad3d2bdd37fce011d94b64ea01413b0d9))
### [3.1.7](https://github.com/apify/apify-sdk-js/compare/apify@3.1.6...apify@3.1.7) (2023-06-09)[](#317-2023-06-09)
**Note:** Version bump only for package apify
### [3.1.6](https://github.com/apify/apify-sdk-js/compare/apify@3.1.5...apify@3.1.6) (2023-06-09)[](#316-2023-06-09)
#### Bug Fixes[](#bug-fixes-17)
* only print status message when explicitly provided in `Actor.exit()` ([#203](https://github.com/apify/apify-sdk-js/issues/203)) ([85159e4](https://github.com/apify/apify-sdk-js/commit/85159e499984c78eee90b6d92332ea63b9f46c8c))
### [3.1.5](https://github.com/apify/apify-sdk-js/compare/apify@3.1.4...apify@3.1.5) (2023-05-31)[](#315-2023-05-31)
#### Bug Fixes[](#bug-fixes-18)
* add missing `options` parameter to `Actor.setStatusMessage()` ([712e8c6](https://github.com/apify/apify-sdk-js/commit/712e8c66755ac8baeb35fcc1ad000487da8b2c48))
#### Features[](#features-10)
* add `Actor.getInputOrThrow()` method ([#198](https://github.com/apify/apify-sdk-js/issues/198)) ([5fbbfe4](https://github.com/apify/apify-sdk-js/commit/5fbbfe4960a79fbbd23f4fdd7d07a1a5063820f4))
### [3.1.4](https://github.com/apify/apify-sdk-js/compare/apify@3.1.3...apify@3.1.4) (2023-03-23)[](#314-2023-03-23)
#### Bug Fixes[](#bug-fixes-19)
* log status message only once and without prefix ([#179](https://github.com/apify/apify-sdk-js/issues/179)) ([1f11a6a](https://github.com/apify/apify-sdk-js/commit/1f11a6ad8ebc8a0cfaef58be47ba8b12c75018f1))
### [3.1.3](https://github.com/apify/apify-sdk-js/compare/apify@3.1.2...apify@3.1.3) (2023-03-22)[](#313-2023-03-22)
#### Bug Fixes[](#bug-fixes-20)
* `call/callTask` accept `waitSecs` instead of `waitForFinish` ([#176](https://github.com/apify/apify-sdk-js/issues/176)) ([f0c73d8](https://github.com/apify/apify-sdk-js/commit/f0c73d8765091212f2abb4b4faaf109f9447d90a))
#### Features[](#features-11)
* terminal message on Actor.exit() ([#172](https://github.com/apify/apify-sdk-js/issues/172)) ([e0feca8](https://github.com/apify/apify-sdk-js/commit/e0feca895766af0d92fbf78ca4c2d7b49bd2acff))
### [3.1.2](https://github.com/apify/apify-sdk-js/compare/apify@3.1.1...apify@3.1.2) (2023-02-07)[](#312-2023-02-07)
#### Bug Fixes[](#bug-fixes-21)
* declare missing dependency on tslib ([bc27118](https://github.com/apify/apify-sdk-js/commit/bc27118daab211857305f7617b1ee1433da13d4a))
* remove unused export of `QueueOperationInfoOptions` ([b29fe48](https://github.com/apify/apify-sdk-js/commit/b29fe4853d637ab527a7f7e3e53c7a5b0fe27a32))
### [3.1.1](https://github.com/apify/apify-sdk-js/compare/apify@3.1.0...apify@3.1.1) (2022-11-13)[](#311-2022-11-13)
#### Features[](#features-12)
* add `statusMessage` to `AbortOptions` ([fb10bb6](https://github.com/apify/apify-sdk-js/commit/fb10bb60c12c0af97e41ae88adcf0b2000286235))
* warn about Actor not being initialized before using storage methods ([#126](https://github.com/apify/apify-sdk-js/issues/126)) ([91cd246](https://github.com/apify/apify-sdk-js/commit/91cd2467d111de19490a6bf47b4a9138f26a37d4))
## 3.1.0 (2022-10-13)[](#310-2022-10-13)
#### Bug Fixes[](#bug-fixes-22)
* **apify:** add `@apify/timeout` to dependencies ([#76](https://github.com/apify/apify-sdk-js/issues/76)) ([1d64a1f](https://github.com/apify/apify-sdk-js/commit/1d64a1fa8f0e88a96eb82c2669e85b09dd4f372d))
* use correct event manager for Actor methods ([#49](https://github.com/apify/apify-sdk-js/issues/49)) ([ef3a0c5](https://github.com/apify/apify-sdk-js/commit/ef3a0c54359be64c89e76b0cac600cd780281321))
* wait for memory storage to write changes before `Actor.exit` exists the process ([c721d98](https://github.com/apify/apify-sdk-js/commit/c721d988141cf5b7aa170fddeffb792ded769622))
#### Features[](#features-13)
* add `Actor.useState()` helper ([#98](https://github.com/apify/apify-sdk-js/issues/98)) ([27dc413](https://github.com/apify/apify-sdk-js/commit/27dc4139caa0a2d94c570edac2cb628f6b3f747c))
* **apify:** add decryption for input secrets ([#83](https://github.com/apify/apify-sdk-js/issues/83)) ([78bb990](https://github.com/apify/apify-sdk-js/commit/78bb990817c01254de19c828937181c1263e21eb))
* re-export the logger in Actor sdk ([#54](https://github.com/apify/apify-sdk-js/issues/54)) ([c78d8a4](https://github.com/apify/apify-sdk-js/commit/c78d8a44d7af5de7fda7bf2e436fefda752a4b1a))
* update @apify/scraper-tools ([#37](https://github.com/apify/apify-sdk-js/issues/37)) ([788913e](https://github.com/apify/apify-sdk-js/commit/788913e0cc669b15b35359df30202a449b881b5f))
* update the scrapers ([#70](https://github.com/apify/apify-sdk-js/issues/70)) ([efbfc44](https://github.com/apify/apify-sdk-js/commit/efbfc442bc8be4f07b5f2432a750cb861d7f05e8))
### [3.0.0](https://github.com/apify/apify-sdk-js/compare/v2.3.2...v3.0.0) (2022-07-13)[](#300-2022-07-13)
This section summarizes most of the breaking changes between Crawlee (v3) and Apify SDK (v2). Crawlee is the spiritual successor to Apify SDK, so we decided to keep the versioning and release Crawlee as v3.
#### Crawlee vs Apify SDK[](#crawlee-vs-apify-sdk)
Up until version 3 of `apify`, the package contained both scraping related tools and Apify platform related helper methods. With v3 we are splitting the whole project into two main parts:
* Crawlee, the new web-scraping library, available as `crawlee` package on NPM
* Apify SDK, helpers for the Apify platform, available as `apify` package on NPM
Moreover, the Crawlee library is published as several packages under `@crawlee` namespace:
* `@crawlee/core`: the base for all the crawler implementations, also contains things like `Request`, `RequestQueue`, `RequestList` or `Dataset` classes
* `@crawlee/basic`: exports `BasicCrawler`
* `@crawlee/cheerio`: exports `CheerioCrawler`
* `@crawlee/browser`: exports `BrowserCrawler` (which is used for creating `@crawlee/playwright` and `@crawlee/puppeteer`)
* `@crawlee/playwright`: exports `PlaywrightCrawler`
* `@crawlee/puppeteer`: exports `PuppeteerCrawler`
* `@crawlee/memory-storage`: `@apify/storage-local` alternative
* `@crawlee/browser-pool`: previously `browser-pool` package
* `@crawlee/utils`: utility methods
* `@crawlee/types`: holds TS interfaces mainly about the `StorageClient`
##### Installing Crawlee[](#installing-crawlee)
\> As Crawlee is not yet released as `latest`, we need to install from the `next` distribution tag!
Most of the Crawlee packages are extending and reexporting each other, so it's enough to install just the one you plan on using, e.g. `@crawlee/playwright` if you plan on using `playwright` - it already contains everything from the `@crawlee/browser` package, which includes everything from `@crawlee/basic`, which includes everything from `@crawlee/core`.
npm install crawlee@next
Or if all we need is cheerio support, we can install only @crawlee/cheerio
npm install @crawlee/cheerio@next
When using `playwright` or `puppeteer`, we still need to install those dependencies explicitly - this allows the users to be in control of which version will be used.
npm install crawlee@next playwright
or npm install @crawlee/playwright@next playwright
Alternatively we can also use the `crawlee` meta-package which contains (re-exports) most of the `@crawlee/*` packages, and therefore contains all the crawler classes.
\> Sometimes you might want to use some utility methods from `@crawlee/utils`, so you might want to install that as well. This package contains some utilities that were previously available under `Apify.utils`. Browser related utilities can be also found in the crawler packages (e.g. `@crawlee/playwright`).
#### Full TypeScript support[](#full-typescript-support)
Both Crawlee and Apify SDK are full TypeScript rewrite, so they include up-to-date types in the package. For your TypeScript crawlers we recommend using our predefined TypeScript configuration from `@apify/tsconfig` package. Don't forget to set the `module` and `target` to `ES2022` or above to be able to use top level await.
\> The `@apify/tsconfig` config has [`noImplicitAny`](https://www.typescriptlang.org/tsconfig#noImplicitAny) enabled, you might want to disable it during the initial development as it will cause build failures if you left some unused local variables in your code.
tsconfig.json
{ "extends": "@apify/tsconfig", "compilerOptions": { "module": "ES2022", "target": "ES2022", "outDir": "dist", "lib": ["DOM"] }, "include": ["./src/**/*"] }
##### Docker build[](#docker-build)
For `Dockerfile` we recommend using multi-stage build, so you don't install the dev dependencies like TypeScript in your final image:
Dockerfile
using multistage build, as we need dev deps to build the TS source code
FROM apify/actor-node:16 AS builder
copy all files, install all dependencies (including dev deps) and build the project
COPY . ./
RUN npm install --include=dev
&& npm run build
create final image
FROM apify/actor-node:16
copy only necessary files
COPY --from=builder /usr/src/app/package*.json ./ COPY --from=builder /usr/src/app/README.md ./ COPY --from=builder /usr/src/app/dist ./dist COPY --from=builder /usr/src/app/apify.json ./apify.json COPY --from=builder /usr/src/app/INPUT_SCHEMA.json ./INPUT_SCHEMA.json
install only prod deps
RUN npm --quiet set progress=false
&& npm install --only=prod --no-optional
&& echo "Installed NPM packages:"
&& (npm list --only=prod --no-optional --all || true)
&& echo "Node.js version:"
&& node --version
&& echo "NPM version:"
&& npm --version
run compiled code
CMD npm run start:prod
#### Browser fingerprints[](#browser-fingerprints)
Previously we had a magical `stealth` option in the puppeteer crawler that enabled several tricks aiming to mimic the real users as much as possible. While this worked to a certain degree, we decided to replace it with generated browser fingerprints.
In case we don't want to have dynamic fingerprints, we can disable this behaviour via `useFingerprints` in `browserPoolOptions`:
const crawler = new PlaywrightCrawler({ browserPoolOptions: { useFingerprints: false, }, });
#### Session cookie method renames[](#session-cookie-method-renames)
Previously, if we wanted to get or add cookies for the session that would be used for the request, we had to call `session.getPuppeteerCookies()` or `session.setPuppeteerCookies()`. Since this method could be used for any of our crawlers, not just `PuppeteerCrawler`, the methods have been renamed to `session.getCookies()` and `session.setCookies()` respectively. Otherwise, their usage is exactly the same!
#### Memory storage[](#memory-storage)
When we store some data or intermediate state (like the one `RequestQueue` holds), we now use `@crawlee/memory-storage` by default. It is an alternative to the `@apify/storage-local`, that stores the state inside memory (as opposed to SQLite database used by `@apify/storage-local`). While the state is stored in memory, it also dumps it to the file system, so we can observe it, as well as respects the existing data stored in KeyValueStore (e.g. the `INPUT.json` file).
When we want to run the crawler on Apify platform, we need to use `Actor.init` or `Actor.main`, which will automatically switch the storage client to `ApifyClient` when on the Apify platform.
We can still use the `@apify/storage-local`, to do it, first install it pass it to the `Actor.init` or `Actor.main` options:
\> `@apify/storage-local` v2.1.0+ is required for Crawlee
import { Actor } from 'apify'; import { ApifyStorageLocal } from '@apify/storage-local';
const storage =
new ApifyStorageLocal(/* options like enableWalMode belong here */);
await Actor.init({ storage });
#### Purging of the default storage[](#purging-of-the-default-storage)
Previously the state was preserved between local runs, and we had to use `--purge` argument of the `apify-cli`. With Crawlee, this is now the default behaviour, we purge the storage automatically on `Actor.init/main` call. We can opt out of it via `purge: false` in the `Actor.init` options.
#### Renamed crawler options and interfaces[](#renamed-crawler-options-and-interfaces)
Some options were renamed to better reflect what they do. We still support all the old parameter names too, but not at the TS level.
* `handleRequestFunction` -> `requestHandler`
* `handlePageFunction` -> `requestHandler`
* `handleRequestTimeoutSecs` -> `requestHandlerTimeoutSecs`
* `handlePageTimeoutSecs` -> `requestHandlerTimeoutSecs`
* `requestTimeoutSecs` -> `navigationTimeoutSecs`
* `handleFailedRequestFunction` -> `failedRequestHandler`
We also renamed the crawling context interfaces, so they follow the same convention and are more meaningful:
* `CheerioHandlePageInputs` -> `CheerioCrawlingContext`
* `PlaywrightHandlePageFunction` -> `PlaywrightCrawlingContext`
* `PuppeteerHandlePageFunction` -> `PuppeteerCrawlingContext`
#### Context aware helpers[](#context-aware-helpers)
Some utilities previously available under `Apify.utils` namespace are now moved to the crawling context and are *context aware*. This means they have some parameters automatically filled in from the context, like the current `Request` instance or current `Page` object, or the `RequestQueue` bound to the crawler.
##### Enqueuing links[](#enqueuing-links)
One common helper that received more attention is the `enqueueLinks`. As mentioned above, it is context aware - we no longer need pass in the `requestQueue` or `page` arguments (or the cheerio handle `$`). In addition to that, it now offers 3 enqueuing strategies:
* `EnqueueStrategy.All` (`'all'`): Matches any URLs found
* `EnqueueStrategy.SameHostname` (`'same-hostname'`) Matches any URLs that have the same subdomain as the base URL (default)
* `EnqueueStrategy.SameDomain` (`'same-domain'`) Matches any URLs that have the same domain name. For example, `https://wow.an.example.com` and `https://example.com` will both be matched for a base url of `https://example.com`.
This means we can even call `enqueueLinks()` without any parameters. By default, it will go through all the links found on current page and filter only those targeting the same subdomain.
Moreover, we can specify patterns the URL should match via globs:
const crawler = new PlaywrightCrawler({
async requestHandler({ enqueueLinks }) {
await enqueueLinks({
globs: ['https://apify.com//'],
// we can also use regexps and pseudoUrls keys here
});
},
});
#### Implicit `RequestQueue` instance[](#implicit-requestqueue-instance)
All crawlers now have the `RequestQueue` instance automatically available via `crawler.getRequestQueue()` method. It will create the instance for you if it does not exist yet. This mean we no longer need to create the `RequestQueue` instance manually, and we can just use `crawler.addRequests()` method described underneath.
\> We can still create the `RequestQueue` explicitly, the `crawler.getRequestQueue()` method will respect that and return the instance provided via crawler options.
#### `crawler.addRequests()`[](#crawleraddrequests)
We can now add multiple requests in batches. The newly added `addRequests` method will handle everything for us. It enqueues the first 1000 requests and resolves, while continuing with the rest in the background, again in a smaller 1000 items batches, so we don't fall into any API rate limits. This means the crawling will start almost immediately (within few seconds at most), something previously possible only with a combination of `RequestQueue` and `RequestList`.
// will resolve right after the initial batch of 1000 requests is added const result = await crawler.addRequests([ /* many requests, can be even millions */ ]);
// if we want to wait for all the requests to be added, we can await the waitForAllRequestsToBeAdded promise
await result.waitForAllRequestsToBeAdded;
#### Less verbose error logging[](#less-verbose-error-logging)
Previously an error thrown from inside request handler resulted in full error object being logged. With Crawlee, we log only the error message as a warning as long as we know the request will be retried. If you want to enable verbose logging like in v2, use the `CRAWLEE_VERBOSE_LOG` env var.
#### Removal of `requestAsBrowser`[](#removal-of-requestasbrowser)
In v1 we replaced the underlying implementation of `requestAsBrowser` to be just a proxy over calling [`got-scraping`](https://github.com/apify/got-scraping) - our custom extension to `got` that tries to mimic the real browsers as much as possible. With v3, we are removing the `requestAsBrowser`, encouraging the use of [`got-scraping`](https://github.com/apify/got-scraping) directly.
For easier migration, we also added `context.sendRequest()` helper that allows processing the context bound `Request` object through [`got-scraping`](https://github.com/apify/got-scraping):
const crawler = new BasicCrawler({ async requestHandler({ sendRequest, log }) { // we can use the options parameter to override gotScraping options const res = await sendRequest({ responseType: 'json' }); log.info('received body', res.body); }, });
##### How to use `sendRequest()`?[](#how-to-use-sendrequest)
See [the Got Scraping guide](https://crawlee.dev/docs/guides/got-scraping).
##### Removed options[](#removed-options)
The `useInsecureHttpParser` option has been removed. It's permanently set to `true` in order to better mimic browsers' behavior.
Got Scraping automatically performs protocol negotiation, hence we removed the `useHttp2` option. It's set to `true` - 100% of browsers nowadays are capable of HTTP/2 requests. Oh, more and more of the web is using it too!
##### Renamed options[](#renamed-options)
In the `requestAsBrowser` approach, some of the options were named differently. Here's a list of renamed options:
###### `payload`[](#payload)
This options represents the body to send. It could be a `string` or a `Buffer`. However, there is no `payload` option anymore. You need to use `body` instead. Or, if you wish to send JSON, `json`. Here's an example:
// Before: await Apify.utils.requestAsBrowser({ …, payload: 'Hello, world!' }); await Apify.utils.requestAsBrowser({ …, payload: Buffer.from('c0ffe', 'hex') }); await Apify.utils.requestAsBrowser({ …, json: { hello: 'world' } });
// After: await gotScraping({ …, body: 'Hello, world!' }); await gotScraping({ …, body: Buffer.from('c0ffe', 'hex') }); await gotScraping({ …, json: { hello: 'world' } });
###### `ignoreSslErrors`[](#ignoresslerrors)
It has been renamed to `https.rejectUnauthorized`. By default, it's set to `false` for convenience. However, if you want to make sure the connection is secure, you can do the following:
// Before: await Apify.utils.requestAsBrowser({ …, ignoreSslErrors: false });
// After: await gotScraping({ …, https: { rejectUnauthorized: true } });
Please note: the meanings are opposite! So we needed to invert the values as well.
###### `header-generator` options[](#header-generator-options)
`useMobileVersion`, `languageCode` and `countryCode` no longer exist. Instead, you need to use `headerGeneratorOptions` directly:
// Before: await Apify.utils.requestAsBrowser({ …, useMobileVersion: true, languageCode: 'en', countryCode: 'US', });
// After: await gotScraping({ …, headerGeneratorOptions: { devices: ['mobile'], // or ['desktop'] locales: ['en-US'], }, });
###### `timeoutSecs`[](#timeoutsecs)
In order to set a timeout, use `timeout.request` (which is **milliseconds** now).
// Before: await Apify.utils.requestAsBrowser({ …, timeoutSecs: 30, });
// After: await gotScraping({ …, timeout: { request: 30 * 1000, }, });
###### `throwOnHttpErrors`[](#throwonhttperrors)
`throwOnHttpErrors` → `throwHttpErrors`. This options throws on unsuccessful HTTP status codes, for example `404`. By default, it's set to `false`.
###### `decodeBody`[](#decodebody)
`decodeBody` → `decompress`. This options decompresses the body. Defaults to `true` - please do not change this or websites will break (unless you know what you're doing!).
###### `abortFunction`[](#abortfunction)
This function used to make the promise throw on specific responses, if it returned `true`. However, it wasn't that useful.
You probably want to cancel the request instead, which you can do in the following way:
const promise = gotScraping(…);
promise.on('request', request => { // Please note this is not a Got Request instance, but a ClientRequest one. // https://nodejs.org/api/http.html#class-httpclientrequest
if (request.protocol !== 'https:') {
// Unsecure request, abort.
promise.cancel();
// If you set `isStream` to `true`, please use `stream.destroy()` instead.
}
});
const response = await promise;
#### Removal of browser pool plugin mixing[](#removal-of-browser-pool-plugin-mixing)
Previously, you were able to have a browser pool that would mix Puppeteer and Playwright plugins (or even your own custom plugins if you've built any). As of this version, that is no longer allowed, and creating such a browser pool will cause an error to be thrown (it's expected that all plugins that will be used are of the same type).
#### Handling requests outside of browser[](#handling-requests-outside-of-browser)
One small feature worth mentioning is the ability to handle requests with browser crawlers outside the browser. To do that, we can use a combination of `Request.skipNavigation` and `context.sendRequest()`.
Take a look at how to achieve this by checking out the [Skipping navigation for certain requests](https://crawlee.dev/docs/examples/skip-navigation) example!
#### Logging[](#logging)
Crawlee exports the default `log` instance directly as a named export. We also have a scoped `log` instance provided in the crawling context - this one will log messages prefixed with the crawler name and should be preferred for logging inside the request handler.
const crawler = new CheerioCrawler({
async requestHandler({ log, request }) {
log.info(Opened ${request.loadedUrl});
},
});
#### Auto-saved crawler state[](#auto-saved-crawler-state)
Every crawler instance now has `useState()` method that will return a state object we can use. It will be automatically saved when `persistState` event occurs. The value is cached, so we can freely call this method multiple times and get the exact same reference. No need to worry about saving the value either, as it will happen automatically.
const crawler = new CheerioCrawler({ async requestHandler({ crawler }) { const state = await crawler.useState({ foo: [] as number[] }); // just change the value, no need to care about saving it state.foo.push(123); }, });
#### Apify SDK[](#apify-sdk)
The Apify platform helpers can be now found in the Apify SDK (`apify` NPM package). It exports the `Actor` class that offers following static helpers:
* `ApifyClient` shortcuts: `addWebhook()`, `call()`, `callTask()`, `metamorph()`
* helpers for running on Apify platform: `init()`, `exit()`, `fail()`, `main()`, `isAtHome()`, `createProxyConfiguration()`
* storage support: `getInput()`, `getValue()`, `openDataset()`, `openKeyValueStore()`, `openRequestQueue()`, `pushData()`, `setValue()`
* events support: `on()`, `off()`
* other utilities: `getEnv()`, `newClient()`, `reboot()`
`Actor.main` is now just a syntax sugar around calling `Actor.init()` at the beginning and `Actor.exit()` at the end (plus wrapping the user function in try/catch block). All those methods are async and should be awaited - with node 16 we can use the top level await for that. In other words, following is equivalent:
import { Actor } from 'apify';
await Actor.init(); // your code await Actor.exit('Crawling finished!');
import { Actor } from 'apify';
await Actor.main( async () => { // your code }, { statusMessage: 'Crawling finished!' }, );
`Actor.init()` will conditionally set the storage implementation of Crawlee to the `ApifyClient` when running on the Apify platform, or keep the default (memory storage) implementation otherwise. It will also subscribe to the websocket events (or mimic them locally). `Actor.exit()` will handle the tear down and calls `process.exit()` to ensure our process won't hang indefinitely for some reason.
##### Events[](#events)
Apify SDK (v2) exports `Apify.events`, which is an `EventEmitter` instance. With Crawlee, the events are managed by [`EventManager`](https://crawlee.dev/api/core/class/EventManager) class instead. We can either access it via `Actor.eventManager` getter, or use `Actor.on` and `Actor.off` shortcuts instead.
-Apify.events.on(...); +Actor.on(...);
\> We can also get the [`EventManager`](https://crawlee.dev/api/core/class/EventManager) instance via `Configuration.getEventManager()`.
In addition to the existing events, we now have an `exit` event fired when calling `Actor.exit()` (which is called at the end of `Actor.main()`). This event allows you to gracefully shut down any resources when `Actor.exit` is called.
#### Smaller/internal breaking changes[](#smallerinternal-breaking-changes)
* `Apify.call()` is now just a shortcut for running `ApifyClient.actor(actorId).call(input, options)`, while also taking the token inside env vars into account
* `Apify.callTask()` is now just a shortcut for running `ApifyClient.task(taskId).call(input, options)`, while also taking the token inside env vars into account
* `Apify.metamorph()` is now just a shortcut for running `ApifyClient.task(taskId).metamorph(input, options)`, while also taking the ACTOR\_RUN\_ID inside env vars into account
* `Apify.waitForRunToFinish()` has been removed, use `ApifyClient.waitForFinish()` instead
* `Actor.main/init` purges the storage by default
* remove `purgeLocalStorage` helper, move purging to the storage class directly
<!-- -->
* `StorageClient` interface now has optional `purge` method
* purging happens automatically via `Actor.init()` (you can opt out via `purge: false` in the options of `init/main` methods)
* `QueueOperationInfo.request` is no longer available
* `Request.handledAt` is now string date in ISO format
* `Request.inProgress` and `Request.reclaimed` are now `Set`s instead of POJOs
* `injectUnderscore` from puppeteer utils has been removed
* `APIFY_MEMORY_MBYTES` is no longer taken into account, use `CRAWLEE_AVAILABLE_MEMORY_RATIO` instead
* some `AutoscaledPool` options are no longer available:
<!-- -->
* `cpuSnapshotIntervalSecs` and `memorySnapshotIntervalSecs` has been replaced with top level `systemInfoIntervalMillis` configuration
* `maxUsedCpuRatio` has been moved to the top level configuration
* `ProxyConfiguration.newUrlFunction` can be async. `.newUrl()` and `.newProxyInfo()` now return promises.
* `prepareRequestFunction` and `postResponseFunction` options are removed, use navigation hooks instead
* `gotoFunction` and `gotoTimeoutSecs` are removed
* removed compatibility fix for old/broken request queues with null `Request` props
* `fingerprintsOptions` renamed to `fingerprintOptions` (`fingerprints` -> `fingerprint`).
* `fingerprintOptions` now accept `useFingerprintCache` and `fingerprintCacheSize` (instead of `useFingerprintPerProxyCache` and `fingerprintPerProxyCacheSize`, which are now no longer available). This is because the cached fingerprints are no longer connected to proxy URLs but to sessions.
### [2.3.2](https://github.com/apify/apify-sdk-js/compare/v2.3.1...v2.3.2) (2022-05-05)[](#232-2022-05-05)
* fix: use default user agent for playwright with chrome instead of the default "headless UA"
* fix: always hide webdriver of chrome browsers
### [2.3.1](https://github.com/apify/apify-sdk-js/compare/v2.3.0...v2.3.1) (2022-05-03)[](#231-2022-05-03)
* fix: `utils.apifyClient` early instantiation (#1330)
* feat: `utils.playwright.injectJQuery()` (#1337)
* feat: add `keyValueStore` option to `Statistics` class (#1345)
* fix: ensure failed req count is correct when using `RequestList` (#1347)
* fix: random puppeteer crawler (running in headful mode) failure (#1348) > This should help with the `We either navigate top level or have old version of the navigated frame` bug in puppeteer.
* fix: allow returning falsy values in `RequestTransform`'s return type
### [2.3.0](https://github.com/apify/apify-sdk-js/compare/v2.2.2...v2.3.0) (2022-04-07)[](#230-2022-04-07)
* feat: accept more social media patterns (#1286)
* feat: add multiple click support to `enqueueLinksByClickingElements` (#1295)
* feat: instance-scoped "global" configuration (#1315)
* feat: requestList accepts proxyConfiguration for requestsFromUrls (#1317)
* feat: update `playwright` to v1.20.2
* feat: update `puppeteer` to v13.5.2 > We noticed that with this version of puppeteer Actor run could crash with > `We either navigate top level or have old version of the navigated frame` error > (puppeteer issue [here](https://github.com/puppeteer/puppeteer/issues/7050)). > It should not happen while running the browser in headless mode. > In case you need to run the browser in headful mode (`headless: false`), > we recommend pinning puppeteer version to `10.4.0` in Actor `package.json` file.
* feat: stealth deprecation (#1314)
* feat: allow passing a stream to KeyValueStore.setRecord (#1325)
* fix: use correct apify-client instance for snapshotting (#1308)
* fix: automatically reset `RequestQueue` state after 5 minutes of inactivity, closes #997
* fix: improve guessing of chrome executable path on windows (#1294)
* fix: prune CPU snapshots locally (#1313)
* fix: improve browser launcher types (#1318)
#### 0 concurrency mitigation[](#0-concurrency-mitigation)
This release should resolve the 0 concurrency bug by automatically resetting the internal `RequestQueue` state after 5 minutes of inactivity.
We now track last activity done on a `RequestQueue` instance:
* added new request
* started processing a request (added to `inProgress` cache)
* marked request as handled
* reclaimed request
If we don't detect one of those actions in last 5 minutes, and we have some requests in the `inProgress` cache, we try to reset the state. We can override this limit via `CRAWLEE_INTERNAL_TIMEOUT` env var.
This should finally resolve the 0 concurrency bug, as it was always about stuck requests in the `inProgress` cache.
### [2.2.2](https://github.com/apify/apify-sdk-js/compare/v2.2.1...v2.2.2) (2022-02-14)[](#222-2022-02-14)
* fix: ensure `request.headers` is set
* fix: lower `RequestQueue` API timeout to 30 seconds
* improve logging for fetching next request and timeouts
### [2.2.1](https://github.com/apify/apify-sdk-js/compare/v2.2.0...v2.2.1) (2022-01-03)[](#221-2022-01-03)
* fix: ignore requests that are no longer in progress (#1258)
* fix: do not use `tryCancel()` from inside sync callback (#1265)
* fix: revert to puppeteer 10.x (#1276)
* fix: wait when `body` is not available in `infiniteScroll()` from Puppeteer utils (#1238)
* fix: expose logger classes on the `utils.log` instance (#1278)
### [2.2.0](https://github.com/apify/apify-sdk-js/compare/v2.1.0...v2.2.0) (2021-12-17)[](#220-2021-12-17)
#### Proxy per page[](#proxy-per-page)
Up until now, browser crawlers used the same session (and therefore the same proxy) for all request from a single browser \* now get a new proxy for each session. This means that with incognito pages, each page will get a new proxy, aligning the behaviour with `CheerioCrawler`.
This feature is not enabled by default. To use it, we need to enable `useIncognitoPages` flag under `launchContext`:
new Apify.Playwright({ launchContext: { useIncognitoPages: true, }, // ... });
\> Note that currently there is a performance overhead for using `useIncognitoPages`. > Use this flag at your own will.
We are planning to enable this feature by default in SDK v3.0.
#### Abortable timeouts[](#abortable-timeouts)
Previously when a page function timed out, the task still kept running. This could lead to requests being processed multiple times. In v2.2 we now have abortable timeouts that will cancel the task as early as possible.
#### Mitigation of zero concurrency issue[](#mitigation-of-zero-concurrency-issue)
Several new timeouts were added to the task function, which should help mitigate the zero concurrency bug. Namely fetching of next request information and reclaiming failed requests back to the queue are now executed with a timeout with 3 additional retries before the task fails. The timeout is always at least 300s (5 minutes), or `requestHandlerTimeoutSecs` if that value is higher.
#### Full list of changes[](#full-list-of-changes)
* fix `RequestError: URI malformed` in cheerio crawler (#1205)
* only provide Cookie header if cookies are present (#1218)
* handle extra cases for `diffCookie` (#1217)
* add timeout for task function (#1234)
* implement proxy per page in browser crawlers (#1228)
* add fingerprinting support (#1243)
* implement abortable timeouts (#1245)
* add timeouts with retries to `runTaskFunction()` (#1250)
* automatically convert google spreadsheet URLs to CSV exports (#1255)
### [2.1.0](https://github.com/apify/apify-sdk-js/compare/v2.0.7...v2.1.0) (2021-10-07)[](#210-2021-10-07)
* automatically convert google docs share urls to csv download ones in request list (#1174)
* use puppeteer emulating scrolls instead of `window.scrollBy` (#1170)
* warn if apify proxy is used in proxyUrls (#1173)
* fix `YOUTUBE_REGEX_STRING` being too greedy (#1171)
* add `purgeLocalStorage` utility method (#1187)
* catch errors inside request interceptors (#1188, #1190)
* add support for cgroups v2 (#1177)
* fix incorrect offset in `fixUrl` function (#1184)
* support channel and user links in YouTube regex (#1178)
* fix: allow passing `requestsFromUrl` to `RequestListOptions` in TS (#1191)
* allow passing `forceCloud` down to the KV store (#1186), closes #752
* merge cookies from session with user provided ones (#1201), closes #1197
* use `ApifyClient` v2 (full rewrite to TS)
### [2.0.7](https://github.com/apify/apify-sdk-js/compare/v2.0.6...v2.0.7) (2021-09-08)[](#207-2021-09-08)
* Fix casting of int/bool environment variables (e.g. `APIFY_LOCAL_STORAGE_ENABLE_WAL_MODE`), closes #956
* Fix incognito pages and user data dir (#1145)
* Add `@ts-ignore` comments to imports of optional peer dependencies (#1152)
* Use config instance in `sdk.openSessionPool()` (#1154)
* Add a breaking callback to `infiniteScroll` (#1140)
### [2.0.6](https://github.com/apify/apify-sdk-js/compare/v2.0.5...v2.0.6) (2021-08-27)[](#206-2021-08-27)
* Fix deprecation messages logged from `ProxyConfiguration` and `CheerioCrawler`.
* Update `got-scraping` to receive multiple improvements.
### [2.0.5](https://github.com/apify/apify-sdk-js/compare/v2.0.4...v2.0.5) (2021-08-24)[](#205-2021-08-24)
* Fix error handling in puppeteer crawler
### [2.0.4](https://github.com/apify/apify-sdk-js/compare/v2.0.3...v2.0.4) (2021-08-23)[](#204-2021-08-23)
* Use `sessionToken` with `got-scraping`
### [2.0.3](https://github.com/apify/apify-sdk-js/compare/v2.0.2...v2.0.3) (2021-08-20)[](#203-2021-08-20)
* **BREAKING IN EDGE CASES** \* We removed `forceUrlEncoding` in `requestAsBrowser` because we found out that recent versions of the underlying HTTP client `got` already encode URLs and `forceUrlEncoding` could lead to weird behavior. We think of this as fixing a bug, so we're not bumping the major version.
* Limit `handleRequestTimeoutMillis` to max valid value to prevent Node.js fallback to `1`.
* Use `got-scraping@^3.0.1`
* Disable SSL validation on MITM proxie
* Limit `handleRequestTimeoutMillis` to max valid value
### [2.0.2](https://github.com/apify/apify-sdk-js/compare/v2.0.1...v2.0.2) (2021-08-12)[](#202-2021-08-12)
* Fix serialization issues in `CheerioCrawler` caused by parser conflicts in recent versions of `cheerio`.
### [2.0.1](https://github.com/apify/apify-sdk-js/compare/v2.0.0...v2.0.1) (2021-08-06)[](#201-2021-08-06)
* Use `got-scraping` 2.0.1 until fully compatible.
### [2.0.0](https://github.com/apify/apify-sdk-js/compare/v1.3.4...v2.0.0) (2021-08-05)[](#200-2021-08-05)
* **BREAKING**: Require Node.js >=15.10.0 because HTTP2 support on lower Node.js versions is very buggy.
* **BREAKING**: Bump `cheerio` to `1.0.0-rc.10` from `rc.3`. There were breaking changes in `cheerio` between the versions so this bump might be breaking for you as well.
* Remove `LiveViewServer` which was deprecated before release of SDK v1.
---
# Accept user input
Copy for LLM
This example accepts and logs user input:
import { Actor } from 'apify';
await Actor.init();
const input = await Actor.getInput(); console.log(input);
await Actor.exit();
To provide the actor with input, create a `INPUT.json` file inside the "default" key-value store:
{PROJECT_FOLDER}/storage/key_value_stores/default/INPUT.json
Anything in this file will be available to the actor when it runs.
To learn about other ways to provide an actor with input, refer to the [Apify Platform Documentation](https://apify.com/docs/actor#run).
---
# Add data to dataset
Copy for LLM
This example saves data to the default dataset. If the dataset doesn't exist, it will be created. You can save data to custom datasets by using [`Actor.openDataset()`](https://docs.apify.com/sdk/js/sdk/js/reference/class/Dataset.md#open)
[Run on](https://console.apify.com/actors/kk67IcZkKSSBTslXI?runConfig=eyJ1IjoiRWdQdHczb2VqNlRhRHQ1cW4iLCJ2IjoxfQ.eyJpbnB1dCI6IntcImNvZGVcIjpcImltcG9ydCB7IEFjdG9yIH0gZnJvbSAnYXBpZnknO1xcbmltcG9ydCB7IENoZWVyaW9DcmF3bGVyIH0gZnJvbSAnY3Jhd2xlZSc7XFxuXFxuYXdhaXQgQWN0b3IuaW5pdCgpO1xcblxcbi8vIENyZWF0ZSBhIGRhdGFzZXQgd2hlcmUgd2Ugd2lsbCBzdG9yZSB0aGUgcmVzdWx0cy5cXG5jb25zdCBjcmF3bGVyID0gbmV3IENoZWVyaW9DcmF3bGVyKHtcXG4gICAgLy8gRnVuY3Rpb24gY2FsbGVkIGZvciBlYWNoIFVSTFxcbiAgICBhc3luYyByZXF1ZXN0SGFuZGxlcih7IHJlcXVlc3QsIGJvZHkgfSkge1xcbiAgICAgICAgLy8gU2F2ZSBkYXRhIHRvIGRlZmF1bHQgZGF0YXNldFxcbiAgICAgICAgYXdhaXQgQWN0b3IucHVzaERhdGEoe1xcbiAgICAgICAgICAgIHVybDogcmVxdWVzdC51cmwsXFxuICAgICAgICAgICAgaHRtbDogYm9keSxcXG4gICAgICAgIH0pO1xcbiAgICB9LFxcbn0pO1xcblxcbi8vIFJ1biB0aGUgY3Jhd2xlclxcbmF3YWl0IGNyYXdsZXIucnVuKFtcXG4gICAgeyB1cmw6ICdodHRwOi8vd3d3LmV4YW1wbGUuY29tL3BhZ2UtMScgfSxcXG4gICAgeyB1cmw6ICdodHRwOi8vd3d3LmV4YW1wbGUuY29tL3BhZ2UtMicgfSxcXG4gICAgeyB1cmw6ICdodHRwOi8vd3d3LmV4YW1wbGUuY29tL3BhZ2UtMycgfSxcXG5dKTtcXG5cXG5hd2FpdCBBY3Rvci5leGl0KCk7XFxuXCJ9Iiwib3B0aW9ucyI6eyJidWlsZCI6ImxhdGVzdCIsImNvbnRlbnRUeXBlIjoiYXBwbGljYXRpb24vanNvbjsgY2hhcnNldD11dGYtOCIsIm1lbW9yeSI6MTAyNCwidGltZW91dCI6MTgwfX0.fhpAfqCjjEMd7THx-jtJurjuRe7si1RztaBrOcDRcQ8\&asrc=run_on_apify)
import { Actor } from 'apify'; import { CheerioCrawler } from 'crawlee';
await Actor.init();
// Create a dataset where we will store the results. const crawler = new CheerioCrawler({ // Function called for each URL async requestHandler({ request, body }) { // Save data to default dataset await Actor.pushData({ url: request.url, html: body, }); }, });
// Run the crawler await crawler.run([ { url: 'http://www.example.com/page-1' }, { url: 'http://www.example.com/page-2' }, { url: 'http://www.example.com/page-3' }, ]);
await Actor.exit();
Each item in this dataset will be saved to its own file in the following directory:
{PROJECT_FOLDER}/storage/datasets/default/
---
# Basic crawler
Copy for LLM
This is the most bare-bones example of the Apify SDK, which demonstrates some of its building blocks such as the [`BasicCrawler`](https://crawlee.dev/api/basic-crawler/class/BasicCrawler). You probably don't need to go this deep though, and it would be better to start with one of the full-featured crawlers like [`CheerioCrawler`](https://crawlee.dev/api/cheerio-crawler/class/CheerioCrawler) or [`PlaywrightCrawler`](https://crawlee.dev/api/playwright-crawler/class/PlaywrightCrawler).
The script simply downloads several web pages with plain HTTP requests using the [`got-scraping`](https://github.com/apify/got-scraping) npm package and stores their raw HTML and URL in the default dataset. In local configuration, the data will be stored as JSON files in `./storage/datasets/default`.
[Run on](https://console.apify.com/actors/kk67IcZkKSSBTslXI?runConfig=eyJ1IjoiRWdQdHczb2VqNlRhRHQ1cW4iLCJ2IjoxfQ.eyJpbnB1dCI6IntcImNvZGVcIjpcImltcG9ydCB7IEFjdG9yIH0gZnJvbSAnYXBpZnknO1xcbmltcG9ydCB7IEJhc2ljQ3Jhd2xlciB9IGZyb20gJ2NyYXdsZWUnO1xcbmltcG9ydCB7IGdvdFNjcmFwaW5nIH0gZnJvbSAnZ290LXNjcmFwaW5nJztcXG5cXG5hd2FpdCBBY3Rvci5pbml0KCk7XFxuXFxuLy8gQ3JlYXRlIGEgZGF0YXNldCB3aGVyZSB3ZSB3aWxsIHN0b3JlIHRoZSByZXN1bHRzLlxcbi8vIENyZWF0ZSBhIEJhc2ljQ3Jhd2xlciAtIHRoZSBzaW1wbGVzdCBjcmF3bGVyIHRoYXQgZW5hYmxlc1xcbi8vIHVzZXJzIHRvIGltcGxlbWVudCB0aGUgY3Jhd2xpbmcgbG9naWMgdGhlbXNlbHZlcy5cXG5jb25zdCBjcmF3bGVyID0gbmV3IEJhc2ljQ3Jhd2xlcih7XFxuICAgIC8vIFRoaXMgZnVuY3Rpb24gd2lsbCBiZSBjYWxsZWQgZm9yIGVhY2ggVVJMIHRvIGNyYXdsLlxcbiAgICBhc3luYyByZXF1ZXN0SGFuZGxlcih7IHJlcXVlc3QgfSkge1xcbiAgICAgICAgY29uc3QgeyB1cmwgfSA9IHJlcXVlc3Q7XFxuICAgICAgICBjb25zb2xlLmxvZyhgUHJvY2Vzc2luZyAke3VybH0uLi5gKTtcXG5cXG4gICAgICAgIC8vIEZldGNoIHRoZSBwYWdlIEhUTUwgdmlhIEFwaWZ5IHV0aWxzIGdvdFNjcmFwaW5nXFxuICAgICAgICBjb25zdCB7IGJvZHkgfSA9IGF3YWl0IGdvdFNjcmFwaW5nKHsgdXJsIH0pO1xcblxcbiAgICAgICAgLy8gU3RvcmUgdGhlIEhUTUwgYW5kIFVSTCB0byB0aGUgZGVmYXVsdCBkYXRhc2V0LlxcbiAgICAgICAgYXdhaXQgQWN0b3IucHVzaERhdGEoe1xcbiAgICAgICAgICAgIHVybDogcmVxdWVzdC51cmwsXFxuICAgICAgICAgICAgaHRtbDogYm9keSxcXG4gICAgICAgIH0pO1xcbiAgICB9LFxcbn0pO1xcblxcbi8vIFRoZSBpbml0aWFsIGxpc3Qgb2YgVVJMcyB0byBjcmF3bC4gSGVyZSB3ZSB1c2UganVzdCBhIGZldyBoYXJkLWNvZGVkIFVSTHMuXFxuYXdhaXQgY3Jhd2xlci5ydW4oW1xcbiAgICB7IHVybDogJ2h0dHA6Ly93d3cuZ29vZ2xlLmNvbS8nIH0sXFxuICAgIHsgdXJsOiAnaHR0cDovL3d3dy5leGFtcGxlLmNvbS8nIH0sXFxuICAgIHsgdXJsOiAnaHR0cDovL3d3dy5iaW5nLmNvbS8nIH0sXFxuICAgIHsgdXJsOiAnaHR0cDovL3d3dy53aWtpcGVkaWEuY29tLycgfSxcXG5dKTtcXG5cXG5jb25zb2xlLmxvZygnQ3Jhd2xlciBmaW5pc2hlZC4nKTtcXG5cXG5hd2FpdCBBY3Rvci5leGl0KCk7XFxuXCJ9Iiwib3B0aW9ucyI6eyJidWlsZCI6ImxhdGVzdCIsImNvbnRlbnRUeXBlIjoiYXBwbGljYXRpb24vanNvbjsgY2hhcnNldD11dGYtOCIsIm1lbW9yeSI6MTAyNCwidGltZW91dCI6MTgwfX0.-TdH8qt-fjSHPGoP8mJHr2LqYkhq6aWUhY9IdesMFrM\&asrc=run_on_apify)
import { Actor } from 'apify'; import { BasicCrawler } from 'crawlee'; import { gotScraping } from 'got-scraping';
await Actor.init();
// Create a dataset where we will store the results.
// Create a BasicCrawler - the simplest crawler that enables
// users to implement the crawling logic themselves.
const crawler = new BasicCrawler({
// This function will be called for each URL to crawl.
async requestHandler({ request }) {
const { url } = request;
console.log(Processing ${url}...);
// Fetch the page HTML via Apify utils gotScraping
const { body } = await gotScraping({ url });
// Store the HTML and URL to the default dataset.
await Actor.pushData({
url: request.url,
html: body,
});
},
});
// The initial list of URLs to crawl. Here we use just a few hard-coded URLs. await crawler.run([ { url: 'http://www.google.com/' }, { url: 'http://www.example.com/' }, { url: 'http://www.bing.com/' }, { url: 'http://www.wikipedia.com/' }, ]);
console.log('Crawler finished.');
await Actor.exit();
---
# Call actor
Copy for LLM
This example demonstrates how to start an Apify actor using [`Actor.call()`](https://docs.apify.com/sdk/js/sdk/js/reference/class/Actor.md#call) and how to call the Apify API using [`Actor.newClient()`](https://docs.apify.com/sdk/js/sdk/js/reference/class/Actor.md#newClient). The script gets a random weird word and its explanation from [randomword.com](https://randomword.com/) and sends it to your email using the [`apify/send-mail`](https://apify.com/apify/send-mail) actor.
To make the example work, you'll need an [Apify account](https://console.apify.com/). Go to the [Settings - Integrations](https://console.apify.com/account?tab=integrations) page to obtain your API token and set it to the [`APIFY_TOKEN`](https://docs.apify.com/sdk/js/sdk/js/docs/guides/environment-variables.md#APIFY_TOKEN) environment variable, or run the script using the Apify CLI. If you deploy this actor to the Apify Cloud, you can do things like set up a scheduler to run your actor early in the morning.
To see what other actors are available, visit the [Apify Store](https://apify.com/store).
> To run this example on Apify Platform, use the `apify/actor-node-puppeteer-chrome` image for your Dockerfile.
import { Actor } from 'apify'; import { launchPuppeteer } from 'crawlee';
await Actor.init();
// Launch the web browser. const browser = await launchPuppeteer();
console.log('Obtaining own email address...'); const apifyClient = Actor.newClient(); const { email } = await apifyClient.user().get();
// Load randomword.com and get a random word console.log('Fetching a random word.'); const page = await browser.newPage(); await page.goto('https://randomword.com/'); const randomWord = await page.$eval('#shared_section', (el) => el.outerHTML);
// Send random word to your email. For that, you can use an actor we already
// have available on the platform under the name: apify/send-mail.
// The second parameter to the Actor.call() invocation is the actor's
// desired input. You can find the required input parameters by checking
// the actor's documentation page: https://apify.com/apify/send-mail
console.log(Sending email to ${user.email}...);
await Actor.call('apify/send-mail', {
to: email,
subject: 'Random Word',
html: <h1>Random Word</h1>${randomWord},
});
console.log('Email sent. Good luck!');
// Close Browser await browser.close();
await Actor.exit();
---
# Capture a screenshot using Puppeteer
Copy for LLM
tip
To run this example on the Apify Platform, select the `apify/actor-node-puppeteer-chrome` image for your Dockerfile.
This example captures a screenshot of a web page using `Puppeteer`. It would look almost exactly the same with `Playwright`.
* Page Screenshot
* Crawler Utils Screenshot
Using `page.screenshot()`:
[Run on](https://console.apify.com/actors/7tWSD8hrYzuc9Lte7?runConfig=eyJ1IjoiRWdQdHczb2VqNlRhRHQ1cW4iLCJ2IjoxfQ.eyJpbnB1dCI6IntcImNvZGVcIjpcImltcG9ydCB7IEFjdG9yIH0gZnJvbSAnYXBpZnknO1xcbmltcG9ydCB7IGxhdW5jaFB1cHBldGVlciB9IGZyb20gJ2NyYXdsZWUnO1xcblxcbmF3YWl0IEFjdG9yLmluaXQoKTtcXG5cXG5jb25zdCB1cmwgPSAnaHR0cDovL3d3dy5leGFtcGxlLmNvbS8nO1xcbi8vIFN0YXJ0IGEgYnJvd3NlclxcbmNvbnN0IGJyb3dzZXIgPSBhd2FpdCBsYXVuY2hQdXBwZXRlZXIoKTtcXG5cXG4vLyBPcGVuIG5ldyB0YWIgaW4gdGhlIGJyb3dzZXJcXG5jb25zdCBwYWdlID0gYXdhaXQgYnJvd3Nlci5uZXdQYWdlKCk7XFxuXFxuLy8gTmF2aWdhdGUgdG8gdGhlIFVSTFxcbmF3YWl0IHBhZ2UuZ290byh1cmwpO1xcblxcbi8vIENhcHR1cmUgdGhlIHNjcmVlbnNob3RcXG5jb25zdCBzY3JlZW5zaG90ID0gYXdhaXQgcGFnZS5zY3JlZW5zaG90KCk7XFxuXFxuLy8gU2F2ZSB0aGUgc2NyZWVuc2hvdCB0byB0aGUgZGVmYXVsdCBrZXktdmFsdWUgc3RvcmVcXG5hd2FpdCBBY3Rvci5zZXRWYWx1ZSgnbXkta2V5Jywgc2NyZWVuc2hvdCwgeyBjb250ZW50VHlwZTogJ2ltYWdlL3BuZycgfSk7XFxuXFxuLy8gQ2xvc2UgUHVwcGV0ZWVyXFxuYXdhaXQgYnJvd3Nlci5jbG9zZSgpO1xcblxcbmF3YWl0IEFjdG9yLmV4aXQoKTtcXG5cIn0iLCJvcHRpb25zIjp7ImJ1aWxkIjoibGF0ZXN0IiwiY29udGVudFR5cGUiOiJhcHBsaWNhdGlvbi9qc29uOyBjaGFyc2V0PXV0Zi04IiwibWVtb3J5Ijo0MDk2LCJ0aW1lb3V0IjoxODB9fQ.xy-Qn13nROyNEPEB6pUG8xQ1VfIjq56rsat4wKqhq9o\&asrc=run_on_apify)
import { Actor } from 'apify'; import { launchPuppeteer } from 'crawlee';
await Actor.init();
const url = 'http://www.example.com/'; // Start a browser const browser = await launchPuppeteer();
// Open new tab in the browser const page = await browser.newPage();
// Navigate to the URL await page.goto(url);
// Capture the screenshot const screenshot = await page.screenshot();
// Save the screenshot to the default key-value store await Actor.setValue('my-key', screenshot, { contentType: 'image/png' });
// Close Puppeteer await browser.close();
await Actor.exit();
Using `puppeteerUtils.saveSnapshot()`:
[Run on](https://console.apify.com/actors/7tWSD8hrYzuc9Lte7?runConfig=eyJ1IjoiRWdQdHczb2VqNlRhRHQ1cW4iLCJ2IjoxfQ.eyJpbnB1dCI6IntcImNvZGVcIjpcImltcG9ydCB7IEFjdG9yIH0gZnJvbSAnYXBpZnknO1xcbmltcG9ydCB7IGxhdW5jaFB1cHBldGVlciwgdXRpbHMgfSBmcm9tICdjcmF3bGVlJztcXG5cXG5hd2FpdCBBY3Rvci5pbml0KCk7XFxuXFxuY29uc3QgdXJsID0gJ2h0dHA6Ly93d3cuZXhhbXBsZS5jb20vJztcXG4vLyBTdGFydCBhIGJyb3dzZXJcXG5jb25zdCBicm93c2VyID0gYXdhaXQgbGF1bmNoUHVwcGV0ZWVyKCk7XFxuXFxuLy8gT3BlbiBuZXcgdGFiIGluIHRoZSBicm93c2VyXFxuY29uc3QgcGFnZSA9IGF3YWl0IGJyb3dzZXIubmV3UGFnZSgpO1xcblxcbi8vIE5hdmlnYXRlIHRvIHRoZSBVUkxcXG5hd2FpdCBwYWdlLmdvdG8odXJsKTtcXG5cXG4vLyBDYXB0dXJlIHRoZSBzY3JlZW5zaG90XFxuYXdhaXQgdXRpbHMucHVwcGV0ZWVyLnNhdmVTbmFwc2hvdChwYWdlLCB7IGtleTogJ215LWtleScsIHNhdmVIdG1sOiBmYWxzZSB9KTtcXG5cXG4vLyBDbG9zZSBQdXBwZXRlZXJcXG5hd2FpdCBicm93c2VyLmNsb3NlKCk7XFxuXFxuYXdhaXQgQWN0b3IuZXhpdCgpO1xcblwifSIsIm9wdGlvbnMiOnsiYnVpbGQiOiJsYXRlc3QiLCJjb250ZW50VHlwZSI6ImFwcGxpY2F0aW9uL2pzb247IGNoYXJzZXQ9dXRmLTgiLCJtZW1vcnkiOjQwOTYsInRpbWVvdXQiOjE4MH19.QSyAaQjtq2wJi2-pHooiFMBrLOELGoFYIBj8kQcDYtA\&asrc=run_on_apify)
import { Actor } from 'apify'; import { launchPuppeteer, utils } from 'crawlee';
await Actor.init();
const url = 'http://www.example.com/'; // Start a browser const browser = await launchPuppeteer();
// Open new tab in the browser const page = await browser.newPage();
// Navigate to the URL await page.goto(url);
// Capture the screenshot await utils.puppeteer.saveSnapshot(page, { key: 'my-key', saveHtml: false });
// Close Puppeteer await browser.close();
await Actor.exit();
This example captures a screenshot of multiple web pages when using `PuppeteerCrawler`:
* Page Screenshot
* Crawler Utils Screenshot
Using `page.screenshot()`:
[Run on](https://console.apify.com/actors/7tWSD8hrYzuc9Lte7?runConfig=eyJ1IjoiRWdQdHczb2VqNlRhRHQ1cW4iLCJ2IjoxfQ.eyJpbnB1dCI6IntcImNvZGVcIjpcImltcG9ydCB7IEFjdG9yIH0gZnJvbSAnYXBpZnknO1xcbmltcG9ydCB7IFB1cHBldGVlckNyYXdsZXIgfSBmcm9tICdjcmF3bGVlJztcXG5cXG5hd2FpdCBBY3Rvci5pbml0KCk7XFxuXFxuLy8gQ3JlYXRlIGEgUHVwcGV0ZWVyQ3Jhd2xlclxcbmNvbnN0IGNyYXdsZXIgPSBuZXcgUHVwcGV0ZWVyQ3Jhd2xlcih7XFxuICAgIGFzeW5jIHJlcXVlc3RIYW5kbGVyKHsgcmVxdWVzdCwgcGFnZSB9KSB7XFxuICAgICAgICAvLyBDYXB0dXJlIHRoZSBzY3JlZW5zaG90IHdpdGggUHVwcGV0ZWVyXFxuICAgICAgICBjb25zdCBzY3JlZW5zaG90ID0gYXdhaXQgcGFnZS5zY3JlZW5zaG90KCk7XFxuICAgICAgICAvLyBDb252ZXJ0IHRoZSBVUkwgaW50byBhIHZhbGlkIGtleVxcbiAgICAgICAgY29uc3Qga2V5ID0gcmVxdWVzdC51cmwucmVwbGFjZSgvWzovXS9nLCAnXycpO1xcbiAgICAgICAgLy8gU2F2ZSB0aGUgc2NyZWVuc2hvdCB0byB0aGUgZGVmYXVsdCBrZXktdmFsdWUgc3RvcmVcXG4gICAgICAgIGF3YWl0IEFjdG9yLnNldFZhbHVlKGtleSwgc2NyZWVuc2hvdCwgeyBjb250ZW50VHlwZTogJ2ltYWdlL3BuZycgfSk7XFxuICAgIH0sXFxufSk7XFxuXFxuLy8gUnVuIHRoZSBjcmF3bGVyXFxuYXdhaXQgY3Jhd2xlci5ydW4oW1xcbiAgICB7IHVybDogJ2h0dHA6Ly93d3cuZXhhbXBsZS5jb20vcGFnZS0xJyB9LFxcbiAgICB7IHVybDogJ2h0dHA6Ly93d3cuZXhhbXBsZS5jb20vcGFnZS0yJyB9LFxcbiAgICB7IHVybDogJ2h0dHA6Ly93d3cuZXhhbXBsZS5jb20vcGFnZS0zJyB9LFxcbl0pO1xcblxcbmF3YWl0IEFjdG9yLmV4aXQoKTtcXG5cIn0iLCJvcHRpb25zIjp7ImJ1aWxkIjoibGF0ZXN0IiwiY29udGVudFR5cGUiOiJhcHBsaWNhdGlvbi9qc29uOyBjaGFyc2V0PXV0Zi04IiwibWVtb3J5Ijo0MDk2LCJ0aW1lb3V0IjoxODB9fQ.V_BcbfCWH__rcmGznaMSLm6R1wTtqF583QKH4Z3n5Uc\&asrc=run_on_apify)
import { Actor } from 'apify'; import { PuppeteerCrawler } from 'crawlee';
await Actor.init();
// Create a PuppeteerCrawler const crawler = new PuppeteerCrawler({ async requestHandler({ request, page }) { // Capture the screenshot with Puppeteer const screenshot = await page.screenshot(); // Convert the URL into a valid key const key = request.url.replace(/[:/]/g, '_'); // Save the screenshot to the default key-value store await Actor.setValue(key, screenshot, { contentType: 'image/png' }); }, });
// Run the crawler await crawler.run([ { url: 'http://www.example.com/page-1' }, { url: 'http://www.example.com/page-2' }, { url: 'http://www.example.com/page-3' }, ]);
await Actor.exit();
Using `puppeteerUtils.saveSnapshot()`:
[Run on](https://console.apify.com/actors/7tWSD8hrYzuc9Lte7?runConfig=eyJ1IjoiRWdQdHczb2VqNlRhRHQ1cW4iLCJ2IjoxfQ.eyJpbnB1dCI6IntcImNvZGVcIjpcImltcG9ydCB7IEFjdG9yIH0gZnJvbSAnYXBpZnknO1xcbmltcG9ydCB7IFB1cHBldGVlckNyYXdsZXIsIHB1cHBldGVlclV0aWxzIH0gZnJvbSAnY3Jhd2xlZSc7XFxuXFxuYXdhaXQgQWN0b3IuaW5pdCgpO1xcblxcbi8vIENyZWF0ZSBhIFB1cHBldGVlckNyYXdsZXJcXG5jb25zdCBjcmF3bGVyID0gbmV3IFB1cHBldGVlckNyYXdsZXIoe1xcbiAgICBhc3luYyByZXF1ZXN0SGFuZGxlcih7IHJlcXVlc3QsIHBhZ2UgfSkge1xcbiAgICAgICAgLy8gQ29udmVydCB0aGUgVVJMIGludG8gYSB2YWxpZCBrZXlcXG4gICAgICAgIGNvbnN0IGtleSA9IHJlcXVlc3QudXJsLnJlcGxhY2UoL1s6L10vZywgJ18nKTtcXG4gICAgICAgIC8vIENhcHR1cmUgdGhlIHNjcmVlbnNob3RcXG4gICAgICAgIGF3YWl0IHB1cHBldGVlclV0aWxzLnNhdmVTbmFwc2hvdChwYWdlLCB7IGtleSwgc2F2ZUh0bWw6IGZhbHNlIH0pO1xcbiAgICB9LFxcbn0pO1xcblxcbi8vIFJ1biB0aGUgY3Jhd2xlclxcbmF3YWl0IGNyYXdsZXIucnVuKFtcXG4gICAgeyB1cmw6ICdodHRwOi8vd3d3LmV4YW1wbGUuY29tL3BhZ2UtMScgfSxcXG4gICAgeyB1cmw6ICdodHRwOi8vd3d3LmV4YW1wbGUuY29tL3BhZ2UtMicgfSxcXG4gICAgeyB1cmw6ICdodHRwOi8vd3d3LmV4YW1wbGUuY29tL3BhZ2UtMycgfSxcXG5dKTtcXG5cXG5hd2FpdCBBY3Rvci5leGl0KCk7XFxuXCJ9Iiwib3B0aW9ucyI6eyJidWlsZCI6ImxhdGVzdCIsImNvbnRlbnRUeXBlIjoiYXBwbGljYXRpb24vanNvbjsgY2hhcnNldD11dGYtOCIsIm1lbW9yeSI6NDA5NiwidGltZW91dCI6MTgwfX0.udR8araTvFL0crHf63ENyHe6LCZ4yd1J7FwSdJauc5M\&asrc=run_on_apify)
import { Actor } from 'apify'; import { PuppeteerCrawler, puppeteerUtils } from 'crawlee';
await Actor.init();
// Create a PuppeteerCrawler const crawler = new PuppeteerCrawler({ async requestHandler({ request, page }) { // Convert the URL into a valid key const key = request.url.replace(/[:/]/g, '_'); // Capture the screenshot await puppeteerUtils.saveSnapshot(page, { key, saveHtml: false }); }, });
// Run the crawler await crawler.run([ { url: 'http://www.example.com/page-1' }, { url: 'http://www.example.com/page-2' }, { url: 'http://www.example.com/page-3' }, ]);
await Actor.exit();
In both examples using `page.screenshot()`, a `key` variable is created based on the URL of the web page. This variable is used as the key when saving each screenshot into a key-value store.
---
# Cheerio crawler
Copy for LLM
This example demonstrates how to use [`CheerioCrawler`](https://crawlee.dev/api/cheerio-crawler/class/CheerioCrawler) to crawl a list of URLs from an external file, load each URL using a plain HTTP request, parse the HTML using the [Cheerio library](https://www.npmjs.com/package/cheerio) and extract some data from it: the page title and all `h1` tags.
[Run on](https://console.apify.com/actors/kk67IcZkKSSBTslXI?runConfig=eyJ1IjoiRWdQdHczb2VqNlRhRHQ1cW4iLCJ2IjoxfQ.eyJpbnB1dCI6IntcImNvZGVcIjpcImltcG9ydCB7IENoZWVyaW9DcmF3bGVyLCBsb2csIExvZ0xldmVsIH0gZnJvbSAnY3Jhd2xlZSc7XFxuXFxuLy8gQ3Jhd2xlcnMgY29tZSB3aXRoIHZhcmlvdXMgdXRpbGl0aWVzLCBlLmcuIGZvciBsb2dnaW5nLlxcbi8vIEhlcmUgd2UgdXNlIGRlYnVnIGxldmVsIG9mIGxvZ2dpbmcgdG8gaW1wcm92ZSB0aGUgZGVidWdnaW5nIGV4cGVyaWVuY2UuXFxuLy8gVGhpcyBmdW5jdGlvbmFsaXR5IGlzIG9wdGlvbmFsIVxcbmxvZy5zZXRMZXZlbChMb2dMZXZlbC5ERUJVRyk7XFxuXFxuLy8gQ3JlYXRlIGFuIGluc3RhbmNlIG9mIHRoZSBDaGVlcmlvQ3Jhd2xlciBjbGFzcyAtIGEgY3Jhd2xlclxcbi8vIHRoYXQgYXV0b21hdGljYWxseSBsb2FkcyB0aGUgVVJMcyBhbmQgcGFyc2VzIHRoZWlyIEhUTUwgdXNpbmcgdGhlIGNoZWVyaW8gbGlicmFyeS5cXG5jb25zdCBjcmF3bGVyID0gbmV3IENoZWVyaW9DcmF3bGVyKHtcXG4gICAgLy8gVGhlIGNyYXdsZXIgZG93bmxvYWRzIGFuZCBwcm9jZXNzZXMgdGhlIHdlYiBwYWdlcyBpbiBwYXJhbGxlbCwgd2l0aCBhIGNvbmN1cnJlbmN5XFxuICAgIC8vIGF1dG9tYXRpY2FsbHkgbWFuYWdlZCBiYXNlZCBvbiB0aGUgYXZhaWxhYmxlIHN5c3RlbSBtZW1vcnkgYW5kIENQVSAoc2VlIEF1dG9zY2FsZWRQb29sIGNsYXNzKS5cXG4gICAgLy8gSGVyZSB3ZSBkZWZpbmUgc29tZSBoYXJkIGxpbWl0cyBmb3IgdGhlIGNvbmN1cnJlbmN5LlxcbiAgICBtaW5Db25jdXJyZW5jeTogMTAsXFxuICAgIG1heENvbmN1cnJlbmN5OiA1MCxcXG5cXG4gICAgLy8gT24gZXJyb3IsIHJldHJ5IGVhY2ggcGFnZSBhdCBtb3N0IG9uY2UuXFxuICAgIG1heFJlcXVlc3RSZXRyaWVzOiAxLFxcblxcbiAgICAvLyBJbmNyZWFzZSB0aGUgdGltZW91dCBmb3IgcHJvY2Vzc2luZyBvZiBlYWNoIHBhZ2UuXFxuICAgIHJlcXVlc3RIYW5kbGVyVGltZW91dFNlY3M6IDMwLFxcblxcbiAgICAvLyBMaW1pdCB0byAxMCByZXF1ZXN0cyBwZXIgb25lIGNyYXdsXFxuICAgIG1heFJlcXVlc3RzUGVyQ3Jhd2w6IDEwLFxcblxcbiAgICAvLyBUaGlzIGZ1bmN0aW9uIHdpbGwgYmUgY2FsbGVkIGZvciBlYWNoIFVSTCB0byBjcmF3bC5cXG4gICAgLy8gSXQgYWNjZXB0cyBhIHNpbmdsZSBwYXJhbWV0ZXIsIHdoaWNoIGlzIGFuIG9iamVjdCB3aXRoIG9wdGlvbnMgYXM6XFxuICAgIC8vIGh0dHBzOi8vc2RrLmFwaWZ5LmNvbS9kb2NzL3R5cGVkZWZzL2NoZWVyaW8tY3Jhd2xlci1vcHRpb25zI2hhbmRsZXBhZ2VmdW5jdGlvblxcbiAgICAvLyBXZSB1c2UgZm9yIGRlbW9uc3RyYXRpb24gb25seSAyIG9mIHRoZW06XFxuICAgIC8vIC0gcmVxdWVzdDogYW4gaW5zdGFuY2Ugb2YgdGhlIFJlcXVlc3QgY2xhc3Mgd2l0aCBpbmZvcm1hdGlvbiBzdWNoIGFzIFVSTCBhbmQgSFRUUCBtZXRob2RcXG4gICAgLy8gLSAkOiB0aGUgY2hlZXJpbyBvYmplY3QgY29udGFpbmluZyBwYXJzZWQgSFRNTFxcbiAgICBhc3luYyByZXF1ZXN0SGFuZGxlcih7IHJlcXVlc3QsICQgfSkge1xcbiAgICAgICAgbG9nLmRlYnVnKGBQcm9jZXNzaW5nICR7cmVxdWVzdC51cmx9Li4uYCk7XFxuXFxuICAgICAgICAvLyBFeHRyYWN0IGRhdGEgZnJvbSB0aGUgcGFnZSB1c2luZyBjaGVlcmlvLlxcbiAgICAgICAgY29uc3QgdGl0bGUgPSAkKCd0aXRsZScpLnRleHQoKTtcXG4gICAgICAgIGNvbnN0IGgxdGV4dHMgPSBbXTtcXG4gICAgICAgICQoJ2gxJykuZWFjaCgoaW5kZXgsIGVsKSA9PiB7XFxuICAgICAgICAgICAgaDF0ZXh0cy5wdXNoKHtcXG4gICAgICAgICAgICAgICAgdGV4dDogJChlbCkudGV4dCgpLFxcbiAgICAgICAgICAgIH0pO1xcbiAgICAgICAgfSk7XFxuXFxuICAgICAgICAvLyBTdG9yZSB0aGUgcmVzdWx0cyB0byB0aGUgZGF0YXNldC4gSW4gbG9jYWwgY29uZmlndXJhdGlvbixcXG4gICAgICAgIC8vIHRoZSBkYXRhIHdpbGwgYmUgc3RvcmVkIGFzIEpTT04gZmlsZXMgaW4gLi9zdG9yYWdlL2RhdGFzZXRzL2RlZmF1bHRcXG4gICAgICAgIGF3YWl0IEFjdG9yLnB1c2hEYXRhKHtcXG4gICAgICAgICAgICB1cmw6IHJlcXVlc3QudXJsLFxcbiAgICAgICAgICAgIHRpdGxlLFxcbiAgICAgICAgICAgIGgxdGV4dHMsXFxuICAgICAgICB9KTtcXG4gICAgfSxcXG5cXG4gICAgLy8gVGhpcyBmdW5jdGlvbiBpcyBjYWxsZWQgaWYgdGhlIHBhZ2UgcHJvY2Vzc2luZyBmYWlsZWQgbW9yZSB0aGFuIG1heFJlcXVlc3RSZXRyaWVzKzEgdGltZXMuXFxuICAgIGZhaWxlZFJlcXVlc3RIYW5kbGVyKHsgcmVxdWVzdCB9KSB7XFxuICAgICAgICBsb2cuZGVidWcoYFJlcXVlc3QgJHtyZXF1ZXN0LnVybH0gZmFpbGVkIHR3aWNlLmApO1xcbiAgICB9LFxcbn0pO1xcblxcbi8vIFJ1biB0aGUgY3Jhd2xlciBhbmQgd2FpdCBmb3IgaXQgdG8gZmluaXNoLlxcbmF3YWl0IGNyYXdsZXIucnVuKCk7XFxuXFxubG9nLmRlYnVnKCdDcmF3bGVyIGZpbmlzaGVkLicpO1xcblwifSIsIm9wdGlvbnMiOnsiYnVpbGQiOiJsYXRlc3QiLCJjb250ZW50VHlwZSI6ImFwcGxpY2F0aW9uL2pzb247IGNoYXJzZXQ9dXRmLTgiLCJtZW1vcnkiOjEwMjQsInRpbWVvdXQiOjE4MH19.dOZILM56nUwSSVMoLgQB0brbbjQm2W2FDao35eLD72s\&asrc=run_on_apify)
import { CheerioCrawler, log, LogLevel } from 'crawlee';
// Crawlers come with various utilities, e.g. for logging. // Here we use debug level of logging to improve the debugging experience. // This functionality is optional! log.setLevel(LogLevel.DEBUG);
// Create an instance of the CheerioCrawler class - a crawler // that automatically loads the URLs and parses their HTML using the cheerio library. const crawler = new CheerioCrawler({ // The crawler downloads and processes the web pages in parallel, with a concurrency // automatically managed based on the available system memory and CPU (see AutoscaledPool class). // Here we define some hard limits for the concurrency. minConcurrency: 10, maxConcurrency: 50,
// On error, retry each page at most once.
maxRequestRetries: 1,
// Increase the timeout for processing of each page.
requestHandlerTimeoutSecs: 30,
// Limit to 10 requests per one crawl
maxRequestsPerCrawl: 10,
// This function will be called for each URL to crawl.
// It accepts a single parameter, which is an object with options as:
// https://sdk.apify.com/docs/typedefs/cheerio-crawler-options#handlepagefunction
// We use for demonstration only 2 of them:
// - request: an instance of the Request class with information such as URL and HTTP method
// - $: the cheerio object containing parsed HTML
async requestHandler({ request, $ }) {
log.debug(`Processing ${request.url}...`);
// Extract data from the page using cheerio.
const title = $('title').text();
const h1texts = [];
$('h1').each((index, el) => {
h1texts.push({
text: $(el).text(),
});
});
// Store the results to the dataset. In local configuration,
// the data will be stored as JSON files in ./storage/datasets/default
await Actor.pushData({
url: request.url,
title,
h1texts,
});
},
// This function is called if the page processing failed more than maxRequestRetries+1 times.
failedRequestHandler({ request }) {
log.debug(`Request ${request.url} failed twice.`);
},
});
// Run the crawler and wait for it to finish. await crawler.run();
log.debug('Crawler finished.');
---
# Crawl all links on a website
Copy for LLM
This example uses the `enqueueLinks()` method to add new links to the `RequestQueue` as the crawler navigates from page to page. If only the required parameters are defined, all links will be crawled.
* Cheerio Crawler
* Puppeteer Crawler
* Playwright Crawler
Using `CheerioCrawler`:
[Run on](https://console.apify.com/actors/kk67IcZkKSSBTslXI?runConfig=eyJ1IjoiRWdQdHczb2VqNlRhRHQ1cW4iLCJ2IjoxfQ.eyJpbnB1dCI6IntcImNvZGVcIjpcImltcG9ydCB7IEFjdG9yIH0gZnJvbSAnYXBpZnknO1xcbmltcG9ydCB7IENoZWVyaW9DcmF3bGVyIH0gZnJvbSAnY3Jhd2xlZSc7XFxuXFxuYXdhaXQgQWN0b3IuaW5pdCgpO1xcblxcbmNvbnN0IGNyYXdsZXIgPSBuZXcgQ2hlZXJpb0NyYXdsZXIoe1xcbiAgICBhc3luYyByZXF1ZXN0SGFuZGxlcih7IHJlcXVlc3QsIGVucXVldWVMaW5rcyB9KSB7XFxuICAgICAgICBjb25zb2xlLmxvZyhyZXF1ZXN0LnVybCk7XFxuICAgICAgICAvLyBBZGQgYWxsIGxpbmtzIGZyb20gcGFnZSB0byBSZXF1ZXN0UXVldWVcXG4gICAgICAgIGF3YWl0IGVucXVldWVMaW5rcygpO1xcbiAgICB9LFxcbiAgICBtYXhSZXF1ZXN0c1BlckNyYXdsOiAxMCwgLy8gTGltaXRhdGlvbiBmb3Igb25seSAxMCByZXF1ZXN0cyAoZG8gbm90IHVzZSBpZiB5b3Ugd2FudCB0byBjcmF3bCBhbGwgbGlua3MpXFxufSk7XFxuXFxuLy8gUnVuIHRoZSBjcmF3bGVyXFxuYXdhaXQgY3Jhd2xlci5ydW4oWydodHRwczovL2FwaWZ5LmNvbS8nXSk7XFxuXFxuYXdhaXQgQWN0b3IuZXhpdCgpO1xcblwifSIsIm9wdGlvbnMiOnsiYnVpbGQiOiJsYXRlc3QiLCJjb250ZW50VHlwZSI6ImFwcGxpY2F0aW9uL2pzb247IGNoYXJzZXQ9dXRmLTgiLCJtZW1vcnkiOjEwMjQsInRpbWVvdXQiOjE4MH19.WZ0oMu6yd1pBKWHbkngs3qzaOVhpacPP6PKxjXnRLbc\&asrc=run_on_apify)
import { Actor } from 'apify'; import { CheerioCrawler } from 'crawlee';
await Actor.init();
const crawler = new CheerioCrawler({ async requestHandler({ request, enqueueLinks }) { console.log(request.url); // Add all links from page to RequestQueue await enqueueLinks(); }, maxRequestsPerCrawl: 10, // Limitation for only 10 requests (do not use if you want to crawl all links) });
// Run the crawler await crawler.run(['https://apify.com/']);
await Actor.exit();
Using `PuppeteerCrawler`:
tip
To run this example on the Apify Platform, select the `apify/actor-node-puppeteer-chrome` image for your Dockerfile.
[Run on](https://console.apify.com/actors/7tWSD8hrYzuc9Lte7?runConfig=eyJ1IjoiRWdQdHczb2VqNlRhRHQ1cW4iLCJ2IjoxfQ.eyJpbnB1dCI6IntcImNvZGVcIjpcImltcG9ydCB7IEFjdG9yIH0gZnJvbSAnYXBpZnknO1xcbmltcG9ydCB7IFB1cHBldGVlckNyYXdsZXIgfSBmcm9tICdjcmF3bGVlJztcXG5cXG5hd2FpdCBBY3Rvci5pbml0KCk7XFxuXFxuY29uc3QgY3Jhd2xlciA9IG5ldyBQdXBwZXRlZXJDcmF3bGVyKHtcXG4gICAgYXN5bmMgcmVxdWVzdEhhbmRsZXIoeyByZXF1ZXN0LCBlbnF1ZXVlTGlua3MgfSkge1xcbiAgICAgICAgY29uc29sZS5sb2cocmVxdWVzdC51cmwpO1xcbiAgICAgICAgLy8gQWRkIGFsbCBsaW5rcyBmcm9tIHBhZ2UgdG8gUmVxdWVzdFF1ZXVlXFxuICAgICAgICBhd2FpdCBlbnF1ZXVlTGlua3MoKTtcXG4gICAgfSxcXG4gICAgbWF4UmVxdWVzdHNQZXJDcmF3bDogMTAsIC8vIExpbWl0YXRpb24gZm9yIG9ubHkgMTAgcmVxdWVzdHMgKGRvIG5vdCB1c2UgaWYgeW91IHdhbnQgdG8gY3Jhd2wgYWxsIGxpbmtzKVxcbn0pO1xcblxcbi8vIFJ1biB0aGUgY3Jhd2xlclxcbmF3YWl0IGNyYXdsZXIucnVuKFsnaHR0cHM6Ly9hcGlmeS5jb20vJ10pO1xcblxcbmF3YWl0IEFjdG9yLmV4aXQoKTtcXG5cIn0iLCJvcHRpb25zIjp7ImJ1aWxkIjoibGF0ZXN0IiwiY29udGVudFR5cGUiOiJhcHBsaWNhdGlvbi9qc29uOyBjaGFyc2V0PXV0Zi04IiwibWVtb3J5Ijo0MDk2LCJ0aW1lb3V0IjoxODB9fQ.gNhqxwBfIYMReWTkgUMf9WC-YJ_1Vy7-cQOmxNZDobM\&asrc=run_on_apify)
import { Actor } from 'apify'; import { PuppeteerCrawler } from 'crawlee';
await Actor.init();
const crawler = new PuppeteerCrawler({ async requestHandler({ request, enqueueLinks }) { console.log(request.url); // Add all links from page to RequestQueue await enqueueLinks(); }, maxRequestsPerCrawl: 10, // Limitation for only 10 requests (do not use if you want to crawl all links) });
// Run the crawler await crawler.run(['https://apify.com/']);
await Actor.exit();
Using `PlaywrightCrawler`:
tip
To run this example on the Apify Platform, select the `apify/actor-node-playwright-chrome` image for your Dockerfile.
[Run on](https://console.apify.com/actors/6i5QsHBMtm3hKph70?runConfig=eyJ1IjoiRWdQdHczb2VqNlRhRHQ1cW4iLCJ2IjoxfQ.eyJpbnB1dCI6IntcImNvZGVcIjpcImltcG9ydCB7IEFjdG9yIH0gZnJvbSAnYXBpZnknO1xcbmltcG9ydCB7IFBsYXl3cmlnaHRDcmF3bGVyIH0gZnJvbSAnY3Jhd2xlZSc7XFxuXFxuYXdhaXQgQWN0b3IuaW5pdCgpO1xcblxcbmNvbnN0IGNyYXdsZXIgPSBuZXcgUGxheXdyaWdodENyYXdsZXIoe1xcbiAgICBhc3luYyByZXF1ZXN0SGFuZGxlcih7IHJlcXVlc3QsIGVucXVldWVMaW5rcyB9KSB7XFxuICAgICAgICBjb25zb2xlLmxvZyhyZXF1ZXN0LnVybCk7XFxuICAgICAgICAvLyBBZGQgYWxsIGxpbmtzIGZyb20gcGFnZSB0byBSZXF1ZXN0UXVldWVcXG4gICAgICAgIGF3YWl0IGVucXVldWVMaW5rcygpO1xcbiAgICB9LFxcbiAgICBtYXhSZXF1ZXN0c1BlckNyYXdsOiAxMCwgLy8gTGltaXRhdGlvbiBmb3Igb25seSAxMCByZXF1ZXN0cyAoZG8gbm90IHVzZSBpZiB5b3Ugd2FudCB0byBjcmF3bCBhbGwgbGlua3MpXFxufSk7XFxuXFxuLy8gUnVuIHRoZSBjcmF3bGVyXFxuYXdhaXQgY3Jhd2xlci5ydW4oWydodHRwczovL2FwaWZ5LmNvbS8nXSk7XFxuXFxuYXdhaXQgQWN0b3IuZXhpdCgpO1xcblwifSIsIm9wdGlvbnMiOnsiYnVpbGQiOiJsYXRlc3QiLCJjb250ZW50VHlwZSI6ImFwcGxpY2F0aW9uL2pzb247IGNoYXJzZXQ9dXRmLTgiLCJtZW1vcnkiOjQwOTYsInRpbWVvdXQiOjE4MH19.eVg0BTpLuA9jZtmijHGMjetPuME0zmTZX4oo8kxSAh8\&asrc=run_on_apify)
import { Actor } from 'apify'; import { PlaywrightCrawler } from 'crawlee';
await Actor.init();
const crawler = new PlaywrightCrawler({ async requestHandler({ request, enqueueLinks }) { console.log(request.url); // Add all links from page to RequestQueue await enqueueLinks(); }, maxRequestsPerCrawl: 10, // Limitation for only 10 requests (do not use if you want to crawl all links) });
// Run the crawler await crawler.run(['https://apify.com/']);
await Actor.exit();
---
# Crawl multiple URLs
Copy for LLM
This example crawls the specified list of URLs.
* Cheerio Crawler
* Puppeteer Crawler
* Playwright Crawler
Using `CheerioCrawler`:
[Run on](https://console.apify.com/actors/kk67IcZkKSSBTslXI?runConfig=eyJ1IjoiRWdQdHczb2VqNlRhRHQ1cW4iLCJ2IjoxfQ.eyJpbnB1dCI6IntcImNvZGVcIjpcImltcG9ydCB7IEFjdG9yIH0gZnJvbSAnYXBpZnknO1xcbmltcG9ydCB7IENoZWVyaW9DcmF3bGVyIH0gZnJvbSAnY3Jhd2xlZSc7XFxuXFxuYXdhaXQgQWN0b3IuaW5pdCgpO1xcblxcbmNvbnN0IGNyYXdsZXIgPSBuZXcgQ2hlZXJpb0NyYXdsZXIoe1xcbiAgICAvLyBGdW5jdGlvbiBjYWxsZWQgZm9yIGVhY2ggVVJMXFxuICAgIGFzeW5jIHJlcXVlc3RIYW5kbGVyKHsgcmVxdWVzdCwgJCB9KSB7XFxuICAgICAgICBjb25zdCB0aXRsZSA9ICQoJ3RpdGxlJykudGV4dCgpO1xcbiAgICAgICAgY29uc29sZS5sb2coYFVSTDogJHtyZXF1ZXN0LnVybH1cXFxcblRJVExFOiAke3RpdGxlfWApO1xcbiAgICB9LFxcbn0pO1xcblxcbi8vIFJ1biB0aGUgY3Jhd2xlclxcbmF3YWl0IGNyYXdsZXIucnVuKFtcXG4gICAgJ2h0dHA6Ly93d3cuZXhhbXBsZS5jb20vcGFnZS0xJyxcXG4gICAgJ2h0dHA6Ly93d3cuZXhhbXBsZS5jb20vcGFnZS0yJyxcXG4gICAgJ2h0dHA6Ly93d3cuZXhhbXBsZS5jb20vcGFnZS0zJyxcXG5dKTtcXG5cXG5hd2FpdCBBY3Rvci5leGl0KCk7XFxuXCJ9Iiwib3B0aW9ucyI6eyJidWlsZCI6ImxhdGVzdCIsImNvbnRlbnRUeXBlIjoiYXBwbGljYXRpb24vanNvbjsgY2hhcnNldD11dGYtOCIsIm1lbW9yeSI6MTAyNCwidGltZW91dCI6MTgwfX0.CeiVEdnjPDfQ0i8PLiJLQhDJFF2dN9OtHDx7MiAmQD8\&asrc=run_on_apify)
import { Actor } from 'apify'; import { CheerioCrawler } from 'crawlee';
await Actor.init();
const crawler = new CheerioCrawler({
// Function called for each URL
async requestHandler({ request, $ }) {
const title = $('title').text();
console.log(URL: ${request.url}\nTITLE: ${title});
},
});
// Run the crawler await crawler.run([ 'http://www.example.com/page-1', 'http://www.example.com/page-2', 'http://www.example.com/page-3', ]);
await Actor.exit();
Using `PuppeteerCrawler`:
tip
To run this example on the Apify Platform, select the `apify/actor-node-puppeteer-chrome` image for your Dockerfile.
[Run on](https://console.apify.com/actors/7tWSD8hrYzuc9Lte7?runConfig=eyJ1IjoiRWdQdHczb2VqNlRhRHQ1cW4iLCJ2IjoxfQ.eyJpbnB1dCI6IntcImNvZGVcIjpcImltcG9ydCB7IEFjdG9yIH0gZnJvbSAnYXBpZnknO1xcbmltcG9ydCB7IFB1cHBldGVlckNyYXdsZXIgfSBmcm9tICdjcmF3bGVlJztcXG5cXG5hd2FpdCBBY3Rvci5pbml0KCk7XFxuXFxuY29uc3QgY3Jhd2xlciA9IG5ldyBQdXBwZXRlZXJDcmF3bGVyKHtcXG4gICAgLy8gRnVuY3Rpb24gY2FsbGVkIGZvciBlYWNoIFVSTFxcbiAgICBhc3luYyByZXF1ZXN0SGFuZGxlcih7IHJlcXVlc3QsIHBhZ2UgfSkge1xcbiAgICAgICAgY29uc3QgdGl0bGUgPSBhd2FpdCBwYWdlLnRpdGxlKCk7XFxuICAgICAgICBjb25zb2xlLmxvZyhgVVJMOiAke3JlcXVlc3QudXJsfVxcXFxuVElUTEU6ICR7dGl0bGV9YCk7XFxuICAgIH0sXFxufSk7XFxuXFxuLy8gUnVuIHRoZSBjcmF3bGVyXFxuYXdhaXQgY3Jhd2xlci5ydW4oW1xcbiAgICAnaHR0cDovL3d3dy5leGFtcGxlLmNvbS9wYWdlLTEnLFxcbiAgICAnaHR0cDovL3d3dy5leGFtcGxlLmNvbS9wYWdlLTInLFxcbiAgICAnaHR0cDovL3d3dy5leGFtcGxlLmNvbS9wYWdlLTMnLFxcbl0pO1xcblxcbmF3YWl0IEFjdG9yLmV4aXQoKTtcXG5cIn0iLCJvcHRpb25zIjp7ImJ1aWxkIjoibGF0ZXN0IiwiY29udGVudFR5cGUiOiJhcHBsaWNhdGlvbi9qc29uOyBjaGFyc2V0PXV0Zi04IiwibWVtb3J5Ijo0MDk2LCJ0aW1lb3V0IjoxODB9fQ.N3_G0e276h-8f8FDQW4iLmyjhKEPItvUgrKXe3Rpxy8\&asrc=run_on_apify)
import { Actor } from 'apify'; import { PuppeteerCrawler } from 'crawlee';
await Actor.init();
const crawler = new PuppeteerCrawler({
// Function called for each URL
async requestHandler({ request, page }) {
const title = await page.title();
console.log(URL: ${request.url}\nTITLE: ${title});
},
});
// Run the crawler await crawler.run([ 'http://www.example.com/page-1', 'http://www.example.com/page-2', 'http://www.example.com/page-3', ]);
await Actor.exit();
Using `PlaywrightCrawler`:
tip
To run this example on the Apify Platform, select the `apify/actor-node-playwright-chrome` image for your Dockerfile.
[Run on](https://console.apify.com/actors/6i5QsHBMtm3hKph70?runConfig=eyJ1IjoiRWdQdHczb2VqNlRhRHQ1cW4iLCJ2IjoxfQ.eyJpbnB1dCI6IntcImNvZGVcIjpcImltcG9ydCB7IEFjdG9yIH0gZnJvbSAnYXBpZnknO1xcbmltcG9ydCB7IFBsYXl3cmlnaHRDcmF3bGVyIH0gZnJvbSAnY3Jhd2xlZSc7XFxuXFxuYXdhaXQgQWN0b3IuaW5pdCgpO1xcblxcbmNvbnN0IGNyYXdsZXIgPSBuZXcgUGxheXdyaWdodENyYXdsZXIoe1xcbiAgICAvLyBGdW5jdGlvbiBjYWxsZWQgZm9yIGVhY2ggVVJMXFxuICAgIGFzeW5jIHJlcXVlc3RIYW5kbGVyKHsgcmVxdWVzdCwgcGFnZSB9KSB7XFxuICAgICAgICBjb25zdCB0aXRsZSA9IGF3YWl0IHBhZ2UudGl0bGUoKTtcXG4gICAgICAgIGNvbnNvbGUubG9nKGBVUkw6ICR7cmVxdWVzdC51cmx9XFxcXG5USVRMRTogJHt0aXRsZX1gKTtcXG4gICAgfSxcXG59KTtcXG5cXG4vLyBSdW4gdGhlIGNyYXdsZXJcXG5hd2FpdCBjcmF3bGVyLnJ1bihbXFxuICAgICdodHRwOi8vd3d3LmV4YW1wbGUuY29tL3BhZ2UtMScsXFxuICAgICdodHRwOi8vd3d3LmV4YW1wbGUuY29tL3BhZ2UtMicsXFxuICAgICdodHRwOi8vd3d3LmV4YW1wbGUuY29tL3BhZ2UtMycsXFxuXSk7XFxuXFxuYXdhaXQgQWN0b3IuZXhpdCgpO1xcblwifSIsIm9wdGlvbnMiOnsiYnVpbGQiOiJsYXRlc3QiLCJjb250ZW50VHlwZSI6ImFwcGxpY2F0aW9uL2pzb247IGNoYXJzZXQ9dXRmLTgiLCJtZW1vcnkiOjQwOTYsInRpbWVvdXQiOjE4MH19.tFxeTZWttzvkWqmTccMmErP36zwOU4YG608H07ALpD0\&asrc=run_on_apify)
import { Actor } from 'apify'; import { PlaywrightCrawler } from 'crawlee';
await Actor.init();
const crawler = new PlaywrightCrawler({
// Function called for each URL
async requestHandler({ request, page }) {
const title = await page.title();
console.log(URL: ${request.url}\nTITLE: ${title});
},
});
// Run the crawler await crawler.run([ 'http://www.example.com/page-1', 'http://www.example.com/page-2', 'http://www.example.com/page-3', ]);
await Actor.exit();
---
# Crawl a website with relative links
Copy for LLM
When crawling a website, you may encounter different types of links present that you may want to crawl. To facilitate the easy crawling of such links, we provide the `enqueueLinks()` method on the crawler context, which will automatically find links and add them to the crawler's [`RequestQueue`](https://docs.apify.com/sdk/js/sdk/js/reference/class/RequestQueue.md).
We provide 3 different strategies for crawling relative links:
* [All](https://crawlee.dev/api/core/enum/EnqueueStrategy#All)
<!-- -->
which will enqueue all links found, regardless of the domain they point to.
* [SameHostname](https://crawlee.dev/api/core/enum/EnqueueStrategy#SameHostname)
<!-- -->
which will enqueue all links found for the same hostname (regardless of any subdomains present).
* [SameSubdomain](https://crawlee.dev/api/core/enum/EnqueueStrategy#SameSubdomain)
<!-- -->
which will enqueue all links found that have the same subdomain and hostname. This is the default strategy.
note
For these examples, we are using the [`CheerioCrawler`](https://crawlee.dev/api/cheerio-crawler/class/CheerioCrawler), however the same method is available for both the [`PuppeteerCrawler`](https://crawlee.dev/api/puppeteer-crawler/class/PuppeteerCrawler) and [`PlaywrightCrawler`](https://crawlee.dev/api/playwright-crawler/class/PlaywrightCrawler), and you use it the exact same way.
* All Links
* Same Hostname
* Same Subdomain
Example domains
Any urls found will be matched by this strategy, even if they go off of the site you are currently crawling.
[Run on](https://console.apify.com/actors/kk67IcZkKSSBTslXI?runConfig=eyJ1IjoiRWdQdHczb2VqNlRhRHQ1cW4iLCJ2IjoxfQ.eyJpbnB1dCI6IntcImNvZGVcIjpcImltcG9ydCB7IEFjdG9yIH0gZnJvbSAnYXBpZnknO1xcbmltcG9ydCB7IENoZWVyaW9DcmF3bGVyIH0gZnJvbSAnY3Jhd2xlZSc7XFxuXFxuYXdhaXQgQWN0b3IuaW5pdCgpO1xcblxcbmNvbnN0IGNyYXdsZXIgPSBuZXcgQ2hlZXJpb0NyYXdsZXIoe1xcbiAgICBtYXhSZXF1ZXN0c1BlckNyYXdsOiAxMCwgLy8gTGltaXRhdGlvbiBmb3Igb25seSAxMCByZXF1ZXN0cyAoZG8gbm90IHVzZSBpZiB5b3Ugd2FudCB0byBjcmF3bCBhbGwgbGlua3MpXFxuICAgIGFzeW5jIHJlcXVlc3RIYW5kbGVyKHsgcmVxdWVzdCwgZW5xdWV1ZUxpbmtzIH0pIHtcXG4gICAgICAgIGNvbnNvbGUubG9nKHJlcXVlc3QudXJsKTtcXG4gICAgICAgIGF3YWl0IGVucXVldWVMaW5rcyh7XFxuICAgICAgICAgICAgLy8gU2V0dGluZyB0aGUgc3RyYXRlZ3kgdG8gJ2FsbCcgd2lsbCBlbnF1ZXVlIGFsbCBsaW5rcyBmb3VuZFxcbiAgICAgICAgICAgIC8vIGhpZ2hsaWdodC1uZXh0LWxpbmVcXG4gICAgICAgICAgICBzdHJhdGVneTogJ2FsbCcsXFxuICAgICAgICB9KTtcXG4gICAgfSxcXG59KTtcXG5cXG4vLyBSdW4gdGhlIGNyYXdsZXJcXG5hd2FpdCBjcmF3bGVyLnJ1bihbJ2h0dHBzOi8vYXBpZnkuY29tLyddKTtcXG5cXG5hd2FpdCBBY3Rvci5leGl0KCk7XFxuXCJ9Iiwib3B0aW9ucyI6eyJidWlsZCI6ImxhdGVzdCIsImNvbnRlbnRUeXBlIjoiYXBwbGljYXRpb24vanNvbjsgY2hhcnNldD11dGYtOCIsIm1lbW9yeSI6MTAyNCwidGltZW91dCI6MTgwfX0.a1IFpzCtFyz6kXkEkdwjYb-WWnJaRH4hJxbbzFMcYfg\&asrc=run_on_apify)
import { Actor } from 'apify'; import { CheerioCrawler } from 'crawlee';
await Actor.init();
const crawler = new CheerioCrawler({ maxRequestsPerCrawl: 10, // Limitation for only 10 requests (do not use if you want to crawl all links) async requestHandler({ request, enqueueLinks }) { console.log(request.url); await enqueueLinks({ // Setting the strategy to 'all' will enqueue all links found strategy: 'all', }); }, });
// Run the crawler await crawler.run(['https://apify.com/']);
await Actor.exit();
Example domains
For a url of `https://example.com`, `enqueueLinks()` will match relative urls, urls that point to the same full domain or urls that point to any subdomain of the provided domain.
For instance, hyperlinks like `https://subdomain.example.com/some/path`, `https://example.com/some/path`, `/absolute/example` or `./relative/example` will all be matched by this strategy.
[Run on](https://console.apify.com/actors/kk67IcZkKSSBTslXI?runConfig=eyJ1IjoiRWdQdHczb2VqNlRhRHQ1cW4iLCJ2IjoxfQ.eyJpbnB1dCI6IntcImNvZGVcIjpcImltcG9ydCB7IEFjdG9yIH0gZnJvbSAnYXBpZnknO1xcbmltcG9ydCB7IENoZWVyaW9DcmF3bGVyLCBFbnF1ZXVlU3RyYXRlZ3kgfSBmcm9tICdjcmF3bGVlJztcXG5cXG5hd2FpdCBBY3Rvci5pbml0KCk7XFxuXFxuY29uc3QgY3Jhd2xlciA9IG5ldyBDaGVlcmlvQ3Jhd2xlcih7XFxuICAgIG1heFJlcXVlc3RzUGVyQ3Jhd2w6IDEwLCAvLyBMaW1pdGF0aW9uIGZvciBvbmx5IDEwIHJlcXVlc3RzIChkbyBub3QgdXNlIGlmIHlvdSB3YW50IHRvIGNyYXdsIGFsbCBsaW5rcylcXG4gICAgYXN5bmMgcmVxdWVzdEhhbmRsZXIoeyByZXF1ZXN0LCBlbnF1ZXVlTGlua3MgfSkge1xcbiAgICAgICAgY29uc29sZS5sb2cocmVxdWVzdC51cmwpO1xcbiAgICAgICAgYXdhaXQgZW5xdWV1ZUxpbmtzKHtcXG4gICAgICAgICAgICAvLyBTZXR0aW5nIHRoZSBzdHJhdGVneSB0byAnc2FtZS1zdWJkb21haW4nIHdpbGwgZW5xdWV1ZSBhbGwgbGlua3MgZm91bmQgdGhhdCBhcmUgb24gdGhlIHNhbWUgaG9zdG5hbWVcXG4gICAgICAgICAgICAvLyBhcyByZXF1ZXN0LmxvYWRlZFVybCBvciByZXF1ZXN0LnVybFxcbiAgICAgICAgICAgIC8vIGhpZ2hsaWdodC1uZXh0LWxpbmVcXG4gICAgICAgICAgICBzdHJhdGVneTogRW5xdWV1ZVN0cmF0ZWd5LlNhbWVIb3N0bmFtZSxcXG4gICAgICAgICAgICAvLyBBbHRlcm5hdGl2ZWx5LCB5b3UgY2FuIHBhc3MgaW4gdGhlIHN0cmluZyAnc2FtZS1ob3N0bmFtZSdcXG4gICAgICAgICAgICAvLyBzdHJhdGVneTogJ3NhbWUtaG9zdG5hbWUnLFxcbiAgICAgICAgfSk7XFxuICAgIH0sXFxufSk7XFxuXFxuLy8gUnVuIHRoZSBjcmF3bGVyXFxuYXdhaXQgY3Jhd2xlci5ydW4oWydodHRwczovL2FwaWZ5LmNvbS8nXSk7XFxuXFxuYXdhaXQgQWN0b3IuZXhpdCgpO1xcblwifSIsIm9wdGlvbnMiOnsiYnVpbGQiOiJsYXRlc3QiLCJjb250ZW50VHlwZSI6ImFwcGxpY2F0aW9uL2pzb247IGNoYXJzZXQ9dXRmLTgiLCJtZW1vcnkiOjEwMjQsInRpbWVvdXQiOjE4MH19.yF2AJFRXorzWRuCXhRGjM8nWXBFT585D7nwOkBPAPf0\&asrc=run_on_apify)
import { Actor } from 'apify'; import { CheerioCrawler, EnqueueStrategy } from 'crawlee';
await Actor.init();
const crawler = new CheerioCrawler({ maxRequestsPerCrawl: 10, // Limitation for only 10 requests (do not use if you want to crawl all links) async requestHandler({ request, enqueueLinks }) { console.log(request.url); await enqueueLinks({ // Setting the strategy to 'same-subdomain' will enqueue all links found that are on the same hostname // as request.loadedUrl or request.url strategy: EnqueueStrategy.SameHostname, // Alternatively, you can pass in the string 'same-hostname' // strategy: 'same-hostname', }); }, });
// Run the crawler await crawler.run(['https://apify.com/']);
await Actor.exit();
tip
This is the default strategy when calling `enqueueLinks()`, so you don't have to specify it.
Example domains
For a url of `https://subdomain.example.com`, `enqueueLinks()` will only match relative urls or urls that point to the same full domain.
For instance, hyperlinks like `https://subdomain.example.com/some/path`, `/absolute/example` or `./relative/example` will all be matched by this strategy, while `https://other-subdomain.example.com` or `https://otherexample.com` will not.
[Run on](https://console.apify.com/actors/kk67IcZkKSSBTslXI?runConfig=eyJ1IjoiRWdQdHczb2VqNlRhRHQ1cW4iLCJ2IjoxfQ.eyJpbnB1dCI6IntcImNvZGVcIjpcImltcG9ydCB7IEFjdG9yIH0gZnJvbSAnYXBpZnknO1xcbmltcG9ydCB7IENoZWVyaW9DcmF3bGVyLCBFbnF1ZXVlU3RyYXRlZ3kgfSBmcm9tICdjcmF3bGVlJztcXG5cXG5hd2FpdCBBY3Rvci5pbml0KCk7XFxuXFxuY29uc3QgY3Jhd2xlciA9IG5ldyBDaGVlcmlvQ3Jhd2xlcih7XFxuICAgIG1heFJlcXVlc3RzUGVyQ3Jhd2w6IDEwLCAvLyBMaW1pdGF0aW9uIGZvciBvbmx5IDEwIHJlcXVlc3RzIChkbyBub3QgdXNlIGlmIHlvdSB3YW50IHRvIGNyYXdsIGFsbCBsaW5rcylcXG4gICAgYXN5bmMgcmVxdWVzdEhhbmRsZXIoeyByZXF1ZXN0LCBlbnF1ZXVlTGlua3MgfSkge1xcbiAgICAgICAgY29uc29sZS5sb2cocmVxdWVzdC51cmwpO1xcbiAgICAgICAgYXdhaXQgZW5xdWV1ZUxpbmtzKHtcXG4gICAgICAgICAgICAvLyBTZXR0aW5nIHRoZSBzdHJhdGVneSB0byAnc2FtZS1zdWJkb21haW4nIHdpbGwgZW5xdWV1ZSBhbGwgbGlua3MgZm91bmQgdGhhdCBhcmUgb24gdGhlIHNhbWUgc3ViZG9tYWluIGFuZCBob3N0bmFtZVxcbiAgICAgICAgICAgIC8vIGFzIHJlcXVlc3QubG9hZGVkVXJsIG9yIHJlcXVlc3QudXJsXFxuICAgICAgICAgICAgLy8gaGlnaGxpZ2h0LW5leHQtbGluZVxcbiAgICAgICAgICAgIHN0cmF0ZWd5OiBFbnF1ZXVlU3RyYXRlZ3kuU2FtZUhvc3RuYW1lLFxcbiAgICAgICAgICAgIC8vIEFsdGVybmF0aXZlbHksIHlvdSBjYW4gcGFzcyBpbiB0aGUgc3RyaW5nICdzYW1lLXN1YmRvbWFpbidcXG4gICAgICAgICAgICAvLyBzdHJhdGVneTogJ3NhbWUtc3ViZG9tYWluJyxcXG4gICAgICAgIH0pO1xcbiAgICB9LFxcbn0pO1xcblxcbi8vIFJ1biB0aGUgY3Jhd2xlclxcbmF3YWl0IGNyYXdsZXIucnVuKFsnaHR0cHM6Ly9hcGlmeS5jb20vJ10pO1xcblxcbmF3YWl0IEFjdG9yLmV4aXQoKTtcXG5cIn0iLCJvcHRpb25zIjp7ImJ1aWxkIjoibGF0ZXN0IiwiY29udGVudFR5cGUiOiJhcHBsaWNhdGlvbi9qc29uOyBjaGFyc2V0PXV0Zi04IiwibWVtb3J5IjoxMDI0LCJ0aW1lb3V0IjoxODB9fQ.dyU8vmMEV9LyeUOm-72BRE7THBxt7nDR7zN35H27ulw\&asrc=run_on_apify)
import { Actor } from 'apify'; import { CheerioCrawler, EnqueueStrategy } from 'crawlee';
await Actor.init();
const crawler = new CheerioCrawler({ maxRequestsPerCrawl: 10, // Limitation for only 10 requests (do not use if you want to crawl all links) async requestHandler({ request, enqueueLinks }) { console.log(request.url); await enqueueLinks({ // Setting the strategy to 'same-subdomain' will enqueue all links found that are on the same subdomain and hostname // as request.loadedUrl or request.url strategy: EnqueueStrategy.SameHostname, // Alternatively, you can pass in the string 'same-subdomain' // strategy: 'same-subdomain', }); }, });
// Run the crawler await crawler.run(['https://apify.com/']);
await Actor.exit();
---
# Crawl a single URL
Copy for LLM
This example uses the [`got-scraping`](https://github.com/apify/got-scraping) npm package to grab the HTML of a web page.
[Run on](https://console.apify.com/actors/kk67IcZkKSSBTslXI?runConfig=eyJ1IjoiRWdQdHczb2VqNlRhRHQ1cW4iLCJ2IjoxfQ.eyJpbnB1dCI6IntcImNvZGVcIjpcImltcG9ydCB7IGdvdFNjcmFwaW5nIH0gZnJvbSAnZ290LXNjcmFwaW5nJztcXG5cXG4vLyBHZXQgdGhlIEhUTUwgb2YgYSB3ZWIgcGFnZVxcbmNvbnN0IHsgYm9keSB9ID0gYXdhaXQgZ290U2NyYXBpbmcoeyB1cmw6ICdodHRwczovL3d3dy5leGFtcGxlLmNvbScgfSk7XFxuY29uc29sZS5sb2coYm9keSk7XFxuXCJ9Iiwib3B0aW9ucyI6eyJidWlsZCI6ImxhdGVzdCIsImNvbnRlbnRUeXBlIjoiYXBwbGljYXRpb24vanNvbjsgY2hhcnNldD11dGYtOCIsIm1lbW9yeSI6MTAyNCwidGltZW91dCI6MTgwfX0.0S1i1yD10_82mLCH3VWFtCZTU4-BDrDU1UGY208IqgE\&asrc=run_on_apify)
import { gotScraping } from 'got-scraping';
// Get the HTML of a web page const { body } = await gotScraping({ url: 'https://www.example.com' }); console.log(body);
If you don't want to hard-code the URL into the script, refer to the [Accept User Input](https://docs.apify.com/sdk/js/sdk/js/docs/examples/accept-user-input.md) example.
---
# Crawl a sitemap
Copy for LLM
This example downloads and crawls the URLs from a sitemap.
* Cheerio Crawler
* Puppeteer Crawler
* Playwright Crawler
Using `CheerioCrawler`:
[Run on](https://console.apify.com/actors/kk67IcZkKSSBTslXI?runConfig=eyJ1IjoiRWdQdHczb2VqNlRhRHQ1cW4iLCJ2IjoxfQ.eyJpbnB1dCI6IntcImNvZGVcIjpcImltcG9ydCB7IEFjdG9yIH0gZnJvbSAnYXBpZnknO1xcbmltcG9ydCB7IENoZWVyaW9DcmF3bGVyLCBkb3dubG9hZExpc3RPZlVybHMgfSBmcm9tICdjcmF3bGVlJztcXG5cXG5hd2FpdCBBY3Rvci5pbml0KCk7XFxuXFxuY29uc3QgY3Jhd2xlciA9IG5ldyBDaGVlcmlvQ3Jhd2xlcih7XFxuICAgIC8vIEZ1bmN0aW9uIGNhbGxlZCBmb3IgZWFjaCBVUkxcXG4gICAgYXN5bmMgcmVxdWVzdEhhbmRsZXIoeyByZXF1ZXN0IH0pIHtcXG4gICAgICAgIGNvbnNvbGUubG9nKHJlcXVlc3QudXJsKTtcXG4gICAgfSxcXG4gICAgbWF4UmVxdWVzdHNQZXJDcmF3bDogMTAsIC8vIExpbWl0YXRpb24gZm9yIG9ubHkgMTAgcmVxdWVzdHMgKGRvIG5vdCB1c2UgaWYgeW91IHdhbnQgdG8gY3Jhd2wgYSBzaXRlbWFwKVxcbn0pO1xcblxcbmNvbnN0IGxpc3RPZlVybHMgPSBhd2FpdCBkb3dubG9hZExpc3RPZlVybHMoe1xcbiAgICB1cmw6ICdodHRwczovL2FwaWZ5LmNvbS9zaXRlbWFwLnhtbCcsXFxufSk7XFxuXFxuLy8gUnVuIHRoZSBjcmF3bGVyXFxuYXdhaXQgY3Jhd2xlci5ydW4obGlzdE9mVXJscyk7XFxuXFxuYXdhaXQgQWN0b3IuZXhpdCgpO1xcblwifSIsIm9wdGlvbnMiOnsiYnVpbGQiOiJsYXRlc3QiLCJjb250ZW50VHlwZSI6ImFwcGxpY2F0aW9uL2pzb247IGNoYXJzZXQ9dXRmLTgiLCJtZW1vcnkiOjEwMjQsInRpbWVvdXQiOjE4MH19.XWC3QQWKIsRIB8TdL40CGjzvHiqadKnt7F-9rhoHEEo\&asrc=run_on_apify)
import { Actor } from 'apify'; import { CheerioCrawler, downloadListOfUrls } from 'crawlee';
await Actor.init();
const crawler = new CheerioCrawler({ // Function called for each URL async requestHandler({ request }) { console.log(request.url); }, maxRequestsPerCrawl: 10, // Limitation for only 10 requests (do not use if you want to crawl a sitemap) });
const listOfUrls = await downloadListOfUrls({ url: 'https://apify.com/sitemap.xml', });
// Run the crawler await crawler.run(listOfUrls);
await Actor.exit();
Using `PuppeteerCrawler`:
tip
To run this example on the Apify Platform, select the `apify/actor-node-puppeteer-chrome` image for your Dockerfile.
[Run on](https://console.apify.com/actors/7tWSD8hrYzuc9Lte7?runConfig=eyJ1IjoiRWdQdHczb2VqNlRhRHQ1cW4iLCJ2IjoxfQ.eyJpbnB1dCI6IntcImNvZGVcIjpcImltcG9ydCB7IEFjdG9yIH0gZnJvbSAnYXBpZnknO1xcbmltcG9ydCB7IGRvd25sb2FkTGlzdE9mVXJscywgUHVwcGV0ZWVyQ3Jhd2xlciB9IGZyb20gJ2NyYXdsZWUnO1xcblxcbmF3YWl0IEFjdG9yLmluaXQoKTtcXG5cXG5jb25zdCBjcmF3bGVyID0gbmV3IFB1cHBldGVlckNyYXdsZXIoe1xcbiAgICAvLyBGdW5jdGlvbiBjYWxsZWQgZm9yIGVhY2ggVVJMXFxuICAgIGFzeW5jIHJlcXVlc3RIYW5kbGVyKHsgcmVxdWVzdCB9KSB7XFxuICAgICAgICBjb25zb2xlLmxvZyhyZXF1ZXN0LnVybCk7XFxuICAgIH0sXFxuICAgIG1heFJlcXVlc3RzUGVyQ3Jhd2w6IDEwLCAvLyBMaW1pdGF0aW9uIGZvciBvbmx5IDEwIHJlcXVlc3RzIChkbyBub3QgdXNlIGlmIHlvdSB3YW50IHRvIGNyYXdsIGEgc2l0ZW1hcClcXG59KTtcXG5cXG5jb25zdCBsaXN0T2ZVcmxzID0gYXdhaXQgZG93bmxvYWRMaXN0T2ZVcmxzKHtcXG4gICAgdXJsOiAnaHR0cHM6Ly9hcGlmeS5jb20vc2l0ZW1hcC54bWwnLFxcbn0pO1xcblxcbi8vIFJ1biB0aGUgY3Jhd2xlclxcbmF3YWl0IGNyYXdsZXIucnVuKGxpc3RPZlVybHMpO1xcblxcbmF3YWl0IEFjdG9yLmV4aXQoKTtcXG5cIn0iLCJvcHRpb25zIjp7ImJ1aWxkIjoibGF0ZXN0IiwiY29udGVudFR5cGUiOiJhcHBsaWNhdGlvbi9qc29uOyBjaGFyc2V0PXV0Zi04IiwibWVtb3J5Ijo0MDk2LCJ0aW1lb3V0IjoxODB9fQ._LOESjvhSiJamXz1EhpRWvA_afgRmfQABfI1Wgts8c8\&asrc=run_on_apify)
import { Actor } from 'apify'; import { downloadListOfUrls, PuppeteerCrawler } from 'crawlee';
await Actor.init();
const crawler = new PuppeteerCrawler({ // Function called for each URL async requestHandler({ request }) { console.log(request.url); }, maxRequestsPerCrawl: 10, // Limitation for only 10 requests (do not use if you want to crawl a sitemap) });
const listOfUrls = await downloadListOfUrls({ url: 'https://apify.com/sitemap.xml', });
// Run the crawler await crawler.run(listOfUrls);
await Actor.exit();
Using `PlaywrightCrawler`:
tip
To run this example on the Apify Platform, select the `apify/actor-node-playwright-chrome` image for your Dockerfile.
[Run on](https://console.apify.com/actors/6i5QsHBMtm3hKph70?runConfig=eyJ1IjoiRWdQdHczb2VqNlRhRHQ1cW4iLCJ2IjoxfQ.eyJpbnB1dCI6IntcImNvZGVcIjpcImltcG9ydCB7IEFjdG9yIH0gZnJvbSAnYXBpZnknO1xcbmltcG9ydCB7IGRvd25sb2FkTGlzdE9mVXJscywgUGxheXdyaWdodENyYXdsZXIgfSBmcm9tICdjcmF3bGVlJztcXG5cXG5hd2FpdCBBY3Rvci5pbml0KCk7XFxuXFxuY29uc3QgY3Jhd2xlciA9IG5ldyBQbGF5d3JpZ2h0Q3Jhd2xlcih7XFxuICAgIC8vIEZ1bmN0aW9uIGNhbGxlZCBmb3IgZWFjaCBVUkxcXG4gICAgYXN5bmMgcmVxdWVzdEhhbmRsZXIoeyByZXF1ZXN0IH0pIHtcXG4gICAgICAgIGNvbnNvbGUubG9nKHJlcXVlc3QudXJsKTtcXG4gICAgfSxcXG4gICAgbWF4UmVxdWVzdHNQZXJDcmF3bDogMTAsIC8vIExpbWl0YXRpb24gZm9yIG9ubHkgMTAgcmVxdWVzdHMgKGRvIG5vdCB1c2UgaWYgeW91IHdhbnQgdG8gY3Jhd2wgYSBzaXRlbWFwKVxcbn0pO1xcblxcbmNvbnN0IGxpc3RPZlVybHMgPSBhd2FpdCBkb3dubG9hZExpc3RPZlVybHMoe1xcbiAgICB1cmw6ICdodHRwczovL2FwaWZ5LmNvbS9zaXRlbWFwLnhtbCcsXFxufSk7XFxuXFxuLy8gUnVuIHRoZSBjcmF3bGVyXFxuYXdhaXQgY3Jhd2xlci5ydW4obGlzdE9mVXJscyk7XFxuXFxuYXdhaXQgQWN0b3IuZXhpdCgpO1xcblwifSIsIm9wdGlvbnMiOnsiYnVpbGQiOiJsYXRlc3QiLCJjb250ZW50VHlwZSI6ImFwcGxpY2F0aW9uL2pzb247IGNoYXJzZXQ9dXRmLTgiLCJtZW1vcnkiOjQwOTYsInRpbWVvdXQiOjE4MH19.qbl4ro1qZvqNhlkeysCWDSDwM0LV0A3CVXl89bDLbR4\&asrc=run_on_apify)
import { Actor } from 'apify'; import { downloadListOfUrls, PlaywrightCrawler } from 'crawlee';
await Actor.init();
const crawler = new PlaywrightCrawler({ // Function called for each URL async requestHandler({ request }) { console.log(request.url); }, maxRequestsPerCrawl: 10, // Limitation for only 10 requests (do not use if you want to crawl a sitemap) });
const listOfUrls = await downloadListOfUrls({ url: 'https://apify.com/sitemap.xml', });
// Run the crawler await crawler.run(listOfUrls);
await Actor.exit();
---
# Crawl some links on a website
Copy for LLM
This [`CheerioCrawler`](https://crawlee.dev/api/cheerio-crawler/class/CheerioCrawler) example uses the [`pseudoUrls`](https://crawlee.dev/api/core/class/PseudoUrl) property in the [`enqueueLinks()`](https://crawlee.dev/api/cheerio-crawler/interface/CheerioRequestHandlerInputs#enqueueLinks) method to only add links to the [`RequestQueue`](https://docs.apify.com/sdk/js/sdk/js/reference/class/RequestQueue.md) queue if they match the specified regular expression.
[Run on](https://console.apify.com/actors/kk67IcZkKSSBTslXI?runConfig=eyJ1IjoiRWdQdHczb2VqNlRhRHQ1cW4iLCJ2IjoxfQ.eyJpbnB1dCI6IntcImNvZGVcIjpcImltcG9ydCB7IEFjdG9yIH0gZnJvbSAnYXBpZnknO1xcbmltcG9ydCB7IENoZWVyaW9DcmF3bGVyIH0gZnJvbSAnY3Jhd2xlZSc7XFxuXFxuYXdhaXQgQWN0b3IuaW5pdCgpO1xcblxcbi8vIENyZWF0ZSBhIENoZWVyaW9DcmF3bGVyXFxuY29uc3QgY3Jhd2xlciA9IG5ldyBDaGVlcmlvQ3Jhd2xlcih7XFxuICAgIC8vIExpbWl0cyB0aGUgY3Jhd2xlciB0byBvbmx5IDEwIHJlcXVlc3RzIChkbyBub3QgdXNlIGlmIHlvdSB3YW50IHRvIGNyYXdsIGFsbCBsaW5rcylcXG4gICAgbWF4UmVxdWVzdHNQZXJDcmF3bDogMTAsXFxuICAgIC8vIEZ1bmN0aW9uIGNhbGxlZCBmb3IgZWFjaCBVUkxcXG4gICAgYXN5bmMgcmVxdWVzdEhhbmRsZXIoeyByZXF1ZXN0LCBlbnF1ZXVlTGlua3MgfSkge1xcbiAgICAgICAgY29uc29sZS5sb2cocmVxdWVzdC51cmwpO1xcbiAgICAgICAgLy8gQWRkIHNvbWUgbGlua3MgZnJvbSBwYWdlIHRvIHRoZSBjcmF3bGVyJ3MgUmVxdWVzdFF1ZXVlXFxuICAgICAgICBhd2FpdCBlbnF1ZXVlTGlua3Moe1xcbiAgICAgICAgICAgIHBzZXVkb1VybHM6IFsnaHR0cFtzP106Ly9hcGlmeS5jb20vWy4rXS9bLitdJ10sXFxuICAgICAgICB9KTtcXG4gICAgfSxcXG59KTtcXG5cXG4vLyBEZWZpbmUgdGhlIHN0YXJ0aW5nIFVSTCBhbmQgcnVuIHRoZSBjcmF3bGVyXFxuYXdhaXQgY3Jhd2xlci5ydW4oWydodHRwczovL2FwaWZ5LmNvbS9zdG9yZSddKTtcXG5cXG5hd2FpdCBBY3Rvci5leGl0KCk7XFxuXCJ9Iiwib3B0aW9ucyI6eyJidWlsZCI6ImxhdGVzdCIsImNvbnRlbnRUeXBlIjoiYXBwbGljYXRpb24vanNvbjsgY2hhcnNldD11dGYtOCIsIm1lbW9yeSI6MTAyNCwidGltZW91dCI6MTgwfX0.wHLH-CdKCylWDVcIRISOGWdcfzTZHeVAVlfiQhkzdko\&asrc=run_on_apify)
import { Actor } from 'apify'; import { CheerioCrawler } from 'crawlee';
await Actor.init();
// Create a CheerioCrawler const crawler = new CheerioCrawler({ // Limits the crawler to only 10 requests (do not use if you want to crawl all links) maxRequestsPerCrawl: 10, // Function called for each URL async requestHandler({ request, enqueueLinks }) { console.log(request.url); // Add some links from page to the crawler's RequestQueue await enqueueLinks({ pseudoUrls: ['http[s?]://apify.com/[.+]/[.+]'], }); }, });
// Define the starting URL and run the crawler await crawler.run(['https://apify.com/store']);
await Actor.exit();
---
# Forms
Copy for LLM
This example demonstrates how to use [`PuppeteerCrawler`](https://crawlee.dev/api/puppeteer-crawler/class/PuppeteerCrawler) to automatically fill and submit a search form to look up repositories on [GitHub](https://github.com) using headless Chrome / Puppeteer. The actor first fills in the search term, repository owner, start date and language of the repository, then submits the form and prints out the results. Finally, the results are saved either on the Apify platform to the default [`dataset`](https://docs.apify.com/sdk/js/sdk/js/reference/class/Dataset.md) or on the local machine as JSON files in `./storage/datasets/default`.
tip
To run this example on the Apify Platform, select the `apify/actor-node-puppeteer-chrome` image for your Dockerfile.
[Run on](https://console.apify.com/actors/7tWSD8hrYzuc9Lte7?runConfig=eyJ1IjoiRWdQdHczb2VqNlRhRHQ1cW4iLCJ2IjoxfQ.eyJpbnB1dCI6IntcImNvZGVcIjpcImltcG9ydCB7IEFjdG9yIH0gZnJvbSAnYXBpZnknO1xcbmltcG9ydCB7IGxhdW5jaFB1cHBldGVlciB9IGZyb20gJ2NyYXdsZWUnO1xcblxcbmF3YWl0IEFjdG9yLmluaXQoKTtcXG5cXG4vLyBMYXVuY2ggdGhlIHdlYiBicm93c2VyLlxcbmNvbnN0IGJyb3dzZXIgPSBhd2FpdCBsYXVuY2hQdXBwZXRlZXIoKTtcXG5cXG4vLyBDcmVhdGUgYW5kIG5hdmlnYXRlIG5ldyBwYWdlXFxuY29uc29sZS5sb2coJ09wZW4gdGFyZ2V0IHBhZ2UnKTtcXG5jb25zdCBwYWdlID0gYXdhaXQgYnJvd3Nlci5uZXdQYWdlKCk7XFxuYXdhaXQgcGFnZS5nb3RvKCdodHRwczovL2dpdGh1Yi5jb20vc2VhcmNoL2FkdmFuY2VkJyk7XFxuXFxuLy8gRmlsbCBmb3JtIGZpZWxkcyBhbmQgc2VsZWN0IGRlc2lyZWQgc2VhcmNoIG9wdGlvbnNcXG5jb25zb2xlLmxvZygnRmlsbCBpbiBzZWFyY2ggZm9ybScpO1xcbmF3YWl0IHBhZ2UudHlwZSgnI2Fkdl9jb2RlX3NlYXJjaCBpbnB1dC5qcy1hZHZhbmNlZC1zZWFyY2gtaW5wdXQnLCAnYXBpZnktanMnKTtcXG5hd2FpdCBwYWdlLnR5cGUoJyNzZWFyY2hfZnJvbScsICdhcGlmeScpO1xcbmF3YWl0IHBhZ2UudHlwZSgnI3NlYXJjaF9kYXRlJywgJz4yMDE1Jyk7XFxuYXdhaXQgcGFnZS5zZWxlY3QoJ3NlbGVjdCNzZWFyY2hfbGFuZ3VhZ2UnLCAnSmF2YVNjcmlwdCcpO1xcblxcbi8vIFN1Ym1pdCB0aGUgZm9ybSBhbmQgd2FpdCBmb3IgZnVsbCBsb2FkIG9mIG5leHQgcGFnZVxcbmNvbnNvbGUubG9nKCdTdWJtaXQgc2VhcmNoIGZvcm0nKTtcXG5hd2FpdCBQcm9taXNlLmFsbChbXFxuICAgIHBhZ2Uud2FpdEZvck5hdmlnYXRpb24oKSxcXG4gICAgcGFnZS5jbGljaygnI2Fkdl9jb2RlX3NlYXJjaCBidXR0b25bdHlwZT1cXFwic3VibWl0XFxcIl0nKSxcXG5dKTtcXG5cXG4vLyBPYnRhaW4gYW5kIHByaW50IGxpc3Qgb2Ygc2VhcmNoIHJlc3VsdHNcXG5jb25zdCByZXN1bHRzID0gYXdhaXQgcGFnZS4kJGV2YWwoJ2Rpdi5mNC50ZXh0LW5vcm1hbCBhJywgKG5vZGVzKSA9PlxcbiAgICBub2Rlcy5tYXAoKG5vZGUpID0-ICh7XFxuICAgICAgICB1cmw6IG5vZGUuaHJlZixcXG4gICAgICAgIG5hbWU6IG5vZGUuaW5uZXJUZXh0LFxcbiAgICB9KSksXFxuKTtcXG5cXG5jb25zb2xlLmxvZygnUmVzdWx0czonLCByZXN1bHRzKTtcXG5cXG4vLyBTdG9yZSBkYXRhIGluIGRlZmF1bHQgZGF0YXNldFxcbmF3YWl0IEFjdG9yLnB1c2hEYXRhKHJlc3VsdHMpO1xcblxcbi8vIENsb3NlIGJyb3dzZXJcXG5hd2FpdCBicm93c2VyLmNsb3NlKCk7XFxuXFxuYXdhaXQgQWN0b3IuZXhpdCgpO1xcblwifSIsIm9wdGlvbnMiOnsiYnVpbGQiOiJsYXRlc3QiLCJjb250ZW50VHlwZSI6ImFwcGxpY2F0aW9uL2pzb247IGNoYXJzZXQ9dXRmLTgiLCJtZW1vcnkiOjQwOTYsInRpbWVvdXQiOjE4MH19.50kP3gcHDUJWt6VevBrpm1zXyG6s5l7JYuSd2JiWhVg\&asrc=run_on_apify)
import { Actor } from 'apify'; import { launchPuppeteer } from 'crawlee';
await Actor.init();
// Launch the web browser. const browser = await launchPuppeteer();
// Create and navigate new page console.log('Open target page'); const page = await browser.newPage(); await page.goto('https://github.com/search/advanced');
// Fill form fields and select desired search options console.log('Fill in search form'); await page.type('#adv_code_search input.js-advanced-search-input', 'apify-js'); await page.type('#search_from', 'apify'); await page.type('#search_date', '>2015'); await page.select('select#search_language', 'JavaScript');
// Submit the form and wait for full load of next page console.log('Submit search form'); await Promise.all([ page.waitForNavigation(), page.click('#adv_code_search button[type="submit"]'), ]);
// Obtain and print list of search results const results = await page.$$eval('div.f4.text-normal a', (nodes) => nodes.map((node) => ({ url: node.href, name: node.innerText, })), );
console.log('Results:', results);
// Store data in default dataset await Actor.pushData(results);
// Close browser await browser.close();
await Actor.exit();
---
# Dataset Map and Reduce methods
Copy for LLM
This example shows an easy use-case of the [`Dataset`](https://docs.apify.com/sdk/js/sdk/js/reference/class/Dataset.md) [`map`](https://docs.apify.com/sdk/js/sdk/js/reference/class/Dataset.md#map) and [`reduce`](https://docs.apify.com/sdk/js/sdk/js/reference/class/Dataset.md#reduce) methods. Both methods can be used to simplify the dataset results workflow process. Both can be called on the [dataset](https://docs.apify.com/sdk/js/sdk/js/reference/class/Dataset.md) directly.
Important to mention is that both methods return a new result (`map` returns a new array and `reduce` can return any type) - neither method updates the dataset in any way.
Examples for both methods are demonstrated on a simple dataset containing the results scraped from a page: the `URL` and a hypothetical number of `h1` - `h3` header elements under the `headingCount` key.
This data structure is stored in the default dataset under `{PROJECT_FOLDER}/storage/datasets/default/`. If you want to simulate the functionality, you can use the [`Actor.pushData()`](https://docs.apify.com/sdk/js/sdk/js/reference/class/Dataset.md#pushData) method to save the example `JSON array` to your dataset.
[ { "url": "https://apify.com/", "headingCount": 11 }, { "url": "https://apify.com/storage", "headingCount": 8 }, { "url": "https://apify.com/proxy", "headingCount": 4 } ]
### Map[](#map)
The dataset `map` method is very similar to standard Array mapping methods. It produces a new array of values by mapping each value in the existing array through a transformation function and an options parameter.
The `map` method used to check if are there more than 5 header elements on each page:
[Run on](https://console.apify.com/actors/kk67IcZkKSSBTslXI?runConfig=eyJ1IjoiRWdQdHczb2VqNlRhRHQ1cW4iLCJ2IjoxfQ.eyJpbnB1dCI6IntcImNvZGVcIjpcImltcG9ydCB7IEFjdG9yIH0gZnJvbSAnYXBpZnknO1xcblxcbmF3YWl0IEFjdG9yLmluaXQoKTtcXG5cXG5jb25zdCBkYXRhc2V0ID0gYXdhaXQgQWN0b3Iub3BlbkRhdGFzZXQ8eyBoZWFkaW5nQ291bnQ6IG51bWJlciB9PigpO1xcblxcbi8vIGNhbGxpbmcgbWFwIGZ1bmN0aW9uIGFuZCBmaWx0ZXJpbmcgdGhyb3VnaCBtYXBwZWQgaXRlbXNcXG5jb25zdCBtb3JlVGhhbjVoZWFkZXJzID0gKFxcbiAgICBhd2FpdCBkYXRhc2V0Lm1hcCgoaXRlbSkgPT4gaXRlbS5oZWFkaW5nQ291bnQpXFxuKS5maWx0ZXIoKGNvdW50KSA9PiBjb3VudCA-IDUpO1xcblxcbi8vIHNhdmluZyByZXN1bHQgb2YgbWFwIHRvIGRlZmF1bHQgS2V5LXZhbHVlIHN0b3JlXFxuYXdhaXQgQWN0b3Iuc2V0VmFsdWUoJ3BhZ2VzX3dpdGhfbW9yZV90aGFuXzVfaGVhZGVycycsIG1vcmVUaGFuNWhlYWRlcnMpO1xcblxcbmF3YWl0IEFjdG9yLmV4aXQoKTtcXG5cIn0iLCJvcHRpb25zIjp7ImJ1aWxkIjoibGF0ZXN0IiwiY29udGVudFR5cGUiOiJhcHBsaWNhdGlvbi9qc29uOyBjaGFyc2V0PXV0Zi04IiwibWVtb3J5IjoxMDI0LCJ0aW1lb3V0IjoxODB9fQ.rEYgnbXjDJ4eTxXqxEB8PtTkf-Ky6EDTYuYqMHw2XKE\&asrc=run_on_apify)
import { Actor } from 'apify';
await Actor.init();
const dataset = await Actor.openDataset<{ headingCount: number }>();
// calling map function and filtering through mapped items const moreThan5headers = ( await dataset.map((item) => item.headingCount) ).filter((count) => count > 5);
// saving result of map to default Key-value store await Actor.setValue('pages_with_more_than_5_headers', moreThan5headers);
await Actor.exit();
The `moreThan5headers` variable is an array of `headingCount` attributes where the number of headers is greater than 5.
The `map` method's result value saved to the [`key-value store`](https://docs.apify.com/sdk/js/sdk/js/reference/class/KeyValueStore.md) should be:
[11, 8];
### Reduce[](#reduce)
The dataset `reduce` method does not produce a new array of values - it reduces a list of values down to a single value. The method iterates through the items in the dataset using the [`memo` argument](https://docs.apify.com/sdk/js/sdk/js/reference/class/Dataset.md#reduce). After performing the necessary calculation, the `memo` is sent to the next iteration, while the item just processed is reduced (removed).
Using the `reduce` method to get the total number of headers scraped (all items in the dataset):
[Run on](https://console.apify.com/actors/kk67IcZkKSSBTslXI?runConfig=eyJ1IjoiRWdQdHczb2VqNlRhRHQ1cW4iLCJ2IjoxfQ.eyJpbnB1dCI6IntcImNvZGVcIjpcImltcG9ydCB7IEFjdG9yIH0gZnJvbSAnYXBpZnknO1xcblxcbmNvbnN0IGRhdGFzZXQgPSBhd2FpdCBBY3Rvci5vcGVuRGF0YXNldCgpO1xcblxcbi8vIGNhbGxpbmcgcmVkdWNlIGZ1bmN0aW9uIGFuZCB1c2luZyBtZW1vIHRvIGNhbGN1bGF0ZSBudW1iZXIgb2YgaGVhZGVyc1xcbmNvbnN0IHBhZ2VzSGVhZGluZ0NvdW50ID0gYXdhaXQgZGF0YXNldC5yZWR1Y2UoKG1lbW8sIHZhbHVlKSA9PiB7XFxuICAgIHJldHVybiBtZW1vICsgdmFsdWUuaGVhZGluZ0NvdW50O1xcbn0sIDApO1xcblxcbi8vIHNhdmluZyByZXN1bHQgb2YgbWFwIHRvIGRlZmF1bHQgS2V5LXZhbHVlIHN0b3JlXFxuYXdhaXQgQWN0b3Iuc2V0VmFsdWUoJ3BhZ2VzX2hlYWRpbmdfY291bnQnLCBwYWdlc0hlYWRpbmdDb3VudCk7XFxuXCJ9Iiwib3B0aW9ucyI6eyJidWlsZCI6ImxhdGVzdCIsImNvbnRlbnRUeXBlIjoiYXBwbGljYXRpb24vanNvbjsgY2hhcnNldD11dGYtOCIsIm1lbW9yeSI6MTAyNCwidGltZW91dCI6MTgwfX0.Ca5oSQWfTfmi-fp-gu9TTQKaoJ4BQW-1AhHXekmCV9c\&asrc=run_on_apify)
import { Actor } from 'apify';
const dataset = await Actor.openDataset();
// calling reduce function and using memo to calculate number of headers const pagesHeadingCount = await dataset.reduce((memo, value) => { return memo + value.headingCount; }, 0);
// saving result of map to default Key-value store await Actor.setValue('pages_heading_count', pagesHeadingCount);
The original dataset will be reduced to a single value, `pagesHeadingCount`, which contains the count of all headers for all scraped pages (all dataset items).
The `reduce` method's result value saved to the [`key-value store`](https://docs.apify.com/sdk/js/sdk/js/reference/class/KeyValueStore.md) should be:
23;
---
# Playwright crawler
Copy for LLM
This example demonstrates how to use [`PlaywrightCrawler`](https://crawlee.dev/api/playwright-crawler/class/PlaywrightCrawler) in combination with [`RequestQueue`](https://docs.apify.com/sdk/js/sdk/js/reference/class/RequestQueue.md) to recursively scrape the [Hacker News website](https://news.ycombinator.com) using headless Chrome / Playwright.
The crawler starts with a single URL, finds links to next pages, enqueues them and continues until no more desired links are available. The results are stored to the default dataset. In local configuration, the results are stored as JSON files in `./storage/datasets/default`
tip
To run this example on the Apify Platform, select the `apify/actor-node-playwright-chrome` image for your Dockerfile.
[Run on](https://console.apify.com/actors/6i5QsHBMtm3hKph70?runConfig=eyJ1IjoiRWdQdHczb2VqNlRhRHQ1cW4iLCJ2IjoxfQ.eyJpbnB1dCI6IntcImNvZGVcIjpcImltcG9ydCB7IEFjdG9yIH0gZnJvbSAnYXBpZnknO1xcbmltcG9ydCB7IFBsYXl3cmlnaHRDcmF3bGVyIH0gZnJvbSAnY3Jhd2xlZSc7XFxuXFxuYXdhaXQgQWN0b3IuaW5pdCgpO1xcblxcbi8vIENyZWF0ZSBhbiBpbnN0YW5jZSBvZiB0aGUgUGxheXdyaWdodENyYXdsZXIgY2xhc3MgLSBhIGNyYXdsZXJcXG4vLyB0aGF0IGF1dG9tYXRpY2FsbHkgbG9hZHMgdGhlIFVSTHMgaW4gaGVhZGxlc3MgQ2hyb21lIC8gUGxheXdyaWdodC5cXG5jb25zdCBjcmF3bGVyID0gbmV3IFBsYXl3cmlnaHRDcmF3bGVyKHtcXG4gICAgbGF1bmNoQ29udGV4dDoge1xcbiAgICAgICAgLy8gSGVyZSB5b3UgY2FuIHNldCBvcHRpb25zIHRoYXQgYXJlIHBhc3NlZCB0byB0aGUgcGxheXdyaWdodCAubGF1bmNoKCkgZnVuY3Rpb24uXFxuICAgICAgICBsYXVuY2hPcHRpb25zOiB7XFxuICAgICAgICAgICAgaGVhZGxlc3M6IHRydWUsXFxuICAgICAgICB9LFxcbiAgICB9LFxcblxcbiAgICAvLyBTdG9wIGNyYXdsaW5nIGFmdGVyIHNldmVyYWwgcGFnZXNcXG4gICAgbWF4UmVxdWVzdHNQZXJDcmF3bDogNTAsXFxuXFxuICAgIC8vIFRoaXMgZnVuY3Rpb24gd2lsbCBiZSBjYWxsZWQgZm9yIGVhY2ggVVJMIHRvIGNyYXdsLlxcbiAgICAvLyBIZXJlIHlvdSBjYW4gd3JpdGUgdGhlIFBsYXl3cmlnaHQgc2NyaXB0cyB5b3UgYXJlIGZhbWlsaWFyIHdpdGgsXFxuICAgIC8vIHdpdGggdGhlIGV4Y2VwdGlvbiB0aGF0IGJyb3dzZXJzIGFuZCBwYWdlcyBhcmUgYXV0b21hdGljYWxseSBtYW5hZ2VkIGJ5IHRoZSBBcGlmeSBTREsuXFxuICAgIC8vIFRoZSBmdW5jdGlvbiBhY2NlcHRzIGEgc2luZ2xlIHBhcmFtZXRlciwgd2hpY2ggaXMgYW4gb2JqZWN0IHdpdGggYSBsb3Qgb2YgcHJvcGVydGllcyxcXG4gICAgLy8gdGhlIG1vc3QgaW1wb3J0YW50IGJlaW5nOlxcbiAgICAvLyAtIHJlcXVlc3Q6IGFuIGluc3RhbmNlIG9mIHRoZSBSZXF1ZXN0IGNsYXNzIHdpdGggaW5mb3JtYXRpb24gc3VjaCBhcyBVUkwgYW5kIEhUVFAgbWV0aG9kXFxuICAgIC8vIC0gcGFnZTogUGxheXdyaWdodCdzIFBhZ2Ugb2JqZWN0IChzZWUgaHR0cHM6Ly9wbGF5d3JpZ2h0LmRldi9kb2NzL2FwaS9jbGFzcy1wYWdlKVxcbiAgICBhc3luYyByZXF1ZXN0SGFuZGxlcih7IHJlcXVlc3QsIHBhZ2UsIGVucXVldWVMaW5rcyB9KSB7XFxuICAgICAgICBjb25zb2xlLmxvZyhgUHJvY2Vzc2luZyAke3JlcXVlc3QudXJsfS4uLmApO1xcblxcbiAgICAgICAgLy8gQSBmdW5jdGlvbiB0byBiZSBldmFsdWF0ZWQgYnkgUGxheXdyaWdodCB3aXRoaW4gdGhlIGJyb3dzZXIgY29udGV4dC5cXG4gICAgICAgIGNvbnN0IGRhdGEgPSBhd2FpdCBwYWdlLiQkZXZhbCgnLmF0aGluZycsICgkcG9zdHMpID0-IHtcXG4gICAgICAgICAgICBjb25zdCBzY3JhcGVkRGF0YSA9IFtdO1xcblxcbiAgICAgICAgICAgIC8vIFdlJ3JlIGdldHRpbmcgdGhlIHRpdGxlLCByYW5rIGFuZCBVUkwgb2YgZWFjaCBwb3N0IG9uIEhhY2tlciBOZXdzLlxcbiAgICAgICAgICAgICRwb3N0cy5mb3JFYWNoKCgkcG9zdCkgPT4ge1xcbiAgICAgICAgICAgICAgICBzY3JhcGVkRGF0YS5wdXNoKHtcXG4gICAgICAgICAgICAgICAgICAgIHRpdGxlOiAkcG9zdC5xdWVyeVNlbGVjdG9yKCcudGl0bGUgYScpLmlubmVyVGV4dCxcXG4gICAgICAgICAgICAgICAgICAgIHJhbms6ICRwb3N0LnF1ZXJ5U2VsZWN0b3IoJy5yYW5rJykuaW5uZXJUZXh0LFxcbiAgICAgICAgICAgICAgICAgICAgaHJlZjogJHBvc3QucXVlcnlTZWxlY3RvcignLnRpdGxlIGEnKS5ocmVmLFxcbiAgICAgICAgICAgICAgICB9KTtcXG4gICAgICAgICAgICB9KTtcXG5cXG4gICAgICAgICAgICByZXR1cm4gc2NyYXBlZERhdGE7XFxuICAgICAgICB9KTtcXG5cXG4gICAgICAgIC8vIFN0b3JlIHRoZSByZXN1bHRzIHRvIHRoZSBkZWZhdWx0IGRhdGFzZXQuXFxuICAgICAgICBhd2FpdCBBY3Rvci5wdXNoRGF0YShkYXRhKTtcXG5cXG4gICAgICAgIC8vIEZpbmQgYSBsaW5rIHRvIHRoZSBuZXh0IHBhZ2UgYW5kIGVucXVldWUgaXQgaWYgaXQgZXhpc3RzLlxcbiAgICAgICAgY29uc3QgaW5mb3MgPSBhd2FpdCBlbnF1ZXVlTGlua3Moe1xcbiAgICAgICAgICAgIHNlbGVjdG9yOiAnLm1vcmVsaW5rJyxcXG4gICAgICAgIH0pO1xcblxcbiAgICAgICAgaWYgKGluZm9zLnByb2Nlc3NlZFJlcXVlc3RzLmxlbmd0aCA9PT0gMClcXG4gICAgICAgICAgICBjb25zb2xlLmxvZyhgJHtyZXF1ZXN0LnVybH0gaXMgdGhlIGxhc3QgcGFnZSFgKTtcXG4gICAgfSxcXG5cXG4gICAgLy8gVGhpcyBmdW5jdGlvbiBpcyBjYWxsZWQgaWYgdGhlIHBhZ2UgcHJvY2Vzc2luZyBmYWlsZWQgbW9yZSB0aGFuIG1heFJlcXVlc3RSZXRyaWVzKzEgdGltZXMuXFxuICAgIGZhaWxlZFJlcXVlc3RIYW5kbGVyKHsgcmVxdWVzdCB9KSB7XFxuICAgICAgICBjb25zb2xlLmxvZyhgUmVxdWVzdCAke3JlcXVlc3QudXJsfSBmYWlsZWQgdG9vIG1hbnkgdGltZXMuYCk7XFxuICAgIH0sXFxufSk7XFxuXFxuLy8gUnVuIHRoZSBjcmF3bGVyIGFuZCB3YWl0IGZvciBpdCB0byBmaW5pc2guXFxuYXdhaXQgY3Jhd2xlci5ydW4oWydodHRwczovL25ld3MueWNvbWJpbmF0b3IuY29tLyddKTtcXG5cXG5jb25zb2xlLmxvZygnQ3Jhd2xlciBmaW5pc2hlZC4nKTtcXG5cXG5hd2FpdCBBY3Rvci5leGl0KCk7XFxuXCJ9Iiwib3B0aW9ucyI6eyJidWlsZCI6ImxhdGVzdCIsImNvbnRlbnRUeXBlIjoiYXBwbGljYXRpb24vanNvbjsgY2hhcnNldD11dGYtOCIsIm1lbW9yeSI6NDA5NiwidGltZW91dCI6MTgwfX0.pYKENUrfvL61rPML7uc96hLxWD7O0UxTc_ZALKmFpyA\&asrc=run_on_apify)
import { Actor } from 'apify'; import { PlaywrightCrawler } from 'crawlee';
await Actor.init();
// Create an instance of the PlaywrightCrawler class - a crawler // that automatically loads the URLs in headless Chrome / Playwright. const crawler = new PlaywrightCrawler({ launchContext: { // Here you can set options that are passed to the playwright .launch() function. launchOptions: { headless: true, }, },
// Stop crawling after several pages
maxRequestsPerCrawl: 50,
// This function will be called for each URL to crawl.
// Here you can write the Playwright scripts you are familiar with,
// with the exception that browsers and pages are automatically managed by the Apify SDK.
// The function accepts a single parameter, which is an object with a lot of properties,
// the most important being:
// - request: an instance of the Request class with information such as URL and HTTP method
// - page: Playwright's Page object (see https://playwright.dev/docs/api/class-page)
async requestHandler({ request, page, enqueueLinks }) {
console.log(`Processing ${request.url}...`);
// A function to be evaluated by Playwright within the browser context.
const data = await page.$$eval('.athing', ($posts) => {
const scrapedData = [];
// We're getting the title, rank and URL of each post on Hacker News.
$posts.forEach(($post) => {
scrapedData.push({
title: $post.querySelector('.title a').innerText,
rank: $post.querySelector('.rank').innerText,
href: $post.querySelector('.title a').href,
});
});
return scrapedData;
});
// Store the results to the default dataset.
await Actor.pushData(data);
// Find a link to the next page and enqueue it if it exists.
const infos = await enqueueLinks({
selector: '.morelink',
});
if (infos.processedRequests.length === 0)
console.log(`${request.url} is the last page!`);
},
// This function is called if the page processing failed more than maxRequestRetries+1 times.
failedRequestHandler({ request }) {
console.log(`Request ${request.url} failed too many times.`);
},
});
// Run the crawler and wait for it to finish. await crawler.run(['https://news.ycombinator.com/']);
console.log('Crawler finished.');
await Actor.exit();
---
# Puppeteer crawler
Copy for LLM
This example demonstrates how to use [`PuppeteerCrawler`](https://crawlee.dev/api/puppeteer-crawler/class/PuppeteerCrawler) in combination with [`RequestQueue`](https://docs.apify.com/sdk/js/sdk/js/reference/class/RequestQueue.md) to recursively scrape the [Hacker News website](https://news.ycombinator.com) using headless Chrome / Puppeteer.
The crawler starts with a single URL, finds links to next pages, enqueues them and continues until no more desired links are available. The results are stored to the default dataset. In local configuration, the results are stored as JSON files in `./storage/datasets/default`
tip
To run this example on the Apify Platform, select the `apify/actor-node-puppeteer-chrome` image for your Dockerfile.
[Run on](https://console.apify.com/actors/7tWSD8hrYzuc9Lte7?runConfig=eyJ1IjoiRWdQdHczb2VqNlRhRHQ1cW4iLCJ2IjoxfQ.eyJpbnB1dCI6IntcImNvZGVcIjpcImltcG9ydCB7IEFjdG9yIH0gZnJvbSAnYXBpZnknO1xcbmltcG9ydCB7IFB1cHBldGVlckNyYXdsZXIgfSBmcm9tICdjcmF3bGVlJztcXG5cXG5hd2FpdCBBY3Rvci5pbml0KCk7XFxuXFxuLy8gQ3JlYXRlIGFuIGluc3RhbmNlIG9mIHRoZSBQdXBwZXRlZXJDcmF3bGVyIGNsYXNzIC0gYSBjcmF3bGVyXFxuLy8gdGhhdCBhdXRvbWF0aWNhbGx5IGxvYWRzIHRoZSBVUkxzIGluIGhlYWRsZXNzIENocm9tZSAvIFB1cHBldGVlci5cXG5jb25zdCBjcmF3bGVyID0gbmV3IFB1cHBldGVlckNyYXdsZXIoe1xcbiAgICAvLyBIZXJlIHlvdSBjYW4gc2V0IG9wdGlvbnMgdGhhdCBhcmUgcGFzc2VkIHRvIHRoZSBsYXVuY2hQdXBwZXRlZXIoKSBmdW5jdGlvbi5cXG4gICAgbGF1bmNoQ29udGV4dDoge1xcbiAgICAgICAgbGF1bmNoT3B0aW9uczoge1xcbiAgICAgICAgICAgIGhlYWRsZXNzOiB0cnVlLFxcbiAgICAgICAgICAgIC8vIE90aGVyIFB1cHBldGVlciBvcHRpb25zXFxuICAgICAgICB9LFxcbiAgICB9LFxcblxcbiAgICAvLyBTdG9wIGNyYXdsaW5nIGFmdGVyIHNldmVyYWwgcGFnZXNcXG4gICAgbWF4UmVxdWVzdHNQZXJDcmF3bDogNTAsXFxuXFxuICAgIC8vIFRoaXMgZnVuY3Rpb24gd2lsbCBiZSBjYWxsZWQgZm9yIGVhY2ggVVJMIHRvIGNyYXdsLlxcbiAgICAvLyBIZXJlIHlvdSBjYW4gd3JpdGUgdGhlIFB1cHBldGVlciBzY3JpcHRzIHlvdSBhcmUgZmFtaWxpYXIgd2l0aCxcXG4gICAgLy8gd2l0aCB0aGUgZXhjZXB0aW9uIHRoYXQgYnJvd3NlcnMgYW5kIHBhZ2VzIGFyZSBhdXRvbWF0aWNhbGx5IG1hbmFnZWQgYnkgdGhlIEFwaWZ5IFNESy5cXG4gICAgLy8gVGhlIGZ1bmN0aW9uIGFjY2VwdHMgYSBzaW5nbGUgcGFyYW1ldGVyLCB3aGljaCBpcyBhbiBvYmplY3Qgd2l0aCB0aGUgZm9sbG93aW5nIGZpZWxkczpcXG4gICAgLy8gLSByZXF1ZXN0OiBhbiBpbnN0YW5jZSBvZiB0aGUgUmVxdWVzdCBjbGFzcyB3aXRoIGluZm9ybWF0aW9uIHN1Y2ggYXMgVVJMIGFuZCBIVFRQIG1ldGhvZFxcbiAgICAvLyAtIHBhZ2U6IFB1cHBldGVlcidzIFBhZ2Ugb2JqZWN0IChzZWUgaHR0cHM6Ly9wcHRyLmRldi8jc2hvdz1hcGktY2xhc3MtcGFnZSlcXG4gICAgYXN5bmMgcmVxdWVzdEhhbmRsZXIoeyByZXF1ZXN0LCBwYWdlLCBlbnF1ZXVlTGlua3MgfSkge1xcbiAgICAgICAgY29uc29sZS5sb2coYFByb2Nlc3NpbmcgJHtyZXF1ZXN0LnVybH0uLi5gKTtcXG5cXG4gICAgICAgIC8vIEEgZnVuY3Rpb24gdG8gYmUgZXZhbHVhdGVkIGJ5IFB1cHBldGVlciB3aXRoaW4gdGhlIGJyb3dzZXIgY29udGV4dC5cXG4gICAgICAgIGNvbnN0IGRhdGEgPSBhd2FpdCBwYWdlLiQkZXZhbCgnLmF0aGluZycsICgkcG9zdHMpID0-IHtcXG4gICAgICAgICAgICBjb25zdCBzY3JhcGVkRGF0YSA9IFtdO1xcblxcbiAgICAgICAgICAgIC8vIFdlJ3JlIGdldHRpbmcgdGhlIHRpdGxlLCByYW5rIGFuZCBVUkwgb2YgZWFjaCBwb3N0IG9uIEhhY2tlciBOZXdzLlxcbiAgICAgICAgICAgICRwb3N0cy5mb3JFYWNoKCgkcG9zdCkgPT4ge1xcbiAgICAgICAgICAgICAgICBzY3JhcGVkRGF0YS5wdXNoKHtcXG4gICAgICAgICAgICAgICAgICAgIHRpdGxlOiAkcG9zdC5xdWVyeVNlbGVjdG9yKCcudGl0bGUgYScpLmlubmVyVGV4dCxcXG4gICAgICAgICAgICAgICAgICAgIHJhbms6ICRwb3N0LnF1ZXJ5U2VsZWN0b3IoJy5yYW5rJykuaW5uZXJUZXh0LFxcbiAgICAgICAgICAgICAgICAgICAgaHJlZjogJHBvc3QucXVlcnlTZWxlY3RvcignLnRpdGxlIGEnKS5ocmVmLFxcbiAgICAgICAgICAgICAgICB9KTtcXG4gICAgICAgICAgICB9KTtcXG5cXG4gICAgICAgICAgICByZXR1cm4gc2NyYXBlZERhdGE7XFxuICAgICAgICB9KTtcXG5cXG4gICAgICAgIC8vIFN0b3JlIHRoZSByZXN1bHRzIHRvIHRoZSBkZWZhdWx0IGRhdGFzZXQuXFxuICAgICAgICBhd2FpdCBBY3Rvci5wdXNoRGF0YShkYXRhKTtcXG5cXG4gICAgICAgIC8vIEZpbmQgYSBsaW5rIHRvIHRoZSBuZXh0IHBhZ2UgYW5kIGVucXVldWUgaXQgaWYgaXQgZXhpc3RzLlxcbiAgICAgICAgY29uc3QgaW5mb3MgPSBhd2FpdCBlbnF1ZXVlTGlua3Moe1xcbiAgICAgICAgICAgIHNlbGVjdG9yOiAnLm1vcmVsaW5rJyxcXG4gICAgICAgIH0pO1xcblxcbiAgICAgICAgaWYgKGluZm9zLmxlbmd0aCA9PT0gMCkgY29uc29sZS5sb2coYCR7cmVxdWVzdC51cmx9IGlzIHRoZSBsYXN0IHBhZ2UhYCk7XFxuICAgIH0sXFxuXFxuICAgIC8vIFRoaXMgZnVuY3Rpb24gaXMgY2FsbGVkIGlmIHRoZSBwYWdlIHByb2Nlc3NpbmcgZmFpbGVkIG1vcmUgdGhhbiBtYXhSZXF1ZXN0UmV0cmllcysxIHRpbWVzLlxcbiAgICBmYWlsZWRSZXF1ZXN0SGFuZGxlcih7IHJlcXVlc3QgfSkge1xcbiAgICAgICAgY29uc29sZS5sb2coYFJlcXVlc3QgJHtyZXF1ZXN0LnVybH0gZmFpbGVkIHRvbyBtYW55IHRpbWVzLmApO1xcbiAgICB9LFxcbn0pO1xcblxcbi8vIFJ1biB0aGUgY3Jhd2xlciBhbmQgd2FpdCBmb3IgaXQgdG8gZmluaXNoLlxcbmF3YWl0IGNyYXdsZXIucnVuKFsnaHR0cHM6Ly9uZXdzLnljb21iaW5hdG9yLmNvbS8nXSk7XFxuXFxuY29uc29sZS5sb2coJ0NyYXdsZXIgZmluaXNoZWQuJyk7XFxuXFxuYXdhaXQgQWN0b3IuZXhpdCgpO1xcblwifSIsIm9wdGlvbnMiOnsiYnVpbGQiOiJsYXRlc3QiLCJjb250ZW50VHlwZSI6ImFwcGxpY2F0aW9uL2pzb247IGNoYXJzZXQ9dXRmLTgiLCJtZW1vcnkiOjQwOTYsInRpbWVvdXQiOjE4MH19.88cqtP3DJA1811DUd2fOqdjsLFRPvz91Pi_WHe8Yt5U\&asrc=run_on_apify)
import { Actor } from 'apify'; import { PuppeteerCrawler } from 'crawlee';
await Actor.init();
// Create an instance of the PuppeteerCrawler class - a crawler // that automatically loads the URLs in headless Chrome / Puppeteer. const crawler = new PuppeteerCrawler({ // Here you can set options that are passed to the launchPuppeteer() function. launchContext: { launchOptions: { headless: true, // Other Puppeteer options }, },
// Stop crawling after several pages
maxRequestsPerCrawl: 50,
// This function will be called for each URL to crawl.
// Here you can write the Puppeteer scripts you are familiar with,
// with the exception that browsers and pages are automatically managed by the Apify SDK.
// The function accepts a single parameter, which is an object with the following fields:
// - request: an instance of the Request class with information such as URL and HTTP method
// - page: Puppeteer's Page object (see https://pptr.dev/#show=api-class-page)
async requestHandler({ request, page, enqueueLinks }) {
console.log(`Processing ${request.url}...`);
// A function to be evaluated by Puppeteer within the browser context.
const data = await page.$$eval('.athing', ($posts) => {
const scrapedData = [];
// We're getting the title, rank and URL of each post on Hacker News.
$posts.forEach(($post) => {
scrapedData.push({
title: $post.querySelector('.title a').innerText,
rank: $post.querySelector('.rank').innerText,
href: $post.querySelector('.title a').href,
});
});
return scrapedData;
});
// Store the results to the default dataset.
await Actor.pushData(data);
// Find a link to the next page and enqueue it if it exists.
const infos = await enqueueLinks({
selector: '.morelink',
});
if (infos.length === 0) console.log(`${request.url} is the last page!`);
},
// This function is called if the page processing failed more than maxRequestRetries+1 times.
failedRequestHandler({ request }) {
console.log(`Request ${request.url} failed too many times.`);
},
});
// Run the crawler and wait for it to finish. await crawler.run(['https://news.ycombinator.com/']);
console.log('Crawler finished.');
await Actor.exit();
---
# Puppeteer recursive crawl
Copy for LLM
Run the following example to perform a recursive crawl of a website using [`PuppeteerCrawler`](https://crawlee.dev/api/puppeteer-crawler/class/PuppeteerCrawler).
tip
To run this example on the Apify Platform, select the `apify/actor-node-puppeteer-chrome` image for your Dockerfile.
[Run on](https://console.apify.com/actors/7tWSD8hrYzuc9Lte7?runConfig=eyJ1IjoiRWdQdHczb2VqNlRhRHQ1cW4iLCJ2IjoxfQ.eyJpbnB1dCI6IntcImNvZGVcIjpcImltcG9ydCB7IEFjdG9yIH0gZnJvbSAnYXBpZnknO1xcbmltcG9ydCB7IFB1cHBldGVlckNyYXdsZXIgfSBmcm9tICdjcmF3bGVlJztcXG5cXG5hd2FpdCBBY3Rvci5pbml0KCk7XFxuXFxuY29uc3QgY3Jhd2xlciA9IG5ldyBQdXBwZXRlZXJDcmF3bGVyKHtcXG4gICAgYXN5bmMgcmVxdWVzdEhhbmRsZXIoeyByZXF1ZXN0LCBwYWdlLCBlbnF1ZXVlTGlua3MgfSkge1xcbiAgICAgICAgY29uc3QgdGl0bGUgPSBhd2FpdCBwYWdlLnRpdGxlKCk7XFxuICAgICAgICBjb25zb2xlLmxvZyhgVGl0bGUgb2YgJHtyZXF1ZXN0LnVybH06ICR7dGl0bGV9YCk7XFxuXFxuICAgICAgICBhd2FpdCBlbnF1ZXVlTGlua3Moe1xcbiAgICAgICAgICAgIHBzZXVkb1VybHM6IFsnaHR0cHM6Ly93d3cuaWFuYS5vcmcvWy4qXSddLFxcbiAgICAgICAgfSk7XFxuICAgIH0sXFxuICAgIG1heFJlcXVlc3RzUGVyQ3Jhd2w6IDEwLFxcbn0pO1xcblxcbmF3YWl0IGNyYXdsZXIucnVuKFsnaHR0cHM6Ly93d3cuaWFuYS5vcmcvJ10pO1xcblxcbmF3YWl0IEFjdG9yLmV4aXQoKTtcXG5cIn0iLCJvcHRpb25zIjp7ImJ1aWxkIjoibGF0ZXN0IiwiY29udGVudFR5cGUiOiJhcHBsaWNhdGlvbi9qc29uOyBjaGFyc2V0PXV0Zi04IiwibWVtb3J5Ijo0MDk2LCJ0aW1lb3V0IjoxODB9fQ.8btSf7N11TyAU4POBztQTOCmNYkaZxZ9FeoCUoRa5YE\&asrc=run_on_apify)
import { Actor } from 'apify'; import { PuppeteerCrawler } from 'crawlee';
await Actor.init();
const crawler = new PuppeteerCrawler({
async requestHandler({ request, page, enqueueLinks }) {
const title = await page.title();
console.log(Title of ${request.url}: ${title});
await enqueueLinks({
pseudoUrls: ['https://www.iana.org/[.*]'],
});
},
maxRequestsPerCrawl: 10,
});
await crawler.run(['https://www.iana.org/']);
await Actor.exit();
---
# Puppeteer with proxy
Copy for LLM
This example demonstrates how to load pages in headless Chrome / Puppeteer over [Apify Proxy](https://docs.apify.com/proxy).
To make it work, you'll need an Apify account with access to the proxy. Visit the [Apify platform introduction](https://docs.apify.com/sdk/js/sdk/js/docs/guides/apify-platform.md) to find how to log into your account from the SDK.
tip
To run this example on the Apify Platform, select the `apify/actor-node-puppeteer-chrome` image for your Dockerfile.
[Run on](https://console.apify.com/actors/7tWSD8hrYzuc9Lte7?runConfig=eyJ1IjoiRWdQdHczb2VqNlRhRHQ1cW4iLCJ2IjoxfQ.eyJpbnB1dCI6IntcImNvZGVcIjpcImltcG9ydCB7IEFjdG9yIH0gZnJvbSAnYXBpZnknO1xcbmltcG9ydCB7IFB1cHBldGVlckNyYXdsZXIgfSBmcm9tICdjcmF3bGVlJztcXG5cXG5hd2FpdCBBY3Rvci5pbml0KCk7XFxuXFxuLy8gUHJveHkgY29ubmVjdGlvbiBpcyBhdXRvbWF0aWNhbGx5IGVzdGFibGlzaGVkIGluIHRoZSBDcmF3bGVyXFxuY29uc3QgcHJveHlDb25maWd1cmF0aW9uID0gYXdhaXQgQWN0b3IuY3JlYXRlUHJveHlDb25maWd1cmF0aW9uKCk7XFxuXFxuY29uc3QgY3Jhd2xlciA9IG5ldyBQdXBwZXRlZXJDcmF3bGVyKHtcXG4gICAgcHJveHlDb25maWd1cmF0aW9uLFxcbiAgICBhc3luYyByZXF1ZXN0SGFuZGxlcih7IHBhZ2UgfSkge1xcbiAgICAgICAgY29uc3Qgc3RhdHVzID0gYXdhaXQgcGFnZS4kZXZhbCgndGQuc3RhdHVzJywgKGVsKSA9PiBlbC50ZXh0Q29udGVudCk7XFxuICAgICAgICBjb25zb2xlLmxvZyhgUHJveHkgU3RhdHVzOiAke3N0YXR1c31gKTtcXG4gICAgfSxcXG59KTtcXG5cXG5jb25zb2xlLmxvZygnUnVubmluZyBQdXBwZXRlZXIgc2NyaXB0Li4uJyk7XFxuXFxuYXdhaXQgY3Jhd2xlci5ydW4oWydodHRwOi8vcHJveHkuYXBpZnkuY29tJ10pO1xcblxcbmNvbnNvbGUubG9nKCdQdXBwZXRlZXIgY2xvc2VkLicpO1xcblxcbmF3YWl0IEFjdG9yLmV4aXQoKTtcXG5cIn0iLCJvcHRpb25zIjp7ImJ1aWxkIjoibGF0ZXN0IiwiY29udGVudFR5cGUiOiJhcHBsaWNhdGlvbi9qc29uOyBjaGFyc2V0PXV0Zi04IiwibWVtb3J5Ijo0MDk2LCJ0aW1lb3V0IjoxODB9fQ.Z2NfopKj1DbaGy58OZ3N2Og8hM7AvkFTeEbBFCwOtGk\&asrc=run_on_apify)
import { Actor } from 'apify'; import { PuppeteerCrawler } from 'crawlee';
await Actor.init();
// Proxy connection is automatically established in the Crawler const proxyConfiguration = await Actor.createProxyConfiguration();
const crawler = new PuppeteerCrawler({
proxyConfiguration,
async requestHandler({ page }) {
const status = await page.$eval('td.status', (el) => el.textContent);
console.log(Proxy Status: ${status});
},
});
console.log('Running Puppeteer script...');
await crawler.run(['http://proxy.apify.com']);
console.log('Puppeteer closed.');
await Actor.exit();
---
# Apify Platform
Copy for LLM
Apify is a [platform](https://apify.com) built to serve large-scale and high-performance web scraping and automation needs. It provides easy access to [compute instances (Actors)](#what-is-an-actor), convenient [request](https://docs.apify.com/sdk/js/sdk/js/docs/guides/request-storage.md) and [result](https://docs.apify.com/sdk/js/sdk/js/docs/guides/result-storage.md) storages, [proxies](https://docs.apify.com/sdk/js/sdk/js/docs/guides/proxy-management.md), [scheduling](https://docs.apify.com/scheduler), [webhooks](https://docs.apify.com/webhooks) and [more](https://docs.apify.com/), accessible through a [web interface](https://console.apify.com) or an [API](https://docs.apify.com/api).
While we think that the Apify platform is super cool, and it's definitely worth signing up for a [free account](https://console.apify.com/sign-up), **Crawlee is and will always be open source**, runnable locally or on any cloud infrastructure.
note
We do not test Crawlee in other cloud environments such as Lambda or on specific architectures such as Raspberry PI. We strive to make it work, but there are no guarantees.
## Logging into Apify platform from Crawlee[](#logging-into-apify-platform-from-crawlee)
To access your [Apify account](https://console.apify.com/sign-up) from Crawlee, you must provide credentials - your [API token](https://console.apify.com/account?tab=integrations). You can do that either by utilizing [Apify CLI](https://github.com/apify/apify-cli) or with environment variables.
Once you provide credentials to your scraper, you will be able to use all the Apify platform features, such as calling actors, saving to cloud storages, using Apify proxies, setting up webhooks and so on.
### Log in with CLI[](#log-in-with-cli)
Apify CLI allows you to log in to your Apify account on your computer. If you then run your scraper using the CLI, your credentials will automatically be added.
npm install -g apify-cli apify login -t YOUR_API_TOKEN
### Log in with environment variables[](#log-in-with-environment-variables)
Alternatively, you can always provide credentials to your scraper by setting the [`APIFY_TOKEN`](#apify_token) environment variable to your API token.
> There's also the [`APIFY_PROXY_PASSWORD`](#apify_proxy_password) environment variable. Actor automatically infers that from your token, but it can be useful when you need to access proxies from a different account than your token represents.
### Log in with Configuration[](#log-in-with-configuration)
Another option is to use the [`Configuration`](https://sdk.apify.com/api/apify/class/Configuration) instance and set your api token there.
import { Actor } from 'apify';
const sdk = new Actor({ token: 'your_api_token' });
## What is an actor[](#what-is-an-actor)
When you deploy your script to the Apify platform, it becomes an [actor](https://apify.com/actors). An actor is a serverless microservice that accepts an input and produces an output. It can run for a few seconds, hours or even infinitely. An actor can perform anything from a simple action such as filling out a web form or sending an email, to complex operations such as crawling an entire website and removing duplicates from a large dataset.
Actors can be shared in the [Apify Store](https://apify.com/store) so that other people can use them. But don't worry, if you share your actor in the store and somebody uses it, it runs under their account, not yours.
**Related links**
* [Store of existing actors](https://apify.com/store)
* [Documentation](https://docs.apify.com/actors)
* [View actors in Apify Console](https://console.apify.com/actors)
* [API reference](https://apify.com/docs/api/v2#/reference/actors)
## Running an actor locally[](#running-an-actor-locally)
First let's create a boilerplate of the new actor. You could use Apify CLI and just run:
apify create my-hello-world
The CLI will prompt you to select a project boilerplate template - let's pick "Hello world". The tool will create a directory called `my-hello-world` with a Node.js project files. You can run the actor as follows:
cd my-hello-world apify run
## Running Crawlee code as an actor[](#running-crawlee-code-as-an-actor)
For running Crawlee code as an actor on [Apify platform](https://apify.com/actors) you should either:
* use a combination of [`Actor.init()`](https://sdk.apify.com/api/apify/class/Actor#init) and [`Actor.exit()`](https://sdk.apify.com/api/apify/class/Actor#exit) functions;
* or wrap it into [`Actor.main()`](https://sdk.apify.com/api/apify/class/Actor#main) function.
NOTE
* Adding [`Actor.init()`](https://sdk.apify.com/api/apify/class/Actor#init) and [`Actor.exit()`](https://sdk.apify.com/api/apify/class/Actor#exit) to your code are the only two important things needed to run it on Apify platform as an actor. `Actor.init()` is needed to initialize your actor (e.g. to set the correct storage implementation), while without `Actor.exit()` the process will simply never stop.
* [`Actor.main()`](https://sdk.apify.com/api/apify/class/Actor#main) is an alternative to `Actor.init()` and `Actor.exit()` as it calls both behind the scenes.
Let's look at the `CheerioCrawler` example from the [Quick Start](https://crawlee.dev/docs/quick-start) guide:
* Using Actor.main()
* Using Actor.init() and Actor.exit()
import { Actor } from 'apify'; import { CheerioCrawler } from 'crawlee';
await Actor.main(async () => { const crawler = new CheerioCrawler({ async requestHandler({ request, $, enqueueLinks }) { const { url } = request;
// Extract HTML title of the page.
const title = $('title').text();
console.log(`Title of ${url}: ${title}`);
// Add URLs that match the provided pattern.
await enqueueLinks({
globs: ['https://www.iana.org/*'],
});
// Save extracted data to dataset.
await Actor.pushData({ url, title });
},
});
// Enqueue the initial request and run the crawler
await crawler.run(['https://www.iana.org/']);
});
import { Actor } from 'apify'; import { CheerioCrawler } from 'crawlee';
await Actor.init();
const crawler = new CheerioCrawler({ async requestHandler({ request, $, enqueueLinks }) { const { url } = request;
// Extract HTML title of the page.
const title = $('title').text();
console.log(`Title of ${url}: ${title}`);
// Add URLs that match the provided pattern.
await enqueueLinks({
globs: ['https://www.iana.org/*'],
});
// Save extracted data to dataset.
await Actor.pushData({ url, title });
},
});
// Enqueue the initial request and run the crawler await crawler.run(['https://www.iana.org/']);
await Actor.exit();
Note that you could also run your actor (that is using Crawlee) locally with Apify CLI. You could start it via the following command in your project folder:
apify run
## Deploying an actor to Apify platform[](#deploying-an-actor-to-apify-platform)
Now (assuming you are already logged in to your Apify account) you can easily deploy your code to the Apify platform by running:
apify push
Your script will be uploaded to and built on the Apify platform so that it can be run there. For more information, view the [Apify Actor](https://docs.apify.com/cli) documentation.
## Usage on Apify platform[](#usage-on-apify-platform)
You can also develop your actor in an online code editor directly on the platform (you'll need an Apify Account). Let's go to the [Actors](https://console.apify.com/actors) page in the app, click *Create new* and then go to the *Source* tab and start writing the code or paste one of the examples from the [Examples](https://docs.apify.com/sdk/js/sdk/js/docs/examples) section.
## Storages[](#storages)
There are several things worth mentioning here.
### Helper functions for default Key-Value Store and Dataset[](#helper-functions-for-default-key-value-store-and-dataset)
To simplify access to the *default* storages, instead of using the helper functions of respective storage classes, you could use:
* [`Actor.setValue()`](https://sdk.apify.com/api/apify/class/Actor#setValue), [`Actor.getValue()`](https://sdk.apify.com/api/apify/class/Actor#getValue), [`Actor.getInput()`](https://sdk.apify.com/api/apify/class/Actor#getInput) for `Key-Value Store`
* [`Actor.pushData()`](https://sdk.apify.com/api/apify/class/Actor#pushData) for `Dataset`
### Using platform storage in a local actor[](#using-platform-storage-in-a-local-actor)
When you plan to use the platform storage while developing and running your actor locally, you should use [`Actor.openKeyValueStore()`](https://sdk.apify.com/api/apify/class/Actor#openKeyValueStore), [`Actor.openDataset()`](https://sdk.apify.com/api/apify/class/Actor#openDataset) and [`Actor.openRequestQueue()`](https://sdk.apify.com/api/apify/class/Actor#openRequestQueue) to open the respective storage.
Using each of these methods allows to pass the [`OpenStorageOptions`](https://sdk.apify.com/api/apify/interface/OpenStorageOptions) as a second argument, which has only one optional property: [`forceCloud`](https://sdk.apify.com/api/apify/interface/OpenStorageOptions#forceCloud). If set to `true` - cloud storage will be used instead of the folder on the local disk.
note
If you don't plan to force usage of the platform storages when running the actor locally, there is no need to use the [`Actor`](https://sdk.apify.com/api/apify/class/Actor) class for it. The Crawlee variants [`KeyValueStore.open()`](https://docs.apify.com/sdk/js/sdk/js/reference/class/KeyValueStore.md#open), [`Dataset.open()`](https://docs.apify.com/sdk/js/sdk/js/reference/class/Dataset.md#open) and [`RequestQueue.open()`](https://docs.apify.com/sdk/js/sdk/js/reference/class/RequestQueue.md#open) will work the same.
### Getting public url of an item in the platform storage[](#getting-public-url-of-an-item-in-the-platform-storage)
If you need to share a link to some file stored in a Key-Value Store on Apify Platform, you can use [`getPublicUrl()`](https://sdk.apify.com/api/apify/class/KeyValueStore#getPublicUrl) method. It accepts only one parameter: `key` - the key of the item you want to share.
import { KeyValueStore } from 'apify';
const store = await KeyValueStore.open(); await store.setValue('your-file', { foo: 'bar' }); const url = store.getPublicUrl('your-file'); // https://api.apify.com/v2/key-value-stores//records/your-file
### Exporting dataset data[](#exporting-dataset-data)
When the [`Dataset`](https://docs.apify.com/sdk/js/sdk/js/reference/class/Dataset.md) is stored on the [Apify platform](https://apify.com/actors), you can export its data to the following formats: HTML, JSON, CSV, Excel, XML and RSS. The datasets are displayed on the actor run details page and in the [Storage](https://console.apify.com/storage) section in the Apify Console. The actual data is exported using the [Get dataset items](https://apify.com/docs/api/v2#/reference/datasets/item-collection/get-items) Apify API endpoint. This way you can easily share the crawling results.
**Related links**
* [Apify platform storage documentation](https://docs.apify.com/storage)
* [View storage in Apify Console](https://console.apify.com/storage)
* [Key-value stores API reference](https://apify.com/docs/api/v2#/reference/key-value-stores)
* [Datasets API reference](https://docs.apify.com/api/v2#/reference/datasets)
* [Request queues API reference](https://docs.apify.com/api/v2#/reference/request-queues)
## Environment variables[](#environment-variables)
The following are some additional environment variables specific to Apify platform. More Crawlee specific environment variables could be found in the [Environment Variables](https://crawlee.dev/docs/guides/configuration#environment-variables) guide.
note
It's important to notice that `CRAWLEE_` environment variables don't need to be replaced with equivalent `APIFY_` ones. Likewise, Crawlee understands `APIFY_` environment variables after calling `Actor.init()` or when using `Actor.main()`.
### `APIFY_TOKEN`[](#apify_token)
The API token for your Apify account. It is used to access the Apify API, e.g. to access cloud storage or to run an actor on the Apify platform. You can find your API token on the [Account Settings / Integrations](https://console.apify.com/account?tab=integrations) page.
### Combinations of `APIFY_TOKEN` and `CRAWLEE_STORAGE_DIR`[](#combinations-of-apify_token-and-crawlee_storage_dir)
> `CRAWLEE_STORAGE_DIR` env variable description could be found in [Environment Variables](https://crawlee.dev/docs/guides/configuration#crawlee_storage_dir) guide.
By combining the env vars in various ways, you can greatly influence the actor's behavior.
| Env Vars | API | Storages |
| --------------------------------------- | --- | ---------------- |
| none OR `CRAWLEE_STORAGE_DIR` | no | local |
| `APIFY_TOKEN` | yes | Apify platform |
| `APIFY_TOKEN` AND `CRAWLEE_STORAGE_DIR` | yes | local + platform |
When using both `APIFY_TOKEN` and `CRAWLEE_STORAGE_DIR`, you can use all the Apify platform features and your data will be stored locally by default. If you want to access platform storages, you can use the `{ forceCloud: true }` option in their respective functions.
import { Actor } from 'apify'; import { Dataset } from 'crawlee';
// or Dataset.open('my-local-data')
const localDataset = await Actor.openDataset('my-local-data');
// but here we need the Actor class
const remoteDataset = await Actor.openDataset('my-dataset', {
forceCloud: true,
});
### `APIFY_PROXY_PASSWORD`[](#apify_proxy_password)
Optional password to [Apify Proxy](https://docs.apify.com/proxy) for IP address rotation. Assuming Apify Account was already created, you can find the password on the [Proxy page](https://console.apify.com/proxy) in the Apify Console. The password is automatically inferred using the `APIFY_TOKEN` env var, so in most cases, you don't need to touch it. You should use it when, for some reason, you need access to Apify Proxy, but not access to Apify API, or when you need access to proxy from a different account than your token represents.
## Proxy management[](#proxy-management)
In addition to your own proxy servers and proxy servers acquired from third-party providers used together with Crawlee, you can also rely on [Apify Proxy](https://apify.com/proxy) for your scraping needs.
### Apify Proxy[](#apify-proxy)
If you are already subscribed to Apify Proxy, you can start using them immediately in only a few lines of code (for local usage you first should be [logged in](#logging-into-apify-platform-from-crawlee) to your Apify account.
import { Actor } from 'apify';
const proxyConfiguration = await Actor.createProxyConfiguration(); const proxyUrl = await proxyConfiguration.newUrl();
Note that unlike using your own proxies in Crawlee, you shouldn't use the constructor to create [`ProxyConfiguration`](https://docs.apify.com/sdk/js/sdk/js/reference/class/ProxyConfiguration.md) instance. For using Apify Proxy you should create an instance using the [`Actor.createProxyConfiguration()`](https://sdk.apify.com/api/apify/class/Actor#createProxyConfiguration) function instead.
### Apify Proxy Configuration[](#apify-proxy-configuration)
With Apify Proxy, you can select specific proxy groups to use, or countries to connect from. This allows you to get better proxy performance after some initial research.
import { Actor } from 'apify';
const proxyConfiguration = await Actor.createProxyConfiguration({ groups: ['RESIDENTIAL'], countryCode: 'US', }); const proxyUrl = await proxyConfiguration.newUrl();
Now your crawlers will use only Residential proxies from the US. Note that you must first get access to a proxy group before you are able to use it. You can check proxy groups available to you in the [proxy dashboard](https://console.apify.com/proxy).
### Apify Proxy vs. Own proxies[](#apify-proxy-vs-own-proxies)
The `ProxyConfiguration` class covers both Apify Proxy and custom proxy URLs so that you can easily switch between proxy providers. However, some features of the class are available only to Apify Proxy users, mainly because Apify Proxy is what one would call a super-proxy. It's not a single proxy server, but an API endpoint that allows connection through millions of different IP addresses. So the class essentially has two modes: Apify Proxy or Own (third party) proxy.
The difference is easy to remember.
* If you're using your own proxies - you should create an instance with the ProxyConfiguration [`constructor`](https://docs.apify.com/sdk/js/sdk/js/reference/class/ProxyConfiguration.md#constructor) function based on the provided [`ProxyConfigurationOptions`](https://docs.apify.com/sdk/js/sdk/js/reference/interface/ProxyConfigurationOptions.md).
* If you are planning to use Apify Proxy - you should create an instance using the [`Actor.createProxyConfiguration()`](https://sdk.apify.com/api/apify/class/Actor#createProxyConfiguration) function. [`ProxyConfigurationOptions.proxyUrls`](https://docs.apify.com/sdk/js/sdk/js/reference/interface/ProxyConfigurationOptions.md#proxyUrls) and [`ProxyConfigurationOptions.newUrlFunction`](https://docs.apify.com/sdk/js/sdk/js/reference/interface/ProxyConfigurationOptions.md#newUrlFunction) enable use of your custom proxy URLs, whereas all the other options are there to configure Apify Proxy.
**Related links**
* [Apify Proxy docs](https://docs.apify.com/proxy)
---
# Running in Docker
Copy for LLM
Running headless browsers in Docker requires a lot of setup to do it right. But there's no need to worry about that, because we already created base images that you can freely use. We use them every day on the [Apify Platform](https://docs.apify.com/sdk/js/sdk/js/docs/guides/apify-platform.md).
All images can be found in their [GitHub repo](https://github.com/apify/apify-actor-docker) and in our [DockerHub](https://hub.docker.com/orgs/apify).
## Overview[](#overview)
Browsers are pretty big, so we try to provide a wide variety of images to suit the specific needs. Here's a full list of our Docker images.
* [`apify/actor-node`](#actor-node)
* [`apify/actor-node-puppeteer-chrome`](#actor-node-puppeteer-chrome)
* [`apify/actor-node-playwright`](#actor-node-playwright)
* [`apify/actor-node-playwright-chrome`](#actor-node-playwright-chrome)
* [`apify/actor-node-playwright-firefox`](#actor-node-playwright-firefox)
* [`apify/actor-node-playwright-webkit`](#actor-node-playwright-webkit)
## Versioning[](#versioning)
Each image is tagged with up to 2 version tags, depending on the type of the image. One for Node.js version and second for pre-installed web automation library version. If you use the image name without a version tag, you'll always get the latest available version.
> We recommend always using at least the Node.js version tag in production Dockerfiles. It will ensure that a future update of Node.js will not break our automations.
### Node.js versioning[](#nodejs-versioning)
Our images are built with multiple Node.js versions to ensure backwards compatibility. Currently, Node.js **versions 16 and 18 are supported** (legacy versions still exist, see DockerHub). To select the preferred version, use the appropriate number as the image tag.
Use Node.js 16
FROM apify/actor-node:16
### Automation library versioning[](#automation-library-versioning)
Images that include a pre-installed automation library, which means all images that include `puppeteer` or `playwright` in their name, are also tagged with the pre-installed version of the library. For example, `apify/actor-node-puppeteer-chrome:16-13.7.0` comes with Node.js 16 and Puppeteer v13.7.0. If you try to install a different version of Puppeteer into this image, you may run into compatibility issues, because the Chromium version bundled with `puppeteer` will not match the version of Chromium that's pre-installed.
Similarly `apify/actor-node-playwright-firefox:14-1.21.1` runs on Node.js 14 and is pre-installed with the Firefox version that comes with v1.21.1.
Installing `apify/actor-node-puppeteer-chrome` (without a tag) will install the latest available version of Node.js and `puppeteer`.
### Pre-release tags[](#pre-release-tags)
We also build pre-release versions of the images to test the changes we make. Those are typically denoted by a `beta` suffix, but it can vary depending on our needs. If you need to try a pre-release version, you can do it like this:
Without library version.
FROM apify/actor-node:16-beta
With library version.
FROM apify/actor-node-playwright-chrome:16-1.10.0-beta
## Best practices[](#best-practices)
* Node.js version tag should **always** be used.
* The automation library version tag should be used for **added security**.
* Asterisk `*` should be used as the automation library version in our `package.json` files.
It makes sure the pre-installed version of Puppeteer or Playwright is not re-installed on build. This is important, because those libraries are only guaranteed to work with specific versions of browsers, and those browsers come pre-installed in the image.
FROM apify/actor-node-playwright-chrome:16
{ "dependencies": { "crawlee": "^3.0.0", "playwright": "*" } }
### Warning about image size[](#warning-about-image-size)
Browsers are huge. If you don't need them all in your image, it's better to use a smaller image with only the one browser you need.
You should also be careful when installing new dependencies. Nothing prevents you from installing Playwright into the`actor-node-puppeteer-chrome` image, but the resulting image will be about 3 times larger and extremely slow to download and build.
When you use only what you need, you'll be rewarded with reasonable build and start times.
## Apify Docker Images[](#apify-docker-images)
### actor-node[](#actor-node)
This is the smallest image we have based on Alpine Linux. It does not include any browsers, and it's therefore best used with [`CheerioCrawler`](https://crawlee.dev/api/cheerio-crawler/class/CheerioCrawler). It benefits from lightning fast builds and container startups.
[`PuppeteerCrawler`](https://crawlee.dev/api/puppeteer-crawler/class/PuppeteerCrawler)
,
[`PlaywrightCrawler`](https://crawlee.dev/api/playwright-crawler/class/PlaywrightCrawler)
and other browser based features will **NOT** work with this image.
FROM apify/actor-node:16
### actor-node-puppeteer-chrome[](#actor-node-puppeteer-chrome)
This image includes Puppeteer (Chromium) and the Chrome browser. It can be used with [`CheerioCrawler`](https://crawlee.dev/api/cheerio-crawler/class/CheerioCrawler) and [`PuppeteerCrawler`](https://crawlee.dev/api/puppeteer-crawler/class/PuppeteerCrawler), but **NOT** with [`PlaywrightCrawler`](https://crawlee.dev/api/playwright-crawler/class/PlaywrightCrawler).
The image supports XVFB by default, so you can run both `headless` and `headful` browsers with it.
FROM apify/actor-node-puppeteer-chrome:16
### actor-node-playwright[](#actor-node-playwright)
A very large and slow image that can run all Playwright browsers: Chromium, Chrome, Firefox, WebKit. Everything is installed. If you need to develop or test with multiple browsers, this is the image to choose, but in most cases, it's better to use the specialized images below.
FROM apify/actor-node-playwright:16
### actor-node-playwright-chrome[](#actor-node-playwright-chrome)
Similar to [`actor-node-puppeteer-chrome`](#actor-node-puppeteer-chrome), but for Playwright. You can run [`CheerioCrawler`](https://crawlee.dev/api/cheerio-crawler/class/CheerioCrawler) and [`PlaywrightCrawler`](https://crawlee.dev/api/playwright-crawler/class/PlaywrightCrawler), but **NOT** [`PuppeteerCrawler`](https://crawlee.dev/api/puppeteer-crawler/class/PuppeteerCrawler).
It uses the [`PLAYWRIGHT_SKIP_BROWSER_DOWNLOAD`](https://playwright.dev/docs/api/environment-variables/) environment variable to block installation of more browsers into the image to keep it small. If you want more browsers, either use the [`actor-node-playwright`](#actor-node-playwright) image override this env var.
The image supports XVFB by default, so we can run both `headless` and `headful` browsers with it.
FROM apify/actor-node-playwright-chrome:16
### actor-node-playwright-firefox[](#actor-node-playwright-firefox)
Same idea as [`actor-node-playwright-chrome`](#actor-node-playwright-chrome), but with Firefox pre-installed.
FROM apify/actor-node-playwright-firefox:16
### actor-node-playwright-webkit[](#actor-node-playwright-webkit)
Same idea as [`actor-node-playwright-chrome`](#actor-node-playwright-chrome), but with WebKit pre-installed.
FROM apify/actor-node-playwright-webkit:16
## Example Dockerfile[](#example-dockerfile)
To use the above images, it's necessary to have a [`Dockerfile`](https://docs.docker.com/engine/reference/builder/). You can either use this example, or bootstrap your projects with the [Crawlee CLI](https://crawlee.dev/docs/introduction/setting-up) which automatically adds the correct Dockerfile into our project folder.
* Node+JavaScript
* Node+TypeScript
* Browser+JavaScript
* Browser+TypeScript
Specify the base Docker image. You can read more about
the available images at https://crawlee.dev/docs/guides/docker-images
You can also use any other image from Docker Hub.
FROM apify/actor-node:16
Copy just package.json and package-lock.json
to speed up the build using Docker layer cache.
COPY package*.json ./
Install NPM packages, skip optional and development dependencies to
keep the image small. Avoid logging too much and print the dependency
tree for debugging
RUN npm --quiet set progress=false
&& npm install --omit=dev --omit=optional
&& echo "Installed NPM packages:"
&& (npm list --omit=dev --all || true)
&& echo "Node.js version:"
&& node --version
&& echo "NPM version:"
&& npm --version
Next, copy the remaining files and directories with the source code.
Since we do this after NPM install, quick build will be really fast
for most source file changes.
COPY . ./
Run the image.
CMD npm start --silent
Specify the base Docker image. You can read more about
the available images at https://crawlee.dev/docs/guides/docker-images
You can also use any other image from Docker Hub.
FROM apify/actor-node:16 AS builder
Copy just package.json and package-lock.json
to speed up the build using Docker layer cache.
COPY package*.json ./
Install all dependencies. Don't audit to speed up the installation.
RUN npm install --include=dev --audit=false
Next, copy the source files using the user set
in the base image.
COPY . ./
Install all dependencies and build the project.
Don't audit to speed up the installation.
RUN npm run build
Create final image
FROM apify/actor-node:16
Copy only built JS files from builder image
COPY --from=builder /usr/src/app/dist ./dist
Copy just package.json and package-lock.json
to speed up the build using Docker layer cache.
COPY package*.json ./
Install NPM packages, skip optional and development dependencies to
keep the image small. Avoid logging too much and print the dependency
tree for debugging
RUN npm --quiet set progress=false
&& npm install --omit=dev --omit=optional
&& echo "Installed NPM packages:"
&& (npm list --omit=dev --all || true)
&& echo "Node.js version:"
&& node --version
&& echo "NPM version:"
&& npm --version
Next, copy the remaining files and directories with the source code.
Since we do this after NPM install, quick build will be really fast
for most source file changes.
COPY . ./
Run the image.
CMD npm run start:prod --silent
This example is for Playwright. If you want to use Puppeteer, simply replace **playwright** with **puppeteer** in the `FROM` declaration.
Specify the base Docker image. You can read more about
the available images at https://crawlee.dev/docs/guides/docker-images
You can also use any other image from Docker Hub.
FROM apify/actor-node-playwright-chrome:16
Copy just package.json and package-lock.json
to speed up the build using Docker layer cache.
COPY --chown=myuser package*.json ./
Install NPM packages, skip optional and development dependencies to
keep the image small. Avoid logging too much and print the dependency
tree for debugging
RUN npm --quiet set progress=false
&& npm install --omit=dev --omit=optional
&& echo "Installed NPM packages:"
&& (npm list --omit=dev --all || true)
&& echo "Node.js version:"
&& node --version
&& echo "NPM version:"
&& npm --version
Next, copy the remaining files and directories with the source code.
Since we do this after NPM install, quick build will be really fast
for most source file changes.
COPY --chown=myuser . ./
Run the image.
CMD npm start --silent
This example is for Playwright. If you want to use Puppeteer, simply replace **playwright** with **puppeteer** in both `FROM` declarations.
Specify the base Docker image. You can read more about
the available images at https://crawlee.dev/docs/guides/docker-images
You can also use any other image from Docker Hub.
FROM apify/actor-node-playwright-chrome:16 AS builder
Copy just package.json and package-lock.json
to speed up the build using Docker layer cache.
COPY --chown=myuser package*.json ./
Install all dependencies. Don't audit to speed up the installation.
RUN npm install --include=dev --audit=false
Next, copy the source files using the user set
in the base image.
COPY --chown=myuser . ./
Install all dependencies and build the project.
Don't audit to speed up the installation.
RUN npm run build
Create final image
FROM apify/actor-node-playwright-chrome:16
Copy only built JS files from builder image
COPY --from=builder --chown=myuser /home/myuser/dist ./dist
Copy just package.json and package-lock.json
to speed up the build using Docker layer cache.
COPY --chown=myuser package*.json ./
Install NPM packages, skip optional and development dependencies to
keep the image small. Avoid logging too much and print the dependency
tree for debugging
RUN npm --quiet set progress=false
&& npm install --omit=dev --omit=optional
&& echo "Installed NPM packages:"
&& (npm list --omit=dev --all || true)
&& echo "Node.js version:"
&& node --version
&& echo "NPM version:"
&& npm --version
Next, copy the remaining files and directories with the source code.
Since we do this after NPM install, quick build will be really fast
for most source file changes.
COPY --chown=myuser . ./
Run the image. If you know you won't need headful browsers,
you can remove the XVFB start script for a micro perf gain.
CMD ./start_xvfb_and_run_cmd.sh && npm run start:prod --silent
---
# Environment Variables
Copy for LLM
The following is a list of the environment variables used by Apify SDK that are available to the user. The SDK is capable of running without any env vars present, but certain features will only become available after env vars are properly set. You can use [Apify CLI](https://github.com/apify/apify-cli) to set the env vars for you. [Apify platform](https://docs.apify.com/sdk/js/sdk/js/docs/guides/apify-platform.md) also sets the variables automatically.
## Important env vars[](#important-env-vars)
The following environment variables have large impact on the way Apify SDK works and its behavior can be changed significantly by setting or unsetting them.
### `APIFY_LOCAL_STORAGE_DIR`[](#apify_local_storage_dir)
Defines the path to a local directory where [`KeyValueStore`](https://docs.apify.com/sdk/js/sdk/js/reference/class/KeyValueStore.md), [`Dataset`](https://docs.apify.com/sdk/js/sdk/js/reference/class/Dataset.md), and [`RequestQueue`](https://docs.apify.com/sdk/js/sdk/js/reference/class/RequestQueue.md) store their data. Typically, it is set to `./storage`. If omitted, you should define the [`APIFY_TOKEN`](#apify_token) environment variable instead.
### `APIFY_TOKEN`[](#apify_token)
The API token for your Apify account. It is used to access the Apify API, e.g. to access cloud storage or to run an actor on the Apify platform. You can find your API token on the [Account - Integrations](https://console.apify.com/account#/integrations) page. If omitted, you should define the `APIFY_LOCAL_STORAGE_DIR` environment variable instead.
### Combinations of `APIFY_LOCAL_STORAGE_DIR` and `APIFY_TOKEN`[](#combinations-of-apify_local_storage_dir-and-apify_token)
By combining the env vars in various ways, you can greatly influence the behavior of Apify SDK.
| Env Vars | API | Storages |
| ------------------------------------------- | --- | -------------- |
| none OR `APIFY_LOCAL_STORAGE_DIR` | no | local |
| `APIFY_TOKEN` | yes | Apify platform |
| `APIFY_TOKEN` AND `APIFY_LOCAL_STORAGE_DIR` | yes | local+platform |
When using both `APIFY_TOKEN` and `APIFY_LOCAL_STORAGE_DIR`, you can use all the Apify platform features and your data will be stored locally by default. If you want to access platform storages, you can use the `{ forceCloud: true }` option in their respective functions.
const localDataset = await Actor.openDataset('my-local-data'); const remoteDataset = await Actor.openDataset('my-remote-data', { forceCloud: true, });
## Convenience env vars[](#convenience-env-vars)
The next group includes env vars that can help achieve certain goals without having to change your code, such as temporarily switching log level to DEBUG.
### `APIFY_HEADLESS`[](#apify_headless)
If set to `1`, web browsers launched by Apify SDK will run in the headless mode. You can still override this setting in the code, e.g. by passing the `headless: true` option to the
[`Actor.launchPuppeteer()`](https://docs.apify.com/sdk/js/sdk/js/reference/class/Actor.md#launchPuppeteer)
function. But having this setting in an environment variable allows you to develop the crawler locally in headful mode to simplify the debugging, and only run the crawler in headless mode once you deploy it to the Apify platform. By default, the browsers are launched in headful mode, i.e. with windows.
### `APIFY_LOG_LEVEL`[](#apify_log_level)
Specifies the minimum log level, which can be one of the following values (in order of severity): `DEBUG`, `INFO`, `WARNING` and `ERROR`. By default, the log level is set to `INFO`, which means that `DEBUG` messages are not printed to console. See the [`utils.log`](https://crawlee.dev/api/core/class/Log) namespace for logging utilities.
### `APIFY_MEMORY_MBYTES`[](#apify_memory_mbytes)
Sets the amount of system memory in megabytes to be used by the [`AutoscaledPool`](https://crawlee.dev/api/core/class/AutoscaledPool). It is used to limit the number of concurrently running tasks. By default, the max amount of memory to be used is set to one quarter of total system memory, i.e. on a system with 8192 MB of memory, the autoscaling feature will only use up to 2048 MB of memory.
### `APIFY_PROXY_PASSWORD`[](#apify_proxy_password)
Optional password to [Apify Proxy](https://docs.apify.com/proxy) for IP address rotation. If you have an Apify Account, you can find the password on the [Proxy page](https://console.apify.com/proxy) in the Apify Console. The password is automatically inferred using the `APIFY_TOKEN` env var, so in most cases, you don't need to touch it. You should use it when, for some reason, you need access to Apify Proxy, but no access to Apify API, or when you need access to proxy from a different account than your token represents.
---
# Pay-per-event Monetization
Copy for LLM
Apify provides several [pricing models](https://docs.apify.com/platform/actors/publishing/monetize) for monetizing your Actors. The most recent and most flexible one is [pay-per-event](https://docs.apify.com/platform/actors/running/actors-in-store#pay-per-event), which lets you charge your users programmatically directly from your Actor. As the name suggests, you may charge the users each time a specific event occurs, for example a call to an external API or when you return a result.
To use the pay-per-event pricing model, you first need to [set it up](https://docs.apify.com/platform/actors/running/actors-in-store#pay-per-event) for your Actor in the Apify console. After that, you're free to start charging for events.
How pay-per-event pricing works
If you want more details about PPE pricing, please refer to our [PPE documentation](https://docs.apify.com/platform/actors/publishing/monetize/pay-per-event).
## Charging for events[](#charging-for-events)
After monetization is set in the Apify console, you can add [`Actor.charge`](https://docs.apify.com/sdk/js/sdk/js/reference/class/Actor.md#charge) calls to your code and start monetizing!
import { Actor } from 'apify';
await Actor.init();
// Charge for a single occurence of an event await Actor.charge({ eventName: 'init' });
// Prepare some mock results const result = [ { word: 'Lorem' }, { word: 'Ipsum' }, { word: 'Dolor' }, { word: 'Sit' }, { word: 'Amet' }, ];
// Shortcut for charging for each pushed dataset item await Actor.pushData(result, 'result-item');
// Or you can charge for a given number of events manually await Actor.charge({ eventName: 'result-item', count: result.length, });
await Actor.exit();
Then you just push your code to Apify and that's it! The SDK will even keep track of the max total charge setting for you, so you will not provide more value than what the user chose to pay for.
If you need finer control over charging, you can access call [`Actor.getChargingManager()`](https://docs.apify.com/sdk/js/sdk/js/reference/class/Actor.md#getChargingManager) to access the [`ChargingManager`](https://docs.apify.com/sdk/js/sdk/js/reference/class/ChargingManager.md), which can provide more detailed information - for example how many events of each type can be charged before reaching the configured limit.
## Transitioning from a different pricing model[](#transitioning-from-a-different-pricing-model)
When you plan to start using the pay-per-event pricing model for an Actor that is already monetized with a different pricing model, your source code will need support both pricing models during the transition period enforced by the Apify platform. Arguably the most frequent case is the transition from the pay-per-result model which utilizes the `ACTOR_MAX_PAID_DATASET_ITEMS` environment variable to prevent returning unpaid dataset items. The following is an example how to handle such scenarios. The key part is the [`ChargingManager.getPricingInfo`](https://docs.apify.com/sdk/js/sdk/js/reference/class/ChargingManager.md#getPricingInfo) method which returns information about the current pricing model.
import { Actor } from 'apify';
await Actor.init();
// Check the dataset because there might already be items if the run migrated or was restarted const defaultDataset = await Actor.openDataset(); let chargedItems = (await defaultDataset.getInfo())!.itemCount;
if (Actor.getChargingManager().getPricingInfo().isPayPerEvent) { await Actor.pushData({ hello: 'world' }, 'dataset-item'); } else if (chargedItems < Number(process.env.ACTOR_MAX_PAID_DATASET_ITEMS)) { await Actor.pushData({ hello: 'world' }); chargedItems += 1; }
await Actor.exit();
## Local development[](#local-development)
It is encouraged to test your monetization code on your machine before releasing it to the public. To tell your Actor that it should work in pay-per-event mode, pass it the `ACTOR_TEST_PAY_PER_EVENT` environment variable:
ACTOR_TEST_PAY_PER_EVENT=true npm start
If you also wish to see a log of all the events charged throughout the run, you also need to pass the `ACTOR_USE_CHARGING_LOG_DATASET` environment variable. Your charging dataset will then be available under the `charging_log` name (unless you change your storage settings, this dataset is stored in `storage/datasets/charging_log/`). Please note that this log is not available when running the Actor in production on the Apify platform.
Because pricing configuration is stored by the Apify platform, all events will have a default price of $1.
---
# Proxy Management
Copy for LLM
[IP address blocking](https://en.wikipedia.org/wiki/IP_address_blocking) is one of the oldest and most effective ways of preventing access to a website. It is therefore paramount for a good web scraping library to provide easy to use but powerful tools which can work around IP blocking. The most powerful weapon in your anti IP blocking arsenal is a [proxy server](https://en.wikipedia.org/wiki/Proxy_server).
With Apify SDK you can use your own proxy servers, proxy servers acquired from third-party providers, or you can rely on [Apify Proxy](https://apify.com/proxy) for your scraping needs.
## Quick start[](#quick-start)
If you already subscribed to Apify Proxy or have proxy URLs of your own, you can start using them immediately in only a few lines of code.
> If you want to use Apify Proxy, make sure that your [scraper is logged in](https://docs.apify.com/sdk/js/sdk/js/docs/guides/apify-platform.md).
const proxyConfiguration = await Actor.createProxyConfiguration(); const proxyUrl = proxyConfiguration.newUrl();
const proxyConfiguration = await Actor.createProxyConfiguration({ proxyUrls: ['http://proxy-1.com', 'http://proxy-2.com'], }); const proxyUrl = proxyConfiguration.newUrl();
## Proxy Configuration[](#proxy-configuration)
All your proxy needs are managed by the [`ProxyConfiguration`](https://docs.apify.com/sdk/js/sdk/js/reference/class/ProxyConfiguration.md) class. You create an instance using the [`Actor.createProxyConfiguration()`](https://docs.apify.com/sdk/js/sdk/js/reference/class/Actor.md#createProxyConfiguration) function. See the [`ProxyConfigurationOptions`](https://docs.apify.com/sdk/js/sdk/js/reference/interface/ProxyConfigurationOptions.md) for all the possible constructor options.
### Crawler integration[](#crawler-integration)
`ProxyConfiguration` integrates seamlessly into [`CheerioCrawler`](https://crawlee.dev/api/cheerio-crawler/class/CheerioCrawler) and [`PuppeteerCrawler`](https://crawlee.dev/api/puppeteer-crawler/class/PuppeteerCrawler).
const proxyConfiguration = await Actor.createProxyConfiguration({ /* your proxy opts */ }); const crawler = new CheerioCrawler({ proxyConfiguration, // ... });
const proxyConfiguration = await Actor.createProxyConfiguration({ /* your proxy opts */ }); const crawler = new PuppeteerCrawler({ proxyConfiguration, // ... });
Your crawlers will now use the selected proxies for all connections.
### IP Rotation and session management[](#ip-rotation-and-session-management)
[`proxyConfiguration.newUrl()`](https://docs.apify.com/sdk/js/sdk/js/reference/class/ProxyConfiguration.md#newUrl)
allows you to pass a `sessionId` parameter. It will then be used to create a `sessionId`-`proxyUrl` pair, and subsequent `newUrl()` calls with the same `sessionId` will always return the same `proxyUrl`. This is extremely useful in scraping, because you want to create the impression of a real user. See the [session management guide](https://docs.apify.com/sdk/js/sdk/js/docs/guides/session-management.md) and [`SessionPool`](https://crawlee.dev/api/core/class/SessionPool) class for more information on how keeping a real session helps you avoid blocking.
When no `sessionId` is provided, your proxy URLs are rotated round-robin, whereas Apify Proxy manages their rotation using black magic to get the best performance.
const proxyConfiguration = await Actor.createProxyConfiguration({ /* opts / }); const sessionPool = await SessionPool.open({ / opts */ }); const session = await sessionPool.getSession(); const proxyUrl = proxyConfiguration.newUrl(session.id);
const proxyConfiguration = await Actor.createProxyConfiguration({ /* opts */ }); const crawler = new PuppeteerCrawler({ useSessionPool: true, persistCookiesPerSession: true, proxyConfiguration, // ... });
## Apify Proxy vs. Your own proxies[](#apify-proxy-vs-your-own-proxies)
The `ProxyConfiguration` class covers both Apify Proxy and custom proxy URLs so that you can easily switch between proxy providers, however, some features of the class are available only to Apify Proxy users, mainly because Apify Proxy is what one would call a super-proxy. It's not a single proxy server, but an API endpoint that allows connection through millions of different IP addresses. So the class essentially has two modes: Apify Proxy or Your proxy.
The difference is easy to remember. [`ProxyConfigurationOptions.proxyUrls`](https://docs.apify.com/sdk/js/sdk/js/reference/interface/ProxyConfigurationOptions.md#proxyUrls) and [`ProxyConfigurationOptions.newUrlFunction`](https://docs.apify.com/sdk/js/sdk/js/reference/interface/ProxyConfigurationOptions.md#newUrlFunction) enable use of your custom proxy URLs, whereas all the other options are there to configure Apify Proxy. Visit the [Apify Proxy docs](https://docs.apify.com/proxy) for more info on how these parameters work.
## Apify Proxy Configuration[](#apify-proxy-configuration)
With Apify Proxy, you can select specific proxy groups to use, or countries to connect from. This allows you to get better proxy performance after some initial research.
const proxyConfiguration = await Actor.createProxyConfiguration({ groups: ['RESIDENTIAL'], countryCode: 'US', }); const proxyUrl = proxyConfiguration.newUrl();
Now your crawlers will use only Residential proxies from the US. Note that you must first get access to a proxy group before you are able to use it. You can find your available proxy groups in the [proxy dashboard](https://console.apify.com/proxy).
## Inspecting current proxy in Crawlers[](#inspecting-current-proxy-in-crawlers)
`CheerioCrawler` and `PuppeteerCrawler` grant access to information about the currently used proxy in their `handlePageFunction` using a [`proxyInfo`](https://docs.apify.com/sdk/js/sdk/js/reference/interface/ProxyInfo.md) object. With the object, you can easily access the proxy URL. If you're using Apify Proxy, the other configuration parameters will also be available in the `proxyInfo` object.
---
# Request Storage
Copy for LLM
The Apify SDK has several request storage types that are useful for specific tasks. The requests are stored either on local disk to a directory defined by the `APIFY_LOCAL_STORAGE_DIR` environment variable, or on the [Apify platform](https://docs.apify.com/sdk/js/sdk/js/docs/guides/apify-platform.md) under the user account identified by the API token defined by the `APIFY_TOKEN` environment variable. If neither of these variables is defined, by default Apify SDK sets `APIFY_LOCAL_STORAGE_DIR` to `./storage` in the current working directory and prints a warning.
Typically, you will be developing the code on your local computer and thus set the `APIFY_LOCAL_STORAGE_DIR` environment variable. Once the code is ready, you will deploy it to the Apify platform, where it will automatically set the `APIFY_TOKEN` environment variable and thus use cloud storage. No code changes are needed.
**Related links**
* [Apify platform storage documentation](https://docs.apify.com/storage)
* [View storage in Apify Console](https://console.apify.com/storage)
* [Request queues API reference](https://docs.apify.com/api/v2#/reference/request-queues)
## Request queue[](#request-queue)
The request queue is a storage of URLs to crawl. The queue is used for the deep crawling of websites, where you start with several URLs and then recursively follow links to other pages. The data structure supports both breadth-first and depth-first crawling orders.
Each actor run is associated with a **default request queue**, which is created exclusively for the actor run. Typically, it is used to store URLs to crawl in the specific actor run. Its usage is optional.
In Apify SDK, the request queue is represented by the [`RequestQueue`](https://docs.apify.com/sdk/js/sdk/js/reference/class/RequestQueue.md) class.
In local configuration, the request queue is emulated by [@apify/storage-local](https://github.com/apify/apify-storage-local-js) NPM package and its data is stored in SQLite database in the directory specified by the `APIFY_LOCAL_STORAGE_DIR` environment variable as follows:
{APIFY_LOCAL_STORAGE_DIR}/request_queues/{QUEUE_ID}/db.sqlite
Note that `{QUEUE_ID}` is the name or ID of the request queue. The default queue has ID `default`, unless you override it by setting the `APIFY_DEFAULT_REQUEST_QUEUE_ID` environment variable.
The following code demonstrates basic operations of the request queue:
// Open the default request queue associated with the actor run const requestQueue = await RequestQueue.open(); // Enqueue the initial request await requestQueue.addRequest({ url: 'https://example.com' });
// The crawler will automatically process requests from the queue const crawler = new CheerioCrawler({ requestQueue, handlePageFunction: async ({ $, request }) => { // Add new request to the queue await requestQueue.addRequest({ url: 'https://example.com/new-page' }); // Add links found on page to the queue await Actor.utils.enqueueLinks({ $, requestQueue }); }, });
To see more detailed example of how to use the request queue with a crawler, see the [Puppeteer Crawler](https://docs.apify.com/sdk/js/sdk/js/docs/examples/puppeteer-crawler.md) example.
## Request list[](#request-list)
The request list is not a storage per se - it represents the list of URLs to crawl that is stored in a run memory (or optionally in default [Key-Value Store](https://docs.apify.com/sdk/js/sdk/js/docs/guides/result-storage.md#key-value-store) associated with the run, if specified). The list is used for the crawling of a large number of URLs, when you know all the URLs which should be visited by the crawler and no URLs would be added during the run. The URLs can be provided either in code or parsed from a text file hosted on the web.
Request list is created exclusively for the actor run and only if its usage is explicitly specified in the code. Its usage is optional.
In Apify SDK, the request list is represented by the [`RequestList`](https://crawlee.dev/api/core/class/RequestList) class.
The following code demonstrates basic operations of the request list:
// Prepare the sources array with URLs to visit const sources = [ { url: 'http://www.example.com/page-1' }, { url: 'http://www.example.com/page-2' }, { url: 'http://www.example.com/page-3' }, ]; // Open the request list. // List name is used to persist the sources and the list state in the key-value store const requestList = await RequestList.open('my-list', sources);
// The crawler will automatically process requests from the list const crawler = new PuppeteerCrawler({ requestList, handlePageFunction: async ({ page, request }) => { // Process the page (extract data, take page screenshot, etc). // No more requests could be added to the request list here }, });
To see more detailed example of how to use the request list with a crawler, see the [Puppeteer with proxy](https://docs.apify.com/sdk/js/sdk/js/docs/examples/puppeteer-with-proxy.md) example.
## Which one to choose?[](#which-one-to-choose)
When using Request queue - you would normally have several start URLs (e.g. category pages on e-commerce website) and then recursively add more (e.g. individual item pages) programmatically to the queue, it supports dynamic adding and removing of requests. No more URLs can be added to Request list after its initialization as it is immutable, URLs cannot be removed from the list either.
On the other hand, the Request queue is not optimized for adding or removing numerous URLs in a batch. This is technically possible, but requests are added one by one to the queue, and thus it would take significant time with a larger number of requests. Request list however can contain even millions of URLs, and it would take significantly less time to add them to the list, compared to the queue.
Note that Request queue and Request list can be used together by the same crawler. In such cases, each request from the Request list is enqueued into the Request queue first (to the foremost position in the queue, even if Request queue is not empty) and then consumed from the latter. This is necessary to avoid the same URL being processed more than once (from the list first and then possibly from the queue). In practical terms, such a combination can be useful when there are numerous initial URLs, but more URLs would be added dynamically by the crawler.
The following code demonstrates how to use Request queue and Request list in the same crawler:
// Prepare the sources array with URLs to visit (it can contain millions of URLs) const sources = [ { url: 'http://www.example.com/page-1' }, { url: 'http://www.example.com/page-2' }, { url: 'http://www.example.com/page-3' }, ]; // Open the request list const requestList = await RequestList.open('my-list', sources);
// Open the default request queue. It's not necessary to add any requests to the queue const requestQueue = await RequestQueue.open();
// The crawler will automatically process requests from the list and the queue const crawler = new PuppeteerCrawler({ requestList, requestQueue, // Each request from the request list is enqueued to the request queue one by one. // At this point request with the same URL would exist in the list and the queue handlePageFunction: async ({ request, page }) => { // Add new request to the queue await requestQueue.addRequest({ url: 'http://www.example.com/new-page', });
// Add links found on page to the queue
await Actor.utils.enqueueLinks({ page, requestQueue });
// The requests above would be added to the queue (but not to the list)
// and would be processed after the request list is empty.
// No more requests could be added to the list here
},
});
---
# Result Storage
Copy for LLM
The Apify SDK has several result storage types that are useful for specific tasks. The data is stored either on local disk to a directory defined by the `APIFY_LOCAL_STORAGE_DIR` environment variable, or on the [Apify platform](https://docs.apify.com/sdk/js/sdk/js/docs/guides/apify-platform.md) under the user account identified by the API token defined by the `APIFY_TOKEN` environment variable. If neither of these variables is defined, by default Apify SDK sets `APIFY_LOCAL_STORAGE_DIR` to `./storage` in the current working directory and prints a warning.
Typically, you will be developing the code on your local computer and thus set the `APIFY_LOCAL_STORAGE_DIR` environment variable. Once the code is ready, you will deploy it to the Apify platform, where it will automatically set the `APIFY_TOKEN` environment variable and thus use cloud storage. No code changes are needed.
**Related links**
* [Apify platform storage documentation](https://docs.apify.com/storage)
* [View storage in Apify Console](https://console.apify.com/storage)
* [Key-value stores API reference](https://apify.com/docs/api/v2#/reference/key-value-stores)
* [Datasets API reference](https://docs.apify.com/api/v2#/reference/datasets)
## Key-value store[](#key-value-store)
The key-value store is used for saving and reading data records or files. Each data record is represented by a unique key and associated with a MIME content type. Key-value stores are ideal for saving screenshots of web pages, PDFs or to persist the state of crawlers.
Each actor run is associated with a **default key-value store**, which is created exclusively for the actor run. By convention, the actor run input and output is stored in the default key-value store under the `INPUT` and `OUTPUT` key, respectively. Typically the input and output is a JSON file, although it can be any other format.
In the Apify SDK, the key-value store is represented by the [`KeyValueStore`](https://docs.apify.com/sdk/js/sdk/js/reference/class/KeyValueStore.md) class. In order to simplify access to the default key-value store, the SDK also provides [`Actor.getValue()`](https://docs.apify.com/sdk/js/sdk/js/reference/class/Actor.md#getValue) and [`Actor.setValue()`](https://docs.apify.com/sdk/js/sdk/js/reference/class/Actor.md#setValue) functions.
In local configuration, the data is stored in the directory specified by the `APIFY_LOCAL_STORAGE_DIR` environment variable as follows:
{APIFY_LOCAL_STORAGE_DIR}/key_value_stores/{STORE_ID}/{KEY}.{EXT}
Note that `{STORE_ID}` is the name or ID of the key-value store. The default key value store has ID `default`, unless you override it by setting the `APIFY_DEFAULT_KEY_VALUE_STORE_ID` environment variable. The `{KEY}` is the key of the record and `{EXT}` corresponds to the MIME content type of the data value.
The following code demonstrates basic operations of key-value stores:
// Get actor input from the default key-value store const input = await Actor.getInput();
// Write actor output to the default key-value store. await Actor.setValue('OUTPUT', { myResult: 123 });
// Open a named key-value store const store = await Actor.openKeyValueStore('some-name');
// Write record. JavaScript object is automatically converted to JSON, // strings and binary buffers are stored as they are await store.setValue('some-key', { foo: 'bar' });
// Read record. Note that JSON is automatically parsed to a JavaScript object, // text data returned as a string and other data is returned as binary buffer const value = await store.getValue('some-key');
// Delete record await store.setValue('some-key', null);
To see a real-world example of how to get the input from the key-value store, see the [Screenshots](https://docs.apify.com/sdk/js/sdk/js/docs/examples/capture-screenshot.md) example.
## Dataset[](#dataset)
Datasets are used to store structured data where each object stored has the same attributes, such as online store products or real estate offers. You can imagine a dataset as a table, where each object is a row and its attributes are columns. Dataset is an append-only storage - you can only add new records to it but you cannot modify or remove existing records.
When the dataset is stored on the [Apify platform](https://docs.apify.com/sdk/js/sdk/js/docs/guides/apify-platform.md), you can export its data to the following formats: HTML, JSON, CSV, Excel, XML and RSS. The datasets are displayed on the actor run details page and in the [Storage](https://console.apify.com/storage) section in the Apify Console. The actual data is exported using the [Get dataset items](https://apify.com/docs/api/v2#/reference/datasets/item-collection/get-items) Apify API endpoint. This way you can easily share crawling results.
Each actor run is associated with a **default dataset**, which is created exclusively for the actor run. Typically, it is used to store crawling results specific for the actor run. Its usage is optional.
In the Apify SDK, the dataset is represented by the [`Dataset`](https://docs.apify.com/sdk/js/sdk/js/reference/class/Dataset.md) class. In order to simplify writes to the default dataset, the SDK also provides the [`Actor.pushData()`](https://docs.apify.com/sdk/js/sdk/js/reference/class/Actor.md#pushData) function.
In local configuration, the data is stored in the directory specified by the `APIFY_LOCAL_STORAGE_DIR` environment variable as follows:
{APIFY_LOCAL_STORAGE_DIR}/datasets/{DATASET_ID}/{INDEX}.json
Note that `{DATASET_ID}` is the name or ID of the dataset. The default dataset has ID `default`, unless you override it by setting the `APIFY_DEFAULT_DATASET_ID` environment variable. Each dataset item is stored as a separate JSON file, where `{INDEX}` is a zero-based index of the item in the dataset.
The following code demonstrates basic operations of the dataset:
// Write a single row to the default dataset await Actor.pushData({ col1: 123, col2: 'val2' });
// Open a named dataset const dataset = await Actor.openDataset('some-name');
// Write a single row await dataset.pushData({ foo: 'bar' });
// Write multiple rows await dataset.pushData([{ foo: 'bar2', col2: 'val2' }, { col3: 123 }]);
To see how to use the dataset to store crawler results, see the [Cheerio Crawler](https://docs.apify.com/sdk/js/sdk/js/docs/examples/cheerio-crawler.md) example.
---
# Session Management
Copy for LLM
[`SessionPool`](https://crawlee.dev/api/core/class/SessionPool) is a class that allows you to handle the rotation of proxy IP addresses along with cookies and other custom settings in Apify SDK.
The main benefit of a Session pool is that you can filter out blocked or non-working proxies, so your actor does not retry requests over known blocked/non-working proxies. Another benefit of using SessionPool is that you can store information tied tightly to an IP address, such as cookies, auth tokens, and particular headers. Having your cookies and other identificators used only with a specific IP will reduce the chance of being blocked. Last but not least, another benefit is the even rotation of IP addresses - SessionPool picks the session randomly, which should prevent burning out a small pool of available IPs.
Now let's take a look at how to use a Session pool.
**Example usage in [`PuppeteerCrawler`](https://crawlee.dev/api/puppeteer-crawler/class/PuppeteerCrawler)**
const proxyConfiguration = await Actor.createProxyConfiguration();
const crawler = new PuppeteerCrawler({ requestQueue, // To use the proxy IP session rotation logic, you must turn the proxy usage on. proxyConfiguration, // Activates the Session pool. useSessionPool: true, // Overrides default Session pool configuration sessionPoolOptions: { maxPoolSize: 100, }, // Set to true if you want the crawler to save cookies per session, // and set the cookies to page before navigation automatically. persistCookiesPerSession: true, handlePageFunction: async ({ request, page, session }) => { const title = await page.title();
if (title === 'Blocked') {
session.retire();
} else if (
title === 'Not sure if blocked, might also be a connection error'
) {
session.markBad();
} else {
// session.markGood() - this step is done automatically in puppeteer pool.
}
},
});
**Example usage in [`CheerioCrawler`](https://crawlee.dev/api/cheerio-crawler/class/CheerioCrawler)**
const proxyConfiguration = await Actor.createProxyConfiguration();
const crawler = new CheerioCrawler({ requestQueue, // To use the proxy IP session rotation logic, you must turn the proxy usage on. proxyConfiguration, // Activates the Session pool. useSessionPool: true, // Overrides default Session pool configuration. sessionPoolOptions: { maxPoolSize: 100, }, // Set to true if you want the crawler to save cookies per session, // and set the cookie header to request automatically... persistCookiesPerSession: true, handlePageFunction: async ({ request, $, session }) => { const title = $('title');
if (title === 'Blocked') {
session.retire();
} else if (
title === 'Not sure if blocked, might also be a connection error'
) {
session.markBad();
} else {
// session.markGood() - this step is done automatically in BasicCrawler.
}
},
});
**Example usage in [`BasicCrawler`](https://crawlee.dev/api/basic-crawler/class/BasicCrawler)**
const { gotScraping } = require('got-scraping'); const proxyConfiguration = await Actor.createProxyConfiguration();
const crawler = new BasicCrawler({ requestQueue, // Allows access to proxyInfo object in handleRequestFunction proxyConfiguration, useSessionPool: true, sessionPoolOptions: { maxPoolSize: 100, }, handleRequestFunction: async ({ request, session, proxyInfo }) => { // To use the proxy IP session rotation logic, you must turn the proxy usage on. const proxyUrl = proxyInfo.url; const requestOptions = { url: request.url, proxyUrl, throwHttpErrors: false, headers: { // If you want to use the cookieJar. // This way you get the Cookie headers string from session. Cookie: session.getCookieString(), }, }; let response;
try {
response = await gotScraping(requestOptions);
} catch (e) {
if (e === 'SomeNetworkError') {
// If a network error happens, such as timeout, socket hangup etc...
// There is usually a chance that it was just bad luck and the proxy works.
// No need to throw it away.
session.markBad();
}
throw e;
}
// Automatically retires the session based on response HTTP status code.
session.retireOnBlockedStatusCodes(response.statusCode);
if (response.body.blocked) {
// You are sure it is blocked.
// This will throw away the session.
session.retire();
}
// Everything is ok, you can get the data.
// No need to call session.markGood -> BasicCrawler calls it for you.
// If you want to use the CookieJar in session you need.
session.setCookiesFromResponse(response);
},
});
**Example solo usage**
Actor.main(async () => { const sessionPoolOptions = { maxPoolSize: 100, }; const sessionPool = await SessionPool.open(sessionPoolOptions);
// Get session
const session = sessionPool.getSession();
// Increase the errorScore.
session.markBad();
// Throw away the session
session.retire();
// Lower the errorScore and marks the session good.
session.markGood();
});
These are the basics of configuring SessionPool. Please, bear in mind that a Session pool needs time to find working IPs and build up the pool, so you will probably see a lot of errors until it becomes stabilized.
---
# Setting up a TypeScript project
Copy for LLM
Apify SDK supports TypeScript by covering public APIs with type declarations. This allows writing code with auto-completion for TypeScript and JavaScript code alike. Besides that, actors written in TypeScript can take advantage of compile-time type-checking and avoid many coding mistakes, while providing documentation for functions, parameters and return values.
To use TypeScript in your actors, you'll need the following prerequisites.
1. TypeScript compiler `tsc` installed somewhere:
npm install --dev typescript
TypeScript can be a development dependency in your project, as shown above. There's no need to pollute your production environment or your system's global repository with TypeScript.
2. A build script invoking `tsc` and a correctly specified `main` entry point defined in your `package.json`:
{ "scripts": { "build": "tsc -p tsconfig.json" }, "main": "build/main.js" }
3. Type declarations for NodeJS, so you can take advantage of type-checking in all the features you'll use:
npm install --dev @types/node
4. TypeScript configuration file allowing `tsc` to understand your project layout and the features used in your project:
{ "compilerOptions": { "target": "es2019", "module": "commonjs", "moduleResolution": "node", "strict": true, "noImplicitAny": false, "strictNullChecks": false, "lib": [ "DOM", "DOM.Iterable", "ES2015", "ES2016", "ES2018", "ES2019.Object", "ES2018.AsyncIterable", "ES2020.String", "ES2019.Array" ], "rootDir": "src/", "outDir": "build/" }, "include": ["src/"] }
Place the content above inside a `tsconfig.json` in your root folder.
Also, if you are a VSCode user that is using JavaScript, create a `jsconfig.json` with the same content, adding `"checkJs": true` to `"compilerOptions"`, so you can enjoy using the types in your `.js` source files.
## Auto-completion[](#auto-completion)
IDE auto-completion should work in most places. That's true even if you are writting actors in pure JavaScript. For time constraints, we left out the amendment of an internal API for the time being, and these need to be added as the SDK developers write new and enhance old code.
## SDK Documentation[](#sdk-documentation)
SDK documentation has grown a lot. There is a new API Reference section **Type definitions** that holds documentation for all constructible types, function parameters and return types, in the Apify SDK.
## Caveats[](#caveats)
As of version 1.0+, the generated typings, due to JSDoc limitations, have some properties and parameters annotated with `any` type, therefore the settings `noImplicitAny` and `strictNullChecks`, set to `true`, may not be advised. You may try enabling them, but it might hinder development because of the need for typecasts to be able to compile, your mileage may vary.
Besides the *implicit any* errors that might occur in the code when writing in TypeScript, the current typings doesn't offer generics that make outputs type-safe, so you need to declare your types, as such:
interface MySchema { expectedParam1?: string; expectedParam2?: number; }
const input: MySchema = (await Actor.getInput()) as any; // getInput returns Promise<Object<string, *>|string|Buffer|null> here
if (!input?.expectedParam1) { // input is MySchema now and you can check in a type-safe way throw new Error('Missing expectedParam1'); }
There are also other places where you need to explicitly provide your interface / type, like in Dataset iterators (`map`, `reduce`, `forEach`):
interface ExpectedShape { id: string; someFields: Fields[]; }
const dataset = await Actor.openDataset(); await dataset.forEach((item: ExpectedShape) => { // deal with item.id / item.someFields // otherwise item is "any" });
---
Copy for LLM
# Apify SDK: The scalable web crawling and scraping library for JavaScript
[](https://www.npmjs.com/package/apify)
Apify SDK simplifies the development of web crawlers, scrapers, data extractors and web automation jobs. It provides tools to manage and automatically scale a pool of headless browsers, to maintain queues of URLs to crawl, store crawling results to a local filesystem or into the cloud, rotate proxies and much more. The SDK is available as the [`apify`](https://www.npmjs.com/package/apify) NPM package. It can be used either stand-alone in your own applications or in [actors](https://docs.apify.com/actor) running on the [Apify Cloud](https://apify.com/).
**View full documentation, guides and examples on the [Apify SDK project website](https://sdk.apify.com)**
---
# overview
Copy for LLM
## Overview[](#overview)
The Apify SDK is available as the [`apify`](https://www.npmjs.com/package/apify) NPM package and it provides the following tools:
* [`Actor`](https://sdk.apify.com/api/apify/class/Actor) - Serves as an alternative approach to the static helpers exported from the package. This class can be used to control the current actor run and to interact with the actor's environment.
* [`ApifyClient`](https://sdk.apify.com/api/apify/class/ApifyClient) - Allows user to interact with the Apify platform from code, control and schedule actors on the platform and access the result data stores.
* [`Configuration`](https://sdk.apify.com/api/apify/class/Configuration) - Helper class encapsulating the configuration of the current actor run.
* [`PlatformEventManager`](https://sdk.apify.com/api/apify/class/PlatformEventManager) - Event emitter for the platform and SDK events. Can be used to track actor run performance or serverless container migration.
* [`ProxyConfiguration`](https://sdk.apify.com/api/apify/class/ProxyConfiguration) - Configures connection to a proxy server with the provided options. Setting proxy configuration in your crawlers automatically configures them to use the selected proxies for all connections. The proxy servers are managed by Apify Proxy.
* [`RequestQueue`](https://sdk.apify.com/api/apify/class/RequestQueue) - Represents a queue of URLs to crawl, which is stored either on a local filesystem or in the [Apify Cloud](https://apify.com). The queue is used for deep crawling of websites, where you start with several URLs and then recursively follow links to other pages. The data structure supports both breadth-first and depth-first crawling orders.
* [`Dataset`](https://sdk.apify.com/api/apify/class/Dataset) - Provides a store for structured data and enables their export to formats like JSON, JSONL, CSV, XML, Excel or HTML. The data is stored on a local filesystem or in the Apify Cloud. Datasets are useful for storing and sharing large tabular crawling results, such as a list of products or real estate offers.
* [`KeyValueStore`](https://sdk.apify.com/api/apify/class/KeyValueStore) - A simple key-value store for arbitrary data records or files, along with their MIME content type. It is ideal for saving screenshots of web pages, PDFs or to persist the state of your crawlers. The data is stored on a local filesystem or in the Apify Cloud.
Additionally, the package provides various helper functions to simplify running your code on the Apify Cloud and thus take advantage of its pool of proxies, job scheduler, data storage, etc. For more information, see the [Apify SDK Programmer's Reference](https://sdk.apify.com).
---
# support
Copy for LLM
## Support[](#support)
If you find any bug or issue with the Apify SDK, please [submit an issue on GitHub](https://github.com/apify/apify-js/issues). For questions, you can ask on [Stack Overflow](https://stackoverflow.com/questions/tagged/apify) or contact <support@apify.com>
## Contributing[](#contributing)
Your code contributions are welcome and you'll be praised to eternity! If you have any ideas for improvements, either submit an issue or create a pull request. For contribution guidelines and the code of conduct, see [CONTRIBUTING.md](https://github.com/apify/apify-js/blob/master/CONTRIBUTING.md).
## License[](#license)
This project is licensed under the Apache License 2.0 - see the [LICENSE.md](https://github.com/apify/apify-js/blob/master/LICENSE.md) file for details.
## Acknowledgments[](#acknowledgments)
Many thanks to [Chema Balsas](https://www.npmjs.com/~jbalsas) for giving up the `apify` package name on NPM and renaming his project to [jsdocify](https://www.npmjs.com/package/jsdocify).
---
# Upgrading to v1
Copy for LLM
## Summary[](#summary)
After 3.5 years of rapid development and a lot of breaking changes and deprecations, here comes the result - **Apify SDK v1**. There were two goals for this release. **Stability** and **adding support for more browsers** - Firefox and Webkit (Safari).
The SDK has grown quite popular over the years, powering thousands of web scraping and automation projects. We think our developers deserve a stable environment to work in and by releasing SDK v1, **we commit to only make breaking changes once a year, with a new major release**.
We added support for more browsers by replacing `PuppeteerPool` with [`browser-pool`](https://github.com/apify/browser-pool). A new library that we created specifically for this purpose. It builds on the ideas from `PuppeteerPool` and extends them to support [Playwright](https://github.com/microsoft/playwright). Playwright is a browser automation library similar to Puppeteer. It works with all well known browsers and uses almost the same interface as Puppeteer, while adding useful features and simplifying common tasks. Don't worry, you can still use Puppeteer with the new `BrowserPool`.
A large breaking change is that neither `puppeteer` nor `playwright` are bundled with the SDK v1. To make the choice of a library easier and installs faster, users will have to install the selected modules and versions themselves. This allows us to add support for even more libraries in the future.
Thanks to the addition of Playwright we now have a `PlaywrightCrawler`. It is very similar to `PuppeteerCrawler` and you can pick the one you prefer. It also means we needed to make some interface changes. The `launchPuppeteerFunction` option of `PuppeteerCrawler` is gone and `launchPuppeteerOptions` were replaced by `launchContext`. We also moved things around in the `handlePageFunction` arguments. See the [migration guide](#migration-guide) for more detailed explanation and migration examples.
What's in store for SDK v2? We want to split the SDK into smaller libraries, so that everyone can install only the things they need. We plan a TypeScript migration to make crawler development faster and safer. Finally, we will take a good look at the interface of the whole SDK and update it to improve the developer experience. Bug fixes and scraping features will of course keep landing in versions 1.X as well.
## Migration Guide[](#migration-guide)
There are a lot of breaking changes in the v1.0.0 release, but we're confident that updating your code will be a matter of minutes. Below, you'll find examples how to do it and also short tutorials how to use many of the new features.
> Many of the new features are made with power users in mind, so don't worry if something looks complicated. You don't need to use it.
## Installation[](#installation)
Previous versions of the SDK bundled the `puppeteer` package, so you did not have to install it. SDK v1 supports also `playwright` and we don't want to force users to install both. To install SDK v1 with Puppeteer (same as previous versions), run:
npm install apify puppeteer
To install SDK v1 with Playwright run:
npm install apify playwright
> While we tried to add the most important functionality in the initial release, you may find that there are still some utilities or options that are only supported by Puppeteer and not Playwright.
## Running on Apify Platform[](#running-on-apify-platform)
If you want to make use of Playwright on the Apify Platform, you need to use a Docker image that supports Playwright. We've created them for you, so head over to the new [Docker image guide](https://sdk.apify.com/docs/guides/docker-images) and pick the one that best suits your needs.
Note that your `package.json` **MUST** include `puppeteer` and/or `playwright` as dependencies. If you don't list them, the libraries will be uninstalled from your `node_modules` folder when you build your actors.
## Handler arguments are now Crawling Context[](#handler-arguments-are-now-crawling-context)
Previously, arguments of user provided handler functions were provided in separate objects. This made it difficult to track values across function invocations.
const handlePageFunction = async (args1) => { args1.hasOwnProperty('proxyInfo'); // true };
const handleFailedRequestFunction = async (args2) => { args2.hasOwnProperty('proxyInfo'); // false };
args1 === args2; // false
This happened because a new arguments object was created for each function. With SDK v1 we now have a single object called Crawling Context.
const handlePageFunction = async (crawlingContext1) => { crawlingContext1.hasOwnProperty('proxyInfo'); // true };
const handleFailedRequestFunction = async (crawlingContext2) => { crawlingContext2.hasOwnProperty('proxyInfo'); // true };
// All contexts are the same object. crawlingContext1 === crawlingContext2; // true
### `Map` of crawling contexts and their IDs[](#map-of-crawling-contexts-and-their-ids)
Now that all the objects are the same, we can keep track of all running crawling contexts. We can do that by working with the new `id` property of `crawlingContext` This is useful when you need cross-context access.
let masterContextId; const handlePageFunction = async ({ id, page, request, crawler }) => { if (request.userData.masterPage) { masterContextId = id; // Prepare the master page. } else { const masterContext = crawler.crawlingContexts.get(masterContextId); const masterPage = masterContext.page; const masterRequest = masterContext.request; // Now we can manipulate the master data from another handlePageFunction. } };
### `autoscaledPool` was moved under `crawlingContext.crawler`[](#autoscaledpool-was-moved-under-crawlingcontextcrawler)
To prevent bloat and to make access to certain key objects easier, we exposed a `crawler` property on the handle page arguments.
const handePageFunction = async ({ request, page, crawler }) => { await crawler.requestQueue.addRequest({ url: 'https://example.com' }); await crawler.autoscaledPool.pause(); };
This also means that some shorthands like `puppeteerPool` or `autoscaledPool` were no longer necessary.
const handePageFunction = async (crawlingContext) => { crawlingContext.autoscaledPool; // does NOT exist anymore crawlingContext.crawler.autoscaledPool; // <= this is correct usage };
## Replacement of `PuppeteerPool` with `BrowserPool`[](#replacement-of-puppeteerpool-with-browserpool)
`BrowserPool` was created to extend `PuppeteerPool` with the ability to manage other browser automation libraries. The API is similar, but not the same.
### Access to running `BrowserPool`[](#access-to-running-browserpool)
Only `PuppeteerCrawler` and `PlaywrightCrawler` use `BrowserPool`. You can access it on the `crawler` object.
const crawler = new Apify.PlaywrightCrawler({ handlePageFunction: async ({ page, crawler }) => { crawler.browserPool; // <----- }, });
crawler.browserPool; // <-----
### Pages now have IDs[](#pages-now-have-ids)
And they're equal to `crawlingContext.id` which gives you access to full `crawlingContext` in hooks. See [Lifecycle hooks](#configuration-and-lifecycle-hooks) below.
const pageId = browserPool.getPageId;
### Configuration and lifecycle hooks[](#configuration-and-lifecycle-hooks)
The most important addition with `BrowserPool` are the [lifecycle hooks](https://github.com/apify/browser-pool#browserpool). You can access them via `browserPoolOptions` in both crawlers. A full list of `browserPoolOptions` can be found in [`browser-pool` readme](https://github.com/apify/browser-pool#new-browserpooloptions).
const crawler = new Apify.PuppeteerCrawler({ browserPoolOptions: { retireBrowserAfterPageCount: 10, preLaunchHooks: [ async (pageId, launchContext) => { const { request } = crawler.crawlingContexts.get(pageId); if (request.userData.useHeadful === true) { launchContext.launchOptions.headless = false; } }, ], }, });
### Introduction of `BrowserController`[](#introduction-of-browsercontroller)
[`BrowserController`](https://github.com/apify/browser-pool#browsercontroller) is a class of `browser-pool` that's responsible for browser management. Its purpose is to provide a single API for working with both Puppeteer and Playwright browsers. It works automatically in the background, but if you ever wanted to close a browser properly, you should use a `browserController` to do it. You can find it in the handle page arguments.
const handlePageFunction = async ({ page, browserController }) => { // Wrong usage. Could backfire because it bypasses BrowserPool. await page.browser().close();
// Correct usage. Allows graceful shutdown.
await browserController.close();
const cookies = [
/* some cookie objects */
];
// Wrong usage. Will only work in Puppeteer and not Playwright.
await page.setCookies(...cookies);
// Correct usage. Will work in both.
await browserController.setCookies(page, cookies);
};
The `BrowserController` also includes important information about the browser, such as the context it was launched with. This was difficult to do before SDK v1.
const handlePageFunction = async ({ browserController }) => { // Information about the proxy used by the browser browserController.launchContext.proxyInfo;
// Session used by the browser
browserController.launchContext.session;
};
### `BrowserPool` methods vs `PuppeteerPool`[](#browserpool-methods-vs-puppeteerpool)
Some functions were removed (in line with earlier deprecations), and some were changed a bit:
// OLD await puppeteerPool.recyclePage(page);
// NEW await page.close();
// OLD await puppeteerPool.retire(page.browser());
// NEW browserPool.retireBrowserByPage(page);
// OLD await puppeteerPool.serveLiveViewSnapshot();
// NEW // There's no LiveView in BrowserPool
## Updated `PuppeteerCrawlerOptions`[](#updated-puppeteercrawleroptions)
To keep `PuppeteerCrawler` and `PlaywrightCrawler` consistent, we updated the options.
### Removal of `gotoFunction`[](#removal-of-gotofunction)
The concept of a configurable `gotoFunction` is not ideal. Especially since we use a modified `gotoExtended`. Users have to know this when they override `gotoFunction` if they want to extend default behavior. We decided to replace `gotoFunction` with `preNavigationHooks` and `postNavigationHooks`.
The following example illustrates how `gotoFunction` makes things complicated.
const gotoFunction = async ({ request, page }) => { // pre-processing await makePageStealthy(page);
// Have to remember how to do this:
const response = await gotoExtended(page, request, {
/* have to remember the defaults */
});
// post-processing
await page.evaluate(() => {
window.foo = 'bar';
});
// Must not forget!
return response;
};
const crawler = new Apify.PuppeteerCrawler({ gotoFunction, // ... });
With `preNavigationHooks` and `postNavigationHooks` it's much easier. `preNavigationHooks` are called with two arguments: `crawlingContext` and `gotoOptions`. `postNavigationHooks` are called only with `crawlingContext`.
const preNavigationHooks = [async ({ page }) => makePageStealthy(page)];
const postNavigationHooks = [ async ({ page }) => page.evaluate(() => { window.foo = 'bar'; }), ];
const crawler = new Apify.PuppeteerCrawler({ preNavigationHooks, postNavigationHooks, // ... });
### `launchPuppeteerOptions` => `launchContext`[](#launchpuppeteeroptions--launchcontext)
Those were always a point of confusion because they merged custom Apify options with `launchOptions` of Puppeteer.
const launchPuppeteerOptions = { useChrome: true, // Apify option headless: false, // Puppeteer option };
Use the new `launchContext` object, which explicitly defines `launchOptions`. `launchPuppeteerOptions` were removed.
const crawler = new Apify.PuppeteerCrawler({ launchContext: { useChrome: true, // Apify option launchOptions: { headless: false, // Puppeteer option }, }, });
> LaunchContext is also a type of [`browser-pool`](https://github.com/apify/browser-pool) and the structure is exactly the same there. SDK only adds extra options.
### Removal of `launchPuppeteerFunction`[](#removal-of-launchpuppeteerfunction)
`browser-pool` introduces the idea of [lifecycle hooks](https://github.com/apify/browser-pool#browserpool), which are functions that are executed when a certain event in the browser lifecycle happens.
const launchPuppeteerFunction = async (launchPuppeteerOptions) => { if (someVariable === 'chrome') { launchPuppeteerOptions.useChrome = true; } return Apify.launchPuppeteer(launchPuppeteerOptions); };
const crawler = new Apify.PuppeteerCrawler({ launchPuppeteerFunction, // ... });
Now you can recreate the same functionality with a `preLaunchHook`:
const maybeLaunchChrome = (pageId, launchContext) => { if (someVariable === 'chrome') { launchContext.useChrome = true; } };
const crawler = new Apify.PuppeteerCrawler({ browserPoolOptions: { preLaunchHooks: [maybeLaunchChrome], }, // ... });
This is better in multiple ways. It is consistent across both Puppeteer and Playwright. It allows you to easily construct your browsers with pre-defined behavior:
const preLaunchHooks = [ maybeLaunchChrome, useHeadfulIfNeeded, injectNewFingerprint, ];
And thanks to the addition of [`crawler.crawlingContexts`](#handler-arguments-are-now-crawling-context) the functions also have access to the `crawlingContext` of the `request` that triggered the launch.
const preLaunchHooks = [ async function maybeLaunchChrome(pageId, launchContext) { const { request } = crawler.crawlingContexts.get(pageId); if (request.userData.useHeadful === true) { launchContext.launchOptions.headless = false; } }, ];
## Launch functions[](#launch-functions)
In addition to `Apify.launchPuppeteer()` we now also have `Apify.launchPlaywright()`.
### Updated arguments[](#updated-arguments)
We [updated the launch options object](#launchpuppeteeroptions--launchcontext) because it was a frequent source of confusion.
// OLD await Apify.launchPuppeteer({ useChrome: true, headless: true, });
// NEW await Apify.launchPuppeteer({ useChrome: true, launchOptions: { headless: true, }, });
### Custom modules[](#custom-modules)
`Apify.launchPuppeteer` already supported the `puppeteerModule` option. With Playwright, we normalized the name to `launcher` because the `playwright` module itself does not launch browsers.
const puppeteer = require('puppeteer'); const playwright = require('playwright');
await Apify.launchPuppeteer(); // Is the same as: await Apify.launchPuppeteer({ launcher: puppeteer, });
await Apify.launchPlaywright(); // Is the same as: await Apify.launchPlaywright({ launcher: playwright.chromium, });
---
# Upgrading to v2
Copy for LLM
* **BREAKING**: Require Node.js >=15.10.0 because HTTP2 support on lower Node.js versions is very buggy.
* **BREAKING**: Bump `cheerio` to `1.0.0-rc.10` from `rc.3`. There were breaking changes in `cheerio` between the versions so this bump might be breaking for you as well.
* Remove `LiveViewServer` which was deprecated before release of SDK v1.
---
# Upgrading to v3
Copy for LLM
This page summarizes most of the breaking changes between Crawlee (v3) and Apify SDK (v2). Crawlee is the spiritual successor to Apify SDK, so we decided to keep the versioning and release Crawlee as v3.
Crawlee vs Apify SDK v2
Up until version 3 of `apify`, the package contained both scraping related tools and Apify platform related helper methods. With v3 we are splitting the whole project into two main parts:
* [Crawlee](https://github.com/apify/crawlee), the new web-scraping library, available as [`crawlee`](https://www.npmjs.com/package/crawlee) package on NPM
* [Apify SDK](https://github.com/apify/apify-sdk-js), helpers for the Apify platform, available as [`apify`](https://www.npmjs.com/package/apify) package on NPM
## Crawlee monorepo[](#crawlee-monorepo)
The [`crawlee`](https://www.npmjs.com/package/crawlee) package consists of several smaller packages, released separately under `@crawlee` namespace:
* `@crawlee/core`: the base for all the crawler implementations, also contains things like `Request`, `RequestQueue`, `RequestList` or `Dataset` classes
* `@crawlee/basic`: exports `BasicCrawler`
* `@crawlee/http`: exports `HttpCrawler` (which is used for creating `@crawlee/dom` and `@crawlee/cheerio`)
* `@crawlee/dom`: exports `DOMCrawler`
* `@crawlee/cheerio`: exports `CheerioCrawler`
* `@crawlee/browser`: exports `BrowserCrawler` (which is used for creating `@crawlee/playwright` and `@crawlee/puppeteer`)
* `@crawlee/playwright`: exports `PlaywrightCrawler`
* `@crawlee/puppeteer`: exports `PuppeteerCrawler`
* `@crawlee/memory-storage`: `@apify/storage-local` alternative
* `@crawlee/browser-pool`: previously `browser-pool` package
* `@crawlee/utils`: utility methods
* `@crawlee/types`: holds TS interfaces mainly about the `StorageClient`
### Installing Crawlee[](#installing-crawlee)
Most of the Crawlee packages are extending and reexporting each other, so it's enough to install just the one you plan on using, e.g. `@crawlee/playwright` if you plan on using `playwright` - it already contains everything from the `@crawlee/browser` package, which includes everything from `@crawlee/basic`, which includes everything from `@crawlee/core`.
If we don't care much about additional code being pulled in, we can just use the `crawlee` meta-package, which contains (re-exports) most of the `@crawlee/*` packages, and therefore contains all the crawler classes.
npm install crawlee
Or if all we need is cheerio support, we can install only `@crawlee/cheerio`.
npm install @crawlee/cheerio
When using `playwright` or `puppeteer`, we still need to install those dependencies explicitly - this allows the users to be in control of which version will be used.
npm install crawlee playwright
or npm install @crawlee/playwright playwright
Alternatively we can also use the `crawlee` meta-package which contains (re-exports) most of the `@crawlee/*` packages, and therefore contains all the crawler classes.
> Sometimes you might want to use some utility methods from `@crawlee/utils`, so you might want to install that as well. This package contains some utilities that were previously available under `Apify.utils`. Browser related utilities can be also found in the crawler packages (e.g. `@crawlee/playwright`).
## Full TypeScript support[](#full-typescript-support)
Both Crawlee and Apify SDK are full TypeScript rewrite, so they include up-to-date types in the package. For your TypeScript crawlers we recommend using our predefined TypeScript configuration from `@apify/tsconfig` package. Don't forget to set the `module` and `target` to `ES2022` or above to be able to use top level await.
> The `@apify/tsconfig` config has [`noImplicitAny`](https://www.typescriptlang.org/tsconfig#noImplicitAny) enabled, you might want to disable it during the initial development as it will cause build failures if you left some unused local variables in your code.
tsconfig.json
{ "extends": "@apify/tsconfig", "compilerOptions": { "module": "ES2022", "target": "ES2022", "outDir": "dist", "lib": ["DOM"] }, "include": ["./src/**/*"] }
### Docker build[](#docker-build)
For `Dockerfile` we recommend using multi-stage build, so you don't install the dev dependencies like TypeScript in your final image:
Dockerfile
using multistage build, as we need dev deps to build the TS source code
FROM apify/actor-node:16 AS builder
copy all files, install all dependencies (including dev deps) and build the project
COPY . ./
RUN npm install --include=dev
&& npm run build
create final image
FROM apify/actor-node:16
copy only necessary files
COPY --from=builder /usr/src/app/package*.json ./ COPY --from=builder /usr/src/app/README.md ./ COPY --from=builder /usr/src/app/dist ./dist COPY --from=builder /usr/src/app/apify.json ./apify.json COPY --from=builder /usr/src/app/INPUT_SCHEMA.json ./INPUT_SCHEMA.json
install only prod deps
RUN npm --quiet set progress=false
&& npm install --only=prod --no-optional
&& echo "Installed NPM packages:"
&& (npm list --only=prod --no-optional --all || true)
&& echo "Node.js version:"
&& node --version
&& echo "NPM version:"
&& npm --version
run compiled code
CMD npm run start:prod
## Browser fingerprints[](#browser-fingerprints)
Previously we had a magical `stealth` option in the puppeteer crawler that enabled several tricks aiming to mimic the real users as much as possible. While this worked to a certain degree, we decided to replace it with generated browser fingerprints.
In case we don't want to have dynamic fingerprints, we can disable this behaviour via `useFingerprints` in `browserPoolOptions`:
const crawler = new PlaywrightCrawler({ browserPoolOptions: { useFingerprints: false, }, });
## Session cookie method renames[](#session-cookie-method-renames)
Previously, if we wanted to get or add cookies for the session that would be used for the request, we had to call `session.getPuppeteerCookies()` or `session.setPuppeteerCookies()`. Since this method could be used for any of our crawlers, not just `PuppeteerCrawler`, the methods have been renamed to `session.getCookies()` and `session.setCookies()` respectively. Otherwise, their usage is exactly the same!
## Memory storage[](#memory-storage)
When we store some data or intermediate state (like the one `RequestQueue` holds), we now use `@crawlee/memory-storage` by default. It is an alternative to the `@apify/storage-local`, that stores the state inside memory (as opposed to SQLite database used by `@apify/storage-local`). While the state is stored in memory, it also dumps it to the file system, so we can observe it, as well as respects the existing data stored in KeyValueStore (e.g. the `INPUT.json` file).
When we want to run the crawler on Apify platform, we need to use `Actor.init` or `Actor.main`, which will automatically switch the storage client to `ApifyClient` when on the Apify platform.
We can still use the `@apify/storage-local`, to do it, first install it pass it to the `Actor.init` or `Actor.main` options:
> `@apify/storage-local` v2.1.0+ is required for Crawlee
import { Actor } from 'apify'; import { ApifyStorageLocal } from '@apify/storage-local';
const storage =
new ApifyStorageLocal(/* options like enableWalMode belong here */);
await Actor.init({ storage });
## Purging of the default storage[](#purging-of-the-default-storage)
Previously the state was preserved between local runs, and we had to use `--purge` argument of the `apify-cli`. With Crawlee, this is now the default behaviour, we purge the storage automatically on `Actor.init/main` call. We can opt out of it via `purge: false` in the `Actor.init` options.
## Renamed crawler options and interfaces[](#renamed-crawler-options-and-interfaces)
Some options were renamed to better reflect what they do. We still support all the old parameter names too, but not at the TS level.
* `handleRequestFunction` -> `requestHandler`
* `handlePageFunction` -> `requestHandler`
* `handleRequestTimeoutSecs` -> `requestHandlerTimeoutSecs`
* `handlePageTimeoutSecs` -> `requestHandlerTimeoutSecs`
* `requestTimeoutSecs` -> `navigationTimeoutSecs`
* `handleFailedRequestFunction` -> `failedRequestHandler`
We also renamed the crawling context interfaces, so they follow the same convention and are more meaningful:
* `CheerioHandlePageInputs` -> `CheerioCrawlingContext`
* `PlaywrightHandlePageFunction` -> `PlaywrightCrawlingContext`
* `PuppeteerHandlePageFunction` -> `PuppeteerCrawlingContext`
## Context aware helpers[](#context-aware-helpers)
Some utilities previously available under `Apify.utils` namespace are now moved to the crawling context and are *context aware*. This means they have some parameters automatically filled in from the context, like the current `Request` instance or current `Page` object, or the `RequestQueue` bound to the crawler.
### Enqueuing links[](#enqueuing-links)
One common helper that received more attention is the `enqueueLinks`. As mentioned above, it is context aware - we no longer need pass in the `requestQueue` or `page` arguments (or the cheerio handle `$`). In addition to that, it now offers 3 enqueuing strategies:
* `EnqueueStrategy.All` (`'all'`): Matches any URLs found
* `EnqueueStrategy.SameHostname` (`'same-hostname'`) Matches any URLs that have the same subdomain as the base URL (default)
* `EnqueueStrategy.SameDomain` (`'same-domain'`) Matches any URLs that have the same domain name. For example, `https://wow.an.example.com` and `https://example.com` will both be matched for a base url of `https://example.com`.
This means we can even call `enqueueLinks()` without any parameters. By default, it will go through all the links found on current page and filter only those targeting the same subdomain.
Moreover, we can specify patterns the URL should match via globs:
const crawler = new PlaywrightCrawler({
async requestHandler({ enqueueLinks }) {
await enqueueLinks({
globs: ['https://crawlee.dev//'],
// we can also use regexps and pseudoUrls keys here
});
},
});
## Implicit `RequestQueue` instance[](#implicit-requestqueue-instance)
All crawlers now have the `RequestQueue` instance automatically available via `crawler.getRequestQueue()` method. It will create the instance for you if it does not exist yet. This mean we no longer need to create the `RequestQueue` instance manually, and we can just use `crawler.addRequests()` method described underneath.
> We can still create the `RequestQueue` explicitly, the `crawler.getRequestQueue()` method will respect that and return the instance provided via crawler options.
## `crawler.addRequests()`[](#crawleraddrequests)
We can now add multiple requests in batches. The newly added `addRequests` method will handle everything for us. It enqueues the first 1000 requests and resolves, while continuing with the rest in the background, again in a smaller 1000 items batches, so we don't fall into any API rate limits. This means the crawling will start almost immediately (within few seconds at most), something previously possible only with a combination of `RequestQueue` and `RequestList`.
// will resolve right after the initial batch of 1000 requests is added const result = await crawler.addRequests([ /* many requests, can be even millions */ ]);
// if we want to wait for all the requests to be added, we can await the waitForAllRequestsToBeAdded promise
await result.waitForAllRequestsToBeAdded;
## Less verbose error logging[](#less-verbose-error-logging)
Previously an error thrown from inside request handler resulted in full error object being logged. With Crawlee, we log only the error message as a warning as long as we know the request will be retried. If you want to enable verbose logging like in v2, use the `CRAWLEE_VERBOSE_LOG` env var.
## `Request.label` shortcut[](#requestlabel-shortcut)
Labeling requests used to work via the `Request.userData` object. With Crawlee, we can also use the `Request.label` shortcut. It is implemented as a `get/set` pair, using the value from `Request.userData`. The support for this shortcut is also added to the `enqueueLinks` options interface.
async requestHandler({ request, enqueueLinks }) { if (request.label !== 'DETAIL') { await enqueueLinks({ globs: ['...'], label: 'DETAIL', }); } }
## Removal of `requestAsBrowser`[](#removal-of-requestasbrowser)
In v1 we replaced the underlying implementation of `requestAsBrowser` to be just a proxy over calling [`got-scraping`](https://github.com/apify/got-scraping) - our custom extension to `got` that tries to mimic the real browsers as much as possible. With v3, we are removing the `requestAsBrowser`, encouraging the use of [`got-scraping`](https://github.com/apify/got-scraping) directly.
For easier migration, we also added `context.sendRequest()` helper that allows processing the context bound `Request` object through [`got-scraping`](https://github.com/apify/got-scraping):
const crawler = new BasicCrawler({ async requestHandler({ sendRequest, log }) { // we can use the options parameter to override gotScraping options const res = await sendRequest({ responseType: 'json' }); log.info('received body', res.body); }, });
### How to use `sendRequest()`?[](#how-to-use-sendrequest)
See [the Got Scraping guide](https://crawlee.dev/docs/guides/got-scraping).
### Removed options[](#removed-options)
The `useInsecureHttpParser` option has been removed. It's permanently set to `true` in order to better mimic browsers' behavior.
Got Scraping automatically performs protocol negotiation, hence we removed the `useHttp2` option. It's set to `true` - 100% of browsers nowadays are capable of HTTP/2 requests. Oh, more and more of the web is using it too!
### Renamed options[](#renamed-options)
In the `requestAsBrowser` approach, some of the options were named differently. Here's a list of renamed options:
#### `payload`[](#payload)
This options represents the body to send. It could be a `string` or a `Buffer`. However, there is no `payload` option anymore. You need to use `body` instead. Or, if you wish to send JSON, `json`. Here's an example:
// Before: await Apify.utils.requestAsBrowser({ …, payload: 'Hello, world!' }); await Apify.utils.requestAsBrowser({ …, payload: Buffer.from('c0ffe', 'hex') }); await Apify.utils.requestAsBrowser({ …, json: { hello: 'world' } });
// After: await gotScraping({ …, body: 'Hello, world!' }); await gotScraping({ …, body: Buffer.from('c0ffe', 'hex') }); await gotScraping({ …, json: { hello: 'world' } });
#### `ignoreSslErrors`[](#ignoresslerrors)
It has been renamed to `https.rejectUnauthorized`. By default, it's set to `false` for convenience. However, if you want to make sure the connection is secure, you can do the following:
// Before: await Apify.utils.requestAsBrowser({ …, ignoreSslErrors: false });
// After: await gotScraping({ …, https: { rejectUnauthorized: true } });
Please note: the meanings are opposite! So we needed to invert the values as well.
#### `header-generator` options[](#header-generator-options)
`useMobileVersion`, `languageCode` and `countryCode` no longer exist. Instead, you need to use `headerGeneratorOptions` directly:
// Before: await Apify.utils.requestAsBrowser({ …, useMobileVersion: true, languageCode: 'en', countryCode: 'US', });
// After: await gotScraping({ …, headerGeneratorOptions: { devices: ['mobile'], // or ['desktop'] locales: ['en-US'], }, });
#### `timeoutSecs`[](#timeoutsecs)
In order to set a timeout, use `timeout.request` (which is **milliseconds** now).
// Before: await Apify.utils.requestAsBrowser({ …, timeoutSecs: 30, });
// After: await gotScraping({ …, timeout: { request: 30 * 1000, }, });
#### `throwOnHttpErrors`[](#throwonhttperrors)
`throwOnHttpErrors` → `throwHttpErrors`. This options throws on unsuccessful HTTP status codes, for example `404`. By default, it's set to `false`.
#### `decodeBody`[](#decodebody)
`decodeBody` → `decompress`. This options decompresses the body. Defaults to `true` - please do not change this or websites will break (unless you know what you're doing!).
#### `abortFunction`[](#abortfunction)
This function used to make the promise throw on specific responses, if it returned `true`. However, it wasn't that useful.
You probably want to cancel the request instead, which you can do in the following way:
const promise = gotScraping(…);
promise.on('request', request => { // Please note this is not a Got Request instance, but a ClientRequest one. // https://nodejs.org/api/http.html#class-httpclientrequest
if (request.protocol !== 'https:') {
// Unsecure request, abort.
promise.cancel();
// If you set `isStream` to `true`, please use `stream.destroy()` instead.
}
});
const response = await promise;
## Removal of browser pool plugin mixing[](#removal-of-browser-pool-plugin-mixing)
Previously, you were able to have a browser pool that would mix Puppeteer and Playwright plugins (or even your own custom plugins if you've built any). As of this version, that is no longer allowed, and creating such a browser pool will cause an error to be thrown (it's expected that all plugins that will be used are of the same type).
Confused?
As an example, this change disallows a pool to mix Puppeteer with Playwright. You can still create pools that use multiple Playwright plugins, each with a different launcher if you want!
## Handling requests outside of browser[](#handling-requests-outside-of-browser)
One small feature worth mentioning is the ability to handle requests with browser crawlers outside the browser. To do that, we can use a combination of `Request.skipNavigation` and `context.sendRequest()`.
Take a look at how to achieve this by checking out the [Skipping navigation for certain requests](https://crawlee.dev/docs/examples/skip-navigation) example!
## Logging[](#logging)
Crawlee exports the default `log` instance directly as a named export. We also have a scoped `log` instance provided in the crawling context - this one will log messages prefixed with the crawler name and should be preferred for logging inside the request handler.
const crawler = new CheerioCrawler({
async requestHandler({ log, request }) {
log.info(Opened ${request.loadedUrl});
},
});
## Auto-saved crawler state[](#auto-saved-crawler-state)
Every crawler instance now has `useState()` method that will return a state object we can use. It will be automatically saved when `persistState` event occurs. The value is cached, so we can freely call this method multiple times and get the exact same reference. No need to worry about saving the value either, as it will happen automatically.
const crawler = new CheerioCrawler({ async requestHandler({ crawler }) { const state = await crawler.useState({ foo: [] as number[] }); // just change the value, no need to care about saving it state.foo.push(123); }, });
## Apify SDK[](#apify-sdk)
The Apify platform helpers can be now found in the Apify SDK (`apify` NPM package). It exports the `Actor` class that offers following static helpers:
* `ApifyClient` shortcuts: `addWebhook()`, `call()`, `callTask()`, `metamorph()`
* helpers for running on Apify platform: `init()`, `exit()`, `fail()`, `main()`, `isAtHome()`, `createProxyConfiguration()`
* storage support: `getInput()`, `getValue()`, `openDataset()`, `openKeyValueStore()`, `openRequestQueue()`, `pushData()`, `setValue()`
* events support: `on()`, `off()`
* other utilities: `getEnv()`, `newClient()`, `reboot()`
`Actor.main` is now just a syntax sugar around calling `Actor.init()` at the beginning and `Actor.exit()` at the end (plus wrapping the user function in try/catch block). All those methods are async and should be awaited - with node 16 we can use the top level await for that. In other words, following is equivalent:
import { Actor } from 'apify';
await Actor.init(); // your code await Actor.exit('Crawling finished!');
import { Actor } from 'apify';
await Actor.main( async () => { // your code }, { statusMessage: 'Crawling finished!' }, );
`Actor.init()` will conditionally set the storage implementation of Crawlee to the `ApifyClient` when running on the Apify platform, or keep the default (memory storage) implementation otherwise. It will also subscribe to the websocket events (or mimic them locally). `Actor.exit()` will handle the tear down and calls `process.exit()` to ensure our process won't hang indefinitely for some reason.
### Events[](#events)
Apify SDK (v2) exports `Apify.events`, which is an `EventEmitter` instance. With Crawlee, the events are managed by [`EventManager`](https://crawlee.dev/api/core/class/EventManager) class instead. We can either access it via `Actor.eventManager` getter, or use `Actor.on` and `Actor.off` shortcuts instead.
-Apify.events.on(...); +Actor.on(...);
> We can also get the [`EventManager`](https://crawlee.dev/api/core/class/EventManager) instance via `Configuration.getEventManager()`.
In addition to the existing events, we now have an `exit` event fired when calling `Actor.exit()` (which is called at the end of `Actor.main()`). This event allows you to gracefully shut down any resources when `Actor.exit` is called.
## Smaller/internal breaking changes[](#smallerinternal-breaking-changes)
* `Apify.call()` is now just a shortcut for running `ApifyClient.actor(actorId).call(input, options)`, while also taking the token inside env vars into account
* `Apify.callTask()` is now just a shortcut for running `ApifyClient.task(taskId).call(input, options)`, while also taking the token inside env vars into account
* `Apify.metamorph()` is now just a shortcut for running `ApifyClient.task(taskId).metamorph(input, options)`, while also taking the ACTOR\_RUN\_ID inside env vars into account
* `Apify.waitForRunToFinish()` has been removed, use `ApifyClient.waitForFinish()` instead
* `Actor.main/init` purges the storage by default
* remove `purgeLocalStorage` helper, move purging to the storage class directly
<!-- -->
* `StorageClient` interface now has optional `purge` method
* purging happens automatically via `Actor.init()` (you can opt out via `purge: false` in the options of `init/main` methods)
* `QueueOperationInfo.request` is no longer available
* `Request.handledAt` is now string date in ISO format
* `Request.inProgress` and `Request.reclaimed` are now `Set`s instead of POJOs
* `injectUnderscore` from puppeteer utils has been removed
* `APIFY_MEMORY_MBYTES` is no longer taken into account, use `CRAWLEE_AVAILABLE_MEMORY_RATIO` instead
* some `AutoscaledPool` options are no longer available:
<!-- -->
* `cpuSnapshotIntervalSecs` and `memorySnapshotIntervalSecs` has been replaced with top level `systemInfoIntervalMillis` configuration
* `maxUsedCpuRatio` has been moved to the top level configuration
* `ProxyConfiguration.newUrlFunction` can be async. `.newUrl()` and `.newProxyInfo()` now return promises.
* `prepareRequestFunction` and `postResponseFunction` options are removed, use navigation hooks instead
* `gotoFunction` and `gotoTimeoutSecs` are removed
* removed compatibility fix for old/broken request queues with null `Request` props
* `fingerprintsOptions` renamed to `fingerprintOptions` (`fingerprints` -> `fingerprint`).
* `fingerprintOptions` now accept `useFingerprintCache` and `fingerprintCacheSize` (instead of `useFingerprintPerProxyCache` and `fingerprintPerProxyCacheSize`, which are now no longer available). This is because the cached fingerprints are no longer connected to proxy URLs but to sessions.
---
# apify<!-- -->
[](https://www.npmjs.com/package/apify) [](https://www.npmjs.com/package/apify) [](https://discord.gg/jyEM2PRvMU) [](https://github.com/apify/apify-sdk-js/actions/workflows/test-and-release.yaml)
Apify SDK provides the tools required to run your own Apify Actors. The crawlers and scraping related tools, previously included in Apify SDK (v2), have been split into a brand-new module - [`crawlee`](https://npmjs.org/crawlee), while keeping the Apify specific parts in this module.
> Would you like to work with us on Crawlee, Apify SDK or similar projects? We are hiring [Node.js engineers](https://apify.com/jobs#senior-node.js-engineer).
## Upgrading from v2[](#upgrading-from-v2)
A lot of things have changed since version 2 of the Apify SDK, including the split of the crawlers to the new [`crawlee`](https://npmjs.org/crawlee) module. We've written a guide to help you easily migrate from v2 to v3. Visit the [Upgrading Guide](https://docs.apify.com/sdk/js/sdk/js/docs/upgrading/upgrading-to-v3.md) to find out what changes you need to make (especially the section related to this very [Apify SDK](https://docs.apify.com/sdk/js/sdk/js/docs/upgrading/upgrading-to-v3.md#apify-sdk)), and, if you encounter any issues, join our [Discord server](https://discord.gg/jyEM2PRvMU) for help!
## Quick Start[](#quick-start)
This short tutorial will set you up to start using Apify SDK in a minute or two. If you want to learn more, proceed to the [Apify Platform](https://docs.apify.com/sdk/js/sdk/js/docs/guides/apify-platform.md) guide that will take you step by step through running your Actor on Apify's platform.
Apify SDK requires [Node.js](https://nodejs.org/en/) 16 or later. Add Apify SDK to any Node.js project by running:
npm install apify crawlee playwright
> For this example, we'll also install the [`crawlee`](https://npmjs.org/crawlee) module, as it now provides the crawlers that were previously exported by Apify SDK. If you don't plan to use crawlers in your Actors, then you don't need to install it. Keep in mind that neither `playwright` nor `puppeteer` are bundled with `crawlee` in order to reduce install size and allow greater flexibility. That's why we manually install it with NPM. You can choose one, both, or neither.
There are two ways to initialize your Actor: by using the `Actor.main()` function you're probably used to, or by calling `Actor.init()` and `Actor.exit()` manually. We prefer explicitly calling `init` and `exit`.
### Using `Actor.init()` and `Actor.exit()`[](#using-actorinit-and-actorexit)
import { Actor } from 'apify'; import { PlaywrightCrawler } from 'crawlee';
await Actor.init();
const crawler = new PlaywrightCrawler({
async requestHandler({ request, page, enqueueLinks }) {
// Extract HTML title of the page.
const title = await page.title();
console.log(Title of ${request.url}: ${title});
// Add URLs that point to the same hostname.
await enqueueLinks();
},
});
await crawler.run(['https://crawlee.dev/']);
await Actor.exit();
### Using `Actor.main()`[](#using-actormain)
import { Actor } from 'apify'; import { PlaywrightCrawler } from 'crawlee';
await Actor.main(async () => {
const crawler = new PlaywrightCrawler({
async requestHandler({ request, page, enqueueLinks }) {
// Extract HTML title of the page.
const title = await page.title();
console.log(Title of ${request.url}: ${title});
// Add URLs that point to the same hostname.
await enqueueLinks();
},
});
await crawler.run(['https://crawlee.dev/']);
});
## Support[](#support)
If you find any bug or issue with the Apify SDK, please [submit an issue on GitHub](https://github.com/apify/apify-sdk-js/issues). For questions, you can ask on [Stack Overflow](https://stackoverflow.com/questions/tagged/apify) or contact <support@apify.com>
## Contributing[](#contributing)
Your code contributions are welcome, and you'll be praised to eternity! If you have any ideas for improvements, either submit an issue or create a pull request. For contribution guidelines and the code of conduct, see [CONTRIBUTING.md](https://github.com/apify/apify-sdk-js/blob/master/CONTRIBUTING.md).
## License[](#license)
This project is licensed under the Apache License 2.0 - see the [LICENSE.md](https://github.com/apify/apify-sdk-js/blob/master/LICENSE.md) file for details.
## Acknowledgments[](#acknowledgments)
Many thanks to [Chema Balsas](https://www.npmjs.com/~jbalsas) for giving up the `apify` package name on NPM and renaming his project to [jsdocify](https://www.npmjs.com/package/jsdocify).
## Index[**](#Index)
### Result Stores
* [**Dataset](https://docs.apify.com/sdk/js/sdk/js/reference/class/Dataset.md)
### Scaling
* [**ProxyConfiguration](https://docs.apify.com/sdk/js/sdk/js/reference/class/ProxyConfiguration.md)
### Sources
* [**RequestQueue](https://docs.apify.com/sdk/js/sdk/js/reference/class/RequestQueue.md)
### Other
* [**LogLevel](https://docs.apify.com/sdk/js/sdk/js/reference/enum/LogLevel.md)
* [**Actor](https://docs.apify.com/sdk/js/sdk/js/reference/class/Actor.md)
* [**ApifyClient](https://docs.apify.com/sdk/js/sdk/js/reference/class/ApifyClient.md)
* [**Configuration](https://docs.apify.com/sdk/js/sdk/js/reference/class/Configuration.md)
* [**ChargingManager](https://docs.apify.com/sdk/js/sdk/js/reference/class/ChargingManager.md)
* [**KeyValueStore](https://docs.apify.com/sdk/js/sdk/js/reference/class/KeyValueStore.md)
* [**Log](https://docs.apify.com/sdk/js/sdk/js/reference/class/Log.md)
* [**Logger](https://docs.apify.com/sdk/js/sdk/js/reference/class/Logger.md)
* [**LoggerJson](https://docs.apify.com/sdk/js/sdk/js/reference/class/LoggerJson.md)
* [**LoggerText](https://docs.apify.com/sdk/js/sdk/js/reference/class/LoggerText.md)
* [**PlatformEventManager](https://docs.apify.com/sdk/js/sdk/js/reference/class/PlatformEventManager.md)
* [**AbortOptions](https://docs.apify.com/sdk/js/sdk/js/reference/interface/AbortOptions.md)
* [**ActorPricingInfo](https://docs.apify.com/sdk/js/sdk/js/reference/interface/ActorPricingInfo.md)
* [**ActorRun](https://docs.apify.com/sdk/js/sdk/js/reference/interface/ActorRun.md)
* [**ApifyClientOptions](https://docs.apify.com/sdk/js/sdk/js/reference/interface/ApifyClientOptions.md)
* [**ApifyEnv](https://docs.apify.com/sdk/js/sdk/js/reference/interface/ApifyEnv.md)
* [**CallOptions](https://docs.apify.com/sdk/js/sdk/js/reference/interface/CallOptions.md)
* [**CallTaskOptions](https://docs.apify.com/sdk/js/sdk/js/reference/interface/CallTaskOptions.md)
* [**ConfigurationOptions](https://docs.apify.com/sdk/js/sdk/js/reference/interface/ConfigurationOptions.md)
* [**DatasetConsumer](https://docs.apify.com/sdk/js/sdk/js/reference/interface/DatasetConsumer.md)
* [**DatasetContent](https://docs.apify.com/sdk/js/sdk/js/reference/interface/DatasetContent.md)
* [**DatasetDataOptions](https://docs.apify.com/sdk/js/sdk/js/reference/interface/DatasetDataOptions.md)
* [**DatasetIteratorOptions](https://docs.apify.com/sdk/js/sdk/js/reference/interface/DatasetIteratorOptions.md)
* [**DatasetMapper](https://docs.apify.com/sdk/js/sdk/js/reference/interface/DatasetMapper.md)
* [**DatasetOptions](https://docs.apify.com/sdk/js/sdk/js/reference/interface/DatasetOptions.md)
* [**DatasetReducer](https://docs.apify.com/sdk/js/sdk/js/reference/interface/DatasetReducer.md)
* [**ExitOptions](https://docs.apify.com/sdk/js/sdk/js/reference/interface/ExitOptions.md)
* [**ChargeOptions](https://docs.apify.com/sdk/js/sdk/js/reference/interface/ChargeOptions.md)
* [**ChargeResult](https://docs.apify.com/sdk/js/sdk/js/reference/interface/ChargeResult.md)
* [**InitOptions](https://docs.apify.com/sdk/js/sdk/js/reference/interface/InitOptions.md)
* [**KeyConsumer](https://docs.apify.com/sdk/js/sdk/js/reference/interface/KeyConsumer.md)
* [**KeyValueStoreIteratorOptions](https://docs.apify.com/sdk/js/sdk/js/reference/interface/KeyValueStoreIteratorOptions.md)
* [**KeyValueStoreOptions](https://docs.apify.com/sdk/js/sdk/js/reference/interface/KeyValueStoreOptions.md)
* [**LoggerOptions](https://docs.apify.com/sdk/js/sdk/js/reference/interface/LoggerOptions.md)
* [**MainOptions](https://docs.apify.com/sdk/js/sdk/js/reference/interface/MainOptions.md)
* [**MetamorphOptions](https://docs.apify.com/sdk/js/sdk/js/reference/interface/MetamorphOptions.md)
* [**OpenStorageOptions](https://docs.apify.com/sdk/js/sdk/js/reference/interface/OpenStorageOptions.md)
* [**ProxyConfigurationOptions](https://docs.apify.com/sdk/js/sdk/js/reference/interface/ProxyConfigurationOptions.md)
* [**ProxyInfo](https://docs.apify.com/sdk/js/sdk/js/reference/interface/ProxyInfo.md)
* [**QueueOperationInfo](https://docs.apify.com/sdk/js/sdk/js/reference/interface/QueueOperationInfo.md)
* [**RebootOptions](https://docs.apify.com/sdk/js/sdk/js/reference/interface/RebootOptions.md)
* [**RecordOptions](https://docs.apify.com/sdk/js/sdk/js/reference/interface/RecordOptions.md)
* [**RequestQueueOperationOptions](https://docs.apify.com/sdk/js/sdk/js/reference/interface/RequestQueueOperationOptions.md)
* [**RequestQueueOptions](https://docs.apify.com/sdk/js/sdk/js/reference/interface/RequestQueueOptions.md)
* [**WebhookOptions](https://docs.apify.com/sdk/js/sdk/js/reference/interface/WebhookOptions.md)
* [**UserFunc](https://docs.apify.com/sdk/js/sdk/js/reference.md#UserFunc)
* [**log](https://docs.apify.com/sdk/js/sdk/js/reference.md#log)
## Other<!-- -->[**](#__CATEGORY__)
### [**](#UserFunc)[**](https://github.com/apify/apify-sdk-js/blob/master/packages/apify/src/actor.ts#L1889)UserFunc
**UserFunc\<T>: () => Awaitable\<T>
#### Type parameters
* **T** = unknown
#### Type declaration
* * **(): Awaitable\<T>
- #### Returns Awaitable\<T>
### [**](#log)[**](https://undefined/apify/apify-sdk-js/blob/master/node_modules/@apify/log/src/index.d.ts#L252)externalconstlog
**log: [Log](https://docs.apify.com/sdk/js/sdk/js/reference/class/Log.md)
---
# Changelog
# Change Log
All notable changes to this project will be documented in this file. See [Conventional Commits](https://conventionalcommits.org) for commit guidelines.
## [3.5.1](https://github.com/apify/apify-sdk-js/compare/apify@3.5.0...apify@3.5.1) (2025-10-20)[](#351-2025-10-20)
### Performance Improvements[](#performance-improvements)
* Use Apify-provided environment variables to obtain PPE pricing information ([#483](https://github.com/apify/apify-sdk-js/issues/483)) ([98dd09b](https://github.com/apify/apify-sdk-js/commit/98dd09b7d28f073e5cf35143634068b28d767d24)), closes [#481](https://github.com/apify/apify-sdk-js/issues/481)
# [3.5.0](https://github.com/apify/apify-sdk-js/compare/apify@3.4.5...apify@3.5.0) (2025-10-06)
### Bug Fixes[](#bug-fixes)
* adjust `ProxyConfiguration` to support crawlee v3.15 ([#473](https://github.com/apify/apify-sdk-js/issues/473)) ([f5c7feb](https://github.com/apify/apify-sdk-js/commit/f5c7febb8566e48d850cf27e4d2e2b048177394b))
* ensure the `Actor` instance is initialized while calling its methods ([#471](https://github.com/apify/apify-sdk-js/issues/471)) ([70465f7](https://github.com/apify/apify-sdk-js/commit/70465f7a5ab722b41c82e71a0a1addb0c8612ad0))
### Features[](#features)
* allow skipping access checks when initializing ProxyConfiguration ([#474](https://github.com/apify/apify-sdk-js/issues/474)) ([c87a228](https://github.com/apify/apify-sdk-js/commit/c87a2289598c094e6700374f176fb91e4246aead)), closes [#472](https://github.com/apify/apify-sdk-js/issues/472)
* respect input schema defaults in `Actor.getInput()` ([#409](https://github.com/apify/apify-sdk-js/issues/409)) ([bd9181d](https://github.com/apify/apify-sdk-js/commit/bd9181d11044e66b56120c37a6813fe11a37556e)), closes [#287](https://github.com/apify/apify-sdk-js/issues/287)
## [3.4.5](https://github.com/apify/apify-sdk-js/compare/apify@3.4.4...apify@3.4.5) (2025-09-11)[](#345-2025-09-11)
### Bug Fixes[](#bug-fixes-1)
* consistent parameters for platform event listeners ([#451](https://github.com/apify/apify-sdk-js/issues/451)) ([705ae50](https://github.com/apify/apify-sdk-js/commit/705ae502495a6c2716552f16b8e1dc16e847ebcf)), closes [#405](https://github.com/apify/apify-sdk-js/issues/405)
* force quit stuck `Actor.exit()` calls ([#420](https://github.com/apify/apify-sdk-js/issues/420)) ([483fc43](https://github.com/apify/apify-sdk-js/commit/483fc4399890f3b2c00869c85c295b8c5aee8826))
* respect `forceCloud` in `KeyValueStore.getPublicUrl()` calls ([#462](https://github.com/apify/apify-sdk-js/issues/462)) ([12e5f9f](https://github.com/apify/apify-sdk-js/commit/12e5f9f877465e04829e390ed1dff2a0b34e66e8)), closes [#302](https://github.com/apify/apify-sdk-js/issues/302) [#459](https://github.com/apify/apify-sdk-js/issues/459)
## [3.4.4](https://github.com/apify/apify-sdk-js/compare/apify@3.4.3...apify@3.4.4) (2025-07-28)[](#344-2025-07-28)
**Note:** Version bump only for package apify
## [3.4.3](https://github.com/apify/apify-sdk-js/compare/apify@3.4.2...apify@3.4.3) (2025-07-14)[](#343-2025-07-14)
### Bug Fixes[](#bug-fixes-2)
* Return eventChargeLimitReached=false for charge calls with count=0 ([#395](https://github.com/apify/apify-sdk-js/issues/395)) ([4f97da0](https://github.com/apify/apify-sdk-js/commit/4f97da0cf4bbda33dcaa3d91f0f543f080dbab8b)), closes [#372](https://github.com/apify/apify-sdk-js/issues/372)
## [3.4.2](https://github.com/apify/apify-sdk-js/compare/apify@3.4.1...apify@3.4.2) (2025-05-19)[](#342-2025-05-19)
### Bug Fixes[](#bug-fixes-3)
* improve extension of `Configuration` class to fix issues in native ESM projects ([#394](https://github.com/apify/apify-sdk-js/issues/394)) ([8842706](https://github.com/apify/apify-sdk-js/commit/884270611e09a0fec40903958f74d458ba454300))
## [3.4.1](https://github.com/apify/apify-sdk-js/compare/apify@3.4.0...apify@3.4.1) (2025-05-07)[](#341-2025-05-07)
### Bug Fixes[](#bug-fixes-4)
* convert `[@apilink](https://github.com/apilink)` to `[@link](https://github.com/link)` on build ([#383](https://github.com/apify/apify-sdk-js/issues/383)) ([ccae1ac](https://github.com/apify/apify-sdk-js/commit/ccae1ac9737dfc5bfc64e4586846e413ddb54a37))
* improve check for crawlee version mismatch ([#386](https://github.com/apify/apify-sdk-js/issues/386)) ([721e67d](https://github.com/apify/apify-sdk-js/commit/721e67dbde367b01e1347900b73394221bca0c9d)), closes [#375](https://github.com/apify/apify-sdk-js/issues/375)
* prefer proxy password from env var ([#385](https://github.com/apify/apify-sdk-js/issues/385)) ([132b5dc](https://github.com/apify/apify-sdk-js/commit/132b5dc5b0c5b77cad357b4d022b53ab6801a3a2)), closes [#20502](https://github.com/apify/apify-sdk-js/issues/20502)
# [3.4.0](https://github.com/apify/apify-sdk-js/compare/apify@3.3.2...apify@3.4.0) (2025-04-01)
### Features[](#features-1)
* sign record's public url ([#358](https://github.com/apify/apify-sdk-js/issues/358)) ([6274cc0](https://github.com/apify/apify-sdk-js/commit/6274cc018ab3b02787c234eacbb025d4d973a95d))
## [3.3.2](https://github.com/apify/apify-sdk-js/compare/apify@3.3.1...apify@3.3.2) (2025-02-20)[](#332-2025-02-20)
### Bug Fixes[](#bug-fixes-5)
* ensure `maxTotalChargeUsd` is correctly mapped to number, consider empty string as infinity ([#361](https://github.com/apify/apify-sdk-js/issues/361)) ([bb65f70](https://github.com/apify/apify-sdk-js/commit/bb65f70be4750c8dc1bee368f849fafa924add39))
## [3.3.1](https://github.com/apify/apify-sdk-js/compare/apify@3.3.0...apify@3.3.1) (2025-02-19)[](#331-2025-02-19)
### Bug Fixes[](#bug-fixes-6)
* Add workaround for incorrect handling of maxTotalChargeUsd ([#360](https://github.com/apify/apify-sdk-js/issues/360)) ([acb2abe](https://github.com/apify/apify-sdk-js/commit/acb2abe9a3422e5b0b28972085377664173fd3ff))
# [3.3.0](https://github.com/apify/apify-sdk-js/compare/apify@3.2.6...apify@3.3.0) (2025-02-06)
### Bug Fixes[](#bug-fixes-7)
* load `initialCount` in `openRequestQueue()` ([#339](https://github.com/apify/apify-sdk-js/issues/339)) ([48548cd](https://github.com/apify/apify-sdk-js/commit/48548cd088365b84a0178ba38c5d3da7f4922ade))
* prevent reboot loops ([#345](https://github.com/apify/apify-sdk-js/issues/345)) ([271bc99](https://github.com/apify/apify-sdk-js/commit/271bc999c1a6c75f8e8359214237b51f8ade03c7))
### Features[](#features-2)
* Actor.charge() ([#346](https://github.com/apify/apify-sdk-js/issues/346)) ([e26e496](https://github.com/apify/apify-sdk-js/commit/e26e49669cae04df11f2138b80549e5cd8611b3c))
* add SDK and Crawlee version to the `ApifyClient`'s user agent ([#335](https://github.com/apify/apify-sdk-js/issues/335)) ([9c069a1](https://github.com/apify/apify-sdk-js/commit/9c069a1643f0a5f417765e9391550ae06c50160f)), closes [#331](https://github.com/apify/apify-sdk-js/issues/331)
* add standby URL, change default port ([#328](https://github.com/apify/apify-sdk-js/issues/328)) ([7d265f3](https://github.com/apify/apify-sdk-js/commit/7d265f3e2a7dfdda232e0bbf7c6bb73736112950))
## [3.2.6](https://github.com/apify/apify-sdk-js/compare/apify@3.2.5...apify@3.2.6) (2024-10-07)[](#326-2024-10-07)
### Bug Fixes[](#bug-fixes-8)
* decode special characters in proxy `username` and `password` ([#326](https://github.com/apify/apify-sdk-js/issues/326)) ([9a7a4d0](https://github.com/apify/apify-sdk-js/commit/9a7a4d0ecc30f21d2be607840ce28903dbf1d191))
## [3.2.5](https://github.com/apify/apify-sdk-js/compare/apify@3.2.4...apify@3.2.5) (2024-08-14)[](#325-2024-08-14)
### Features[](#features-3)
* add `metaOrigin` to `Actor.config` ([#320](https://github.com/apify/apify-sdk-js/issues/320)) ([5a4d2eb](https://github.com/apify/apify-sdk-js/commit/5a4d2ebb9218bd342438f740d035a563444037d3))
## [3.2.4](https://github.com/apify/apify-sdk-js/compare/apify@3.2.3...apify@3.2.4) (2024-07-04)[](#324-2024-07-04)
### Bug Fixes[](#bug-fixes-9)
* add `standbyPort` to `ConfigurationOptions` ([#311](https://github.com/apify/apify-sdk-js/issues/311)) ([530b8a1](https://github.com/apify/apify-sdk-js/commit/530b8a133f2808c61e079449156e5ed1fe73ce64))
### Features[](#features-4)
* add standby port to configuration ([#310](https://github.com/apify/apify-sdk-js/issues/310)) ([cc26098](https://github.com/apify/apify-sdk-js/commit/cc26098da862a7338fdf776956b904d5672a5daf))
## [3.2.3](https://github.com/apify/apify-sdk-js/compare/apify@3.2.2...apify@3.2.3) (2024-06-03)[](#323-2024-06-03)
### Bug Fixes[](#bug-fixes-10)
* respect `KVS.getPublicUrl()` from core when not on apify platform ([#302](https://github.com/apify/apify-sdk-js/issues/302)) ([a4d80bb](https://github.com/apify/apify-sdk-js/commit/a4d80bbeee2fd2db145638b17757fa5f673e7452))
## [3.2.2](https://github.com/apify/apify-sdk-js/compare/apify@3.2.1...apify@3.2.2) (2024-05-23)[](#322-2024-05-23)
### Bug Fixes[](#bug-fixes-11)
* dont fail on resolution of not installed packages ([0cea251](https://github.com/apify/apify-sdk-js/commit/0cea251b35c652d529320a0570d6b283f52f0ac1))
## [3.2.1](https://github.com/apify/apify-sdk-js/compare/apify@3.2.0...apify@3.2.1) (2024-05-23)[](#321-2024-05-23)
### Features[](#features-5)
* validate crawlee versions in `Actor.init` ([#301](https://github.com/apify/apify-sdk-js/issues/301)) ([66ff6a9](https://github.com/apify/apify-sdk-js/commit/66ff6a9090e9e3321a217e14019e8c3001e3df4d)), closes [#237](https://github.com/apify/apify-sdk-js/issues/237)
# [3.2.0](https://github.com/apify/apify-sdk-js/compare/apify@3.1.16...apify@3.2.0) (2024-04-11)
### Features[](#features-6)
* support for proxy tiers ([#290](https://github.com/apify/apify-sdk-js/issues/290)) ([fff3a66](https://github.com/apify/apify-sdk-js/commit/fff3a66d3a0fe5080121cc083e27f59db3d979b5))
## [3.1.16](https://github.com/apify/apify-sdk-js/compare/apify@3.1.15...apify@3.1.16) (2024-02-23)[](#3116-2024-02-23)
**Note:** Version bump only for package apify
## [3.1.15](https://github.com/apify/apify-sdk-js/compare/apify@3.1.14...apify@3.1.15) (2024-01-08)[](#3115-2024-01-08)
### Features[](#features-7)
* ignore proxy configuration locally if no valid token or password is found ([#272](https://github.com/apify/apify-sdk-js/issues/272)) ([0931c2e](https://github.com/apify/apify-sdk-js/commit/0931c2e27e48425bfc58c5df80cd42ed66b9395d)), closes [#262](https://github.com/apify/apify-sdk-js/issues/262)
## [3.1.14](https://github.com/apify/apify-sdk-js/compare/apify@3.1.13...apify@3.1.14) (2023-11-27)[](#3114-2023-11-27)
**Note:** Version bump only for package apify
## [3.1.13](https://github.com/apify/apify-sdk-js/compare/apify@3.1.12...apify@3.1.13) (2023-11-15)[](#3113-2023-11-15)
### Bug Fixes[](#bug-fixes-12)
* **apify:** declare got-scraping as dependency ([#252](https://github.com/apify/apify-sdk-js/issues/252)) ([a6bcf1d](https://github.com/apify/apify-sdk-js/commit/a6bcf1d578a7c7ebbb23b3768e8bbf9e94e2b404))
## [3.1.12](https://github.com/apify/apify-sdk-js/compare/apify@3.1.11...apify@3.1.12) (2023-10-05)[](#3112-2023-10-05)
### Bug Fixes[](#bug-fixes-13)
* add more logging to `Actor.init` and `Actor.exit` ([#236](https://github.com/apify/apify-sdk-js/issues/236)) ([b7e01fc](https://github.com/apify/apify-sdk-js/commit/b7e01fc649de84d6f1391bf95e0f349f7ca32536))
## [3.1.11](https://github.com/apify/apify-sdk-js/compare/apify@3.1.10...apify@3.1.11) (2023-10-04)[](#3111-2023-10-04)
### Bug Fixes[](#bug-fixes-14)
* run the whole `Actor.exit()` code inside a timeout handler ([#235](https://github.com/apify/apify-sdk-js/issues/235)) ([c8aabae](https://github.com/apify/apify-sdk-js/commit/c8aabaee5f2de1ab40947f47f95f54ccff37cad0))
### Features[](#features-8)
* Use `.reboot()` instead of `.metamorph()` for reboot ([#227](https://github.com/apify/apify-sdk-js/issues/227)) ([8c0bff5](https://github.com/apify/apify-sdk-js/commit/8c0bff5a8d3ea65e532b3700b34b9c563856158a))
## [3.1.10](https://github.com/apify/apify-sdk-js/compare/apify@3.1.9...apify@3.1.10) (2023-09-07)[](#3110-2023-09-07)
### Bug Fixes[](#bug-fixes-15)
* require newer version of crawlee to fix possible issues with `purgeDefaultStorages` ([#226](https://github.com/apify/apify-sdk-js/issues/226)) ([95cf31f](https://github.com/apify/apify-sdk-js/commit/95cf31f3d1d054a1c8e3daac89f41bbb0aaddbba))
## [3.1.9](https://github.com/apify/apify-sdk-js/compare/apify@3.1.8...apify@3.1.9) (2023-09-06)[](#319-2023-09-06)
**Note:** Version bump only for package apify
## [3.1.8](https://github.com/apify/apify-sdk-js/compare/apify@3.1.7...apify@3.1.8) (2023-07-20)[](#318-2023-07-20)
### Bug Fixes[](#bug-fixes-16)
* require newer version of apify-client and other packages ([24a3a4b](https://github.com/apify/apify-sdk-js/commit/24a3a4b5bf2f61e690348727e7f24c06c45a0999))
### Features[](#features-9)
* Use Actor env vars ([#216](https://github.com/apify/apify-sdk-js/issues/216)) ([11ff740](https://github.com/apify/apify-sdk-js/commit/11ff740ad3d2bdd37fce011d94b64ea01413b0d9))
## [3.1.7](https://github.com/apify/apify-sdk-js/compare/apify@3.1.6...apify@3.1.7) (2023-06-09)[](#317-2023-06-09)
**Note:** Version bump only for package apify
## [3.1.6](https://github.com/apify/apify-sdk-js/compare/apify@3.1.5...apify@3.1.6) (2023-06-09)[](#316-2023-06-09)
### Bug Fixes[](#bug-fixes-17)
* only print status message when explicitly provided in `Actor.exit()` ([#203](https://github.com/apify/apify-sdk-js/issues/203)) ([85159e4](https://github.com/apify/apify-sdk-js/commit/85159e499984c78eee90b6d92332ea63b9f46c8c))
## [3.1.5](https://github.com/apify/apify-sdk-js/compare/apify@3.1.4...apify@3.1.5) (2023-05-31)[](#315-2023-05-31)
### Bug Fixes[](#bug-fixes-18)
* add missing `options` parameter to `Actor.setStatusMessage()` ([712e8c6](https://github.com/apify/apify-sdk-js/commit/712e8c66755ac8baeb35fcc1ad000487da8b2c48))
### Features[](#features-10)
* add `Actor.getInputOrThrow()` method ([#198](https://github.com/apify/apify-sdk-js/issues/198)) ([5fbbfe4](https://github.com/apify/apify-sdk-js/commit/5fbbfe4960a79fbbd23f4fdd7d07a1a5063820f4))
## [3.1.4](https://github.com/apify/apify-sdk-js/compare/apify@3.1.3...apify@3.1.4) (2023-03-23)[](#314-2023-03-23)
### Bug Fixes[](#bug-fixes-19)
* log status message only once and without prefix ([#179](https://github.com/apify/apify-sdk-js/issues/179)) ([1f11a6a](https://github.com/apify/apify-sdk-js/commit/1f11a6ad8ebc8a0cfaef58be47ba8b12c75018f1))
## [3.1.3](https://github.com/apify/apify-sdk-js/compare/apify@3.1.2...apify@3.1.3) (2023-03-22)[](#313-2023-03-22)
### Bug Fixes[](#bug-fixes-20)
* `call/callTask` accept `waitSecs` instead of `waitForFinish` ([#176](https://github.com/apify/apify-sdk-js/issues/176)) ([f0c73d8](https://github.com/apify/apify-sdk-js/commit/f0c73d8765091212f2abb4b4faaf109f9447d90a))
### Features[](#features-11)
* terminal message on Actor.exit() ([#172](https://github.com/apify/apify-sdk-js/issues/172)) ([e0feca8](https://github.com/apify/apify-sdk-js/commit/e0feca895766af0d92fbf78ca4c2d7b49bd2acff))
## [3.1.2](https://github.com/apify/apify-sdk-js/compare/apify@3.1.1...apify@3.1.2) (2023-02-07)[](#312-2023-02-07)
### Bug Fixes[](#bug-fixes-21)
* declare missing dependency on tslib ([bc27118](https://github.com/apify/apify-sdk-js/commit/bc27118daab211857305f7617b1ee1433da13d4a))
* remove unused export of `QueueOperationInfoOptions` ([b29fe48](https://github.com/apify/apify-sdk-js/commit/b29fe4853d637ab527a7f7e3e53c7a5b0fe27a32))
## [3.1.1](https://github.com/apify/apify-sdk-js/compare/apify@3.1.0...apify@3.1.1) (2022-11-13)[](#311-2022-11-13)
### Features[](#features-12)
* add `statusMessage` to `AbortOptions` ([fb10bb6](https://github.com/apify/apify-sdk-js/commit/fb10bb60c12c0af97e41ae88adcf0b2000286235))
* warn about Actor not being initialized before using storage methods ([#126](https://github.com/apify/apify-sdk-js/issues/126)) ([91cd246](https://github.com/apify/apify-sdk-js/commit/91cd2467d111de19490a6bf47b4a9138f26a37d4))
# 3.1.0 (2022-10-13)
### Bug Fixes[](#bug-fixes-22)
* **apify:** add `@apify/timeout` to dependencies ([#76](https://github.com/apify/apify-sdk-js/issues/76)) ([1d64a1f](https://github.com/apify/apify-sdk-js/commit/1d64a1fa8f0e88a96eb82c2669e85b09dd4f372d))
* use correct event manager for Actor methods ([#49](https://github.com/apify/apify-sdk-js/issues/49)) ([ef3a0c5](https://github.com/apify/apify-sdk-js/commit/ef3a0c54359be64c89e76b0cac600cd780281321))
* wait for memory storage to write changes before `Actor.exit` exists the process ([c721d98](https://github.com/apify/apify-sdk-js/commit/c721d988141cf5b7aa170fddeffb792ded769622))
### Features[](#features-13)
* add `Actor.useState()` helper ([#98](https://github.com/apify/apify-sdk-js/issues/98)) ([27dc413](https://github.com/apify/apify-sdk-js/commit/27dc4139caa0a2d94c570edac2cb628f6b3f747c))
* **apify:** add decryption for input secrets ([#83](https://github.com/apify/apify-sdk-js/issues/83)) ([78bb990](https://github.com/apify/apify-sdk-js/commit/78bb990817c01254de19c828937181c1263e21eb))
* re-export the logger in Actor sdk ([#54](https://github.com/apify/apify-sdk-js/issues/54)) ([c78d8a4](https://github.com/apify/apify-sdk-js/commit/c78d8a44d7af5de7fda7bf2e436fefda752a4b1a))
* update @apify/scraper-tools ([#37](https://github.com/apify/apify-sdk-js/issues/37)) ([788913e](https://github.com/apify/apify-sdk-js/commit/788913e0cc669b15b35359df30202a449b881b5f))
* update the scrapers ([#70](https://github.com/apify/apify-sdk-js/issues/70)) ([efbfc44](https://github.com/apify/apify-sdk-js/commit/efbfc442bc8be4f07b5f2432a750cb861d7f05e8))
## [3.0.0](https://github.com/apify/apify-sdk-js/compare/v2.3.2...v3.0.0) (2022-07-13)[](#300-2022-07-13)
This section summarizes most of the breaking changes between Crawlee (v3) and Apify SDK (v2). Crawlee is the spiritual successor to Apify SDK, so we decided to keep the versioning and release Crawlee as v3.
### Crawlee vs Apify SDK[](#crawlee-vs-apify-sdk)
Up until version 3 of `apify`, the package contained both scraping related tools and Apify platform related helper methods. With v3 we are splitting the whole project into two main parts:
* Crawlee, the new web-scraping library, available as `crawlee` package on NPM
* Apify SDK, helpers for the Apify platform, available as `apify` package on NPM
Moreover, the Crawlee library is published as several packages under `@crawlee` namespace:
* `@crawlee/core`: the base for all the crawler implementations, also contains things like `Request`, `RequestQueue`, `RequestList` or `Dataset` classes
* `@crawlee/basic`: exports `BasicCrawler`
* `@crawlee/cheerio`: exports `CheerioCrawler`
* `@crawlee/browser`: exports `BrowserCrawler` (which is used for creating `@crawlee/playwright` and `@crawlee/puppeteer`)
* `@crawlee/playwright`: exports `PlaywrightCrawler`
* `@crawlee/puppeteer`: exports `PuppeteerCrawler`
* `@crawlee/memory-storage`: `@apify/storage-local` alternative
* `@crawlee/browser-pool`: previously `browser-pool` package
* `@crawlee/utils`: utility methods
* `@crawlee/types`: holds TS interfaces mainly about the `StorageClient`
#### Installing Crawlee[](#installing-crawlee)
> As Crawlee is not yet released as `latest`, we need to install from the `next` distribution tag!
Most of the Crawlee packages are extending and reexporting each other, so it's enough to install just the one you plan on using, e.g. `@crawlee/playwright` if you plan on using `playwright` - it already contains everything from the `@crawlee/browser` package, which includes everything from `@crawlee/basic`, which includes everything from `@crawlee/core`.
npm install crawlee@next
Or if all we need is cheerio support, we can install only @crawlee/cheerio
npm install @crawlee/cheerio@next
When using `playwright` or `puppeteer`, we still need to install those dependencies explicitly - this allows the users to be in control of which version will be used.
npm install crawlee@next playwright
or npm install @crawlee/playwright@next playwright
Alternatively we can also use the `crawlee` meta-package which contains (re-exports) most of the `@crawlee/*` packages, and therefore contains all the crawler classes.
> Sometimes you might want to use some utility methods from `@crawlee/utils`, so you might want to install that as well. This package contains some utilities that were previously available under `Apify.utils`. Browser related utilities can be also found in the crawler packages (e.g. `@crawlee/playwright`).
### Full TypeScript support[](#full-typescript-support)
Both Crawlee and Apify SDK are full TypeScript rewrite, so they include up-to-date types in the package. For your TypeScript crawlers we recommend using our predefined TypeScript configuration from `@apify/tsconfig` package. Don't forget to set the `module` and `target` to `ES2022` or above to be able to use top level await.
> The `@apify/tsconfig` config has [`noImplicitAny`](https://www.typescriptlang.org/tsconfig#noImplicitAny) enabled, you might want to disable it during the initial development as it will cause build failures if you left some unused local variables in your code.
tsconfig.json
{ "extends": "@apify/tsconfig", "compilerOptions": { "module": "ES2022", "target": "ES2022", "outDir": "dist", "lib": ["DOM"] }, "include": ["./src/**/*"] }
#### Docker build[](#docker-build)
For `Dockerfile` we recommend using multi-stage build, so you don't install the dev dependencies like TypeScript in your final image:
Dockerfile
using multistage build, as we need dev deps to build the TS source code
FROM apify/actor-node:16 AS builder
copy all files, install all dependencies (including dev deps) and build the project
COPY . ./
RUN npm install --include=dev
&& npm run build
create final image
FROM apify/actor-node:16
copy only necessary files
COPY --from=builder /usr/src/app/package*.json ./ COPY --from=builder /usr/src/app/README.md ./ COPY --from=builder /usr/src/app/dist ./dist COPY --from=builder /usr/src/app/apify.json ./apify.json COPY --from=builder /usr/src/app/INPUT_SCHEMA.json ./INPUT_SCHEMA.json
install only prod deps
RUN npm --quiet set progress=false
&& npm install --only=prod --no-optional
&& echo "Installed NPM packages:"
&& (npm list --only=prod --no-optional --all || true)
&& echo "Node.js version:"
&& node --version
&& echo "NPM version:"
&& npm --version
run compiled code
CMD npm run start:prod
### Browser fingerprints[](#browser-fingerprints)
Previously we had a magical `stealth` option in the puppeteer crawler that enabled several tricks aiming to mimic the real users as much as possible. While this worked to a certain degree, we decided to replace it with generated browser fingerprints.
In case we don't want to have dynamic fingerprints, we can disable this behaviour via `useFingerprints` in `browserPoolOptions`:
const crawler = new PlaywrightCrawler({ browserPoolOptions: { useFingerprints: false, }, });
### Session cookie method renames[](#session-cookie-method-renames)
Previously, if we wanted to get or add cookies for the session that would be used for the request, we had to call `session.getPuppeteerCookies()` or `session.setPuppeteerCookies()`. Since this method could be used for any of our crawlers, not just `PuppeteerCrawler`, the methods have been renamed to `session.getCookies()` and `session.setCookies()` respectively. Otherwise, their usage is exactly the same!
### Memory storage[](#memory-storage)
When we store some data or intermediate state (like the one `RequestQueue` holds), we now use `@crawlee/memory-storage` by default. It is an alternative to the `@apify/storage-local`, that stores the state inside memory (as opposed to SQLite database used by `@apify/storage-local`). While the state is stored in memory, it also dumps it to the file system, so we can observe it, as well as respects the existing data stored in KeyValueStore (e.g. the `INPUT.json` file).
When we want to run the crawler on Apify platform, we need to use `Actor.init` or `Actor.main`, which will automatically switch the storage client to `ApifyClient` when on the Apify platform.
We can still use the `@apify/storage-local`, to do it, first install it pass it to the `Actor.init` or `Actor.main` options:
> `@apify/storage-local` v2.1.0+ is required for Crawlee
import { Actor } from 'apify'; import { ApifyStorageLocal } from '@apify/storage-local';
const storage =
new ApifyStorageLocal(/* options like enableWalMode belong here */);
await Actor.init({ storage });
### Purging of the default storage[](#purging-of-the-default-storage)
Previously the state was preserved between local runs, and we had to use `--purge` argument of the `apify-cli`. With Crawlee, this is now the default behaviour, we purge the storage automatically on `Actor.init/main` call. We can opt out of it via `purge: false` in the `Actor.init` options.
### Renamed crawler options and interfaces[](#renamed-crawler-options-and-interfaces)
Some options were renamed to better reflect what they do. We still support all the old parameter names too, but not at the TS level.
* `handleRequestFunction` -> `requestHandler`
* `handlePageFunction` -> `requestHandler`
* `handleRequestTimeoutSecs` -> `requestHandlerTimeoutSecs`
* `handlePageTimeoutSecs` -> `requestHandlerTimeoutSecs`
* `requestTimeoutSecs` -> `navigationTimeoutSecs`
* `handleFailedRequestFunction` -> `failedRequestHandler`
We also renamed the crawling context interfaces, so they follow the same convention and are more meaningful:
* `CheerioHandlePageInputs` -> `CheerioCrawlingContext`
* `PlaywrightHandlePageFunction` -> `PlaywrightCrawlingContext`
* `PuppeteerHandlePageFunction` -> `PuppeteerCrawlingContext`
### Context aware helpers[](#context-aware-helpers)
Some utilities previously available under `Apify.utils` namespace are now moved to the crawling context and are *context aware*. This means they have some parameters automatically filled in from the context, like the current `Request` instance or current `Page` object, or the `RequestQueue` bound to the crawler.
#### Enqueuing links[](#enqueuing-links)
One common helper that received more attention is the `enqueueLinks`. As mentioned above, it is context aware - we no longer need pass in the `requestQueue` or `page` arguments (or the cheerio handle `$`). In addition to that, it now offers 3 enqueuing strategies:
* `EnqueueStrategy.All` (`'all'`): Matches any URLs found
* `EnqueueStrategy.SameHostname` (`'same-hostname'`) Matches any URLs that have the same subdomain as the base URL (default)
* `EnqueueStrategy.SameDomain` (`'same-domain'`) Matches any URLs that have the same domain name. For example, `https://wow.an.example.com` and `https://example.com` will both be matched for a base url of `https://example.com`.
This means we can even call `enqueueLinks()` without any parameters. By default, it will go through all the links found on current page and filter only those targeting the same subdomain.
Moreover, we can specify patterns the URL should match via globs:
const crawler = new PlaywrightCrawler({
async requestHandler({ enqueueLinks }) {
await enqueueLinks({
globs: ['https://apify.com//'],
// we can also use regexps and pseudoUrls keys here
});
},
});
### Implicit `RequestQueue` instance[](#implicit-requestqueue-instance)
All crawlers now have the `RequestQueue` instance automatically available via `crawler.getRequestQueue()` method. It will create the instance for you if it does not exist yet. This mean we no longer need to create the `RequestQueue` instance manually, and we can just use `crawler.addRequests()` method described underneath.
> We can still create the `RequestQueue` explicitly, the `crawler.getRequestQueue()` method will respect that and return the instance provided via crawler options.
### `crawler.addRequests()`[](#crawleraddrequests)
We can now add multiple requests in batches. The newly added `addRequests` method will handle everything for us. It enqueues the first 1000 requests and resolves, while continuing with the rest in the background, again in a smaller 1000 items batches, so we don't fall into any API rate limits. This means the crawling will start almost immediately (within few seconds at most), something previously possible only with a combination of `RequestQueue` and `RequestList`.
// will resolve right after the initial batch of 1000 requests is added const result = await crawler.addRequests([ /* many requests, can be even millions */ ]);
// if we want to wait for all the requests to be added, we can await the waitForAllRequestsToBeAdded promise
await result.waitForAllRequestsToBeAdded;
### Less verbose error logging[](#less-verbose-error-logging)
Previously an error thrown from inside request handler resulted in full error object being logged. With Crawlee, we log only the error message as a warning as long as we know the request will be retried. If you want to enable verbose logging like in v2, use the `CRAWLEE_VERBOSE_LOG` env var.
### Removal of `requestAsBrowser`[](#removal-of-requestasbrowser)
In v1 we replaced the underlying implementation of `requestAsBrowser` to be just a proxy over calling [`got-scraping`](https://github.com/apify/got-scraping) - our custom extension to `got` that tries to mimic the real browsers as much as possible. With v3, we are removing the `requestAsBrowser`, encouraging the use of [`got-scraping`](https://github.com/apify/got-scraping) directly.
For easier migration, we also added `context.sendRequest()` helper that allows processing the context bound `Request` object through [`got-scraping`](https://github.com/apify/got-scraping):
const crawler = new BasicCrawler({ async requestHandler({ sendRequest, log }) { // we can use the options parameter to override gotScraping options const res = await sendRequest({ responseType: 'json' }); log.info('received body', res.body); }, });
#### How to use `sendRequest()`?[](#how-to-use-sendrequest)
See [the Got Scraping guide](https://crawlee.dev/docs/guides/got-scraping).
#### Removed options[](#removed-options)
The `useInsecureHttpParser` option has been removed. It's permanently set to `true` in order to better mimic browsers' behavior.
Got Scraping automatically performs protocol negotiation, hence we removed the `useHttp2` option. It's set to `true` - 100% of browsers nowadays are capable of HTTP/2 requests. Oh, more and more of the web is using it too!
#### Renamed options[](#renamed-options)
In the `requestAsBrowser` approach, some of the options were named differently. Here's a list of renamed options:
##### `payload`[](#payload)
This options represents the body to send. It could be a `string` or a `Buffer`. However, there is no `payload` option anymore. You need to use `body` instead. Or, if you wish to send JSON, `json`. Here's an example:
// Before: await Apify.utils.requestAsBrowser({ …, payload: 'Hello, world!' }); await Apify.utils.requestAsBrowser({ …, payload: Buffer.from('c0ffe', 'hex') }); await Apify.utils.requestAsBrowser({ …, json: { hello: 'world' } });
// After: await gotScraping({ …, body: 'Hello, world!' }); await gotScraping({ …, body: Buffer.from('c0ffe', 'hex') }); await gotScraping({ …, json: { hello: 'world' } });
##### `ignoreSslErrors`[](#ignoresslerrors)
It has been renamed to `https.rejectUnauthorized`. By default, it's set to `false` for convenience. However, if you want to make sure the connection is secure, you can do the following:
// Before: await Apify.utils.requestAsBrowser({ …, ignoreSslErrors: false });
// After: await gotScraping({ …, https: { rejectUnauthorized: true } });
Please note: the meanings are opposite! So we needed to invert the values as well.
##### `header-generator` options[](#header-generator-options)
`useMobileVersion`, `languageCode` and `countryCode` no longer exist. Instead, you need to use `headerGeneratorOptions` directly:
// Before: await Apify.utils.requestAsBrowser({ …, useMobileVersion: true, languageCode: 'en', countryCode: 'US', });
// After: await gotScraping({ …, headerGeneratorOptions: { devices: ['mobile'], // or ['desktop'] locales: ['en-US'], }, });
##### `timeoutSecs`[](#timeoutsecs)
In order to set a timeout, use `timeout.request` (which is **milliseconds** now).
// Before: await Apify.utils.requestAsBrowser({ …, timeoutSecs: 30, });
// After: await gotScraping({ …, timeout: { request: 30 * 1000, }, });
##### `throwOnHttpErrors`[](#throwonhttperrors)
`throwOnHttpErrors` → `throwHttpErrors`. This options throws on unsuccessful HTTP status codes, for example `404`. By default, it's set to `false`.
##### `decodeBody`[](#decodebody)
`decodeBody` → `decompress`. This options decompresses the body. Defaults to `true` - please do not change this or websites will break (unless you know what you're doing!).
##### `abortFunction`[](#abortfunction)
This function used to make the promise throw on specific responses, if it returned `true`. However, it wasn't that useful.
You probably want to cancel the request instead, which you can do in the following way:
const promise = gotScraping(…);
promise.on('request', request => { // Please note this is not a Got Request instance, but a ClientRequest one. // https://nodejs.org/api/http.html#class-httpclientrequest
if (request.protocol !== 'https:') {
// Unsecure request, abort.
promise.cancel();
// If you set `isStream` to `true`, please use `stream.destroy()` instead.
}
});
const response = await promise;
### Removal of browser pool plugin mixing[](#removal-of-browser-pool-plugin-mixing)
Previously, you were able to have a browser pool that would mix Puppeteer and Playwright plugins (or even your own custom plugins if you've built any). As of this version, that is no longer allowed, and creating such a browser pool will cause an error to be thrown (it's expected that all plugins that will be used are of the same type).
### Handling requests outside of browser[](#handling-requests-outside-of-browser)
One small feature worth mentioning is the ability to handle requests with browser crawlers outside the browser. To do that, we can use a combination of `Request.skipNavigation` and `context.sendRequest()`.
Take a look at how to achieve this by checking out the [Skipping navigation for certain requests](https://crawlee.dev/docs/examples/skip-navigation) example!
### Logging[](#logging)
Crawlee exports the default `log` instance directly as a named export. We also have a scoped `log` instance provided in the crawling context - this one will log messages prefixed with the crawler name and should be preferred for logging inside the request handler.
const crawler = new CheerioCrawler({
async requestHandler({ log, request }) {
log.info(Opened ${request.loadedUrl});
},
});
### Auto-saved crawler state[](#auto-saved-crawler-state)
Every crawler instance now has `useState()` method that will return a state object we can use. It will be automatically saved when `persistState` event occurs. The value is cached, so we can freely call this method multiple times and get the exact same reference. No need to worry about saving the value either, as it will happen automatically.
const crawler = new CheerioCrawler({ async requestHandler({ crawler }) { const state = await crawler.useState({ foo: [] as number[] }); // just change the value, no need to care about saving it state.foo.push(123); }, });
### Apify SDK[](#apify-sdk)
The Apify platform helpers can be now found in the Apify SDK (`apify` NPM package). It exports the `Actor` class that offers following static helpers:
* `ApifyClient` shortcuts: `addWebhook()`, `call()`, `callTask()`, `metamorph()`
* helpers for running on Apify platform: `init()`, `exit()`, `fail()`, `main()`, `isAtHome()`, `createProxyConfiguration()`
* storage support: `getInput()`, `getValue()`, `openDataset()`, `openKeyValueStore()`, `openRequestQueue()`, `pushData()`, `setValue()`
* events support: `on()`, `off()`
* other utilities: `getEnv()`, `newClient()`, `reboot()`
`Actor.main` is now just a syntax sugar around calling `Actor.init()` at the beginning and `Actor.exit()` at the end (plus wrapping the user function in try/catch block). All those methods are async and should be awaited - with node 16 we can use the top level await for that. In other words, following is equivalent:
import { Actor } from 'apify';
await Actor.init(); // your code await Actor.exit('Crawling finished!');
import { Actor } from 'apify';
await Actor.main( async () => { // your code }, { statusMessage: 'Crawling finished!' }, );
`Actor.init()` will conditionally set the storage implementation of Crawlee to the `ApifyClient` when running on the Apify platform, or keep the default (memory storage) implementation otherwise. It will also subscribe to the websocket events (or mimic them locally). `Actor.exit()` will handle the tear down and calls `process.exit()` to ensure our process won't hang indefinitely for some reason.
#### Events[](#events)
Apify SDK (v2) exports `Apify.events`, which is an `EventEmitter` instance. With Crawlee, the events are managed by [`EventManager`](https://crawlee.dev/api/core/class/EventManager) class instead. We can either access it via `Actor.eventManager` getter, or use `Actor.on` and `Actor.off` shortcuts instead.
-Apify.events.on(...); +Actor.on(...);
> We can also get the [`EventManager`](https://crawlee.dev/api/core/class/EventManager) instance via `Configuration.getEventManager()`.
In addition to the existing events, we now have an `exit` event fired when calling `Actor.exit()` (which is called at the end of `Actor.main()`). This event allows you to gracefully shut down any resources when `Actor.exit` is called.
### Smaller/internal breaking changes[](#smallerinternal-breaking-changes)
* `Apify.call()` is now just a shortcut for running `ApifyClient.actor(actorId).call(input, options)`, while also taking the token inside env vars into account
* `Apify.callTask()` is now just a shortcut for running `ApifyClient.task(taskId).call(input, options)`, while also taking the token inside env vars into account
* `Apify.metamorph()` is now just a shortcut for running `ApifyClient.task(taskId).metamorph(input, options)`, while also taking the ACTOR\_RUN\_ID inside env vars into account
* `Apify.waitForRunToFinish()` has been removed, use `ApifyClient.waitForFinish()` instead
* `Actor.main/init` purges the storage by default
* remove `purgeLocalStorage` helper, move purging to the storage class directly
<!-- -->
* `StorageClient` interface now has optional `purge` method
* purging happens automatically via `Actor.init()` (you can opt out via `purge: false` in the options of `init/main` methods)
* `QueueOperationInfo.request` is no longer available
* `Request.handledAt` is now string date in ISO format
* `Request.inProgress` and `Request.reclaimed` are now `Set`s instead of POJOs
* `injectUnderscore` from puppeteer utils has been removed
* `APIFY_MEMORY_MBYTES` is no longer taken into account, use `CRAWLEE_AVAILABLE_MEMORY_RATIO` instead
* some `AutoscaledPool` options are no longer available:
<!-- -->
* `cpuSnapshotIntervalSecs` and `memorySnapshotIntervalSecs` has been replaced with top level `systemInfoIntervalMillis` configuration
* `maxUsedCpuRatio` has been moved to the top level configuration
* `ProxyConfiguration.newUrlFunction` can be async. `.newUrl()` and `.newProxyInfo()` now return promises.
* `prepareRequestFunction` and `postResponseFunction` options are removed, use navigation hooks instead
* `gotoFunction` and `gotoTimeoutSecs` are removed
* removed compatibility fix for old/broken request queues with null `Request` props
* `fingerprintsOptions` renamed to `fingerprintOptions` (`fingerprints` -> `fingerprint`).
* `fingerprintOptions` now accept `useFingerprintCache` and `fingerprintCacheSize` (instead of `useFingerprintPerProxyCache` and `fingerprintPerProxyCacheSize`, which are now no longer available). This is because the cached fingerprints are no longer connected to proxy URLs but to sessions.
## [2.3.2](https://github.com/apify/apify-sdk-js/compare/v2.3.1...v2.3.2) (2022-05-05)[](#232-2022-05-05)
* fix: use default user agent for playwright with chrome instead of the default "headless UA"
* fix: always hide webdriver of chrome browsers
## [2.3.1](https://github.com/apify/apify-sdk-js/compare/v2.3.0...v2.3.1) (2022-05-03)[](#231-2022-05-03)
* fix: `utils.apifyClient` early instantiation (#1330)
* feat: `utils.playwright.injectJQuery()` (#1337)
* feat: add `keyValueStore` option to `Statistics` class (#1345)
* fix: ensure failed req count is correct when using `RequestList` (#1347)
* fix: random puppeteer crawler (running in headful mode) failure (#1348)
<!-- -->
> This should help with the `We either navigate top level or have old version of the navigated frame` bug in puppeteer.
* fix: allow returning falsy values in `RequestTransform`'s return type
## [2.3.0](https://github.com/apify/apify-sdk-js/compare/v2.2.2...v2.3.0) (2022-04-07)[](#230-2022-04-07)
* feat: accept more social media patterns (#1286)
* feat: add multiple click support to `enqueueLinksByClickingElements` (#1295)
* feat: instance-scoped "global" configuration (#1315)
* feat: requestList accepts proxyConfiguration for requestsFromUrls (#1317)
* feat: update `playwright` to v1.20.2
* feat: update `puppeteer` to v13.5.2
<!-- -->
> We noticed that with this version of puppeteer Actor run could crash with `We either navigate top level or have old version of the navigated frame` error (puppeteer issue [here](https://github.com/puppeteer/puppeteer/issues/7050)). It should not happen while running the browser in headless mode. In case you need to run the browser in headful mode (`headless: false`), we recommend pinning puppeteer version to `10.4.0` in Actor `package.json` file.
* feat: stealth deprecation (#1314)
* feat: allow passing a stream to KeyValueStore.setRecord (#1325)
* fix: use correct apify-client instance for snapshotting (#1308)
* fix: automatically reset `RequestQueue` state after 5 minutes of inactivity, closes #997
* fix: improve guessing of chrome executable path on windows (#1294)
* fix: prune CPU snapshots locally (#1313)
* fix: improve browser launcher types (#1318)
### 0 concurrency mitigation[](#0-concurrency-mitigation)
This release should resolve the 0 concurrency bug by automatically resetting the internal `RequestQueue` state after 5 minutes of inactivity.
We now track last activity done on a `RequestQueue` instance:
* added new request
* started processing a request (added to `inProgress` cache)
* marked request as handled
* reclaimed request
If we don't detect one of those actions in last 5 minutes, and we have some requests in the `inProgress` cache, we try to reset the state. We can override this limit via `CRAWLEE_INTERNAL_TIMEOUT` env var.
This should finally resolve the 0 concurrency bug, as it was always about stuck requests in the `inProgress` cache.
## [2.2.2](https://github.com/apify/apify-sdk-js/compare/v2.2.1...v2.2.2) (2022-02-14)[](#222-2022-02-14)
* fix: ensure `request.headers` is set
* fix: lower `RequestQueue` API timeout to 30 seconds
* improve logging for fetching next request and timeouts
## [2.2.1](https://github.com/apify/apify-sdk-js/compare/v2.2.0...v2.2.1) (2022-01-03)[](#221-2022-01-03)
* fix: ignore requests that are no longer in progress (#1258)
* fix: do not use `tryCancel()` from inside sync callback (#1265)
* fix: revert to puppeteer 10.x (#1276)
* fix: wait when `body` is not available in `infiniteScroll()` from Puppeteer utils (#1238)
* fix: expose logger classes on the `utils.log` instance (#1278)
## [2.2.0](https://github.com/apify/apify-sdk-js/compare/v2.1.0...v2.2.0) (2021-12-17)[](#220-2021-12-17)
### Proxy per page[](#proxy-per-page)
Up until now, browser crawlers used the same session (and therefore the same proxy) for all request from a single browser \* now get a new proxy for each session. This means that with incognito pages, each page will get a new proxy, aligning the behaviour with `CheerioCrawler`.
This feature is not enabled by default. To use it, we need to enable `useIncognitoPages` flag under `launchContext`:
new Apify.Playwright({ launchContext: { useIncognitoPages: true, }, // ... });
> Note that currently there is a performance overhead for using `useIncognitoPages`. Use this flag at your own will.
We are planning to enable this feature by default in SDK v3.0.
### Abortable timeouts[](#abortable-timeouts)
Previously when a page function timed out, the task still kept running. This could lead to requests being processed multiple times. In v2.2 we now have abortable timeouts that will cancel the task as early as possible.
### Mitigation of zero concurrency issue[](#mitigation-of-zero-concurrency-issue)
Several new timeouts were added to the task function, which should help mitigate the zero concurrency bug. Namely fetching of next request information and reclaiming failed requests back to the queue are now executed with a timeout with 3 additional retries before the task fails. The timeout is always at least 300s (5 minutes), or `requestHandlerTimeoutSecs` if that value is higher.
### Full list of changes[](#full-list-of-changes)
* fix `RequestError: URI malformed` in cheerio crawler (#1205)
* only provide Cookie header if cookies are present (#1218)
* handle extra cases for `diffCookie` (#1217)
* add timeout for task function (#1234)
* implement proxy per page in browser crawlers (#1228)
* add fingerprinting support (#1243)
* implement abortable timeouts (#1245)
* add timeouts with retries to `runTaskFunction()` (#1250)
* automatically convert google spreadsheet URLs to CSV exports (#1255)
## [2.1.0](https://github.com/apify/apify-sdk-js/compare/v2.0.7...v2.1.0) (2021-10-07)[](#210-2021-10-07)
* automatically convert google docs share urls to csv download ones in request list (#1174)
* use puppeteer emulating scrolls instead of `window.scrollBy` (#1170)
* warn if apify proxy is used in proxyUrls (#1173)
* fix `YOUTUBE_REGEX_STRING` being too greedy (#1171)
* add `purgeLocalStorage` utility method (#1187)
* catch errors inside request interceptors (#1188, #1190)
* add support for cgroups v2 (#1177)
* fix incorrect offset in `fixUrl` function (#1184)
* support channel and user links in YouTube regex (#1178)
* fix: allow passing `requestsFromUrl` to `RequestListOptions` in TS (#1191)
* allow passing `forceCloud` down to the KV store (#1186), closes #752
* merge cookies from session with user provided ones (#1201), closes #1197
* use `ApifyClient` v2 (full rewrite to TS)
## [2.0.7](https://github.com/apify/apify-sdk-js/compare/v2.0.6...v2.0.7) (2021-09-08)[](#207-2021-09-08)
* Fix casting of int/bool environment variables (e.g. `APIFY_LOCAL_STORAGE_ENABLE_WAL_MODE`), closes #956
* Fix incognito pages and user data dir (#1145)
* Add `@ts-ignore` comments to imports of optional peer dependencies (#1152)
* Use config instance in `sdk.openSessionPool()` (#1154)
* Add a breaking callback to `infiniteScroll` (#1140)
## [2.0.6](https://github.com/apify/apify-sdk-js/compare/v2.0.5...v2.0.6) (2021-08-27)[](#206-2021-08-27)
* Fix deprecation messages logged from `ProxyConfiguration` and `CheerioCrawler`.
* Update `got-scraping` to receive multiple improvements.
## [2.0.5](https://github.com/apify/apify-sdk-js/compare/v2.0.4...v2.0.5) (2021-08-24)[](#205-2021-08-24)
* Fix error handling in puppeteer crawler
## [2.0.4](https://github.com/apify/apify-sdk-js/compare/v2.0.3...v2.0.4) (2021-08-23)[](#204-2021-08-23)
* Use `sessionToken` with `got-scraping`
## [2.0.3](https://github.com/apify/apify-sdk-js/compare/v2.0.2...v2.0.3) (2021-08-20)[](#203-2021-08-20)
* **BREAKING IN EDGE CASES** \* We removed `forceUrlEncoding` in `requestAsBrowser` because we found out that recent versions of the underlying HTTP client `got` already encode URLs and `forceUrlEncoding` could lead to weird behavior. We think of this as fixing a bug, so we're not bumping the major version.
* Limit `handleRequestTimeoutMillis` to max valid value to prevent Node.js fallback to `1`.
* Use `got-scraping@^3.0.1`
* Disable SSL validation on MITM proxie
* Limit `handleRequestTimeoutMillis` to max valid value
## [2.0.2](https://github.com/apify/apify-sdk-js/compare/v2.0.1...v2.0.2) (2021-08-12)[](#202-2021-08-12)
* Fix serialization issues in `CheerioCrawler` caused by parser conflicts in recent versions of `cheerio`.
## [2.0.1](https://github.com/apify/apify-sdk-js/compare/v2.0.0...v2.0.1) (2021-08-06)[](#201-2021-08-06)
* Use `got-scraping` 2.0.1 until fully compatible.
## [2.0.0](https://github.com/apify/apify-sdk-js/compare/v1.3.4...v2.0.0) (2021-08-05)[](#200-2021-08-05)
* **BREAKING**: Require Node.js >=15.10.0 because HTTP2 support on lower Node.js versions is very buggy.
* **BREAKING**: Bump `cheerio` to `1.0.0-rc.10` from `rc.3`. There were breaking changes in `cheerio` between the versions so this bump might be breaking for you as well.
* Remove `LiveViewServer` which was deprecated before release of SDK v1.
---
# Actor<!-- --> \<Data>
`Actor` class serves as an alternative approach to the static helpers exported from the package. It allows to pass configuration that will be used on the instance methods. Environment variables will have precedence over this configuration. See [Configuration](https://docs.apify.com/sdk/js/sdk/js/reference/class/Configuration.md) for details about what can be configured and what are the default values.
## Index[**](#Index)
### Constructors
* [**constructor](#constructor)
### Properties
* [**initialized](#initialized)
### Accessors
* [**apifyClient](#apifyClient)
* [**config](#config)
### Methods
* [**getInputOrThrow](#getInputOrThrow)
* [**useState](#useState)
* [**abort](#abort)
* [**addWebhook](#addWebhook)
* [**call](#call)
* [**callTask](#callTask)
* [**createProxyConfiguration](#createProxyConfiguration)
* [**exit](#exit)
* [**fail](#fail)
* [**getEnv](#getEnv)
* [**getChargingManager](#getChargingManager)
* [**getInput](#getInput)
* [**getInputOrThrow](#getInputOrThrow)
* [**getValue](#getValue)
* [**charge](#charge)
* [**init](#init)
* [**isAtHome](#isAtHome)
* [**main](#main)
* [**metamorph](#metamorph)
* [**newClient](#newClient)
* [**off](#off)
* [**on](#on)
* [**openDataset](#openDataset)
* [**openKeyValueStore](#openKeyValueStore)
* [**openRequestQueue](#openRequestQueue)
* [**pushData](#pushData)
* [**reboot](#reboot)
* [**setStatusMessage](#setStatusMessage)
* [**setValue](#setValue)
* [**start](#start)
* [**useState](#useState)
## Constructors<!-- -->[**](#Constructors)
### [**](#constructor)[**](https://github.com/apify/apify-sdk-js/blob/master/packages/apify/src/actor.ts#L93)constructor
* ****new Actor**\<Data>(options): [Actor](https://docs.apify.com/sdk/js/sdk/js/reference/class/Actor.md)\<Data>
- #### Parameters
* ##### options: ConfigurationOptions = <!-- -->{}
#### Returns [Actor](https://docs.apify.com/sdk/js/sdk/js/reference/class/Actor.md)\<Data>
## Properties<!-- -->[**](#Properties)
### [**](#initialized)[**](https://github.com/apify/apify-sdk-js/blob/master/packages/apify/src/actor.ts#L78)initialized
**initialized: boolean =
<!-- -->
false
Whether the Actor instance was initialized. This is set by calling [Actor.init](https://docs.apify.com/sdk/js/sdk/js/reference/class/Actor.md#init).
## Accessors<!-- -->[**](#Accessors)
### [**](#apifyClient)[**](https://github.com/apify/apify-sdk-js/blob/master/packages/apify/src/actor.ts#L1708)staticapifyClient
* **get apifyClient(): [ApifyClient](https://docs.apify.com/sdk/js/sdk/js/reference/class/ApifyClient.md)
- Default [ApifyClient](https://docs.apify.com/sdk/js/sdk/js/reference/class/ApifyClient.md) instance.
***
#### Returns [ApifyClient](https://docs.apify.com/sdk/js/sdk/js/reference/class/ApifyClient.md)
### [**](#config)[**](https://github.com/apify/apify-sdk-js/blob/master/packages/apify/src/actor.ts#L1713)staticconfig
* **get config(): [Configuration](https://docs.apify.com/sdk/js/sdk/js/reference/class/Configuration.md)
- Default [Configuration](https://docs.apify.com/sdk/js/sdk/js/reference/class/Configuration.md) instance.
***
#### Returns [Configuration](https://docs.apify.com/sdk/js/sdk/js/reference/class/Configuration.md)
## Methods<!-- -->[**](#Methods)
### [**](#getInputOrThrow)[**](https://github.com/apify/apify-sdk-js/blob/master/packages/apify/src/actor.ts#L846)getInputOrThrow
* ****getInputOrThrow**\<T>(): Promise\<T>
- Gets the Actor input value just like the [Actor.getInput](https://docs.apify.com/sdk/js/sdk/js/reference/class/Actor.md#getInput) method, but throws if it is not found.
***
#### Returns Promise\<T>
### [**](#useState)[**](https://github.com/apify/apify-sdk-js/blob/master/packages/apify/src/actor.ts#L1079)useState
* ****useState**\<State>(name, defaultValue, options): Promise\<State>
- Easily create and manage state values. All state values are automatically persisted.
Values can be modified by simply using the assignment operator.
***
#### Parameters
* ##### optionalname: string
The name of the store to use.
* ##### defaultValue: State = <!-- -->...
If the store does not yet have a value in it, the value will be initialized with the `defaultValue` you provide.
* ##### optionaloptions: UseStateOptions
An optional object parameter where a custom `keyValueStoreName` and `config` can be passed in.
#### Returns Promise\<State>
### [**](#abort)[**](https://github.com/apify/apify-sdk-js/blob/master/packages/apify/src/actor.ts#L1320)staticabort
* ****abort**(runId, options): Promise<[ActorRun](https://docs.apify.com/sdk/js/sdk/js/reference/interface/ActorRun.md)>
- Aborts given Actor run on the Apify platform using the current user account (determined by the `APIFY_TOKEN` environment variable).
The result of the function is an [ActorRun](https://docs.apify.com/sdk/js/sdk/js/reference/interface/ActorRun.md) object that contains details about the Actor run.
For more information about Actors, read the [documentation](https://docs.apify.com/actor).
**Example usage:**
const run = await Actor.abort(runId);
***
#### Parameters
* ##### runId: string
* ##### options: [AbortOptions](https://docs.apify.com/sdk/js/sdk/js/reference/interface/AbortOptions.md) = <!-- -->{}
#### Returns Promise<[ActorRun](https://docs.apify.com/sdk/js/sdk/js/reference/interface/ActorRun.md)>
### [**](#addWebhook)[**](https://github.com/apify/apify-sdk-js/blob/master/packages/apify/src/actor.ts#L1361)staticaddWebhook
* ****addWebhook**(options): Promise\<undefined | Webhook>
- Creates an ad-hoc webhook for the current Actor run, which lets you receive a notification when the Actor run finished or failed. For more information about Apify Actor webhooks, please see the [documentation](https://docs.apify.com/webhooks).
Note that webhooks are only supported for Actors running on the Apify platform. In local environment, the function will print a warning and have no effect.
***
#### Parameters
* ##### options: [WebhookOptions](https://docs.apify.com/sdk/js/sdk/js/reference/interface/WebhookOptions.md)
#### Returns Promise\<undefined | Webhook>
The return value is the Webhook object. For more information, see the [Get webhook](https://apify.com/docs/api/v2#/reference/webhooks/webhook-object/get-webhook) API endpoint.
### [**](#call)[**](https://github.com/apify/apify-sdk-js/blob/master/packages/apify/src/actor.ts#L1246)staticcall
* ****call**(actorId, input, options): Promise<[ActorRun](https://docs.apify.com/sdk/js/sdk/js/reference/interface/ActorRun.md)>
- Runs an Actor on the Apify platform using the current user account (determined by the `APIFY_TOKEN` environment variable).
The result of the function is an [ActorRun](https://docs.apify.com/sdk/js/sdk/js/reference/interface/ActorRun.md) object that contains details about the Actor run.
If you want to run an Actor task rather than an Actor, please use the [Actor.callTask](https://docs.apify.com/sdk/js/sdk/js/reference/class/Actor.md#callTask) function instead.
For more information about Actors, read the [documentation](https://docs.apify.com/actor).
**Example usage:**
const run = await Actor.call('apify/hello-world', { myInput: 123 });
***
#### Parameters
* ##### actorId: string
Allowed formats are `username/actor-name`, `userId/actor-name` or Actor ID.
* ##### optionalinput: unknown
Input for the Actor. If it is an object, it will be stringified to JSON and its content type set to `application/json; charset=utf-8`. Otherwise the `options.contentType` parameter must be provided.
* ##### optionaloptions: [CallOptions](https://docs.apify.com/sdk/js/sdk/js/reference/interface/CallOptions.md) = <!-- -->{}
#### Returns Promise<[ActorRun](https://docs.apify.com/sdk/js/sdk/js/reference/interface/ActorRun.md)>
### [**](#callTask)[**](https://github.com/apify/apify-sdk-js/blob/master/packages/apify/src/actor.ts#L1275)staticcallTask
* ****callTask**(taskId, input, options): Promise<[ActorRun](https://docs.apify.com/sdk/js/sdk/js/reference/interface/ActorRun.md)>
- Runs an Actor task on the Apify platform using the current user account (determined by the `APIFY_TOKEN` environment variable).
The result of the function is an [ActorRun](https://docs.apify.com/sdk/js/sdk/js/reference/interface/ActorRun.md) object that contains details about the Actor run.
Note that an Actor task is a saved input configuration and options for an Actor. If you want to run an Actor directly rather than an Actor task, please use the [Actor.call](https://docs.apify.com/sdk/js/sdk/js/reference/class/Actor.md#call) function instead.
For more information about Actor tasks, read the [documentation](https://docs.apify.com/tasks).
**Example usage:**
const run = await Actor.callTask('bob/some-task');
***
#### Parameters
* ##### taskId: string
Allowed formats are `username/task-name`, `userId/task-name` or task ID.
* ##### optionalinput: Dictionary
Input overrides for the Actor task. If it is an object, it will be stringified to JSON and its content type set to `application/json; charset=utf-8`. Provided input will be merged with Actor task input.
* ##### optionaloptions: [CallTaskOptions](https://docs.apify.com/sdk/js/sdk/js/reference/interface/CallTaskOptions.md) = <!-- -->{}
#### Returns Promise<[ActorRun](https://docs.apify.com/sdk/js/sdk/js/reference/interface/ActorRun.md)>
### [**](#createProxyConfiguration)[**](https://github.com/apify/apify-sdk-js/blob/master/packages/apify/src/actor.ts#L1656)staticcreateProxyConfiguration
* ****createProxyConfiguration**(proxyConfigurationOptions): Promise\<undefined | [ProxyConfiguration](https://docs.apify.com/sdk/js/sdk/js/reference/class/ProxyConfiguration.md)>
- Creates a proxy configuration and returns a promise resolving to an instance of the [ProxyConfiguration](https://docs.apify.com/sdk/js/sdk/js/reference/class/ProxyConfiguration.md) class that is already initialized.
Configures connection to a proxy server with the provided options. Proxy servers are used to prevent target websites from blocking your crawlers based on IP address rate limits or blacklists. Setting proxy configuration in your crawlers automatically configures them to use the selected proxies for all connections.
For more details and code examples, see the [ProxyConfiguration](https://docs.apify.com/sdk/js/sdk/js/reference/class/ProxyConfiguration.md) class.
// Returns initialized proxy configuration class const proxyConfiguration = await Actor.createProxyConfiguration({ groups: ['GROUP1', 'GROUP2'] // List of Apify proxy groups countryCode: 'US' });
const crawler = new CheerioCrawler({ // ... proxyConfiguration, requestHandler({ proxyInfo }) { const usedProxyUrl = proxyInfo.url; // Getting the proxy URL } })
For compatibility with existing Actor Input UI (Input Schema), this function returns `undefined` when the following object is passed as `proxyConfigurationOptions`.
{ useApifyProxy: false }
***
#### Parameters
* ##### proxyConfigurationOptions: [ProxyConfigurationOptions](https://docs.apify.com/sdk/js/sdk/js/reference/interface/ProxyConfigurationOptions.md) & { useApifyProxy?<!-- -->: boolean } = <!-- -->{}
#### Returns Promise\<undefined | [ProxyConfiguration](https://docs.apify.com/sdk/js/sdk/js/reference/class/ProxyConfiguration.md)>
### [**](#exit)[**](https://github.com/apify/apify-sdk-js/blob/master/packages/apify/src/actor.ts#L1202)staticexit
* ****exit**(messageOrOptions, options): Promise\<void>
- Gracefully exits the Actor run with the provided status message and exit code.
***
#### Parameters
* ##### optionalmessageOrOptions: string | [ExitOptions](https://docs.apify.com/sdk/js/sdk/js/reference/interface/ExitOptions.md)
First parameter accepts either a string (a terminal status message) or an `ExitOptions` object.
* ##### options: [ExitOptions](https://docs.apify.com/sdk/js/sdk/js/reference/interface/ExitOptions.md) = <!-- -->{}
Second parameter accepts an `ExitOptions` object.
#### Returns Promise\<void>
### [**](#fail)[**](https://github.com/apify/apify-sdk-js/blob/master/packages/apify/src/actor.ts#L1211)staticfail
* ****fail**(messageOrOptions, options): Promise\<void>
- Calls `Actor.exit()` with `options.exitCode` set to `1`.
***
#### Parameters
* ##### optionalmessageOrOptions: string | [ExitOptions](https://docs.apify.com/sdk/js/sdk/js/reference/interface/ExitOptions.md)
First parameter accepts either a string (a terminal status message) or an `ExitOptions` object.
* ##### options: [ExitOptions](https://docs.apify.com/sdk/js/sdk/js/reference/interface/ExitOptions.md) = <!-- -->{}
Second parameter accepts an `ExitOptions` object.
#### Returns Promise\<void>
### [**](#getEnv)[**](https://github.com/apify/apify-sdk-js/blob/master/packages/apify/src/actor.ts#L1685)staticgetEnv
* ****getEnv**(): [ApifyEnv](https://docs.apify.com/sdk/js/sdk/js/reference/interface/ApifyEnv.md)
- Returns a new [ApifyEnv](https://docs.apify.com/sdk/js/sdk/js/reference/interface/ApifyEnv.md) object which contains information parsed from all the Apify environment variables.
For the list of the Apify environment variables, see [Actor documentation](https://docs.apify.com/platform/actors/development/programming-interface/environment-variables). If some of the variables are not defined or are invalid, the corresponding value in the resulting object will be null.
***
#### Returns [ApifyEnv](https://docs.apify.com/sdk/js/sdk/js/reference/interface/ApifyEnv.md)
### [**](#getChargingManager)[**](https://github.com/apify/apify-sdk-js/blob/master/packages/apify/src/actor.ts#L1674)staticgetChargingManager
* ****getChargingManager**(): [ChargingManager](https://docs.apify.com/sdk/js/sdk/js/reference/class/ChargingManager.md)
- Retrieve the charging manager to access granular pricing information.
***
#### Returns [ChargingManager](https://docs.apify.com/sdk/js/sdk/js/reference/class/ChargingManager.md)
### [**](#getInput)[**](https://github.com/apify/apify-sdk-js/blob/master/packages/apify/src/actor.ts#L1571)staticgetInput
* ****getInput**\<T>(): Promise\<null | T>
- Gets the Actor input value from the default [KeyValueStore](https://docs.apify.com/sdk/js/sdk/js/reference/class/KeyValueStore.md) associated with the current Actor run.
This is just a convenient shortcut for [`keyValueStore.getValue('INPUT')`](https://docs.apify.com/sdk/js/sdk/js/reference/class/KeyValueStore.md#getValue). For example, calling the following code:
const input = await Actor.getInput();
is equivalent to:
const store = await Actor.openKeyValueStore(); await store.getValue('INPUT');
Note that the `getInput()` function does not cache the value read from the key-value store. If you need to use the input multiple times in your Actor, it is far more efficient to read it once and store it locally.
For more information, see [Actor.openKeyValueStore](https://docs.apify.com/sdk/js/sdk/js/reference/class/Actor.md#openKeyValueStore) and [KeyValueStore.getValue](https://docs.apify.com/sdk/js/sdk/js/reference/class/KeyValueStore.md#getValue).
***
#### Returns Promise\<null | T>
Returns a promise that resolves to an object, string or [`Buffer`](https://nodejs.org/api/buffer.html), depending on the MIME content type of the record, or `null` if the record is missing.
### [**](#getInputOrThrow)[**](https://github.com/apify/apify-sdk-js/blob/master/packages/apify/src/actor.ts#L1579)staticgetInputOrThrow
* ****getInputOrThrow**\<T>(): Promise\<T>
- Gets the Actor input value just like the [Actor.getInput](https://docs.apify.com/sdk/js/sdk/js/reference/class/Actor.md#getInput) method, but throws if it is not found.
***
#### Returns Promise\<T>
### [**](#getValue)[**](https://github.com/apify/apify-sdk-js/blob/master/packages/apify/src/actor.ts#L1506)staticgetValue
* ****getValue**\<T>(key): Promise\<null | T>
- Gets a value from the default [KeyValueStore](https://docs.apify.com/sdk/js/sdk/js/reference/class/KeyValueStore.md) associated with the current Actor run.
This is just a convenient shortcut for [KeyValueStore.getValue](https://docs.apify.com/sdk/js/sdk/js/reference/class/KeyValueStore.md#getValue). For example, calling the following code:
const value = await Actor.getValue('my-key');
is equivalent to:
const store = await Actor.openKeyValueStore(); const value = await store.getValue('my-key');
To store the value to the default key-value store, you can use the [Actor.setValue](https://docs.apify.com/sdk/js/sdk/js/reference/class/Actor.md#setValue) function.
For more information, see [Actor.openKeyValueStore](https://docs.apify.com/sdk/js/sdk/js/reference/class/Actor.md#openKeyValueStore) and [KeyValueStore.getValue](https://docs.apify.com/sdk/js/sdk/js/reference/class/KeyValueStore.md#getValue).
***
#### Parameters
* ##### key: string
Unique record key.
#### Returns Promise\<null | T>
Returns a promise that resolves to an object, string or [`Buffer`](https://nodejs.org/api/buffer.html), depending on the MIME content type of the record, or `null` if the record is missing.
### [**](#charge)[**](https://github.com/apify/apify-sdk-js/blob/master/packages/apify/src/actor.ts#L1667)staticcharge
* ****charge**(options): Promise<[ChargeResult](https://docs.apify.com/sdk/js/sdk/js/reference/interface/ChargeResult.md)>
- Charge for a specified number of events - sub-operations of the Actor.
***
#### Parameters
* ##### options: [ChargeOptions](https://docs.apify.com/sdk/js/sdk/js/reference/interface/ChargeOptions.md)
The name of the event to charge for and the number of events to be charged.
#### Returns Promise<[ChargeResult](https://docs.apify.com/sdk/js/sdk/js/reference/interface/ChargeResult.md)>
### [**](#init)[**](https://github.com/apify/apify-sdk-js/blob/master/packages/apify/src/actor.ts#L1193)staticinit
* ****init**(options): Promise\<void>
- Initializes the Actor, enabling support for the [Apify platform](https://apify.com/actors) dynamically based on `APIFY_IS_AT_HOME` env var. If you are not running the code on Apify, you don't need to use it. The method will switch storage client implementation automatically, so when you run on the Apify platform, it will use its API instead of the default memory storage. It also increases the available memory ratio from 25% to 100% on the platform.
Calling `Actor.exit()` is required if you use the `Actor.init()` method, since it opens websocket connection (see Actor.events for details), which needs to be terminated for the code to finish.
import { gotScraping } from 'got-scraping';
await Actor.init();
const html = await gotScraping('http://www.example.com'); console.log(html);
await Actor.exit();
***
#### Parameters
* ##### options: [InitOptions](https://docs.apify.com/sdk/js/sdk/js/reference/interface/InitOptions.md) = <!-- -->{}
#### Returns Promise\<void>
### [**](#isAtHome)[**](https://github.com/apify/apify-sdk-js/blob/master/packages/apify/src/actor.ts#L1703)staticisAtHome
* ****isAtHome**(): boolean
- Returns `true` when code is running on Apify platform and `false` otherwise (for example locally).
***
#### Returns boolean
### [**](#main)[**](https://github.com/apify/apify-sdk-js/blob/master/packages/apify/src/actor.ts#L1166)staticmain
* ****main**\<T>(userFunc, options): Promise\<T>
- Runs the main user function that performs the job of the Actor and terminates the process when the user function finishes.
**The `Actor.main()` function is optional** and is provided merely for your convenience. It is mainly useful when you're running your code as an Actor on the [Apify platform](https://apify.com/actors). However, if you want to use Apify SDK tools directly inside your existing projects, e.g. running in an [Express](https://expressjs.com/) server, on [Google Cloud functions](https://cloud.google.com/functions) or [AWS Lambda](https://aws.amazon.com/lambda/), it's better to avoid it since the function terminates the main process when it finishes!
The `Actor.main()` function performs the following actions:
* When running on the Apify platform (i.e. `APIFY_IS_AT_HOME` environment variable is set), it sets up a connection to listen for platform events. For example, to get a notification about an imminent migration to another server. See Actor.events for details.
* It invokes the user function passed as the `userFunc` parameter.
* If the user function returned a promise, waits for it to resolve.
* If the user function throws an exception or some other error is encountered, prints error details to console so that they are stored to the log.
* Exits the Node.js process, with zero exit code on success and non-zero on errors.
The user function can be synchronous:
await Actor.main(() => { // My synchronous function that returns immediately console.log('Hello world from Actor!'); });
If the user function returns a promise, it is considered asynchronous:
import { gotScraping } from 'got-scraping';
await Actor.main(() => { // My asynchronous function that returns a promise return gotScraping('http://www.example.com').then((html) => { console.log(html); }); });
To simplify your code, you can take advantage of the `async`/`await` keywords:
import { gotScraping } from 'got-scraping';
await Actor.main(async () => { // My asynchronous function const html = await gotScraping('http://www.example.com'); console.log(html); });
***
#### Parameters
* ##### userFunc: [UserFunc](https://docs.apify.com/sdk/js/sdk/js/reference.md#UserFunc)\<T>
User function to be executed. If it returns a promise, the promise will be awaited. The user function is called with no arguments.
* ##### optionaloptions: [MainOptions](https://docs.apify.com/sdk/js/sdk/js/reference/interface/MainOptions.md)
#### Returns Promise\<T>
### [**](#metamorph)[**](https://github.com/apify/apify-sdk-js/blob/master/packages/apify/src/actor.ts#L1337)staticmetamorph
* ****metamorph**(targetActorId, input, options): Promise\<void>
- Transforms this Actor run to an Actor run of a given Actor. The system stops the current container and starts the new container instead. All the default storages are preserved and the new input is stored under the `INPUT-METAMORPH-1` key in the same default key-value store.
***
#### Parameters
* ##### targetActorId: string
Either `username/actor-name` or Actor ID of an Actor to which we want to metamorph.
* ##### optionalinput: unknown
Input for the Actor. If it is an object, it will be stringified to JSON and its content type set to `application/json; charset=utf-8`. Otherwise, the `options.contentType` parameter must be provided.
* ##### optionaloptions: [MetamorphOptions](https://docs.apify.com/sdk/js/sdk/js/reference/interface/MetamorphOptions.md) = <!-- -->{}
#### Returns Promise\<void>
### [**](#newClient)[**](https://github.com/apify/apify-sdk-js/blob/master/packages/apify/src/actor.ts#L1696)staticnewClient
* ****newClient**(options): [ApifyClient](https://docs.apify.com/sdk/js/sdk/js/reference/class/ApifyClient.md)
- Returns a new instance of the Apify API client. The `ApifyClient` class is provided by the [apify-client](https://www.npmjs.com/package/apify-client) NPM package, and it is automatically configured using the `APIFY_API_BASE_URL`, and `APIFY_TOKEN` environment variables. You can override the token via the available options. That's useful if you want to use the client as a different Apify user than the SDK internals are using.
***
#### Parameters
* ##### options: [ApifyClientOptions](https://docs.apify.com/sdk/js/sdk/js/reference/interface/ApifyClientOptions.md) = <!-- -->{}
#### Returns [ApifyClient](https://docs.apify.com/sdk/js/sdk/js/reference/class/ApifyClient.md)
### [**](#off)[**](https://github.com/apify/apify-sdk-js/blob/master/packages/apify/src/actor.ts#L1219)staticoff
* ****off**(event, listener): void
- #### Parameters
* ##### event: EventTypeName
* ##### optionallistener: (...args) => any
#### Returns void
### [**](#on)[**](https://github.com/apify/apify-sdk-js/blob/master/packages/apify/src/actor.ts#L1215)staticon
* ****on**(event, listener): void
- #### Parameters
* ##### event: EventTypeName
* ##### listener: (...args) => any
#### Returns void
### [**](#openDataset)[**](https://github.com/apify/apify-sdk-js/blob/master/packages/apify/src/actor.ts#L1473)staticopenDataset
* ****openDataset**\<Data>(datasetIdOrName, options): Promise<[Dataset](https://docs.apify.com/sdk/js/sdk/js/reference/class/Dataset.md)\<Data>>
- Opens a dataset and returns a promise resolving to an instance of the [Dataset](https://docs.apify.com/sdk/js/sdk/js/reference/class/Dataset.md) class.
Datasets are used to store structured data where each object stored has the same attributes, such as online store products or real estate offers. The actual data is stored either on the local filesystem or in the cloud.
For more details and code examples, see the [Dataset](https://docs.apify.com/sdk/js/sdk/js/reference/class/Dataset.md) class.
***
#### Parameters
* ##### optionaldatasetIdOrName: null | string
ID or name of the dataset to be opened. If `null` or `undefined`, the function returns the default dataset associated with the Actor run.
* ##### optionaloptions: [OpenStorageOptions](https://docs.apify.com/sdk/js/sdk/js/reference/interface/OpenStorageOptions.md) = <!-- -->{}
#### Returns Promise<[Dataset](https://docs.apify.com/sdk/js/sdk/js/reference/class/Dataset.md)\<Data>>
### [**](#openKeyValueStore)[**](https://github.com/apify/apify-sdk-js/blob/master/packages/apify/src/actor.ts#L1597)staticopenKeyValueStore
* ****openKeyValueStore**(storeIdOrName, options): Promise<[KeyValueStore](https://docs.apify.com/sdk/js/sdk/js/reference/class/KeyValueStore.md)>
- Opens a key-value store and returns a promise resolving to an instance of the [KeyValueStore](https://docs.apify.com/sdk/js/sdk/js/reference/class/KeyValueStore.md) class.
Key-value stores are used to store records or files, along with their MIME content type. The records are stored and retrieved using a unique key. The actual data is stored either on a local filesystem or in the Apify cloud.
For more details and code examples, see the [KeyValueStore](https://docs.apify.com/sdk/js/sdk/js/reference/class/KeyValueStore.md) class.
***
#### Parameters
* ##### optionalstoreIdOrName: null | string
ID or name of the key-value store to be opened. If `null` or `undefined`, the function returns the default key-value store associated with the Actor run.
* ##### optionaloptions: [OpenStorageOptions](https://docs.apify.com/sdk/js/sdk/js/reference/interface/OpenStorageOptions.md) = <!-- -->{}
#### Returns Promise<[KeyValueStore](https://docs.apify.com/sdk/js/sdk/js/reference/class/KeyValueStore.md)>
### [**](#openRequestQueue)[**](https://github.com/apify/apify-sdk-js/blob/master/packages/apify/src/actor.ts#L1617)staticopenRequestQueue
* ****openRequestQueue**(queueIdOrName, options): Promise<[RequestQueue](https://docs.apify.com/sdk/js/sdk/js/reference/class/RequestQueue.md)>
- Opens a request queue and returns a promise resolving to an instance of the [RequestQueue](https://docs.apify.com/sdk/js/sdk/js/reference/class/RequestQueue.md) class.
[RequestQueue](https://docs.apify.com/sdk/js/sdk/js/reference/class/RequestQueue.md) represents a queue of URLs to crawl, which is stored either on local filesystem or in the cloud. The queue is used for deep crawling of websites, where you start with several URLs and then recursively follow links to other pages. The data structure supports both breadth-first and depth-first crawling orders.
For more details and code examples, see the [RequestQueue](https://docs.apify.com/sdk/js/sdk/js/reference/class/RequestQueue.md) class.
***
#### Parameters
* ##### optionalqueueIdOrName: null | string
ID or name of the request queue to be opened. If `null` or `undefined`, the function returns the default request queue associated with the Actor run.
* ##### optionaloptions: [OpenStorageOptions](https://docs.apify.com/sdk/js/sdk/js/reference/interface/OpenStorageOptions.md) = <!-- -->{}
#### Returns Promise<[RequestQueue](https://docs.apify.com/sdk/js/sdk/js/reference/class/RequestQueue.md)>
### [**](#pushData)[**](https://github.com/apify/apify-sdk-js/blob/master/packages/apify/src/actor.ts#L1402)[**](https://github.com/apify/apify-sdk-js/blob/master/packages/apify/src/actor.ts#L1427)[**](https://github.com/apify/apify-sdk-js/blob/master/packages/apify/src/actor.ts#L1452)staticpushData
* ****pushData**\<Data>(item): Promise\<void>
* ****pushData**\<Data>(item, eventName): Promise<[ChargeResult](https://docs.apify.com/sdk/js/sdk/js/reference/interface/ChargeResult.md)>
- Stores an object or an array of objects to the default [Dataset](https://docs.apify.com/sdk/js/sdk/js/reference/class/Dataset.md) of the current Actor run.
This is just a convenient shortcut for [Dataset.pushData](https://docs.apify.com/sdk/js/sdk/js/reference/class/Dataset.md#pushData). For example, calling the following code:
await Actor.pushData({ myValue: 123 });
is equivalent to:
const dataset = await Actor.openDataset(); await dataset.pushData({ myValue: 123 });
For more information, see [Actor.openDataset](https://docs.apify.com/sdk/js/sdk/js/reference/class/Actor.md#openDataset) and [Dataset.pushData](https://docs.apify.com/sdk/js/sdk/js/reference/class/Dataset.md#pushData)
**IMPORTANT**: Make sure to use the `await` keyword when calling `pushData()`, otherwise the Actor process might finish before the data are stored!
***
#### Parameters
* ##### item: Data | Data\[]
Object or array of objects containing data to be stored in the default dataset. The objects must be serializable to JSON and the JSON representation of each object must be smaller than 9MB.
#### Returns Promise\<void>
### [**](#reboot)[**](https://github.com/apify/apify-sdk-js/blob/master/packages/apify/src/actor.ts#L1346)staticreboot
* ****reboot**(options): Promise\<void>
- Internally reboots this Actor run. The system stops the current container and starts a new container with the same run id. This can be used to get the Actor out of irrecoverable error state and continue where it left off.
***
#### Parameters
* ##### options: [RebootOptions](https://docs.apify.com/sdk/js/sdk/js/reference/interface/RebootOptions.md) = <!-- -->{}
#### Returns Promise\<void>
### [**](#setStatusMessage)[**](https://github.com/apify/apify-sdk-js/blob/master/packages/apify/src/actor.ts#L1375)staticsetStatusMessage
* ****setStatusMessage**(statusMessage, options): Promise<[ActorRun](https://docs.apify.com/sdk/js/sdk/js/reference/interface/ActorRun.md)>
- Sets the status message for the current Actor run.
***
#### Parameters
* ##### statusMessage: string
The status message to set.
* ##### optionaloptions: SetStatusMessageOptions
#### Returns Promise<[ActorRun](https://docs.apify.com/sdk/js/sdk/js/reference/interface/ActorRun.md)>
The return value is the Run object. When run locally, this method returns empty object (`{}`). For more information, see the [Actor Runs](https://docs.apify.com/api/v2#/reference/actor-runs/) API endpoints.
### [**](#setValue)[**](https://github.com/apify/apify-sdk-js/blob/master/packages/apify/src/actor.ts#L1540)staticsetValue
* ****setValue**\<T>(key, value, options): Promise\<void>
- Stores or deletes a value in the default [KeyValueStore](https://docs.apify.com/sdk/js/sdk/js/reference/class/KeyValueStore.md) associated with the current Actor run.
This is just a convenient shortcut for [KeyValueStore.setValue](https://docs.apify.com/sdk/js/sdk/js/reference/class/KeyValueStore.md#setValue). For example, calling the following code:
await Actor.setValue('OUTPUT', { foo: "bar" });
is equivalent to:
const store = await Actor.openKeyValueStore(); await store.setValue('OUTPUT', { foo: "bar" });
To get a value from the default key-value store, you can use the [Actor.getValue](https://docs.apify.com/sdk/js/sdk/js/reference/class/Actor.md#getValue) function.
For more information, see [Actor.openKeyValueStore](https://docs.apify.com/sdk/js/sdk/js/reference/class/Actor.md#openKeyValueStore) and [KeyValueStore.getValue](https://docs.apify.com/sdk/js/sdk/js/reference/class/KeyValueStore.md#getValue).
***
#### Parameters
* ##### key: string
Unique record key.
* ##### value: null | T
Record data, which can be one of the following values:
* If `null`, the record in the key-value store is deleted.
* If no `options.contentType` is specified, `value` can be any JavaScript object, and it will be stringified to JSON.
* If `options.contentType` is set, `value` is taken as is, and it must be a `String` or [`Buffer`](https://nodejs.org/api/buffer.html). For any other value an error will be thrown.
* ##### optionaloptions: [RecordOptions](https://docs.apify.com/sdk/js/sdk/js/reference/interface/RecordOptions.md) = <!-- -->{}
#### Returns Promise\<void>
### [**](#start)[**](https://github.com/apify/apify-sdk-js/blob/master/packages/apify/src/actor.ts#L1302)staticstart
* ****start**(actorId, input, options): Promise<[ActorRun](https://docs.apify.com/sdk/js/sdk/js/reference/interface/ActorRun.md)>
- Runs an Actor on the Apify platform using the current user account (determined by the `APIFY_TOKEN` environment variable), unlike `Actor.call`, this method just starts the run without waiting for finish.
The result of the function is an [ActorRun](https://docs.apify.com/sdk/js/sdk/js/reference/interface/ActorRun.md) object that contains details about the Actor run.
For more information about Actors, read the [documentation](https://docs.apify.com/actor).
**Example usage:**
const run = await Actor.start('apify/hello-world', { myInput: 123 });
***
#### Parameters
* ##### actorId: string
Allowed formats are `username/actor-name`, `userId/actor-name` or Actor ID.
* ##### optionalinput: Dictionary
Input for the Actor. If it is an object, it will be stringified to JSON and its content type set to `application/json; charset=utf-8`. Otherwise the `options.contentType` parameter must be provided.
* ##### optionaloptions: [CallOptions](https://docs.apify.com/sdk/js/sdk/js/reference/interface/CallOptions.md) = <!-- -->{}
#### Returns Promise<[ActorRun](https://docs.apify.com/sdk/js/sdk/js/reference/interface/ActorRun.md)>
### [**](#useState)[**](https://github.com/apify/apify-sdk-js/blob/master/packages/apify/src/actor.ts#L1097)staticuseState
* ****useState**\<State>(name, defaultValue, options): Promise\<State>
- Easily create and manage state values. All state values are automatically persisted.
Values can be modified by simply using the assignment operator.
***
#### Parameters
* ##### optionalname: string
The name of the store to use.
* ##### defaultValue: State = <!-- -->...
If the store does not yet have a value in it, the value will be initialized with the `defaultValue` you provide.
* ##### optionaloptions: UseStateOptions
An optional object parameter where a custom `keyValueStoreName` and `config` can be passed in.
#### Returns Promise\<State>
---
# externalApifyClient<!-- -->
ApifyClient is the official library to access [Apify API](https://docs.apify.com/api/v2) from your JavaScript applications. It runs both in Node.js and browser.
## Index[**](#Index)
### Constructors
* [**constructor](#constructor)
### Properties
* [**baseUrl](#baseUrl)
* [**httpClient](#httpClient)
* [**logger](#logger)
* [**stats](#stats)
* [**token](#token)
### Methods
* [**actor](#actor)
* [**actors](#actors)
* [**build](#build)
* [**builds](#builds)
* [**dataset](#dataset)
* [**datasets](#datasets)
* [**keyValueStore](#keyValueStore)
* [**keyValueStores](#keyValueStores)
* [**log](#log)
* [**requestQueue](#requestQueue)
* [**requestQueues](#requestQueues)
* [**run](#run)
* [**runs](#runs)
* [**setStatusMessage](#setStatusMessage)
* [**schedule](#schedule)
* [**schedules](#schedules)
* [**store](#store)
* [**task](#task)
* [**tasks](#tasks)
* [**user](#user)
* [**webhook](#webhook)
* [**webhookDispatch](#webhookDispatch)
* [**webhookDispatches](#webhookDispatches)
* [**webhooks](#webhooks)
## Constructors<!-- -->[**](#Constructors)
### [**](#constructor)[**](https://undefined/apify/apify-sdk-js/blob/master/node_modules/apify-client/src/apify_client.d.ts#L40)externalconstructor
* ****new ApifyClient**(options): [ApifyClient](https://docs.apify.com/sdk/js/sdk/js/reference/class/ApifyClient.md)
- #### Parameters
* ##### externaloptionaloptions: [ApifyClientOptions](https://docs.apify.com/sdk/js/sdk/js/reference/interface/ApifyClientOptions.md)
#### Returns [ApifyClient](https://docs.apify.com/sdk/js/sdk/js/reference/class/ApifyClient.md)
## Properties<!-- -->[**](#Properties)
### [**](#baseUrl)[**](https://undefined/apify/apify-sdk-js/blob/master/node_modules/apify-client/src/apify_client.d.ts#L35)externalbaseUrl
**baseUrl: string
### [**](#httpClient)[**](https://undefined/apify/apify-sdk-js/blob/master/node_modules/apify-client/src/apify_client.d.ts#L39)externalhttpClient
**httpClient: HttpClient
### [**](#logger)[**](https://undefined/apify/apify-sdk-js/blob/master/node_modules/apify-client/src/apify_client.d.ts#L38)externallogger
**logger: [Log](https://docs.apify.com/sdk/js/sdk/js/reference/class/Log.md)
### [**](#stats)[**](https://undefined/apify/apify-sdk-js/blob/master/node_modules/apify-client/src/apify_client.d.ts#L37)externalstats
**stats: Statistics
### [**](#token)[**](https://undefined/apify/apify-sdk-js/blob/master/node_modules/apify-client/src/apify_client.d.ts#L36)externaloptionaltoken
**token?
<!-- -->
: string
## Methods<!-- -->[**](#Methods)
### [**](#actor)[**](https://undefined/apify/apify-sdk-js/blob/master/node_modules/apify-client/src/apify_client.d.ts#L49)externalactor
* ****actor**(id): ActorClient
- <https://docs.apify.com/api/v2#/reference/actors/actor-object>
***
#### Parameters
* ##### externalid: string
#### Returns ActorClient
### [**](#actors)[**](https://undefined/apify/apify-sdk-js/blob/master/node_modules/apify-client/src/apify_client.d.ts#L45)externalactors
* ****actors**(): ActorCollectionClient
- <https://docs.apify.com/api/v2#/reference/actors/actor-collection>
***
#### Returns ActorCollectionClient
### [**](#build)[**](https://undefined/apify/apify-sdk-js/blob/master/node_modules/apify-client/src/apify_client.d.ts#L57)externalbuild
* ****build**(id): BuildClient
- <https://docs.apify.com/api/v2#/reference/actor-builds/build-object>
***
#### Parameters
* ##### externalid: string
#### Returns BuildClient
### [**](#builds)[**](https://undefined/apify/apify-sdk-js/blob/master/node_modules/apify-client/src/apify_client.d.ts#L53)externalbuilds
* ****builds**(): BuildCollectionClient
- <https://docs.apify.com/api/v2#/reference/actor-builds/build-collection>
***
#### Returns BuildCollectionClient
### [**](#dataset)[**](https://undefined/apify/apify-sdk-js/blob/master/node_modules/apify-client/src/apify_client.d.ts#L65)externaldataset
* ****dataset**\<Data>(id): DatasetClient\<Data>
- <https://docs.apify.com/api/v2#/reference/datasets/dataset>
***
#### Parameters
* ##### externalid: string
#### Returns DatasetClient\<Data>
### [**](#datasets)[**](https://undefined/apify/apify-sdk-js/blob/master/node_modules/apify-client/src/apify_client.d.ts#L61)externaldatasets
* ****datasets**(): DatasetCollectionClient
- <https://docs.apify.com/api/v2#/reference/datasets/dataset-collection>
***
#### Returns DatasetCollectionClient
### [**](#keyValueStore)[**](https://undefined/apify/apify-sdk-js/blob/master/node_modules/apify-client/src/apify_client.d.ts#L73)externalkeyValueStore
* ****keyValueStore**(id): KeyValueStoreClient
- <https://docs.apify.com/api/v2#/reference/key-value-stores/store-object>
***
#### Parameters
* ##### externalid: string
#### Returns KeyValueStoreClient
### [**](#keyValueStores)[**](https://undefined/apify/apify-sdk-js/blob/master/node_modules/apify-client/src/apify_client.d.ts#L69)externalkeyValueStores
* ****keyValueStores**(): KeyValueStoreCollectionClient
- <https://docs.apify.com/api/v2#/reference/key-value-stores/store-collection>
***
#### Returns KeyValueStoreCollectionClient
### [**](#log)[**](https://undefined/apify/apify-sdk-js/blob/master/node_modules/apify-client/src/apify_client.d.ts#L77)externallog
* ****log**(buildOrRunId): LogClient
- <https://docs.apify.com/api/v2#/reference/logs>
***
#### Parameters
* ##### externalbuildOrRunId: string
#### Returns LogClient
### [**](#requestQueue)[**](https://undefined/apify/apify-sdk-js/blob/master/node_modules/apify-client/src/apify_client.d.ts#L85)externalrequestQueue
* ****requestQueue**(id, options): RequestQueueClient
- <https://docs.apify.com/api/v2#/reference/request-queues/queue>
***
#### Parameters
* ##### externalid: string
* ##### externaloptionaloptions: RequestQueueUserOptions
#### Returns RequestQueueClient
### [**](#requestQueues)[**](https://undefined/apify/apify-sdk-js/blob/master/node_modules/apify-client/src/apify_client.d.ts#L81)externalrequestQueues
* ****requestQueues**(): RequestQueueCollectionClient
- <https://docs.apify.com/api/v2#/reference/request-queues/queue-collection>
***
#### Returns RequestQueueCollectionClient
### [**](#run)[**](https://undefined/apify/apify-sdk-js/blob/master/node_modules/apify-client/src/apify_client.d.ts#L93)externalrun
* ****run**(id): RunClient
- <https://docs.apify.com/api/v2#/reference/actor-runs/run-object-and-its-storages>
***
#### Parameters
* ##### externalid: string
#### Returns RunClient
### [**](#runs)[**](https://undefined/apify/apify-sdk-js/blob/master/node_modules/apify-client/src/apify_client.d.ts#L89)externalruns
* ****runs**(): RunCollectionClient
- <https://docs.apify.com/api/v2#/reference/actor-runs/run-collection>
***
#### Returns RunCollectionClient
### [**](#setStatusMessage)[**](https://undefined/apify/apify-sdk-js/blob/master/node_modules/apify-client/src/apify_client.d.ts#L134)externalsetStatusMessage
* ****setStatusMessage**(message, options): Promise\<void>
- #### Parameters
* ##### externalmessage: string
* ##### externaloptionaloptions: SetStatusMessageOptions
#### Returns Promise\<void>
### [**](#schedule)[**](https://undefined/apify/apify-sdk-js/blob/master/node_modules/apify-client/src/apify_client.d.ts#L109)externalschedule
* ****schedule**(id): ScheduleClient
- <https://docs.apify.com/api/v2#/reference/schedules/schedule-object>
***
#### Parameters
* ##### externalid: string
#### Returns ScheduleClient
### [**](#schedules)[**](https://undefined/apify/apify-sdk-js/blob/master/node_modules/apify-client/src/apify_client.d.ts#L105)externalschedules
* ****schedules**(): ScheduleCollectionClient
- <https://docs.apify.com/api/v2#/reference/schedules/schedules-collection>
***
#### Returns ScheduleCollectionClient
### [**](#store)[**](https://undefined/apify/apify-sdk-js/blob/master/node_modules/apify-client/src/apify_client.d.ts#L133)externalstore
* ****store**(): StoreCollectionClient
- <https://docs.apify.com/api/v2/#/reference/store>
***
#### Returns StoreCollectionClient
### [**](#task)[**](https://undefined/apify/apify-sdk-js/blob/master/node_modules/apify-client/src/apify_client.d.ts#L101)externaltask
* ****task**(id): TaskClient
- <https://docs.apify.com/api/v2#/reference/actor-tasks/task-object>
***
#### Parameters
* ##### externalid: string
#### Returns TaskClient
### [**](#tasks)[**](https://undefined/apify/apify-sdk-js/blob/master/node_modules/apify-client/src/apify_client.d.ts#L97)externaltasks
* ****tasks**(): TaskCollectionClient
- <https://docs.apify.com/api/v2#/reference/actor-tasks/task-collection>
***
#### Returns TaskCollectionClient
### [**](#user)[**](https://undefined/apify/apify-sdk-js/blob/master/node_modules/apify-client/src/apify_client.d.ts#L113)externaluser
* ****user**(id): UserClient
- <https://docs.apify.com/api/v2#/reference/users>
***
#### Parameters
* ##### externaloptionalid: string
#### Returns UserClient
### [**](#webhook)[**](https://undefined/apify/apify-sdk-js/blob/master/node_modules/apify-client/src/apify_client.d.ts#L121)externalwebhook
* ****webhook**(id): WebhookClient
- <https://docs.apify.com/api/v2#/reference/webhooks/webhook-object>
***
#### Parameters
* ##### externalid: string
#### Returns WebhookClient
### [**](#webhookDispatch)[**](https://undefined/apify/apify-sdk-js/blob/master/node_modules/apify-client/src/apify_client.d.ts#L129)externalwebhookDispatch
* ****webhookDispatch**(id): WebhookDispatchClient
- <https://docs.apify.com/api/v2#/reference/webhook-dispatches/webhook-dispatch-object>
***
#### Parameters
* ##### externalid: string
#### Returns WebhookDispatchClient
### [**](#webhookDispatches)[**](https://undefined/apify/apify-sdk-js/blob/master/node_modules/apify-client/src/apify_client.d.ts#L125)externalwebhookDispatches
* ****webhookDispatches**(): WebhookDispatchCollectionClient
- <https://docs.apify.com/api/v2#/reference/webhook-dispatches>
***
#### Returns WebhookDispatchCollectionClient
### [**](#webhooks)[**](https://undefined/apify/apify-sdk-js/blob/master/node_modules/apify-client/src/apify_client.d.ts#L117)externalwebhooks
* ****webhooks**(): WebhookCollectionClient
- <https://docs.apify.com/api/v2#/reference/webhooks/webhook-collection>
***
#### Returns WebhookCollectionClient
---
# ChargingManager<!-- -->
Handles pay-per-event charging.
## Index[**](#Index)
### Constructors
* [**constructor](#constructor)
### Methods
* [**calculateMaxEventChargeCountWithinLimit](#calculateMaxEventChargeCountWithinLimit)
* [**getChargedEventCount](#getChargedEventCount)
* [**getMaxTotalChargeUsd](#getMaxTotalChargeUsd)
* [**getPricingInfo](#getPricingInfo)
* [**charge](#charge)
* [**init](#init)
## Constructors<!-- -->[**](#Constructors)
### [**](#constructor)[**](https://github.com/apify/apify-sdk-js/blob/master/packages/apify/src/charging.ts#L28)constructor
* ****new ChargingManager**(configuration, apifyClient): [ChargingManager](https://docs.apify.com/sdk/js/sdk/js/reference/class/ChargingManager.md)
- #### Parameters
* ##### configuration: [Configuration](https://docs.apify.com/sdk/js/sdk/js/reference/class/Configuration.md)
* ##### apifyClient: [ApifyClient](https://docs.apify.com/sdk/js/sdk/js/reference/class/ApifyClient.md)
#### Returns [ChargingManager](https://docs.apify.com/sdk/js/sdk/js/reference/class/ChargingManager.md)
## Methods<!-- -->[**](#Methods)
### [**](#calculateMaxEventChargeCountWithinLimit)[**](https://github.com/apify/apify-sdk-js/blob/master/packages/apify/src/charging.ts#L264)calculateMaxEventChargeCountWithinLimit
* ****calculateMaxEventChargeCountWithinLimit**(eventName): number
- How many events of a given type can still be charged for before reaching the limit; If the event is not registered, returns Infinity (free of charge)
***
#### Parameters
* ##### eventName: string
#### Returns number
### [**](#getChargedEventCount)[**](https://github.com/apify/apify-sdk-js/blob/master/packages/apify/src/charging.ts#L230)getChargedEventCount
* ****getChargedEventCount**(eventName): number
- Get the number of events with given name that the Actor has charged for so far.
***
#### Parameters
* ##### eventName: string
#### Returns number
### [**](#getMaxTotalChargeUsd)[**](https://github.com/apify/apify-sdk-js/blob/master/packages/apify/src/charging.ts#L241)getMaxTotalChargeUsd
* ****getMaxTotalChargeUsd**(): number
- Get the maximum amount of money that the Actor is allowed to charge.
***
#### Returns number
### [**](#getPricingInfo)[**](https://github.com/apify/apify-sdk-js/blob/master/packages/apify/src/charging.ts#L129)getPricingInfo
* ****getPricingInfo**(): [ActorPricingInfo](https://docs.apify.com/sdk/js/sdk/js/reference/interface/ActorPricingInfo.md)
- Get information about the pricing for this Actor.
***
#### Returns [ActorPricingInfo](https://docs.apify.com/sdk/js/sdk/js/reference/interface/ActorPricingInfo.md)
### [**](#charge)[**](https://github.com/apify/apify-sdk-js/blob/master/packages/apify/src/charging.ts#L149)charge
* ****charge**(options): Promise<[ChargeResult](https://docs.apify.com/sdk/js/sdk/js/reference/interface/ChargeResult.md)>
- Charge for a specified number of events - sub-operations of the Actor.
***
#### Parameters
* ##### options: [ChargeOptions](https://docs.apify.com/sdk/js/sdk/js/reference/interface/ChargeOptions.md)
The name of the event to charge for and the number of events to be charged.
#### Returns Promise<[ChargeResult](https://docs.apify.com/sdk/js/sdk/js/reference/interface/ChargeResult.md)>
### [**](#init)[**](https://github.com/apify/apify-sdk-js/blob/master/packages/apify/src/charging.ts#L57)init
* ****init**(): Promise\<void>
- Initialize the ChargingManager by loading pricing information and charging state via Apify API.
***
#### Returns Promise\<void>
---
# Configuration<!-- -->
`Configuration` is a value object holding the SDK configuration. We can use it in two ways:
1. When using `Actor` class, we can get the instance configuration via `sdk.config`
import { Actor } from 'apify'; import { BasicCrawler } from 'crawlee';
const sdk = new Actor({ token: '123' }); console.log(sdk.config.get('token')); // '123'
const crawler = new BasicCrawler({ // ... crawler options }, sdk.config);
2. To get the global configuration (singleton instance). It will respect the environment variables.
<!-- -->
import { BasicCrawler, Configuration } from 'crawlee';
// Get the global configuration const config = Configuration.getGlobalConfig(); // Set the 'persistStateIntervalMillis' option // of global configuration to 30 seconds config.set('persistStateIntervalMillis', 30_000);
// No need to pass the configuration to the crawler, // as it's using the global configuration by default const crawler = new BasicCrawler();
## Supported Configuration Options
| Key | Environment Variable | Default Value |
| :--------------------------- | :------------------------------------ | :------------ |
| `memoryMbytes` | `ACTOR_MEMORY_MBYTES` | - |
| `headless` | `APIFY_HEADLESS` | - |
| `persistStateIntervalMillis` | `APIFY_PERSIST_STATE_INTERVAL_MILLIS` | `60e3` |
| `token` | `APIFY_TOKEN` | - |
| `isAtHome` | `APIFY_IS_AT_HOME` | - |
| `defaultDatasetId` | `ACTOR_DEFAULT_DATASET_ID` | `'default'` |
| `defaultKeyValueStoreId` | `ACTOR_DEFAULT_KEY_VALUE_STORE_ID` | `'default'` |
| `defaultRequestQueueId` | `ACTOR_DEFAULT_REQUEST_QUEUE_ID` | `'default'` |
## Advanced Configuration Options
| Key | Environment Variable | Default Value |
| :-------------------------- | :----------------------------------- | :------------------------- |
| `actorEventsWsUrl` | `ACTOR_EVENTS_WEBSOCKET_URL` | - |
| `actorId` | `ACTOR_ID` | - |
| `actorRunId` | `ACTOR_RUN_ID` | - |
| `actorTaskId` | `ACTOR_TASK_ID` | - |
| `apiBaseUrl` | `APIFY_API_BASE_URL` | `'https://api.apify.com'` |
| `containerPort` | `ACTOR_WEB_SERVER_PORT` | `4321` |
| `containerUrl` | `ACTOR_WEB_SERVER_URL` | `'http://localhost:4321'` |
| `inputKey` | `ACTOR_INPUT_KEY` | `'INPUT'` |
| `metamorphAfterSleepMillis` | `APIFY_METAMORPH_AFTER_SLEEP_MILLIS` | `300e3` |
| `metaOrigin` | `APIFY_META_ORIGIN` | - |
| `proxyHostname` | `APIFY_PROXY_HOSTNAME` | `'proxy.apify.com'` |
| `proxyPassword` | `APIFY_PROXY_PASSWORD` | - |
| `proxyPort` | `APIFY_PROXY_PORT` | `8000` |
| `proxyStatusUrl` | `APIFY_PROXY_STATUS_URL` | `'http://proxy.apify.com'` |
| `userId` | `APIFY_USER_ID` | - |
| `xvfb` | `APIFY_XVFB` | - |
| `standbyPort` | `ACTOR_STANDBY_PORT` | `4321` |
| `standbyUrl` | `ACTOR_STANDBY_URL` | - |
| `chromeExecutablePath` | `APIFY_CHROME_EXECUTABLE_PATH` | - |
| `defaultBrowserPath` | `APIFY_DEFAULT_BROWSER_PATH` | - |
### Hierarchy
* Configuration
* *Configuration*
## Index[**](#Index)
### Constructors
* [**constructor](#constructor)
### Properties
* [**storageManagers](#storageManagers)
* [**globalConfig](#globalConfig)
### Methods
* [**get](#get)
* [**getEventManager](#getEventManager)
* [**set](#set)
* [**useEventManager](#useEventManager)
* [**useStorageClient](#useStorageClient)
* [**getEventManager](#getEventManager)
* [**getGlobalConfig](#getGlobalConfig)
* [**getStorageClient](#getStorageClient)
* [**resetGlobalState](#resetGlobalState)
* [**set](#set)
* [**useStorageClient](#useStorageClient)
## Constructors<!-- -->[**](#Constructors)
### [**](#constructor)[**](https://undefined/apify/apify-sdk-js/blob/master/node_modules/@crawlee/core/configuration.d.ts#L241)externalconstructor
* ****new Configuration**(options): [Configuration](https://docs.apify.com/sdk/js/sdk/js/reference/class/Configuration.md)
- Inherited from CoreConfiguration.constructor
Creates new `Configuration` instance with provided options. Env vars will have precedence over those.
***
#### Parameters
* ##### externaloptionaloptions: ConfigurationOptions
#### Returns [Configuration](https://docs.apify.com/sdk/js/sdk/js/reference/class/Configuration.md)
## Properties<!-- -->[**](#Properties)
### [**](#storageManagers)[**](https://undefined/apify/apify-sdk-js/blob/master/node_modules/@crawlee/core/configuration.d.ts#L237)externalreadonlyinheritedstorageManagers
**storageManagers: Map\<Constructor, StorageManager\<IStorage>>
Inherited from CoreConfiguration.storageManagers
### [**](#globalConfig)[**](https://github.com/apify/apify-sdk-js/blob/master/packages/apify/src/configuration.ts#L116)staticoptionalglobalConfig
**globalConfig?
<!-- -->
: [Configuration](https://docs.apify.com/sdk/js/sdk/js/reference/class/Configuration.md)
Overrides CoreConfiguration.globalConfig
* **@inheritDoc**
## Methods<!-- -->[**](#Methods)
### [**](#get)[**](https://github.com/apify/apify-sdk-js/blob/master/packages/apify/src/configuration.ts#L206)get
* ****get**\<T, U>(key, defaultValue): U
- Overrides CoreConfiguration.get
* **@inheritDoc**
***
#### Parameters
* ##### key: T
* ##### optionaldefaultValue: U
#### Returns U
### [**](#getEventManager)[**](https://undefined/apify/apify-sdk-js/blob/master/node_modules/@crawlee/core/configuration.d.ts#L269)externalinheritedgetEventManager
* ****getEventManager**(): EventManager
- Inherited from CoreConfiguration.getEventManager
#### Returns EventManager
### [**](#set)[**](https://github.com/apify/apify-sdk-js/blob/master/packages/apify/src/configuration.ts#L213)set
* ****set**(key, value): void
- Overrides CoreConfiguration.set
* **@inheritDoc**
***
#### Parameters
* ##### key: keyof<!-- --> [ConfigurationOptions](https://docs.apify.com/sdk/js/sdk/js/reference/interface/ConfigurationOptions.md)
* ##### optionalvalue: any
#### Returns void
### [**](#useEventManager)[**](https://undefined/apify/apify-sdk-js/blob/master/node_modules/@crawlee/core/configuration.d.ts#L277)externalinheriteduseEventManager
* ****useEventManager**(events): void
- Inherited from CoreConfiguration.useEventManager
#### Parameters
* ##### externalevents: EventManager
#### Returns void
### [**](#useStorageClient)[**](https://undefined/apify/apify-sdk-js/blob/master/node_modules/@crawlee/core/configuration.d.ts#L275)externalinheriteduseStorageClient
* ****useStorageClient**(client): void
- Inherited from CoreConfiguration.useStorageClient
#### Parameters
* ##### externalclient: StorageClient
#### Returns void
### [**](#getEventManager)[**](https://undefined/apify/apify-sdk-js/blob/master/node_modules/@crawlee/core/configuration.d.ts#L289)staticexternalinheritedgetEventManager
* ****getEventManager**(): EventManager
- Inherited from CoreConfiguration.getEventManager
Gets default EventManager instance.
***
#### Returns EventManager
### [**](#getGlobalConfig)[**](https://github.com/apify/apify-sdk-js/blob/master/packages/apify/src/configuration.ts#L220)staticgetGlobalConfig
* ****getGlobalConfig**(): [Configuration](https://docs.apify.com/sdk/js/sdk/js/reference/class/Configuration.md)
- Overrides CoreConfiguration.getGlobalConfig
* **@inheritDoc**
***
#### Returns [Configuration](https://docs.apify.com/sdk/js/sdk/js/reference/class/Configuration.md)
### [**](#getStorageClient)[**](https://undefined/apify/apify-sdk-js/blob/master/node_modules/@crawlee/core/configuration.d.ts#L285)staticexternalinheritedgetStorageClient
* ****getStorageClient**(): StorageClient
- Inherited from CoreConfiguration.getStorageClient
Gets default StorageClient instance.
***
#### Returns StorageClient
### [**](#resetGlobalState)[**](https://github.com/apify/apify-sdk-js/blob/master/packages/apify/src/configuration.ts#L233)staticresetGlobalState
* ****resetGlobalState**(): void
- Overrides CoreConfiguration.resetGlobalState
Resets global configuration instance. The default instance holds configuration based on env vars, if we want to change them, we need to first reset the global state. Used mainly for testing purposes.
***
#### Returns void
### [**](#set)[**](https://undefined/apify/apify-sdk-js/blob/master/node_modules/@crawlee/core/configuration.d.ts#L258)staticexternalinheritedset
* ****set**(key, value): void
- Inherited from CoreConfiguration.set
Sets value for given option. Only affects the global `Configuration` instance, the value will not be propagated down to the env var. To reset a value, we can omit the `value` argument or pass `undefined` there.
***
#### Parameters
* ##### externalkey: keyof<!-- --> ConfigurationOptions
* ##### externaloptionalvalue: any
#### Returns void
### [**](#useStorageClient)[**](https://undefined/apify/apify-sdk-js/blob/master/node_modules/@crawlee/core/configuration.d.ts#L276)staticexternalinheriteduseStorageClient
* ****useStorageClient**(client): void
- Inherited from CoreConfiguration.useStorageClient
#### Parameters
* ##### externalclient: StorageClient
#### Returns void
---
# externalDataset<!-- --> \<Data>
The `Dataset` class represents a store for structured data where each object stored has the same attributes, such as online store products or real estate offers. You can imagine it as a table, where each object is a row and its attributes are columns. Dataset is an append-only storage - you can only add new records to it but you cannot modify or remove existing records. Typically it is used to store crawling results.
Do not instantiate this class directly, use the [Dataset.open](https://docs.apify.com/sdk/js/sdk/js/reference/class/Dataset.md#open) function instead.
`Dataset` stores its data either on local disk or in the Apify cloud, depending on whether the `APIFY_LOCAL_STORAGE_DIR` or `APIFY_TOKEN` environment variables are set.
If the `APIFY_LOCAL_STORAGE_DIR` environment variable is set, the data is stored in the local directory in the following files:
{APIFY_LOCAL_STORAGE_DIR}/datasets/{DATASET_ID}/{INDEX}.json
Note that `{DATASET_ID}` is the name or ID of the dataset. The default dataset has ID: `default`, unless you override it by setting the `APIFY_DEFAULT_DATASET_ID` environment variable. Each dataset item is stored as a separate JSON file, where `{INDEX}` is a zero-based index of the item in the dataset.
If the `APIFY_TOKEN` environment variable is set but `APIFY_LOCAL_STORAGE_DIR` not, the data is stored in the [Apify Dataset](https://docs.apify.com/storage/dataset) cloud storage. Note that you can force usage of the cloud storage also by passing the `forceCloud` option to [Dataset.open](https://docs.apify.com/sdk/js/sdk/js/reference/class/Dataset.md#open) function, even if the `APIFY_LOCAL_STORAGE_DIR` variable is set.
**Example usage:**
// Write a single row to the default dataset await Dataset.pushData({ col1: 123, col2: 'val2' });
// Open a named dataset const dataset = await Dataset.open('some-name');
// Write a single row await dataset.pushData({ foo: 'bar' });
// Write multiple rows await dataset.pushData([ { foo: 'bar2', col2: 'val2' }, { col3: 123 }, ]);
// Export the entirety of the dataset to one file in the key-value store await dataset.exportToCSV('MY-DATA');
## Index[**](#Index)
### Properties
* [**client](#client)
* [**config](#config)
* [**id](#id)
* [**log](#log)
* [**name](#name)
### Methods
* [**drop](#drop)
* [**export](#export)
* [**exportTo](#exportTo)
* [**exportToCSV](#exportToCSV)
* [**exportToJSON](#exportToJSON)
* [**forEach](#forEach)
* [**getData](#getData)
* [**getInfo](#getInfo)
* [**map](#map)
* [**pushData](#pushData)
* [**reduce](#reduce)
* [**exportToCSV](#exportToCSV)
* [**exportToJSON](#exportToJSON)
* [**getData](#getData)
* [**open](#open)
## Properties<!-- -->[**](#Properties)
### [**](#client)[**](https://undefined/apify/apify-sdk-js/blob/master/node_modules/@crawlee/core/storages/dataset.d.ts#L147)externalclient
**client: DatasetClient\<Data>
### [**](#config)[**](https://undefined/apify/apify-sdk-js/blob/master/node_modules/@crawlee/core/storages/dataset.d.ts#L144)externalreadonlyconfig
**config: Configuration
### [**](#id)[**](https://undefined/apify/apify-sdk-js/blob/master/node_modules/@crawlee/core/storages/dataset.d.ts#L145)externalid
**id: string
### [**](#log)[**](https://undefined/apify/apify-sdk-js/blob/master/node_modules/@crawlee/core/storages/dataset.d.ts#L148)externallog
**log: [Log](https://docs.apify.com/sdk/js/sdk/js/reference/class/Log.md)
### [**](#name)[**](https://undefined/apify/apify-sdk-js/blob/master/node_modules/@crawlee/core/storages/dataset.d.ts#L146)externaloptionalname
**name?
<!-- -->
: string
## Methods<!-- -->[**](#Methods)
### [**](#drop)[**](https://undefined/apify/apify-sdk-js/blob/master/node_modules/@crawlee/core/storages/dataset.d.ts#L333)externaldrop
* ****drop**(): Promise\<void>
- Removes the dataset either from the Apify cloud storage or from the local directory, depending on the mode of operation.
***
#### Returns Promise\<void>
### [**](#export)[**](https://undefined/apify/apify-sdk-js/blob/master/node_modules/@crawlee/core/storages/dataset.d.ts#L186)externalexport
* ****export**(options): Promise\<Data\[]>
- Returns all the data from the dataset. This will iterate through the whole dataset via the `listItems()` client method, which gives you only paginated results.
***
#### Parameters
* ##### externaloptionaloptions: DatasetExportOptions
#### Returns Promise\<Data\[]>
### [**](#exportTo)[**](https://undefined/apify/apify-sdk-js/blob/master/node_modules/@crawlee/core/storages/dataset.d.ts#L194)externalexportTo
* ****exportTo**(key, options, contentType): Promise\<Data\[]>
- Save the entirety of the dataset's contents into one file within a key-value store.
***
#### Parameters
* ##### externalkey: string
The name of the value to save the data in.
* ##### externaloptionaloptions: DatasetExportToOptions
An optional options object where you can provide the dataset and target KVS name.
* ##### externaloptionalcontentType: string
Only JSON and CSV are supported currently, defaults to JSON.
#### Returns Promise\<Data\[]>
### [**](#exportToCSV)[**](https://undefined/apify/apify-sdk-js/blob/master/node_modules/@crawlee/core/storages/dataset.d.ts#L208)externalexportToCSV
* ****exportToCSV**(key, options): Promise\<void>
- Save entire default dataset's contents into one CSV file within a key-value store.
***
#### Parameters
* ##### externalkey: string
The name of the value to save the data in.
* ##### externaloptionaloptions: Omit\<DatasetExportToOptions, fromDataset>
An optional options object where you can provide the target KVS name.
#### Returns Promise\<void>
### [**](#exportToJSON)[**](https://undefined/apify/apify-sdk-js/blob/master/node_modules/@crawlee/core/storages/dataset.d.ts#L201)externalexportToJSON
* ****exportToJSON**(key, options): Promise\<void>
- Save entire default dataset's contents into one JSON file within a key-value store.
***
#### Parameters
* ##### externalkey: string
The name of the value to save the data in.
* ##### externaloptionaloptions: Omit\<DatasetExportToOptions, fromDataset>
An optional options object where you can provide the target KVS name.
#### Returns Promise\<void>
### [**](#forEach)[**](https://undefined/apify/apify-sdk-js/blob/master/node_modules/@crawlee/core/storages/dataset.d.ts#L266)externalforEach
* ****forEach**(iteratee, options, index): Promise\<void>
- Iterates over dataset items, yielding each in turn to an `iteratee` function. Each invocation of `iteratee` is called with two arguments: `(item, index)`.
If the `iteratee` function returns a Promise then it is awaited before the next call. If it throws an error, the iteration is aborted and the `forEach` function throws the error.
**Example usage**
const dataset = await Dataset.open('my-results');
await dataset.forEach(async (item, index) => {
console.log(Item at ${index}: ${JSON.stringify(item)});
});
***
#### Parameters
* ##### externaliteratee: [DatasetConsumer](https://docs.apify.com/sdk/js/sdk/js/reference/interface/DatasetConsumer.md)\<Data>
A function that is called for every item in the dataset.
* ##### externaloptionaloptions: [DatasetIteratorOptions](https://docs.apify.com/sdk/js/sdk/js/reference/interface/DatasetIteratorOptions.md)
All `forEach()` parameters.
* ##### externaloptionalindex: number
Specifies the initial index number passed to the `iteratee` function.
#### Returns Promise\<void>
### [**](#getData)[**](https://undefined/apify/apify-sdk-js/blob/master/node_modules/@crawlee/core/storages/dataset.d.ts#L181)externalgetData
* ****getData**(options): Promise<[DatasetContent](https://docs.apify.com/sdk/js/sdk/js/reference/interface/DatasetContent.md)\<Data>>
- Returns [DatasetContent](https://docs.apify.com/sdk/js/sdk/js/reference/interface/DatasetContent.md) object holding the items in the dataset based on the provided parameters.
***
#### Parameters
* ##### externaloptionaloptions: [DatasetDataOptions](https://docs.apify.com/sdk/js/sdk/js/reference/interface/DatasetDataOptions.md)
#### Returns Promise<[DatasetContent](https://docs.apify.com/sdk/js/sdk/js/reference/interface/DatasetContent.md)\<Data>>
### [**](#getInfo)[**](https://undefined/apify/apify-sdk-js/blob/master/node_modules/@crawlee/core/storages/dataset.d.ts#L245)externalgetInfo
* ****getInfo**(): Promise\<undefined | DatasetInfo>
- Returns an object containing general information about the dataset.
The function returns the same object as the Apify API Client's [getDataset](https://docs.apify.com/api/apify-client-js/latest#ApifyClient-datasets-getDataset) function, which in turn calls the [Get dataset](https://apify.com/docs/api/v2#/reference/datasets/dataset/get-dataset) API endpoint.
**Example:**
{ id: "WkzbQMuFYuamGv3YF", name: "my-dataset", userId: "wRsJZtadYvn4mBZmm", createdAt: new Date("2015-12-12T07:34:14.202Z"), modifiedAt: new Date("2015-12-13T08:36:13.202Z"), accessedAt: new Date("2015-12-14T08:36:13.202Z"), itemCount: 14, }
***
#### Returns Promise\<undefined | DatasetInfo>
### [**](#map)[**](https://undefined/apify/apify-sdk-js/blob/master/node_modules/@crawlee/core/storages/dataset.d.ts#L276)externalmap
* ****map**\<R>(iteratee, options): Promise\<R\[]>
- Produces a new array of values by mapping each value in list through a transformation function `iteratee()`. Each invocation of `iteratee()` is called with two arguments: `(element, index)`.
If `iteratee` returns a `Promise` then it's awaited before a next call.
***
#### Parameters
* ##### externaliteratee: [DatasetMapper](https://docs.apify.com/sdk/js/sdk/js/reference/interface/DatasetMapper.md)\<Data, R>
* ##### externaloptionaloptions: [DatasetIteratorOptions](https://docs.apify.com/sdk/js/sdk/js/reference/interface/DatasetIteratorOptions.md)
All `map()` parameters.
#### Returns Promise\<R\[]>
### [**](#pushData)[**](https://undefined/apify/apify-sdk-js/blob/master/node_modules/@crawlee/core/storages/dataset.d.ts#L177)externalpushData
* ****pushData**(data): Promise\<void>
- Stores an object or an array of objects to the dataset. The function returns a promise that resolves when the operation finishes. It has no result, but throws on invalid args or other errors.
**IMPORTANT**: Make sure to use the `await` keyword when calling `pushData()`, otherwise the crawler process might finish before the data is stored!
The size of the data is limited by the receiving API and therefore `pushData()` will only allow objects whose JSON representation is smaller than 9MB. When an array is passed, none of the included objects may be larger than 9MB, but the array itself may be of any size.
The function internally chunks the array into separate items and pushes them sequentially. The chunking process is stable (keeps order of data), but it does not provide a transaction safety mechanism. Therefore, in the event of an uploading error (after several automatic retries), the function's Promise will reject and the dataset will be left in a state where some of the items have already been saved to the dataset while other items from the source array were not. To overcome this limitation, the developer may, for example, read the last item saved in the dataset and re-attempt the save of the data from this item onwards to prevent duplicates.
***
#### Parameters
* ##### externaldata: Data | Data\[]
Object or array of objects containing data to be stored in the default dataset. The objects must be serializable to JSON and the JSON representation of each object must be smaller than 9MB.
#### Returns Promise\<void>
### [**](#reduce)[**](https://undefined/apify/apify-sdk-js/blob/master/node_modules/@crawlee/core/storages/dataset.d.ts#L294)[**](https://undefined/apify/apify-sdk-js/blob/master/node_modules/@crawlee/core/storages/dataset.d.ts#L314)[**](https://undefined/apify/apify-sdk-js/blob/master/node_modules/@crawlee/core/storages/dataset.d.ts#L328)externalreduce
* ****reduce**(iteratee): Promise\<undefined | Data>
* ****reduce**(iteratee, memo, options): Promise\<undefined | Data>
* ****reduce**\<T>(iteratee, memo, options): Promise\<T>
- Reduces a list of values down to a single value.
The first element of the dataset is the initial value, with each successive reductions should be returned by `iteratee()`. The `iteratee()` is passed three arguments: the `memo`, `value` and `index` of the current element being folded into the reduction.
The `iteratee` is first invoked on the second element of the list (`index = 1`), with the first element given as the memo parameter. After that, the rest of the elements in the dataset is passed to `iteratee`, with the result of the previous invocation as the memo.
If `iteratee()` returns a `Promise` it's awaited before a next call.
If the dataset is empty, reduce will return undefined.
***
#### Parameters
* ##### externaliteratee: [DatasetReducer](https://docs.apify.com/sdk/js/sdk/js/reference/interface/DatasetReducer.md)\<Data, Data>
#### Returns Promise\<undefined | Data>
### [**](#exportToCSV)[**](https://undefined/apify/apify-sdk-js/blob/master/node_modules/@crawlee/core/storages/dataset.d.ts#L222)staticexternalexportToCSV
* ****exportToCSV**(key, options): Promise\<void>
- Save entire default dataset's contents into one CSV file within a key-value store.
***
#### Parameters
* ##### externalkey: string
The name of the value to save the data in.
* ##### externaloptionaloptions: DatasetExportToOptions
An optional options object where you can provide the dataset and target KVS name.
#### Returns Promise\<void>
### [**](#exportToJSON)[**](https://undefined/apify/apify-sdk-js/blob/master/node_modules/@crawlee/core/storages/dataset.d.ts#L215)staticexternalexportToJSON
* ****exportToJSON**(key, options): Promise\<void>
- Save entire default dataset's contents into one JSON file within a key-value store.
***
#### Parameters
* ##### externalkey: string
The name of the value to save the data in.
* ##### externaloptionaloptions: DatasetExportToOptions
An optional options object where you can provide the dataset and target KVS name.
#### Returns Promise\<void>
### [**](#getData)[**](https://undefined/apify/apify-sdk-js/blob/master/node_modules/@crawlee/core/storages/dataset.d.ts#L377)staticexternalgetData
* ****getData**\<Data>(options): Promise<[DatasetContent](https://docs.apify.com/sdk/js/sdk/js/reference/interface/DatasetContent.md)\<Data>>
- Returns [DatasetContent](https://docs.apify.com/sdk/js/sdk/js/reference/interface/DatasetContent.md) object holding the items in the dataset based on the provided parameters.
***
#### Parameters
* ##### externaloptionaloptions: [DatasetDataOptions](https://docs.apify.com/sdk/js/sdk/js/reference/interface/DatasetDataOptions.md)
#### Returns Promise<[DatasetContent](https://docs.apify.com/sdk/js/sdk/js/reference/interface/DatasetContent.md)\<Data>>
### [**](#open)[**](https://undefined/apify/apify-sdk-js/blob/master/node_modules/@crawlee/core/storages/dataset.d.ts#L348)staticexternalopen
* ****open**\<Data>(datasetIdOrName, options): Promise<[Dataset](https://docs.apify.com/sdk/js/sdk/js/reference/class/Dataset.md)\<Data>>
- Opens a dataset and returns a promise resolving to an instance of the [Dataset](https://docs.apify.com/sdk/js/sdk/js/reference/class/Dataset.md) class.
Datasets are used to store structured data where each object stored has the same attributes, such as online store products or real estate offers. The actual data is stored either on the local filesystem or in the cloud.
For more details and code examples, see the [Dataset](https://docs.apify.com/sdk/js/sdk/js/reference/class/Dataset.md) class.
***
#### Parameters
* ##### externaloptionaldatasetIdOrName: null | string
ID or name of the dataset to be opened. If `null` or `undefined`, the function returns the default dataset associated with the crawler run.
* ##### externaloptionaloptions: StorageManagerOptions
Storage manager options.
#### Returns Promise<[Dataset](https://docs.apify.com/sdk/js/sdk/js/reference/class/Dataset.md)\<Data>>
---
# KeyValueStore<!-- -->
* **@inheritDoc**
### Hierarchy
* KeyValueStore
* *KeyValueStore*
## Index[**](#Index)
### Properties
* [**config](#config)
* [**id](#id)
* [**name](#name)
* [**storageObject](#storageObject)
### Methods
* [**drop](#drop)
* [**forEachKey](#forEachKey)
* [**getAutoSavedValue](#getAutoSavedValue)
* [**getPublicUrl](#getPublicUrl)
* [**getValue](#getValue)
* [**recordExists](#recordExists)
* [**setValue](#setValue)
* [**getAutoSavedValue](#getAutoSavedValue)
* [**open](#open)
* [**recordExists](#recordExists)
## Properties<!-- -->[**](#Properties)
### [**](#config)[**](https://undefined/apify/apify-sdk-js/blob/master/node_modules/@crawlee/core/storages/key_value_store.d.ts#L70)externalreadonlyinheritedconfig
**config: Configuration
Inherited from CoreKeyValueStore.config
### [**](#id)[**](https://undefined/apify/apify-sdk-js/blob/master/node_modules/@crawlee/core/storages/key_value_store.d.ts#L71)externalreadonlyinheritedid
**id: string
Inherited from CoreKeyValueStore.id
### [**](#name)[**](https://undefined/apify/apify-sdk-js/blob/master/node_modules/@crawlee/core/storages/key_value_store.d.ts#L72)externaloptionalreadonlyinheritedname
**name?
<!-- -->
: string
Inherited from CoreKeyValueStore.name
### [**](#storageObject)[**](https://undefined/apify/apify-sdk-js/blob/master/node_modules/@crawlee/core/storages/key_value_store.d.ts#L73)externaloptionalreadonlyinheritedstorageObject
**storageObject?
<!-- -->
: Record\<string, unknown>
Inherited from CoreKeyValueStore.storageObject
## Methods<!-- -->[**](#Methods)
### [**](#drop)[**](https://undefined/apify/apify-sdk-js/blob/master/node_modules/@crawlee/core/storages/key_value_store.d.ts#L203)externalinheriteddrop
* ****drop**(): Promise\<void>
- Inherited from CoreKeyValueStore.drop
Removes the key-value store either from the Apify cloud storage or from the local directory, depending on the mode of operation.
***
#### Returns Promise\<void>
### [**](#forEachKey)[**](https://undefined/apify/apify-sdk-js/blob/master/node_modules/@crawlee/core/storages/key_value_store.d.ts#L227)externalinheritedforEachKey
* ****forEachKey**(iteratee, options): Promise\<void>
- Inherited from CoreKeyValueStore.forEachKey
Iterates over key-value store keys, yielding each in turn to an `iteratee` function. Each invocation of `iteratee` is called with three arguments: `(key, index, info)`, where `key` is the record key, `index` is a zero-based index of the key in the current iteration (regardless of `options.exclusiveStartKey`) and `info` is an object that contains a single property `size` indicating size of the record in bytes.
If the `iteratee` function returns a Promise then it is awaited before the next call. If it throws an error, the iteration is aborted and the `forEachKey` function throws the error.
**Example usage**
const keyValueStore = await KeyValueStore.open();
await keyValueStore.forEachKey(async (key, index, info) => {
console.log(Key at ${index}: ${key} has size ${info.size});
});
***
#### Parameters
* ##### externaliteratee: [KeyConsumer](https://docs.apify.com/sdk/js/sdk/js/reference/interface/KeyConsumer.md)
A function that is called for every key in the key-value store.
* ##### externaloptionaloptions: [KeyValueStoreIteratorOptions](https://docs.apify.com/sdk/js/sdk/js/reference/interface/KeyValueStoreIteratorOptions.md)
All `forEachKey()` parameters.
#### Returns Promise\<void>
### [**](#getAutoSavedValue)[**](https://undefined/apify/apify-sdk-js/blob/master/node_modules/@crawlee/core/storages/key_value_store.d.ts#L153)externalinheritedgetAutoSavedValue
* ****getAutoSavedValue**\<T>(key, defaultValue): Promise\<T>
- Inherited from CoreKeyValueStore.getAutoSavedValue
#### Parameters
* ##### externalkey: string
* ##### externaloptionaldefaultValue: T
#### Returns Promise\<T>
### [**](#getPublicUrl)[**](https://github.com/apify/apify-sdk-js/blob/master/packages/apify/src/key_value_store.ts#L18)getPublicUrl
* ****getPublicUrl**(key): string
- Overrides CoreKeyValueStore.getPublicUrl
Returns a URL for the given key that may be used to publicly access the value in the remote key-value store.
***
#### Parameters
* ##### key: string
#### Returns string
### [**](#getValue)[**](https://undefined/apify/apify-sdk-js/blob/master/node_modules/@crawlee/core/storages/key_value_store.d.ts#L112)[**](https://undefined/apify/apify-sdk-js/blob/master/node_modules/@crawlee/core/storages/key_value_store.d.ts#L145)externalinheritedgetValue
* ****getValue**\<T>(key): Promise\<null | T>
* ****getValue**\<T>(key, defaultValue): Promise\<T>
- Inherited from CoreKeyValueStore.getValue
Gets a value from the key-value store.
The function returns a `Promise` that resolves to the record value, whose JavaScript type depends on the MIME content type of the record. Records with the `application/json` content type are automatically parsed and returned as a JavaScript object. Similarly, records with `text/plain` content types are returned as a string. For all other content types, the value is returned as a raw [`Buffer`](https://nodejs.org/api/buffer.html) instance.
If the record does not exist, the function resolves to `null`.
To save or delete a value in the key-value store, use the [KeyValueStore.setValue](https://docs.apify.com/sdk/js/sdk/js/reference/class/KeyValueStore.md#setValue) function.
**Example usage:**
const store = await KeyValueStore.open(); const buffer = await store.getValue('screenshot1.png');
***
#### Parameters
* ##### externalkey: string
Unique key of the record. It can be at most 256 characters long and only consist of the following characters: `a`-`z`, `A`-`Z`, `0`-`9` and `!-_.'()`
#### Returns Promise\<null | T>
Returns a promise that resolves to an object, string or [`Buffer`](https://nodejs.org/api/buffer.html), depending on the MIME content type of the record.
### [**](#recordExists)[**](https://undefined/apify/apify-sdk-js/blob/master/node_modules/@crawlee/core/storages/key_value_store.d.ts#L152)externalinheritedrecordExists
* ****recordExists**(key): Promise\<boolean>
- Inherited from CoreKeyValueStore.recordExists
Tests whether a record with the given key exists in the key-value store without retrieving its value.
***
#### Parameters
* ##### externalkey: string
The queried record key.
#### Returns Promise\<boolean>
`true` if the record exists, `false` if it does not.
### [**](#setValue)[**](https://undefined/apify/apify-sdk-js/blob/master/node_modules/@crawlee/core/storages/key_value_store.d.ts#L198)externalinheritedsetValue
* ****setValue**\<T>(key, value, options): Promise\<void>
- Inherited from CoreKeyValueStore.setValue
Saves or deletes a record in the key-value store. The function returns a promise that resolves once the record has been saved or deleted.
**Example usage:**
const store = await KeyValueStore.open(); await store.setValue('OUTPUT', { foo: 'bar' });
Beware that the key can be at most 256 characters long and only contain the following characters: `a-zA-Z0-9!-_.'()`
By default, `value` is converted to JSON and stored with the `application/json; charset=utf-8` MIME content type. To store the value with another content type, pass it in the options as follows:
const store = await KeyValueStore.open('my-text-store'); await store.setValue('RESULTS', 'my text data', { contentType: 'text/plain' });
If you set custom content type, `value` must be either a string or [`Buffer`](https://nodejs.org/api/buffer.html), otherwise an error will be thrown.
If `value` is `null`, the record is deleted instead. Note that the `setValue()` function succeeds regardless whether the record existed or not.
To retrieve a value from the key-value store, use the [KeyValueStore.getValue](https://docs.apify.com/sdk/js/sdk/js/reference/class/KeyValueStore.md#getValue) function.
**IMPORTANT:** Always make sure to use the `await` keyword when calling `setValue()`, otherwise the crawler process might finish before the value is stored!
***
#### Parameters
* ##### externalkey: string
Unique key of the record. It can be at most 256 characters long and only consist of the following characters: `a`-`z`, `A`-`Z`, `0`-`9` and `!-_.'()`
* ##### externalvalue: null | T
Record data, which can be one of the following values:
* If `null`, the record in the key-value store is deleted.
* If no `options.contentType` is specified, `value` can be any JavaScript object and it will be stringified to JSON.
* If `options.contentType` is set, `value` is taken as is and it must be a `String` or [`Buffer`](https://nodejs.org/api/buffer.html). For any other value an error will be thrown.
* ##### externaloptionaloptions: [RecordOptions](https://docs.apify.com/sdk/js/sdk/js/reference/interface/RecordOptions.md)
Record options.
#### Returns Promise\<void>
### [**](#getAutoSavedValue)[**](https://undefined/apify/apify-sdk-js/blob/master/node_modules/@crawlee/core/storages/key_value_store.d.ts#L312)staticexternalinheritedgetAutoSavedValue
* ****getAutoSavedValue**\<T>(key, defaultValue): Promise\<T>
- Inherited from CoreKeyValueStore.getAutoSavedValue
#### Parameters
* ##### externalkey: string
* ##### externaloptionaldefaultValue: T
#### Returns Promise\<T>
### [**](#open)[**](https://github.com/apify/apify-sdk-js/blob/master/packages/apify/src/key_value_store.ts#L36)staticopen
* ****open**(storeIdOrName, options): Promise<[KeyValueStore](https://docs.apify.com/sdk/js/sdk/js/reference/class/KeyValueStore.md)>
- Overrides CoreKeyValueStore.open
* **@inheritDoc**
***
#### Parameters
* ##### optionalstoreIdOrName: null | string
* ##### options: StorageManagerOptions = <!-- -->{}
#### Returns Promise<[KeyValueStore](https://docs.apify.com/sdk/js/sdk/js/reference/class/KeyValueStore.md)>
### [**](#recordExists)[**](https://undefined/apify/apify-sdk-js/blob/master/node_modules/@crawlee/core/storages/key_value_store.d.ts#L311)staticexternalinheritedrecordExists
* ****recordExists**(key): Promise\<boolean>
- Inherited from CoreKeyValueStore.recordExists
Tests whether a record with the given key exists in the default [KeyValueStore](https://docs.apify.com/sdk/js/sdk/js/reference/class/KeyValueStore.md) associated with the current crawler run.
***
#### Parameters
* ##### externalkey: string
The queried record key.
#### Returns Promise\<boolean>
`true` if the record exists, `false` if it does not.
---
# externalLog<!-- -->
The log instance enables level aware logging of messages and we advise to use it instead of `console.log()` and its aliases in most development scenarios.
A very useful use case for `log` is using `log.debug` liberally throughout the codebase to get useful logging messages only when appropriate log level is set and keeping the console tidy in production environments.
The available logging levels are, in this order: `DEBUG`, `INFO`, `WARNING`, `ERROR`, `OFF` and can be referenced from the `log.LEVELS` constant, such as `log.LEVELS.ERROR`.
To log messages to the system console, use the `log.level(message)` invocation, such as `log.debug('this is a debug message')`.
To prevent writing of messages above a certain log level to the console, simply set the appropriate level. The default log level is `INFO`, which means that `DEBUG` messages will not be printed, unless enabled.
**Example:**
import log from '@apify/log';
// importing from the Apify SDK or Crawlee is also supported: // import { log } from 'apify'; // import { log } from 'crawlee';
log.info('Information message', { someData: 123 }); // prints message log.debug('Debug message', { debugData: 'hello' }); // doesn't print anything
log.setLevel(log.LEVELS.DEBUG); log.debug('Debug message'); // prints message
log.setLevel(log.LEVELS.ERROR); log.debug('Debug message'); // doesn't print anything log.info('Info message'); // doesn't print anything log.error('Error message', { errorDetails: 'This is bad!' }); // prints message
try { throw new Error('Not good!'); } catch (e) { log.exception(e, 'Exception occurred', { errorDetails: 'This is really bad!' }); // prints message }
log.setOptions({ prefix: 'My actor' }); log.info('I am running!'); // prints "My actor: I am running"
const childLog = log.child({ prefix: 'Crawler' }); log.info('I am crawling!'); // prints "My actor:Crawler: I am crawling"
Another very useful way of setting the log level is by setting the `APIFY_LOG_LEVEL` environment variable, such as `APIFY_LOG_LEVEL=DEBUG`. This way, no code changes are necessary to turn on your debug messages and start debugging right away.
To add timestamps to your logs, you can override the default logger settings:
log.setOptions({ logger: new log.LoggerText({ skipTime: false }), });
You can customize your logging further by extending or replacing the default logger instances with your own implementations.
## Index[**](#Index)
### Constructors
* [**constructor](#constructor)
### Properties
* [**LEVELS](#LEVELS)
### Methods
* [**debug](#debug)
* [**deprecated](#deprecated)
* [**error](#error)
* [**exception](#exception)
* [**getLevel](#getLevel)
* [**getOptions](#getOptions)
* [**child](#child)
* [**info](#info)
* [**internal](#internal)
* [**perf](#perf)
* [**setLevel](#setLevel)
* [**setOptions](#setOptions)
* [**softFail](#softFail)
* [**warning](#warning)
* [**warningOnce](#warningOnce)
## Constructors<!-- -->[**](#Constructors)
### [**](#constructor)[**](https://undefined/apify/apify-sdk-js/blob/master/node_modules/@apify/log/src/index.d.ts#L136)externalconstructor
* ****new Log**(options): [Log](https://docs.apify.com/sdk/js/sdk/js/reference/class/Log.md)
- #### Parameters
* ##### externaloptionaloptions: Partial<[LoggerOptions](https://docs.apify.com/sdk/js/sdk/js/reference/interface/LoggerOptions.md)>
#### Returns [Log](https://docs.apify.com/sdk/js/sdk/js/reference/class/Log.md)
## Properties<!-- -->[**](#Properties)
### [**](#LEVELS)[**](https://undefined/apify/apify-sdk-js/blob/master/node_modules/@apify/log/src/index.d.ts#L133)externalreadonlyLEVELS
**LEVELS: typeof [LogLevel](https://docs.apify.com/sdk/js/sdk/js/reference/enum/LogLevel.md)
Map of available log levels that's useful for easy setting of appropriate log levels. Each log level is represented internally by a number. Eg. `log.LEVELS.DEBUG === 5`.
## Methods<!-- -->[**](#Methods)
### [**](#debug)[**](https://undefined/apify/apify-sdk-js/blob/master/node_modules/@apify/log/src/index.d.ts#L195)externaldebug
* ****debug**(message, data): void
- Logs a `DEBUG` message. By default, it will not be written to the console. To see `DEBUG` messages in the console, set the log level to `DEBUG` either using the `log.setLevel(log.LEVELS.DEBUG)` method or using the environment variable `APIFY_LOG_LEVEL=DEBUG`. Data are stringified and appended to the message.
***
#### Parameters
* ##### externalmessage: string
* ##### externaloptionaldata: AdditionalData
#### Returns void
### [**](#deprecated)[**](https://undefined/apify/apify-sdk-js/blob/master/node_modules/@apify/log/src/index.d.ts#L204)externaldeprecated
* ****deprecated**(message): void
- Logs given message only once as WARNING. It's used to warn user that some feature he is using has been deprecated.
***
#### Parameters
* ##### externalmessage: string
#### Returns void
### [**](#error)[**](https://undefined/apify/apify-sdk-js/blob/master/node_modules/@apify/log/src/index.d.ts#L173)externalerror
* ****error**(message, data): void
- Logs an `ERROR` message. Use this method to log error messages that are not directly connected to an exception. For logging exceptions, use the `log.exception` method.
***
#### Parameters
* ##### externalmessage: string
* ##### externaloptionaldata: AdditionalData
#### Returns void
### [**](#exception)[**](https://undefined/apify/apify-sdk-js/blob/master/node_modules/@apify/log/src/index.d.ts#L178)externalexception
* ****exception**(exception, message, data): void
- Logs an `ERROR` level message with a nicely formatted exception. Note that the exception is the first parameter here and an additional message is only optional.
***
#### Parameters
* ##### externalexception: Error
* ##### externalmessage: string
* ##### externaloptionaldata: AdditionalData
#### Returns void
### [**](#getLevel)[**](https://undefined/apify/apify-sdk-js/blob/master/node_modules/@apify/log/src/index.d.ts#L144)externalgetLevel
* ****getLevel**(): number
- Returns the currently selected logging level. This is useful for checking whether a message will actually be printed to the console before one actually performs a resource intensive operation to construct the message, such as querying a DB for some metadata that need to be added. If the log level is not high enough at the moment, it doesn't make sense to execute the query.
***
#### Returns number
### [**](#getOptions)[**](https://undefined/apify/apify-sdk-js/blob/master/node_modules/@apify/log/src/index.d.ts#L164)externalgetOptions
* ****getOptions**(): Required<[LoggerOptions](https://docs.apify.com/sdk/js/sdk/js/reference/interface/LoggerOptions.md)>
- Returns the logger configuration.
***
#### Returns Required<[LoggerOptions](https://docs.apify.com/sdk/js/sdk/js/reference/interface/LoggerOptions.md)>
### [**](#child)[**](https://undefined/apify/apify-sdk-js/blob/master/node_modules/@apify/log/src/index.d.ts#L168)externalchild
* ****child**(options): [Log](https://docs.apify.com/sdk/js/sdk/js/reference/class/Log.md)
- Creates a new instance of logger that inherits settings from a parent logger.
***
#### Parameters
* ##### externaloptions: Partial<[LoggerOptions](https://docs.apify.com/sdk/js/sdk/js/reference/interface/LoggerOptions.md)>
#### Returns [Log](https://docs.apify.com/sdk/js/sdk/js/reference/class/Log.md)
### [**](#info)[**](https://undefined/apify/apify-sdk-js/blob/master/node_modules/@apify/log/src/index.d.ts#L188)externalinfo
* ****info**(message, data): void
- Logs an `INFO` message. `INFO` is the default log level so info messages will be always logged, unless the log level is changed. Data are stringified and appended to the message.
***
#### Parameters
* ##### externalmessage: string
* ##### externaloptionaldata: AdditionalData
#### Returns void
### [**](#internal)[**](https://undefined/apify/apify-sdk-js/blob/master/node_modules/@apify/log/src/index.d.ts#L156)externalinternal
* ****internal**(level, message, data, exception): void
- #### Parameters
* ##### externallevel: [LogLevel](https://docs.apify.com/sdk/js/sdk/js/reference/enum/LogLevel.md)
* ##### externalmessage: string
* ##### externaloptionaldata: any
* ##### externaloptionalexception: any
#### Returns void
### [**](#perf)[**](https://undefined/apify/apify-sdk-js/blob/master/node_modules/@apify/log/src/index.d.ts#L196)externalperf
* ****perf**(message, data): void
- #### Parameters
* ##### externalmessage: string
* ##### externaloptionaldata: AdditionalData
#### Returns void
### [**](#setLevel)[**](https://undefined/apify/apify-sdk-js/blob/master/node_modules/@apify/log/src/index.d.ts#L155)externalsetLevel
* ****setLevel**(level): void
- Sets the log level to the given value, preventing messages from less important log levels from being printed to the console. Use in conjunction with the `log.LEVELS` constants such as
log.setLevel(log.LEVELS.DEBUG);
Default log level is INFO.
***
#### Parameters
* ##### externallevel: [LogLevel](https://docs.apify.com/sdk/js/sdk/js/reference/enum/LogLevel.md)
#### Returns void
### [**](#setOptions)[**](https://undefined/apify/apify-sdk-js/blob/master/node_modules/@apify/log/src/index.d.ts#L160)externalsetOptions
* ****setOptions**(options): void
- Configures logger.
***
#### Parameters
* ##### externaloptions: Partial<[LoggerOptions](https://docs.apify.com/sdk/js/sdk/js/reference/interface/LoggerOptions.md)>
#### Returns void
### [**](#softFail)[**](https://undefined/apify/apify-sdk-js/blob/master/node_modules/@apify/log/src/index.d.ts#L179)externalsoftFail
* ****softFail**(message, data): void
- #### Parameters
* ##### externalmessage: string
* ##### externaloptionaldata: AdditionalData
#### Returns void
### [**](#warning)[**](https://undefined/apify/apify-sdk-js/blob/master/node_modules/@apify/log/src/index.d.ts#L183)externalwarning
* ****warning**(message, data): void
- Logs a `WARNING` level message. Data are stringified and appended to the message.
***
#### Parameters
* ##### externalmessage: string
* ##### externaloptionaldata: AdditionalData
#### Returns void
### [**](#warningOnce)[**](https://undefined/apify/apify-sdk-js/blob/master/node_modules/@apify/log/src/index.d.ts#L200)externalwarningOnce
* ****warningOnce**(message): void
- Logs a `WARNING` level message only once.
***
#### Parameters
* ##### externalmessage: string
#### Returns void
---
# externalLogger<!-- -->
This is an abstract class that should be extended by custom logger classes.
this.\_log() method must be implemented by them.
### Hierarchy
* EventEmitter
* *Logger*
* [LoggerJson](https://docs.apify.com/sdk/js/sdk/js/reference/class/LoggerJson.md)
* [LoggerText](https://docs.apify.com/sdk/js/sdk/js/reference/class/LoggerText.md)
## Index[**](#Index)
### Constructors
* [**constructor](#constructor)
### Properties
* [**captureRejections](#captureRejections)
* [**captureRejectionSymbol](#captureRejectionSymbol)
* [**defaultMaxListeners](#defaultMaxListeners)
* [**errorMonitor](#errorMonitor)
### Methods
* [**\_log](#_log)
* [**\_outputWithConsole](#_outputWithConsole)
* [**\[captureRejectionSymbol\]](#\[captureRejectionSymbol])
* [**addListener](#addListener)
* [**emit](#emit)
* [**eventNames](#eventNames)
* [**getMaxListeners](#getMaxListeners)
* [**getOptions](#getOptions)
* [**listenerCount](#listenerCount)
* [**listeners](#listeners)
* [**log](#log)
* [**off](#off)
* [**on](#on)
* [**once](#once)
* [**prependListener](#prependListener)
* [**prependOnceListener](#prependOnceListener)
* [**rawListeners](#rawListeners)
* [**removeAllListeners](#removeAllListeners)
* [**removeListener](#removeListener)
* [**setMaxListeners](#setMaxListeners)
* [**setOptions](#setOptions)
* [**addAbortListener](#addAbortListener)
* [**getEventListeners](#getEventListeners)
* [**getMaxListeners](#getMaxListeners)
* [**listenerCount](#listenerCount)
* [**on](#on)
* [**once](#once)
* [**setMaxListeners](#setMaxListeners)
## Constructors<!-- -->[**](#Constructors)
### [**](#constructor)[**](https://undefined/apify/apify-sdk-js/blob/master/node_modules/@apify/log/src/index.d.ts#L33)externalconstructor
* ****new Logger**(options): [Logger](https://docs.apify.com/sdk/js/sdk/js/reference/class/Logger.md)
- Overrides EventEmitter.constructor
#### Parameters
* ##### externaloptions: Record\<string, any>
#### Returns [Logger](https://docs.apify.com/sdk/js/sdk/js/reference/class/Logger.md)
## Properties<!-- -->[**](#Properties)
### [**](#captureRejections)[**](https://undefined/apify/apify-sdk-js/blob/master/node_modules/@types/node/events.d.ts#L459)staticexternalinheritedcaptureRejections
**captureRejections: boolean
Inherited from EventEmitter.captureRejections
Value: [boolean](https://developer.mozilla.org/en-US/docs/Web/JavaScript/Data_structures#Boolean_type)
Change the default `captureRejections` option on all new `EventEmitter` objects.
* **@since**
v13.4.0, v12.16.0
### [**](#captureRejectionSymbol)[**](https://undefined/apify/apify-sdk-js/blob/master/node_modules/@types/node/events.d.ts#L452)staticexternalreadonlyinheritedcaptureRejectionSymbol
**captureRejectionSymbol: typeof captureRejectionSymbol
Inherited from EventEmitter.captureRejectionSymbol
Value: `Symbol.for('nodejs.rejection')`
See how to write a custom `rejection handler`.
* **@since**
v13.4.0, v12.16.0
### [**](#defaultMaxListeners)[**](https://undefined/apify/apify-sdk-js/blob/master/node_modules/@types/node/events.d.ts#L498)staticexternalinheriteddefaultMaxListeners
**defaultMaxListeners: number
Inherited from EventEmitter.defaultMaxListeners
By default, a maximum of `10` listeners can be registered for any single event. This limit can be changed for individual `EventEmitter` instances using the `emitter.setMaxListeners(n)` method. To change the default for *all*`EventEmitter` instances, the `events.defaultMaxListeners` property can be used. If this value is not a positive number, a `RangeError` is thrown.
Take caution when setting the `events.defaultMaxListeners` because the change affects *all* `EventEmitter` instances, including those created before the change is made. However, calling `emitter.setMaxListeners(n)` still has precedence over `events.defaultMaxListeners`.
This is not a hard limit. The `EventEmitter` instance will allow more listeners to be added but will output a trace warning to stderr indicating that a "possible EventEmitter memory leak" has been detected. For any single `EventEmitter`, the `emitter.getMaxListeners()` and `emitter.setMaxListeners()` methods can be used to temporarily avoid this warning:
import { EventEmitter } from 'node:events'; const emitter = new EventEmitter(); emitter.setMaxListeners(emitter.getMaxListeners() + 1); emitter.once('event', () => { // do stuff emitter.setMaxListeners(Math.max(emitter.getMaxListeners() - 1, 0)); });
The `--trace-warnings` command-line flag can be used to display the stack trace for such warnings.
The emitted warning can be inspected with `process.on('warning')` and will have the additional `emitter`, `type`, and `count` properties, referring to the event emitter instance, the event's name and the number of attached listeners, respectively. Its `name` property is set to `'MaxListenersExceededWarning'`.
* **@since**
v0.11.2
### [**](#errorMonitor)[**](https://undefined/apify/apify-sdk-js/blob/master/node_modules/@types/node/events.d.ts#L445)staticexternalreadonlyinheritederrorMonitor
**errorMonitor: typeof errorMonitor
Inherited from EventEmitter.errorMonitor
This symbol shall be used to install a listener for only monitoring `'error'` events. Listeners installed using this symbol are called before the regular `'error'` listeners are called.
Installing a listener using this symbol does not change the behavior once an `'error'` event is emitted. Therefore, the process will still crash if no regular `'error'` listener is installed.
* **@since**
v13.6.0, v12.17.0
## Methods<!-- -->[**](#Methods)
### [**](#_log)[**](https://undefined/apify/apify-sdk-js/blob/master/node_modules/@apify/log/src/index.d.ts#L37)external\_log
* ****\_log**(level, message, data, exception, opts): void
- #### Parameters
* ##### externallevel: [LogLevel](https://docs.apify.com/sdk/js/sdk/js/reference/enum/LogLevel.md)
* ##### externalmessage: string
* ##### externaloptionaldata: any
* ##### externaloptionalexception: unknown
* ##### externaloptionalopts: Record\<string, any>
#### Returns void
### [**](#_outputWithConsole)[**](https://undefined/apify/apify-sdk-js/blob/master/node_modules/@apify/log/src/index.d.ts#L36)external\_outputWithConsole
* ****\_outputWithConsole**(level, line): void
- #### Parameters
* ##### externallevel: [LogLevel](https://docs.apify.com/sdk/js/sdk/js/reference/enum/LogLevel.md)
* ##### externalline: string
#### Returns void
### [**](#\[captureRejectionSymbol])[**](https://undefined/apify/apify-sdk-js/blob/master/node_modules/@types/node/events.d.ts#L136)externaloptionalinherited\[captureRejectionSymbol]
* ****\[captureRejectionSymbol]**\<K>(error, event, ...args): void
- Inherited from EventEmitter.\[captureRejectionSymbol]
#### Parameters
* ##### externalerror: Error
* ##### externalevent: string | symbol
* ##### externalrest...args: AnyRest
#### Returns void
### [**](#addListener)[**](https://undefined/apify/apify-sdk-js/blob/master/node_modules/@types/node/events.d.ts#L597)externalinheritedaddListener
* ****addListener**\<K>(eventName, listener): this
- Inherited from EventEmitter.addListener
Alias for `emitter.on(eventName, listener)`.
* **@since**
v0.1.26
***
#### Parameters
* ##### externaleventName: string | symbol
* ##### externallistener: (...args) => void
#### Returns this
### [**](#emit)[**](https://undefined/apify/apify-sdk-js/blob/master/node_modules/@types/node/events.d.ts#L859)externalinheritedemit
* ****emit**\<K>(eventName, ...args): boolean
- Inherited from EventEmitter.emit
Synchronously calls each of the listeners registered for the event named `eventName`, in the order they were registered, passing the supplied arguments to each.
Returns `true` if the event had listeners, `false` otherwise.
import { EventEmitter } from 'node:events'; const myEmitter = new EventEmitter();
// First listener
myEmitter.on('event', function firstListener() {
console.log('Helloooo! first listener');
});
// Second listener
myEmitter.on('event', function secondListener(arg1, arg2) {
console.log(event with parameters ${arg1}, ${arg2} in second listener);
});
// Third listener
myEmitter.on('event', function thirdListener(...args) {
const parameters = args.join(', ');
console.log(event with parameters ${parameters} in third listener);
});
console.log(myEmitter.listeners('event'));
myEmitter.emit('event', 1, 2, 3, 4, 5);
// Prints: // [ // [Function: firstListener], // [Function: secondListener], // [Function: thirdListener] // ] // Helloooo! first listener // event with parameters 1, 2 in second listener // event with parameters 1, 2, 3, 4, 5 in third listener
* **@since**
v0.1.26
***
#### Parameters
* ##### externaleventName: string | symbol
* ##### externalrest...args: AnyRest
#### Returns boolean
### [**](#eventNames)[**](https://undefined/apify/apify-sdk-js/blob/master/node_modules/@types/node/events.d.ts#L922)externalinheritedeventNames
* ****eventNames**(): (string | symbol)\[]
- Inherited from EventEmitter.eventNames
Returns an array listing the events for which the emitter has registered listeners. The values in the array are strings or `Symbol`s.
import { EventEmitter } from 'node:events';
const myEE = new EventEmitter(); myEE.on('foo', () => {}); myEE.on('bar', () => {});
const sym = Symbol('symbol'); myEE.on(sym, () => {});
console.log(myEE.eventNames()); // Prints: [ 'foo', 'bar', Symbol(symbol) ]
* **@since**
v6.0.0
***
#### Returns (string | symbol)\[]
### [**](#getMaxListeners)[**](https://undefined/apify/apify-sdk-js/blob/master/node_modules/@types/node/events.d.ts#L774)externalinheritedgetMaxListeners
* ****getMaxListeners**(): number
- Inherited from EventEmitter.getMaxListeners
Returns the current max listener value for the `EventEmitter` which is either set by `emitter.setMaxListeners(n)` or defaults to defaultMaxListeners.
* **@since**
v1.0.0
***
#### Returns number
### [**](#getOptions)[**](https://undefined/apify/apify-sdk-js/blob/master/node_modules/@apify/log/src/index.d.ts#L35)externalgetOptions
* ****getOptions**(): Record\<string, any>
- #### Returns Record\<string, any>
### [**](#listenerCount)[**](https://undefined/apify/apify-sdk-js/blob/master/node_modules/@types/node/events.d.ts#L868)externalinheritedlistenerCount
* ****listenerCount**\<K>(eventName, listener): number
- Inherited from EventEmitter.listenerCount
Returns the number of listeners listening for the event named `eventName`. If `listener` is provided, it will return how many times the listener is found in the list of the listeners of the event.
* **@since**
v3.2.0
***
#### Parameters
* ##### externaleventName: string | symbol
The name of the event being listened for
* ##### externaloptionallistener: Function
The event handler function
#### Returns number
### [**](#listeners)[**](https://undefined/apify/apify-sdk-js/blob/master/node_modules/@types/node/events.d.ts#L787)externalinheritedlisteners
* ****listeners**\<K>(eventName): Function\[]
- Inherited from EventEmitter.listeners
Returns a copy of the array of listeners for the event named `eventName`.
server.on('connection', (stream) => { console.log('someone connected!'); }); console.log(util.inspect(server.listeners('connection'))); // Prints: [ [Function] ]
* **@since**
v0.1.26
***
#### Parameters
* ##### externaleventName: string | symbol
#### Returns Function\[]
### [**](#log)[**](https://undefined/apify/apify-sdk-js/blob/master/node_modules/@apify/log/src/index.d.ts#L38)externallog
* ****log**(level, message, ...args): void
- #### Parameters
* ##### externallevel: [LogLevel](https://docs.apify.com/sdk/js/sdk/js/reference/enum/LogLevel.md)
* ##### externalmessage: string
* ##### externalrest...args: any\[]
#### Returns void
### [**](#off)[**](https://undefined/apify/apify-sdk-js/blob/master/node_modules/@types/node/events.d.ts#L747)externalinheritedoff
* ****off**\<K>(eventName, listener): this
- Inherited from EventEmitter.off
Alias for `emitter.removeListener()`.
* **@since**
v10.0.0
***
#### Parameters
* ##### externaleventName: string | symbol
* ##### externallistener: (...args) => void
#### Returns this
### [**](#on)[**](https://undefined/apify/apify-sdk-js/blob/master/node_modules/@types/node/events.d.ts#L629)externalinheritedon
* ****on**\<K>(eventName, listener): this
- Inherited from EventEmitter.on
Adds the `listener` function to the end of the listeners array for the event named `eventName`. No checks are made to see if the `listener` has already been added. Multiple calls passing the same combination of `eventName` and `listener` will result in the `listener` being added, and called, multiple times.
server.on('connection', (stream) => { console.log('someone connected!'); });
Returns a reference to the `EventEmitter`, so that calls can be chained.
By default, event listeners are invoked in the order they are added. The `emitter.prependListener()` method can be used as an alternative to add the event listener to the beginning of the listeners array.
import { EventEmitter } from 'node:events'; const myEE = new EventEmitter(); myEE.on('foo', () => console.log('a')); myEE.prependListener('foo', () => console.log('b')); myEE.emit('foo'); // Prints: // b // a
* **@since**
v0.1.101
***
#### Parameters
* ##### externaleventName: string | symbol
The name of the event.
* ##### externallistener: (...args) => void
The callback function
#### Returns this
### [**](#once)[**](https://undefined/apify/apify-sdk-js/blob/master/node_modules/@types/node/events.d.ts#L659)externalinheritedonce
* ****once**\<K>(eventName, listener): this
- Inherited from EventEmitter.once
Adds a **one-time** `listener` function for the event named `eventName`. The next time `eventName` is triggered, this listener is removed and then invoked.
server.once('connection', (stream) => { console.log('Ah, we have our first user!'); });
Returns a reference to the `EventEmitter`, so that calls can be chained.
By default, event listeners are invoked in the order they are added. The `emitter.prependOnceListener()` method can be used as an alternative to add the event listener to the beginning of the listeners array.
import { EventEmitter } from 'node:events'; const myEE = new EventEmitter(); myEE.once('foo', () => console.log('a')); myEE.prependOnceListener('foo', () => console.log('b')); myEE.emit('foo'); // Prints: // b // a
* **@since**
v0.3.0
***
#### Parameters
* ##### externaleventName: string | symbol
The name of the event.
* ##### externallistener: (...args) => void
The callback function
#### Returns this
### [**](#prependListener)[**](https://undefined/apify/apify-sdk-js/blob/master/node_modules/@types/node/events.d.ts#L886)externalinheritedprependListener
* ****prependListener**\<K>(eventName, listener): this
- Inherited from EventEmitter.prependListener
Adds the `listener` function to the *beginning* of the listeners array for the event named `eventName`. No checks are made to see if the `listener` has already been added. Multiple calls passing the same combination of `eventName` and `listener` will result in the `listener` being added, and called, multiple times.
server.prependListener('connection', (stream) => { console.log('someone connected!'); });
Returns a reference to the `EventEmitter`, so that calls can be chained.
* **@since**
v6.0.0
***
#### Parameters
* ##### externaleventName: string | symbol
The name of the event.
* ##### externallistener: (...args) => void
The callback function
#### Returns this
### [**](#prependOnceListener)[**](https://undefined/apify/apify-sdk-js/blob/master/node_modules/@types/node/events.d.ts#L902)externalinheritedprependOnceListener
* ****prependOnceListener**\<K>(eventName, listener): this
- Inherited from EventEmitter.prependOnceListener
Adds a **one-time**`listener` function for the event named `eventName` to the *beginning* of the listeners array. The next time `eventName` is triggered, this listener is removed, and then invoked.
server.prependOnceListener('connection', (stream) => { console.log('Ah, we have our first user!'); });
Returns a reference to the `EventEmitter`, so that calls can be chained.
* **@since**
v6.0.0
***
#### Parameters
* ##### externaleventName: string | symbol
The name of the event.
* ##### externallistener: (...args) => void
The callback function
#### Returns this
### [**](#rawListeners)[**](https://undefined/apify/apify-sdk-js/blob/master/node_modules/@types/node/events.d.ts#L818)externalinheritedrawListeners
* ****rawListeners**\<K>(eventName): Function\[]
- Inherited from EventEmitter.rawListeners
Returns a copy of the array of listeners for the event named `eventName`, including any wrappers (such as those created by `.once()`).
import { EventEmitter } from 'node:events'; const emitter = new EventEmitter(); emitter.once('log', () => console.log('log once'));
// Returns a new Array with a function onceWrapper which has a property
// listener which contains the original listener bound above
const listeners = emitter.rawListeners('log');
const logFnWrapper = listeners[0];
// Logs "log once" to the console and does not unbind the once event
logFnWrapper.listener();
// Logs "log once" to the console and removes the listener logFnWrapper();
emitter.on('log', () => console.log('log persistently'));
// Will return a new Array with a single function bound by .on() above
const newListeners = emitter.rawListeners('log');
// Logs "log persistently" twice newListeners0; emitter.emit('log');
* **@since**
v9.4.0
***
#### Parameters
* ##### externaleventName: string | symbol
#### Returns Function\[]
### [**](#removeAllListeners)[**](https://undefined/apify/apify-sdk-js/blob/master/node_modules/@types/node/events.d.ts#L758)externalinheritedremoveAllListeners
* ****removeAllListeners**(eventName): this
- Inherited from EventEmitter.removeAllListeners
Removes all listeners, or those of the specified `eventName`.
It is bad practice to remove listeners added elsewhere in the code, particularly when the `EventEmitter` instance was created by some other component or module (e.g. sockets or file streams).
Returns a reference to the `EventEmitter`, so that calls can be chained.
* **@since**
v0.1.26
***
#### Parameters
* ##### externaloptionaleventName: string | symbol
#### Returns this
### [**](#removeListener)[**](https://undefined/apify/apify-sdk-js/blob/master/node_modules/@types/node/events.d.ts#L742)externalinheritedremoveListener
* ****removeListener**\<K>(eventName, listener): this
- Inherited from EventEmitter.removeListener
Removes the specified `listener` from the listener array for the event named `eventName`.
const callback = (stream) => { console.log('someone connected!'); }; server.on('connection', callback); // ... server.removeListener('connection', callback);
`removeListener()` will remove, at most, one instance of a listener from the listener array. If any single listener has been added multiple times to the listener array for the specified `eventName`, then `removeListener()` must be called multiple times to remove each instance.
Once an event is emitted, all listeners attached to it at the time of emitting are called in order. This implies that any `removeListener()` or `removeAllListeners()` calls *after* emitting and *before* the last listener finishes execution will not remove them from`emit()` in progress. Subsequent events behave as expected.
import { EventEmitter } from 'node:events'; class MyEmitter extends EventEmitter {} const myEmitter = new MyEmitter();
const callbackA = () => { console.log('A'); myEmitter.removeListener('event', callbackB); };
const callbackB = () => { console.log('B'); };
myEmitter.on('event', callbackA);
myEmitter.on('event', callbackB);
// callbackA removes listener callbackB but it will still be called. // Internal listener array at time of emit [callbackA, callbackB] myEmitter.emit('event'); // Prints: // A // B
// callbackB is now removed. // Internal listener array [callbackA] myEmitter.emit('event'); // Prints: // A
Because listeners are managed using an internal array, calling this will change the position indices of any listener registered *after* the listener being removed. This will not impact the order in which listeners are called, but it means that any copies of the listener array as returned by the `emitter.listeners()` method will need to be recreated.
When a single function has been added as a handler multiple times for a single event (as in the example below), `removeListener()` will remove the most recently added instance. In the example the `once('ping')` listener is removed:
import { EventEmitter } from 'node:events'; const ee = new EventEmitter();
function pong() { console.log('pong'); }
ee.on('ping', pong); ee.once('ping', pong); ee.removeListener('ping', pong);
ee.emit('ping'); ee.emit('ping');
Returns a reference to the `EventEmitter`, so that calls can be chained.
* **@since**
v0.1.26
***
#### Parameters
* ##### externaleventName: string | symbol
* ##### externallistener: (...args) => void
#### Returns this
### [**](#setMaxListeners)[**](https://undefined/apify/apify-sdk-js/blob/master/node_modules/@types/node/events.d.ts#L768)externalinheritedsetMaxListeners
* ****setMaxListeners**(n): this
- Inherited from EventEmitter.setMaxListeners
By default `EventEmitter`s will print a warning if more than `10` listeners are added for a particular event. This is a useful default that helps finding memory leaks. The `emitter.setMaxListeners()` method allows the limit to be modified for this specific `EventEmitter` instance. The value can be set to `Infinity` (or `0`) to indicate an unlimited number of listeners.
Returns a reference to the `EventEmitter`, so that calls can be chained.
* **@since**
v0.3.5
***
#### Parameters
* ##### externaln: number
#### Returns this
### [**](#setOptions)[**](https://undefined/apify/apify-sdk-js/blob/master/node_modules/@apify/log/src/index.d.ts#L34)externalsetOptions
* ****setOptions**(options): void
- #### Parameters
* ##### externaloptions: Record\<string, any>
#### Returns void
### [**](#addAbortListener)[**](https://undefined/apify/apify-sdk-js/blob/master/node_modules/@types/node/events.d.ts#L437)staticexternalinheritedaddAbortListener
* ****addAbortListener**(signal, resource): Disposable
- Inherited from EventEmitter.addAbortListener
experimental
Listens once to the `abort` event on the provided `signal`.
Listening to the `abort` event on abort signals is unsafe and may lead to resource leaks since another third party with the signal can call `e.stopImmediatePropagation()`. Unfortunately Node.js cannot change this since it would violate the web standard. Additionally, the original API makes it easy to forget to remove listeners.
This API allows safely using `AbortSignal`s in Node.js APIs by solving these two issues by listening to the event such that `stopImmediatePropagation` does not prevent the listener from running.
Returns a disposable so that it may be unsubscribed from more easily.
import { addAbortListener } from 'node:events';
function example(signal) { let disposable; try { signal.addEventListener('abort', (e) => e.stopImmediatePropagation()); disposable = addAbortListener(signal, (e) => { // Do something when signal is aborted. }); } finally { disposable?.Symbol.dispose; } }
* **@since**
v20.5.0
***
#### Parameters
* ##### externalsignal: AbortSignal
* ##### externalresource: (event) => void
#### Returns Disposable
Disposable that removes the `abort` listener.
### [**](#getEventListeners)[**](https://undefined/apify/apify-sdk-js/blob/master/node_modules/@types/node/events.d.ts#L358)staticexternalinheritedgetEventListeners
* ****getEventListeners**(emitter, name): Function\[]
- Inherited from EventEmitter.getEventListeners
Returns a copy of the array of listeners for the event named `eventName`.
For `EventEmitter`s this behaves exactly the same as calling `.listeners` on the emitter.
For `EventTarget`s this is the only way to get the event listeners for the event target. This is useful for debugging and diagnostic purposes.
import { getEventListeners, EventEmitter } from 'node:events';
{ const ee = new EventEmitter(); const listener = () => console.log('Events are fun'); ee.on('foo', listener); console.log(getEventListeners(ee, 'foo')); // [ [Function: listener] ] } { const et = new EventTarget(); const listener = () => console.log('Events are fun'); et.addEventListener('foo', listener); console.log(getEventListeners(et, 'foo')); // [ [Function: listener] ] }
* **@since**
v15.2.0, v14.17.0
***
#### Parameters
* ##### externalemitter: EventEmitter\<DefaultEventMap> | EventTarget
* ##### externalname: string | symbol
#### Returns Function\[]
### [**](#getMaxListeners)[**](https://undefined/apify/apify-sdk-js/blob/master/node_modules/@types/node/events.d.ts#L387)staticexternalinheritedgetMaxListeners
* ****getMaxListeners**(emitter): number
- Inherited from EventEmitter.getMaxListeners
Returns the currently set max amount of listeners.
For `EventEmitter`s this behaves exactly the same as calling `.getMaxListeners` on the emitter.
For `EventTarget`s this is the only way to get the max event listeners for the event target. If the number of event handlers on a single EventTarget exceeds the max set, the EventTarget will print a warning.
import { getMaxListeners, setMaxListeners, EventEmitter } from 'node:events';
{ const ee = new EventEmitter(); console.log(getMaxListeners(ee)); // 10 setMaxListeners(11, ee); console.log(getMaxListeners(ee)); // 11 } { const et = new EventTarget(); console.log(getMaxListeners(et)); // 10 setMaxListeners(11, et); console.log(getMaxListeners(et)); // 11 }
* **@since**
v19.9.0
***
#### Parameters
* ##### externalemitter: EventEmitter\<DefaultEventMap> | EventTarget
#### Returns number
### [**](#listenerCount)[**](https://undefined/apify/apify-sdk-js/blob/master/node_modules/@types/node/events.d.ts#L330)staticexternalinheritedlistenerCount
* ****listenerCount**(emitter, eventName): number
- Inherited from EventEmitter.listenerCount
A class method that returns the number of listeners for the given `eventName` registered on the given `emitter`.
import { EventEmitter, listenerCount } from 'node:events';
const myEmitter = new EventEmitter(); myEmitter.on('event', () => {}); myEmitter.on('event', () => {}); console.log(listenerCount(myEmitter, 'event')); // Prints: 2
* **@since**
v0.9.12
* **@deprecated**
Since v3.2.0 - Use `listenerCount` instead.
***
#### Parameters
* ##### externalemitter: EventEmitter\<DefaultEventMap>
The emitter to query
* ##### externaleventName: string | symbol
The event name
#### Returns number
### [**](#on)[**](https://undefined/apify/apify-sdk-js/blob/master/node_modules/@types/node/events.d.ts#L303)[**](https://undefined/apify/apify-sdk-js/blob/master/node_modules/@types/node/events.d.ts#L308)staticexternalinheritedon
* ****on**(emitter, eventName, options): AsyncIterator\<any\[], any, any>
* ****on**(emitter, eventName, options): AsyncIterator\<any\[], any, any>
- Inherited from EventEmitter.on
import { on, EventEmitter } from 'node:events'; import process from 'node:process';
const ee = new EventEmitter();
// Emit later on process.nextTick(() => { ee.emit('foo', 'bar'); ee.emit('foo', 42); });
for await (const event of on(ee, 'foo')) { // The execution of this inner block is synchronous and it // processes one event at a time (even with await). Do not use // if concurrent execution is required. console.log(event); // prints ['bar'] [42] } // Unreachable here
Returns an `AsyncIterator` that iterates `eventName` events. It will throw if the `EventEmitter` emits `'error'`. It removes all listeners when exiting the loop. The `value` returned by each iteration is an array composed of the emitted event arguments.
An `AbortSignal` can be used to cancel waiting on events:
import { on, EventEmitter } from 'node:events'; import process from 'node:process';
const ac = new AbortController();
(async () => { const ee = new EventEmitter();
// Emit later on
process.nextTick(() => {
ee.emit('foo', 'bar');
ee.emit('foo', 42);
});
for await (const event of on(ee, 'foo', { signal: ac.signal })) {
// The execution of this inner block is synchronous and it
// processes one event at a time (even with await). Do not use
// if concurrent execution is required.
console.log(event); // prints ['bar'] [42]
}
// Unreachable here
})();
process.nextTick(() => ac.abort());
Use the `close` option to specify an array of event names that will end the iteration:
import { on, EventEmitter } from 'node:events'; import process from 'node:process';
const ee = new EventEmitter();
// Emit later on process.nextTick(() => { ee.emit('foo', 'bar'); ee.emit('foo', 42); ee.emit('close'); });
for await (const event of on(ee, 'foo', { close: ['close'] })) { console.log(event); // prints ['bar'] [42] } // the loop will exit after 'close' is emitted console.log('done'); // prints 'done'
* **@since**
v13.6.0, v12.16.0
***
#### Parameters
* ##### externalemitter: EventEmitter\<DefaultEventMap>
* ##### externaleventName: string | symbol
* ##### externaloptionaloptions: StaticEventEmitterIteratorOptions
#### Returns AsyncIterator\<any\[], any, any>
An `AsyncIterator` that iterates `eventName` events emitted by the `emitter`
### [**](#once)[**](https://undefined/apify/apify-sdk-js/blob/master/node_modules/@types/node/events.d.ts#L217)[**](https://undefined/apify/apify-sdk-js/blob/master/node_modules/@types/node/events.d.ts#L222)staticexternalinheritedonce
* ****once**(emitter, eventName, options): Promise\<any\[]>
* ****once**(emitter, eventName, options): Promise\<any\[]>
- Inherited from EventEmitter.once
Creates a `Promise` that is fulfilled when the `EventEmitter` emits the given event or that is rejected if the `EventEmitter` emits `'error'` while waiting. The `Promise` will resolve with an array of all the arguments emitted to the given event.
This method is intentionally generic and works with the web platform [EventTarget](https://dom.spec.whatwg.org/#interface-eventtarget) interface, which has no special`'error'` event semantics and does not listen to the `'error'` event.
import { once, EventEmitter } from 'node:events'; import process from 'node:process';
const ee = new EventEmitter();
process.nextTick(() => { ee.emit('myevent', 42); });
const [value] = await once(ee, 'myevent'); console.log(value);
const err = new Error('kaboom'); process.nextTick(() => { ee.emit('error', err); });
try { await once(ee, 'myevent'); } catch (err) { console.error('error happened', err); }
The special handling of the `'error'` event is only used when `events.once()` is used to wait for another event. If `events.once()` is used to wait for the '`error'` event itself, then it is treated as any other kind of event without special handling:
import { EventEmitter, once } from 'node:events';
const ee = new EventEmitter();
once(ee, 'error') .then(([err]) => console.log('ok', err.message)) .catch((err) => console.error('error', err.message));
ee.emit('error', new Error('boom'));
// Prints: ok boom
An `AbortSignal` can be used to cancel waiting for the event:
import { EventEmitter, once } from 'node:events';
const ee = new EventEmitter(); const ac = new AbortController();
async function foo(emitter, event, signal) { try { await once(emitter, event, { signal }); console.log('event emitted!'); } catch (error) { if (error.name === 'AbortError') { console.error('Waiting for the event was canceled!'); } else { console.error('There was an error', error.message); } } }
foo(ee, 'foo', ac.signal); ac.abort(); // Abort waiting for the event ee.emit('foo'); // Prints: Waiting for the event was canceled!
* **@since**
v11.13.0, v10.16.0
***
#### Parameters
* ##### externalemitter: EventEmitter\<DefaultEventMap>
* ##### externaleventName: string | symbol
* ##### externaloptionaloptions: StaticEventEmitterOptions
#### Returns Promise\<any\[]>
### [**](#setMaxListeners)[**](https://undefined/apify/apify-sdk-js/blob/master/node_modules/@types/node/events.d.ts#L402)staticexternalinheritedsetMaxListeners
* ****setMaxListeners**(n, ...eventTargets): void
- Inherited from EventEmitter.setMaxListeners
import { setMaxListeners, EventEmitter } from 'node:events';
const target = new EventTarget(); const emitter = new EventEmitter();
setMaxListeners(5, target, emitter);
* **@since**
v15.4.0
***
#### Parameters
* ##### externaloptionaln: number
A non-negative number. The maximum number of listeners per `EventTarget` event.
* ##### externalrest...eventTargets: (EventEmitter\<DefaultEventMap> | EventTarget)\[]
Zero or more {EventTarget} or {EventEmitter} instances. If none are specified, `n` is set as the default max for all newly created {EventTarget} and {EventEmitter} objects.
#### Returns void
---
# externalLoggerJson<!-- -->
This is an abstract class that should be extended by custom logger classes.
this.\_log() method must be implemented by them.
### Hierarchy
* [Logger](https://docs.apify.com/sdk/js/sdk/js/reference/class/Logger.md)
* *LoggerJson*
## Index[**](#Index)
### Constructors
* [**constructor](#constructor)
### Properties
* [**captureRejections](#captureRejections)
* [**captureRejectionSymbol](#captureRejectionSymbol)
* [**defaultMaxListeners](#defaultMaxListeners)
* [**errorMonitor](#errorMonitor)
### Methods
* [**\_log](#_log)
* [**\_outputWithConsole](#_outputWithConsole)
* [**\[captureRejectionSymbol\]](#\[captureRejectionSymbol])
* [**addListener](#addListener)
* [**emit](#emit)
* [**eventNames](#eventNames)
* [**getMaxListeners](#getMaxListeners)
* [**getOptions](#getOptions)
* [**listenerCount](#listenerCount)
* [**listeners](#listeners)
* [**log](#log)
* [**off](#off)
* [**on](#on)
* [**once](#once)
* [**prependListener](#prependListener)
* [**prependOnceListener](#prependOnceListener)
* [**rawListeners](#rawListeners)
* [**removeAllListeners](#removeAllListeners)
* [**removeListener](#removeListener)
* [**setMaxListeners](#setMaxListeners)
* [**setOptions](#setOptions)
* [**addAbortListener](#addAbortListener)
* [**getEventListeners](#getEventListeners)
* [**getMaxListeners](#getMaxListeners)
* [**listenerCount](#listenerCount)
* [**on](#on)
* [**once](#once)
* [**setMaxListeners](#setMaxListeners)
## Constructors<!-- -->[**](#Constructors)
### [**](#constructor)[**](https://undefined/apify/apify-sdk-js/blob/master/node_modules/@apify/log/src/index.d.ts#L241)externalconstructor
* ****new LoggerJson**(options): [LoggerJson](https://docs.apify.com/sdk/js/sdk/js/reference/class/LoggerJson.md)
- Overrides Logger.constructor
#### Parameters
* ##### externaloptionaloptions: <!-- -->{}
#### Returns [LoggerJson](https://docs.apify.com/sdk/js/sdk/js/reference/class/LoggerJson.md)
## Properties<!-- -->[**](#Properties)
### [**](#captureRejections)[**](https://undefined/apify/apify-sdk-js/blob/master/node_modules/@types/node/events.d.ts#L459)staticexternalinheritedcaptureRejections
**captureRejections: boolean
Inherited from Logger.captureRejections
Value: [boolean](https://developer.mozilla.org/en-US/docs/Web/JavaScript/Data_structures#Boolean_type)
Change the default `captureRejections` option on all new `EventEmitter` objects.
* **@since**
v13.4.0, v12.16.0
### [**](#captureRejectionSymbol)[**](https://undefined/apify/apify-sdk-js/blob/master/node_modules/@types/node/events.d.ts#L452)staticexternalreadonlyinheritedcaptureRejectionSymbol
**captureRejectionSymbol: typeof captureRejectionSymbol
Inherited from Logger.captureRejectionSymbol
Value: `Symbol.for('nodejs.rejection')`
See how to write a custom `rejection handler`.
* **@since**
v13.4.0, v12.16.0
### [**](#defaultMaxListeners)[**](https://undefined/apify/apify-sdk-js/blob/master/node_modules/@types/node/events.d.ts#L498)staticexternalinheriteddefaultMaxListeners
**defaultMaxListeners: number
Inherited from Logger.defaultMaxListeners
By default, a maximum of `10` listeners can be registered for any single event. This limit can be changed for individual `EventEmitter` instances using the `emitter.setMaxListeners(n)` method. To change the default for *all*`EventEmitter` instances, the `events.defaultMaxListeners` property can be used. If this value is not a positive number, a `RangeError` is thrown.
Take caution when setting the `events.defaultMaxListeners` because the change affects *all* `EventEmitter` instances, including those created before the change is made. However, calling `emitter.setMaxListeners(n)` still has precedence over `events.defaultMaxListeners`.
This is not a hard limit. The `EventEmitter` instance will allow more listeners to be added but will output a trace warning to stderr indicating that a "possible EventEmitter memory leak" has been detected. For any single `EventEmitter`, the `emitter.getMaxListeners()` and `emitter.setMaxListeners()` methods can be used to temporarily avoid this warning:
import { EventEmitter } from 'node:events'; const emitter = new EventEmitter(); emitter.setMaxListeners(emitter.getMaxListeners() + 1); emitter.once('event', () => { // do stuff emitter.setMaxListeners(Math.max(emitter.getMaxListeners() - 1, 0)); });
The `--trace-warnings` command-line flag can be used to display the stack trace for such warnings.
The emitted warning can be inspected with `process.on('warning')` and will have the additional `emitter`, `type`, and `count` properties, referring to the event emitter instance, the event's name and the number of attached listeners, respectively. Its `name` property is set to `'MaxListenersExceededWarning'`.
* **@since**
v0.11.2
### [**](#errorMonitor)[**](https://undefined/apify/apify-sdk-js/blob/master/node_modules/@types/node/events.d.ts#L445)staticexternalreadonlyinheritederrorMonitor
**errorMonitor: typeof errorMonitor
Inherited from Logger.errorMonitor
This symbol shall be used to install a listener for only monitoring `'error'` events. Listeners installed using this symbol are called before the regular `'error'` listeners are called.
Installing a listener using this symbol does not change the behavior once an `'error'` event is emitted. Therefore, the process will still crash if no regular `'error'` listener is installed.
* **@since**
v13.6.0, v12.17.0
## Methods<!-- -->[**](#Methods)
### [**](#_log)[**](https://undefined/apify/apify-sdk-js/blob/master/node_modules/@apify/log/src/index.d.ts#L242)external\_log
* ****\_log**(level, message, data, exception, opts): string
- Overrides Logger.\_log
#### Parameters
* ##### externallevel: [LogLevel](https://docs.apify.com/sdk/js/sdk/js/reference/enum/LogLevel.md)
* ##### externalmessage: string
* ##### externaloptionaldata: any
* ##### externaloptionalexception: unknown
* ##### externaloptionalopts: Record\<string, any>
#### Returns string
### [**](#_outputWithConsole)[**](https://undefined/apify/apify-sdk-js/blob/master/node_modules/@apify/log/src/index.d.ts#L36)externalinherited\_outputWithConsole
* ****\_outputWithConsole**(level, line): void
- Inherited from Logger.\_outputWithConsole
#### Parameters
* ##### externallevel: [LogLevel](https://docs.apify.com/sdk/js/sdk/js/reference/enum/LogLevel.md)
* ##### externalline: string
#### Returns void
### [**](#\[captureRejectionSymbol])[**](https://undefined/apify/apify-sdk-js/blob/master/node_modules/@types/node/events.d.ts#L136)externaloptionalinherited\[captureRejectionSymbol]
* ****\[captureRejectionSymbol]**\<K>(error, event, ...args): void
- Inherited from Logger.\[captureRejectionSymbol]
#### Parameters
* ##### externalerror: Error
* ##### externalevent: string | symbol
* ##### externalrest...args: AnyRest
#### Returns void
### [**](#addListener)[**](https://undefined/apify/apify-sdk-js/blob/master/node_modules/@types/node/events.d.ts#L597)externalinheritedaddListener
* ****addListener**\<K>(eventName, listener): this
- Inherited from Logger.addListener
Alias for `emitter.on(eventName, listener)`.
* **@since**
v0.1.26
***
#### Parameters
* ##### externaleventName: string | symbol
* ##### externallistener: (...args) => void
#### Returns this
### [**](#emit)[**](https://undefined/apify/apify-sdk-js/blob/master/node_modules/@types/node/events.d.ts#L859)externalinheritedemit
* ****emit**\<K>(eventName, ...args): boolean
- Inherited from Logger.emit
Synchronously calls each of the listeners registered for the event named `eventName`, in the order they were registered, passing the supplied arguments to each.
Returns `true` if the event had listeners, `false` otherwise.
import { EventEmitter } from 'node:events'; const myEmitter = new EventEmitter();
// First listener
myEmitter.on('event', function firstListener() {
console.log('Helloooo! first listener');
});
// Second listener
myEmitter.on('event', function secondListener(arg1, arg2) {
console.log(event with parameters ${arg1}, ${arg2} in second listener);
});
// Third listener
myEmitter.on('event', function thirdListener(...args) {
const parameters = args.join(', ');
console.log(event with parameters ${parameters} in third listener);
});
console.log(myEmitter.listeners('event'));
myEmitter.emit('event', 1, 2, 3, 4, 5);
// Prints: // [ // [Function: firstListener], // [Function: secondListener], // [Function: thirdListener] // ] // Helloooo! first listener // event with parameters 1, 2 in second listener // event with parameters 1, 2, 3, 4, 5 in third listener
* **@since**
v0.1.26
***
#### Parameters
* ##### externaleventName: string | symbol
* ##### externalrest...args: AnyRest
#### Returns boolean
### [**](#eventNames)[**](https://undefined/apify/apify-sdk-js/blob/master/node_modules/@types/node/events.d.ts#L922)externalinheritedeventNames
* ****eventNames**(): (string | symbol)\[]
- Inherited from Logger.eventNames
Returns an array listing the events for which the emitter has registered listeners. The values in the array are strings or `Symbol`s.
import { EventEmitter } from 'node:events';
const myEE = new EventEmitter(); myEE.on('foo', () => {}); myEE.on('bar', () => {});
const sym = Symbol('symbol'); myEE.on(sym, () => {});
console.log(myEE.eventNames()); // Prints: [ 'foo', 'bar', Symbol(symbol) ]
* **@since**
v6.0.0
***
#### Returns (string | symbol)\[]
### [**](#getMaxListeners)[**](https://undefined/apify/apify-sdk-js/blob/master/node_modules/@types/node/events.d.ts#L774)externalinheritedgetMaxListeners
* ****getMaxListeners**(): number
- Inherited from Logger.getMaxListeners
Returns the current max listener value for the `EventEmitter` which is either set by `emitter.setMaxListeners(n)` or defaults to defaultMaxListeners.
* **@since**
v1.0.0
***
#### Returns number
### [**](#getOptions)[**](https://undefined/apify/apify-sdk-js/blob/master/node_modules/@apify/log/src/index.d.ts#L35)externalinheritedgetOptions
* ****getOptions**(): Record\<string, any>
- Inherited from Logger.getOptions
#### Returns Record\<string, any>
### [**](#listenerCount)[**](https://undefined/apify/apify-sdk-js/blob/master/node_modules/@types/node/events.d.ts#L868)externalinheritedlistenerCount
* ****listenerCount**\<K>(eventName, listener): number
- Inherited from Logger.listenerCount
Returns the number of listeners listening for the event named `eventName`. If `listener` is provided, it will return how many times the listener is found in the list of the listeners of the event.
* **@since**
v3.2.0
***
#### Parameters
* ##### externaleventName: string | symbol
The name of the event being listened for
* ##### externaloptionallistener: Function
The event handler function
#### Returns number
### [**](#listeners)[**](https://undefined/apify/apify-sdk-js/blob/master/node_modules/@types/node/events.d.ts#L787)externalinheritedlisteners
* ****listeners**\<K>(eventName): Function\[]
- Inherited from Logger.listeners
Returns a copy of the array of listeners for the event named `eventName`.
server.on('connection', (stream) => { console.log('someone connected!'); }); console.log(util.inspect(server.listeners('connection'))); // Prints: [ [Function] ]
* **@since**
v0.1.26
***
#### Parameters
* ##### externaleventName: string | symbol
#### Returns Function\[]
### [**](#log)[**](https://undefined/apify/apify-sdk-js/blob/master/node_modules/@apify/log/src/index.d.ts#L38)externalinheritedlog
* ****log**(level, message, ...args): void
- Inherited from Logger.log
#### Parameters
* ##### externallevel: [LogLevel](https://docs.apify.com/sdk/js/sdk/js/reference/enum/LogLevel.md)
* ##### externalmessage: string
* ##### externalrest...args: any\[]
#### Returns void
### [**](#off)[**](https://undefined/apify/apify-sdk-js/blob/master/node_modules/@types/node/events.d.ts#L747)externalinheritedoff
* ****off**\<K>(eventName, listener): this
- Inherited from Logger.off
Alias for `emitter.removeListener()`.
* **@since**
v10.0.0
***
#### Parameters
* ##### externaleventName: string | symbol
* ##### externallistener: (...args) => void
#### Returns this
### [**](#on)[**](https://undefined/apify/apify-sdk-js/blob/master/node_modules/@types/node/events.d.ts#L629)externalinheritedon
* ****on**\<K>(eventName, listener): this
- Inherited from Logger.on
Adds the `listener` function to the end of the listeners array for the event named `eventName`. No checks are made to see if the `listener` has already been added. Multiple calls passing the same combination of `eventName` and `listener` will result in the `listener` being added, and called, multiple times.
server.on('connection', (stream) => { console.log('someone connected!'); });
Returns a reference to the `EventEmitter`, so that calls can be chained.
By default, event listeners are invoked in the order they are added. The `emitter.prependListener()` method can be used as an alternative to add the event listener to the beginning of the listeners array.
import { EventEmitter } from 'node:events'; const myEE = new EventEmitter(); myEE.on('foo', () => console.log('a')); myEE.prependListener('foo', () => console.log('b')); myEE.emit('foo'); // Prints: // b // a
* **@since**
v0.1.101
***
#### Parameters
* ##### externaleventName: string | symbol
The name of the event.
* ##### externallistener: (...args) => void
The callback function
#### Returns this
### [**](#once)[**](https://undefined/apify/apify-sdk-js/blob/master/node_modules/@types/node/events.d.ts#L659)externalinheritedonce
* ****once**\<K>(eventName, listener): this
- Inherited from Logger.once
Adds a **one-time** `listener` function for the event named `eventName`. The next time `eventName` is triggered, this listener is removed and then invoked.
server.once('connection', (stream) => { console.log('Ah, we have our first user!'); });
Returns a reference to the `EventEmitter`, so that calls can be chained.
By default, event listeners are invoked in the order they are added. The `emitter.prependOnceListener()` method can be used as an alternative to add the event listener to the beginning of the listeners array.
import { EventEmitter } from 'node:events'; const myEE = new EventEmitter(); myEE.once('foo', () => console.log('a')); myEE.prependOnceListener('foo', () => console.log('b')); myEE.emit('foo'); // Prints: // b // a
* **@since**
v0.3.0
***
#### Parameters
* ##### externaleventName: string | symbol
The name of the event.
* ##### externallistener: (...args) => void
The callback function
#### Returns this
### [**](#prependListener)[**](https://undefined/apify/apify-sdk-js/blob/master/node_modules/@types/node/events.d.ts#L886)externalinheritedprependListener
* ****prependListener**\<K>(eventName, listener): this
- Inherited from Logger.prependListener
Adds the `listener` function to the *beginning* of the listeners array for the event named `eventName`. No checks are made to see if the `listener` has already been added. Multiple calls passing the same combination of `eventName` and `listener` will result in the `listener` being added, and called, multiple times.
server.prependListener('connection', (stream) => { console.log('someone connected!'); });
Returns a reference to the `EventEmitter`, so that calls can be chained.
* **@since**
v6.0.0
***
#### Parameters
* ##### externaleventName: string | symbol
The name of the event.
* ##### externallistener: (...args) => void
The callback function
#### Returns this
### [**](#prependOnceListener)[**](https://undefined/apify/apify-sdk-js/blob/master/node_modules/@types/node/events.d.ts#L902)externalinheritedprependOnceListener
* ****prependOnceListener**\<K>(eventName, listener): this
- Inherited from Logger.prependOnceListener
Adds a **one-time**`listener` function for the event named `eventName` to the *beginning* of the listeners array. The next time `eventName` is triggered, this listener is removed, and then invoked.
server.prependOnceListener('connection', (stream) => { console.log('Ah, we have our first user!'); });
Returns a reference to the `EventEmitter`, so that calls can be chained.
* **@since**
v6.0.0
***
#### Parameters
* ##### externaleventName: string | symbol
The name of the event.
* ##### externallistener: (...args) => void
The callback function
#### Returns this
### [**](#rawListeners)[**](https://undefined/apify/apify-sdk-js/blob/master/node_modules/@types/node/events.d.ts#L818)externalinheritedrawListeners
* ****rawListeners**\<K>(eventName): Function\[]
- Inherited from Logger.rawListeners
Returns a copy of the array of listeners for the event named `eventName`, including any wrappers (such as those created by `.once()`).
import { EventEmitter } from 'node:events'; const emitter = new EventEmitter(); emitter.once('log', () => console.log('log once'));
// Returns a new Array with a function onceWrapper which has a property
// listener which contains the original listener bound above
const listeners = emitter.rawListeners('log');
const logFnWrapper = listeners[0];
// Logs "log once" to the console and does not unbind the once event
logFnWrapper.listener();
// Logs "log once" to the console and removes the listener logFnWrapper();
emitter.on('log', () => console.log('log persistently'));
// Will return a new Array with a single function bound by .on() above
const newListeners = emitter.rawListeners('log');
// Logs "log persistently" twice newListeners0; emitter.emit('log');
* **@since**
v9.4.0
***
#### Parameters
* ##### externaleventName: string | symbol
#### Returns Function\[]
### [**](#removeAllListeners)[**](https://undefined/apify/apify-sdk-js/blob/master/node_modules/@types/node/events.d.ts#L758)externalinheritedremoveAllListeners
* ****removeAllListeners**(eventName): this
- Inherited from Logger.removeAllListeners
Removes all listeners, or those of the specified `eventName`.
It is bad practice to remove listeners added elsewhere in the code, particularly when the `EventEmitter` instance was created by some other component or module (e.g. sockets or file streams).
Returns a reference to the `EventEmitter`, so that calls can be chained.
* **@since**
v0.1.26
***
#### Parameters
* ##### externaloptionaleventName: string | symbol
#### Returns this
### [**](#removeListener)[**](https://undefined/apify/apify-sdk-js/blob/master/node_modules/@types/node/events.d.ts#L742)externalinheritedremoveListener
* ****removeListener**\<K>(eventName, listener): this
- Inherited from Logger.removeListener
Removes the specified `listener` from the listener array for the event named `eventName`.
const callback = (stream) => { console.log('someone connected!'); }; server.on('connection', callback); // ... server.removeListener('connection', callback);
`removeListener()` will remove, at most, one instance of a listener from the listener array. If any single listener has been added multiple times to the listener array for the specified `eventName`, then `removeListener()` must be called multiple times to remove each instance.
Once an event is emitted, all listeners attached to it at the time of emitting are called in order. This implies that any `removeListener()` or `removeAllListeners()` calls *after* emitting and *before* the last listener finishes execution will not remove them from`emit()` in progress. Subsequent events behave as expected.
import { EventEmitter } from 'node:events'; class MyEmitter extends EventEmitter {} const myEmitter = new MyEmitter();
const callbackA = () => { console.log('A'); myEmitter.removeListener('event', callbackB); };
const callbackB = () => { console.log('B'); };
myEmitter.on('event', callbackA);
myEmitter.on('event', callbackB);
// callbackA removes listener callbackB but it will still be called. // Internal listener array at time of emit [callbackA, callbackB] myEmitter.emit('event'); // Prints: // A // B
// callbackB is now removed. // Internal listener array [callbackA] myEmitter.emit('event'); // Prints: // A
Because listeners are managed using an internal array, calling this will change the position indices of any listener registered *after* the listener being removed. This will not impact the order in which listeners are called, but it means that any copies of the listener array as returned by the `emitter.listeners()` method will need to be recreated.
When a single function has been added as a handler multiple times for a single event (as in the example below), `removeListener()` will remove the most recently added instance. In the example the `once('ping')` listener is removed:
import { EventEmitter } from 'node:events'; const ee = new EventEmitter();
function pong() { console.log('pong'); }
ee.on('ping', pong); ee.once('ping', pong); ee.removeListener('ping', pong);
ee.emit('ping'); ee.emit('ping');
Returns a reference to the `EventEmitter`, so that calls can be chained.
* **@since**
v0.1.26
***
#### Parameters
* ##### externaleventName: string | symbol
* ##### externallistener: (...args) => void
#### Returns this
### [**](#setMaxListeners)[**](https://undefined/apify/apify-sdk-js/blob/master/node_modules/@types/node/events.d.ts#L768)externalinheritedsetMaxListeners
* ****setMaxListeners**(n): this
- Inherited from Logger.setMaxListeners
By default `EventEmitter`s will print a warning if more than `10` listeners are added for a particular event. This is a useful default that helps finding memory leaks. The `emitter.setMaxListeners()` method allows the limit to be modified for this specific `EventEmitter` instance. The value can be set to `Infinity` (or `0`) to indicate an unlimited number of listeners.
Returns a reference to the `EventEmitter`, so that calls can be chained.
* **@since**
v0.3.5
***
#### Parameters
* ##### externaln: number
#### Returns this
### [**](#setOptions)[**](https://undefined/apify/apify-sdk-js/blob/master/node_modules/@apify/log/src/index.d.ts#L34)externalinheritedsetOptions
* ****setOptions**(options): void
- Inherited from Logger.setOptions
#### Parameters
* ##### externaloptions: Record\<string, any>
#### Returns void
### [**](#addAbortListener)[**](https://undefined/apify/apify-sdk-js/blob/master/node_modules/@types/node/events.d.ts#L437)staticexternalinheritedaddAbortListener
* ****addAbortListener**(signal, resource): Disposable
- Inherited from Logger.addAbortListener
experimental
Listens once to the `abort` event on the provided `signal`.
Listening to the `abort` event on abort signals is unsafe and may lead to resource leaks since another third party with the signal can call `e.stopImmediatePropagation()`. Unfortunately Node.js cannot change this since it would violate the web standard. Additionally, the original API makes it easy to forget to remove listeners.
This API allows safely using `AbortSignal`s in Node.js APIs by solving these two issues by listening to the event such that `stopImmediatePropagation` does not prevent the listener from running.
Returns a disposable so that it may be unsubscribed from more easily.
import { addAbortListener } from 'node:events';
function example(signal) { let disposable; try { signal.addEventListener('abort', (e) => e.stopImmediatePropagation()); disposable = addAbortListener(signal, (e) => { // Do something when signal is aborted. }); } finally { disposable?.Symbol.dispose; } }
* **@since**
v20.5.0
***
#### Parameters
* ##### externalsignal: AbortSignal
* ##### externalresource: (event) => void
#### Returns Disposable
Disposable that removes the `abort` listener.
### [**](#getEventListeners)[**](https://undefined/apify/apify-sdk-js/blob/master/node_modules/@types/node/events.d.ts#L358)staticexternalinheritedgetEventListeners
* ****getEventListeners**(emitter, name): Function\[]
- Inherited from Logger.getEventListeners
Returns a copy of the array of listeners for the event named `eventName`.
For `EventEmitter`s this behaves exactly the same as calling `.listeners` on the emitter.
For `EventTarget`s this is the only way to get the event listeners for the event target. This is useful for debugging and diagnostic purposes.
import { getEventListeners, EventEmitter } from 'node:events';
{ const ee = new EventEmitter(); const listener = () => console.log('Events are fun'); ee.on('foo', listener); console.log(getEventListeners(ee, 'foo')); // [ [Function: listener] ] } { const et = new EventTarget(); const listener = () => console.log('Events are fun'); et.addEventListener('foo', listener); console.log(getEventListeners(et, 'foo')); // [ [Function: listener] ] }
* **@since**
v15.2.0, v14.17.0
***
#### Parameters
* ##### externalemitter: EventEmitter\<DefaultEventMap> | EventTarget
* ##### externalname: string | symbol
#### Returns Function\[]
### [**](#getMaxListeners)[**](https://undefined/apify/apify-sdk-js/blob/master/node_modules/@types/node/events.d.ts#L387)staticexternalinheritedgetMaxListeners
* ****getMaxListeners**(emitter): number
- Inherited from Logger.getMaxListeners
Returns the currently set max amount of listeners.
For `EventEmitter`s this behaves exactly the same as calling `.getMaxListeners` on the emitter.
For `EventTarget`s this is the only way to get the max event listeners for the event target. If the number of event handlers on a single EventTarget exceeds the max set, the EventTarget will print a warning.
import { getMaxListeners, setMaxListeners, EventEmitter } from 'node:events';
{ const ee = new EventEmitter(); console.log(getMaxListeners(ee)); // 10 setMaxListeners(11, ee); console.log(getMaxListeners(ee)); // 11 } { const et = new EventTarget(); console.log(getMaxListeners(et)); // 10 setMaxListeners(11, et); console.log(getMaxListeners(et)); // 11 }
* **@since**
v19.9.0
***
#### Parameters
* ##### externalemitter: EventEmitter\<DefaultEventMap> | EventTarget
#### Returns number
### [**](#listenerCount)[**](https://undefined/apify/apify-sdk-js/blob/master/node_modules/@types/node/events.d.ts#L330)staticexternalinheritedlistenerCount
* ****listenerCount**(emitter, eventName): number
- Inherited from Logger.listenerCount
A class method that returns the number of listeners for the given `eventName` registered on the given `emitter`.
import { EventEmitter, listenerCount } from 'node:events';
const myEmitter = new EventEmitter(); myEmitter.on('event', () => {}); myEmitter.on('event', () => {}); console.log(listenerCount(myEmitter, 'event')); // Prints: 2
* **@since**
v0.9.12
* **@deprecated**
Since v3.2.0 - Use `listenerCount` instead.
***
#### Parameters
* ##### externalemitter: EventEmitter\<DefaultEventMap>
The emitter to query
* ##### externaleventName: string | symbol
The event name
#### Returns number
### [**](#on)[**](https://undefined/apify/apify-sdk-js/blob/master/node_modules/@types/node/events.d.ts#L303)[**](https://undefined/apify/apify-sdk-js/blob/master/node_modules/@types/node/events.d.ts#L308)staticexternalinheritedon
* ****on**(emitter, eventName, options): AsyncIterator\<any\[], any, any>
* ****on**(emitter, eventName, options): AsyncIterator\<any\[], any, any>
- Inherited from Logger.on
import { on, EventEmitter } from 'node:events'; import process from 'node:process';
const ee = new EventEmitter();
// Emit later on process.nextTick(() => { ee.emit('foo', 'bar'); ee.emit('foo', 42); });
for await (const event of on(ee, 'foo')) { // The execution of this inner block is synchronous and it // processes one event at a time (even with await). Do not use // if concurrent execution is required. console.log(event); // prints ['bar'] [42] } // Unreachable here
Returns an `AsyncIterator` that iterates `eventName` events. It will throw if the `EventEmitter` emits `'error'`. It removes all listeners when exiting the loop. The `value` returned by each iteration is an array composed of the emitted event arguments.
An `AbortSignal` can be used to cancel waiting on events:
import { on, EventEmitter } from 'node:events'; import process from 'node:process';
const ac = new AbortController();
(async () => { const ee = new EventEmitter();
// Emit later on
process.nextTick(() => {
ee.emit('foo', 'bar');
ee.emit('foo', 42);
});
for await (const event of on(ee, 'foo', { signal: ac.signal })) {
// The execution of this inner block is synchronous and it
// processes one event at a time (even with await). Do not use
// if concurrent execution is required.
console.log(event); // prints ['bar'] [42]
}
// Unreachable here
})();
process.nextTick(() => ac.abort());
Use the `close` option to specify an array of event names that will end the iteration:
import { on, EventEmitter } from 'node:events'; import process from 'node:process';
const ee = new EventEmitter();
// Emit later on process.nextTick(() => { ee.emit('foo', 'bar'); ee.emit('foo', 42); ee.emit('close'); });
for await (const event of on(ee, 'foo', { close: ['close'] })) { console.log(event); // prints ['bar'] [42] } // the loop will exit after 'close' is emitted console.log('done'); // prints 'done'
* **@since**
v13.6.0, v12.16.0
***
#### Parameters
* ##### externalemitter: EventEmitter\<DefaultEventMap>
* ##### externaleventName: string | symbol
* ##### externaloptionaloptions: StaticEventEmitterIteratorOptions
#### Returns AsyncIterator\<any\[], any, any>
An `AsyncIterator` that iterates `eventName` events emitted by the `emitter`
### [**](#once)[**](https://undefined/apify/apify-sdk-js/blob/master/node_modules/@types/node/events.d.ts#L217)[**](https://undefined/apify/apify-sdk-js/blob/master/node_modules/@types/node/events.d.ts#L222)staticexternalinheritedonce
* ****once**(emitter, eventName, options): Promise\<any\[]>
* ****once**(emitter, eventName, options): Promise\<any\[]>
- Inherited from Logger.once
Creates a `Promise` that is fulfilled when the `EventEmitter` emits the given event or that is rejected if the `EventEmitter` emits `'error'` while waiting. The `Promise` will resolve with an array of all the arguments emitted to the given event.
This method is intentionally generic and works with the web platform [EventTarget](https://dom.spec.whatwg.org/#interface-eventtarget) interface, which has no special`'error'` event semantics and does not listen to the `'error'` event.
import { once, EventEmitter } from 'node:events'; import process from 'node:process';
const ee = new EventEmitter();
process.nextTick(() => { ee.emit('myevent', 42); });
const [value] = await once(ee, 'myevent'); console.log(value);
const err = new Error('kaboom'); process.nextTick(() => { ee.emit('error', err); });
try { await once(ee, 'myevent'); } catch (err) { console.error('error happened', err); }
The special handling of the `'error'` event is only used when `events.once()` is used to wait for another event. If `events.once()` is used to wait for the '`error'` event itself, then it is treated as any other kind of event without special handling:
import { EventEmitter, once } from 'node:events';
const ee = new EventEmitter();
once(ee, 'error') .then(([err]) => console.log('ok', err.message)) .catch((err) => console.error('error', err.message));
ee.emit('error', new Error('boom'));
// Prints: ok boom
An `AbortSignal` can be used to cancel waiting for the event:
import { EventEmitter, once } from 'node:events';
const ee = new EventEmitter(); const ac = new AbortController();
async function foo(emitter, event, signal) { try { await once(emitter, event, { signal }); console.log('event emitted!'); } catch (error) { if (error.name === 'AbortError') { console.error('Waiting for the event was canceled!'); } else { console.error('There was an error', error.message); } } }
foo(ee, 'foo', ac.signal); ac.abort(); // Abort waiting for the event ee.emit('foo'); // Prints: Waiting for the event was canceled!
* **@since**
v11.13.0, v10.16.0
***
#### Parameters
* ##### externalemitter: EventEmitter\<DefaultEventMap>
* ##### externaleventName: string | symbol
* ##### externaloptionaloptions: StaticEventEmitterOptions
#### Returns Promise\<any\[]>
### [**](#setMaxListeners)[**](https://undefined/apify/apify-sdk-js/blob/master/node_modules/@types/node/events.d.ts#L402)staticexternalinheritedsetMaxListeners
* ****setMaxListeners**(n, ...eventTargets): void
- Inherited from Logger.setMaxListeners
import { setMaxListeners, EventEmitter } from 'node:events';
const target = new EventTarget(); const emitter = new EventEmitter();
setMaxListeners(5, target, emitter);
* **@since**
v15.4.0
***
#### Parameters
* ##### externaloptionaln: number
A non-negative number. The maximum number of listeners per `EventTarget` event.
* ##### externalrest...eventTargets: (EventEmitter\<DefaultEventMap> | EventTarget)\[]
Zero or more {EventTarget} or {EventEmitter} instances. If none are specified, `n` is set as the default max for all newly created {EventTarget} and {EventEmitter} objects.
#### Returns void
---
# externalLoggerText<!-- -->
This is an abstract class that should be extended by custom logger classes.
this.\_log() method must be implemented by them.
### Hierarchy
* [Logger](https://docs.apify.com/sdk/js/sdk/js/reference/class/Logger.md)
* *LoggerText*
## Index[**](#Index)
### Constructors
* [**constructor](#constructor)
### Properties
* [**captureRejections](#captureRejections)
* [**captureRejectionSymbol](#captureRejectionSymbol)
* [**defaultMaxListeners](#defaultMaxListeners)
* [**errorMonitor](#errorMonitor)
### Methods
* [**\_log](#_log)
* [**\_outputWithConsole](#_outputWithConsole)
* [**\[captureRejectionSymbol\]](#\[captureRejectionSymbol])
* [**addListener](#addListener)
* [**emit](#emit)
* [**eventNames](#eventNames)
* [**getMaxListeners](#getMaxListeners)
* [**getOptions](#getOptions)
* [**listenerCount](#listenerCount)
* [**listeners](#listeners)
* [**log](#log)
* [**off](#off)
* [**on](#on)
* [**once](#once)
* [**prependListener](#prependListener)
* [**prependOnceListener](#prependOnceListener)
* [**rawListeners](#rawListeners)
* [**removeAllListeners](#removeAllListeners)
* [**removeListener](#removeListener)
* [**setMaxListeners](#setMaxListeners)
* [**setOptions](#setOptions)
* [**addAbortListener](#addAbortListener)
* [**getEventListeners](#getEventListeners)
* [**getMaxListeners](#getMaxListeners)
* [**listenerCount](#listenerCount)
* [**on](#on)
* [**once](#once)
* [**setMaxListeners](#setMaxListeners)
## Constructors<!-- -->[**](#Constructors)
### [**](#constructor)[**](https://undefined/apify/apify-sdk-js/blob/master/node_modules/@apify/log/src/index.d.ts#L246)externalconstructor
* ****new LoggerText**(options): [LoggerText](https://docs.apify.com/sdk/js/sdk/js/reference/class/LoggerText.md)
- Overrides Logger.constructor
#### Parameters
* ##### externaloptionaloptions: <!-- -->{}
#### Returns [LoggerText](https://docs.apify.com/sdk/js/sdk/js/reference/class/LoggerText.md)
## Properties<!-- -->[**](#Properties)
### [**](#captureRejections)[**](https://undefined/apify/apify-sdk-js/blob/master/node_modules/@types/node/events.d.ts#L459)staticexternalinheritedcaptureRejections
**captureRejections: boolean
Inherited from Logger.captureRejections
Value: [boolean](https://developer.mozilla.org/en-US/docs/Web/JavaScript/Data_structures#Boolean_type)
Change the default `captureRejections` option on all new `EventEmitter` objects.
* **@since**
v13.4.0, v12.16.0
### [**](#captureRejectionSymbol)[**](https://undefined/apify/apify-sdk-js/blob/master/node_modules/@types/node/events.d.ts#L452)staticexternalreadonlyinheritedcaptureRejectionSymbol
**captureRejectionSymbol: typeof captureRejectionSymbol
Inherited from Logger.captureRejectionSymbol
Value: `Symbol.for('nodejs.rejection')`
See how to write a custom `rejection handler`.
* **@since**
v13.4.0, v12.16.0
### [**](#defaultMaxListeners)[**](https://undefined/apify/apify-sdk-js/blob/master/node_modules/@types/node/events.d.ts#L498)staticexternalinheriteddefaultMaxListeners
**defaultMaxListeners: number
Inherited from Logger.defaultMaxListeners
By default, a maximum of `10` listeners can be registered for any single event. This limit can be changed for individual `EventEmitter` instances using the `emitter.setMaxListeners(n)` method. To change the default for *all*`EventEmitter` instances, the `events.defaultMaxListeners` property can be used. If this value is not a positive number, a `RangeError` is thrown.
Take caution when setting the `events.defaultMaxListeners` because the change affects *all* `EventEmitter` instances, including those created before the change is made. However, calling `emitter.setMaxListeners(n)` still has precedence over `events.defaultMaxListeners`.
This is not a hard limit. The `EventEmitter` instance will allow more listeners to be added but will output a trace warning to stderr indicating that a "possible EventEmitter memory leak" has been detected. For any single `EventEmitter`, the `emitter.getMaxListeners()` and `emitter.setMaxListeners()` methods can be used to temporarily avoid this warning:
import { EventEmitter } from 'node:events'; const emitter = new EventEmitter(); emitter.setMaxListeners(emitter.getMaxListeners() + 1); emitter.once('event', () => { // do stuff emitter.setMaxListeners(Math.max(emitter.getMaxListeners() - 1, 0)); });
The `--trace-warnings` command-line flag can be used to display the stack trace for such warnings.
The emitted warning can be inspected with `process.on('warning')` and will have the additional `emitter`, `type`, and `count` properties, referring to the event emitter instance, the event's name and the number of attached listeners, respectively. Its `name` property is set to `'MaxListenersExceededWarning'`.
* **@since**
v0.11.2
### [**](#errorMonitor)[**](https://undefined/apify/apify-sdk-js/blob/master/node_modules/@types/node/events.d.ts#L445)staticexternalreadonlyinheritederrorMonitor
**errorMonitor: typeof errorMonitor
Inherited from Logger.errorMonitor
This symbol shall be used to install a listener for only monitoring `'error'` events. Listeners installed using this symbol are called before the regular `'error'` listeners are called.
Installing a listener using this symbol does not change the behavior once an `'error'` event is emitted. Therefore, the process will still crash if no regular `'error'` listener is installed.
* **@since**
v13.6.0, v12.17.0
## Methods<!-- -->[**](#Methods)
### [**](#_log)[**](https://undefined/apify/apify-sdk-js/blob/master/node_modules/@apify/log/src/index.d.ts#L247)external\_log
* ****\_log**(level, message, data, exception, opts): string
- Overrides Logger.\_log
#### Parameters
* ##### externallevel: [LogLevel](https://docs.apify.com/sdk/js/sdk/js/reference/enum/LogLevel.md)
* ##### externalmessage: string
* ##### externaloptionaldata: any
* ##### externaloptionalexception: unknown
* ##### externaloptionalopts: Record\<string, any>
#### Returns string
### [**](#_outputWithConsole)[**](https://undefined/apify/apify-sdk-js/blob/master/node_modules/@apify/log/src/index.d.ts#L36)externalinherited\_outputWithConsole
* ****\_outputWithConsole**(level, line): void
- Inherited from Logger.\_outputWithConsole
#### Parameters
* ##### externallevel: [LogLevel](https://docs.apify.com/sdk/js/sdk/js/reference/enum/LogLevel.md)
* ##### externalline: string
#### Returns void
### [**](#\[captureRejectionSymbol])[**](https://undefined/apify/apify-sdk-js/blob/master/node_modules/@types/node/events.d.ts#L136)externaloptionalinherited\[captureRejectionSymbol]
* ****\[captureRejectionSymbol]**\<K>(error, event, ...args): void
- Inherited from Logger.\[captureRejectionSymbol]
#### Parameters
* ##### externalerror: Error
* ##### externalevent: string | symbol
* ##### externalrest...args: AnyRest
#### Returns void
### [**](#addListener)[**](https://undefined/apify/apify-sdk-js/blob/master/node_modules/@types/node/events.d.ts#L597)externalinheritedaddListener
* ****addListener**\<K>(eventName, listener): this
- Inherited from Logger.addListener
Alias for `emitter.on(eventName, listener)`.
* **@since**
v0.1.26
***
#### Parameters
* ##### externaleventName: string | symbol
* ##### externallistener: (...args) => void
#### Returns this
### [**](#emit)[**](https://undefined/apify/apify-sdk-js/blob/master/node_modules/@types/node/events.d.ts#L859)externalinheritedemit
* ****emit**\<K>(eventName, ...args): boolean
- Inherited from Logger.emit
Synchronously calls each of the listeners registered for the event named `eventName`, in the order they were registered, passing the supplied arguments to each.
Returns `true` if the event had listeners, `false` otherwise.
import { EventEmitter } from 'node:events'; const myEmitter = new EventEmitter();
// First listener
myEmitter.on('event', function firstListener() {
console.log('Helloooo! first listener');
});
// Second listener
myEmitter.on('event', function secondListener(arg1, arg2) {
console.log(event with parameters ${arg1}, ${arg2} in second listener);
});
// Third listener
myEmitter.on('event', function thirdListener(...args) {
const parameters = args.join(', ');
console.log(event with parameters ${parameters} in third listener);
});
console.log(myEmitter.listeners('event'));
myEmitter.emit('event', 1, 2, 3, 4, 5);
// Prints: // [ // [Function: firstListener], // [Function: secondListener], // [Function: thirdListener] // ] // Helloooo! first listener // event with parameters 1, 2 in second listener // event with parameters 1, 2, 3, 4, 5 in third listener
* **@since**
v0.1.26
***
#### Parameters
* ##### externaleventName: string | symbol
* ##### externalrest...args: AnyRest
#### Returns boolean
### [**](#eventNames)[**](https://undefined/apify/apify-sdk-js/blob/master/node_modules/@types/node/events.d.ts#L922)externalinheritedeventNames
* ****eventNames**(): (string | symbol)\[]
- Inherited from Logger.eventNames
Returns an array listing the events for which the emitter has registered listeners. The values in the array are strings or `Symbol`s.
import { EventEmitter } from 'node:events';
const myEE = new EventEmitter(); myEE.on('foo', () => {}); myEE.on('bar', () => {});
const sym = Symbol('symbol'); myEE.on(sym, () => {});
console.log(myEE.eventNames()); // Prints: [ 'foo', 'bar', Symbol(symbol) ]
* **@since**
v6.0.0
***
#### Returns (string | symbol)\[]
### [**](#getMaxListeners)[**](https://undefined/apify/apify-sdk-js/blob/master/node_modules/@types/node/events.d.ts#L774)externalinheritedgetMaxListeners
* ****getMaxListeners**(): number
- Inherited from Logger.getMaxListeners
Returns the current max listener value for the `EventEmitter` which is either set by `emitter.setMaxListeners(n)` or defaults to defaultMaxListeners.
* **@since**
v1.0.0
***
#### Returns number
### [**](#getOptions)[**](https://undefined/apify/apify-sdk-js/blob/master/node_modules/@apify/log/src/index.d.ts#L35)externalinheritedgetOptions
* ****getOptions**(): Record\<string, any>
- Inherited from Logger.getOptions
#### Returns Record\<string, any>
### [**](#listenerCount)[**](https://undefined/apify/apify-sdk-js/blob/master/node_modules/@types/node/events.d.ts#L868)externalinheritedlistenerCount
* ****listenerCount**\<K>(eventName, listener): number
- Inherited from Logger.listenerCount
Returns the number of listeners listening for the event named `eventName`. If `listener` is provided, it will return how many times the listener is found in the list of the listeners of the event.
* **@since**
v3.2.0
***
#### Parameters
* ##### externaleventName: string | symbol
The name of the event being listened for
* ##### externaloptionallistener: Function
The event handler function
#### Returns number
### [**](#listeners)[**](https://undefined/apify/apify-sdk-js/blob/master/node_modules/@types/node/events.d.ts#L787)externalinheritedlisteners
* ****listeners**\<K>(eventName): Function\[]
- Inherited from Logger.listeners
Returns a copy of the array of listeners for the event named `eventName`.
server.on('connection', (stream) => { console.log('someone connected!'); }); console.log(util.inspect(server.listeners('connection'))); // Prints: [ [Function] ]
* **@since**
v0.1.26
***
#### Parameters
* ##### externaleventName: string | symbol
#### Returns Function\[]
### [**](#log)[**](https://undefined/apify/apify-sdk-js/blob/master/node_modules/@apify/log/src/index.d.ts#L38)externalinheritedlog
* ****log**(level, message, ...args): void
- Inherited from Logger.log
#### Parameters
* ##### externallevel: [LogLevel](https://docs.apify.com/sdk/js/sdk/js/reference/enum/LogLevel.md)
* ##### externalmessage: string
* ##### externalrest...args: any\[]
#### Returns void
### [**](#off)[**](https://undefined/apify/apify-sdk-js/blob/master/node_modules/@types/node/events.d.ts#L747)externalinheritedoff
* ****off**\<K>(eventName, listener): this
- Inherited from Logger.off
Alias for `emitter.removeListener()`.
* **@since**
v10.0.0
***
#### Parameters
* ##### externaleventName: string | symbol
* ##### externallistener: (...args) => void
#### Returns this
### [**](#on)[**](https://undefined/apify/apify-sdk-js/blob/master/node_modules/@types/node/events.d.ts#L629)externalinheritedon
* ****on**\<K>(eventName, listener): this
- Inherited from Logger.on
Adds the `listener` function to the end of the listeners array for the event named `eventName`. No checks are made to see if the `listener` has already been added. Multiple calls passing the same combination of `eventName` and `listener` will result in the `listener` being added, and called, multiple times.
server.on('connection', (stream) => { console.log('someone connected!'); });
Returns a reference to the `EventEmitter`, so that calls can be chained.
By default, event listeners are invoked in the order they are added. The `emitter.prependListener()` method can be used as an alternative to add the event listener to the beginning of the listeners array.
import { EventEmitter } from 'node:events'; const myEE = new EventEmitter(); myEE.on('foo', () => console.log('a')); myEE.prependListener('foo', () => console.log('b')); myEE.emit('foo'); // Prints: // b // a
* **@since**
v0.1.101
***
#### Parameters
* ##### externaleventName: string | symbol
The name of the event.
* ##### externallistener: (...args) => void
The callback function
#### Returns this
### [**](#once)[**](https://undefined/apify/apify-sdk-js/blob/master/node_modules/@types/node/events.d.ts#L659)externalinheritedonce
* ****once**\<K>(eventName, listener): this
- Inherited from Logger.once
Adds a **one-time** `listener` function for the event named `eventName`. The next time `eventName` is triggered, this listener is removed and then invoked.
server.once('connection', (stream) => { console.log('Ah, we have our first user!'); });
Returns a reference to the `EventEmitter`, so that calls can be chained.
By default, event listeners are invoked in the order they are added. The `emitter.prependOnceListener()` method can be used as an alternative to add the event listener to the beginning of the listeners array.
import { EventEmitter } from 'node:events'; const myEE = new EventEmitter(); myEE.once('foo', () => console.log('a')); myEE.prependOnceListener('foo', () => console.log('b')); myEE.emit('foo'); // Prints: // b // a
* **@since**
v0.3.0
***
#### Parameters
* ##### externaleventName: string | symbol
The name of the event.
* ##### externallistener: (...args) => void
The callback function
#### Returns this
### [**](#prependListener)[**](https://undefined/apify/apify-sdk-js/blob/master/node_modules/@types/node/events.d.ts#L886)externalinheritedprependListener
* ****prependListener**\<K>(eventName, listener): this
- Inherited from Logger.prependListener
Adds the `listener` function to the *beginning* of the listeners array for the event named `eventName`. No checks are made to see if the `listener` has already been added. Multiple calls passing the same combination of `eventName` and `listener` will result in the `listener` being added, and called, multiple times.
server.prependListener('connection', (stream) => { console.log('someone connected!'); });
Returns a reference to the `EventEmitter`, so that calls can be chained.
* **@since**
v6.0.0
***
#### Parameters
* ##### externaleventName: string | symbol
The name of the event.
* ##### externallistener: (...args) => void
The callback function
#### Returns this
### [**](#prependOnceListener)[**](https://undefined/apify/apify-sdk-js/blob/master/node_modules/@types/node/events.d.ts#L902)externalinheritedprependOnceListener
* ****prependOnceListener**\<K>(eventName, listener): this
- Inherited from Logger.prependOnceListener
Adds a **one-time**`listener` function for the event named `eventName` to the *beginning* of the listeners array. The next time `eventName` is triggered, this listener is removed, and then invoked.
server.prependOnceListener('connection', (stream) => { console.log('Ah, we have our first user!'); });
Returns a reference to the `EventEmitter`, so that calls can be chained.
* **@since**
v6.0.0
***
#### Parameters
* ##### externaleventName: string | symbol
The name of the event.
* ##### externallistener: (...args) => void
The callback function
#### Returns this
### [**](#rawListeners)[**](https://undefined/apify/apify-sdk-js/blob/master/node_modules/@types/node/events.d.ts#L818)externalinheritedrawListeners
* ****rawListeners**\<K>(eventName): Function\[]
- Inherited from Logger.rawListeners
Returns a copy of the array of listeners for the event named `eventName`, including any wrappers (such as those created by `.once()`).
import { EventEmitter } from 'node:events'; const emitter = new EventEmitter(); emitter.once('log', () => console.log('log once'));
// Returns a new Array with a function onceWrapper which has a property
// listener which contains the original listener bound above
const listeners = emitter.rawListeners('log');
const logFnWrapper = listeners[0];
// Logs "log once" to the console and does not unbind the once event
logFnWrapper.listener();
// Logs "log once" to the console and removes the listener logFnWrapper();
emitter.on('log', () => console.log('log persistently'));
// Will return a new Array with a single function bound by .on() above
const newListeners = emitter.rawListeners('log');
// Logs "log persistently" twice newListeners0; emitter.emit('log');
* **@since**
v9.4.0
***
#### Parameters
* ##### externaleventName: string | symbol
#### Returns Function\[]
### [**](#removeAllListeners)[**](https://undefined/apify/apify-sdk-js/blob/master/node_modules/@types/node/events.d.ts#L758)externalinheritedremoveAllListeners
* ****removeAllListeners**(eventName): this
- Inherited from Logger.removeAllListeners
Removes all listeners, or those of the specified `eventName`.
It is bad practice to remove listeners added elsewhere in the code, particularly when the `EventEmitter` instance was created by some other component or module (e.g. sockets or file streams).
Returns a reference to the `EventEmitter`, so that calls can be chained.
* **@since**
v0.1.26
***
#### Parameters
* ##### externaloptionaleventName: string | symbol
#### Returns this
### [**](#removeListener)[**](https://undefined/apify/apify-sdk-js/blob/master/node_modules/@types/node/events.d.ts#L742)externalinheritedremoveListener
* ****removeListener**\<K>(eventName, listener): this
- Inherited from Logger.removeListener
Removes the specified `listener` from the listener array for the event named `eventName`.
const callback = (stream) => { console.log('someone connected!'); }; server.on('connection', callback); // ... server.removeListener('connection', callback);
`removeListener()` will remove, at most, one instance of a listener from the listener array. If any single listener has been added multiple times to the listener array for the specified `eventName`, then `removeListener()` must be called multiple times to remove each instance.
Once an event is emitted, all listeners attached to it at the time of emitting are called in order. This implies that any `removeListener()` or `removeAllListeners()` calls *after* emitting and *before* the last listener finishes execution will not remove them from`emit()` in progress. Subsequent events behave as expected.
import { EventEmitter } from 'node:events'; class MyEmitter extends EventEmitter {} const myEmitter = new MyEmitter();
const callbackA = () => { console.log('A'); myEmitter.removeListener('event', callbackB); };
const callbackB = () => { console.log('B'); };
myEmitter.on('event', callbackA);
myEmitter.on('event', callbackB);
// callbackA removes listener callbackB but it will still be called. // Internal listener array at time of emit [callbackA, callbackB] myEmitter.emit('event'); // Prints: // A // B
// callbackB is now removed. // Internal listener array [callbackA] myEmitter.emit('event'); // Prints: // A
Because listeners are managed using an internal array, calling this will change the position indices of any listener registered *after* the listener being removed. This will not impact the order in which listeners are called, but it means that any copies of the listener array as returned by the `emitter.listeners()` method will need to be recreated.
When a single function has been added as a handler multiple times for a single event (as in the example below), `removeListener()` will remove the most recently added instance. In the example the `once('ping')` listener is removed:
import { EventEmitter } from 'node:events'; const ee = new EventEmitter();
function pong() { console.log('pong'); }
ee.on('ping', pong); ee.once('ping', pong); ee.removeListener('ping', pong);
ee.emit('ping'); ee.emit('ping');
Returns a reference to the `EventEmitter`, so that calls can be chained.
* **@since**
v0.1.26
***
#### Parameters
* ##### externaleventName: string | symbol
* ##### externallistener: (...args) => void
#### Returns this
### [**](#setMaxListeners)[**](https://undefined/apify/apify-sdk-js/blob/master/node_modules/@types/node/events.d.ts#L768)externalinheritedsetMaxListeners
* ****setMaxListeners**(n): this
- Inherited from Logger.setMaxListeners
By default `EventEmitter`s will print a warning if more than `10` listeners are added for a particular event. This is a useful default that helps finding memory leaks. The `emitter.setMaxListeners()` method allows the limit to be modified for this specific `EventEmitter` instance. The value can be set to `Infinity` (or `0`) to indicate an unlimited number of listeners.
Returns a reference to the `EventEmitter`, so that calls can be chained.
* **@since**
v0.3.5
***
#### Parameters
* ##### externaln: number
#### Returns this
### [**](#setOptions)[**](https://undefined/apify/apify-sdk-js/blob/master/node_modules/@apify/log/src/index.d.ts#L34)externalinheritedsetOptions
* ****setOptions**(options): void
- Inherited from Logger.setOptions
#### Parameters
* ##### externaloptions: Record\<string, any>
#### Returns void
### [**](#addAbortListener)[**](https://undefined/apify/apify-sdk-js/blob/master/node_modules/@types/node/events.d.ts#L437)staticexternalinheritedaddAbortListener
* ****addAbortListener**(signal, resource): Disposable
- Inherited from Logger.addAbortListener
experimental
Listens once to the `abort` event on the provided `signal`.
Listening to the `abort` event on abort signals is unsafe and may lead to resource leaks since another third party with the signal can call `e.stopImmediatePropagation()`. Unfortunately Node.js cannot change this since it would violate the web standard. Additionally, the original API makes it easy to forget to remove listeners.
This API allows safely using `AbortSignal`s in Node.js APIs by solving these two issues by listening to the event such that `stopImmediatePropagation` does not prevent the listener from running.
Returns a disposable so that it may be unsubscribed from more easily.
import { addAbortListener } from 'node:events';
function example(signal) { let disposable; try { signal.addEventListener('abort', (e) => e.stopImmediatePropagation()); disposable = addAbortListener(signal, (e) => { // Do something when signal is aborted. }); } finally { disposable?.Symbol.dispose; } }
* **@since**
v20.5.0
***
#### Parameters
* ##### externalsignal: AbortSignal
* ##### externalresource: (event) => void
#### Returns Disposable
Disposable that removes the `abort` listener.
### [**](#getEventListeners)[**](https://undefined/apify/apify-sdk-js/blob/master/node_modules/@types/node/events.d.ts#L358)staticexternalinheritedgetEventListeners
* ****getEventListeners**(emitter, name): Function\[]
- Inherited from Logger.getEventListeners
Returns a copy of the array of listeners for the event named `eventName`.
For `EventEmitter`s this behaves exactly the same as calling `.listeners` on the emitter.
For `EventTarget`s this is the only way to get the event listeners for the event target. This is useful for debugging and diagnostic purposes.
import { getEventListeners, EventEmitter } from 'node:events';
{ const ee = new EventEmitter(); const listener = () => console.log('Events are fun'); ee.on('foo', listener); console.log(getEventListeners(ee, 'foo')); // [ [Function: listener] ] } { const et = new EventTarget(); const listener = () => console.log('Events are fun'); et.addEventListener('foo', listener); console.log(getEventListeners(et, 'foo')); // [ [Function: listener] ] }
* **@since**
v15.2.0, v14.17.0
***
#### Parameters
* ##### externalemitter: EventEmitter\<DefaultEventMap> | EventTarget
* ##### externalname: string | symbol
#### Returns Function\[]
### [**](#getMaxListeners)[**](https://undefined/apify/apify-sdk-js/blob/master/node_modules/@types/node/events.d.ts#L387)staticexternalinheritedgetMaxListeners
* ****getMaxListeners**(emitter): number
- Inherited from Logger.getMaxListeners
Returns the currently set max amount of listeners.
For `EventEmitter`s this behaves exactly the same as calling `.getMaxListeners` on the emitter.
For `EventTarget`s this is the only way to get the max event listeners for the event target. If the number of event handlers on a single EventTarget exceeds the max set, the EventTarget will print a warning.
import { getMaxListeners, setMaxListeners, EventEmitter } from 'node:events';
{ const ee = new EventEmitter(); console.log(getMaxListeners(ee)); // 10 setMaxListeners(11, ee); console.log(getMaxListeners(ee)); // 11 } { const et = new EventTarget(); console.log(getMaxListeners(et)); // 10 setMaxListeners(11, et); console.log(getMaxListeners(et)); // 11 }
* **@since**
v19.9.0
***
#### Parameters
* ##### externalemitter: EventEmitter\<DefaultEventMap> | EventTarget
#### Returns number
### [**](#listenerCount)[**](https://undefined/apify/apify-sdk-js/blob/master/node_modules/@types/node/events.d.ts#L330)staticexternalinheritedlistenerCount
* ****listenerCount**(emitter, eventName): number
- Inherited from Logger.listenerCount
A class method that returns the number of listeners for the given `eventName` registered on the given `emitter`.
import { EventEmitter, listenerCount } from 'node:events';
const myEmitter = new EventEmitter(); myEmitter.on('event', () => {}); myEmitter.on('event', () => {}); console.log(listenerCount(myEmitter, 'event')); // Prints: 2
* **@since**
v0.9.12
* **@deprecated**
Since v3.2.0 - Use `listenerCount` instead.
***
#### Parameters
* ##### externalemitter: EventEmitter\<DefaultEventMap>
The emitter to query
* ##### externaleventName: string | symbol
The event name
#### Returns number
### [**](#on)[**](https://undefined/apify/apify-sdk-js/blob/master/node_modules/@types/node/events.d.ts#L303)[**](https://undefined/apify/apify-sdk-js/blob/master/node_modules/@types/node/events.d.ts#L308)staticexternalinheritedon
* ****on**(emitter, eventName, options): AsyncIterator\<any\[], any, any>
* ****on**(emitter, eventName, options): AsyncIterator\<any\[], any, any>
- Inherited from Logger.on
import { on, EventEmitter } from 'node:events'; import process from 'node:process';
const ee = new EventEmitter();
// Emit later on process.nextTick(() => { ee.emit('foo', 'bar'); ee.emit('foo', 42); });
for await (const event of on(ee, 'foo')) { // The execution of this inner block is synchronous and it // processes one event at a time (even with await). Do not use // if concurrent execution is required. console.log(event); // prints ['bar'] [42] } // Unreachable here
Returns an `AsyncIterator` that iterates `eventName` events. It will throw if the `EventEmitter` emits `'error'`. It removes all listeners when exiting the loop. The `value` returned by each iteration is an array composed of the emitted event arguments.
An `AbortSignal` can be used to cancel waiting on events:
import { on, EventEmitter } from 'node:events'; import process from 'node:process';
const ac = new AbortController();
(async () => { const ee = new EventEmitter();
// Emit later on
process.nextTick(() => {
ee.emit('foo', 'bar');
ee.emit('foo', 42);
});
for await (const event of on(ee, 'foo', { signal: ac.signal })) {
// The execution of this inner block is synchronous and it
// processes one event at a time (even with await). Do not use
// if concurrent execution is required.
console.log(event); // prints ['bar'] [42]
}
// Unreachable here
})();
process.nextTick(() => ac.abort());
Use the `close` option to specify an array of event names that will end the iteration:
import { on, EventEmitter } from 'node:events'; import process from 'node:process';
const ee = new EventEmitter();
// Emit later on process.nextTick(() => { ee.emit('foo', 'bar'); ee.emit('foo', 42); ee.emit('close'); });
for await (const event of on(ee, 'foo', { close: ['close'] })) { console.log(event); // prints ['bar'] [42] } // the loop will exit after 'close' is emitted console.log('done'); // prints 'done'
* **@since**
v13.6.0, v12.16.0
***
#### Parameters
* ##### externalemitter: EventEmitter\<DefaultEventMap>
* ##### externaleventName: string | symbol
* ##### externaloptionaloptions: StaticEventEmitterIteratorOptions
#### Returns AsyncIterator\<any\[], any, any>
An `AsyncIterator` that iterates `eventName` events emitted by the `emitter`
### [**](#once)[**](https://undefined/apify/apify-sdk-js/blob/master/node_modules/@types/node/events.d.ts#L217)[**](https://undefined/apify/apify-sdk-js/blob/master/node_modules/@types/node/events.d.ts#L222)staticexternalinheritedonce
* ****once**(emitter, eventName, options): Promise\<any\[]>
* ****once**(emitter, eventName, options): Promise\<any\[]>
- Inherited from Logger.once
Creates a `Promise` that is fulfilled when the `EventEmitter` emits the given event or that is rejected if the `EventEmitter` emits `'error'` while waiting. The `Promise` will resolve with an array of all the arguments emitted to the given event.
This method is intentionally generic and works with the web platform [EventTarget](https://dom.spec.whatwg.org/#interface-eventtarget) interface, which has no special`'error'` event semantics and does not listen to the `'error'` event.
import { once, EventEmitter } from 'node:events'; import process from 'node:process';
const ee = new EventEmitter();
process.nextTick(() => { ee.emit('myevent', 42); });
const [value] = await once(ee, 'myevent'); console.log(value);
const err = new Error('kaboom'); process.nextTick(() => { ee.emit('error', err); });
try { await once(ee, 'myevent'); } catch (err) { console.error('error happened', err); }
The special handling of the `'error'` event is only used when `events.once()` is used to wait for another event. If `events.once()` is used to wait for the '`error'` event itself, then it is treated as any other kind of event without special handling:
import { EventEmitter, once } from 'node:events';
const ee = new EventEmitter();
once(ee, 'error') .then(([err]) => console.log('ok', err.message)) .catch((err) => console.error('error', err.message));
ee.emit('error', new Error('boom'));
// Prints: ok boom
An `AbortSignal` can be used to cancel waiting for the event:
import { EventEmitter, once } from 'node:events';
const ee = new EventEmitter(); const ac = new AbortController();
async function foo(emitter, event, signal) { try { await once(emitter, event, { signal }); console.log('event emitted!'); } catch (error) { if (error.name === 'AbortError') { console.error('Waiting for the event was canceled!'); } else { console.error('There was an error', error.message); } } }
foo(ee, 'foo', ac.signal); ac.abort(); // Abort waiting for the event ee.emit('foo'); // Prints: Waiting for the event was canceled!
* **@since**
v11.13.0, v10.16.0
***
#### Parameters
* ##### externalemitter: EventEmitter\<DefaultEventMap>
* ##### externaleventName: string | symbol
* ##### externaloptionaloptions: StaticEventEmitterOptions
#### Returns Promise\<any\[]>
### [**](#setMaxListeners)[**](https://undefined/apify/apify-sdk-js/blob/master/node_modules/@types/node/events.d.ts#L402)staticexternalinheritedsetMaxListeners
* ****setMaxListeners**(n, ...eventTargets): void
- Inherited from Logger.setMaxListeners
import { setMaxListeners, EventEmitter } from 'node:events';
const target = new EventTarget(); const emitter = new EventEmitter();
setMaxListeners(5, target, emitter);
* **@since**
v15.4.0
***
#### Parameters
* ##### externaloptionaln: number
A non-negative number. The maximum number of listeners per `EventTarget` event.
* ##### externalrest...eventTargets: (EventEmitter\<DefaultEventMap> | EventTarget)\[]
Zero or more {EventTarget} or {EventEmitter} instances. If none are specified, `n` is set as the default max for all newly created {EventTarget} and {EventEmitter} objects.
#### Returns void
---
# PlatformEventManager<!-- -->
Gets an instance of a Node.js' [EventEmitter](https://nodejs.org/api/events.html#events_class_eventemitter) class that emits various events from the SDK or the Apify platform. The event emitter is initialized by calling the [Actor.main](https://docs.apify.com/sdk/js/sdk/js/reference/class/Actor.md#main) function.
**Example usage:**
Actor.on('cpuInfo', (data) => { if (data.isCpuOverloaded) console.log('Oh no, the CPU is overloaded!'); });
The following events are emitted:
* `cpuInfo`: `{ "isCpuOverloaded": Boolean }` The event is emitted approximately every second and it indicates whether the Actor is using the maximum of available CPU resources. If that's the case, the Actor should not add more workload. For example, this event is used by the AutoscaledPool class.
* `migrating`: `void` Emitted when the Actor running on the Apify platform is going to be migrated to another worker server soon. You can use it to persist the state of the Actor and gracefully stop your in-progress tasks, so that they are not interrupted by the migration. For example, this is used by the RequestList class.
* `aborting`: `void` When a user aborts an Actor run on the Apify platform, they can choose to abort gracefully to allow the Actor some time before getting killed. This graceful abort emits the `aborting` event which the SDK uses to gracefully stop running crawls and you can use it to do your own cleanup as well.
* `persistState`: `{ "isMigrating": Boolean }` Emitted in regular intervals (by default 60 seconds) to notify all components of Apify SDK that it is time to persist their state, in order to avoid repeating all work when the Actor restarts. This event is automatically emitted together with the `migrating` event, in which case the `isMigrating` flag is set to `true`. Otherwise the flag is `false`. Note that the `persistState` event is provided merely for user convenience, you can achieve the same effect using `setInterval()` and listening for the `migrating` event.
### Hierarchy
* EventManager
* *PlatformEventManager*
## Index[**](#Index)
### Constructors
* [**constructor](#constructor)
### Properties
* [**config](#config)
### Methods
* [**close](#close)
* [**emit](#emit)
* [**init](#init)
* [**isInitialized](#isInitialized)
* [**off](#off)
* [**on](#on)
## Constructors<!-- -->[**](#Constructors)
### [**](#constructor)[**](https://github.com/apify/apify-sdk-js/blob/master/packages/apify/src/platform_event_manager.ts#L50)constructor
* ****new PlatformEventManager**(config): [PlatformEventManager](https://docs.apify.com/sdk/js/sdk/js/reference/class/PlatformEventManager.md)
- Overrides EventManager.constructor
#### Parameters
* ##### config: [Configuration](https://docs.apify.com/sdk/js/sdk/js/reference/class/Configuration.md) = <!-- -->...
#### Returns [PlatformEventManager](https://docs.apify.com/sdk/js/sdk/js/reference/class/PlatformEventManager.md)
## Properties<!-- -->[**](#Properties)
### [**](#config)[**](https://github.com/apify/apify-sdk-js/blob/master/packages/apify/src/platform_event_manager.ts#L50)readonlyinheritedconfig
**config: [Configuration](https://docs.apify.com/sdk/js/sdk/js/reference/class/Configuration.md) =
<!-- -->
...
Inherited from EventManager.config
## Methods<!-- -->[**](#Methods)
### [**](#close)[**](https://github.com/apify/apify-sdk-js/blob/master/packages/apify/src/platform_event_manager.ts#L112)close
* ****close**(): Promise\<void>
- Overrides EventManager.close
Closes websocket providing events from Actor infrastructure and also stops sending internal events of Apify package such as `persistState`. This is automatically called at the end of `Actor.main()`.
***
#### Returns Promise\<void>
### [**](#emit)[**](https://undefined/apify/apify-sdk-js/blob/master/node_modules/@crawlee/core/events/event_manager.d.ts#L36)externalinheritedemit
* ****emit**(event, ...args): void
- Inherited from EventManager.emit
#### Parameters
* ##### externalevent: EventTypeName
* ##### externalrest...args: unknown\[]
#### Returns void
### [**](#init)[**](https://github.com/apify/apify-sdk-js/blob/master/packages/apify/src/platform_event_manager.ts#L58)init
* ****init**(): Promise\<void>
- Overrides EventManager.init
Initializes `Actor.events` event emitter by creating a connection to a websocket that provides them. This is an internal function that is automatically called by `Actor.main()`.
***
#### Returns Promise\<void>
### [**](#isInitialized)[**](https://undefined/apify/apify-sdk-js/blob/master/node_modules/@crawlee/core/events/event_manager.d.ts#L37)externalinheritedisInitialized
* ****isInitialized**(): boolean
- Inherited from EventManager.isInitialized
#### Returns boolean
### [**](#off)[**](https://undefined/apify/apify-sdk-js/blob/master/node_modules/@crawlee/core/events/event_manager.d.ts#L35)externalinheritedoff
* ****off**(event, listener): void
- Inherited from EventManager.off
#### Parameters
* ##### externalevent: EventTypeName
* ##### externaloptionallistener: (...args) => any
#### Returns void
### [**](#on)[**](https://undefined/apify/apify-sdk-js/blob/master/node_modules/@crawlee/core/events/event_manager.d.ts#L34)externalinheritedon
* ****on**(event, listener): void
- Inherited from EventManager.on
#### Parameters
* ##### externalevent: EventTypeName
* ##### externallistener: (...args) => any
#### Returns void
---
# ProxyConfiguration<!-- -->
Configures connection to a proxy server with the provided options. Proxy servers are used to prevent target websites from blocking your crawlers based on IP address rate limits or blacklists. Setting proxy configuration in your crawlers automatically configures them to use the selected proxies for all connections. You can get information about the currently used proxy by inspecting the [ProxyInfo](https://docs.apify.com/sdk/js/sdk/js/reference/interface/ProxyInfo.md) property in your crawler's page function. There, you can inspect the proxy's URL and other attributes.
The proxy servers are managed by [Apify Proxy](https://docs.apify.com/proxy). To be able to use Apify Proxy, you need an Apify account and access to the selected proxies. If you provide no configuration option, the proxies will be managed automatically using a smart algorithm.
If you want to use your own proxies, use the [ProxyConfigurationOptions.proxyUrls](https://docs.apify.com/sdk/js/sdk/js/reference/interface/ProxyConfigurationOptions.md#proxyUrls) option. Your list of proxy URLs will be rotated by the configuration if this option is provided.
**Example usage:**
const proxyConfiguration = await Actor.createProxyConfiguration({ groups: ['GROUP1', 'GROUP2'] // List of Apify Proxy groups countryCode: 'US', });
const crawler = new CheerioCrawler({ // ... proxyConfiguration, requestHandler({ proxyInfo }) { const usedProxyUrl = proxyInfo.url; // Getting the proxy URL } })
### Hierarchy
* ProxyConfiguration
* *ProxyConfiguration*
## Index[**](#Index)
### Properties
* [**config](#config)
* [**isManInTheMiddle](#isManInTheMiddle)
### Methods
* [**initialize](#initialize)
* [**newProxyInfo](#newProxyInfo)
* [**newUrl](#newUrl)
## Properties<!-- -->[**](#Properties)
### [**](#config)[**](https://github.com/apify/apify-sdk-js/blob/master/packages/apify/src/proxy_configuration.ts#L171)readonlyconfig
**config: [Configuration](https://docs.apify.com/sdk/js/sdk/js/reference/class/Configuration.md) =
<!-- -->
...
### [**](#isManInTheMiddle)[**](https://undefined/apify/apify-sdk-js/blob/master/node_modules/@crawlee/core/proxy_configuration.d.ts#L157)externalinheritedisManInTheMiddle
**isManInTheMiddle: boolean
Inherited from CoreProxyConfiguration.isManInTheMiddle
## Methods<!-- -->[**](#Methods)
### [**](#initialize)[**](https://github.com/apify/apify-sdk-js/blob/master/packages/apify/src/proxy_configuration.ts#L234)initialize
* ****initialize**(): Promise\<boolean>
- Loads proxy password if token is provided and checks access to Apify Proxy and provided proxy groups if Apify Proxy configuration is used. Also checks if country has access to Apify Proxy groups if the country code is provided.
You should use the createProxyConfiguration function to create a pre-initialized `ProxyConfiguration` instance instead of calling this manually.
***
#### Returns Promise\<boolean>
### [**](#newProxyInfo)[**](https://github.com/apify/apify-sdk-js/blob/master/packages/apify/src/proxy_configuration.ts#L260)newProxyInfo
* ****newProxyInfo**(sessionId, options): Promise\<undefined | [ProxyInfo](https://docs.apify.com/sdk/js/sdk/js/reference/interface/ProxyInfo.md)>
- Overrides CoreProxyConfiguration.newProxyInfo
This function creates a new [ProxyInfo](https://docs.apify.com/sdk/js/sdk/js/reference/interface/ProxyInfo.md) info object. It is used by CheerioCrawler and PuppeteerCrawler to generate proxy URLs and also to allow the user to inspect the currently used proxy via the requestHandler parameter `proxyInfo`. Use it if you want to work with a rich representation of a proxy URL. If you need the URL string only, use [ProxyConfiguration.newUrl](https://docs.apify.com/sdk/js/sdk/js/reference/class/ProxyConfiguration.md#newUrl).
***
#### Parameters
* ##### optionalsessionId: string | number
Represents the identifier of user Session that can be managed by the SessionPool or you can use the Apify Proxy [Session](https://docs.apify.com/proxy#sessions) identifier. When the provided sessionId is a number, it's converted to a string. Property sessionId of [ProxyInfo](https://docs.apify.com/sdk/js/sdk/js/reference/interface/ProxyInfo.md) is always returned as a type string.
All the HTTP requests going through the proxy with the same session identifier will use the same target proxy server (i.e. the same IP address). The identifier must not be longer than 50 characters and include only the following: `0-9`, `a-z`, `A-Z`, `"."`, `"_"` and `"~"`.
* ##### optionaloptions: TieredProxyOptions
#### Returns Promise\<undefined | [ProxyInfo](https://docs.apify.com/sdk/js/sdk/js/reference/interface/ProxyInfo.md)>
Represents information about used proxy and its configuration.
### [**](#newUrl)[**](https://github.com/apify/apify-sdk-js/blob/master/packages/apify/src/proxy_configuration.ts#L294)newUrl
* ****newUrl**(sessionId, options): Promise\<undefined | string>
- Overrides CoreProxyConfiguration.newUrl
Returns a new proxy URL based on provided configuration options and the `sessionId` parameter.
***
#### Parameters
* ##### optionalsessionId: string | number
Represents the identifier of user Session that can be managed by the SessionPool or you can use the Apify Proxy [Session](https://docs.apify.com/proxy#sessions) identifier. When the provided sessionId is a number, it's converted to a string.
All the HTTP requests going through the proxy with the same session identifier will use the same target proxy server (i.e. the same IP address). The identifier must not be longer than 50 characters and include only the following: `0-9`, `a-z`, `A-Z`, `"."`, `"_"` and `"~"`.
* ##### optionaloptions: TieredProxyOptions
#### Returns Promise\<undefined | string>
A string with a proxy URL, including authentication credentials and port number. For example, `http://bob:password123@proxy.example.com:8000`
---
# externalRequestQueue<!-- -->
Represents a queue of URLs to crawl, which is used for deep crawling of websites where you start with several URLs and then recursively follow links to other pages. The data structure supports both breadth-first and depth-first crawling orders.
Each URL is represented using an instance of the Request class. The queue can only contain unique URLs. More precisely, it can only contain Request instances with distinct `uniqueKey` properties. By default, `uniqueKey` is generated from the URL, but it can also be overridden. To add a single URL multiple times to the queue, corresponding Request objects will need to have different `uniqueKey` properties.
Do not instantiate this class directly, use the [RequestQueue.open](https://docs.apify.com/sdk/js/sdk/js/reference/class/RequestQueue.md#open) function instead.
`RequestQueue` is used by BasicCrawler, CheerioCrawler, PuppeteerCrawler and PlaywrightCrawler as a source of URLs to crawl. Unlike RequestList, `RequestQueue` supports dynamic adding and removing of requests. On the other hand, the queue is not optimized for operations that add or remove a large number of URLs in a batch.
**Example usage:**
// Open the default request queue associated with the crawler run const queue = await RequestQueue.open();
// Open a named request queue const queueWithName = await RequestQueue.open('some-name');
// Enqueue few requests await queue.addRequest({ url: 'http://example.com/aaa' }); await queue.addRequest({ url: 'http://example.com/bbb' }); await queue.addRequest({ url: 'http://example.com/foo/bar' }, { forefront: true });
### Hierarchy
* RequestProvider
* *RequestQueue*
## Index[**](#Index)
### Constructors
* [**constructor](#constructor)
### Properties
* [**assumedHandledCount](#assumedHandledCount)
* [**assumedTotalCount](#assumedTotalCount)
* [**client](#client)
* [**clientKey](#clientKey)
* [**config](#config)
* [**id](#id)
* [**internalTimeoutMillis](#internalTimeoutMillis)
* [**log](#log)
* [**name](#name)
* [**requestLockSecs](#requestLockSecs)
* [**timeoutSecs](#timeoutSecs)
### Methods
* [**addRequest](#addRequest)
* [**addRequests](#addRequests)
* [**addRequestsBatched](#addRequestsBatched)
* [**drop](#drop)
* [**fetchNextRequest](#fetchNextRequest)
* [**getInfo](#getInfo)
* [**getRequest](#getRequest)
* [**getTotalCount](#getTotalCount)
* [**handledCount](#handledCount)
* [**isEmpty](#isEmpty)
* [**isFinished](#isFinished)
* [**markRequestHandled](#markRequestHandled)
* [**reclaimRequest](#reclaimRequest)
* [**open](#open)
## Constructors<!-- -->[**](#Constructors)
### [**](#constructor)[**](https://undefined/apify/apify-sdk-js/blob/master/node_modules/@crawlee/core/storages/request_queue_v2.d.ts#L45)externalconstructor
* ****new RequestQueue**(options, config): [RequestQueue](https://docs.apify.com/sdk/js/sdk/js/reference/class/RequestQueue.md)
- Overrides RequestProvider.constructor
#### Parameters
* ##### externaloptions: RequestProviderOptions
* ##### externaloptionalconfig: Configuration
#### Returns [RequestQueue](https://docs.apify.com/sdk/js/sdk/js/reference/class/RequestQueue.md)
## Properties<!-- -->[**](#Properties)
### [**](#assumedHandledCount)[**](https://undefined/apify/apify-sdk-js/blob/master/node_modules/@crawlee/core/storages/request_provider.d.ts#L21)externalinheritedassumedHandledCount
**assumedHandledCount: number
Inherited from RequestProvider.assumedHandledCount
### [**](#assumedTotalCount)[**](https://undefined/apify/apify-sdk-js/blob/master/node_modules/@crawlee/core/storages/request_provider.d.ts#L20)externalinheritedassumedTotalCount
**assumedTotalCount: number
Inherited from RequestProvider.assumedTotalCount
### [**](#client)[**](https://undefined/apify/apify-sdk-js/blob/master/node_modules/@crawlee/core/storages/request_provider.d.ts#L15)externalinheritedclient
**client: RequestQueueClient
Inherited from RequestProvider.client
### [**](#clientKey)[**](https://undefined/apify/apify-sdk-js/blob/master/node_modules/@crawlee/core/storages/request_provider.d.ts#L14)externalinheritedclientKey
**clientKey: string
Inherited from RequestProvider.clientKey
### [**](#config)[**](https://undefined/apify/apify-sdk-js/blob/master/node_modules/@crawlee/core/storages/request_provider.d.ts#L10)externalreadonlyinheritedconfig
**config: Configuration
Inherited from RequestProvider.config
### [**](#id)[**](https://undefined/apify/apify-sdk-js/blob/master/node_modules/@crawlee/core/storages/request_provider.d.ts#L11)externalinheritedid
**id: string
Inherited from RequestProvider.id
### [**](#internalTimeoutMillis)[**](https://undefined/apify/apify-sdk-js/blob/master/node_modules/@crawlee/core/storages/request_provider.d.ts#L18)externalinheritedinternalTimeoutMillis
**internalTimeoutMillis: number
Inherited from RequestProvider.internalTimeoutMillis
### [**](#log)[**](https://undefined/apify/apify-sdk-js/blob/master/node_modules/@crawlee/core/storages/request_provider.d.ts#L17)externalinheritedlog
**log: [Log](https://docs.apify.com/sdk/js/sdk/js/reference/class/Log.md)
Inherited from RequestProvider.log
### [**](#name)[**](https://undefined/apify/apify-sdk-js/blob/master/node_modules/@crawlee/core/storages/request_provider.d.ts#L12)externaloptionalinheritedname
**name?
<!-- -->
: string
Inherited from RequestProvider.name
### [**](#requestLockSecs)[**](https://undefined/apify/apify-sdk-js/blob/master/node_modules/@crawlee/core/storages/request_provider.d.ts#L19)externalinheritedrequestLockSecs
**requestLockSecs: number
Inherited from RequestProvider.requestLockSecs
### [**](#timeoutSecs)[**](https://undefined/apify/apify-sdk-js/blob/master/node_modules/@crawlee/core/storages/request_provider.d.ts#L13)externalinheritedtimeoutSecs
**timeoutSecs: number
Inherited from RequestProvider.timeoutSecs
## Methods<!-- -->[**](#Methods)
### [**](#addRequest)[**](https://undefined/apify/apify-sdk-js/blob/master/node_modules/@crawlee/core/storages/request_queue_v2.d.ts#L53)externaladdRequest
* ****addRequest**(requestLike, options): Promise\<RequestQueueOperationInfo>
- Overrides RequestProvider.addRequest
* **@inheritDoc**
***
#### Parameters
* ##### externalrequestLike: Source
* ##### externaloptionaloptions: [RequestQueueOperationOptions](https://docs.apify.com/sdk/js/sdk/js/reference/interface/RequestQueueOperationOptions.md)
#### Returns Promise\<RequestQueueOperationInfo>
### [**](#addRequests)[**](https://undefined/apify/apify-sdk-js/blob/master/node_modules/@crawlee/core/storages/request_queue_v2.d.ts#L57)externaladdRequests
* ****addRequests**(requestsLike, options): Promise\<BatchAddRequestsResult>
- Overrides RequestProvider.addRequests
* **@inheritDoc**
***
#### Parameters
* ##### externalrequestsLike: Source\[]
* ##### externaloptionaloptions: [RequestQueueOperationOptions](https://docs.apify.com/sdk/js/sdk/js/reference/interface/RequestQueueOperationOptions.md)
#### Returns Promise\<BatchAddRequestsResult>
### [**](#addRequestsBatched)[**](https://undefined/apify/apify-sdk-js/blob/master/node_modules/@crawlee/core/storages/request_provider.d.ts#L76)externalinheritedaddRequestsBatched
* ****addRequestsBatched**(requests, options): Promise\<AddRequestsBatchedResult>
- Inherited from RequestProvider.addRequestsBatched
Adds requests to the queue in batches. By default, it will resolve after the initial batch is added, and continue adding the rest in the background. You can configure the batch size via `batchSize` option and the sleep time in between the batches via `waitBetweenBatchesMillis`. If you want to wait for all batches to be added to the queue, you can use the `waitForAllRequestsToBeAdded` promise you get in the response object.
***
#### Parameters
* ##### externalrequests: (string | Source)\[]
The requests to add
* ##### externaloptionaloptions: AddRequestsBatchedOptions
Options for the request queue
#### Returns Promise\<AddRequestsBatchedResult>
### [**](#drop)[**](https://undefined/apify/apify-sdk-js/blob/master/node_modules/@crawlee/core/storages/request_provider.d.ts#L144)externalinheriteddrop
* ****drop**(): Promise\<void>
- Inherited from RequestProvider.drop
Removes the queue either from the Apify Cloud storage or from the local database, depending on the mode of operation.
***
#### Returns Promise\<void>
### [**](#fetchNextRequest)[**](https://undefined/apify/apify-sdk-js/blob/master/node_modules/@crawlee/core/storages/request_queue_v2.d.ts#L61)externalfetchNextRequest
* ****fetchNextRequest**\<T>(): Promise\<null | Request\<T>>
- Overrides RequestProvider.fetchNextRequest
* **@inheritDoc**
***
#### Returns Promise\<null | Request\<T>>
### [**](#getInfo)[**](https://undefined/apify/apify-sdk-js/blob/master/node_modules/@crawlee/core/storages/request_provider.d.ts#L179)externalinheritedgetInfo
* ****getInfo**(): Promise\<undefined | RequestQueueInfo>
- Inherited from RequestProvider.getInfo
Returns an object containing general information about the request queue.
The function returns the same object as the Apify API Client's [getQueue](https://docs.apify.com/api/apify-client-js/latest#ApifyClient-requestQueues) function, which in turn calls the [Get request queue](https://apify.com/docs/api/v2#/reference/request-queues/queue/get-request-queue) API endpoint.
**Example:**
{ id: "WkzbQMuFYuamGv3YF", name: "my-queue", userId: "wRsJZtadYvn4mBZmm", createdAt: new Date("2015-12-12T07:34:14.202Z"), modifiedAt: new Date("2015-12-13T08:36:13.202Z"), accessedAt: new Date("2015-12-14T08:36:13.202Z"), totalRequestCount: 25, handledRequestCount: 5, pendingRequestCount: 20, }
***
#### Returns Promise\<undefined | RequestQueueInfo>
### [**](#getRequest)[**](https://undefined/apify/apify-sdk-js/blob/master/node_modules/@crawlee/core/storages/request_provider.d.ts#L83)externalinheritedgetRequest
* ****getRequest**\<T>(id): Promise\<null | Request\<T>>
- Inherited from RequestProvider.getRequest
Gets the request from the queue specified by ID.
***
#### Parameters
* ##### externalid: string
ID of the request.
#### Returns Promise\<null | Request\<T>>
Returns the request object, or `null` if it was not found.
### [**](#getTotalCount)[**](https://undefined/apify/apify-sdk-js/blob/master/node_modules/@crawlee/core/storages/request_provider.d.ts#L36)externalinheritedgetTotalCount
* ****getTotalCount**(): number
- Inherited from RequestProvider.getTotalCount
Returns an offline approximation of the total number of requests in the queue (i.e. pending + handled).
Survives restarts and actor migrations.
***
#### Returns number
### [**](#handledCount)[**](https://undefined/apify/apify-sdk-js/blob/master/node_modules/@crawlee/core/storages/request_provider.d.ts#L154)externalinheritedhandledCount
* ****handledCount**(): Promise\<number>
- Inherited from RequestProvider.handledCount
Returns the number of handled requests.
This function is just a convenient shortcut for:
const { handledRequestCount } = await queue.getInfo();
***
#### Returns Promise\<number>
### [**](#isEmpty)[**](https://undefined/apify/apify-sdk-js/blob/master/node_modules/@crawlee/core/storages/request_provider.d.ts#L123)externalinheritedisEmpty
* ****isEmpty**(): Promise\<boolean>
- Inherited from RequestProvider.isEmpty
Resolves to `true` if the next call to [RequestQueue.fetchNextRequest](https://docs.apify.com/sdk/js/sdk/js/reference/class/RequestQueue.md#fetchNextRequest) would return `null`, otherwise it resolves to `false`. Note that even if the queue is empty, there might be some pending requests currently being processed. If you need to ensure that there is no activity in the queue, use [RequestQueue.isFinished](https://docs.apify.com/sdk/js/sdk/js/reference/class/RequestQueue.md#isFinished).
***
#### Returns Promise\<boolean>
### [**](#isFinished)[**](https://undefined/apify/apify-sdk-js/blob/master/node_modules/@crawlee/core/storages/request_queue_v2.d.ts#L69)externalisFinished
* ****isFinished**(): Promise\<boolean>
- Overrides RequestProvider.isFinished
* **@inheritDoc**
***
#### Returns Promise\<boolean>
### [**](#markRequestHandled)[**](https://undefined/apify/apify-sdk-js/blob/master/node_modules/@crawlee/core/storages/request_queue_v2.d.ts#L65)externalmarkRequestHandled
* ****markRequestHandled**(request): Promise\<null | RequestQueueOperationInfo>
- Overrides RequestProvider.markRequestHandled
* **@inheritDoc**
***
#### Parameters
* ##### externalrequest: Request\<Dictionary>
#### Returns Promise\<null | RequestQueueOperationInfo>
### [**](#reclaimRequest)[**](https://undefined/apify/apify-sdk-js/blob/master/node_modules/@crawlee/core/storages/request_queue_v2.d.ts#L73)externalreclaimRequest
* ****reclaimRequest**(...args): Promise\<null | RequestQueueOperationInfo>
- Overrides RequestProvider.reclaimRequest
* **@inheritDoc**
***
#### Parameters
* ##### externalrest...args: \[request: Request\<Dictionary>, options?: [RequestQueueOperationOptions](https://docs.apify.com/sdk/js/sdk/js/reference/interface/RequestQueueOperationOptions.md)]
#### Returns Promise\<null | RequestQueueOperationInfo>
### [**](#open)[**](https://undefined/apify/apify-sdk-js/blob/master/node_modules/@crawlee/core/storages/request_queue_v2.d.ts#L85)staticexternalopen
* ****open**(...args): Promise<[RequestQueue](https://docs.apify.com/sdk/js/sdk/js/reference/class/RequestQueue.md)>
- Overrides RequestProvider.open
* **@inheritDoc**
***
#### Parameters
* ##### externalrest...args: \[queueIdOrName?: null | string, options?: StorageManagerOptions]
#### Returns Promise<[RequestQueue](https://docs.apify.com/sdk/js/sdk/js/reference/class/RequestQueue.md)>
---
# externalLogLevel<!-- -->
## Index[**](#Index)
### Enumeration Members
* [**DEBUG](#DEBUG)
* [**ERROR](#ERROR)
* [**INFO](#INFO)
* [**OFF](#OFF)
* [**PERF](#PERF)
* [**SOFT\_FAIL](#SOFT_FAIL)
* [**WARNING](#WARNING)
## Enumeration Members<!-- -->[**](<#Enumeration Members>)
### [**](#DEBUG)[**](https://undefined/apify/apify-sdk-js/blob/master/node_modules/@apify/log/src/index.d.ts#L9)externalDEBUG
**DEBUG: 5
### [**](#ERROR)[**](https://undefined/apify/apify-sdk-js/blob/master/node_modules/@apify/log/src/index.d.ts#L5)externalERROR
**ERROR: 1
### [**](#INFO)[**](https://undefined/apify/apify-sdk-js/blob/master/node_modules/@apify/log/src/index.d.ts#L8)externalINFO
**INFO: 4
### [**](#OFF)[**](https://undefined/apify/apify-sdk-js/blob/master/node_modules/@apify/log/src/index.d.ts#L4)externalOFF
**OFF: 0
### [**](#PERF)[**](https://undefined/apify/apify-sdk-js/blob/master/node_modules/@apify/log/src/index.d.ts#L10)externalPERF
**PERF: 6
### [**](#SOFT_FAIL)[**](https://undefined/apify/apify-sdk-js/blob/master/node_modules/@apify/log/src/index.d.ts#L6)externalSOFT\_FAIL
**SOFT\_FAIL: 2
### [**](#WARNING)[**](https://undefined/apify/apify-sdk-js/blob/master/node_modules/@apify/log/src/index.d.ts#L7)externalWARNING
**WARNING: 3
---
# AbortOptions<!-- -->
### Hierarchy
* RunAbortOptions
* *AbortOptions*
## Index[**](#Index)
### Properties
* [**gracefully](#gracefully)
* [**statusMessage](#statusMessage)
* [**token](#token)
## Properties<!-- -->[**](#Properties)
### [**](#gracefully)[**](https://undefined/apify/apify-sdk-js/blob/master/node_modules/apify-client/src/resource_clients/run.d.ts#L89)externaloptionalinheritedgracefully
**gracefully?
<!-- -->
: boolean
Inherited from RunAbortOptions.gracefully
### [**](#statusMessage)[**](https://github.com/apify/apify-sdk-js/blob/master/packages/apify/src/actor.ts#L1912)optionalstatusMessage
**statusMessage?
<!-- -->
: string
Exit with given status message
### [**](#token)[**](https://github.com/apify/apify-sdk-js/blob/master/packages/apify/src/actor.ts#L1909)optionaltoken
**token?
<!-- -->
: string
User API token that is used to run the Actor. By default, it is taken from the `APIFY_TOKEN` environment variable.
---
# ActorPricingInfo<!-- -->
## Index[**](#Index)
### Properties
* [**isPayPerEvent](#isPayPerEvent)
* [**maxTotalChargeUsd](#maxTotalChargeUsd)
* [**perEventPrices](#perEventPrices)
* [**pricingModel](#pricingModel)
## Properties<!-- -->[**](#Properties)
### [**](#isPayPerEvent)[**](https://github.com/apify/apify-sdk-js/blob/master/packages/apify/src/charging.ts#L306)isPayPerEvent
**isPayPerEvent: boolean
### [**](#maxTotalChargeUsd)[**](https://github.com/apify/apify-sdk-js/blob/master/packages/apify/src/charging.ts#L305)maxTotalChargeUsd
**maxTotalChargeUsd: number
### [**](#perEventPrices)[**](https://github.com/apify/apify-sdk-js/blob/master/packages/apify/src/charging.ts#L307)perEventPrices
**perEventPrices: Record\<string, number>
### [**](#pricingModel)[**](https://github.com/apify/apify-sdk-js/blob/master/packages/apify/src/charging.ts#L304)optionalpricingModel
**pricingModel?
<!-- -->
: PAY\_PER\_EVENT | PRICE\_PER\_DATASET\_ITEM | FLAT\_PRICE\_PER\_MONTH | FREE
---
# externalActorRun<!-- -->
### Hierarchy
* ActorRunListItem
* *ActorRun*
## Index[**](#Index)
### Properties
* [**actId](#actId)
* [**actorTaskId](#actorTaskId)
* [**buildId](#buildId)
* [**buildNumber](#buildNumber)
* [**containerUrl](#containerUrl)
* [**defaultDatasetId](#defaultDatasetId)
* [**defaultKeyValueStoreId](#defaultKeyValueStoreId)
* [**defaultRequestQueueId](#defaultRequestQueueId)
* [**exitCode](#exitCode)
* [**finishedAt](#finishedAt)
* [**gitBranchName](#gitBranchName)
* [**chargedEventCounts](#chargedEventCounts)
* [**id](#id)
* [**isContainerServerReady](#isContainerServerReady)
* [**meta](#meta)
* [**options](#options)
* [**pricingInfo](#pricingInfo)
* [**startedAt](#startedAt)
* [**stats](#stats)
* [**status](#status)
* [**statusMessage](#statusMessage)
* [**usage](#usage)
* [**usageTotalUsd](#usageTotalUsd)
* [**usageUsd](#usageUsd)
* [**userId](#userId)
## Properties<!-- -->[**](#Properties)
### [**](#actId)[**](https://undefined/apify/apify-sdk-js/blob/master/node_modules/apify-client/src/resource_clients/actor.d.ts#L180)externalinheritedactId
**actId: string
Inherited from ActorRunListItem.actId
### [**](#actorTaskId)[**](https://undefined/apify/apify-sdk-js/blob/master/node_modules/apify-client/src/resource_clients/actor.d.ts#L181)externaloptionalinheritedactorTaskId
**actorTaskId?
<!-- -->
: string
Inherited from ActorRunListItem.actorTaskId
### [**](#buildId)[**](https://undefined/apify/apify-sdk-js/blob/master/node_modules/apify-client/src/resource_clients/actor.d.ts#L186)externalinheritedbuildId
**buildId: string
Inherited from ActorRunListItem.buildId
### [**](#buildNumber)[**](https://undefined/apify/apify-sdk-js/blob/master/node_modules/apify-client/src/resource_clients/actor.d.ts#L187)externalinheritedbuildNumber
**buildNumber: string
Inherited from ActorRunListItem.buildNumber
### [**](#containerUrl)[**](https://undefined/apify/apify-sdk-js/blob/master/node_modules/apify-client/src/resource_clients/actor.d.ts#L199)externalcontainerUrl
**containerUrl: string
### [**](#defaultDatasetId)[**](https://undefined/apify/apify-sdk-js/blob/master/node_modules/apify-client/src/resource_clients/actor.d.ts#L189)externalinheriteddefaultDatasetId
**defaultDatasetId: string
Inherited from ActorRunListItem.defaultDatasetId
### [**](#defaultKeyValueStoreId)[**](https://undefined/apify/apify-sdk-js/blob/master/node_modules/apify-client/src/resource_clients/actor.d.ts#L188)externalinheriteddefaultKeyValueStoreId
**defaultKeyValueStoreId: string
Inherited from ActorRunListItem.defaultKeyValueStoreId
### [**](#defaultRequestQueueId)[**](https://undefined/apify/apify-sdk-js/blob/master/node_modules/apify-client/src/resource_clients/actor.d.ts#L190)externalinheriteddefaultRequestQueueId
**defaultRequestQueueId: string
Inherited from ActorRunListItem.defaultRequestQueueId
### [**](#exitCode)[**](https://undefined/apify/apify-sdk-js/blob/master/node_modules/apify-client/src/resource_clients/actor.d.ts#L198)externaloptionalexitCode
**exitCode?
<!-- -->
: number
### [**](#finishedAt)[**](https://undefined/apify/apify-sdk-js/blob/master/node_modules/apify-client/src/resource_clients/actor.d.ts#L183)externalinheritedfinishedAt
**finishedAt: Date
Inherited from ActorRunListItem.finishedAt
### [**](#gitBranchName)[**](https://undefined/apify/apify-sdk-js/blob/master/node_modules/apify-client/src/resource_clients/actor.d.ts#L201)externaloptionalgitBranchName
**gitBranchName?
<!-- -->
: string
### [**](#chargedEventCounts)[**](https://undefined/apify/apify-sdk-js/blob/master/node_modules/apify-client/src/resource_clients/actor.d.ts#L205)externaloptionalchargedEventCounts
**chargedEventCounts?
<!-- -->
: Record\<string, number>
### [**](#id)[**](https://undefined/apify/apify-sdk-js/blob/master/node_modules/apify-client/src/resource_clients/actor.d.ts#L179)externalinheritedid
**id: string
Inherited from ActorRunListItem.id
### [**](#isContainerServerReady)[**](https://undefined/apify/apify-sdk-js/blob/master/node_modules/apify-client/src/resource_clients/actor.d.ts#L200)externaloptionalisContainerServerReady
**isContainerServerReady?
<!-- -->
: boolean
### [**](#meta)[**](https://undefined/apify/apify-sdk-js/blob/master/node_modules/apify-client/src/resource_clients/actor.d.ts#L185)externalinheritedmeta
**meta: ActorRunMeta
Inherited from ActorRunListItem.meta
### [**](#options)[**](https://undefined/apify/apify-sdk-js/blob/master/node_modules/apify-client/src/resource_clients/actor.d.ts#L197)externaloptions
**options: ActorRunOptions
### [**](#pricingInfo)[**](https://undefined/apify/apify-sdk-js/blob/master/node_modules/apify-client/src/resource_clients/actor.d.ts#L204)externaloptionalpricingInfo
**pricingInfo?
<!-- -->
: ActorRunPricingInfo
### [**](#startedAt)[**](https://undefined/apify/apify-sdk-js/blob/master/node_modules/apify-client/src/resource_clients/actor.d.ts#L182)externalinheritedstartedAt
**startedAt: Date
Inherited from ActorRunListItem.startedAt
### [**](#stats)[**](https://undefined/apify/apify-sdk-js/blob/master/node_modules/apify-client/src/resource_clients/actor.d.ts#L196)externalstats
**stats: ActorRunStats
### [**](#status)[**](https://undefined/apify/apify-sdk-js/blob/master/node_modules/apify-client/src/resource_clients/actor.d.ts#L184)externalinheritedstatus
**status: READY | RUNNING | SUCCEEDED | FAILED | ABORTING | ABORTED | TIMING-OUT | TIMED-OUT
Inherited from ActorRunListItem.status
### [**](#statusMessage)[**](https://undefined/apify/apify-sdk-js/blob/master/node_modules/apify-client/src/resource_clients/actor.d.ts#L195)externaloptionalstatusMessage
**statusMessage?
<!-- -->
: string
### [**](#usage)[**](https://undefined/apify/apify-sdk-js/blob/master/node_modules/apify-client/src/resource_clients/actor.d.ts#L202)externaloptionalusage
**usage?
<!-- -->
: ActorRunUsage
### [**](#usageTotalUsd)[**](https://undefined/apify/apify-sdk-js/blob/master/node_modules/apify-client/src/resource_clients/actor.d.ts#L191)externaloptionalinheritedusageTotalUsd
**usageTotalUsd?
<!-- -->
: number
Inherited from ActorRunListItem.usageTotalUsd
### [**](#usageUsd)[**](https://undefined/apify/apify-sdk-js/blob/master/node_modules/apify-client/src/resource_clients/actor.d.ts#L203)externaloptionalusageUsd
**usageUsd?
<!-- -->
: ActorRunUsage
### [**](#userId)[**](https://undefined/apify/apify-sdk-js/blob/master/node_modules/apify-client/src/resource_clients/actor.d.ts#L194)externaluserId
**userId: string
---
# externalApifyClientOptions<!-- -->
## Index[**](#Index)
### Properties
* [**baseUrl](#baseUrl)
* [**maxRetries](#maxRetries)
* [**minDelayBetweenRetriesMillis](#minDelayBetweenRetriesMillis)
* [**requestInterceptors](#requestInterceptors)
* [**timeoutSecs](#timeoutSecs)
* [**token](#token)
* [**userAgentSuffix](#userAgentSuffix)
## Properties<!-- -->[**](#Properties)
### [**](#baseUrl)[**](https://undefined/apify/apify-sdk-js/blob/master/node_modules/apify-client/src/apify_client.d.ts#L138)externaloptionalbaseUrl
**baseUrl?
<!-- -->
: string = https\://api.apify.com
### [**](#maxRetries)[**](https://undefined/apify/apify-sdk-js/blob/master/node_modules/apify-client/src/apify_client.d.ts#L140)externaloptionalmaxRetries
**maxRetries?
<!-- -->
: number = 8
### [**](#minDelayBetweenRetriesMillis)[**](https://undefined/apify/apify-sdk-js/blob/master/node_modules/apify-client/src/apify_client.d.ts#L142)externaloptionalminDelayBetweenRetriesMillis
**minDelayBetweenRetriesMillis?
<!-- -->
: number = 500
### [**](#requestInterceptors)[**](https://undefined/apify/apify-sdk-js/blob/master/node_modules/apify-client/src/apify_client.d.ts#L144)externaloptionalrequestInterceptors
**requestInterceptors?
<!-- -->
: (undefined | null | (value) => ApifyRequestConfig | Promise\<ApifyRequestConfig>)\[] = \[]
### [**](#timeoutSecs)[**](https://undefined/apify/apify-sdk-js/blob/master/node_modules/apify-client/src/apify_client.d.ts#L146)externaloptionaltimeoutSecs
**timeoutSecs?
<!-- -->
: number = 360
### [**](#token)[**](https://undefined/apify/apify-sdk-js/blob/master/node_modules/apify-client/src/apify_client.d.ts#L147)externaloptionaltoken
**token?
<!-- -->
: string
### [**](#userAgentSuffix)[**](https://undefined/apify/apify-sdk-js/blob/master/node_modules/apify-client/src/apify_client.d.ts#L148)externaloptionaluserAgentSuffix
**userAgentSuffix?
<!-- -->
: string | string\[]
---
# ApifyEnv<!-- -->
Parsed representation of the Apify environment variables. This object is returned by the [Actor.getEnv](https://docs.apify.com/sdk/js/sdk/js/reference/class/Actor.md#getEnv) function.
## Index[**](#Index)
### Properties
* [**actorBuildId](#actorBuildId)
* [**actorBuildNumber](#actorBuildNumber)
* [**actorEventsWsUrl](#actorEventsWsUrl)
* [**actorId](#actorId)
* [**actorMaxPaidDatasetItems](#actorMaxPaidDatasetItems)
* [**actorRunId](#actorRunId)
* [**actorTaskId](#actorTaskId)
* [**apiBaseUrl](#apiBaseUrl)
* [**apiPublicBaseUrl](#apiPublicBaseUrl)
* [**containerPort](#containerPort)
* [**containerUrl](#containerUrl)
* [**dedicatedCpus](#dedicatedCpus)
* [**defaultDatasetId](#defaultDatasetId)
* [**defaultKeyValueStoreId](#defaultKeyValueStoreId)
* [**defaultRequestQueueId](#defaultRequestQueueId)
* [**disableOutdatedWarning](#disableOutdatedWarning)
* [**fact](#fact)
* [**headless](#headless)
* [**chromeExecutablePath](#chromeExecutablePath)
* [**inputKey](#inputKey)
* [**inputSecretsPrivateKeyFile](#inputSecretsPrivateKeyFile)
* [**inputSecretsPrivateKeyPassphrase](#inputSecretsPrivateKeyPassphrase)
* [**isAtHome](#isAtHome)
* [**localStorageDir](#localStorageDir)
* [**logFormat](#logFormat)
* [**logLevel](#logLevel)
* [**memoryMbytes](#memoryMbytes)
* [**metaOrigin](#metaOrigin)
* [**proxyHostname](#proxyHostname)
* [**proxyPassword](#proxyPassword)
* [**proxyPort](#proxyPort)
* [**proxyStatusUrl](#proxyStatusUrl)
* [**sdkLatestVersion](#sdkLatestVersion)
* [**startedAt](#startedAt)
* [**systemInfoIntervalMillis](#systemInfoIntervalMillis)
* [**timeoutAt](#timeoutAt)
* [**token](#token)
* [**userId](#userId)
* [**workflowKey](#workflowKey)
## Properties<!-- -->[**](#Properties)
### [**](#actorBuildId)[**](https://github.com/apify/apify-sdk-js/blob/master/packages/apify/src/actor.ts#L1779)actorBuildId
**actorBuildId: null | string
ID of the Actor build used in the run. (ACTOR\_BUILD\_ID)
### [**](#actorBuildNumber)[**](https://github.com/apify/apify-sdk-js/blob/master/packages/apify/src/actor.ts#L1881)actorBuildNumber
**actorBuildNumber: null | string
### [**](#actorEventsWsUrl)[**](https://github.com/apify/apify-sdk-js/blob/master/packages/apify/src/actor.ts#L1882)actorEventsWsUrl
**actorEventsWsUrl: null | string
### [**](#actorId)[**](https://github.com/apify/apify-sdk-js/blob/master/packages/apify/src/actor.ts#L1764)actorId
**actorId: null | string
ID of the Actor (ACTOR\_ID)
### [**](#actorMaxPaidDatasetItems)[**](https://github.com/apify/apify-sdk-js/blob/master/packages/apify/src/actor.ts#L1883)actorMaxPaidDatasetItems
**actorMaxPaidDatasetItems: null | number
### [**](#actorRunId)[**](https://github.com/apify/apify-sdk-js/blob/master/packages/apify/src/actor.ts#L1769)actorRunId
**actorRunId: null | string
ID of the Actor run (ACTOR\_RUN\_ID)
### [**](#actorTaskId)[**](https://github.com/apify/apify-sdk-js/blob/master/packages/apify/src/actor.ts#L1774)actorTaskId
**actorTaskId: null | string
ID of the Actor task (ACTOR\_TASK\_ID)
### [**](#apiBaseUrl)[**](https://github.com/apify/apify-sdk-js/blob/master/packages/apify/src/actor.ts#L1844)apiBaseUrl
**apiBaseUrl: null | string
### [**](#apiPublicBaseUrl)[**](https://github.com/apify/apify-sdk-js/blob/master/packages/apify/src/actor.ts#L1845)apiPublicBaseUrl
**apiPublicBaseUrl: null | string
### [**](#containerPort)[**](https://github.com/apify/apify-sdk-js/blob/master/packages/apify/src/actor.ts#L1884)containerPort
**containerPort: null | number
### [**](#containerUrl)[**](https://github.com/apify/apify-sdk-js/blob/master/packages/apify/src/actor.ts#L1885)containerUrl
**containerUrl: null | string
### [**](#dedicatedCpus)[**](https://github.com/apify/apify-sdk-js/blob/master/packages/apify/src/actor.ts#L1847)dedicatedCpus
**dedicatedCpus: null | string
### [**](#defaultDatasetId)[**](https://github.com/apify/apify-sdk-js/blob/master/packages/apify/src/actor.ts#L1813)defaultDatasetId
**defaultDatasetId: null | string
ID of the dataset where input and output data of this Actor is stored (ACTOR\_DEFAULT\_DATASET\_ID)
### [**](#defaultKeyValueStoreId)[**](https://github.com/apify/apify-sdk-js/blob/master/packages/apify/src/actor.ts#L1807)defaultKeyValueStoreId
**defaultKeyValueStoreId: null | string
ID of the key-value store where input and output data of this Actor is stored (ACTOR\_DEFAULT\_KEY\_VALUE\_STORE\_ID)
### [**](#defaultRequestQueueId)[**](https://github.com/apify/apify-sdk-js/blob/master/packages/apify/src/actor.ts#L1886)defaultRequestQueueId
**defaultRequestQueueId: null | string
### [**](#disableOutdatedWarning)[**](https://github.com/apify/apify-sdk-js/blob/master/packages/apify/src/actor.ts#L1848)disableOutdatedWarning
**disableOutdatedWarning: null | 1
### [**](#fact)[**](https://github.com/apify/apify-sdk-js/blob/master/packages/apify/src/actor.ts#L1849)fact
**fact: null | string
### [**](#headless)[**](https://github.com/apify/apify-sdk-js/blob/master/packages/apify/src/actor.ts#L1825)headless
**headless: null | string
If set to "1", the web browsers inside the Actor should run in headless mode because there is no windowing system available. (APIFY\_HEADLESS)
### [**](#chromeExecutablePath)[**](https://github.com/apify/apify-sdk-js/blob/master/packages/apify/src/actor.ts#L1846)chromeExecutablePath
**chromeExecutablePath: null | string
### [**](#inputKey)[**](https://github.com/apify/apify-sdk-js/blob/master/packages/apify/src/actor.ts#L1877)inputKey
**inputKey: null | string
The key of the input record in the Actor’s default key-value store (ACTOR\_INPUT\_KEY)
### [**](#inputSecretsPrivateKeyFile)[**](https://github.com/apify/apify-sdk-js/blob/master/packages/apify/src/actor.ts#L1850)inputSecretsPrivateKeyFile
**inputSecretsPrivateKeyFile: null | string
### [**](#inputSecretsPrivateKeyPassphrase)[**](https://github.com/apify/apify-sdk-js/blob/master/packages/apify/src/actor.ts#L1851)inputSecretsPrivateKeyPassphrase
**inputSecretsPrivateKeyPassphrase: null | string
### [**](#isAtHome)[**](https://github.com/apify/apify-sdk-js/blob/master/packages/apify/src/actor.ts#L1831)isAtHome
**isAtHome: null | string
Is set to "1" if the Actor is running on Apify servers. (APIFY\_IS\_AT\_HOME)
### [**](#localStorageDir)[**](https://github.com/apify/apify-sdk-js/blob/master/packages/apify/src/actor.ts#L1859)localStorageDir
**localStorageDir: null | string
Defines the path to a local directory where KeyValueStore, Dataset, and RequestQueue store their data. Typically, it is set to ./storage. If omitted, you should define the APIFY\_TOKEN environment variable instead. See more info on combination of this and APIFY\_TOKEN [here](https://docs.apify.com/sdk/js/sdk/js/docs/guides/environment-variables.md#combinations-of-apify_local_storage_dir-and-apify_token)(CRAWLEE\_STORAGE\_DIR)
### [**](#logFormat)[**](https://github.com/apify/apify-sdk-js/blob/master/packages/apify/src/actor.ts#L1866)logFormat
**logFormat: null | string
### [**](#logLevel)[**](https://github.com/apify/apify-sdk-js/blob/master/packages/apify/src/actor.ts#L1865)logLevel
**logLevel: null | string
Specifies the minimum log level, which can be one of the following values (in order of severity): DEBUG, INFO, WARNING and ERROR (APIFY\_LOG\_LEVEL)
### [**](#memoryMbytes)[**](https://github.com/apify/apify-sdk-js/blob/master/packages/apify/src/actor.ts#L1819)memoryMbytes
**memoryMbytes: null | number
Amount of memory allocated for the Actor, in megabytes (ACTOR\_MEMORY\_MBYTES)
### [**](#metaOrigin)[**](https://github.com/apify/apify-sdk-js/blob/master/packages/apify/src/actor.ts#L1872)metaOrigin
**metaOrigin: null | string
Origin for the Actor run, i.e. how it was started. See [here](https://docs.apify.com/sdk/python/reference/enum/MetaOrigin) for more details. (APIFY\_META\_ORIGIN)
### [**](#proxyHostname)[**](https://github.com/apify/apify-sdk-js/blob/master/packages/apify/src/actor.ts#L1837)proxyHostname
**proxyHostname: null | string
### [**](#proxyPassword)[**](https://github.com/apify/apify-sdk-js/blob/master/packages/apify/src/actor.ts#L1836)proxyPassword
**proxyPassword: null | string
The Apify Proxy password of the user who started the Actor. (APIFY\_PROXY\_PASSWORD)
### [**](#proxyPort)[**](https://github.com/apify/apify-sdk-js/blob/master/packages/apify/src/actor.ts#L1838)proxyPort
**proxyPort: null | string
### [**](#proxyStatusUrl)[**](https://github.com/apify/apify-sdk-js/blob/master/packages/apify/src/actor.ts#L1843)proxyStatusUrl
**proxyStatusUrl: null | string
You can visit this page to troubleshoot your proxy connection. (APIFY\_PROXY\_STATUS\_URL)
### [**](#sdkLatestVersion)[**](https://github.com/apify/apify-sdk-js/blob/master/packages/apify/src/actor.ts#L1878)sdkLatestVersion
**sdkLatestVersion: null | string
### [**](#startedAt)[**](https://github.com/apify/apify-sdk-js/blob/master/packages/apify/src/actor.ts#L1796)startedAt
**startedAt: null | Date
Date when the Actor was started (ACTOR\_STARTED\_AT)
### [**](#systemInfoIntervalMillis)[**](https://github.com/apify/apify-sdk-js/blob/master/packages/apify/src/actor.ts#L1879)systemInfoIntervalMillis
**systemInfoIntervalMillis: null | string
### [**](#timeoutAt)[**](https://github.com/apify/apify-sdk-js/blob/master/packages/apify/src/actor.ts#L1801)timeoutAt
**timeoutAt: null | Date
Date when the Actor will time out (ACTOR\_TIMEOUT\_AT)
### [**](#token)[**](https://github.com/apify/apify-sdk-js/blob/master/packages/apify/src/actor.ts#L1791)token
**token: null | string
Authentication token representing privileges given to the Actor run, it can be passed to various Apify APIs (APIFY\_TOKEN)
### [**](#userId)[**](https://github.com/apify/apify-sdk-js/blob/master/packages/apify/src/actor.ts#L1785)userId
**userId: null | string
ID of the user who started the Actor - note that it might be different than the owner of the Actor (APIFY\_USER\_ID)
### [**](#workflowKey)[**](https://github.com/apify/apify-sdk-js/blob/master/packages/apify/src/actor.ts#L1880)workflowKey
**workflowKey: null | string
---
# CallOptions<!-- -->
### Hierarchy
* ActorCallOptions
* *CallOptions*
## Index[**](#Index)
### Properties
* [**build](#build)
* [**contentType](#contentType)
* [**maxItems](#maxItems)
* [**memory](#memory)
* [**timeout](#timeout)
* [**token](#token)
* [**waitSecs](#waitSecs)
* [**webhooks](#webhooks)
## Properties<!-- -->[**](#Properties)
### [**](#build)[**](https://undefined/apify/apify-sdk-js/blob/master/node_modules/apify-client/src/resource_clients/actor.d.ts#L137)externaloptionalinheritedbuild
**build?
<!-- -->
: string
Inherited from ActorCallOptions.build
Tag or number of the actor build to run (e.g. `beta` or `1.2.345`). If not provided, the run uses build tag or number from the default actor run configuration (typically `latest`).
### [**](#contentType)[**](https://undefined/apify/apify-sdk-js/blob/master/node_modules/apify-client/src/resource_clients/actor.d.ts#L144)externaloptionalinheritedcontentType
**contentType?
<!-- -->
: string
Inherited from ActorCallOptions.contentType
Content type for the `input`. If not specified, `input` is expected to be an object that will be stringified to JSON and content type set to `application/json; charset=utf-8`. If `options.contentType` is specified, then `input` must be a `String` or `Buffer`.
### [**](#maxItems)[**](https://undefined/apify/apify-sdk-js/blob/master/node_modules/apify-client/src/resource_clients/actor.d.ts#L173)externaloptionalinheritedmaxItems
**maxItems?
<!-- -->
: number
Inherited from ActorCallOptions.maxItems
Specifies maximum number of items that the actor run should return. This is used by pay per result actors to limit the maximum number of results that will be charged to customer. Value can be accessed in actor run using `ACTOR_MAX_PAID_DATASET_ITEMS` environment variable.
### [**](#memory)[**](https://undefined/apify/apify-sdk-js/blob/master/node_modules/apify-client/src/resource_clients/actor.d.ts#L149)externaloptionalinheritedmemory
**memory?
<!-- -->
: number
Inherited from ActorCallOptions.memory
Memory in megabytes which will be allocated for the new actor run. If not provided, the run uses memory of the default actor run configuration.
### [**](#timeout)[**](https://undefined/apify/apify-sdk-js/blob/master/node_modules/apify-client/src/resource_clients/actor.d.ts#L154)externaloptionalinheritedtimeout
**timeout?
<!-- -->
: number
Inherited from ActorCallOptions.timeout
Timeout for the actor run in seconds. Zero value means there is no timeout. If not provided, the run uses timeout of the default actor run configuration.
### [**](#token)[**](https://github.com/apify/apify-sdk-js/blob/master/packages/apify/src/actor.ts#L1895)optionaltoken
**token?
<!-- -->
: string
User API token that is used to run the Actor. By default, it is taken from the `APIFY_TOKEN` environment variable.
### [**](#waitSecs)[**](https://undefined/apify/apify-sdk-js/blob/master/node_modules/apify-client/src/resource_clients/actor.d.ts#L176)externaloptionalinheritedwaitSecs
**waitSecs?
<!-- -->
: number
Inherited from ActorCallOptions.waitSecs
### [**](#webhooks)[**](https://undefined/apify/apify-sdk-js/blob/master/node_modules/apify-client/src/resource_clients/actor.d.ts#L167)externaloptionalinheritedwebhooks
**webhooks?
<!-- -->
: readonly
<!-- -->
WebhookUpdateData\[]
Inherited from ActorCallOptions.webhooks
Specifies optional webhooks associated with the actor run, which can be used to receive a notification e.g. when the actor finished or failed, see [ad hook webhooks documentation](https://docs.apify.com/webhooks/ad-hoc-webhooks) for detailed description.
---
# CallTaskOptions<!-- -->
### Hierarchy
* TaskCallOptions
* *CallTaskOptions*
## Index[**](#Index)
### Properties
* [**build](#build)
* [**maxItems](#maxItems)
* [**memory](#memory)
* [**timeout](#timeout)
* [**token](#token)
* [**waitSecs](#waitSecs)
* [**webhooks](#webhooks)
## Properties<!-- -->[**](#Properties)
### [**](#build)[**](https://undefined/apify/apify-sdk-js/blob/master/node_modules/apify-client/src/resource_clients/actor.d.ts#L137)externaloptionalinheritedbuild
**build?
<!-- -->
: string
Inherited from TaskCallOptions.build
Tag or number of the actor build to run (e.g. `beta` or `1.2.345`). If not provided, the run uses build tag or number from the default actor run configuration (typically `latest`).
### [**](#maxItems)[**](https://undefined/apify/apify-sdk-js/blob/master/node_modules/apify-client/src/resource_clients/actor.d.ts#L173)externaloptionalinheritedmaxItems
**maxItems?
<!-- -->
: number
Inherited from TaskCallOptions.maxItems
Specifies maximum number of items that the actor run should return. This is used by pay per result actors to limit the maximum number of results that will be charged to customer. Value can be accessed in actor run using `ACTOR_MAX_PAID_DATASET_ITEMS` environment variable.
### [**](#memory)[**](https://undefined/apify/apify-sdk-js/blob/master/node_modules/apify-client/src/resource_clients/actor.d.ts#L149)externaloptionalinheritedmemory
**memory?
<!-- -->
: number
Inherited from TaskCallOptions.memory
Memory in megabytes which will be allocated for the new actor run. If not provided, the run uses memory of the default actor run configuration.
### [**](#timeout)[**](https://undefined/apify/apify-sdk-js/blob/master/node_modules/apify-client/src/resource_clients/actor.d.ts#L154)externaloptionalinheritedtimeout
**timeout?
<!-- -->
: number
Inherited from TaskCallOptions.timeout
Timeout for the actor run in seconds. Zero value means there is no timeout. If not provided, the run uses timeout of the default actor run configuration.
### [**](#token)[**](https://github.com/apify/apify-sdk-js/blob/master/packages/apify/src/actor.ts#L1902)optionaltoken
**token?
<!-- -->
: string
User API token that is used to run the Actor. By default, it is taken from the `APIFY_TOKEN` environment variable.
### [**](#waitSecs)[**](https://undefined/apify/apify-sdk-js/blob/master/node_modules/apify-client/src/resource_clients/task.d.ts#L87)externaloptionalinheritedwaitSecs
**waitSecs?
<!-- -->
: number
Inherited from TaskCallOptions.waitSecs
### [**](#webhooks)[**](https://undefined/apify/apify-sdk-js/blob/master/node_modules/apify-client/src/resource_clients/actor.d.ts#L167)externaloptionalinheritedwebhooks
**webhooks?
<!-- -->
: readonly
<!-- -->
WebhookUpdateData\[]
Inherited from TaskCallOptions.webhooks
Specifies optional webhooks associated with the actor run, which can be used to receive a notification e.g. when the actor finished or failed, see [ad hook webhooks documentation](https://docs.apify.com/webhooks/ad-hoc-webhooks) for detailed description.
---
# ChargeOptions<!-- -->
## Index[**](#Index)
### Properties
* [**count](#count)
* [**eventName](#eventName)
## Properties<!-- -->[**](#Properties)
### [**](#count)[**](https://github.com/apify/apify-sdk-js/blob/master/packages/apify/src/charging.ts#L294)optionalcount
**count?
<!-- -->
: number
### [**](#eventName)[**](https://github.com/apify/apify-sdk-js/blob/master/packages/apify/src/charging.ts#L293)eventName
**eventName: string
---
# ChargeResult<!-- -->
## Index[**](#Index)
### Properties
* [**eventChargeLimitReached](#eventChargeLimitReached)
* [**chargeableWithinLimit](#chargeableWithinLimit)
* [**chargedCount](#chargedCount)
## Properties<!-- -->[**](#Properties)
### [**](#eventChargeLimitReached)[**](https://github.com/apify/apify-sdk-js/blob/master/packages/apify/src/charging.ts#L298)eventChargeLimitReached
**eventChargeLimitReached: boolean
### [**](#chargeableWithinLimit)[**](https://github.com/apify/apify-sdk-js/blob/master/packages/apify/src/charging.ts#L300)chargeableWithinLimit
**chargeableWithinLimit: Record\<string, number>
### [**](#chargedCount)[**](https://github.com/apify/apify-sdk-js/blob/master/packages/apify/src/charging.ts#L299)chargedCount
**chargedCount: number
---
# ConfigurationOptions<!-- -->
### Hierarchy
* ConfigurationOptions
* *ConfigurationOptions*
## Index[**](#Index)
### Properties
* [**actorEventsWsUrl](#actorEventsWsUrl)
* [**actorId](#actorId)
* [**actorRunId](#actorRunId)
* [**actorTaskId](#actorTaskId)
* [**apiBaseUrl](#apiBaseUrl)
* [**apiPublicBaseUrl](#apiPublicBaseUrl)
* [**availableMemoryRatio](#availableMemoryRatio)
* [**containerized](#containerized)
* [**containerPort](#containerPort)
* [**containerUrl](#containerUrl)
* [**defaultBrowserPath](#defaultBrowserPath)
* [**defaultDatasetId](#defaultDatasetId)
* [**defaultKeyValueStoreId](#defaultKeyValueStoreId)
* [**defaultRequestQueueId](#defaultRequestQueueId)
* [**disableBrowserSandbox](#disableBrowserSandbox)
* [**eventManager](#eventManager)
* [**headless](#headless)
* [**chromeExecutablePath](#chromeExecutablePath)
* [**inputKey](#inputKey)
* [**inputSecretsPrivateKeyFile](#inputSecretsPrivateKeyFile)
* [**inputSecretsPrivateKeyPassphrase](#inputSecretsPrivateKeyPassphrase)
* [**isAtHome](#isAtHome)
* [**logLevel](#logLevel)
* [**maxTotalChargeUsd](#maxTotalChargeUsd)
* [**maxUsedCpuRatio](#maxUsedCpuRatio)
* [**memoryMbytes](#memoryMbytes)
* [**metamorphAfterSleepMillis](#metamorphAfterSleepMillis)
* [**metaOrigin](#metaOrigin)
* [**persistStateIntervalMillis](#persistStateIntervalMillis)
* [**persistStorage](#persistStorage)
* [**proxyHostname](#proxyHostname)
* [**proxyPassword](#proxyPassword)
* [**proxyPort](#proxyPort)
* [**proxyStatusUrl](#proxyStatusUrl)
* [**purgeOnStart](#purgeOnStart)
* [**standbyPort](#standbyPort)
* [**standbyUrl](#standbyUrl)
* [**storageClient](#storageClient)
* [**storageClientOptions](#storageClientOptions)
* [**systemInfoIntervalMillis](#systemInfoIntervalMillis)
* [**systemInfoV2](#systemInfoV2)
* [**testPayPerEvent](#testPayPerEvent)
* [**token](#token)
* [**useChargingLogDataset](#useChargingLogDataset)
* [**userId](#userId)
* [**xvfb](#xvfb)
## Properties<!-- -->[**](#Properties)
### [**](#actorEventsWsUrl)[**](https://github.com/apify/apify-sdk-js/blob/master/packages/apify/src/configuration.ts#L13)optionalactorEventsWsUrl
**actorEventsWsUrl?
<!-- -->
: string
### [**](#actorId)[**](https://github.com/apify/apify-sdk-js/blob/master/packages/apify/src/configuration.ts#L15)optionalactorId
**actorId?
<!-- -->
: string
### [**](#actorRunId)[**](https://github.com/apify/apify-sdk-js/blob/master/packages/apify/src/configuration.ts#L16)optionalactorRunId
**actorRunId?
<!-- -->
: string
### [**](#actorTaskId)[**](https://github.com/apify/apify-sdk-js/blob/master/packages/apify/src/configuration.ts#L17)optionalactorTaskId
**actorTaskId?
<!-- -->
: string
### [**](#apiBaseUrl)[**](https://github.com/apify/apify-sdk-js/blob/master/packages/apify/src/configuration.ts#L18)optionalapiBaseUrl
**apiBaseUrl?
<!-- -->
: string
### [**](#apiPublicBaseUrl)[**](https://github.com/apify/apify-sdk-js/blob/master/packages/apify/src/configuration.ts#L21)optionalapiPublicBaseUrl
**apiPublicBaseUrl?
<!-- -->
: string
### [**](#availableMemoryRatio)[**](https://undefined/apify/apify-sdk-js/blob/master/node_modules/@crawlee/core/configuration.d.ts#L66)externaloptionalinheritedavailableMemoryRatio
**availableMemoryRatio?
<!-- -->
: number = 0.25
Inherited from CoreConfigurationOptions.availableMemoryRatio
Sets the ratio, defining the amount of system memory that could be used by the AutoscaledPool. When the memory usage is more than the provided ratio, the memory is considered overloaded.
Alternative to `CRAWLEE_AVAILABLE_MEMORY_RATIO` environment variable.
### [**](#containerized)[**](https://undefined/apify/apify-sdk-js/blob/master/node_modules/@crawlee/core/configuration.d.ts#L150)externaloptionalinheritedcontainerized
**containerized?
<!-- -->
: boolean
Inherited from CoreConfigurationOptions.containerized
Used in place of `isContainerized()` when collecting system metrics.
Alternative to `CRAWLEE_CONTAINERIZED` environment variable.
### [**](#containerPort)[**](https://github.com/apify/apify-sdk-js/blob/master/packages/apify/src/configuration.ts#L22)optionalcontainerPort
**containerPort?
<!-- -->
: number
### [**](#containerUrl)[**](https://github.com/apify/apify-sdk-js/blob/master/packages/apify/src/configuration.ts#L23)optionalcontainerUrl
**containerUrl?
<!-- -->
: string
### [**](#defaultBrowserPath)[**](https://undefined/apify/apify-sdk-js/blob/master/node_modules/@crawlee/core/configuration.d.ts#L119)externaloptionalinheriteddefaultBrowserPath
**defaultBrowserPath?
<!-- -->
: string
Inherited from CoreConfigurationOptions.defaultBrowserPath
Defines a path to default browser executable.
Alternative to `CRAWLEE_DEFAULT_BROWSER_PATH` environment variable.
### [**](#defaultDatasetId)[**](https://undefined/apify/apify-sdk-js/blob/master/node_modules/@crawlee/core/configuration.d.ts#L31)externaloptionalinheriteddefaultDatasetId
**defaultDatasetId?
<!-- -->
: string = ‘default’
Inherited from CoreConfigurationOptions.defaultDatasetId
Default dataset id.
Alternative to `CRAWLEE_DEFAULT_DATASET_ID` environment variable.
### [**](#defaultKeyValueStoreId)[**](https://undefined/apify/apify-sdk-js/blob/master/node_modules/@crawlee/core/configuration.d.ts#L45)externaloptionalinheriteddefaultKeyValueStoreId
**defaultKeyValueStoreId?
<!-- -->
: string = ‘default’
Inherited from CoreConfigurationOptions.defaultKeyValueStoreId
Default key-value store id.
Alternative to `CRAWLEE_DEFAULT_KEY_VALUE_STORE_ID` environment variable.
### [**](#defaultRequestQueueId)[**](https://undefined/apify/apify-sdk-js/blob/master/node_modules/@crawlee/core/configuration.d.ts#L52)externaloptionalinheriteddefaultRequestQueueId
**defaultRequestQueueId?
<!-- -->
: string = ‘default’
Inherited from CoreConfigurationOptions.defaultRequestQueueId
Default request queue id.
Alternative to `CRAWLEE_DEFAULT_REQUEST_QUEUE_ID` environment variable.
### [**](#disableBrowserSandbox)[**](https://undefined/apify/apify-sdk-js/blob/master/node_modules/@crawlee/core/configuration.d.ts#L125)externaloptionalinheriteddisableBrowserSandbox
**disableBrowserSandbox?
<!-- -->
: boolean
Inherited from CoreConfigurationOptions.disableBrowserSandbox
Defines whether to disable browser sandbox by adding `--no-sandbox` flag to `launchOptions`.
Alternative to `CRAWLEE_DISABLE_BROWSER_SANDBOX` environment variable.
### [**](#eventManager)[**](https://undefined/apify/apify-sdk-js/blob/master/node_modules/@crawlee/core/configuration.d.ts#L19)externaloptionalinheritedeventManager
**eventManager?
<!-- -->
: EventManager = EventManager
Inherited from CoreConfigurationOptions.eventManager
Defines the Event Manager to be used.
### [**](#headless)[**](https://undefined/apify/apify-sdk-js/blob/master/node_modules/@crawlee/core/configuration.d.ts#L100)externaloptionalinheritedheadless
**headless?
<!-- -->
: boolean = true
Inherited from CoreConfigurationOptions.headless
Defines whether web browsers launched by Crawlee will run in the headless mode.
Alternative to `CRAWLEE_HEADLESS` environment variable.
### [**](#chromeExecutablePath)[**](https://undefined/apify/apify-sdk-js/blob/master/node_modules/@crawlee/core/configuration.d.ts#L113)externaloptionalinheritedchromeExecutablePath
**chromeExecutablePath?
<!-- -->
: string
Inherited from CoreConfigurationOptions.chromeExecutablePath
Defines a path to Chrome executable.
Alternative to `CRAWLEE_CHROME_EXECUTABLE_PATH` environment variable.
### [**](#inputKey)[**](https://undefined/apify/apify-sdk-js/blob/master/node_modules/@crawlee/core/configuration.d.ts#L93)externaloptionalinheritedinputKey
**inputKey?
<!-- -->
: string = ‘INPUT’
Inherited from CoreConfigurationOptions.inputKey
Defines the default input key, i.e. the key that is used to get the crawler input value from the default [KeyValueStore](https://docs.apify.com/sdk/js/sdk/js/reference/class/KeyValueStore.md) associated with the current crawler run.
Alternative to `CRAWLEE_INPUT_KEY` environment variable.
### [**](#inputSecretsPrivateKeyFile)[**](https://github.com/apify/apify-sdk-js/blob/master/packages/apify/src/configuration.ts#L36)optionalinputSecretsPrivateKeyFile
**inputSecretsPrivateKeyFile?
<!-- -->
: string
### [**](#inputSecretsPrivateKeyPassphrase)[**](https://github.com/apify/apify-sdk-js/blob/master/packages/apify/src/configuration.ts#L35)optionalinputSecretsPrivateKeyPassphrase
**inputSecretsPrivateKeyPassphrase?
<!-- -->
: string
### [**](#isAtHome)[**](https://github.com/apify/apify-sdk-js/blob/master/packages/apify/src/configuration.ts#L33)optionalisAtHome
**isAtHome?
<!-- -->
: boolean
### [**](#logLevel)[**](https://undefined/apify/apify-sdk-js/blob/master/node_modules/@crawlee/core/configuration.d.ts#L132)externaloptionalinheritedlogLevel
**logLevel?
<!-- -->
: [LogLevel](https://docs.apify.com/sdk/js/sdk/js/reference/enum/LogLevel.md) | (radix) => string | (fractionDigits) => string | (fractionDigits) => string | (precision) => string | () => number | ({ (locales, options): string; (locales, options): string }) = [LogLevel](https://docs.apify.com/sdk/js/sdk/js/reference/enum/LogLevel.md) | (radix) => string | (fractionDigits) => string | (fractionDigits) => string | (precision) => string | () => number | ({ (locales, options): string; (locales, options): string })
Inherited from CoreConfigurationOptions.logLevel
Sets the log level to the given value.
Alternative to `CRAWLEE_LOG_LEVEL` environment variable.
### [**](#maxTotalChargeUsd)[**](https://github.com/apify/apify-sdk-js/blob/master/packages/apify/src/configuration.ts#L37)optionalmaxTotalChargeUsd
**maxTotalChargeUsd?
<!-- -->
: number
### [**](#maxUsedCpuRatio)[**](https://undefined/apify/apify-sdk-js/blob/master/node_modules/@crawlee/core/configuration.d.ts#L58)externaloptionalinheritedmaxUsedCpuRatio
**maxUsedCpuRatio?
<!-- -->
: number = 0.95
Inherited from CoreConfigurationOptions.maxUsedCpuRatio
Sets the ratio, defining the maximum CPU usage. When the CPU usage is higher than the provided ratio, the CPU is considered overloaded.
### [**](#memoryMbytes)[**](https://undefined/apify/apify-sdk-js/blob/master/node_modules/@crawlee/core/configuration.d.ts#L73)externaloptionalinheritedmemoryMbytes
**memoryMbytes?
<!-- -->
: number
Inherited from CoreConfigurationOptions.memoryMbytes
Sets the amount of system memory in megabytes to be used by the AutoscaledPool. By default, the maximum memory is set to one quarter of total system memory.
Alternative to `CRAWLEE_MEMORY_MBYTES` environment variable.
### [**](#metamorphAfterSleepMillis)[**](https://github.com/apify/apify-sdk-js/blob/master/packages/apify/src/configuration.ts#L12)optionalmetamorphAfterSleepMillis
**metamorphAfterSleepMillis?
<!-- -->
: number
### [**](#metaOrigin)[**](https://github.com/apify/apify-sdk-js/blob/master/packages/apify/src/configuration.ts#L38)optionalmetaOrigin
**metaOrigin?
<!-- -->
: DEVELOPMENT | WEB | API | SCHEDULER | TEST | WEBHOOK | ACTOR | CLI | STANDBY
### [**](#persistStateIntervalMillis)[**](https://undefined/apify/apify-sdk-js/blob/master/node_modules/@crawlee/core/configuration.d.ts#L80)externaloptionalinheritedpersistStateIntervalMillis
**persistStateIntervalMillis?
<!-- -->
: number = 60\_000
Inherited from CoreConfigurationOptions.persistStateIntervalMillis
Defines the interval of emitting the `persistState` event.
Alternative to `CRAWLEE_PERSIST_STATE_INTERVAL_MILLIS` environment variable.
### [**](#persistStorage)[**](https://undefined/apify/apify-sdk-js/blob/master/node_modules/@crawlee/core/configuration.d.ts#L138)externaloptionalinheritedpersistStorage
**persistStorage?
<!-- -->
: boolean
Inherited from CoreConfigurationOptions.persistStorage
Defines whether the storage client used should persist the data it stores.
Alternative to `CRAWLEE_PERSIST_STORAGE` environment variable.
### [**](#proxyHostname)[**](https://github.com/apify/apify-sdk-js/blob/master/packages/apify/src/configuration.ts#L24)optionalproxyHostname
**proxyHostname?
<!-- -->
: string
### [**](#proxyPassword)[**](https://github.com/apify/apify-sdk-js/blob/master/packages/apify/src/configuration.ts#L25)optionalproxyPassword
**proxyPassword?
<!-- -->
: string
### [**](#proxyPort)[**](https://github.com/apify/apify-sdk-js/blob/master/packages/apify/src/configuration.ts#L26)optionalproxyPort
**proxyPort?
<!-- -->
: number
### [**](#proxyStatusUrl)[**](https://github.com/apify/apify-sdk-js/blob/master/packages/apify/src/configuration.ts#L27)optionalproxyStatusUrl
**proxyStatusUrl?
<!-- -->
: string
### [**](#purgeOnStart)[**](https://undefined/apify/apify-sdk-js/blob/master/node_modules/@crawlee/core/configuration.d.ts#L38)externaloptionalinheritedpurgeOnStart
**purgeOnStart?
<!-- -->
: boolean = true
Inherited from CoreConfigurationOptions.purgeOnStart
Defines whether to purge the default storage folders before starting the crawler run.
Alternative to `CRAWLEE_PURGE_ON_START` environment variable.
### [**](#standbyPort)[**](https://github.com/apify/apify-sdk-js/blob/master/packages/apify/src/configuration.ts#L31)optionalstandbyPort
**standbyPort?
<!-- -->
: number
* **@deprecated**
use `containerPort` instead
### [**](#standbyUrl)[**](https://github.com/apify/apify-sdk-js/blob/master/packages/apify/src/configuration.ts#L32)optionalstandbyUrl
**standbyUrl?
<!-- -->
: string
### [**](#storageClient)[**](https://undefined/apify/apify-sdk-js/blob/master/node_modules/@crawlee/core/configuration.d.ts#L14)externaloptionalinheritedstorageClient
**storageClient?
<!-- -->
: StorageClient = StorageClient
Inherited from CoreConfigurationOptions.storageClient
Defines storage client to be used.
### [**](#storageClientOptions)[**](https://undefined/apify/apify-sdk-js/blob/master/node_modules/@crawlee/core/configuration.d.ts#L24)externaloptionalinheritedstorageClientOptions
**storageClientOptions?
<!-- -->
: Dictionary
Inherited from CoreConfigurationOptions.storageClientOptions
Could be used to adjust the storage client behavior e.g. MemoryStorageOptions could be used to adjust the MemoryStorage behavior.
### [**](#systemInfoIntervalMillis)[**](https://undefined/apify/apify-sdk-js/blob/master/node_modules/@crawlee/core/configuration.d.ts#L85)externaloptionalinheritedsystemInfoIntervalMillis
**systemInfoIntervalMillis?
<!-- -->
: number = 1\_000
Inherited from CoreConfigurationOptions.systemInfoIntervalMillis
Defines the interval of emitting the `systemInfo` event.
### [**](#systemInfoV2)[**](https://undefined/apify/apify-sdk-js/blob/master/node_modules/@crawlee/core/configuration.d.ts#L144)externaloptionalinheritedsystemInfoV2
**systemInfoV2?
<!-- -->
: boolean
Inherited from CoreConfigurationOptions.systemInfoV2
Defines whether to use the systemInfoV2 metric collection experiment.
Alternative to `CRAWLEE_SYSTEM_INFO_V2` environment variable.
### [**](#testPayPerEvent)[**](https://github.com/apify/apify-sdk-js/blob/master/packages/apify/src/configuration.ts#L39)optionaltestPayPerEvent
**testPayPerEvent?
<!-- -->
: boolean
### [**](#token)[**](https://github.com/apify/apify-sdk-js/blob/master/packages/apify/src/configuration.ts#L14)optionaltoken
**token?
<!-- -->
: string
### [**](#useChargingLogDataset)[**](https://github.com/apify/apify-sdk-js/blob/master/packages/apify/src/configuration.ts#L40)optionaluseChargingLogDataset
**useChargingLogDataset?
<!-- -->
: boolean
### [**](#userId)[**](https://github.com/apify/apify-sdk-js/blob/master/packages/apify/src/configuration.ts#L34)optionaluserId
**userId?
<!-- -->
: string
### [**](#xvfb)[**](https://undefined/apify/apify-sdk-js/blob/master/node_modules/@crawlee/core/configuration.d.ts#L107)externaloptionalinheritedxvfb
**xvfb?
<!-- -->
: boolean = false
Inherited from CoreConfigurationOptions.xvfb
Defines whether to run X virtual framebuffer on the web browsers launched by Crawlee.
Alternative to `CRAWLEE_XVFB` environment variable.
---
# externalDatasetConsumer<!-- --> \<Data>
User-function used in the `Dataset.forEach()` API.
### Callable
* ****DatasetConsumer**(item, index): Awaitable\<void>
***
* #### Parameters
* ##### externalitem: Data
Current [Dataset](https://docs.apify.com/sdk/js/sdk/js/reference/class/Dataset.md) entry being processed.
* ##### externalindex: number
Position of current [Dataset](https://docs.apify.com/sdk/js/sdk/js/reference/class/Dataset.md) entry.
#### Returns Awaitable\<void>
---
# externalDatasetContent<!-- --> \<Data>
## Index[**](#Index)
### Properties
* [**count](#count)
* [**desc](#desc)
* [**items](#items)
* [**limit](#limit)
* [**offset](#offset)
* [**total](#total)
## Properties<!-- -->[**](#Properties)
### [**](#count)[**](https://undefined/apify/apify-sdk-js/blob/master/node_modules/@crawlee/core/storages/dataset.d.ts#L420)externalcount
**count: number
Count of dataset entries returned in this set.
### [**](#desc)[**](https://undefined/apify/apify-sdk-js/blob/master/node_modules/@crawlee/core/storages/dataset.d.ts#L428)externaloptionaldesc
**desc?
<!-- -->
: boolean
Should the results be in descending order.
### [**](#items)[**](https://undefined/apify/apify-sdk-js/blob/master/node_modules/@crawlee/core/storages/dataset.d.ts#L426)externalitems
**items: Data\[]
Dataset entries based on chosen format parameter.
### [**](#limit)[**](https://undefined/apify/apify-sdk-js/blob/master/node_modules/@crawlee/core/storages/dataset.d.ts#L424)externallimit
**limit: number
Maximum number of dataset entries requested.
### [**](#offset)[**](https://undefined/apify/apify-sdk-js/blob/master/node_modules/@crawlee/core/storages/dataset.d.ts#L422)externaloffset
**offset: number
Position of the first returned entry in the dataset.
### [**](#total)[**](https://undefined/apify/apify-sdk-js/blob/master/node_modules/@crawlee/core/storages/dataset.d.ts#L418)externaltotal
**total: number
Total count of entries in the dataset.
---
# externalDatasetDataOptions<!-- -->
## Index[**](#Index)
### Properties
* [**clean](#clean)
* [**desc](#desc)
* [**fields](#fields)
* [**limit](#limit)
* [**offset](#offset)
* [**skipEmpty](#skipEmpty)
* [**skipHidden](#skipHidden)
* [**unwind](#unwind)
## Properties<!-- -->[**](#Properties)
### [**](#clean)[**](https://undefined/apify/apify-sdk-js/blob/master/node_modules/@crawlee/core/storages/dataset.d.ts#L56)externaloptionalclean
**clean?
<!-- -->
: boolean = false
If `true` then the function returns only non-empty items and skips hidden fields (i.e. fields starting with `#` character). Note that the `clean` parameter is a shortcut for `skipHidden: true` and `skipEmpty: true` options.
### [**](#desc)[**](https://undefined/apify/apify-sdk-js/blob/master/node_modules/@crawlee/core/storages/dataset.d.ts#L41)externaloptionaldesc
**desc?
<!-- -->
: boolean = false
If `true` then the objects are sorted by `createdAt` in descending order. Otherwise they are sorted in ascending order.
### [**](#fields)[**](https://undefined/apify/apify-sdk-js/blob/master/node_modules/@crawlee/core/storages/dataset.d.ts#L45)externaloptionalfields
**fields?
<!-- -->
: string\[]
An array of field names that will be included in the result. If omitted, all fields are included in the results.
### [**](#limit)[**](https://undefined/apify/apify-sdk-js/blob/master/node_modules/@crawlee/core/storages/dataset.d.ts#L35)externaloptionallimit
**limit?
<!-- -->
: number = 250000
Maximum number of array elements to return.
### [**](#offset)[**](https://undefined/apify/apify-sdk-js/blob/master/node_modules/@crawlee/core/storages/dataset.d.ts#L30)externaloptionaloffset
**offset?
<!-- -->
: number = 0
Number of array elements that should be skipped at the start.
### [**](#skipEmpty)[**](https://undefined/apify/apify-sdk-js/blob/master/node_modules/@crawlee/core/storages/dataset.d.ts#L67)externaloptionalskipEmpty
**skipEmpty?
<!-- -->
: boolean = false
If `true` then the function doesn't return empty items. Note that in this case the returned number of items might be lower than limit parameter and pagination must be done using the `limit` value.
### [**](#skipHidden)[**](https://undefined/apify/apify-sdk-js/blob/master/node_modules/@crawlee/core/storages/dataset.d.ts#L61)externaloptionalskipHidden
**skipHidden?
<!-- -->
: boolean = false
If `true` then the function doesn't return hidden fields (fields starting with "#" character).
### [**](#unwind)[**](https://undefined/apify/apify-sdk-js/blob/master/node_modules/@crawlee/core/storages/dataset.d.ts#L50)externaloptionalunwind
**unwind?
<!-- -->
: string
Specifies a name of the field in the result objects that will be used to unwind the resulting objects. By default, the results are returned as they are.
---
# externalDatasetIteratorOptions<!-- -->
### Hierarchy
* Omit<[DatasetDataOptions](https://docs.apify.com/sdk/js/sdk/js/reference/interface/DatasetDataOptions.md), offset | limit | clean | skipHidden | skipEmpty>
* *DatasetIteratorOptions*
## Index[**](#Index)
### Properties
* [**desc](#desc)
* [**fields](#fields)
* [**unwind](#unwind)
## Properties<!-- -->[**](#Properties)
### [**](#desc)[**](https://undefined/apify/apify-sdk-js/blob/master/node_modules/@crawlee/core/storages/dataset.d.ts#L41)externaloptionalinheriteddesc
**desc?
<!-- -->
: boolean = false
Inherited from Omit.desc
If `true` then the objects are sorted by `createdAt` in descending order. Otherwise they are sorted in ascending order.
### [**](#fields)[**](https://undefined/apify/apify-sdk-js/blob/master/node_modules/@crawlee/core/storages/dataset.d.ts#L45)externaloptionalinheritedfields
**fields?
<!-- -->
: string\[]
Inherited from Omit.fields
An array of field names that will be included in the result. If omitted, all fields are included in the results.
### [**](#unwind)[**](https://undefined/apify/apify-sdk-js/blob/master/node_modules/@crawlee/core/storages/dataset.d.ts#L50)externaloptionalinheritedunwind
**unwind?
<!-- -->
: string
Inherited from Omit.unwind
Specifies a name of the field in the result objects that will be used to unwind the resulting objects. By default, the results are returned as they are.
---
# externalDatasetMapper<!-- --> \<Data, R>
User-function used in the `Dataset.map()` API.
### Callable
* ****DatasetMapper**(item, index): Awaitable\<R>
***
* User-function used in the `Dataset.map()` API.
***
#### Parameters
* ##### externalitem: Data
Current [Dataset](https://docs.apify.com/sdk/js/sdk/js/reference/class/Dataset.md) entry being processed.
* ##### externalindex: number
Position of current [Dataset](https://docs.apify.com/sdk/js/sdk/js/reference/class/Dataset.md) entry.
#### Returns Awaitable\<R>
---
# externalDatasetOptions<!-- -->
## Index[**](#Index)
### Properties
* [**client](#client)
* [**id](#id)
* [**name](#name)
## Properties<!-- -->[**](#Properties)
### [**](#client)[**](https://undefined/apify/apify-sdk-js/blob/master/node_modules/@crawlee/core/storages/dataset.d.ts#L414)externalclient
**client: StorageClient
### [**](#id)[**](https://undefined/apify/apify-sdk-js/blob/master/node_modules/@crawlee/core/storages/dataset.d.ts#L412)externalid
**id: string
### [**](#name)[**](https://undefined/apify/apify-sdk-js/blob/master/node_modules/@crawlee/core/storages/dataset.d.ts#L413)externaloptionalname
**name?
<!-- -->
: string
---
# externalDatasetReducer<!-- --> \<T, Data>
User-function used in the `Dataset.reduce()` API.
### Callable
* ****DatasetReducer**(memo, item, index): Awaitable\<T>
***
* #### Parameters
* ##### externalmemo: T
Previous state of the reduction.
* ##### externalitem: Data
Current [Dataset](https://docs.apify.com/sdk/js/sdk/js/reference/class/Dataset.md) entry being processed.
* ##### externalindex: number
Position of current [Dataset](https://docs.apify.com/sdk/js/sdk/js/reference/class/Dataset.md) entry.
#### Returns Awaitable\<T>
---
# ExitOptions<!-- -->
### Hierarchy
* *ExitOptions*
* [MainOptions](https://docs.apify.com/sdk/js/sdk/js/reference/interface/MainOptions.md)
## Index[**](#Index)
### Properties
* [**exit](#exit)
* [**exitCode](#exitCode)
* [**statusMessage](#statusMessage)
* [**timeoutSecs](#timeoutSecs)
## Properties<!-- -->[**](#Properties)
### [**](#exit)[**](https://github.com/apify/apify-sdk-js/blob/master/packages/apify/src/actor.ts#L1981)optionalexit
**exit?
<!-- -->
: boolean
Call `process.exit()`? Defaults to true
### [**](#exitCode)[**](https://github.com/apify/apify-sdk-js/blob/master/packages/apify/src/actor.ts#L1979)optionalexitCode
**exitCode?
<!-- -->
: number
Exit code, defaults to 0
### [**](#statusMessage)[**](https://github.com/apify/apify-sdk-js/blob/master/packages/apify/src/actor.ts#L1972)optionalstatusMessage
**statusMessage?
<!-- -->
: string
Exit with given status message
### [**](#timeoutSecs)[**](https://github.com/apify/apify-sdk-js/blob/master/packages/apify/src/actor.ts#L1977)optionaltimeoutSecs
**timeoutSecs?
<!-- -->
: number = 30
Amount of time, in seconds, to wait for all event handlers to finish before exiting the process.
---
# InitOptions<!-- -->
### Hierarchy
* *InitOptions*
* [MainOptions](https://docs.apify.com/sdk/js/sdk/js/reference/interface/MainOptions.md)
## Index[**](#Index)
### Properties
* [**storage](#storage)
## Properties<!-- -->[**](#Properties)
### [**](#storage)[**](https://github.com/apify/apify-sdk-js/blob/master/packages/apify/src/actor.ts#L1748)optionalstorage
**storage?
<!-- -->
: StorageClient
---
# externalKeyConsumer<!-- -->
User-function used in the [KeyValueStore.forEachKey](https://docs.apify.com/sdk/js/sdk/js/reference/class/KeyValueStore.md#forEachKey) method.
### Callable
* ****KeyConsumer**(key, index, info): Awaitable\<void>
***
* #### Parameters
* ##### externalkey: string
Current [KeyValueStore](https://docs.apify.com/sdk/js/sdk/js/reference/class/KeyValueStore.md) key being processed.
* ##### externalindex: number
Position of the current key in [KeyValueStore](https://docs.apify.com/sdk/js/sdk/js/reference/class/KeyValueStore.md).
* ##### externalinfo: { size: number }
Information about the current [KeyValueStore](https://docs.apify.com/sdk/js/sdk/js/reference/class/KeyValueStore.md) entry.
* ##### externalsize: number
Size of the value associated with the current key in bytes.
#### Returns Awaitable\<void>
---
# externalKeyValueStoreIteratorOptions<!-- -->
## Index[**](#Index)
### Properties
* [**exclusiveStartKey](#exclusiveStartKey)
## Properties<!-- -->[**](#Properties)
### [**](#exclusiveStartKey)[**](https://undefined/apify/apify-sdk-js/blob/master/node_modules/@crawlee/core/storages/key_value_store.d.ts#L396)externaloptionalexclusiveStartKey
**exclusiveStartKey?
<!-- -->
: string
All keys up to this one (including) are skipped from the result.
---
# externalKeyValueStoreOptions<!-- -->
## Index[**](#Index)
### Properties
* [**client](#client)
* [**id](#id)
* [**name](#name)
* [**storageObject](#storageObject)
## Properties<!-- -->[**](#Properties)
### [**](#client)[**](https://undefined/apify/apify-sdk-js/blob/master/node_modules/@crawlee/core/storages/key_value_store.d.ts#L383)externalclient
**client: StorageClient
### [**](#id)[**](https://undefined/apify/apify-sdk-js/blob/master/node_modules/@crawlee/core/storages/key_value_store.d.ts#L381)externalid
**id: string
### [**](#name)[**](https://undefined/apify/apify-sdk-js/blob/master/node_modules/@crawlee/core/storages/key_value_store.d.ts#L382)externaloptionalname
**name?
<!-- -->
: string
### [**](#storageObject)[**](https://undefined/apify/apify-sdk-js/blob/master/node_modules/@crawlee/core/storages/key_value_store.d.ts#L384)externaloptionalstorageObject
**storageObject?
<!-- -->
: Record\<string, unknown>
---
# externalLoggerOptions<!-- -->
## Index[**](#Index)
### Properties
* [**data](#data)
* [**level](#level)
* [**logger](#logger)
* [**maxDepth](#maxDepth)
* [**maxStringLength](#maxStringLength)
* [**prefix](#prefix)
* [**suffix](#suffix)
## Properties<!-- -->[**](#Properties)
### [**](#data)[**](https://undefined/apify/apify-sdk-js/blob/master/node_modules/@apify/log/src/index.d.ts#L61)externaloptionaldata
**data?
<!-- -->
: Record\<string, unknown>
Additional data to be added to each log line.
### [**](#level)[**](https://undefined/apify/apify-sdk-js/blob/master/node_modules/@apify/log/src/index.d.ts#L46)externaloptionallevel
**level?
<!-- -->
: number
Sets the log level to the given value, preventing messages from less important log levels from being printed to the console. Use in conjunction with the `log.LEVELS` constants.
### [**](#logger)[**](https://undefined/apify/apify-sdk-js/blob/master/node_modules/@apify/log/src/index.d.ts#L59)externaloptionallogger
**logger?
<!-- -->
: [Logger](https://docs.apify.com/sdk/js/sdk/js/reference/class/Logger.md)
Logger implementation to be used. Default one is log.LoggerText to log messages as easily readable strings. Optionally you can use `log.LoggerJson` that formats each log line as a JSON.
### [**](#maxDepth)[**](https://undefined/apify/apify-sdk-js/blob/master/node_modules/@apify/log/src/index.d.ts#L48)externaloptionalmaxDepth
**maxDepth?
<!-- -->
: number
Max depth of data object that will be logged. Anything deeper than the limit will be stripped off.
### [**](#maxStringLength)[**](https://undefined/apify/apify-sdk-js/blob/master/node_modules/@apify/log/src/index.d.ts#L50)externaloptionalmaxStringLength
**maxStringLength?
<!-- -->
: number
Max length of the string to be logged. Longer strings will be truncated.
### [**](#prefix)[**](https://undefined/apify/apify-sdk-js/blob/master/node_modules/@apify/log/src/index.d.ts#L52)externaloptionalprefix
**prefix?
<!-- -->
: null | string
Prefix to be prepended the each logged line.
### [**](#suffix)[**](https://undefined/apify/apify-sdk-js/blob/master/node_modules/@apify/log/src/index.d.ts#L54)externaloptionalsuffix
**suffix?
<!-- -->
: null | string
Suffix that will be appended the each logged line.
---
# MainOptions<!-- -->
### Hierarchy
* [ExitOptions](https://docs.apify.com/sdk/js/sdk/js/reference/interface/ExitOptions.md)
* [InitOptions](https://docs.apify.com/sdk/js/sdk/js/reference/interface/InitOptions.md)
* *MainOptions*
## Index[**](#Index)
### Properties
* [**exit](#exit)
* [**exitCode](#exitCode)
* [**statusMessage](#statusMessage)
* [**storage](#storage)
* [**timeoutSecs](#timeoutSecs)
## Properties<!-- -->[**](#Properties)
### [**](#exit)[**](https://github.com/apify/apify-sdk-js/blob/master/packages/apify/src/actor.ts#L1981)optionalinheritedexit
**exit?
<!-- -->
: boolean
Inherited from ExitOptions.exit
Call `process.exit()`? Defaults to true
### [**](#exitCode)[**](https://github.com/apify/apify-sdk-js/blob/master/packages/apify/src/actor.ts#L1979)optionalinheritedexitCode
**exitCode?
<!-- -->
: number
Inherited from ExitOptions.exitCode
Exit code, defaults to 0
### [**](#statusMessage)[**](https://github.com/apify/apify-sdk-js/blob/master/packages/apify/src/actor.ts#L1972)optionalinheritedstatusMessage
**statusMessage?
<!-- -->
: string
Inherited from ExitOptions.statusMessage
Exit with given status message
### [**](#storage)[**](https://github.com/apify/apify-sdk-js/blob/master/packages/apify/src/actor.ts#L1748)optionalinheritedstorage
**storage?
<!-- -->
: StorageClient
Inherited from InitOptions.storage
### [**](#timeoutSecs)[**](https://github.com/apify/apify-sdk-js/blob/master/packages/apify/src/actor.ts#L1977)optionalinheritedtimeoutSecs
**timeoutSecs?
<!-- -->
: number = 30
Inherited from ExitOptions.timeoutSecs
Amount of time, in seconds, to wait for all event handlers to finish before exiting the process.
---
# MetamorphOptions<!-- -->
## Index[**](#Index)
### Properties
* [**build](#build)
* [**contentType](#contentType)
## Properties<!-- -->[**](#Properties)
### [**](#build)[**](https://github.com/apify/apify-sdk-js/blob/master/packages/apify/src/actor.ts#L1959)optionalbuild
**build?
<!-- -->
: string
Tag or number of the target Actor build to metamorph into (e.g. `beta` or `1.2.345`). If not provided, the run uses build tag or number from the default Actor run configuration (typically `latest`).
### [**](#contentType)[**](https://github.com/apify/apify-sdk-js/blob/master/packages/apify/src/actor.ts#L1953)optionalcontentType
**contentType?
<!-- -->
: string
Content type for the `input`. If not specified, `input` is expected to be an object that will be stringified to JSON and content type set to `application/json; charset=utf-8`. If `options.contentType` is specified, then `input` must be a `String` or `Buffer`.
---
# OpenStorageOptions<!-- -->
## Index[**](#Index)
### Properties
* [**forceCloud](#forceCloud)
## Properties<!-- -->[**](#Properties)
### [**](#forceCloud)[**](https://github.com/apify/apify-sdk-js/blob/master/packages/apify/src/actor.ts#L1990)optionalforceCloud
**forceCloud?
<!-- -->
: boolean = false
If set to `true` then the cloud storage is used even if the `CRAWLEE_STORAGE_DIR` environment variable is set. This way it is possible to combine local and cloud storage.
---
# ProxyConfigurationOptions<!-- -->
### Hierarchy
* ProxyConfigurationOptions
* *ProxyConfigurationOptions*
## Index[**](#Index)
### Properties
* [**apifyProxyCountry](#apifyProxyCountry)
* [**apifyProxyGroups](#apifyProxyGroups)
* [**countryCode](#countryCode)
* [**groups](#groups)
* [**newUrlFunction](#newUrlFunction)
* [**password](#password)
* [**proxyUrls](#proxyUrls)
* [**tieredProxyConfig](#tieredProxyConfig)
* [**tieredProxyUrls](#tieredProxyUrls)
## Properties<!-- -->[**](#Properties)
### [**](#apifyProxyCountry)[**](https://github.com/apify/apify-sdk-js/blob/master/packages/apify/src/proxy_configuration.ts#L59)optionalapifyProxyCountry
**apifyProxyCountry?
<!-- -->
: string
Same option as `countryCode` which can be used to configurate the proxy by UI input schema. You should use the `countryCode` option in your crawler code.
### [**](#apifyProxyGroups)[**](https://github.com/apify/apify-sdk-js/blob/master/packages/apify/src/proxy_configuration.ts#L53)optionalapifyProxyGroups
**apifyProxyGroups?
<!-- -->
: string\[]
Same option as `groups` which can be used to configurate the proxy by UI input schema. You should use the `groups` option in your crawler code.
### [**](#countryCode)[**](https://github.com/apify/apify-sdk-js/blob/master/packages/apify/src/proxy_configuration.ts#L47)optionalcountryCode
**countryCode?
<!-- -->
: string
If set and relevant proxies are available in your Apify account, all proxied requests will use IP addresses that are geolocated to the specified country. For example `GB` for IPs from Great Britain. Note that online services often have their own rules for handling geolocation and thus the country selection is a best attempt at geolocation, rather than a guaranteed hit. This parameter is optional, by default, each proxied request is assigned an IP address from a random country. The country code needs to be a two letter ISO country code. See the [full list of available country codes](https://en.wikipedia.org/wiki/ISO_3166-1_alpha-2#Officially_assigned_code_elements). This parameter is optional, by default, the proxy uses all available proxy servers from all countries. on the Apify cloud, or when using the [Apify CLI](https://github.com/apify/apify-cli).
### [**](#groups)[**](https://github.com/apify/apify-sdk-js/blob/master/packages/apify/src/proxy_configuration.ts#L34)optionalgroups
**groups?
<!-- -->
: string\[]
An array of proxy groups to be used by the [Apify Proxy](https://docs.apify.com/proxy). If not provided, the proxy will select the groups automatically.
### [**](#newUrlFunction)[**](https://undefined/apify/apify-sdk-js/blob/master/node_modules/@crawlee/core/proxy_configuration.d.ts#L20)externaloptionalinheritednewUrlFunction
**newUrlFunction?
<!-- -->
: ProxyConfigurationFunction
Inherited from CoreProxyConfigurationOptions.newUrlFunction
Custom function that allows you to generate the new proxy URL dynamically. It gets the `sessionId` as a parameter and an optional parameter with the `Request` object when applicable. Can return either stringified proxy URL or `null` if the proxy should not be used. Can be asynchronous.
This function is used to generate the URL when [ProxyConfiguration.newUrl](https://docs.apify.com/sdk/js/sdk/js/reference/class/ProxyConfiguration.md#newUrl) or [ProxyConfiguration.newProxyInfo](https://docs.apify.com/sdk/js/sdk/js/reference/class/ProxyConfiguration.md#newProxyInfo) is called.
### [**](#password)[**](https://github.com/apify/apify-sdk-js/blob/master/packages/apify/src/proxy_configuration.ts#L28)optionalpassword
**password?
<!-- -->
: string
User's password for the proxy. By default, it is taken from the `APIFY_PROXY_PASSWORD` environment variable, which is automatically set by the system when running the Actors.
### [**](#proxyUrls)[**](https://undefined/apify/apify-sdk-js/blob/master/node_modules/@crawlee/core/proxy_configuration.d.ts#L13)externaloptionalinheritedproxyUrls
**proxyUrls?
<!-- -->
: string\[]
Inherited from CoreProxyConfigurationOptions.proxyUrls
An array of custom proxy URLs to be rotated. Custom proxies are not compatible with Apify Proxy and an attempt to use both configuration options will cause an error to be thrown on initialize.
### [**](#tieredProxyConfig)[**](https://github.com/apify/apify-sdk-js/blob/master/packages/apify/src/proxy_configuration.ts#L65)optionaltieredProxyConfig
**tieredProxyConfig?
<!-- -->
: Omit<[ProxyConfigurationOptions](https://docs.apify.com/sdk/js/sdk/js/reference/interface/ProxyConfigurationOptions.md), keyof ProxyConfigurationOptions | tieredProxyConfig>\[]
Multiple different ProxyConfigurationOptions stratified into tiers. Crawlee crawlers will switch between those tiers based on the blocked request statistics.
### [**](#tieredProxyUrls)[**](https://undefined/apify/apify-sdk-js/blob/master/node_modules/@crawlee/core/proxy_configuration.d.ts#L32)externaloptionalinheritedtieredProxyUrls
**tieredProxyUrls?
<!-- -->
: (null | string)\[]\[]
Inherited from CoreProxyConfigurationOptions.tieredProxyUrls
An array of custom proxy URLs to be rotated stratified in tiers. This is a more advanced version of `proxyUrls` that allows you to define a hierarchy of proxy URLs If everything goes well, all the requests will be sent through the first proxy URL in the list. Whenever the crawler encounters a problem with the current proxy on the given domain, it will switch to the higher tier for this domain. The crawler probes lower-level proxies at intervals to check if it can make the tier downshift.
This feature is useful when you have a set of proxies with different performance characteristics (speed, price, antibot performance etc.) and you want to use the best one for each domain.
Use `null` as a proxy URL to disable the proxy for the given tier.
---
# ProxyInfo<!-- -->
The main purpose of the ProxyInfo object is to provide information about the current proxy connection used by the crawler for the request. Outside of crawlers, you can get this object by calling [ProxyConfiguration.newProxyInfo](https://docs.apify.com/sdk/js/sdk/js/reference/class/ProxyConfiguration.md#newProxyInfo).
**Example usage:**
const proxyConfiguration = await Actor.createProxyConfiguration({ groups: ['GROUP1', 'GROUP2'] // List of Apify Proxy groups countryCode: 'US', });
// Getting proxyInfo object by calling class method directly const proxyInfo = proxyConfiguration.newProxyInfo();
// In crawler const crawler = new CheerioCrawler({ // ... proxyConfiguration, requestHandler({ proxyInfo }) { // Getting used proxy URL const proxyUrl = proxyInfo.url;
// Getting ID of used Session
const sessionIdentifier = proxyInfo.sessionId;
} })
### Hierarchy
* ProxyInfo
* *ProxyInfo*
## Index[**](#Index)
### Properties
* [**countryCode](#countryCode)
* [**groups](#groups)
* [**hostname](#hostname)
* [**password](#password)
* [**port](#port)
* [**proxyTier](#proxyTier)
* [**sessionId](#sessionId)
* [**url](#url)
* [**username](#username)
## Properties<!-- -->[**](#Properties)
### [**](#countryCode)[**](https://github.com/apify/apify-sdk-js/blob/master/packages/apify/src/proxy_configuration.ts#L117)optionalcountryCode
**countryCode?
<!-- -->
: string
If set and relevant proxies are available in your Apify account, all proxied requests will use IP addresses that are geolocated to the specified country. For example `GB` for IPs from Great Britain. Note that online services often have their own rules for handling geolocation and thus the country selection is a best attempt at geolocation, rather than a guaranteed hit. This parameter is optional, by default, each proxied request is assigned an IP address from a random country. The country code needs to be a two letter ISO country code. See the [full list of available country codes](https://en.wikipedia.org/wiki/ISO_3166-1_alpha-2#Officially_assigned_code_elements). This parameter is optional, by default, the proxy uses all available proxy servers from all countries.
### [**](#groups)[**](https://github.com/apify/apify-sdk-js/blob/master/packages/apify/src/proxy_configuration.ts#L105)groups
**groups: string\[]
An array of proxy groups to be used by the [Apify Proxy](https://docs.apify.com/proxy). If not provided, the proxy will select the groups automatically.
### [**](#hostname)[**](https://undefined/apify/apify-sdk-js/blob/master/node_modules/@crawlee/core/proxy_configuration.d.ts#L88)externalinheritedhostname
**hostname: string
Inherited from CoreProxyInfo.hostname
Hostname of your proxy.
### [**](#password)[**](https://github.com/apify/apify-sdk-js/blob/master/packages/apify/src/proxy_configuration.ts#L124)password
**password: string
Overrides CoreProxyInfo.password
User's password for the proxy. By default, it is taken from the `APIFY_PROXY_PASSWORD` environment variable, which is automatically set by the system when running the Actors on the Apify cloud, or when using the [Apify CLI](https://github.com/apify/apify-cli).
### [**](#port)[**](https://undefined/apify/apify-sdk-js/blob/master/node_modules/@crawlee/core/proxy_configuration.d.ts#L92)externalinheritedport
**port: string | number
Inherited from CoreProxyInfo.port
Proxy port.
### [**](#proxyTier)[**](https://undefined/apify/apify-sdk-js/blob/master/node_modules/@crawlee/core/proxy_configuration.d.ts#L96)externaloptionalinheritedproxyTier
**proxyTier?
<!-- -->
: number
Inherited from CoreProxyInfo.proxyTier
Proxy tier for the current proxy, if applicable (only for `tieredProxyUrls`).
### [**](#sessionId)[**](https://undefined/apify/apify-sdk-js/blob/master/node_modules/@crawlee/core/proxy_configuration.d.ts#L72)externaloptionalinheritedsessionId
**sessionId?
<!-- -->
: string
Inherited from CoreProxyInfo.sessionId
The identifier of used Session, if used.
### [**](#url)[**](https://undefined/apify/apify-sdk-js/blob/master/node_modules/@crawlee/core/proxy_configuration.d.ts#L76)externalinheritedurl
**url: string
Inherited from CoreProxyInfo.url
The URL of the proxy.
### [**](#username)[**](https://undefined/apify/apify-sdk-js/blob/master/node_modules/@crawlee/core/proxy_configuration.d.ts#L80)externaloptionalinheritedusername
**username?
<!-- -->
: string
Inherited from CoreProxyInfo.username
Username for the proxy.
---
# externalQueueOperationInfo<!-- -->
A helper class that is used to report results from various [RequestQueue](https://docs.apify.com/sdk/js/sdk/js/reference/class/RequestQueue.md) functions as well as enqueueLinks.
## Index[**](#Index)
### Properties
* [**requestId](#requestId)
* [**wasAlreadyHandled](#wasAlreadyHandled)
* [**wasAlreadyPresent](#wasAlreadyPresent)
## Properties<!-- -->[**](#Properties)
### [**](#requestId)[**](https://undefined/apify/apify-sdk-js/blob/master/node_modules/@crawlee/types/storages.d.ts#L12)externalrequestId
**requestId: string
The ID of the added request
### [**](#wasAlreadyHandled)[**](https://undefined/apify/apify-sdk-js/blob/master/node_modules/@crawlee/types/storages.d.ts#L10)externalwasAlreadyHandled
**wasAlreadyHandled: boolean
Indicates if request was already marked as handled.
### [**](#wasAlreadyPresent)[**](https://undefined/apify/apify-sdk-js/blob/master/node_modules/@crawlee/types/storages.d.ts#L8)externalwasAlreadyPresent
**wasAlreadyPresent: boolean
Indicates if request was already present in the queue.
---
# RebootOptions<!-- -->
---
# externalRecordOptions<!-- -->
## Index[**](#Index)
### Properties
* [**contentType](#contentType)
## Properties<!-- -->[**](#Properties)
### [**](#contentType)[**](https://undefined/apify/apify-sdk-js/blob/master/node_modules/@crawlee/core/storages/key_value_store.d.ts#L390)externaloptionalcontentType
**contentType?
<!-- -->
: string
Specifies a custom MIME content type of the record.
---
# externalRequestQueueOperationOptions<!-- -->
## Index[**](#Index)
### Properties
* [**forefront](#forefront)
## Properties<!-- -->[**](#Properties)
### [**](#forefront)[**](https://undefined/apify/apify-sdk-js/blob/master/node_modules/@crawlee/core/storages/request_provider.d.ts#L256)externaloptionalforefront
**forefront?
<!-- -->
: boolean = false
If set to `true`:
* while adding the request to the queue: the request will be added to the foremost position in the queue.
* while reclaiming the request: the request will be placed to the beginning of the queue, so that it's returned in the next call to [RequestQueue.fetchNextRequest](https://docs.apify.com/sdk/js/sdk/js/reference/class/RequestQueue.md#fetchNextRequest). By default, it's put to the end of the queue.
In case the request is already present in the queue, this option has no effect.
If more requests are added with this option at once, their order in the following `fetchNextRequest` call is arbitrary.
---
# externalRequestQueueOptions<!-- -->
* **@deprecated**
Use RequestProviderOptions instead.
### Hierarchy
* RequestProviderOptions
* *RequestQueueOptions*
## Index[**](#Index)
### Properties
* [**client](#client)
* [**id](#id)
* [**name](#name)
* [**proxyConfiguration](#proxyConfiguration)
## Properties<!-- -->[**](#Properties)
### [**](#client)[**](https://undefined/apify/apify-sdk-js/blob/master/node_modules/@crawlee/core/storages/request_provider.d.ts#L221)externalinheritedclient
**client: StorageClient
Inherited from RequestProviderOptions.client
### [**](#id)[**](https://undefined/apify/apify-sdk-js/blob/master/node_modules/@crawlee/core/storages/request_provider.d.ts#L219)externalinheritedid
**id: string
Inherited from RequestProviderOptions.id
### [**](#name)[**](https://undefined/apify/apify-sdk-js/blob/master/node_modules/@crawlee/core/storages/request_provider.d.ts#L220)externaloptionalinheritedname
**name?
<!-- -->
: string
Inherited from RequestProviderOptions.name
### [**](#proxyConfiguration)[**](https://undefined/apify/apify-sdk-js/blob/master/node_modules/@crawlee/core/storages/request_provider.d.ts#L227)externaloptionalinheritedproxyConfiguration
**proxyConfiguration?
<!-- -->
: ProxyConfiguration
Inherited from RequestProviderOptions.proxyConfiguration
Used to pass the proxy configuration for the `requestsFromUrl` objects. Takes advantage of the internal address rotation and authentication process. If undefined, the `requestsFromUrl` requests will be made without proxy.
---
# WebhookOptions<!-- -->
## Index[**](#Index)
### Properties
* [**eventTypes](#eventTypes)
* [**idempotencyKey](#idempotencyKey)
* [**payloadTemplate](#payloadTemplate)
* [**requestUrl](#requestUrl)
## Properties<!-- -->[**](#Properties)
### [**](#eventTypes)[**](https://github.com/apify/apify-sdk-js/blob/master/packages/apify/src/actor.ts#L1920)eventTypes
**eventTypes: readonly
<!-- -->
WebhookEventType\[]
Array of event types, which you can set for Actor run, see the [Actor run events](https://docs.apify.com/webhooks/events#actor-run) in the Apify doc.
### [**](#idempotencyKey)[**](https://github.com/apify/apify-sdk-js/blob/master/packages/apify/src/actor.ts#L1943)optionalidempotencyKey
**idempotencyKey?
<!-- -->
: string
Idempotency key enables you to ensure that a webhook will not be added multiple times in case of an Actor restart or other situation that would cause the `addWebhook()` function to be called again. We suggest using the Actor run ID as the idempotency key. You can get the run ID by calling [Actor.getEnv](https://docs.apify.com/sdk/js/sdk/js/reference/class/Actor.md#getEnv) function.
### [**](#payloadTemplate)[**](https://github.com/apify/apify-sdk-js/blob/master/packages/apify/src/actor.ts#L1935)optionalpayloadTemplate
**payloadTemplate?
<!-- -->
: string
Payload template is a JSON-like string that describes the structure of the webhook POST request payload. It uses JSON syntax, extended with a double curly braces syntax for injecting variables `{{variable}}`. Those variables are resolved at the time of the webhook's dispatch, and a list of available variables with their descriptions is available in the [Apify webhook documentation](https://docs.apify.com/webhooks). If `payloadTemplate` is omitted, the default payload template is used ([view docs](https://docs.apify.com/webhooks/actions#payload-template)).
### [**](#requestUrl)[**](https://github.com/apify/apify-sdk-js/blob/master/packages/apify/src/actor.ts#L1925)requestUrl
**requestUrl: string
URL which will be requested using HTTP POST request, when Actor run will reach the set event type.
---
[Skip to main content](#__docusaurus_skipToContent_fallback)
[](https://docs.apify.com)
[Academy](https://docs.apify.com/academy)[Platform](https://docs.apify.com/platform)
[API](https://docs.apify.com/api)
* [Reference](https://docs.apify.com/api/v2)
* [Client for JavaScript](https://docs.apify.com/api/client/js/)
* [Client for Python](https://docs.apify.com/api/client/python/)
[SDK](https://docs.apify.com/sdk)
* [SDK for JavaScript](https://docs.apify.com/sdk/js/)
* [SDK for Python](https://docs.apify.com/sdk/python/)
[CLI](https://docs.apify.com/cli/)
[Open source](https://docs.apify.com/open-source)
* [Crawlee](https://crawlee.dev)
* [Got Scraping](https://github.com/apify/got-scraping)
* [Fingerprint Suite](https://github.com/apify/fingerprint-suite)
* [Apify on GitHub](https://github.com/apify)
* [Actor whitepaper](https://whitepaper.actor)
[Discord](https://discord.com/invite/jyEM2PRvMU "Chat on Discord")[Get started](https://console.apify.com)
[SDK for JavaScript](https://docs.apify.com/sdk/js/sdk/js/.md)
[Docs](https://docs.apify.com/sdk/js/sdk/js/docs/guides/apify-platform.md)[Examples](https://docs.apify.com/sdk/js/sdk/js/docs/examples)[Reference](https://docs.apify.com/sdk/js/sdk/js/reference.md)[Changelog](https://docs.apify.com/sdk/js/sdk/js/docs/changelog.md)[GitHub](https://github.com/apify/apify-sdk-js)
[3.4](https://docs.apify.com/sdk/js/sdk/js/docs/guides/apify-platform.md)
* [Next](https://docs.apify.com/sdk/js/sdk/js/docs/next/guides/apify-platform)
* [3.4](https://docs.apify.com/sdk/js/sdk/js/docs/guides/apify-platform.md)
* [3.3](https://docs.apify.com/sdk/js/sdk/js/docs/3.3/guides/apify-platform)
* [3.2](https://docs.apify.com/sdk/js/sdk/js/docs/3.2/guides/apify-platform)
* [3.1](https://docs.apify.com/sdk/js/sdk/js/docs/3.1/guides/apify-platform)
* [3.0](https://docs.apify.com/sdk/js/sdk/js/docs/3.0/guides/apify-platform)
* [2.3](https://docs.apify.com/sdk/js/sdk/js/docs/2.3/guides/motivation)
* [1.3](https://docs.apify.com/sdk/js/sdk/js/docs/1.3/guides/motivation)
# Apify SDK for JavaScript and Node.js
# Apify SDK for<!-- --> JavaScript and Node.js
## Toolkit for building<!-- --> [Actors](https://docs.apify.com/actors)—serverless microservices running (not only) on the Apify platform.
[Get started](https://docs.apify.com/sdk/js/sdk/js/docs/guides/apify-platform.md)[GitHub](https://ghbtns.com/github-btn.html?user=apify\&repo=apify-sdk-js\&type=star\&count=true\&size=large)

npx apify-cli create my-crawler
## Apify SDK v3 is out 🚀<br />What's new? Read below 👇
Four years ago, Apify released its<!-- --> **open-source Node.js** library for web scraping and automation, **Apify SDK**. It became popular among the community, but there was a problem. Despite being open-source,<!-- --> **the library's name caused users to think its features were restricted to the Apify platform**, which was never the case.
With this in mind, we decided to split Apify SDK into two libraries,[** Crawlee**](https://crawlee.dev) <!-- -->and **Apify SDK v3**.** Crawlee** will retain all the **crawling and scraping-related tools **and will always strive to be the best web scraping library for its community. At the same time,<!-- --> **Apify SDK** will continue to exist, but keep only the Apify-specific features related to<!-- --> **building actors** on the<!-- --> [**Apify platform**](https://apify.com).

## How it works now
### Outside of the Apify platform
If you want to use the **crawling functionality** of Apify SDK v2 outside of the Apify platform, head to<!-- --> [**Crawlee documentation**](https://crawlee.dev) <!-- -->to get started. The interface is almost exactly the same as the original SDK, but we've made a lot of improvements under the hood to improve the developer experience.
npm install crawlee
### On the Apify platform
In **Apify SDK v2**, both the<!-- --> **crawling and actor building logic were mixed** <!-- -->together. This made it easy to build crawlers on the Apify platform, but confusing to build anything else.** <!-- -->Apify SDK v3 includes only the Apify platform specific functionality**. To build crawlers on the Apify platform, you need to combine it with<!-- --> [**Crawlee**](https://crawlee.dev). Or you can use it standalone for other projects.
### Build a crawler like you're used to
The following example shows how to build an<!-- --> **SDK-v2-like crawler on the Apify platform**. To use<!-- --> `PlaywrightCrawler` you need to install 3 libraries. Apify SDK v3, Crawlee and Playwright. In v2, you only needed to install Apify SDK v2 and Playwright.
npm install apify crawlee playwright
Don't forget about module imports
To run the example, add a `"type": "module"`
<!-- -->
clause into your `package.json` or copy it into a file with an `.mjs` suffix. This enables `import` statements in Node.js. See
<!-- -->
[Node.js docs](https://nodejs.org/dist/latest-v16.x/docs/api/esm.html#enabling)
<!-- -->
for more information.
// Apify SDK v3 uses named exports instead of the Apify object. // You can import Dataset, KeyValueStore and more. import { Actor } from 'apify'; // We moved all the crawling components to Crawlee. // See the documentation on https://crawlee.dev import { PlaywrightCrawler } from 'crawlee';
// Initialize the actor on the platform. This function connects your // actor to platform events, storages and API. It replaces Apify.main() await Actor.init();
const crawler = new PlaywrightCrawler({
// handle(Page|Request)Functions of all Crawlers
// are now simply called a requestHandler.
async requestHandler({ request, page, enqueueLinks }) {
const title = await page.title();
console.log(Title of ${request.loadedUrl} is '${title}');
// Use Actor instead of the Apify object to save data.
await Actor.pushData({ title, url: request.loadedUrl });
// We simplified enqueuing links a lot, see the docs.
// This way the function adds only links to same hostname.
await enqueueLinks();
}
});
// You can now add requests to the queue directly from the run function. // No need to create an instance of the queue separately. await crawler.run(['https://crawlee.dev']);
// This function disconnects the actor from the platform // and optionally sends an exit message. await Actor.exit();
upgrading guide
For more information, see the[ <!-- -->upgrading guide](https://docs.apify.com/sdk/js/docs/upgrading/upgrading-to-v3) <!-- -->that explains all the changes in great detail.
### Build an actor without Crawlee
If your actors are not crawlers, or you want to simply wrap existing code and turn it into an actor on the Apify platform, you can do that with standalone Apify SDK v3.
npm install apify
import { Actor } from 'apify';
// Initialize the actor on the platform. This function connects your // actor to platform events, storages and API. It replaces Apify.main() await Actor.init();
const input = await Actor.getInput()
// Do something with the input in your own code. const output = await magicallyCreateOutput(input)
await Actor.setValue('my-output', output);
// This function disconnects the actor from the platform // and optionally sends an exit message. await Actor.exit();
Learn
* [Academy](https://docs.apify.com/academy)
* [Platform](https://docs.apify.com/platform)
API
* [Reference](https://docs.apify.com/api/v2)
* [Client for JavaScript](https://docs.apify.com/api/client/js/)
* [Client for Python](https://docs.apify.com/api/client/python/)
SDK
* [SDK for JavaScript](https://docs.apify.com/sdk/js/)
* [SDK for Python](https://docs.apify.com/sdk/python/)
Other
* [CLI](https://docs.apify.com/cli/)
* [Open source](https://docs.apify.com/open-source)
More
* [Crawlee](https://crawlee.dev)
* [GitHub](https://github.com/apify)
* [Discord](https://discord.com/invite/jyEM2PRvMU)
* [Trust Center](https://trust.apify.com)
[](https://apify.com)
---
# SDK for Python | Apify Documentation
## sdk
- [Search the documentation](https://docs.apify.com/sdk/python/search.md)
- [Changelog](https://docs.apify.com/sdk/python/docs/changelog.md): All notable changes to this project will be documented in this file.
- [Accessing Apify API](https://docs.apify.com/sdk/python/docs/concepts/access-apify-api.md): The Apify SDK contains many useful features for making Actor development easier. However, it does not cover all the features the Apify API offers.
- [Actor configuration](https://docs.apify.com/sdk/python/docs/concepts/actor-configuration.md): The Actor class gets configured using the Configuration class, which initializes itself based on the provided environment variables.
- [Actor events & state persistence](https://docs.apify.com/sdk/python/docs/concepts/actor-events.md): During its runtime, the Actor receives Actor events sent by the Apify platform or generated by the Apify SDK itself.
- [Actor input](https://docs.apify.com/sdk/python/docs/concepts/actor-input.md): The Actor gets its input from the input record in its default key-value store.
- [Actor lifecycle](https://docs.apify.com/sdk/python/docs/concepts/actor-lifecycle.md): This guide explains how an Apify Actor starts, runs, and shuts down, describing the complete Actor lifecycle. For information about the core concepts such as Actors, the Apify Console, storages, and events, check out the Apify platform documentation.
- [Interacting with other Actors](https://docs.apify.com/sdk/python/docs/concepts/interacting-with-other-actors.md): There are several methods that interact with other Actors and Actor tasks on the Apify platform.
- [Logging](https://docs.apify.com/sdk/python/docs/concepts/logging.md): The Apify SDK is logging useful information through the logging module from Python's standard library, into the logger with the name apify.
- [Pay-per-event monetization](https://docs.apify.com/sdk/python/docs/concepts/pay-per-event.md): Monetize your Actors using the pay-per-event pricing model
- [Proxy management](https://docs.apify.com/sdk/python/docs/concepts/proxy-management.md): IP address blocking is one of the oldest and most effective ways of preventing access to a website. It is therefore paramount for a good web scraping library to provide easy to use but powerful tools which can work around IP blocking. The most powerful weapon in your anti IP blocking arsenal is a proxy server.
- [Running webserver in your Actor](https://docs.apify.com/sdk/python/docs/concepts/running-webserver.md): Each Actor run on the Apify platform is assigned a unique hard-to-guess URL (for example https://8segt5i81sokzm.runs.apify.net), which enables HTTP access to an optional web server running inside the Actor run's container.
- [Working with storages](https://docs.apify.com/sdk/python/docs/concepts/storages.md): The Actor class provides methods to work either with the default storages of the Actor, or with any other storage, named or unnamed.
- [Creating webhooks](https://docs.apify.com/sdk/python/docs/concepts/webhooks.md): Webhooks allow you to configure the Apify platform to perform an action when a certain event occurs. For example, you can use them to start another Actor when the current run finishes or fails.
- [Using BeautifulSoup with HTTPX](https://docs.apify.com/sdk/python/docs/guides/beautifulsoup-httpx.md): In this guide, you'll learn how to use the BeautifulSoup library with the HTTPX library in your Apify Actors.
- [Using Crawlee](https://docs.apify.com/sdk/python/docs/guides/crawlee.md): In this guide you'll learn how to use the Crawlee library in your Apify Actors.
- [Using Parsel with Impit](https://docs.apify.com/sdk/python/docs/guides/parsel-impit.md): In this guide, you'll learn how to combine the Parsel and Impit libraries when building Apify Actors.
- [Using Playwright](https://docs.apify.com/sdk/python/docs/guides/playwright.md): Playwright is a tool for web automation and testing that can also be used for web scraping. It allows you to control a web browser programmatically and interact with web pages just as a human would.
- [Using Scrapy](https://docs.apify.com/sdk/python/docs/guides/scrapy.md): Scrapy is an open-source web scraping framework for Python. It provides tools for defining scrapers, extracting data from web pages, following links, and handling pagination. With the Apify SDK, Scrapy projects can be converted into Apify Actors, integrated with Apify storages, and executed on the Apify platform.
- [Using Selenium](https://docs.apify.com/sdk/python/docs/guides/selenium.md): Selenium is a tool for web automation and testing that can also be used for web scraping. It allows you to control a web browser programmatically and interact with web pages just as a human would.
- [Actor structure](https://docs.apify.com/sdk/python/docs/overview/actor-structure.md): All Python Actor templates follow the same structure.
- [Introduction](https://docs.apify.com/sdk/python/docs/overview/introduction.md): The Apify SDK for Python is the official library for creating Apify Actors using Python.
- [Running Actors locally](https://docs.apify.com/sdk/python/docs/overview/running-actors-locally.md): In this page, you'll learn how to create and run Apify Actors locally on your computer.
- [Upgrading to v2](https://docs.apify.com/sdk/python/docs/upgrading/upgrading-to-v2.md): This page summarizes the breaking changes between Apify Python SDK v1.x and v2.0.
- [Upgrading to v3](https://docs.apify.com/sdk/python/docs/upgrading/upgrading-to-v3.md): This page summarizes the breaking changes between Apify Python SDK v2.x and v3.0.
- [apify-sdk-python](https://docs.apify.com/sdk/python/reference.md)
- [_FetchedPricingInfoDict](https://docs.apify.com/sdk/python/reference/class/_FetchedPricingInfoDict.md)
- [_RequestDetails](https://docs.apify.com/sdk/python/reference/class/_RequestDetails.md)
- [_RequestsFromUrlInput](https://docs.apify.com/sdk/python/reference/class/_RequestsFromUrlInput.md)
- [_SimpleUrlInput](https://docs.apify.com/sdk/python/reference/class/_SimpleUrlInput.md)
- [AbortingEvent](https://docs.apify.com/sdk/python/reference/class/AbortingEvent.md)
- [Actor](https://docs.apify.com/sdk/python/reference/class/Actor.md): The core class for building Actors on the Apify platform.
- [ActorChargeEvent](https://docs.apify.com/sdk/python/reference/class/ActorChargeEvent.md)
- [ActorDatasetPushPipeline](https://docs.apify.com/sdk/python/reference/class/ActorDatasetPushPipeline.md): A Scrapy pipeline for pushing items to an Actor's default dataset.
- [ActorLogFormatter](https://docs.apify.com/sdk/python/reference/class/ActorLogFormatter.md)
- [ActorPricingInfo](https://docs.apify.com/sdk/python/reference/class/ActorPricingInfo.md): Result of the `ChargingManager.get_pricing_info` method.
- [ActorRun](https://docs.apify.com/sdk/python/reference/class/ActorRun.md)
- [ActorRunMeta](https://docs.apify.com/sdk/python/reference/class/ActorRunMeta.md)
- [ActorRunOptions](https://docs.apify.com/sdk/python/reference/class/ActorRunOptions.md)
- [ActorRunStats](https://docs.apify.com/sdk/python/reference/class/ActorRunStats.md)
- [ActorRunUsage](https://docs.apify.com/sdk/python/reference/class/ActorRunUsage.md)
- [AddRequestsResponse](https://docs.apify.com/sdk/python/reference/class/AddRequestsResponse.md): Model for a response to add requests to a queue.
- [AliasResolver](https://docs.apify.com/sdk/python/reference/class/AliasResolver.md): Class for handling aliases.
- [ApifyCacheStorage](https://docs.apify.com/sdk/python/reference/class/ApifyCacheStorage.md): A Scrapy cache storage that uses the Apify `KeyValueStore` to store responses.
- [ApifyDatasetClient](https://docs.apify.com/sdk/python/reference/class/ApifyDatasetClient.md): An Apify platform implementation of the dataset client.
- [ApifyEventManager](https://docs.apify.com/sdk/python/reference/class/ApifyEventManager.md): Event manager for the Apify platform.
- [ApifyFileSystemKeyValueStoreClient](https://docs.apify.com/sdk/python/reference/class/ApifyFileSystemKeyValueStoreClient.md): Apify-specific implementation of the `FileSystemKeyValueStoreClient`.
- [ApifyFileSystemStorageClient](https://docs.apify.com/sdk/python/reference/class/ApifyFileSystemStorageClient.md): Apify-specific implementation of the file system storage client.
- [ApifyHttpProxyMiddleware](https://docs.apify.com/sdk/python/reference/class/ApifyHttpProxyMiddleware.md): Apify HTTP proxy middleware for Scrapy.
- [ApifyKeyValueStoreClient](https://docs.apify.com/sdk/python/reference/class/ApifyKeyValueStoreClient.md): An Apify platform implementation of the key-value store client.
- [ApifyKeyValueStoreMetadata](https://docs.apify.com/sdk/python/reference/class/ApifyKeyValueStoreMetadata.md): Extended key-value store metadata model for Apify platform.
- [ApifyRequestList](https://docs.apify.com/sdk/python/reference/class/ApifyRequestList.md): Extends crawlee RequestList.
- [ApifyRequestQueueClient](https://docs.apify.com/sdk/python/reference/class/ApifyRequestQueueClient.md): Base class for Apify platform implementations of the request queue client.
- [ApifyRequestQueueMetadata](https://docs.apify.com/sdk/python/reference/class/ApifyRequestQueueMetadata.md)
- [ApifyRequestQueueSharedClient](https://docs.apify.com/sdk/python/reference/class/ApifyRequestQueueSharedClient.md): An Apify platform implementation of the request queue client.
- [ApifyRequestQueueSingleClient](https://docs.apify.com/sdk/python/reference/class/ApifyRequestQueueSingleClient.md): An Apify platform implementation of the request queue client with limited capability.
- [ApifyScheduler](https://docs.apify.com/sdk/python/reference/class/ApifyScheduler.md): A Scrapy scheduler that uses the Apify `RequestQueue` to manage requests.
- [ApifyStorageClient](https://docs.apify.com/sdk/python/reference/class/ApifyStorageClient.md): Apify platform implementation of the storage client.
- [AsyncThread](https://docs.apify.com/sdk/python/reference/class/AsyncThread.md): Class for running an asyncio event loop in a separate thread.
- [CachedRequest](https://docs.apify.com/sdk/python/reference/class/CachedRequest.md): Pydantic model for cached request information.
- [ChargeResult](https://docs.apify.com/sdk/python/reference/class/ChargeResult.md): Result of the `ChargingManager.charge` method.
- [ChargingManager](https://docs.apify.com/sdk/python/reference/class/ChargingManager.md): Provides fine-grained access to pay-per-event functionality.
- [ChargingManagerImplementation](https://docs.apify.com/sdk/python/reference/class/ChargingManagerImplementation.md): Implementation of the `ChargingManager` Protocol - this is only meant to be instantiated internally.
- [ChargingStateItem](https://docs.apify.com/sdk/python/reference/class/ChargingStateItem.md)
- [Configuration](https://docs.apify.com/sdk/python/reference/class/Configuration.md): A class for specifying the configuration of an Actor.
- [Dataset](https://docs.apify.com/sdk/python/reference/class/Dataset.md): Dataset is a storage for managing structured tabular data.
- [DatasetItemsListPage](https://docs.apify.com/sdk/python/reference/class/DatasetItemsListPage.md): Model for a single page of dataset items returned from a collection list method.
- [DatasetMetadata](https://docs.apify.com/sdk/python/reference/class/DatasetMetadata.md): Model for a dataset metadata.
- [DeprecatedEvent](https://docs.apify.com/sdk/python/reference/class/DeprecatedEvent.md)
- [EventAbortingData](https://docs.apify.com/sdk/python/reference/class/EventAbortingData.md): Data for the aborting event.
- [EventExitData](https://docs.apify.com/sdk/python/reference/class/EventExitData.md): Data for the exit event.
- [EventManager](https://docs.apify.com/sdk/python/reference/class/EventManager.md): Manage events and their listeners, enabling registration, emission, and execution control.
- [EventMigratingData](https://docs.apify.com/sdk/python/reference/class/EventMigratingData.md): Data for the migrating event.
- [EventPersistStateData](https://docs.apify.com/sdk/python/reference/class/EventPersistStateData.md): Data for the persist state event.
- [EventSystemInfoData](https://docs.apify.com/sdk/python/reference/class/EventSystemInfoData.md): Data for the system info event.
- [EventWithoutData](https://docs.apify.com/sdk/python/reference/class/EventWithoutData.md)
- [ExitEvent](https://docs.apify.com/sdk/python/reference/class/ExitEvent.md)
- [FileSystemStorageClient](https://docs.apify.com/sdk/python/reference/class/FileSystemStorageClient.md): File system implementation of the storage client.
- [FlatPricePerMonthActorPricingInfo](https://docs.apify.com/sdk/python/reference/class/FlatPricePerMonthActorPricingInfo.md)
- [FreeActorPricingInfo](https://docs.apify.com/sdk/python/reference/class/FreeActorPricingInfo.md)
- [KeyValueStore](https://docs.apify.com/sdk/python/reference/class/KeyValueStore.md): Key-value store is a storage for reading and writing data records with unique key identifiers.
- [KeyValueStoreKeyInfo](https://docs.apify.com/sdk/python/reference/class/KeyValueStoreKeyInfo.md): Model for a key-value store key info.
- [KeyValueStoreListKeysPage](https://docs.apify.com/sdk/python/reference/class/KeyValueStoreListKeysPage.md): Model for listing keys in the key-value store.
- [KeyValueStoreMetadata](https://docs.apify.com/sdk/python/reference/class/KeyValueStoreMetadata.md): Model for a key-value store metadata.
- [KeyValueStoreRecord](https://docs.apify.com/sdk/python/reference/class/KeyValueStoreRecord.md): Model for a key-value store record.
- [KeyValueStoreRecordMetadata](https://docs.apify.com/sdk/python/reference/class/KeyValueStoreRecordMetadata.md): Model for a key-value store record metadata.
- [LocalEventManager](https://docs.apify.com/sdk/python/reference/class/LocalEventManager.md): Event manager for local environments.
- [MemoryStorageClient](https://docs.apify.com/sdk/python/reference/class/MemoryStorageClient.md): Memory implementation of the storage client.
- [MigratingEvent](https://docs.apify.com/sdk/python/reference/class/MigratingEvent.md)
- [PayPerEventActorPricingInfo](https://docs.apify.com/sdk/python/reference/class/PayPerEventActorPricingInfo.md)
- [PersistStateEvent](https://docs.apify.com/sdk/python/reference/class/PersistStateEvent.md)
- [PricePerDatasetItemActorPricingInfo](https://docs.apify.com/sdk/python/reference/class/PricePerDatasetItemActorPricingInfo.md)
- [PricingInfoItem](https://docs.apify.com/sdk/python/reference/class/PricingInfoItem.md)
- [PricingPerEvent](https://docs.apify.com/sdk/python/reference/class/PricingPerEvent.md)
- [ProcessedRequest](https://docs.apify.com/sdk/python/reference/class/ProcessedRequest.md): Represents a processed request.
- [ProlongRequestLockResponse](https://docs.apify.com/sdk/python/reference/class/ProlongRequestLockResponse.md): Response to prolong request lock calls.
- [ProxyConfiguration](https://docs.apify.com/sdk/python/reference/class/ProxyConfiguration.md): Configures a connection to a proxy server with the provided options.
- [ProxyInfo](https://docs.apify.com/sdk/python/reference/class/ProxyInfo.md): Provides information about a proxy connection that is used for requests.
- [Request](https://docs.apify.com/sdk/python/reference/class/Request.md): Represents a request in the Crawlee framework, containing the necessary information for crawling operations.
- [RequestLoader](https://docs.apify.com/sdk/python/reference/class/RequestLoader.md): An abstract class defining the interface for classes that provide access to a read-only stream of requests.
- [RequestManager](https://docs.apify.com/sdk/python/reference/class/RequestManager.md): Base class that extends `RequestLoader` with the capability to enqueue new requests and reclaim failed ones.
- [RequestManagerTandem](https://docs.apify.com/sdk/python/reference/class/RequestManagerTandem.md): Implements a tandem behaviour for a pair of `RequestLoader` and `RequestManager`.
- [RequestQueue](https://docs.apify.com/sdk/python/reference/class/RequestQueue.md): Request queue is a storage for managing HTTP requests.
- [RequestQueueHead](https://docs.apify.com/sdk/python/reference/class/RequestQueueHead.md): Model for request queue head.
- [RequestQueueMetadata](https://docs.apify.com/sdk/python/reference/class/RequestQueueMetadata.md): Model for a request queue metadata.
- [RequestQueueStats](https://docs.apify.com/sdk/python/reference/class/RequestQueueStats.md)
- [SitemapRequestLoader](https://docs.apify.com/sdk/python/reference/class/SitemapRequestLoader.md): A request loader that reads URLs from sitemap(s).
- [SmartApifyStorageClient](https://docs.apify.com/sdk/python/reference/class/SmartApifyStorageClient.md): Storage client that automatically selects cloud or local storage client based on the environment.
- [SqlStorageClient](https://docs.apify.com/sdk/python/reference/class/SqlStorageClient.md): SQL implementation of the storage client.
- [Storage](https://docs.apify.com/sdk/python/reference/class/Storage.md): Base class for storages.
- [StorageClient](https://docs.apify.com/sdk/python/reference/class/StorageClient.md): Base class for storage clients.
- [StorageMetadata](https://docs.apify.com/sdk/python/reference/class/StorageMetadata.md): Represents the base model for storage metadata.
- [SystemInfoEvent](https://docs.apify.com/sdk/python/reference/class/SystemInfoEvent.md)
- [SystemInfoEventData](https://docs.apify.com/sdk/python/reference/class/SystemInfoEventData.md)
- [UnknownEvent](https://docs.apify.com/sdk/python/reference/class/UnknownEvent.md)
- [Webhook](https://docs.apify.com/sdk/python/reference/class/Webhook.md)
- [Event](https://docs.apify.com/sdk/python/reference/enum/Event.md): Names of all possible events that can be emitted using an `EventManager`.
- [Apify SDK for Python is a toolkit for building Actors](https://docs.apify.com/sdk/python/index.md)
---
# Full Documentation Content
[Skip to main content](#__docusaurus_skipToContent_fallback)
[](https://docs.apify.com)
[Academy](https://docs.apify.com/academy)[Platform](https://docs.apify.com/platform)
[API](https://docs.apify.com/api)
* [Reference](https://docs.apify.com/api/v2)
* [Client for JavaScript](https://docs.apify.com/api/client/js/)
* [Client for Python](https://docs.apify.com/api/client/python/)
[SDK](https://docs.apify.com/sdk)
* [SDK for JavaScript](https://docs.apify.com/sdk/js/)
* [SDK for Python](https://docs.apify.com/sdk/python/)
[CLI](https://docs.apify.com/cli/)
[Open source](https://docs.apify.com/open-source)
* [Crawlee](https://crawlee.dev)
* [Got Scraping](https://github.com/apify/got-scraping)
* [Fingerprint Suite](https://github.com/apify/fingerprint-suite)
* [Apify on GitHub](https://github.com/apify)
* [Actor whitepaper](https://whitepaper.actor)
[Discord](https://discord.com/invite/jyEM2PRvMU "Chat on Discord")[Get started](https://console.apify.com)
[SDK for Python](https://docs.apify.com/sdk/python/sdk/python/.md)
[Docs](https://docs.apify.com/sdk/python/sdk/python/docs/overview/introduction.md)[Reference](https://docs.apify.com/sdk/python/sdk/python/reference.md)[Changelog](https://docs.apify.com/sdk/python/sdk/python/docs/changelog.md)[GitHub](https://github.com/apify/apify-sdk-python)
# Search the documentation
Type your search here
[](https://www.algolia.com/)
Learn
* [Academy](https://docs.apify.com/academy)
* [Platform](https://docs.apify.com/platform)
API
* [Reference](https://docs.apify.com/api/v2)
* [Client for JavaScript](https://docs.apify.com/api/client/js/)
* [Client for Python](https://docs.apify.com/api/client/python/)
SDK
* [SDK for JavaScript](https://docs.apify.com/sdk/js/)
* [SDK for Python](https://docs.apify.com/sdk/python/)
Other
* [CLI](https://docs.apify.com/cli/)
* [Open source](https://docs.apify.com/open-source)
More
* [Crawlee](https://crawlee.dev)
* [GitHub](https://github.com/apify)
* [Discord](https://discord.com/invite/jyEM2PRvMU)
* [Trust Center](https://trust.apify.com)
[](https://apify.com)
---
# Changelog
All notable changes to this project will be documented in this file.
### 3.0.4 - **not yet released**[](#304---not-yet-released)
#### 🐛 Bug Fixes[](#-bug-fixes)
* Fix type of `cloud_storage_client` in `SmartApifyStorageClient` ([#642](https://github.com/apify/apify-sdk-python/pull/642)) ([3bf285d](https://github.com/apify/apify-sdk-python/commit/3bf285d60f507730954986a80c19ed2e27a38f9c)) by [@vdusek](https://github.com/vdusek)
* Fix local charging log dataset name ([#649](https://github.com/apify/apify-sdk-python/pull/649)) ([fdb1276](https://github.com/apify/apify-sdk-python/commit/fdb1276264aee2687596d87c96d19033fe915823)) by [@vdusek](https://github.com/vdusek), closes [#648](https://github.com/apify/apify-sdk-python/issues/648)
#### ⚡ Performance[](#-performance)
* Use Apify-provided environment variables to obtain PPE pricing information ([#644](https://github.com/apify/apify-sdk-python/pull/644)) ([0c32f29](https://github.com/apify/apify-sdk-python/commit/0c32f29d6a316f5bacc931595d694f262c925b2b)) by [@Mantisus](https://github.com/Mantisus), closes [#614](https://github.com/apify/apify-sdk-python/issues/614)
### [3.0.3](https://github.com/apify/apify-sdk-python/releases/tag/v3.0.3) (2025-10-21)[](#303-2025-10-21)
#### 🐛 Bug Fixes[](#-bug-fixes-1)
* Cache requests in RQ implementations by `id` ([#633](https://github.com/apify/apify-sdk-python/pull/633)) ([76886ce](https://github.com/apify/apify-sdk-python/commit/76886ce496165346a01f67e018547287c211ea54)) by [@Pijukatel](https://github.com/Pijukatel), closes [#630](https://github.com/apify/apify-sdk-python/issues/630)
### [3.0.2](https://github.com/apify/apify-sdk-python/releases/tag/v3.0.2) (2025-10-17)[](#302-2025-10-17)
#### 🐛 Bug Fixes[](#-bug-fixes-2)
* Handle None result in single consumer request queue client ([#623](https://github.com/apify/apify-sdk-python/pull/623)) ([451284a](https://github.com/apify/apify-sdk-python/commit/451284a5c633bc5613bd1e9060df286a1c20b259)) by [@janbuchar](https://github.com/janbuchar), closes [#1472](https://github.com/apify/apify-sdk-python/issues/1472)
* Unify Actor context manager with init & exit methods ([#600](https://github.com/apify/apify-sdk-python/pull/600)) ([6b0d084](https://github.com/apify/apify-sdk-python/commit/6b0d0842ae66a3a206bbb682a3e5f81ad552f029)) by [@vdusek](https://github.com/vdusek), closes [#598](https://github.com/apify/apify-sdk-python/issues/598)
* Handle truncated `unique_key` in `list_head` by fetching full request data ([#631](https://github.com/apify/apify-sdk-python/pull/631)) ([4238086](https://github.com/apify/apify-sdk-python/commit/423808678d9155a84a266bf50bb09f1a56466174)) by [@vdusek](https://github.com/vdusek), closes [#627](https://github.com/apify/apify-sdk-python/issues/627)
### [3.0.1](https://github.com/apify/apify-sdk-python/releases/tag/v3.0.1) (2025-10-08)[](#301-2025-10-08)
#### 🐛 Bug Fixes[](#-bug-fixes-3)
* Also load input from a file with a .json extension in file system storage ([#617](https://github.com/apify/apify-sdk-python/pull/617)) ([b62804c](https://github.com/apify/apify-sdk-python/commit/b62804c170069cd7aa77572bb9682a156581cbac)) by [@janbuchar](https://github.com/janbuchar)
### [3.0.0](https://github.com/apify/apify-sdk-python/releases/tag/v3.0.0) (2025-09-29)[](#300-2025-09-29)
* Check out the [Upgrading guide](https://docs.apify.com/sdk/python/sdk/python/docs/upgrading/upgrading-to-v3.md) to ensure a smooth update.
#### 🚀 Features[](#-features)
* Add deduplication to `add_batch_of_requests` ([#534](https://github.com/apify/apify-sdk-python/pull/534)) ([dd03c4d](https://github.com/apify/apify-sdk-python/commit/dd03c4d446f611492adf35f1b5738648ee5a66f7)) by [@Pijukatel](https://github.com/Pijukatel), closes [#514](https://github.com/apify/apify-sdk-python/issues/514)
* Add new methods to ChargingManager ([#580](https://github.com/apify/apify-sdk-python/pull/580)) ([54f7f8b](https://github.com/apify/apify-sdk-python/commit/54f7f8b29c5982be98b595dac11eceff915035c9)) by [@vdusek](https://github.com/vdusek)
* Add support for NDU storages ([#594](https://github.com/apify/apify-sdk-python/pull/594)) ([8721ef5](https://github.com/apify/apify-sdk-python/commit/8721ef5731bcb1a04ad63c930089bf83be29f308)) by [@vdusek](https://github.com/vdusek), closes [#1175](https://github.com/apify/apify-sdk-python/issues/1175)
* Add stats to `ApifyRequestQueueClient` ([#574](https://github.com/apify/apify-sdk-python/pull/574)) ([21f6782](https://github.com/apify/apify-sdk-python/commit/21f6782b444f623aba986b4922cf67bafafd4b2c)) by [@Pijukatel](https://github.com/Pijukatel), closes [#1344](https://github.com/apify/apify-sdk-python/issues/1344)
* Add specialized ApifyRequestQueue clients ([#573](https://github.com/apify/apify-sdk-python/pull/573)) ([f830ab0](https://github.com/apify/apify-sdk-python/commit/f830ab09b1fa12189c9d3297d5cf18a4f2da62fa)) by [@Pijukatel](https://github.com/Pijukatel)
#### 🐛 Bug Fixes[](#-bug-fixes-4)
* Restrict apify-shared and apify-client versions ([#523](https://github.com/apify/apify-sdk-python/pull/523)) ([b3ae5a9](https://github.com/apify/apify-sdk-python/commit/b3ae5a972a65454a4998eda59c9fcc3f6b7e8579)) by [@vdusek](https://github.com/vdusek)
* Expose `APIFY_USER_IS_PAYING` env var to the configuration ([#507](https://github.com/apify/apify-sdk-python/pull/507)) ([0801e54](https://github.com/apify/apify-sdk-python/commit/0801e54887317c1280cc6828ecd3f2cc53287e76)) by [@stepskop](https://github.com/stepskop)
* Resolve DeprecationWarning in ApifyEventManager ([#555](https://github.com/apify/apify-sdk-python/pull/555)) ([0c5111d](https://github.com/apify/apify-sdk-python/commit/0c5111dafe19796ec1fb9652a44c031bed9758df)) by [@vdusek](https://github.com/vdusek), closes [#343](https://github.com/apify/apify-sdk-python/issues/343)
* Use same `client_key` for `Actor` created `request_queue` and improve its metadata estimation ([#552](https://github.com/apify/apify-sdk-python/pull/552)) ([7e4e5da](https://github.com/apify/apify-sdk-python/commit/7e4e5da81dd87e84ebeef2bd336c6c1d422cb9a7)) by [@Pijukatel](https://github.com/Pijukatel), closes [#536](https://github.com/apify/apify-sdk-python/issues/536)
* Properly process pre-existing Actor input file ([#591](https://github.com/apify/apify-sdk-python/pull/591)) ([cc5075f](https://github.com/apify/apify-sdk-python/commit/cc5075fab8c72ca5711cfd97932037b34e6997cd)) by [@Pijukatel](https://github.com/Pijukatel), closes [#590](https://github.com/apify/apify-sdk-python/issues/590)
#### Chore[](#chore)
* \[**breaking**] Update apify-client and apify-shared to v2.0 ([#548](https://github.com/apify/apify-sdk-python/pull/548)) ([8ba084d](https://github.com/apify/apify-sdk-python/commit/8ba084ded6cd018111343f2219260b481c8d4e35)) by [@vdusek](https://github.com/vdusek)
#### Refactor[](#refactor)
* \[**breaking**] Adapt to the Crawlee v1.0 ([#470](https://github.com/apify/apify-sdk-python/pull/470)) ([f7e3320](https://github.com/apify/apify-sdk-python/commit/f7e33206cf3e4767faacbdc43511b45b6785f929)) by [@vdusek](https://github.com/vdusek), closes [#469](https://github.com/apify/apify-sdk-python/issues/469), [#540](https://github.com/apify/apify-sdk-python/issues/540)
* \[**breaking**] Replace `httpx` with `impit` ([#560](https://github.com/apify/apify-sdk-python/pull/560)) ([cca3869](https://github.com/apify/apify-sdk-python/commit/cca3869e85968865e56aafcdcb36fbccba27aef0)) by [@Mantisus](https://github.com/Mantisus), closes [#558](https://github.com/apify/apify-sdk-python/issues/558)
* \[**breaking**] Remove `Request.id` field ([#553](https://github.com/apify/apify-sdk-python/pull/553)) ([445ab5d](https://github.com/apify/apify-sdk-python/commit/445ab5d752b785fc2018b35c8adbe779253d7acd)) by [@Pijukatel](https://github.com/Pijukatel)
* \[**breaking**] Make `Actor` initialization stricter and more predictable ([#576](https://github.com/apify/apify-sdk-python/pull/576)) ([912222a](https://github.com/apify/apify-sdk-python/commit/912222a7a8123be66c94c50a2e461276fbfc50c4)) by [@Pijukatel](https://github.com/Pijukatel)
* \[**breaking**] Make default Apify storages use alias mechanism ([#606](https://github.com/apify/apify-sdk-python/pull/606)) ([dbea7d9](https://github.com/apify/apify-sdk-python/commit/dbea7d97fe7f25aa8658a32c5bb46a3800561df5)) by [@Pijukatel](https://github.com/Pijukatel), closes [#599](https://github.com/apify/apify-sdk-python/issues/599)
### [2.7.3](https://github.com/apify/apify-sdk-python/releases/tag/v2.7.3) (2025-08-11)[](#273-2025-08-11)
#### 🐛 Bug Fixes[](#-bug-fixes-5)
* Expose `APIFY_USER_IS_PAYING` env var to the configuration (#507) ([0de022c](https://github.com/apify/apify-sdk-python/commit/0de022c3435f24c821053c771e7b659433e3fb6e))
### [2.7.2](https://github.com/apify/apify-sdk-python/releases/tag/v2.7.2) (2025-07-30)[](#272-2025-07-30)
#### 🐛 Bug Fixes[](#-bug-fixes-6)
* Restrict apify-shared and apify-client versions ([#523](https://github.com/apify/apify-sdk-python/pull/523)) ([581ebae](https://github.com/apify/apify-sdk-python/commit/581ebae5752a984a34cbabc02c49945ae392db00)) by [@vdusek](https://github.com/vdusek)
### [2.7.1](https://github.com/apify/apify-sdk-python/releases/tag/v2.7.1) (2025-07-24)[](#271-2025-07-24)
#### 🐛 Bug Fixes[](#-bug-fixes-7)
* Add back support for Python 3.9.
### [2.7.0](https://github.com/apify/apify-sdk-python/releases/tag/v2.7.0) (2025-07-14)[](#270-2025-07-14)
#### 🚀 Features[](#-features-1)
* Expose `logger` argument on `Actor.call` to control log redirection from started Actor run ([#487](https://github.com/apify/apify-sdk-python/pull/487)) ([aa6fa47](https://github.com/apify/apify-sdk-python/commit/aa6fa4750ea1bc7909be1191c0d276a2046930c2)) by [@Pijukatel](https://github.com/Pijukatel)
* **crypto:** Decrypt secret objects ([#482](https://github.com/apify/apify-sdk-python/pull/482)) ([ce9daf7](https://github.com/apify/apify-sdk-python/commit/ce9daf7381212b8dc194e8a643e5ca0dedbc0078)) by [@MFori](https://github.com/MFori)
### [2.6.0](https://github.com/apify/apify-sdk-python/releases/tag/v2.6.0) (2025-06-09)[](#260-2025-06-09)
#### 🚀 Features[](#-features-2)
* Add `RemainingTime` option for `timeout` argument of `Actor.call` and `Actor.start` ([#473](https://github.com/apify/apify-sdk-python/pull/473)) ([ba7f757](https://github.com/apify/apify-sdk-python/commit/ba7f757a82661a5a181d9bd767950d09557409f9)) by [@Pijukatel](https://github.com/Pijukatel), closes [#472](https://github.com/apify/apify-sdk-python/issues/472)
#### 🐛 Bug Fixes[](#-bug-fixes-8)
* Fix duplicate logs from apify logger in Scrapy integration ([#457](https://github.com/apify/apify-sdk-python/pull/457)) ([2745ee6](https://github.com/apify/apify-sdk-python/commit/2745ee6529deecb4f2838c764b9bb3fb6606762b)) by [@vdusek](https://github.com/vdusek), closes [#391](https://github.com/apify/apify-sdk-python/issues/391)
* Prefer proxy password from env var ([#468](https://github.com/apify/apify-sdk-python/pull/468)) ([1c4ad9b](https://github.com/apify/apify-sdk-python/commit/1c4ad9bcfbf6ac404f942d7d2d249b036c2e7f54)) by [@stepskop](https://github.com/stepskop)
### [2.5.0](https://github.com/apify/apify-sdk-python/releases/tag/v2.5.0) (2025-03-27)[](#250-2025-03-27)
#### 🚀 Features[](#-features-3)
* Implement Scrapy HTTP cache backend ([#403](https://github.com/apify/apify-sdk-python/pull/403)) ([137e3c8](https://github.com/apify/apify-sdk-python/commit/137e3c8d5c6b28cf6935cfb742b5f072cd2e0a02)) by [@honzajavorek](https://github.com/honzajavorek)
#### 🐛 Bug Fixes[](#-bug-fixes-9)
* Fix calculation of CPU utilization from SystemInfo events ([#447](https://github.com/apify/apify-sdk-python/pull/447)) ([eb4c8e4](https://github.com/apify/apify-sdk-python/commit/eb4c8e4e498e23f573b9e2d4c7dbd8e2ecc277d9)) by [@janbuchar](https://github.com/janbuchar)
### [2.4.0](https://github.com/apify/apify-sdk-python/releases/tag/v2.4.0) (2025-03-07)[](#240-2025-03-07)
#### 🚀 Features[](#-features-4)
* Update to Crawlee v0.6 ([#420](https://github.com/apify/apify-sdk-python/pull/420)) ([9be4336](https://github.com/apify/apify-sdk-python/commit/9be433667231cc5739861fa693d7a726860d6aca)) by [@vdusek](https://github.com/vdusek)
* Add Actor `exit_process` option ([#424](https://github.com/apify/apify-sdk-python/pull/424)) ([994c832](https://github.com/apify/apify-sdk-python/commit/994c8323b994e009db0ccdcb624891a2fef97070)) by [@vdusek](https://github.com/vdusek), closes [#396](https://github.com/apify/apify-sdk-python/issues/396), [#401](https://github.com/apify/apify-sdk-python/issues/401)
* Upgrade websockets to v14 to adapt to library API changes ([#425](https://github.com/apify/apify-sdk-python/pull/425)) ([5f49275](https://github.com/apify/apify-sdk-python/commit/5f49275ca1177e5ba56856ffe3860f6b97bee9ee)) by [@Mantisus](https://github.com/Mantisus), closes [#325](https://github.com/apify/apify-sdk-python/issues/325)
* Add signing of public URL ([#407](https://github.com/apify/apify-sdk-python/pull/407)) ([a865461](https://github.com/apify/apify-sdk-python/commit/a865461c703aea01d91317f4fdf38c1bedd35f00)) by [@danpoletaev](https://github.com/danpoletaev)
### [2.3.1](https://github.com/apify/apify-sdk-python/releases/tag/v2.3.1) (2025-02-25)[](#231-2025-02-25)
#### 🐛 Bug Fixes[](#-bug-fixes-10)
* Allow None value in 'inputBodyLen' in ActorRunStats ([#413](https://github.com/apify/apify-sdk-python/pull/413)) ([1cf37f1](https://github.com/apify/apify-sdk-python/commit/1cf37f13f8db1313ac82276d13200af4aa2bf773)) by [@janbuchar](https://github.com/janbuchar)
### [2.3.0](https://github.com/apify/apify-sdk-python/releases/tag/v2.3.0) (2025-02-19)[](#230-2025-02-19)
#### 🚀 Features[](#-features-5)
* Add `rate_limit_errors` property for `ApifyStorageClient` ([#387](https://github.com/apify/apify-sdk-python/pull/387)) ([89c230a](https://github.com/apify/apify-sdk-python/commit/89c230a21a1a8698159975f97c73a724b9063278)) by [@Mantisus](https://github.com/Mantisus), closes [#318](https://github.com/apify/apify-sdk-python/issues/318)
* Unify Apify and Scrapy to use single event loop & remove `nest-asyncio` ([#390](https://github.com/apify/apify-sdk-python/pull/390)) ([96949be](https://github.com/apify/apify-sdk-python/commit/96949be4f7687ac9285992d1fb02ac6172307bdb)) by [@vdusek](https://github.com/vdusek), closes [#148](https://github.com/apify/apify-sdk-python/issues/148), [#176](https://github.com/apify/apify-sdk-python/issues/176), [#392](https://github.com/apify/apify-sdk-python/issues/392)
* Support pay-per-event via `Actor.charge` ([#393](https://github.com/apify/apify-sdk-python/pull/393)) ([78888c4](https://github.com/apify/apify-sdk-python/commit/78888c4d6258211cdbc5fd5b5cbadbf23c39d818)) by [@janbuchar](https://github.com/janbuchar), closes [#374](https://github.com/apify/apify-sdk-python/issues/374)
#### 🐛 Bug Fixes[](#-bug-fixes-11)
* Fix RQ usage in Scrapy scheduler ([#385](https://github.com/apify/apify-sdk-python/pull/385)) ([3363478](https://github.com/apify/apify-sdk-python/commit/3363478dbf6eb35e45c237546fe0df5c104166f6)) by [@vdusek](https://github.com/vdusek)
* Make sure that Actor instances with non-default configurations are also accessible through the global Actor proxy after initialization ([#402](https://github.com/apify/apify-sdk-python/pull/402)) ([b956a02](https://github.com/apify/apify-sdk-python/commit/b956a02d0ba59e0cfde489cc13ca92d7f8f8c84f)) by [@janbuchar](https://github.com/janbuchar), closes [#397](https://github.com/apify/apify-sdk-python/issues/397)
### [2.2.1](https://github.com/apify/apify-sdk-python/releases/tag/v2.2.1) (2025-01-17)[](#221-2025-01-17)
#### 🐛 Bug Fixes[](#-bug-fixes-12)
* Better event listener type definitions ([#354](https://github.com/apify/apify-sdk-python/pull/354)) ([52a6dee](https://github.com/apify/apify-sdk-python/commit/52a6dee92cc0cc4fa032dfc8c312545bc5e07206)) by [@janbuchar](https://github.com/janbuchar), closes [#344](https://github.com/apify/apify-sdk-python/issues/344)
### [2.2.0](https://github.com/apify/apify-sdk-python/releases/tag/v2.2.0) (2025-01-10)[](#220-2025-01-10)
#### 🚀 Features[](#-features-6)
* Add new config variables to `Actor.config` ([#351](https://github.com/apify/apify-sdk-python/pull/351)) ([7b6478c](https://github.com/apify/apify-sdk-python/commit/7b6478c3fc239b454f733fbd98348dab7b3a1766)) by [@fnesveda](https://github.com/fnesveda)
* Upgrade to Crawlee v0.5 ([#355](https://github.com/apify/apify-sdk-python/pull/355)) ([826f4db](https://github.com/apify/apify-sdk-python/commit/826f4dbcc8cfd693d97e40c17faf91d225d7ffaf)) by [@vdusek](https://github.com/vdusek)
#### 🐛 Bug Fixes[](#-bug-fixes-13)
* Better error message when attempting to use force\_cloud without an Apify token ([#356](https://github.com/apify/apify-sdk-python/pull/356)) ([33245ce](https://github.com/apify/apify-sdk-python/commit/33245ceddb1fa0ed39548181fb57fb3e6b98f954)) by [@janbuchar](https://github.com/janbuchar)
* Allow calling `Actor.reboot()` from migrating handler, align reboot behavior with JS SDK ([#361](https://github.com/apify/apify-sdk-python/pull/361)) ([7ba0221](https://github.com/apify/apify-sdk-python/commit/7ba022121fe7b65470fec901295f74cebce72610)) by [@fnesveda](https://github.com/fnesveda)
### [2.1.0](https://github.com/apify/apify-sdk-python/releases/tag/v2.1.0) (2024-12-03)[](#210-2024-12-03)
#### 🚀 Features[](#-features-7)
* Handle request list user input ([#326](https://github.com/apify/apify-sdk-python/pull/326)) ([c14fb9a](https://github.com/apify/apify-sdk-python/commit/c14fb9a9527c8b699e32ed49d39ce0a69447f87c)) by [@Pijukatel](https://github.com/Pijukatel), closes [#310](https://github.com/apify/apify-sdk-python/issues/310)
#### 🐛 Bug Fixes[](#-bug-fixes-14)
* Add upper bound of HTTPX version ([#347](https://github.com/apify/apify-sdk-python/pull/347)) ([e86dbce](https://github.com/apify/apify-sdk-python/commit/e86dbce69f6978cf2c15910213655e5d80f62a23)) by [@vdusek](https://github.com/vdusek)
### [2.0.2](https://github.com/apify/apify-sdk-python/releases/tag/v2.0.2) (2024-11-12)[](#202-2024-11-12)
#### 🐛 Bug Fixes[](#-bug-fixes-15)
* Fix CPU usage calculation ([#315](https://github.com/apify/apify-sdk-python/pull/315)) ([0521d91](https://github.com/apify/apify-sdk-python/commit/0521d911afbb8029ad29949f69c4f19166a01fc0)) by [@janbuchar](https://github.com/janbuchar)
* Set version constraint of the `websockets` dependency to <14.0.0 ([#322](https://github.com/apify/apify-sdk-python/pull/322)) ([15ad055](https://github.com/apify/apify-sdk-python/commit/15ad0550e7a5508adff3eb35511248c611a0f595)) by [@Pijukatel](https://github.com/Pijukatel)
* Fix Dataset.iter\_items for apify\_storage ([#321](https://github.com/apify/apify-sdk-python/pull/321)) ([2db1beb](https://github.com/apify/apify-sdk-python/commit/2db1beb2d56a7e7954cd76023d1273c7546d7cbf)) by [@Pijukatel](https://github.com/Pijukatel), closes [#320](https://github.com/apify/apify-sdk-python/issues/320)
### [2.0.1](https://github.com/apify/apify-sdk-python/releases/tag/v2.0.1) (2024-10-25)[](#201-2024-10-25)
#### 🚀 Features[](#-features-8)
* Add standby URL, change default standby port ([#287](https://github.com/apify/apify-sdk-python/pull/287)) ([8cd2f2c](https://github.com/apify/apify-sdk-python/commit/8cd2f2cb9d1191dbc93bf1b8a2d70189881c64ad)) by [@jirimoravcik](https://github.com/jirimoravcik)
* Add crawlee version to system info print ([#304](https://github.com/apify/apify-sdk-python/pull/304)) ([c28f38f](https://github.com/apify/apify-sdk-python/commit/c28f38f4e205515e1b5d1ce97a2072be3a09d338)) by [@vdusek](https://github.com/vdusek)
#### 🐛 Bug Fixes[](#-bug-fixes-16)
* Adjust tests of scrapy user data ([#284](https://github.com/apify/apify-sdk-python/pull/284)) ([26ffb15](https://github.com/apify/apify-sdk-python/commit/26ffb15797effcfad1a25c840dd3d17663e26ea3)) by [@janbuchar](https://github.com/janbuchar)
* Use HttpHeaders type in Scrapy integration ([#289](https://github.com/apify/apify-sdk-python/pull/289)) ([3e33e91](https://github.com/apify/apify-sdk-python/commit/3e33e9147bfd60554b9da41b032c0451f91ba27b)) by [@vdusek](https://github.com/vdusek)
* Allow empty timeout\_at env variable ([#303](https://github.com/apify/apify-sdk-python/pull/303)) ([b67ec98](https://github.com/apify/apify-sdk-python/commit/b67ec989dfcc21756cc976c52edc25735a3f0501)) by [@janbuchar](https://github.com/janbuchar), closes [#596](https://github.com/apify/apify-sdk-python/issues/596)
### [2.0.0](https://github.com/apify/apify-sdk-python/releases/tag/v2.0.0) (2024-09-10)[](#200-2024-09-10)
* Check out the [Upgrading guide](https://docs.apify.com/sdk/python/sdk/python/docs/upgrading/upgrading-to-v2.md) to ensure a smooth update.
#### 🚀 Features[](#-features-9)
* Better Actor API typing ([#256](https://github.com/apify/apify-sdk-python/pull/256)) ([abb87e7](https://github.com/apify/apify-sdk-python/commit/abb87e7f3c272f88a9a76292d8394fe93b98428a)) by [@janbuchar](https://github.com/janbuchar), closes [#243](https://github.com/apify/apify-sdk-python/issues/243)
* Expose Request from Crawlee ([#266](https://github.com/apify/apify-sdk-python/pull/266)) ([1f01278](https://github.com/apify/apify-sdk-python/commit/1f01278c77f261500bc74efd700c0583ac45fd82)) by [@vdusek](https://github.com/vdusek)
* Automatically configure logging ([#271](https://github.com/apify/apify-sdk-python/pull/271)) ([1906bb2](https://github.com/apify/apify-sdk-python/commit/1906bb216b8a3f1c2ad740c551ee019c2ba0696f)) by [@janbuchar](https://github.com/janbuchar)
#### 🐛 Bug Fixes[](#-bug-fixes-17)
* Make apify.log public again ([#249](https://github.com/apify/apify-sdk-python/pull/249)) ([22677f5](https://github.com/apify/apify-sdk-python/commit/22677f57b2aff6c9bddbee305e5a62e39bbf5915)) by [@janbuchar](https://github.com/janbuchar)
* Dataset list response handling ([#257](https://github.com/apify/apify-sdk-python/pull/257)) ([0ea57d7](https://github.com/apify/apify-sdk-python/commit/0ea57d7c4788bff31f215c447c1881e56d6508bb)) by [@janbuchar](https://github.com/janbuchar)
* Ignore deprecated platform events ([#258](https://github.com/apify/apify-sdk-python/pull/258)) ([ed5ab3b](https://github.com/apify/apify-sdk-python/commit/ed5ab3b80c851a817aa87806c39cd8ef3e86fde5)) by [@janbuchar](https://github.com/janbuchar)
* Possible infinity loop in Apify-Scrapy proxy middleware ([#259](https://github.com/apify/apify-sdk-python/pull/259)) ([8647a94](https://github.com/apify/apify-sdk-python/commit/8647a94289423528f2940d9f7174f81682fbb407)) by [@vdusek](https://github.com/vdusek)
* Hotfix for batch\_add\_requests batch size limit ([#261](https://github.com/apify/apify-sdk-python/pull/261)) ([61d7a39](https://github.com/apify/apify-sdk-python/commit/61d7a392d182a752c91193170dca351f4cb0fbf3)) by [@janbuchar](https://github.com/janbuchar)
#### Refactor[](#refactor-1)
* \[**breaking**] Preparation for v2 release ([#210](https://github.com/apify/apify-sdk-python/pull/210)) ([2f9dcc5](https://github.com/apify/apify-sdk-python/commit/2f9dcc559414f31e3f4fc87e72417a36494b9c84)) by [@janbuchar](https://github.com/janbuchar), closes [#135](https://github.com/apify/apify-sdk-python/issues/135), [#137](https://github.com/apify/apify-sdk-python/issues/137), [#138](https://github.com/apify/apify-sdk-python/issues/138), [#147](https://github.com/apify/apify-sdk-python/issues/147), [#149](https://github.com/apify/apify-sdk-python/issues/149), [#237](https://github.com/apify/apify-sdk-python/issues/237)
#### Chore[](#chore-1)
* \[**breaking**] Drop support for Python 3.8
### [1.7.2](https://github.com/apify/apify-sdk-python/releases/tag/v1.7.2) (2024-07-08)[](#172-2024-07-08)
* Add Actor Standby port
### [1.7.1](https://github.com/apify/apify-sdk-python/releases/tag/v1.7.1) (2024-05-23)[](#171-2024-05-23)
#### 🐛 Bug Fixes[](#-bug-fixes-18)
* Set a timeout for Actor cleanup
### [1.7.0](https://github.com/apify/apify-sdk-python/releases/tag/v1.7.0) (2024-03-12)[](#170-2024-03-12)
#### 🚀 Features[](#-features-10)
* Add a new way of generating the `uniqueKey` field of the request, aligning it with the Crawlee.
#### 🐛 Bug Fixes[](#-bug-fixes-19)
* Improve error handling for `to_apify_request` serialization failures
* Scrapy's `Request.dont_filter` works.
### [1.6.0](https://github.com/apify/apify-sdk-python/releases/tag/v1.6.0) (2024-02-23)[](#160-2024-02-23)
#### 🐛 Bug Fixes[](#-bug-fixes-20)
* Update of Scrapy integration, fixes in `ApifyScheduler`, `to_apify_request` and `apply_apify_settings`.
#### Chore[](#chore-2)
* Remove `ApifyRetryMiddleware` and stay with the Scrapy's default one
### [1.5.5](https://github.com/apify/apify-sdk-python/releases/tag/v1.5.5) (2024-02-01)[](#155-2024-02-01)
#### 🐛 Bug Fixes[](#-bug-fixes-21)
* Fix conversion of `headers` fields in Apify <--> Scrapy request translation
### [1.5.4](https://github.com/apify/apify-sdk-python/releases/tag/v1.5.4) (2024-01-24)[](#154-2024-01-24)
#### 🐛 Bug Fixes[](#-bug-fixes-22)
* Fix conversion of `userData` and `headers` fields in Apify <--> Scrapy request translation
### [1.5.3](https://github.com/apify/apify-sdk-python/releases/tag/v1.5.3) (2024-01-23)[](#153-2024-01-23)
#### 🚀 Features[](#-features-11)
* Add `apply_apify_settings` function to Scrapy subpackage
### [1.5.2](https://github.com/apify/apify-sdk-python/releases/tag/v1.5.2) (2024-01-19)[](#152-2024-01-19)
#### 🐛 Bug Fixes[](#-bug-fixes-23)
* Add missing import check to `ApifyHttpProxyMiddleware`
#### Chore[](#chore-3)
* Create a new subpackage for Scrapy pipelines
* Remove some noqas thanks to the new Ruff release
* Replace relative imports with absolute imports
* Replace asserts with custom checks in Scrapy subpackage
### [1.5.1](https://github.com/apify/apify-sdk-python/releases/tag/v1.5.1) (2024-01-10)[](#151-2024-01-10)
#### Chore[](#chore-4)
* Allowed running integration tests from PRs from forks, after maintainer approval
* Do not close `nested_event_loop` in the `Scheduler.__del__`
### [1.5.0](https://github.com/apify/apify-sdk-python/releases/tag/v1.5.0) (2024-01-03)[](#150-2024-01-03)
#### 🚀 Features[](#-features-12)
* Add `ApifyHttpProxyMiddleware`
### [1.4.1](https://github.com/apify/apify-sdk-python/releases/tag/v1.4.1) (2023-12-21)[](#141-2023-12-21)
#### 🐛 Bug Fixes[](#-bug-fixes-24)
* Resolve issue in `ApifyRetryMiddleware.process_exception()`, where requests were getting stuck in the request queue
#### Chore[](#chore-5)
* Fix type hint problems for resource clients
### [1.4.0](https://github.com/apify/apify-sdk-python/releases/tag/v1.4.0) (2023-12-05)[](#140-2023-12-05)
#### Chore[](#chore-6)
* Migrate from Autopep8 and Flake8 to Ruff
### [1.3.0](https://github.com/apify/apify-sdk-python/releases/tag/v1.3.0) (2023-11-15)[](#130-2023-11-15)
#### 🚀 Features[](#-features-13)
* Add `scrapy` extra
### [1.2.0](https://github.com/apify/apify-sdk-python/releases/tag/v1.2.0) (2023-10-23)[](#120-2023-10-23)
#### 🚀 Features[](#-features-14)
* Add support for Python 3.12
#### Chore[](#chore-7)
* Fix lint error (E721) in unit tests (for instance checks use `isinstance()`)
### [1.1.5](https://github.com/apify/apify-sdk-python/releases/tag/v1.1.5) (2023-10-03)[](#115-2023-10-03)
#### 🚀 Features[](#-features-15)
* Update the Apify log formatter to contain an option for adding the logger name
#### Chore[](#chore-8)
* Rewrite documentation publication to use Docusaurus
* Remove PR Toolkit workflow
### [1.1.4](https://github.com/apify/apify-sdk-python/releases/tag/v1.1.4) (2023-09-06)[](#114-2023-09-06)
#### 🐛 Bug Fixes[](#-bug-fixes-25)
* Resolve issue with querying request queue head multiple times in parallel
#### Chore[](#chore-9)
* Fix integration tests for Actor logger
* Remove `pytest-randomly` Pytest plugin
* Unpin `apify-client` and `apify-shared` to improve compatibility with their newer versions
### [1.1.3](https://github.com/apify/apify-sdk-python/releases/tag/v1.1.3) (2023-08-25)[](#113-2023-08-25)
#### Chore[](#chore-10)
* Unify indentation in configuration files
* Update the `Actor.reboot` method to use the new reboot endpoint
### [1.1.2](https://github.com/apify/apify-sdk-python/releases/tag/v1.1.2) (2023-08-02)[](#112-2023-08-02)
#### Chore[](#chore-11)
* Start importing general constants and utilities from the `apify-shared` library
* Simplify code via `flake8-simplify`
* Start using environment variables with prefix `ACTOR_` instead of some with prefix `APIFY_`
* Pin `apify-client` and `apify-shared` to prevent their implicit updates from breaking SDK
### [1.1.1](https://github.com/apify/apify-sdk-python/releases/tag/v1.1.1) (2023-05-23)[](#111-2023-05-23)
#### 🐛 Bug Fixes[](#-bug-fixes-26)
* Relax dependency requirements to improve compatibility with other libraries
### [1.1.0](https://github.com/apify/apify-sdk-python/releases/tag/v1.1.0) (2023-05-23)[](#110-2023-05-23)
#### 🚀 Features[](#-features-16)
* Add option to add event handlers which accept no arguments
* Add support for `is_terminal` flag in status message update
* Add option to set status message along with `Actor.exit()`
#### 🐛 Bug Fixes[](#-bug-fixes-27)
* Start enforcing local storage to always use the UTF-8 encoding
* Fix saving key-value store values to local storage with the right extension for a given content type
#### Chore[](#chore-12)
* Switch from `setup.py` to `pyproject.toml` for specifying project setup
### [1.0.0](https://github.com/apify/apify-sdk-python/releases/tag/v1.0.0) (2023-03-13)[](#100-2023-03-13)
#### 🐛 Bug Fixes[](#-bug-fixes-28)
* Fix `RequestQueue` not loading requests from an existing queue properly
#### Chore[](#chore-13)
* Update to `apify-client` 1.0.0
* Start triggering base Docker image builds when releasing a new version
### [0.2.0](https://github.com/apify/apify-sdk-python/releases/tag/v0.2.0) (2023-03-06)[](#020-2023-03-06)
#### 🚀 Features[](#-features-17)
* Add chunking mechanism to push\_data, cleanup TODOs ([#67](https://github.com/apify/apify-sdk-python/pull/67)) ([5f38d51](https://github.com/apify/apify-sdk-python/commit/5f38d51a57912071439ac88405311d2cb7044190)) by [@jirimoravcik](https://github.com/jirimoravcik)
### [0.1.0](https://github.com/apify/apify-sdk-python/releases/tag/v0.1.0) (2023-02-09)[](#010-2023-02-09)
#### 🚀 Features[](#-features-18)
* Implement MemoryStorage and local storage clients ([#15](https://github.com/apify/apify-sdk-python/pull/15)) ([b7c9886](https://github.com/apify/apify-sdk-python/commit/b7c98869bdc749feadc7b5a0d105fce041506011)) by [@jirimoravcik](https://github.com/jirimoravcik)
* Implement Dataset, KeyValueStore classes, create storage management logic ([#21](https://github.com/apify/apify-sdk-python/pull/21)) ([d1b357c](https://github.com/apify/apify-sdk-python/commit/d1b357cd02f7357137fd9413b105a8ac48b1796b)) by [@jirimoravcik](https://github.com/jirimoravcik)
* Implement RequestQueue class ([#25](https://github.com/apify/apify-sdk-python/pull/25)) ([c6cad34](https://github.com/apify/apify-sdk-python/commit/c6cad3442d1a9a37c3eb3991cf45daed03e74ff5)) by [@jirimoravcik](https://github.com/jirimoravcik)
* Add test for get\_env and is\_at\_home ([#29](https://github.com/apify/apify-sdk-python/pull/29)) ([cc45afb](https://github.com/apify/apify-sdk-python/commit/cc45afbf848db3626054c599cb3a5a2972a48748)) by [@drobnikj](https://github.com/drobnikj)
* Updating pull request toolkit config \[INTERNAL] ([387143c](https://github.com/apify/apify-sdk-python/commit/387143ccf2c32a99c95e9931e5649e558d35daeb)) by [@mtrunkat](https://github.com/mtrunkat)
* Add documentation for `StorageManager` and `StorageClientManager`, open\_\* methods in `Actor` ([#34](https://github.com/apify/apify-sdk-python/pull/34)) ([3f6b942](https://github.com/apify/apify-sdk-python/commit/3f6b9426dc03fea40d80af2e4c8f04ecf2620e8a)) by [@jirimoravcik](https://github.com/jirimoravcik)
* Add tests for actor lifecycle ([#35](https://github.com/apify/apify-sdk-python/pull/35)) ([4674728](https://github.com/apify/apify-sdk-python/commit/4674728905be5076283ff3795332866e8bef6ee8)) by [@drobnikj](https://github.com/drobnikj)
* Add docs for `Dataset`, `KeyValueStore`, and `RequestQueue` ([#37](https://github.com/apify/apify-sdk-python/pull/37)) ([174548e](https://github.com/apify/apify-sdk-python/commit/174548e952b47ee519d1a05c0821a2c42c2fddf6)) by [@jirimoravcik](https://github.com/jirimoravcik)
* Docs string for memory storage clients ([#31](https://github.com/apify/apify-sdk-python/pull/31)) ([8f55d46](https://github.com/apify/apify-sdk-python/commit/8f55d463394307b004193efc43b67b44d030f6de)) by [@drobnikj](https://github.com/drobnikj)
* Add test for storage actor methods ([#39](https://github.com/apify/apify-sdk-python/pull/39)) ([b89bbcf](https://github.com/apify/apify-sdk-python/commit/b89bbcfdcae4f436a68e92f1f60628aea1036dde)) by [@drobnikj](https://github.com/drobnikj)
* Various fixes and improvements ([#41](https://github.com/apify/apify-sdk-python/pull/41)) ([5bae238](https://github.com/apify/apify-sdk-python/commit/5bae238821b3b63c73d0cbadf4b478511cb045d2)) by [@jirimoravcik](https://github.com/jirimoravcik)
* Add the rest unit tests for actor ([#40](https://github.com/apify/apify-sdk-python/pull/40)) ([72d92ea](https://github.com/apify/apify-sdk-python/commit/72d92ea080670ceecc234c149058d2ebe763e3a8)) by [@drobnikj](https://github.com/drobnikj)
* Decrypt input secrets if there are some ([#45](https://github.com/apify/apify-sdk-python/pull/45)) ([6eb1630](https://github.com/apify/apify-sdk-python/commit/6eb163077341218a3f9dcf566986d7464f6ab09e)) by [@drobnikj](https://github.com/drobnikj)
* Add a few integration tests ([#48](https://github.com/apify/apify-sdk-python/pull/48)) ([1843f48](https://github.com/apify/apify-sdk-python/commit/1843f48845e724e1c2682b8d09a6b5c48c57d9ec)) by [@drobnikj](https://github.com/drobnikj)
* Add integration tests for storages, proxy configuration ([#49](https://github.com/apify/apify-sdk-python/pull/49)) ([fd0566e](https://github.com/apify/apify-sdk-python/commit/fd0566ed3b8c85c7884f8bba3cf7394215fabed0)) by [@jirimoravcik](https://github.com/jirimoravcik)
* Unify datetime handling, remove utcnow() ([#52](https://github.com/apify/apify-sdk-python/pull/52)) ([09dd8ac](https://github.com/apify/apify-sdk-python/commit/09dd8ac9dc26afee777f497ed1d2733af1eef848)) by [@jirimoravcik](https://github.com/jirimoravcik)
* Separate ID and name params for `Actor.open_xxx` ([#56](https://github.com/apify/apify-sdk-python/pull/56)) ([a1e962e](https://github.com/apify/apify-sdk-python/commit/a1e962ebe74384baabb96fdbb4f0e0ed2f92e454)) by [@jirimoravcik](https://github.com/jirimoravcik)
#### 🐛 Bug Fixes[](#-bug-fixes-29)
* Key error for storage name ([#28](https://github.com/apify/apify-sdk-python/pull/28)) ([83b30a9](https://github.com/apify/apify-sdk-python/commit/83b30a90df4d3b173302f1c6006b346091fced60)) by [@drobnikj](https://github.com/drobnikj)
---
# Accessing Apify API
Copy for LLM
The Apify SDK contains many useful features for making Actor development easier. However, it does not cover all the features the Apify API offers.
For working with the Apify API directly, you can use the provided instance of the [Apify API Client](https://docs.apify.com/api/client/python) library.
## Actor client[](#actor-client)
To access the provided instance of [`ApifyClientAsync`](https://docs.apify.com/api/client/python/reference/class/ApifyClientAsync), you can use the [`Actor.apify_client`](https://docs.apify.com/sdk/python/sdk/python/reference/class/Actor.md#apify_client) property.
For example, to get the details of your user, you can use this snippet:
from apify import Actor
async def main() -> None: async with Actor: # Create a new user client. user_client = Actor.apify_client.user('me')
# Get information about the current user.
me = await user_client.get()
Actor.log.info(f'User: {me}')
## Actor new client[](#actor-new-client)
If you want to create a completely new instance of the client, for example, to get a client for a different user or change the configuration of the client,you can use the [`Actor.new_client`](https://docs.apify.com/sdk/python/sdk/python/reference/class/Actor.md#new_client) method:
from apify import Actor
TOKEN = 'ANOTHER_USERS_TOKEN'
async def main() -> None: async with Actor: # Create a new user client with a custom token. apify_client = Actor.new_client(token=TOKEN, max_retries=2) user_client = apify_client.user('me')
# Get information about the another user.
them = await user_client.get()
Actor.log.info(f'Another user: {them}')
---
# Actor configuration
Copy for LLM
The [`Actor`](https://docs.apify.com/sdk/python/sdk/python/reference/class/Actor.md) class gets configured using the [`Configuration`](https://docs.apify.com/sdk/python/sdk/python/reference/class/Configuration.md) class, which initializes itself based on the provided environment variables.
If you're using the Apify SDK in your Actors on the Apify platform, or Actors running locally through the Apify CLI, you don't need to configure the `Actor` class manually,unless you have some specific requirements, everything will get configured automatically.
If you need some special configuration, you can adjust it either through the `Configuration` class directly,or by setting environment variables when running the Actor locally.
To see the full list of configuration options, check the `Configuration` class or the list of environment variables that the Actor understands.
## Configuring from code[](#configuring-from-code)
This will cause the Actor to persist its state every 10 seconds:
from datetime import timedelta
from apify import Actor, Configuration, Event
async def main() -> None: global_config = Configuration.get_global_configuration() global_config.persist_state_interval = timedelta(seconds=10)
async with Actor:
# Define a handler that will be called for every persist state event.
async def save_state() -> None:
await Actor.set_value('STATE', 'Hello, world!')
# The save_state handler will be called every 10 seconds now.
Actor.on(Event.PERSIST_STATE, save_state)
## Configuring via environment variables[](#configuring-via-environment-variables)
All the configuration options can be set via environment variables. The environment variables are prefixed with `APIFY_`, and the configuration options are in uppercase, with underscores as separators. See the [`Configuration`](https://docs.apify.com/sdk/python/sdk/python/reference/class/Configuration.md) API reference for the full list of configuration options.
This Actor run will not persist its local storages to the filesystem:
APIFY_PERSIST_STORAGE=0 apify run
---
# Actor events & state persistence
Copy for LLM
During its runtime, the Actor receives Actor events sent by the Apify platform or generated by the Apify SDK itself.
## Event types[](#event-types)
| Event | Data | Description |
| --------------- | ------------------------------------------------------------------------------------------------------------ | ----------------------------------------------------------------------------------------------------------------------------------------------------------------------------------------------------------------------------------------------------------------------------------------------------------------------------------------------------------------------------------------------------------------------------------------------------------------------------------------------------------------------------------------------------------------------------------------------------------------------- |
| `SYSTEM_INFO` | ```
{
"created_at": datetime,
"cpu_current_usage": float,
"mem_current_bytes": int,
"is_cpu_overloaded": bool
}
``` | This event is emitted regularly and it indicates the current resource usage of the Actor.The `is_cpu_overloaded` argument indicates whether the current CPU usage is higher than `Config.max_used_cpu_ratio` |
| `MIGRATING` | `None` | Emitted when the Actor running on the Apify platform is going to be [migrated](https://docs.apify.com/platform/actors/development/state-persistence#what-is-a-migration) <!-- --><!-- -->to another worker server soon.You can use it to persist the state of the Actor so that once it is executed again on the new server, it doesn't have to start over from the beginning. Once you have persisted the state of your Actor, you can call [`Actor.reboot`](https://docs.apify.com/sdk/python/../../reference/class/Actor#reboot) to reboot the Actor and trigger the migration immediately, to speed up the process. |
| `ABORTING` | `None` | When a user aborts an Actor run on the Apify platform, they can choose to abort gracefully to allow the Actor some time before getting killed. This graceful abort emits the `ABORTING` event which you can use to finish all running tasks and do cleanup. |
| `PERSIST_STATE` | ```
{ "is_migrating": bool }
``` | Emitted in regular intervals (by default 60 seconds) to notify the Actor that it should persist its state, in order to avoid repeating all work when the Actor restarts.This event is also emitted automatically when the `MIGRATING` event happens, in which case the `is_migrating` flag is set to `True`.Note that the `PERSIST_STATE` event is provided merely for user convenience, you can achieve the same effect by persisting the state regularly in an interval and listening for the migrating event. |
## Adding handlers to events[](#adding-handlers-to-events)
To add handlers to these events, you use the [`Actor.on`](https://docs.apify.com/sdk/python/sdk/python/reference/class/Actor.md#on) method, and to remove them, you use the [`Actor.off`](https://docs.apify.com/sdk/python/sdk/python/reference/class/Actor.md#off) method.
import asyncio from typing import Any
from apify import Actor, Event
async def main() -> None: async with Actor: total_items = 1000
# Load the state if it's saved from some previous execution
processed_items = 0
actor_state = await Actor.get_value('STATE')
if actor_state is not None:
processed_items = actor_state
# Save the state when the `PERSIST_STATE` event happens
async def save_state(event_data: Any) -> None:
nonlocal processed_items
Actor.log.info('Saving Actor state', extra=event_data)
await Actor.set_value('STATE', processed_items)
Actor.on(Event.PERSIST_STATE, save_state)
# Do some fake work
for i in range(processed_items, total_items):
Actor.log.info(f'Processing item {i}...')
processed_items = i
await asyncio.sleep(0.1)
# Suppose we can stop saving the state now
Actor.off(Event.PERSIST_STATE, save_state)
# Do some more fake work, this time something that can't be restarted,
# so no point persisting the state
for j in range(10):
Actor.log.info(f'Processing item {j} of another kind...')
await asyncio.sleep(1)
---
# Actor input
Copy for LLM
The Actor gets its [input](https://docs.apify.com/platform/actors/running/input) from the input record in its default [key-value store](https://docs.apify.com/platform/storage/key-value-store).
To access it, instead of reading the record manually, you can use the [`Actor.get_input`](https://docs.apify.com/sdk/python/sdk/python/reference/class/Actor.md#get_input) convenience method. It will get the input record key from the Actor configuration, read the record from the default key-value store,and decrypt any [secret input fields](https://docs.apify.com/platform/actors/development/secret-input).
For example, if an Actor received a JSON input with two fields, `{ "firstNumber": 1, "secondNumber": 2 }`, this is how you might process it:
from apify import Actor
async def main() -> None: async with Actor: actor_input = await Actor.get_input() or {} first_number = actor_input.get('firstNumber', 0) second_number = actor_input.get('secondNumber', 0) Actor.log.info('Sum: %s', first_number + second_number)
---
# Actor lifecycle
Copy for LLM
This guide explains how an **Apify Actor** starts, runs, and shuts down, describing the complete Actor lifecycle. For information about the core concepts such as Actors, the Apify Console, storages, and events, check out the [Apify platform documentation](https://docs.apify.com/platform).
## Actor initialization[](#actor-initialization)
During initialization, the SDK prepares all the components required to integrate with the Apify platform. It loads configuration from environment variables, initializes access to platform storages such as the [key-value store, dataset, and request queue](https://docs.apify.com/platform/storage), sets up event handling for [platform events](https://docs.apify.com/platform/integrations/webhooks/events), and configures logging.
The recommended approach in Python is to use the global [`Actor`](https://docs.apify.com/sdk/python/sdk/python/reference/class/Actor.md) class as an asynchronous context manager. This approach automatically manages setup and teardown and keeps your code concise. When entering the context, the SDK loads configuration and initializes clients lazily—for example, a dataset is opened only when it is first accessed. If the Actor runs on the Apify platform, it also begins listening for platform events.
When the Actor exits, either normally or due to an exception, the SDK performs a graceful shutdown. It persists the final Actor state, stops event handling, and sets the terminal exit code together with the [status message](https://docs.apify.com/platform/actors/development/programming-interface/status-messages).
* Actor class with context manager
* Actor class with manual init/exit
import asyncio
from apify import Actor
async def main() -> None: async with Actor: # Get input actor_input = await Actor.get_input() Actor.log.info('Actor input: %s', actor_input)
# Your Actor logic here
data = {'message': 'Hello from Actor!', 'input': actor_input}
await Actor.push_data(data)
# Set status message
await Actor.set_status_message('Actor completed successfully')
if name == 'main': asyncio.run(main())
import asyncio
from apify import Actor
async def main() -> None: await Actor.init()
try:
# Get input
actor_input = await Actor.get_input()
Actor.log.info('Actor input: %s', actor_input)
# Your Actor logic here
data = {'message': 'Hello from Actor!', 'input': actor_input}
await Actor.push_data(data)
# Set status message
await Actor.set_status_message('Actor completed successfully')
finally:
await Actor.exit()
if name == 'main': asyncio.run(main())
You can also create an [`Actor`](https://docs.apify.com/sdk/python/sdk/python/reference/class/Actor.md) instance directly. This does not change its capabilities but allows you to specify optional parameters during initialization, such as disabling automatic `sys.exit()` calls or customizing timeouts. The choice between using a context manager or manual initialization depends on how much control you require over the Actor's startup and shutdown sequence.
* Actor instance with context manager
* Actor instance with manual init/exit
import asyncio from datetime import timedelta
from apify import Actor
async def main() -> None: actor = Actor( event_listeners_timeout=timedelta(seconds=30), cleanup_timeout=timedelta(seconds=30), )
async with actor:
# Get input
actor_input = await actor.get_input()
actor.log.info('Actor input: %s', actor_input)
# Your Actor logic here
data = {'message': 'Hello from Actor instance!', 'input': actor_input}
await actor.push_data(data)
# Set status message
await actor.set_status_message('Actor completed successfully')
if name == 'main': asyncio.run(main())
import asyncio from datetime import timedelta
from apify import Actor
async def main() -> None: actor = Actor( event_listeners_timeout=timedelta(seconds=30), cleanup_timeout=timedelta(seconds=30), )
await actor.init()
try:
# Get input
actor_input = await actor.get_input()
actor.log.info('Actor input: %s', actor_input)
# Your Actor logic here
data = {'message': 'Hello from Actor!', 'input': actor_input}
await actor.push_data(data)
# Set status message
await actor.set_status_message('Actor completed successfully')
finally:
await actor.exit()
if name == 'main': asyncio.run(main())
## Error handling[](#error-handling)
Good error handling lets your Actor fail fast on critical errors, retry transient issues safely, and keep data consistent. Normally you rely on the `async with Actor:` block—if it finishes, the run succeeds (exit code 0); if an unhandled exception occurs, the run fails (exit code 1).
The SDK provides helper methods for explicit control:
* [`Actor.exit`](https://docs.apify.com/sdk/python/sdk/python/reference/class/Actor.md#exit) - terminates the run successfully (default exit code 0).
* [`Actor.fail`](https://docs.apify.com/sdk/python/sdk/python/reference/class/Actor.md#fail) - marks the run as failed (default exit code 1).
Any non-zero exit code is treated as a `FAILED` run. You rarely need to call these methods directly unless you want to perform a controlled shutdown or customize the exit behavior.
Catch exceptions only when necessary - for example, to retry network timeouts or map specific errors to exit codes. Keep retry loops bounded with backoff and re-raise once exhausted. Make your processing idempotent so that restarts don't corrupt results. Both [`Actor.exit`](https://docs.apify.com/sdk/python/sdk/python/reference/class/Actor.md#exit) and [`Actor.fail`](https://docs.apify.com/sdk/python/sdk/python/reference/class/Actor.md#fail) perform the same cleanup, so complete any long-running persistence before calling them.
Below is a minimal context-manager example where an unhandled exception automatically fails the run, followed by a manual pattern giving you more control.
import asyncio
from apify import Actor
async def main() -> None: async with Actor: # Any unhandled exception triggers Actor.fail() automatically raise RuntimeError('Boom')
if name == 'main': asyncio.run(main())
If you need explicit control over exit codes or status messages, you can manage the Actor manually using [`Actor.init`](https://docs.apify.com/sdk/python/sdk/python/reference/class/Actor.md#init), [`Actor.exit`](https://docs.apify.com/sdk/python/sdk/python/reference/class/Actor.md#exit), and [`Actor.fail`](https://docs.apify.com/sdk/python/sdk/python/reference/class/Actor.md#fail).
import asyncio import random
from apify import Actor
async def do_work() -> None: # Simulate random outcomes: success or one of two exception types. outcome = random.random()
if outcome < 0.33:
raise ValueError('Invalid input data encountered')
if outcome < 0.66:
raise RuntimeError('Unexpected runtime failure')
# Simulate successful work
Actor.log.info('Work completed successfully')
async def main() -> None: await Actor.init() try: await do_work() except ValueError as exc: # Specific error mapping example await Actor.fail(exit_code=10, exception=exc) except Exception as exc: # Catch-all for unexpected errors await Actor.fail(exit_code=91, exception=exc) else: await Actor.exit(status_message='Actor completed successfully')
if name == 'main': asyncio.run(main())
## Reboot[](#reboot)
Rebooting (available on the Apify platform only) instructs the platform worker to restart your Actor from the beginning of its execution. Use this mechanism only for transient conditions that are likely to resolve after a fresh start — for example, rotating a blocked proxy pool or recovering from a stuck browser environment.
Before triggering a reboot, persist any essential state externally (e.g., to the key-value store or dataset), as all in-memory data is lost after reboot. The example below tracks a reboot counter in the default key-value store and allows at most three restarts before exiting normally.
import asyncio
from apify import Actor
async def main() -> None: async with Actor: # Use the KVS to persist a simple reboot counter across restarts. kvs = await Actor.open_key_value_store() reboot_counter = await kvs.get_value('reboot_counter', 0)
# Limit the number of reboots to avoid infinite loops.
if reboot_counter < 3:
await kvs.set_value('reboot_counter', reboot_counter + 1)
Actor.log.info(f'Reboot attempt {reboot_counter + 1}/3')
# Trigger a platform reboot; after restart the code runs from the beginning.
await Actor.reboot()
Actor.log.info('Reboot limit reached, finishing run')
if name == 'main': asyncio.run(main())
## Status message[](#status-message)
[Status messages](https://docs.apify.com/platform/actors/development/programming-interface/status-messages) are lightweight, human-readable progress indicators displayed with the Actor run on the Apify platform (separate from logs). Use them to communicate high-level phases or milestones, such as "Fetching list", "Processed 120/500 pages", or "Uploading results".
Update the status only when the user's understanding of progress changes - avoid frequent updates for every processed item. Detailed information should go to logs or storages (dataset, key-value store) instead.
The SDK optimizes updates by sending an API request only when the message text changes, so repeating the same message incurs no additional cost.
import asyncio
from apify import Actor
async def main() -> None: async with Actor: await Actor.set_status_message('Here we go!') # Do some work... await asyncio.sleep(3) await Actor.set_status_message('So far so good...') await asyncio.sleep(3) # Do some more work... await Actor.set_status_message('Steady as she goes...') await asyncio.sleep(3) # Do even more work... await Actor.set_status_message('Almost there...') await asyncio.sleep(3) # Finish the job await Actor.set_status_message('Phew! That was not that hard!')
if name == 'main': asyncio.run(main())
## Conclusion[](#conclusion)
This page has presented the full Actor lifecycle: initialization, execution, error handling, rebooting, shutdown and status messages. You've seen how the SDK supports both context-based and manual control patterns. For deeper dives, explore the [reference docs](https://docs.apify.com/sdk/python/sdk/python/reference.md), [guides](https://docs.apify.com/sdk/python/sdk/python/docs/guides/beautifulsoup-httpx.md), and [platform documentation](https://docs.apify.com/platform).
---
# Interacting with other Actors
Copy for LLM
There are several methods that interact with other Actors and Actor tasks on the Apify platform.
## Actor start[](#actor-start)
The [`Actor.start`](https://docs.apify.com/sdk/python/sdk/python/reference/class/Actor.md#start) method starts another Actor on the Apify platform, and immediately returns the details of the started Actor run.
from apify import Actor
async def main() -> None: async with Actor: # Start your own Actor named 'my-fancy-actor'. actor_run = await Actor.start( actor_id='~my-fancy-actor', run_input={'foo': 'bar'}, )
# Log the Actor run ID.
Actor.log.info(f'Actor run ID: {actor_run.id}')
## Actor call[](#actor-call)
The [`Actor.call`](https://docs.apify.com/sdk/python/sdk/python/reference/class/Actor.md#call) method starts another Actor on the Apify platform, and waits for the started Actor run to finish.
from apify import Actor
async def main() -> None: async with Actor: # Start the apify/screenshot-url Actor. actor_run = await Actor.call( actor_id='apify/screenshot-url', run_input={'url': 'http://example.com', 'delay': 10000}, )
if actor_run is None:
raise RuntimeError('Actor task failed to start.')
# Wait for the Actor run to finish.
run_client = Actor.apify_client.run(actor_run.id)
await run_client.wait_for_finish()
# Get the Actor output from the key-value store.
kvs_client = run_client.key_value_store()
output = await kvs_client.get_record('OUTPUT')
Actor.log.info(f'Actor output: {output}')
## Actor call task[](#actor-call-task)
The [`Actor.call_task`](https://docs.apify.com/sdk/python/sdk/python/reference/class/Actor.md#call_task) method starts an [Actor task](https://docs.apify.com/platform/actors/tasks) on the Apify platform, and waits for the started Actor run to finish.
from apify import Actor
async def main() -> None: async with Actor: # Start the Actor task by its ID. actor_run = await Actor.call_task(task_id='Z3m6FPSj0GYZ25rQc')
if actor_run is None:
raise RuntimeError('Actor task failed to start.')
# Wait for the task run to finish.
run_client = Actor.apify_client.run(actor_run.id)
await run_client.wait_for_finish()
# Get the task run dataset items
dataset_client = run_client.dataset()
items = await dataset_client.list_items()
Actor.log.info(f'Task run dataset items: {items}')
## Actor metamorph[](#actor-metamorph)
The [`Actor.metamorph`](https://docs.apify.com/sdk/python/sdk/python/reference/class/Actor.md#metamorph) operation transforms an Actor run into a run of another Actor with a new input. This feature is useful if you want to use another Actor to finish the work of your current Actor, instead of internally starting a new Actor run and waiting for its finish. With metamorph, you can easily create new Actors on top of existing ones, and give your users nicer input structure and user interface for the final Actor. For the users of your Actors, the metamorph operation is completely transparent; they will just see your Actor got the work done.
Internally, the system stops the container corresponding to the original Actor run and starts a new container using a different container image. All the default storages are preserved,and the new Actor input is stored under the `INPUT-METAMORPH-1` key in the same default key-value store.
To make you Actor compatible with the metamorph operation, use [`Actor.get_input`](https://docs.apify.com/sdk/python/sdk/python/reference/class/Actor.md#get_input) instead of [`Actor.get_value('INPUT')`](https://docs.apify.com/sdk/python/sdk/python/reference/class/Actor.md#get_value) to read your Actor input. This method will fetch the input using the right key in a case of metamorphed run.
For example, imagine you have an Actor that accepts a hotel URL on input, and then internally uses the [`apify/web-scraper`](https://apify.com/apify/web-scraper) public Actor to scrape all the hotel reviews. The metamorphing code would look as follows:
from apify import Actor
async def main() -> None: async with Actor: # Get the original Actor input. actor_input = await Actor.get_input() or {} hotel_url = actor_input.get('hotel_url')
# Create new input for apify/web-scraper Actor.
web_scraper_input = {
'startUrls': [{'url': hotel_url}],
'pageFunction': """async function pageFunction(context) {
// Here you pass the JavaScript page function
// that scrapes all the reviews from the hotel's URL
}""",
}
# Metamorph the Actor run to `apify/web-scraper` with the new input.
await Actor.metamorph('apify/web-scraper', web_scraper_input)
# This code will not be called, since the `metamorph` action terminates
# the current Actor run container.
Actor.log.info('You will not see this!')
---
# Logging
Copy for LLM
The Apify SDK is logging useful information through the [`logging`](https://docs.python.org/3/library/logging.html) module from Python's standard library, into the logger with the name `apify`.
## Automatic configuration[](#automatic-configuration)
When you create an Actor from an Apify-provided template, either in Apify Console or through the Apify CLI, you do not have to configure the logger yourself. The template already contains initialization code for the logger,which sets the logger level to `DEBUG` and the log formatter to [`ActorLogFormatter`](https://docs.apify.com/sdk/python/sdk/python/reference/class/ActorLogFormatter.md).
## Manual configuration[](#manual-configuration)
### Configuring the log level[](#configuring-the-log-level)
In Python's default behavior, if you don't configure the logger otherwise, only logs with level `WARNING` or higher are printed out to the standard output, without any formatting. To also have logs with `DEBUG` and `INFO` level printed out, you need to call the [`Logger.setLevel`](https://docs.python.org/3/library/logging.html#logging.Logger.setLevel) method on the logger, with the desired minimum level as an argument.
### Configuring the log formatting[](#configuring-the-log-formatting)
By default, only the log message is printed out to the output, without any formatting. To have a nicer output, with the log level printed in color, the messages nicely aligned, and extra log fields printed out,you can use the [`ActorLogFormatter`](https://docs.apify.com/sdk/python/sdk/python/reference/class/ActorLogFormatter.md) class from the `apify.log` module.
### Example log configuration[](#example-log-configuration)
To configure and test the logger, you can use this snippet:
import logging
from apify.log import ActorLogFormatter
async def main() -> None: handler = logging.StreamHandler() handler.setFormatter(ActorLogFormatter())
apify_logger = logging.getLogger('apify')
apify_logger.setLevel(logging.DEBUG)
apify_logger.addHandler(handler)
This configuration will cause all levels of messages to be printed to the standard output, with some pretty formatting.
## Logger usage[](#logger-usage)
Here you can see how all the log levels would look like.
You can use the `extra` argument for all log levels, it's not specific to the warning level. When you use `Logger.exception`, there is no need to pass the Exception object to the log manually, it will automatiacally infer it from the current execution context and print the exception details.
import logging
from apify import Actor from apify.log import ActorLogFormatter
async def main() -> None: handler = logging.StreamHandler() handler.setFormatter(ActorLogFormatter())
apify_logger = logging.getLogger('apify')
apify_logger.setLevel(logging.DEBUG)
apify_logger.addHandler(handler)
async with Actor:
Actor.log.debug('This is a debug message')
Actor.log.info('This is an info message')
Actor.log.warning('This is a warning message', extra={'reason': 'Bad Actor!'})
Actor.log.error('This is an error message')
try:
raise RuntimeError('Ouch!')
except RuntimeError:
Actor.log.exception('This is an exceptional message')
Result:
DEBUG This is a debug message INFO This is an info message WARN This is a warning message ({"reason": "Bad Actor!"}) ERROR This is an error message ERROR This is an exceptional message Traceback (most recent call last): File "main.py", line 6, in raise RuntimeError('Ouch!') RuntimeError: Ouch!
## Redirect logs from other Actor runs[](#redirect-logs-from-other-actor-runs)
In some situations, one Actor is going to start one or more other Actors and wait for them to finish and produce some results. In such cases, you might want to redirect the logs and status messages of the started Actors runs back to the parent Actor run, so that you can see the progress of the started Actors' runs in the parent Actor's logs. This guide will show possibilities on how to do it.
### Redirecting logs from Actor.call[](#redirecting-logs-from-actorcall)
Typical use case for log redirection is to call another Actor using the [`Actor.call`](https://docs.apify.com/sdk/python/sdk/python/reference/class/Actor.md#call) method. This method has an optional `logger` argument, which is by default set to the `default` literal. This means that the logs of the called Actor will be automatically redirected to the parent Actor's logs with default formatting and filtering. If you set the `logger` argument to `None`, then no log redirection happens. The third option is to pass your own `Logger` instance with the possibility to define your own formatter, filter, and handler. Below you can see those three possible ways of log redirection when starting another Actor run through [`Actor.call`](https://docs.apify.com/sdk/python/sdk/python/reference/class/Actor.md#call).
import logging
from apify import Actor
async def main() -> None: async with Actor: # Default redirect logger await Actor.call(actor_id='some_actor_id') # No redirect logger await Actor.call(actor_id='some_actor_id', logger=None) # Custom redirect logger await Actor.call( actor_id='some_actor_id', logger=logging.getLogger('custom_logger') )
Each default redirect logger log entry will have a specific format. After the timestamp, it will contain cyan colored text that will contain the redirect information - the other actor's name and the run ID. The rest of the log message will be printed in the same manner as the parent Actor's logger is configured.
The log redirection can be deep, meaning that if the other actor also starts another actor and is redirecting logs from it, then in the top-level Actor, you can see it as well. See the following example screenshot of the Apify log console when one actor recursively starts itself (there are 2 levels of recursion in the example).

### Redirecting logs from already running Actor run[](#redirecting-logs-from-already-running-actor-run)
In some cases, you might want to connect to an already running Actor run and redirect its logs to your current Actor run. This can be done using the [ApifyClient](https://docs.apify.com/sdk/python/sdk/python/reference/class/Actor.md#apify_client) and getting the streamed log from a specific Actor run. You can then use it as a context manager, and the log redirection will be active in the context, or you can control the log redirection manually by explicitly calling `start` and `stop` methods.
You can further decide whether you want to redirect just new logs of the ongoing Actor run, or if you also want to redirect historical logs from that Actor's run, so all logs it has produced since it was started. Both options are shown in the example code below.
import asyncio
from apify import Actor
async def main() -> None: async with Actor: # Lifecycle of redirected logs is handled by the context manager. async with await Actor.apify_client.run('some_actor_id').get_streamed_log( # Redirect all logs from the start of that run, even the logs from past. from_start=True ): await asyncio.sleep(5) # Logging will stop out of context
# Lifecycle of redirected logs can be handled manually.
streamed_log = await Actor.apify_client.run('some_id').get_streamed_log(
# Do not redirect historical logs from this actor run.
# Redirect only new logs from now on.
from_start=False
)
streamed_log.start()
await asyncio.sleep(5)
await streamed_log.stop()
---
# Pay-per-event monetization
Copy for LLM
Apify provides several [pricing models](https://docs.apify.com/platform/actors/publishing/monetize) for monetizing your Actors. The most recent and most flexible one is [pay-per-event](https://docs.apify.com/platform/actors/running/actors-in-store#pay-per-event), which lets you charge your users programmatically directly from your Actor. As the name suggests, you may charge the users each time a specific event occurs, for example a call to an external API or when you return a result.
To use the pay-per-event pricing model, you first need to [set it up](https://docs.apify.com/platform/actors/running/actors-in-store#pay-per-event) for your Actor in the Apify console. After that, you're free to start charging for events.
How pay-per-event pricing works
If you want more details about PPE pricing, please refer to our [PPE documentation](https://docs.apify.com/platform/actors/publishing/monetize/pay-per-event).
## Charging for events[](#charging-for-events)
After monetization is set in the Apify console, you can add [`Actor.charge`](https://docs.apify.com/sdk/python/sdk/python/reference/class/Actor.md#charge) calls to your code and start monetizing!
from apify import Actor
async def main() -> None: async with Actor: # Charge for a single occurence of an event await Actor.charge(event_name='init')
# Prepare some mock results
result = [
{'word': 'Lorem'},
{'word': 'Ipsum'},
{'word': 'Dolor'},
{'word': 'Sit'},
{'word': 'Amet'},
]
# Shortcut for charging for each pushed dataset item
await Actor.push_data(result, 'result-item')
# Or you can charge for a given number of events manually
await Actor.charge(
event_name='result-item',
count=len(result),
)
Then you just push your code to Apify and that's it! The SDK will even keep track of the max total charge setting for you, so you will not provide more value than what the user chose to pay for.
If you need finer control over charging, you can access call [`Actor.get_charging_manager()`](https://docs.apify.com/sdk/python/sdk/python/reference/class/Actor.md#get_charging_manager) to access the [`ChargingManager`](https://docs.apify.com/sdk/python/sdk/python/reference/class/ChargingManager.md), which can provide more detailed information - for example how many events of each type can be charged before reaching the configured limit.
## Transitioning from a different pricing model[](#transitioning-from-a-different-pricing-model)
When you plan to start using the pay-per-event pricing model for an Actor that is already monetized with a different pricing model, your source code will need support both pricing models during the transition period enforced by the Apify platform. Arguably the most frequent case is the transition from the pay-per-result model which utilizes the `ACTOR_MAX_PAID_DATASET_ITEMS` environment variable to prevent returning unpaid dataset items. The following is an example how to handle such scenarios. The key part is the [`ChargingManager.get_pricing_info()`](https://docs.apify.com/sdk/python/sdk/python/reference/class/ChargingManager.md#get_pricing_info) method which returns information about the current pricing model.
from apify import Actor
async def main() -> None: async with Actor: # Check the dataset because there might already be items # if the run migrated or was restarted default_dataset = await Actor.open_dataset() metadata = await default_dataset.get_metadata() charged_items = metadata.item_count
if Actor.get_charging_manager().get_pricing_info().is_pay_per_event:
await Actor.push_data({'hello': 'world'}, 'dataset-item')
elif charged_items < (Actor.configuration.max_paid_dataset_items or 0):
await Actor.push_data({'hello': 'world'})
charged_items += 1
## Local development[](#local-development)
It is encouraged to test your monetization code on your machine before releasing it to the public. To tell your Actor that it should work in pay-per-event mode, pass it the `ACTOR_TEST_PAY_PER_EVENT` environment variable:
ACTOR_TEST_PAY_PER_EVENT=true python -m youractor
If you also wish to see a log of all the events charged throughout the run, the Apify SDK keeps a log of charged events in a so called charging dataset. Your charging dataset can be found under the `charging-log` name (unless you change your storage settings, this dataset is stored in `storage/datasets/charging-log/`). Please note that this log is not available when running the Actor in production on the Apify platform.
Because pricing configuration is stored by the Apify platform, all events will have a default price of $1.
---
# Proxy management
Copy for LLM
[IP address blocking](https://en.wikipedia.org/wiki/IP_address_blocking) is one of the oldest and most effective ways of preventing access to a website. It is therefore paramount for a good web scraping library to provide easy to use but powerful tools which can work around IP blocking. The most powerful weapon in your anti IP blocking arsenal is a [proxy server](https://en.wikipedia.org/wiki/Proxy_server).
With the Apify SDK, you can use your own proxy servers, proxy servers acquired from third-party providers, or you can rely on [Apify Proxy](https://apify.com/proxy) for your scraping needs.
## Quick start[](#quick-start)
If you want to use Apify Proxy locally, make sure that you run your Actors via the Apify CLI and that you are [logged in](https://docs.apify.com/cli/docs/installation#login-with-your-apify-account) with your Apify account in the CLI.
### Using Apify proxy[](#using-apify-proxy)
from apify import Actor
async def main() -> None: async with Actor: proxy_configuration = await Actor.create_proxy_configuration()
if not proxy_configuration:
raise RuntimeError('No proxy configuration available.')
proxy_url = await proxy_configuration.new_url()
Actor.log.info(f'Using proxy URL: {proxy_url}')
### Using your own proxies[](#using-your-own-proxies)
from apify import Actor
async def main() -> None: async with Actor: proxy_configuration = await Actor.create_proxy_configuration( proxy_urls=[ 'http://proxy-1.com', 'http://proxy-2.com', ], )
if not proxy_configuration:
raise RuntimeError('No proxy configuration available.')
proxy_url = await proxy_configuration.new_url()
Actor.log.info(f'Using proxy URL: {proxy_url}')
## Proxy configuration[](#proxy-configuration)
All your proxy needs are managed by the [`ProxyConfiguration`](https://docs.apify.com/sdk/python/sdk/python/reference/class/ProxyConfiguration.md) class. You create an instance using the [`Actor.create_proxy_configuration()`](https://docs.apify.com/sdk/python/sdk/python/reference/class/Actor.md#create_proxy_configuration) method. Then you generate proxy URLs using the [`ProxyConfiguration.new_url()`](https://docs.apify.com/sdk/python/sdk/python/reference/class/ProxyConfiguration.md#new_url) method.
### Apify proxy vs. your own proxies[](#apify-proxy-vs-your-own-proxies)
The `ProxyConfiguration` class covers both Apify Proxy and custom proxy URLs, so that you can easily switch between proxy providers. However, some features of the class are available only to Apify Proxy users, mainly because Apify Proxy is what one would call a super-proxy. It's not a single proxy server, but an API endpoint that allows connectionthrough millions of different IP addresses. So the class essentially has two modes: Apify Proxy or Your proxy.
The difference is easy to remember. Using the `proxy_url` or `new_url_function` arguments enables use of your custom proxy URLs, whereas all the other options are there to configure Apify Proxy. Visit the [Apify Proxy docs](https://docs.apify.com/proxy) for more info on how these parameters work.
### IP rotation and session management[](#ip-rotation-and-session-management)
`ProxyConfiguration.new_url` allows you to pass a `session_id` parameter. It will then be used to create a `session_id`-`proxy_url` pair, and subsequent `new_url()` calls with the same `session_id` will always return the same `proxy_url`. This is extremely useful in scraping, because you want to create the impression of a real user.
When no `session_id` is provided, your custom proxy URLs are rotated round-robin, whereas Apify Proxy manages their rotation using black magic to get the best performance.
from apify import Actor
async def main() -> None: async with Actor: proxy_configuration = await Actor.create_proxy_configuration( proxy_urls=[ 'http://proxy-1.com', 'http://proxy-2.com', ], )
if not proxy_configuration:
raise RuntimeError('No proxy configuration available.')
proxy_url = await proxy_configuration.new_url() # http://proxy-1.com
proxy_url = await proxy_configuration.new_url() # http://proxy-2.com
proxy_url = await proxy_configuration.new_url() # http://proxy-1.com
proxy_url = await proxy_configuration.new_url() # http://proxy-2.com
proxy_url = await proxy_configuration.new_url(
session_id='a'
) # http://proxy-1.com
proxy_url = await proxy_configuration.new_url(
session_id='b'
) # http://proxy-2.com
proxy_url = await proxy_configuration.new_url(
session_id='b'
) # http://proxy-2.com
proxy_url = await proxy_configuration.new_url(
session_id='a'
) # http://proxy-1.com
### Apify proxy configuration[](#apify-proxy-configuration)
With Apify Proxy, you can select specific proxy groups to use, or countries to connect from. This allows you to get better proxy performance after some initial research.
from apify import Actor
async def main() -> None: async with Actor: proxy_configuration = await Actor.create_proxy_configuration( groups=['RESIDENTIAL'], country_code='US', )
if not proxy_configuration:
raise RuntimeError('No proxy configuration available.')
proxy_url = await proxy_configuration.new_url()
Actor.log.info(f'Proxy URL: {proxy_url}')
Now your connections using proxy\_url will use only Residential proxies from the US. Note that you must first get access to a proxy group before you are able to use it. You can find your available proxy groups in the [proxy dashboard](https://console.apify.com/proxy).
If you don't specify any proxy groups, automatic proxy selection will be used.
### Your own proxy configuration[](#your-own-proxy-configuration)
There are two options how to make `ProxyConfiguration` work with your own proxies.
Either you can pass it a list of your own proxy servers:
from apify import Actor
async def main() -> None: async with Actor: proxy_configuration = await Actor.create_proxy_configuration( proxy_urls=[ 'http://proxy-1.com', 'http://proxy-2.com', ], )
if not proxy_configuration:
raise RuntimeError('No proxy configuration available.')
proxy_url = await proxy_configuration.new_url()
Actor.log.info(f'Using proxy URL: {proxy_url}')
Or you can pass it a method (accepting one optional argument, the session ID), to generate proxy URLs automatically:
from future import annotations
from apify import Actor, Request
async def custom_new_url_function( session_id: str | None = None, _: Request | None = None, ) -> str | None: if session_id is not None: return f'http://my-custom-proxy-supporting-sessions.com?session-id={session_id}' return 'http://my-custom-proxy-not-supporting-sessions.com'
async def main() -> None: async with Actor: proxy_configuration = await Actor.create_proxy_configuration( new_url_function=custom_new_url_function, # type: ignore[arg-type] )
if not proxy_configuration:
raise RuntimeError('No proxy configuration available.')
proxy_url_with_session = await proxy_configuration.new_url('a')
Actor.log.info(f'Using proxy URL: {proxy_url_with_session}')
proxy_url_without_session = await proxy_configuration.new_url()
Actor.log.info(f'Using proxy URL: {proxy_url_without_session}')
### Configuring proxy based on Actor input[](#configuring-proxy-based-on-actor-input)
To make selecting the proxies that the Actor uses easier, you can use an input field with the editor [`proxy` in your input schema](https://docs.apify.com/platform/actors/development/input-schema#object). This input will then be filled with a dictionary containing the proxy settings you or the users of your Actor selected for the Actor run.
You can then use that input to create the proxy configuration:
from apify import Actor
async def main() -> None: async with Actor: actor_input = await Actor.get_input() or {} proxy_settings = actor_input.get('proxySettings') proxy_configuration = await Actor.create_proxy_configuration( actor_proxy_input=proxy_settings )
if not proxy_configuration:
raise RuntimeError('No proxy configuration available.')
proxy_url = await proxy_configuration.new_url()
Actor.log.info(f'Using proxy URL: {proxy_url}')
## Using the generated proxy URLs[](#using-the-generated-proxy-urls)
### HTTPX[](#httpx)
To use the generated proxy URLs with the `httpx` library, use the [`proxies`](https://www.python-httpx.org/advanced/#http-proxying) argument:
import httpx
from apify import Actor
async def main() -> None: async with Actor: proxy_configuration = await Actor.create_proxy_configuration( proxy_urls=[ 'http://proxy-1.com', 'http://proxy-2.com', ], )
if not proxy_configuration:
raise RuntimeError('No proxy configuration available.')
proxy_url = await proxy_configuration.new_url()
async with httpx.AsyncClient(proxy=proxy_url) as httpx_client:
response = await httpx_client.get('http://example.com')
Actor.log.info(f'Response: {response}')
Make sure you have the `httpx` library installed:
pip install httpx
---
# Running webserver in your Actor
Copy for LLM
Each Actor run on the Apify platform is assigned a unique hard-to-guess URL (for example `https://8segt5i81sokzm.runs.apify.net`), which enables HTTP access to an optional web server running inside the Actor run's container.
The URL is available in the following places:
* In Apify Console, on the Actor run details page as the **Container URL** field.
* In the API as the `container_url` property of the [Run object](https://docs.apify.com/api/v2#/reference/actors/run-object/get-run).
* In the Actor as the `Actor.configuration.container_url` property.
The web server running inside the container must listen at the port defined by the `Actor.configuration.container_port` property. When running Actors locally, the port defaults to `4321`, so the web server will be accessible at `http://localhost:4321`.
## Example[](#example)
The following example demonstrates how to start a simple web server in your Actor,which will respond to every GET request with the number of items that the Actor has processed so far:
import asyncio from http.server import BaseHTTPRequestHandler, ThreadingHTTPServer
from apify import Actor
processed_items = 0 http_server = None
Just a simple handler that will print the number of processed items so far
on every GET request.
class RequestHandler(BaseHTTPRequestHandler): def do_get(self) -> None: self.log_request() self.send_response(200) self.end_headers() self.wfile.write(bytes(f'Processed items: {processed_items}', encoding='utf-8'))
def run_server() -> None: # Start the HTTP server on the provided port, # and save a reference to the server. global http_server with ThreadingHTTPServer( ('', Actor.configuration.web_server_port), RequestHandler ) as server: Actor.log.info(f'Server running on {Actor.configuration.web_server_port}') http_server = server server.serve_forever()
async def main() -> None: global processed_items async with Actor: # Start the HTTP server in a separate thread. run_server_task = asyncio.get_running_loop().run_in_executor(None, run_server)
# Simulate doing some work.
for _ in range(100):
await asyncio.sleep(1)
processed_items += 1
Actor.log.info(f'Processed items: {processed_items}')
if http_server is None:
raise RuntimeError('HTTP server not started')
# Signal the HTTP server to shut down, and wait for it to finish.
http_server.shutdown()
await run_server_task
---
# Working with storages
Copy for LLM
The `Actor` class provides methods to work either with the default storages of the Actor, or with any other storage, named or unnamed.
## Types of storages[](#types-of-storages)
There are three types of storages available to Actors.
First are [datasets](https://docs.apify.com/platform/storage/dataset), which are append-only tables for storing the results of your Actors. You can open a dataset through the [`Actor.open_dataset`](https://docs.apify.com/sdk/python/sdk/python/reference/class/Actor.md#open_dataset) method, and work with it through the resulting [`Dataset`](https://docs.apify.com/sdk/python/sdk/python/reference/class/Dataset.md) class instance.
Next there are [key-value stores](https://docs.apify.com/platform/storage/key-value-store), which function as a read/write storage for storing file-like objects, typically the Actor state or binary results. You can open a key-value store through the [`Actor.open_key_value_store`](https://docs.apify.com/sdk/python/sdk/python/reference/class/Actor.md#open_key_value_store) method, and work with it through the resulting [`KeyValueStore`](https://docs.apify.com/sdk/python/sdk/python/reference/class/KeyValueStore.md) class instance.
Finally, there are [request queues](https://docs.apify.com/platform/storage/request-queue). These are queues into which you can put the URLs you want to scrape, and from which the Actor can dequeue them and process them. You can open a request queue through the [`Actor.open_request_queue`](https://docs.apify.com/sdk/python/sdk/python/reference/class/Actor.md#open_request_queue) method, and work with it through the resulting [`RequestQueue`](https://docs.apify.com/sdk/python/sdk/python/reference/class/RequestQueue.md) class instance.
Each Actor run has its default dataset, default key-value store and default request queue.
## Local storage emulation[](#local-storage-emulation)
To be able to develop Actors locally, the storages that the Apify platform provides are emulated on the local filesystem.
The storage contents are loaded from and saved to the `storage` folder in the Actor's main folder. Each storage type is stored in its own subfolder, so for example datasets are stored in the `storage/datasets` folder.
Each storage is then stored in its own folder, named after the storage, or called `default` if it's the default storage. For example, a request queue with the name `my-queue` would be stored in `storage/request_queues/my-queue`.
Each dataset item, key-value store record, or request in a request queue is then stored in its own file in the storage folder. Dataset items and request queue requests are always JSON files, and key-value store records can be any file type, based on its content type. For example, the Actor input is typically stored in `storage/key_value_stores/default/INPUT.json`.
## Local Actor run with remote storage[](#local-actor-run-with-remote-storage)
When developing locally, opening any storage will by default use local storage. To change this behavior and to use remote storage you have to use `force_cloud=True` argument in [`Actor.open_dataset`](https://docs.apify.com/sdk/python/sdk/python/reference/class/Actor.md#open_dataset), [`Actor.open_request_queue`](https://docs.apify.com/sdk/python/sdk/python/reference/class/Actor.md#open_request_queue) or [`Actor.open_key_value_store`](https://docs.apify.com/sdk/python/sdk/python/reference/class/Actor.md#open_key_value_store). Proper use of this argument allows you to work with both local and remote storages.
Calling another remote Actor and accessing its default storage is typical use-case for using `force-cloud=True` argument to open remote Actor's storages.
### Local storage persistence[](#local-storage-persistence)
By default, the storage contents are persisted across multiple Actor runs. To clean up the Actor storages before the running the Actor, use the `--purge` flag of the [`apify run`](https://docs.apify.com/cli/docs/reference#apify-run) command of the Apify CLI.
apify run --purge
## Convenience methods for working with default storages[](#convenience-methods-for-working-with-default-storages)
There are several methods for directly working with the default key-value store or default dataset of the Actor.
* [`Actor.get_value('my-record')`](https://docs.apify.com/sdk/python/sdk/python/reference/class/Actor.md#get_value) reads a record from the default key-value store of the Actor.
* [`Actor.set_value('my-record', 'my-value')`](https://docs.apify.com/sdk/python/sdk/python/reference/class/Actor.md#set_value) saves a new value to the record in the default key-value store.
* [`Actor.get_input`](https://docs.apify.com/sdk/python/sdk/python/reference/class/Actor.md#get_input) reads the Actor input from the default key-value store of the Actor.
* [`Actor.push_data([{'result': 'Hello, world!'}, ...])`](https://docs.apify.com/sdk/python/sdk/python/reference/class/Actor.md#push_data) saves results to the default dataset of the Actor.
## Opening named and unnamed storages[](#opening-named-and-unnamed-storages)
The [`Actor.open_dataset`](https://docs.apify.com/sdk/python/sdk/python/reference/class/Actor.md#open_dataset), [`Actor.open_key_value_store`](https://docs.apify.com/sdk/python/sdk/python/reference/class/Actor.md#open_key_value_store) and [`Actor.open_request_queue`](https://docs.apify.com/sdk/python/sdk/python/reference/class/Actor.md#open_request_queue) methods can be used to open any storage for reading and writing. You can either use them without arguments to open the default storages, or you can pass a storage ID or name to open another storage.
from apify import Actor, Request
async def main() -> None: async with Actor: # Work with the default dataset of the Actor dataset = await Actor.open_dataset() await dataset.push_data({'result': 'Hello, world!'})
# Work with the key-value store with ID 'mIJVZsRQrDQf4rUAf'
key_value_store = await Actor.open_key_value_store(id='mIJVZsRQrDQf4rUAf')
await key_value_store.set_value('record', 'Hello, world!')
# Work with the request queue with the name 'my-queue'
request_queue = await Actor.open_request_queue(name='my-queue')
await request_queue.add_request(Request.from_url('https://apify.com'))
## Deleting storages[](#deleting-storages)
To delete a storage, you can use the [`Dataset.drop`](https://docs.apify.com/sdk/python/sdk/python/reference/class/Dataset.md#drop), [`KeyValueStore.drop`](https://docs.apify.com/sdk/python/sdk/python/reference/class/KeyValueStore.md#drop) or [`RequestQueue.drop`](https://docs.apify.com/sdk/python/sdk/python/reference/class/RequestQueue.md#drop) methods.
from apify import Actor
async def main() -> None: async with Actor: # Open a key-value store with the name 'my-cool-store' key_value_store = await Actor.open_key_value_store(name='my-cool-store') await key_value_store.set_value('record', 'Hello, world!')
# Do something ...
# Now we don't want it anymore
await key_value_store.drop()
## Working with datasets[](#working-with-datasets)
In this section we will show you how to work with [datasets](https://docs.apify.com/platform/storage/dataset).
### Reading & writing items[](#reading--writing-items)
To write data into a dataset, you can use the [`Dataset.push_data`](https://docs.apify.com/sdk/python/sdk/python/reference/class/Dataset.md#push_data) method.
To read data from a dataset, you can use the [`Dataset.get_data`](https://docs.apify.com/sdk/python/sdk/python/reference/class/Dataset.md#get_data) method.
To get an iterator of the data, you can use the [`Dataset.iterate_items`](https://docs.apify.com/sdk/python/sdk/python/reference/class/Dataset.md#iterate_items) method.
from apify import Actor
async def main() -> None: async with Actor: # Open a dataset and write some data in it dataset = await Actor.open_dataset(name='my-cool-dataset') await dataset.push_data([{'itemNo': i} for i in range(1000)])
# Read back the first half of the data
first_half = await dataset.get_data(limit=500)
Actor.log.info(f'The first half of items = {first_half.items}')
# Iterate over the second half
second_half = [item async for item in dataset.iterate_items(offset=500)]
Actor.log.info(f'The second half of items = {second_half}')
### Exporting items[](#exporting-items)
You can also export the dataset items into a key-value store, as either a CSV or a JSON record, using the [`Dataset.export_to_csv`](https://docs.apify.com/sdk/python/sdk/python/reference/class/Dataset.md#export_to_csv) or [`Dataset.export_to_json`](https://docs.apify.com/sdk/python/sdk/python/reference/class/Dataset.md#export_to_json) method.
from apify import Actor
async def main() -> None: async with Actor: # Open a dataset and write some data in it dataset = await Actor.open_dataset(name='my-cool-dataset') await dataset.push_data([{'itemNo': i} for i in range(1000)])
# Export the data as CSV
await dataset.export_to(
content_type='csv',
key='data.csv',
to_kvs_name='my-cool-key-value-store',
)
# Export the data as JSON
await dataset.export_to(
content_type='json',
key='data.json',
to_kvs_name='my-cool-key-value-store',
)
# Print the exported records
store = await Actor.open_key_value_store(name='my-cool-key-value-store')
csv_data = await store.get_value('data.csv')
Actor.log.info(f'CSV data: {csv_data}')
json_data = await store.get_value('data.json')
Actor.log.info(f'JSON data: {json_data}')
## Working with key-value stores[](#working-with-key-value-stores)
In this section we will show you how to work with [key-value stores](https://docs.apify.com/platform/storage/key-value-store).
### Reading and writing records[](#reading-and-writing-records)
To read records from a key-value store, you can use the [`KeyValueStore.get_value`](https://docs.apify.com/sdk/python/sdk/python/reference/class/KeyValueStore.md#get_value) method.
To write records into a key-value store, you can use the [`KeyValueStore.set_value`](https://docs.apify.com/sdk/python/sdk/python/reference/class/KeyValueStore.md#set_value) method. You can set the content type of a record with the `content_type` argument. To delete a record, set its value to `None`.
from apify import Actor
async def main() -> None: async with Actor: # Open a named key-value store kvs = await Actor.open_key_value_store(name='my-cool-key-value-store')
# Write some data to it
await kvs.set_value('automatic_text', 'abcd')
await kvs.set_value('automatic_json', {'ab': 'cd'})
await kvs.set_value('explicit_csv', 'a,b\nc,d', content_type='text/csv')
# Get the values and log them
automatic_text = await kvs.get_value('automatic_text')
Actor.log.info(f'Automatic text: {automatic_text}')
automatic_json = await kvs.get_value('automatic_json')
Actor.log.info(f'Automatic JSON: {automatic_json}')
explicit_csv = await kvs.get_value('explicit_csv')
Actor.log.info(f'Explicit CSV: {explicit_csv}')
# Delete the `automatic_text` value
await kvs.set_value('automatic_text', None)
### Iterating keys[](#iterating-keys)
To get an iterator of the key-value store record keys, you can use the [`KeyValueStore.iterate_keys`](https://docs.apify.com/sdk/python/sdk/python/reference/class/KeyValueStore.md#iterate_keys) method.
from apify import Actor
async def main() -> None: async with Actor: # Open a named key-value store kvs = await Actor.open_key_value_store(name='my-cool-key-value-store')
# Write some data to it
await kvs.set_value('automatic_text', 'abcd')
await kvs.set_value('automatic_json', {'ab': 'cd'})
await kvs.set_value('explicit_csv', 'a,b\nc,d', content_type='text/csv')
# Print the info for each record
Actor.log.info('Records in store:')
async for key, info in kvs.iterate_keys():
Actor.log.info(f'key={key}, info={info}')
### Public URLs of records[](#public-urls-of-records)
To get a publicly accessible URL of a key-value store record, you can use the [`KeyValueStore.get_public_url`](https://docs.apify.com/sdk/python/sdk/python/reference/class/KeyValueStore.md#get_public_url) method.
from apify import Actor
async def main() -> None: async with Actor: # Open a named key-value store store = await Actor.open_key_value_store(name='my-cool-key-value-store')
# Get the public URL of a record
my_record_url = await store.get_public_url('my_record')
Actor.log.info(f'URL of "my_record": {my_record_url}')
## Working with request queues[](#working-with-request-queues)
In this section we will show you how to work with [request queues](https://docs.apify.com/platform/storage/request-queue).
### Adding requests to a queue[](#adding-requests-to-a-queue)
To add a request into the queue, you can use the [`RequestQueue.add_request`](https://docs.apify.com/sdk/python/sdk/python/reference/class/RequestQueue.md#add_request) method.
You can use the `forefront` boolean argument to specify whether the request should go to the beginning of the queue, or to the end.
You can use the `unique_key` of the request to uniquely identify a request. If you try to add more requests with the same unique key, only the first one will be added.
Check out the [`Request`](https://docs.apify.com/sdk/python/sdk/python/reference/class/Request.md) for more information on how to create requests and what properties they have.
### Reading requests[](#reading-requests)
To fetch the next request from the queue for processing, you can use the [`RequestQueue.fetch_next_request`](https://docs.apify.com/sdk/python/sdk/python/reference/class/RequestQueue.md#fetch_next_request) method.
To get info about a specific request from the queue, you can use the [`RequestQueue.get_request`](https://docs.apify.com/sdk/python/sdk/python/reference/class/RequestQueue.md#get_request) method.
### Handling requests[](#handling-requests)
To mark a request as handled, you can use the [`RequestQueue.mark_request_as_handled`](https://docs.apify.com/sdk/python/sdk/python/reference/class/RequestQueue.md#mark_request_as_handled) method.
To mark a request as not handled, so that it gets retried, you can use the [`RequestQueue.reclaim_request`](https://docs.apify.com/sdk/python/sdk/python/reference/class/RequestQueue.md#reclaim_request) method.
To check if all the requests in the queue are handled, you can use the [`RequestQueue.is_finished`](https://docs.apify.com/sdk/python/sdk/python/reference/class/RequestQueue.md#is_finished) method.
### Full example[](#full-example)
import asyncio import random
from apify import Actor, Request
FAILURE_RATE = 0.3
async def main() -> None: async with Actor: # Open the queue queue = await Actor.open_request_queue()
# Add some requests to the queue
for i in range(1, 10):
await queue.add_request(Request.from_url(f'http://example.com/{i}'))
# Add a request to the start of the queue, for priority processing
await queue.add_request(Request.from_url('http://example.com/0'), forefront=True)
# If you try to add an existing request again, it will not do anything
add_request_info = await queue.add_request(
Request.from_url('http://example.com/5')
)
Actor.log.info(f'Add request info: {add_request_info}')
# Finally, process the queue until all requests are handled
while not await queue.is_finished():
# Fetch the next unhandled request in the queue
request = await queue.fetch_next_request()
# This can happen due to the eventual consistency of the underlying request
# queue storage, best solution is just to sleep a bit.
if request is None:
await asyncio.sleep(1)
continue
Actor.log.info(f'Processing request {request.unique_key}...')
Actor.log.info(f'Scraping URL {request.url}...')
# Do some fake work, which fails 30% of the time
await asyncio.sleep(1)
if random.random() > FAILURE_RATE:
# If processing the request was successful, mark it as handled
Actor.log.info('Request successful.')
await queue.mark_request_as_handled(request)
else:
# If processing the request was unsuccessful, reclaim it so it can be
# processed again.
Actor.log.warning('Request failed, will retry!')
await queue.reclaim_request(request)
---
# Creating webhooks
Copy for LLM
Webhooks allow you to configure the Apify platform to perform an action when a certain event occurs. For example, you can use them to start another Actor when the current run finishes or fails.
You can learn more in the [documentation for webhooks](https://docs.apify.com/platform/integrations/webhooks).
## Creating an ad-hoc webhook dynamically[](#creating-an-ad-hoc-webhook-dynamically)
Besides creating webhooks manually in Apify Console, or through the Apify API,you can also create [ad-hoc webhooks](https://docs.apify.com/platform/integrations/webhooks/ad-hoc-webhooks) dynamically from the code of your Actor using the [`Actor.add_webhook`](https://docs.apify.com/sdk/python/sdk/python/reference/class/Actor.md#add_webhook) method:
from apify import Actor, Webhook
async def main() -> None: async with Actor: # Create a webhook that will be triggered when the Actor run fails. webhook = Webhook( event_types=['ACTOR.RUN.FAILED'], request_url='https://example.com/run-failed', )
# Add the webhook to the Actor.
await Actor.add_webhook(webhook)
# Raise an error to simulate a failed run.
raise RuntimeError('I am an error and I know it!')
Note that webhooks are only supported when running on the Apify platform. When running the Actor locally, the method will print a warning and have no effect.
## Preventing duplicate webhooks[](#preventing-duplicate-webhooks)
To ensure that duplicate ad-hoc webhooks won't get created in a case of Actor restart, you can use the `idempotency_key` parameter. The idempotency key must be unique across all the webhooks of a user so that only one webhook gets created for a given value. You can use, for example, the Actor run ID as the idempotency key:
from apify import Actor, Webhook
async def main() -> None: async with Actor: # Create a webhook that will be triggered when the Actor run fails. webhook = Webhook( event_types=['ACTOR.RUN.FAILED'], request_url='https://example.com/run-failed', idempotency_key=Actor.configuration.actor_run_id, )
# Add the webhook to the Actor.
await Actor.add_webhook(webhook)
# Raise an error to simulate a failed run.
raise RuntimeError('I am an error and I know it!')
---
# Using BeautifulSoup with HTTPX
Copy for LLM
In this guide, you'll learn how to use the [BeautifulSoup](https://www.crummy.com/software/BeautifulSoup/) library with the [HTTPX](https://www.python-httpx.org/) library in your Apify Actors.
## Introduction[](#introduction)
[BeautifulSoup](https://www.crummy.com/software/BeautifulSoup/) is a Python library for extracting data from HTML and XML files. It provides simple methods and Pythonic idioms for navigating, searching, and modifying a website's element tree, enabling efficient data extraction.
[HTTPX](https://www.python-httpx.org/) is a modern, high-level HTTP client library for Python. It provides a simple interface for making HTTP requests and supports both synchronous and asynchronous requests.
To create an Actor which uses those libraries, start from the [BeautifulSoup & Python](https://apify.com/templates/categories/python) Actor template. This template includes the [BeautifulSoup](https://www.crummy.com/software/BeautifulSoup/) and [HTTPX](https://www.python-httpx.org/) libraries preinstalled, allowing you to begin development immediately.
## Example Actor[](#example-actor)
Below is a simple Actor that recursively scrapes titles from all linked websites, up to a specified maximum depth, starting from URLs provided in the Actor input. It uses [HTTPX](https://www.python-httpx.org/) for fetching pages and [BeautifulSoup](https://www.crummy.com/software/BeautifulSoup/) for parsing their content to extract titles and links to other pages.
import asyncio from urllib.parse import urljoin
import httpx from bs4 import BeautifulSoup
from apify import Actor, Request
async def main() -> None: # Enter the context of the Actor. async with Actor: # Retrieve the Actor input, and use default values if not provided. actor_input = await Actor.get_input() or {} start_urls = actor_input.get('start_urls', [{'url': 'https://apify.com'}]) max_depth = actor_input.get('max_depth', 1)
# Exit if no start URLs are provided.
if not start_urls:
Actor.log.info('No start URLs specified in Actor input, exiting...')
await Actor.exit()
# Open the default request queue for handling URLs to be processed.
request_queue = await Actor.open_request_queue()
# Enqueue the start URLs with an initial crawl depth of 0.
for start_url in start_urls:
url = start_url.get('url')
Actor.log.info(f'Enqueuing {url} ...')
new_request = Request.from_url(url, user_data={'depth': 0})
await request_queue.add_request(new_request)
# Create an HTTPX client to fetch the HTML content of the URLs.
async with httpx.AsyncClient() as client:
# Process the URLs from the request queue.
while request := await request_queue.fetch_next_request():
url = request.url
if not isinstance(request.user_data['depth'], (str, int)):
raise TypeError('Request.depth is an enexpected type.')
depth = int(request.user_data['depth'])
Actor.log.info(f'Scraping {url} (depth={depth}) ...')
try:
# Fetch the HTTP response from the specified URL using HTTPX.
response = await client.get(url, follow_redirects=True)
# Parse the HTML content using Beautiful Soup.
soup = BeautifulSoup(response.content, 'html.parser')
# If the current depth is less than max_depth, find nested links
# and enqueue them.
if depth < max_depth:
for link in soup.find_all('a'):
link_href = link.get('href')
link_url = urljoin(url, link_href)
if link_url.startswith(('http://', 'https://')):
Actor.log.info(f'Enqueuing {link_url} ...')
new_request = Request.from_url(
link_url,
user_data={'depth': depth + 1},
)
await request_queue.add_request(new_request)
# Extract the desired data.
data = {
'url': url,
'title': soup.title.string if soup.title else None,
'h1s': [h1.text for h1 in soup.find_all('h1')],
'h2s': [h2.text for h2 in soup.find_all('h2')],
'h3s': [h3.text for h3 in soup.find_all('h3')],
}
# Store the extracted data to the default dataset.
await Actor.push_data(data)
except Exception:
Actor.log.exception(f'Cannot extract data from {url}.')
finally:
# Mark the request as handled to ensure it is not processed again.
await request_queue.mark_request_as_handled(new_request)
if name == 'main': asyncio.run(main())
## Conclusion[](#conclusion)
In this guide, you learned how to use the [BeautifulSoup](https://www.crummy.com/software/BeautifulSoup/) with the [HTTPX](https://www.python-httpx.org/) in your Apify Actors. By combining these libraries, you can efficiently extract data from HTML or XML files, making it easy to build web scraping tasks in Python. See the [Actor templates](https://apify.com/templates/categories/python) to get started with your own scraping tasks. If you have questions or need assistance, feel free to reach out on our [GitHub](https://github.com/apify/apify-sdk-python) or join our [Discord community](https://discord.com/invite/jyEM2PRvMU). Happy scraping!
---
# Using Crawlee
Copy for LLM
In this guide you'll learn how to use the [Crawlee](https://crawlee.dev/python) library in your Apify Actors.
## Introduction[](#introduction)
[Crawlee](https://crawlee.dev/python) is a Python library for web scraping and browser automation that provides a robust and flexible framework for building web scraping tasks. It seamlessly integrates with the Apify platform and supports a variety of scraping techniques, from static HTML parsing to dynamic JavaScript-rendered content handling. Crawlee offers a range of crawlers, including HTTP-based crawlers like [`HttpCrawler`](https://crawlee.dev/python/api/class/HttpCrawler), [`BeautifulSoupCrawler`](https://crawlee.dev/python/api/class/BeautifulSoupCrawler) and [`ParselCrawler`](https://crawlee.dev/python/api/class/ParselCrawler), and browser-based crawlers like [`PlaywrightCrawler`](https://crawlee.dev/python/api/class/PlaywrightCrawler), to suit different scraping needs.
In this guide, you'll learn how to use Crawlee with [`BeautifulSoupCrawler`](https://crawlee.dev/python/api/class/BeautifulSoupCrawler), [`ParselCrawler`](https://crawlee.dev/python/api/class/ParselCrawler), and [`PlaywrightCrawler`](https://crawlee.dev/python/api/class/PlaywrightCrawler) to build Apify Actors for web scraping.
## Actor with BeautifulSoupCrawler[](#actor-with-beautifulsoupcrawler)
The [`BeautifulSoupCrawler`](https://crawlee.dev/python/api/class/BeautifulSoupCrawler) is ideal for extracting data from static HTML pages. It uses [BeautifulSoup](https://www.crummy.com/software/BeautifulSoup/bs4/doc/) for parsing and [`ImpitHttpClient`](https://crawlee.dev/python/api/class/ImpitHttpClient) for HTTP communication, ensuring efficient and lightweight scraping. If you do not need to execute JavaScript on the page, [`BeautifulSoupCrawler`](https://crawlee.dev/python/api/class/BeautifulSoupCrawler) is a great choice for your scraping tasks. Below is an example of how to use it\` in an Apify Actor.
import asyncio
from crawlee.crawlers import BeautifulSoupCrawler, BeautifulSoupCrawlingContext
from apify import Actor
Create a crawler.
crawler = BeautifulSoupCrawler( # Limit the crawl to max requests. Remove or increase it for crawling all links. max_requests_per_crawl=50, )
Define a request handler, which will be called for every request.
@crawler.router.default_handler async def request_handler(context: BeautifulSoupCrawlingContext) -> None: Actor.log.info(f'Scraping {context.request.url}...')
# Extract the desired data.
data = {
'url': context.request.url,
'title': context.soup.title.string if context.soup.title else None,
'h1s': [h1.text for h1 in context.soup.find_all('h1')],
'h2s': [h2.text for h2 in context.soup.find_all('h2')],
'h3s': [h3.text for h3 in context.soup.find_all('h3')],
}
# Store the extracted data to the default dataset.
await context.push_data(data)
# Enqueue additional links found on the current page.
await context.enqueue_links(strategy='same-domain')
async def main() -> None: # Enter the context of the Actor. async with Actor: # Retrieve the Actor input, and use default values if not provided. actor_input = await Actor.get_input() or {} start_urls = [ url.get('url') for url in actor_input.get('start_urls', [{'url': 'https://apify.com'}]) ]
# Exit if no start URLs are provided.
if not start_urls:
Actor.log.info('No start URLs specified in Actor input, exiting...')
await Actor.exit()
# Run the crawler with the starting requests.
await crawler.run(start_urls)
if name == 'main': asyncio.run(main())
## Actor with ParselCrawler[](#actor-with-parselcrawler)
The [`ParselCrawler`](https://crawlee.dev/python/api/class/ParselCrawler) works in the same way as [`BeautifulSoupCrawler`](https://crawlee.dev/python/api/class/BeautifulSoupCrawler), but it uses the [Parsel](https://parsel.readthedocs.io/en/latest/) library for HTML parsing. This allows for more powerful and flexible data extraction using [XPath](https://en.wikipedia.org/wiki/XPath) selectors. It should be faster than [`BeautifulSoupCrawler`](https://crawlee.dev/python/api/class/BeautifulSoupCrawler). Below is an example of how to use [`ParselCrawler`](https://crawlee.dev/python/api/class/ParselCrawler) in an Apify Actor.
import asyncio
from crawlee.crawlers import ParselCrawler, ParselCrawlingContext
from apify import Actor
Create a crawler.
crawler = ParselCrawler( # Limit the crawl to max requests. Remove or increase it for crawling all links. max_requests_per_crawl=50, )
Define a request handler, which will be called for every request.
@crawler.router.default_handler async def request_handler(context: ParselCrawlingContext) -> None: Actor.log.info(f'Scraping {context.request.url}...')
# Extract the desired data.
data = {
'url': context.request.url,
'title': context.selector.xpath('//title/text()').get(),
'h1s': context.selector.xpath('//h1/text()').getall(),
'h2s': context.selector.xpath('//h2/text()').getall(),
'h3s': context.selector.xpath('//h3/text()').getall(),
}
# Store the extracted data to the default dataset.
await context.push_data(data)
# Enqueue additional links found on the current page.
await context.enqueue_links(strategy='same-domain')
async def main() -> None: # Enter the context of the Actor. async with Actor: # Retrieve the Actor input, and use default values if not provided. actor_input = await Actor.get_input() or {} start_urls = [ url.get('url') for url in actor_input.get('start_urls', [{'url': 'https://apify.com'}]) ]
# Exit if no start URLs are provided.
if not start_urls:
Actor.log.info('No start URLs specified in Actor input, exiting...')
await Actor.exit()
# Run the crawler with the starting requests.
await crawler.run(start_urls)
if name == 'main': asyncio.run(main())
## Actor with PlaywrightCrawler[](#actor-with-playwrightcrawler)
The [`PlaywrightCrawler`](https://crawlee.dev/python/api/class/PlaywrightCrawler) is built for handling dynamic web pages that rely on JavaScript for content rendering. Using the [Playwright](https://playwright.dev/) library, it provides a browser-based automation environment to interact with complex websites. Below is an example of how to use [`PlaywrightCrawler`](https://crawlee.dev/python/api/class/PlaywrightCrawler) in an Apify Actor.
import asyncio
from crawlee.crawlers import PlaywrightCrawler, PlaywrightCrawlingContext
from apify import Actor
Create a crawler.
crawler = PlaywrightCrawler( # Limit the crawl to max requests. Remove or increase it for crawling all links. max_requests_per_crawl=50, # Run the browser in a headless mode. headless=True, browser_launch_options={'args': ['--disable-gpu']}, )
Define a request handler, which will be called for every request.
@crawler.router.default_handler async def request_handler(context: PlaywrightCrawlingContext) -> None: Actor.log.info(f'Scraping {context.request.url}...')
# Extract the desired data.
data = {
'url': context.request.url,
'title': await context.page.title(),
'h1s': [await h1.text_content() for h1 in await context.page.locator('h1').all()],
'h2s': [await h2.text_content() for h2 in await context.page.locator('h2').all()],
'h3s': [await h3.text_content() for h3 in await context.page.locator('h3').all()],
}
# Store the extracted data to the default dataset.
await context.push_data(data)
# Enqueue additional links found on the current page.
await context.enqueue_links(strategy='same-domain')
async def main() -> None: # Enter the context of the Actor. async with Actor: # Retrieve the Actor input, and use default values if not provided. actor_input = await Actor.get_input() or {} start_urls = [ url.get('url') for url in actor_input.get('start_urls', [{'url': 'https://apify.com'}]) ]
# Exit if no start URLs are provided.
if not start_urls:
Actor.log.info('No start URLs specified in Actor input, exiting...')
await Actor.exit()
# Run the crawler with the starting requests.
await crawler.run(start_urls)
if name == 'main': asyncio.run(main())
## Conclusion[](#conclusion)
In this guide, you learned how to use the [Crawlee](https://crawlee.dev/python) library in your Apify Actors. By using the [`BeautifulSoupCrawler`](https://crawlee.dev/python/api/class/BeautifulSoupCrawler), [`ParselCrawler`](https://crawlee.dev/python/api/class/ParselCrawler), and [`PlaywrightCrawler`](https://crawlee.dev/python/api/class/PlaywrightCrawler) crawlers, you can efficiently scrape static or dynamic web pages, making it easy to build web scraping tasks in Python. See the [Actor templates](https://apify.com/templates/categories/python) to get started with your own scraping tasks. If you have questions or need assistance, feel free to reach out on our [GitHub](https://github.com/apify/apify-sdk-python) or join our [Discord community](https://discord.com/invite/jyEM2PRvMU). Happy scraping!
---
# Using Parsel with Impit
Copy for LLM
In this guide, you'll learn how to combine the [Parsel](https://github.com/scrapy/parsel) and [Impit](https://github.com/apify/impit) libraries when building Apify Actors.
## Introduction[](#introduction)
[Parsel](https://github.com/scrapy/parsel) is a Python library for extracting data from HTML and XML documents using CSS selectors and [XPath](https://en.wikipedia.org/wiki/XPath) expressions. It offers an intuitive API for navigating and extracting structured data, making it a popular choice for web scraping. Compared to [BeautifulSoup](https://www.crummy.com/software/BeautifulSoup/), it also delivers better performance.
[Impit](https://github.com/apify/impit) is Apify's high-performance HTTP client for Python. It supports both synchronous and asynchronous workflows and is built for large-scale web scraping, where making thousands of requests efficiently is essential. With built-in browser impersonation and anti-blocking features, it simplifies handling modern websites.
## Example Actor[](#example-actor)
The following example shows a simple Actor that recursively scrapes titles from linked pages, up to a user-defined maximum depth. It uses [Impit](https://github.com/apify/impit) to fetch pages and [Parsel](https://github.com/scrapy/parsel) to extract titles and discover new links.
import asyncio from urllib.parse import urljoin
import impit import parsel
from apify import Actor, Request
async def main() -> None: # Enter the context of the Actor. async with Actor: # Retrieve the Actor input, and use default values if not provided. actor_input = await Actor.get_input() or {} start_urls = actor_input.get('start_urls', [{'url': 'https://apify.com'}]) max_depth = actor_input.get('max_depth', 1)
# Exit if no start URLs are provided.
if not start_urls:
Actor.log.info('No start URLs specified in Actor input, exiting...')
await Actor.exit()
# Open the default request queue for handling URLs to be processed.
request_queue = await Actor.open_request_queue()
# Enqueue the start URLs with an initial crawl depth of 0.
for start_url in start_urls:
url = start_url.get('url')
Actor.log.info(f'Enqueuing {url} ...')
new_request = Request.from_url(url, user_data={'depth': 0})
await request_queue.add_request(new_request)
# Create an Impit client to fetch the HTML content of the URLs.
async with impit.AsyncClient() as client:
# Process the URLs from the request queue.
while request := await request_queue.fetch_next_request():
url = request.url
if not isinstance(request.user_data['depth'], (str, int)):
raise TypeError('Request.depth is an unexpected type.')
depth = int(request.user_data['depth'])
Actor.log.info(f'Scraping {url} (depth={depth}) ...')
try:
# Fetch the HTTP response from the specified URL using Impit.
response = await client.get(url)
# Parse the HTML content using Parsel Selector.
selector = parsel.Selector(text=response.text)
# If the current depth is less than max_depth, find nested links
# and enqueue them.
if depth < max_depth:
# Extract all links using CSS selector
links = selector.css('a::attr(href)').getall()
for link_href in links:
link_url = urljoin(url, link_href)
if link_url.startswith(('http://', 'https://')):
Actor.log.info(f'Enqueuing {link_url} ...')
new_request = Request.from_url(
link_url,
user_data={'depth': depth + 1},
)
await request_queue.add_request(new_request)
# Extract the desired data using Parsel selectors.
title = selector.css('title::text').get()
h1s = selector.css('h1::text').getall()
h2s = selector.css('h2::text').getall()
h3s = selector.css('h3::text').getall()
data = {
'url': url,
'title': title,
'h1s': h1s,
'h2s': h2s,
'h3s': h3s,
}
# Store the extracted data to the default dataset.
await Actor.push_data(data)
except Exception:
Actor.log.exception(f'Cannot extract data from {url}.')
finally:
# Mark the request as handled to ensure it is not processed again.
await request_queue.mark_request_as_handled(request)
if name == 'main': asyncio.run(main())
## Conclusion[](#conclusion)
In this guide, you learned how to use [Parsel](https://github.com/scrapy/parsel) with [Impit](https://github.com/apify/impit) in your Apify Actors. By combining these libraries, you get a powerful and efficient solution for web scraping: [Parsel](https://github.com/scrapy/parsel) provides excellent CSS selector and XPath support for data extraction, while [Impit](https://github.com/apify/impit) offers a fast and simple HTTP client built by Apify. This combination makes it easy to build scalable web scraping tasks in Python. See the [Actor templates](https://apify.com/templates/categories/python) to get started with your own scraping tasks. If you have questions or need assistance, feel free to reach out on our [GitHub](https://github.com/apify/apify-sdk-python) or join our [Discord community](https://discord.com/invite/jyEM2PRvMU). Happy scraping!
---
# Using Playwright
Copy for LLM
[Playwright](https://playwright.dev) is a tool for web automation and testing that can also be used for web scraping. It allows you to control a web browser programmatically and interact with web pages just as a human would.
Some of the key features of Playwright for web scraping include:
* **Cross-browser support** - Playwright supports the latest versions of major browsers like Chrome, Firefox, and Safari, so you can choose the one that suits your needs the best.
* **Headless mode** - Playwright can run in headless mode, meaning that the browser window is not visible on your screen while it is scraping, which can be useful for running scraping tasks in the background or in containers without a display.
* **Powerful selectors** - Playwright provides a variety of powerful selectors that allow you to target specific elements on a web page, including CSS selectors, XPath, and text matching.
* **Emulation of user interactions** - Playwright allows you to emulate user interactions like clicking, scrolling, filling out forms, and even typing in text, which can be useful for scraping websites that have dynamic content or require user input.
## Using Playwright in Actors[](#using-playwright-in-actors)
To create Actors which use Playwright, start from the [Playwright & Python](https://apify.com/templates/categories/python) Actor template.
On the Apify platform, the Actor will already have Playwright and the necessary browsers preinstalled in its Docker image, including the tools and setup necessary to run browsers in headful mode.
When running the Actor locally, you'll need to finish the Playwright setup yourself before you can run the Actor.
* Linux / macOS
* Windows
source .venv/bin/activate playwright install --with-deps
.venv\Scripts\activate playwright install --with-deps
## Example Actor[](#example-actor)
This is a simple Actor that recursively scrapes titles from all linked websites, up to a maximum depth, starting from URLs in the Actor input.
It uses Playwright to open the pages in an automated Chrome browser, and to extract the title and anchor elements after the pages load.
import asyncio from urllib.parse import urljoin
from playwright.async_api import async_playwright
from apify import Actor, Request
Note: To run this Actor locally, ensure that Playwright browsers are installed.
Run playwright install --with-deps in the Actor's virtual environment to install them.
When running on the Apify platform, these dependencies are already included
in the Actor's Docker image.
async def main() -> None: # Enter the context of the Actor. async with Actor: # Retrieve the Actor input, and use default values if not provided. actor_input = await Actor.get_input() or {} start_urls = actor_input.get('start_urls', [{'url': 'https://apify.com'}]) max_depth = actor_input.get('max_depth', 1)
# Exit if no start URLs are provided.
if not start_urls:
Actor.log.info('No start URLs specified in actor input, exiting...')
await Actor.exit()
# Open the default request queue for handling URLs to be processed.
request_queue = await Actor.open_request_queue()
# Enqueue the start URLs with an initial crawl depth of 0.
for start_url in start_urls:
url = start_url.get('url')
Actor.log.info(f'Enqueuing {url} ...')
new_request = Request.from_url(url, user_data={'depth': 0})
await request_queue.add_request(new_request)
Actor.log.info('Launching Playwright...')
# Launch Playwright and open a new browser context.
async with async_playwright() as playwright:
# Configure the browser to launch in headless mode as per Actor configuration.
browser = await playwright.chromium.launch(
headless=Actor.configuration.headless,
args=['--disable-gpu'],
)
context = await browser.new_context()
# Process the URLs from the request queue.
while request := await request_queue.fetch_next_request():
url = request.url
if not isinstance(request.user_data['depth'], (str, int)):
raise TypeError('Request.depth is an enexpected type.')
depth = int(request.user_data['depth'])
Actor.log.info(f'Scraping {url} (depth={depth}) ...')
try:
# Open a new page in the browser context and navigate to the URL.
page = await context.new_page()
await page.goto(url)
# If the current depth is less than max_depth, find nested links
# and enqueue them.
if depth < max_depth:
for link in await page.locator('a').all():
link_href = await link.get_attribute('href')
link_url = urljoin(url, link_href)
if link_url.startswith(('http://', 'https://')):
Actor.log.info(f'Enqueuing {link_url} ...')
new_request = Request.from_url(
link_url,
user_data={'depth': depth + 1},
)
await request_queue.add_request(new_request)
# Extract the desired data.
data = {
'url': url,
'title': await page.title(),
}
# Store the extracted data to the default dataset.
await Actor.push_data(data)
except Exception:
Actor.log.exception(f'Cannot extract data from {url}.')
finally:
await page.close()
# Mark the request as handled to ensure it is not processed again.
await request_queue.mark_request_as_handled(request)
if name == 'main': asyncio.run(main())
## Conclusion[](#conclusion)
In this guide you learned how to create Actors that use Playwright to scrape websites. Playwright is a powerful tool that can be used to manage browser instances and scrape websites that require JavaScript execution. See the [Actor templates](https://apify.com/templates/categories/python) to get started with your own scraping tasks. If you have questions or need assistance, feel free to reach out on our [GitHub](https://github.com/apify/apify-sdk-python) or join our [Discord community](https://discord.com/invite/jyEM2PRvMU). Happy scraping!
---
# Using Scrapy
Copy for LLM
[Scrapy](https://scrapy.org/) is an open-source web scraping framework for Python. It provides tools for defining scrapers, extracting data from web pages, following links, and handling pagination. With the Apify SDK, Scrapy projects can be converted into Apify [Actors](https://docs.apify.com/platform/actors), integrated with Apify [storages](https://docs.apify.com/platform/storage), and executed on the Apify [platform](https://docs.apify.com/platform).
## Integrating Scrapy with the Apify platform[](#integrating-scrapy-with-the-apify-platform)
The Apify SDK provides an Apify-Scrapy integration. The main challenge of this is to combine two asynchronous frameworks that use different event loop implementations. Scrapy uses [Twisted](https://twisted.org/) for asynchronous execution, while the Apify SDK is based on [asyncio](https://docs.python.org/3/library/asyncio.html). The key thing is to install the Twisted's `asyncioreactor` to run Twisted's asyncio compatible event loop. This allows both Twisted and asyncio to run on a single event loop, enabling a Scrapy spider to run as an Apify Actor with minimal modifications.
\_\_main.py\_\_: The Actor entry point
from future import annotations
from scrapy.utils.reactor import install_reactor
Install Twisted's asyncio reactor before importing any other Twisted or
Scrapy components.
install_reactor('twisted.internet.asyncioreactor.AsyncioSelectorReactor')
import os
from apify.scrapy import initialize_logging, run_scrapy_actor
Import your main Actor coroutine here.
from .main import main
Ensure the location to the Scrapy settings module is defined.
os.environ['SCRAPY_SETTINGS_MODULE'] = 'src.settings'
if name == 'main': initialize_logging() run_scrapy_actor(main())
In this setup, `apify.scrapy.initialize_logging` configures an Apify log formatter and reconfigures loggers to ensure consistent logging across Scrapy, the Apify SDK, and other libraries. The `apify.scrapy.run_scrapy_actor` bridges asyncio coroutines with Twisted's reactor, enabling the Actor's main coroutine, which contains the Scrapy spider, to be executed.
Make sure the `SCRAPY_SETTINGS_MODULE` environment variable is set to the path of the Scrapy settings module. This variable is also used by the `Actor` class to detect that the project is a Scrapy project, triggering additional actions.
main.py: The Actor main coroutine
from future import annotations
from scrapy.crawler import CrawlerRunner from scrapy.utils.defer import deferred_to_future
from apify import Actor from apify.scrapy import apply_apify_settings
Import your Scrapy spider here.
from .spiders import TitleSpider as Spider
async def main() -> None: """Apify Actor main coroutine for executing the Scrapy spider.""" async with Actor: # Retrieve and process Actor input. actor_input = await Actor.get_input() or {} start_urls = [url['url'] for url in actor_input.get('startUrls', [])] allowed_domains = actor_input.get('allowedDomains') proxy_config = actor_input.get('proxyConfiguration')
# Apply Apify settings, which will override the Scrapy project settings.
settings = apply_apify_settings(proxy_config=proxy_config)
# Create CrawlerRunner and execute the Scrapy spider.
crawler_runner = CrawlerRunner(settings)
crawl_deferred = crawler_runner.crawl(
Spider,
start_urls=start_urls,
allowed_domains=allowed_domains,
)
await deferred_to_future(crawl_deferred)
Within the Actor's main coroutine, the Actor's input is processed as usual. The function `apify.scrapy.apply_apify_settings` is then used to configure Scrapy settings with Apify-specific components before the spider is executed. The key components and other helper functions are described in the next section.
## Key integration components[](#key-integration-components)
The Apify SDK provides several custom components to support integration with the Apify platform:
* [`apify.scrapy.ApifyScheduler`](https://docs.apify.com/sdk/python/sdk/python/reference/class/ApifyScheduler.md) - Replaces Scrapy's default [scheduler](https://docs.scrapy.org/en/latest/topics/scheduler.html) with one that uses Apify's [request queue](https://docs.apify.com/platform/storage/request-queue) for storing requests. It manages enqueuing, dequeuing, and maintaining the state and priority of requests.
* [`apify.scrapy.ActorDatasetPushPipeline`](https://docs.apify.com/sdk/python/sdk/python/reference/class/ActorDatasetPushPipeline.md) - A Scrapy [item pipeline](https://docs.scrapy.org/en/latest/topics/item-pipeline.html) that pushes scraped items to Apify's [dataset](https://docs.apify.com/platform/storage/dataset). When enabled, every item produced by the spider is sent to the dataset.
* [`apify.scrapy.ApifyHttpProxyMiddleware`](https://docs.apify.com/sdk/python/sdk/python/reference/class/ApifyHttpProxyMiddleware.md) - A Scrapy [middleware](https://docs.scrapy.org/en/latest/topics/downloader-middleware.html) that manages proxy configurations. This middleware replaces Scrapy's default `HttpProxyMiddleware` to facilitate the use of Apify's proxy service.
* [`apify.scrapy.extensions.ApifyCacheStorage`](https://docs.apify.com/sdk/python/sdk/python/reference/class/ApifyCacheStorage.md) - A storage backend for Scrapy's built-in [HTTP cache middleware](https://docs.scrapy.org/en/latest/topics/downloader-middleware.html#module-scrapy.downloadermiddlewares.httpcache). This backend uses Apify's [key-value store](https://docs.apify.com/platform/storage/key-value-store). Make sure to set `HTTPCACHE_ENABLED` and `HTTPCACHE_EXPIRATION_SECS` in your settings, or caching won't work.
Additional helper functions in the [`apify.scrapy`](https://github.com/apify/apify-sdk-python/tree/master/src/apify/scrapy) subpackage include:
* `apply_apify_settings` - Applies Apify-specific components to Scrapy settings.
* `to_apify_request` and `to_scrapy_request` - Convert between Apify and Scrapy request objects.
* `initialize_logging` - Configures logging for the Actor environment.
* `run_scrapy_actor` - Bridges asyncio and Twisted event loops.
## Create a new Apify-Scrapy project[](#create-a-new-apify-scrapy-project)
The simplest way to start using Scrapy in Apify Actors is to use the [Scrapy Actor template](https://apify.com/templates/python-scrapy). The template provides a pre-configured project structure and setup that includes all necessary components to run Scrapy spiders as Actors and store their output in Apify datasets. If you prefer manual setup, refer to the example Actor section below for configuration details.
## Wrapping an existing Scrapy project[](#wrapping-an-existing-scrapy-project)
The Apify CLI supports converting an existing Scrapy project into an Apify Actor with a single command. The CLI expects the project to follow the standard Scrapy layout (including a `scrapy.cfg` file in the project root). During the wrapping process, the CLI:
* Creates the necessary files and directories for an Apify Actor.
* Installs the Apify SDK and required dependencies.
* Updates Scrapy settings to include Apify-specific components.
For further details, see the [Scrapy migration guide](https://docs.apify.com/cli/docs/integrating-scrapy).
## Example Actor[](#example-actor)
The following example demonstrates a Scrapy Actor that scrapes page titles and enqueues links found on each page. This example aligns with the structure provided in the Apify Actor templates.
* \_\_main.py\_\_
* main.py
* settings.py
* items.py
* spiders/title.py
from future import annotations
from scrapy.utils.reactor import install_reactor
Install Twisted's asyncio reactor before importing any other Twisted or
Scrapy components.
install_reactor('twisted.internet.asyncioreactor.AsyncioSelectorReactor')
import os
from apify.scrapy import initialize_logging, run_scrapy_actor
Import your main Actor coroutine here.
from .main import main
Ensure the location to the Scrapy settings module is defined.
os.environ['SCRAPY_SETTINGS_MODULE'] = 'src.settings'
if name == 'main': initialize_logging() run_scrapy_actor(main())
from future import annotations
from scrapy.crawler import CrawlerRunner from scrapy.utils.defer import deferred_to_future
from apify import Actor from apify.scrapy import apply_apify_settings
Import your Scrapy spider here.
from .spiders import TitleSpider as Spider
async def main() -> None: """Apify Actor main coroutine for executing the Scrapy spider.""" async with Actor: # Retrieve and process Actor input. actor_input = await Actor.get_input() or {} start_urls = [url['url'] for url in actor_input.get('startUrls', [])] allowed_domains = actor_input.get('allowedDomains') proxy_config = actor_input.get('proxyConfiguration')
# Apply Apify settings, which will override the Scrapy project settings.
settings = apply_apify_settings(proxy_config=proxy_config)
# Create CrawlerRunner and execute the Scrapy spider.
crawler_runner = CrawlerRunner(settings)
crawl_deferred = crawler_runner.crawl(
Spider,
start_urls=start_urls,
allowed_domains=allowed_domains,
)
await deferred_to_future(crawl_deferred)
BOT_NAME = 'titlebot' DEPTH_LIMIT = 1 LOG_LEVEL = 'INFO' NEWSPIDER_MODULE = 'src.spiders' ROBOTSTXT_OBEY = True SPIDER_MODULES = ['src.spiders'] TELNETCONSOLE_ENABLED = False
Do not change the Twisted reactor unless you really know what you are doing.
TWISTED_REACTOR = 'twisted.internet.asyncioreactor.AsyncioSelectorReactor' HTTPCACHE_ENABLED = True HTTPCACHE_EXPIRATION_SECS = 7200
from future import annotations
from scrapy import Field, Item
class TitleItem(Item): """Represents a title item scraped from a web page."""
url = Field()
title = Field()
from future import annotations
from typing import TYPE_CHECKING, Any from urllib.parse import urljoin
from scrapy import Request, Spider
from ..items import TitleItem
if TYPE_CHECKING: from collections.abc import Generator
from scrapy.http.response import Response
class TitleSpider(Spider): """A spider that scrapes web pages to extract titles and discover new links.
This spider retrieves the content of the <title> element from each page and queues
any valid hyperlinks for further crawling.
"""
name = 'title_spider'
# Limit the number of pages to scrape.
custom_settings = {'CLOSESPIDER_PAGECOUNT': 10}
def __init__(
self,
start_urls: list[str],
allowed_domains: list[str],
*args: Any,
**kwargs: Any,
) -> None:
"""A default costructor.
Args:
start_urls: URLs to start the scraping from.
allowed_domains: Domains that the scraper is allowed to crawl.
*args: Additional positional arguments.
**kwargs: Additional keyword arguments.
"""
super().__init__(*args, **kwargs)
self.start_urls = start_urls
self.allowed_domains = allowed_domains
def parse(self, response: Response) -> Generator[TitleItem | Request, None, None]:
"""Parse the web page response.
Args:
response: The web page response.
Yields:
Yields scraped `TitleItem` and new `Request` objects for links.
"""
self.logger.info('TitleSpider is parsing %s...', response)
# Extract and yield the TitleItem
url = response.url
title = response.css('title::text').extract_first()
yield TitleItem(url=url, title=title)
# Extract all links from the page, create `Request` objects out of them,
# and yield them.
for link_href in response.css('a::attr("href")'):
link_url = urljoin(response.url, link_href.get())
if link_url.startswith(('http://', 'https://')):
yield Request(link_url)
## Dealing with ‘imminent migration to another host’[](#dealing-with-imminent-migration-to-another-host)
Under some circumstances, the platform may decide to [migrate your Actor](https://docs.apify.com/academy/expert-scraping-with-apify/migrations-maintaining-state) from one piece of infrastructure to another while it's in progress. While [Crawlee](https://crawlee.dev/python)-based projects can pause and resume their work after a restart, achieving the same with a Scrapy-based project can be challenging.
As a workaround for this issue (tracked as [apify/actor-templates#303](https://github.com/apify/actor-templates/issues/303)), turn on caching with `HTTPCACHE_ENABLED` and set `HTTPCACHE_EXPIRATION_SECS` to at least a few minutes—the exact value depends on your use case. If your Actor gets migrated and restarted, the subsequent run will hit the cache, making it fast and avoiding unnecessary resource consumption.
## Conclusion[](#conclusion)
In this guide you learned how to use Scrapy in Apify Actors. You can now start building your own web scraping projects using Scrapy, the Apify SDK and host them on the Apify platform. See the [Actor templates](https://apify.com/templates/categories/python) to get started with your own scraping tasks. If you have questions or need assistance, feel free to reach out on our [GitHub](https://github.com/apify/apify-sdk-python) or join our [Discord community](https://discord.com/invite/jyEM2PRvMU). Happy scraping!
## Additional resources[](#additional-resources)
* [Apify CLI: Integrating Scrapy projects](https://docs.apify.com/cli/docs/integrating-scrapy)
* [Apify: Run Scrapy spiders on Apify](https://apify.com/run-scrapy-in-cloud)
* [Apify templates: Pyhon Actor Scrapy template](https://apify.com/templates/python-scrapy)
* [Apify store: Scrapy Books Example Actor](https://apify.com/vdusek/scrapy-books-example)
* [Scrapy: Official documentation](https://docs.scrapy.org/)
---
# Using Selenium
Copy for LLM
[Selenium](https://www.selenium.dev/) is a tool for web automation and testing that can also be used for web scraping. It allows you to control a web browser programmatically and interact with web pages just as a human would.
Some of the key features of Selenium for web scraping include:
* **Cross-browser support** - Selenium supports the latest versions of major browsers like Chrome, Firefox, and Safari, so you can choose the one that suits your needs the best.
* **Headless mode** - Selenium can run in headless mode, meaning that the browser window is not visible on your screen while it is scraping, which can be useful for running scraping tasks in the background or in containers without a display.
* **Powerful selectors** - Selenium provides a variety of powerful selectors that allow you to target specific elements on a web page, including CSS selectors, XPath, and text matching.
* **Emulation of user interactions** - Selenium allows you to emulate user interactions like clicking, scrolling, filling out forms, and even typing in text, which can be useful for scraping websites that have dynamic content or require user input.
## Using Selenium in Actors[](#using-selenium-in-actors)
To create Actors which use Selenium, start from the [Selenium & Python](https://apify.com/templates/categories/python) Actor template.
On the Apify platform, the Actor will already have Selenium and the necessary browsers preinstalled in its Docker image, including the tools and setup necessary to run browsers in headful mode.
When running the Actor locally, you'll need to install the Selenium browser drivers yourself. Refer to the [Selenium documentation](https://www.selenium.dev/documentation/webdriver/getting_started/install_drivers/) for installation instructions.
## Example Actor[](#example-actor)
This is a simple Actor that recursively scrapes titles from all linked websites, up to a maximum depth, starting from URLs in the Actor input.
It uses Selenium ChromeDriver to open the pages in an automated Chrome browser, and to extract the title and anchor elements after the pages load.
import asyncio from urllib.parse import urljoin
from selenium import webdriver from selenium.webdriver.chrome.options import Options as ChromeOptions from selenium.webdriver.common.by import By
from apify import Actor, Request
To run this Actor locally, you need to have the Selenium Chromedriver installed.
Follow the installation guide at:
https://www.selenium.dev/documentation/webdriver/getting_started/install_drivers/
When running on the Apify platform, the Chromedriver is already included
in the Actor's Docker image.
async def main() -> None: # Enter the context of the Actor. async with Actor: # Retrieve the Actor input, and use default values if not provided. actor_input = await Actor.get_input() or {} start_urls = actor_input.get('start_urls', [{'url': 'https://apify.com'}]) max_depth = actor_input.get('max_depth', 1)
# Exit if no start URLs are provided.
if not start_urls:
Actor.log.info('No start URLs specified in actor input, exiting...')
await Actor.exit()
# Open the default request queue for handling URLs to be processed.
request_queue = await Actor.open_request_queue()
# Enqueue the start URLs with an initial crawl depth of 0.
for start_url in start_urls:
url = start_url.get('url')
Actor.log.info(f'Enqueuing {url} ...')
new_request = Request.from_url(url, user_data={'depth': 0})
await request_queue.add_request(new_request)
# Launch a new Selenium Chrome WebDriver and configure it.
Actor.log.info('Launching Chrome WebDriver...')
chrome_options = ChromeOptions()
if Actor.configuration.headless:
chrome_options.add_argument('--headless')
chrome_options.add_argument('--no-sandbox')
chrome_options.add_argument('--disable-dev-shm-usage')
driver = webdriver.Chrome(options=chrome_options)
# Test WebDriver setup by navigating to an example page.
driver.get('http://www.example.com')
if driver.title != 'Example Domain':
raise ValueError('Failed to open example page.')
# Process the URLs from the request queue.
while request := await request_queue.fetch_next_request():
url = request.url
if not isinstance(request.user_data['depth'], (str, int)):
raise TypeError('Request.depth is an enexpected type.')
depth = int(request.user_data['depth'])
Actor.log.info(f'Scraping {url} (depth={depth}) ...')
try:
# Navigate to the URL using Selenium WebDriver. Use asyncio.to_thread
# for non-blocking execution.
await asyncio.to_thread(driver.get, url)
# If the current depth is less than max_depth, find nested links
# and enqueue them.
if depth < max_depth:
for link in driver.find_elements(By.TAG_NAME, 'a'):
link_href = link.get_attribute('href')
link_url = urljoin(url, link_href)
if link_url.startswith(('http://', 'https://')):
Actor.log.info(f'Enqueuing {link_url} ...')
new_request = Request.from_url(
link_url,
user_data={'depth': depth + 1},
)
await request_queue.add_request(new_request)
# Extract the desired data.
data = {
'url': url,
'title': driver.title,
}
# Store the extracted data to the default dataset.
await Actor.push_data(data)
except Exception:
Actor.log.exception(f'Cannot extract data from {url}.')
finally:
# Mark the request as handled to ensure it is not processed again.
await request_queue.mark_request_as_handled(request)
driver.quit()
if name == 'main': asyncio.run(main())
## Conclusion[](#conclusion)
In this guide you learned how to use Selenium for web scraping in Apify Actors. You can now create your own Actors that use Selenium to scrape dynamic websites and interact with web pages just like a human would. See the [Actor templates](https://apify.com/templates/categories/python) to get started with your own scraping tasks. If you have questions or need assistance, feel free to reach out on our [GitHub](https://github.com/apify/apify-sdk-python) or join our [Discord community](https://discord.com/invite/jyEM2PRvMU). Happy scraping!
---
# Actor structure
Copy for LLM
All Python Actor templates follow the same structure.
The `.actor/` directory contains the [Actor configuration](https://docs.apify.com/platform/actors/development/actor-config), such as the Actor's definition and input schema, and the Dockerfile necessary to run the Actor on the Apify platform.
The Actor's runtime dependencies are specified in the `requirements.txt` file, which follows the [standard requirements file format](https://pip.pypa.io/en/stable/reference/requirements-file-format/).
The Actor's source code is in the `src/` folder. This folder contains two important files: `main.py`, which contains the main function of the Actor, and `__main__.py`, which is the entrypoint of the Actor package, setting up the Actor [logger](https://docs.apify.com/sdk/python/sdk/python/docs/concepts/logging.md) and executing the Actor's main function via [`asyncio.run`](https://docs.python.org/3/library/asyncio-runner.html#asyncio.run).
* main.py
* \_\_main.py\_\_
import asyncio
from .main import main
if name == 'main': asyncio.run(main())
from apify import Actor
async def main() -> None: async with Actor: actor_input = await Actor.get_input() Actor.log.info('Actor input: %s', actor_input) await Actor.set_value('OUTPUT', 'Hello, world!')
If you want to modify the Actor structure, you need to make sure that your Actor is executable as a module, via `python -m src`, as that is the command started by `apify run` in the Apify CLI. We recommend keeping the entrypoint for the Actor in the `src/__main__.py` file.
---
# Introduction
Copy for LLM
The Apify SDK for Python is the official library for creating [Apify Actors](https://docs.apify.com/platform/actors) using Python.
import httpx from bs4 import BeautifulSoup
from apify import Actor
async def main() -> None: async with Actor: actor_input = await Actor.get_input() async with httpx.AsyncClient() as client: response = await client.get(actor_input['url']) soup = BeautifulSoup(response.content, 'html.parser') data = { 'url': actor_input['url'], 'title': soup.title.string if soup.title else None, } await Actor.push_data(data)
## What are Actors?[](#what-are-actors)
Actors are serverless cloud programs capable of performing tasks in a web browser, similar to what a human can do. These tasks can range from simple operations, such as filling out forms or unsubscribing from services, to complex jobs like scraping and processing large numbers of web pages.
Actors can be executed locally or on the [Apify platform](https://docs.apify.com/platform/), which provides features for running them at scale, monitoring, scheduling, and even publishing and monetizing them.
If you're new to Apify, refer to the Apify platform documentation to learn [what Apify is](https://docs.apify.com/platform/about).
## Quick start[](#quick-start)
This section provides a quick start guide for creating and running Actors.
### Creating Actors[](#creating-actors)
To create and run Actors using the Apify Console, see the [Console documentation](https://docs.apify.com/platform/console).
For creating and running Python Actors locally, refer to the documentation for [creating and running Python Actors locally](https://docs.apify.com/sdk/python/sdk/python/docs/overview/running-actors-locally.md).
### Guides[](#guides)
Integrate the Apify SDK with popular web scraping libraries by following these guides:
* [BeautifulSoup with HTTPX](https://docs.apify.com/sdk/python/sdk/python/docs/guides/beautifulsoup-httpx.md)
* [Crawlee](https://docs.apify.com/sdk/python/sdk/python/docs/guides/crawlee.md)
* [Playwright](https://docs.apify.com/sdk/python/sdk/python/docs/guides/playwright.md)
* [Selenium](https://docs.apify.com/sdk/python/sdk/python/docs/guides/selenium.md)
* [Scrapy](https://docs.apify.com/sdk/python/sdk/python/docs/guides/scrapy.md)
### Usage concepts[](#usage-concepts)
For a deeper understanding of the Apify SDK's features, refer to the **Usage concepts** section in the sidebar. Key topics include:
* [Actor lifecycle](https://docs.apify.com/sdk/python/sdk/python/docs/concepts/actor-lifecycle.md)
* [Working with storages](https://docs.apify.com/sdk/python/sdk/python/docs/concepts/storages.md)
* [Handling Actor events](https://docs.apify.com/sdk/python/sdk/python/docs/concepts/actor-events.md)
* [Using proxies](https://docs.apify.com/sdk/python/sdk/python/docs/concepts/proxy-management.md)
## Installing the Apify SDK separately[](#installing-the-apify-sdk-separately)
When creating an Actor using the Apify CLI, the Apify SDK for Python is installed automatically. If you want to install it independently, use the following command:
pip install apify
If your goal is not to develop Apify Actors but to interact with the Apify API from Python, consider using the [Apify API client for Python](https://docs.apify.com/api/client/python) directly.
---
# Running Actors locally
Copy for LLM
In this page, you'll learn how to create and run Apify Actors locally on your computer.
## Requirements[](#requirements)
The Apify SDK requires Python version 3.10 or above to run Python Actors locally.
## Creating your first Actor[](#creating-your-first-actor)
To create a new Apify Actor on your computer, you can use the [Apify CLI](https://docs.apify.com/cli), and select one of the [Python Actor templates](https://apify.com/templates/categories/python).
For example, to create an Actor from the Python SDK template, you can use the [`apify create`](https://docs.apify.com/cli/docs/reference#apify-create-actorname) command.
apify create my-first-actor --template python-start
This will create a new folder called `my-first-actor`, download and extract the "Getting started with Python" Actor template there, create a virtual environment in `my-first-actor/.venv`, and install the Actor dependencies in it.
## Running the Actor[](#running-the-actor)
To run the Actor, you can use the [`apify run`](https://docs.apify.com/cli/docs/reference#apify-run) command:
cd my-first-actor apify run
This will activate the virtual environment in `.venv` (if no other virtual environment is activated yet), then start the Actor, passing the right environment variables for local running, and configure it to use local storages from the `storage` folder.
The Actor input, for example, will be in `storage/key_value_stores/default/INPUT.json`.
## Adding dependencies[](#adding-dependencies)
Adding dependencies into the Actor is simple.
First, add them in the [`requirements.txt`](https://pip.pypa.io/en/stable/reference/requirements-file-format/) file in the Actor source folder.
Then activate the virtual environment in `.venv`:
* Linux / macOS
* Windows
source .venv/bin/activate
.venv\Scripts\activate
Then install the dependencies:
python -m pip install -r requirements.txt
---
# Upgrading to v2
Copy for LLM
This page summarizes the breaking changes between Apify Python SDK v1.x and v2.0.
## Python version support[](#python-version-support)
Support for Python 3.8 has been dropped. The Apify Python SDK v2.x now requires Python 3.9 or later. Make sure your environment is running a compatible version before upgrading.
## Storages[](#storages)
* The SDK now uses [crawlee](https://github.com/apify/crawlee-python) for local storage emulation. This change should not affect intended usage (working with `Dataset`, `KeyValueStore` and `RequestQueue` classes from the `apify.storages` module or using the shortcuts exposed by the `Actor` class) in any way.
* There is a difference in the `RequestQueue.add_request` method: it accepts an `apify.Request` object instead of a free-form dictionary.
<!-- -->
* A quick way to migrate from dict-based arguments is to wrap it with a `Request.model_validate()` call.
* The preferred way is using the `Request.from_url` helper which prefills the `unique_key` and `id` attributes, or instantiating it directly, e.g., `Request(url='https://example.tld', ...)`.
* For simple use cases, `add_request` also accepts plain strings that contain an URL, e.g. `queue.add_request('https://example.tld')`.
* Removing the `StorageClientManager` class is a significant change. If you need to change the storage client, use `crawlee.service_container` instead.
## Configuration[](#configuration)
The `apify.Configuration` class now uses `pydantic_settings` to load configuration from environment variables. This eliminates the need for the helper functions which handled environment variables in `apify._utils`.
Attributes suffixed with `_millis` were renamed to remove said suffix and have the `datetime.timedelta` type now.
## Actor[](#actor)
* The `Actor.main` method has been removed as it brings no benefits compared to using `async with Actor`.
* The `Actor.add_webhook`, `Actor.start`, `Actor.call` and `Actor.start_task` methods now accept instances of the `apify.Webhook` model instead of an untyped `dict`.
* `Actor.start`, `Actor.call`, `Actor.start_task`, `Actor.set_status_message` and `Actor.abort` return instances of the `ActorRun` model instead of an untyped `dict`.
* Upon entering the context manager (`async with Actor`), the `Actor` puts the default logging configuration in place. This can be disabled using the `configure_logging` parameter.
* The `config` parameter of `Actor` has been renamed to `configuration`.
* Event handlers registered via `Actor.on` will now receive Pydantic objects instead of untyped dicts. For example, where you would do `event['isMigrating']`, you should now use `event.is_migrating`
## Scrapy integration[](#scrapy-integration)
The `apify.scrapy.utils.open_queue_with_custom_client` function is not necessary anymore and has been removed.
## Subpackage visibility[](#subpackage-visibility)
The following modules were made private:
* `apify.proxy_configuration` (`ProxyConfiguration` is still exported from `apify`)
* `apify.config` (`Configuration` is still exported from `apify`)
* `apify.actor` (`Actor` is still exported from `apify`)
* `apify.event_manager`
* `apify.consts`
---
# Upgrading to v3
Copy for LLM
This page summarizes the breaking changes between Apify Python SDK v2.x and v3.0.
## Python version support[](#python-version-support)
Support for Python 3.9 has been dropped. The Apify Python SDK v3.x now requires Python 3.10 or later. Make sure your environment is running a compatible version before upgrading.
## Changes in storages[](#changes-in-storages)
Apify Python SDK v3.0 includes Crawlee v1.0, which brings significant changes to the storage APIs. In Crawlee v1.0, the `Dataset`, `KeyValueStore`, and `RequestQueue` storage APIs have been updated for consistency and simplicity. Below is a detailed overview of what's new, what's changed, and what's been removed.
See the Crawlee's [Storages guide](https://crawlee.dev/python/docs/guides/storages) for more details.
### Dataset[](#dataset)
The `Dataset` API now includes several new methods, such as:
* `get_metadata` - retrieves metadata information for the dataset.
* `purge` - completely clears the dataset, including all items (keeps the metadata only).
* `list_items` - returns the dataset's items in a list format.
Some older methods have been removed or replaced:
* `from_storage_object` constructor has been removed. You should now use the `open` method with either a `name` or `id` parameter.
* `get_info` method and the `storage_object` property have been replaced by the new `get_metadata` method.
* `set_metadata` method has been removed.
* `write_to_json` and `write_to_csv` methods have been removed; instead, use the `export_to` method for exporting data in different formats.
### Key-value store[](#key-value-store)
The `KeyValueStore` API now includes several new methods, such as:
* `get_metadata` - retrieves metadata information for the key-value store.
* `purge` - completely clears the key-value store, removing all keys and values (keeps the metadata only).
* `delete_value` - deletes a specific key and its associated value.
* `list_keys` - lists all keys in the key-value store.
Some older methods have been removed or replaced:
* `from_storage_object` - removed; use the `open` method with either a `name` or `id` instead.
* `get_info` and `storage_object` - replaced by the new `get_metadata` method.
* `set_metadata` method has been removed.
### Request queue[](#request-queue)
The `RequestQueue` API now includes several new methods, such as:
* `get_metadata` - retrieves metadata information for the request queue.
* `purge` - completely clears the request queue, including all pending and processed requests (keeps the metadata only).
* `add_requests` - replaces the previous `add_requests_batched` method, offering the same functionality under a simpler name.
Some older methods have been removed or replaced:
* `from_storage_object` - removed; use the `open` method with either a `name` or `id` instead.
* `get_info` and `storage_object` - replaced by the new `get_metadata` method.
* `get_request` has argument `unique_key` instead of `request_id` as the `id` field was removed from the `Request`.
* `set_metadata` method has been removed.
Some changes in the related model classes:
* `resource_directory` in `RequestQueueMetadata` - removed; use the corresponding `path_to_*` property instead.
* `stats` field in `RequestQueueMetadata` - removed as it was unused.
* `RequestQueueHead` - replaced by `RequestQueueHeadWithLocks`.
## Removed Actor.config property[](#removed-actorconfig-property)
* `Actor.config` property has been removed. Use `Actor.configuration` instead.
## Default storage ids in configuration changed to None[](#default-storage-ids-in-configuration-changed-to-none)
* `Configuration.default_key_value_store_id` changed from `'default'` to `None`.
* `Configuration.default_dataset_id` changed from `'default'` to `None`.
* `Configuration.default_request_queue_id` changed from `'default'` to `None`.
Previously using the default storage without specifying its `id` in `Configuration` would lead to using specific storage with id `'default'`. Now it will use newly created unnamed storage with `'id'` assigned by the Apify platform, consecutive calls to get the default storage will return the same storage.
## Actor initialization and ServiceLocator changes[](#actor-initialization-and-servicelocator-changes)
`Actor` initialization and global `service_locator` services setup is more strict and predictable.
* Services in `Actor` can't be changed after calling `Actor.init`, entering the `async with Actor` context manager or after requesting them from the `Actor`.
* Services in `Actor` can be different from services in Crawler.
**Now (v3.0):**
from crawlee.crawlers import BasicCrawler from crawlee.storage_clients import MemoryStorageClient from crawlee.configuration import Configuration from crawlee.events import LocalEventManager from apify import Actor
async def main():
async with Actor():
# This crawler will use same services as Actor and global service_locator
crawler_1 = BasicCrawler()
# This crawler will use custom services
custom_configuration = Configuration()
custom_event_manager = LocalEventManager.from_config(custom_configuration)
custom_storage_client = MemoryStorageClient()
crawler_2 = BasicCrawler(
configuration=custom_configuration,
event_manager=custom_event_manager,
storage_client=custom_storage_client,
)
### Changes in storage clients[](#changes-in-storage-clients)
## Explicit control over storage clients used in Actor[](#explicit-control-over-storage-clients-used-in-actor)
* It is now possible to have full control over which storage clients are used by the `Actor`. To make development of Actors convenient, the `Actor` has two storage clients. One that is used when running on Apify platform or when opening storages with `force_cloud=True` and the other client that is used when running outside the Apify platform. The `Actor` has reasonable defaults and for the majority of use-cases there is no need to change it. However, if you need to use a different storage client, you can set it up before entering `Actor` context through `service_locator`.
**Now (v3.0):**
from crawlee import service_locator from apify.storage_clients import ApifyStorageClient, SmartApifyStorageClient, MemoryStorageClient from apify import Actor
async def main(): service_locator.set_storage_client( SmartApifyStorageClient( cloud_storage_client=ApifyStorageClient(request_queue_access="single"), local_storage_client=MemoryStorageClient() ) ) async with Actor: rq = await Actor.open_request_queue()
## The default use of optimized ApifyRequestQueueClient[](#the-default-use-of-optimized-apifyrequestqueueclient)
* The default client for working with Apify platform based `RequestQueue` is now optimized and simplified client which does significantly lower amount of API calls, but does not support multiple consumers working on the same queue. It is cheaper and faster and is suitable for the majority of the use cases.
* The full client is still available, but it has to be explicitly requested via `request_queue_access="shared"` argument when using the `ApifyStorageClient`.
**Now (v3.0):**
from crawlee import service_locator from apify.storage_clients import ApifyStorageClient, SmartApifyStorageClient from apify import Actor
async def main(): # Full client that supports multiple consumers of the Apify Request Queue service_locator.set_storage_client( SmartApifyStorageClient( cloud_storage_client=ApifyStorageClient(request_queue_access="shared"), ) ) async with Actor: rq = await Actor.open_request_queue()
---
# apify-sdk-python<!-- -->
## Index[**](#Index)
### Actor
* [**Actor](https://docs.apify.com/sdk/python/sdk/python/reference/class/Actor.md)
* [**ActorRun](https://docs.apify.com/sdk/python/sdk/python/reference/class/ActorRun.md)
* [**ActorRunMeta](https://docs.apify.com/sdk/python/sdk/python/reference/class/ActorRunMeta.md)
* [**ActorRunOptions](https://docs.apify.com/sdk/python/sdk/python/reference/class/ActorRunOptions.md)
* [**ActorRunStats](https://docs.apify.com/sdk/python/sdk/python/reference/class/ActorRunStats.md)
* [**ActorRunUsage](https://docs.apify.com/sdk/python/sdk/python/reference/class/ActorRunUsage.md)
* [**Webhook](https://docs.apify.com/sdk/python/sdk/python/reference/class/Webhook.md)
### Charging
* [**ActorPricingInfo](https://docs.apify.com/sdk/python/sdk/python/reference/class/ActorPricingInfo.md)
* [**ChargeResult](https://docs.apify.com/sdk/python/sdk/python/reference/class/ChargeResult.md)
* [**ChargingManager](https://docs.apify.com/sdk/python/sdk/python/reference/class/ChargingManager.md)
### Configuration
* [**Configuration](https://docs.apify.com/sdk/python/sdk/python/reference/class/Configuration.md)
* [**ProxyConfiguration](https://docs.apify.com/sdk/python/sdk/python/reference/class/ProxyConfiguration.md)
* [**ProxyInfo](https://docs.apify.com/sdk/python/sdk/python/reference/class/ProxyInfo.md)
### Event data
* [**SystemInfoEventData](https://docs.apify.com/sdk/python/sdk/python/reference/class/SystemInfoEventData.md)
* [**EventAbortingData](https://docs.apify.com/sdk/python/sdk/python/reference/class/EventAbortingData.md)
* [**EventExitData](https://docs.apify.com/sdk/python/sdk/python/reference/class/EventExitData.md)
* [**EventMigratingData](https://docs.apify.com/sdk/python/sdk/python/reference/class/EventMigratingData.md)
* [**EventPersistStateData](https://docs.apify.com/sdk/python/sdk/python/reference/class/EventPersistStateData.md)
* [**EventSystemInfoData](https://docs.apify.com/sdk/python/sdk/python/reference/class/EventSystemInfoData.md)
### Event managers
* [**ApifyEventManager](https://docs.apify.com/sdk/python/sdk/python/reference/class/ApifyEventManager.md)
* [**EventManager](https://docs.apify.com/sdk/python/sdk/python/reference/class/EventManager.md)
* [**LocalEventManager](https://docs.apify.com/sdk/python/sdk/python/reference/class/LocalEventManager.md)
### Events
* [**AbortingEvent](https://docs.apify.com/sdk/python/sdk/python/reference/class/AbortingEvent.md)
* [**DeprecatedEvent](https://docs.apify.com/sdk/python/sdk/python/reference/class/DeprecatedEvent.md)
* [**EventWithoutData](https://docs.apify.com/sdk/python/sdk/python/reference/class/EventWithoutData.md)
* [**ExitEvent](https://docs.apify.com/sdk/python/sdk/python/reference/class/ExitEvent.md)
* [**MigratingEvent](https://docs.apify.com/sdk/python/sdk/python/reference/class/MigratingEvent.md)
* [**PersistStateEvent](https://docs.apify.com/sdk/python/sdk/python/reference/class/PersistStateEvent.md)
* [**SystemInfoEvent](https://docs.apify.com/sdk/python/sdk/python/reference/class/SystemInfoEvent.md)
* [**UnknownEvent](https://docs.apify.com/sdk/python/sdk/python/reference/class/UnknownEvent.md)
* [**Event](https://docs.apify.com/sdk/python/sdk/python/reference/enum/Event.md)
### Request loaders
* [**ApifyRequestList](https://docs.apify.com/sdk/python/sdk/python/reference/class/ApifyRequestList.md)
* [**RequestLoader](https://docs.apify.com/sdk/python/sdk/python/reference/class/RequestLoader.md)
* [**RequestManager](https://docs.apify.com/sdk/python/sdk/python/reference/class/RequestManager.md)
* [**RequestManagerTandem](https://docs.apify.com/sdk/python/sdk/python/reference/class/RequestManagerTandem.md)
* [**SitemapRequestLoader](https://docs.apify.com/sdk/python/sdk/python/reference/class/SitemapRequestLoader.md)
### Storage clients
* [**ApifyStorageClient](https://docs.apify.com/sdk/python/sdk/python/reference/class/ApifyStorageClient.md)
* [**SmartApifyStorageClient](https://docs.apify.com/sdk/python/sdk/python/reference/class/SmartApifyStorageClient.md)
* [**StorageClient](https://docs.apify.com/sdk/python/sdk/python/reference/class/StorageClient.md)
* [**MemoryStorageClient](https://docs.apify.com/sdk/python/sdk/python/reference/class/MemoryStorageClient.md)
* [**FileSystemStorageClient](https://docs.apify.com/sdk/python/sdk/python/reference/class/FileSystemStorageClient.md)
* [**SqlStorageClient](https://docs.apify.com/sdk/python/sdk/python/reference/class/SqlStorageClient.md)
### Storage data
* [**ApifyKeyValueStoreMetadata](https://docs.apify.com/sdk/python/sdk/python/reference/class/ApifyKeyValueStoreMetadata.md)
* [**ProlongRequestLockResponse](https://docs.apify.com/sdk/python/sdk/python/reference/class/ProlongRequestLockResponse.md)
* [**RequestQueueHead](https://docs.apify.com/sdk/python/sdk/python/reference/class/RequestQueueHead.md)
* [**AddRequestsResponse](https://docs.apify.com/sdk/python/sdk/python/reference/class/AddRequestsResponse.md)
* [**DatasetItemsListPage](https://docs.apify.com/sdk/python/sdk/python/reference/class/DatasetItemsListPage.md)
* [**DatasetMetadata](https://docs.apify.com/sdk/python/sdk/python/reference/class/DatasetMetadata.md)
* [**KeyValueStoreMetadata](https://docs.apify.com/sdk/python/sdk/python/reference/class/KeyValueStoreMetadata.md)
* [**KeyValueStoreRecord](https://docs.apify.com/sdk/python/sdk/python/reference/class/KeyValueStoreRecord.md)
* [**KeyValueStoreRecordMetadata](https://docs.apify.com/sdk/python/sdk/python/reference/class/KeyValueStoreRecordMetadata.md)
* [**ProcessedRequest](https://docs.apify.com/sdk/python/sdk/python/reference/class/ProcessedRequest.md)
* [**Request](https://docs.apify.com/sdk/python/sdk/python/reference/class/Request.md)
* [**RequestQueueMetadata](https://docs.apify.com/sdk/python/sdk/python/reference/class/RequestQueueMetadata.md)
* [**StorageMetadata](https://docs.apify.com/sdk/python/sdk/python/reference/class/StorageMetadata.md)
### Storages
* [**Storage](https://docs.apify.com/sdk/python/sdk/python/reference/class/Storage.md)
* [**Dataset](https://docs.apify.com/sdk/python/sdk/python/reference/class/Dataset.md)
* [**KeyValueStore](https://docs.apify.com/sdk/python/sdk/python/reference/class/KeyValueStore.md)
* [**RequestQueue](https://docs.apify.com/sdk/python/sdk/python/reference/class/RequestQueue.md)
---
# \_FetchedPricingInfoDict<!-- -->
## Index[**](#Index)
### Properties
* [**charged\_event\_counts](https://docs.apify.com/sdk/python/sdk/python/reference/class/_FetchedPricingInfoDict.md#charged_event_counts)
* [**max\_total\_charge\_usd](https://docs.apify.com/sdk/python/sdk/python/reference/class/_FetchedPricingInfoDict.md#max_total_charge_usd)
* [**pricing\_info](https://docs.apify.com/sdk/python/sdk/python/reference/class/_FetchedPricingInfoDict.md#pricing_info)
## Properties<!-- -->[**](#Properties)
### [**](#charged_event_counts)[**](https://github.com/apify/apify-sdk-python/blob/master//src/apify/_charging.py#L392)charged\_event\_counts
**charged\_event\_counts: dict\[str, int]
### [**](#max_total_charge_usd)[**](https://github.com/apify/apify-sdk-python/blob/master//src/apify/_charging.py#L393)max\_total\_charge\_usd
**max\_total\_charge\_usd: Decimal
### [**](#pricing_info)[**](https://github.com/apify/apify-sdk-python/blob/master//src/apify/_charging.py#L385)pricing\_info
**pricing\_info: ((([FreeActorPricingInfo](https://docs.apify.com/sdk/python/sdk/python/reference/class/FreeActorPricingInfo.md) | [FlatPricePerMonthActorPricingInfo](https://docs.apify.com/sdk/python/sdk/python/reference/class/FlatPricePerMonthActorPricingInfo.md)) | [PricePerDatasetItemActorPricingInfo](https://docs.apify.com/sdk/python/sdk/python/reference/class/PricePerDatasetItemActorPricingInfo.md)) | [PayPerEventActorPricingInfo](https://docs.apify.com/sdk/python/sdk/python/reference/class/PayPerEventActorPricingInfo.md)) | None
---
# \_RequestDetails<!-- -->
### Hierarchy
* *\_RequestDetails*
* [\_RequestsFromUrlInput](https://docs.apify.com/sdk/python/sdk/python/reference/class/_RequestsFromUrlInput.md)
* [\_SimpleUrlInput](https://docs.apify.com/sdk/python/sdk/python/reference/class/_SimpleUrlInput.md)
## Index[**](#Index)
### Properties
* [**headers](https://docs.apify.com/sdk/python/sdk/python/reference/class/_RequestDetails.md#headers)
* [**method](https://docs.apify.com/sdk/python/sdk/python/reference/class/_RequestDetails.md#method)
* [**payload](https://docs.apify.com/sdk/python/sdk/python/reference/class/_RequestDetails.md#payload)
* [**user\_data](https://docs.apify.com/sdk/python/sdk/python/reference/class/_RequestDetails.md#user_data)
## Properties<!-- -->[**](#Properties)
### [**](#headers)[**](https://github.com/apify/apify-sdk-python/blob/master//src/apify/request_loaders/_apify_request_list.py#L25)headers
**headers: dict\[str, str]
### [**](#method)[**](https://github.com/apify/apify-sdk-python/blob/master//src/apify/request_loaders/_apify_request_list.py#L23)method
**method: HttpMethod
### [**](#payload)[**](https://github.com/apify/apify-sdk-python/blob/master//src/apify/request_loaders/_apify_request_list.py#L24)payload
**payload: str
### [**](#user_data)[**](https://github.com/apify/apify-sdk-python/blob/master//src/apify/request_loaders/_apify_request_list.py#L26)user\_data
**user\_data: dict\[str, str]
---
# \_RequestsFromUrlInput<!-- -->
### Hierarchy
* [\_RequestDetails](https://docs.apify.com/sdk/python/sdk/python/reference/class/_RequestDetails.md)
* *\_RequestsFromUrlInput*
## Index[**](#Index)
### Properties
* [**headers](https://docs.apify.com/sdk/python/sdk/python/reference/class/_RequestsFromUrlInput.md#headers)
* [**method](https://docs.apify.com/sdk/python/sdk/python/reference/class/_RequestsFromUrlInput.md#method)
* [**payload](https://docs.apify.com/sdk/python/sdk/python/reference/class/_RequestsFromUrlInput.md#payload)
* [**requests\_from\_url](https://docs.apify.com/sdk/python/sdk/python/reference/class/_RequestsFromUrlInput.md#requests_from_url)
* [**user\_data](https://docs.apify.com/sdk/python/sdk/python/reference/class/_RequestsFromUrlInput.md#user_data)
## Properties<!-- -->[**](#Properties)
### [**](#headers)[**](https://github.com/apify/apify-sdk-python/blob/master//src/apify/request_loaders/_apify_request_list.py#L25)headers
**headers: dict\[str, str]
Inherited from [\_RequestDetails.headers](https://docs.apify.com/sdk/python/sdk/python/reference/class/_RequestDetails.md#headers)
### [**](#method)[**](https://github.com/apify/apify-sdk-python/blob/master//src/apify/request_loaders/_apify_request_list.py#L23)method
**method: HttpMethod
Inherited from [\_RequestDetails.method](https://docs.apify.com/sdk/python/sdk/python/reference/class/_RequestDetails.md#method)
### [**](#payload)[**](https://github.com/apify/apify-sdk-python/blob/master//src/apify/request_loaders/_apify_request_list.py#L24)payload
**payload: str
Inherited from [\_RequestDetails.payload](https://docs.apify.com/sdk/python/sdk/python/reference/class/_RequestDetails.md#payload)
### [**](#requests_from_url)[**](https://github.com/apify/apify-sdk-python/blob/master//src/apify/request_loaders/_apify_request_list.py#L30)requests\_from\_url
**requests\_from\_url: str
### [**](#user_data)[**](https://github.com/apify/apify-sdk-python/blob/master//src/apify/request_loaders/_apify_request_list.py#L26)user\_data
**user\_data: dict\[str, str]
Inherited from [\_RequestDetails.user\_data](https://docs.apify.com/sdk/python/sdk/python/reference/class/_RequestDetails.md#user_data)
---
# \_SimpleUrlInput<!-- -->
### Hierarchy
* [\_RequestDetails](https://docs.apify.com/sdk/python/sdk/python/reference/class/_RequestDetails.md)
* *\_SimpleUrlInput*
## Index[**](#Index)
### Properties
* [**headers](https://docs.apify.com/sdk/python/sdk/python/reference/class/_SimpleUrlInput.md#headers)
* [**method](https://docs.apify.com/sdk/python/sdk/python/reference/class/_SimpleUrlInput.md#method)
* [**payload](https://docs.apify.com/sdk/python/sdk/python/reference/class/_SimpleUrlInput.md#payload)
* [**url](https://docs.apify.com/sdk/python/sdk/python/reference/class/_SimpleUrlInput.md#url)
* [**user\_data](https://docs.apify.com/sdk/python/sdk/python/reference/class/_SimpleUrlInput.md#user_data)
## Properties<!-- -->[**](#Properties)
### [**](#headers)[**](https://github.com/apify/apify-sdk-python/blob/master//src/apify/request_loaders/_apify_request_list.py#L25)headers
**headers: dict\[str, str]
Inherited from [\_RequestDetails.headers](https://docs.apify.com/sdk/python/sdk/python/reference/class/_RequestDetails.md#headers)
### [**](#method)[**](https://github.com/apify/apify-sdk-python/blob/master//src/apify/request_loaders/_apify_request_list.py#L23)method
**method: HttpMethod
Inherited from [\_RequestDetails.method](https://docs.apify.com/sdk/python/sdk/python/reference/class/_RequestDetails.md#method)
### [**](#payload)[**](https://github.com/apify/apify-sdk-python/blob/master//src/apify/request_loaders/_apify_request_list.py#L24)payload
**payload: str
Inherited from [\_RequestDetails.payload](https://docs.apify.com/sdk/python/sdk/python/reference/class/_RequestDetails.md#payload)
### [**](#url)[**](https://github.com/apify/apify-sdk-python/blob/master//src/apify/request_loaders/_apify_request_list.py#L34)url
**url: str
### [**](#user_data)[**](https://github.com/apify/apify-sdk-python/blob/master//src/apify/request_loaders/_apify_request_list.py#L26)user\_data
**user\_data: dict\[str, str]
Inherited from [\_RequestDetails.user\_data](https://docs.apify.com/sdk/python/sdk/python/reference/class/_RequestDetails.md#user_data)
---
# AbortingEvent<!-- -->
## Index[**](#Index)
### Properties
* [**data](https://docs.apify.com/sdk/python/sdk/python/reference/class/AbortingEvent.md#data)
* [**name](https://docs.apify.com/sdk/python/sdk/python/reference/class/AbortingEvent.md#name)
## Properties<!-- -->[**](#Properties)
### [**](#data)[**](https://github.com/apify/apify-sdk-python/blob/master//src/apify/events/_types.py#L68)data
**data: EventAbortingData
### [**](#name)[**](https://github.com/apify/apify-sdk-python/blob/master//src/apify/events/_types.py#L67)name
**name: Literal\[Event.ABORTING]
---
# Actor<!-- -->
The core class for building Actors on the Apify platform.
Actors are serverless programs running in the cloud that can perform anything from simple actions (such as filling out a web form or sending an email) to complex operations (such as crawling an entire website or removing duplicates from a large dataset). They are packaged as Docker containers which accept well-defined JSON input, perform an action, and optionally produce well-defined output.
### References
* Apify platform documentation: <https://docs.apify.com/platform/actors>
* Actor whitepaper: <https://whitepaper.actor/>
### Usage
import asyncio
import httpx from apify import Actor from bs4 import BeautifulSoup
async def main() -> None: async with Actor: actor_input = await Actor.get_input() async with httpx.AsyncClient() as client: response = await client.get(actor_input['url']) soup = BeautifulSoup(response.content, 'html.parser') data = { 'url': actor_input['url'], 'title': soup.title.string if soup.title else None, } await Actor.push_data(data)
if name == 'main': asyncio.run(main())
## Index[**](#Index)
### Methods
* [**\_\_aenter\_\_](https://docs.apify.com/sdk/python/sdk/python/reference/class/Actor.md#__aenter__)
* [**\_\_aexit\_\_](https://docs.apify.com/sdk/python/sdk/python/reference/class/Actor.md#__aexit__)
* [**\_\_call\_\_](https://docs.apify.com/sdk/python/sdk/python/reference/class/Actor.md#__call__)
* [**\_\_init\_\_](https://docs.apify.com/sdk/python/sdk/python/reference/class/Actor.md#__init__)
* [**\_\_repr\_\_](https://docs.apify.com/sdk/python/sdk/python/reference/class/Actor.md#__repr__)
* [**abort](https://docs.apify.com/sdk/python/sdk/python/reference/class/Actor.md#abort)
* [**add\_webhook](https://docs.apify.com/sdk/python/sdk/python/reference/class/Actor.md#add_webhook)
* [**call](https://docs.apify.com/sdk/python/sdk/python/reference/class/Actor.md#call)
* [**call\_task](https://docs.apify.com/sdk/python/sdk/python/reference/class/Actor.md#call_task)
* [**charge](https://docs.apify.com/sdk/python/sdk/python/reference/class/Actor.md#charge)
* [**configuration](https://docs.apify.com/sdk/python/sdk/python/reference/class/Actor.md#configuration)
* [**create\_proxy\_configuration](https://docs.apify.com/sdk/python/sdk/python/reference/class/Actor.md#create_proxy_configuration)
* [**event\_manager](https://docs.apify.com/sdk/python/sdk/python/reference/class/Actor.md#event_manager)
* [**exit](https://docs.apify.com/sdk/python/sdk/python/reference/class/Actor.md#exit)
* [**exit\_code](https://docs.apify.com/sdk/python/sdk/python/reference/class/Actor.md#exit_code)
* [**fail](https://docs.apify.com/sdk/python/sdk/python/reference/class/Actor.md#fail)
* [**get\_charging\_manager](https://docs.apify.com/sdk/python/sdk/python/reference/class/Actor.md#get_charging_manager)
* [**get\_env](https://docs.apify.com/sdk/python/sdk/python/reference/class/Actor.md#get_env)
* [**get\_input](https://docs.apify.com/sdk/python/sdk/python/reference/class/Actor.md#get_input)
* [**get\_value](https://docs.apify.com/sdk/python/sdk/python/reference/class/Actor.md#get_value)
* [**init](https://docs.apify.com/sdk/python/sdk/python/reference/class/Actor.md#init)
* [**is\_at\_home](https://docs.apify.com/sdk/python/sdk/python/reference/class/Actor.md#is_at_home)
* [**metamorph](https://docs.apify.com/sdk/python/sdk/python/reference/class/Actor.md#metamorph)
* [**new\_client](https://docs.apify.com/sdk/python/sdk/python/reference/class/Actor.md#new_client)
* [**off](https://docs.apify.com/sdk/python/sdk/python/reference/class/Actor.md#off)
* [**on](https://docs.apify.com/sdk/python/sdk/python/reference/class/Actor.md#on)
* [**open\_dataset](https://docs.apify.com/sdk/python/sdk/python/reference/class/Actor.md#open_dataset)
* [**open\_key\_value\_store](https://docs.apify.com/sdk/python/sdk/python/reference/class/Actor.md#open_key_value_store)
* [**open\_request\_queue](https://docs.apify.com/sdk/python/sdk/python/reference/class/Actor.md#open_request_queue)
* [**push\_data](https://docs.apify.com/sdk/python/sdk/python/reference/class/Actor.md#push_data)
* [**reboot](https://docs.apify.com/sdk/python/sdk/python/reference/class/Actor.md#reboot)
* [**set\_status\_message](https://docs.apify.com/sdk/python/sdk/python/reference/class/Actor.md#set_status_message)
* [**set\_value](https://docs.apify.com/sdk/python/sdk/python/reference/class/Actor.md#set_value)
* [**start](https://docs.apify.com/sdk/python/sdk/python/reference/class/Actor.md#start)
* [**status\_message](https://docs.apify.com/sdk/python/sdk/python/reference/class/Actor.md#status_message)
### Properties
* [**apify\_client](https://docs.apify.com/sdk/python/sdk/python/reference/class/Actor.md#apify_client)
* [**exit\_code](https://docs.apify.com/sdk/python/sdk/python/reference/class/Actor.md#exit_code)
* [**log](https://docs.apify.com/sdk/python/sdk/python/reference/class/Actor.md#log)
* [**status\_message](https://docs.apify.com/sdk/python/sdk/python/reference/class/Actor.md#status_message)
## Methods<!-- -->[**](#Methods)
### [**](#__aenter__)[**](https://github.com/apify/apify-sdk-python/blob/master//src/apify/_actor.py#L145)\_\_aenter\_\_
* **async **\_\_aenter\_\_**(): Self
- Enter the Actor context.
Initializes the Actor when used in an `async with` block. This method:
* Sets up local or cloud storage clients depending on whether the Actor runs locally or on the Apify platform.
* Configures the event manager and starts periodic state persistence.
* Initializes the charging manager for handling charging events.
* Configures logging after all core services are registered.
This method must be called exactly once per Actor instance. Re-initializing an Actor or having multiple active Actor instances is not standard usage and may lead to warnings or unexpected behavior.
***
#### Returns Self
### [**](#__aexit__)[**](https://github.com/apify/apify-sdk-python/blob/master//src/apify/_actor.py#L203)\_\_aexit\_\_
* **async **\_\_aexit\_\_**(exc\_type, exc\_value, exc\_traceback): None
- Exit the Actor context.
If the block exits with an exception, the Actor fails with a non-zero exit code. Otherwise, it exits cleanly. In both cases the Actor:
* Cancels periodic `PERSIST_STATE` events.
* Sends a final `PERSIST_STATE` event.
* Waits for all event listeners to finish.
* Stops the event manager and the charging manager.
* Optionally terminates the process with the selected exit code.
***
#### Parameters
* ##### exc\_type: type\[BaseException] | None
* ##### exc\_value: BaseException | None
* ##### exc\_traceback: TracebackType | None
#### Returns None
### [**](#__call__)[**](https://github.com/apify/apify-sdk-python/blob/master//src/apify/_actor.py#L259)\_\_call\_\_
* ****\_\_call\_\_**(configuration, \*, configure\_logging, exit\_process, exit\_code, event\_listeners\_timeout, status\_message, cleanup\_timeout): Self
- Make a new Actor instance with a non-default configuration.
This is necessary due to the lazy object proxying of the global `Actor` instance.
***
#### Parameters
* ##### optionalconfiguration: [Configuration](https://docs.apify.com/sdk/python/sdk/python/reference/class/Configuration.md) | None = <!-- -->None
* ##### optionalkeyword-onlyconfigure\_logging: bool = <!-- -->True
* ##### optionalkeyword-onlyexit\_process: bool | None = <!-- -->None
* ##### optionalkeyword-onlyexit\_code: int = <!-- -->0
* ##### optionalkeyword-onlyevent\_listeners\_timeout: timedelta | None = <!-- -->EVENT\_LISTENERS\_TIMEOUT
* ##### optionalkeyword-onlystatus\_message: str | None = <!-- -->None
* ##### optionalkeyword-onlycleanup\_timeout: timedelta = <!-- -->timedelta(seconds=30)
#### Returns Self
### [**](#__init__)[**](https://github.com/apify/apify-sdk-python/blob/master//src/apify/_actor.py#L104)\_\_init\_\_
* ****\_\_init\_\_**(configuration, \*, configure\_logging, exit\_process, exit\_code, status\_message, event\_listeners\_timeout, cleanup\_timeout): None
- Initialize a new instance.
***
#### Parameters
* ##### optionalconfiguration: [Configuration](https://docs.apify.com/sdk/python/sdk/python/reference/class/Configuration.md) | None = <!-- -->None
The Actor configuration to use. If not provided, a default configuration is created.
* ##### optionalkeyword-onlyconfigure\_logging: bool = <!-- -->True
Whether to set up the default logging configuration.
* ##### optionalkeyword-onlyexit\_process: bool | None = <!-- -->None
Whether the Actor should call `sys.exit` when the context manager exits. Defaults to True, except in IPython, Pytest, and Scrapy environments.
* ##### optionalkeyword-onlyexit\_code: int = <!-- -->0
The exit code the Actor should use when exiting.
* ##### optionalkeyword-onlystatus\_message: str | None = <!-- -->None
Final status message to display upon Actor termination.
* ##### optionalkeyword-onlyevent\_listeners\_timeout: timedelta | None = <!-- -->EVENT\_LISTENERS\_TIMEOUT
Maximum time to wait for Actor event listeners to complete before exiting.
* ##### optionalkeyword-onlycleanup\_timeout: timedelta = <!-- -->timedelta(seconds=30)
Maximum time to wait for cleanup tasks to finish.
#### Returns None
### [**](#__repr__)[**](https://github.com/apify/apify-sdk-python/blob/master//src/apify/_actor.py#L253)\_\_repr\_\_
* ****\_\_repr\_\_**(): str
- #### Returns str
### [**](#abort)[**](https://github.com/apify/apify-sdk-python/blob/master//src/apify/_actor.py#L877)abort
* **async **abort**(run\_id, \*, token, status\_message, gracefully): [ActorRun](https://docs.apify.com/sdk/python/sdk/python/reference/class/ActorRun.md)
- Abort given Actor run on the Apify platform using the current user account.
The user account is determined by the `APIFY_TOKEN` environment variable.
***
#### Parameters
* ##### run\_id: str
The ID of the Actor run to be aborted.
* ##### optionalkeyword-onlytoken: str | None = <!-- -->None
The Apify API token to use for this request (defaults to the `APIFY_TOKEN` environment variable).
* ##### optionalkeyword-onlystatus\_message: str | None = <!-- -->None
Status message of the Actor to be set on the platform.
* ##### optionalkeyword-onlygracefully: bool | None = <!-- -->None
If True, the Actor run will abort gracefully. It will send `aborting` and `persistState` events into the run and force-stop the run after 30 seconds. It is helpful in cases where you plan to resurrect the run later.
#### Returns [ActorRun](https://docs.apify.com/sdk/python/sdk/python/reference/class/ActorRun.md)
### [**](#add_webhook)[**](https://github.com/apify/apify-sdk-python/blob/master//src/apify/_actor.py#L1149)add\_webhook
* **async **add\_webhook**(webhook, \*, ignore\_ssl\_errors, do\_not\_retry, idempotency\_key): None
- Create an ad-hoc webhook for the current Actor run.
This webhook lets you receive a notification when the Actor run finished or failed.
Note that webhooks are only supported for Actors running on the Apify platform. When running the Actor locally, the function will print a warning and have no effect.
For more information about Apify Actor webhooks, please see the [documentation](https://docs.apify.com/webhooks).
***
#### Parameters
* ##### webhook: [Webhook](https://docs.apify.com/sdk/python/sdk/python/reference/class/Webhook.md)
The webhook to be added
* ##### optionalkeyword-onlyignore\_ssl\_errors: bool | None = <!-- -->None
Whether the webhook should ignore SSL errors returned by request\_url
* ##### optionalkeyword-onlydo\_not\_retry: bool | None = <!-- -->None
Whether the webhook should retry sending the payload to request\_url upon failure.
* ##### optionalkeyword-onlyidempotency\_key: str | None = <!-- -->None
A unique identifier of a webhook. You can use it to ensure that you won't create the same webhook multiple times.
#### Returns None
### [**](#call)[**](https://github.com/apify/apify-sdk-python/blob/master//src/apify/_actor.py#L911)call
* **async **call**(actor\_id, run\_input, \*, token, content\_type, build, memory\_mbytes, timeout, webhooks, wait, logger): [ActorRun](https://docs.apify.com/sdk/python/sdk/python/reference/class/ActorRun.md) | None
- Start an Actor on the Apify Platform and wait for it to finish before returning.
It waits indefinitely, unless the wait argument is provided.
***
#### Parameters
* ##### actor\_id: str
The ID of the Actor to be run.
* ##### optionalrun\_input: Any = <!-- -->None
The input to pass to the Actor run.
* ##### optionalkeyword-onlytoken: str | None = <!-- -->None
The Apify API token to use for this request (defaults to the `APIFY_TOKEN` environment variable).
* ##### optionalkeyword-onlycontent\_type: str | None = <!-- -->None
The content type of the input.
* ##### optionalkeyword-onlybuild: str | None = <!-- -->None
Specifies the Actor build to run. It can be either a build tag or build number. By default, the run uses the build specified in the default run configuration for the Actor (typically latest).
* ##### optionalkeyword-onlymemory\_mbytes: int | None = <!-- -->None
Memory limit for the run, in megabytes. By default, the run uses a memory limit specified in the default run configuration for the Actor.
* ##### optionalkeyword-onlytimeout: (timedelta | None) | Literal\[RemainingTime] = <!-- -->None
Optional timeout for the run, in seconds. By default, the run uses timeout specified in the default run configuration for the Actor. Using `RemainingTime` will set timeout of the other Actor to the time remaining from this Actor timeout.
* ##### optionalkeyword-onlywebhooks: list\[[Webhook](https://docs.apify.com/sdk/python/sdk/python/reference/class/Webhook.md)] | None = <!-- -->None
Optional webhooks (<https://docs.apify.com/webhooks>) associated with the Actor run, which can be used to receive a notification, e.g. when the Actor finished or failed. If you already have a webhook set up for the Actor, you do not have to add it again here.
* ##### optionalkeyword-onlywait: timedelta | None = <!-- -->None
The maximum number of seconds the server waits for the run to finish. If not provided, waits indefinitely.
* ##### optionalkeyword-onlylogger: (logging.Logger | None) | Literal\[default] = <!-- -->'default'
Logger used to redirect logs from the Actor run. Using "default" literal means that a predefined default logger will be used. Setting `None` will disable any log propagation. Passing custom logger will redirect logs to the provided logger.
#### Returns [ActorRun](https://docs.apify.com/sdk/python/sdk/python/reference/class/ActorRun.md) | None
### [**](#call_task)[**](https://github.com/apify/apify-sdk-python/blob/master//src/apify/_actor.py#L986)call\_task
* **async **call\_task**(task\_id, task\_input, \*, build, memory\_mbytes, timeout, webhooks, wait, token): [ActorRun](https://docs.apify.com/sdk/python/sdk/python/reference/class/ActorRun.md) | None
- Start an Actor task on the Apify Platform and wait for it to finish before returning.
It waits indefinitely, unless the wait argument is provided.
Note that an Actor task is a saved input configuration and options for an Actor. If you want to run an Actor directly rather than an Actor task, please use the `Actor.call`
***
#### Parameters
* ##### task\_id: str
The ID of the Actor to be run.
* ##### optionaltask\_input: dict | None = <!-- -->None
Overrides the input to pass to the Actor run.
* ##### optionalkeyword-onlybuild: str | None = <!-- -->None
Specifies the Actor build to run. It can be either a build tag or build number. By default, the run uses the build specified in the default run configuration for the Actor (typically latest).
* ##### optionalkeyword-onlymemory\_mbytes: int | None = <!-- -->None
Memory limit for the run, in megabytes. By default, the run uses a memory limit specified in the default run configuration for the Actor.
* ##### optionalkeyword-onlytimeout: timedelta | None = <!-- -->None
Optional timeout for the run, in seconds. By default, the run uses timeout specified in the default run configuration for the Actor.
* ##### optionalkeyword-onlywebhooks: list\[[Webhook](https://docs.apify.com/sdk/python/sdk/python/reference/class/Webhook.md)] | None = <!-- -->None
Optional webhooks (<https://docs.apify.com/webhooks>) associated with the Actor run, which can be used to receive a notification, e.g. when the Actor finished or failed. If you already have a webhook set up for the Actor, you do not have to add it again here.
* ##### optionalkeyword-onlywait: timedelta | None = <!-- -->None
The maximum number of seconds the server waits for the run to finish. If not provided, waits indefinitely.
* ##### optionalkeyword-onlytoken: str | None = <!-- -->None
The Apify API token to use for this request (defaults to the `APIFY_TOKEN` environment variable).
#### Returns [ActorRun](https://docs.apify.com/sdk/python/sdk/python/reference/class/ActorRun.md) | None
### [**](#charge)[**](https://github.com/apify/apify-sdk-python/blob/master//src/apify/_actor.py#L685)charge
* **async **charge**(event\_name, count): [ChargeResult](https://docs.apify.com/sdk/python/sdk/python/reference/class/ChargeResult.md)
- Charge for a specified number of events - sub-operations of the Actor.
This is relevant only for the pay-per-event pricing model.
***
#### Parameters
* ##### event\_name: str
Name of the event to be charged for.
* ##### optionalcount: int = <!-- -->1
Number of events to charge for.
#### Returns [ChargeResult](https://docs.apify.com/sdk/python/sdk/python/reference/class/ChargeResult.md)
### [**](#configuration)[**](https://github.com/apify/apify-sdk-python/blob/master//src/apify/_actor.py#L315)configuration
* ****configuration**(): [Configuration](https://docs.apify.com/sdk/python/sdk/python/reference/class/Configuration.md)
- Actor configuration, uses the default instance if not explicitly set.
***
#### Returns [Configuration](https://docs.apify.com/sdk/python/sdk/python/reference/class/Configuration.md)
### [**](#create_proxy_configuration)[**](https://github.com/apify/apify-sdk-python/blob/master//src/apify/_actor.py#L1228)create\_proxy\_configuration
* **async **create\_proxy\_configuration**(\*, actor\_proxy\_input, password, groups, country\_code, proxy\_urls, new\_url\_function): [ProxyConfiguration](https://docs.apify.com/sdk/python/sdk/python/reference/class/ProxyConfiguration.md) | None
- Create a ProxyConfiguration object with the passed proxy configuration.
Configures connection to a proxy server with the provided options. Proxy servers are used to prevent target websites from blocking your crawlers based on IP address rate limits or blacklists.
For more details and code examples, see the `ProxyConfiguration` class.
***
#### Parameters
* ##### optionalkeyword-onlyactor\_proxy\_input: dict | None = <!-- -->None
Proxy configuration field from the Actor input, if input has such input field. If you pass this argument, all the other arguments will be inferred from it.
* ##### optionalkeyword-onlypassword: str | None = <!-- -->None
Password for the Apify Proxy. If not provided, will use os.environ\['APIFY\_PROXY\_PASSWORD'], if available.
* ##### optionalkeyword-onlygroups: list\[str] | None = <!-- -->None
Proxy groups which the Apify Proxy should use, if provided.
* ##### optionalkeyword-onlycountry\_code: str | None = <!-- -->None
Country which the Apify Proxy should use, if provided.
* ##### optionalkeyword-onlyproxy\_urls: list\[str | None] | None = <!-- -->None
Custom proxy server URLs which should be rotated through.
* ##### optionalkeyword-onlynew\_url\_function: \_NewUrlFunction | None = <!-- -->None
Function which returns a custom proxy URL to be used.
#### Returns [ProxyConfiguration](https://docs.apify.com/sdk/python/sdk/python/reference/class/ProxyConfiguration.md) | None
### [**](#event_manager)[**](https://github.com/apify/apify-sdk-python/blob/master//src/apify/_actor.py#L336)event\_manager
* ****event\_manager**(): EventManager
- Manages Apify platform events.
It uses `ApifyEventManager` on the Apify platform and `LocalEventManager` otherwise.
***
#### Returns EventManager
### [**](#exit)[**](https://github.com/apify/apify-sdk-python/blob/master//src/apify/_actor.py#L399)exit
* **async **exit**(\*, exit\_code, status\_message, event\_listeners\_timeout, cleanup\_timeout): None
- Exit the Actor without using context-manager syntax.
Equivalent to `await Actor.__aexit__()`.
***
#### Parameters
* ##### optionalkeyword-onlyexit\_code: int = <!-- -->0
The exit code the Actor should use when exiting.
* ##### optionalkeyword-onlystatus\_message: str | None = <!-- -->None
Final status message to display upon Actor termination.
* ##### optionalkeyword-onlyevent\_listeners\_timeout: timedelta | None = <!-- -->EVENT\_LISTENERS\_TIMEOUT
Maximum time to wait for Actor event listeners to complete before exiting.
* ##### optionalkeyword-onlycleanup\_timeout: timedelta = <!-- -->timedelta(seconds=30)
Maximum time to wait for cleanup tasks to finish.
#### Returns None
### [**](#exit_code)[**](https://github.com/apify/apify-sdk-python/blob/master//src/apify/_actor.py#L295)exit\_code
* ****exit\_code**(value): None
- #### Parameters
* ##### value: int
#### Returns None
### [**](#fail)[**](https://github.com/apify/apify-sdk-python/blob/master//src/apify/_actor.py#L423)fail
* **async **fail**(\*, exit\_code, exception, status\_message): None
- Fail the Actor instance without using context-manager syntax.
Equivalent to setting the `self.exit_code` and `self.status_message` properties and using `await Actor.__aexit__()`.
***
#### Parameters
* ##### optionalkeyword-onlyexit\_code: int = <!-- -->1
The exit code with which the Actor should fail (defaults to `1`).
* ##### optionalkeyword-onlyexception: BaseException | None = <!-- -->None
The exception with which the Actor failed.
* ##### optionalkeyword-onlystatus\_message: str | None = <!-- -->None
The final status message that the Actor should display.
#### Returns None
### [**](#get_charging_manager)[**](https://github.com/apify/apify-sdk-python/blob/master//src/apify/_actor.py#L680)get\_charging\_manager
* ****get\_charging\_manager**(): [ChargingManager](https://docs.apify.com/sdk/python/sdk/python/reference/class/ChargingManager.md)
- Retrieve the charging manager to access granular pricing information.
***
#### Returns [ChargingManager](https://docs.apify.com/sdk/python/sdk/python/reference/class/ChargingManager.md)
### [**](#get_env)[**](https://github.com/apify/apify-sdk-python/blob/master//src/apify/_actor.py#L778)get\_env
* ****get\_env**(): dict
- Return a dictionary with information parsed from all the `APIFY_XXX` environment variables.
For a list of all the environment variables, see the [Actor documentation](https://docs.apify.com/actors/development/environment-variables). If some variables are not defined or are invalid, the corresponding value in the resulting dictionary will be None.
***
#### Returns dict
### [**](#get_input)[**](https://github.com/apify/apify-sdk-python/blob/master//src/apify/_actor.py#L633)get\_input
* **async **get\_input**(): Any
- Get the Actor input value from the default key-value store associated with the current Actor run.
***
#### Returns Any
### [**](#get_value)[**](https://github.com/apify/apify-sdk-python/blob/master//src/apify/_actor.py#L649)get\_value
* **async **get\_value**(key, default\_value): Any
- Get a value from the default key-value store associated with the current Actor run.
***
#### Parameters
* ##### key: str
The key of the record which to retrieve.
* ##### optionaldefault\_value: Any = <!-- -->None
Default value returned in case the record does not exist.
#### Returns Any
### [**](#init)[**](https://github.com/apify/apify-sdk-python/blob/master//src/apify/_actor.py#L392)init
* **async **init**(): None
- Initialize the Actor without using context-manager syntax.
Equivalent to `await Actor.__aenter__()`.
***
#### Returns None
### [**](#is_at_home)[**](https://github.com/apify/apify-sdk-python/blob/master//src/apify/_actor.py#L774)is\_at\_home
* ****is\_at\_home**(): bool
- Return `True` when the Actor is running on the Apify platform, and `False` otherwise (e.g. local run).
***
#### Returns bool
### [**](#metamorph)[**](https://github.com/apify/apify-sdk-python/blob/master//src/apify/_actor.py#L1047)metamorph
* **async **metamorph**(target\_actor\_id, run\_input, \*, target\_actor\_build, content\_type, custom\_after\_sleep): None
- Transform this Actor run to an Actor run of a different Actor.
The platform stops the current Actor container and starts a new container with the new Actor instead. All the default storages are preserved, and the new input is stored under the `INPUT-METAMORPH-1` key in the same default key-value store.
***
#### Parameters
* ##### target\_actor\_id: str
ID of the target Actor that the run should be transformed into
* ##### optionalrun\_input: Any = <!-- -->None
The input to pass to the new run.
* ##### optionalkeyword-onlytarget\_actor\_build: str | None = <!-- -->None
The build of the target Actor. It can be either a build tag or build number. By default, the run uses the build specified in the default run configuration for the target Actor (typically the latest build).
* ##### optionalkeyword-onlycontent\_type: str | None = <!-- -->None
The content type of the input.
* ##### optionalkeyword-onlycustom\_after\_sleep: timedelta | None = <!-- -->None
How long to sleep for after the metamorph, to wait for the container to be stopped.
#### Returns None
### [**](#new_client)[**](https://github.com/apify/apify-sdk-python/blob/master//src/apify/_actor.py#L449)new\_client
* ****new\_client**(\*, token, api\_url, max\_retries, min\_delay\_between\_retries, timeout): ApifyClientAsync
- Return a new instance of the Apify API client.
The `ApifyClientAsync` class is provided by the [apify-client](https://github.com/apify/apify-client-python) package, and it is automatically configured using the `APIFY_API_BASE_URL` and `APIFY_TOKEN` environment variables.
You can override the token via the available options. That's useful if you want to use the client as a different Apify user than the SDK internals are using.
***
#### Parameters
* ##### optionalkeyword-onlytoken: str | None = <!-- -->None
The Apify API token.
* ##### optionalkeyword-onlyapi\_url: str | None = <!-- -->None
The URL of the Apify API server to which to connect to. Defaults to <https://api.apify.com>.
* ##### optionalkeyword-onlymax\_retries: int | None = <!-- -->None
How many times to retry a failed request at most.
* ##### optionalkeyword-onlymin\_delay\_between\_retries: timedelta | None = <!-- -->None
How long will the client wait between retrying requests (increases exponentially from this value).
* ##### optionalkeyword-onlytimeout: timedelta | None = <!-- -->None
The socket timeout of the HTTP requests sent to the Apify API.
#### Returns ApifyClientAsync
### [**](#off)[**](https://github.com/apify/apify-sdk-python/blob/master//src/apify/_actor.py#L762)off
* ****off**(event\_name: Event, listener?
<!-- -->
: Callable | None): None
* ****off**(event\_name: Literal\[Event.PERSIST\_STATE], listener: EventListener\[EventPersistStateData]): None
* ****off**(event\_name: Literal\[Event.SYSTEM\_INFO], listener: EventListener\[EventSystemInfoData]): None
* ****off**(event\_name: Literal\[Event.MIGRATING], listener: EventListener\[EventMigratingData]): None
* ****off**(event\_name: Literal\[Event.ABORTING], listener: EventListener\[EventAbortingData]): None
* ****off**(event\_name: Literal\[Event.EXIT], listener: EventListener\[EventExitData]): None
* ****off**(event\_name: Event, listener: EventListener\[None]): None
- Remove a listener, or all listeners, from an Actor event.
***
#### Parameters
* ##### event\_name: Event
The Actor event for which to remove listeners.
* ##### optionallistener: Callable | None = <!-- -->None
The listener which is supposed to be removed. If not passed, all listeners of this event are removed.
#### Returns None
### [**](#on)[**](https://github.com/apify/apify-sdk-python/blob/master//src/apify/_actor.py#L720)on
* ****on**(event\_name: Event, listener: EventListener\[Any]): EventListener\[Any]
* ****on**(event\_name: Literal\[Event.PERSIST\_STATE], listener: EventListener\[EventPersistStateData]): EventListener\[EventPersistStateData]
* ****on**(event\_name: Literal\[Event.SYSTEM\_INFO], listener: EventListener\[EventSystemInfoData]): EventListener\[EventSystemInfoData]
* ****on**(event\_name: Literal\[Event.MIGRATING], listener: EventListener\[EventMigratingData]): EventListener\[EventMigratingData]
* ****on**(event\_name: Literal\[Event.ABORTING], listener: EventListener\[EventAbortingData]): EventListener\[EventAbortingData]
* ****on**(event\_name: Literal\[Event.EXIT], listener: EventListener\[EventExitData]): EventListener\[EventExitData]
* ****on**(event\_name: Event, listener: EventListener\[None]): EventListener\[Any]
- Add an event listener to the Actor's event manager.
The following events can be emitted:
* `Event.SYSTEM_INFO`: Emitted every minute; the event data contains information about the Actor's resource usage.
* `Event.MIGRATING`: Emitted when the Actor on the Apify platform is about to be migrated to another worker server. Use this event to persist the Actor's state and gracefully stop in-progress tasks, preventing disruption.
* `Event.PERSIST_STATE`: Emitted regularly (default: 60 seconds) to notify the Actor to persist its state, preventing work repetition after a restart. This event is emitted together with the `MIGRATING` event, where the `isMigrating` flag in the event data is `True`; otherwise, the flag is `False`. This event is for convenience; the same effect can be achieved by setting an interval and listening for the `MIGRATING` event.
* `Event.ABORTING`: Emitted when a user aborts an Actor run on the Apify platform, allowing the Actor time to clean up its state if the abort is graceful.
***
#### Parameters
* ##### event\_name: Event
The Actor event to listen for.
* ##### listener: EventListener\[Any]
The function to be called when the event is emitted (can be async).
#### Returns EventListener\[Any]
### [**](#open_dataset)[**](https://github.com/apify/apify-sdk-python/blob/master//src/apify/_actor.py#L487)open\_dataset
* **async **open\_dataset**(\*, id, alias, name, force\_cloud): Dataset
- Open a dataset.
Datasets are used to store structured data where each object stored has the same attributes, such as online store products or real estate offers. The actual data is stored either on the local filesystem or in the Apify cloud.
***
#### Parameters
* ##### optionalkeyword-onlyid: str | None = <!-- -->None
The ID of the dataset to open. If provided, searches for existing dataset by ID. Mutually exclusive with name and alias.
* ##### optionalkeyword-onlyalias: str | None = <!-- -->None
The alias of the dataset to open (run scope, creates unnamed storage). Mutually exclusive with id and name.
* ##### optionalkeyword-onlyname: str | None = <!-- -->None
The name of the dataset to open (global scope, persists across runs). Mutually exclusive with id and alias.
* ##### optionalkeyword-onlyforce\_cloud: bool = <!-- -->False
If set to `True` then the Apify cloud storage is always used. This way it is possible to combine local and cloud storage.
#### Returns Dataset
### [**](#open_key_value_store)[**](https://github.com/apify/apify-sdk-python/blob/master//src/apify/_actor.py#L522)open\_key\_value\_store
* **async **open\_key\_value\_store**(\*, id, alias, name, force\_cloud): KeyValueStore
- Open a key-value store.
Key-value stores are used to store records or files, along with their MIME content type. The records are stored and retrieved using a unique key. The actual data is stored either on a local filesystem or in the Apify cloud.
***
#### Parameters
* ##### optionalkeyword-onlyid: str | None = <!-- -->None
The ID of the KVS to open. If provided, searches for existing KVS by ID. Mutually exclusive with name and alias.
* ##### optionalkeyword-onlyalias: str | None = <!-- -->None
The alias of the KVS to open (run scope, creates unnamed storage). Mutually exclusive with id and name.
* ##### optionalkeyword-onlyname: str | None = <!-- -->None
The name of the KVS to open (global scope, persists across runs). Mutually exclusive with id and alias.
* ##### optionalkeyword-onlyforce\_cloud: bool = <!-- -->False
If set to `True` then the Apify cloud storage is always used. This way it is possible to combine local and cloud storage.
#### Returns KeyValueStore
### [**](#open_request_queue)[**](https://github.com/apify/apify-sdk-python/blob/master//src/apify/_actor.py#L556)open\_request\_queue
* **async **open\_request\_queue**(\*, id, alias, name, force\_cloud): RequestQueue
- Open a request queue.
Request queue represents a queue of URLs to crawl, which is stored either on local filesystem or in the Apify cloud. The queue is used for deep crawling of websites, where you start with several URLs and then recursively follow links to other pages. The data structure supports both breadth-first and depth-first crawling orders.
***
#### Parameters
* ##### optionalkeyword-onlyid: str | None = <!-- -->None
The ID of the RQ to open. If provided, searches for existing RQ by ID. Mutually exclusive with name and alias.
* ##### optionalkeyword-onlyalias: str | None = <!-- -->None
The alias of the RQ to open (run scope, creates unnamed storage). Mutually exclusive with id and name.
* ##### optionalkeyword-onlyname: str | None = <!-- -->None
The name of the RQ to open (global scope, persists across runs). Mutually exclusive with id and alias.
* ##### optionalkeyword-onlyforce\_cloud: bool = <!-- -->False
If set to `True` then the Apify cloud storage is always used. This way it is possible to combine local and cloud storage.
#### Returns RequestQueue
### [**](#push_data)[**](https://github.com/apify/apify-sdk-python/blob/master//src/apify/_actor.py#L596)push\_data
* **async **push\_data**(data: dict | list\[dict], charged\_event\_name?
<!-- -->
: str | None): [ChargeResult](https://docs.apify.com/sdk/python/sdk/python/reference/class/ChargeResult.md) | None
* **async **push\_data**(data: dict | list\[dict]): None
* **async **push\_data**(data: dict | list\[dict], charged\_event\_name: str): [ChargeResult](https://docs.apify.com/sdk/python/sdk/python/reference/class/ChargeResult.md)
- Store an object or a list of objects to the default dataset of the current Actor run.
***
#### Parameters
* ##### data: dict | list\[dict]
The data to push to the default dataset.
* ##### optionalcharged\_event\_name: str | None = <!-- -->None
If provided and if the Actor uses the pay-per-event pricing model, the method will attempt to charge for the event for each pushed item.
#### Returns [ChargeResult](https://docs.apify.com/sdk/python/sdk/python/reference/class/ChargeResult.md) | None
### [**](#reboot)[**](https://github.com/apify/apify-sdk-python/blob/master//src/apify/_actor.py#L1094)reboot
* **async **reboot**(\*, event\_listeners\_timeout, custom\_after\_sleep): None
- Internally reboot this Actor.
The system stops the current container and starts a new one, with the same run ID and default storages.
***
#### Parameters
* ##### optionalkeyword-onlyevent\_listeners\_timeout: timedelta | None = <!-- -->EVENT\_LISTENERS\_TIMEOUT
How long should the Actor wait for Actor event listeners to finish before exiting.
* ##### optionalkeyword-onlycustom\_after\_sleep: timedelta | None = <!-- -->None
How long to sleep for after the reboot, to wait for the container to be stopped.
#### Returns None
### [**](#set_status_message)[**](https://github.com/apify/apify-sdk-python/blob/master//src/apify/_actor.py#L1196)set\_status\_message
* **async **set\_status\_message**(status\_message, \*, is\_terminal): [ActorRun](https://docs.apify.com/sdk/python/sdk/python/reference/class/ActorRun.md) | None
- Set the status message for the current Actor run.
***
#### Parameters
* ##### status\_message: str
The status message to set to the run.
* ##### optionalkeyword-onlyis\_terminal: bool | None = <!-- -->None
Set this flag to True if this is the final status message of the Actor run.
#### Returns [ActorRun](https://docs.apify.com/sdk/python/sdk/python/reference/class/ActorRun.md) | None
### [**](#set_value)[**](https://github.com/apify/apify-sdk-python/blob/master//src/apify/_actor.py#L661)set\_value
* **async **set\_value**(key, value, \*, content\_type): None
- Set or delete a value in the default key-value store associated with the current Actor run.
***
#### Parameters
* ##### key: str
The key of the record which to set.
* ##### value: Any
The value of the record which to set, or None, if the record should be deleted.
* ##### optionalkeyword-onlycontent\_type: str | None = <!-- -->None
The content type which should be set to the value.
#### Returns None
### [**](#start)[**](https://github.com/apify/apify-sdk-python/blob/master//src/apify/_actor.py#L807)start
* **async **start**(actor\_id, run\_input, \*, token, content\_type, build, memory\_mbytes, timeout, wait\_for\_finish, webhooks): [ActorRun](https://docs.apify.com/sdk/python/sdk/python/reference/class/ActorRun.md)
- Run an Actor on the Apify platform.
Unlike `Actor.call`, this method just starts the run without waiting for finish.
***
#### Parameters
* ##### actor\_id: str
The ID of the Actor to be run.
* ##### optionalrun\_input: Any = <!-- -->None
The input to pass to the Actor run.
* ##### optionalkeyword-onlytoken: str | None = <!-- -->None
The Apify API token to use for this request (defaults to the `APIFY_TOKEN` environment variable).
* ##### optionalkeyword-onlycontent\_type: str | None = <!-- -->None
The content type of the input.
* ##### optionalkeyword-onlybuild: str | None = <!-- -->None
Specifies the Actor build to run. It can be either a build tag or build number. By default, the run uses the build specified in the default run configuration for the Actor (typically latest).
* ##### optionalkeyword-onlymemory\_mbytes: int | None = <!-- -->None
Memory limit for the run, in megabytes. By default, the run uses a memory limit specified in the default run configuration for the Actor.
* ##### optionalkeyword-onlytimeout: (timedelta | None) | Literal\[RemainingTime] = <!-- -->None
Optional timeout for the run, in seconds. By default, the run uses timeout specified in the default run configuration for the Actor. Using `RemainingTime` will set timeout of the other Actor to the time remaining from this Actor timeout.
* ##### optionalkeyword-onlywait\_for\_finish: int | None = <!-- -->None
The maximum number of seconds the server waits for the run to finish. By default, it is 0, the maximum value is 300.
* ##### optionalkeyword-onlywebhooks: list\[[Webhook](https://docs.apify.com/sdk/python/sdk/python/reference/class/Webhook.md)] | None = <!-- -->None
Optional ad-hoc webhooks (<https://docs.apify.com/webhooks/ad-hoc-webhooks>) associated with the Actor run which can be used to receive a notification, e.g. when the Actor finished or failed. If you already have a webhook set up for the Actor or task, you do not have to add it again here.
#### Returns [ActorRun](https://docs.apify.com/sdk/python/sdk/python/reference/class/ActorRun.md)
### [**](#status_message)[**](https://github.com/apify/apify-sdk-python/blob/master//src/apify/_actor.py#L304)status\_message
* ****status\_message**(value): None
- #### Parameters
* ##### value: str | None
#### Returns None
## Properties<!-- -->[**](#Properties)
### [**](#apify_client)[**](https://github.com/apify/apify-sdk-python/blob/master//src/apify/_actor.py#L308)apify\_client
**apify\_client: ApifyClientAsync
Asynchronous Apify client for interacting with the Apify API.
### [**](#exit_code)[**](https://github.com/apify/apify-sdk-python/blob/master//src/apify/_actor.py#L290)exit\_code
**exit\_code: int
The exit code the Actor will use when exiting.
### [**](#log)[**](https://github.com/apify/apify-sdk-python/blob/master//src/apify/_actor.py#L285)log
**log: logging.Logger
Logger configured for this Actor.
### [**](#status_message)[**](https://github.com/apify/apify-sdk-python/blob/master//src/apify/_actor.py#L299)status\_message
**status\_message: str | None
The final status message that the Actor will display upon termination.
---
# ActorChargeEvent<!-- -->
## Index[**](#Index)
### Properties
* [**event\_description](https://docs.apify.com/sdk/python/sdk/python/reference/class/ActorChargeEvent.md#event_description)
* [**event\_price\_usd](https://docs.apify.com/sdk/python/sdk/python/reference/class/ActorChargeEvent.md#event_price_usd)
* [**event\_title](https://docs.apify.com/sdk/python/sdk/python/reference/class/ActorChargeEvent.md#event_title)
## Properties<!-- -->[**](#Properties)
### [**](#event_description)[**](https://github.com/apify/apify-sdk-python/blob/master//src/apify/_models.py#L156)event\_description
**event\_description: str | None
### [**](#event_price_usd)[**](https://github.com/apify/apify-sdk-python/blob/master//src/apify/_models.py#L154)event\_price\_usd
**event\_price\_usd: Decimal
### [**](#event_title)[**](https://github.com/apify/apify-sdk-python/blob/master//src/apify/_models.py#L155)event\_title
**event\_title: str
---
# ActorDatasetPushPipeline<!-- -->
A Scrapy pipeline for pushing items to an Actor's default dataset.
This pipeline is designed to be enabled only when the Scrapy project is run as an Actor.
## Index[**](#Index)
### Methods
* [**process\_item](https://docs.apify.com/sdk/python/sdk/python/reference/class/ActorDatasetPushPipeline.md#process_item)
## Methods<!-- -->[**](#Methods)
### [**](#process_item)[**](https://github.com/apify/apify-sdk-python/blob/master//src/apify/scrapy/pipelines/actor_dataset_push.py#L22)process\_item
* **async **process\_item**(item, spider): Item
- Pushes the provided Scrapy item to the Actor's default dataset.
***
#### Parameters
* ##### item: Item
* ##### spider: Spider
#### Returns Item
---
# ActorLogFormatter<!-- -->
---
# ActorPricingInfo<!-- -->
Result of the `ChargingManager.get_pricing_info` method.
## Index[**](#Index)
### Properties
* [**is\_pay\_per\_event](https://docs.apify.com/sdk/python/sdk/python/reference/class/ActorPricingInfo.md#is_pay_per_event)
* [**max\_total\_charge\_usd](https://docs.apify.com/sdk/python/sdk/python/reference/class/ActorPricingInfo.md#max_total_charge_usd)
* [**per\_event\_prices](https://docs.apify.com/sdk/python/sdk/python/reference/class/ActorPricingInfo.md#per_event_prices)
* [**pricing\_model](https://docs.apify.com/sdk/python/sdk/python/reference/class/ActorPricingInfo.md#pricing_model)
## Properties<!-- -->[**](#Properties)
### [**](#is_pay_per_event)[**](https://github.com/apify/apify-sdk-python/blob/master//src/apify/_charging.py#L111)is\_pay\_per\_event
**is\_pay\_per\_event: bool
A shortcut - true if the Actor runs with the pay-per-event pricing model.
### [**](#max_total_charge_usd)[**](https://github.com/apify/apify-sdk-python/blob/master//src/apify/_charging.py#L108)max\_total\_charge\_usd
**max\_total\_charge\_usd: Decimal
A configured limit for the total charged amount - if you exceed it, you won't receive more money than this.
### [**](#per_event_prices)[**](https://github.com/apify/apify-sdk-python/blob/master//src/apify/_charging.py#L114)per\_event\_prices
**per\_event\_prices: dict\[str, Decimal]
Price of every known event type.
### [**](#pricing_model)[**](https://github.com/apify/apify-sdk-python/blob/master//src/apify/_charging.py#L105)pricing\_model
**pricing\_model: Literal\[ 'FREE', 'FLAT\_PRICE\_PER\_MONTH', 'PRICE\_PER\_DATASET\_ITEM', 'PAY\_PER\_EVENT',] | None
The currently effective pricing model.
---
# ActorRun<!-- -->
## Index[**](#Index)
### Properties
* [**\_\_model\_config\_\_](https://docs.apify.com/sdk/python/sdk/python/reference/class/ActorRun.md#__model_config__)
* [**act\_id](https://docs.apify.com/sdk/python/sdk/python/reference/class/ActorRun.md#act_id)
* [**actor\_task\_id](https://docs.apify.com/sdk/python/sdk/python/reference/class/ActorRun.md#actor_task_id)
* [**build\_id](https://docs.apify.com/sdk/python/sdk/python/reference/class/ActorRun.md#build_id)
* [**build\_number](https://docs.apify.com/sdk/python/sdk/python/reference/class/ActorRun.md#build_number)
* [**charged\_event\_counts](https://docs.apify.com/sdk/python/sdk/python/reference/class/ActorRun.md#charged_event_counts)
* [**container\_url](https://docs.apify.com/sdk/python/sdk/python/reference/class/ActorRun.md#container_url)
* [**default\_dataset\_id](https://docs.apify.com/sdk/python/sdk/python/reference/class/ActorRun.md#default_dataset_id)
* [**default\_key\_value\_store\_id](https://docs.apify.com/sdk/python/sdk/python/reference/class/ActorRun.md#default_key_value_store_id)
* [**default\_request\_queue\_id](https://docs.apify.com/sdk/python/sdk/python/reference/class/ActorRun.md#default_request_queue_id)
* [**exit\_code](https://docs.apify.com/sdk/python/sdk/python/reference/class/ActorRun.md#exit_code)
* [**finished\_at](https://docs.apify.com/sdk/python/sdk/python/reference/class/ActorRun.md#finished_at)
* [**git\_branch\_name](https://docs.apify.com/sdk/python/sdk/python/reference/class/ActorRun.md#git_branch_name)
* [**id](https://docs.apify.com/sdk/python/sdk/python/reference/class/ActorRun.md#id)
* [**is\_container\_server\_ready](https://docs.apify.com/sdk/python/sdk/python/reference/class/ActorRun.md#is_container_server_ready)
* [**is\_status\_message\_terminal](https://docs.apify.com/sdk/python/sdk/python/reference/class/ActorRun.md#is_status_message_terminal)
* [**meta](https://docs.apify.com/sdk/python/sdk/python/reference/class/ActorRun.md#meta)
* [**options](https://docs.apify.com/sdk/python/sdk/python/reference/class/ActorRun.md#options)
* [**pricing\_info](https://docs.apify.com/sdk/python/sdk/python/reference/class/ActorRun.md#pricing_info)
* [**started\_at](https://docs.apify.com/sdk/python/sdk/python/reference/class/ActorRun.md#started_at)
* [**stats](https://docs.apify.com/sdk/python/sdk/python/reference/class/ActorRun.md#stats)
* [**status](https://docs.apify.com/sdk/python/sdk/python/reference/class/ActorRun.md#status)
* [**status\_message](https://docs.apify.com/sdk/python/sdk/python/reference/class/ActorRun.md#status_message)
* [**usage](https://docs.apify.com/sdk/python/sdk/python/reference/class/ActorRun.md#usage)
* [**usage\_total\_usd](https://docs.apify.com/sdk/python/sdk/python/reference/class/ActorRun.md#usage_total_usd)
* [**usage\_usd](https://docs.apify.com/sdk/python/sdk/python/reference/class/ActorRun.md#usage_usd)
* [**user\_id](https://docs.apify.com/sdk/python/sdk/python/reference/class/ActorRun.md#user_id)
## Properties<!-- -->[**](#Properties)
### [**](#__model_config__)[**](https://github.com/apify/apify-sdk-python/blob/master//src/apify/_models.py#L97)\_\_model\_config\_\_
**\_\_model\_config\_\_: Undefined
### [**](#act_id)[**](https://github.com/apify/apify-sdk-python/blob/master//src/apify/_models.py#L100)act\_id
**act\_id: str
### [**](#actor_task_id)[**](https://github.com/apify/apify-sdk-python/blob/master//src/apify/_models.py#L102)actor\_task\_id
**actor\_task\_id: str | None
### [**](#build_id)[**](https://github.com/apify/apify-sdk-python/blob/master//src/apify/_models.py#L111)build\_id
**build\_id: str
### [**](#build_number)[**](https://github.com/apify/apify-sdk-python/blob/master//src/apify/_models.py#L116)build\_number
**build\_number: str | None
### [**](#charged_event_counts)[**](https://github.com/apify/apify-sdk-python/blob/master//src/apify/_models.py#L131)charged\_event\_counts
**charged\_event\_counts: dict\[str, int] | None
### [**](#container_url)[**](https://github.com/apify/apify-sdk-python/blob/master//src/apify/_models.py#L117)container\_url
**container\_url: str
### [**](#default_dataset_id)[**](https://github.com/apify/apify-sdk-python/blob/master//src/apify/_models.py#L114)default\_dataset\_id
**default\_dataset\_id: str
### [**](#default_key_value_store_id)[**](https://github.com/apify/apify-sdk-python/blob/master//src/apify/_models.py#L113)default\_key\_value\_store\_id
**default\_key\_value\_store\_id: str
### [**](#default_request_queue_id)[**](https://github.com/apify/apify-sdk-python/blob/master//src/apify/_models.py#L115)default\_request\_queue\_id
**default\_request\_queue\_id: str
### [**](#exit_code)[**](https://github.com/apify/apify-sdk-python/blob/master//src/apify/_models.py#L112)exit\_code
**exit\_code: int | None
### [**](#finished_at)[**](https://github.com/apify/apify-sdk-python/blob/master//src/apify/_models.py#L104)finished\_at
**finished\_at: datetime | None
### [**](#git_branch_name)[**](https://github.com/apify/apify-sdk-python/blob/master//src/apify/_models.py#L119)git\_branch\_name
**git\_branch\_name: str | None
### [**](#id)[**](https://github.com/apify/apify-sdk-python/blob/master//src/apify/_models.py#L99)id
**id: str
### [**](#is_container_server_ready)[**](https://github.com/apify/apify-sdk-python/blob/master//src/apify/_models.py#L118)is\_container\_server\_ready
**is\_container\_server\_ready: bool | None
### [**](#is_status_message_terminal)[**](https://github.com/apify/apify-sdk-python/blob/master//src/apify/_models.py#L107)is\_status\_message\_terminal
**is\_status\_message\_terminal: bool | None
### [**](#meta)[**](https://github.com/apify/apify-sdk-python/blob/master//src/apify/_models.py#L108)meta
**meta: [ActorRunMeta](https://docs.apify.com/sdk/python/sdk/python/reference/class/ActorRunMeta.md)
### [**](#options)[**](https://github.com/apify/apify-sdk-python/blob/master//src/apify/_models.py#L110)options
**options: [ActorRunOptions](https://docs.apify.com/sdk/python/sdk/python/reference/class/ActorRunOptions.md)
### [**](#pricing_info)[**](https://github.com/apify/apify-sdk-python/blob/master//src/apify/_models.py#L123)pricing\_info
**pricing\_info: ((([FreeActorPricingInfo](https://docs.apify.com/sdk/python/sdk/python/reference/class/FreeActorPricingInfo.md) | [FlatPricePerMonthActorPricingInfo](https://docs.apify.com/sdk/python/sdk/python/reference/class/FlatPricePerMonthActorPricingInfo.md)) | [PricePerDatasetItemActorPricingInfo](https://docs.apify.com/sdk/python/sdk/python/reference/class/PricePerDatasetItemActorPricingInfo.md)) | [PayPerEventActorPricingInfo](https://docs.apify.com/sdk/python/sdk/python/reference/class/PayPerEventActorPricingInfo.md)) | None
### [**](#started_at)[**](https://github.com/apify/apify-sdk-python/blob/master//src/apify/_models.py#L103)started\_at
**started\_at: datetime
### [**](#stats)[**](https://github.com/apify/apify-sdk-python/blob/master//src/apify/_models.py#L109)stats
**stats: [ActorRunStats](https://docs.apify.com/sdk/python/sdk/python/reference/class/ActorRunStats.md)
### [**](#status)[**](https://github.com/apify/apify-sdk-python/blob/master//src/apify/_models.py#L105)status
**status: ActorJobStatus
### [**](#status_message)[**](https://github.com/apify/apify-sdk-python/blob/master//src/apify/_models.py#L106)status\_message
**status\_message: str | None
### [**](#usage)[**](https://github.com/apify/apify-sdk-python/blob/master//src/apify/_models.py#L120)usage
**usage: [ActorRunUsage](https://docs.apify.com/sdk/python/sdk/python/reference/class/ActorRunUsage.md) | None
### [**](#usage_total_usd)[**](https://github.com/apify/apify-sdk-python/blob/master//src/apify/_models.py#L121)usage\_total\_usd
**usage\_total\_usd: float | None
### [**](#usage_usd)[**](https://github.com/apify/apify-sdk-python/blob/master//src/apify/_models.py#L122)usage\_usd
**usage\_usd: [ActorRunUsage](https://docs.apify.com/sdk/python/sdk/python/reference/class/ActorRunUsage.md) | None
### [**](#user_id)[**](https://github.com/apify/apify-sdk-python/blob/master//src/apify/_models.py#L101)user\_id
**user\_id: str
---
# ActorRunMeta<!-- -->
## Index[**](#Index)
### Properties
* [**\_\_model\_config\_\_](https://docs.apify.com/sdk/python/sdk/python/reference/class/ActorRunMeta.md#__model_config__)
* [**origin](https://docs.apify.com/sdk/python/sdk/python/reference/class/ActorRunMeta.md#origin)
## Properties<!-- -->[**](#Properties)
### [**](#__model_config__)[**](https://github.com/apify/apify-sdk-python/blob/master//src/apify/_models.py#L40)\_\_model\_config\_\_
**\_\_model\_config\_\_: Undefined
### [**](#origin)[**](https://github.com/apify/apify-sdk-python/blob/master//src/apify/_models.py#L42)origin
**origin: MetaOrigin
---
# ActorRunOptions<!-- -->
## Index[**](#Index)
### Properties
* [**\_\_model\_config\_\_](https://docs.apify.com/sdk/python/sdk/python/reference/class/ActorRunOptions.md#__model_config__)
* [**build](https://docs.apify.com/sdk/python/sdk/python/reference/class/ActorRunOptions.md#build)
* [**disk\_mbytes](https://docs.apify.com/sdk/python/sdk/python/reference/class/ActorRunOptions.md#disk_mbytes)
* [**max\_total\_charge\_usd](https://docs.apify.com/sdk/python/sdk/python/reference/class/ActorRunOptions.md#max_total_charge_usd)
* [**memory\_mbytes](https://docs.apify.com/sdk/python/sdk/python/reference/class/ActorRunOptions.md#memory_mbytes)
* [**timeout](https://docs.apify.com/sdk/python/sdk/python/reference/class/ActorRunOptions.md#timeout)
## Properties<!-- -->[**](#Properties)
### [**](#__model_config__)[**](https://github.com/apify/apify-sdk-python/blob/master//src/apify/_models.py#L68)\_\_model\_config\_\_
**\_\_model\_config\_\_: Undefined
### [**](#build)[**](https://github.com/apify/apify-sdk-python/blob/master//src/apify/_models.py#L70)build
**build: str
### [**](#disk_mbytes)[**](https://github.com/apify/apify-sdk-python/blob/master//src/apify/_models.py#L73)disk\_mbytes
**disk\_mbytes: int
### [**](#max_total_charge_usd)[**](https://github.com/apify/apify-sdk-python/blob/master//src/apify/_models.py#L74)max\_total\_charge\_usd
**max\_total\_charge\_usd: Decimal | None
### [**](#memory_mbytes)[**](https://github.com/apify/apify-sdk-python/blob/master//src/apify/_models.py#L72)memory\_mbytes
**memory\_mbytes: int
### [**](#timeout)[**](https://github.com/apify/apify-sdk-python/blob/master//src/apify/_models.py#L71)timeout
**timeout: timedelta
---
# ActorRunStats<!-- -->
## Index[**](#Index)
### Properties
* [**\_\_model\_config\_\_](https://docs.apify.com/sdk/python/sdk/python/reference/class/ActorRunStats.md#__model_config__)
* [**compute\_units](https://docs.apify.com/sdk/python/sdk/python/reference/class/ActorRunStats.md#compute_units)
* [**cpu\_avg\_usage](https://docs.apify.com/sdk/python/sdk/python/reference/class/ActorRunStats.md#cpu_avg_usage)
* [**cpu\_current\_usage](https://docs.apify.com/sdk/python/sdk/python/reference/class/ActorRunStats.md#cpu_current_usage)
* [**cpu\_max\_usage](https://docs.apify.com/sdk/python/sdk/python/reference/class/ActorRunStats.md#cpu_max_usage)
* [**duration](https://docs.apify.com/sdk/python/sdk/python/reference/class/ActorRunStats.md#duration)
* [**input\_body\_len](https://docs.apify.com/sdk/python/sdk/python/reference/class/ActorRunStats.md#input_body_len)
* [**mem\_avg\_bytes](https://docs.apify.com/sdk/python/sdk/python/reference/class/ActorRunStats.md#mem_avg_bytes)
* [**mem\_current\_bytes](https://docs.apify.com/sdk/python/sdk/python/reference/class/ActorRunStats.md#mem_current_bytes)
* [**mem\_max\_bytes](https://docs.apify.com/sdk/python/sdk/python/reference/class/ActorRunStats.md#mem_max_bytes)
* [**metamorph](https://docs.apify.com/sdk/python/sdk/python/reference/class/ActorRunStats.md#metamorph)
* [**net\_rx\_bytes](https://docs.apify.com/sdk/python/sdk/python/reference/class/ActorRunStats.md#net_rx_bytes)
* [**net\_tx\_bytes](https://docs.apify.com/sdk/python/sdk/python/reference/class/ActorRunStats.md#net_tx_bytes)
* [**restart\_count](https://docs.apify.com/sdk/python/sdk/python/reference/class/ActorRunStats.md#restart_count)
* [**resurrect\_count](https://docs.apify.com/sdk/python/sdk/python/reference/class/ActorRunStats.md#resurrect_count)
* [**run\_time](https://docs.apify.com/sdk/python/sdk/python/reference/class/ActorRunStats.md#run_time)
## Properties<!-- -->[**](#Properties)
### [**](#__model_config__)[**](https://github.com/apify/apify-sdk-python/blob/master//src/apify/_models.py#L47)\_\_model\_config\_\_
**\_\_model\_config\_\_: Undefined
### [**](#compute_units)[**](https://github.com/apify/apify-sdk-python/blob/master//src/apify/_models.py#L63)compute\_units
**compute\_units: float
### [**](#cpu_avg_usage)[**](https://github.com/apify/apify-sdk-python/blob/master//src/apify/_models.py#L55)cpu\_avg\_usage
**cpu\_avg\_usage: float | None
### [**](#cpu_current_usage)[**](https://github.com/apify/apify-sdk-python/blob/master//src/apify/_models.py#L57)cpu\_current\_usage
**cpu\_current\_usage: float | None
### [**](#cpu_max_usage)[**](https://github.com/apify/apify-sdk-python/blob/master//src/apify/_models.py#L56)cpu\_max\_usage
**cpu\_max\_usage: float | None
### [**](#duration)[**](https://github.com/apify/apify-sdk-python/blob/master//src/apify/_models.py#L60)duration
**duration: timedelta\_ms | None
### [**](#input_body_len)[**](https://github.com/apify/apify-sdk-python/blob/master//src/apify/_models.py#L49)input\_body\_len
**input\_body\_len: int | None
### [**](#mem_avg_bytes)[**](https://github.com/apify/apify-sdk-python/blob/master//src/apify/_models.py#L52)mem\_avg\_bytes
**mem\_avg\_bytes: float | None
### [**](#mem_current_bytes)[**](https://github.com/apify/apify-sdk-python/blob/master//src/apify/_models.py#L54)mem\_current\_bytes
**mem\_current\_bytes: int | None
### [**](#mem_max_bytes)[**](https://github.com/apify/apify-sdk-python/blob/master//src/apify/_models.py#L53)mem\_max\_bytes
**mem\_max\_bytes: int | None
### [**](#metamorph)[**](https://github.com/apify/apify-sdk-python/blob/master//src/apify/_models.py#L62)metamorph
**metamorph: int | None
### [**](#net_rx_bytes)[**](https://github.com/apify/apify-sdk-python/blob/master//src/apify/_models.py#L58)net\_rx\_bytes
**net\_rx\_bytes: int | None
### [**](#net_tx_bytes)[**](https://github.com/apify/apify-sdk-python/blob/master//src/apify/_models.py#L59)net\_tx\_bytes
**net\_tx\_bytes: int | None
### [**](#restart_count)[**](https://github.com/apify/apify-sdk-python/blob/master//src/apify/_models.py#L50)restart\_count
**restart\_count: int
### [**](#resurrect_count)[**](https://github.com/apify/apify-sdk-python/blob/master//src/apify/_models.py#L51)resurrect\_count
**resurrect\_count: int
### [**](#run_time)[**](https://github.com/apify/apify-sdk-python/blob/master//src/apify/_models.py#L61)run\_time
**run\_time: timedelta | None
---
# ActorRunUsage<!-- -->
## Index[**](#Index)
### Properties
* [**\_\_model\_config\_\_](https://docs.apify.com/sdk/python/sdk/python/reference/class/ActorRunUsage.md#__model_config__)
* [**actor\_compute\_units](https://docs.apify.com/sdk/python/sdk/python/reference/class/ActorRunUsage.md#actor_compute_units)
* [**data\_transfer\_external\_gbytes](https://docs.apify.com/sdk/python/sdk/python/reference/class/ActorRunUsage.md#data_transfer_external_gbytes)
* [**data\_transfer\_internal\_gbytes](https://docs.apify.com/sdk/python/sdk/python/reference/class/ActorRunUsage.md#data_transfer_internal_gbytes)
* [**dataset\_reads](https://docs.apify.com/sdk/python/sdk/python/reference/class/ActorRunUsage.md#dataset_reads)
* [**dataset\_writes](https://docs.apify.com/sdk/python/sdk/python/reference/class/ActorRunUsage.md#dataset_writes)
* [**key\_value\_store\_lists](https://docs.apify.com/sdk/python/sdk/python/reference/class/ActorRunUsage.md#key_value_store_lists)
* [**key\_value\_store\_reads](https://docs.apify.com/sdk/python/sdk/python/reference/class/ActorRunUsage.md#key_value_store_reads)
* [**key\_value\_store\_writes](https://docs.apify.com/sdk/python/sdk/python/reference/class/ActorRunUsage.md#key_value_store_writes)
* [**proxy\_residential\_transfer\_gbytes](https://docs.apify.com/sdk/python/sdk/python/reference/class/ActorRunUsage.md#proxy_residential_transfer_gbytes)
* [**proxy\_serps](https://docs.apify.com/sdk/python/sdk/python/reference/class/ActorRunUsage.md#proxy_serps)
* [**request\_queue\_reads](https://docs.apify.com/sdk/python/sdk/python/reference/class/ActorRunUsage.md#request_queue_reads)
* [**request\_queue\_writes](https://docs.apify.com/sdk/python/sdk/python/reference/class/ActorRunUsage.md#request_queue_writes)
## Properties<!-- -->[**](#Properties)
### [**](#__model_config__)[**](https://github.com/apify/apify-sdk-python/blob/master//src/apify/_models.py#L79)\_\_model\_config\_\_
**\_\_model\_config\_\_: Undefined
### [**](#actor_compute_units)[**](https://github.com/apify/apify-sdk-python/blob/master//src/apify/_models.py#L81)actor\_compute\_units
**actor\_compute\_units: float | None
### [**](#data_transfer_external_gbytes)[**](https://github.com/apify/apify-sdk-python/blob/master//src/apify/_models.py#L90)data\_transfer\_external\_gbytes
**data\_transfer\_external\_gbytes: float | None
### [**](#data_transfer_internal_gbytes)[**](https://github.com/apify/apify-sdk-python/blob/master//src/apify/_models.py#L89)data\_transfer\_internal\_gbytes
**data\_transfer\_internal\_gbytes: float | None
### [**](#dataset_reads)[**](https://github.com/apify/apify-sdk-python/blob/master//src/apify/_models.py#L82)dataset\_reads
**dataset\_reads: float | None
### [**](#dataset_writes)[**](https://github.com/apify/apify-sdk-python/blob/master//src/apify/_models.py#L83)dataset\_writes
**dataset\_writes: float | None
### [**](#key_value_store_lists)[**](https://github.com/apify/apify-sdk-python/blob/master//src/apify/_models.py#L86)key\_value\_store\_lists
**key\_value\_store\_lists: float | None
### [**](#key_value_store_reads)[**](https://github.com/apify/apify-sdk-python/blob/master//src/apify/_models.py#L84)key\_value\_store\_reads
**key\_value\_store\_reads: float | None
### [**](#key_value_store_writes)[**](https://github.com/apify/apify-sdk-python/blob/master//src/apify/_models.py#L85)key\_value\_store\_writes
**key\_value\_store\_writes: float | None
### [**](#proxy_residential_transfer_gbytes)[**](https://github.com/apify/apify-sdk-python/blob/master//src/apify/_models.py#L91)proxy\_residential\_transfer\_gbytes
**proxy\_residential\_transfer\_gbytes: float | None
### [**](#proxy_serps)[**](https://github.com/apify/apify-sdk-python/blob/master//src/apify/_models.py#L92)proxy\_serps
**proxy\_serps: float | None
### [**](#request_queue_reads)[**](https://github.com/apify/apify-sdk-python/blob/master//src/apify/_models.py#L87)request\_queue\_reads
**request\_queue\_reads: float | None
### [**](#request_queue_writes)[**](https://github.com/apify/apify-sdk-python/blob/master//src/apify/_models.py#L88)request\_queue\_writes
**request\_queue\_writes: float | None
---
# AddRequestsResponse<!-- -->
Model for a response to add requests to a queue.
Contains detailed information about the processing results when adding multiple requests to a queue. This includes which requests were successfully processed and which ones encountered issues during processing.
## Index[**](#Index)
### Properties
* [**model\_config](https://docs.apify.com/sdk/python/sdk/python/reference/class/AddRequestsResponse.md#model_config)
* [**processed\_requests](https://docs.apify.com/sdk/python/sdk/python/reference/class/AddRequestsResponse.md#processed_requests)
* [**unprocessed\_requests](https://docs.apify.com/sdk/python/sdk/python/reference/class/AddRequestsResponse.md#unprocessed_requests)
## Properties<!-- -->[**](#Properties)
### [**](#model_config)[**](https://github.com/apify/crawlee-python/blob/master//src/crawlee/storage_clients/models.py#L168)model\_config
**model\_config: Undefined
### [**](#processed_requests)[**](https://github.com/apify/crawlee-python/blob/master//src/crawlee/storage_clients/models.py#L170)processed\_requests
**processed\_requests: list\[[ProcessedRequest](https://crawlee.dev/python/api/class/ProcessedRequest)]
Successfully processed requests, including information about whether they were already present in the queue and whether they had been handled previously.
### [**](#unprocessed_requests)[**](https://github.com/apify/crawlee-python/blob/master//src/crawlee/storage_clients/models.py#L174)unprocessed\_requests
**unprocessed\_requests: list\[[UnprocessedRequest](https://crawlee.dev/python/api/class/UnprocessedRequest)]
Requests that could not be processed, typically due to validation errors or other issues.
---
# AliasResolver<!-- -->
Class for handling aliases.
The purpose of this is class is to ensure that alias storages are created with correct id. This is achieved by using default kvs as a storage for global mapping of aliases to storage ids. Same mapping is also kept in memory to avoid unnecessary calls to API and also have limited support of alias storages when not running on Apify platform. When on Apify platform, the storages created with alias are accessible by the same alias even after migration or reboot.
## Index[**](#Index)
### Methods
* [**\_\_aenter\_\_](https://docs.apify.com/sdk/python/sdk/python/reference/class/AliasResolver.md#__aenter__)
* [**\_\_aexit\_\_](https://docs.apify.com/sdk/python/sdk/python/reference/class/AliasResolver.md#__aexit__)
* [**\_\_init\_\_](https://docs.apify.com/sdk/python/sdk/python/reference/class/AliasResolver.md#__init__)
* [**resolve\_id](https://docs.apify.com/sdk/python/sdk/python/reference/class/AliasResolver.md#resolve_id)
* [**store\_mapping](https://docs.apify.com/sdk/python/sdk/python/reference/class/AliasResolver.md#store_mapping)
## Methods<!-- -->[**](#Methods)
### [**](#__aenter__)[**](https://github.com/apify/apify-sdk-python/blob/master//src/apify/storage_clients/_apify/_utils.py#L50)\_\_aenter\_\_
* **async **\_\_aenter\_\_**(): [AliasResolver](https://docs.apify.com/sdk/python/sdk/python/reference/class/AliasResolver.md)
- Context manager to prevent race condition in alias creation.
***
#### Returns [AliasResolver](https://docs.apify.com/sdk/python/sdk/python/reference/class/AliasResolver.md)
### [**](#__aexit__)[**](https://github.com/apify/apify-sdk-python/blob/master//src/apify/storage_clients/_apify/_utils.py#L56)\_\_aexit\_\_
* **async **\_\_aexit\_\_**(exc\_type, exc\_value, exc\_traceback): None
- #### Parameters
* ##### exc\_type: type\[BaseException] | None
* ##### exc\_value: BaseException | None
* ##### exc\_traceback: TracebackType | None
#### Returns None
### [**](#__init__)[**](https://github.com/apify/apify-sdk-python/blob/master//src/apify/storage_clients/_apify/_utils.py#L43)\_\_init\_\_
* ****\_\_init\_\_**(storage\_type, alias, configuration): None
- #### Parameters
* ##### storage\_type: type\[(Dataset | KeyValueStore) | RequestQueue]
* ##### alias: str
* ##### configuration: [Configuration](https://docs.apify.com/sdk/python/sdk/python/reference/class/Configuration.md)
#### Returns None
### [**](#resolve_id)[**](https://github.com/apify/apify-sdk-python/blob/master//src/apify/storage_clients/_apify/_utils.py#L98)resolve\_id
* **async **resolve\_id**(): str | None
- Get id of the aliased storage.
Either locate the id in the in-memory mapping or create the new storage.
***
#### Returns str | None
### [**](#store_mapping)[**](https://github.com/apify/apify-sdk-python/blob/master//src/apify/storage_clients/_apify/_utils.py#L108)store\_mapping
* **async **store\_mapping**(storage\_id): None
- Add alias and related storage id to the mapping in default kvs and local in-memory mapping.
***
#### Parameters
* ##### storage\_id: str
#### Returns None
---
# ApifyCacheStorage<!-- -->
A Scrapy cache storage that uses the Apify `KeyValueStore` to store responses.
It can be set as a storage for Scrapy's built-in `HttpCacheMiddleware`, which caches responses to requests. See HTTPCache middleware settings (prefixed with `HTTPCACHE_`) in the Scrapy documentation for more information. Requires the asyncio Twisted reactor to be installed.
## Index[**](#Index)
### Methods
* [**\_\_init\_\_](https://docs.apify.com/sdk/python/sdk/python/reference/class/ApifyCacheStorage.md#__init__)
* [**close\_spider](https://docs.apify.com/sdk/python/sdk/python/reference/class/ApifyCacheStorage.md#close_spider)
* [**open\_spider](https://docs.apify.com/sdk/python/sdk/python/reference/class/ApifyCacheStorage.md#open_spider)
* [**retrieve\_response](https://docs.apify.com/sdk/python/sdk/python/reference/class/ApifyCacheStorage.md#retrieve_response)
* [**store\_response](https://docs.apify.com/sdk/python/sdk/python/reference/class/ApifyCacheStorage.md#store_response)
## Methods<!-- -->[**](#Methods)
### [**](#__init__)[**](https://github.com/apify/apify-sdk-python/blob/master//src/apify/scrapy/extensions/_httpcache.py#L38)\_\_init\_\_
* ****\_\_init\_\_**(settings): None
- #### Parameters
* ##### settings: BaseSettings
#### Returns None
### [**](#close_spider)[**](https://github.com/apify/apify-sdk-python/blob/master//src/apify/scrapy/extensions/_httpcache.py#L69)close\_spider
* ****close\_spider**(\_, current\_time): None
- Close the cache storage for a spider.
***
#### Parameters
* ##### \_: Spider
* ##### optionalcurrent\_time: int | None = <!-- -->None
#### Returns None
### [**](#open_spider)[**](https://github.com/apify/apify-sdk-python/blob/master//src/apify/scrapy/extensions/_httpcache.py#L46)open\_spider
* ****open\_spider**(spider): None
- Open the cache storage for a spider.
***
#### Parameters
* ##### spider: Spider
#### Returns None
### [**](#retrieve_response)[**](https://github.com/apify/apify-sdk-python/blob/master//src/apify/scrapy/extensions/_httpcache.py#L112)retrieve\_response
* ****retrieve\_response**(\_, request, current\_time): Response | None
- Retrieve a response from the cache storage.
***
#### Parameters
* ##### \_: Spider
* ##### request: Request
* ##### optionalcurrent\_time: int | None = <!-- -->None
#### Returns Response | None
### [**](#store_response)[**](https://github.com/apify/apify-sdk-python/blob/master//src/apify/scrapy/extensions/_httpcache.py#L144)store\_response
* ****store\_response**(\_, request, response): None
- Store a response in the cache storage.
***
#### Parameters
* ##### \_: Spider
* ##### request: Request
* ##### response: Response
#### Returns None
---
# ApifyDatasetClient<!-- -->
An Apify platform implementation of the dataset client.
## Index[**](#Index)
### Methods
* [**\_\_init\_\_](https://docs.apify.com/sdk/python/sdk/python/reference/class/ApifyDatasetClient.md#__init__)
* [**drop](https://docs.apify.com/sdk/python/sdk/python/reference/class/ApifyDatasetClient.md#drop)
* [**get\_data](https://docs.apify.com/sdk/python/sdk/python/reference/class/ApifyDatasetClient.md#get_data)
* [**get\_metadata](https://docs.apify.com/sdk/python/sdk/python/reference/class/ApifyDatasetClient.md#get_metadata)
* [**iterate\_items](https://docs.apify.com/sdk/python/sdk/python/reference/class/ApifyDatasetClient.md#iterate_items)
* [**open](https://docs.apify.com/sdk/python/sdk/python/reference/class/ApifyDatasetClient.md#open)
* [**purge](https://docs.apify.com/sdk/python/sdk/python/reference/class/ApifyDatasetClient.md#purge)
* [**push\_data](https://docs.apify.com/sdk/python/sdk/python/reference/class/ApifyDatasetClient.md#push_data)
## Methods<!-- -->[**](#Methods)
### [**](#__init__)[**](https://github.com/apify/apify-sdk-python/blob/master//src/apify/storage_clients/_apify/_dataset_client.py#L41)\_\_init\_\_
* ****\_\_init\_\_**(\*, api\_client, api\_public\_base\_url, lock): None
- Initialize a new instance.
Preferably use the `ApifyDatasetClient.open` class method to create a new instance.
***
#### Parameters
* ##### keyword-onlyapi\_client: DatasetClientAsync
* ##### keyword-onlyapi\_public\_base\_url: str
* ##### keyword-onlylock: asyncio.Lock
#### Returns None
### [**](#drop)[**](https://github.com/apify/apify-sdk-python/blob/master//src/apify/storage_clients/_apify/_dataset_client.py#L176)drop
* **async **drop**(): None
- #### Returns None
### [**](#get_data)[**](https://github.com/apify/apify-sdk-python/blob/master//src/apify/storage_clients/_apify/_dataset_client.py#L199)get\_data
* **async **get\_data**(\*, offset, limit, clean, desc, fields, omit, unwind, skip\_empty, skip\_hidden, flatten, view): DatasetItemsListPage
- #### Parameters
* ##### optionalkeyword-onlyoffset: int = <!-- -->0
* ##### optionalkeyword-onlylimit: int | None = <!-- -->999\_999\_999\_999
* ##### optionalkeyword-onlyclean: bool = <!-- -->False
* ##### optionalkeyword-onlydesc: bool = <!-- -->False
* ##### optionalkeyword-onlyfields: list\[str] | None = <!-- -->None
* ##### optionalkeyword-onlyomit: list\[str] | None = <!-- -->None
* ##### optionalkeyword-onlyunwind: list\[str] | None = <!-- -->None
* ##### optionalkeyword-onlyskip\_empty: bool = <!-- -->False
* ##### optionalkeyword-onlyskip\_hidden: bool = <!-- -->False
* ##### optionalkeyword-onlyflatten: list\[str] | None = <!-- -->None
* ##### optionalkeyword-onlyview: str | None = <!-- -->None
#### Returns DatasetItemsListPage
### [**](#get_metadata)[**](https://github.com/apify/apify-sdk-python/blob/master//src/apify/storage_clients/_apify/_dataset_client.py#L67)get\_metadata
* **async **get\_metadata**(): DatasetMetadata
- #### Returns DatasetMetadata
### [**](#iterate_items)[**](https://github.com/apify/apify-sdk-python/blob/master//src/apify/storage_clients/_apify/_dataset_client.py#L230)iterate\_items
* **async **iterate\_items**(\*, offset, limit, clean, desc, fields, omit, unwind, skip\_empty, skip\_hidden): AsyncIterator\[dict]
- #### Parameters
* ##### optionalkeyword-onlyoffset: int = <!-- -->0
* ##### optionalkeyword-onlylimit: int | None = <!-- -->None
* ##### optionalkeyword-onlyclean: bool = <!-- -->False
* ##### optionalkeyword-onlydesc: bool = <!-- -->False
* ##### optionalkeyword-onlyfields: list\[str] | None = <!-- -->None
* ##### optionalkeyword-onlyomit: list\[str] | None = <!-- -->None
* ##### optionalkeyword-onlyunwind: list\[str] | None = <!-- -->None
* ##### optionalkeyword-onlyskip\_empty: bool = <!-- -->False
* ##### optionalkeyword-onlyskip\_hidden: bool = <!-- -->False
#### Returns AsyncIterator\[dict]
### [**](#open)[**](https://github.com/apify/apify-sdk-python/blob/master//src/apify/storage_clients/_apify/_dataset_client.py#L72)open
* **async **open**(\*, id, name, alias, configuration): [ApifyDatasetClient](https://docs.apify.com/sdk/python/sdk/python/reference/class/ApifyDatasetClient.md)
- Open an Apify dataset client.
This method creates and initializes a new instance of the Apify dataset client. It handles authentication, storage lookup/creation, and metadata retrieval.
***
#### Parameters
* ##### keyword-onlyid: str | None
The ID of the dataset to open. If provided, searches for existing dataset by ID. Mutually exclusive with name and alias.
* ##### keyword-onlyname: str | None
The name of the dataset to open (global scope, persists across runs). Mutually exclusive with id and alias.
* ##### keyword-onlyalias: str | None
The alias of the dataset to open (run scope, creates unnamed storage). Mutually exclusive with id and name.
* ##### keyword-onlyconfiguration: [Configuration](https://docs.apify.com/sdk/python/sdk/python/reference/class/Configuration.md)
The configuration object containing API credentials and settings. Must include a valid `token` and `api_base_url`. May also contain a `default_dataset_id` for fallback when neither `id`, `name`, nor `alias` is provided.
#### Returns [ApifyDatasetClient](https://docs.apify.com/sdk/python/sdk/python/reference/class/ApifyDatasetClient.md)
### [**](#purge)[**](https://github.com/apify/apify-sdk-python/blob/master//src/apify/storage_clients/_apify/_dataset_client.py#L169)purge
* **async **purge**(): None
- #### Returns None
### [**](#push_data)[**](https://github.com/apify/apify-sdk-python/blob/master//src/apify/storage_clients/_apify/_dataset_client.py#L181)push\_data
* **async **push\_data**(data): None
- #### Parameters
* ##### data: list\[Any] | dict\[str, Any]
#### Returns None
---
# ApifyEventManager<!-- -->
Event manager for the Apify platform.
This class extends Crawlee's `EventManager` to provide Apify-specific functionality, including websocket connectivity to the Apify platform for receiving platform events.
The event manager handles:
* Registration and emission of events and their listeners.
* Websocket connection to Apify platform events.
* Processing and validation of platform messages.
* Automatic event forwarding from the platform to local event listeners.
This class should not be used directly. Use the `Actor.on` and `Actor.off` methods to interact with the event system.
## Index[**](#Index)
### Methods
* [**\_\_aenter\_\_](https://docs.apify.com/sdk/python/sdk/python/reference/class/ApifyEventManager.md#__aenter__)
* [**\_\_aexit\_\_](https://docs.apify.com/sdk/python/sdk/python/reference/class/ApifyEventManager.md#__aexit__)
* [**\_\_init\_\_](https://docs.apify.com/sdk/python/sdk/python/reference/class/ApifyEventManager.md#__init__)
## Methods<!-- -->[**](#Methods)
### [**](#__aenter__)[**](https://github.com/apify/apify-sdk-python/blob/master//src/apify/events/_apify_event_manager.py#L70)\_\_aenter\_\_
* **async **\_\_aenter\_\_**(): Self
- #### Returns Self
### [**](#__aexit__)[**](https://github.com/apify/apify-sdk-python/blob/master//src/apify/events/_apify_event_manager.py#L88)\_\_aexit\_\_
* **async **\_\_aexit\_\_**(exc\_type, exc\_value, exc\_traceback): None
- #### Parameters
* ##### exc\_type: type\[BaseException] | None
* ##### exc\_value: BaseException | None
* ##### exc\_traceback: TracebackType | None
#### Returns None
### [**](#__init__)[**](https://github.com/apify/apify-sdk-python/blob/master//src/apify/events/_apify_event_manager.py#L48)\_\_init\_\_
* ****\_\_init\_\_**(configuration): None
- Initialize a new instance.
***
#### Parameters
* ##### configuration: [Configuration](https://docs.apify.com/sdk/python/sdk/python/reference/class/Configuration.md)
The Actor configuration for the event manager.
#### Returns None
---
# ApifyFileSystemKeyValueStoreClient<!-- -->
Apify-specific implementation of the `FileSystemKeyValueStoreClient`.
The only difference is that it overrides the `purge` method to delete all files in the key-value store directory, except for the metadata file and the `INPUT.json` file.
## Index[**](#Index)
### Methods
* [**get\_value](https://docs.apify.com/sdk/python/sdk/python/reference/class/ApifyFileSystemKeyValueStoreClient.md#get_value)
* [**open](https://docs.apify.com/sdk/python/sdk/python/reference/class/ApifyFileSystemKeyValueStoreClient.md#open)
* [**purge](https://docs.apify.com/sdk/python/sdk/python/reference/class/ApifyFileSystemKeyValueStoreClient.md#purge)
## Methods<!-- -->[**](#Methods)
### [**](#get_value)[**](https://github.com/apify/apify-sdk-python/blob/master//src/apify/storage_clients/_file_system/_key_value_store_client.py#L94)get\_value
* **async **get\_value**(\*, key): KeyValueStoreRecord | None
- #### Parameters
* ##### keyword-onlykey: str
#### Returns KeyValueStoreRecord | None
### [**](#open)[**](https://github.com/apify/apify-sdk-python/blob/master//src/apify/storage_clients/_file_system/_key_value_store_client.py#L27)open
* **async **open**(\*, id, name, alias, configuration): Self
- #### Parameters
* ##### keyword-onlyid: str | None
* ##### keyword-onlyname: str | None
* ##### keyword-onlyalias: str | None
* ##### keyword-onlyconfiguration: CrawleeConfiguration
#### Returns Self
### [**](#purge)[**](https://github.com/apify/apify-sdk-python/blob/master//src/apify/storage_clients/_file_system/_key_value_store_client.py#L42)purge
* **async **purge**(): None
- Purges the key-value store by deleting all its contents.
It deletes all files in the key-value store directory, except for the metadata file and the `INPUT.json` file. It also updates the metadata to reflect that the store has been purged.
***
#### Returns None
---
# ApifyFileSystemStorageClient<!-- -->
Apify-specific implementation of the file system storage client.
The only difference is that it uses `ApifyFileSystemKeyValueStoreClient` for key-value stores, which overrides the `purge` method to delete all files in the key-value store directory except for the metadata file and the `INPUT.json` file.
## Index[**](#Index)
### Methods
* [**create\_kvs\_client](https://docs.apify.com/sdk/python/sdk/python/reference/class/ApifyFileSystemStorageClient.md#create_kvs_client)
## Methods<!-- -->[**](#Methods)
### [**](#create_kvs_client)[**](https://github.com/apify/apify-sdk-python/blob/master//src/apify/storage_clients/_file_system/_storage_client.py#L25)create\_kvs\_client
* **async **create\_kvs\_client**(\*, id, name, alias, configuration): FileSystemKeyValueStoreClient
- #### Parameters
* ##### optionalkeyword-onlyid: str | None = <!-- -->None
* ##### optionalkeyword-onlyname: str | None = <!-- -->None
* ##### optionalkeyword-onlyalias: str | None = <!-- -->None
* ##### optionalkeyword-onlyconfiguration: [Configuration](https://docs.apify.com/sdk/python/sdk/python/reference/class/Configuration.md) | None = <!-- -->None
#### Returns FileSystemKeyValueStoreClient
---
# ApifyHttpProxyMiddleware<!-- -->
Apify HTTP proxy middleware for Scrapy.
This middleware enhances request processing by adding a 'proxy' field to the request's meta and an authentication header. It draws inspiration from the `HttpProxyMiddleware` included by default in Scrapy projects. The proxy URL is sourced from the settings under the `APIFY_PROXY_SETTINGS` key. The value of this key, a dictionary, should be provided by the Actor input. An example of the proxy settings:
proxy\_settings = {'useApifyProxy': true, 'apifyProxyGroups': \[]}
## Index[**](#Index)
### Methods
* [**\_\_init\_\_](https://docs.apify.com/sdk/python/sdk/python/reference/class/ApifyHttpProxyMiddleware.md#__init__)
* [**from\_crawler](https://docs.apify.com/sdk/python/sdk/python/reference/class/ApifyHttpProxyMiddleware.md#from_crawler)
* [**process\_exception](https://docs.apify.com/sdk/python/sdk/python/reference/class/ApifyHttpProxyMiddleware.md#process_exception)
* [**process\_request](https://docs.apify.com/sdk/python/sdk/python/reference/class/ApifyHttpProxyMiddleware.md#process_request)
## Methods<!-- -->[**](#Methods)
### [**](#__init__)[**](https://github.com/apify/apify-sdk-python/blob/master//src/apify/scrapy/middlewares/apify_proxy.py#L28)\_\_init\_\_
* ****\_\_init\_\_**(proxy\_settings): None
- Create a new instance.
***
#### Parameters
* ##### proxy\_settings: dict
Dictionary containing proxy settings, provided by the Actor input.
#### Returns None
### [**](#from_crawler)[**](https://github.com/apify/apify-sdk-python/blob/master//src/apify/scrapy/middlewares/apify_proxy.py#L39)from\_crawler
* ****from\_crawler**(crawler): [ApifyHttpProxyMiddleware](https://docs.apify.com/sdk/python/sdk/python/reference/class/ApifyHttpProxyMiddleware.md)
- Create an instance of ApifyHttpProxyMiddleware from a Scrapy Crawler.
***
#### Parameters
* ##### crawler: Crawler
Scrapy Crawler object.
#### Returns [ApifyHttpProxyMiddleware](https://docs.apify.com/sdk/python/sdk/python/reference/class/ApifyHttpProxyMiddleware.md)
### [**](#process_exception)[**](https://github.com/apify/apify-sdk-python/blob/master//src/apify/scrapy/middlewares/apify_proxy.py#L89)process\_exception
* ****process\_exception**(request, exception, spider): None
- Process an exception that occurs during request processing.
***
#### Parameters
* ##### request: Request
Scrapy Request object.
* ##### exception: Exception
Exception object.
* ##### spider: Spider
Scrapy Spider object.
#### Returns None
### [**](#process_request)[**](https://github.com/apify/apify-sdk-python/blob/master//src/apify/scrapy/middlewares/apify_proxy.py#L67)process\_request
* **async **process\_request**(request, spider): None
- Process a Scrapy request by assigning a new proxy.
***
#### Parameters
* ##### request: Request
Scrapy Request object.
* ##### spider: Spider
Scrapy Spider object.
#### Returns None
---
# ApifyKeyValueStoreClient<!-- -->
An Apify platform implementation of the key-value store client.
## Index[**](#Index)
### Methods
* [**\_\_init\_\_](https://docs.apify.com/sdk/python/sdk/python/reference/class/ApifyKeyValueStoreClient.md#__init__)
* [**delete\_value](https://docs.apify.com/sdk/python/sdk/python/reference/class/ApifyKeyValueStoreClient.md#delete_value)
* [**drop](https://docs.apify.com/sdk/python/sdk/python/reference/class/ApifyKeyValueStoreClient.md#drop)
* [**get\_metadata](https://docs.apify.com/sdk/python/sdk/python/reference/class/ApifyKeyValueStoreClient.md#get_metadata)
* [**get\_public\_url](https://docs.apify.com/sdk/python/sdk/python/reference/class/ApifyKeyValueStoreClient.md#get_public_url)
* [**get\_value](https://docs.apify.com/sdk/python/sdk/python/reference/class/ApifyKeyValueStoreClient.md#get_value)
* [**iterate\_keys](https://docs.apify.com/sdk/python/sdk/python/reference/class/ApifyKeyValueStoreClient.md#iterate_keys)
* [**open](https://docs.apify.com/sdk/python/sdk/python/reference/class/ApifyKeyValueStoreClient.md#open)
* [**purge](https://docs.apify.com/sdk/python/sdk/python/reference/class/ApifyKeyValueStoreClient.md#purge)
* [**record\_exists](https://docs.apify.com/sdk/python/sdk/python/reference/class/ApifyKeyValueStoreClient.md#record_exists)
* [**set\_value](https://docs.apify.com/sdk/python/sdk/python/reference/class/ApifyKeyValueStoreClient.md#set_value)
## Methods<!-- -->[**](#Methods)
### [**](#__init__)[**](https://github.com/apify/apify-sdk-python/blob/master//src/apify/storage_clients/_apify/_key_value_store_client.py#L30)\_\_init\_\_
* ****\_\_init\_\_**(\*, api\_client, api\_public\_base\_url, lock): None
- Initialize a new instance.
Preferably use the `ApifyKeyValueStoreClient.open` class method to create a new instance.
***
#### Parameters
* ##### keyword-onlyapi\_client: KeyValueStoreClientAsync
* ##### keyword-onlyapi\_public\_base\_url: str
* ##### keyword-onlylock: asyncio.Lock
#### Returns None
### [**](#delete_value)[**](https://github.com/apify/apify-sdk-python/blob/master//src/apify/storage_clients/_apify/_key_value_store_client.py#L185)delete\_value
* **async **delete\_value**(key): None
- #### Parameters
* ##### key: str
#### Returns None
### [**](#drop)[**](https://github.com/apify/apify-sdk-python/blob/master//src/apify/storage_clients/_apify/_key_value_store_client.py#L166)drop
* **async **drop**(): None
- #### Returns None
### [**](#get_metadata)[**](https://github.com/apify/apify-sdk-python/blob/master//src/apify/storage_clients/_apify/_key_value_store_client.py#L56)get\_metadata
* **async **get\_metadata**(): [ApifyKeyValueStoreMetadata](https://docs.apify.com/sdk/python/sdk/python/reference/class/ApifyKeyValueStoreMetadata.md)
- #### Returns [ApifyKeyValueStoreMetadata](https://docs.apify.com/sdk/python/sdk/python/reference/class/ApifyKeyValueStoreMetadata.md)
### [**](#get_public_url)[**](https://github.com/apify/apify-sdk-python/blob/master//src/apify/storage_clients/_apify/_key_value_store_client.py#L226)get\_public\_url
* **async **get\_public\_url**(key): str
- Get a URL for the given key that may be used to publicly access the value in the remote key-value store.
***
#### Parameters
* ##### key: str
The key for which the URL should be generated.
#### Returns str
### [**](#get_value)[**](https://github.com/apify/apify-sdk-python/blob/master//src/apify/storage_clients/_apify/_key_value_store_client.py#L171)get\_value
* **async **get\_value**(key): KeyValueStoreRecord | None
- #### Parameters
* ##### key: str
#### Returns KeyValueStoreRecord | None
### [**](#iterate_keys)[**](https://github.com/apify/apify-sdk-python/blob/master//src/apify/storage_clients/_apify/_key_value_store_client.py#L190)iterate\_keys
* **async **iterate\_keys**(\*, exclusive\_start\_key, limit): AsyncIterator\[KeyValueStoreRecordMetadata]
- #### Parameters
* ##### optionalkeyword-onlyexclusive\_start\_key: str | None = <!-- -->None
* ##### optionalkeyword-onlylimit: int | None = <!-- -->None
#### Returns AsyncIterator\[KeyValueStoreRecordMetadata]
### [**](#open)[**](https://github.com/apify/apify-sdk-python/blob/master//src/apify/storage_clients/_apify/_key_value_store_client.py#L61)open
* **async **open**(\*, id, name, alias, configuration): [ApifyKeyValueStoreClient](https://docs.apify.com/sdk/python/sdk/python/reference/class/ApifyKeyValueStoreClient.md)
- Open an Apify key-value store client.
This method creates and initializes a new instance of the Apify key-value store client. It handles authentication, storage lookup/creation, and metadata retrieval.
***
#### Parameters
* ##### keyword-onlyid: str | None
The ID of the KVS to open. If provided, searches for existing KVS by ID. Mutually exclusive with name and alias.
* ##### keyword-onlyname: str | None
The name of the KVS to open (global scope, persists across runs). Mutually exclusive with id and alias.
* ##### keyword-onlyalias: str | None
The alias of the KVS to open (run scope, creates unnamed storage). Mutually exclusive with id and name.
* ##### keyword-onlyconfiguration: [Configuration](https://docs.apify.com/sdk/python/sdk/python/reference/class/Configuration.md)
The configuration object containing API credentials and settings. Must include a valid `token` and `api_base_url`. May also contain a `default_key_value_store_id` for fallback when neither `id`, `name`, nor `alias` is provided.
#### Returns [ApifyKeyValueStoreClient](https://docs.apify.com/sdk/python/sdk/python/reference/class/ApifyKeyValueStoreClient.md)
### [**](#purge)[**](https://github.com/apify/apify-sdk-python/blob/master//src/apify/storage_clients/_apify/_key_value_store_client.py#L159)purge
* **async **purge**(): None
- #### Returns None
### [**](#record_exists)[**](https://github.com/apify/apify-sdk-python/blob/master//src/apify/storage_clients/_apify/_key_value_store_client.py#L223)record\_exists
* **async **record\_exists**(key): bool
- #### Parameters
* ##### key: str
#### Returns bool
### [**](#set_value)[**](https://github.com/apify/apify-sdk-python/blob/master//src/apify/storage_clients/_apify/_key_value_store_client.py#L176)set\_value
* **async **set\_value**(key, value, content\_type): None
- #### Parameters
* ##### key: str
* ##### value: Any
* ##### optionalcontent\_type: str | None = <!-- -->None
#### Returns None
---
# ApifyKeyValueStoreMetadata<!-- -->
Extended key-value store metadata model for Apify platform.
Includes additional Apify-specific fields.
## Index[**](#Index)
### Properties
* [**url\_signing\_secret\_key](https://docs.apify.com/sdk/python/sdk/python/reference/class/ApifyKeyValueStoreMetadata.md#url_signing_secret_key)
## Properties<!-- -->[**](#Properties)
### [**](#url_signing_secret_key)[**](https://github.com/apify/apify-sdk-python/blob/master//src/apify/storage_clients/_apify/_models.py#L21)url\_signing\_secret\_key
**url\_signing\_secret\_key: str | None
The secret key used for signing URLs for secure access to key-value store records.
---
# ApifyRequestList<!-- -->
Extends crawlee RequestList.
Method open is used to create RequestList from actor's requestListSources input.
## Index[**](#Index)
### Methods
* [**open](https://docs.apify.com/sdk/python/sdk/python/reference/class/ApifyRequestList.md#open)
## Methods<!-- -->[**](#Methods)
### [**](#open)[**](https://github.com/apify/apify-sdk-python/blob/master//src/apify/request_loaders/_apify_request_list.py#L48)open
* **async **open**(name, request\_list\_sources\_input, http\_client): [ApifyRequestList](https://docs.apify.com/sdk/python/sdk/python/reference/class/ApifyRequestList.md)
- Initialize a new instance from request list source input.
***
#### Parameters
* ##### optionalname: str | None = <!-- -->None
Name of the returned RequestList.
* ##### optionalrequest\_list\_sources\_input: list\[dict\[str, Any]] | None = <!-- -->None
List of dicts with either url key or requestsFromUrl key.
* ##### optionalhttp\_client: HttpClient | None = <!-- -->None
Client that will be used to send get request to urls defined by value of requestsFromUrl keys.
#### Returns [ApifyRequestList](https://docs.apify.com/sdk/python/sdk/python/reference/class/ApifyRequestList.md)
---
# ApifyRequestQueueClient<!-- -->
Base class for Apify platform implementations of the request queue client.
## Index[**](#Index)
### Methods
* [**\_\_init\_\_](https://docs.apify.com/sdk/python/sdk/python/reference/class/ApifyRequestQueueClient.md#__init__)
* [**add\_batch\_of\_requests](https://docs.apify.com/sdk/python/sdk/python/reference/class/ApifyRequestQueueClient.md#add_batch_of_requests)
* [**drop](https://docs.apify.com/sdk/python/sdk/python/reference/class/ApifyRequestQueueClient.md#drop)
* [**fetch\_next\_request](https://docs.apify.com/sdk/python/sdk/python/reference/class/ApifyRequestQueueClient.md#fetch_next_request)
* [**get\_metadata](https://docs.apify.com/sdk/python/sdk/python/reference/class/ApifyRequestQueueClient.md#get_metadata)
* [**get\_request](https://docs.apify.com/sdk/python/sdk/python/reference/class/ApifyRequestQueueClient.md#get_request)
* [**is\_empty](https://docs.apify.com/sdk/python/sdk/python/reference/class/ApifyRequestQueueClient.md#is_empty)
* [**mark\_request\_as\_handled](https://docs.apify.com/sdk/python/sdk/python/reference/class/ApifyRequestQueueClient.md#mark_request_as_handled)
* [**open](https://docs.apify.com/sdk/python/sdk/python/reference/class/ApifyRequestQueueClient.md#open)
* [**purge](https://docs.apify.com/sdk/python/sdk/python/reference/class/ApifyRequestQueueClient.md#purge)
* [**reclaim\_request](https://docs.apify.com/sdk/python/sdk/python/reference/class/ApifyRequestQueueClient.md#reclaim_request)
## Methods<!-- -->[**](#Methods)
### [**](#__init__)[**](https://github.com/apify/apify-sdk-python/blob/master//src/apify/storage_clients/_apify/_request_queue_client.py#L35)\_\_init\_\_
* ****\_\_init\_\_**(\*, api\_client, metadata, access): None
- Initialize a new instance.
Preferably use the `ApifyRequestQueueClient.open` class method to create a new instance.
***
#### Parameters
* ##### keyword-onlyapi\_client: RequestQueueClientAsync
* ##### keyword-onlymetadata: RequestQueueMetadata
* ##### optionalkeyword-onlyaccess: Literal\[single, shared] = <!-- -->'single'
#### Returns None
### [**](#add_batch_of_requests)[**](https://github.com/apify/apify-sdk-python/blob/master//src/apify/storage_clients/_apify/_request_queue_client.py#L70)add\_batch\_of\_requests
* **async **add\_batch\_of\_requests**(requests, \*, forefront): AddRequestsResponse
- Add a batch of requests to the queue.
***
#### Parameters
* ##### requests: Sequence\[Request]
The requests to add.
* ##### optionalkeyword-onlyforefront: bool = <!-- -->False
Whether to add the requests to the beginning of the queue.
#### Returns AddRequestsResponse
### [**](#drop)[**](https://github.com/apify/apify-sdk-python/blob/master//src/apify/storage_clients/_apify/_request_queue_client.py#L303)drop
* **async **drop**(): None
- #### Returns None
### [**](#fetch_next_request)[**](https://github.com/apify/apify-sdk-python/blob/master//src/apify/storage_clients/_apify/_request_queue_client.py#L88)fetch\_next\_request
* **async **fetch\_next\_request**(): Request | None
- Return the next request in the queue to be processed.
Once you successfully finish processing of the request, you need to call `mark_request_as_handled` to mark the request as handled in the queue. If there was some error in processing the request, call `reclaim_request` instead, so that the queue will give the request to some other consumer in another call to the `fetch_next_request` method.
***
#### Returns Request | None
### [**](#get_metadata)[**](https://github.com/apify/apify-sdk-python/blob/master//src/apify/storage_clients/_apify/_request_queue_client.py#L157)get\_metadata
* **async **get\_metadata**(): [ApifyRequestQueueMetadata](https://docs.apify.com/sdk/python/sdk/python/reference/class/ApifyRequestQueueMetadata.md)
- Get metadata about the request queue.
***
#### Returns [ApifyRequestQueueMetadata](https://docs.apify.com/sdk/python/sdk/python/reference/class/ApifyRequestQueueMetadata.md)
### [**](#get_request)[**](https://github.com/apify/apify-sdk-python/blob/master//src/apify/storage_clients/_apify/_request_queue_client.py#L116)get\_request
* **async **get\_request**(unique\_key): Request | None
- Get a request by unique key.
***
#### Parameters
* ##### unique\_key: str
Unique key of the request to get.
#### Returns Request | None
### [**](#is_empty)[**](https://github.com/apify/apify-sdk-python/blob/master//src/apify/storage_clients/_apify/_request_queue_client.py#L148)is\_empty
* **async **is\_empty**(): bool
- Check if the queue is empty.
***
#### Returns bool
### [**](#mark_request_as_handled)[**](https://github.com/apify/apify-sdk-python/blob/master//src/apify/storage_clients/_apify/_request_queue_client.py#L102)mark\_request\_as\_handled
* **async **mark\_request\_as\_handled**(request): ProcessedRequest | None
- Mark a request as handled after successful processing.
Handled requests will never again be returned by the `fetch_next_request` method.
***
#### Parameters
* ##### request: Request
The request to mark as handled.
#### Returns ProcessedRequest | None
### [**](#open)[**](https://github.com/apify/apify-sdk-python/blob/master//src/apify/storage_clients/_apify/_request_queue_client.py#L182)open
* **async **open**(\*, id, name, alias, configuration, access): [ApifyRequestQueueClient](https://docs.apify.com/sdk/python/sdk/python/reference/class/ApifyRequestQueueClient.md)
- Open an Apify request queue client.
This method creates and initializes a new instance of the Apify request queue client. It handles authentication, storage lookup/creation, and metadata retrieval, and sets up internal caching and queue management structures.
***
#### Parameters
* ##### keyword-onlyid: str | None
The ID of the RQ to open. If provided, searches for existing RQ by ID. Mutually exclusive with name and alias.
* ##### keyword-onlyname: str | None
The name of the RQ to open (global scope, persists across runs). Mutually exclusive with id and alias.
* ##### keyword-onlyalias: str | None
The alias of the RQ to open (run scope, creates unnamed storage). Mutually exclusive with id and name.
* ##### keyword-onlyconfiguration: [Configuration](https://docs.apify.com/sdk/python/sdk/python/reference/class/Configuration.md)
The configuration object containing API credentials and settings. Must include a valid `token` and `api_base_url`. May also contain a `default_request_queue_id` for fallback when neither `id`, `name`, nor `alias` is provided.
* ##### optionalkeyword-onlyaccess: Literal\[single, shared] = <!-- -->'single'
Controls the implementation of the request queue client based on expected scenario:
* 'single' is suitable for single consumer scenarios. It makes less API calls, is cheaper and faster.
* 'shared' is suitable for multiple consumers scenarios at the cost of higher API usage. Detailed constraints for the 'single' access type:
* Only one client is consuming the request queue at the time.
* Multiple producers can put requests to the queue, but their forefront requests are not guaranteed to be handled so quickly as this client does not aggressively fetch the forefront and relies on local head estimation.
* Requests are only added to the queue, never deleted by other clients. (Marking as handled is ok.)
* Other producers can add new requests, but not modify existing ones. (Modifications would not be included in local cache)
#### Returns [ApifyRequestQueueClient](https://docs.apify.com/sdk/python/sdk/python/reference/class/ApifyRequestQueueClient.md)
### [**](#purge)[**](https://github.com/apify/apify-sdk-python/blob/master//src/apify/storage_clients/_apify/_request_queue_client.py#L296)purge
* **async **purge**(): None
- #### Returns None
### [**](#reclaim_request)[**](https://github.com/apify/apify-sdk-python/blob/master//src/apify/storage_clients/_apify/_request_queue_client.py#L128)reclaim\_request
* **async **reclaim\_request**(request, \*, forefront): ProcessedRequest | None
- Reclaim a failed request back to the queue.
The request will be returned for processing later again by another call to `fetch_next_request`.
***
#### Parameters
* ##### request: Request
The request to return to the queue.
* ##### optionalkeyword-onlyforefront: bool = <!-- -->False
Whether to add the request to the head or the end of the queue.
#### Returns ProcessedRequest | None
---
# ApifyRequestQueueMetadata<!-- -->
## Index[**](#Index)
### Properties
* [**stats](https://docs.apify.com/sdk/python/sdk/python/reference/class/ApifyRequestQueueMetadata.md#stats)
## Properties<!-- -->[**](#Properties)
### [**](#stats)[**](https://github.com/apify/apify-sdk-python/blob/master//src/apify/storage_clients/_apify/_models.py#L130)stats
**stats: [RequestQueueStats](https://docs.apify.com/sdk/python/sdk/python/reference/class/RequestQueueStats.md)
Additional statistics about the request queue.
---
# ApifyRequestQueueSharedClient<!-- -->
An Apify platform implementation of the request queue client.
This implementation supports multiple producers and multiple consumers scenario.
## Index[**](#Index)
### Methods
* [**\_\_init\_\_](https://docs.apify.com/sdk/python/sdk/python/reference/class/ApifyRequestQueueSharedClient.md#__init__)
* [**add\_batch\_of\_requests](https://docs.apify.com/sdk/python/sdk/python/reference/class/ApifyRequestQueueSharedClient.md#add_batch_of_requests)
* [**fetch\_next\_request](https://docs.apify.com/sdk/python/sdk/python/reference/class/ApifyRequestQueueSharedClient.md#fetch_next_request)
* [**get\_request](https://docs.apify.com/sdk/python/sdk/python/reference/class/ApifyRequestQueueSharedClient.md#get_request)
* [**is\_empty](https://docs.apify.com/sdk/python/sdk/python/reference/class/ApifyRequestQueueSharedClient.md#is_empty)
* [**mark\_request\_as\_handled](https://docs.apify.com/sdk/python/sdk/python/reference/class/ApifyRequestQueueSharedClient.md#mark_request_as_handled)
* [**reclaim\_request](https://docs.apify.com/sdk/python/sdk/python/reference/class/ApifyRequestQueueSharedClient.md#reclaim_request)
## Methods<!-- -->[**](#Methods)
### [**](#__init__)[**](https://github.com/apify/apify-sdk-python/blob/master//src/apify/storage_clients/_apify/_request_queue_shared_client.py#L35)\_\_init\_\_
* ****\_\_init\_\_**(\*, api\_client, metadata, cache\_size, metadata\_getter): None
- Initialize a new instance.
Preferably use the `ApifyRequestQueueClient.open` class method to create a new instance.
***
#### Parameters
* ##### keyword-onlyapi\_client: RequestQueueClientAsync
* ##### keyword-onlymetadata: RequestQueueMetadata
* ##### keyword-onlycache\_size: int
* ##### keyword-onlymetadata\_getter: Callable\[\[], Coroutine\[Any, Any, [ApifyRequestQueueMetadata](https://docs.apify.com/sdk/python/sdk/python/reference/class/ApifyRequestQueueMetadata.md)]]
#### Returns None
### [**](#add_batch_of_requests)[**](https://github.com/apify/apify-sdk-python/blob/master//src/apify/storage_clients/_apify/_request_queue_shared_client.py#L83)add\_batch\_of\_requests
* **async **add\_batch\_of\_requests**(requests, \*, forefront): AddRequestsResponse
- Add a batch of requests to the queue.
***
#### Parameters
* ##### requests: Sequence\[Request]
The requests to add.
* ##### optionalkeyword-onlyforefront: bool = <!-- -->False
Whether to add the requests to the beginning of the queue.
#### Returns AddRequestsResponse
### [**](#fetch_next_request)[**](https://github.com/apify/apify-sdk-python/blob/master//src/apify/storage_clients/_apify/_request_queue_shared_client.py#L195)fetch\_next\_request
* **async **fetch\_next\_request**(): Request | None
- Return the next request in the queue to be processed.
Once you successfully finish processing of the request, you need to call `mark_request_as_handled` to mark the request as handled in the queue. If there was some error in processing the request, call `reclaim_request` instead, so that the queue will give the request to some other consumer in another call to the `fetch_next_request` method.
***
#### Returns Request | None
### [**](#get_request)[**](https://github.com/apify/apify-sdk-python/blob/master//src/apify/storage_clients/_apify/_request_queue_shared_client.py#L176)get\_request
* **async **get\_request**(unique\_key): Request | None
- Get a request by unique key.
***
#### Parameters
* ##### unique\_key: str
Unique key of the request to get.
#### Returns Request | None
### [**](#is_empty)[**](https://github.com/apify/apify-sdk-python/blob/master//src/apify/storage_clients/_apify/_request_queue_shared_client.py#L341)is\_empty
* **async **is\_empty**(): bool
- Check if the queue is empty.
***
#### Returns bool
### [**](#mark_request_as_handled)[**](https://github.com/apify/apify-sdk-python/blob/master//src/apify/storage_clients/_apify/_request_queue_shared_client.py#L246)mark\_request\_as\_handled
* **async **mark\_request\_as\_handled**(request): ProcessedRequest | None
- Mark a request as handled after successful processing.
Handled requests will never again be returned by the `fetch_next_request` method.
***
#### Parameters
* ##### request: Request
The request to mark as handled.
#### Returns ProcessedRequest | None
### [**](#reclaim_request)[**](https://github.com/apify/apify-sdk-python/blob/master//src/apify/storage_clients/_apify/_request_queue_shared_client.py#L287)reclaim\_request
* **async **reclaim\_request**(request, \*, forefront): ProcessedRequest | None
- Reclaim a failed request back to the queue.
The request will be returned for processing later again by another call to `fetch_next_request`.
***
#### Parameters
* ##### request: Request
The request to return to the queue.
* ##### optionalkeyword-onlyforefront: bool = <!-- -->False
Whether to add the request to the head or the end of the queue.
#### Returns ProcessedRequest | None
---
# ApifyRequestQueueSingleClient<!-- -->
An Apify platform implementation of the request queue client with limited capability.
This client is designed to use as little resources as possible, but has to be used in constrained context. Constraints:
* Only one client is consuming the request queue at the time.
* Multiple producers can put requests to the queue, but their forefront requests are not guaranteed to be handled so quickly as this client does not aggressively fetch the forefront and relies on local head estimation.
* Requests are only added to the queue, never deleted. (Marking as handled is ok.)
* Other producers can add new requests, but not modify existing ones (otherwise caching can miss the updates)
If the constraints are not met, the client might work in an unpredictable way.
## Index[**](#Index)
### Methods
* [**\_\_init\_\_](https://docs.apify.com/sdk/python/sdk/python/reference/class/ApifyRequestQueueSingleClient.md#__init__)
* [**add\_batch\_of\_requests](https://docs.apify.com/sdk/python/sdk/python/reference/class/ApifyRequestQueueSingleClient.md#add_batch_of_requests)
* [**fetch\_next\_request](https://docs.apify.com/sdk/python/sdk/python/reference/class/ApifyRequestQueueSingleClient.md#fetch_next_request)
* [**get\_request](https://docs.apify.com/sdk/python/sdk/python/reference/class/ApifyRequestQueueSingleClient.md#get_request)
* [**is\_empty](https://docs.apify.com/sdk/python/sdk/python/reference/class/ApifyRequestQueueSingleClient.md#is_empty)
* [**mark\_request\_as\_handled](https://docs.apify.com/sdk/python/sdk/python/reference/class/ApifyRequestQueueSingleClient.md#mark_request_as_handled)
* [**reclaim\_request](https://docs.apify.com/sdk/python/sdk/python/reference/class/ApifyRequestQueueSingleClient.md#reclaim_request)
## Methods<!-- -->[**](#Methods)
### [**](#__init__)[**](https://github.com/apify/apify-sdk-python/blob/master//src/apify/storage_clients/_apify/_request_queue_single_client.py#L41)\_\_init\_\_
* ****\_\_init\_\_**(\*, api\_client, metadata, cache\_size): None
- Initialize a new instance.
Preferably use the `ApifyRequestQueueClient.open` class method to create a new instance.
***
#### Parameters
* ##### keyword-onlyapi\_client: RequestQueueClientAsync
* ##### keyword-onlymetadata: RequestQueueMetadata
* ##### keyword-onlycache\_size: int
#### Returns None
### [**](#add_batch_of_requests)[**](https://github.com/apify/apify-sdk-python/blob/master//src/apify/storage_clients/_apify/_request_queue_single_client.py#L84)add\_batch\_of\_requests
* **async **add\_batch\_of\_requests**(requests, \*, forefront): AddRequestsResponse
- Add a batch of requests to the queue.
***
#### Parameters
* ##### requests: Sequence\[Request]
The requests to add.
* ##### optionalkeyword-onlyforefront: bool = <!-- -->False
Whether to add the requests to the beginning of the queue.
#### Returns AddRequestsResponse
### [**](#fetch_next_request)[**](https://github.com/apify/apify-sdk-python/blob/master//src/apify/storage_clients/_apify/_request_queue_single_client.py#L220)fetch\_next\_request
* **async **fetch\_next\_request**(): Request | None
- Return the next request in the queue to be processed.
Once you successfully finish processing of the request, you need to call `mark_request_as_handled` to mark the request as handled in the queue. If there was some error in processing the request, call `reclaim_request` instead, so that the queue will give the request to some other consumer in another call to the `fetch_next_request` method.
***
#### Returns Request | None
### [**](#get_request)[**](https://github.com/apify/apify-sdk-python/blob/master//src/apify/storage_clients/_apify/_request_queue_single_client.py#L177)get\_request
* **async **get\_request**(unique\_key): Request | None
- Get a request by unique key.
***
#### Parameters
* ##### unique\_key: str
Unique key of the request to get.
#### Returns Request | None
### [**](#is_empty)[**](https://github.com/apify/apify-sdk-python/blob/master//src/apify/storage_clients/_apify/_request_queue_single_client.py#L369)is\_empty
* **async **is\_empty**(): bool
- Check if the queue is empty.
***
#### Returns bool
### [**](#mark_request_as_handled)[**](https://github.com/apify/apify-sdk-python/blob/master//src/apify/storage_clients/_apify/_request_queue_single_client.py#L276)mark\_request\_as\_handled
* **async **mark\_request\_as\_handled**(request): ProcessedRequest | None
- Mark a request as handled after successful processing.
Handled requests will never again be returned by the `fetch_next_request` method.
***
#### Parameters
* ##### request: Request
The request to mark as handled.
#### Returns ProcessedRequest | None
### [**](#reclaim_request)[**](https://github.com/apify/apify-sdk-python/blob/master//src/apify/storage_clients/_apify/_request_queue_single_client.py#L316)reclaim\_request
* **async **reclaim\_request**(request, \*, forefront): ProcessedRequest | None
- Reclaim a failed request back to the queue.
The request will be returned for processing later again by another call to `fetch_next_request`.
***
#### Parameters
* ##### request: Request
The request to return to the queue.
* ##### optionalkeyword-onlyforefront: bool = <!-- -->False
Whether to add the request to the head or the end of the queue.
#### Returns ProcessedRequest | None
---
# ApifyScheduler<!-- -->
A Scrapy scheduler that uses the Apify `RequestQueue` to manage requests.
This scheduler requires the asyncio Twisted reactor to be installed.
## Index[**](#Index)
### Methods
* [**\_\_init\_\_](https://docs.apify.com/sdk/python/sdk/python/reference/class/ApifyScheduler.md#__init__)
* [**close](https://docs.apify.com/sdk/python/sdk/python/reference/class/ApifyScheduler.md#close)
* [**enqueue\_request](https://docs.apify.com/sdk/python/sdk/python/reference/class/ApifyScheduler.md#enqueue_request)
* [**has\_pending\_requests](https://docs.apify.com/sdk/python/sdk/python/reference/class/ApifyScheduler.md#has_pending_requests)
* [**next\_request](https://docs.apify.com/sdk/python/sdk/python/reference/class/ApifyScheduler.md#next_request)
* [**open](https://docs.apify.com/sdk/python/sdk/python/reference/class/ApifyScheduler.md#open)
## Methods<!-- -->[**](#Methods)
### [**](#__init__)[**](https://github.com/apify/apify-sdk-python/blob/master//src/apify/scrapy/scheduler.py#L30)\_\_init\_\_
* ****\_\_init\_\_**(): None
- #### Returns None
### [**](#close)[**](https://github.com/apify/apify-sdk-python/blob/master//src/apify/scrapy/scheduler.py#L69)close
* ****close**(reason): None
- Close the scheduler.
Shut down the event loop and its thread gracefully.
***
#### Parameters
* ##### reason: str
The reason for closing the spider.
#### Returns None
### [**](#enqueue_request)[**](https://github.com/apify/apify-sdk-python/blob/master//src/apify/scrapy/scheduler.py#L107)enqueue\_request
* ****enqueue\_request**(request): bool
- Add a request to the scheduler.
This could be called from either from a spider or a downloader middleware (e.g. redirect, retry, ...).
***
#### Parameters
* ##### request: Request
The request to add to the scheduler.
#### Returns bool
### [**](#has_pending_requests)[**](https://github.com/apify/apify-sdk-python/blob/master//src/apify/scrapy/scheduler.py#L90)has\_pending\_requests
* ****has\_pending\_requests**(): bool
- Check if the scheduler has any pending requests.
***
#### Returns bool
### [**](#next_request)[**](https://github.com/apify/apify-sdk-python/blob/master//src/apify/scrapy/scheduler.py#L141)next\_request
* ****next\_request**(): Request | None
- Fetch the next request from the scheduler.
***
#### Returns Request | None
### [**](#open)[**](https://github.com/apify/apify-sdk-python/blob/master//src/apify/scrapy/scheduler.py#L43)open
* ****open**(spider): Deferred\[None] | None
- Open the scheduler.
***
#### Parameters
* ##### spider: Spider
The spider that the scheduler is associated with.
#### Returns Deferred\[None] | None
---
# ApifyStorageClient<!-- -->
Apify platform implementation of the storage client.
This storage client provides access to datasets, key-value stores, and request queues that persist data to the Apify platform. Each storage type is implemented with its own specific Apify client that stores data in the cloud, making it accessible from anywhere.
The communication with the Apify platform is handled via the Apify API client for Python, which is an HTTP API wrapper. For maximum efficiency and performance of the storage clients, various caching mechanisms are used to minimize the number of API calls made to the Apify platform. Data can be inspected and manipulated through the Apify console web interface or via the Apify API.
The request queue client supports two access modes controlled by the `request_queue_access` parameter:
### Single mode
The `single` mode is optimized for scenarios with only one consumer. It minimizes API calls, making it faster and more cost-efficient compared to the `shared` mode. This option is ideal when a single Actor is responsible for consuming the entire request queue. Using multiple consumers simultaneously may lead to inconsistencies or unexpected behavior.
In this mode, multiple producers can safely add new requests, but forefront requests may not be processed immediately, as the client relies on local head estimation instead of frequent forefront fetching. Requests can also be added or marked as handled by other clients, but they must not be deleted or modified, since such changes would not be reflected in the local cache. If a request is already fully cached locally, marking it as handled by another client will be ignored by this client. This does not cause errors but can occasionally result in reprocessing a request that was already handled elsewhere. If the request was not yet cached locally, marking it as handled poses no issue.
### Shared mode
The `shared` mode is designed for scenarios with multiple concurrent consumers. It ensures proper synchronization and consistency across clients, at the cost of higher API usage and slightly worse performance. This mode is safe for concurrent access from multiple processes, including Actors running in parallel on the Apify platform. It should be used when multiple consumers need to process requests from the same queue simultaneously.
## Index[**](#Index)
### Methods
* [**\_\_init\_\_](https://docs.apify.com/sdk/python/sdk/python/reference/class/ApifyStorageClient.md#__init__)
* [**create\_dataset\_client](https://docs.apify.com/sdk/python/sdk/python/reference/class/ApifyStorageClient.md#create_dataset_client)
* [**create\_kvs\_client](https://docs.apify.com/sdk/python/sdk/python/reference/class/ApifyStorageClient.md#create_kvs_client)
* [**create\_rq\_client](https://docs.apify.com/sdk/python/sdk/python/reference/class/ApifyStorageClient.md#create_rq_client)
* [**get\_storage\_client\_cache\_key](https://docs.apify.com/sdk/python/sdk/python/reference/class/ApifyStorageClient.md#get_storage_client_cache_key)
## Methods<!-- -->[**](#Methods)
### [**](#__init__)[**](https://github.com/apify/apify-sdk-python/blob/master//src/apify/storage_clients/_apify/_storage_client.py#L66)\_\_init\_\_
* ****\_\_init\_\_**(\*, request\_queue\_access): None
- Initialize a new instance.
***
#### Parameters
* ##### optionalkeyword-onlyrequest\_queue\_access: Literal\[single, shared] = <!-- -->'single'
Defines how the request queue client behaves. Use `single` mode for a single consumer. It has fewer API calls, meaning better performance and lower costs. If you need multiple concurrent consumers use `shared` mode, but expect worse performance and higher costs due to the additional overhead.
#### Returns None
### [**](#create_dataset_client)[**](https://github.com/apify/apify-sdk-python/blob/master//src/apify/storage_clients/_apify/_storage_client.py#L78)create\_dataset\_client
* **async **create\_dataset\_client**(\*, id, name, alias, configuration): [ApifyDatasetClient](https://docs.apify.com/sdk/python/sdk/python/reference/class/ApifyDatasetClient.md)
- #### Parameters
* ##### optionalkeyword-onlyid: str | None = <!-- -->None
* ##### optionalkeyword-onlyname: str | None = <!-- -->None
* ##### optionalkeyword-onlyalias: str | None = <!-- -->None
* ##### optionalkeyword-onlyconfiguration: CrawleeConfiguration | None = <!-- -->None
#### Returns [ApifyDatasetClient](https://docs.apify.com/sdk/python/sdk/python/reference/class/ApifyDatasetClient.md)
### [**](#create_kvs_client)[**](https://github.com/apify/apify-sdk-python/blob/master//src/apify/storage_clients/_apify/_storage_client.py#L93)create\_kvs\_client
* **async **create\_kvs\_client**(\*, id, name, alias, configuration): [ApifyKeyValueStoreClient](https://docs.apify.com/sdk/python/sdk/python/reference/class/ApifyKeyValueStoreClient.md)
- #### Parameters
* ##### optionalkeyword-onlyid: str | None = <!-- -->None
* ##### optionalkeyword-onlyname: str | None = <!-- -->None
* ##### optionalkeyword-onlyalias: str | None = <!-- -->None
* ##### optionalkeyword-onlyconfiguration: CrawleeConfiguration | None = <!-- -->None
#### Returns [ApifyKeyValueStoreClient](https://docs.apify.com/sdk/python/sdk/python/reference/class/ApifyKeyValueStoreClient.md)
### [**](#create_rq_client)[**](https://github.com/apify/apify-sdk-python/blob/master//src/apify/storage_clients/_apify/_storage_client.py#L108)create\_rq\_client
* **async **create\_rq\_client**(\*, id, name, alias, configuration): [ApifyRequestQueueClient](https://docs.apify.com/sdk/python/sdk/python/reference/class/ApifyRequestQueueClient.md)
- #### Parameters
* ##### optionalkeyword-onlyid: str | None = <!-- -->None
* ##### optionalkeyword-onlyname: str | None = <!-- -->None
* ##### optionalkeyword-onlyalias: str | None = <!-- -->None
* ##### optionalkeyword-onlyconfiguration: CrawleeConfiguration | None = <!-- -->None
#### Returns [ApifyRequestQueueClient](https://docs.apify.com/sdk/python/sdk/python/reference/class/ApifyRequestQueueClient.md)
### [**](#get_storage_client_cache_key)[**](https://github.com/apify/apify-sdk-python/blob/master//src/apify/storage_clients/_apify/_storage_client.py#L125)get\_storage\_client\_cache\_key
* ****get\_storage\_client\_cache\_key**(configuration): Hashable
- #### Parameters
* ##### configuration: CrawleeConfiguration
#### Returns Hashable
---
# AsyncThread<!-- -->
Class for running an asyncio event loop in a separate thread.
This allows running asynchronous coroutines from synchronous code by executingthem on an event loop that runs in its own dedicated thread.
## Index[**](#Index)
### Methods
* [**\_\_init\_\_](https://docs.apify.com/sdk/python/sdk/python/reference/class/AsyncThread.md#__init__)
* [**close](https://docs.apify.com/sdk/python/sdk/python/reference/class/AsyncThread.md#close)
* [**run\_coro](https://docs.apify.com/sdk/python/sdk/python/reference/class/AsyncThread.md#run_coro)
## Methods<!-- -->[**](#Methods)
### [**](#__init__)[**](https://github.com/apify/apify-sdk-python/blob/master//src/apify/scrapy/_async_thread.py#L23)\_\_init\_\_
* ****\_\_init\_\_**(): None
- #### Returns None
### [**](#close)[**](https://github.com/apify/apify-sdk-python/blob/master//src/apify/scrapy/_async_thread.py#L70)close
* ****close**(timeout): None
- Close the event loop and its thread gracefully.
This method cancels all pending tasks, stops the event loop, and waits for the thread to exit. If the thread does not exit within the given timeout, a forced shutdown is attempted.
***
#### Parameters
* ##### optionaltimeout: timedelta = <!-- -->timedelta(seconds=60)
The maximum number of seconds to wait for the event loop thread to exit.
#### Returns None
### [**](#run_coro)[**](https://github.com/apify/apify-sdk-python/blob/master//src/apify/scrapy/_async_thread.py#L33)run\_coro
* ****run\_coro**(coro, timeout): Any
- Run a coroutine on an event loop running in a separate thread.
This method schedules the coroutine to run on the event loop and blocks until the coroutine completes or the specified timeout is reached.
***
#### Parameters
* ##### coro: Coroutine
The coroutine to run.
* ##### optionaltimeout: timedelta = <!-- -->timedelta(seconds=60)
The maximum number of seconds to wait for the coroutine to finish.
#### Returns Any
---
# CachedRequest<!-- -->
Pydantic model for cached request information.
Only internal structure.
## Index[**](#Index)
### Properties
* [**hydrated](https://docs.apify.com/sdk/python/sdk/python/reference/class/CachedRequest.md#hydrated)
* [**id](https://docs.apify.com/sdk/python/sdk/python/reference/class/CachedRequest.md#id)
* [**lock\_expires\_at](https://docs.apify.com/sdk/python/sdk/python/reference/class/CachedRequest.md#lock_expires_at)
* [**was\_already\_handled](https://docs.apify.com/sdk/python/sdk/python/reference/class/CachedRequest.md#was_already_handled)
## Properties<!-- -->[**](#Properties)
### [**](#hydrated)[**](https://github.com/apify/apify-sdk-python/blob/master//src/apify/storage_clients/_apify/_models.py#L103)hydrated
**hydrated: Request | None
The hydrated request object (the original one).
### [**](#id)[**](https://github.com/apify/apify-sdk-python/blob/master//src/apify/storage_clients/_apify/_models.py#L97)id
**id: str
Id of the request.
### [**](#lock_expires_at)[**](https://github.com/apify/apify-sdk-python/blob/master//src/apify/storage_clients/_apify/_models.py#L106)lock\_expires\_at
**lock\_expires\_at: datetime | None
The expiration time of the lock on the request.
### [**](#was_already_handled)[**](https://github.com/apify/apify-sdk-python/blob/master//src/apify/storage_clients/_apify/_models.py#L100)was\_already\_handled
**was\_already\_handled: bool
Whether the request was already handled.
---
# ChargeResult<!-- -->
Result of the `ChargingManager.charge` method.
## Index[**](#Index)
### Properties
* [**chargeable\_within\_limit](https://docs.apify.com/sdk/python/sdk/python/reference/class/ChargeResult.md#chargeable_within_limit)
* [**charged\_count](https://docs.apify.com/sdk/python/sdk/python/reference/class/ChargeResult.md#charged_count)
* [**event\_charge\_limit\_reached](https://docs.apify.com/sdk/python/sdk/python/reference/class/ChargeResult.md#event_charge_limit_reached)
## Properties<!-- -->[**](#Properties)
### [**](#chargeable_within_limit)[**](https://github.com/apify/apify-sdk-python/blob/master//src/apify/_charging.py#L96)chargeable\_within\_limit
**chargeable\_within\_limit: dict\[str, int | None]
How many events of each known type can still be charged within the limit.
### [**](#charged_count)[**](https://github.com/apify/apify-sdk-python/blob/master//src/apify/_charging.py#L93)charged\_count
**charged\_count: int
Total amount of charged events - may be lower than the requested amount.
### [**](#event_charge_limit_reached)[**](https://github.com/apify/apify-sdk-python/blob/master//src/apify/_charging.py#L90)event\_charge\_limit\_reached
**event\_charge\_limit\_reached: bool
If true, no more events of this type can be charged within the limit.
---
# ChargingManager<!-- -->
Provides fine-grained access to pay-per-event functionality.
The ChargingManager allows you to charge for specific events in your Actor when using the pay-per-event pricing model. This enables precise cost control and transparent billing for different operations within your Actor.
### References
* Apify platform documentation: <https://docs.apify.com/platform/actors/publishing/monetize>
### Hierarchy
* *ChargingManager*
* [ChargingManagerImplementation](https://docs.apify.com/sdk/python/sdk/python/reference/class/ChargingManagerImplementation.md)
## Index[**](#Index)
### Methods
* [**calculate\_max\_event\_charge\_count\_within\_limit](https://docs.apify.com/sdk/python/sdk/python/reference/class/ChargingManager.md#calculate_max_event_charge_count_within_limit)
* [**calculate\_total\_charged\_amount](https://docs.apify.com/sdk/python/sdk/python/reference/class/ChargingManager.md#calculate_total_charged_amount)
* [**charge](https://docs.apify.com/sdk/python/sdk/python/reference/class/ChargingManager.md#charge)
* [**get\_charged\_event\_count](https://docs.apify.com/sdk/python/sdk/python/reference/class/ChargingManager.md#get_charged_event_count)
* [**get\_max\_total\_charge\_usd](https://docs.apify.com/sdk/python/sdk/python/reference/class/ChargingManager.md#get_max_total_charge_usd)
* [**get\_pricing\_info](https://docs.apify.com/sdk/python/sdk/python/reference/class/ChargingManager.md#get_pricing_info)
## Methods<!-- -->[**](#Methods)
### [**](#calculate_max_event_charge_count_within_limit)[**](https://github.com/apify/apify-sdk-python/blob/master//src/apify/_charging.py#L61)calculate\_max\_event\_charge\_count\_within\_limit
* ****calculate\_max\_event\_charge\_count\_within\_limit**(event\_name): int | None
- Overrides [ChargingManager.calculate\_max\_event\_charge\_count\_within\_limit](https://docs.apify.com/sdk/python/sdk/python/reference/class/ChargingManager.md#calculate_max_event_charge_count_within_limit)
Calculate how many instances of an event can be charged before we reach the configured limit.
***
#### Parameters
* ##### event\_name: str
Name of the inspected event.
#### Returns int | None
### [**](#calculate_total_charged_amount)[**](https://github.com/apify/apify-sdk-python/blob/master//src/apify/_charging.py#L58)calculate\_total\_charged\_amount
* ****calculate\_total\_charged\_amount**(): Decimal
- Overrides [ChargingManager.calculate\_total\_charged\_amount](https://docs.apify.com/sdk/python/sdk/python/reference/class/ChargingManager.md#calculate_total_charged_amount)
Calculate the total amount of money charged for pay-per-event events so far.
***
#### Returns Decimal
### [**](#charge)[**](https://github.com/apify/apify-sdk-python/blob/master//src/apify/_charging.py#L48)charge
* **async **charge**(event\_name, count): [ChargeResult](https://docs.apify.com/sdk/python/sdk/python/reference/class/ChargeResult.md)
- Overrides [ChargingManager.charge](https://docs.apify.com/sdk/python/sdk/python/reference/class/ChargingManager.md#charge)
Charge for a specified number of events - sub-operations of the Actor.
This is relevant only for the pay-per-event pricing model.
***
#### Parameters
* ##### event\_name: str
Name of the event to be charged for.
* ##### optionalcount: int = <!-- -->1
Number of events to charge for.
#### Returns [ChargeResult](https://docs.apify.com/sdk/python/sdk/python/reference/class/ChargeResult.md)
### [**](#get_charged_event_count)[**](https://github.com/apify/apify-sdk-python/blob/master//src/apify/_charging.py#L74)get\_charged\_event\_count
* ****get\_charged\_event\_count**(event\_name): int
- Overrides [ChargingManager.get\_charged\_event\_count](https://docs.apify.com/sdk/python/sdk/python/reference/class/ChargingManager.md#get_charged_event_count)
Get the number of events with the given name that were charged so far.
***
#### Parameters
* ##### event\_name: str
Name of the inspected event.
#### Returns int
### [**](#get_max_total_charge_usd)[**](https://github.com/apify/apify-sdk-python/blob/master//src/apify/_charging.py#L81)get\_max\_total\_charge\_usd
* ****get\_max\_total\_charge\_usd**(): Decimal
- Overrides [ChargingManager.get\_max\_total\_charge\_usd](https://docs.apify.com/sdk/python/sdk/python/reference/class/ChargingManager.md#get_max_total_charge_usd)
Get the configured maximum total charge for this Actor run.
***
#### Returns Decimal
### [**](#get_pricing_info)[**](https://github.com/apify/apify-sdk-python/blob/master//src/apify/_charging.py#L68)get\_pricing\_info
* ****get\_pricing\_info**(): [ActorPricingInfo](https://docs.apify.com/sdk/python/sdk/python/reference/class/ActorPricingInfo.md)
- Overrides [ChargingManager.get\_pricing\_info](https://docs.apify.com/sdk/python/sdk/python/reference/class/ChargingManager.md#get_pricing_info)
Retrieve detailed information about the effective pricing of the current Actor run.
This can be used for instance when your code needs to support multiple pricing models in transition periods.
***
#### Returns [ActorPricingInfo](https://docs.apify.com/sdk/python/sdk/python/reference/class/ActorPricingInfo.md)
---
# ChargingManagerImplementation<!-- -->
Implementation of the `ChargingManager` Protocol - this is only meant to be instantiated internally.
### Hierarchy
* [ChargingManager](https://docs.apify.com/sdk/python/sdk/python/reference/class/ChargingManager.md)
* *ChargingManagerImplementation*
## Index[**](#Index)
### Methods
* [**\_\_aenter\_\_](https://docs.apify.com/sdk/python/sdk/python/reference/class/ChargingManagerImplementation.md#__aenter__)
* [**\_\_aexit\_\_](https://docs.apify.com/sdk/python/sdk/python/reference/class/ChargingManagerImplementation.md#__aexit__)
* [**\_\_init\_\_](https://docs.apify.com/sdk/python/sdk/python/reference/class/ChargingManagerImplementation.md#__init__)
* [**calculate\_max\_event\_charge\_count\_within\_limit](https://docs.apify.com/sdk/python/sdk/python/reference/class/ChargingManagerImplementation.md#calculate_max_event_charge_count_within_limit)
* [**calculate\_total\_charged\_amount](https://docs.apify.com/sdk/python/sdk/python/reference/class/ChargingManagerImplementation.md#calculate_total_charged_amount)
* [**charge](https://docs.apify.com/sdk/python/sdk/python/reference/class/ChargingManagerImplementation.md#charge)
* [**get\_charged\_event\_count](https://docs.apify.com/sdk/python/sdk/python/reference/class/ChargingManagerImplementation.md#get_charged_event_count)
* [**get\_max\_total\_charge\_usd](https://docs.apify.com/sdk/python/sdk/python/reference/class/ChargingManagerImplementation.md#get_max_total_charge_usd)
* [**get\_pricing\_info](https://docs.apify.com/sdk/python/sdk/python/reference/class/ChargingManagerImplementation.md#get_pricing_info)
### Properties
* [**LOCAL\_CHARGING\_LOG\_DATASET\_NAME](https://docs.apify.com/sdk/python/sdk/python/reference/class/ChargingManagerImplementation.md#LOCAL_CHARGING_LOG_DATASET_NAME)
## Methods<!-- -->[**](#Methods)
### [**](#__aenter__)[**](https://github.com/apify/apify-sdk-python/blob/master//src/apify/_charging.py#L140)\_\_aenter\_\_
* **async **\_\_aenter\_\_**(): None
- Initialize the charging manager - this is called by the `Actor` class and shouldn't be invoked manually.
***
#### Returns None
### [**](#__aexit__)[**](https://github.com/apify/apify-sdk-python/blob/master//src/apify/_charging.py#L192)\_\_aexit\_\_
* **async **\_\_aexit\_\_**(exc\_type, exc\_value, exc\_traceback): None
- #### Parameters
* ##### exc\_type: type\[BaseException] | None
* ##### exc\_value: BaseException | None
* ##### exc\_traceback: TracebackType | None
#### Returns None
### [**](#__init__)[**](https://github.com/apify/apify-sdk-python/blob/master//src/apify/_charging.py#L123)\_\_init\_\_
* ****\_\_init\_\_**(configuration, client): None
- #### Parameters
* ##### configuration: [Configuration](https://docs.apify.com/sdk/python/sdk/python/reference/class/Configuration.md)
* ##### client: ApifyClientAsync
#### Returns None
### [**](#calculate_max_event_charge_count_within_limit)[**](https://github.com/apify/apify-sdk-python/blob/master//src/apify/_charging.py#L301)calculate\_max\_event\_charge\_count\_within\_limit
* ****calculate\_max\_event\_charge\_count\_within\_limit**(event\_name): int | None
- Overrides [ChargingManager.calculate\_max\_event\_charge\_count\_within\_limit](https://docs.apify.com/sdk/python/sdk/python/reference/class/ChargingManager.md#calculate_max_event_charge_count_within_limit)
Calculate how many instances of an event can be charged before we reach the configured limit.
***
#### Parameters
* ##### event\_name: str
Name of the inspected event.
#### Returns int | None
### [**](#calculate_total_charged_amount)[**](https://github.com/apify/apify-sdk-python/blob/master//src/apify/_charging.py#L294)calculate\_total\_charged\_amount
* ****calculate\_total\_charged\_amount**(): Decimal
- Overrides [ChargingManager.calculate\_total\_charged\_amount](https://docs.apify.com/sdk/python/sdk/python/reference/class/ChargingManager.md#calculate_total_charged_amount)
Calculate the total amount of money charged for pay-per-event events so far.
***
#### Returns Decimal
### [**](#charge)[**](https://github.com/apify/apify-sdk-python/blob/master//src/apify/_charging.py#L204)charge
* **async **charge**(event\_name, count): [ChargeResult](https://docs.apify.com/sdk/python/sdk/python/reference/class/ChargeResult.md)
- Overrides [ChargingManager.charge](https://docs.apify.com/sdk/python/sdk/python/reference/class/ChargingManager.md#charge)
Charge for a specified number of events - sub-operations of the Actor.
This is relevant only for the pay-per-event pricing model.
***
#### Parameters
* ##### event\_name: str
Name of the event to be charged for.
* ##### optionalcount: int = <!-- -->1
Number of events to charge for.
#### Returns [ChargeResult](https://docs.apify.com/sdk/python/sdk/python/reference/class/ChargeResult.md)
### [**](#get_charged_event_count)[**](https://github.com/apify/apify-sdk-python/blob/master//src/apify/_charging.py#L331)get\_charged\_event\_count
* ****get\_charged\_event\_count**(event\_name): int
- Overrides [ChargingManager.get\_charged\_event\_count](https://docs.apify.com/sdk/python/sdk/python/reference/class/ChargingManager.md#get_charged_event_count)
Get the number of events with the given name that were charged so far.
***
#### Parameters
* ##### event\_name: str
Name of the inspected event.
#### Returns int
### [**](#get_max_total_charge_usd)[**](https://github.com/apify/apify-sdk-python/blob/master//src/apify/_charging.py#L336)get\_max\_total\_charge\_usd
* ****get\_max\_total\_charge\_usd**(): Decimal
- Overrides [ChargingManager.get\_max\_total\_charge\_usd](https://docs.apify.com/sdk/python/sdk/python/reference/class/ChargingManager.md#get_max_total_charge_usd)
Get the configured maximum total charge for this Actor run.
***
#### Returns Decimal
### [**](#get_pricing_info)[**](https://github.com/apify/apify-sdk-python/blob/master//src/apify/_charging.py#L318)get\_pricing\_info
* ****get\_pricing\_info**(): [ActorPricingInfo](https://docs.apify.com/sdk/python/sdk/python/reference/class/ActorPricingInfo.md)
- Overrides [ChargingManager.get\_pricing\_info](https://docs.apify.com/sdk/python/sdk/python/reference/class/ChargingManager.md#get_pricing_info)
Retrieve detailed information about the effective pricing of the current Actor run.
This can be used for instance when your code needs to support multiple pricing models in transition periods.
***
#### Returns [ActorPricingInfo](https://docs.apify.com/sdk/python/sdk/python/reference/class/ActorPricingInfo.md)
## Properties<!-- -->[**](#Properties)
### [**](#LOCAL_CHARGING_LOG_DATASET_NAME)[**](https://github.com/apify/apify-sdk-python/blob/master//src/apify/_charging.py#L121)LOCAL\_CHARGING\_LOG\_DATASET\_NAME
**LOCAL\_CHARGING\_LOG\_DATASET\_NAME: Undefined
---
# ChargingStateItem<!-- -->
## Index[**](#Index)
### Properties
* [**charge\_count](https://docs.apify.com/sdk/python/sdk/python/reference/class/ChargingStateItem.md#charge_count)
* [**total\_charged\_amount](https://docs.apify.com/sdk/python/sdk/python/reference/class/ChargingStateItem.md#total_charged_amount)
## Properties<!-- -->[**](#Properties)
### [**](#charge_count)[**](https://github.com/apify/apify-sdk-python/blob/master//src/apify/_charging.py#L374)charge\_count
**charge\_count: int
### [**](#total_charged_amount)[**](https://github.com/apify/apify-sdk-python/blob/master//src/apify/_charging.py#L375)total\_charged\_amount
**total\_charged\_amount: Decimal
---
# Configuration<!-- -->
A class for specifying the configuration of an Actor.
Can be used either globally via `Configuration.get_global_configuration()`, or it can be specific to each `Actor` instance on the `actor.config` property.
## Index[**](#Index)
### Methods
* [**disable\_browser\_sandbox\_on\_platform](https://docs.apify.com/sdk/python/sdk/python/reference/class/Configuration.md#disable_browser_sandbox_on_platform)
* [**from\_configuration](https://docs.apify.com/sdk/python/sdk/python/reference/class/Configuration.md#from_configuration)
* [**get\_global\_configuration](https://docs.apify.com/sdk/python/sdk/python/reference/class/Configuration.md#get_global_configuration)
### Properties
* [**actor\_build\_id](https://docs.apify.com/sdk/python/sdk/python/reference/class/Configuration.md#actor_build_id)
* [**actor\_build\_number](https://docs.apify.com/sdk/python/sdk/python/reference/class/Configuration.md#actor_build_number)
* [**actor\_build\_tags](https://docs.apify.com/sdk/python/sdk/python/reference/class/Configuration.md#actor_build_tags)
* [**actor\_events\_ws\_url](https://docs.apify.com/sdk/python/sdk/python/reference/class/Configuration.md#actor_events_ws_url)
* [**actor\_full\_name](https://docs.apify.com/sdk/python/sdk/python/reference/class/Configuration.md#actor_full_name)
* [**actor\_id](https://docs.apify.com/sdk/python/sdk/python/reference/class/Configuration.md#actor_id)
* [**actor\_pricing\_info](https://docs.apify.com/sdk/python/sdk/python/reference/class/Configuration.md#actor_pricing_info)
* [**actor\_run\_id](https://docs.apify.com/sdk/python/sdk/python/reference/class/Configuration.md#actor_run_id)
* [**actor\_task\_id](https://docs.apify.com/sdk/python/sdk/python/reference/class/Configuration.md#actor_task_id)
* [**api\_base\_url](https://docs.apify.com/sdk/python/sdk/python/reference/class/Configuration.md#api_base_url)
* [**api\_public\_base\_url](https://docs.apify.com/sdk/python/sdk/python/reference/class/Configuration.md#api_public_base_url)
* [**canonical\_input\_key](https://docs.apify.com/sdk/python/sdk/python/reference/class/Configuration.md#canonical_input_key)
* [**charged\_event\_counts](https://docs.apify.com/sdk/python/sdk/python/reference/class/Configuration.md#charged_event_counts)
* [**dedicated\_cpus](https://docs.apify.com/sdk/python/sdk/python/reference/class/Configuration.md#dedicated_cpus)
* [**default\_dataset\_id](https://docs.apify.com/sdk/python/sdk/python/reference/class/Configuration.md#default_dataset_id)
* [**default\_key\_value\_store\_id](https://docs.apify.com/sdk/python/sdk/python/reference/class/Configuration.md#default_key_value_store_id)
* [**default\_request\_queue\_id](https://docs.apify.com/sdk/python/sdk/python/reference/class/Configuration.md#default_request_queue_id)
* [**disable\_outdated\_warning](https://docs.apify.com/sdk/python/sdk/python/reference/class/Configuration.md#disable_outdated_warning)
* [**fact](https://docs.apify.com/sdk/python/sdk/python/reference/class/Configuration.md#fact)
* [**input\_key](https://docs.apify.com/sdk/python/sdk/python/reference/class/Configuration.md#input_key)
* [**input\_key\_candidates](https://docs.apify.com/sdk/python/sdk/python/reference/class/Configuration.md#input_key_candidates)
* [**input\_secrets\_private\_key\_file](https://docs.apify.com/sdk/python/sdk/python/reference/class/Configuration.md#input_secrets_private_key_file)
* [**input\_secrets\_private\_key\_passphrase](https://docs.apify.com/sdk/python/sdk/python/reference/class/Configuration.md#input_secrets_private_key_passphrase)
* [**is\_at\_home](https://docs.apify.com/sdk/python/sdk/python/reference/class/Configuration.md#is_at_home)
* [**latest\_sdk\_version](https://docs.apify.com/sdk/python/sdk/python/reference/class/Configuration.md#latest_sdk_version)
* [**log\_format](https://docs.apify.com/sdk/python/sdk/python/reference/class/Configuration.md#log_format)
* [**max\_paid\_dataset\_items](https://docs.apify.com/sdk/python/sdk/python/reference/class/Configuration.md#max_paid_dataset_items)
* [**max\_total\_charge\_usd](https://docs.apify.com/sdk/python/sdk/python/reference/class/Configuration.md#max_total_charge_usd)
* [**meta\_origin](https://docs.apify.com/sdk/python/sdk/python/reference/class/Configuration.md#meta_origin)
* [**metamorph\_after\_sleep](https://docs.apify.com/sdk/python/sdk/python/reference/class/Configuration.md#metamorph_after_sleep)
* [**proxy\_hostname](https://docs.apify.com/sdk/python/sdk/python/reference/class/Configuration.md#proxy_hostname)
* [**proxy\_password](https://docs.apify.com/sdk/python/sdk/python/reference/class/Configuration.md#proxy_password)
* [**proxy\_port](https://docs.apify.com/sdk/python/sdk/python/reference/class/Configuration.md#proxy_port)
* [**proxy\_status\_url](https://docs.apify.com/sdk/python/sdk/python/reference/class/Configuration.md#proxy_status_url)
* [**standby\_port](https://docs.apify.com/sdk/python/sdk/python/reference/class/Configuration.md#standby_port)
* [**standby\_url](https://docs.apify.com/sdk/python/sdk/python/reference/class/Configuration.md#standby_url)
* [**started\_at](https://docs.apify.com/sdk/python/sdk/python/reference/class/Configuration.md#started_at)
* [**test\_pay\_per\_event](https://docs.apify.com/sdk/python/sdk/python/reference/class/Configuration.md#test_pay_per_event)
* [**timeout\_at](https://docs.apify.com/sdk/python/sdk/python/reference/class/Configuration.md#timeout_at)
* [**token](https://docs.apify.com/sdk/python/sdk/python/reference/class/Configuration.md#token)
* [**user\_id](https://docs.apify.com/sdk/python/sdk/python/reference/class/Configuration.md#user_id)
* [**user\_is\_paying](https://docs.apify.com/sdk/python/sdk/python/reference/class/Configuration.md#user_is_paying)
* [**web\_server\_port](https://docs.apify.com/sdk/python/sdk/python/reference/class/Configuration.md#web_server_port)
* [**web\_server\_url](https://docs.apify.com/sdk/python/sdk/python/reference/class/Configuration.md#web_server_url)
* [**workflow\_key](https://docs.apify.com/sdk/python/sdk/python/reference/class/Configuration.md#workflow_key)
## Methods<!-- -->[**](#Methods)
### [**](#disable_browser_sandbox_on_platform)[**](https://github.com/apify/apify-sdk-python/blob/master//src/apify/_configuration.py#L443)disable\_browser\_sandbox\_on\_platform
* ****disable\_browser\_sandbox\_on\_platform**(): Self
- Disable the browser sandbox mode when running on the Apify platform.
Running in environment where `is_at_home` is True does not benefit from browser sandbox as it is already running in a container. It can be on the contrary undesired as the process in the container might be running as root and this will crash chromium that was started with browser sandbox mode.
***
#### Returns Self
### [**](#from_configuration)[**](https://github.com/apify/apify-sdk-python/blob/master//src/apify/_configuration.py#L485)from\_configuration
* ****from\_configuration**(configuration): [Configuration](https://docs.apify.com/sdk/python/sdk/python/reference/class/Configuration.md)
- Create Apify Configuration from existing Crawlee Configuration.
***
#### Parameters
* ##### configuration: CrawleeConfiguration
The existing Crawlee Configuration.
#### Returns [Configuration](https://docs.apify.com/sdk/python/sdk/python/reference/class/Configuration.md)
### [**](#get_global_configuration)[**](https://github.com/apify/apify-sdk-python/blob/master//src/apify/_configuration.py#L464)get\_global\_configuration
* ****get\_global\_configuration**(): [Configuration](https://docs.apify.com/sdk/python/sdk/python/reference/class/Configuration.md)
- Retrieve the global instance of the configuration.
This method ensures that ApifyConfigration is returned, even if CrawleeConfiguration was set in the service locator.
***
#### Returns [Configuration](https://docs.apify.com/sdk/python/sdk/python/reference/class/Configuration.md)
## Properties<!-- -->[**](#Properties)
### [**](#actor_build_id)[**](https://github.com/apify/apify-sdk-python/blob/master//src/apify/_configuration.py#L76)actor\_build\_id
**actor\_build\_id: str | None
### [**](#actor_build_number)[**](https://github.com/apify/apify-sdk-python/blob/master//src/apify/_configuration.py#L87)actor\_build\_number
**actor\_build\_number: str | None
### [**](#actor_build_tags)[**](https://github.com/apify/apify-sdk-python/blob/master//src/apify/_configuration.py#L98)actor\_build\_tags
**actor\_build\_tags: list\[str] | None
### [**](#actor_events_ws_url)[**](https://github.com/apify/apify-sdk-python/blob/master//src/apify/_configuration.py#L117)actor\_events\_ws\_url
**actor\_events\_ws\_url: str | None
### [**](#actor_full_name)[**](https://github.com/apify/apify-sdk-python/blob/master//src/apify/_configuration.py#L57)actor\_full\_name
**actor\_full\_name: str | None
### [**](#actor_id)[**](https://github.com/apify/apify-sdk-python/blob/master//src/apify/_configuration.py#L45)actor\_id
**actor\_id: str | None
### [**](#actor_pricing_info)[**](https://github.com/apify/apify-sdk-python/blob/master//src/apify/_configuration.py#L419)actor\_pricing\_info
**actor\_pricing\_info: ((([FreeActorPricingInfo](https://docs.apify.com/sdk/python/sdk/python/reference/class/FreeActorPricingInfo.md) | [FlatPricePerMonthActorPricingInfo](https://docs.apify.com/sdk/python/sdk/python/reference/class/FlatPricePerMonthActorPricingInfo.md)) | [PricePerDatasetItemActorPricingInfo](https://docs.apify.com/sdk/python/sdk/python/reference/class/PricePerDatasetItemActorPricingInfo.md)) | [PayPerEventActorPricingInfo](https://docs.apify.com/sdk/python/sdk/python/reference/class/PayPerEventActorPricingInfo.md)) | None
### [**](#actor_run_id)[**](https://github.com/apify/apify-sdk-python/blob/master//src/apify/_configuration.py#L64)actor\_run\_id
**actor\_run\_id: str | None
### [**](#actor_task_id)[**](https://github.com/apify/apify-sdk-python/blob/master//src/apify/_configuration.py#L106)actor\_task\_id
**actor\_task\_id: str | None
### [**](#api_base_url)[**](https://github.com/apify/apify-sdk-python/blob/master//src/apify/_configuration.py#L128)api\_base\_url
**api\_base\_url: str
### [**](#api_public_base_url)[**](https://github.com/apify/apify-sdk-python/blob/master//src/apify/_configuration.py#L136)api\_public\_base\_url
**api\_public\_base\_url: str
### [**](#canonical_input_key)[**](https://github.com/apify/apify-sdk-python/blob/master//src/apify/_configuration.py#L456)canonical\_input\_key
**canonical\_input\_key: str
### [**](#charged_event_counts)[**](https://github.com/apify/apify-sdk-python/blob/master//src/apify/_configuration.py#L433)charged\_event\_counts
**charged\_event\_counts: dict\[str, int] | None
### [**](#dedicated_cpus)[**](https://github.com/apify/apify-sdk-python/blob/master//src/apify/_configuration.py#L144)dedicated\_cpus
**dedicated\_cpus: float | None
### [**](#default_dataset_id)[**](https://github.com/apify/apify-sdk-python/blob/master//src/apify/_configuration.py#L152)default\_dataset\_id
**default\_dataset\_id: str | None
### [**](#default_key_value_store_id)[**](https://github.com/apify/apify-sdk-python/blob/master//src/apify/_configuration.py#L163)default\_key\_value\_store\_id
**default\_key\_value\_store\_id: str | None
### [**](#default_request_queue_id)[**](https://github.com/apify/apify-sdk-python/blob/master//src/apify/_configuration.py#L174)default\_request\_queue\_id
**default\_request\_queue\_id: str | None
### [**](#disable_outdated_warning)[**](https://github.com/apify/apify-sdk-python/blob/master//src/apify/_configuration.py#L185)disable\_outdated\_warning
**disable\_outdated\_warning: bool
### [**](#fact)[**](https://github.com/apify/apify-sdk-python/blob/master//src/apify/_configuration.py#L194)fact
**fact: str | None
### [**](#input_key)[**](https://github.com/apify/apify-sdk-python/blob/master//src/apify/_configuration.py#L196)input\_key
**input\_key: str
### [**](#input_key_candidates)[**](https://github.com/apify/apify-sdk-python/blob/master//src/apify/_configuration.py#L460)input\_key\_candidates
**input\_key\_candidates: set\[str]
### [**](#input_secrets_private_key_file)[**](https://github.com/apify/apify-sdk-python/blob/master//src/apify/_configuration.py#L208)input\_secrets\_private\_key\_file
**input\_secrets\_private\_key\_file: str | None
### [**](#input_secrets_private_key_passphrase)[**](https://github.com/apify/apify-sdk-python/blob/master//src/apify/_configuration.py#L216)input\_secrets\_private\_key\_passphrase
**input\_secrets\_private\_key\_passphrase: str | None
### [**](#is_at_home)[**](https://github.com/apify/apify-sdk-python/blob/master//src/apify/_configuration.py#L224)is\_at\_home
**is\_at\_home: bool
### [**](#latest_sdk_version)[**](https://github.com/apify/apify-sdk-python/blob/master//src/apify/_configuration.py#L232)latest\_sdk\_version
**latest\_sdk\_version: str | None
### [**](#log_format)[**](https://github.com/apify/apify-sdk-python/blob/master//src/apify/_configuration.py#L242)log\_format
**log\_format: str | None
### [**](#max_paid_dataset_items)[**](https://github.com/apify/apify-sdk-python/blob/master//src/apify/_configuration.py#L248)max\_paid\_dataset\_items
**max\_paid\_dataset\_items: int | None
### [**](#max_total_charge_usd)[**](https://github.com/apify/apify-sdk-python/blob/master//src/apify/_configuration.py#L257)max\_total\_charge\_usd
**max\_total\_charge\_usd: Decimal | None
### [**](#meta_origin)[**](https://github.com/apify/apify-sdk-python/blob/master//src/apify/_configuration.py#L274)meta\_origin
**meta\_origin: str | None
### [**](#metamorph_after_sleep)[**](https://github.com/apify/apify-sdk-python/blob/master//src/apify/_configuration.py#L282)metamorph\_after\_sleep
**metamorph\_after\_sleep: timedelta\_ms
### [**](#proxy_hostname)[**](https://github.com/apify/apify-sdk-python/blob/master//src/apify/_configuration.py#L290)proxy\_hostname
**proxy\_hostname: str
### [**](#proxy_password)[**](https://github.com/apify/apify-sdk-python/blob/master//src/apify/_configuration.py#L298)proxy\_password
**proxy\_password: str | None
### [**](#proxy_port)[**](https://github.com/apify/apify-sdk-python/blob/master//src/apify/_configuration.py#L306)proxy\_port
**proxy\_port: int
### [**](#proxy_status_url)[**](https://github.com/apify/apify-sdk-python/blob/master//src/apify/_configuration.py#L314)proxy\_status\_url
**proxy\_status\_url: str
### [**](#standby_port)[**](https://github.com/apify/apify-sdk-python/blob/master//src/apify/_configuration.py#L345)standby\_port
**standby\_port: int
### [**](#standby_url)[**](https://github.com/apify/apify-sdk-python/blob/master//src/apify/_configuration.py#L354)standby\_url
**standby\_url: str
### [**](#started_at)[**](https://github.com/apify/apify-sdk-python/blob/master//src/apify/_configuration.py#L322)started\_at
**started\_at: datetime | None
### [**](#test_pay_per_event)[**](https://github.com/apify/apify-sdk-python/blob/master//src/apify/_configuration.py#L266)test\_pay\_per\_event
**test\_pay\_per\_event: bool
### [**](#timeout_at)[**](https://github.com/apify/apify-sdk-python/blob/master//src/apify/_configuration.py#L333)timeout\_at
**timeout\_at: datetime | None
### [**](#token)[**](https://github.com/apify/apify-sdk-python/blob/master//src/apify/_configuration.py#L363)token
**token: str | None
### [**](#user_id)[**](https://github.com/apify/apify-sdk-python/blob/master//src/apify/_configuration.py#L371)user\_id
**user\_id: str | None
### [**](#user_is_paying)[**](https://github.com/apify/apify-sdk-python/blob/master//src/apify/_configuration.py#L379)user\_is\_paying
**user\_is\_paying: bool
### [**](#web_server_port)[**](https://github.com/apify/apify-sdk-python/blob/master//src/apify/_configuration.py#L388)web\_server\_port
**web\_server\_port: int
### [**](#web_server_url)[**](https://github.com/apify/apify-sdk-python/blob/master//src/apify/_configuration.py#L400)web\_server\_url
**web\_server\_url: str
### [**](#workflow_key)[**](https://github.com/apify/apify-sdk-python/blob/master//src/apify/_configuration.py#L411)workflow\_key
**workflow\_key: str | None
---
# Dataset<!-- -->
Dataset is a storage for managing structured tabular data.
The dataset class provides a high-level interface for storing and retrieving structured data with consistent schema, similar to database tables or spreadsheets. It abstracts the underlying storage implementation details, offering a consistent API regardless of where the data is physically stored.
Dataset operates in an append-only mode, allowing new records to be added but not modified or deleted after creation. This makes it particularly suitable for storing crawling results and other data that should be immutable once collected.
The class provides methods for adding data, retrieving data with various filtering options, and exporting data to different formats. You can create a dataset using the `open` class method, specifying either a name or ID. The underlying storage implementation is determined by the configured storage client.
### Usage
from crawlee.storages import Dataset
Open a dataset
dataset = await Dataset.open(name='my_dataset')
Add data
await dataset.push_data({'title': 'Example Product', 'price': 99.99})
Retrieve filtered data
results = await dataset.get_data(limit=10, desc=True)
Export data
await dataset.export_to('results.json', content_type='json')
### Hierarchy
* [Storage](https://crawlee.dev/python/api/class/Storage)
* *Dataset*
## Index[**](#Index)
### Methods
* [**\_\_init\_\_](https://docs.apify.com/sdk/python/sdk/python/reference/class/Dataset.md#__init__)
* [**drop](https://docs.apify.com/sdk/python/sdk/python/reference/class/Dataset.md#drop)
* [**export\_to](https://docs.apify.com/sdk/python/sdk/python/reference/class/Dataset.md#export_to)
* [**get\_data](https://docs.apify.com/sdk/python/sdk/python/reference/class/Dataset.md#get_data)
* [**get\_metadata](https://docs.apify.com/sdk/python/sdk/python/reference/class/Dataset.md#get_metadata)
* [**iterate\_items](https://docs.apify.com/sdk/python/sdk/python/reference/class/Dataset.md#iterate_items)
* [**list\_items](https://docs.apify.com/sdk/python/sdk/python/reference/class/Dataset.md#list_items)
* [**open](https://docs.apify.com/sdk/python/sdk/python/reference/class/Dataset.md#open)
* [**purge](https://docs.apify.com/sdk/python/sdk/python/reference/class/Dataset.md#purge)
* [**push\_data](https://docs.apify.com/sdk/python/sdk/python/reference/class/Dataset.md#push_data)
### Properties
* [**id](https://docs.apify.com/sdk/python/sdk/python/reference/class/Dataset.md#id)
* [**name](https://docs.apify.com/sdk/python/sdk/python/reference/class/Dataset.md#name)
## Methods<!-- -->[**](#Methods)
### [**](#__init__)[**](https://github.com/apify/crawlee-python/blob/master//src/crawlee/storages/_dataset.py#L69)\_\_init\_\_
* ****\_\_init\_\_**(client, id, name): None
- Initialize a new instance.
Preferably use the `Dataset.open` constructor to create a new instance.
***
#### Parameters
* ##### client: [DatasetClient](https://crawlee.dev/python/api/class/DatasetClient)
An instance of a storage client.
* ##### id: str
The unique identifier of the storage.
* ##### name: str | None
The name of the storage, if available.
#### Returns None
### [**](#drop)[**](https://github.com/apify/crawlee-python/blob/master//src/crawlee/storages/_dataset.py#L128)drop
* **async **drop**(): None
- Overrides [Storage.drop](https://crawlee.dev/python/api/class/Storage#drop)
Drop the storage, removing it from the underlying storage client and clearing the cache.
***
#### Returns None
### [**](#export_to)[**](https://github.com/apify/crawlee-python/blob/master//src/crawlee/storages/_dataset.py#L323)export\_to
* **async **export\_to**(key: str, content\_type?
<!-- -->
: Literal\[json, csv], to\_kvs\_id?
<!-- -->
: str | None, to\_kvs\_name?
<!-- -->
: str | None, to\_kvs\_storage\_client?
<!-- -->
: [StorageClient](https://crawlee.dev/python/api/class/StorageClient) | None, to\_kvs\_configuration?
<!-- -->
: [Configuration](https://crawlee.dev/python/api/class/Configuration) | None, kwargs: Any): None
* **async **export\_to**(key: str, content\_type: Literal\[json], to\_kvs\_id?
<!-- -->
: str | None, to\_kvs\_name?
<!-- -->
: str | None, to\_kvs\_storage\_client?
<!-- -->
: [StorageClient](https://crawlee.dev/python/api/class/StorageClient) | None, to\_kvs\_configuration?
<!-- -->
: [Configuration](https://crawlee.dev/python/api/class/Configuration) | None, \*: , skipkeys: NotRequired\[bool], ensure\_ascii: NotRequired\[bool], check\_circular: NotRequired\[bool], allow\_nan: NotRequired\[bool], cls: NotRequired\[[type](https://crawlee.dev/python/api/class/SitemapSource#type)\[json.JSONEncoder]], indent: NotRequired\[int], separators: NotRequired\[tuple\[str, str]], default: NotRequired\[Callable], sort\_keys: NotRequired\[bool]): None
* **async **export\_to**(key: str, content\_type: Literal\[csv], to\_kvs\_id?
<!-- -->
: str | None, to\_kvs\_name?
<!-- -->
: str | None, to\_kvs\_storage\_client?
<!-- -->
: [StorageClient](https://crawlee.dev/python/api/class/StorageClient) | None, to\_kvs\_configuration?
<!-- -->
: [Configuration](https://crawlee.dev/python/api/class/Configuration) | None, \*: , dialect: NotRequired\[str], delimiter: NotRequired\[str], doublequote: NotRequired\[bool], escapechar: NotRequired\[str], lineterminator: NotRequired\[str], quotechar: NotRequired\[str], quoting: NotRequired\[int], skipinitialspace: NotRequired\[bool], strict: NotRequired\[bool]): None
- Export the entire dataset into a specified file stored under a key in a key-value store.
This method consolidates all entries from a specified dataset into one file, which is then saved under a given key in a key-value store. The format of the exported file is determined by the `content_type` parameter. Either the dataset's ID or name should be specified, and similarly, either the target key-value store's ID or name should be used.
***
#### Parameters
* ##### key: str
The key under which to save the data in the key-value store.
* ##### optionalcontent\_type: Literal\[json, csv] = <!-- -->'json'
The format in which to export the data.
* ##### optionalto\_kvs\_id: str | None = <!-- -->None
ID of the key-value store to save the exported file. Specify only one of ID or name.
* ##### optionalto\_kvs\_name: str | None = <!-- -->None
Name of the key-value store to save the exported file. Specify only one of ID or name.
* ##### optionalto\_kvs\_storage\_client: [StorageClient](https://crawlee.dev/python/api/class/StorageClient) | None = <!-- -->None
Storage client to use for the key-value store.
* ##### optionalto\_kvs\_configuration: [Configuration](https://crawlee.dev/python/api/class/Configuration) | None = <!-- -->None
Configuration for the key-value store.
* ##### kwargs: Any
Additional parameters for the export operation, specific to the chosen content type.
#### Returns None
### [**](#get_data)[**](https://github.com/apify/crawlee-python/blob/master//src/crawlee/storages/_dataset.py#L150)get\_data
* **async **get\_data**(\*, offset, limit, clean, desc, fields, omit, unwind, skip\_empty, skip\_hidden, flatten, view): [DatasetItemsListPage](https://crawlee.dev/python/api/class/DatasetItemsListPage)
- Retrieve a paginated list of items from a dataset based on various filtering parameters.
This method provides the flexibility to filter, sort, and modify the appearance of dataset items when listed. Each parameter modifies the result set according to its purpose. The method also supports pagination through 'offset' and 'limit' parameters.
***
#### Parameters
* ##### optionalkeyword-onlyoffset: int = <!-- -->0
Skips the specified number of items at the start.
* ##### optionalkeyword-onlylimit: int | None = <!-- -->999\_999\_999\_999
The maximum number of items to retrieve. Unlimited if None.
* ##### optionalkeyword-onlyclean: bool = <!-- -->False
Return only non-empty items and excludes hidden fields. Shortcut for skip\_hidden and skip\_empty.
* ##### optionalkeyword-onlydesc: bool = <!-- -->False
Set to True to sort results in descending order.
* ##### optionalkeyword-onlyfields: list\[str] | None = <!-- -->None
Fields to include in each item. Sorts fields as specified if provided.
* ##### optionalkeyword-onlyomit: list\[str] | None = <!-- -->None
Fields to exclude from each item.
* ##### optionalkeyword-onlyunwind: list\[str] | None = <!-- -->None
Unwinds items by a specified array field, turning each element into a separate item.
* ##### optionalkeyword-onlyskip\_empty: bool = <!-- -->False
Excludes empty items from the results if True.
* ##### optionalkeyword-onlyskip\_hidden: bool = <!-- -->False
Excludes fields starting with '#' if True.
* ##### optionalkeyword-onlyflatten: list\[str] | None = <!-- -->None
Fields to be flattened in returned items.
* ##### optionalkeyword-onlyview: str | None = <!-- -->None
Specifies the dataset view to be used.
#### Returns [DatasetItemsListPage](https://crawlee.dev/python/api/class/DatasetItemsListPage)
### [**](#get_metadata)[**](https://github.com/apify/crawlee-python/blob/master//src/crawlee/storages/_dataset.py#L96)get\_metadata
* **async **get\_metadata**(): ([DatasetMetadata](https://crawlee.dev/python/api/class/DatasetMetadata) | [KeyValueStoreMetadata](https://crawlee.dev/python/api/class/KeyValueStoreMetadata)) | [RequestQueueMetadata](https://crawlee.dev/python/api/class/RequestQueueMetadata)
- Overrides [Storage.get\_metadata](https://crawlee.dev/python/api/class/Storage#get_metadata)
Get the storage metadata.
***
#### Returns ([DatasetMetadata](https://crawlee.dev/python/api/class/DatasetMetadata) | [KeyValueStoreMetadata](https://crawlee.dev/python/api/class/KeyValueStoreMetadata)) | [RequestQueueMetadata](https://crawlee.dev/python/api/class/RequestQueueMetadata)
### [**](#iterate_items)[**](https://github.com/apify/crawlee-python/blob/master//src/crawlee/storages/_dataset.py#L201)iterate\_items
* **async **iterate\_items**(\*, offset, limit, clean, desc, fields, omit, unwind, skip\_empty, skip\_hidden): AsyncIterator\[dict\[str, Any]]
- Iterate over items in the dataset according to specified filters and sorting.
This method allows for asynchronously iterating through dataset items while applying various filters such as skipping empty items, hiding specific fields, and sorting. It supports pagination via `offset` and `limit` parameters, and can modify the appearance of dataset items using `fields`, `omit`, `unwind`, `skip_empty`, and `skip_hidden` parameters.
***
#### Parameters
* ##### optionalkeyword-onlyoffset: int = <!-- -->0
Skips the specified number of items at the start.
* ##### optionalkeyword-onlylimit: int | None = <!-- -->999\_999\_999\_999
The maximum number of items to retrieve. Unlimited if None.
* ##### optionalkeyword-onlyclean: bool = <!-- -->False
Return only non-empty items and excludes hidden fields. Shortcut for skip\_hidden and skip\_empty.
* ##### optionalkeyword-onlydesc: bool = <!-- -->False
Set to True to sort results in descending order.
* ##### optionalkeyword-onlyfields: list\[str] | None = <!-- -->None
Fields to include in each item. Sorts fields as specified if provided.
* ##### optionalkeyword-onlyomit: list\[str] | None = <!-- -->None
Fields to exclude from each item.
* ##### optionalkeyword-onlyunwind: list\[str] | None = <!-- -->None
Unwinds items by a specified array field, turning each element into a separate item.
* ##### optionalkeyword-onlyskip\_empty: bool = <!-- -->False
Excludes empty items from the results if True.
* ##### optionalkeyword-onlyskip\_hidden: bool = <!-- -->False
Excludes fields starting with '#' if True.
#### Returns AsyncIterator\[dict\[str, Any]]
### [**](#list_items)[**](https://github.com/apify/crawlee-python/blob/master//src/crawlee/storages/_dataset.py#L249)list\_items
* **async **list\_items**(\*, offset, limit, clean, desc, fields, omit, unwind, skip\_empty, skip\_hidden): list\[dict\[str, Any]]
- Retrieve a list of all items from the dataset according to specified filters and sorting.
This method collects all dataset items into a list while applying various filters such as skipping empty items, hiding specific fields, and sorting. It supports pagination via `offset` and `limit` parameters, and can modify the appearance of dataset items using `fields`, `omit`, `unwind`, `skip_empty`, and `skip_hidden` parameters.
***
#### Parameters
* ##### optionalkeyword-onlyoffset: int = <!-- -->0
Skips the specified number of items at the start.
* ##### optionalkeyword-onlylimit: int | None = <!-- -->999\_999\_999\_999
The maximum number of items to retrieve. Unlimited if None.
* ##### optionalkeyword-onlyclean: bool = <!-- -->False
Return only non-empty items and excludes hidden fields. Shortcut for skip\_hidden and skip\_empty.
* ##### optionalkeyword-onlydesc: bool = <!-- -->False
Set to True to sort results in descending order.
* ##### optionalkeyword-onlyfields: list\[str] | None = <!-- -->None
Fields to include in each item. Sorts fields as specified if provided.
* ##### optionalkeyword-onlyomit: list\[str] | None = <!-- -->None
Fields to exclude from each item.
* ##### optionalkeyword-onlyunwind: list\[str] | None = <!-- -->None
Unwinds items by a specified array field, turning each element into a separate item.
* ##### optionalkeyword-onlyskip\_empty: bool = <!-- -->False
Excludes empty items from the results if True.
* ##### optionalkeyword-onlyskip\_hidden: bool = <!-- -->False
Excludes fields starting with '#' if True.
#### Returns list\[dict\[str, Any]]
### [**](#open)[**](https://github.com/apify/crawlee-python/blob/master//src/crawlee/storages/_dataset.py#L101)open
* **async **open**(\*, id, name, alias, configuration, storage\_client): [Storage](https://crawlee.dev/python/api/class/Storage)
- Overrides [Storage.open](https://crawlee.dev/python/api/class/Storage#open)
Open a storage, either restore existing or create a new one.
***
#### Parameters
* ##### optionalkeyword-onlyid: str | None = <!-- -->None
The storage ID.
* ##### optionalkeyword-onlyname: str | None = <!-- -->None
The storage name (global scope, persists across runs). Name can only contain letters "a" through "z", the digits "0" through "9", and the hyphen ("-") but only in the middle of the string (e.g. "my-value-1").
* ##### optionalkeyword-onlyalias: str | None = <!-- -->None
The storage alias (run scope, creates unnamed storage).
* ##### optionalkeyword-onlyconfiguration: [Configuration](https://crawlee.dev/python/api/class/Configuration) | None = <!-- -->None
Configuration object used during the storage creation or restoration process.
* ##### optionalkeyword-onlystorage\_client: [StorageClient](https://crawlee.dev/python/api/class/StorageClient) | None = <!-- -->None
Underlying storage client to use. If not provided, the default global storage client from the service locator will be used.
#### Returns [Storage](https://crawlee.dev/python/api/class/Storage)
### [**](#purge)[**](https://github.com/apify/crawlee-python/blob/master//src/crawlee/storages/_dataset.py#L134)purge
* **async **purge**(): None
- Overrides [Storage.purge](https://crawlee.dev/python/api/class/Storage#purge)
Purge the storage, removing all items from the underlying storage client.
This method does not remove the storage itself, e.g. don't remove the metadata, but clears all items within it.
***
#### Returns None
### [**](#push_data)[**](https://github.com/apify/crawlee-python/blob/master//src/crawlee/storages/_dataset.py#L137)push\_data
* **async **push\_data**(data): None
- Store an object or an array of objects to the dataset.
The size of the data is limited by the receiving API and therefore `push_data()` will only allow objects whose JSON representation is smaller than 9MB. When an array is passed, none of the included objects may be larger than 9MB, but the array itself may be of any size.
***
#### Parameters
* ##### data: list\[dict\[str, Any]] | dict\[str, Any]
A JSON serializable data structure to be stored in the dataset. The JSON representation of each item must be smaller than 9MB.
#### Returns None
## Properties<!-- -->[**](#Properties)
### [**](#id)[**](https://github.com/apify/crawlee-python/blob/master//src/crawlee/storages/_dataset.py#L87)id
**id: str
Overrides [Storage.id](https://crawlee.dev/python/api/class/Storage#id)
Get the storage ID.
### [**](#name)[**](https://github.com/apify/crawlee-python/blob/master//src/crawlee/storages/_dataset.py#L92)name
**name: str | None
Overrides [Storage.name](https://crawlee.dev/python/api/class/Storage#name)
Get the storage name.
---
# DatasetItemsListPage<!-- -->
Model for a single page of dataset items returned from a collection list method.
## Index[**](#Index)
### Properties
* [**count](https://docs.apify.com/sdk/python/sdk/python/reference/class/DatasetItemsListPage.md#count)
* [**desc](https://docs.apify.com/sdk/python/sdk/python/reference/class/DatasetItemsListPage.md#desc)
* [**items](https://docs.apify.com/sdk/python/sdk/python/reference/class/DatasetItemsListPage.md#items)
* [**limit](https://docs.apify.com/sdk/python/sdk/python/reference/class/DatasetItemsListPage.md#limit)
* [**model\_config](https://docs.apify.com/sdk/python/sdk/python/reference/class/DatasetItemsListPage.md#model_config)
* [**offset](https://docs.apify.com/sdk/python/sdk/python/reference/class/DatasetItemsListPage.md#offset)
* [**total](https://docs.apify.com/sdk/python/sdk/python/reference/class/DatasetItemsListPage.md#total)
## Properties<!-- -->[**](#Properties)
### [**](#count)[**](https://github.com/apify/crawlee-python/blob/master//src/crawlee/storage_clients/models.py#L115)count
**count: int
The number of objects returned on this page.
### [**](#desc)[**](https://github.com/apify/crawlee-python/blob/master//src/crawlee/storage_clients/models.py#L127)desc
**desc: bool
Indicates if the returned list is in descending order.
### [**](#items)[**](https://github.com/apify/crawlee-python/blob/master//src/crawlee/storage_clients/models.py#L130)items
**items: list\[dict]
The list of dataset items returned on this page.
### [**](#limit)[**](https://github.com/apify/crawlee-python/blob/master//src/crawlee/storage_clients/models.py#L121)limit
**limit: int
The maximum number of objects to return, as specified in the API call.
### [**](#model_config)[**](https://github.com/apify/crawlee-python/blob/master//src/crawlee/storage_clients/models.py#L113)model\_config
**model\_config: Undefined
### [**](#offset)[**](https://github.com/apify/crawlee-python/blob/master//src/crawlee/storage_clients/models.py#L118)offset
**offset: int
The starting position of the first object returned, as specified in the API call.
### [**](#total)[**](https://github.com/apify/crawlee-python/blob/master//src/crawlee/storage_clients/models.py#L124)total
**total: int
The total number of objects that match the criteria of the API call.
---
# DatasetMetadata<!-- -->
Model for a dataset metadata.
### Hierarchy
* [StorageMetadata](https://crawlee.dev/python/api/class/StorageMetadata)
* *DatasetMetadata*
## Index[**](#Index)
### Properties
* [**accessed\_at](https://docs.apify.com/sdk/python/sdk/python/reference/class/DatasetMetadata.md#accessed_at)
* [**created\_at](https://docs.apify.com/sdk/python/sdk/python/reference/class/DatasetMetadata.md#created_at)
* [**id](https://docs.apify.com/sdk/python/sdk/python/reference/class/DatasetMetadata.md#id)
* [**item\_count](https://docs.apify.com/sdk/python/sdk/python/reference/class/DatasetMetadata.md#item_count)
* [**model\_config](https://docs.apify.com/sdk/python/sdk/python/reference/class/DatasetMetadata.md#model_config)
* [**modified\_at](https://docs.apify.com/sdk/python/sdk/python/reference/class/DatasetMetadata.md#modified_at)
* [**name](https://docs.apify.com/sdk/python/sdk/python/reference/class/DatasetMetadata.md#name)
## Properties<!-- -->[**](#Properties)
### [**](#accessed_at)[**](https://github.com/apify/crawlee-python/blob/master//src/crawlee/storage_clients/models.py#L31)accessed\_at
**accessed\_at: Annotated\[datetime, Field(alias='accessedAt')]
Inherited from [StorageMetadata.accessed\_at](https://crawlee.dev/python/api/class/StorageMetadata#accessed_at)
The timestamp when the storage was last accessed.
### [**](#created_at)[**](https://github.com/apify/crawlee-python/blob/master//src/crawlee/storage_clients/models.py#L34)created\_at
**created\_at: Annotated\[datetime, Field(alias='createdAt')]
Inherited from [StorageMetadata.created\_at](https://crawlee.dev/python/api/class/StorageMetadata#created_at)
The timestamp when the storage was created.
### [**](#id)[**](https://github.com/apify/crawlee-python/blob/master//src/crawlee/storage_clients/models.py#L25)id
**id: Annotated\[str, Field(alias='id')]
Inherited from [StorageMetadata.id](https://crawlee.dev/python/api/class/StorageMetadata#id)
The unique identifier of the storage.
### [**](#item_count)[**](https://github.com/apify/crawlee-python/blob/master//src/crawlee/storage_clients/models.py#L47)item\_count
**item\_count: int
The number of items in the dataset.
### [**](#model_config)[**](https://github.com/apify/crawlee-python/blob/master//src/crawlee/storage_clients/models.py#L45)model\_config
**model\_config: Undefined
Overrides [StorageMetadata.model\_config](https://crawlee.dev/python/api/class/StorageMetadata#model_config)
### [**](#modified_at)[**](https://github.com/apify/crawlee-python/blob/master//src/crawlee/storage_clients/models.py#L37)modified\_at
**modified\_at: Annotated\[datetime, Field(alias='modifiedAt')]
Inherited from [StorageMetadata.modified\_at](https://crawlee.dev/python/api/class/StorageMetadata#modified_at)
The timestamp when the storage was last modified.
### [**](#name)[**](https://github.com/apify/crawlee-python/blob/master//src/crawlee/storage_clients/models.py#L28)name
**name: Annotated\[str | None, Field(alias='name', default=None)]
Inherited from [StorageMetadata.name](https://crawlee.dev/python/api/class/StorageMetadata#name)
The name of the storage.
---
# DeprecatedEvent<!-- -->
## Index[**](#Index)
### Properties
* [**data](https://docs.apify.com/sdk/python/sdk/python/reference/class/DeprecatedEvent.md#data)
* [**name](https://docs.apify.com/sdk/python/sdk/python/reference/class/DeprecatedEvent.md#name)
## Properties<!-- -->[**](#Properties)
### [**](#data)[**](https://github.com/apify/apify-sdk-python/blob/master//src/apify/events/_types.py#L93)data
**data: dict\[str, Any]
### [**](#name)[**](https://github.com/apify/apify-sdk-python/blob/master//src/apify/events/_types.py#L92)name
**name: Literal\[cpuInfo]
---
# EventAbortingData<!-- -->
Data for the aborting event.
## Index[**](#Index)
### Properties
* [**model\_config](https://docs.apify.com/sdk/python/sdk/python/reference/class/EventAbortingData.md#model_config)
## Properties<!-- -->[**](#Properties)
### [**](#model_config)[**](https://github.com/apify/crawlee-python/blob/master//src/crawlee/events/_types.py#L76)model\_config
**model\_config: Undefined
---
# EventExitData<!-- -->
Data for the exit event.
## Index[**](#Index)
### Properties
* [**model\_config](https://docs.apify.com/sdk/python/sdk/python/reference/class/EventExitData.md#model_config)
## Properties<!-- -->[**](#Properties)
### [**](#model_config)[**](https://github.com/apify/crawlee-python/blob/master//src/crawlee/events/_types.py#L83)model\_config
**model\_config: Undefined
---
# EventManager<!-- -->
Manage events and their listeners, enabling registration, emission, and execution control.
It allows for registering event listeners, emitting events, and ensuring all listeners complete their execution. Built on top of `pyee.asyncio.AsyncIOEventEmitter`. It implements additional features such as waiting for all listeners to complete and emitting `PersistState` events at regular intervals.
### Hierarchy
* *EventManager*
* [LocalEventManager](https://crawlee.dev/python/api/class/LocalEventManager)
## Index[**](#Index)
### Methods
* [**\_\_aenter\_\_](https://docs.apify.com/sdk/python/sdk/python/reference/class/EventManager.md#__aenter__)
* [**\_\_aexit\_\_](https://docs.apify.com/sdk/python/sdk/python/reference/class/EventManager.md#__aexit__)
* [**\_\_init\_\_](https://docs.apify.com/sdk/python/sdk/python/reference/class/EventManager.md#__init__)
* [**emit](https://docs.apify.com/sdk/python/sdk/python/reference/class/EventManager.md#emit)
* [**off](https://docs.apify.com/sdk/python/sdk/python/reference/class/EventManager.md#off)
* [**on](https://docs.apify.com/sdk/python/sdk/python/reference/class/EventManager.md#on)
* [**wait\_for\_all\_listeners\_to\_complete](https://docs.apify.com/sdk/python/sdk/python/reference/class/EventManager.md#wait_for_all_listeners_to_complete)
### Properties
* [**active](https://docs.apify.com/sdk/python/sdk/python/reference/class/EventManager.md#active)
## Methods<!-- -->[**](#Methods)
### [**](#__aenter__)[**](https://github.com/apify/crawlee-python/blob/master//src/crawlee/events/_event_manager.py#L104)\_\_aenter\_\_
* **async **\_\_aenter\_\_**(): [EventManager](https://crawlee.dev/python/api/class/EventManager)
- Initialize the event manager upon entering the async context.
***
#### Returns [EventManager](https://crawlee.dev/python/api/class/EventManager)
### [**](#__aexit__)[**](https://github.com/apify/crawlee-python/blob/master//src/crawlee/events/_event_manager.py#L117)\_\_aexit\_\_
* **async **\_\_aexit\_\_**(exc\_type, exc\_value, exc\_traceback): None
- Close the local event manager upon exiting the async context.
This will stop listening for the events, and it will wait for all the event listeners to finish.
***
#### Parameters
* ##### exc\_type: [type](https://crawlee.dev/python/api/class/SitemapSource#type)\[BaseException] | None
* ##### exc\_value: BaseException | None
* ##### exc\_traceback: TracebackType | None
#### Returns None
### [**](#__init__)[**](https://github.com/apify/crawlee-python/blob/master//src/crawlee/events/_event_manager.py#L63)\_\_init\_\_
* ****\_\_init\_\_**(\*, persist\_state\_interval, close\_timeout): None
- Initialize a new instance.
***
#### Parameters
* ##### optionalkeyword-onlypersist\_state\_interval: timedelta = <!-- -->timedelta(minutes=1)
Interval between emitted `PersistState` events to maintain state persistence.
* ##### optionalkeyword-onlyclose\_timeout: timedelta | None = <!-- -->None
Optional timeout for canceling pending event listeners if they exceed this duration.
#### Returns None
### [**](#emit)[**](https://github.com/apify/crawlee-python/blob/master//src/crawlee/events/_event_manager.py#L233)emit
* ****emit**(\*: , event: [Event](https://crawlee.dev/python/api/enum/Event), event\_data: [EventData](https://crawlee.dev/python/api#EventData)): None
* ****emit**(\*: , event: Literal\[Event.PERSIST\_STATE], event\_data: [EventPersistStateData](https://crawlee.dev/python/api/class/EventPersistStateData)): None
* ****emit**(\*: , event: Literal\[Event.SYSTEM\_INFO], event\_data: [EventSystemInfoData](https://crawlee.dev/python/api/class/EventSystemInfoData)): None
* ****emit**(\*: , event: Literal\[Event.MIGRATING], event\_data: [EventMigratingData](https://crawlee.dev/python/api/class/EventMigratingData)): None
* ****emit**(\*: , event: Literal\[Event.ABORTING], event\_data: [EventAbortingData](https://crawlee.dev/python/api/class/EventAbortingData)): None
* ****emit**(\*: , event: Literal\[Event.EXIT], event\_data: [EventExitData](https://crawlee.dev/python/api/class/EventExitData)): None
* ****emit**(\*: , event: Literal\[Event.CRAWLER\_STATUS], event\_data: [EventCrawlerStatusData](https://crawlee.dev/python/api/class/EventCrawlerStatusData)): None
* ****emit**(\*: , event: [Event](https://crawlee.dev/python/api/enum/Event), event\_data: Any): None
- Emit an event with the associated data to all registered listeners.
***
#### Parameters
* ##### keyword-onlyevent: [Event](https://crawlee.dev/python/api/enum/Event)
The event which will be emitted.
* ##### keyword-onlyevent\_data: [EventData](https://crawlee.dev/python/api#EventData)
The data which will be passed to the event listeners.
#### Returns None
### [**](#off)[**](https://github.com/apify/crawlee-python/blob/master//src/crawlee/events/_event_manager.py#L201)off
* ****off**(\*, event, listener): None
- Remove a specific listener or all listeners for an event.
***
#### Parameters
* ##### keyword-onlyevent: [Event](https://crawlee.dev/python/api/enum/Event)
The Actor event for which to remove listeners.
* ##### optionalkeyword-onlylistener: [EventListener](https://crawlee.dev/python/api#EventListener)\[Any] | None = <!-- -->None
The listener which is supposed to be removed. If not passed, all listeners of this event are removed.
#### Returns None
### [**](#on)[**](https://github.com/apify/crawlee-python/blob/master//src/crawlee/events/_event_manager.py#L155)on
* ****on**(\*: , event: [Event](https://crawlee.dev/python/api/enum/Event), listener: [EventListener](https://crawlee.dev/python/api#EventListener)\[Any]): None
* ****on**(\*: , event: Literal\[Event.PERSIST\_STATE], listener: [EventListener](https://crawlee.dev/python/api#EventListener)\[[EventPersistStateData](https://crawlee.dev/python/api/class/EventPersistStateData)]): None
* ****on**(\*: , event: Literal\[Event.SYSTEM\_INFO], listener: [EventListener](https://crawlee.dev/python/api#EventListener)\[[EventSystemInfoData](https://crawlee.dev/python/api/class/EventSystemInfoData)]): None
* ****on**(\*: , event: Literal\[Event.MIGRATING], listener: [EventListener](https://crawlee.dev/python/api#EventListener)\[[EventMigratingData](https://crawlee.dev/python/api/class/EventMigratingData)]): None
* ****on**(\*: , event: Literal\[Event.ABORTING], listener: [EventListener](https://crawlee.dev/python/api#EventListener)\[[EventAbortingData](https://crawlee.dev/python/api/class/EventAbortingData)]): None
* ****on**(\*: , event: Literal\[Event.EXIT], listener: [EventListener](https://crawlee.dev/python/api#EventListener)\[[EventExitData](https://crawlee.dev/python/api/class/EventExitData)]): None
* ****on**(\*: , event: Literal\[Event.CRAWLER\_STATUS], listener: [EventListener](https://crawlee.dev/python/api#EventListener)\[[EventCrawlerStatusData](https://crawlee.dev/python/api/class/EventCrawlerStatusData)]): None
* ****on**(\*: , event: [Event](https://crawlee.dev/python/api/enum/Event), listener: [EventListener](https://crawlee.dev/python/api#EventListener)\[None]): None
- Register an event listener for a specific event.
***
#### Parameters
* ##### keyword-onlyevent: [Event](https://crawlee.dev/python/api/enum/Event)
The event for which to listen to.
* ##### keyword-onlylistener: [EventListener](https://crawlee.dev/python/api#EventListener)\[Any]
The function (sync or async) which is to be called when the event is emitted.
#### Returns None
### [**](#wait_for_all_listeners_to_complete)[**](https://github.com/apify/crawlee-python/blob/master//src/crawlee/events/_event_manager.py#L243)wait\_for\_all\_listeners\_to\_complete
* **async **wait\_for\_all\_listeners\_to\_complete**(\*, timeout): None
- Wait for all currently executing event listeners to complete.
***
#### Parameters
* ##### optionalkeyword-onlytimeout: timedelta | None = <!-- -->None
The maximum time to wait for the event listeners to finish. If they do not complete within the specified timeout, they will be canceled.
#### Returns None
## Properties<!-- -->[**](#Properties)
### [**](#active)[**](https://github.com/apify/crawlee-python/blob/master//src/crawlee/events/_event_manager.py#L100)active
**active: bool
Indicate whether the context is active.
---
# EventMigratingData<!-- -->
Data for the migrating event.
## Index[**](#Index)
### Properties
* [**model\_config](https://docs.apify.com/sdk/python/sdk/python/reference/class/EventMigratingData.md#model_config)
* [**time\_remaining](https://docs.apify.com/sdk/python/sdk/python/reference/class/EventMigratingData.md#time_remaining)
## Properties<!-- -->[**](#Properties)
### [**](#model_config)[**](https://github.com/apify/crawlee-python/blob/master//src/crawlee/events/_types.py#L65)model\_config
**model\_config: Undefined
### [**](#time_remaining)[**](https://github.com/apify/crawlee-python/blob/master//src/crawlee/events/_types.py#L69)time\_remaining
**time\_remaining: [timedelta\_secs](https://crawlee.dev/python/api#timedelta_secs) | None
---
# EventPersistStateData<!-- -->
Data for the persist state event.
## Index[**](#Index)
### Properties
* [**is\_migrating](https://docs.apify.com/sdk/python/sdk/python/reference/class/EventPersistStateData.md#is_migrating)
* [**model\_config](https://docs.apify.com/sdk/python/sdk/python/reference/class/EventPersistStateData.md#model_config)
## Properties<!-- -->[**](#Properties)
### [**](#is_migrating)[**](https://github.com/apify/crawlee-python/blob/master//src/crawlee/events/_types.py#L45)is\_migrating
**is\_migrating: bool
### [**](#model_config)[**](https://github.com/apify/crawlee-python/blob/master//src/crawlee/events/_types.py#L43)model\_config
**model\_config: Undefined
---
# EventSystemInfoData<!-- -->
Data for the system info event.
## Index[**](#Index)
### Properties
* [**cpu\_info](https://docs.apify.com/sdk/python/sdk/python/reference/class/EventSystemInfoData.md#cpu_info)
* [**memory\_info](https://docs.apify.com/sdk/python/sdk/python/reference/class/EventSystemInfoData.md#memory_info)
* [**model\_config](https://docs.apify.com/sdk/python/sdk/python/reference/class/EventSystemInfoData.md#model_config)
## Properties<!-- -->[**](#Properties)
### [**](#cpu_info)[**](https://github.com/apify/crawlee-python/blob/master//src/crawlee/events/_types.py#L54)cpu\_info
**cpu\_info: [CpuInfo](https://crawlee.dev/python/api/class/CpuInfo)
### [**](#memory_info)[**](https://github.com/apify/crawlee-python/blob/master//src/crawlee/events/_types.py#L55)memory\_info
**memory\_info: [MemoryUsageInfo](https://crawlee.dev/python/api/class/MemoryUsageInfo)
### [**](#model_config)[**](https://github.com/apify/crawlee-python/blob/master//src/crawlee/events/_types.py#L52)model\_config
**model\_config: Undefined
---
# EventWithoutData<!-- -->
## Index[**](#Index)
### Properties
* [**data](https://docs.apify.com/sdk/python/sdk/python/reference/class/EventWithoutData.md#data)
* [**name](https://docs.apify.com/sdk/python/sdk/python/reference/class/EventWithoutData.md#name)
## Properties<!-- -->[**](#Properties)
### [**](#data)[**](https://github.com/apify/apify-sdk-python/blob/master//src/apify/events/_types.py#L87)data
**data: Any
### [**](#name)[**](https://github.com/apify/apify-sdk-python/blob/master//src/apify/events/_types.py#L79)name
**name: Literal\[Event.SESSION\_RETIRED, Event.BROWSER\_LAUNCHED, Event.BROWSER\_RETIRED, Event.BROWSER\_CLOSED, Event.PAGE\_CREATED, Event.PAGE\_CLOSED]
---
# ExitEvent<!-- -->
## Index[**](#Index)
### Properties
* [**data](https://docs.apify.com/sdk/python/sdk/python/reference/class/ExitEvent.md#data)
* [**name](https://docs.apify.com/sdk/python/sdk/python/reference/class/ExitEvent.md#name)
## Properties<!-- -->[**](#Properties)
### [**](#data)[**](https://github.com/apify/apify-sdk-python/blob/master//src/apify/events/_types.py#L74)data
**data: EventExitData
### [**](#name)[**](https://github.com/apify/apify-sdk-python/blob/master//src/apify/events/_types.py#L73)name
**name: Literal\[Event.EXIT]
---
# FileSystemStorageClient<!-- -->
File system implementation of the storage client.
This storage client provides access to datasets, key-value stores, and request queues that persist data to the local file system. Each storage type is implemented with its own specific file system client that stores data in a structured directory hierarchy.
Data is stored in JSON format in predictable file paths, making it easy to inspect and manipulate the stored data outside of the Crawlee application if needed.
All data persists between program runs but is limited to access from the local machine where the files are stored.
Warning: This storage client is not safe for concurrent access from multiple crawler processes. Use it only when running a single crawler process at a time.
### Hierarchy
* [StorageClient](https://crawlee.dev/python/api/class/StorageClient)
* *FileSystemStorageClient*
## Index[**](#Index)
### Methods
* [**create\_dataset\_client](https://docs.apify.com/sdk/python/sdk/python/reference/class/FileSystemStorageClient.md#create_dataset_client)
* [**create\_kvs\_client](https://docs.apify.com/sdk/python/sdk/python/reference/class/FileSystemStorageClient.md#create_kvs_client)
* [**create\_rq\_client](https://docs.apify.com/sdk/python/sdk/python/reference/class/FileSystemStorageClient.md#create_rq_client)
* [**get\_rate\_limit\_errors](https://docs.apify.com/sdk/python/sdk/python/reference/class/FileSystemStorageClient.md#get_rate_limit_errors)
* [**get\_storage\_client\_cache\_key](https://docs.apify.com/sdk/python/sdk/python/reference/class/FileSystemStorageClient.md#get_storage_client_cache_key)
## Methods<!-- -->[**](#Methods)
### [**](#create_dataset_client)[**](https://github.com/apify/crawlee-python/blob/master//src/crawlee/storage_clients/_file_system/_storage_client.py#L43)create\_dataset\_client
* **async **create\_dataset\_client**(\*, id, name, alias, configuration): [DatasetClient](https://crawlee.dev/python/api/class/DatasetClient)
- Overrides [StorageClient.create\_dataset\_client](https://crawlee.dev/python/api/class/StorageClient#create_dataset_client)
Create a dataset client.
***
#### Parameters
* ##### optionalkeyword-onlyid: str | None = <!-- -->None
* ##### optionalkeyword-onlyname: str | None = <!-- -->None
* ##### optionalkeyword-onlyalias: str | None = <!-- -->None
* ##### optionalkeyword-onlyconfiguration: [Configuration](https://crawlee.dev/python/api/class/Configuration) | None = <!-- -->None
#### Returns [DatasetClient](https://crawlee.dev/python/api/class/DatasetClient)
### [**](#create_kvs_client)[**](https://github.com/apify/crawlee-python/blob/master//src/crawlee/storage_clients/_file_system/_storage_client.py#L57)create\_kvs\_client
* **async **create\_kvs\_client**(\*, id, name, alias, configuration): [KeyValueStoreClient](https://crawlee.dev/python/api/class/KeyValueStoreClient)
- Overrides [StorageClient.create\_kvs\_client](https://crawlee.dev/python/api/class/StorageClient#create_kvs_client)
Create a key-value store client.
***
#### Parameters
* ##### optionalkeyword-onlyid: str | None = <!-- -->None
* ##### optionalkeyword-onlyname: str | None = <!-- -->None
* ##### optionalkeyword-onlyalias: str | None = <!-- -->None
* ##### optionalkeyword-onlyconfiguration: [Configuration](https://crawlee.dev/python/api/class/Configuration) | None = <!-- -->None
#### Returns [KeyValueStoreClient](https://crawlee.dev/python/api/class/KeyValueStoreClient)
### [**](#create_rq_client)[**](https://github.com/apify/crawlee-python/blob/master//src/crawlee/storage_clients/_file_system/_storage_client.py#L71)create\_rq\_client
* **async **create\_rq\_client**(\*, id, name, alias, configuration): [RequestQueueClient](https://crawlee.dev/python/api/class/RequestQueueClient)
- Overrides [StorageClient.create\_rq\_client](https://crawlee.dev/python/api/class/StorageClient#create_rq_client)
Create a request queue client.
***
#### Parameters
* ##### optionalkeyword-onlyid: str | None = <!-- -->None
* ##### optionalkeyword-onlyname: str | None = <!-- -->None
* ##### optionalkeyword-onlyalias: str | None = <!-- -->None
* ##### optionalkeyword-onlyconfiguration: [Configuration](https://crawlee.dev/python/api/class/Configuration) | None = <!-- -->None
#### Returns [RequestQueueClient](https://crawlee.dev/python/api/class/RequestQueueClient)
### [**](#get_rate_limit_errors)[**](https://github.com/apify/crawlee-python/blob/master//src/crawlee/storage_clients/_base/_storage_client.py#L74)get\_rate\_limit\_errors
* ****get\_rate\_limit\_errors**(): dict\[int, int]
- Inherited from [StorageClient.get\_rate\_limit\_errors](https://crawlee.dev/python/api/class/StorageClient#get_rate_limit_errors)
Return statistics about rate limit errors encountered by the HTTP client in storage client.
***
#### Returns dict\[int, int]
### [**](#get_storage_client_cache_key)[**](https://github.com/apify/crawlee-python/blob/master//src/crawlee/storage_clients/_file_system/_storage_client.py#L38)get\_storage\_client\_cache\_key
* ****get\_storage\_client\_cache\_key**(configuration): Hashable
- Overrides [StorageClient.get\_storage\_client\_cache\_key](https://crawlee.dev/python/api/class/StorageClient#get_storage_client_cache_key)
Return a cache key that can differentiate between different storages of this and other clients.
Can be based on configuration or on the client itself. By default, returns a module and name of the client class.
***
#### Parameters
* ##### configuration: [Configuration](https://crawlee.dev/python/api/class/Configuration)
#### Returns Hashable
---
# FlatPricePerMonthActorPricingInfo<!-- -->
## Index[**](#Index)
### Properties
* [**price\_per\_unit\_usd](https://docs.apify.com/sdk/python/sdk/python/reference/class/FlatPricePerMonthActorPricingInfo.md#price_per_unit_usd)
* [**pricing\_model](https://docs.apify.com/sdk/python/sdk/python/reference/class/FlatPricePerMonthActorPricingInfo.md#pricing_model)
* [**trial\_minutes](https://docs.apify.com/sdk/python/sdk/python/reference/class/FlatPricePerMonthActorPricingInfo.md#trial_minutes)
## Properties<!-- -->[**](#Properties)
### [**](#price_per_unit_usd)[**](https://github.com/apify/apify-sdk-python/blob/master//src/apify/_models.py#L144)price\_per\_unit\_usd
**price\_per\_unit\_usd: Decimal
### [**](#pricing_model)[**](https://github.com/apify/apify-sdk-python/blob/master//src/apify/_models.py#L142)pricing\_model
**pricing\_model: Literal\[FLAT\_PRICE\_PER\_MONTH]
### [**](#trial_minutes)[**](https://github.com/apify/apify-sdk-python/blob/master//src/apify/_models.py#L143)trial\_minutes
**trial\_minutes: int | None
---
# FreeActorPricingInfo<!-- -->
## Index[**](#Index)
### Properties
* [**pricing\_model](https://docs.apify.com/sdk/python/sdk/python/reference/class/FreeActorPricingInfo.md#pricing_model)
## Properties<!-- -->[**](#Properties)
### [**](#pricing_model)[**](https://github.com/apify/apify-sdk-python/blob/master//src/apify/_models.py#L138)pricing\_model
**pricing\_model: Literal\[FREE]
---
# KeyValueStore<!-- -->
Key-value store is a storage for reading and writing data records with unique key identifiers.
The key-value store class acts as a high-level interface for storing, retrieving, and managing data records identified by unique string keys. It abstracts away the underlying storage implementation details, allowing you to work with the same API regardless of whether data is stored in memory, on disk, or in the cloud.
Each data record is associated with a specific MIME content type, allowing storage of various data formats such as JSON, text, images, HTML snapshots or any binary data. This class is commonly used to store inputs, outputs, and other artifacts of crawler operations.
You can instantiate a key-value store using the `open` class method, which will create a store with the specified name or id. The underlying storage implementation is determined by the configured storage client.
### Usage
from crawlee.storages import KeyValueStore
Open a named key-value store
kvs = await KeyValueStore.open(name='my-store')
Store and retrieve data
await kvs.set_value('product-1234.json', [{'name': 'Smartphone', 'price': 799.99}]) product = await kvs.get_value('product-1234')
### Hierarchy
* [Storage](https://crawlee.dev/python/api/class/Storage)
* *KeyValueStore*
## Index[**](#Index)
### Methods
* [**\_\_init\_\_](https://docs.apify.com/sdk/python/sdk/python/reference/class/KeyValueStore.md#__init__)
* [**delete\_value](https://docs.apify.com/sdk/python/sdk/python/reference/class/KeyValueStore.md#delete_value)
* [**drop](https://docs.apify.com/sdk/python/sdk/python/reference/class/KeyValueStore.md#drop)
* [**get\_auto\_saved\_value](https://docs.apify.com/sdk/python/sdk/python/reference/class/KeyValueStore.md#get_auto_saved_value)
* [**get\_metadata](https://docs.apify.com/sdk/python/sdk/python/reference/class/KeyValueStore.md#get_metadata)
* [**get\_public\_url](https://docs.apify.com/sdk/python/sdk/python/reference/class/KeyValueStore.md#get_public_url)
* [**get\_value](https://docs.apify.com/sdk/python/sdk/python/reference/class/KeyValueStore.md#get_value)
* [**iterate\_keys](https://docs.apify.com/sdk/python/sdk/python/reference/class/KeyValueStore.md#iterate_keys)
* [**list\_keys](https://docs.apify.com/sdk/python/sdk/python/reference/class/KeyValueStore.md#list_keys)
* [**open](https://docs.apify.com/sdk/python/sdk/python/reference/class/KeyValueStore.md#open)
* [**persist\_autosaved\_values](https://docs.apify.com/sdk/python/sdk/python/reference/class/KeyValueStore.md#persist_autosaved_values)
* [**purge](https://docs.apify.com/sdk/python/sdk/python/reference/class/KeyValueStore.md#purge)
* [**record\_exists](https://docs.apify.com/sdk/python/sdk/python/reference/class/KeyValueStore.md#record_exists)
* [**set\_value](https://docs.apify.com/sdk/python/sdk/python/reference/class/KeyValueStore.md#set_value)
### Properties
* [**id](https://docs.apify.com/sdk/python/sdk/python/reference/class/KeyValueStore.md#id)
* [**name](https://docs.apify.com/sdk/python/sdk/python/reference/class/KeyValueStore.md#name)
## Methods<!-- -->[**](#Methods)
### [**](#__init__)[**](https://github.com/apify/crawlee-python/blob/master//src/crawlee/storages/_key_value_store.py#L78)\_\_init\_\_
* ****\_\_init\_\_**(client, id, name): None
- Initialize a new instance.
Preferably use the `KeyValueStore.open` constructor to create a new instance.
***
#### Parameters
* ##### client: [KeyValueStoreClient](https://crawlee.dev/python/api/class/KeyValueStoreClient)
An instance of a storage client.
* ##### id: str
The unique identifier of the storage.
* ##### name: str | None
The name of the storage, if available.
#### Returns None
### [**](#delete_value)[**](https://github.com/apify/crawlee-python/blob/master//src/crawlee/storages/_key_value_store.py#L188)delete\_value
* **async **delete\_value**(key): None
- Delete a value from the KVS.
***
#### Parameters
* ##### key: str
Key of the record to delete.
#### Returns None
### [**](#drop)[**](https://github.com/apify/crawlee-python/blob/master//src/crawlee/storages/_key_value_store.py#L140)drop
* **async **drop**(): None
- Overrides [Storage.drop](https://crawlee.dev/python/api/class/Storage#drop)
Drop the storage, removing it from the underlying storage client and clearing the cache.
***
#### Returns None
### [**](#get_auto_saved_value)[**](https://github.com/apify/crawlee-python/blob/master//src/crawlee/storages/_key_value_store.py#L262)get\_auto\_saved\_value
* **async **get\_auto\_saved\_value**(key, default\_value): dict\[str, JsonSerializable]
- Get a value from KVS that will be automatically saved on changes.
***
#### Parameters
* ##### key: str
Key of the record, to store the value.
* ##### optionaldefault\_value: dict\[str, JsonSerializable] | None = <!-- -->None
Value to be used if the record does not exist yet. Should be a dictionary.
#### Returns dict\[str, JsonSerializable]
### [**](#get_metadata)[**](https://github.com/apify/crawlee-python/blob/master//src/crawlee/storages/_key_value_store.py#L108)get\_metadata
* **async **get\_metadata**(): ([DatasetMetadata](https://crawlee.dev/python/api/class/DatasetMetadata) | [KeyValueStoreMetadata](https://crawlee.dev/python/api/class/KeyValueStoreMetadata)) | [RequestQueueMetadata](https://crawlee.dev/python/api/class/RequestQueueMetadata)
- Overrides [Storage.get\_metadata](https://crawlee.dev/python/api/class/Storage#get_metadata)
Get the storage metadata.
***
#### Returns ([DatasetMetadata](https://crawlee.dev/python/api/class/DatasetMetadata) | [KeyValueStoreMetadata](https://crawlee.dev/python/api/class/KeyValueStoreMetadata)) | [RequestQueueMetadata](https://crawlee.dev/python/api/class/RequestQueueMetadata)
### [**](#get_public_url)[**](https://github.com/apify/crawlee-python/blob/master//src/crawlee/storages/_key_value_store.py#L251)get\_public\_url
* **async **get\_public\_url**(key): str
- Get the public URL for the given key.
***
#### Parameters
* ##### key: str
Key of the record for which URL is required.
#### Returns str
### [**](#get_value)[**](https://github.com/apify/crawlee-python/blob/master//src/crawlee/storages/_key_value_store.py#L160)get\_value
* **async **get\_value**(key: str, default\_value?
<!-- -->
: [T](https://crawlee.dev/python/api#T) | None): [T](https://crawlee.dev/python/api#T) | None
* **async **get\_value**(key: str): Any
* **async **get\_value**(key: str, default\_value: [T](https://crawlee.dev/python/api#T)): [T](https://crawlee.dev/python/api#T)
* **async **get\_value**(key: str, default\_value?
<!-- -->
: [T](https://crawlee.dev/python/api#T) | None): [T](https://crawlee.dev/python/api#T) | None
- Get a value from the KVS.
***
#### Parameters
* ##### key: str
Key of the record to retrieve.
* ##### optionaldefault\_value: [T](https://crawlee.dev/python/api#T) | None = <!-- -->None
Default value returned in case the record does not exist.
#### Returns [T](https://crawlee.dev/python/api#T) | None
### [**](#iterate_keys)[**](https://github.com/apify/crawlee-python/blob/master//src/crawlee/storages/_key_value_store.py#L196)iterate\_keys
* **async **iterate\_keys**(exclusive\_start\_key, limit): AsyncIterator\[[KeyValueStoreRecordMetadata](https://crawlee.dev/python/api/class/KeyValueStoreRecordMetadata)]
- Iterate over the existing keys in the KVS.
***
#### Parameters
* ##### optionalexclusive\_start\_key: str | None = <!-- -->None
Key to start the iteration from.
* ##### optionallimit: int | None = <!-- -->None
Maximum number of keys to return. None means no limit.
#### Returns AsyncIterator\[[KeyValueStoreRecordMetadata](https://crawlee.dev/python/api/class/KeyValueStoreRecordMetadata)]
### [**](#list_keys)[**](https://github.com/apify/crawlee-python/blob/master//src/crawlee/storages/_key_value_store.py#L216)list\_keys
* **async **list\_keys**(exclusive\_start\_key, limit): list\[[KeyValueStoreRecordMetadata](https://crawlee.dev/python/api/class/KeyValueStoreRecordMetadata)]
- List all the existing keys in the KVS.
It uses client's `iterate_keys` method to get the keys.
***
#### Parameters
* ##### optionalexclusive\_start\_key: str | None = <!-- -->None
Key to start the iteration from.
* ##### optionallimit: int = <!-- -->1000
Maximum number of keys to return.
#### Returns list\[[KeyValueStoreRecordMetadata](https://crawlee.dev/python/api/class/KeyValueStoreRecordMetadata)]
### [**](#open)[**](https://github.com/apify/crawlee-python/blob/master//src/crawlee/storages/_key_value_store.py#L113)open
* **async **open**(\*, id, name, alias, configuration, storage\_client): [Storage](https://crawlee.dev/python/api/class/Storage)
- Overrides [Storage.open](https://crawlee.dev/python/api/class/Storage#open)
Open a storage, either restore existing or create a new one.
***
#### Parameters
* ##### optionalkeyword-onlyid: str | None = <!-- -->None
The storage ID.
* ##### optionalkeyword-onlyname: str | None = <!-- -->None
The storage name (global scope, persists across runs). Name can only contain letters "a" through "z", the digits "0" through "9", and the hyphen ("-") but only in the middle of the string (e.g. "my-value-1").
* ##### optionalkeyword-onlyalias: str | None = <!-- -->None
The storage alias (run scope, creates unnamed storage).
* ##### optionalkeyword-onlyconfiguration: [Configuration](https://crawlee.dev/python/api/class/Configuration) | None = <!-- -->None
Configuration object used during the storage creation or restoration process.
* ##### optionalkeyword-onlystorage\_client: [StorageClient](https://crawlee.dev/python/api/class/StorageClient) | None = <!-- -->None
Underlying storage client to use. If not provided, the default global storage client from the service locator will be used.
#### Returns [Storage](https://crawlee.dev/python/api/class/Storage)
### [**](#persist_autosaved_values)[**](https://github.com/apify/crawlee-python/blob/master//src/crawlee/storages/_key_value_store.py#L299)persist\_autosaved\_values
* **async **persist\_autosaved\_values**(): None
- Force autosaved values to be saved without waiting for an event in Event Manager.
***
#### Returns None
### [**](#purge)[**](https://github.com/apify/crawlee-python/blob/master//src/crawlee/storages/_key_value_store.py#L148)purge
* **async **purge**(): None
- Overrides [Storage.purge](https://crawlee.dev/python/api/class/Storage#purge)
Purge the storage, removing all items from the underlying storage client.
This method does not remove the storage itself, e.g. don't remove the metadata, but clears all items within it.
***
#### Returns None
### [**](#record_exists)[**](https://github.com/apify/crawlee-python/blob/master//src/crawlee/storages/_key_value_store.py#L240)record\_exists
* **async **record\_exists**(key): bool
- Check if a record with the given key exists in the key-value store.
***
#### Parameters
* ##### key: str
Key of the record to check for existence.
#### Returns bool
### [**](#set_value)[**](https://github.com/apify/crawlee-python/blob/master//src/crawlee/storages/_key_value_store.py#L173)set\_value
* **async **set\_value**(key, value, content\_type): None
- Set a value in the KVS.
***
#### Parameters
* ##### key: str
Key of the record to set.
* ##### value: Any
Value to set.
* ##### optionalcontent\_type: str | None = <!-- -->None
The MIME content type string.
#### Returns None
## Properties<!-- -->[**](#Properties)
### [**](#id)[**](https://github.com/apify/crawlee-python/blob/master//src/crawlee/storages/_key_value_store.py#L99)id
**id: str
Overrides [Storage.id](https://crawlee.dev/python/api/class/Storage#id)
Get the storage ID.
### [**](#name)[**](https://github.com/apify/crawlee-python/blob/master//src/crawlee/storages/_key_value_store.py#L104)name
**name: str | None
Overrides [Storage.name](https://crawlee.dev/python/api/class/Storage#name)
Get the storage name.
---
# KeyValueStoreKeyInfo<!-- -->
Model for a key-value store key info.
Only internal structure.
## Index[**](#Index)
### Properties
* [**key](https://docs.apify.com/sdk/python/sdk/python/reference/class/KeyValueStoreKeyInfo.md#key)
* [**model\_config](https://docs.apify.com/sdk/python/sdk/python/reference/class/KeyValueStoreKeyInfo.md#model_config)
* [**size](https://docs.apify.com/sdk/python/sdk/python/reference/class/KeyValueStoreKeyInfo.md#size)
## Properties<!-- -->[**](#Properties)
### [**](#key)[**](https://github.com/apify/apify-sdk-python/blob/master//src/apify/storage_clients/_apify/_models.py#L71)key
**key: str
### [**](#model_config)[**](https://github.com/apify/apify-sdk-python/blob/master//src/apify/storage_clients/_apify/_models.py#L69)model\_config
**model\_config: Undefined
### [**](#size)[**](https://github.com/apify/apify-sdk-python/blob/master//src/apify/storage_clients/_apify/_models.py#L72)size
**size: int
---
# KeyValueStoreListKeysPage<!-- -->
Model for listing keys in the key-value store.
Only internal structure.
## Index[**](#Index)
### Properties
* [**count](https://docs.apify.com/sdk/python/sdk/python/reference/class/KeyValueStoreListKeysPage.md#count)
* [**exclusive\_start\_key](https://docs.apify.com/sdk/python/sdk/python/reference/class/KeyValueStoreListKeysPage.md#exclusive_start_key)
* [**is\_truncated](https://docs.apify.com/sdk/python/sdk/python/reference/class/KeyValueStoreListKeysPage.md#is_truncated)
* [**items](https://docs.apify.com/sdk/python/sdk/python/reference/class/KeyValueStoreListKeysPage.md#items)
* [**limit](https://docs.apify.com/sdk/python/sdk/python/reference/class/KeyValueStoreListKeysPage.md#limit)
* [**model\_config](https://docs.apify.com/sdk/python/sdk/python/reference/class/KeyValueStoreListKeysPage.md#model_config)
* [**next\_exclusive\_start\_key](https://docs.apify.com/sdk/python/sdk/python/reference/class/KeyValueStoreListKeysPage.md#next_exclusive_start_key)
## Properties<!-- -->[**](#Properties)
### [**](#count)[**](https://github.com/apify/apify-sdk-python/blob/master//src/apify/storage_clients/_apify/_models.py#L83)count
**count: int
### [**](#exclusive_start_key)[**](https://github.com/apify/apify-sdk-python/blob/master//src/apify/storage_clients/_apify/_models.py#L87)exclusive\_start\_key
**exclusive\_start\_key: str | None
### [**](#is_truncated)[**](https://github.com/apify/apify-sdk-python/blob/master//src/apify/storage_clients/_apify/_models.py#L85)is\_truncated
**is\_truncated: bool
### [**](#items)[**](https://github.com/apify/apify-sdk-python/blob/master//src/apify/storage_clients/_apify/_models.py#L86)items
**items: list\[[KeyValueStoreKeyInfo](https://docs.apify.com/sdk/python/sdk/python/reference/class/KeyValueStoreKeyInfo.md)]
### [**](#limit)[**](https://github.com/apify/apify-sdk-python/blob/master//src/apify/storage_clients/_apify/_models.py#L84)limit
**limit: int
### [**](#model_config)[**](https://github.com/apify/apify-sdk-python/blob/master//src/apify/storage_clients/_apify/_models.py#L81)model\_config
**model\_config: Undefined
### [**](#next_exclusive_start_key)[**](https://github.com/apify/apify-sdk-python/blob/master//src/apify/storage_clients/_apify/_models.py#L88)next\_exclusive\_start\_key
**next\_exclusive\_start\_key: str | None
---
# KeyValueStoreMetadata<!-- -->
Model for a key-value store metadata.
### Hierarchy
* [StorageMetadata](https://crawlee.dev/python/api/class/StorageMetadata)
* *KeyValueStoreMetadata*
## Index[**](#Index)
### Properties
* [**accessed\_at](https://docs.apify.com/sdk/python/sdk/python/reference/class/KeyValueStoreMetadata.md#accessed_at)
* [**created\_at](https://docs.apify.com/sdk/python/sdk/python/reference/class/KeyValueStoreMetadata.md#created_at)
* [**id](https://docs.apify.com/sdk/python/sdk/python/reference/class/KeyValueStoreMetadata.md#id)
* [**model\_config](https://docs.apify.com/sdk/python/sdk/python/reference/class/KeyValueStoreMetadata.md#model_config)
* [**modified\_at](https://docs.apify.com/sdk/python/sdk/python/reference/class/KeyValueStoreMetadata.md#modified_at)
* [**name](https://docs.apify.com/sdk/python/sdk/python/reference/class/KeyValueStoreMetadata.md#name)
## Properties<!-- -->[**](#Properties)
### [**](#accessed_at)[**](https://github.com/apify/crawlee-python/blob/master//src/crawlee/storage_clients/models.py#L31)accessed\_at
**accessed\_at: Annotated\[datetime, Field(alias='accessedAt')]
Inherited from [StorageMetadata.accessed\_at](https://crawlee.dev/python/api/class/StorageMetadata#accessed_at)
The timestamp when the storage was last accessed.
### [**](#created_at)[**](https://github.com/apify/crawlee-python/blob/master//src/crawlee/storage_clients/models.py#L34)created\_at
**created\_at: Annotated\[datetime, Field(alias='createdAt')]
Inherited from [StorageMetadata.created\_at](https://crawlee.dev/python/api/class/StorageMetadata#created_at)
The timestamp when the storage was created.
### [**](#id)[**](https://github.com/apify/crawlee-python/blob/master//src/crawlee/storage_clients/models.py#L25)id
**id: Annotated\[str, Field(alias='id')]
Inherited from [StorageMetadata.id](https://crawlee.dev/python/api/class/StorageMetadata#id)
The unique identifier of the storage.
### [**](#model_config)[**](https://github.com/apify/crawlee-python/blob/master//src/crawlee/storage_clients/models.py#L55)model\_config
**model\_config: Undefined
Overrides [StorageMetadata.model\_config](https://crawlee.dev/python/api/class/StorageMetadata#model_config)
### [**](#modified_at)[**](https://github.com/apify/crawlee-python/blob/master//src/crawlee/storage_clients/models.py#L37)modified\_at
**modified\_at: Annotated\[datetime, Field(alias='modifiedAt')]
Inherited from [StorageMetadata.modified\_at](https://crawlee.dev/python/api/class/StorageMetadata#modified_at)
The timestamp when the storage was last modified.
### [**](#name)[**](https://github.com/apify/crawlee-python/blob/master//src/crawlee/storage_clients/models.py#L28)name
**name: Annotated\[str | None, Field(alias='name', default=None)]
Inherited from [StorageMetadata.name](https://crawlee.dev/python/api/class/StorageMetadata#name)
The name of the storage.
---
# KeyValueStoreRecord<!-- -->
Model for a key-value store record.
### Hierarchy
* [KeyValueStoreRecordMetadata](https://crawlee.dev/python/api/class/KeyValueStoreRecordMetadata)
* *KeyValueStoreRecord*
## Index[**](#Index)
### Properties
* [**content\_type](https://docs.apify.com/sdk/python/sdk/python/reference/class/KeyValueStoreRecord.md#content_type)
* [**key](https://docs.apify.com/sdk/python/sdk/python/reference/class/KeyValueStoreRecord.md#key)
* [**model\_config](https://docs.apify.com/sdk/python/sdk/python/reference/class/KeyValueStoreRecord.md#model_config)
* [**size](https://docs.apify.com/sdk/python/sdk/python/reference/class/KeyValueStoreRecord.md#size)
* [**value](https://docs.apify.com/sdk/python/sdk/python/reference/class/KeyValueStoreRecord.md#value)
## Properties<!-- -->[**](#Properties)
### [**](#content_type)[**](https://github.com/apify/crawlee-python/blob/master//src/crawlee/storage_clients/models.py#L89)content\_type
**content\_type: Annotated\[str, Field(alias='contentType')]
Inherited from [KeyValueStoreRecordMetadata.content\_type](https://crawlee.dev/python/api/class/KeyValueStoreRecordMetadata#content_type)
The MIME type of the record.
Describe the format and type of data stored in the record, following the MIME specification.
### [**](#key)[**](https://github.com/apify/crawlee-python/blob/master//src/crawlee/storage_clients/models.py#L83)key
**key: Annotated\[str, Field(alias='key')]
Inherited from [KeyValueStoreRecordMetadata.key](https://crawlee.dev/python/api/class/KeyValueStoreRecordMetadata#key)
The key of the record.
A unique identifier for the record in the key-value store.
### [**](#model_config)[**](https://github.com/apify/crawlee-python/blob/master//src/crawlee/storage_clients/models.py#L103)model\_config
**model\_config: Undefined
Overrides [KeyValueStoreRecordMetadata.model\_config](https://crawlee.dev/python/api/class/KeyValueStoreRecordMetadata#model_config)
### [**](#size)[**](https://github.com/apify/crawlee-python/blob/master//src/crawlee/storage_clients/models.py#L95)size
**size: Annotated\[int | None, Field(alias='size', default=None)]
Inherited from [KeyValueStoreRecordMetadata.size](https://crawlee.dev/python/api/class/KeyValueStoreRecordMetadata#size)
The size of the record in bytes.
### [**](#value)[**](https://github.com/apify/crawlee-python/blob/master//src/crawlee/storage_clients/models.py#L105)value
**value: [KvsValueType](https://crawlee.dev/python/api#KvsValueType)
The value of the record.
---
# KeyValueStoreRecordMetadata<!-- -->
Model for a key-value store record metadata.
### Hierarchy
* *KeyValueStoreRecordMetadata*
* [KeyValueStoreRecord](https://crawlee.dev/python/api/class/KeyValueStoreRecord)
## Index[**](#Index)
### Properties
* [**content\_type](https://docs.apify.com/sdk/python/sdk/python/reference/class/KeyValueStoreRecordMetadata.md#content_type)
* [**key](https://docs.apify.com/sdk/python/sdk/python/reference/class/KeyValueStoreRecordMetadata.md#key)
* [**model\_config](https://docs.apify.com/sdk/python/sdk/python/reference/class/KeyValueStoreRecordMetadata.md#model_config)
* [**size](https://docs.apify.com/sdk/python/sdk/python/reference/class/KeyValueStoreRecordMetadata.md#size)
## Properties<!-- -->[**](#Properties)
### [**](#content_type)[**](https://github.com/apify/crawlee-python/blob/master//src/crawlee/storage_clients/models.py#L89)content\_type
**content\_type: str
The MIME type of the record.
Describe the format and type of data stored in the record, following the MIME specification.
### [**](#key)[**](https://github.com/apify/crawlee-python/blob/master//src/crawlee/storage_clients/models.py#L83)key
**key: str
The key of the record.
A unique identifier for the record in the key-value store.
### [**](#model_config)[**](https://github.com/apify/crawlee-python/blob/master//src/crawlee/storage_clients/models.py#L81)model\_config
**model\_config: Undefined
### [**](#size)[**](https://github.com/apify/crawlee-python/blob/master//src/crawlee/storage_clients/models.py#L95)size
**size: int | None
The size of the record in bytes.
---
# LocalEventManager<!-- -->
Event manager for local environments.
It extends the `EventManager` to emit `SystemInfo` events at regular intervals. The `LocalEventManager` is intended to be used in local environments, where the system metrics are required managing the `Snapshotter` and `AutoscaledPool`.
### Hierarchy
* [EventManager](https://crawlee.dev/python/api/class/EventManager)
* *LocalEventManager*
## Index[**](#Index)
### Methods
* [**\_\_aenter\_\_](https://docs.apify.com/sdk/python/sdk/python/reference/class/LocalEventManager.md#__aenter__)
* [**\_\_aexit\_\_](https://docs.apify.com/sdk/python/sdk/python/reference/class/LocalEventManager.md#__aexit__)
* [**\_\_init\_\_](https://docs.apify.com/sdk/python/sdk/python/reference/class/LocalEventManager.md#__init__)
* [**emit](https://docs.apify.com/sdk/python/sdk/python/reference/class/LocalEventManager.md#emit)
* [**from\_config](https://docs.apify.com/sdk/python/sdk/python/reference/class/LocalEventManager.md#from_config)
* [**off](https://docs.apify.com/sdk/python/sdk/python/reference/class/LocalEventManager.md#off)
* [**on](https://docs.apify.com/sdk/python/sdk/python/reference/class/LocalEventManager.md#on)
* [**wait\_for\_all\_listeners\_to\_complete](https://docs.apify.com/sdk/python/sdk/python/reference/class/LocalEventManager.md#wait_for_all_listeners_to_complete)
### Properties
* [**active](https://docs.apify.com/sdk/python/sdk/python/reference/class/LocalEventManager.md#active)
## Methods<!-- -->[**](#Methods)
### [**](#__aenter__)[**](https://github.com/apify/crawlee-python/blob/master//src/crawlee/events/_local_event_manager.py#L72)\_\_aenter\_\_
* **async **\_\_aenter\_\_**(): [LocalEventManager](https://crawlee.dev/python/api/class/LocalEventManager)
- Overrides [EventManager.\_\_aenter\_\_](https://crawlee.dev/python/api/class/EventManager#__aenter__)
Initialize the local event manager upon entering the async context.
It starts emitting system info events at regular intervals.
***
#### Returns [LocalEventManager](https://crawlee.dev/python/api/class/LocalEventManager)
### [**](#__aexit__)[**](https://github.com/apify/crawlee-python/blob/master//src/crawlee/events/_local_event_manager.py#L81)\_\_aexit\_\_
* **async **\_\_aexit\_\_**(exc\_type, exc\_value, exc\_traceback): None
- Overrides [EventManager.\_\_aexit\_\_](https://crawlee.dev/python/api/class/EventManager#__aexit__)
Close the local event manager upon exiting the async context.
It stops emitting system info events and closes the event manager.
***
#### Parameters
* ##### exc\_type: [type](https://crawlee.dev/python/api/class/SitemapSource#type)\[BaseException] | None
* ##### exc\_value: BaseException | None
* ##### exc\_traceback: TracebackType | None
#### Returns None
### [**](#__init__)[**](https://github.com/apify/crawlee-python/blob/master//src/crawlee/events/_local_event_manager.py#L34)\_\_init\_\_
* ****\_\_init\_\_**(system\_info\_interval, \*, persist\_state\_interval, close\_timeout): None
- Overrides [EventManager.\_\_init\_\_](https://crawlee.dev/python/api/class/EventManager#__init__)
Initialize a new instance.
In most cases, you should use the `from_config` constructor to create a new instance based on the provided configuration.
***
#### Parameters
* ##### optionalsystem\_info\_interval: timedelta = <!-- -->timedelta(seconds=1)
Interval at which `SystemInfo` events are emitted.
* ##### keyword-onlyoptionalpersist\_state\_interval: timedelta
Interval between emitted `PersistState` events to maintain state persistence.
* ##### keyword-onlyoptionalclose\_timeout: timedelta | None
Optional timeout for canceling pending event listeners if they exceed this duration.
#### Returns None
### [**](#emit)[**](https://github.com/apify/crawlee-python/blob/master//src/crawlee/events/_event_manager.py#L233)emit
* ****emit**(\*: , event: [Event](https://crawlee.dev/python/api/enum/Event), event\_data: [EventData](https://crawlee.dev/python/api#EventData)): None
* ****emit**(\*: , event: Literal\[Event.PERSIST\_STATE], event\_data: [EventPersistStateData](https://crawlee.dev/python/api/class/EventPersistStateData)): None
* ****emit**(\*: , event: Literal\[Event.SYSTEM\_INFO], event\_data: [EventSystemInfoData](https://crawlee.dev/python/api/class/EventSystemInfoData)): None
* ****emit**(\*: , event: Literal\[Event.MIGRATING], event\_data: [EventMigratingData](https://crawlee.dev/python/api/class/EventMigratingData)): None
* ****emit**(\*: , event: Literal\[Event.ABORTING], event\_data: [EventAbortingData](https://crawlee.dev/python/api/class/EventAbortingData)): None
* ****emit**(\*: , event: Literal\[Event.EXIT], event\_data: [EventExitData](https://crawlee.dev/python/api/class/EventExitData)): None
* ****emit**(\*: , event: Literal\[Event.CRAWLER\_STATUS], event\_data: [EventCrawlerStatusData](https://crawlee.dev/python/api/class/EventCrawlerStatusData)): None
* ****emit**(\*: , event: [Event](https://crawlee.dev/python/api/enum/Event), event\_data: Any): None
- Inherited from [EventManager.emit](https://crawlee.dev/python/api/class/EventManager#emit)
Emit an event with the associated data to all registered listeners.
***
#### Parameters
* ##### keyword-onlyevent: [Event](https://crawlee.dev/python/api/enum/Event)
The event which will be emitted.
* ##### keyword-onlyevent\_data: [EventData](https://crawlee.dev/python/api#EventData)
The data which will be passed to the event listeners.
#### Returns None
### [**](#from_config)[**](https://github.com/apify/crawlee-python/blob/master//src/crawlee/events/_local_event_manager.py#L59)from\_config
* ****from\_config**(config): [LocalEventManager](https://crawlee.dev/python/api/class/LocalEventManager)
- Initialize a new instance based on the provided `Configuration`.
***
#### Parameters
* ##### optionalconfig: [Configuration](https://crawlee.dev/python/api/class/Configuration) | None = <!-- -->None
The `Configuration` instance. Uses the global (default) one if not provided.
#### Returns [LocalEventManager](https://crawlee.dev/python/api/class/LocalEventManager)
### [**](#off)[**](https://github.com/apify/crawlee-python/blob/master//src/crawlee/events/_event_manager.py#L201)off
* ****off**(\*, event, listener): None
- Inherited from [EventManager.off](https://crawlee.dev/python/api/class/EventManager#off)
Remove a specific listener or all listeners for an event.
***
#### Parameters
* ##### keyword-onlyevent: [Event](https://crawlee.dev/python/api/enum/Event)
The Actor event for which to remove listeners.
* ##### optionalkeyword-onlylistener: EventListener\[Any] | None = <!-- -->None
The listener which is supposed to be removed. If not passed, all listeners of this event are removed.
#### Returns None
### [**](#on)[**](https://github.com/apify/crawlee-python/blob/master//src/crawlee/events/_event_manager.py#L155)on
* ****on**(\*: , event: [Event](https://crawlee.dev/python/api/enum/Event), listener: EventListener\[Any]): None
* ****on**(\*: , event: Literal\[Event.PERSIST\_STATE], listener: EventListener\[EventPersistStateData]): None
* ****on**(\*: , event: Literal\[Event.SYSTEM\_INFO], listener: EventListener\[EventSystemInfoData]): None
* ****on**(\*: , event: Literal\[Event.MIGRATING], listener: EventListener\[EventMigratingData]): None
* ****on**(\*: , event: Literal\[Event.ABORTING], listener: EventListener\[EventAbortingData]): None
* ****on**(\*: , event: Literal\[Event.EXIT], listener: EventListener\[EventExitData]): None
* ****on**(\*: , event: Literal\[Event.CRAWLER\_STATUS], listener: EventListener\[EventCrawlerStatusData]): None
* ****on**(\*: , event: [Event](https://crawlee.dev/python/api/enum/Event), listener: EventListener\[None]): None
- Inherited from [EventManager.on](https://crawlee.dev/python/api/class/EventManager#on)
Register an event listener for a specific event.
***
#### Parameters
* ##### keyword-onlyevent: [Event](https://crawlee.dev/python/api/enum/Event)
The event for which to listen to.
* ##### keyword-onlylistener: EventListener\[Any]
The function (sync or async) which is to be called when the event is emitted.
#### Returns None
### [**](#wait_for_all_listeners_to_complete)[**](https://github.com/apify/crawlee-python/blob/master//src/crawlee/events/_event_manager.py#L243)wait\_for\_all\_listeners\_to\_complete
* **async **wait\_for\_all\_listeners\_to\_complete**(\*, timeout): None
- Inherited from [EventManager.wait\_for\_all\_listeners\_to\_complete](https://crawlee.dev/python/api/class/EventManager#wait_for_all_listeners_to_complete)
Wait for all currently executing event listeners to complete.
***
#### Parameters
* ##### optionalkeyword-onlytimeout: timedelta | None = <!-- -->None
The maximum time to wait for the event listeners to finish. If they do not complete within the specified timeout, they will be canceled.
#### Returns None
## Properties<!-- -->[**](#Properties)
### [**](#active)[**](https://github.com/apify/crawlee-python/blob/master//src/crawlee/events/_event_manager.py#L100)active
**active: bool
Inherited from [EventManager.active](https://crawlee.dev/python/api/class/EventManager#active)
Indicate whether the context is active.
---
# MemoryStorageClient<!-- -->
Memory implementation of the storage client.
This storage client provides access to datasets, key-value stores, and request queues that store all data in memory using Python data structures (lists and dictionaries). No data is persisted between process runs, meaning all stored data is lost when the program terminates.
The memory implementation provides fast access to data but is limited by available memory and does not support data sharing across different processes. All storage operations happen entirely in memory with no disk operations.
The memory storage client is useful for testing and development environments, or short-lived crawler operations where persistence is not required.
### Hierarchy
* [StorageClient](https://crawlee.dev/python/api/class/StorageClient)
* *MemoryStorageClient*
## Index[**](#Index)
### Methods
* [**create\_dataset\_client](https://docs.apify.com/sdk/python/sdk/python/reference/class/MemoryStorageClient.md#create_dataset_client)
* [**create\_kvs\_client](https://docs.apify.com/sdk/python/sdk/python/reference/class/MemoryStorageClient.md#create_kvs_client)
* [**create\_rq\_client](https://docs.apify.com/sdk/python/sdk/python/reference/class/MemoryStorageClient.md#create_rq_client)
* [**get\_rate\_limit\_errors](https://docs.apify.com/sdk/python/sdk/python/reference/class/MemoryStorageClient.md#get_rate_limit_errors)
* [**get\_storage\_client\_cache\_key](https://docs.apify.com/sdk/python/sdk/python/reference/class/MemoryStorageClient.md#get_storage_client_cache_key)
## Methods<!-- -->[**](#Methods)
### [**](#create_dataset_client)[**](https://github.com/apify/crawlee-python/blob/master//src/crawlee/storage_clients/_memory/_storage_client.py#L31)create\_dataset\_client
* **async **create\_dataset\_client**(\*, id, name, alias, configuration): [DatasetClient](https://crawlee.dev/python/api/class/DatasetClient)
- Overrides [StorageClient.create\_dataset\_client](https://crawlee.dev/python/api/class/StorageClient#create_dataset_client)
Create a dataset client.
***
#### Parameters
* ##### optionalkeyword-onlyid: str | None = <!-- -->None
* ##### optionalkeyword-onlyname: str | None = <!-- -->None
* ##### optionalkeyword-onlyalias: str | None = <!-- -->None
* ##### optionalkeyword-onlyconfiguration: [Configuration](https://crawlee.dev/python/api/class/Configuration) | None = <!-- -->None
#### Returns [DatasetClient](https://crawlee.dev/python/api/class/DatasetClient)
### [**](#create_kvs_client)[**](https://github.com/apify/crawlee-python/blob/master//src/crawlee/storage_clients/_memory/_storage_client.py#L45)create\_kvs\_client
* **async **create\_kvs\_client**(\*, id, name, alias, configuration): [KeyValueStoreClient](https://crawlee.dev/python/api/class/KeyValueStoreClient)
- Overrides [StorageClient.create\_kvs\_client](https://crawlee.dev/python/api/class/StorageClient#create_kvs_client)
Create a key-value store client.
***
#### Parameters
* ##### optionalkeyword-onlyid: str | None = <!-- -->None
* ##### optionalkeyword-onlyname: str | None = <!-- -->None
* ##### optionalkeyword-onlyalias: str | None = <!-- -->None
* ##### optionalkeyword-onlyconfiguration: [Configuration](https://crawlee.dev/python/api/class/Configuration) | None = <!-- -->None
#### Returns [KeyValueStoreClient](https://crawlee.dev/python/api/class/KeyValueStoreClient)
### [**](#create_rq_client)[**](https://github.com/apify/crawlee-python/blob/master//src/crawlee/storage_clients/_memory/_storage_client.py#L59)create\_rq\_client
* **async **create\_rq\_client**(\*, id, name, alias, configuration): [RequestQueueClient](https://crawlee.dev/python/api/class/RequestQueueClient)
- Overrides [StorageClient.create\_rq\_client](https://crawlee.dev/python/api/class/StorageClient#create_rq_client)
Create a request queue client.
***
#### Parameters
* ##### optionalkeyword-onlyid: str | None = <!-- -->None
* ##### optionalkeyword-onlyname: str | None = <!-- -->None
* ##### optionalkeyword-onlyalias: str | None = <!-- -->None
* ##### optionalkeyword-onlyconfiguration: [Configuration](https://crawlee.dev/python/api/class/Configuration) | None = <!-- -->None
#### Returns [RequestQueueClient](https://crawlee.dev/python/api/class/RequestQueueClient)
### [**](#get_rate_limit_errors)[**](https://github.com/apify/crawlee-python/blob/master//src/crawlee/storage_clients/_base/_storage_client.py#L74)get\_rate\_limit\_errors
* ****get\_rate\_limit\_errors**(): dict\[int, int]
- Inherited from [StorageClient.get\_rate\_limit\_errors](https://crawlee.dev/python/api/class/StorageClient#get_rate_limit_errors)
Return statistics about rate limit errors encountered by the HTTP client in storage client.
***
#### Returns dict\[int, int]
### [**](#get_storage_client_cache_key)[**](https://github.com/apify/crawlee-python/blob/master//src/crawlee/storage_clients/_base/_storage_client.py#L33)get\_storage\_client\_cache\_key
* ****get\_storage\_client\_cache\_key**(configuration): Hashable
- Inherited from [StorageClient.get\_storage\_client\_cache\_key](https://crawlee.dev/python/api/class/StorageClient#get_storage_client_cache_key)
Return a cache key that can differentiate between different storages of this and other clients.
Can be based on configuration or on the client itself. By default, returns a module and name of the client class.
***
#### Parameters
* ##### configuration: [Configuration](https://crawlee.dev/python/api/class/Configuration)
#### Returns Hashable
---
# MigratingEvent<!-- -->
## Index[**](#Index)
### Properties
* [**data](https://docs.apify.com/sdk/python/sdk/python/reference/class/MigratingEvent.md#data)
* [**name](https://docs.apify.com/sdk/python/sdk/python/reference/class/MigratingEvent.md#name)
## Properties<!-- -->[**](#Properties)
### [**](#data)[**](https://github.com/apify/apify-sdk-python/blob/master//src/apify/events/_types.py#L62)data
**data: EventMigratingData
### [**](#name)[**](https://github.com/apify/apify-sdk-python/blob/master//src/apify/events/_types.py#L61)name
**name: Literal\[Event.MIGRATING]
---
# PayPerEventActorPricingInfo<!-- -->
## Index[**](#Index)
### Properties
* [**minimal\_max\_total\_charge\_usd](https://docs.apify.com/sdk/python/sdk/python/reference/class/PayPerEventActorPricingInfo.md#minimal_max_total_charge_usd)
* [**pricing\_model](https://docs.apify.com/sdk/python/sdk/python/reference/class/PayPerEventActorPricingInfo.md#pricing_model)
* [**pricing\_per\_event](https://docs.apify.com/sdk/python/sdk/python/reference/class/PayPerEventActorPricingInfo.md#pricing_per_event)
## Properties<!-- -->[**](#Properties)
### [**](#minimal_max_total_charge_usd)[**](https://github.com/apify/apify-sdk-python/blob/master//src/apify/_models.py#L166)minimal\_max\_total\_charge\_usd
**minimal\_max\_total\_charge\_usd: Decimal | None
### [**](#pricing_model)[**](https://github.com/apify/apify-sdk-python/blob/master//src/apify/_models.py#L164)pricing\_model
**pricing\_model: Literal\[PAY\_PER\_EVENT]
### [**](#pricing_per_event)[**](https://github.com/apify/apify-sdk-python/blob/master//src/apify/_models.py#L165)pricing\_per\_event
**pricing\_per\_event: [PricingPerEvent](https://docs.apify.com/sdk/python/sdk/python/reference/class/PricingPerEvent.md)
---
# PersistStateEvent<!-- -->
## Index[**](#Index)
### Properties
* [**data](https://docs.apify.com/sdk/python/sdk/python/reference/class/PersistStateEvent.md#data)
* [**name](https://docs.apify.com/sdk/python/sdk/python/reference/class/PersistStateEvent.md#name)
## Properties<!-- -->[**](#Properties)
### [**](#data)[**](https://github.com/apify/apify-sdk-python/blob/master//src/apify/events/_types.py#L50)data
**data: EventPersistStateData
### [**](#name)[**](https://github.com/apify/apify-sdk-python/blob/master//src/apify/events/_types.py#L49)name
**name: Literal\[Event.PERSIST\_STATE]
---
# PricePerDatasetItemActorPricingInfo<!-- -->
## Index[**](#Index)
### Properties
* [**price\_per\_unit\_usd](https://docs.apify.com/sdk/python/sdk/python/reference/class/PricePerDatasetItemActorPricingInfo.md#price_per_unit_usd)
* [**pricing\_model](https://docs.apify.com/sdk/python/sdk/python/reference/class/PricePerDatasetItemActorPricingInfo.md#pricing_model)
* [**unit\_name](https://docs.apify.com/sdk/python/sdk/python/reference/class/PricePerDatasetItemActorPricingInfo.md#unit_name)
## Properties<!-- -->[**](#Properties)
### [**](#price_per_unit_usd)[**](https://github.com/apify/apify-sdk-python/blob/master//src/apify/_models.py#L150)price\_per\_unit\_usd
**price\_per\_unit\_usd: Decimal
### [**](#pricing_model)[**](https://github.com/apify/apify-sdk-python/blob/master//src/apify/_models.py#L148)pricing\_model
**pricing\_model: Literal\[PRICE\_PER\_DATASET\_ITEM]
### [**](#unit_name)[**](https://github.com/apify/apify-sdk-python/blob/master//src/apify/_models.py#L149)unit\_name
**unit\_name: str | None
---
# PricingInfoItem<!-- -->
## Index[**](#Index)
### Properties
* [**price](https://docs.apify.com/sdk/python/sdk/python/reference/class/PricingInfoItem.md#price)
* [**title](https://docs.apify.com/sdk/python/sdk/python/reference/class/PricingInfoItem.md#title)
## Properties<!-- -->[**](#Properties)
### [**](#price)[**](https://github.com/apify/apify-sdk-python/blob/master//src/apify/_charging.py#L380)price
**price: Decimal
### [**](#title)[**](https://github.com/apify/apify-sdk-python/blob/master//src/apify/_charging.py#L381)title
**title: str
---
# PricingPerEvent<!-- -->
## Index[**](#Index)
### Properties
* [**actor\_charge\_events](https://docs.apify.com/sdk/python/sdk/python/reference/class/PricingPerEvent.md#actor_charge_events)
## Properties<!-- -->[**](#Properties)
### [**](#actor_charge_events)[**](https://github.com/apify/apify-sdk-python/blob/master//src/apify/_models.py#L160)actor\_charge\_events
**actor\_charge\_events: dict\[str, [ActorChargeEvent](https://docs.apify.com/sdk/python/sdk/python/reference/class/ActorChargeEvent.md)]
---
# ProcessedRequest<!-- -->
Represents a processed request.
## Index[**](#Index)
### Properties
* [**id](https://docs.apify.com/sdk/python/sdk/python/reference/class/ProcessedRequest.md#id)
* [**model\_config](https://docs.apify.com/sdk/python/sdk/python/reference/class/ProcessedRequest.md#model_config)
* [**unique\_key](https://docs.apify.com/sdk/python/sdk/python/reference/class/ProcessedRequest.md#unique_key)
* [**was\_already\_handled](https://docs.apify.com/sdk/python/sdk/python/reference/class/ProcessedRequest.md#was_already_handled)
* [**was\_already\_present](https://docs.apify.com/sdk/python/sdk/python/reference/class/ProcessedRequest.md#was_already_present)
## Properties<!-- -->[**](#Properties)
### [**](#id)[**](https://github.com/apify/crawlee-python/blob/master//src/crawlee/storage_clients/models.py#L140)id
**id: str | None
Internal representation of the request by the storage client. Only some clients use id.
### [**](#model_config)[**](https://github.com/apify/crawlee-python/blob/master//src/crawlee/storage_clients/models.py#L138)model\_config
**model\_config: Undefined
### [**](#unique_key)[**](https://github.com/apify/crawlee-python/blob/master//src/crawlee/storage_clients/models.py#L143)unique\_key
**unique\_key: str
### [**](#was_already_handled)[**](https://github.com/apify/crawlee-python/blob/master//src/crawlee/storage_clients/models.py#L145)was\_already\_handled
**was\_already\_handled: bool
### [**](#was_already_present)[**](https://github.com/apify/crawlee-python/blob/master//src/crawlee/storage_clients/models.py#L144)was\_already\_present
**was\_already\_present: bool
---
# ProlongRequestLockResponse<!-- -->
Response to prolong request lock calls.
## Index[**](#Index)
### Properties
* [**lock\_expires\_at](https://docs.apify.com/sdk/python/sdk/python/reference/class/ProlongRequestLockResponse.md#lock_expires_at)
* [**model\_config](https://docs.apify.com/sdk/python/sdk/python/reference/class/ProlongRequestLockResponse.md#model_config)
## Properties<!-- -->[**](#Properties)
### [**](#lock_expires_at)[**](https://github.com/apify/apify-sdk-python/blob/master//src/apify/storage_clients/_apify/_models.py#L31)lock\_expires\_at
**lock\_expires\_at: datetime
### [**](#model_config)[**](https://github.com/apify/apify-sdk-python/blob/master//src/apify/storage_clients/_apify/_models.py#L29)model\_config
**model\_config: Undefined
---
# ProxyConfiguration<!-- -->
Configures a connection to a proxy server with the provided options.
Proxy servers are used to prevent target websites from blocking your crawlers based on IP address rate limits or blacklists. The default servers used by this class are managed by [Apify Proxy](https://docs.apify.com/proxy). To be able to use Apify Proxy, you need an Apify account and access to the selected proxies. If you provide no configuration option, the proxies will be managed automatically using a smart algorithm.
If you want to use your own proxies, use the `proxy_urls` or `new_url_function` constructor options. Your list of proxy URLs will be rotated by the configuration, if this option is provided.
## Index[**](#Index)
### Methods
* [**\_\_init\_\_](https://docs.apify.com/sdk/python/sdk/python/reference/class/ProxyConfiguration.md#__init__)
* [**initialize](https://docs.apify.com/sdk/python/sdk/python/reference/class/ProxyConfiguration.md#initialize)
* [**new\_proxy\_info](https://docs.apify.com/sdk/python/sdk/python/reference/class/ProxyConfiguration.md#new_proxy_info)
## Methods<!-- -->[**](#Methods)
### [**](#__init__)[**](https://github.com/apify/apify-sdk-python/blob/master//src/apify/_proxy_configuration.py#L108)\_\_init\_\_
* ****\_\_init\_\_**(\*, password, groups, country\_code, proxy\_urls, new\_url\_function, tiered\_proxy\_urls, \_actor\_config, \_apify\_client): None
- Create a ProxyConfiguration instance.
It is highly recommended to use `Actor.create_proxy_configuration()` instead of this.
***
#### Parameters
* ##### optionalkeyword-onlypassword: str | None = <!-- -->None
Password for the Apify Proxy. If not provided, will use os.environ\['APIFY\_PROXY\_PASSWORD'], if available.
* ##### optionalkeyword-onlygroups: list\[str] | None = <!-- -->None
Proxy groups which the Apify Proxy should use, if provided.
* ##### optionalkeyword-onlycountry\_code: str | None = <!-- -->None
Country which the Apify Proxy should use, if provided.
* ##### optionalkeyword-onlyproxy\_urls: list\[str | None] | None = <!-- -->None
Custom proxy server URLs which should be rotated through.
* ##### optionalkeyword-onlynew\_url\_function: \_NewUrlFunction | None = <!-- -->None
Function which returns a custom proxy URL to be used.
* ##### optionalkeyword-onlytiered\_proxy\_urls: list\[list\[str | None]] | None = <!-- -->None
Proxy URLs arranged into tiers
* ##### optionalkeyword-only\_actor\_config: [Configuration](https://docs.apify.com/sdk/python/sdk/python/reference/class/Configuration.md) | None = <!-- -->None
* ##### optionalkeyword-only\_apify\_client: ApifyClientAsync | None = <!-- -->None
#### Returns None
### [**](#initialize)[**](https://github.com/apify/apify-sdk-python/blob/master//src/apify/_proxy_configuration.py#L180)initialize
* **async **initialize**(): None
- Check if using proxy, if so, check the access.
Load the Apify Proxy password from API (only if not passed to constructor or through env var).
Only called if Apify Proxy configuration is used. Also checks if country has access to Apify Proxy groups if the country code is provided.
You should use the Actor.create\_proxy\_configuration function to create a pre-initialized `ProxyConfiguration` instance instead of calling this manually.
***
#### Returns None
### [**](#new_proxy_info)[**](https://github.com/apify/apify-sdk-python/blob/master//src/apify/_proxy_configuration.py#L205)new\_proxy\_info
* **async **new\_proxy\_info**(session\_id, request, proxy\_tier): [ProxyInfo](https://docs.apify.com/sdk/python/sdk/python/reference/class/ProxyInfo.md) | None
- Create a new ProxyInfo object.
Use it if you want to work with a rich representation of a proxy URL. If you need the URL string only, use `ProxyConfiguration.new_url`.
***
#### Parameters
* ##### optionalsession\_id: str | None = <!-- -->None
Represents the identifier of a proxy session (<https://docs.apify.com/proxy#sessions>). All the HTTP requests going through the proxy with the same session identifier will use the same target proxy server (i.e. the same IP address). The identifier must not be longer than 50 characters and include only the following: `0-9`, `a-z`, `A-Z`, `"."`, `"_"` and `"~"`.
* ##### optionalrequest: Request | None = <!-- -->None
request for which the proxy info is being issued, used in proxy tier handling.
* ##### optionalproxy\_tier: int | None = <!-- -->None
allows forcing the proxy tier to be used.
#### Returns [ProxyInfo](https://docs.apify.com/sdk/python/sdk/python/reference/class/ProxyInfo.md) | None
---
# ProxyInfo<!-- -->
Provides information about a proxy connection that is used for requests.
## Index[**](#Index)
### Properties
* [**country\_code](https://docs.apify.com/sdk/python/sdk/python/reference/class/ProxyInfo.md#country_code)
* [**groups](https://docs.apify.com/sdk/python/sdk/python/reference/class/ProxyInfo.md#groups)
## Properties<!-- -->[**](#Properties)
### [**](#country_code)[**](https://github.com/apify/apify-sdk-python/blob/master//src/apify/_proxy_configuration.py#L82)country\_code
**country\_code: str | None
If set and relevant proxies are available in your Apify account, all proxied requests will use IP addresses that are geolocated to the specified country. For example `GB` for IPs from Great Britain. Note that online services often have their own rules for handling geolocation and thus the country selection is a best attempt at geolocation, rather than a guaranteed hit. This parameter is optional, by default, each proxied request is assigned an IP address from a random country. The country code needs to be a two letter ISO country code. See the [full list of available country codes](https://en.wikipedia.org/wiki/ISO_3166-1_alpha-2#Officially_assigned_code_elements). This parameter is optional, by default, the proxy uses all available proxy servers from all countries.
### [**](#groups)[**](https://github.com/apify/apify-sdk-python/blob/master//src/apify/_proxy_configuration.py#L78)groups
**groups: list\[str]
An array of proxy groups to be used by the [Apify Proxy](https://docs.apify.com/proxy). If not provided, the proxy will select the groups automatically.
---
# Request<!-- -->
Represents a request in the Crawlee framework, containing the necessary information for crawling operations.
The `Request` class is one of the core components in Crawlee, utilized by various components such as request providers, HTTP clients, crawlers, and more. It encapsulates the essential data for executing web requests, including the URL, HTTP method, headers, payload, and user data. The user data allows custom information to be stored and persisted throughout the request lifecycle, including its retries.
Key functionalities include managing the request's identifier (`id`), unique key (`unique_key`) that is used for request deduplication, controlling retries, handling state management, and enabling configuration for session rotation and proxy handling.
The recommended way to create a new instance is by using the `Request.from_url` constructor, which automatically generates a unique key and identifier based on the URL and request parameters.
### Usage
from crawlee import Request
request = Request.from_url('https://crawlee.dev')
### Hierarchy
* *Request*
* [RequestWithLock](https://crawlee.dev/python/api/class/RequestWithLock)
## Index[**](#Index)
### Methods
* [**crawl\_depth](https://docs.apify.com/sdk/python/sdk/python/reference/class/Request.md#crawl_depth)
* [**enqueue\_strategy](https://docs.apify.com/sdk/python/sdk/python/reference/class/Request.md#enqueue_strategy)
* [**forefront](https://docs.apify.com/sdk/python/sdk/python/reference/class/Request.md#forefront)
* [**from\_url](https://docs.apify.com/sdk/python/sdk/python/reference/class/Request.md#from_url)
* [**get\_query\_param\_from\_url](https://docs.apify.com/sdk/python/sdk/python/reference/class/Request.md#get_query_param_from_url)
* [**last\_proxy\_tier](https://docs.apify.com/sdk/python/sdk/python/reference/class/Request.md#last_proxy_tier)
* [**max\_retries](https://docs.apify.com/sdk/python/sdk/python/reference/class/Request.md#max_retries)
* [**session\_rotation\_count](https://docs.apify.com/sdk/python/sdk/python/reference/class/Request.md#session_rotation_count)
* [**state](https://docs.apify.com/sdk/python/sdk/python/reference/class/Request.md#state)
### Properties
* [**crawl\_depth](https://docs.apify.com/sdk/python/sdk/python/reference/class/Request.md#crawl_depth)
* [**crawlee\_data](https://docs.apify.com/sdk/python/sdk/python/reference/class/Request.md#crawlee_data)
* [**enqueue\_strategy](https://docs.apify.com/sdk/python/sdk/python/reference/class/Request.md#enqueue_strategy)
* [**forefront](https://docs.apify.com/sdk/python/sdk/python/reference/class/Request.md#forefront)
* [**handled\_at](https://docs.apify.com/sdk/python/sdk/python/reference/class/Request.md#handled_at)
* [**label](https://docs.apify.com/sdk/python/sdk/python/reference/class/Request.md#label)
* [**last\_proxy\_tier](https://docs.apify.com/sdk/python/sdk/python/reference/class/Request.md#last_proxy_tier)
* [**loaded\_url](https://docs.apify.com/sdk/python/sdk/python/reference/class/Request.md#loaded_url)
* [**max\_retries](https://docs.apify.com/sdk/python/sdk/python/reference/class/Request.md#max_retries)
* [**method](https://docs.apify.com/sdk/python/sdk/python/reference/class/Request.md#method)
* [**model\_config](https://docs.apify.com/sdk/python/sdk/python/reference/class/Request.md#model_config)
* [**no\_retry](https://docs.apify.com/sdk/python/sdk/python/reference/class/Request.md#no_retry)
* [**payload](https://docs.apify.com/sdk/python/sdk/python/reference/class/Request.md#payload)
* [**retry\_count](https://docs.apify.com/sdk/python/sdk/python/reference/class/Request.md#retry_count)
* [**session\_id](https://docs.apify.com/sdk/python/sdk/python/reference/class/Request.md#session_id)
* [**session\_rotation\_count](https://docs.apify.com/sdk/python/sdk/python/reference/class/Request.md#session_rotation_count)
* [**state](https://docs.apify.com/sdk/python/sdk/python/reference/class/Request.md#state)
* [**unique\_key](https://docs.apify.com/sdk/python/sdk/python/reference/class/Request.md#unique_key)
* [**url](https://docs.apify.com/sdk/python/sdk/python/reference/class/Request.md#url)
* [**was\_already\_handled](https://docs.apify.com/sdk/python/sdk/python/reference/class/Request.md#was_already_handled)
## Methods<!-- -->[**](#Methods)
### [**](#crawl_depth)[**](https://github.com/apify/crawlee-python/blob/master//src/crawlee/_request.py#L351)crawl\_depth
* ****crawl\_depth**(new\_value): None
- #### Parameters
* ##### new\_value: int
#### Returns None
### [**](#enqueue_strategy)[**](https://github.com/apify/crawlee-python/blob/master//src/crawlee/_request.py#L387)enqueue\_strategy
* ****enqueue\_strategy**(new\_enqueue\_strategy): None
- #### Parameters
* ##### new\_enqueue\_strategy: [EnqueueStrategy](https://crawlee.dev/python/api#EnqueueStrategy)
#### Returns None
### [**](#forefront)[**](https://github.com/apify/crawlee-python/blob/master//src/crawlee/_request.py#L405)forefront
* ****forefront**(new\_value): None
- #### Parameters
* ##### new\_value: bool
#### Returns None
### [**](#from_url)[**](https://github.com/apify/crawlee-python/blob/master//src/crawlee/_request.py#L240)from\_url
* ****from\_url**(url, \*, method, headers, payload, label, session\_id, unique\_key, keep\_url\_fragment, use\_extended\_unique\_key, always\_enqueue, kwargs): Self
- Create a new `Request` instance from a URL.
This is recommended constructor for creating new `Request` instances. It generates a `Request` object from a given URL with additional options to customize HTTP method, payload, unique key, and other request properties. If no `unique_key` or `id` is provided, they are computed automatically based on the URL, method and payload. It depends on the `keep_url_fragment` and `use_extended_unique_key` flags.
***
#### Parameters
* ##### url: str
The URL of the request.
* ##### optionalkeyword-onlymethod: [HttpMethod](https://crawlee.dev/python/api#HttpMethod) = <!-- -->'GET'
The HTTP method of the request.
* ##### optionalkeyword-onlyheaders: ([HttpHeaders](https://crawlee.dev/python/api/class/HttpHeaders) | dict\[str, str]) | None = <!-- -->None
The HTTP headers of the request.
* ##### optionalkeyword-onlypayload: ([HttpPayload](https://crawlee.dev/python/api#HttpPayload) | str) | None = <!-- -->None
The data to be sent as the request body. Typically used with 'POST' or 'PUT' requests.
* ##### optionalkeyword-onlylabel: str | None = <!-- -->None
A custom label to differentiate between request types. This is stored in `user_data`, and it is used for request routing (different requests go to different handlers).
* ##### optionalkeyword-onlysession\_id: str | None = <!-- -->None
ID of a specific `Session` to which the request will be strictly bound. If the session becomes unavailable when the request is processed, a `RequestCollisionError` will be raised.
* ##### optionalkeyword-onlyunique\_key: str | None = <!-- -->None
A unique key identifying the request. If not provided, it is automatically computed based on the URL and other parameters. Requests with the same `unique_key` are treated as identical.
* ##### optionalkeyword-onlykeep\_url\_fragment: bool = <!-- -->False
Determines whether the URL fragment (e.g., `` `section` ``) should be included in the `unique_key` computation. This is only relevant when `unique_key` is not provided.
* ##### optionalkeyword-onlyuse\_extended\_unique\_key: bool = <!-- -->False
Determines whether to include the HTTP method, ID Session and payload in the `unique_key` computation. This is only relevant when `unique_key` is not provided.
* ##### optionalkeyword-onlyalways\_enqueue: bool = <!-- -->False
If set to `True`, the request will be enqueued even if it is already present in the queue. Using this is not allowed when a custom `unique_key` is also provided and will result in a `ValueError`.
* ##### kwargs: Any
#### Returns Self
### [**](#get_query_param_from_url)[**](https://github.com/apify/crawlee-python/blob/master//src/crawlee/_request.py#L321)get\_query\_param\_from\_url
* ****get\_query\_param\_from\_url**(param, \*, default): str | None
- Get the value of a specific query parameter from the URL.
***
#### Parameters
* ##### param: str
* ##### optionalkeyword-onlydefault: str | None = <!-- -->None
#### Returns str | None
### [**](#last_proxy_tier)[**](https://github.com/apify/crawlee-python/blob/master//src/crawlee/_request.py#L396)last\_proxy\_tier
* ****last\_proxy\_tier**(new\_value): None
- #### Parameters
* ##### new\_value: int
#### Returns None
### [**](#max_retries)[**](https://github.com/apify/crawlee-python/blob/master//src/crawlee/_request.py#L369)max\_retries
* ****max\_retries**(new\_max\_retries): None
- #### Parameters
* ##### new\_max\_retries: int
#### Returns None
### [**](#session_rotation_count)[**](https://github.com/apify/crawlee-python/blob/master//src/crawlee/_request.py#L378)session\_rotation\_count
* ****session\_rotation\_count**(new\_session\_rotation\_count): None
- #### Parameters
* ##### new\_session\_rotation\_count: int
#### Returns None
### [**](#state)[**](https://github.com/apify/crawlee-python/blob/master//src/crawlee/_request.py#L360)state
* ****state**(new\_state): None
- #### Parameters
* ##### new\_state: [RequestState](https://crawlee.dev/python/api/class/RequestState)
#### Returns None
## Properties<!-- -->[**](#Properties)
### [**](#crawl_depth)[**](https://github.com/apify/crawlee-python/blob/master//src/crawlee/_request.py#L346)crawl\_depth
**crawl\_depth: int
The depth of the request in the crawl tree.
### [**](#crawlee_data)[**](https://github.com/apify/crawlee-python/blob/master//src/crawlee/_request.py#L337)crawlee\_data
**crawlee\_data: [CrawleeRequestData](https://crawlee.dev/python/api/class/CrawleeRequestData)
Crawlee-specific configuration stored in the `user_data`.
### [**](#enqueue_strategy)[**](https://github.com/apify/crawlee-python/blob/master//src/crawlee/_request.py#L382)enqueue\_strategy
**enqueue\_strategy: [EnqueueStrategy](https://crawlee.dev/python/api#EnqueueStrategy)
The strategy that was used for enqueuing the request.
### [**](#forefront)[**](https://github.com/apify/crawlee-python/blob/master//src/crawlee/_request.py#L400)forefront
**forefront: bool
Indicate whether the request should be enqueued at the front of the queue.
### [**](#handled_at)[**](https://github.com/apify/crawlee-python/blob/master//src/crawlee/_request.py#L236)handled\_at
**handled\_at: datetime | None
Timestamp when the request was handled.
### [**](#label)[**](https://github.com/apify/crawlee-python/blob/master//src/crawlee/_request.py#L327)label
**label: str | None
A string used to differentiate between arbitrary request types.
### [**](#last_proxy_tier)[**](https://github.com/apify/crawlee-python/blob/master//src/crawlee/_request.py#L391)last\_proxy\_tier
**last\_proxy\_tier: int | None
The last proxy tier used to process the request.
### [**](#loaded_url)[**](https://github.com/apify/crawlee-python/blob/master//src/crawlee/_request.py#L233)loaded\_url
**loaded\_url: str | None
URL of the web page that was loaded. This can differ from the original URL in case of redirects.
### [**](#max_retries)[**](https://github.com/apify/crawlee-python/blob/master//src/crawlee/_request.py#L364)max\_retries
**max\_retries: int | None
Crawlee-specific limit on the number of retries of the request.
### [**](#method)[**](https://github.com/apify/crawlee-python/blob/master//src/crawlee/_request.py#L185)method
**method: [HttpMethod](https://crawlee.dev/python/api#HttpMethod)
HTTP request method.
### [**](#model_config)[**](https://github.com/apify/crawlee-python/blob/master//src/crawlee/_request.py#L167)model\_config
**model\_config: Undefined
### [**](#no_retry)[**](https://github.com/apify/crawlee-python/blob/master//src/crawlee/_request.py#L230)no\_retry
**no\_retry: bool
If set to `True`, the request will not be retried in case of failure.
### [**](#payload)[**](https://github.com/apify/crawlee-python/blob/master//src/crawlee/_request.py#L188)payload
**payload: [HttpPayload](https://crawlee.dev/python/api#HttpPayload) | None
HTTP request payload.
### [**](#retry_count)[**](https://github.com/apify/crawlee-python/blob/master//src/crawlee/_request.py#L227)retry\_count
**retry\_count: int
Number of times the request has been retried.
### [**](#session_id)[**](https://github.com/apify/crawlee-python/blob/master//src/crawlee/_request.py#L332)session\_id
**session\_id: str | None
The ID of the bound session, if there is any.
### [**](#session_rotation_count)[**](https://github.com/apify/crawlee-python/blob/master//src/crawlee/_request.py#L373)session\_rotation\_count
**session\_rotation\_count: int | None
Crawlee-specific number of finished session rotations for the request.
### [**](#state)[**](https://github.com/apify/crawlee-python/blob/master//src/crawlee/_request.py#L355)state
**state: [RequestState](https://crawlee.dev/python/api/class/RequestState) | None
Crawlee-specific request handling state.
### [**](#unique_key)[**](https://github.com/apify/crawlee-python/blob/master//src/crawlee/_request.py#L169)unique\_key
**unique\_key: str
A unique key identifying the request. Two requests with the same `unique_key` are considered as pointing to the same URL.
If `unique_key` is not provided, then it is automatically generated by normalizing the URL. For example, the URL of `HTTP://www.EXAMPLE.com/something/` will produce the `unique_key` of `http://www.example.com/something`.
Pass an arbitrary non-empty text value to the `unique_key` property to override the default behavior and specify which URLs shall be considered equal.
### [**](#url)[**](https://github.com/apify/crawlee-python/blob/master//src/crawlee/_request.py#L181)url
**url: str
The URL of the web page to crawl. Must be a valid HTTP or HTTPS URL, and may include query parameters and fragments.
### [**](#was_already_handled)[**](https://github.com/apify/crawlee-python/blob/master//src/crawlee/_request.py#L409)was\_already\_handled
**was\_already\_handled: bool
Indicates whether the request was handled.
---
# RequestLoader<!-- -->
An abstract class defining the interface for classes that provide access to a read-only stream of requests.
Request loaders are used to manage and provide access to a storage of crawling requests.
Key responsibilities:
* Fetching the next request to be processed.
* Marking requests as successfully handled after processing.
* Managing state information such as the total and handled request counts.
### Hierarchy
* *RequestLoader*
* [RequestList](https://crawlee.dev/python/api/class/RequestList)
* [RequestManager](https://crawlee.dev/python/api/class/RequestManager)
* [SitemapRequestLoader](https://crawlee.dev/python/api/class/SitemapRequestLoader)
## Index[**](#Index)
### Methods
* [](https://crawlee.dev/python/api/class/RequestLoader#fetch_next_request)
* [](https://crawlee.dev/python/api/class/RequestLoader#get_handled_count)
* [](https://crawlee.dev/python/api/class/RequestLoader#get_total_count)
* [](https://crawlee.dev/python/api/class/RequestLoader#is_empty)
* [](https://crawlee.dev/python/api/class/RequestLoader#is_finished)
* [](https://crawlee.dev/python/api/class/RequestLoader#mark_request_as_handled)
* [**to\_tandem](https://docs.apify.com/sdk/python/sdk/python/reference/class/RequestLoader.md#to_tandem)
## Methods<!-- -->[**](#Methods)
### [**](#undefined)[**](https://github.com/apify/apify-sdk-python/blob/master//src/crawlee/request_loaders/_request_loader.py#L45)
:
### [**](#undefined)[**](https://github.com/apify/apify-sdk-python/blob/master//src/crawlee/request_loaders/_request_loader.py#L29)
:
### [**](#undefined)[**](https://github.com/apify/apify-sdk-python/blob/master//src/crawlee/request_loaders/_request_loader.py#L33)
:
### [**](#undefined)[**](https://github.com/apify/apify-sdk-python/blob/master//src/crawlee/request_loaders/_request_loader.py#L37)
:
### [**](#undefined)[**](https://github.com/apify/apify-sdk-python/blob/master//src/crawlee/request_loaders/_request_loader.py#L41)
:
### [**](#undefined)[**](https://github.com/apify/apify-sdk-python/blob/master//src/crawlee/request_loaders/_request_loader.py#L53)
:
### [**](#to_tandem)[**](https://github.com/apify/crawlee-python/blob/master//src/crawlee/request_loaders/_request_loader.py#L56)to\_tandem
* **async **to\_tandem**(request\_manager): [RequestManagerTandem](https://crawlee.dev/python/api/class/RequestManagerTandem)
- Combine the loader with a request manager to support adding and reclaiming requests.
***
#### Parameters
* ##### optionalrequest\_manager: [RequestManager](https://crawlee.dev/python/api/class/RequestManager) | None = <!-- -->None
Request manager to combine the loader with. If None is given, the default request queue is used.
#### Returns [RequestManagerTandem](https://crawlee.dev/python/api/class/RequestManagerTandem)
---
# RequestManager<!-- -->
Base class that extends `RequestLoader` with the capability to enqueue new requests and reclaim failed ones.
### Hierarchy
* [RequestLoader](https://crawlee.dev/python/api/class/RequestLoader)
* *RequestManager*
* [RequestQueue](https://crawlee.dev/python/api/class/RequestQueue)
* [RequestManagerTandem](https://crawlee.dev/python/api/class/RequestManagerTandem)
## Index[**](#Index)
### Methods
* [](https://crawlee.dev/python/api/class/RequestManager#add_request)
* [](https://crawlee.dev/python/api/class/RequestManager#add_requests)
* [**drop](https://docs.apify.com/sdk/python/sdk/python/reference/class/RequestManager.md#drop)
* [](https://crawlee.dev/python/api/class/RequestManager#fetch_next_request)
* [](https://crawlee.dev/python/api/class/RequestManager#get_handled_count)
* [](https://crawlee.dev/python/api/class/RequestManager#get_total_count)
* [](https://crawlee.dev/python/api/class/RequestManager#is_empty)
* [](https://crawlee.dev/python/api/class/RequestManager#is_finished)
* [](https://crawlee.dev/python/api/class/RequestManager#mark_request_as_handled)
* [](https://crawlee.dev/python/api/class/RequestManager#reclaim_request)
* [**to\_tandem](https://docs.apify.com/sdk/python/sdk/python/reference/class/RequestManager.md#to_tandem)
## Methods<!-- -->[**](#Methods)
### [**](#undefined)[**](https://github.com/apify/apify-sdk-python/blob/master//src/crawlee/request_loaders/_request_manager.py#L26)
:
### [**](#undefined)[**](https://github.com/apify/apify-sdk-python/blob/master//src/crawlee/request_loaders/_request_manager.py#L43)
:
### [**](#drop)[**](https://github.com/apify/crawlee-python/blob/master//src/crawlee/request_loaders/_request_manager.py#L22)drop
* **async **drop**(): None
- Overrides [Storage.drop](https://crawlee.dev/python/api/class/Storage#drop)
Remove persistent state either from the Apify Cloud storage or from the local database.
***
#### Returns None
### [**](#undefined)[**](https://github.com/apify/apify-sdk-python/blob/master//src/crawlee/request_loaders/_request_loader.py#L45)
:
### [**](#undefined)[**](https://github.com/apify/apify-sdk-python/blob/master//src/crawlee/request_loaders/_request_loader.py#L29)
:
### [**](#undefined)[**](https://github.com/apify/apify-sdk-python/blob/master//src/crawlee/request_loaders/_request_loader.py#L33)
:
### [**](#undefined)[**](https://github.com/apify/apify-sdk-python/blob/master//src/crawlee/request_loaders/_request_loader.py#L37)
:
### [**](#undefined)[**](https://github.com/apify/apify-sdk-python/blob/master//src/crawlee/request_loaders/_request_loader.py#L41)
:
### [**](#undefined)[**](https://github.com/apify/apify-sdk-python/blob/master//src/crawlee/request_loaders/_request_loader.py#L53)
:
### [**](#undefined)[**](https://github.com/apify/apify-sdk-python/blob/master//src/crawlee/request_loaders/_request_manager.py#L70)
:
### [**](#to_tandem)[**](https://github.com/apify/crawlee-python/blob/master//src/crawlee/request_loaders/_request_loader.py#L56)to\_tandem
* **async **to\_tandem**(request\_manager): [RequestManagerTandem](https://crawlee.dev/python/api/class/RequestManagerTandem)
- Inherited from [RequestLoader.to\_tandem](https://crawlee.dev/python/api/class/RequestLoader#to_tandem)
Combine the loader with a request manager to support adding and reclaiming requests.
***
#### Parameters
* ##### optionalrequest\_manager: RequestManager | None = <!-- -->None
Request manager to combine the loader with. If None is given, the default request queue is used.
#### Returns [RequestManagerTandem](https://crawlee.dev/python/api/class/RequestManagerTandem)
---
# RequestManagerTandem<!-- -->
Implements a tandem behaviour for a pair of `RequestLoader` and `RequestManager`.
In this scenario, the contents of the "loader" get transferred into the "manager", allowing processing the requests from both sources and also enqueueing new requests (not possible with plain `RequestManager`).
### Hierarchy
* [RequestManager](https://crawlee.dev/python/api/class/RequestManager)
* *RequestManagerTandem*
## Index[**](#Index)
### Methods
* [**\_\_init\_\_](https://docs.apify.com/sdk/python/sdk/python/reference/class/RequestManagerTandem.md#__init__)
* [**add\_request](https://docs.apify.com/sdk/python/sdk/python/reference/class/RequestManagerTandem.md#add_request)
* [**add\_requests](https://docs.apify.com/sdk/python/sdk/python/reference/class/RequestManagerTandem.md#add_requests)
* [**drop](https://docs.apify.com/sdk/python/sdk/python/reference/class/RequestManagerTandem.md#drop)
* [**fetch\_next\_request](https://docs.apify.com/sdk/python/sdk/python/reference/class/RequestManagerTandem.md#fetch_next_request)
* [**get\_handled\_count](https://docs.apify.com/sdk/python/sdk/python/reference/class/RequestManagerTandem.md#get_handled_count)
* [**get\_total\_count](https://docs.apify.com/sdk/python/sdk/python/reference/class/RequestManagerTandem.md#get_total_count)
* [**is\_empty](https://docs.apify.com/sdk/python/sdk/python/reference/class/RequestManagerTandem.md#is_empty)
* [**is\_finished](https://docs.apify.com/sdk/python/sdk/python/reference/class/RequestManagerTandem.md#is_finished)
* [**mark\_request\_as\_handled](https://docs.apify.com/sdk/python/sdk/python/reference/class/RequestManagerTandem.md#mark_request_as_handled)
* [**reclaim\_request](https://docs.apify.com/sdk/python/sdk/python/reference/class/RequestManagerTandem.md#reclaim_request)
* [**to\_tandem](https://docs.apify.com/sdk/python/sdk/python/reference/class/RequestManagerTandem.md#to_tandem)
## Methods<!-- -->[**](#Methods)
### [**](#__init__)[**](https://github.com/apify/crawlee-python/blob/master//src/crawlee/request_loaders/_request_manager_tandem.py#L31)\_\_init\_\_
* ****\_\_init\_\_**(request\_loader, request\_manager): None
- #### Parameters
* ##### request\_loader: [RequestLoader](https://crawlee.dev/python/api/class/RequestLoader)
* ##### request\_manager: [RequestManager](https://crawlee.dev/python/api/class/RequestManager)
#### Returns None
### [**](#add_request)[**](https://github.com/apify/crawlee-python/blob/master//src/crawlee/request_loaders/_request_manager_tandem.py#L52)add\_request
* **async **add\_request**(request, \*, forefront): [ProcessedRequest](https://crawlee.dev/python/api/class/ProcessedRequest)
- Overrides [RequestManager.add\_request](https://crawlee.dev/python/api/class/RequestManager#add_request)
Add a single request to the manager and store it in underlying resource client.
***
#### Parameters
* ##### request: str | [Request](https://crawlee.dev/python/api/class/Request)
The request object (or its string representation) to be added to the manager.
* ##### optionalkeyword-onlyforefront: bool = <!-- -->False
Determines whether the request should be added to the beginning (if True) or the end (if False) of the manager.
#### Returns [ProcessedRequest](https://crawlee.dev/python/api/class/ProcessedRequest)
### [**](#add_requests)[**](https://github.com/apify/crawlee-python/blob/master//src/crawlee/request_loaders/_request_manager_tandem.py#L56)add\_requests
* **async **add\_requests**(requests, \*, forefront, batch\_size, wait\_time\_between\_batches, wait\_for\_all\_requests\_to\_be\_added, wait\_for\_all\_requests\_to\_be\_added\_timeout): None
- Overrides [RequestManager.add\_requests](https://crawlee.dev/python/api/class/RequestManager#add_requests)
Add requests to the manager in batches.
***
#### Parameters
* ##### requests: Sequence\[str | [Request](https://crawlee.dev/python/api/class/Request)]
Requests to enqueue.
* ##### optionalkeyword-onlyforefront: bool = <!-- -->False
If True, add requests to the beginning of the queue.
* ##### optionalkeyword-onlybatch\_size: int = <!-- -->1000
The number of requests to add in one batch.
* ##### optionalkeyword-onlywait\_time\_between\_batches: timedelta = <!-- -->timedelta(seconds=1)
Time to wait between adding batches.
* ##### optionalkeyword-onlywait\_for\_all\_requests\_to\_be\_added: bool = <!-- -->False
If True, wait for all requests to be added before returning.
* ##### optionalkeyword-onlywait\_for\_all\_requests\_to\_be\_added\_timeout: timedelta | None = <!-- -->None
Timeout for waiting for all requests to be added.
#### Returns None
### [**](#drop)[**](https://github.com/apify/crawlee-python/blob/master//src/crawlee/request_loaders/_request_manager_tandem.py#L107)drop
* **async **drop**(): None
- Overrides [Storage.drop](https://crawlee.dev/python/api/class/Storage#drop)
Remove persistent state either from the Apify Cloud storage or from the local database.
***
#### Returns None
### [**](#fetch_next_request)[**](https://github.com/apify/crawlee-python/blob/master//src/crawlee/request_loaders/_request_manager_tandem.py#L76)fetch\_next\_request
* **async **fetch\_next\_request**(): Request | None
- Overrides [RequestManager.fetch\_next\_request](https://crawlee.dev/python/api/class/RequestManager#fetch_next_request)
Return the next request to be processed, or `None` if there are no more pending requests.
The method should return `None` if and only if `is_finished` would return `True`. In other cases, the method should wait until a request appears.
***
#### Returns Request | None
### [**](#get_handled_count)[**](https://github.com/apify/crawlee-python/blob/master//src/crawlee/request_loaders/_request_manager_tandem.py#L36)get\_handled\_count
* **async **get\_handled\_count**(): int
- Overrides [RequestManager.get\_handled\_count](https://crawlee.dev/python/api/class/RequestManager#get_handled_count)
Get the number of requests in the loader that have been handled.
***
#### Returns int
### [**](#get_total_count)[**](https://github.com/apify/crawlee-python/blob/master//src/crawlee/request_loaders/_request_manager_tandem.py#L40)get\_total\_count
* **async **get\_total\_count**(): int
- Overrides [RequestManager.get\_total\_count](https://crawlee.dev/python/api/class/RequestManager#get_total_count)
Get an offline approximation of the total number of requests in the loader (i.e. pending + handled).
***
#### Returns int
### [**](#is_empty)[**](https://github.com/apify/crawlee-python/blob/master//src/crawlee/request_loaders/_request_manager_tandem.py#L44)is\_empty
* **async **is\_empty**(): bool
- Overrides [RequestManager.is\_empty](https://crawlee.dev/python/api/class/RequestManager#is_empty)
Return True if there are no more requests in the loader (there might still be unfinished requests).
***
#### Returns bool
### [**](#is_finished)[**](https://github.com/apify/crawlee-python/blob/master//src/crawlee/request_loaders/_request_manager_tandem.py#L48)is\_finished
* **async **is\_finished**(): bool
- Overrides [RequestManager.is\_finished](https://crawlee.dev/python/api/class/RequestManager#is_finished)
Return True if all requests have been handled.
***
#### Returns bool
### [**](#mark_request_as_handled)[**](https://github.com/apify/crawlee-python/blob/master//src/crawlee/request_loaders/_request_manager_tandem.py#L103)mark\_request\_as\_handled
* **async **mark\_request\_as\_handled**(request): ProcessedRequest | None
- Overrides [RequestManager.mark\_request\_as\_handled](https://crawlee.dev/python/api/class/RequestManager#mark_request_as_handled)
Mark a request as handled after a successful processing (or after giving up retrying).
***
#### Parameters
* ##### request: [Request](https://crawlee.dev/python/api/class/Request)
#### Returns ProcessedRequest | None
### [**](#reclaim_request)[**](https://github.com/apify/crawlee-python/blob/master//src/crawlee/request_loaders/_request_manager_tandem.py#L99)reclaim\_request
* **async **reclaim\_request**(request, \*, forefront): [ProcessedRequest](https://crawlee.dev/python/api/class/ProcessedRequest) | None
- Overrides [RequestManager.reclaim\_request](https://crawlee.dev/python/api/class/RequestManager#reclaim_request)
Reclaims a failed request back to the source, so that it can be returned for processing later again.
It is possible to modify the request data by supplying an updated request as a parameter.
***
#### Parameters
* ##### request: [Request](https://crawlee.dev/python/api/class/Request)
* ##### optionalkeyword-onlyforefront: bool = <!-- -->False
#### Returns [ProcessedRequest](https://crawlee.dev/python/api/class/ProcessedRequest) | None
### [**](#to_tandem)[**](https://github.com/apify/crawlee-python/blob/master//src/crawlee/request_loaders/_request_loader.py#L56)to\_tandem
* **async **to\_tandem**(request\_manager): [RequestManagerTandem](https://crawlee.dev/python/api/class/RequestManagerTandem)
- Inherited from [RequestLoader.to\_tandem](https://crawlee.dev/python/api/class/RequestLoader#to_tandem)
Combine the loader with a request manager to support adding and reclaiming requests.
***
#### Parameters
* ##### optionalrequest\_manager: RequestManager | None = <!-- -->None
Request manager to combine the loader with. If None is given, the default request queue is used.
#### Returns [RequestManagerTandem](https://crawlee.dev/python/api/class/RequestManagerTandem)
---
# RequestQueue<!-- -->
Request queue is a storage for managing HTTP requests.
The request queue class serves as a high-level interface for organizing and managing HTTP requests during web crawling. It provides methods for adding, retrieving, and manipulating requests throughout the crawling lifecycle, abstracting away the underlying storage implementation details.
Request queue maintains the state of each URL to be crawled, tracking whether it has been processed, is currently being handled, or is waiting in the queue. Each URL in the queue is uniquely identified by a `unique_key` property, which prevents duplicate processing unless explicitly configured otherwise.
The class supports both breadth-first and depth-first crawling strategies through its `forefront` parameter when adding requests. It also provides mechanisms for error handling and request reclamation when processing fails.
You can open a request queue using the `open` class method, specifying either a name or ID to identify the queue. The underlying storage implementation is determined by the configured storage client.
### Usage
from crawlee.storages import RequestQueue
Open a request queue
rq = await RequestQueue.open(name='my_queue')
Add a request
await rq.add_request('https://example.com')
Process requests
request = await rq.fetch_next_request() if request: try: # Process the request # ... await rq.mark_request_as_handled(request) except Exception: await rq.reclaim_request(request)
### Hierarchy
* [RequestManager](https://crawlee.dev/python/api/class/RequestManager)
* [Storage](https://crawlee.dev/python/api/class/Storage)
* *RequestQueue*
## Index[**](#Index)
### Methods
* [**\_\_init\_\_](https://docs.apify.com/sdk/python/sdk/python/reference/class/RequestQueue.md#__init__)
* [**add\_request](https://docs.apify.com/sdk/python/sdk/python/reference/class/RequestQueue.md#add_request)
* [**add\_requests](https://docs.apify.com/sdk/python/sdk/python/reference/class/RequestQueue.md#add_requests)
* [**drop](https://docs.apify.com/sdk/python/sdk/python/reference/class/RequestQueue.md#drop)
* [**fetch\_next\_request](https://docs.apify.com/sdk/python/sdk/python/reference/class/RequestQueue.md#fetch_next_request)
* [**get\_handled\_count](https://docs.apify.com/sdk/python/sdk/python/reference/class/RequestQueue.md#get_handled_count)
* [**get\_metadata](https://docs.apify.com/sdk/python/sdk/python/reference/class/RequestQueue.md#get_metadata)
* [**get\_request](https://docs.apify.com/sdk/python/sdk/python/reference/class/RequestQueue.md#get_request)
* [**get\_total\_count](https://docs.apify.com/sdk/python/sdk/python/reference/class/RequestQueue.md#get_total_count)
* [**is\_empty](https://docs.apify.com/sdk/python/sdk/python/reference/class/RequestQueue.md#is_empty)
* [**is\_finished](https://docs.apify.com/sdk/python/sdk/python/reference/class/RequestQueue.md#is_finished)
* [**mark\_request\_as\_handled](https://docs.apify.com/sdk/python/sdk/python/reference/class/RequestQueue.md#mark_request_as_handled)
* [**open](https://docs.apify.com/sdk/python/sdk/python/reference/class/RequestQueue.md#open)
* [**purge](https://docs.apify.com/sdk/python/sdk/python/reference/class/RequestQueue.md#purge)
* [**reclaim\_request](https://docs.apify.com/sdk/python/sdk/python/reference/class/RequestQueue.md#reclaim_request)
* [**to\_tandem](https://docs.apify.com/sdk/python/sdk/python/reference/class/RequestQueue.md#to_tandem)
### Properties
* [**id](https://docs.apify.com/sdk/python/sdk/python/reference/class/RequestQueue.md#id)
* [**name](https://docs.apify.com/sdk/python/sdk/python/reference/class/RequestQueue.md#name)
## Methods<!-- -->[**](#Methods)
### [**](#__init__)[**](https://github.com/apify/crawlee-python/blob/master//src/crawlee/storages/_request_queue.py#L74)\_\_init\_\_
* ****\_\_init\_\_**(client, id, name): None
- Initialize a new instance.
Preferably use the `RequestQueue.open` constructor to create a new instance.
***
#### Parameters
* ##### client: [RequestQueueClient](https://crawlee.dev/python/api/class/RequestQueueClient)
An instance of a storage client.
* ##### id: str
The unique identifier of the storage.
* ##### name: str | None
The name of the storage, if available.
#### Returns None
### [**](#add_request)[**](https://github.com/apify/crawlee-python/blob/master//src/crawlee/storages/_request_queue.py#L156)add\_request
* **async **add\_request**(request, \*, forefront): [ProcessedRequest](https://crawlee.dev/python/api/class/ProcessedRequest)
- Overrides [RequestManager.add\_request](https://crawlee.dev/python/api/class/RequestManager#add_request)
Add a single request to the manager and store it in underlying resource client.
***
#### Parameters
* ##### request: str | [Request](https://crawlee.dev/python/api/class/Request)
The request object (or its string representation) to be added to the manager.
* ##### optionalkeyword-onlyforefront: bool = <!-- -->False
Determines whether the request should be added to the beginning (if True) or the end (if False) of the manager.
#### Returns [ProcessedRequest](https://crawlee.dev/python/api/class/ProcessedRequest)
### [**](#add_requests)[**](https://github.com/apify/crawlee-python/blob/master//src/crawlee/storages/_request_queue.py#L167)add\_requests
* **async **add\_requests**(requests, \*, forefront, batch\_size, wait\_time\_between\_batches, wait\_for\_all\_requests\_to\_be\_added, wait\_for\_all\_requests\_to\_be\_added\_timeout): None
- Overrides [RequestManager.add\_requests](https://crawlee.dev/python/api/class/RequestManager#add_requests)
Add requests to the manager in batches.
***
#### Parameters
* ##### requests: Sequence\[str | [Request](https://crawlee.dev/python/api/class/Request)]
Requests to enqueue.
* ##### optionalkeyword-onlyforefront: bool = <!-- -->False
If True, add requests to the beginning of the queue.
* ##### optionalkeyword-onlybatch\_size: int = <!-- -->1000
The number of requests to add in one batch.
* ##### optionalkeyword-onlywait\_time\_between\_batches: timedelta = <!-- -->timedelta(seconds=1)
Time to wait between adding batches.
* ##### optionalkeyword-onlywait\_for\_all\_requests\_to\_be\_added: bool = <!-- -->False
If True, wait for all requests to be added before returning.
* ##### optionalkeyword-onlywait\_for\_all\_requests\_to\_be\_added\_timeout: timedelta | None = <!-- -->None
Timeout for waiting for all requests to be added.
#### Returns None
### [**](#drop)[**](https://github.com/apify/crawlee-python/blob/master//src/crawlee/storages/_request_queue.py#L144)drop
* **async **drop**(): None
- Overrides [Storage.drop](https://crawlee.dev/python/api/class/Storage#drop)
Remove persistent state either from the Apify Cloud storage or from the local database.
***
#### Returns None
### [**](#fetch_next_request)[**](https://github.com/apify/crawlee-python/blob/master//src/crawlee/storages/_request_queue.py#L217)fetch\_next\_request
* **async **fetch\_next\_request**(): [Request](https://crawlee.dev/python/api/class/Request) | None
- Overrides [RequestManager.fetch\_next\_request](https://crawlee.dev/python/api/class/RequestManager#fetch_next_request)
Return the next request in the queue to be processed.
Once you successfully finish processing of the request, you need to call `RequestQueue.mark_request_as_handled` to mark the request as handled in the queue. If there was some error in processing the request, call `RequestQueue.reclaim_request` instead, so that the queue will give the request to some other consumer in another call to the `fetch_next_request` method.
Note that the `None` return value does not mean the queue processing finished, it means there are currently no pending requests. To check whether all requests in queue were finished, use `RequestQueue.is_finished` instead.
***
#### Returns [Request](https://crawlee.dev/python/api/class/Request) | None
### [**](#get_handled_count)[**](https://github.com/apify/crawlee-python/blob/master//src/crawlee/storages/_request_queue.py#L108)get\_handled\_count
* **async **get\_handled\_count**(): int
- Overrides [RequestManager.get\_handled\_count](https://crawlee.dev/python/api/class/RequestManager#get_handled_count)
Get the number of requests in the loader that have been handled.
***
#### Returns int
### [**](#get_metadata)[**](https://github.com/apify/crawlee-python/blob/master//src/crawlee/storages/_request_queue.py#L104)get\_metadata
* **async **get\_metadata**(): ([DatasetMetadata](https://crawlee.dev/python/api/class/DatasetMetadata) | [KeyValueStoreMetadata](https://crawlee.dev/python/api/class/KeyValueStoreMetadata)) | [RequestQueueMetadata](https://crawlee.dev/python/api/class/RequestQueueMetadata)
- Overrides [Storage.get\_metadata](https://crawlee.dev/python/api/class/Storage#get_metadata)
Get the storage metadata.
***
#### Returns ([DatasetMetadata](https://crawlee.dev/python/api/class/DatasetMetadata) | [KeyValueStoreMetadata](https://crawlee.dev/python/api/class/KeyValueStoreMetadata)) | [RequestQueueMetadata](https://crawlee.dev/python/api/class/RequestQueueMetadata)
### [**](#get_request)[**](https://github.com/apify/crawlee-python/blob/master//src/crawlee/storages/_request_queue.py#L234)get\_request
* **async **get\_request**(unique\_key): [Request](https://crawlee.dev/python/api/class/Request) | None
- Retrieve a specific request from the queue by its ID.
***
#### Parameters
* ##### unique\_key: str
Unique key of the request to retrieve.
#### Returns [Request](https://crawlee.dev/python/api/class/Request) | None
### [**](#get_total_count)[**](https://github.com/apify/crawlee-python/blob/master//src/crawlee/storages/_request_queue.py#L113)get\_total\_count
* **async **get\_total\_count**(): int
- Overrides [RequestManager.get\_total\_count](https://crawlee.dev/python/api/class/RequestManager#get_total_count)
Get an offline approximation of the total number of requests in the loader (i.e. pending + handled).
***
#### Returns int
### [**](#is_empty)[**](https://github.com/apify/crawlee-python/blob/master//src/crawlee/storages/_request_queue.py#L282)is\_empty
* **async **is\_empty**(): bool
- Overrides [RequestManager.is\_empty](https://crawlee.dev/python/api/class/RequestManager#is_empty)
Check if the request queue is empty.
An empty queue means that there are no requests currently in the queue, either pending or being processed. However, this does not necessarily mean that the crawling operation is finished, as there still might be tasks that could add additional requests to the queue.
***
#### Returns bool
### [**](#is_finished)[**](https://github.com/apify/crawlee-python/blob/master//src/crawlee/storages/_request_queue.py#L294)is\_finished
* **async **is\_finished**(): bool
- Overrides [RequestManager.is\_finished](https://crawlee.dev/python/api/class/RequestManager#is_finished)
Check if the request queue is finished.
A finished queue means that all requests in the queue have been processed (the queue is empty) and there are no more tasks that could add additional requests to the queue. This is the definitive way to check if a crawling operation is complete.
***
#### Returns bool
### [**](#mark_request_as_handled)[**](https://github.com/apify/crawlee-python/blob/master//src/crawlee/storages/_request_queue.py#L245)mark\_request\_as\_handled
* **async **mark\_request\_as\_handled**(request): [ProcessedRequest](https://crawlee.dev/python/api/class/ProcessedRequest) | None
- Overrides [RequestManager.mark\_request\_as\_handled](https://crawlee.dev/python/api/class/RequestManager#mark_request_as_handled)
Mark a request as handled after successful processing.
This method should be called after a request has been successfully processed. Once marked as handled, the request will be removed from the queue and will not be returned in subsequent calls to `fetch_next_request` method.
***
#### Parameters
* ##### request: [Request](https://crawlee.dev/python/api/class/Request)
The request to mark as handled.
#### Returns [ProcessedRequest](https://crawlee.dev/python/api/class/ProcessedRequest) | None
### [**](#open)[**](https://github.com/apify/crawlee-python/blob/master//src/crawlee/storages/_request_queue.py#L119)open
* **async **open**(\*, id, name, alias, configuration, storage\_client): [Storage](https://crawlee.dev/python/api/class/Storage)
- Overrides [Storage.open](https://crawlee.dev/python/api/class/Storage#open)
Open a storage, either restore existing or create a new one.
***
#### Parameters
* ##### optionalkeyword-onlyid: str | None = <!-- -->None
The storage ID.
* ##### optionalkeyword-onlyname: str | None = <!-- -->None
The storage name (global scope, persists across runs). Name can only contain letters "a" through "z", the digits "0" through "9", and the hyphen ("-") but only in the middle of the string (e.g. "my-value-1").
* ##### optionalkeyword-onlyalias: str | None = <!-- -->None
The storage alias (run scope, creates unnamed storage).
* ##### optionalkeyword-onlyconfiguration: [Configuration](https://crawlee.dev/python/api/class/Configuration) | None = <!-- -->None
Configuration object used during the storage creation or restoration process.
* ##### optionalkeyword-onlystorage\_client: [StorageClient](https://crawlee.dev/python/api/class/StorageClient) | None = <!-- -->None
Underlying storage client to use. If not provided, the default global storage client from the service locator will be used.
#### Returns [Storage](https://crawlee.dev/python/api/class/Storage)
### [**](#purge)[**](https://github.com/apify/crawlee-python/blob/master//src/crawlee/storages/_request_queue.py#L152)purge
* **async **purge**(): None
- Overrides [Storage.purge](https://crawlee.dev/python/api/class/Storage#purge)
Purge the storage, removing all items from the underlying storage client.
This method does not remove the storage itself, e.g. don't remove the metadata, but clears all items within it.
***
#### Returns None
### [**](#reclaim_request)[**](https://github.com/apify/crawlee-python/blob/master//src/crawlee/storages/_request_queue.py#L260)reclaim\_request
* **async **reclaim\_request**(request, \*, forefront): [ProcessedRequest](https://crawlee.dev/python/api/class/ProcessedRequest) | None
- Overrides [RequestManager.reclaim\_request](https://crawlee.dev/python/api/class/RequestManager#reclaim_request)
Reclaim a failed request back to the queue for later processing.
If a request fails during processing, this method can be used to return it to the queue. The request will be returned for processing again in a subsequent call to `RequestQueue.fetch_next_request`.
***
#### Parameters
* ##### request: [Request](https://crawlee.dev/python/api/class/Request)
The request to return to the queue.
* ##### optionalkeyword-onlyforefront: bool = <!-- -->False
If true, the request will be added to the beginning of the queue. Otherwise, it will be added to the end.
#### Returns [ProcessedRequest](https://crawlee.dev/python/api/class/ProcessedRequest) | None
### [**](#to_tandem)[**](https://github.com/apify/crawlee-python/blob/master//src/crawlee/request_loaders/_request_loader.py#L56)to\_tandem
* **async **to\_tandem**(request\_manager): [RequestManagerTandem](https://crawlee.dev/python/api/class/RequestManagerTandem)
- Inherited from [RequestLoader.to\_tandem](https://crawlee.dev/python/api/class/RequestLoader#to_tandem)
Combine the loader with a request manager to support adding and reclaiming requests.
***
#### Parameters
* ##### optionalrequest\_manager: RequestManager | None = <!-- -->None
Request manager to combine the loader with. If None is given, the default request queue is used.
#### Returns [RequestManagerTandem](https://crawlee.dev/python/api/class/RequestManagerTandem)
## Properties<!-- -->[**](#Properties)
### [**](#id)[**](https://github.com/apify/crawlee-python/blob/master//src/crawlee/storages/_request_queue.py#L95)id
**id: str
Overrides [Storage.id](https://crawlee.dev/python/api/class/Storage#id)
Get the storage ID.
### [**](#name)[**](https://github.com/apify/crawlee-python/blob/master//src/crawlee/storages/_request_queue.py#L100)name
**name: str | None
Overrides [Storage.name](https://crawlee.dev/python/api/class/Storage#name)
Get the storage name.
---
# RequestQueueHead<!-- -->
Model for request queue head.
Represents a collection of requests retrieved from the beginning of a queue, including metadata about the queue's state and lock information for the requests.
## Index[**](#Index)
### Properties
* [**had\_multiple\_clients](https://docs.apify.com/sdk/python/sdk/python/reference/class/RequestQueueHead.md#had_multiple_clients)
* [**items](https://docs.apify.com/sdk/python/sdk/python/reference/class/RequestQueueHead.md#items)
* [**limit](https://docs.apify.com/sdk/python/sdk/python/reference/class/RequestQueueHead.md#limit)
* [**lock\_time](https://docs.apify.com/sdk/python/sdk/python/reference/class/RequestQueueHead.md#lock_time)
* [**model\_config](https://docs.apify.com/sdk/python/sdk/python/reference/class/RequestQueueHead.md#model_config)
* [**queue\_has\_locked\_requests](https://docs.apify.com/sdk/python/sdk/python/reference/class/RequestQueueHead.md#queue_has_locked_requests)
* [**queue\_modified\_at](https://docs.apify.com/sdk/python/sdk/python/reference/class/RequestQueueHead.md#queue_modified_at)
## Properties<!-- -->[**](#Properties)
### [**](#had_multiple_clients)[**](https://github.com/apify/apify-sdk-python/blob/master//src/apify/storage_clients/_apify/_models.py#L47)had\_multiple\_clients
**had\_multiple\_clients: bool
Indicates whether the queue has been accessed by multiple clients (consumers).
### [**](#items)[**](https://github.com/apify/apify-sdk-python/blob/master//src/apify/storage_clients/_apify/_models.py#L59)items
**items: list\[Request]
The list of request objects retrieved from the beginning of the queue.
### [**](#limit)[**](https://github.com/apify/apify-sdk-python/blob/master//src/apify/storage_clients/_apify/_models.py#L44)limit
**limit: int | None
The maximum number of requests that were requested from the queue.
### [**](#lock_time)[**](https://github.com/apify/apify-sdk-python/blob/master//src/apify/storage_clients/_apify/_models.py#L53)lock\_time
**lock\_time: timedelta | None
The duration for which the returned requests are locked and cannot be processed by other clients.
### [**](#model_config)[**](https://github.com/apify/apify-sdk-python/blob/master//src/apify/storage_clients/_apify/_models.py#L42)model\_config
**model\_config: Undefined
### [**](#queue_has_locked_requests)[**](https://github.com/apify/apify-sdk-python/blob/master//src/apify/storage_clients/_apify/_models.py#L56)queue\_has\_locked\_requests
**queue\_has\_locked\_requests: bool | None
Indicates whether the queue contains any locked requests.
### [**](#queue_modified_at)[**](https://github.com/apify/apify-sdk-python/blob/master//src/apify/storage_clients/_apify/_models.py#L50)queue\_modified\_at
**queue\_modified\_at: datetime
The timestamp when the queue was last modified.
---
# RequestQueueMetadata<!-- -->
Model for a request queue metadata.
### Hierarchy
* [StorageMetadata](https://crawlee.dev/python/api/class/StorageMetadata)
* *RequestQueueMetadata*
## Index[**](#Index)
### Properties
* [**accessed\_at](https://docs.apify.com/sdk/python/sdk/python/reference/class/RequestQueueMetadata.md#accessed_at)
* [**created\_at](https://docs.apify.com/sdk/python/sdk/python/reference/class/RequestQueueMetadata.md#created_at)
* [**had\_multiple\_clients](https://docs.apify.com/sdk/python/sdk/python/reference/class/RequestQueueMetadata.md#had_multiple_clients)
* [**handled\_request\_count](https://docs.apify.com/sdk/python/sdk/python/reference/class/RequestQueueMetadata.md#handled_request_count)
* [**id](https://docs.apify.com/sdk/python/sdk/python/reference/class/RequestQueueMetadata.md#id)
* [**model\_config](https://docs.apify.com/sdk/python/sdk/python/reference/class/RequestQueueMetadata.md#model_config)
* [**modified\_at](https://docs.apify.com/sdk/python/sdk/python/reference/class/RequestQueueMetadata.md#modified_at)
* [**name](https://docs.apify.com/sdk/python/sdk/python/reference/class/RequestQueueMetadata.md#name)
* [**pending\_request\_count](https://docs.apify.com/sdk/python/sdk/python/reference/class/RequestQueueMetadata.md#pending_request_count)
* [**total\_request\_count](https://docs.apify.com/sdk/python/sdk/python/reference/class/RequestQueueMetadata.md#total_request_count)
## Properties<!-- -->[**](#Properties)
### [**](#accessed_at)[**](https://github.com/apify/crawlee-python/blob/master//src/crawlee/storage_clients/models.py#L31)accessed\_at
**accessed\_at: Annotated\[datetime, Field(alias='accessedAt')]
Inherited from [StorageMetadata.accessed\_at](https://crawlee.dev/python/api/class/StorageMetadata#accessed_at)
The timestamp when the storage was last accessed.
### [**](#created_at)[**](https://github.com/apify/crawlee-python/blob/master//src/crawlee/storage_clients/models.py#L34)created\_at
**created\_at: Annotated\[datetime, Field(alias='createdAt')]
Inherited from [StorageMetadata.created\_at](https://crawlee.dev/python/api/class/StorageMetadata#created_at)
The timestamp when the storage was created.
### [**](#had_multiple_clients)[**](https://github.com/apify/crawlee-python/blob/master//src/crawlee/storage_clients/models.py#L64)had\_multiple\_clients
**had\_multiple\_clients: bool
Indicates whether the queue has been accessed by multiple clients (consumers).
### [**](#handled_request_count)[**](https://github.com/apify/crawlee-python/blob/master//src/crawlee/storage_clients/models.py#L67)handled\_request\_count
**handled\_request\_count: int
The number of requests that have been handled from the queue.
### [**](#id)[**](https://github.com/apify/crawlee-python/blob/master//src/crawlee/storage_clients/models.py#L25)id
**id: Annotated\[str, Field(alias='id')]
Inherited from [StorageMetadata.id](https://crawlee.dev/python/api/class/StorageMetadata#id)
The unique identifier of the storage.
### [**](#model_config)[**](https://github.com/apify/crawlee-python/blob/master//src/crawlee/storage_clients/models.py#L62)model\_config
**model\_config: Undefined
Overrides [StorageMetadata.model\_config](https://crawlee.dev/python/api/class/StorageMetadata#model_config)
### [**](#modified_at)[**](https://github.com/apify/crawlee-python/blob/master//src/crawlee/storage_clients/models.py#L37)modified\_at
**modified\_at: Annotated\[datetime, Field(alias='modifiedAt')]
Inherited from [StorageMetadata.modified\_at](https://crawlee.dev/python/api/class/StorageMetadata#modified_at)
The timestamp when the storage was last modified.
### [**](#name)[**](https://github.com/apify/crawlee-python/blob/master//src/crawlee/storage_clients/models.py#L28)name
**name: Annotated\[str | None, Field(alias='name', default=None)]
Inherited from [StorageMetadata.name](https://crawlee.dev/python/api/class/StorageMetadata#name)
The name of the storage.
### [**](#pending_request_count)[**](https://github.com/apify/crawlee-python/blob/master//src/crawlee/storage_clients/models.py#L70)pending\_request\_count
**pending\_request\_count: int
The number of requests that are still pending in the queue.
### [**](#total_request_count)[**](https://github.com/apify/crawlee-python/blob/master//src/crawlee/storage_clients/models.py#L73)total\_request\_count
**total\_request\_count: int
The total number of requests that have been added to the queue.
---
# RequestQueueStats<!-- -->
## Index[**](#Index)
### Properties
* [**delete\_count](https://docs.apify.com/sdk/python/sdk/python/reference/class/RequestQueueStats.md#delete_count)
* [**head\_item\_read\_count](https://docs.apify.com/sdk/python/sdk/python/reference/class/RequestQueueStats.md#head_item_read_count)
* [**model\_config](https://docs.apify.com/sdk/python/sdk/python/reference/class/RequestQueueStats.md#model_config)
* [**read\_count](https://docs.apify.com/sdk/python/sdk/python/reference/class/RequestQueueStats.md#read_count)
* [**storage\_bytes](https://docs.apify.com/sdk/python/sdk/python/reference/class/RequestQueueStats.md#storage_bytes)
* [**write\_count](https://docs.apify.com/sdk/python/sdk/python/reference/class/RequestQueueStats.md#write_count)
## Properties<!-- -->[**](#Properties)
### [**](#delete_count)[**](https://github.com/apify/apify-sdk-python/blob/master//src/apify/storage_clients/_apify/_models.py#L113)delete\_count
**delete\_count: int
"The number of request queue deletes.
### [**](#head_item_read_count)[**](https://github.com/apify/apify-sdk-python/blob/master//src/apify/storage_clients/_apify/_models.py#L116)head\_item\_read\_count
**head\_item\_read\_count: int
The number of request queue head reads.
### [**](#model_config)[**](https://github.com/apify/apify-sdk-python/blob/master//src/apify/storage_clients/_apify/_models.py#L111)model\_config
**model\_config: Undefined
### [**](#read_count)[**](https://github.com/apify/apify-sdk-python/blob/master//src/apify/storage_clients/_apify/_models.py#L119)read\_count
**read\_count: int
The number of request queue reads.
### [**](#storage_bytes)[**](https://github.com/apify/apify-sdk-python/blob/master//src/apify/storage_clients/_apify/_models.py#L122)storage\_bytes
**storage\_bytes: int
Storage size in bytes.
### [**](#write_count)[**](https://github.com/apify/apify-sdk-python/blob/master//src/apify/storage_clients/_apify/_models.py#L125)write\_count
**write\_count: int
The number of request queue writes.
---
# SitemapRequestLoader<!-- -->
A request loader that reads URLs from sitemap(s).
The loader is designed to handle sitemaps that follow the format described in the Sitemaps protocol (<https://www.sitemaps.org/protocol.html>). It supports both XML and plain text sitemap formats. Note that HTML pages containing links are not supported - those should be handled by regular crawlers and the `enqueue_links` functionality.
The loader fetches and parses sitemaps in the background, allowing crawling to start before all URLs are loaded. It supports filtering URLs using glob and regex patterns.
The loader supports state persistence, allowing it to resume from where it left off after interruption when a `persist_state_key` is provided during initialization.
### Hierarchy
* [RequestLoader](https://crawlee.dev/python/api/class/RequestLoader)
* *SitemapRequestLoader*
## Index[**](#Index)
### Methods
* [**\_\_aenter\_\_](https://docs.apify.com/sdk/python/sdk/python/reference/class/SitemapRequestLoader.md#__aenter__)
* [**\_\_aexit\_\_](https://docs.apify.com/sdk/python/sdk/python/reference/class/SitemapRequestLoader.md#__aexit__)
* [**\_\_init\_\_](https://docs.apify.com/sdk/python/sdk/python/reference/class/SitemapRequestLoader.md#__init__)
* [**abort\_loading](https://docs.apify.com/sdk/python/sdk/python/reference/class/SitemapRequestLoader.md#abort_loading)
* [**close](https://docs.apify.com/sdk/python/sdk/python/reference/class/SitemapRequestLoader.md#close)
* [**fetch\_next\_request](https://docs.apify.com/sdk/python/sdk/python/reference/class/SitemapRequestLoader.md#fetch_next_request)
* [**get\_handled\_count](https://docs.apify.com/sdk/python/sdk/python/reference/class/SitemapRequestLoader.md#get_handled_count)
* [**get\_total\_count](https://docs.apify.com/sdk/python/sdk/python/reference/class/SitemapRequestLoader.md#get_total_count)
* [**is\_empty](https://docs.apify.com/sdk/python/sdk/python/reference/class/SitemapRequestLoader.md#is_empty)
* [**is\_finished](https://docs.apify.com/sdk/python/sdk/python/reference/class/SitemapRequestLoader.md#is_finished)
* [**mark\_request\_as\_handled](https://docs.apify.com/sdk/python/sdk/python/reference/class/SitemapRequestLoader.md#mark_request_as_handled)
* [**start](https://docs.apify.com/sdk/python/sdk/python/reference/class/SitemapRequestLoader.md#start)
* [**to\_tandem](https://docs.apify.com/sdk/python/sdk/python/reference/class/SitemapRequestLoader.md#to_tandem)
## Methods<!-- -->[**](#Methods)
### [**](#__aenter__)[**](https://github.com/apify/crawlee-python/blob/master//src/crawlee/request_loaders/_sitemap_request_loader.py#L353)\_\_aenter\_\_
* **async **\_\_aenter\_\_**(): [SitemapRequestLoader](https://crawlee.dev/python/api/class/SitemapRequestLoader)
- Enter the context manager.
***
#### Returns [SitemapRequestLoader](https://crawlee.dev/python/api/class/SitemapRequestLoader)
### [**](#__aexit__)[**](https://github.com/apify/crawlee-python/blob/master//src/crawlee/request_loaders/_sitemap_request_loader.py#L358)\_\_aexit\_\_
* **async **\_\_aexit\_\_**(exc\_type, exc\_value, exc\_traceback): None
- Exit the context manager.
***
#### Parameters
* ##### exc\_type: [type](https://crawlee.dev/python/api/class/SitemapSource#type)\[BaseException] | None
* ##### exc\_value: BaseException | None
* ##### exc\_traceback: TracebackType | None
#### Returns None
### [**](#__init__)[**](https://github.com/apify/crawlee-python/blob/master//src/crawlee/request_loaders/_sitemap_request_loader.py#L105)\_\_init\_\_
* ****\_\_init\_\_**(sitemap\_urls, http\_client, \*, proxy\_info, include, exclude, max\_buffer\_size, persist\_state\_key): None
- Initialize the sitemap request loader.
***
#### Parameters
* ##### sitemap\_urls: list\[str]
Configuration options for the loader.
* ##### http\_client: [HttpClient](https://crawlee.dev/python/api/class/HttpClient)
the instance of `HttpClient` to use for fetching sitemaps.
* ##### optionalkeyword-onlyproxy\_info: [ProxyInfo](https://crawlee.dev/python/api/class/ProxyInfo) | None = <!-- -->None
Optional proxy to use for fetching sitemaps.
* ##### optionalkeyword-onlyinclude: list\[re.Pattern\[Any] | [Glob](https://crawlee.dev/python/api/class/Glob)] | None = <!-- -->None
List of glob or regex patterns to include URLs.
* ##### optionalkeyword-onlyexclude: list\[re.Pattern\[Any] | [Glob](https://crawlee.dev/python/api/class/Glob)] | None = <!-- -->None
List of glob or regex patterns to exclude URLs.
* ##### optionalkeyword-onlymax\_buffer\_size: int = <!-- -->200
Maximum number of URLs to buffer in memory.
* ##### optionalkeyword-onlypersist\_state\_key: str | None = <!-- -->None
A key for persisting the loader's state in the KeyValueStore. When provided, allows resuming from where it left off after interruption. If None, no state persistence occurs.
#### Returns None
### [**](#abort_loading)[**](https://github.com/apify/crawlee-python/blob/master//src/crawlee/request_loaders/_sitemap_request_loader.py#L335)abort\_loading
* **async **abort\_loading**(): None
- Abort the sitemap loading process.
***
#### Returns None
### [**](#close)[**](https://github.com/apify/crawlee-python/blob/master//src/crawlee/request_loaders/_sitemap_request_loader.py#L348)close
* **async **close**(): None
- Close the request loader.
***
#### Returns None
### [**](#fetch_next_request)[**](https://github.com/apify/crawlee-python/blob/master//src/crawlee/request_loaders/_sitemap_request_loader.py#L306)fetch\_next\_request
* **async **fetch\_next\_request**(): [Request](https://crawlee.dev/python/api/class/Request) | None
- Overrides [RequestLoader.fetch\_next\_request](https://crawlee.dev/python/api/class/RequestLoader#fetch_next_request)
Fetch the next request to process.
***
#### Returns [Request](https://crawlee.dev/python/api/class/Request) | None
### [**](#get_handled_count)[**](https://github.com/apify/crawlee-python/blob/master//src/crawlee/request_loaders/_sitemap_request_loader.py#L288)get\_handled\_count
* **async **get\_handled\_count**(): int
- Overrides [RequestLoader.get\_handled\_count](https://crawlee.dev/python/api/class/RequestLoader#get_handled_count)
Return the number of URLs that have been handled.
***
#### Returns int
### [**](#get_total_count)[**](https://github.com/apify/crawlee-python/blob/master//src/crawlee/request_loaders/_sitemap_request_loader.py#L282)get\_total\_count
* **async **get\_total\_count**(): int
- Overrides [RequestLoader.get\_total\_count](https://crawlee.dev/python/api/class/RequestLoader#get_total_count)
Return the total number of URLs found so far.
***
#### Returns int
### [**](#is_empty)[**](https://github.com/apify/crawlee-python/blob/master//src/crawlee/request_loaders/_sitemap_request_loader.py#L294)is\_empty
* **async **is\_empty**(): bool
- Overrides [RequestLoader.is\_empty](https://crawlee.dev/python/api/class/RequestLoader#is_empty)
Check if there are no more URLs to process.
***
#### Returns bool
### [**](#is_finished)[**](https://github.com/apify/crawlee-python/blob/master//src/crawlee/request_loaders/_sitemap_request_loader.py#L300)is\_finished
* **async **is\_finished**(): bool
- Overrides [RequestLoader.is\_finished](https://crawlee.dev/python/api/class/RequestLoader#is_finished)
Check if all URLs have been processed.
***
#### Returns bool
### [**](#mark_request_as_handled)[**](https://github.com/apify/crawlee-python/blob/master//src/crawlee/request_loaders/_sitemap_request_loader.py#L327)mark\_request\_as\_handled
* **async **mark\_request\_as\_handled**(request): [ProcessedRequest](https://crawlee.dev/python/api/class/ProcessedRequest) | None
- Overrides [RequestLoader.mark\_request\_as\_handled](https://crawlee.dev/python/api/class/RequestLoader#mark_request_as_handled)
Mark a request as successfully handled.
***
#### Parameters
* ##### request: [Request](https://crawlee.dev/python/api/class/Request)
#### Returns [ProcessedRequest](https://crawlee.dev/python/api/class/ProcessedRequest) | None
### [**](#start)[**](https://github.com/apify/crawlee-python/blob/master//src/crawlee/request_loaders/_sitemap_request_loader.py#L342)start
* **async **start**(): None
- Start the sitemap loading process.
***
#### Returns None
### [**](#to_tandem)[**](https://github.com/apify/crawlee-python/blob/master//src/crawlee/request_loaders/_request_loader.py#L56)to\_tandem
* **async **to\_tandem**(request\_manager): [RequestManagerTandem](https://crawlee.dev/python/api/class/RequestManagerTandem)
- Inherited from [RequestLoader.to\_tandem](https://crawlee.dev/python/api/class/RequestLoader#to_tandem)
Combine the loader with a request manager to support adding and reclaiming requests.
***
#### Parameters
* ##### optionalrequest\_manager: RequestManager | None = <!-- -->None
Request manager to combine the loader with. If None is given, the default request queue is used.
#### Returns [RequestManagerTandem](https://crawlee.dev/python/api/class/RequestManagerTandem)
---
# SmartApifyStorageClient<!-- -->
Storage client that automatically selects cloud or local storage client based on the environment.
This storage client provides access to datasets, key-value stores, and request queues by intelligently delegating to either the cloud or local storage client based on the execution environment and configuration.
When running on the Apify platform (which is detected via environment variables), this client automatically uses the `cloud_storage_client` to store storage data there. When running locally, it uses the `local_storage_client` to store storage data there. You can also force cloud storage usage from your local machine by using the `force_cloud` argument.
This storage client is designed to work specifically in `Actor` context and provides a seamless development experience where the same code works both locally and on the Apify platform without any changes.
## Index[**](#Index)
### Methods
* [**\_\_init\_\_](https://docs.apify.com/sdk/python/sdk/python/reference/class/SmartApifyStorageClient.md#__init__)
* [**\_\_str\_\_](https://docs.apify.com/sdk/python/sdk/python/reference/class/SmartApifyStorageClient.md#__str__)
* [**create\_dataset\_client](https://docs.apify.com/sdk/python/sdk/python/reference/class/SmartApifyStorageClient.md#create_dataset_client)
* [**create\_kvs\_client](https://docs.apify.com/sdk/python/sdk/python/reference/class/SmartApifyStorageClient.md#create_kvs_client)
* [**create\_rq\_client](https://docs.apify.com/sdk/python/sdk/python/reference/class/SmartApifyStorageClient.md#create_rq_client)
* [**get\_storage\_client\_cache\_key](https://docs.apify.com/sdk/python/sdk/python/reference/class/SmartApifyStorageClient.md#get_storage_client_cache_key)
* [**get\_suitable\_storage\_client](https://docs.apify.com/sdk/python/sdk/python/reference/class/SmartApifyStorageClient.md#get_suitable_storage_client)
## Methods<!-- -->[**](#Methods)
### [**](#__init__)[**](https://github.com/apify/apify-sdk-python/blob/master//src/apify/storage_clients/_smart_apify/_storage_client.py#L35)\_\_init\_\_
* ****\_\_init\_\_**(\*, cloud\_storage\_client, local\_storage\_client): None
- Initialize a new instance.
***
#### Parameters
* ##### optionalkeyword-onlycloud\_storage\_client: StorageClient | None = <!-- -->None
Storage client used when an Actor is running on the Apify platform, or when explicitly enabled via the `force_cloud` argument. Defaults to `ApifyStorageClient`.
* ##### optionalkeyword-onlylocal\_storage\_client: StorageClient | None = <!-- -->None
Storage client used when an Actor is not running on the Apify platform and when `force_cloud` flag is not set. Defaults to `FileSystemStorageClient`.
#### Returns None
### [**](#__str__)[**](https://github.com/apify/apify-sdk-python/blob/master//src/apify/storage_clients/_smart_apify/_storage_client.py#L52)\_\_str\_\_
* ****\_\_str\_\_**(): str
- #### Returns str
### [**](#create_dataset_client)[**](https://github.com/apify/apify-sdk-python/blob/master//src/apify/storage_clients/_smart_apify/_storage_client.py#L68)create\_dataset\_client
* **async **create\_dataset\_client**(\*, id, name, alias, configuration): DatasetClient
- #### Parameters
* ##### optionalkeyword-onlyid: str | None = <!-- -->None
* ##### optionalkeyword-onlyname: str | None = <!-- -->None
* ##### optionalkeyword-onlyalias: str | None = <!-- -->None
* ##### optionalkeyword-onlyconfiguration: CrawleeConfiguration | None = <!-- -->None
#### Returns DatasetClient
### [**](#create_kvs_client)[**](https://github.com/apify/apify-sdk-python/blob/master//src/apify/storage_clients/_smart_apify/_storage_client.py#L81)create\_kvs\_client
* **async **create\_kvs\_client**(\*, id, name, alias, configuration): KeyValueStoreClient
- #### Parameters
* ##### optionalkeyword-onlyid: str | None = <!-- -->None
* ##### optionalkeyword-onlyname: str | None = <!-- -->None
* ##### optionalkeyword-onlyalias: str | None = <!-- -->None
* ##### optionalkeyword-onlyconfiguration: CrawleeConfiguration | None = <!-- -->None
#### Returns KeyValueStoreClient
### [**](#create_rq_client)[**](https://github.com/apify/apify-sdk-python/blob/master//src/apify/storage_clients/_smart_apify/_storage_client.py#L94)create\_rq\_client
* **async **create\_rq\_client**(\*, id, name, alias, configuration): RequestQueueClient
- #### Parameters
* ##### optionalkeyword-onlyid: str | None = <!-- -->None
* ##### optionalkeyword-onlyname: str | None = <!-- -->None
* ##### optionalkeyword-onlyalias: str | None = <!-- -->None
* ##### optionalkeyword-onlyconfiguration: CrawleeConfiguration | None = <!-- -->None
#### Returns RequestQueueClient
### [**](#get_storage_client_cache_key)[**](https://github.com/apify/apify-sdk-python/blob/master//src/apify/storage_clients/_smart_apify/_storage_client.py#L59)get\_storage\_client\_cache\_key
* ****get\_storage\_client\_cache\_key**(configuration): Hashable
- #### Parameters
* ##### configuration: CrawleeConfiguration
#### Returns Hashable
### [**](#get_suitable_storage_client)[**](https://github.com/apify/apify-sdk-python/blob/master//src/apify/storage_clients/_smart_apify/_storage_client.py#L106)get\_suitable\_storage\_client
* ****get\_suitable\_storage\_client**(\*, force\_cloud): StorageClient
- Get a suitable storage client based on the global configuration and the value of the force\_cloud flag.
***
#### Parameters
* ##### optionalkeyword-onlyforce\_cloud: bool = <!-- -->False
If True, return `cloud_storage_client`.
#### Returns StorageClient
---
# SqlStorageClient<!-- -->
SQL implementation of the storage client.
This storage client provides access to datasets, key-value stores, and request queues that persist data to a SQL database using SQLAlchemy 2+. Each storage type uses two tables: one for metadata and one for records.
The client accepts either a database connection string or a pre-configured AsyncEngine. If neither is provided, it creates a default SQLite database 'crawlee.db' in the storage directory.
Database schema is automatically created during initialization. SQLite databases receive performance optimizations including WAL mode and increased cache size.
### Hierarchy
* [StorageClient](https://crawlee.dev/python/api/class/StorageClient)
* *SqlStorageClient*
## Index[**](#Index)
### Methods
* [**\_\_aenter\_\_](https://docs.apify.com/sdk/python/sdk/python/reference/class/SqlStorageClient.md#__aenter__)
* [**\_\_aexit\_\_](https://docs.apify.com/sdk/python/sdk/python/reference/class/SqlStorageClient.md#__aexit__)
* [**\_\_init\_\_](https://docs.apify.com/sdk/python/sdk/python/reference/class/SqlStorageClient.md#__init__)
* [**close](https://docs.apify.com/sdk/python/sdk/python/reference/class/SqlStorageClient.md#close)
* [**create\_dataset\_client](https://docs.apify.com/sdk/python/sdk/python/reference/class/SqlStorageClient.md#create_dataset_client)
* [**create\_kvs\_client](https://docs.apify.com/sdk/python/sdk/python/reference/class/SqlStorageClient.md#create_kvs_client)
* [**create\_rq\_client](https://docs.apify.com/sdk/python/sdk/python/reference/class/SqlStorageClient.md#create_rq_client)
* [**create\_session](https://docs.apify.com/sdk/python/sdk/python/reference/class/SqlStorageClient.md#create_session)
* [**get\_accessed\_modified\_update\_interval](https://docs.apify.com/sdk/python/sdk/python/reference/class/SqlStorageClient.md#get_accessed_modified_update_interval)
* [**get\_dialect\_name](https://docs.apify.com/sdk/python/sdk/python/reference/class/SqlStorageClient.md#get_dialect_name)
* [**get\_rate\_limit\_errors](https://docs.apify.com/sdk/python/sdk/python/reference/class/SqlStorageClient.md#get_rate_limit_errors)
* [**get\_storage\_client\_cache\_key](https://docs.apify.com/sdk/python/sdk/python/reference/class/SqlStorageClient.md#get_storage_client_cache_key)
* [**initialize](https://docs.apify.com/sdk/python/sdk/python/reference/class/SqlStorageClient.md#initialize)
### Properties
* [**engine](https://docs.apify.com/sdk/python/sdk/python/reference/class/SqlStorageClient.md#engine)
## Methods<!-- -->[**](#Methods)
### [**](#__aenter__)[**](https://github.com/apify/crawlee-python/blob/master//src/crawlee/storage_clients/_sql/_storage_client.py#L84)\_\_aenter\_\_
* **async **\_\_aenter\_\_**(): [SqlStorageClient](https://crawlee.dev/python/api/class/SqlStorageClient)
- Async context manager entry.
***
#### Returns [SqlStorageClient](https://crawlee.dev/python/api/class/SqlStorageClient)
### [**](#__aexit__)[**](https://github.com/apify/crawlee-python/blob/master//src/crawlee/storage_clients/_sql/_storage_client.py#L88)\_\_aexit\_\_
* **async **\_\_aexit\_\_**(exc\_type, exc\_value, exc\_traceback): None
- Async context manager exit.
***
#### Parameters
* ##### exc\_type: [type](https://crawlee.dev/python/api/class/SitemapSource#type)\[BaseException] | None
* ##### exc\_value: BaseException | None
* ##### exc\_traceback: TracebackType | None
#### Returns None
### [**](#__init__)[**](https://github.com/apify/crawlee-python/blob/master//src/crawlee/storage_clients/_sql/_storage_client.py#L49)\_\_init\_\_
* ****\_\_init\_\_**(\*, connection\_string, engine): None
- Initialize the SQL storage client.
***
#### Parameters
* ##### optionalkeyword-onlyconnection\_string: str | None = <!-- -->None
Database connection string (e.g., "sqlite+aiosqlite:///crawlee.db"). If not provided, defaults to SQLite database in the storage directory.
* ##### optionalkeyword-onlyengine: AsyncEngine | None = <!-- -->None
Pre-configured AsyncEngine instance. If provided, connection\_string is ignored.
#### Returns None
### [**](#close)[**](https://github.com/apify/crawlee-python/blob/master//src/crawlee/storage_clients/_sql/_storage_client.py#L166)close
* **async **close**(): None
- Close the database connection pool.
***
#### Returns None
### [**](#create_dataset_client)[**](https://github.com/apify/crawlee-python/blob/master//src/crawlee/storage_clients/_sql/_storage_client.py#L183)create\_dataset\_client
* **async **create\_dataset\_client**(\*, id, name, alias, configuration): [DatasetClient](https://crawlee.dev/python/api/class/DatasetClient)
- Overrides [StorageClient.create\_dataset\_client](https://crawlee.dev/python/api/class/StorageClient#create_dataset_client)
Create a dataset client.
***
#### Parameters
* ##### optionalkeyword-onlyid: str | None = <!-- -->None
* ##### optionalkeyword-onlyname: str | None = <!-- -->None
* ##### optionalkeyword-onlyalias: str | None = <!-- -->None
* ##### optionalkeyword-onlyconfiguration: [Configuration](https://crawlee.dev/python/api/class/Configuration) | None = <!-- -->None
#### Returns [DatasetClient](https://crawlee.dev/python/api/class/DatasetClient)
### [**](#create_kvs_client)[**](https://github.com/apify/crawlee-python/blob/master//src/crawlee/storage_clients/_sql/_storage_client.py#L205)create\_kvs\_client
* **async **create\_kvs\_client**(\*, id, name, alias, configuration): [KeyValueStoreClient](https://crawlee.dev/python/api/class/KeyValueStoreClient)
- Overrides [StorageClient.create\_kvs\_client](https://crawlee.dev/python/api/class/StorageClient#create_kvs_client)
Create a key-value store client.
***
#### Parameters
* ##### optionalkeyword-onlyid: str | None = <!-- -->None
* ##### optionalkeyword-onlyname: str | None = <!-- -->None
* ##### optionalkeyword-onlyalias: str | None = <!-- -->None
* ##### optionalkeyword-onlyconfiguration: [Configuration](https://crawlee.dev/python/api/class/Configuration) | None = <!-- -->None
#### Returns [KeyValueStoreClient](https://crawlee.dev/python/api/class/KeyValueStoreClient)
### [**](#create_rq_client)[**](https://github.com/apify/crawlee-python/blob/master//src/crawlee/storage_clients/_sql/_storage_client.py#L227)create\_rq\_client
* **async **create\_rq\_client**(\*, id, name, alias, configuration): [RequestQueueClient](https://crawlee.dev/python/api/class/RequestQueueClient)
- Overrides [StorageClient.create\_rq\_client](https://crawlee.dev/python/api/class/StorageClient#create_rq_client)
Create a request queue client.
***
#### Parameters
* ##### optionalkeyword-onlyid: str | None = <!-- -->None
* ##### optionalkeyword-onlyname: str | None = <!-- -->None
* ##### optionalkeyword-onlyalias: str | None = <!-- -->None
* ##### optionalkeyword-onlyconfiguration: [Configuration](https://crawlee.dev/python/api/class/Configuration) | None = <!-- -->None
#### Returns [RequestQueueClient](https://crawlee.dev/python/api/class/RequestQueueClient)
### [**](#create_session)[**](https://github.com/apify/crawlee-python/blob/master//src/crawlee/storage_clients/_sql/_storage_client.py#L172)create\_session
* ****create\_session**(): AsyncSession
- Create a new database session.
***
#### Returns AsyncSession
### [**](#get_accessed_modified_update_interval)[**](https://github.com/apify/crawlee-python/blob/master//src/crawlee/storage_clients/_sql/_storage_client.py#L108)get\_accessed\_modified\_update\_interval
* ****get\_accessed\_modified\_update\_interval**(): timedelta
- Get the interval for accessed and modified updates.
***
#### Returns timedelta
### [**](#get_dialect_name)[**](https://github.com/apify/crawlee-python/blob/master//src/crawlee/storage_clients/_sql/_storage_client.py#L104)get\_dialect\_name
* ****get\_dialect\_name**(): str | None
- Get the database dialect name.
***
#### Returns str | None
### [**](#get_rate_limit_errors)[**](https://github.com/apify/crawlee-python/blob/master//src/crawlee/storage_clients/_base/_storage_client.py#L74)get\_rate\_limit\_errors
* ****get\_rate\_limit\_errors**(): dict\[int, int]
- Inherited from [StorageClient.get\_rate\_limit\_errors](https://crawlee.dev/python/api/class/StorageClient#get_rate_limit_errors)
Return statistics about rate limit errors encountered by the HTTP client in storage client.
***
#### Returns dict\[int, int]
### [**](#get_storage_client_cache_key)[**](https://github.com/apify/crawlee-python/blob/master//src/crawlee/storage_clients/_base/_storage_client.py#L33)get\_storage\_client\_cache\_key
* ****get\_storage\_client\_cache\_key**(configuration): Hashable
- Inherited from [StorageClient.get\_storage\_client\_cache\_key](https://crawlee.dev/python/api/class/StorageClient#get_storage_client_cache_key)
Return a cache key that can differentiate between different storages of this and other clients.
Can be based on configuration or on the client itself. By default, returns a module and name of the client class.
***
#### Parameters
* ##### configuration: [Configuration](https://crawlee.dev/python/api/class/Configuration)
#### Returns Hashable
### [**](#initialize)[**](https://github.com/apify/crawlee-python/blob/master//src/crawlee/storage_clients/_sql/_storage_client.py#L112)initialize
* **async **initialize**(configuration): None
- Initialize the database schema.
This method creates all necessary tables if they don't exist. Should be called before using the storage client.
***
#### Parameters
* ##### configuration: [Configuration](https://crawlee.dev/python/api/class/Configuration)
#### Returns None
## Properties<!-- -->[**](#Properties)
### [**](#engine)[**](https://github.com/apify/crawlee-python/blob/master//src/crawlee/storage_clients/_sql/_storage_client.py#L98)engine
**engine: AsyncEngine
Get the SQLAlchemy AsyncEngine instance.
---
# Storage<!-- -->
Base class for storages.
### Hierarchy
* *Storage*
* [KeyValueStore](https://crawlee.dev/python/api/class/KeyValueStore)
* [Dataset](https://crawlee.dev/python/api/class/Dataset)
* [RequestQueue](https://crawlee.dev/python/api/class/RequestQueue)
## Index[**](#Index)
### Methods
* [](https://crawlee.dev/python/api/class/Storage#drop)
* [](https://crawlee.dev/python/api/class/Storage#get_metadata)
* [](https://crawlee.dev/python/api/class/Storage#open)
* [](https://crawlee.dev/python/api/class/Storage#purge)
### Properties
* [**id](https://docs.apify.com/sdk/python/sdk/python/reference/class/Storage.md#id)
* [**name](https://docs.apify.com/sdk/python/sdk/python/reference/class/Storage.md#name)
## Methods<!-- -->[**](#Methods)
### [**](#undefined)[**](https://github.com/apify/apify-sdk-python/blob/master//src/crawlee/storages/_base.py#L57)
:
### [**](#undefined)[**](https://github.com/apify/apify-sdk-python/blob/master//src/crawlee/storages/_base.py#L29)
:
### [**](#undefined)[**](https://github.com/apify/apify-sdk-python/blob/master//src/crawlee/storages/_base.py#L34)
:
### [**](#undefined)[**](https://github.com/apify/apify-sdk-python/blob/master//src/crawlee/storages/_base.py#L61)
:
## Properties<!-- -->[**](#Properties)
### [**](#id)[**](https://github.com/apify/crawlee-python/blob/master//src/crawlee/storages/_base.py#L20)id
**id: str
Get the storage ID.
### [**](#name)[**](https://github.com/apify/crawlee-python/blob/master//src/crawlee/storages/_base.py#L25)name
**name: str | None
Get the storage name.
---
# StorageClient<!-- -->
Base class for storage clients.
The `StorageClient` serves as an abstract base class that defines the interface for accessing Crawlee's storage types: datasets, key-value stores, and request queues. It provides methods to open clients for each of these storage types and handles common functionality.
Storage clients implementations can be provided for various backends (file system, memory, databases, various cloud providers, etc.) to support different use cases from development to production environments.
Each storage client implementation is responsible for ensuring proper initialization, data persistence (where applicable), and consistent access patterns across all storage types it supports.
### Hierarchy
* *StorageClient*
* [SqlStorageClient](https://crawlee.dev/python/api/class/SqlStorageClient)
* [FileSystemStorageClient](https://crawlee.dev/python/api/class/FileSystemStorageClient)
* [MemoryStorageClient](https://crawlee.dev/python/api/class/MemoryStorageClient)
## Index[**](#Index)
### Methods
* [](https://crawlee.dev/python/api/class/StorageClient#create_dataset_client)
* [](https://crawlee.dev/python/api/class/StorageClient#create_kvs_client)
* [](https://crawlee.dev/python/api/class/StorageClient#create_rq_client)
* [**get\_rate\_limit\_errors](https://docs.apify.com/sdk/python/sdk/python/reference/class/StorageClient.md#get_rate_limit_errors)
* [](https://crawlee.dev/python/api/class/StorageClient#get_storage_client_cache_key)
## Methods<!-- -->[**](#Methods)
### [**](#undefined)[**](https://github.com/apify/apify-sdk-python/blob/master//src/crawlee/storage_clients/_base/_storage_client.py#L42)
:
### [**](#undefined)[**](https://github.com/apify/apify-sdk-python/blob/master//src/crawlee/storage_clients/_base/_storage_client.py#L53)
:
### [**](#undefined)[**](https://github.com/apify/apify-sdk-python/blob/master//src/crawlee/storage_clients/_base/_storage_client.py#L64)
:
### [**](#get_rate_limit_errors)[**](https://github.com/apify/crawlee-python/blob/master//src/crawlee/storage_clients/_base/_storage_client.py#L74)get\_rate\_limit\_errors
* ****get\_rate\_limit\_errors**(): dict\[int, int]
- Return statistics about rate limit errors encountered by the HTTP client in storage client.
***
#### Returns dict\[int, int]
### [**](#undefined)[**](https://github.com/apify/apify-sdk-python/blob/master//src/crawlee/storage_clients/_base/_storage_client.py#L33)
:
---
# StorageMetadata<!-- -->
Represents the base model for storage metadata.
It contains common fields shared across all specific storage types.
### Hierarchy
* *StorageMetadata*
* [DatasetMetadata](https://crawlee.dev/python/api/class/DatasetMetadata)
* [KeyValueStoreMetadata](https://crawlee.dev/python/api/class/KeyValueStoreMetadata)
* [RequestQueueMetadata](https://crawlee.dev/python/api/class/RequestQueueMetadata)
## Index[**](#Index)
### Properties
* [**accessed\_at](https://docs.apify.com/sdk/python/sdk/python/reference/class/StorageMetadata.md#accessed_at)
* [**created\_at](https://docs.apify.com/sdk/python/sdk/python/reference/class/StorageMetadata.md#created_at)
* [**id](https://docs.apify.com/sdk/python/sdk/python/reference/class/StorageMetadata.md#id)
* [**model\_config](https://docs.apify.com/sdk/python/sdk/python/reference/class/StorageMetadata.md#model_config)
* [**modified\_at](https://docs.apify.com/sdk/python/sdk/python/reference/class/StorageMetadata.md#modified_at)
* [**name](https://docs.apify.com/sdk/python/sdk/python/reference/class/StorageMetadata.md#name)
## Properties<!-- -->[**](#Properties)
### [**](#accessed_at)[**](https://github.com/apify/crawlee-python/blob/master//src/crawlee/storage_clients/models.py#L31)accessed\_at
**accessed\_at: datetime
The timestamp when the storage was last accessed.
### [**](#created_at)[**](https://github.com/apify/crawlee-python/blob/master//src/crawlee/storage_clients/models.py#L34)created\_at
**created\_at: datetime
The timestamp when the storage was created.
### [**](#id)[**](https://github.com/apify/crawlee-python/blob/master//src/crawlee/storage_clients/models.py#L25)id
**id: str
The unique identifier of the storage.
### [**](#model_config)[**](https://github.com/apify/crawlee-python/blob/master//src/crawlee/storage_clients/models.py#L23)model\_config
**model\_config: Undefined
### [**](#modified_at)[**](https://github.com/apify/crawlee-python/blob/master//src/crawlee/storage_clients/models.py#L37)modified\_at
**modified\_at: datetime
The timestamp when the storage was last modified.
### [**](#name)[**](https://github.com/apify/crawlee-python/blob/master//src/crawlee/storage_clients/models.py#L28)name
**name: str | None
The name of the storage.
---
# SystemInfoEvent<!-- -->
## Index[**](#Index)
### Properties
* [**data](https://docs.apify.com/sdk/python/sdk/python/reference/class/SystemInfoEvent.md#data)
* [**name](https://docs.apify.com/sdk/python/sdk/python/reference/class/SystemInfoEvent.md#name)
## Properties<!-- -->[**](#Properties)
### [**](#data)[**](https://github.com/apify/apify-sdk-python/blob/master//src/apify/events/_types.py#L56)data
**data: [SystemInfoEventData](https://docs.apify.com/sdk/python/sdk/python/reference/class/SystemInfoEventData.md)
### [**](#name)[**](https://github.com/apify/apify-sdk-python/blob/master//src/apify/events/_types.py#L55)name
**name: Literal\[Event.SYSTEM\_INFO]
---
# SystemInfoEventData<!-- -->
## Index[**](#Index)
### Methods
* [**to\_crawlee\_format](https://docs.apify.com/sdk/python/sdk/python/reference/class/SystemInfoEventData.md#to_crawlee_format)
### Properties
* [**cpu\_avg\_usage](https://docs.apify.com/sdk/python/sdk/python/reference/class/SystemInfoEventData.md#cpu_avg_usage)
* [**cpu\_current\_usage](https://docs.apify.com/sdk/python/sdk/python/reference/class/SystemInfoEventData.md#cpu_current_usage)
* [**cpu\_max\_usage](https://docs.apify.com/sdk/python/sdk/python/reference/class/SystemInfoEventData.md#cpu_max_usage)
* [**created\_at](https://docs.apify.com/sdk/python/sdk/python/reference/class/SystemInfoEventData.md#created_at)
* [**is\_cpu\_overloaded](https://docs.apify.com/sdk/python/sdk/python/reference/class/SystemInfoEventData.md#is_cpu_overloaded)
* [**mem\_avg\_bytes](https://docs.apify.com/sdk/python/sdk/python/reference/class/SystemInfoEventData.md#mem_avg_bytes)
* [**mem\_current\_bytes](https://docs.apify.com/sdk/python/sdk/python/reference/class/SystemInfoEventData.md#mem_current_bytes)
* [**mem\_max\_bytes](https://docs.apify.com/sdk/python/sdk/python/reference/class/SystemInfoEventData.md#mem_max_bytes)
## Methods<!-- -->[**](#Methods)
### [**](#to_crawlee_format)[**](https://github.com/apify/apify-sdk-python/blob/master//src/apify/events/_types.py#L31)to\_crawlee\_format
* ****to\_crawlee\_format**(dedicated\_cpus): EventSystemInfoData
- #### Parameters
* ##### dedicated\_cpus: float
#### Returns EventSystemInfoData
## Properties<!-- -->[**](#Properties)
### [**](#cpu_avg_usage)[**](https://github.com/apify/apify-sdk-python/blob/master//src/apify/events/_types.py#L25)cpu\_avg\_usage
**cpu\_avg\_usage: float
### [**](#cpu_current_usage)[**](https://github.com/apify/apify-sdk-python/blob/master//src/apify/events/_types.py#L27)cpu\_current\_usage
**cpu\_current\_usage: float
### [**](#cpu_max_usage)[**](https://github.com/apify/apify-sdk-python/blob/master//src/apify/events/_types.py#L26)cpu\_max\_usage
**cpu\_max\_usage: float
### [**](#created_at)[**](https://github.com/apify/apify-sdk-python/blob/master//src/apify/events/_types.py#L29)created\_at
**created\_at: datetime
### [**](#is_cpu_overloaded)[**](https://github.com/apify/apify-sdk-python/blob/master//src/apify/events/_types.py#L28)is\_cpu\_overloaded
**is\_cpu\_overloaded: bool
### [**](#mem_avg_bytes)[**](https://github.com/apify/apify-sdk-python/blob/master//src/apify/events/_types.py#L22)mem\_avg\_bytes
**mem\_avg\_bytes: float
### [**](#mem_current_bytes)[**](https://github.com/apify/apify-sdk-python/blob/master//src/apify/events/_types.py#L23)mem\_current\_bytes
**mem\_current\_bytes: float
### [**](#mem_max_bytes)[**](https://github.com/apify/apify-sdk-python/blob/master//src/apify/events/_types.py#L24)mem\_max\_bytes
**mem\_max\_bytes: float
---
# UnknownEvent<!-- -->
## Index[**](#Index)
### Properties
* [**data](https://docs.apify.com/sdk/python/sdk/python/reference/class/UnknownEvent.md#data)
* [**name](https://docs.apify.com/sdk/python/sdk/python/reference/class/UnknownEvent.md#name)
## Properties<!-- -->[**](#Properties)
### [**](#data)[**](https://github.com/apify/apify-sdk-python/blob/master//src/apify/events/_types.py#L99)data
**data: dict\[str, Any]
### [**](#name)[**](https://github.com/apify/apify-sdk-python/blob/master//src/apify/events/_types.py#L98)name
**name: str
---
# Webhook<!-- -->
## Index[**](#Index)
### Properties
* [**\_\_model\_config\_\_](https://docs.apify.com/sdk/python/sdk/python/reference/class/Webhook.md#__model_config__)
* [**event\_types](https://docs.apify.com/sdk/python/sdk/python/reference/class/Webhook.md#event_types)
* [**payload\_template](https://docs.apify.com/sdk/python/sdk/python/reference/class/Webhook.md#payload_template)
* [**request\_url](https://docs.apify.com/sdk/python/sdk/python/reference/class/Webhook.md#request_url)
## Properties<!-- -->[**](#Properties)
### [**](#__model_config__)[**](https://github.com/apify/apify-sdk-python/blob/master//src/apify/_models.py#L21)\_\_model\_config\_\_
**\_\_model\_config\_\_: Undefined
### [**](#event_types)[**](https://github.com/apify/apify-sdk-python/blob/master//src/apify/_models.py#L23)event\_types
**event\_types: list\[WebhookEventType]
### [**](#payload_template)[**](https://github.com/apify/apify-sdk-python/blob/master//src/apify/_models.py#L32)payload\_template
**payload\_template: str | None
### [**](#request_url)[**](https://github.com/apify/apify-sdk-python/blob/master//src/apify/_models.py#L27)request\_url
**request\_url: str
---
# Event<!-- -->
Names of all possible events that can be emitted using an `EventManager`.
## Index[**](#Index)
### Enumeration members
* [**ABORTING](https://docs.apify.com/sdk/python/sdk/python/reference/enum/Event.md#ABORTING)
* [**BROWSER\_CLOSED](https://docs.apify.com/sdk/python/sdk/python/reference/enum/Event.md#BROWSER_CLOSED)
* [**BROWSER\_LAUNCHED](https://docs.apify.com/sdk/python/sdk/python/reference/enum/Event.md#BROWSER_LAUNCHED)
* [**BROWSER\_RETIRED](https://docs.apify.com/sdk/python/sdk/python/reference/enum/Event.md#BROWSER_RETIRED)
* [**CRAWLER\_STATUS](https://docs.apify.com/sdk/python/sdk/python/reference/enum/Event.md#CRAWLER_STATUS)
* [**EXIT](https://docs.apify.com/sdk/python/sdk/python/reference/enum/Event.md#EXIT)
* [**MIGRATING](https://docs.apify.com/sdk/python/sdk/python/reference/enum/Event.md#MIGRATING)
* [**PAGE\_CLOSED](https://docs.apify.com/sdk/python/sdk/python/reference/enum/Event.md#PAGE_CLOSED)
* [**PAGE\_CREATED](https://docs.apify.com/sdk/python/sdk/python/reference/enum/Event.md#PAGE_CREATED)
* [**PERSIST\_STATE](https://docs.apify.com/sdk/python/sdk/python/reference/enum/Event.md#PERSIST_STATE)
* [**SESSION\_RETIRED](https://docs.apify.com/sdk/python/sdk/python/reference/enum/Event.md#SESSION_RETIRED)
* [**SYSTEM\_INFO](https://docs.apify.com/sdk/python/sdk/python/reference/enum/Event.md#SYSTEM_INFO)
## Enumeration members<!-- -->[**](<#Enumeration members>)
### [**](#ABORTING)[**](https://github.com/apify/crawlee-python/blob/master//src/crawlee/events/_types.py#L22)ABORTING
**ABORTING: 'aborting'
### [**](#BROWSER_CLOSED)[**](https://github.com/apify/crawlee-python/blob/master//src/crawlee/events/_types.py#L31)BROWSER\_CLOSED
**BROWSER\_CLOSED: 'browserClosed'
### [**](#BROWSER_LAUNCHED)[**](https://github.com/apify/crawlee-python/blob/master//src/crawlee/events/_types.py#L29)BROWSER\_LAUNCHED
**BROWSER\_LAUNCHED: 'browserLaunched'
### [**](#BROWSER_RETIRED)[**](https://github.com/apify/crawlee-python/blob/master//src/crawlee/events/_types.py#L30)BROWSER\_RETIRED
**BROWSER\_RETIRED: 'browserRetired'
### [**](#CRAWLER_STATUS)[**](https://github.com/apify/crawlee-python/blob/master//src/crawlee/events/_types.py#L36)CRAWLER\_STATUS
**CRAWLER\_STATUS: 'crawlerStatus'
### [**](#EXIT)[**](https://github.com/apify/crawlee-python/blob/master//src/crawlee/events/_types.py#L23)EXIT
**EXIT: 'exit'
### [**](#MIGRATING)[**](https://github.com/apify/crawlee-python/blob/master//src/crawlee/events/_types.py#L21)MIGRATING
**MIGRATING: 'migrating'
### [**](#PAGE_CLOSED)[**](https://github.com/apify/crawlee-python/blob/master//src/crawlee/events/_types.py#L33)PAGE\_CLOSED
**PAGE\_CLOSED: 'pageClosed'
### [**](#PAGE_CREATED)[**](https://github.com/apify/crawlee-python/blob/master//src/crawlee/events/_types.py#L32)PAGE\_CREATED
**PAGE\_CREATED: 'pageCreated'
### [**](#PERSIST_STATE)[**](https://github.com/apify/crawlee-python/blob/master//src/crawlee/events/_types.py#L19)PERSIST\_STATE
**PERSIST\_STATE: 'persistState'
### [**](#SESSION_RETIRED)[**](https://github.com/apify/crawlee-python/blob/master//src/crawlee/events/_types.py#L26)SESSION\_RETIRED
**SESSION\_RETIRED: 'sessionRetired'
### [**](#SYSTEM_INFO)[**](https://github.com/apify/crawlee-python/blob/master//src/crawlee/events/_types.py#L20)SYSTEM\_INFO
**SYSTEM\_INFO: 'systemInfo'
---
[Skip to main content](#__docusaurus_skipToContent_fallback)
[](https://docs.apify.com)
[Academy](https://docs.apify.com/academy)[Platform](https://docs.apify.com/platform)
[API](https://docs.apify.com/api)
* [Reference](https://docs.apify.com/api/v2)
* [Client for JavaScript](https://docs.apify.com/api/client/js/)
* [Client for Python](https://docs.apify.com/api/client/python/)
[SDK](https://docs.apify.com/sdk)
* [SDK for JavaScript](https://docs.apify.com/sdk/js/)
* [SDK for Python](https://docs.apify.com/sdk/python/)
[CLI](https://docs.apify.com/cli/)
[Open source](https://docs.apify.com/open-source)
* [Crawlee](https://crawlee.dev)
* [Got Scraping](https://github.com/apify/got-scraping)
* [Fingerprint Suite](https://github.com/apify/fingerprint-suite)
* [Apify on GitHub](https://github.com/apify)
* [Actor whitepaper](https://whitepaper.actor)
[Discord](https://discord.com/invite/jyEM2PRvMU "Chat on Discord")[Get started](https://console.apify.com)
[SDK for Python](https://docs.apify.com/sdk/python/sdk/python/.md)
[Docs](https://docs.apify.com/sdk/python/sdk/python/docs/overview/introduction.md)[Reference](https://docs.apify.com/sdk/python/sdk/python/reference.md)[Changelog](https://docs.apify.com/sdk/python/sdk/python/docs/changelog.md)[GitHub](https://github.com/apify/apify-sdk-python)
# Apify SDK for Python<br />is a toolkit for<br />building Actors
# Apify SDK for Python<br />is a toolkit for<br />building Actors
##
## The Apify SDK for Python is the official library for creating Apify Actors in Python. It provides useful features like Actor lifecycle management, local storage emulation, and Actor event handling.
[Get Started](https://docs.apify.com/sdk/python/sdk/python/docs/overview/introduction.md)[GitHub](https://ghbtns.com/github-btn.html?user=apify\&repo=apify-sdk-python\&type=star\&count=true\&size=large)

apify create my-python-actor
For example, the Apify SDK makes it easy to read the Actor input with the `Actor.get_input()` method, and to save scraped data from your Actors to a dataset by simply using the `Actor.push_data()` method.
import httpx from bs4 import BeautifulSoup
from apify import Actor
async def main() -> None: async with Actor: actor_input = await Actor.get_input() async with httpx.AsyncClient() as client: response = await client.get(actor_input['url']) soup = BeautifulSoup(response.content, 'html.parser') data = {'url': actor_input['url'], 'title': soup.title.string if soup.title else None} await Actor.push_data(data)
Learn
* [Academy](https://docs.apify.com/academy)
* [Platform](https://docs.apify.com/platform)
API
* [Reference](https://docs.apify.com/api/v2)
* [Client for JavaScript](https://docs.apify.com/api/client/js/)
* [Client for Python](https://docs.apify.com/api/client/python/)
SDK
* [SDK for JavaScript](https://docs.apify.com/sdk/js/)
* [SDK for Python](https://docs.apify.com/sdk/python/)
Other
* [CLI](https://docs.apify.com/cli/)
* [Open source](https://docs.apify.com/open-source)
More
* [Crawlee](https://crawlee.dev)
* [GitHub](https://github.com/apify)
* [Discord](https://discord.com/invite/jyEM2PRvMU)
* [Trust Center](https://trust.apify.com)
[](https://apify.com)
---
# CLI | Apify Documentation
## cli
- [Search the documentation](https://docs.apify.com/cli/search.md)
- [Overview](https://docs.apify.com/cli/docs.md): Apify command-line interface (Apify CLI) helps you create, develop, build and run
- [Changelog](https://docs.apify.com/cli/docs/changelog.md): 1.1.2-beta.0
- [Installation](https://docs.apify.com/cli/docs/installation.md): Learn how to install Apify CLI using installation scripts, Homebrew, or NPM.
- [Integrating Scrapy projects](https://docs.apify.com/cli/docs/integrating-scrapy.md): Learn how to run Scrapy projects as Apify Actors and deploy them on the Apify platform.
- [Quick start](https://docs.apify.com/cli/docs/quick-start.md): Learn how to create, run, and manage Actors using Apify CLI.
- [Apify CLI Reference Documentation](https://docs.apify.com/cli/docs/reference.md): The Apify CLI provides tools for managing your Apify projects and resources from the command line. Use these commands to develop Actors locally, deploy them to Apify platform, manage storage, orchestrate runs, and handle account configuration.
- [Telemetry](https://docs.apify.com/cli/docs/telemetry.md): Apify collects telemetry data about the general usage of the CLI to help us improve the product. Participation in this program is optional and you may opt out if you prefer not to share any information.
- [Troubleshooting](https://docs.apify.com/cli/docs/troubleshooting.md): Problems with installation
- [Environment variables](https://docs.apify.com/cli/docs/vars.md): Learn how use environment variables for Apify CLI
- [Apify command-line interface (CLI)](https://docs.apify.com/cli/index.md)
---
# Full Documentation Content
[Skip to main content](#__docusaurus_skipToContent_fallback)
[](https://docs.apify.com)
[Academy](https://docs.apify.com/academy)[Platform](https://docs.apify.com/platform)
[API](https://docs.apify.com/api)
* [Reference](https://docs.apify.com/api/v2)
* [Client for JavaScript](https://docs.apify.com/api/client/js/)
* [Client for Python](https://docs.apify.com/api/client/python/)
[SDK](https://docs.apify.com/sdk)
* [SDK for JavaScript](https://docs.apify.com/sdk/js/)
* [SDK for Python](https://docs.apify.com/sdk/python/)
[CLI](https://docs.apify.com/cli/)
[Open source](https://docs.apify.com/open-source)
* [Crawlee](https://crawlee.dev)
* [Got Scraping](https://github.com/apify/got-scraping)
* [Fingerprint Suite](https://github.com/apify/fingerprint-suite)
* [Apify on GitHub](https://github.com/apify)
* [Actor whitepaper](https://whitepaper.actor)
[Discord](https://discord.com/invite/jyEM2PRvMU "Chat on Discord")[Get started](https://console.apify.com)
[Apify CLI](https://docs.apify.com/cli/cli/.md)
[Docs](https://docs.apify.com/cli/cli/docs.md)[Reference](https://docs.apify.com/cli/cli/docs/reference.md)[Changelog](https://docs.apify.com/cli/cli/docs/changelog.md)[GitHub](https://github.com/apify/apify-cli)
[1.1.0](https://docs.apify.com/cli/cli/docs.md)
* [Next](https://docs.apify.com/cli/cli/docs/next)
* [1.1.0](https://docs.apify.com/cli/cli/docs.md)
* [0.21](https://docs.apify.com/cli/cli/docs/0.21)
* [0.20](https://docs.apify.com/cli/cli/docs/0.20)
# Search the documentation
Type your search here
Next (current)
[](https://www.algolia.com/)
Learn
* [Academy](https://docs.apify.com/academy)
* [Platform](https://docs.apify.com/platform)
API
* [Reference](https://docs.apify.com/api/v2)
* [Client for JavaScript](https://docs.apify.com/api/client/js/)
* [Client for Python](https://docs.apify.com/api/client/python/)
SDK
* [SDK for JavaScript](https://docs.apify.com/sdk/js/)
* [SDK for Python](https://docs.apify.com/sdk/python/)
Other
* [CLI](https://docs.apify.com/cli/)
* [Open source](https://docs.apify.com/open-source)
More
* [Crawlee](https://crawlee.dev)
* [GitHub](https://github.com/apify)
* [Discord](https://discord.com/invite/jyEM2PRvMU)
* [Trust Center](https://trust.apify.com)
[](https://apify.com)
---
# Overview
Copy for LLM
Apify command-line interface (Apify CLI) helps you create, develop, build and run [Apify Actors](https://apify.com/actors), and manage the Apify cloud platform from any computer.
Apify Actors are cloud programs that can perform arbitrary web scraping, automation or data processing job. They accept input, perform their job and generate output. While you can develop Actors in an online IDE directly in the [Apify web application](https://console.apify.com/), for complex projects it is more convenient to develop Actors locally on your computer using [Apify SDK](https://github.com/apify/apify-sdk-js) and only push the Actors to the Apify cloud during deployment. This is where the Apify CLI comes in.
Run Actors in Docker
Actors running on the Apify platform are executed in Docker containers, so with an appropriate `Dockerfile` you can build your Actors in any programming language. However, we recommend using JavaScript/Node.js and Python, for which we provide most libraries and support.
---
# Changelog
### [1.1.2-beta.18](https://github.com/apify/apify-cli/releases/tag/v1.1.2-beta.18)[](#112-beta18)
### [1.1.2-beta.17](https://github.com/apify/apify-cli/releases/tag/v1.1.2-beta.17)[](#112-beta17)
### [1.1.2-beta.16](https://github.com/apify/apify-cli/releases/tag/v1.1.2-beta.16)[](#112-beta16)
### [1.1.2-beta.15](https://github.com/apify/apify-cli/releases/tag/v1.1.2-beta.15)[](#112-beta15)
### [1.1.2-beta.14](https://github.com/apify/apify-cli/releases/tag/v1.1.2-beta.14)[](#112-beta14)
### [1.1.2-beta.13](https://github.com/apify/apify-cli/releases/tag/v1.1.2-beta.13)[](#112-beta13)
### [1.1.2-beta.12](https://github.com/apify/apify-cli/releases/tag/v1.1.2-beta.12)[](#112-beta12)
### [1.1.2-beta.11](https://github.com/apify/apify-cli/releases/tag/v1.1.2-beta.11)[](#112-beta11)
### [1.1.2-beta.9](https://github.com/apify/apify-cli/releases/tag/v1.1.2-beta.9)[](#112-beta9)
### [1.1.2-beta.10](https://github.com/apify/apify-cli/releases/tag/v1.1.2-beta.10)[](#112-beta10)
### [1.1.2-beta.8](https://github.com/apify/apify-cli/releases/tag/v1.1.2-beta.8)[](#112-beta8)
### [1.1.2-beta.7](https://github.com/apify/apify-cli/releases/tag/v1.1.2-beta.7)[](#112-beta7)
### [1.1.2-beta.6](https://github.com/apify/apify-cli/releases/tag/v1.1.2-beta.6)[](#112-beta6)
### [1.1.2-beta.5](https://github.com/apify/apify-cli/releases/tag/v1.1.2-beta.5)[](#112-beta5)
### [1.1.2-beta.4](https://github.com/apify/apify-cli/releases/tag/v1.1.2-beta.4)[](#112-beta4)
### [1.1.2-beta.3](https://github.com/apify/apify-cli/releases/tag/v1.1.2-beta.3)[](#112-beta3)
### [1.1.2-beta.2](https://github.com/apify/apify-cli/releases/tag/v1.1.2-beta.2)[](#112-beta2)
### [1.1.2-beta.1](https://github.com/apify/apify-cli/releases/tag/v1.1.2-beta.1)[](#112-beta1)
### [1.1.2-beta.0](https://github.com/apify/apify-cli/releases/tag/v1.1.2-beta.0)[](#112-beta0)
### [1.1.1](https://github.com/apify/apify-cli/releases/tag/v1.1.1)[](#111)
##### [1.1.1](https://github.com/apify/apify-cli/releases/tag/v1.1.1) (2025-08-18)[](#111-2025-08-18)
###### 🐛 Bug Fixes[](#-bug-fixes)
* Unknown errors from tracking ([#895](https://github.com/apify/apify-cli/pull/895)) ([3485f36](https://github.com/apify/apify-cli/commit/3485f366f3a62117ac833e78157c230206c3c60e)) by [@vladfrangu](https://github.com/vladfrangu)
* Upgrade command should always check when manually ran ([#897](https://github.com/apify/apify-cli/pull/897)) ([5e0ea9f](https://github.com/apify/apify-cli/commit/5e0ea9ff84012732ca7117d1f68207b5170ffeed)) by [@vladfrangu](https://github.com/vladfrangu)
### [1.1.1-beta.3](https://github.com/apify/apify-cli/releases/tag/v1.1.1-beta.3)[](#111-beta3)
### [1.1.1-beta.2](https://github.com/apify/apify-cli/releases/tag/v1.1.1-beta.2)[](#111-beta2)
### [1.1.1-beta.1](https://github.com/apify/apify-cli/releases/tag/v1.1.1-beta.1)[](#111-beta1)
### [1.1.1-beta.0](https://github.com/apify/apify-cli/releases/tag/v1.1.1-beta.0)[](#111-beta0)
### [1.1.0](https://github.com/apify/apify-cli/releases/tag/v1.1.0)[](#110)
##### [1.1.0](https://github.com/apify/apify-cli/releases/tag/v1.1.0) (2025-08-13)[](#110-2025-08-13)
###### 🚀 Features[](#-features)
* Upgrade command, install shell script ([#810](https://github.com/apify/apify-cli/pull/810)) ([51ef00a](https://github.com/apify/apify-cli/commit/51ef00ad32a6835c48781b99c6233113cf58d8a4)) by [@vladfrangu](https://github.com/vladfrangu)
* \[**breaking**] Make storage purging default, add `--resurrect` ([#729](https://github.com/apify/apify-cli/pull/729)) ([8dff93a](https://github.com/apify/apify-cli/commit/8dff93a2d769997a96d4a7750fb36c2770b9a61c)) by [@vladfrangu](https://github.com/vladfrangu)
* Handle sub-schema validation ([#853](https://github.com/apify/apify-cli/pull/853)) ([5fc2a2f](https://github.com/apify/apify-cli/commit/5fc2a2f6b780a86a250b69375455f3bb2e9a8983)) by [@MFori](https://github.com/MFori)
* Upgrade command upgrading CLI + install command ([#856](https://github.com/apify/apify-cli/pull/856)) ([4252e6c](https://github.com/apify/apify-cli/commit/4252e6cb681deb5f92c654520d0ed03b70e426c3)) by [@vladfrangu](https://github.com/vladfrangu)
* Add signature to KV store URLs where required ([#875](https://github.com/apify/apify-cli/pull/875)) ([a1e9982](https://github.com/apify/apify-cli/commit/a1e998270b5c05cd91280efa144325e2d7a7de0e)) by [@danpoletaev](https://github.com/danpoletaev)
###### 🐛 Bug Fixes[](#-bug-fixes-1)
* Pretty message for invalid choices ([#805](https://github.com/apify/apify-cli/pull/805)) ([57bd5de](https://github.com/apify/apify-cli/commit/57bd5de9bc5289f151a9083533dc3d2c71f8b9ab)) by [@vladfrangu](https://github.com/vladfrangu)
* Shebangs ([#806](https://github.com/apify/apify-cli/pull/806)) ([1cdc101](https://github.com/apify/apify-cli/commit/1cdc1011f36974708ab91a25d4d6c6a5dc43d989)) by [@vladfrangu](https://github.com/vladfrangu)
* Recognize sh files as text files ([#813](https://github.com/apify/apify-cli/pull/813)) ([ef3e9b0](https://github.com/apify/apify-cli/commit/ef3e9b064483c04cd7bef2143a19e1a6992ddcff)) by [@DaveHanns](https://github.com/DaveHanns)
* **init:** Prompt for a name if an old config does not exist ([#836](https://github.com/apify/apify-cli/pull/836)) ([26fcd66](https://github.com/apify/apify-cli/commit/26fcd660a0f7b4adb4e1a3329705a8ff6d8f43b2)) by [@vladfrangu](https://github.com/vladfrangu)
* Pass apify client down to output job log wherever possible ([#839](https://github.com/apify/apify-cli/pull/839)) ([5cdb06c](https://github.com/apify/apify-cli/commit/5cdb06c0e24c2501b2034dbb7339798985b269cc)) by [@vladfrangu](https://github.com/vladfrangu)
* **pull:** Handle private actors correctly ([#865](https://github.com/apify/apify-cli/pull/865)) ([efd7308](https://github.com/apify/apify-cli/commit/efd730855f99a36091ce51d501e5755b5ad79ffb)) by [@vladfrangu](https://github.com/vladfrangu)
###### Chore[](#chore)
* \[**breaking**] Move from yargs to node
<!-- -->
:util
<!-- -->
([#871](https://github.com/apify/apify-cli/pull/871)) ([482d0b2](https://github.com/apify/apify-cli/commit/482d0b29f285c020320f1f2e3f0fd08a362d57cc)) by [@vladfrangu](https://github.com/vladfrangu)
* \[**breaking**] Make opening the actor build results in push opt-in ([#881](https://github.com/apify/apify-cli/pull/881)) ([d842424](https://github.com/apify/apify-cli/commit/d84242421387a9487eef5c07183dd0b8ac7ae67b)) by [@vladfrangu](https://github.com/vladfrangu)
### [0.21.10-beta.25](https://github.com/apify/apify-cli/releases/tag/v0.21.10-beta.25)[](#02110-beta25)
### [0.21.10-beta.24](https://github.com/apify/apify-cli/releases/tag/v0.21.10-beta.24)[](#02110-beta24)
### [0.21.10-beta.23](https://github.com/apify/apify-cli/releases/tag/v0.21.10-beta.23)[](#02110-beta23)
### [0.21.10-beta.22](https://github.com/apify/apify-cli/releases/tag/v0.21.10-beta.22)[](#02110-beta22)
### [0.21.10-beta.21](https://github.com/apify/apify-cli/releases/tag/v0.21.10-beta.21)[](#02110-beta21)
---
# Installation
Copy for LLM
Learn how to install Apify CLI using installation scripts, Homebrew, or NPM.
***
## Installation scripts[](#installation-scripts)
### MacOS / Linux[](#macos--linux)
curl -fsSL https://apify.com/install-cli.sh | bash
### Windows[](#windows)
irm https://apify.com/install-cli.ps1 | iex
No need for Node.js
If you install Apify CLI using our installation scripts, you don't need Node.js. The scripts use [Bun](https://bun.sh/) to create a standalone executable file.
This approach eliminates Node.js dependency management, which is useful for Python developers or users working in non-Node.js environments.
## Homebrew[](#homebrew)
brew install apify-cli
Homebrew and Node.js dependency
When you install Apify CLI using Homebrew, it automatically installs Node.js as a dependency. If you already have Node.js installed through another method (e.g., `nvm`), this may create version conflicts.
If you experience Node.js version conflicts, modify your `PATH` environment variable to prioritize your preferred Node.js installation over Homebrew's version.
## NPM[](#npm)
First, make sure you have [Node.js](https://nodejs.org) version 22 or higher with NPM installed on your computer:
node --version npm --version
Install or upgrade Apify CLI by running:
npm install -g apify-cli
Troubleshooting
If you receive a permission error, read npm's [official guide](https://docs.npmjs.com/resolving-eacces-permissions-errors-when-installing-packages-globally) on installing packages globally.
## Verify installation[](#verify-installation)
You can verify the installation process by running the following command:
apify --version
The output should resemble the following (exact details like version or platform may vary):
apify-cli/1.0.1 (0dfcfd8) running on darwin-arm64 with bun-1.2.19 (emulating node 24.3.0), installed via bundle
## Upgrading[](#upgrading)
Upgrading Apify CLI is as simple as running the following command:
apify upgrade
---
# Integrating Scrapy projects
Copy for LLM
[Scrapy](https://scrapy.org/) is a widely used open-source web scraping framework for Python. Scrapy projects can now be executed on the Apify platform using our dedicated wrapping tool. This tool allows users to transform their Scrapy projects into [Apify Actors](https://docs.apify.com/platform/actors) with just a few simple commands.
## Prerequisites[](#prerequisites)
Before you begin, make sure you have the Apify CLI installed on your system. If you haven't installed it yet, follow the [installation guide](https://docs.apify.com/cli/cli/docs/installation.md).
## Actorization of your existing Scrapy spider[](#actorization-of-your-existing-scrapy-spider)
Assuming your Scrapy project is set up, navigate to the project root where the `scrapy.cfg` file is located.
cd your_scraper
Verify the directory contents to ensure the correct location.
$ ls -R .: your_scraper README.md requirements.txt scrapy.cfg
./your_scraper: init.py items.py main.py main.py pipelines.py settings.py spiders
./your_scraper/spiders: your_spider.py init.py
To convert your Scrapy project into an Apify Actor, initiate the wrapping process by executing the following command:
apify init
The script will prompt you with a series of questions. Upon completion, the output might resemble the following:
Info: The current directory looks like a Scrapy project. Using automatic project wrapping. ? Enter the Scrapy BOT_NAME (see settings.py): books_scraper ? What folder are the Scrapy spider modules stored in? (see SPIDER_MODULES in settings.py): books_scraper.spiders ? Pick the Scrapy spider you want to wrap: BookSpider (/home/path/to/actor-scrapy-books-example/books_scraper/spiders/book.py) Info: Downloading the latest Scrapy wrapper template... Info: Wrapping the Scrapy project... Success: The Scrapy project has been wrapped successfully.
For example, here is a [source code](https://github.com/apify/actor-scrapy-books-example) of an actorized Scrapy project, and [here](https://apify.com/vdusek/scrapy-books-example) the corresponding Actor in Apify Store.
### Run the Actor locally[](#run-the-actor-locally)
Create a Python virtual environment by running:
python -m virtualenv .venv
Activate the virtual environment:
source .venv/bin/activate
Install Python dependencies using the provided requirements file named `requirements_apify.txt`. Ensure these requirements are installed before executing your project as an Apify Actor locally. You can put your own dependencies there as well.
pip install -r requirements-apify.txt [-r requirements.txt]
Finally execute the Apify Actor.
apify run [--purge]
If [ActorDatasetPushPipeline](https://github.com/apify/apify-sdk-python/blob/master/src/apify/scrapy/pipelines.py) is configured, the Actor's output will be stored in the `storage/datasets/default/` directory.
### Run the scraper as Scrapy project[](#run-the-scraper-as-scrapy-project)
The project remains executable as a Scrapy project.
scrapy crawl your_spider -o books.json
## Deploy on Apify[](#deploy-on-apify)
### Log in to Apify[](#log-in-to-apify)
You will need to provide your [Apify API Token](https://console.apify.com/settings/integrations) to complete this action.
apify login
### Deploy your Actor[](#deploy-your-actor)
This command will deploy and build the Actor on the Apify platform. You can find your newly created Actor under [Actors -> My Actors](https://console.apify.com/actors?tab=my).
apify push
## What the wrapping process does[](#what-the-wrapping-process-does)
The initialization command enhances your project by adding necessary files and updating some of them while preserving its functionality as a typical Scrapy project. The additional requirements file, named `requirements_apify.txt`, includes the Apify Python SDK and other essential requirements. The `.actor/` directory contains basic configuration of your Actor. We provide two new Python files [main.py](https://github.com/apify/actor-templates/blob/master/templates/python-scrapy/src/main.py) and [\_\_main\_\_.py](https://github.com/apify/actor-templates/blob/master/templates/python-scrapy/src/__main__.py), where we encapsulate the Scrapy project within an Actor. We also import and use there a few Scrapy components from our [Python SDK](https://github.com/apify/apify-sdk-python/tree/master/src/apify/scrapy). These components facilitate the integration of the Scrapy projects with the Apify platform. Further details about these components are provided in the following subsections.
### Scheduler[](#scheduler)
The [scheduler](https://docs.scrapy.org/en/latest/topics/scheduler.html) is a core component of Scrapy responsible for receiving and providing requests to be processed. To leverage the [Apify request queue](https://docs.apify.com/platform/storage/request-queue) for storing requests, a custom scheduler becomes necessary. Fortunately, Scrapy is a modular framework, allowing the creation of custom components. As a result, we have implemented the [ApifyScheduler](https://github.com/apify/apify-sdk-python/blob/master/src/apify/scrapy/scheduler.py). When using the Apify CLI wrapping tool, the scheduler is configured in the [src/main.py](https://github.com/apify/actor-templates/blob/master/templates/python-scrapy/src/main.py) file of your Actor.
### Dataset push pipeline[](#dataset-push-pipeline)
[Item pipelines](https://docs.scrapy.org/en/latest/topics/item-pipeline.html) are used for the processing of the results produced by your spiders. To handle the transmission of result data to the [Apify dataset](https://docs.apify.com/platform/storage/dataset), we have implemented the [ActorDatasetPushPipeline](https://github.com/apify/apify-sdk-python/blob/master/src/apify/scrapy/pipelines.py). When using the Apify CLI wrapping tool, the pipeline is configured in the [src/main.py](https://github.com/apify/actor-templates/blob/master/templates/python-scrapy/src/main.py) file of your Actor. It is assigned the highest integer value (1000), ensuring its execution as the final step in the pipeline sequence.
### Retry middleware[](#retry-middleware)
[Downloader middlewares](https://docs.scrapy.org/en/latest/topics/downloader-middleware.html) are a way how to hook into Scrapy's request/response processing. Scrapy comes with various default middlewares, including the [RetryMiddleware](https://docs.scrapy.org/en/latest/topics/downloader-middleware.html#module-scrapy.downloadermiddlewares.retry), designed to handle retries for requests that may have failed due to temporary issues. When integrating with the [Apify request queue](https://docs.apify.com/platform/storage/request-queue), it becomes necessary to enhance this middleware to facilitate communication with the request queue marking the requests either as handled or ready for a retry. When using the Apify CLI wrapping tool, the default `RetryMiddleware` is disabled, and [ApifyRetryMiddleware](https://github.com/apify/apify-sdk-python/blob/master/src/apify/scrapy/middlewares/apify_retry.py) takes its place. Configuration for the middlewares is established in the [src/main.py](https://github.com/apify/actor-templates/blob/master/templates/python-scrapy/src/main.py) file of your Actor.
### HTTP proxy middleware[](#http-proxy-middleware)
Another default Scrapy [downloader middleware](https://docs.scrapy.org/en/latest/topics/downloader-middleware.html) that requires replacement is [HttpProxyMiddleware](https://docs.scrapy.org/en/latest/topics/downloader-middleware.html#module-scrapy.downloadermiddlewares.httpproxy). To utilize the use of proxies managed through the Apify [ProxyConfiguration](https://github.com/apify/apify-sdk-python/blob/master/src/apify/proxy_configuration.py), we provide [ApifyHttpProxyMiddleware](https://github.com/apify/apify-sdk-python/blob/master/src/apify/scrapy/middlewares/apify_proxy.py). When using the Apify CLI wrapping tool, the default `HttpProxyMiddleware` is disabled, and [ApifyHttpProxyMiddleware](https://github.com/apify/apify-sdk-python/blob/master/src/apify/scrapy/middlewares/apify_proxy.py) takes its place. Additionally, inspect the [.actor/input\_schema.json](https://github.com/apify/actor-templates/blob/master/templates/python-scrapy/.actor/input_schema.json) file, where proxy configuration is specified as an input property for your Actor. The processing of this input is carried out together with the middleware configuration in [src/main.py](https://github.com/apify/actor-templates/blob/master/templates/python-scrapy/src/main.py).
## Known limitations[](#known-limitations)
There are some known limitations of running the Scrapy projects on Apify platform we are aware of.
### Asynchronous code in spiders and other components[](#asynchronous-code-in-spiders-and-other-components)
Scrapy asynchronous execution is based on the [Twisted](https://twisted.org/) library, not the [AsyncIO](https://docs.python.org/3/library/asyncio.html), which brings some complications on the table.
Due to the asynchronous nature of the Actors, all of their code is executed as a coroutine inside the `asyncio.run`. In order to execute Scrapy code inside an Actor, following the section [Run Scrapy from a script](https://docs.scrapy.org/en/latest/topics/practices.html?highlight=CrawlerProcess#run-scrapy-from-a-script) from the official Scrapy documentation, we need to invoke a [`CrawlProcess.start`](https://github.com/scrapy/scrapy/blob/2.11.0/scrapy/crawler.py#L393:L427) method. This method triggers Twisted's event loop, also known as a reactor. Consequently, Twisted's event loop is executed within AsyncIO's event loop. On top of that, when employing AsyncIO code in spiders or other components, it necessitates the creation of a new AsyncIO event loop, within which the coroutines from these components are executed. This means there is an execution of the AsyncIO event loop inside the Twisted event loop inside the AsyncIO event loop.
We have resolved this issue by leveraging the [nest-asyncio](https://pypi.org/project/nest-asyncio/) library, enabling the execution of nested AsyncIO event loops. For executing a coroutine within a spider or other component, it is recommended to use Apify's instance of the nested event loop. Refer to the code example below or derive inspiration from Apify's Scrapy components, such as the [ApifyScheduler](https://github.com/apify/apify-sdk-python/blob/v1.5.0/src/apify/scrapy/scheduler.py#L114).
from apify.scrapy.utils import nested_event_loop ...
Coroutine execution inside a spider
nested_event_loop.run_until_complete(my_coroutine())
### More spiders per Actor[](#more-spiders-per-actor)
It is recommended to execute only one Scrapy spider per Apify Actor.
Mapping more Scrapy spiders to a single Apify Actor does not make much sense. We would have to create a separate instace of the [request queue](https://docs.apify.com/platform/storage/request-queue) for every spider. Also, every spider can produce a different output resulting in a mess in an output [dataset](https://docs.apify.com/platform/storage/dataset). A solution for this could be to store an output of every spider to a different [key-value store](https://docs.apify.com/platform/storage/key-value-store). However, a much more simple solution to this problem would be to just have a single spider per Actor.
If you want to share common Scrapy components (middlewares, item pipelines, ...) among more spiders (Actors), you can use a dedicated Python package containing your components and install it to your Actors environment. The other solution to this problem could be to have more spiders per Actor, but keep only one spider run per Actor. What spider is going to be executed in an Actor run can be specified in the [input schema](https://docs.apify.com/academy/deploying-your-code/input-schema).
## Additional links[](#additional-links)
* [Scrapy Books Example Actor](https://apify.com/vdusek/scrapy-books-example)
* [Python Actor Scrapy template](https://apify.com/templates/python-scrapy)
* [Apify SDK for Python](https://docs.apify.com/sdk/python)
* [Apify platform](https://docs.apify.com/platform)
* [Join our developer community on Discord](https://discord.com/invite/jyEM2PRvMU)
> We welcome any feedback! Please feel free to contact us at <python@apify.com>. Thank you for your valuable input.
---
# Quick start
Copy for LLM
Learn how to create, run, and manage Actors using Apify CLI.
## Prerequisites[](#prerequisites)
Before you begin, make sure you have the Apify CLI installed on your system. If you haven't installed it yet, follow the [installation guide](https://docs.apify.com/cli/cli/docs/installation.md).
## Step 1: Create your Actor[](#step-1-create-your-actor)
Run the following command in your terminal. It will guide you step by step through the creation process.
apify create
Explore Actor templates
The Apify CLI will prompt you to choose a template. Browse the [full list of templates](https://apify.com/templates) to find the best fit for your Actor.
## Step 2: Run your Actor[](#step-2-run-your-actor)
Once the Actor is initialized, you can run it:
apify run
You'll see output similar to this in your terminal:
INFO System info {"apifyVersion":"3.4.3","apifyClientVersion":"2.12.6","crawleeVersion":"3.13.10","osType":"Darwin","nodeVersion":"v22.17.0"} Extracted heading { level: 'h1', text: 'Your full‑stack platform for web scraping' } Extracted heading { level: 'h3', text: 'TikTok Scraper' } Extracted heading { level: 'h3', text: 'Google Maps Scraper' } Extracted heading { level: 'h3', text: 'Instagram Scraper' }
## Step 3: Push your Actor[](#step-3-push-your-actor)
Once you are ready, you can push your Actor to the Apify platform, where you can schedule runs, or make the Actor public for other developers.
### Login to Apify Console[](#login-to-apify-console)
apify login
Create an Apify account
Before you can interact with the Apify Console, [create an Apify account](https://console.apify.com/). When you run `apify login`, you can choose one of the following methods:
* Sign in via the Apify Console in your browser — recommended.
* Provide an [Apify API token](https://console.apify.com/settings/integrations) — alternative method.
The interactive prompt will guide you through either option.
### Push to Apify Console[](#push-to-apify-console)
apify push
## Step 4: Call your Actor (optional)[](#step-4-call-your-actor-optional)
You can run your Actor on the Apify platform. In the following example, the command runs `apify/hello-world` on the Apify platform.
apify call apify/hello-world
## Next steps[](#next-steps)
* Check the [command reference](https://docs.apify.com/cli/cli/docs/reference.md) for more information about individual commands.
* If you have a problem with the Apify CLI, check the [troubleshooting](https://docs.apify.com/cli/cli/docs/troubleshooting.md) guide.
* Learn more about [Actors](https://docs.apify.com/platform/actors).
---
# Apify CLI Reference Documentation
Copy for LLM
The Apify CLI provides tools for managing your Apify projects and resources from the command line. Use these commands to develop Actors locally, deploy them to Apify platform, manage storage, orchestrate runs, and handle account configuration.
This reference guide documents available commands, their options, and common usage patterns, to efficiently work with Apify platform.
### General[](#general)
The general commands provide basic functionality for getting help and information about the Apify CLI.
##### `apify help`[](#apify-help)
DESCRIPTION Prints out help about a command, or all available commands.
USAGE $ apify help [commandString]
ARGUMENTS commandString The command to get help for.
##### `apify upgrade`[](#apify-upgrade)
DESCRIPTION Checks that installed Apify CLI version is up to date.
USAGE $ apify upgrade [-f] [--version ]
FLAGS -f, --force [DEPRECATED] This flag is now ignored, as running the command manually will always check for the latest version. --version= The version of the CLI to upgrade to. If not provided, the latest version will be used.
##### `apify telemetry`[](#apify-telemetry)
DESCRIPTION Manages telemetry settings. We use this data to improve the CLI and the Apify platform. Read more: https://docs.apify.com/cli/docs/telemetry
SUBCOMMANDS telemetry enable Enables telemetry. telemetry disable Disables telemetry.
##### `apify telemetry enable`[](#apify-telemetry-enable)
DESCRIPTION Enables telemetry.
USAGE $ apify telemetry enable
##### `apify telemetry disable`[](#apify-telemetry-disable)
DESCRIPTION Disables telemetry.
USAGE $ apify telemetry disable
### Authentication & Account Management[](#authentication--account-management)
Use these commands to manage your Apify account authentication, access tokens, and configuration settings. These commands control how you interact with Apify platform and manage sensitive information.
##### `apify login`[](#apify-login)
DESCRIPTION Authenticates your Apify account and saves credentials to '~/.apify/auth.json'. All other commands use these stored credentials.
Run 'apify logout' to remove authentication.
USAGE $ apify login [-m console|manual] [-t ]
FLAGS -m, --method= Method of logging in to Apify <options: console|manual> -t, --token= Apify API token
##### `apify logout`[](#apify-logout)
DESCRIPTION Removes authentication by deleting your API token and account information from '~/.apify/auth.json'. Run 'apify login' to authenticate again.
USAGE $ apify logout
##### `apify info`[](#apify-info)
DESCRIPTION Prints details about your currently authenticated Apify account.
USAGE $ apify info
##### `apify secrets`[](#apify-secrets)
DESCRIPTION Manages secure environment variables for Actors.
Example: $ apify secrets add mySecret TopSecretValue123
The "mySecret" value can be used in an environment variable defined in '.actor/actor.json' file by adding the "@" prefix:
{ "actorSpecification": 1, "name": "my_actor", "environmentVariables": { "SECRET_ENV_VAR": "@mySecret" }, "version": "0.1" }
When the Actor is pushed to Apify cloud, the "SECRET_ENV_VAR" and its value is stored as a secret environment variable of the Actor.
SUBCOMMANDS secrets add Adds a new secret to '~/.apify' for use in Actor environment variables. secrets rm Permanently deletes a secret from your stored credentials.
##### `apify secrets add`[](#apify-secrets-add)
DESCRIPTION Adds a new secret to '~/.apify' for use in Actor environment variables.
USAGE $ apify secrets add
ARGUMENTS name Name of the secret value Value of the secret
##### `apify secrets rm`[](#apify-secrets-rm)
DESCRIPTION Permanently deletes a secret from your stored credentials.
USAGE $ apify secrets rm
ARGUMENTS name Name of the secret
### Actor Development[](#actor-development)
These commands help you develop Actors locally. Use them to create new Actor projects, initialize configurations, run Actors in development mode, and validate input schemas.
##### `apify create`[](#apify-create)
DESCRIPTION Creates an Actor project from a template in a new directory.
USAGE $ apify create [actorName] [--omit-optional-deps] [--skip-dependency-install] [-t ]
ARGUMENTS actorName Name of the Actor and its directory
FLAGS --omit-optional-deps Skip installing optional dependencies. --skip-dependency-install Skip installing Actor dependencies. -t, --template= Template for the Actor. If not provided, the command will prompt for it. Visit https://raw.githubusercontent.com/apify/actor-templates/master/templates/manifest.json to find available template names.
##### `apify init`[](#apify-init)
DESCRIPTION Sets up an Actor project in your current directory by creating actor.json and storage files. If the directory contains a Scrapy project in Python, the command automatically creates wrappers so that you can run your scrapers without changes. Creates the '.actor/actor.json' file and the 'storage' directory in the current directory, but does not touch any other existing files or directories.
WARNING: Overwrites existing 'storage' directory.
USAGE $ apify init [actorName] [-y]
ARGUMENTS actorName Name of the Actor. If not provided, you will be prompted for it.
FLAGS -y, --yes Automatic yes to prompts; assume "yes" as answer to all prompts. Note that in some cases, the command may still ask for confirmation.
##### `apify run`[](#apify-run)
DESCRIPTION Executes Actor locally with simulated Apify environment variables. Stores data in local 'storage' directory.
NOTE: For Node.js Actors, customize behavior by modifying the 'start' script in package.json file.
USAGE $ apify run [--entrypoint ] [-i | --input-file ] [-p | --resurrect]
FLAGS
--entrypoint= Optional entrypoint for running
with injected environment variables.
For Python, it is the module name, or a path to a file.
For Node.js, it is the npm script name, or a path to a
JS/MJS file. You can also pass in a directory name,
provided that directory contains an "index.js" file.
-i, --input= Optional JSON input to be
given to the Actor.
--input-file= Optional path to a file with JSON
input to be given to the Actor. The file must be a valid
JSON file. You can also specify - to read from
standard input.
-p, --purge Whether to purge the default
request queue, dataset and key-value store before the
run starts.
For crawlee projects, this is the default behavior, and
the flag is optional.
Use --no-purge to keep the storage folder intact.
--resurrect Whether to keep the default
request queue, dataset and key-value store before the
run starts.
##### `apify validate-schema`[](#apify-validate-schema)
DESCRIPTION Validates Actor input schema from one of these locations (in priority order): 1. Object in '.actor/actor.json' under "input" key 2. JSON file path in '.actor/actor.json' "input" key 3. .actor/INPUT_SCHEMA.json 4. INPUT_SCHEMA.json
Optionally specify custom schema path to validate.
USAGE $ apify validate-schema [path]
ARGUMENTS path Optional path to your INPUT_SCHEMA.json file. If not provided ./INPUT_SCHEMA.json is used.
### Actor Management[](#actor-management)
These commands let you manage Actors on Apify platform. They provide functionality for deployment, execution, monitoring, and maintenance of your Actors in the cloud environment.
#### Basic Actor Operations[](#basic-actor-operations)
Use these commands to handle core Actor operations like creation, listing, deletion, and basic runtime management. These are the essential commands for working with Actors on Apify platform.
##### `apify actors`[](#apify-actors)
DESCRIPTION Manages Actor creation, deployment, and execution on the Apify platform.
SUBCOMMANDS actors start Starts Actor remotely and returns run details immediately. actors rm Permanently removes an Actor from your account. actors push Deploys Actor to Apify platform using settings from '.actor/actor.json'. actors pull Download Actor code to current directory. Clones Git repositories or fetches Actor files based on the source type. actors ls Prints a list of recently executed Actors or Actors you own. actors info Get information about an Actor. actors call Executes Actor remotely using your authenticated account. actors build Creates a new build of the Actor.
##### `apify actors ls`[](#apify-actors-ls)
DESCRIPTION Prints a list of recently executed Actors or Actors you own.
USAGE $ apify actors ls [--desc] [--json] [--limit ] [--my] [--offset ]
FLAGS --desc Sort Actors in descending order. --json Format the command output as JSON --limit= Number of Actors that will be listed. --my Whether to list Actors made by the logged in user. --offset= Number of Actors that will be skipped.
##### `apify actors rm`[](#apify-actors-rm)
DESCRIPTION Permanently removes an Actor from your account.
USAGE $ apify actors rm
ARGUMENTS actorId The Actor ID to delete.
##### `apify actor`[](#apify-actor)
DESCRIPTION Manages runtime data operations inside of a running Actor.
SUBCOMMANDS actor set-value Sets or removes record into the default key-value store associated with the Actor run. actor push-data Saves data to Actor's run default dataset. actor get-value Gets a value from the default key-value store associated with the Actor run. actor get-public-url Get an HTTP URL that allows public access to a key-value store item. actor get-input Gets the Actor input value from the default key-value store associated with the Actor run. actor charge Charge for a specific event in the pay-per-event Actor run.
##### `apify actor charge`[](#apify-actor-charge)
DESCRIPTION Charge for a specific event in the pay-per-event Actor run.
USAGE $ apify actor charge [--count ] [--idempotency-key ] [--test-pay-per-event]
ARGUMENTS eventName Name of the event to charge for
FLAGS --count= Number of events to charge --idempotency-key= Idempotency key for the charge request --test-pay-per-event Test pay-per-event charging without actually charging
##### `apify actor get-input`[](#apify-actor-get-input)
DESCRIPTION Gets the Actor input value from the default key-value store associated with the Actor run.
USAGE $ apify actor get-input
##### `apify actor get-public-url`[](#apify-actor-get-public-url)
DESCRIPTION Get an HTTP URL that allows public access to a key-value store item.
USAGE $ apify actor get-public-url
ARGUMENTS key Key of the record in key-value store
##### `apify actor get-value`[](#apify-actor-get-value)
DESCRIPTION Gets a value from the default key-value store associated with the Actor run.
USAGE $ apify actor get-value
ARGUMENTS key Key of the record in key-value store
##### `apify actor push-data`[](#apify-actor-push-data)
DESCRIPTION Saves data to Actor's run default dataset.
Accept input as: - JSON argument: $ apify actor push-data {"key": "value"} - Piped stdin: $ cat ./test.json | apify actor push-data
USAGE $ apify actor push-data [item]
ARGUMENTS item JSON string with one object or array of objects containing data to be stored in the default dataset.
##### `apify actor set-value`[](#apify-actor-set-value)
DESCRIPTION Sets or removes record into the default key-value store associated with the Actor run.
It is possible to pass data using argument or stdin.
Passing data using argument: $ apify actor set-value KEY my-value
Passing data using stdin with pipe: $ cat ./my-text-file.txt | apify actor set-value KEY --contentType text/plain
USAGE $ apify actor set-value [value] [-c ]
ARGUMENTS
key Key of the record in key-value store.
value Record data, which can be one of the following values:
- If empty, the record in the key-value store is deleted.
- If no contentType flag is specified, value is expected to be any JSON
string value.
- If options.contentType is set, value is taken as is.
FLAGS -c, --content-type= Specifies a custom MIME content type of the record. By default "application/json" is used.
#### Actor Deployment[](#actor-deployment)
These commands handle the deployment workflow of Actors to Apify platform. Use them to push local changes, pull remote Actors, and manage Actor versions and builds.
##### `apify actors push` / `apify push`[](#apify-actors-push--apify-push)
DESCRIPTION Deploys Actor to Apify platform using settings from '.actor/actor.json'. Files under '3' MB upload as "Multiple source files"; larger projects upload as ZIP file. Use --force to override newer remote versions.
USAGE $ apify actors push [actorId] [-b ] [--dir ] [--force] [--open] [-v ] [-w ]
ARGUMENTS actorId Name or ID of the Actor to push (e.g. "apify/hello-world" or "E2jjCZBezvAZnX8Rb"). If not provided, the command will create or modify the Actor with the name specified in '.actor/actor.json' file.
FLAGS -b, --build-tag= Build tag to be applied to the successful Actor build. By default, it is taken from the '.actor/actor.json' file --dir= Directory where the Actor is located --force Push an Actor even when the local files are older than the Actor on the platform. --open Whether to open the browser automatically to the Actor details page. -v, --version= Actor version number to which the files should be pushed. By default, it is taken from the '.actor/actor.json' file. -w, --wait-for-finish= Seconds for waiting to build to finish, if no value passed, it waits forever.
##### `apify actors pull` / `apify pull`[](#apify-actors-pull--apify-pull)
DESCRIPTION Download Actor code to current directory. Clones Git repositories or fetches Actor files based on the source type.
USAGE $ apify actors pull [actorId] [--dir ] [-v ]
ARGUMENTS actorId Name or ID of the Actor to run (e.g. "apify/hello-world" or "E2jjCZBezvAZnX8Rb"). If not provided, the command will update the Actor in the current directory based on its name in ".actor/actor.json" file.
FLAGS --dir= Directory where the Actor should be pulled to -v, --version= Actor version number which will be pulled, e.g. 1.2. Default: the highest version
##### `apify actors call` / `apify call`[](#apify-actors-call--apify-call)
DESCRIPTION Executes Actor remotely using your authenticated account. Reads input from local key-value store by default.
USAGE $ apify actors call [actorId] [-b ] [-i | -f ] [--json] [-m ] [-o] [-s] [-t ]
ARGUMENTS actorId Name or ID of the Actor to run (e.g. "my-actor", "apify/hello-world" or "E2jjCZBezvAZnX8Rb"). If not provided, the command runs the remote Actor specified in the '.actor/actor.json' file.
FLAGS
-b, --build= Tag or number of the build to
run (e.g. "latest" or "1.2.34").
-i, --input= Optional JSON input to be
given to the Actor.
-f, --input-file= Optional path to a file with
JSON input to be given to the Actor. The file must be a
valid JSON file. You can also specify - to read from
standard input.
--json Format the command output as JSON
-m, --memory= Amount of memory allocated for
the Actor run, in megabytes.
-o, --output-dataset Prints out the entire default
dataset on successful run of the Actor.
-s, --silent Prevents printing the logs of
the Actor run to the console.
-t, --timeout= Timeout for the Actor run in
seconds. Zero value means there is no timeout.
##### `apify actors start`[](#apify-actors-start)
DESCRIPTION Starts Actor remotely and returns run details immediately. Uses authenticated account and local key-value store for input.
USAGE $ apify actors start [actorId] [-b ] [-i | --input-file ] [--json] [-m ] [-t ]
ARGUMENTS actorId Name or ID of the Actor to run (e.g. "my-actor", "apify/hello-world" or "E2jjCZBezvAZnX8Rb"). If not provided, the command runs the remote Actor specified in the '.actor/actor.json' file.
FLAGS
-b, --build= Tag or number of the build to
run (e.g. "latest" or "1.2.34").
-i, --input= Optional JSON input to be
given to the Actor.
--input-file= Optional path to a file with JSON
input to be given to the Actor. The file must be a valid
JSON file. You can also specify - to read from
standard input.
--json Format the command output as JSON
-m, --memory= Amount of memory allocated for
the Actor run, in megabytes.
-t, --timeout= Timeout for the Actor run in
seconds. Zero value means there is no timeout.
##### `apify actors info`[](#apify-actors-info)
DESCRIPTION Get information about an Actor.
USAGE $ apify actors info [--input | --readme] [--json]
ARGUMENTS actorId The ID of the Actor to return information about.
FLAGS --input Return the Actor input schema. --json Format the command output as JSON --readme Return the Actor README.
#### Actor Builds[](#actor-builds)
Use these commands to manage Actor build processes. They help you create, monitor, and maintain versioned snapshots of your Actors that can be executed on Apify platform.
##### `apify builds`[](#apify-builds)
DESCRIPTION Manages Actor build processes and versioning.
SUBCOMMANDS builds rm Permanently removes an Actor build from the Apify platform. builds ls Lists all builds of the Actor. builds log Prints the log of a specific build. builds info Prints information about a specific build. builds create Creates a new build of the Actor.
##### `apify builds create` / `apify actors build`[](#apify-builds-create--apify-actors-build)
DESCRIPTION Creates a new build of the Actor.
USAGE $ apify builds create [actorId] [--json] [--log] [--tag ] [--version ]
ARGUMENTS actorId Optional Actor ID or Name to trigger a build for. By default, it will use the Actor from the current directory.
FLAGS --json Format the command output as JSON --log Whether to print out the build log after the build is triggered. --tag= Build tag to be applied to the successful Actor build. By default, this is "latest". --version= Optional Actor Version to build. By default, this will be inferred from the tag, but this flag is required when multiple versions have the same tag.
##### `apify builds info`[](#apify-builds-info)
DESCRIPTION Prints information about a specific build.
USAGE $ apify builds info [--json]
ARGUMENTS buildId The build ID to get information about.
FLAGS --json Format the command output as JSON
##### `apify builds log`[](#apify-builds-log)
DESCRIPTION Prints the log of a specific build.
USAGE $ apify builds log
ARGUMENTS buildId The build ID to get the log from.
##### `apify builds ls`[](#apify-builds-ls)
DESCRIPTION Lists all builds of the Actor.
USAGE $ apify builds ls [actorId] [-c] [--desc] [--json] [--limit ] [--offset ]
ARGUMENTS actorId Optional Actor ID or Name to list runs for. By default, it will use the Actor from the current directory.
FLAGS -c, --compact Display a compact table. --desc Sort builds in descending order. --json Format the command output as JSON --limit= Number of builds that will be listed. --offset= Number of builds that will be skipped.
##### `apify builds rm`[](#apify-builds-rm)
DESCRIPTION Permanently removes an Actor build from the Apify platform.
USAGE $ apify builds rm
ARGUMENTS buildId The build ID to delete.
#### Actor Runs[](#actor-runs)
These commands control Actor execution on Apify platform. Use them to start, monitor, and manage Actor runs, including accessing logs and handling execution states.
##### `apify runs`[](#apify-runs)
DESCRIPTION Manages Actor run operations
SUBCOMMANDS runs abort Aborts an Actor run. runs info Prints information about an Actor run. runs log Prints the log of a specific run. runs ls Lists all runs of the Actor. runs resurrect Resurrects an aborted or finished Actor Run. runs rm Deletes an Actor Run.
##### `apify runs abort`[](#apify-runs-abort)
DESCRIPTION Aborts an Actor run.
USAGE $ apify runs abort [-f] [--json]
ARGUMENTS runId The run ID to abort.
FLAGS -f, --force Whether to force the run to abort immediately, instead of gracefully. --json Format the command output as JSON
##### `apify runs info`[](#apify-runs-info)
DESCRIPTION Prints information about an Actor run.
USAGE $ apify runs info [--json] [-v]
ARGUMENTS runId The run ID to print information about.
FLAGS --json Format the command output as JSON -v, --verbose Prints more in-depth information about the Actor run.
##### `apify runs log`[](#apify-runs-log)
DESCRIPTION Prints the log of a specific run.
USAGE $ apify runs log
ARGUMENTS runId The run ID to get the log from.
##### `apify runs ls`[](#apify-runs-ls)
DESCRIPTION Lists all runs of the Actor.
USAGE $ apify runs ls [actorId] [-c] [--desc] [--json] [--limit ] [--offset ]
ARGUMENTS actorId Optional Actor ID or Name to list runs for. By default, it will use the Actor from the current directory.
FLAGS -c, --compact Display a compact table. --desc Sort runs in descending order. --json Format the command output as JSON --limit= Number of runs that will be listed. --offset= Number of runs that will be skipped.
##### `apify runs resurrect`[](#apify-runs-resurrect)
DESCRIPTION Resurrects an aborted or finished Actor Run.
USAGE $ apify runs resurrect [--json]
ARGUMENTS runId The run ID to resurrect.
FLAGS --json Format the command output as JSON
##### `apify runs rm`[](#apify-runs-rm)
DESCRIPTION Deletes an Actor Run.
USAGE $ apify runs rm
ARGUMENTS runId The run ID to delete.
### Storage[](#storage)
These commands manage data storage on Apify platform. Use them to work with datasets, key-value stores, and request queues for persistent data storage and retrieval.
#### Datasets[](#datasets)
Use these commands to manage datasets, which provide structured storage for tabular data. They enable creation, modification, and data manipulation within datasets.
##### `apify datasets`[](#apify-datasets)
DESCRIPTION Manages structured data storage and retrieval.
SUBCOMMANDS datasets create Creates a new dataset for storing structured data on your account. datasets get-items Retrieves dataset items in specified format (JSON, CSV, etc). datasets ls Prints all datasets on your account. datasets info Prints information about a specific dataset. datasets rm Permanently removes a dataset. datasets rename Change dataset name or removes name with --unname flag. datasets push-items Adds data items to specified dataset. Accepts single object or array of objects.
##### `apify datasets create`[](#apify-datasets-create)
DESCRIPTION Creates a new dataset for storing structured data on your account.
USAGE $ apify datasets create [datasetName] [--json]
ARGUMENTS datasetName Optional name for the Dataset
FLAGS --json Format the command output as JSON
##### `apify datasets get-items`[](#apify-datasets-get-items)
DESCRIPTION Retrieves dataset items in specified format (JSON, CSV, etc).
USAGE $ apify datasets get-items [--format json|jsonl|csv|html|rss|xml|xlsx] [--limit ] [--offset ]
ARGUMENTS datasetId The ID of the Dataset to export the items for
FLAGS --format= The format of the returned output. By default, it is set to 'json' <options: json|jsonl|csv|html|rss|xml|xlsx> --limit= The amount of elements to get from the dataset. By default, it will return all available items. --offset= The offset in the dataset where to start getting items.
##### `apify datasets info`[](#apify-datasets-info)
DESCRIPTION Prints information about a specific dataset.
USAGE $ apify datasets info [--json]
ARGUMENTS storeId The dataset store ID to print information about.
FLAGS --json Format the command output as JSON
##### `apify datasets ls`[](#apify-datasets-ls)
DESCRIPTION Prints all datasets on your account.
USAGE $ apify datasets ls [--desc] [--json] [--limit ] [--offset ] [--unnamed]
FLAGS --desc Sorts datasets in descending order. --json Format the command output as JSON --limit= Number of datasets that will be listed. --offset= Number of datasets that will be skipped. --unnamed Lists datasets that don't have a name set.
##### `apify datasets push-items`[](#apify-datasets-push-items)
DESCRIPTION Adds data items to specified dataset. Accepts single object or array of objects.
USAGE $ apify datasets push-items [item]
ARGUMENTS nameOrId The dataset ID or name to push the objects to item The object or array of objects to be pushed.
##### `apify datasets rename`[](#apify-datasets-rename)
DESCRIPTION Change dataset name or removes name with --unname flag.
USAGE $ apify datasets rename [newName] [--unname]
ARGUMENTS nameOrId The dataset ID or name to delete. newName The new name for the dataset.
FLAGS --unname Removes the unique name of the dataset.
##### `apify datasets rm`[](#apify-datasets-rm)
DESCRIPTION Permanently removes a dataset.
USAGE $ apify datasets rm
ARGUMENTS datasetNameOrId The dataset ID or name to delete
#### Key-Value Stores[](#key-value-stores)
These commands handle key-value store operations. Use them to create stores, manage key-value pairs, and handle persistent storage of arbitrary data types.
##### `apify key-value-stores`[](#apify-key-value-stores)
DESCRIPTION Manages persistent key-value storage.
Alias: kvs
SUBCOMMANDS key-value-stores create Creates a new key-value store on your account. key-value-stores delete-value Delete a value from a key-value store. key-value-stores get-value Retrieves stored value for specified key. Use --only-content-type to check MIME type. key-value-stores info Shows information about a key-value store. key-value-stores keys Lists all keys in a key-value store. key-value-stores ls Lists all key-value stores on your account. key-value-stores rename Renames a key-value store, or removes its unique name. key-value-stores rm Permanently removes a key-value store. key-value-stores set-value Stores value with specified key. Set content-type with --content-type flag.
##### `apify key-value-stores create`[](#apify-key-value-stores-create)
DESCRIPTION Creates a new key-value store on your account.
USAGE $ apify key-value-stores create [key-value store name] [--json]
ARGUMENTS key-value store name Optional name for the key-value store
FLAGS --json Format the command output as JSON
##### `apify key-value-stores delete-value`[](#apify-key-value-stores-delete-value)
DESCRIPTION Delete a value from a key-value store.
USAGE $ apify key-value-stores delete-value
ARGUMENTS store id The key-value store ID to delete the value from. itemKey The key of the item in the key-value store.
##### `apify key-value-stores get-value`[](#apify-key-value-stores-get-value)
DESCRIPTION Retrieves stored value for specified key. Use --only-content-type to check MIME type.
USAGE $ apify key-value-stores get-value [--only-content-type]
ARGUMENTS keyValueStoreId The key-value store ID to get the value from. itemKey The key of the item in the key-value store.
FLAGS --only-content-type Only return the content type of the specified key
##### `apify key-value-stores info`[](#apify-key-value-stores-info)
DESCRIPTION Shows information about a key-value store.
USAGE $ apify key-value-stores info [--json]
ARGUMENTS storeId The key-value store ID to print information about.
FLAGS --json Format the command output as JSON
##### `apify key-value-stores keys`[](#apify-key-value-stores-keys)
DESCRIPTION Lists all keys in a key-value store.
USAGE $ apify key-value-stores keys [--exclusive-start-key ] [--json] [--limit ]
ARGUMENTS storeId The key-value store ID to list keys for.
FLAGS --exclusive-start-key= The key to start the list from. --json Format the command output as JSON --limit= The maximum number of keys to return.
##### `apify key-value-stores ls`[](#apify-key-value-stores-ls)
DESCRIPTION Lists all key-value stores on your account.
USAGE $ apify key-value-stores ls [--desc] [--json] [--limit ] [--offset ] [--unnamed]
FLAGS --desc Sorts key-value stores in descending order. --json Format the command output as JSON --limit= Number of key-value stores that will be listed. --offset= Number of key-value stores that will be skipped. --unnamed Lists key-value stores that don't have a name set.
##### `apify key-value-stores rename`[](#apify-key-value-stores-rename)
DESCRIPTION Renames a key-value store, or removes its unique name.
USAGE $ apify key-value-stores rename [newName] [--unname]
ARGUMENTS keyValueStoreNameOrId The key-value store ID or name to delete newName The new name for the key-value store
FLAGS --unname Removes the unique name of the key-value store
##### `apify key-value-stores rm`[](#apify-key-value-stores-rm)
DESCRIPTION Permanently removes a key-value store.
USAGE $ apify key-value-stores rm
ARGUMENTS keyValueStoreNameOrId The key-value store ID or name to delete
##### `apify key-value-stores set-value`[](#apify-key-value-stores-set-value)
DESCRIPTION Stores value with specified key. Set content-type with --content-type flag.
USAGE $ apify key-value-stores set-value [value] [--content-type ]
ARGUMENTS storeId The key-value store ID to set the value in. itemKey The key of the item in the key-value store. value The value to set.
FLAGS --content-type= The MIME content type of the value. By default, "application/json" is assumed.
#### Request Queues[](#request-queues)
These commands manage request queues, which handle URL processing for web scraping and automation tasks. Use them to maintain lists of URLs with automatic retry mechanisms and state management.
##### `apify request-queues`[](#apify-request-queues)
DESCRIPTION Manages URL queues for web scraping and automation tasks.
USAGE $ apify request-queues
### Tasks[](#tasks)
These commands help you manage scheduled and configured Actor runs. Use them to create, modify, and execute predefined Actor configurations as tasks.
##### `apify task`[](#apify-task)
DESCRIPTION Manages scheduled and predefined Actor configurations.
SUBCOMMANDS task run Executes predefined Actor task remotely using local key-value store for input.
##### `apify task run`[](#apify-task-run)
DESCRIPTION Executes predefined Actor task remotely using local key-value store for input. Customize with --memory and --timeout flags.
USAGE $ apify task run [-b ] [-m ] [-t ]
ARGUMENTS taskId Name or ID of the Task to run (e.g. "my-task" or "E2jjCZBezvAZnX8Rb").
FLAGS -b, --build= Tag or number of the build to run (e.g. "latest" or "1.2.34"). -m, --memory= Amount of memory allocated for the Task run, in megabytes. -t, --timeout= Timeout for the Task run in seconds. Zero value means there is no timeout.
---
# Telemetry
Copy for LLM
Apify collects telemetry data about the general usage of the CLI to help us improve the product. Participation in this program is optional and you may opt out if you prefer not to share any information.
## Data Collection[](#data-collection)
All telemetry data is collected and stored securely on [Mixpanel](https://mixpanel.com/). We do not collect any sensitive information such as your API token or personal information.
### Metrics Collected[](#metrics-collected)
Before a user connects to the Apify platform, we collect anonymous information about CLI usage including:
* Usage of all commands
* Internal attributes of the local environment (OS, shell, Node.js version, Python version, Apify CLI version)
* For the `actor create` command, we identify which template was used to create the Actor (language, template name, template ID)
After a user connects to the Apify platform (successful `apify login`), we collect the same information about CLI usage along with the ID of the connected user. You can read more about how we protect personal information in our [Privacy Policy](https://apify.com/privacy-policy).
## How to opt out[](#how-to-opt-out)
You can disable telemetry by setting the "APIFY\_CLI\_DISABLE\_TELEMETRY" environment variable to "1". After setting this variable, the CLI will not send any telemetry data whether you are connected with Apify or not.
---
# Troubleshooting
Copy for LLM
## Problems with installation[](#problems-with-installation)
If you receive a permission error, read npm's [official guide](https://docs.npmjs.com/resolving-eacces-permissions-errors-when-installing-packages-globally) on installing packages globally.
The best practice is to use a Node.js version manager to install Node.js 22+. It prevents permission issues from happening in the first place. We recommend:
* [fnm (Fast Node Manager)](https://github.com/Schniz/fnm)
* [Volta](https://volta.sh/).
Once you have the correct version of Node.js on your machine, install the Apify CLI with the following command:
npm install -g apify-cli
## Migrations[](#migrations)
You can find the differences and migration info in [migration guidelines](https://github.com/apify/apify-cli/blob/master/MIGRATIONS.md).
## Help command[](#help-command)
To see all CLI commands simply run:
apify help
To get information about a specific command run:
apify help COMMAND
## Need help?[](#need-help)
For general support, reach out to us at [apify.com/contact](https://apify.com/contact). You can also join [Apify Discord](https://apify.com/discord), if you have a question. If you believe you are encountering a bug, file it on [GitHub](https://github.com/apify/apify-cli/issues/new).
---
# Environment variables
Copy for LLM
There are two options how you can set up environment variables for Actors.
### Set up environment variables in `.actor/actor.json`[](#set-up-environment-variables-in-actoractorjson)
All keys from `environmentVariables` will be set as environment variables into Apify platform after you push Actor to Apify. Current values on Apify will be overridden.
{ "actorSpecification": 1, "name": "dataset-to-mysql", "version": "0.1", "buildTag": "latest", "environmentVariables": { "MYSQL_USER": "my_username", "MYSQL_PASSWORD": "@mySecretPassword" } }
### Set up environment variables in Apify Console[](#set-up-environment-variables-in-apify-console)
In [Apify Console](https://console.apify.com/actors) select your Actor, you can set up variables into Source tab. After setting up variables in the app, remove the `environmentVariables` from `.actor/actor.json`. Otherwise, variables from `.actor/actor.json` will override variables in the app.
{ "actorSpecification": 1, "name": "dataset-to-mysql", "version": "0.1", "buildTag": "latest" }
#### How to set secret environment variables in `.actor/actor.json`[](#how-to-set-secret-environment-variables-in-actoractorjson)
CLI provides commands to manage secrets environment variables. Secrets are stored to the `~/.apify` directory. You can add a new secret using the command:
apify secrets add mySecretPassword pwd1234
After adding a new secret you can use the secret in `.actor/actor.json`.
{ "actorSpecification": 1, "name": "dataset-to-mysql", ... "environmentVariables": { "MYSQL_PASSWORD": "@mySecretPassword" }, ... }
---
[Skip to main content](#__docusaurus_skipToContent_fallback)
[](https://docs.apify.com)
[Academy](https://docs.apify.com/academy)[Platform](https://docs.apify.com/platform)
[API](https://docs.apify.com/api)
* [Reference](https://docs.apify.com/api/v2)
* [Client for JavaScript](https://docs.apify.com/api/client/js/)
* [Client for Python](https://docs.apify.com/api/client/python/)
[SDK](https://docs.apify.com/sdk)
* [SDK for JavaScript](https://docs.apify.com/sdk/js/)
* [SDK for Python](https://docs.apify.com/sdk/python/)
[CLI](https://docs.apify.com/cli/)
[Open source](https://docs.apify.com/open-source)
* [Crawlee](https://crawlee.dev)
* [Got Scraping](https://github.com/apify/got-scraping)
* [Fingerprint Suite](https://github.com/apify/fingerprint-suite)
* [Apify on GitHub](https://github.com/apify)
* [Actor whitepaper](https://whitepaper.actor)
[Discord](https://discord.com/invite/jyEM2PRvMU "Chat on Discord")[Get started](https://console.apify.com)
[Apify CLI](https://docs.apify.com/cli/cli/.md)
[Docs](https://docs.apify.com/cli/cli/docs.md)[Reference](https://docs.apify.com/cli/cli/docs/reference.md)[Changelog](https://docs.apify.com/cli/cli/docs/changelog.md)[GitHub](https://github.com/apify/apify-cli)
[1.1.0](https://docs.apify.com/cli/cli/docs.md)
* [Next](https://docs.apify.com/cli/cli/docs/next)
* [1.1.0](https://docs.apify.com/cli/cli/docs.md)
* [0.21](https://docs.apify.com/cli/cli/docs/0.21)
* [0.20](https://docs.apify.com/cli/cli/docs/0.20)
# Apify command-line interface (CLI)
##
## Create, develop, build, and run [Apify Actors](https://docs.apify.com/actors) from your terminal. Manage the Apify platform from shell scripts.
[Learn more](https://docs.apify.com/cli/cli/docs.md)[GitHub](https://ghbtns.com/github-btn.html?user=apify\&repo=apify-cli\&type=star\&count=true\&size=large)

npm i -g apify-cli
Apify Actors are cloud programs that can perform arbitrary web scraping, automation, or data processing job. They accept input, perform their job and generate output.
While you can develop Actors in an online IDE in [Apify Console](https://console.apify.com/), for larger projects, it is more convenient to develop Actors locally on your computer using [Apify SDK](https://docs.apify.com/sdk/js/) and only push the Actors to the Apify platform during deployment. This is where the Apify CLI comes in to allow you to quickly develop locally and then deploy to the cloud with a single command.
Create your first Actor
apify create my-actor
Go into the project directory
cd my-actor
Run it locally
apify run
Log into your Apify account and deploy it to Apify Platform
apify login apify push
Learn
* [Academy](https://docs.apify.com/academy)
* [Platform](https://docs.apify.com/platform)
API
* [Reference](https://docs.apify.com/api/v2)
* [Client for JavaScript](https://docs.apify.com/api/client/js/)
* [Client for Python](https://docs.apify.com/api/client/python/)
SDK
* [SDK for JavaScript](https://docs.apify.com/sdk/js/)
* [SDK for Python](https://docs.apify.com/sdk/python/)
Other
* [CLI](https://docs.apify.com/cli/)
* [Open source](https://docs.apify.com/open-source)
More
* [Crawlee](https://crawlee.dev)
* [GitHub](https://github.com/apify)
* [Discord](https://discord.com/invite/jyEM2PRvMU)
* [Trust Center](https://trust.apify.com)
[](https://apify.com)
---
# The Web Actor Programming Model Whitepaper
**This whitepaper describes a new concept for building serverless microapps called **_Actors_**,
which are easy to develop, share, integrate, and build upon.
Actors are a reincarnation of the UNIX philosophy
for programs running in the cloud.**
By [Jan Čurn](https://apify.com/jancurn),
[Marek Trunkát](https://apify.com/mtrunkat),
[Ondra Urban](https://apify.com/mnmkng), and the entire Apify team.
**Version 0.999 (February 2025)**
## Contents
<!-- toc -->
- [Introduction](#introduction)
* [Background](#background)
* [Overview](#overview)
* [Apify platform](#apify-platform)
- [Basic concepts](#basic-concepts)
* [Input](#input)
* [Run environment](#run-environment)
* [Output](#output)
* [Storage](#storage)
* [Integrations](#integrations)
* [What Actors are not](#what-actors-are-not)
- [Philosophy](#philosophy)
* [UNIX programs vs. Actors](#unix-programs-vs-actors)
* [Design principles](#design-principles)
* [Relation to the Actor model](#relation-to-the-actor-model)
* [Why the name "Actor"](#why-the-name-actor)
- [Installation and setup](#installation-and-setup)
* [Running on the Apify platform](#running-on-the-apify-platform)
* [Node.js](#nodejs)
* [Python](#python)
* [Command-line interface (CLI)](#command-line-interface-cli)
- [Actor programming interface](#actor-programming-interface)
* [Initialization](#initialization)
* [Get input](#get-input)
* [Key-value store access](#key-value-store-access)
* [Push results to dataset](#push-results-to-dataset)
* [Exit Actor](#exit-actor)
* [Environment variables](#environment-variables)
* [Actor status](#actor-status)
* [System events](#system-events)
* [Get memory information](#get-memory-information)
* [Start another Actor](#start-another-actor)
* [Metamorph](#metamorph)
* [Attach webhook to an Actor run](#attach-webhook-to-an-actor-run)
* [Abort another Actor](#abort-another-actor)
* [Reboot an Actor](#reboot-an-actor)
* [Actor web server](#actor-web-server)
* [Standby mode](#standby-mode)
* [Migration to another server](#migration-to-another-server)
* [Charging money](#charging-money)
- [Actor definition files](#actor-definition-files)
* [Actor file](#actor-file)
* [Dockerfile](#dockerfile)
* [README](#readme)
* [Input schema file](#input-schema-file)
* [Output schema file](#output-schema-file)
* [Storage schema files](#storage-schema-files)
* [Backward compatibility](#backward-compatibility)
- [Development](#development)
* [Local development](#local-development)
* [Deployment to Apify platform](#deployment-to-apify-platform)
* [Continuous integration and delivery](#continuous-integration-and-delivery)
* [Actorizing existing code](#actorizing-existing-code)
- [Sharing and publishing](#sharing-and-publishing)
* [Monetization](#monetization)
- [Future work](#future-work)
- [Links](#links)
<!-- tocstop -->
## Introduction
This whitepaper introduces **_Actors_**,
a new language-agnostic model for building general-purpose
web computing and automation programs (also known as agents, functions, or apps).
The main goal for Actors is to make it easy for developers to build and ship reusable
software tools, which are easy to run, integrate, and build upon.
Actors are useful for building
web scrapers, crawlers, automations, and AI agents.
### Background
Actors were first introduced by [Apify](https://apify.com/) in late 2017,
as a way to easily build, package, and ship web scraping and web automation jobs to customers.
Over the years, Apify has continued to develop the concept and applied
it successfully to thousands of real-world use cases in many business areas,
well beyond the domain of web scraping.
Building on this experience,
we're releasing this whitepaper to introduce the philosophy of Actors
to other developers and receive your feedback on it.
We aim to establish the Actor programming model as an open standard,
which will help the community to more effectively
build and ship reusable software automation tools,
as well as encourage new implementations of the model in other programming languages.
The goal of this whitepaper is to be the North Star that shows what the
Actor programming model is and what operations it should support.
**But this document is not an official specification.**
The specification will be an OpenAPI schema of the Actor system interface,
to enable new independent implementations of both the client libraries and backend systems. This is currently a work in progress.
Currently, the most complete implementation of the Actor model is provided
by the Apify platform, with SDKs for
[Node.js](https://sdk.apify.com/) and
[Python](https://pypi.org/project/apify/),
and a [command-line interface (CLI)](https://docs.apify.com/cli).
Beware that the frameworks might not yet implement all the features of the Actor programming model
described in this whitepaper.
### Overview
Actors are serverless programs that run in the cloud.
They can perform anything from simple actions such as
filling out a web form or sending an email,
to complex operations such as crawling an entire website,
or removing duplicates from a large dataset.
Actors can persist their state and be restarted, and thus they can
run as short or as long as necessary, from seconds to hours, even infinitely.
Basically, Actors are programs packaged as Docker images,
which accept a well-defined JSON input, perform
an action, and optionally produce a well-defined JSON output.
Actors have the following elements:
- **Dockerfile** which specifies where the Actor's source code is,
how to build it, and run it.
- **Documentation** in a form of a README.md file.
- **Input and output schemas** that describe what input the Actor requires,
and what results it produces.
- Access to an out-of-the-box **storage system** for Actor data, results, and files.
- **Metadata** such as the Actor name, description, author, and version.
The documentation and the input/output schemas make it possible for people to easily understand what the Actor does,
enter the required inputs both in user interface or API,
and integrate the results of the Actor into their other workflows.
Actors can easily call and interact with each other, enabling the building of more complex
systems on top of simple ones.
<!-- ASTRO: <Diagram horizontal={illuDiagramHoriz} vertical={illuDiagramVert} alt="Actor drawing" /> -->

<!-- Image sources:
https://docs.google.com/presentation/d/1nDgrI0p2r8ouP_t_Wn02aTllP8_Std-kRuIbO8QLE7M/edit
https://www.figma.com/design/6vbmKvB6oY3b3mTN0oAscE/Actor-Whitepaper-Diagrams-and-Presentations?node-id=0-1&p=f&t=JwAJfru2GjdQBpBV-11
-->
### Apify platform
Actors can be published
on the [Apify platform](https://apify.com/store),
which automatically generates a rich website with documentation based on the README
and a practical user interface, in order to encourage people to try the Actor right away.
The Apify platform takes care of securely hosting the Actor's Docker containers
and scaling the computing, storage and network resources as needed,
so neither Actor developers nor the users need to deal with the infrastructure.
It just works.
The Apify platform provides an open API, cron-style scheduler, webhooks
and [integrations](https://apify.com/integrations)
to services such as Zapier or Make, which make it easy for users
to integrate Actors into their existing workflows. Additionally, the Actor developers
can set a price tag for the usage of their Actors, and thus earn income
and have an incentive to keep developing and improving the Actor for the users.
For details, see [Monetization](#monetization).
## Basic concepts
This section describes core features of Actors, what they are good for,
and how Actors differ from other serverless computing systems.
### Input
<!-- ASTRO:
<Illustration
description="Each Actor accepts an input object, which tells it what it should do."
position="content"
image={illuBasicConceptsInput}
noCaption
/>
-->
Each Actor accepts an **input object**, which tells it what it should do.
The object is passed in JSON format, and its properties have
a similar role as command-line arguments when running a program in a UNIX-like operating system.
For example, an input object for an Actor `bob/screenshotter` could look like this:
```json
{
"url": "https://www.example.com",
"width": 800
}
The input object represents a standardized way for the caller to control the Actor's activity, whether starting it using API, user interface, CLI, or scheduler. The Actor can access the value of the input object using the Get input function.
In order to specify what kind of input object an Actor expects, the Actor developer can define an Input schema file.
The input schema is used by the system to generate user interface, API examples, and simplify integration with external systems.
Example of auto-generated Actor input UI

Run environment
Actors run within an isolated Docker container with access to local file system and network, and they can perform arbitrary computing activity or call external APIs. The standard output of the Actor's program (stdout and stderr) is printed out and logged, which is useful for development and debugging.
To inform the users about the progress, the Actors might set a status message, which is then displayed in the user interface and also available via API.
A running Actor can also launch a web server, which is assigned a unique local or public URL to receive HTTP requests. For example, this is useful for messaging and interaction between Actors, for running request-response REST APIs, or providing a full-featured website.
Actors can store their working data or results into specialized storages called Key-value store and Dataset storages, from which they can be easily exported using API or integrated in other Actors.
Output
While the input object provides a standardized way to invoke Actors, Actors can also generate an output object, which is a standardized way to display, consume, and integrate Actors' results.
Actor results are typically fully available only after the Actor run finishes, but the consumers of the results might want to access partial results during the run. Therefore, Actors don't generate the output object in their code, but they define an Output schema file, which contains instruction how to generate such output object automatically.
You can define how the Actor output looks using the Output schema file.
The system uses this information to automatically generate an immutable JSON file,
which tells users where to find the results produced by the Actor.
The output object is stored by the system
to the Actor run object under the output property, and returned via API immediately when
the Actor is started, without the need to wait for it to finish or generate the actual results.
This is useful to automatically generate UI previews of the results, API examples,
and integrations.
The output object is similar to the input object, as it contains properties and values.
For example, for the bob/screenshotter Actor, the output object could look like this:
{
"screenshotUrl": "https://api.apify.com/v2/key-value-stores/skgGkFLQpax59AsFD/records/screenshot.jpg",
"productImages": "https://api.apify.com/v2/key-value-stores/skgGkFLQpax59AsFD/records/product*.jpg",
"productDetails": "https://api.apify.com/datasets/9dFknjkxxGkspwWd/records?fields=url,name",
"productExplorer": "https://bob--screenshotter.apify.actor/product-explorer",
// or this with live view
"productExplorer": "https://13413434.runs.apify.net/product-explorer"
}
Storage
The Actor system provides two specialized storages that can be used by Actors for storing files and results: key-value store and dataset, respectively. For each Actor run, the system automatically creates so-called default storages of both these types in empty state and makes them readily available for the Actor.
Alternatively, a caller can request reusing existing storage when starting a new Actor run. This is similar to redirecting standard input in UNIX, and it is useful if you want an Actor to operate on an existing key-value store or dataset instead of creating a new one.
Besides these so-called default storages, which are created or linked automatically, Actors are free to create new storages or
access existing ones, either by ID or a name that can be set for them (e.g. bob/screenshots).
The input schema file and output schema file provide special support for referencing these storages,
in order to simplify linking an output of one Actor to an input of another.
The storages are also accessible through an API and SDK externally, for example,
to download results when the Actor finishes.
Note that Actors are free to access any other external storage system through a third-party API, e.g. an SQL database or a vector database.
Key-value store
The key-value store is a simple data storage that is used for saving and reading files or data records. The records are represented by a unique text key and the data associated with a MIME content type. Key-value stores are ideal for saving things like screenshots, web pages, PDFs, or to persist the state of Actors e.g. as a JSON file.
Each Actor run is associated with a default empty key-value store, which is created exclusively for the run,
or alternatively with an existing key-value store if requested by the user on Actor start.
The Actor input is stored as JSON file into the default key-value store under the key defined by
the ACTOR_INPUT_KEY environment variable (usually INPUT).
The Actor can read this input object using the Get input function.
An Actor can read and write records to key-value stores using the API. For details, see Key-value store access.
An Actor can define a schema for the key-value store to ensure files stored in it conform to certain rules. For details, see Storage schema files.
Dataset
The dataset is an append-only storage that allows you to store a series of data objects such as results from web scraping, crawling, or data processing jobs. You or your users can then export the dataset to formats such as JSON, CSV, XML, RSS, Excel, or HTML.
The dataset represents a store for structured data where each object stored has the same attributes, such as online store products or real estate offers. You can imagine it as a table, where each object is a row and its attributes are columns. Dataset is an append-only storage — you can only add new records to it, but you cannot modify or remove existing records. Typically, it is used to store an array or collection of results, such as a list of products or web pages.
An Actor can define a schema for the Dataset to ensure objects stored in it conform to certain rules. For details, see Storage schema files.
Integrations
Actors are designed for interoperability. Thanks to the input and output schemas, it easy to connect Actors with external systems, be it directly via REST API, Node.js or Python clients, CLI, or no-code automations. From the schema files, the system can automatically generate API documentation, OpenAPI specification, and validate inputs and outputs, simplifying their integrations to any other systems.
Furthermore, Actors can interact with themselves, for example start another Actors, attach Webhooks to process the results, or Metamorph into another Actor to have it finish the work.
What Actors are not
Actors are best suited for compute operations that take an input, perform an isolated job for a user, and potentially produce some output.
For long-running jobs, Actor execution might be migrated from server to another server, making it unsuitable for running dependable storage workloads such as SQL databases.
As Actors are based on Docker, it takes a certain amount of time to spin up the container and launch its main process. Doing this for every small HTTP transaction (e.g. API call) is not efficient, even for highly-optimized Docker images. However, Actor Standby mode enables an Actor to run as a web server, to more effectively process small API requests.
Philosophy
Actors are inspired by the UNIX philosophy from the 1970s, adapted to the age of the cloud:
- Make each program do one thing well. To do a new job, build afresh rather than complicate old programs by adding new “features”.
- Expect the output of every program to become the input to another, as yet unknown, program. Don’t clutter output with extraneous information. Avoid stringently columnar or binary input formats. Don’t insist on interactive input.
- Design and build software, even operating systems, to be tried early, ideally within weeks. Don’t hesitate to throw away the clumsy parts and rebuild them.
- Use tools in preference to unskilled help to lighten a programming task, even if you have to detour to build the tools and expect to throw some of them out after you’ve finished using them.
The UNIX philosophy is arguably one of the most important software engineering paradigms which, together with other favorable design choices of UNIX operating systems, ushered in the computer and internet revolution. By combining smaller parts that can be developed and used independently (programs), it suddenly became possible to build, manage and gradually evolve ever more complex computing systems. Even today's modern mobile devices are effectively UNIX-based machines that run a lot of programs interacting with each other, and provide a terminal which looks very much like early UNIX terminals. In fact, terminal is just another program.
UNIX-style programs represent a great way to package software for usage on a local computer. The programs can easily be used stand-alone, but also in combination and in scripts in order to perform much more complex tasks than an individual program ever could, which in turn can be packaged as new programs.
The idea of Actors is to bring the benefits of UNIX-style programs from a local computer to a cloud environment where programs run on multiple computers communicating over a network that is subject to latency and partitioning, there is no global atomic filesystem, and where programs are invoked via API calls rather than system calls.
Each Actor should do just one thing and do it well. Actors can be used stand-alone, as well as combined or scripted into more complex systems, which in turn can become new Actors. Actors provide a simple user interface and documentation to help users interact with them.
UNIX programs vs. Actors
The following table shows the equivalents of key concepts of UNIX programs and Actors.
| UNIX programs | Actors |
|---|---|
| Command-line options | Input object |
| Read stdin | No direct equivalent, you can read from a dataset specified in the input. |
| Write to stdout | Push results to dataset, set Actor status |
| Write to stderr | No direct equivalent, you can write errors to log, set error status message, or push failed dataset items into an "error" dataset. |
| File system | Key-value store |
| Process identifier (PID) | Actor run ID |
| Process exit code | Actor exit code |
Design principles
- Each Actor should do just one thing, and do it well.
- Optimize for the users of the Actors, help them understand what the Actor does, easily run it, and integrate.
- Also optimize for interoperability, to make it ever easier to connect Actors with other systems. Expect objects you work with to contain additional not-yet-known fields.
- Keep the API as simple as possible and write great documentation, so that Actors can be built and used by >90% of software developers, even ones using no-code tools (yes, that's also software development!).
Relation to the Actor model
Note that Actors are only loosely related to the Actor model in computer science introduced by the 1973 paper by Carl Hewitt. According to Wikipedia:
The Actor model in computer science is a mathematical model of concurrent computation that treats Actor as the universal primitive of concurrent computation. In response to a message it receives, an Actor can: make local decisions, create more Actors, send more messages, and determine how to respond to the next message received. Actors may modify their own private state, but can only affect each other indirectly through messaging (removing the need for lock-based synchronization).
While the theoretical Actor model is conceptually very similar to "our" Actor programming model, this similarity is rather coincidental. Our primary focus was always on practical software engineering utility, not an implementation of a formal mathematical model.
For example, our Actors do not provide any standard message passing mechanism, but they can communicate together directly via HTTP requests (see Actor web server), manipulate each other's operation via the Apify platform API (e.g. abort another Actor), or affect each other by sharing some internal state or storage. Actors do not have any formal restrictions, and they can access whichever external systems they want, thus going beyond the formal mathematical Actor model.
Why the name "Actor"
In movies and theater, an actor is someone who gets a script and plays a role according to that script. Our Actors also perform an act on someone's behalf, using a provided script. They work well with Puppeteers and Playwrights.
To make it clear that Actors are not people, the letter "A" is capitalized.
Installation and setup
Below are the steps to start building Actors in various languages and environments.
Running on the Apify platform
You can develop and run Actors in Apify Console without installing any software locally. Just create a free Apify account, and start building Actors in an online IDE.
Node.js
The most complete implementation of the Actor system is provided by the Apify SDK for Node.js, via the apify NPM package. The package contains everything that you need to start building Actors locally. You can install it to your Node.js project by running:
$ npm install apify
Python
To build Actors in Python, simply install the Apify SDK for Python, via the apify PyPi package into your project:
$ pip3 install apify
Command-line interface (CLI)
For local development of Actors and management of the Apify platform, it is handy to install the Apify CLI. You can install it with:
$ brew install apify-cli
or via the apify-cli Node.js package:
$ npm install -g apify-cli
You can confirm the installation succeeded and log in to the Apify platform by running:
$ apify login
The Apify CLI provides two commands: apify and actor.
apify command lets you interact with the Apify platform, for example run an Actor,
push deployment of an Actor to cloud, or access storages. For details, see Local development.
actor command is to be used from within an Actor in the runtime, to implement the Actors functionality in a shell script.
For details, see Actorizing existing code.
To get help for a specific command, run:
$ apify help <command>
$ actor help <command>
Actor programming interface
The commands described in this section are expected to be called from within a context of a running Actor, both in local environment or on the Apify platform.
The Actor runtime system passes the context via environment variables,
such as APIFY_TOKEN or ACTOR_RUN_ID, which is used by the SDK or CLI to interact with the runtime.
Initialization
The SDKs provide convenience methods to initialize the Actor and handle its results. During initialization, the SDK loads environment variables, checks the configuration, prepares to receive system events, and optionally purges previous state from local storage.
Node.js
In Node.js the Actor is initialized by calling the init() method. It should be paired with an exit() method
which terminates the Actor. Use of exit() is not required, but recommended. For more information go to Exit Actor.
import { Actor } from 'apify';
await Actor.init();
const input = await Actor.getInput();
console.log(input);
await Actor.exit();
An alternative way of initializing the Actor is with a main() function. This is useful in environments where the latest JavaScript
syntax and top level awaits are not supported. The main function is only syntax-sugar for init() and exit(). It will call init() before it executes its callback and exit() after the callback resolves.
import { Actor } from 'apify';
Actor.main(async () => {
const input = await Actor.getInput();
// ...
});
Python
import asyncio
from apify import Actor
async def main():
async with Actor:
input = await Actor.get_input()
print(input)
asyncio.run(main())
CLI
No initialization needed, the process exit terminates the Actor, with the process status code determining whether it succeeded or failed.
$ actor set-status-message "My work is done, friend"
$ exit 0
UNIX equivalent
int main (int argc, char *argv[]) {
...
}
Get input
Get access to the Actor input object passed by the user.
It is parsed from a JSON file, which is stored by the system in the Actor's default key-value store,
Usually the file is called INPUT, but the exact key is defined in the ACTOR_INPUT_KEY environment variable.
The input is an object with properties. If the Actor defines the input schema, the input object is guaranteed to conform to it. For details, see Input.
Node.js
const input = await Actor.getInput();
console.log(input);
// prints: { "option1": "aaa", "option2": 456 }
Python
input = Actor.get_input()
print(input)
CLI
# Emits a JSON object, which can be parsed e.g. using the "jq" tool
$ actor get-input | jq
> { "option1": "aaa", "option2": 456 }
UNIX equivalent
$ command --option1=aaa --option2=bbb
int main (int argc, char *argv[]) {}
Key-value store access
Write and read arbitrary files using a storage called Key-value store. When an Actor starts, by default it is associated with a newly-created key-value store, which only contains one file with the input of the Actor (see Get input).
The user can override this behavior and specify another key-value store or input key when running the Actor.
Node.js
// Save objects to the default key-value store
await Actor.setValue('my_state', { something: 123 }); // (stringified to JSON)
await Actor.setValue('screenshot.png', buffer, { contentType: 'image/png' });
// Get record from the default key-value store, automatically parsed from JSON
const value = await Actor.getValue('my_state');
// Access another key-value store by its name
const store = await Actor.openKeyValueStore('screenshots-store');
const imageBuffer = await store.getValue('screenshot.png');
Python
# Save object to store (stringified to JSON)
await Actor.set_value('my-state', { 'something': 123 })
# Save binary file to store with content type
await Actor.set_value('screenshot', buffer, content_type='image/png')
# Get object from store (automatically parsed from JSON)
state = await Actor.get_value('my-state')
UNIX
$ echo "hello world" > file.txt
$ cat file.txt
Push results to dataset
Larger results can be saved to append-only object storage called Dataset. When an Actor starts, by default it is associated with a newly-created empty default dataset. The Actor can create additional datasets or access existing datasets created by other Actors, and use those as needed.
Note that datasets can optionally be equipped with schema that ensures only certain kinds of objects are stored in them. See Dataset schema file for more details.
Node.js
// Append result object to the default dataset associated with the run
await Actor.pushData({
someResult: 123,
});
// Append result object to a specific named dataset
const dataset = await Actor.openDataset('bob/poll-results-2019');
await dataset.pushData({ someResult: 123 });
Python
# Append result object to the default dataset associated with the run
await Actor.push_data({ 'some_result': 123 })
# Append result object to a specific named dataset
dataset = await Actor.open_dataset('bob/poll-results-2019')
await dataset.push_data({ 'some_result': 123 })
CLI
# Push data to default dataset, in JSON format
$ echo '{ "someResult": 123 }' | actor push-data --json
$ actor push-data --json='{ "someResult": 123 }'
$ actor push-data --json=@result.json
# Push data to default dataset, in text format
$ echo "someResult=123" | actor push-data
$ actor push-data someResult=123
# Push to a specific dataset in the cloud
$ actor push-data --dataset=bob/election-data someResult=123
# Push to dataset on local system
$ actor push-data --dataset=./my_dataset someResult=123
UNIX equivalent
printf("Hello world\tColum 2\tColumn 3");
Exit Actor
When the main Actor process exits and the Docker container stops running,
the Actor run is considered finished and the process exit code is used to determine
whether the Actor has succeeded (exit code 0 leads to status SUCCEEDED)
or failed (exit code not equal to 0 leads to status FAILED).
In the event of a non-zero exit code, the system automatically sets the Actor status message
to something like Actor exited with code 0, and it might attempt
to restart the Actor to recover from the error, depending on the system and Actor configuration.
A preferred way to exit an Actor intentionally is using the exit or fail functions in SDK, as
shown below. This has several advantages:
- You can provide a custom status message for users to tell them what the Actor achieved, or why it failed and how they can fix it. This greatly improves user experience.
- When using
failto fail the Actor, the system considers the error permanent and will not attempt to restart the Actor. - The SDK emits the
exitevent, which can be listened to and used by various components of the Actor to perform a cleanup, persist state, etc. Note that the caller of exit can specify how long should the system wait for allexitevent handlers to complete before closing the process, using thetimeoutSecsoption. For details, see System Events.
Node.js
// Actor will finish with 'SUCCEEDED' status
await Actor.exit('Succeeded, crawled 50 pages');
// Exit right away without calling `exit` handlers at all
await Actor.exit('Done right now', { timeoutSecs: 0 });
// Actor will finish with 'FAILED' status
await Actor.exit('Could not finish the crawl, try increasing memory', { exitCode: 1 });
// ... or nicer way using this syntactic sugar:
await Actor.fail('Could not finish the crawl, try increasing memory');
// Register a handler to be called on exit.
// Note that the handler has `timeoutSecs` to finish its job
Actor.on('exit', ({ statusMessage, exitCode, timeoutSecs }) => {
// Perform cleanup...
})
Python
# Actor will finish in 'SUCCEEDED' state
await Actor.exit('Generated 14 screenshots')
# Actor will finish in 'FAILED' state
await Actor.exit('Could not finish the crawl, try increasing memory', exit_code=1)
# ... or nicer way using this syntactic sugar:
await Actor.fail('Could not finish the crawl, try increasing memory');
CLI
# Actor will finish in 'SUCCEEDED' state
$ actor exit
$ actor exit --message "Email sent"
# Actor will finish in 'FAILED' state
$ actor exit --code=1 --message "Couldn't fetch the URL"
UNIX equivalent
exit(1);
Environment variables
Actors have access to standard process environment variables.
The Apify platform uses environment variables prefixed with ACTOR_ to pass information to Actors
about the execution context.
| Environment variable | Description |
|---|---|
ACTOR_ID |
ID of the Actor. |
ACTOR_FULL_NAME |
Full technical name of the Actor, in the format owner-username/actor-name. |
ACTOR_RUN_ID |
ID of the Actor run. |
ACTOR_BUILD_ID |
ID of the Actor build. |
ACTOR_BUILD_NUMBER |
A string representing the version of the current Actor build. |
ACTOR_BUILD_TAGS |
A comma-separated list of tags of the Actor build used in the run. Note that this environment variable is assigned at the time of start of the Actor and doesn't change over time, even if the assigned build tags change. |
ACTOR_TASK_ID |
ID of the saved Actor task. |
ACTOR_DEFAULT_KEY_VALUE_STORE_ID |
ID of the key-value store where the Actor's input and output data are stored. |
ACTOR_DEFAULT_DATASET_ID |
ID of the dataset where you can push the data. |
ACTOR_DEFAULT_REQUEST_QUEUE_ID |
ID of the request queue that stores and handles requests that you enqueue. |
ACTOR_INPUT_KEY |
The key of the record in the default key-value store that holds the Actor input. Typically it's INPUT, but it might be something else. |
ACTOR_MEMORY_MBYTES |
Indicates the size of memory allocated for the Actor run, in megabytes (1,000,000 bytes). It can be used by Actors to optimize their memory usage. |
ACTOR_STARTED_AT |
Date when the Actor was started, in ISO 8601 format. For example, 2022-01-02T03:04:05.678. |
ACTOR_TIMEOUT_AT |
Date when the Actor will time out, in ISO 8601 format. |
ACTOR_EVENTS_WEBSOCKET_URL |
Websocket URL where Actor may listen for events from Actor platform. See System events for details. |
ACTOR_WEB_SERVER_PORT |
TCP port on which the Actor can start a HTTP server to receive messages from the outside world, either as Actor web server or in the Standby mode. |
ACTOR_WEB_SERVER_URL |
A unique hard-to-guess URL under which the current Actor run's web server is accessible from the outside world. See Actor web server section for details. |
ACTOR_STANDBY_URL |
A general public URL under which the Actor can be started and its web server accessed in the Standby mode. |
ACTOR_MAX_PAID_DATASET_ITEMS |
A maximum number of results that will be charged to the user using a pay-per-result Actor. |
ACTOR_MAX_TOTAL_CHARGE_USD |
The maximum amount of money in USD an Actor can charge its user. See Charging money for details. |
The Actor developer can also define custom environment variables
that are then passed to the Actor process both in the local development environment or on the Apify platform.
These variables are defined in the Actor file at .actor/actor.json using the environmentVariables directive,
or manually in the user interface in Apify Console.
The environment variables can be set as secure in order to protect sensitive data such as API keys or passwords. The value of a secure environment variable is encrypted and can only be retrieved by the Actors during their run, but not outside runs. Furthermore, values of secure environment variables are omitted from the log.
Node.js
For convenience, rather than using environment vars directly, we provide a Configuration class
that allows reading and updating the Actor configuration.
const token = Actor.config.get('token');
// use different token
Actor.config.set('token', 's0m3n3wt0k3n')
CLI
$ echo "$ACTOR_RUN_ID started at $ACTOR_STARTED_AT"
UNIX equivalent
$ echo $ACTOR_RUN_ID
Actor status
Each Actor run has a status (the status field), which indicates its stage in the Actor's lifecycle.
The status can be one of the following values:
| Status | Type | Description |
|---|---|---|
READY |
initial | Started but not allocated to any worker yet |
RUNNING |
transitional | Executing on a worker |
SUCCEEDED |
terminal | Finished successfully |
FAILED |
terminal | Run failed |
TIMING-OUT |
transitional | Timing out now |
TIMED-OUT |
terminal | Timed out |
ABORTING |
transitional | Being aborted by a user or system |
ABORTED |
terminal | Aborted by a user or system |
Additionally, the Actor run has a status message (the statusMessage field),
which contains text for users informing them what the Actor is currently doing,
and thus greatly improving their user experience.
When an Actor exits, the status message is either automatically set to some default text (e.g. "Actor finished with exit code 1"), or to a custom message - see Exit Actor for details.
When the Actor is running, it should periodically update the status message as follows, to keep users informed and happy. The function can be called as often as necessary, the SDK only invokes API if status changed. This is to simplify usage.
Node.js
await Actor.setStatusMessage('Crawled 45 of 100 pages');
// Setting status message to other Actor externally is also possible
await Actor.setStatusMessage('Everyone is well', { actorRunId: 123 });
Python
await Actor.set_status_message('Crawled 45 of 100 pages')
CLI
$ actor set-status-message "Crawled 45 of 100 pages"
$ actor set-status-message --run=[RUN_ID] --token=X "Crawled 45 of 100 pages"
Convention: The end user of an Actor should never need to look into the log to understand what happened, e.g. why the Actor failed. All necessary information must be set by the Actor in the status message.
System events
Actors are notified by the system about various events such as a migration to another server, abort operation triggered by another Actor, or the CPU being overloaded.
Currently, the system sends the following events:
| Event name | Payload | Description |
|---|---|---|
cpuInfo |
{ isCpuOverloaded: Boolean } |
The event is emitted approximately every second and it indicates whether the Actor is using the maximum of available CPU resources. If that’s the case, the Actor should not add more workload. For example, this event is used by the AutoscaledPool class. |
migrating |
N/A | Emitted when the Actor running on the Apify platform is going to be migrated to another worker server soon. You can use it to persist the state of the Actor and abort the run, to speed up migration. See Migration to another server. |
aborting |
N/A | When a user aborts an Actor run on the Apify platform, they can choose to abort gracefully to allow the Actor some time before getting killed. This graceful abort emits the aborting event which the SDK uses to gracefully stop running crawls and you can use it to do your own cleanup as well. |
persistState |
{ isMigrating: Boolean } |
Emitted in regular intervals (by default 60 seconds) to notify all components of Apify SDK that it is time to persist their state, in order to avoid repeating all work when the Actor restarts. This event is automatically emitted together with the migrating event, in which case the isMigrating flag is set to true. Otherwise the flag is false. Note that the persistState event is provided merely for user convenience, you can achieve the same effect using setInterval() and listening for the migrating event. |
In the future, the event mechanism might be extended to custom events and messages enabling communication between Actors.
Under the hood, Actors receive system events by connecting to a web socket address specified
by the ACTOR_EVENTS_WEBSOCKET_URL environment variable.
The system sends messages in JSON format in the following structure:
{
// Event name
name: String,
// Time when the event was created, in ISO format
createdAt: String,
// Optional object with payload
data: Object,
}
Note that some events (e.g. persistState) are not sent by the system via the web socket,
but generated virtually on the Actor SDK level.
Node.js
// Add event handler
const handler = (data) => {
if (data.isCpuOverloaded) console.log('Oh no, we need to slow down!');
}
Actor.on('systemInfo', handler);
// Remove all handlers for a specific event
Actor.off('systemInfo');
// Remove a specific event handler
Actor.off('systemInfo', handler);
Python
from apify import Actor, Event
# Add event handler
async def handler(data):
if data.cpu_info.is_overloaded:
print('Oh no, we need to slow down!')
Actor.on(Event.SYSTEM_INFO, handler);
# Remove all handlers for a specific event
Actor.off(Event.SYSTEM_INFO);
# Remove a specific event handler
Actor.off(Event.SYSTEM_INFO, handler);
UNIX equivalent
signal(SIGINT, handle_sigint);
Get memory information
Get information about the total and available memory of the Actor’s container or local system. This is useful to, for example, auto-scale a pool of workers used for crawling large websites.
Node.js
const memoryInfo = await Actor.getMemoryInfo();
UNIX equivalent
# Print memory usage of programs
$ ps -a
Start another Actor
Actor can start other Actors, if they have permission.
The Actor can override the default dataset or key-value store, and, e.g. forward the data to another named dataset that will be consumed by the other Actor.
The call operation waits for the other Actor to finish, the start operation
returns immediately.
Node.js
// Start Actor and return a Run object
const run = await Actor.start(
'apify/google-search-scraper', // name of the Actor to start
{ queries: 'test' }, // input of the Actor
{ memory: 2048 }, // run configuration
);
// Start Actor and wait for it to finish
const run2 = await Actor.call(
'apify/google-search-scraper',
{ queries: 'test' },
{ memory: 2048 },
);
CLI
# On stdout, the commands emit Actor run object (in text or JSON format),
# we shouldn't wait for finish, for that it should be e.g. "execute"
$ apify call apify/google-search-scraper queries='test\ntest2' \
countryCode='US'
$ apify call --json apify/google-search-scraper '{ "queries": }'
$ apify call --input=@data.json --json apify/google-search-scraper
$ apify call --memory=1024 --build=beta apify/google-search-scraper
$ apify call --output-record-key=SCREENSHOT apify/google-search-scraper
# Pass input from stdin
$ cat input.json | actor call apify/google-search-scraper --json
# Call local actor during development
$ apify call file:../some-dir someInput='xxx'
Slack
It will also be possible to run Actors from the Slack app. The following command starts the Actor, and then prints the messages to a Slack channel.
/apify start bob/google-search-scraper startUrl=afff
API
[POST] https://api.apify.com/v2/actors/apify~google-search-scraper/run
[POST|GET] https://api.apify.com/v2/actors/apify~google-search-scraper/run-sync?
token=rWLaYmvZeK55uatRrZib4xbZs&
outputRecordKey=OUTPUT
returnDataset=true
UNIX equivalent
# Run a program in the background
$ command <arg1>, <arg2>, … &
// Spawn another process
posix_spawn();
Metamorph
This is the most magical Actor operation. It replaces a running Actor’s Docker image with another Actor,
similarly to UNIX exec command.
It is used for building new Actors on top of existing ones.
You simply define the input schema and write README for a specific use case,
and then delegate the work to another Actor.
The target Actor inherits the default storages used by the calling Actor.
The target Actor input is stored to the default key-value store,
under a key such as INPUT-2 (the actual key is passed via the ACTOR_INPUT_KEY environment variable).
Internally, the target Actor can recursively metamorph into another Actor.
An Actor can metamorph only to Actors that have compatible output schema as the main Actor, in order to ensure logical and consistent outcomes for users. If the output schema of the target Actor is not compatible, the system should throw an error.
Node.js
await Actor.metamorph(
'bob/web-scraper',
{ startUrls: [ "https://www.example.com" ] },
{ memoryMbytes: 4096 },
);
CLI
$ actor metamorph bob/web-scraper startUrls=http://example.com
$ actor metamorph --input=@input.json --json --memory=4096 \
bob/web-scraper
UNIX equivalent
$ exec /bin/bash
Attach webhook to an Actor run
Run another Actor or an external HTTP API endpoint after an Actor run finishes or fails.
Node.js
await Actor.addWebhook({
eventType: ['ACTOR.RUN.SUCCEEDED', 'ACTOR.RUN.FAILED'],
requestUrl: 'http://api.example.com?something=123',
payloadTemplate: `{
"userId": {{userId}},
"createdAt": {{createdAt}},
"eventType": {{eventType}},
"eventData": {{eventData}},
"resource": {{resource}}
}`,
});
CLI
$ actor add-webhook \\
--event-types=ACTOR.RUN.SUCCEEDED,ACTOR.RUN.FAILED \\
--request-url=https://api.example.com \\
--payload-template='{ "test": 123" }'
$ actor add-webhook --event-types=ACTOR.RUN.SUCCEEDED \\
--request-actor=apify/send-mail \\
--memory=4096 --build=beta \\
--payload-template=@template.json
# Or maybe have a simpler API for self-actor?
$ actor add-webhook --event-types=ACTOR.RUN.SUCCEEDED --request-actor=apify/send-mail
UNIX equivalent
# Execute commands sequentially, based on their status
$ command1; command2 # (command separator)
$ command1 && command2 # ("andf" symbol)
$ command1 || command2 # ("orf" symbol)
Abort another Actor
Abort itself or another Actor running on the Apify platform.
Aborting an Actor changes its status to ABORTED.
Node.js
await Actor.abort({ statusMessage: 'Your job is done, friend.', actorRunId: 'RUN_ID' });
CLI
$ actor abort --run-id RUN_ID
UNIX equivalent
# Terminate a program
$ kill <PID>
Reboot an Actor
Sometimes, an Actor might get into some error state from which it's not safe or possible to recover, e.g. an assertion error or a web browser crash. Rather than crashing and potentially failing the user job, the Actor can reboot its own Docker container and continue work from its previously persisted state.
Normally, if an Actor crashes, the system also restarts its container, but if that happens too often in a short period of time, the system might completely abort the Actor run. The reboot operation can be used by the Actor developer to indicate that this is a controlled operation, and not to be considered by the system as a crash.
Node.js
await Actor.reboot();
Python
await Actor.reboot()
CLI
$ actor reboot
Actor web server
An Actor can launch an HTTP web server that is exposed to the outside world to handle requests. This enables Actors to provide a custom HTTP API to integrate with other systems, to provide a web application for human users, to show Actor run details, diagnostics, charts, or to run an arbitrary web app.
The port on which the Actor can launch the web server
is specified by the ACTOR_WEB_SERVER_PORT environment variable.
Once the web server is started, it is exposed to the public internet on a live view URL identified
by the ACTOR_WEB_SERVER_URL, for example:
https://hard-to-guess-identifier.runs.apify.net
The live view URL has a unique hostname, which is practically impossible to guess. This lets you keep the web server hidden from the public yet accessible from the external internet by any parties with whom you share the URL.
Node.js
const express = require('express');
const app = express();
app.get('/', (req, res) => {
res.send('Hello World!')
})
app.listen(process.env.ACTOR_WEB_SERVER_PORT, () => {
console.log(`Example live view web server running at ${process.env.ACTOR_WEB_SERVER_URL}`)
})
Standby mode
Actor Standby mode lets Actors run in the background and respond to incoming HTTP requests, like a web or API server.
Starting an Actor run requires launching a Docker container, and so it comes with a performance penalty, sometimes many seconds for large images. For batch jobs this penalty is negligible, but for quick request-response interactions it becomes inefficient. Standby mode lets developers run Actors as web servers to run jobs that require quick response times.
To use Standby mode, start an HTTP web server at the ACTOR_WEB_SERVER_PORT TCP port,
and process HTTP requests.
The Actor system publishes a Standby Actor's web server
at a URL reported in the ACTOR_STANDBY_URL environment variable,
and will automatically start or abort an Actor run as needed by the volume of HTTP requests or system load.
The external Standby public URL might look like this:
https://bob--screenshotter.apify.actor
Unlike the live view URL reported in the ACTOR_WEB_SERVER_URL environment variable,
the Standby URL is the same for all runs of the Actor, and it's intended to be publicly known.
The Actor system can perform authentication of the requests going to the Standby URL using API tokens.
Currently, the specific Standby mode settings, authentication options, or OpenAPI schema are not part of this Actor specification,
but they might be in the future introduced as new settings in the actor.json file.
Migration to another server
Actors can be migrated from another host server from time to time, especially long-running ones.
When migration is imminent, the system sends the Actor the migrating system event
to inform the Actor, so that it can persist its state to storages.
All executed writes to the default Actor storage are guaranteed to be persisted before the migration.
After migration, the Actor is restarted on a new host. It can restore its customer state from the storages again.
Charging money
To run an Actor on the Apify platform or another cloud platform, a user typically needs to pay to cover the computing costs. Additionally, the platforms are free to introduce other monetization mechanisms, such as charging the users a fixed monthly fee for "renting" the Actor, or a variable fee for the number of results produced by the Actor. These charging mechanisms are beyond the scope of this whitepaper.
On top of these external monetization systems, Actors provide a built-in monetization system that enables developers to charge users variable amounts per event, e.g. based on the number of returned results, complexity of the input, or the cost of external APIs used internally by the Actor.
An Actor can dynamically charge the current user a specific amount of money
by calling the charge function.
Users of Actors can limit the maximum amount to be charged by the Actor
using the maxTotalChargeUsd run option, which is then passed to the Actor using
the ACTOR_MAX_TOTAL_CHARGE_USD environment variable.
The Actor can call the charge function as many times as necessary,
but once the total sum of charged credits would exceed this maximum limit,
the invocation of the function throws an error.
When a paid Actor subsequently starts another paid Actor, the charges performed by the subsequent Actors are taken from the calling Actor's allowance. This enables Actor economy, where Actors hierarchically pay other Actors or external APIs to perform parts of the job.
An Actor developer can also charge the current user of an Actor a specific amount of USD.
Node.js
const chargeInfo = await Actor.charge({
eventName: 'gpt-4o-token',
count: 1000,
chargePerEventUsd: 0.0001,
});
Python
charge_info = await Actor.charge(
event_name='gpt-4o-token',
count=1000,
charge_per_event_usd=0.0001
)
CLI
$ actor charge gpt-4o-token \
--count=1000
--chargePerEventUsd=0.0001
An Actor user can specify the maximum amount they are willing to pay when starting an Actor.
Node.js
const run = await Actor.call(
'bob/analyse-images',
{ imageUrls: ['https://www.example.com/image.png'] },
{
// By default this is 0, hence Actors cannot charge users unless they explicitly allow that.
maxTotalChargeUsd: 5,
},
);
Python
run = await Actor.call(
'bob/analyse-images' ,
{'imageUrls': ['https://www.example.com/image.png']},
max_total_charge_usd=5
)
CLI
$ actor call bob/analyse-images \
--input='{"imageUrls": ["https://www.example.com/image.png"]}'
--max-total-charge-usd=5
Rules for building Actors with variable charging
If your Actor is charging users, you need to make sure at the earliest time possible
that the Actor is being run with sufficient credits with respect to its input.
If the maximum credits specified by the ACTOR_MAX_TOTAL_CHARGE_USD environment variable is
not sufficient for the Actor's operation with respect
to the input (e.g. user is requesting too many results for too little money),
the Actor must fail immediately with an explanatory error status message for the user,
and not charge the user anything.
You must also charge users only after you have incurred the costs, not before. If an Actor fails in the middle of a run or is aborted, the users only need to be charged for results they actually received. Nothing will make users of your Actors angrier than charging them for something they didn't receive.
Actor definition files
The Actor system uses several special files that define Actor metadata, documentation, instructions how to build and run it, input and output schema, etc.
These files MUST be stored in the .actor directory placed in Actor's top-level directory.
The entire .actor directory should be added to the source control.
The only required files are Actor file and Dockerfile,
all other files are optional.
The Actor definition files are used by the CLI (e.g. by apify push and apify run commands),
as well as when building Actors on the Apify platform.
The motivation to place the files into a separate directory
is to keep the source code repository tidy and to prevent interactions with other source files,
in particular when creating an Actor from pre-existing software repositories.
Actor file
This is the main definition file of the Actor,
and it must always be present at .actor/actor.json.
This file is in JSON format and contains a single object, whose properties
define the main features of the Actor and link to all other necessary files.
For details, see the Actor file specification page.
Example Actor file at .actor/actor.json
{
"actorSpecification": 1,
"name": "screenshotter",
"title": "Screenshotter",
"description": "Take a screenshot of any URL",
"version": "0.0",
"inputSchema": "./input_schema.json",
"outputSchema": "./output_schema.json",
"dockerfile": "./Dockerfile"
}
Dockerfile
This file contains instructions for the system on how to build the Actor's
Docker image and how to run it.
Actors are started by running their Docker image,
both locally using the apify run command
as well as on the Apify platform.
The Dockerfile is referenced from the Actor file using the dockerfile
directive, and is typically stored at .actor/Dockerfile.
Note that paths in Dockerfile are always specified relative to the Dockerfile's location. Learn more about Dockerfiles in the official Docker reference.
Example Dockerfile of an Actor
# Specify the base Docker image. You can read more about
# the available images at https://crawlee.dev/docs/guides/docker-images
# You can also use any other image from Docker Hub.
FROM apify/actor-node-playwright-chrome:22-1.46.0 AS builder
# Copy just package.json and package-lock.json
# to speed up the build using Docker layer cache.
COPY --chown=myuser package*.json ./
# Install all dependencies. Don't audit to speed up the installation.
RUN npm install --include=dev --audit=false
# Next, copy the source files using the user set
# in the base image.
COPY --chown=myuser . ./
# Install all dependencies and build the project.
# Don't audit to speed up the installation.
RUN npm run build
# Create final image
FROM apify/actor-node-playwright-firefox:22-1.46.0
# Copy just package.json and package-lock.json
# to speed up the build using Docker layer cache.
COPY --chown=myuser package*.json ./
# Install NPM packages, skip optional and development dependencies to
# keep the image small. Avoid logging too much and print the dependency
# tree for debugging
RUN npm --quiet set progress=false \
&& npm install --omit=dev --omit=optional \
&& echo "Installed NPM packages:" \
&& (npm list --omit=dev --all || true) \
&& echo "Node.js version:" \
&& node --version \
&& echo "NPM version:" \
&& npm --version \
&& rm -r ~/.npm
# Install all required Playwright dependencies for Firefox
RUN npx playwright install firefox
# Copy built JS files from builder image
COPY --from=builder --chown=myuser /home/myuser/dist ./dist
# Next, copy the remaining files and directories with the source code.
# Since we do this after NPM install, quick build will be really fast
# for most source file changes.
COPY --chown=myuser . ./
# Run the image. If you know you won't need headful browsers,
# you can remove the XVFB start script for a micro perf gain.
CMD ./start_xvfb_and_run_cmd.sh && ./run_protected.sh npm run start:prod --silent
README
The README file contains Actor documentation written in Markdown. It should contain a great explanation of what the Actor does and how to use it. The README file is used to generate an Actor's public web page on Apify and for other purposes.
The README file is referenced from the Actor file using the readme
property, and typically stored at .actor/README.md.
Good documentation makes good Actors. Read the Apify Actor marketing playbook for tips on how to write great READMEs and market Actors.
Input schema file
Actors accept an input JSON object on start, whose schema can be defined
by the input schema file. This file is referenced in the Actor file (.actor/actor.json) file
as the input property.
It is a standard JSON Schema file with our extensions, and it is typically stored at .actor/input_schema.json.
The input schema file defines properties accepted by Actor on input. It is used by the system to:
- Validate the passed input JSON object on Actor run, so that Actors don't need to perform input validation and error handling in their code.
- Render user interface for Actors to make it easy for users to run and test them manually.
- Generate Actor API documentation and integration code examples on the web or in CLI, making Actors easy to integrate for users.
- Simplify integration of Actors into automation workflows such as Zapier or Make, by providing smart connectors that smartly pre-populate and link Actor input properties.
For details, see Actor input schema file specification.
This is an example of the input schema file for the bob/screenshotter Actor:
{
"actorInputSchemaVersion": 1,
"title": "Input schema for Screenshotter Actor",
"description": "Enter a web page URL and it will take its screenshot with a specific width",
"type": "object",
"properties": {
"url": {
"title": "URL",
"type": "string",
"editor": "textfield",
"description": "URL of the webpage"
},
"width": {
"title": "Viewport width",
"type": "integer",
"description": "Width of the browser window.",
"default": 1200,
"minimum": 1,
"unit": "pixels"
}
},
"required": [
"url"
]
}
Output schema file
Similarly to input, Actors can generate an output JSON object, which links to their results.
The Actor output schema file defines how such output object looks like,
including types of its properties and description.
This file is referenced in the Actor file (.actor/actor.json) file
as the output property.
It is a standard JSON Schema file with our extensions, and it is typically stored at .actor/output_schema.json.
The output schema describes how the Actor stores its results, and it is used by the other systems:
- Generate API documentation for users of Actors to figure where to find results.
- Publish OpenAPI specification to make it easy for callers of Actors to figure where to find results.
- Enable integrating Actors with external systems and automated workflows.
For details, see Actor output schema file specification.
This is an example of the output schema file for the bob/screenshotter Actor:
{
"actorOutputSchemaVersion": 1,
"title": "Output schema for Screenshotter Actor",
"description": "The URL to the resulting screenshot",
"properties": {
"screenshotUrl": {
"type": "string",
"title": "Web page screenshot",
"resourceType": "file",
"template": "{{actorRun.defaultKeyValueStoreUrl}}/screenshot.png"
}
}
}
Storage schema files
Both main Actor file and input and output schema files can additionally reference schema files for specific storages. These files have custom JSON-based formats, see:
These storage schemas are used to ensure that stored objects or files fulfil specific criteria, their fields have certain types, etc. On the Apify platform, the schemas can be applied to the storages directly, without Actors.
Note that all the storage schemas are weak, in a sense that if the schema doesn't define a property,
such property can be added to the storage and have an arbitrary type.
Only properties explicitly mentioned by the schema
are validated. This is an important feature which allows extensibility.
For example, a data deduplication Actor might require on input datasets
that have an uuid: String field in objects, but it does not care about other fields.
Backward compatibility
If the .actor/actor.json file is missing,
the system falls back to the legacy mode,
and looks for apify.json, Dockerfile, README.md and INPUT_SCHEMA.json
files in the Actor's top-level directory instead.
This behavior might be deprecated in the future.
Development
Actors can be developed locally, using a git integration, or in a web IDE. The SDK is currently available for Node.js, Python, and CLI.
Local development
The Actor programming model is language agnostic, but the framework has native support for detection of the JavaScript and Python languages.
Tip: Apify CLI provides convenient templates to bootstrap an Actor in Python, JavaScript, and TypeScript.
This example is describing how to create a simple "echo" Actor locally. The Actor will retrieve the Input Object and it will push it to the default dataset.
Bootstrap the Actor directory
The actor bootstrap CLI command will automatically generate the .actor directory and configuration files:
$ actor bootstrap
? Actor name: actor-test
Success: The Actor has been initialized in the current directory.
$ tree -a
.
|-- .actor
| `-- actor.json
|-- .gitignore
`-- storage
|-- datasets
| `-- default
|-- key_value_stores
| `-- default
| `-- INPUT.json
`-- request_queues
`-- default
The command works on the best-effort basis, creating necessary configuration files for the specific programming language and libraries.
Note: this command is not yet available and represents a future vision for the CLI.
Add the Actor code
$ cat << EOF > Dockerfile
FROM node:alpine
RUN npm -g install apify-cli
CMD actor push-data $(actor get-input)
EOF
Run to test the Actor locally
$ echo '{"bar": "foo"}' | actor run -o -s
[{
"foo": "bar"
}]
apify run - starts the Actor using Dockerfile
referenced from .actor/actor.json or Dockerfile in the Actor top-level directory
(if the first is not present)
Deployment to Apify platform
The apify push CLI command takes information from the .actor directory and builds an Actor on the Apify platform,
so that you can run it remotely.
$ apify login
? Choose how you want to log in to Apify (Use arrow keys)
❯ Through Apify Console in your default browser
$ apify push
Continuous integration and delivery
The source code of Actors can be hosted on external source control systems like GitHub or GitLab, and integrated into CI/CD pipelines. The implementation details, as well as details of the Actor build and version management process, are beyond the scope of this whitepaper.
Actorizing existing code
You can repackage many existing software repositories
as an Actor by creating the .actor/ directory with the Actor definition files,
and providing a Dockerfile with instruction how to run the software.
The actor CLI command can be used from the Dockerfile's RUN script transform the Actor JSON input
into the configuration of the software, usually passed via command-line arguments,
and then store the Actor output results.
This example wraps the curl UNIX command and pushes the result to the Actor's key-value store:
FROM alpine/curl:latest
# Install node to the Alpine Docker image
COPY --from=node:current-alpine /usr/lib /usr/lib
COPY --from=node:current-alpine /usr/local/lib /usr/local/lib
COPY --from=node:current-alpine /usr/local/include /usr/local/include
COPY --from=node:current-alpine /usr/local/bin /usr/local/bin
# Install the Actor CLI
RUN npm -g install apify-cli
CMD curl $(actor get-input) | actor set-value example-com --contentType text/html
Actorization of existing code gives developers an easy way to give their code a presence in the cloud in the form of an Actor, so that the users can easily try it without having to install and manage it locally.
Sharing and publishing
Once an Actor is developed, the Actor platform lets you share it with other specific users, and decide whether you want to make its source code open or closed.
You can also publish the Actor for anyone to use on a marketplace like Apify Store.
The Actor will get a public landing page like https://apify.com/bob/screenshotter,
showing its README, description of inputs, outputs, API examples, etc.
Once published, your Actor is automatically exposed to organic traffic of users and potential customers.

Monetization
To build a SaaS product, you usually need to:
- Develop the product
- Write documentation
- Find and buy a domain name
- Set up a website
- Setup cloud infrastructure where it runs and scales
- Handle payments, billing, and taxes
- Marketing (content, ads, SEO, and more)
- Sales (demos, procurement)
Building software as an Actor and deploying it to the Apify platform changes this to:
- Develop the Actor
- Write the README
- Publish the Actor on Apify Store
Packaging your software as Actors makes it faster to launch new small SaaS products and then earn income on them, using various monetization options, e.g. fixed rental fee, payment per result, or payment per event (see Charging money). This monetization gives developers an incentive to further develop and maintain their Actors.
Actors provide a new way for software developers like you to monetize their skills, bringing the creator economy model to SaaS.
For more details, read our essay Make passive income developing web automation Actors.
Future work
The goal of this whitepaper is to introduce the Actor philosophy and programming model to other developers, to receive feedback, and to open the way to making Actors an open standard. To create an open standard, we need to:
- Define a standardized low-level HTTP REST API interface for the Actor system, to separate "frontend" and "backend" Actor programming model implementations. For example, if somebody wants to build support for the Actor programming model in Rust, they should just need to write a Rust "frontend" translating the commands to HTTP API calls, rather than having to implement the entire system. And equally, if one decides to develop a new Actor "backend", all existing client libraries for Rust or other languages should work with it.
- Finalize specification of all the schema files, including output and storage schema files.
- Clearly separate what is the part of the standard and what is up to the discretion of the implementations.
Links
Actor file specification
This JSON file must be present at .actor/actor.json and defines core properties of a single web Actor.
The file contains a single JSON object with the following properties:
{
// Required field, indicates that this is an Actor definition file and the specific version of the Actor specification.
"actorSpecification": 1,
// Required "technical" name of the Actor, must be a DNS hostname-friendly text.
"name": "google-search-scraper",
// Human-friendly name and description of the Actor.
"title": "Google Search Scraper",
"description": "A 200-char description",
// Required, indicates the version of the Actor. Since actor.json file is commited to Git, you can have different Actor
// versions in different branches.
"version": "0.0",
// Optional tag that is applied to the builds of this Actor. If omitted, it defaults to "latest".
"buildTag": "latest",
// An optional object with environment variables expected by the Actor.
// Secret values are prefixed by @ and their actual values need to be registered with the CLI, for example:
// $ apify secrets add mySecretPassword pwd1234
"environmentVariables": {
"MYSQL_USER": "my_username",
"MYSQL_PASSWORD": "@mySecretPassword"
},
// Optional field. If true, the Actor indicates it can be run in the Standby mode,
// to get started and be kept alive by the system to handle incoming HTTP REST requests by the Actor's web server.
"usesStandbyMode": true,
// An optional metadata object enabling implementations to pass arbitrary additional properties.
// The properties and their values must be strings.
"labels": {
"something": "bla bla"
},
// Optional minimum and maximum memory for running the Actor.
"minMemoryMbytes": 128,
"maxMemoryMbytes": 4096,
// When user doesn't specify memory when starting an Actor run, the system will use this amount.
// The goal of this feature is to optimize user experience vs. compute costs.
// The value might reference properties of the Actor run object (e.g. `{{actorRun.options.maxTotalChargeUsd}}`)
// or Actor input (e.g. `{{actorRun.input}}`), similar to Output schema. It can also use basic arithmetic expressions.
// The value will be clamped between `minMemoryMbytes` and `maxMemoryMbytes` (if provided), and rounded up to the nearest higher power of 2.
// If the variable is undefined or empty, the behavior is undefined and the system will select memory arbitrarily.
// In the future, we might change this behavior.
"defaultMemoryMbytes": "{{actorRun.input.maxParallelRequests}} * 256 + 128",
// Optional link to the Actor Dockerfile.
// If omitted, the system looks for "./Dockerfile" or "../Dockerfile"
"dockerfile": "./Dockerfile",
// Optional link to the Actor README file in Markdown format.
// If omitted, the system looks for "./ACTOR.md" and "../README.md"
"readme": "./README.md",
// Optional link to the Actor changelog file in Markdown format.
"changelog": "../../../shared/CHANGELOG.md",
// Optional link to Actor input or output schema file, or inlined schema object,
// which is a JSON schema with our extensions. For details see ./INPUT_SCHEMA.md or ./OUTPUT_SCHEMA.md, respectively.
// BACKWARDS COMPATIBILITY: "inputSchema" used to be called "input", all implementations should support this.
"inputSchema": "./input_schema.json",
"outputSchema": "./output_schema.json",
// Optional path to Dataset or Key-value Store schema file or inlined schema object for the Actor's default dataset or key-value store.
// For detail, see ./DATASET_SCHEMA.md or ./KEY_VALUE_STORE_SCHEMA.md, respectively.
// BACKWARDS COMPATIBILITY: "datasetSchema" used to be "storages.keyValueStore" sub-object, all implementations should support this.
"datasetSchema": "../shared_schemas/generic_dataset_schema.json",
"keyValueStoreSchema": "./key_value_store_schema.json",
// Optional path or inlined schema object of the Actor's web server in OpenAPI format.
"webServerSchema": "./web_server_openapi.json",
// Optional URL path and query parameters to the Model Context Protocol (MCP) server exposed by the Actor web server.
// If present, the system knows the Actor provides an MCP server, which can be used by the platform
// and integrations to integrate the Actor with various AI/LLM systems.
"webServerMcpPath": "/mcp?version=2",
// Scripts can be used by tools like the CLI to do certain actions based on the commands you run.
// The presence of this object in your Actor config is optional, but we recommend always defining at least the `run` key.
"scripts": {
// The `run` script is special - it defines *the* way to run your Actor locally. While tools can decide
// to implement mechanisms to detect what type of project your Actor is, and how to run it, you can choose to
// define this as the source of truth.
//
// This should be the same command you run as if you were at the root of your Actor when you start it locally.
// This can be anything from an npm script, as shown below, to a full chain of commands (ex.: `cargo test && cargo run --release`).
//
// CLIs may opt to also request this command when initializing a new Actor, or to automatically migrate and add it in the first time
// you start the Actor locally.
"run": "npm start"
}
}
Notes
- The
namedoesn't contain the developer username, so that the Actor can be easily deployed to any user account. This is useful for tutorials and examples, as well as pull requests done externally to create Actors from existing source code files owned by external developers (the developer might not have Apify account yet, and we might want to show them deployment to some testing account). Note thatapify pushhas option--target=eva/my-actor:0.0that allows deployment of the Actor under a different user account, using permissions and personal API token of the current user. We should also add options to override only parts of this, like--target-user(ID or username),--name,--build-tagand--version, it would be useful e.g. in CI for beta versions etc. - Note that
versionandbuildTagare shared across Actor deployments to all user accounts, similarly as with software libraries, and hence they are part ofactor.json. - The
dockerfileproperty points to a Dockerfile that is to be used to build the Actor image. If not present, the system looks for Dockerfile in the.actordirectory and if not found, then in Actor's top-level directory. This setting is useful if the source code repository has some other Dockerfile in the top-level directory, to separate Actor Docker image from the other one. Note that paths in Dockerfile are ALWAYS relative to the Dockerfile's location. When callingapify run, the system runs the Actor using the Dockerfile. - When calling
actor pushand thetitleordescriptionare already set on the Actor (maybe SEO-optimized versions from copywriter), by default we do not overwrite them unlessapify pushis called with options--force-titleor--force-description.
Changes from the legacy apify.json file
The .actor/actor.json replaces the legacy apify.json file. Here are main changes from the previous version:
- We removed the
templateproperty as it's not needed for anything, it only stored the original template - There's a new
titlefield for a human-readable name of the Actor. We're moving towards having human-readable names shown for Actors everywhere, so it makes sense to definetitledirectly in the source code. - Similarly, we added
descriptionfor the short description of what the Actor does. envwas renamed toenvironmentVariablesfor more clarity.apify buildorapify runcould have an option--apply-env-vars-to-buildlike we have it on platform.- The
dockerfileandreadmedirectives are optional, the system falls back to reasonable defaults, first in.actordirectory and then in the top-level directory. scriptssection was added
Dataset schema file specification 1.0
Dataset storage enables you to sequentially store and retrieve data records, in various formats. Each Actor run is assigned its own dataset, which is created when the first item is stored to it. Datasets usually contain results from web scraping, crawling or data processing jobs. The data can be visualized as a table where each object is a row and its attributes are the columns. The data can be exported in JSON, CSV, XML, RSS, Excel, or HTML formats.
The specification is also at https://docs.apify.com/platform/actors/development/actor-definition/output-schema
Dataset can be assigned a schema which describes:
- Content of the dataset, i.e., the schema of objects that are allowed to be added
- Different views on how we can look at the data, aka transformations
- Visualization of the View using predefined components (grid, table, ...), which improves the run view interface at Apify Console and also provides a better interface for datasets shared by Apify users

Basic properties
- Storage is immutable. I.e., if you want to change the structure, then you need to create a new dataset.
- Its schema is weak. I.e., you can always push their additional properties, but schema will ensure that all the listed once are there with a correct type. This is to make Actors more compatible, i.e., some Actor expects dataset to contain certain fields but does not care about the additional ones.
There are two ways how to create a dataset with schema:
-
User can start the Actor that has dataset schema linked from its OUTPUT_SCHEMA.json
-
Or user can do it pragmatically via API (for empty dataset) by
- either by passing the schema as payload to create dataset API endpoint.
- or using the SDK:
const dataset = await Apify.openDataset('my-new-dataset', { schema });
By opening an existing dataset with schema parameter, the system ensures that you are opening a dataset that is compatible with the Actor as otherwise, you get an error:
Uncaught Error: Dataset schema is not compatible with the provided schema
Structure
{
"actorDatasetSchemaVersion": 1,
"title": "E-shop products",
"description": "Dataset containing the whole product catalog including prices and stock availability.",
// A JSON schema object describing the dataset fields, with our extensions: the "title", "description", and "example" properties.
// "example" is used to generate code and API examples for the Actor output.
// For details, see https://docs.apify.com/platform/actors/development/actor-definition/dataset-schema
"fields": {
"type": "object",
"properties": {
"title": {
"type": "string",
"description": "The name of the results",
},
"imageUrl": {
"type": "string",
"description": "Function executed for each request",
},
"priceUsd": {
"type": "integer",
"description": "Price of the item",
},
"manufacturer": {
"type": "object",
"properties": {
"title": { ... },
"url": { ... },
}
},
...
},
"required": ["title"],
},
// Define the ways how to present the Dataset to users
"views": {
"overview": {
"title": "Products overview",
"description": "Displays only basic fields such as title and price",
"transformation": {
"flatten": ["stockInfo"],
"fields": [
"title",
"imageUrl",
"variants"
]
},
"display": {
"component": "table",
"properties": {
"title": {
"label": "Title"
},
"imageUrl": {
"label": "Image",
"format": "image" // optional, in this case the format is overridden to show "image" instead of image link "text". "image" format only works with .jpeg, .png or other image format urls.
},
"stockInfo.availability": {
"label": "Availability"
}
}
}
},
"productVariants": {
"title": "Product variants",
"description": "Each product expanded into item per variant",
"transformation": {
"fields": [
"title",
"price",
"productVariants"
],
"unwind": "productVariants"
},
"display": {
// Simply renders all the available fields.
// This component is used by default when no display is specified.
"component": "table"
}
}
},
}
DatasetSchema object definition
| Property | Type | Required | Description |
|---|---|---|---|
| actorSpecification | integer | true | Specifies the version of dataset schema structure document. Currently only version 1 is available. |
| fields | JSON schema | true | JSON schema object with more formats in the future. |
| views | [DatasetView] | true | An array of objects with a description of an API and UI views. |
JSON schema
Items of a dataset can be described by a JSON schema definition, passed into the fields property.
The Actor system then ensures that each records added to the dataset complies with the provided schema.
{
"type": "object",
"required": [
"name",
"email"
],
"properties": {
"id": {
"type": "string"
},
"name": {
"type": "string"
},
"email": {
"type": "string"
},
"arr": {
"type": "array",
"items": {
"type": "object",
"required": [],
"properties": {
"site": {
"type": "string"
},
"url": {
"type": "string"
}
}
}
}
}
}
DatasetView object definition
| Property | Type | Required | Description |
|---|---|---|---|
| title | string | true | The title is visible in UI in the Output tab as well as in the API. |
| description | string | false | The description is only available in the API response. The usage of this field is optional. |
| transformation | ViewTransformation object | true | The definition of data transformation is applied when dataset data are loaded from Dataset API. |
| display | ViewDisplay object | true | The definition of Output tab UI visualization. |
ViewTransformation object definition
| Property | Type | Required | Description |
|---|---|---|---|
| fields | string[] | true | Selects fields that are going to be presented in the output. The order of fields matches the order of columns in visualization UI. In case the fields value is missing, it will be presented as “undefined” in the UI. |
| unwind | string | false | Deconstructs nested children into parent object, e.g.: with unwind:[”foo”], the object {”foo”:{”bar”:”hello”}} is turned into {’bar”:”hello”}. |
| flatten | string[] | false | Transforms nested object into flat structure. eg: with flatten:[”foo”] the object {”foo”:{”bar”:”hello”}} is turned into {’foo.bar”:”hello”}. |
| omit | string | false | Removes the specified fields from the output. Nested fields names can be used there as well. |
| limit | integer | false | The maximum number of results returned. Default is all results. |
| desc | boolean | false | By default, results are sorted in ascending based on the write event into the dataset. desc:true param will return the newest writes to the dataset first. |
ViewDisplay object definition
| Property | Type | Required | Description |
|---|---|---|---|
| component | string | true | Only component “table” is available. |
| properties | Object | false | Object with keys matching the transformation.fields and ViewDisplayProperty as values. In case properties are not set the table will be rendered automatically with fields formatted as Strings, Arrays or Objects. |
ViewDisplayProperty object definition
| Property | Type | Required | Description |
|---|---|---|---|
| label | string | false | In case the data are visualized as in Table view. The label will be visible table column’s header. |
| format | enum(text, number, date, link, boolean, image, array, object) |
false | Describes how output data values are formatted in order to be rendered in the output tab UI. |
Sandbox for various ideas
Here you can find random ideas and notes, in no particular order, relevance, or promise they will be implemented.
TODOs
-
Add ideas for the permission system
- Note from Marek regarding permission:
- Just a note on this, I was thinking about how this could be done systematically, so dropping the notes here:
- By default, the Actor should have following permissions that the user would accept when running the Actor for the first time:
- Write to all the default + named storages linked in the output schema
- Proxy - simply because we want all the traffic to run thru the proxy so we don't want Actors scraping directly
- In
actor.jsonthe Actor could request additional permissions, basically anything from permissions, for example,DATASET.READto be able to read all the datasets orSCHEDULER.WRITEto manage schedules There is one tricky part:- If an Actor needs to
.call()other Actors then basically the user must give him full permissions. Otherwise, the Actor would have to list all the other Actors it's going to call and the user would have to accept all the permissions needed in recursive calls. Extra question: - What to do if the new version of the Actor requires more permissions? We should probably require the author to increase a major version and keep users on the old build + email them to accept the updated permissions.
- If an Actor needs to
-
We should make env vars independent of Apify, i.e. start them with
ACTOR_, rather thenAPIFY_ -
To storages, add info about atomic rename, e.g.
setNamefunction, and link to other operations... -
Maybe add
Actor.getThisRun()function to return run object of the current Actor. Not sure about use case... -
Figure the push/build workflow, see https://github.com/apify/actor-specs/pull/7/files#r997020215 / https://github.com/apify/actor-specs/pull/7#pullrequestreview-1144097598 how should that work with
-
Would be nice to have an API that would send a message to a run and the run would get it as
.on('message', (msg) => { ... }). Would save people from implementing their own servers in Actors. It would make it easier to orchestrate Actors. Currently it's a bit painful to create a "master" Actor and then "workers" to process some workloads. But it could probably be achieved with a queue. if it were distributed and generic. Explain why is this better than live-view HTTP API -
NOTE: BTW we have a new API v3 doc with ideas for changes in API https://www.notion.so/apify/API-v3-6fcd240d9621427f9650b741ec6fa06b ?
-
For DATASET schema, In future versions let's consider referencing schema using URL, for now let's keep it simple
Pipe result of an Actor to another (aka chaining)
Actor can start other Actors and pass them its own dataset or key-value store. For example, the main Actor can produce files and the spawned others can consume them, from the same storages.
In the future, we could let datasets be cleaned up from the beginning, effectively creating a pipe, with custom rolling window. Webhooks can be attached to storage operations, and so launch other Actors to consume newly added items or files.
UNIX equivalent
$ ls -l | grep "something" | wc -l
TODO (@jancurn): Move to IDEAS.md We could have a special CLI support for creating Actor chains using pipe operator, like this:
$ apify call apify/google-search-scraper | apify call apify/send-email queryTerms="aaa\nbbb"
Note from Marek: Here we will need some way how to map outputs from old Actor to inputs of the following Actor, perhaps we could pipeline thru some utility like jq or use some mapping like:
--input-dataset-id="$output.defaultDatasetId" --dataset-name="xxx"
Note from Ondra: I tried to write a JS example for piping, but figured that piping is not really aligned with how Actors work, because piping assumes the output of one program is immediately processed by another program. Actors can produce output like this, but they can't process input like this. Input is provided only once, when the Actor starts. Unless we consider e.g. request queue as input. We will have to think about this a bit differently.
Note from Jan: Indeed, the flow is to start one Actor, and pass one of it's storages as default to the other newly started Actor. If we had a generic Queue, it could be used nicely for these use case. I'm adding these notes to the doc, so that we can get back to them later.
Jan: I'd get rid of the Request queue from Actor specification, and kept it as Apify's extension only.
Actor input schema file specification 1.0
This JSON file defines the schema and description of the input object accepted by the
Actor (see Input for details).
The file is referenced from the main Actor file (.actor/actor.json) using the input directive,
and it is typically stored in .actor/input_schema.json.
The file is a JSON schema with our extensions describing a single Actor input object and its properties, including documentation, default value, and user interface definition.
For full reference, see Input schema specification in Apify documentation.
Example Actor input schema
{
"actorInputSchemaVersion": 1,
"title": "Input schema for an Actor",
"description": "Enter the start URL(s) of the website(s) to crawl, configure other optional settings, and run the Actor to crawl the pages and extract their text content.",
"type": "object",
"properties": {
"startUrls": {
"title": "Start URLs",
"type": "array",
"description": "One or more URLs of the pages where the crawler will start. Note that the Actor will additionally only crawl sub-pages of these URLs. For example, for the start URL `https://www.example.com/blog`, it will crawl pages like `https://example.com/blog/article-1`, but will skip `https://example.com/docs/something-else`.",
"editor": "requestListSources",
"prefill": [{ "url": "https://docs.apify.com/" }]
},
// The input value is another Dataset. The system can generate an UI to make it easy to select the dataset.
"processDatasetId": {
"title": "Input dataset",
"type": "string",
"resourceType": "dataset",
"description": "Dataset to be processed by the Actor",
// Optional link to dataset schema, used by the system to validate the input dataset
"schema": "./input_dataset_schema.json"
},
"screenshotsKeyValueStoreId": {
"title": "Screenshots to process",
"type": "string",
"resourceType": "keyValueStore",
"description": "Screenshots to be compressed",
"schema": "./input_key_value_store_schema.json"
},
"singleFileUrl": {
"title": "Some file",
"type": "string",
"editor": "fileupload",
"description": "Screenshots to be compressed",
"schema": "./input_key_value_store_schema.json"
},
"crawlerType": {
"sectionCaption": "Crawler settings",
"title": "Crawler type",
"type": "string",
"enum": ["playwright:chrome", "cheerio", "jsdom"],
"enumTitles": ["Headless web browser (Chrome+Playwright)", "Raw HTTP client (Cheerio)", "Raw HTTP client with JS execution (JSDOM) (experimental!)"],
"description": "Select the crawling engine:\n- **Headless web browser** (default) - Useful for modern websites with anti-scraping protections and JavaScript rendering. It recognizes common blocking patterns like CAPTCHAs and automatically retries blocked requests through new sessions. However, running web browsers is more expensive as it requires more computing resources and is slower. It is recommended to use at least 8 GB of RAM.\n- **Raw HTTP client** - High-performance crawling mode that uses raw HTTP requests to fetch the pages. It is faster and cheaper, but it might not work on all websites.",
"default": "playwright:chrome"
},
"maxCrawlDepth": {
"title": "Max crawling depth",
"type": "integer",
"description": "The maximum number of links starting from the start URL that the crawler will recursively descend. The start URLs have a depth of 0, the pages linked directly from the start URLs have a depth of 1, and so on.\n\nThis setting is useful to prevent accidental crawler runaway. By setting it to 0, the Actor will only crawl start URLs.",
"minimum": 0,
"default": 20
},
"maxCrawlPages": {
"title": "Max pages",
"type": "integer",
"description": "The maximum number pages to crawl. It includes the start URLs, pagination pages, pages with no content, etc. The crawler will automatically finish after reaching this number. This setting is useful to prevent accidental crawler runaway.",
"minimum": 0,
"default": 9999999
}
}
}
Random notes
We could also add an actor resource type. The use case could be for example a testing Actor with three inputs:
- Actor to be tested
- test function containing for example Jest unit test over the output
- input for the Actor
...and the testing Actor would call the given Actor with a given output and in the end execute tests if the results are correct.
Key-value store schema file specification [work in progress]
This JSON file should contain schema for files stored in the key-value store, defining their name, format, or content type.
BEWARE: This is currently not implemented yet and subject to change.
Basic properties
Key-value store schema has two main use cases described in the following examples:
- Some Actors such as Instagram scraper store multiple types of files into the key-value store. Let's say the scraper stores images and user pictures. So for each of these, we would define a prefix group called collection and allow the user to list images from a single collection in both the UI and API.
{
"collections": {
"screenshots": {
"name": "Post images",
"keyPrefix": "images-",
"contentTypes": ["image/jpeg", "image/png"]
}
}
}
- Some Actor stores a specific record, and we want to ensure the content type to be HTML and embed it into the run view. A good example is monitoring Actor that generates HTML report that we would like to embed to run view for the user once the monitoring is finished.
{
"collections": {
"monitoringReport": {
"name": "Monitoring report",
"description": "HTML page containing monitoring results",
"key": "REPORT",
"contentTypes": ["text/html"]
}
}
}
- Some Actors store a record that has a specific structure. The structure can be specified using JSON schema. Contrary to dataset schema, the record in key-value store represents output that is a single item, instead of a sequence of items. But both approaches use JSON schema to describe the structure.
{
"collections": {
"monitoringReportData": {
"name": "Monitoring report data",
"description": "JSON containing the report data",
"key": "report-data.json",
"contentTypes": ["application/json"],
"jsonSchema": {
"$schema": "http://json-schema.org/draft-07/schema#",
"type": "object",
"properties": {
"summary": { "type": "string" },
"totalResults": { "type": "number" }
}
} // alternatively "jsonSchema": "./report-schema.json" can be used
}
}
}
Structure
{
"actorKeyValueStoreSchemaVersion": 1,
"name": "My Instagram backup",
"description": "Backup of my Instagram account",
"collections": {
"postImages": {
"name": "Post images",
"description": "Contains all Instagram post images",
"keyPrefix": "post-image-",
"contentTypes": ["image/jpeg", "image/png"]
},
"profilePicture": {
"name": "Profile picture",
"key": "profile-picture",
"contentTypes": ["image/*"] // Be able to enable all images or text types etc.
}
}
}
API implications
Enable user to list keys for specific collection:
https://api.apify.com/v2/key-value-stores/storeId/keys?collection=postImages&exclusiveStartKey=xxx
In addition to this user will be able to list by prefix directly:
https://api.apify.com/v2/key-value-stores/storeId/keys?prefix=post-images-
Actor output schema file specification 1.0 [work in progress]
This JSON file defines the schema of the output object produced by a web Actor.
The file is referenced from the main Actor file using the output property,
and it is typically stored in .actor/output_schema.json.
The format is a JSON Schema with our extensions, describing a single object.
The output schema is used by the system to generate the
output JSON object,
whose fields corresponding to properties, where values are URLs linking to actual Actor results in a dataset, key-value store files, or live view web server.
This output object is generated by system right when the Actor starts withour executing any Actor's code,
and remains static over entire lifecycle of Actor; only the linked content changes over time as Actor produces the results.
This is necessary to enable integrations of results to other systems, as you don't need to run an Actor
to see format of its results as it's predefined by the output schema.
The output schema is also used by the system to generate the user interface, API examples, integrations, etc.
Structure
{
"actorOutputSchemaVersion": 1,
"title": "Some title",
"description": "This text is shown in the Output UI",
"type": "object",
"properties": {
// This property in output object will contain a URL to the dataset containing Actor results,
// for example: https://api.apify.com/v2/datasets/XYZabc/items?format=json&view=product_details
"currentProductsDatasetUrl": {
// Type is string, because the value in output object is a URL
"type": "string",
"title": "Current products",
"description": "Yaddada",
// Identifies what kind of object is refereced by this output property (same syntax as "resourceType" in input schema).
// If used, the system will interepret the "source" and render the dataset in UI special way.
"resourceType": "dataset",
// Defines how the output value is created, using text format where {{x}} denote variables (same syntax as webhook templates)
"template": "{{actorRun.defaultDatasetUrl}}?format=json&view=product_details",
// Or reference a property from input object, the linkage will be checked for type compatibility
// "template": "{{actorRun.input.myProductsDatasetId}}"
},
// Selects a specific group of records with a certain prefix. In UI, this can be shown
// as a list of images. In the output object, this will be a link to a API with "prefix" param.
"productImagesUrl": {
"type": "string",
"title": "Product screenshots",
"resourceType": "keyValueStore",
// Define how the URL is created, in this case it will link to the default Actor key-value store
"template": "{{actorRun.defaultKeyValueStoreUrl}}?collection=screenshots"
},
// Example of reference to a file stored in Actor's default key-value store.
// In UI can be rendered as a file download.
"mainScreenshotFileUrl": {
"type": "string",
"title": "Main screenshot",
"description": "URL to an image with main product screenshot.",
"template": "{{actorRun.defaultKeyValueStoreUrl}}/screenshot.png",
},
// Live view web server for to the Actor
// In the "output" view, this page is rendered in an IFRAME
"productExplorerWebUrl": {
"type": "string",
"resourceType": "webServer",
"title": "Live product explorer app",
"description": "API documentation is available in swagger.com/api/xxxx", // optional
// TODO: ideally this should be named {{actorRun.webServerUrl}} for consistency, but we'd need to change ActorRun everywhere
"template": "{{actorRun.containerUrl}}/product-explorer/",
}
}
}
Random notes
The output schema can reference other datasets/kv-stores/queues but only those ones that are referenced in the input, or the default. Hence there's no point to include storage schema here again, as it's done elsewhere.
- NOTE: The output schema should enable developers to define schema for the
default dataset and key-value store. But how? It should be declarative
so that the system can check that e.g. the overridden default dataset
has the right schema. But then, when it comes to kv-store, that's not purely
output object but INPUT, similarly for overridden dataset or request queue.
Perhaps the cleanest way would be to set these directly in
.actor/actor.json. - The Run Sync API could have an option to automatically return (or redirect to?)
a specific property (i.e. URL) of the output object.
This would supersede the
outputRecordKey=OUTPUTAPI param as well as the run-sync-get-dataset-items API endpoint. Maybe we could have one of the output properties as the main one, which would be used by default for this kind of API endpoint, and just return data to user. - Same as we show Output in UI, we need to autogenerate the OUTPUT in API e.g. JSON format.
There would be properties like in the output_schema.json file, with e.g. URL to dataset,
log file, kv-store, live view etc. So it would be an auto-generated field "output"
that we can add to JSON returned by the Run API endpoints
(e.g. https://docs.apify.com/api/v2#/reference/actor-tasks/run-collection/run-task)
- Also see: https://github.com/apify/actor-specs/pull/5#discussion_r775641112
outputwill be a property of run object generated from Output schema
Examples of ideal Actor run UI
- For the majority of Actors, we want to see the dataset with new records being added in realtime
- For Google Spreadsheet Import, we want to first display Live View for the user to set up OAUTH, and once this is set up, then we want to display the log next time.
- For technical Actors, it might be a log
- For HTML to PDF convertor it's a single record from key-value store
- For Monitoring it's log during the runtime and a single HTML record in an iframe in the end
- For an Actor that has failed, it might be the log
How to define Actor run UI
Simple version
There will be a new tab on Actor run detail for every Actor with output schema called "Output". This tab will be at the first position and displayed by default. Tab will show the following:
- Items from output schema with property
visible: truewill be rendered in the same order as they are in schema - The live view will be displayed only when it has
visible: trueand when it's active. Otherwise, we should show just a short message "This show is over". - If the dataset has more views then we should have some select or tabs to select the view
Ideal most comprehensive state
- Default setup, i.e., what output components should be displayed at the default run tab
- Optionally, the setup for different states
- Be able to pragmatically changes this using API by Actor itself
Request queue schema file specification [work in progress]
Currently, this is neither specified nor implemented. We think that request queue schema might be useful for two things:
- ensuring what kind of URLs might be enqueued (certain domains or subdomains, ...)
- ensure that for example each request has
userData.label, i.e. schema ofuserDatathe same way as we enforce it for the Datasets
We should consider renaming RequestQueue to just Queue and make it more generic, and then it makes sense to have request schema.
This is to be done